Red Hat JBoss Enterprise Application Platform 7.2 Getting ......Red Hat JBoss Enterprise Application...
58
Red Hat JBoss Enterprise Application Platform 7.2 Getting Started Guide For Use with Red Hat JBoss Enterprise Application Platform 7.2 Last Updated: 2019-09-26
Transcript of Red Hat JBoss Enterprise Application Platform 7.2 Getting ......Red Hat JBoss Enterprise Application...
Red Hat JBoss Enterprise ApplicationPlatform 7.2
Getting Started Guide
For Use with Red Hat JBoss Enterprise Application Platform 7.2
Last Updated: 2019-09-26


Red Hat JBoss Enterprise Application Platform 7.2 Getting Started Guide
For Use with Red Hat JBoss Enterprise Application Platform 7.2

Legal Notice
Copyright © 2019 Red Hat, Inc.
The text of and illustrations in this document are licensed by Red Hat under a Creative CommonsAttribution–Share Alike 3.0 Unported license ("CC-BY-SA"). An explanation of CC-BY-SA isavailable athttp://creativecommons.org/licenses/by-sa/3.0/. In accordance with CC-BY-SA, if you distribute this document or an adaptation of it, you mustprovide the URL for the original version.
Red Hat, as the licensor of this document, waives the right to enforce, and agrees not to assert,Section 4d of CC-BY-SA to the fullest extent permitted by applicable law.
Red Hat, Red Hat Enterprise Linux, the Shadowman logo, the Red Hat logo, JBoss, OpenShift,Fedora, the Infinity logo, and RHCE are trademarks of Red Hat, Inc., registered in the United Statesand other countries.
Linux ® is the registered trademark of Linus Torvalds in the United States and other countries.
Java ® is a registered trademark of Oracle and/or its affiliates.
XFS ® is a trademark of Silicon Graphics International Corp. or its subsidiaries in the United Statesand/or other countries.
MySQL ® is a registered trademark of MySQL AB in the United States, the European Union andother countries.
Node.js ® is an official trademark of Joyent. Red Hat is not formally related to or endorsed by theofficial Joyent Node.js open source or commercial project.
The OpenStack ® Word Mark and OpenStack logo are either registered trademarks/service marksor trademarks/service marks of the OpenStack Foundation, in the United States and othercountries and are used with the OpenStack Foundation's permission. We are not affiliated with,endorsed or sponsored by the OpenStack Foundation, or the OpenStack community.
All other trademarks are the property of their respective owners.
Abstract
The purpose of this guide is to get you up and running with JBoss EAP quickly. It coversadministrative tasks such as basic installation, management, and configuration for JBoss EAP. Thisguide also helps developers get started writing Java EE applications by using the JBoss EAPquickstarts. To learn more, see the entire JBoss EAP documentation suite.
. . . . . . . . . . . . . . . . . . . . . . . . . . . . . . . . . . . . . . . . . . . . . . . . . . . . . . . . . . . . . . . . . . . . . . . . . . . . . . . . . . . . . . . . . . . . . . . . . . . . . . . . . . . . . . . . . . . . . . . . . . . . . . . . . . . . . . . . . . . . . . . . . . . . . . . . . . . . . . . . . . . . . . . . . . . . . . . . . . . . . . . . . . . . . . . . . . . . . . . . . . . . . . . . . . . . . . . . . . . . . . . . . . . . . . . . . . . . . . . . . . . . . . . . . . . . . . . . . . . . . . . . . . . . . . . . . . . . . . . .
Table of Contents
CHAPTER 1. ADMINISTERING JBOSS EAP1.1. DOWNLOADING AND INSTALLING JBOSS EAP
1.1.1. Installation Prerequisites1.1.2. Download JBoss EAP1.1.3. Install JBoss EAP
1.2. STARTING AND STOPPING JBOSS EAP1.2.1. Starting JBoss EAP
Start JBoss EAP as a Standalone ServerStart JBoss EAP in a Managed Domain
1.2.2. Stopping JBoss EAPStop an Interactive Instance of JBoss EAPStop a Background Instance of JBoss EAP
1.3. JBOSS EAP MANAGEMENT1.3.1. Management Users
1.3.1.1. Adding a Management User1.3.1.2. Running the Add-User Utility Non-Interactively
Create a User Belonging to Multiple GroupsSpecify an Alternative Properties File
1.3.2. Management Interfaces1.3.2.1. Management CLI
Launch the Management CLIConnect to a Running ServerDisplay HelpQuit the Management CLIView System SettingsUpdate System SettingsStart Servers
1.3.2.2. Management Console1.3.3. Configuration Files
1.3.3.1. Standalone Server Configuration Files1.3.3.2. Managed Domain Configuration Files1.3.3.3. Backing Up Configuration Data1.3.3.4. Configuration File Snapshots
Take a SnapshotList SnapshotsDelete a SnapshotStart the Server with a Snapshot
1.3.3.5. Property ReplacementNested ExpressionsDescriptor-Based Property Replacement
1.4. NETWORK AND PORT CONFIGURATION1.4.1. Interfaces
1.4.1.1. Default Interface Configurations1.4.1.2. Configuring Interfaces
Add an Interface with a NIC ValueAdd an Interface with Several Conditional ValuesUpdate an Interface AttributeAdd an Interface to a Server in a Managed Domain
1.4.2. Socket Bindings1.4.2.1. Management Ports1.4.2.2. Default Socket Bindings
444445555666667888999999
101010101111
121213131313131414151516161617171717181819
Table of Contents
1
. . . . . . . . . . . . . . . . . . . . . . . . . . . . . . . . . . . . . . . . . . . . . . . . . . . . . . . . . . . . . . . . . . . . . . . . . . . . . . . . . . . . . . . . . . . . . . . . . . . . . . . . . . . . . . . . . . . . . . . . . . . . . . . . . . . . . . . . . . . . . . . . . . . . . . . . . . . . . . . . . . . . . . . . . . . . . . . . . . . . . . . . . . . . . . . . . . . . . . . . . . . . . . . . . . . . . . . . . . . . . . . . . . . . . . . . . . . . . . . . . . . . . . . . . . . . . . . . . . . . . . . . . . . . . . . . . . . . . . . .
. . . . . . . . . . . . . . . . . . . . . . . . . . . . . . . . . . . . . . . . . . . . . . . . . . . . . . . . . . . . . . . . . . . . . . . . . . . . . . . . . . . . . . . . . . . . . . . . . . . . . . . . . . . . . . . . . . . . . . . . . . . . . . . . . . . . . . . . . . . . . . . . . . . . . . . . . . . . . . . . . . . . . . . . . . . . . . . . . . . . . . . . . . . . . . . . . . . . . . . . . . . . . . . . . . . . . . . . . . . . . . . . . . . . . . . . . . . . . . . . . . . . . . . . . . . . . . . . . . . . . . . . . . . . . . . . . . . . . . . .
Standalone ServerManaged Domain
1.4.2.3. Configuring Socket Bindings1.4.2.4. Port Offsets
1.4.3. IPv6 AddressesConfigure the JVM Stack for IPv6 AddressesUpdate Interface Declarations for IPv6 Addresses
1.5. OPTIMIZING THE JBOSS EAP SERVER CONFIGURATION
CHAPTER 2. DEVELOPING APPLICATIONS USING JBOSS EAP2.1. OVERVIEW2.2. SETTING UP THE DEVELOPMENT ENVIRONMENT2.3. USING THE QUICKSTART EXAMPLES
2.3.1. About Maven2.3.2. Using Maven with the Quickstarts2.3.3. Download and Run the Quickstarts
2.3.3.1. Download the Quickstarts2.3.3.2. Run the Quickstarts in Red Hat CodeReady Studio2.3.3.3. Run the Quickstarts from the Command Line
2.4. REVIEW THE QUICKSTART EXAMPLES2.4.1. Explore the helloworld Quickstart
PrerequisitesExamine the Directory StructureExamine the Code
2.4.2. Explore the numberguess QuickstartPrerequisitesExamine the Configuration Files2.4.2.1. Examine the JSF Code2.4.2.2. Examine the Class Files
APPENDIX A. REFERENCE MATERIALA.1. SERVER RUNTIME ARGUMENTSA.2. ADD-USER UTILITY ARGUMENTSA.3. INTERFACE ATTRIBUTESA.4. SOCKET BINDING ATTRIBUTESA.5. DEFAULT SOCKET BINDINGS
1919212122222223
2424242424242525253233333333343535353638
424245464850
Red Hat JBoss Enterprise Application Platform 7.2 Getting Started Guide
2

Table of Contents
3
CHAPTER 1. ADMINISTERING JBOSS EAP
1.1. DOWNLOADING AND INSTALLING JBOSS EAP
This guide provides basic instructions for downloading and installing JBoss EAP using the ZIPinstallation, which is platform independent.
See the Installation Guide for additional details, including instructions for installing JBoss EAP using thegraphical installer or RPM package installation methods.
1.1.1. Installation Prerequisites
Verify that the following prerequisites have been met before installing JBoss EAP.
Common Prerequisites
Your system is supported according to the JBoss EAP 7 supported configurations .
Your system is up-to-date with Red Hat issued updates and errata.
ZIP Installation Prerequisites
The user who will run JBoss EAP has read and write access for the installation directory.
The desired Java development kit has been installed.
For Windows Server, the JAVA_HOME and PATH environment variables have been set.
1.1.2. Download JBoss EAP
The JBoss EAP ZIP file is available from the Red Hat Customer Portal. The ZIP file installation isplatform-independent.
1. Log in to the Red Hat Customer Portal .
2. Click Downloads.
3. Click Red Hat JBoss Enterprise Application Platform in the Product Downloads list.
4. In the Version drop-down menu, select 7.2.
5. Find Red Hat JBoss Enterprise Application Platform 7.2.0 in the list and click the Downloadlink.
1.1.3. Install JBoss EAP
Once the JBoss EAP ZIP installation file has been downloaded, it can be installed by extracting thepackage contents.
1. If necessary, move the ZIP file to the server and location where JBoss EAP should be installed.
NOTE
Red Hat JBoss Enterprise Application Platform 7.2 Getting Started Guide
4
NOTE
The user who will be running JBoss EAP must have read and write access to thisdirectory.
2. Extract the ZIP archive.
$ unzip jboss-eap-7.2.0.zip
NOTE
For Windows Server, right-click the ZIP file and select Extract All.
The directory created by extracting the ZIP archive is the top-level directory for the JBoss EAPinstallation. This is referred to as EAP_HOME.
1.2. STARTING AND STOPPING JBOSS EAP
1.2.1. Starting JBoss EAP
JBoss EAP is supported on Red Hat Enterprise Linux, Windows Server, and Oracle Solaris, and runs ineither a standalone server or managed domain operating mode. The specific command to start JBossEAP depends on the underlying platform and the desired operating mode.
Servers are initially started in a suspended state and will not accept any requests until all requiredservices have started, at which time the servers are placed into a normal running state and can startaccepting requests.
Start JBoss EAP as a Standalone Server
$ EAP_HOME/bin/standalone.sh
NOTE
For Windows Server, use the EAP_HOME\bin\standalone.bat script.
This startup script uses the EAP_HOME/bin/standalone.conf file, or standalone.conf.bat for WindowsServer, to set some default preferences, such as JVM options. You can customize the settings in thisfile.
JBoss EAP uses the standalone.xml configuration file by default, but can be started using a differentone. For details on the available standalone configuration files and how to use them, see the StandaloneServer Configuration Files section.
For a complete listing of all available startup script arguments and their purposes, use the --helpargument or see the Server Runtime Arguments section.
Start JBoss EAP in a Managed DomainThe domain controller must be started before the servers in any of the server groups in the domain. Usethis script to first start the domain controller, and then for each associated host controller.
$ EAP_HOME/bin/domain.sh
NOTE
CHAPTER 1. ADMINISTERING JBOSS EAP
5
NOTE
For Windows Server, use the EAP_HOME\bin\domain.bat script.
This startup script uses the EAP_HOME/bin/domain.conf file, or domain.conf.bat for Windows Server,to set some default preferences, such as JVM options. You can customize the settings in this file.
JBoss EAP uses the host.xml host configuration file by default, but can be started using a different one.For details on the available managed domain configuration files and how to use them, see the ManagedDomain Configuration Files section.
When setting up a managed domain, additional arguments will need to be passed into the startup script.For a complete listing of all available startup script arguments and their purposes, use the --helpargument or see the Server Runtime Arguments section.
1.2.2. Stopping JBoss EAP
The way that you stop JBoss EAP depends on how it was started.
Stop an Interactive Instance of JBoss EAPPress Ctrl+C in the terminal where JBoss EAP was started.
Stop a Background Instance of JBoss EAPUse the management CLI to connect to the running instance and shut down the server.
1. Launch the management CLI.
$ EAP_HOME/bin/jboss-cli.sh --connect
2. Issue the shutdown command.
shutdown
NOTE
When running in a managed domain, you must specify the host name to shut down byusing the --host argument with the shutdown command.
1.3. JBOSS EAP MANAGEMENT
JBoss EAP uses a simplified configuration, with one configuration file per standalone server or manageddomain. Default configuration for a standalone server is stored in the EAP_HOME/standalone/configuration/standalone.xml file and default configuration for a manageddomain is stored in the EAP_HOME/domain/configuration/domain.xml file. Additionally, the defaultconfiguration for a host controller is stored in the EAP_HOME/domain/configuration/host.xml file.
JBoss EAP can be configured using the command-line management CLI, web-based managementconsole, Java API, or HTTP API. Changes made using these management interfaces persistautomatically, and the XML configuration files are overwritten by the Management API. Themanagement CLI and management console are the preferred methods, and it is not recommended toedit the XML configuration files manually.
1.3.1. Management Users
Red Hat JBoss Enterprise Application Platform 7.2 Getting Started Guide
6
The default JBoss EAP configuration provides local authentication so that a user can access themanagement CLI on the local host without requiring authentication.
However, you must add a management user if you want to access the management CLI remotely or usethe management console, which is considered remote access even if the traffic originates on the localhost. If you attempt to access the management console before adding a management user, you willreceive an error message.
If JBoss EAP is installed using the graphical installer, then a management user is created during theinstallation process.
This guide covers simple user management for JBoss EAP using the add-user script, which is a utility foradding new users to the properties files for out-of-the-box authentication.
For more advanced authentication and authorization options, such as LDAP or Role-Based AccessControl (RBAC), see the Core Management Authentication section of the JBoss EAP SecurityArchitecture.
1.3.1.1. Adding a Management User
1. Run the add-user utility script and follow the prompts.
$ EAP_HOME/bin/add-user.sh
NOTE
For Windows Server, use the EAP_HOME\bin\add-user.bat script.
2. Press ENTER to select the default option a to add a management user.This user will be added to the ManagementRealm and will be authorized to performmanagement operations using the management console or management CLI. The other choice,b, adds a user to the ApplicationRealm, which is used for applications and provides no particularpermissions.
3. Enter the desired username and password. You will be prompted to confirm the password.
NOTE
User names can only contain the following characters, in any number and in anyorder:
Alphanumeric characters (a-z, A-Z, 0-9)
Dashes (-), periods (.), commas (,), at sign (@)
Backslash (\)
Equals (=)
By default, JBoss EAP allows weak passwords but will issue a warning.
See the Setting Add-User Utility Password Restrictions section of the JBoss EAP ConfigurationGuide for details on changing this default behavior.
4. Enter a comma-separated list of groups to which the user belongs. If you do not want the user
CHAPTER 1. ADMINISTERING JBOSS EAP
7
4. Enter a comma-separated list of groups to which the user belongs. If you do not want the userto belong to any groups, press ENTER to leave it blank.
5. Review the information and enter yes to confirm.
6. Determine whether this user represents a remote JBoss EAP server instance. For a basicmanagement user, enter no.One type of user that may need to be added to the ManagementRealm is a user representinganother instance of JBoss EAP, which must be able to authenticate to join as a member of acluster. If this is the case, then answer yes to this prompt and you will be given a hashed secretvalue representing the user’s password, which will need to be added to a different configurationfile.
Users can also be created non-interactively by passing parameters to the add-user script. Thisapproach is not recommended on shared systems, because the passwords will be visible in log andhistory files. For more information, see Running the Add-User Utility Non-Interactively .
1.3.1.2. Running the Add-User Utility Non-Interactively
You can run the add-user script non-interactively by passing in arguments on the command line. At aminimum, the username and password must be provided.
WARNING
This approach is not recommended on shared systems, because the passwords willbe visible in log and history files.
Create a User Belonging to Multiple GroupsThe following command adds a management user, mgmtuser1, with the guest and mgmtgroup groups.
$ EAP_HOME/bin/add-user.sh -u 'mgmtuser1' -p 'password1!' -g 'guest,mgmtgroup'
Specify an Alternative Properties FileBy default, user and group information created using the add-user script are stored in properties fileslocated in the server configuration directory.
User information is stored in the following properties files:
EAP_HOME/standalone/configuration/mgmt-users.properties
EAP_HOME/domain/configuration/mgmt-users.properties
Group information is stored in the following properties files:
EAP_HOME/standalone/configuration/mgmt-groups.properties
EAP_HOME/domain/configuration/mgmt-groups.properties
These default directories and properties file names can be overridden. The following command adds anew user, specifying a different name and location for the user properties files.
Red Hat JBoss Enterprise Application Platform 7.2 Getting Started Guide
8
$ EAP_HOME/bin/add-user.sh -u 'mgmtuser2' -p 'password1!' -sc '/path/to/standaloneconfig/' -dc '/path/to/domainconfig/' -up 'newname.properties'
The new user was added to the user properties files located at /path/to/standaloneconfig/newname.properties and /path/to/domainconfig/newname.properties.Note that these files must already exist or you will see an error.
For a complete listing of all available add-user arguments and their purposes, use the --help argumentor see the Add-User Utility Arguments section.
1.3.2. Management Interfaces
1.3.2.1. Management CLI
The management command-line interface (CLI) is a command-line administration tool for JBoss EAP.
Use the management CLI to start and stop servers, deploy and undeploy applications, configure systemsettings, and perform other administrative tasks. Operations can be performed in batch mode, allowingmultiple tasks to be run as a group.
Many common terminal commands are available, such as ls, cd, and pwd. The management CLI alsosupports tab completion.
For detailed information on using the management CLI, including commands and operations, syntax, andrunning in batch mode, see the JBoss EAP Management CLI Guide .
Launch the Management CLI
$ EAP_HOME/bin/jboss-cli.sh
NOTE
For Windows Server, use the EAP_HOME\bin\jboss-cli.bat script.
Connect to a Running Server
connect
Or you can launch the management CLI and connect in one step by using the EAP_HOME/bin/jboss-cli.sh --connect command.
Display HelpUse the following command for general help.
help
Use the --help flag on a command to receive instructions on using that specific command. For instance,to receive information on using deploy, the following command is executed.
deploy --help
Quit the Management CLI
CHAPTER 1. ADMINISTERING JBOSS EAP
9
quit
View System SettingsThe following command uses the read-attribute operation to display whether the example datasource isenabled.
/subsystem=datasources/data-source=ExampleDS:read-attribute(name=enabled){ "outcome" => "success", "result" => true}
When running in a managed domain, you must specify which profile to update by preceding thecommand with /profile=PROFILE_NAME.
/profile=default/subsystem=datasources/data-source=ExampleDS:read-attribute(name=enabled)
Update System SettingsThe following command uses the write-attribute operation to disable the example datasource.
/subsystem=datasources/data-source=ExampleDS:write-attribute(name=enabled,value=false)
Start ServersThe management CLI can also be used to start and stop servers when running in a managed domain.
/host=HOST_NAME/server-config=server-one:start
1.3.2.2. Management Console
The management console is a web-based administration tool for JBoss EAP.
Use the management console to start and stop servers, deploy and undeploy applications, tune systemsettings, and make persistent modifications to the server configuration. The management console alsohas the ability to perform administrative tasks, with live notifications when any changes performed bythe current user require the server instance to be restarted or reloaded.
In a managed domain, server instances and server groups in the same domain can be centrally managedfrom the management console of the domain controller.
For a JBoss EAP instance running on the local host using the default management port, themanagement console can be accessed through a web browser athttp://localhost:9990/console/index.html. You will need to authenticate with a user that haspermissions to access the management console.
The management console provides the following tabs for navigating and managing your JBoss EAPstandalone server or managed domain.
Home
Learn how to accomplish several common configuration and management tasks. Take a tour tobecome familiar with the JBoss EAP management console.
Deployments
Add, remove, and enable deployments. In a managed domain, assign deployments to server groups.
Red Hat JBoss Enterprise Application Platform 7.2 Getting Started Guide
10
Configuration
Configure available subsystems, which provide capabilities such as web services, messaging, or highavailability. In a managed domain, manage the profiles that contain different subsystemconfigurations.
Runtime
View runtime information, such as server status, JVM usage, and server logs. In a managed domain,manage your hosts, server groups, and servers.
Patching
Apply patches to your JBoss EAP instances.
Access Control
Assign roles to users and groups when using Role-Based Access Control.
1.3.3. Configuration Files
1.3.3.1. Standalone Server Configuration Files
The standalone configuration files are located in the EAP_HOME/standalone/configuration/ directory.A separate file exists for each of the five predefined profiles (default, ha, full, full-ha , load-balancer).
Table 1.1. Standalone Configuration Files
Configuration File Purpose
standalone.xml This standalone configuration file is the default configuration that is used whenyou start your standalone server. It contains all information about the server,including subsystems, networking, deployments, socket bindings, and otherconfigurable details. It does not provide the subsystems necessary for messagingor high availability.
standalone-ha.xml This standalone configuration file includes all of the default subsystems and addsthe modcluster and jgroups subsystems for high availability. It does not providethe subsystems necessary for messaging.
standalone-full.xml This standalone configuration file includes all of the default subsystems and addsthe messaging-activemq and iiop-openjdk subsystems. It does not providethe subsystems necessary for high availability.
standalone-full-ha.xml
This standalone configuration file includes support for every possible subsystem,including those for messaging and high availability.
standalone-load-balancer.xml
This standalone configuration file includes the minimum subsystems necessary touse the built-in mod_cluster front-end load balancer to load balance other JBossEAP instances.
By default, starting JBoss EAP as a standalone server uses the standalone.xml file. To start JBoss EAPwith a different configuration, use the --server-config argument. For example,
$ EAP_HOME/bin/standalone.sh --server-config=standalone-full.xml
CHAPTER 1. ADMINISTERING JBOSS EAP
11
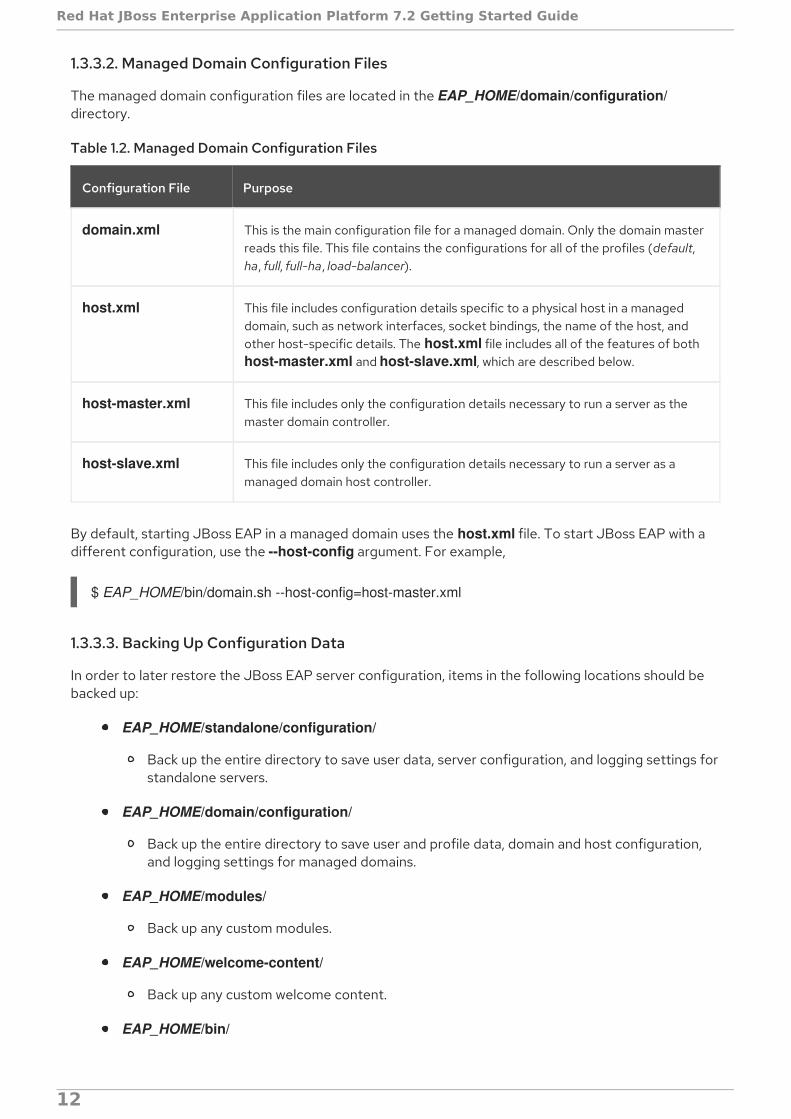
1.3.3.2. Managed Domain Configuration Files
The managed domain configuration files are located in the EAP_HOME/domain/configuration/directory.
Table 1.2. Managed Domain Configuration Files
Configuration File Purpose
domain.xml This is the main configuration file for a managed domain. Only the domain masterreads this file. This file contains the configurations for all of the profiles (default,ha, full, full-ha, load-balancer).
host.xml This file includes configuration details specific to a physical host in a manageddomain, such as network interfaces, socket bindings, the name of the host, andother host-specific details. The host.xml file includes all of the features of both host-master.xml and host-slave.xml, which are described below.
host-master.xml This file includes only the configuration details necessary to run a server as themaster domain controller.
host-slave.xml This file includes only the configuration details necessary to run a server as amanaged domain host controller.
By default, starting JBoss EAP in a managed domain uses the host.xml file. To start JBoss EAP with adifferent configuration, use the --host-config argument. For example,
$ EAP_HOME/bin/domain.sh --host-config=host-master.xml
1.3.3.3. Backing Up Configuration Data
In order to later restore the JBoss EAP server configuration, items in the following locations should bebacked up:
EAP_HOME/standalone/configuration/
Back up the entire directory to save user data, server configuration, and logging settings forstandalone servers.
EAP_HOME/domain/configuration/
Back up the entire directory to save user and profile data, domain and host configuration,and logging settings for managed domains.
EAP_HOME/modules/
Back up any custom modules.
EAP_HOME/welcome-content/
Back up any custom welcome content.
EAP_HOME/bin/
Red Hat JBoss Enterprise Application Platform 7.2 Getting Started Guide
12
Back up any custom scripts or startup configuration files.
1.3.3.4. Configuration File Snapshots
To assist in the maintenance and management of the server, JBoss EAP creates a timestamped versionof the original configuration file at the time of startup. Any additional configuration changes made bymanagement operations will result in the original file being automatically backed up, and a working copyof the instance being preserved for reference and rollback. Additionally, configuration snapshots can betaken, which are point-in-time copies of the current server configuration. These snapshots can be savedand loaded by an administrator.
The following examples use the standalone.xml file, but the same process applies to the domain.xmland host.xml files.
Take a SnapshotUse the management CLI to take a snapshot of the current configurations.
:take-snapshot{ "outcome" => "success", "result" => "EAP_HOME/standalone/configuration/standalone_xml_history/snapshot/20151022-133109702standalone.xml"}
List SnapshotsUse the management CLI to list all snapshots that have been taken.
:list-snapshots{ "outcome" => "success", "result" => { "directory" => "EAP_HOME/standalone/configuration/standalone_xml_history/snapshot", "names" => [ "20151022-133109702standalone.xml", "20151022-132715958standalone.xml" ] }}
Delete a SnapshotUse the management CLI to delete a snapshot.
:delete-snapshot(name=20151022-133109702standalone.xml)
Start the Server with a SnapshotThe server can be started using a snapshot or an automatically-saved version of the configuration.
1. Navigate to the EAP_HOME/standalone/configuration/standalone_xml_history directoryand identify the snapshot or saved configuration file to be loaded.
2. Start the server and point to the selected configuration file. Pass in the file path relative to theconfiguration directory, EAP_HOME/standalone/configuration/.
$ EAP_HOME/bin/standalone.sh --server-config=standalone_xml_history/snapshot/20151022-133109702standalone.xml
CHAPTER 1. ADMINISTERING JBOSS EAP
13
NOTE
When running in a managed domain, use the --host-config argument instead to specifythe configuration file.
1.3.3.5. Property Replacement
JBoss EAP allows you to use expressions to define replaceable properties in place of literal values in theconfiguration. Expressions use the format ${PARAMETER:DEFAULT_VALUE}. If the specifiedparameter is set, then the parameter’s value will be used. Otherwise, the default value provided will beused.
The supported sources for resolving expressions are system properties, environment variables, and thevault. For deployments only, the source can be properties listed in a META-INF/jboss.properties file inthe deployment archive. For deployment types that support subdeployments, the resolution is scoped toall subdeployments if the properties file is in the outer deployment, for example the EAR. If theproperties file is in the subdeployment, then the resolution is scoped just to that subdeployment.
The example below from the standalone.xml configuration file sets the inet-address for the publicinterface to 127.0.0.1 unless the jboss.bind.address parameter is set.
The jboss.bind.address parameter can be set when starting EAP as a standalone server with thefollowing command:
$ EAP_HOME/bin/standalone.sh -Djboss.bind.address=IP_ADDRESS
Nested ExpressionsExpressions can be nested, which allows for more advanced use of expressions in place of fixed values.The format of a nested expression is like that of a normal expression, but one expression is embedded inthe other, for example:
${SYSTEM_VALUE_1${SYSTEM_VALUE_2}}
Nested expressions are evaluated recursively, so the inner expression is first evaluated, then the outerexpression is evaluated. Expressions may also be recursive, where an expression resolves to anotherexpression, which is then resolved. Nested expressions are permitted anywhere that expressions arepermitted, with the exception of management CLI commands.
An example of where a nested expression might be used is if the password used in a datasourcedefinition is masked. The configuration for the datasource might have the following line:
The value of ds_ExampleDS could be replaced with a system property ( datasource_name) using anested expression. The configuration for the datasource could instead have the following line:
JBoss EAP would first evaluate the expression ${datasource_name}, then input this to the larger
<interface name="public"> <inet-address value="${jboss.bind.address:127.0.0.1}"/></interface>
<password>${VAULT::ds_ExampleDS::password::1}</password>
<password>${VAULT::${datasource_name}::password::1}</password>
Red Hat JBoss Enterprise Application Platform 7.2 Getting Started Guide
14
JBoss EAP would first evaluate the expression ${datasource_name}, then input this to the largerexpression and evaluate the resulting expression. The advantage of this configuration is that the nameof the datasource is abstracted from the fixed configuration.
Descriptor-Based Property ReplacementApplication configuration, such as datasource connection parameters, typically varies betweendevelopment, testing, and production environments. This variance is sometimes accommodated by buildsystem scripts, as the Java EE specification does not contain a method to externalize theseconfigurations. With JBoss EAP, you can use descriptor-based property replacement to manageconfiguration externally.
Descriptor-based property replacement substitutes properties based on descriptors, allowing you toremove assumptions about the environment from the application and the build chain. Environment-specific configurations can be specified in deployment descriptors rather than annotations or buildsystem scripts. You can provide configuration in files or as parameters at the command line.
There are several flags in the ee subsystem that control whether property replacement is applied.
JBoss-specific descriptor replacement is controlled by the jboss-descriptor-property-replacementflag and is enabled by default. When enabled, properties can be replaced in the following deploymentdescriptors:
jboss-ejb3.xml
jboss-app.xml
jboss-web.xml
*-jms.xml
*-ds.xml
The following management CLI command can be used to enable or disable property replacement inJBoss-specific descriptors:
/subsystem=ee:write-attribute(name="jboss-descriptor-property-replacement",value=VALUE)
Java EE descriptor replacement controlled by the spec-descriptor-property-replacement flag and isdisabled by default. When enabled, properties can be replaced in the following deployment descriptors:
ejb-jar.xml
persistence.xml
application.xml
web.xml
The following management CLI command can be used to enable or disable property replacement inJava EE descriptors:
/subsystem=ee:write-attribute(name="spec-descriptor-property-replacement",value=VALUE)
1.4. NETWORK AND PORT CONFIGURATION
CHAPTER 1. ADMINISTERING JBOSS EAP
15
1.4.1. Interfaces
JBoss EAP references named interfaces throughout the configuration. This allows the configuration toreference individual interface declarations with logical names, rather than requiring the full details of theinterface at each use.
This also allows for easier configuration in a managed domain, where network interface details can varyacross multiple machines. Each server instance can correspond to a logical name group.
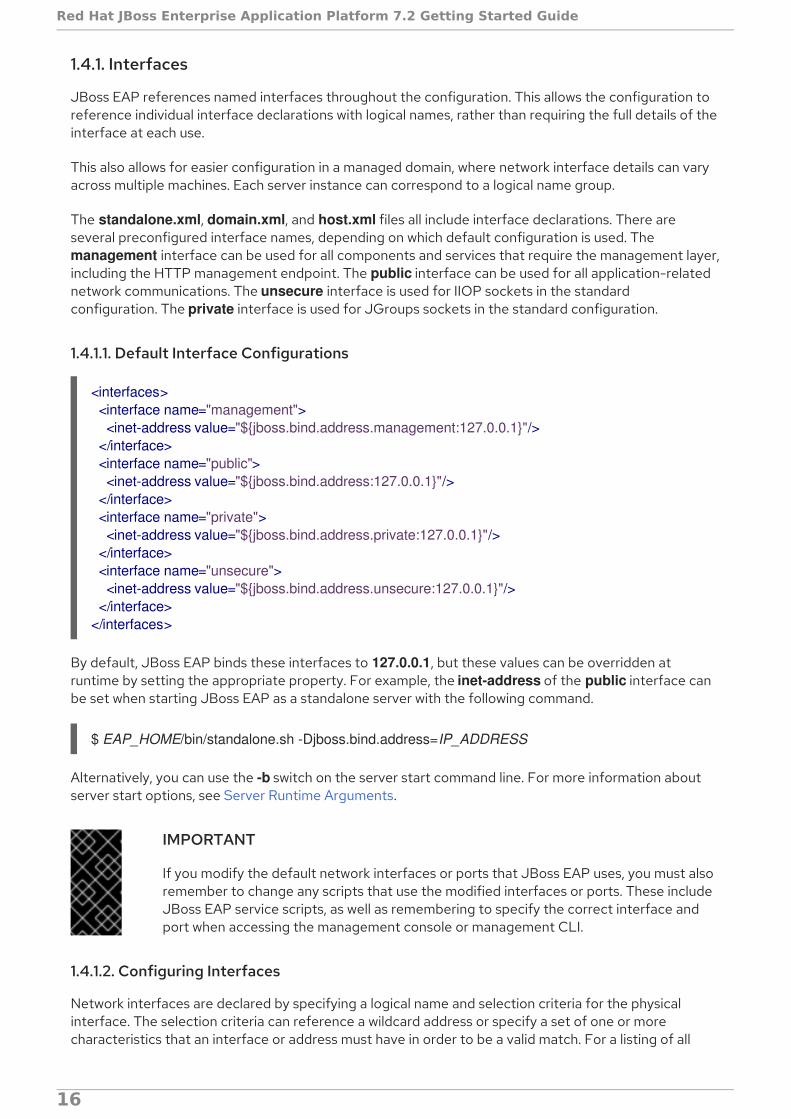
The standalone.xml, domain.xml, and host.xml files all include interface declarations. There areseveral preconfigured interface names, depending on which default configuration is used. The management interface can be used for all components and services that require the management layer,including the HTTP management endpoint. The public interface can be used for all application-relatednetwork communications. The unsecure interface is used for IIOP sockets in the standardconfiguration. The private interface is used for JGroups sockets in the standard configuration.
1.4.1.1. Default Interface Configurations
By default, JBoss EAP binds these interfaces to 127.0.0.1, but these values can be overridden atruntime by setting the appropriate property. For example, the inet-address of the public interface canbe set when starting JBoss EAP as a standalone server with the following command.
$ EAP_HOME/bin/standalone.sh -Djboss.bind.address=IP_ADDRESS
Alternatively, you can use the -b switch on the server start command line. For more information aboutserver start options, see Server Runtime Arguments.
IMPORTANT
If you modify the default network interfaces or ports that JBoss EAP uses, you must alsoremember to change any scripts that use the modified interfaces or ports. These includeJBoss EAP service scripts, as well as remembering to specify the correct interface andport when accessing the management console or management CLI.
1.4.1.2. Configuring Interfaces
Network interfaces are declared by specifying a logical name and selection criteria for the physicalinterface. The selection criteria can reference a wildcard address or specify a set of one or morecharacteristics that an interface or address must have in order to be a valid match. For a listing of all
<interfaces> <interface name="management"> <inet-address value="${jboss.bind.address.management:127.0.0.1}"/> </interface> <interface name="public"> <inet-address value="${jboss.bind.address:127.0.0.1}"/> </interface> <interface name="private"> <inet-address value="${jboss.bind.address.private:127.0.0.1}"/> </interface> <interface name="unsecure"> <inet-address value="${jboss.bind.address.unsecure:127.0.0.1}"/> </interface></interfaces>
Red Hat JBoss Enterprise Application Platform 7.2 Getting Started Guide
16
available interface selection criteria, see the Interface Attributes section.
Interfaces can be configured using the management console or the management CLI. Below are severalexamples of adding and updating interfaces. The management CLI command is shown first, followed bythe corresponding configuration XML.
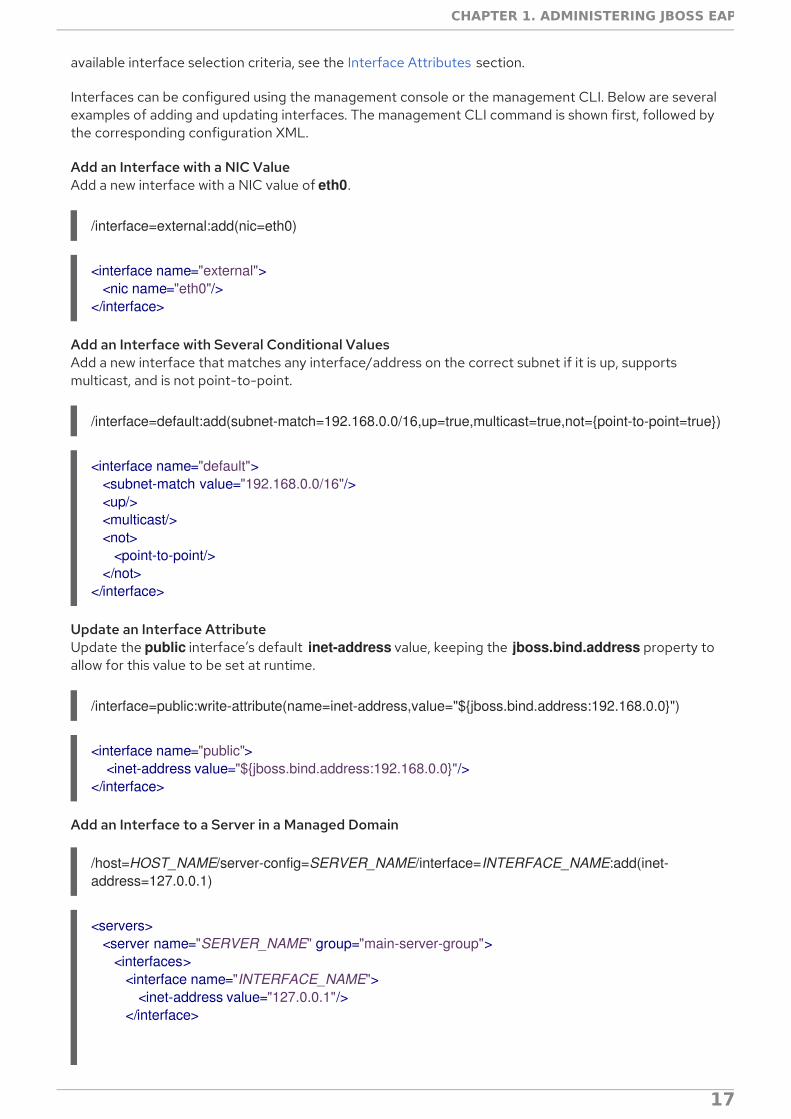
Add an Interface with a NIC ValueAdd a new interface with a NIC value of eth0.
/interface=external:add(nic=eth0)
Add an Interface with Several Conditional ValuesAdd a new interface that matches any interface/address on the correct subnet if it is up, supportsmulticast, and is not point-to-point.
/interface=default:add(subnet-match=192.168.0.0/16,up=true,multicast=true,not={point-to-point=true})
Update an Interface AttributeUpdate the public interface’s default inet-address value, keeping the jboss.bind.address property toallow for this value to be set at runtime.
/interface=public:write-attribute(name=inet-address,value="${jboss.bind.address:192.168.0.0}")
Add an Interface to a Server in a Managed Domain
/host=HOST_NAME/server-config=SERVER_NAME/interface=INTERFACE_NAME:add(inet-address=127.0.0.1)
<interface name="external"> <nic name="eth0"/></interface>
<interface name="default"> <subnet-match value="192.168.0.0/16"/> <up/> <multicast/> <not> <point-to-point/> </not></interface>
<interface name="public"> <inet-address value="${jboss.bind.address:192.168.0.0}"/></interface>
<servers> <server name="SERVER_NAME" group="main-server-group"> <interfaces> <interface name="INTERFACE_NAME"> <inet-address value="127.0.0.1"/> </interface>
CHAPTER 1. ADMINISTERING JBOSS EAP
17
1.4.2. Socket Bindings
Socket bindings and socket binding groups allow you to define network ports and their relationship tothe networking interfaces required for your JBoss EAP configuration. A socket binding is a namedconfiguration for a socket. A socket binding group is a collection of socket binding declarations that aregrouped under a logical name.
This allows other sections of the configuration to reference socket bindings by their logical name, ratherthan requiring the full details of the socket configuration at each use.
The declarations for these named configurations can be found in the standalone.xml and domain.xmlconfiguration files. A standalone server contains only one socket binding group, while a managed domaincan contain multiple groups. You can create a socket binding group for each server group in themanaged domain, or share a socket binding group between multiple server groups.
The ports JBoss EAP uses by default depend on which socket binding groups are used and therequirements of your individual deployments.
There are three types of socket bindings that can be defined in a socket binding group in the JBoss EAPconfiguration:
Inbound Socket Bindings
The socket-binding element is used to configure inbound socket bindings for the JBoss EAP server.The default JBoss EAP configurations provide several preconfigured socket-binding elements, forexample, for HTTP and HTTPS traffic. Another example can be found in the Broadcast Groupssection of Configuring Messaging for JBoss EAP.Attributes for this element can be found in the Inbound Socket Binding Attributes table.
Remote Outbound Socket Bindings
The remote-destination-outbound-socket-binding element is used to configure outbound socketbindings for destinations that are remote to the JBoss EAP server. The default JBoss EAPconfigurations provide an example remote destination socket binding that can be used for a mailserver. Another example can be found in the Using the Integrated Artemis Resource Adapter forRemote Connections section of Configuring Messaging for JBoss EAP.Attributes for this element can be found in the Remote Outbound Socket Binding Attributes table.
Local Outbound Socket Bindings
The local-destination-outbound-socket-binding element is used to configure outbound socketbindings for destinations that are local to the JBoss EAP server. This type of socket binding is notexpected to be commonly used.Attributes for this element can be found in the Local Outbound Socket Binding Attributes table.
1.4.2.1. Management Ports
Management ports were consolidated in JBoss EAP 7. By default, JBoss EAP 7 uses port 9990 for bothnative management, used by the management CLI, and HTTP management, used by the web-basedmanagement console. Port 9999, which was used as the native management port in JBoss EAP 6, is nolonger used but can still be enabled if desired.
</interfaces> </server></servers>
Red Hat JBoss Enterprise Application Platform 7.2 Getting Started Guide
18
If HTTPS is enabled for the management console, then port 9993 is used by default.
1.4.2.2. Default Socket Bindings
JBoss EAP ships with a socket binding group for each of the five predefined profiles (default, ha, full,full-ha , load-balancer).
For detailed information about the default socket bindings, such as default ports and descriptions, seethe Default Socket Bindings section.
IMPORTANT
If you modify the default network interfaces or ports that JBoss EAP uses, you must alsoremember to change any scripts that use the modified interfaces or ports. These includeJBoss EAP service scripts, as well as remembering to specify the correct interface andport when accessing the management console or management CLI.
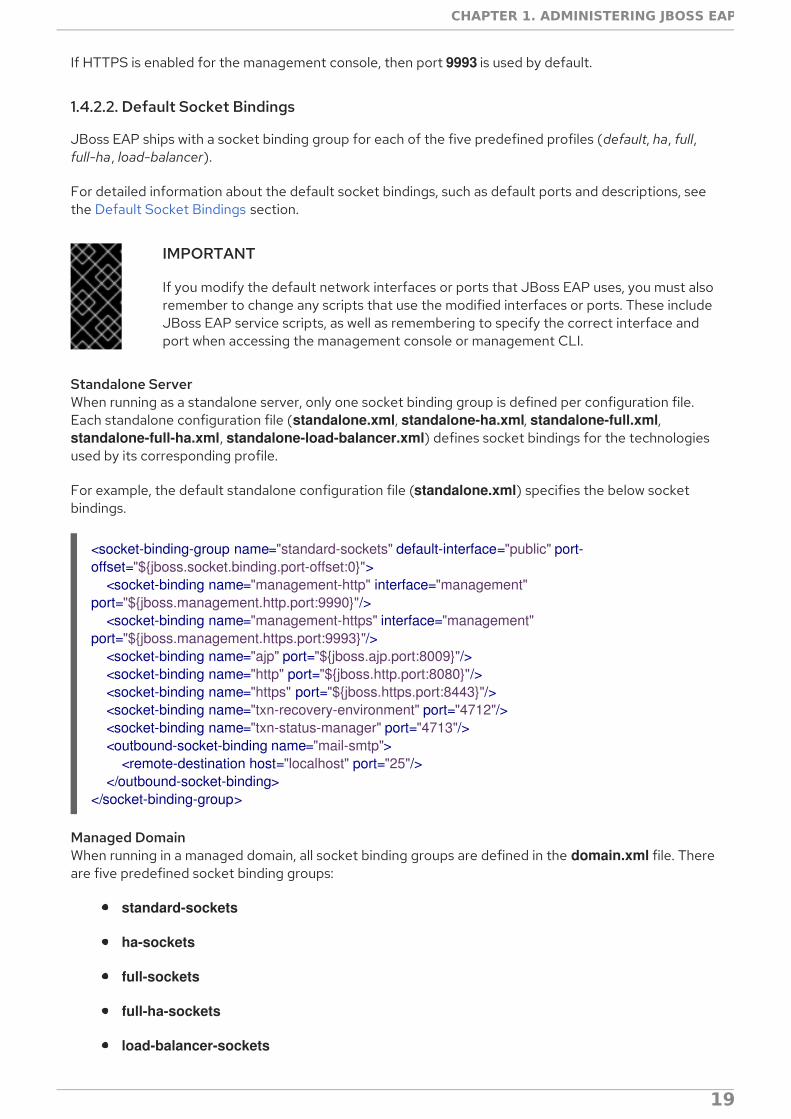
Standalone ServerWhen running as a standalone server, only one socket binding group is defined per configuration file.Each standalone configuration file (standalone.xml, standalone-ha.xml, standalone-full.xml, standalone-full-ha.xml, standalone-load-balancer.xml) defines socket bindings for the technologiesused by its corresponding profile.
For example, the default standalone configuration file (standalone.xml) specifies the below socketbindings.
Managed DomainWhen running in a managed domain, all socket binding groups are defined in the domain.xml file. Thereare five predefined socket binding groups:
standard-sockets
ha-sockets
full-sockets
full-ha-sockets
load-balancer-sockets
<socket-binding-group name="standard-sockets" default-interface="public" port-offset="${jboss.socket.binding.port-offset:0}"> <socket-binding name="management-http" interface="management" port="${jboss.management.http.port:9990}"/> <socket-binding name="management-https" interface="management" port="${jboss.management.https.port:9993}"/> <socket-binding name="ajp" port="${jboss.ajp.port:8009}"/> <socket-binding name="http" port="${jboss.http.port:8080}"/> <socket-binding name="https" port="${jboss.https.port:8443}"/> <socket-binding name="txn-recovery-environment" port="4712"/> <socket-binding name="txn-status-manager" port="4713"/> <outbound-socket-binding name="mail-smtp"> <remote-destination host="localhost" port="25"/> </outbound-socket-binding></socket-binding-group>
CHAPTER 1. ADMINISTERING JBOSS EAP
19
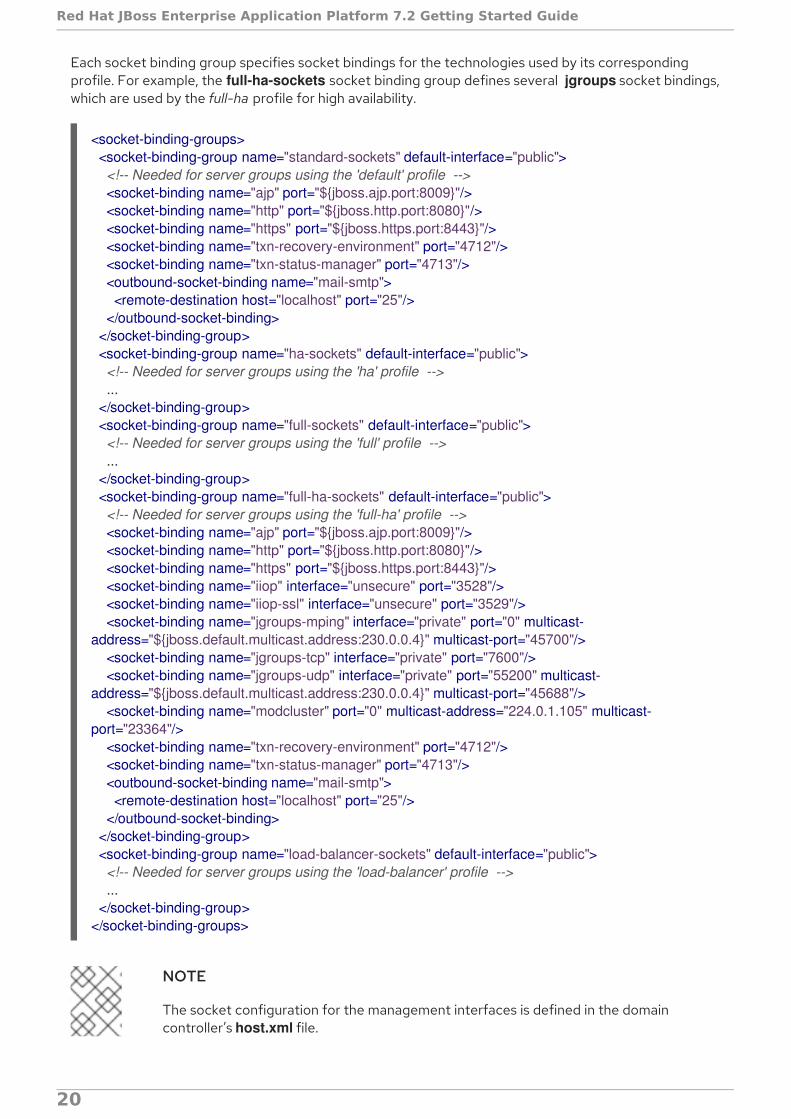
Each socket binding group specifies socket bindings for the technologies used by its correspondingprofile. For example, the full-ha-sockets socket binding group defines several jgroups socket bindings,which are used by the full-ha profile for high availability.
NOTE
The socket configuration for the management interfaces is defined in the domaincontroller’s host.xml file.
<socket-binding-groups> <socket-binding-group name="standard-sockets" default-interface="public"> <!-- Needed for server groups using the 'default' profile --> <socket-binding name="ajp" port="${jboss.ajp.port:8009}"/> <socket-binding name="http" port="${jboss.http.port:8080}"/> <socket-binding name="https" port="${jboss.https.port:8443}"/> <socket-binding name="txn-recovery-environment" port="4712"/> <socket-binding name="txn-status-manager" port="4713"/> <outbound-socket-binding name="mail-smtp"> <remote-destination host="localhost" port="25"/> </outbound-socket-binding> </socket-binding-group> <socket-binding-group name="ha-sockets" default-interface="public"> <!-- Needed for server groups using the 'ha' profile --> ... </socket-binding-group> <socket-binding-group name="full-sockets" default-interface="public"> <!-- Needed for server groups using the 'full' profile --> ... </socket-binding-group> <socket-binding-group name="full-ha-sockets" default-interface="public"> <!-- Needed for server groups using the 'full-ha' profile --> <socket-binding name="ajp" port="${jboss.ajp.port:8009}"/> <socket-binding name="http" port="${jboss.http.port:8080}"/> <socket-binding name="https" port="${jboss.https.port:8443}"/> <socket-binding name="iiop" interface="unsecure" port="3528"/> <socket-binding name="iiop-ssl" interface="unsecure" port="3529"/> <socket-binding name="jgroups-mping" interface="private" port="0" multicast-address="${jboss.default.multicast.address:230.0.0.4}" multicast-port="45700"/> <socket-binding name="jgroups-tcp" interface="private" port="7600"/> <socket-binding name="jgroups-udp" interface="private" port="55200" multicast-address="${jboss.default.multicast.address:230.0.0.4}" multicast-port="45688"/> <socket-binding name="modcluster" port="0" multicast-address="224.0.1.105" multicast-port="23364"/> <socket-binding name="txn-recovery-environment" port="4712"/> <socket-binding name="txn-status-manager" port="4713"/> <outbound-socket-binding name="mail-smtp"> <remote-destination host="localhost" port="25"/> </outbound-socket-binding> </socket-binding-group> <socket-binding-group name="load-balancer-sockets" default-interface="public"> <!-- Needed for server groups using the 'load-balancer' profile --> ... </socket-binding-group></socket-binding-groups>
Red Hat JBoss Enterprise Application Platform 7.2 Getting Started Guide
20
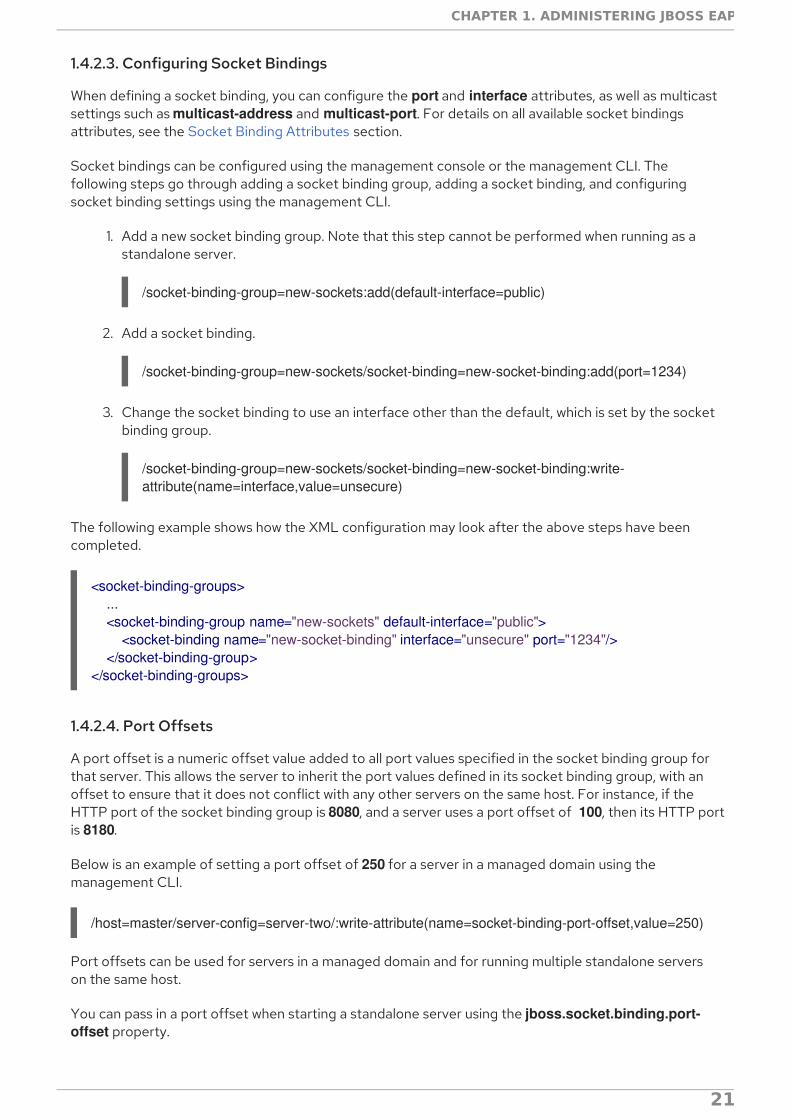
1.4.2.3. Configuring Socket Bindings
When defining a socket binding, you can configure the port and interface attributes, as well as multicastsettings such as multicast-address and multicast-port. For details on all available socket bindingsattributes, see the Socket Binding Attributes section.
Socket bindings can be configured using the management console or the management CLI. Thefollowing steps go through adding a socket binding group, adding a socket binding, and configuringsocket binding settings using the management CLI.
1. Add a new socket binding group. Note that this step cannot be performed when running as astandalone server.
/socket-binding-group=new-sockets:add(default-interface=public)
2. Add a socket binding.
/socket-binding-group=new-sockets/socket-binding=new-socket-binding:add(port=1234)
3. Change the socket binding to use an interface other than the default, which is set by the socketbinding group.
/socket-binding-group=new-sockets/socket-binding=new-socket-binding:write-attribute(name=interface,value=unsecure)
The following example shows how the XML configuration may look after the above steps have beencompleted.
1.4.2.4. Port Offsets
A port offset is a numeric offset value added to all port values specified in the socket binding group forthat server. This allows the server to inherit the port values defined in its socket binding group, with anoffset to ensure that it does not conflict with any other servers on the same host. For instance, if theHTTP port of the socket binding group is 8080, and a server uses a port offset of 100, then its HTTP portis 8180.
Below is an example of setting a port offset of 250 for a server in a managed domain using themanagement CLI.
/host=master/server-config=server-two/:write-attribute(name=socket-binding-port-offset,value=250)
Port offsets can be used for servers in a managed domain and for running multiple standalone serverson the same host.
You can pass in a port offset when starting a standalone server using the jboss.socket.binding.port-offset property.
<socket-binding-groups> ... <socket-binding-group name="new-sockets" default-interface="public"> <socket-binding name="new-socket-binding" interface="unsecure" port="1234"/> </socket-binding-group></socket-binding-groups>
CHAPTER 1. ADMINISTERING JBOSS EAP
21
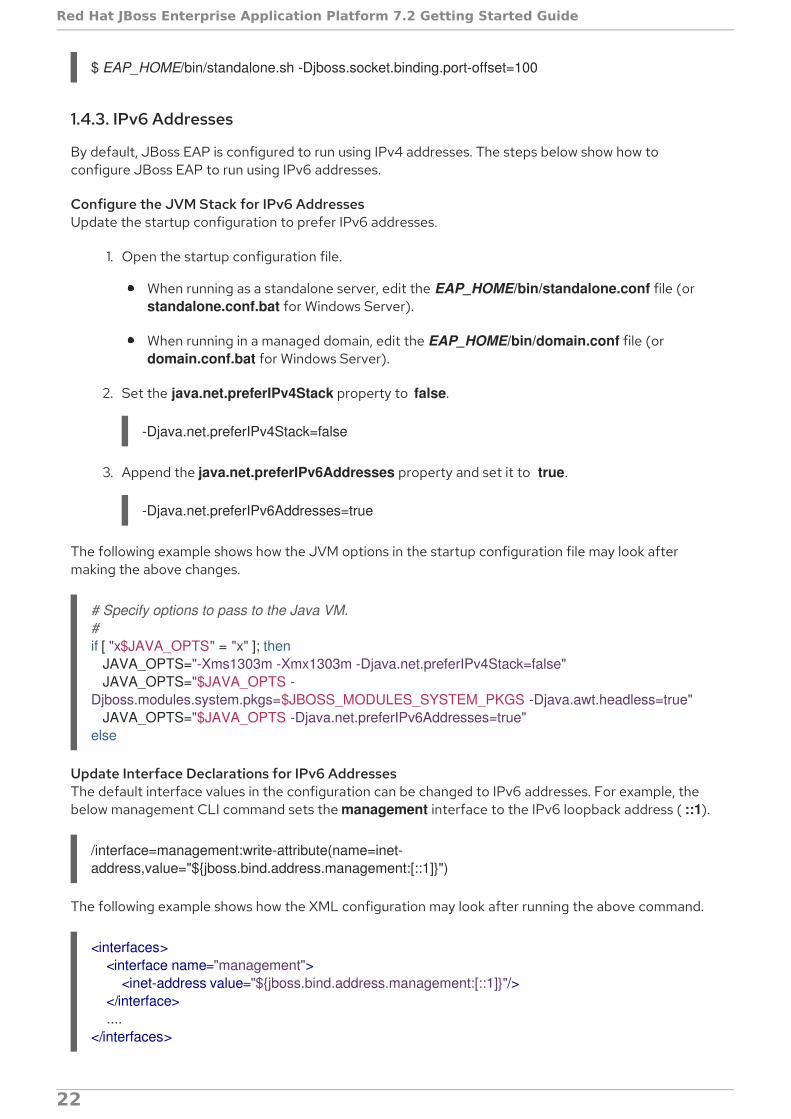
$ EAP_HOME/bin/standalone.sh -Djboss.socket.binding.port-offset=100
1.4.3. IPv6 Addresses
By default, JBoss EAP is configured to run using IPv4 addresses. The steps below show how toconfigure JBoss EAP to run using IPv6 addresses.
Configure the JVM Stack for IPv6 AddressesUpdate the startup configuration to prefer IPv6 addresses.
1. Open the startup configuration file.
When running as a standalone server, edit the EAP_HOME/bin/standalone.conf file (or standalone.conf.bat for Windows Server).
When running in a managed domain, edit the EAP_HOME/bin/domain.conf file (or domain.conf.bat for Windows Server).
2. Set the java.net.preferIPv4Stack property to false.
-Djava.net.preferIPv4Stack=false
3. Append the java.net.preferIPv6Addresses property and set it to true.
-Djava.net.preferIPv6Addresses=true
The following example shows how the JVM options in the startup configuration file may look aftermaking the above changes.
Update Interface Declarations for IPv6 AddressesThe default interface values in the configuration can be changed to IPv6 addresses. For example, thebelow management CLI command sets the management interface to the IPv6 loopback address ( ::1).
/interface=management:write-attribute(name=inet-address,value="${jboss.bind.address.management:[::1]}")
The following example shows how the XML configuration may look after running the above command.
# Specify options to pass to the Java VM.#if [ "x$JAVA_OPTS" = "x" ]; then JAVA_OPTS="-Xms1303m -Xmx1303m -Djava.net.preferIPv4Stack=false" JAVA_OPTS="$JAVA_OPTS -Djboss.modules.system.pkgs=$JBOSS_MODULES_SYSTEM_PKGS -Djava.awt.headless=true" JAVA_OPTS="$JAVA_OPTS -Djava.net.preferIPv6Addresses=true"else
<interfaces> <interface name="management"> <inet-address value="${jboss.bind.address.management:[::1]}"/> </interface> ....</interfaces>
Red Hat JBoss Enterprise Application Platform 7.2 Getting Started Guide
22
1.5. OPTIMIZING THE JBOSS EAP SERVER CONFIGURATION
Once you have installed the JBoss EAP server, and you have created a management user , Red Hatrecommends that you optimize your server configuration.
Make sure you review information in the Performance Tuning Guide for information about how tooptimize the server configuration to avoid common problems when deploying applications in aproduction environment. Common optimizations include setting ulimits, enabling garbage collection ,creating Java heap dumps, and adjusting the thread pool size .
It is also a good idea to apply any existing patches for your release of the product. Each patch for EAPcontains numerous bug fixes. For more information, see Patching JBoss EAP in the Patching andUpgrading Guide for JBoss EAP.
CHAPTER 1. ADMINISTERING JBOSS EAP
23
CHAPTER 2. DEVELOPING APPLICATIONS USING JBOSS EAP
2.1. OVERVIEW
This guide provides information on getting started developing applications by using Red Hat CodeReadyStudio and the JBoss EAP 7 quickstart examples.
Red Hat CodeReady Studio is an Eclipse-based integrated development environment (IDE) thatintegrates JBoss application development plug-ins. Red Hat CodeReady Studio can assist with yourapplication development with the availability of JBoss-specific wizards and the ability to deployapplications to JBoss EAP servers. Many quickstart code examples are provided with JBoss EAP 7 tohelp users get started writing applications using different Java EE technologies.
2.2. SETTING UP THE DEVELOPMENT ENVIRONMENT
1. Download and install Red Hat CodeReady Studio.For instructions, see Installing CodeReady Studio stand-alone using the Installer in the Red HatCodeReady Studio Installation Guide.
2. Set up the JBoss EAP server in Red Hat CodeReady Studio.For instructions, see Downloading, Installing, and Setting Up JBoss EAP from within the IDE inthe Getting Started with CodeReady Studio Tools guide.
2.3. USING THE QUICKSTART EXAMPLES
The quickstart examples provided with JBoss EAP are Maven projects.
2.3.1. About Maven
Apache Maven is a distributed build automation tool used in Java application development to create,manage, and build software projects. Maven uses standard configuration files called Project ObjectModel (POM) files to define projects and manage the build process. POMs describe the module andcomponent dependencies, build order, and targets for the resulting project packaging and output usingan XML file. This ensures that the project is built in a correct and uniform manner.
Maven achieves this by using a repository. A Maven repository stores Java libraries, plug-ins, and otherbuild artifacts. The default public repository is the Maven 2 Central Repository, but repositories can beprivate and internal within a company with a goal to share common artifacts among development teams.Repositories are also available from third-parties. For more information, see the Apache Maven projectand the Introduction to Repositories guide.
JBoss EAP includes a Maven repository that contains many of the requirements that Java EEdevelopers typically use to build applications on JBoss EAP.
For more information about how to use Maven with JBoss EAP, see Using Maven with JBoss EAP in theJBoss EAP Development Guide.
2.3.2. Using Maven with the Quickstarts
The artifacts and dependencies needed to build and deploy applications to JBoss EAP 7 are hosted on apublic repository. Starting with the JBoss EAP 7 quickstarts, it is no longer necessary to configure yourMaven settings.xml file to use these repositories when building the quickstarts. The Maven repositories
Red Hat JBoss Enterprise Application Platform 7.2 Getting Started Guide
24
are now configured in the quickstart project POM files. This method of configuration is provided tomake it easier to get started with the quickstarts, however, is generally not recommended for productionprojects because it can slow down your build.
Red Hat CodeReady Studio includes Maven, so there is no need to download and install it separately.
If you plan to use the Maven command line to build and deploy your applications, then you must firstdownload Maven from the Apache Maven project and install it using the instructions provided in theMaven documentation.
2.3.3. Download and Run the Quickstarts
2.3.3.1. Download the Quickstarts
JBoss EAP comes with a comprehensive set of quickstart code examples designed to help users beginwriting applications using various Java EE technologies. The quickstarts can be downloaded from theRed Hat Customer Portal.
1. Log in to the JBoss EAP download page on the Red Hat Customer Portal.
2. Select 7.2 in the Version drop-down menu.
3. Find the Red Hat JBoss Enterprise Application Platform 7.2.0 Quickstarts entry in the listand click Download to download a ZIP file containing the quickstarts.
4. Save the ZIP file to the desired directory.
5. Extract the ZIP file.
2.3.3.2. Run the Quickstarts in Red Hat CodeReady Studio
Once the quickstarts have been downloaded, they can be imported into Red Hat CodeReady Studio anddeployed to JBoss EAP.
Import a Quickstart into Red Hat CodeReady Studio
Each quickstart ships with a POM file that contains its project and configuration information. Use thisPOM file to easily import the quickstart into Red Hat CodeReady Studio.
IMPORTANT
If your quickstart project folder is located within the IDE workspace when you import itinto Red Hat CodeReady Studio, the IDE generates an invalid project name and WARarchive name. Be sure your quickstart project folder is located outside the IDE workspacebefore you begin.
1. Start Red Hat CodeReady Studio.
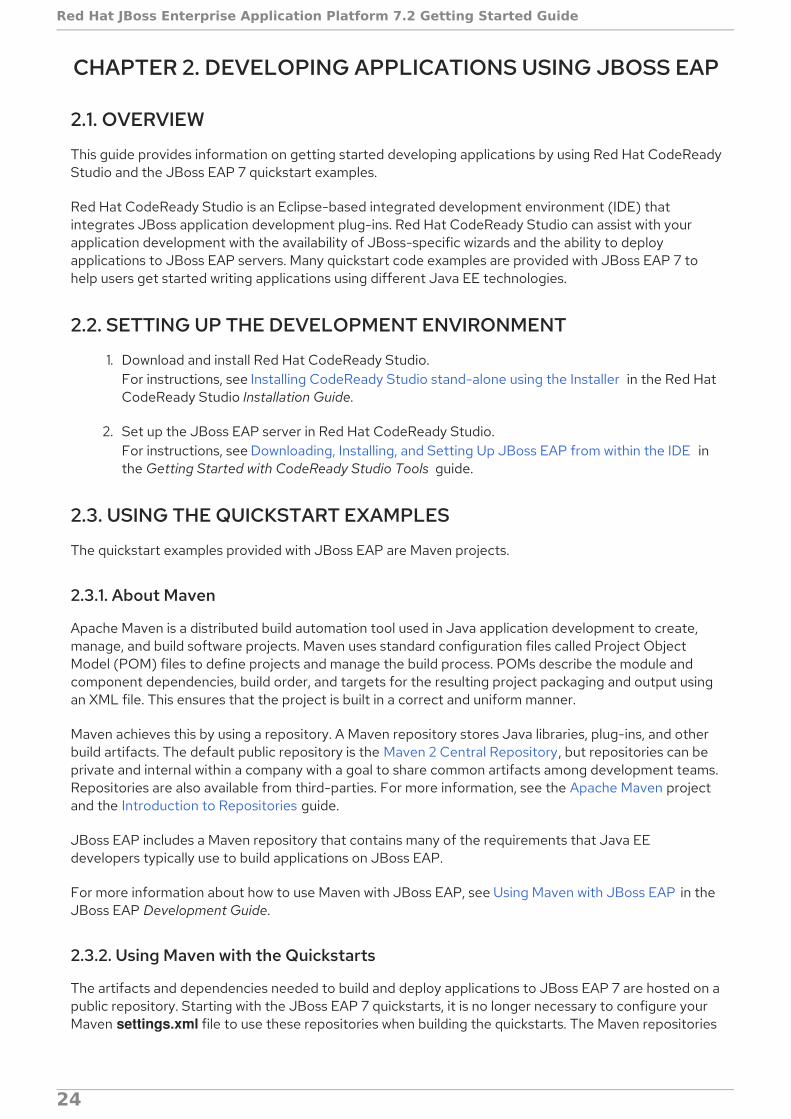
2. Select File → Import.
3. Choose Maven → Existing Maven Projects, then click Next.
Figure 2.1. Import Existing Maven Projects
CHAPTER 2. DEVELOPING APPLICATIONS USING JBOSS EAP
25
Figure 2.1. Import Existing Maven Projects
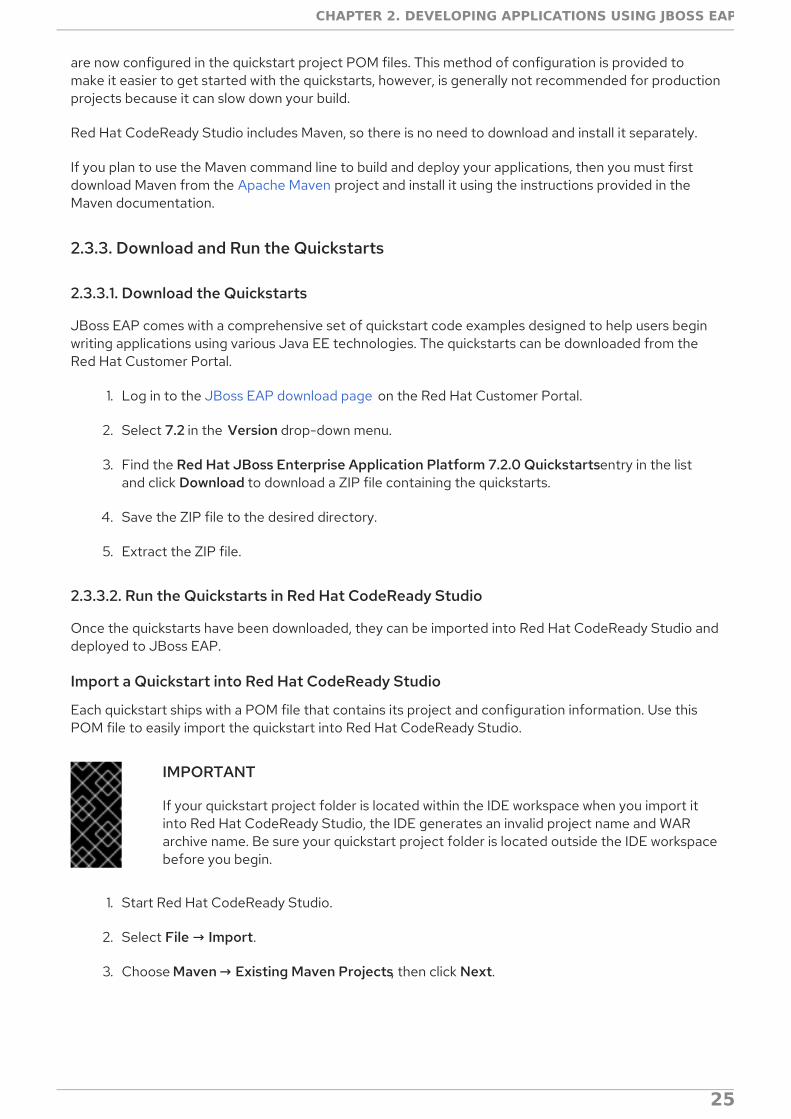
4. Browse to the desired quickstart’s directory (for example the helloworld quickstart), and clickOK. The Projects list box is populated with the pom.xml file of the selected quickstart project.
Figure 2.2. Select Maven Projects
Red Hat JBoss Enterprise Application Platform 7.2 Getting Started Guide
26
Figure 2.2. Select Maven Projects
5. Click Finish.
Run the helloworld Quickstart
Running the helloworld quickstart is a simple way to verify that the JBoss EAP server is configured andrunning correctly.
1. If you have not yet defined a server, add the JBoss EAP server to Red Hat CodeReady Studio.See Downloading, Installing, and Setting Up JBoss EAP from within the IDE in the GettingStarted with CodeReady Studio Tools guide.
2. Right-click the helloworld project in the Project Explorer tab and select Run As → Run onServer.
Figure 2.3. Run As - Run on Server
CHAPTER 2. DEVELOPING APPLICATIONS USING JBOSS EAP
27
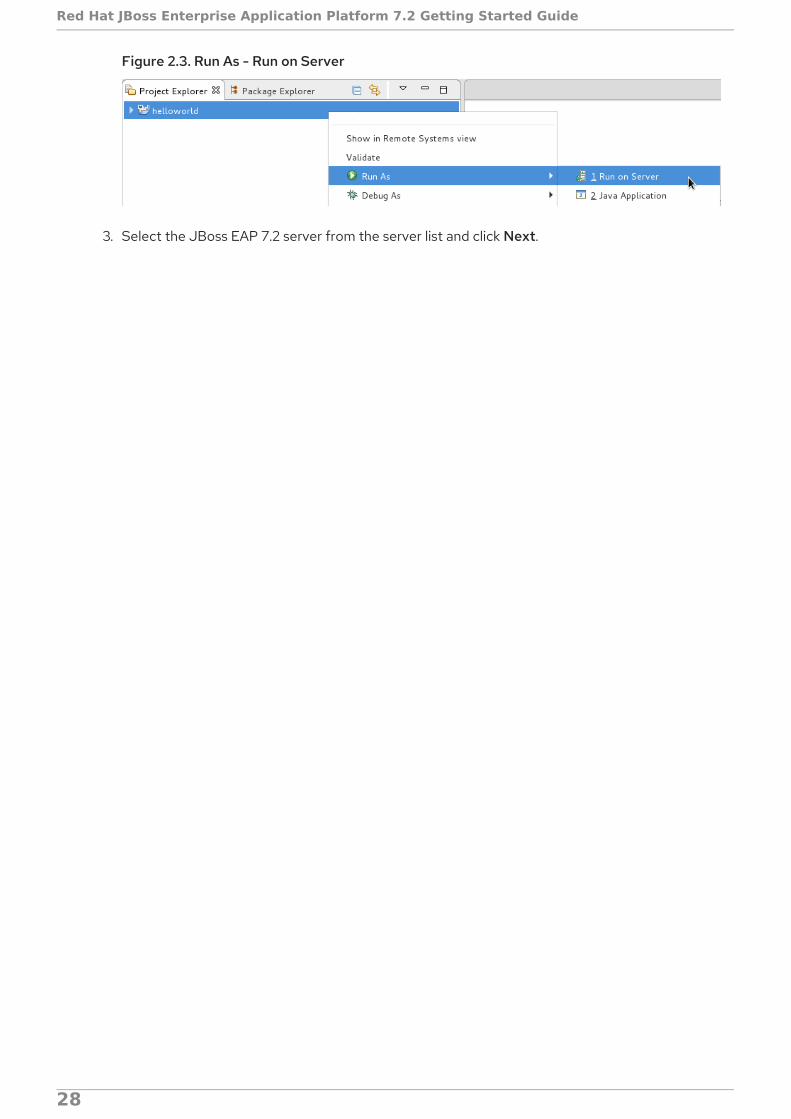
Figure 2.3. Run As - Run on Server
3. Select the JBoss EAP 7.2 server from the server list and click Next.
Figure 2.4. Run on Server
Red Hat JBoss Enterprise Application Platform 7.2 Getting Started Guide
28
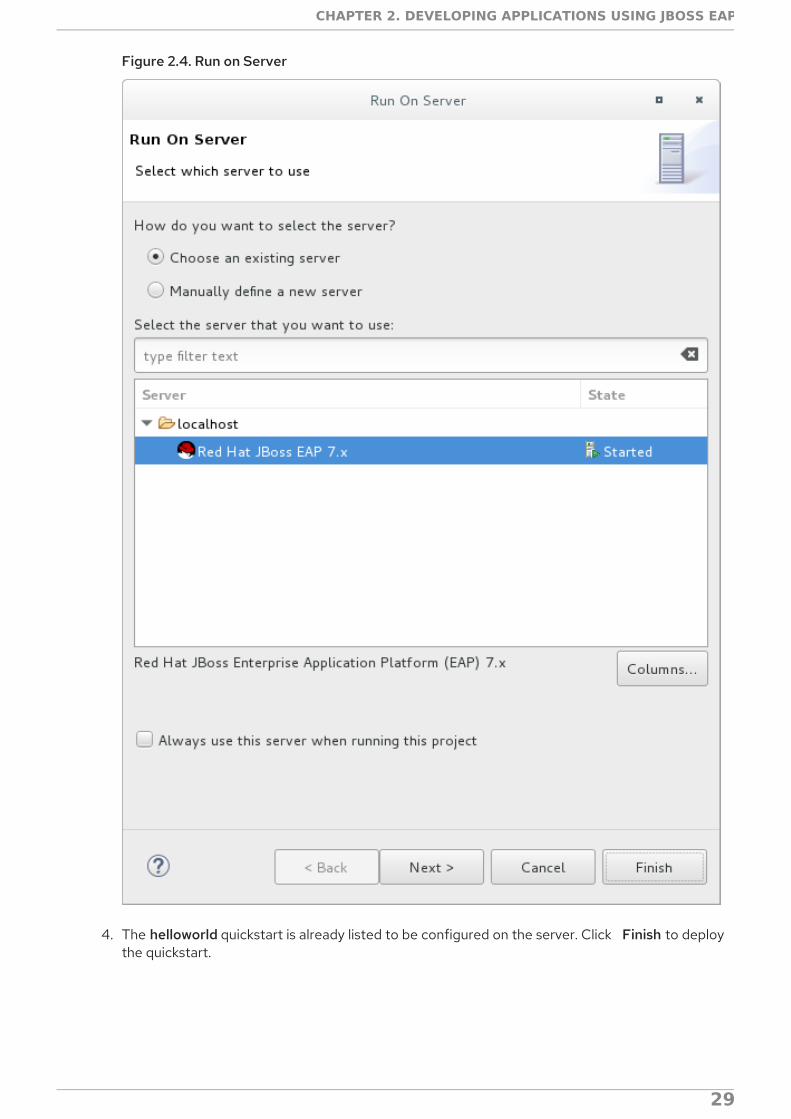
Figure 2.4. Run on Server
4. The helloworld quickstart is already listed to be configured on the server. Click Finish to deploythe quickstart.
Figure 2.5. Modify Resources Configured on the Server
CHAPTER 2. DEVELOPING APPLICATIONS USING JBOSS EAP
29
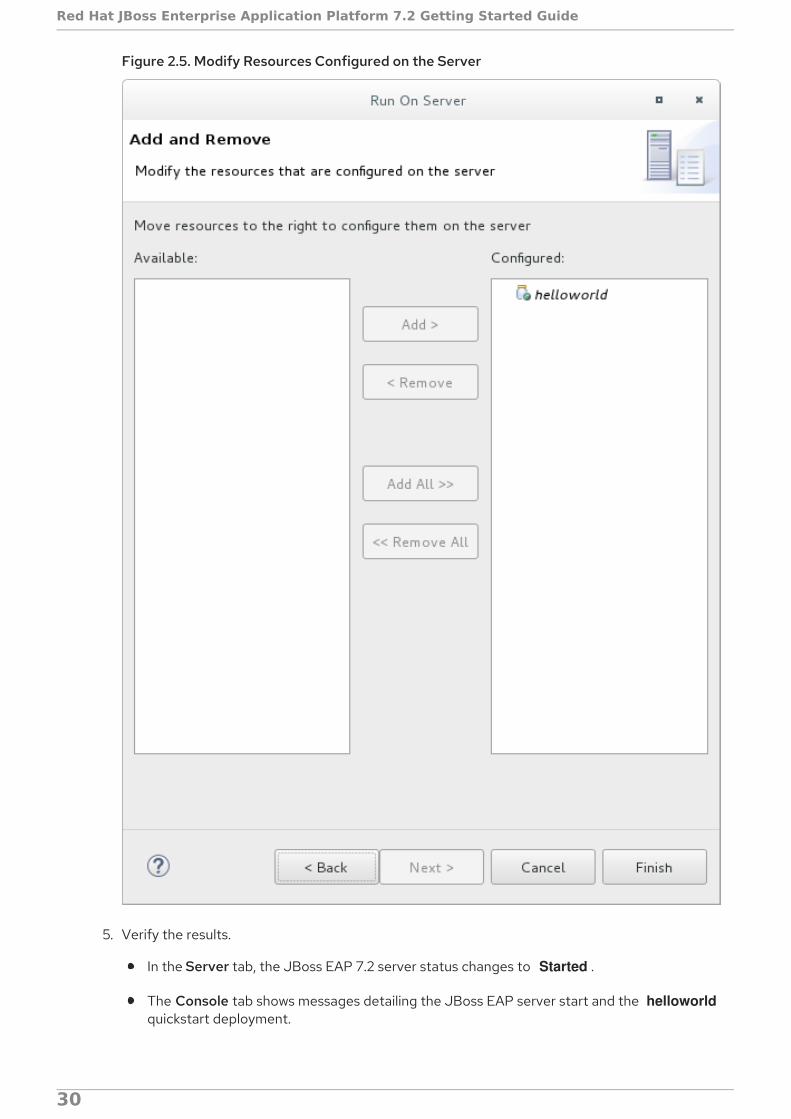
Figure 2.5. Modify Resources Configured on the Server
5. Verify the results.
In the Server tab, the JBoss EAP 7.2 server status changes to Started .
The Console tab shows messages detailing the JBoss EAP server start and the helloworldquickstart deployment.
Red Hat JBoss Enterprise Application Platform 7.2 Getting Started Guide
30
WFLYUT0021: Registered web context: /helloworldWFLYSRV0010: Deployed "helloworld.war" (runtime-name : "helloworld.war")
The helloworld application is available at http://localhost:8080/helloworld and displays thetext Hello World!.
For further details on the helloworld quickstart, see Explore the helloworld Quickstart.
Run the bean-validation Quickstart
Some quickstarts, such as the bean-validation quickstart, do not provide a user interface layer andinstead provide Arquillian tests to demonstrate functionality.
1. Import the bean-validation quickstart into Red Hat CodeReady Studio.
2. In the Servers tab, right-click on the server and choose Start to start the JBoss EAP server. Ifyou do not see a Servers tab or have not yet defined a server, add the JBoss EAP server to RedHat CodeReady Studio. See Downloading, Installing, and Setting Up JBoss EAP from within theIDE in the Getting Started with CodeReady Studio Tools guide.
3. Right-click on the bean-validation project in the Project Explorer tab and select Run As →Maven Build.
4. Enter the following in the Goals input field and then click Run.
clean verify -Parq-remote
Figure 2.6. Edit Configuration
CHAPTER 2. DEVELOPING APPLICATIONS USING JBOSS EAP
31
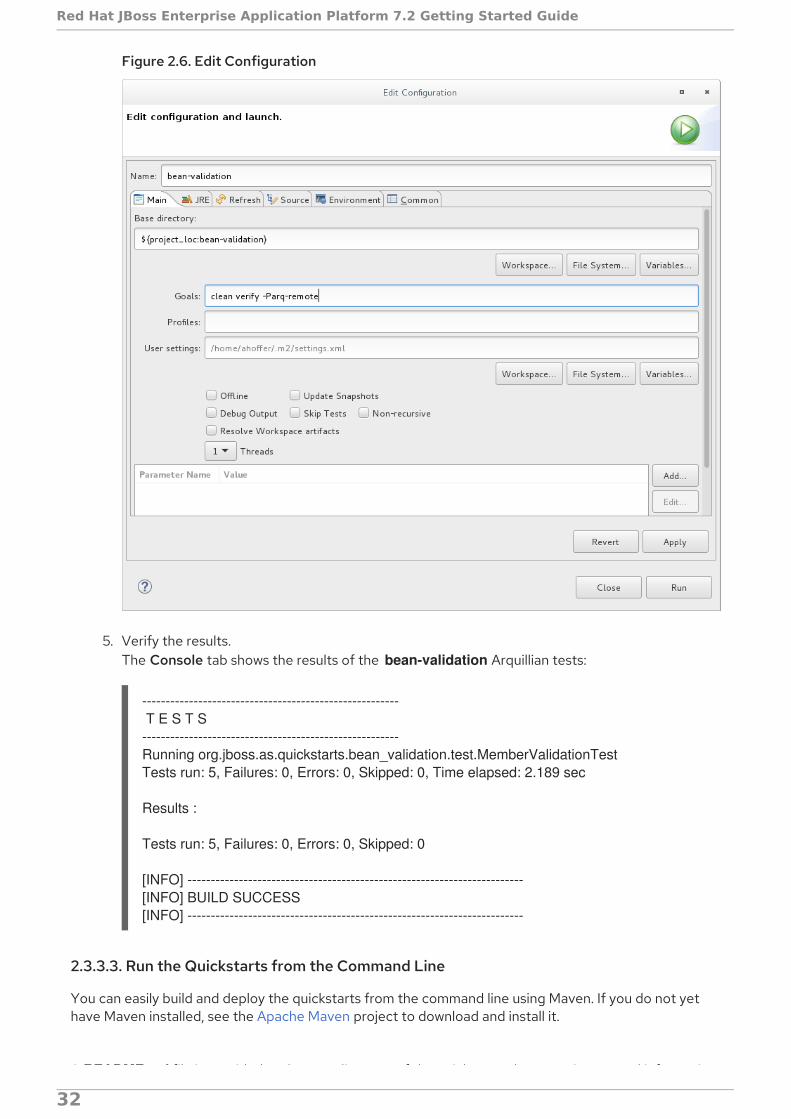
Figure 2.6. Edit Configuration
5. Verify the results.The Console tab shows the results of the bean-validation Arquillian tests:
------------------------------------------------------- T E S T S-------------------------------------------------------Running org.jboss.as.quickstarts.bean_validation.test.MemberValidationTestTests run: 5, Failures: 0, Errors: 0, Skipped: 0, Time elapsed: 2.189 sec
Results :
Tests run: 5, Failures: 0, Errors: 0, Skipped: 0
[INFO] ------------------------------------------------------------------------[INFO] BUILD SUCCESS[INFO] ------------------------------------------------------------------------
2.3.3.3. Run the Quickstarts from the Command Line
You can easily build and deploy the quickstarts from the command line using Maven. If you do not yethave Maven installed, see the Apache Maven project to download and install it.
A README.md file is provided at the root directory of the quickstarts that contains general information
Red Hat JBoss Enterprise Application Platform 7.2 Getting Started Guide
32
A README.md file is provided at the root directory of the quickstarts that contains general informationabout system requirements, configuring Maven, adding users, and running the quickstarts.
Each quickstart also contains its own README.md file that provides the specific instructions andMaven commands to run that quickstart.
Run the helloworld Quickstart from the Command Line
1. Review the README.md file in the root directory of the helloworld quickstart.
2. Start the JBoss EAP server.
$ EAP_HOME/bin/standalone.sh
3. Navigate to the helloworld quickstart directory.
4. Build and deploy the quickstart using the Maven command provided in the quickstart’s README.md file.
$ mvn clean install wildfly:deploy
5. The helloworld application is now available at http://localhost:8080/helloworld and displays thetext Hello World!.
2.4. REVIEW THE QUICKSTART EXAMPLES
2.4.1. Explore the helloworld Quickstart
The helloworld quickstart shows you how to deploy a simple servlet to JBoss EAP. The business logic isencapsulated in a service, which is provided as a Contexts and Dependency Injection (CDI) bean andinjected into the Servlet. This quickstart is a starting point to be sure you have configured and startedyour server properly.
Detailed instructions to build and deploy this quickstart using the command line can be found in the README.html file at the root of the helloworld quickstart directory. This topic shows you how to useRed Hat CodeReady Studio to run the quickstart and assumes you have installed Red Hat CodeReadyStudio, configured Maven, and imported and successfully run the helloworld quickstart.
Prerequisites
Install Red Hat CodeReady Studio. For instructions, see Installing CodeReady Studio stand-alone using the Installer in the Red Hat CodeReady Studio Installation Guide.
Run the helloworld quickstart. For instructions, see Run the Quickstarts in Red Hat CodeReadyStudio.
Verify that the helloworld quickstart was successfully deployed to JBoss EAP by opening a webbrowser and accessing the application at http://localhost:8080/helloworld.
Examine the Directory StructureThe code for the helloworld quickstart can be found in the QUICKSTART_HOME/helloworld/directory. The helloworld quickstart is comprised of a Servlet and a CDI bean. It also contains a beans.xml file in the application’s WEB-INF/ directory that has a version number of 1.1 and a bean-discovery-mode of all. This marker file identifies the WAR as a bean archive and tells JBoss EAP to lookfor beans in this application and to activate the CDI.
CHAPTER 2. DEVELOPING APPLICATIONS USING JBOSS EAP
33
The src/main/webapp/ directory contains the files for the quickstart. All the configuration files for thisexample are located in the WEB-INF/ directory within src/main/webapp/, including the beans.xml file.The src/main/webapp/ directory also includes an index.html file, which uses a simple meta refresh toredirect the user’s browser to the Servlet, which is located athttp://localhost:8080/helloworld/HelloWorld. The quickstart does not require a web.xml file.
Examine the CodeThe package declaration and imports have been excluded from these listings. The complete listing isavailable in the quickstart source code.
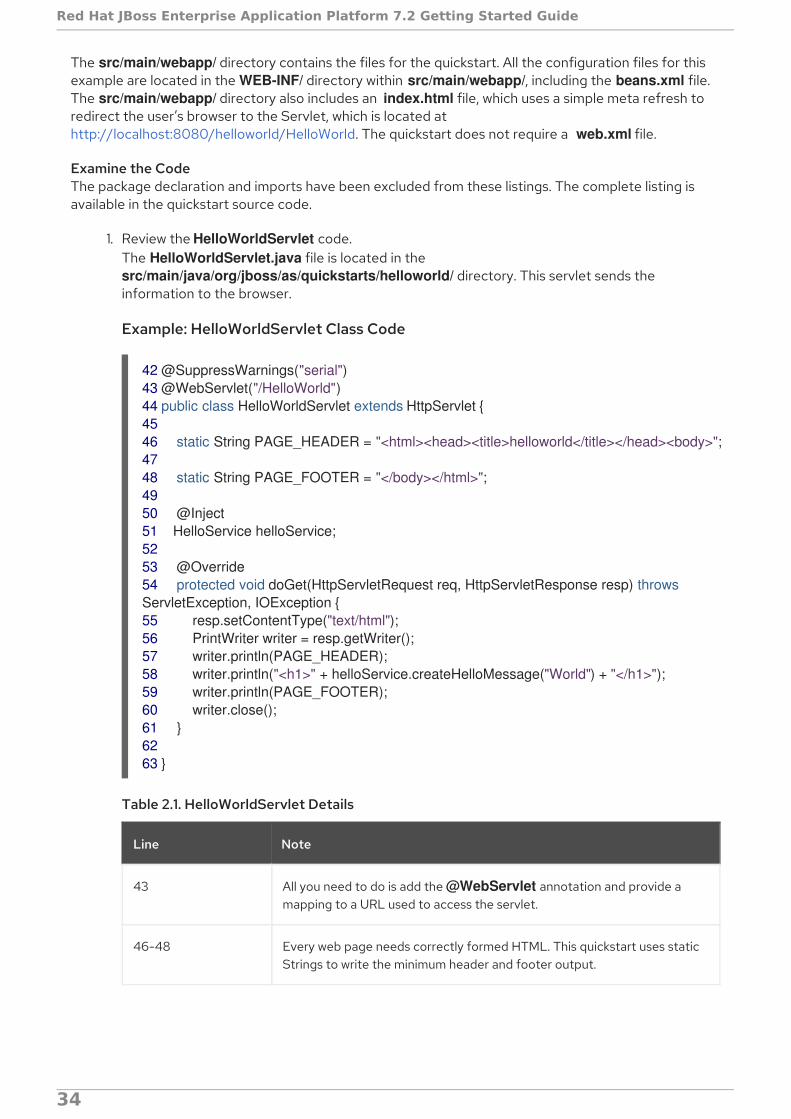
1. Review the HelloWorldServlet code.The HelloWorldServlet.java file is located in the src/main/java/org/jboss/as/quickstarts/helloworld/ directory. This servlet sends theinformation to the browser.
Example: HelloWorldServlet Class Code
Table 2.1. HelloWorldServlet Details
Line Note
43 All you need to do is add the @WebServlet annotation and provide amapping to a URL used to access the servlet.
46-48 Every web page needs correctly formed HTML. This quickstart uses staticStrings to write the minimum header and footer output.
42 @SuppressWarnings("serial")43 @WebServlet("/HelloWorld")44 public class HelloWorldServlet extends HttpServlet {4546 static String PAGE_HEADER = "<html><head><title>helloworld</title></head><body>";4748 static String PAGE_FOOTER = "</body></html>";4950 @Inject51 HelloService helloService;5253 @Override54 protected void doGet(HttpServletRequest req, HttpServletResponse resp) throws ServletException, IOException {55 resp.setContentType("text/html");56 PrintWriter writer = resp.getWriter();57 writer.println(PAGE_HEADER);58 writer.println("<h1>" + helloService.createHelloMessage("World") + "</h1>");59 writer.println(PAGE_FOOTER);60 writer.close();61 }6263 }
Red Hat JBoss Enterprise Application Platform 7.2 Getting Started Guide
34
50-51 These lines inject the HelloService CDI bean which generates the actualmessage. As long as we don’t alter the API of HelloService, this approachallows us to alter the implementation of HelloService at a later datewithout changing the view layer.
58 This line calls into the service to generate the message "Hello World", andwrite it out to the HTTP request.
Line Note
2. Review the HelloService code.The HelloService.java file is located in the src/main/java/org/jboss/as/quickstarts/helloworld/ directory. This service simply returns amessage. No XML or annotation registration is required.
Example: HelloService Class Code
2.4.2. Explore the numberguess Quickstart
The numberguess quickstart shows you how to create and deploy a simple non-persistant applicationto JBoss EAP. Information is displayed using a JSF view and business logic is encapsulated in two CDIbeans. In the numberguess quickstart, you have ten attempts to guess a number between 1 and 100.After each attempt, you’re told whether your guess was too high or too low.
The code for the numberguess quickstart can be found in the QUICKSTART_HOME/numberguess/directory where QUICKSTART_HOME is the directory where you downloaded and unzipped the JBossEAP quickstarts. The numberguess quickstart is comprised of a number of beans, configuration files,and Facelets (JSF) views, and is packaged as a WAR module.
Detailed instructions to build and deploy this quickstart using the command line can be found in the README.html file at the root of the numberguess quickstart directory. The following examples useRed Hat CodeReady Studio to run the quickstart.
Prerequisites
Install Red Hat CodeReady Studio. For instructions, see Installing CodeReady Studio stand-alone using the Installer in the Red Hat CodeReady Studio Installation Guide.
Run the numberguess quickstart. For instructions, see Run the Quickstarts in Red HatCodeReady Studio and replace helloworld with numberguess in the instructions.
Verify the numberguess quickstart was deployed successfully to JBoss EAP by opening a webbrowser and accessing the application at this URL: http://localhost:8080/numberguess.
Examine the Configuration Files
All the configuration files for this example are located in the
public class HelloService {
String createHelloMessage(String name) { return "Hello " + name + "!"; }}
CHAPTER 2. DEVELOPING APPLICATIONS USING JBOSS EAP
35
All the configuration files for this example are located in the QUICKSTART_HOME/numberguess/src/main/webapp/WEB-INF/ directory of the quickstart.
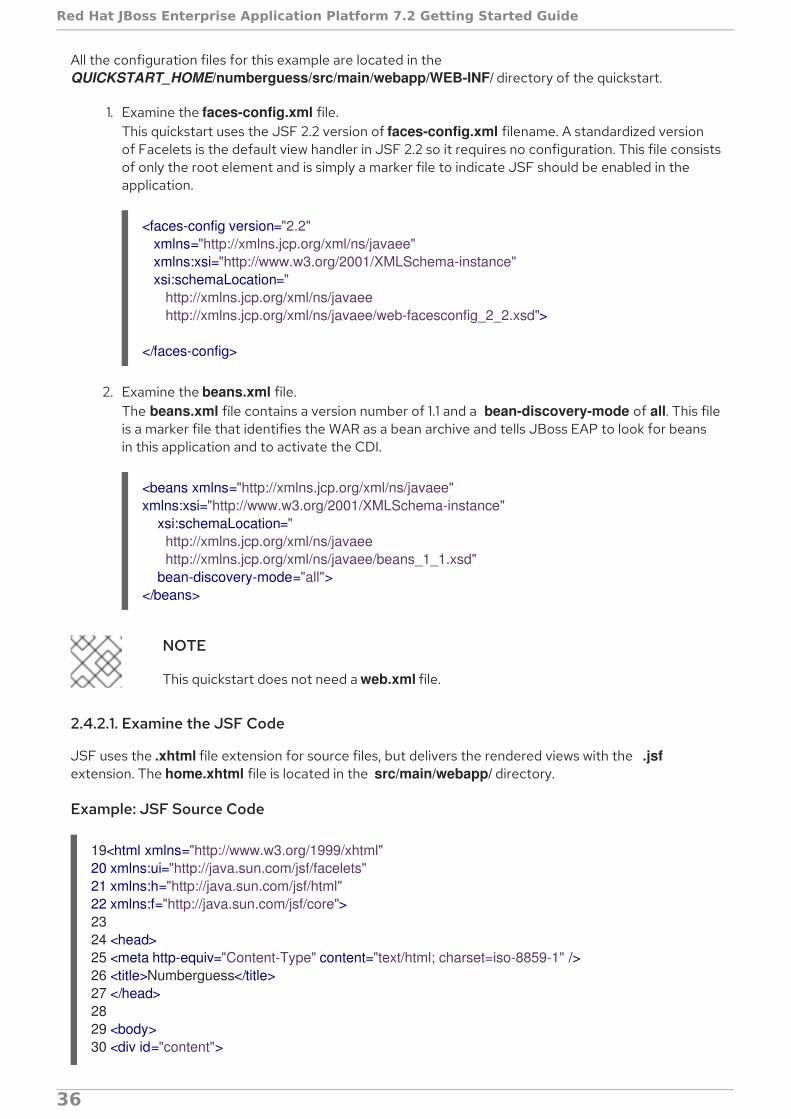
1. Examine the faces-config.xml file.This quickstart uses the JSF 2.2 version of faces-config.xml filename. A standardized versionof Facelets is the default view handler in JSF 2.2 so it requires no configuration. This file consistsof only the root element and is simply a marker file to indicate JSF should be enabled in theapplication.
2. Examine the beans.xml file.The beans.xml file contains a version number of 1.1 and a bean-discovery-mode of all. This fileis a marker file that identifies the WAR as a bean archive and tells JBoss EAP to look for beansin this application and to activate the CDI.
NOTE
This quickstart does not need a web.xml file.
2.4.2.1. Examine the JSF Code
JSF uses the .xhtml file extension for source files, but delivers the rendered views with the .jsfextension. The home.xhtml file is located in the src/main/webapp/ directory.
Example: JSF Source Code
<faces-config version="2.2" xmlns="http://xmlns.jcp.org/xml/ns/javaee" xmlns:xsi="http://www.w3.org/2001/XMLSchema-instance" xsi:schemaLocation=" http://xmlns.jcp.org/xml/ns/javaee http://xmlns.jcp.org/xml/ns/javaee/web-facesconfig_2_2.xsd">
</faces-config>
<beans xmlns="http://xmlns.jcp.org/xml/ns/javaee" xmlns:xsi="http://www.w3.org/2001/XMLSchema-instance" xsi:schemaLocation=" http://xmlns.jcp.org/xml/ns/javaee http://xmlns.jcp.org/xml/ns/javaee/beans_1_1.xsd" bean-discovery-mode="all"></beans>
19<html xmlns="http://www.w3.org/1999/xhtml"20 xmlns:ui="http://java.sun.com/jsf/facelets"21 xmlns:h="http://java.sun.com/jsf/html"22 xmlns:f="http://java.sun.com/jsf/core">2324 <head>25 <meta http-equiv="Content-Type" content="text/html; charset=iso-8859-1" />26 <title>Numberguess</title>27 </head>2829 <body>30 <div id="content">
Red Hat JBoss Enterprise Application Platform 7.2 Getting Started Guide
36
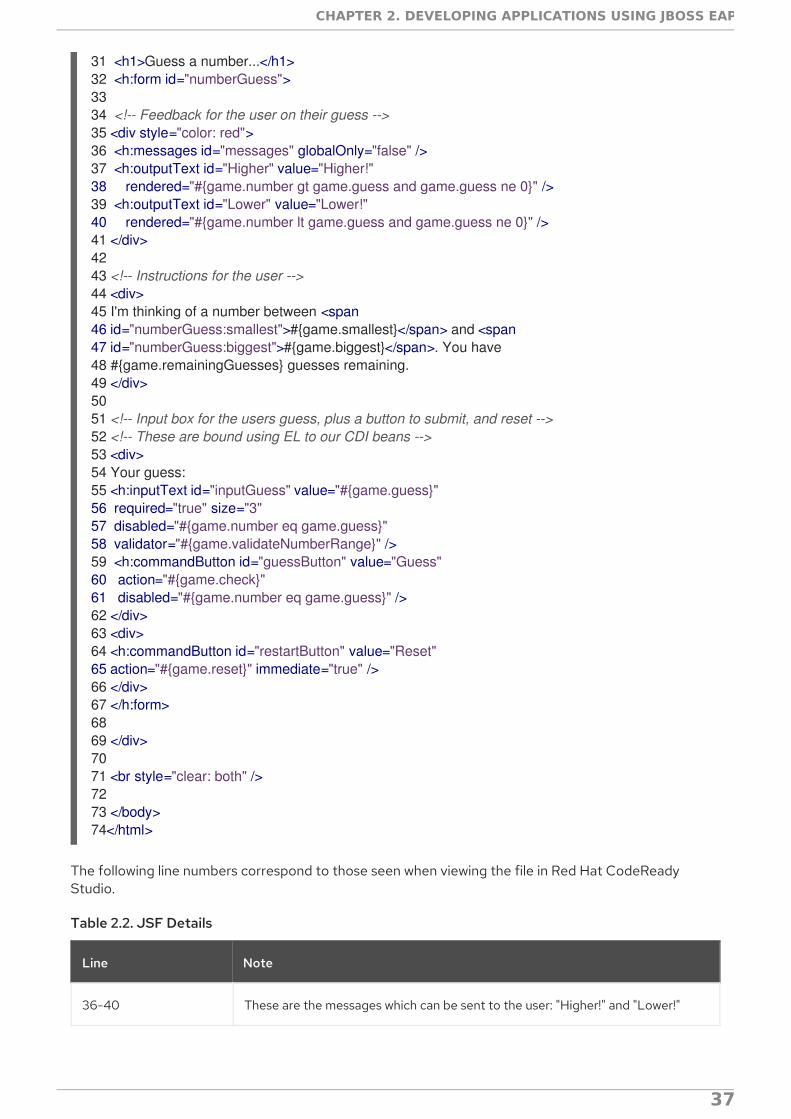
The following line numbers correspond to those seen when viewing the file in Red Hat CodeReadyStudio.
Table 2.2. JSF Details
Line Note
36-40 These are the messages which can be sent to the user: "Higher!" and "Lower!"
31 <h1>Guess a number...</h1>32 <h:form id="numberGuess">3334 <!-- Feedback for the user on their guess -->35 <div style="color: red">36 <h:messages id="messages" globalOnly="false" />37 <h:outputText id="Higher" value="Higher!"38 rendered="#{game.number gt game.guess and game.guess ne 0}" />39 <h:outputText id="Lower" value="Lower!"40 rendered="#{game.number lt game.guess and game.guess ne 0}" />41 </div>4243 <!-- Instructions for the user -->44 <div>45 I'm thinking of a number between <span46 id="numberGuess:smallest">#{game.smallest}</span> and <span47 id="numberGuess:biggest">#{game.biggest}</span>. You have48 #{game.remainingGuesses} guesses remaining.49 </div>5051 <!-- Input box for the users guess, plus a button to submit, and reset -->52 <!-- These are bound using EL to our CDI beans -->53 <div>54 Your guess:55 <h:inputText id="inputGuess" value="#{game.guess}"56 required="true" size="3"57 disabled="#{game.number eq game.guess}"58 validator="#{game.validateNumberRange}" />59 <h:commandButton id="guessButton" value="Guess"60 action="#{game.check}"61 disabled="#{game.number eq game.guess}" />62 </div>63 <div>64 <h:commandButton id="restartButton" value="Reset"65 action="#{game.reset}" immediate="true" />66 </div>67 </h:form>6869 </div>7071 <br style="clear: both" />7273 </body>74</html>
CHAPTER 2. DEVELOPING APPLICATIONS USING JBOSS EAP
37
45-48 As the user guesses, the range of numbers they can guess gets smaller. Thissentence changes to make sure they know the number range of a valid guess.
55-58 This input field is bound to a bean property using a value expression.
58 A validator binding is used to make sure the user does not accidentally input anumber outside of the range in which they can guess. If the validator was not here,the user might use up a guess on an out of bounds number.
59-61 There must be a way for the user to send their guess to the server. Here we bindto an action method on the bean.
Line Note
2.4.2.2. Examine the Class Files
All of the numberguess quickstart source files can be found in the QUICKSTART_HOME/numberguess/src/main/java/org/jboss/as/quickstarts/numberguess/directory. The package declaration and imports have been excluded from these listings. The completelisting is available in the quickstart source code.
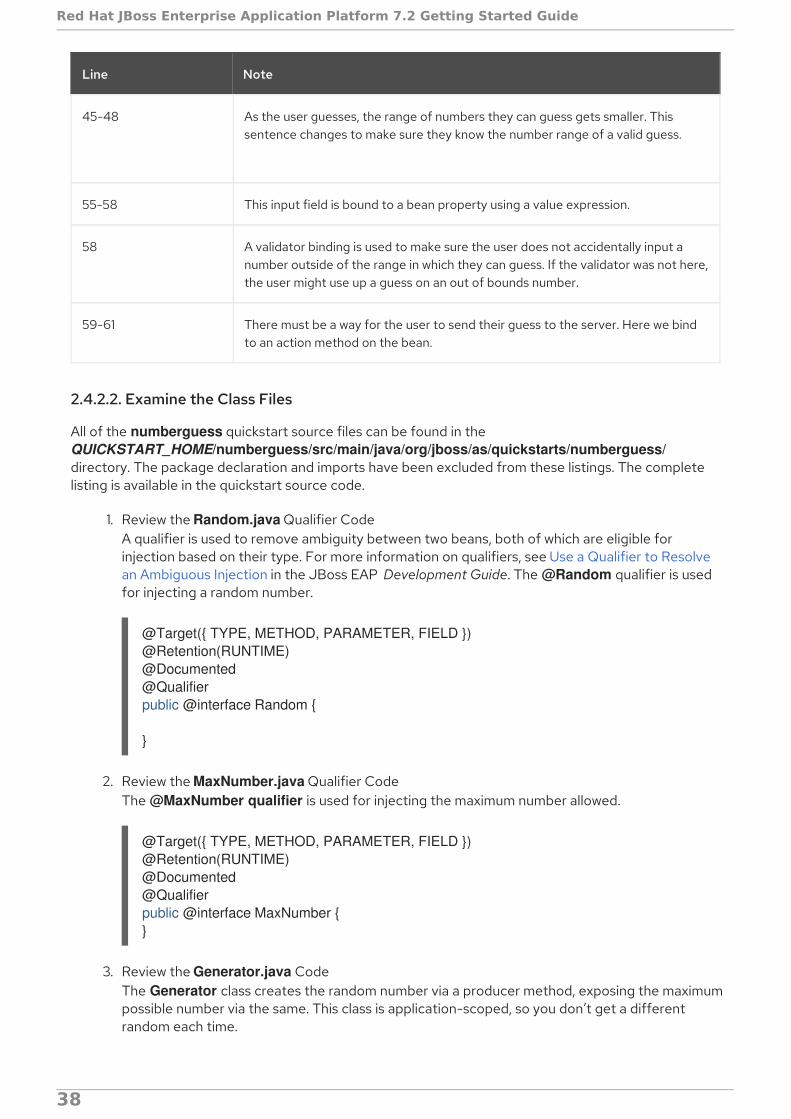
1. Review the Random.java Qualifier CodeA qualifier is used to remove ambiguity between two beans, both of which are eligible forinjection based on their type. For more information on qualifiers, see Use a Qualifier to Resolvean Ambiguous Injection in the JBoss EAP Development Guide. The @Random qualifier is usedfor injecting a random number.
2. Review the MaxNumber.java Qualifier CodeThe @MaxNumber qualifier is used for injecting the maximum number allowed.
3. Review the Generator.java CodeThe Generator class creates the random number via a producer method, exposing the maximumpossible number via the same. This class is application-scoped, so you don’t get a differentrandom each time.
@Target({ TYPE, METHOD, PARAMETER, FIELD })@Retention(RUNTIME)@Documented@Qualifierpublic @interface Random {
}
@Target({ TYPE, METHOD, PARAMETER, FIELD })@Retention(RUNTIME)@Documented@Qualifierpublic @interface MaxNumber {}
Red Hat JBoss Enterprise Application Platform 7.2 Getting Started Guide
38
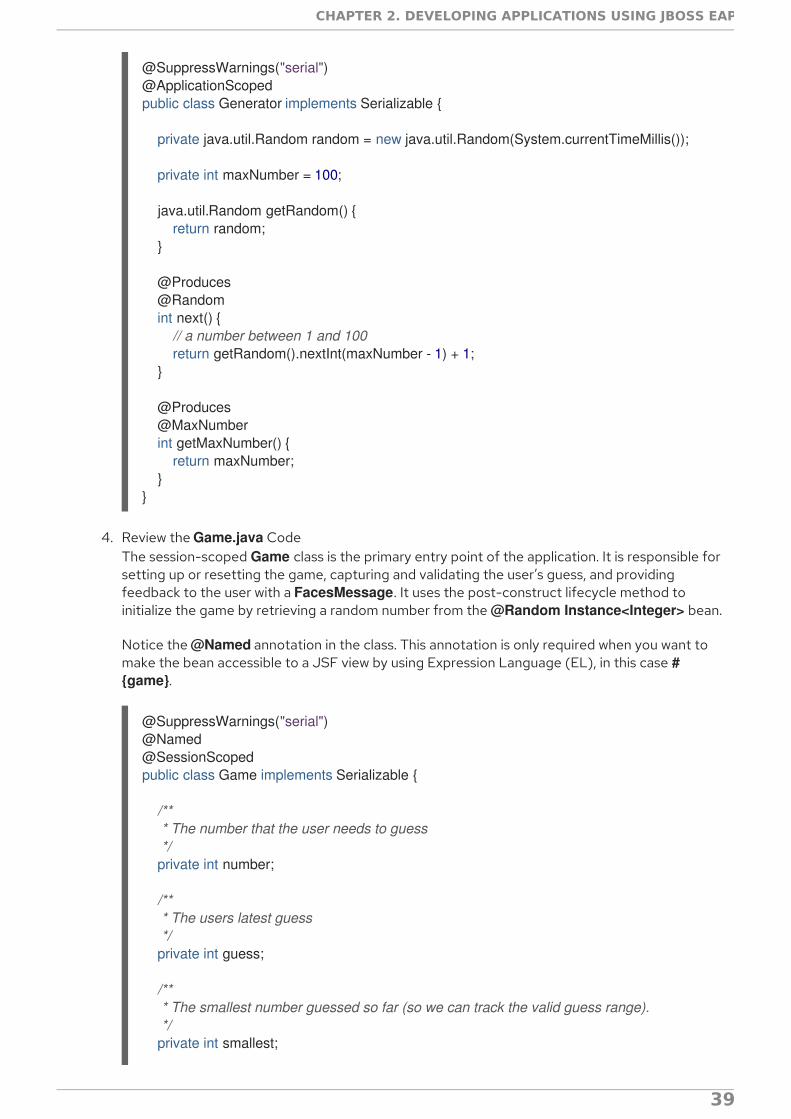
4. Review the Game.java CodeThe session-scoped Game class is the primary entry point of the application. It is responsible forsetting up or resetting the game, capturing and validating the user’s guess, and providingfeedback to the user with a FacesMessage. It uses the post-construct lifecycle method toinitialize the game by retrieving a random number from the @Random Instance<Integer> bean.
Notice the @Named annotation in the class. This annotation is only required when you want tomake the bean accessible to a JSF view by using Expression Language (EL), in this case #{game}.
@SuppressWarnings("serial")@ApplicationScopedpublic class Generator implements Serializable {
private java.util.Random random = new java.util.Random(System.currentTimeMillis());
private int maxNumber = 100;
java.util.Random getRandom() { return random; }
@Produces @Random int next() { // a number between 1 and 100 return getRandom().nextInt(maxNumber - 1) + 1; }
@Produces @MaxNumber int getMaxNumber() { return maxNumber; }}
@SuppressWarnings("serial")@Named@SessionScopedpublic class Game implements Serializable {
/** * The number that the user needs to guess */ private int number;
/** * The users latest guess */ private int guess;
/** * The smallest number guessed so far (so we can track the valid guess range). */ private int smallest;
CHAPTER 2. DEVELOPING APPLICATIONS USING JBOSS EAP
39
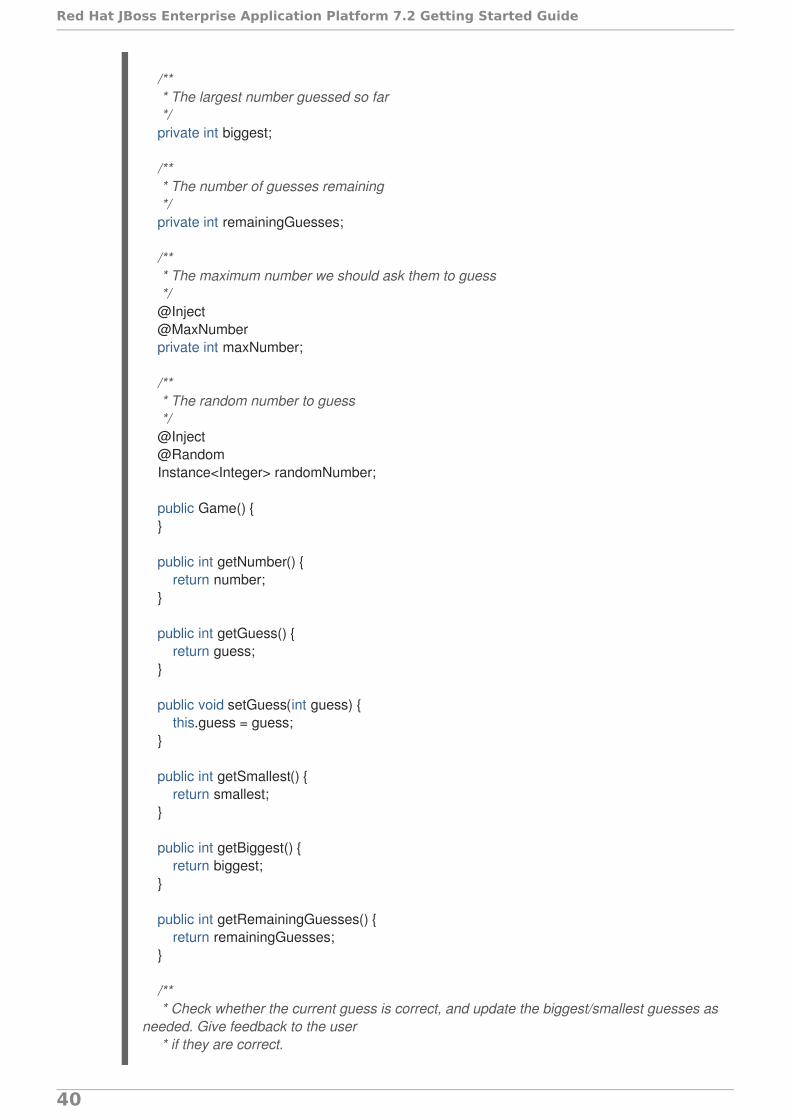
/** * The largest number guessed so far */ private int biggest;
/** * The number of guesses remaining */ private int remainingGuesses;
/** * The maximum number we should ask them to guess */ @Inject @MaxNumber private int maxNumber;
/** * The random number to guess */ @Inject @Random Instance<Integer> randomNumber;
public Game() { }
public int getNumber() { return number; }
public int getGuess() { return guess; }
public void setGuess(int guess) { this.guess = guess; }
public int getSmallest() { return smallest; }
public int getBiggest() { return biggest; }
public int getRemainingGuesses() { return remainingGuesses; }
/** * Check whether the current guess is correct, and update the biggest/smallest guesses as needed. Give feedback to the user * if they are correct.
Red Hat JBoss Enterprise Application Platform 7.2 Getting Started Guide
40
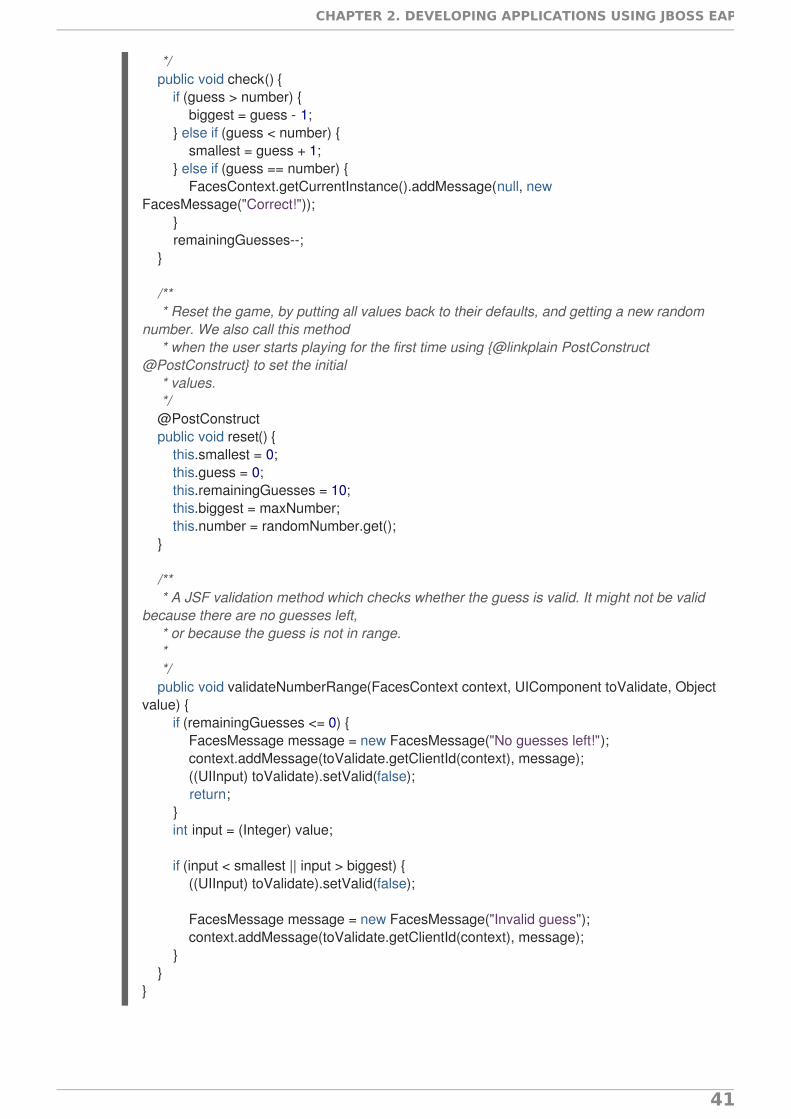
*/ public void check() { if (guess > number) { biggest = guess - 1; } else if (guess < number) { smallest = guess + 1; } else if (guess == number) { FacesContext.getCurrentInstance().addMessage(null, new FacesMessage("Correct!")); } remainingGuesses--; }
/** * Reset the game, by putting all values back to their defaults, and getting a new random number. We also call this method * when the user starts playing for the first time using {@linkplain PostConstruct @PostConstruct} to set the initial * values. */ @PostConstruct public void reset() { this.smallest = 0; this.guess = 0; this.remainingGuesses = 10; this.biggest = maxNumber; this.number = randomNumber.get(); }
/** * A JSF validation method which checks whether the guess is valid. It might not be valid because there are no guesses left, * or because the guess is not in range. * */ public void validateNumberRange(FacesContext context, UIComponent toValidate, Object value) { if (remainingGuesses <= 0) { FacesMessage message = new FacesMessage("No guesses left!"); context.addMessage(toValidate.getClientId(context), message); ((UIInput) toValidate).setValid(false); return; } int input = (Integer) value;
if (input < smallest || input > biggest) { ((UIInput) toValidate).setValid(false);
FacesMessage message = new FacesMessage("Invalid guess"); context.addMessage(toValidate.getClientId(context), message); } }}
CHAPTER 2. DEVELOPING APPLICATIONS USING JBOSS EAP
41

APPENDIX A. REFERENCE MATERIAL
A.1. SERVER RUNTIME ARGUMENTS
The application server startup script accepts arguments and switches at runtime. This allows the serverto start under alternative configurations to those defined in the standalone.xml, domain.xml, and host.xml configuration files.
Alternative configurations might include starting the server with an alternative socket bindings set or asecondary configuration.
The available parameters list can be accessed by passing the help switch -h or --help at startup.
Table A.1. Runtime Switches and Arguments
Argument or Switch OperatingMode
Description
--admin-only Standalone Set the server’s running type to ADMIN_ONLY.This will cause it to open administrative interfacesand accept management requests, but not startother runtime services or accept end userrequests. Note that it is recommended to use --start-mode=admin-only instead.
--admin-only Domain Set the host controller’s running type to ADMIN_ONLY causing it to open administrativeinterfaces and accept management requests butnot start servers or, if this host controller is themaster for the domain, accept incomingconnections from slave host controllers.
-b=<value>, -b <value> Standalone,Domain
Set system property jboss.bind.address, whichis used in configuring the bind address for thepublic interface. This defaults to 127.0.0.1 if novalue is specified. See the -b<interface>=<value> entry for setting the bind address forother interfaces.
-b<interface>=<value> Standalone,Domain
Set system property jboss.bind.address.<interface> to the given value. For example, -bmanagement=IP_ADDRESS
--backup Domain Keep a copy of the persistent domainconfiguration even if this host is not the domaincontroller.
-c=<config>, -c <config> Standalone Name of the server configuration file to use. Thedefault is standalone.xml.
-c=<config>, -c <config> Domain Name of the server configuration file to use. Thedefault is domain.xml.
Red Hat JBoss Enterprise Application Platform 7.2 Getting Started Guide
42
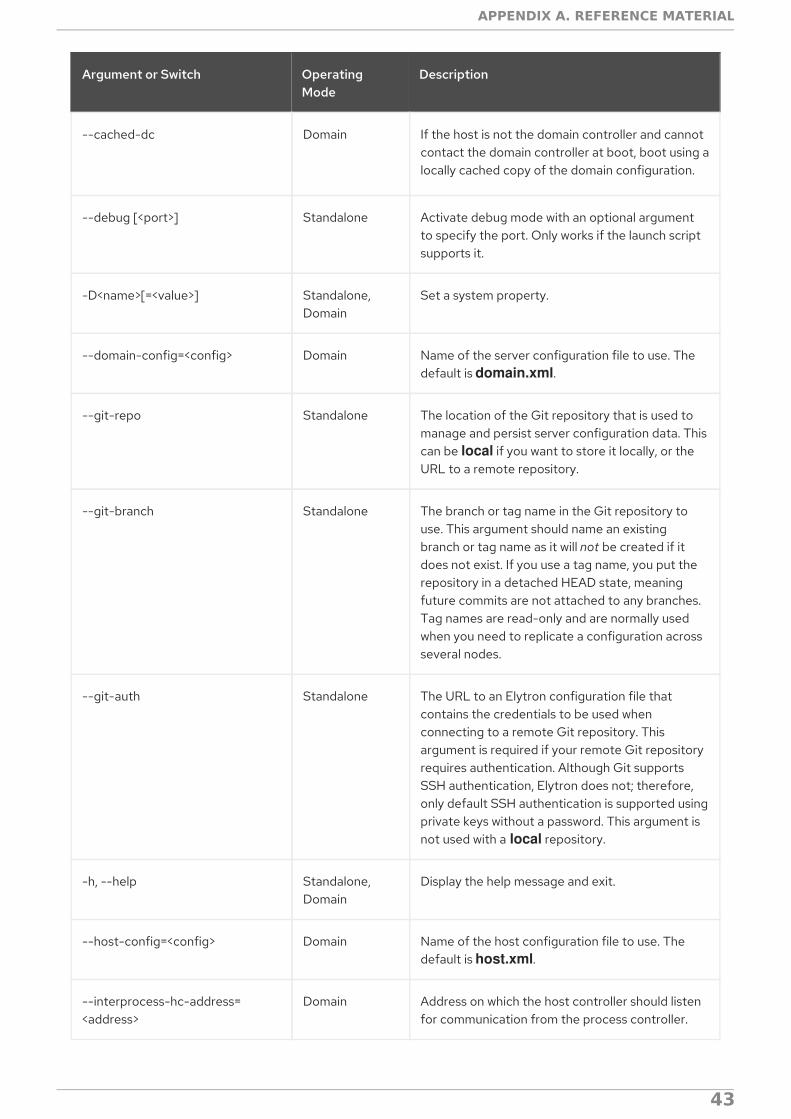
--cached-dc Domain If the host is not the domain controller and cannotcontact the domain controller at boot, boot using alocally cached copy of the domain configuration.
--debug [<port>] Standalone Activate debug mode with an optional argumentto specify the port. Only works if the launch scriptsupports it.
-D<name>[=<value>] Standalone,Domain
Set a system property.
--domain-config=<config> Domain Name of the server configuration file to use. Thedefault is domain.xml.
--git-repo Standalone The location of the Git repository that is used tomanage and persist server configuration data. Thiscan be local if you want to store it locally, or theURL to a remote repository.
--git-branch Standalone The branch or tag name in the Git repository touse. This argument should name an existingbranch or tag name as it will not be created if itdoes not exist. If you use a tag name, you put therepository in a detached HEAD state, meaningfuture commits are not attached to any branches.Tag names are read-only and are normally usedwhen you need to replicate a configuration acrossseveral nodes.
--git-auth Standalone The URL to an Elytron configuration file thatcontains the credentials to be used whenconnecting to a remote Git repository. Thisargument is required if your remote Git repositoryrequires authentication. Although Git supportsSSH authentication, Elytron does not; therefore,only default SSH authentication is supported usingprivate keys without a password. This argument isnot used with a local repository.
-h, --help Standalone,Domain
Display the help message and exit.
--host-config=<config> Domain Name of the host configuration file to use. Thedefault is host.xml.
--interprocess-hc-address=<address>
Domain Address on which the host controller should listenfor communication from the process controller.
Argument or Switch OperatingMode
Description
APPENDIX A. REFERENCE MATERIAL
43

--interprocess-hc-port=<port> Domain Port on which the host controller should listen forcommunication from the process controller.
--master-address=<address> Domain Set system property jboss.domain.master.address to the givenvalue. In a default slave host controllerconfiguration, this is used to configure the addressof the master host controller.
--master-port=<port> Domain Set system property jboss.domain.master.port to the given value.In a default slave host controller configuration, thisis used to configure the port used for nativemanagement communication by the master hostcontroller.
--read-only-server-config=<config>
Standalone Name of the server configuration file to use. Thisdiffers from --server-config and -c in that theoriginal file is never overwritten.
--read-only-domain-config=<config>
Domain Name of the domain configuration file to use. Thisdiffers from --domain-config and -c in that theinitial file is never overwritten.
--read-only-host-config=<config> Domain Name of the host configuration file to use. Thisdiffers from --host-config in that the initial file isnever overwritten.
-P=<url>, -P <url>, --properties=<url>
Standalone,Domain
Load system properties from the given URL.
--pc-address=<address> Domain Address on which the process controller listens forcommunication from processes it controls.
--pc-port=<port> Domain Port on which the process controller listens forcommunication from processes it controls.
-S<name>[=<value>] Standalone Set a security property.
-secmgr Standalone,Domain
Runs the server with a security manager installed.
--server-config=<config> Standalone Name of the server configuration file to use. Thedefault is standalone.xml.
Argument or Switch OperatingMode
Description
Red Hat JBoss Enterprise Application Platform 7.2 Getting Started Guide
44
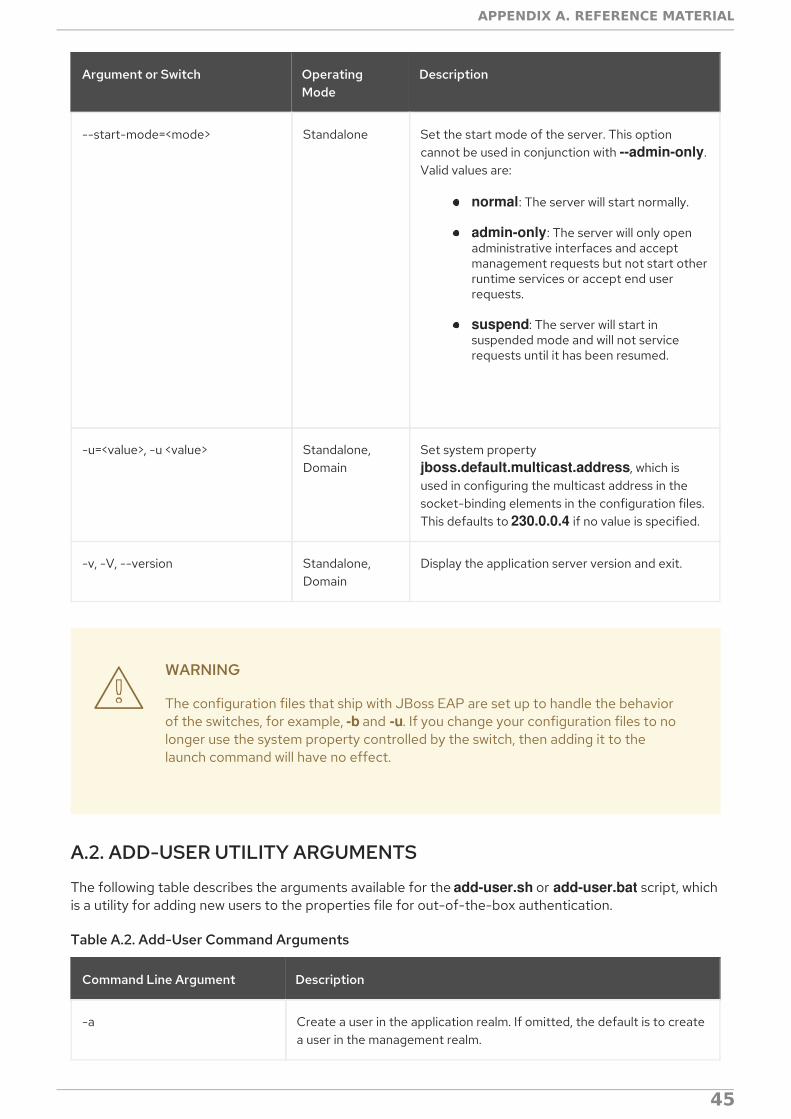
--start-mode=<mode> Standalone Set the start mode of the server. This optioncannot be used in conjunction with --admin-only.Valid values are:
normal: The server will start normally.
admin-only: The server will only openadministrative interfaces and acceptmanagement requests but not start otherruntime services or accept end userrequests.
suspend: The server will start insuspended mode and will not servicerequests until it has been resumed.
-u=<value>, -u <value> Standalone,Domain
Set system property jboss.default.multicast.address, which isused in configuring the multicast address in thesocket-binding elements in the configuration files.This defaults to 230.0.0.4 if no value is specified.
-v, -V, --version Standalone,Domain
Display the application server version and exit.
Argument or Switch OperatingMode
Description
WARNING
The configuration files that ship with JBoss EAP are set up to handle the behaviorof the switches, for example, -b and -u. If you change your configuration files to nolonger use the system property controlled by the switch, then adding it to thelaunch command will have no effect.
A.2. ADD-USER UTILITY ARGUMENTS
The following table describes the arguments available for the add-user.sh or add-user.bat script, whichis a utility for adding new users to the properties file for out-of-the-box authentication.
Table A.2. Add-User Command Arguments
Command Line Argument Description
-a Create a user in the application realm. If omitted, the default is to createa user in the management realm.
APPENDIX A. REFERENCE MATERIAL
45
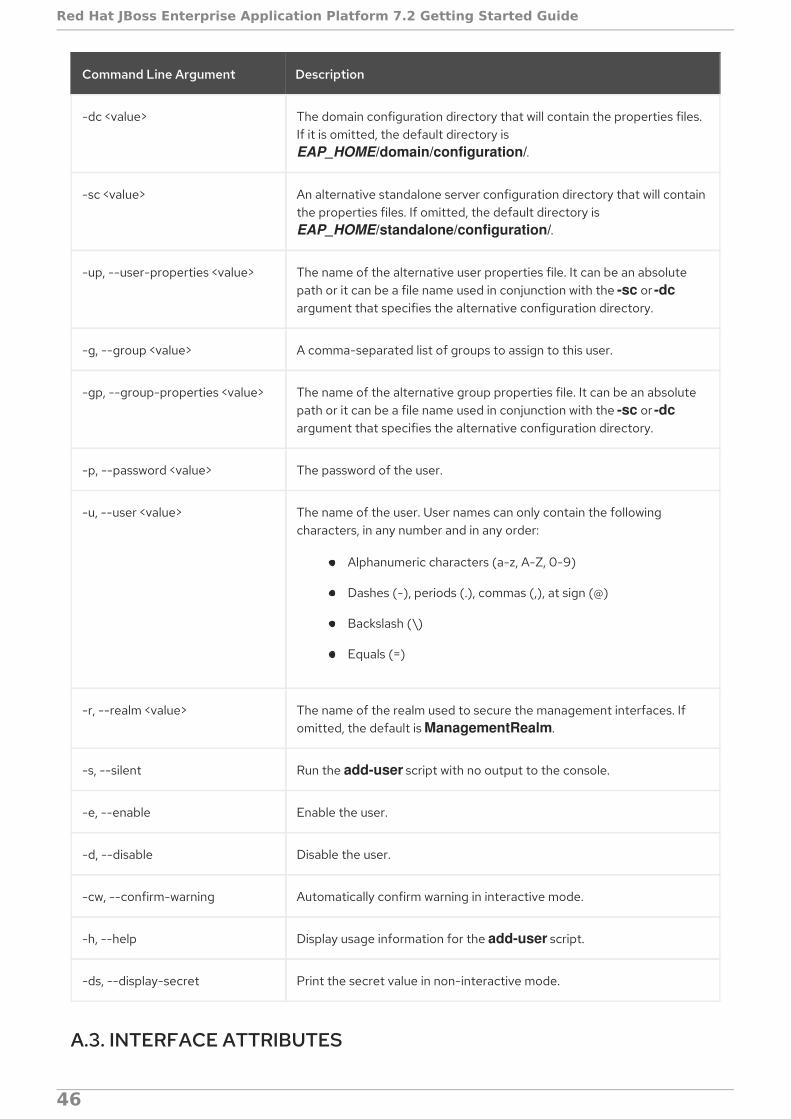
-dc <value> The domain configuration directory that will contain the properties files.If it is omitted, the default directory is EAP_HOME/domain/configuration/.
-sc <value> An alternative standalone server configuration directory that will containthe properties files. If omitted, the default directory is EAP_HOME/standalone/configuration/.
-up, --user-properties <value> The name of the alternative user properties file. It can be an absolutepath or it can be a file name used in conjunction with the -sc or -dcargument that specifies the alternative configuration directory.
-g, --group <value> A comma-separated list of groups to assign to this user.
-gp, --group-properties <value> The name of the alternative group properties file. It can be an absolutepath or it can be a file name used in conjunction with the -sc or -dcargument that specifies the alternative configuration directory.
-p, --password <value> The password of the user.
-u, --user <value> The name of the user. User names can only contain the followingcharacters, in any number and in any order:
Alphanumeric characters (a-z, A-Z, 0-9)
Dashes (-), periods (.), commas (,), at sign (@)
Backslash (\)
Equals (=)
-r, --realm <value> The name of the realm used to secure the management interfaces. Ifomitted, the default is ManagementRealm.
-s, --silent Run the add-user script with no output to the console.
-e, --enable Enable the user.
-d, --disable Disable the user.
-cw, --confirm-warning Automatically confirm warning in interactive mode.
-h, --help Display usage information for the add-user script.
-ds, --display-secret Print the secret value in non-interactive mode.
Command Line Argument Description
A.3. INTERFACE ATTRIBUTES
Red Hat JBoss Enterprise Application Platform 7.2 Getting Started Guide
46
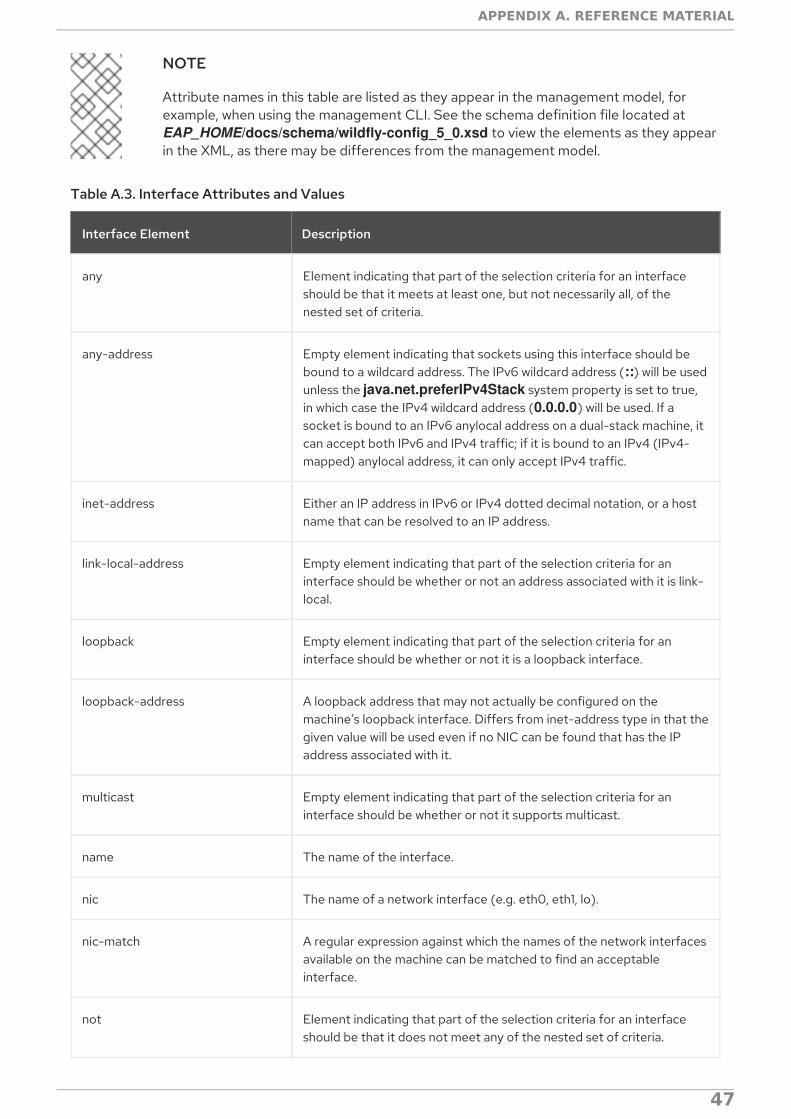
NOTE
Attribute names in this table are listed as they appear in the management model, forexample, when using the management CLI. See the schema definition file located at EAP_HOME/docs/schema/wildfly-config_5_0.xsd to view the elements as they appearin the XML, as there may be differences from the management model.
Table A.3. Interface Attributes and Values
Interface Element Description
any Element indicating that part of the selection criteria for an interfaceshould be that it meets at least one, but not necessarily all, of thenested set of criteria.
any-address Empty element indicating that sockets using this interface should bebound to a wildcard address. The IPv6 wildcard address (::) will be usedunless the java.net.preferIPv4Stack system property is set to true,in which case the IPv4 wildcard address (0.0.0.0) will be used. If asocket is bound to an IPv6 anylocal address on a dual-stack machine, itcan accept both IPv6 and IPv4 traffic; if it is bound to an IPv4 (IPv4-mapped) anylocal address, it can only accept IPv4 traffic.
inet-address Either an IP address in IPv6 or IPv4 dotted decimal notation, or a hostname that can be resolved to an IP address.
link-local-address Empty element indicating that part of the selection criteria for aninterface should be whether or not an address associated with it is link-local.
loopback Empty element indicating that part of the selection criteria for aninterface should be whether or not it is a loopback interface.
loopback-address A loopback address that may not actually be configured on themachine’s loopback interface. Differs from inet-address type in that thegiven value will be used even if no NIC can be found that has the IPaddress associated with it.
multicast Empty element indicating that part of the selection criteria for aninterface should be whether or not it supports multicast.
name The name of the interface.
nic The name of a network interface (e.g. eth0, eth1, lo).
nic-match A regular expression against which the names of the network interfacesavailable on the machine can be matched to find an acceptableinterface.
not Element indicating that part of the selection criteria for an interfaceshould be that it does not meet any of the nested set of criteria.
APPENDIX A. REFERENCE MATERIAL
47
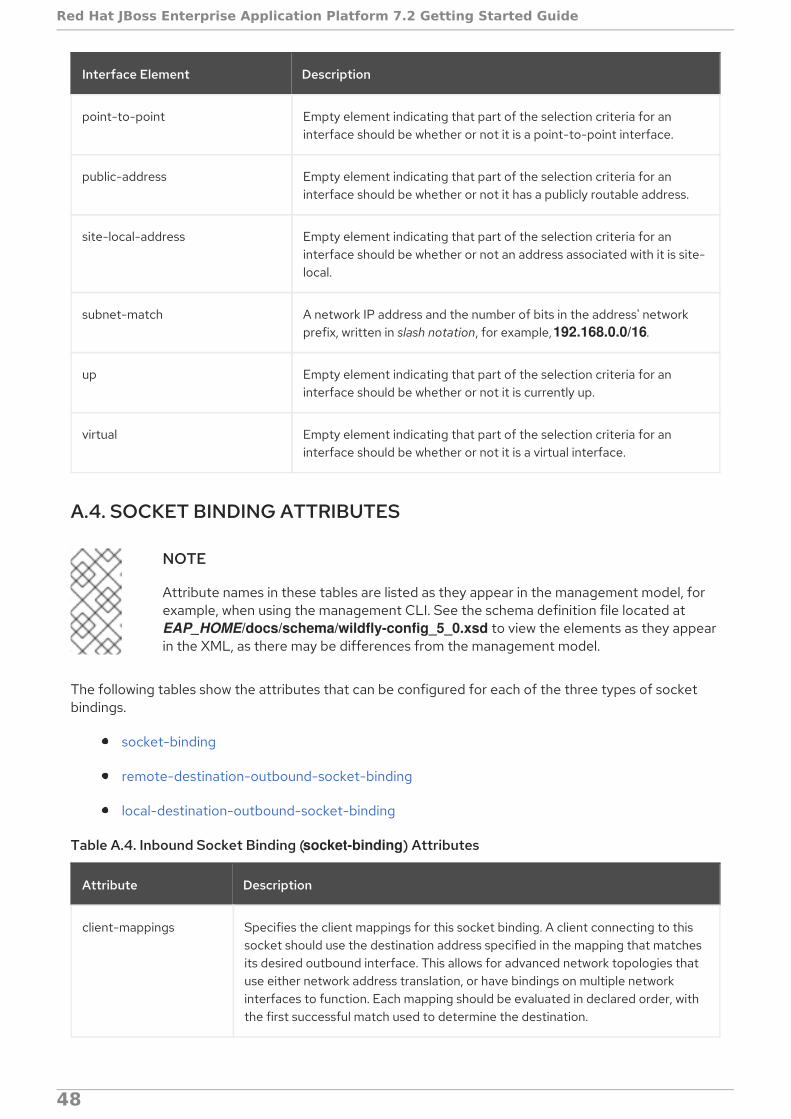
point-to-point Empty element indicating that part of the selection criteria for aninterface should be whether or not it is a point-to-point interface.
public-address Empty element indicating that part of the selection criteria for aninterface should be whether or not it has a publicly routable address.
site-local-address Empty element indicating that part of the selection criteria for aninterface should be whether or not an address associated with it is site-local.
subnet-match A network IP address and the number of bits in the address' networkprefix, written in slash notation, for example, 192.168.0.0/16.
up Empty element indicating that part of the selection criteria for aninterface should be whether or not it is currently up.
virtual Empty element indicating that part of the selection criteria for aninterface should be whether or not it is a virtual interface.
Interface Element Description
A.4. SOCKET BINDING ATTRIBUTES
NOTE
Attribute names in these tables are listed as they appear in the management model, forexample, when using the management CLI. See the schema definition file located at EAP_HOME/docs/schema/wildfly-config_5_0.xsd to view the elements as they appearin the XML, as there may be differences from the management model.
The following tables show the attributes that can be configured for each of the three types of socketbindings.
socket-binding
remote-destination-outbound-socket-binding
local-destination-outbound-socket-binding
Table A.4. Inbound Socket Binding (socket-binding) Attributes
Attribute Description
client-mappings Specifies the client mappings for this socket binding. A client connecting to thissocket should use the destination address specified in the mapping that matchesits desired outbound interface. This allows for advanced network topologies thatuse either network address translation, or have bindings on multiple networkinterfaces to function. Each mapping should be evaluated in declared order, withthe first successful match used to determine the destination.
Red Hat JBoss Enterprise Application Platform 7.2 Getting Started Guide
48
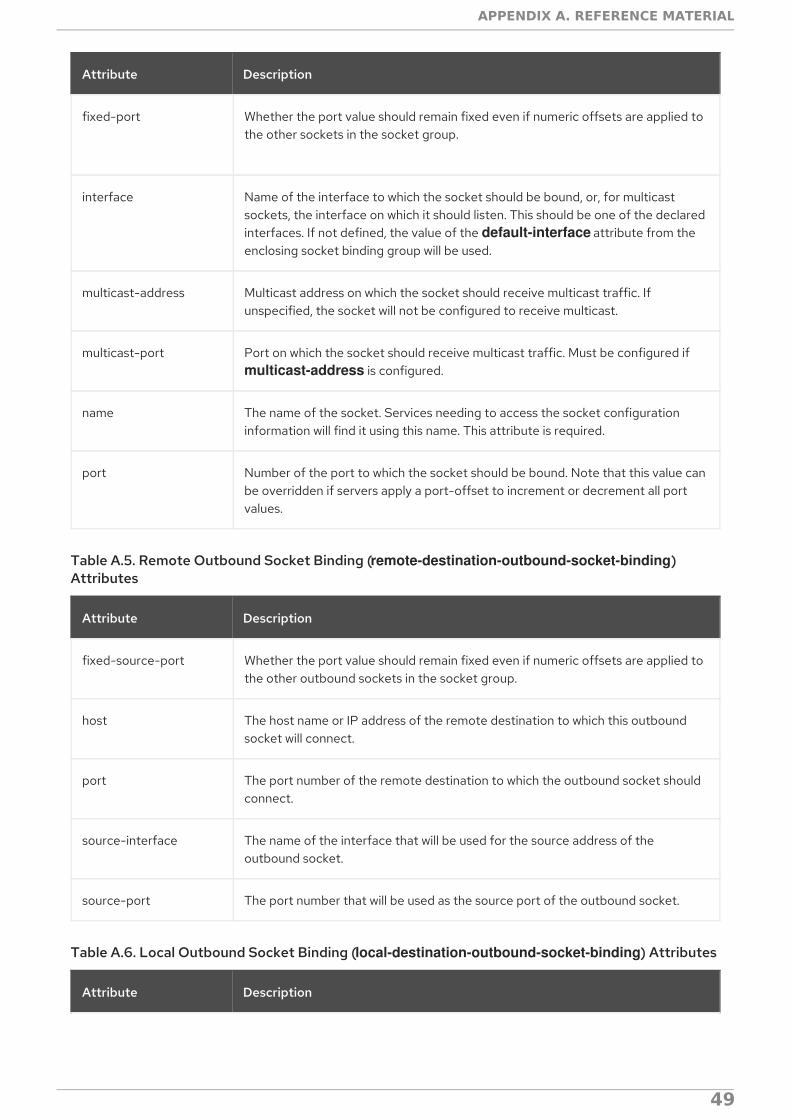
fixed-port Whether the port value should remain fixed even if numeric offsets are applied tothe other sockets in the socket group.
interface Name of the interface to which the socket should be bound, or, for multicastsockets, the interface on which it should listen. This should be one of the declaredinterfaces. If not defined, the value of the default-interface attribute from theenclosing socket binding group will be used.
multicast-address Multicast address on which the socket should receive multicast traffic. Ifunspecified, the socket will not be configured to receive multicast.
multicast-port Port on which the socket should receive multicast traffic. Must be configured if multicast-address is configured.
name The name of the socket. Services needing to access the socket configurationinformation will find it using this name. This attribute is required.
port Number of the port to which the socket should be bound. Note that this value canbe overridden if servers apply a port-offset to increment or decrement all portvalues.
Attribute Description
Table A.5. Remote Outbound Socket Binding (remote-destination-outbound-socket-binding)Attributes
Attribute Description
fixed-source-port Whether the port value should remain fixed even if numeric offsets are applied tothe other outbound sockets in the socket group.
host The host name or IP address of the remote destination to which this outboundsocket will connect.
port The port number of the remote destination to which the outbound socket shouldconnect.
source-interface The name of the interface that will be used for the source address of theoutbound socket.
source-port The port number that will be used as the source port of the outbound socket.
Table A.6. Local Outbound Socket Binding (local-destination-outbound-socket-binding) Attributes
Attribute Description
APPENDIX A. REFERENCE MATERIAL
49
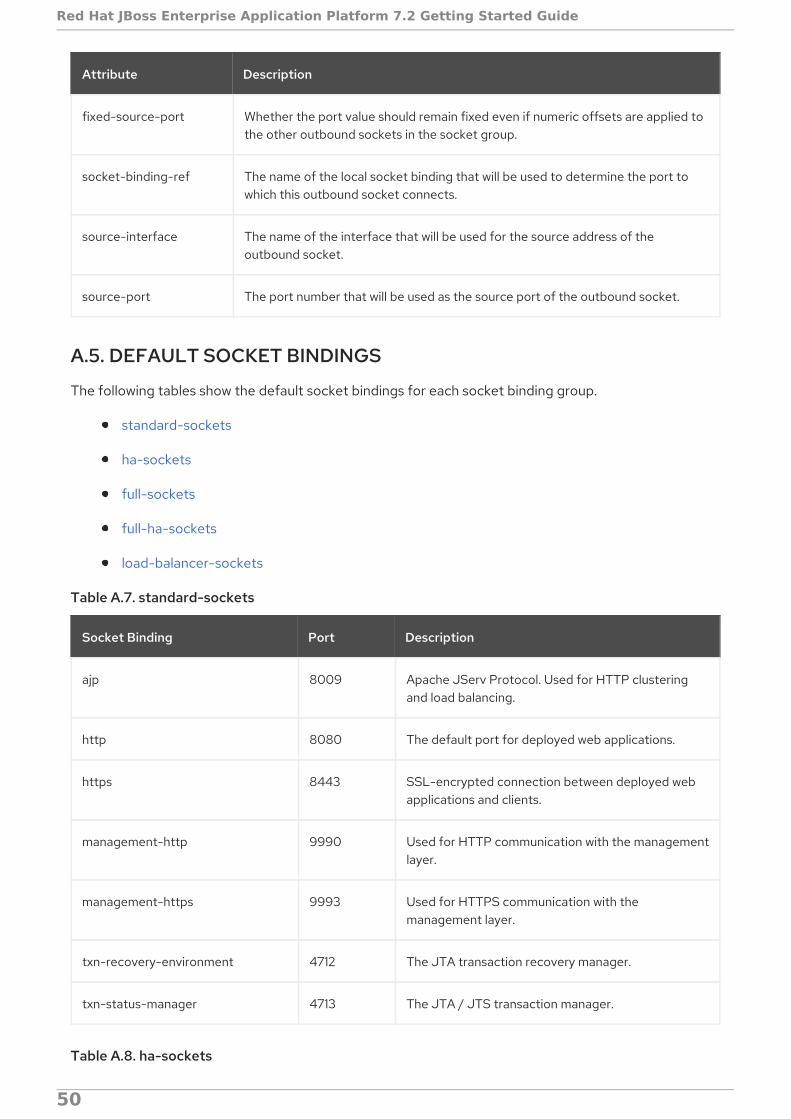
fixed-source-port Whether the port value should remain fixed even if numeric offsets are applied tothe other outbound sockets in the socket group.
socket-binding-ref The name of the local socket binding that will be used to determine the port towhich this outbound socket connects.
source-interface The name of the interface that will be used for the source address of theoutbound socket.
source-port The port number that will be used as the source port of the outbound socket.
Attribute Description
A.5. DEFAULT SOCKET BINDINGS
The following tables show the default socket bindings for each socket binding group.
standard-sockets
ha-sockets
full-sockets
full-ha-sockets
load-balancer-sockets
Table A.7. standard-sockets
Socket Binding Port Description
ajp 8009 Apache JServ Protocol. Used for HTTP clusteringand load balancing.
http 8080 The default port for deployed web applications.
https 8443 SSL-encrypted connection between deployed webapplications and clients.
management-http 9990 Used for HTTP communication with the managementlayer.
management-https 9993 Used for HTTPS communication with themanagement layer.
txn-recovery-environment 4712 The JTA transaction recovery manager.
txn-status-manager 4713 The JTA / JTS transaction manager.
Table A.8. ha-sockets
Red Hat JBoss Enterprise Application Platform 7.2 Getting Started Guide
50
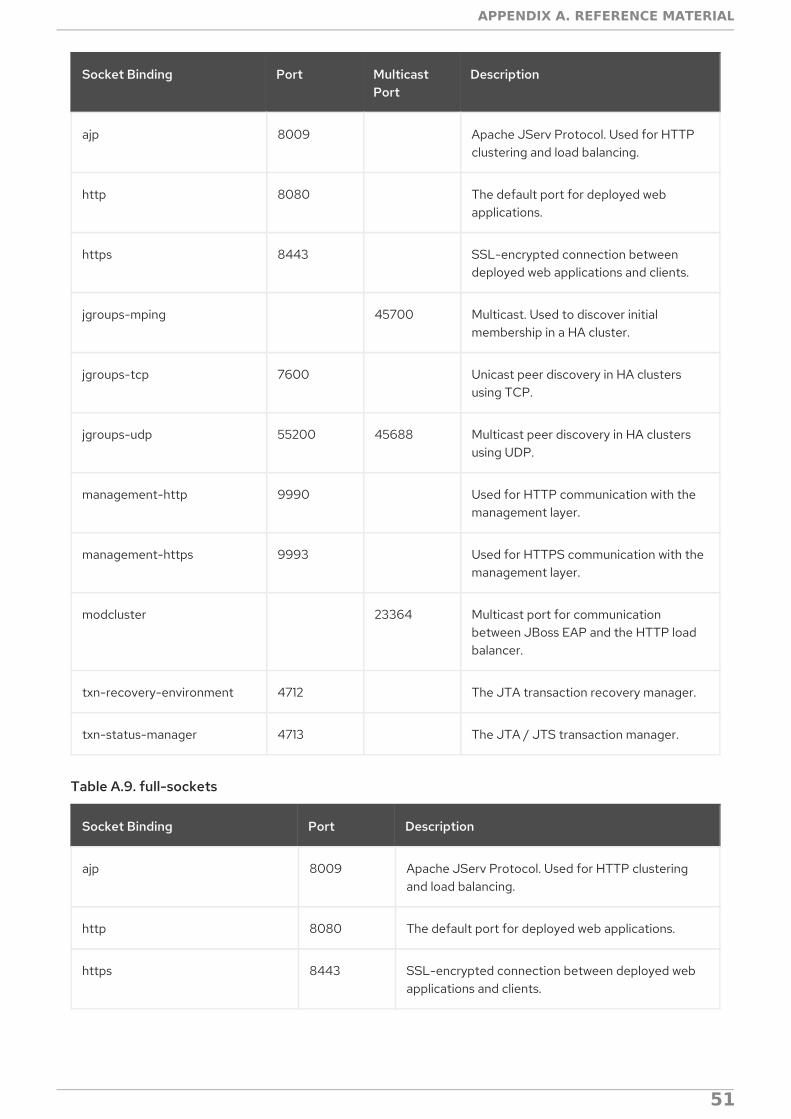
Socket Binding Port MulticastPort
Description
ajp 8009 Apache JServ Protocol. Used for HTTPclustering and load balancing.
http 8080 The default port for deployed webapplications.
https 8443 SSL-encrypted connection betweendeployed web applications and clients.
jgroups-mping 45700 Multicast. Used to discover initialmembership in a HA cluster.
jgroups-tcp 7600 Unicast peer discovery in HA clustersusing TCP.
jgroups-udp 55200 45688 Multicast peer discovery in HA clustersusing UDP.
management-http 9990 Used for HTTP communication with themanagement layer.
management-https 9993 Used for HTTPS communication with themanagement layer.
modcluster 23364 Multicast port for communicationbetween JBoss EAP and the HTTP loadbalancer.
txn-recovery-environment 4712 The JTA transaction recovery manager.
txn-status-manager 4713 The JTA / JTS transaction manager.
Table A.9. full-sockets
Socket Binding Port Description
ajp 8009 Apache JServ Protocol. Used for HTTP clusteringand load balancing.
http 8080 The default port for deployed web applications.
https 8443 SSL-encrypted connection between deployed webapplications and clients.
APPENDIX A. REFERENCE MATERIAL
51
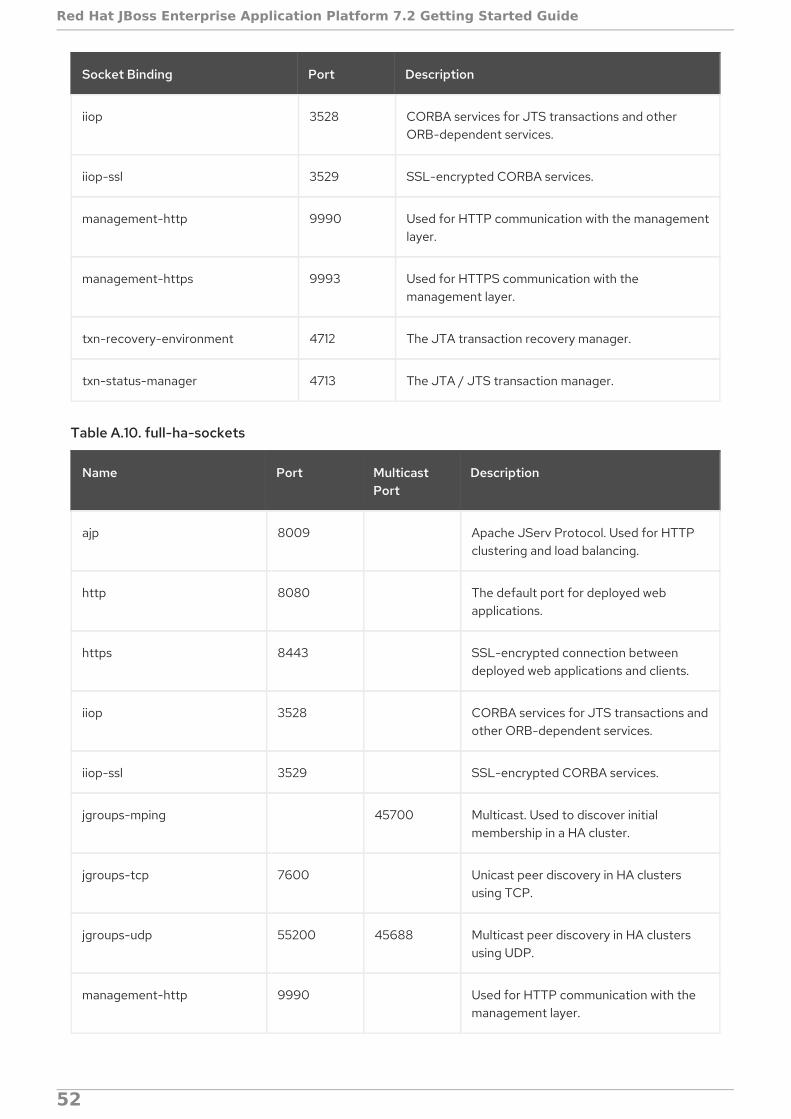
iiop 3528 CORBA services for JTS transactions and otherORB-dependent services.
iiop-ssl 3529 SSL-encrypted CORBA services.
management-http 9990 Used for HTTP communication with the managementlayer.
management-https 9993 Used for HTTPS communication with themanagement layer.
txn-recovery-environment 4712 The JTA transaction recovery manager.
txn-status-manager 4713 The JTA / JTS transaction manager.
Socket Binding Port Description
Table A.10. full-ha-sockets
Name Port MulticastPort
Description
ajp 8009 Apache JServ Protocol. Used for HTTPclustering and load balancing.
http 8080 The default port for deployed webapplications.
https 8443 SSL-encrypted connection betweendeployed web applications and clients.
iiop 3528 CORBA services for JTS transactions andother ORB-dependent services.
iiop-ssl 3529 SSL-encrypted CORBA services.
jgroups-mping 45700 Multicast. Used to discover initialmembership in a HA cluster.
jgroups-tcp 7600 Unicast peer discovery in HA clustersusing TCP.
jgroups-udp 55200 45688 Multicast peer discovery in HA clustersusing UDP.
management-http 9990 Used for HTTP communication with themanagement layer.
Red Hat JBoss Enterprise Application Platform 7.2 Getting Started Guide
52
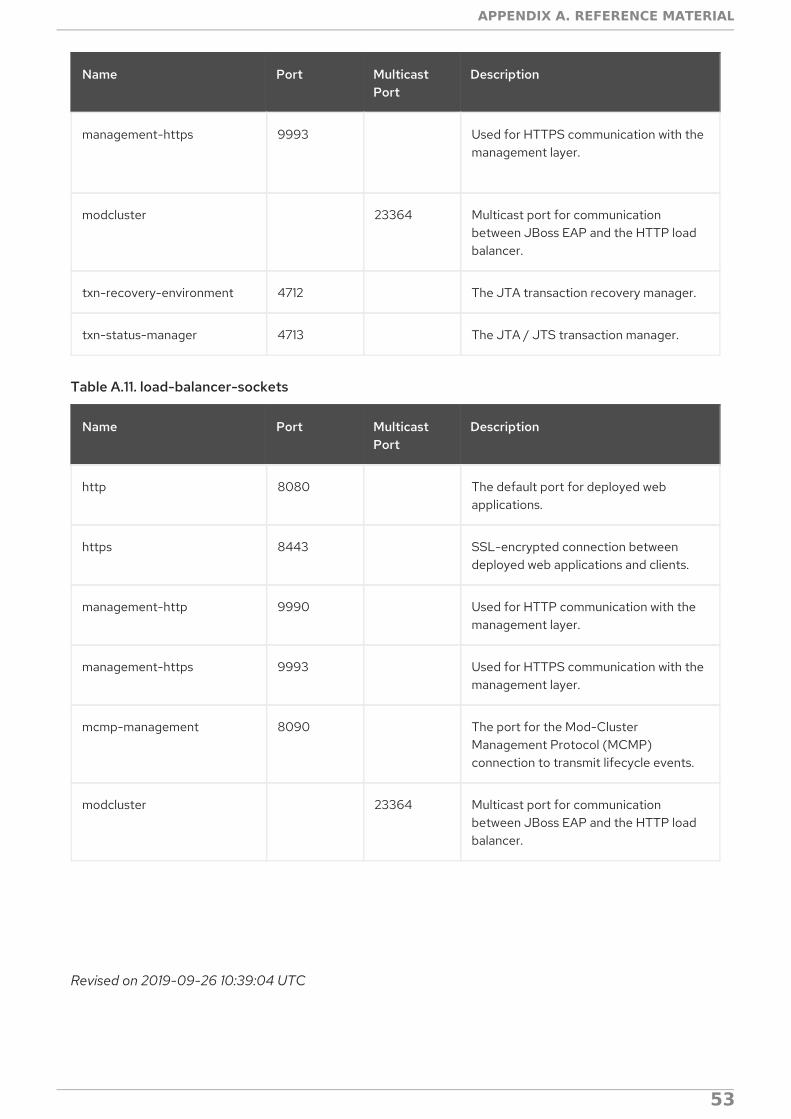
management-https 9993 Used for HTTPS communication with themanagement layer.
modcluster 23364 Multicast port for communicationbetween JBoss EAP and the HTTP loadbalancer.
txn-recovery-environment 4712 The JTA transaction recovery manager.
txn-status-manager 4713 The JTA / JTS transaction manager.
Name Port MulticastPort
Description
Table A.11. load-balancer-sockets
Name Port MulticastPort
Description
http 8080 The default port for deployed webapplications.
https 8443 SSL-encrypted connection betweendeployed web applications and clients.
management-http 9990 Used for HTTP communication with themanagement layer.
management-https 9993 Used for HTTPS communication with themanagement layer.
mcmp-management 8090 The port for the Mod-ClusterManagement Protocol (MCMP)connection to transmit lifecycle events.
modcluster 23364 Multicast port for communicationbetween JBoss EAP and the HTTP loadbalancer.
Revised on 2019-09-26 10:39:04 UTC
APPENDIX A. REFERENCE MATERIAL
53

Red Hat JBoss Enterprise Application Platform 7.2 Getting Started Guide
54