Red Hat Enterprise Linux-5-Logical Volume Manager Administration-En-US
128
Red Hat Enterprise Linux 5 Logical Volume Manager Administration LVM Administrator's Guide Edition 1
-
Upload
naveenramachandra -
Category
Documents
-
view
62 -
download
0
description
RHEL
Transcript of Red Hat Enterprise Linux-5-Logical Volume Manager Administration-En-US

Red Hat Enterprise Linux 5Logical Volume ManagerAdministration
LVM Administrator's GuideEdit ion 1


Red Hat Enterprise Linux 5 Logical Volume Manager Administrat ion
LVM Administrator's GuideEdit ion 1
Legal Notice
Copyright © 2014 Red Hat Inc..
This document is licensed by Red Hat under the Creative Commons Attribution-ShareAlike 3.0Unported License. If you distribute this document, o r a modified version o f it, you must provideattribution to Red Hat, Inc. and provide a link to the original. If the document is modified, all RedHat trademarks must be removed.
Red Hat, as the licensor o f this document, waives the right to enforce, and agrees not to assert,Section 4d o f CC-BY-SA to the fullest extent permitted by applicable law.
Red Hat, Red Hat Enterprise Linux, the Shadowman logo, JBoss, MetaMatrix, Fedora, the InfinityLogo, and RHCE are trademarks o f Red Hat, Inc., registered in the United States and o thercountries.
Linux ® is the registered trademark o f Linus Torvalds in the United States and o ther countries.
Java ® is a registered trademark o f Oracle and/or its affiliates.
XFS ® is a trademark o f Silicon Graphics International Corp. or its subsidiaries in the UnitedStates and/or o ther countries.
MySQL ® is a registered trademark o f MySQL AB in the United States, the European Union andother countries.
Node.js ® is an o fficial trademark o f Joyent. Red Hat Software Collections is not fo rmallyrelated to or endorsed by the o fficial Joyent Node.js open source or commercial pro ject.
The OpenStack ® Word Mark and OpenStack Logo are either registered trademarks/servicemarks or trademarks/service marks o f the OpenStack Foundation, in the United States and o thercountries and are used with the OpenStack Foundation's permission. We are not affiliated with,endorsed or sponsored by the OpenStack Foundation, or the OpenStack community.
All o ther trademarks are the property o f their respective owners.
AbstractThis book describes the LVM logical vo lume manager, including information on running LVM ina clustered environment. The content o f this document is specific to the LVM2 release.

. . . . . . . . . . . . . . . . . . . . . . . . . . . . . . . . . . . . . . . . . . . . . . . . . . . . . . . . . . . . . . . . . . . . . . . . . . . . . . . . . . . . . . . . . . . . . . . . . . . . . . . . . . . . . . . . . . . . . . . . . . . . . . . . . . . . . . . . . . . . . . . . . . . . . . . . . . . . . . . . . . . . . . . . . . . . . . . . . . . . . . . . . . . . . . . . . . . . . . . . . . . . . . . . . . . . . . . . . . . . . . . . . . . . . . . . . . . . . . . . . . . . . . . . . . . . . . . . . . . . . . . . . . . . . . . . . . . . . . . .
. . . . . . . . . . . . . . . . . . . . . . . . . . . . . . . . . . . . . . . . . . . . . . . . . . . . . . . . . . . . . . . . . . . . . . . . . . . . . . . . . . . . . . . . . . . . . . . . . . . . . . . . . . . . . . . . . . . . . . . . . . . . . . . . . . . . . . . . . . . . . . . . . . . . . . . . . . . . . . . . . . . . . . . . . . . . . . . . . . . . . . . . . . . . . . . . . . . . . . . . . . . . . . . . . . . . . . . . . . . . . . . . . . . . . . . . . . . . . . . . . . . . . . . . . . . . . . . . . . . . . . . . . . . . . . . . . . . . . . . .
. . . . . . . . . . . . . . . . . . . . . . . . . . . . . . . . . . . . . . . . . . . . . . . . . . . . . . . . . . . . . . . . . . . . . . . . . . . . . . . . . . . . . . . . . . . . . . . . . . . . . . . . . . . . . . . . . . . . . . . . . . . . . . . . . . . . . . . . . . . . . . . . . . . . . . . . . . . . . . . . . . . . . . . . . . . . . . . . . . . . . . . . . . . . . . . . . . . . . . . . . . . . . . . . . . . . . . . . . . . . . . . . . . . . . . . . . . . . . . . . . . . . . . . . . . . . . . . . . . . . . . . . . . . . . . . . . . . . . . . .
. . . . . . . . . . . . . . . . . . . . . . . . . . . . . . . . . . . . . . . . . . . . . . . . . . . . . . . . . . . . . . . . . . . . . . . . . . . . . . . . . . . . . . . . . . . . . . . . . . . . . . . . . . . . . . . . . . . . . . . . . . . . . . . . . . . . . . . . . . . . . . . . . . . . . . . . . . . . . . . . . . . . . . . . . . . . . . . . . . . . . . . . . . . . . . . . . . . . . . . . . . . . . . . . . . . . . . . . . . . . . . . . . . . . . . . . . . . . . . . . . . . . . . . . . . . . . . . . . . . . . . . . . . . . . . . . . . . . . . . .
. . . . . . . . . . . . . . . . . . . . . . . . . . . . . . . . . . . . . . . . . . . . . . . . . . . . . . . . . . . . . . . . . . . . . . . . . . . . . . . . . . . . . . . . . . . . . . . . . . . . . . . . . . . . . . . . . . . . . . . . . . . . . . . . . . . . . . . . . . . . . . . . . . . . . . . . . . . . . . . . . . . . . . . . . . . . . . . . . . . . . . . . . . . . . . . . . . . . . . . . . . . . . . . . . . . . . . . . . . . . . . . . . . . . . . . . . . . . . . . . . . . . . . . . . . . . . . . . . . . . . . . . . . . . . . . . . . . . . . . .
Table of Contents
Int roduct ion1. Ab o ut This Guid e2. Aud ience3. So ftware Vers io ns4. Related Do cumentatio n5. Feed b ack6 . Do cument Co nventio ns6 .1. Typ o g rap hic Co nventio ns6 .2. Pull-q uo te Co nventio ns6 .3. No tes and Warning s
Chapt er 1 . T he LVM Logical Volume Manager1.1. New and Chang ed Features1.1.1. New and Chang ed Features fo r Red Hat Enterp rise Linux 5.61.1.2. New and Chang ed Features fo r Red Hat Enterp rise Linux 5.71.1.3. New and Chang ed Features fo r Red Hat Enterp rise Linux 5.81.1.4. New and Chang ed Features fo r Red Hat Enterp rise Linux 5.9 and Red Hat Enterp rise LInux5.101.1.5. New and Chang ed Features fo r Red Hat Enterp rise Linux 5.11
1.2. Lo g ical Vo lumes1.3. LVM Architecture Overview1.4. The Clustered Lo g ical Vo lume Manag er (CLVM)1.5. Do cument Overview
Chapt er 2 . LVM Component s2.1. Physical Vo lumes2.1.1. LVM Physical Vo lume Layo ut2.1.2. Multip le Partitio ns o n a Disk
2.2. Vo lume Gro up s2.3. LVM Lo g ical Vo lumes2.3.1. Linear Vo lumes2.3.2. Strip ed Lo g ical Vo lumes2.3.3. Mirro red Lo g ical Vo lumes2.3.4. Snap sho t Vo lumes
Chapt er 3. LVM Administ rat ion Overview3.1. Creating LVM Vo lumes in a Cluster3.2. Lo g ical Vo lume Creatio n Overview3.3. Gro wing a File System o n a Lo g ical Vo lume3.4. Lo g ical Vo lume Backup3.5. Lo g g ing3.6 . Online Device Reco nfig uratio n
Chapt er 4 . LVM Administ rat ion wit h CLI Commands4.1. Using CLI Co mmand s4.2. Physical Vo lume Ad ministratio n4.2.1. Creating Physical Vo lumes4.2.1.1. Setting the Partitio n Typ e4.2.1.2. Initial iz ing Physical Vo lumes4.2.1.3. Scanning fo r Blo ck Devices
4.2.2. Disp laying Physical Vo lumes4.2.3. Preventing Allo catio n o n a Physical Vo lume4.2.4. Resiz ing a Physical Vo lume
5555566688
1 010101011
111112121315
1 7171718181919212223
2 5252626262727
2 8282929293030303131
T able of Cont ent s
1

. . . . . . . . . . . . . . . . . . . . . . . . . . . . . . . . . . . . . . . . . . . . . . . . . . . . . . . . . . . . . . . . . . . . . . . . . . . . . . . . . . . . . . . . . . . . . . . . . . . . . . . . . . . . . . . . . . . . . . . . . . . . . . . . . . . . . . . . . . . . . . . . . . . . . . . . . . . . . . . . . . . . . . . . . . . . . . . . . . . . . . . . . . . . . . . . . . . . . . . . . . . . . . . . . . . . . . . . . . . . . . . . . . . . . . . . . . . . . . . . . . . . . . . . . . . . . . . . . . . . . . . . . . . . . . . . . . . . . . . .
. . . . . . . . . . . . . . . . . . . . . . . . . . . . . . . . . . . . . . . . . . . . . . . . . . . . . . . . . . . . . . . . . . . . . . . . . . . . . . . . . . . . . . . . . . . . . . . . . . . . . . . . . . . . . . . . . . . . . . . . . . . . . . . . . . . . . . . . . . . . . . . . . . . . . . . . . . . . . . . . . . . . . . . . . . . . . . . . . . . . . . . . . . . . . . . . . . . . . . . . . . . . . . . . . . . . . . . . . . . . . . . . . . . . . . . . . . . . . . . . . . . . . . . . . . . . . . . . . . . . . . . . . . . . . . . . . . . . . . . .
. . . . . . . . . . . . . . . . . . . . . . . . . . . . . . . . . . . . . . . . . . . . . . . . . . . . . . . . . . . . . . . . . . . . . . . . . . . . . . . . . . . . . . . . . . . . . . . . . . . . . . . . . . . . . . . . . . . . . . . . . . . . . . . . . . . . . . . . . . . . . . . . . . . . . . . . . . . . . . . . . . . . . . . . . . . . . . . . . . . . . . . . . . . . . . . . . . . . . . . . . . . . . . . . . . . . . . . . . . . . . . . . . . . . . . . . . . . . . . . . . . . . . . . . . . . . . . . . . . . . . . . . . . . . . . . . . . . . . . . .
4.2.4. Resiz ing a Physical Vo lume4.2.5. Remo ving Physical Vo lumes
4.3. Vo lume Gro up Ad ministratio n4.3.1. Creating Vo lume Gro up s4.3.2. LVM Allo catio n4.3.3. Creating Vo lume Gro up s in a Cluster4.3.4. Ad d ing Physical Vo lumes to a Vo lume Gro up4.3.5. Disp laying Vo lume Gro up s4.3.6 . Scanning Disks fo r Vo lume Gro up s to Build the Cache File4.3.7. Remo ving Physical Vo lumes fro m a Vo lume Gro up4.3.8 . Chang ing the Parameters o f a Vo lume Gro up4.3.9 . Activating and Deactivating Vo lume Gro up s4.3.10 . Remo ving Vo lume Gro up s4.3.11. Sp litting a Vo lume Gro up4.3.12. Co mb ining Vo lume Gro up s4.3.13. Backing Up Vo lume Gro up Metad ata4.3.14. Renaming a Vo lume Gro up4.3.15. Mo ving a Vo lume Gro up to Ano ther System4.3.16 . Recreating a Vo lume Gro up Directo ry
4.4. Lo g ical Vo lume Ad ministratio n4.4.1. Creating Lo g ical Vo lumes4.4.1.1. Creating Linear Vo lumes4.4.1.2. Creating Strip ed Vo lumes4.4.1.3. Creating Mirro red Vo lumes4.4.1.3.1. Mirro ring the Mirro r Lo g4.4.1.3.2. Sp ecifying Devices fo r Mirro r Co mp o nents4.4.1.3.3. Sp litting O ff a Red und ant Imag e o f a Mirro red Lo g ical Vo lume
4.4.1.4. Chang ing Mirro red Vo lume Co nfig uratio n4.4.2. Pers istent Device Numb ers4.4.3. Resiz ing Lo g ical Vo lumes4.4.4. Chang ing the Parameters o f a Lo g ical Vo lume Gro up4.4.5. Renaming Lo g ical Vo lumes4.4.6 . Remo ving Lo g ical Vo lumes4.4.7. Disp laying Lo g ical Vo lumes4.4.8 . Gro wing Lo g ical Vo lumes4.4.9 . Extend ing a Strip ed Vo lume4.4.10 . Extend ing a Mirro red Vo lume4.4.11. Extend ing a Lo g ical Vo lume with the c ling Allo catio n Po licy4.4.12. Shrinking Lo g ical Vo lumes
4.5. Creating Snap sho t Vo lumes4.6 . Co ntro ll ing LVM Device Scans with Filters4.7. Online Data Relo catio n4.8 . Activating Lo g ical Vo lumes o n Ind ivid ual No d es in a Cluster4.9 . Custo mized Rep o rting fo r LVM4.9 .1. Fo rmat Co ntro l4.9 .2. Ob ject Selectio n
T he pvs Command
T he vgs Command
T he lvs Command4.9 .3. So rting LVM Rep o rts4.9 .4. Sp ecifying Units
31313232333435353636373737373838383839393940414143444444454545464646474749505151535454555557
57
59
6 06 26 3
Red Hat Ent erprise Linux 5 Logical Volume Manager Administ rat ion
2
. . . . . . . . . . . . . . . . . . . . . . . . . . . . . . . . . . . . . . . . . . . . . . . . . . . . . . . . . . . . . . . . . . . . . . . . . . . . . . . . . . . . . . . . . . . . . . . . . . . . . . . . . . . . . . . . . . . . . . . . . . . . . . . . . . . . . . . . . . . . . . . . . . . . . . . . . . . . . . . . . . . . . . . . . . . . . . . . . . . . . . . . . . . . . . . . . . . . . . . . . . . . . . . . . . . . . . . . . . . . . . . . . . . . . . . . . . . . . . . . . . . . . . . . . . . . . . . . . . . . . . . . . . . . . . . . . . . . . . . .
. . . . . . . . . . . . . . . . . . . . . . . . . . . . . . . . . . . . . . . . . . . . . . . . . . . . . . . . . . . . . . . . . . . . . . . . . . . . . . . . . . . . . . . . . . . . . . . . . . . . . . . . . . . . . . . . . . . . . . . . . . . . . . . . . . . . . . . . . . . . . . . . . . . . . . . . . . . . . . . . . . . . . . . . . . . . . . . . . . . . . . . . . . . . . . . . . . . . . . . . . . . . . . . . . . . . . . . . . . . . . . . . . . . . . . . . . . . . . . . . . . . . . . . . . . . . . . . . . . . . . . . . . . . . . . . . . . . . . . . .
. . . . . . . . . . . . . . . . . . . . . . . . . . . . . . . . . . . . . . . . . . . . . . . . . . . . . . . . . . . . . . . . . . . . . . . . . . . . . . . . . . . . . . . . . . . . . . . . . . . . . . . . . . . . . . . . . . . . . . . . . . . . . . . . . . . . . . . . . . . . . . . . . . . . . . . . . . . . . . . . . . . . . . . . . . . . . . . . . . . . . . . . . . . . . . . . . . . . . . . . . . . . . . . . . . . . . . . . . . . . . . . . . . . . . . . . . . . . . . . . . . . . . . . . . . . . . . . . . . . . . . . . . . . . . . . . . . . . . . . .
. . . . . . . . . . . . . . . . . . . . . . . . . . . . . . . . . . . . . . . . . . . . . . . . . . . . . . . . . . . . . . . . . . . . . . . . . . . . . . . . . . . . . . . . . . . . . . . . . . . . . . . . . . . . . . . . . . . . . . . . . . . . . . . . . . . . . . . . . . . . . . . . . . . . . . . . . . . . . . . . . . . . . . . . . . . . . . . . . . . . . . . . . . . . . . . . . . . . . . . . . . . . . . . . . . . . . . . . . . . . . . . . . . . . . . . . . . . . . . . . . . . . . . . . . . . . . . . . . . . . . . . . . . . . . . . . . . . . . . . .
. . . . . . . . . . . . . . . . . . . . . . . . . . . . . . . . . . . . . . . . . . . . . . . . . . . . . . . . . . . . . . . . . . . . . . . . . . . . . . . . . . . . . . . . . . . . . . . . . . . . . . . . . . . . . . . . . . . . . . . . . . . . . . . . . . . . . . . . . . . . . . . . . . . . . . . . . . . . . . . . . . . . . . . . . . . . . . . . . . . . . . . . . . . . . . . . . . . . . . . . . . . . . . . . . . . . . . . . . . . . . . . . . . . . . . . . . . . . . . . . . . . . . . . . . . . . . . . . . . . . . . . . . . . . . . . . . . . . . . . .
Chapt er 5. LVM Configurat ion Examples5.1. Creating an LVM Lo g ical Vo lume o n Three Disks5.1.1. Creating the Physical Vo lumes5.1.2. Creating the Vo lume Gro up5.1.3. Creating the Lo g ical Vo lume5.1.4. Creating the File System
5.2. Creating a Strip ed Lo g ical Vo lume5.2.1. Creating the Physical Vo lumes5.2.2. Creating the Vo lume Gro up5.2.3. Creating the Lo g ical Vo lume5.2.4. Creating the File System
5.3. Sp litting a Vo lume Gro up5.3.1. Determining Free Sp ace5.3.2. Mo ving the Data5.3.3. Sp litting the Vo lume Gro up5.3.4. Creating the New Lo g ical Vo lume5.3.5. Making a File System and Mo unting the New Lo g ical Vo lume5.3.6 . Activating and Mo unting the Orig inal Lo g ical Vo lume
5.4. Remo ving a Disk fro m a Lo g ical Vo lume5.4.1. Mo ving Extents to Existing Physical Vo lumes5.4.2. Mo ving Extents to a New Disk5.4.2.1. Creating the New Physical Vo lume5.4.2.2. Ad d ing the New Physical Vo lume to the Vo lume Gro up5.4.2.3. Mo ving the Data5.4.2.4. Remo ving the O ld Physical Vo lume fro m the Vo lume Gro up
5.5. Creating a Mirro red LVM Lo g ical Vo lume in a Cluster
Chapt er 6 . LVM T roubleshoot ing6 .1. Tro ub lesho o ting Diag no stics6 .2. Disp laying Info rmatio n o n Failed Devices6 .3. Reco vering fro m LVM Mirro r Failure6 .4. Reco vering Physical Vo lume Metad ata6 .5. Rep lacing a Missing Physical Vo lume6 .6 . Remo ving Lo st Physical Vo lumes fro m a Vo lume Gro up6 .7. Insuffic ient Free Extents fo r a Lo g ical Vo lume
Chapt er 7 . LVM Administ rat ion wit h t he LVM GUI
T he Device MapperA.1. Device Tab le Map p ing sA.1.1. The l inear Map p ing Targ etA.1.2. The strip ed Map p ing Targ etA.1.3. The mirro r Map p ing Targ etA.1.4. The snap sho t and snap sho t-o rig in Map p ing Targ etsA.1.5. The erro r Map p ing Targ etA.1.6 . The zero Map p ing Targ etA.1.7. The multip ath Map p ing Targ etA.1.8 . The cryp t Map p ing Targ et
A.2. The d msetup Co mmandA.2.1. The d msetup info Co mmandA.2.2. The d msetup ls Co mmandA.2.3. The d msetup status Co mmandA.2.4. The d msetup d ep s Co mmand
T he LVM Configurat ion Files
6 56 56 56 56 56 56 66 66 66 66 76 76 76 86 86 86 96 96 96 9707070717171
7 5757576798 08 08 1
8 2
8 38 38 48 48 68 88 99 09 09 29 39 39 59 59 6
9 7
T able of Cont ent s
3

. . . . . . . . . . . . . . . . . . . . . . . . . . . . . . . . . . . . . . . . . . . . . . . . . . . . . . . . . . . . . . . . . . . . . . . . . . . . . . . . . . . . . . . . . . . . . . . . . . . . . . . . . . . . . . . . . . . . . . . . . . . . . . . . . . . . . . . . . . . . . . . . . . . . . . . . . . . . . . . . . . . . . . . . . . . . . . . . . . . . . . . . . . . . . . . . . . . . . . . . . . . . . . . . . . . . . . . . . . . . . . . . . . . . . . . . . . . . . . . . . . . . . . . . . . . . . . . . . . . . . . . . . . . . . . . . . . . . . . . .
. . . . . . . . . . . . . . . . . . . . . . . . . . . . . . . . . . . . . . . . . . . . . . . . . . . . . . . . . . . . . . . . . . . . . . . . . . . . . . . . . . . . . . . . . . . . . . . . . . . . . . . . . . . . . . . . . . . . . . . . . . . . . . . . . . . . . . . . . . . . . . . . . . . . . . . . . . . . . . . . . . . . . . . . . . . . . . . . . . . . . . . . . . . . . . . . . . . . . . . . . . . . . . . . . . . . . . . . . . . . . . . . . . . . . . . . . . . . . . . . . . . . . . . . . . . . . . . . . . . . . . . . . . . . . . . . . . . . . . . .
. . . . . . . . . . . . . . . . . . . . . . . . . . . . . . . . . . . . . . . . . . . . . . . . . . . . . . . . . . . . . . . . . . . . . . . . . . . . . . . . . . . . . . . . . . . . . . . . . . . . . . . . . . . . . . . . . . . . . . . . . . . . . . . . . . . . . . . . . . . . . . . . . . . . . . . . . . . . . . . . . . . . . . . . . . . . . . . . . . . . . . . . . . . . . . . . . . . . . . . . . . . . . . . . . . . . . . . . . . . . . . . . . . . . . . . . . . . . . . . . . . . . . . . . . . . . . . . . . . . . . . . . . . . . . . . . . . . . . . . .
. . . . . . . . . . . . . . . . . . . . . . . . . . . . . . . . . . . . . . . . . . . . . . . . . . . . . . . . . . . . . . . . . . . . . . . . . . . . . . . . . . . . . . . . . . . . . . . . . . . . . . . . . . . . . . . . . . . . . . . . . . . . . . . . . . . . . . . . . . . . . . . . . . . . . . . . . . . . . . . . . . . . . . . . . . . . . . . . . . . . . . . . . . . . . . . . . . . . . . . . . . . . . . . . . . . . . . . . . . . . . . . . . . . . . . . . . . . . . . . . . . . . . . . . . . . . . . . . . . . . . . . . . . . . . . . . . . . . . . . .
. . . . . . . . . . . . . . . . . . . . . . . . . . . . . . . . . . . . . . . . . . . . . . . . . . . . . . . . . . . . . . . . . . . . . . . . . . . . . . . . . . . . . . . . . . . . . . . . . . . . . . . . . . . . . . . . . . . . . . . . . . . . . . . . . . . . . . . . . . . . . . . . . . . . . . . . . . . . . . . . . . . . . . . . . . . . . . . . . . . . . . . . . . . . . . . . . . . . . . . . . . . . . . . . . . . . . . . . . . . . . . . . . . . . . . . . . . . . . . . . . . . . . . . . . . . . . . . . . . . . . . . . . . . . . . . . . . . . . . . .
T he LVM Configurat ion FilesB.1. The LVM Co nfig uratio n FilesB.2. Samp le lvm.co nf File
LVM Object T agsC.1. Ad d ing and Remo ving Ob ject Tag sC.2. Ho st Tag sC.3. Co ntro ll ing Activatio n with Tag s
LVM Volume Group Met adat aD.1. The Physical Vo lume Lab elD.2. Metad ata Co ntentsD.3. Samp le Metad ata
Revision Hist ory
Index
9 79 79 7
1 1 0110110110
1 1 2112113113
1 1 6
1 1 8
Red Hat Ent erprise Linux 5 Logical Volume Manager Administ rat ion
4
Introduction
1. About This Guide
This book describes the Logical Volume Manager (LVM), including information on running LVM in aclustered environment. The content of this document is specific to the LVM2 release.
2. Audience
This book is intended to be used by system administrators managing systems running the Linuxoperating system. It requires familiarity with Red Hat Enterprise Linux 5 and GFS or GFS2 file systemadministration.
3. Software Versions
Table 1. Sof tware Versions
Sof tware Descript ionRed Hat EnterpriseLinux 5
refers to Red Hat Enterprise Linux 5 and higher
GFS refers to GFS for Red Hat Enterprise Linux and higher
4. Related Documentat ion
For more information about using Red Hat Enterprise Linux, refer to the following resources:
Red Hat Enterprise Linux Installation Guide — Provides information regarding installation of Red HatEnterprise Linux 5.
Red Hat Enterprise Linux Deployment Guide — Provides information regarding the deployment,configuration and administration of Red Hat Enterprise Linux 5.
For more information about Red Hat Cluster Suite for Red Hat Enterprise Linux 5, refer to the followingresources:
Red Hat Cluster Suite Overview — Provides a high level overview of the Red Hat Cluster Suite.
Cluster Administration — Provides information about installing, configuring and managing Red HatCluster components.
Global File System: Configuration and Administration — Provides information about installing,configuring, and maintaining Red Hat GFS (Red Hat Global File System).
Global File System 2: Configuration and Administration — Provides information about installing,configuring, and maintaining Red Hat GFS2 (Red Hat Global File System 2).
Using Device-Mapper Multipath — Provides information about using the Device-Mapper Multipathfeature of Red Hat Enterprise Linux 5.
Using GNBD with Global File System — Provides an overview on using Global Network BlockDevice (GNBD) with Red Hat GFS.
Int roduct ion
5

Linux Virtual Server Administration — Provides information on configuring high-performancesystems and services with the Linux Virtual Server (LVS).
Red Hat Cluster Suite Release Notes — Provides information about the current release of Red HatCluster Suite.
Red Hat Cluster Suite documentation and other Red Hat documents are available in HTML, PDF, andRPM versions on the Red Hat Enterprise Linux Documentation CD and online athttps://access.redhat.com/site/documentation/en-US/.
5. Feedback
If you spot a typo, or if you have thought of a way to make this manual better, we would love to hearfrom you. Please submit a report in Bugzilla (http://bugzilla.redhat.com/bugzilla/) against thecomponent Documentat ion-cluster.
Be sure to mention the manual's identifier:
Bugzilla component: Documentation-clusterBook identifier: Logical_Volume_Manager_Administration(EN)-5 (2014-6-30T15:20)
By mentioning this manual's identifier, we know exactly which version of the guide you have.
If you have a suggestion for improving the documentation, try to be as specific as possible. If youhave found an error, please include the section number and some of the surrounding text so we canfind it easily.
6. Document Convent ions
This manual uses several conventions to highlight certain words and phrases and draw attention tospecific pieces of information.
6.1. T ypographic Convent ions
Four typographic conventions are used to call attention to specific words and phrases. Theseconventions, and the circumstances they apply to, are as follows.
Mono-spaced Bold
Used to highlight system input, including shell commands, file names and paths. Also used tohighlight keys and key combinations. For example:
To see the contents of the file my_next_bestselling_novel in your currentworking directory, enter the cat my_next_bestselling_novel command at theshell prompt and press Enter to execute the command.
The above includes a file name, a shell command and a key, all presented in mono-spaced bold andall distinguishable thanks to context.
Key combinations can be distinguished from an individual key by the plus sign that connects eachpart of a key combination. For example:
Press Enter to execute the command.
Press Ctrl+Alt+F2 to switch to a virtual terminal.
Red Hat Ent erprise Linux 5 Logical Volume Manager Administ rat ion
6

The first example highlights a particular key to press. The second example highlights a keycombination: a set of three keys pressed simultaneously.
If source code is discussed, class names, methods, functions, variable names and returned valuesmentioned within a paragraph will be presented as above, in mono-spaced bold. For example:
File-related classes include filesystem for file systems, file for files, and dir fordirectories. Each class has its own associated set of permissions.
Proport ional Bold
This denotes words or phrases encountered on a system, including application names; dialog-boxtext; labeled buttons; check-box and radio-button labels; menu titles and submenu titles. Forexample:
Choose System → Preferences → Mouse from the main menu bar to launchMouse Preferences . In the Buttons tab, select the Left-handed mouse checkbox and click Close to switch the primary mouse button from the left to the right(making the mouse suitable for use in the left hand).
To insert a special character into a gedit file, choose Applicat ions →Accessories → Character Map from the main menu bar. Next, choose Search →Find… from the Character Map menu bar, type the name of the character in theSearch field and click Next. The character you sought will be highlighted in theCharacter Table. Double-click this highlighted character to place it in the Textto copy field and then click the Copy button. Now switch back to your document andchoose Edit → Paste from the gedit menu bar.
The above text includes application names; system-wide menu names and items; application-specificmenu names; and buttons and text found within a GUI interface, all presented in proportional boldand all distinguishable by context.
Mono-spaced Bold Italic or Proportional Bold Italic
Whether mono-spaced bold or proportional bold, the addition of italics indicates replaceable orvariable text. Italics denotes text you do not input literally or displayed text that changes dependingon circumstance. For example:
To connect to a remote machine using ssh, type ssh [email protected] at ashell prompt. If the remote machine is example.com and your username on thatmachine is john, type ssh [email protected].
The mount -o remount file-system command remounts the named file system.For example, to remount the /home file system, the command is mount -o remount /home.
To see the version of a currently installed package, use the rpm -q packagecommand. It will return a result as follows: package-version-release.
Note the words in bold italics above: username, domain.name, file-system, package, version andrelease. Each word is a placeholder, either for text you enter when issuing a command or for textdisplayed by the system.
Aside from standard usage for presenting the title of a work, italics denotes the first use of a new andimportant term. For example:
Publican is a DocBook publishing system.
Int roduct ion
7

6.2. Pull-quote Convent ions
Terminal output and source code listings are set off visually from the surrounding text.
Output sent to a terminal is set in mono-spaced roman and presented thus:
books Desktop documentation drafts mss photos stuff svnbooks_tests Desktop1 downloads images notes scripts svgs
Source-code listings are also set in mono-spaced roman but add syntax highlighting as follows:
static int kvm_vm_ioctl_deassign_device(struct kvm *kvm, struct kvm_assigned_pci_dev *assigned_dev){ int r = 0; struct kvm_assigned_dev_kernel *match;
mutex_lock(&kvm->lock);
match = kvm_find_assigned_dev(&kvm->arch.assigned_dev_head, assigned_dev->assigned_dev_id); if (!match) { printk(KERN_INFO "%s: device hasn't been assigned before, " "so cannot be deassigned\n", __func__); r = -EINVAL; goto out; }
kvm_deassign_device(kvm, match);
kvm_free_assigned_device(kvm, match);
out: mutex_unlock(&kvm->lock); return r;}
6.3. Notes and Warnings
Finally, we use three visual styles to draw attention to information that might otherwise be overlooked.
Note
Notes are tips, shortcuts or alternative approaches to the task at hand. Ignoring a note shouldhave no negative consequences, but you might miss out on a trick that makes your life easier.
Important
Important boxes detail things that are easily missed: configuration changes that only apply tothe current session, or services that need restarting before an update will apply. Ignoring abox labeled “ Important” will not cause data loss but may cause irritation and frustration.
Red Hat Ent erprise Linux 5 Logical Volume Manager Administ rat ion
8

Warning
Warnings should not be ignored. Ignoring warnings will most likely cause data loss.
Int roduct ion
9

Chapter 1. The LVM Logical Volume Manager
This chapter provides a summary of the features of the LVM logical volume manager that are newsince the release of Red Hat Enterprise Linux 5.6. Following that, this chapter provides a high-leveloverview of the components of the Logical Volume Manager (LVM).
1.1. New and Changed Features
This section lists new and changed features of the LVM logical volume manager that are includedwith the release of Red Hat Enterprise Linux 5.6 and later.
1.1.1. New and Changed Features for Red Hat Enterprise Linux 5.6
Red Hat Enterprise Linux 5.6 includes the following documentation and feature updates andchanges.
In Red Hat Enterprise Linux 5.6, the lvm.conf configuration file includes a default_data_alignment parameter that allows you to set the default alignment of the start ofa data area. For information on data alignment in LVM as well as information on changing thedefault value of default_data_alignment, see the inline documentation for the /etc/lvm/lvm.conf file, which is also documented in Appendix B, The LVM Configuration Files.
In the Red Hat Enterprise Linux 5.6 release, you can use the --splitmirrors argument of the lvconvert command to split off a redundant image of a mirrored logical volume to form a newlogical volume. For information on using this option, see Section 4.4.1.3.3, “Splitting Off aRedundant Image of a Mirrored Logical Volume” .
You can now create a mirror log for a mirrored logical device that is itself mirrored by using the --mirrorlog mirrored argument of the lvcreate command when creating a mirrored logicaldevice. For information on using this option, see Section 4.4.1.3.1, “Mirroring the Mirror Log” .
In the Red Hat Enterprise Linux 5.6 release, you can control metadata storage on a physicalvolume by using the --metadataignore option of the pvcreate command. For information onsetting this value, see Appendix D, LVM Volume Group Metadata and the pvcreate man page.
In the Red Hat Enterprise Linux 5.6 release, you can determine the number of metadata copies atthe volume group level with the --vgmetadatacopies option of the vgcreate command. Forinformation on setting this value, see Appendix D, LVM Volume Group Metadata and the vgcreateman page.
1.1.2. New and Changed Features for Red Hat Enterprise Linux 5.7
Red Hat Enterprise Linux 5.7 includes the following documentation and feature updates andchanges.
You can now combine RAID0 (striping) and RAID1 (mirroring) in a single logical volume. Creatinga logical volume while simultaneously specifying the number of mirrors (--mirrors X) and thenumber of stripes (--stripes Y) results in a mirror device whose constituent devices are striped.For information on creating mirrored logical volumes, see Section 4.4.1.3, “Creating MirroredVolumes” .
As of the Red Hat Enterprise Linux 5.7 release, there are two new features related to snapshots.First, in addition to the snapshot itself being invalidated when full, any mounted file systems onthat snapshot device are forcibly unmounted, avoiding the inevitable file system errors upon
Red Hat Ent erprise Linux 5 Logical Volume Manager Administ rat ion
10
access to the mount point. Second, you can specify the snapshot_autoextend_thresholdoption in the lvm.conf file. This option allows automatic extension of a snapshot whenever theremaining snapshot space drops below the threshold you set. This feature requires that there beunallocated space in the volume group.
Information on setting snapshot_autoextend_threshold and snapshot_autoextend_percent is provided in the lvm.conf file itself. For information aboutthe lvm.conf file, refer to Appendix B, The LVM Configuration Files.
When extending an LVM volume, you can now use the --alloc cling option of the lvextendcommand to specify the cling allocation policy. This policy will choose space on the samephysical volumes as the last segment of the existing logical volume. If there is insufficient spaceon the physical volumes and a list of tags is defined in the lvm.conf file, LVM will check whetherany of the tags are attached to the physical volumes and seek to match those physical volumetags between existing extents and new extents.
For information on extending LVM mirrored volumes with the --alloc cling option of the lvextend command, see Section 4.4.11, “Extending a Logical Volume with the cling AllocationPolicy” .
As of the Red Hat Enterprise Linux 5.7 release, if you need to create a consistent backup of dataon a clustered logical volume you can activate the volume exclusively and then create thesnapshot. For information on activating logical volumes exclusively on one node, seeSection 4.8, “Activating Logical Volumes on Individual Nodes in a Cluster” .
1.1.3. New and Changed Features for Red Hat Enterprise Linux 5.8
Red Hat Enterprise Linux 5.8 includes the following documentation and feature updates andchanges.
As of the Red Hat Enterprise Linux 5.8 release, it is possible to grow mirrored logical volumes withthe lvextend command without performing a synchronization of the new mirror regions. Forinformation on extending a mirrored logical volume, see Section 4.4.10, “Extending a MirroredVolume” .
Small clarifactions have been made throughout this document.
1.1.4 . New and Changed Features for Red Hat Enterprise Linux 5.9 and RedHat Enterprise LInux 5.10
Red Hat Enterprise Linux 5.9 and Red Hat Enterprise Linux 5.10 include the following documentationand feature updates and changes.
Small clarifactions have been made throughout this document.
1.1.5. New and Changed Features for Red Hat Enterprise Linux 5.11
Red Hat Enterprise Linux 5.11 includes the following documentation and feature updates andchanges.
This manual documents the lvm tags command, which lists the currently active host tags. Forinformation on LVM object tags, see Appendix C, LVM Object Tags.
Chapt er 1 . T he LVM Logical Volume Manager
11
As of the Red Hat Enterprise Linux 5.11 release, you no longer need to specify a major numberwhen using the --persistent option of the lvcreate or lvchange command. This had noeffect on the major number, which the kernel assigned dynamically. For information on persistentdevice numbers, see Section 4.4.2, “Persistent Device Numbers” .
1.2. Logical Volumes
Volume management creates a layer of abstraction over physical storage, allowing you to createlogical storage volumes. This provides much greater flexibility in a number of ways than usingphysical storage directly. With a logical volume, you are not restricted to physical disk sizes. Inaddition, the hardware storage configuration is hidden from the software so it can be resized andmoved without stopping applications or unmounting file systems. This can reduce operational costs.
Logical volumes provide the following advantages over using physical storage directly:
Flexible capacity
When using logical volumes, file systems can extend across multiple disks, since you canaggregate disks and partitions into a single logical volume.
Resizeable storage pools
You can extend logical volumes or reduce logical volumes in size with simple softwarecommands, without reformatting and repartitioning the underlying disk devices.
Online data relocation
To deploy newer, faster, or more resilient storage subsystems, you can move data while yoursystem is active. Data can be rearranged on disks while the disks are in use. For example, youcan empty a hot-swappable disk before removing it.
Convenient device naming
Logical storage volumes can be managed in user-defined groups, which you can nameaccording to your convenience.
Disk striping
You can create a logical volume that stripes data across two or more disks. This can dramaticallyincrease throughput.
Mirroring volumes
Logical volumes provide a convenient way to configure a mirror for your data.
Volume Snapshots
Using logical volumes, you can take device snapshots for consistent backups or to test the effectof changes without affecting the real data.
The implementation of these features in LVM is described in the remainder of this document.
1.3. LVM Architecture Overview
For the Red Hat Enterprise Linux 4 release, the original LVM1 logical volume manager was replacedby LVM2, which has a more generic kernel framework than LVM1. LVM2 provides the followingimprovements over LVM1:
Red Hat Ent erprise Linux 5 Logical Volume Manager Administ rat ion
12
flexible capacity
more efficient metadata storage
better recovery format
new ASCII metadata format
atomic changes to metadata
redundant copies of metadata
LVM2 is backwards compatible with LVM1, with the exception of snapshot and cluster support. Youcan convert a volume group from LVM1 format to LVM2 format with the vgconvert command. Forinformation on converting LVM metadata format, see the vgconvert(8) man page.
The underlying physical storage unit of an LVM logical volume is a block device such as a partitionor whole disk. This device is initialized as an LVM physical volume (PV).
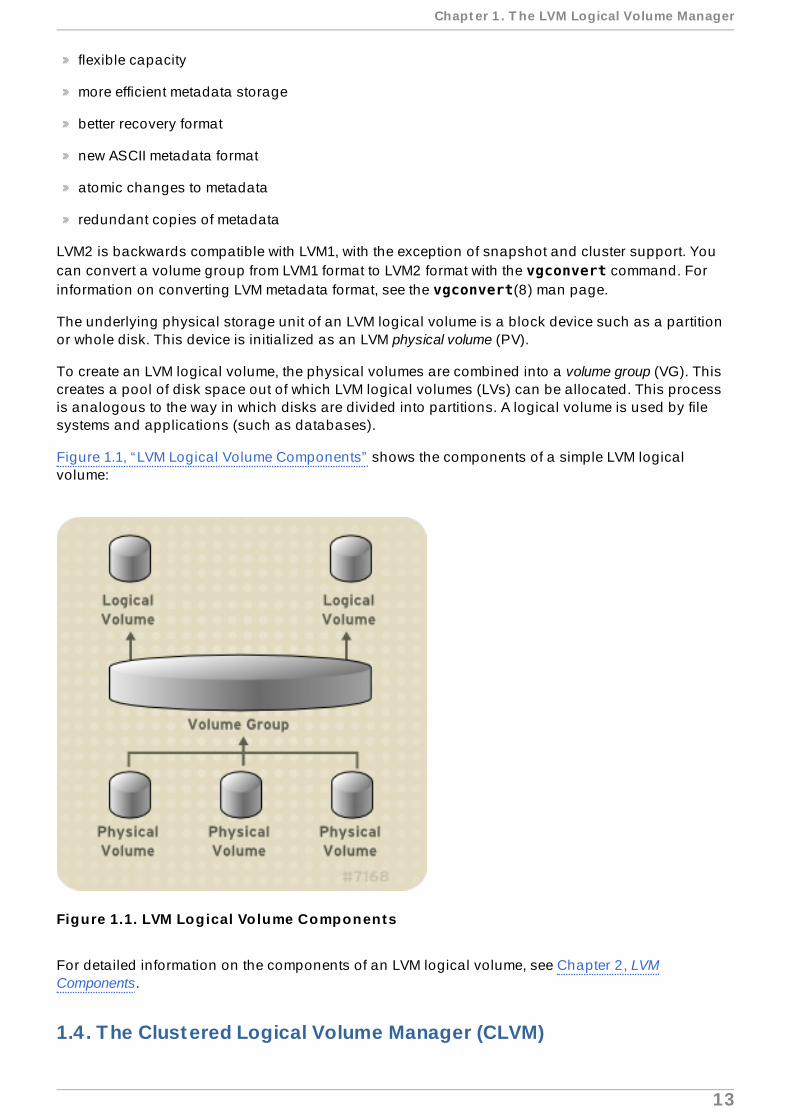
To create an LVM logical volume, the physical volumes are combined into a volume group (VG). Thiscreates a pool of disk space out of which LVM logical volumes (LVs) can be allocated. This processis analogous to the way in which disks are divided into partitions. A logical volume is used by filesystems and applications (such as databases).
Figure 1.1, “LVM Logical Volume Components” shows the components of a simple LVM logicalvolume:
Figure 1.1. LVM Logical Volume Components
For detailed information on the components of an LVM logical volume, see Chapter 2, LVMComponents.
1.4 . The Clustered Logical Volume Manager (CLVM)
Chapt er 1 . T he LVM Logical Volume Manager
13
The Clustered Logical Volume Manager (CLVM) is a set of clustering extensions to LVM. Theseextensions allow a cluster of computers to manage shared storage (for example, on a SAN) usingLVM.
Whether you should use CLVM depends on your system requirements:
If only one node of your system requires access to the storage you are configuring as logicalvolumes, then you can use LVM without the CLVM extensions and the logical volumes created withthat node are all local to the node.
If you are using a clustered system for failover where only a single node that accesses the storageis active at any one time, you should use High Availability Logical Volume Management agents(HA-LVM).
If more than one node of your cluster will require access to your storage which is then sharedamong the active nodes, then you must use CLVM. CLVM allows a user to configure logicalvolumes on shared storage by locking access to physical storage while a logical volume is beingconfigured, and uses clustered locking services to manage the shared storage.
In order to use CLVM, the Red Hat Cluster Suite software, including the clvmd daemon, must berunning. The clvmd daemon is the key clustering extension to LVM. The clvmd daemon runs in eachcluster computer and distributes LVM metadata updates in a cluster, presenting each clustercomputer with the same view of the logical volumes. For information on installing and administeringRed Hat Cluster Suite, see Cluster Administration.
To ensure that clvmd is started at boot time, you can execute a chkconfig ... on command onthe clvmd service, as follows:
# chkconfig clvmd on
If the clvmd daemon has not been started, you can execute a service ... start command onthe clvmd service, as follows:
# service clvmd start
Creating LVM logical volumes in a cluster environment is identical to creating LVM logical volumeson a single node. There is no difference in the LVM commands themselves, or in the LVM graphicaluser interface, as described in Chapter 4, LVM Administration with CLI Commands and Chapter 7, LVMAdministration with the LVM GUI. In order to enable the LVM volumes you are creating in a cluster, thecluster infrastructure must be running and the cluster must be quorate.
By default, logical volumes created with CLVM on shared storage are visible to all systems that haveaccess to the shared storage. It is possible to create volume groups in which all of the storagedevices are visible to only one node in the cluster. It is also possible to change the status of a volumegroup from a local volume group to a clustered volume group. For information, see Section 4.3.3,“Creating Volume Groups in a Cluster” and Section 4.3.8, “Changing the Parameters of a VolumeGroup” .
Warning
When you create volume groups with CLVM on shared storage, you must ensure that all nodesin the cluster have access to the physical volumes that constitute the volume group.Asymmmetric cluster configurations in which some nodes have access to the storage andothers do not are not supported.
Red Hat Ent erprise Linux 5 Logical Volume Manager Administ rat ion
14
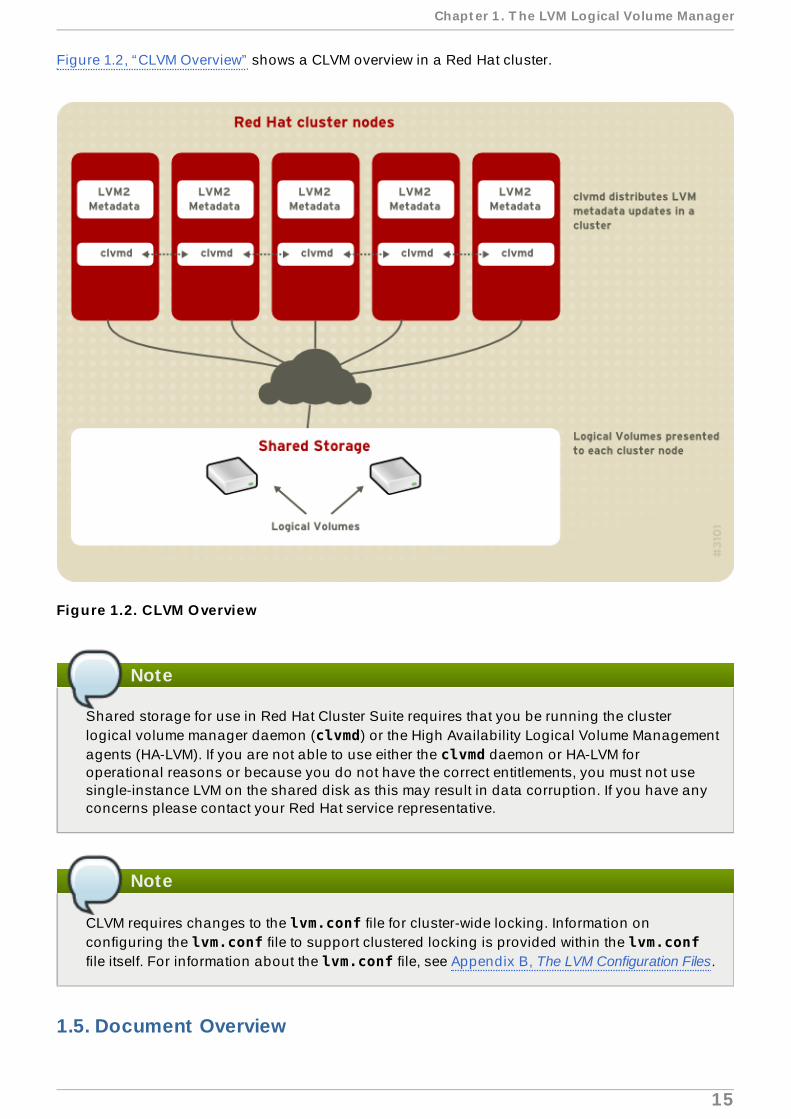
Figure 1.2, “CLVM Overview” shows a CLVM overview in a Red Hat cluster.
Figure 1.2. CLVM Overview
Note
Shared storage for use in Red Hat Cluster Suite requires that you be running the clusterlogical volume manager daemon (clvmd) or the High Availability Logical Volume Managementagents (HA-LVM). If you are not able to use either the clvmd daemon or HA-LVM foroperational reasons or because you do not have the correct entitlements, you must not usesingle-instance LVM on the shared disk as this may result in data corruption. If you have anyconcerns please contact your Red Hat service representative.
Note
CLVM requires changes to the lvm.conf file for cluster-wide locking. Information onconfiguring the lvm.conf file to support clustered locking is provided within the lvm.conffile itself. For information about the lvm.conf file, see Appendix B, The LVM Configuration Files.
1.5. Document Overview
Chapt er 1 . T he LVM Logical Volume Manager
15

This remainder of this document includes the following chapters:
Chapter 2, LVM Components describes the components that make up an LVM logical volume.
Chapter 3, LVM Administration Overview provides an overview of the basic steps you perform toconfigure LVM logical volumes, whether you are using the LVM Command Line Interface (CLI)commands or the LVM Graphical User Interface (GUI).
Chapter 4, LVM Administration with CLI Commands summarizes the individual administrative tasksyou can perform with the LVM CLI commands to create and maintain logical volumes.
Chapter 5, LVM Configuration Examples provides a variety of LVM configuration examples.
Chapter 6, LVM Troubleshooting provides instructions for troubleshooting a variety of LVM issues.
Chapter 7, LVM Administration with the LVM GUI summarizes the operating of the LVM GUI.
Appendix A, The Device Mapper describes the Device Mapper that LVM uses to map logical andphysical volumes.
Appendix B, The LVM Configuration Files describes the LVM configuration files.
Appendix C, LVM Object Tags describes LVM object tags and host tags.
Appendix D, LVM Volume Group Metadata describes LVM volume group metadata, and includes asample copy of metadata for an LVM volume group.
Red Hat Ent erprise Linux 5 Logical Volume Manager Administ rat ion
16
Chapter 2. LVM Components
This chapter describes the components of an LVM Logical volume.
2.1. Physical Volumes
The underlying physical storage unit of an LVM logical volume is a block device such as a partitionor whole disk. To use the device for an LVM logical volume the device must be initialized as aphysical volume (PV). Initializing a block device as a physical volume places a label near the start ofthe device.
By default, the LVM label is placed in the second 512-byte sector. You can overwrite this default byplacing the label on any of the first 4 sectors. This allows LVM volumes to co-exist with other users ofthese sectors, if necessary.
An LVM label provides correct identification and device ordering for a physical device, since devicescan come up in any order when the system is booted. An LVM label remains persistent across rebootsand throughout a cluster.
The LVM label identifies the device as an LVM physical volume. It contains a random unique identifier(the UUID) for the physical volume. It also stores the size of the block device in bytes, and it recordswhere the LVM metadata will be stored on the device.
The LVM metadata contains the configuration details of the LVM volume groups on your system. Bydefault, an identical copy of the metadata is maintained in every metadata area in every physicalvolume within the volume group. LVM metadata is small and stored as ASCII.
Currently LVM allows you to store 0, 1 or 2 identical copies of its metadata on each physical volume.The default is 1 copy. Once you configure the number of metadata copies on the physical volume,you cannot change that number at a later time. The first copy is stored at the start of the device,shortly after the label. If there is a second copy, it is placed at the end of the device. If youaccidentally overwrite the area at the beginning of your disk by writing to a different disk than youintend, a second copy of the metadata at the end of the device will allow you to recover the metadata.
For detailed information about the LVM metadata and changing the metadata parameters, seeAppendix D, LVM Volume Group Metadata.
2.1.1. LVM Physical Volume Layout
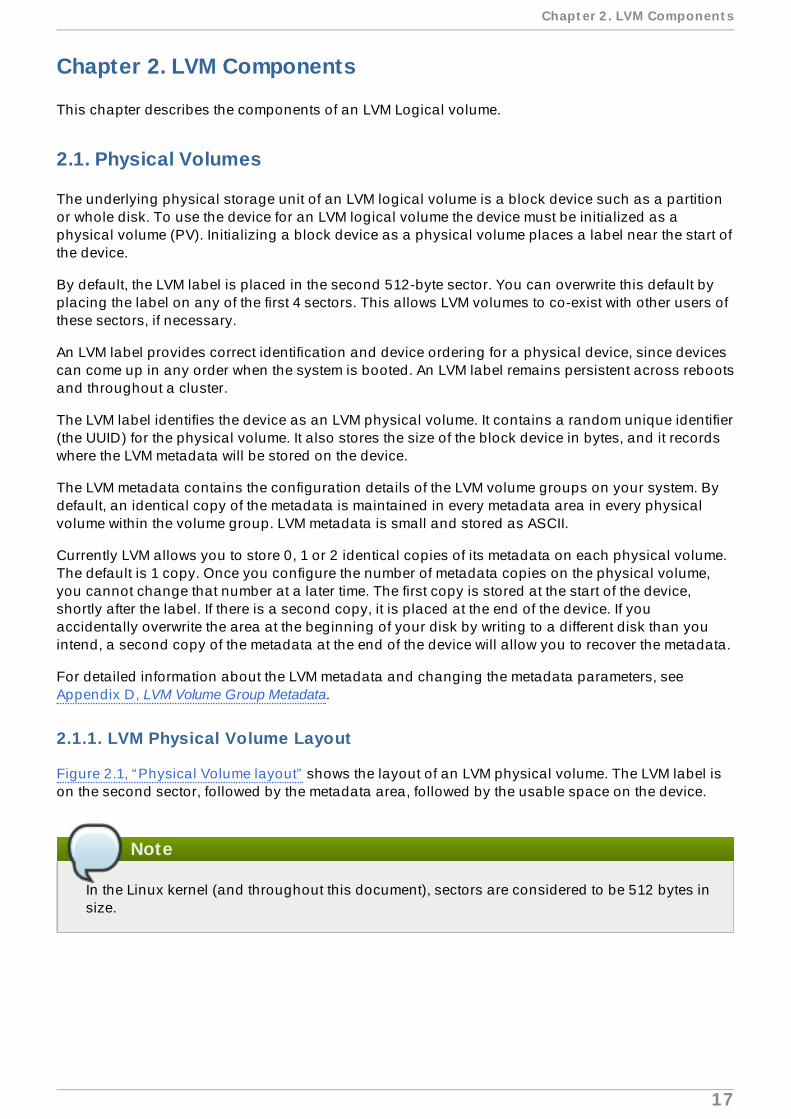
Figure 2.1, “Physical Volume layout” shows the layout of an LVM physical volume. The LVM label ison the second sector, followed by the metadata area, followed by the usable space on the device.
Note
In the Linux kernel (and throughout this document), sectors are considered to be 512 bytes insize.
Chapt er 2 . LVM Component s
17
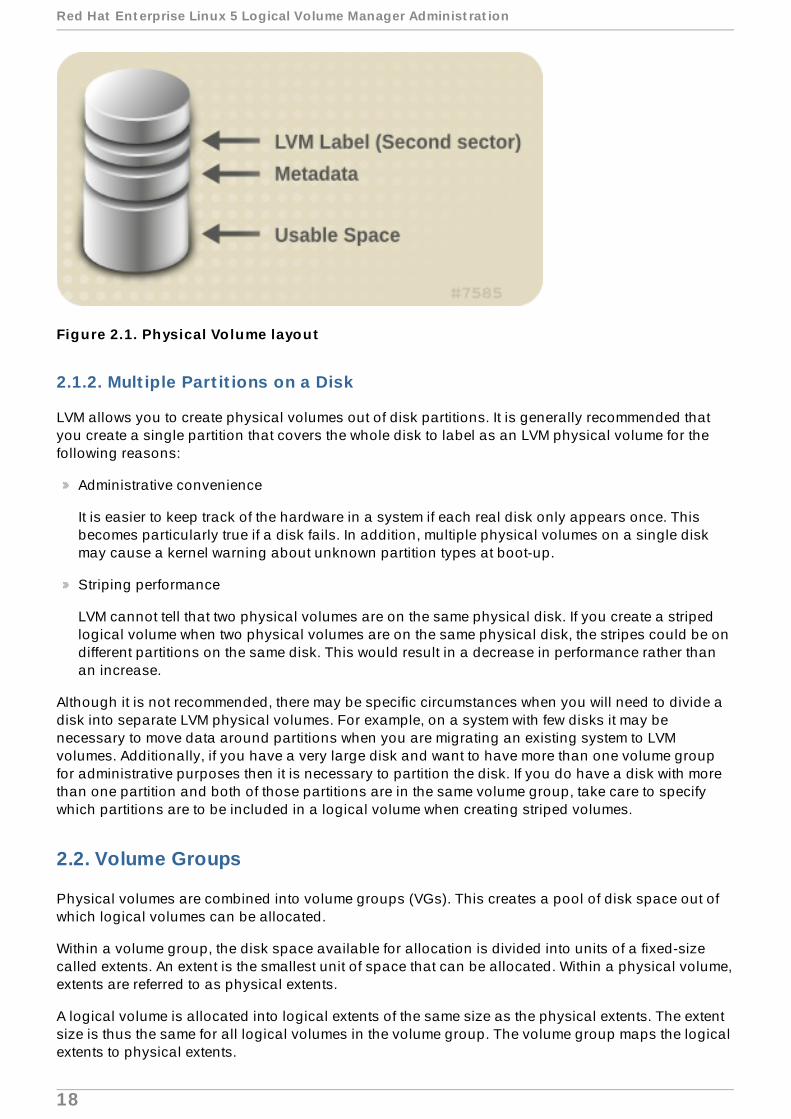
Figure 2.1. Physical Volume layout
2.1.2. Mult iple Part it ions on a Disk
LVM allows you to create physical volumes out of disk partitions. It is generally recommended thatyou create a single partition that covers the whole disk to label as an LVM physical volume for thefollowing reasons:
Administrative convenience
It is easier to keep track of the hardware in a system if each real disk only appears once. Thisbecomes particularly true if a disk fails. In addition, multiple physical volumes on a single diskmay cause a kernel warning about unknown partition types at boot-up.
Striping performance
LVM cannot tell that two physical volumes are on the same physical disk. If you create a stripedlogical volume when two physical volumes are on the same physical disk, the stripes could be ondifferent partitions on the same disk. This would result in a decrease in performance rather thanan increase.
Although it is not recommended, there may be specific circumstances when you will need to divide adisk into separate LVM physical volumes. For example, on a system with few disks it may benecessary to move data around partitions when you are migrating an existing system to LVMvolumes. Additionally, if you have a very large disk and want to have more than one volume groupfor administrative purposes then it is necessary to partition the disk. If you do have a disk with morethan one partition and both of those partitions are in the same volume group, take care to specifywhich partitions are to be included in a logical volume when creating striped volumes.
2.2. Volume Groups
Physical volumes are combined into volume groups (VGs). This creates a pool of disk space out ofwhich logical volumes can be allocated.
Within a volume group, the disk space available for allocation is divided into units of a fixed-sizecalled extents. An extent is the smallest unit of space that can be allocated. Within a physical volume,extents are referred to as physical extents.
A logical volume is allocated into logical extents of the same size as the physical extents. The extentsize is thus the same for all logical volumes in the volume group. The volume group maps the logicalextents to physical extents.
Red Hat Ent erprise Linux 5 Logical Volume Manager Administ rat ion
18

2.3. LVM Logical Volumes
In LVM, a volume group is divided up into logical volumes. There are three types of LVM logicalvolumes: linear volumes, striped volumes, and mirrored volumes. These are described in the followingsections.
2.3.1. Linear Volumes
A linear volume aggregates space from one or more physical volumes into one logical volume. Forexample, if you have two 60GB disks, you can create a 120GB logical volume. The physical storageis concatenated.
Creating a linear volume assigns a range of physical extents to an area of a logical volume in order.For example, as shown in Figure 2.2, “Extent Mapping” logical extents 1 to 99 could map to onephysical volume and logical extents 100 to 198 could map to a second physical volume. From thepoint of view of the application, there is one device that is 198 extents in size.
Figure 2.2. Extent Mapping
The physical volumes that make up a logical volume do not have to be the same size. Figure 2.3,“Linear Volume with Unequal Physical Volumes” shows volume group VG1 with a physical extent sizeof 4MB. This volume group includes 2 physical volumes named PV1 and PV2. The physical volumes
Chapt er 2 . LVM Component s
19
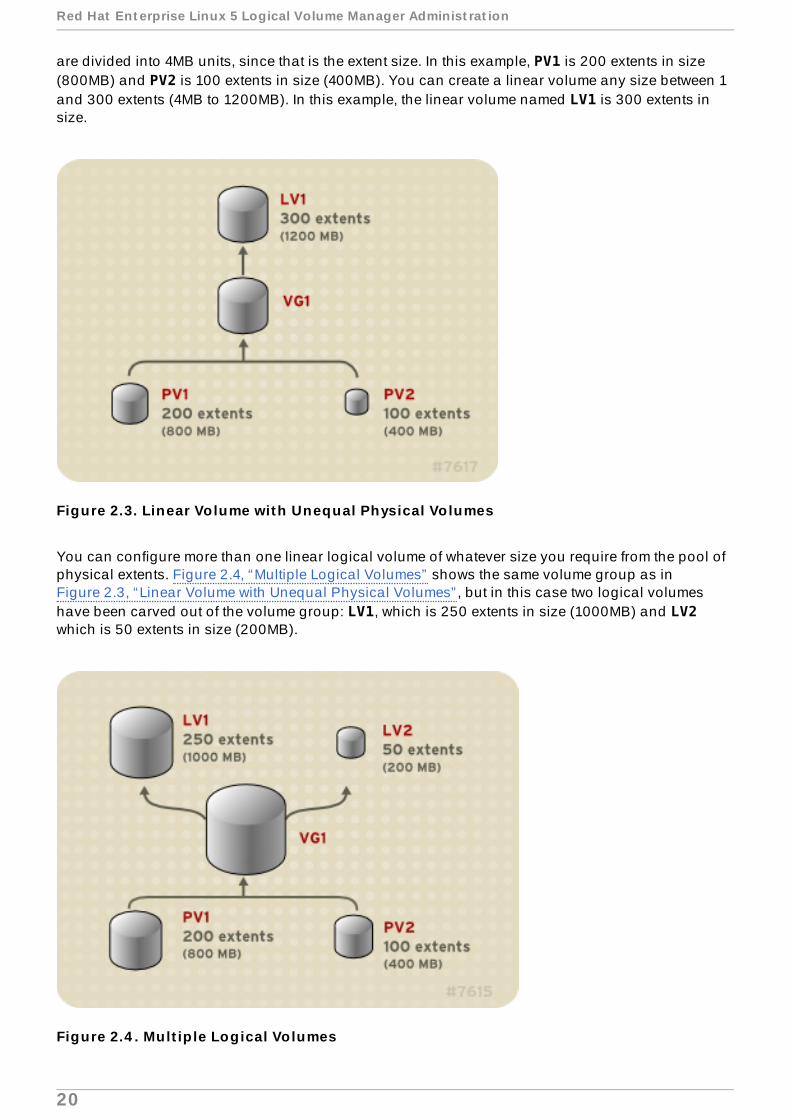
are divided into 4MB units, since that is the extent size. In this example, PV1 is 200 extents in size(800MB) and PV2 is 100 extents in size (400MB). You can create a linear volume any size between 1and 300 extents (4MB to 1200MB). In this example, the linear volume named LV1 is 300 extents insize.
Figure 2.3. Linear Volume with Unequal Physical Volumes
You can configure more than one linear logical volume of whatever size you require from the pool ofphysical extents. Figure 2.4, “Multiple Logical Volumes” shows the same volume group as inFigure 2.3, “Linear Volume with Unequal Physical Volumes” , but in this case two logical volumeshave been carved out of the volume group: LV1, which is 250 extents in size (1000MB) and LV2which is 50 extents in size (200MB).
Figure 2.4 . Mult ip le Logical Volumes
Red Hat Ent erprise Linux 5 Logical Volume Manager Administ rat ion
20
2.3.2. St riped Logical Volumes
When you write data to an LVM logical volume, the file system lays the data out across the underlyingphysical volumes. You can control the way the data is written to the physical volumes by creating astriped logical volume. For large sequential reads and writes, this can improve the efficiency of thedata I/O.
Striping enhances performance by writing data to a predetermined number of physical volumes inround-robin fashion. With striping, I/O can be done in parallel. In some situations, this can result innear-linear performance gain for each additional physical volume in the stripe.
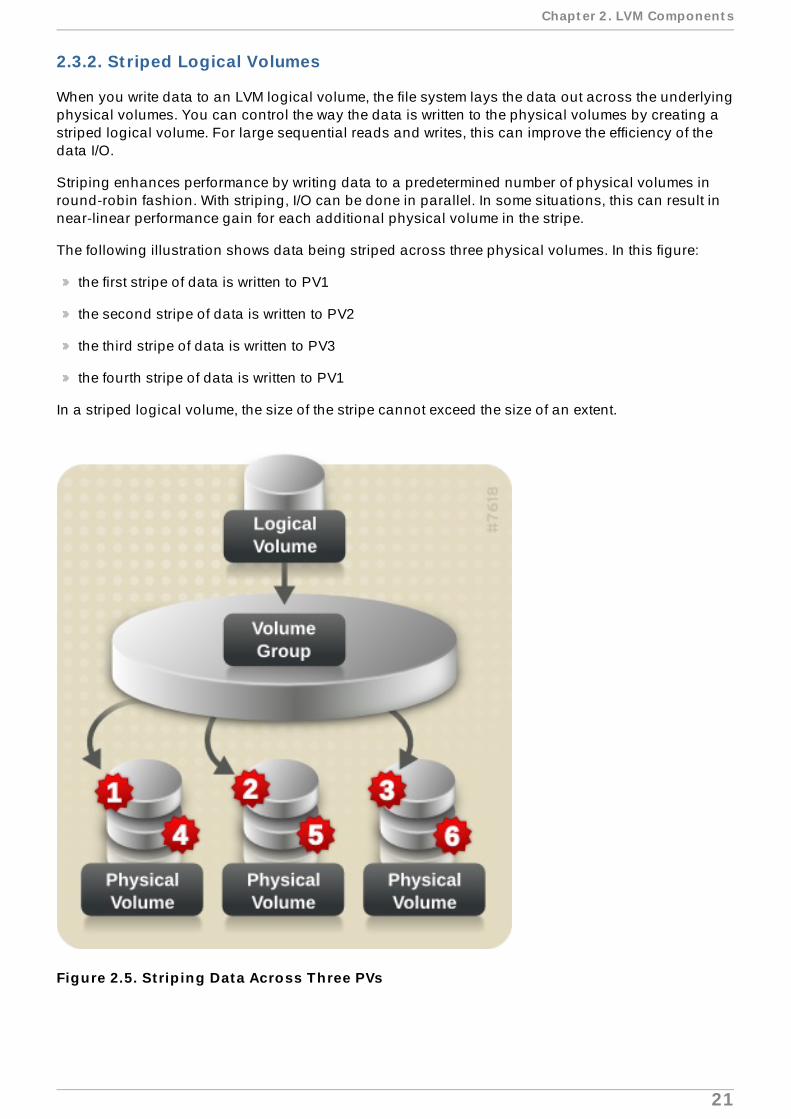
The following illustration shows data being striped across three physical volumes. In this figure:
the first stripe of data is written to PV1
the second stripe of data is written to PV2
the third stripe of data is written to PV3
the fourth stripe of data is written to PV1
In a striped logical volume, the size of the stripe cannot exceed the size of an extent.
Figure 2.5. St rip ing Data Across Three PVs
Chapt er 2 . LVM Component s
21
Striped logical volumes can be extended by concatenating another set of devices onto the end of thefirst set. In order to extend a striped logical volume, however, there must be enough free space on theunderlying physical volumes that make up the volume group to support the stripe. For example, ifyou have a two-way stripe that uses up an entire volume group, adding a single physical volume tothe volume group will not enable you to extend the stripe. Instead, you must add at least two physicalvolumes to the volume group. For more information on extending a striped volume, see Section 4.4.9,“Extending a Striped Volume” .
2.3.3. Mirrored Logical Volumes
A mirror maintains identical copies of data on different devices. When data is written to one device, itis written to a second device as well, mirroring the data. This provides protection for device failures.When one leg of a mirror fails, the logical volume becomes a linear volume and can still be accessed.
LVM supports mirrored volumes. When you create a mirrored logical volume, LVM ensures that datawritten to an underlying physical volume is mirrored onto a separate physical volume. With LVM, youcan create mirrored logical volumes with multiple mirrors.
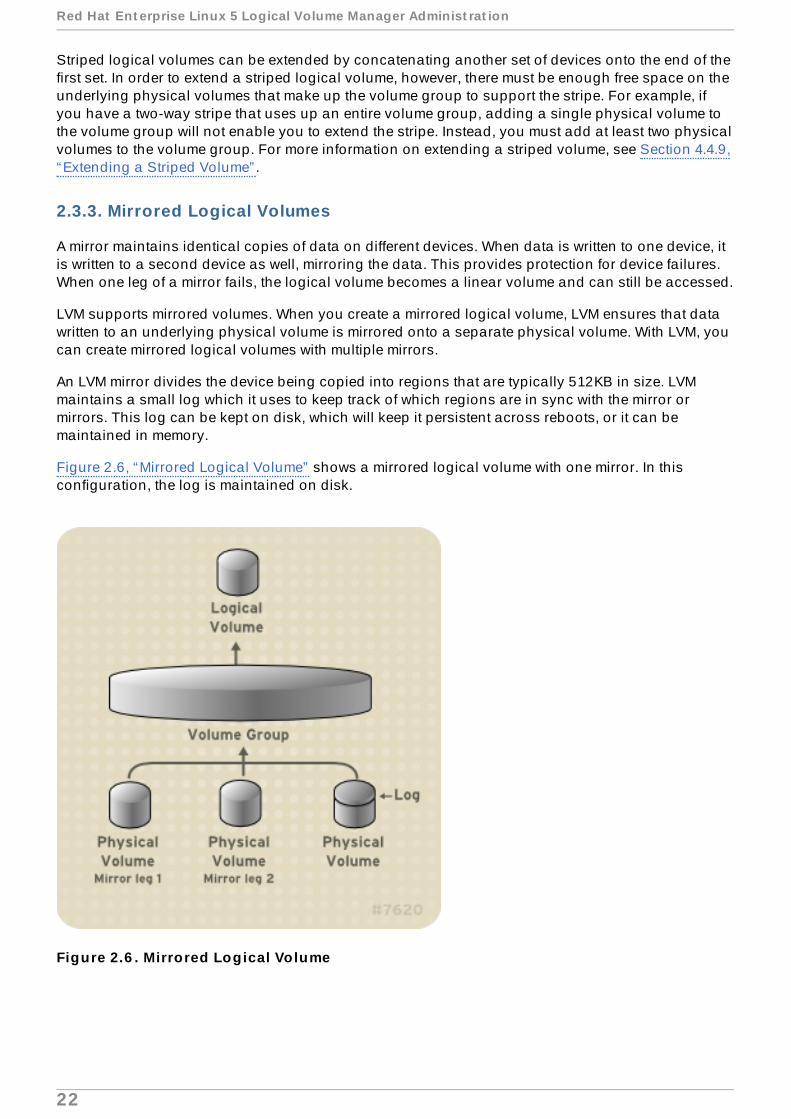
An LVM mirror divides the device being copied into regions that are typically 512KB in size. LVMmaintains a small log which it uses to keep track of which regions are in sync with the mirror ormirrors. This log can be kept on disk, which will keep it persistent across reboots, or it can bemaintained in memory.
Figure 2.6, “Mirrored Logical Volume” shows a mirrored logical volume with one mirror. In thisconfiguration, the log is maintained on disk.
Figure 2.6 . Mirrored Logical Volume
Red Hat Ent erprise Linux 5 Logical Volume Manager Administ rat ion
22
Note
As of the Red Hat Enterprise Linux 5.3 release, mirrored logical volumes are supported in acluster.
For information on creating and modifying mirrors, see Section 4.4.1.3, “Creating Mirrored Volumes” .
2.3.4 . Snapshot Volumes
The LVM snapshot feature provides the ability to create virtual images of a device at a particularinstant without causing a service interruption. When a change is made to the original device (theorigin) after a snapshot is taken, the snapshot feature makes a copy of the changed data area as itwas prior to the change so that it can reconstruct the state of the device.
Note
LVM snapshots are not supported across the nodes in a cluster. You cannot create asnapshot volume in a clustered volume group.
Because a snapshot copies only the data areas that change after the snapshot is created, thesnapshot feature requires a minimal amount of storage. For example, with a rarely updated origin, 3-5 % of the origin's capacity is sufficient to maintain the snapshot.
Note
Snapshot copies of a file system are virtual copies, not actual media backup for a file system.Snapshots do not provide a substitute for a backup procedure.
The size of the snapshot governs the amount of space set aside for storing the changes to the originvolume. For example, if you made a snapshot and then completely overwrote the origin the snapshotwould have to be at least as big as the origin volume to hold the changes. You need to dimension asnapshot according to the expected level of change. So for example a short-lived snapshot of aread-mostly volume, such as /usr, would need less space than a long-lived snapshot of a volumethat sees a greater number of writes, such as /home.
If a snapshot runs full, the snapshot becomes invalid, since it can no longer track changes on theorigin volumed. You should regularly monitor the size of the snapshot. Snapshots are fullyresizeable, however, so if you have the storage capacity you can increase the size of the snapshotvolume to prevent it from getting dropped. Conversely, if you find that the snapshot volume is largerthan you need, you can reduce the size of the volume to free up space that is needed by other logicalvolumes.
When you create a snapshot file system, full read and write access to the origin stays possible. If achunk on a snapshot is changed, that chunk is marked and never gets copied from the originalvolume.
There are several uses for the snapshot feature:
Most typically, a snapshot is taken when you need to perform a backup on a logical volumewithout halting the live system that is continuously updating the data.
Chapt er 2 . LVM Component s
23

You can execute the fsck command on a snapshot file system to check the file system integrityand determine whether the original file system requires file system repair.
Because the snapshot is read/write, you can test applications against production data by takinga snapshot and running tests against the snapshot, leaving the real data untouched.
You can create volumes for use with the Xen virtual machine monitor. You can use the snapshotfeature to create a disk image, snapshot it, and modify the snapshot for a particular domUinstance. You can then create another snapshot and modify it for another domU instance. Sincethe only storage used is chunks that were changed on the origin or snapshot, the majority of thevolume is shared.
Red Hat Ent erprise Linux 5 Logical Volume Manager Administ rat ion
24
Chapter 3. LVM Administration Overview
This chapter provides an overview of the administrative procedures you use to configure LVM logicalvolumes. This chapter is intended to provide a general understanding of the steps involved. Forspecific step-by-step examples of common LVM configuration procedures, see Chapter 5, LVMConfiguration Examples.
For descriptions of the CLI commands you can use to perform LVM administration, see Chapter 4,LVM Administration with CLI Commands. Alternately, you can use the LVM GUI, which is described inChapter 7, LVM Administration with the LVM GUI.
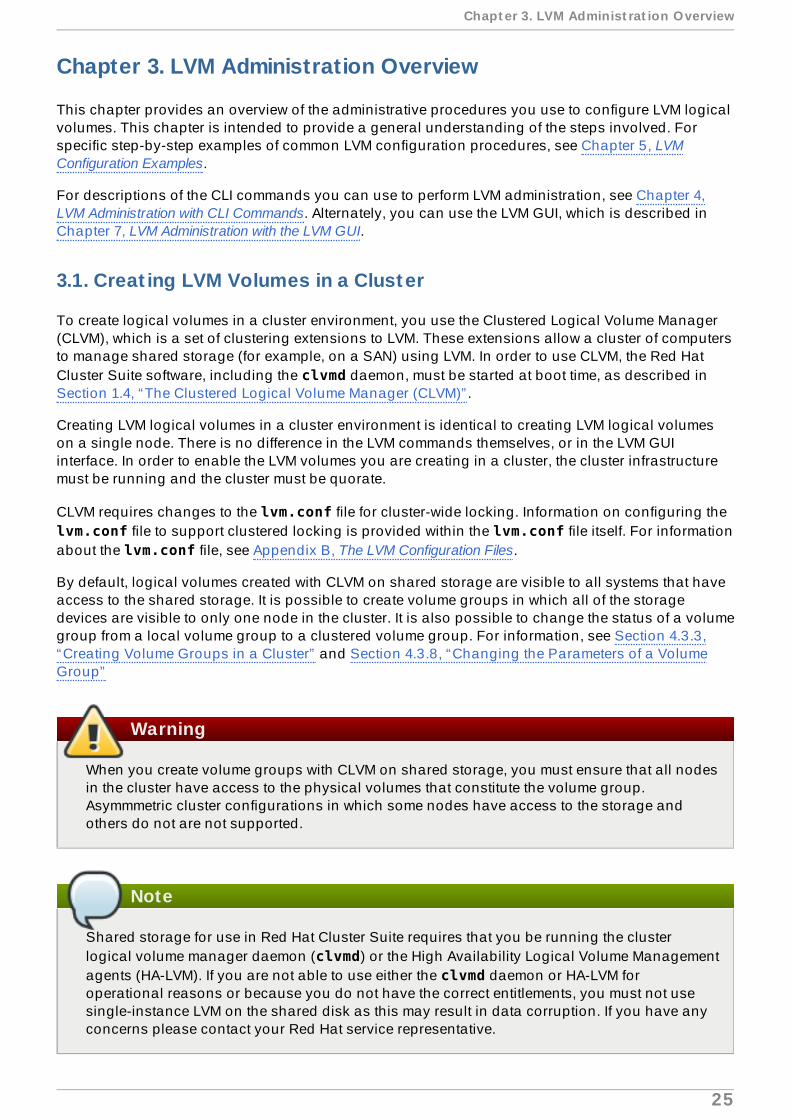
3.1. Creat ing LVM Volumes in a Cluster
To create logical volumes in a cluster environment, you use the Clustered Logical Volume Manager(CLVM), which is a set of clustering extensions to LVM. These extensions allow a cluster of computersto manage shared storage (for example, on a SAN) using LVM. In order to use CLVM, the Red HatCluster Suite software, including the clvmd daemon, must be started at boot time, as described inSection 1.4, “The Clustered Logical Volume Manager (CLVM)” .
Creating LVM logical volumes in a cluster environment is identical to creating LVM logical volumeson a single node. There is no difference in the LVM commands themselves, or in the LVM GUIinterface. In order to enable the LVM volumes you are creating in a cluster, the cluster infrastructuremust be running and the cluster must be quorate.
CLVM requires changes to the lvm.conf file for cluster-wide locking. Information on configuring the lvm.conf file to support clustered locking is provided within the lvm.conf file itself. For informationabout the lvm.conf file, see Appendix B, The LVM Configuration Files.
By default, logical volumes created with CLVM on shared storage are visible to all systems that haveaccess to the shared storage. It is possible to create volume groups in which all of the storagedevices are visible to only one node in the cluster. It is also possible to change the status of a volumegroup from a local volume group to a clustered volume group. For information, see Section 4.3.3,“Creating Volume Groups in a Cluster” and Section 4.3.8, “Changing the Parameters of a VolumeGroup”
Warning
When you create volume groups with CLVM on shared storage, you must ensure that all nodesin the cluster have access to the physical volumes that constitute the volume group.Asymmmetric cluster configurations in which some nodes have access to the storage andothers do not are not supported.
Note
Shared storage for use in Red Hat Cluster Suite requires that you be running the clusterlogical volume manager daemon (clvmd) or the High Availability Logical Volume Managementagents (HA-LVM). If you are not able to use either the clvmd daemon or HA-LVM foroperational reasons or because you do not have the correct entitlements, you must not usesingle-instance LVM on the shared disk as this may result in data corruption. If you have anyconcerns please contact your Red Hat service representative.
Chapt er 3. LVM Administ rat ion Overview
25

For information on how to install Red Hat Cluster Suite and set up the cluster infrastructure, seeCluster Administration.
For an example of creating a mirrored logical volume in a cluster, see Section 5.5, “Creating aMirrored LVM Logical Volume in a Cluster” .
3.2. Logical Volume Creat ion Overview
The following is a summary of the steps to perform to create an LVM logical volume.
1. Initialize the partitions you will use for the LVM volume as physical volumes (this labels them).
2. Create a volume group.
3. Create a logical volume.
After creating the logical volume you can create and mount the file system. The examples in thisdocument use GFS file systems.
1. Create a GFS file system on the logical volume with the gfs_mkfs command.
2. Create a new mount point with the mkdir command. In a clustered system, create the mountpoint on all nodes in the cluster.
3. Mount the file system. You may want to add a line to the fstab file for each node in thesystem.
Alternately, you can create and mount the GFS file system with the LVM GUI.
Creating the LVM volume is machine independent, since the storage area for LVM setup information ison the physical volumes and not the machine where the volume was created. Servers that use thestorage have local copies, but can recreate that from what is on the physical volumes. You canattach physical volumes to a different server if the LVM versions are compatible.
3.3. Growing a File System on a Logical Volume
To grow a file system on a logical volume, perform the following steps:
1. Make a new physical volume.
2. Extend the volume group that contains the logical volume with the file system you are growingto include the new physical volume.
3. Extend the logical volume to include the new physical volume.
4. Grow the file system.
If you have sufficient unallocated space in the volume group, you can use that space to extend thelogical volume instead of performing steps 1 and 2.
3.4 . Logical Volume Backup
Metadata backups and archives are automatically created on every volume group and logicalvolume configuration change unless disabled in the lvm.conf file. By default, the metadata backupis stored in the /etc/lvm/backup file and the metadata archives are stored in the /etc/lvm/archive file. How long the metadata archives stored in the /etc/lvm/archive file are
Red Hat Ent erprise Linux 5 Logical Volume Manager Administ rat ion
26
kept and how many archive files are kept is determined by parameters you can set in the lvm.conffile. A daily system backup should include the contents of the /etc/lvm directory in the backup.
Note that a metadata backup does not back up the user and system data contained in the logicalvolumes.
You can manually back up the metadata to the /etc/lvm/backup file with the vgcfgbackupcommand. You can restore metadata with the vgcfgrestore command. The vgcfgbackup and vgcfgrestore commands are described in Section 4.3.13, “Backing Up Volume Group Metadata” .
3.5. Logging
All message output passes through a logging module with independent choices of logging levels for:
standard output/error
syslog
log file
external log function
The logging levels are set in the /etc/lvm/lvm.conf file, which is described in Appendix B, TheLVM Configuration Files.
3.6. Online Device Reconfigurat ion
When you change your hardware configuration after system bootup and add or delete a device on anode, you may need to update the LVM cache file, which maintains a listing of current LVM devices.For example, when you add new disks to the system on a SAN or hotplug a new disk that is an LVMphysical volume, you may need to update this file.
You can update the LVM cache file by running the vgscan command. For information on the vgscancommand and the LVM cache file, see Section 4.3.6, “Scanning Disks for Volume Groups to Build theCache File” .
Chapt er 3. LVM Administ rat ion Overview
27

Chapter 4. LVM Administration with CLI Commands
This chapter summarizes the individual administrative tasks you can perform with the LVM CommandLine Interface (CLI) commands to create and maintain logical volumes.
Note
If you are creating or modifying an LVM volume for a clustered environment, you must ensurethat you are running the clvmd daemon. For information, see Section 3.1, “Creating LVMVolumes in a Cluster” .
4.1. Using CLI Commands
There are several general features of all LVM CLI commands.
When sizes are required in a command line argument, units can always be specified explicitly. If youdo not specify a unit, then a default is assumed, usually KB or MB. LVM CLI commands do not acceptfractions.
When specifying units in a command line argument, LVM is case-insensitive; specifying M or m isequivalent, for example, and powers of 2 (multiples of 1024) are used. However, when specifying the --units argument in a command, lower-case indicates that units are in multiples of 1024 whileupper-case indicates that units are in multiples of 1000.
Where commands take volume group or logical volume names as arguments, the full path name isoptional. A logical volume called lvol0 in a volume group called vg0 can be specified as vg0/lvol0. Where a list of volume groups is required but is left empty, a list of all volume groups willbe substituted. Where a list of logical volumes is required but a volume group is given, a list of all thelogical volumes in that volume group will be substituted. For example, the lvdisplay vg0command will display all the logical volumes in volume group vg0.
All LVM commands accept a -v argument, which can be entered multiple times to increase the outputverbosity. For example, the following examples shows the default output of the lvcreate command.
# lvcreate -L 50MB new_vg Rounding up size to full physical extent 52.00 MB Logical volume "lvol0" created
The following command shows the output of the lvcreate command with the -v argument.
# lvcreate -v -L 50MB new_vg Finding volume group "new_vg" Rounding up size to full physical extent 52.00 MB Archiving volume group "new_vg" metadata (seqno 4). Creating logical volume lvol0 Creating volume group backup "/etc/lvm/backup/new_vg" (seqno 5). Found volume group "new_vg" Creating new_vg-lvol0 Loading new_vg-lvol0 table Resuming new_vg-lvol0 (253:2) Clearing start of logical volume "lvol0" Creating volume group backup "/etc/lvm/backup/new_vg" (seqno 5). Logical volume "lvol0" created
Red Hat Ent erprise Linux 5 Logical Volume Manager Administ rat ion
28
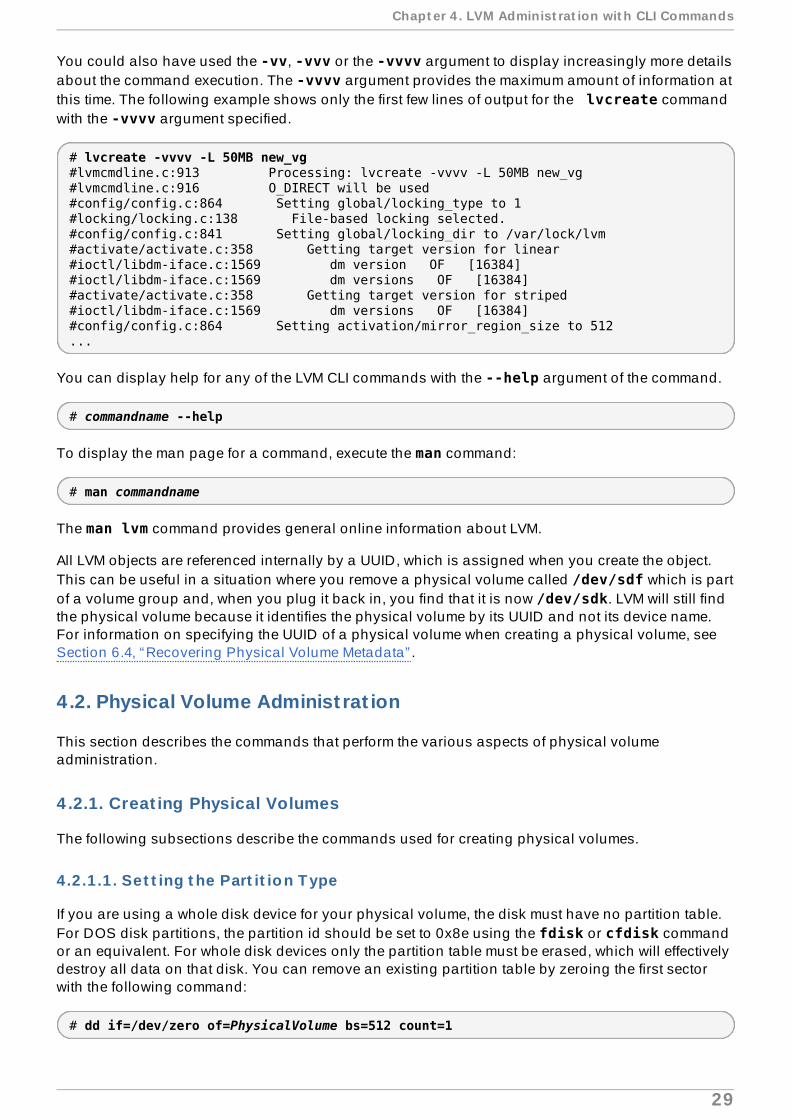
You could also have used the -vv, -vvv or the -vvvv argument to display increasingly more detailsabout the command execution. The -vvvv argument provides the maximum amount of information atthis time. The following example shows only the first few lines of output for the lvcreate commandwith the -vvvv argument specified.
# lvcreate -vvvv -L 50MB new_vg#lvmcmdline.c:913 Processing: lvcreate -vvvv -L 50MB new_vg#lvmcmdline.c:916 O_DIRECT will be used#config/config.c:864 Setting global/locking_type to 1#locking/locking.c:138 File-based locking selected.#config/config.c:841 Setting global/locking_dir to /var/lock/lvm#activate/activate.c:358 Getting target version for linear#ioctl/libdm-iface.c:1569 dm version OF [16384]#ioctl/libdm-iface.c:1569 dm versions OF [16384]#activate/activate.c:358 Getting target version for striped#ioctl/libdm-iface.c:1569 dm versions OF [16384]#config/config.c:864 Setting activation/mirror_region_size to 512...
You can display help for any of the LVM CLI commands with the --help argument of the command.
# commandname --help
To display the man page for a command, execute the man command:
# man commandname
The man lvm command provides general online information about LVM.
All LVM objects are referenced internally by a UUID, which is assigned when you create the object.This can be useful in a situation where you remove a physical volume called /dev/sdf which is partof a volume group and, when you plug it back in, you find that it is now /dev/sdk. LVM will still findthe physical volume because it identifies the physical volume by its UUID and not its device name.For information on specifying the UUID of a physical volume when creating a physical volume, seeSection 6.4, “Recovering Physical Volume Metadata” .
4.2. Physical Volume Administ rat ion
This section describes the commands that perform the various aspects of physical volumeadministration.
4 .2.1. Creat ing Physical Volumes
The following subsections describe the commands used for creating physical volumes.
4.2 .1 .1 . Set t ing t he Part it io n T ype
If you are using a whole disk device for your physical volume, the disk must have no partition table.For DOS disk partitions, the partition id should be set to 0x8e using the fdisk or cfdisk commandor an equivalent. For whole disk devices only the partition table must be erased, which will effectivelydestroy all data on that disk. You can remove an existing partition table by zeroing the first sectorwith the following command:
# dd if=/dev/zero of=PhysicalVolume bs=512 count=1
Chapt er 4 . LVM Administ rat ion wit h CLI Commands
29
4.2 .1 .2 . Init ializing Physical Vo lumes
Use the pvcreate command to initialize a block device to be used as a physical volume.Initialization is analogous to formatting a file system.
The following command initializes /dev/sdd, /dev/sde, and /dev/sdf as LVM physical volumesfor later use as part of LVM logical volumes.
# pvcreate /dev/sdd /dev/sde /dev/sdf
To initialize partitions rather than whole disks: run the pvcreate command on the partition. Thefollowing example initializes the partition /dev/hdb1 as an LVM physical volume for later use aspart of an LVM logical volume.
# pvcreate /dev/hdb1
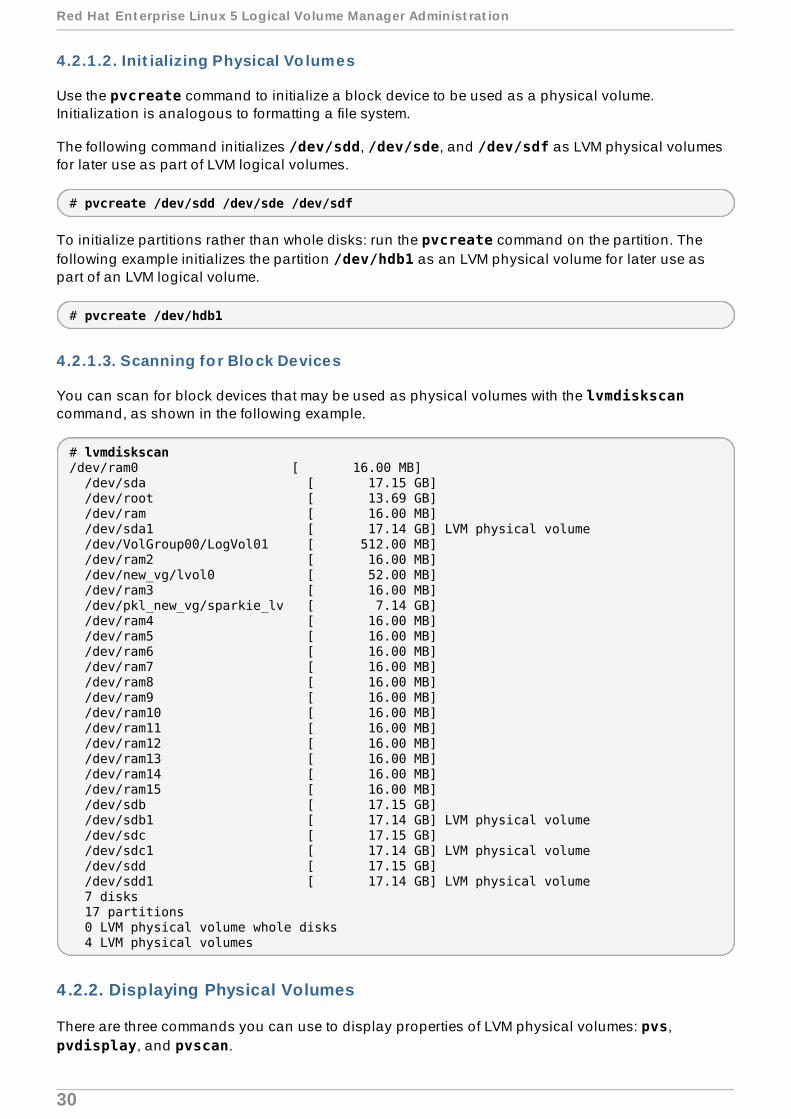
4.2 .1 .3. Scanning fo r Blo ck Devices
You can scan for block devices that may be used as physical volumes with the lvmdiskscancommand, as shown in the following example.
# lvmdiskscan/dev/ram0 [ 16.00 MB] /dev/sda [ 17.15 GB] /dev/root [ 13.69 GB] /dev/ram [ 16.00 MB] /dev/sda1 [ 17.14 GB] LVM physical volume /dev/VolGroup00/LogVol01 [ 512.00 MB] /dev/ram2 [ 16.00 MB] /dev/new_vg/lvol0 [ 52.00 MB] /dev/ram3 [ 16.00 MB] /dev/pkl_new_vg/sparkie_lv [ 7.14 GB] /dev/ram4 [ 16.00 MB] /dev/ram5 [ 16.00 MB] /dev/ram6 [ 16.00 MB] /dev/ram7 [ 16.00 MB] /dev/ram8 [ 16.00 MB] /dev/ram9 [ 16.00 MB] /dev/ram10 [ 16.00 MB] /dev/ram11 [ 16.00 MB] /dev/ram12 [ 16.00 MB] /dev/ram13 [ 16.00 MB] /dev/ram14 [ 16.00 MB] /dev/ram15 [ 16.00 MB] /dev/sdb [ 17.15 GB] /dev/sdb1 [ 17.14 GB] LVM physical volume /dev/sdc [ 17.15 GB] /dev/sdc1 [ 17.14 GB] LVM physical volume /dev/sdd [ 17.15 GB] /dev/sdd1 [ 17.14 GB] LVM physical volume 7 disks 17 partitions 0 LVM physical volume whole disks 4 LVM physical volumes
4 .2.2. Displaying Physical Volumes
There are three commands you can use to display properties of LVM physical volumes: pvs, pvdisplay, and pvscan.
Red Hat Ent erprise Linux 5 Logical Volume Manager Administ rat ion
30

The pvs command provides physical volume information in a configurable form, displaying one lineper physical volume. The pvs command provides a great deal of format control, and is useful forscripting. For information on using the pvs command to customize your output, see Section 4.9,“Customized Reporting for LVM” .
The pvdisplay command provides a verbose multi-line output for each physical volume. It displaysphysical properties (size, extents, volume group, etc.) in a fixed format.
The following example shows the output of the pvdisplay command for a single physical volume.
# pvdisplay --- Physical volume --- PV Name /dev/sdc1 VG Name new_vg PV Size 17.14 GB / not usable 3.40 MB Allocatable yes PE Size (KByte) 4096 Total PE 4388 Free PE 4375 Allocated PE 13 PV UUID Joqlch-yWSj-kuEn-IdwM-01S9-XO8M-mcpsVe
The pvscan command scans all supported LVM block devices in the system for physical volumes.
The following command shows all physical devices found:
# pvscan PV /dev/sdb2 VG vg0 lvm2 [964.00 MB / 0 free] PV /dev/sdc1 VG vg0 lvm2 [964.00 MB / 428.00 MB free] PV /dev/sdc2 lvm2 [964.84 MB] Total: 3 [2.83 GB] / in use: 2 [1.88 GB] / in no VG: 1 [964.84 MB]
You can define a filter in the lvm.conf so that this command will avoid scanning specific physicalvolumes. For information on using filters to control which devices are scanned, see Section 4.6,“Controlling LVM Device Scans with Filters” .
4 .2.3. Prevent ing Allocat ion on a Physical Volume
You can prevent allocation of physical extents on the free space of one or more physical volumeswith the pvchange command. This may be necessary if there are disk errors, or if you will beremoving the physical volume.
The following command disallows the allocation of physical extents on /dev/sdk1.
# pvchange -x n /dev/sdk1
You can also use the -xy arguments of the pvchange command to allow allocation where it hadpreviously been disallowed.
4 .2.4 . Resiz ing a Physical Volume
If you need to change the size of an underlying block device for any reason, use the pvresizecommand to update LVM with the new size. You can execute this command while LVM is using thephysical volume.
4 .2.5. Removing Physical Volumes
Chapt er 4 . LVM Administ rat ion wit h CLI Commands
31

If a device is no longer required for use by LVM, you can remove the LVM label with the pvremovecommand. Executing the pvremove command zeroes the LVM metadata on an empty physicalvolume.
If the physical volume you want to remove is currently part of a volume group, you must remove itfrom the volume group with the vgreduce command, as described in Section 4.3.7, “RemovingPhysical Volumes from a Volume Group” .
# pvremove /dev/ram15 Labels on physical volume "/dev/ram15" successfully wiped
4.3. Volume Group Administ rat ion
This section describes the commands that perform the various aspects of volume groupadministration.
4 .3.1. Creat ing Volume Groups
To create a volume group from one or more physical volumes, use the vgcreate command. The vgcreate command creates a new volume group by name and adds at least one physical volume toit.
The following command creates a volume group named vg1 that contains physical volumes /dev/sdd1 and /dev/sde1.
# vgcreate vg1 /dev/sdd1 /dev/sde1
When physical volumes are used to create a volume group, its disk space is divided into 4 MBextents, by default. This extent is the minimum amount by which the logical volume may be increasedor decreased in size. Large numbers of extents will have no impact on I/O performance of the logicalvolume.
You can specify the extent size with the -s option to the vgcreate command if the default extent sizeis not suitable. You can put limits on the number of physical or logical volumes the volume groupcan have by using the -p and -l arguments of the vgcreate command.
By default, a volume group allocates physical extents according to common-sense rules such as notplacing parallel stripes on the same physical volume. This is the normal allocation policy. You canuse the --alloc argument of the vgcreate command to specify an allocation policy of contiguous, anywhere, or cling.
The contiguous policy requires that new extents are adjacent to existing extents. If there aresufficient free extents to satisfy an allocation request but a normal allocation policy would not usethem, the anywhere allocation policy will, even if that reduces performance by placing two stripes onthe same physical volume. The cling policy places new extents on the same physical volume asexisting extents in the same stripe of the logical volume. These policies can be changed using the vgchange command.
For information on using the cling policy in conjunction with LVM tags to specify which additionalphysical volumes to use when extending an LVM volume, see Section 4.4.11, “Extending a LogicalVolume with the cling Allocation Policy” .
In general, allocation policies other than normal are required only in special cases where you needto specify unusual or nonstandard extent allocation.
Red Hat Ent erprise Linux 5 Logical Volume Manager Administ rat ion
32
LVM volume groups and underlying logical volumes are included in the device special file directorytree in the /dev directory with the following layout:
/dev/vg/lv/
For example, if you create two volume groups myvg1 and myvg2, each with three logical volumesnamed lv01, lv02, and lv03, this creates six device special files:
/dev/myvg1/lv01/dev/myvg1/lv02/dev/myvg1/lv03/dev/myvg2/lv01/dev/myvg2/lv02/dev/myvg2/lv03
The maximum device size with LVM is 8 Exabytes on 64-bit CPUs.
4 .3.2. LVM Allocat ion
When an LVM operation needs to allocate physical extents for one or more logical volumes, theallocation proceeds as follows:
The complete set of unallocated physical extents in the volume group is generated forconsideration. If you supply any ranges of physical extents at the end of the command line, onlyunallocated physical extents within those ranges on the specified physical volumes areconsidered.
Each allocation policy is tried in turn, starting with the strictest policy (contiguous) and endingwith the allocation policy specified using the --alloc option or set as the default for theparticular logical volume or volume group. For each policy, working from the lowest-numberedlogical extent of the empty logical volume space that needs to be filled, as much space aspossible is allocated, according to the restrictions imposed by the allocation policy. If more spaceis needed, LVM moves on to the next policy.
The allocation policy restrictions are as follows:
An allocation policy of contiguous requires that the physical location of any logical extent thatis not the first logical extent of a logical volume is adjacent to the physical location of the logicalextent immediately preceding it.
When a logical volume is striped or mirrored, the contiguous allocation restriction is appliedindependently to each stripe or mirror image (leg) that needs space.
An allocation policy of cling requires that the physical volume used for any logical extent to beadded to an existing logical volume is already in use by at least one logical extent earlier in thatlogical volume. If the configuration parameter allocation/cling_tag_list is defined, thentwo physical volumes are considered to match if any of the listed tags is present on both physicalvolumes. This allows groups of physical volumes with similar properties (such as their physicallocation) to be tagged and treated as equivalent for allocation purposes. For more information onusing the cling policy in conjunction with LVM tags to specify which additional physicalvolumes to use when extending an LVM volume, see Section 4.4.11, “Extending a Logical Volumewith the cling Allocation Policy” .
When a Logical Volume is striped or mirrored, the cling allocation restriction is appliedindependently to each stripe or mirror image (leg) that needs space.
Chapt er 4 . LVM Administ rat ion wit h CLI Commands
33

An allocation policy of normal will not choose a physical extent that shares the same physicalvolume as a logical extent already allocated to a parallel logical volume (that is, a different stripeor mirror image/leg) at the same offset within that parallel logical volume.
When allocating a mirror log at the same time as logical volumes to hold the mirror data, anallocation policy of normal will first try to select different physical volumes for the log and thedata. If that is not possible and the allocation/mirror_logs_require_separate_pvsconfiguration parameter is set to 0, it will then allow the log to share physical volume(s) with partof the data.
If there are sufficient free extents to satisfy an allocation request but a normal allocation policywould not use them, the anywhere allocation policy will, even if that reduces performance byplacing two stripes on the same physical volume.
The allocation policies can be changed using the vgchange command.
Note
If you rely upon any layout behaviour beyond that documented in this section according tothe defined allocation policies, you should note that this might change in future versions of thecode. For example, if you supply on the command line two empty physical volumes that havean identical number of free physical extents available for allocation, LVM currently considersusing each of them in the order they are listed; there is no guarantee that future releases willmaintain that property. If it is important to obtain a specific layout for a particular LogicalVolume, then you should build it up through a sequence of lvcreate and lvconvert stepssuch that the allocation policies applied to each step leave LVM no discretion over the layout.
To view the way the allocation process currently works in any specific case, you can read the debuglogging output, for example by adding the -vvvv option to a command.
4 .3.3. Creat ing Volume Groups in a Cluster
You create volume groups in a cluster environment with the vgcreate command, just as you createthem on a single node.
By default, volume groups created with CLVM on shared storage are visible to all computers thathave access to the shared storage. It is possible, however, to create volume groups that are local,visible only to one node in the cluster, by using the -c n of the vgcreate command.
The following command, when executed in a cluster environment, creates a volume group that islocal to the node from which the command was executed. The command creates a local volumenamed vg1 that contains physical volumes /dev/sdd1 and /dev/sde1.
# vgcreate -c n vg1 /dev/sdd1 /dev/sde1
You can change whether an existing volume group is local or clustered with the -c option of the vgchange command, which is described in Section 4.3.8, “Changing the Parameters of a VolumeGroup” .
You can check whether an existing volume group is a clustered volume group with the vgscommand, which displays the c attribute if the volume is clustered. The following command displaysthe attributes of the volume groups VolGroup00 and testvg1. In this example, VolGroup00 is notclustered, while testvg1 is clustered, as indicated by the c attribute under the Attr heading.
Red Hat Ent erprise Linux 5 Logical Volume Manager Administ rat ion
34

# vgs VG #PV #LV #SN Attr VSize VFree VolGroup00 1 2 0 wz--n- 19.88G 0 testvg1 1 1 0 wz--nc 46.00G 8.00M
For more information on the vgs command, see Section 4.3.5, “Displaying VolumeGroups”Section 4.9, “Customized Reporting for LVM” , and the vgs man page.
4 .3.4 . Adding Physical Volumes to a Volume Group
To add additional physical volumes to an existing volume group, use the vgextend command. The vgextend command increases a volume group's capacity by adding one or more free physicalvolumes.
The following command adds the physical volume /dev/sdf1 to the volume group vg1.
# vgextend vg1 /dev/sdf1
4 .3.5. Displaying Volume Groups
There are two commands you can use to display properties of LVM volume groups: vgs and vgdisplay.
The vgscan command, which scans all the disks for volume groups and rebuilds the LVM cache file,also displays the volume groups. For information on the vgscan command, see Section 4.3.6,“Scanning Disks for Volume Groups to Build the Cache File” .
The vgs command provides volume group information in a configurable form, displaying one lineper volume group. The vgs command provides a great deal of format control, and is useful forscripting. For information on using the vgs command to customize your output, see Section 4.9,“Customized Reporting for LVM” .
The vgdisplay command displays volume group properties (such as size, extents, number ofphysical volumes, etc.) in a fixed form. The following example shows the output of a vgdisplaycommand for the volume group new_vg. If you do not specify a volume group, all existing volumegroups are displayed.
# vgdisplay new_vg --- Volume group --- VG Name new_vg System ID Format lvm2 Metadata Areas 3 Metadata Sequence No 11 VG Access read/write VG Status resizable MAX LV 0 Cur LV 1 Open LV 0 Max PV 0 Cur PV 3 Act PV 3 VG Size 51.42 GB PE Size 4.00 MB Total PE 13164 Alloc PE / Size 13 / 52.00 MB Free PE / Size 13151 / 51.37 GB VG UUID jxQJ0a-ZKk0-OpMO-0118-nlwO-wwqd-fD5D32
Chapt er 4 . LVM Administ rat ion wit h CLI Commands
35
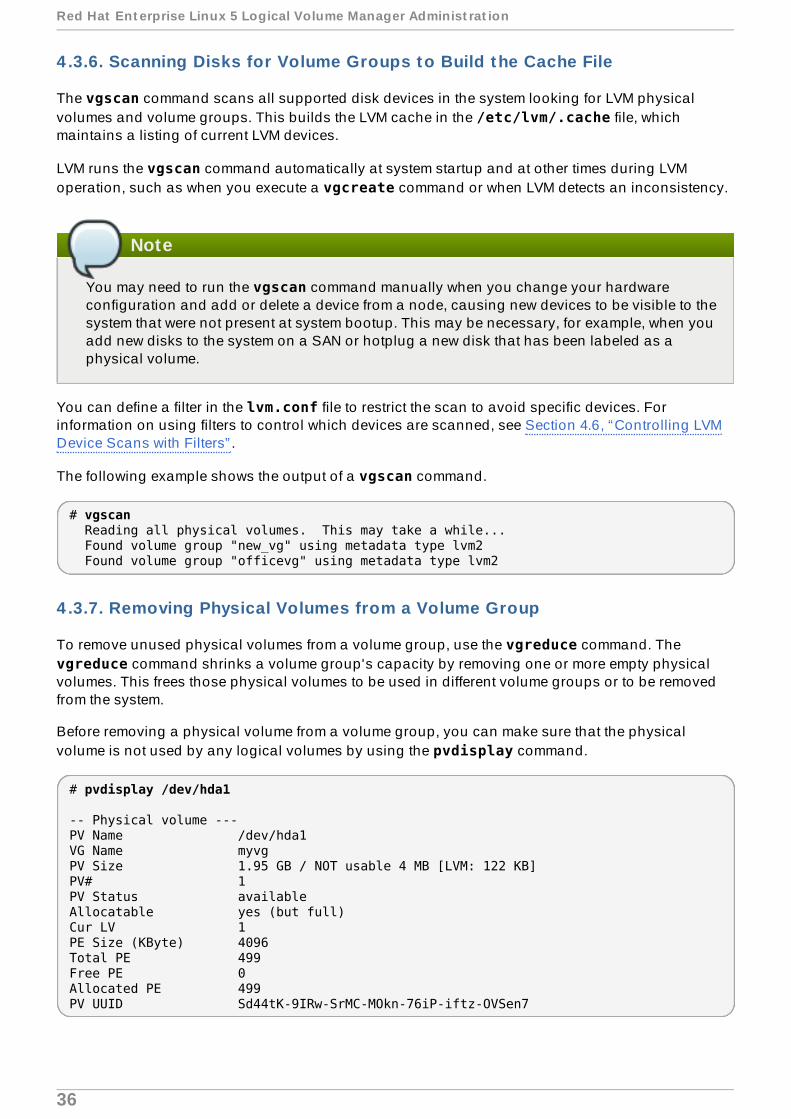
4 .3.6. Scanning Disks for Volume Groups to Build the Cache File
The vgscan command scans all supported disk devices in the system looking for LVM physicalvolumes and volume groups. This builds the LVM cache in the /etc/lvm/.cache file, whichmaintains a listing of current LVM devices.
LVM runs the vgscan command automatically at system startup and at other times during LVMoperation, such as when you execute a vgcreate command or when LVM detects an inconsistency.
Note
You may need to run the vgscan command manually when you change your hardwareconfiguration and add or delete a device from a node, causing new devices to be visible to thesystem that were not present at system bootup. This may be necessary, for example, when youadd new disks to the system on a SAN or hotplug a new disk that has been labeled as aphysical volume.
You can define a filter in the lvm.conf file to restrict the scan to avoid specific devices. Forinformation on using filters to control which devices are scanned, see Section 4.6, “Controlling LVMDevice Scans with Filters” .
The following example shows the output of a vgscan command.
# vgscan Reading all physical volumes. This may take a while... Found volume group "new_vg" using metadata type lvm2 Found volume group "officevg" using metadata type lvm2
4 .3.7. Removing Physical Volumes from a Volume Group
To remove unused physical volumes from a volume group, use the vgreduce command. The vgreduce command shrinks a volume group's capacity by removing one or more empty physicalvolumes. This frees those physical volumes to be used in different volume groups or to be removedfrom the system.
Before removing a physical volume from a volume group, you can make sure that the physicalvolume is not used by any logical volumes by using the pvdisplay command.
# pvdisplay /dev/hda1
-- Physical volume ---PV Name /dev/hda1VG Name myvgPV Size 1.95 GB / NOT usable 4 MB [LVM: 122 KB]PV# 1PV Status availableAllocatable yes (but full)Cur LV 1PE Size (KByte) 4096Total PE 499Free PE 0Allocated PE 499PV UUID Sd44tK-9IRw-SrMC-MOkn-76iP-iftz-OVSen7
Red Hat Ent erprise Linux 5 Logical Volume Manager Administ rat ion
36

If the physical volume is still being used you will have to migrate the data to another physical volumeusing the pvmove command. Then use the vgreduce command to remove the physical volume:
The following command removes the physical volume /dev/hda1 from the volume group my_volume_group.
# vgreduce my_volume_group /dev/hda1
4 .3.8. Changing the Parameters of a Volume Group
The vgchange command is used to deactivate and activate volume groups, as described inSection 4.3.9, “Activating and Deactivating Volume Groups” . You can also use this command tochange several volume group parameters for an existing volume group.
The following command changes the maximum number of logical volumes of volume group vg00 to128.
# vgchange -l 128 /dev/vg00
For a description of the volume group parameters you can change with the vgchange command, seethe vgchange(8) man page.
4 .3.9. Act ivat ing and Deact ivat ing Volume Groups
When you create a volume group it is, by default, activated. This means that the logical volumes inthat group are accessible and subject to change.
There are various circumstances for which you need to make a volume group inactive and thusunknown to the kernel. To deactivate or activate a volume group, use the -a (--available)argument of the vgchange command.
The following example deactivates the volume group my_volume_group.
# vgchange -a n my_volume_group
If clustered locking is enabled, add ’e’ to activate or deactivate a volume group exclusively on onenode or ’l’ to activate or/deactivate a volume group only on the local node. Logical volumes withsingle-host snapshots are always activated exclusively because they can only be used on one nodeat once.
You can deactivate individual logical volumes with the lvchange command, as described inSection 4.4.4, “Changing the Parameters of a Logical Volume Group” , For information on activatinglogical volumes on individual nodes in a cluster, see Section 4.8, “Activating Logical Volumes onIndividual Nodes in a Cluster” .
4 .3.10. Removing Volume Groups
To remove a volume group that contains no logical volumes, use the vgremove command.
# vgremove officevg Volume group "officevg" successfully removed
4 .3.11. Split t ing a Volume Group
Chapt er 4 . LVM Administ rat ion wit h CLI Commands
37
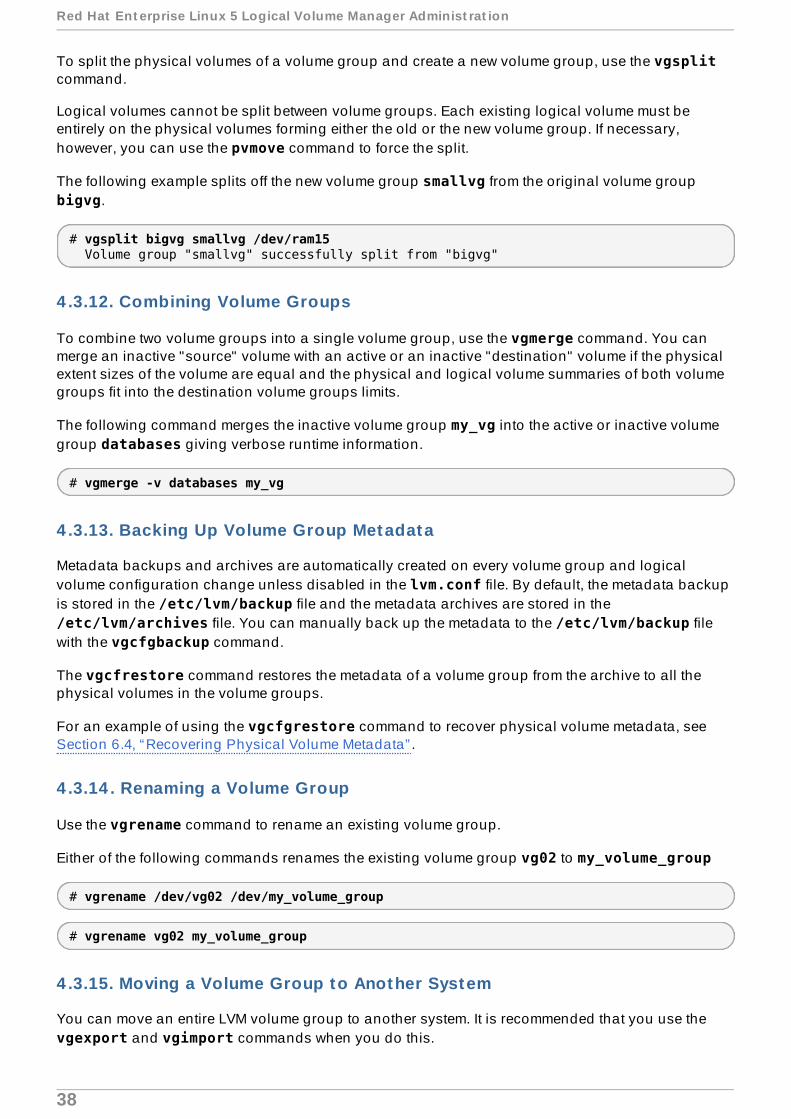
To split the physical volumes of a volume group and create a new volume group, use the vgsplitcommand.
Logical volumes cannot be split between volume groups. Each existing logical volume must beentirely on the physical volumes forming either the old or the new volume group. If necessary,however, you can use the pvmove command to force the split.
The following example splits off the new volume group smallvg from the original volume group bigvg.
# vgsplit bigvg smallvg /dev/ram15 Volume group "smallvg" successfully split from "bigvg"
4 .3.12. Combining Volume Groups
To combine two volume groups into a single volume group, use the vgmerge command. You canmerge an inactive "source" volume with an active or an inactive "destination" volume if the physicalextent sizes of the volume are equal and the physical and logical volume summaries of both volumegroups fit into the destination volume groups limits.
The following command merges the inactive volume group my_vg into the active or inactive volumegroup databases giving verbose runtime information.
# vgmerge -v databases my_vg
4 .3.13. Backing Up Volume Group Metadata
Metadata backups and archives are automatically created on every volume group and logicalvolume configuration change unless disabled in the lvm.conf file. By default, the metadata backupis stored in the /etc/lvm/backup file and the metadata archives are stored in the /etc/lvm/archives file. You can manually back up the metadata to the /etc/lvm/backup filewith the vgcfgbackup command.
The vgcfrestore command restores the metadata of a volume group from the archive to all thephysical volumes in the volume groups.
For an example of using the vgcfgrestore command to recover physical volume metadata, seeSection 6.4, “Recovering Physical Volume Metadata” .
4 .3.14 . Renaming a Volume Group
Use the vgrename command to rename an existing volume group.
Either of the following commands renames the existing volume group vg02 to my_volume_group
# vgrename /dev/vg02 /dev/my_volume_group
# vgrename vg02 my_volume_group
4 .3.15. Moving a Volume Group to Another System
You can move an entire LVM volume group to another system. It is recommended that you use the vgexport and vgimport commands when you do this.
Red Hat Ent erprise Linux 5 Logical Volume Manager Administ rat ion
38
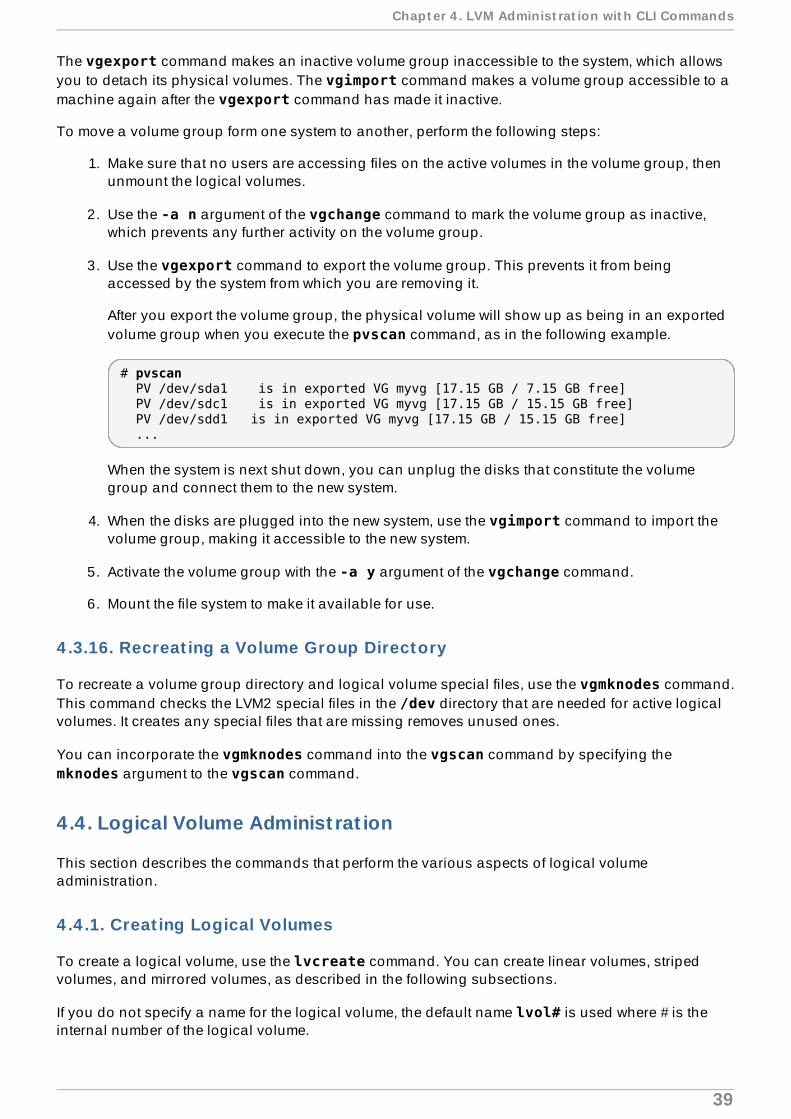
The vgexport command makes an inactive volume group inaccessible to the system, which allowsyou to detach its physical volumes. The vgimport command makes a volume group accessible to amachine again after the vgexport command has made it inactive.
To move a volume group form one system to another, perform the following steps:
1. Make sure that no users are accessing files on the active volumes in the volume group, thenunmount the logical volumes.
2. Use the -a n argument of the vgchange command to mark the volume group as inactive,which prevents any further activity on the volume group.
3. Use the vgexport command to export the volume group. This prevents it from beingaccessed by the system from which you are removing it.
After you export the volume group, the physical volume will show up as being in an exportedvolume group when you execute the pvscan command, as in the following example.
# pvscan PV /dev/sda1 is in exported VG myvg [17.15 GB / 7.15 GB free] PV /dev/sdc1 is in exported VG myvg [17.15 GB / 15.15 GB free] PV /dev/sdd1 is in exported VG myvg [17.15 GB / 15.15 GB free] ...
When the system is next shut down, you can unplug the disks that constitute the volumegroup and connect them to the new system.
4. When the disks are plugged into the new system, use the vgimport command to import thevolume group, making it accessible to the new system.
5. Activate the volume group with the -a y argument of the vgchange command.
6. Mount the file system to make it available for use.
4 .3.16. Recreat ing a Volume Group Directory
To recreate a volume group directory and logical volume special files, use the vgmknodes command.This command checks the LVM2 special files in the /dev directory that are needed for active logicalvolumes. It creates any special files that are missing removes unused ones.
You can incorporate the vgmknodes command into the vgscan command by specifying the mknodes argument to the vgscan command.
4.4 . Logical Volume Administ rat ion
This section describes the commands that perform the various aspects of logical volumeadministration.
4 .4 .1. Creat ing Logical Volumes
To create a logical volume, use the lvcreate command. You can create linear volumes, stripedvolumes, and mirrored volumes, as described in the following subsections.
If you do not specify a name for the logical volume, the default name lvol# is used where # is theinternal number of the logical volume.
Chapt er 4 . LVM Administ rat ion wit h CLI Commands
39

The following sections provide examples of logical volume creation for the three types of logicalvolumes you can create with LVM.
4.4 .1 .1 . Creat ing Linear Vo lumes
When you create a logical volume, the logical volume is carved from a volume group using the freeextents on the physical volumes that make up the volume group. Normally logical volumes use upany space available on the underlying physical volumes on a next-free basis. Modifying the logicalvolume frees and reallocates space in the physical volumes.
The following command creates a logical volume 10 gigabytes in size in the volume group vg1.
# lvcreate -L 10G vg1
The following command creates a 1500 MB linear logical volume named testlv in the volumegroup testvg, creating the block device /dev/testvg/testlv.
# lvcreate -L1500 -n testlv testvg
The following command creates a 50 gigabyte logical volume named gfslv from the free extents involume group vg0.
# lvcreate -L 50G -n gfslv vg0
You can use the -l argument of the lvcreate command to specify the size of the logical volume inextents. You can also use this argument to specify the percentage of the volume group to use for thelogical volume. The following command creates a logical volume called mylv that uses 60% of thetotal space in volume group testvg.
# lvcreate -l 60%VG -n mylv testvg
You can also use the -l argument of the lvcreate command to specify the percentage of theremaining free space in a volume group as the size of the logical volume. The following commandcreates a logical volume called yourlv that uses all of the unallocated space in the volume group testvg.
# lvcreate -l 100%FREE -n yourlv testvg
You can use -l argument of the lvcreate command to create a logical volume that uses the entirevolume group. Another way to create a logical volume that uses the entire volume group is to use the vgdisplay command to find the "Total PE" size and to use those results as input to the lvcreatecommand.
The following commands create a logical volume called mylv that fills the volume group named testvg.
# vgdisplay testvg | grep "Total PE"Total PE 10230# lvcreate -l 10230 testvg -n mylv
The underlying physical volumes used to create a logical volume can be important if the physicalvolume needs to be removed, so you may need to consider this possibility when you create thelogical volume. For information on removing a physical volume from a volume group, seeSection 4.3.7, “Removing Physical Volumes from a Volume Group” .
Red Hat Ent erprise Linux 5 Logical Volume Manager Administ rat ion
4 0

To create a logical volume to be allocated from a specific physical volume in the volume group,specify the physical volume or volumes at the end at the lvcreate command line. The followingcommand creates a logical volume named testlv in volume group testvg allocated from thephysical volume /dev/sdg1,
# lvcreate -L 1500 -ntestlv testvg /dev/sdg1
You can specify which extents of a physical volume are to be used for a logical volume. Thefollowing example creates a linear logical volume out of extents 0 through 24 of physical volume /dev/sda1 and extents 50 through 124 of physical volume /dev/sdb1 in volume group testvg.
# lvcreate -l 100 -n testlv testvg /dev/sda1:0-24 /dev/sdb1:50-124
The following example creates a linear logical volume out of extents 0 through 24 of physical volume /dev/sda1 and then continues laying out the logical volume at extent 100.
# lvcreate -l 100 -n testlv testvg /dev/sda1:0-24:100-
The default policy for how the extents of a logical volume are allocated is inherit, which appliesthe same policy as for the volume group. These policies can be changed using the lvchangecommand. For information on allocation policies, see Section 4.3.1, “Creating Volume Groups” .
4.4 .1 .2 . Creat ing St riped Vo lumes
For large sequential reads and writes, creating a striped logical volume can improve the efficiency ofthe data I/O. For general information about striped volumes, see Section 2.3.2, “Striped LogicalVolumes” .
When you create a striped logical volume, you specify the number of stripes with the -i argument ofthe lvcreate command. This determines over how many physical volumes the logical volume willbe striped. The number of stripes cannot be greater than the number of physical volumes in thevolume group (unless the --alloc anywhere argument is used).
If the underlying physical devices that make up a striped logical volume are different sizes, themaximum size of the striped volume is determined by the smallest underlying device. For example, ina two-legged stripe, the maximum size is twice the size of the smaller device. In a three-legged stripe,the maximum size is three times the size of the smallest device.
The following command creates a striped logical volume across 2 physical volumes with a stripe of64kB. The logical volume is 50 gigabytes in size, is named gfslv, and is carved out of volumegroup vg0.
# lvcreate -L 50G -i2 -I64 -n gfslv vg0
As with linear volumes, you can specify the extents of the physical volume that you are using for thestripe. The following command creates a striped volume 100 extents in size that stripes across twophysical volumes, is named stripelv and is in volume group testvg. The stripe will use sectors 0-49 of /dev/sda1 and sectors 50-99 of /dev/sdb1.
# lvcreate -l 100 -i2 -nstripelv testvg /dev/sda1:0-49 /dev/sdb1:50-99 Using default stripesize 64.00 KB Logical volume "stripelv" created
4.4 .1 .3. Creat ing Mirro red Vo lumes
Chapt er 4 . LVM Administ rat ion wit h CLI Commands
4 1
Note
As of the Red Hat Enterprise Linux 5.3 release, mirrored logical volumes are supported in acluster. Creating a mirrored LVM logical volume in a cluster requires the same commands andprocedures as creating a mirrored LVM logical volume on a single node. However, in order tocreate a mirrored LVM volume in a cluster the cluster and cluster mirror infrastructure must berunning, the cluster must be quorate, and the locking type in the lvm.conf file must be setcorrectly to enable cluster locking. For an example of creating a mirrored volume in a cluster,see Section 5.5, “Creating a Mirrored LVM Logical Volume in a Cluster” .
When you create a mirrored volume, you specify the number of copies of the data to make with the -margument of the lvcreate command. Specifying -m1 creates one mirror, which yields two copies ofthe file system: a linear logical volume plus one copy. Similarly, specifying -m2 creates two mirrors,yielding three copies of the file system.
The following command creates a mirrored logical volume with a single mirror. The volume is 50gigabytes in size, is named mirrorlv, and is carved out of volume group vg0:
# lvcreate -L 50G -m1 -n mirrorlv vg0
An LVM mirror divides the device being copied into regions that, by default, are 512KB in size. Youcan use the -R argument of the lvcreate command to specify the region size in megabytes. Youcan also change the default region size by editing the mirror_region_size setting in the lvm.conf file.
Note
Due to limitations in the cluster infrastructure, cluster mirrors greater than 1.5TB cannot becreated with the default region size of 512KB. Users that require larger mirrors should increasethe region size from its default to something larger. Failure to increase the region size willcause LVM creation to hang and may hang other LVM commands as well.
As a general guideline for specifying the region size for mirrors that are larger than 1.5TB, youcould take your mirror size in terabytes and round up that number to the next power of 2,using that number as the -R argument to the lvcreate command. For example, if your mirrorsize is 1.5TB, you could specify -R 2. If your mirror size is 3TB, you could specify -R 4. For amirror size of 5TB, you could specify -R 8.
The following command creates a mirrored logical volume with a region size of 2 MB:
# lvcreate -m1 -L 2T -R 2 -n mirror vol_group
When a mirror is created, the mirror regions are synchronized. For large mirror components, the syncprocess may take a long time. When you are creating a new mirror that does not need to be revived,you can specify the --nosync argument to indicate that an initial synchronization from the firstdevice is not required.
LVM maintains a small log which it uses to keep track of which regions are in sync with the mirror ormirrors. By default, this log is kept on disk, which keeps it persistent across reboots. You can specifyinstead that this log be kept in memory with the --corelog argument; this eliminates the need for anextra log device, but it requires that the entire mirror be resynchronized at every reboot.
Red Hat Ent erprise Linux 5 Logical Volume Manager Administ rat ion
4 2

The following command creates a mirrored logical volume from the volume group bigvg. The logicalis named ondiskmirvol and has a single mirror. The volume is 12 MB in size and keeps the mirrorlog in memory.
# lvcreate -L 12MB -m1 --corelog -n ondiskmirvol bigvg Logical volume "ondiskmirvol" created
The mirror log is created on a separate device from the devices on which any of the mirror legs arecreated. It is possible, however, to create the mirror log on the same device as one of the mirror legsby using the --alloc anywhere argument of the vgcreate command. This may degradeperformance, but it allows you to create a mirror even if you have only two underlying devices.
The following command creates a mirrored logical volume with a single mirror for which the mirror logis on the same device as one of the mirror legs. In this example, the volume group vg0 consists ofonly two devices. This command creates a 500 MB volume named mirrorlv in the vg0 volumegroup.
# lvcreate -L 500M -m1 -n mirrorlv -alloc anywhere vg0
Note
As of the Red Hat Enterprise Linux 5.7 release, you can combine RAID0 (striping) and RAID1(mirroring) in a single logical volume. Creating a logical volume while simultaneouslyspecifying the number of mirrors (--mirrors X) and the number of stripes (--stripes Y)results in a mirror device whose constituent devices are striped.
Note
With clustered mirrors, the mirror log management is completely the responsibility of the clusternode with the currently lowest cluster ID. Therefore, when the device holding the cluster mirrorlog becomes unavailable on a subset of the cluster, the clustered mirror can continueoperating without any impact, as long as the cluster node with lowest ID retains access to themirror log. Since the mirror is undisturbed, no automatic corrective action (repair) is issued,either. When the lowest-ID cluster node loses access to the mirror log, however, automaticaction will kick in (regardless of accessibility of the log from other nodes).
4 .4 .1.3.1. Mirroring the Mirror Log
To create a mirror log that is itself mirrored, you can specify the --mirrorlog mirrored argument.The following command creates a mirrored logical volume from the volume group bigvg. The logicalvolume is named twologvol and has a single mirror. The volume is 12 MB in size and the mirror logis mirrored, with each log kept on a separate device.
# lvcreate -L 12MB -m1 --mirrorlog mirrored -n twologvol bigvg Logical volume "twologvol" created
Just as with a standard mirror log, it is possible to create the redundant mirror logs on the samedevice as the mirror legs by using the --alloc anywhere argument of the vgcreate command.This may degrade performance, but it allows you to create a redundant mirror log even if you do nothave sufficient underlying devices for each log to be kept on a separate device than the mirror legs.
Chapt er 4 . LVM Administ rat ion wit h CLI Commands
4 3
4 .4 .1.3.2. Specifying Devices for Mirror Components
You can specify which devices to use for the mirror legs and log, and which extents of the devices touse. To force the log onto a particular disk, specify exactly one extent on the disk on which it will beplaced. LVM does not necessary respect the order in which devices are listed in the command line. Ifany physical volumes are listed that is the only space on which allocation will take place. Anyphysical extents included in the list that are already allocated will get ignored.
The following command creates a mirrored logical volume with a single mirror. The volume is 500 MBin size, it is named mirrorlv, and it is carved out of volume group vg0. The first leg of the mirror ison device /dev/sda1, the second leg of the mirror is on device /dev/sdb1, and the mirror log is on /dev/sdc1.
# lvcreate -L 500M -m1 -n mirrorlv vg0 /dev/sda1 /dev/sdb1 /dev/sdc1
The following command creates a mirrored logical volume with a single mirror. The volume is 500 MBin size, it is named mirrorlv, and it is carved out of volume group vg0. The first leg of the mirror ison extents 0 through 499 of device /dev/sda1, the second leg of the mirror is on extents 0 through499 of device /dev/sdb1, and the mirror log starts on extent 0 of device /dev/sdc1. These are 1MB extents. If any of the specified extents have already been allocated, they will be ignored.
# lvcreate -L 500M -m1 -n mirrorlv vg0 /dev/sda1:0-499 /dev/sdb1:0-499 /dev/sdc1:0
4 .4 .1.3.3. Split t ing Of f a Redundant Image of a Mirrored Logical Volume
You can split off a redundant image of a mirrored logical volume to form a new logical volume. Tosplit off an image, you use the --splitmirrors argument of the lvconvert command, specifyingthe number of redundant images to split off. You must use the --name argument of the command tospecify a name for the newly-split-off logical volume.
The following command splits off a new logical volume named copy from the mirrored logical volumevg/lv. The new logical volume contains two mirror legs. In this example, LVM selects which devicesto split off.
# lvconvert --splitmirrors 2 --name copy vg/lv
You can specify which devices to split off. The following command splits off a new logical volumenamed copy from the mirrored logical volume vg/lv. The new logical volume contains two mirrorlegs consisting of devices /dev/sdc1 and /dev/sde1.
# lvconvert --splitmirrors 2 --name copy vg/lv /dev/sd[ce]1
4.4 .1 .4 . Changing Mirro red Vo lume Co nfigurat io n
You can convert a logical volume from a mirrored volume to a linear volume or from a linear volumeto a mirrored volume with the lvconvert command. You can also use this command to reconfigureother mirror parameters of an existing logical volume, such as corelog.
When you convert a logical volume to a mirrored volume, you are basically creating mirror legs foran existing volume. This means that your volume group must contain the devices and space for themirror legs and for the mirror log.
Red Hat Ent erprise Linux 5 Logical Volume Manager Administ rat ion
4 4
If you lose a leg of a mirror, LVM converts the volume to a linear volume so that you still have accessto the volume, without the mirror redundancy. After you replace the leg, you can use the lvconvertcommand to restore the mirror. This procedure is provided in Section 6.3, “Recovering from LVMMirror Failure” .
The following command converts the linear logical volume vg00/lvol1 to a mirrored logicalvolume.
# lvconvert -m1 vg00/lvol1
The following command converts the mirrored logical volume vg00/lvol1 to a linear logicalvolume, removing the mirror leg.
# lvconvert -m0 vg00/lvol1
4 .4 .2. Persistent Device Numbers
Major and minor device numbers are allocated dynamically at module load. Some applications workbest if the block device always is activated with the same device minor number. You can specify thiswith the lvcreate and the lvchange commands by using the following arguments:
--persistent y --minor minor
Use a large minor number to be sure that it has not already been allocated to another devicedynamically.
If you are exporting a file system using NFS, specifying the fsid parameter in the exports file mayavoid the need to set a persistent device number within LVM.
Note
Prior to the Red Hat Enterprise Linux 5.11 release, it was necessary to specify a major numberwhen using the --persistent option. This had no effect on the major number, which thekernel assigned dynamically.
4 .4 .3. Resiz ing Logical Volumes
To reduce the size of a logical volume, use the lvreduce command. If the logical volume contains afile system, be sure to reduce the file system first (or use the LVM GUI) so that the logical volume isalways at least as large as the file system expects it to be.
The following command reduces the size of logical volume lvol1 in volume group vg00 by 3 logicalextents.
# lvreduce -l -3 vg00/lvol1
4 .4 .4 . Changing the Parameters of a Logical Volume Group
To change the parameters of a logical volume, use the lvchange command. For a listing of theparameters you can change, see the lvchange(8) man page.
Chapt er 4 . LVM Administ rat ion wit h CLI Commands
4 5
You can use the lvchange command to activate and deactivate logical volumes. To activate anddeactivate all the logical volumes in a volume group at the same time, use the vgchange command,as described in Section 4.3.8, “Changing the Parameters of a Volume Group” .
The following command changes the permission on volume lvol1 in volume group vg00 to be read-only.
# lvchange -pr vg00/lvol1
4 .4 .5. Renaming Logical Volumes
To rename an existing logical volume, use the lvrename command.
Either of the following commands renames logical volume lvold in volume group vg02 to lvnew.
# lvrename /dev/vg02/lvold /dev/vg02/lvnew
# lvrename vg02 lvold lvnew
For more information on activating logical volumes on individual nodes in a cluster, see Section 4.8,“Activating Logical Volumes on Individual Nodes in a Cluster” .
4 .4 .6. Removing Logical Volumes
To remove an inactive logical volume, use the lvremove command. If the logical volume is currentlymounted, unmount the volume before removing it. In addition, in a clustered environment you mustdeactivate a logical volume before it can be removed.
The following command removes the logical volume /dev/testvg/testlv. from the volume group testvg. Note that in this case the logical volume has not been deactivated.
# lvremove /dev/testvg/testlvDo you really want to remove active logical volume "testlv"? [y/n]: y Logical volume "testlv" successfully removed
You could explicitly deactivate the logical volume before removing it with the lvchange -ancommand, in which case you would not see the prompt verifying whether you want to remove anactive logical volume.
4 .4 .7. Displaying Logical Volumes
There are three commands you can use to display properties of LVM logical volumes: lvs, lvdisplay, and lvscan.
The lvs command provides logical volume information in a configurable form, displaying one lineper logical volume. The lvs command provides a great deal of format control, and is useful forscripting. For information on using the lvs command to customize your output, see Section 4.9,“Customized Reporting for LVM” .
The lvdisplay command displays logical volume properties (such as size, layout, and mapping) ina fixed format.
The following command shows the attributes of lvol2 in vg00. If snapshot logical volumes havebeen created for this original logical volume, this command shows a list of all snapshot logicalvolumes and their status (active or inactive) as well.
Red Hat Ent erprise Linux 5 Logical Volume Manager Administ rat ion
4 6

# lvdisplay -v /dev/vg00/lvol2
The lvscan command scans for all logical volumes in the system and lists them, as in the followingexample.
# lvscan ACTIVE '/dev/vg0/gfslv' [1.46 GB] inherit
4 .4 .8. Growing Logical Volumes
To increase the size of a logical volume, use the lvextend command.
After extending the logical volume, you will need to increase the size of the associated file system tomatch.
When you extend the logical volume, you can indicate how much you want to extend the volume, orhow large you want it to be after you extend it.
The following command extends the logical volume /dev/myvg/homevol to 12 gigabytes.
# lvextend -L12G /dev/myvg/homevol lvextend -- extending logical volume "/dev/myvg/homevol" to 12 GBlvextend -- doing automatic backup of volume group "myvg"lvextend -- logical volume "/dev/myvg/homevol" successfully extended
The following command adds another gigabyte to the logical volume /dev/myvg/homevol.
# lvextend -L+1G /dev/myvg/homevollvextend -- extending logical volume "/dev/myvg/homevol" to 13 GBlvextend -- doing automatic backup of volume group "myvg"lvextend -- logical volume "/dev/myvg/homevol" successfully extended
As with the lvcreate command, you can use the -l argument of the lvextend command to specifythe number of extents by which to increase the size of the logical volume. You can also use thisargument to specify a percentage of the volume group, or a percentage of the remaining free space inthe volume group. The following command extends the logical volume called testlv to fill all of theunallocated space in the volume group myvg.
# lvextend -l +100%FREE /dev/myvg/testlv Extending logical volume testlv to 68.59 GB Logical volume testlv successfully resized
After you have extended the logical volume it is necessary to increase the file system size to match.
By default, most file system resizing tools will increase the size of the file system to be the size of theunderlying logical volume so you do not need to worry about specifying the same size for each of thetwo commands.
4 .4 .9. Extending a St riped Volume
In order to increase the size of a striped logical volume, there must be enough free space on theunderlying physical volumes that make up the volume group to support the stripe. For example, ifyou have a two-way stripe that that uses up an entire volume group, adding a single physical volumeto the volume group will not enable you to extend the stripe. Instead, you must add at least twophysical volumes to the volume group.
Chapt er 4 . LVM Administ rat ion wit h CLI Commands
4 7

For example, consider a volume group vg that consists of two underlying physical volumes, asdisplayed with the following vgs command.
# vgs VG #PV #LV #SN Attr VSize VFree vg 2 0 0 wz--n- 271.31G 271.31G
You can create a stripe using the entire amount of space in the volume group.
# lvcreate -n stripe1 -L 271.31G -i 2 vg Using default stripesize 64.00 KB Rounding up size to full physical extent 271.31 GB Logical volume "stripe1" created# lvs -a -o +devices LV VG Attr LSize Origin Snap% Move Log Copy% Devices stripe1 vg -wi-a- 271.31G /dev/sda1(0),/dev/sdb1(0)
Note that the volume group now has no more free space.
# vgs VG #PV #LV #SN Attr VSize VFree vg 2 1 0 wz--n- 271.31G 0
The following command adds another physical volume to the volume group, which then has 135G ofadditional space.
# vgextend vg /dev/sdc1 Volume group "vg" successfully extended# vgs VG #PV #LV #SN Attr VSize VFree vg 3 1 0 wz--n- 406.97G 135.66G
At this point you cannot extend the striped logical volume to the full size of the volume group,because two underlying devices are needed in order to stripe the data.
# lvextend vg/stripe1 -L 406G Using stripesize of last segment 64.00 KB Extending logical volume stripe1 to 406.00 GB Insufficient suitable allocatable extents for logical volume stripe1: 34480 more required
To extend the striped logical volume, add another physical volume and then extend the logicalvolume. In this example, having added two physical volumes to the volume group we can extend thelogical volume to the full size of the volume group.
# vgextend vg /dev/sdd1 Volume group "vg" successfully extended# vgs VG #PV #LV #SN Attr VSize VFree vg 4 1 0 wz--n- 542.62G 271.31G# lvextend vg/stripe1 -L 542G Using stripesize of last segment 64.00 KB Extending logical volume stripe1 to 542.00 GB Logical volume stripe1 successfully resized
If you do not have enough underlying physical devices to extend the striped logical volume, it ispossible to extend the volume anyway if it does not matter that the extension is not striped, which mayresult in uneven performance. When adding space to the logical volume, the default operation is touse the same striping parameters of the last segment of the existing logical volume, but you can
Red Hat Ent erprise Linux 5 Logical Volume Manager Administ rat ion
4 8

override those parameters. The following example extends the existing striped logical volume to usethe remaining free space after the initial lvextend command fails.
# lvextend vg/stripe1 -L 406G Using stripesize of last segment 64.00 KB Extending logical volume stripe1 to 406.00 GB Insufficient suitable allocatable extents for logical volume stripe1: 34480 more required# lvextend -i1 -l+100%FREE vg/stripe1
4 .4 .10. Extending a Mirrored Volume
As of the Red Hat Enterprise Linux 5.8 release, it is possible to grow mirrored logical volumes with thelvextend command without performing a synchronization of the new mirror regions.
If you specify the --nosync option when you create a mirrored logical volume with the lvcreatecommand, the mirror regions are not synchronized when the mirror is created, as described inSection 4.4.1.3, “Creating Mirrored Volumes” . If you later extend a mirror that you have created withthe --nosync option, the mirror extensions are not synchronized at that time, either.
You can determine whether an existing logical volume was created with the --nosync option byusing the lvs command to display the volume's attributes. A logical volume will have an attribute of"M" if it is a mirrored volume that was created without an initial synchronization, and it will have anattribute of "m" if it was created with initial synchronization.
The following command displays the attributes of a mirrored logical volume named lv that wascreated without initial synchronization.
# lvs vg LV VG Attr LSize Pool Origin Snap% Move Log Copy% Convert lv vg Mwi-a-m- 5.00g lv_mlog 100.00
If you grow this mirrored logical volume with the lvextend command, the mirror extension will not beresynchronized. For more information on displaying the attributes of logical volumes with the lvscommand, refer to Table 4.3, “ lvs Display Fields” .
If you created a mirrored logical volume without specifying the --nosync option of the lvcreatecommand, you can grow the logical volume without resynchronizing the mirror by specifying the --nosync option of the lvextend command.
The following example extends a logical volume that was created without the --nosync option,indicated that the mirror was synchronized when it was created. This example, however, specifies thatthe mirror not be synchronized when the volume is extended. Note that the volume has an attribute of"m", but after executing the lvextend commmand with the --nosync option the volume has anattribute of "M".
# lvs vg LV VG Attr LSize Pool Origin Snap% Move Log Copy% Convert lv vg mwi-a-m- 20.00m lv_mlog 100.00 # lvextend -L +5G vg/lv --nosync Extending 2 mirror images. Extending logical volume lv to 5.02 GiB Logical volume lv successfully resized# lvs vg LV VG Attr LSize Pool Origin Snap% Move Log Copy% Convert lv vg Mwi-a-m- 5.02g lv_mlog 100.00
If a mirror is inactive, it will not automatically skip synchronization when you extend the mirror, even if
Chapt er 4 . LVM Administ rat ion wit h CLI Commands
4 9

you create the mirror with the --nosync option specified. Instead, you will be prompted whether to doa full resync of the extended portion of the logical volume.
Note
If a mirror is performing recovery, you cannot extend the mirrored logical volume if you createdor extended the volume with the --nosync option specified. If you did not specify the --nosync option, however, you can extend the mirror while it is recovering.
4 .4 .11. Extending a Logical Volume with the cling Allocat ion Policy
As of the Red Hat Enterprise Linux 5.7 release, when extending an LVM volume, you can use the --alloc cling option of the lvextend command to specify the cling allocation policy. This policywill choose space on the same physical volumes as the last segment of the existing logical volume. Ifthere is insufficient space on the physical volumes and a list of tags is defined in the lvm.conf file,LVM will check whether any of the tags are attached to the physical volumes and seek to match thosephysical volume tags between existing extents and new extents.
For example, if you have logical volumes that are mirrored between two sites within a single volumegroup, you can tag the physical volumes according to where they are situated by tagging thephysical volumes with @site1 and @site2 tags and specify the following line in the lvm.conf file:
cling_tag_list = [ "@site1", "@site2" ]
For information on tagging physical volumes, see Appendix C, LVM Object Tags.
In the following example, the lvm.conf file has been modified to contain the following line:
cling_tag_list = [ "@A", "@B" ]
Also in this example, a volume group taft has been created that consists of the physical volumes /dev/sdb1, /dev/sdc1, /dev/sdd1, /dev/sde1, /dev/sdf1, /dev/sdg1, and /dev/sdh1.These physical volumes have been tagged with tags A, B, and C. The example does not use the C tag,but this will show that LVM uses the tags to select which physical volumes to use for the mirror legs.
# pvs -a -o +pv_tags /dev/sd[bcdefgh]1 PV VG Fmt Attr PSize PFree PV Tags /dev/sdb1 taft lvm2 a- 135.66g 135.66g A /dev/sdc1 taft lvm2 a- 135.66g 135.66g B /dev/sdd1 taft lvm2 a- 135.66g 135.66g B /dev/sde1 taft lvm2 a- 135.66g 135.66g C /dev/sdf1 taft lvm2 a- 135.66g 135.66g C /dev/sdg1 taft lvm2 a- 135.66g 135.66g A /dev/sdh1 taft lvm2 a- 135.66g 135.66g A
The following command creates a 100G mirrored volume from the volume group taft.
# lvcreate -m 1 -n mirror --nosync -L 100G taft
The following command shows which devices are used for the mirror legs and mirror log.
# lvs -a -o +devices LV VG Attr LSize Log Copy% Devices mirror taft Mwi-a- 100.00g mirror_mlog 100.00
Red Hat Ent erprise Linux 5 Logical Volume Manager Administ rat ion
50

mirror_mimage_0(0),mirror_mimage_1(0) [mirror_mimage_0] taft iwi-ao 100.00g /dev/sdb1(0) [mirror_mimage_1] taft iwi-ao 100.00g /dev/sdc1(0) [mirror_mlog] taft lwi-ao 4.00m /dev/sdh1(0)
The following command extends the size of the mirrored volume, using the cling allocation policy toindicate that the mirror legs should be extended using physical volumes with the same tag.
# lvextend --alloc cling -L +100G taft/mirror Extending 2 mirror images. Extending logical volume mirror to 200.00 GiB Logical volume mirror successfully resized
The following display command shows that the mirror legs have been extended using physicalvolumes with the same tag as the leg. Note that the physical volumes with a tag of C were ignored.
# lvs -a -o +devices LV VG Attr LSize Log Copy% Devices mirror taft Mwi-a- 200.00g mirror_mlog 50.16mirror_mimage_0(0),mirror_mimage_1(0) [mirror_mimage_0] taft Iwi-ao 200.00g /dev/sdb1(0) [mirror_mimage_0] taft Iwi-ao 200.00g /dev/sdg1(0) [mirror_mimage_1] taft Iwi-ao 200.00g /dev/sdc1(0) [mirror_mimage_1] taft Iwi-ao 200.00g /dev/sdd1(0) [mirror_mlog] taft lwi-ao 4.00m /dev/sdh1(0)
4 .4 .12. Shrinking Logical Volumes
To reduce the size of a logical volume, first unmount the file system. You can then use the lvreducecommand to shrink the volume. After shrinking the volume, remount the file system.
Warning
It is important to reduce the size of the file system or whatever is residing in the volume beforeshrinking the volume itself, otherwise you risk losing data.
Shrinking a logical volume frees some of the volume group to be allocated to other logical volumesin the volume group.
The following example reduces the size of logical volume lvol1 in volume group vg00 by 3 logicalextents.
# lvreduce -l -3 vg00/lvol1
4.5. Creat ing Snapshot Volumes
Use the -s argument of the lvcreate command to create a snapshot volume. A snapshot volume iswritable.
Chapt er 4 . LVM Administ rat ion wit h CLI Commands
51

Note
LVM snapshots are not supported across the nodes in a cluster. You cannot create asnapshot volume in a clustered volume group. As of the Red Hat Enterprise Linux 5.7 release,however, if you need to create a consistent backup of data on a clustered logical volume thatis not mirrored, you can activate the volume exclusively and then create the snapshot. Forinformation on activating logical volumes exclusively on one node, see Section 4.8,“Activating Logical Volumes on Individual Nodes in a Cluster” .
The following command creates a snapshot logical volume that is 100 MB in size named /dev/vg00/snap. This creates a snapshot of the origin logical volume named /dev/vg00/lvol1.If the original logical volume contains a file system, you can mount the snapshot logical volume onan arbitrary directory in order to access the contents of the file system to run a backup while theoriginal file system continues to get updated.
# lvcreate --size 100M --snapshot --name snap /dev/vg00/lvol1
After you create a snapshot logical volume, specifying the origin volume on the lvdisplaycommand yields output that includes a list of all snapshot logical volumes and their status (active orinactive).
The following example shows the status of the logical volume /dev/new_vg/lvol0, for which asnapshot volume /dev/new_vg/newvgsnap has been created.
# lvdisplay /dev/new_vg/lvol0 --- Logical volume --- LV Name /dev/new_vg/lvol0 VG Name new_vg LV UUID LBy1Tz-sr23-OjsI-LT03-nHLC-y8XW-EhCl78 LV Write Access read/write LV snapshot status source of /dev/new_vg/newvgsnap1 [active] LV Status available # open 0 LV Size 52.00 MB Current LE 13 Segments 1 Allocation inherit Read ahead sectors 0 Block device 253:2
The lvs command, by default, displays the origin volume and the current percentage of thesnapshot volume being used for each snapshot volume. The following example shows the defaultoutput for the lvs command for a system that includes the logical volume /dev/new_vg/lvol0, forwhich a snapshot volume /dev/new_vg/newvgsnap has been created.
# lvs LV VG Attr LSize Origin Snap% Move Log Copy% lvol0 new_vg owi-a- 52.00M newvgsnap1 new_vg swi-a- 8.00M lvol0 0.20
Red Hat Ent erprise Linux 5 Logical Volume Manager Administ rat ion
52

Warning
Because the snapshot increases in size as the origin volume changes, it is important tomonitor the percentage of the snapshot volume regularly with the lvs command to be sure itdoes not fill. A snapshot that is 100% full is lost completely, as a write to unchanged parts ofthe origin would be unable to succeed without corrupting the snapshot.
As of the Red Hat Enterprise Linux 5.7 release, there are two new features related to snapshots.First, in addition to the snapshot itself being invalidated when full, any mounted file systemson that snapshot device are forcibly unmounted, avoiding the inevitable file system errorsupon access to the mount point. Second, you can specify the snapshot_autoextend_threshold option in the lvm.conf file. This option allowsautomatic extension of a snapshot whenever the remaining snapshot space drops below thethreshold you set. This feature requires that there be unallocated space in the volume group.
Information on setting snapshot_autoextend_threshold and snapshot_autoextend_percent is provided in the lvm.conf file itself. For informationabout the lvm.conf file, refer to Appendix B, The LVM Configuration Files.
4.6. Cont rolling LVM Device Scans with Filt ers
At startup, the vgscan command is run to scan the block devices on the system looking for LVMlabels, to determine which of them are physical volumes and to read the metadata and build up a listof volume groups. The names of the physical volumes are stored in the cache file of each node in thesystem, /etc/lvm/.cache. Subsequent commands may read that file to avoiding rescanning.
You can control which devices LVM scans by setting up filters in the lvm.conf configuration file.The filters in the lvm.conf file consist of a series of simple regular expressions that get applied tothe device names that are in the /dev directory to decide whether to accept or reject each blockdevice found.
The following examples show the use of filters to control which devices LVM scans. Note that some ofthese examples do not necessarily represent best practice, as the regular expressions are matchedfreely against the complete pathname. For example, a/loop/ is equivalent to a/.*loop.*/ andwould match /dev/solooperation/lvol1.
The following filter adds all discovered devices, which is the default behavior as there is no filterconfigured in the configuration file:
filter = [ "a/.*/" ]
The following filter removes the cdrom device in order to avoid delays if the drive contains no media:
filter = [ "r|/dev/cdrom|" ]
The following filter adds all loop and removes all other block devices:
filter = [ "a/loop.*/", "r/.*/" ]
The following filter adds all loop and IDE and removes all other block devices:
filter =[ "a|loop.*|", "a|/dev/hd.*|", "r|.*|" ]
Chapt er 4 . LVM Administ rat ion wit h CLI Commands
53

The following filter adds just partition 8 on the first IDE drive and removes all other block devices:
filter = [ "a|^/dev/hda8$|", "r/.*/" ]
For more information on the lvm.conf file, see Appendix B, The LVM Configuration Files and the lvm.conf(5) man page.
4.7. Online Data Relocat ion
You can move data while the system is in use with the pvmove command.
The pvmove command breaks up the data to be moved into sections and creates a temporary mirrorto move each section. For more information on the operation of the pvmove command, see the pvmove(8) man page.
Note
In order to perform a pvmove operation in a cluster, you should ensure that the cmirror and cmirror-kmod packages are installed and that the cmirror service is running. The cmirror-kmod package that must be installed depends on the kernel that is running. Forexample, if the running kernel is kernel-largesmp, it is necessary to have cmirror-kmod-largesmp for the corresponding kernel version.
The following command moves all allocated space off the physical volume /dev/sdc1 to other freephysical volumes in the volume group:
# pvmove /dev/sdc1
The following command moves just the extents of the logical volume MyLV.
# pvmove -n MyLV /dev/sdc1
Since the pvmove command can take a long time to execute, you may want to run the command inthe background to avoid display of progress updates in the foreground. The following commandmoves all extents allocated to the physical volume /dev/sdc1 over to /dev/sdf1 in thebackground.
# pvmove -b /dev/sdc1 /dev/sdf1
The following command reports the progress of the move as a percentage at five second intervals.
# pvmove -i5 /dev/sdd1
4.8. Act ivat ing Logical Volumes on Individual Nodes in a Cluster
If you have LVM installed in a cluster environment, you may at times need to activate logical volumesexclusively on one node.
Red Hat Ent erprise Linux 5 Logical Volume Manager Administ rat ion
54

To activate logical volumes exclusively on one node, use the lvchange -aey command.Alternatively, you can use lvchange -aly command to activate logical volumes only on the localnode but not exclusively. You can later activate them on additional nodes concurrently.
You can also activate logical volumes on individual nodes by using LVM tags, which are describedin Appendix C, LVM Object Tags. You can also specify activation of nodes in the configuration file,which is described in Appendix B, The LVM Configuration Files.
4.9. Customized Report ing for LVM
You can produce concise and customizable reports of LVM objects with the pvs, lvs, and vgscommands. The reports that these commands generate include one line of output for each object.Each line contains an ordered list of fields of properties related to the object. There are five ways toselect the objects to be reported: by physical volume, volume group, logical volume, physical volumesegment, and logical volume segment.
The following sections provide:
A summary of command arguments you can use to control the format of the generated report.
A list of the fields you can select for each LVM object.
A summary of command arguments you can use to sort the generated report.
Instructions for specifying the units of the report output.
4 .9.1. Format Cont rol
Whether you use the pvs, lvs, or vgs command determines the default set of fields displayed andthe sort order. You can control the output of these commands with the following arguments:
You can change what fields are displayed to something other than the default by using the -oargument. For example, the following output is the default display for the pvs command (whichdisplays information about physcial volumes).
# pvs PV VG Fmt Attr PSize PFree /dev/sdb1 new_vg lvm2 a- 17.14G 17.14G /dev/sdc1 new_vg lvm2 a- 17.14G 17.09G /dev/sdd1 new_vg lvm2 a- 17.14G 17.14G
The following command displays only the physical volume name and size.
# pvs -o pv_name,pv_size PV PSize /dev/sdb1 17.14G /dev/sdc1 17.14G /dev/sdd1 17.14G
You can append a field to the output with the plus sign (+), which is used in combination with the-o argument.
The following example displays the UUID of the physical volume in addition to the default fields.
# pvs -o +pv_uuid PV VG Fmt Attr PSize PFree PV UUID /dev/sdb1 new_vg lvm2 a- 17.14G 17.14G onFF2w-1fLC-ughJ-D9eB-M7iv-6XqA-dqGeXY
Chapt er 4 . LVM Administ rat ion wit h CLI Commands
55

/dev/sdc1 new_vg lvm2 a- 17.14G 17.09G Joqlch-yWSj-kuEn-IdwM-01S9-X08M-mcpsVe /dev/sdd1 new_vg lvm2 a- 17.14G 17.14G yvfvZK-Cf31-j75k-dECm-0RZ3-0dGW-UqkCS
Adding the -v argument to a command includes some extra fields. For example, the pvs -vcommand will display the DevSize and PV UUID fields in addition to the default fields.
# pvs -v Scanning for physical volume names PV VG Fmt Attr PSize PFree DevSize PV UUID /dev/sdb1 new_vg lvm2 a- 17.14G 17.14G 17.14G onFF2w-1fLC-ughJ-D9eB-M7iv-6XqA-dqGeXY /dev/sdc1 new_vg lvm2 a- 17.14G 17.09G 17.14G Joqlch-yWSj-kuEn-IdwM-01S9-XO8M-mcpsVe /dev/sdd1 new_vg lvm2 a- 17.14G 17.14G 17.14G yvfvZK-Cf31-j75k-dECm-0RZ3-0dGW-tUqkCS
The --noheadings argument suppresses the headings line. This can be useful for writingscripts.
The following example uses the --noheadings argument in combination with the pv_nameargument, which will generate a list of all physical volumes.
# pvs --noheadings -o pv_name /dev/sdb1 /dev/sdc1 /dev/sdd1
The --separator separator argument uses separator to separate each field.
The following example separates the default output fields of the pvs command with an equalssign (=).
# pvs --separator = PV=VG=Fmt=Attr=PSize=PFree /dev/sdb1=new_vg=lvm2=a-=17.14G=17.14G /dev/sdc1=new_vg=lvm2=a-=17.14G=17.09G /dev/sdd1=new_vg=lvm2=a-=17.14G=17.14G
To keep the fields aligned when using the separator argument, use the separator argument inconjunction with the --aligned argument.
# pvs --separator = --aligned PV =VG =Fmt =Attr=PSize =PFree /dev/sdb1 =new_vg=lvm2=a- =17.14G=17.14G /dev/sdc1 =new_vg=lvm2=a- =17.14G=17.09G /dev/sdd1 =new_vg=lvm2=a- =17.14G=17.14G
You can use the -P argument of the lvs or vgs command to display information about a failedvolume that would otherwise not appear in the output. For information on the output this argumentyields, see Section 6.2, “Displaying Information on Failed Devices” .
For a full listing of display arguments, see the pvs(8), vgs(8) and lvs(8) man pages.
Volume group fields can be mixed with either physical volume (and physical volume segment) fieldsor with logical volume (and logical volume segment) fields, but physical volume and logical volumefields cannot be mixed. For example, the following command will display one line of output for eachphysical volume.
# vgs -o +pv_name
Red Hat Ent erprise Linux 5 Logical Volume Manager Administ rat ion
56

VG #PV #LV #SN Attr VSize VFree PV new_vg 3 1 0 wz--n- 51.42G 51.37G /dev/sdc1 new_vg 3 1 0 wz--n- 51.42G 51.37G /dev/sdd1 new_vg 3 1 0 wz--n- 51.42G 51.37G /dev/sdb1
4 .9.2. Object Select ion
This section provides a series of tables that list the information you can display about the LVMobjects with the pvs, vgs, and lvs commands.
For convenience, a field name prefix can be dropped if it matches the default for the command. Forexample, with the pvs command, name means pv_name, but with the vgs command, name isinterpreted as vg_name.
Executing the following command is the equivalent of executing pvs -o pv_free.
# pvs -o +free PFree 17.14G 17.09G 17.14G
The pvs Command
Table 4.1, “pvs Display Fields” lists the display arguments of the pvs command, along with the fieldname as it appears in the header display and a description of the field.
Table 4 .1. pvs Display Fields
Argument Header Descript ion
dev_size DevSize The size of the underlying device on which the physicalvolume was created
pe_start 1st PE Offset to the start of the first physical extent in theunderlying device
pv_attr Attr Status of the physical volume: (a)llocatable ore(x)ported.
pv_fmt Fmt The metadata format of the physical volume (lvm2 or lvm1)
pv_free PFree The free space remaining on the physical volume
pv_name PV The physical volume name
pv_pe_alloc_count Alloc Number of used physical extents
pv_pe_count PE Number of physical extents
pvseg_size SSize The segment size of the physical volume
pvseg_start Start The starting physical extent of the physical volumesegment
pv_size PSize The size of the physical volume
pv_tags PV Tags LVM tags attached to the physical volume
pv_used Used The amount of space currently used on the physicalvolume
pv_uuid PV UUID The UUID of the physical volume
T he pvs Command
57

The pvs command displays the following fields by default: pv_name, vg_name, pv_fmt, pv_attr, pv_size, pv_free. The display is sorted by pv_name.
# pvs PV VG Fmt Attr PSize PFree /dev/sdb1 new_vg lvm2 a- 17.14G 17.14G /dev/sdc1 new_vg lvm2 a- 17.14G 17.09G /dev/sdd1 new_vg lvm2 a- 17.14G 17.13G
Using the -v argument with the pvs command adds the following fields to the default display: dev_size, pv_uuid.
# pvs -v Scanning for physical volume names PV VG Fmt Attr PSize PFree DevSize PV UUID /dev/sdb1 new_vg lvm2 a- 17.14G 17.14G 17.14G onFF2w-1fLC-ughJ-D9eB-M7iv-6XqA-dqGeXY /dev/sdc1 new_vg lvm2 a- 17.14G 17.09G 17.14G Joqlch-yWSj-kuEn-IdwM-01S9-XO8M-mcpsVe /dev/sdd1 new_vg lvm2 a- 17.14G 17.13G 17.14G yvfvZK-Cf31-j75k-dECm-0RZ3-0dGW-tUqkCS
You can use the --segments argument of the pvs command to display information about eachphysical volume segment. A segment is a group of extents. A segment view can be useful if you wantto see whether your logical volume is fragmented.
The pvs --segments command displays the following fields by default: pv_name, vg_name, pv_fmt, pv_attr, pv_size, pv_free, pvseg_start, pvseg_size. The display is sorted by pv_name and pvseg_size within the physical volume.
# pvs --segments PV VG Fmt Attr PSize PFree Start SSize /dev/hda2 VolGroup00 lvm2 a- 37.16G 32.00M 0 1172 /dev/hda2 VolGroup00 lvm2 a- 37.16G 32.00M 1172 16 /dev/hda2 VolGroup00 lvm2 a- 37.16G 32.00M 1188 1 /dev/sda1 vg lvm2 a- 17.14G 16.75G 0 26 /dev/sda1 vg lvm2 a- 17.14G 16.75G 26 24 /dev/sda1 vg lvm2 a- 17.14G 16.75G 50 26 /dev/sda1 vg lvm2 a- 17.14G 16.75G 76 24 /dev/sda1 vg lvm2 a- 17.14G 16.75G 100 26 /dev/sda1 vg lvm2 a- 17.14G 16.75G 126 24 /dev/sda1 vg lvm2 a- 17.14G 16.75G 150 22 /dev/sda1 vg lvm2 a- 17.14G 16.75G 172 4217 /dev/sdb1 vg lvm2 a- 17.14G 17.14G 0 4389 /dev/sdc1 vg lvm2 a- 17.14G 17.14G 0 4389 /dev/sdd1 vg lvm2 a- 17.14G 17.14G 0 4389 /dev/sde1 vg lvm2 a- 17.14G 17.14G 0 4389 /dev/sdf1 vg lvm2 a- 17.14G 17.14G 0 4389 /dev/sdg1 vg lvm2 a- 17.14G 17.14G 0 4389
You can use the pvs -a command to see devices detected by LVM that have not been initialized asLVM physical volumes.
# pvs -a PV VG Fmt Attr PSize PFree /dev/VolGroup00/LogVol01 -- 0 0 /dev/new_vg/lvol0 -- 0 0 /dev/ram -- 0 0 /dev/ram0 -- 0 0 /dev/ram2 -- 0 0 /dev/ram3 -- 0 0
Red Hat Ent erprise Linux 5 Logical Volume Manager Administ rat ion
58

/dev/ram4 -- 0 0 /dev/ram5 -- 0 0 /dev/ram6 -- 0 0 /dev/root -- 0 0 /dev/sda -- 0 0 /dev/sdb -- 0 0 /dev/sdb1 new_vg lvm2 a- 17.14G 17.14G /dev/sdc -- 0 0 /dev/sdc1 new_vg lvm2 a- 17.14G 17.09G /dev/sdd -- 0 0 /dev/sdd1 new_vg lvm2 a- 17.14G 17.14G
The vgs Command
Table 4.2, “ vgs Display Fields” lists the display arguments of the vgs command, along with the fieldname as it appears in the header display and a description of the field.
Table 4 .2. vgs Display Fields
Argument Header Descript ion
lv_count #LV The number of logical volumes the volume groupcontains
max_lv MaxLV The maximum number of logical volumes allowed in thevolume group (0 if unlimited)
max_pv MaxPV The maximum number of physical volumes allowed inthe volume group (0 if unlimited)
pv_count #PV The number of physical volumes that define the volumegroup
snap_count #SN The number of snapshots the volume group contains
vg_attr Attr Status of the volume group: (w)riteable, (r)eadonly,resi(z)eable, e(x)ported, (p)artial and (c)lustered.
vg_extent_count #Ext The number of physical extents in the volume group
vg_extent_size Ext The size of the physical extents in the volume group
vg_fmt Fmt The metadata format of the volume group (lvm2 or lvm1)
vg_free VFree Size of the free space remaining in the volume group
vg_free_count Free Number of free physical extents in the volume group
vg_name VG The volume group name
vg_seqno Seq Number representing the revision of the volume group
vg_size VSize The size of the volume group
vg_sysid SYS ID LVM1 System ID
vg_tags VG Tags LVM tags attached to the volume group
vg_uuid VG UUID The UUID of the volume group
The vgs command displays the following fields by default: vg_name, pv_count, lv_count, snap_count, vg_attr, vg_size, vg_free. The display is sorted by vg_name.
# vgs VG #PV #LV #SN Attr VSize VFree new_vg 3 1 1 wz--n- 51.42G 51.36G
T he vgs Command
59
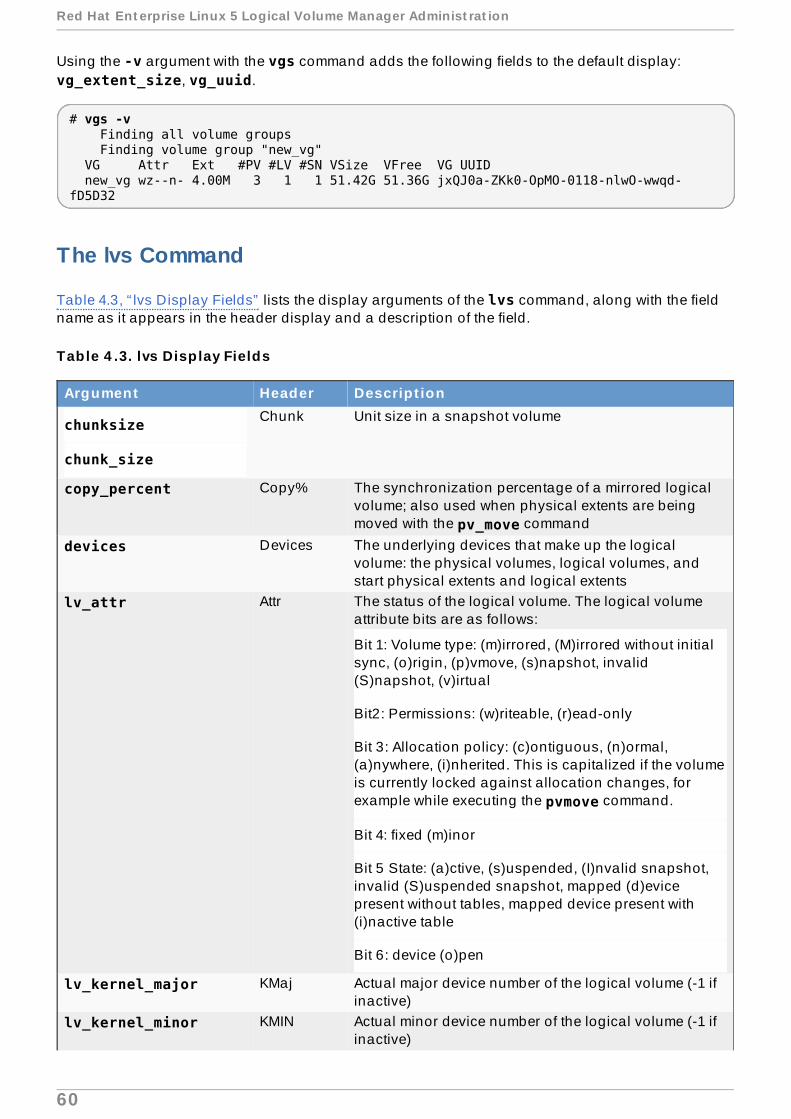
Using the -v argument with the vgs command adds the following fields to the default display: vg_extent_size, vg_uuid.
# vgs -v Finding all volume groups Finding volume group "new_vg" VG Attr Ext #PV #LV #SN VSize VFree VG UUID new_vg wz--n- 4.00M 3 1 1 51.42G 51.36G jxQJ0a-ZKk0-OpMO-0118-nlwO-wwqd-fD5D32
The lvs Command
Table 4.3, “ lvs Display Fields” lists the display arguments of the lvs command, along with the fieldname as it appears in the header display and a description of the field.
Table 4 .3. lvs Display Fields
Argument Header Descript ion
chunksize
chunk_size
Chunk Unit size in a snapshot volume
copy_percent Copy% The synchronization percentage of a mirrored logicalvolume; also used when physical extents are beingmoved with the pv_move command
devices Devices The underlying devices that make up the logicalvolume: the physical volumes, logical volumes, andstart physical extents and logical extents
lv_attr Attr The status of the logical volume. The logical volumeattribute bits are as follows:
Bit 1: Volume type: (m)irrored, (M)irrored without initialsync, (o)rigin, (p)vmove, (s)napshot, invalid(S)napshot, (v)irtual
Bit2: Permissions: (w)riteable, (r)ead-only
Bit 3: Allocation policy: (c)ontiguous, (n)ormal,(a)nywhere, (i)nherited. This is capitalized if the volumeis currently locked against allocation changes, forexample while executing the pvmove command.
Bit 4: fixed (m)inor
Bit 5 State: (a)ctive, (s)uspended, (I)nvalid snapshot,invalid (S)uspended snapshot, mapped (d)evicepresent without tables, mapped device present with(i)nactive table
Bit 6: device (o)pen
lv_kernel_major KMaj Actual major device number of the logical volume (-1 ifinactive)
lv_kernel_minor KMIN Actual minor device number of the logical volume (-1 ifinactive)
Red Hat Ent erprise Linux 5 Logical Volume Manager Administ rat ion
60
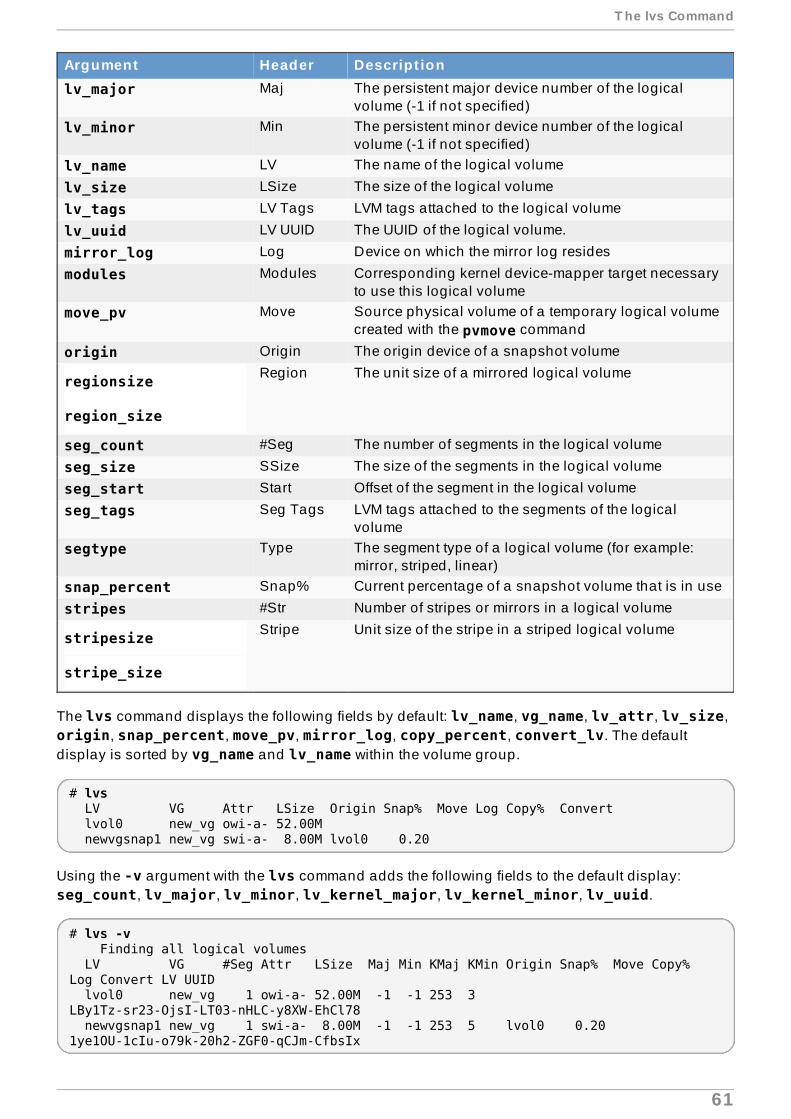
lv_major Maj The persistent major device number of the logicalvolume (-1 if not specified)
lv_minor Min The persistent minor device number of the logicalvolume (-1 if not specified)
lv_name LV The name of the logical volume
lv_size LSize The size of the logical volume
lv_tags LV Tags LVM tags attached to the logical volume
lv_uuid LV UUID The UUID of the logical volume.
mirror_log Log Device on which the mirror log resides
modules Modules Corresponding kernel device-mapper target necessaryto use this logical volume
move_pv Move Source physical volume of a temporary logical volumecreated with the pvmove command
origin Origin The origin device of a snapshot volume
regionsize
region_size
Region The unit size of a mirrored logical volume
seg_count #Seg The number of segments in the logical volume
seg_size SSize The size of the segments in the logical volume
seg_start Start Offset of the segment in the logical volume
seg_tags Seg Tags LVM tags attached to the segments of the logicalvolume
segtype Type The segment type of a logical volume (for example:mirror, striped, linear)
snap_percent Snap% Current percentage of a snapshot volume that is in use
stripes #Str Number of stripes or mirrors in a logical volume
stripesize
stripe_size
Stripe Unit size of the stripe in a striped logical volume
Argument Header Descript ion
The lvs command displays the following fields by default: lv_name, vg_name, lv_attr, lv_size, origin, snap_percent, move_pv, mirror_log, copy_percent, convert_lv. The defaultdisplay is sorted by vg_name and lv_name within the volume group.
# lvs LV VG Attr LSize Origin Snap% Move Log Copy% Convert lvol0 new_vg owi-a- 52.00M newvgsnap1 new_vg swi-a- 8.00M lvol0 0.20
Using the -v argument with the lvs command adds the following fields to the default display: seg_count, lv_major, lv_minor, lv_kernel_major, lv_kernel_minor, lv_uuid.
# lvs -v Finding all logical volumes LV VG #Seg Attr LSize Maj Min KMaj KMin Origin Snap% Move Copy% Log Convert LV UUID lvol0 new_vg 1 owi-a- 52.00M -1 -1 253 3 LBy1Tz-sr23-OjsI-LT03-nHLC-y8XW-EhCl78 newvgsnap1 new_vg 1 swi-a- 8.00M -1 -1 253 5 lvol0 0.20 1ye1OU-1cIu-o79k-20h2-ZGF0-qCJm-CfbsIx
T he lvs Command
61
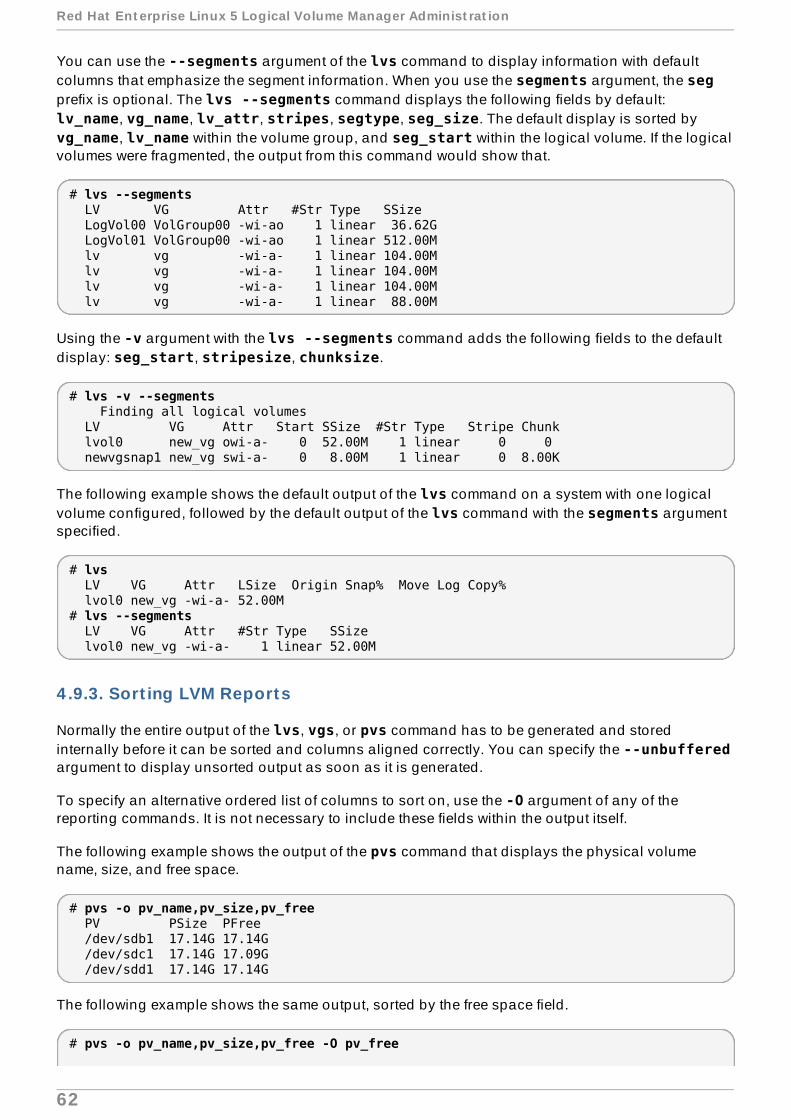
You can use the --segments argument of the lvs command to display information with defaultcolumns that emphasize the segment information. When you use the segments argument, the segprefix is optional. The lvs --segments command displays the following fields by default: lv_name, vg_name, lv_attr, stripes, segtype, seg_size. The default display is sorted by vg_name, lv_name within the volume group, and seg_start within the logical volume. If the logicalvolumes were fragmented, the output from this command would show that.
# lvs --segments LV VG Attr #Str Type SSize LogVol00 VolGroup00 -wi-ao 1 linear 36.62G LogVol01 VolGroup00 -wi-ao 1 linear 512.00M lv vg -wi-a- 1 linear 104.00M lv vg -wi-a- 1 linear 104.00M lv vg -wi-a- 1 linear 104.00M lv vg -wi-a- 1 linear 88.00M
Using the -v argument with the lvs --segments command adds the following fields to the defaultdisplay: seg_start, stripesize, chunksize.
# lvs -v --segments Finding all logical volumes LV VG Attr Start SSize #Str Type Stripe Chunk lvol0 new_vg owi-a- 0 52.00M 1 linear 0 0 newvgsnap1 new_vg swi-a- 0 8.00M 1 linear 0 8.00K
The following example shows the default output of the lvs command on a system with one logicalvolume configured, followed by the default output of the lvs command with the segments argumentspecified.
# lvs LV VG Attr LSize Origin Snap% Move Log Copy% lvol0 new_vg -wi-a- 52.00M# lvs --segments LV VG Attr #Str Type SSize lvol0 new_vg -wi-a- 1 linear 52.00M
4 .9.3. Sort ing LVM Reports
Normally the entire output of the lvs, vgs, or pvs command has to be generated and storedinternally before it can be sorted and columns aligned correctly. You can specify the --unbufferedargument to display unsorted output as soon as it is generated.
To specify an alternative ordered list of columns to sort on, use the -O argument of any of thereporting commands. It is not necessary to include these fields within the output itself.
The following example shows the output of the pvs command that displays the physical volumename, size, and free space.
# pvs -o pv_name,pv_size,pv_free PV PSize PFree /dev/sdb1 17.14G 17.14G /dev/sdc1 17.14G 17.09G /dev/sdd1 17.14G 17.14G
The following example shows the same output, sorted by the free space field.
# pvs -o pv_name,pv_size,pv_free -O pv_free
Red Hat Ent erprise Linux 5 Logical Volume Manager Administ rat ion
62

PV PSize PFree /dev/sdc1 17.14G 17.09G /dev/sdd1 17.14G 17.14G /dev/sdb1 17.14G 17.14G
The following example shows that you do not need to display the field on which you are sorting.
# pvs -o pv_name,pv_size -O pv_free PV PSize /dev/sdc1 17.14G /dev/sdd1 17.14G /dev/sdb1 17.14G
To display a reverse sort, precede a field you specify after the -O argument with the - character.
# pvs -o pv_name,pv_size,pv_free -O -pv_free PV PSize PFree /dev/sdd1 17.14G 17.14G /dev/sdb1 17.14G 17.14G /dev/sdc1 17.14G 17.09G
4 .9.4 . Specifying Units
To specify the unit for the LVM report display, use the --units argument of the report command. Youcan specify (b)ytes, (k)ilobytes, (m)egabytes, (g)igabytes, (t)erabytes, (e)xabytes, (p)etabytes, and(h)uman-readable. The default display is human-readable. You can override the default by settingthe units parameter in the global section of the lvm.conf file.
The following example specifies the output of the pvs command in megabytes rather than the defaultgigabytes.
# pvs --units m PV VG Fmt Attr PSize PFree /dev/sda1 lvm2 -- 17555.40M 17555.40M /dev/sdb1 new_vg lvm2 a- 17552.00M 17552.00M /dev/sdc1 new_vg lvm2 a- 17552.00M 17500.00M /dev/sdd1 new_vg lvm2 a- 17552.00M 17552.00M
By default, units are displayed in powers of 2 (multiples of 1024). You can specify that units bedisplayed in multiples of 1000 by capitalizing the unit specification (B, K, M, G, T, H).
The following command displays the output as a multiple of 1024, the default behavior.
# pvs PV VG Fmt Attr PSize PFree /dev/sdb1 new_vg lvm2 a- 17.14G 17.14G /dev/sdc1 new_vg lvm2 a- 17.14G 17.09G /dev/sdd1 new_vg lvm2 a- 17.14G 17.14G
The following command displays the output as a multiple of 1000.
# pvs --units G PV VG Fmt Attr PSize PFree /dev/sdb1 new_vg lvm2 a- 18.40G 18.40G /dev/sdc1 new_vg lvm2 a- 18.40G 18.35G /dev/sdd1 new_vg lvm2 a- 18.40G 18.40G
You can also specify (s)ectors (defined as 512 bytes) or custom units.
T he lvs Command
63

The following example displays the output of the pvs command as a number of sectors.
# pvs --units s PV VG Fmt Attr PSize PFree /dev/sdb1 new_vg lvm2 a- 35946496S 35946496S /dev/sdc1 new_vg lvm2 a- 35946496S 35840000S /dev/sdd1 new_vg lvm2 a- 35946496S 35946496S
The following example displays the output of the pvs command in units of 4 megabytes.
# pvs --units 4m PV VG Fmt Attr PSize PFree /dev/sdb1 new_vg lvm2 a- 4388.00U 4388.00U /dev/sdc1 new_vg lvm2 a- 4388.00U 4375.00U /dev/sdd1 new_vg lvm2 a- 4388.00U 4388.00U
Red Hat Ent erprise Linux 5 Logical Volume Manager Administ rat ion
64

Chapter 5. LVM Configuration Examples
This chapter provides some basic LVM configuration examples.
5.1. Creat ing an LVM Logical Volume on Three Disks
This example creates an LVM logical volume called new_logical_volume that consists of the disksat /dev/sda1, /dev/sdb1, and /dev/sdc1.
5.1.1. Creat ing the Physical Volumes
To use disks in a volume group, you label them as LVM physical volumes.
Warning
This command destroys any data on /dev/sda1, /dev/sdb1, and /dev/sdc1.
# pvcreate /dev/sda1 /dev/sdb1 /dev/sdc1 Physical volume "/dev/sda1" successfully created Physical volume "/dev/sdb1" successfully created Physical volume "/dev/sdc1" successfully created
5.1.2. Creat ing the Volume Group
The following command creates the volume group new_vol_group.
# vgcreate new_vol_group /dev/sda1 /dev/sdb1 /dev/sdc1 Volume group "new_vol_group" successfully created
You can use the vgs command to display the attributes of the new volume group.
# vgs VG #PV #LV #SN Attr VSize VFree new_vol_group 3 0 0 wz--n- 51.45G 51.45G
5.1.3. Creat ing the Logical Volume
The following command creates the logical volume new_logical_volume from the volume group new_vol_group. This example creates a logical volume that uses 2GB of the volume group.
# lvcreate -L2G -n new_logical_volume new_vol_group Logical volume "new_logical_volume" created
5.1.4 . Creat ing the File System
The following command creates a GFS file system on the logical volume.
# gfs_mkfs -plock_nolock -j 1 /dev/new_vol_group/new_logical_volumeThis will destroy any data on /dev/new_vol_group/new_logical_volume.
Chapt er 5. LVM Configurat ion Examples
65

Are you sure you want to proceed? [y/n] y
Device: /dev/new_vol_group/new_logical_volumeBlocksize: 4096Filesystem Size: 491460Journals: 1Resource Groups: 8Locking Protocol: lock_nolockLock Table:
Syncing...All Done
The following commands mount the logical volume and report the file system disk space usage.
# mount /dev/new_vol_group/new_logical_volume /mnt# dfFilesystem 1K-blocks Used Available Use% Mounted on/dev/new_vol_group/new_logical_volume 1965840 20 1965820 1% /mnt
5.2. Creat ing a St riped Logical Volume
This example creates an LVM striped logical volume called striped_logical_volume that stripesdata across the disks at /dev/sda1, /dev/sdb1, and /dev/sdc1.
5.2.1. Creat ing the Physical Volumes
Label the disks you will use in the volume groups as LVM physical volumes.
Warning
This command destroys any data on /dev/sda1, /dev/sdb1, and /dev/sdc1.
# pvcreate /dev/sda1 /dev/sdb1 /dev/sdc1 Physical volume "/dev/sda1" successfully created Physical volume "/dev/sdb1" successfully created Physical volume "/dev/sdc1" successfully created
5.2.2. Creat ing the Volume Group
The following command creates the volume group volgroup01.
# vgcreate volgroup01 /dev/sda1 /dev/sdb1 /dev/sdc1 Volume group "volgroup01" successfully created
You can use the vgs command to display the attributes of the new volume group.
# vgs VG #PV #LV #SN Attr VSize VFree volgroup01 3 0 0 wz--n- 51.45G 51.45G
5.2.3. Creat ing the Logical Volume
Red Hat Ent erprise Linux 5 Logical Volume Manager Administ rat ion
66

The following command creates the striped logical volume striped_logical_volume from thevolume group volgroup01. This example creates a logical volume that is 2 gigabytes in size, withthree stripes and a stripe size of 4 kilobytes.
# lvcreate -i3 -I4 -L2G -nstriped_logical_volume volgroup01 Rounding size (512 extents) up to stripe boundary size (513 extents) Logical volume "striped_logical_volume" created
5.2.4 . Creat ing the File System
The following command creates a GFS file system on the logical volume.
# gfs_mkfs -plock_nolock -j 1 /dev/volgroup01/striped_logical_volumeThis will destroy any data on /dev/volgroup01/striped_logical_volume.
Are you sure you want to proceed? [y/n] y
Device: /dev/volgroup01/striped_logical_volumeBlocksize: 4096Filesystem Size: 492484Journals: 1Resource Groups: 8Locking Protocol: lock_nolockLock Table:
Syncing...All Done
The following commands mount the logical volume and report the file system disk space usage.
# mount /dev/volgroup01/striped_logical_volume /mnt# dfFilesystem 1K-blocks Used Available Use% Mounted on/dev/mapper/VolGroup00-LogVol00 13902624 1656776 11528232 13% //dev/hda1 101086 10787 85080 12% /boottmpfs 127880 0 127880 0% /dev/shm/dev/volgroup01/striped_logical_volume 1969936 20 1969916 1% /mnt
5.3. Split t ing a Volume Group
In this example, an existing volume group consists of three physical volumes. If there is enoughunused space on the physical volumes, a new volume group can be created without adding newdisks.
In the initial set up, the logical volume mylv is carved from the volume group myvol, which in turnconsists of the three physical volumes, /dev/sda1, /dev/sdb1, and /dev/sdc1.
After completing this procedure, the volume group myvg will consist of /dev/sda1 and /dev/sdb1.A second volume group, yourvg, will consist of /dev/sdc1.
5.3.1. Determining Free Space
You can use the pvscan command to determine how much free space is currently available in thevolume group.
Chapt er 5. LVM Configurat ion Examples
67

# pvscan PV /dev/sda1 VG myvg lvm2 [17.15 GB / 0 free] PV /dev/sdb1 VG myvg lvm2 [17.15 GB / 12.15 GB free] PV /dev/sdc1 VG myvg lvm2 [17.15 GB / 15.80 GB free] Total: 3 [51.45 GB] / in use: 3 [51.45 GB] / in no VG: 0 [0 ]
5.3.2. Moving the Data
You can move all the used physical extents in /dev/sdc1 to /dev/sdb1 with the pvmove command.The pvmove command can take a long time to execute.
# pvmove /dev/sdc1 /dev/sdb1 /dev/sdc1: Moved: 14.7% /dev/sdc1: Moved: 30.3% /dev/sdc1: Moved: 45.7% /dev/sdc1: Moved: 61.0% /dev/sdc1: Moved: 76.6% /dev/sdc1: Moved: 92.2% /dev/sdc1: Moved: 100.0%
After moving the data, you can see that all of the space on /dev/sdc1 is free.
# pvscan PV /dev/sda1 VG myvg lvm2 [17.15 GB / 0 free] PV /dev/sdb1 VG myvg lvm2 [17.15 GB / 10.80 GB free] PV /dev/sdc1 VG myvg lvm2 [17.15 GB / 17.15 GB free] Total: 3 [51.45 GB] / in use: 3 [51.45 GB] / in no VG: 0 [0 ]
5.3.3. Split t ing the Volume Group
To create the new volume group yourvg, use the vgsplit command to split the volume group myvg.
Before you can split the volume group, the logical volume must be inactive. If the file system ismounted, you must unmount the file system before deactivating the logical volume.
You can deactivate the logical volumes with the lvchange command or the vgchange command.The following command deactivates the logical volume mylv and then splits the volume group yourvg from the volume group myvg, moving the physical volume /dev/sdc1 into the new volumegroup yourvg.
# lvchange -a n /dev/myvg/mylv# vgsplit myvg yourvg /dev/sdc1 Volume group "yourvg" successfully split from "myvg"
You can use the vgs command to see the attributes of the two volume groups.
# vgs VG #PV #LV #SN Attr VSize VFree myvg 2 1 0 wz--n- 34.30G 10.80G yourvg 1 0 0 wz--n- 17.15G 17.15G
5.3.4 . Creat ing the New Logical Volume
After creating the new volume group, you can create the new logical volume yourlv.
Red Hat Ent erprise Linux 5 Logical Volume Manager Administ rat ion
68

# lvcreate -L5G -n yourlv yourvg Logical volume "yourlv" created
5.3.5. Making a File System and Mount ing the New Logical Volume
You can make a file system on the new logical volume and mount it.
# gfs_mkfs -plock_nolock -j 1 /dev/yourvg/yourlvThis will destroy any data on /dev/yourvg/yourlv.
Are you sure you want to proceed? [y/n] y
Device: /dev/yourvg/yourlvBlocksize: 4096Filesystem Size: 1277816Journals: 1Resource Groups: 20Locking Protocol: lock_nolockLock Table:
Syncing...All Done
# mount /dev/yourvg/yourlv /mnt
5.3.6. Act ivat ing and Mount ing the Original Logical Volume
Since you had to deactivate the logical volume mylv, you need to activate it again before you canmount it.
# lvchange -a y /dev/myvg/mylv
# mount /dev/myvg/mylv /mnt# dfFilesystem 1K-blocks Used Available Use% Mounted on/dev/yourvg/yourlv 24507776 32 24507744 1% /mnt/dev/myvg/mylv 24507776 32 24507744 1% /mnt
5.4 . Removing a Disk from a Logical Volume
This example shows how you can remove a disk from an existing logical volume, either to replace thedisk or to use the disk as part of a different volume. In order to remove a disk, you must first move theextents on the LVM physical volume to a different disk or set of disks.
5.4 .1. Moving Extents to Exist ing Physical Volumes
In this example, the logical volume is distributed across four physical volumes in the volume group myvg.
# pvs -o+pv_used PV VG Fmt Attr PSize PFree Used /dev/sda1 myvg lvm2 a- 17.15G 12.15G 5.00G /dev/sdb1 myvg lvm2 a- 17.15G 12.15G 5.00G /dev/sdc1 myvg lvm2 a- 17.15G 12.15G 5.00G /dev/sdd1 myvg lvm2 a- 17.15G 2.15G 15.00G
Chapt er 5. LVM Configurat ion Examples
69

We want to move the extents off of /dev/sdb1 so that we can remove it from the volume group.
If there are enough free extents on the other physical volumes in the volume group, you can executethe pvmove command on the device you want to remove with no other options and the extents will bedistributed to the other devices.
# pvmove /dev/sdb1 /dev/sdb1: Moved: 2.0% ... /dev/sdb1: Moved: 79.2% ... /dev/sdb1: Moved: 100.0%
After the pvmove command has finished executing, the distribution of extents is as follows:
# pvs -o+pv_used PV VG Fmt Attr PSize PFree Used /dev/sda1 myvg lvm2 a- 17.15G 7.15G 10.00G /dev/sdb1 myvg lvm2 a- 17.15G 17.15G 0 /dev/sdc1 myvg lvm2 a- 17.15G 12.15G 5.00G /dev/sdd1 myvg lvm2 a- 17.15G 2.15G 15.00G
Use the vgreduce command to remove the physical volume /dev/sdb1 from the volume group.
# vgreduce myvg /dev/sdb1 Removed "/dev/sdb1" from volume group "myvg"# pvs PV VG Fmt Attr PSize PFree /dev/sda1 myvg lvm2 a- 17.15G 7.15G /dev/sdb1 lvm2 -- 17.15G 17.15G /dev/sdc1 myvg lvm2 a- 17.15G 12.15G /dev/sdd1 myvg lvm2 a- 17.15G 2.15G
The disk can now be physically removed or allocated to other users.
5.4 .2. Moving Extents to a New Disk
In this example, the logical volume is distributed across three physical volumes in the volume group myvg as follows:
# pvs -o+pv_used PV VG Fmt Attr PSize PFree Used /dev/sda1 myvg lvm2 a- 17.15G 7.15G 10.00G /dev/sdb1 myvg lvm2 a- 17.15G 15.15G 2.00G /dev/sdc1 myvg lvm2 a- 17.15G 15.15G 2.00G
We want to move the extents of /dev/sdb1 to a new device, /dev/sdd1.
5.4 .2 .1 . Creat ing t he New Physical Vo lume
Create a new physical volume from /dev/sdd1.
# pvcreate /dev/sdd1 Physical volume "/dev/sdd1" successfully created
5.4 .2 .2 . Adding t he New Physical Vo lume t o t he Vo lume Gro up
Red Hat Ent erprise Linux 5 Logical Volume Manager Administ rat ion
70
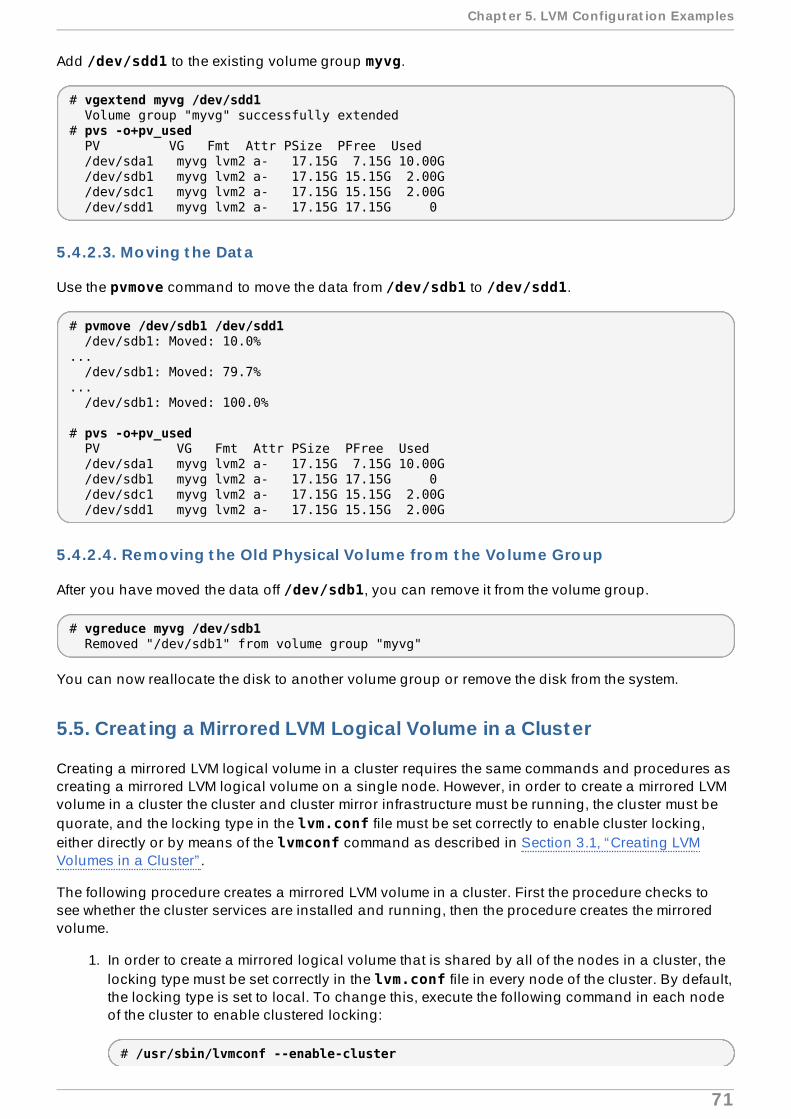
Add /dev/sdd1 to the existing volume group myvg.
# vgextend myvg /dev/sdd1 Volume group "myvg" successfully extended# pvs -o+pv_used PV VG Fmt Attr PSize PFree Used /dev/sda1 myvg lvm2 a- 17.15G 7.15G 10.00G /dev/sdb1 myvg lvm2 a- 17.15G 15.15G 2.00G /dev/sdc1 myvg lvm2 a- 17.15G 15.15G 2.00G /dev/sdd1 myvg lvm2 a- 17.15G 17.15G 0
5.4 .2 .3. Mo ving t he Dat a
Use the pvmove command to move the data from /dev/sdb1 to /dev/sdd1.
# pvmove /dev/sdb1 /dev/sdd1 /dev/sdb1: Moved: 10.0%... /dev/sdb1: Moved: 79.7%... /dev/sdb1: Moved: 100.0%
# pvs -o+pv_used PV VG Fmt Attr PSize PFree Used /dev/sda1 myvg lvm2 a- 17.15G 7.15G 10.00G /dev/sdb1 myvg lvm2 a- 17.15G 17.15G 0 /dev/sdc1 myvg lvm2 a- 17.15G 15.15G 2.00G /dev/sdd1 myvg lvm2 a- 17.15G 15.15G 2.00G
5.4 .2 .4 . Remo ving t he Old Physical Vo lume fro m t he Vo lume Gro up
After you have moved the data off /dev/sdb1, you can remove it from the volume group.
# vgreduce myvg /dev/sdb1 Removed "/dev/sdb1" from volume group "myvg"
You can now reallocate the disk to another volume group or remove the disk from the system.
5.5. Creat ing a Mirrored LVM Logical Volume in a Cluster
Creating a mirrored LVM logical volume in a cluster requires the same commands and procedures ascreating a mirrored LVM logical volume on a single node. However, in order to create a mirrored LVMvolume in a cluster the cluster and cluster mirror infrastructure must be running, the cluster must bequorate, and the locking type in the lvm.conf file must be set correctly to enable cluster locking,either directly or by means of the lvmconf command as described in Section 3.1, “Creating LVMVolumes in a Cluster” .
The following procedure creates a mirrored LVM volume in a cluster. First the procedure checks tosee whether the cluster services are installed and running, then the procedure creates the mirroredvolume.
1. In order to create a mirrored logical volume that is shared by all of the nodes in a cluster, thelocking type must be set correctly in the lvm.conf file in every node of the cluster. By default,the locking type is set to local. To change this, execute the following command in each nodeof the cluster to enable clustered locking:
# /usr/sbin/lvmconf --enable-cluster
Chapt er 5. LVM Configurat ion Examples
71

2. To create a clustered logical volume, the cluster infrastructure must be up and running onevery node in the cluster. The following example verifies that the clvmd daemon is runningon the node from which it was issued:
# ps auxw | grep clvmdroot 17642 0.0 0.1 32164 1072 ? Ssl Apr06 0:00 clvmd -T20 -t 90
The following command shows the local view of the cluster status:
# cman_tool servicesService Name GID LID State Code...DLM Lock Space: "clvmd" 7 3 run -[1 2 3]...
3. Ensure that the cmirror and cmirror-kmod packages are installed. The cmirror-kmodpackage that must be installed depends on the kernel that is running. For example, if therunning kernel is kernel-largesmp, it is necessary to have cmirror-kmod-largesmp forthe corresponding kernel version.
4. Start the cmirror service.
# service cmirror startLoading clustered mirror log: [ OK ]
5. Create the mirror. The first step is creating the physical volumes. The following commandscreate three physical volumes. Two of the physical volumes will be used for the legs of themirror, and the third physical volume will contain the mirror log.
# pvcreate /dev/xvdb1 Physical volume "/dev/xvdb1" successfully created# pvcreate /dev/xvdb2 Physical volume "/dev/xvdb2" successfully created# pvcreate /dev/xvdc1 Physical volume "/dev/xvdc1" successfully created
6. Create the volume group. This example creates a volume group vg001 that consists of thethree physical volumes that were created in the previous step.
# vgcreate vg001 /dev/xvdb1 /dev/xvdb2 /dev/xvdc1 Clustered volume group "vg001" successfully created
Note that the output of the vgcreate command indicates that the volume group is clustered.You can verify that a volume group is clustered with the vgs command, which will show thevolume group's attributes. If a volume group is clustered, it will show a c attribute.
# vgs vg001 VG #PV #LV #SN Attr VSize VFree vg001 3 0 0 wz--nc 68.97G 68.97G
7. Create the mirrored logical volume. This example creates the logical volume mirrorlv fromthe volume group vg001. This volume has one mirror leg. This example specifies whichextents of the physical volume will be used for the logical volume.
Red Hat Ent erprise Linux 5 Logical Volume Manager Administ rat ion
72
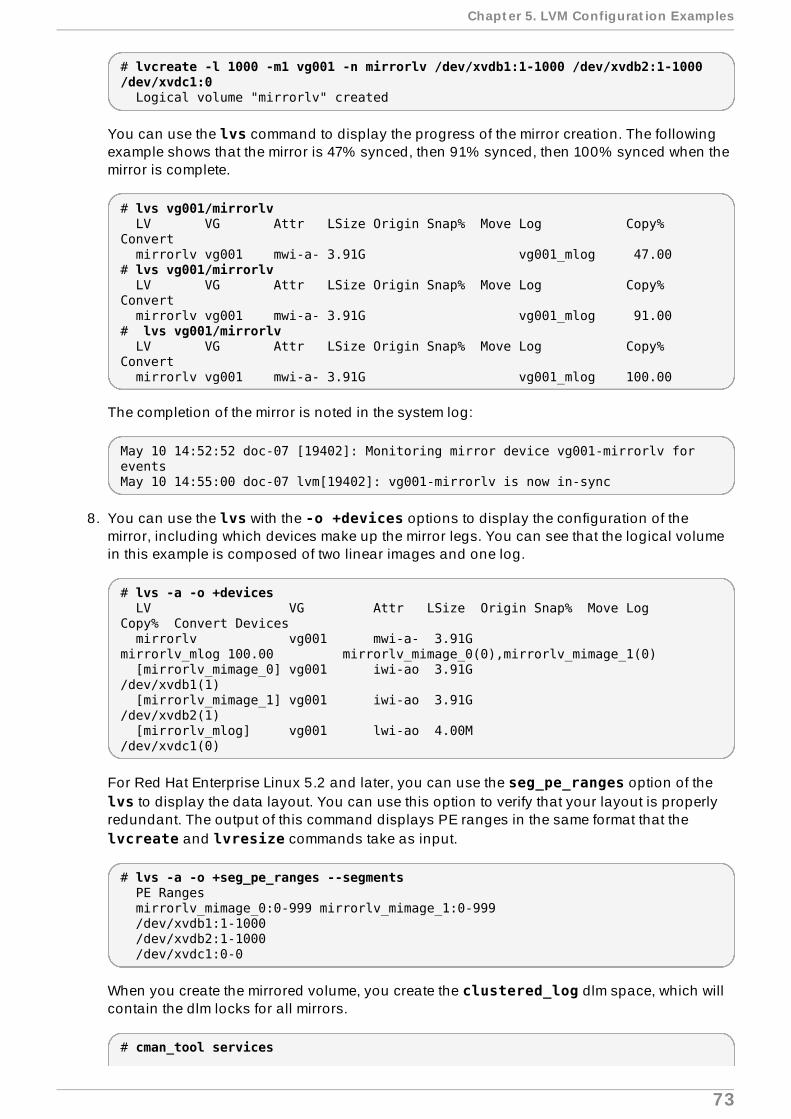
# lvcreate -l 1000 -m1 vg001 -n mirrorlv /dev/xvdb1:1-1000 /dev/xvdb2:1-1000 /dev/xvdc1:0 Logical volume "mirrorlv" created
You can use the lvs command to display the progress of the mirror creation. The followingexample shows that the mirror is 47% synced, then 91% synced, then 100% synced when themirror is complete.
# lvs vg001/mirrorlv LV VG Attr LSize Origin Snap% Move Log Copy% Convert mirrorlv vg001 mwi-a- 3.91G vg001_mlog 47.00# lvs vg001/mirrorlv LV VG Attr LSize Origin Snap% Move Log Copy% Convert mirrorlv vg001 mwi-a- 3.91G vg001_mlog 91.00 # lvs vg001/mirrorlv LV VG Attr LSize Origin Snap% Move Log Copy% Convert mirrorlv vg001 mwi-a- 3.91G vg001_mlog 100.00
The completion of the mirror is noted in the system log:
May 10 14:52:52 doc-07 [19402]: Monitoring mirror device vg001-mirrorlv for eventsMay 10 14:55:00 doc-07 lvm[19402]: vg001-mirrorlv is now in-sync
8. You can use the lvs with the -o +devices options to display the configuration of themirror, including which devices make up the mirror legs. You can see that the logical volumein this example is composed of two linear images and one log.
# lvs -a -o +devices LV VG Attr LSize Origin Snap% Move Log Copy% Convert Devices mirrorlv vg001 mwi-a- 3.91G mirrorlv_mlog 100.00 mirrorlv_mimage_0(0),mirrorlv_mimage_1(0) [mirrorlv_mimage_0] vg001 iwi-ao 3.91G /dev/xvdb1(1) [mirrorlv_mimage_1] vg001 iwi-ao 3.91G /dev/xvdb2(1) [mirrorlv_mlog] vg001 lwi-ao 4.00M /dev/xvdc1(0)
For Red Hat Enterprise Linux 5.2 and later, you can use the seg_pe_ranges option of the lvs to display the data layout. You can use this option to verify that your layout is properlyredundant. The output of this command displays PE ranges in the same format that the lvcreate and lvresize commands take as input.
# lvs -a -o +seg_pe_ranges --segments PE Ranges mirrorlv_mimage_0:0-999 mirrorlv_mimage_1:0-999 /dev/xvdb1:1-1000 /dev/xvdb2:1-1000 /dev/xvdc1:0-0
When you create the mirrored volume, you create the clustered_log dlm space, which willcontain the dlm locks for all mirrors.
# cman_tool services
Chapt er 5. LVM Configurat ion Examples
73

Service Name GID LID State CodeFence Domain: "default" 4 2 run -[1 2 3]
DLM Lock Space: "clvmd" 12 7 run -[1 2 3]
DLM Lock Space: "clustered_log" 14 9 run -[1 2 3]
User: "usrm::manager" 10 4 run -[1 2 3]
Note
For information on recovering from the failure of one of the legs of an LVM mirrored volume,see Section 6.3, “Recovering from LVM Mirror Failure” .
Red Hat Ent erprise Linux 5 Logical Volume Manager Administ rat ion
74

Chapter 6. LVM Troubleshooting
This chapter provide instructions for troubleshooting a variety of LVM issues.
6.1. Troubleshoot ing Diagnost ics
If a command is not working as expected, you can gather diagnostics in the following ways:
Use the -v, -vv, -vvv, or -vvvv argument of any command for increasingly verbose levels ofoutput.
If the problem is related to the logical volume activation, set 'activation = 1' in the ' log' section ofthe configuration file and run the command with the -vvvv argument. After you have finishedexamining this output be sure to reset this parameter to 0, to avoid possible problems with themachine locking during low memory situations.
Run the lvmdump command, which provides an information dump for diagnostic purposes. Forinformation, see the lvmdump(8) man page.
Execute the lvs -v, pvs -a or dmsetup info -c command for additional system information.
Examine the last backup of the metadata in the /etc/lvm/backup file and archived versions inthe /etc/lvm/archive file.
Check the current configuration information by running the lvm dumpconfig command.
Check the .cache file in the /etc/lvm directory for a record of which devices have physicalvolumes on them.
6.2. Displaying Informat ion on Failed Devices
You can use the -P argument of the lvs or vgs command to display information about a failedvolume that would otherwise not appear in the output. This argument permits some operations eventhough the metatdata is not completely consistent internally. For example, if one of the devices thatmade up the volume group vg failed, the vgs command might show the following output.
# vgs -o +devices Volume group "vg" not found
If you specify the -P argument of the vgs command, the volume group is still unusable but you cansee more information about the failed device.
vgs -P -o +devices Partial mode. Incomplete volume groups will be activated read-only. VG #PV #LV #SN Attr VSize VFree Devices vg 9 2 0 rz-pn- 2.11T 2.07T unknown device(0) vg 9 2 0 rz-pn- 2.11T 2.07T unknown device(5120),/dev/sda1(0)
In this example, the failed device caused both a linear and a striped logical volume in the volumegroup to fail. The lvs command without the -P argument shows the following output.
# lvs -a -o +devices Volume group "vg" not found
Chapt er 6 . LVM T roubleshoot ing
75

Using the -P argument shows the logical volumes that have failed.
# lvs -P -a -o +devices Partial mode. Incomplete volume groups will be activated read-only. LV VG Attr LSize Origin Snap% Move Log Copy% Devices linear vg -wi-a- 20.00G unknown device(0) stripe vg -wi-a- 20.00G unknown device(5120),/dev/sda1(0)
The following examples show the output of the pvs and lvs commands with the -P argumentspecified when a leg of a mirrored logical volume has failed.
# vgs -a -o +devices -P Partial mode. Incomplete volume groups will be activated read-only. VG #PV #LV #SN Attr VSize VFree Devices corey 4 4 0 rz-pnc 1.58T 1.34T my_mirror_mimage_0(0),my_mirror_mimage_1(0) corey 4 4 0 rz-pnc 1.58T 1.34T /dev/sdd1(0) corey 4 4 0 rz-pnc 1.58T 1.34T unknown device(0) corey 4 4 0 rz-pnc 1.58T 1.34T /dev/sdb1(0)
# lvs -a -o +devices -P Partial mode. Incomplete volume groups will be activated read-only. LV VG Attr LSize Origin Snap% Move Log Copy% Devices my_mirror corey mwi-a- 120.00G my_mirror_mlog 1.95 my_mirror_mimage_0(0),my_mirror_mimage_1(0) [my_mirror_mimage_0] corey iwi-ao 120.00G unknown device(0) [my_mirror_mimage_1] corey iwi-ao 120.00G /dev/sdb1(0) [my_mirror_mlog] corey lwi-ao 4.00M /dev/sdd1(0)
6.3. Recovering from LVM Mirror Failure
This section provides an example of recovering from a situation where one leg of an LVM mirroredvolume fails because the underlying device for a physical volume goes down. When a mirror leg fails,LVM converts the mirrored volume into a linear volume, which continues to operate as before butwithout the mirrored redundancy. At that point, you can add a new disk device to the system to use asa replacement physical device and rebuild the mirror.
The following command creates the physical volumes which will be used for the mirror.
# pvcreate /dev/sd[abcdefgh][12] Physical volume "/dev/sda1" successfully created Physical volume "/dev/sda2" successfully created Physical volume "/dev/sdb1" successfully created Physical volume "/dev/sdb2" successfully created Physical volume "/dev/sdc1" successfully created Physical volume "/dev/sdc2" successfully created Physical volume "/dev/sdd1" successfully created Physical volume "/dev/sdd2" successfully created Physical volume "/dev/sde1" successfully created Physical volume "/dev/sde2" successfully created Physical volume "/dev/sdf1" successfully created Physical volume "/dev/sdf2" successfully created Physical volume "/dev/sdg1" successfully created Physical volume "/dev/sdg2" successfully created Physical volume "/dev/sdh1" successfully created Physical volume "/dev/sdh2" successfully created
Red Hat Ent erprise Linux 5 Logical Volume Manager Administ rat ion
76
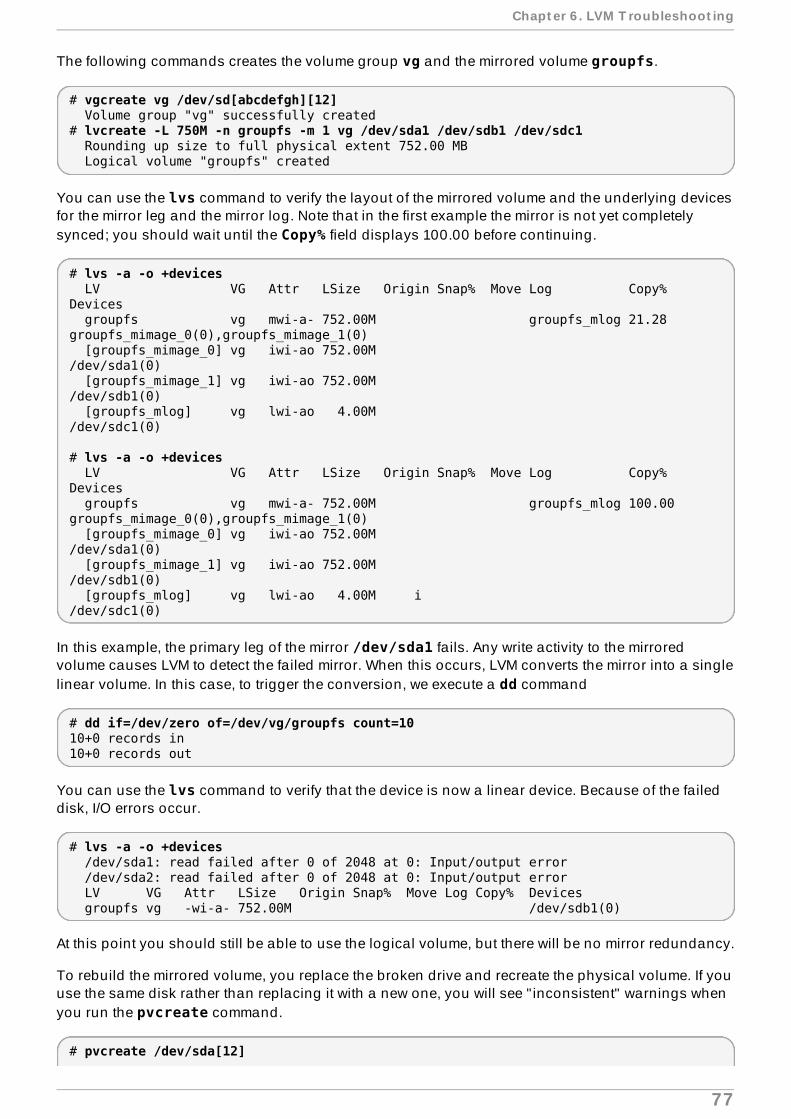
The following commands creates the volume group vg and the mirrored volume groupfs.
# vgcreate vg /dev/sd[abcdefgh][12] Volume group "vg" successfully created# lvcreate -L 750M -n groupfs -m 1 vg /dev/sda1 /dev/sdb1 /dev/sdc1 Rounding up size to full physical extent 752.00 MB Logical volume "groupfs" created
You can use the lvs command to verify the layout of the mirrored volume and the underlying devicesfor the mirror leg and the mirror log. Note that in the first example the mirror is not yet completelysynced; you should wait until the Copy% field displays 100.00 before continuing.
# lvs -a -o +devices LV VG Attr LSize Origin Snap% Move Log Copy% Devices groupfs vg mwi-a- 752.00M groupfs_mlog 21.28 groupfs_mimage_0(0),groupfs_mimage_1(0) [groupfs_mimage_0] vg iwi-ao 752.00M /dev/sda1(0) [groupfs_mimage_1] vg iwi-ao 752.00M /dev/sdb1(0) [groupfs_mlog] vg lwi-ao 4.00M /dev/sdc1(0)
# lvs -a -o +devices LV VG Attr LSize Origin Snap% Move Log Copy% Devices groupfs vg mwi-a- 752.00M groupfs_mlog 100.00 groupfs_mimage_0(0),groupfs_mimage_1(0) [groupfs_mimage_0] vg iwi-ao 752.00M /dev/sda1(0) [groupfs_mimage_1] vg iwi-ao 752.00M /dev/sdb1(0) [groupfs_mlog] vg lwi-ao 4.00M i /dev/sdc1(0)
In this example, the primary leg of the mirror /dev/sda1 fails. Any write activity to the mirroredvolume causes LVM to detect the failed mirror. When this occurs, LVM converts the mirror into a singlelinear volume. In this case, to trigger the conversion, we execute a dd command
# dd if=/dev/zero of=/dev/vg/groupfs count=1010+0 records in10+0 records out
You can use the lvs command to verify that the device is now a linear device. Because of the faileddisk, I/O errors occur.
# lvs -a -o +devices /dev/sda1: read failed after 0 of 2048 at 0: Input/output error /dev/sda2: read failed after 0 of 2048 at 0: Input/output error LV VG Attr LSize Origin Snap% Move Log Copy% Devices groupfs vg -wi-a- 752.00M /dev/sdb1(0)
At this point you should still be able to use the logical volume, but there will be no mirror redundancy.
To rebuild the mirrored volume, you replace the broken drive and recreate the physical volume. If youuse the same disk rather than replacing it with a new one, you will see " inconsistent" warnings whenyou run the pvcreate command.
# pvcreate /dev/sda[12]
Chapt er 6 . LVM T roubleshoot ing
77
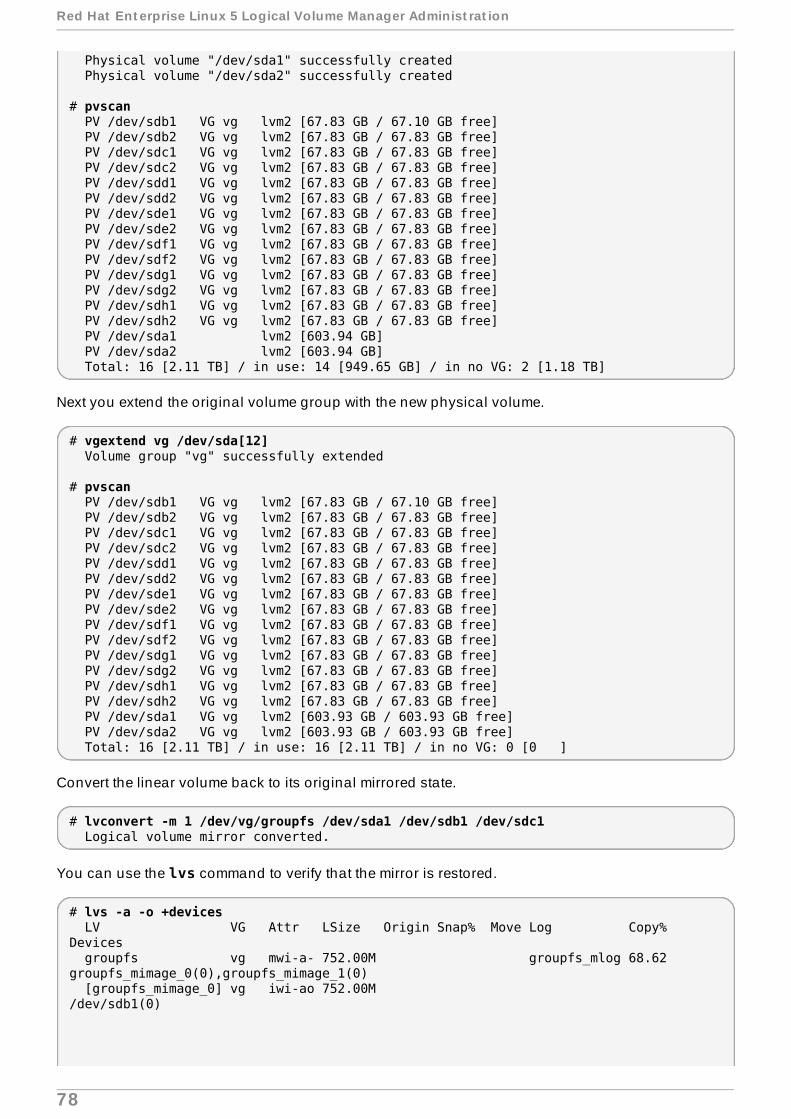
Physical volume "/dev/sda1" successfully created Physical volume "/dev/sda2" successfully created
# pvscan PV /dev/sdb1 VG vg lvm2 [67.83 GB / 67.10 GB free] PV /dev/sdb2 VG vg lvm2 [67.83 GB / 67.83 GB free] PV /dev/sdc1 VG vg lvm2 [67.83 GB / 67.83 GB free] PV /dev/sdc2 VG vg lvm2 [67.83 GB / 67.83 GB free] PV /dev/sdd1 VG vg lvm2 [67.83 GB / 67.83 GB free] PV /dev/sdd2 VG vg lvm2 [67.83 GB / 67.83 GB free] PV /dev/sde1 VG vg lvm2 [67.83 GB / 67.83 GB free] PV /dev/sde2 VG vg lvm2 [67.83 GB / 67.83 GB free] PV /dev/sdf1 VG vg lvm2 [67.83 GB / 67.83 GB free] PV /dev/sdf2 VG vg lvm2 [67.83 GB / 67.83 GB free] PV /dev/sdg1 VG vg lvm2 [67.83 GB / 67.83 GB free] PV /dev/sdg2 VG vg lvm2 [67.83 GB / 67.83 GB free] PV /dev/sdh1 VG vg lvm2 [67.83 GB / 67.83 GB free] PV /dev/sdh2 VG vg lvm2 [67.83 GB / 67.83 GB free] PV /dev/sda1 lvm2 [603.94 GB] PV /dev/sda2 lvm2 [603.94 GB] Total: 16 [2.11 TB] / in use: 14 [949.65 GB] / in no VG: 2 [1.18 TB]
Next you extend the original volume group with the new physical volume.
# vgextend vg /dev/sda[12] Volume group "vg" successfully extended
# pvscan PV /dev/sdb1 VG vg lvm2 [67.83 GB / 67.10 GB free] PV /dev/sdb2 VG vg lvm2 [67.83 GB / 67.83 GB free] PV /dev/sdc1 VG vg lvm2 [67.83 GB / 67.83 GB free] PV /dev/sdc2 VG vg lvm2 [67.83 GB / 67.83 GB free] PV /dev/sdd1 VG vg lvm2 [67.83 GB / 67.83 GB free] PV /dev/sdd2 VG vg lvm2 [67.83 GB / 67.83 GB free] PV /dev/sde1 VG vg lvm2 [67.83 GB / 67.83 GB free] PV /dev/sde2 VG vg lvm2 [67.83 GB / 67.83 GB free] PV /dev/sdf1 VG vg lvm2 [67.83 GB / 67.83 GB free] PV /dev/sdf2 VG vg lvm2 [67.83 GB / 67.83 GB free] PV /dev/sdg1 VG vg lvm2 [67.83 GB / 67.83 GB free] PV /dev/sdg2 VG vg lvm2 [67.83 GB / 67.83 GB free] PV /dev/sdh1 VG vg lvm2 [67.83 GB / 67.83 GB free] PV /dev/sdh2 VG vg lvm2 [67.83 GB / 67.83 GB free] PV /dev/sda1 VG vg lvm2 [603.93 GB / 603.93 GB free] PV /dev/sda2 VG vg lvm2 [603.93 GB / 603.93 GB free] Total: 16 [2.11 TB] / in use: 16 [2.11 TB] / in no VG: 0 [0 ]
Convert the linear volume back to its original mirrored state.
# lvconvert -m 1 /dev/vg/groupfs /dev/sda1 /dev/sdb1 /dev/sdc1 Logical volume mirror converted.
You can use the lvs command to verify that the mirror is restored.
# lvs -a -o +devices LV VG Attr LSize Origin Snap% Move Log Copy% Devices groupfs vg mwi-a- 752.00M groupfs_mlog 68.62 groupfs_mimage_0(0),groupfs_mimage_1(0) [groupfs_mimage_0] vg iwi-ao 752.00M /dev/sdb1(0)
Red Hat Ent erprise Linux 5 Logical Volume Manager Administ rat ion
78

[groupfs_mimage_1] vg iwi-ao 752.00M /dev/sda1(0) [groupfs_mlog] vg lwi-ao 4.00M /dev/sdc1(0)
6.4 . Recovering Physical Volume Metadata
If the volume group metadata area of a physical volume is accidentally overwritten or otherwisedestroyed, you will get an error message indicating that the metadata area is incorrect, or that thesystem was unable to find a physical volume with a particular UUID. You may be able to recover thedata the physical volume by writing a new metadata area on the physical volume specifying the sameUUID as the lost metadata.
Warning
You should not attempt this procedure with a working LVM logical volume. You will lose yourdata if you specify the incorrect UUID.
The following example shows the sort of output you may see if the metadata area is missing orcorrupted.
# lvs -a -o +devices Couldn't find device with uuid 'FmGRh3-zhok-iVI8-7qTD-S5BI-MAEN-NYM5Sk'. Couldn't find all physical volumes for volume group VG. Couldn't find device with uuid 'FmGRh3-zhok-iVI8-7qTD-S5BI-MAEN-NYM5Sk'. Couldn't find all physical volumes for volume group VG. ...
You may be able to find the UUID for the physical volume that was overwritten by looking in the /etc/lvm/archive directory. Look in the file VolumeGroupName_xxxx.vg for the last knownvalid archived LVM metadata for that volume group.
Alternately, you may find that deactivating the volume and setting the partial (-P) argument willenable you to find the UUID of the missing corrupted physical volume.
# vgchange -an --partial Partial mode. Incomplete volume groups will be activated read-only. Couldn't find device with uuid 'FmGRh3-zhok-iVI8-7qTD-S5BI-MAEN-NYM5Sk'. Couldn't find device with uuid 'FmGRh3-zhok-iVI8-7qTD-S5BI-MAEN-NYM5Sk'. ...
Use the --uuid and --restorefile arguments of the pvcreate command to restore the physicalvolume. The following example labels the /dev/sdh1 device as a physical volume with the UUIDindicated above, FmGRh3-zhok-iVI8-7qTD-S5BI-MAEN-NYM5Sk. This command restores thephysical volume label with the metadata information contained in VG_00050.vg, the most recentgood archived metatdata for volume group . The restorefile argument instructs the pvcreatecommand to make the new physical volume compatible with the old one on the volume group,ensuring that the new metadata will not be placed where the old physical volume contained data(which could happen, for example, if the original pvcreate command had used the command linearguments that control metadata placement, or it the physical volume was originally created using adifferent version of the software that used different defaults). The pvcreate command overwrites onlythe LVM metadata areas and does not affect the existing data areas.
Chapt er 6 . LVM T roubleshoot ing
79
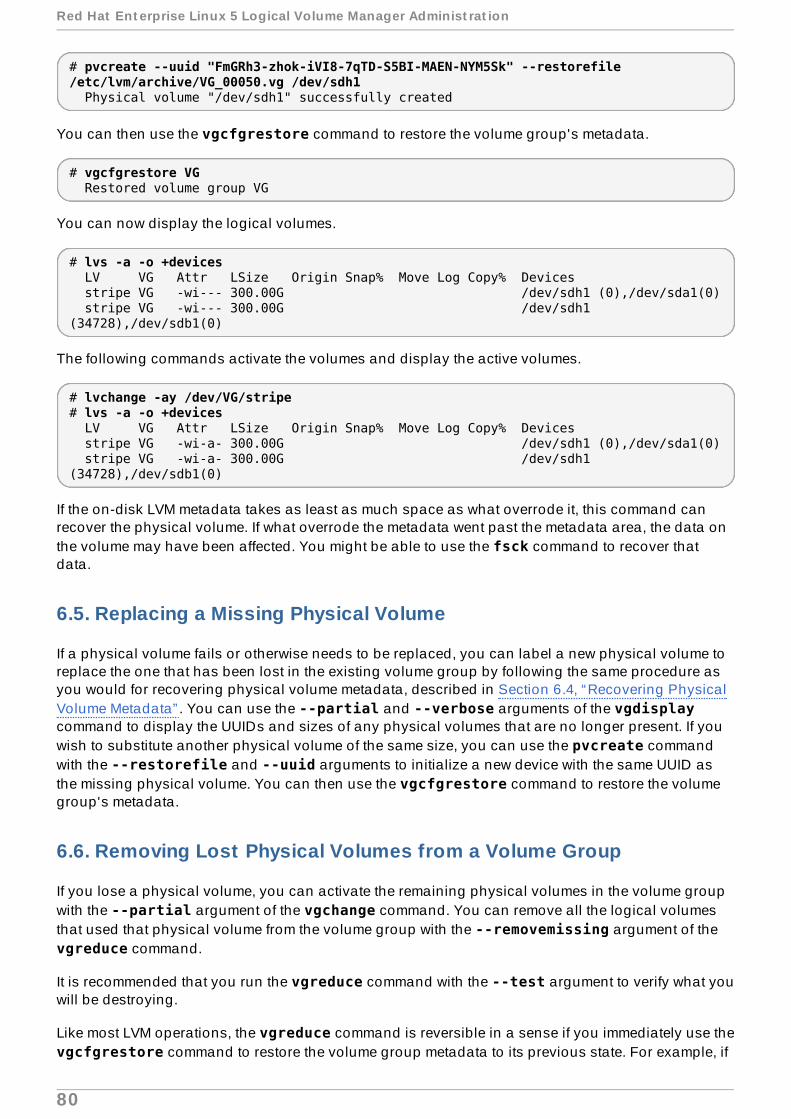
# pvcreate --uuid "FmGRh3-zhok-iVI8-7qTD-S5BI-MAEN-NYM5Sk" --restorefile /etc/lvm/archive/VG_00050.vg /dev/sdh1 Physical volume "/dev/sdh1" successfully created
You can then use the vgcfgrestore command to restore the volume group's metadata.
# vgcfgrestore VG Restored volume group VG
You can now display the logical volumes.
# lvs -a -o +devices LV VG Attr LSize Origin Snap% Move Log Copy% Devices stripe VG -wi--- 300.00G /dev/sdh1 (0),/dev/sda1(0) stripe VG -wi--- 300.00G /dev/sdh1 (34728),/dev/sdb1(0)
The following commands activate the volumes and display the active volumes.
# lvchange -ay /dev/VG/stripe# lvs -a -o +devices LV VG Attr LSize Origin Snap% Move Log Copy% Devices stripe VG -wi-a- 300.00G /dev/sdh1 (0),/dev/sda1(0) stripe VG -wi-a- 300.00G /dev/sdh1 (34728),/dev/sdb1(0)
If the on-disk LVM metadata takes as least as much space as what overrode it, this command canrecover the physical volume. If what overrode the metadata went past the metadata area, the data onthe volume may have been affected. You might be able to use the fsck command to recover thatdata.
6.5. Replacing a Missing Physical Volume
If a physical volume fails or otherwise needs to be replaced, you can label a new physical volume toreplace the one that has been lost in the existing volume group by following the same procedure asyou would for recovering physical volume metadata, described in Section 6.4, “Recovering PhysicalVolume Metadata” . You can use the --partial and --verbose arguments of the vgdisplaycommand to display the UUIDs and sizes of any physical volumes that are no longer present. If youwish to substitute another physical volume of the same size, you can use the pvcreate commandwith the --restorefile and --uuid arguments to initialize a new device with the same UUID asthe missing physical volume. You can then use the vgcfgrestore command to restore the volumegroup's metadata.
6.6. Removing Lost Physical Volumes from a Volume Group
If you lose a physical volume, you can activate the remaining physical volumes in the volume groupwith the --partial argument of the vgchange command. You can remove all the logical volumesthat used that physical volume from the volume group with the --removemissing argument of the vgreduce command.
It is recommended that you run the vgreduce command with the --test argument to verify what youwill be destroying.
Like most LVM operations, the vgreduce command is reversible in a sense if you immediately use thevgcfgrestore command to restore the volume group metadata to its previous state. For example, if
Red Hat Ent erprise Linux 5 Logical Volume Manager Administ rat ion
80

you used the --removemissing argument of the vgreduce command without the --testargument and find you have removed logical volumes you wanted to keep, you can still replace thephysical volume and use another vgcfgrestore command to return the volume group to itsprevious state.
6.7. Insufficient Free Extents for a Logical Volume
You may get the error message " Insufficient free extents" when creating a logical volume when youthink you have enough extents based on the output of the vgdisplay or vgs commands. This isbecause these commands round figures to 2 decimal places to provide human-readable output. Tospecify exact size, use free physical extent count instead of some multiple of bytes to determine thesize of the logical volume.
The vgdisplay command, by default, includes this line of output that indicates the free physicalextents.
# vgdisplay --- Volume group --- ... Free PE / Size 8780 / 34.30 GB
Alternately, you can use the vg_free_count and vg_extent_count arguments of the vgscommand to display the free extents and the total number of extents.
# vgs -o +vg_free_count,vg_extent_count VG #PV #LV #SN Attr VSize VFree Free #Ext testvg 2 0 0 wz--n- 34.30G 34.30G 8780 8780
With 8780 free physical extents, you can run the following command, using the lower-case largument to use extents instead of bytes:
# lvcreate -l8780 -n testlv testvg
This uses all the free extents in the volume group.
# vgs -o +vg_free_count,vg_extent_count VG #PV #LV #SN Attr VSize VFree Free #Ext testvg 2 1 0 wz--n- 34.30G 0 0 8780
Alternately, you can extend the logical volume to use a percentage of the remaining free space in thevolume group by using the -l argument of the lvcreate command. For information, seeSection 4.4.1.1, “Creating Linear Volumes” .
Chapt er 6 . LVM T roubleshoot ing
81
Chapter 7. LVM Administration with the LVM GUI
In addition to the Command Line Interface (CLI), LVM provides a Graphical User Interface (GUI) whichyou can use to configure LVM logical volumes. You can bring up this utility by typing system-config-lvm. The LVM chapter of the Red Hat Enterprise Linux Deployment Guide provides step-by-stepinstructions for configuring an LVM logical volume using this utility.
In addition, the LVM GUI is available as part of the Conga management interface. For information onusing the LVM GUI with Conga, see the online help for Conga.
Red Hat Ent erprise Linux 5 Logical Volume Manager Administ rat ion
82
The Device Mapper
The Device Mapper is a kernel driver that provides a framework for volume management. It provides ageneric way of creating mapped devices, which may be used as logical volumes. It does notspecifically know about volume groups or metadata formats.
The Device Mapper provides the foundation for a number of higher-level technologies. In addition toLVM, Device-Mapper multipath and the dmraid command use the Device Mapper. The applicationinterface to the Device Mapper is the ioctl system call. The user interface is the dmsetup command.
LVM logical volumes are activated using the Device Mapper. Each logical volume is translated into amapped device. Each segment translates into a line in the mapping table that describes the device.The Device Mapper supports a variety of mapping targets, including linear mapping, stripedmapping, and error mapping. So, for example, two disks may be concatenated into one logicalvolume with a pair of linear mappings, one for each disk. When LVM2 creates a volume, it creates anunderlying device-mapper device that can be queried with the dmsetup command. For informationabout the format of devices in a mapping table, see Section A.1, “Device Table Mappings” . Forinformation about using the dmsetup command to query a device, see Section A.2, “The dmsetupCommand” .
A.1. Device Table Mappings
A mapped device is defined by a table that specifies how to map each range of logical sectors of thedevice using a supported Device Table mapping. The table for a mapped device is constructed froma list of lines of the form:
start length mapping [mapping_parameters...]
In the first line of a Device Mapper table, the start parameter must equal 0. The start + lengthparameters on one line must equal the start on the next line. Which mapping parameters arespecified in a line of the mapping table depends on which mapping type is specified on the line.
Sizes in the Device Mapper are always specified in sectors (512 bytes).
When a device is specified as a mapping parameter in the Device Mapper, it can be referenced by thedevice name in the filesystem (for example, /dev/hda) or by the major and minor numbers in theformat major:minor. The major:minor format is preferred because it avoids pathname lookups.
The following shows a sample mapping table for a device. In this table there are four linear targets:
0 35258368 linear 8:48 6592035258368 35258368 linear 8:32 6592070516736 17694720 linear 8:16 1769497688211456 17694720 linear 8:16 256
The first 2 parameters of each line are the segment starting block and the length of the segment. Thenext keyword is the mapping target, which in all of the cases in this example is linear. The rest ofthe line consists of the parameters for a linear target.
The following subsections describe the format of the following mappings:
linear
striped
mirror
T he Device Mapper
83

snapshot and snapshot-origin
error
zero
multipath
crypt
A.1.1. T he linear Mapping T arget
A linear mapping target maps a continuous range of blocks onto another block device. The format ofa linear target is as follows:
start length linear device offset
start
starting block in virtual device
length
length of this segment
device
block device, referenced by the device name in the filesystem or by the major and minornumbers in the format major:minor
offset
starting offset of the mapping on the device
The following example shows a linear target with a starting block in the virtual device of 0, a segmentlength of 1638400, a major:minor number pair of 8:2, and a starting offset for the device of 41146992.
0 16384000 linear 8:2 41156992
The following example shows a linear target with the device parameter specified as the device /dev/hda.
0 20971520 linear /dev/hda 384
A.1.2. T he st riped Mapping T arget
The striped mapping target supports striping across physical devices. It takes as arguments thenumber of stripes and the striping chunk size followed by a list of pairs of device name and sector.The format of a striped target is as follows:
start length striped #stripes chunk_size device1 offset1 ... deviceN offsetN
There is one set of device and offset parameters for each stripe.
start
starting block in virtual device
Red Hat Ent erprise Linux 5 Logical Volume Manager Administ rat ion
84

length
length of this segment
#stripes
number of stripes for the virtual device
chunk_size
number of sectors written to each stripe before switching to the next; must be power of 2 atleast as big as the kernel page size
device
block device, referenced by the device name in the filesystem or by the major and minornumbers in the format major:minor.
offset
starting offset of the mapping on the device
The following example shows a striped target with three stripes and a chunk size of 128:
0 73728 striped 3 128 8:9 384 8:8 384 8:7 9789824
0
starting block in virtual device
73728
length of this segment
st riped 3 128
stripe across three devices with chunk size of 128 blocks
8:9
major:minor numbers of first device
384
starting offset of the mapping on the first device
8:8
major:minor numbers of second device
384
starting offset of the mapping on the second device
8:7
major:minor numbers of third device
9 789 824
starting offset of the mapping on the third device
T he Device Mapper
85

The following example shows a striped target for 2 stripes with 256 KiB chunks, with the deviceparameters specified by the device names in the file system rather than by the major and minornumbers.
0 65536 striped 2 512 /dev/hda 0 /dev/hdb 0
A.1.3. T he mirror Mapping T arget
The mirror mapping target supports the mapping of a mirrored logical device. The format of amirrored target is as follows:
start length mirror log_type #logargs logarg1 ... logargN #devs device1 offset1 ... deviceN offsetN
start
starting block in virtual device
length
length of this segment
log_type
The possible log types and their arguments are as follows:
core
The mirror is local and the mirror log is kept in core memory. This log type takes 1- 3 arguments:
regionsize [[no]sync] [block_on_error]
disk
The mirror is local and the mirror log is kept on disk. This log type takes 2 - 4arguments:
logdevice regionsize [[no]sync] [block_on_error]
clustered_core
The mirror is clustered and the mirror log is kept in core memory. This log typetakes 2 - 4 arguments:
regionsize UUID [[no]sync] [block_on_error]
clustered_disk
The mirror is clustered and the mirror log is kept on disk. This log type takes 3 - 5arguments:
logdevice regionsize UUID [[no]sync] [block_on_error]
LVM maintains a small log which it uses to keep track of which regions are in sync with themirror or mirrors. The regionsize argument specifies the size of these regions.
In a clustered environment, the UUID argument is a unique identifier associated with themirror log device so that the log state can be maintained throughout the cluster.
Red Hat Ent erprise Linux 5 Logical Volume Manager Administ rat ion
86

The optional [no]sync argument can be used to specify the mirror as " in-sync" or "out-of-sync". The block_on_error argument is used to tell the mirror to respond to errors ratherthan ignoring them.
#log_args
number of log arguments that will be specified in the mapping
logargs
the log arguments for the mirror; the number of log arguments provided is specified by the #log-args parameter and the valid log arguments are determined by the log_typeparameter.
#devs
the number of legs in the mirror; a device and an offset is specified for each leg.
device
block device for each mirror leg, referenced by the device name in the filesystem or by themajor and minor numbers in the format major:minor. A block device and offset is specifiedfor each mirror leg, as indicated by the #devs parameter.
offset
starting offset of the mapping on the device. A block device and offset is specified for eachmirror leg, as indicated by the #devs parameter.
The following example shows a mirror mapping target for a clustered mirror with a mirror log kept ondisk.
0 52428800 mirror clustered_disk 4 253:2 1024 UUID block_on_error 3 253:3 0 253:4 0 253:5 0
0
starting block in virtual device
524 28800
length of this segment
mirror clustered_disk
mirror target with a log type specifying that mirror is clustered and the mirror log ismaintained on disk
4
4 mirror log arguments will follow
253:2
major:minor numbers of log device
1024
region size the mirror log uses to keep track of what is in sync
UUID
T he Device Mapper
87

UUID of mirror log device to maintain log information throughout a cluster
block_on_error
mirror should respond to errors
3
number of legs in mirror
253:3 0 253:4 0 253:5 0
major:minor numbers and offset for devices constituting each leg of mirror
A.1.4 . T he snapshot and snapshot -origin Mapping T argets
When you create the first LVM snapshot of a volume, four Device Mapper devices are used:
1. A device with a linear mapping containing the original mapping table of the source volume.
2. A device with a linear mapping used as the copy-on-write (COW) device for the sourcevolume; for each write, the original data is saved in the COW device of each snapshot to keepits visible content unchanged (until the COW device fills up).
3. A device with a snapshot mapping combining #1 and #2, which is the visible snapshotvolume
4. The "original" volume (which uses the device number used by the original source volume),whose table is replaced by a "snapshot-origin" mapping from device #1.
A fixed naming scheme is used to create these devices, For example, you might use the followingcommands to create an LVM volume named base and a snapshot volume named snap based onthat volume.
# lvcreate -L 1G -n base volumeGroup# lvcreate -L 100M --snapshot -n snap volumeGroup/base
This yields four devices, which you can view with the following commands:
# dmsetup table|grep volumeGroupvolumeGroup-base-real: 0 2097152 linear 8:19 384volumeGroup-snap-cow: 0 204800 linear 8:19 2097536volumeGroup-snap: 0 2097152 snapshot 254:11 254:12 P 16volumeGroup-base: 0 2097152 snapshot-origin 254:11
# ls -lL /dev/mapper/volumeGroup-*brw------- 1 root root 254, 11 29 ago 18:15 /dev/mapper/volumeGroup-base-realbrw------- 1 root root 254, 12 29 ago 18:15 /dev/mapper/volumeGroup-snap-cowbrw------- 1 root root 254, 13 29 ago 18:15 /dev/mapper/volumeGroup-snapbrw------- 1 root root 254, 10 29 ago 18:14 /dev/mapper/volumeGroup-base
The format for the snapshot-origin target is as follows:
start length snapshot-origin origin
start
starting block in virtual device
Red Hat Ent erprise Linux 5 Logical Volume Manager Administ rat ion
88

length
length of this segment
origin
base volume of snapshot
The snapshot-origin will normally have one or more snapshots based on it. Reads will bemapped directly to the backing device. For each write, the original data will be saved in the COWdevice of each snapshot to keep its visible content unchanged until the COW device fills up.
The format for the snapshot target is as follows:
start length snapshot origin COW-device P|N chunksize
start
starting block in virtual device
length
length of this segment
origin
base volume of snapshot
COW-device
Device on which changed chunks of data are stored
P|N
P (Persistent) or N (Not persistent); indicates whether snapshot will survive after reboot. Fortransient snapshots (N) less metadata must be saved on disk; they can be kept in memoryby the kernel.
chunksize
Size in sectors of changed chunks of data that will be stored on the COW device
The following example shows a snapshot-origin target with an origin device of 254:11.
0 2097152 snapshot-origin 254:11
The following example shows a snapshot target with an origin device of 254:11 and a COW deviceof 254:12. This snapshot device is persistent across reboots and the chunk size for the data storedon the COW device is 16 sectors.
0 2097152 snapshot 254:11 254:12 P 16
A.1.5. T he error Mapping T arget
With an error mapping target, any I/O operation to the mapped sector fails.
T he Device Mapper
89

An error mapping target can be used for testing. To test how a device behaves in failure, you cancreate a device mapping with a bad sector in the middle of a device, or you can swap out the leg of amirror and replace the leg with an error target.
An error target can be used in place of a failing device, as a way of avoiding timeouts and retries onthe actual device. It can serve as an intermediate target while you rearrange LVM metadata duringfailures.
The error mapping target takes no additional parameters besides the start and length parameters.
The following example shows an error target.
0 65536 error
A.1.6. T he zero Mapping T arget
The zero mapping target is a block device equivalent of /dev/zero. A read operation to thismapping returns blocks of zeros. Data written to this mapping is discarded, but the write succeeds.The zero mapping target takes no additional parameters besides the start and length parameters.
The following example shows a zero target for a 16Tb Device.
0 65536 zero
A.1.7. T he mult ipath Mapping T arget
The multipath mapping target supports the mapping of a multipathed device. The format for the multipath target is as follows:
start length multipath #features [feature1 ... featureN] #handlerargs [handlerarg1 ... handlerargN] #pathgroups pathgroup pathgroupargs1 ... pathgroupargsN
There is one set of pathgroupargs parameters for each path group.
start
starting block in virtual device
length
length of this segment
#features
The number of multipath features, followed by those features. If this parameter is zero, thenthere is no feature parameter and the next device mapping parameter is #handlerargs.Currently there is one supported feature that can be set with the features attribute in the multipath.conf file, queue_if_no_path. This indicates that this multipathed device iscurrently set to queue I/O operations if there is no path available.
In the following example, the no_path_retry attribute in the multipath.conf file hasbeen set to queue I/O operations only until all paths have been marked as failed after a setnumber of attempts have been made to use the paths. In this case, the mapping appears asfollows until all the path checkers have failed the specified number of checks.
Red Hat Ent erprise Linux 5 Logical Volume Manager Administ rat ion
90

0 71014400 multipath 1 queue_if_no_path 0 2 1 round-robin 0 2 1 66:128 \1000 65:64 1000 round-robin 0 2 1 8:0 1000 67:192 1000
After all the path checkers have failed the specified number of checks, the mapping wouldappear as follows.
0 71014400 multipath 0 0 2 1 round-robin 0 2 1 66:128 1000 65:64 1000 \round-robin 0 2 1 8:0 1000 67:192 1000
#handlerargs
The number of hardware handler arguments, followed by those arguments. A hardwarehandler specifies a module that will be used to perform hardware-specific actions whenswitching path groups or handling I/O errors. If this is set to 0, then the next parameter is #pathgroups.
#pathgroups
The number of path groups. A path group is the set of paths over which a multipatheddevice will load balance. There is one set of pathgroupargs parameters for each pathgroup.
pathgroup
The next path group to try.
pathgroupsargs
Each path group consists of the following arguments:
pathselector #selectorargs #paths #pathargs device1 ioreqs1 ... deviceN ioreqsN
There is one set of path arguments for each path in the path group.
pathselector
Specifies the algorithm in use to determine what path in this path group to use forthe next I/O operation.
#selectorargs
The number of path selector arguments which follow this argument in themultipath mapping. Currently, the value of this argument is always 0.
#paths
The number of paths in this path group.
#pathargs
The number of path arguments specified for each path in this group. Currently thisnumber is always 1, the ioreqs argument.
device
The block device number of the path, referenced by the major and minor numbersin the format major:minor
T he Device Mapper
91
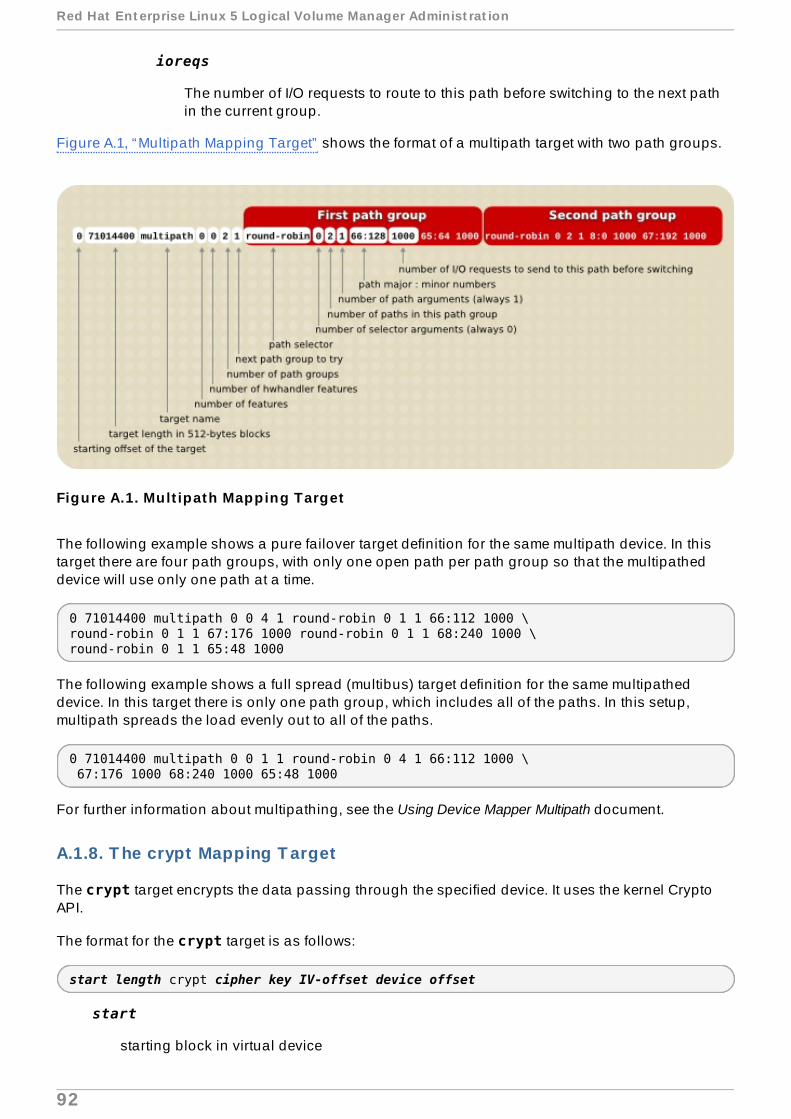
ioreqs
The number of I/O requests to route to this path before switching to the next pathin the current group.
Figure A.1, “Multipath Mapping Target” shows the format of a multipath target with two path groups.
Figure A.1. Mult ipath Mapping Target
The following example shows a pure failover target definition for the same multipath device. In thistarget there are four path groups, with only one open path per path group so that the multipatheddevice will use only one path at a time.
0 71014400 multipath 0 0 4 1 round-robin 0 1 1 66:112 1000 \round-robin 0 1 1 67:176 1000 round-robin 0 1 1 68:240 1000 \round-robin 0 1 1 65:48 1000
The following example shows a full spread (multibus) target definition for the same multipatheddevice. In this target there is only one path group, which includes all of the paths. In this setup,multipath spreads the load evenly out to all of the paths.
0 71014400 multipath 0 0 1 1 round-robin 0 4 1 66:112 1000 \ 67:176 1000 68:240 1000 65:48 1000
For further information about multipathing, see the Using Device Mapper Multipath document.
A.1.8. T he crypt Mapping T arget
The crypt target encrypts the data passing through the specified device. It uses the kernel CryptoAPI.
The format for the crypt target is as follows:
start length crypt cipher key IV-offset device offset
start
starting block in virtual device
Red Hat Ent erprise Linux 5 Logical Volume Manager Administ rat ion
92
length
length of this segment
cipher
Cipher consists of cipher[-chainmode]-ivmode[:iv options].
cipher
Ciphers available are listed in /proc/crypto (for example, aes).
chainmode
Always use cbc. Do not use ebc; it does not use an initial vector (IV).
ivmode[:iv options]
IV is an initial vector used to vary the encryption. The IV mode is plain or essiv:hash. An ivmode of -plain uses the sector number (plus IV offset) as theIV. An ivmode of -essiv is an enhancement avoiding a watermark weakness.
key
Encryption key, supplied in hex
IV-offset
Initial Vector (IV) offset
device
block device, referenced by the device name in the filesystem or by the major and minornumbers in the format major:minor
offset
starting offset of the mapping on the device
The following is an example of a crypt target.
0 2097152 crypt aes-plain 0123456789abcdef0123456789abcdef 0 /dev/hda 0
A.2. The dmsetup Command
The dmsetup command is a command line wrapper for communication with the Device Mapper. Forgeneral system information about LVM devices, you may find the info, ls, status, and depsoptions of the dmsetup command to be useful, as described in the following subsections.
For information about additional options and capabilities of the dmsetup command, see the dmsetup(8) man page.
A.2.1. T he dmsetup info Command
T he Device Mapper
93

The dmsetup info device command provides summary information about Device Mapperdevices. If you do not specify a device name, the output is information about all of the currentlyconfigured Device Mapper devices. If you specify a device, then this command yields information forthat device only.
The dmsetup info command provides information in the following categories:
Name
The name of the device. An LVM device is expressed as the volume group name and thelogical volume name separated by a hyphen. A hyphen in the original name is translated totwo hyphens.
State
Possible device states are SUSPENDED, ACTIVE, and READ-ONLY. The dmsetup suspendcommand sets a device state to SUSPENDED. When a device is suspended, all I/Ooperations to that device stop. The dmsetup resume command restores a device state to ACTIVE.
Read Ahead
The number of data blocks that the system reads ahead for any open file on which readoperations are ongoing. By default, the kernel chooses a suitable value automatically. Youcan change this value with the --readahead option of the dmsetup command.
Tables present
Possible states for this category are LIVE and INACTIVE. An INACTIVE state indicatesthat a table has been loaded which will be swapped in when a dmsetup resumecommand restores a device state to ACTIVE, at which point the table's state becomes LIVE.For information, see the dmsetup man page.
Open count
The open reference count indicates how many times the device is opened. A mountcommand opens a device.
Event number
The current number of events received. Issuing a dmsetup wait n command allows theuser to wait for the n'th event, blocking the call until it is received.
Major, minor
Major and minor device number
Number of targets
The number of fragments that make up a device. For example, a linear device spanning 3disks would have 3 targets. A linear device composed of the beginning and end of a disk,but not the middle would have 2 targets.
UUID
UUID of the device.
The following example shows partial output for the dmsetup info command.
Red Hat Ent erprise Linux 5 Logical Volume Manager Administ rat ion
94

[root@ask-07 ~]# dmsetup infoName: testgfsvg-testgfslv1State: ACTIVERead Ahead: 256Tables present: LIVEOpen count: 0Event number: 0Major, minor: 253, 2Number of targets: 2UUID: LVM-K528WUGQgPadNXYcFrrf9LnPlUMswgkCkpgPIgYzSvigM7SfeWCypddNSWtNzc2N...Name: VolGroup00-LogVol00State: ACTIVERead Ahead: 256Tables present: LIVEOpen count: 1Event number: 0Major, minor: 253, 0Number of targets: 1UUID: LVM-tOcS1kqFV9drb0X1Vr8sxeYP0tqcrpdegyqj5lZxe45JMGlmvtqLmbLpBcenh2L3
A.2.2. T he dmsetup ls Command
You can list the device names of mapped devices with the dmsetup ls command. You can listdevices that have at least one target of a specified type with the dmsetup ls --target target_type command. For other options of the dmsetup ls, see the dmsetup man page.
The following example shows the command to list the device names of currently configured mappeddevices.
# dmsetup lstestgfsvg-testgfslv3 (253, 4)testgfsvg-testgfslv2 (253, 3)testgfsvg-testgfslv1 (253, 2)VolGroup00-LogVol01 (253, 1)VolGroup00-LogVol00 (253, 0)
The following example shows the command to list the devices names of currently configured mirrormappings.
# dmsetup ls --target mirrorlock_stress-grant--02.1722 (253, 34)lock_stress-grant--01.1720 (253, 18)lock_stress-grant--03.1718 (253, 52)lock_stress-grant--02.1716 (253, 40)lock_stress-grant--03.1713 (253, 47)lock_stress-grant--02.1709 (253, 23)lock_stress-grant--01.1707 (253, 8)lock_stress-grant--01.1724 (253, 14)lock_stress-grant--03.1711 (253, 27)
A.2.3. T he dmsetup status Command
The dmsetup status device command provides status information for each target in a specifieddevice. If you do not specify a device name, the output is information about all of the currentlyconfigured Device Mapper devices. You can list the status only of devices that have at least onetarget of a specified type with the dmsetup status --target target_type command.
T he Device Mapper
95
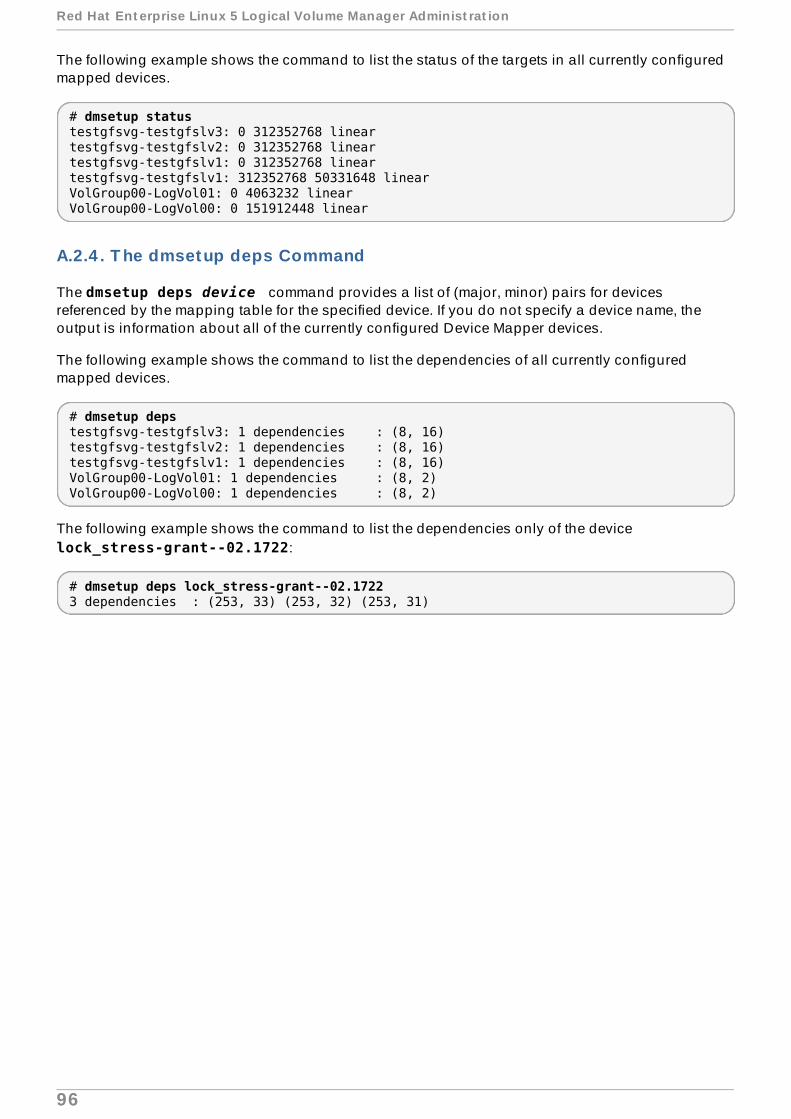
The following example shows the command to list the status of the targets in all currently configuredmapped devices.
# dmsetup statustestgfsvg-testgfslv3: 0 312352768 linear testgfsvg-testgfslv2: 0 312352768 linear testgfsvg-testgfslv1: 0 312352768 linear testgfsvg-testgfslv1: 312352768 50331648 linear VolGroup00-LogVol01: 0 4063232 linear VolGroup00-LogVol00: 0 151912448 linear
A.2.4 . T he dmsetup deps Command
The dmsetup deps device command provides a list of (major, minor) pairs for devicesreferenced by the mapping table for the specified device. If you do not specify a device name, theoutput is information about all of the currently configured Device Mapper devices.
The following example shows the command to list the dependencies of all currently configuredmapped devices.
# dmsetup depstestgfsvg-testgfslv3: 1 dependencies : (8, 16)testgfsvg-testgfslv2: 1 dependencies : (8, 16)testgfsvg-testgfslv1: 1 dependencies : (8, 16)VolGroup00-LogVol01: 1 dependencies : (8, 2)VolGroup00-LogVol00: 1 dependencies : (8, 2)
The following example shows the command to list the dependencies only of the device lock_stress-grant--02.1722:
# dmsetup deps lock_stress-grant--02.17223 dependencies : (253, 33) (253, 32) (253, 31)
Red Hat Ent erprise Linux 5 Logical Volume Manager Administ rat ion
96

The LVM Configuration Files
LVM supports multiple configuration files. At system startup, the lvm.conf configuration file isloaded from the directory specified by the environment variable LVM_SYSTEM_DIR, which is set to /etc/lvm by default.
The lvm.conf file can specify additional configuration files to load. Settings in later files overridesettings from earlier ones. To display the settings in use after loading all the configuration files,execute the lvm dumpconfig command.
For information on loading additional configuration files, see Section C.2, “Host Tags” .
B.1. The LVM Configurat ion Files
The following files are used for LVM configuration:
/etc/lvm/lvm.conf
Central configuration file read by the tools.
etc/lvm/lvm_hosttag.conf
For each host tag, an extra configuration file is read if it exists: lvm_hosttag.conf. If thatfile defines new tags, then further configuration files will be appended to the list of files toread in. For information on host tags, see Section C.2, “Host Tags” .
In addition to the LVM configuration files, a system running LVM includes the following files that affectLVM system setup:
/etc/lvm/.cache
Device name filter cache file (configurable).
/etc/lvm/backup/
Directory for automatic volume group metadata backups (configurable).
/etc/lvm/archive/
Directory for automatic volume group metadata archives (configurable with regard todirectory path and archive history depth).
/var/lock/lvm/
In single-host configuration, lock files to prevent parallel tool runs from corrupting themetadata; in a cluster, cluster-wide DLM is used.
B.2. Sample lvm.conf File
The following is a sample lvm.conf configuration file. This configuration file is the default file for theRed Hat Enterprise Linux 5.9 release. If your system is running a different release of Red HatEnterprise Linux, some of the default settings may differ.
# This is an example configuration file for the LVM2 system.# It contains the default settings that would be used if there was no# /etc/lvm/lvm.conf file.
T he LVM Configurat ion Files
97

## Refer to 'man lvm.conf' for further information including the file layout.## To put this file in a different directory and override /etc/lvm set# the environment variable LVM_SYSTEM_DIR before running the tools.## N.B. Take care that each setting only appears once if uncommenting# example settings in this file.
# This section allows you to configure which block devices should# be used by the LVM system.devices {
# Where do you want your volume groups to appear ? dir = "/dev"
# An array of directories that contain the device nodes you wish # to use with LVM2. scan = [ "/dev" ]
# If set, the cache of block device nodes with all associated symlinks # will be constructed out of the existing udev database content. # This avoids using and opening any inapplicable non-block devices or # subdirectories found in the device directory. This setting is applied # to udev-managed device directory only, other directories will be scanned # fully. LVM2 needs to be compiled with udev support for this setting to # take effect. N.B. Any device node or symlink not managed by udev in # udev directory will be ignored with this setting on. obtain_device_list_from_udev = 1
# If several entries in the scanned directories correspond to the # same block device and the tools need to display a name for device, # all the pathnames are matched against each item in the following # list of regular expressions in turn and the first match is used. # preferred_names = [ ]
# Try to avoid using undescriptive /dev/dm-N names, if present. preferred_names = [ "^/dev/mpath/", "^/dev/mapper/mpath", "^/dev/[hs]d" ]
# A filter that tells LVM2 to only use a restricted set of devices. # The filter consists of an array of regular expressions. These # expressions can be delimited by a character of your choice, and # prefixed with either an 'a' (for accept) or 'r' (for reject). # The first expression found to match a device name determines if # the device will be accepted or rejected (ignored). Devices that # don't match any patterns are accepted.
# Be careful if there there are symbolic links or multiple filesystem # entries for the same device as each name is checked separately against # the list of patterns. The effect is that if the first pattern in the # list to match a name is an 'a' pattern for any of the names, the device # is accepted; otherwise if the first pattern in the list to match a name # is an 'r' pattern for any of the names it is rejected; otherwise it is # accepted.
# Don't have more than one filter line active at once: only one gets used.
# Run vgscan after you change this parameter to ensure that # the cache file gets regenerated (see below). # If it doesn't do what you expect, check the output of 'vgscan -vvvv'.
# By default we accept every block device: filter = [ "a/.*/" ]
Red Hat Ent erprise Linux 5 Logical Volume Manager Administ rat ion
98
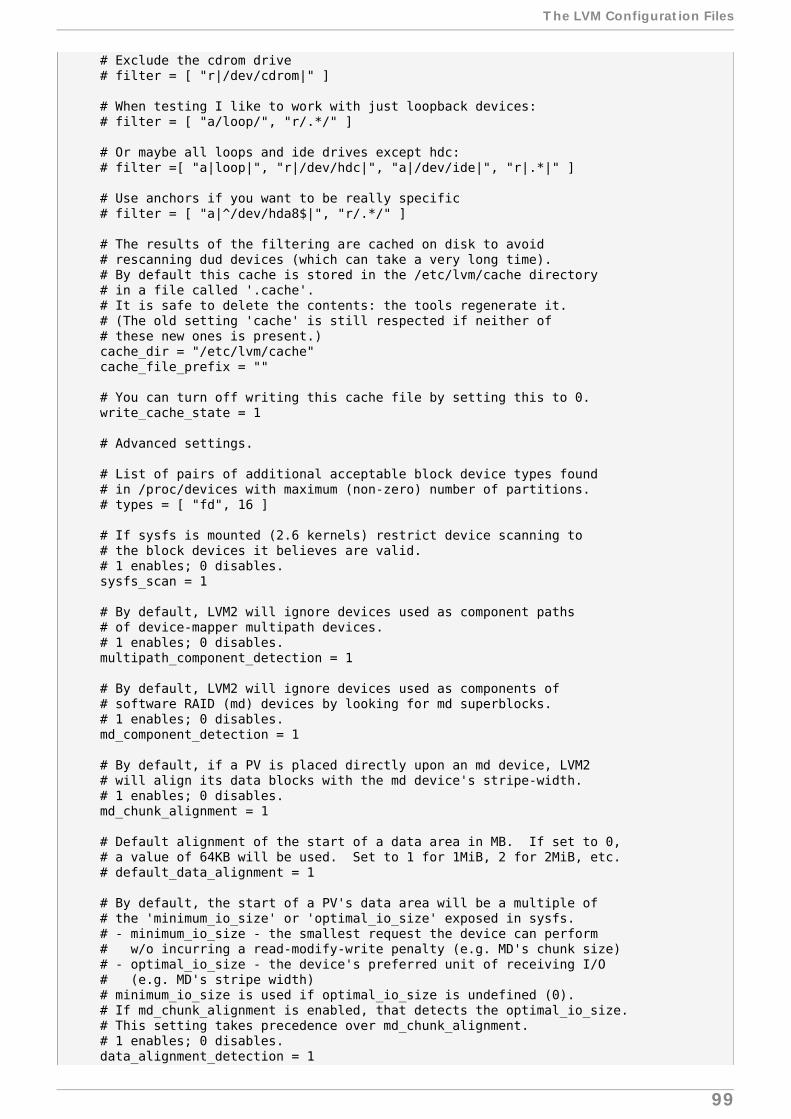
# Exclude the cdrom drive # filter = [ "r|/dev/cdrom|" ]
# When testing I like to work with just loopback devices: # filter = [ "a/loop/", "r/.*/" ]
# Or maybe all loops and ide drives except hdc: # filter =[ "a|loop|", "r|/dev/hdc|", "a|/dev/ide|", "r|.*|" ]
# Use anchors if you want to be really specific # filter = [ "a|^/dev/hda8$|", "r/.*/" ]
# The results of the filtering are cached on disk to avoid # rescanning dud devices (which can take a very long time). # By default this cache is stored in the /etc/lvm/cache directory # in a file called '.cache'. # It is safe to delete the contents: the tools regenerate it. # (The old setting 'cache' is still respected if neither of # these new ones is present.) cache_dir = "/etc/lvm/cache" cache_file_prefix = ""
# You can turn off writing this cache file by setting this to 0. write_cache_state = 1
# Advanced settings.
# List of pairs of additional acceptable block device types found # in /proc/devices with maximum (non-zero) number of partitions. # types = [ "fd", 16 ]
# If sysfs is mounted (2.6 kernels) restrict device scanning to # the block devices it believes are valid. # 1 enables; 0 disables. sysfs_scan = 1
# By default, LVM2 will ignore devices used as component paths # of device-mapper multipath devices. # 1 enables; 0 disables. multipath_component_detection = 1
# By default, LVM2 will ignore devices used as components of # software RAID (md) devices by looking for md superblocks. # 1 enables; 0 disables. md_component_detection = 1
# By default, if a PV is placed directly upon an md device, LVM2 # will align its data blocks with the md device's stripe-width. # 1 enables; 0 disables. md_chunk_alignment = 1
# Default alignment of the start of a data area in MB. If set to 0, # a value of 64KB will be used. Set to 1 for 1MiB, 2 for 2MiB, etc. # default_data_alignment = 1
# By default, the start of a PV's data area will be a multiple of # the 'minimum_io_size' or 'optimal_io_size' exposed in sysfs. # - minimum_io_size - the smallest request the device can perform # w/o incurring a read-modify-write penalty (e.g. MD's chunk size) # - optimal_io_size - the device's preferred unit of receiving I/O # (e.g. MD's stripe width) # minimum_io_size is used if optimal_io_size is undefined (0). # If md_chunk_alignment is enabled, that detects the optimal_io_size. # This setting takes precedence over md_chunk_alignment. # 1 enables; 0 disables. data_alignment_detection = 1
T he LVM Configurat ion Files
99
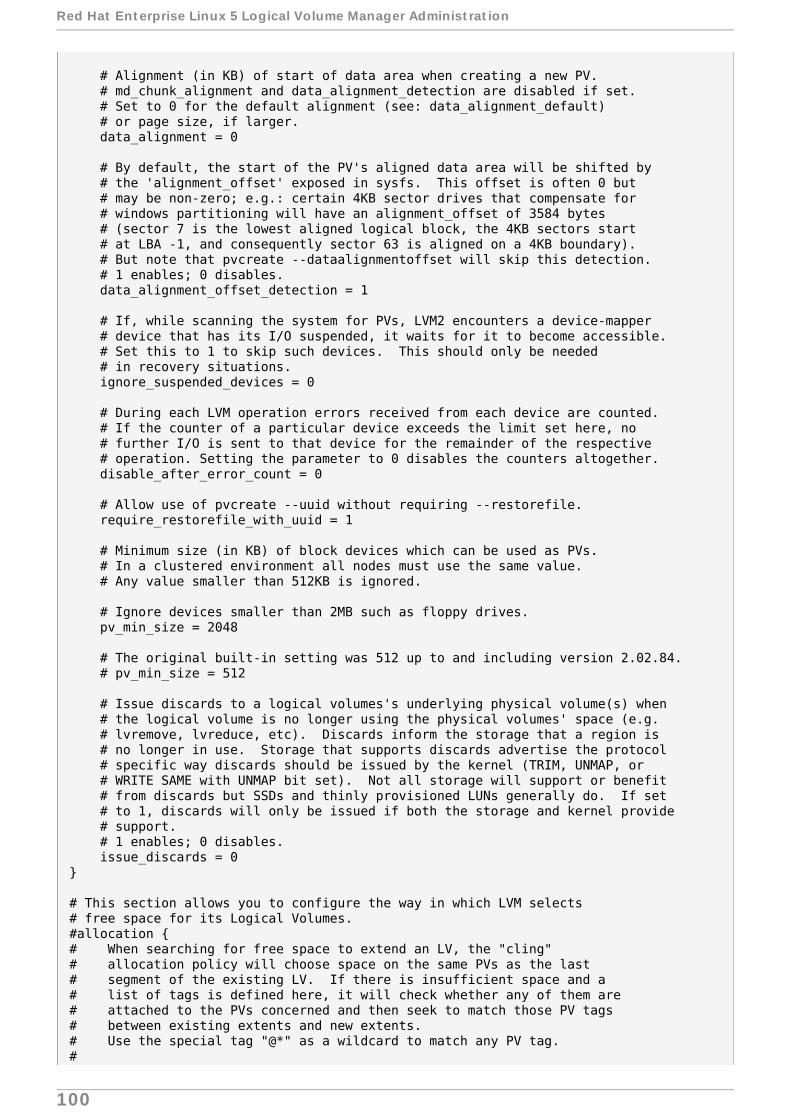
# Alignment (in KB) of start of data area when creating a new PV. # md_chunk_alignment and data_alignment_detection are disabled if set. # Set to 0 for the default alignment (see: data_alignment_default) # or page size, if larger. data_alignment = 0
# By default, the start of the PV's aligned data area will be shifted by # the 'alignment_offset' exposed in sysfs. This offset is often 0 but # may be non-zero; e.g.: certain 4KB sector drives that compensate for # windows partitioning will have an alignment_offset of 3584 bytes # (sector 7 is the lowest aligned logical block, the 4KB sectors start # at LBA -1, and consequently sector 63 is aligned on a 4KB boundary). # But note that pvcreate --dataalignmentoffset will skip this detection. # 1 enables; 0 disables. data_alignment_offset_detection = 1
# If, while scanning the system for PVs, LVM2 encounters a device-mapper # device that has its I/O suspended, it waits for it to become accessible. # Set this to 1 to skip such devices. This should only be needed # in recovery situations. ignore_suspended_devices = 0
# During each LVM operation errors received from each device are counted. # If the counter of a particular device exceeds the limit set here, no # further I/O is sent to that device for the remainder of the respective # operation. Setting the parameter to 0 disables the counters altogether. disable_after_error_count = 0
# Allow use of pvcreate --uuid without requiring --restorefile. require_restorefile_with_uuid = 1
# Minimum size (in KB) of block devices which can be used as PVs. # In a clustered environment all nodes must use the same value. # Any value smaller than 512KB is ignored.
# Ignore devices smaller than 2MB such as floppy drives. pv_min_size = 2048
# The original built-in setting was 512 up to and including version 2.02.84. # pv_min_size = 512
# Issue discards to a logical volumes's underlying physical volume(s) when # the logical volume is no longer using the physical volumes' space (e.g. # lvremove, lvreduce, etc). Discards inform the storage that a region is # no longer in use. Storage that supports discards advertise the protocol # specific way discards should be issued by the kernel (TRIM, UNMAP, or # WRITE SAME with UNMAP bit set). Not all storage will support or benefit # from discards but SSDs and thinly provisioned LUNs generally do. If set # to 1, discards will only be issued if both the storage and kernel provide # support. # 1 enables; 0 disables. issue_discards = 0}
# This section allows you to configure the way in which LVM selects# free space for its Logical Volumes.#allocation {# When searching for free space to extend an LV, the "cling"# allocation policy will choose space on the same PVs as the last# segment of the existing LV. If there is insufficient space and a# list of tags is defined here, it will check whether any of them are# attached to the PVs concerned and then seek to match those PV tags# between existing extents and new extents.# Use the special tag "@*" as a wildcard to match any PV tag.#
Red Hat Ent erprise Linux 5 Logical Volume Manager Administ rat ion
100

# Example: LVs are mirrored between two sites within a single VG.# PVs are tagged with either @site1 or @site2 to indicate where# they are situated.## cling_tag_list = [ "@site1", "@site2" ]# cling_tag_list = [ "@*" ]## Changes made in version 2.02.85 extended the reach of the 'cling'# policies to detect more situations where data can be grouped# onto the same disks. Set this to 0 to revert to the previous# algorithm.## maximise_cling = 1## Set to 1 to guarantee that mirror logs will always be placed on # different PVs from the mirror images. This was the default# until version 2.02.85.## mirror_logs_require_separate_pvs = 0## Set to 1 to guarantee that thin pool metadata will always# be placed on different PVs from the pool data.## thin_pool_metadata_require_separate_pvs = 0#}
# This section that allows you to configure the nature of the# information that LVM2 reports.log {
# Controls the messages sent to stdout or stderr. # There are three levels of verbosity, 3 being the most verbose. verbose = 0
# Should we send log messages through syslog? # 1 is yes; 0 is no. syslog = 1
# Should we log error and debug messages to a file? # By default there is no log file. #file = "/var/log/lvm2.log"
# Should we overwrite the log file each time the program is run? # By default we append. overwrite = 0
# What level of log messages should we send to the log file and/or syslog? # There are 6 syslog-like log levels currently in use - 2 to 7 inclusive. # 7 is the most verbose (LOG_DEBUG). level = 0
# Format of output messages # Whether or not (1 or 0) to indent messages according to their severity indent = 1
# Whether or not (1 or 0) to display the command name on each line output command_names = 0
# A prefix to use before the message text (but after the command name, # if selected). Default is two spaces, so you can see/grep the severity # of each message. prefix = " "
# To make the messages look similar to the original LVM tools use: # indent = 0 # command_names = 1
T he LVM Configurat ion Files
101

# prefix = " -- "
# Set this if you want log messages during activation. # Don't use this in low memory situations (can deadlock). # activation = 0}
# Configuration of metadata backups and archiving. In LVM2 when we# talk about a 'backup' we mean making a copy of the metadata for the# *current* system. The 'archive' contains old metadata configurations.# Backups are stored in a human readeable text format.backup {
# Should we maintain a backup of the current metadata configuration ? # Use 1 for Yes; 0 for No. # Think very hard before turning this off! backup = 1
# Where shall we keep it ? # Remember to back up this directory regularly! backup_dir = "/etc/lvm/backup"
# Should we maintain an archive of old metadata configurations. # Use 1 for Yes; 0 for No. # On by default. Think very hard before turning this off. archive = 1
# Where should archived files go ? # Remember to back up this directory regularly! archive_dir = "/etc/lvm/archive"
# What is the minimum number of archive files you wish to keep ? retain_min = 10
# What is the minimum time you wish to keep an archive file for ? retain_days = 30}
# Settings for the running LVM2 in shell (readline) mode.shell {
# Number of lines of history to store in ~/.lvm_history history_size = 100}
# Miscellaneous global LVM2 settingsglobal {
# The file creation mask for any files and directories created. # Interpreted as octal if the first digit is zero. umask = 077
# Allow other users to read the files #umask = 022
# Enabling test mode means that no changes to the on disk metadata # will be made. Equivalent to having the -t option on every # command. Defaults to off. test = 0
# Default value for --units argument units = "h"
# Since version 2.02.54, the tools distinguish between powers of # 1024 bytes (e.g. KiB, MiB, GiB) and powers of 1000 bytes (e.g.
Red Hat Ent erprise Linux 5 Logical Volume Manager Administ rat ion
102
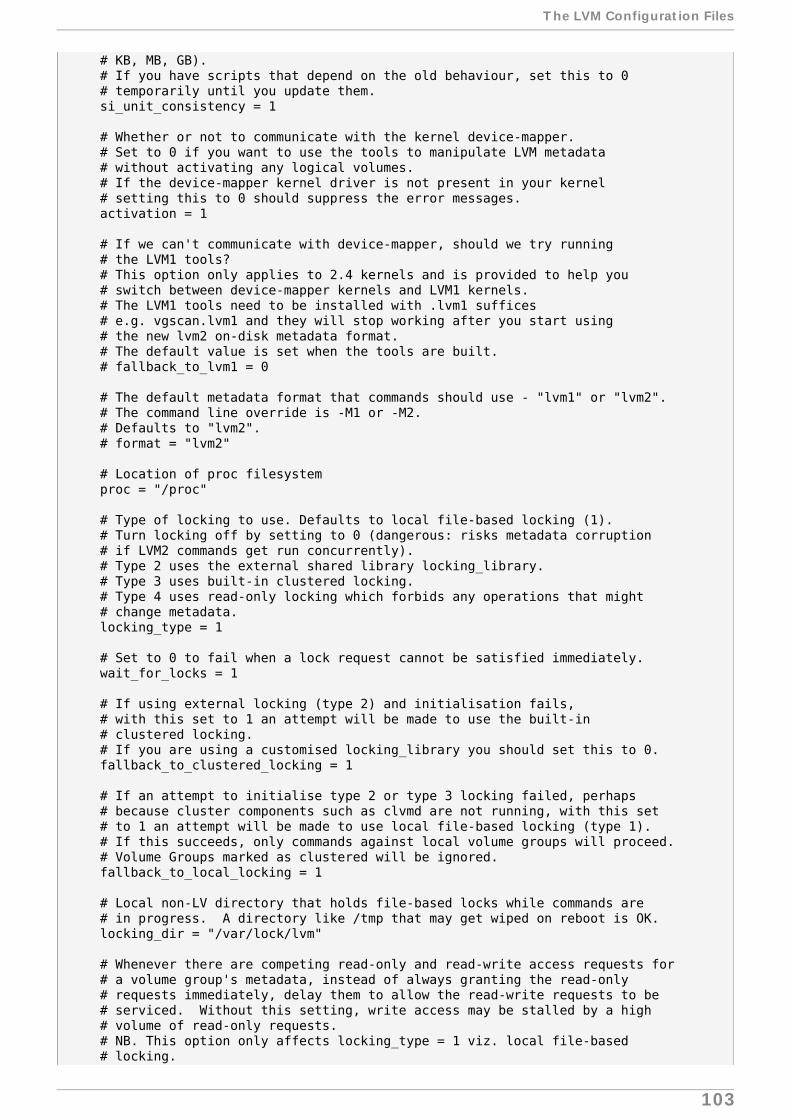
# KB, MB, GB). # If you have scripts that depend on the old behaviour, set this to 0 # temporarily until you update them. si_unit_consistency = 1
# Whether or not to communicate with the kernel device-mapper. # Set to 0 if you want to use the tools to manipulate LVM metadata # without activating any logical volumes. # If the device-mapper kernel driver is not present in your kernel # setting this to 0 should suppress the error messages. activation = 1
# If we can't communicate with device-mapper, should we try running # the LVM1 tools? # This option only applies to 2.4 kernels and is provided to help you # switch between device-mapper kernels and LVM1 kernels. # The LVM1 tools need to be installed with .lvm1 suffices # e.g. vgscan.lvm1 and they will stop working after you start using # the new lvm2 on-disk metadata format. # The default value is set when the tools are built. # fallback_to_lvm1 = 0
# The default metadata format that commands should use - "lvm1" or "lvm2". # The command line override is -M1 or -M2. # Defaults to "lvm2". # format = "lvm2"
# Location of proc filesystem proc = "/proc"
# Type of locking to use. Defaults to local file-based locking (1). # Turn locking off by setting to 0 (dangerous: risks metadata corruption # if LVM2 commands get run concurrently). # Type 2 uses the external shared library locking_library. # Type 3 uses built-in clustered locking. # Type 4 uses read-only locking which forbids any operations that might # change metadata. locking_type = 1
# Set to 0 to fail when a lock request cannot be satisfied immediately. wait_for_locks = 1
# If using external locking (type 2) and initialisation fails, # with this set to 1 an attempt will be made to use the built-in # clustered locking. # If you are using a customised locking_library you should set this to 0. fallback_to_clustered_locking = 1
# If an attempt to initialise type 2 or type 3 locking failed, perhaps # because cluster components such as clvmd are not running, with this set # to 1 an attempt will be made to use local file-based locking (type 1). # If this succeeds, only commands against local volume groups will proceed. # Volume Groups marked as clustered will be ignored. fallback_to_local_locking = 1
# Local non-LV directory that holds file-based locks while commands are # in progress. A directory like /tmp that may get wiped on reboot is OK. locking_dir = "/var/lock/lvm"
# Whenever there are competing read-only and read-write access requests for # a volume group's metadata, instead of always granting the read-only # requests immediately, delay them to allow the read-write requests to be # serviced. Without this setting, write access may be stalled by a high # volume of read-only requests. # NB. This option only affects locking_type = 1 viz. local file-based # locking.
T he LVM Configurat ion Files
103
prioritise_write_locks = 1
# Other entries can go here to allow you to load shared libraries # e.g. if support for LVM1 metadata was compiled as a shared library use # format_libraries = "liblvm2format1.so" # Full pathnames can be given.
# Search this directory first for shared libraries. # library_dir = "/lib"
# The external locking library to load if locking_type is set to 2. # locking_library = "liblvm2clusterlock.so"
# Treat any internal errors as fatal errors, aborting the process that # encountered the internal error. Please only enable for debugging. abort_on_internal_errors = 0
# Check whether CRC is matching when parsed VG is used multiple times. # This is useful to catch unexpected internal cached volume group # structure modification. Please only enable for debugging. detect_internal_vg_cache_corruption = 0
# If set to 1, no operations that change on-disk metadata will be permitted. # Additionally, read-only commands that encounter metadata in need of repair # will still be allowed to proceed exactly as if the repair had been # performed (except for the unchanged vg_seqno). # Inappropriate use could mess up your system, so seek advice first! metadata_read_only = 0
# 'mirror_segtype_default' defines which segtype will be used when the # shorthand '-m' option is used for mirroring. The possible options are: # # "mirror" - The original RAID1 implementation provided by LVM2/DM. It is # characterized by a flexible log solution (core, disk, mirrored) # and by the necessity to block I/O while reconfiguring in the # event of a failure. # # There is an inherent race in the dmeventd failure handling # logic with snapshots of devices using this type of RAID1 that # in the worst case could cause a deadlock. # Ref: https://bugzilla.redhat.com/show_bug.cgi?id=817130#c10 # # "raid1" - This implementation leverages MD's RAID1 personality through # device-mapper. It is characterized by a lack of log options. # (A log is always allocated for every device and they are placed # on the same device as the image - no separate devices are # required.) This mirror implementation does not require I/O # to be blocked in the kernel in the event of a failure. # This mirror implementation is not cluster-aware and cannot be # used in a shared (active/active) fashion in a cluster. # # Specify the '--type <mirror|raid1>' option to override this default # setting. mirror_segtype_default = "mirror"
# The default format for displaying LV names in lvdisplay was changed # in version 2.02.89 to show the LV name and path separately. # Previously this was always shown as /dev/vgname/lvname even when that # was never a valid path in the /dev filesystem. # Set to 1 to reinstate the previous format. # # lvdisplay_shows_full_device_path = 0
# Whether to use (trust) a running instance of lvmetad. If this is set to # 0, all commands fall back to the usual scanning mechanisms. When set to 1 # *and* when lvmetad is running (it is not auto-started), the volume group
Red Hat Ent erprise Linux 5 Logical Volume Manager Administ rat ion
104

# metadata and PV state flags are obtained from the lvmetad instance and no # scanning is done by the individual commands. In a setup with lvmetad, # lvmetad udev rules *must* be set up for LVM to work correctly. Without # proper udev rules, all changes in block device configuration will be # *ignored* until a manual 'vgscan' is performed. use_lvmetad = 0}
activation { # Set to 1 to perform internal checks on the operations issued to # libdevmapper. Useful for debugging problems with activation. # Some of the checks may be expensive, so it's best to use this # only when there seems to be a problem. checks = 0
# Set to 0 to disable udev synchronisation (if compiled into the binaries). # Processes will not wait for notification from udev. # They will continue irrespective of any possible udev processing # in the background. You should only use this if udev is not running # or has rules that ignore the devices LVM2 creates. # The command line argument --nodevsync takes precedence over this setting. # If set to 1 when udev is not running, and there are LVM2 processes # waiting for udev, run 'dmsetup udevcomplete_all' manually to wake them up. udev_sync = 1
# Set to 0 to disable the udev rules installed by LVM2 (if built with # --enable-udev_rules). LVM2 will then manage the /dev nodes and symlinks # for active logical volumes directly itself. # N.B. Manual intervention may be required if this setting is changed # while any logical volumes are active. udev_rules = 1
# Set to 1 for LVM2 to verify operations performed by udev. This turns on # additional checks (and if necessary, repairs) on entries in the device # directory after udev has completed processing its events. # Useful for diagnosing problems with LVM2/udev interactions. verify_udev_operations = 0
# If set to 1 and if deactivation of an LV fails, perhaps because # a process run from a quick udev rule temporarily opened the device, # retry the operation for a few seconds before failing. retry_deactivation = 1
# How to fill in missing stripes if activating an incomplete volume. # Using "error" will make inaccessible parts of the device return # I/O errors on access. You can instead use a device path, in which # case, that device will be used to in place of missing stripes. # But note that using anything other than "error" with mirrored # or snapshotted volumes is likely to result in data corruption. missing_stripe_filler = "error"
# The linear target is an optimised version of the striped target # that only handles a single stripe. Set this to 0 to disable this # optimisation and always use the striped target. use_linear_target = 1
# How much stack (in KB) to reserve for use while devices suspended # Prior to version 2.02.89 this used to be set to 256KB reserved_stack = 64
# How much memory (in KB) to reserve for use while devices suspended reserved_memory = 8192
# Nice value used while devices suspended process_priority = -18
T he LVM Configurat ion Files
105

# If volume_list is defined, each LV is only activated if there is a # match against the list. # "vgname" and "vgname/lvname" are matched exactly. # "@tag" matches any tag set in the LV or VG. # "@*" matches if any tag defined on the host is also set in the LV or VG # # volume_list = [ "vg1", "vg2/lvol1", "@tag1", "@*" ]
# If read_only_volume_list is defined, each LV that is to be activated # is checked against the list, and if it matches, it as activated # in read-only mode. (This overrides '--permission rw' stored in the # metadata.) # "vgname" and "vgname/lvname" are matched exactly. # "@tag" matches any tag set in the LV or VG. # "@*" matches if any tag defined on the host is also set in the LV or VG # # read_only_volume_list = [ "vg1", "vg2/lvol1", "@tag1", "@*" ]
# Size (in KB) of each copy operation when mirroring mirror_region_size = 512
# Setting to use when there is no readahead value stored in the metadata. # # "none" - Disable readahead. # "auto" - Use default value chosen by kernel. readahead = "auto"
# 'raid_fault_policy' defines how a device failure in a RAID logical # volume is handled. This includes logical volumes that have the following # segment types: raid1, raid4, raid5*, and raid6*. # # In the event of a failure, the following policies will determine what # actions are performed during the automated response to failures (when # dmeventd is monitoring the RAID logical volume) and when 'lvconvert' is # called manually with the options '--repair' and '--use-policies'. # # "warn" - Use the system log to warn the user that a device in the RAID # logical volume has failed. It is left to the user to run # 'lvconvert --repair' manually to remove or replace the failed # device. As long as the number of failed devices does not # exceed the redundancy of the logical volume (1 device for # raid4/5, 2 for raid6, etc) the logical volume will remain # usable. # # "allocate" - Attempt to use any extra physical volumes in the volume # group as spares and replace faulty devices. # raid_fault_policy = "warn"
# 'mirror_image_fault_policy' and 'mirror_log_fault_policy' define # how a device failure affecting a mirror (of "mirror" segment type) is # handled. A mirror is composed of mirror images (copies) and a log. # A disk log ensures that a mirror does not need to be re-synced # (all copies made the same) every time a machine reboots or crashes. # # In the event of a failure, the specified policy will be used to determine # what happens. This applies to automatic repairs (when the mirror is being # monitored by dmeventd) and to manual lvconvert --repair when # --use-policies is given. # # "remove" - Simply remove the faulty device and run without it. If # the log device fails, the mirror would convert to using # an in-memory log. This means the mirror will not # remember its sync status across crashes/reboots and # the entire mirror will be re-synced. If a # mirror image fails, the mirror will convert to a
Red Hat Ent erprise Linux 5 Logical Volume Manager Administ rat ion
106

# non-mirrored device if there is only one remaining good # copy. # # "allocate" - Remove the faulty device and try to allocate space on # a new device to be a replacement for the failed device. # Using this policy for the log is fast and maintains the # ability to remember sync state through crashes/reboots. # Using this policy for a mirror device is slow, as it # requires the mirror to resynchronize the devices, but it # will preserve the mirror characteristic of the device. # This policy acts like "remove" if no suitable device and # space can be allocated for the replacement. # # "allocate_anywhere" - Not yet implemented. Useful to place the log device # temporarily on same physical volume as one of the mirror # images. This policy is not recommended for mirror devices # since it would break the redundant nature of the mirror. This # policy acts like "remove" if no suitable device and space can # be allocated for the replacement.
mirror_log_fault_policy = "allocate" mirror_image_fault_policy = "remove"
# 'snapshot_autoextend_threshold' and 'snapshot_autoextend_percent' define # how to handle automatic snapshot extension. The former defines when the # snapshot should be extended: when its space usage exceeds this many # percent. The latter defines how much extra space should be allocated for # the snapshot, in percent of its current size. # # For example, if you set snapshot_autoextend_threshold to 70 and # snapshot_autoextend_percent to 20, whenever a snapshot exceeds 70% usage, # it will be extended by another 20%. For a 1G snapshot, using up 700M will # trigger a resize to 1.2G. When the usage exceeds 840M, the snapshot will # be extended to 1.44G, and so on. # # Setting snapshot_autoextend_threshold to 100 disables automatic # extensions. The minimum value is 50 (A setting below 50 will be treated # as 50).
snapshot_autoextend_threshold = 100 snapshot_autoextend_percent = 20
# 'thin_pool_autoextend_threshold' and 'thin_pool_autoextend_percent' define # how to handle automatic pool extension. The former defines when the # pool should be extended: when its space usage exceeds this many # percent. The latter defines how much extra space should be allocated for # the pool, in percent of its current size. # # For example, if you set thin_pool_autoextend_threshold to 70 and # thin_pool_autoextend_percent to 20, whenever a pool exceeds 70% usage, # it will be extended by another 20%. For a 1G pool, using up 700M will # trigger a resize to 1.2G. When the usage exceeds 840M, the pool will # be extended to 1.44G, and so on. # # Setting thin_pool_autoextend_threshold to 100 disables automatic # extensions. The minimum value is 50 (A setting below 50 will be treated # as 50).
thin_pool_autoextend_threshold = 100 thin_pool_autoextend_percent = 20
# Full path of the utility called to check that a thin metadata device # is in a state that allows it to be used. # Each time a thin pool needs to be activated, this utility is executed. # The activation will only proceed if the utility has an exit status of 0. # Set to "" to skip this check. (Not recommended.)
T he LVM Configurat ion Files
107

# The thin tools are available as part of the device-mapper-persistent-data # package from https://github.com/jthornber/thin-provisioning-tools. # thin_check_executable = "/usr/sbin/thin_check"
# String with options passed with thin_check command. By default, # option '-q' is for quiet output. thin_check_options = [ "-q" ]
# While activating devices, I/O to devices being (re)configured is # suspended, and as a precaution against deadlocks, LVM2 needs to pin # any memory it is using so it is not paged out. Groups of pages that # are known not to be accessed during activation need not be pinned # into memory. Each string listed in this setting is compared against # each line in /proc/self/maps, and the pages corresponding to any # lines that match are not pinned. On some systems locale-archive was # found to make up over 80% of the memory used by the process. # mlock_filter = [ "locale/locale-archive", "gconv/gconv-modules.cache" ]
# Set to 1 to revert to the default behaviour prior to version 2.02.62 # which used mlockall() to pin the whole process's memory while activating # devices. use_mlockall = 0
# Monitoring is enabled by default when activating logical volumes. # Set to 0 to disable monitoring or use the --ignoremonitoring option. monitoring = 1
# When pvmove or lvconvert must wait for the kernel to finish # synchronising or merging data, they check and report progress # at intervals of this number of seconds. The default is 15 seconds. # If this is set to 0 and there is only one thing to wait for, there # are no progress reports, but the process is awoken immediately the # operation is complete. polling_interval = 15}
##################### Advanced section #####################
# Metadata settings## metadata { # Default number of copies of metadata to hold on each PV. 0, 1 or 2. # You might want to override it from the command line with 0 # when running pvcreate on new PVs which are to be added to large VGs.
# pvmetadatacopies = 1
# Default number of copies of metadata to maintain for each VG. # If set to a non-zero value, LVM automatically chooses which of # the available metadata areas to use to achieve the requested # number of copies of the VG metadata. If you set a value larger # than the the total number of metadata areas available then # metadata is stored in them all. # The default value of 0 ("unmanaged") disables this automatic # management and allows you to control which metadata areas # are used at the individual PV level using 'pvchange # --metadataignore y/n'.
# vgmetadatacopies = 0
# Approximate default size of on-disk metadata areas in sectors. # You should increase this if you have large volume groups or
Red Hat Ent erprise Linux 5 Logical Volume Manager Administ rat ion
108

# you want to retain a large on-disk history of your metadata changes.
# pvmetadatasize = 255
# List of directories holding live copies of text format metadata. # These directories must not be on logical volumes! # It's possible to use LVM2 with a couple of directories here, # preferably on different (non-LV) filesystems, and with no other # on-disk metadata (pvmetadatacopies = 0). Or this can be in # addition to on-disk metadata areas. # The feature was originally added to simplify testing and is not # supported under low memory situations - the machine could lock up. # # Never edit any files in these directories by hand unless you # you are absolutely sure you know what you are doing! Use # the supplied toolset to make changes (e.g. vgcfgrestore).
# dirs = [ "/etc/lvm/metadata", "/mnt/disk2/lvm/metadata2" ]#}
# Event daemon#dmeventd { # mirror_library is the library used when monitoring a mirror device. # # "libdevmapper-event-lvm2mirror.so" attempts to recover from # failures. It removes failed devices from a volume group and # reconfigures a mirror as necessary. If no mirror library is # provided, mirrors are not monitored through dmeventd.
mirror_library = "libdevmapper-event-lvm2mirror.so"
# snapshot_library is the library used when monitoring a snapshot device. # # "libdevmapper-event-lvm2snapshot.so" monitors the filling of # snapshots and emits a warning through syslog when the use of # the snapshot exceeds 80%. The warning is repeated when 85%, 90% and # 95% of the snapshot is filled.
snapshot_library = "libdevmapper-event-lvm2snapshot.so"
# thin_library is the library used when monitoring a thin device. # # "libdevmapper-event-lvm2thin.so" monitors the filling of # pool and emits a warning through syslog when the use of # the pool exceeds 80%. The warning is repeated when 85%, 90% and # 95% of the pool is filled.
thin_library = "libdevmapper-event-lvm2thin.so"
# Full path of the dmeventd binary. # # executable = "/sbin/dmeventd"}
T he LVM Configurat ion Files
109

LVM Object Tags
An LVM tag is a word that can be used to group LVM2 objects of the same type together. Tags can beattached to objects such as physical volumes, volume groups, and logical volumes. Tags can beattached to hosts in a cluster configuration. Snapshots cannot be tagged.
Tags can be given on the command line in place of PV, VG or LV arguments. Tags should beprefixed with @ to avoid ambiguity. Each tag is expanded by replacing it with all objects possessingthat tag which are of the type expected by its position on the command line.
LVM tags are strings using [A-Za-z0-9_+.-] of up to 128 characters. They cannot start with a hyphen.
Only objects in a volume group can be tagged. Physical volumes lose their tags if they are removedfrom a volume group; this is because tags are stored as part of the volume group metadata and thatis deleted when a physical volume is removed. Snapshots cannot be tagged.
The following command lists all the logical volumes with the database tag.
lvs @database
The following command lists the currently active host tags.
lvm tags
C.1. Adding and Removing Object Tags
To add or delete tags from physical volumes, use the --addtag or --deltag option of the pvchange command.
To add or delete tags from volume groups, use the --addtag or --deltag option of the vgchangeor vgcreate commands.
To add or delete tags from logical volumes, use the --addtag or --deltag option of the lvchangeor lvcreate commands.
C.2. Host Tags
In a cluster configuration, you can define host tags in the configuration files. If you set hosttags = 1 in the tags section, a host tag is automatically defined using the machine's hostname. This allowyou to use a common configuration file which can be replicated on all your machines so they holdidentical copies of the file, but the behavior can differ between machines according to the hostname.
For information on the configuration files, see Appendix B, The LVM Configuration Files.
For each host tag, an extra configuration file is read if it exists: lvm_hosttag.conf. If that file definesnew tags, then further configuration files will be appended to the list of files to read in.
For example, the following entry in the configuration file always defines tag1, and defines tag2 if thehostname is host1.
tags { tag1 { } tag2 { host_list = ["host1"] } }
C.3. Cont rolling Act ivat ion with Tags
Red Hat Ent erprise Linux 5 Logical Volume Manager Administ rat ion
110

You can specify in the configuration file that only certain logical volumes should be activated on thathost. For example, the following entry acts as a filter for activation requests (such as vgchange -ay) and only activates vg1/lvol0 and any logical volumes or volume groups with the databasetag in the metadata on that host.
activation { volume_list = ["vg1/lvol0", "@database" ] }
There is a special match "@*" that causes a match only if any metadata tag matches any host tag onthat machine.
As another example, consider a situation where every machine in the cluster has the following entryin the configuration file:
tags { hosttags = 1 }
If you want to activate vg1/lvol2 only on host db2, do the following:
1. Run lvchange --addtag @db2 vg1/lvol2 from any host in the cluster.
2. Run lvchange -ay vg1/lvol2.
This solution involves storing hostnames inside the volume group metadata.
LVM Object T ags
111
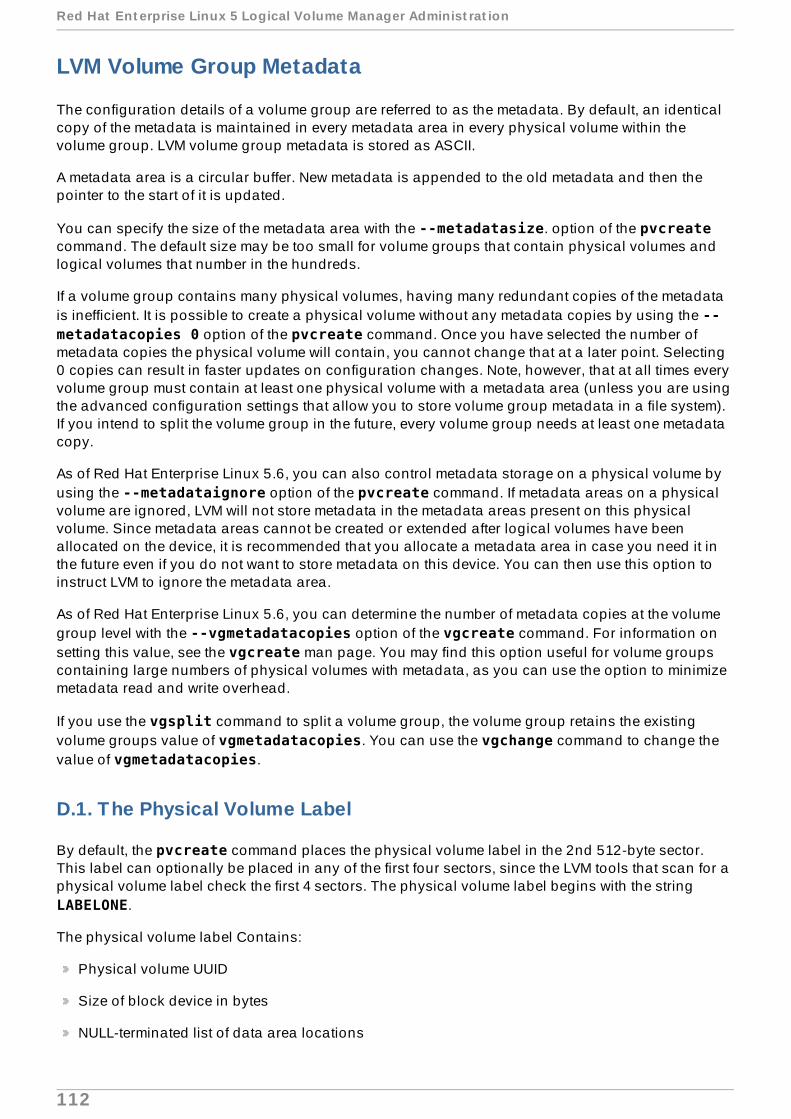
LVM Volume Group Metadata
The configuration details of a volume group are referred to as the metadata. By default, an identicalcopy of the metadata is maintained in every metadata area in every physical volume within thevolume group. LVM volume group metadata is stored as ASCII.
A metadata area is a circular buffer. New metadata is appended to the old metadata and then thepointer to the start of it is updated.
You can specify the size of the metadata area with the --metadatasize. option of the pvcreatecommand. The default size may be too small for volume groups that contain physical volumes andlogical volumes that number in the hundreds.
If a volume group contains many physical volumes, having many redundant copies of the metadatais inefficient. It is possible to create a physical volume without any metadata copies by using the --metadatacopies 0 option of the pvcreate command. Once you have selected the number ofmetadata copies the physical volume will contain, you cannot change that at a later point. Selecting0 copies can result in faster updates on configuration changes. Note, however, that at all times everyvolume group must contain at least one physical volume with a metadata area (unless you are usingthe advanced configuration settings that allow you to store volume group metadata in a file system).If you intend to split the volume group in the future, every volume group needs at least one metadatacopy.
As of Red Hat Enterprise Linux 5.6, you can also control metadata storage on a physical volume byusing the --metadataignore option of the pvcreate command. If metadata areas on a physicalvolume are ignored, LVM will not store metadata in the metadata areas present on this physicalvolume. Since metadata areas cannot be created or extended after logical volumes have beenallocated on the device, it is recommended that you allocate a metadata area in case you need it inthe future even if you do not want to store metadata on this device. You can then use this option toinstruct LVM to ignore the metadata area.
As of Red Hat Enterprise Linux 5.6, you can determine the number of metadata copies at the volumegroup level with the --vgmetadatacopies option of the vgcreate command. For information onsetting this value, see the vgcreate man page. You may find this option useful for volume groupscontaining large numbers of physical volumes with metadata, as you can use the option to minimizemetadata read and write overhead.
If you use the vgsplit command to split a volume group, the volume group retains the existingvolume groups value of vgmetadatacopies. You can use the vgchange command to change thevalue of vgmetadatacopies.
D.1. The Physical Volume Label
By default, the pvcreate command places the physical volume label in the 2nd 512-byte sector.This label can optionally be placed in any of the first four sectors, since the LVM tools that scan for aphysical volume label check the first 4 sectors. The physical volume label begins with the string LABELONE.
The physical volume label Contains:
Physical volume UUID
Size of block device in bytes
NULL-terminated list of data area locations
Red Hat Ent erprise Linux 5 Logical Volume Manager Administ rat ion
112

NULL-terminated lists of metadata area locations
Metadata locations are stored as offset and size (in bytes). There is room in the label for about 15locations, but the LVM tools currently use 3: a single data area plus up to two metadata areas.
D.2. Metadata Contents
The volume group metadata contains:
Information about how and when it was created
Information about the volume group:
The volume group information contains:
Name and unique id
A version number which is incremented whenever the metadata gets updated
Any properties: Read/Write? Resizeable?
Any administrative limit on the number of physical volumes and logical volumes it may contain
The extent size (in units of sectors which are defined as 512 bytes)
An unordered list of physical volumes making up the volume group, each with:
Its UUID, used to determine the block device containing it
Any properties, such as whether the physical volume is allocatable
The offset to the start of the first extent within the physical volume (in sectors)
The number of extents
An unordered list of logical volumes. each consisting of
An ordered list of logical volume segments. For each segment the metadata includes amapping applied to an ordered list of physical volume segments or logical volume segments
D.3. Sample Metadata
The following shows an example of LVM volume group metadata for a volume group called myvg.
# Generated by LVM2: Tue Jan 30 16:28:15 2007
contents = "Text Format Volume Group"version = 1
description = "Created *before* executing 'lvextend -L+5G /dev/myvg/mylv /dev/sdc'"
creation_host = "tng3-1" # Linux tng3-1 2.6.18-8.el5 #1 SMP Fri Jan 26 14:15:21 EST 2007 i686creation_time = 1170196095 # Tue Jan 30 16:28:15 2007
myvg { id = "0zd3UT-wbYT-lDHq-lMPs-EjoE-0o18-wL28X4" seqno = 3 status = ["RESIZEABLE", "READ", "WRITE"] extent_size = 8192 # 4 Megabytes
LVM Volume Group Met adat a
113

max_lv = 0 max_pv = 0
physical_volumes {
pv0 { id = "ZBW5qW-dXF2-0bGw-ZCad-2RlV-phwu-1c1RFt" device = "/dev/sda" # Hint only
status = ["ALLOCATABLE"] dev_size = 35964301 # 17.1491 Gigabytes pe_start = 384 pe_count = 4390 # 17.1484 Gigabytes }
pv1 { id = "ZHEZJW-MR64-D3QM-Rv7V-Hxsa-zU24-wztY19" device = "/dev/sdb" # Hint only
status = ["ALLOCATABLE"] dev_size = 35964301 # 17.1491 Gigabytes pe_start = 384 pe_count = 4390 # 17.1484 Gigabytes }
pv2 { id = "wCoG4p-55Ui-9tbp-VTEA-jO6s-RAVx-UREW0G" device = "/dev/sdc" # Hint only
status = ["ALLOCATABLE"] dev_size = 35964301 # 17.1491 Gigabytes pe_start = 384 pe_count = 4390 # 17.1484 Gigabytes }
pv3 { id = "hGlUwi-zsBg-39FF-do88-pHxY-8XA2-9WKIiA" device = "/dev/sdd" # Hint only
status = ["ALLOCATABLE"] dev_size = 35964301 # 17.1491 Gigabytes pe_start = 384 pe_count = 4390 # 17.1484 Gigabytes } } logical_volumes {
mylv { id = "GhUYSF-qVM3-rzQo-a6D2-o0aV-LQet-Ur9OF9" status = ["READ", "WRITE", "VISIBLE"] segment_count = 2
segment1 { start_extent = 0 extent_count = 1280 # 5 Gigabytes
type = "striped" stripe_count = 1 # linear
stripes = [ "pv0", 0 ] } segment2 { start_extent = 1280 extent_count = 1280 # 5 Gigabytes
Red Hat Ent erprise Linux 5 Logical Volume Manager Administ rat ion
114
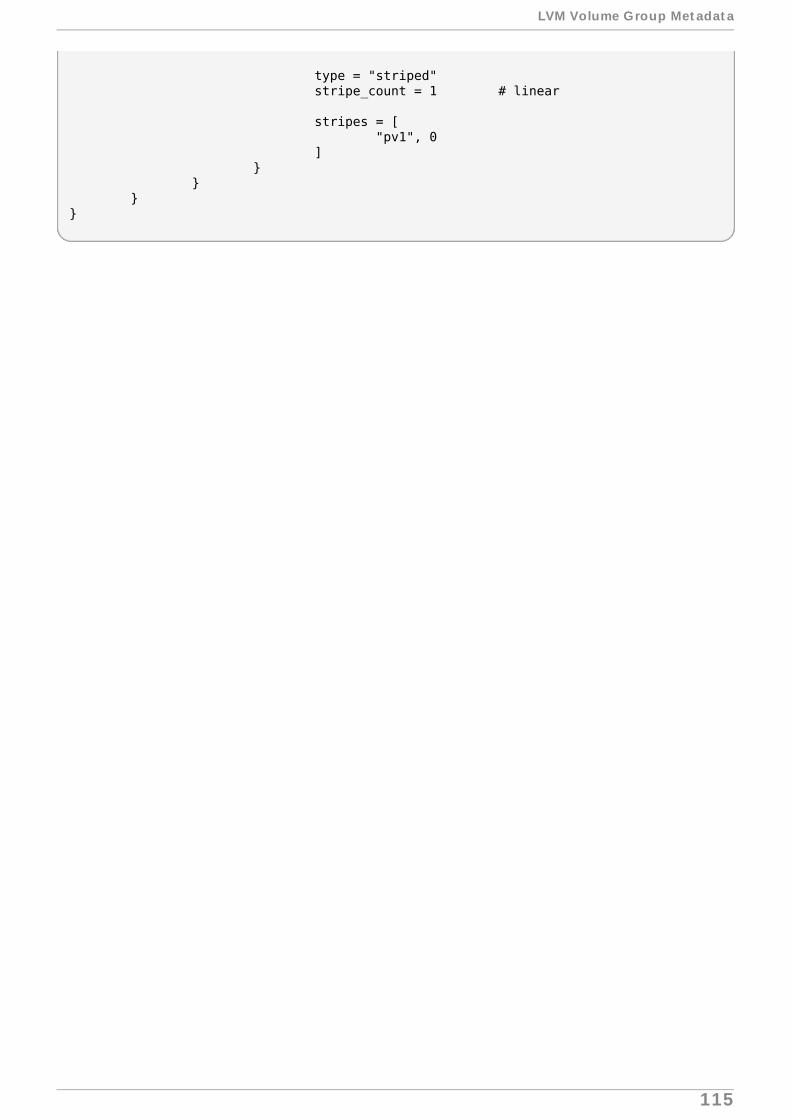
type = "striped" stripe_count = 1 # linear
stripes = [ "pv1", 0 ] } } }}
LVM Volume Group Met adat a
115
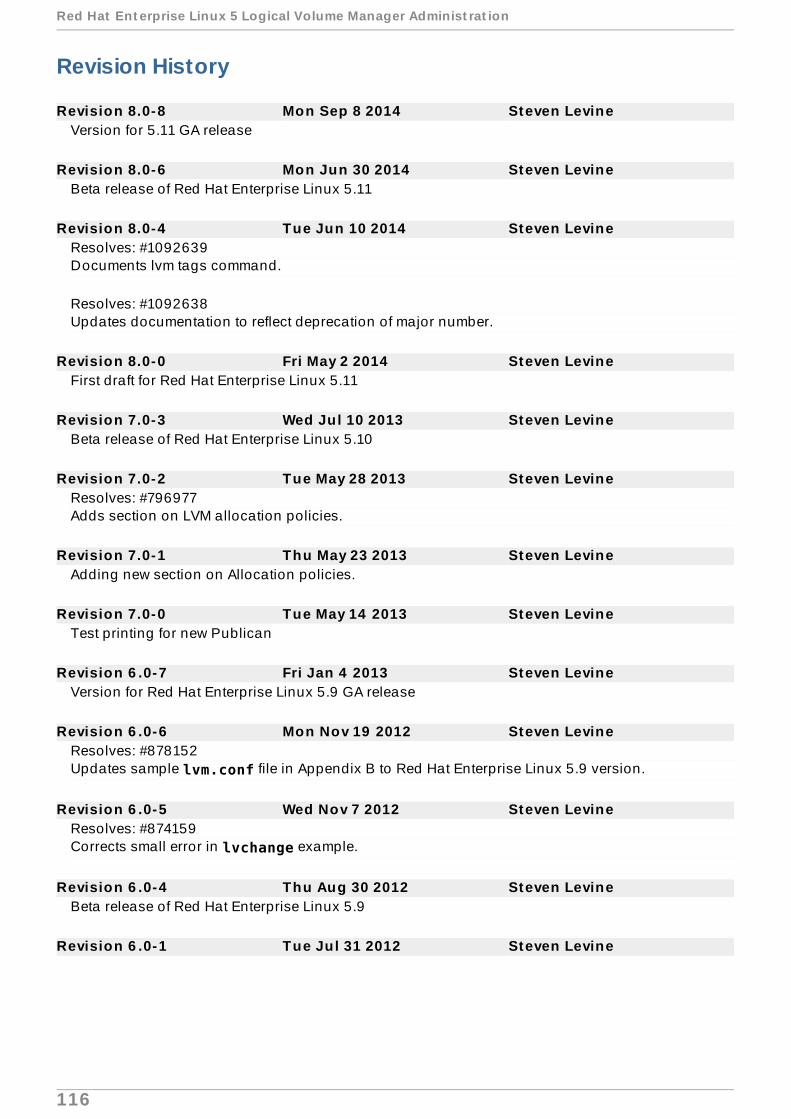
Revision History
Revision 8.0-8 Mon Sep 8 2014 Steven LevineVersion for 5.11 GA release
Revision 8.0-6 Mon Jun 30 2014 Steven LevineBeta release of Red Hat Enterprise Linux 5.11
Revision 8.0-4 Tue Jun 10 2014 Steven LevineResolves: #1092639Documents lvm tags command.
Resolves: #1092638Updates documentation to reflect deprecation of major number.
Revision 8.0-0 Fri May 2 2014 Steven LevineFirst draft for Red Hat Enterprise Linux 5.11
Revision 7.0-3 Wed Jul 10 2013 Steven LevineBeta release of Red Hat Enterprise Linux 5.10
Revision 7.0-2 Tue May 28 2013 Steven LevineResolves: #796977Adds section on LVM allocation policies.
Revision 7.0-1 Thu May 23 2013 Steven LevineAdding new section on Allocation policies.
Revision 7.0-0 Tue May 14 2013 Steven LevineTest printing for new Publican
Revision 6 .0-7 Fri Jan 4 2013 Steven LevineVersion for Red Hat Enterprise Linux 5.9 GA release
Revision 6 .0-6 Mon Nov 19 2012 Steven LevineResolves: #878152Updates sample lvm.conf file in Appendix B to Red Hat Enterprise Linux 5.9 version.
Revision 6 .0-5 Wed Nov 7 2012 Steven LevineResolves: #874159Corrects small error in lvchange example.
Revision 6 .0-4 Thu Aug 30 2012 Steven LevineBeta release of Red Hat Enterprise Linux 5.9
Revision 6 .0-1 Tue Jul 31 2012 Steven Levine
Red Hat Ent erprise Linux 5 Logical Volume Manager Administ rat ion
116

Resolves: #736548Notes that clustered log daemon should be installed and running to perform pvmove in a cluster.
Resolves: #801525Makes prompts consistent in all examples.
Revision 5.0-4 Thu Feb 16 2012 Steven LevineRelease for GA of Red Hat Enterprise Linux 5.8
Revision 5.0-3 Thu Dec 15 2011 Steven LevineBeta release of Red Hat Enterprise Linux 5.8
Revision 5.0-2 Tue Nov 23 2011 Steven LevineResolves: #755739, #755734, #755736Corrects and clarifies small issues found during QE review.
Revision 5.0-1 Thu Nov 9 2011 Steven LevineResolves: #742311Documents the --nosync option of lvextend command in Red Hat Enterprise Linux 5.8.
Resolves: #736458Indicates that cluster mirror packages should be installed to relocate a pv in a cluster.
Resolves: #730761Removes outdated references.
Revision 4 .0-1 Thu Jul 21 2011 Steven LevineResolves: #705139Documents new LVM features supported in Red Hat Enterprise Linux release 5.7.
Resolves: #712437Documents support of mirrored stripes in Red Hat Enterprise Linux release 5.7.
Resolves: #654898Fixes minor typographical errors.
Revision 3.0-1 Thu Dec 23 2010 Steven LevineUpdates sample lvm.conf file for Red Hat Enterprise Linux 5.6 release.
Resolves: #531637Adds note clarifying behavior of mirror log management when the device holding the cluster mirrorlog becomes unavailable.
Resolves: #659496Documents new features: splitmirror, mirroring mirror log, and managing metadata, as described inNew and Changed Features section.
Resolves: #637188Removes outdated information that the pvmove command is not supported in a cluster.
Resolves: #656195Corrects small typographic errors.
Revision Hist ory
117

Revision 2.0-1 Thu Mar 11 2010 Steven LevineUpdates lvm.conf for Red Hat Enterprise Linux 5.5 release.
Resolves: #532588Clarifies necessity for running vgscan when hardware configuration changes.
Revision 1.0-1 Tue Aug 18 2009 Steven LevineReplaces Cluster Logical Volume Manager, resolving bugs against that document.
Resolves: #510273Clarifies lack of snapshot support in clustered volume groups.
Resolves: #515742Documents necessity for increasing mirror region size from default value for mirrors that are largerthan 1.5TB.
Resolves: #491028Fixes assorted wording and format errors.
Resolves: #491028Fixes assorted wording and format errors.
Resolves: #504028Provides new sections and documentation on creating mirrors in a cluster; general technicalcorrections.
Resolves: #494007Clarifies description of setting snapshot size.
Resolves: #504028Adds example showing creation of a mirrored volume in a cluster.
Resolves: #518567Adds caution about ensuring all nodes in a cluster can access shared storage.
Resolves: #510920Fixes typo.
Index
Aact ivat ing logical vo lumes
- individual nodes, Activating Logical Volumes on Individual Nodes in a Cluster
act ivat ing volume groups, Act ivat ing and Deact ivat ing Volume Groups- individual nodes, Activating and Deactivating Volume Groups- local node only, Activating and Deactivating Volume Groups
administ rat ive procedures, LVM Administ rat ion Overview
allocat ion, LVM Allocat ion
Red Hat Ent erprise Linux 5 Logical Volume Manager Administ rat ion
118
- policy, Creating Volume Groups- preventing, Preventing Allocation on a Physical Volume
archive f ile, Logical Volume Backup, Backing Up Volume Group Metadata
Bbackup
- file, Logical Volume Backup- metadata, Logical Volume Backup, Backing Up Volume Group Metadata
backup f ile, Backing Up Volume Group Metadata
block device- scanning, Scanning for Block Devices
Ccache f ile
- building, Scanning Disks for Volume Groups to Build the Cache File
cluster environment , The Clustered Logical Volume Manager (CLVM) , Creat ing LVMVolumes in a Cluster
CLVM- definition, The Clustered Logical Volume Manager (CLVM)
clvmd daemon, The Clustered Logical Volume Manager (CLVM)
command line units, Using CLI Commands
conf igurat ion examples, LVM Conf igurat ion Examples
creat ing- logical volume, Creating Logical Volumes- logical volume, example, Creating an LVM Logical Volume on Three Disks- LVM volumes in a cluster, Creating LVM Volumes in a Cluster- physical volumes, Creating Physical Volumes- striped logical volume, example, Creating a Striped Logical Volume- volume group, clustered, Creating Volume Groups in a Cluster- volume groups, Creating Volume Groups
creat ing LVM volumes- overview, Logical Volume Creation Overview
Ddata relocat ion, online, Online Data Relocat ion
deact ivat ing volume groups, Act ivat ing and Deact ivat ing Volume Groups- exclusive on one node, Activating and Deactivating Volume Groups- local node only, Activating and Deactivating Volume Groups
device numbers- major, Persistent Device Numbers- minor, Persistent Device Numbers- persistent, Persistent Device Numbers
device path names, Using CLI Commands
device scan f ilters, Contro lling LVM Device Scans with Filters
device siz e, maximum, Creat ing Volume Groups
Index
119

device special f i le d irectory, Creat ing Volume Groups
display- sorting output, Sorting LVM Reports
displaying- logical volumes, Displaying Logical Volumes, The lvs Command- physical volumes, Displaying Physical Volumes, The pvs Command- volume groups, Displaying Volume Groups, The vgs Command
Eextent
- allocation, Creating Volume Groups, LVM Allocation- definition, Volume Groups, Creating Volume Groups
Ffailed devices
- displaying, Displaying Information on Failed Devices
features, new and changed, New and Changed Features
feedback, Feedback
f ile system- growing on a logical volume, Growing a File System on a Logical Volume
f i lters, Contro lling LVM Device Scans with Filters
Ggrowing f ile system
- logical volume, Growing a File System on a Logical Volume
Hhelp d isplay, Using CLI Commands
Iin it ializ ing
- partitions, Initializing Physical Volumes- physical volumes, Initializing Physical Volumes
Insuf f icient Free Extents message, Insuf f icient Free Extents for a Logical Volume
Ll inear logical vo lume
- converting to mirrored, Changing Mirrored Volume Configuration- creation, Creating Linear Volumes- definition, Linear Volumes
logging, Logging
logical vo lume- administration, general, Logical Volume Administration- changing parameters, Changing the Parameters of a Logical Volume Group- creation, Creating Logical Volumes- creation example, Creating an LVM Logical Volume on Three Disks- definition, Logical Volumes, LVM Logical Volumes
Red Hat Ent erprise Linux 5 Logical Volume Manager Administ rat ion
120

- displaying, Displaying Logical Volumes, Customized Reporting for LVM, The lvsCommand- exclusive access, Activating Logical Volumes on Individual Nodes in a Cluster- extending, Growing Logical Volumes- growing, Growing Logical Volumes- linear, Creating Linear Volumes- local access, Activating Logical Volumes on Individual Nodes in a Cluster- lvs display arguments, The lvs Command- mirrored, Creating Mirrored Volumes- reducing, Shrinking Logical Volumes- removing, Removing Logical Volumes- renaming, Renaming Logical Volumes- resizing, Resizing Logical Volumes- shrinking, Shrinking Logical Volumes- snapshot, Creating Snapshot Volumes- striped, Creating Striped Volumes
lvchange command, Changing the Parameters of a Logical Volume Group
lvconvert command, Changing Mirrored Volume Conf igurat ion
lvcreate command, Creat ing Logical Volumes
lvdisplay command, Displaying Logical Volumes
lvextend command, Growing Logical Volumes
LVM- architecture overview, LVM Architecture Overview- clustered, The Clustered Logical Volume Manager (CLVM)- components, LVM Architecture Overview, LVM Components- custom report format, Customized Reporting for LVM- directory structure, Creating Volume Groups- help, Using CLI Commands- history, LVM Architecture Overview- label, Physical Volumes- logging, Logging- logical volume administration, Logical Volume Administration- physical volume administration, Physical Volume Administration- physical volume, definition, Physical Volumes- volume group, definition, Volume Groups
LVM1, LVM Architecture Overview
LVM2, LVM Architecture Overview
lvmdiskscan command, Scanning for Block Devices
lvreduce command, Resiz ing Logical Volumes, Shrinking Logical Volumes
lvremove command, Removing Logical Volumes
lvrename command, Renaming Logical Volumes
lvs command, Customiz ed Report ing for LVM, The lvs Command- display arguments, The lvs Command
lvscan command, Displaying Logical Volumes
Mman page d isplay, Using CLI Commands
metadata
Index
121

- backup, Logical Volume Backup, Backing Up Volume Group Metadata- recovery, Recovering Physical Volume Metadata
mirrored logical vo lume- clustered, Creating a Mirrored LVM Logical Volume in a Cluster- converting to linear, Changing Mirrored Volume Configuration- creation, Creating Mirrored Volumes- definition, Mirrored Logical Volumes- extending, Extending a Mirrored Volume- failure recovery, Recovering from LVM Mirror Failure- growing, Extending a Mirrored Volume- reconfiguration, Changing Mirrored Volume Configuration
Oonline data relocat ion, Online Data Relocat ion
overview- features, new and changed, New and Changed Features
Ppart it ion type, set t ing, Set t ing the Part it ion Type
part it ions- multiple, Multiple Partitions on a Disk
path names, Using CLI Commands
persistent device numbers, Persistent Device Numbers
physical extent- preventing allocation, Preventing Allocation on a Physical Volume
physical vo lume- adding to a volume group, Adding Physical Volumes to a Volume Group- administration, general, Physical Volume Administration- creating, Creating Physical Volumes- definition, Physical Volumes- display, The pvs Command- displaying, Displaying Physical Volumes, Customized Reporting for LVM- illustration, LVM Physical Volume Layout- initializing, Initializing Physical Volumes- layout, LVM Physical Volume Layout- pvs display arguments, The pvs Command- recovery, Replacing a Missing Physical Volume- removing, Removing Physical Volumes- removing from volume group, Removing Physical Volumes from a Volume Group- removing lost volume, Removing Lost Physical Volumes from a Volume Group- resizing, Resizing a Physical Volume
pvdisplay command, Displaying Physical Volumes
pvmove command, Online Data Relocat ion
pvremove command, Removing Physical Volumes
pvresiz e command, Resiz ing a Physical Volume
pvs command, Customiz ed Report ing for LVM- display arguments, The pvs Command
Red Hat Ent erprise Linux 5 Logical Volume Manager Administ rat ion
122

pvscan command, Displaying Physical Volumes
Rremoving
- disk from a logical volume, Removing a Disk from a Logical Volume- logical volume, Removing Logical Volumes- physical volumes, Removing Physical Volumes
renaming- logical volume, Renaming Logical Volumes- volume group, Renaming a Volume Group
report format , LVM devices, Customiz ed Report ing for LVM
resiz ing- logical volume, Resizing Logical Volumes- physical volume, Resizing a Physical Volume
Sscanning
- block devices, Scanning for Block Devices
scanning devices, f i lters, Contro lling LVM Device Scans with Filters
snapshot logical vo lume- creation, Creating Snapshot Volumes
snapshot volume- definition, Snapshot Volumes
st riped logical vo lume- creation, Creating Striped Volumes- creation example, Creating a Striped Logical Volume- definition, Striped Logical Volumes- extending, Extending a Striped Volume- growing, Extending a Striped Volume
Tt roubleshoot ing, LVM Troubleshoot ing
Uunits, command line, Using CLI Commands
Vverbose output , Using CLI Commands
vgcfbackup command, Backing Up Volume Group Metadata
vgcfrestore command, Backing Up Volume Group Metadata
vgchange command, Changing the Parameters of a Volume Group
vgcreate command, Creat ing Volume Groups, Creat ing Volume Groups in a Cluster
vgdisplay command, Displaying Volume Groups
vgexport command, Moving a Volume Group to Another System
vgextend command, Adding Physical Volumes to a Volume Group
Index
123
vgimport command, Moving a Volume Group to Another System
vgmerge command, Combining Volume Groups
vgmknodes command, Recreat ing a Volume Group Directory
vgreduce command, Removing Physical Volumes f rom a Volume Group
vgrename command, Renaming a Volume Group
vgs command, Customiz ed Report ing for LVM- display arguments, The vgs Command
vgscan command, Scanning Disks for Volume Groups to Build the Cache File
vgsplit command, Split t ing a Volume Group
volume group- activating, Activating and Deactivating Volume Groups- administration, general, Volume Group Administration- changing parameters, Changing the Parameters of a Volume Group- combining, Combining Volume Groups- creating, Creating Volume Groups- creating in a cluster, Creating Volume Groups in a Cluster- deactivating, Activating and Deactivating Volume Groups- definition, Volume Groups- displaying, Displaying Volume Groups, Customized Reporting for LVM, The vgsCommand- extending, Adding Physical Volumes to a Volume Group- growing, Adding Physical Volumes to a Volume Group- merging, Combining Volume Groups- moving between systems, Moving a Volume Group to Another System- reducing, Removing Physical Volumes from a Volume Group- removing, Removing Volume Groups- renaming, Renaming a Volume Group- shrinking, Removing Physical Volumes from a Volume Group- splitting, Splitting a Volume Group
- example procedure, Splitting a Volume Group
- vgs display arguments, The vgs Command
Red Hat Ent erprise Linux 5 Logical Volume Manager Administ rat ion
124