RECREATING - Peter Follansbee, joiner's notes · RECREATING A 17th CENTURY CARVED BOX ... The chip...
8
M ost 17th-century households in England and New England con- tained one or more small boxes for storing a variety of everyday objects. These boxes were made in a joiner’s shop and were usually decorated with carving on the front, and sometimes the sides. Making a box is a good introduction to the basic elements of the joiner’s craft. MATERIALS The box requires several oak boards whose width becomes the box’s height–generally 6" to 9". The box’s body is composed of two long boards (the front and back) and two short boards (the ends). Typically the ends are slightly thicker. Ends that are 3/4" thick and front and back boards that are 1/2" thick work well. The front and back boards are rabbet- ted to receive the end boards. The joint is secured with three wrought nails or slightly tapered, square wooden pegs, and glued. The box’s bottom and lid can be white pine, which allows you to work with a sin- gle board, or oak, which is usually glued up to form the necessary width. Make these pieces from 1/2" to 5/8" thick. The lid can be attached with wooden pintle hinges or iron hinges made by a blacksmith (see Gimmal Hinges, page xx). RIVE THE LOG Oak boards are split or “riven” from the log. Select a straight-grained, knot-free sec- tion of freshly cut red or white oak. Split the log into halves, then quarters and eighths, using wedges and a sledge hammer or maul (1). Always wear safety glasses when driving metal wedges with a sledge- hammer or maul. Split the resulting pie-shaped bolts with a froe and club (2).You’ll get the best results when you split a bolt in halves, which equalizes the stress on the timber. Drive the froe until it is fully buried, then twist the handle to further the split. Slide the froe’s blade down the open split, and twist the handle again. Continue until the piece breaks open. If it’s difficult to lever the piece open with the froe, go back to using wedges. Split your stock slightly oversize, to allow for dressing the boards. Split two pieces for the front and back, and a third for both ends. Riving produces high-quality radial boards, essentially the same as truly quar- WOODWORK 42 SPRING 2009 RECREATING A 17th CENTURY CARVED BOX TEXT AND PHOTOS: PETER FOLLANSBEE EDITOR: TOM CASPAR
Transcript of RECREATING - Peter Follansbee, joiner's notes · RECREATING A 17th CENTURY CARVED BOX ... The chip...

Most 17th-century households inEngland and New England con-tained one or more small boxes
for storing a variety of everyday objects.These boxes were made in a joiner’s shopand were usually decorated with carving onthe front, and sometimes the sides. Makinga box is a good introduction to the basicelements of the joiner’s craft.
MATERIALSThe box requires several oak boards
whose width becomes the box’sheight–generally 6" to 9". The box’s body iscomposed of two long boards (the frontand back) and two short boards (the ends).Typically the ends are slightly thicker. Endsthat are 3/4" thick and front and backboards that are 1/2" thick work well.
The front and back boards are rabbet-ted to receive the end boards. The joint issecured with three wrought nails or slightlytapered, square wooden pegs, and glued.
The box’s bottom and lid can be whitepine, which allows you to work with a sin-gle board, or oak, which is usually glued upto form the necessary width. Make thesepieces from 1/2" to 5/8" thick. The lid canbe attached with wooden pintle hinges oriron hinges made by a blacksmith (seeGimmal Hinges, page xx).
RIVE THE LOG Oak boards are split or “riven” from the
log. Select a straight-grained, knot-free sec-tion of freshly cut red or white oak. Splitthe log into halves, then quarters andeighths, using wedges and a sledge hammer
or maul (1). Always wear safety glasseswhen driving metal wedges with a sledge-hammer or maul.
Split the resulting pie-shaped bolts witha froe and club (2). You’ll get the best resultswhen you split a bolt in halves, whichequalizes the stress on the timber. Drive thefroe until it is fully buried, then twist thehandle to further the split. Slide the froe’sblade down the open split, and twist thehandle again. Continue until the piecebreaks open. If it’s difficult to lever the pieceopen with the froe, go back to usingwedges. Split your stock slightly oversize, toallow for dressing the boards. Split twopieces for the front and back, and a thirdfor both ends.
Riving produces high-quality radialboards, essentially the same as truly quar-
W O O D W O R K 42 S P R I N G 2 0 0 9
RECREATINGA 17th CENTURY CARVED BOX
TEXT AND PHOTOS: PETER FOLLANSBEE
ED
ITO
R:T
OM
CA
SPA
R

tersawn stock. They’re dimensionally verystable and easier to work than tangential,or flatsawn boards.
DRESS THE BOARDS Green wood is easier to plane and carve
than dried wood, so begin working on therough-split sections as soon as you can.Their stability ensures that the finished piecewon’t distort much as it loses moisture.
Some boards might need hewing first inorder to rectify twisted or unevenly splitsurfaces (3). A hewing hatchet is essentiallya small version of the broad axe–flat on theback, one bevel on the front.
Now, on to planing. I prefer to usewood-bodied planes, because they won’tstain green oak. Metal-bodied planes mayleave a stain, but it’s usually superficial andcan be removed with one light shaving.
Begin planing the first face of the stockwith a scrub or fore plane (4). Both planeshave convex-shaped irons that removestock quickly. I often plane across the widthof the board, because it requires less effort.The resulting surface must be dressed witha smooth plane to clean up the hollows leftby the fore plane. If a riven surface is rea-sonably flat, I go directly to the smoothplane. As you plane, sight across the topedges of a pair of winding sticks to checkfor twist (5). Green oak planes very easily,so don’t overdo it.
After you’ve planed one face flat, planean edge along the board’s bark edge,removing all of the sapwood first. Makesure it’s square to the board’s face. Then usea chalkline to mark a straight line parallelto this edge at the heart side of the board.Hew and plane this edge, then mark theboard’s thickness by using a marking gaugeto scribe a line around the board’s perime-ter. Plane to the line.
The inner surface of the front boardshould be fairly flat, but it needn’t be per-fect. It mainly needs to be flat so it sitssteady while carving. For the back board,the face inside the box should be the bettersurface. Its outer surface is not very critical,and can retain some coarse tool marks.
When you’re done with each planingsession, disassemble your irons and cleanthem well. Wipe a metal-bodied plane. Wet,acidic green-oak shavings can rust and dis-color blades and plane bodies.
After all the boards are dressed, set them
W O O D W O R K 43 S P R I N G 2 0 0 9
1 2
3 4
5

aside for a short time for initial drying. Aweek or two is usually sufficient, but thetime required depends on the humiditywhere you store the boards. Carving is eas-ier on timber that is only slightly seasoned.
LAY OUT THE CARVING Carving on 17th-century boxes was laid
out with a compass, straightedge, ruler andawl–not a template. These tools are muchmore versatile-it’s easy to adjust a compassfor variously sized boards. I prefer an awland a marking gauge for layout over a pen-cil because pencil marks are troublesometo remove. I allow some of the scribed linesto remain in the finished carving, in keep-ing with 17th-century practice.
Begin by using a try square and awl todefine the width of the box on the front andinside faces of the front board. Leave about3/4" of waste wood beyond these lines fornailing or clamping the board to the bench.Using the marking gauge, scribe a 1/2" mar-gin along both edges, to define the field tobe carved. Mark vertical and horizontalcenterlines.
While I do all the layout directly on myboard, you may want to make a pencilsketch of the general layout before scribingthe wood (6). Set the compass to the dis-tance from the horizontal centerline to oneof the horizontal margins. Starting at oneend, scribe a half-circle above the horizon-tal centerline. When the leg of the compassswings over and hits the centerline, pivotthe compass and scribe the next half-circlebelow the centerline. Continue leapfrog-ging these half-circles until you reach theother end of the board. Close the legs ofthe compass a bit, and using the centerpoints you created before, scribe the innerhalf-circles. This time you must lift thecompass and move it to each center point.With a square and awl, scribe vertical cen-terlines that run between the circles andthrough their centers.
OUTLINE THE PATTERN For removal of the background, I use
several different gouges and chisels, includ-ing a V-tool, at least two fairly large gouges,a smaller slightly curved gouge, and somealmost flat narrow gouges (7). SometimesI also use a shop-made punch for texturingthe background, or accenting the carvings.
The angle between the tool’s handle and
W O O D W O R K 44 S P R I N G 2 0 0 9
6 8
7 12
9
10
11

the board dictate the carving’s depth. Begin-ners tend to carve too shallow. Remember,as you’re carving you’re closer to the piecethan you will be when it’s finished, so don’tbe afraid to cut a little deeper. Experimentwith different angles: the steeper the han-dle, the deeper the carving.
Using the V-tool, begin carving the halfcircles on the upper section of the pattern.Go from the top center towards the bottomleft (think 12 o’clock to 9 o’clock). While inthe same position, cut the bottom circlesfrom the right-hand centerline towards thebottom center of the circles (3 o’clock to 6o’clock). Using the same posture to makesimilar cuts helps with uniformity and effi-ciency. Switch your posture and cut theremaining half-circles, working your wayalong the board (8).
Strike a small, tightly curved gouge withthe mallet to incise the beginnings of thepattern within the half-circles (9). This usu-ally requires two overlapping strikes, sideby side. The first is connected to the endsof the inner half-circles. Next, use a fairlywide curved gouge to begin defining thethree-lobed leaves (10). Strike the gougetwice, to the right and left of the semicir-cles top center. Do all the cuts to the right,then switch around and do all the ones onthe left. Make the next cuts with a moresteeply curved large gouge, to connect thetwo elements cut previously (11). This takestwo side-by-side chops with the gouge.
CARVE THE BACKGROUNDBegin removing the background with a
very shallow curved gouge (12). Instead ofthe mallet providing pressure, these cuts aremostly done with hand pressure. Supportthe cutting edge of the tool by resting yourlower hand on the wood. Brace the handgripping the handle against your torso.Some of the force comes from your body,not from moving your arms.
Move the tool side-to-side by hand asyou work it up to the incised cuts of theoutline. The chip will pop up. If the verti-cal cut is not deep enough, sometimes thechip does not pop out. In this case, the ten-dency is to try to flick it with the gouge.Don’t do it. Redo the vertical cut to releasethe chips.
Half of the background is now removed.All that’s left are the hard-to-reach spotswhere the upper and lower patterns meet
W O O D W O R K 45 S P R I N G 2 0 0 9
18 19
20 21
13
17
14
15 16

(13). I often use the mallet to get in here;hand pressure in these tight spots cansometimes go astray and remove somethingthat’s meant to stay.
Once all the background is removed, usethe V-tool to cut a centered line between thehalf circles. These cuts are not as deep as theoriginal outlines. Cutting them too deepcan break off the outlines’“positive” wood.
Use the shallow gouge to bevel the areabetween the arcs of the half-circles (14). Myleft hand is braced against the board, andthe tool pivots from the heel of my hand.Do all the arcs to the right, turn around anddo all the arcs to the left.
Next, use the large curved gouge to dec-orate the leaves (15). Make the first cutstraight down into the wood; make the sec-ond cut with the tool held at an angle, cre-ating a sort of crescent-moon motif.
Small punches were often used to adddetails to carvings. For this pattern, I useda punch made from an old cut nail with asmall cross filed into its end. I strike it witha hammer, once for each spot (16). Here’sthe finished carving (17).
MAKE THE RABBET JOINTS Cut the rabbets after the carving is done.
It’s best to keep the front and rear boards alittle extra long, to help prevent splitting.Dress and cut the end boards to final length.
Use a marking gauge to scribe the rab-bets’ depth, referencing from the board’sflat face. Saw the rabbets’ shoulders with thestock braced in a wooden bench hook (18).Use a backsaw or tenon saw. Cut down tothe gauge line.
Holding the piece upright, either in avice or clamped to the bench’s edge, splitout the waste with a broad chisel and mal-let (19). Straight-grained quartered timberusually splits cleanly and accurately. At first,position the chisel just inside the waste sideof the scribed line, and lightly tap the chiselwith a mallet. The wood should split downto the sawn shoulder. Repeat as necessary.
Lay the board face down in the benchhook and cut across the grain with a long-bladed paring chisel to make the rabbet flatand even (20). (A rabbet or shoulder planeis a good alternative to using a chisel.) Takethe rabbet down to the scribed line cut withthe marking gauge. Both rabbets need to bein the same plane–this is one of the mostcritical factors in making the box. Check
W O O D W O R K 46 S P R I N G 2 0 0 9
22
23
25
24
W O O D W O R K 47 S P R I N G 2 0 0 9
GIMMAL HINGES
LIDS ON 17TH-CENTURY BOXES andchests were often hinged with iron “gimmals,”made by a blacksmith. (They’re also calledsnipebill or snipe hinges.) Gimmals are essen-tially two linked rings with split tails, like a pairof cotter pins. I’ll show you how to install themon a box.
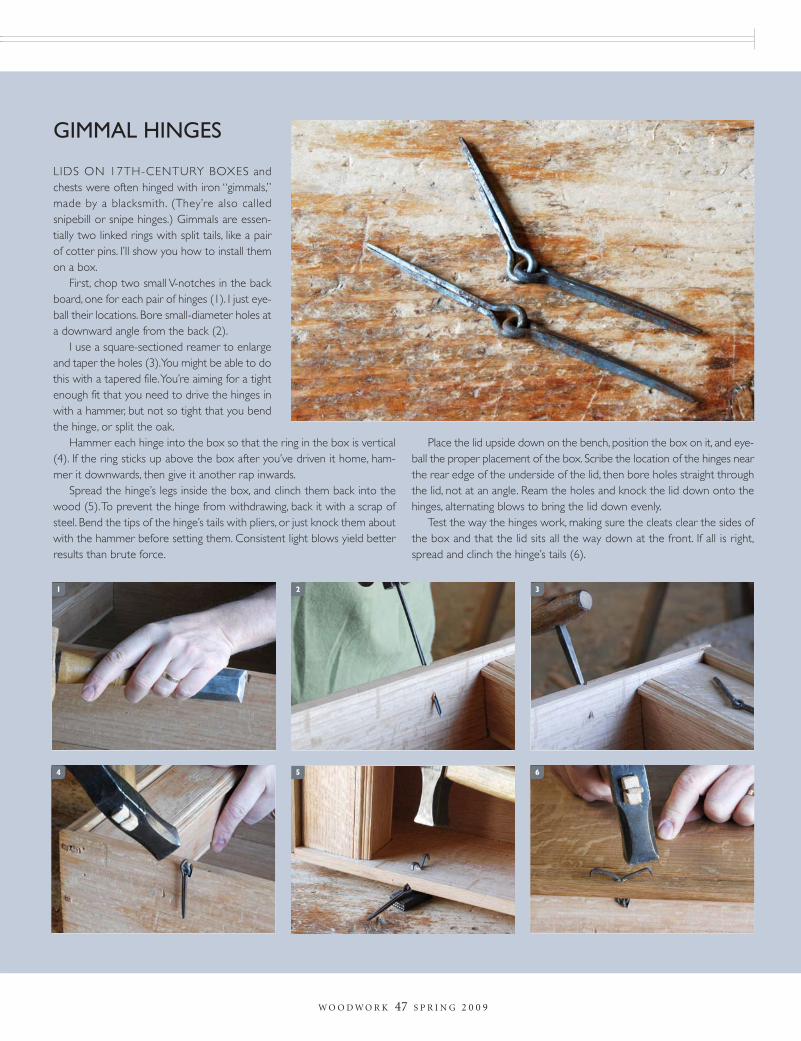
First, chop two small V-notches in the backboard, one for each pair of hinges (1). I just eye-ball their locations. Bore small-diameter holes ata downward angle from the back (2).
I use a square-sectioned reamer to enlargeand taper the holes (3).You might be able to dothis with a tapered file.You’re aiming for a tightenough fit that you need to drive the hinges inwith a hammer, but not so tight that you bendthe hinge, or split the oak.
Hammer each hinge into the box so that the ring in the box is vertical(4). If the ring sticks up above the box after you’ve driven it home, ham-mer it downwards, then give it another rap inwards.
Spread the hinge’s legs inside the box, and clinch them back into thewood (5).To prevent the hinge from withdrawing, back it with a scrap ofsteel. Bend the tips of the hinge’s tails with pliers, or just knock them aboutwith the hammer before setting them. Consistent light blows yield betterresults than brute force.
Place the lid upside down on the bench, position the box on it, and eye-ball the proper placement of the box. Scribe the location of the hinges nearthe rear edge of the underside of the lid, then bore holes straight throughthe lid, not at an angle. Ream the holes and knock the lid down onto thehinges, alternating blows to bring the lid down evenly.
Test the way the hinges work, making sure the cleats clear the sides ofthe box and that the lid sits all the way down at the front. If all is right,spread and clinch the hinge’s tails (6).
2 3
5
1
4 6

32
them with the winding sticks and make anynecessary corrections. The flatness of thewood between them isn’t so critical.
After finishing the rabbets, set the endboard in place, with the front board facedown on the bench. Mark just outside theend board, then cut the front board tolength using a handsaw. Do the final trim-ming with a plane, after assembly, butbefore the bottom gets nailed on.
To locate the rabbets on the inner faceof the rear boards, first mark out a shoul-der at one end of the rear board. Leaveabout 1-1/2" beyond the shoulder, toaccommodate the rabbet and the pintlehinge extension. (If you are using ironhinges, make this rabbet just a bit longerthan the thickness of the end board.)
Next, lay the front and rear boards facedown, with their bottom edges buttedagainst each other. Line up the scribedshoulder with its counterpart on the frontboard. Then mark the shoulder-to-shoul-der distance from the front board to therear board (21). Position the end boards inplace, then scribe against their outside sur-face to determine the overall length of thebox’s carcass (22).
If you’re making pintle hinges, cut therabbets extra-long to allow for the hinge’sround tenon (see 36). Cut the rabbets asbefore, saw the back board to length andwhittle the tenons.
ASSEMBLE WITH PEGSBore three 1/4" dia. holes in each rabbet.
I bore from the inside of the rabbet becauseit’s easier to center the holes by eye. Markthe end boards with an awl (23). (Here, I’mworking on a box with different carving.)Remove the front or rear board and boreholes into the side pieces’ end grain.
Make pins that are about 5" long fromdry, straight-grained riven oak. I split themout with a carving knife and pare them witha broad chisel (24). They should be just theslightest bit tight in the hole and veryslightly tapered along their length.
Assemble the box by gluing each jointand driving in the pegs (25). A tight fit takesa shaving off the corners of the pegs (26).Trim the pegs flush with the surface usinga sharp chisel with the bevel down. Don’tpare straight across the peg’s head, butcome in from both sides. This eliminatestear-out as you come off the peg.
W O O D W O R K 48 S P R I N G 2 0 0 9
26
28
30
27
29
31

Decorate the front corners with a row ofgouge cuts (27). Work by eye and strike thegouge with the mallet.
ADD THE BOTTOMDress the bottom board, but leave it a bit
oversize. Set the box on the bottom board,flush with the rear edge. Scribe lines on thebottom board, inside and outside the box(28). Measure about 1/2" to 3/4" from theoutside lines, then cut and plane the boardto size.
Bore pilot holes for nails to secure thebottom (29). Don’t position a hole too closeto the corner joints. I use two nails in eachshort end and three in each long end.
Using a fairly long plane, form a bevelaround the bottom board (30). Plane theends first, then the sides. Squat down andsight the bevel as you work. You’re aimingfor a neat appearance, but it doesn’t have tobe perfect.
Countersink holes for the nails by mak-ing two swiveling passes with a carvinggouge (31). Set the box upside down andposition the bottom. Transfer the nail holesby poking an awl through each one.Remove the bottom board and bore theseholes. Nail on the bottom (32).
ADD THE LIDThe lid has a thumbnail profile, but you
don’t need a molding plane to make it.Mark a line around the lid to define thethumbnail’s fillet. Clamp a board on theline to guide a rabbet plane, then shave rab-bets around the lid (33).
Use a smooth plane to gradually formthe thumbnail shape (34). This is all doneby eye. Plane the end grain first, and keepthe plane skewed for a smoother cut.
The lid has two oak cleats nailed to itsunderside. Here’s the procedure if you’reusing wooden pintle hinges. Make the cleatswider towards the rear and bore holes intothe ends of each cleat to receive the pintle.Bore pilot holes through the cleats for nails.Lay the lid on the bench and position thebox and cleats. Mark nail holes in the lidand drill them. Nail one cleat in place,clinching the tips of the nails on the uppersurface of the lid (35). Slip a piece of steelunder the nail head so it doesn’t back out.Slide the lid into position on the pintle, slipthe next cleat in place, flip the box over, andthen nail the second cleat (36).
W O O D W O R K 49 S P R I N G 2 0 0 9
33
34
36
35