Real-Time Integration Business Insight 12.2.1.1.0 AstraTeq ... · Real-Time Integration Business...
99
Real-Time Integration Business Insight 12.2.1.1.0 AstraTeq Help Desk Tutorial
Transcript of Real-Time Integration Business Insight 12.2.1.1.0 AstraTeq ... · Real-Time Integration Business...

Real-Time Integration Business Insight 12.2.1.1.0
AstraTeq Help Desk Tutorial

Real-Time Integration Business Insight 12.2.1.1.0: AstraTeq Help Desk Tutorial Page 2 of 99
Table of Contents
OVERVIEW OF THE TUTORIAL .......................................................................................................................... 4 SETTING THE SCENE ................................................................................................................................................................ 4 HELPDESK SERVICE BUS PROJECT ....................................................................................................................................... 5 HELPDESK SOA COMPOSITE ................................................................................................................................................. 7 WHY REAL-TIME INTEGRATION BUSINESS INSIGHT? ...................................................................................................... 8
INTRODUCTION AND CONCEPTS ...................................................................................................................... 9
PREPARE FOR THE TUTORIAL ....................................................................................................................... 10 DOWNLOAD THE TUTORIAL RESOURCES ........................................................................................................................... 10 SETUP THE INSIGHT DOMAIN ............................................................................................................................................... 10
TUTORIAL INSTRUCTIONS: ASTRATEQ HELP DESK ............................................................................... 11 TUTORIAL USERS ................................................................................................................................................................... 11 IMPORT THE ASTRATEQ HELP DESK MODEL ................................................................................................................... 12 BUSINESS USER: DEFINE MILESTONES .............................................................................................................................. 18
Incident Created ..................................................................................................................................................................... 23 Analysis Started ...................................................................................................................................................................... 25 Ticket Suspended ................................................................................................................................................................... 25 Problem Resolved .................................................................................................................................................................. 26 Re-order Milestones .............................................................................................................................................................. 27
BUSINESS USER – DEFINE UNIQUE INSTANCE IDENTIFIER ............................................................................................ 28 BUSINESS USER - DEFINE DIMENSIONS AND MEASURES ............................................................................................... 30 INTEGRATION ARCHITECT – MAP MILESTONES TO IMPLEMENTATION ...................................................................... 34
Incident Created ..................................................................................................................................................................... 34 Analysis Started ...................................................................................................................................................................... 40 Ticket Suspended ................................................................................................................................................................... 47 Problem Resolved .................................................................................................................................................................. 49
INTEGRATION ARCHITECT – DEFINE EXTRACTION CRITERIA FOR UNIQUE INSTANCE IDENTIFIER ........................ 51 INTEGRATION ARCHITECT – DEFINE EXTRACTION CRITERIA FOR INDICATORS ......................................................... 55
Total Resolution Cost ........................................................................................................................................................... 55 Reason for Suspension ......................................................................................................................................................... 57 Resolution .................................................................................................................................................................................. 60
INTEGRATION ARCHITECT - ACTIVATE THE ASTRATEQ HELP DESK MODEL ............................................................. 62 CHANGE AN ACTIVATED MODEL .......................................................................................................................................... 64 TEST THE ASTRATEQ HELP DESK APPLICATION TO START COLLECTING METRICS .................................................... 65 WORK WITH THE CONSOLE – PRE-CONFIGURED/OUT OF THE BOX DASHBOARDS ..................................................... 68
New in release 12.2.1.1.0 ...................................................................................................................................................................................... 71 Exercise: Use the Milestone Status Dashboards on the Console ....................................................................... 73
BUSINESS TRANSACTIONS (OR INSTANCE LISTING) PAGE ............................................................................................. 76 BUSINESS TRANSACTION DETAIL PAGE ............................................................................................................................ 80 CREATE CUSTOM DASHBOARDS FOR “ASTRATEQ HELP DESK” MODEL ..................................................................... 85
Defects per Customer Status ............................................................................................................................................................................... 87 Problems by Region Over Time ......................................................................................................................................................................... 88 Product Value to Resolution Cost and Problem Count ........................................................................................................................... 90 Escalations Over Time ............................................................................................................................................................................................ 92

Real-Time Integration Business Insight 12.2.1.1.0: AstraTeq Help Desk Tutorial Page 3 of 99
Issue Type per Customer ...................................................................................................................................................................................... 93 Problems by Country Over Time....................................................................................................................................................................... 95
VIEW OF THE LAST FIVE DAYS ............................................................................................................................................. 98

Real-Time Integration Business Insight 12.2.1.1.0: AstraTeq Help Desk Tutorial Page 4 of 99
Overview of the tutorial
Oracle Real-Time Integration Business Insight (or short Insight) is designed for business users to model, collect and monitor business level metrics. It comes fully integrated with Oracle SOA Suite and Oracle Service Bus.
Oracle Real-Time Integration Business Insight puts the business owner in control of the content, timing and format of metrics they need to make informed decisions daily. By simply identifying the key points within their business integrations, stakeholders immediately have access to detailed and actionable data, in real-time, with no costly engineering engagements or production redeployments.
For more information, please visit the Oracle Real-Time Integration Business Insight product page.
In the detailed tutorial 01: Oracle Real-Time Integration Business Insight: Designing Insight Models, the user takes on the role of a Business User to create a model with business milestones and indicators, which represents AstraTeq’s new HelpDesk application.
In 02: Oracle Real-Time Integration Business Insight: Mapping Models to Implementation, the previously created milestones and indicators are mapped to the integration implementation as an Integration Architect.
In the third tutorial, to be released soon, the user steps into the role of a Business Owner to view the preconfigured dashboards and create custom dashboards for the Help Desk model to gain valuable insight into their business.
The current document is a shorter form of the tutorial and focuses on the Business Owner persona. It describes the import of an already nearly completed model, with only a few milestones and indicators left to define and map.
Before we begin, let’s have a look behind the scenes to see how the Help Desk application is implemented, on which you will define your model and analyze metrics.
Setting the scene The help desk service company AstraTeq has created a new solution for its customers. Their proprietary help desk application has been implemented using Oracle SOA Suite, including Oracle Service Bus, and integrates AstraTeq’s consumer mobile application, Oracle E-Business Suite and Oracle RightNow Cloud Service (which is part of Oracle Service Cloud). A key goal in creating the new help desk application was to improve operational efficiency, avoid integration hot spots and minimize escalations.
The picture below shows the flow of steps in this integration application.
A customer submitting a problem report in their mobile application triggers the application.
An incident is created in Oracle RightNow and the issue is qualified for service.
If service is required, a service request (SR) is initialized in Oracle E-Business Suite and assigned to a front-line technician, unless the customer is part of a priority program (has gold status), in which case the SR is escalated immediately to backline support.
The support engineer analyzes the issue and escalates if there is a security issue or high risk.

Real-Time Integration Business Insight 12.2.1.1.0: AstraTeq Help Desk Tutorial Page 5 of 99
If the problem cannot be reproduced, and more data is needed from the customer, the SR is suspended until the customer provides the missing information.
If the issue can be successfully resolved or the SR is rejected, the customer is notified and the SR and incident are closed.
The following sections describe the implementation of the underlying help desk application, which consists of a Service Bus project and a SOA composite.
HelpDesk Service Bus Project The receipt of an xml message through a web service call (from the mobile application) triggers the Service Bus project.
The input message looks similar to the following:

Real-Time Integration Business Insight 12.2.1.1.0: AstraTeq Help Desk Tutorial Page 6 of 99
and includes:
Customer ID
Product Category
Problem Description
Product Type (Phone, tablet, service, accessory)
Device ID
Retail Value of product The Service Bus pipeline submitProblemReport executes the following high-level steps:
Create a unique incident ID (this is necessary as we don’t have access to a real RightNow application during the demos)
Invoke pipeline insertProblemReport The Service Bus pipeline insertProblemReport executes the following high-level steps:
Create the incident in RightNow (we simulate this in through a database table)
Call the SOA composite for further processing

Real-Time Integration Business Insight 12.2.1.1.0: AstraTeq Help Desk Tutorial Page 7 of 99
HelpDesk SOA composite
The composite is triggered by the Service Bus pipeline and consists of the following services, references and components:
Web Service receiving the input message from Service Bus
createEBS_SRAndTrack BPEL process:
o Qualifies the problem for technical support
o Retrieves customer information from E-Business Suite
o Creates Service Request in E-Business Suite
o If Gold Customer
Assigns SR to tier 2 (backline) technician (== escalate issue)
Diagnoses the issue (invokes diagnosisService BPEL process)
o Else
Assigns SR to tier 1 (frontline) technician
Diagnoses the issue
If issue is high profile or security risk
Escalate (assign to backline technician)
Diagnoses the issue (invokes diagnosisService BPEL process)

Real-Time Integration Business Insight 12.2.1.1.0: AstraTeq Help Desk Tutorial Page 8 of 99
diagnosisService BPEL process: diagnoses the issue
resolutionService BPEL process: notifies customer of resolution
rejectionService BPEL process: notifies customer of rejection and reason
suspensionService BPEL process: notifies customer of suspension and reason
createSRInEBS reference: simulates E-Business Suite application to create SR
getCustomerInfo reference: simulates E-Business Suite application to retrieve customer info
escalateSR reference: assigns SR to backline technician
assignSR reference: assigns SR to frontline technician
Why Real-Time Integration Business Insight? A key goal in creating the new help desk application was to improve operational efficiency, avoid integration hot spots and minimize escalations. Rather than writing a custom set of dashboards to track business performance when the new application goes live, AstraTeq has decided to implement Oracle Real-Time Integration Business Insight due to the pre-configured dashboards and bundled reports. The business directors also are interested in establishing real time metrics to track paid support programs, measure resolution velocity and technician performance, identify high-maintenance products and surface regional support hotspots.

Real-Time Integration Business Insight 12.2.1.1.0: AstraTeq Help Desk Tutorial Page 9 of 99
Introduction and Concepts
Before diving into the tutorial, please make yourself familiar with the concepts of Insight, described in the following documentation sections:
Getting Started with Oracle Real-Time Integration Insight
Understanding Oracle Real-Time Integration Business Insight

Real-Time Integration Business Insight 12.2.1.1.0: AstraTeq Help Desk Tutorial Page 10 of 99
Prepare for the tutorial
Download the tutorial resources Download AstraTeqHelpDeskTutorial.zip from the Insight AstraTeq Help Desk tutorial OTN page, after accepting the license agreement, and extract into a folder of your choice. Let’s call this folder AstraTeqHelpDeskTutorialROOT.
Setup the Insight domain In order to work through this tutorial, you have the following options:
Native Install (on your own laptop or server):
o Install Oracle Real-Time Integration Business insight natively and configure a compact domain, following the steps in the Real-Time Integration Business Insight Quick Start Guide.
o Setup your environment for the tutorial by following the steps in the Real-Time Integration Business Insight Tutorial setup for native install.
Pre-configured VirtualBox image:
o Download and import the SOA Suite plus Insight 12.2.1.1.0 VirtualBox image, following the steps outlined in the README document.
o Setup your environment for the tutorial by following the steps in the Real-Time Integration Business Insight Tutorial setup for VirtualBox image.
Once your environment is set up, start the Insight Server as described in the corresponding document.
You are now ready to start the AstraTeq Help Desk Tutorial!

Real-Time Integration Business Insight 12.2.1.1.0: AstraTeq Help Desk Tutorial Page 11 of 99
Tutorial Instructions: AstraTeq Help Desk
This chapter describes step-by-step how to define your first Insight model with milestones and indicators, test the application to start collecting metrics, analyze the out of the box dashboards and create custom dashboards.
Tutorial Users The following users have been created for the tutorial. Please refer to User Personas in the product documentation for a description of the personas used within Insight.
Susan - Model Creator: The person creating the model. In reality, Susan would assign model permissions the other users. We skipped this step in the tutorial for simplicity.
Nina - Business User: The business user has the functional knowledge of the business use case and will create milestones and indicators using business language, irrespective of the implementation.
Karl - Integration Architect: The integration architect has an understanding of the implementation of the application. He defines the mapping of milestones to the appropriate location in the implementation and the extraction of indicators.
John - Business Owner: The business owner has access to the real-time business data provided by the consoles and defines custom dashboards for a tailored view of the data.
Emily - Administrator: The administrator manages the Insight application itself and creates connections to the implementation to enable mapping of the models.
We also gave Nina and Karl Business Owner privileges, so that they can test the consoles of the model they are creating. They may not have those permissions in a production system.

Real-Time Integration Business Insight 12.2.1.1.0: AstraTeq Help Desk Tutorial Page 12 of 99
Import the AstraTeq Help Desk Model Locate AstraTeq Help Desk_partialModel.zip in AstraTeqHelpDeskTutorialROOT/model.
This zip file includes a partial implementation of the AstraTeq Help Desk model as a starting point for this tutorial.
A model can be imported by a user of type Model Creator, but before it can be activated, the data connections to the SOA and Service Bus servers have to be defined and tested by an Administrator.
Emily, the administrator, also has model creator privileges: Sign in as Emily (password “welcome1”)
If the home screen doesn’t look like the below after signing in, sign out and sign back in.
Select the Designer tab on top
If you haven’t created any models yet, you will see a message “You currently have no Models”.

Real-Time Integration Business Insight 12.2.1.1.0: AstraTeq Help Desk Tutorial Page 13 of 99
You can either create a new model or import a model that was provided to you
Click the button Import Model on top.
Click Choose File in the Import Model dialog
Locate AstraTeq Help Desk_partialModel.zip
Click Open

Real-Time Integration Business Insight 12.2.1.1.0: AstraTeq Help Desk Tutorial Page 14 of 99
Click Import Model
You should see a message “Model successfully imported. To activate, first configure imported Connections.”
Click on the Connections hyperlink to see the list of connections that have been imported. You should see SBConnection and SOAConnection.
Click on either one of the connections to open the Admin page

Real-Time Integration Business Insight 12.2.1.1.0: AstraTeq Help Desk Tutorial Page 15 of 99
You can see both data connections in draft state. They have to be configured for your environment before they can be activated.
Hover with your mouse over the SBConnection and click the edit button
In the Edit Connection dialog, enter the values for host, port, admin user and admin password for your environment where Service Bus is running
Click Test Connection
Real-Time Integration Business Insight 12.2.1.1.0: AstraTeq Help Desk Tutorial Page 16 of 99
If the result is not Configured, correct the values you entered
Click Save
Repeat the same steps for the SOAConnection

Real-Time Integration Business Insight 12.2.1.1.0: AstraTeq Help Desk Tutorial Page 17 of 99
Both connections should now be configured
You have now completed the import of the partial model and the data connections setup. Log out from the Insight UI.
Real-Time Integration Business Insight 12.2.1.1.0: AstraTeq Help Desk Tutorial Page 18 of 99
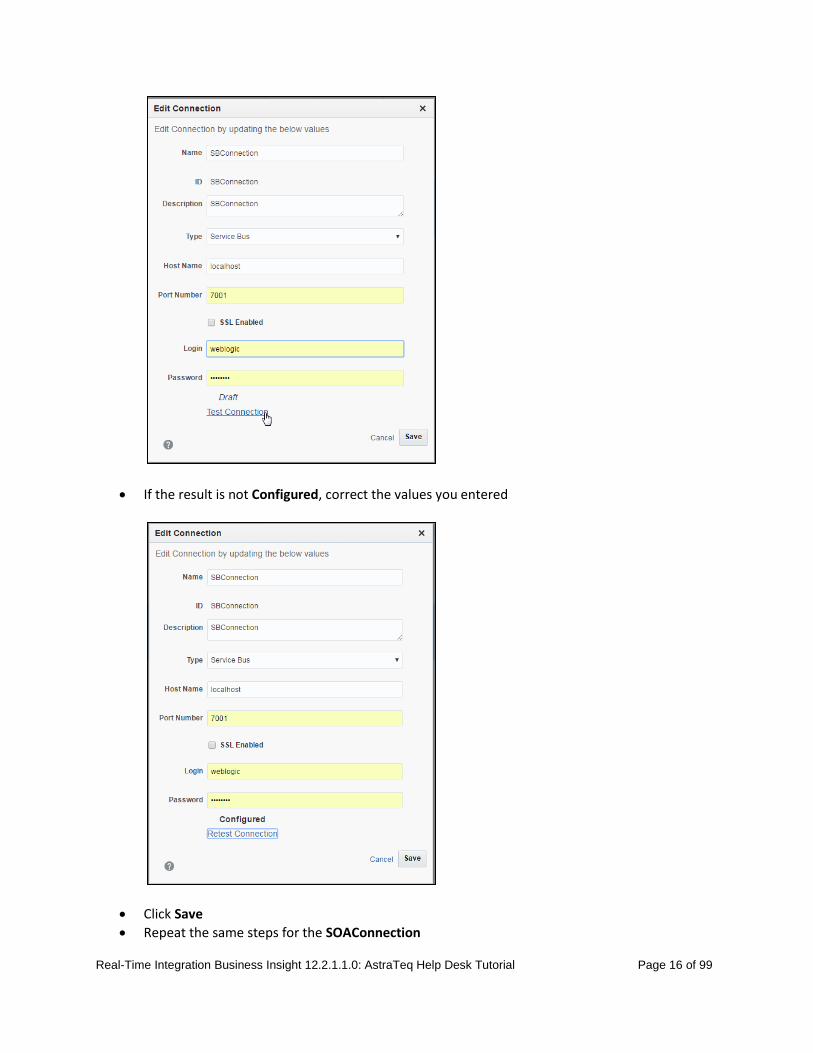
Business User: Define Milestones The model you imported in the previous section has a number of milestones and indictors already configured and mapped. This section will lead you through the creation of a few additional milestones, followed by a section focusing on creation of additional indicators.
Once those are complete, you will map the milestones and define the extraction criteria for the indicators to complete the model creation.
Sign in as Nina with password welcome1.
Nina doesn’t have access to any administration task, which is why the Administration tab is not shown for her
Select the AstraTeq Help Desk model under Recent Models
Note:
If you want to create a new model from scratch and define and map additional milestones and indicators, feel free to follow the steps in the 01: Oracle Real-Time Integration Business Insight: Designing Insight Models and 02: Oracle Real-Time Integration Business Insight: Mapping Models to Implementation tutorials. You can even just delete a few milestones and indicators from the model you imported and re-create them, following the steps in the tutorials mentioned above.
Real-Time Integration Business Insight 12.2.1.1.0: AstraTeq Help Desk Tutorial Page 19 of 99
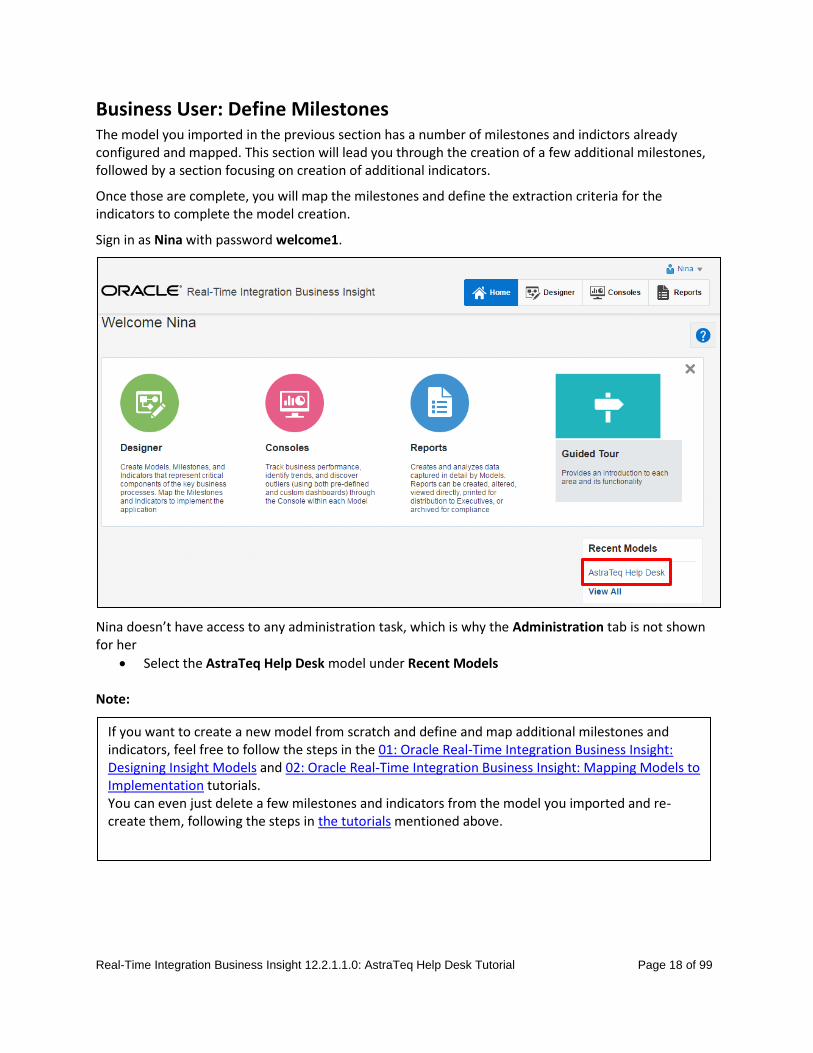
The imported model is in daft state and is missing
Four milestones (Incident Created, Analysis Started, Ticket Suspended and Problem Resolved)
The unique instance identifier Incident ID
Three indicators (Reason for Suspension, Total Resolution Cost, Resolution) The unique instance identifier is mandatory and you will only be able to activate the model once you created and mapped it and also mapped al milestones and indicators. This is visualized as 26 mandatory task to complete.
You can see on top of the model definition that the Single Instance Label is set as Service Request.
Feel free to make yourself familiar with the milestones that have already been created. This includes the initial milestone “Problem Received”.
Three indicators are extracted when this milestone is passed: Problem Description, Retail Value of Product and Product.
The completed model will consist of the following milestones:
Initial milestone
Problem Received
o Once this milestone has been passed, a new instance, or rather a new service request, is created in Insight.
o Three indicators are extracted when this milestone is passed: Problem Description, Retail Value of Product and Product.

Real-Time Integration Business Insight 12.2.1.1.0: AstraTeq Help Desk Tutorial Page 20 of 99
Standard milestones
Incident Qualified
o After the incident has been created, the issue is qualified for technical support
o No indicators are assigned to this milestone
Customer Data Retrieved
o E-Business Suite contains data related to the customer who reported the problem, like name, address and status. This information is retrieved using the customer ID that was included in the problem description. You will be extracting the data at this milestone and use it for your dashboards.
o Several customer data related indicators are extracted when this milestone is passed

Real-Time Integration Business Insight 12.2.1.1.0: AstraTeq Help Desk Tutorial Page 21 of 99
Ticket Created
o This milestone marks the creation of the ticket in E-Business Suite. It is used to extract the EBS ticket ID.
Ticket Assigned o After the ticket has been created, it is assigned to a front-line engineer unless the
customer is a premium (= gold) customer, in which case the ticket is escalated right away.
o The name of the frontline technician is extracted when this milestone is passed.
Problem Diagnosed

Real-Time Integration Business Insight 12.2.1.1.0: AstraTeq Help Desk Tutorial Page 22 of 99
o This milestone is passed when the problem has been diagnosed. You will extract the issue type here and an indicator showing how many times the same issue has been reported before.
Ticket Escalated
o If the customer reporting an issue is a premium (=gold) customer or the analysis shows a high risk or security issue, the ticket is escalated to a backline support engineer.
o The name of the backline support engineer and the reason for escalation are extracted at this milestone.
o The milestone is mapped to 2 different locations in the implementation.
Ticket Rejected
o This milestone is passed if the engineer rejects the ticket. The reason for rejection will be extracted.
o From a business perspective, this is an error state, and as it cannot be revoked, it is also a terminal state.
o The reason for rejection is extracted when the milestone is passed.

Real-Time Integration Business Insight 12.2.1.1.0: AstraTeq Help Desk Tutorial Page 23 of 99
Problem Resolved
o This milestone is passed if the reported problem has been successfully resolved. The problem resolution will be extracted.
o You will create this milestone yourself and define indicators for resolution and total resolution cost.
Follow the steps below to create the missing milestones:
Incident Created This milestone will be passed after the incident has been created in the RightNow application, and will be used to extract the unique instance identifier Incident ID.
Note:
Select Create Milestone.
Select the Milestone Name field and enter "Incident Created".
It is extremely important that the unique instance identifier is indeed unique across all instances. If that is not the case, unexpected behavior will be noticed.
Real-Time Integration Business Insight 12.2.1.1.0: AstraTeq Help Desk Tutorial Page 24 of 99
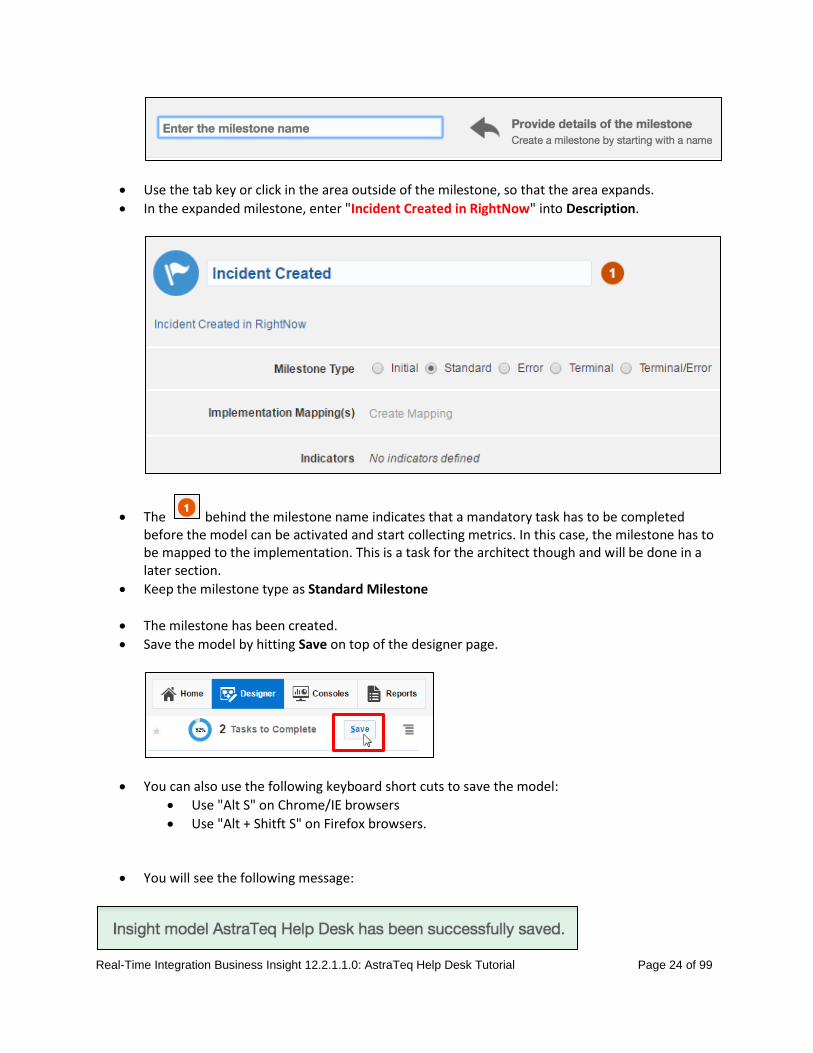
Use the tab key or click in the area outside of the milestone, so that the area expands.
In the expanded milestone, enter "Incident Created in RightNow" into Description.
The behind the milestone name indicates that a mandatory task has to be completed before the model can be activated and start collecting metrics. In this case, the milestone has to be mapped to the implementation. This is a task for the architect though and will be done in a later section.
Keep the milestone type as Standard Milestone
The milestone has been created.
Save the model by hitting Save on top of the designer page.
You can also use the following keyboard short cuts to save the model:
Use "Alt S" on Chrome/IE browsers
Use "Alt + Shitft S" on Firefox browsers.
You will see the following message:
Real-Time Integration Business Insight 12.2.1.1.0: AstraTeq Help Desk Tutorial Page 25 of 99
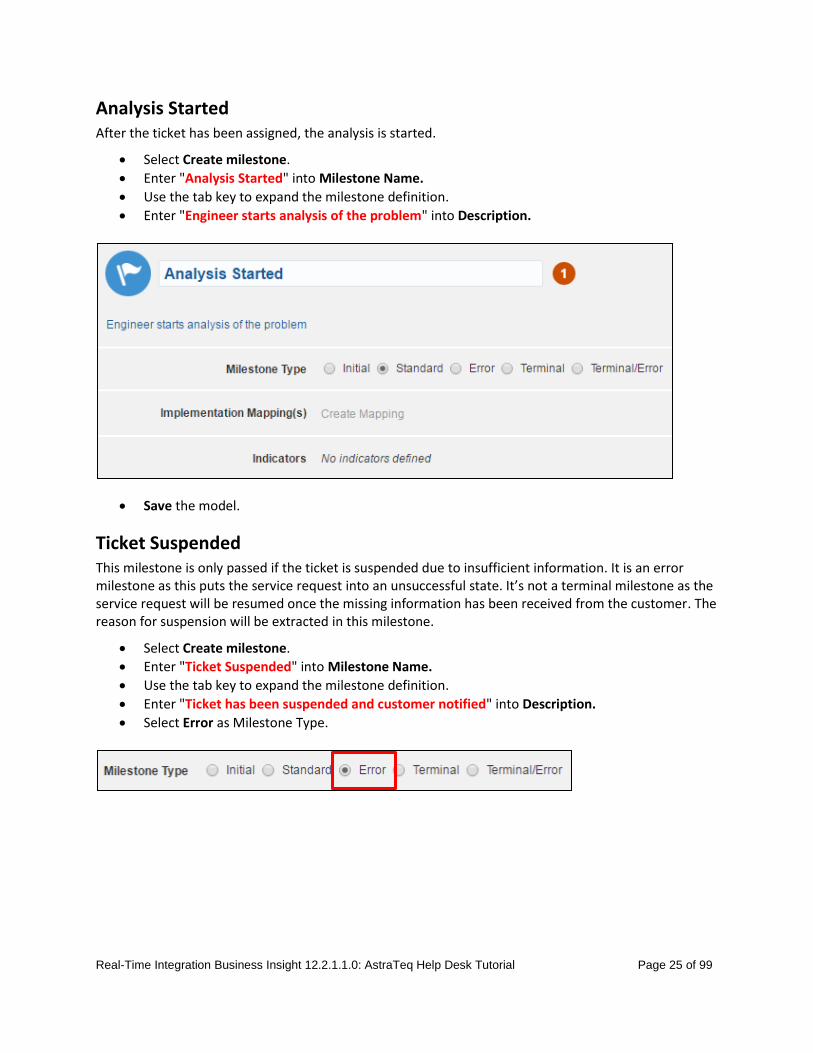
Analysis Started After the ticket has been assigned, the analysis is started.
Select Create milestone.
Enter "Analysis Started" into Milestone Name.
Use the tab key to expand the milestone definition.
Enter "Engineer starts analysis of the problem" into Description.
Save the model.
Ticket Suspended This milestone is only passed if the ticket is suspended due to insufficient information. It is an error milestone as this puts the service request into an unsuccessful state. It’s not a terminal milestone as the service request will be resumed once the missing information has been received from the customer. The reason for suspension will be extracted in this milestone.
Select Create milestone.
Enter "Ticket Suspended" into Milestone Name.
Use the tab key to expand the milestone definition.
Enter "Ticket has been suspended and customer notified" into Description.
Select Error as Milestone Type.

Real-Time Integration Business Insight 12.2.1.1.0: AstraTeq Help Desk Tutorial Page 26 of 99
Save the model.
Problem Resolved This milestone is passed if the reported problem has been successfully resolved. The problem resolution will be extracted.
Select Create milestone.
Enter "Problem Resolved" into Milestone Name.
Use the tab key to expand the milestone definition.
Enter "Problem has been resolved and customer notified" into Description.
Select Terminal as Milestone Type.

Real-Time Integration Business Insight 12.2.1.1.0: AstraTeq Help Desk Tutorial Page 27 of 99
Save the model.
Re-order Milestones All milestones have now been defined, but they are out of order. You can leave it like this, but it’s sometimes easier to have the milestones in “natural order”, i.e. the order in which they normally happen.
Highlight the milestone you would like to move and click on the appropriate arrow to move it up or down.
Move the Incident Created milestone under the initial milestone Problem Received
Move the Analysis Started milestone under the milestone Ticket Assigned
Move the Ticket Suspended milestone under the milestone Ticket Escalated
The model now looks like this:
This concludes the creation of the milestones. In the next section, you will define the unique instance identifier.
Real-Time Integration Business Insight 12.2.1.1.0: AstraTeq Help Desk Tutorial Page 28 of 99
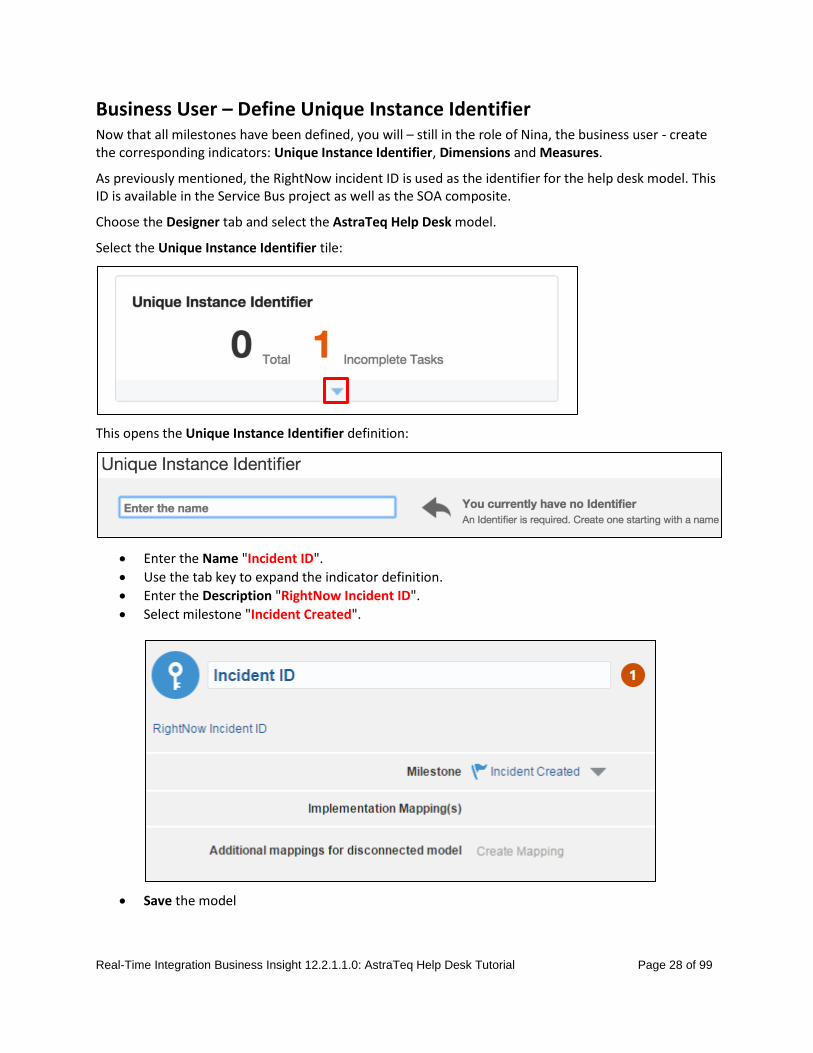
Business User – Define Unique Instance Identifier Now that all milestones have been defined, you will – still in the role of Nina, the business user - create the corresponding indicators: Unique Instance Identifier, Dimensions and Measures.
As previously mentioned, the RightNow incident ID is used as the identifier for the help desk model. This ID is available in the Service Bus project as well as the SOA composite.
Choose the Designer tab and select the AstraTeq Help Desk model.
Select the Unique Instance Identifier tile:
This opens the Unique Instance Identifier definition:
Enter the Name "Incident ID".
Use the tab key to expand the indicator definition.
Enter the Description "RightNow Incident ID".
Select milestone "Incident Created".
Save the model

Real-Time Integration Business Insight 12.2.1.1.0: AstraTeq Help Desk Tutorial Page 29 of 99

Real-Time Integration Business Insight 12.2.1.1.0: AstraTeq Help Desk Tutorial Page 30 of 99
Business User - Define Dimensions and Measures Both Dimensions and Measures can be created within the milestone they are associated with, by selecting the Create a new indicator button within the expanded milestone definition. You may have to expand the milestone first, clicking the small arrow on the left.
Click on the “+” sign at the bottom right of the milestone
Alternatively, you can select the Dimensions and Measures tile on top of the designer and select the Add Indicator button.
As a reminder, Measures identify values, which allow the state of the application to be quantified. Dimensions provide a type of grouping and categorization of applications, allowing for "slicing and dicing" of aggregate measures.
In this tutorial, you only need to define indicators Reason for Suspension, Total Resolution Cost and Resolution.
Select the Dimensions and Measures tile
Select the Add indicator button on top and select Measure

Real-Time Integration Business Insight 12.2.1.1.0: AstraTeq Help Desk Tutorial Page 31 of 99
Enter the name “Total Resolution Cost”
Use the tab key to expand the indicator definition
Enter the description “Total resolution Cost of Issue”
Filterable: No
Select milestone Problem Resolved
Save the model
The next two indicators to be defined are dimensions:
Select the Add indicator button on top (or at the bottom) and select Dimension
Enter the name “Reason for Suspension”
Use the tab key to expand the indicator definition
Enter the description “Insufficient information or not reproducible”

Real-Time Integration Business Insight 12.2.1.1.0: AstraTeq Help Desk Tutorial Page 32 of 99
Filterable: No
Select milestone Ticket Suspended
Save the model
Select the Add indicator button on top (or at the bottom) and select Dimension
Enter the name “Resolution”
Use the tab key to expand the indicator definition
Enter the description “Hardware replacement, Bug fixed, Documentation updated, Bug declared as feature”
Filterable: No
Select milestone Problem Resolved
Save the model
Remember to save the model.

Real-Time Integration Business Insight 12.2.1.1.0: AstraTeq Help Desk Tutorial Page 33 of 99

Real-Time Integration Business Insight 12.2.1.1.0: AstraTeq Help Desk Tutorial Page 34 of 99
Integration Architect – Map Milestones to Implementation In this section, you will map the previously created milestones to the implementation in the role of Karl, the integration architect.
Sign out and sign back in as Karl, the integration architect (password: welcome1).
Click on the Designer tab and select the AstraTeq HelpDesk(Draft) model:
33 tasks have to be completed before the model can be activated.
After selecting the model, you can see that 4 milestones have to be mapped and extraction criteria for the Unique Instance Identifier and 3 indicators have to be defined.
Let’s get started with the milestone mapping.
Incident Created This milestone is mapped at the invocation point for the SOA composite HelpDesk, at the REQUEST of operation process of the createSRandTrack business service. At this point, the incident has been created and the incidentID is available.

Real-Time Integration Business Insight 12.2.1.1.0: AstraTeq Help Desk Tutorial Page 35 of 99
Expand milestone Incident Created by clicking on the arrow left of the milestone icon.
Select Create Mapping to open the Implementation Mappings page.
Before you can start mapping, you need to select the data connection to the deployed application, to which you will define the mapping.
Because the previous milestone has been mapped within the Service Bus domain, the Service Bus Data Connection (SBConnection) is already selected.
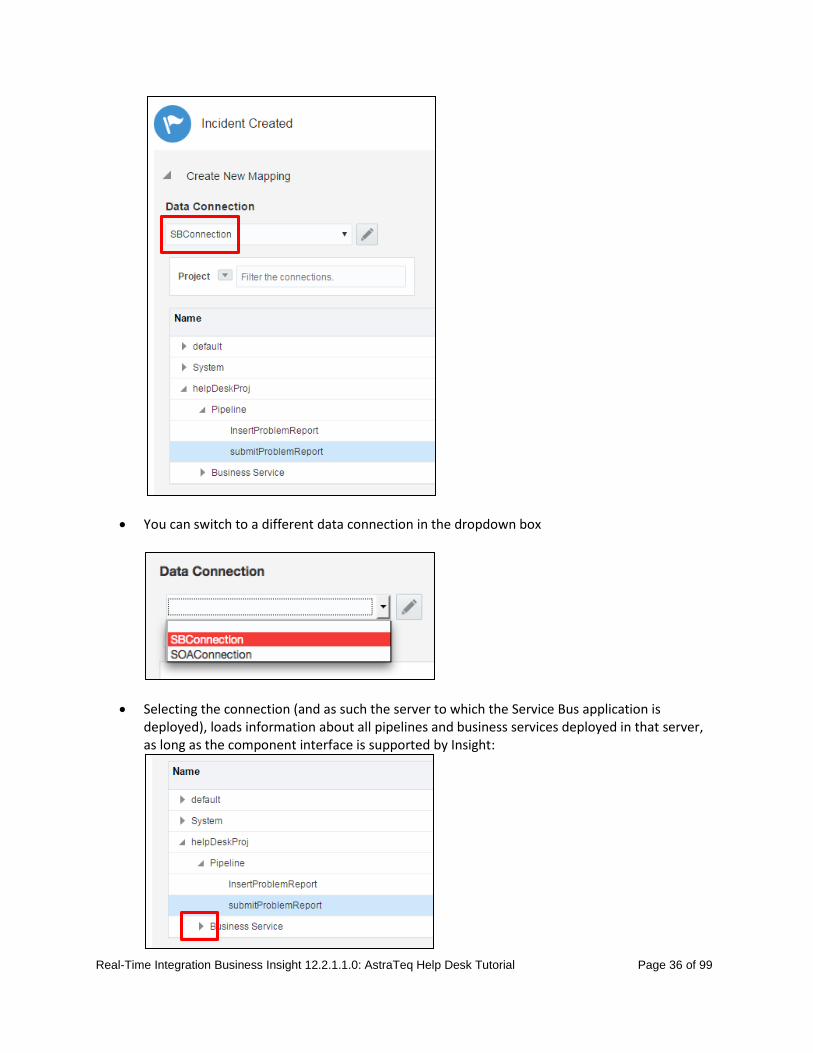
Real-Time Integration Business Insight 12.2.1.1.0: AstraTeq Help Desk Tutorial Page 36 of 99
You can switch to a different data connection in the dropdown box
Selecting the connection (and as such the server to which the Service Bus application is deployed), loads information about all pipelines and business services deployed in that server, as long as the component interface is supported by Insight:

Real-Time Integration Business Insight 12.2.1.1.0: AstraTeq Help Desk Tutorial Page 37 of 99
If you have a large number of artifacts in your domain, you can filter the view.
You can see both Service Bus pipelines in this project: insertProblemReport and submitProblemReport. The latter pipeline is invoked when the problem report is received from the mobile application.
Expand Business Service to see the list of business services in this project
The project includes three business services: o createSRAndTrack: invokes the SOA composite o getIncidentId: internal implementation o insertIncidentReport: invokes incident creation in RightNow
Select the createSRandTrack business service and you will see an icon to map the milestone to the pipeline:
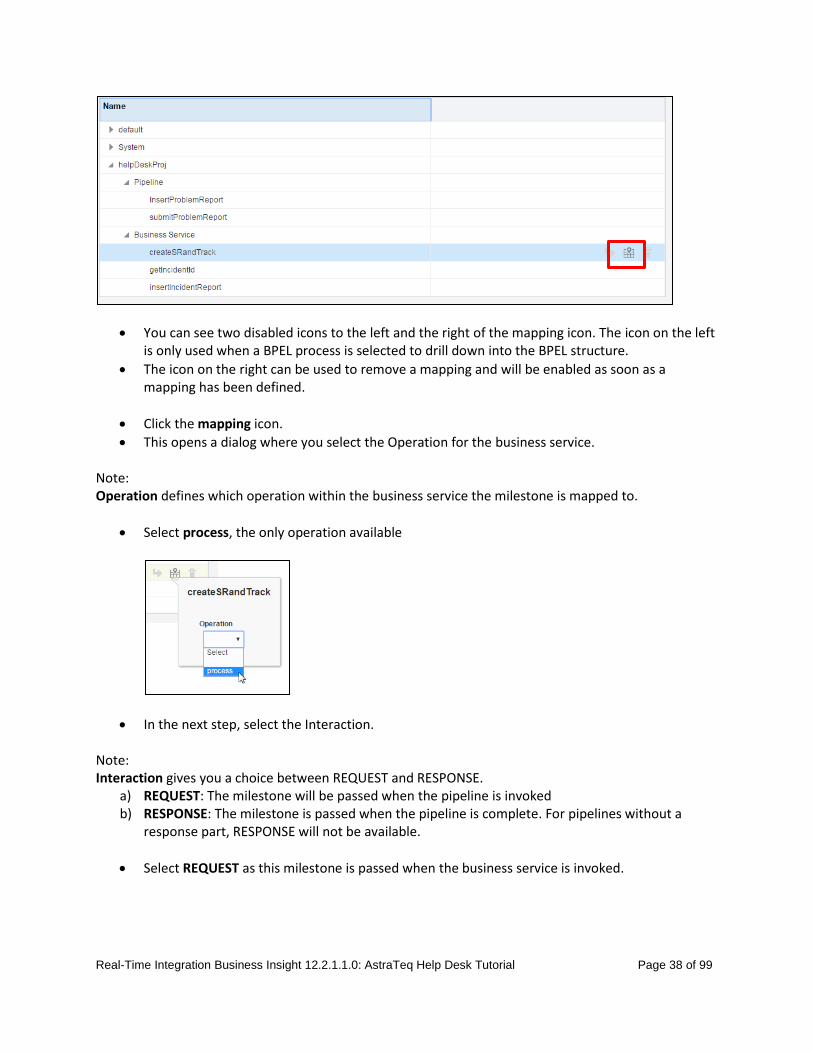
Real-Time Integration Business Insight 12.2.1.1.0: AstraTeq Help Desk Tutorial Page 38 of 99
You can see two disabled icons to the left and the right of the mapping icon. The icon on the left is only used when a BPEL process is selected to drill down into the BPEL structure.
The icon on the right can be used to remove a mapping and will be enabled as soon as a mapping has been defined.
Click the mapping icon.
This opens a dialog where you select the Operation for the business service. Note: Operation defines which operation within the business service the milestone is mapped to.
Select process, the only operation available
In the next step, select the Interaction. Note: Interaction gives you a choice between REQUEST and RESPONSE.
a) REQUEST: The milestone will be passed when the pipeline is invoked b) RESPONSE: The milestone is passed when the pipeline is complete. For pipelines without a
response part, RESPONSE will not be available.
Select REQUEST as this milestone is passed when the business service is invoked.

Real-Time Integration Business Insight 12.2.1.1.0: AstraTeq Help Desk Tutorial Page 39 of 99
The mapping is confirmed and the mapping string is displayed on the top of the page and next to the pipeline: helpDeskProj > createSRandTrack > process > REQUEST (the string has been concatenated from Service Bus project name > Business Service name > operation name > interaction)
Now that the mapping has been defined, the Clear Mapping icon is also enabled.
Select Return to Editor on top of the page to get back to the milestones page.

Real-Time Integration Business Insight 12.2.1.1.0: AstraTeq Help Desk Tutorial Page 40 of 99
The Incident Created milestone has been successfully mapped to the entry point of the createSRandTrack business service.
The number of incomplete tasks has been reduced by one:
Save the model.
Analysis Started The problem analysis is handled by the BPEL process diagnosisService. You will map this milestone to the REQUEST of this BPEL process. On the Implementation Mappings page, select SOAConnection if it’s not already selected:

Real-Time Integration Business Insight 12.2.1.1.0: AstraTeq Help Desk Tutorial Page 41 of 99
The mapping screen shows what has been mapped for the previous milestone. This has been done, so that the user doesn’t have to continue expanding the same notes in case of similar milestone mappings.
In the implementation mapping screen, exit the previous drill-down into the createEBS_SRAndTrack BPEL process

Real-Time Integration Business Insight 12.2.1.1.0: AstraTeq Help Desk Tutorial Page 42 of 99
You can see all composites deployed to this server (your list may look slightly different, dependant on your domain).
Filter for “service” in “composite” filter to restrict the list to the ServiceRequest SOA composite:
Expand “Services”, “References” and “Components”:

Real-Time Integration Business Insight 12.2.1.1.0: AstraTeq Help Desk Tutorial Page 43 of 99
Highlight the diagnosisService component and click the map icon
Select operation process

Real-Time Integration Business Insight 12.2.1.1.0: AstraTeq Help Desk Tutorial Page 44 of 99
Select Interaction REQUEST
The view changes and highlights the mapped BPEL process.
If the BPEL process is visible just at the bottom of the screen, pull it up with your mouse.
Real-Time Integration Business Insight 12.2.1.1.0: AstraTeq Help Desk Tutorial Page 45 of 99
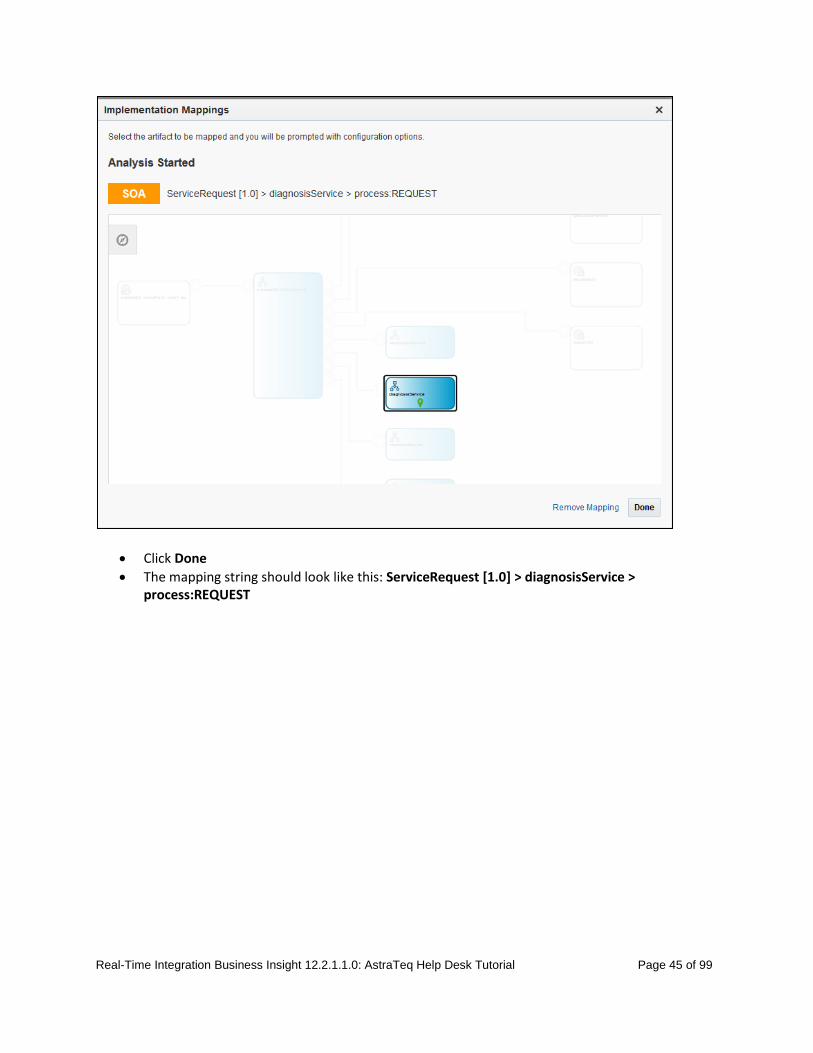
Click Done
The mapping string should look like this: ServiceRequest [1.0] > diagnosisService > process:REQUEST

Real-Time Integration Business Insight 12.2.1.1.0: AstraTeq Help Desk Tutorial Page 46 of 99
Return to the editor
The milestone should look like this:
Save the model

Real-Time Integration Business Insight 12.2.1.1.0: AstraTeq Help Desk Tutorial Page 47 of 99
Ticket Suspended A ticket is suspended if more information is needed from the customer to continue the analysis. The milestone will be mapped within the suspensionService BPEL process, which handles the steps necessary in case of a suspension. The mapping will be done to the entry point of the notifyCustomerOfSuspension activity. At this point, the suspension reason is available and can be extracted.
On the Implementation Mapping screen, exit the previous BPEL drill-down
Select the suspensionService BPEL process and select the “drill down” button BPEL Structure
This opens the structure of the BPEL process
Select the notifyCustomerOfSuspension activity and the Edit Mapping button
Select On Entry: this defines the milestone is passed as the activity is entered, also called activation.
Note:

Real-Time Integration Business Insight 12.2.1.1.0: AstraTeq Help Desk Tutorial Page 48 of 99
When mapping to a BPEL activity, you have a choice to define the mapping at the beginning of the activity (On Entry), the end of the activity (On Exit) or in case of a fault during the execution of the activity (On Error).
This defines the mapping string as ServiceRequest [1.0] > suspensionService > notifyCustomerOfSuspension
Return to the editor and save the model. The milestone should now look like this:

Real-Time Integration Business Insight 12.2.1.1.0: AstraTeq Help Desk Tutorial Page 49 of 99
Problem Resolved And finally, the Problem Resolved milestone is mapped to the end of the resolutionService BPEL process, at the activity Assign – IssueResolved (On Exit):

Real-Time Integration Business Insight 12.2.1.1.0: AstraTeq Help Desk Tutorial Page 50 of 99
The mapping string looks like this: ServiceRequest [1.0] > resolutionService > IssueResolved
The milestone should now look like this:
Save the model.
All milestones have now been mapped, 4 tasks still need to be completed: the mapping of the Unique Instance Identifier and three additional indicators.

Real-Time Integration Business Insight 12.2.1.1.0: AstraTeq Help Desk Tutorial Page 51 of 99
Integration Architect – Define extraction criteria for Unique Instance Identifier
Now that the milestones have been mapped, you are ready to define the extraction criteria for the indicators.
First, you will define the Unique Instance Identifier, the Incident ID.
Both the Service Bus project and the SOA composite are part of the same integration flow, which means that the model is connected from beginning to end and you only have to define one mapping for the identifier.
Select the Unique Instance Identifier tile:
The Identifier has been assigned to the Incident Created milestone and the mapping for that milestone is shown.
Click the Define link next to Extraction Criteria. This opens the Implementation Mappings page.
Click on the Edit Extraction Criterion pencil icon:
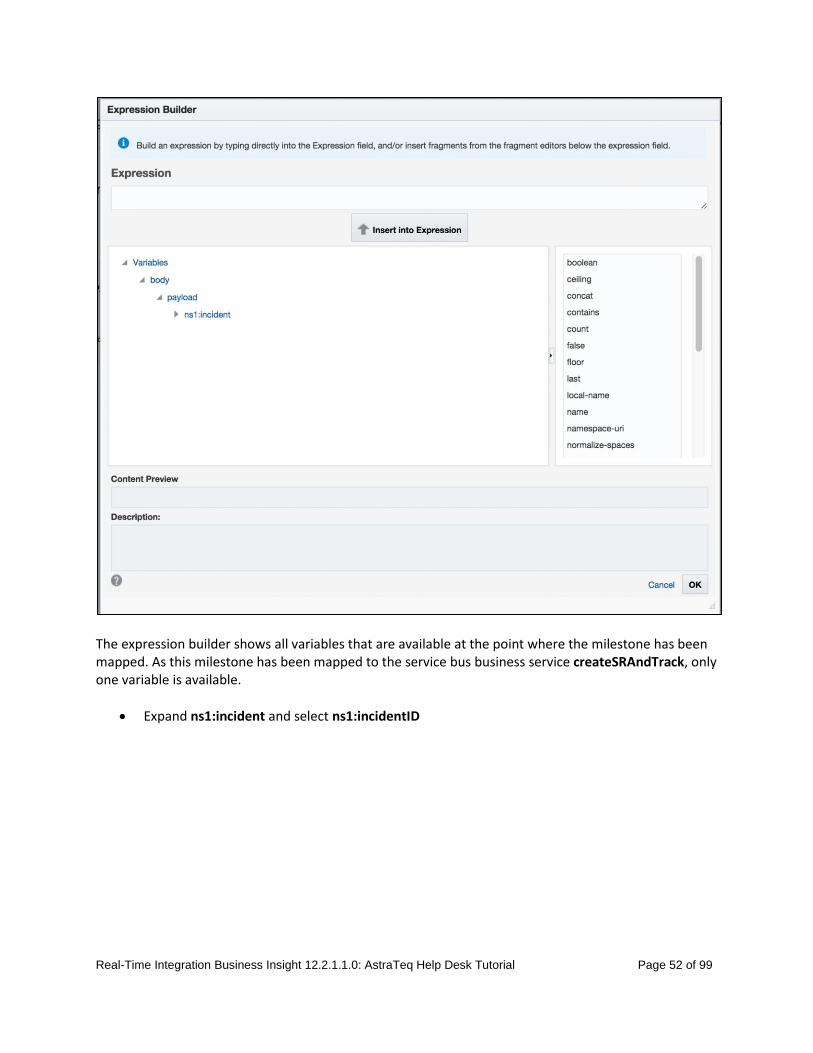
This opens the expression builder:
Real-Time Integration Business Insight 12.2.1.1.0: AstraTeq Help Desk Tutorial Page 52 of 99
The expression builder shows all variables that are available at the point where the milestone has been mapped. As this milestone has been mapped to the service bus business service createSRAndTrack, only one variable is available.
Expand ns1:incident and select ns1:incidentID

Real-Time Integration Business Insight 12.2.1.1.0: AstraTeq Help Desk Tutorial Page 53 of 99
Push “Insert into Expression”
Click OK
Click Return To Editor The Unique Instance Identifier should now look like this:

Real-Time Integration Business Insight 12.2.1.1.0: AstraTeq Help Desk Tutorial Page 54 of 99
If an instance of the help desk spanned several domains or integration flows (so called disconnected flows), additional mappings would be necessary for correlation. As that is not the case with this application, the Unique Instance Identifier is now complete. Save the model.
3 tasks are yet to be completed before the model can be activated.

Real-Time Integration Business Insight 12.2.1.1.0: AstraTeq Help Desk Tutorial Page 55 of 99
Integration Architect – Define extraction criteria for Indicators Select the Dimensions and Measures tile:
Most indicators have already been completed, only Total Resolution Cost, Reason for Suspension and Resolution are left to be mapped.
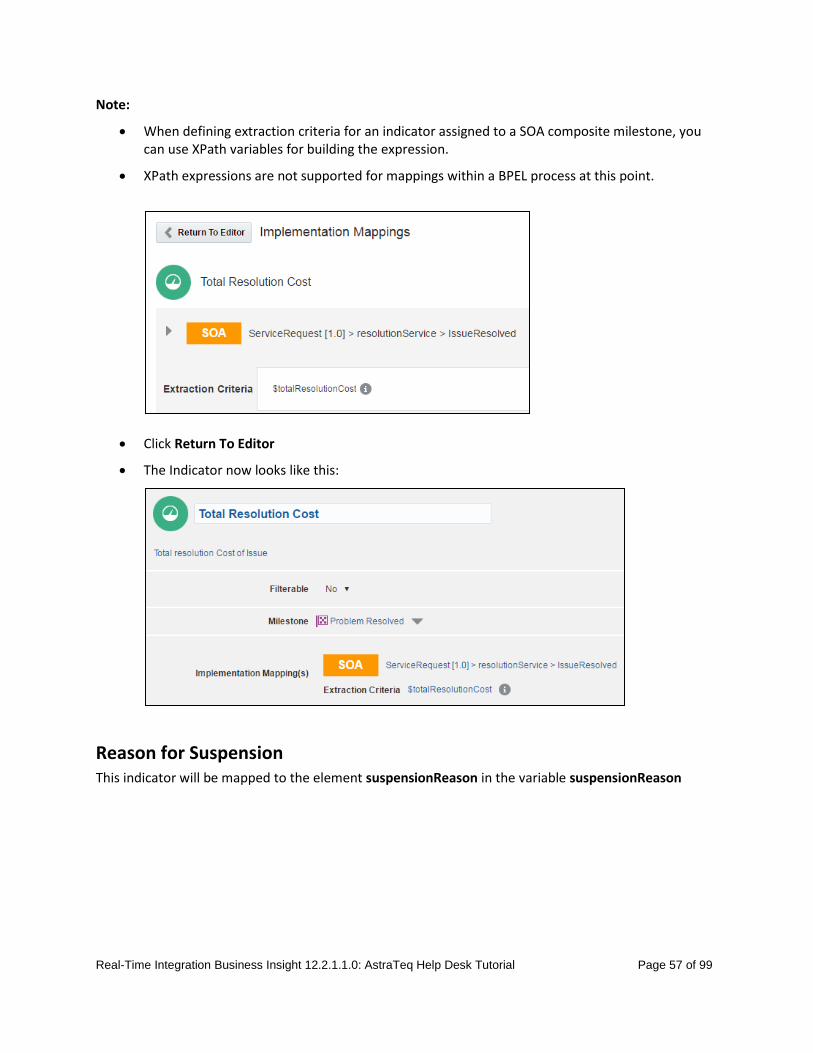
Total Resolution Cost This indicator will be mapped to the variable totalResolutionCost in the BPEL process resolutionService.
Click the Define link next to Extraction Criteria. This opens the Implementation Mappings page.

Real-Time Integration Business Insight 12.2.1.1.0: AstraTeq Help Desk Tutorial Page 56 of 99
Click on the Edit Extraction Criterion pencil icon to open the expression builder:
Select the variable totalResolutionCost and push the button Insert into Expression
The expression is now complete: $totalResolutionCost
Press OK
Real-Time Integration Business Insight 12.2.1.1.0: AstraTeq Help Desk Tutorial Page 57 of 99
Note:
When defining extraction criteria for an indicator assigned to a SOA composite milestone, you can use XPath variables for building the expression.
XPath expressions are not supported for mappings within a BPEL process at this point.
Click Return To Editor
The Indicator now looks like this:
Reason for Suspension This indicator will be mapped to the element suspensionReason in the variable suspensionReason
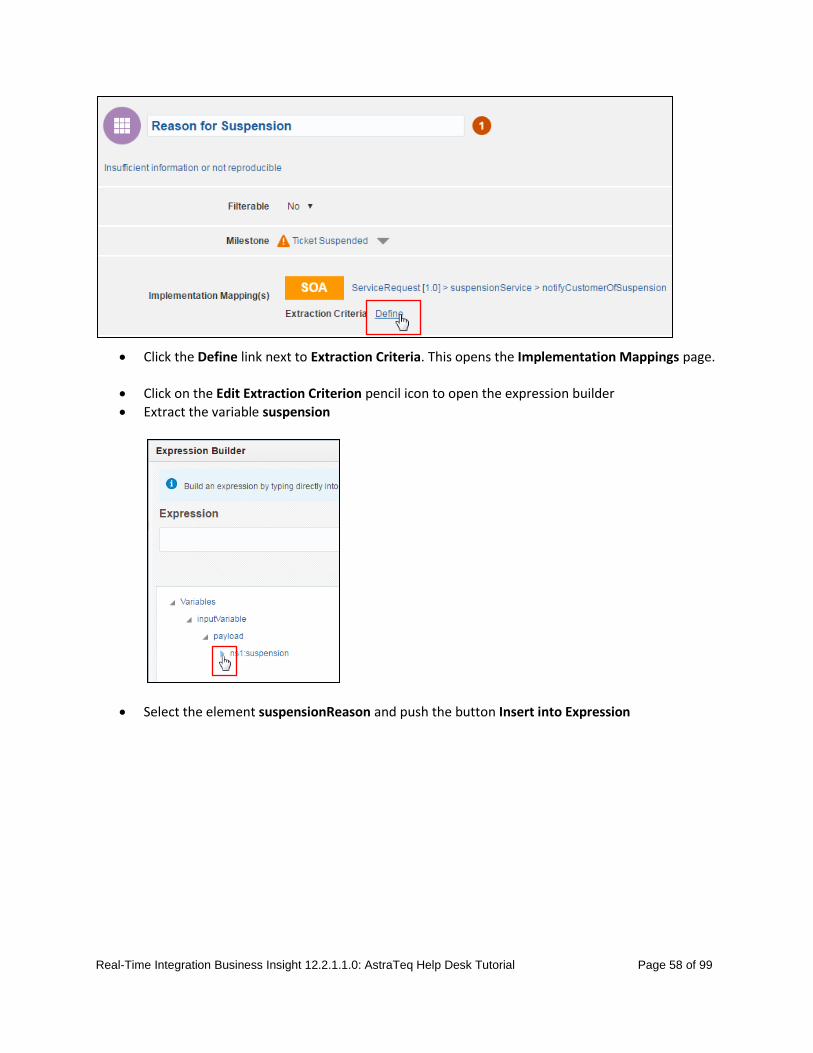
Real-Time Integration Business Insight 12.2.1.1.0: AstraTeq Help Desk Tutorial Page 58 of 99
Click the Define link next to Extraction Criteria. This opens the Implementation Mappings page.
Click on the Edit Extraction Criterion pencil icon to open the expression builder
Extract the variable suspension
Select the element suspensionReason and push the button Insert into Expression

Real-Time Integration Business Insight 12.2.1.1.0: AstraTeq Help Desk Tutorial Page 59 of 99
The expression is now complete: $inputVariable/payload/ns1:suspension/ns1:suspensionReason
Press OK
Click Return To Editor
The Indicator now looks like this:
Save the model.

Real-Time Integration Business Insight 12.2.1.1.0: AstraTeq Help Desk Tutorial Page 60 of 99
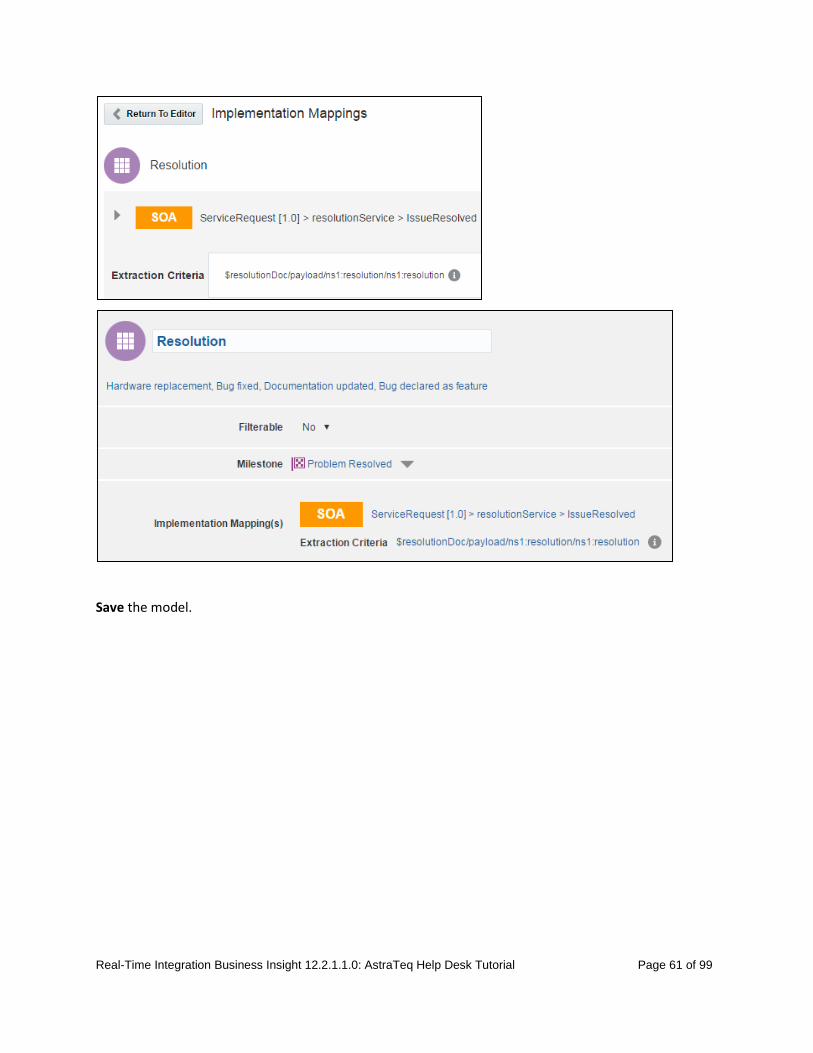
Resolution
Extraction criteria:
$resolutionDoc/payload/ns1:resolution/ns1:resolution
Real-Time Integration Business Insight 12.2.1.1.0: AstraTeq Help Desk Tutorial Page 61 of 99
Save the model.

Real-Time Integration Business Insight 12.2.1.1.0: AstraTeq Help Desk Tutorial Page 62 of 99
Integration Architect - Activate the AstraTeq Help Desk model With all milestones mapped and indicator extraction criteria defined, there are 0 tasks to be completed. The model can now be activated.
Select Activate from the “hamburger” menu on the top right of the page:
Click Continue to confirm activation.
The view is switched to the Designer home page.

Real-Time Integration Business Insight 12.2.1.1.0: AstraTeq Help Desk Tutorial Page 63 of 99
Activation will take at least one minute.
The model is activate when you see the green check mark and is now ready to start collecting metrics:

Real-Time Integration Business Insight 12.2.1.1.0: AstraTeq Help Desk Tutorial Page 64 of 99
Change an activated model If you want to make further changes or corrections to your model, follow these steps:
Click on the model actions menu and select “Create Draft”
This creates a draft model and opens the model page
If you save the draft model and go back to the Designer home page, you see the activated model and the draft model
Making changes to the draft will not affect the currently active model until you activate the draft:
Complete your changes.
Save the model.
Activate the draft.
This will overwrite the active model with the changes you’ve just made.
If you decide not to go forward with the changes, you can discard the draft. Note: Refer to Model Lifecycle States for more details on the different states of a model.

Real-Time Integration Business Insight 12.2.1.1.0: AstraTeq Help Desk Tutorial Page 65 of 99
Test the AstraTeq Help desk application to start collecting metrics Perform the same test as previously.
Copy one of the test files, e.g customerReport1.txt, into /home/oracle/Insight/problem (or the folder you defined earlier)
A successful test will show a server output similar to the below, or you can just check for a new instance in Enterprise Manager Fusion Middleware Control, following the steps below.
Now let’s double check Enterprise Manager Fusion Middleware Control:
Open Enterprise Manager Fusion Middleware Control using http://<hostname>:<port>/em, e.g http://localhost:7001/em
Log in with your admin user
Click on Target Navigation on top left

Real-Time Integration Business Insight 12.2.1.1.0: AstraTeq Help Desk Tutorial Page 66 of 99
Expand SOA, then click soa-infra (AdminServer)
Click the Deployed Composites tab.
Click on ServiceRequest [1.0]
Click on Flow Instances
Click on the Search button on the right

Real-Time Integration Business Insight 12.2.1.1.0: AstraTeq Help Desk Tutorial Page 67 of 99
You should see one instance for the one test message you had copied over or several if you ran more than one test
Click on the Flow ID to bring up the Flow Trace
It should look similar as the above
You should start seeing metrics in the Insight console right away. Work through the following sections to learn more about the console, dashboards and metrics. If the test is successful, copy all 499 messages. It will take a while to process all messages. The more test messages you process, the better the metrics will be.

Real-Time Integration Business Insight 12.2.1.1.0: AstraTeq Help Desk Tutorial Page 68 of 99
Work with the Console – pre-configured/out of the box dashboards Push all test messages through, following the steps in the previous section. Feel free to continue testing, while you discover the console functionality to get more varied results.
Nina and Karl both have business owner privileges in the test system, so that they can check the consoles while running test messages through. You can do the following exercises with either one of those users or you can log in as John, the Business Owner.
John does not have permission to design models; his activities in Insight are restricted to the consoles and reports:
When John logs in for the first time, his home page is empty.
Add the AstraTeq Help Desk console summary card to the home page by selecting “Add Console” -> “AstraTeq Help Desk”:
The summary card on your setup will differ from the below screenshot dependant on the test data in your system. You will most likely only see data for one day instead of five.
Real-Time Integration Business Insight 12.2.1.1.0: AstraTeq Help Desk Tutorial Page 69 of 99
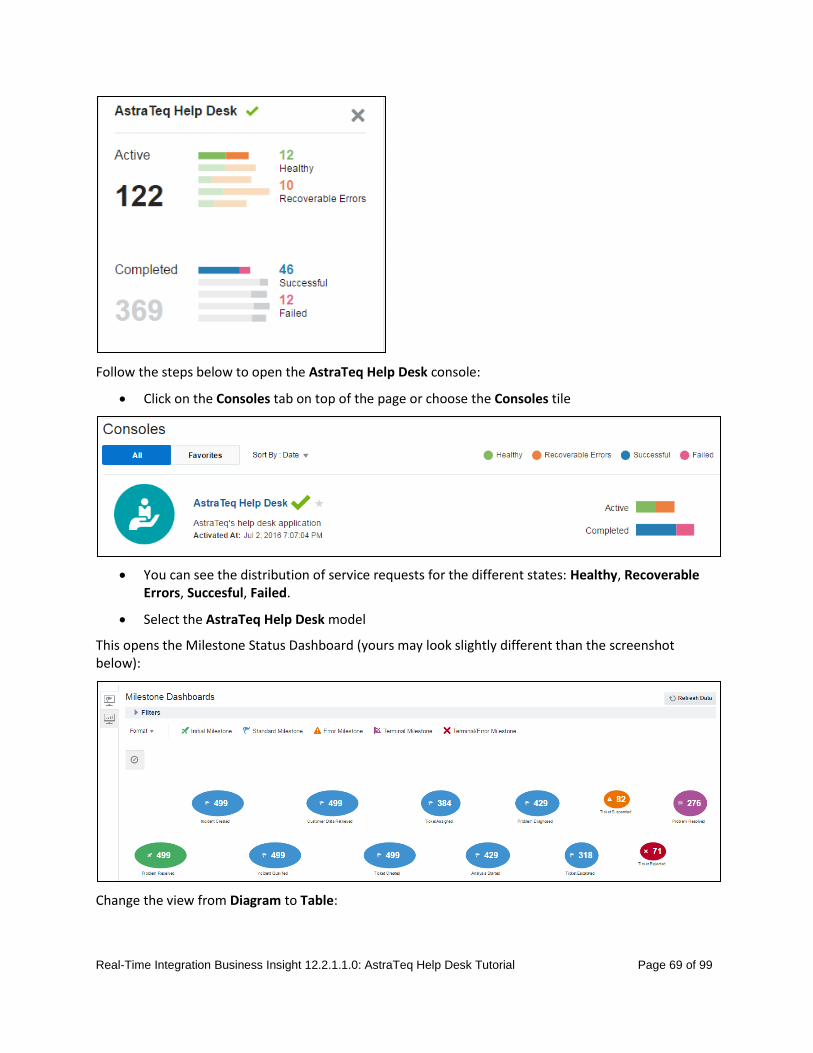
Follow the steps below to open the AstraTeq Help Desk console:
Click on the Consoles tab on top of the page or choose the Consoles tile
You can see the distribution of service requests for the different states: Healthy, Recoverable Errors, Succesful, Failed.
Select the AstraTeq Help Desk model
This opens the Milestone Status Dashboard (yours may look slightly different than the screenshot below):
Change the view from Diagram to Table:

Real-Time Integration Business Insight 12.2.1.1.0: AstraTeq Help Desk Tutorial Page 70 of 99
The table form of this view is paginated for performance and space reasons. You can use the page numbers or arrows at the bottom to move between pages.
The below screenshot shows an example of the four preconfigured (or out of the box) dashboards on the console page:

Real-Time Integration Business Insight 12.2.1.1.0: AstraTeq Help Desk Tutorial Page 71 of 99
This is the view if metrics are available for five days:
New in release 12.2.1.1.0 Dependant on the number of instances in the system, loading of the four dashboards can be slow.
Release 12.2.1.1.0 provides a user preference that lets you change the console view to only show one of the four dashboards:
Click the user name on top of the page select Preferences
Change the Milestone Dashboard View to Separated
Select the dashboard you want to see when entering the page, e.g. Active Instances

Real-Time Integration Business Insight 12.2.1.1.0: AstraTeq Help Desk Tutorial Page 72 of 99
Click Save on top of the page
Click Done
You will now only see one dashboard, with a legend on top to select any of the three other dashboards.

Real-Time Integration Business Insight 12.2.1.1.0: AstraTeq Help Desk Tutorial Page 73 of 99
For more details on user preferences, consult the Preferences chapter in Oracle® Fusion Middleware Using Oracle Real-Time Integration Business Insight.
Exercise: Use the Milestone Status Dashboards on the Console As an example of the type of information that can be gleaned from the default console, try and answer the following questions using the capabilities of the Insight console, such as the milestone status table and the pre-configured dashboards.
Q: How many failures have happened over the past five days?
A: By default, the console shows activity over the last five days, so you will not need to change the filter criteria.
Looking at the milestone status diagram, there is one failure (also known as “terminal/error”) milestone: Ticket Rejected.
o Ticket Suspended is not terminal and can still be recovered, so an instance that has most recently passed this milestone does not count as failed.
o The count for the Ticket Rejected milestone will tell you the total number for failures for the application over the past five days.
Note: you can also see details of the failures by looking at the “Instance Errors” chart.

Real-Time Integration Business Insight 12.2.1.1.0: AstraTeq Help Desk Tutorial Page 74 of 99
Q: Do any milestones appear to be bottlenecks over the past five days?
A: Milestones with a count that is significantly larger than other milestones can be an indication of application slowdown at that milestone.
You can use the “Diagram” view of milestone status to aid in identifying milestones that are potential bottlenecks. In the diagram view, the size of each milestone is determined by the milestone traversal count.
Q: Over the past 30 days, which milestone has been taking the longest to complete?
A: Milestones are atomic and instantaneous in nature, in that they do not have a “begin” or an “end” time, just a “time that the milestone was passed”. Therefore, the question “how long did a milestone take to complete” doesn’t really make sense. We can however determine how long it takes on average to get from one milestone to another.
In the milestone status table, this information is aggregated in two columns: “Avg Time To Following Milestone” and “Avg Time From Previous Milestone”. It’s reasonable to assume that for any given milestone, the time spent after passing the previous milestone was used to accomplish the tasks required to mark the next milestone as complete.

Real-Time Integration Business Insight 12.2.1.1.0: AstraTeq Help Desk Tutorial Page 75 of 99
Take a look at the milestone status table and identify the entry with the largest value in the “Avg Time From Previous Milestone” column. This is the milestone that is taking the most time (on average) to reach, and therefore could be a bottleneck in the application.
Q: How many instances that were started today are still running?
A: The “Active Instances” chart shows how many instances are still active, grouped on the x-axis by the day on which they were started. For each day, you can also see what the most recently passed milestone is.
You would expect active instance that most recently passed “Ticket Suspended”, but the high number of instances that most recently passed the “Ticket Assign” milestone are alarming.
Real-Time Integration Business Insight 12.2.1.1.0: AstraTeq Help Desk Tutorial Page 76 of 99
Business Transactions (or Instance Listing) Page Recall that Insight collects metrics and data about applications for which an abstract model has been defined (i.e., milestones and indicators). Each time that an initial milestone is passed, a new instance (i.e. service request) is created to track the details associated with that particular execution flow throughout the integration application. You can inspect the details of groups of service requests using the Business Transaction or Instance Listing Page, as well as drill into fine-grained details on individual service requests.
There are a number of different ways that you can inspect groups of service requests in Insight, including:
Searching for service requests using a portion of the unique instance identifier (incident ID)
Drilling into entries on the milestone table or the milestone diagram
Drilling into elements of either preconfigured dashboards or custom dashboards
Note: every time that you perform a search, Insight opens a new tab in your browser.
Make sure that the popup blocker on your browser is disabled for this new tab to open.
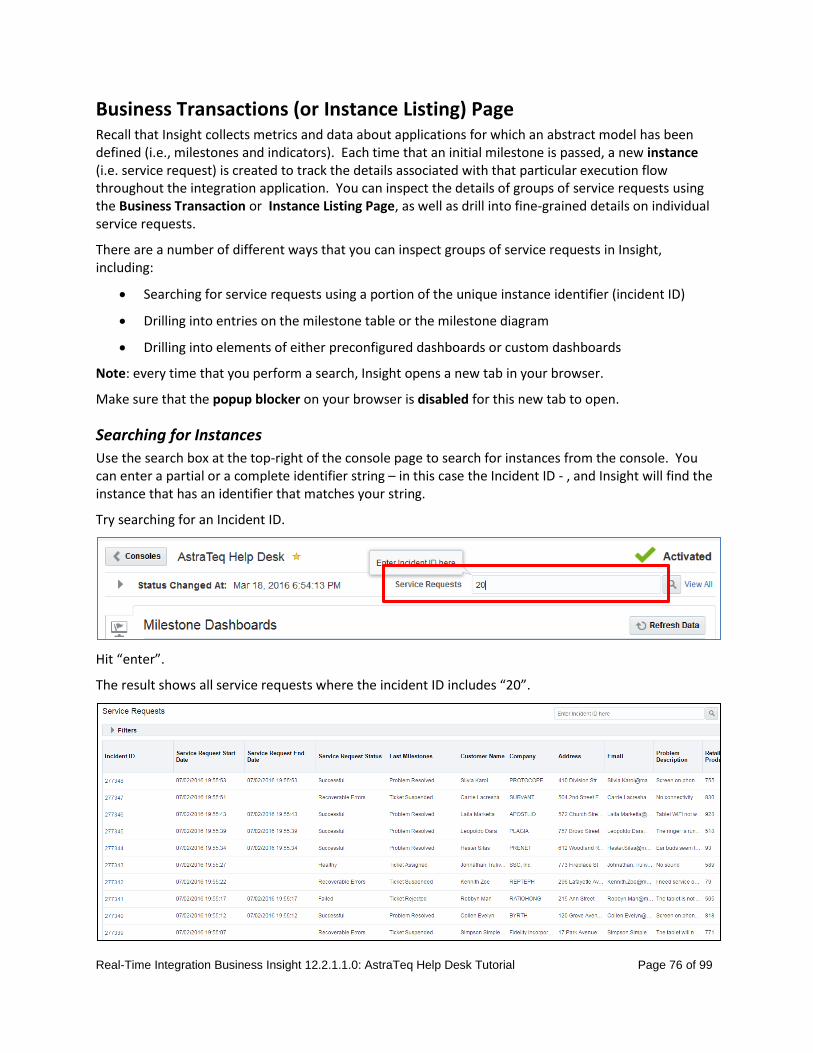
Searching for Instances
Use the search box at the top-right of the console page to search for instances from the console. You can enter a partial or a complete identifier string – in this case the Incident ID - , and Insight will find the instance that has an identifier that matches your string.
Try searching for an Incident ID.
Hit “enter”.
The result shows all service requests where the incident ID includes “20”.

Real-Time Integration Business Insight 12.2.1.1.0: AstraTeq Help Desk Tutorial Page 77 of 99
Drilling Into Milestone Status Entries
You can drill into milestone status entries on either the milestone status table or the milestone status diagram.
From the milestone status table, simply click on any row in the table and a search will be executed to show you all service requests that most recently passed that milestone.
From the milestone status diagram, click on the icon for any node in the diagram, and a search will be executed to show you all service requests that most recently passed that milestone.
Drilling Into Milestone Charts & Graphs
For charts and graphs on the milestone status portion of the console, as well as on custom dashboards, it is also possible to do a search for all instances that contribute to a particular chart element. To do this, right click on any chart element (e.g., a bar in a bar chart, or a slice in a pie chart) and select “Instance List”. A search will be performed that will show all instances that are represented in that portion of the chart.
Right-click on the “Ticket Assigned” section of today’s bar chart to see why so many instances are stuck at that milestone, and select “Instance List”.
Scroll to the right in the list and you will see that all stuck instances are assigned to the same frontline technician, Victor Diaz. It may be a good idea to check if Joe is on vacation or sick and re-assign to a different engineer.

Real-Time Integration Business Insight 12.2.1.1.0: AstraTeq Help Desk Tutorial Page 78 of 99
Indicators on the Business Transaction Page
Once a search has been performed (either an explicit identifier search, or a drill-down), the user is presented with a list of service requests that match the search criteria specified. All identifiers are listed in tabular form in the search results table.
Clicking on any value in the identifier column will drill into the details for a particular service request. See the next section for details on how to use the Business Transaction Details page.
The user can sort the list by clicking one of the arrows on one of the column headers:
Note:

Real-Time Integration Business Insight 12.2.1.1.0: AstraTeq Help Desk Tutorial Page 79 of 99
Some indicator columns may not have values for certain service request. This could be due to the fact that no values were present in the message when the extraction criteria was evaluated, or also due to the fact that the milestone at which the identifier was to be extracted was not passed by the instance.
For example, an indicator called “Suspension Reason” would likely not have a value if a service request was not suspended.
Completed service requests show the Service Request End Date while active service requests show no date in that column.
The list also shows the status of each service request and the last passed milestone.
You can change the order of the columns to get a better view of the indicators that are most important to you.
Filtering the Business Transaction (Instance Listing) Page
The list of service requests can be refined using the filter criteria at the top of the page. There are two categories of filter criteria that can be specified: Lifecycle and Indicators.
Lifecycle criteria allow the user to filter by terms related to the progression of a service request through its lifecycle. For example, the user can limit by the date that a service request was created, or limit the matching service requests by the most recently passed milestone.
Indicator criteria allow a business owner to limit search results based on value ranges applied to the indicators that are unique to their model. For example, one might limit matching service requests to those issues that have been reported between 0 and 4 times.

Real-Time Integration Business Insight 12.2.1.1.0: AstraTeq Help Desk Tutorial Page 80 of 99
Business Transaction Detail Page The business transaction details page gives a chronological view and detailed flow of any single service request that a user wishes to inspect.
A user looking for failed service requests, or active service requests, or any other filtered list of service requests on this page may as a consequence want to delve into each of these service requests to investigate the causes for the same. Business owners may drill into a specific service requests by clicking on the identifier value in the business transaction listing page.

Real-Time Integration Business Insight 12.2.1.1.0: AstraTeq Help Desk Tutorial Page 81 of 99
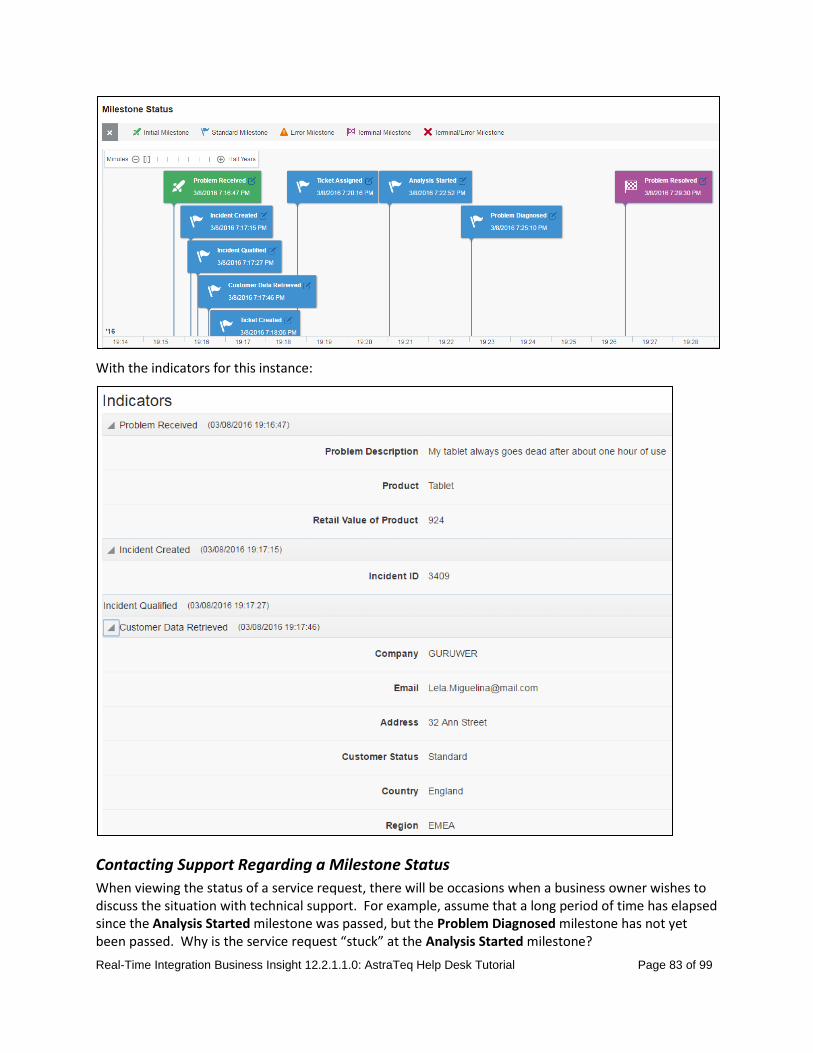
The details page also shows a list of indicators grouped according to the milestone with which they are associated, and the values of these indicators.
Just below the timeline is an expandable/collapsible list view component, showing all the milestone names (and the timestamp of reaching the milestone) as headers, which then can be expanded to view all indicators associated with the particular milestone along with indicator values captured.
Real-Time Integration Business Insight 12.2.1.1.0: AstraTeq Help Desk Tutorial Page 82 of 99
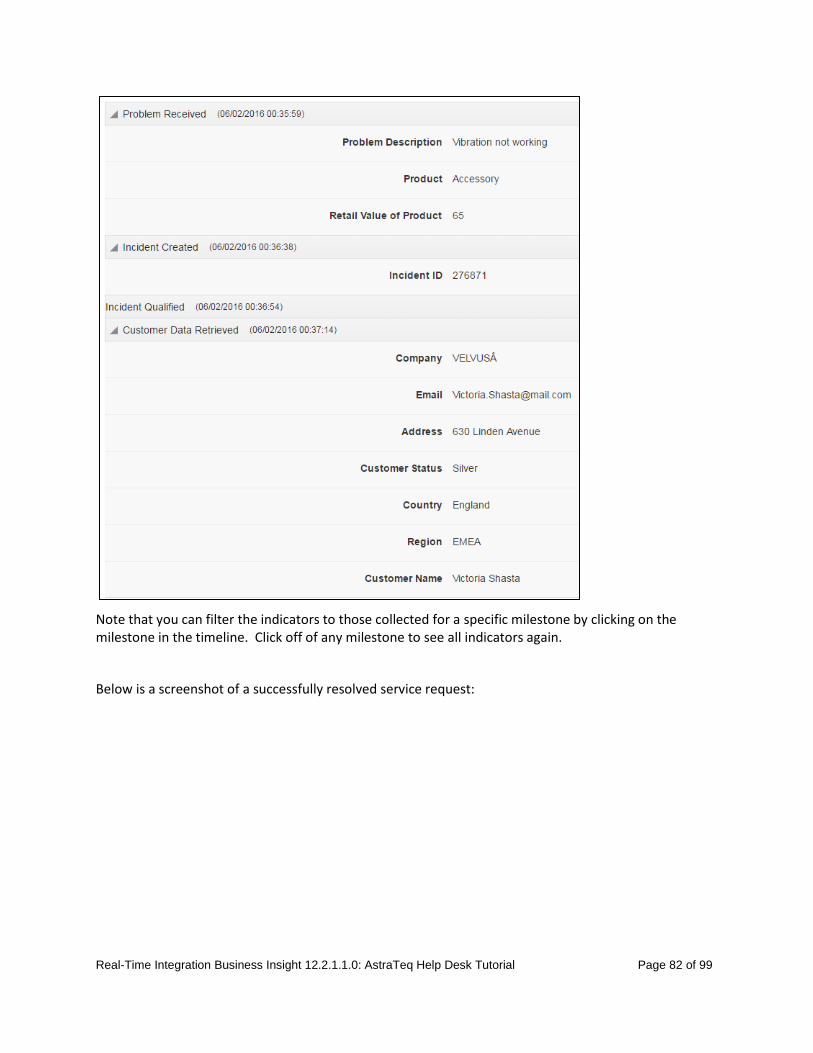
Note that you can filter the indicators to those collected for a specific milestone by clicking on the milestone in the timeline. Click off of any milestone to see all indicators again.
Below is a screenshot of a successfully resolved service request:
Real-Time Integration Business Insight 12.2.1.1.0: AstraTeq Help Desk Tutorial Page 83 of 99
With the indicators for this instance:
Contacting Support Regarding a Milestone Status
When viewing the status of a service request, there will be occasions when a business owner wishes to discuss the situation with technical support. For example, assume that a long period of time has elapsed since the Analysis Started milestone was passed, but the Problem Diagnosed milestone has not yet been passed. Why is the service request “stuck” at the Analysis Started milestone?

Real-Time Integration Business Insight 12.2.1.1.0: AstraTeq Help Desk Tutorial Page 84 of 99
This could be a business problem, but the business owner may also want to exclude a technical problem.
In such cases, the business user can “escalate” the service request by clicking on the “Report a Problem” icon embedded in the milestone in which the error occurred. This will generate an email to a system administrator including information on where the problem was seen in Insight, as well as providing a link to the technical flow trace so that the administrator can view the associated technical objects in Enterprise Manager.
Note: Clicking the “Report a Problem” icon will launch your default email browser if one is defined.

Real-Time Integration Business Insight 12.2.1.1.0: AstraTeq Help Desk Tutorial Page 85 of 99
Create Custom Dashboards for “AstraTeq Help Desk” Model Business owners often want to track metrics, ratios, and trends on their console that are important to their business, but for which the preconfigured dashboards do not provide clarity. Insight allows users to do this by creating custom dashboards that can be used to visualize indicators defined in the model and extracted as the application runs.
Custom dashboards are collected on the custom dashboard tab of the console. You can add as many as you like.
The best way to understand how custom dashboards work is to create a few for yourself! Try to create the following custom dashboards. Feel free to play around and create your own, too.
A few example dashboards are listed in the next section.

Real-Time Integration Business Insight 12.2.1.1.0: AstraTeq Help Desk Tutorial Page 86 of 99
Note: when you first select the “Custom Dashboards” tab, you will have no custom dashboards defined. Simply click on the large green “Create Dashboard” button to get started creating your first dashboard.
This brings up the Create Dashboard page:
Real-Time Integration Business Insight 12.2.1.1.0: AstraTeq Help Desk Tutorial Page 87 of 99
Select an icon for the dashboard by clicking on the right arrow next to the default icon. Follow the same steps as when selecting an icon representing your model
Enter a title for your model
Select a chart type from Pie Chart, Bar Chart, Bubble Chart or Area Chart
Select measures and dimensions to define what metrics are visualized in the charts
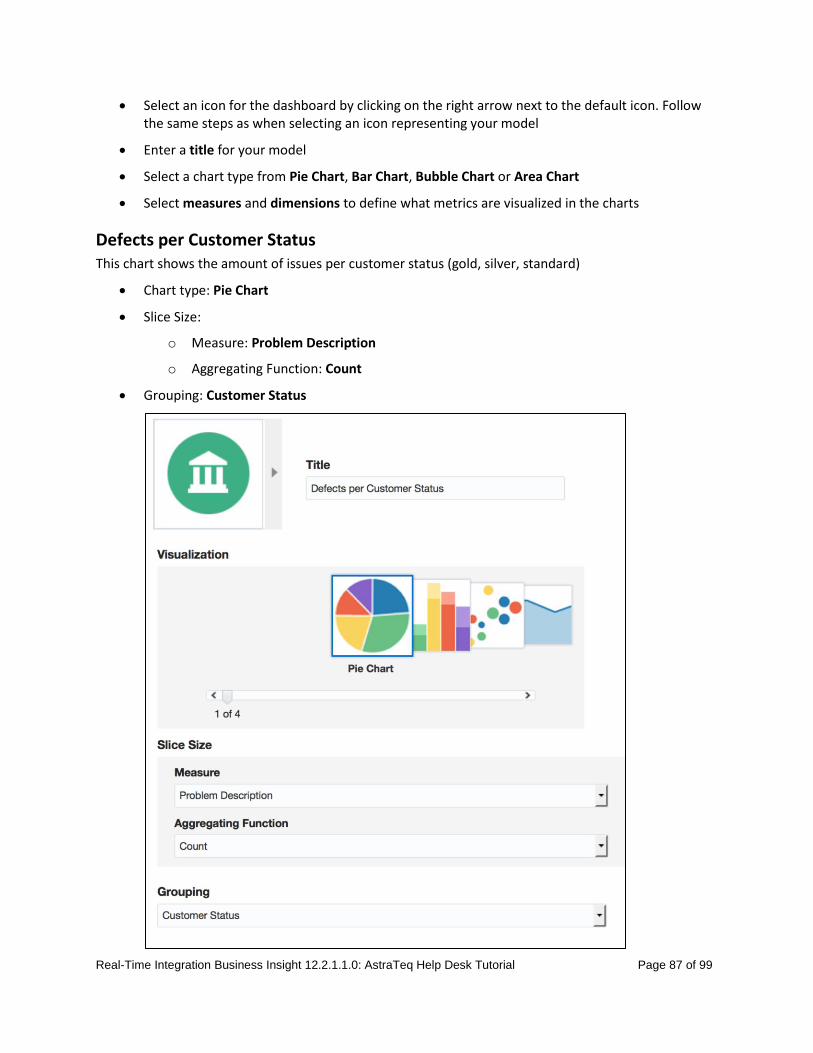
Defects per Customer Status This chart shows the amount of issues per customer status (gold, silver, standard)
Chart type: Pie Chart
Slice Size:
o Measure: Problem Description
o Aggregating Function: Count
Grouping: Customer Status
Real-Time Integration Business Insight 12.2.1.1.0: AstraTeq Help Desk Tutorial Page 88 of 99
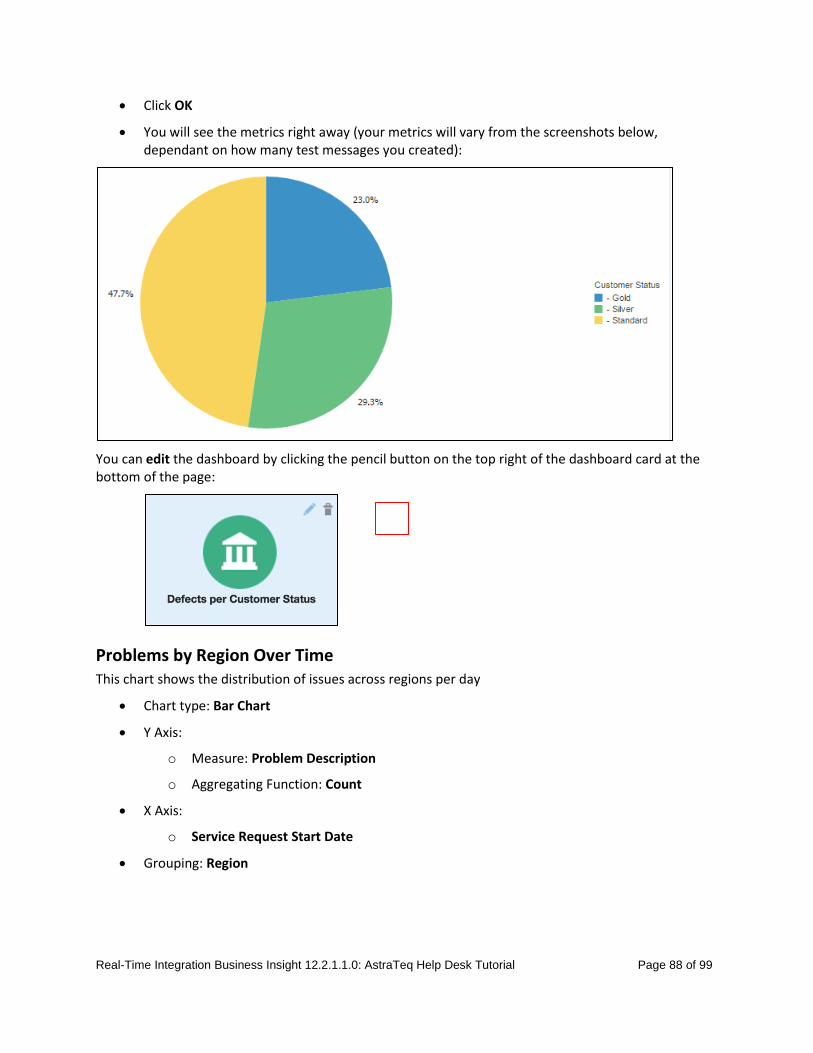
Click OK
You will see the metrics right away (your metrics will vary from the screenshots below, dependant on how many test messages you created):
You can edit the dashboard by clicking the pencil button on the top right of the dashboard card at the bottom of the page:
Problems by Region Over Time This chart shows the distribution of issues across regions per day
Chart type: Bar Chart
Y Axis:
o Measure: Problem Description
o Aggregating Function: Count
X Axis:
o Service Request Start Date
Grouping: Region

Real-Time Integration Business Insight 12.2.1.1.0: AstraTeq Help Desk Tutorial Page 89 of 99
Click OK
Your metrics will vary from the screenshots below, dependant on your test data:

Real-Time Integration Business Insight 12.2.1.1.0: AstraTeq Help Desk Tutorial Page 90 of 99
Product Value to Resolution Cost and Problem Count This chart shows the relation between the retail value of the products on which issues have been reported, the total resolution cost of the problem, and how many times the same problem has been reported.
Chart type: Bubble Chart
X Axis:
o Measure: Retail Value of Product
o Aggregating Function: Average
Y Axis:
o Measure: Total Resolution Cost
o Aggregating Function: Sum
Bubble Size:
o Measure: Problem Description
o Aggregating Function: Count
Grouping: Product

Real-Time Integration Business Insight 12.2.1.1.0: AstraTeq Help Desk Tutorial Page 91 of 99
Every bubble represents a different product type:

Real-Time Integration Business Insight 12.2.1.1.0: AstraTeq Help Desk Tutorial Page 92 of 99
The bubble color shows the product type, the bubble size shows how many problems have been reported for this product and the position on the Y axis shows the sum of the cost to resolve the issues.
Mouse over a bubble to see the values
Escalations Over Time This chart shows the number of escalations over time.
Chart type: Area Chart
Y Axis:
o Measure: Backline Technicians
o Aggregating Function: Count
X Axis: Service Request Start Date

Real-Time Integration Business Insight 12.2.1.1.0: AstraTeq Help Desk Tutorial Page 93 of 99
Issue Type per Customer This chart shows the percentage of issues types per customer.
Chart type: Pie chart
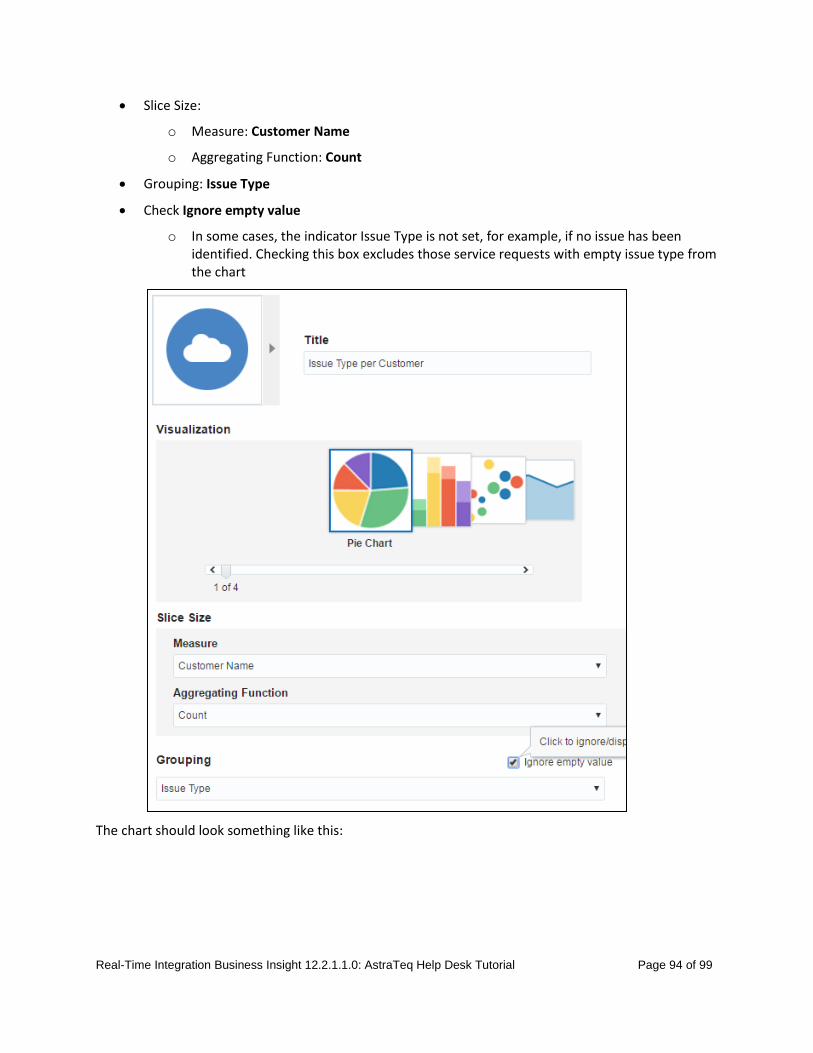
Real-Time Integration Business Insight 12.2.1.1.0: AstraTeq Help Desk Tutorial Page 94 of 99
Slice Size:
o Measure: Customer Name
o Aggregating Function: Count
Grouping: Issue Type
Check Ignore empty value
o In some cases, the indicator Issue Type is not set, for example, if no issue has been identified. Checking this box excludes those service requests with empty issue type from the chart
The chart should look something like this:

Real-Time Integration Business Insight 12.2.1.1.0: AstraTeq Help Desk Tutorial Page 95 of 99
Problems by Country Over Time Here you can see how many issues were reported per country every day.
Chart type: Bar chart
Y Axis:
o Measure: Problem Description
o Aggregating Function: Count
X Axis: Service Request Start Date
Grouping: Country

Real-Time Integration Business Insight 12.2.1.1.0: AstraTeq Help Desk Tutorial Page 96 of 99
The chart should look something like this:
You can simplify the diagram by unchecking countries in the right legend. A diagram with less countries could look like this:

Real-Time Integration Business Insight 12.2.1.1.0: AstraTeq Help Desk Tutorial Page 97 of 99
In addition to changing the filter for the dashboards, you can also limit the timeframe in the chart itself by moving the slider at the bottom:

Real-Time Integration Business Insight 12.2.1.1.0: AstraTeq Help Desk Tutorial Page 98 of 99
View of the last five days Signed in as John, the business owner, go to the Home page (click on the Home tab).
You can add a “console tile” to this page for each model to get a view of the last five days if you haven’t done so yet.
Click Add Console and select “AstraTeq Help Desk” from the drop-down list:
The metrics are grouped into
Active orders (orders not passed a terminal milestones yet)
o Healthy: last milestone passed was a standard milestone. Service Requests that have been started, but are not complete yet.
o Recoverable Errors: last milestone passed was an error milestone, but not terminal. This service request can still be successful as it is not complete yet. If the service request has been suspended, it can still be recovered, for example if the customer provides additional information to the support engineer.
Completed orders (orders that have passed a terminal milestone)
o Successful: last milestone passed was terminal: service requests that have been resolved.
o Failed: last milestone was a terminal error milestone: service requests that have been rejected.

Real-Time Integration Business Insight 12.2.1.1.0: AstraTeq Help Desk Tutorial Page 99 of 99
The numbers on the left are a cumulating metrics for the last five days, numbers on the right represent the current day.
You can select bars in the middle from past days to retrieve the numbers from that day:
This concludes the AstraTeq Help Desk tutorial for Real-Time Integration Business Insight. We hope you enjoyed the experience. Please let us know any questions or comments you may have.