EASI a free web database application for collecting and managing monitoring records.

ReadyResults.net2014
Managing the Databaseand Student Records Online
(at the District Level)
For Administrators Only
For help, send email to:[email protected]
or call:877-456-1547

.
Table of Contents
Overview....................................................................................................................................................... 1
Managing User Accounts.............................................................................................................................. 2
Creating a New Account.................................................................................................................. 2
Editing an Account .......................................................................................................................... 5
Accessing Account Reports ............................................................................................................. 8
Filling in the Contact List ................................................................................................................ 9
Managing Student Records Online ............................................................................................................... 9
Adding Districts, Schools or Teachers............................................................................................. 9
Editing/Merging Districts, Schools or Teachers ............................................................................ 10
Finding/Editing/Deleting/Merging Student Information ............................................................... 12
Test Administrations................................................................................................................................... 15
Deleting a Test Administration...................................................................................................... 15
Deleting a Student from a Test Administration ............................................................................. 16
Cleaning Up the Database........................................................................................................................... 17
Clearing the Rosters....................................................................................................................... 17
Deleting Students with No Tests.................................................................................................... 18
Deleting Teachers with No Students.............................................................................................. 19
Promoting Each Student’s Grade Level......................................................................................... 19
Quick Reports ............................................................................................................................................. 20
Creating a Quick Report ................................................................................................................ 20
Creating a New Quick Report Based on an Current One .............................................................. 22
Editing a Quick Report .................................................................................................................. 23
Related Documents ..................................................................................................................................... 23
Copyright © 2014 NCS Pearson, Inc. ReadyResults.net powered by Certica Solutions, Inc. All rightsreserved.Warning: No part of this publication may be reproduced or transmitted in any form or by any means,electronic or mechanical, including photocopy, recording, or any information storage and retrievalsystem, without permission in writing from the copyright owner.Pearson, ReadyResults, Stanford, Aprenda, Otis-Lennon School Ability Test, OLSAT, SELP, and SSLPare trademarks in the U.S. and/or other countries of Pearson Education, Inc., or its affiliate(s). Printedin the United States of America.

Copyright © 2014 NCS Pearson, Inc. ReadyResults.net powered by Certica Solutions, Inc.All rights reserved. Page 1 of 24
Overview
The database in ReadyResults contains all the test and student information with which reports are created.This document covers database management tasks the database administrator performs.
Your first task as an administrator is to set up user accounts for members of your group. You will createtheir accounts and assign them the appropriate permission to access the database. Refer to “ManagingUser Accounts” on page 2 for details on what this involves.
Other tasks involve managing the database of student records. Some tasks are covered here; others arecovered in separate documents. The tasks include:
1. Importing an electronic file containing student roster information. There is a separatedocument called Importing Student Information that addresses this process.
2. Modifying the database manually. This involves working with the database directly. Tasksrelated to teachers and teacher assignments are covered in a separate document, TeacherAssignments. Managing Special Codes/Demographics manually is described in a separatedocument, Special Codes.
Tasks that can also be performed by building-level users (e.g., adding students, editing students ata building level, and printing class rosters) are covered in the document, Managing StudentRecords Online at the Building Level.
This document covers:
a. Adding or editing districts, schools, or teachers
b. Finding/Editing student records at a district level
c. Merging duplicate student or teacher records
d. Year-end clean up procedures, such as promoting all students to the next grade level orclearing rosters
3. Other miscellaneous tasks covered in this document:
a. Working with test administrations
b. Creating Quick Reports

Copyright © 2014 NCS Pearson, Inc. ReadyResults.net powered by Certica Solutions, Inc.All rights reserved. Page 2 of 24
Managing User Accounts
Administrators are responsible for creating and editing user accounts. This involves giving users theappropriate access to the database and to reports. Administrators can also edit and fill in the Contact List.
Creating a New AccountWhen you create accounts, each one will have associated with it
basic information such as a user name, a password, and an email address;
a reports-access level (how much private student details the user can see on reports); and
a database-management-access level (what kind of changes the user is allowed to make to thedatabase).
To create a new account:
1. Choose Utilities from the top menu bar to arrive at the ReadyResults Utilities Console page.
2. Choose Manage Users from the User Accounts menu.
3. Then Select and Delete User Accounts page appears. Click Add New User.
The Create and Update User Accounts page appears.
Copyright © 2014 NCS Pearson, Inc. ReadyResults.net powered by Certica Solutions, Inc.All rights reserved. Page 3 of 24
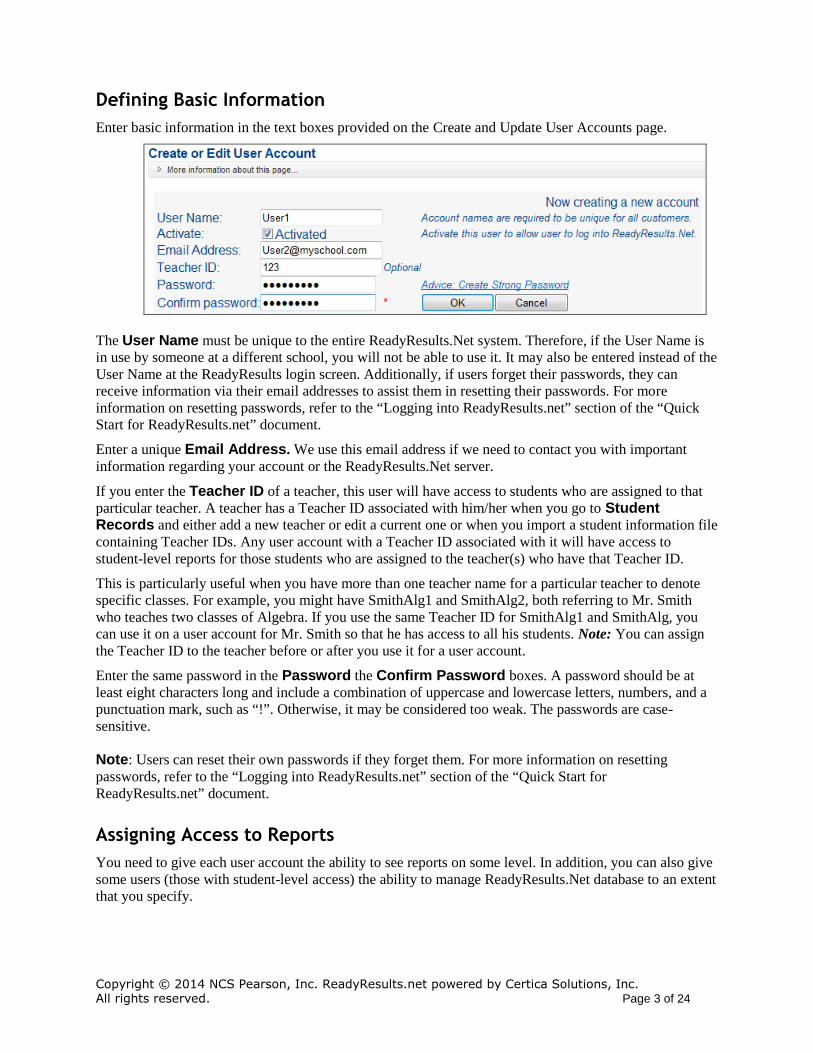
Defining Basic Information
Enter basic information in the text boxes provided on the Create and Update User Accounts page.
The User Name must be unique to the entire ReadyResults.Net system. Therefore, if the User Name isin use by someone at a different school, you will not be able to use it. It may also be entered instead of theUser Name at the ReadyResults login screen. Additionally, if users forget their passwords, they canreceive information via their email addresses to assist them in resetting their passwords. For moreinformation on resetting passwords, refer to the “Logging into ReadyResults.net” section of the “QuickStart for ReadyResults.net” document.
Enter a unique Email Address. We use this email address if we need to contact you with importantinformation regarding your account or the ReadyResults.Net server.
If you enter the Teacher ID of a teacher, this user will have access to students who are assigned to thatparticular teacher. A teacher has a Teacher ID associated with him/her when you go to StudentRecords and either add a new teacher or edit a current one or when you import a student information filecontaining Teacher IDs. Any user account with a Teacher ID associated with it will have access tostudent-level reports for those students who are assigned to the teacher(s) who have that Teacher ID.
This is particularly useful when you have more than one teacher name for a particular teacher to denotespecific classes. For example, you might have SmithAlg1 and SmithAlg2, both referring to Mr. Smithwho teaches two classes of Algebra. If you use the same Teacher ID for SmithAlg1 and SmithAlg, youcan use it on a user account for Mr. Smith so that he has access to all his students. Note: You can assignthe Teacher ID to the teacher before or after you use it for a user account.
Enter the same password in the Password the Confirm Password boxes. A password should be atleast eight characters long and include a combination of uppercase and lowercase letters, numbers, and apunctuation mark, such as “!”. Otherwise, it may be considered too weak. The passwords are case-sensitive.
Note: Users can reset their own passwords if they forget them. For more information on resettingpasswords, refer to the “Logging into ReadyResults.net” section of the “Quick Start forReadyResults.net” document.
Assigning Access to Reports
You need to give each user account the ability to see reports on some level. In addition, you can also givesome users (those with student-level access) the ability to manage ReadyResults.Net database to an extentthat you specify.

Copyright © 2014 NCS Pearson, Inc. ReadyResults.net powered by Certica Solutions, Inc.All rights reserved. Page 4 of 24
Viewing Summary Reports
Under “Permission to view reports,” choose Summary reports only if you do not want the user to seeany private student information. This option may be appropriate for a board member or a parent.
Note: You cannot give any kind of permission to manage the ReadyResults.net database to a user onlyhas access to summary reports.
Student Level Reports
Under “Permission to view reports,” choose Student level details and summary reports if youwant the user to see student level reports in addition to summary reports.
For a user who can see student-level details, you must specify whether the user can see all students or justsome students.
The Allow access to some students option typically is to grant teacher access. To do this, use thepermissions tree to select a specific class. Click on the plus (+) sign next to the District name. Continueclicking on the (+) signs until you find the name(s) of the teacher(s) to whom you are giving user access.
Note: If you use Teacher IDs and your student records are associated with those IDs, you do not need tomake selections here. They will be done for you automatically. See the discussion on Teacher ID in the“Designing Basic Information” on page 3.
Assigning Ability to Manage the Database
Case 1: Users with access to some students—If you choose Access to some students, the“Optional: Assign Permission to edit the database” section appears. Select specific tasks you want theuser to be able to perform in the database. For example, click Enter Scores or Responses if the userneeds to enter scores into ReadyResults.net. Click OK when you are finished editing or creating a newuser.

Copyright © 2014 NCS Pearson, Inc. ReadyResults.net powered by Certica Solutions, Inc.All rights reserved. Page 5 of 24
Note: A user with limited student access has limited access to database editing. If the user needs to beable to perform more database editing tasks, he/she should be given access to all students.
Case 2: Users with access to all students—If you choose Allow access to all students, theuser also has permission to edit/manage the database. Select specific tasks you want the user to be able toperform in the database. For example, click Enter Scores and Responses if the user needs to enterscores into ReadyResults.net. Click OK when you are finished editing or creating a new user.
Editing an AccountAfter you create an account, you can make changes to it. For your own account, you can change thePassword or the Email Address. For accounts that you (an administrator) have created, you can changeaccount details, such as the Password, the Email Address, and the permission that an account has to viewreports or to edit the database.
Your Own Account
You were given a user name and password for your account by Certica Solutions. You should changeyour password to a strong one, using combinations of letters and numbers.
Copyright © 2014 NCS Pearson, Inc. ReadyResults.net powered by Certica Solutions, Inc.All rights reserved. Page 6 of 24
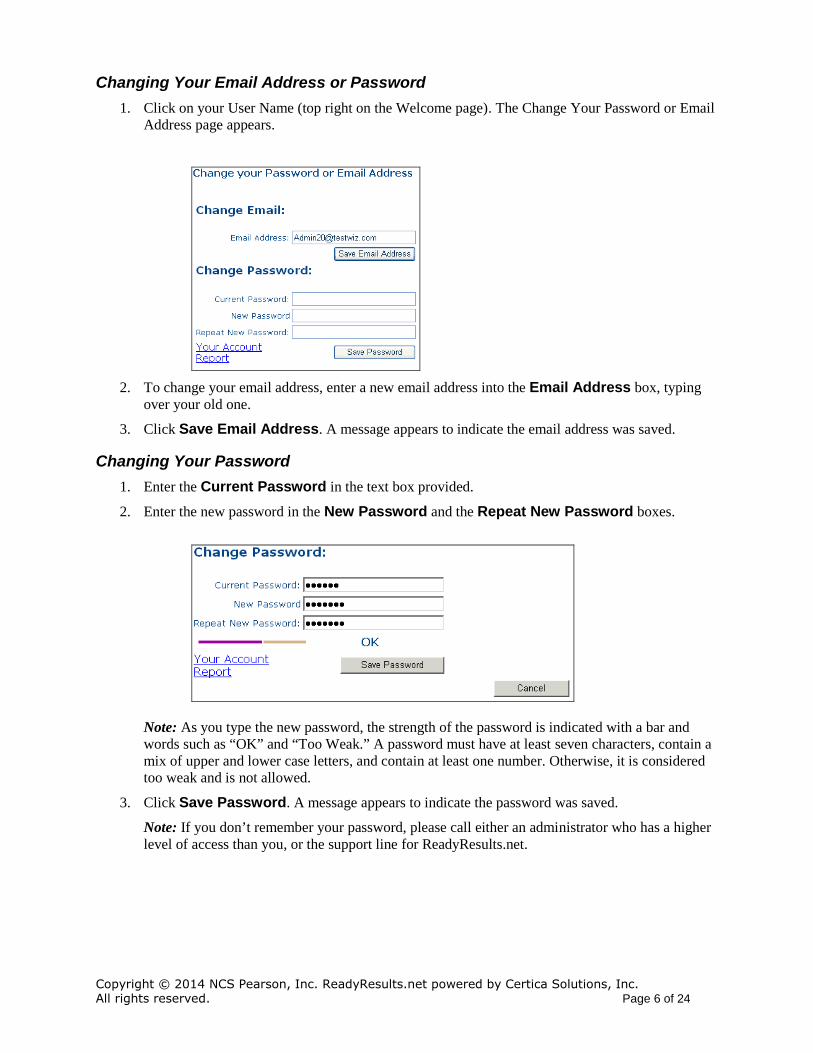
Changing Your Email Address or Password
1. Click on your User Name (top right on the Welcome page). The Change Your Password or EmailAddress page appears.
2. To change your email address, enter a new email address into the Email Address box, typingover your old one.
3. Click Save Email Address. A message appears to indicate the email address was saved.
Changing Your Password
1. Enter the Current Password in the text box provided.
2. Enter the new password in the New Password and the Repeat New Password boxes.
Note: As you type the new password, the strength of the password is indicated with a bar andwords such as “OK” and “Too Weak.” A password must have at least seven characters, contain amix of upper and lower case letters, and contain at least one number. Otherwise, it is consideredtoo weak and is not allowed.
3. Click Save Password. A message appears to indicate the password was saved.
Note: If you don’t remember your password, please call either an administrator who has a higherlevel of access than you, or the support line for ReadyResults.net.

Copyright © 2014 NCS Pearson, Inc. ReadyResults.net powered by Certica Solutions, Inc.All rights reserved. Page 7 of 24
Changing Any Information in a User Account
1. Choose Utilities from the top menu bar to arrive at the ReadyResults Utilities Consolepage.
2. Choose Manage Users from the User Accounts menu.3. The Select and Delete User Accounts page appears. Click Edit next to the account you
want to modify.
Note: If a user name has an * next to it, it means that the user’s access control(permissions) is no longer valid because of a change in the data during an upload. Tocorrect this, you need to edit the user’s access permission by editing the user account.
4. The Create and Update User Accounts page appears.
5. Enter or change any information.6. Click OK when you are finished editing.

Copyright © 2014 NCS Pearson, Inc. ReadyResults.net powered by Certica Solutions, Inc.All rights reserved. Page 8 of 24
Accessing Account ReportsYou can get information about an account through an account report. The report is a PDF file thatdisplays all the account information such as the date of the last login, the creator of the account, and thenumber of logins. A report for any account looks something like this:
You can get a report on just one account, all the accounts, or your own account.
Note: If the field titled “Orphan ACL” has a “Yes,” you need to reset the user access control by editingthe user account.
Your Account
To see a report for your own account:
1. Choose Utilities from the top menu bar to arrive at the ReadyResults UtilitiesConsole page.
2. Choose My Account from the User Accounts menu.
3. Click the link at the bottom of the page that says “Your Account Report.” Your report becomes aPDF file that opens in Adobe Acrobat or Reader.
User Accounts
To see a report for one or all user accounts:
1. Choose Utilities from the top menu bar to arrive at the ReadyResults Utilities Console page.
2. Choose Manage Users from the User Accounts menu. The Select and Delete User Accountspage appears.
3. For a report covering all the accounts, click the link at the bottom of the screen that says “ViewUser Accounts Report.” The report becomes a PDF file that opens in Adobe Acrobat or Reader.Alternatively, for a report on just one account, click Edit next to the account on which you want areport. Then on the Create and Update User Accounts page, click the link at the bottom that says“View user account report.”

Copyright © 2014 NCS Pearson, Inc. ReadyResults.net powered by Certica Solutions, Inc.All rights reserved. Page 9 of 24
Filling in the Contact ListAfter you set up accounts, you should choose one or two users to be contacts for ReadyResults.Netnotifications. When you store users’ information in the ReadyResults.Net Contact List, they will becontacted regarding ReadyResults.Net if need be. To add users to your Contact List:
1. Click Utilities if you are not already in the Utilities Console.
2. Choose Key Contacts from the User Accounts menu.
3. Click Add new record.
4. Choose a user account name and enter the contact information for that user.
5. Click the Insert link at the bottom. The user is added. Choose Key Contacts from the UserAccounts menu again to see your updated list of contacts.
Managing Student Records Online
As an administrator, you manage the student record information. One way to add or update databaseinformation is to import an electronic ASCII file. For information on updating student recordselectronically, refer to the document, Importing Student Information. Adding and updating databaseinformation manually online is covered here.
Adding Districts, Schools or TeachersTo add a district, school, or teacher to your database:
1. Go to Utilities and move the cursor to the Student Records menu. Hover over District,School, or Teacher followed by the Add option.
2. Enter a name for the district in the Name box. If you are adding a school, choose a District forthe school and then enter a name. If you are adding a teacher, choose a District and School andthen enter a name.
Note: Click Show Existing to see a list of the districts, schools, or teachers you already have.This helps to avoid adding duplicates.
3. If you want to add an ID, enter one in the ID box. If you enter the ID, you can use that whenassigning access for a user account. If a user has an ID associated with him/her, any user accountthat uses this ID will then always have access to any students assigned to that teacher.

Copyright © 2014 NCS Pearson, Inc. ReadyResults.net powered by Certica Solutions, Inc.All rights reserved. Page 10 of 24
This is particularly useful when you have more than one teacher name for a particular teacher todenote specific classes. For example, you might have SmithAlg1 and SmithAlg2, both referringto Mr. Smith who teaches two classes of Algebra. If you use the same Teacher ID for SmithAlg1and SmithAlg, you can use it on a user account for Mr. Smith so that he has access to all hisstudents.
4. Click Add.
Editing/Merging Districts, Schools or TeachersTo edit a District, School, or Teacher or delete one:
1. Click on Utilities. Hover the cursor over the Student Records menu. Hover over District,School, or Teacher and click Edit, Merge, or Delete (District Level).
2. If you are editing a school or teacher, choose a School and/or District from the drop-downmenus.
3. Click the Edit link next to the district, school, or teacher you want to edit. Or click Delete if youwant to remove it.
4. The field opens if you are editing. Edit the name in the text box as needed.

Copyright © 2014 NCS Pearson, Inc. ReadyResults.net powered by Certica Solutions, Inc.All rights reserved. Page 11 of 24
5. Click the Update link located to the left. The change is saved.
To merge two districts, schools, or teachers:
a. Identify the one you want to merge into another and click the From button next to it.
b. Identify the district, school, or teacher into which you want to merge the other.
6. Click on the To button next to it.
7. Click Merge. A message appears asking if you are sure you want to merge the records. ClickOK. The records are merged.
The record selected as From is removed and its information is merged into the record selected as To.

Copyright © 2014 NCS Pearson, Inc. ReadyResults.net powered by Certica Solutions, Inc.All rights reserved. Page 12 of 24
Finding/Editing/Deleting/Merging Student InformationBuilding-level users as well as administrators can edit student records at a basic level using the Student-Edit option found under the Student Records menu in Utilities. Use that option to find/edit studentsbased on building. This option is covered in the document, Managing Student Records Online at theBuilding Level.
As an administrator, you can also find/edit any student in the database using the Edit, Merge or Delete(District Level) option under the Student Records menu. You can edit a student’s ID, make SpecialCode assignments, assign teachers, delete one or more students, or merge two student records into one.Directions follow.
To find or make any changes to any student in the database, delete, or merge student records:
1. Go to Utilities.
2. From the Student Records menu, choose Student followed by Edit, Merge or Delete(District Level).
2. By default, the list of students is filtered to the first school in your database. Information such asname, grade, and DOB is shown.

Copyright © 2014 NCS Pearson, Inc. ReadyResults.net powered by Certica Solutions, Inc.All rights reserved. Page 13 of 24
3. To change the information shown, click on Columns to Show and select the items you want toshow. To control which teacher you see listed from the database, use the Teacher Type dropdown menu in the top filter section.
4. You can also use filter options and drop-down menus to select a different school or view adifferent Teacher Type.
5. To find a student by name, ID, or grade instead of district or school, remove the check mark nextto Filter on Selected School. Enter information into the Last name, First name, or ID textboxes and then click Filter.
Note: To hide the filter information, click .

Copyright © 2014 NCS Pearson, Inc. ReadyResults.net powered by Certica Solutions, Inc.All rights reserved. Page 14 of 24
6. To delete a student, click the Delete link next to the name of the student.
7. To view the full information for a student, click the Edit link next to the name of the student. Thestudent field opens.
8. You can edit the student name, ID, DOB, Grade, and Special Codes. Click Save Changes afteryou make any edits.
Note: For more information on creating and assigning Special Codes refer to the document, AllAbout Special Codes.
The student’s teacher assignments appear in the Student’s Teachers section on the right.
1. To assign teachers to the student, make changes by selecting a Teacher Type. Then makeselections in the drop-down menus for District, School, and Teacher.
2. Click Assign Student to Teacher when you are finished. Note: For more information onassigning teachers, including other ways to assign teachers, refer to the separate document,Teacher Assignments.

Copyright © 2014 NCS Pearson, Inc. ReadyResults.net powered by Certica Solutions, Inc.All rights reserved. Page 15 of 24
3. To merge two students, identify the one you want to merge into another and click the Frombutton next to it. Identify the district, school, teacher, or student into which you want to merge theother. Click on the To button next to it.
4. Click Merge. A message appears asking if you are sure you want to merge the records. ClickOK. The records are merged. The record selected as From is removed and its information ismerged into the record selected as To.
Test Administrations
Deleting a Test AdministrationYou may delete test administration data if you no longer access it. However, you should avoid deletingtest administration files that are associated with scannable tests. Deleting a test administration file or a testconfiguration file for a scannable test will cause you to lose data if the test was already scanned. It willalso prevent you from printing or scanning answer sheets.
1. Click Utilities. Hover the cursor over the Test Management menu, then TestAdministrations, and click Delete Test Administration.
2. The Delete Test Administration page appears.

Copyright © 2014 NCS Pearson, Inc. ReadyResults.net powered by Certica Solutions, Inc.All rights reserved. Page 16 of 24
3. Click the Remove button next to the Test Administration you want to delete from the server. Awarning appears if “Warn me before removing administrations” is checked.
4. Click OK on the warning if one appears. The Test Administration is deleted.
Deleting a Student from a Test AdministrationYou may delete a student from a test administration if you no longer want the student associated with thattest. To delete student fro a test administration file:
1. At the main ReadyResults Utilities Console, hover the cursor over the Test Managementmenu, hover over Test Administrations, and click Remove Students. The RemoveStudents from a Test Administration page appears.
2. Locate the Test Administration in the table and click on its row. A table of students appears.

Copyright © 2014 NCS Pearson, Inc. ReadyResults.net powered by Certica Solutions, Inc.All rights reserved. Page 17 of 24
3. Click the Delete link to the left of a student in order to remove the student from the TestAdministration. A warning appears.
4. Click OK to confirm. The student is removed from the Test Administration.
Cleaning Up the Database
There are tasks you can perform to clean up your database, keeping it current and eliminatingunused data.
Clear class rosters in preparation for new teacher assignment information
Delete unused information such as students who have no test data as well as districts, schools, andteachers who have no students associated with them.
Move the grade of every student up one level by promoting all students.
To perform any of these tasks, click Utilities and hover the cursor over the Student Records menu.Choose Cleanup followed by the option you want.
Clearing the RostersClearing the rosters sets the current location of all the students in the selected schools to “zUnspecified.”Their assigned district, school, and selected teacher assignments all set to zUnspecified. Then, if youimport a new student information file, the district, school, and primary teacher information for currentstudents is updated while the students who are no longer in your district remain in the database aszUnspecified.
To clear the rosters for one or more schools:
1. Hover over the Student Records menu in Utilities and choose Cleanup followed by ClearRosters.

Copyright © 2014 NCS Pearson, Inc. ReadyResults.net powered by Certica Solutions, Inc.All rights reserved. Page 18 of 24
2. Select the school(s) whose class rosters you want to clear. Click Select/Unselect All Schoolsto select them all or unselect them all.
3. Select the teacher types whose assignments you want to clear away to be zUnspecified. Choose“Current Location” if you want to essentially remove them from your district and school.
4. Click Clear Roster for Selected Teachers in Selected Schools. A message such as thefollowing appears:
5. Click OK to confirm that all students associated with the selected schools and teacher typesshould have zUnspecified as their assignment.
Students in the selected schools now have zUnspecified as their district, school, and selected teacher.Other teacher assignments through other teacher types are unaffected. When you next bring in newstudent information, the students who are still in your district will be updated with their current district,school, and Current Location assignments. Students who are no longer in your district will still havezUnspecified as their district, school, and the selected teacher.
Deleting Students with No TestsAfter using ReadyResults for many years, you may consider removing old test administrations. To dothis, go to Utilities, click on Test Management, and then select Delete Test Administrations.After you delete test administrations, you may have students in your database who have no tests andshould be deleted. If you know who those students are, you can delete them one at a time, using theStudent option on the Student Records menu. You may also use the Cleanup option, which deletesall the students without test data as well as any districts, schools, or teachers that have no associatedstudents.
To delete students who have no tests associated with them:
1. Hover over the Student Records menu in Utilities and choose Cleanup followed by DeleteStudents Having No Tests. The Delete Students Having No Tests page appears.

Copyright © 2014 NCS Pearson, Inc. ReadyResults.net powered by Certica Solutions, Inc.All rights reserved. Page 19 of 24
2. Click Delete Students.
3. A message appears. Click OK to confirm that all students without test data and all teachers,schools, and districts without students are to be removed from the database.
Warning: If you have recently imported student information in order to enter test data manuallyor in order to scan in test data, do not use this feature. Otherwise, valid student information couldbe deleted.
Deleting Teachers with No StudentsIf you have teachers in your database who have no students, consider deleting them. If you know whothose teachers are, you can delete them one at a time, using the Teacher option on the StudentRecords menu. You also may use the Cleanup option, which deletes all the teachers who have nostudents assigned to them.
Warning: If you have recently imported student information in order to key-enter test data or in order toscan in test data, do not use this feature. Otherwise, valid student information could be deleted.
To delete all the teachers with no students:
1. Hover over the Student Records menu in Utilities and choose Cleanup followed by DeleteTeachers Having No Students.
2. Click Delete Orphan Teacher Records.
3. A message appears asking if you are sure you want to delete teachers who have no students. ClickOK to confirm.
Promoting Each Student’s Grade LevelAt the end of the year, you may want to move all the students in your database up to the next grade level.You can do this by importing an updated student database file (see the Importing Student Informationdocument) or you can promote the students. To promote all students under your control to the next gradelevel:
1. Hover over the Student Records menu in Utilities and choose Cleanup followed byPromote Student Grades.
2. Be very sure that you wish to do this because there is no simple way to undo it. This process isallowed only once in a 10-month period. If you need to promote before 10 months has past,please contact Technical Support.
3. Click Promote All Students.
A message appears asking if you are sure you want to promote all students. Click OK to confirm.
Copyright © 2014 NCS Pearson, Inc. ReadyResults.net powered by Certica Solutions, Inc.All rights reserved. Page 20 of 24
Quick Reports
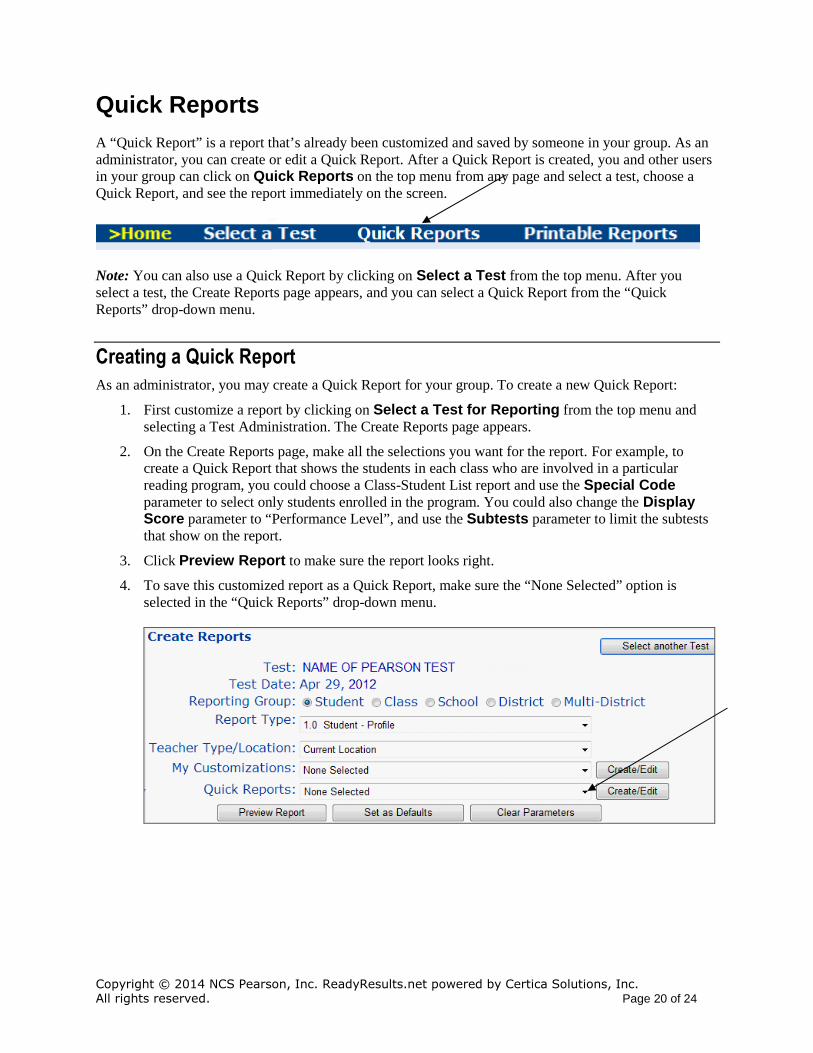
A “Quick Report” is a report that’s already been customized and saved by someone in your group. As anadministrator, you can create or edit a Quick Report. After a Quick Report is created, you and other usersin your group can click on Quick Reports on the top menu from any page and select a test, choose aQuick Report, and see the report immediately on the screen.
Note: You can also use a Quick Report by clicking on Select a Test from the top menu. After youselect a test, the Create Reports page appears, and you can select a Quick Report from the “QuickReports” drop-down menu.
Creating a Quick ReportAs an administrator, you may create a Quick Report for your group. To create a new Quick Report:
1. First customize a report by clicking on Select a Test for Reporting from the top menu andselecting a Test Administration. The Create Reports page appears.
2. On the Create Reports page, make all the selections you want for the report. For example, tocreate a Quick Report that shows the students in each class who are involved in a particularreading program, you could choose a Class-Student List report and use the Special Codeparameter to select only students enrolled in the program. You could also change the DisplayScore parameter to “Performance Level”, and use the Subtests parameter to limit the subteststhat show on the report.
3. Click Preview Report to make sure the report looks right.
4. To save this customized report as a Quick Report, make sure the “None Selected” option isselected in the “Quick Reports” drop-down menu.
Copyright © 2014 NCS Pearson, Inc. ReadyResults.net powered by Certica Solutions, Inc.All rights reserved. Page 21 of 24
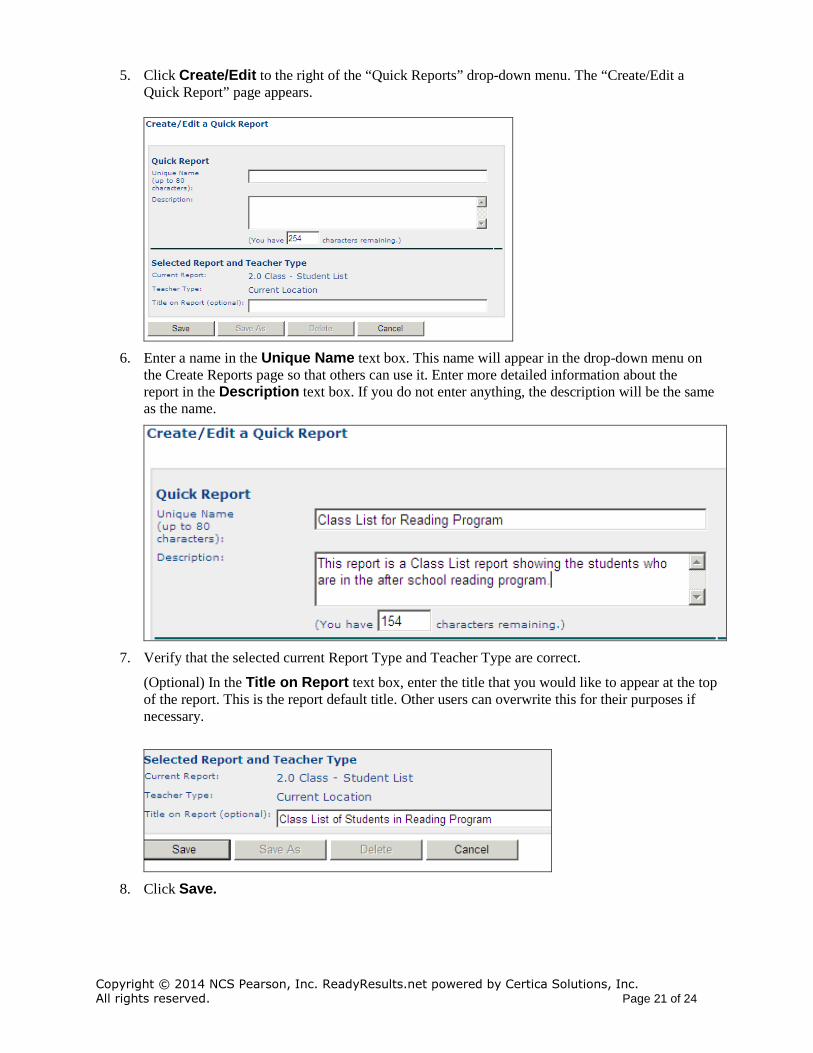
5. Click Create/Edit to the right of the “Quick Reports” drop-down menu. The “Create/Edit aQuick Report” page appears.
6. Enter a name in the Unique Name text box. This name will appear in the drop-down menu onthe Create Reports page so that others can use it. Enter more detailed information about thereport in the Description text box. If you do not enter anything, the description will be the sameas the name.
7. Verify that the selected current Report Type and Teacher Type are correct.
(Optional) In the Title on Report text box, enter the title that you would like to appear at the topof the report. This is the report default title. Other users can overwrite this for their purposes ifnecessary.
8. Click Save.
Copyright © 2014 NCS Pearson, Inc. ReadyResults.net powered by Certica Solutions, Inc.All rights reserved. Page 22 of 24
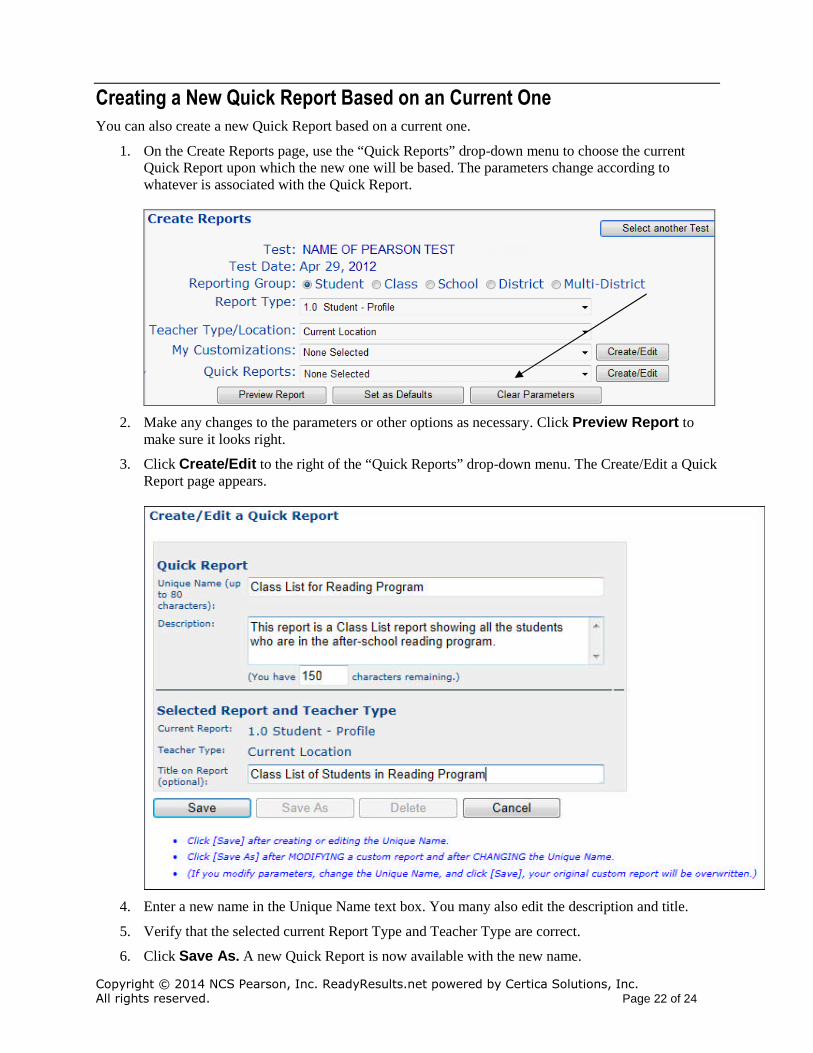
Creating a New Quick Report Based on an Current OneYou can also create a new Quick Report based on a current one.
1. On the Create Reports page, use the “Quick Reports” drop-down menu to choose the currentQuick Report upon which the new one will be based. The parameters change according towhatever is associated with the Quick Report.
2. Make any changes to the parameters or other options as necessary. Click Preview Report tomake sure it looks right.
3. Click Create/Edit to the right of the “Quick Reports” drop-down menu. The Create/Edit a QuickReport page appears.
4. Enter a new name in the Unique Name text box. You many also edit the description and title.
5. Verify that the selected current Report Type and Teacher Type are correct.
6. Click Save As. A new Quick Report is now available with the new name.

Copyright © 2014 NCS Pearson, Inc. ReadyResults.net powered by Certica Solutions, Inc.All rights reserved. Page 23 of 24
Editing a Quick ReportTo make any changes to a Quick Report or to delete one, follow these steps to begin:
1. Choose Select a Test for Reporting from the top menu. Choose a Test Administration.
2. Choose the Quick Report from the “Quick Reports” drop-down menu on the Create Reports page.
3. If you want to make changes to the parameters or other options associated with the Quick Report,do so now.
4. Click Create/Edit. The Create/Edit a Quick Report page appears.
5. To delete a Quick Report, click Delete at the bottom. To rename a Quick Report or change it’sdescription or title, delete the current name, description, or title and enter something else. ClickSave at the bottom of the page. If you edited the name, a message asks if you are sure you wantto overwrite with a new name. Click OK. The Quick Report is saved with the changes.
Note: If you click Save As instead of Save and you edited the name of the Quick Report, youwill have two Quick Reports: a new Quick Report is created and the original remains as well.
Related Documents
Managing Student Records Online at the Building Level—covers steps for editing a studentrecord at a building level, adding students, and printing class rosters.
Importing Student Information—describes how to add or change student information (includingteacher assignments and Special Code assignments) by importing an ASCII file containingstudent information.
Teacher Assignments—gives you information on creating Teacher Types, entering teacher names,and assigning groups of students to a teacher directly in ReadyResults.
Special Codes—explains how to create a Special Code directly in ReadyResults and how toassign a Special Code to groups of students.
Utility Reports—describes how to create a Tests Taken Report and a Correlation Report.