Ready, Set, GO! SET YOUR TABLE - accuquilt.com€¦ · ©2014 AccuQuilt PQ10401 Fabric provided by...
28
Ready, Set, GO! SET YOUR TABLE Using the AccuQuilt GO! ® FREE patterns INSIDE 8 ©2017 AccuQuilt to order call 888.258.7913 more patterns @ accuquilt.com C1708C-01 GO! Big ® & GO! ® Fabric Cutter Friendly GO! Let’s Talk Turkey Placemats
Transcript of Ready, Set, GO! SET YOUR TABLE - accuquilt.com€¦ · ©2014 AccuQuilt PQ10401 Fabric provided by...

Ready, Set, GO!SET YOUR TABLE
Using the AccuQuilt GO!®
FREEpatterns
INSIDE
8
©2017 AccuQuilt to order call 888.258.7913 more patterns @ accuquilt.com C1708C-01
GO! Big® & GO!® Fabric Cutter Friendly
GO! Let’s Talk Turkey Placemats

©2015 AccuQuilt PQ10675
GO! Let's Talk Turkey Placemats (Set of Two)
Finished Size 18" x 12"
Fabrics provided by Island Batik
GO!® Dies Used, Number of Shapes to Cut & Fabric Requirements
Fabric Color Shape GO! Dies Used Number of Shapes to Cut Fabric Required
NOTE: Apply fusible web to the wrong side of asterisked fabrics following manufacturer’s instructions before cutting appliqué shapes.
Orange GO! Dresden Plates (55071)
Cut 1—6”W x 7¼”H rectangle. Lay rectangle on pointed Dresden Plates and cut 4—pointed plates.
Fat Eighth
*Orange GO! Holiday Accessories (55321) (use carrot shape to cut beaks)
Cut 2—1 ¼”W x 1¾”H rectangles. Lay rectangles on ⅝"W x 1¼" H beaks and cut 2—beaks.
Yardage included above
Gold GO! Dresden Plates (55071)
Cut 1—6”W x 7¼”H rectangle. Lay rectangle on pointed Dresden Plates and cut 4—pointed plates.
Fat Eighth
*Gold GO! Dresden Plates (55071)
Cut 1—5¼”W x 4¾”H rectangle. Lay rectangle on round Dresden Plate and cut 2—round plates (clip off notches).
Yardage included above
Green GO! Dresden Plates (55071)
Cut 1—6”W x 7¼”H rectangle. Lay rectangle on pointed Dresden Plates and cut 4—pointed plates.
⅓ Yard
Green GO! Strip Cutter-4½" (4" Finished) (55054)
Cut 1—4½" x width of fabric (WOF) strip. Sub cut 4—10" strips
Yardage included above
Light Brown
GO! Dresden Plates (55071)
Cut 1—6”W x 7¼”H rectangle. Lay rectangle on pointed Dresden Plates and cut 4—pointed plates.
⅓ Yard
Light Brown
GO! Strip Cutter-1½" (1" Finished) (55024 or 55164)
Cut 2—1½" x WOF strips. Sub cut 4—18" strips.
Yardage included above
Medium Brown
GO! Dresden Plates (55071)
Cut 1—6”W x 7¼”H rectangle. Lay rectangle on pointed Dresden Plates and cut 4—pointed plates.
Fat Eighth
*Medium Brown
GO! Dresden Plates (55071)
Cut 1—4½”W x 8¾”H rectangle. Lay rectangle over circles and cut 2—4" circles.
Yardage included above

©2015 AccuQuilt PQ10675
Dark Brown
GO! Dresden Plates (55071)
Cut 1—6”W x 4¼”H rectangle. Lay rectangle on pointed Dresden Plates and cut 2—pointed plates.
½ Yard
*Dark Brown
GO! Holiday Accessories (55321) (use snowman arms to cut turkey legs)
Cut 4—4”W x 2¼”H rectangles. Lay rectangles on legs and cut 4—legs.
Yardage included above
Dark Brown
GO! Strip Cutter-2½" (2" Finished) (55017 or 55014)
Cut 4—2½" x WOF strips for binding. (2 strips per placemat)
Yardage included above
Ecru GO! Big Square-10" (9½" finished) (55451)
Cut 1—10½” x WOF strip. Fanfold the strip into 10½” widths. Cut 2—10" squares.
Fat Quarter
Additional Fabrics Needed:
Fusible Web—⅜ yard Backing Fabric—two pieces: 24" x 18" Batting— two pieces: 24" x 18"
Sewing Directions:
1. Lay out one ecru 10" square and two green 4½" x 10" strips in a row as shown.
2. Pin and sew row unit. Press seams toward strips.
3. Pin and sew one light brown 1½" x 18" strip to both the top and the bottom of the row unit. Press seams toward strips. Make two block units. Set aside.
4. Prepare 22 pointed petals (11 per placemat):
Fold one pointed petal in half right sides together. Pin and stitch ¼" seam across folded end as shown, reinforcing stitching at both ends of seam. Trim corner at fold.
Lightly press fold (wrong sides together).
Press open seam allowance with tip of iron.
Turn point right side out with point turner tool or blunt knitting needle. Press so seam allowance is in line with lightly pressed foldline.
5. Lay out two light brown pointed petals, two orange pointed petals, two gold pointed petals, two green pointed petals, two medium brown pointed petals, and one dark brown pointed petal to form a half circle.

©2015 AccuQuilt PQ10675
6. Sew pointed petals together using ¼" seam allowance, matching notches. Press seams in one direction around the half circle of pointed petals.
7. Position pieced petal unit on block unit using the placemat image as a guide. Pin, fuse, or baste in place. Machine appliqué around perimeter to secure.
8. Position, fuse and machine appliqué one medium brown circle, two dark brown legs, one gold round plate, and one beak on block unit to complete the turkey.
9. Choose your favorite method for the turkey eyes:
Hand stitch French knots with dark brown floss Machine specialty stitch with dark brown thread Attach buttons Fuse and machine appliqué tiny dark brown circles
10. Repeat steps 5-9 for second placemat.
Quilting & Finishing:
1. Layer batting between placemat top and backing. 2. Pin or baste layers together. 3. Quilt as desired. 4. Add dark brown fabric binding, mitering corners. 5. Repeat steps 1 - 4 for the second placemat.

©2014 AccuQuilt PQ10401
Fabric provided by Moda Fabrics
GO! Flying Windmill Table RunnerFinished Size 22" x 64"Finished Block Size 12" x 12"
GO!® Dies Used, Number of Shapes to Cut & Fabric Requirements Fabric Color
Shape GO! Dies Used Number of Shapes to Cut
Fabric Required
One BlockWhite GO! Flying Geese-3½” x 6½” (3” x 6” Finished)
(55456 or 55009)32—3” finished half square triangles
3/8 yard
Pink GO! Strip Cutter-2½” (2” Finished)(55017 or 55014)
1—(2½” x width of fabric strips(WOF) for sashing Sub cut into 3—2½” x 12½” rectangles
7/8 yard
Pink GO! Flying Geese-3½” x 6½” (3” x 6” Finished) (55456 or 55002)
22—6” finished quarter square triangles
Yardage included above
Pink GO! Flying Geese-3½” x 6½” (3” x 6” Finished) (55456 or 55009)
16—3” finished half square triangles
Yardage included above
Pink GO! Square-3½” (3” Finished) (55006) 4 Yardage included above
Orange GO! Flying Geese-3½” x 6½” (3” x 6” Finished) (55456 or 55002)
16—6” finished quarter square triangles
1/2 yard
Light Orange
GO! Flying Geese-3½” x 6½” (3” x 6” Finished) (55456 or 55009)
60—3” finished half square triangles
1 yard
Light Orange
GO! Strip Cutter-2½” (2” Finished) (55017 or 55014)
5—2½” x WOF strips for binding Yardage included above
Green GO! Flying Geese-3½” x 6½” (3” x 6” Finished) (55456 or 55002)
16—6” finished quarter square triangles
1 yard
Green GO! Strip Cutter-2½” (2” Finished) (55017 or 55014)
3—2½” x WOF strips for inner border
Yardage included above
Green GO! Strip Cutter-2½” (2” Finished) (55017 or 55014)
2—2½” x WOF strips for inner border
Yardage included above
Additional Fabrics NeededBacking–28” x 70”Batting–28” x 70”

©2014 AccuQuilt PQ10401
Sewing Directions
Windmill Variation Block
1. Pin and sew one pink and one light orange 3” finished half square triangle (HST) together as shown. Press seams toward orange triangle. Make four HST units.
2. Pin and sew one HST unit and two white 3” finished HSTs together as shown. Press seams toward white triangles. Make four combined units.
3. Pin and sew one orange and one green 6” finished quarter square triangle (QST) together as shown. Make four QST units.
4. Pin and sew one HST unit and one QST unit together as shown. Press seams toward QST unit. Make four quarter blocks.
5. Pin and sew quarter blocks into half blocks. Press seams open. Make two half blocks.
6. Pin and sew half blocks together to complete block. Press seams open.
7. Make a total of four Windmill Variation blocks.
Flying Geese Border
1. Pin and sew one pink 6” finished QST and two light orange 3” finished HSTs together as shown to form a flying geese unit as shown. Make 22 flying geese units.
2. Pin and sew nine flying geese units together following table runner diagram. Press seams open. Make two flying geese border units.
3. Pin and sew two flying geese units together as shown. Press seams open. Make two flying geese pair border units.
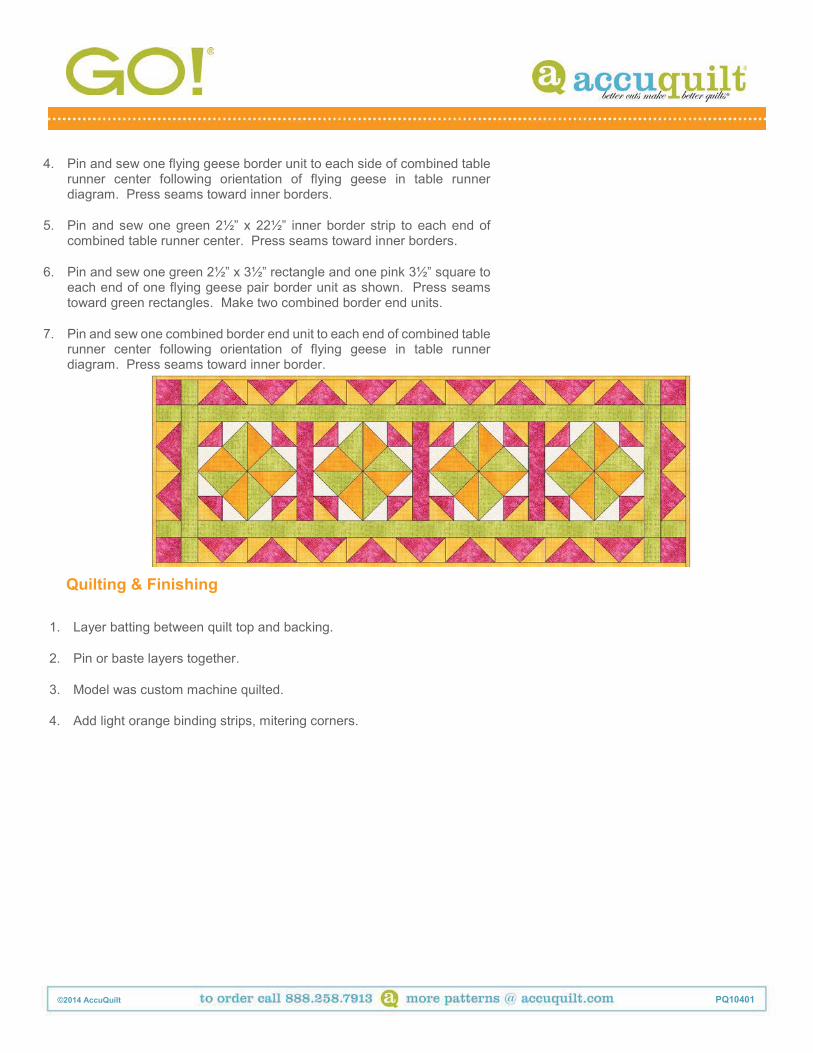
Table Runner Assembly
1. Pin and sew three pink 2½” x 12½” sashing strips between four Windmill Variation blocks following table runner diagram. Press seams toward sashing strips.
2. Pin and sew three green 2½” strips together end to end. Press seams open. Sub cut into two 2½” x 54½” lengths.
3. Pin and sew one green 2½” x 54½” inner border strip to each side of combined table runner center. Press seams toward inner borders.
©2014 AccuQuilt PQ10401
Quilting & Finishing
4. Pin and sew one flying geese border unit to each side of combined table runner center following orientation of flying geese in table runner diagram. Press seams toward inner borders.
5. Pin and sew one green 2½” x 22½” inner border strip to each end of combined table runner center. Press seams toward inner borders.
6. Pin and sew one green 2½” x 3½” rectangle and one pink 3½” square to each end of one flying geese pair border unit as shown. Press seams toward green rectangles. Make two combined border end units.
7. Pin and sew one combined border end unit to each end of combined table runner center following orientation of flying geese in table runner diagram. Press seams toward inner border.
1. Layer batting between quilt top and backing.
2. Pin or baste layers together.
3. Model was custom machine quilted.
4. Add light orange binding strips, mitering corners.
©2015 AccuQuilt PQ10673
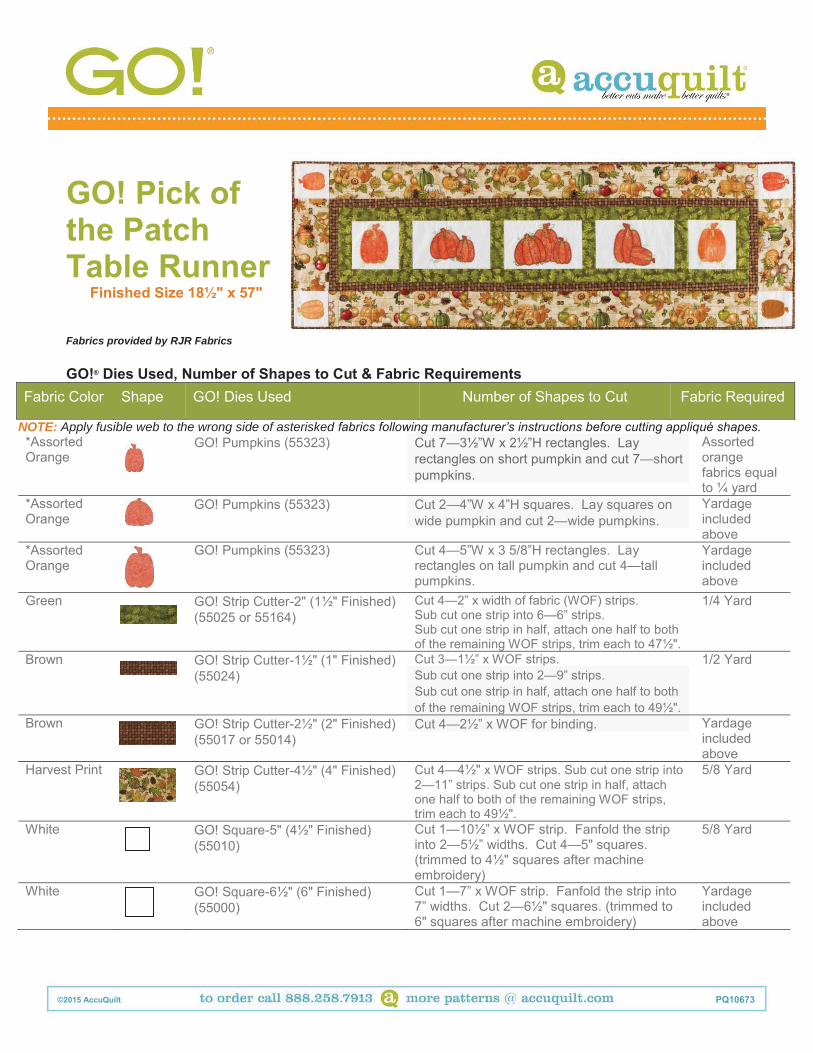
GO! Pick of the Patch Table Runner
Finished Size 18½" x 57"
Fabrics provided by RJR Fabrics
GO!® Dies Used, Number of Shapes to Cut & Fabric Requirements
Fabric Color Shape GO! Dies Used Number of Shapes to Cut Fabric Required
NOTE: Apply fusible web to the wrong side of asterisked fabrics following manufacturer’s instructions before cutting appliqué shapes. *Assorted Orange
GO! Pumpkins (55323) Cut 7—3½”W x 2½”H rectangles. Lay rectangles on short pumpkin and cut 7—short pumpkins.
Assorted orange fabrics equal to ¼ yard
*Assorted Orange
GO! Pumpkins (55323) Cut 2—4”W x 4”H squares. Lay squares on wide pumpkin and cut 2—wide pumpkins.
Yardage included above
*Assorted Orange
GO! Pumpkins (55323) Cut 4—5”W x 3 5/8”H rectangles. Lay rectangles on tall pumpkin and cut 4—tall pumpkins.
Yardage included above
Green
GO! Strip Cutter-2" (1½" Finished) (55025 or 55164)
Cut 4—2” x width of fabric (WOF) strips. Sub cut one strip into 6—6” strips. Sub cut one strip in half, attach one half to both of the remaining WOF strips, trim each to 47½".
1/4 Yard
Brown
GO! Strip Cutter-1½" (1" Finished) (55024)
Cut 3—1½” x WOF strips. Sub cut one strip into 2—9” strips. Sub cut one strip in half, attach one half to both of the remaining WOF strips, trim each to 49½".
1/2 Yard
Brown GO! Strip Cutter-2½" (2" Finished) (55017 or 55014)
Cut 4—2½” x WOF for binding. Yardage included above
Harvest Print
GO! Strip Cutter-4½" (4" Finished) (55054)
Cut 4—4½" x WOF strips. Sub cut one strip into 2—11” strips. Sub cut one strip in half, attach one half to both of the remaining WOF strips, trim each to 49½".
5/8 Yard
White GO! Square-5" (4½" Finished) (55010)
Cut 1—10½” x WOF strip. Fanfold the strip into 2—5½” widths. Cut 4—5" squares. (trimmed to 4½" squares after machine embroidery)
5/8 Yard
White
GO! Square-6½" (6" Finished) (55000)
Cut 1—7” x WOF strip. Fanfold the strip into 7” widths. Cut 2—6½" squares. (trimmed to 6" squares after machine embroidery)
Yardage included above

©2015 AccuQuilt PQ10673
White GO! Big Square-10" (9½" Finished) (55451)
From remaining 10½” x WOF strip, fanfold the strip into 10½” widths and cut 3—10" squares. (trimmed to 9½"W x 6"H after machine embroidery)
Yardage included above
Additional Fabrics Needed: Backing—25” x 63” Batting—25” x 63” Fusible Web—⅓ Yard
Additional Products Needed: GO! Pumpkin Triple #1 Embroidery Designs by V-Stitch Designs (VQ-PPT01) GO! Pumpkin Double #1 Embroidery Designs by V-Stitch Designs (VQ-PPD01) GO! Pumpkin Double #3 Embroidery Designs by V-Stitch Designs (VQ-PPD03) GO! Pumpkins Embroidery Designs by V-Stitch Designs (VQ-Pe)
Sewing Directions:
1. Following the instructions provided with the GO! Pumpkins Embroidery by V-Stitch Designs (VQ-Pe), machine appliqué each of the single pumpkin blocks. Use the block images as a reference.
Four short pumpkins on four white 5" squares. Trim to 4½" squares after machine embroidery.
Two tall pumpkins on two white 6½" squares. Trim to 6" squares after machine embroidery.
2. Following the instructions provided with the GO! Pumpkin Triple #1 Embroidery Designs by V-Stitch Designs (VQ-PPT01), machine appliqué one pumpkin block. Use the block image as a reference.
One short pumpkin, one wide pumpkin, one tall pumpkin on one white 10" square. Trim to 9½" W x 6" H after machine embroidery.
3. Following the instructions provided with the GO! Pumpkin Double #1 Embroidery Designs by V-Stitch Designs (VQ-PPD01), machine appliqué one pumpkin block. Use the block image as a reference.
One short pumpkin and one wide pumpkin on one white 10" square. Trim to 9½" W x 6" H after machine embroidery.

©2015 AccuQuilt PQ10673
4. Following the instructions provided with the GO! Pumpkin Double #3 Embroidery Designs by V-Stitch Designs (VQ-PPD03), machine appliqué one pumpkin block. Use the block image as a reference.
One short pumpkin and one tall pumpkin on one white 10" square. Trim to 9½"W x 6"H after machine embroidery.
5. Lay out six green 2” x 6" sashing strips, two single tall pumpkin embroidery blocks, the triple pumpkin embroidery block and the two double pumpkin embroidery blocks in a row, as shown.
6. Pin and sew row. Press seams toward the sashing strips.
7. Pin and sew one green 2" x 47½" border strip on the top and one on the bottom of the row unit. Press seams toward the border strips.
8. Pin and sew one brown 1½” x 9" border strip on either side of the pieced row unit. Press seams toward the border strips.
9. Pin and sew one brown 1½” x 49½" border strip on the top and one on the bottom of the pieced row unit. Press seams toward the border strips.
10. Pin and sew one harvest print 4½” x 49½" border strip on the top and one on the bottom of the pieced row unit. Press seams toward the border strips.
11. Pin and sew one small pumpkin embroidered 4½” block on either side of one harvest print 4½” x 11" border strip. Press seams toward the border strip. Make two units.
12. Pin and sew one border unit with embroidered blocks on either side of the pieced row unit.
Quilting & Finishing:
1. Layer batting between table runner top and backing.
2. Pin or baste layers together.
3. Quilt as desired.
4. Add brown binding, mitering corners.

Project Specifications Skill Level: Intermediate
Quilt Size: 24" x 24"
Block Size: 6" x 6"
Number of Blocks: 8 and 4
Materials• 3⁄8 yard tan batik
• ½ yard turquoise batik
• ½ yard orange batik
• 15⁄8 yards brown batik
• Batting 28" x 28"
• Neutral-color all-purpose thread
• Variegated quilting thread
• GO! Dies:
B: GO! Square-3½" (3" Finished) (55006)
C: GO! Half Square-6" Finished Square (55001)
E: GO! Half Square-3" Finished Square (55009)
F: GO! Square on Point-4¾" (4¼" Finished) (55019)
• 1 (11⁄8") brown button
• 12 (3⁄8") teal buttons
• Basic quilting tools and supplies
Die-Cutting Instructions1. Cut 1–8" x width of fabric (WOF) strip of brown batik
and fan-fold 4½" wide. Die-cut 16 B squares using
GO! Square-3½" (55006).
2. Cut 1–8" x WOF strip orange batik and fan-fold
4½" wide. Die-cut four B squares using
GO! Square-3½" (55006).
3. Cut 1–8" x 23" strip tan batik and fan-fold 4½" wide.
Die-cut eight B squares using GO! Square-3½" (55006).
4. Cut 1–7½" x WOF strip brown batik and fan-fold 7½"
wide. Die-cut eight C triangles using GO! Half Square-6"
Finished Square (55001).
5. Cut 1–7½" x WOF strip turquoise batik and fan-fold
7½" wide. Die-cut four C triangles using GO! Half
Square-6" Finished Square (55001).
6. Cut 1–9½" x 18" strip brown batik and fan-fold 4½"
wide. Die-cut 16 E triangles using GO! Half Square-3"
Finished Square (55009).
7. Cut 1–9½" x 9" strip orange batik and fan-fold 4½"
wide. Die-cut eight E triangles using GO! Half Square-3"
Finished Square (55009).
8. Cut 1–9½" x 9" strip tan batik and fan-fold 4½" wide.
Die-cut eight E triangles using GO! Half Square-3"
Finished Square (55009).
9. Cut 1–10½" x 9" strip orange batik and fan-fold 5¾"
wide. Die-cut four F squares using GO! Square on
Point-4¾" (55019).
10. Cut 1–10½" x 9" strip turquoise batik and fan-fold 5¾"
wide. Die-cut four F squares using GO! Square on
Point-4¾" (55019).
Additional Cutting Instructions1. From brown batik cut a 28" x 28" square for backing.
Making Small Prairie Points1. Fold and press orange and tan B squares in half on
both diagonals, referring to Figure 1. Make four orange
and eight tan prairie points.
Points of InterestDesigned & Quilted by Connie Kauffman
Fold simple die-cut shapes to create dimension. Prairie points add interest and create movement in this earthy, yet elegant, table topper.
Block 16" x 6" Block
Make 8
Block 26" x 6" Block
Make 4
Figure 1
©2015 AccuQuilt
Code PQ55971-7www.accuquilt.com 888.258.7913
GO! Big®
GO!®
GO! Baby®
Use with:

2. Lay an orange prairie point between two tan points,
overlapping edges as shown in Figure 2. Adjust posi-
tioning so that there is 1½" between triangle points as
shown in Figure 2. Pin and baste through all points.
3. Trim excess ¼" below basting (Figure 3).
Repeat steps 1 and 2 to make four sets of small prairie
points. Set aside. Note: Pay close attention to the direction
of the folded triangles, it looks nice to have all folded edges
going in the same direction in each set. To do this, keep prairie
points organized and aligned in sets as you fold and press.
Making the Blocks1. Sew a brown E triangle to a tan E triangle along long
edge (Figure 4). Press seam toward brown E. Repeat with
a brown E triangle and an orange E triangle. Make eight
of each color E/E squares (Figure 4).
2. Sew an E/E square to a brown B square. Repeat with
all E/E squares, making eight B/E tan and B/E orange
units (Figure 5).
3. Sew a B/E tan unit to a B/E orange unit, referring to
Block 1 diagram, to make eight Block 1 blocks. Referring
to Figure 6, sew blocks together in (four) two-block units.
4. Using four each turquoise and orange F squares, fold
squares in half on both diagonals and press to make a
large prairie point, referring to Figure 1. Make four each
orange and turquoise large prairie points.
5. Center and baste a large prairie point on each brown
C triangle (Figure 7). Note: Turquoise points will lie flat on C
triangles until project is turned right side out before quilting,
when they will extend out from project corners.
6. Sew turquoise C triangles to brown C triangles with
orange prairie points, referring to Figure 8. Press seam
toward brown C triangles. Repeat to make four C units.
7. Center and baste a set of small prairie points on
the turquoise side of C units, as shown in Figure 9, to
complete a Block 2. Repeat to make four Block 2 blocks.
Figure 2
11/2"
Figure 3
1/4"
Figure 4
Make 8 Make 8
E
Figure 5
Make 8Make 8
B
Figure 6
Make 4
Figure 7
Figure 8
C
Figure 9
Make 4
©2015 AccuQuilt
Code PQ55971-7www.accuquilt.com 888.258.7913


8. Referring to Figure 10 for orientation, sew four completed
Block 2 blocks together to make the center unit.
Completing the Quilt1. Sew a turquoise prairie point C triangle to either
side of a Block 1 unit (Figure 11). Press seams toward C
triangles. Repeat to make a top and bottom row. Sew
a Block 1 unit to either side of the center unit to make
Figure 10
TipPress the fabric before positioning it on the die to
eliminate any wrinkles that could show up in the
fi nished cuts.
©2015 AccuQuilt
Code PQ55971-7www.accuquilt.com 888.258.7913

center row, referring to Figure 11. Press seams toward
center unit.
2. Sew top and bottom rows to the center row, again
referring to Figure 11 for placement and orientation.
Press seams in one direction.
3. Layer 28" x 28" batting, 28" x 28" backing piece, right
side up; and the completed quilt top, right side down,
on a flat surface and pin or baste around outside edge
of quilt sandwich through all layers. Note: Make sure
turquoise triangles are folded toward quilt center.
4. Sew ¼" around quilt sandwich outside edges, leaving
a 4" opening for turning.
5. Trim batting and backing to match quilt top and turn
right side out through opening.
6. Press edges, turning opening seam allowance to
inside. Press turquoise points away from quilt center.
Hand-stitch opening closed. Quilt as desired.
7. Finish quilt by sewing large button at quilt center
and 3 small buttons on each side, extending out from
turquoise center corners as seen in Placement Diagram
and project photo. ❖
Figure 11
Points of InterestPlacement Diagram 24" x 24"
TipDon’t waste that fabric! For easy scrap quilts, take
all your project scraps and cut them into individual
shapes before putting away your GO! cutter. Store the
shapes in shoe boxes labeled with the type of shape
in the box. The next time you need a scrap quilt, pull
out the appropriate boxes and start stitching.
©2015 AccuQuilt
Code PQ55971-7www.accuquilt.com 888.258.7913
Project NotesMaterials listed and instructions are for two place mats.
Project SpecificationsSkill Level: Beginner
Place Mat Size: 14" x 20"
Block Size: 6" x 6"
Number of Blocks: 4 and 4
Materials• 2 fat quarters medium purple
• 2 fat quarters light purple
• ¼ yard green print
• 1½ yard dark purple
• 2 pieces 18" x 24" batting
• Neutral-color all-purpose thread
• GO! Dies:
B: GO! Square-3½" (3" Finished) (55006)
D: GO! Quarter Square Triangle-6" Finished
Square (55002)
E: GO! Half Square Triangle-3" Finished Square (55009)
H: GO! Rectangle-3½" x 6½" (3" x 6" Finished) (55005)
Optional: GO! Strip Cutter-1½" (1" Finished) (55024)
Optional: GO! Strip Cutter-2½" (2" Finished)
(55017 or 55014)
• Basic quilting tools and supplies
Die-Cutting Instructions1. Cut 1–9" x width of fabric (WOF) strip dark purple and
fan-fold 4½" wide. Die-cut 16 E squares using GO! Half
Square Triangle-3" Finished Square (55009).
2. Cut 1–8" x 22" strip from each medium and light
purple fat quarter. Die-cut four B squares from each strip
using GO! Square-3½" (55006).
3. Cut 1–8" x 22" strip from each medium and light purple
fat quarter. Die-cut four B squares from each strip using
GO! Square-3½" (55006).
4. Cut 2–4½" x 22" strips from each medium and light
purple fat quarter. Die-cut four D triangles from each strip
using GO! Quarter Square Triangle-6" Finished Square
(55002).
Additional Cutting InstructionsTIP: Use GO! Strip Cutter dies 1½", and 2½" to cut borders
and binding.
1. Cut one 6½" by fabric width strip dark purple. Subcut
into two I rectangles 6½" x 12½".
2. Cut two 18" x 24" rectangles dark purple for place
mat backing.
3. Cut four 1½" by fabric width strips from green print for
borders. Subcut four 1½" x 12½" J borders and four 1½" x
20½" K borders.
4. Cut four 2½" x 22" strips from light and medium
purple for binding.
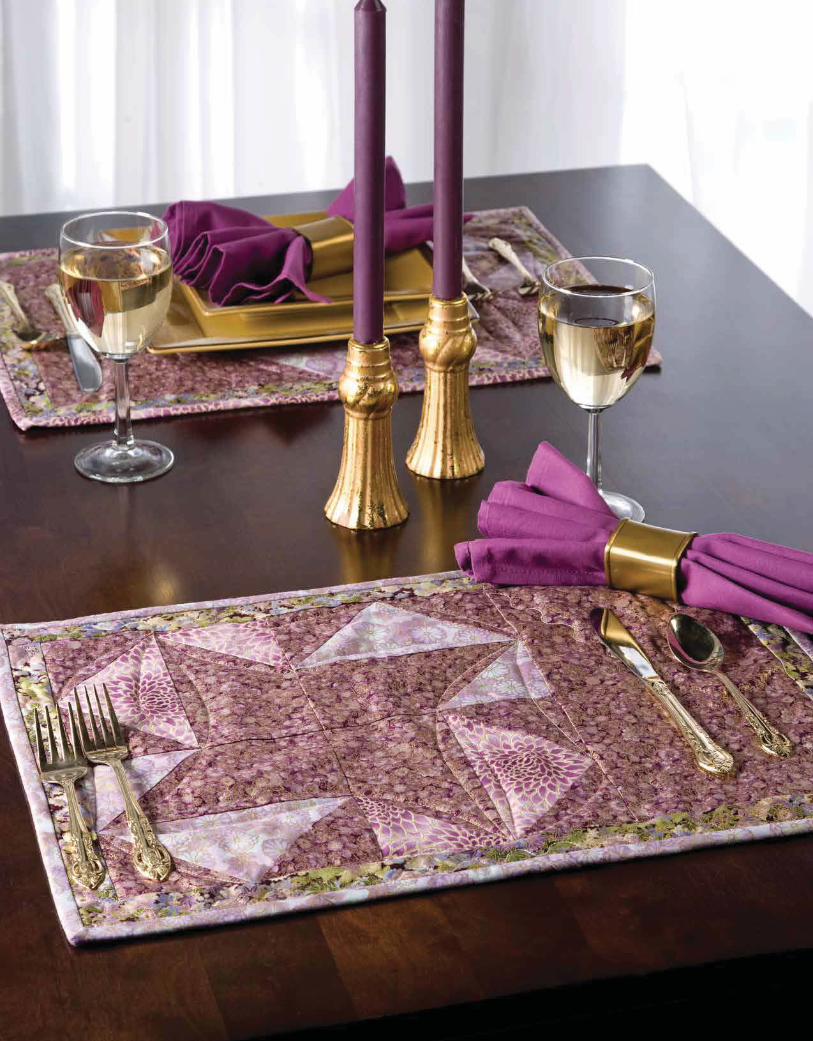
Imperial Gardens Place Mats
Designed & Quilted by Jill Reber
A set of elegant place mats comes together easily in an afternoon when using the AccuQuilt GO!® cutter. Add some style to
your dinner table tonight, or make a quick set for a friend.
Medium6" x 6" Block
Make 4
Light 6" x 6" Block
Make 4
©2015 AccuQuilt
Code PQ55971-8www.accuquilt.com 888.258.7913
GO! Big®
GO!®
GO! Baby®
Use with:

Completing the Place Mats1. Sew a dark purple E triangle to both sides of a
light D triangle (Figure 1). Press seams toward E.
Repeat to make four light purple flying geese units.
2. Repeat step 1 with medium purple D triangles
and dark purple E triangles to make four medium
purple flying geese units.
3. Use a ruler to draw a diagonal line on the wrong
side of each B square. Sew a B square to the left
corner of each H rectangle stitching on diagonal line,
referring to Figure 2. Trim seam to ¼ " and press toward
B (Figure 2). Repeat to make four light purple B/H units
and 4 medium B/H units.
4. Sew a light flying geese unit and light B/H unit
together along one long edge, referring to Figure 3. Press
seams toward B/H unit. Using light and medium purple
units, make four Light blocks and four Medium blocks.
5. Sew a Light and Medium block together, referring
to Figure 4 for orientation. Repeat to make four rows,
two for each place mat.
6. Sew two rows together for each place mat, again
referring to Figure 4 for orientation of rows, to make
two block units.
7. Sew I to the right side of each block unit, again
referring to Figure 4. Press seams toward I.
8. Sew J borders to sides and K borders to top and
bottom of place mat. Press seams toward borders.
Repeat for second place mat.
9. Layer, quilt and bind, using the light and medium
purple 2½ " strips. Note: Use medium purple strips for one
place mat and light purple strips for second place mat. ❖
Figure 2
BHB
Figure 3
LightMake 4 Medium
Make 4
Figure 4
I
Imperial GardensPlacement Diagram 14" x 20"
J
K
E D
Figure 1
©2015 AccuQuilt
Code PQ55971-8www.accuquilt.com 888.258.7913
©2014 AccuQuilt PQ10410
A A A A
B
C
D E
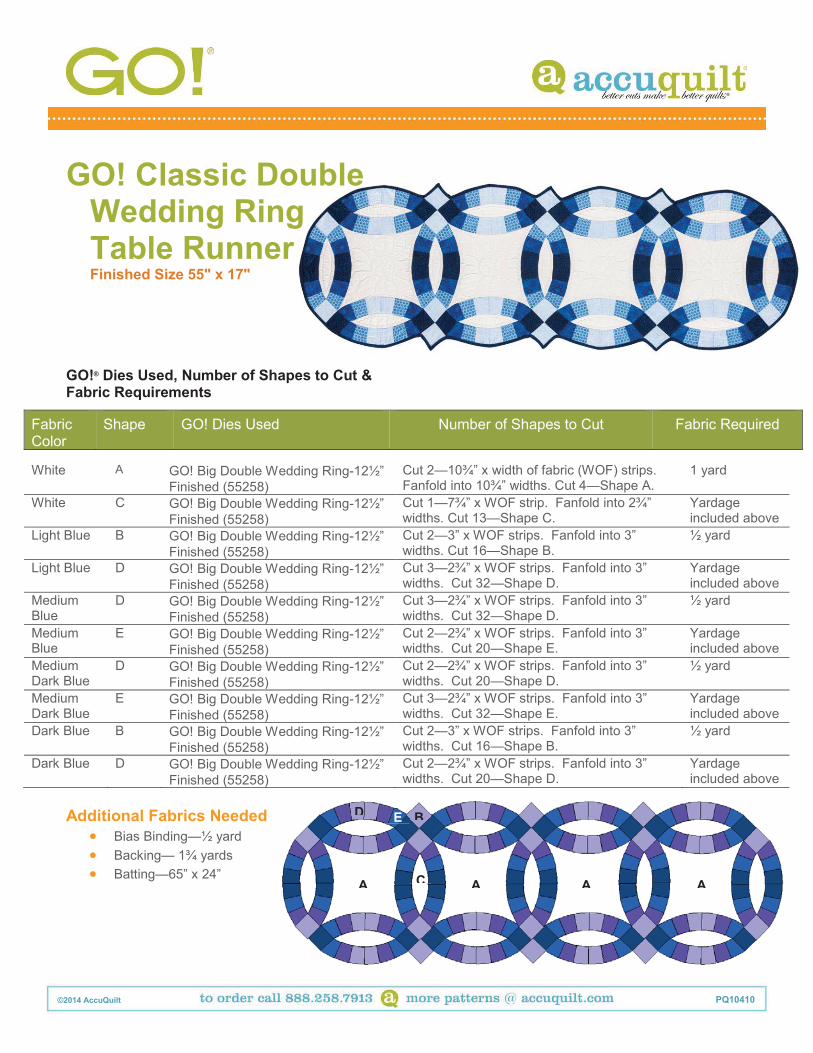
GO! Classic Double Wedding Ring Table Runner Finished Size 55" x 17"
GO!® Dies Used, Number of Shapes to Cut & Fabric Requirements
Fabric Color
Shape GO! Dies Used Number of Shapes to Cut Fabric Required
One Block White A GO! Big Double Wedding Ring-12½”
Finished (55258) Cut 2—10¾” x width of fabric (WOF) strips. Fanfold into 10¾” widths. Cut 4—Shape A.
1 yard
White C GO! Big Double Wedding Ring-12½” Finished (55258)
Cut 1—7¾” x WOF strip. Fanfold into 2¾” widths. Cut 13—Shape C.
Yardage included above
Light Blue B GO! Big Double Wedding Ring-12½” Finished (55258)
Cut 2—3” x WOF strips. Fanfold into 3” widths. Cut 16—Shape B.
½ yard
Light Blue D GO! Big Double Wedding Ring-12½” Finished (55258)
Cut 3—2¾” x WOF strips. Fanfold into 3” widths. Cut 32—Shape D.
Yardage included above
Medium Blue
D GO! Big Double Wedding Ring-12½” Finished (55258)
Cut 3—2¾” x WOF strips. Fanfold into 3” widths. Cut 32—Shape D.
½ yard
Medium Blue
E GO! Big Double Wedding Ring-12½” Finished (55258)
Cut 2—2¾” x WOF strips. Fanfold into 3” widths. Cut 20—Shape E.
Yardage included above
Medium Dark Blue
D GO! Big Double Wedding Ring-12½” Finished (55258)
Cut 2—2¾” x WOF strips. Fanfold into 3” widths. Cut 20—Shape D.
½ yard
Medium Dark Blue
E GO! Big Double Wedding Ring-12½” Finished (55258)
Cut 3—2¾” x WOF strips. Fanfold into 3” widths. Cut 32—Shape E.
Yardage included above
Dark Blue B GO! Big Double Wedding Ring-12½” Finished (55258)
Cut 2—3” x WOF strips. Fanfold into 3” widths. Cut 16—Shape B.
½ yard
Dark Blue D GO! Big Double Wedding Ring-12½” Finished (55258)
Cut 2—2¾” x WOF strips. Fanfold into 3” widths. Cut 20—Shape D.
Yardage included above
Additional Fabrics Needed
Bias Binding—½ yard Backing— 1¾ yards Batting—65” x 24”

©2014 AccuQuilt PQ10410
Sewing Directions
1. Lay out shapes for one Arc Unit #1. Two medium dark blue Shape E, two medium blue Shape D and two light blue Shape D as shown.
2. Pin and sew together with an accurate ¼” seam allowance. Press seams in one direction. (It does not matter which direction, but be consistent). Press carefully to avoid distortion of shapes. Repeat steps 1 and 2 to make a total of two combined Arc Unit #1.
3. Mark ¼” points on one white Shape C as shown.
4. Pin and sew one white Shape C to one combined Arc Unit #1 matching ¼” points and notches, starting and stopping at the ¼” points. Press seams towards Shape C.
5. Mark ¼” points on two dark blue Shape B squares as shown.
6. Pin and sew one dark blue Shape B to each end of the remaining combined arc unit starting and stopping at the ¼” markings.
7. Pin and sew one combined arc unit with corner squares to combined arc shape with Shape C starting and stopping at the ¼” point of Shape B. Press seam toward Shape C.
8. Repeat steps 1 through 8 to make a total of eight Arc Unit #1’s.
9. Lay out shapes for one Arc Unit #2. Two medium blue Shape E, two medium dark blue Shape D and two dark Blue Shape D as shown.
10. Pin and sew together with an accurate ¼” seam allowance. Press seams in one direction. Repeat steps 9 and 10 to make a total of two combined Arc Unit #2.
11. Mark ¼” points on one white Shape C as shown.
12. Pin and sew one white Shape C to one combined Arc Unit #2 matching ¼” points and notches, starting and stopping at the ¼” points. Press seams towards Shape C.
13. Mark ¼” points on two light blue Shape B squares as shown.
14. Pin and sew one light blue Shape B to each end of the remaining combined arc unit starting and stopping at the ¼” markings.
15. Pin and sew one combined arc unit with corner squares to combined arc with Shape C starting and stopping at the ¼” point of Shape B. Press seam toward Shape C.
16. Repeat steps 9 through 15 to make a total of five Arc Unit #2.
D D D D EE
B
Arc Unit #1
C
B B
Arc Unit #2
E ED D D D
D D D D EE
C
B
B B
©2014 AccuQuilt PQ10410
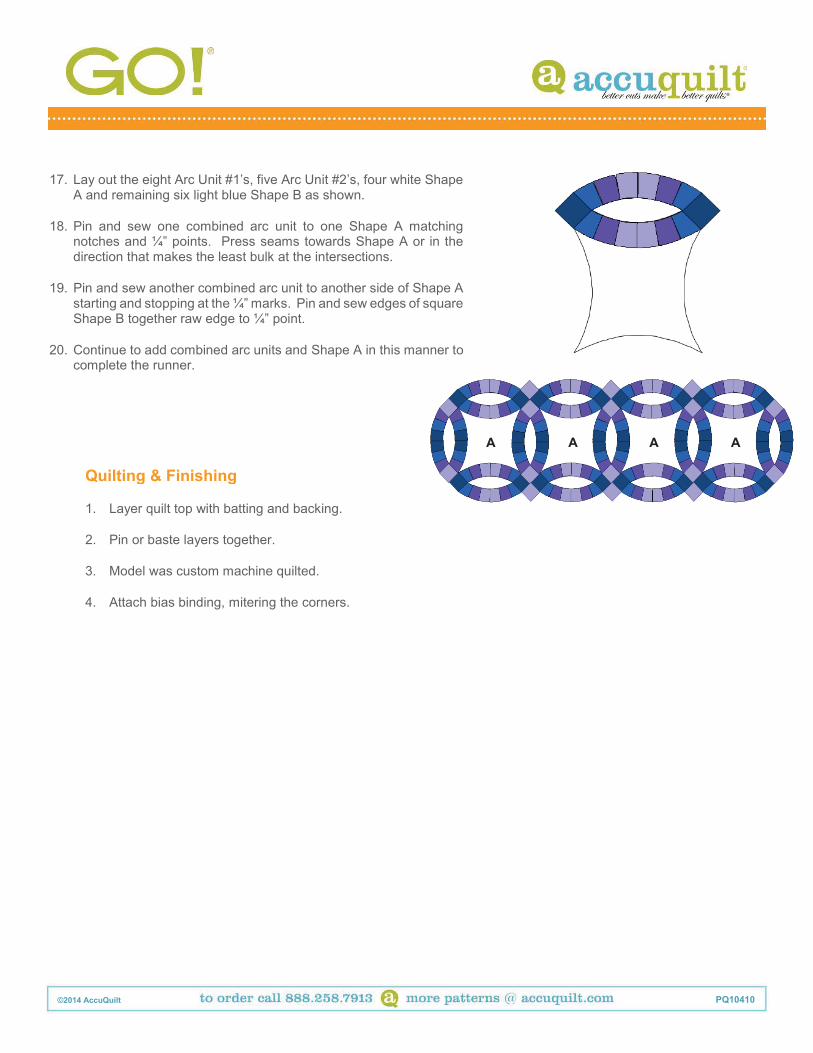
17. Lay out the eight Arc Unit #1’s, five Arc Unit #2’s, four white Shape A and remaining six light blue Shape B as shown.
18. Pin and sew one combined arc unit to one Shape A matching notches and ¼” points. Press seams towards Shape A or in the direction that makes the least bulk at the intersections.
19. Pin and sew another combined arc unit to another side of Shape A starting and stopping at the ¼” marks. Pin and sew edges of square Shape B together raw edge to ¼” point.
20. Continue to add combined arc units and Shape A in this manner to complete the runner.
Quilting & Finishing
1. Layer quilt top with batting and backing.
2. Pin or baste layers together.
3. Model was custom machine quilted.
4. Attach bias binding, mitering the corners.
A A A A

©2015 AccuQuilt PQ10510

©2015 AccuQuilt PQ10510
GO! Stretched Star Wide Table Runner
Finished Size 18½" x 40½"
Fabrics are Soho Solids provided by Timeless Treasures
GO!® Dies Used, Number of Shapes to Cut & Fabric Requirements Note: Yardages are based on “rough-cuts” of 3” x 5½” rectangles for A triangles, 3¾” x 6¾” rectangles for B triangles and 5½” x 5¾” rectangles for C diamonds
Fabric Color Shape GO! Dies Used Number of Shapes to Cut Fabric Required
One Block Soho Solids Milk, Cream and White
Triangle B Triangle A
GO! LeMoyne Star-9” Finished (55453) Diamond C
From each 5/8 yard, cut one 5½” x WOF strip and six 7¾” x 6¾” rectangles. From each 5½” strip, sub cut 6—3” x 5½” rectangles. Cut 12 small A triangles from the rectangles. From each 7¾” x 6¾” rectangles. Cut 2—small A triangles, 2—large B triangles and 2—C diamonds from the rectangles.
5/8 yard of each color
Soho Solids Canary, Gold, Chambray, Delft, Scarlet, Wine, Grass, Kelly, Spring, Avocado, Lilac and Pansy
Triangle B
GO! LeMoyne Star-9” Finished (55453) Diamond C
Cut 2—large B triangles and 2—C diamonds from each 7” x 10” rectangle.
One rectangle, 7” x 10” of each color
Soho Solids Daffodil, Orange and Red Triangle B
GO! LeMoyne Star-9” Finished (55453) Diamond C
Cut 2—7” x 10” rectangles from each fat eighth. Sub cut 2—large B triangles and 2—C diamonds from each 7” x 10” rectangle.
One fat eighth (11” x 18”) of each color
Additional Fabrics Needed
Binding and Backing—7/8 yard o Use GO! Strip Cutter-2¼” (1¾” Finished)
(55053) for binding. Cut 3—2¼” x WOF strips for binding. Use remaining yardage for backing.
Batting—24” x 46”

©2015 AccuQuilt PQ10510
Sewing Directions Note: Press all seams open, unless otherwise indicated.
1. Referring to the Assembly Diagram for color placement,
organize the cut pieces for nine Stretched Star blocks.
Each block requires two light and two dark color B
triangles, two light and two dark color C diamonds, four
white, milk, or cream B triangles, four white, milk, or
cream C diamonds, and 8 white, milk or cream A
triangles.
2. Lay out each block, making sure the edges of the dog-
eared corners are facing as shown in Diagram 1.
3. Sew each A Triangle to its corresponding C Diamond as
shown in Diagram 2.
4. Align each B Triangle to the edge of the adjacent A/C unit.
Start sewing from the outside edge to make the A/B/C
units as shown in Diagram 3.
5. Sew two A/B/C units together along the long diagonal
edge to complete each quarter unit as shown in Diagram
4.
6. Sew four quarter units together to make one complete
Stretched Star block as shown in Diagram 5. Make 8
complete blocks.
7. Sew two quarter units together to make one half-
Stretched Star block as shown in Diagram 6. Make 2
half-blocks.
8. Referring to the Assembly Diagram, arrange the 8 blocks
and two half blocks into two vertical rows. Sew the blocks
in each vertical row together, matching seams, then sew
the two rows together.

©2015 AccuQuilt PQ10510
Quilting & Finishing
1. Layer the batting between the table runner top and
backing, with the wrong sides facing the batting. Pin or
baste the layers together.
2. Quilt as desired. Trim excess batting and backing even
with the quilt top.
3. Sew the binding strips together along the short ends,
using either straight or diagonal seams. Press the strip in
half lengthwise, with wrong sides together. Stitch the
binding to the quilt front, matching raw edges and mitering
corners. Fold the binding to the quilt back, encasing the
raw edges. Hand stitch the binding to the quilt back.
©2015 AccuQuilt PQ10511
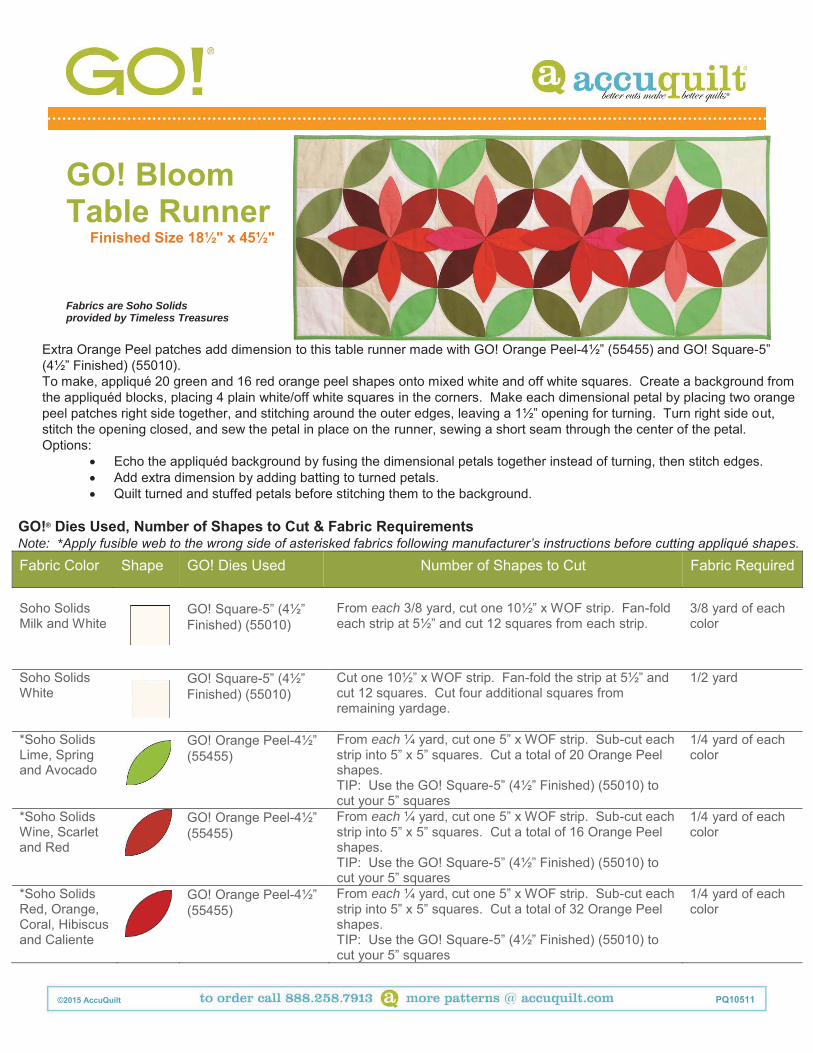
GO! Bloom Table Runner
Finished Size 18½" x 45½"
Fabrics are Soho Solids provided by Timeless Treasures
Extra Orange Peel patches add dimension to this table runner made with GO! Orange Peel-4½” (55455) and GO! Square-5” (4½” Finished) (55010). To make, appliqué 20 green and 16 red orange peel shapes onto mixed white and off white squares. Create a background from the appliquéd blocks, placing 4 plain white/off white squares in the corners. Make each dimensional petal by placing two orange peel patches right side together, and stitching around the outer edges, leaving a 1½” opening for turning. Turn right side out, stitch the opening closed, and sew the petal in place on the runner, sewing a short seam through the center of the petal. Options:
Echo the appliquéd background by fusing the dimensional petals together instead of turning, then stitch edges. Add extra dimension by adding batting to turned petals. Quilt turned and stuffed petals before stitching them to the background.
GO!® Dies Used, Number of Shapes to Cut & Fabric Requirements Note: *Apply fusible web to the wrong side of asterisked fabrics following manufacturer’s instructions before cutting appliqué shapes.
Fabric Color Shape GO! Dies Used Number of Shapes to Cut Fabric Required
One Block Soho Solids Milk and White
GO! Square-5” (4½” Finished) (55010)
From each 3/8 yard, cut one 10½” x WOF strip. Fan-fold each strip at 5½” and cut 12 squares from each strip.
3/8 yard of each color
Soho Solids White
GO! Square-5” (4½” Finished) (55010)
Cut one 10½” x WOF strip. Fan-fold the strip at 5½” and cut 12 squares. Cut four additional squares from remaining yardage.
1/2 yard
*Soho Solids Lime, Spring and Avocado
GO! Orange Peel-4½” (55455)
From each ¼ yard, cut one 5” x WOF strip. Sub-cut each strip into 5” x 5” squares. Cut a total of 20 Orange Peel shapes. TIP: Use the GO! Square-5” (4½” Finished) (55010) to cut your 5” squares
1/4 yard of each color
*Soho Solids Wine, Scarlet and Red
GO! Orange Peel-4½” (55455)
From each ¼ yard, cut one 5” x WOF strip. Sub-cut each strip into 5” x 5” squares. Cut a total of 16 Orange Peel shapes. TIP: Use the GO! Square-5” (4½” Finished) (55010) to cut your 5” squares
1/4 yard of each color
*Soho Solids Red, Orange, Coral, Hibiscus and Caliente
GO! Orange Peel-4½” (55455)
From each ¼ yard, cut one 5” x WOF strip. Sub-cut each strip into 5” x 5” squares. Cut a total of 32 Orange Peel shapes. TIP: Use the GO! Square-5” (4½” Finished) (55010) to cut your 5” squares
1/4 yard of each color

©2015 AccuQuilt PQ10511
Additional Fabrics Needed Binding and Backing—1 3/8 yard
o Use GO! Strip Cutter-2¼” (1¾” Finished) (55053) for binding. Cut 3—2¼” x LOF strips for binding. Use remaining yardage for backing.
Batting—24” x 51” Fusible Web—3 yards (based on 17” width)
Sewing Directions Note: Press all seams open and use a ¼” seam allowance unless otherwise indicated.
1. Place each fusible-backed orange peel shape diagonally on one milk, cream, or white square, with each orange peel point 1/4" from the square's corners. Fuse the orange peel shapes in place according to manufacturer's instructions. Make 20 lime, spring or avocado leaf blocks, and 16 wine, scarlet, or cherry petal blocks.
2. Straight or decorative stitch around the edges of each orange peel shape, securing the fused shapes to the block.
3. Referring to the Bloom Assembly Diagram, arrange the four remaining milk, cream, or white squares and the fused leaf and petal blocks into ten rows of four blocks each.
4. Sew the blocks in each row together along adjacent edges.
5. Sew the rows together, matching seams.
6. To make the dimensional petals, place two of the red, orange, punch, coral or hibiscus orange peel shapes right sides together, matching outer edges. Using a 1/4" seam allowance, stitch around the outer edge of the petal, leaving a 2" opening on one edge for turning as shown in Diagram 1.
Note: For more dimensional petals, place a layer of batting beneath petals before sewing around the outer edge. Trim excess batting very close to stitching before turning.
7. Trim the seam allowance at each petal point, then turn the petal right side out. Smooth the curved seams and points. Press, tucking the seam allowances inside at the opening. Topstitch around the petal perimeter, close to

©2015 AccuQuilt PQ10511
the outer edge, or hand stitch the opening closed. Add extra stitching to the petals, if desired. Make 16 dimensional petals.
Quilting & Finishing
1. Layer the batting between the table runner top and
backing, with the wrong sides facing the batting. Pin or
baste the layers together.
2. Quilt as desired. Trim excess batting and backing even
with the quilt top.
3. Sew the binding strips together along the short ends,
using either straight or diagonal seams. Press the strip in
half lengthwise, with wrong sides together. Stitch the
binding to the quilt front, matching raw edges and mitering
corners. Fold the binding to the quilt back, encasing the
raw edges. Handstitch the binding to the quilt back.
4. Position the dimensional petals on the table runner,
aligning the points of the dimensional petals with the
seams between the runner’s petal blocks, as shown in
Diagram 2. Hand or machine stitch one end of each
dimensional petal to the runner to secure the petals in
place.
Alternate Color Scheme