
Railsconf 2017 - React & React Native a common codebase across native and web

React Native
i
React Native
i
About the Tutorial
React Native is a JavaScript framework for building native mobile apps. It uses the React framework and offers large amount of inbuilt components and APIs.
Audience
This tutorial is designed for JavaScript and React developers who aspire to learn mobile
building skills. By following this course, you will expand your React and JavaScript
knowledge, learn some concepts of functional programming, and prepare to enter the mobile world.
Since JavaScript world is moving forward, we will keep up with it and use EC6 syntax in this tutorial.
Prerequisites
To be able to follow this tutorial, you should be familiar with React and have solid
JavaScript knowledge. Even if you do not have previous experience with React, you should
be able to follow it. In this tutorial, we will explain some fundamental React concepts.
Copyright & Disclaimer
Copyright 2017 by Tutorials Point (I) Pvt. Ltd.
All the content and graphics published in this e-book are the property of Tutorials Point (I)
Pvt. Ltd. The user of this e-book is prohibited to reuse, retain, copy, distribute or republish
any contents or a part of contents of this e-book in any manner without written consent of the publisher.
We strive to update the contents of our website and tutorials as timely and as precisely as
possible, however, the contents may contain inaccuracies or errors. Tutorials Point (I) Pvt.
Ltd. provides no guarantee regarding the accuracy, timeliness or completeness of our
website or its contents including this tutorial. If you discover any errors on our website or in this tutorial, please notify us at [email protected]

React Native
ii
Table of Contents
About the Tutorial ............................................................................................................................................ i Audience ........................................................................................................................................................... i Prerequisites ..................................................................................................................................................... i Copyright & Disclaimer ..................................................................................................................................... i Table of Contents ............................................................................................................................................ ii
CORE CONCEPTS ......................................................................................................................... 1
1. React Native – Overview ........................................................................................................................... 2
2. React Native – Environment Setup ............................................................................................................ 3
3. React Native – State .................................................................................................................................. 5 Difference between State and Props............................................................................................................... 5
4. React Native – Props ............................................................................................................................... 10 Container Component ................................................................................................................................... 10 Presentational Component ........................................................................................................................... 11
5. React Native – Styling ............................................................................................................................. 13 Container Component ................................................................................................................................... 13 Presentational Component ........................................................................................................................... 13
6. React Native – Flexbox ............................................................................................................................ 16
7. React Native – ListView ........................................................................................................................... 24
8. React Native – Text Input ........................................................................................................................ 28
9. React Native – ScrollView ....................................................................................................................... 32
10. React Native – Images ............................................................................................................................. 35 Adding Image ................................................................................................................................................. 35 Screen Density ............................................................................................................................................... 36 Network Images ............................................................................................................................................ 37
11. React Native – HTTP ................................................................................................................................ 38 Using Fetch .................................................................................................................................................... 38
12. React Native – Buttons ........................................................................................................................... 41 Touchable Opacity ......................................................................................................................................... 41 Touchable Highlight ....................................................................................................................................... 42 Touchable Native Feedback .......................................................................................................................... 43 Touchable Without Feedback ........................................................................................................................ 44
13. React Native – Animations ...................................................................................................................... 45 Home Component ......................................................................................................................................... 45 Animations Component ................................................................................................................................. 45

React Native
iii
14. React Native – Debugging ....................................................................................................................... 53 In App Developer Menu ................................................................................................................................ 53
15. React Native – Router ............................................................................................................................. 55
16. React Native – Running IOS ..................................................................................................................... 60
17. React Native – Running Android ............................................................................................................. 61
COMPONENTS AND APIS ........................................................................................................... 62
18. React Native – View ................................................................................................................................ 63 Use Cases ....................................................................................................................................................... 63
19. React Native – WebView ......................................................................................................................... 64 Using WebView ............................................................................................................................................. 64
20. React Native – Modal .............................................................................................................................. 66
21. React Native – ActivityIndicator .............................................................................................................. 70
22. React Native – Picker .............................................................................................................................. 73
23. React Native – Status Bar ........................................................................................................................ 75
24. React Native – Switch ............................................................................................................................. 76
25. React Native – Text ................................................................................................................................. 79
26. React Native – Alert ................................................................................................................................ 83
27. React Native – Geolocation ..................................................................................................................... 85
28. React Native – AsyncStorage ................................................................................................................... 89
29. React Native – CameraRoll ...................................................................................................................... 93

React Native
1
Core Concepts
React Native
2
For better understanding of React Native concepts, we will borrow a few lines from the official documentation –
React Native lets you build mobile apps using only JavaScript. It uses the same design as React, letting you compose a rich mobile UI from declarative components.
With React Native, you don't build a mobile web app, an HTML5 app, or a hybrid app; you
build a real mobile app that's indistinguishable from an app built using Objective-C or Java.
React Native uses the same fundamental UI building blocks as regular iOS and Android apps. You just put those building blocks together using JavaScript and React.
React Native Features
React – This is a Framework for building web and mobile apps using JavaScript.
Native − You can use native components controlled by JavaScript.
Platforms – React Native supports IOS and Android platform.
React Native Advantages
JavaScript − You can use the existing JavaScript knowledge to build native mobile apps.
Code sharing − You can share most of your code on different platforms.
Community – The community around React and React Native is large, and you will be able to find any answer you need.
React Native Limitations
Native Components − If you want to create native functionality which is not
created yet, you will need to write some platform specific code.
1. React Native – Overview
React Native
3
There are a couple of things you need to install to set up the environment for React Native. We will use OSX as our building platform.
S.NO. Software Description
1 NodeJS and NPM You can follow our NodeJS Environment Setup tutorial to
install NodeJS.
Step 1 – Install Homebrew
Open your terminal and run the following code to install Homebrew −
/usr/bin/ruby -e "$(curl -fsSL https://raw.githubusercontent.com/Homebrew/install/master/install)"
Step 2 – Install Watchman
Run the following code to install Watchman.
brew install watchman
Step 3 – Install React Native
Now, run the following code to install React Native.
npm install -g react-native-cli
Step 4 Android – Install Visual Studio
You can install Android studio by following this link.
Step 4 IOS – Install XCode
For IOS development you will need XCode.
Step 5 – Create First App
We will initialize our first app by running the code given below in the terminal from the folder where we want to create the app (in our case Desktop).
react-native init reactTutorialApp
2. React Native – Environment Setup
React Native
4
Step 6 – Run React Native Packager
First, we need to open the app folder in terminal.
cd reactTutorialApp
Now, we can run the packager.
react-native start
You should keep this terminal window running while developing your app.
Step 7 – Run the App on IOS simulator
This step will open your app in the IOS simulator. Run the following command in another
terminal.
react-native run-ios
React Native
5
The data inside React Components is managed by state and props. In this chapter, we will talk about state.
Difference between State and Props
The state is mutable while props are immutable. This means that state can be updated
in the future while props cannot be updated.
Using State
This is our root component. We are just importing Home which will be used in most of the chapters.
NOTE: This file won't change during the course of this tutorial, so we will leave it out in the future.
index.ios.js
import React, { Component } from 'react';
import { AppRegistry, View } from 'react-native';
import Home from './src/components/home/Home.js'
class reactTutorialApp extends Component {
render() {
return (
<View>
<Home />
</View>
);
}
}
export default reactTutorialApp
AppRegistry.registerComponent('reactTutorialApp', () ⇒ reactTutorialApp);
Initial state is defined inside the Home class by using the state = {} syntax.
We will bind myText in a view using the {this.state.myText} syntax.
3. React Native – State
React Native
6
src/components/home/Home.js
import React, { Component } from 'react';
import { Text, View } from 'react-native';
class Home extends Component {
state = {
myState: 'Lorem ipsum dolor sit amet, consectetur adipisicing elit,
sed do eiusmod tempor incididunt ut labore et dolore magna aliqua.
Ut enim ad minim veniam, quis nostrud exercitation ullamco laboris
nisi ut aliquip ex ea commodo consequat. Duis aute irure dolor in
reprehenderit in voluptate velit esse cillum dolore eu fugiat nulla pariatur.
Excepteur sint occaecat cupidatat non proident, sunt in culpa qui
officia deserunt mollit anim id est laborum.'
}
render() {
return (
<View>
<Text>
{this.state.myState}
</Text>
</View>
);
}
}
export default Home;
React Native
7
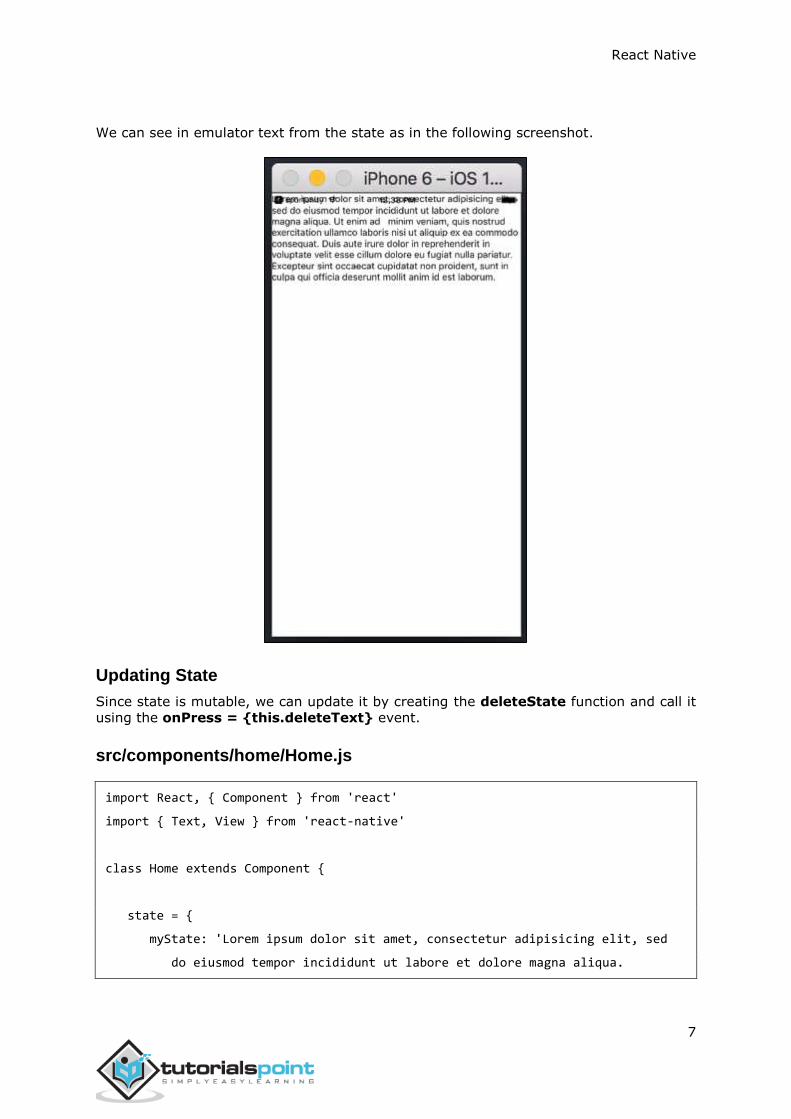
We can see in emulator text from the state as in the following screenshot.
Updating State
Since state is mutable, we can update it by creating the deleteState function and call it
using the onPress = {this.deleteText} event.
src/components/home/Home.js
import React, { Component } from 'react'
import { Text, View } from 'react-native'
class Home extends Component {
state = {
myState: 'Lorem ipsum dolor sit amet, consectetur adipisicing elit, sed
do eiusmod tempor incididunt ut labore et dolore magna aliqua.
React Native
8
Ut enim ad minim veniam, quis nostrud exercitation ullamco laboris nisi
ut aliquip ex ea commodo consequat. Duis aute irure dolor in reprehenderit
in voluptate velit esse cillum dolore eu fugiat nulla pariatur.
Excepteur sint occaecat cupidatat non proident, sunt in culpa qui officia
deserunt mollit anim id est laborum.'
}
updateState = () ⇒ this.setState({ myState: 'The state is updated' })
render() {
return (
<View>
<Text onPress = {this.updateState}>
{this.state.myState}
</Text>
</View>
);
}
}
export default Home;
NOTES − In all chapters, we will use the class syntax for stateful (container) components
and function syntax for stateless (presentational) components. We will learn more about components in the next chapter.
In our second example, we are using the arrow function syntax for updateState. You
should keep in mind that this syntax uses the lexical scope, and this keyword will be bound to the environment object (Class). This will sometimes lead to unexpected behavior.
The other way to define methods is to use the EC5 functions but in that case we will need
to bind this manually in the constructor. Consider the following example to understand this.
class Home extends Component {
constructor(){
super()
this.updateState = this.updateState.bind(this)
}
updateState(){

React Native
9
//
}
render(){
//
}
}
React Native
10
In our last chapter, we showed you how to use mutable state. In this chapter, we will show you how to combine the state and the props.
Presentational components should get all data by passing props. Only container components should have state.
Container Component
We will now understand what a container compenent is and also how it works.
Theory
Now we will update our container component. This component will handle the state and pass the props to the presentational component.
Container component is only used for handling state. All functionality related to view (styling etc.) will be handled in the presentational component.
Example
If we want to use example from the last chapter we need to remove the Text element
from the render function since this element is used for presenting text to the users. This should be inside the presentational component.
Let us review the code in the example given below. We will import the PresentationalComponent and pass it to the render function.
After we import the PresentationalComponent and pass it to the render function, we
need to pass the props. We will pass the props by adding myText = {this.state.myText}
and deleteText = {this.deleteText} to <PresentationalComponent>. Now, we will be able to access this inside the presentational component.
src/components/home/Home.js
import React, { Component } from 'react'
import { View } from 'react-native'
import PresentationalComponent from './PresentationalComponent'
class Home extends Component {
state = {
myState: 'Lorem ipsum dolor sit amet, consectetur adipisicing elit,
sed do eiusmod tempor incididunt ut labore et dolore magna aliqua.
Ut enim ad minim veniam, quis nostrud exercitation ullamco laboris nisi
4. React Native – Props
React Native
11
ut aliquip ex ea commodo consequat. Duis aute irure dolor in reprehenderit in
voluptate velit esse cillum dolore eu fugiat nulla pariatur. Excepteur
sint occaecat cupidatat non proident, sunt in culpa qui officia
deserunt mollit anim id est laborum.'
}
updateState = () ⇒ {
this.setState({ myState: 'The state is updated' })
}
render() {
return (
<View>
<PresentationalComponent myState = {this.state.myState} updateState = {this.updateState}/>
</View>
)
}
}
export default Home
Presentational Component
We will now understand what a presentational component is and also how it works.
Theory
Presentational components should be used only for presenting view to the users. These components do not have state. They receive all data and functions as props.
The best practice is to use as much presentational components as possible.
Example
As we mentioned in our previous chapter, we are using the EC6 function syntax for
presentational components.
Our component will receive props, return view elements, present text using
{props.myText} and call the {props.deleteText} function when a user clicks on the text.
React Native
12
src/components/home/PresentationalComponent.js
import React, { Component } from 'react'
import { Text, View } from 'react-native'
const PresentationalComponent = (props) ⇒ {
return (
<View>
<Text onPress = {props.updateState}>
{props.myState}
</Text>
</View>
)
}
export default PresentationalComponent
Now, we have the same functionality as in our State chapter. The only difference is that we refactored our code to the container and the presentational component.
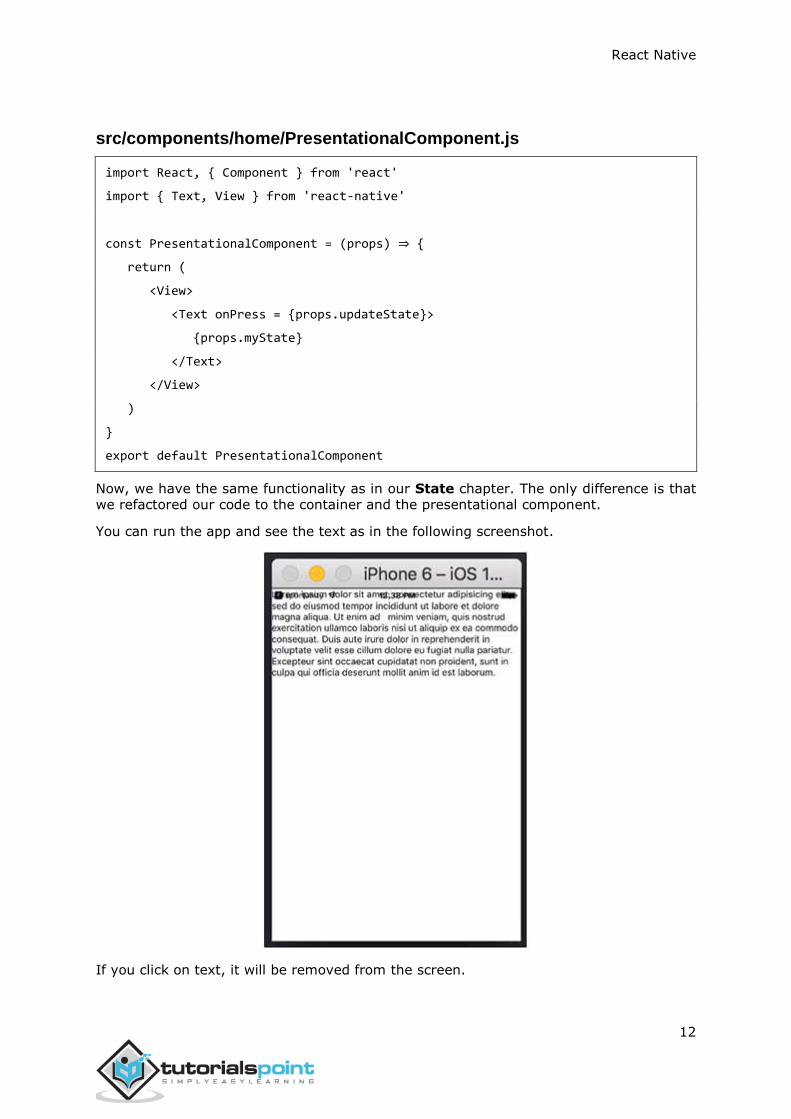
You can run the app and see the text as in the following screenshot.
If you click on text, it will be removed from the screen.
React Native
13
There are a couple of ways to style your elements in React Native.
You can use the style property to add the styles inline. However, this is not the best practice because it can be hard to read the code.
In this chapter, we will use the Stylesheet for styling.
Container Component
In this section, we will simplify our container component from our previous chapter.
src/components/home/Home.js
import React, { Component } from 'react'
import { View } from 'react-native'
import PresentationalComponent from './PresentationalComponent'
class Home extends Component {
state = {
myState: 'This is my state'
}
render() {
return (
<View>
<PresentationalComponent myState = {this.state.myState}/>
</View>
)
}
}
export default Home
Presentational Component
In the following example, we will import the StyleSheet. At the bottom of the file, we will
create our stylesheet and assign it to the styles constant. Note that our styles are in
camelCase and we do not use px or % for styling.
To apply styles to our text, we need to add style = {styles.myText} property to the Text element.
5. React Native – Styling
React Native
14
src/components/home/PresentationalComponent.js
import React, { Component } from 'react'
import { Text, View, StyleSheet } from 'react-native'
const PresentationalComponent = (props) ⇒ {
return (
<View>
<Text style = {styles.myState}>
{props.myState}
</Text>
</View>
)
}
export default PresentationalComponent
const styles = StyleSheet.create ({
myState: {
marginTop: 20,
textAlign: 'center',
color: 'blue',
fontWeight: 'bold',
fontSize: 20
}
})

React Native
15
When we run the app, we will receive the following output.
React Native
16
To accommodate different screen sizes, React Native offers Flexbox support.
We will use the same code that we used in our React Native - Styling chapter. We will only change the PresentationalComponent.
Layout
To achieve the desired layout, flexbox offers three main properties − flexDirection
justifyContent and alignItems.
The following table shows the possible options.
Property Values Description
flexDirection 'column', 'row' Used to specify if elements will be aligned vertically or horizontally.
justifyContent
'center', 'flex-start',
'flex-end', 'space-
around', 'space-between'
Used to determine how should elements be distributed inside the container.
alignItems 'center', 'flex-start', 'flex-end', 'stretched'
Used to determine how should elements be
distributed inside the container along the
secondary axis (opposite of flexDirection)
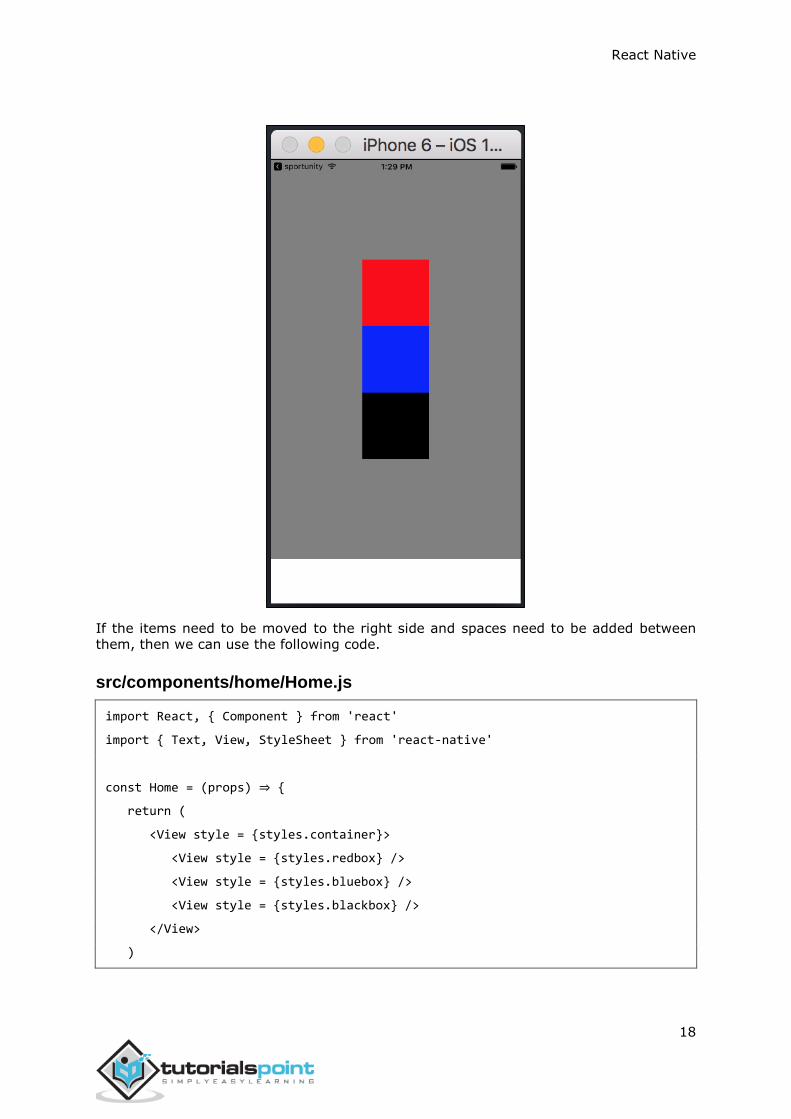
If you want to align the items vertically and centralize them, then you can use the following code.
src/components/home/Home.js
import React, { Component } from 'react'
import { View, StyleSheet } from 'react-native'
const Home = (props) ⇒ {
return (
<View style = {styles.container}>
<View style = {styles.redbox} />
<View style = {styles.bluebox} />
<View style = {styles.blackbox} />
</View>
)
}
6. React Native – Flexbox
React Native
17
export default Home
const styles = StyleSheet.create ({
container: {
flexDirection: 'column',
justifyContent: 'center',
alignItems: 'center',
backgroundColor: 'grey',
height: 600
},
redbox: {
width: 100,
height: 100,
backgroundColor: 'red'
},
bluebox: {
width: 100,
height: 100,
backgroundColor: 'blue'
},
blackbox: {
width: 100,
height: 100,
backgroundColor: 'black'
},
})
React Native
18
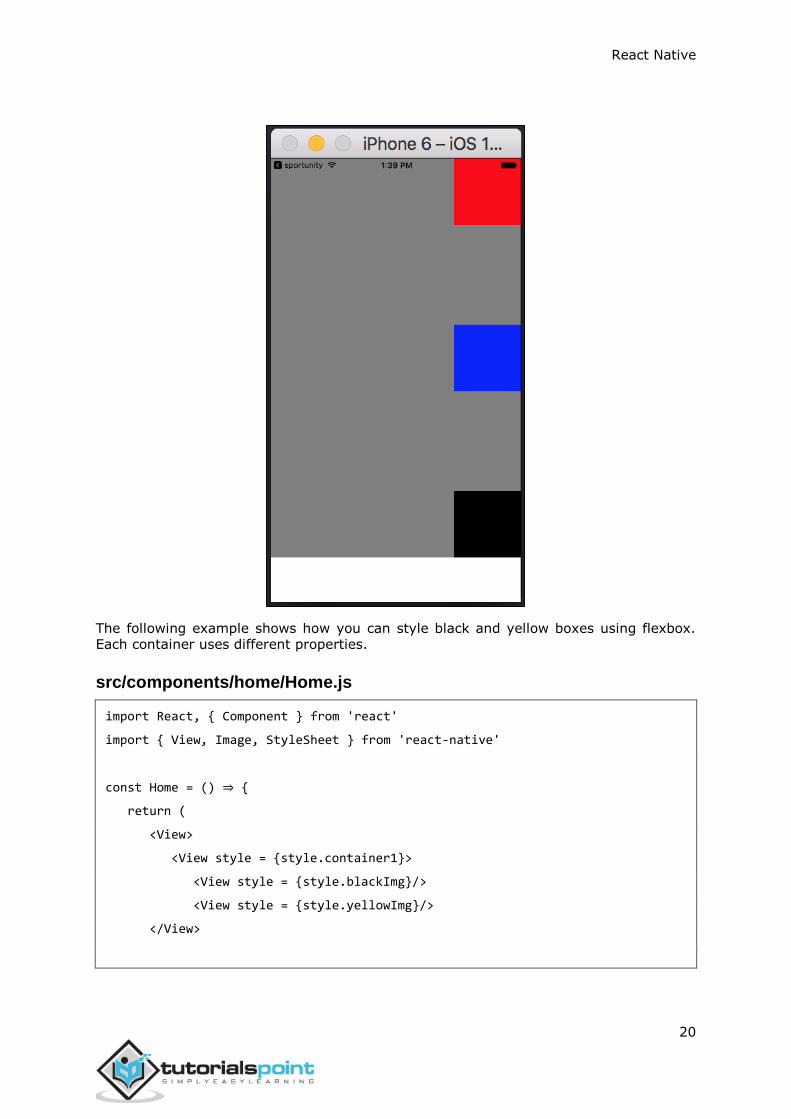
If the items need to be moved to the right side and spaces need to be added between them, then we can use the following code.
src/components/home/Home.js
import React, { Component } from 'react'
import { Text, View, StyleSheet } from 'react-native'
const Home = (props) ⇒ {
return (
<View style = {styles.container}>
<View style = {styles.redbox} />
<View style = {styles.bluebox} />
<View style = {styles.blackbox} />
</View>
)

React Native
19
}
export default Home
const styles = StyleSheet.create ({
container: {
flexDirection: 'column',
justifyContent: 'space-between',
alignItems: 'flex-end',
backgroundColor: 'grey',
height: 600
},
redbox: {
width: 100,
height: 100,
backgroundColor: 'red'
},
bluebox: {
width: 100,
height: 100,
backgroundColor: 'blue'
},
blackbox: {
width: 100,
height: 100,
backgroundColor: 'black'
},
})
React Native
20
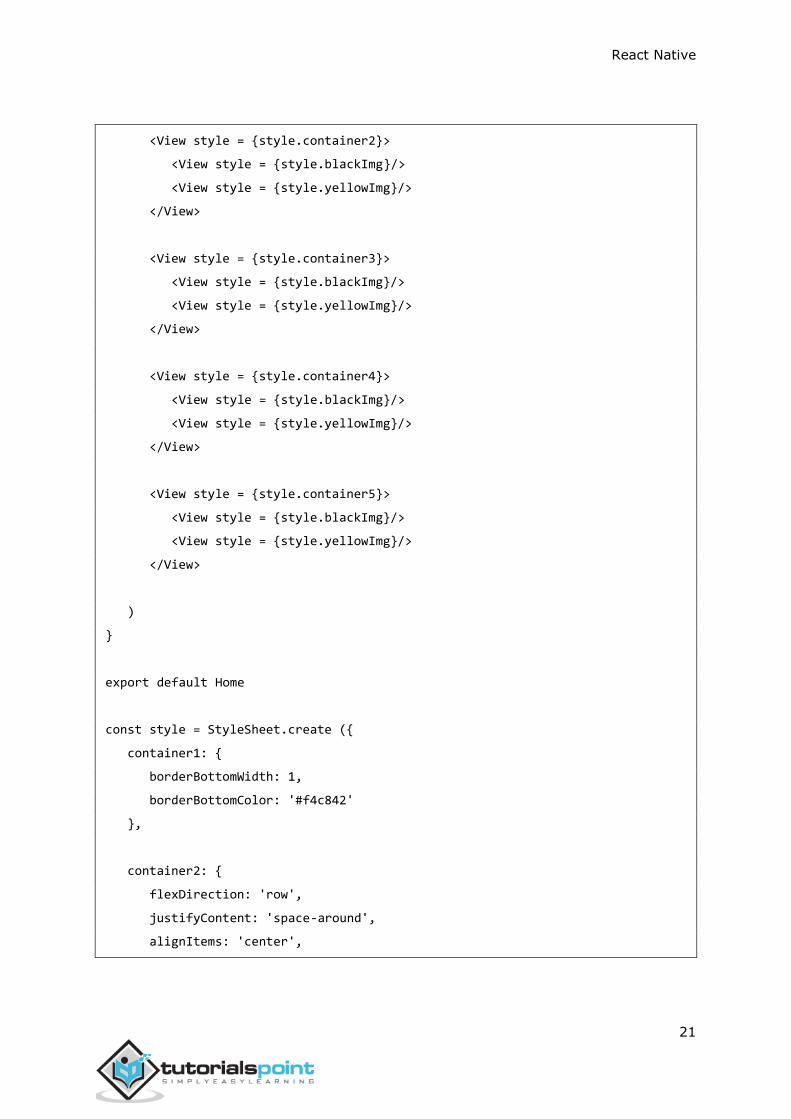
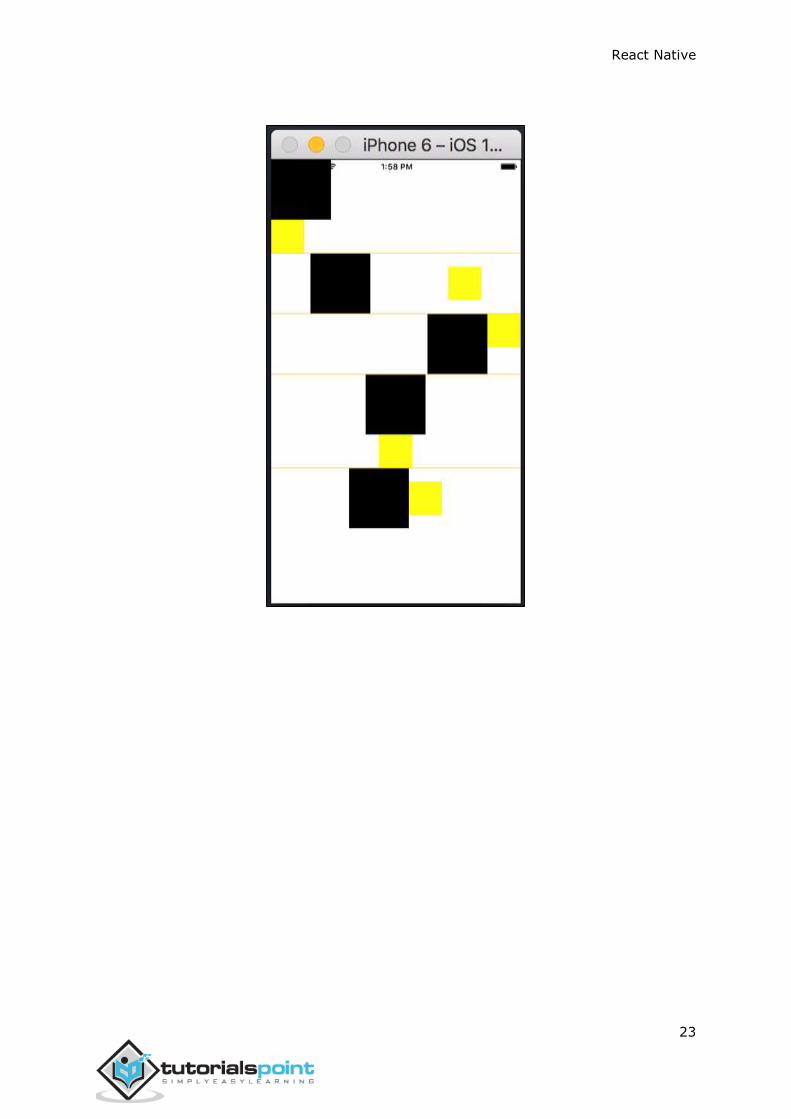
The following example shows how you can style black and yellow boxes using flexbox. Each container uses different properties.
src/components/home/Home.js
import React, { Component } from 'react'
import { View, Image, StyleSheet } from 'react-native'
const Home = () ⇒ {
return (
<View>
<View style = {style.container1}>
<View style = {style.blackImg}/>
<View style = {style.yellowImg}/>
</View>
React Native
21
<View style = {style.container2}>
<View style = {style.blackImg}/>
<View style = {style.yellowImg}/>
</View>
<View style = {style.container3}>
<View style = {style.blackImg}/>
<View style = {style.yellowImg}/>
</View>
<View style = {style.container4}>
<View style = {style.blackImg}/>
<View style = {style.yellowImg}/>
</View>
<View style = {style.container5}>
<View style = {style.blackImg}/>
<View style = {style.yellowImg}/>
</View>
)
}
export default Home
const style = StyleSheet.create ({
container1: {
borderBottomWidth: 1,
borderBottomColor: '#f4c842'
},
container2: {
flexDirection: 'row',
justifyContent: 'space-around',
alignItems: 'center',
React Native
22
borderBottomWidth: 1,
borderBottomColor: '#f4c842'
},
container3: {
flexDirection: 'row',
justifyContent: 'flex-end',
borderBottomWidth: 1,
borderBottomColor: '#f4c842'
},
container4: {
alignItems: 'center',
borderBottomWidth: 1,
borderBottomColor: '#f4c842'
},
container5: {
flexDirection: 'row',
justifyContent: 'center',
alignItems: 'center',
},
blackImg: {
backgroundColor: 'black',
height: 90,
width: 90
},
yellowImg: {
backgroundColor: 'yellow',
height: 50,
width: 50
}
})
React Native
23
React Native
24
In this chapter, we will show you how to create a list in React Native. We will import List
in our Home component and show it on screen.
src/components/home/Home.js
import React from 'react'
import List from './List.js'
const Home = () => {
return (
<List />
)
}
export default Home
To create a list, we will use the map() method. This will iterate over an array of items,
and render each one.
src/components/home/List.js
import React, { Component } from 'react'
import { Text, View, TouchableOpacity, StyleSheet } from 'react-native'
class List extends Component {
state = {
names: [
{
id: 0,
name: 'Ben',
},
{
id: 1,
name: 'Susan',
},
{
id: 2,
7. React Native – ListView
React Native
25
name: 'Robert',
},
{
id: 3,
name: 'Mary',
}
]
}
alertItemName = (item) => {
alert(item.name)
}
render() {
return (
<View>
{
this.state.names.map((item, index) => (
<TouchableOpacity
key = {item.id}
style = {styles.container}
onPress = {() => this.alertItemName(item)}
>
<Text style={styles.text}>
{item.name}
</Text>
</TouchableOpacity>
))
}
</View>
)
}
}
export default List
React Native
26
const styles = StyleSheet.create ({
container: {
padding: 10,
marginTop: 3,
backgroundColor: '#d9f9b1',
alignItems: 'center',
},
text: {
color: '#4f603c'
}
})
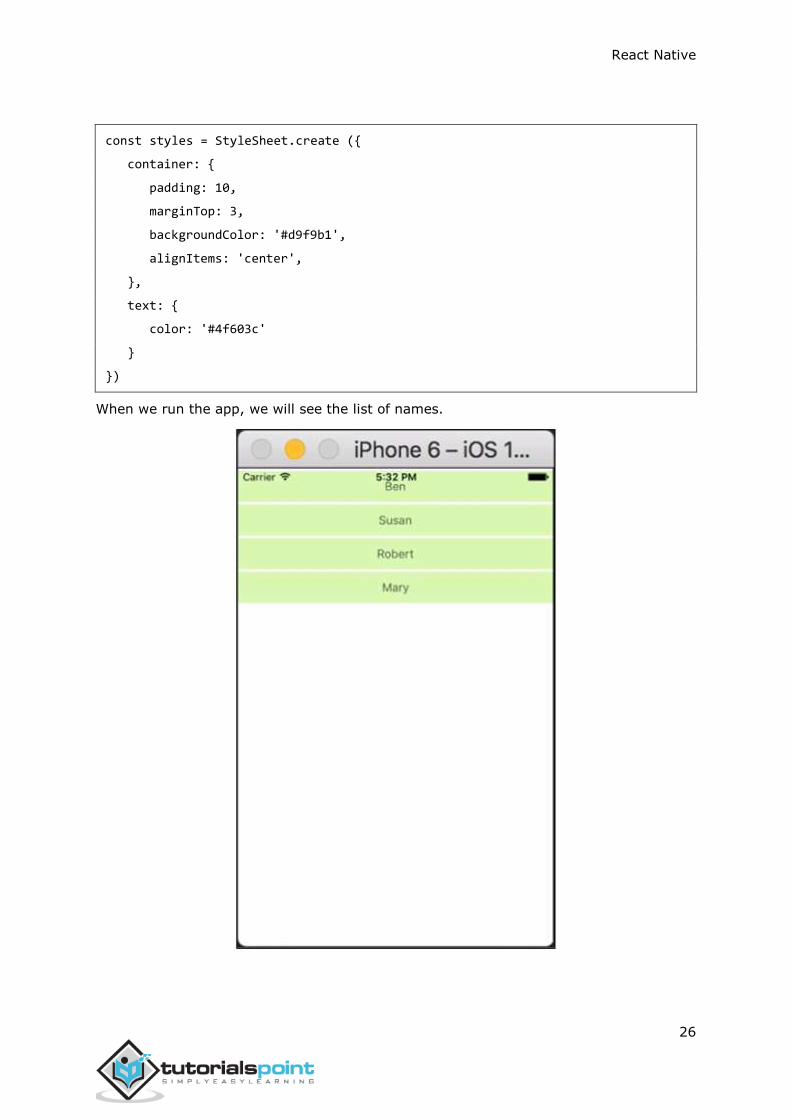
When we run the app, we will see the list of names.

React Native
27
You can click on each item in the list to trigger an alert with the name.
React Native
28
In this chapter, we will show you how to work with TextInput elements in React Native.
The Home component will import and render inputs.
src/components/home/Home.js
import React from 'react';
import Inputs from './Inputs.js'
const Home = () ⇒ {
return (
<Inputs />
)
}
export default Home
Inputs
We will define the initial state. After defining the initial state, we will create the
handleEmail and the handlePassword functions. These functions are used for updating state.
The login() function will just alert the current value of the state.
We will also add some other properties to text inputs to disable auto capitalisation, remove
the bottom border on Android devices and set a placeholder.
src/components/home/Inputs.js
import React, { Component } from 'react'
import { View, Text, TouchableOpacity, TextInput, StyleSheet } from 'react-native'
class Inputs extends Component {
state = {
email: '',
password: ''
}
8. React Native – Text Input
React Native
29
handleEmail = (text) ⇒ {
this.setState({ email: text })
}
handlePassword = (text) ⇒ {
this.setState({ password: text })
}
login = (email, pass) ⇒ {
alert('email: ' + email + ' password: ' + pass)
}
render(){
return (
<View style = {styles.container}>
<TextInput style = {styles.input}
underlineColorAndroid = "transparent"
placeholder = "Email"
placeholderTextColor = "#9a73ef"
autoCapitalize = "none"
onChangeText = {this.handleEmail}/>
<TextInput style = {styles.input}
underlineColorAndroid = "transparent"
placeholder = "Password"
placeholderTextColor = "#9a73ef"
autoCapitalize = "none"
onChangeText = {this.handlePassword}/>
<TouchableOpacity
style = {styles.submitButton}
onPress = { () ⇒ this.login(this.state.email, this.state.password)}>
<Text style = {styles.submitButtonText}>
Submit
React Native
30
</Text>
</TouchableOpacity>
</View>
)
}
}
export default Inputs
const styles = StyleSheet.create({
container: {
paddingTop: 23
},
input: {
margin: 15,
height: 40,
borderColor: '#7a42f4',
borderWidth: 1
},
submitButton: {
backgroundColor: '#7a42f4',
padding: 10,
margin: 15,
height: 40,
},
submitButtonText:{
color: 'white'
}
})
React Native
31
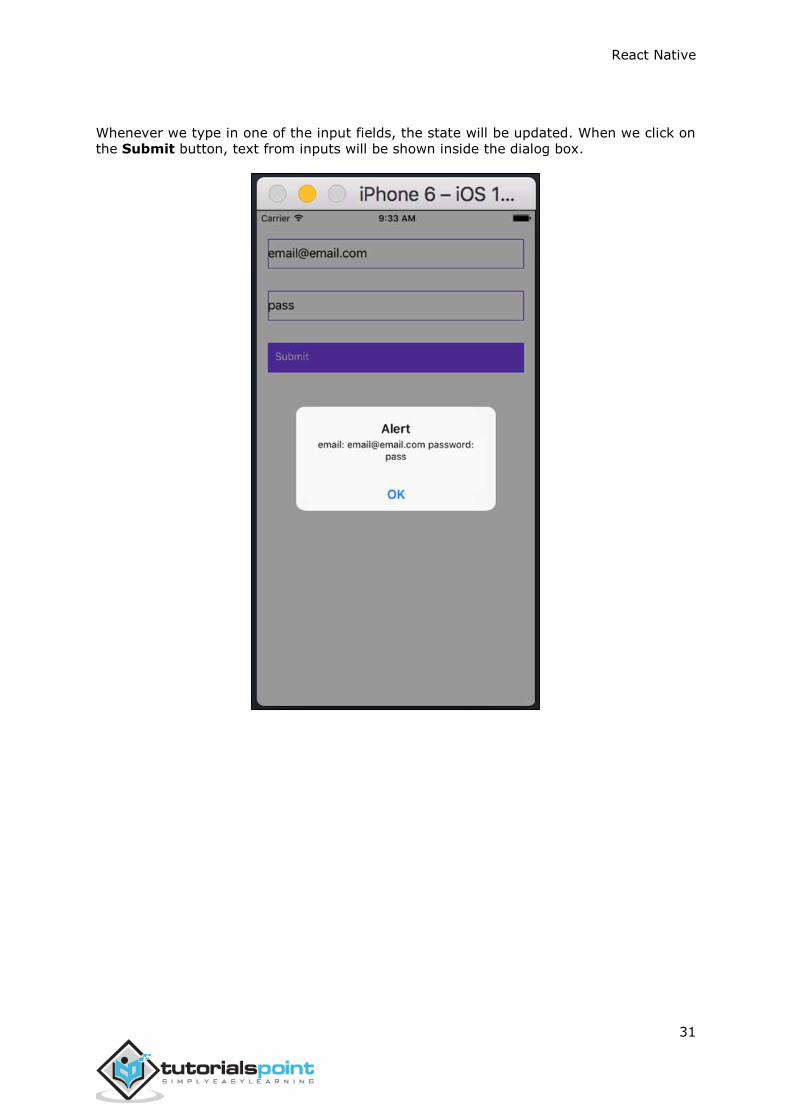
Whenever we type in one of the input fields, the state will be updated. When we click on the Submit button, text from inputs will be shown inside the dialog box.
React Native
32
In this chapter, we will show you how to work with the ScrollView element.
We will again create ScrollViewExample.js and import it in Home.
src/components/home/Home.js
import React from 'react'
import ScrollViewExample from './ScrollViewExample.js'
const Home = () ⇒ {
return (
<ScrollViewExample />
)
}
export default Home
Scrollview will render a list of names. We will create it in state.
src/components/home/ScrollViewExample.js
import React, { Component } from 'react';
import { Text, Image, View, StyleSheet, ScrollView } from 'react-native';
class ScrollViewExample extends Component {
state = {
names: [
{'name': 'Ben', 'id': 1},
{'name': 'Susan', 'id': 2},
{'name': 'Robert', 'id': 3},
{'name': 'Mary', 'id': 4},
{'name': 'Daniel', 'id': 5},
{'name': 'Laura', 'id': 6},
{'name': 'John', 'id': 7},
{'name': 'Debra', 'id': 8},
{'name': 'Aron', 'id': 9},
9. React Native – ScrollView
React Native
33
{'name': 'Ann', 'id': 10},
{'name': 'Steve', 'id': 11},
{'name': 'Olivia', 'id': 12}
]
}
render() {
return (
<View>
<ScrollView>
{
this.state.names.map((item, index) ⇒ (
<View key = {item.id} style = {styles.item}>
<Text>{item.name}</Text>
</View>
))
}
</ScrollView>
</View>
)
}
}
export default ScrollViewExample
const styles = StyleSheet.create ({
item: {
flexDirection: 'row',
justifyContent: 'space-between',
alignItems: 'center',
padding: 30,
margin: 2,
borderColor: '#2a4944',
borderWidth: 1,
backgroundColor: '#d2f7f1'
}
})
React Native
34
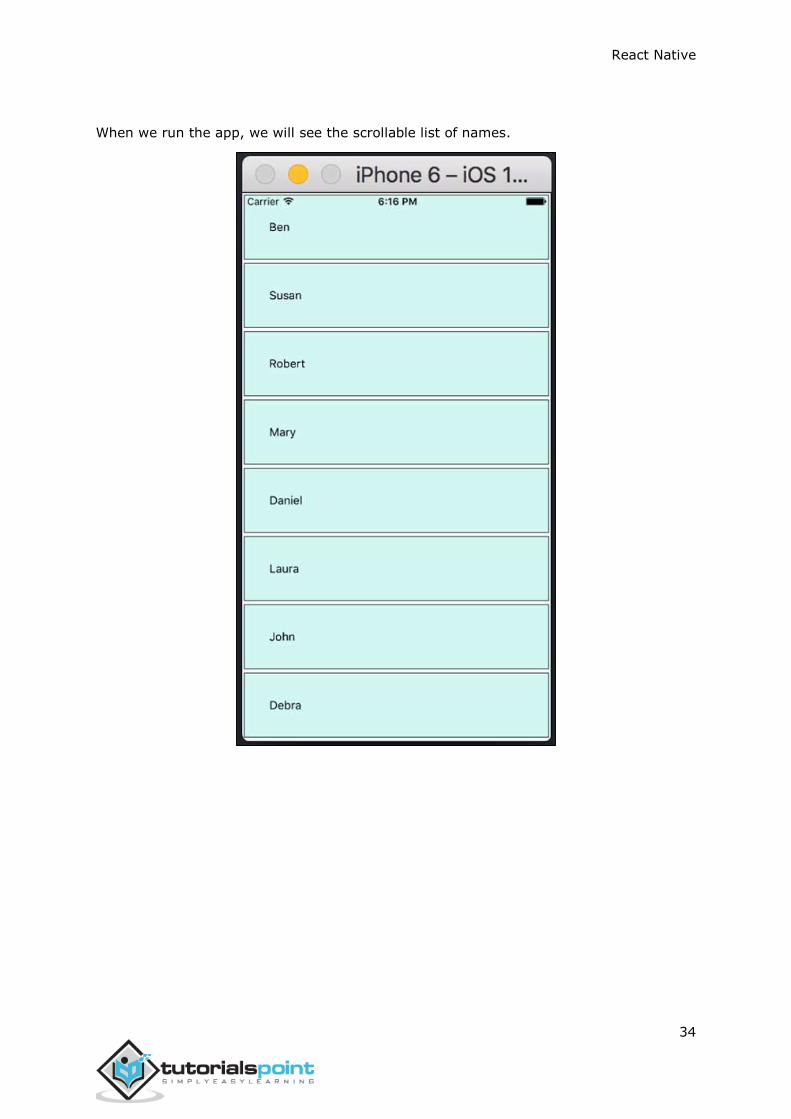
When we run the app, we will see the scrollable list of names.
React Native
35
In this chapter, we will understand how to work with images in React Native.
Adding Image
Let us create a new folder img inside the src folder. We will add our image (myImage.png) inside this folder.
We will show images on the home screen.
src/components/home/Home.js
import React from 'react';
import ImagesExample from './ImagesExample.js'
const Home = () ⇒ {
return (
<ImagesExample />
)
}
export default Home
Local image can be accessed using the following syntax.
src/components/home/ImagesExample.js
import React, { Component } from 'react'
import { Image } from 'react-native'
const Home = () ⇒ (
<Image source = {require('../../img/myImage.png')} />
)
export default Home
10. React Native – Images
React Native
36
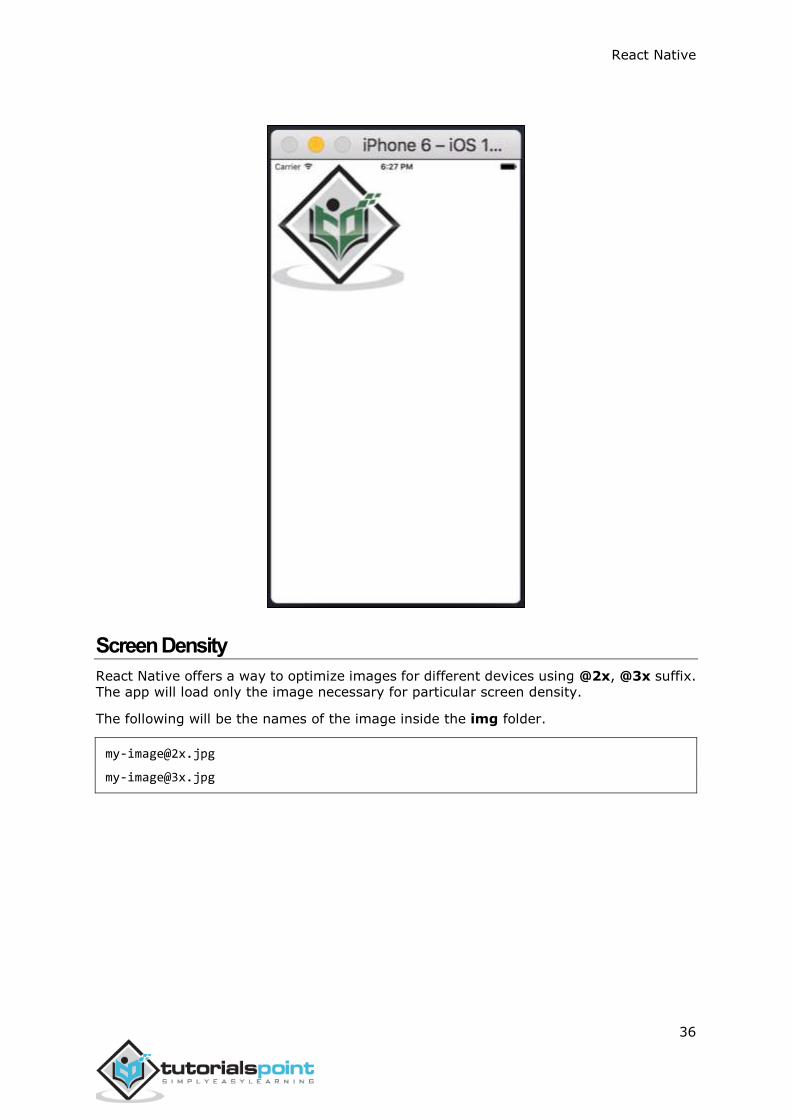
Screen Density
React Native offers a way to optimize images for different devices using @2x, @3x suffix. The app will load only the image necessary for particular screen density.
The following will be the names of the image inside the img folder.
React Native
37
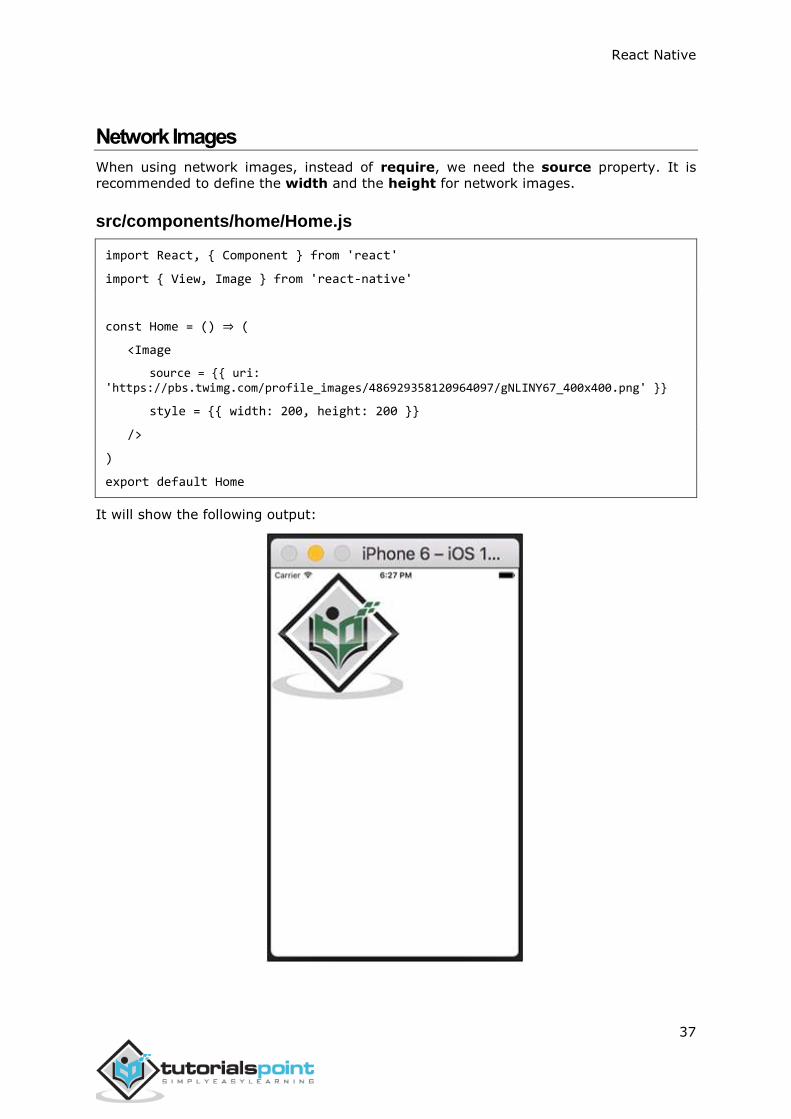
Network Images
When using network images, instead of require, we need the source property. It is
recommended to define the width and the height for network images.
src/components/home/Home.js
import React, { Component } from 'react'
import { View, Image } from 'react-native'
const Home = () ⇒ (
<Image
source = {{ uri: 'https://pbs.twimg.com/profile_images/486929358120964097/gNLINY67_400x400.png' }}
style = {{ width: 200, height: 200 }}
/>
)
export default Home
It will show the following output:

React Native
38
In this chapter, we will show you how to use fetch for handling network requests.
src/components/home/Home.js
import React from 'react';
import HttpExample from './HttpExample.js'
const Home = () ⇒ {
return (
<HttpExample />
)
}
export default Home
Using Fetch
We will use the componentDidMount lifecycle method to load the data from server as
soon as the component is mounted. This function will send GET request to the server, return JSON data, log output to console and update our state.
src/components/home/HttpExample.js
import React, { Component } from 'react'
import { View, Text } from 'react-native'
class HttpExample extends Component {
state = {
data: ''
}
componentDidMount = () ⇒ {
fetch('https://jsonplaceholder.typicode.com/posts/1', {
method: 'GET'
})
11. React Native – HTTP
React Native
39
.then((response) ⇒ response.json())
.then((responseJson) ⇒ {
console.log(responseJson);
this.setState({
data: responseJson
})
})
.catch((error) ⇒ {
console.error(error);
});
}
render() {
return (
<View>
<Text>
{this.state.data.body}
</Text>
</View>
)
}
}
export default HttpExample
React Native
40
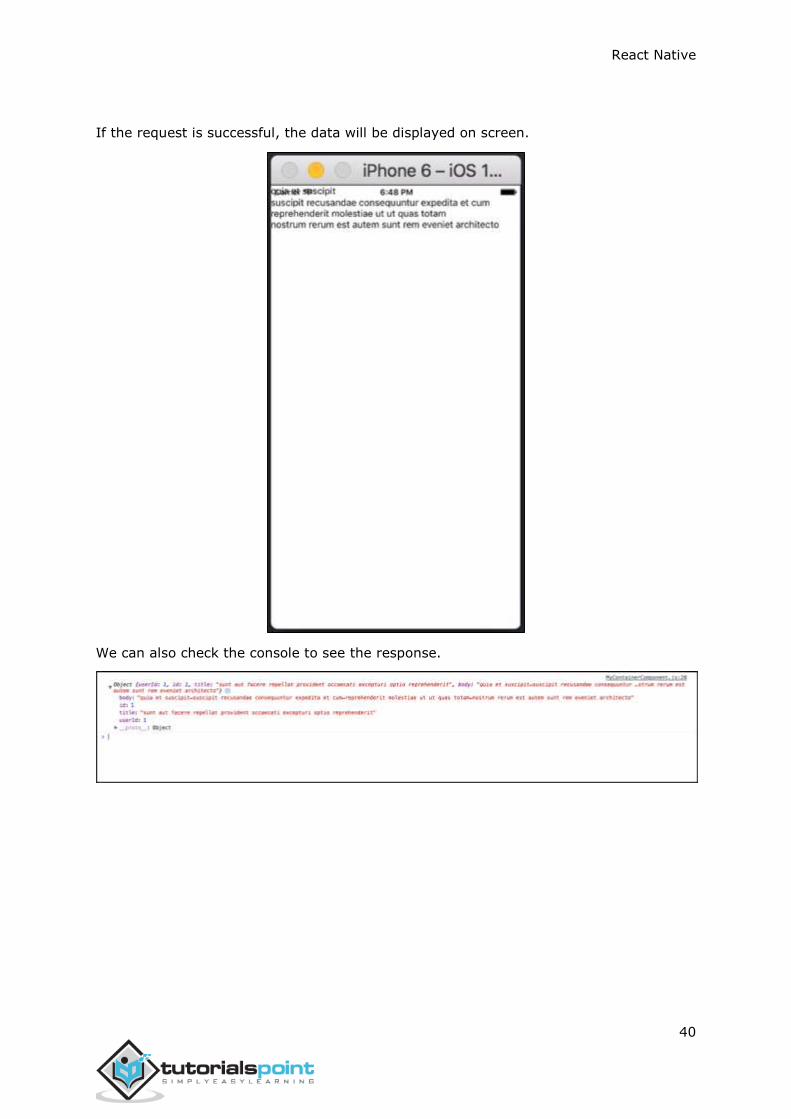
If the request is successful, the data will be displayed on screen.
We can also check the console to see the response.
React Native
41
In this chapter, we will show you touchable components in react Native. We call them
'touchable' because they offer built in animations and we can use the onPress prop for
handling touch event.
Facebook offers the Button component, which can be used as a generic button. Consider
the following example to understand the same.
src/components/home/Home.js
import React, { Component } from 'react'
import { Button } from 'react-native'
const Home = () ⇒ {
const handlePress = () ⇒ false
return (
<Button
onPress = {handlePress}
title = "Red button!"
color = "red"
/>
)
}
export default Home
If the default Button component does not suit your needs, you can use one of the following
components instead.
Touchable Opacity
This element will change the opacity of an element when touched.
src/components/home/Home.js
import React from 'react'
import { TouchableOpacity, StyleSheet, View, Text } from 'react-native'
const Home = () ⇒ {
return (
<View style = {styles.container}>
12. React Native – Buttons
React Native
42
<TouchableOpacity>
<Text style = {styles.text}>
Button
</Text>
</TouchableOpacity>
</View>
)
}
export default Home
const styles = StyleSheet.create ({
container: {
alignItems: 'center',
},
text: {
borderWidth: 1,
padding: 25,
borderColor: 'black',
backgroundColor: 'red'
}
})
Touchable Highlight
When a user presses the element, it will get darker and the underlying color will show through.
src/components/home/Home.js
import React from 'react'
import { View, TouchableHighlight, Text, StyleSheet } from 'react-native'
const Home = (props) ⇒ {
return (
<View style = {styles.container}>
React Native
43
<TouchableHighlight>
<Text style = {styles.text}>
Button
</Text>
</TouchableHighlight>
</View>
)
}
export default Home
const styles = StyleSheet.create ({
container: {
alignItems: 'center',
},
text: {
borderWidth: 1,
padding: 25,
borderColor: 'black',
backgroundColor: 'red'
}
})
Touchable Native Feedback
This will simulate ink animation when the element is pressed.
src/components/home/Home.js
import React from 'react'
import { View, TouchableNativeFeedback, Text, StyleSheet } from 'react-native'
const Home = (props) ⇒ {
return (
<View style = {styles.container}>
<TouchableNativeFeedback>
React Native
44
<Text style = {styles.text}>
Button
</Text>
</TouchableNativeFeedback>
</View>
)
}
export default Home
const styles = StyleSheet.create ({
container: {
alignItems: 'center',
},
text: {
borderWidth: 1,
padding: 25,
borderColor: 'black',
backgroundColor: 'red'
}
})
Touchable Without Feedback
This should be used when you want to handle the touch event without any animation. Usually, this component is not used much.
<TouchableWithoutFeedback>
<Text>
Button
</Text>
</TouchableWithoutFeedback>
React Native
45
In this chapter, we will show you how to use LayoutAnimation in React Native.
Home Component
We will use Home screen like in other chapters. Let us now import the Animations component and render it on screen.
src/components/home/Animations.js
import React from 'react';
import Animations from './Animations.js'
const Home = () ⇒ {
return (
<Animations />
)
}
export default Home
Animations Component
We will set myStyle as a property of the state. This property is used for styling an element inside PresentationalAnimationComponent.
We will also create two functions: expandElement and collapseElement. These
functions will update values from the state. The first one will use the spring preset
animation while the second one will have the linear preset. We will pass these as props
too. The Expand and the Collapse buttons call the expandElement() and collapseElement() functions.
src/components/home/Home
import React, { Component } from 'react'
import { View, LayoutAnimation, TouchableOpacity, Text, StyleSheet } from 'react-native'
class Animations extends Component {
13. React Native – Animations
React Native
46
state = {
myStyle: {
height: 100,
backgroundColor: 'red'
}
}
expandElement = () ⇒ {
LayoutAnimation.configureNext(LayoutAnimation.Presets.spring);
this.setState({
myStyle: {
height: 400,
backgroundColor: 'red'
}
})
}
collapseElement = () ⇒ {
LayoutAnimation.configureNext(LayoutAnimation.Presets.linear);
this.setState({
myStyle: {
height: 100,
backgroundColor: 'red'
}
})
}
render() {
return (
<View>
<View>
<View style = {this.state.myStyle}>
</View>
<TouchableOpacity>
React Native
47
<Text style = {styles.button} onPress = {this.expandElement}>
Expand
</Text>
</TouchableOpacity>
<TouchableOpacity>
<Text style = {styles.button} onPress = {this.collapseElement}>
Collapse
</Text>
</TouchableOpacity>
</View>
)
}
}
export default Animations
const styles = StyleSheet.create({
button: {
borderWidth: 1,
borderColor: 'red',
color: 'red',
textAlign: 'center',
marginTop: 50,
padding: 10
}
})
export default Home
React Native
48
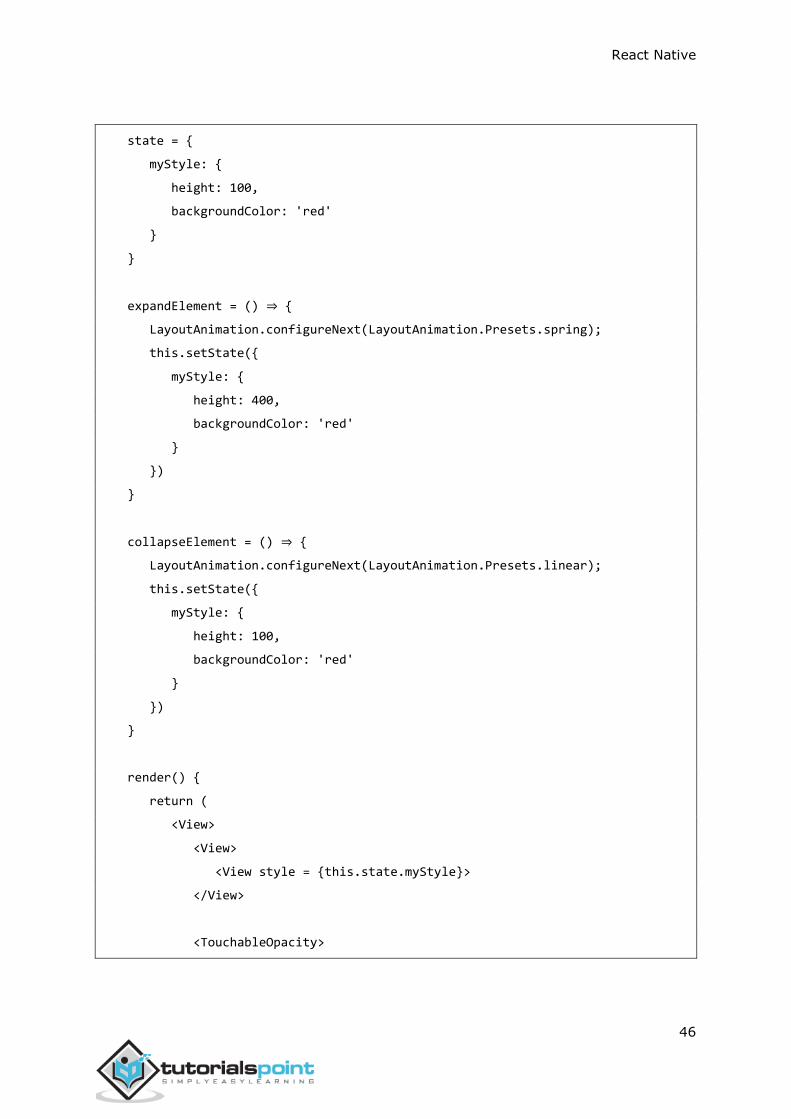
You can test the app and see the animations we created. The initial setup will look like this –
React Native
49
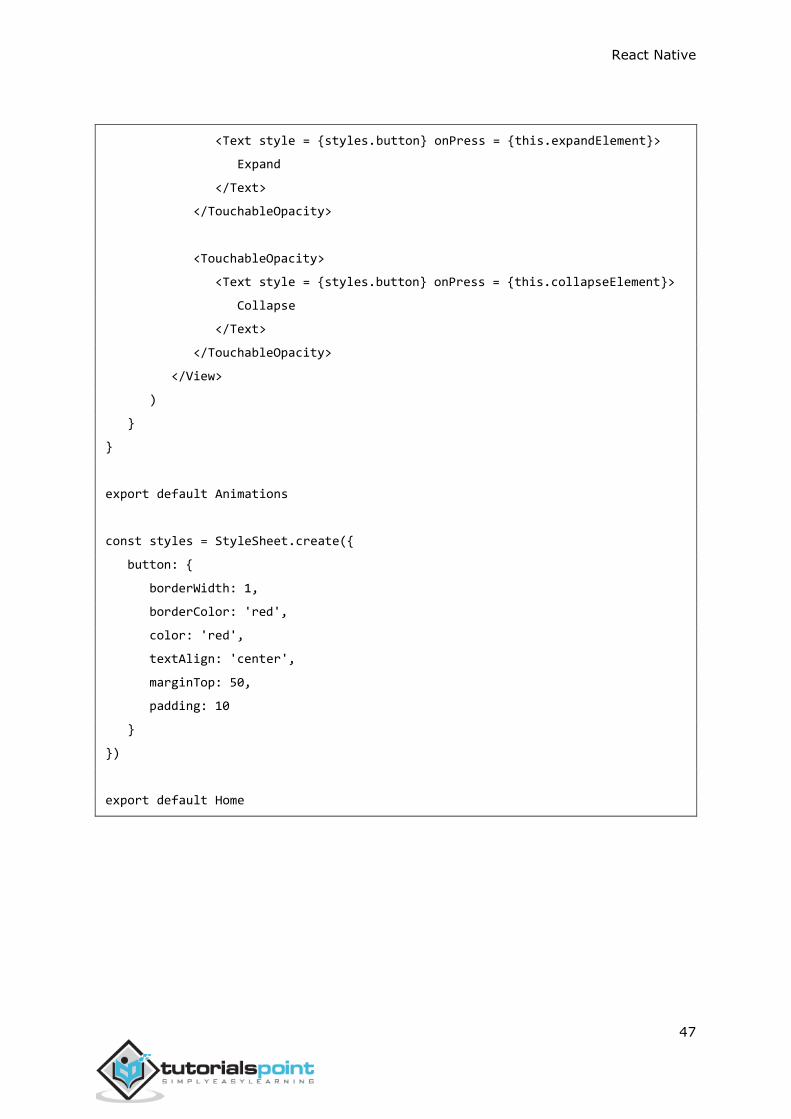
We can press the Expand button to see an animation.
Example
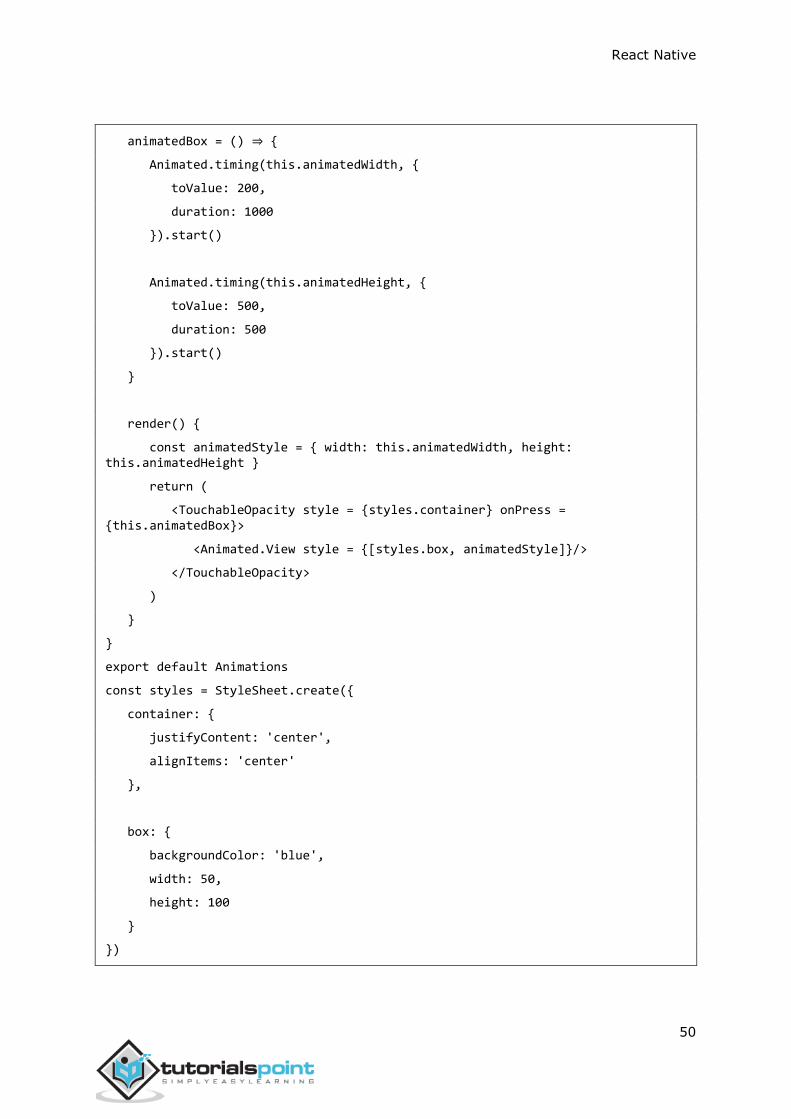
In this example, we will dynamically change the width and the height of the box. Since
the Home component will be the same, we will only change the Animations component.
src/components/home/Animations
import React, { Component } from 'react'
import { View, StyleSheet, Animated, TouchableOpacity } from 'react-native'
class Animations extends Component {
componentWillMount = () ⇒ {
this.animatedWidth = new Animated.Value(50)
this.animatedHeight = new Animated.Value(100)
}
React Native
50
animatedBox = () ⇒ {
Animated.timing(this.animatedWidth, {
toValue: 200,
duration: 1000
}).start()
Animated.timing(this.animatedHeight, {
toValue: 500,
duration: 500
}).start()
}
render() {
const animatedStyle = { width: this.animatedWidth, height: this.animatedHeight }
return (
<TouchableOpacity style = {styles.container} onPress = {this.animatedBox}>
<Animated.View style = {[styles.box, animatedStyle]}/>
</TouchableOpacity>
)
}
}
export default Animations
const styles = StyleSheet.create({
container: {
justifyContent: 'center',
alignItems: 'center'
},
box: {
backgroundColor: 'blue',
width: 50,
height: 100
}
})
React Native
51
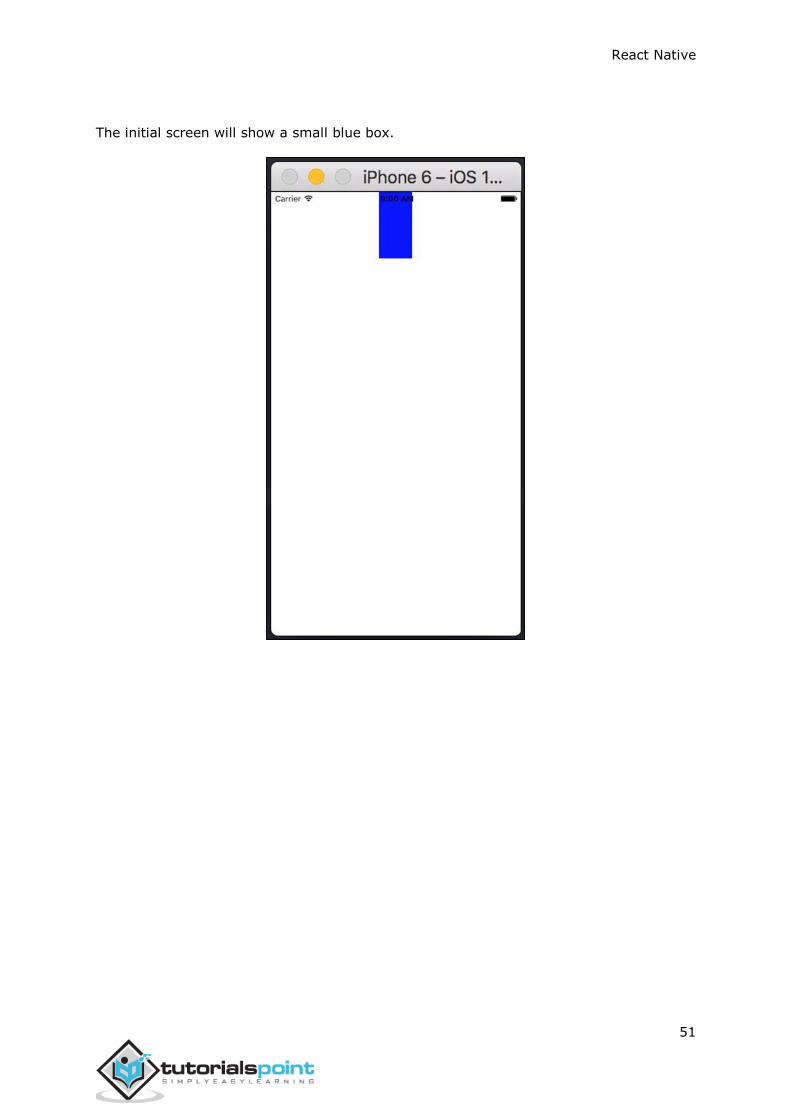
The initial screen will show a small blue box.
React Native
52
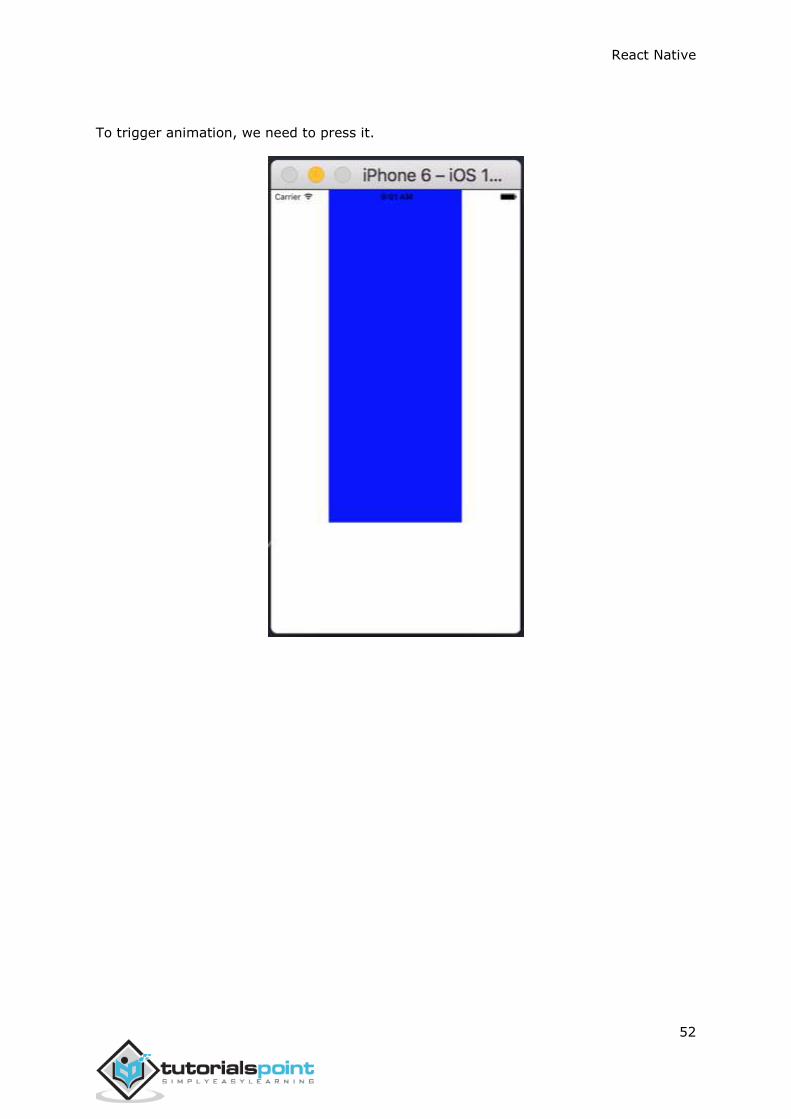
To trigger animation, we need to press it.
React Native
53
React native offers a couple of methods that help in debugging your code.
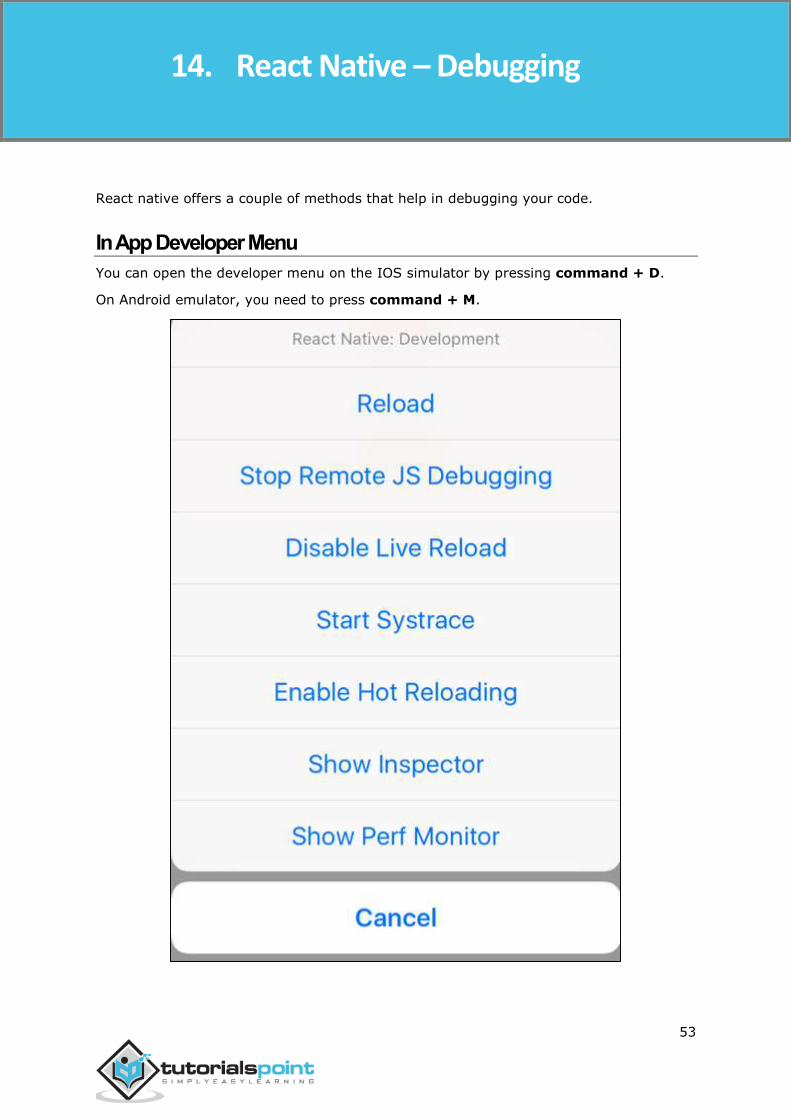
In App Developer Menu
You can open the developer menu on the IOS simulator by pressing command + D.
On Android emulator, you need to press command + M.
14. React Native – Debugging
React Native
54
Reload − Used for reloading simulator. You can use shortcut command + R
Debug JS Remotely − Used for activating debugging inside browser developer
console.
Enable Live Reload − Used for enabling live reloading whenever your code is saved. The debugger will open at localhost:8081/debugger-ui.
Start Systrace − Used for starting Android marker based profiling tool.
Show Inspector − Used for opening inspector where you can find info about your components. You can use shortcut command + I
Show Perf Monitor − Perf monitor is used for keeping track of the performance of your app.
React Native
55
In this chapter, we will understand navigation in React Native.
Step 1 – Install Router
To begin with, we need to install the Router. We will use the React Native Router Flux in
this chapter. You can run the following command in terminal, from the project folder.
npm i react-native-router-flux --save
Step 2
Since we want our router to handle the entire application, we will add it in index.ios.js.
For Android, you can do the same in index.android.js.
Index.ios.js && index.android.js
import React, { Component } from 'react';
import { AppRegistry, View } from 'react-native';
import Routes from './src/components/routes/Routes.js'
class reactTutorialApp extends Component {
render() {
return (
<Routes />
)
}
}
export default reactTutorialApp
AppRegistry.registerComponent('reactTutorialApp', () ⇒ reactTutorialApp)
Step 3 – Add Router
Now we will create the Routes component inside the components folder. It will return
Router with several scenes. Each scene will need key, component and title. Router uses
the key property to switch between scenes, component will be rendered on screen and the
title will be shown in the navigation bar. We can also set the initial property to the scene that is to be rendered initially.
15. React Native – Router
React Native
56
src/components/routes/Routes.js
import React from 'react'
import { Router, Scene } from 'react-native-router-flux'
import Home from '../home/Home.js'
import About from '../about/About.js'
const Routes = () ⇒ (
<Router>
<Scene key = "root">
<Scene key = "home" component = {Home} title = "Home" initial = {true} />
<Scene key = "about" component = {About} title = "About" />
</Scene>
</Router>
)
export default Routes
Step 4 – Create components
We already have the Home component from previous chapters; now, we need to add the
About component. We will add the goToAbout and the goToHome functions to switch between scenes.
src/components/home/Home.js
import React from 'react'
import { TouchableOpacity, Text } from 'react-native';
import { Actions } from 'react-native-router-flux';
const Home = () ⇒ {
const goToAbout = () ⇒ {
Actions.about()
}
return (
<TouchableOpacity style = {{ margin: 128 }} onPress = {goToAbout}>
<Text>This is HOME!</Text>
</TouchableOpacity>
)
}
React Native
57
export default Home
src/components/home/About.js
import React from 'react'
import { TouchableOpacity, Text } from 'react-native'
import { Actions } from 'react-native-router-flux'
const About = () ⇒ {
const goToHome = () ⇒ {
Actions.home()
}
return (
<TouchableOpacity style = {{ margin: 128 }} onPress = {goToHome}>
<Text>This is ABOUT</Text>
</TouchableOpacity>
)
}
export default About
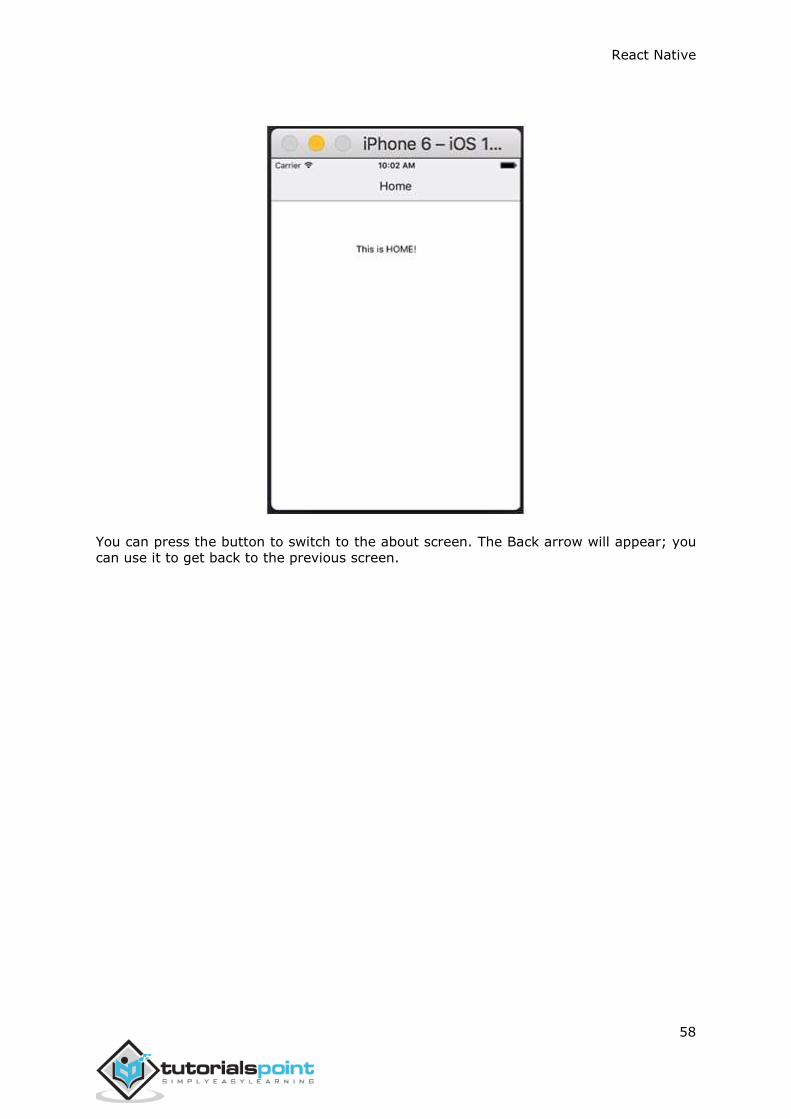
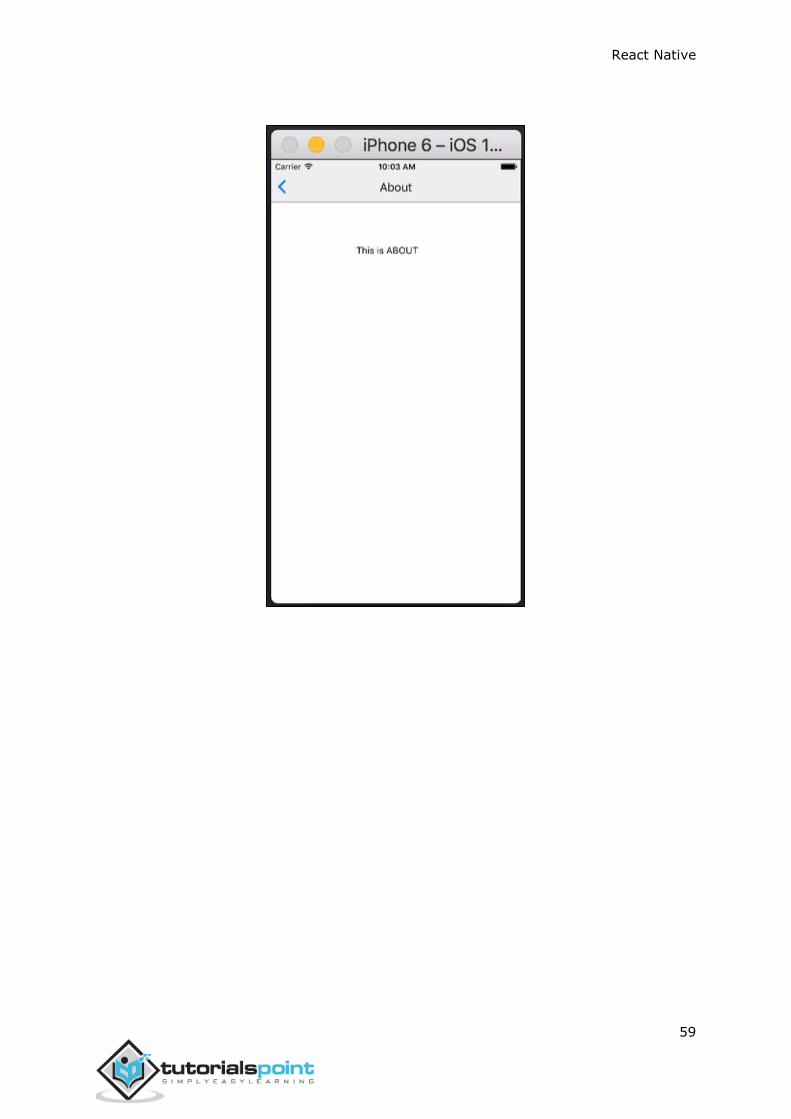
The app will render the initial Home screen.
React Native
58
You can press the button to switch to the about screen. The Back arrow will appear; you can use it to get back to the previous screen.
React Native
59
React Native
60
If you want to test your app in the IOS simulator, all you need is to open the root folder of your app in terminal and run −
react-native run-ios
The above command will start the simulator and run the app.
We can also specify the device we want to use.
react-native run-ios --simulator "iPhone 5s
After you open the app in simulator, you can press command + D on IOS to open the developers menu. You can check more about this in our debugging chapter.
You can also reload the IOS simulator by pressing command + R.
16. React Native – Running IOS
React Native
61
We can run the React Native app on Android platform by running the following code in the terminal.
react-native run-android
Before you can run your app on Android device, you need to enable USB Debugging inside the Developer Options.
When USB Debugging is enabled, you can plug in your device and run the code snippet
given above.
The Native Android emulator is slow. We recommend downloading Genymotion for testing your app.
The developer menu can be accessed by pressing command + M.
17. React Native – Running Android

React Native
62
Components and APIs
React Native
63
View is the most common element in React Native. You can consider it as an equivalent of the div element used in web development.
Use Cases
Let us now see a few common use cases.
When you need to wrap your elements inside the container, you can use View as
a container element.
When you want to nest more elements inside the parent element, both parent and child can be View. It can have as many children as you want.
When you want to style different elements, you can place them inside View since it supports style property, flexbox etc.
View also supports synthetic touch events, which can be useful for different purposes.
We already used View in our previous chapters and we will use it in almost all subsequent
chapters as well. The View can be assumed as a default element in React Native. In
example given below, we will nest two Views and a text.
src/components/home/Home.js
import React, { Component } from 'react'
import { View, Text } from 'react-native'
const Home = () ⇒ {
return (
<View>
<View>
<Text>This is my text</Text>
</View>
</View>
)
}
export default Home
18. React Native – View
React Native
64
In this chapter, we will learn how to use WebView. It is used when you want to render web page to your mobile app inline.
Using WebView
The HomeContainer will be a container component.
src/components/home/HomeContainer.js
import React, { Component } from 'react'
import WebViewExample from './WebViewExample'
const Home = () ⇒ {
return (
<WebViewExample/>
)
}
export default Home;
Let us create a new file called WebViewExample.js inside the src/components/home
folder.
src/components/home/WebViewExample.js
import React, { Component } from 'react'
import {
View,
WebView,
StyleSheet
} from 'react-native'
const WebViewExample = () ⇒ {
return (
<View style = {styles.container}>
<WebView
19. React Native – WebView
React Native
65
source = {{ uri: 'https://www.google.com/?gws_rd=cr,ssl&ei=SICcV9_EFqqk6ASA3ZaABA#q=tutorialspoint' }}
/>
</View>
)
}
export default WebViewExample;
const styles = StyleSheet.create({
container: {
height: 350,
}
})
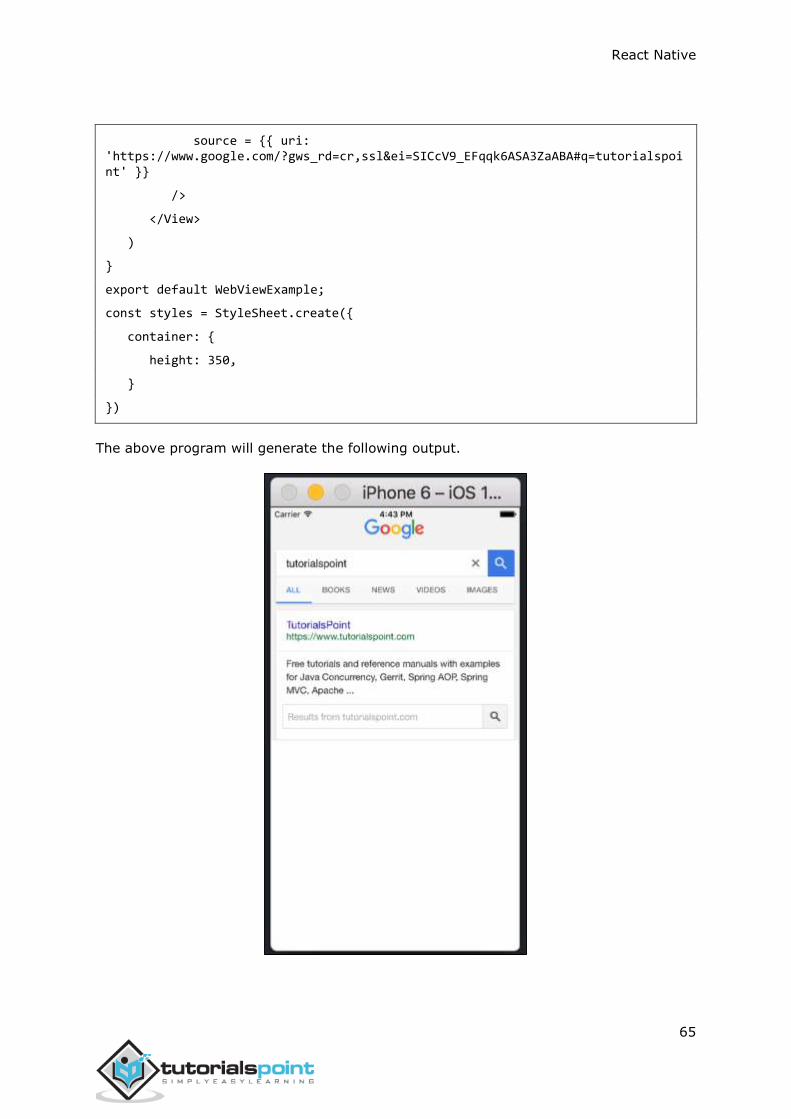
The above program will generate the following output.
React Native
66
In this chapter, we will show you how to use the modal component in React Native.
Let us now create a new file: src/components/home/ModalExample.js
We will put logic inside ModalExample. We can update the initial state by running the toggleModal.
After updating the initial state by running the toggleModal, we will set the visible property to our modal. This prop will be updated when the state changes.
The onRequestClose is required for Android devices.
src/components/home/Home.js
import React from 'react'
import ModalExample from './ModalExample.js'
const Home = () ⇒ {
return (
<ModalExample />
)
}
export default Home
src/components/home/ModalExample.js
import React, { Component } from 'react';
import {
Modal,
Text,
TouchableHighlight,
View,
StyleSheet
} from 'react-native'
class ModalExample extends Component {
state = {
modalVisible: false,
20. React Native – Modal
React Native
67
}
toggleModal(visible) {
this.setState({ modalVisible: visible });
}
render() {
return (
<View style = {styles.container}>
<Modal animationType = {"slide"} transparent = {false}
visible = {this.state.modalVisible}
onRequestClose = {() ⇒ { console.log("Modal has been closed.") } }>
<View style = {styles.modal}>
<Text style = {styles.text}>Modal is open!</Text>
<TouchableHighlight onPress={() ⇒ {this.toggleModal(!this.state.modalVisible)}}>
<Text style = {styles.text}>Close Modal</Text>
</TouchableHighlight>
</View>
</Modal>
<TouchableHighlight onPress = {() ⇒ {this.toggleModal(true)}}>
<Text style = {styles.text}>Open Modal</Text>
</TouchableHighlight>
</View>
)
}
}
export default ModalExample
const styles = StyleSheet.create ({
container: {
alignItems: 'center',
backgroundColor: '#ede3f2',
React Native
68
padding: 100
},
modal: {
flex: 1,
alignItems: 'center',
backgroundColor: '#f7021a',
padding: 100
},
text: {
color: '#3f2949',
marginTop: 10
}
})
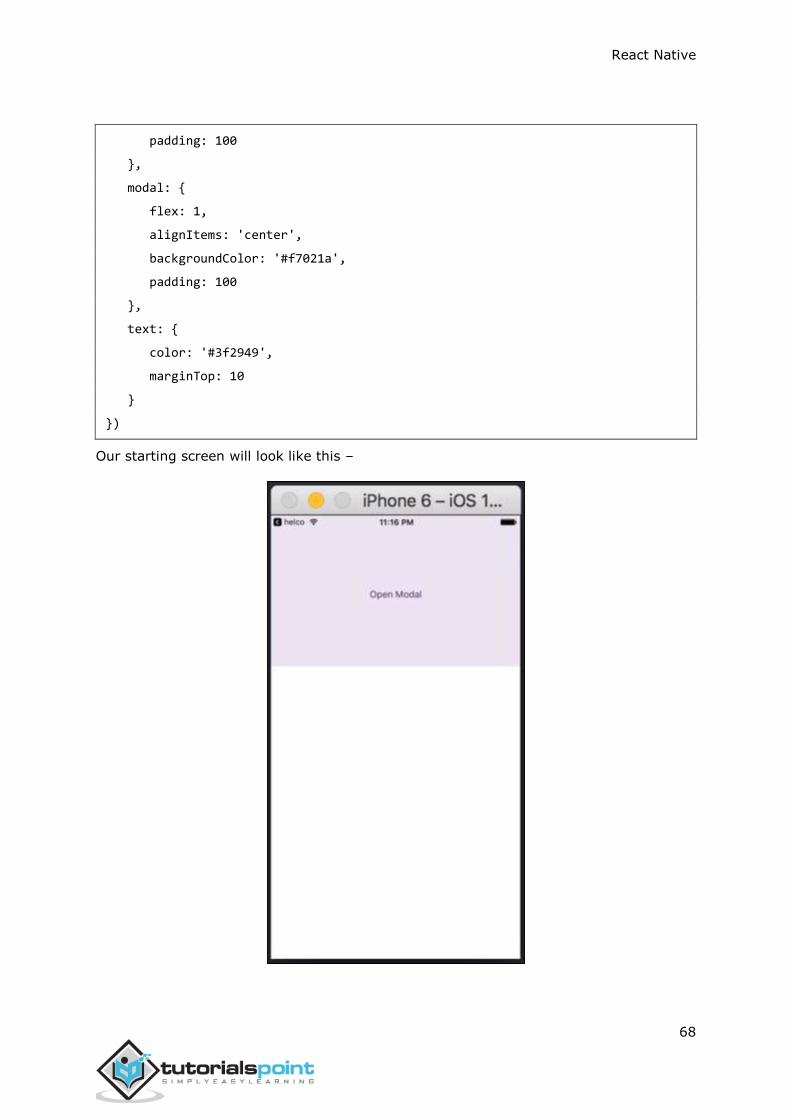
Our starting screen will look like this –

React Native
69
If we click the button, the modal will open.
React Native
70
In this chapter we will show you how to use the activity indicator in React Native.
Step 1 – Home
Home component will be used to import and show our ActivityIndicator.
src/components/home/Home.js
import React from 'react'
import ActivityIndicatorExample from './ActivityIndicatorExample.js'
const Home = () ⇒ {
return (
<ActivityIndicatorExample />
)
}
export default Home
Step 2 – ActivityIndicatorExample
Animating property is a Boolean which is used for showing the activity indicator. The latter
closes six seconds after the component is mounted. This is done using the
closeActivityIndicator() function.
src/components/home/ActivityIndicatorExample.js
import React, { Component } from 'react';
import { ActivityIndicator, View, Text, TouchableOpacity, StyleSheet } from 'react-native';
class ActivityIndicatorExample extends Component {
state = { animating: true }
closeActivityIndicator = () ⇒ setTimeout(() ⇒ this.setState({ animating: false }), 6000)
21. React Native – ActivityIndicator
React Native
71
componentDidMount = () ⇒ this.closeActivityIndicator()
render() {
const animating = this.state.animating
return (
<View style = {styles.container}>
<ActivityIndicator
animating = {animating}
color = '#bc2b78'
size = "large"
style = {styles.activityIndicator}
/>
</View>
)
}
}
export default ActivityIndicatorExample
const styles = StyleSheet.create ({
container: {
flex: 1,
justifyContent: 'center',
alignItems: 'center',
marginTop: 70
},
activityIndicator: {
flex: 1,
justifyContent: 'center',
alignItems: 'center',
height: 80
}
})
React Native
72
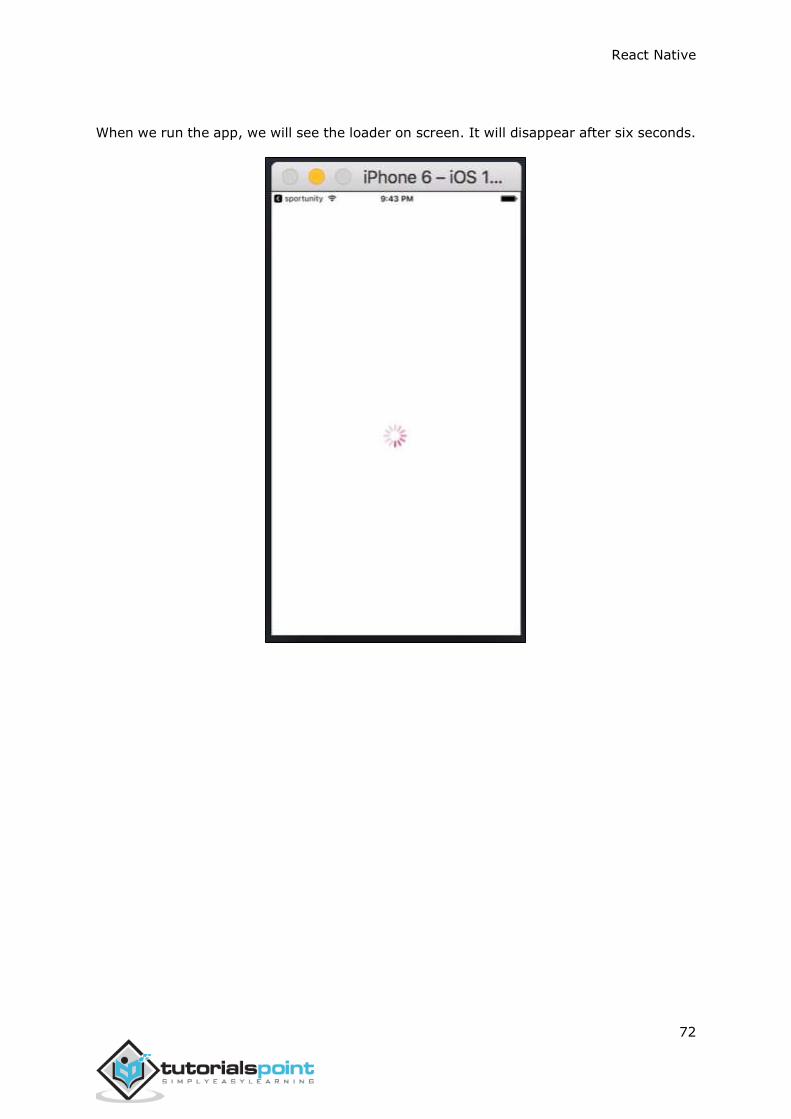
When we run the app, we will see the loader on screen. It will disappear after six seconds.
React Native
73
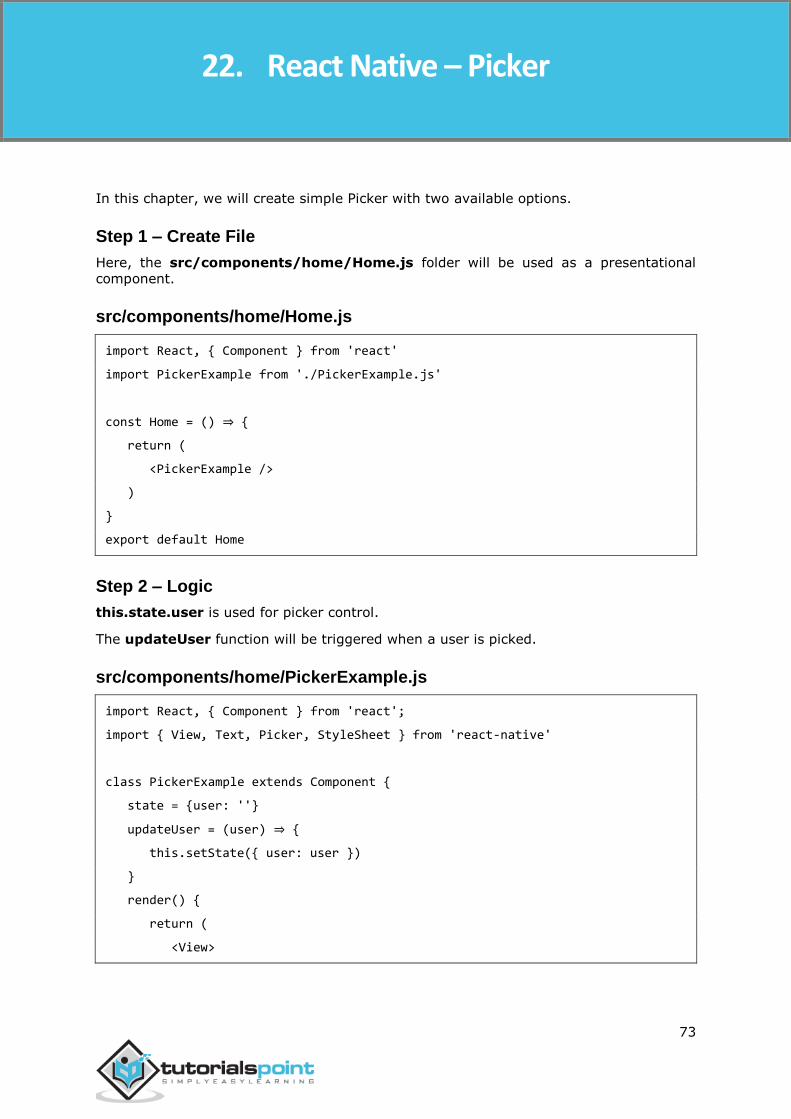
In this chapter, we will create simple Picker with two available options.
Step 1 – Create File
Here, the src/components/home/Home.js folder will be used as a presentational
component.
src/components/home/Home.js
import React, { Component } from 'react'
import PickerExample from './PickerExample.js'
const Home = () ⇒ {
return (
<PickerExample />
)
}
export default Home
Step 2 – Logic
this.state.user is used for picker control.
The updateUser function will be triggered when a user is picked.
src/components/home/PickerExample.js
import React, { Component } from 'react';
import { View, Text, Picker, StyleSheet } from 'react-native'
class PickerExample extends Component {
state = {user: ''}
updateUser = (user) ⇒ {
this.setState({ user: user })
}
render() {
return (
<View>
22. React Native – Picker
React Native
74
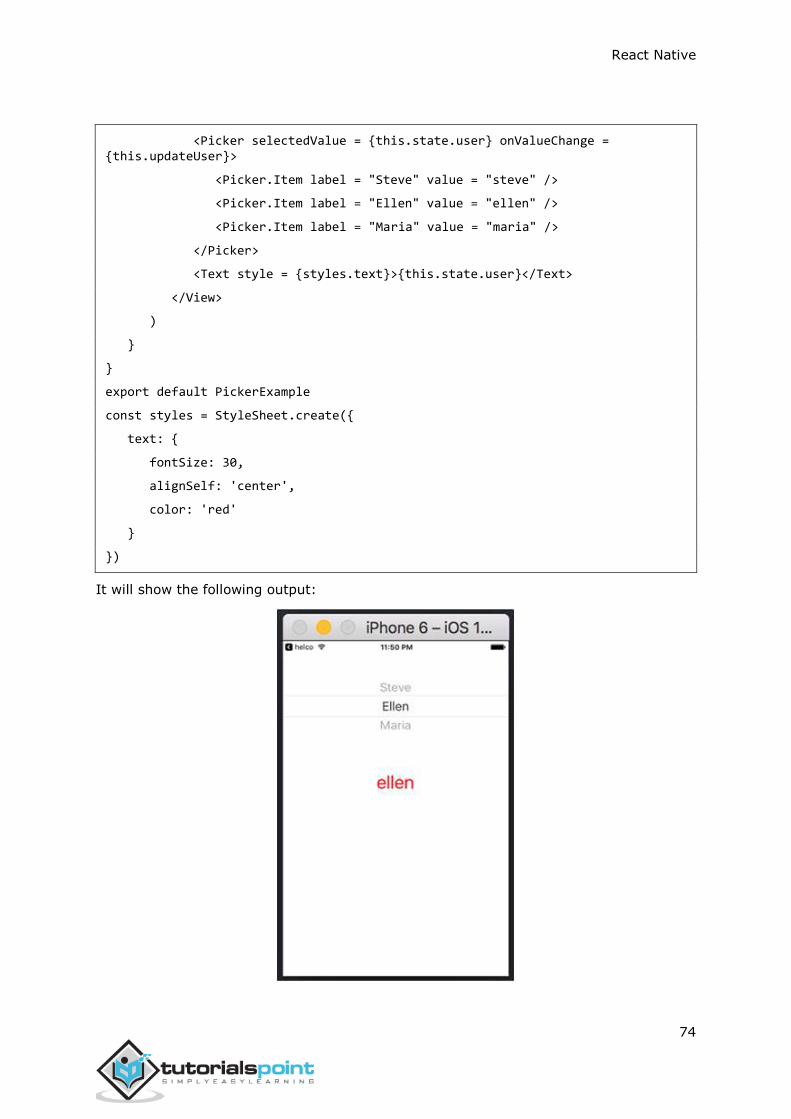
<Picker selectedValue = {this.state.user} onValueChange = {this.updateUser}>
<Picker.Item label = "Steve" value = "steve" />
<Picker.Item label = "Ellen" value = "ellen" />
<Picker.Item label = "Maria" value = "maria" />
</Picker>
<Text style = {styles.text}>{this.state.user}</Text>
</View>
)
}
}
export default PickerExample
const styles = StyleSheet.create({
text: {
fontSize: 30,
alignSelf: 'center',
color: 'red'
}
})
It will show the following output:
React Native
75
In this chapter, we will show you how to control the status bar appearance in React Native.
The Status bar is easy to use and all you need to do is set properties to change it.
The hidden property can be used to hide the status bar. In our example it is set to false. This is default value.
The barStyle can have three values – dark-content, light-content and default.
This component has several other properties that can be used. Some of them are Android or IOS specific. You can check it in official documentation.
src/components/home/Home.js
import React, { Component } from 'react';
import { StatusBar } from 'react-native'
const Home = () ⇒ {
return (
<StatusBar barStyle = "dark-content" hidden = {false}/>
)
}
export default Home
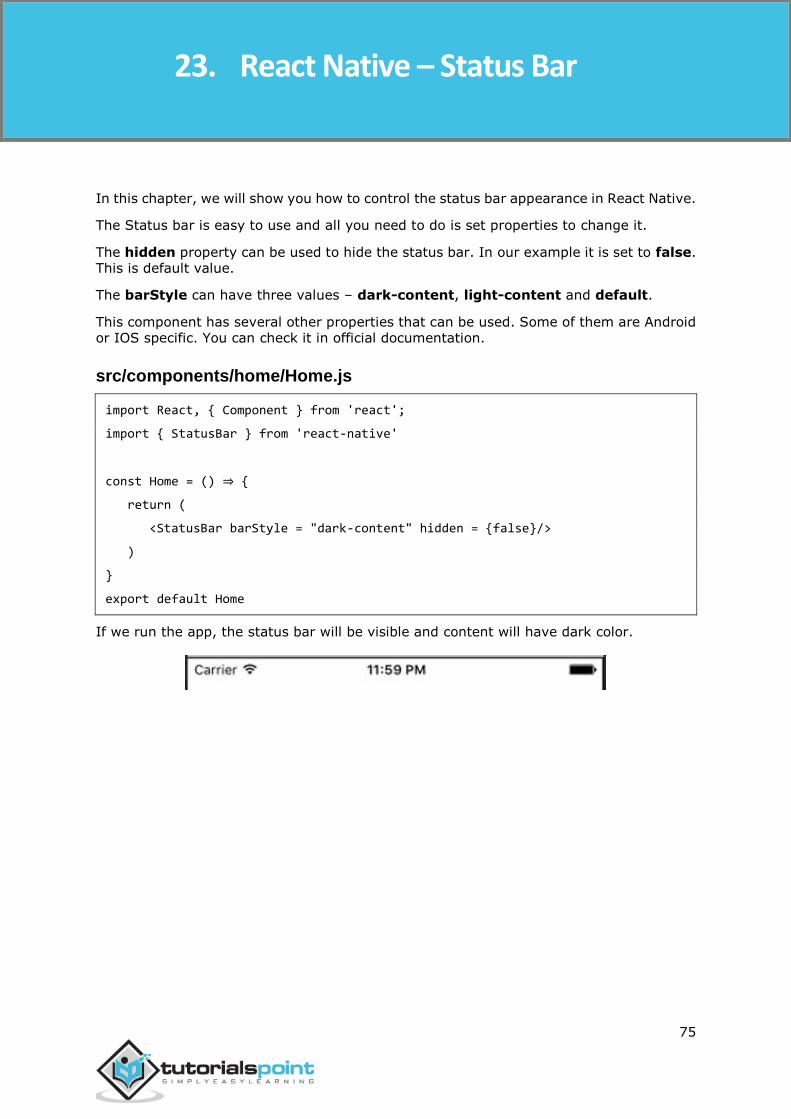
If we run the app, the status bar will be visible and content will have dark color.
23. React Native – Status Bar
React Native
76
In this chapter, we will explain the Switch component in a couple of steps.
Step 1 – Create File
We will use the HomeContainer component for logic, but we need to create the
presentational component.
Let us now create a new file: src/components/home/SwitchExample.js.
Step 2 – Logic
We are passing value from the state and functions for toggling switch items to SwitchExample component. Toggle functions will be used for updating the state.
src/component/home/HomeContainer.js
Example
import React, { Component } from 'react'
import {
View
} from 'react-native'
import SwitchExample from './SwitchExample'
export default class HomeContainer extends Component {
constructor() {
super();
this.state = {
switch1Value: false,
switch2Value: false,
}
}
toggleSwitch1 = (value) => {
this.setState({switch1Value: value})
console.log('Switch 1 is: ' + value)
}
toggleSwitch2 = (value) => {
24. React Native – Switch
React Native
77
this.setState({switch2Value: value})
console.log('Switch 2 is: ' + value)
}
render() {
return (
<View>
<SwitchExample
toggleSwitch1 = {this.toggleSwitch1}
toggleSwitch2 = {this.toggleSwitch2}
switch1Value = {this.state.switch1Value}
switch2Value = {this.state.switch2Value}/>
</View>
);
}
}
Step 3 – Presentation
Switch component takes two props. The onValueChange prop will trigger our toggle
functions after a user presses the switch. The value prop is bound to the state of the
HomeContainer component.
Example
import React, { Component } from 'react'
import {
View,
Switch,
StyleSheet
} from 'react-native'
export default SwitchExample = (props) => {
return (
<View style = {styles.container}>
<Switch
onValueChange = {props.toggleSwitch1}
value = {props.switch1Value}/>
React Native
78
<Switch
onValueChange = {props.toggleSwitch2}
value = {props.switch2Value}/>
</View>
)
}
const styles = StyleSheet.create ({
container: {
flex: 1,
alignItems: 'center',
marginTop: 100
}
})
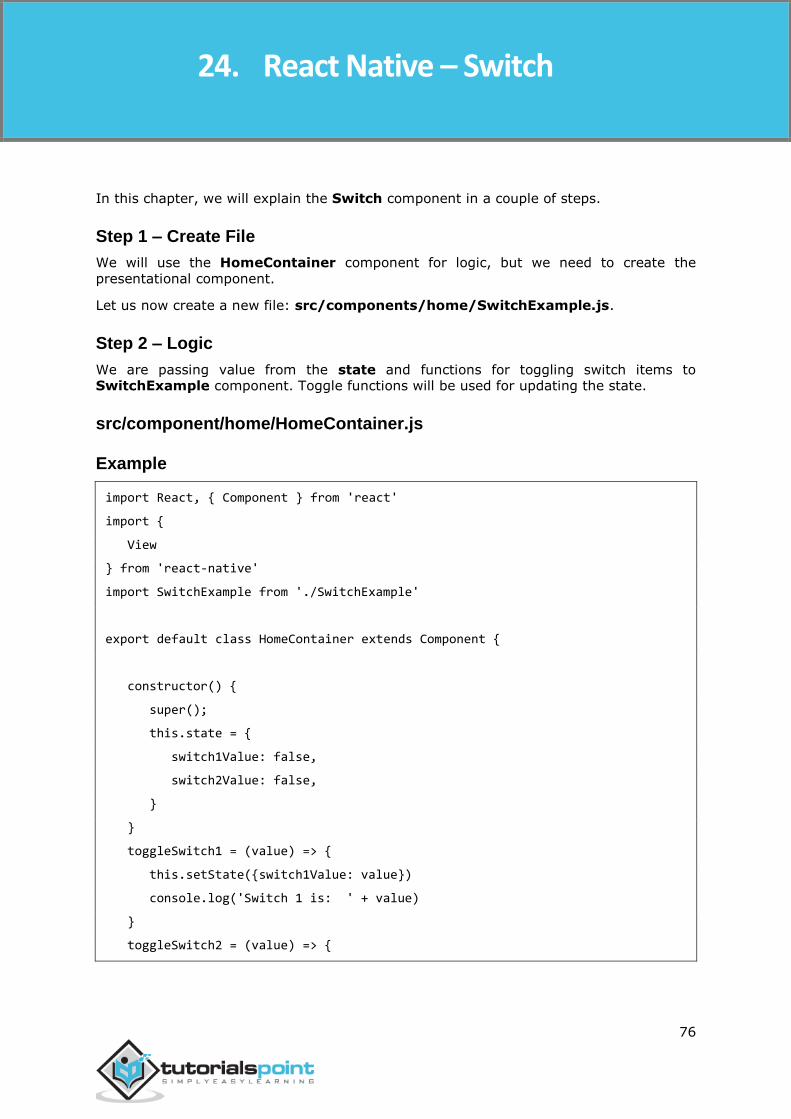
If we press the switch, the state will be updated. You can check values in the console.
React Native
79
In this chapter, we will talk about Text component in React Native.
This component can be nested and it can inherit properties from parent to child. This can
be useful in many ways. We will show you example of capitalizing the first letter, styling words or parts of the text, etc.
Step 1 – Create File
The file we are going to create is src/components/home/TextExample.js.
Step 2 – Home
In this step, we will just create a simple container.
src/components/home/Home.js
import React, { Component } from 'react'
import TextExample from './TextExample'
const Home = () ⇒ {
return (
<TextExample/>
)
}
export default Home
Step 3 – Text
In this step, we will use the inheritance pattern. styles.text will be applied to all Text
components.
You can also notice how we set other styling properties to some parts of the text. It is important to know that all child elements have parent styles passed to them.
src/components/home/TextExample.js
import React, { Component } from 'react';
import { View, Text, Image, StyleSheet } from 'react-native'
const TextExample = () ⇒ {
return (
25. React Native – Text
React Native
80
<View style = {styles.container}>
<Text style = {styles.text}>
<Text style = {styles.capitalLetter}>
L
</Text>
<Text>
orem ipsum dolor sit amet, sed do eiusmod.
</Text>
<Text>
Ut enim ad <Text style = {styles.wordBold}>minim </Text> veniam, quis aliquip ex ea commodo consequat.
</Text>
<Text style = {styles.italicText}>
Duis aute irure dolor in reprehenderit in voluptate velit esse cillum.
</Text>
<Text style = {styles.textShadow}>
Excepteur sint occaecat cupidatat non proident, sunt in culpa qui officia
deserunt mollit anim id est laborum.
</Text>
</Text>
</View>
)
}
export default TextExample
const styles = StyleSheet.create ({
container: {
alignItems: 'center',
marginTop: 100,
padding: 20
},
React Native
81
text: {
color: '#41cdf4',
},
capitalLetter: {
color: 'red',
fontSize: 20
},
wordBold: {
fontWeight: 'bold',
color: 'black'
},
italicText: {
color: '#37859b',
fontStyle: 'italic'
},
textShadow: {
textShadowColor: 'red',
textShadowOffset: { width: 2, height: 2 },
textShadowRadius : 5
}
})
React Native
82
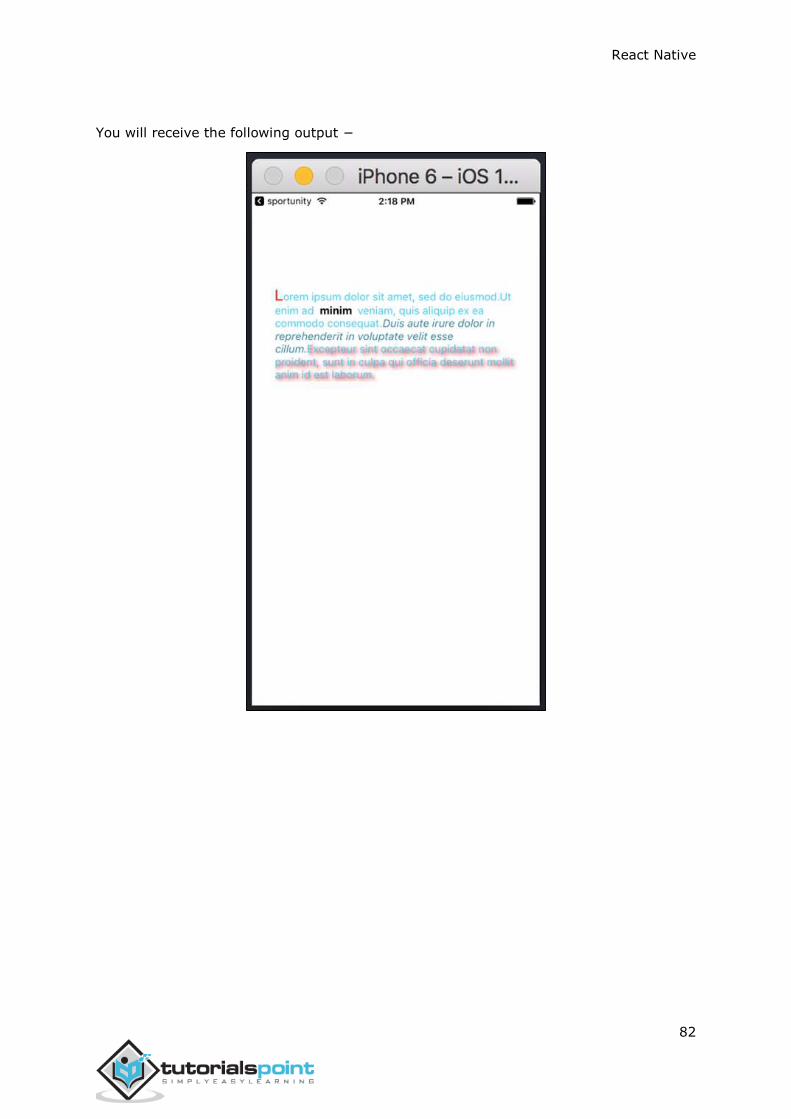
You will receive the following output −

React Native
83
In this chapter, we will understand how to create custom Alert component.
Step 1 – Home
src/components/home/Home.js
import React from 'react'
import AlertExample from './AlertExample.js'
const Home = () ⇒ {
return (
<AlertExample />
)
}
export default Home
Step 2 – AlertExample.js
We will create a button for triggering the showAlert function.
src/components/home/AlertExample.js
import React from 'react'
import { Alert, Text, TouchableOpacity, StyleSheet } from 'react-native'
const AlertExample = () ⇒ {
const showAlert = () ⇒ {
Alert.alert(
'You need to...'
)
}
return (
<TouchableOpacity onPress = {showAlert} style = {styles.button}>
<Text>Alert</Text>
26. React Native – Alert
React Native
84
</TouchableOpacity>
)
}
export default AlertExample
const styles = StyleSheet.create ({
button: {
backgroundColor: '#4ba37b',
width: 100,
borderRadius: 50,
alignItems: 'center',
marginTop: 100
}
})
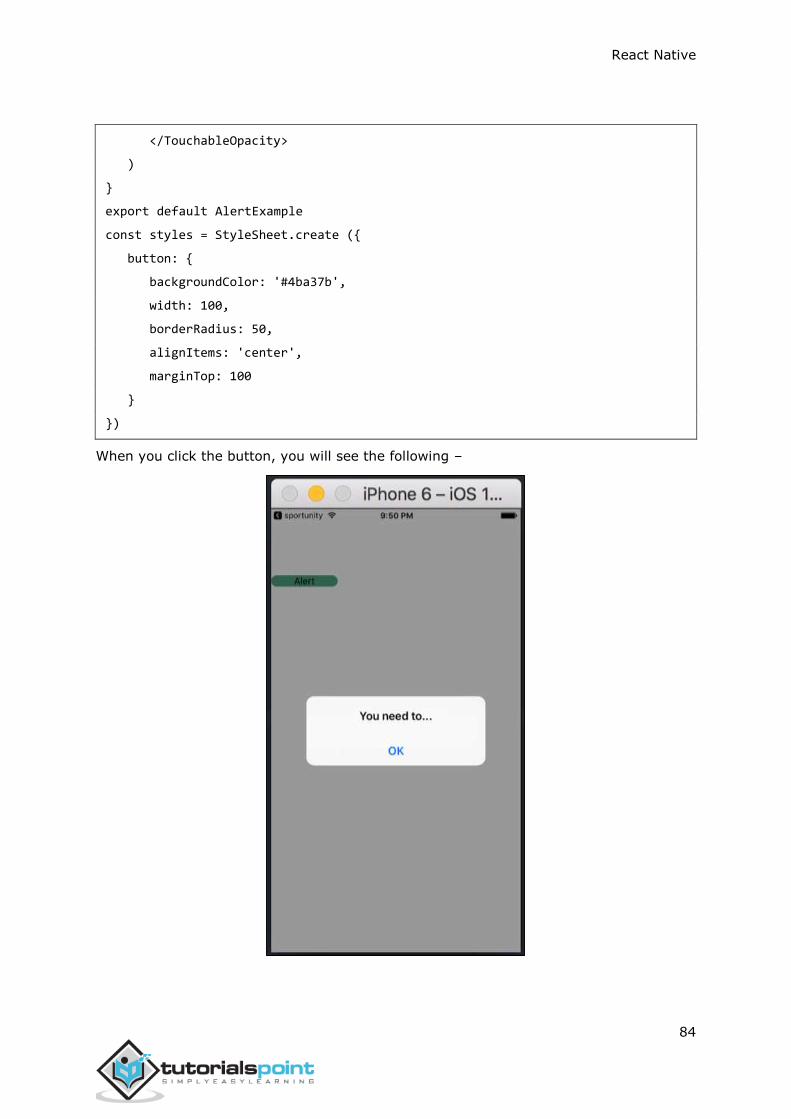
When you click the button, you will see the following –
React Native
85
In this chapter, we will show you how to use Geolocation.
Step 1 – Home
src/components/home/Home.js
import React from 'react'
import GeolocationExample from './GeolocationExample.js'
const Home = () ⇒ {
return (
<GeolocationExample />
)
}
export default Home
Step 2 – Geolocation
We will start by setting up the initial state for that will hold the initial and the last position.
Now, we need to get current position of the device when a component is mounted using
the navigator.geolocation.getCurrentPosition. We will stringify the response so we can update the state.
navigator.geolocation.watchPosition is used for tracking the users’ position. We also
clear the watchers in this step.
src/components/home/AsyncStorageExample.js
import React, { Component } from 'react'
import { View, Text, Switch, StyleSheet} from 'react-native'
class SwichExample extends Component {
state = {
initialPosition: 'unknown',
lastPosition: 'unknown',
}
27. React Native – Geolocation
React Native
86
watchID: ?number = null;
componentDidMount = () ⇒ {
navigator.geolocation.getCurrentPosition(
(position) ⇒ {
const initialPosition = JSON.stringify(position);
this.setState({ initialPosition });
},
(error) ⇒ alert(error.message),
{ enableHighAccuracy: true, timeout: 20000, maximumAge: 1000 }
);
this.watchID = navigator.geolocation.watchPosition((position) ⇒ {
const lastPosition = JSON.stringify(position);
this.setState({ lastPosition });
});
}
componentWillUnmount = () ⇒ {
navigator.geolocation.clearWatch(this.watchID);
}
render() {
return (
<View style = {styles.container}>
<Text style = {styles.boldText}>
Initial position:
</Text>
<Text>
{this.state.initialPosition}
</Text>
<Text style = {styles.boldText}>
Current position:
React Native
87
</Text>
<Text>
{this.state.lastPosition}
</Text>
</View>
)
}
}
export default SwichExample
const styles = StyleSheet.create ({
container: {
flex: 1,
alignItems: 'center',
marginTop: 50
},
boldText: {
fontSize: 30,
color: 'red',
}
})
React Native
88
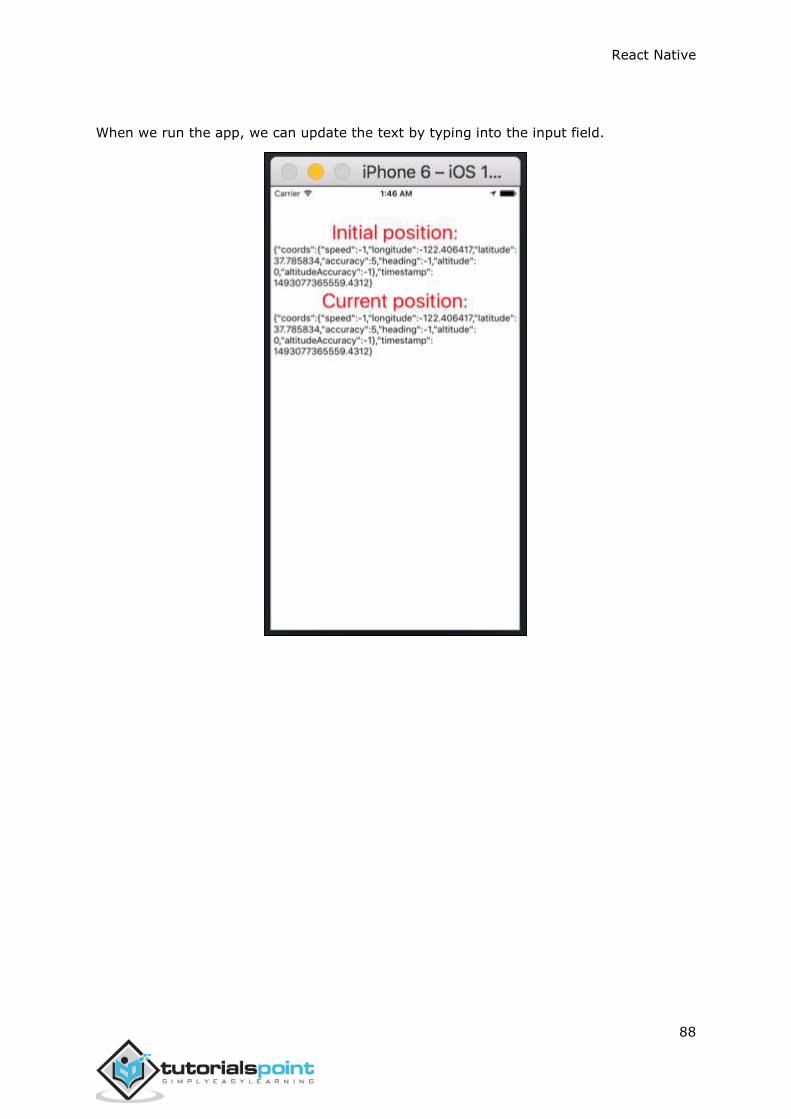
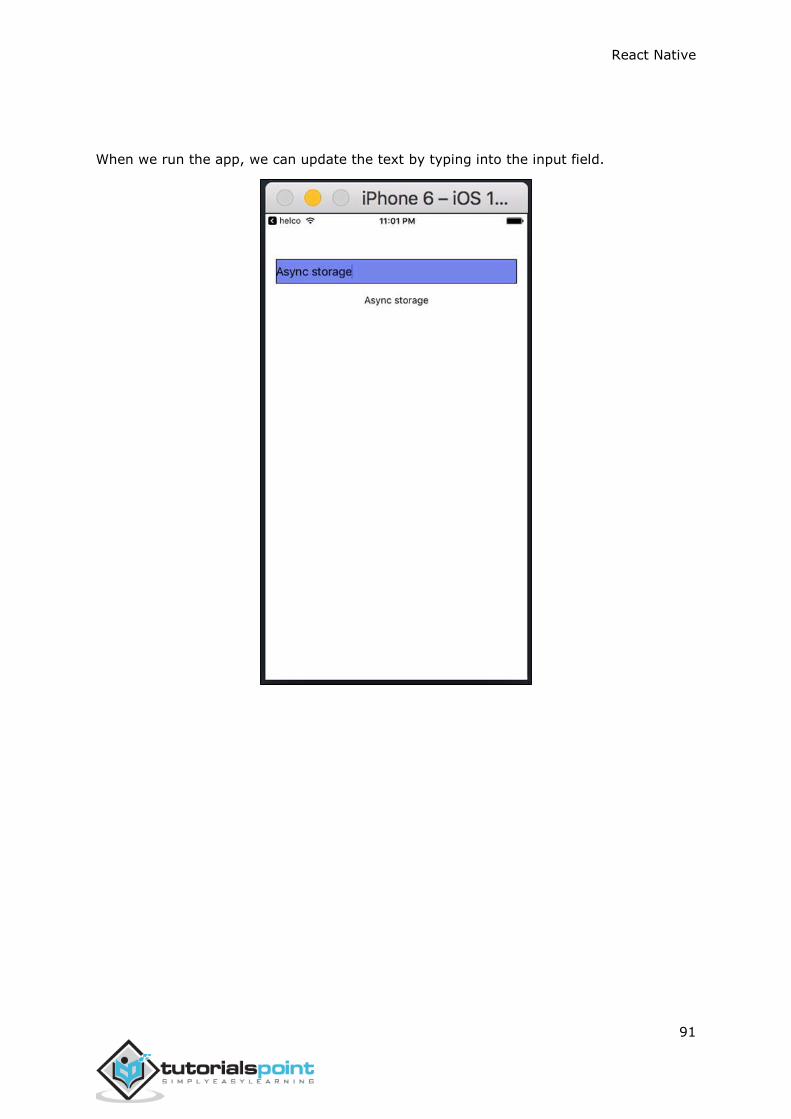
When we run the app, we can update the text by typing into the input field.
React Native
89
In this chapter, we will show you how to persist your data using AsyncStorage.
Step 1 – Presentation
In this step, we will create the src/components/home/Home.js file.
import React from 'react'
import AsyncStorageExample from './AsyncStorageExample.js'
const Home = () ⇒ {
return (
<AsyncStorageExample />
)
}
export default Home
Step 2 – Logic
Name from the initial state is empty string. We will update it from persistent storage when
the component is mounted.
setName will take the text from our input field, save it using AsyncStorage and update
the state.
src/components/home/AsyncStorageExample.js
import React, { Component } from 'react'
import { AsyncStorage, Text, View, TextInput, StyleSheet } from 'react-native'
class AsyncStorageExample extends Component {
state = {
'name': ''
}
componentDidMount = () ⇒ AsyncStorage.getItem('name').then((value) ⇒ this.setState({ 'name': value }))
28. React Native – AsyncStorage
React Native
90
setName = (value) ⇒ {
AsyncStorage.setItem('name', value);
this.setState({ 'name': value });
}
render() {
return (
<View style = {styles.container}>
<TextInput style = {styles.textInput} autoCapitalize = 'none' onChangeText = {this.setName}/>
<Text>
{this.state.name}
</Text>
</View>
)
}
}
export default AsyncStorageExample
const styles = StyleSheet.create ({
container: {
flex: 1,
alignItems: 'center',
marginTop: 50
},
textInput: {
margin: 15,
height: 35,
borderWidth: 1,
backgroundColor: '#7685ed'
}
})
React Native
91
When we run the app, we can update the text by typing into the input field.
React Native
92
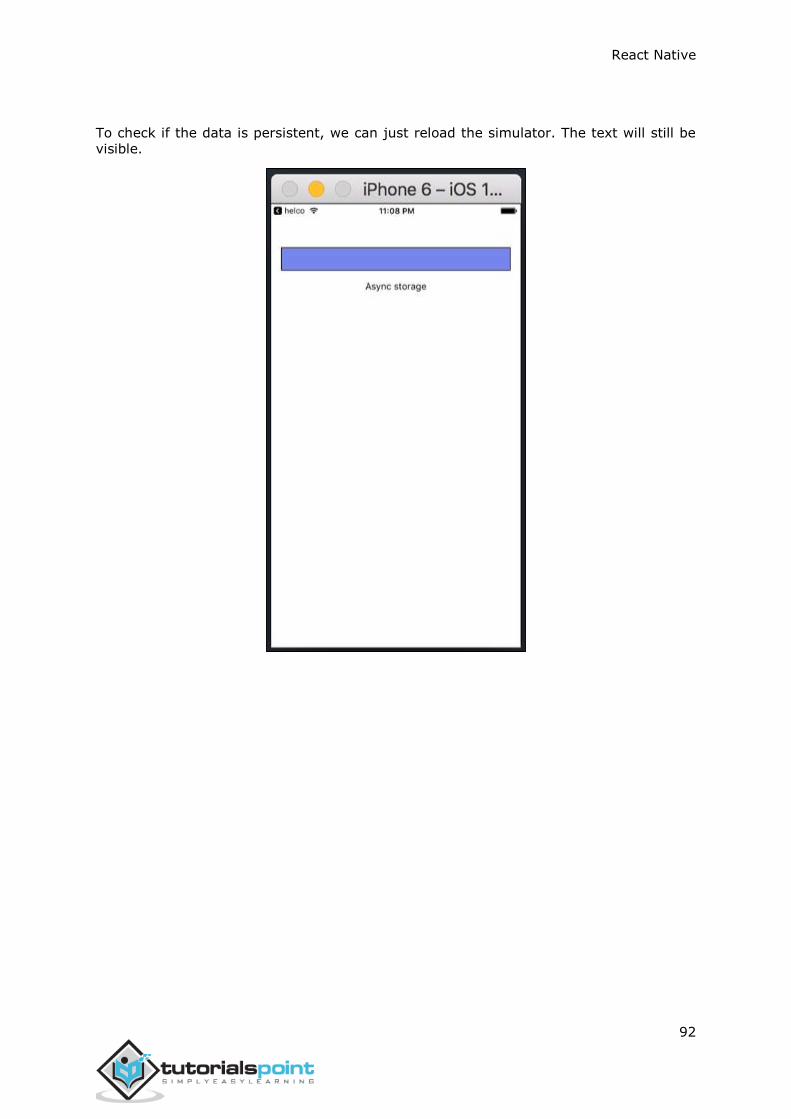
To check if the data is persistent, we can just reload the simulator. The text will still be visible.

React Native
93
In this chapter, we will show you how to use Camera.
Step 1 – Home
In this step, we will create the src/components/home/Home.js file.
src/components/home/Home.js
import React from 'react'
import CameraExample from './CameraExample.js'
const Home = () ⇒ {
return (
<CameraExample />
)
}
export default Home
Step 2 – Install Camera
The Camera module we want to use in this example is external so we need to install it first. We can do it from the terminal.
npm i [email protected]
Step 2 – Permissions
If you use IOS 10, you need to add permissions in ios/reactTutorialApp/Info.plist.
<key>NSCameraUsageDescription</key>
<string>Your message to user when the camera is accessed for the first time</string>
<key>NSPhotoLibraryUsageDescription</key>
<string>Your message to user when the photo library is accessed for the first time</string>
29. React Native – CameraRoll
React Native
94
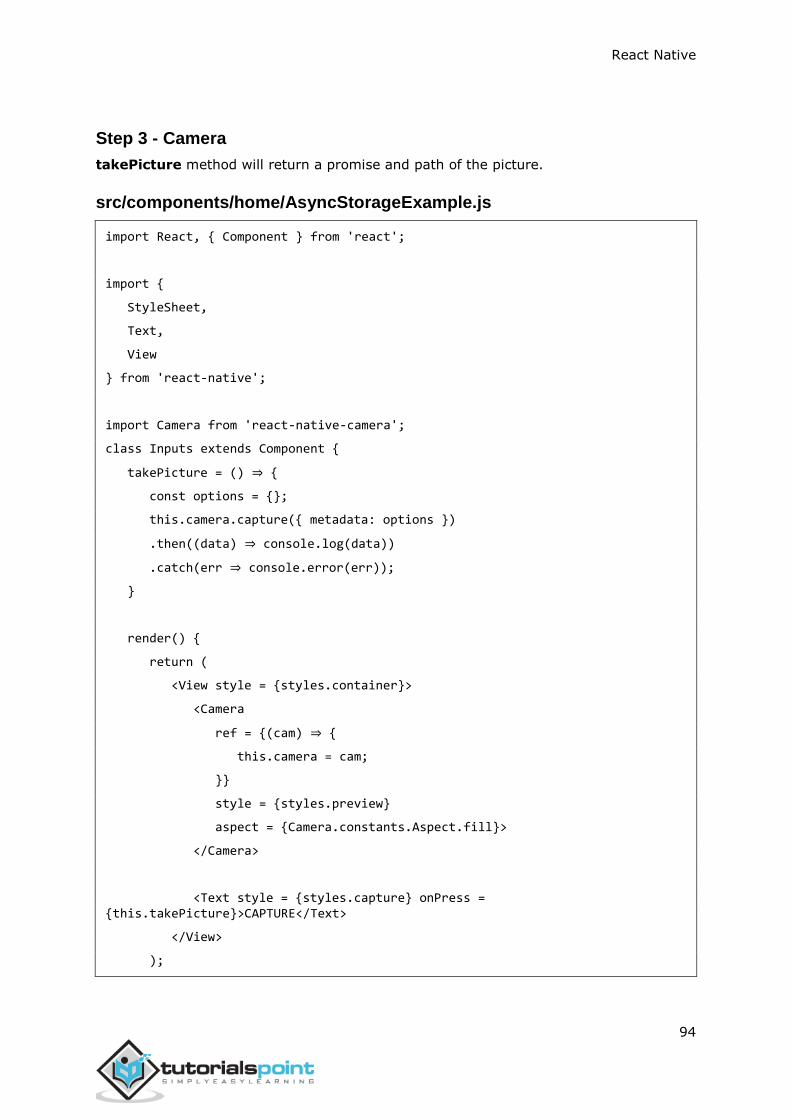
Step 3 - Camera
takePicture method will return a promise and path of the picture.
src/components/home/AsyncStorageExample.js
import React, { Component } from 'react';
import {
StyleSheet,
Text,
View
} from 'react-native';
import Camera from 'react-native-camera';
class Inputs extends Component {
takePicture = () ⇒ {
const options = {};
this.camera.capture({ metadata: options })
.then((data) ⇒ console.log(data))
.catch(err ⇒ console.error(err));
}
render() {
return (
<View style = {styles.container}>
<Camera
ref = {(cam) ⇒ {
this.camera = cam;
}}
style = {styles.preview}
aspect = {Camera.constants.Aspect.fill}>
</Camera>
<Text style = {styles.capture} onPress = {this.takePicture}>CAPTURE</Text>
</View>
);
React Native
95
}
}
export default Inputs
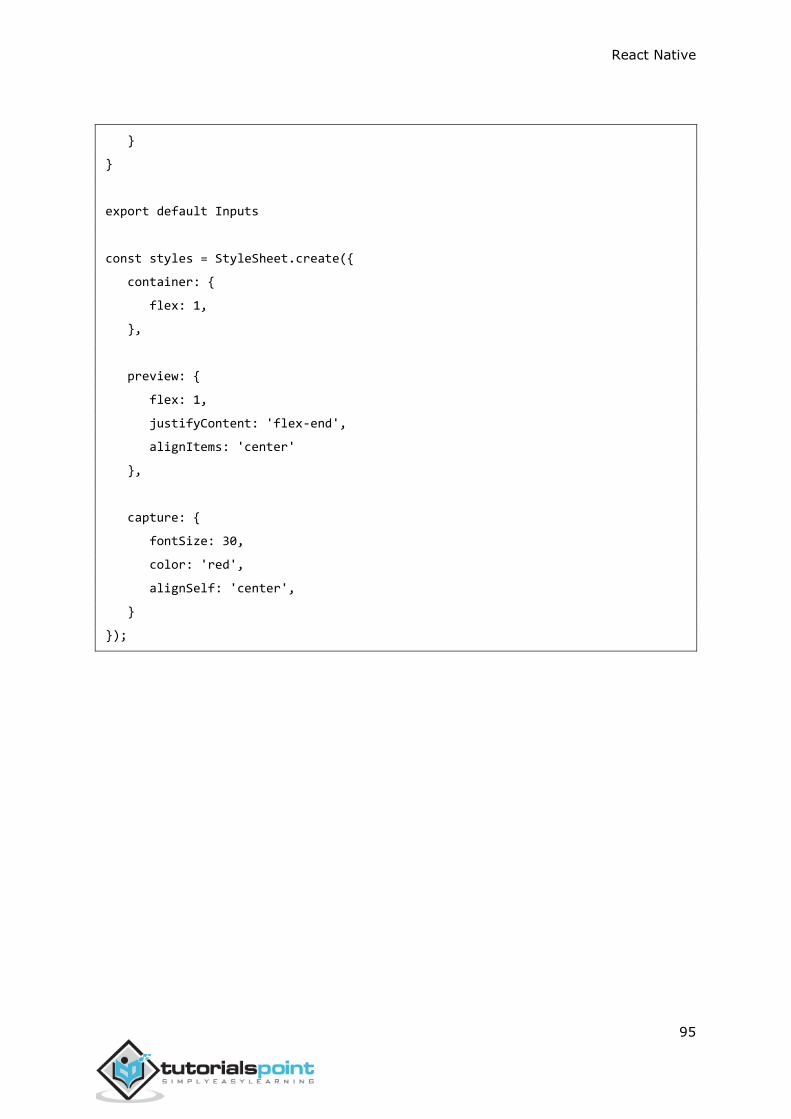
const styles = StyleSheet.create({
container: {
flex: 1,
},
preview: {
flex: 1,
justifyContent: 'flex-end',
alignItems: 'center'
},
capture: {
fontSize: 30,
color: 'red',
alignSelf: 'center',
}
});
React Native
96
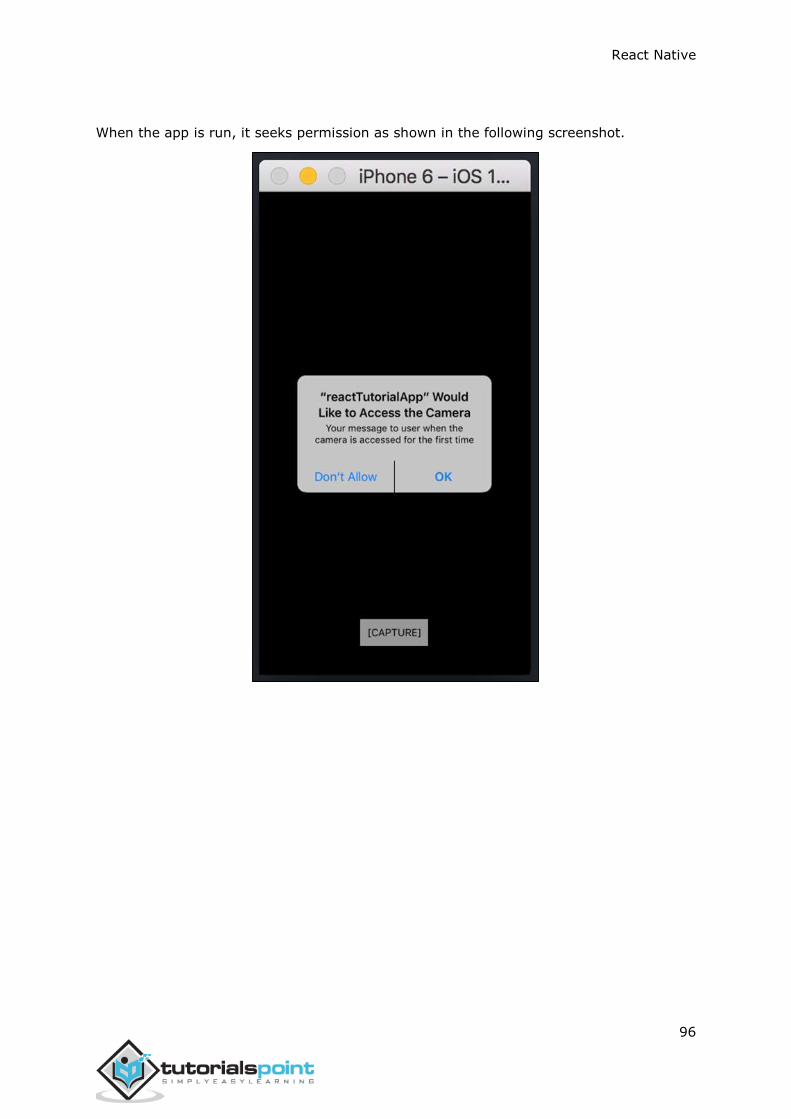
When the app is run, it seeks permission as shown in the following screenshot.
React Native
97
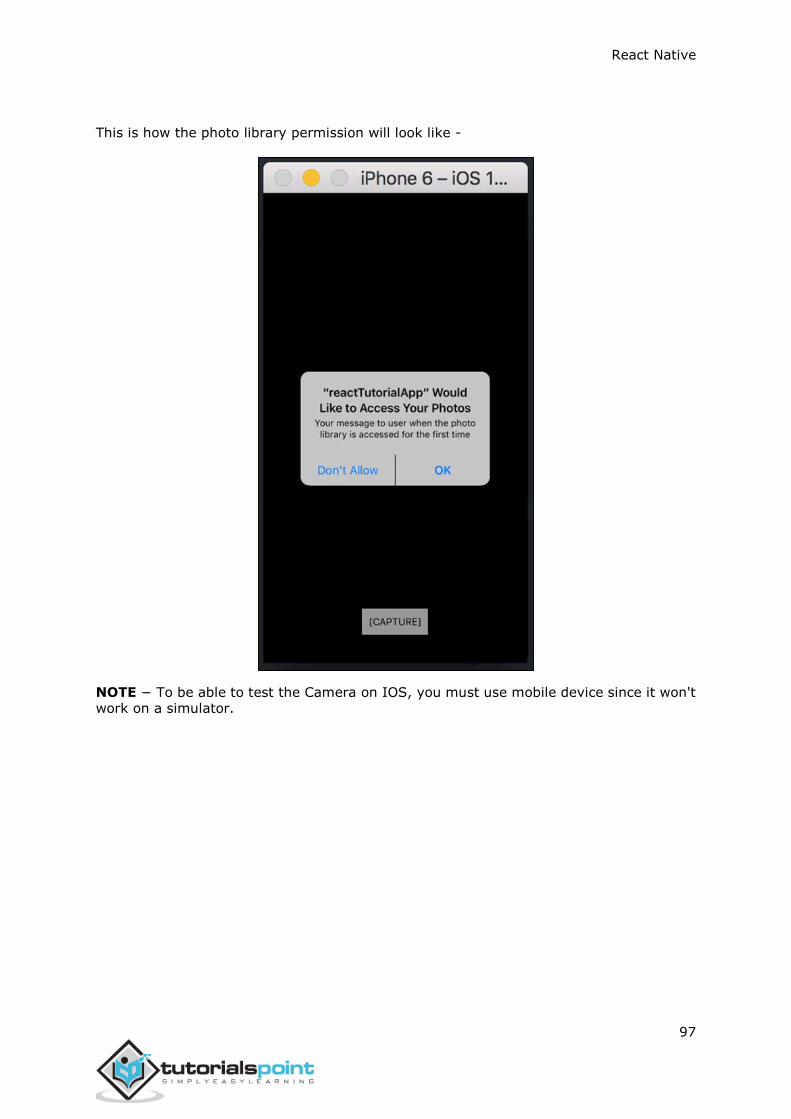
This is how the photo library permission will look like -
NOTE − To be able to test the Camera on IOS, you must use mobile device since it won't work on a simulator.


![[React Native Tutorial] Lecture 5: Input and State](https://static.fdocuments.us/doc/165x107/58728d3f1a28ab36118b57ed/react-native-tutorial-lecture-5-input-and-state.jpg)