Re-tinning Your Gas Filler Tube -...
7
Though many of the reproduction gas filler tubes we see today appear to be plated in zinc originally they were lead dipped. We are uncertain if this was to reduce the chance or possibility of spark- ing or to protect the tube and things placed in the trunk. Though there are some plating shops will- ing to plate these for customers this method was developed purely out the de- sire to do things myself. Though the originals were lead dipped, I choose to use tin rather than its close rela- tive lead due to all the concerns about fumes and handling of 100% lead. I was able to locate the ingots I used on Ebay under reloading suppliers. It seems that the tin is used straight or mixed with other metals when casting your own slugs used in the reloading hobby. The following pages cover the steps I used in reproducing the finish success- fully during the last couple of years. As always this is likely not the only way to achieve the same outcome or the easiest but it worked for me. Re-tinning Your Gas Filler Tube ConcoursMustang.com Approx Time Needed For Completion: 30-45 mins Supplies/Equipment Needed: - Ingot of 99% pure tin - Jar of tinning butter - Acid brushes - MAP or propane torch - Vise - 2” metal bar or tube - Multiple clean rags - Clean well ventilated work area - Safety equipment. Goggles, gloves, mask as needed - Pliers - Vice-grips This document, pictures, and descriptions contained within are the property of Jeff Speegle-2011. It is attended for private use and may not be transferred, repro- duced, or sold by others without written permission. All rights reserved by its creator. Right Click to Print Entire Article
Transcript of Re-tinning Your Gas Filler Tube -...

Though many of the reproduction gas filler tubes we see today appear to be plated in zinc originally they were lead dipped. We are uncertain if this was to reduce the chance or possibility of spark-ing or to protect the tube and things placed in the trunk.
Though there are some plating shops will-ing to plate these for customers this method was developed purely out the de-sire to do things myself.
Though the originals were lead dipped, I choose to use tin rather than its close rela-tive lead due to all the concerns about fumes and handling of 100% lead. I was able to locate the ingots I used on Ebay under reloading suppliers. It seems that the tin is used straight or mixed with other metals when casting your own slugs used in the reloading hobby.
The following pages cover the steps I used in reproducing the finish success-fully during the last couple of years. As always this is likely not the only way to
achieve the same outcome or the easiest but it worked for me.
Re-tinning Your Gas Filler Tube
ConcoursMustang.com
Approx Time Needed For Completion: 30-45 mins Supplies/Equipment Needed: - Ingot of 99% pure tin - Jar of tinning butter - Acid brushes - MAP or propane torch - Vise - 2” metal bar or tube - Multiple clean rags - Clean well ventilated work area - Safety equipment. Goggles, gloves, mask as needed - Pliers - Vice-grips
This document, pictures, and descriptions contained within are the property of Jeff Speegle-2011. It is attended for private use and may not be transferred, repro-duced, or sold by others without written permission. All rights reserved by its creator.
Right Click to Print Entire Article

ConcoursMustang.com Page 2 F i l le r Nec k Re- T inni ng
This document, pictures, and descriptions contained within are the property of Jeff Speegle-2011. It is attended for private use and may not be transferred, repro-duced, or sold by others without written permission. All rights reserved by its creator.
Preparation In this process we will be handling very hot pieces of metal, being ex-posed to vapors and cleaning products that may not agree with you. Please read all the steps, evaluate the process, your abilities, tools and safety equip-
ment before you purchase or start anything. Only after evaluating all the steps can you determine if this is a task you wish to attempt. The writer and ConcoursMustang.com, its mem-bers and owners accept no responsi-
bility for your actions, choices or your application of the information con-tained in this article. Attempt it at your own risk.

ConcoursMustang.com Page 3 F i l le r Nec k Re- T inni ng
This document, pictures, and descriptions contained within are the property of Jeff Speegle-2011. It is attended for private use and may not be transferred, repro-duced, or sold by others without written permission. All rights reserved by its creator.
After the filler neck is cleaned and brushed, without handling the sur-face much, I place in on a iron tube or rod I’ve previously clamped in a vice. The rod/tube is placed at an angle so that the neck can not fall off, but can rotate with manipula-tion during the process.
You may need to adjust the angle to suit your needs and balance before or during the process.
Step #2
Step #1 it be.
For the surface I choose to simply clean the surface with a brass wire bush (mounted on a grinding wheel) to remove any oxidized lead from the surface, remove any rust if scratches have gotten that deep and sealer from behind the taillight panel mounting surface.
Your first task (while you are obtain-ing all the needed equipment needed) is to find a nice undented filler neck. Remember that there are differences between different years so choose accordingly. Also, as always when do-ing something like this, it’s a good idea to have more than one. If you replate three or four, for example, then you can choose the best one from the lot for your project and save or sell the remaining filler necks if
they turn our well also. You can also use a dented one to practice on.
Since we will be recoating only the visible exterior nothing is planned for the inside of the tube. Its possible that disturbing the interior might invite rust or corrosion to develop or get worst over time. I’ve simply knocked what I could reach with a scratch pad lightly to get any major stuff, then let
Step #3 First, I start out with the gas cap face and coat it with the tinning butter. Now, unlike what the instructions sug-gest, I found that I have more success skipping the baking soda cleaning and both that the company sug-gest between the fluxing and the laying on of lead or in this case tin.
With the use a acid brush I spread the butter on in a nice full, but not thick coat.
ConcoursMustang.com Page 4 F i l le r Nec k Re- T inni ng
Step #5
This document, pictures, and descriptions contained within are the property of Jeff Speegle-2011. It is attended for private use and may not be transferred, repro-duced, or sold by others without written permission. All rights reserved by its creator.
Step #6
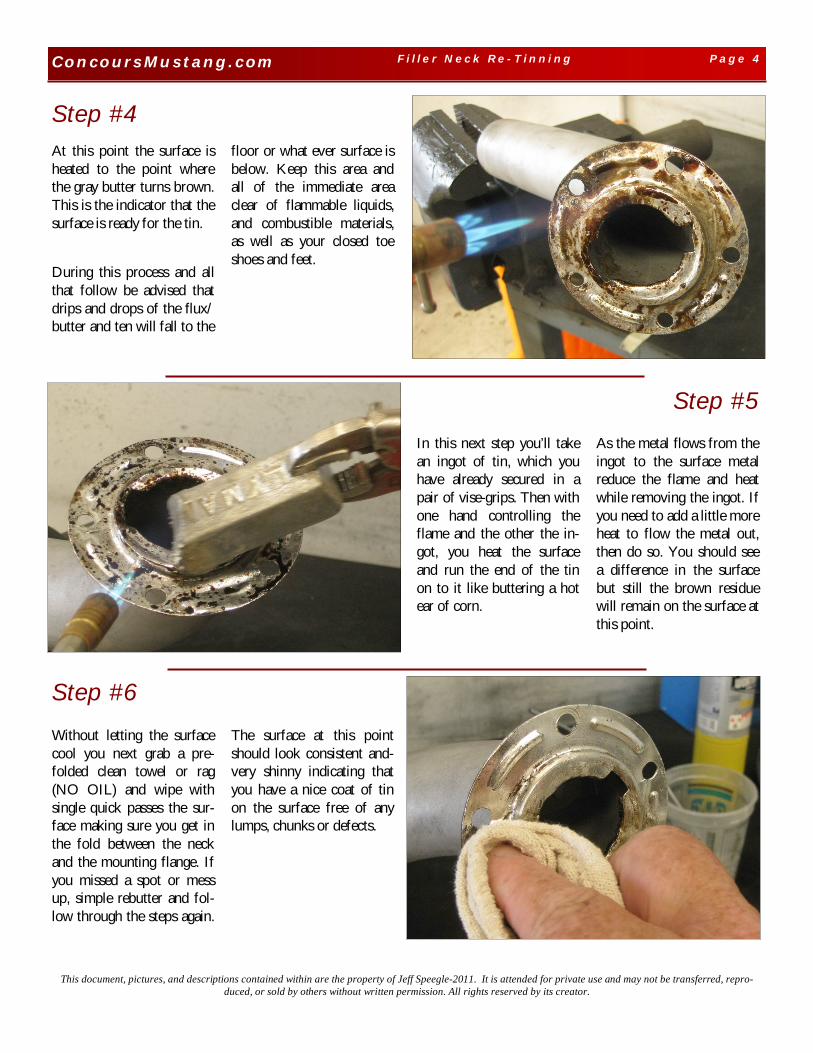
In this next step you’ll take an ingot of tin, which you have already secured in a pair of vise-grips. Then with one hand controlling the flame and the other the in-got, you heat the surface and run the end of the tin on to it like buttering a hot ear of corn.
As the metal flows from the ingot to the surface metal reduce the flame and heat while removing the ingot. If you need to add a little more heat to flow the metal out, then do so. You should see a difference in the surface but still the brown residue will remain on the surface at this point.
Without letting the surface cool you next grab a pre-folded clean towel or rag (NO OIL) and wipe with single quick passes the sur-face making sure you get in the fold between the neck and the mounting flange. If you missed a spot or mess up, simple rebutter and fol-low through the steps again.
The surface at this point should look consistent and-very shinny indicating that you have a nice coat of tin on the surface free of any lumps, chunks or defects.
Step #4 At this point the surface is heated to the point where the gray butter turns brown. This is the indicator that the surface is ready for the tin.
During this process and all that follow be advised that drips and drops of the flux/butter and ten will fall to the
floor or what ever surface is below. Keep this area and all of the immediate area clear of flammable liquids, and combustible materials, as well as your closed toe shoes and feet.

ConcoursMustang.com Page 5 F i l le r Nec k Re- T inni ng
This document, pictures, and descriptions contained within are the property of Jeff Speegle-2011. It is attended for private use and may not be transferred, repro-duced, or sold by others without written permission. All rights reserved by its creator.
Step #8
Step #7 Next we move onto the neck section, repositioning the filler neck as needed. You can use a pair of pliers to grab the end and rotate. Remember this tube is VERY HOT at this point
Step #9
Now we coat the complete tube section of the filler neck with the tinning butter, making sure we get the ma-terial on every inch of the tube. We may need to rotate the filler neck to reach all the areas
Since the tube is a much larger surface I work one area at a time stating at the bottom of the tube behind the flange (I don’t typically recoat the back side of the flange) working down then around. What I want to end up with is that I want finish the top last since that is the surface we will be seeing the
most of once installed in the car. While the natural bend of the neck (towards where it will attach with to the tank) is in the down po-sition letting me work and melt any extra tin so it pools and runs off the bottom lip that, once installed, will be under the rubber hose.

you will learn with each tube you complete (the rea-son your doing more than one)
ConcoursMustang.com Page 6 F i l le r Nec k Re- T inni ng
Step #11 Once the surface has a nice smooth coat on it (brown burnt butter/flux still re-maining) you wipe the sur-face with quick straight strokes. This can be done as you go but in larger sections than your tinning applica-tion. Once you get the rhythm down it will go quickly and smoothly while
Step #10
This document, pictures, and descriptions contained within are the property of Jeff Speegle-2011. It is attended for private use and may not be transferred, repro-duced, or sold by others without written permission. All rights reserved by its creator.
Again applying the tin, with heat to the surface of the tube and basically rubbing the tin onto the surface. Then heating the butter for the next section (maybe 3” x 3” ) then applying the tin again, until you reach the end of the tube.
If, at this time, you get any chunks or build up, you can simply heat that area later and the extra material will form a drip then travel down hill until it reaches the lip finally falling off onto the floor below.
ConcoursMustang.com Page 7 F i l le r Nec k Re- T inni ng
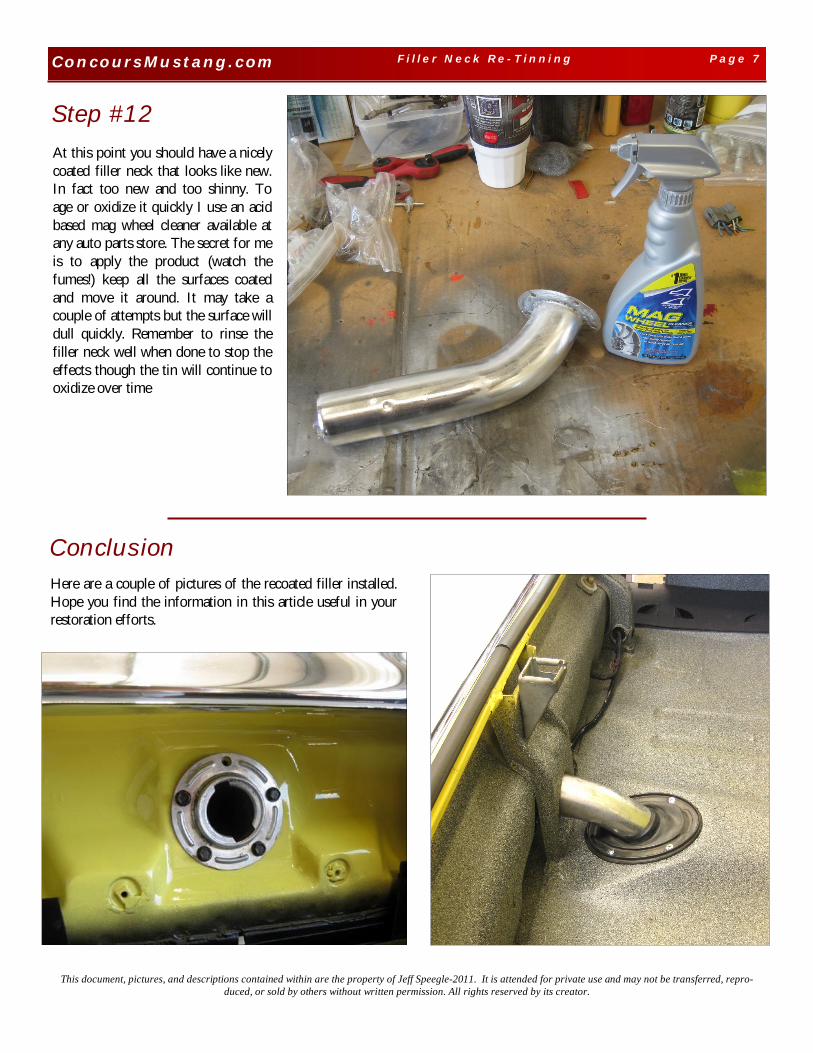
Conclusion Here are a couple of pictures of the recoated filler installed. Hope you find the information in this article useful in your restoration efforts.
This document, pictures, and descriptions contained within are the property of Jeff Speegle-2011. It is attended for private use and may not be transferred, repro-duced, or sold by others without written permission. All rights reserved by its creator.
Step #12 At this point you should have a nicely coated filler neck that looks like new. In fact too new and too shinny. To age or oxidize it quickly I use an acid based mag wheel cleaner available at any auto parts store. The secret for me is to apply the product (watch the fumes!) keep all the surfaces coated and move it around. It may take a couple of attempts but the surface will dull quickly. Remember to rinse the filler neck well when done to stop the effects though the tin will continue to oxidize over time