RBP1 Belt Positioner - Flexco
24
RBP1 Belt Positioner Installation, Operation and Maintenance Manual www.flexco.com
Transcript of RBP1 Belt Positioner - Flexco
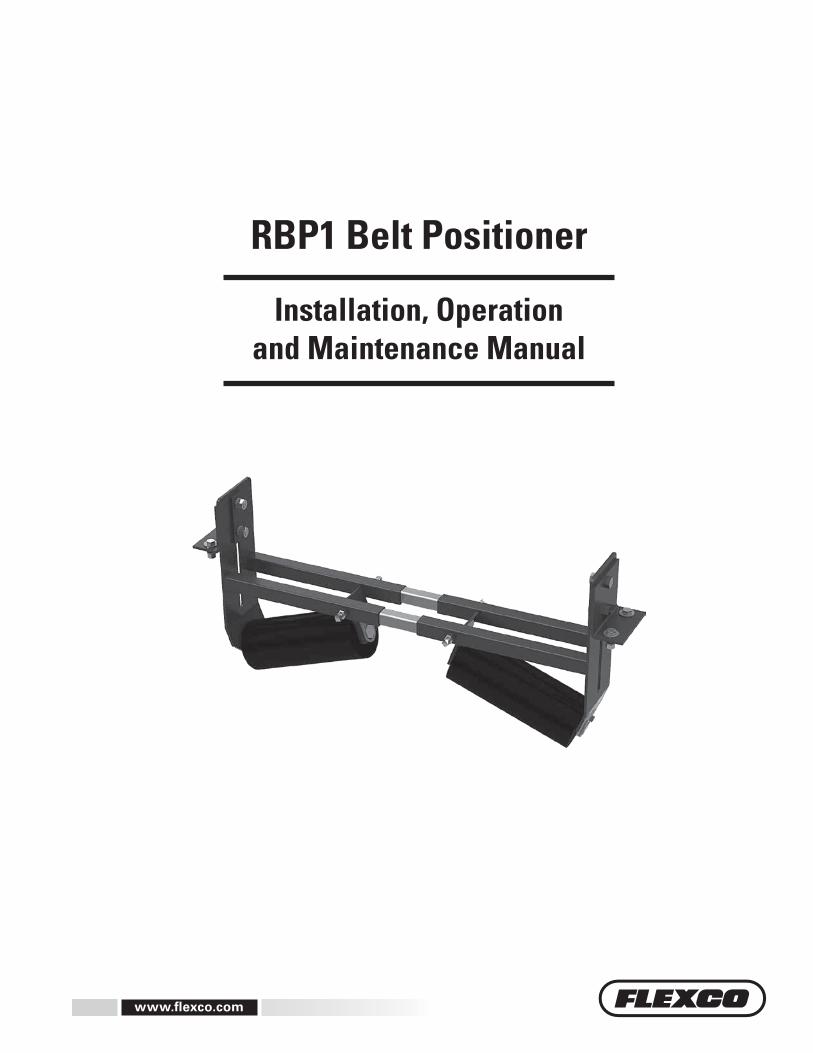
RBP1 Belt Positioner
Installation, Operation and Maintenance Manual
www.flexco.comwww.flexco.com
2 RBP1 Belt Positioner
RBP1 Belt Positioner
Serial Number: _____________________________________________________________
Purchase Date: ______________________________________________________________
Purchased From: ____________________________________________________________
Installation Date: ____________________________________________________________
Serial number information can be found on the Serial Number Label included in the Information Packet found in the cleaner carton.
This information will be helpful for any future inquiries or questions about belt cleaner replacement parts, specifications or troubleshooting.
1
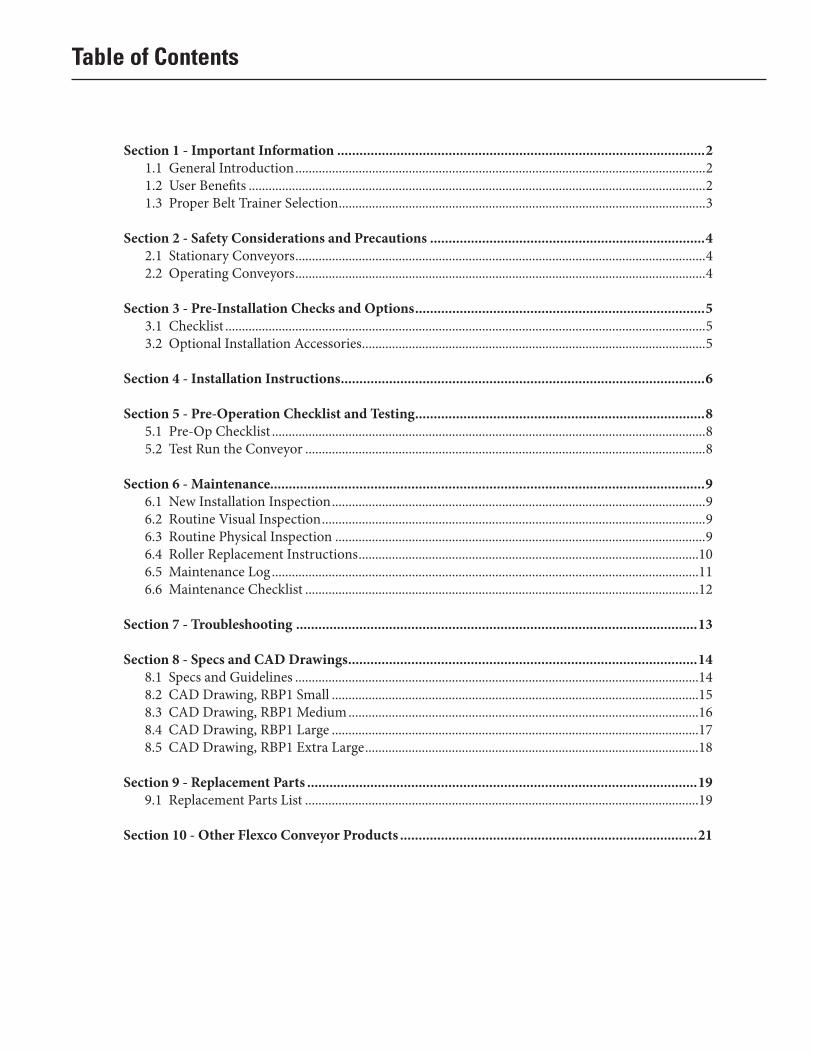
Section 1 - Important Information ...................................................................................................2 1.1 General Introduction ...........................................................................................................................2 1.2 User Benefits .........................................................................................................................................2 1.3 Proper Belt Trainer Selection ..............................................................................................................3 Section 2 - Safety Considerations and Precautions ..........................................................................4 2.1 Stationary Conveyors ...........................................................................................................................4 2.2 Operating Conveyors ...........................................................................................................................4 Section 3 - Pre-Installation Checks and Options ..............................................................................5 3.1 Checklist ................................................................................................................................................5 3.2 Optional Installation Accessories .......................................................................................................5 Section 4 - Installation Instructions ..................................................................................................6 Section 5 - Pre-Operation Checklist and Testing ..............................................................................8 5.1 Pre-Op Checklist ..................................................................................................................................8 5.2 Test Run the Conveyor ........................................................................................................................8
Section 6 - Maintenance.....................................................................................................................9 6.1 New Installation Inspection ................................................................................................................9 6.2 Routine Visual Inspection ...................................................................................................................9 6.3 Routine Physical Inspection ...............................................................................................................9 6.4 Roller Replacement Instructions ......................................................................................................10 6.5 Maintenance Log ................................................................................................................................11 6.6 Maintenance Checklist ......................................................................................................................12 Section 7 - Troubleshooting ............................................................................................................13
Section 8 - Specs and CAD Drawings ..............................................................................................14 8.1 Specs and Guidelines .........................................................................................................................14 8.2 CAD Drawing, RBP1 Small ..............................................................................................................15 8.3 CAD Drawing, RBP1 Medium .........................................................................................................16 8.4 CAD Drawing, RBP1 Large ..............................................................................................................17 8.5 CAD Drawing, RBP1 Extra Large ....................................................................................................18 Section 9 - Replacement Parts .........................................................................................................19 9.1 Replacement Parts List ......................................................................................................................19 Section 10 - Other Flexco Conveyor Products ................................................................................21
Table of Contents
2 RBP1 Belt Positioner
Section 1 - Important Information
1.1 General Introduction We at Flexco are very pleased that you have selected a RBP1 Belt Positioner™ for your conveyor system.
This manual will help you to understand the installation, operation and maintenance of this product and assist you in making it work up to its maximum efficiency over its lifetime of service.
It is essential for safe and efficient operation that the information and guidelines presented be properly understood and implemented. This manual will provide safety precautions, installation instructions, maintenance procedures and troubleshooting tips. In addition, please follow all standard, approved safety guidelines when working on your conveyor.
If, however, you have any questions or problems that are not covered, please visit our web site or contact our Customer Service Department:
Customer Service: 1-800-541-8028
Visit www.flexco.com for other Flexco locations and products.
Please read this manual thoroughly and pass it on to any others who will be directly responsible for installation, operation and maintenance of this impact bed. While we have tried to make the installation and service tasks as easy and simple as possible, this product does however require correct installation and regular inspection and maintenance to maintain top working condition.
1.2 User Benefits
Belt mistracking is a common problem that produces various problems, ranging from belt and structure damage to product spillage and safety issues. By utilizing the RBP1 Belt Positioner, it is possible to correct a belt that is mistracking and causing these problems. Multiple units may be required depending on the length of the mistracking belt.
3
Section 1 - Important Information
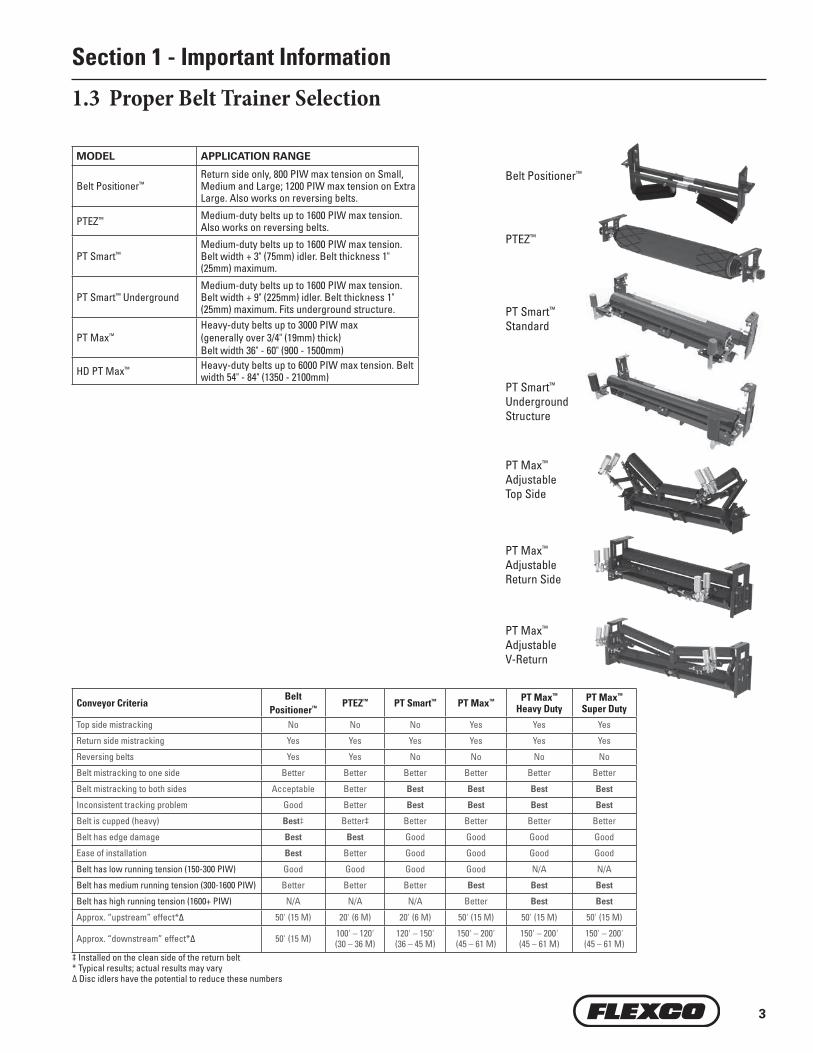
1.3 Proper Belt Trainer Selection
MODEL APPLICATION RANGE
Belt Positioner™Return side only, 800 PIW max tension on Small, Medium and Large; 1200 PIW max tension on Extra Large. Also works on reversing belts.
PTEZ™ Medium-duty belts up to 1600 PIW max tension. Also works on reversing belts.
PT Smart™Medium-duty belts up to 1600 PIW max tension. Belt width + 3" (75mm) idler. Belt thickness 1" (25mm) maximum.
PT Smart™ UndergroundMedium-duty belts up to 1600 PIW max tension. Belt width + 9" (225mm) idler. Belt thickness 1" (25mm) maximum. Fits underground structure.
PT Max™Heavy-duty belts up to 3000 PIW max(generally over 3/4" (19mm) thick)Belt width 36" - 60" (900 - 1500mm)
HD PT Max™ Heavy-duty belts up to 6000 PIW max tension. Belt width 54" - 84" (1350 - 2100mm)
Belt Positioner™
PTEZ™
PT Smart™
Standard
PT Smart™
Underground Structure
PT Max™
Adjustable Top Side
PT Max™
AdjustableReturn Side
PT Max™
Adjustable
V-Return
Conveyor CriteriaBelt
Positioner™ PTEZ™ PT Smart™ PT Max™ PT Max™ Heavy Duty
PT Max™ Super Duty
Top side mistracking No No No Yes Yes Yes
Return side mistracking Yes Yes Yes Yes Yes Yes
Reversing belts Yes Yes No No No No
Belt mistracking to one side Better Better Better Better Better Better
Belt mistracking to both sides Acceptable Better Best Best Best Best
Inconsistent tracking problem Good Better Best Best Best Best
Belt is cupped (heavy) Best‡ Better‡ Better Better Better Better
Belt has edge damage Best Best Good Good Good Good
Ease of installation Best Better Good Good Good Good
Belt has low running tension (150-300 PIW) Good Good Good Good N/A N/A
Belt has medium running tension (300-1600 PIW) Better Better Better Best Best Best
Belt has high running tension (1600+ PIW) N/A N/A N/A Better Best Best
Approx. “upstream” effect*∆ 50' (15 M) 20' (6 M) 20' (6 M) 50' (15 M) 50' (15 M) 50' (15 M)
Approx. “downstream” effect*∆ 50' (15 M) 100' – 120'(30 – 36 M)
120' – 150'(36 – 45 M)
150' – 200'(45 – 61 M)
150' – 200'(45 – 61 M)
150' – 200'(45 – 61 M)
‡ Installed on the clean side of the return belt* Typical results; actual results may vary∆ Disc idlers have the potential to reduce these numbers
4 RBP1 Belt Positioner
Section 2 - Safety Considerations and Precautions
Before installing and operating the RBP1 Belt Positioner it is important to review and understand the following safety information.
There are setup, maintenance and operational activities involving both stationary and operating conveyors. Each case has a safety protocol.
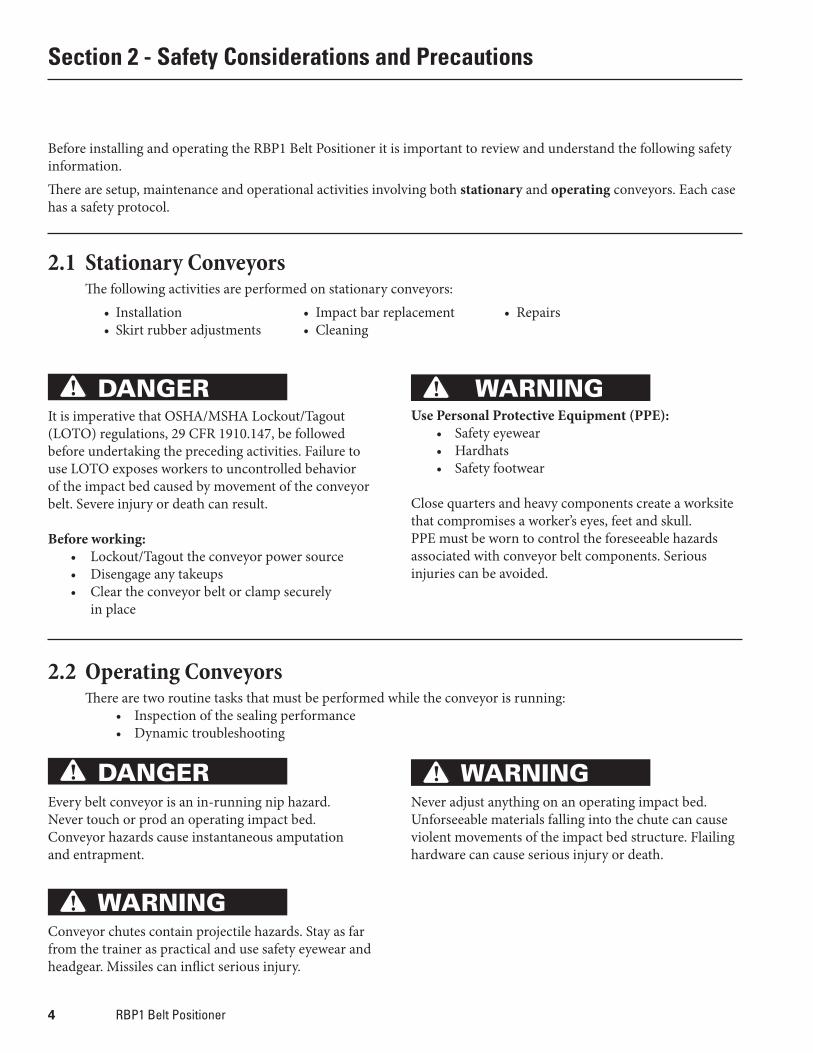
2.1 Stationary Conveyors The following activities are performed on stationary conveyors:
• Installation • Impact bar replacement • Repairs • Skirt rubber adjustments • Cleaning
DANGER
DANGER
WARNING
WARNING
WARNING
!
!
!
!
!
It is imperative that OSHA/MSHA Lockout/Tagout (LOTO) regulations, 29 CFR 1910.147, be followed before undertaking the preceding activities. Failure to use LOTO exposes workers to uncontrolled behavior of the impact bed caused by movement of the conveyor belt. Severe injury or death can result.
Before working: • Lockout/Tagout the conveyor power source • Disengage any takeups • Clear the conveyor belt or clamp securely in place
Use Personal Protective Equipment (PPE): • Safety eyewear • Hardhats • Safety footwear
Close quarters and heavy components create a worksite that compromises a worker’s eyes, feet and skull.PPE must be worn to control the foreseeable hazards associated with conveyor belt components. Serious injuries can be avoided.
2.2 Operating Conveyors There are two routine tasks that must be performed while the conveyor is running: • Inspection of the sealing performance • Dynamic troubleshooting
Every belt conveyor is an in-running nip hazard. Never touch or prod an operating impact bed. Conveyor hazards cause instantaneous amputation and entrapment.
Never adjust anything on an operating impact bed. Unforseeable materials falling into the chute can cause violent movements of the impact bed structure. Flailing hardware can cause serious injury or death.
Conveyor chutes contain projectile hazards. Stay as far from the trainer as practical and use safety eyewear and headgear. Missiles can inflict serious injury.
5
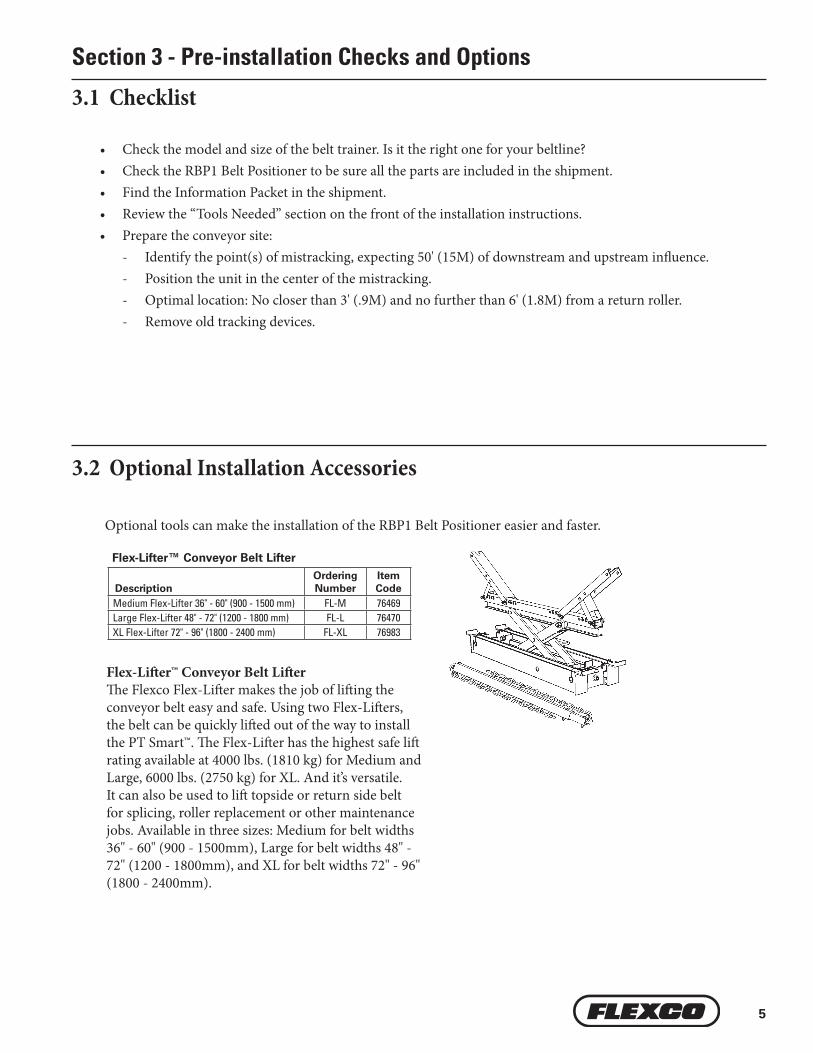
3.1 Checklist
• Check the model and size of the belt trainer. Is it the right one for your beltline? • Check the RBP1 Belt Positioner to be sure all the parts are included in the shipment. • Find the Information Packet in the shipment. • Review the “Tools Needed” section on the front of the installation instructions. • Prepare the conveyor site: - Identify the point(s) of mistracking, expecting 50' (15M) of downstream and upstream influence. - Position the unit in the center of the mistracking. - Optimal location: No closer than 3' (.9M) and no further than 6' (1.8M) from a return roller. - Remove old tracking devices.
Section 3 - Pre-installation Checks and Options
3.2 Optional Installation Accessories
Flex-Lifter™ Conveyor Belt LifterThe Flexco Flex-Lifter makes the job of lifting the conveyor belt easy and safe. Using two Flex-Lifters, the belt can be quickly lifted out of the way to install the PT Smart™. The Flex-Lifter has the highest safe lift rating available at 4000 lbs. (1810 kg) for Medium and Large, 6000 lbs. (2750 kg) for XL. And it’s versatile. It can also be used to lift topside or return side belt for splicing, roller replacement or other maintenance jobs. Available in three sizes: Medium for belt widths 36" - 60" (900 - 1500mm), Large for belt widths 48" - 72" (1200 - 1800mm), and XL for belt widths 72" - 96" (1800 - 2400mm).
Flex-Lifter™ Conveyor Belt Lifter
DescriptionOrdering Number
Item Code
Medium Flex-Lifter 36" - 60" (900 - 1500 mm) FL-M 76469 Large Flex-Lifter 48" - 72" (1200 - 1800 mm) FL-L 76470 XL Flex-Lifter 72" - 96" (1800 - 2400 mm) FL-XL 76983
Optional tools can make the installation of the RBP1 Belt Positioner easier and faster.
6 RBP1 Belt Positioner
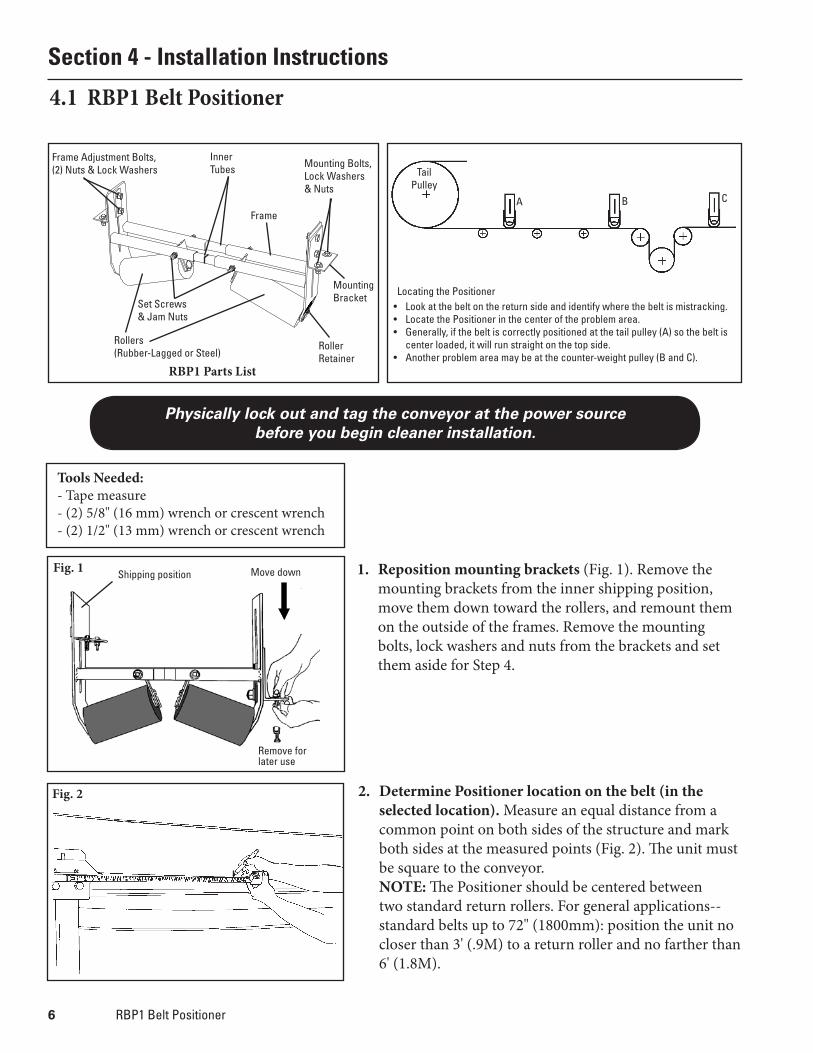
Section 4 - Installation Instructions
Physically lock out and tag the conveyor at the power source before you begin cleaner installation.
Locating the Positioner
A B C
• Look at the belt on the return side and identify where the belt is mistracking.• Locate the Positioner in the center of the problem area.• Generally, if the belt is correctly positioned at the tail pulley (A) so the belt is
center loaded, it will run straight on the top side. • Another problem area may be at the counter-weight pulley (B and C).
TailPulley
RBP1 Parts List
Rollers(Rubber-Lagged or Steel)
Set Screws& Jam Nuts
Mounting Bolts, Lock Washers & Nuts
Mounting Bracket
InnerTubes
Frame Adjustment Bolts, (2) Nuts & Lock Washers
Roller Retainer
Frame
1. Reposition mounting brackets (Fig. 1). Remove the mounting brackets from the inner shipping position, move them down toward the rollers, and remount them on the outside of the frames. Remove the mounting bolts, lock washers and nuts from the brackets and set them aside for Step 4.
Move down
Remove for later use
Shipping positionFig. 1
Fig. 2 2. Determine Positioner location on the belt (in the selected location). Measure an equal distance from a common point on both sides of the structure and mark both sides at the measured points (Fig. 2). The unit must be square to the conveyor.
NOTE: The Positioner should be centered between two standard return rollers. For general applications--standard belts up to 72" (1800mm): position the unit no closer than 3' (.9M) to a return roller and no farther than 6' (1.8M).
4.1 RBP1 Belt Positioner
Tools Needed: - Tape measure - (2) 5/8" (16 mm) wrench or crescent wrench- (2) 1/2" (13 mm) wrench or crescent wrench
7
Section 4 - Installation Instructions
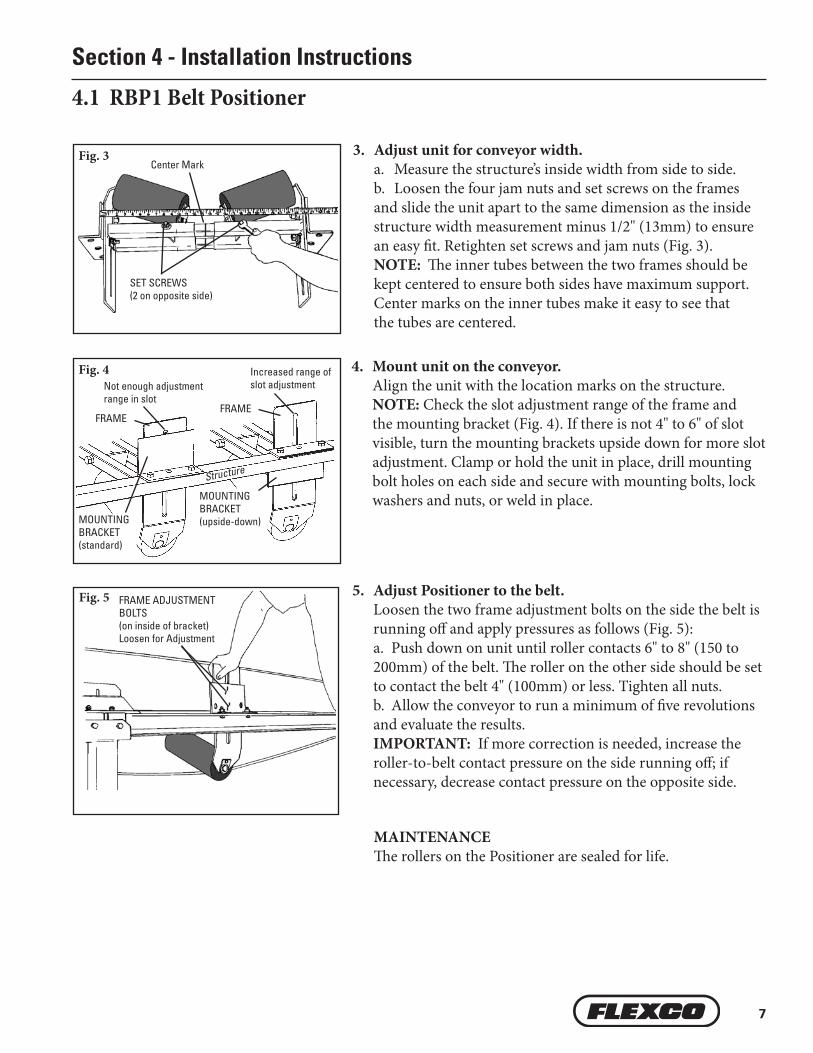
3. Adjust unit for conveyor width. a. Measure the structure’s inside width from side to side. b. Loosen the four jam nuts and set screws on the frames
and slide the unit apart to the same dimension as the inside structure width measurement minus 1/2" (13mm) to ensure an easy fit. Retighten set screws and jam nuts (Fig. 3).
NOTE: The inner tubes between the two frames should be kept centered to ensure both sides have maximum support. Center marks on the inner tubes make it easy to see that the tubes are centered.
4. Mount unit on the conveyor. Align the unit with the location marks on the structure. NOTE: Check the slot adjustment range of the frame and
the mounting bracket (Fig. 4). If there is not 4" to 6" of slot visible, turn the mounting brackets upside down for more slot adjustment. Clamp or hold the unit in place, drill mounting bolt holes on each side and secure with mounting bolts, lock washers and nuts, or weld in place.
5. Adjust Positioner to the belt. Loosen the two frame adjustment bolts on the side the belt is
running off and apply pressures as follows (Fig. 5): a. Push down on unit until roller contacts 6" to 8" (150 to
200mm) of the belt. The roller on the other side should be set to contact the belt 4" (100mm) or less. Tighten all nuts.
b. Allow the conveyor to run a minimum of five revolutions and evaluate the results.
IMPORTANT: If more correction is needed, increase the roller-to-belt contact pressure on the side running off; if necessary, decrease contact pressure on the opposite side.
Fig. 3
Fig. 5 FRAME ADJUSTMENT BOLTS(on inside of bracket)Loosen for Adjustment
MAINTENANCEThe rollers on the Positioner are sealed for life.
Center Mark
SET SCREWS(2 on opposite side)
Fig. 4Not enough adjustment range in slot
Increased range of slot adjustment
MOUNTING BRACKET(upside-down)MOUNTING
BRACKET(standard)
FRAMEFRAME
Structure
4.1 RBP1 Belt Positioner
8 RBP1 Belt Positioner
Section 5 - Pre-Operation Checklist and Testing
• Run the conveyor for at least 15 minutes and confirm the belt is tracking properly.• If belt is still mistracking too far to one side, increase the roller-to-belt contact pressure on the side
running off; if necessary, decrease contact pressure on the opposite side.
• Recheck that all fasteners are tight• Apply all supplied labels • Be sure that all installation materials and tools have been removed from the belt and conveyor area
5.1 Pre-Op Checklist
5.2 Test Run the Conveyor

9
Section 6 - Maintenance
Flexco belt trainers are designed to operate with minimum maintenance. However, to maintain superior performance some service is required. When the trainer is installed a regular maintenance program should be set up. This program will ensure that the trainer operates at optimal efficiency, and problems can be identified and fixed before any damage is done to the belt, the trainer, other conveyor components, or structure.
All safety procedures for inspection of equipment (stationary or operating) must be observed. The RBP1 Belt Positioner is in direct contact with the moving belt. Only visual observations can be made while the belt is running. Service tasks can be done only with the conveyor stopped and by observing the correct lockout/tagout procedures.
6.1 New Installation InspectionAfter the RBP1 Belt Positioner has run for 15 minutes a visual inspection should be made to ensure the trainer is performing properly. Make adjustments as needed.
6.2 Routine Visual Inspection (every 2-4 weeks)A visual inspection of the RBP1 Belt Positioner can determine:
• If the belt is tracking as required• If the main frame is free of material and rolling properly• If there is damage to the main frame or other components• If the rollers are turning freely and without damage
If any of the above conditions exist, a determination should be made on when the conveyor can be stopped for trainer maintenance.
6.3 Routine Physical Inspection (every 6-8 weeks)When the conveyor is not in operation and properly locked and tagged out, a physical inspection of the trainer to perform the following tasks:
• Clean material buildup off the trainer and components.• Closely inspect main roller for free movement and wear. Replace if needed.• Closely inspect complete unit for damage.• Inspect all fasteners for tightness and wear. Tighten or replace if needed. • When maintenance tasks are completed, test run the conveyor to ensure the trainer is
performing properly.
10 RBP1 Belt Positioner
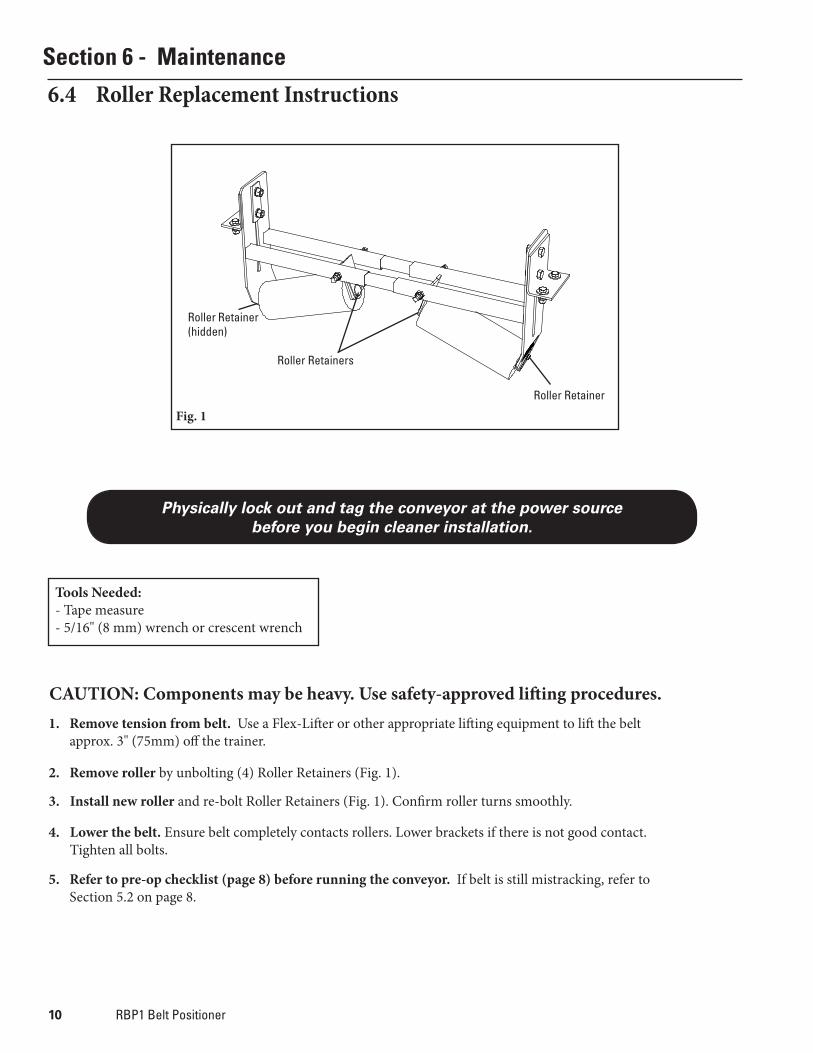
6.4 Roller Replacement InstructionsSection 6 - Maintenance
2. Remove roller by unbolting (4) Roller Retainers (Fig. 1).
1. Remove tension from belt. Use a Flex-Lifter or other appropriate lifting equipment to lift the belt approx. 3" (75mm) off the trainer.
3. Install new roller and re-bolt Roller Retainers (Fig. 1). Confirm roller turns smoothly.
4. Lower the belt. Ensure belt completely contacts rollers. Lower brackets if there is not good contact. Tighten all bolts.
5. Refer to pre-op checklist (page 8) before running the conveyor. If belt is still mistracking, refer to Section 5.2 on page 8.
CAUTION: Components may be heavy. Use safety-approved lifting procedures.
Physically lock out and tag the conveyor at the power source before you begin cleaner installation.
Tools Needed: - Tape measure - 5/16" (8 mm) wrench or crescent wrench
Fig. 1Roller Retainer
Roller Retainers
Roller Retainer(hidden)

11
Section 6 - Maintenance
6.5 Maintenance Log
Conveyor Name/No. _________________________
Date: ____________________ Work done by: ____________________ Service Quote #: ____________________
Activity: ______________________________________________________________________________________________________________Date: ____________________ Work done by: ____________________ Service Quote #: ____________________
Activity: ______________________________________________________________________________________________________________Date: ____________________ Work done by: ____________________ Service Quote #: ____________________
Activity: ______________________________________________________________________________________________________________Date: ____________________ Work done by: ____________________ Service Quote #: ____________________
Activity: ______________________________________________________________________________________________________________Date: ____________________ Work done by: ____________________ Service Quote #: ____________________
Activity: ______________________________________________________________________________________________________________Date: ____________________ Work done by: ____________________ Service Quote #: ____________________
Activity: ______________________________________________________________________________________________________________Date: ____________________ Work done by: ____________________ Service Quote #: ____________________
Activity: ______________________________________________________________________________________________________________
12 RBP1 Belt Positioner
Section 6 - Maintenance
6.6 Belt Trainer Maintenance Checklist
RBP1 Belt Positioner: ___________________________________ Serial Number: __________________________
Beltline Information:
Beltline Number: ____________________ Belt Condition: ___________________________________________________________________
Belt Width: ¨ 450mm ¨ 600mm ¨ 750mm ¨ 900mm ¨ 1050mm ¨ 1200mm ¨ 1350mm ¨ 1500mm ¨ 1800mm ¨ 2100mm ¨ 2400mm (18") (24") (30") (36") (42") (48") (54") (60") (72") (84") (96")
Belt Speed: __________________ Belt Thickness: __________________
Idler Roller Life (Right Side):
Date Roller Installed:_________________ Date Roller Inspected:________________ Estimated Roller Life:_______________
Roller Condition: ______________________________________________________________________________________________________
Idler Roller Life (Left Side):
Date Roller Installed:_________________ Date Roller Inspected:________________ Estimated Roller Life:_______________
Roller Condition: ______________________________________________________________________________________________________
RBP1 Frame Condition: ¨ Good ¨ Bent ¨ Rusted
Overall RBP1 Performance: ( Rate the following 1 - 5, 1=very poor - 5= very good )
Appearance: ¨ Comments: ________________________________________________________________________________________
Location: ¨ Comments: ________________________________________________________________________________________
Maintenance: ¨ Comments: ________________________________________________________________________________________
Performance: ¨ Comments: ________________________________________________________________________________________
Other Comments:______________________________________________________________________________________________________
____________________________________________________________________________________________________________________
____________________________________________________________________________________________________________________
____________________________________________________________________________________________________________________
____________________________________________________________________________________________________________________
________________________________________________________________________________________________________
________________________________________________________________________________________________________
________________________________________________________________________________________________________
________________________________________________________________________________________________________
13
Section 7 - Troubleshooting
Problem Possible Cause Possible Solutions
Little to no effect on trouble area of belt
Unit installed in wrong location Relocate in the center of problem area of belt
Incorrect tension on unit Lower height of unit to provide 1/2" - 1" (13-25mm) pressure on belt
Unit mis-adjusted Go to step 5 of Installation Instructions
Buildup on main roller Clean unit
Belt not correcting enough Unit mis-adjusted Go to step 5 of Installation Instructions
Belt moving over too much Unit mis-adjusted Go to step 5 of Installation Instructions
Roller not turningBuildup on main roller Clean unit
Roller bearing bad Replace roller
14 RBP1 Belt Positioner
Section 8 - Specs and CAD Drawings
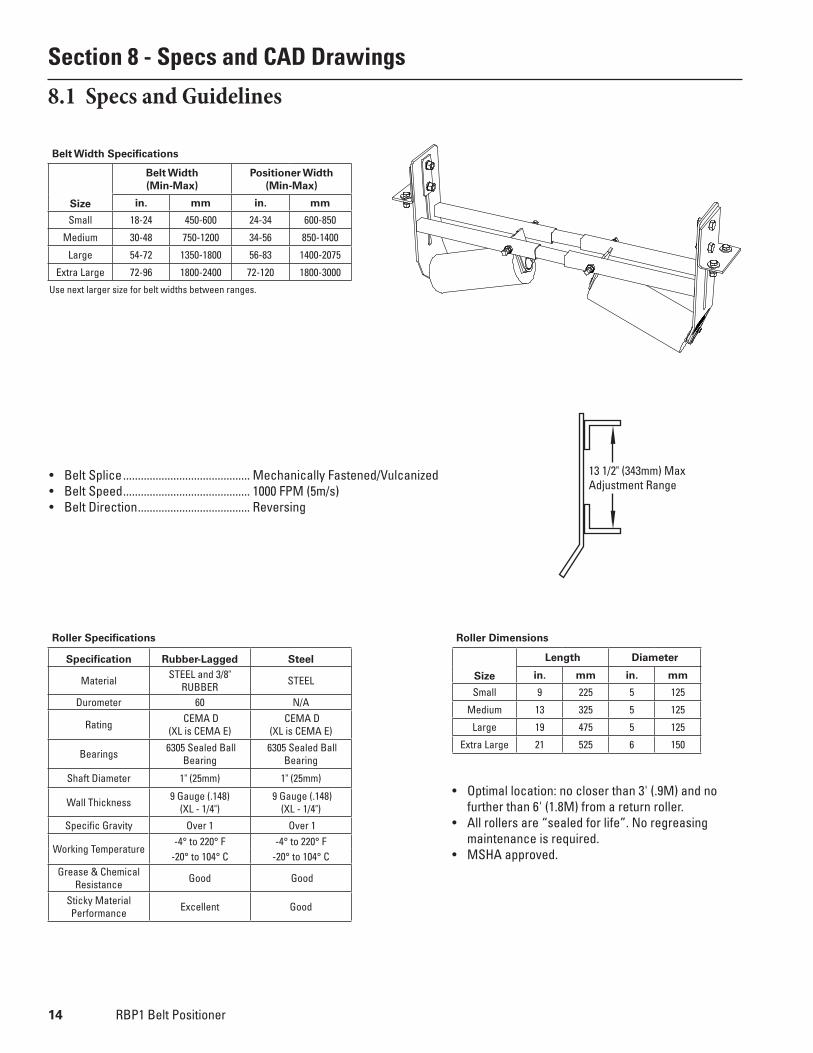
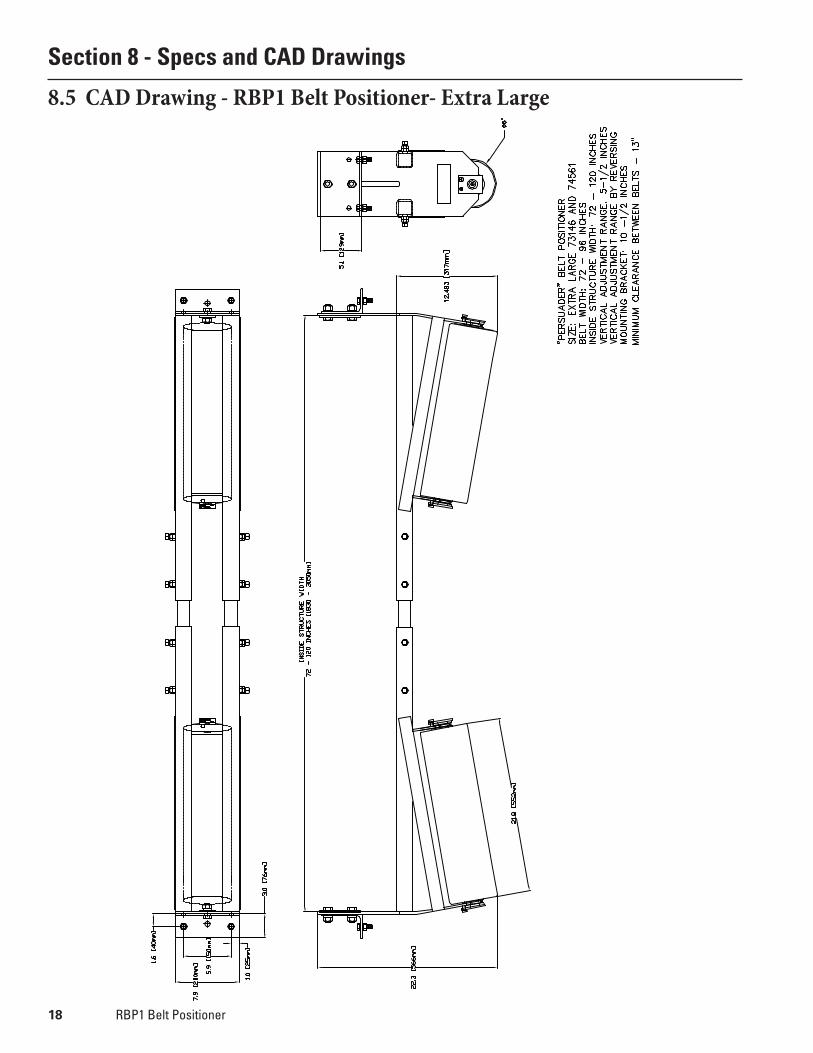
8.1 Specs and Guidelines
Application Guidelines• Belt Splice ........................................... Mechanically Fastened/Vulcanized• Belt Speed ........................................... 1000 FPM (5m/s)• Belt Direction ...................................... Reversing
Use next larger size for belt widths between ranges.
• Optimal location: no closer than 3' (.9M) and no further than 6' (1.8M) from a return roller.
• All rollers are “sealed for life”. No regreasing maintenance is required.
• MSHA approved.
13 1/2" (343mm) MaxAdjustment Range
Belt Width Specifications
Size
Belt Width (Min-Max)
Positioner Width (Min-Max)
in. mm in. mm
Small 18-24 450-600 24-34 600-850
Medium 30-48 750-1200 34-56 850-1400
Large 54-72 1350-1800 56-83 1400-2075
Extra Large 72-96 1800-2400 72-120 1800-3000
Roller Dimensions
Size
Length Diameter
in. mm in. mm
Small 9 225 5 125
Medium 13 325 5 125
Large 19 475 5 125
Extra Large 21 525 6 150
Roller Specifications
Specification Rubber-Lagged Steel
Material STEEL and 3/8" RUBBER STEEL
Durometer 60 N/A
Rating CEMA D (XL is CEMA E)
CEMA D (XL is CEMA E)
Bearings 6305 Sealed Ball Bearing
6305 Sealed Ball Bearing
Shaft Diameter 1" (25mm) 1" (25mm)
Wall Thickness 9 Gauge (.148) (XL - 1/4")
9 Gauge (.148) (XL - 1/4")
Specific Gravity Over 1 Over 1
Working Temperature-4° to 220° F -4° to 220° F
-20° to 104° C -20° to 104° CGrease & Chemical
Resistance Good Good
Sticky Material Performance Excellent Good
15
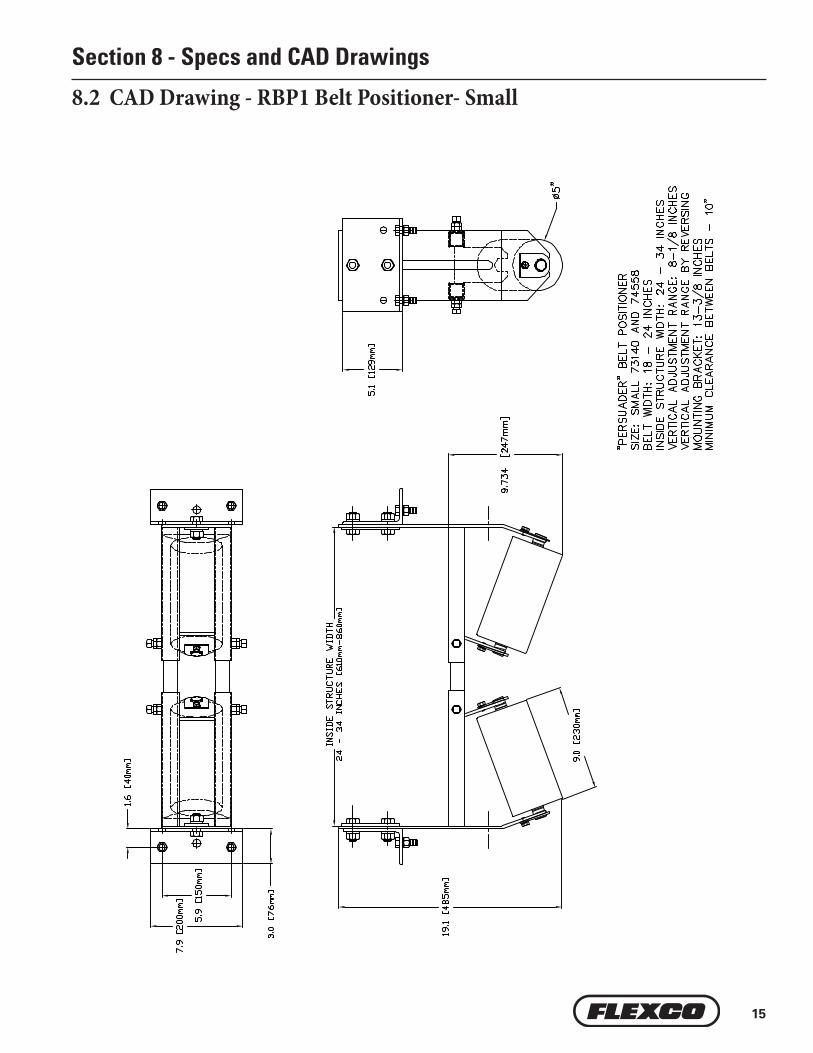
Section 8 - Specs and CAD Drawings
8.2 CAD Drawing - RBP1 Belt Positioner- Small
16 RBP1 Belt Positioner
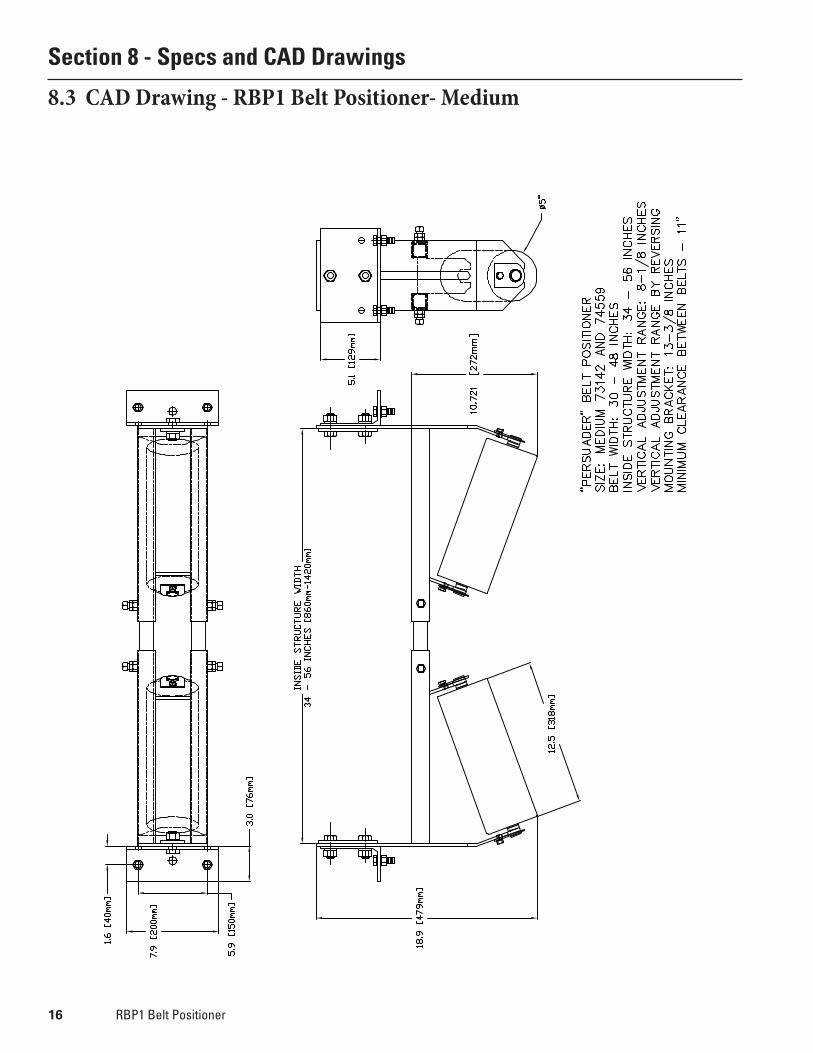
Section 8 - Specs and CAD Drawings
8.3 CAD Drawing - RBP1 Belt Positioner- Medium
17
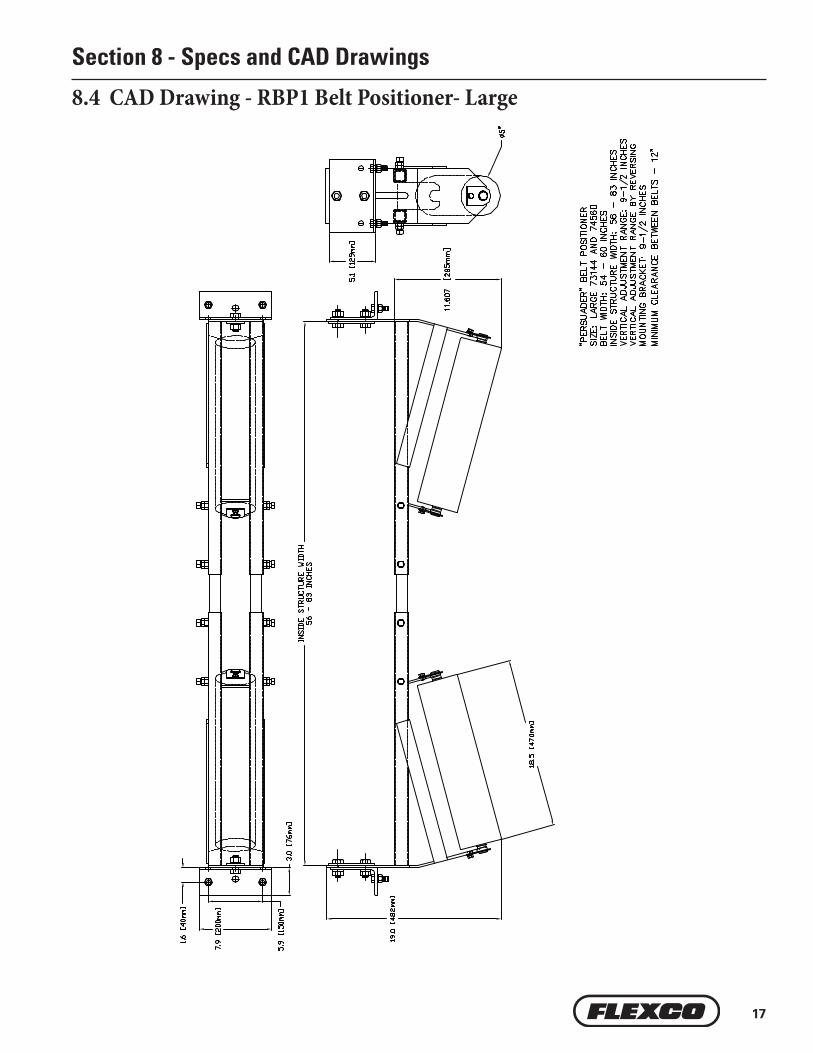
Section 8 - Specs and CAD Drawings
8.4 CAD Drawing - RBP1 Belt Positioner- Large
18 RBP1 Belt Positioner
Section 8 - Specs and CAD Drawings
8.5 CAD Drawing - RBP1 Belt Positioner- Extra Large
19
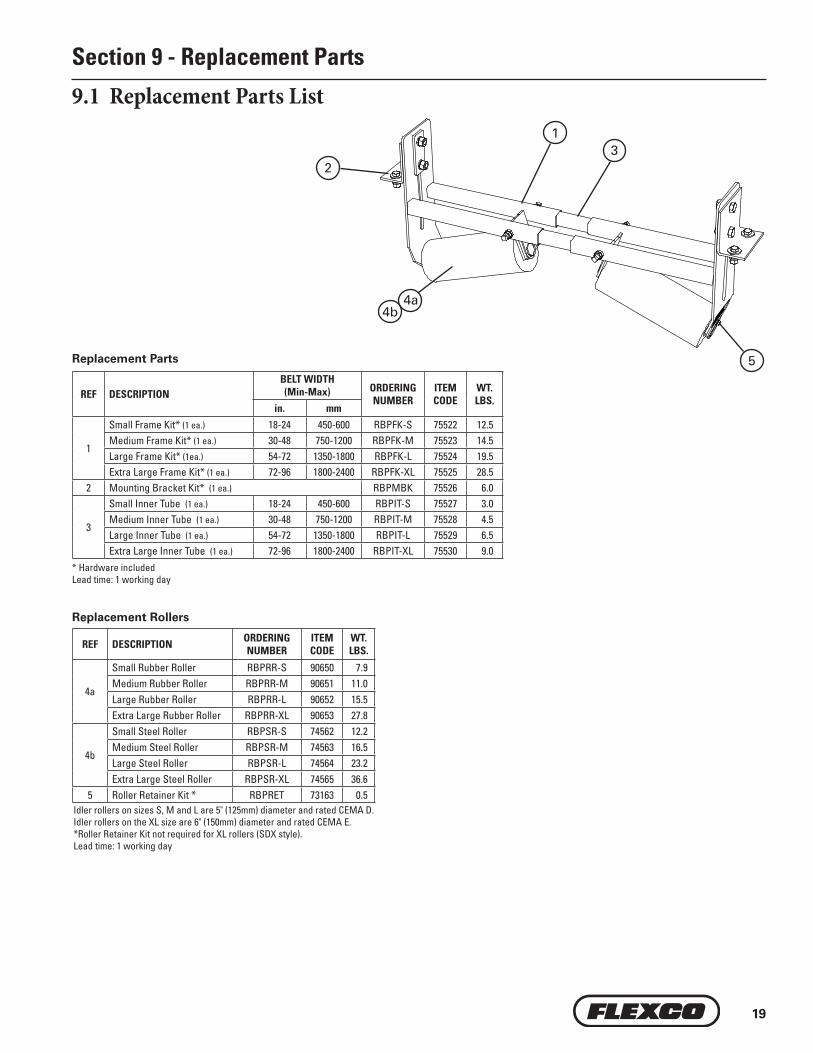
Section 9 - Replacement Parts
9.1 Replacement Parts List
Replacement Rollers
* Hardware includedLead time: 1 working day
Replacement Parts
Idler rollers on sizes S, M and L are 5" (125mm) diameter and rated CEMA D.Idler rollers on the XL size are 6" (150mm) diameter and rated CEMA E.*Roller Retainer Kit not required for XL rollers (SDX style).Lead time: 1 working day
4a
1
2
5
4b
3
REF DESCRIPTIONBELT WIDTH (Min-Max) ORDERING
NUMBERITEM CODE
WT. LBS.
in. mm
1
Small Frame Kit* (1 ea.) 18-24 450-600 RBPFK-S 75522 12.5 Medium Frame Kit* (1 ea.) 30-48 750-1200 RBPFK-M 75523 14.5 Large Frame Kit* (1ea.) 54-72 1350-1800 RBPFK-L 75524 19.5 Extra Large Frame Kit* (1 ea.) 72-96 1800-2400 RBPFK-XL 75525 28.5
2 Mounting Bracket Kit* (1 ea.) RBPMBK 75526 6.0
3
Small Inner Tube (1 ea.) 18-24 450-600 RBPIT-S 75527 3.0 Medium Inner Tube (1 ea.) 30-48 750-1200 RBPIT-M 75528 4.5 Large Inner Tube (1 ea.) 54-72 1350-1800 RBPIT-L 75529 6.5 Extra Large Inner Tube (1 ea.) 72-96 1800-2400 RBPIT-XL 75530 9.0
REF DESCRIPTION ORDERING NUMBER
ITEM CODE
WT. LBS.
4a
Small Rubber Roller RBPRR-S 90650 7.9 Medium Rubber Roller RBPRR-M 90651 11.0 Large Rubber Roller RBPRR-L 90652 15.5 Extra Large Rubber Roller RBPRR-XL 90653 27.8
4b
Small Steel Roller RBPSR-S 74562 12.2 Medium Steel Roller RBPSR-M 74563 16.5 Large Steel Roller RBPSR-L 74564 23.2 Extra Large Steel Roller RBPSR-XL 74565 36.6
5 Roller Retainer Kit * RBPRET 73163 0.5

21
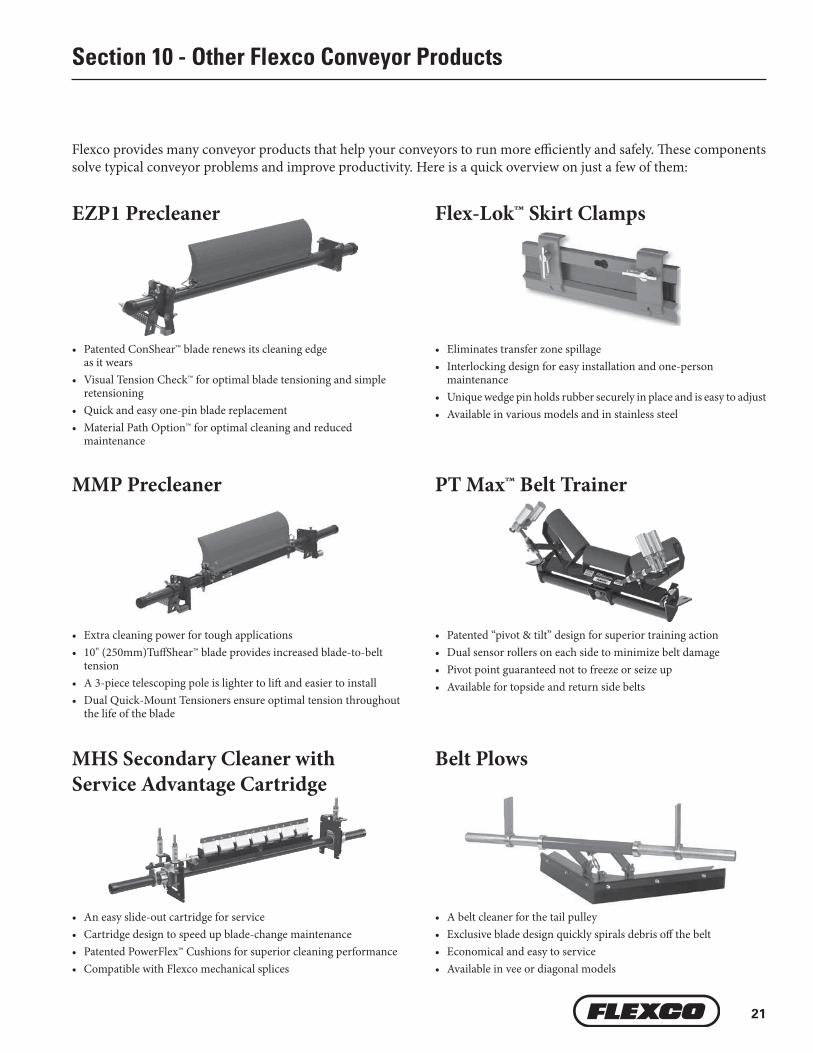
Section 10 - Other Flexco Conveyor Products
Flexco provides many conveyor products that help your conveyors to run more efficiently and safely. These components solve typical conveyor problems and improve productivity. Here is a quick overview on just a few of them:
• An easy slide-out cartridge for service• Cartridge design to speed up blade-change maintenance• Patented PowerFlex™ Cushions for superior cleaning performance• Compatible with Flexco mechanical splices
MHS Secondary Cleaner with Service Advantage Cartridge
• Eliminates transfer zone spillage• Interlocking design for easy installation and one-person
maintenance• Unique wedge pin holds rubber securely in place and is easy to adjust• Available in various models and in stainless steel
• Patented “pivot & tilt” design for superior training action• Dual sensor rollers on each side to minimize belt damage• Pivot point guaranteed not to freeze or seize up• Available for topside and return side belts
• A belt cleaner for the tail pulley• Exclusive blade design quickly spirals debris off the belt• Economical and easy to service• Available in vee or diagonal models
PT Max™ Belt Trainer
Belt Plows
• Patented ConShear™ blade renews its cleaning edge as it wears
• Visual Tension Check™ for optimal blade tensioning and simple retensioning
• Quick and easy one-pin blade replacement• Material Path Option™ for optimal cleaning and reduced
maintenance
Flex-Lok™ Skirt Clamps
MMP Precleaner
• Extra cleaning power for tough applications• 10" (250mm)TuffShear™ blade provides increased blade-to-belt
tension• A 3-piece telescoping pole is lighter to lift and easier to install• Dual Quick-Mount Tensioners ensure optimal tension throughout
the life of the blade
EZP1 Precleaner

The Flexco Vision
To become the leader in maximising belt conveyor productivity for our customers worldwide
through superior service and innovation.
2525 Wisconsin Avenue • Downers Grove, IL 60515-4200 • USA Tel: (630) 971-0150 • Fax: (630) 971-1180 • E-mail: [email protected]
Visit www.flexco.com for other Flexco locations and products.
©2018 Flexible Steel Lacing Company. 12/10/18. For reorder: X2510