Raptor University Student...
37
Raptor University Student Admin Training RAPTOR TECHNOLOGIES, LLC Instructor:
Transcript of Raptor University Student...

Raptor UniversityStudent Admin Training
RAPTOR TECHNOLOGIES, LLC
Instructor:

Learning Objectives
This presentation will teach the attendee the following topics to get you started using the Raptor Student module:
➢Adding Students
➢Manually Add Students
➢Import Students
➢ Approved Guardianships
➢ Import Guardians
➢ Manually Add Guardianships
➢ Student Sign In/Sign Out
➢ Student Reports
Agenda
This presentation will cover the following topics to familiarize you with the Raptor Student module:
➢ Navigating Raptor
➢ Log In/Out of the Raptor Software
➢ Understanding the Raptor Interface
➢ User Profile
➢ Student Dashboard
➢Adding Students
➢Manually Add Students
➢Import Students
➢ Approved Guardianships
➢ Import Guardians
➢ Manually Add Guardianships
➢ Student Sign In/Sign Out
➢ Student Reports

Log In and Log Out
1. In your browser, enter https://apps.raptortech.com.
2. On the Raptor Login screen, enter your assigned Username and Password, and then click Log in to Raptor.
Maintenance Notifications
If Raptor is scheduled to perform maintenance on the application, a notification will be displayed when you log in. The date and time the maintenance is scheduled will be listed.
Click Continue to complete the login.Change Password for First Time Users
1. If your district requires users to change their password after the first login, you will be prompted to change your password.
2. Enter a new password in the Password field.
Note: The password must contain a minimum of 8 characters and must include 1 uppercase character and 1 special character.
3. Re-enter the password in the Confirm New Password field and click Save New Password.
Log Out of Raptor
To log out of Raptor, select the Logout link in the upper area of the navigation menu.

Request Forgotten Password/Username
Forgotten Password
1. On the Raptor Log In screen, select the Forgot Password link, enter your Username and click Send Reset Email.
2. Open the email and click the Please click herelink to confirm your request and reset your password.
3. On the Password Reset screen, enter a new Password, re-enter to confirm it, and then click Save New Password.
The Raptor Log In screen displays with a message indicating your password has been changed. You can now log in to Raptor with your new password.
Forgotten Username
If you have forgotten your user name, select the Forgot Username link. A message displays informing you that your user name is your email address.

Understanding Raptor Interface
The Raptor user interface consists of the following main elements:
▪ Building Selector – Used to select the building for which you are performing tasks
▪ User Profile/Logout – Displays currently signed in user and link to access their Profile, and Log Out link
▪ Navigation Menu – Used to select the workspace in which you want to work
▪ Workspace – Area that displays in right pane when a menu item is select in the Navigation menu

User Profile
In the upper portion of the navigation pane, click the Profile link just below the currently signed in user’s name to open the Profile workspace.
From this workspace, you can:
▪ Upload a photo
▪ Modify your user informationand preferences
▪ Edit your contact information(if you have been set up as a contact)
▪ Change your password.

User Profile, cont.
Upload Your Photo
1. Select Profile in the navigation menu (just below your name).
2. On the Profile tab, click Select File.
3. On the File Upload dialog, navigate to the photo to be uploaded and click Open. The photo is uploaded and will now display next to your name when logged into Raptor.
Modify User Information
You can update your name and title and view other information that is included in your user profile
from the Profile tab.
1. On the Profile tab, you can modify the following information:
▪ First Name and Last Name
▪ Preferred Contact Method – If you are defined as a contact, you can modify your preferred
method of contact. Otherwise, this field does not display.
▪ Title – Select your title from the drop-down list.
▪ Primary Building – If you are defined as a contact, you can modify the primary building
assigned to your account. Otherwise, this field does not display.
▪ Text Messaging Phone – If you are defined as a contact, you can modify your phone number
to be used for text message notifications. Otherwise, this field does not display.
2. Click Save.

User Profile—User Preferences
The Preferences tab on the Profile workspace is used to specify certain user preferences.
1. Click the Preferences tab and specify the following preferences:
▪ Default Number of Grid Rows – Select the number of grid rows from the drop-down list. This is the default number of rows that displays on each page in the user interface based on the size of your monitor.
▪ Building Preference* – For users who have access to more than one building, select the building that displays as your default. When you log in to Raptor, this building will display in the Building Selector.
▪ Time Zone* – Select the time zone for which you would like to view data (typically for customers who have buildings in two or more time zones).
2. Click Save.

User Profile—Change Password
Users can change their password at any time from the Profile workspace.
1. Click the Change Password tab and enter your Current Password in the text field.
2. Enter a New Password in the text field and then re-enter it in the Confirm New Password field.
Note: The password must contain a minimum of 8 characters and must include 1 uppercase character and 1 special character.
3. Click Change Password.

Student Dashboard
▪ Student Sign-Out By Destination (This Week) – A graphical view of student sign-out events based on reason. The top five reasons are shown and the remaining reasons display as Other.
▪ Student Sign-In By Day of Week (This Week) – A graphical view of excused and unexcused sign-in events by day of week.

Students WorkspaceYou can manage the students in your building using the Students workspace. Select Modules > Students in the navigation menu and then click the tab in the Students workspace for the tasks you want to perform.
Print Temporary ID
Click the icon in the Options column to print a temporary ID badge for the student.
Reset Tardy Count
Click the Reset Tardy Count button to reset the tardy count to zero (0) for all students.
Note: Tardy count can be reset at the district level, building level, or individual student level.

Manually Add Students
1. In the navigation menu, select Modules > Students.
2. From the Building selector, select the school the student attends.
3. On the All Students workspace, click Add Student.

Add Students, cont.4. Enter the following information. Required fields are indicated with an asterisk (*).
▪ First Name* – Enter the student’s first name.
▪ Middle Name – Optionally enter the student’s middle name.
▪ Last Name* – Enter the student’s last name.
▪ Date of Birth – Click the icon and select the student’s date of birth from the calendar.
▪ ID Type* – This field is set to Student ID and cannot be changed.
▪ ID Number* – Enter the number that is on the ID Type.
Note: If the 1D barcode reader is used for student sign-in and sign-out on the Kiosk, the barcode ID is referenced from the ID Number field (normally, the student's ID Number is the same as the 1D barcode on their student ID card). ID numbers must be unique.
▪ Grade* – Select the grade level for the student from the drop-down list.
▪ Gender – Optionally, select the student’s gender (for future identification purposes).
▪ Allow Self Sign Out – Select Yes or No from the drop-down list to indicate whether the student is allowed to sign themselves out of the building.
5. In the Buildings area, the currently selected school should be displayed. To add additional schools (buildings) the student may attend, click Add Building and select the building name from the drop-down list.
6. Click Save.

Import StudentsThe Import Students utility enables you to import a list of students into the Raptor system. It also includes the ability for unattended import of students by creating a manifest file that includes information about the field mapping and file to be imported.
Notes: To use this feature, you must first create an Excel spreadsheet or comma delimited file that contains the required information. The use of special characters in an Excel formatted import file may cause unexpected results.
1. In the navigation menu, select Modules > Students.
2. From the Building Selector, choose the building where the student information will be imported.
3. On the All Students workspace, click Import and choose Import Students.
4. Click Select File, navigate to the file on your computer, select the Excel or CSV file and click Open.
5. If you used Excel and the file contains multiple worksheets, choose the worksheet that contains the student information from the Select Worksheet drop-down list.
The file can contain the following Student information to be imported:▪ First Name*▪ Last Name*▪ Middle Name▪ Date of Birth▪ ID Number*▪ Gender▪ Grade▪ Self Sign Out (true/false) – if
not mapped, defaults to false)*Indicates required information.
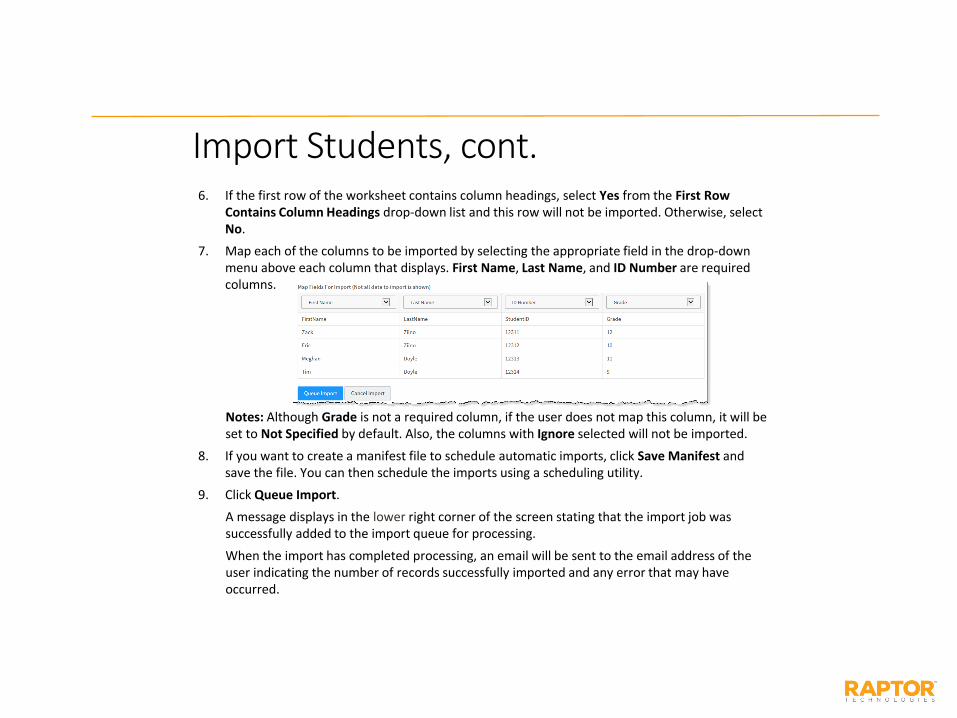
Import Students, cont.6. If the first row of the worksheet contains column headings, select Yes from the First Row
Contains Column Headings drop-down list and this row will not be imported. Otherwise, select No.
7. Map each of the columns to be imported by selecting the appropriate field in the drop-down menu above each column that displays. First Name, Last Name, and ID Number are required columns.
Notes: Although Grade is not a required column, if the user does not map this column, it will be set to Not Specified by default. Also, the columns with Ignore selected will not be imported.
8. If you want to create a manifest file to schedule automatic imports, click Save Manifest and save the file. You can then schedule the imports using a scheduling utility.
9. Click Queue Import.
A message displays in the lower right corner of the screen stating that the import job was successfully added to the import queue for processing.
When the import has completed processing, an email will be sent to the email address of the user indicating the number of records successfully imported and any error that may have occurred.

Import Student Photos
Student photos can be imported to display in their student detail information. You can import a single student photo or multiple student photos.
Note: To use this feature, you must first create a compressed zip file that contains the student photos you want to import.
▪ The student photos should be approximately 640 x 480 pixels (H x W) and saved as a .jpg file.
▪ The file name should be the student’s ID number (for example, 1234567.jpg).
▪ Student photo files must be in a compressed zip format. The maximum size of the zip file is 50 GB.
Perform the following steps to import student photos:
1. On the All Students workspace, click Import > Student Photos.
2. Click Select Files.
3. Navigate to the zipped file, select it and click Open.
4. If you want to create a manifest file to schedule automatic imports, click Save Manifest and save the file. You can then schedule the imports using a scheduling utility.
5. Click Queue Import.
A message displays in the lower right corner of the screen stating that the import job was successfully added to the import queue for processing.
When the import has completed processing, an email will be sent to the email address of the user indicating the number of photos successfully imported and any error that may have occurred.

Import Guardians
The Import utility enables you to import a list of guardians and associate them with the students that have already been entered in Raptor.
Note: To use this feature, you must first create an Excel spreadsheet or comma delimited file that contains the required information.
IMPORTANT!
If the guardian is associated with multiple students (has more than one child in a school), it is important that the import file also includes the guardian’s Date of Birth to avoid having duplicate records created for the guardian during the import process. A row containing the guardian information must be created for each student.
Perform the following steps to import guardians:
1. In the navigation menu, select Modules > Students and then click the All Students tab.
2. From the Building Selector, choose the building where the guardian information will be imported.
3. On the All Students workspace, click Import and choose Guardians from the drop-down list.
4. Click Select File, navigate to the file on your computer and select it, and then click Open.
5. If you used Excel and the file contains multiple worksheets, choose the worksheet that contains the guardian information from the Select Worksheet drop-down list.
6. If the first row of the worksheet contains column headings, select Yes from the First Row Contains Column Headings drop-down list. Otherwise, select No.

Import Guardians, cont.
7. Map each of the columns to be imported by selecting the appropriate field in the drop-down menu above each column that displays.
Note: The columns with Ignore selected with not be imported.
8. If you want to create a manifest file to schedule automatic imports, click Save Manifest and save the file. You can then schedule the imports using a scheduling utility.
9. Click Queue Import.
A message displays in the lower right corner of the screen stating that the import job was successfully added to the import queue for processing.
When the import has completed processing, an email will be sent to the email address of the user indicating the number of records successfully imported and any error that may have occurred.

View and Modify Student DetailsTo view the details about a specific student:
1. In the navigation menu, select View Modules > Students.
2. From the Building Selector, choose the school the student attends.
3. On the All Students workspace, click the icon to expand the Student Detail and view or modify the information in the student record.
4. Click Save to update the record.

View/Modify Student Details, cont.4. Modify any of the following information in the student record (asterisk * indicates a required field):
▪ First Name*
▪ Middle Name
▪ Last Name*
▪ Date of Birth
▪ ID Type* – This field is set to Student ID and cannot be changed.
▪ ID Number* – The identification number associated with the ID Type.
▪ Grade* – Select the grade the student is currently in.
▪ Gender – The student’s gender. Select Female, Male or Unspecified.
▪ Allow Self-Sign Out – Select True or False to indicate whether the student can sign out without a guardian being present using the Kiosk or Front Desk.
▪ Buildings* – The buildings where the student may sign in and sign out.
5. Click Save to update the record.

View Tardy and Temporary ID CountView Tardy and Temporary ID Count
In the Tardy and Temporary ID Count area on the Student Detail workspace, users can view the number of times the student has been tardy (unexcused or excused), and the number of temporary IDs that have been issued to the student since the last reset.
Reset Tardy Count
Click Reset Tardy Count to reset the tardy count to zero (0) for the selected students.
Note: Tardy count can also be reset at the district level and building level.

View or Add Guardian InformationUse the Guardians area on the Student Detail workspace to view the details for the guardian who is approved to sign out the selected student, and to modify the guardian information or add a guardian.
Note: You can also import guardians from the All Students workspace (Import > Guardians).
Add Guardian
1. In the navigation menu, select Modules > Students.
2. From the Building Selector, select the school the student attends.
3. On the All Students workspace, click the icon next to the student’s name to expand the Student Detail.
4. In the Guardians area, click Add Guardian.

5. Use one of the following methods to enter the guardian’s information into Raptor:
▪ Click Scan to scan the guardian’s ID and enter the information into the system.
▪ For guardians who have been previously scanned into the system, enter their name and click Find.
▪ Click Manual and enter the information on the guardian form.
Add Guardian, cont.
If you are using manual entry, enter the following information.
▪ First Name* – Enter the guardian’s first name.
▪ Middle Name – Optionally enter the guardian’s middle name.
▪ Last Name* – Enter the guardian’s last name.
▪ Date of Birth – Click the icon and select the guardian’s date of birth from the calendar.
IMPORTANT: If the guardian is associated with multiple students (has more than one child in a school), it is important that the manually added guardian’s information includes their Date of Birth. Without the date of birth, the Raptor system does not have enough information about the guardian to link subsequent manual entries to the same guardian.
▪ ID Type – Select the type of government-issued identification used (Driver License or Passport).
▪ ID Number – Enter the number that is on the ID Type.
▪ Relationship* – Select how the guardian is related to the student from the drop-down list.
6. Click Save.
Add Guardian, cont.

View Student Activity HistoryUse the Activity History area on the Student Detail workspace to view details for all sign in events, sign out events, and temporary IDs created for the student.
By default, the Date/Time, Event Type, Building Name and Destination columns display. From the column menu, you can also choose to display the Event Method and Notes columns.
Note: The Event Method and Guardian Name are hidden by default.

Student ActivityUse the Activity tab to view student sign in and sign out activity for the current day, such as the name of the student and their ID number, the time they signed in/signed out, when a temporary ID is created, destination (reason for sign in/sign out), method for sign in/sign out, and guardian name.

Student Sign-In ProceduresUse the Sign In/Sign Out workspace to sign in and sign out students entering and leaving your building.
1. Select Sign In/Sign Out in the navigation menu. By default, the Sign In button is selected.
2. In the Find text box, enter First and/or Last Name or Student ID and then click Find.
Note: If the system finds the exact match during the search, the student's information displays.
If the system returns multiple matches, find the name in the Search Results list and then click Sign In next to the name of the person you are signing in.

Student Sign-In Procedures, cont.3. From the Destination/Reason drop-down list, select the reason for late sign in.
4. Click Submit & Print to sign in and print a tardy badge, or click Submit to enter the information into the system without printing a badge.

Sign Out StudentsTo sign out students when they leave the building, perform the following steps:
1. From the navigation menu, select Sign In/Sign Out and then click Sign Out.
2. Click Student.
3. In the Find text box, type the First Name, Last Name or ID Number and then click Find.
If the system finds the exact match during the search, the person's information displays.
4. If the system returns multiple matches, find the name in the Search Results list and then click Sign Out next to their name.
Use one of the following methods to complete the student sign out process.
▪ Guardian Pickup
▪ One-Time Pickup
▪ Self-Sign Out

Sign Out Students, cont.Guardian Pickup
1. If the person picking up the student is listed in the Guardian area, select the check box next to the name of the person signing out the student and click Guardian Sign-Out.
2. If the selected guardian does not have a complete record, a window displays informing you that the guardian’s record is incomplete. Click one of the following buttons to continue the sign out:
▪ Scan ID – Insert the guardian’s ID in the scanner and click Scan ID. If there is a problem with the scan, the user can click Rescan ID or click Edit to modify the guardian’s record.
▪ Continue Without Scanning (the next time the guardian picks up the student, the user will be asked again to scan their license.)
The Guardian Details workspace displays where the user can update the guardian details or sign out additional students.
• If the guardian is signing out additional students at the same time (and is authorized to sign out), click Add Students and enter the name(s) of the students the guardian is authorized to sign out.
• Select the check box next to the name of each student the guardian is signing out and then click Continue.
▪ Cancel – Exit the dialog and select a different guardian or perform a One-Time Pickup.
3. Select the Destination/Reason for sign out from the drop-down list and then click Submit & Print or Submit.
Note: If Submit & Print is selected, a Visitors badge is printed that includes the guardian’s name and the name of the student(s) being signed out.

Sign Out Students, cont.One-Time Pickup
1. If the person picking up the student is not listed in the Guardian area, click One-Time Pickup.
2. Specify the person who is picking up the student by scanning their ID, entering their name in the Find text box, or manually entering their information.
3. Select the Destination/Reason for sign out from the drop-down list and then click Submit & Print or Submit.
Self Sign-Out
If the student has permission to perform Self Sign-Out, their profile will display Yes in the Allow Self Sign-Out field. In this scenario, perform the following steps to sign out the student:
1. Click Self Sign-Out.
2. Select the appropriate Destination/Reason from the drop-down list.
3. Click Submit & Print or Submit.
Note: The Self Sign-Out button will not display for students when the Allow Self Sign-Out field is set to No.

Delayed Sign In and Sign Out
If you are unable to sign in or sign out due to equipment issues or internet connection issues, you can use the Delayed Entry feature to manually enter the sign-in or sign-out date and time. This feature allows users with the Can Sign In Students permission to record the actual sign-in or sign-out times but the entry is delayed until the system is available.
Note: This feature is not visible at the All Buildings level.
1. Select the school from the Building selector.
2. From the navigation menu, select Modules > Students and then click the Delayed Entry tab.
3. Enter the student’s First Name and/or Last Name or ID Number in the text field, click Find.
4. Select Sign In or Sign Out next to the student’s name.
5. Complete the following information:
▪ Sign-In/Sign-Out Date/Time – Click the icon to select the date and then click the icon to select the time that the student actually signed in or signed out.
▪ Destination/Reason – From the drop-down list, select the reason the student is signing in or signing out.
6. Click Submit.
A Delayed Entry Successful message displays in the lower right corner of the screen.
Student Reports
You can access Student reports from the Students workspace or the Reports workspace:
▪ To access from the Students workspace, select Students in the navigation menu and then click the Reports tab.
▪ To access from the Reports workspace, select Reports in the navigation menu and then click the Students tab.
The following Student reports are available:
▪ Active Students – All students who are currently active, including student ID, grade, excused and unexcused tardy counts, and number of temporary IDs issues.
▪ Temporary IDs – All students who have been issued a temporary ID, including date and time.
▪ Tardy Count – All students who have signed in tardy, including the total excused or unexcused tardy counts.
▪ Student Sign-In/Sign-Out History – A history of all student sign-in and sign-out instances, including the reason.

Support
The Support menu item launches the Raptor Support Center where you can find Self Help Resources for using Raptor.
➢ Raptor Support Center
➢ Self Help Resources

Raptor Support Center
The Support menu item in the navigation menu launches the Raptor Support Center where you can find Self Help Resources for using Raptor.
Contact Us Via EmailTo contact the Raptor Support team through email:1. Click Send Email To Support.2. Complete the information on the form and then click Send.

Self Help Resources
Raptor Self Help Resources are available to enhance your understanding and use of the product:
▪ Getting Started – Supported Environments, Raptor Hardware Service Installation, and Raptor CLI Import Tool
▪ Knowledge Base – not yet available
▪ Product News – Release Notes and Recorded Release Webinars
▪ Raptor University – Documentation and Raptor University Training Courses
▪ Community – Submit your feedback and future user forum