
Rapid Eye Remote View Operator Guide
150
Document 800-07767 – Rev A – 02/11 Remote View Operator Guide Rapid Eye TM Digital Video Recorder
Transcript of Rapid Eye Remote View Operator Guide

Document 800-07767 – Rev A – 02/11
Remote ViewOperator Guide
Rapid EyeTM
Digital Video Recorder


Remote ViewOperator Guide

Revisions
Issue Date Revisions
A 02/11 New document, based on 800-02951V3, rev A for Rapid Eye Multi-Media, V9.
4

Rapid Eye Remote View Operator Guide
Document 800-07767 Rev A 502/11
ContentsAbout This Document . . . . . . . . . . . . . . . . . . . . . . . . . . . . . . . . . . . . . . . . . . . . 17
Overview of Contents. . . . . . . . . . . . . . . . . . . . . . . . . . . . . . . . . . . . . . . . . . . 17Warranty and Service. . . . . . . . . . . . . . . . . . . . . . . . . . . . . . . . . . . . . . . . . . . 18Related Documents . . . . . . . . . . . . . . . . . . . . . . . . . . . . . . . . . . . . . . . . . . . 18Typographical Conventions . . . . . . . . . . . . . . . . . . . . . . . . . . . . . . . . . . . . . . . 19
1 Running View . . . . . . . . . . . . . . . . . . . . . . . . . . . . . . . . . . . . . . . . . . . . . 21
Starting View . . . . . . . . . . . . . . . . . . . . . . . . . . . . . . . . . . . . . . . . . . . . . . . . 21The Sites Tab . . . . . . . . . . . . . . . . . . . . . . . . . . . . . . . . . . . . . . . . . . . . . . . . 22
Changing the Language . . . . . . . . . . . . . . . . . . . . . . . . . . . . . . . . . . . . . 22Selecting a Multi-Media Site . . . . . . . . . . . . . . . . . . . . . . . . . . . . . . . . . . . 23Quick Search for Sites . . . . . . . . . . . . . . . . . . . . . . . . . . . . . . . . . . . . . . 23Displaying Site Properties . . . . . . . . . . . . . . . . . . . . . . . . . . . . . . . . . . . . 24Site Properties Reference. . . . . . . . . . . . . . . . . . . . . . . . . . . . . . . . . . . . . 24Obtaining the Latest Site List . . . . . . . . . . . . . . . . . . . . . . . . . . . . . . . . . . . 25Time Limit when Using Sites . . . . . . . . . . . . . . . . . . . . . . . . . . . . . . . . . . . 25Your Account Information. . . . . . . . . . . . . . . . . . . . . . . . . . . . . . . . . . . . . 25
Customizing the View Window . . . . . . . . . . . . . . . . . . . . . . . . . . . . . . . . . . . . . . . 25Minimizing the View Application . . . . . . . . . . . . . . . . . . . . . . . . . . . . . . . . . 26Sites Tab Toolbar Reference . . . . . . . . . . . . . . . . . . . . . . . . . . . . . . . . . . . 26
Honeywell Video Analytics . . . . . . . . . . . . . . . . . . . . . . . . . . . . . . . . . . . . . . . . . 27More About View . . . . . . . . . . . . . . . . . . . . . . . . . . . . . . . . . . . . . . . . . . . . . . 28
2 Live Video . . . . . . . . . . . . . . . . . . . . . . . . . . . . . . . . . . . . . . . . . . . . . . . 29
Viewing Live Video . . . . . . . . . . . . . . . . . . . . . . . . . . . . . . . . . . . . . . . . . . . . . 29Starting a Live Session . . . . . . . . . . . . . . . . . . . . . . . . . . . . . . . . . . . . . . 29Selecting Live Video Feeds by Camera . . . . . . . . . . . . . . . . . . . . . . . . . . . . . 30
Tear-Away Player . . . . . . . . . . . . . . . . . . . . . . . . . . . . . . . . . . . . . . . . . . . . . . 31Reopening a Closed Camera Window . . . . . . . . . . . . . . . . . . . . . . . . . . . . . . 31Toggling the Size of a Camera Window/Data Window. . . . . . . . . . . . . . . . . . . . . . 32Setting a Default Video Quality for All Camera Windows . . . . . . . . . . . . . . . . . . . . 32Setting the Video Quality on One Camera . . . . . . . . . . . . . . . . . . . . . . . . . . . . 33
Setting the Multi-Media Time Reference . . . . . . . . . . . . . . . . . . . . . . . . . . . . . . . . . . 33Checking the Windows Date and Time on an Operator’s PC . . . . . . . . . . . . . . . . . . 34Temporarily Changing a Time Reference . . . . . . . . . . . . . . . . . . . . . . . . . . . . 34
Resolution Gauge and Recording Indicator for Live Video . . . . . . . . . . . . . . . . . . . . . . . . 34Recording Indicator on the Resolution Gauge . . . . . . . . . . . . . . . . . . . . . . . . . . 35Sizing a Live Camera Window Optimally . . . . . . . . . . . . . . . . . . . . . . . . . . . . . 36
Other Settings for Enhancing Video . . . . . . . . . . . . . . . . . . . . . . . . . . . . . . . . . . . . 36Customizing the Initial Size of a Camera Window . . . . . . . . . . . . . . . . . . . . . . . . 36
Ending a Live Session . . . . . . . . . . . . . . . . . . . . . . . . . . . . . . . . . . . . . . . . . . . 37Customizing Windows for a PC Monitor’s Settings . . . . . . . . . . . . . . . . . . . . . . . . . . . . 37
Larger Monitors and Microsoft Windows . . . . . . . . . . . . . . . . . . . . . . . . . . . . . 38Changing a PC Monitor’s Refresh Rate . . . . . . . . . . . . . . . . . . . . . . . . . . . . . 38Microsoft Dual View and Rapid Eye View Software . . . . . . . . . . . . . . . . . . . . . . . 39
Troubleshooting Video at an Operator’s PC . . . . . . . . . . . . . . . . . . . . . . . . . . . . . . . . 39

6
Contents
Troubleshooting Cameras in the Environment . . . . . . . . . . . . . . . . . . . . . . . . . . 40Pan, Tilt and Zoom . . . . . . . . . . . . . . . . . . . . . . . . . . . . . . . . . . . . . . . . . . . . . 40
Controlling a PTZ Camera . . . . . . . . . . . . . . . . . . . . . . . . . . . . . . . . . . . . 41Toggling Between Zonal Mode and Pull Mode . . . . . . . . . . . . . . . . . . . . . . . . . 41PTZ Pull Mode and Rubber Band Control . . . . . . . . . . . . . . . . . . . . . . . . . . . . 42Using Zonal Mode . . . . . . . . . . . . . . . . . . . . . . . . . . . . . . . . . . . . . . . . 43PTZ Dartboard Command and Control. . . . . . . . . . . . . . . . . . . . . . . . . . . . . . 43Controlling a PTZ Camera Using the Dartboard . . . . . . . . . . . . . . . . . . . . . . . . . 44Choosing a Preset for a PTZ Camera . . . . . . . . . . . . . . . . . . . . . . . . . . . . . . 45PTZ Tours and PTZ Vectors . . . . . . . . . . . . . . . . . . . . . . . . . . . . . . . . . . . 46Privacy Zones . . . . . . . . . . . . . . . . . . . . . . . . . . . . . . . . . . . . . . . . . . . 46
PTZ Camera Position After a Session Closes . . . . . . . . . . . . . . . . . . . . . . . . . . . . . . . 47PTZ and Motion Search. . . . . . . . . . . . . . . . . . . . . . . . . . . . . . . . . . . . . . 47
Sharing Live Sessions from One Unit . . . . . . . . . . . . . . . . . . . . . . . . . . . . . . . . . . . 47Simultaneous Use of Many Units by One Operator . . . . . . . . . . . . . . . . . . . . . . . 48
3 Recorded Video . . . . . . . . . . . . . . . . . . . . . . . . . . . . . . . . . . . . . . . . . . . . 49
Viewing Recorded Video . . . . . . . . . . . . . . . . . . . . . . . . . . . . . . . . . . . . . . . . . . 49Selecting a Site . . . . . . . . . . . . . . . . . . . . . . . . . . . . . . . . . . . . . . . . . . 49Starting a Retrieval Session . . . . . . . . . . . . . . . . . . . . . . . . . . . . . . . . . . . 49Setting a Start Date and Time . . . . . . . . . . . . . . . . . . . . . . . . . . . . . . . . . . 50Entering the Start Date and Time of Recorded Video . . . . . . . . . . . . . . . . . . . . . . 50Setting the Date of Retrieval with the Calendar Utility . . . . . . . . . . . . . . . . . . . . . . 50
Searching for Events to Obtain Video . . . . . . . . . . . . . . . . . . . . . . . . . . . . . . . . . . . 51Playback Speed Slider . . . . . . . . . . . . . . . . . . . . . . . . . . . . . . . . . . . . . . . . . . . 52
Scanning a Recorded Video Feed Quickly. . . . . . . . . . . . . . . . . . . . . . . . . . . . 52Slowing Down and Pausing a Recorded Video Feed . . . . . . . . . . . . . . . . . . . . . . 52
Skipping Through Recorded Video . . . . . . . . . . . . . . . . . . . . . . . . . . . . . . . . . . . . 52Reviewing Recorded Video of an Event Seen Moments Ago . . . . . . . . . . . . . . . . . . 53
Going To a Specific Time of Recorded Video . . . . . . . . . . . . . . . . . . . . . . . . . . . . . . . 53First Available Video, Sound or Data . . . . . . . . . . . . . . . . . . . . . . . . . . . . . . . 53
Other Playback Options . . . . . . . . . . . . . . . . . . . . . . . . . . . . . . . . . . . . . . . . . . 54Player . . . . . . . . . . . . . . . . . . . . . . . . . . . . . . . . . . . . . . . . . . . . . . . 54Image Options . . . . . . . . . . . . . . . . . . . . . . . . . . . . . . . . . . . . . . . . . . 55Video Production . . . . . . . . . . . . . . . . . . . . . . . . . . . . . . . . . . . . . . . . . 56
Resolution of Recorded Video . . . . . . . . . . . . . . . . . . . . . . . . . . . . . . . . . . . . . . . 56Sizing a Camera Window Optimally for a Resolution . . . . . . . . . . . . . . . . . . . . . . 56Resolution Gauge for Recorded Video . . . . . . . . . . . . . . . . . . . . . . . . . . . . . . 57
Video Recorded Using Boosted Settings . . . . . . . . . . . . . . . . . . . . . . . . . . . . . . . . . 57Ending a Retrieval Session . . . . . . . . . . . . . . . . . . . . . . . . . . . . . . . . . . . . . . . . . 58
4 Event Recording for Video . . . . . . . . . . . . . . . . . . . . . . . . . . . . . . . . . . . . . . 59
Boosting the Recording of One Camera or Many . . . . . . . . . . . . . . . . . . . . . . . . 59Overriding Scheduling . . . . . . . . . . . . . . . . . . . . . . . . . . . . . . . . . . . . . . 60
5 Searching for Motion . . . . . . . . . . . . . . . . . . . . . . . . . . . . . . . . . . . . . . . . . 61
Starting a Motion Session . . . . . . . . . . . . . . . . . . . . . . . . . . . . . . . . . . . . 61Preparing a Motion Search . . . . . . . . . . . . . . . . . . . . . . . . . . . . . . . . . . . . . . . . . 62
No Video at Specified Date and Time . . . . . . . . . . . . . . . . . . . . . . . . . . . . . . 62Obtaining the Time Offset of Later Media . . . . . . . . . . . . . . . . . . . . . . . . . . . . 63Motion Threshold . . . . . . . . . . . . . . . . . . . . . . . . . . . . . . . . . . . . . . . . . 63Masking that Detects Motion . . . . . . . . . . . . . . . . . . . . . . . . . . . . . . . . . . . 63Focusing a Motion Search on an Area of Video . . . . . . . . . . . . . . . . . . . . . . . . . 64Excluding an Area from a Search . . . . . . . . . . . . . . . . . . . . . . . . . . . . . . . . 65
Search Report . . . . . . . . . . . . . . . . . . . . . . . . . . . . . . . . . . . . . . . . . . . . . . . 65Report Options . . . . . . . . . . . . . . . . . . . . . . . . . . . . . . . . . . . . . . . . . . 66Motion Events Timeline . . . . . . . . . . . . . . . . . . . . . . . . . . . . . . . . . . . . . . 67
Obtaining Video After Performing a Motion Search . . . . . . . . . . . . . . . . . . . . . . . . . . . . 69Video Controls for Motion . . . . . . . . . . . . . . . . . . . . . . . . . . . . . . . . . . . . 69

Rapid Eye Remote View Operator Guide
Document 800-07767 Rev A 702/11
Optimizing the Time Spent Watching Video . . . . . . . . . . . . . . . . . . . . . . . . . . . 70Changing the Length of the Preview . . . . . . . . . . . . . . . . . . . . . . . . . . . . . . . 70
Opting for Many Cameras in a Retrieval Session . . . . . . . . . . . . . . . . . . . . . . . . . . . . . 70Viewing Video in a Retrieval Session . . . . . . . . . . . . . . . . . . . . . . . . . . . . . . . 71Returning to a Motion Session from a Retrieval Session . . . . . . . . . . . . . . . . . . . . 71
False Positive Reports . . . . . . . . . . . . . . . . . . . . . . . . . . . . . . . . . . . . . . . . . . . 71Flashing Lights and False Positives . . . . . . . . . . . . . . . . . . . . . . . . . . . . . . . 72Using a Smaller Detection Mask to Counter False Positives. . . . . . . . . . . . . . . . . . . 72Using Highlighting . . . . . . . . . . . . . . . . . . . . . . . . . . . . . . . . . . . . . . . . 73Enabling or Disabling the Highlighting of Motion . . . . . . . . . . . . . . . . . . . . . . . . 74Adjusting Highlighting for False Positives or False Negatives . . . . . . . . . . . . . . . . . . 74
Saving and Reusing Search Data . . . . . . . . . . . . . . . . . . . . . . . . . . . . . . . . . . . . . 74Saving and Repeating a Motion Search . . . . . . . . . . . . . . . . . . . . . . . . . . . . . 74Using the Report of a Motion Search. . . . . . . . . . . . . . . . . . . . . . . . . . . . . . . 75
6 Alarms from Events . . . . . . . . . . . . . . . . . . . . . . . . . . . . . . . . . . . . . . . . . . 77
About Alarms . . . . . . . . . . . . . . . . . . . . . . . . . . . . . . . . . . . . . . . . . . . . . . . . 77Alarm Notification . . . . . . . . . . . . . . . . . . . . . . . . . . . . . . . . . . . . . . . . . 78Viewing Video from the Time of an Alarm . . . . . . . . . . . . . . . . . . . . . . . . . . . . 78Event Processing . . . . . . . . . . . . . . . . . . . . . . . . . . . . . . . . . . . . . . . . . 78
Customizing Alarm Handling . . . . . . . . . . . . . . . . . . . . . . . . . . . . . . . . . . . . . . . . 79Ignoring Alarms from Other Sites while Monitoring a Site . . . . . . . . . . . . . . . . . . . . 80Right for Operator to Receive and Process Alarms . . . . . . . . . . . . . . . . . . . . . . . 81Overview of Automatic Rearm Feature . . . . . . . . . . . . . . . . . . . . . . . . . . . . . . 81
Alarm Callbacks . . . . . . . . . . . . . . . . . . . . . . . . . . . . . . . . . . . . . . . . . . . . . . 82Setting Up an Alarm Station for Alarm Callback . . . . . . . . . . . . . . . . . . . . . . . . . 83
Live Alarmed Session. . . . . . . . . . . . . . . . . . . . . . . . . . . . . . . . . . . . . . . . . . . . 84Retrieving Video Recorded at the Time of an Alarm . . . . . . . . . . . . . . . . . . . . . . . 85
Making a Clip of Video During an Alarm . . . . . . . . . . . . . . . . . . . . . . . . . . . . . . . . . . 85Stopping Clip Making During a Live Alarmed Session. . . . . . . . . . . . . . . . . . . . . . 85
Alarm Session . . . . . . . . . . . . . . . . . . . . . . . . . . . . . . . . . . . . . . . . . . . . . . . 85Running an Alarm Session . . . . . . . . . . . . . . . . . . . . . . . . . . . . . . . . . . . . 86Acknowledging an Alarm . . . . . . . . . . . . . . . . . . . . . . . . . . . . . . . . . . . . . 86Acknowledging Alarms Automatically . . . . . . . . . . . . . . . . . . . . . . . . . . . . . . 87Acknowledging (ACK) Before REARM . . . . . . . . . . . . . . . . . . . . . . . . . . . . . . 87
Rearming Alarms . . . . . . . . . . . . . . . . . . . . . . . . . . . . . . . . . . . . . . . . . . . . . . 87Event Video Options . . . . . . . . . . . . . . . . . . . . . . . . . . . . . . . . . . . . . . . . . . . . 88
Video Retrieval . . . . . . . . . . . . . . . . . . . . . . . . . . . . . . . . . . . . . . . . . . 88Go Live . . . . . . . . . . . . . . . . . . . . . . . . . . . . . . . . . . . . . . . . . . . . . . 89Making a Clip . . . . . . . . . . . . . . . . . . . . . . . . . . . . . . . . . . . . . . . . . . . 89Video During Multiple Alarms. . . . . . . . . . . . . . . . . . . . . . . . . . . . . . . . . . . 89
Controlling an Onsite Device Output . . . . . . . . . . . . . . . . . . . . . . . . . . . . . . . . . . . . 90Peephole Application Preparation . . . . . . . . . . . . . . . . . . . . . . . . . . . . . . . . 90Peephole Access Control. . . . . . . . . . . . . . . . . . . . . . . . . . . . . . . . . . . . . 91
Multi-Media Event Sources . . . . . . . . . . . . . . . . . . . . . . . . . . . . . . . . . . . . . . . . . 91Event Authority . . . . . . . . . . . . . . . . . . . . . . . . . . . . . . . . . . . . . . . . . . 92Tamper Detection. . . . . . . . . . . . . . . . . . . . . . . . . . . . . . . . . . . . . . . . . 92
Reading the Alarm Log . . . . . . . . . . . . . . . . . . . . . . . . . . . . . . . . . . . . . . . . . . . 93Displaying the Alarm Log . . . . . . . . . . . . . . . . . . . . . . . . . . . . . . . . . . . . . 93Inputting a Different Time and Date . . . . . . . . . . . . . . . . . . . . . . . . . . . . . . . 93Reporting the Earliest/Latest Alarms in the Log . . . . . . . . . . . . . . . . . . . . . . . . . 94Setting the Date in Windows for Correct Alarm Sorting . . . . . . . . . . . . . . . . . . . . . 94
Alarm Station . . . . . . . . . . . . . . . . . . . . . . . . . . . . . . . . . . . . . . . . . . . . . . . . 94Alarm Station vs. Alarm Session . . . . . . . . . . . . . . . . . . . . . . . . . . . . . . . . . 94Speed of Alarm Notification . . . . . . . . . . . . . . . . . . . . . . . . . . . . . . . . . . . 95
Using an External Alarm Panel with the Fault Relay . . . . . . . . . . . . . . . . . . . . . . . . . . . . 95Checking if a Pulse Is Enabled On a Unit . . . . . . . . . . . . . . . . . . . . . . . . . . . . 95

8
Contents
7 Clips and Stills . . . . . . . . . . . . . . . . . . . . . . . . . . . . . . . . . . . . . . . . . . . . 97
Making Clips . . . . . . . . . . . . . . . . . . . . . . . . . . . . . . . . . . . . . . . . . . . . . . . . 97Making a Clip of Live Video. . . . . . . . . . . . . . . . . . . . . . . . . . . . . . . . . . . . 98Making a Clip from Recorded Video . . . . . . . . . . . . . . . . . . . . . . . . . . . . . . . 98Clip Name Reference . . . . . . . . . . . . . . . . . . . . . . . . . . . . . . . . . . . . . . . 99Automatic Clip of Alarms . . . . . . . . . . . . . . . . . . . . . . . . . . . . . . . . . . . . 100
Customizing the Storage of Clips and Stills . . . . . . . . . . . . . . . . . . . . . . . . . . . . . . . 100Viewing a Clip. . . . . . . . . . . . . . . . . . . . . . . . . . . . . . . . . . . . . . . . . . . . . . . 101
Viewing a Clip in Reverse. . . . . . . . . . . . . . . . . . . . . . . . . . . . . . . . . . . . 101Deleting a Clip . . . . . . . . . . . . . . . . . . . . . . . . . . . . . . . . . . . . . . . . . . . . . . 101Coarse Editing . . . . . . . . . . . . . . . . . . . . . . . . . . . . . . . . . . . . . . . . . . . . . . 102
Time Gap . . . . . . . . . . . . . . . . . . . . . . . . . . . . . . . . . . . . . . . . . . . . 102Viewing Many Clips at Once . . . . . . . . . . . . . . . . . . . . . . . . . . . . . . . . . . . . . . . 102
Viewing Two Instances of the Same Clip. . . . . . . . . . . . . . . . . . . . . . . . . . . . 102Distributing a Clip. . . . . . . . . . . . . . . . . . . . . . . . . . . . . . . . . . . . . . . . . . . . . 103
Burning Clips at the PC of a View Operator . . . . . . . . . . . . . . . . . . . . . . . . . . 103Burning Clips at a Multi-Media Site . . . . . . . . . . . . . . . . . . . . . . . . . . . . . . . 103
Clip Players . . . . . . . . . . . . . . . . . . . . . . . . . . . . . . . . . . . . . . . . . . . . . . . . 104REMM Clip Player Software . . . . . . . . . . . . . . . . . . . . . . . . . . . . . . . . . . 104Rapid Eye Clip Player (RCP) Software . . . . . . . . . . . . . . . . . . . . . . . . . . . . . 104Clip Properties Reports Include Events . . . . . . . . . . . . . . . . . . . . . . . . . . . . 105
Enabling the Production of Stills . . . . . . . . . . . . . . . . . . . . . . . . . . . . . . . . . . . . . 105Producing Bitmaps of a Live Camera Feed . . . . . . . . . . . . . . . . . . . . . . . . . . 106Still Image Name Reference . . . . . . . . . . . . . . . . . . . . . . . . . . . . . . . . . . 107Still Size Reference . . . . . . . . . . . . . . . . . . . . . . . . . . . . . . . . . . . . . . . 108
8 Audio . . . . . . . . . . . . . . . . . . . . . . . . . . . . . . . . . . . . . . . . . . . . . . . . .109
Overview . . . . . . . . . . . . . . . . . . . . . . . . . . . . . . . . . . . . . . . . . . . . . . . . . 109Listening to Live Audio . . . . . . . . . . . . . . . . . . . . . . . . . . . . . . . . . . . . . . . . . . 110Talking to a Multi-Media Site . . . . . . . . . . . . . . . . . . . . . . . . . . . . . . . . . . . . . . . 110Recorded Audio . . . . . . . . . . . . . . . . . . . . . . . . . . . . . . . . . . . . . . . . . . . . . 111Setting Up . . . . . . . . . . . . . . . . . . . . . . . . . . . . . . . . . . . . . . . . . . . . . . . . 111Testing Recording . . . . . . . . . . . . . . . . . . . . . . . . . . . . . . . . . . . . . . . . . . . . 112Using the Simplex Audio Feature . . . . . . . . . . . . . . . . . . . . . . . . . . . . . . . . . . . . 112
Enabling Simplex Audio . . . . . . . . . . . . . . . . . . . . . . . . . . . . . . . . . . . . 112Using Audio Features with Simplex Audio Mode . . . . . . . . . . . . . . . . . . . . . . . 113Switching Audio Modes . . . . . . . . . . . . . . . . . . . . . . . . . . . . . . . . . . . . 114
Eagle Audio. . . . . . . . . . . . . . . . . . . . . . . . . . . . . . . . . . . . . . . . . . . . . . . . 114
9 Watching Site Tours . . . . . . . . . . . . . . . . . . . . . . . . . . . . . . . . . . . . . . . . .115
Running a Site Tour . . . . . . . . . . . . . . . . . . . . . . . . . . . . . . . . . . . . . . . . . . . 115Managing a Tour . . . . . . . . . . . . . . . . . . . . . . . . . . . . . . . . . . . . . . . . 116Event Recording During a Site Tour . . . . . . . . . . . . . . . . . . . . . . . . . . . . . . 116
Site Tour Properties . . . . . . . . . . . . . . . . . . . . . . . . . . . . . . . . . . . . . . . . . . . 117Stopping a Site Tour . . . . . . . . . . . . . . . . . . . . . . . . . . . . . . . . . . . . . . . . . . . 117
Pausing a Site Tour . . . . . . . . . . . . . . . . . . . . . . . . . . . . . . . . . . . . . . . 117Resuming a Site Tour. . . . . . . . . . . . . . . . . . . . . . . . . . . . . . . . . . . . . . 118Ending a Site Tour . . . . . . . . . . . . . . . . . . . . . . . . . . . . . . . . . . . . . . . 118
10 Event Searches . . . . . . . . . . . . . . . . . . . . . . . . . . . . . . . . . . . . . . . . . . . .119
Preparation . . . . . . . . . . . . . . . . . . . . . . . . . . . . . . . . . . . . . . . . . . . . . . . . 119Searching for Event Records . . . . . . . . . . . . . . . . . . . . . . . . . . . . . . . . . . . . . . . 119
Inputting Different Times and Dates . . . . . . . . . . . . . . . . . . . . . . . . . . . . . . 120Selecting Events for an Event Search . . . . . . . . . . . . . . . . . . . . . . . . . . . . . 121Data Recording As an Event . . . . . . . . . . . . . . . . . . . . . . . . . . . . . . . . . . 122
Search Results . . . . . . . . . . . . . . . . . . . . . . . . . . . . . . . . . . . . . . . . . . . . . . 122Viewing Video from the Time of an Event . . . . . . . . . . . . . . . . . . . . . . . . . . . 122Printing a Log Entry. . . . . . . . . . . . . . . . . . . . . . . . . . . . . . . . . . . . . . . 122

Rapid Eye Remote View Operator Guide
Document 800-07767 Rev A 902/11
11 Archival Policies . . . . . . . . . . . . . . . . . . . . . . . . . . . . . . . . . . . . . . . . . . .123
Using an Archival Policy . . . . . . . . . . . . . . . . . . . . . . . . . . . . . . . . . . . . . . . . . 123Playing Back Archived Data . . . . . . . . . . . . . . . . . . . . . . . . . . . . . . . . . . . . . . . 125
Setting Up an Archival Server . . . . . . . . . . . . . . . . . . . . . . . . . . . . . . . . . 125Discovering Sites on the Archival Server . . . . . . . . . . . . . . . . . . . . . . . . . . . . 126Playing Back Archived Video and Data . . . . . . . . . . . . . . . . . . . . . . . . . . . . 127
Creating Clips During Playback . . . . . . . . . . . . . . . . . . . . . . . . . . . . . . . . . . . . . 128Creating a Self-Executable Clip . . . . . . . . . . . . . . . . . . . . . . . . . . . . . . . . 129Creating a Rapid Clip . . . . . . . . . . . . . . . . . . . . . . . . . . . . . . . . . . . . . . 130
12 Customer Devices. . . . . . . . . . . . . . . . . . . . . . . . . . . . . . . . . . . . . . . . . . .131
Live Data Messages from POS Hardware . . . . . . . . . . . . . . . . . . . . . . . . . . . . . . . . 131Viewing Live Data . . . . . . . . . . . . . . . . . . . . . . . . . . . . . . . . . . . . . . . . 131
Recorded Data . . . . . . . . . . . . . . . . . . . . . . . . . . . . . . . . . . . . . . . . . . . . . . 132Viewing Recorded Data. . . . . . . . . . . . . . . . . . . . . . . . . . . . . . . . . . . . . 132
Searching for Data . . . . . . . . . . . . . . . . . . . . . . . . . . . . . . . . . . . . . . . . . . . . 133Finding and Listing Records of Events . . . . . . . . . . . . . . . . . . . . . . . . . . . . . 134Inputting Different Times and Dates for a Search . . . . . . . . . . . . . . . . . . . . . . . 134Matching Data to Labels . . . . . . . . . . . . . . . . . . . . . . . . . . . . . . . . . . . . 134Regular Expressions . . . . . . . . . . . . . . . . . . . . . . . . . . . . . . . . . . . . . . 136
External System Interface . . . . . . . . . . . . . . . . . . . . . . . . . . . . . . . . . . . . . . . . 137Modems and Telephony . . . . . . . . . . . . . . . . . . . . . . . . . . . . . . . . . . . . . . . . . 137
13 Scheduling . . . . . . . . . . . . . . . . . . . . . . . . . . . . . . . . . . . . . . . . . . . . . .139
Effects of Scheduling . . . . . . . . . . . . . . . . . . . . . . . . . . . . . . . . . . . . . . . . . . . 139
Index . . . . . . . . . . . . . . . . . . . . . . . . . . . . . . . . . . . . . . . . . . . . . . . . . . . . 141

10
Contents

Rapid Eye Remote View Operator Guide
Document 800-07767 Rev A 1102/11
FiguresFigure 1-1 Logging-On to a Multi-Media System . . . . . . . . . . . . . . . . . . . . . . . . . . . . . 21
Figure 1-2 On the Sites tab, Units Are Listed . . . . . . . . . . . . . . . . . . . . . . . . . . . . . . . 22
Figure 1-3 Language Setting . . . . . . . . . . . . . . . . . . . . . . . . . . . . . . . . . . . . . . . 23
Figure 1-4 Find Name Containing Search . . . . . . . . . . . . . . . . . . . . . . . . . . . . . . . . 23
Figure 1-5 Hiding and Showing the Toolbar and Status Bar . . . . . . . . . . . . . . . . . . . . . . . 26
Figure 1-6 Example of a System Tray . . . . . . . . . . . . . . . . . . . . . . . . . . . . . . . . . . . 26
Figure 2-1 Choosing a Connection . . . . . . . . . . . . . . . . . . . . . . . . . . . . . . . . . . . . 30
Figure 2-2 Selecting Live Streams and Showing Connection Icon () . . . . . . . . . . . . . . . . . . 30
Figure 2-3 Live Video Feed . . . . . . . . . . . . . . . . . . . . . . . . . . . . . . . . . . . . . . . . 31
Figure 2-4 Tear-Away Player Options for Live Video . . . . . . . . . . . . . . . . . . . . . . . . . . . 32
Figure 2-5 Resolution and Quality Can Be Adjusted During a Live Session . . . . . . . . . . . . . . . 33
Figure 2-6 Globally Customizing the Time Reference . . . . . . . . . . . . . . . . . . . . . . . . . . 33
Figure 2-7 Resolution Gauge for an NTSC Camera During Live Sessions . . . . . . . . . . . . . . . . 34
Figure 2-8 Location of the Resolution Gauge . . . . . . . . . . . . . . . . . . . . . . . . . . . . . . . 35
Figure 2-9 Resolution Gauge for a PAL Camera During Live Sessions . . . . . . . . . . . . . . . . . 35
Figure 2-10 Microsoft Windows’ Screen Area Settings . . . . . . . . . . . . . . . . . . . . . . . . . . 38
Figure 2-11 PTZ Control Options . . . . . . . . . . . . . . . . . . . . . . . . . . . . . . . . . . . . . . 41
Figure 2-12 Dragging the Mouse Pointer to Control a PTZ Camera . . . . . . . . . . . . . . . . . . . . 42
Figure 2-13 Zonal Mode Transforms the Mouse Pointer in PTZ Camera Windows . . . . . . . . . . . . 43
Figure 2-14 Displaying the PTZ Dartboard Control . . . . . . . . . . . . . . . . . . . . . . . . . . . . 43
Figure 2-15 PTZ Dartboard Control Commands . . . . . . . . . . . . . . . . . . . . . . . . . . . . . . 44
Figure 2-16 Using PTZ Presets . . . . . . . . . . . . . . . . . . . . . . . . . . . . . . . . . . . . . . . 46
Figure 3-1 Setting the Starting Point of a Retrieval Session . . . . . . . . . . . . . . . . . . . . . . . 51
Figure 3-2 The Playback Speed Slider . . . . . . . . . . . . . . . . . . . . . . . . . . . . . . . . . . 52
Figure 3-3 Skipping to a Later Time. . . . . . . . . . . . . . . . . . . . . . . . . . . . . . . . . . . . 52
Figure 3-4 The Go To Button and its Dialog . . . . . . . . . . . . . . . . . . . . . . . . . . . . . . . 53
Figure 3-5 Indicator for Later Media Resembles the Face of a Clock . . . . . . . . . . . . . . . . . . 53
Figure 3-6 Report Earliest Available Video Recording . . . . . . . . . . . . . . . . . . . . . . . . . . 54
Figure 3-7 Recorded Video Utilities . . . . . . . . . . . . . . . . . . . . . . . . . . . . . . . . . . . . 54
Figure 3-8 Paused Video Image Showing Milliseconds . . . . . . . . . . . . . . . . . . . . . . . . . 55
Figure 3-9 Copying a Video Image to the Windows Clipboard . . . . . . . . . . . . . . . . . . . . . . 55
Figure 3-10 Video Image Pasted in Word Processing Software . . . . . . . . . . . . . . . . . . . . . . 55
Figure 3-11 Previewing the Printing of a Video Image . . . . . . . . . . . . . . . . . . . . . . . . . . . 56
Figure 3-12 PAL Camera Window Menu and Report. . . . . . . . . . . . . . . . . . . . . . . . . . . . 57
Figure 3-13 NTSC Resolution Gauge Example . . . . . . . . . . . . . . . . . . . . . . . . . . . . . . 57
Figure 3-14 PAL Resolution Gauge Example. . . . . . . . . . . . . . . . . . . . . . . . . . . . . . . . 58

12
Figures
Figure 4-1 Boost Button for Event Recording . . . . . . . . . . . . . . . . . . . . . . . . . . . . . . . 59
Figure 4-2 Event Recording (Dormant Timer and Counting Down) . . . . . . . . . . . . . . . . . . . 59
Figure 4-3 Frame Rate Gauge Changes during Event Recording and Retrieval . . . . . . . . . . . . . 60
Figure 5-1 Motion Button . . . . . . . . . . . . . . . . . . . . . . . . . . . . . . . . . . . . . . . . . 61
Figure 5-2 Online Reminder of the Next Step When Searching for Motion . . . . . . . . . . . . . . . 61
Figure 5-3 Steps to Prepare a Search for Motion . . . . . . . . . . . . . . . . . . . . . . . . . . . . . 62
Figure 5-4 Report When Requesting Video and None is Available . . . . . . . . . . . . . . . . . . . . 63
Figure 5-5 Detection Toolbar Sensitivity and Interval Options . . . . . . . . . . . . . . . . . . . . . . 63
Figure 5-6 Enlarged Detail of an Image Used During a Motion Search . . . . . . . . . . . . . . . . . 64
Figure 5-7 Motion Search Report . . . . . . . . . . . . . . . . . . . . . . . . . . . . . . . . . . . . . 66
Figure 5-8 Detail of Selection in the Density Chart of a Report . . . . . . . . . . . . . . . . . . . . . . 67
Figure 5-9 Effect of Zoom Button on the Selection of List Items . . . . . . . . . . . . . . . . . . . . . 68
Figure 5-10 Buttons on the Video Toolbar of a Motion Search Session . . . . . . . . . . . . . . . . . . 69
Figure 5-11 Fast-Forward Options . . . . . . . . . . . . . . . . . . . . . . . . . . . . . . . . . . . . . 70
Figure 5-12 Setting Pre-Detection Viewing to Two Minutes . . . . . . . . . . . . . . . . . . . . . . . . 70
Figure 5-13 Item Box Shown when Retrieval Starts from a Motion Session . . . . . . . . . . . . . . . . 71
Figure 5-14 Masking a Source of False Positive Reports . . . . . . . . . . . . . . . . . . . . . . . . . 72
Figure 5-15 Masking the Entrance or Exit to a Parking Lot . . . . . . . . . . . . . . . . . . . . . . . . 73
Figure 5-16 A Small Detection Mask Shown Above a Dotted Line . . . . . . . . . . . . . . . . . . . . 73
Figure 6-1 A Unit Can Respond to Events by Sending Alarms . . . . . . . . . . . . . . . . . . . . . . 77
Figure 6-2 The Alarm Bell Icon in View Software . . . . . . . . . . . . . . . . . . . . . . . . . . . . . 78
Figure 6-3 Once Set to Alarm an Event Can Trigger an Alarm . . . . . . . . . . . . . . . . . . . . . . 78
Figure 6-4 Multi-Media Options for Video Delivery Options During an Alarm . . . . . . . . . . . . . . 79
Figure 6-5 Live Alarmed Toolbar Details . . . . . . . . . . . . . . . . . . . . . . . . . . . . . . . . . 80
Figure 6-6 Alarm Handling Options . . . . . . . . . . . . . . . . . . . . . . . . . . . . . . . . . . . . 82
Figure 6-7 Live Alarmed Toolbar and Session . . . . . . . . . . . . . . . . . . . . . . . . . . . . . . 84
Figure 6-8 Alarm Session Components . . . . . . . . . . . . . . . . . . . . . . . . . . . . . . . . . . 86
Figure 6-9 Retrieval Session Started from an Alarm Session. . . . . . . . . . . . . . . . . . . . . . . 89
Figure 6-10 Source of Alarms. . . . . . . . . . . . . . . . . . . . . . . . . . . . . . . . . . . . . . . . 91
Figure 6-11 Alarm Log Search . . . . . . . . . . . . . . . . . . . . . . . . . . . . . . . . . . . . . . . 93
Figure 7-1 The Clips Tab in View Software . . . . . . . . . . . . . . . . . . . . . . . . . . . . . . . . 97
Figure 7-2 Changing the Folder for Multi-Media Stills and Clips . . . . . . . . . . . . . . . . . . . . 100
Figure 7-3 List of Clips on the Clips Tab . . . . . . . . . . . . . . . . . . . . . . . . . . . . . . . . 101
Figure 7-4 Clip Properties Report . . . . . . . . . . . . . . . . . . . . . . . . . . . . . . . . . . . . 105
Figure 7-5 Enabling the Production of Stills (Bitmap Images) . . . . . . . . . . . . . . . . . . . . . 105
Figure 7-6 Button for Producing Stills (Bitmap Images) . . . . . . . . . . . . . . . . . . . . . . . . 106
Figure 7-7 Stills Listed on the Clips Action Tab as *.bmp Files . . . . . . . . . . . . . . . . . . . . 107
Figure 8-1 Audio Toolbar . . . . . . . . . . . . . . . . . . . . . . . . . . . . . . . . . . . . . . . . 110
Figure 8-2 Audio Tab Detail . . . . . . . . . . . . . . . . . . . . . . . . . . . . . . . . . . . . . . . 112
Figure 8-3 Options for New Players Window . . . . . . . . . . . . . . . . . . . . . . . . . . . . . . 113
Figure 9-1 Site Tour Information Is Displayed in the Title Bar . . . . . . . . . . . . . . . . . . . . . 115
Figure 9-2 Samples of Site Tours in List . . . . . . . . . . . . . . . . . . . . . . . . . . . . . . . . 116
Figure 9-3 Site Tour Information Displayed in Title Bar . . . . . . . . . . . . . . . . . . . . . . . . . 116
Figure 9-4 Site Tour Properties Dialog . . . . . . . . . . . . . . . . . . . . . . . . . . . . . . . . . 117
Figure 10-1 The Search for Events Window . . . . . . . . . . . . . . . . . . . . . . . . . . . . . . . 120
Figure 11-1 List of Archival Policies and Servers. . . . . . . . . . . . . . . . . . . . . . . . . . . . . 124
Figure 11-2 Archival Policy Properties . . . . . . . . . . . . . . . . . . . . . . . . . . . . . . . . . . 124

Rapid Eye Remote View Operator Guide
Document 800-07767 Rev A 1302/11
Figure 11-3 Archiving Progress Bar . . . . . . . . . . . . . . . . . . . . . . . . . . . . . . . . . . . 125
Figure 11-4 Add Archival Server Window . . . . . . . . . . . . . . . . . . . . . . . . . . . . . . . . 126
Figure 11-5 Discovering Sites on an Archival Server. . . . . . . . . . . . . . . . . . . . . . . . . . . 126
Figure 11-6 Archival Playback Select Date and Time Window. . . . . . . . . . . . . . . . . . . . . . 127
Figure 11-7 Select Streams for Archival Playback Window . . . . . . . . . . . . . . . . . . . . . . . 127
Figure 11-8 Archival Playback Options and Controls . . . . . . . . . . . . . . . . . . . . . . . . . . 127
Figure 11-9 Save Recorded Clip to File . . . . . . . . . . . . . . . . . . . . . . . . . . . . . . . . . 129
Figure 11-10 Select Clip Type Window . . . . . . . . . . . . . . . . . . . . . . . . . . . . . . . . . . 130
Figure 11-11 Create a Rapid Clip Window. . . . . . . . . . . . . . . . . . . . . . . . . . . . . . . . . 130
Figure 11-12 Clip Creation in Progress . . . . . . . . . . . . . . . . . . . . . . . . . . . . . . . . . . 130
Figure 12-1 Selecting Data Streams Shows the Connection Icon () . . . . . . . . . . . . . . . . . . . 131
Figure 12-2 Search for Data Session . . . . . . . . . . . . . . . . . . . . . . . . . . . . . . . . . . . 133
Figure 12-3 Comparing Data Labels in Data and Event Sessions . . . . . . . . . . . . . . . . . . . . 135
Figure 13-1 Comparing the Resolution Gauge for a Live Camera Window . . . . . . . . . . . . . . . 139

14
Figures
Rapid Eye Remote View Operator Guide
Document 800-07767 Rev A 1502/11
TablesTable 1-1 Sites Toolbar Reference . . . . . . . . . . . . . . . . . . . . . . . . . . . . . . . . . . . . 26
Table 1-2 Commands to Open Video Analytics Sessions . . . . . . . . . . . . . . . . . . . . . . . . 27
Table 2-1 Display Properties in Microsoft Windows. . . . . . . . . . . . . . . . . . . . . . . . . . . . 37
Table 2-2 PTZ Camera Position After a Session Closes . . . . . . . . . . . . . . . . . . . . . . . . . 47
Table 2-3 Camera Groups . . . . . . . . . . . . . . . . . . . . . . . . . . . . . . . . . . . . . . . . . 48
Table 3-1 NTSC Camera Recording Resolution Selection (Pixel x Pixel). . . . . . . . . . . . . . . . . 57
Table 3-2 PAL Camera Recording Resolution Selection (Pixel x Pixel). . . . . . . . . . . . . . . . . . 57
Table 6-1 Values for a Callback Limit . . . . . . . . . . . . . . . . . . . . . . . . . . . . . . . . . . . 81
Table 7-1 Default Format for Multi-Media Clip Names . . . . . . . . . . . . . . . . . . . . . . . . . . 99
Table 7-2 Media for Video Clips . . . . . . . . . . . . . . . . . . . . . . . . . . . . . . . . . . . . . 103
Table 7-3 Name Format for Still Images. . . . . . . . . . . . . . . . . . . . . . . . . . . . . . . . . 107
Table 7-4 Size of Still Images as a Function of Resolution . . . . . . . . . . . . . . . . . . . . . . . 108
Table 10-1 Searchable Events . . . . . . . . . . . . . . . . . . . . . . . . . . . . . . . . . . . . . . 121
Table 12-1 Regular Expressions and Special Characters in Rules . . . . . . . . . . . . . . . . . . . 136

16
Tables

Rapid Eye Remote View Operator Guide
Document 800-07767 Rev A 1702/11
About This Document
This document introduces the Remote View application for the Rapid Eye Multi-Media DVR system. It covers how to run and operate the Remote View application with the Rapid Eye family of DVRs (Rapid Eye Multi-Media, Multi-Media DSP, Active Alert, and Multi-Media LT).
This document is intended for Remote View operators and System Administrators that require Remote View functions.
Overview of Contents
This document contains the following chapters and appendixes:
• Chapter 1, Running View, introduces you to the Remote View application and the Remote View workspace and how to launch the application.
• Chapter 2, Live Video, provides procedures for viewing live video and setting up live video options.
• Chapter 3, Recorded Video, describes viewing recorded video and the recorded video options.
• Chapter 4, Event Recording for Video, covers boosting video recording settings.• Chapter 5, Searching for Motion, explains preparing and using motion searches as
well as retrieving video from motion search results.• Chapter 6, Alarms from Events, illustrates alarms and the alarm options available to a
Remote View operator.• Chapter 7, Clips and Stills, outlines the making, viewing, deleting, editing and
distribution of video clips and still images.• Chapter 8, Audio, relates the simplex and duplex audio options and features of the
Remote View application.• Chapter 9, Watching Site Tours, describes running a site tour with the Remote View
application for multiple sites in your system.• Chapter 10, Event Searches, provides procedures for preparing and using event
searches.• Chapter 11, Archival Policies, explains using Archival Policies to archive data and
playing back and creating clips from the archived data.• Chapter 12, Customer Devices, covers recording and searching for data collected
from customer devices (such as a cash register).• Chapter 13, Scheduling, explains the effects of scheduling on alarms, live and
recorded video.

18
Warranty and Service
Subject to the terms and conditions listed on the Product warranty, during the warranty period Honeywell will repair or replace, at its sole option, free of charge, any defective products returned prepaid.
In the event you have a problem with any Honeywell product, please call Customer Service at 1.800.796.CCTV for assistance or to request a Return Merchandise Authorization (RMA) number.
Be sure to have the model number, serial number, and the nature of the problem available for the technical service representative.
Prior authorization must be obtained for all returns, exchanges, or credits. Items shipped to Honeywell without a clearly identified Return Merchandise Authorization (RMA) number may be refused.
Related Documents
This document is a necessary prerequisite for understanding the Rapid Eye system. For more information, please refer to the following documents that are available on the Documentation CD that came with your unit:
Document title Description
Rapid Eye™ Multi-Media Digital Video Recorder Installation Guide
Written for installers and new users to the Honeywell Rapid Eye DVR system, this guide describes how to install a Rapid Eye DVR system to optimize the performance. This document covers installation of the Multi-Media, Multi-Media DSP and Active Alert units.
Rapid Eye™ Multi-Media LT Digital Video Recorder Installation Guide
This guide describes how to install a Rapid Eye Multi-Media LT DVR system to optimize the performance.
Rapid Eye™ Multi-Media Digital Video System Administrator Guide
This guide is written for System Administrators of Rapid Eye Multi-Media DVRs. This guide covers using the Admin and View applications to setup Rapid Eye configurations such as recording settings, schedules, and alarms.
Rapid Eye™ Multi-Media Digital Video Common Operations Guide
A short guide written for the security operator who uses the software for common, daily surveillance tasks, such as live monitoring of events and alarms, and after-the-fact forensics searches.
Rapid Eye™ Multi-Media Unit Quick Start Guide
This guide is a quick reference for installing and setting up a new Honeywell Rapid Eye DVR system. This document covers setting up the Multi-Media, Multi-Media DSP and Active Alert units.
Rapid Eye™ Multi-Media LT Unit Quick Start Guide
This guide is a quick reference for installing and setting up a new Honeywell Rapid Eye Multi-Media LT DVR system.

Rapid Eye Remote View Operator Guide
Document 800-07767 Rev A 1902/11
Typographical Conventions
This document uses the following typographical conventions:
Font What it represents Example
Helvetica Keys on the keyboard Press Ctrl+C
Lucida Values of editable fields that are mentioned in the body text of the document for reference purposes, but do not need to be entered as part of a procedure
The Time from field can be set to Hours:Minutes:Seconds.
Text strings displayed on the screen
Syntax
The message Unauthorized displays.
(object) entered
Swiss721 BT Bold
Words or characters that you must type. The word “enter” is used if you must type text and then press the Enter or Return key.
Enter the password.
Menu titles and other items you select Double-click Open from the File menu.
Buttons you click to perform actions Click Exit to close the program.
Italic Placeholders: words that vary depending on the situation user name
Cross-reference to external source Refer to the Rapid Eye™ Multi-Media Digital Video Recorder Installation Guide.
Cross-reference within document See Viewing Live Video on page 29.

20

Document 800-07767 Rev A 2102/11
1
Running View
For a short introduction to the common operations used with the View application, see the Rapid Eye™ Multi-Media Digital Video Common Operations Guide.
Your Rapid Eye Multi-Media System Administrator (Multi SA) needs to prepare a Multi-Media database before operators can run View. This is explained in the Rapid Eye™ Multi-Media Digital Video System Administrator Guide.
Starting View
1. On your Microsoft Windows desktop, either double-click the shortcut to View ( ), or click Start, point or click to All Programs and then Rapid Eye Multi-Media. Click Rapid Eye Multi-Media View.
2. In the logon dialog’s User ID field, enter the name of a Multi-Media operator account (see Figure 1-1, below). If your Multi SA has assigned a password to the account, enter it in the Password field.
3. If a Multi-Media database was not selected during the installation of View, see your Multi SA for its type (Access or SQL), location (path), and name.
4. Click OK. The Rapid Eye Multi-Media View application opens.
User Account and Password
Passwords can be assigned to a user account by your Multi SA. Your password cannot be changed using View; it can be changed using the Admin application.
Figure 1-1 Logging-On to a Multi-Media System
Operator’s account
Account’s passwordMulti-Media database, path and name
22
Running View
The Sites Tab
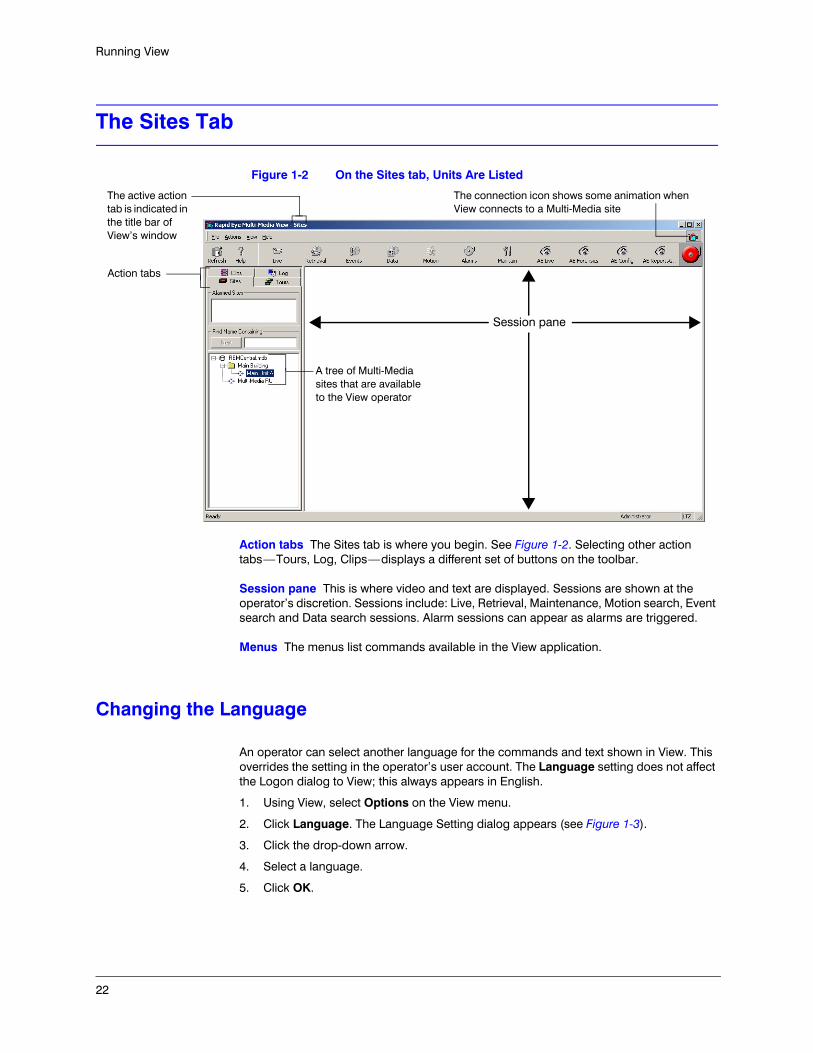
Figure 1-2 On the Sites tab, Units Are Listed
Action tabs The Sites tab is where you begin. See Figure 1-2. Selecting other action tabs—Tours, Log, Clips—displays a different set of buttons on the toolbar.
Session pane This is where video and text are displayed. Sessions are shown at the operator’s discretion. Sessions include: Live, Retrieval, Maintenance, Motion search, Event search and Data search sessions. Alarm sessions can appear as alarms are triggered.
Menus The menus list commands available in the View application.
Changing the Language
An operator can select another language for the commands and text shown in View. This overrides the setting in the operator’s user account. The Language setting does not affect the Logon dialog to View; this always appears in English.
1. Using View, select Options on the View menu.
2. Click Language. The Language Setting dialog appears (see Figure 1-3).
3. Click the drop-down arrow.
4. Select a language.
5. Click OK.
The active action tab is indicated in the title bar of View’s window
The connection icon shows some animation when View connects to a Multi-Media site
Session pane
A tree of Multi-Media sites that are available to the View operator
Action tabs

Rapid Eye Remote View Operator Guide
Document 800-07767 Rev A 2302/11
Figure 1-3 Language Setting
Selecting a Multi-Media Site
After starting View, the Sites action tab and its toolbar are displayed by default. Select a site name listed on the tab. A site is a Rapid Eye unit (such as a Multi-Media LT unit) that is connected and operational. Sites and folders containing names of sites are displayed in the tree of sites. For long lists of sites, use the Quick Search for Sites on page 23.
List of Multi-Media Sites
Your organization’s Multi-Media System Administrator (Multi SA) prepares the site list. Folders cannot be added or modified in View, nor can a site’s name be moved to another folder. At the top of the tree for sites and folders is the name of the Multi-Media database used to logon to View. See Figure 1-2 and Figure 1-4.
Missing Site
If the site is not listed, click Refresh (as explained in Your Account Information on page 25). If the site still does not appear, ask your Multi SA if an entry for the unit was made in the Multi-Media database or if your View operator account has the rights to use the site.
Quick Search for Sites
Figure 1-4 Find Name Containing Search
1. Click the Sites tab if it is not already selected.
Action tabs
Quick Search on the Sites action tab

24
Running View
2. In the Find Name Containing field (see Figure 1-4), enter a few characters that follow each other in the site’s name. The first site where this combination of characters occurs is automatically selected.
• You can type any sequence of characters in a site name: they can be at the beginning, middle or end of the name. For example: to locate Rosde lab 35, you can enter either 35 or sde.
• You have the option of typing in more contiguous characters of the site’s name to narrow the search.
3. Once the site that you are looking for is highlighted, start a session, as needed.
Displaying Site Properties
1. Using View, select a site name on the Sites tab. To view the site properties, do one of the following:
• Place the mouse pointer on a site. A message appears—like a tool tip—showing information about a site.
• Right-click on the site name to view the shortcut menu and select Properties.• With the site selected, click Properties on the Actions menu.
2. To close the Site Properties dialog, click OK.
Site Properties Reference
The following information displays on the Site Properties dialog:
• The Site Name. The site tree in Rapid Eye View software displays this Site Name set by the Multi SA in the site’s definition, using the Admin application.
• Version of the Rapid Eye software running on the unit and the unit’s serial number.• Time zone. Set by the Multi SA, to provide correct timestamps for recorded video.• User Management: local or central. Data for your Multi SA.• Connection. If a connection cannot be established, this field can be used to check the
phone number for a dial-up connection, or the IP address/computer name for a network connection.
LocalView Site Name
At the unit, LocalView operators may see a Site Name that differs from the Site Name shown in View’s Site Properties report. The Rapid Eye unit’s serial number is used as the default Site Name in LocalView.
Caution If your user account gives you access to a Maintenance session, do not change the Site Name on the System tab. This Site Name is used for connections on a network that is enabled for DHCP and matches the Site Name shown by LocalView at the unit.

Rapid Eye Remote View Operator Guide
Document 800-07767 Rev A 2502/11
Obtaining the Latest Site List
Click Refresh on the View menu or click the Refresh button ( ). The Refresh command updates:
• The list of the sites and connections in your Multi-Media system.• Information about your Multi-Media user account.• Site tours.
Your Multi SA can let you know whenever changes have been made to these items. Clicking the Refresh command repeatedly will show little effect.
Time Limit when Using Sites
A time limit for operating units can be set by your organization’s Multi SA. The time limit is shown when you connect to a unit, and a countdown shows how much time remains. While processing alarms, this countdown is cancelled and not shown.
You can set the Default time limit of a new User (in minutes) in the Options dialog box of the Admin application (View menu Options).
Your Account Information
Click Info on the View menu. View makes your Multi-Media account’s information available. Info indicates the database file in use, its location, the name of the user account, the rights of the operator using the account, the status of alarm notification, and more.
Customizing the View Window
Maximizing Screen Real Estate (Hiding the Toolbar and Status Bar)
On smaller PC screens, real estate for video can be limited. Removing the toolbar and status bar can help free up more of the screen for video feeds (see Figure 1-5).
1. Click Toolbar on the View menu (see Figure 1-5). When the checkmark is removed, the main View toolbar is hidden away.
2. Click Status Bar on the View menu so that the checkmark is removed. This hides the bottom of the View window.
Alternatively, you can move the Toolbar by dragging the two vertical bars at the far-left side of it. The Status bar cannot be moved.

26
Running View
Figure 1-5 Hiding and Showing the Toolbar and Status Bar
Minimizing the View Application
When you click to minimize the View application on your desktop, View does not minimize to your taskbar as other programs would. Instead View minimizes to the System Tray on the taskbar and is represented by the View ( ) icon. See the example below.
Figure 1-6 Example of a System Tray
Sites Tab Toolbar Reference
Table 1-1 Sites Toolbar Reference
Command Function Section
Refresh Multi-Media database with the latest user account rights, sites added, modified or deleted, and so on.
Your Account Information, page 25
Displays this guide in PDF format. More About View, page 28
Displays live video from the site selected on the Sites tab. Starting a Live Session, page 29
Displays recorded video stored at a site. Viewing Recorded Video, page 49
Searches a site for events set to be silently logged. Event Searches, page 119
Searches for data from customer devices. Searching for Data, page 133
Searches recorded video for motion. This works only if motion detection is enabled before video is recorded.
Searching for Motion, page 61
Lists alarms from (or about) a site. Alarms from Events, page 77
Maintenance sessions can be run by your organization’s Multi SA to configure Video, Audio, other connected hardware, and security settings.
A Multi SA can limit access to Maintenance sessions.
Opening a session on a unit automatically connects to that unit. For a dial-up connection, you have the option of connecting before running sessions on a unit, to save time when starting sessions.
N/A

Rapid Eye Remote View Operator Guide
Document 800-07767 Rev A 2702/11
Honeywell Video Analytics
The View application displays up to four Honeywell Video Analytics (HVA) commands, on the Sites toolbar, depending on the rights of the Rapid Eye Operator’s account.
Honeywell Video Analytics can only be used on Rapid Eye Active Alert units that have Video Analytics activated.
See the Video Analytics V4 Rapid Eye DVR Integration Application Note, publication number 800-03866, for more information on using Video Analytics with Rapid Eye.
Note Use of an HVA command on a unit without HVA only produces a message.
Ends the connection to a site, giving you a quick, way to end all sessions involving a site.
N/A
Lists a site’s name, version of software, serial number, time zone and connection information.
Site Properties Reference, page 24
Table 1-1 Sites Toolbar Reference (cont’d)
Command Function Section
Table 1-2 Commands to Open Video Analytics Sessions
Commanda Session (opens) Referenceb
Live Monitoring Station session.
See the Video Analytics Reference Guide, by Honeywell, publication number 800-04267.
Forensics session. See the Video Analytics Reference Guide, by Honeywell, publication number 800-04267.
Configuration Tool session. See the Video Analytics Reference Guide, by Honeywell, publication number 800-04267.
Report Generator session. See the Video Analytics Reference Guide, by Honeywell, publication number 800-04267.
a Honeywell Video Analytics icons/commands can only be used on Rapid Eye Active Alert units that have Video Analytics activated.
b Honeywell Video Analytics documentation is available at the operator’s PC. Click Start All Programs Honeywell Video Analytics Documentation HVA publication title (choose the document you want to view). Some of the material in the HVA documentation does not apply to HVA use from within Rapid Eye.

28
Running View
Honeywell Video Analytics sessions can be run:
• While running the View application. Use the Analytics icons (see Table 1-2) on the View application’s toolbar to start the corresponding Analytics session.
• After letting the operator run View once, to register his Rapid Eye account, that operator has the option of clicking Start All Programs Honeywell Video Analytics [type of session].
It is usually best to use the Configuration Tool first, to set up Honeywell Video Analytics objects, making the Forensics session more useful. For an introduction to Honeywell Video Analytics, see the Video Analytics: Getting Started Guide, publication number 800-00923.
More About View
Using this Document
The View procedures that you will use most often are documented in this user guide. They are grouped by tasks, so that you may start using View as quickly as possible. Reference information is also included, as needed, usually at the end of subsections.
Other Guides
The Read Me First, 800-02346, contains release notes and is available on the View Operator’s PC, by clicking:
Start All Programs Rapid Eye Multi-Media 9.0 Documentation Read Me First
Web Site
Look for Rapid Eye products at http://www.honeywellvideo.com.
Technical Support
For installation questions, or for ordering and parts information, have your Multi SA contact the vendor or distributor of the system. For software training, or for reporting a malfunction, the Multi SA can call Honeywell Multi-Media Technical support at 1 (800) 796-2288.

Document 800-07767 Rev A 2902/11
2
Live Video
Using a Live session, you can access and monitor the video feed of many cameras at once, and even access many Multi-Media sites, all at once.
This section shows how to:
• Obtain live video.• Use cameras that can pan, tilt and zoom.• End a Live session.
See also Recorded Video on page 49 for details on recorded video, Live Data Messages from POS Hardware on page 131 for more information on data recording, and Listening to Live Audio on page 110 for more information on Rapid Eye audio options.
Caution Do not use audio on a dial-up connection. Video can be corrupted by using audio over a dial-up connection. Live video can be combined with audio only on a network connection.
Viewing Live Video
Start by selecting a Multi-Media site and then running a Live session. Select which cameras to view. Video is sent to your PC until the Live session ends.
Starting a Live Session
1. Run View (see Starting View on page 21).
2. After selecting a site, do one of the following:
• Click on the toolbar.• Double-click the site name. If a live session is already running, double-clicking
the site name has no effect.• Right-click on the site name. Select Live on the shortcut menu that appears.• Click Live on the Actions menu.
30
Live Video
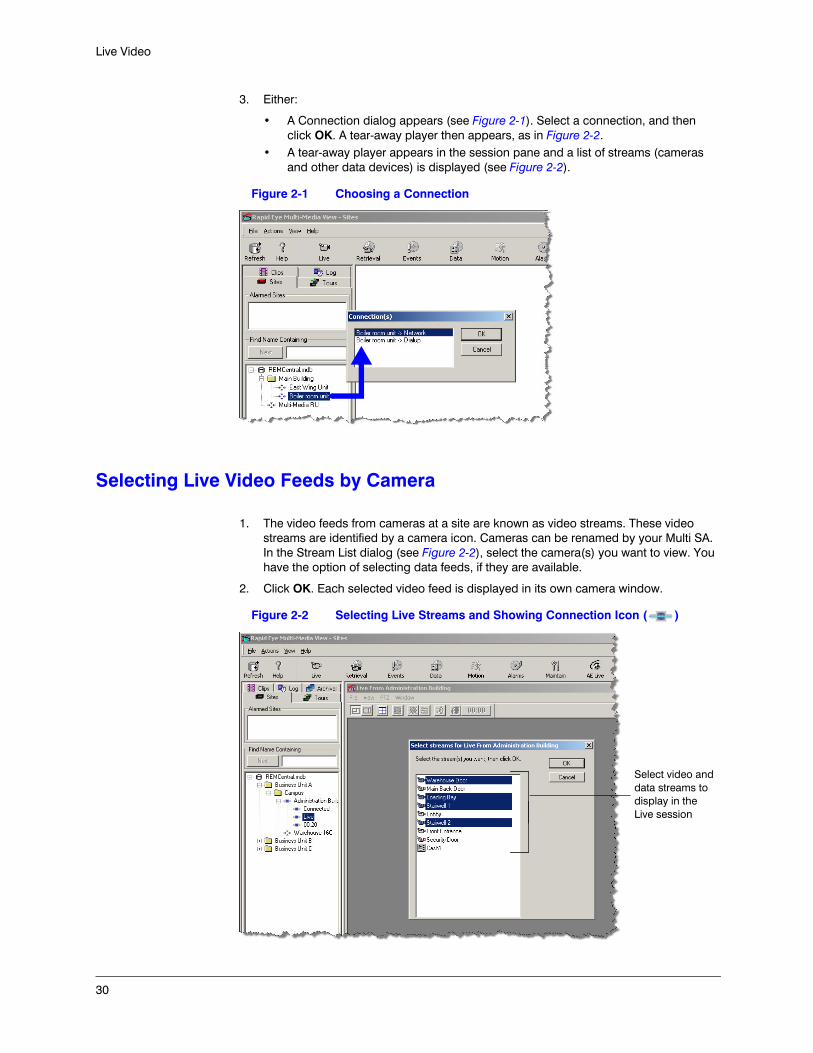
3. Either:
• A Connection dialog appears (see Figure 2-1). Select a connection, and then click OK. A tear-away player then appears, as in Figure 2-2.
• A tear-away player appears in the session pane and a list of streams (cameras and other data devices) is displayed (see Figure 2-2).
Figure 2-1 Choosing a Connection
Selecting Live Video Feeds by Camera
1. The video feeds from cameras at a site are known as video streams. These video streams are identified by a camera icon. Cameras can be renamed by your Multi SA. In the Stream List dialog (see Figure 2-2), select the camera(s) you want to view. You have the option of selecting data feeds, if they are available.
2. Click OK. Each selected video feed is displayed in its own camera window.
Figure 2-2 Selecting Live Streams and Showing Connection Icon ( )
Select video and data streams to display in the Live session

Rapid Eye Remote View Operator Guide
Document 800-07767 Rev A 3102/11
Tear-Away Player
You can drag a player window from the View window. When dragged away, an asterisk is added to the title of the tear-away player’s name.
To return a tear-away player to its session pane, either:
• Click Embed to Sites Tab ( ). It appears when a tear-away player is dragged from the session window.
• Click Embed to Sites Tab on a session’s Windows menu.
A tear-away player returns to the session pane. When not embedded, an asterisk is added to the tear-away player’s title bar.
Moving, Sizing and Tiling Camera Windows
Each tear-away player has its own menu, listing commands for the orderly display of camera and text windows. Individual feeds can be dragged and resized within a session window, as needed.
Closing Monitored Video Feeds
In a Live session, you have the option of closing one or many camera windows, one-by-one (see Figure 2-3). Ending a live session discards all video feeds.
Figure 2-3 Live Video Feed
Reopening a Closed Camera Window
1. Display the site’s Stream List by clicking Add Stream on the player’s File menu, for a list of unused video feeds. You can see a Stream List in Figure 2-2, on page 30.
Tear-away player window
Player toolbar
Camera window
Image from video feed
Close video feed

32
Live Video
2. Select one or more cameras.
3. Click OK. You may have to use the scroll bars to view the newly opened window.
Toggling the Size of a Camera Window/Data Window
Double-click the title bar of a camera window. The camera window quadruples in area. Its video is now a double-sized stream. You can move the feed around if it is covering up other feeds. To return the camera window to its original size, double-click the title bar again.
Printing an Image
Printouts of images from a video feed can be made only during the retrieval of recorded video or when watching a video clip (see Enabling the Production of Stills on page 105).
Dial-Up Tip
When using a dial-up connection, closing unneeded camera windows for that site can increase the speed of the remaining video feeds.
Setting a Default Video Quality for All Camera Windows
Figure 2-4 Tear-Away Player Options for Live Video
1. Select Options in the View menu of the View application (not to be mistaken for the View menu of the Live session).
2. Click New Players. The Options for New Players dialog appears (see Figure 2-4).
3. Select a Video Quality.
4. Click OK. The default Video Quality is set.
Camera window options
Default Video Quality setting

Rapid Eye Remote View Operator Guide
Document 800-07767 Rev A 3302/11
Setting the Video Quality on One Camera
Video quality can be lowered on low-speed dial-up connections to improve the transmission time of images (while monitoring live sessions). It can also be heightened on one camera for more detail, as needed.
1. Do one of the following:
• Right-click in a camera window. A menu appears showing Video Quality (see Figure 2-5).
• Select Options Video Quality in the View menu of the Live session.
2. Place the mouse pointer on the Video Quality command, and select another Video Quality value, as needed.
Figure 2-5 Resolution and Quality Can Be Adjusted During a Live Session
All cameras can be set at once by pressing and holding the CTRL key on the PC keyboard while changing a Video Quality setting.
Setting the Multi-Media Time Reference
You have the option of displaying time as Universal Coordinated Time (UTC), or showing the Multi-Media unit’s time zone (RTZ), or the View Operator PC’s own local time (LTZ).
1. Using View, on the main View menu, select Options, then click Time Reference. The Show Time Reference As dialog is displayed (see Figure 2-6).
2. Set the time display reference to either your local time zone (LTZ), the Rapid Eye Multi-Media unit’s time zone (RTZ), or to Universal Coordinated Time (UTC).
3. Click OK.
Figure 2-6 Globally Customizing the Time Reference
TIP! Customizing the time reference does not change the time on your Multi-Media unit, the timestamps on video, or the time on your PC. Only the time displayed changes (see Setting the Date in Windows for Correct Alarm Sorting on page 94).

34
Live Video
Checking the Windows Date and Time on an Operator’s PC
The time on an Operator’s PC is displayed in the bottom right-hand corner of the screen. Hover your mouse over the time display to view the date tooltip. Use the control panel to change the date and time options on your PC, as needed.
Temporarily Changing a Time Reference
Click Set Time Reference on the tear-away player’s File menu. A Customize Time Reference for Session dialog (similar to Figure 2-6) is displayed to set the time display reference to either your LTZ, the camera’s RTZ or to UTC. When you close the tear-away player, these temporary settings are reset.
Resolution Gauge and Recording Indicator for Live Video
Automatic Optimization of Resolution for Live Video
If an operator changes the size of a camera window, the resolution of the images are optimized for speed and image definition. A resolution gauge reports the change. See Figure 2-7 (for NTSC) and Figure 2-9 (for PAL).
Figure 2-7 Resolution Gauge for an NTSC Camera During Live Sessions
Small camera windows for Live sessions automatically use low resolution
This camera’s video feed is being recorded (indicated by red bar)
Indicator or live resolution (NTSC)
Gauge for recorded frame rate
Rapid Eye Remote View Operator Guide
Document 800-07767 Rev A 3502/11
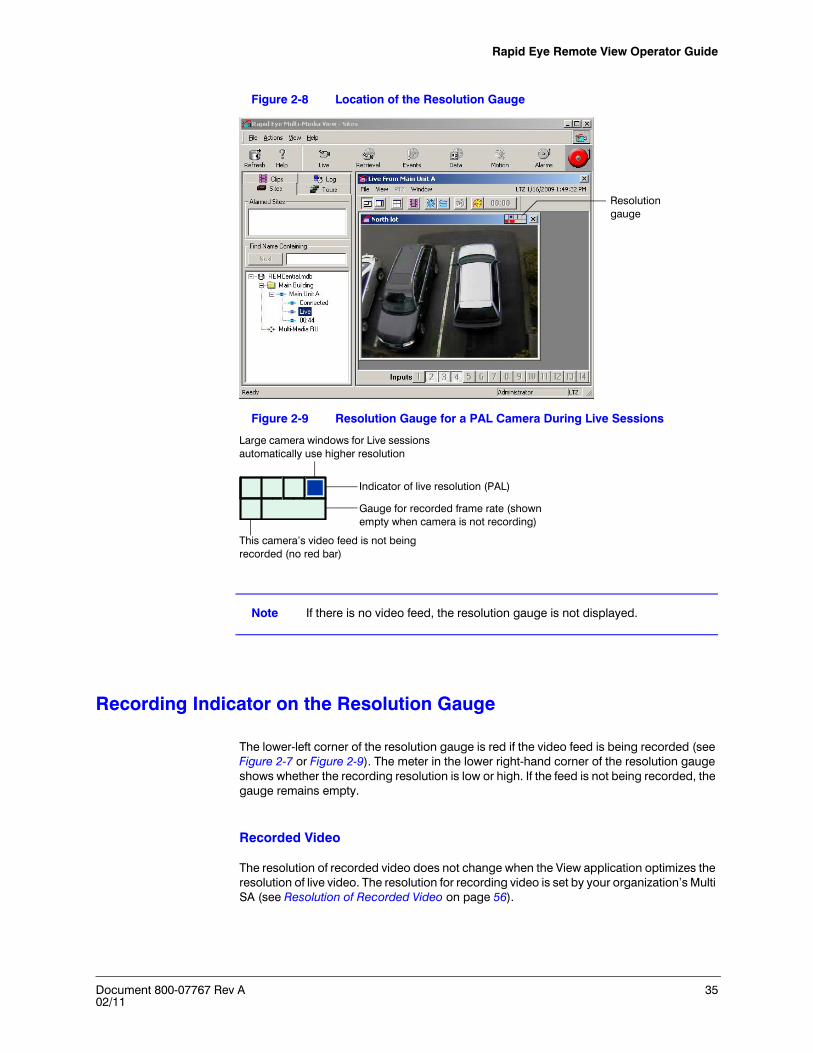
Figure 2-8 Location of the Resolution Gauge
Figure 2-9 Resolution Gauge for a PAL Camera During Live Sessions
Note If there is no video feed, the resolution gauge is not displayed.
Recording Indicator on the Resolution Gauge
The lower-left corner of the resolution gauge is red if the video feed is being recorded (see Figure 2-7 or Figure 2-9). The meter in the lower right-hand corner of the resolution gauge shows whether the recording resolution is low or high. If the feed is not being recorded, the gauge remains empty.
Recorded Video
The resolution of recorded video does not change when the View application optimizes the resolution of live video. The resolution for recording video is set by your organization’s Multi SA (see Resolution of Recorded Video on page 56).
Resolution gauge
Large camera windows for Live sessions automatically use higher resolution
This camera’s video feed is not being recorded (no red bar)
Indicator of live resolution (PAL)
Gauge for recorded frame rate (shown empty when camera is not recording)

36
Live Video
Sizing a Live Camera Window Optimally
1. While running a Live session, right-click on a camera window’s video. A small menu appears on the video (see Figure 2-5).
2. Select Video Resolution to display a list of resolutions.
3. Click a value. The menu vanishes and the camera window is sized optimally.
TIP! A Multi-Media unit uses either NTSC or PAL cameras. Both signals cannot be used on the same unit.
Other Settings for Enhancing Video
Video smoothing. A View Operator has the option of using Video Smoothing ( ) when an image is stretched to sizes that are not optimal for the resolution. The effect of video smoothing is not recorded. Video smoothing can be toggled off/on in Live sessions and during the Retrieval of recorded video.
Camera position. If a video feed needs improvement beyond settings in View, consider modifying a camera’s focus, position (distance, angle), or lighting (see Troubleshooting Cameras in the Environment on page 40).
Microsoft Windows’ Screen area. The Windows desktop can be customized (see Larger Monitors and Microsoft Windows on page 38).
Throughput option. This option is only available on Rapid Eye Multi-Media DSP units. The available bandwidth of the network you use to connect to the Rapid Eye Multi-Media DSP unit can affect the quality of video displayed. Set the Throughput option to High for systems with high bandwidth and Low for systems with low bandwidth. Settings will be automatically adjusted for the bandwidth you have selected. Access this option on the System tab of a Maintenance session (see Rapid Eye™ Multi-Media Digital Video System Administrator Guide for more information).
Customizing the Initial Size of a Camera Window
1. On the main View menu, select Options, then New Players. The Options for New Players window appears, as in Figure 2-4.
2. Select either Best Fit or Image Size. If you select Image Size, you can then choose a size for the type of Multi-Media units in your system (NTSC, PAL, or both).
Live Alarm Session
The Best Fit tiling mode overrides any current image size settings. Changing the setting does not take effect until Image Size is selected to control tiling. Tiling is disabled by changing the resolution of a window. If a global resolution is selected (using the tear-away player’s View/Options menu, or the window’s context menu by holding Ctrl), the tiling is set to Image Size, using the selected resolution.

Rapid Eye Remote View Operator Guide
Document 800-07767 Rev A 3702/11
Ending a Live Session
Close the tear-away player window or click Disconnect on the View toolbar. This also closes other sessions such as retrieval or alarm at the site. The Live indicator disappears beneath the site on the Site action tab. Ending a live session discards all video feeds. A live session also ends when you exit View.
Customizing Windows for a PC Monitor’s Settings
Using Microsoft Windows
If operators plan to use View’s higher resolution settings, set the Screen area (for the monitor running View) to 1280 by 1024 pixels or higher. Microsoft Windows is used to set this value, not the View application. Other recommended values are listed in Table 2-1. The PC monitor’s refresh rate can also be changed. Not all monitors and video cards support the resolutions indicated in Table 2-1. Consult the documentation supplied with Microsoft Windows, your monitor, and the video card for more information.
Table 2-1 Display Properties in Microsoft Windows
Screen Area (Pixels) For Multi-Media DSP (recommended)a
For Multi-Media, Multi-Media LT and Over Dial-Up Connectionsb
1600 by 1200 Yes Yes
1280 by 1024 Yes Yes
1280 by 960 Yes Yes
1152 by 864 Noc Yes
1024 by 768 No Yes
800 by 600 No Noc
a For higher video resolutions.b Dial-up connections using few cameras are faster, as is retrieval of video recorded at
lower resolutions. Lower settings for screen area may be sufficient for such use.c Video is visible and workable even when using smaller screen area settings.

38
Live Video
Larger Monitors and Microsoft Windows
Figure 2-10 Microsoft Windows’ Screen Area Settings
Larger computer monitors and better video cards are assets when setting Microsoft Windows for high screen area settings. In Figure 2-10, a camera window is highlighted for comparison as the screen area changes. More cameras can be seen at once, and at higher resolutions, when a recommended setting is used (as in A or B). Even at other settings, video can still be viewed, though some camera windows can extend beyond the monitor’s surface. At any setting, camera windows can be dragged as needed and the player window scrolled.
Changing a PC Monitor’s Refresh Rate
Higher refresh rates can alleviate eye fatigue when monitoring video over time. You can change the refresh frequency, and the refresh rate (Hertz), as needed.
Not all monitors and video cards support the resolutions indicated in the preceding sections, nor do all offer various refresh rates. Consult the documentation supplied with Microsoft Windows, your monitor, and the video card for more information.
1280 x 960 1600 x 1200
1152 x 864 1024 x 768
Recommended resolution settings:
Resolution settings that are not recommended:
Green screen areas use recommended settings and fit better in the Viewing Window (see the scrolling bars below).

Rapid Eye Remote View Operator Guide
Document 800-07767 Rev A 3902/11
Microsoft Dual View and Rapid Eye View Software
Two monitors can be effectively used with View software to display more camera feeds at once. To set up a dual view system, see your Microsoft documentation.
Note A second video card is needed on the View operator’s PC for Microsoft’s dual view setup.
Troubleshooting Video at an Operator’s PC
If overtaxed, the priority of a Multi-Media unit is always to store video, audio, data and alarms. This may result in slower service to View Operators using Live sessions. If the video you are observing appears sluggish, Honeywell recommends that a Multi SA:
• Close unused software. View makes use of Microsoft Windows’ video resources and your PC’s CPU. Other software that uses of these resources (software for producing graphics, downloading, and so on) can hamper the delivery of video. Network intensive applications such as backups can also slow down the performance of View software. Video recording is not affected, only its delivery to the PC’s desktop may be.
• Close unnecessary camera windows. Fewer open camera windows increase the speed of the other video feeds being displayed from that site. To discard a video feed from a Live session, close its Camera window (see Figure 2-3 on page 31).
• Network Bandwidth. Select the Low Throughput option on the System tab of a Maintenance session if you are connected to a low bandwidth network with Rapid Eye Multi-Media DSP units. See Throughput option. on page 36 for more information.
Note The Network Bandwidth Throughput option is only supported on Rapid Eye Multi-Media DSP units. This option will not be available on other Rapid Eye units (Rapid Eye Multi-Media, Active Alert, and Multi-Media LT).
Hyper-Threading
Some of the latest PCs can use hyper-threading technology. This can cause a conflict when long Retrieval and Live sessions are run in tandem from the same Multi-Media unit.
Caution If you experience system lockup in this situation, Honeywell recommends disabling hyper-threading in the PC at boot-up, in the PC’s BIOS.

40
Live Video
Dual CPUs
Some PCs work with two processors (CPUs).
Caution If you experience system lockup in this situation, Honeywell recommends disabling use of dual-CPUs for Multi-Media software.
Troubleshooting Cameras in the Environment
Normal operation of View can reveal weaknesses in the position of cameras. Video surveillance can be hampered by:
• Blind spots. Mobile equipment blocking a camera (such as vehicle docking, renovation work, and so on).
• Environmental lighting. A camera can be rendered ineffective by direct sunlight, artificial lighting or darkness.
• Environmental conditions. Condensation, excessive heat or cold, even a dirty camera lens, due to dust or grease can build up over time and require onsite maintenance.
Pan, Tilt and Zoom
Use of cameras that can pan, tilt and zoom (PTZ) is optional. Your Multi-Media System Administrator (Multi SA) can inform you if PTZ cameras are connected to a Multi-Media unit.
Recording Video and Using PTZ
Moving a camera affects the video being recorded by your Rapid Eye Multi-Media unit.
Before a View Operator Can Use a PTZ Camera
Your Multi SA has to:
• Add the Use PTZ right to a View operator account.• Grant access to the site(s) assigned to operator(s) by their supervisors.
Selecting a PTZ Camera Window
A camera window for a PTZ camera has [PTZ] added in the window’s title bar, when running a live session (see Figure 2-14 on page 43).
Rapid Eye Remote View Operator Guide
Document 800-07767 Rev A 4102/11
Controlling a PTZ Camera
Three PTZ controls are available to make PTZ commands: a dartboard-like control, a rubber band control, and a Zonal Mode control. All three options are available while running a Live session or while using LocalView.
TIP! The rubber-band control and zonal mode PTZ control cannot be used at the same time.
Caution Not all PTZ cameras support every PTZ command offered. See your PTZ camera’s documentation for more information on its features.
Toggling Between Zonal Mode and Pull Mode
Globally and for New Players
1. Open the View menu on the View application (not the Live session).
2. Select Options and click New Players.
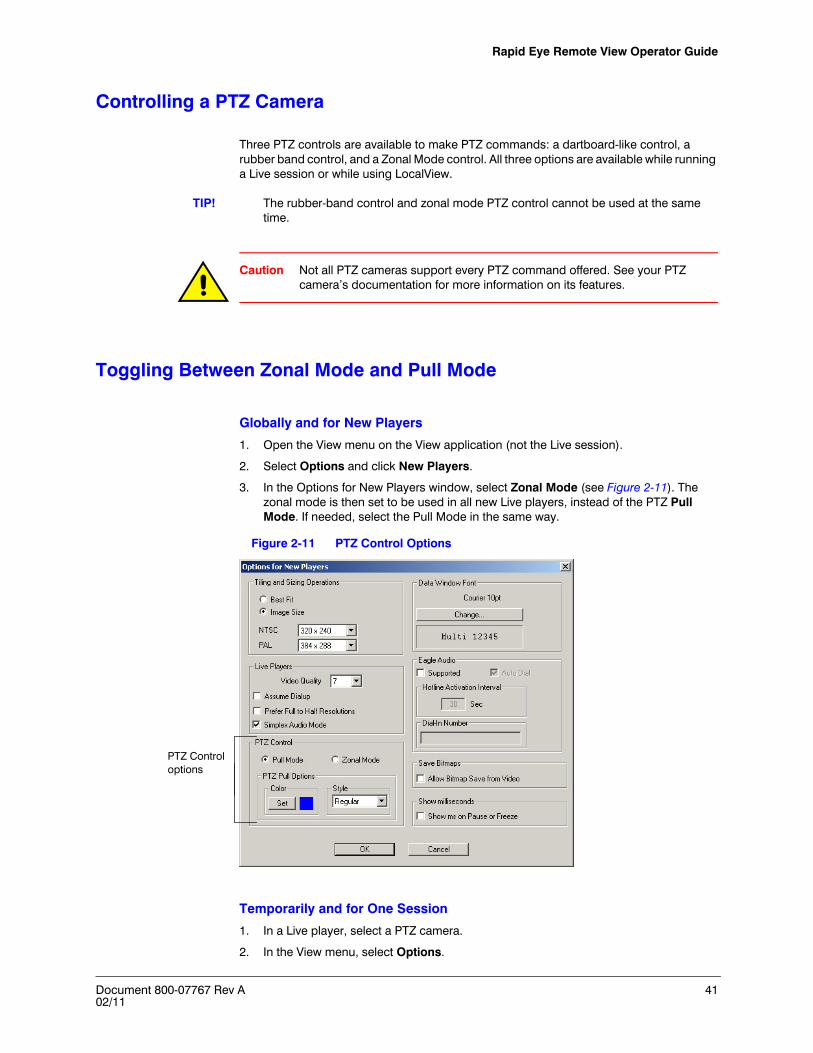
3. In the Options for New Players window, select Zonal Mode (see Figure 2-11). The zonal mode is then set to be used in all new Live players, instead of the PTZ Pull Mode. If needed, select the Pull Mode in the same way.
Figure 2-11 PTZ Control Options
Temporarily and for One Session
1. In a Live player, select a PTZ camera.
2. In the View menu, select Options.
PTZ Control options

42
Live Video
3. Click the Zonal PTZ Control Mode option.
• If there is no checkmark next to the option, Zonal mode is enabled and replaces the rubber band-like control (Pull Mode).
• If there is a checkmark next to the Zonal PTZ Control Mode option, Zonal mode is replaced by the rubber band control (Pull Mode).
PTZ Pull Mode and Rubber Band Control
Figure 2-12 Dragging the Mouse Pointer to Control a PTZ Camera
Pan / Tilt. On the video image, click and drag the mouse. A line is overlaid on the video. Pull the line around to indicate the direction you to pan or tilt the camera. Figure 2-12 shows the pointer dragged from left to right. Lengthening the line speeds-up the PTZ camera’s panning or tilting. Release the mouse button to stop the camera. If you do not see a rubber-band-like control, the View application may be set for Zonal Mode. See Using Zonal Mode on page 43.
Zoom. You have the option of using the wheel on the mouse to Zoom in and out, when the mouse pointer is on a PTZ camera window.
The line drawn by dragging the mouse in a PTZ camera window can be customized: None, Thin, Regular, and Thick. The line’s color can also be changed (see Figure 2-11).

Rapid Eye Remote View Operator Guide
Document 800-07767 Rev A 4302/11
Using Zonal Mode
Figure 2-13 Zonal Mode Transforms the Mouse Pointer in PTZ Camera Windows
• To pan or tilt. Move the mouse pointer onto the video in a PTZ camera window. The pointer changes to an icon. Nudge the mouse until the arrow points in a direction that you want it to move. The number next to the arrow indicates how much panning/tilting will occur after you click (see Figure 2-13). For continuous panning or tilting, click the arrow that is the furthest from the center.
• To stop continuous panning or tilting. Move the mouse through the PTZ camera’s window until the pointer changes to an octagon ( ), then click the mouse button.
• To zoom. Use the wheel on the mouse, or use the PTZ Dartboard. • Using PTZ presets, tours and vectors. While the pointer is in a PTZ camera window,
right-click it. A window menu appears. Make a selection, as needed.
PTZ Dartboard Command and Control
Figure 2-14 Displaying the PTZ Dartboard Control
1. During a Live session, open and select a PTZ camera window.
2. Click , the Enable PTZ Control button. A dartboard control appears (as in Figure 2-14).
• The title bar in the dartboard control shows the name of the camera and adds PTZ (see Figure 2-14).
• The PTZ tip shows what the active area of the controller does (see Figure 2-14).
123
Move the mouse over the PTZ camera window until the pointer changes to a numbered arrow. Click the mouse to pan or tilt in that direction. Higher values make the camera pan or tilt more than lower values.
Name of PTZ camera
PTZ tip

44
Live Video
For a reminder of what an area of the dartboard can do, watch the PTZ tip as you surf the dartboard with the mouse pointer (see Figure 2-15).
• Click. The duration of PTZ commands is fixed and depends on the inner ring that is chosen. Watch the PTZ tips change as the mouse pointer surfs the dartboard.
• Hold. PTZ commands last as long as the mouse button is held.• Speed. Clicking the inner circle of the PTZ controller cycles the control speed through
Slow, Medium, Fast, back to Slow, and so on. In Click style, the Speed setting changes the duration of commands. In Hold style, the setting changes the speed of the camera’s response to commands.
Controlling a PTZ Camera Using the Dartboard
1. On the PTZ Control, the Click button is selected by default when the control appears (see Figure 2-14 or Figure 2-15). You have the option of clicking the Hold button. With the Hold option, holding the mouse button down makes the command last as long as it’s needed.
2. Move the mouse pointer over the dartboard to highlight areas of the dartboard. Each area on the dartboard offers a PTZ tip in the box below the controls. When the command that you need is highlighted, click the mouse button (see Figure 2-15). If the mouse pointer is not on the dartboard, no PTZ tip is shown. If auto-iris is not supported, only one black dot appears in the arc for Iris on the dartboard.
Figure 2-15 PTZ Dartboard Control Commands
The Zoom, Focus, and Iris Rings
• Zoom. On the dartboard, use the left side of the Zoom arc (–) to zoom out and the right side of the Zoom arc (+) to zoom in (see the Zoom arc in Figure 2-15).
• Focus. On the dartboard, use the left side of the Focus arc (–) to focus out and the right side (+) to focus in. If auto-focus is supported by the camera, two black dots appear in the Focus arc and the auto-focus command is between the two dots.
• Iris. On the dartboard, use the left side of the Iris arc (–) on the dartboard to close the iris and the right side (+) to open the iris. If auto-iris is supported by the camera, two black dots appear in the Iris arc and the auto-iris command is between the dots (see auto-iris in Figure 2-15).
• Pan. When the Click option is in use, the outer Pan areas send a continuous panning command to the PTZ camera.
PTZ tip
Zoom arc
Continuous panning
Speed
Auto-irisFocus arc
Iris arc
Pan

Rapid Eye Remote View Operator Guide
Document 800-07767 Rev A 4502/11
The Inner Rings and Fans
For a reminder of what an area on the dartboard does, watch the PTZ tip as you surf the dartboard with the mouse pointer.
• Click button. When the Click option is in use, the areas on the dartboard give a PTZ camera pan and tilt commands.
• Hold button. When the Hold option is in use, clicking and holding the mouse on a fan area prolongs the duration of the PTZ command sent to the camera. For continuous panning, use the Click style of control.
More Commands
• Reset. The Reset button is available if the command is supported by the dome. Availability of the Reset command depends on the make and model of camera.
• Stop. Stops the command currently being carried out.• Close. Closes the dartboard control window.
Ultrak KD6i Domes and Auto-Iris
Before the setting for aperture (another term meaning iris) can be changed manually on an Ultrak KD6i dome, the operator needs to turn OFF the auto-aperture option, using an auto-iris command followed by the Stop button on the PTZ controller.
Choosing a Preset for a PTZ Camera
1. During a Live session, select a PTZ camera window. How to run a live session is explained in Starting a Live Session on page 29.
2. Do one of the following (see Figure 2-16):
• Right-click in the PTZ camera window. A menu appears in the camera window next to the pointer. Select PTZ Preset. A list of eight presets is displayed.
• Using the PTZ dartboard controller, leave or set Preset in the box near the top of the controller. Click one of the numbered buttons.
3. Choose a PTZ preset. The PTZ camera goes to the PTZ settings of the preset. If the camera does not move, either:
• A preset has not been set for that number.• The camera is already in the preset position.• The selected camera is not a PTZ camera.

46
Live Video
Figure 2-16 Using PTZ Presets
Number of Presets Available
Not all makes and models of PTZ cameras offer presets, or the same number of presets. View lists the number of presets available for a camera connected to the unit. If a camera model offers four presets, buttons #5 to #8 are unavailable on the PTZ dartboard control.
Listing PTZ Presets 9 to 128
1. Using the PTZ controller, leave or set Preset in the box near the top of the controller.
2. Click the double-arrow button next to the button for PTZ preset #8. A list of the rest of the presets appears. Click the double-arrow button again to close the list.
3. Select a preset. Available preset numbers depend on the make and model of the PTZ camera. The PTZ camera goes to the PTZ settings in the preset.
PTZ Tours and PTZ Vectors
PTZ tours and vectors are set by your organization’s Multi SA. They can be used by a Multi-Media operator in the same way as PTZ presets. See Choosing a Preset for a PTZ Camera, page 45, and select Tours or Vectors, as needed.
Privacy Zones
On RapidDome models, presets 100 to 127 can be designated as privacy zones. Video is not displayed when a dome is placed in a privacy zone position. Privacy zones are setup by your Multi SA.
Selecting Preset, Tour, and Vector determines the effect of the numbered buttons (1–8)

Rapid Eye Remote View Operator Guide
Document 800-07767 Rev A 4702/11
PTZ Camera Position After a Session Closes
After use, a PTZ camera can be returned automatically to a set direction and zoom (see Table 2-2). A Multi SA makes the setting in a Maintenance session, on the Video tab with PTZ selected. Make the selection in the When Live/Response ends section.
PTZ and Motion Search
Motion search is not effective on video recorded as a PTZ camera is panning, tilting, zooming or touring. If you plan to use motion search on a PTZ camera, use Stay put or a preset for the close of session option. Video recorded while a PTZ camera is immobile can be searched for motion (see Searching for Motion, page 61). A motion search can also be used to find out when a PTZ camera was moved, if that camera should be staying put.
Sharing Live Sessions from One Unit
Limitations on Viewing Live Video in many Live Sessions
When live video is monitored, no more than 8 live video streams from the same group of cameras can be viewed at a time. The groups of cameras are defined in Table 2-3.
For example:
• Two operators are viewing live video from 3 cameras in group C (3 cameras × 2 operators = 6 live streams). Therefore, a third operator can view live video using only 2 of the cameras in group C.
• Eight operators, each running a live session, are viewing the same live camera. A ninth operator cannot view live video using a camera from the same group.
Table 2-2 PTZ Camera Position After a Session Closes
Session Ends Behavior
Stay put The camera remains in the last position used by the operator. If it is panning, it keeps on panning. If it is not moving, it stays put. The stay put behavior makes the Return to Auto-iris and Return to Auto-focus options available.
Go to preset1 The camera returns to preset 1, configured using a Multi-Media unit.
Start tour1a Some camera models can keep moving when not in use by an operator.
a A PTZ tour differs from site tours (see Watching Site Tours, page 115).

48
Live Video
Sessions
• If ten operators open a live session on one Rapid Eye unit, an eleventh operator cannot. However, that operator can open another type of session (such as retrieval, event, data, alarm, or motion).
• For Multi-Media LT units, the number of simultaneous View operators may be less.
Streams
Up to 32 live video streams are available.
• Two operators open a Live session to the same unit, and each operator monitors video from 16 cameras. A third operator can open a Live session to the same unit, but cannot monitor video because the 32 streams available are already in use.
• For live audio, up to ten operators running Live sessions could each hear the channels of Live audio, and each could monitor all live data streams.
Simultaneous Use of Many Units by One Operator
Up to 64 simultaneous connections to different units can be made by one operator. This number can be lower due to the CPU of the PC that is running View, the PC’s memory and the number of other tasks currently running.
Only 6 Maintenance sessions can be active at the same time. When a View operator has connected to 6 Maintenance sessions for different units at the same time, they will not be able to connect to a seventh Maintenance session.
Audio Broadcast
Audio can be broadcast to many units simultaneously using the View application. To broadcast, click Talk in more than one player before the microphone at the operator’s PC.
Table 2-3 Camera Groups
Group Camera Port Numbera
A 1, 8, 11, 14
B 2, 5, 12, 15
C 3, 6, 9, 16
D 4, 7, 10, 13
a The camera port numbers listed only apply to Rapid Eye Multi-Media DSP units.

Document 800-07767 Rev A 4902/11
3
Recorded Video
To view recorded video, use a Retrieval session. The recorded video is stored on a unit. You can view the recordings from all cameras (or fewer). Many Multi-Media sites can be accessed, all at once.
Viewing Recorded Video
Process
Start by selecting a Multi-Media site and then run a Retrieval session. You can specify the date and time of the start of the video. Recorded video reaches your PC until you end the Retrieval session.
TIP! You can run retrieval and live sessions concurrently, from one or many sites.
Selecting a Site
1. Run View (see Starting View on page 21).
2. Click the Sites tab.
3. Click a site name listed on the tab (see Selecting a Multi-Media Site on page 23).
Starting a Retrieval Session
1. After selecting a site, do one of the following:
• Click on the Toolbar.• Right-click on the site name. Click Retrieval on the shortcut menu that appears.• Click Retrieval on the Actions menu.

50
Recorded Video
2. To obtain a video player, either:
• A tear-away player appears in the session pane. A list of streams (from cameras and other data devices) is displayed (see Figure 3-1).
- or -
• A Connection dialog appears if there are other, optional connections to a site. Select a connection, then click OK. A tear-away player appears with its streams.
3. In the Stream List dialog, select as many cameras as you need. All streams (video and text) are pre-selected by default. Use of the calendar and start time fields are optional.
4. Click OK. Each feed of retrieved video is displayed in its own camera window.
If a Camera Window Shows no Video
Cameras can be scheduled not to record. Starting a retrieval session at such a time produces a tear-away player displaying blacked-out camera windows.
Setting a Start Date and Time
When you start a Retrieval session, the nearest minute to the current time is chosen as a start time. The date chosen is the current day’s date. You have the option of specifying the beginning date/time of the retrieval session before or after selecting video feeds.
Entering the Start Date and Time of Recorded Video
1. In the Stream List dialog, click the part of the date or time that you want to change in the Retrieve from fields.
2. Use the arrow keys on your keyboard to scroll through the numbers, or enter the number that you want.
3. Repeat these steps, as needed, for the rest of the date and time units.
Setting the Date of Retrieval with the Calendar Utility
1. In the Stream List dialog, display the calendar utility by clicking the drop-down arrow next to the date field (see Figure 3-1).
2. Select a date in the calendar. To go to another month, click the arrow keys next to the month/year headings in the utility.
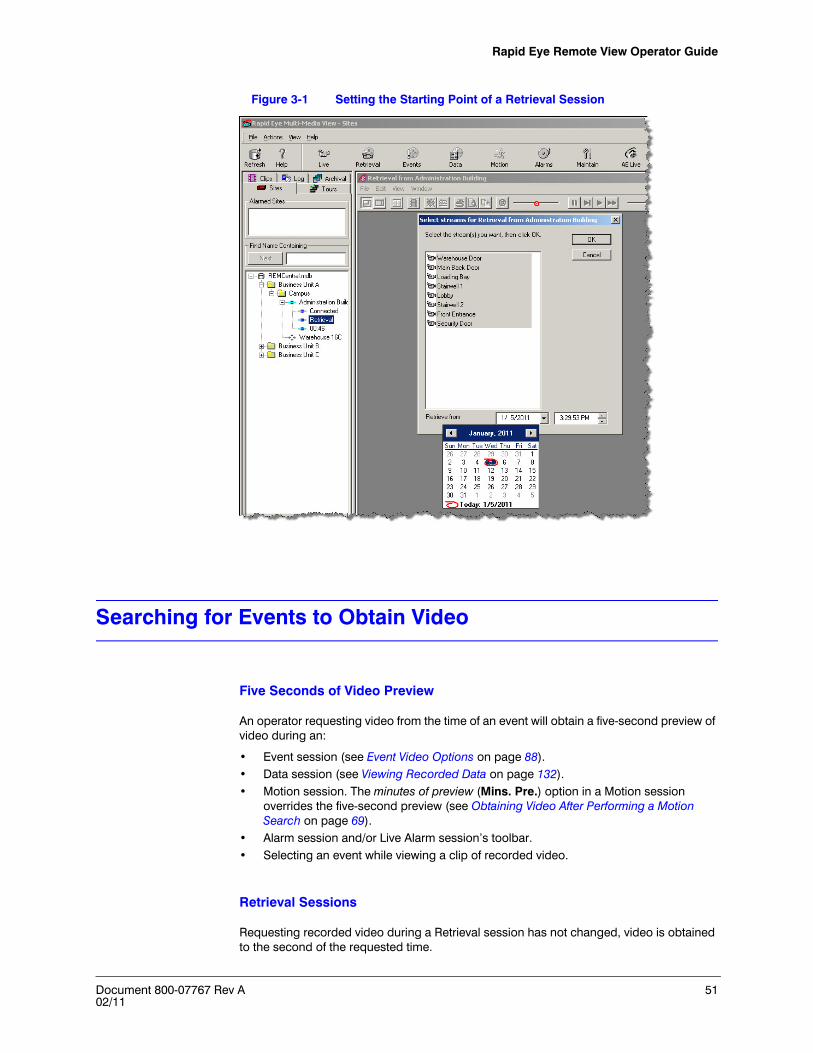
Rapid Eye Remote View Operator Guide
Document 800-07767 Rev A 5102/11
Figure 3-1 Setting the Starting Point of a Retrieval Session
Searching for Events to Obtain Video
Five Seconds of Video Preview
An operator requesting video from the time of an event will obtain a five-second preview of video during an:
• Event session (see Event Video Options on page 88).• Data session (see Viewing Recorded Data on page 132).• Motion session. The minutes of preview (Mins. Pre.) option in a Motion session
overrides the five-second preview (see Obtaining Video After Performing a Motion Search on page 69).
• Alarm session and/or Live Alarm session’s toolbar.• Selecting an event while viewing a clip of recorded video.
Retrieval Sessions
Requesting recorded video during a Retrieval session has not changed, video is obtained to the second of the requested time.

52
Recorded Video
Older Units
On older Multi-Media units, video starts from the start of the minute of the requested time.
Playback Speed Slider
Figure 3-2 The Playback Speed Slider
Scanning a Recorded Video Feed Quickly
Drag the speed slider to the right of its center position. The slider’s speed setting appears as a tool tip (see Figure 3-2).
Slowing Down and Pausing a Recorded Video Feed
Drag the speed slider to the left of its center position. Sliding it to the very left pauses the video.
TIP! Dial-up connections cannot achieve playback speeds much greater than double speed (2x), even if the Speed Slider is set at higher values.
Skipping Through Recorded Video
For quickly spotting recorded video, drag the Skip-to-time slider to the right of its center position. A tool tip shows the amount of skip (see Figure 3-3). After use, the Skip-to-time slider returns to its center position. Skipping can be combined with playback speed (see above), to scan for video.
Figure 3-3 Skipping to a Later Time

Rapid Eye Remote View Operator Guide
Document 800-07767 Rev A 5302/11
Reviewing Recorded Video of an Event Seen Moments Ago
1. Set the speed slider to scan the video at a comfortable speed.
2. Jump to a time before the event by repeatedly dragging the time jumper to the left of its center position by small amounts.
3. Place the mouse pointer above the Pause button.
4. When the event occurs, click Pause.
Going To a Specific Time of Recorded Video
When you know the time of the recorded video that you need, click the Go to button. This displays a Go To a Specific Time dialog for entering a date and time (see Figure 3-4).
Figure 3-4 The Go To Button and its Dialog
First Available Video, Sound or Data
Later Media
If an operator requests video from a time at which the unit was not recording, the first image after the requested time is displayed and the later media indicator appears. The same applies to data and sound.
Figure 3-5 Indicator for Later Media Resembles the Face of a Clock
Later media is indicated by an icon (see Figure 3-5) that flashes in the upper-right corner of the Retrieval window (see Figure 3-6). A report appears. A report occurs when a request for a date or time (as in Figure 3-6), is beyond the video storage’s limit, or during a period of time when recording was off. Right-clicking hides the icon and no report is produced.

54
Recorded Video
Figure 3-6 Report Earliest Available Video Recording
Power outages can temporarily stop a unit from recording. When recording resumes, there is a hole (data is missing) in the video archive.
Other Playback Options
Figure 3-7 Recorded Video Utilities
Player
Image size. A button that sizes camera windows optimally for the resolution. The resolution is chosen automatically, as if all streams were displayed.
Best fit. A button that sizes camera windows to take up a tear-away player’s entire window.
Full screen / embed. A button that toggles the size of a tear-away player, displaying the player full screen or embedded in the View window.
Flashing icon indicates later media
A later media report occurs when a request for date or time is beyond the video storage’s limit or during a period when recording was off.
Save a video image
Produce a clip of video
Or to embed
Image size
Best fit
Full screen Freeze
SmoothPrint Copy
Print previewPlayer Image Options
Video Production

Rapid Eye Remote View Operator Guide
Document 800-07767 Rev A 5502/11
Image Options
Freeze. The Freeze button stops a video feed and displays a timestamp in the camera window’s title bar (see Figure 3-8). You have the option of adding milliseconds in the title bar of a frozen image. Use the Show ms on Pause or Freeze command in the Options for New Players dialog accessed from the View menu.
Figure 3-8 Paused Video Image Showing Milliseconds
Smooth. The effect of toggling video smoothing is stronger when a camera window is stretched to a non-optimal size for the resolution. Video smoothing is not recorded.
Copy. Send an image to the clipboard in Microsoft Windows, for adding it to word processing software or to a spreadsheet. In the target software, use the Paste command after using the Copy button in View. You have the option of adding data about the image.
Figure 3-9 Copying a Video Image to the Windows Clipboard
Figure 3-10 Video Image Pasted in Word Processing Software
Print. Immediately prints a camera window’s image.
Print preview. The image of one camera window is shown ready for printing.
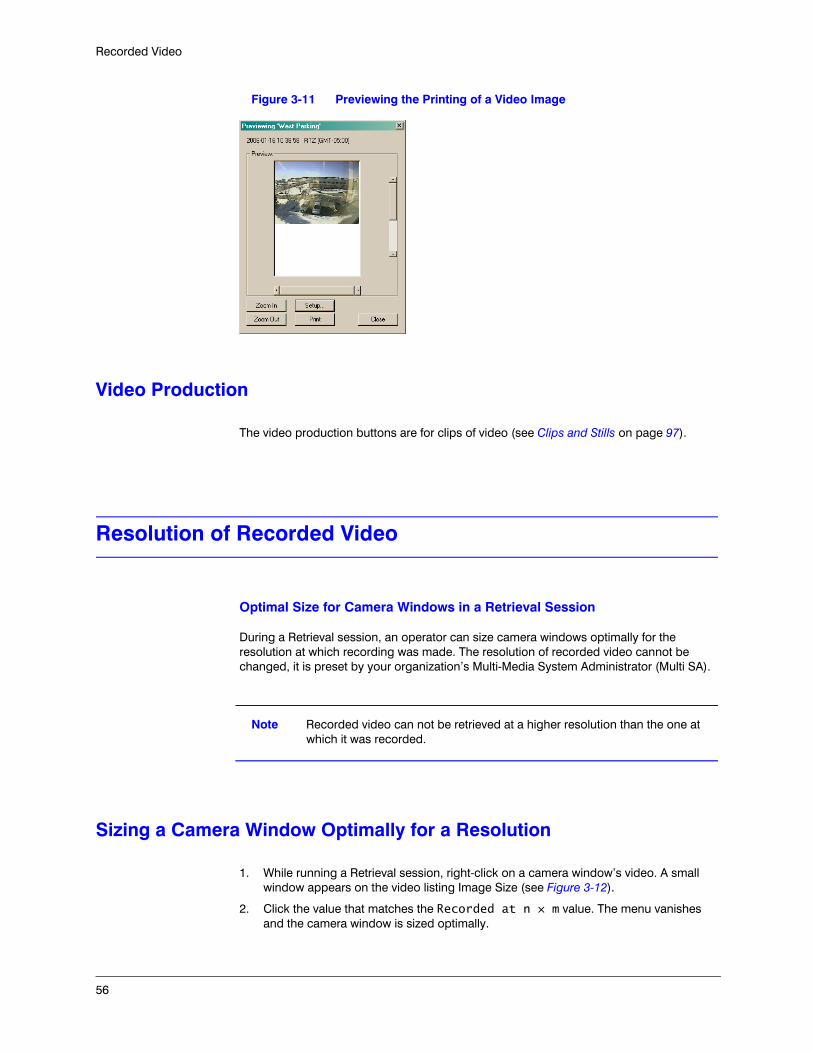
56
Recorded Video
Figure 3-11 Previewing the Printing of a Video Image
Video Production
The video production buttons are for clips of video (see Clips and Stills on page 97).
Resolution of Recorded Video
Optimal Size for Camera Windows in a Retrieval Session
During a Retrieval session, an operator can size camera windows optimally for the resolution at which recording was made. The resolution of recorded video cannot be changed, it is preset by your organization’s Multi-Media System Administrator (Multi SA).
Note Recorded video can not be retrieved at a higher resolution than the one at which it was recorded.
Sizing a Camera Window Optimally for a Resolution
1. While running a Retrieval session, right-click on a camera window’s video. A small window appears on the video listing Image Size (see Figure 3-12).
2. Click the value that matches the Recorded at n × m value. The menu vanishes and the camera window is sized optimally.

Rapid Eye Remote View Operator Guide
Document 800-07767 Rev A 5702/11
Figure 3-12 PAL Camera Window Menu and Report
Resolution Gauge for Recorded Video
During a Retrieval session, a resolution gauge reports the resolution at which the recording was made (see Table 3-1 and Table 3-2).
Video Recorded Using Boosted Settings
Your organization’s Multi SA has the option of programming event recording settings to higher settings than those for continuous recording.
Figure 3-13 NTSC Resolution Gauge Example
Table 3-1 NTSC Camera Recording Resolution Selectiona (Pixel x Pixel)
Resolution 160 x 120 Legacyb 320 x 240 640 x 240 640 x 480c 704 x 480c
Gauge N/A
a Some early Multi-Media units offer less selection.b Legacy, used by older Multi-Media units, is included for compatibility. There is no gauge for the NTSC legacy set-
ting. The legacy resolution is not shown in the Enhanced Preview.c Not available on Multi-Media LT units.
Table 3-2 PAL Camera Recording Resolution Selection (Pixel x Pixel)
Resolution 192 x 144 384 x 288 704 x 288 704 x 576a
Gauge
a Not available on Multi-Media LT units.
Continuous Recording Settings Boosted Recording Settings

58
Recorded Video
The resolution gauge of recorded video may change if:
• A View Operator boosted the recording settings during a Live session.• A Response schedule is in use, to automatically boost recording settings when events
occur. A response schedule is preset by your organization’s Multi SA.
The back and forth on a gauge is shown for PAL in Figure 3-14. If boosting occurs, the dot moves to the right. When boosting stops, the gauge again shows the setting for continuous recording.
Figure 3-14 PAL Resolution Gauge Example
TIP! If the resolution setting for Event recording is the same as for Continuous recording, the Resolution gauge does not change. The dots may appear in different positions on the gauge, depending on the resolution settings for Continuous and Event recording (see Table 3-1 and Table 3-2, on page 57).
Ending a Retrieval Session
Do one of the following:
• Close a Retrieval from [site name] window.
- or -
• Click Disconnect on the Toolbar. This also closes other sessions (for example, live video, retrieval, and alarm) at the site. On the Site action tab, beneath that site, the Retrieval indicator is removed.
See also Recorded Audio on page 111 for information on recording audio, Live Data Messages from POS Hardware on page 131 for POS device information, Live Video on page 29 for more details on live video and Scheduling on page 139 for more information on schedules. A Multi-Media unit can be scheduled to suspend the recording of video feeds.
Continuous recording
Boosted recording
Back to Continuous recording

Document 800-07767 Rev A 5902/11
4
Event Recording for Video
Event Recording is Preset
Your organization’s Multi-Media System Administrator (Multi SA) has the option of setting Multi-Media units to record video at higher rates, resolution and quality. Consult your Multi SA to find out if the settings for event recording are higher than those for continuous recording. To set up event recording, see the Rapid Eye™ Multi-Media Digital Video System Administrator Guide.
Event Recording on Demand
A View operator can use the boost button whenever an event of interest occurs during a Live session (or during site tours). While the boost button is clicked, the values for event recording—set by the Multi SA during configuration—are used.
Figure 4-1 Boost Button for Event Recording
Clicking the Boost button displays a timer that immediately starts counting down from five minutes. Boosted recording automatically stops when the timer finishes counting down. The timer is provided so that event recording is not accidentally left ON for an extended length of time. Event recording can have a considerable impact on the length of the video archive and should be used sparingly. Nonetheless, the timer can be reset to extend the boosting of recording.
Figure 4-2 Event Recording (Dormant Timer and Counting Down)
Resetting the Event Recording Timer
Click the timer. The timer is reset to five minutes and starts counting down again.
Boosting the Recording of One Camera or Many
1. Select a camera window.
Dormant Timer Counting Down
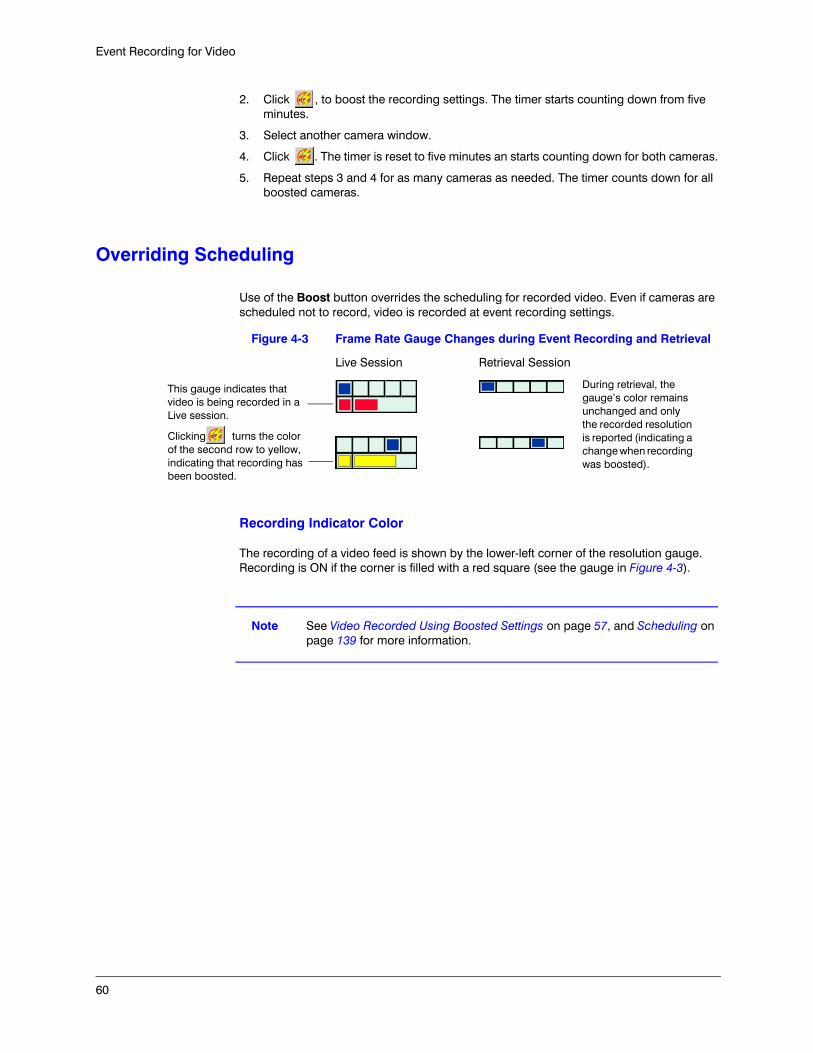
60
Event Recording for Video
2. Click , to boost the recording settings. The timer starts counting down from five minutes.
3. Select another camera window.
4. Click . The timer is reset to five minutes an starts counting down for both cameras.
5. Repeat steps 3 and 4 for as many cameras as needed. The timer counts down for all boosted cameras.
Overriding Scheduling
Use of the Boost button overrides the scheduling for recorded video. Even if cameras are scheduled not to record, video is recorded at event recording settings.
Figure 4-3 Frame Rate Gauge Changes during Event Recording and Retrieval
Recording Indicator Color
The recording of a video feed is shown by the lower-left corner of the resolution gauge. Recording is ON if the corner is filled with a red square (see the gauge in Figure 4-3).
Note See Video Recorded Using Boosted Settings on page 57, and Scheduling on page 139 for more information.
This gauge indicates that video is being recorded in a Live session.
Clicking turns the color of the second row to yellow, indicating that recording has been boosted.
During retrieval, the gauge’s color remains unchanged and only the recorded resolution is reported (indicating a change when recording was boosted).
Live Session Retrieval Session

Document 800-07767 Rev A 6102/11
5
Searching for Motion
The recording of motion data is enabled by default. If a Motion session is unavailable, check with your organization’s Multi SA.
Figure 5-1 Motion Button
Starting a Motion Session
Figure 5-2 Online Reminder of the Next Step When Searching for Motion
On the Site action tab, either:
• Right-click the name of the site you plan to search. Click Motion on the menu that appears.
• Click the name of the site, then click Motion on the View toolbar.
A Search for Motion at site name window appears in the session pane.
Reminder of what to do next in a Motion Search.
Select a stream from the drop-down list.

62
Searching for Motion
Contextual Help When Searching for Motion
A reminder of the next step that you need to take is displayed near the upper-right corner of the Search for Motion window (see Figure 5-2).
Preparing a Motion Search
Figure 5-3 Steps to Prepare a Search for Motion
1. Start a motion session and click the Stream drop-down arrow to display a list of the site’s cameras. Other streams are not listed in a Motion Search. Select a camera from the Stream list (see Figure 5-3).
2. Indicate date and time to search by selecting a date and entering a time in the From and To fields. Use the From and To drop-down arrows to select a date with the calendar utility.
3. Click Fetch. Two frames of video are displayed: an initial frame from the From time and date, and another, final frame, from the To time and date. The initial frame is enlarged for setting the search options.
4. Do one of the following:
• Click Search. The Search button changes to either Redefine or Stop, in case you need change the motion options and search again.
• Use Motion Threshold options, or Masking to specify the type of motion you are search for (see Motion Threshold on page 63, and Masking that Detects Motion on page 63).
5. See Obtaining Video After Performing a Motion Search on page 69 to use the video after you’ve performed a motion search.
No Video at Specified Date and Time
From. If the from time for a motion search is a time at which the unit was not recording video, the first image after the requested time is displayed. A flashing later media icon appears, indicating that the image in a still frame is later than the from time requested (see Figure 5-4). The earliest date that can be selected using the calendar utility is January first, 2000.
To. Requests for a future date or time cannot be requested.

Rapid Eye Remote View Operator Guide
Document 800-07767 Rev A 6302/11
Figure 5-4 Report When Requesting Video and None is Available
TIP! When a power outage temporarily stops a unit from recording, a gap is produced in the video archive. Such a gap can also cause the later media indicator to appear.
Obtaining the Time Offset of Later Media
Click the later media icon (shown in Figure 5-4). If the image is dark, check the time in the Offset Image Time window to find out if, for example, the video was recorded at night.
Motion Threshold
Figure 5-5 Detection Toolbar Sensitivity and Interval Options
Sensitivity. Threshold for reporting movement. Moving the slider to the right of center picks up smaller movements. Setting the slider to the far left turns off motion searching. Slider range of magnitudes is from 1 to 100.
Interval. The minimum amount of time, in seconds, between separate motion reports. Two or more occurrences of movement within the interval period are reported as a single item in the motion search report. Adjust as needed (Interval ranges from 0 to 9999 seconds).
Masking that Detects Motion
Show / Hide masking grid ( ). Toggle for the presence/absence of a grid overlay on the video image, to help select the area(s) used to search for motion.
Later media is indicated by the flashing icon (above). Click the icon for a report.

64
Searching for Motion
Show / Hide mask and Enable / Disable mask edit ( ). Toggle this option to search for motion using either a partial area (mask), or the full area of a video image. When enabled, only the areas that you have masked are searched for motion (see Figure 5-6). To focus your motion search on a part of a video feed, see Focusing a Motion Search on an Area of Video, page 64. The mask(s) can also be shown during video playback, in a Motion Search session. To save a mask, see Saving and Repeating a Motion Search on page 74.
Focusing a Motion Search on an Area of Video
1. After preparing a motion search (see Preparing a Motion Search on page 62), click the Show / Hide mask button ( ). You have the option of clicking the Show / Hide masking grid button ( ).
2. On the larger image, click where you need the motion search to occur. Green blocks appear as you click. You can click as many times as needed (see Figure 5-6).
Removing a Block in a Mask
• Click the block.
- or -
• Click Undo, if your last action was placing a block, or a series of blocks. You can click Undo repeatedly.
Viewing More Masking Commands
Place the mouse pointer on the large video image of a motion session and right-click. A menu appears showing global masking commands (see Figure 5-6).
Figure 5-6 Enlarged Detail of an Image Used During a Motion Search
Global Masking Commands
Show Mask. Displays/hides where the search for motion occurs. When masks are hidden, the entire area of the video is searched.
Right-click on the large image to view masking commands.
Masks that specify where to search.
Motion pointer
Rapid Eye Remote View Operator Guide
Document 800-07767 Rev A 6502/11
Show Grid. Toggle to display a grid overlay, to help select the area(s) used to search for motion. Works like the Show / Hide masking grid button.
Set All. Covers the entire area of a video image with a mask. The mouse can then be used to remove part of the mask, as needed. When used with the Invert Mask command, small areas can be excluded from a search (see Excluding an Area from a Search on page 65).
Clear All. Removes all masks from the image area. The mouse can then be used to add new masks.
Invert Mask. Unmasks masked areas, and masks unmasked areas.
Masking a Larger Area with One Click
Press and hold the Ctrl key on the PC’s keyboard, then click the larger image. A larger mask (3x3 blocks) is inserted.
Note for the Multi-Media System Administrator
In motion detection, the mask is red and movement behind a mask is ignored. The masking behaves opposite to that of a motion search. In a motion search, the parts masked in green act as triggers more than as a mask.
Excluding an Area from a Search
1. After preparing a motion search (see Preparing a Motion Search on page 62), click the Show / Hide mask button ( ). You have the option of clicking the Show / Hide masking grid button ( ).
2. Click on areas of the image where you need to exclude in a search for motion. As you click, highlighted blocks appear (see Figure 5-6).
3. Show the masking commands by right-clicking the larger video image.
4. Click Invert Mask.
5. You have the option of saving the mask, along with other search options (see Saving and Repeating a Motion Search on page 74).
Undo / Redo
The Undo and Redo commands apply to the Motion mask.
Search Report
After preparing a motion search (see Preparing a Motion Search on page 62), and using the optional motion options, click Search. A motion search report (Figure 5-7) is produced.

66
Searching for Motion
Figure 5-7 Motion Search Report
Report Options
Magnitudes Filter (Filter Mag.)
In Figure 5-7, you can see that the leftmost column of a report shows the magnitude, or how strongly a video image has changed. Low magnitudes of 10% to 20% indicate that gradual changes in lighting or slow movement are being detected. Higher magnitudes (70% or more) usually mean quick motion or sudden, dramatic changes in lighting.
Customizing the Range of Magnitudes Reported
1. After obtaining a motion search report, click in the magnitude filter’s Filter Mag From or To fields, as needed.
2. Adjust the value by either:
• Entering a value with the keyboard.• Clicking on the arrows at the right-hand side of the box.
Example
To obtain a report of only the highest magnitudes, say from 90% to 100%, click in the From box and then enter 90. The report is updated for magnitudes of 90% or higher.
Results, the number of times that motion was found.
Magnitudes of the detected motion.
Results can be filtered by magnitude.
Right-click the bar display to filter the bars by a different criteria (Percent is the default).
The list can be saved

Rapid Eye Remote View Operator Guide
Document 800-07767 Rev A 6702/11
Motion Events Timeline
Selecting the Criteria for the Timeline of Motion Events
Right-click the bar display to filter the bars by criteria. Bars in the chart reflect the criteria selected. Percent is the default.
Figure 5-8 Detail of Selection in the Density Chart of a Report
Other Criteria
Percent. The amount of motion (magnitude) as a percentage of change.
Peak Energy. The highest level of instantaneous motion during the event.
Total Energy. Total cumulative motion during the event.
Duration. The length of each bar reflects how long the motion events lasted.
Motion Count. Total number of video frames that registered motion during the event.
Selecting Items in the Report
You can select one or more items in the report using either:
• The list of every detected motion.• The density chart, at the top of the report (see Figure 5-8).
Zoom
The density chart of a selection of items can be zoomed for an enhanced view of the chart between reports of motion detection (see Figure 5-9). Zooming makes a cluster of items appear more spread-out and facilitates a finer selection, making it easier to double-click a vertical bar to see the video excerpt associated with it.
The arrow moves as video is played.
Your selection in the density chart
Items selected in either the density chart or the list of Motion events are shown in both areas.

68
Searching for Motion
Figure 5-9 Effect of Zoom Button on the Selection of List Items
Trim
The Trim button works after the View operator has zoomed into the density chart. You can then trim the list, showing only the selected items. Together with the magnitudes filter, Trim can help reduce the amount of items in a motion search report, for using the report with other software.
Save
The list can be saved to an *.rmr file by clicking Save and entering a file name. The file can be opened using any text editor, wordprocessor or spreadsheet software.
Norm
The Norm (normal) button cancels the zoomed view of the frequency chart. The frequency chart for the whole report is displayed.
Unselect
To show the report without any highlighting, click Unselect.
Items that Are Out-of-Order in the List
Setting the clock on the Multi-Media unit back in time can produce such results. The items are still in order, even if the time index contradicts the list.
Selection before zooming
Zoomed-in view of above selection
Reminder of the span of the zoomed-in selection.
Magnitudes of motion

Rapid Eye Remote View Operator Guide
Document 800-07767 Rev A 6902/11
Obtaining Video After Performing a Motion Search
In the motion search report, do one of the following:
• Double-click a list item. The video excerpt plays in the working frame of the Search for Motion window.
• Select one or many items, then click Video. Video plays, starting at the time of the first of the selected items.
• Click Video. If no item is selected, video plays, starting from the date and time of the From field.
Video is shown using the camera that detected the motion. Video keeps playing until you stop it or until the Motion Search session is closed.
You can control the playback using the playback toolbar, much as you would in a Retrieval session (see Figure 5-10 for more information).
Video Controls for Motion
Replaying Video
The Replay ( ) button restarts an excerpt of video.
Next Image
Click Next Image ( ) repeatedly, as needed, to view video frame-by-frame. This is useful if the pause button is clicked a moment too soon. Video must be paused for this button to be available.
Figure 5-10 Buttons on the Video Toolbar of a Motion Search Session
Fast-Forward to Next Event
The Fast-Forward button ( ) speeds up video, then slows down video to 1x speed (auto-1x), four seconds before the video shows the detected motion. The slowing of video is a cue that motion is about to be displayed. After you have witnessed the motion, you can click the Fast-Forward button again, speeding up video leading to the next instance of motion. See Fast-Forwarding Without Automatically Slowing Down, page 70, to fast-forward without slowing down.
Show specified number of minutes of video before viewing the detected motion.
Highlight motion
Jump-to-timeReplay video
Pause video
Play
Show next frame
Playback speed
Fast-forward to the next event (auto-1x)

70
Searching for Motion
Optimizing the Time Spent Watching Video
1. After obtaining a motion search report, double-click a list item or a bar in the density chart. The video excerpt plays in the working frame.
2. Click on the Motion Search toolbar. Video speeds up through the minutes of pre-detection video, then slows to normal speed (1x) a few seconds before motion is detected, and remains at normal speed. You have the option of clicking Pause as needed.
3. To view the next instance of motion, click , as needed.
Fast-Forwarding Without Automatically Slowing Down
Set the slider for playback speed to its rightmost setting (Fast, as in Figure 5-11).
Figure 5-11 Fast-Forward Options
Viewing Video of Events just Prior to Detection of Motion
You can adjust the amount of video seen before motion was detected, using the Mins Pre (minutes of viewing, prior to detection) field (see Figure 5-12).
Figure 5-12 Setting Pre-Detection Viewing to Two Minutes
By default, the preview is set to zero minutes. You may not need to adjust the amount of time spent on pre-detection viewing, due to the enhanced fast-forward button ( ).
Changing the Length of the Preview
1. After obtaining a motion search report, click in the Mins Pre box.
2. Adjust the value by entering a value, or by clicking the arrows at the right-hand side of the box.
Opting for Many Cameras in a Retrieval Session
To view video from many cameras, at the time that the motion was detected, a Retrieval session can be started from a Motion Search session.
Fast-forward that slows down just before motion appears (auto-1x)
For continuous fast-forwarding, set the slider for playback speed to its rightmost position (Fast).

Rapid Eye Remote View Operator Guide
Document 800-07767 Rev A 7102/11
Viewing Video in a Retrieval Session
1. Select one or many items in the Motion Search report.
2. Click Retrieval. A Retrieval session starts, starting at the time that the selected item’s motion was detected. Select the cameras to view. A box is added, showing that a Motion event is being shown. When many items are selected, they are listed in that Retrieval session’s item box (see Figure 5-13).
Figure 5-13 Item Box Shown when Retrieval Starts from a Motion Session
Returning to a Motion Session from a Retrieval Session
The Motion Search report is still available in the Motion session, if you need video from motion that occurred at other times.
1. Either:
• Select the Motion heading on the site tree.• Drag the Retrieval session aside. If the tear-away player is maximized, resize the
Retrieval session before dragging it aside. • Close the Retrieval session.
2. In the Search for Motion window, either:
• Double-click a list item. The video excerpt plays in the working frame of the Search for Motion window (see Figure 5-7 on page 66).
• Select one or many items, then click Retrieval. A Retrieval session starts, using all cameras and starting at the time of the first of the selected items.
False Positive Reports
Motion search can be triggered by changes in lighting or movement outside of an area of interest.
Item box

72
Searching for Motion
Flashing Lights and False Positives
A computer monitor can also be a source of false positives. To unmask it or a flashing light from a search for motion, see Figure 5-14. The section, Excluding an Area from a Search on page 65, also explains how to exclude an area.
1. After preparing a motion search (see Preparing a Motion Search on page 62), click the Show / Hide mask button ( ).
2. Click on areas of the image where there are computer monitors, television sets or other sources of flashing light that need to be excluded from a search for motion. As you click, blocks appear (see Figure 5-14).
3. Show the masking commands, by placing the mouse pointer on the large video image and right-clicking.
4. Click Invert Mask (see Figure 5-14).
Figure 5-14 Masking a Source of False Positive Reports
Using a Smaller Detection Mask to Counter False Positives
The easiest solution for false reports of motion is to use smaller masks to search for motion.
In a parking lot, you can search for arrival and departure times by using masks at entry points to an area, and/or at the boundaries of an image. Use of a mask excludes unmasked areas from being searched for movement.
Flicker from a monitor can cause false reports of motion. However, motion from an arm, for example, may need to be reported.
Mark flickering areas using the motion pointer M.
The Invert Mask command excludes the marked area from being searched. Only the area masked for motion detection is searched.

Rapid Eye Remote View Operator Guide
Document 800-07767 Rev A 7302/11
Figure 5-15 Masking the Entrance or Exit to a Parking Lot
To search for the opening of a door, when many people walk by that door, set the motion search mask on the top corner of the door (see Figure 5-16).
Figure 5-16 A Small Detection Mask Shown Above a Dotted Line
Using Highlighting
Motion Highlighting ( ). Enables/disables the highlighting of motion. If you are getting more reports of movement than you expect (false positives), click Motion Highlighting (see Figure 5-10 on page 69), while running a video feed. This lets you see motion as it is detected by a Multi-Media unit. When enabled, moving objects produce colored pixels. The color produced indicates if the Multi-Media unit will report the movement or not:
• Red or Green. Indicates motion is at or above the detection threshold. • Blue. Indicates motion that is below the threshold of Sensitivity or detected before the
time set in Interval has elapsed. This movement is not reported. If you need it to be reported, adjust the time of Interval and/or the Sensitivity. See Enabling or Disabling the Highlighting of Motion, page 74, and Adjusting Highlighting for False Positives or False Negatives on page 74.
Motion is ignored on parts of the image where no masking is used, such as this road.
Lot entrance is masked to detect vehicles entering or exiting the lot.
A detection mask is added to the working frame’s boundary to detect vehicles entering from another direction.
A small mask is set to detect when the door opens.
Persons walking by the door are below the mask and are not detected.

74
Searching for Motion
Enabling or Disabling the Highlighting of Motion
1. After preparing a motion search (see Preparing a Motion Search on page 62) and obtaining search results (see Search Report on page 65), view video from a result.
2. Click the Motion Highlight button ( ) to toggle highlighting on and off.
Adjusting Highlighting for False Positives or False Negatives
1. Using the information reported by motion highlighting, make note if too much or too little movement is being detected.
2. Click Redefine. The button is renamed to Search.
3. Adjust the Sensitivity slider. Set it towards the right if too little movement was being detected. Set it to the left if too much movement is detected. Moving the slider right of center shows movements more as red or green and less as blue. Setting the slider further left makes movements shown more as blue, and then not at all.
4. Lengthen or shorten the time of the Interval.
5. Click Search. You have the option of clicking Stop and redefining further.
More Solutions
Camera position. For false positives that occur at the edge of camera windows, consider repositioning a camera. Placing a camera on the ceiling gives an odd view but may mask flickering naturally. Movement from cars on a roadway, outside the area of interest, can also be remedied by repositioning a camera.
Report customization. Customize the range of magnitudes that are reported (see Report Options on page 66).
Saving and Reusing Search Data
You can save:
• The date and time for a motion search and its motion detection options for reuse.
- or -
• The lists of movement found in the video or edited lists, for further use with word processing software or spreadsheets.
Saving and Repeating a Motion Search
1. You have the option of saving all preparation settings by clicking Save Cfg (save the configuration settings). A dialog appears for saving the information as a computer file.

Rapid Eye Remote View Operator Guide
Document 800-07767 Rev A 7502/11
2. Enter a filename and select a folder, as needed.
3. Click Save. The information is saved in a file that has an .rmc extension.
4. In a Motion Search session, click the Stream drop-down arrow to display a list of the site’s cameras. You can see the arrow in Figure 5-3 on page 62.
5. Select a camera from the Stream list.
6. Click Load Cfg (load the configuration settings). A dialog appears for selecting a computer file.
7. Select a file with an .rmc extension, as needed.
8. Click Open.
9. Click Fetch, and then click Search.
TIP! Reusing settings on the same video generates the same motion detection report. For a different report, change the motion options, the date and time or both.
Using the Report of a Motion Search
1. The report from a motion search can be saved as a text file. To do so, click Save (see Figure 5-7 on page 66). A dialog appears for saving the report as a text file.
2. Enter a filename and select a folder, as needed.
3. Click Save. The text file of the motion search report can be opened using a word processor, for further enhancement.
TIP! You have the option of filtering the magnitudes and/or trimming the report before saving it as a text file. Only the items displayed in the list are saved to the file.

76
Searching for Motion
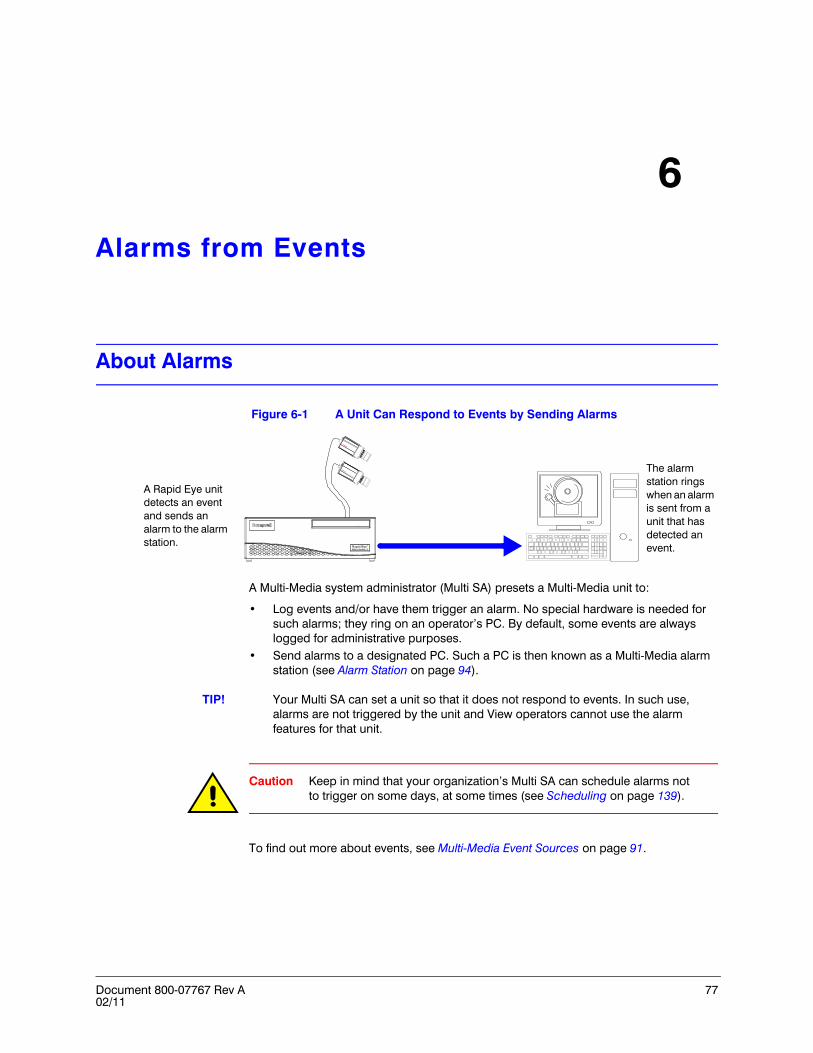
Document 800-07767 Rev A 7702/11
6
Alarms from Events
About Alarms
Figure 6-1 A Unit Can Respond to Events by Sending Alarms
A Multi-Media system administrator (Multi SA) presets a Multi-Media unit to:
• Log events and/or have them trigger an alarm. No special hardware is needed for such alarms; they ring on an operator’s PC. By default, some events are always logged for administrative purposes.
• Send alarms to a designated PC. Such a PC is then known as a Multi-Media alarm station (see Alarm Station on page 94).
TIP! Your Multi SA can set a unit so that it does not respond to events. In such use, alarms are not triggered by the unit and View operators cannot use the alarm features for that unit.
Caution Keep in mind that your organization’s Multi SA can schedule alarms not to trigger on some days, at some times (see Scheduling on page 139).
To find out more about events, see Multi-Media Event Sources on page 91.
A Rapid Eye unit detects an event and sends an alarm to the alarm station.
The alarm station rings when an alarm is sent from a unit that has detected an event.

78
Alarms from Events
Alarm Notification
When an alarm reaches a View operator’s PC, the alarm bell icon in View appears to vibrate (see Figure 6-2) and the PC produces a beeping sound.
Figure 6-2 The Alarm Bell Icon in View Software
Click the alarm bell icon (shown in Figure 6-2) to stop the ringing of an alarm. Alarms are not acknowledged; only the ringing stops. Ringing will resume if a session is reopened.
Viewing Video from the Time of an Alarm
A View operator has the option of customizing if and how video from the time and site of the alarm is received. Video can be seen:
• Immediately. Live video from the site where the alarm was sent is seen full-screen (see Live Alarmed Session on page 84). Alarms are then acknowledged and re-armed as needed.
• On request (see Alarm Session on page 85). Video from multiple alarms can be managed, with video retrieved as it is needed.
Event Processing
Figure 6-3 Once Set to Alarm an Event Can Trigger an Alarm
The alarm icon vibrates when an alarm reaches a View operator’s PC.
Multi database
A Multi SA sets which events trigger alarms.
An event is detected
The alarm is dealt with by an operator using View.
A record of the alarm is stored in the Multi-Media database.
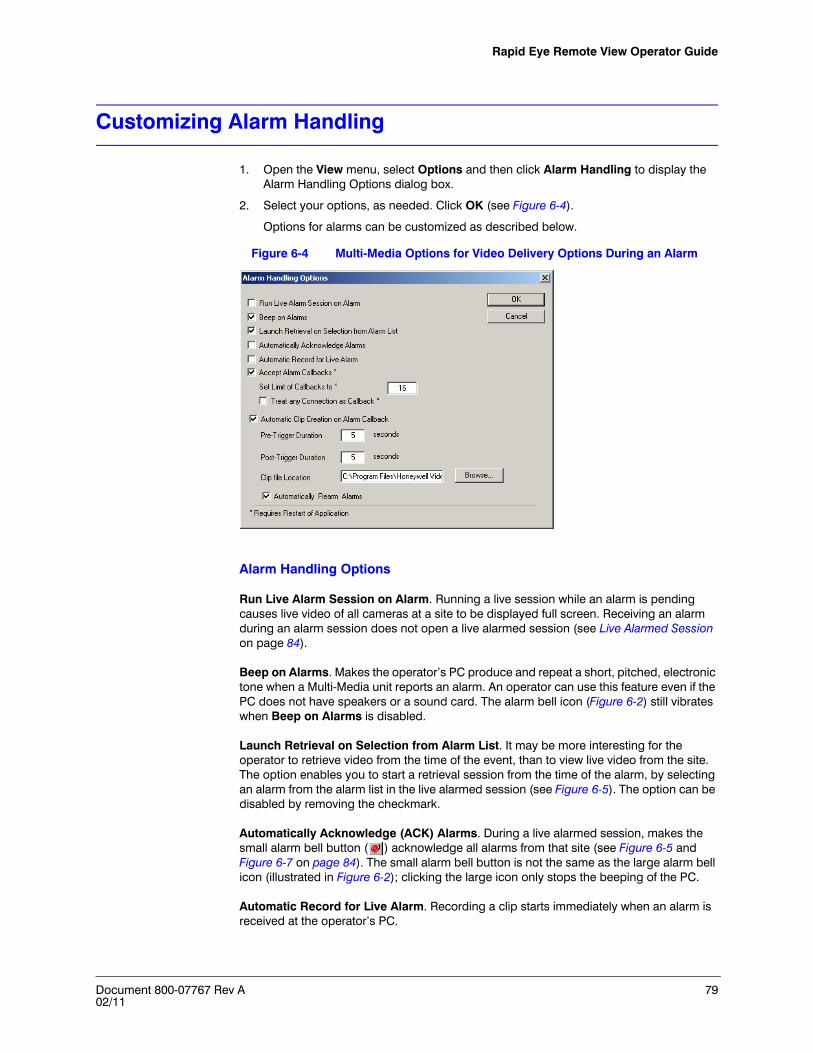
Rapid Eye Remote View Operator Guide
Document 800-07767 Rev A 7902/11
Customizing Alarm Handling
1. Open the View menu, select Options and then click Alarm Handling to display the Alarm Handling Options dialog box.
2. Select your options, as needed. Click OK (see Figure 6-4).
Options for alarms can be customized as described below.
Figure 6-4 Multi-Media Options for Video Delivery Options During an Alarm
Alarm Handling Options
Run Live Alarm Session on Alarm. Running a live session while an alarm is pending causes live video of all cameras at a site to be displayed full screen. Receiving an alarm during an alarm session does not open a live alarmed session (see Live Alarmed Session on page 84).
Beep on Alarms. Makes the operator’s PC produce and repeat a short, pitched, electronic tone when a Multi-Media unit reports an alarm. An operator can use this feature even if the PC does not have speakers or a sound card. The alarm bell icon (Figure 6-2) still vibrates when Beep on Alarms is disabled.
Launch Retrieval on Selection from Alarm List. It may be more interesting for the operator to retrieve video from the time of the event, than to view live video from the site. The option enables you to start a retrieval session from the time of the alarm, by selecting an alarm from the alarm list in the live alarmed session (see Figure 6-5). The option can be disabled by removing the checkmark.
Automatically Acknowledge (ACK) Alarms. During a live alarmed session, makes the small alarm bell button ( ) acknowledge all alarms from that site (see Figure 6-5 and Figure 6-7 on page 84). The small alarm bell button is not the same as the large alarm bell icon (illustrated in Figure 6-2); clicking the large icon only stops the beeping of the PC.
Automatic Record for Live Alarm. Recording a clip starts immediately when an alarm is received at the operator’s PC.

80
Alarms from Events
Figure 6-5 Live Alarmed Toolbar Details
Accept Alarm Callbacks. Setting for PCs designated as Multi-Media alarm stations.
Set Limit of Callbacks to [ n ]. Where n is the maximum number (from 1 to 16) of units from which callbacks are accepted before more are turned away to call other alarm stations.
Automatic Clip Creation on Alarm Callback. Set to have clips created automatically when an alarm callback occurs. This option is enabled by default.
Pre/Post -Trigger Duration (in seconds). Enter the number of seconds before and after an alarm trigger that the automatically created clip will encompass. The default duration is 5 seconds.
Clip file Location. Specify the location where automatically created clips will be stored. Ensure that the location exists before setting it. A folder created when the applications were installed is selected as the clip file location by default.
Requirements
The Set Limit of Callbacks to [ n ] and Accept Alarm Callbacks options have no effect if:
• A PC is not designated as a Multi-Media alarm station. See the Rapid Eye™ Multi-Media Digital Video System Administrator Guide, to set up a Multi-Media alarm station.
- or -
• An alarm station operator has logged in to View using an account that does not hold the right to process alarms.
Ignoring Alarms from Other Sites while Monitoring a Site
The alarm handling options include Treat any Connection as Callback (of an alarm). An operator of a Multi-Media alarm station can set this to count a connection to a unit as adding a callback.
1. From a Multi-Media alarm station, use the View application to click the Alarm Handling command, under Options in the View menu.
2. Select Accept Alarm Callbacks.
3. You have the option to set the callback limit (see Table 6-1 for values).
4. Select Treat any Connection as Callback. Click OK.
5. Close and then re-launch View.
Create a clip
List of alarms
Checkmark indicates that the Launch Retrieval on Selection from Alarm List option is enabled.
Stop the ringing of alarm bell button. Button can also ACK ALL if the Automaticaly Acknowledge Alarms option is selected.

Rapid Eye Remote View Operator Guide
Document 800-07767 Rev A 8102/11
Result
By setting the callback limit to 1, a Multi-Media alarm station operator monitoring a Multi-Media site will not receive alarms from other sites until the connection to the monitored site ends. The monitored site however, remains monitored for alarms.
Right for Operator to Receive and Process Alarms
The Multi SA needs to:
1. Add the Process Alarms right to a View operator account.
2. Grant access to sites which are set to send alarms.
Time Limit for Operating Sites is Suspended while Alarm is Processed
Operator accounts restricted by a time limit for operating Multi-Media units do not show a countdown when processing alarms; the time limit is cancelled while processing alarms. Alarms usually mean some type of emergency is occurring, which may require more time to be dealt with than that given by the time limit.
Overview of Automatic Rearm Feature
Rapid Eye Multi-Media units with the automatic rearm feature support automatically rearming Input Activated and Motion alarms from a Rapid Eye unit. Alarms are automatically rearmed once the automatic clip creation is completed. If the View application is shut down before automatic clip creation is completed, the corresponding alarms (Input Activated and Motion) will not be rearmed. With the Automatic Rearm feature, the application automatically rearms the alarms the next time the application is opened.
Table 6-1 Values for a Callback Limit
Set Limit (Value) Connections (to Multi-Media sites)
Alarms from Other Sitesa (are received)
1 1 No
1 0 Yes
2 2 No
2 1 Yes
2 0 Yes
3 3 No
3 2 Yes
3 1 Yes
3 0 Yes
and so on...
a Other Sites are sites set to call the alarm station, not currently being monitored by the alarm station.

82
Alarms from Events
The user can enable the Automatic Rearm feature from the Alarm Handling Options window (opened with the Rapid Eye View application, View menu Options Alarm Handling), shown in Figure 6-6.
Figure 6-6 Alarm Handling Options
Please note that:
• When the Rapid Eye software is installed and started for the first time, it does not have any information about the alarms that are not rearmed. Therefore automatically rearming alarms will not be supported on the initial startup. After the application has been running and alarm callbacks are received, it maintains information about the status of the alarms (Rearmed / Not Rearmed). If the application shuts down in the middle of clip creation, pending Input Activated and Motion alarms will be automatically rearmed the next time the application starts.
• The Automatic Rearm feature is system dependent. That is, this feature will be supported only from the server that has been configured as the Alarm Station.
• While trying to automatically rearm, if any of the sites are unreachable, alarms from those sites will remain in their non-rearmed state.
Alarm Callbacks
Note Recording is enabled on the cameras where alarms are expected. If recording is not enabled, clips will not be automatically created and the corresponding alarm will not be automatically rearmed. Operators will have to manually rearm alarms with an Alarm session.
Make sure that the file location for saved clips exists to confirm that they will be saved.

Rapid Eye Remote View Operator Guide
Document 800-07767 Rev A 8302/11
Note When the View application is shutdown during automatic clip creation, the alarms will not be automatically rearmed by the application if the automatic rearming of alarms feature is not selected. Operators will have to manually rearm alarms with an Alarm session.
Setting Up an Alarm Station for Alarm Callback
Keep the following points in mind when setting up an Alarm Station for alarm callback:
• At any point during alarm callback, only one Alarm Station can have Alarm callbacks reported at one time even if we have multiple Alarm stations configured for a unit. Alarm Stations will be notified in the sequence that you setup (see Cascading Alarm Stations in the Rapid Eye™ Multi-Media Digital Video System Administrator Guide).
• If an Alarm session is kept open in the Remote View application in any of the user PCs, then the Alarms are reported in the Alarm session only, rather than to Alarm Callback stations. Open Alarm sessions take the first priority (see Setting Response Priority for Alarm Notification in the Rapid Eye™ Multi-Media Digital Video System Administrator Guide). If no alarm sessions are open, alarm callbacks will go to the Alarm station.
• If you are trying to change the alarm station, then make sure that you use one of the following two steps:
a. Update Security for the unit rearm all Alarms reported in the alarm session reboot the unit.
b. Update Security for the unit make sure no new alarms are generated (to avoid alarm generation, disable all of the events reporting alarms) rearm any pending Alarms reported through an alarm session (if necessary) pause for 10 to 15 seconds then try enabling all the events which generates alarms.
Note The above steps a and b, are to avoid any racing conditions, between switching over from the old alarm station to a new alarm station.
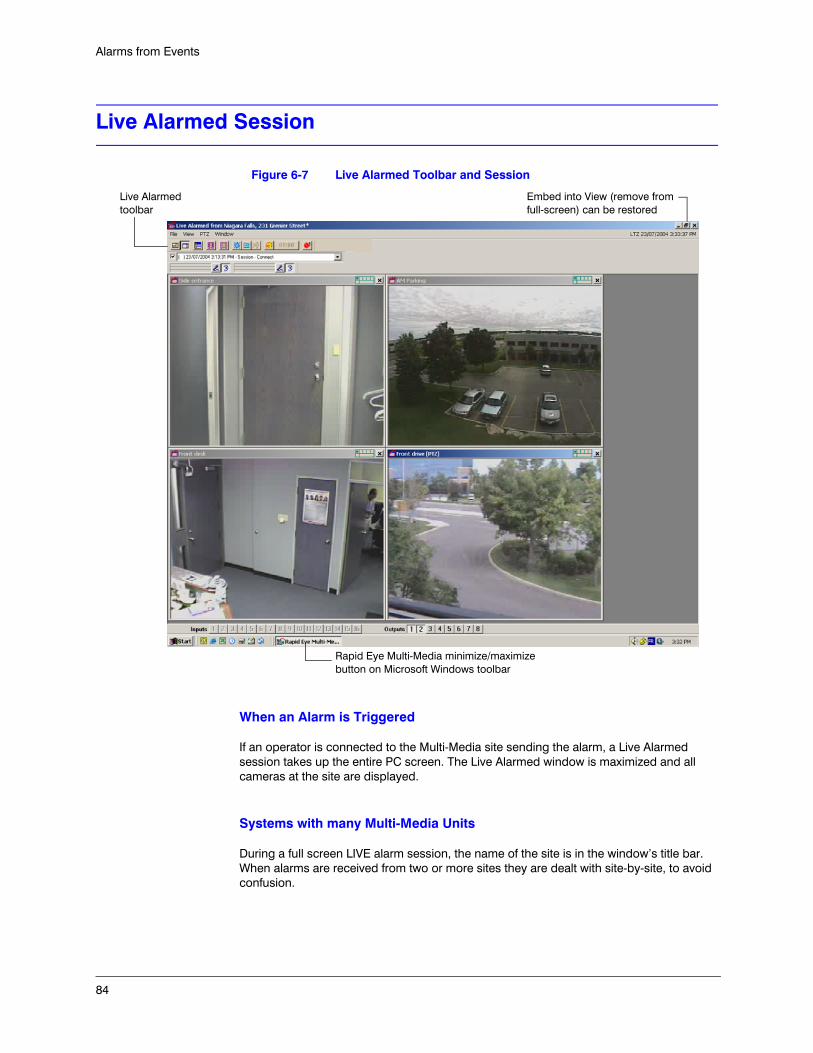
84
Alarms from Events
Live Alarmed Session
Figure 6-7 Live Alarmed Toolbar and Session
When an Alarm is Triggered
If an operator is connected to the Multi-Media site sending the alarm, a Live Alarmed session takes up the entire PC screen. The Live Alarmed window is maximized and all cameras at the site are displayed.
Systems with many Multi-Media Units
During a full screen LIVE alarm session, the name of the site is in the window’s title bar. When alarms are received from two or more sites they are dealt with site-by-site, to avoid confusion.
Rapid Eye Multi-Media minimize/maximize button on Microsoft Windows toolbar
Embed into View (remove from full-screen) can be restored
Live Alarmed toolbar

Rapid Eye Remote View Operator Guide
Document 800-07767 Rev A 8502/11
Retrieving Video Recorded at the Time of an Alarm
1. Select the Launch a Retrieval on Selection from Alarm List option as explained in Customizing Alarm Handling on page 79. This makes a checkmark appear next to the list of alarms, under the live alarmed toolbar (see Figure 6-5).
2. Click the drop-down arrow to view the list of alarms. Note that there can be one or more alarms.
3. Start a retrieval session by selecting an alarm from the list. The retrieval session starts in a new tear-away player.
Making a Clip of Video During an Alarm
Preparation
• Automatic. Select the Automatic Record for Live Alarm options, as explained in Customizing Alarm Handling on page 79. During a live alarmed session, the unit starts recording a clip of all video feeds, without prompting, in the background.
• Manual. Remove the checkmark in the Automatic Record for Live Alarm option, as explained in Customizing Alarm Handling on page 79. During a live alarmed session, click on the Playback toolbar. The color of the button changes to red, indicating that video feeds are being recorded.
Stopping Clip Making During a Live Alarmed Session
1. To stop recording, do one of the following:
• Click , the start/stop recording button.• Close the live alarmed session.
2. When you are prompted to save the clip, either:
• Save the clip. Enter a name in the Save dialog that appears and click OK.• Discard the clip. Click Cancel.
Alarm Session
Depending on your selection of alarm handling options, a live alarm session may be disabled. You can use an alarm session to see the list of alarms and/or acknowledged alarms at a site. You can run an alarm session even if no alarms are set or ringing. A red square around a site’s connection icon indicates that a site is sending alarms.
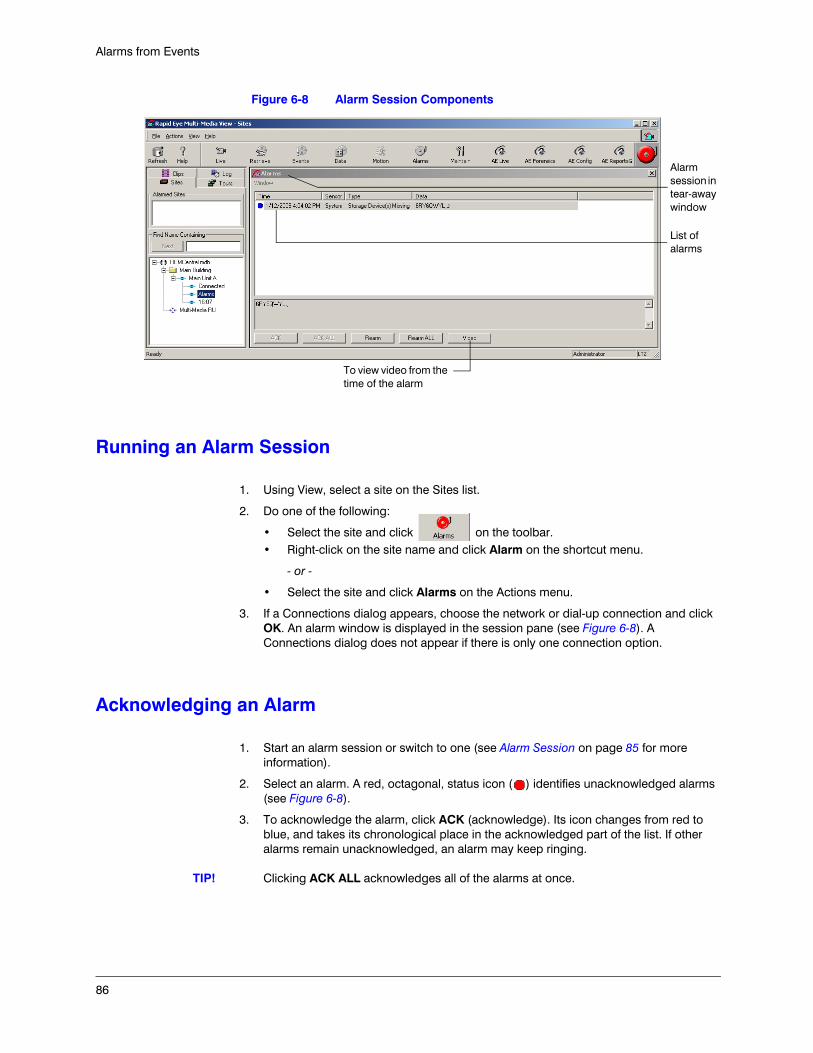
86
Alarms from Events
Figure 6-8 Alarm Session Components
Running an Alarm Session
1. Using View, select a site on the Sites list.
2. Do one of the following:
• Select the site and click on the toolbar.• Right-click on the site name and click Alarm on the shortcut menu.
- or -
• Select the site and click Alarms on the Actions menu.
3. If a Connections dialog appears, choose the network or dial-up connection and click OK. An alarm window is displayed in the session pane (see Figure 6-8). A Connections dialog does not appear if there is only one connection option.
Acknowledging an Alarm
1. Start an alarm session or switch to one (see Alarm Session on page 85 for more information).
2. Select an alarm. A red, octagonal, status icon ( ) identifies unacknowledged alarms (see Figure 6-8).
3. To acknowledge the alarm, click ACK (acknowledge). Its icon changes from red to blue, and takes its chronological place in the acknowledged part of the list. If other alarms remain unacknowledged, an alarm may keep ringing.
TIP! Clicking ACK ALL acknowledges all of the alarms at once.
List of alarms
Alarm session in tear-away window
To view video from the time of the alarm

Rapid Eye Remote View Operator Guide
Document 800-07767 Rev A 8702/11
Acknowledging Alarms Automatically
1. Set your copy of View to Automatically Acknowledge Alarms (as explained in Customizing Alarm Handling on page 79).
2. In a live alarmed window click the small on the toolbar. An (A) appears next to alarms in the alarm list.
TIP! If Automatically Acknowledge Alarms is not enabled the button only stops the alarm bell. Clicking ACK ALL acknowledges every alarm at once.
If Disconnected
If you end the alarm session before acknowledging the alarm or are disconnected from the site, the alarm is kept active and is again reported when you run the next alarm session.
Acknowledging (ACK) Before REARM
When operators acknowledge alarms, the alarms remain listed for operator reference. Alarms cannot be triggered again if they are not rearmed. This can be simpler than turning alarms off (for example, during construction work or other temporary onsite situations). Consult your security officer about alarm handling and alarm suspension.
Rearming Alarms
Alarms on a Multi-Media unit can be rearmed with or without acknowledgment. Once rearmed, if the event occurs again, a fresh alarm can sound at the Multi-Media operator’s station.
Rearming an Alarm in a Live Alarmed Session
1. Select an alarm. The alarm can be active or acknowledged.
2. Right-click the alarm list. A menu is displayed.
3. Click Rearm.
Rearming an Alarm in an Alarm Session
1. Start or switch to an alarm session.
2. Select an alarm. A red, octagonal, status icon ( ) identifies unacknowledged alarms. A blue icon identifies acknowledged alarms.
3. Click REARM ALL.
TIP! Clicking REARM ALL resets all alarms, acknowledged or not.

88
Alarms from Events
Event Video Options
Surveillance Common Sense
View Operators may find that security video from the time of an outside world event and/or a customer-device event are usually more informative than video from the time of other events (such as View operator and Multi-Media unit events). For example, viewing video from the time of an alarm caused by an intrusion detection sensor at your site makes good sense. Video from the time of a View session starting might not make as much sense since the event did not happen at a Multi-Media site.
Tamper Detection
Events due to tamper detection can compromise cameras and video and may not be available afterwards (see Tamper Detection on page 92).
Video Retrieval
1. Run an alarm session.
2. Select an alarm from the session’s tear-away player (as explained in Alarm Session, page 85).
3. Click Video to start a Retrieval session from the time of the alarm (see Figure 6-8 on page 86 for the location of Video button). When a site has many cameras, you are asked to select the camera(s) to view. Figure 6-9 (page 89) shows a Retrieval session that has been dragged down, revealing the Alarm session in the background.
4. To watch video obtained before or after the time of the alarm, use the jump-to-time slider, as needed (see Skipping Through Recorded Video on page 52).
5. Click Alarms in the site tree to display the Alarm session.

Rapid Eye Remote View Operator Guide
Document 800-07767 Rev A 8902/11
Figure 6-9 Retrieval Session Started from an Alarm Session
Go Live
Live video can be effective when an event is still in progress. Either:
• Start a live session at the site of the alarm (see Starting a Live Session on page 29 for more information).
- or -
• Enable Run Live Alarm (as explained Live Alarmed Session on page 84).
Making a Clip
See Making a Clip of Live Video, page 98, and Making a Clip from Recorded Video on page 98.
Video During Multiple Alarms
1. While running an alarm session, select more than one alarm from the session’s tear-away player. To select specific alarms, use MS-Windows mouse and keyboard techniques (hold down the Ctrl key while selecting alarms).
2. Click Video. When a site has many cameras, you are asked to select one or more. A Retrieval session starts, displaying the date and time of the earliest alarm that you selected in step 1.
3. To display a list of the other alarms selected at step 1, click the drop-down arrow to the right of the item box (see Figure 6-9).
4. Select an alarm in the list that appears.
When an operator starts a Retrieval session from an Alarm session, text about the alarm is repeated in an item box.

90
Alarms from Events
5. Click Alarms in the site tree to display the Alarm session.
Controlling an Onsite Device Output
The outputs are displayed during a Live session. Click the output that matches the device. Your Multi SA can let you know which output matches which device.
Flexibility
Like other Multi-Media features, use of outputs to control onsite devices is optional. Ask your Multi SA if such devices are connected to the Rapid Eye Multi-Media unit(s) in your system.
You can use outputs to remotely control onsite devices such as lights, sirens, or gates before, during, or after an alarm.
Before You Can Use an Output
Before a View operator can use the outputs, the Multi SA needs to:
• Add the Use outputs and Live video rights to the user account (see the Rapid Eye™ Multi-Media Digital Video System Administrator Guide). This enables a View operator to run a live session and click the output buttons (numbered 1 to 8).
• Grant access to the site(s) assigned to the operator by their supervisor.
Note Outputs can also be referred to as general-purpose outputs (GPOs), in technical documentation.
Example
One application for controlling outputs is to remotely unlock a door after visually inspecting a doorway (see Peephole Access Control on page 91).
Peephole Application Preparation
Installation personnel connect two devices to a Multi-Media unit:
• The locking mechanism of a security door (or gate).• A doorbell.

Rapid Eye Remote View Operator Guide
Document 800-07767 Rev A 9102/11
The Multi SA sets the Multi-Media unit’s input connected to the doorbell, to trigger an alarm and sets up the site’s Multi-Media unit to call an alarm station. The Run Live Alarm Session on Alarm option can be disabled, as needed.
Peephole Access Control
1. At a Multi-Media site that is setup as described above (page 90), run an alarm session when an alarm rings (see Alarm Session, page 85, for more information).
2. If the alarm is from the input connected to the doorbell, acknowledge it (see Alarm Session, page 85, for more information).
3. Start a Live video session to view the caller. Live video sessions are explained in Live Video on page 29.
4. Use the output that matches the door (see Controlling an Onsite Device Output on page 90, for more information).
5. Rearm the alarm (see the following sections for more information).
Multi-Media Event Sources
Figure 6-10 Source of Alarms
1. Outside world event, such as detected motion.
2. Multi-Media unit event, such as a power outage.
3. Point-of-sales (POS) event, such as from an ATM.
4. View Operator event, such as unauthorized use of a site.
A Multi-Media alarm station can receive alarms from many sources.

92
Alarms from Events
Sources of Events
• Outside World event. Events triggered by sensors connected to a unit, such as motion detection or Tamper Detection for cameras.
• Customer-Device event. Messages from a cash register, card swipe and so on, that can be sent to a Multi-Media unit.
• Multi-Media Unit event. For notifying a Multi SA of events at the unit. Extended power outages that stop a unit can also be monitored by connecting a Multi-Media unit to an alarm panel (see Using an External Alarm Panel with the Fault Relay on page 95).
• View Operator event. An administrator can trace events caused by View Operators, such as connecting to a site, and so on. Notification of such events is usually of more concern than video of that event.
Event Authority
Your Multi SA sets which events can trigger alarms.
Tamper Detection
Your Multi SA has the option of setting camera Tamper Detection to trigger alarms. If true sabotage to a camera occurs, the camera will probably need Maintenance after the event. Let your Multi SA or the system installers know that service is needed.
Alarms
Blind. A camera can be blinded by too much or too little light. Blinding a camera also triggers the Blur- and scene Changed-type of sabotage detection. Note that turning lights on and off at the scene can indirectly blind a camera. Panning a PTZ camera from a light-colored scene to a darker scene (or vice versa) can also have that effect.
Changed. Changed is sensitive to large scale changes in a scene. For example, using Changed for a camera that shows many empty chairs in a row, close by, such as in an airport or casino, may trigger an alarm when people sit in the chairs and change the scene. The same can be said for a row of vehicles that are frequently moved, such as in a taxi stand or truck depot.
Blur. After Blur-type sabotage, the camera will probably need Maintenance. Let your Multi SA or the system installers know when Blur-type sabotage occurs.
Forty-Eight Seconds
If Blind-, Changed- or Blur-type activity lasts less than 48 seconds, it does not trigger an alarm or log entry. This is designed to reduce the number of false positives that are recorded. For example, a person walking by a camera at close range and blinding the camera is not considered sabotage unless that person remains in front of the camera for more than 48 seconds.

Rapid Eye Remote View Operator Guide
Document 800-07767 Rev A 9302/11
Video from a Tamper Detection Event
After cameras have been tampered with during an event, video may not be available.
Reading the Alarm Log
The Alarm Log displays all alarms at all units and their state, whether new, acknowledged or rearmed.
Displaying the Alarm Log
1. Using View, click the Log tab. The buttons on the View toolbar may change.
2. Leave or select another earliest date and time in the Show Alarms from fields (see Figure 6-11).
3. Leave or select another latest date and time in the Show Alarms up to fields.
4. Click Display Alarm Log or . The alarm log appears in the session pane.
Figure 6-11 Alarm Log Search
Inputting a Different Time and Date
1. Display the calendar utility by clicking the drop-down arrow next to the date box. Select a date. Use the left and right arrows to change months.
2. Click on the part of the time that you want to change. Then press and to increase/decrease the value. Press and to move the cursor to another field. You can also enter a value with the keyboard, as needed.
Note Attempting to select a date or time beyond the limits of the log sets the input to that limit.

94
Alarms from Events
Reporting the Earliest/Latest Alarms in the Log
Select Properties in the Actions menu to view the times of the earliest and latest alarms in the database.
Setting the Date in Windows for Correct Alarm Sorting
The date uses a format from the Regional Settings of your Windows Control Panel. Multi-Media reports uses true chronological lists of alarms only if care is taken to express the date in numbers, as yyyy-MM-dd, in Microsoft Windows. To do so, consult the documentation supplied with Microsoft Windows.
Alarm Station
Your Multi SA can configure a Rapid Eye Multi-Media unit to call a specific PC when an alarm is triggered by an event. Such a PC is then a Multi-Media Alarm Station. A Multi-Media Alarm Station can be more effective than running many alarm sessions in sequence (a polling method), especially on Multi-Media systems that use dial-up connections.
Note After updating or adding a new alarm station, you must click Update Security on a maintenance session for each site that sends alarms to the station.
Alarm Station vs. Alarm Session
Your organization’s Multi SA sets Multi-Media sites to call/callback Multi-Media alarm stations. Critical sites should be setup this way to ensure that alarms reach your alarm station, even if no alarm session is in progress. For example, callbacks are effective for:
• A large number of sites. It can be impractical to start, use and end alarm sessions on many Multi-Media units, especially with a dial-up connection. Having a Multi SA set up a callback frees you of polling the sites for alarms.
• 24/7 situations. Having a Multi SA set up a callback ensures notification of your alarm station. Alarm sessions can be ended.

Rapid Eye Remote View Operator Guide
Document 800-07767 Rev A 9502/11
Speed of Alarm Notification
After you have set events to alarm and the alarm hardware connected to the unit is triggered, notification of the event is either:
• Immediate. Your Multi-Media units are networked to the alarm station or an alarm session is in progress at the site where the alarm occurs. Note that units using dial-up connections monopolize an operator’s modem; it is not possible to run alarm sessions at many of these sites at the same time. More occurrences of the event are ignored until the alarm is rearmed.
• Within the minute. Your Multi-Media Administrator has set the video unit to call an alarm station as soon as possible after an alarm. You are notified of the alarm whether or not an alarm session is in progress at that site. If the alarm station is unavailable or busy, an attempt to call it back is made every minute until a connection is established. When more than one alarm station is assigned, they are polled in sequence.
- or -
• Deferred. When a Multi-Media unit is not assigned to an alarm station, the unit holds alarms until you start an alarm session for the site.
Using an External Alarm Panel with the Fault Relay
Your Multi SA has the option of enabling a FAULT Relay on a Multi-Media unit. If the FAULT Relay is connected to an alarm panel, an operator can be warned of unit failure.
Checking if a Pulse Is Enabled On a Unit
In a Search for Events session, click the Outputs tab. Options for Output 6 are greyed out. Your Multi SA can change the name of outputs, as needed.
Note Output 6 is greyed out only when the FAULT Relay is connected to a 16-channel Rapid Eye unit (Rapid Eye Multi-Media and Multi-Media DSP). Rapid Eye Multi-Media LT units are not affected by this feature.

96
Alarms from Events

Document 800-07767 Rev A 9702/11
7
Clips and Stills
Making Clips
A clip is a copy of video, audio or data. A clip is made during a live session or a retrieval session. Clips are listed on the Clips tab (see Figure 7-1).
Figure 7-1 The Clips Tab in View Software
The file of a video clip (including audio and data) can be as big as two gigabytes (2 GB). Large clips may exceed the capacity of some distribution media (see Distributing a Clip on page 103).
After using View to make clips, you can:
• View portions of video without having to connect to a site.• Review clips at a later time. See Viewing a Clip on page 101 for more information on
how to check folders for clips.• Copy clips to other computers.• Distribute clips on computers not running Multi-Media software, and view them
using the Clip Player.
View’s title bar reports that the Clips tab is selected.
Clips made by the View operator are listed on the Clips tab.

98
Clips and Stills
Note See Creating Clips During Playback, page 128, in Chapter 11, Archival Policies for tips on creating clips from Archival Policy data.
Making a Clip of Live Video
Clips made from live video hold all streams, unlike clips made from recorded video.
1. From a site, start a live session (see Starting a Live Session on page 29).
2. You will have the option of adding or removing streams while the clip is playing.
3. Click on the Playback toolbar. The color of the button changes to red and flashes, indicating that the video feed is being recorded.
4. When all the video you need is recorded, click again. A Save Recorded Clip to File dialog is displayed.
5. You have the option of:
• Changing the name of the clip, by entering another name (the default for naming clips is explained in Table 7-1, on page 99).
• Choosing another drive and/or folder to store the clip in.
6. Click Save. The clip is stored as a *.rem file and the Save As dialog is closed.
7. You have the option of ending the live session (see Ending a Live Session, page 37).
Caution Honeywell recommends storing stills and clips in their own folder.Clips and stills can be erased routinely after use, making it easy to erase other files by mistake. Storing clips and stills in a folder other than View’s application folder (the default folder for clips and stills) prevents the deletion of View system files.
Making a Clip from Recorded Video
Clips made from recorded video only hold the streams that are used while making the clip, unlike clips made from live video.
1. From a site, start a retrieval session (see Starting a Retrieval Session on page 49 for more information).
2. Select the streams that you need to record. Only the video that is being shown is recorded. You have the option of adding or removing streams while the clip is playing. Only open streams will be part of the clip.
3. Control the playback of the video to determine where a clip is to begin. You have the option of clicking Pause.
4. Click on the Playback toolbar. The color of the button changes to red and flashes while recorded video is being copied to a clip. You have the option of clicking Fast Forward on the playback toolbar to reduce the time spent making the clip.

Rapid Eye Remote View Operator Guide
Document 800-07767 Rev A 9902/11
5. When all the video you need is recorded, click again. A Save Recorded Clip to File dialog is displayed.
6. As you would with any file, name the clip and choose a folder to store the clip in. The clip is stored as a *.rem file and the Save As dialog is closed.
7. You have the option of ending the session (see Ending a Retrieval Session, page 58).
TIP! Making a clip of recorded video at a faster speed does not affect clip playback.
Caution Honeywell recommends storing stills and clips in their own folder.Clips and stills can be erased routinely after use, making it easy to erase other files by mistake. Storing clips and stills in a folder other than View’s application folder (the default folder for clips and stills) prevents the deletion of View system files.
Clip Name Reference
Table 7-1 explains each part of a clip’s filename, using as an example:
Main Unit_RTZ_20090124_133114.REM. Note the .REM file extension.
Renaming a Clip
You have the option of renaming clips (see Making a Clip of Live Video on page 98). Leaving the .REM file extension is recommended.
Table 7-1 Default Format for Multi-Media Clip Names
Examplea Format Element
Main Unit Site name
RTZ Time reference
2009 Four digit year
01 Two digit month
24 Two digit day
13 Two digit hour, 24-hour clock
31 Two digit minute
14 Two digit second
.rem Microsoft Windows file extension
REM File File type in Microsoft Windows’ Explorer
a See the clip listed in Figure 7-2 (page 100).

100
Clips and Stills
Automatic Clip of Alarms
You can set View to make a clip automatically during a live alarmed session. The opportunity to save the clip (or discard it) is offered when the session is closed. See the Automatic Record for Live Alarm option in Customizing Alarm Handling on page 79.
When the View application is shutdown during automatic clip creation, the alarms will not be automatically rearmed by the application if the automatic rearming of alarms feature is not selected. Operators will have to manually rearm alarms with an Alarm session.
Customizing the Storage of Clips and Stills
When View is used to make clips and/or stills, they are stored in the Multi-Media application folder. The operator has the option of storing them elsewhere.
1. Using View, click the Clips tab.
2. Click Directory.
3. Click the create new folder button, .
4. Enter the name of your choice for the stills and clip folder, such as: Multi-Media Clips and Stills.
5. Double-click the icon of the folder that you have added.
6. Click Open. The folder that you have added and named will hold all clips and stills made from then on.
Figure 7-2 Changing the Folder for Multi-Media Stills and Clips
Caution Store stills and clips in their own folder. Clips and stills can be erased routinely after use, making it easy to erase other files by mistake. Storing clips and stills in a folder other than View’s application folder (the default folder for clips and stills) prevents the deletion of View system files.
The REM File in the Type column means the clip was made using a Rapid Eye Multi-Media unit.

Rapid Eye Remote View Operator Guide
Document 800-07767 Rev A 10102/11
TIP! To browse folders for clips (*.REM files) click Directory on the Actions menu.
Viewing a Clip
Figure 7-3 List of Clips on the Clips Tab
1. Click the Clips tab in the View window.
2. To view the clip, do one of the following:
• Double-click its name on the Clips tab.
- or -
• Click its name and click on the Toolbar.
Play Options
Using View, you can:
• Play one clip at different speeds, as during a retrieval session.• Play many clips at once, each in its own session. Use this option to compare two
scenes or two subjects at different times.• Play a clip and a copy of the clip at the same time. Use this option to compare a clip
with itself, to note minute details of what is captured on video, or to compare two times within the same clip.
Viewing a Clip in Reverse
When playing back a clip, the Play Backwards and Rewind playback navigation buttons are added to the playback toolbar. Click them as required.
Deleting a Clip
1. Click a clip name on the Clips tab.
2. Do one of the following:
• Click in the Toolbar.• Right-click on the recorded name and select Delete.

102
Clips and Stills
Coarse Editing
Comparing Events by Making a Clip with a Jump
While making a clip from recorded video and after clicking on the Playback toolbar, you have the option of using the Go to command ( ) to jump to a past or future time. This option is useful for comparing two events within the same clip.
Time Gap
Jumps into the Future or the Past
Making a clip of two segments, say from 8:00 AM to 8:05 AM, on two consecutive days, introduces a gap of 24 hours in the clip. On playback, the clip skips the gap and shows the next image. If you suspect there are gaps in a clip, check the date and time of the video.
Viewing Many Clips at Once
Another way to compare video is to play two or more clips. To highlight a portion of a clip, you can view a copy that is slightly out of sequence or pause one copy while the other continues.
1. View a clip (as explained in Viewing a Clip on page 101).
2. Drag the tear-away player from the session pane (see Figure 2-3 on page 31).
3. Repeat steps 1 and 2, as needed.
Viewing Two Instances of the Same Clip
1. Using Microsoft Windows’ Explorer, duplicate the *.rem file in its folder. To do so, use Windows explorer to locate the file and to make a copy of it in the same directory. Windows makes a copy of a file and names it copy [of filename] by default. You have the option of renaming the copied file as you see fit.
2. Play the original clip.
3. Drag the tear-away player from the session pane.
4. Play the copy of the clip. Each clip is in its own session, making it easy to pause one clip at a time (for example, before a theft), and then to pause the other clip at another point of interest, for the sake of comparison (for example, during and after a theft).

Rapid Eye Remote View Operator Guide
Document 800-07767 Rev A 10302/11
Distributing a Clip
Media Limits
The file of a video clip (including audio and data) can be as big as two gigabytes (2 GB).
• CD media holds about 0.6 GB• A single-layer, DVD media holds about 4.7 GB• A double-layer, DVD media holds about 9.0 GB.• A USB memory stick can hold from 0.5 GB to 2 GB, or more.
If the size of a clip exceeds the space available on the media, a warning message appears. You can reduce the size of a clip by removing video feeds, or by shortening the clip.
If the person receiving the clip(s) does not have View software, a Clip Player can be supplied (see Clip Players on page 104).
Burning Clips at the PC of a View Operator
Use a PC running a third-party software utility and a DVD (or CD) drive. To copy clips, follow the instructions from the third-party software for media creation. To add the REMM Clip Player to the media, see REMM Clip Player Software on page 104.
Burning Clips at a Multi-Media Site
To produce a clip using LocalView and the DVD drive on a Multi-Media unit, refer to LocalView’s context-sensitive Help. See Table 7-2 for supported media. When burning a clip onsite, a Rapid Eye Clip Player is automatically included on the disk (see Rapid Eye Clip Player (RCP) Software on page 104).
Table 7-2 Media for Video Clips
Media Supported (Yes/No)
CD-R Yes
CD-RW Yes
DVD-R Yes
DVD+R Yes
DVD-RW No
DVD+RW Yes
DVD-RAM No

104
Clips and Stills
Clip Players
When distributing clips to people who do not have View software, two software Clip Players are available:
• REMM Clip Player, from the Honeywell website. See REMM Clip Player Software, page 104, for the web page address.
• Rapid Eye Clip Player, from a Multi-Media unit.
Installing a Player
One or both players can be installed on the same PC. Only one is needed to play clips.
View Software
On a PC running View, an operator does not need a clip player to view clips; the View application can be used to view clips. The REMM Clip Player cannot be installed on a PC running Rapid Eye View software, however the Rapid Eye Clip Player can.
REMM Clip Player Software
To view clips obtained from a View operator, the recipient needs to download a free, zipped copy of the REMM Clip Player from Honeywell’s Download Center:
1. From the recipient’s PC, use a web browser to navigate to:
http://www.honeywellsystems.com/support/download-center/index.html
2. Follow the instructions on the webpage to obtain a username and password and then login to the Download Center.
3. Navigate to the Rapid Eye section of the Download Center. Scroll down and find the link to Clip Player - Web Edition [version number, build number]. The numbers of the version and build are unimportant.
4. Click the Clip Player - Web Edition link. You can either run or save the REMClipPlayer.exe file.
5. Run REMClipPlayer.exe to setup the REMM Clip Player. After setup, the Windows desktop displays the icon.
6. Double-click the REMM Clip Player icon, and browse to find and select the clip.
Rapid Eye Clip Player (RCP) Software
When a Multi-Media unit is used to make or copy clips to DVD onsite, Rapid Eye Clip Player software is also copied to the DVD. On a PC running Microsoft Windows, the Rapid Eye Clip Player runs automatically when the DVD is inserted in the DVD drive.

Rapid Eye Remote View Operator Guide
Document 800-07767 Rev A 10502/11
Users have the option of setting up Rapid Eye Clip Player on their PC. Consult the Rapid Eye Clip Player context-sensitive Help. Installing the player eliminates the latency inherent in the use of a DVD drive on a PC. After setup, the Windows desktop displays the icon.
Clip Properties Reports Include Events
If Multi-Media events such as motion and so on are part of a clip, their number is included in the Clip Properties report (see Figure 7-4).
Figure 7-4 Clip Properties Report
Enabling the Production of Stills
Figure 7-5 Enabling the Production of Stills (Bitmap Images)
1. While running View, select Options on the View menu, and click New Players. The Options for New Players dialog appears.
Enable this option to be able to save bitmap images.

106
Clips and Stills
2. Select the Allow Bitmap Save from Video checkbox (see Figure 7-5).
3. Click OK. After enabling View to produce bitmaps, a stills button appears on the session toolbar when you run live, retrieval or clip sessions.
Producing Bitmaps of a Live Camera Feed
While running a live, retrieval or clip session, click the Start Recording Bitmaps button. The button starts flashing and stills of the video are produced.
Figure 7-6 Button for Producing Stills (Bitmap Images)
Stopping Bitmap Production
While the Start Recording Bitmaps button is flashing, click it to stop bitmap production.
Many Bitmaps from One Click
Stills are produced at a rhythm matching the camera’s frame rate. For example, cameras set to capture 10 frames of video per second produces ten bitmap files (*.BMP) per second (for each open camera). The size of the bitmap files varies with the resolution setting (see Table 7-4 on page 108). Stills can also be obtained while viewing a video clip (see Viewing a Clip on page 101).
Caution Honeywell recommends that when producing bitmaps for more than a few seconds, the operator keeps an eye on the PC’s hard disk. Bitmap production can quickly fill up a PC’s storage.
Handouts for Users and Non-Users of Rapid Eye
You can distribute stills of video as computer files. They are known as bitmaps in the View application. These stills can be viewed and printed using any bitmap reading software, such as: Corel Photo Paint, Adobe Photoshop, Microsoft Paint, and others.
Start Recording Bitmaps button

Rapid Eye Remote View Operator Guide
Document 800-07767 Rev A 10702/11
Still Image Name Reference
Figure 7-7 Stills Listed on the Clips Action Tab as *.bmp Files
Microsoft Windows File Explorer
The File Type for bitmaps is Bitmap Image in Windows. File names are a combination of the site name, camera name and a number, each separated by an underscore. For example, the file name of an image (saved as a still) could be:
Main Unit A_South stairwell_LTZ_20090116_141626_00000084.bmp
The name’s parts are defined in Table 7-3.
TIP! You have the option of renaming stills. Honeywell recommends leaving the file extension as .bmp.
Time and date stamp
Still image: site, camera name and still number. Note the BMP extension.
Table 7-3 Name Format for Still Images
Example Meaning
Main Unit A Site name
South stairwell Camera name
LTZ Time reference
20090116 Date of bitmap (year/month/day)
141626 Time of bitmap (24-hour clock)
00000084 Eight-digit sequence number
.bmp Extension
Bitmap image Microsoft Windows file type
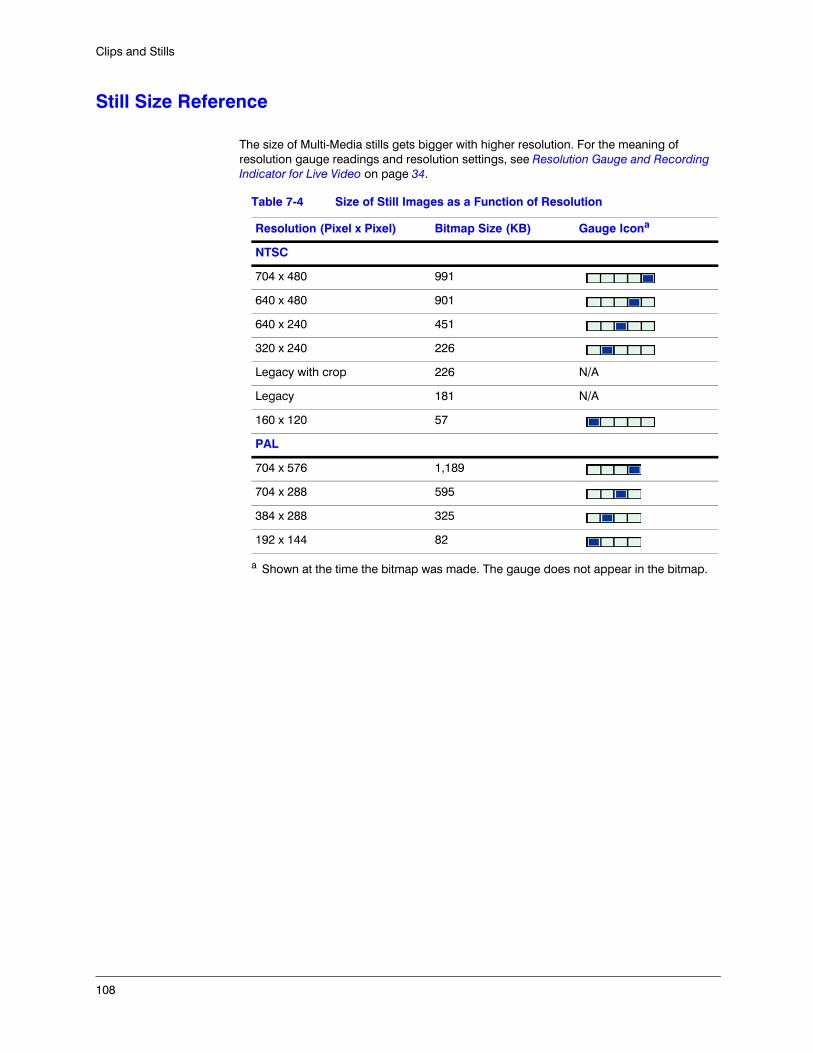
108
Clips and Stills
Still Size Reference
The size of Multi-Media stills gets bigger with higher resolution. For the meaning of resolution gauge readings and resolution settings, see Resolution Gauge and Recording Indicator for Live Video on page 34.
Table 7-4 Size of Still Images as a Function of Resolution
Resolution (Pixel x Pixel) Bitmap Size (KB) Gauge Icona
NTSC
704 x 480 991
640 x 480 901
640 x 240 451
320 x 240 226
Legacy with crop 226 N/A
Legacy 181 N/A
160 x 120 57
PAL
704 x 576 1,189
704 x 288 595
384 x 288 325
192 x 144 82
a Shown at the time the bitmap was made. The gauge does not appear in the bitmap.
Document 800-07767 Rev A 10902/11
8
Audio
Overview
Like most of the Multi-Media features, use of audio is optional. Audio can be monitored and recorded along with video or independently of it.
Your Multi-Media system administrator (Multi SA) can inform you about which Multi-Media sites have audio in an operational state.
Simplex and Duplex Audio Modes
Audio for your Rapid Eye system can be set up for the Duplex audio mode (2 channels, users can talk and listen at the same time) or the Simplex audio mode (single channel audio, users cannot talk and listen simultaneously). See Using the Simplex Audio Feature on page 112 for more information on the Simplex audio mode.
The following sections describe using audio features with the duplex audio mode:
• Listening to Live Audio on page 110.• Talking to a Multi-Media Site on page 110.• Recorded Audio on page 111.• Setting Up on page 111.
Hardware
View operators need a sound card in their PC to hear sound from the Rapid Eye Multi-Media site, to send sound to it and to have the audio toolbar (shown in Figure 8-1) appear in the session pane.
Caution The audio toolbar (see Figure 8-1) does not appear on a PC without a sound card.

110
Audio
Listening to Live Audio
To listen to a Multi-Media site, click the Channel 1: Listen button on the audio toolbar, the Channel 2: Listen button or both (see Figure 8-1).
Figure 8-1 Audio Toolbar
Listening is metered at the bottom of the peak / talk / listen meter of each channel (see Figure 8-1). Many users running live sessions to the same Multi-Media site can listen in at once. All sound sources are mixed at a Multi-Media operator’s station, regardless of the number of sites being monitored at once.
Caution Do not use a dial-up connection for live audio in combination with live video. Video can be corrupted due to the bandwidth limitations of dial-up. Recorded video and audio can be saved to a clip and the clip transferred to an Operator’s PC. Only combine Live video with audio on a network connection.
A Multi-Media unit offers two channels of audio. Each channel of sound can be monitored independently or together. When the mouse pointer is placed on a button, a tool tip appears to identify the channel.
Minimizing Background Noise
Background noise can build-up as an operator monitors more sites at the same time. To reduce this background noise, end the audio monitoring of the Multi-Media sites that you do not need to monitor.
Talking to a Multi-Media Site
Click the Channel 1: Talk button on the audio toolbar, the Channel 2: Talk button or both. Talk is metered in the center of the peak / talk / listen metering of each channel (see Figure 8-1). An operator can broadcast on one or both channels, and all at once to many sites that have audio (as many as can be opened).
Channel 1 peak / talk / listen (PTL) meter
Talk: channel 1
Listen: channel 1
Channel 2 meter and buttons

Rapid Eye Remote View Operator Guide
Document 800-07767 Rev A 11102/11
Talk Button Availability
When two or more View operators start live sessions at one Multi-Media site, only the first operator to connect to the site will have the Talk button available. The Talk button on other View operators’ PCs is unavailable until the first user disconnects. When two View operators start live sessions at different Multi-Media sites, each can use the Talk button, unless one is logged into the other site as well.
If an operator is running a Maintenance session, the Talk button in Maintenance overrides use of audio in a Live session.
LocalView
At sites where LocalView is in use, one channel of audio can be reserved for onsite use. View operators using these sites can use only the remaining channel of audio.
See also Live Video on page 29 for more information on live video, and Live Data Messages from POS Hardware on page 131 for data.
Recorded Audio
Recorded audio is available along with video when performing a retrieval session. Your Multi-Media system administrator (Multi SA) can inform you about which Multi-Media sites are set to record audio.
TIP! The recording of audio can be unlawful. Check your right to do so with a legal authority.
See also Recorded Video on page 49.
Setting Up
Audio setup is performed during a Maintenance session. Microphones, speakers, and so on are needed for audio, both at the operator’s station and at the Multi-Media site. For audio setup procedures, see the Rapid Eye™ Multi-Media Digital Video Recorder Installation Guide, and the Rapid Eye™ Multi-Media Digital Video System Administrator Guide.
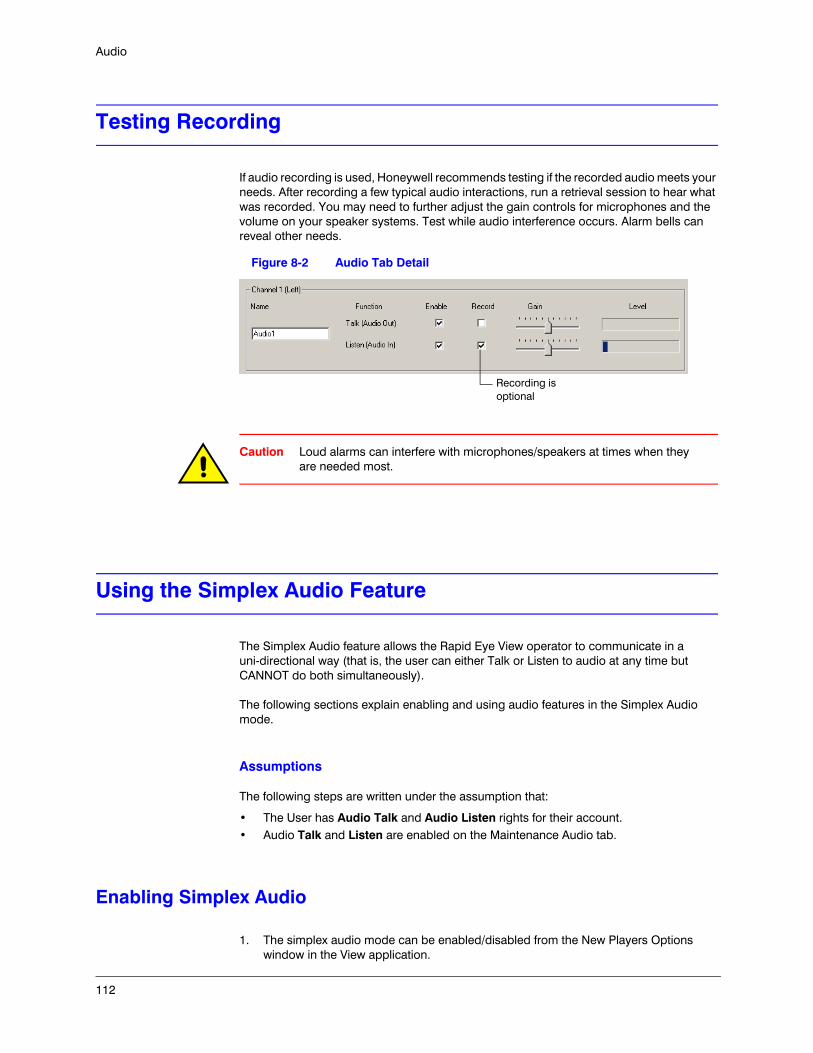
112
Audio
Testing Recording
If audio recording is used, Honeywell recommends testing if the recorded audio meets your needs. After recording a few typical audio interactions, run a retrieval session to hear what was recorded. You may need to further adjust the gain controls for microphones and the volume on your speaker systems. Test while audio interference occurs. Alarm bells can reveal other needs.
Figure 8-2 Audio Tab Detail
Caution Loud alarms can interfere with microphones/speakers at times when they are needed most.
Using the Simplex Audio Feature
The Simplex Audio feature allows the Rapid Eye View operator to communicate in a uni-directional way (that is, the user can either Talk or Listen to audio at any time but CANNOT do both simultaneously).
The following sections explain enabling and using audio features in the Simplex Audio mode.
Assumptions
The following steps are written under the assumption that:
• The User has Audio Talk and Audio Listen rights for their account.• Audio Talk and Listen are enabled on the Maintenance Audio tab.
Enabling Simplex Audio
1. The simplex audio mode can be enabled/disabled from the New Players Options window in the View application.
Recording is optional

Rapid Eye Remote View Operator Guide
Document 800-07767 Rev A 11302/11
2. Select the View menu Options New Players window. By default, the Simplex Audio mode will be enabled (checked).
Figure 8-3 Options for New Players Window
Using Audio Features with Simplex Audio Mode
To use audio features with the Simplex audio mode enabled:
1. Open a Live session by selecting a site and clicking Live ( ). On the Live window, notice that the listen streams are ON by default.
2. To talk on channel 1 (for example broadcasting an audio on channel 1), click and hold the channel 1 Talk button ( ). The listen streams will automatically be toggled OFF and the listen buttons will be greyed out. That is, the user will not be able to listen to any of the channels while the channel 1 Talk button is pressed down.
3. To stop talking on channel 1 (stop broadcasting audio on channel 1), release the channel 1 Talk button ( ). The listen streams will automatically be toggled ON and the listen buttons will be enabled. The user can now listen to both the channels but cannot talk on any of the channels.
Note There should be a 1 second delay between clicking the two Talk buttons. That is, after releasing one of the Talk buttons, the user has to wait 1 second before they click the next Talk button. If the user clicks the Talk button without waiting 1 second, the talk stream will not be enabled.
114
Audio
Switching Audio Modes
To switch from Simplex mode to Duplex mode or vice versa:
1. In the Rapid Eye View application, close any open Live windows.
2. Select the View menu Options New Players window.
3. Check/Uncheck the Simplex Audio Mode option (see Figure 8-3).
4. Open a new Live session and observe the changes in the audio features.
Eagle Audio
Eagle Audio is an optional audio interface. It is discussed in the Multi and Eagle Audio Configuration Guide, part number K9203.

Document 800-07767 Rev A 11502/11
9
Watching Site Tours
Like most of the Multi-Media security features, use of site tours is optional. Your Multi-Media system administrator (Multi SA) presets which sites (if any) are part of a tour. Multi-Media View operators can consider these guidelines as suggestions. They are intended to complement your organization’s security policies and procedures.
Figure 9-1 Site Tour Information Is Displayed in the Title Bar
Process
Site Tour acts like a security guard, electronically visiting sites in a sequential order. Once each site has been configured in the Multi-Media Admin software to be part of the Site Tour, you can connect and view the images on all available cameras at each of the sites in the list. The duration specified in the Admin software limits the amount of time that you can spend monitoring each site.
Running a Site Tour
1. Click the Tours tab in the Multi-Media View window. Tours that are listed have been set up using the Admin application.
Tour buttons: Suspend, Resume and Advance to the next site.
Site tour name is Day watch.
Countdown of time (in minutes:seconds) remaining at this site before the tour displays the next site.

116
Watching Site Tours
Figure 9-2 Samples of Site Tours in List
2. Click beside the tour name to display the sequence of the sites that will be toured. Click beside the tour name to collapse the branch.
Figure 9-3 Site Tour Information Displayed in Title Bar
3. Select a tour on the tab and do one of the following:
• Click in the Toolbar.• Double-click the tour listed in the Tours tab.• Right-click on the Tour name and select Start.
The first site is connected and all available camera images are tiled on your screen. After the specified duration, the current site is disconnected and the next site is connected and displayed. After the last site disconnects, the Site Tour loops back to the first site.
4. Observe the Player Window Title Bar. It displays the site, tour name, and remaining time.
Managing a Tour
When you run a site tour, live video feeds are shown from many sites, one by one. By default, all of the cameras at a site are displayed during the site tour. However, you may close, add, and adjust camera settings while the site tour is in progress. Streams that are closed or added are displayed again once the site tour returns to the site.
TIP! Over dial-up connections, closing unnecessary camera windows increases the speed of the video feeds being displayed.
Event Recording During a Site Tour
To enable the boost button ( ) for recording settings during a site tour (see Event Recording for Video on page 59), pause the tour first (see Pausing a Site Tour on page 117).

Rapid Eye Remote View Operator Guide
Document 800-07767 Rev A 11702/11
Site Tour Properties
You can display properties of the site tour such as the sites to be visited and the duration of each visit. These properties reflect the site tour settings made using the Admin application. See your Multi SA to setup or modify a site tour.
Do one of the following:
• Select a site tour on the Tours tab and click on the toolbar.• Right-click on a site tour and select Properties.• Site Tour properties.
Figure 9-4 Site Tour Properties Dialog
Stopping a Site Tour
While viewing camera images when conducting a site tour, you can temporarily suspend the site tour. For example, if a robbery is in progress at one of the monitored sites, you can suspend the site tour until the event is resolved. Then, you can resume the site tour to continue to monitor other sites.
Once you resume, the site will be connected for the full duration time as specified for that tour in the Admin application.
Pausing a Site Tour
Click in the Player Window toolbar or select Suspend Tour in the File menu. Only the time duration of the site tour is suspended. The live video retrieval of the site is not affected.

118
Watching Site Tours
Resuming a Site Tour
While suspending a site tour, click in the Player Window toolbar or select Resume Tour in the File menu to continue the tour. The current site tour resumes for the remaining time as displayed in the Title Bar before the next site configured in the tour is displayed.
Ending a Site Tour
Close the Site Tour window. To do so, click the X in the top-right corner of the Site Tour window.

Document 800-07767 Rev A 11902/11
10
Event Searches
Preparation
Only Logged Events can be Searched
Before you can search for the record(s) of an event, you or your Multi SA needs to set the event to be logged, prior to an event’s occurrence. Afterwards, a log entry is made on the Rapid Eye Multi-Media unit each time that event occurs.
Searching for Event Records
While a site name is selected, on the Sites tab:
1. Click .
2. Enter a date and time in the From and To fields (see Figure 10-1 on page 120).
3. Click the tab of the event whose occurrences are to be searched. For a list of what can be searched, see Table 10-1 on page 121.
4. Click Start. The Start button is unavailable until dates and times differ in the From and To fields.
Note Motion events are selected on the Analytics tab.

120
Event Searches
Figure 10-1 The Search for Events Window
Inputting Different Times and Dates
Click on the part of the time that you want to change and either:
• Press and to move the cursor to the next field. Press and to increase/decrease the value.
• Enter a value with your keyboard, as needed.
Using the Calendar Utility
1. In the Stream List dialog, click the drop-down arrow next to the date box.
2. Click a date in the calendar. To go to another month, click the arrow keys next to the month/year heading.
You Cannot Go Beyond the Limits of the Log
Attempting to input or select dates or times beyond the limits of the log sets the input to that limit.
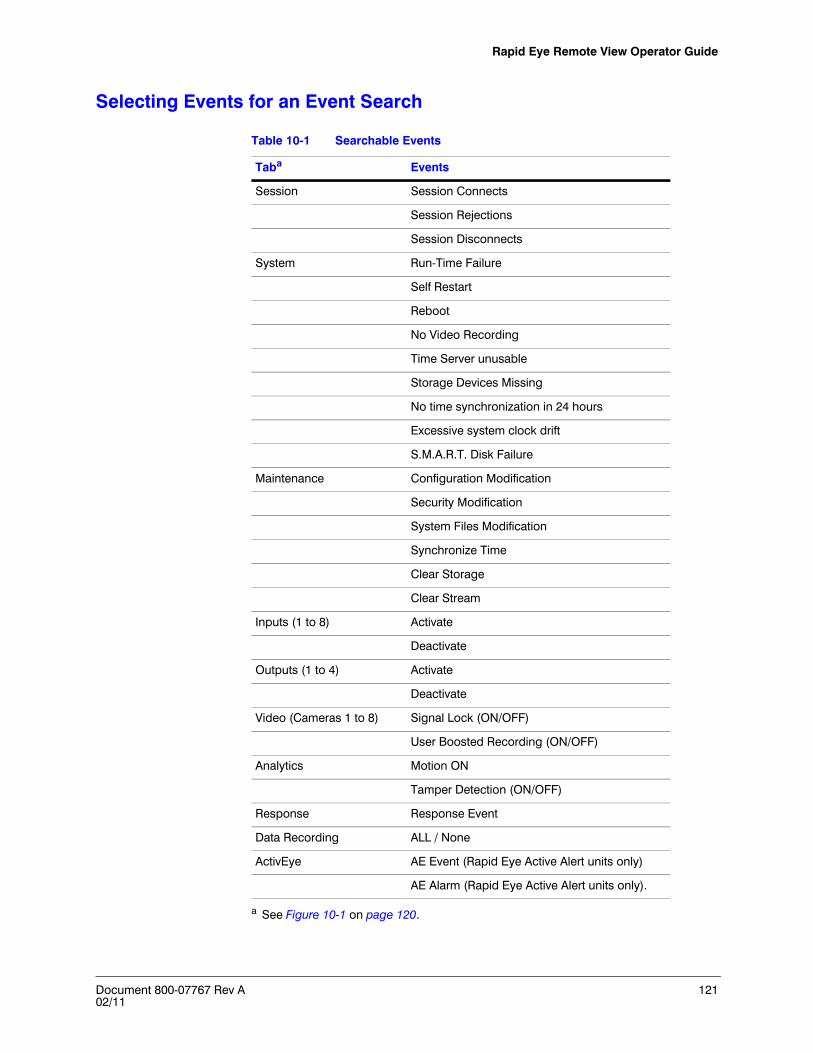
Rapid Eye Remote View Operator Guide
Document 800-07767 Rev A 12102/11
Selecting Events for an Event Search
Table 10-1 Searchable Events
Taba
a See Figure 10-1 on page 120.
Events
Session Session Connects
Session Rejections
Session Disconnects
System Run-Time Failure
Self Restart
Reboot
No Video Recording
Time Server unusable
Storage Devices Missing
No time synchronization in 24 hours
Excessive system clock drift
S.M.A.R.T. Disk Failure
Maintenance Configuration Modification
Security Modification
System Files Modification
Synchronize Time
Clear Storage
Clear Stream
Inputs (1 to 8) Activate
Deactivate
Outputs (1 to 4) Activate
Deactivate
Video (Cameras 1 to 8) Signal Lock (ON/OFF)
User Boosted Recording (ON/OFF)
Analytics Motion ON
Tamper Detection (ON/OFF)
Response Response Event
Data Recording ALL / None
ActivEye AE Event (Rapid Eye Active Alert units only)
AE Alarm (Rapid Eye Active Alert units only).

122
Event Searches
Data Recording As an Event
You can search for data recording rules for customer devices as you would other events. However, there are no checkboxes for data recording rules. You have to click on a rule, to find instances of it. See Searching for Data on page 133 for another utility used to search data recording records.
Search Results
You can use the search results to:
• View video from the time of events located by a search.• Print the log entry of an event.• Make a copy of the log entry in a *.txt file.
Viewing Video from the Time of an Event
1. Locate records of events, as explained in Searching for Event Records on page 119.
2. Select a record from the list. The Video button becomes available (see Figure 10-1).
3. Click Video. A retrieval session similar to the one in Event Video Options on page 88, starts.
4. To control the playback and manipulate the recorded video windows, use the controls in the Playback toolbar (see Playback Speed Slider on page 52).
5. To go back to the Events window, either close the Video Retrieval window or click Events on the Sites tab.
Printing a Log Entry
1. After locating records of events (as explained in Searching for Event Records on page 119), select a record. The Print button becomes available.
2. Click Print.
3. Click OK. A Font dialog appears. Select a font and click OK.

Document 800-07767 Rev A 12302/11
11
Archival Policies
Use Archival Policies to archive data from multiple units at one remote view station and then store the archived video clips on either the local PC or a network server. This chapter covers running an archival policy, playing back archived data, and creating clips from the archived data.
See the Rapid Eye™ Multi-Media Digital Video System Administrator Guide, for intructions on configuring an Archival policy.
Using an Archival Policy
Note It may take a considerable amount of time for archiving to complete. We recommend you run archival policies at times when no other operations are in progress (such as late at night).
Note When an archival policy backs up redundant data (data from a time and site that has previously been backed up), the policy will overwrite the data from the same time period.
Caution Do not turn the Rapid Eye Multi-Media unit off when archiving is in progress. This may result in archiving errors and the application may not behave as expected.
To run an archival policy:
1. Launch the View application and select the Archival tab. The archival policies and servers that have already been configured are listed here.
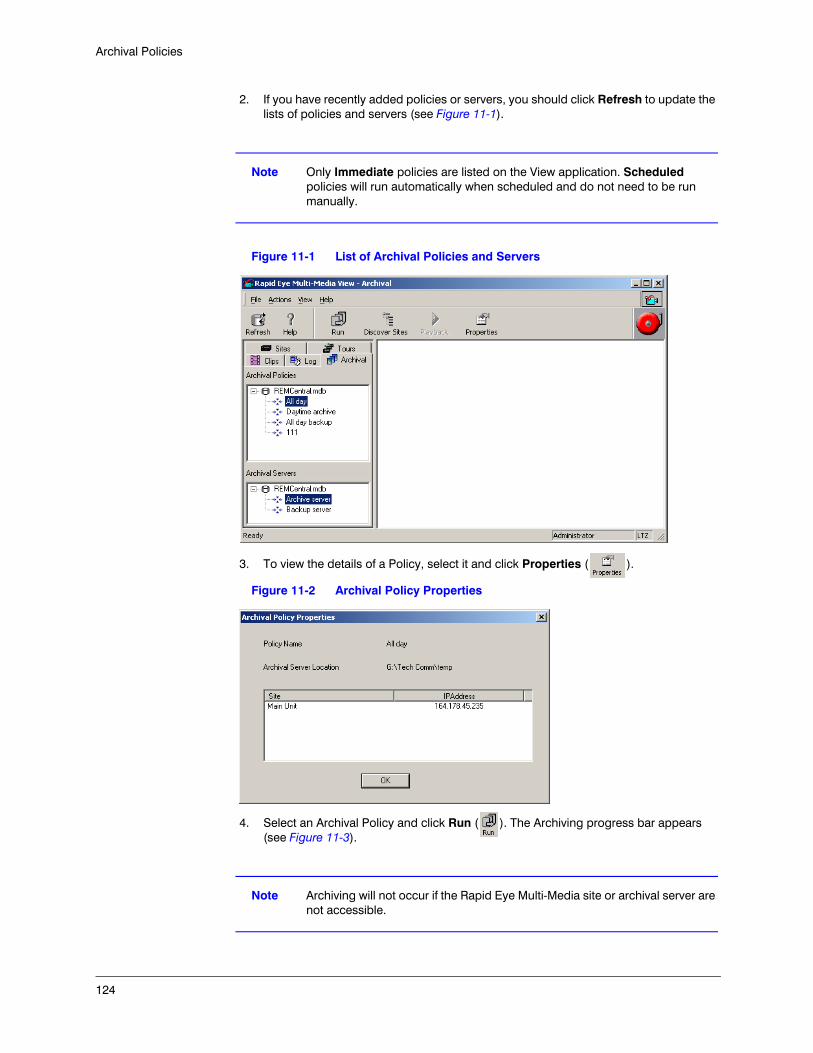
124
Archival Policies
2. If you have recently added policies or servers, you should click Refresh to update the lists of policies and servers (see Figure 11-1).
Note Only Immediate policies are listed on the View application. Scheduled policies will run automatically when scheduled and do not need to be run manually.
Figure 11-1 List of Archival Policies and Servers
3. To view the details of a Policy, select it and click Properties ( ).
Figure 11-2 Archival Policy Properties
4. Select an Archival Policy and click Run ( ). The Archiving progress bar appears (see Figure 11-3).
Note Archiving will not occur if the Rapid Eye Multi-Media site or archival server are not accessible.

Rapid Eye Remote View Operator Guide
Document 800-07767 Rev A 12502/11
Figure 11-3 Archiving Progress Bar
5. Click Close when the archiving is 100% completed.
Note Only one archival policy can run at a time (immediate or scheduled). If a policy is running when a scheduled policy is set up to run, the scheduled policy will be queued to run when the first archival policy is finished.
Playing Back Archived Data
To play back archived data, you must first add an archival server with the Admin application. Once the server is added, you then discover the archival sites with the View application, select a site to retrieve data from, and then play back the video.
Note Video recorded at a very low frame rate (0.5 fps) may not play back properly. Green blocks may be observed during playback. Increase the recording frame rate to work around this issue.
Note Playing back clips from an archival server will be slower than playing back clips from a retrieval session.
Setting Up an Archival Server
See the Rapid Eye™ Multi-Media Digital Video System Administrator Guide, for more information on setting up Archival policies and Archival servers.
1. Right-click in the Archival Server tab of the Admin application.
2. Click Add on the menu that appears.
3. Enter a name for the server in the Share Name field (see Figure 11-4).
Note If you click Cancel, the current archiving will stop, but anything archived previous to clicking Cancel will be retained in the local folder or network share path Server Location.

126
Archival Policies
4. Click the browse button ( ) to select a Server Location.
Figure 11-4 Add Archival Server Window
Note The Server Location can be a local folder or a network share path. Data will backup to the working directory (location where the application is installed) by default if the server location is not accessible. If data has been backed up to the working directory, you can choose the working directory in this step as the Server Location or manually copy and paste the files to the proper location.
5. Select an archival server location in the Browse for Folder dialog box and click OK.
6. Click Save and Close.
Note Select an archival server and click to modify the server’s options. You can also add another server ( ) or delete a server ( ).
Discovering Sites on the Archival Server
1. Launch the View application and select the Archival tab. The archival policies and servers that have already been configured are listed here.
2. If you have recently added policies or servers, you should click Refresh to update the lists of policies and servers.
3. Select an Archival Server and click Discover Sites ( ).
4. All the sites found on the archival server will be listed after clicking Discover Sites (see Figure 11-5 as an example).
Figure 11-5 Discovering Sites on an Archival Server
Archival Servers before discovery
Archival Servers after discovery

Rapid Eye Remote View Operator Guide
Document 800-07767 Rev A 12702/11
Playing Back Archived Video and Data
Before you can play back archived data, you must first set up an archival server and discover the sites on the archival server (see Setting Up an Archival Server, page 125, and Discovering Sites on the Archival Server on page 126). To play back video and data:
1. Select a site listed under an Archival Server and click Playback ( ). The Archival Playback Select Date and Time window (Figure 11-6) appears.
Figure 11-6 Archival Playback Select Date and Time Window
2. Use the Date drop-down arrow to open the calendar utility. Select the date and time from which data is to be played back. Click the left or right arrows to change the month that is displayed.
3. Select an element of the Time field (hours, minutes, seconds, AM/PM) and use the arrow buttons ( ) to change the playback time.
4. Click OK. The Select streams for Archival Playback window (Figure 11-7) appears.
Figure 11-7 Select Streams for Archival Playback Window
5. Select the video and data streams that you want to play back. To select more than one camera, press the Ctrl or Shift keys while selecting the streams in the list.
6. Click OK. Video from the selected streams will play back in the View application. Use the playback controls to find the video you are looking for. See Chapter 3, Recorded Video, for more information on playback options and controls (Figure 11-8).
Figure 11-8 Archival Playback Options and Controls

128
Archival Policies
Note Playback of archived data is NOT continuous. Because the archived data is chunked into 30 minute files, playback of the data can only occur within the 30 minute data file that is currently selected. If you want to play the next 30 minutes of video, you will need to close the viewing window, click Playback again, and select the appropriate time in the Select Date and Time window.
Note If media is not available from the requested time, the Late Media Indication window will open. This window shows the nearest future time at which data is available. Click OK to start playback from this time.
Creating Clips During Playback
Clips made from archived video and POS data only include the streams that are being shown while making the clip. When you select the streams to play back, only select the streams that you want included in the clip.
1. First, start playing back some video (see Playing Back Archived Data on page 125). Make sure the only streams open are the ones you want to include in the clip.
2. Use the playback controls to find the point in the video that you want to start recording the clip at (see Chapter 3, Recorded Video, for more information).
3. Click on the Playback toolbar. The color of the button changes to red and flashes while a clip is being created from recorded video. You have the option of clicking the Fast Forward button on the playback toolbar to reduce the time spent making the clip.
4. When all the video you need is recorded, click again. The Save Recorded Clip To File window appears (see Figure 11-9.)
5. Name the clip and choose a folder where the clip will be stored. Click Save. The clip will be saved as an .rem file.

Rapid Eye Remote View Operator Guide
Document 800-07767 Rev A 12902/11
Figure 11-9 Save Recorded Clip to File
Caution Honeywell recommends storing stills and clips in their own folder. Clips and stills can be erased routinely after use, making it easy to erase other files by mistake. Storing clips and stills in a folder other than View’s application folder (the default folder for clips and stills) prevents the deletion of View system files.
Note Clips recorded with this method will only play back on stations with the Remote View software installed. See Creating a Self-Executable Clip on page 129 to create a file that can play on PCs without the Remote View software installed.
Note See Chapter 7, Clips and Stills, for more information on saved clip options and playing back saved clips.
Creating a Self-Executable Clip
To create a self-executable clip that will play back on PCs without the Remote View software installed, you must first select the self-executable file as the clip type:
1. Open the File menu and click Select Clip Type.
2. Select the SelfExecutable Clip option (see Figure 11-10).
Note This option is only available when playing back video from an archival policy. Other retrieval sessions will not offer this option.

130
Archival Policies
Figure 11-10 Select Clip Type Window
3. Start playing back some video (see Playing Back Archived Data on page 125). Make sure the only streams open are the ones you want to include in the clip.
4. Click on the Playback toolbar. The color of the button changes to red and flashes while a clip is being created from recorded video.
5. When all the video you need is recorded, click again.
6. Name the clip and choose a folder where it will be stored. Click Save.
Creating a Rapid Clip
You can also create a Rapid Clip (also called REM clip or exe clip):
1. Start playing back some video (see Playing Back Archived Data on page 125). Make sure the only streams open are the ones you want to include in the clip.
2. Open the File menu and click Create Rapid Clip.
Figure 11-11 Create a Rapid Clip Window
3. Change the time and dates in the From and To fields to create the clip that you are looking for.
4. Click Make Clip after all the time fields are filled out appropriately.
Figure 11-12 Clip Creation in Progress
5. Click Close when the clip creation is finished.
6. Name the clip and choose a folder where the clip will be stored.
7. Click Save.

Document 800-07767 Rev A 13102/11
12
Customer Devices
Live Data Messages from POS Hardware
Hardware devices that provide messages over a serial cable, such as point-of-sale (POS) devices can be connected to a Multi-Media unit. These messages can be viewed in real time, in a data window during a live session.
Figure 12-1 Selecting Data Streams Shows the Connection Icon ( )
Viewing Live Data
1. Start a Live session. A Stream List dialog appears.
2. In the Stream List dialog (see Figure 12-1), select as many POS devices as you need. You have the option of selecting cameras, if they are available.
3. Click OK. Each data feed selected in step 2 is displayed in its own window.
Select as many camera and POS data streams as you need to view.
132
Customer Devices
Live Data Feed
The Paste command that is obtained by right-clicking a window that displays data cannot be used.
See also Live Video on page 29.
Recorded Data
Messages from Hardware
View can be used to record and retrieve messages from devices/systems external to the Multi-Media hardware, such as: cash registers, door access sensors, a guest registration system, and so on. The data can be viewed in its own window, alongside recorded video.
Viewing Recorded Data
1. Start a Retrieval session. A Stream List dialog appears.
2. In the Stream List dialog, select as many POS devices as you need. You have the option of selecting camera feeds, if they are available.
3. Click OK. A recording of each data feed selected in step 2 is displayed in its own window.
Recorded Data Feed
Right-clicking a camera window that displays data, displays a Paste command that cannot be used. The Print commands in the Tear-away player’s File menu also have no effect.
See also Recorded Video on page 49.

Rapid Eye Remote View Operator Guide
Document 800-07767 Rev A 13302/11
Searching for Data
Preparation
Before searching for customer events:
• Data devices need to be connected and assigned to a serial port on a Rapid Eye Multi-Media unit.
• A View operator needs to know how to identify the rule (string of text) of the event.
Purpose
View can be used to search for messages from devices/systems external to the Multi-Media hardware, such as: cash registers, door access sensors, a guest registration system, and so on. Recorded video can be obtained from the time of the message. Regular Expressions, page 136, can be used to search for rules. Regular expressions are listed in Table 12-1 on page 136. These techniques are a powerful asset to surveillance technology.
Devices connected to the unit (for example, a cash register) are listed automatically.
1. Enter the data to be searched for and a date/time range.
2. Click Start.
3. Video from a result can be obtained by selecting a result and clicking Video.
Figure 12-2 Search for Data Session
Select a result and click Video to view video of the time the data was captured.
Select the POS data to search for and the time and date range to search in.
Click Start to generate a list of results.

134
Customer Devices
Results
You can use the search results to:
• View video from the time of an event.• Print the details of an event.• Save the event details to a *.txt file.
Finding and Listing Records of Events
1. Select a site name on the Sites tab.
2. Display the Search for Data window by clicking on the Toolbar.
3. Either:
• Select events that you want to search for, or• Enter a specific rule in the Edit Search Data field, then click Add. Regular
expressions can be used to search for data. Table 12-1 on page 136 lists the special characters that can be used for performing an extended search.
4. Enter a date and time in the From and To fields (explained in the next procedures).
5. Click Start. The Start button is unavailable until the dates and times in the From and To fields form a searcheable time period (can not be the same).
Inputting Different Times and Dates for a Search
Click on the part of the time that you want to change and do one of the following:
• Press cursor keys on the keyboard. Press and to move the cursor between the fields, and and to increase or decrease the value.
• Enter a value with your keyboard, as needed.
Calendar Utility
You can display a calendar utility by clicking the drop-down arrow next to a date field.
1. In the Search for Data dialog, display the calendar utility by clicking the drop-down arrow next to the From date field or the To date field.
2. Click a date in the calendar. To go to another month, click the arrow keys next to the month/year heading.
You Cannot Go Beyond the Limits of the Data
Attempts to select dates or times beyond the data archive limits sets the input to that limit.
Matching Data to Labels
The labels associated to serial device data can also be viewed in an Event session.

Rapid Eye Remote View Operator Guide
Document 800-07767 Rev A 13502/11
For a quick reminder of the labels associated with serial device data, run a Search for Events session (as explained in Event Searches on page 119) and click the Data Recording tab. The data/rules are listed along with its labels. These are the same labels that are assigned to data during the Maintenance session for the serial device.
Figure 12-3 Comparing Data Labels in Data and Event Sessions
Data labels in Data session match up to those on the Data Recording tab of an Event session.

136
Customer Devices
Regular Expressions
Technical Note on Special Characters
Operators who know how to use a regular expression (RE) benefit most from using the special characters in a rule. Table 12-1 lists the special characters that can be used for performing an extended search.
Table 12-1 Regular Expressions and Special Characters in Rules
Character Name Within the Rule, Searches for a Match to...
. Period Any one character.
Example: .ire finds wire, tire, 4ire, and so on.
[ ] Square brackets Each character in the brackets, in turn.
Example: c[aou]t finds cat, cot or cut.
^ Caret 1. Characters that are not in brackets (Example: r[^a] finds rb, rc, rA, r1, and so on).
2. A rule at the beginning of a ine, when placed before it (Example: ^Hume finds only Hume at the beginning of a line).
3. A control code, when used with a backslash (Example: \^C find the control-C control code).
$ Dollar sign A rule at the end of a line, when placed after it.
Example: Kant$ finds only Kant at the end of a line.
- Dash A range of characters set in square brackets.
Example: [a-z] matches any lower case letter.
+ Plus sign The character that it follows, once or more.
Example: tu+ finds tu, tuu, tuuu, and so on.
* Asterisk The character that it follows, whether absent, occuring once or more (Example: mo*e finds me, moe, mooe, moooe, and so on).
Example: c[au]*t finds ct, cat, caat, cut, cuut, and so on.
? Question mark A character that follows it, whether absent or occuring once (Example: me?y matches either mey or my).
\ Backslash 1. Characters, when placed prior (Example: /? finds ?).
2. Control character, when placed before their symbols (Example: \e is an escape command, \f is a form feed, \n is a new line, and so on).

Rapid Eye Remote View Operator Guide
Document 800-07767 Rev A 13702/11
External System Interface
Discussion of an external system interface (ESI) is beyond the scope of this guide. The ESI Configuration command is available from the View menu, under Options. For information about ESI configuration, see the Multi-Media ESI User Guide, 800-08254, available from Honeywell Video Systems.
Modems and Telephony
The Modems command and the Telephony command are available from the View menu, under Options. They show settings made using Microsoft Windows. For information about these settings, see the documentation for Microsoft Windows.

138
Customer Devices

Document 800-07767 Rev A 13902/11
13
Scheduling
Use of scheduling is optional. Scheduling is performed unit-by-unit by a Multi-Media system administrator (Multi SA) who can schedule cameras and/or alarms.
Effects of Scheduling
Effect of Scheduling on Live Video
A Multi-Media unit can be scheduled by your Multi SA to not record video at times or days that your organization specifies. For example, your organization might need to record video only on holidays or at night, and so on. Scheduling can lengthen a unit’s video archive. Video can of course be recorded all of the time instead of being specifically scheduled.
A View operator that is monitoring Live video has the option of recording any event of interest by using the Boost recording button, even if cameras are scheduled to not record. Figure 13-1 shows a camera that is scheduled to not record. The Boost button is shown along with the result of using the event recording.
Figure 13-1 Comparing the Resolution Gauge for a Live Camera Window
Using Event Recording to Override a Camera Schedule
Event recording settings are preset by your organization’s Multi SA. Recording of video occurs, regardless of boosted settings. The resolution and frame rate obtained depends on settings made by your organization’s Multi SA (see Event Recording for Video on page 59). To setup schedules, see the Rapid Eye™ Multi-Media Digital Video System Administrator Guide.
No recording currenly scheduled
Boosted recording settings

140
Scheduling
Effect on Recorded Video
The result of scheduling is that there may be times when Retrieval sessions have no video to show. Schedules may apply to specific cameras, or groups of cameras. See your organization’s Multi SA for camera schedules.
Effect on Alarms
Alarms can be scheduled separately from cameras, to trigger only after office hours, and so on. How to set up scheduling is explained in the Rapid Eye™ Multi-Media Digital Video System Administrator Guide. Scheduling can be used in combination with response recording to provide video as events occur.
Rapid Eye Remote View Operator Guide
Document 800-07767 Rev A 14102/11
Index
Aaccount information 25ack button (acknowledge) 86action tabs 22alarm
about 77acknowledging 86automatic clip creation on callback 80automatically acknowledge 79, 87beep 79deferred report 95event, immediate notification 95handling options 79handling, customizing 79ignoring other alarms 80ignoring other sites 80immediate report 95immediate video 78limiting callbacks 80live alarm session 79live session 84log, displaying 93log, reading 93make clip automatically 79making clip during alarm 85multiple alarms, with video 89notification 78notification speed 95onsite device 90options 79rearming 87retreiving recorded video 85retrieval from list 79rights to receive 81running a session 86session 85station 94toolbar 84video on request 78viewing video from alarm time 78when triggered 84
alarm bell, and audio interference 112archival policies
creating a clip from 128
overview 123playing back data 125setting up server 125using 123
asterisk, in regular expression 136audio
background noise 110Eagle Audio 114enabling simplex mode 112interference 112listening to 110live 110LocalView 111many View operators 110, 111overview 109recorded 111setup 111simplex 112soundcard needed 109switching modes 114talking to a site 110toolbar 110using simplex features 113
Bbeep on alarm 79best fit, camera window 36bitmap of video, see stills, bitmapsblind spot, vehicle docking 40blinding a camera, see tamper detectionblurring a camera, see tamper detectionboost button 59, 116, 139button
ack (acknowledge) 86boost 59, 116, 139fast-forward 69fetch 62go to 102hide grid 63hide mask 64invert mask 65mins pre 70motion highlighting 73next image 69

142
norm 68rearm 87rearm all 87redefine 62redo 65replay 69retrieval 71save 68search 62show grid 63show mask 64stop 62talk 111trim 68undo 64, 65unselect 68video 69, 88video controls for motion 69zoom 67
Ccalendar utility 93, 120, 134callback
24/7 notification 94limit values 81set limits 80
cameradouble-sized window 32lens hampered by blind spot 40lens hampered by condensation, dust or grease 40lens hampered by strong or weak lighting 40moving windows 31position 74reopening window 31selecting 62selecting feeds 30setting video quality 33sizing windows 31tiling windows 31time zone at Multi-Media unit (RTZ) 33
chart of motion frequencyplaying video excerpt 70selecting items 67
clear all, motion search command 65clip player, installing 104clips
automatic, during alarm 100burning at PC 103burning at site 103clip players 104coarse editing 102comparing 102definition 97deleting 101distributing 103go to command 102list of 101making 97
making from live video 98making from recorded video 98media limits 103name reference 99play options 101properties reports 105recorded video 98storage 100time gap 102viewing 101viewing in reverse 101
coarse editing, clip 102Common Operator guide 21condensation on camera lens 40CSD (camera sabotage detection), see tamper detectioncue, motion to appear in video 69customer device
defining events 133POS hardware 131rules 133
customer events, defining 133customer support 28customizing, motion search report 74, 75
Ddarkness, on camera lens 40dartboard control, PTZ 43data
matching to labels 134search results 134
data stream 131database, refreshing 25date, calendar utility 93detecting sabotage, see, tamper detectiondouble-sizing a stream 32duration of motion, see report, motion searchdust on camera lens 40
EEagle Audio 114ESI configuration 137event
alarm options 79alarm, deferred report 95alarm, immediate report 95authority 92boosting recording 59customer, defining 133customer-device 88, 92data recording 122finding records 134listing records 134live video 89log 77Multi-Media unit 88, 92onsite device 90

Rapid Eye Remote View Operator Guide
Document 800-07767 Rev A 14302/11
outside world 88, 92overriding camera schedule 139preparing to receive alarms 81preset recording 59preview 51processing 78recording during site tour 116recording on demand 59recording video 59search procedure 119search results 122search session 119selecting events to search for 121sources 91tamper detection 92trigger alarm 77video options 88video retrieval 88view operator 88, 92viewing video from event time 122
event recordingboost button 59boosting 59indicator color 60on demand 59overriding scheduling 60preset 59timer 59video 59
event searchpreparation 119procedure 119results 122selecting events 121
event video, five second preview 51excluding area from search 65external system interface (ESI) 137
Ffast-forward button 69fault relay 95fetch button 62first preset, PTZ 47
Ggo to command 102go to time, see retrieval session, go to timeGPO (general purpose output), see outputgrease on camera lens 40
Hhelp, online reminder of next step 62hide grid button 63hide mask button 64hierarchical sites, see Multi-Media site, selecting
higher mask 73Honeywell, contacting customer support 28
Iimage size, initial camera window 36interval, setting 63invert mask command 65
Llanguage, logon dialog language 22later media
icon 53, 63motion search 62retrieval 53time offset 63
launching View 21lighting, motion search trigger 71live data
feed 132messages 131viewing 131
live sessionending 37resolution gauge 34selecting feeds 30starting 29
live sound, see audio, livelocal time zone of View operator (LTZ) 33LocalView
audio 111site name 24
logalarm, displaying 93alarm, reading 93printing entry 122
LTZ (local time zone) 33
Mmaintenance session
site name 24tasks 26user account rights 26
masking3x3 blocks 65clear all 65detects motion 63excluding as area 65flashing lights 72focusing on area 64global commands 64green 65hide grid 63hide mask 64higher area, avoiding false positives 73invert mask 65

144
red 65removing block in a mask 64set all 65show grid 63, 65show mask 64smaller detection mask, avoiding false positives 72
Microsoft Windowsdate and time display 34display properties 37regional settings for date format 94screen area 37
mins pre button 70modem 137monitor
display properties 37high resolution 37refresh rate 38settings 37
motion count, see report, motion searchmotion detection, masking 65motion events timeline 67motion highlighting
button 73how to 73, 74
motion searchbutton 61changing preview length 70clear all 65excluding area 65false negative 73, 74false positive 73, 74focus on area 64hide grid 63hide mask 64interval 63invert mask 65later media 62masking 63masking 3x3 blocks 65masking commands 64, 65menu 64obtaining video 69on PTZ 47preparing 62, 63remove block in mask 64repeating 74report 65report options 66report, customizing magnitude range 66report, magnitudes filter 66saving 74sensitivity 63session 61set all 65show grid 63, 65show mask 64starting 61threshold 63timeline 67
motion search reportchart of motion frequency 67customizing 74, 75customizing magnitude range 66duration 67false positives 71magnitudes filter 66motion count 67options 66other software 75overview 65peak energy 67percent 67total energy 67using 75
moving a camera, see tamper detectionMulti SA
contacting Honeywell technical support 28defining alarm session user 90defining customer events 133installing Multi software guidelines 115tasks for maintenance 26View operators, and 90
Multi security, see securityMulti-Media site
properties 24properties reference 24quick search 23selecting 23site name at unit 24site name in View software 24time limit for operator 25, 81
Multi-Media unit, time zone (RTZ) 33
Nnext image button 69noise
alarm bell 112loud alarm 112
norm (normal appearance of frequency chart) button 68
Ooperator, time limit at site 25, 81output, technical term 90
Ppan camera, see PTZpan, tilt, zoom, see PTZpassword 21peak energy of motion, see report, motion searchpeephole
access control 91preparation 90
percent of motion, see report, motion searchplaying back archived data 125

Rapid Eye Remote View Operator Guide
Document 800-07767 Rev A 14502/11
point-of-sale (POS) 131POS (point-of-sale) device 131position of camera 74pre-detection, duration of video preview 70preset 1, PTZ, see PTZ, first presetpreview, changing length 70PTZ
auto-focus 47auto-iris 47choosing preset 45dartboard control 43end of session behavior 47first preset 47listing presets 9 to 128 46motion search 47number of presets available 46pan, tilt, zoom 40preset tour 47privacy zones 46pull mode 42tours 46Ultrak KD6i restriction 45vectors 46zonal mode 42, 43
pull mode, PTZ 42
Qquestion
customer support 28index 28reference information 28
quick search, for multi site 23
Rreal estate, session pane 25rearm button 87recorded data
feed 132messages 132overview 132viewing 132
recorded sound, see audio, recordedrecorded sound, using Multi, see audiorecorded video, viewing 49recording event, during site tour 116reference information 28refresh database 25regular expression 136repeating motion search 74replay button 69report options 66report, motion search
chart of motion frequency 67customizing magnitude range 66duration 67false positives 71
magnitudes filter 66motion count 67options 66peak energy 67percent 67total energy 67
resolutionautomatic optimization 34recording 35
resolution gaugecomparing 139location 35NTSC 34PAL 35recording indicator 35
retrieval button 71retrieval session
ending 58entering time 50go to time 53later media 53many cameras 70on alarm 79setting date 50skip-to-time 52spotting video 52start 88start time 50starting 49used for motion search excerpts 71video 71video from time of alarm 85
RTZ (unit’s remote time zone) 33rules
customer device 133data recording 122listed 135special characters 136specified 134
Ssabotage, see tamper detectionsave button 68saving
motion search 74search data 74search mask 65
scheduleseffect of recorded video 140effect on alarms 140effect on live video 139optional 139overriding 60, 139
screen areadisplay properties 37larger monitors 38monitor settings 37two monitors 39

146
searchbutton 62event records 119for events 119motion, see motion searchrepeating 74report 65results 122reusing data 74saving data 74
securityalarm use 90events, by type 99, 107, 108, 121officer 87optional 85tracing events 85
sensitivity slider 63serial communications, customer device 133session pane
maximizing real estate 25moving 31overview 22sizing 31tear-away player 31
set all, search for motion command 65show grid
button 63search for motion command 65
show maskbutton 64search for motion command 64
simplex audio mode 112site name, in LocalView software 24site name, in View software 24site properties report 24site tours
ending 118managing 116overview 115pausing 117properties 117recording event 116resuming 118running 115stopping 117watching 115
site, see Multi siteskip-to-time, see retrieval sessionsmaller mask 72sound, using Multi, see audiospecial characters 136speed slider 52spotting video, see retrieval sessionstills
bitmap from live feed 106bitmaps 106enabling production 105for distribution 106
identifying 107name reference 107producing 106setup 106size reference 108storage 100
stop button 62stream
availibility 48data, selecting 131displaying list 31double-sized 32list for motion search 62moving windows 31restrictions 47selecting 62, 98selecting feeds 30sizing windows 31
sunlight on camera lens 40System Administrator guide 21, 59, 111, 140system administrator, see Multi SAsystem with many Multi-Media units 84
Ttabs, main 22talk button 111talking to a site, see audiotamper detection
alarm delay 92blind 92blur 92event 92event search 121optional 92scene changed 92video 88, 93
tear-away player 31technical support 28telephony 137tilt camera, see PTZtime gap, in clip 102time limit, site operation 25, 81time reference
operator preference 33temporary setting 34
total energy of motion, see report, motion searchtrim button 68troubleshooting
blind spot 40dual CPUs 40environmental conditions 40hyper-threading 39lighting 40no video at time 62video 39

Rapid Eye Remote View Operator Guide
Document 800-07767 Rev A 14702/11
UUltrak, KD6i restriction 45undo button 64universal coordinated time (UTC) 33unselect button 68user account 21, 25user rights
defining customer event 133process alarms 81receive alarms 81time limit at site 81
UTC (universal coordinated time) 33
Vvehicle docking, blind spot 40video
analytics 27camera positioning 36quality settings 33resolution gauge 35retrieval from alarm 88retrieval session 71retrieving from alarm 85selecting feeds 30smoothing 36unit, serial port 133
Video Analytics 27, 121video bitmap, see still, bitmapvideo button 69, 88video clip
automatic, during alarm 100buring at PC 103burning at site 103clip players 104coarse editing 102
comparing 102deleting 101distributing 103making 97making during alarm 85making from live video 98making from recorded video 98name reference 99play options 101stopping recording 85storage 100time gap 102viewing 101
video excerptin retrieval session 71optimized viewing of many 70replay 69
video retrieval, see retrieval sessionView application
launching 21learning about 28main window 22password 21site name 24user account 21
View operator, event 88, 92
WWindows, see Microsoft Windows
Zzonal mode, PTZ 42, 43zoom button 67zoom camera, see PTZ

148

Honeywell Systems (Head Office)2700 Blankenbaker Pkwy, Suite 150Louisville, KY 40299, USAwww.honeywellvideo.com +1.800.796.2288
Honeywell Systems Europe/South AfricaAston Fields Road, Whitehouse Industrial EstateRuncorn, Cheshire, WA7 3DL, UKwww.honeywell.com/security/uk +44.01928.754028
Honeywell Systems Caribbean/Latin America9315 NW 112th Ave.Miami, FL 33178, USAwww.honeywellvideo.com +1.305.805.8188
Honeywell Systems PacificLevel 3, 2 Richardson PlaceNorth Ryde, NSW 2113, Australiawww.honeywellsecurity.com.au +61.2.8837.9300
Honeywell Systems Asia35F Tower A, City Center, 100 Zun Yi RoadShanghai 200051, Chinawww.asia.security.honeywell.com +86 21.9353.7000
Honeywell Systems Middle East/N. AfricaPost Office Box 18530LOB Building 08, Office 199Jebel Ali, Dubai, United Arab Emirateswww.honeywell.com/security/me +971.04.881.5506
Honeywell Systems Northern EuropeAmpèrestraat 411446 TR Purmerend, The Netherlandswww.honeywell.com/security/nl +31.299.410.200
Honeywell Systems DeutschlandJohannes-Mauthe-Straße 14D-72458 Albstadt, Germanywww.honeywell.com/security/de +49.74 31.8 01.0
Honeywell Systems FranceImmeuble LavoisierParc de Haute Technologie3-7 rue George Besse92160, Antony, Francewww.honeywell.com/security/fr +33.(0).1.40.96.20.50
Honeywell Systems Italia SpAVia della Resistenza 53/5920090 BuccinascoMilan, Italywww.honeywell.com/security/it +39.02.4888.051
Honeywell Systems EspañaMijancas 1. 3a plantaP.Ind. Las Mercedes28022 Madrid, Spainwww.honeywell.com/security/es +34.902.667.800
© 2011 Honeywell International Inc. All rights reserved. No part of this publication may be reproduced by any means without written permission from Honeywell. The information in this publication is believed to be accurate in all respects. However, Honeywell cannot assume responsibility for any consequences resulting from the use thereof. The information contained herein is subject to change without notice. Revisions or new editions to this publication may be issued to incorporate such changes.
Document 800-07767 – Rev A – 02/11
www.honeywellvideo.com+1.800.796.CCTV (North America only)


