Rangers Work Out
66
Stew Smith’s Downloadable Workout Series The U.S. Army Ranger and Special Forces Workout Waiver of Liability What you are about to undertake is an advanced fitness program. Injuries may occur in any workout program as with this specific program written by Stew Smith. By downloading the program, you are waiving any liability to Stew Smith or StewSmith.com. This is a recommended program that has worked for many others. It may not be right for you. It is recommended that you consult a physician before undertaking any new fitness regimen.
description
RLTW
Transcript of Rangers Work Out

Stew Smith’s Downloadable Workout Series The U.S. Army Ranger and Special Forces Workout
Waiver of Liability
What you are about to undertake is an advanced fitness program. Injuries may occur in any workout program as with this specific
program written by Stew Smith. By downloading the program, you are waiving any liability to Stew Smith or StewSmith.com. This is a
recommended program that has worked for many others. It may not be right for you. It is recommended that you consult a physician
before undertaking any new fitness regimen.

Table of Contents About the Author Introduction Stretching Program Exercises Explained Workouts Explained Nutrition Tips Swimming Tips FAQ Section The Ten Week Workout
Stew Smith’s Military Fitness Series
An S. Smith Publication / 2005
Copyright © 2006 by StewSmith.com LLC
No part of this book may be reproduced or transmitted in
any form or by any means, electronic or mechanical,
including photocopying, recording, or by any information
storage and retrieval system, without permission in
writing from the publisher.
Library of Congress Cataloging-in-Publication Data
Stew Smith ISBN 978-0-9769320-6-7
SSmith Publications LLC, P.O. Box 122, Severna Park,
MD 21146
1 2 3 4 5 6 7 8 9 0

About the Author – Stew Smith CSCS
Former Navy Lieutenant Stew Smith graduated from the United States Naval Academy in 1991 and Basic Underwater Demolition/SEAL (BUD/S) training, (Class 182). He has written workouts that prepare future BUD/S students for BUD/S since 1991, which are still in use today by SEAL recruiters - The BUD/S Warning Order and the books "The Complete Guide to Navy SEAL Fitness” and “Maximum Fitness." Stew Smith served in the Naval Academy Physical Education Department and ran the
remedial programs that included running, swimming, and calisthenics. Now he writes about fitness and acing physical fitness tests and is certified by the world renowned National Strength and Conditioning Association as a CSCS – Certified Strength and Conditioning Specialist. The following list is the six published books he has written and the twenty-five eBooks to his credit as well. All books and eBooks are fitness related and are simply written accounts of his experience as a trainer and his own athletic history. These books and eBooks can take you from beginner to a combat conditioned veteran. Let these workouts assist you in becoming a better fighter or athlete. Stew Smith’s Published Books
The Complete Guide to Navy SEAL Fitness Maximum Fitness – The Complete Guide to Navy SEAL Cross-training Common Sense Self Defense The Special Operations Workout The TV Watchers Workout The SWAT Workout

The Complete List of Stew Smith’s eBooks:
General Fitness and Nutritional Guides for Everyone The Beginner / Intermediate Guide to Fitness Reclaim Your Life - Erin O'neill Story (beginner / intermediate) Veterans Fitness - Baby Boomer and a Flat Stomach! Kids Workout - Ace the President Fitness Test / Award The Diabetic Prevention Workout / Diet The Athlete Workout - Rugby, Soccer, Lacrosse & Football The Busy Executive Workout Routine The Advanced Weight Training / PT Guide (Part I / II) The Perfect Pushup Bible The New Advanced Weights / PT / Cardio Plan - Winter Phase Advanced Maintenance / Recovery Plan
The Military Physical Fitness Workouts Combat Conditioning Workout Navy SEAL Workout Phase 1 Beginner Weeks 1-6 Navy SEAL Workout Phase 2 - 3 - Intermediate Weeks 1-12 Navy SEAL Workout Phase 4 Grinder PT - Four weeks before Hell Week Navy SWCC Workout The Army Special Forces / Ranger Workout Phase 1 & 2 The Army Air Assault School Workout The Army Airborne Workout USMC IST and PFT USMC RECON Workout Phase 1 & 2 Air Force PJ / CCT Workout The Coast Guard Rescue Swimmer Workout Navy, Air Force, and Coast Guard OCS Workout USMC OCS / TBS Workout The Service Academy Workout (West Point, Navy, Air Force Academy) The Navy, Air Force, Marine Corp Bootcamp Workout The Army OCS and PFT Workout The Army Air Assault School Workout The Army Airborne Workout The Air Force OTS Workout
The Law Enforcement Physical Fitness Workouts The FBI Academy Workout | The DEA Workout The FLETC Workout - Ace the PEB (Border Patrol, ATF etc) The PFT Bible: Pushups, Situps, 1.5 Mile Run The Public Safety Diver Workout The Fire Fighter Workout

Stew Smith’s eBooks are sold on the following sites:
www.stewsmith.com www.heroesoftomorrow.org
www.military.com www.navyseals.com www.policelink.com
And his published books can be found at local book retailers
as well as www.amazon.com www.bn.com
Contact Stew Smith (Email, mail, phone)
As part of the downloadable, you do have access to email me
at anytime and I will answer your questions as soon as possible. Below are the different ways to contact me for any
of the products and services at www.stewsmith.com.
Mail and email addresses:
StewSmith.com PO Box 122 Severna Park MD 21146 410-544-0059 Email - [email protected]
© All rights reserved. Any part of this book may NOT be reproduced without the permission of the author. Any unauthorized transmission electronic or printed is prohibited.

Army Special Forces / Ranger Introduction
Ever wanted to put on the Army Ranger Tab on your uniform? Here is what you have to do to become a Ranger. The training is broken up into three phases: Fort Benning Phase, Mountain Phase, and Florida Phase. The Benning Phase is executed in two parts and lasts for a total of 20 days. As with most Special Operations units, the first phase is very physical. You will be required to perform an Army Ranger PFT consisting of the following:
This is from the Ranger Training Brigade Web Page: "The Initial Phase is conducted in two parts; the first part, Ranger Assessment Phase (RAP), is conducted at Camp Rogers in the Harmony Church area of Fort Benning. This phase consists of a Ranger Physical Fitness Test: - requiring 49 push-ups, - 59 sit-ups, - an individual 5-mile release run event finished in 40 minutes or less, - concluding 6 chin-ups. Other physical requirements and tests: - Combat water survival test - Darby Mile Run event - 5-mile runs - Terrain runs with the Malvesti obstacle course - 12-mile foot march - Night and day land navigation tests Advanced physical training assures physical and mental endurance and the stamina required for obtaining basic Ranger characteristics; commitment, confidence and physical and mental toughness. Additionally, the student executes demolitions training and airborne refresher training. Airborne Soldiers will exit from a high performance aircraft and conduct tactical assembly area procedures. " The most important pre-training exercise to do prior to Ranger school is walking fast in your boots with 50 pounds of weight on your back. You will do this everyday you are at Ranger School. Running at least 5 miles, 3-4 times a week and swimming in uniform 2-3 times a week is recommended as well. Pack on a 5-10 pounds of body weight prior to going so you have a little to lose when you are consuming fewer calories a day.

The second part of First Phase uses obstacle courses and long ruck marches as a major part of the physical fitness requirements. However, the fundamentals of patrolling and small unit tactics are the focus of this part of the Benning Phase. These graded field exercises include ambush and reconnaissance patrols, close quarters combat, airborne operations, and air assault operations. The Ranger student must then demonstrate his expertise through a series of cadre and student led tactical patrol operations. The second phase, or Mountain phase last 20 days and nights and teaches operating in small units while sustaining himself and his subordinates in the adverse conditions of the mountains. The rugged terrain, hunger, and sleep deprivation are the biggest causes of emotional stress that the student encounters. He will eat, sleep and operate in these conditions for 3 weeks, usually eating no more than 2 MREs a day (Meals Ready to Eat). The Third phase, or Florida phase, teaches small boat operations, ship to shore operations, stream crossing techniques, and skills needed to survive and operate in a jungle and swamp environment. This phase lasts 16 days and nights and tests the patrolling and leadership techniques of every Ranger. Ranger School is a grueling school due to the long hours of walking with your gear, sleeping in the field and eating 1-2 meals less a day than normal. Many students lose 20 pounds in the 56 day school. But the school teaches the Ranger he can overcome insurmountable challenges while under simulated combat conditions. Ranger school has honed the professional skills and techniques necessary to conduct small unit operations. And of course, he can wear the well deserved Ranger Tab on his shoulder.
Army Special Forces – SFAS Prep
Army Special Forces to include Delta Force, the Army SF - Green Berets, and Rangers all have a long history of excellence and are performing brilliantly in the United States’ War against Terrorism all over the world.
Today’s young recruits seeking the honor of wearing the Green Beret have an extensive training process that begins with a Selection and Assessment Course. To become a highly trained Army Special Forces soldier takes over a solid year of intense training. The first step for a soldier to become a Special Forces operator – or Green Beret - is to attend the Special Forces Assessment and Selection (SFAS). This course is a four week “prep” course that is designed to screen, assess and select soldiers for the Special Forces Qualification Course (SFQC). Many Rangers attend this training, but it is not mandatory for you to be a Ranger to strive to wear the Green Beret. It is however, an unwritten rule that you attend Ranger School prior to becoming SF. To qualify for this training you must first be:

You Must:
1. Be a male US Citizen
2. Have a GT score of 110 or higher for E-1 to E-3 and a GT score of 100 for E-4 to E-6
3. Airborne qualified
4. Meet specific physical fitness standards
5. Swim 50m in full BDU prior to SFAS
6. Be a High School graduate or have a GED
7. Able to obtain a SECRET security clearance
8. Score a minimum of 229 points on the Army Physical Fitness Test (APFT), with No Less than 60 points on any event, using the Standards for age group 17-21
9. E-1 through E-3 can only have 11C or 11B as a military occupational specialty.
This program allows the Special Forces instructors an opportunity to assess each soldier by testing his physical, emotional, and mental stamina. The program assesses the tactical skills, leadership, physical fitness, motivation, and the ability to cope with stress of every soldier in a controlled and subjective environment. This phase helps reduce the attrition rate and produces only the highest motivated soldiers to attend the next phase of training – Then the Q course or Qualification Course! The SFAS also allows each soldier the opportunity to make an educated decision about SF and his career plan.
The SFAS Program weeds out soldiers who lack the potential to become Special Forces operators. If you can successfully pass the following tests, you will be invited to attend the Special Forces Qualification Course:
Psychology Tests Physical Fitness
Swim Test Runs
Obstacle Courses Rucksack Marches
Small Unit Tactics Land Navigation Exercises
The distances and weight carried on rucks increase during the course, so being prepared mentally and physically for the events cannot be over emphasized. The program in this book will be able to help you not only practice land navigation, but provide you with the fitness level and insight needed in successfully navigating over rough terrain with at least 25 -50 lbs on your back.
After the SFAS, Phase One of training will begin and last 40 days long in which individual skills are assessed and taught. Such skills are

map reading and land navigation, small units tactics and patrols, and survival in harsh environments. One of the toughest daily grinds on the body is the fact that you CANNOT sit down ALL day.
Phase Two of the Army SF training is specialty training and last for 60 days. Training in one of the five specialties also begins in this phase. These specialties of those who wear the Green Berets are:
1) 18A – Detachment commander where officers learn how to deploy and use the Special Forces in any area of the world. This training last for 26 weeks.
2) 18B – Weapons Sergeant – This job specializes in every weapon the United States utilizes as well as those of enemy forces. This training lasts for 24 weeks.
3) 18C – Engineer – Construction and explosives are taught in this specialty. Engineers in the Special Forces Groups are extremely knowledgeable of demolition techniques and civil engineering. This is a 24 week course.
4) 18D – Medical - Special Forces medics are among the most experienced trauma medics who even learn surgery techniques as well. This is a 57 week course.
5) 18E – Communications - Worldwide communications are taught in this 32 week course dealing with the latest in communication technology, encryption and data transfer.
All Army SF are trained in one or more languages. The courses taught at the Army Language School are: Arabic, Czech, Russian, Korean, Persian, Polish, Serb-Croat, Tagalog, Thai, French, Spanish, and Portuguese.
As you can see, these are highly trained special operators who also endure long, physically exerting days while learning this highly complex course of instruction. The six week workouts will help prepare you physically for the long days and heavy pack walking and running you will experience at the Army Special Forces Courses. This program will also help you the physical demands of another supporting element of Special Forces – The Army Rangers!
THE RANGER COURSE
The Ranger Course provides tough, realistic training with almost 100% field instruction. It teaches and develops fighting skills in close combat and direct fire battle. Selected officer and enlisted personnel will be challenged by requiring them to perform effectively as small unit leaders in a realistic tactical environment under mental and physical stress in simulated combat. Ranger training carries the students through three phases / environments: wooded, swamp and mountainous. Learning to plan and conduct infantry, airborne, air assault and amphibious squad and platoon size combat operations combined with testing every student’s leadership abilities is the overall goal of Ranger Training.

The Ranger Course is 61 days in length with an average of nearly 20 hours of training each day, seven days a week. It is divided into THREE phases of training with each phase being conducted at a different geographical location. The first (Benning Phase), 21 days in length, at Fort Benning, Georgia. The second (Mountain Phase), 21 days in length, is conducted at Dahlonega, Georgia. The third (Florida Phase), 17 days in length, at Eglin AFB, Florida.
Fatigue and hunger are challenging issues you will have to handle at Ranger School. But making sound decisions and remaining calm while tired and hungry adds to the true test of leadership. The units you will patrol with 2-30 kms a day vary in size from an infantry rifle squad to a rifle platoon. The students are evaluated as small-unit leaders through field training exercises (FTXs) which are conducted primarily at night under all weather conditions and personal stresses.
The Ranger Course produces a mentally hardened soldier, who possesses abilities to operate on land, air, and sea. After the 61 day course, he is authorized to wear the Ranger tab.
Good luck to you on your journey to become one of the Army’s finest soldiers. Use these stretches to prevent injury now and while at Ranger / SF training.
Getting Started The following stretching plan will assist you with getting started again safely and without as much post-exercise soreness. Most injuries are strains or muscle pulls that can be prevented with a few simple stretching exercises done daily. The added flexibility will not only assist in injury prevention, but with speed workouts enable you to run faster. The following is a stretching routine that can be used whether you are a beginner or advanced athlete.

The Stretching Program (FULL BODY STRETCH) Increasing one’s flexibility should be the first goal before starting a fitness program. Follow the stretching chart after your workout. Hold these stretches or do these movements for at least 15-20 seconds each:
List of the Stretches Neck stretch (yes/no) Shoulder Shrugs Chest / Bicep / Shoulder / Back Stretch Arm/Shoulder Stretch Triceps / Lat Stretch (half moon) Stomach Stretch Plank Pose 1:00 Thigh Stretch Hamstring Stretch
Lower back Stretch
Hurdler Stretch Psoas Stretch ITB / Hip Butterfly 1 & 2 Piriformis Stretch 1 & 2 Cat Stretch Down Dog Pose Shin Warm-up / Stretches Lower back stretch – Swiss knife Calve Stretch
Stretching and Warming Up
Jog five minutes or do a series of light calisthenics like jumping jacks, crunches, pushups, squats prior to stretching. Stretching is a major part of warming up and cooling down. After working out, the best way to reduce muscle fatigue and soreness and prevent injuries is to perform a light cool-down and stretch.
Static stretching: Holding these stretches for 15-20 seconds is the best way to end your workout. Do not bounce when performing these stretches and inhale deeply for three seconds, hold for three seconds and fully exhale. Do this twice per stretch. This will take you to the 15-20 second time minimum for holding these stretches for optimal results.
Neck Stretch Turn your head to the left, right, up and down, as if you were nodding "yes" and "no". Often people pull neck / trapezius muscles during pull-ups if neck/shoulder girdle muscles are not lose. Do this stretch slowly. Do not raise, lower, or rotate your neck too much or you may cause neck injury.
Triceps into Back Stretch - Place both arms over and behind your head. Grab your right elbow with your left hand and pull your elbow toward your opposite shoulder. Lean with the pull. Repeat with the other arm.
This stretch not only prepares you for the dumbbell triceps exercises, pushups, and dips, but also prepares the back muscles for pull-ups and the lower back for running! This is a very important stretch for upper body exercises and swimming.
Stomach Stretch - Lie on your stomach. Push yourself up to your elbows if your back is previously injured or you are a beginner stretcher. Slowly lift your head and shoulders and look up at the sky or ceiling. Hold for 15 seconds and repeat two times.
(advanced stomach Stretch above – go to elbows if beginner)

Plank Pose – Keep your back straight and abs tight while placing your elbows and toes on the floor and holding for as long as you can. Build up to 1:00. Advanced is 3-5:00.
Plank Pose advanced – Pushup – Up Position – Tighten abs and keep your back straight. If shoulders bother you or arms are not built up – do this same exercise on your elbows where only your elbows and toes are touching.
As you may know, the lower back is the most commonly injured area of the body. Many lower back problems stem from inactivity, lack of flexibility, and improper lifting of heavy objects as well as hip and leg muscle instability. Stretching and exercising your lower back, hips, and legs will help prevent some of those injuries.
Thigh Stretch Standing - Standing, bend your knee and grab your foot at the ankle. Pull your heel to your butt and push your hips forward. Squeeze your butt cheeks together keep your knees close together. Hold for 10-15 seconds and repeat with the other leg.( You can hold onto something for balance if you need to OR you can lie down on your hip and perform this stretch.

Hamstring Stretch #1 - From the standing or sitting position, bend forward at the waist and come close to touching your toes. Keep your back straight and slightly bend your knees. Go back and forth from straight legs to bent knees to feel the top / bottom part of the hamstring stretch. You should feel this stretching the back of your thighs. Lower back Hamstring stretch #2 – Spread your legs while standing.. Drop your chest down to your knees and place your hands on the floor. Hold for 10 seconds, then try to straighten the legs.
Hurdler Stretch - Sit on the floor with your legs straight in front of you. Bend your right knee and place the bottom of your foot on the inside of your opposite thigh. With your back straight, lean forward in order to stretch the back of your legs and your lower back. Hold the stretch for 15 seconds, switch legs, and repeat.
Psoas Stretch – Hips / Back – Change one leg of the Hurdler stretch above by bending the straightened leg 90 degrees behind you. Lean forward on the bent knee taking your chest down to your thigh / knee as shown. Hold for 15 seconds and repeat. ITB Stretch - Sit on the ground with your legs crossed in front of you. Keeping your legs crossed bring the top leg to your chest and bend it at the knee so that your foot is placed

outside of your opposite leg’s thigh. Hold your knee for 15 seconds against your chest and repeat with the other leg.
Note: Before and after running you should perform this stretch. This will help prevent very common overuse injuries in the hips and knees. Butterfly stretch #1 / #2 – Sitting with legs bent in front of you, place your feet so the heels of your feet touch and bring them as close to your body as you can. Try to stretch by opening your leg further – NO NEED TO PRESS on your legs to open. Now #2 – Slightly straighten your legs about 1 ft. but keep your feet touching and try to take your head in between your knees.
Piriformis Stretch #1 – Place your right knee on the ground roughly in line with your left shoulder. The right foot should be just in front of the left knee. Press your hips towards the ground so that your bodyweight is on your right leg. Take your left shoulder toward your right knee. This stretches the hip / buttocks.
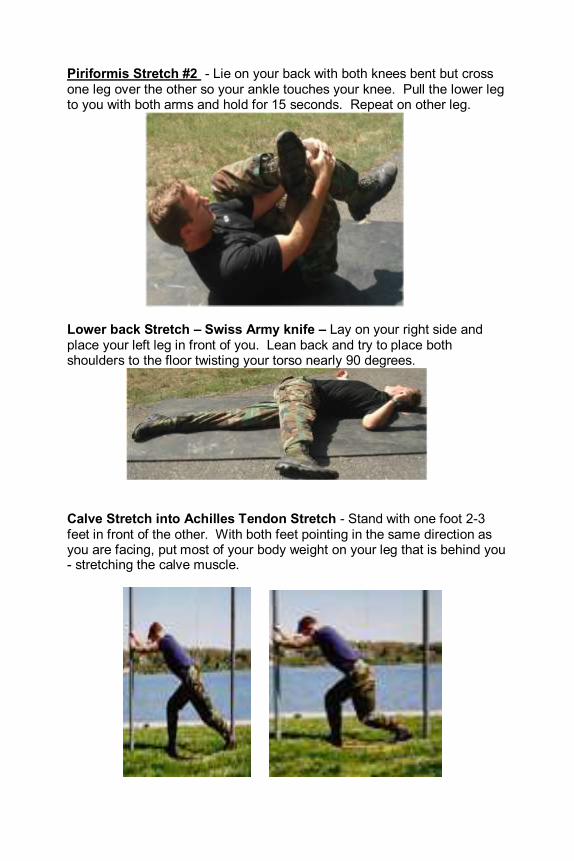
Piriformis Stretch #2 - Lie on your back with both knees bent but cross one leg over the other so your ankle touches your knee. Pull the lower leg to you with both arms and hold for 15 seconds. Repeat on other leg.
Lower back Stretch – Swiss Army knife – Lay on your right side and place your left leg in front of you. Lean back and try to place both shoulders to the floor twisting your torso nearly 90 degrees.
Calve Stretch into Achilles Tendon Stretch - Stand with one foot 2-3 feet in front of the other. With both feet pointing in the same direction as you are facing, put most of your body weight on your leg that is behind you - stretching the calve muscle.

Now, bend the rear knee slightly. You should now feel the stretch in your heel. This stretch helps prevent Achilles tendonitis, a severe injury that will sideline most people for about 4-6 weeks. Abdominal exercises as a warm up before / after stretching
When you exercise your stomach muscles, make sure to exercise and stretch your back also. The stomach and lower back muscles are opposing muscle groups and if one is much stronger than the other, you can injure the weaker muscle group easily.
Advanced Crunch - (Legs up) - Lie on your back with your feet straight in the air. Keep your legs straight up in the air for the advanced crunches. Cross your hands over your chest and bring your elbows to your knees by flexing your stomach. (Do not do if you have previous lower back injury – place feet on the floor)
Reverse Crunch - In the same position as the regular crunch, lift your knees and butt toward your elbows. Leave your head and upper body flat on the ground. Only move your legs and butt. (Do not do if you have severe lower back injury or if this hurts your back) Double Crunch – Add the regular and reverse crunch together in one motion…You will feel this one twice as fast…
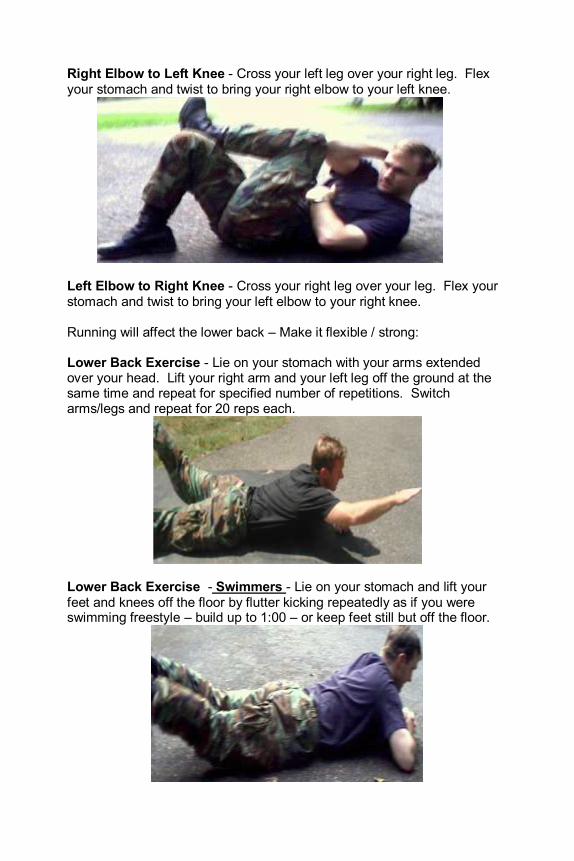
Right Elbow to Left Knee - Cross your left leg over your right leg. Flex your stomach and twist to bring your right elbow to your left knee.
Left Elbow to Right Knee - Cross your right leg over your leg. Flex your stomach and twist to bring your left elbow to your right knee. Running will affect the lower back – Make it flexible / strong: Lower Back Exercise - Lie on your stomach with your arms extended over your head. Lift your right arm and your left leg off the ground at the same time and repeat for specified number of repetitions. Switch arms/legs and repeat for 20 reps each.
Lower Back Exercise - Swimmers - Lie on your stomach and lift your feet and knees off the floor by flutter kicking repeatedly as if you were swimming freestyle – build up to 1:00 – or keep feet still but off the floor.
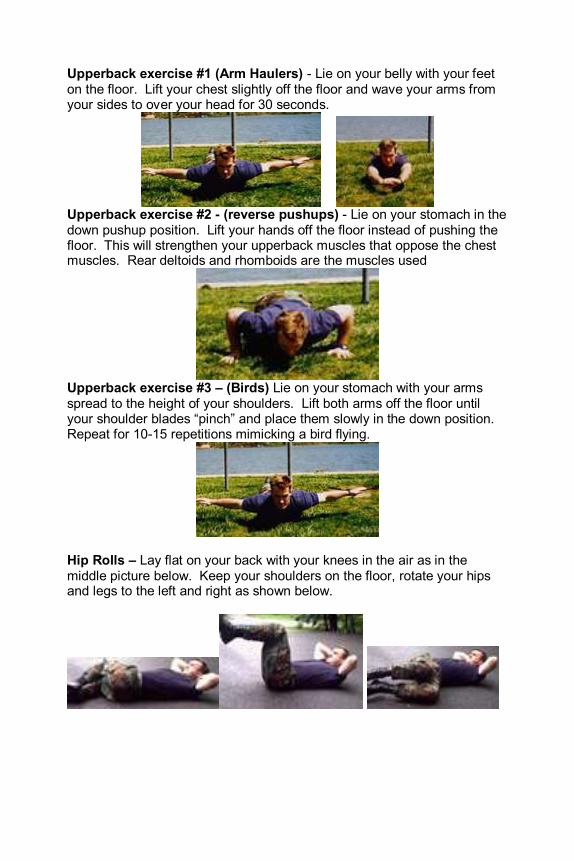
Upperback exercise #1 (Arm Haulers) - Lie on your belly with your feet on the floor. Lift your chest slightly off the floor and wave your arms from your sides to over your head for 30 seconds.
Upperback exercise #2 - (reverse pushups) - Lie on your stomach in the down pushup position. Lift your hands off the floor instead of pushing the floor. This will strengthen your upperback muscles that oppose the chest muscles. Rear deltoids and rhomboids are the muscles used
Upperback exercise #3 – (Birds) Lie on your stomach with your arms spread to the height of your shoulders. Lift both arms off the floor until your shoulder blades “pinch” and place them slowly in the down position. Repeat for 10-15 repetitions mimicking a bird flying.
Hip Rolls – Lay flat on your back with your knees in the air as in the middle picture below. Keep your shoulders on the floor, rotate your hips and legs to the left and right as shown below.

Tender Shin Exercises: If you get shin splints from running or walking, here are two great exercises to build your shins. Stand on your heels for 10-15 seconds. Repeat a few times and even throughout the day to build your shins. Prior to walking and running, do a foot flex / stretch exercise 30-40 times each leg. See Youtube link for video ideas on this movement. Descriptions of the PT exercises Regular Push-ups - Lie on the ground with your hands placed flat next to your chest. Your hands should be about shoulder width apart. Push yourself up by straightening your arms and keeping your back stiff. Look forward as you perform this exercise. This exercise will build and firm your shoulders, arms, and chest.
Wide Push-ups - From the same position as the previous push-up, place your hands about six to twelve inches away from your chest. Your hands should be greater than shoulder width apart. The slight change of the arm distance changes the focus of what muscle are exercised. Now, you are building the chest more than your arms and shoulders.

Triceps Push-ups - From the same position as the regular push-up, place your hands under your chest about 1-2 inches away from each other. Spread your legs in order to help with balance. This exercise will concentrate more on the triceps of the arm than the chest.
Dive bomber Pushups
Get into the pike pushup position as in pic#1, lower yourself to the position of pic#2 as if you were a plane dive bombing, straighten your arms in order to finish as in pic #3. Repeat in reverse order to get back to pic#1.
Note – Pushups are a punishment exercise at any military training. Several days in a row you will be required to perform pushups. This goes against every physiology rule of good training, but that is the nature of the beast in these types of military training environments. You will also be required to remain in the leaning rest for many minutes at a time. It is smart to shake out your shoulders occasionally and stretch after a long “rest”.
In fact, when you fail at pushups during the workout, stay in this position for an extra 30-60 seconds each time. This will prepare you well for the long periods of time in the “leaning rest”.

8 Count bodybuilder pushups - The all time favorite group PT exercise
Pos 1 Pos 2 Pos 3 Pos 4
Pos 5 Pos 6 Pos 7 pos 8 Pull-ups (regular grip) - Grab the pull-up bar with your hands placed about shoulder width apart and your palms facing away from you. Pull yourself upward until your chin is over the bar and complete the exercise by slowly moving to the hanging position.
*Mixing 8 count BB pushups and pull-ups together with a short and fast 20-30m run is a great way to build up obstacle course strength without an actual course. See 8Count/Pushup Pyramid
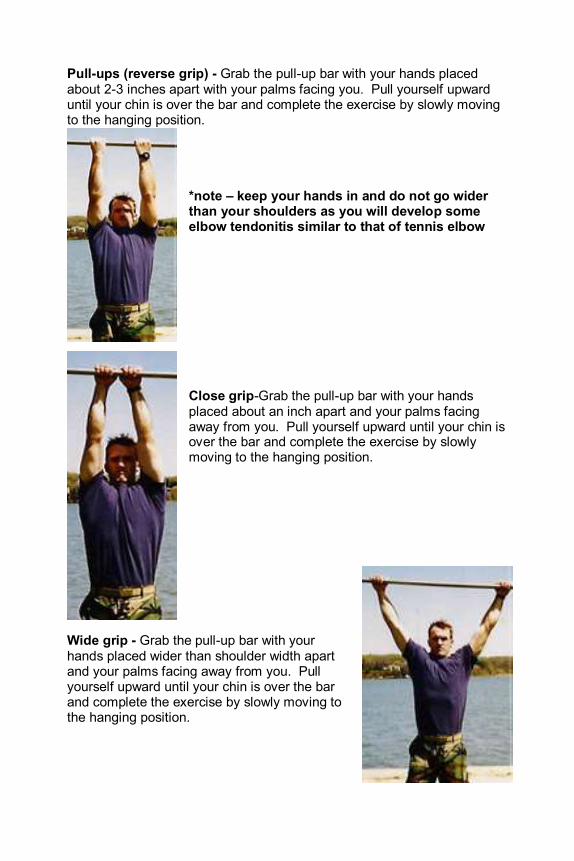
Pull-ups (reverse grip) - Grab the pull-up bar with your hands placed about 2-3 inches apart with your palms facing you. Pull yourself upward until your chin is over the bar and complete the exercise by slowly moving to the hanging position.
*note – keep your hands in and do not go wider than your shoulders as you will develop some elbow tendonitis similar to that of tennis elbow
Close grip-Grab the pull-up bar with your hands placed about an inch apart and your palms facing away from you. Pull yourself upward until your chin is over the bar and complete the exercise by slowly moving to the hanging position.
Wide grip - Grab the pull-up bar with your hands placed wider than shoulder width apart and your palms facing away from you. Pull yourself upward until your chin is over the bar and complete the exercise by slowly moving to the hanging position.
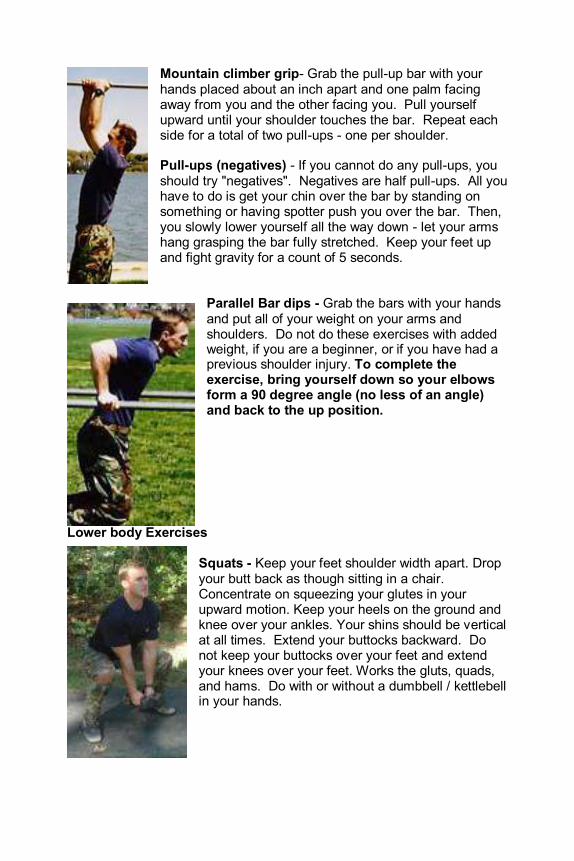
Mountain climber grip- Grab the pull-up bar with your hands placed about an inch apart and one palm facing away from you and the other facing you. Pull yourself upward until your shoulder touches the bar. Repeat each side for a total of two pull-ups - one per shoulder. Pull-ups (negatives) - If you cannot do any pull-ups, you should try "negatives". Negatives are half pull-ups. All you have to do is get your chin over the bar by standing on something or having spotter push you over the bar. Then, you slowly lower yourself all the way down - let your arms hang grasping the bar fully stretched. Keep your feet up and fight gravity for a count of 5 seconds.
Parallel Bar dips - Grab the bars with your hands and put all of your weight on your arms and shoulders. Do not do these exercises with added weight, if you are a beginner, or if you have had a previous shoulder injury. To complete the exercise, bring yourself down so your elbows form a 90 degree angle (no less of an angle) and back to the up position.
Lower body Exercises Squats - Keep your feet shoulder width apart. Drop your butt back as though sitting in a chair. Concentrate on squeezing your glutes in your upward motion. Keep your heels on the ground and knee over your ankles. Your shins should be vertical at all times. Extend your buttocks backward. Do not keep your buttocks over your feet and extend your knees over your feet. Works the gluts, quads, and hams. Do with or without a dumbbell / kettlebell in your hands.

The 1/2 squat - Intensify your squat by doing 1/2 squats. While in the full squat position, hold the pose and push yourself up and down within a 6” range of motion....just like riding a horse. Do not straighten your legs until completely done with 20-30 reps as written in the workout section. Wood Chopper Squat with Dumbbell – Add a dumbbell to the squat by swinging the weight over your head when standing and between your legs when squatting. Keep head up and back straight.
Frog hops or jumping squats – Squat down and explode forward as far as you can. These are simply broad jumps repeated several times.

Walking Lunge - The lunge is a great leg exercise to develop shape and flexibility. Keep your chest up high and your stomach tight. Take a long step forward and drop your back knee toward the ground. Stand up on your forward leg, bringing your feet together and repeat with the other leg. Make sure your knee never extends past your foot. Keep your shin vertical in other words. Muscles used: quadriceps, hams, and gluteus.
Stationary Lunge - Take a big stride forward. Bend both knees as you lower yourself so your front thigh is near parallel to the floor. Lift yourself up so your knees are straight but your feet have remained in the same position. If you have bad knees either avoid the lunge exercise or only go half way down. Jumping lunge – This is also another goon squad favorite if you fail a run. You start off in the lunge position with your left leg forward and do a full lunge, then jump in the air and land with your right leg forward and do a right legged lunge – repeat until the instructors get tired.

Wood Chopper Lunges with Dumbbell – Add a dumbbell and swing from over your head to the outside of the front leg when in the down position.
Heel Raise (with weights too) Hook one foot behind the other and raise up on your toes. Make certain you use a full range of motion. It won’t take long to make this burn. Muscles used gastrocnemius and soleus. (single leg heel raise)

MJDB#1 = Multi-Joint Dumbbell Exercise #1 - Perform a bicep curl, then press the Dbs over your head with a military press, and then go straight into a tricep extension - repeat in reverse order to get to the starting position.
MJDB#2 - same as above but add in a squat when your hands are in the down bicep position (by your hips)
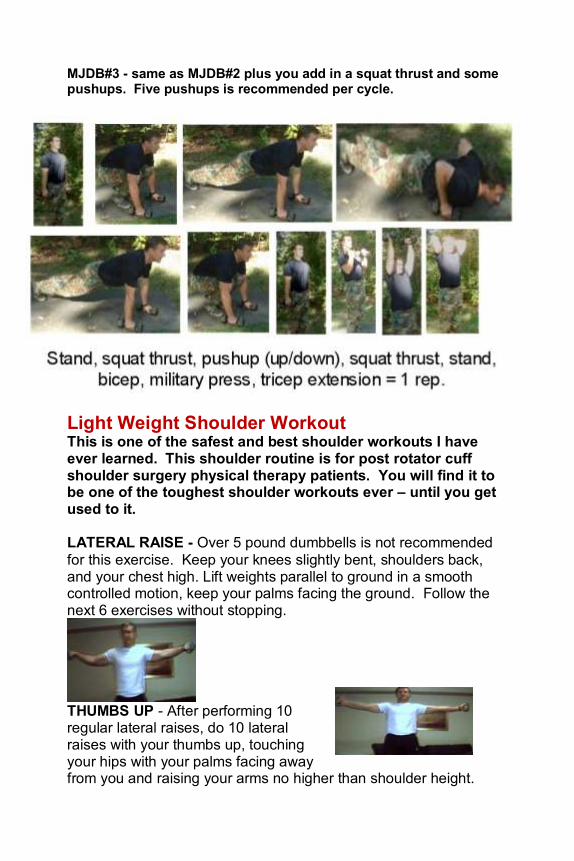
MJDB#3 - same as MJDB#2 plus you add in a squat thrust and some pushups. Five pushups is recommended per cycle.
Light Weight Shoulder Workout This is one of the safest and best shoulder workouts I have ever learned. This shoulder routine is for post rotator cuff shoulder surgery physical therapy patients. You will find it to be one of the toughest shoulder workouts ever – until you get used to it. LATERAL RAISE - Over 5 pound dumbbells is not recommended
for this exercise. Keep your knees slightly bent, shoulders back, and your chest high. Lift weights parallel to ground in a smooth controlled motion, keep your palms facing the ground. Follow the next 6 exercises without stopping.
THUMBS UP - After performing 10 regular lateral raises, do 10 lateral raises with your thumbs up, touching your hips with your palms facing away from you and raising your arms no higher than shoulder height.

THUMBS DOWN - Continue with side lateral raises. As you lift your arms upward, keep your thumbs down this time. Repeat for 10 times, keeping in the down direction with your thumbs. FRONT RAISE (THUMBS UP) - Now, for 10 more repetitions, time to work your front deltoids. Lift the dumbbells from your waist to shoulder height keeping your thumbs up.
CROSS OVERS - With your palms facing away from
you and arms relaxed in front of your hips, bring your arms up and over your head as if you were doing a jumping jack (without jumping). Cross your arms IN FRONT of your head and bring them back to your
hips for 10 repetitions.
MILITARY PRESS
Place one foot ahead of the other as shown and knees slightly bent to reduce strain on your lower back. Exhale as you push the weights over your head for 10 final repetitions in the mega-shoulder pump workout.. Slowly lower them to shoulder height and repeat. Muscles used are shoulders and triceps (back of arm).
Nutrition Section Additional Reading – Learning about calories to lose weight and gain weight: On average, when people stop exercising and no longer care about what they eat, they can gain five to ten pounds a year. That is why in five short years, people step on a scale and cannot believe they are nearly FIFTY pounds overweight. Weight has a way of sneaking up on you over time. You do not get overweight overnight and you do not lose the weight overnight either. Both take time, but fortunately losing weight can be faster if you follow a strict nutritional and exercise plan. Both take only minutes a day. Here are a few eating tips and some ideas on quick exercises routines to try when time is limited:
Lay off the fast food – Before you go on a trip or a long day at work, try to eat before you leave and pack a lunch. Foods high in protein mixed with a natural carbohydrate are great energy meals. Try a lean turkey or chicken sandwich with vegetables like lettuce and tomato. Watch out for the mayo – too many calories and fat grams. Try mustard instead. Fruits are great quick snacks too. Try apples, oranges, bananas for natural sources of energy. For more ideas see www.stewsmith.com/linkpages/dietplan.htm
Wake up and burn some calories – As busy days pile up with more and more obligations, the scheduled 5:00pm workout can easily get bumped! Make thirty minutes of exercise fit into your mornings and do some type of workout.
- Try biking, walking, or running for 30 minutes - Go to your gym for a quick circuit routine
- Try calisthenics like jumping jacks /
pushups / crunch routine and jumping jacks / squats / lunges / crunches
- Try using dumbbells for arms and shoulders - Another Tip – if you do not schedule a
workout – it does not exist!!
Don’t wait – Start NOW! – Why wait? When you can, you should try to eat at regularly scheduled times during the day. Healthy snacks and meals will carry you through your stressful days much better than skipping meals or binge eating. You will find that if you keep a good schedule, you will lose weight and inches. Add exercise to the plan and you will also get
fit and feel better than you have in years. Try an eating schedule of the following recommended times:
0630 – breakfast 0930 – morning snack 1230 – lunch 1530 – afternoon snack 1830 – dinner
If your days are longer than 15-18 hours you should try another light snack at 2100 of foods like yogurt, grapes, milk. Other snacks during the day can be salads, fruits, lean meats, small sandwiches, boiled eggs and others. See chart on next page for better ideas on what to eat during the day and before and after exercise sessions. Walk more – When safety is not an issue, try to walk farther than normal when going about your normal day. Burning a few more calories by walking is one of the easiest ways to walk off that extra weight. Just twenty minutes of brisk walking can burn over 100-150 calories.
Keep working the abdominal region – Not with food but with exercises like crunches, situps, and lower back stretches. Check out the articles on Washboard Abs and Lose those Love Handles for ideas. When you do these exercises for just 5-10 minutes daily, it is easier to remember to watch your food intake and stop yourself from gorging.

Overall, it is important to keep up the habit of moving more and eating better foods for you. These tips can help you prevent unneeded weight gain. See Fundamentals of Nutrition Chart below and on the next page:
The Fundamentals of Nutrition Morning Meal (Serving = fist size) Eat 2-3 servings of any *minimal fat - 1 qt water
Proteins – boiled egg whites, yogurt, milk, lean meats, protein shake, vege beef stew…
Carb/Protein mix – some fruits like grapes, bananas, blueberries – cereal with milk…
Mid Morning Meal Eat 1 serving
Slimfast meal bar, boiled egg, Go-Gurt, Tuna…
Fruit salad, apple, orange, banana etc…
Lunch 1 qt water
Chicken, tuna, fish, lean meat sandwich on wheat bread, no mayo – mix meat with
salad
Mixed salads with variety of vegetables – green leafy lettuce, broccoli, carrots, tomatoes, onion
Mid Afternoon Meal 1 qt water
Optional – peanuts, almonds = high calories
Optional – juice, fruit, vegetable – small salad
Evening Meal 1 qt water
Lean chicken, fish, meat, broiled NOT FRIED
Large Salad – above eggplant

Pre – Post Workout Meals
Before Your Cardio Workout
Before Your Lifting or PT Workout
Carbohydrates – 75 – 100%
Carbohydrates 75% & Protein 25%
Prior to running, swimming, biking etc…at medium to high intensity levels for 30-40 minutes, it is best to eat a small snack to boost sugar levels in your body especially if your workout is before your morning meal. After a night of sleeping and not eating for over 10-12 hours, you need a boost to help you get through the workout. Fruit or fruit juice is fine 20 minutes prior to workout and during is fine. Foods with small amounts of protein can be eaten pre-workout and will help post workout requirements of protein too. Sample Ideas for pre-workout snack are: Bananas, apples, oranges, carrots, juice, Gatorade, (any fruit of choice really). Before workouts longer than 30-40 minute, add some protein to stabilize absorption rates so you can last longer: Eat the following about 1-2 hours prior to exercise: Yogurt, protein drink*, milk, boiled egg, slice of meat or cheese, Slimfast meal replacement bar Sip water and carbohydrate drink throughout the workout
1-2 hours prior to lifting eat protein foods and carbohydrates so the protein is there for you after the workout. Lifting weights and doing high repetition calisthenics will break down your muscles and require protein immediately after your workout – within 30 minutes. Foods high in carbohydrates to replace the loss of glycogen stores are needed within this time too. For a great rule of thumb – after you workout eat protein, carbohydrates and minimize fatty foods. Foods that should be considered are: Pre-workout ideas for lifters / PTers: Bananas, berries, boiled eggs, tuna fish, Met-rx Drink / bar. Protein or carb replacement drinks are great if post workout occurs mid-day or early morning. See above meal options for protein and carbohydrates sources and these below: Tuna, chicken, boiled eggs, and green leafy salads with tomatoes, broccoli, cucumber, carrots, onions, and light dressing or

Post Workout Meals
The key is to replace carbohydrates and electrolytes lost during the workout – drink Powerade / Gatorade immediately
after workout Another important factor is to add protein to help rebuild
muscles – see above meal / snack ideas within 30 minutes of workouts
Fitness Performance Nutrition Tips
When to eat and what to eat are constant questions that affect your fitness performance, weight loss / gain goals, as well as overall health. I was recently challenged with a question by email that asked, “What should I eat/drink before, during, and after my workout? My goal is to perform better in my running, swimming, PT test and following spec ops training.” The answer will vary depending on your goal, but understanding After, Before, During (ABD’s) of Workout Nutrition will better help all groups reach their fitness goals. I saw the” ABD’s of Recovery Nutrition” at a recent Mid-Atlantic NSCA Regional conference given by Paul Moore, MS, RD, CSCS of Fitness4 Pros and thought it was a brilliant way to discuss nutrition throughout the training cycle.
This understanding of what foods / drinks work best for performance gains requires a constant search for the individual. Here are some suggestions that will help you figure out WHAT to eat, WHEN to eat, as it all depends on your individual likes / dislikes and goals.
For the Performance Fitness Goal: If you are preparing to ace a fitness test, compete in a race, or another athletic event, sports nutrition is vital to your performance. You have to experiment with immediate energy of carbohydrates of fruits, juices, sports drinks, protein and fat sources to find what works best for you. Keep track of what and how much you ate and drank, and how you slept that night on your best performance days. Often these in combination will set you on an optimal performance path. Repeating those optimal performance days is obviously your goal to make it through tough training programs and fitness entrance testing. You may even be exercising for more than one session per day and for several hours a day. If so, you really need to eat / hydrate well and usually larger quantities of quality food will help you recover from the multiple workouts per day. For instance:
AFTER WORKOUT: This could be a few of your regularly scheduled meals depending upon the time of day you choose to work out. The

fitness performance group needs to immediately focus on carbohydrate replacement as well as protein consumption for both glycogen stores and muscle repair / growth for the next workout respectively. Find what carbohydrates and proteins work best for you but I would make sure that these meals are not only a post workout meal but also a PRE-workout meal for the next workout later in the day or early the following day. Supplements tend to come into play during the post workout nutrition game. I am not personally into supplementing daily other than some omega 3 and 6 capsules and some multi-vitamins rich in all the B vitamins especially. For a quick fix and in replacement of food in a pinch, I will take some whey protein powder with some chocolate milk. See list below of quality carbs / protein sources that work great as post workout meal ideas.
BEFORE WORKOUT: If you are training for long, tough training programs coupled with a high intensity effort for testing your maximums in calisthenics, miles of running, and hundreds of yards of swimming, you need to eat a majority of carbohydrates no less than 45-60 minutes prior to exercise sessions. Choose low fiber, low fat, low/medium on the glycemic index for immediate and sustainable carbohydrate energy. I personally like baby carrots, bananas, and apples for performance testing pre-workout snacks. In fact, many of my weekly 4 mile timed beach runs and 2 mile ocean swims at SEAL training were preceded with these fruits / vegetables. I often joke that baby carrots and apples helped me get through SEAL training.
DURING WORKOUT: Unless you are working out for extended periods of time to get used to 8-10 hours of training at Special Operations School, food intake during normal 1-2 hour workouts is not needed. However, during high intensity training off and on throughout the day, you should be eating a higher carbohydrate diet but mixed with some light protein snacks as well. The carbs are there to fuel you through the rest of the workout day and the protein comes in to assist with added calories but to also help you recover when the day/long workout is complete. Consider this an endurance athlete approach to training. You need to be able to sustain high repetitions of body weight movements, some strength /power for moving heavier team building objects, and endurance as well as the calories to handle many miles of running, rucking, or swimming.
Great ideas are:
Carbohydrate Options: Multi grain breads and pastas, cereals, vegetables (romaine lettuce, broccoli, asparagus, carrots), fruits, (tomatoes, strawberries, apples, berries, oranges, grapes, and bananas ) make great carbohydrates for energy. However, if you need to add some calories for either weight gain or weight maintenance due to high calorie
burn rates, add in a limited amount of post meal milk shakes, or a great mix of both carbs / protein is chocolate milk.
Protein Options: Meats, fish, chicken, eggs, nuts, almonds, beans, milk, milk shakes with additional whey protein powder (optional), peanut butter. I personally eat brown rice and lima beans in between workouts during snack time, or have a few servings with a main course of meat or fish for a good balance of plant and animal protein.
Fat Options: Fish, nuts, olive oils, omega 3 fortified products (milk, margarine, peanut butter). Typically, I get most of these fats from nuts and fish, but I also supplement the omega 3 fatty acids most important to longevity / healthy recovery.
The ABD’s of HYDRATION: Not only does the performance group need to super hydrate due to hard workouts especially during excessively sweaty workouts, but you need to add electrolytes (sodium potassium, magnesium, calcium as well. So foods / drinks rich in many of these elements are essential to your recovery from significant water / electrolyte loss. Personally, if I can wring out my shirt after a workout, I will add more of these “salts” into my post exercise diet. Sure you can add sports drinks but stay away from the “energy” drinks that are loaded with caffeine as these are not what you need. Sports drinks with sodium, potassium, carbohydrates (sugar) are your best bet for hydration during and after hard sweaty exercise. But bananas and water are also sufficient in most cases. Here are some ideas for hydration:
After Workouts - One of my favorite post exercise snacks is a can of chicken noodle soup (Campbells Noodle O’s) as it is loaded with potassium, sodium, carbs, protein as well. In fact it has about 3-4 times the potassium of a banana and about 5-6 times the potassium of Gatorade. If you are not sweating much nor in arid environment, water will be enough to hydrate you.
Before workouts, do not drink too much if you are doing significant running as the bouncing will potentially cause cramping.
During workouts, sip water or carbohydrate / electrolyte mix every 10-15 minutes to maintain high intensity performance training.
A ballpark equation for daily consumption of liquids for highly active person is:
50-75% body weight in lbs = oz per day of H2O
Finding the right mix of carbohydrates, protein, fats, electrolytes and water all depend on your age, sex, weight, activity level, and goals. Every day you have a killer good workout / test scores and feel great afterwards,

make a note of everything you did that day. Very often it is the formula that works best for you and your fitness performance goals.
Supplemental Running Plan - OPTIONAL
I developed a Six Week Running Program you can download for free to help you with achieving your running goal whether it is to run a faster 5-10km run or ace a PFT run in the military or in law enforcement. It never fails – unless you are a cross-country runner or track star in high school or college – you will probably have a problem with running a timed run at an above average pace. The reasons for this can range from being a little heavier and stronger in the upper body to never having run timed runs. And if you were a football player or basketball you may consider long distance running anything in the 1 mile range. The truth is anyone can be a faster runner – it takes time, hard speed work, flexibility, and in some cases weight loss will help more than anything. I developed a six week running program you can download for free at (www.stewsmithptclub.com/6weekrunningplan.pdf This eBook running program supplement is designed to assist with increasing speed, endurance, and flexibility. The program is also designed to be added as a supplement to your current workout program which can either replace the running in your program all together or you add this program to your present workout regimen increasing the mileage per week to a higher level. Naturally, that choice is yours and I would recommend adding this program to your present program ONLY if you have been running at least 15-20 miles a week. This workout is created to help people go from a 9:00 mile pace to a 6-7 minute mile pace so you can score better on the 2 mile timed run of the Army, the 3 mile timed run of the Marine Corps, or the 1.5 mile timed run of the Navy, Air Force, Coast Guard, and nearly one-half of the States Law Enforcement Academies. When running daily or several times a week – you must follow all stretches thoroughly and do each of them for at least 15 seconds each. This should take only 5:00-10:00 but it is very important not to miss stretching before and after running workout. Workout Note: If you see 50 pushups or another exercise that you know that you cannot perform (yet), do not get discouraged. Push yourself and see how well you can do until you fail. Rest and try again on your knees if it is pushups, or with lighter weights if it is a weight machine or dumbbell exercise.

You can also break up 50 reps of anything into 2 x 25 or 5 x 10 if you need to. Remember – you will “Succeed by Failing.” Good luck with the program and remember to consult your physician first before starting any program if you have not exercised in several months or years. Good luck with the plan and if you need help with any fitness related questions please feel free to email me at [email protected]. PT Workouts Explained Rest Day / Stretch These are days to relax and stretch. Your body needs rest from rigorous exercise. In fact, it is the only way you will grow and get stronger. You should exercise 5 to 6 times per week and rest 1- 2 days per week. Though the days of the workouts are listed, you do not have to follow per day the program. If you must skip a day during the week, try to make it up on Sunday which is usually considered as off day. The Pyramid Workouts: If you take a look at one of the pyramids, you will notice that it is numbered on both sides. It goes from 1-10 on one side, with the number 6 on the top, and then 10-1 on the other side. Each number represents a step in the pyramid. Your goal is to climb the pyramid all the way up, and all the way back down. So you can consider each step a "set" of your workout. At the bottom, you will find "pullups x 1, pushups x 2, situps x 3". What this means is that at each "set" or step of the pyramid, you perform 1 pullup for every step you are on, 2 pushups for each step, and 3 situps for each step. You start at the bottom of the pyramid, at number one. For each set, you times that set number by 1 and that tells you how many pullups to do. You multiply it by 2 to get your pushups, and multiply by 3 for situps. So you keep progressing until you get to the top of the pyramid, or your MAX At step ten you perform 10 pullups/ 20 pushups/30 situps. Now you start working your way back down the other side. So the next set you do will be at step 9 on the way back down. So, you'll do 9 pullups/18 pushups/27 situps. Keep going until you worked all the way back down to one. So here is a number summary of the pyramid: Go up the pyramid: (or half pyramid workout) Set/Step 1: 1 pullups/2 pushups/3 situps Set/Step 2: 2 pullups/4 pushups/6 situps Set/Step 3: 3 pullups/6 pushups/9 situps Set/Step 4: 4 pullups/8 pushups/12 situps

Set/Step 5: 5 pullups/10 pushups/15 situps (Your first set sets are basically a warmup) Set/Step 6: 6 pullups/12 pushups/18 situps Set/Step 7: 7 pullups/14 pushups/21 situps Set/Step 8: 8 pullups/16 pushups/24 situps Set/Step 9: 9 pullups/18 pushups/27 situps Set/Step 10: 10 pullups/20 pushups/30 situps (Here is where you should fail / max out) Go down the pyramid: (or reverse order pyramid = toughest to easiest number of reps)
2
4
8
3
56
7
910
9876543211
Pullups x 1 / Pushups x 2
Situps x 3
The Pull-up Workouts: 1) The Pullup Pyramid: You will want to rest in between pull-up sets for no longer than one minute. Continue the pull-ups until you cannot perform any more - THEN resort to negatives for the remainder of the workout. In between sets, instead of resting and doing nothing, try to do at least 25 abdominal exercises of your choice. 2) 50 Pullup Workout - The object of the 50 or 100 pullup workout is to do as many pullups in as few sets as possible. Make your own goals, but shoot for 2-3 sets for the 50 pullups workout and maybe 6-8 for the 100 pullup workout. In certain weeks you may have to repeat 50 pullups again. Take a break in between these sets by doing stomach exercises or run 100yds or bike for two-three minutes. Assisted Pullups - This is the first step to being able to perform pullups. Do pullups on a lower bar that is about 3-4 feet high off the ground or a pullup and dip machine using the dip bars as pullup bars. Your feet remain on the floor allowing for less weight to be on your arms, so you can get the needed repetitions. These are also great to do after you can no
longer perform anymore dead-hang pullups. This is a good replacement for the Lat Pulldown machine as well. Negatives - Negatives should be done if you cannot do pull-ups. Many men and women cannot perform any pull-ups. So, for the majority of you who have not done pull-ups in years or have never done pull-ups, this workout will challenge you. This is step two to doing pullups. After you can easily do the required reps with the assisted pullup routines, try a negative. A negative simply takes you through half of a pullup. Get yourself over the bar, either by standing on something or having someone lift you. Once your chin is above the bar, slowly let yourself down counting for 5 seconds. This will get your arms used to supporting your weight. You can build up your strength and within a few months of this workout, you will have your first pullup in years - maybe ever!! Most people have a goal of achieving a pullup when they start working out again with this type of program. You will see there are several different grips to use while doing pullups. This is to equally exercise every angle of the back, arms and forearms. Pushup/Crunch Superset: This is a great way to achieve extraordinary repetitions of pushups and crunches! Each set of six exercises should be completed within a two minute period. For example, Set #1: 10 regular pushups 10 regular crunches 10 wide pushups 10 reverse crunches 10 triceps pushups 10 -1/2 sit-ups Do the above circuit within a two minute time period. You should finish this with at least 30-45 seconds remaining. Use this time to stretch, drink some water etc... You will repeat this particular workout 5 times. Total time should only be 10 minutes, BUT you will achieve 150 pushups and 150 abdominal exercises in that time!! Rest: There is no rest time while on the 2 minute clock. Do your set as quickly as possible, but watch your form. Do not jeopardize your form for a faster superset time. This is a great time saver workout if you are too busy to take 30-45 minutes to exercise. Take 10-20 minutes and be amazed at yourself performing 100-200 pushups and crunches in that time. Say you finish your superset in 1 minute and 30 seconds, you get 30 seconds rest before you have to begin the next set.

8 count bodybuilder pushup / pullup pyramid Workout: Do one 8 count pushup – run 30m to a pullup bar – do 1 pullup. Run back to 8 count area – do two 8 counts – run to pullup bar – do 2 pullups…continue up until you fail at pull-ups – repeat in reverse order Circuit Workouts - You will see several different circuit routines in this workout program. Basically, a circuit workout is designed to move you as quickly through a workout as possible. There are no rest periods in a circuit until the end. Moving from one exercise to the other is the only rest you will get, but you will rarely be using the same muscle group two times in a row. So there is actually rest built into the workout PT with the clock - This type of workout is designed to help students ace a physical fitness test of pullups, pushups, and situps. By performing as many reps as you can of each exercise in a certain time limit, you will be learning the pace required to achieve 100 pushups and 100 situps in two minutes. By using the clock as your training guide, you will become accustomed to doing maximum reps in a time period which will further increase your scores as you continue to practice this type of training. 10,15,20 Workout – When you see these numbers following an exercise, that means you should do the first set of 10 reps at a heavier weight, immediately decrease the weight and do 15 reps, decrease weight again without resting and do 20 reps. It is quite a burnout workout. Swimming Workouts Explained DO NOT DO THIS WORKOUT BY YOURSELF. IN FACT, NEVER SWIM UNDERWATER ALONE OR WITHOUT A LIFEGUARD. Hypoxic pyramids (stroke per breath) This workout makes ordinary swimming seem easy and actually will help make swimming, running, and your overall endurance stronger. By not allowing yourself to breathe as often as you would like, you are training like someone in higher altitudes. Therefore, when you test yourself and breathe regularly, you will be like the high altitude athlete going to sea-level to compete. This particular workout gets increasingly more difficult after each 100m you swim. By adding 2 strokes to your breathing pattern every 100m, you will find the need to breathe more demanding. Simply climb the pyramid making each set of 100m a step. Each step you will add two more strokes per breath. You will be breathing less per length on every step up the pyramid until you reach the maximum of 10 strokes per breath. A stroke is each arm pull, so the count would be this for a 4 strokes per breath step on the pyramid: 1,2,3,4, breathe - this translates to Left, right, left, right arm pull, breathe. I find that if I hold my breath for at least half of the stroke count and then start exhaling slowly that I can make it through the pyramid with
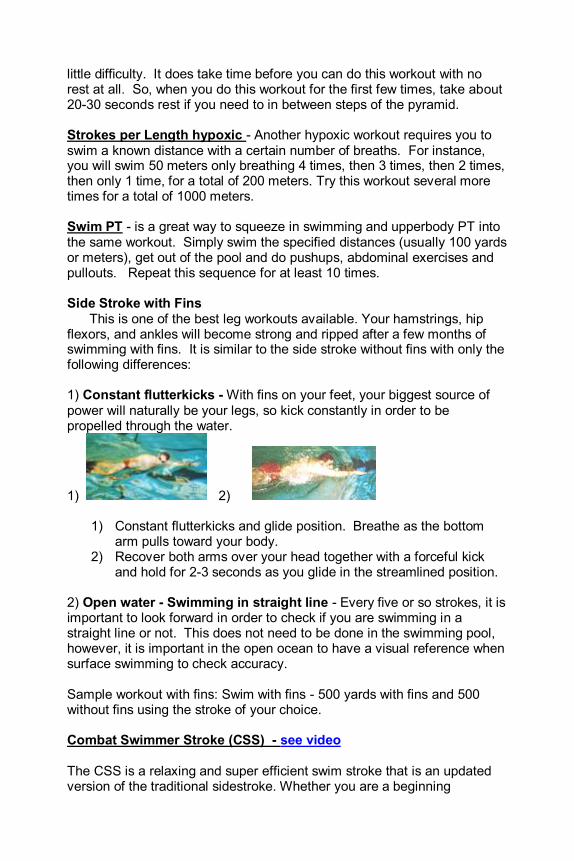
little difficulty. It does take time before you can do this workout with no rest at all. So, when you do this workout for the first few times, take about 20-30 seconds rest if you need to in between steps of the pyramid. Strokes per Length hypoxic - Another hypoxic workout requires you to swim a known distance with a certain number of breaths. For instance, you will swim 50 meters only breathing 4 times, then 3 times, then 2 times, then only 1 time, for a total of 200 meters. Try this workout several more times for a total of 1000 meters. Swim PT - is a great way to squeeze in swimming and upperbody PT into the same workout. Simply swim the specified distances (usually 100 yards or meters), get out of the pool and do pushups, abdominal exercises and pullouts. Repeat this sequence for at least 10 times. Side Stroke with Fins This is one of the best leg workouts available. Your hamstrings, hip flexors, and ankles will become strong and ripped after a few months of swimming with fins. It is similar to the side stroke without fins with only the following differences: 1) Constant flutterkicks - With fins on your feet, your biggest source of power will naturally be your legs, so kick constantly in order to be propelled through the water.
1) 2)
1) Constant flutterkicks and glide position. Breathe as the bottom arm pulls toward your body.
2) Recover both arms over your head together with a forceful kick and hold for 2-3 seconds as you glide in the streamlined position.
2) Open water - Swimming in straight line - Every five or so strokes, it is important to look forward in order to check if you are swimming in a straight line or not. This does not need to be done in the swimming pool, however, it is important in the open ocean to have a visual reference when surface swimming to check accuracy. Sample workout with fins: Swim with fins - 500 yards with fins and 500 without fins using the stroke of your choice. Combat Swimmer Stroke (CSS) - see video The CSS is a relaxing and super efficient swim stroke that is an updated version of the traditional sidestroke. Whether you are a beginning

swimmer or an aspiring Special Operator, this stroke can really help you efficiently move through the water when wearing fins. When you find yourself in deep water with a lot of distance to cover, the CSS will serve you well especially when you are wearing fins. You will tire less quickly if you learn to perform this stroke properly. The object to the CSS and side stroke is efficiency - you should try to get across a 25m pool in as few strokes as possible. If you are doing more than 10 strokes per length you are working too hard. In fact, the fastest and best swimmers get across a 25m pool in 3-5 strokes. The Start: In a big squat position against the wall - push off and stay as streamlined as possible as you glide at least 5-10 yards off the wall. Place your hands on top of each other, place your bicep on your ears, and lock out your arms - streamlined positioning like a rocket. The Glide: With a big double arm pull, add the other 3-5 yards to your glide by pulling with your back, biceps and pushing water with your arms using your triceps.
The Arm Movement: After the arm pull, it is time to breathe - twist and breath then start using the top arm pull as shown. Notice both arms recover together forward, but the top arm pulls from overhead all the way to your hips (similar to freestyle stroke). Then the bottom arm pulls a half stroke (similar to breast stroke) and both arms recover together. Breathe as the top arm completes its pull and the bottom arm begins its pull.
Kick off the Wall
The Glide
Arm Motion
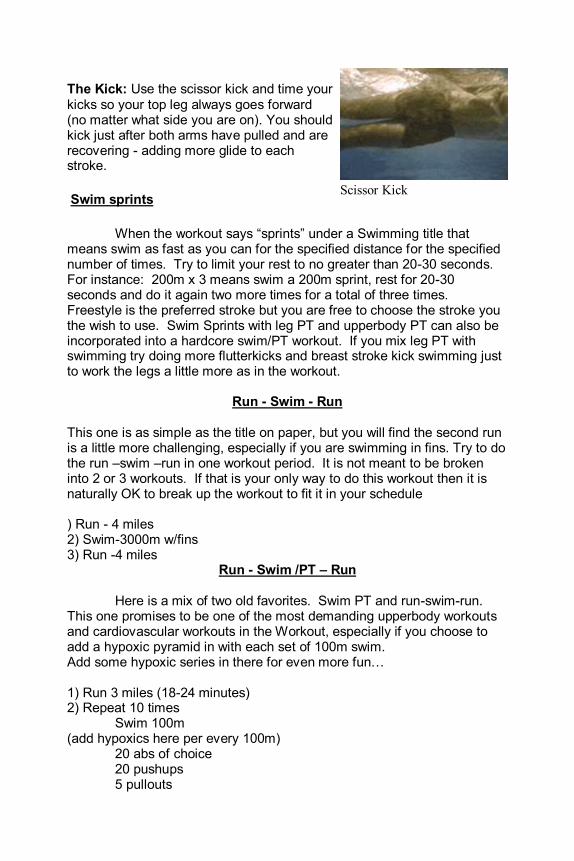
The Kick: Use the scissor kick and time your kicks so your top leg always goes forward (no matter what side you are on). You should kick just after both arms have pulled and are recovering - adding more glide to each stroke.
Swim sprints
When the workout says “sprints” under a Swimming title that means swim as fast as you can for the specified distance for the specified number of times. Try to limit your rest to no greater than 20-30 seconds. For instance: 200m x 3 means swim a 200m sprint, rest for 20-30 seconds and do it again two more times for a total of three times. Freestyle is the preferred stroke but you are free to choose the stroke you the wish to use. Swim Sprints with leg PT and upperbody PT can also be incorporated into a hardcore swim/PT workout. If you mix leg PT with swimming try doing more flutterkicks and breast stroke kick swimming just to work the legs a little more as in the workout.
Run - Swim - Run This one is as simple as the title on paper, but you will find the second run is a little more challenging, especially if you are swimming in fins. Try to do the run –swim –run in one workout period. It is not meant to be broken into 2 or 3 workouts. If that is your only way to do this workout then it is naturally OK to break up the workout to fit it in your schedule ) Run - 4 miles 2) Swim-3000m w/fins 3) Run -4 miles
Run - Swim /PT – Run Here is a mix of two old favorites. Swim PT and run-swim-run. This one promises to be one of the most demanding upperbody workouts and cardiovascular workouts in the Workout, especially if you choose to add a hypoxic pyramid in with each set of 100m swim. Add some hypoxic series in there for even more fun… 1) Run 3 miles (18-24 minutes) 2) Repeat 10 times Swim 100m (add hypoxics here per every 100m) 20 abs of choice 20 pushups 5 pullouts
Scissor Kick

3) Run 3 miles (20-24 minutes) Running – Find the Magic Pace AFTER Transitioning from PT to RUN: After you perform maximum repetition sets with your upper body muscles, your heart has forced blood to the arms, shoulders, and torso leaving you very “pumped up”. Running like this can be difficult because the heart has to now pump the blood from your arms and torso down to your legs and, of course, oxygenate the blood repetitively. When your blood is “stuck” in the upper body after a maximum repetition PT test, your heart pumps harder than normal when running at first Have you ever completed a run and said, “I just did not feel right until after the first ½ mile.”? This is because it takes about 3-4 minutes to get the blood flowing from your torso to your legs to your heart / lungs in a regular pace. This can throw off your known pace that you have trained to maintain for your run. Your breathing is more rapid, your heartbeat is therefore more rapid, your arms swing is more stiff than fluid and relaxed, and your legs are burning for oxygenated blood. This will leave many to say at the end of the run, “I felt OK after the first two laps, but the first half mile about killed me.” Here is the answer to the problem: After you perform the upper body portion of the workout, take 2-3 minutes to stretch the arms, chest, shoulders, stomach and lower back. Then run for about 2-3 minutes at an easy pace to get the blood down toward your legs. Finally, take about 3-5 minutes to stretch your legs. Keep shaking the arms, throughout the time in between the PT and run, to loosen up. For most people the most challenging event of any PFT is by far the run. I receive many requests everyday from military and law enforcement members who are seeking workouts for their PFT runs. But, the challenge has a simple solution: Just like with sit-ups - PACE your Timed run - - The most important thing is to not start off too fast. Learn your pace and set your goal by pacing yourself to the finish. For instance, if your goal is to run the 1.5 mile run in 10:30, you must run a 7:00 mile or a 1:45 - 1/4 mile. Beginner Running Plans If you are a beginner or overweight (20-30lbs) you should walk more than run at first. Really, you should lay off impact aerobics until your knees, back and other joints can handle the added stress to your body. Start off with biking, swimming, rowing, or elliptical gliding and walking until you feel like running or have lost a majority of the weight you are seeking to lose. Running injury free requires near perfect technique, great shoes, possibly the addition of orthotics / insoles, and a gradual build-up after long periods of no running or beginning a running plan. Last week’s article concerning women’s running and training plan caused me to re-think my advice as the intensity of the article was not perfectly directed toward a novice exerciser. In fact, thanks to some feedback from readers, it inspired me to reach
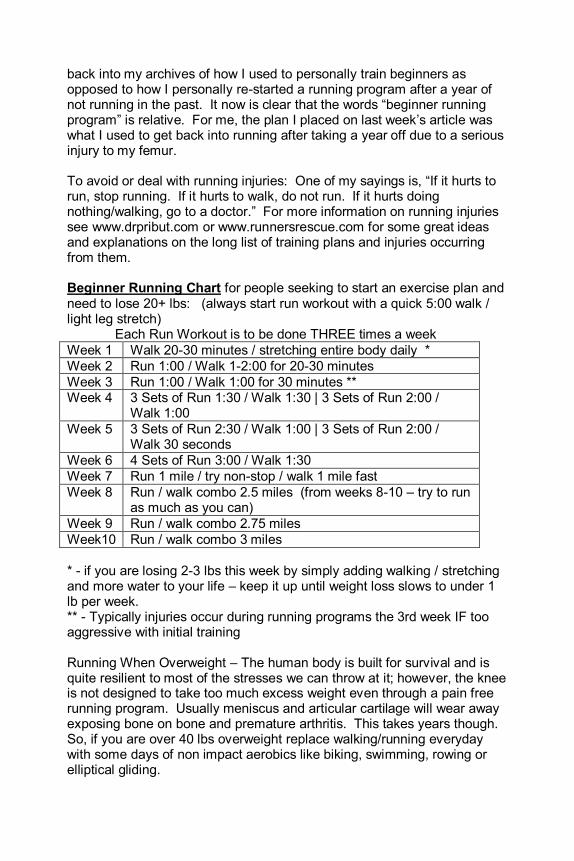
back into my archives of how I used to personally train beginners as opposed to how I personally re-started a running program after a year of not running in the past. It now is clear that the words “beginner running program” is relative. For me, the plan I placed on last week’s article was what I used to get back into running after taking a year off due to a serious injury to my femur. To avoid or deal with running injuries: One of my sayings is, “If it hurts to run, stop running. If it hurts to walk, do not run. If it hurts doing nothing/walking, go to a doctor.” For more information on running injuries see www.drpribut.com or www.runnersrescue.com for some great ideas and explanations on the long list of training plans and injuries occurring from them. Beginner Running Chart for people seeking to start an exercise plan and need to lose 20+ lbs: (always start run workout with a quick 5:00 walk / light leg stretch) Each Run Workout is to be done THREE times a week
Week 1 Walk 20-30 minutes / stretching entire body daily *
Week 2 Run 1:00 / Walk 1-2:00 for 20-30 minutes
Week 3 Run 1:00 / Walk 1:00 for 30 minutes ** Week 4 3 Sets of Run 1:30 / Walk 1:30 | 3 Sets of Run 2:00 /
Walk 1:00
Week 5 3 Sets of Run 2:30 / Walk 1:00 | 3 Sets of Run 2:00 / Walk 30 seconds
Week 6 4 Sets of Run 3:00 / Walk 1:30
Week 7 Run 1 mile / try non-stop / walk 1 mile fast
Week 8 Run / walk combo 2.5 miles (from weeks 8-10 – try to run as much as you can)
Week 9 Run / walk combo 2.75 miles
Week10 Run / walk combo 3 miles
* - if you are losing 2-3 lbs this week by simply adding walking / stretching and more water to your life – keep it up until weight loss slows to under 1 lb per week. ** - Typically injuries occur during running programs the 3rd week IF too aggressive with initial training Running When Overweight – The human body is built for survival and is quite resilient to most of the stresses we can throw at it; however, the knee is not designed to take too much excess weight even through a pain free running program. Usually meniscus and articular cartilage will wear away exposing bone on bone and premature arthritis. This takes years though. So, if you are over 40 lbs overweight replace walking/running everyday with some days of non impact aerobics like biking, swimming, rowing or elliptical gliding.
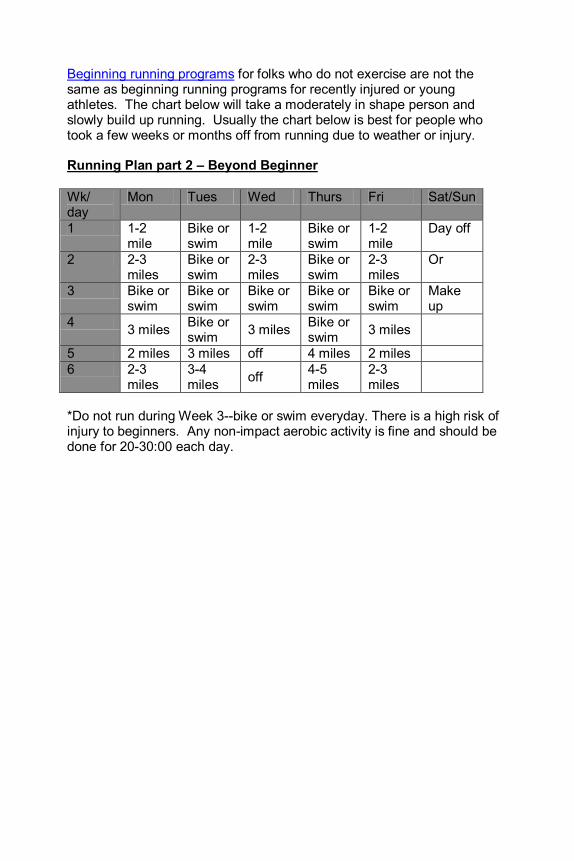
Beginning running programs for folks who do not exercise are not the same as beginning running programs for recently injured or young athletes. The chart below will take a moderately in shape person and slowly build up running. Usually the chart below is best for people who took a few weeks or months off from running due to weather or injury. Running Plan part 2 – Beyond Beginner
Wk/ day
Mon Tues Wed Thurs Fri Sat/Sun
1 1-2 mile
Bike or swim
1-2 mile
Bike or swim
1-2 mile
Day off
2 2-3 miles
Bike or swim
2-3 miles
Bike or swim
2-3 miles
Or
3 Bike or swim
Bike or swim
Bike or swim
Bike or swim
Bike or swim
Make up
4 3 miles
Bike or swim
3 miles Bike or swim
3 miles
5 2 miles 3 miles off 4 miles 2 miles
6 2-3 miles
3-4 miles
off 4-5 miles
2-3 miles
*Do not run during Week 3--bike or swim everyday. There is a high risk of injury to beginners. Any non-impact aerobic activity is fine and should be done for 20-30:00 each day.

Speed Workouts for Runners For more experienced but slower runners, going from 10 – 8:00 mile pace is best done with the following recommendations:
Wk Mon Tues Weds Thurs Fri Sat
1-4 2 miles
¼ mile at goal pace 6–8x’s
No Running – rest or PT
2 mile timed & 2 miles jog
PACE DAY – 3 miles of intervals at goal pace
Long run: 4-6 miles easy pace
5-8 2 miles
½ mile at goal pace 4-5x’s
No Running – rest or PT, swim, bike
2 miles timed & 2 miles jog
PACE DAY – 4 miles of intervals at goal pace
Long run: 4-6 miles easy pace
Chart explained: On Mondays, run two miles but try for as long as you can to run at your goal pace – chart progress each week on how far you were able to maintain goal pace. The chart below will help you figure out your goal pace at the intervals recommended in this running plan:
Goal mile pace 8:00 mile
Goal mile pace 7:00 mile
Goal mile pace 6:00 mile Intervals
½ mile intervals 4:00 3:30 3:00
¼ mile intervals 2:00 1:45 1:30
1/8 mile intervals 1:00 52 seconds 45 seconds
To ace the running portion of any PFT, it is most important to learn your pace. Recognize breathing, arm swing, leg stride, foot strikes and create muscle memory of exactly how you should feel when you are running at your goal pace. As you get into better shape, you should feel better throughout the running event. NOTE - one day a week - you should push the speed limit and do a series of faster than pace runs: On Tuesdays, intervals will help you build your VO2 max and foot speed to better learn your goal pace. On a few of the interval runs, try to run 1-2 at a faster than goal pace just to push your limit. After each interval run, walk or slow jog for a recovery for 1-2:00. During the second month, increase your distance but keep the pace the same. Shoot for ½ mile intervals at goal pace. Wednesday - DAY OFF - swim or rest. Do your PT exercises today as well

as every other day as recommended in any of the PT articles in the StewSmith.com Fitness Article Archive and PFT eBooks. Thursday - 2 mile timed run / 2 mile jog. Test yourself on Thursday, after a day off of running. If your PFT distance is 1.5 miles or 3 miles (USN, USCG, USAF, or USMC respectively), run that distance required for your services PFT followed by a jog of the same distance. On Fridays, learn your PACE. All runs no matter what the distance – 1 mile, 2 mile, 3 miles, ¼, ½ miles etc are to be done at your goal pace. Work up to three miles of running for as long as you can at your goal pace. Once you fall off your pace, stop, walk and recover for two minutes and continue running shorter intervals until you reach a total distance of three miles. Saturday - Long run Saturday - 4-6 miles easy pace. Have a nice leisurely run at slow moderate pace and stretch well after each running session. Sunday - Day off As you can see, the best way to get better or faster at running is to PRACTICE running. This routine is aggressive but doable and should only take 20-40 minutes on most weekdays. All of these workouts are fantastic ways to get faster but build the needed endurance which most sprinters lack. Remember to take big deep breaths, relax your upper body and slightly bend your arms when running. RUCK MARCHES - Also known as “forced marches” or “humps”, these events are basically walking at a fast pace over rough terrain with a back pack at least 45 lbs in weight. When you take the ruck march test, you will also carry a weapon, wear boots, BDU (Battle Dress Uniform – “fatigues” pants/blouse), LBE (Load Bearing Equipment – shoulder harness with canteens with water), and a helmet. If you break it down, you need to train the major muscle groups of the body – legs and back. Sure your upper body (shoulders and arms) come into play carrying the backpack and weapon, but you will get most of your exhaustion from the legs and lower back. So, training your legs in running, leg PT, and rucking will build stamina and endurance you need for any type of Army or land navigation training. There are many ways to develop the legs and torso for the Ruck March. Here are some sample ways pulled from the Army Ranger / SF Prep Workout eBook:
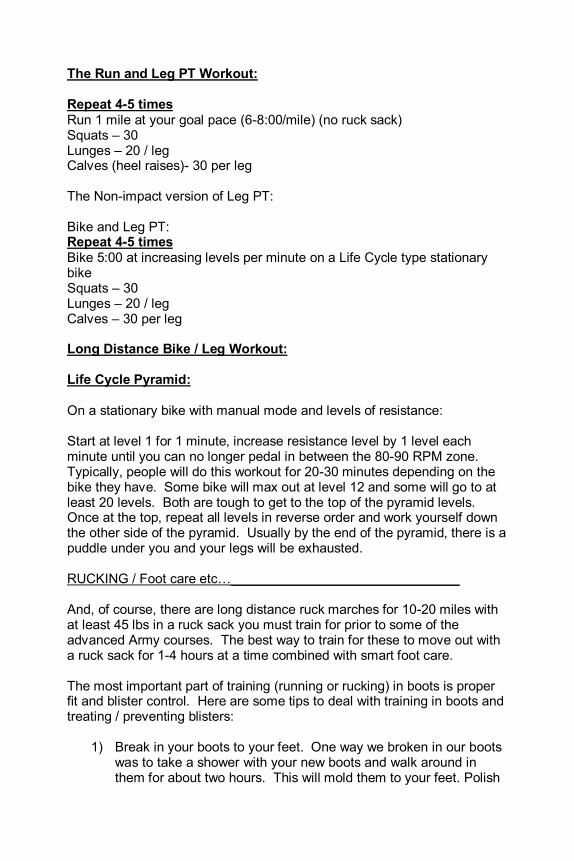
The Run and Leg PT Workout: Repeat 4-5 times Run 1 mile at your goal pace (6-8:00/mile) (no ruck sack) Squats – 30 Lunges – 20 / leg Calves (heel raises)- 30 per leg The Non-impact version of Leg PT: Bike and Leg PT: Repeat 4-5 times Bike 5:00 at increasing levels per minute on a Life Cycle type stationary bike Squats – 30 Lunges – 20 / leg Calves – 30 per leg Long Distance Bike / Leg Workout: Life Cycle Pyramid: On a stationary bike with manual mode and levels of resistance: Start at level 1 for 1 minute, increase resistance level by 1 level each minute until you can no longer pedal in between the 80-90 RPM zone. Typically, people will do this workout for 20-30 minutes depending on the bike they have. Some bike will max out at level 12 and some will go to at least 20 levels. Both are tough to get to the top of the pyramid levels. Once at the top, repeat all levels in reverse order and work yourself down the other side of the pyramid. Usually by the end of the pyramid, there is a puddle under you and your legs will be exhausted. RUCKING / Foot care etc…_______________________________ And, of course, there are long distance ruck marches for 10-20 miles with at least 45 lbs in a ruck sack you must train for prior to some of the advanced Army courses. The best way to train for these to move out with a ruck sack for 1-4 hours at a time combined with smart foot care. The most important part of training (running or rucking) in boots is proper fit and blister control. Here are some tips to deal with training in boots and treating / preventing blisters:
1) Break in your boots to your feet. One way we broken in our boots was to take a shower with your new boots and walk around in them for about two hours. This will mold them to your feet. Polish
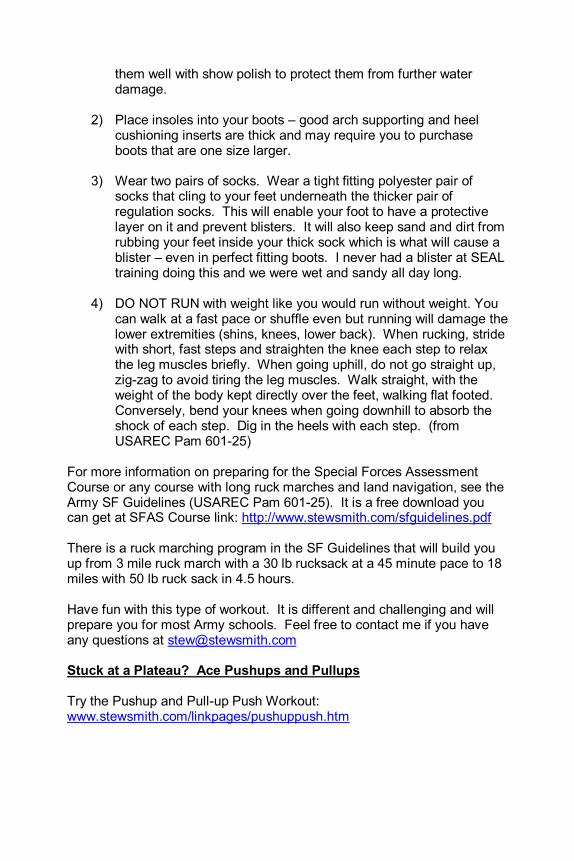
them well with show polish to protect them from further water damage.
2) Place insoles into your boots – good arch supporting and heel cushioning inserts are thick and may require you to purchase boots that are one size larger.
3) Wear two pairs of socks. Wear a tight fitting polyester pair of socks that cling to your feet underneath the thicker pair of regulation socks. This will enable your foot to have a protective layer on it and prevent blisters. It will also keep sand and dirt from rubbing your feet inside your thick sock which is what will cause a blister – even in perfect fitting boots. I never had a blister at SEAL training doing this and we were wet and sandy all day long.
4) DO NOT RUN with weight like you would run without weight. You can walk at a fast pace or shuffle even but running will damage the lower extremities (shins, knees, lower back). When rucking, stride with short, fast steps and straighten the knee each step to relax the leg muscles briefly. When going uphill, do not go straight up, zig-zag to avoid tiring the leg muscles. Walk straight, with the weight of the body kept directly over the feet, walking flat footed. Conversely, bend your knees when going downhill to absorb the shock of each step. Dig in the heels with each step. (from USAREC Pam 601-25)
For more information on preparing for the Special Forces Assessment Course or any course with long ruck marches and land navigation, see the Army SF Guidelines (USAREC Pam 601-25). It is a free download you can get at SFAS Course link: http://www.stewsmith.com/sfguidelines.pdf There is a ruck marching program in the SF Guidelines that will build you up from 3 mile ruck march with a 30 lb rucksack at a 45 minute pace to 18 miles with 50 lb ruck sack in 4.5 hours. Have fun with this type of workout. It is different and challenging and will prepare you for most Army schools. Feel free to contact me if you have any questions at [email protected] Stuck at a Plateau? Ace Pushups and Pullups Try the Pushup and Pull-up Push Workout: www.stewsmith.com/linkpages/pushuppush.htm

Injury Prevention Typically, if you take off for more than 2-3 months from a regular running routine, chances are when you start again you will start off “where you left off” and actually over-train. Basically, you are running too far, too soon. It takes time to build up to a rigorous amount of running (4-6 miles day – 4-5 times a week), even if you used to run this far in the Fall of last year. There is a link I refer many people to who complain of leg injuries. I have had many of these injuries, BUT since I am not a doctor, I like for people to be better informed through the information prepared by www.drpribut.com. Dr. Steven Pribut is a doctor who enjoys running and has a site designed to help describe, prevent, and self-treat the most common running injuries. Click the links below to see what Dr. Pribut has to say about running and injury prevention. The types of injures most common to new runners and I receive questions on are the following: Shin Spints Heel Injuries – Plantar Fasciitis ITB Syndrome Runner’s Knee Achilles Tendonitis If you are an avid runner, chances are you have experienced at least one of these injuries. In fact, according to Runner’s World, over 50% of all runners get injured every year. Now, in the spring, after a winter layoff, OR if you are wishing to start running for the first time, I would recommend the following “step up program”.
1) Stretch using the stretches in this book for a week first to loosen up stiff joints and connective tissue.
2) Choose non-impact aerobic activity like biking, elliptical gliding, rowing or swimming to do when injuries are first felt. It is never a bad idea to cross-train in any of these activities every other day in place a running.
3) Warm up properly and then stretch. Run nice and easy for about 5-10 minutes then stretch once you are warm and the muscles and joints a more pliable. Never stretch “cold”. See stretches listed on the free Six Week Running Program page at www.stewsmith.com
4) Replace running shoes often. I go through shoes about every 2-3 months and ONLY run in my running shoes. Do not walk in your running shoes since you walk differently than you run. You do get what you pay for too. There are a number of types of shoes out there that range from $80-$120 for the better brands, however, you can save $20-30 by going online at retailers such as:

http://www.bodynsolesports.com - this site also has information of gait analysis and the importance of orthotics (shoe inserts) to help prevent injuries.
I hope these links can help you prevent some of the common injuries, however, it is always recommended to see a doctor if you are in pain. Two of the running rules I use is: “If it hurts to run – stop running” and “If it hurts to walk – DO NOT run and go to a doctor.” Myofascia release – Learn this term and get a foam roller for yourself. See Foam Roller Article / Video

Week 1
Monday 5:00 warmup
Run
½ mile repeat
2x’s@3:00 ¼ mile repeat 8
x’s@90 seconds
pushups - 2:00
max
rest 2:00
situps 2:00 max
rest 2:00
pushups 1:00
situps 1:00
More Ranger abs
Flutterkicks - 50 Leg levers - 50
Scissors - 50
½ situps - 50
(with boots on)
Repeat
Wednesday
shoulder
workout
Ruck March – 5 miles with 25 lbs
Tuesday Warmup -run
5:00
stretch
Repeat 10 ‘s
10- Jumping Jacks
20 - squats
10 pullups
Repeat 6 times
Run - 1/2 mile
repeats at sub
3:00
Repeat 5 times Pullups - max
(reg/reverse/wide grip)
squats - 30
lunges - 30
Abs (2x’s) atomic crunches
25
flutterkicks - 100
scissors - 100
leg levers - 100
Wednesday 5:00 warmup run
stretch
2 mile timed run
(2 - 1 mile repeats) and / or
Swim with fins –
500-1000m
Repeat 10 times pushup - 20
situps - 40
tricep pushups - 20
rev. crunches -40
shoulder workout
lateral raises 10 lat raises (th up) 10
lat raise(th up/dn)10
front raise (th up)10
cross overs 10
military press - 10
Ruck March w/ 25
lbs – 5 MILES
Thursday 5:00 warmup
stretch
Back / legs (repeat 3 times) squats - 30
pullups
regular - 10
reverse - 10
Run 1 mile (6:00)
squats – 40
lunges - 40
run 1 mile 6:00
pace
squats – 40
lunges - 40 run 1 mile 6:00
pace
squats 40
lunges - 40
run 1 mile 6:00pace
squats – 40
lunges - 40
Do your best to
keep it at 6:00-7:00
pace
Friday 5:00
warmup
stretch
Day off:
Drink
water
Stretch
Rules:
gallon of
water a
day -
DRINK
Saturday 5:00 warmup jog
stretch
Repeat 2 times
½ mile sprint ¼ mile jog
Repeat 4 times
sprint ¼ mile
jog 1/8 mile
Repeat 8 times
sprint 1/8 mile
jog 1/8 mile
Repeat 10 times
jumping jacks -10 pushups - 10
Ruck march – 5 miles
- 25 #
Sunday - rest

Week 2
Monday 5:00 warmup
stretch
PT with clock
alternate each set
with:
situps 50-60 in
1:00x 2
pushups max in
1:00x2
situps 25-30 in
::30 x 4
pushups – max
::30x 4
PFT technqiues :
pace the situps not
the pushups
Run 2 miles fast
as you can
Optional Bike or
swim
20:00
Tuesday 5:00 warmup
stretch
Bike / leg PT / repeat 4 times bike 5:00
squats - 1:00
lunges - 1:00
calves - 1:00
use lifecycle - with
increasing
resistance for every
minute you are on
(ex: 5:00 bike =
levels 3,6,9,12,15
all for one minute) (manual modes)
lifecycle pyramid
levels 2,4,6,8,10,
12...
1:00 at each level
and repeat in
reverse order -
should take about
10-15:00
Wednesday 5:00 warmup
stretch
Long run day
(intervals) repeat 4 times
¼ mile sprint
¼ jog
repeat 8 times
1/8 sprint
1/8 mile jog
Ruck march 8 miles
with 25#
Cool down jog – 2 miles
Thursday 5:00 warmup
stretch
15 minutes
workout (light weights for
max reps)
Pullups – max rep
Dips max 1:00
Situps 1:00
bench press - max
1:00
squats - 1:00
pulldowns - 1:00
MJDB#3- 1:00
lunges 30 sec/leg
heel raises - 1:00 MJDB#2 – 1:00
bike 3:00
Repeat again
run 2 miles
Friday 5:00 warmup
stretch
Rest day
Enjoy
Swim or bike if
you would like
to just do
something for
30:00
Saturday 5:00 warmup
stretch
8 count bodybuilder
pushup / pullup pyramid
Workout:
Do one 8 count
pushup – run 30m to
a pullup bar – do 1
pullup. Run back to 8
count area – do two 8
counts – run to pullup
bar – do 2
pullups…continue up
until you fail at pull-ups – repeat in
reverse order
run 3 miles
Ruck 8 miles with
25#

Week 3
Monday
Warmup -run
5:00
Repeat 10x‘s
10-Jump Jack 3 - Pullups
Stretch
Repeat 5 times Pullups - max
Squats - 20
(any grip)
Repeat 5 times
Pullups - max
Pulldowns10,10
(reg/reverse
grip) MJDB#2 - 20
squats - 20
lunges - 20
(no weights)
Abs (2x’s) reg crunch - 50
rev crunch - 50
left crunch - 50
rt crunches – 50
Tuesday
Warmup - 5:00
(swim, run, or bike)
Stretch
Swim/PT Swim 100m
(hypoxic pyramid)
2,4,6,8,10,8,6,4,2
strokes/breath=900m
After every 100m -
- do 20 pushups
- do 20 crunches
Total - 180 pushups
/ crunches and / or
Run - 25:00
and Bike
lifecycle pyramid Level 1-12-1
1:00 each level
(manual mode)
total time - 23
minutes
OR
Ruck – 30:00 fast
with 40 lbs
Wednesday
3 mile timed run
Thursday
Max pushups
2:00
Max situps in
2:00
Pullups x 1
PT
Pyramid
Pushups x 2
1123
45678
432
Abs x 3
910
98765
Set #1
1 pullup
2 pushups
3 abs of choice
Set#2
2 pullups
4 pushups 6 abs of choice
and so on...
2 mile timed run
Friday
Warmup - run
5:00
Stretch Ranger Triathlon 1 mile swim
with fins
10 mile ruck
5 mile run
Saturday
Warmup -run 5:00
8 count bodybuilder
pushup / pullup
pyramid
Workout:
Do one 8 count
pushup – run 30m to
a pullup bar – do 1
pullup. Run back to 8
count area – do two 8
counts – run to
pullup bar – do 2
pullups…continue up
until you fail at pull-
ups – repeat in
reverse order
Leg superset repeat 3 times
squats - 20
1/2 squats - 20
lunges - 10-20/leg
walking lunges -20
steps
calves - 20
Stretch legs well

Week 4 Monday
5:00 warmup
stretch
Upperbody PT Repeat 10 times pushups - 10
jumping jacks 10
Repeat 5 times pullups – max reps regular grip
reverse grip
30 abs at every set
Dumbbell PT shoulder workout
reg. lat raise - 10
-thumbs up -10
- thumbs dn - 10
front raise - 10
- thumbs up - 10 military press - 10
repeat w/no
weight
Run or bike-
20:00
Tuesday 5:00 warmup
stretch
Legs /
lowerback
Repeat 5 times
run - 5:00
squats - 30 reps
lunges - 20 / leg
calves - 50 reps
total time - 30:00
PLUS
Ruck– 5 miles 40
lbs fast as
possible
PM workout
plus 13:00 run –
try for 2 miles
Wednesday
30:00 run
stretch
Upperbody Push
Repeat 10 times pushups - 10
jumping jacks 10
Repeat 3 times
reg. pushup: 20 wide pushup: 20
tricep pushup: 10
military press 15
crunches - 50
use knees for pushup if you have
to...
Thursday 20:00 bike
warmupstretch
Legs and
back/bi’s
Repeat 3 times Pullups - max
squats - 25 w/wt.
reg. crunches - 50
MJDB#2 - 20
lunges - 10/leg
rev. crunches - 50
½ squats - 30
L/R crunches - 50
jog / bike 5:00
15:00 run – fast as
far as you can in
15:00
Ruck – 30:00 –
Ruck as far as you
can with 40lbs
Friday 20:00 run
warmup stretch
bike
30:00
Interval training
for jog/bike: 1:00
fast pace / 1:00
slower pace...
For bike increase
tension on fast
pace...
Repeat 5 times
¼ mile run – 90sec rest 45 seconds
Repeat 3 times
½ mile – 3:00
just one time
1 mile – 6:00

Week 5 Monday
Warmup/Stretch
Repeat entire
circuit 2x’s
max pullups Pulldown 15,15,15
wide, regular , rev
crunches - 100
bench press
15,10,5
pushups – max
run or bike 4:00 military - 15
side crunches - 50
/ side
run or bike- 4:00 MJDB#1 - 20
situps - 50
bike - 4:00
Ruck 1 hour - 50 #
Tuesday
Warmup/Stretch
Repeat ten times Jumping Jacks - 10
Squats - 20
Repeat 4 times Squats - 30 w/DB
Lunges - 15 / leg w/DB
Calves - 30 w/ DB
Side Oblique - 50 /side
Repeat 3 times
No weight PT
run ½ mile in 3:00
Squats - 1:00
Lunges - 1:00
calves - 1:00 bike 3:00
Sprints - 20yd - 5
40 yd - 5
100yd - 2
400yd – 2
(start off slow - not full
speed until 3 one of each
10,20,40yd)
Cool down / Stretch
Wednesday
Warmup/Stretch
Upperbody
Repeat 2 times
Pullups - max dips - max
situps - max in 2:00
bench press - 50% max
pushups- max in 1:00
pulldowns - 50%
bodyweight (max)
abs - max in 2:00
MJDB#3 - 10
abs - max in 2:00
Shoulder workout (5,3 lbs nonstop) lateral raises - 10
lat raises (thb up) 10
lat raise(thb up/dn) 10
front raise (thb up) 10
cross over jacks - 10
military press – 10
run - 30:00
Thursday
Ranger Triathlon
Swimming optional but
try...
Run - 5 miles
Bike 30:00 or Swim -
500m with fins and
cammies on
Ruck - 1 hour 50#
Cool down / Stretch
Friday – Day Off
Saturday
8 count bodybuilder
pushup / pullup
pyramid
Workout:
4 mile ruck 50#

Week 6
Monday
Warmup - 5:00
Repeat 10 x‘s
10-Jumping
jack 10 - Pushups
Stretch
Upperbody PT
Circuit
workout (no
rest)
Repeat 5x’s Pullups - max
Dips - 20
Pushups - 20 abs of choice-
50
run 2 mile
sprint
Tuesday
Warmup - run
5:00
Repeat 10 ‘s
10-Jumping Jacks
20 - Squats
Stretch Legs / abs
Repeat 3-4 times
Squats - 25
Lunges - 20 / leg
Calves/shins - 20
Heel /toe raises
(both legs
together)
Situps - 50
Cross situps - 50
each side
Hypoxic Swim
2,4,6,8,10,8,6,4,2
(strokes / breath)
x 100m = 900m
Wednesday
Warmup 5:00
Repeat 10 x‘s
10-Jump Jacks
10 - Pushups
Stretch
Repeat 3 x’s situps 50-60 in
1:00
plank pose 1
min
Repeat 3 x’s situps 25-30 in
::30
plank pose 1
min
Swim with
FINS 1000m
Running
5 mile timed
Thursday
Warmup - run 5:00
8 Count
bodybuilder
pushup / pullup
pyramid:
Do one 8 count
pushup – run 30m
to a pullup bar –
do 1 pullup. Run
back to 8 count
area – do two 8
counts – run to
pullup bar – do 2
pullups…continue
up until you fail at
pull-ups – repeat in reverse order
2 mile sprint
repeat 4 times ¼ mile sprint (sub
::90) ¼ jog (2:00)
10 mile ruck with
50#
Friday
Warmup
Stretch
Rest day
Saturday
Warmup -run 5:00
Stretch
Pullup workout
150 pullups in as few sets as
possible…rest
with 50 abs of
choice in between
sets…
Swim PT
repeat 10 times
swim 100m
hypoxic swim
1000m 2,4,6,8,10,12,10,8,6,4 stroke per
breath x 100m =
1000m
20 abs of choice
20 pushups

Week 7
Monday
5:00 warmup
stretch
ARMY PFT: Pushups – max
Situps – max
Pull-ups – max
(extra)
Rest 10:00
2 mile run
Must score 240
minimum by
end of SFAS
206 to enter…
Swim 500m
timed
Swim 50m in
uniform
Tuesday
Warmup -run
5:00
Stretch
Run - 3 miles
Time-______
Repeat 10 ‘s
10- Jumping
Jacks
20 – squats
Repeat 5 times
pull-ups – max
Pulldowns -
10,10,10
squats - 20
lunges - 20 Abs (2x’s)
reg crunches - 50
rev crunches - 50
left crunches - 50
rt crunches - 50
Ruck 8 miles
Wednesday
5:00 warmup
run
stretch
Circuit workout (no
rest) x 2
dips - max
situps - max in
1:00
bench press –
max reps
pushups - max
1:00
military press –
max reps
MJDB#3 – max in 2 min
Leg levers - 1:00
Run – 4 miles
Swim – 500m
Thursday
5:00 warmup
stretch
Ruck 8 miles
w/40lbs
Back / legs
(repeat 2-3 times)
squats - 30
pullups
regular - 10
reverse - 10
Supersets
Run 10 minutes –
every 2 minutes
stop and do lunges - 30 steps
calves - 25
Repeat 3 times
max pullups
10 wide pulldowns
10 reg pulldown
10 rev pulldowns
Friday
5:00 warmup
stretch
Spartan Run
run 1 mile 100 crunches
75 pushups
1 mile run
75 situps
65 pushups
1 mile run
50 situps
50 pushups
Pullups 3 x max
Rope climbs – 3
or do pull-ups with a towel for
the grip
Saturday
5:00 warmup
stretch
Ruck - swim - run
1) Ruck- 10 miles (2hrs)
2) Swim-500yd
timed
(repeat swim
again) total
1000yd + 50m
BDU swim
3) 4 -miles timed
Sunday rest
*Note – Break up
workouts into two
a day if needed

Week 8
Monday 5:00 warmup
stretch
Test day
Pullups - max - __
Pushups max 2:00
Situps – max 2:00
Army run – 5 miles
in 40 minutes
Cooldown:
Run, Bike or swim
30:00
Tuesday 5:00 warmup
stretch
Lowerbody Day (bike or run) Repeat 4 x’s
Run sprint 400m
Squats in 1:00
Lunges- 15 / leg
Crunches -1:00
Time self on 1
mile bike or ¼
mile sprint each
time
12 mile Ruck
March at 40lbs
Stretch Head to
toe
Wednesday 5:00 warmup
stretch
8 count bodybuilder
pushup / pullup pyramid Workout:
Do one 8 count pushup –
run 30m to a pullup bar –
do 1 pullup. Run back to
8 count area – do two 8
counts – run to pullup bar
– do 2 pullups…continue
up until you fail at pull-
ups – repeat in reverse
order
Run or bike 20:00
crunches – 50
rev crunches -50
double crunches-25
L crunches – 25
R crunches – 25
Plank pose 1 min
Lower back exercises 1,2
Thursday Rest day
warmup /
Stretch
Friday 5:00 warmup
stretch
Run
2 mile run - timed
6 mile ruck march
Repeat 2 times
Pullups - 10
crunches – 50
pull-ups - max
rev crunches -50
pull-ups – max -1
double crunches-25
pull-ups - max - 2
L crunches – 25
Pullups max - 3 R crunches – 25
Pull-ups Max -4
Plank pose 1 min
Lower back exercises
1,2
Upper back exercises
1,2,3
Saturday 5:00 warmup
stretch
Pyramid to failure!
Pushups 3 -max -3 Abs 5- max- 5
Dips 3-max-3
Using the 1-10-1
pyramid like in the
book
Your choice:
2 mile run or 5 mile
bike BUT Followed
by a
5 mile 50 lb ruck
march

Week 9
Monday
5:00 warmup
stretch
Repeat 5 times Jumping jacks - 20
Pushups – 10
Crunches – 20
Pullups – 5-10
stretch
Jog 2 miles
Tuesday
Day off
run - 10:00 easy
fullbody stretch
Weekday prep work:
All week drink at least a
gallon of water everyday
Eat low fat foods / no junk
Tuesday night – pasta,
lean proteins, complex
carbs like green leafy
salads, spinach etc…water
Wednesday AM – small
breakfast of fruit / little
protein like yogurt. I
personally like to eat an
apple, carrot (raw), and a banana prior to testing..1
hour prior..
Lay off water last hour..
Relax!! Breathe deep use
the adrenalin to your
advantage…
Stew
Wednesday
TEST Day
Pushups
Situps 5 mile run
Pullups
Thursday
5:00 warmup
stretch
Day off
Friday
Run 3 miles
Pullups - 50
Pushups - 200
Situps – 300
In as few sets as
possible alternating
max rep sets in 2:00
each
Run 3 miles
All events timed
run 3 miles
Sunday
Rest

Week 10
Monday
Repeat 5 times
Pull-ups – max Bench press – 10
pushups – 20
Abs of choice – 50
Repeat 5 times
Pushups – 20
Pull-downs –
10,10,10
wide,regular,
reverse grips
MJDB#3 – 10
Run 5 mile track
workout:
Run 2 miles timed
1 mile sprint
½ mile jog
1 mile sprint /
½ mile jog
Tuesday
Jog 5:00 / Stretch legs
Repeat 5 times
Bike or run – 5:00
lunges – 30 per leg abs of choice - 100
squats – 30
Run 10 mile timed ruck
Under 3 hrs with 50lbs
Wednesday
Mini - Triathlon
Run 5 miles in 40-minutes
Swim 1000m CSS Bike 60:00 or 4 mile ruck
And repeat on Saturday
Mini - Triathlon
Run 5 miles in 40-minutes
Swim 1000m CSS
Bike 60:00 or 4 mile ruck
Thursday
Run/ Leg Day
Big Cardio day
AM 10 mile ruck
At every mile stop
and do 20 squats with
ruck on
PM
Run 4 miles at 7-
8:00 pace
Friday
Repeat-5 times
Bench press –
20,15,10 reps
Or pushups - 40 Reg crunches – 25
Rev crunches 25
pushups - 20
double crunch - 50
Pullups – max
Pulldowns – 10,10,10
Rope climbs optional
x 3
lower back exercises:
swimmers 1:00
right arm/left leg ::30
left arm/right leg ::30
Lightweight shoulder
run 2 miles sprint

Military Training and Meeting Physical Standards
The hardest thing about failing a physical fitness test or not performing as well as your fellow soldiers is you have to play catch up. The good news is that at the age of 18-20, it is easy to get into shape and become competitive with your comrades, however, it is tough to do while in the middle of military training. My recommendation is to get in the competitive range PRIOR to attending these military programs. I promise you it will save you from becoming discouraged, reduce the pain of muscle soreness, and enable you to focus on your job at hand -- becoming a Soldier, Marine, Sailor, Airman, and Hero of Tomorrow.
Recommended Minimum Standards
MEN WOMEN
Pushups 40 18 in 2:00
Situps 65 65 in 2:00 1.5 mile run 10:30 12:30
2 mile run 14:00 16:30
Above average scores: MEN WOMEN
Pushups 80-90 50-60
Situps 80-90 80-90 2 mile run 12:00-12:30 16:00 Ranger 5 mile run - 40 minutes minimum If you find this workout is too difficult please visit the following link: www.stewsmithptclub.com/45dayplan.pdf
This plan will help you if you are a beginner.

Closing Remarks
Thanks for choosing a profession of serving your country. It is an honorable profession that requires commitment to stay fit and healthy so you can best perform your duties, to stay alive, and keep others alive. Visit the Heroes of Tomorrow at www.heroesoftomorrow.org for more information, local training areas and ways you can help us help others who want to serve their country. Good luck with the program and remember to consult your physician first before starting any program if you have not exercised in several months or years. Good luck with the plan and if you need help with any fitness related questions please feel free to email me at [email protected].
(Ctrl-click links)
Visit our Sponsors who also help the Heroes of Tomorrow