Rane SL3 Interface for Serato
16
OWNER’S MANUAL SL3 RANE SL3 INTERFACE QUICK START MANUAL
Transcript of Rane SL3 Interface for Serato

OWNER’S MANUAL
SL3
RANE SL3 INTERFACE QUICK START MANUAL
OWNER’S MANUAL
2
SL3
Important Safety InstructionsFor the continued safety of yourself and others we recommend that you read the following safety and installation instructions. Keep this document in a safe location for future reference. Please heed all warnings and follow all instructions. Do not use this equipment in a location where it might become wet. Clean only with a damp cloth. This equipment may be used as a table top device, although stacking of the equipment is dangerous and not recommended. Equipment may be located directly above or below this unit, but note that some equipment (like large power amplifiers) may cause an unacceptable amount of hum or may generate too much heat and degrade the performance of this equipment. Only use attachments and accessories specified by Rane. Refer all servicing to qualified service personnel. Servicing is required when the apparatus has been damaged in any way, such as spilled liquid, fallen objects into an opened chassis, exposure to rain or moisture, a dropped unit, or abnormal operation.
WARNING: This product may contain chemicals known to the State of California to cause cancer, or birth defects or other reproductive harm.
FCC StatementThis equipment has been tested and found to comply with the limits for a Class B digital device, pursuant to part 15 of the FCC Rules. These limits are designed to provide reasonable protection against harmful interference in a residential installation. This equipment generates, uses and can radiate radio frequency energy and, if not installed and used in accordance with the instructions, may cause harmful interference to radio communications. However, there is no guarantee that interference will not occur in a particular installation. If this equipment does cause harmful interference to radio or television reception, which can be determined by turning the equipment off and on, the user is encouraged to try to correct the interference by one or more of the following measures:• Reorient or relocate the receiving antenna.• Increase the separation between the equipment and receiver.• Connect the equipment into an outlet on a circuit different from that to which the receiver is connected.• Consult the dealer or an experienced radio/TV technician for help.
CAUTION: Changes or modifications not expressly approved by Rane Corporation could void the user’s authority to operate the equipment.
CAN ICES-3 (B)/NMB-3(B)
FCC Declaration of ConformityBrand: RaneModel: SL3
This device complies with part 15 of the FCC Rules. Operation is subject to the following two conditions: (1) This device may not cause harmful interference, and (2) this device must accept any interference received, including interference that may cause undesired operation.
Responsible Party: Rane Corporation 10802 47th Avenue West Mukilteo WA 98275-5000 USA Phone: 425-355-6000
OWNER’S MANUAL
3
SL3
Copyright Notices©2016 Rane Corporation. All rights reserved. Serato DJ and Scratch Live are trademarks of Serato. Trademarked in the United States and other countries. This software is based in part on the work of the Independent JPEG Group, and uses libpng code, copyright © 2000-2002 Glenn Randers-Pehrson. The Serato NoiseMap ™ Control Tone, the audio pressed on Serato Control vinyl and Control CDs, is copyright ©2004-2016 Serato. The Control Vinyl and Control CDs are licensed for personal use only. The creation of personal backups of the Control CD is allowed, however duplicating Control CDs for commercial benefit is strictly prohibited. For avoidance of doubt the duplication or creation of Control vinyl for any use is strictly prohibited. Please respect our copyright. Windows® is a registered trademark of Microsoft Corporation in the United States and other countries. Apple, Mac, Macintosh, iTunes, Safari, QuickTime, GarageBand, and OS X are registered trademarks of Apple Inc., registered in the United States and other countries.
Check ListThese items are included in the box: • 1 SL3 hardware interface.• 4 rubber feet for the SL3.• 1 external power supply for the SL3.• 1 power supply blade kit.• 1 Serato DJ software install disc.• 1 Serato DJ software manual.• 1 USB cable.• 4 stereo RCA cables. • 2 control CDs. • 2 control vinyl records. • 1 warranty card.• 1 this manual.
Wear PartsThe SL3 Interface contains no wear parts. The control vinyl records and CDs are wear parts as described in "Limited Warranties" on page 12.
Recycle cardboard and paper.
Cartons et papier à recycler.
OWNER’S MANUAL
4
SL3
Contents
2 Important Safety Instructions
2 FCC Statement
2 FCC Declaration of Conformity
3 Copyright Notices
3 Check List
3 Wear Parts
5 Software5 Serato DJ Software Installation for Mac OSX5 Serato DJ Software Installation for Windows5 Serato Scratch Live
6 Hardware6 System Overview7 Connecting the SL37 Turntable Setup7 CD Player Setup8 Kensington Security Slot8 Playing Regular Vinyl and CDs8 Optional Power Supply
9 Rane USB Drivers
10 Technical Specifications
11 Technical Support
12 Limited Warranties
15 EU Declaration of Conformity
OWNER’S MANUAL
5
SL3
SoftwareThis section will help get you started. Refer to the Serato DJ manual for software operating instructions.
Serato DJ Software Installation for Mac OS XBefore installing, we recommend you check for a newer version of Serato DJ at serato.com/downloads and install the latest Serato DJ version if it is newer than the version on the CD-ROM that comes with your SL3.
1. Insert the Serato DJ Installer CD-ROM that came with your unit, -or- browse using Finder to the location where the Serato DJ download was saved.2. Double click the Serato DJ .dmg installer file.3. The software EULA screen will appear - read the License Agreement, then click Agree. 4. The disk image mounts and opens the actions folder, once this is finished you can unmount the disk
image and launch Serato DJ.5. Drag the Serato DJ application icon to the Applications folder alias.6. You may then need to enter your User Password to authenticate.7. Serato DJ will now copy to the Applications folder, once this is finished you can unmount the disk image
and launch Serato DJ.
Serato DJ Software Installation for WindowsBefore installing, we recommend you download and install the latest Serato DJ version from serato.com if it is newer than the version on the CD-ROM that comes with your mixer.
1. Insert the Serato DJ Installer CD-ROM that came with your unit, -or- browse using Windows Explorer to the location where the Serato DJ download installer was saved.2. Double click the Serato DJ .exe installer file.3. Accept the Security Warning and click “Run”.4. The installer introduction screen will appear, click Next.5. Read the License Agreement, then tick “I agree to the license terms and conditions,” then click Install.6. If a User Account Control window appears, click Yes.7. Serato DJ will now perform a standard installation.8. The installation is now complete. You can now click Close.NOTE: A shortcut will be also be created on desktop.
When you first connect your SL3 via USB, you may see a request to install drivers. Accept the request and allow the driver installation to proceed. After drivers are installed, a SL3 control panel will be available, and your software will recognize the SL3.
Serato Scratch LiveYour SL3 is completely compatible with Serato Scratch Live. You may connect to a laptop that has either program installed. The latest version of Scratch Live or Serato DJ is always available for download from serato.com.
OWNER’S MANUAL
6
SL3
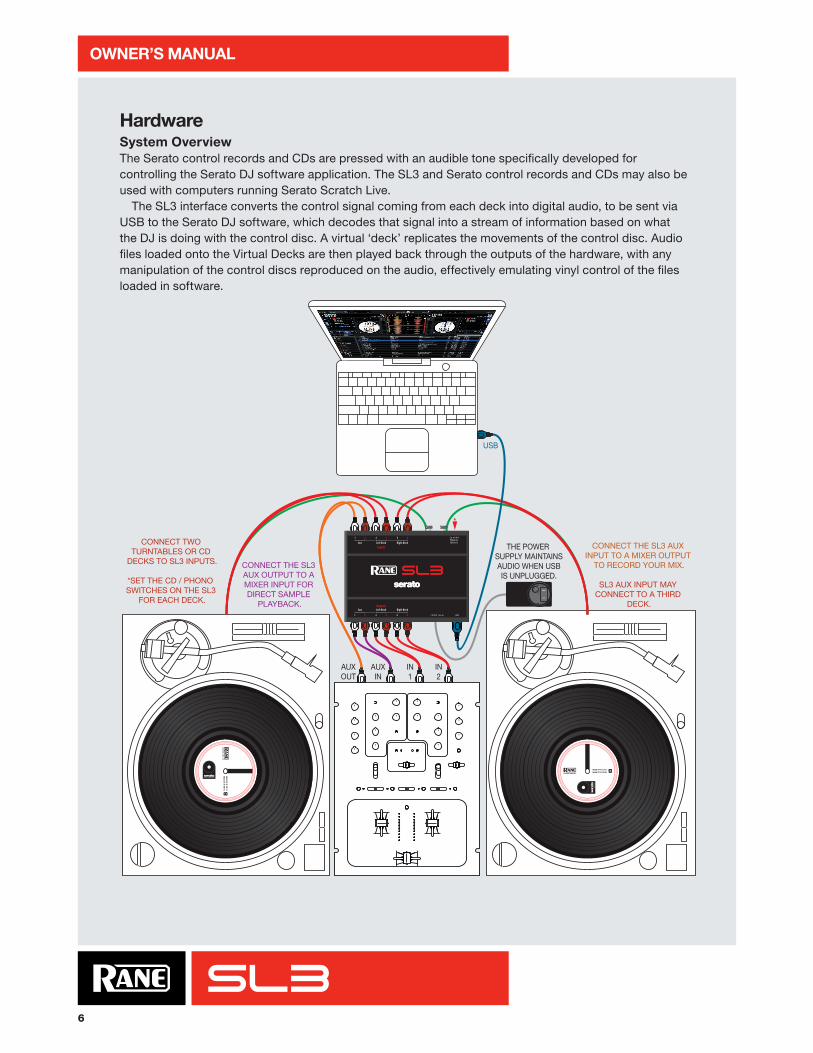
HardwareSystem OverviewThe Serato control records and CDs are pressed with an audible tone specifically developed for controlling the Serato DJ software application. The SL3 and Serato control records and CDs may also be used with computers running Serato Scratch Live. The SL3 interface converts the control signal coming from each deck into digital audio, to be sent via USB to the Serato DJ software, which decodes that signal into a stream of information based on what the DJ is doing with the control disc. A virtual ‘deck’ replicates the movements of the control disc. Audio files loaded onto the Virtual Decks are then played back through the outputs of the hardware, with any manipulation of the control discs reproduced on the audio, effectively emulating vinyl control of the files loaded in software.
LOCK
PUSH
OPEN
CONNECT TWOTURNTABLES OR CD
DECKS TO SL3 INPUTS.
*SET THE CD / PHONO SWITCHES ON THE SL3
FOR EACH DECK.
CONNECT THE SL3AUX OUTPUT TO A MIXER INPUT FOR DIRECT SAMPLE
PLAYBACK.
CONNECT THE SL3 AUX INPUT TO A MIXER OUTPUT
TO RECORD YOUR MIX.
SL3 AUX INPUT MAY CONNECT TO A THIRD
DECK.
THE POWER SUPPLY MAINTAINSAUDIO WHEN USBIS UNPLUGGED.
USB
AUXOUT
AUXIN
IN1
IN2
*
OWNER’S MANUAL
7
SL3
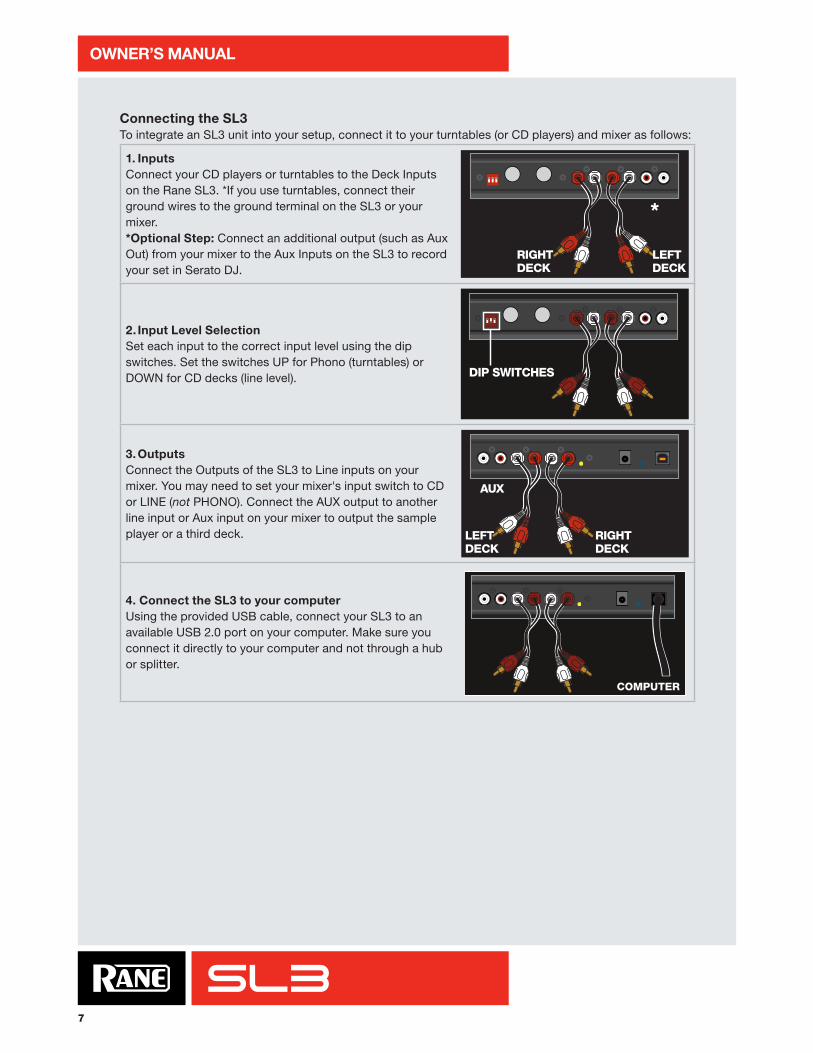
Connecting the SL3To integrate an SL3 unit into your setup, connect it to your turntables (or CD players) and mixer as follows:
1. InputsConnect your CD players or turntables to the Deck Inputs on the Rane SL3. *If you use turntables, connect their ground wires to the ground terminal on the SL3 or your mixer.*Optional Step: Connect an additional output (such as Aux Out) from your mixer to the Aux Inputs on the SL3 to record your set in Serato DJ.
*
RIGHTDECK
2. Input Level SelectionSet each input to the correct input level using the dip switches. Set the switches UP for Phono (turntables) or DOWN for CD decks (line level). DIP SWITCHES
3. OutputsConnect the Outputs of the SL3 to Line inputs on your mixer. You may need to set your mixer's input switch to CD or LINE (not PHONO). Connect the AUX output to another line input or Aux input on your mixer to output the sample player or a third deck.
AUX
LEFTDECK
RIGHTDECK
4. Connect the SL3 to your computerUsing the provided USB cable, connect your SL3 to an available USB 2.0 port on your computer. Make sure you connect it directly to your computer and not through a hub or splitter.
OWNER’S MANUAL
8
SL3
Turntable Setup1. Set the tone arms to the specific recommendations of the cartridge used, so that the needle never
leaves the record, but not heavy enough that it heats up significantly. Both produce poor tracking.
2. Grounding is extremely important when using Serato DJ. Make sure you have good connections from the ground wires of your turntables to the grounding post of your SL3 or your mixer. If you don’t ground your turntables properly, the control signal will be noisy and the record tracking position will be erratic.
3. Ensure the SL3 is set to receive a Phono level signal – See step 2 of Connecting the SL3.
CD Player Setup1. Disable all built-in effects on the CD player, including keylock/master tempo.
2. Ensure the SL3 is set to receive a CD level signal – See step 2 of Connecting the SL3.
Kensington Security SlotYou can use a Kensington security cable to attach the SL3 to an immovable object. Each side of the SL3 has a Kensington Security Slot. Refer to the instructions provided with your Kensington Lock.
Playing Regular Vinyl and CDsNOTE: the SL3 must be powered by USB or the supplied external power supply for the DECK THRUs to work. If external power is connected, the SL3 is self-powered and power is not used from the USB port. If external power is not connected, the SL3 draws power from the USB port. Power switching is automatic and the device continues to operate uninterrupted as long as a power sources is available. To use the SL3 Thru outputs when a computer is not connected, connect the optional external power supply. Thrus are turned on and off in the Control Panel.
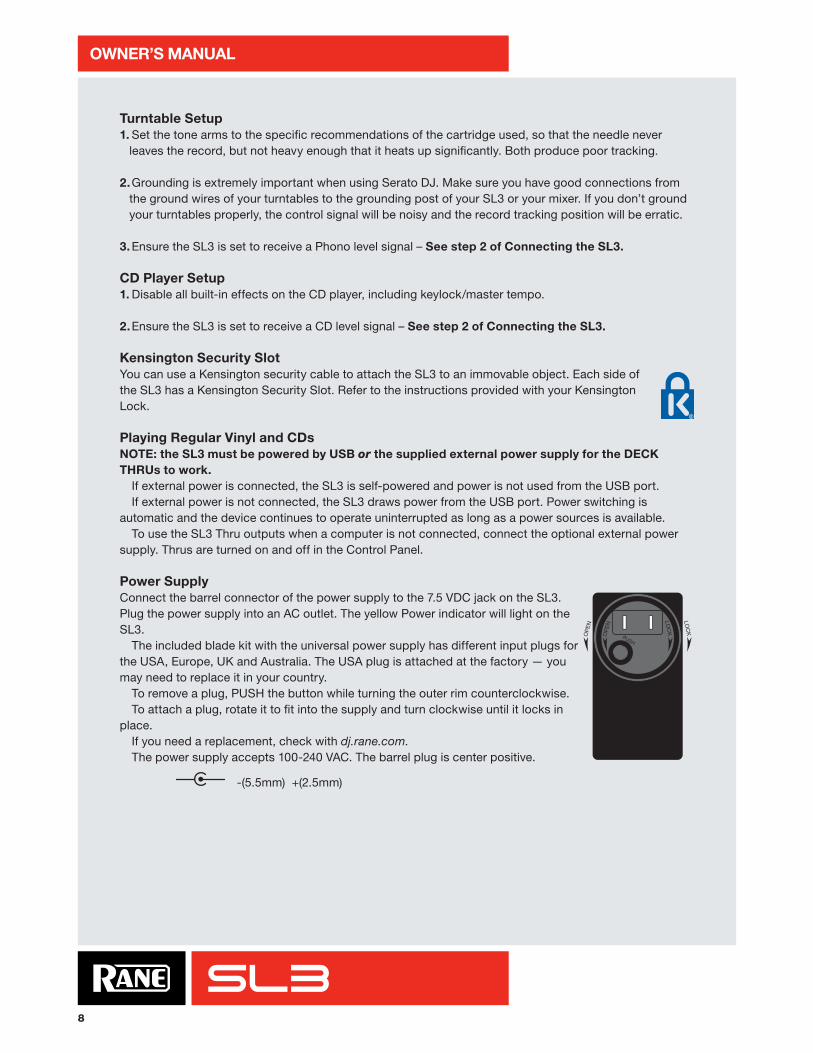
Power SupplyConnect the barrel connector of the power supply to the 7.5 VDC jack on the SL3. Plug the power supply into an AC outlet. The yellow Power indicator will light on the SL3. The included blade kit with the universal power supply has different input plugs for the USA, Europe, UK and Australia. The USA plug is attached at the factory — you may need to replace it in your country. To remove a plug, PUSH the button while turning the outer rim counterclockwise. To attach a plug, rotate it to fit into the supply and turn clockwise until it locks in place. If you need a replacement, check with dj.rane.com. The power supply accepts 100-240 VAC. The barrel plug is center positive.
-(5.5mm) +(2.5mm)
LOC
K
LOC
K
PUSH
OP
EN
OP
EN

OWNER’S MANUAL
9
SL3
Rane USB DriversRane ASIO and Core Audio drivers allow the SL3 to act as a 6-in 6-out external USB sound card for use with multiple third-party software applications that support Core Audio or ASIO. These drivers are multi-client, meaning they allow multiple applications on a computer to share the device at the same time. The ASIO and Core Audio drivers are included in the Serato DJ installer. After Serato DJ is installed, you will be prompted to "Install Driver" in the Online Panel if you connect a new compatible device that has not already had its driver installed.
ASIO (Windows)The SL3 uses a low-latency, multi-client, ASIO device driver to interface with software applications on Windows operating systems. Multi-client ASIO allows different audio software applications to simultaneously stream audio to and from the SL3. If the same playback channel is selected in more than one application, the driver mixes the audio from different applications before streaming it to the device. The driver Control Panel may be launched from the Windows Control Panel. Select Start > Control Panel > Rane SL3.
Core Audio (Macintosh)The SL3 uses a low-latency, Core Audio device driver to interface with software applications on Macintosh operating systems. Core Audio allows different audio software applications to simultaneously stream audio to and from the SL3. To launch the SL3 driver Control Panel, open the System Preferences window. Locate the SL3 in the “Other” section and click the SL3 icon.
Control PanelThe Driver Control Panel supports:• Analog Input Source: for Aux, Left Deck and
Right Deck, the Input as selected on the SL3 is indicated. The mode cannot be changed from the control panel.
• Phono Sensitivity: control appears as shown in the panel above if Phono input is selected on the mixer. Clicking on the down-arrow displays a list of 16 sensitivity settings between 2.5 mV and 10 mV in 0.5 mV steps. Choose the setting that most closely matches the level of a CD input or to the setting that provides the highest output without clipping.
• Output Source: can be set for independently for each of the three stereo outputs. Click the USB icon for USB playback and the Analog button for analog THRU. Analog allows playback of regular vinyl and CDs.
• Buffer Size increases or decreases the USB driver buffer size. The SL3 drivers run very reliably at latencies below 8 milliseconds. However, computer performance and available resources (number of apps running) may adversely affect streaming audio. If pops and clicks are heard in USB audio, try increasing the buffer size. In ASIO, total round-trip latency = buffer size + device latency. In Core Audio, total round-trip latency = buffer size + software application latency + device latency. SL3 latency is 1.6 ms at 48 kHz and 1.8 ms at 44.1 kHz.
• If the SL3 firmware on your computer is newer than installed in your SL3, the Update Device Firmware panel is enabled. Pressing the Update Firmware button updates the SL3 firmware to the newer version installed with your driver.
OWNER’S MANUAL
10
SL3
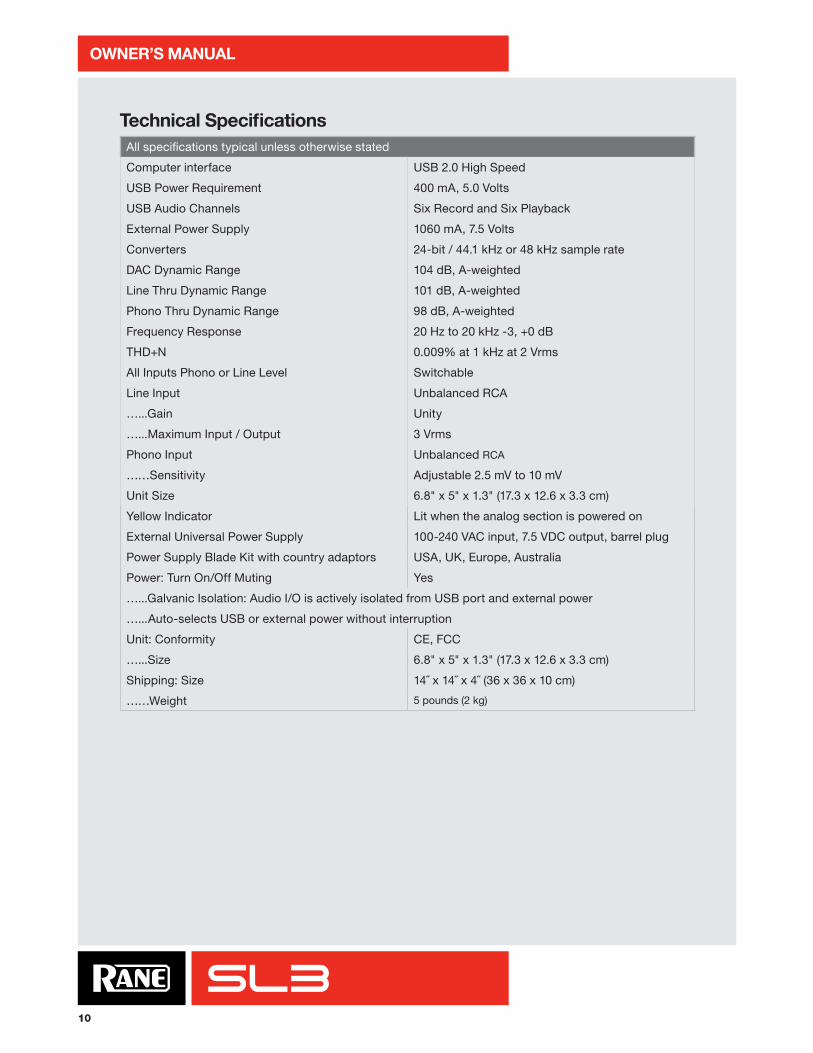
Technical SpecificationsAll specifications typical unless otherwise stated
Computer interface USB 2.0 High Speed
USB Power Requirement 400 mA, 5.0 Volts
USB Audio Channels Six Record and Six Playback
External Power Supply 1060 mA, 7.5 Volts
Converters 24-bit / 44.1 kHz or 48 kHz sample rate
DAC Dynamic Range 104 dB, A-weighted
Line Thru Dynamic Range 101 dB, A-weighted
Phono Thru Dynamic Range 98 dB, A-weighted
Frequency Response 20 Hz to 20 kHz -3, +0 dB
THD+N 0.009% at 1 kHz at 2 Vrms
All Inputs Phono or Line Level Switchable
Line Input Unbalanced RCA
…...Gain Unity
…...Maximum Input / Output 3 Vrms
Phono Input Unbalanced RCA
……Sensitivity Adjustable 2.5 mV to 10 mV
Unit Size 6.8" x 5" x 1.3" (17.3 x 12.6 x 3.3 cm)
Yellow Indicator Lit when the analog section is powered on
External Universal Power Supply 100-240 VAC input, 7.5 VDC output, barrel plug
Power Supply Blade Kit with country adaptors USA, UK, Europe, Australia
Power: Turn On/Off Muting Yes
…...Galvanic Isolation: Audio I/O is actively isolated from USB port and external power
…...Auto-selects USB or external power without interruption
Unit: Conformity CE, FCC
…...Size 6.8" x 5" x 1.3" (17.3 x 12.6 x 3.3 cm)
Shipping: Size 14˝ x 14˝ x 4˝ (36 x 36 x 10 cm)
……Weight 5 pounds (2 kg)
OWNER’S MANUAL
11
SL3
Technical SupportSupport for Serato DJ and Scratch Live software is provided for the life of your Rane hardware. Several support avenues are available:• Check the "support" tab at dj.rane.com.• Check the "support" tab at serato.com.• Phone support for USA customers from the Rane Factory at 425-355-6000 is only available 8:30 AM to
1PM and 2PM to 5PM Pacific Standard Time, Monday through Friday, closed on USA holidays.• International customers may receive phone support from your distributor during their business hours.
Contacts are under the "buy" tab at dj.rane.com.• Serato direct support by email is answered most non-holiday New Zealand weekdays, Monday through
Friday.• Serato direct support by a phone call to New Zealand is answered most non-holiday weekdays, Monday
through Friday 10AM to 6PM, New Zealand time. The phone number and office hours are at serato.com, and a note at the bottom shows if the office is open or closed. From the USA or Canada, dial 011 first, and then their number. Note that most cell phones are not able to call internationally, so use a land line.
The Rane and Serato Relationship• "Scratch Live" and "Serato DJ" are digital DJ solutions using software, hardware and Control Vinyl / CD.• Serato is the company that invented and develops "Serato DJ" and "Scratch Live" software applications.• Serato holds copyright on the Serato Control Vinyl and Serato Control CD.• Rane Corporation is a company that manufactures hardware to operate a functional Serato DJ system
utilizing Serato Control Vinyl and CD.• Rane Corporation & Serato both provide technical support for Rane's "Serato DJ" and "Scratch Live"
software.• Rane does not provide technical support for non-Rane hardware used with Serato software.• Rane does not provide technical support for other Serato software products, such as Serato Video,
Serato Video-SL, Serato Itch, or Serato DJ Intro. Technical support options are at serato.com/support.
dj.rane.com is your center for support, accessories, community, and learning how to get the most from your DJ equipment.
OWNER’S MANUAL
12
SL3
Limited WarrantiesFactory Authorized ServiceYour unit may someday need to be serviced by the Rane Factory if you live in the USA. International customers should contact your dealer or distributor for service. You must call the Rane factory before shipping. Please do not return your unit to Rane without prior authorization.
To obtain service or a Return Authorization in the USA, please phone Rane Corporation at 425-355-6000, or fax Rane at 425-347-7757.
Limited U.S.A. WarrantyRANE CORPORATION WARRANTS ALL RANE PRODUCTS (except those items classified and listed in "Wear Parts" on page 3) PURCHASED IN THE U.S. AGAINST DEFECTS IN MATERIAL OR WORKMANSHIP FOR A PERIOD OF TWO (2) YEARS. WEAR PARTS ARE LIMITED TO A PERIOD OF NINETY (90) DAYS FROM THE INITIAL DATE OF RETAIL PURCHASE FROM AN AUTHORIZED RANE DEALER—WEAR PARTS REQUIRE PROOF OF PURCHASE DATE. This limited warranty extends to all purchasers or owners of the product during the warranty period beginning with the original retail purchase. Rane Corporation does not, however, warrant its products against any and all defects: 1) arising out of material or workmanship not provided or furnished by Rane, or 2) resulting from abnormal use of the product or use in violation of instructions, or 3) in products repaired or serviced by other than the Rane Factory, or 4) in products with removed or defaced serial numbers, or 5) in components or parts or products expressly warranted by another manufacturer. Rane agrees to supply all parts and labor to repair or replace defects covered by this limited warranty with parts or products of original or improved design, at its option in each respect, if the defective product is shipped prior to the end of the warranty period to the Rane Factory in the original packaging or a replacement supplied by Rane, with all transportation costs and full insurance paid each way by the purchaser or owner.
Limited Warranty Outside the U.S.A.RANE PRODUCTS ARE WARRANTED ONLY IN THE COUNTRY WHERE PURCHASED, THROUGH THE AUTHORIZED RANE DISTRIBUTOR IN THAT COUNTRY, AGAINST DEFECTS IN MATERIAL OR WORKMANSHIP, THE SPECIFIC PERIOD OF THIS LIMITED WARRANTY SHALL BE THAT WHICH IS DESCRIBED TO THE ORIGINAL RETAIL PURCHASER BY THE AUTHORIZED RANE DEALER OR DISTRIBUTOR AT THE TIME OF PURCHASE. Rane Corporation does not, however, warrant its products against any and all defects: 1) arising out of materials or workmanship not provided or furnished by Rane, or 2) resulting from abnormal use of the product or use in violation of instructions, or 3) in products repaired or serviced by other than authorized Rane repair facilities, or 4) in products with removed or defaced serial numbers, or 5) in components or parts or products expressly warranted by another manufacturer. Rane agrees, through the applicable authorized distributor, to repair or replace defects covered by this limited warranty with parts or products of original or improved design, at its option in each respect, if the defective product is shipped prior to the end of the warranty period to the designated authorized Rane warranty repair facility in the country where purchased, or to the Rane factory in the U.S., in the original packaging or a replacement supplied by Rane, with all transportation costs and full insurance paid each way by the purchaser or owner.
ALL REMEDIES AND THE MEASURE OF DAMAGES ARE LIMITED TO THE ABOVE SERVICES, IT IS POSSIBLE THAT ECONOMIC LOSS OR INJURY TO PERSON OR PROPERTY MAY RESULT FROM THE FAILURE OF THE PRODUCT; HOWEVER, EVEN IF RANE HAS BEEN ADVISED OF THIS POSSIBILITY, THIS LIMITED WARRANTY DOES NOT COVER ANY SUCH CONSEQUENTIAL OR INCIDENTAL DAMAGES. SOME STATES OR COUNTRIES DO NOT ALLOW THE LIMITATIONS OR EXCLUSION OF INCIDENTAL OR CONSEQUENTIAL DAMAGES, SO THE ABOVE LIMITATION MAY NOT APPLY TO YOU.
ANY AND ALL WARRANTIES, EXPRESS OR IMPLIED, ARISING BY LAW, COURSE OF DEALING, COURSE OF PERFORMANCE, USAGE OF TRADE, OR OTHERWISE, INCLUDING BUT NOT LIMITED TO IMPLIED WARRANTIES OF MERCHANTABILITY AND FITNESS FOR A PARTICULAR PURPOSE, ARE LIMITED TO A PERIOD OF TWO (2) YEARS FROM EITHER THE DATE OF ORIGINAL RETAIL PURCHASE OR, IN THE EVENT NO PROOF OF PURCHASE DATE IS AVAILABLE, THE DATE OF MANUFACTURE, SOME STATES OR COUNTRIES DO NOT ALLOW LIMITATIONS ON HOW LONG AN IMPLIED WARRANTY LASTS, SO THE ABOVE LIMITATIONS MAY NOT APPLY TO YOU. THIS LIMITED WARRANTY GIVES YOU SPECIFIC LEGAL RIGHTS, AND YOU MAY ALSO HAVE OTHER RIGHTS WHICH VARY FROM STATE TO STATE, COUNTRY TO COUNTRY.
OWNER’S MANUAL
13
SL3
Warranty Procedure - Valid in U.S.A. only
NOTICE! You must complete and return the warranty card or register your product online to extend the Warranty from 2 years to 3 years!
TO VALIDATE YOUR EXTENDED WARRANTY: Use the postcard that came in the box with your unit, or go to the
support page at dj.rane.com and click on product registration. Fill out the warranty completely, being sure to include the model and serial number of the unit since this is how warranties are tracked. If your Rane product was purchased in the U.S.A., mail the completed card or register online with to Rane Corporation within 10 days from
the date of purchase. If you purchased the product outside the U.S.A. you must file your warranty registration with the Rane Distributor in that country. It is advised that you keep your bill of sale as proof
of purchase, should any difficulties arise concerning the registration of the warranty card. NOTICE: IT IS NOT NECESSARY TO REGISTER IN ORDER TO RECEIVE RANE CORPORATION’S STANDARD TWO YEAR LIMITED WARRANTY.
WARRANTY REGISTRATION is made and tracked by MODEL AND SERIAL NUMBERS ONLY, not by the purchaser’s or owner’s name. Therefore any warranty correspondence or inquires MUST include the model and serial number of the product in question. Be sure to fill in the model and serial number in the space provided below and keep this in a safe place for future reference.
WARRANTY SERVICE MUST BE PERFORMED ONLY BY AN AUTHORIZED RANE SERVICE FACILITY LOCATED IN THE COUNTRY WHERE THE UNIT WAS PURCHASED, OR (if product was purchased in the U.S.) AT THE RANE FACTORY IN THE U.S.. If the product is being sent to Rane for repair, please call the factory for a Return Authorization number. We recommend advance notice be given to the repair facility to avoid possible needless shipment in case the problem can be solved over the phone. UNAUTHORIZED SERVICE PERFORMED ON ANY RANE PRODUCT WILL VOID ITS EXISTING FACTORY WARRANTY.
FACTORY SERVICE: If you wish your Rane product to be serviced at the factory, it must be shipped FULLY INSURED, IN THE ORIGINAL PACKING OR EQUIVALENT. This warranty will NOT cover repairs on products damaged through improper packaging. If possible, avoid sending products through the mail. Be sure to include in the package:1. Complete return street shipping address (P.O. Box numbers are NOT acceptable).2. A detailed description of any problems experienced, including the make and model numbers of any other system
equipment.3. Remote power supply, if applicable.
Repaired products purchased in the U.S. will be returned prepaid freight via the same method they were sent to Rane. Products purchased in the U.S., but sent to the factory from outside the U.S. MUST include return freight funds, and the sender is fully responsible for all customs procedures, duties, tariffs and deposits.
In order to qualify for Rane’s one year extended warranty (for a total of 3 years parts and labor), the warranty must be completely filled out and sent to us immediately. Valid in USA only.
We recommend you write your serial number here in your owners manual and on your sales receipt for your records.
SERIAL NUMBER:____________________________PURCHASE DATE:___________________________

OWNER’S MANUAL
14
SL3
OWNER’S MANUAL
15
SL3
EU Declaration of Conformity
Product Model: SL3 Serial Numbers: 900000 – 999999Product Type: Professional Audio Signal Processing
Manufacturer: Rane CorporationAddress: 10802 47th Avenue West, Mukilteo WA 98275-5000 USA
This declaration is issued under the sole responsibility of Rane Corporation.
The object of the declaration described above is in conformity with the relevant Union harmonisation legislation:2014/30/EU The Electromagnetic Compatibility Directive2012/19/EU The Waste Electrical and Electronic Equipment Directive2011/65/EU The Restriction of Hazardous Substances Directive
References to the relevant harmonised standards used in relation to which conformity is declared:EN55103-1:2009/AM1:2012 Compatibility of professional electronic A/V apparatus emissions.EN55103-2:2009 Compatibility of professional electronic A/V apparatus immunity.EN50581:2012 Technical documentation for RoHS assessment of electronic products.
Additional Information:Environment E2CE mark first affixed in 2008
In order for the customer to maintain compliance with these regulations, high quality shielded cable must be used for interconnection to other equipment. No changes or modification of the equipment, other than that expressly outlined by the manufacturer, are allowed. The user of this equipment shall accept full responsibility for compliance with Union harmonisation legislation in the event that the equipment is modified without written consent of the manufacturer.
EN55103-2 Immunity Results: THD+N: 4 dBu, 400 Hz, BW 20 Hz - 20 kHz
Test Description Measurement ConditionsRF Electromagnetic Fields Immunity80 MHz - 1000 MHz, 1 kHz AM, 80% depth, 3V/m <-79 dB
Magnetic Fields Immunity50 Hz - 10 kHz, 3.0 - 0.3 A/m <-62 dB
Signed for and on behalf of: Rane CorporationPlace of issue: Mukilteo WA USA Date of issue: July 10, 2008Name: Roy G. Gill Function: Compliance Engineer Signature:

OWNER’S MANUAL
16
SL3PART 22974