RAINBOOK READERS/EDITORS - desertharvesters.org · Web view- U-SHAPED BLOWER TUBE (2 J-SHAPED...
49
DESERT HARVESTERS’ HAMMERMILL OPERATION / MILLING MANUAL June 27, 2016 TABLE OF CONTENTS LIST OF EQUIPMENT, TOOLS, & SUPPLIES p. 2 HOOKING TRAILER UP TO TRUCK FOR TRANSPORT p. 6 SET UP AT SITE p. 7 MESQUITE POD SIGN IN, INSPECTION, TICKETING, AND MILLING PAYMENT – set up and operation p. 13 MESQUITE POD SIGN IN, INSPECTION, TICKETING, AND MILLING PAYMENT – talking points p. 17 OPERATION OF MILL p. 19 CLEANING THE MILL AT MILLING SITE p. 23 CLEANING MILL AT CARWASH p. 24 STORING THE MILL BETWEEN MILLINGS p. 25 TROUBLESHOOTING p. 26 HOW WE RUN THE DESERT HARVESTERS MESQUITE MILLINGS p. 30 1
Transcript of RAINBOOK READERS/EDITORS - desertharvesters.org · Web view- U-SHAPED BLOWER TUBE (2 J-SHAPED...
DESERT HARVESTERS’HAMMERMILL OPERATION / MILLING MANUAL
June 27, 2016
TABLE OF CONTENTS
LIST OF EQUIPMENT, TOOLS, & SUPPLIES p. 2
HOOKING TRAILER UP TO TRUCK FOR TRANSPORT p. 6
SET UP AT SITE p. 7
MESQUITE POD SIGN IN, INSPECTION, TICKETING, AND MILLING PAYMENT – set up and operation p. 13
MESQUITE POD SIGN IN, INSPECTION, TICKETING, AND MILLING PAYMENT – talking points p. 17
OPERATION OF MILL p. 19
CLEANING THE MILL AT MILLING SITE p. 23
CLEANING MILL AT CARWASH p. 24
STORING THE MILL BETWEEN MILLINGS p. 25
TROUBLESHOOTING p. 26
HOW WE RUN THE DESERT HARVESTERS MESQUITE MILLINGS p. 30
INFORMATION YOU CAN SHARE IF PEOPLE QUESTION THE COST/ VALUE OF OUR MILLING SERVICE p. 33
DESERT HARVESTERS RENTAL & MESQUITE MILLING TERMS p. 34
HAMMERMILL MANUAL FROM MEADOWS MILLS p. 38
NOTE: All mill operators must wear closed toe shoes and eye and ear protection. Ideally, they also all wear a Desert Harvesters t-shirt.
1

List of Equipment, Tools, & Suppliesfor Desert Harvesters Hammermill
as of 2/1/2016
MILL EQUIPMENT (ON TRAILER)- MASTER LOCKS, 9 (TO LOCK AMMO BOXES AND TRAILER HITCH)- OTHER LOCKS, 1 FOR GARAGE DOOR (NOT SAME KEY AS MASTER LOCKS)- SUPPORT POLE FOR FLOUR BAG AND BLOWER TUBES (DUCTWORK)- LONG BLOWER TUBE- J-SHAPED BLOWER TUBE- U-SHAPED BLOWER TUBE (2 J-SHAPED TUBES BOLTED TOGETHER)- BLOWER VAT (HOPPER)- RUBBER BOOT COUPLINGS WITH LARGE METAL HOSE CLAMPS: 3 (2 ATTACHED TO LONG BLOWER TUBE, 1 ATTACHED TO BLOWER VAT (HOPPER))- BRUTE GARBAGE CAN, 2 LARGE (FOR COLLECTING LARGE AMOUNTS OF FLOUR) - GARBAGE CANS, 2 LARGE (FOR STORAGE (MISSING 1 LID))- WATER BUCKETS, 8 (CLOTH - BUNGEE CORDS INSIDE ONE)- BUNGEE CORDS : 48” - 3 24”- 6 18”- 2 12”- 8 8”- 2- ASSORTED OTHER-LENGTH BUNGEE CORDS = 6-8- RATCHETING TIEDOWNS, AT LEAST 2 (KEEP IN ONE WATER BUCKET IN BRUTE CAN) TAN – 3 (OLD) ORANGE – 5 RED – 1- GAS CAN (FULL, UNLEADED GAS)- WHITE 5-GALLON BUCKETS W/ LIDS & HANDLES, 30 (TO COLLECT PODS, FLOUR)- CANVAS TARP (IN CASE OF RAIN)- BROOM, 1- BUCKET-VAC VACUUM (FOR FLOUR/CHAFF ONLY = FOOD GRADE)- WET/DRY VACUUM (FOR VACUUMING TRAILER, ETC. (NOT FOR FLOUR/CHAFF))
2
- STEP LADDER, ALUMINUM 6 FT- 4 METAL POSTS (FOR BOUNDARY ROPE TO KEEP PUBLIC SAFELY AWAY FROM MILL)- SPARE TIRE FOR TRAILER- HAND CART WITH WHEELS (FOR PULLING TRAILER BY HAND)- SPRING SCALE POLE STAND- TICKETING BOX - WITH INSPECTION MATERIALS FOR MILLINGS - CHECK TO SEE IT IS COMPLETE (WITH JEAU ALLEN OFF-SEASON)
MILL EQUIPMENT/SUPPLIES BESIDE TRAILER - SANDWICH BOARD SIGN - DESERT HARVESTERS- TICKETING SIGN-IN SIGN (LARGE, WITH JEAU ALLEN OFF SEASON)- TENTS, 2 (LARGE/PORTABLE, WITH COVERS AND BUNGEES INSIDE THEIR BAGS)
MILL EQUIPMENT/SUPPLIES IN CLEAR PLASTIC TOTE BESIDE TRAILER - TASTING PODS (CHECK THAT ALL CATEGORIES OF TYPES OF PODS ARE INCLUDED)- PAPER BAGS (FOR PODS TO TASTE)- STUFF TO SELL (TAKE INVENTORY BEFORE & AFTER EVENT):
- COOKBOOKS, 6 - T-SHIRTS ($15/$20)- ZIPLOCK BAGS, 1 GALLON (FOR $1 DONATION FOR FLOUR, IF NEEDED)
- BLACK TRASH BAGS, 2 BOXES- WIPE CLOTHS, 1 PACKAGE- PAPER TOWELS, 3 ROLLS- ENVELOPES, 1 SMALL BOX- TICKET ROLLS, 3 (1 YELLOW, 1 RED, 1 BLUE)- BLUE TAPE, 1 ROLL- PANCAKE SIGN- DUST MASKS, 1 PACKAGE DISPOSABLE- PENS & PENCILS, 20-30- SCISSORS, 2- BLEACH-WATER SPRAY BOTTLE- BACK-UP BLEACH
SUPPLIES FOR BAGGING FLOUR: - FUNNELS, 2 (1 LARGE, 1 MEDIUM (BOTH FOOD-GRADE))
3
- ZIPLOCK BAGGIES (EXTRA) - SPOONS, 2 LARGE
MILL TOOLS/SUPPLIES AMMO BOX #1:- MILL ENGINE KEY AND AMMO BOXES LOCK KEYS (2 SETS)- LARGE SCALE (SMALL ONE IN TICKETING BOX)- PENS, SHARPIES- 12-FT LINK CHAIN- PLASTIC GAS SIPHON- GAS TANK FILTER, EXTRA- BLACK MILL ENGINE PART- MOTOR OIL (1 PINT, SYNTHETIC 10/30W)- EXTRA MASTER LOCKS, 2- COUNTER- GARAGE DOOR KEY (KEEP HERE UNTIL YOU GIVE BACK TO MILL COORDINATOR)
AMMO BOX #2: - WASHERS, LARGE, 2 (FOR TRAILER TAILGATE)- BOLT WRENCH- JUMPER CABLES- TIRE IRON- CLIMBING CORD- HAND PUMP (TIRE)- ELECTRICAL TAPE, BLACK, 1 ROLL- METAL TAPE, SILVER, 1 ROLL- REFLECTOR TAPE- WRENCH, MISC. (ROUND KEY)- BANDO POWER KING BELT, B-75- NUTS, BOLTS, PLASTIC BOTTLE #1 (ASSORTED)- ROPE (TO GO AROUND AND THROUGH THE METAL POSTS)- TOOLS, PLASTIC BOTTLE #2:
- SCREWDRIVERS, 2 STANDARD- SCREWDRIVER, 1 PHILLIPS- CRESCENT WRENCH, 1- WRENCH, 5/16-INCH- WRENCH, 10 MM
AMMO BOX #3:
4

- 2 STEEL MILL SCREENS (KEEP IN AMMO BOX WHEN NOT IN USE) - LARGE CLOTH BAG W/ZIPPER (FOR FLOUR DUST/PASTRY FLOUR)- FUNNEL-SHAPED FLOUR BAG (ATTACH BY BUNGEE CORD TO 5-GALLON BUCKETS)- FLOUR BAG, 1 (OLD ONE FOR PREVIOUS DUCTWORK SETUP)
AMMO BOX #4:- MONEY BOX ($20, "SQUARE" FOR TRANSACTIONS, PENS, TRANSACTION NOTEBOOK)- 3 RUBBER BOOT COUPLINGS W/ HOSE CLAMPS (IF NOT ALREADY ATTACHED TO TUBES: 2 TO LONG BLOWER TUBE, 1 TO BLOWER VAT/HOPPER)- TRASH BAGS (MORE)- ZIPLOCK BAGGIES (MORE)- FIRE EXTINGUISHER- WHITE TOWELS, 12 (TO KEEP CHAFF OUT OF BLOWER WHEN CLEANING)- CLEANING BRUSHES, 2- HOSE CLAMPS, 2 (EXTRA)- FLANGES WITH HOSE CLAMPS, 4
AMMO BOX #5:- HONDA ENGINE MANUAL- MILL OPERATOR MANUAL - GREEN MILL-EVENT BOOKLET (LISTS, EVENT DETAILS, WORKERS’ COMP FORMS)- FIRST-AID KIT- SAFETY GLASSES – 6 PAIRS- EAR PLUGS – MULTIPLE (DISPOSABLE)- EAR MUFFS FOR EAR PROTECTION, 2- DUST MASKS AND VENTILATORS (MORE, KEEP EXTRAS IN PLASTIC TOTE)- EYE/EAR PROTECTORS, 2- GLOVES, 3 PAIR HEAVY DUTY WORK
5
HOOKING TRAILER UP TO TRUCK FOR TRANSPORT
• Put all loose items from trailer into back of vehicle towing the trailer, making sure all items are secure. Remove fire extinguisher from its holder on trailer, and place in more secure place for transport (may fall out of holder on bumpy road)
• Use hand dolly hitch to move trailer closer to hitch if needed (bike pump is in ammo box if needed to pump up tires). NOTE: It is much easier to move trailer manually if you temporarily put weight on the back of the trailer (4 steel posts work great for this), because the trailer is otherwise too front-heavy.
• Make sure hitch lock is open, then lift trailer onto a 2-inch ball hitch. Lock the hitch lock onto the ball hitch, and secure it in place with cotter pin.
• Hook up trailer taillights to taillight jack on truck.
• Hook trailer chains to truck, making sure the chains cross each other under the hitch (this way the trailer won't be lost if the hitch fails).
• Walk around trailer to inspect if all is road worthy.- Tail lights are working- All stabilizing jacks are up and locked securely in place with cotter pins
all the way in.- There are no loose items in the trailer- All ammo box lids are securely locked in place - Trailer hitch is securely attached to truck's 2-inch ball hitch
6
SET UP AT SITE
Can have volunteers set up sign-in, pod inspection, and ticketing tables and shade canopies (weigh down canopies as soon as they are set up) as mill crew sets up mill
AT MILLING SITE, ORIENT MILL TO WIND• At milling site, place the mill so the garbage can and/or bucket collecting flour and the flour dust bag are downwind of the mill. The bucket collecting the flour is set near the mill’s fan on the rear right corner near (if you are looking to front/hitch of trailer) of trailer, while garbage can collecting the flour is set on the ground by the rear right corner of the trailer.NOTE: collect flour in bucket for small milling batches (less than 15 gallons of whole pods). Collect flour in garbage can for large mill batches (more than 15 gallons of whole pods).
• If you can set up the mill in a spot that will be in shade for the duration of the milling (perhaps under a shade tree), you will not need to set up (and then clean after the milling) a shade canopy over the mill.
STABILIZE & LEVEL TRAILER, and check oil• Park trailer on level ground• Put down stabilizing jacks, making sure trailer is level
- If trailer is not more or less level, but rather sloped, this will affect the level of oil in the engine, and it may not turn on, because the sensor will think the oil level is too low.
- Check oil level in motor – should be ¾ full on dip stick, assuming trailer is level. Replace and tighten dip stick.
• Put fire extinguisher back into its holder on the trailer frame.
SET UP METAL POSTS AND ROPE AROUND MILL• Place them 10 feet from the mill to keep the public away from the mill when in operation• Remove tailgate from back of trailer (hold washers in place with tailgate’s cotter pins)
BLOW OUT ANY DEBRIS THAT MAY BE IN MILL BOX AND FAN• Look inside mill box to make sure there is no large debris or critters that need to be removed before running the motor. Clean out if needed – but do NOT use the chaff vacuum (marked CHAFF ONLY), which is only for food-grade chaff (not rodent droppings and dirt). Close box lid.• Run the mill motor at full throttle for 60 seconds to clear out any debris that may be in the mill box or fan housing.
7
• Turn motor ON with the following steps: 1. Put on ear and eye protection2. Make sure the area around the mill, motor, and belts is clear3. Move throttle level to ON4. Turn fuel valve level ON5. The choke may need to be open full, half open, or closed depending on
how warm the engine is. If cold the choke will likely be needed to be full ON. If the engine is warm, the choke will likely only need to be partially on.
6. Turn motor ON by inserting engine key and turning to START7. Once the motor starts, turn the choke OFF or the motor will run weak and
sputter.
• Turn motor OFF with the following steps:1. Turn key to OFF, and remove key from motor2. Turn OFF throttle.3. Turn OFF fuel valve lever4. Wait for motor to completely shut off
8

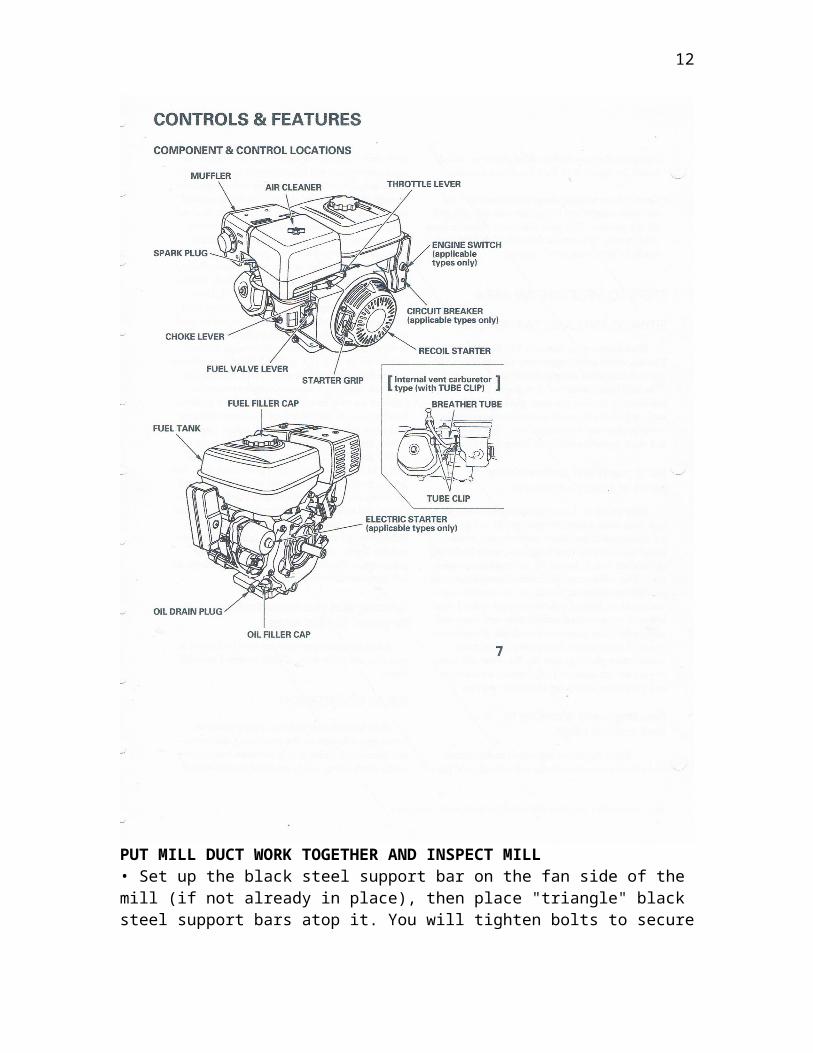
PUT MILL DUCT WORK TOGETHER AND INSPECT MILL• Set up the black steel support bar on the fan side of the mill (if not already in place), then place "triangle" black steel support bars atop it. You will tighten bolts to secure all in place AFTER you get the ductwork where you want it. The ductwork will hang on this steel support.
9

• Set up ductwork so flour bag will be over the rear right corner of the trailer. The exhaust/dust duct and bag should be over the rear right wheel/fender of the trailer. See image. This should be the downwind side of mill so the motor, mill, and millers won’t be covered in mesquite dust.
• Do NOT put cloth bag on the end of the blower vat yet. First…
BLOW OUT DUCTWORK & LISTEN TO MOTOR• Turn motor ON, and run for 60 seconds at full throttle to blow out the ductwork (old flour can crust and mold on inside of ductwork if it was not thoroughly cleaned after last use).
• Listen to the motor, all should sound smooth and even (belts should not be hitting the belt guard, if they are shut the motor off and adjust the belts). There is a bolt on the grey base plate below the motor, facing the hitch side of the trailer. This bolt can be loosened or tightened to adjust belt tension. 3800 rpm is ideal for operating mill.
• When all is good, shut the motor OFF (remove key from motor, turn off throttle, turn off gas). Attach mill key and its cord to motor via carabiner so key does not get pocketed or lost during operation.
• Turn motor OFF (remove key from motor, turn off throttle, turn off fuel valve lever)
• Insert screen into milling chamber (beneath blades)
• Close milling chamber and tighten lid with wing nut (make sure mill box is correctly closed – there should be no visible gap between closed red lid and red metal base of mill box)NOTE: if you loose bolts, nuts, or washers during set up, there are spares in plastic jar in ammo box. Tell hammermill coordinator if we need more spares
• After testing the motor, put narrow end of dust/pastry flour bag over the dust/pastry flour outlet of the duct (see image on next page). Use bungee cord to hold the bag tight to the duct. Make sure zipper (beneath Velcro) at bottom of bag is closed to hold in the mesquite dust/pastry flour.
10

• Tightly attach the narrow end of the cloth funnel "skirt" to the bottom of the blower vat. Use the small funnel “skirt” to collect flour in a 5-gallon bucket. Use the large funnel “bag” if needed on the grey Brute container can. NOTE: If Brute container is not in use make sure it is not left in a place where people will mistake it for a garbage can and put garbage in it.
• Place the bucket or Brute garbage can below the funnel bag (make sure the bucket or Brute container is clean – there can be residual flour, but nothing else in flour bucket or Brute container). Then put one flap of the bag's skirt on the inside of the bucket/Brute, and put the other flap of the skirt on the outside of the bucket/Brute. Bungee the outer skirt tightly against the bucket/Brute. The bucket/Brute will collect the flour.
• If using the 5-gallon bucket for flour, put an extra empty clean bucket beside the bucket attached to the funnel skirt. After milling a batch of pods, the empty bucket will replace the one with flour.
11
• Set CHAFF vacuum on same side of mill as the motor switch to keep vacuum hose AWAY FROM the hot black exhaust box/muffler on top of the motor. Get chaff containers ready for milling—one extra clean bucket and TWO clean Brute containers, one marked GOOD CHAFF the other BAD CHAFF, referring to the flavor quality of the pods being milled). After milling a batch of pods, bucket underneath CHAFF vacuum will get taken to table where flour and chaff are put into containers provided by harvester. If harvester does not want their chaff, the CHAFF bucket is emptied into the appropriate Brute container (flavor quality of pods should be marked on mill ticket).
• Make sure all ammo boxes are closed, and everything not needed for milling is put away (otherwise it will get covered in sticky mesquite dust and may trip someone) and trailer is clear of loose items and ready to mill pods.
• Shade canopy can now be placed over mill and millers, if needed. Make sure canopy is weighed down with a canvas bucket filled with water, dirt, or sand and long bungee cords at each leg of canopy. There should be a folding camping shovel with the trailer to fill the canvas buckets with dirt.
12

MESQUITE POD SIGN-IN, INSPECTION, TICKETING, AND MILLING PAYMENT – set up and operation
Thanks to Jeau Allen of Aravaipa Heirlooms for creating the sign-in, inspection, ticketing, & payment system!
STEP 1 / TABLE 1 — SIGN-IN & TASTE (RED)1. Have harvester sign in on Inspection Sign In (see sign in sheet). A letter
is assigned to each name.2. Fill out RED Inspection Pass with name and queue (letter), and give to
harvester. Explain to harvester that the pass and others to come, make sure they will get the flour from their pods, that their pods are ready to be milled, and enable us to monitor quality and quantity of what goes through mill.
3. Do snap/dryness test on some of the pods the harvester has brought. Pods should be so dry that they snap in two when you try to bend them. Moist, bendy pods will turn into a gooey mess, not flour, in the mill and bog down the milling.
4. Ask the harvester if they’ve tasted their pods…and if so, are they satisfied with the taste? If they haven’t tasted them, have them taste them with you.
5. Compare the flavor of their pods with those in the sample bags. Pods should have a sweetish flavor. The tastes/sensations to avoid are: bitter, chalky, a burning sensation in the back of the throat, or drying of the mouth (samples will be available for comparison).
6. If harvester is satisfied with taste of their pods and wants to continue with grinding, go over fees and send to next table (with Inspection Pass).NOTE: No one is turned away from milling based on flavor of pods. Pods are only turned away if they are too moist and bendy, moldy, or dirty.
7. Let people know they have a will call option at the Desert Harvesters milling. After their pods are inspected, and they’ve received a ticket having paid for the milling their pods, they can leave their pods with us and we’ll call them within a week with info on where to pick up their flour and chaff. They can find out more at the mill ticketing table after pod inspection.
STEP 2 / TABLE 2 — INSPECTION (RED to YELLOW)1. Clip RED Inspection Pass to “Now Inspecting Queue” tag on table.2. Take pods out by handful (don’t dump) from containers the client brought
their pods in, and spread pods onto table for inspection.3. Ask harvester WHEN harvested (before/after rains), WHERE harvested
(on trees/ground, sprayed areas, close to roads, etc., HOW harvested (did they wash the pods, increasing invisible mold/aflatoxin risk?)
4. Explain that in the low desert the best practice is to harvest BEFORE the rains and off the tree (not the ground) as this dramatically reduces the risk of unhealthy invisible molds growing on the pods. Refer to Best Harvesting
13
Practices laminated sheet on inspection table and info at www.DeserHarvesters.org)
5. If harvester wishes to proceed, inspect pods for visible mold, rot, debris, rocks, moisture content/dryness, etc., and remove undesirables. (If milling in an area free of non-native mesquite (such as Cascabel), all undesireable pods and their seeds should be removed from site so any non-native seed don’t accidently germinate in the area).
6. Reject any pods that are not dry enough that they do not snap in two when you try to bend them. Folks can lay moist pods out on a tarp or hood of a car in the full sun to dry out moist pods. Once try they can try going through inspection again.
7. Transfer clean, inspected pods (by handful) into DESERT HARVESTERS containers ONLY (this way we know they’ve been inspected).
8. Inspector signs off on RED Inspection Pass, including Inspector Name and number of gallons to be milled, and:
a. mark a “+” sign in upper right hand corner of ticket if pods have no bad flavor characteristics.
b. Mark a “-“ sign in upper right hand corner of ticket if pods DO have bad flavor characteristics (bitter, chalky, drying, burning).
Give pass back to harvester, direct to next table.9. Clean off table with spray bleach solution
STEP 3 / TABLE 3 – TICKETING, WEIGHING, & PAYMENT (YELLOW to GREEN)
1. Collect RED Inspection pass, and fill in Harvester’s name on Ticketing Log (see log sheet; note that identifying “letter” now becomes “number”).
2. Weigh Desert Harvesters bucket(s) with pods and record weight/total gallons, and amount due on Ticketing Log.
3. Collect fees (See rates below…pods are paid for on the basis of gallons, not weight.)
4. Fill out green Mill Ticket (harvester keeps red Inspection Pass) with Mill Ticket “number”, name, and number of buckets, and tape to outer rim of bucket(s). (Number each of multiple bucket with labels, e.g., 1 of 3, 2 of 3, and 3 of 3, etc.)
5. Ask harvester if they want to keep “chaff”, if so, note on green Mill Ticket “WANT CHAFF”
6. Ask harvester if they have a container for their flour, and one for their chaff (if not, they can purchase zip lock bags for $1.00 each). They MUST put their name and contact information (phone and email) on all their containers.
7. Ask harvester if they plan to leave the premises for the day and not return (if so, their pods are placed in WILL CALL, and will be ground later, and can be picked up another day; time and location to be determined). They will receive a call from Desert Harvester staff within a week. If they plan
14

to stay on the premises, however, they can check back at the table and pick up their flour when ready.
8. Keep harvester’s containers together with their pods, and have a Desert Harvester’s volunteer or miller (ONLY) take the pods and containers to table 4 / the mill.
9. NOTE: We only mill up to 15 gallons of whole pods at a time. This way people who harvested smaller amounts are not waiting behind those that harvested large amounts. Those bringing more than 15 gallons of whole pods, can have extra pods inserted in the back of the milling line in 15 gallon increments, or they can arrange to leave their pods in WILL CALL and have the resulting flour picked up later – MAKE SURE WE HAVE THEIR PAYMENT AND CONTACT INFO (phone and email), and that all has been inspected before pods are placed in will call.
STEP 4 / TABLE 4 – READY TO MILL (GREEN)1. Only a Desert Harvesters volunteer or miller will take ticketed buckets
of pods to Table 4 / the mill or will call. Only the millers are allowed on the inside of the rope surrounding mill.
2. Ticketed buckets are to be kept in separate groups – each group being for a different harvester. The containers into which the resulting flour will be placed must be kept with ticketed buckets. All flour containers must have harvesters’ contact info (phone and email).
3. As desert harvesters buckets are emptied at the mill, the millers must return the empty buckets to Table 4. From there a volunteer must keep taking the empty Desert Harvesters’ buckets back to Table 2 / Inspection.
WILL CALL / OPTIONAL STEP 5 / DESIGNATED AREA 5 – PODS STORED FOR LATER MILLING
- If at the event we are accepting inspected and paid for pods for milling at a later time (potentially within a non-public milling set up within a week of the milling event) – then a location must be identified where these pods can be stored where they won’t be interfered by the public.
- Should there be a lull in the milling, the millers should then begin milling batches of the stored pods in will call, until batches needing to be milled at the milling again pick up.
- Harvesters of the stored pods must be called within a week of dropping off their pods with the location of where they can pick up their flour.
- NOTE: Desert Harvesters must collect the fees for all milling that will be done AFTER the public event
MILLING FEES for Desert Harvesters’ events:$3 per gallon of whole pods, with a minimum of $10.
15

This generally works out to a cost of about $3 per pound of flour milled. This is a bargain considering that the flour usually sells for $14 to $20 per pound.
NOTE: Milling fees may be different (lower, but never higher) at events organized by other organizations that hire Desert Harvesters. Head miller should have this squared away with the host organization BEFORE the event.
EQUIVALENCIES:One gallon of pods mills to one pound of flour.5 gallons of pods mills to a bit more than 1 gallon of flour.
16

MESQUITE POD SIGN IN, INSPECTION, TICKETING, AND MILLING PAYMENT – talking points
KEY TALKING POINTS FOR THE PUBLICThis is the first point of interaction we have with the public. The following are key points to convey to them:
1. THANKSThank and welcome folks for engaging with our abundant, delicious and nutritious wild native foods! They are part of a growing, vibrant movement.
2. QUALITYAsk people if they tasted the pods before they picked.
Then taste their pods and have them taste them too.Ask them how they tasteAny of the 4 unwanted flavor present (or as aftertaste)?
Then invite folks to taste our samples of the 4 unwanted characteristics. Finish with a good tasting sweet pod. GIVE PEOPLE PIECES OF THE PODS NOT WHOLE PODS SO OUR SAMPLES LAST.
Explain we are doing this to increase people’s awareness of the diversity of flavors available for harvest, and to improve the quality of harvests, because the quality of the pod ultimately determines the quality and flavor of any foods made with it. Encourage them to only harvest from, and plant good- to great-tasting trees.
Refer them to the TASTE BEFORE YOU PICK poster.
3. SAFETYAsk people when did they harvest – before or after the rains?Ask people how they harvested their pods – off ground, off tree?
Recommend people in the hot, low desert (below 4,000 feet elevation) harvest BEFORE the rains to avoid unhealthy invisible molds (and associated aflatoxins) that grow on mesquite pods (and other grain crops like wheat and corn) when the ripe pods/crop comes into direct contact with high temperatures and moisture.
In higher, cooler elevations (above 4,000 feet), pods ripen later, often after the rain. The cooler temperatures reduce the invisible mold growth, so harvest the pods as soon as you can after they ripen, dry them out, and store them dry.
It is best to harvest pods off the tree so they don’t come into contact with herbicides, feces, or moisture on the ground.
17
Do not wash or wet harvested pods. Dry them out right after harvest and store them dry.
Refer people to the AFLATOXINS AND HOW TO AVOID THEM poster.
4. INVITATIONLet them know about the Eat Mesquite Cookbook for sale (should bring 6 books per event to sell). Refer them to the Eat Mesquite poster.
Invite the public to sign up to Desert Harvesters list serve on our website and to check our Calendar of Events for workshops, fiestas, millings, harvest tours and more.
Invite the public to become Desert Harvesters members & volunteers.
18

OPERATION OF MILL
Note: never touch the very hot exhaust box/muffler during operation or after the mill has been run. Also never let the vacuum hose touch the hot exhaust box.
Only Desert Harvesters staff can run the mill. However a trained volunteer could feed pods into the mill with a Desert Harvesters staff person running the motor and supervising (this may need to occur if one of the Desert Harvesters crew needs to take a break, or if you are trying to give newly trained personnel more time on the mill).
• Put on safety glasses and ear protection – must be worn by anyone working the mill and feeding pods into the mill
• Close all ammo boxes and make sure the work area is clear. The vacuum and a towel/cloth should be the only loose items on the trailer during operation. The vacuum should be on the same side of the mill as where the operator is when turning the engine on and off. This is to ensure the vacuum hose is never accidentally placed atop the very hot exhaust of the motor – which would melt the hose.
Turn motor ON with the following steps:• Move throttle level to ON (all the way to the left)• Move fuel lever to ON (all the way to the right)• The choke may need to be open full, half open, or closed depending on how warm the engine is. If cold the choke will likely be needed.• Turn motor ON by inserting engine key and turning to START
• Run the pods of only one person through the mill at a time, then empty the ground flour from the 5-gallon bucket or Brute flour container before running the next person’s pods through the mill. This ensures everyone fairly reaps the product and quality of their own harvest.
• All pods to be milled should only be in Desert Harvesters buckets with green tickets that tell you they have been inspected, whose pods they are, if they want their chaff, if their chaff will taste good = “+” sign or bad = “–“ sign, and how many buckets there are in their batch to be milled.
• Keep all containers from each batch of pods to be milled together (green ticket Desert Harvesters buckets of pods and the harvester’s containers that will take their flour and chaff)
• Feed pods into mill by hand (YOU MUST BE WEARING EYE AND EAR PROTECTION ALONG WITH CLOSED-TOE SHOES). Do NOT dump pods into mill from bucket. Your last chance to inspect pods before milling is as you feed
19

them into the mill by hand. Pods should be dry enough to snap when bent; and free of mold, dirt, or debris. If the pods do not appear to be inspected / sorted, you can send them back to the sign-in table, and have the person running sign in find the harvesters that brought the pods, then run them through inspection and ticketing again.
• Listen to the motor, if it sounds as though it is straining you must stop feeding pods into the mill until the mill can grind what is in the mill box, or stop the motor/mill and clean out the chaff from the milling chamber.
• Typically, 5 gallons (one bucket) of whole pods are milled before having to shut off the mill and vacuum out the chaff. Once chaff is vacuumed out, milling can resume.
• Mill feeder and motor operator should continually check and communicate with one another.
- Does the harvester of this batch of pods want their chaff?- If not, will it go in + or – Brute container?- Is weather and pods dry enough to speed up feeding of pods into the
mill?- Or is the motor sounding a bit boggy or flour starting to get a bit goopy
and feeding of pods into the mill needs to slow down?- How does the motor sound?- Ready to go?- Head miller does not need to run the mill motor the whole time, but
rather must supervise all, and get other millers to run the mill to in order to gain experience.
CLEANING OUT CHAFF FROM THE MILLING CHAMBER• Turn motor OFF with ALL the following steps:
1. Turn key to OFF, and remove key from motor2. Turn OFF throttle. 3. Turn OFF fuel valve lever4. Wait for motor to completely shut off
• Loosen the wing nut on the milling chamber lid and open the lid
• Make sure no chaff will fall into the chamber beneath the screen or this will blow into the flour bucket, so fill the gap between screen and mill box with towel.
If cleaning out chaff with the wet/dry vacuum marked “CHAFF” just suck up the chaff with the vacuum. You don’t need to get all the chaff out, just most of it. THE ENGINE MUST BE COMPLETELY OFF OR YOU COULD LOOSE YOUR HAND!
20
If cleaning out chaff by hand, wedge a folded towel into the opening between the screen and mill box, then scoop out most of the chaff by hand into a bag or bucket. THE ENGINE MUST BE COMPLETELY OFF OR YOU COULD LOOSE YOUR HAND!
• Once the milling chamber is relatively clear of chaff, close the chamber lid and tighten down the wing nut. You are then ready to fire up the motor again and run more pods through.
• Give chaff to harvesters that want it—check green mill ticket to see if they do want it.
• For unwanted chaff, empty it in the appropriate Brute container, either “+ GOOD” for good tasting chaff, or “- BAD” for chaff having one or more bad flavor characteristics. See corner of green mill ticket to see if it has a + or – minus symbol.
• NOTE: mesquite chaff can be used to make mesquite beer, non-alcoholic drinks, boiled down with water to make mesquite syrup, or used as livestock fodder. Give it away to those who want it.
GET EMPTY DESERT HARVESTERS BUCKETS BACK TO THE POD INSPECTION TABLE• Once millers empty buckets, the buckets need to get back to the pod inspection table(s) a volunteer should be assigned to this job.
GETTING THE FLOUR• Once you have finished milling ALL the pods in a batch brought by a harvester…
• Turn motor OFF with ALL the following steps (turn key to OFF, remove key from motor, turn OFF throttle, turn OFF fuel valve lever, wait for the motor completely shut off).
• Push any bulges of flour (accumulated on the rim of the bucket or Brute container) into the bucket/container. Slap sides of flour skirt “bag” to get flour on skirt to drop into bucket/container. Then take the bungee cord off the bucket/Brute container. Put all of the funnel bag skirt into the bucket/Brute container and shake the remaining flour into the bucket/Brute container.
21

• Then empty the flour bucket/Brute container into the container(s) provided by the harvester. All containers should be marked with the harvesters’ name, phone number and email. If needed you can use the metal funnel in the ammo box when pouring flour into containers.
• Reattach the skirt bag to the bucket/Brute container. Put one flap of the bag's skirt on the inside of the bucket/Brute container, and put the other flap of the skirt on the outside of the bucket/Brute container. Bungee the outer skirt tightly against the bucket/Brute.
• You are ready to mill again once the chaff has been vacuumed out of the mill.
KEEP TRACK OF HOW MANY GALLONS OF WHOLE PODS YOU MILL AT EVERY EVENT (in mill ticket log), AND GIVE THIS INFORMATION TO MILL COORDINATOR ONCE YOU RETURN HOMEMake sure you get all the sign-in sheets and ticketing sheets. Bring these home and give them to the Mill Coordinator
This is how we determine if our pricing is fair, if demand is growing or decreasing, the value of our services, etc.
22

CLEANING THE MILL AT MILLING SITE
• When all milling is done, turn motor OFF with ALL the following steps (turn OFF throttle, turn key to OFF, remove key from motor, turn OFF fuel valve lever, wait for motor to completely shut off).
• Take the mill ductwork apart.
• Knock accumulated flour out of ducts into a bucket – this will be very fine pastry flour – prime stuff to be saved.
• If an air compressor and high pressure air blower is at hand – blow out the ducts and mill, otherwise vacuum them out. Only use CHAFF vacuum for vacuuming flour or chaff out of mill, mill skirt or bag, mill screen, or mill ductwork—nothing else so only food-grade materials go into it. All else should be swept with broom, not vacuumed.
• Remove the screen from the milling chamber and clean out the chamber. And make sure to clean the screen tracks once screen is removed.
• Sweep off the trailer
• Clean out the buckets
• Clean out the Brute containers
• Fully empty out the cloth bag and skirt, and vacuum or blow them clean
• When all vacuuming is done, empty the vacuum
• Give away the chaff if you haven’t already (it makes great goat feed, mulch, you can cook it down to make syrup, and more)
23
CLEAN UP AT CARWASH(Auto Wash Express at 1435 W. Saint Marys Road in Tucson is conveniently
close to our mill storage site)
• Take mill to a car wash and rinse off trailer, mill, and parts with water only – NO SOAP.
• Get everything off trailer and laid out for easy access / cleaning BEFORE you put money in car wash. $10 should be plenty to do the whole job if you are organized. $10 cash should be in moneybox for this purpose.NOTE: If you had a shade canopy over the mill during milling, it likely is now coated in mesquite flour and must be set up and rinsed off at the carwash.
• Use brushes in ammo box only for scrubbing surfaces that touch food, flour, pods.
• Car wash brush can be used to scrub trailer, motor, etc if needed.
• Buckets may need to be scrubbed with brushes – in ammo boxes
• Toilet bowl brush in ammo box useful for cleaning out cyclone duct
• Hold onto buckets when washing or they will fly with the water pressure. When they are upside down you can hold bucket in place by stepping on bucket. Remove mill ticket tape from buckets.
• When you are almost done with clean up RUN MOTOR AND BLOW ALL WATER OUT OF FAN HOUSING. Do this when you are almost done. Fan will spray gunk up and out, so make sure cleaned items are far enough away that they won’t get soiled again. Shut motor off then carefully spray trailer down one last time, making sure NO water gets into fan housing this time.
• Cloth filter bag and cloth funnel bag should both be banged out then washed in washing machine with COLD water and a mild no scent detergent, such as Oasis laundry detergent. Hot water would shrink the bags. You can bring the bags to Brad as he is all set up to wash the bags.
• Make sure bag is completely clean of flour and dry before putting away from storage. Otherwise mold could result.
24

STORING THE MILL BETWEEN MILLINGS
• Disconnect mill from truck.
• Move mill into place with hand dolly hitch and secure with stabilizing jack at hitch side of trailer.
• Put all mill items from truck into back of trailer
• LOCK TRAILER WITH HITCH LOCK
• Cover trailer with canvas tarp to ensure nothing gets wet while in storage, and to hide loose parts from potential thieves’ eyes.
• If buckets are not yet dry, set them out upside down on concrete pad beside mill to dry. Try not to block parking space beside mill.
• If shade canopy is not yet dry, set it up and over the mill. Weigh the canopy down with canvas buckets and bungee cords so it won’t blow away.
• Get milling/sales/donation money to the mill coordinator ([email protected])
• Report any issues (needed repairs, missing items, etc.) with the mill to the mill coordinator ([email protected]) ASAP so they can be addressed before the next milling.
• Is there anything we need to add or edit within the manual? Let us know ASAP so we can have it all ready for the next milling.
25
TROUBLESHOOTING
ENGINE SPUTTERS
Why?
- choke is still on. (Turn choke off)
- throttle is not up to white mark. (Move throttle up to white mark on motor’s air filter)
- gas is not on. (Make sure gas lever is fully ON)
- mill box is full of pods/flour. (Stop feeding pods into mill. Stop motor. Clean out chaff from mill box).
- mill is running out of gas. (Check gas level in motor, and add if necessary).
ENGINE STOPS
- out of gas. (Check gas level in motor, and add if necessary).
- trailer is not level, so oil level sensor thinks engine is out of oil. (Level trailer with foot jacks).
- oil level is low. (Check oil level in motor, should be ¾ up on guage stick. If oil is low add some. Oil is in small ammo box on trailer).
PODS MILL INTO A GOOPY MASS INSTEAD OF FLOUR
Why?
- pods are too moist. How would you know? (Don’t snap in two when you try to bend them).
- humidity is too high to mill and pods are taking up atmospheric moisture.
- pods may have a very high sugar content.
What do you do?
26
- Go let inspection table know they can’t let such pods through. Tell owner of the pods they need to dry their pods out before we can mill them (they can put them out on the hood of their car in full sun). Refund them their money.
- Clean out all gummy pods stuff from mill before you continue to mill.
- If humidity is up, feed pods into the mill slower. If pods continue to gum up mill you may have to stop milling until things dry out.
- Never run mill out in the rain
- If the pods bog the mill due to very high sugar content, they may need to be roasted before milling.
These pods must go to back of line if they keep bogging the mill, because they cannot hold up entire event. Give harvester a refund if necessary.
WHEN MOTOR IS SHUT OFF AND MILL BOX IS OPENED THERE ARE UNMILLED PODS OR POD PIECES IN MILL BOX
Why might this be the case?
- The mill was shut off too quickly. (Let the motor run for 30 seconds after the last of the pods have been fed into the mill to ensure more thorough milling).
- Pods were put into the mill too quickly or at too great a volume. (Feed pods by hand into the mill more slowly. Don’t mill more than 5 gallons of whole pods before stopping motor and cleaning chaff out of mill box.
BELT COMES OFF MOTOR OR MILL PULLEY
What do you do?
- Stop motor
- Check belt. If it is not broken, try to get it back on pulleys. Ideally you can do this without taking off belt guard. Get belt back onto pulley and then turn pulley to get rest on belt back on. If need be you can temporarily remove yellow belt housing, but this takes a lot of time, so if possible try to get belts back on pulleys without removing the belt housing. DO NOT run mill when people are working on belts or belt housing.
27

- You may need to tighten belt tension if belt keeps coming off. You can do this by turning bolt at back of mill to increase distance between motor and mill. Make sure you turn the belt the right way.
WE NEED TO PROVIDE MORE INFO ON THIS including photomust keep motor and pulley aligned with mill and pulley
MOTOR SOUNDS LIKE IT IS STRAINING, OR MILL BOX IS OVERFLOWING WHEN YOU OPEN IT UP TO CLEAN OUT CHAFF
Why might this be the case?
- May be feeding pods into mill too quickly. (Feed pods into mill more slowly)
- May be milling more than one five-gallon bucket at a time before you clean out chaff. (Don’t mill more than one 5-gallon bucket of pods at a time, before you stop motor and vacuum out the chaff from the mill box)
VACUUM IS CLOGGED OR WEAK
Why might this be the case?
- Vacuum is full. (Empty out the chaff into chaff bucket)
- Vacuum hose is kinked. (Straighten out hose – make sure it does not touch hot exhaust box)
- Towel gets sucked up into vacuum hose. (Reverse flow of vacuum to blow out clog – you do this by taking hose off vacuum hole on the vacuum, and putting it on the exhaust hole on vacuum [opposite side of vacuum hole]).
VACUUM HOSE STARTS TO MELT
Why might this be the case?
- Hose has or is touching the hot exhaust box on motor. (Make sure hose does not touch hot exhaust box. Place vacuum on the same side of mill and motor as the mill operator – away from the exhaust box.
- Might be able to temporarily repair hose with duct tape (in ammo box)
28

- Notify Mill Coordinator ASAP after the event if a new hose is needed for next milling.
FLOUR IS COMING OUT OF CRACKS IN DUCTWORK
- Tape cracks with aluminum tape in ammo box
FLOUR IS COMING OUT OF SEAMS BETWEEN DUCTWORK AND RUBBER BOOTS
- Wrap seams with towels and bungee cords
29

HOW WE RUN THE DESERT HARVESTERS MESQUITE MILLINGS(from Desert Harvesters website)
The following information describes how we run DESERT HARVESTERS-hosted milling events; events hosted by other organizations will be organized in nearly or entirely the same manner. Please note that the pod-tasting, -quality, and -safety/health requirements are non-negotiable and must be observed at every event at which Desert Harvesters is providing milling and educational services.
MILLING SEASON
Our DESERT HARVESTERS milling event is held in June before the summer rains, and during the peak of the traditional bean-tree harvests. Harvesting pre-rains is the best practice to avoid invisible toxic molds. See here for more on why pre-rain harvests are the traditional practice, and so important.
Other organizations hire us for millings in October and November, when we are well out of the humid summer monsoon weather. This ensures that stored mesquite pods (not milled at the ideal time of June) have a chance to dry well and will not reabsorb moisture from the high dew point of the monsoon season. Moist pods bind up the mill.
PIONEERING BEST PRACTICES
Cultivating a more attuned flavor palette. We offer the opportunity to sample a wide variety of pod flavors, so you can determine where in the spectrum the flavor of your pods lies. You can then consciously seek out your preferred flavors in future harvests.
Advancing the safety of the harvest. We share the latest best practices to promote a safe harvest free of toxic molds (visible and invisible) as well as educating you on the latest options for testing mesquite flour for aflatoxin.
MILLING COST & VALUE
We charge $3 per gallon of whole pods, with a minimum of $10. This generally works out to a cost of about $3 per pound of flour. This is a bargain considering that the flour usually sells for $14 to $20 per pound.
o Our milling process ensures that you always get the flour from the pods you harvested. (Your flour will have a greater value to you and your friends and family, as the flour you receive from our mill comes directly from the pods you harvested. Thus the flour is uniquely of you and your experience.)
o In addition, you have the option of taking home the chaff from the milling of your pods at no additional charge. (Chaff can be boiled
30
down to make mesquite-based drinks, beer, broth, and more—yet another reward for selecting only the best-tasting pods.)
o This process allows you to attain the highest-quality mesquite products, as the flavor of your flour and chaff is ultimately determined by the flavor of the pods you harvest. See Best Practices for Harvest & Processing of Mesquite, and be sure to read the Taste Before You Pick section.
QUANTITIES OF PODS
We encourage all those wanting to mill mesquite pods to harvest at least 3 to 5 gallons of whole pods so they will have at least a gallon of flour after milling. We charge a minimum of $10 to mill any amount of whole pods, both to encourage folks to harvest more pods, as well as to cover the costs of operating, maintaining, and insuring the mill, as well as paying our staff.
We typically will allow individuals/households to mill up to 15 gallons of whole pods each at the public milling event. (For those wanting to mill more than 15 gallons of whole pods, please see and make good use of our will-call service described in the next bulleted item below.) The reason for all this is because in the past, many people with only a few pods had to wait hours behind a few people with many pods. However, if there is no one else waiting to mill their pods at a public event, we could mill more than 15 gallons of pods for an individual.
No individual, household, or family will be allowed to mill more than 45 gallons of whole pods, unless they rent the mill and pay staff at the daily/hourly rate. This is to lessen the chance of folks grinding pods for sale rather than personal use. If you want to grind pods for sale, we have a commercial rental rate for the mill and staff.
MILLING-EVENT REQUIREMENTS
Only clean, dry seedpods that readily “snap” when bent will be milled. If they bend rather than snap, they are too moist and will clog the mill. (See the Harvesting and Storage tips page). Pods must be clean and free of stones, dirt, leaves, and black mold otherwise they will not be milled. We will not risk damaging the mill or contaminating the flour. Please note that these pod-quality safety and health requirements are non-negotiable and must be observed at every event at which Desert Harvesters is providing milling services. Note: Carob pods can also be milled as long as at least 10 gallons of mesquite pods are also provided with which we can flush the carob out of the mill. This “flushing” will produce a delicious mesquite/carob flour blend that will go to whoever provides the carob and mesquite pods for milling.
Those having their pods milled must bring food-grade containers into which we can place your flour (and optional chaff). If you don’t bring a
31
container, we can provide one-gallon zip-close bags to those who make a small donation to Desert Harvesters.
CONVENIENT MILLING SERVICES
Once your pods have passed inspection and the milling fee has been paid, you will be given a voucher for your pods, allowing you to enjoy other aspects of the event while your pods are moved through the milling process in your absence.
We offer a convenient will-call service whereby you can drop your pods off for milling (after inspection and payment). Within about a week Desert Harvesters staff will mill the pods and will call the owners when the flour is ready for pick up at a location near Speedway & Stone. If the flour is not picked up within 10 days of notification it becomes property of Desert Harvesters. There will be no refunds. To take advantage of this service, we require the following:
1. Bring your pods in sealed food-grade containers. We prefer 5-gallon plastic buckets with lids—you can often get these buckets with lids for free or at very low cost from bakeries, doughnut shops, and delis.
2. Label each container with your name, email, and phone number(s) on all the containers.
3. Get your pods inspected at the milling event and prepay for their milling.
32
INFORMATION YOU CAN SHARE IF PEOPLE QUESTION THE COST / VALUE OF OUR MILLING SERVICE
Our mill typically grinds over 5 gallons of whole mesquite pods into about 1 gallon of flour in about 5 minutes.
If you were to mill 5 gallons of whole mesquite pods (typically weighing about 7 lbs.), this would likely result in about 5 lbs. of flour.
As mesquite flour typically sells for about $14 per pound, that 5 lbs. of flour would be worth about $70 (retail).
But at our milling fee of $3 per gallon, your 5 lbs. of flour would have only cost you $15, or $3 per pound.
Furthermore, your flour will have an even greater value to you and your friends and family, as the flour you receive from our mill comes directly from the pods you harvested. Thus the flour is uniquely of you and your experience.
We have tried to keep milling cost as low as possible, while meeting our costs (insurance, training millers, paying millers, training and paying mill coordinators, maintenance of mill and trailer, and getting the word out on the millings). We are not profiting from this endeavor. It is a service we are providing to the community.
33

Desert HarvestersHammermill Rental & Mesquite Milling Terms
Last updated June 10, 2016
We, Desert Harvesters, barring inclement weather conditions or other circumstances beyond our control, look forward to working with you and providing the following for your Month Day Year milling event:
a. The hammermill and associated equipment, b. Coordination of transportation for the hammermill and our staff,c. Gasoline to power only the mill motor, andd. Two (2) trained operators to run the mill.
Please read, initial at the end of each item, sign and date at the bottom, and return this sheet with your non-refundable deposit to: Desert Harvesters, P.O. Box 92, Tucson AZ 85702. ______
I, Host Organization Representative, on behalf of Host Organization, agree to the following terms in order to support a smooth, safe, and enjoyable event for all staff, volunteers, and attendees. THANK YOU! ______
1. Desert Harvesters is currently renting its hammermill for public events in hot, low-desert areas (below 3,500-foot elevation) from May 1 through July 4 only The latter date was chosen to assure the milling season concludes before the typical start of the summer rainy season (after which aflatoxin levels have been shown to be higher). The limitation does not apply to private (unadvertised) millings or to those taking place in cooler, high-desert areas. ______
This is intended to send a clear message to the public about the importance of harvesting mesquite pods before the rains to help ensure higher-quality harvests safe from aflatoxin (www.desertharvesters.org/harvesting-processing/aflatoxins-how-to-avoid-them). Similarly, this is why any Desert Harvesters-hosted milling events now happen in June. See here and here for information about the study that informed this policy.
2. Rental fee for the hammermill is dependent on nature of renters’ operations and location of the milling event. Fees for non-profit groups are listed below. Other renters pay an additional $100 per day. ______
34
$175 per day for Tucson-area non-profit groups whose events will take place up to 40 miles from Desert Harvesters’ mill-storage location in downtown Tucson.
$225 per day for Southern-Arizona non-profit groups whose events take place over 40 miles from said mill-storage location. In case the milling time runs longer than six hours, the host organization must be prepared to provide a free place for mill staff and mill to spend the night. Meals for staff are appreciated.
Advance payment of the hammermill rental fee is required as a non-refundable* deposit to secure your milling date and have your event published on our website and social media. *Deposit is fully refundable only if Desert Harvesters explicitly fails to uphold its end of this agreement. ______A rescheduling fee of $100 applies to hosts wishing to reschedule their confirmed event who do so at least 24 hours before the scheduled start time of their event. _____A rescheduling fee of $100 plus any labor &/or travel expenses incurred applies to hosts wishing to reschedule their confirmed event who do so less than 24 hours before the scheduled start time of their event. ______Hosts who cancel their milling for any reason, including weather, and opt not to reschedule will forfeit one day’s hammermill-rental fee plus any labor &/or travel costs incurred. Note that the mill will not be operated in the event of any precipitation at the milling site. In addition, under humid conditions milling can take 3 times longer than normal, or more, while producing lower yields. ______
3. In addition to the hammermill fee, a volunteer deposit is due in advance to schedule your event with Desert Harvesters. If conditions in item 8, below, are met, this deposit will be credited toward payment of Desert Harvesters milling staff. If conditions in item 8 are not fully met, deposit will be used to pay an additional Desert Harvesters staff to oversee tasting, inspection, and ticketing station. Volunteer deposits are listed below. ______
$150 per day for Tucson-area groups whose events will take place up to 40 miles from Desert Harvesters’ mill-storage location in downtown Tucson.
$200 per day for Southern-Arizona groups whose events take place > 40 miles from mill-storage location.
4. When conducting publicity for its milling event (e.g., press releases, flyers, website posts, etc), Host Organization must include a
35

link to the Best Practices for Harvest & Processing page on Desert Harvesters’ website. ______
5. Desert Harvesters strongly encourages Host Organization to:a. Send its members to our annual pre-monsoon in-the-field
harvesting workshop in June, ______
b. Conduct its own annual pre-monsoon harvesting workshop in its community, ______ and
c. Consider organizing pre-monsoon milling event(s) in its community. ______
6. Host Organization agrees to use the same milling-fee structure as Desert Harvesters unless an alternate fee structure is approved by Desert Harvesters in advance. ______
7. Host Organization will be billed $20 per hour for each Desert Harvesters staff person packing up, transporting, and operating the mill; set up and breakdown at the location of the milling event; cleaning the mill; & unpacking the mill at its storage location. Note: Mill staff will work up to 8 hours per day (including packing/ unpacking, set-up, milling, breakdown, and cleaning). If completion of event requires working beyond these 8 hours, both host organization and mill staff must agree whether milling will continue that day. If the mill staff are requested to work beyond the 8 hours and agree to this, the overtime hourly rate for mill staff increases to $30 per hour per person. ______
8. Desert Harvesters requires reimbursement from Host Organization for all-inclusive travel costs to cover transport from mill storage near downtown Tucson to and from the milling site. Travel costs will be billed at the then-current federal per-mile commercial rate. ______
9. Host Organization must provide trained and competent volunteers to assist at the milling event. At least three (3) volunteers must attend and successfully complete Desert Harvesters’ annual tasting, inspection, & ticketing training session plus training to feed pods into mill. Volunteers are invited (but not required) to also attend our mill-operation training. Training sessions are held annually in June. At Host Organization’s milling event, volunteers must be onsite, ready to work at least 30 minutes before milling is scheduled to begin. If 3 trained volunteers are not confirmed by name 48 hours in advance,
36

Desert Harvesters will send an additional staff person & retain volunteer deposit (see item 2) in addition to charging Host Organization for the 2 millers. We encourage you to send more than 3 volunteers to our training and schedule more than 3 of these trained volunteers for your event. ______
10. Host Organization must provide electricity to the mill site, via extension cord, to power a shop vac. This is needed for the milling as the hammermill requires frequent, thorough cleaning of its chaff chamber. ______
11. Host Organization must provide a spot with sufficient natural shade (2 sizeable shade trees) or 2 moveable shade structures for inspection of pods and ticketing functions. ______
12. Host Organization must provide a minimum of four (4) 6-foot tables (clean non-porous surfaces or covered with clean tablecloths) to be used as pod-inspection stations. ______
13. As a representative of Host Organization, I have read the Mesquite Milling Guidelines and Requirements online at www.desertharvesters.org/how-we-run-mesquite-millings. In particular, I agree to inform attendees in advance of the listed pod-quality health & safety requirements and uphold these requirements at our event. _____
___________________________________ ___________________________________Signature of Host Organization rep. Signature of Desert Harvesters rep. ___________________________________ ___________________________________Print name & Host Organization role Print name___________________________________ ___________________________________Date Date
37