R3 Heterogeneous System Copy
112
SAP ® AG ì Neurottstr. 16 ì D-69190 Walldorf R/3 Heterogeneous System Copy Release 3.1H ® UNIX Windows NT OS/390 OS/400
-
Upload
sudhakar-govindaraj -
Category
Documents
-
view
184 -
download
7
description
R3 Heterogeneous System Copy
Transcript of R3 Heterogeneous System Copy

SAP® AG ì Neurottstr. 16 ì D-69190 Walldorf
R/3 Heterogeneous System Copy
Release 3 .1H
®
UNIXWindows NT
OS/390OS/400
R/3 Heterogeneous System Copy SAP AG
Copyright
2 May 1998
Copyright
Copyright 1998 SAP AG. All rights reserved.
No part of this documentation may be reproduced or transmitted in any form or for anypurpose without the express permission of SAP AG.
SAP AG further does not warrant the accuracy or completeness of the information, text,graphics, links or other items contained within these materials. SAP AG shall not beliable for any special, indirect, incidental, or consequential damages, including withoutlimitation, lost revenues or lost profits, which may result from the use of these materials.The information in this documentation is subject to change without notice and does notrepresent a commitment on the part of SAP AG in the future.
Some software products marketed by SAP AG and its distributors contain proprietarysoftware components of other software vendors.
Microsoft®, WINDOWS, NT® ,EXCEL and SQL-Server® are registered trademarksof Microsoft Corporation.
IBM®, OS/2, DB2/6000®, AIX®, OS/400®, AS/400®, OS/390®, DB2 for OS/390®are a registered trademark of IBM Corporation.
OSF/Motif is a registered trademark of Open Software Foundation.
ORACLE is a registered trademark of ORACLE Corporation, California, USA.
INFORMIX-OnLine for SAP is a registered trademark of Informix SoftwareIncorporated.
UNIX® and X/Open® are registered trademarks of SCO Santa Cruz Operation.
SAP, R/2®, R/3®, RIVA®, ABAP/4, SAPoffice, SAPmail, SAPaccess®, SAP-EDI, SAP ArchiveLink, SAP EarlyWatch®, SAP Business Workflow, R/3 Retail®are registered trademarks of SAP AG
All rights reserved.
Internal Info
Migration CD 05/98.

SAP AG R/3 Heterogeneous System Copy
Contents
May 1998 3
Contents
Chapter 1: Introduction................................................................................................. 1–1Reasons for Copying an R/3 System..........................................................................1–2Terminology................................................................................................................1–3General Requirements and Restrictions.....................................................................1–4General Preparations..................................................................................................1–5
Chapter 2: Preparations ................................................................................................ 2–1Heterogeneous System Copy: Overview....................................................................2–2Copy Methods.............................................................................................................2–2Customer Migration Key .............................................................................................2–3Important Documents .................................................................................................2–3
Chapter 3: ADABAS D - OS Migration with DB Tools ................................................3–1OS Migration between UNIX Operating Systems (XLOAD) ....................................... 3–2OS Migration from UNIX to Windows NT (XLOAD) ...................................................3–8OS Migration from Windows NT to UNIX (XLOAD) .................................................3–14OS Migration from Digital UNIX to Windows NT (Backup Method)..........................3–20OS Migration from Windows NT to Digital UNIX (Backup Method)..........................3–20
Chapter 4: ORACLE - OS Migration with DB Tools....................................................4–1OS Migration between UNIX Operating Systems (Export/Import).............................. 4–2OS Migration between NT Operating Systems (Export/Import)..................................4–2OS Migration from UNIX to Windows NT (Export/Import) ..........................................4–2OS Migration from Windows NT to UNIX (Export/Import) ..........................................4–7
Chapter 5: R3load Procedure on UNIX ........................................................................ 5–1Overview.....................................................................................................................5–2Requirements and Restrictions ..................................................................................5–3Preparation Phase......................................................................................................5–4Exporting the Source Database..................................................................................5–4Preparing the Import on the Target Machine............................................................5–12Installing R/3 on the Target Machine........................................................................5–14
Chapter 6: R3load Procedure on Windows NT...........................................................6–1Overview.....................................................................................................................6–2Exporting the Source Database..................................................................................6–5Preparing the Import on the Target Machine............................................................6–13Starting the Import ....................................................................................................6–16
Chapter 7: R3load Procedure on AS/400..................................................................... 7–1Overview.....................................................................................................................7–2Requirements and Restrictions ..................................................................................7–2Preparation Phase......................................................................................................7–3Exporting a DB2/400 Database ..................................................................................7–3Importing a DB2/400 Database ................................................................................7–11Parameter File R3LOAD.PAR ..................................................................................7–19
Chapter 8: Target Database: DB2 for OS/390 .............................................................8–1Exporting the Source Database..................................................................................8–2
Chapter 9: General Subsequent Actions..................................................................... 9–1Subsequent Technical Actions ...................................................................................9–2

R/3 Heterogeneous System Copy SAP AG
Typographic conventions
4 May 1998
Typographic conventions
This convention. . . is used for. . .
0HQX�7H[W menu names and menu items; also field names and screentitles.Select )LOH → 2SHQ
User Entry exact user input. These are words and characters you type onthe keyboard exactly as they are in the documentation;also UNIX users like root, mail, ftp etc.Enter tail -f R3INST.log
File Name file names, UNIX scripts and paths/directories; also screenmessages.Delete the line starting with dba in the file /etc/group
<Variables> variables in general, e.g. variable user entries or file namesThe home directory of the user ora<sid> is/oracle/<SID>
%RRN�7LWOH cross-references to other books
This icon. . . helps you identify. . .
Example an Example. Examples help clarify complicated concepts oractivities.
Note a Note. Notes can contain important information like specialconsiderations or exceptions.
Cautiona Caution. Cautions should help you avoid errors, for example,those that could lead to data loss.

SAP AG Introduction
Contents
May 1998 1–1
Chapter 1: Introduction
Note
Read the following R/3 Note before beginning the system copy. This note contains themost recent information regarding the system copy. It is available only in English.
Note No.74280 5���+RPRJHQHRXV�6\VWHP�&RS\74282 5���+HWHURJHQHRXV�6\VWHP�&RS\
Ensure that you have the most recent version of the note. The note is provided by theOnline Service System (OSS). For information on the OSS, refer to the documentation2QOLQH�6HUYLFH�6\VWHP �5���6HUYLFHV�DQG�6XSSRUW → 2QOLQH�6HUYLFH�6\VWHP on the 2QOLQH'RFXPHQWDWLRQ�&').
Note
A system copy should only be done by a person with experience in copying systems andwith knowledge of the operating system, the database, and the ABAP Dictionary.
SAP can process OSS messages concerning problems with the system copy only if there isa contact person with this knowledge available on site.
In the case of a heterogeneous system copy (OS/DB migration), SAP offers OSS supportonly as part of the Migration Services.
Contents
Reasons for Copying an R/3 System................................................................................... 1–2
Terminology.................................................................................................................... .......1–3
General Requirements and Restrictions.............................................................................1–4
General Preparations ........................................................................................................... .1–5Organizational Preparations...............................................................................................1–5Technical Preparations.......................................................................................................1–7

Introduction SAP AG
Reasons for Copying an R/3 System
1–2 May 1998
Reasons for Copying an R/3 SystemSAP recommends that you make a system copy in order to build a test, demo, training orstandby system. You should perform R/3 upgrades in a test system first. This way you canidentify customer-specific problems which might result from modifications.
The R/3 System infrastructure (development, quality assurance and production system) can beset up without making a system copy as follows:
• Install all R/3 Systems with R3INST (begin with the development system). Customize thedevelopment system as described in the implementation guide.
• Transport the client-dependent and client-independent data to the quality assurance andproduction systems.
• Setup R/3 System Landscape
• Hardware Expansion
• Setup Test, Training, Demo or Standby Systems
Production
Delivery
Source System
Training
New System
Development
Integration ConsolidationAssurance
Quality
However, if you do not follow this concept, you can also install a system, customize it andthen perform a system copy.
If you want to create a copy of your production system in order to build a test system thatcontains data similar to the production system data, you can perform either a system copy orbatch output/input.
If the production system is too large to be copied within a reasonable amount of time, or ifyour hardware resources are not sufficient, consider transfering a subset of the data to the testsystem via batch output/input. This is also advisable if the production system containsconfidential data that should not be stored in a test system.

SAP AG Introduction
Terminology
May 1998 1–3
Note
Client transport is not supported as a system copy method. Transporting productionclients is not supported at all.
When copying a system which contains production data it is important to choose the rightmoment for the copy. This could be a month-end or year-end closing. Ensure that there is awell-defined starting point for the data in the new system.
Note
If you are planning a heterogeneous migration (i.e. changing your operating system ordatabase system during the system copy), please be aware of the migration procedure. Thisprocedure is described in the White Paper “R/3 OS/DB Migration”. Please order the WhitePaper using the product number 50019526 (English) or 50018645 (German).
Note
Export and import of a database with the installation tool R3INST for reorganizationpurposes is not described in this manual, and is not supported by SAP. Please use theappropriate tools for database reorganization.
Note
Copying data from R/2 Systems or non-SAP systems to an R/3 System is not described inthis manual.
Terminology
Source System and Target System
The R/3 System containing the original database is called the source system and the system towhich the database copy is to be imported is called the target system. Their R/3 System namesare abbreviated to SOURCE_SAPSID and TARGET_SAPSID (AS/400: source_<SID> andtarget_<SID>). The terms source database and target database are also used in thisdescription.
System Copy
Duplication of an R/3 System. Certain SAP parameters may change in a copy. When a systemcopy is made, all the instances are newly installed, but the database is set up using a copy ofthe source system database.

Introduction SAP AG
General Requirements and Restrictions
1–4 May 1998
Database Copy
Database-dependent part of the system copy.
Placeholders
Placeholders such as <SAPSID> are used in commands. They are used in the same way as inthe R/3 Installation Guide, and must be replaced with the values valid for your site.
The following additional placeholders are used:
Placeholder Meaning How to find out
<T_HOST> system name of the target host command hostname
<S_HOST> system name of the source host command hostname
<S_DBSID> database name of the source system <SAPSID> of the original system
<T_DBSID> database name of the target system <SAPSID> of the target system
R3INST
Tool for installing and migrating R/3 Systems on UNIX and Windows NT machines. OnAS/400, the installation tool is called R3MENU and the migration tool R3MIG. In the OS-and DB-independent parts of this chapter, the term R3INST is used for all platforms(including AS/400).
General Requirements and RestrictionsTo make a system copy, the versions of the R/3 System and R3INST must be the same on thetarget and source systems (exceptions are only allowed if they are described in an R/3 Note).Order the right version of the installation kit before starting the system copy. Obtain the latestversions of the Notes.
The new SAP System Name <TARGET_SAPSID> (AS/400: <target_SID>) can be chosenfreely (during a new installation), but to meet the requirements of the Workbench Organizeryou must choose different R/3 System names for different systems.
Note
Several R/3 Systems can be operated on a single host without encountering any problems.Nevertheless, SAP recommends that you use a separate host for each system because anR/3 upgrade may depend on an OS upgrade. If the R/3 Systems are on separate hosts, it ispossible to upgrade them at different times.
SAP AG Introduction
General Preparations
May 1998 1–5
Caution
If you have made modifications in your development system, do not copy your qualityassurance or production system onto the development system. Otherwise, all versions ofthe modifications will be lost.
Caution
The source system must be in a consistent state before it can be copied.
Note
The code page cannot be changed during the system copy.
General Preparations
Organizational Preparations
Note
Take into account the downtime of the source system (for preparations and copying) whenplanning the system copy.
SAP License
Once installation is complete and the R/3 System copy has been imported, you will require anew license key for the target system. The license key of the source system is not valid forthis system. You can order a new license key for the target system as described below.
License Key on UNIX
If the R/3 Instance is already installed on the target system, log on to the central instance hostas <sapsid>adm and enter saplicense -get to obtain the customer hardware key.
If the instance has not been installed, create a directory <licdir> (e.g. /tmp/lic) with readand write permissions and perform the following steps to get the customer key:
chmod 777 <licdir>cd <licdir><CDDIR>/UNIX/<OS>/CAR -xvf <CDDIR>/UNIX/<OS>/SAPEXEDB.CAR saplicensesaplicense -get
(<CDDIR> is the mount point for the Kernel CD)
Introduction SAP AG
General Preparations
1–6 May 1998
Fax the customer key to the SAP License Administration together with the name of the R/3System, the installation date and your phone/fax number. Use the form supplied with theinstallation package. Then install the license key according to the instructions in the R/3installation manual.
License Key on Windows NT
If the R/3 Instance is already installed on the target system, log on to the central instance hostand enter saplicense -get in a command prompt window to obtain the customerhardware key.
If the instance has not been installed, create a directory <licdir> (e.g. \tmp\lic) andperform the following steps to get the customer key:
cd <licdir><CD-DRIVE>:\NT\I386\CAR -xvf <CD-DRIVE>:\NT\I386\SAPEXEDB.CAR saplicense.exesaplicense -get
(<CD-DRIVE> is the CD-ROM drive holding the Kernel CD)
Fax the customer key to the SAP License Administration together with the name of the R/3System, the installation date and your phone/fax number. Use the form supplied with theinstallation package. Then install the license key according to the instructions in the R/3installation manual.
License Key on OS/400
1. Find out the host on which the message server is running.
To do this, change to directory /usr/sap/<SAPSID>/SYS/profile/DEFAULT.PFL(with CHGCURDIR) and display stream file DEFAULT.PFL (with DSPSTMF or EDTF).The parameter rdisp/mshost specifies the host on which the message server is running.
Example
rdisp/mshost =as0007
In this example, the message server is started on host as0007.
2. Log on to the host on which the message server is running at operating system level asuser <SID>OFR.
3. Make sure that the executables library (default name R3<REL>OPT) is in your library list.
4. Type command SAPLICENSE at the command prompt and press F4 to see the parameters.
5. Enter the 6$3�6\VWHP�,' (e.g. C11), /LFHQVH�RSWLRQ *GETKEY, and 7UDFH�DFWLYLW\ *NO.
6. When you press ENTER, you will get the 11-position customer hardware key for theinstallation.
Fax the customer key to the SAP License Administration together with the name of the R/3System, the installation date and your phone/fax number. Use the form supplied with theinstallation package. Then install the license key according to the instructions in the R/3installation manual.

SAP AG Introduction
General Preparations
May 1998 1–7
Archive Files
You must make data archived in the source system (data that does not reside in the databasebut was moved to a different storage location using R/3 Archive Management) accessible inthe target system. Adapt the file residence information in the target system. Refer to the 5��2QOLQH�'RFXPHQWDWLRQ��%DVLV�&RPSRQHQWV�→�6\VWHP�$GPLQLVWUDWLRQ�→�$SSOLFDWLRQ�'DWD$UFKLYLQJ�DQG�5HRUJDQL]DWLRQ��for help.
Access to archive files is platform-independent.
Configuration Analysis / Hardware Analysis
The following factors have to be determined:
• the number of application servers
• the expected size of the database
• additional disks or other hardware required
• required memory
Note
The &KHFN�/LVW���,QVWDOODWLRQ�5HTXLUHPHQWV helps you to determine the systemrequirements.
Test Run / Schedule
• Perform a test run of the system copy. During a test run, the entire database or parts of itare exported from the source system. The time taken by the test run is used to calculatethe system downtime. This is particularly important for very large databases (VLDB) orwhen tapes are being used. The test run is also done to determine the amount of exportdata. You should choose the best data transfer method (FTP, tape, NFS, local, etc.).Recommendation: Make export/import actions local whenever possible. Avoid using NFSto transfer data.
• Define a schedule for the test migration and the final migration.
Technical Preparations
In order to make a consistent copy of the database, it is necessary to prepare the source systemand to carry out some subsequent actions on the target system. This is not necessary whenperforming a test run.
The following list describes important preparatory actions (for further information on R/3administration, see the 5���2QOLQH�'RFXPHQWDWLRQ).
Preparing the Source System
• No canceled or pending update requests should be in the system. Check this via: 7RROV�→$GPLQLVWUDWLRQ�→�0RQLWRULQJ�→�8SGDWH (SM13). If canceled or pending updates exist,these must be updated again or deleted from all clients. You can see whether canceled orpending updates exist by finding out if table VBDATA contains any entries. Proceed as

Introduction SAP AG
General Preparations
1–8 May 1998
follows in order to find the canceled or open updates:1. Transaction SM13.2. Delete the default values for the client, user, and time.3. Choose all update requests.
If canceled or pending records exist, then these must be updated again or deleted. Checkwhether this action was successful using transaction SE16 for table VBDATA.
• Cancel all released jobs: 7RROV�→�$GPLQLVWUDWLRQ�→�-REV�→�-RE�2YHUYLHZ. This alsoapplies to the jobs which must run periodically (see Note 16083). Select all jobs (includeVWDUW�DIWHU�HYHQW): -RE�→�6FKHGXOH�-RE�→�&DQFHO.
• Adapt the operation mode timetable to ensure that no switching of operating modes takesplace while a system is being copied: 7RROV�→�$GPLQLVWUDWLRQ�→�&RPSXWLQJ�&HQWHU�→0DQDJHPHQW�6\VWHP�→�&RQILJXUDWLRQ�→�7LPH�7DEOH.
• AS/400 only: You need to transfer the crossload export files to the AS/400 using FTP oran equivalent procedure. (If you have V3R7, you are recommended to use NFS.) It isimportant now (and later) that TCP/IP be configured properly! If the source platform isbased on the ASCII character set, you will have to convert the text files to EBCDIC. Thedata files may not be converted. They have to be transferred in binary mode.
• FI customers: An additional consistency check can be performed by running the jobSAPF190 before the system copy in the source system, as well as after the copy in thetarget system, and the comparing the results. No customer data may be changed in themeantime. ($FFRXQWLQJ�→�)LQDQFLDO�$FFRXQWLQJ�→�*HQHUDO�OHGJHU�→�3HULRGLF3URFHVVLQJ�→�&ORVLQJ�→�&KHFN�FRXQW�→�&RPSDULVRQ)
• FI customers: Consistency can be checked further by running the jobs RFUMSV00 (tax onsales/purchases), RAGITT01 (asset history sheet), RAZUGA01 (asset acquisitions),RAABGA01 (fixed asset retirements) before the system copy in the source system, as well asafter the copy in the target system, and the comparing the results. No customer data may bechanged in the meantime.
• CO customers: An additional consistency check can be performed by running the reportgroup 1SIP before the system copy in the source system, as well as after the copy in thetarget system, and then comparing the results. No customer data may be changed in themeantime.
Heterogeneous System Copy: Dealing with the ABAP/4 Program Loads
This section applies only if you change your operating system or database system during thesystem copy.
The ABAP/4 loads are platform-dependent programs which are generated during R/3 runtimeand which are stored in database tables.
If your target system (R/3 instance) is running on a different platform than the sourcesystem, all ABAP/4 loads are invalid on the new platform and must be re-generated. Youcannot use the ABAP/4 loads of the source system or the pre-generated loads from the R/3installation CD-ROMS.
The target system will be slowed down until the ABAP/4 loads are re-generated.
SAP AG Introduction
General Preparations
May 1998 1–9
To avoid unusable ABAP/4 loads in your target database, you can delete the ABAP/4 loads inthe source system before exporting the database.
Advantage: The useless ABAP/4 loads do not have to be exported and imported.
Disadvantage: Both the source and target systems will be slowed down until the loads are re-generated.
You can also choose not to delete the ABAP/4 loads in the source system.
Advantage: The ABAP/4 loads do not have to be re-generated in the source system. Thesource system is not slowed down.
Disadvantage: The export and import take longer. For reasons of disk space, the invalidABAP/4 loads should be deleted in the target system.

SAP AG Preparations
Contents
May 1998 2–1
Chapter 2: Preparations
Contents
Heterogeneous System Copy: Overview .................................................................... 2–2
Copy Methods................................................................................................................ 2–2OS Migration .............................................................................................................. 2–2DB Migration............................................................................................................... 2–3
Customer Migration Key............................................................................................... 2–3
Important Documents ................................................................................................... 2–3

Preparations SAP AG
Heterogeneous System Copy: Overview
2–2 May 1998
Heterogeneous System Copy: OverviewWhen a heterogeneous system copy is performed, either the operating system is changed (OSmigration), or the database system (DB migration), or both. The contents of the database iscopied from the source system. A migration is a heterogeneous system copy where the sourcesystem is removed at the end of the project.
A consistent system copy can only be ensured if all steps described in this guide and in theinstallation guide are performed. Above all, this applies to the Chapters “Introduction” and“General Subsequent Actions” of this guide.
Caution
The R/3 System release of the source and target systems must be the same.
Copy Methods
OS Migration
An operating system (OS) migration can be performed using a database-specific copy tool(only available for ADABAS D and ORACLE), or using the R3load method that is supportedby the SAP tool R3INST.
I. OS Migration of an ADABAS D System
Chapter “ADABAS D - OS Migration with DB Tools” describes how to copy an R/3 Systemwith ADABAS D tools.
OS migration between UNIX operating systems: If either the source or the target operatingsystem is Digital UNIX (DEC OSF/1), you must use the XLOAD or the R3load method.Otherwise, we recommend that you use the backup method described in Chapter“ADABAS D Specific Procedures” of the manual 5���+RPRJHQHRXV�6\VWHP�&RS\.
OS migration from UNIX to Windows NT or vice versa: You can use the XLOAD methodor the R3load method.
OS migration from Digital UNIX (DEC OSF/1) to Windows NT or vice versa: Werecommend that you use the backup method described in Chapter “ADABAS D - OSMigration with DB Tools”. You can also use the XLOAD method or the R3load method.
II. OS Migration of an ORACLE System
Chapter “ORACLE - OS Migration with DB Tools” describes how to copy an R/3 Systemwith ORACLE tools.
OS migration between UNIX operating systems: You can use the export/import or theR3load method.
OS migration from UNIX to Windows NT: You can use the export/import or the R3loadmethod.

SAP AG Preparations
Customer Migration Key
May 1998 2–3
OS migration from Windows NT to UNIX: Only the R3load method is available.
III. OS Migration of an Informix System
Only the R3load method is available.
DB Migration
A database (DB) migration can only be performed using the R3load method. This method isdescribed in the Chapters 5 to 8.
Customer Migration KeyIf you perform a heterogeneous system copy with the R3load method, you need a customermigration key. You can obtain the key as follows:
1. Create the R3load command files.
2. Copy the parameter file R3LOAD.PAR to the target machine.
3. Generate the customer migration ID with R3INST (see section “Getting and Setting theMigration Key” of Chapter “R3load Procedure on <UNIX | Windows NT | AS/400>”).
4. Fax the customer migration ID to SAP. A fax form is supplied with the Migration CD.
You will then receive the customer migration key from SAP.
For a detailed description, see Chapter “R3load Procedure on <UNIX | Windows NT |AS/400>”.
Note
Please order the migration key at least 5 working days before the system copy. If it is notpossible to do so for technical reasons, inform SAP about this problem via fax also at least5 working days before the system copy.
Important DocumentsAt the start of the project you should create a folder for all important documents which arecreated during the system copy/migration, for example:
• check list
• project plan
• time schedule
• analysis report
• database strucure
• backup concept

SAP AG ADABAS D - OS Migration with DB Tools
Contents
May 1998 3–1
Chapter 3: ADABAS D - OS Migration with DB Tools
Contents
OS Migration between UNIX Operating Systems (XLOAD) ....................................... 3–2General Information.................................................................................................... 3–2Procedure................................................................................................................... 3–2Preparing the Source System .................................................................................... 3–2Preparing the Target System ..................................................................................... 3–3Copying Using a Local Network ................................................................................. 3–3Copying Using a Tape................................................................................................ 3–5Subsequent Processing ............................................................................................. 3–6
OS Migration from UNIX to Windows NT (XLOAD) .................................................... 3–8General Information.................................................................................................... 3–8Procedure................................................................................................................... 3–8Preparing the Source System .................................................................................... 3–8Preparing the Target System ..................................................................................... 3–9Copying Using a Local Network ................................................................................. 3–9Copying Using a Tape.............................................................................................. 3–11Subsequent Processing ........................................................................................... 3–12
OS Migration from Windows NT to UNIX (XLOAD) .................................................. 3–14General Information.................................................................................................. 3–14Procedure................................................................................................................. 3–14Preparing the Source System .................................................................................. 3–14Preparing the Target System ................................................................................... 3–14Copying Using a Local Network ............................................................................... 3–15Copying Using a Tape.............................................................................................. 3–17Subsequent Processing ........................................................................................... 3–18
OS Migration from Digital UNIX to Windows NT (Backup Method)........................ 3–20General Information.................................................................................................. 3–20Procedure................................................................................................................. 3–20
OS Migration from Windows NT to Digital UNIX (Backup Method)........................ 3–20General Information.................................................................................................. 3–20Procedure................................................................................................................. 3–20

ADABAS D - OS Migration with DB Tools SAP AG
OS Migration between UNIX Operating Systems (XLOAD)
3–2 May 1998
OS Migration between UNIX Operating Systems (XLOAD)If both the source and target operating systems are either AIX, HP-UX, ReliantUNIX orSolaris, you should use the backup copy method described in Chapter “ADABAS D SpecificProcedures” of the manual 5���+RPRJHQHRXV�6\VWHP�&RS\.
If either the source or the target system is Digital UNIX (DEC OSF/1), use the methoddescribed below if you are familiar with ADABAS tools. Use the the R3load method if youare familiar with SAP tools.
This section describes how to copy an ADABAS D database between machines of differentoperating systems and/or different manufacturers using the database tool XLOAD.
General Information
Since the ADABAS D tool CONTROL is frequently used, it is advisable to be familiar withthe Media Manager and backup/restore functions of CONTROL. You should always have themanual $'$%$6�'�&21752/������ (March 1996 or later) at hand; the manual version 3.1.2is not sufficient.
Procedure
The ADABAS D tool XLOAD can be used to copy an R/3 System between two machineswith different operating systems. If both machines are in a local network, the contents of thedatabase can be copied using the network. In all other cases, the database has to be copiedusing tapes (ensure that both machines have the same kind of tape devices).
During data export, the database must be in warm mode. No modifying operations may beperformed on the database, because each table is copied with the contents it has (by chance) atthe moment of extraction. If a modification affects two tables, it can produce a logicallyinconsistent R/3 System, if one table is exported before the modification and the other isexported after saving the modification. It is therefore absolutely necessary to stop the R/3System, because this is the only way to ensure that the target system has exactly the samecontents as the source system.
Preparing the Source System
Log on as user sqd<sapsid> or <sapsid>adm.Stop your R/3 System using the command stopsap.Start the database: startsap db.
If the target database will be smaller than the source database, you must determine therequired minimum size. Use the following command:
xsql show stat serverdb
The value in the line USED PERM PAGES divided by 256 is the smallest possible size of thedata devspace in MBytes. The database must be at least 20% larger than the value thusdetermined.

SAP AG ADABAS D - OS Migration with DB Tools
OS Migration between UNIX Operating Systems (XLOAD)
May 1998 3–3
Preparing the Target System
Install a new R/3 System with R3INST as described in the Installation Guide. You can givethe system a new name.Ensure that you use the minimum size required for data devspaces determined on the sourcesystem.If more than one tape device was configured in the source system, you must specify at least 2for the number of tape devices available.
• Run R3INST as usual, skipping the Report Load CD. Cancel R3INST if you are promptedfor EXPORT CD. This creates an empty initialized database.
• Start the target database as user sqd<sapsid> with the commandx_start <SAPSID>.
• Start xcontrol.
The first call of CONTROL initializes the CONTROL user. The database is prepared forthe user control with the password control. The command is:
xcontrol -d <SAPSID> -u control,control
• Install your CONTROL environment for the target system. A description is contained inthe CONTROL manual in chapter 3.3.
• Check the configuration of the created new database using CONTROL. Use the followingCONTROL function:
,1)2�→�&21),*85$7,21
• Check all the parameters for the devspaces, especially those for completeness andspecified size. Then call the CONTROL function:
,1,7�→�&21),*
CONTROL will suggest the existing configuration. Confirm the values withoutmodifications. If devspaces are requested, CONTROL wants to know their type. Specifytype L for all devspaces (SYS, LOG, and DATA).
• Switch the database to warm mode. Use the following CONTROL function:
23(5$7,1*�→�5(67$57
You can now quit CONTROL.
Copying Using a Local Network
Target System
On the target system, the database must be in warm mode and the program xserver must berunning.
Source System
1. Export data
Perform the following commands as user sqd<sapsid> on the source system:cd $DBROOTxload -u superdba,admin -d <T_DBSID> -n <T_HOST> -b \
env/dbload.ins

ADABAS D - OS Migration with DB Tools SAP AG
OS Migration between UNIX Operating Systems (XLOAD)
3–4 May 1998
You need a work space, called here /tmp/wrk, for which there must be at least 20 MBspace in the file system. Create the work directories dbexport and dbimport and anamed pipe there:
cd /tmp/wrkmkdir dbexportmkdir dbimportmknod p PIPEcd dbexportxload -u superdba,admin -d <S_DBSID> -n <S_HOST>
This first xload program on the source system starts a dialog session to export the datafrom the source system. This program expects the following commands in the edit field:
dbextract;outfile catalog.out;outfile /tmp/wrk/PIPE
Start the commands for execution with F5.
2. Import data
Log on to the source system within a second window or terminal as user sqd<sapsid>and execute the following commands:
cd /tmp/wrk/dbimportxload -u superdba,admin -d <T_DBSID> -n <T_HOST>
This second xload program on the source system starts a dialog session to import thedata into the target system. It is therefore remotely connected to the target database andexpects the following commands in the edit field:
catalogload all;infile /tmp/wrk/dbexport/catalog.out
Start the commands for execution with F5.
After execution (about 10 to 20 minutes), enter more commands in the edit field:tableload all;infile /tmp/wrk/PIPE;outfile error.prt
Start these commands for execution with F5.
Execution of these commands takes a very long time; the runtime mainly depends on theamount of data to be copied and the system load on the source system (up to approximately100 minutes per GByte). With time, the copy procedure becomes slower because of thechanging usage level.
• Any errors that occur are logged in the file /tmp/wrk/dbimport/load.prt. Youshould check this file at the end of execution.
• If you want to check the progress, you can log on to the target system as usersqd<sapsid> and monitor the copy operation, e.g., using either the ,1)2 function ofCONTROL or the command
x_cons <SAPSID> show io.
• You can log on to the source system as user sqd<sapsid> and monitor the error log fileduring execution using the command
tail -f /tmp/wrk/dbimport/load.prt

SAP AG ADABAS D - OS Migration with DB Tools
OS Migration between UNIX Operating Systems (XLOAD)
May 1998 3–5
orxsql show stat lock table
The result of each xload run is logged in the file load.prt in the corresponding workdirectory. Messages with the numbers 12941, 12942 and 12945 are not critical and can beignored.
Copying Using a Tape
Ensure that the two machines are connected to the same kind of tape devices and that thesedevices are available during the whole copy action. The number of required tapes depends onthe amount of data on the source system; you should plan one tape per GB. The order of thelabels of the tapes is important.
1. Writing to a Tape
Execute the following commands on the source system as user sqd<sapsid>:cd $DBROOTxload -u superdba,admin -d <S_DBSID> -b env/dbload.ins
You need a work space, called here /tmp/wrk, for which there must be at least 20 MBspace in the file system. Create the work directory dbexport.
cd /tmp/wrkmkdir dbexportcd dbexportxload -u superdba,admin -d <S_DBSID>
This xload program starts a dialog session to export the data from the source system andto write it to the tape device. It expects the following commands in the edit field:
dbextract;outfile catalog.out;
outfile /...<TAPE>; (e.g. /dev/rmt/1h)count 250000 (number of 4K pages)
Start the commands for execution with F5.
If several tapes are needed because of the amount of data involved, the tapes must benumbered so that they can be loaded in the correct order.
After command execution has terminated, copy the file/tmp/wrk/dbexport/catalog.out
to another tape.
Check the export for correct execution in the file load.prt. Messages 12941, 12942 and12945 are not critical and can be ignored.
2. Reading from a Tape
On the target system, the database must be in warm mode.
Log on to the target system as user sqd<sapsid> and execute the following commands:cd /tmp/wrkmkdir dbimportcd dbimport
Load the file catalog.out into this directory and execute the following command:

ADABAS D - OS Migration with DB Tools SAP AG
OS Migration between UNIX Operating Systems (XLOAD)
3–6 May 1998
xload -u superdba,admin -d <T_DBSID>
The xload program on the target system starts a dialog session to import the data into thetarget system. It expects the following commands in the edit field:
catalogload all;infile catalog.out
Start the commands for execution with F5.
After execution (about 10 to 20 minutes), enter more commands in the edit field:tableload all;
infile /...<TAPE>; (e.g. /dev/rmt/1h)count 250000; (number of 4K pages)outfile error.prt
Start the commands for execution with F5.
Execution of these commands takes a very long time; the runtime mainly depends on theamount of data to be copied and the system load (up to approximately 100 minutes per GB).With time, the copy procedure becomes slower because of the changing usage level.
• Any errors that occur are logged in the file load.prt. You should check this file at theend of execution.
• If you want to check the progress, you can log on as user sqd<sapsid> and monitor thecopy operation, e.g., using either the ,1)2 function of CONTROL or the command
x_cons <SAPSID> show io.
• You can monitor the error log file during execution using the commandtail -f /tmp/wrk/dbimport/load.prt.
Check the import for correct execution in the file load.prt. Messages 12941, 12942 and12945 are not critical and can be ignored.
Subsequent Processing
On the source system, you can restart your R/3 System using startsap r3.
On the target system, you must create new database statistics before performing any otheraction on the database. Start CONTROL and use the function
23(5$7,1*�→�83'$7(�67$7,67,&6
The command will run a long time (up to approximately 30 minutes per GB).
The following command will load important help files:
&21),*85$7,21�→�/2$'�6<67$%/(6
You can then quit CONTROL.
The new license key must be installed before you can use your copy to work with R/3. This isdescribed in Chapter “Completing and Checking the SAP Software Installation” of the guide5���,QVWDOODWLRQ�RQ�81,;�
If you made your own entries to the user profiles on the source system, you can now passthem to the target system.

SAP AG ADABAS D - OS Migration with DB Tools
OS Migration between UNIX Operating Systems (XLOAD)
May 1998 3–7
Caution
You may not simply copy the profiles, because the target system has other paths and adifferent node name.
Note
Complete your installation as usual. See the description in the Chapter “GeneralSubsequent Actions”.
Test whether you can start your new R/3 System and perform the transaction SE06. Then stopthe R/3 System and generate a backup of the database (use the CONTROL function: 6$9('$7$). Now you can use the R/3 System.
It is recommended to generate a backup of the newly installed software.

ADABAS D - OS Migration with DB Tools SAP AG
OS Migration from UNIX to Windows NT (XLOAD)
3–8 May 1998
OS Migration from UNIX to Windows NT (XLOAD)If the source system is Digital UNIX, see section “OS Migration from Digital UNIX toWindows NT (Backup Method)”.
If the source system is AIX, HP-UX, ReliantUNIX or Solaris, use the method described belowif you are familiar with ADABAS tools. Use the R3load method if you are familiar with SAPtools.
This section describes how to copy an ADABAS D database between machines of differentoperating systems and/or different manufacturers using the database tool XLOAD.
General Information
Since the ADABAS D tool CONTROL is frequently used, it is advisable to be familiar withthe Media Manager and backup/restore functions of CONTROL. You should always have themanual $'$%$6�'�&21752/������ (March 1996 or later) at hand; the manual version 3.1.2is not sufficient.
Procedure
The ADABAS D tool XLOAD can be used to copy an R/3 System between two machineswith different operating systems. If both machines are in a local network, the contents of thedatabase can be copied using the network. In all the other cases, the database has to be copiedusing tapes (ensure that both machines have the same kind of tape devices).
During data export, the database must be in warm mode. No modifying operations may beperformed on the database, because each table is copied with the contents it has (by chance) atthe moment of extraction. If a modification affects two tables, it can produce a logicallyinconsistent R/3 System, if one table is exported before the modification and the other isexported after saving the modification. It is therefore absolutely necessary to stop the R/3System, because this is the only way to ensure that the target system has exactly the samecontents as the source system.
Preparing the Source System
Log on as user <sapsid>adm.Stop your R/3 System using the SAP Service Manager.The database is still running.
If the target database will be smaller than the source database, you must determine therequired minimum size. Use the following command:
xsql show stat serverdb
The value in the line 'USED PERM PAGES' divided by 256 is the smallest possible size of thedata devspace in MBytes. The database must be at least 20% larger than the value thusdetermined.
SAP AG ADABAS D - OS Migration with DB Tools
OS Migration from UNIX to Windows NT (XLOAD)
May 1998 3–9
Preparing the Target System
Install a new R/3 System with R3INST as described in the Installation Guide. You can givethe system a new name.Ensure that you use the minimum size required for data devspaces determined on the sourcesystem.
• Run R3INST as usual and cancel R3INST when you are prompted for Export CD. Thiscreates an empty initialized database.
• Start the target database as user <sapsid>adm with the commandx_start <SAPSID>.
• Start xcontrol.
The first call of CONTROL initializes the CONTROL user. The database is prepared forthe user control with the password control. The command is:
xcontrol -d <SAPSID> -u control,control
• Install your CONTROL environment for the target system. A description is contained inthe CONTROL manual in chapter 3.3.
• Check the configuration of the created new database using CONTROL. Use the followingCONTROL function:
,1)2�→�&21),*85$7,21
• Check all the parameters for the devspaces, especially those for completeness andspecified size. Then call the CONTROL function:
,1,7�→�&21),*
CONTROL will suggest the existing configuration. Confirm the values withoutmodifications.
• Switch the database to warm mode. Use the following CONTROL function:
23(5$7,1*�→�5(67$57
You can now quit CONTROL.
Copying Using a Local Network
Source System
On the source system, the database must be in warm mode and the program xserver must berunning.
Target System
On the target system, the database must be in warm mode.
1. Export data
Perform the following commands as user <sapsid>adm on the target system:cd /D %DBROOT%xload -u superdba,admin -d <T_DBSID> -n <T_HOST> -b \
env\dbload.ins

ADABAS D - OS Migration with DB Tools SAP AG
OS Migration from UNIX to Windows NT (XLOAD)
3–10 May 1998
You need a work space, called here \temp\wrk, for which there must be at least 20 MBspace in the file system. Create the work directories dbexport and dbimport there:
cd \tempmkdir wrkcd wrkmkdir dbexportmkdir dbimportcd dbexportxload -u superdba,admin -d <S_DBSID> -n <S_HOST>
This first xload program on the source system starts a dialog session to export the datafrom the source system. This program expects the following commands in the edit field:
dbextract;outfile catalog.out;outfile \\.\pipe\ada
Start the commands for execution with F5.
2. Import data
Start a second MS-DOS Command Prompt as user <sapsid>adm and execute thefollowing commands:
cd \temp\wrk\dbimportxload -u superdba,admin -d <T_DBSID> -n <T_HOST>
This second xload program on the source system starts a dialog session to import thedata into the target system. It is therefore remotely connected to the target database andexpects the following commands in the edit field:
catalogload all;infile \temp\wrk\dbexport\catalog.out
Start the commands for execution with F5.
After execution (about 10 to 20 minutes), enter more commands in the edit field:tableload all;infile \\.\pipe\ada;outfile error.prt
Start these commands for execution with F5.
Execution of these commands takes a very long time; the runtime mainly depends on theamount of data to be copied and the system load on the source system (up to approximately100 minutes per GByte). With time, the copy procedure becomes slower because of thechanging usage level.
• Any errors that occur are logged in the file \temp\wrk\dbimport\load.prt.You should check this file at the end of execution.
• If you want to check the progress, monitor the copy operation, e.g., using either the ,1)2function of CONTROL or the command
x_cons <SAPSID> show io.
• You can monitor the error log file during execution using the commandtype \temp\wrk\dbimport\load.prt | more
orxsql show stat lock table

SAP AG ADABAS D - OS Migration with DB Tools
OS Migration from UNIX to Windows NT (XLOAD)
May 1998 3–11
The result of each xload run is logged in the file load.prt in the corresponding workdirectory. Messages with the numbers 12941, 12942 and 12945 are not critical and can beignored.
Copying Using a Tape
Ensure that the two machines are connected to the same type of tape devices and that thesedevices are available during the whole copy action. The number of required tapes depends onthe amount of data on the source system; you should plan one tape per GB. The order of thelabels of the tapes is important.
1. Writing to a Tape
Execute the following commands on the source system as user <sapsid>adm:cd /D %DBROOT%xload -u superdba,admin -d <S_DBSID> -b env\dbload.ins
You need a work space, called here \temp\wrk, for which there must be at least 20 MBspace in the file system. Create the work directory dbexport.
cd \tempmkdir wrkcd wrkmkdir dbexportcd dbexportxload -u superdba,admin -d <S_DBSID>
This xload program starts a dialog session to export the data from the source system andto write it to the tape device. It expects the following commands in the edit field:
dbextract;outfile catalog.out;
outfile /...<TAPE>; (e.g. \\.\tape0)count 250000 (number of 4K pages)
Start the commands for execution with F5.
If several tapes are needed because of the amount of data involved, the tapes must benumbered so that they can be loaded in the correct order.
After command execution has terminated, back up the file\temp\wrk\dbexport\catalog.out
to another tape with NTBackup.
Check the export for correct execution in the file load.prt. Messages 12941, 12942 and12945 are not critical and can be ignored.
2. Reading from a Tape
On the target system, the database must be in warm mode.
Log on to the target system as user <sapsid>adm and execute the following commands:cd \tempmkdir wrkcd wrkmkdir dbimportcd dbimport

ADABAS D - OS Migration with DB Tools SAP AG
OS Migration from UNIX to Windows NT (XLOAD)
3–12 May 1998
Load the file catalog.out into this directory and execute the following command:xload -u superdba,admin -d <T_DBSID>
The xload program on the target system starts a dialog session to import the data into thetarget system. It expects the following commands in the edit field:
catalogload all;infile catalog.out
Start the commands for execution with F5.
After execution (about 10 to 20 minutes), enter more commands in the edit field:tableload all;
infile /...<TAPE>; (e.g. \\.\tape0)count 250000; (number of 4K pages)outfile error.prt
Start the commands for execution with F5.
Execution of these commands takes a very long time; the runtime mainly depends on theamount of data to be copied and the system load (up to approximately 100 minutes per GB).With time, the copy procedure becomes slower because of the changing usage level.
• Any errors that occur are logged in the file load.prt. You should check this file at theend of execution.
• If you want to check the progress, monitor the copy operation, e.g., using either the ,1)2function of CONTROL or the command
x_cons <SAPSID> show io.
• You can monitor the error log file during execution using the commandtype \temp\wrk\dbimport\load.prt | more
Check the import for correct execution in the file load.prt. Messages 12941, 12942 and12945 are not critical and can be ignored.
Subsequent Processing
On the source system you can restart your R/3 System using SAP Service Manager.
On the target system you must create new database statistics before performing any otheraction on the database. Start CONTROL and use the function
23(5$7,1*�→�83'$7(�67$7,67,&6
The command will run a long time (up to 30 minutes per GB).
The following command will load important help files:
&21),*85$7,21�→�/2$'�6<67$%/(6
Then you can leave CONTROL.
The new license key must be installed before you can use your copy to work with R/3. This isdescribed in Chapter “Completing and Checking the SAP Software Installation” of the guide5���,QVWDOODWLRQ�RQ�:LQGRZV�17�
If you made your own entries to the user profiles on the source system, you can now passthem to the target system.

SAP AG ADABAS D - OS Migration with DB Tools
OS Migration from UNIX to Windows NT (XLOAD)
May 1998 3–13
Caution
You may not simply copy the profiles, because the target system has other paths and adifferent node name.
Note
Complete your installation as usual. See the description in the Chapter “GeneralSubsequent Actions”.
Test whether you can start your new R/3 System and perform the transaction SE06. Then stopthe R/3 System and generate a backup of the database (use the CONTROL function 6$9('$7$). Now you can use the R/3 System.
It is recommended to generate a backup of the newly installed software.

ADABAS D - OS Migration with DB Tools SAP AG
OS Migration from Windows NT to UNIX (XLOAD)
3–14 May 1998
OS Migration from Windows NT to UNIX (XLOAD)This section describes how to copy an ADABAS D database from Windows NT to UNIXoperating systems using the database tool XLOAD.
If the target system is Digital UNIX, see section “OS Migration from Windows NT to DigitalUNIX (Backup Method)”.
General Information
Since the ADABAS D tool CONTROL is frequently used, it is advisable to be familiar withthe Media Manager and backup/restore functions of CONTROL. You should always have themanual $'$%$6�'�&21752/������ (March 1996 or later) at hand; the manual version 3.1.2is not sufficient.
Procedure
The ADABAS D tool XLOAD can be used to copy an R/3 System between two machineswith different operating systems. If both machines are in a local network, the contents of thedatabase can be copied via the network. In all the other cases, the database has to be copiedusing tapes (ensure that both machines have the same kind of tape devices).
During data export, the database must be in warm mode. No modifying operations may beperformed on the database, because each table is copied with the contents it has (by chance) atthe moment of extraction. If a modification affects two tables, it can produce a logicallyinconsistent R/3 System, if one table is exported before the modification and the other isexported after saving the modification. It is therefore absolutely necessary to stop the R/3System, because this is the only way to ensure that the target system has exactly the samecontents as the source system.
Preparing the Source System
Log on as user <sapsid>adm.
Stop your R/3 System using the SAP Service Manager. The database is still running.
If the target database will be smaller than the source database, you must determine therequired minimum size. Use the following command:
xsql show stat serverdb
The value in the line 'USED PERM PAGES' divided by 256 is the smallest possible size of thedata devspace in MBytes. The database must be at least 20% larger than the value thusdetermined.
Preparing the Target System
Install a new R/3 System with R3INST as described in the Installation Guide. You can givethe system a new name.
Ensure that you use the minimum size required for data devspaces determined on the sourcesystem.

SAP AG ADABAS D - OS Migration with DB Tools
OS Migration from Windows NT to UNIX (XLOAD)
May 1998 3–15
If more than one tape device was configured in the source system, you must specify at least 2for the number of tape devices available.
• Run R3INST as usual, skipping the Report Load CD. Cancel R3INST when you areprompted for EXPORT CD. This creates an empty initialized database.
• Start target database as user sqd<sapsid> with the commandx_start <SAPSID>.
• Start xcontrol.
The first call of CONTROL initializes the control user. The database is prepared for theuser control with the password control. The command is:
xcontrol -d <SAPSID> -u control,control
• Install your CONTROL environment for the target system. A description is contained inthe CONTROL manual in chapter 3.3.
• Check the configuration of the created new database using CONTROL. Use the followingCONTROL function:
,1)2�→�&21),*85$7,21
• Check all the parameters for the devspaces, especially those for completeness andspecified size. Then call the CONTROL function:
,1,7�→�&21),*
CONTROL will suggest the existing configuration. Confirm the values withoutmodifications. If devspaces are requested, CONTROL wants to know their type. Specifytype L for all devspaces (SYS, LOG, and DATA).
• Switch the database into warm mode. Use the following CONTROL function:
23(5$7,1*�→�5(67$57
You can now quit CONTROL.
Copying Using a Local Network
Source System
On the source system the database must be in warm mode and the program xserver mustbe running.
Target System
1. Export data
Perform the following commands as user sqd<sapsid> on the source system:cd $DBROOTxload -u superdba,admin -d <T_DBSID> -n <T_HOST> -b \
env/dbload.ins
You need a work space, called here /tmp/wrk, for which there must be at least 20 MBspace in the file system. Create the work directories dbexport and dbimport and anamed pipe there:
cd /tmp/wrkmkdir dbexportmkdir dbimport

ADABAS D - OS Migration with DB Tools SAP AG
OS Migration from Windows NT to UNIX (XLOAD)
3–16 May 1998
mknod p PIPEcd dbexportxload -u superdba,admin -d <S_DBSID> -n <S_HOST>
This first xload program on the target system starts a dialog session to export the datafrom the source system. This program expects the following commands in the edit field:
dbextract;outfile catalog.out;outfile /tmp/wrk/PIPE
Start the commands for execution with F5.
2. Import data
Log on to the target system within a second window or terminal as user sqd<sapsid>and execute the following commands:
cd /tmp/wrk/dbimportxload -u superdba,admin -d <T_DBSID> -n <T_HOST>
This second xload program on the target system starts a dialog session to import the datafrom the source system. It is therefore remotely connected to the source database andexpects the following commands in the edit field:
catalogload all;infile /tmp/wrk/dbexport/catalog.out
Start the commands for execution with F5.
After execution (about 10 to 20 minutes), enter more commands in the edit field:tableload all;infile /tmp/wrk/PIPE;outfile error.prt
Start these commands for execution with F5.
Execution of these commands takes a very long time; the runtime mainly depends on theamount of data to be copied and the system load on the source system (up to approximately100 minutes per GByte). With time, the copy procedure becomes slower because of thechanging usage level.
• Any errors that occur are logged in the file /tmp/wrk/dbimport/load.prt.You should check this file at the end of execution.
• If you want to check the progress, you can log on to the target system as usersqd<sapsid> and monitor the copy operation, e.g., using either the ,1)2 function ofCONTROL or the command
x_cons <SAPSID> show io.
• You can log on to the target system as user sqd<sapsid> and monitor the error log fileduring execution using the command
tail -f /tmp/wrk/dbimport/load.prt
orxsql show stat lock table
The result of each xload run is logged in the file load.prt in the corresponding workdirectory. Messages with the numbers 12941, 12942, and 12945 are not critical and can beignored.

SAP AG ADABAS D - OS Migration with DB Tools
OS Migration from Windows NT to UNIX (XLOAD)
May 1998 3–17
Copying Using a Tape
Ensure that the two machines are connected to the same kind of tape devices and that thesedevices are available during the whole copy action. The number of required tapes depends onthe amount of data on the source system; you should plan one tape per GB. The order of thelabels of the tapes is important.
1. Writing to a Tape
Execute the following commands on the source system as user <sapsid>adm:cd /D %DBROOT%xload -u superdba,admin -d <S_DBSID> -b env\dbload.ins
You need a work space, called here \temp\wrk, for which there must be at least 20 MBspace in the file system. Create the work directory dbexport.
cd \tempmkdir wrkcdwrkmkdir dbexportcd dbexportxload -u superdba,admin -d <S_DBSID>
This xload program starts a dialog session to export the data from the source system andto write it to the tape device. It expects the following commands in the edit field:
dbextract;outfile catalog.out;
outfile /...<TAPE>; (e.g. \\.\tape0)count 250000 (number of 4K pages)
Start the commands for execution with F5.
If several tapes are needed because of the amount of data involved, the tapes must benumbered so that they can be loaded in the correct order.
After command execution has terminated, copy the file\temp\wrk\dbexport\catalog.out to another tape with NTBackup.
Check the export for correct execution in the file load.prt. Messages 12941, 12942 and12945 are not critical and can be ignored.
2. Reading from a Tape
On the target system, the database must be in warm mode.
Log on to the target system as user sqd<sapsid> and execute the following commands:cd /tmp/wrkmkdir dbimportcd dbimport
Load the file catalog.out into this directory and execute the following command:xload -u superdba,admin -d <T_DBSID>
The xload program on the target system starts a dialog session to import the data into thetarget system. It expects the following commands in the edit field:
catalogload all;infile catalog.out

ADABAS D - OS Migration with DB Tools SAP AG
OS Migration from Windows NT to UNIX (XLOAD)
3–18 May 1998
Start the commands for execution with F5.
After execution (about 10 to 20 minutes), enter more commands in the edit field:tableload all;
infile /...<TAPE>; (e.g. /dev/rmt/1h)count 250000; (number of 4K pages)outfile error.prt
Start the commands for execution with F5.
Execution of these commands takes a very long time; the runtime mainly depends on theamount of data to be copied and the system load (up to approximately 100 minutes per GB).With time, the copy procedure becomes slower because of the changing usage level.
• Any errors that occur are logged in the file load.prt. You should check this file at theend of execution.
• If you want to check the progress, you can log on as user sqd<sapsid> and monitor thecopy operation, e.g., using either the ,1)2 function of CONTROL or the command
x_cons <SAPSID> show io.
• You can monitor the error log file during execution using the commandtail -f /tmp/wrk/dbimport/load.prt.
Check the import for correct execution in the file load.prt. Messages 12941, 12942 and12945 are not critical and can be ignored.
Subsequent Processing
On the source system you can restart your R/3 System .
On the target system you must create new database statistics before performing any otheraction on the database. Start CONTROL and use the function
23(5$7,1*�→�83'$7(�67$7,67,&6
The command will run a long time (up to approximately 30 minutes per GB).
The following command will load important help files:
&21),*85$7,21�→�/2$'�6<67$%/(6
You can then quit CONTROL.
The new license key must be installed before you can use your copy to work with R/3. This isdescribed in Chapter “Completing and Checking the SAP Software Installation” of the guide5���,QVWDOODWLRQ�RQ�81,;�
If you made your own entries to the user profiles on the source system, you can now passthem to the target system.
Caution
You may not simply copy the profiles, because the target system has other paths and adifferent node name.

SAP AG ADABAS D - OS Migration with DB Tools
OS Migration from Windows NT to UNIX (XLOAD)
May 1998 3–19
Note
Complete your installation as usual. See the description in the Chapter “GeneralSubsequent Actions”.
Test whether you can start your new R/3 System and perform the transaction SE06. Then stopthe R/3 System and generate a backup of the database (use the CONTROL function: 6$9('$7$). Now you can use the R/3 System.
It is recommended to generate a backup of the newly installed software.
ADABAS D - OS Migration with DB Tools SAP AG
OS Migration from Digital UNIX to Windows NT (Backup Method)
3–20 May 1998
OS Migration from Digital UNIX to Windows NT (Backup Method)
General Information
To copy an ADABAS D database from Digital UNIX (DEC OSF/1) to Windows NT, you canuse the backup method. Ensure that the same tape device type is available on both the sourceand target hosts. Do not transfer the data over a network.
Procedure
Source System
Please refer to the description in the section “Backup Procedure for ADABAS D on UNIX” ofthe manual�5���+RPRJHQHRXV�6\VWHP�&RS\ for all actions necessary on the source system.
Target System
Please refer to the description in the section “Backup Procedure for ADABAS D on WindowsNT” of the manual�5���+RPRJHQHRXV�6\VWHP�&RS\ for all actions necessary on the targetsystem.
OS Migration from Windows NT to Digital UNIX (Backup Method)
General Information
To copy an ADABAS D database from Windows NT to Digital UNIX (DEC OSF/1), you canuse the backup method. Ensure that the same tape device type is available on both the sourceand target hosts. Do not transfer the data over a network.
Procedure
Source System
Please refer to the description in the section “Backup Procedure for ADABAS D on WindowsNT” of the manual�5���+RPRJHQHRXV�6\VWHP�&RS\ for all actions necessary on the sourcesystem.
Target System
Please refer to the description in the section “Backup Procedure for ADABAS D on UNIX” ofthe manual�5���+RPRJHQHRXV�6\VWHP�&RS\ for all actions necessary on the target system.

SAP AG ORACLE - OS Migration with DB Tools
Contents
May 1998 4–1
Chapter 4: ORACLE - OS Migration with DB Tools
Contents
OS Migration between UNIX Operating Systems (Export/Import) ............................ 4–2
OS Migration between NT Operating Systems (Export/Import)................................ 4–2
OS Migration from UNIX to Windows NT (Export/Import) ......................................... 4–2Procedure................................................................................................................... 4–2Preparations ............................................................................................................... 4–2Creating the Export Dump in the UNIX Source System............................................. 4–3Installing the Target System on the NT Machine ....................................................... 4–3
OS Migration from Windows NT to UNIX (Export/Import) ......................................... 4–7Procedure................................................................................................................... 4–7Checking the Release Level of your Source System ................................................. 4–7Determining the Size of the Export............................................................................. 4–8Creating the Export Dump in the Source System....................................................... 4–8Determining the Tablespace Sizes in the Source System ......................................... 4–9Determining the Current Sizes of Tablespaces.......................................................... 4–9Determining the Minimum Sizes of Tablespaces ..................................................... 4–10Installing the Target System on UNIX Machine........................................................ 4–10Existing Target System ............................................................................................ 4–10Installing a New Target System................................................................................ 4–11Importing the Source Export..................................................................................... 4–11Subsequent Importing Actions ................................................................................. 4–12Example of the DBUNLOAD Parameter File............................................................ 4–13

ORACLE - OS Migration with DB Tools SAP AG
OS Migration between UNIX Operating Systems (Export/Import)
4–2 May 1998
OS Migration between UNIX Operating Systems (Export/Import)For the description of this procedure, see the guide 5���+RPRJHQHRXV�6\VWHP�&RS\� section“Export/Import Procedure for ORACLE on UNIX” of Chapter “ORACLE SpecificProcedures”.
OS Migration between NT Operating Systems (Export/Import)For the description of migration between NT-INTEL and DEC-ALPHA based Windows NT(without migration of the database), see the guide 5���+RPRJHQHRXV�6\VWHP�&RS\, section“Unload Database Procedure for ORACLE on Windows NT” of Chapter “ORACLE SpecificProcedures”.
OS Migration from UNIX to Windows NT (Export/Import)
Procedure1. Create the export dump in the source system on the UNIX machine.
2. Transport the export dump files to the Windows NT machine.
3. Adapt in the file SAPFS.INF the description of the database (e. g. size values) to thecurrent settings of the exported database and use the adapted file instead of the defaultconfiguration file on the CD-ROM.
4. Import the export dump into the target system.
5. ABAP/4 program loads cannot be installed from the CD-ROM, as the ABAP/4 programloads delivered by SAP have a status different from those in the customer database. Thisleads to an initial deterioration of performance.
Preparations
See Chapter ”Introduction” section ”General Preparations”.
Check the release of your UNIX source system.
Perform the following steps:
1. Make sure that you are logged on as user <sapsid>adm.
Start the ORACLE tool SQLDBA with the following command:sqldba lmode=y
2. Enter the following commands to check the release of your source system:connect sapr3/<password>;select * from svers;exit
Before you start the import into the target system, check the release of the CD-ROM beingused for the installation. The release levels of the source and target system must be identical.
SAP AG ORACLE - OS Migration with DB Tools
OS Migration from UNIX to Windows NT (Export/Import)
May 1998 4–3
Creating the Export Dump in the UNIX Source System
The manual 5���+RPRJHQHRXV�6\VWHP�&RS\ (Chapter “ORACLE Specific Procedures”,section “Export/Import Procedure for ORACLE on UNIX”) describes how to perform adatabase export under UNIX.
• The export must be uncompressed.
• If the export has to be split into several files because of the 2 GB file size limit onUNIX, only splitting at database level is possible.
• The file SAPFS.TPL (database configuration file) must be generated using R3INST.
Caution
The ABAP/4 program loads from the UNIX system cannot be used under Windows NT.Decide whether you want to delete the loads from the source system before you start theexport. Deleting the loads will save space in the export file(s) and in the target database,but it will slow down the source system until the loads have been regenerated.
The created files (one or more export dump files and database configuration file SAPFS.TPL)must be copied to the NT machine.
Installing the Target System on the NT Machine
The target system on the NT machine is installed using R3INST.
Proceed as follows:
1. Prepare the target system as follows:− Create the SAP users SAP Administrator (<SAPSID>ADM) and SAP Service Account
(SAPService<SAPSID>).Adapt the user policies.
− Create and format partitions.− Adjust the virtual memory.− Optimize the Windows NT Server for use with SAP R/3.
A detailed description can be found in the guide 5���,QVWDOODWLRQ�RQ�:LQGRZV�17, Chapter“Installation Preparations”.
2. Check whether the home directory of the user <SAPSID>ADM (for exampleC:\USERS\<SAPSID>ADM) was created.
Ensure that the home directory of <SAPSID>ADM has the correct access authorizations, i.e.Full Control (All) (All) for Everyone.
3. Install the ORACLE database software with the ORACLE tool ORAINST.
A detailed description of the flow can be found in the guide 5���,QVWDOODWLRQ�RQ�:LQGRZV17, Chapter “Installing the Database Software”.
4. Log on to the target system as user <SAPSID>ADM and start the installation tools fromCD-ROM by double-clicking on the file R3INST.EXE. R3INST installs the necessary

ORACLE - OS Migration with DB Tools SAP AG
OS Migration from UNIX to Windows NT (Export/Import)
4–4 May 1998
tools in the installation directory (for example C:\USERS\<SAPSID>ADM\INSTALL) andcreates the start menu entry 6$3�5�� that contains the 5�,167 shortcut.
A detailed description can be found in the guide 5���,QVWDOODWLRQ�RQ�:LQGRZV�17, Chapter“Installing an SAP Instance”.
5. When R3INST is installed, file SAPFS.INF is automatically copied to the installationdirectory (for example C:\USERS\<SAPSID>ADM\INSTALL). The information in this fileis only correct for a standard installation and therefore has to be adjusted.
Increase the tablespace sizes in the file SAPFS.INF in section [ORACLE-DB] according tothe sizes given in the file SAPFS.TPL determined on your UNIX source system.
Example
Entry in SAPFS.INF : Entry in SAPFS.TPL :
[ORACLE-DB]
PSAPTEMP 230 PSAPTEMP 500
A size of 500 KB is entered in SAPFS.INF for tablespace PSAPTEMP.
Entry in SAPFS.INF :
[ORACLE-DB]
PSAPTEMP 500
6. Start the installation of the target system on the NT machine with R3INST.Create the central instance.
A detailed description of the flow can be found in the guide 5���,QVWDOODWLRQ�RQ�:LQGRZV17, Chapter “Installing an SAP Instance”.
7. Build and load the database with R3INST.− Start R3INST. Choose the 6$36,' and then 2..− Select 1HZ from the main menu item 6HUYHU. In the window 1HZ select 'DWDEDVH
VHUYHU and choose 2..− Specify now the installation type 6WDQGDUG�LQVWDOODWLRQ.− Perform the following installation steps as described in the installation guide 5��
,QVWDOODWLRQ�RQ�:LQGRZV�17, Chapter “Database Build and Load”.
SAP AG ORACLE - OS Migration with DB Tools
OS Migration from UNIX to Windows NT (Export/Import)
May 1998 4–5
Note
You created and named your export dump files in the UNIX source system. Keep in mindthat you must select \RXU�H[SRUW�GXPS�ILOHV from the source system as a database dump file- instead of indicating the location of file LABEL.ASC on the export CD during thedatabase server installation.
To select the export dump file, choose ([SRUW�GXPS ( �GPS) under /LVW�)LOHV�RI�7\SH in thewindow /RFDWH�ILOH�/$%(/�$6&�RQ�H[SRUW�&'��. Then browse through your directories tofind your export dump file.
− If you have only one dump file, select your export dump file from the UNIX sourcesystem as database dump file during the database server installation.
− If you have PRUH�WKDQ�RQH dump file, interrupt the installation before the databaseload phase. Then import all dump files except the structure dump file (default nameEXPSTRU.DMP ).The data dump files can be imported by repeatedly restarting R3INST (method 1) ormanually (method 2). A detailed description of these methods can be found below.
Note
SAP recommends that you import by repeatedly restarting R3INST.
The structure dump file (EXPSTRU.DMP) still has to be imported once you have imported thedata dump files. To do this, restart R3INST and select the structure dump file EXPSTRU.DMPas database dump file in the window /RFDWH�ILOH��/$%(/�$6&��RQ�H[SRUW�&'���
Method 1: Import by repeatedly restarting R3INST
To import all data dump files (except the structure dump file EXPSTRU.DMP) by repeatedlyrestarting R3INST proceed as follows:
a) Start R3INST.
b) In the screen 'DWDEDVH�6HUYHU�2SWLRQV, select &UHDWH�'DWDEDVH , ,PSRUW�GDWD and 6HWXSEUEDFNXS�VDSGED.
Press 2..
c) Select the required directories in the window 5HTXLUHG�'LVN�VSDFH�IRU�WKH�'DWDEDVH6HUYHU.
Select 'R�LW from the main menu item ,QVWDOO or click on the ! symbol.
d) In window /RFDWH�ILOH��/$%(/�$6&��RQ�H[SRUW�&'���
Select the location of your database export dump file from the UNIX source system andpress 2..
R3INST starts to import the data. This process may take a while depending on the size ofthe database export dump file.

ORACLE - OS Migration with DB Tools SAP AG
OS Migration from UNIX to Windows NT (Export/Import)
4–6 May 1998
R3INST will fail DIWHU�LPSRUWLQJ these data and report the following error in the window5�,167��QQQ!/2*:
Loading database with r3inst failed.
Either the tables INSCHK/INSCHKB (control tables containing information about all theobjects in the source system) or the objects recorded in these tables were not yetimported.
Also check the log file created by R3INST (e.g. using the File Manager), since not all ofthe information is displayed in the window 5�,167��QQQ!/2*. If further errors arereported, analyze them before continuing with the import.
e) Start R3INST again.
f) In the screen 'DWDEDVH�6HUYHU�2SWLRQV, select only ,PSRUW�GDWD and 6HWXSEUEDFNXS�VDSGED.
Press 2..
g) Select the required directories in the window 5HTXLUHG�'LVN�VSDFH�IRU�WKH�'DWDEDVH6HUYHU.
h) Select 'R�LW from the main menu item ,QVWDOO or click on the ! symbol.
i) In window /RFDWH�ILOH��/$%(/�$6&��RQ�H[SRUW�&'���
Select the location of your next database export dump file from the UNIX source systemand press 2..
j) If R3INST again reports the error
Loading database with r3inst failed.
(and there are no other errors), switch back to the R3INST window 5HTXLUHG�'LVN�VSDFHIRU�WKH�'DWDEDVH�6HUYHU. There is no need to re-enter the drive letters.
k) Now repeat steps h), i) and j) until the error does not occur, that is until all the objectshave been imported.
Note
Keep in mind that the structure dump file (EXPSTRU.DMP) still has to be imported onceyou have imported the data dump files.
Method 2: Manual Import
To import all data dump files (except the structure dump file EXPSTRU.DMP) manuallyproceed as follows:
a) Start R3INST.
b) In the screen 'DWDEDVH�6HUYHU�2SWLRQV, select only &UHDWH�'DWDEDVH.
Press 2..
c) Select the required directories in the window 5HTXLUHG�'LVN�VSDFH�IRU�WKH�'DWDEDVH6HUYHU.
Select 'R�LW from the main menu item ,QVWDOO or click on the ! symbol.
d) Terminate R3INST when R3INST reports that the database was created.
SAP AG ORACLE - OS Migration with DB Tools
OS Migration from Windows NT to UNIX (Export/Import)
May 1998 4–7
e) Use an ORACLE command line window to proceed with the import manually.
To import all data manually use the following command line for all export dump files:imp72 system/manager buffer=3000000file=<DRIVE>:\<PATH>\<exp>.dmpfull=y commit=y grants=y indexes=y ignore=ylog=<DRIVE>:\USERS\<SAPSID>ADM\INSTALL\<exp>.log
where <exp> is the name of the export dump file
This command line is also part of the file IMPDATA.BAT located on the CD in the samedirectory as R3INST. After starting the installation tools from CD-ROM (see step 3.)R3INST copies this file to your installation directory. You can modify it according toyour needs.
Note
Keep in mind that the structure dump file (EXPSTRU.DMP) still has to be imported onceyou have imported the data dump files.
OS Migration from Windows NT to UNIX (Export/Import)
Procedure1. Create the export dump in the source system on the NT machine.
2. Transport the export dump files to the UNIX machine.
3. Adapt the file SAPFS.TPL (description of the database, e. g. size values, to the currentsettings of the exported database). Use the adapted file instead of the defaultconfiguration file on the CD-ROM.
4. Copy the file DBUNLOAD.TPL, rename it to DBLOAD.PAR and adjust it.
5. Import the export dump into the target system.
6. ABAP/4 program loads cannot be installed from the CD-ROM, as the ABAP/4 programloads delivered by SAP have a status different from those in the customer database. Thisleads to an initial deterioration of performance.
Checking the Release Level of your Source System
Use the following commands:
1. Choose in the start menu 2UDFOH�IRU�:LQGRZV�17�→�64/�3OXV��.
2. In the screen /RJ�2Q�
Enter 8VHU�1DPH� sapr3
Enter 3DVVZRUG� ��e.g. sap
Enter +RVW�6WULQJ� T:<hostname>:<SAPSID>
Press 2.�
3. In the screen 2UDFOH�64/ 3OXV���
Enter the following command:

ORACLE - OS Migration with DB Tools SAP AG
OS Migration from Windows NT to UNIX (Export/Import)
4–8 May 1998
select * from svers;
The Release level of your source system will be displayed, e. g. “ 9HUVLRQ�����+�”.
4. Enter exit to leave 64/ 3OXV��.
Before you start the import into the target system, check the release level of the CD-ROMused for installation. The release levels of the source and target systems must be identical.
Determining the Size of the ExportYou can estimate the size of the export dump using the following commands:
1. Choose in the start menu 2UDFOH�IRU�:LQGRZV�17�→�64/�3OXV��.
2. In the screen /RJ�2Q�
Enter 8VHU�1DPH� sapr3
Enter 3DVVZRUG� e.g. sap
Enter +RVW�6WULQJ� T:<hostname>:<SAPSID>
Press 2.�
3. In the screen 2UDFOH�64/ 3OXV���
Enter the following command:select sum(bytes) from dba_segments where segment_type = ’TABLE’;
The result is the sum of all table data present. Dividing this value by 2 gives a roughestimate of the size of the export dump.
4. Enter exit to leave 64/ 3OXV��.
Creating the Export Dump in the Source System
Make sure that no database actions are performed during the export.
Therefore you should:
• start the DB (preferably in DBA mode with sapdba).
• stop SAP R/3.
For reasons of performance and reliability, the file system for the export dumps should resideon a local disk.
Perform the following steps:
1. Log on as user <SAPSID>ADM.
2. Start 5�,167 (6WDUW�→�3URJUDPV�→�6$3�5�).
3. In the screen 5�,167�IRU�:LQGRZV�17�
Select 7RROV → 8QORDG�'DWDEDVH�
4. In the screen 6DYH�WKH�H[SRUW�GXPS�DV�
Choose the drive and directory. Retain the file extension "*.DMP".
Caution
Ensure that enough disk space is available on the desired drive.
SAP AG ORACLE - OS Migration with DB Tools
OS Migration from Windows NT to UNIX (Export/Import)
May 1998 4–9
5. In the popup window 5�,167�
Drop the ABAP/4 load if desired.
Note
It is only necessary to drop the ABAP/4 load if you want to import the database dump ona different platform afterwards. If you choose <(6, the ABAP/4 load in your sourcesystem will be dropped and has to be recreated after the export.
Determining the Tablespace Sizes in the Source System
A relational database system takes over the management of physical structures (extents).Therefore, the sequence of the extents in the target system is usually different from that in thesource system.
To avoid problems caused by the new internal fragmentation of the data files, the database isautomatically reorganized during export. The extents of a database segment are thencombined into one extent and various data files of a tablespace are combined into a singledata file.
If tablespaces of your source database were increased during operation of your R/3 System,you have to determine the sizes of these tablespaces in order to correct the correspondingentries in the file SAPFS.TPL.
You can detrmine:
• the current sizes of tablespaces
• the minimum sizes of tablespaces
Detailed information can be found in the relevant sections.
Determining the Current Sizes of Tablespaces
Perform the following tasks:
1. Choose in the start menu 2UDFOH�IRU�:LQGRZV�17�→�64/�3OXV��.
2. In the screen /RJ�2Q�
Enter 8VHU�1DPH� sapr3
Enter 3DVVZRUG� e.g. sap
Enter +RVW�6WULQJ� T:<hostname>:<SAPSID>
Press 2.�
3. In the screen 2UDFOH�64/ 3OXV���
Enter the following commands to determine the sizes in MB:set pagesize 0
spool TBLSPACE.TXT
select tablespace_name, sum(bytes)/1048576 from dba_data_files group by tablespace_name;
spool off;
ORACLE - OS Migration with DB Tools SAP AG
OS Migration from Windows NT to UNIX (Export/Import)
4–10 May 1998
The information about the sizes is written to file TBLSPACE.TXT in directory<DRIVE>:\ORANT\BIN.
4. Enter exit to leave 64/ 3OXV��.
Determining the Minimum Sizes of Tablespaces
Perform the following tasks:
1. Choose in the start menu 2UDFOH�IRU�:LQGRZV�17�→�64/�3OXV��.
2. In the screen /RJ�2Q�
Enter 8VHU�1DPH� sapr3
Enter 3DVVZRUG� e.g. sap
Enter +RVW�6WULQJ� T:<hostname>:<SAPSID>
Press 2.�
3. In the screen 2UDFOH�64/ 3OXV���
Enter the following commands to determine the sizes in MB:set pagesize 0
spool MINSPACE.TXT
select tablespace_name, sum(bytes)/1048576 from dba_segments group by tablespace_name;
spool off;
The information about the sizes is written to file MINSPACE.TXT in directory<DRIVE>:\ORANT\BIN.
4. Enter exit to leave 64/ 3OXV��.
Installing the Target System on UNIX Machine
You have to import the database dump into the target system. Use R3INST (for UNIX) withthe phases DB-Build and DB-Load to perform this import.
See also guide 5���+RPRJHQHRXV�6\VWHP�&RS\� section “Export/Import Procedure forORACLE on UNIX” of Chapter “ORACLE Specific Procedures”and OSS note 86428.
Note
Check if the R/3 release level and the ORACLE version of the R/3 Systems are the same.
Existing Target System
Caution
The former database will be destroyed after an import of a new database.

SAP AG ORACLE - OS Migration with DB Tools
OS Migration from Windows NT to UNIX (Export/Import)
May 1998 4–11
If the target system already exists, R3INST’s phases DB-Build and DB-Load have to beperformed. Start R3INST as UNIX user root and change the DB-state of the configurationdescription file sapconf to DB-Build-ERR.
Select 6<67(0�→�2SHQ�6\VWHP, select your system and select *(1�722/6�→�(GLW�VWDWHIRU�'%�,QVWDOODWLRQ. Then change the value State to DB-Build-ERR.
Note
If you are importing into an already existing system and the tablespace structure fits intothe existing tablespace distribution, creation of the tablespaces can be skipped. In this caseyou have to change the value State to DB-Build-OK.
Continue and select ,QVWDOO to start/restart the installation. Select 3UHSDUH�GDWDEDVH and select&RQWLQXH as restart point.
Then continue with section "Importing the Source Export" below.
Installing a New Target System
If you are installing a new target system perform all the steps described in the manual 5��,QVWDOODWLRQ�RQ�81,;. Stop before the DB-Build phase. This is indicated by the question"Load Database: Select a task".
Continue with section "Importing the Source Export".
Importing the Source Export1. Copy the file SAPFS.TPL from the SAP KERNEL CD
(<CD-DIR>:/UNIX/COMMON) to the directory <INSTDIR> of the target system. Adapt thefile in accordance with your database needs on the UNIX target system (you getinformation about database sizes as described in section “Determining the TablespaceSizes in the Source System”).
2. Copy the data files from the source system to the target system.
3. Copy the template file DBUNLOAD.TPL from the SAP KERNEL CD(<CD-DIR>:/UNIX/COMMON/INSTALL) to the directory <INSTDIR> of the targetsystem. Rename the file to DBLOAD.PAR.
4. Modify the FULL*, FILENAME*, REST* and STRUCTURE entries in the file DBLOAD.PARfile so that they point to the right file locations. If you use the IGNORE parameter, specifyit in every job section separately. IGNORE has no effect if you specify it in the [IMP-EXP-OPTIONS] section.
5. Do not place the CD-ROM with the delivered database export in the CD-ROM drive.
6. R3INST prompts:Shall tablespaces be created
Choose <(6�
7. R3INST prompts:

ORACLE - OS Migration with DB Tools SAP AG
OS Migration from Windows NT to UNIX (Export/Import)
4–12 May 1998
Do you want to change SAPFS.TPL ...
Choose 12.R3INST uses the file SAPFS.TPL in the working directory.
8. Select the option:
/RDG�FXVWRPHU�H[SRUW�ILOH
and continue.
Importing from a (compressed) export on tape:
In a separate window, create a named pipe with read-write permissions and start a dd readingfrom tape and writing into the named pipe. The name of the pipe must correspond to the nameof the parameter FULL1 defined in DBLOAD.PAR (see example 1 in DBUNLOAD.TPL).If the dump on tape has been compressed, do not forget to uncompress it.
Procedure:
a) Create a named pipe with the right permissions on the target host. mknod <n_pipe> p; chmod 666 <n_pipe>
b) Read the dump from tape with dd (uncompress it) and write it to the named pipe.compressed: dd if=<tape_dev> bs=16K | uncompress -c | dd of=<n_pipe>
uncompressed: dd if=<tape_dev> of=<n_pipe> bs=16K
c) Read the import in R3INST from the named pipe defined in DBLOAD.PAR. (Insert thename of the pipe for the parameter FULL1 in the example in DBUNLOAD.TPL.)
Note
Watch the import log files imp*.log. Messages containing IMP 00015, IMP 00021 orORA 942 in the files imp*.log can be ignored.
If you have an export split on I/O level, also watch the file chopimp*.log.
Since the import procedure creates indexes, it will take longer than the export.
Subsequent Importing Actions
Complete your installation as usual. See the description in Chapter “General SubsequentActions” for the required subsequent actions.

SAP AG ORACLE - OS Migration with DB Tools
OS Migration from Windows NT to UNIX (Export/Import)
May 1998 4–13
Example of the DBUNLOAD Parameter File
########################################################################## README: Description for export and import with R3INST###### Parameter file to create a customer copy of export files## This file must be moved to the installation directory:## for export with the name DBUNLOAD.PAR (read write permissions)## for import with the name DBLOAD.PAR (read permissions)#### There are the following KEYWORDS###### [JOB*] = beginning of a job. x starts with 0 up to 30## [END] = end of a job#### FULL* = names of the full export/import dump file.## * starts with 1 .## You need FULL2, FULL3, ... if you want to split the## full dump in pieces smaller than 2GB.## FULL1=filename1 2000[M]## FULL2=filename2 2000[M]## FULL3=filename3## FILENAME*= names of one export/import dump file.## * starts with 1.## You need FILENAME2, FILENAME3, ... if you want to split## one table or one tablespace in pieces smaller than 2GB.## FILENAME1=filename1 2000[M]## FILENAME2=filename2 2000[M]## FILENAME3=filename3## TST=PSAPLOADD,PSAPDOCUD## REST* = name of the REST export/import dump file## * starts with 1.## You need REST2, REST3, ... if you want to split## the rest of the data in pieces smaller than 2GB.## REST1=filename1 2000[M]## REST2=filename2 2000[M]## REST3=filename3## STRUCTURE= name of the structure export/import dump file.## You need to export/import the structure only if you## split the dump into several jobs with the keywords## FILENAME and REST.#### TSP = name of the tablespace of which all tables will be exported.#### TABLE = name of the table that will be exported.######## CH_COMPRESS=Y/N compress/do not compress the data## CH_CHECKSUM=Y/N write checksum information to chop*.log###### [ADVANCED] section for import/export via pipe## export via SQL*Net V2:## EXP_dbs_ora_tnsname=<SID>## environment varible dbs_ora_tnsname on the source system#### EXP_TNS_ADMIN=<directory_of_oracle_netv2_config_files>## environment variable TNS_ADMIN on the source system## default: /usr/sap/trans

ORACLE - OS Migration with DB Tools SAP AG
OS Migration from Windows NT to UNIX (Export/Import)
4–14 May 1998
###### export via SQL*Net V1:## EXP_TWO_TASK=T:<hostname_of_source_system>:<SID>## environment variable TWO_TASK on the source system##########################################################################[IMP-EXP-OPTIONS]#PARALLEL = Y## PARALLEL = Y/N export/import parallel/not parallel## you only need this parameter if you do an export or## import with the KEYWORDS FILENAME and REST######################################################################### LOGFILES:## The export/import creates the following logfiles:#### exp*.log protocol of exp[st]## imp*.log protocol of imp[st]## chopexp*.log protocol when files are splitted or compressed## during export## chopimp*.log protocol when files are splitted or compressed## during import## R3INST.log Standard protocol for R3INST## R3INST.diag Debugging Logfile######################################################################### In every [JOB] section, you can change the default values for## import or export. If the keyword is omitted or not valid,## exp or imp takes the following default values:#### For imp[st]:## COMMIT=Y; INDEXES=Y; BUFFER=3000000; GRANTS=Y; IGNORE=N;#### For exp[st]:## COMPRESS=Y; BUFFER=3000000;################################################################################################################################################ Example 0## This example could be used to determine the size of every dump file.## You can run this on a production system to get the sizes of the dump## files. The sizes will be printed in chopexp*.log. The dump files will## be exported to /dev/null.## 1.) Get size of the export dump in chopexp*.log##########################################################################[JOB0]#FILENAME=/dev/null#CH_COMPRESS=Y#CH_CHECKSUM=N#TSP=PSAPOOLD#[END]##[JOB1]#FILENAME=/dev/null#CH_COMPRESS=Y#CH_CHECKSUM=N#TSP=PSAPBTABD#[END]###[JOB2]

SAP AG ORACLE - OS Migration with DB Tools
OS Migration from Windows NT to UNIX (Export/Import)
May 1998 4–15
#FILENAME=/dev/null#CH_COMPRESS=Y#CH_CHECKSUM=N#TSP=PSAPOOLD#[END]###[JOB3]#FILENAME=/dev/null#CH_COMPRESS=Y#CH_CHECKSUM=N#TSP=PSAPCLUD#[END]#### ... specify a JOB for every tablespace !!###[JOB<n>]#REST=/dev/null#CH_COMPRESS=Y#CH_CHECKSUM=N#[END]###[JOB<n+1>]#STRUCTURE=/dev/null#[END]####################################################################### Example 1 (Standard export with one file, no split, no compress)## 1. full export or import with 1 dump file## 2. imp exp parameter buffer and commit is changed## 3. files will not be compressed## 4. no checksum## 5. logfiles are exp*.log imp*.log####################################################################### Starting of job0#[JOB0]#FULL1=/cucofs/EXP1.DMP#CH_COMPRESS=N#CH_CHECKSUM=N#COMMIT = n#BUFFER = 4000000#[END]############################################################################################################################################ Example 2## 1. full export or import with 2 dump file## 2. imp exp parameter BUFFER and COMMIT is changed## 3. first dump file with 2000MB and second dump file with the rest## (max filesize is 2GB on a filesystem)## 4. files will be compressed## 5. logfiles are chop*.log exp*.log imp*.log####################################################################### Starting of job0#[JOB0]#FULL1=/cucofs/EXP1.DMP 2000[M]#FULL2=/cucofs/EXP2.DMP#CH_COMPRESS=Y#COMMIT = n#BUFFER = 4000000#[END]############################################################################################################################################ Example 3## 1. splitted export or import## 2. imp exp parameter buffer and commit is changed

ORACLE - OS Migration with DB Tools SAP AG
OS Migration from Windows NT to UNIX (Export/Import)
4–16 May 1998
## 3. files will be compressed## 4. no checksum will be written in cop*.log## 5. exp imp tablespaces PSAPOOLD, PSASOURCED## 6. first dumpfile with 2000MB## 7. second dumpfile with no limit (max filesize will be 2GB)## 8. exp imp the rest of the data with compress and no checksum## 9. exp/imp the structure without compress and checksum##10. logfiles are chop*.log exp*.log imp*.log##11. the export or import will be run parallel####################################################################### Starting of job0#[JOB0]#FILENAME1=/cucofs/EXP1.DMP 2000[M]#FILENAME2=/cucofs/EXP2.DMP#CH_COMPRESS=Y#CH_CHECKSUM=N#TSP=PSAPPOOLD, PSAPSOURCED#[END]###[JOB1]#REST1=/cucofs/REST1.DMP 2000[M]#REST2=/cucofs/REST2.DMP 2000[M]#REST3=/cucofs/REST3.DMP#CH_COMPRESS=Y#CH_CHECKSUM=N#[END]###[JOB2]#STRUCTURE=/cucofs/STRUORA.DMP#[END]#[IMP-EXP-OPTIONS]#PARALLEL = Y############################################################################################################################################ Example 4## 1. export and import via pipe with one job## 2. pipe .pipe1.dmp must exist## 3. remote connect via NETV1 or NETV2 to the source system## 4. import target system## 5. R3INST for import and export must be started on the target####################################################################### Starting of job0#[JOB0]#FULL=/cucofs/.pipe1.dmp#[END]#[ADVANCED]##NETV2 connect#EXP_dbs_ora_tnsname=<SID>#EXP_TNS_ADMIN=/usr/sap/trans##or NETV1 connect##EXP_TWO_TASK=T:<hostname>:<SID>############################################################################################################################################ Example 5## 1. splitted export or import via pipe## 2. pipes .pipe1.dmp, .pipe2.dmp + .pipe3.dmp must exist## 3. remote connect via NETV1 or NETV2 to the source system## 4. import target system## 5. R3INST for import and export must be started on the target## system. The export process connect remote to the source system####################################################################### Starting of job0#[JOB0]#FILENAME1=/cucofs/.pipe1.dmp#TSP=PSAPPOOLD, PSAPSOURCED

SAP AG ORACLE - OS Migration with DB Tools
OS Migration from Windows NT to UNIX (Export/Import)
May 1998 4–17
#[END]###[JOB1]#REST1=/cucofs/.pipe2.dmp#[END]###[JOB2]#STRUCTURE=/cucofs/.pipe3.dmp#[END]#[IMP-EXP-OPTIONS]#PARALLEL = Y#[ADVANCED]##NETV2 connect#EXP_dbs_ora_tnsname=<SID>#EXP_TNS_ADMIN=/usr/sap/trans##or NETV1 connect##EXP_TWO_TASK=T:<hostname>:<SID>#####################################################################

SAP AG R3load Procedure on UNIX
Contents
May 1998 5–1
Chapter 5: R3load Procedure on UNIX
Contents
Overview.........................................................................................................................5–2
Requirements and Restrictions....................................................................................5–3
Preparation Phase .........................................................................................................5–4
Exporting the Source Database ...................................................................................5–4Creating the Parameter File R3LOAD.PAR................................................................5–4Copying the Tools and Starting R3INST.....................................................................5–7Updating the Statistics (only UNIX and Windows NT)................................................5–7Creating the Control Files ...........................................................................................5–8Generating the Templates for the Target Database.................................................5–10Creating the Command Files....................................................................................5–11Exporting the Database ............................................................................................5–11Troubleshooting........................................................................................................5–12
Preparing the Import on the Target Machine............................................................5–12Adapting the R3load Parameter File.........................................................................5–12Transporting the Files to the Target Machine...........................................................5–12
Installing R/3 on the Target Machine......................................................................... 5–14Getting and Setting the Migration Key ......................................................................5–14Preparing the Installation ..........................................................................................5–14Installing R/3 Using the Export of the Source System..............................................5–15

R3load Procedure on UNIX SAP AG
Overview
5–2 May 1998
OverviewThis chapter is valid for all database systems. It describes the R3load procedure on UNIXplatforms.
With the R/3 installation tool R3INST, you can export and import your database in adatabase-independent format using the R3load procedure. This procedure generates adatabase dump of all R/3 objects that are defined in the ABAP/4 Dictionary.
The R3load procedure gets all its information from a command file. This command filein turn refers to control files which contain the structure of the database. The control filescontain the information about table structure, tablespaces/dbspaces, extents, and so on.Since the command and control files are used to export and import the data, you mustfirst create them using the parameter file R3LOAD.PAR.
You need to generate a database-dependent template file that contains the sizes of the filesystems and tablespaces on the target system. You can then export your data into dumpfiles. Once the dump, the parameter, the command, and the control files have been copiedto your target system, you are ready to import the data.
The term TABART which is used in this chapter loosely corresponds to the term dataclass in the Technical Settings of the ABAP/4 Dictionary.
The R3load procedure is the same for all database systems:
1. Create the parameter file R3LOAD.PAR.
2. Create the control files SAP<TABART>.STR, DDL<DBS>.TPL, SAP<TABART>.EXT(where <DBS> is the database system type).
3. Generate a database-dependent template file (SAPFS.TPL, INSTINF.PFL orSAPFS.INF).
4. Create the command files (SAP<TABART>.cmd).
5. Export the database.
6. Transport the database export (dump files) and the other files to the target machine.
7. Install R/3 with R3INST (or R3MENU for AS/400) using your export instead of thedata from the CD.

SAP AG R3load Procedure on UNIX
Requirements and Restrictions
May 1998 5–3
Requirements and RestrictionsSee section ”General Requirements and Restrictions” in Chapter “Introduction”.
Note
R3INST generates a database dump of all R/3 objects that are defined in the ABAP/4Dictionary. Other objects are not exported by R3INST.
No indexes longer than 10+3 characters are allowed on the database to be exported.
Changes to database objects that cannot be maintained in the ABAP/4 Dictionary(SE14), such as the distribution of tables over several tablespaces/dbspaces, are lostafter the system copy.
Note
The code page cannot be changed during the system copy.
Note
If you perform a heterogeneous system copy/migration, you need a customermigration key. You can obtain the key as follows:
1. Perform steps 1 to 4 (see above) so that the command files are created.
2. Copy the parameter file R3LOAD.PAR to the target machine.
3. Generate the customer migration ID with R3INST (see section “Getting andSetting the Migration Key”).
4. Fax the customer migration ID to SAP. A fax form is supplied with the MigrationCD.
You will then receive the customer migration key from SAP.
Please order the migration key at least 5 working days before the system copy. If it isnot possible to do so for technical reasons, inform SAP about this problem via faxalso at least 5 working days before the system copy.
Note
For migrations to and from AS/400, only Latin 1 (ISO 8859-1) languages aresupported.

R3load Procedure on UNIX SAP AG
Preparation Phase
5–4 May 1998
Preparation PhaseSee Chapter “Introduction”, section “General Preparations”, and Chapter ”Preparations”.
Exporting the Source Database
Note
Target database DB2 for OS/390:
Create the file R3ldb2si.TPL as described in the chapter “Target Database: DB2 forOS/390” before you create the parameter file R3LOAD.PAR.
Creating the Parameter File R3LOAD.PAR
On the source system, log on as user root.
Create an installation directory <INST-DIR>. Do not use /tmp or subdirectories thereofif your operating system removes these directories when rebooting. Provide at least25 MB of space for the installation directory.
Copy the parameter file <CD-DIR>/TOOLS/UNIX/COMMON/R3LOAD.TPL from theMigration CD to the installation directory and name it R3LOAD.PAR. Specify thedirectory where the data is to be exported (GLOBAL). You may change the number ofparallel export/import processes (default: PROCESSES=4). The control files for theR3load procedure are created on the basis of this file.
If you do not have enough disk space for the database dump files on either the source orthe target system, you can split the export/import by editing R3LOAD.PAR in twodifferent ways:
• Distribute the database dump to different locations. In addition to the GLOBAL
parameter in the DATA-LOCATION section, specify parameters <TABART1>,<TABART2>, ..., <TABARTn> together with the directories to which the dump forthese TABARTs will be exported, or from which they will be imported, resp.
• Import the dump in several steps. In addition to the MOUNT1 parameter in theADVANCED section, specify parameters MOUNT2, MOUNT3, etc. together with thedirectories from which the dump is to be imported. R3INST will stop before eachstep to allow you to move new dump files to the MOUNT<n> location beforecontinuing the import. This way, you can use the same directory for differentMOUNT<n> parameters (for example, MOUNT1=GLOBAL, MOUNT2=GLOBAL).
You can combine these two options.
SAP AG R3load Procedure on UNIX
Exporting the Source Database
May 1998 5–5
Note
Enable read and write access for all users to the parameter file R3LOAD.PAR.
Enable read and write access for the database owner to the directories that arespecified in the DATA-LOCATION section in R3LOAD.PAR.
The template R3LOAD.TPL for the parameter file R3LOAD.PAR contains a description ofits use:
;###############################################################; README: Description for unload and load with R3INST;;; Parameter file to:; - create DB independent dump files; - load these indepent dump files again into a database.; This file MUST be moved to the installation directory.
;###############################################################; FILES:; The unload/load process creates the following files:;; SAP<tabart>.log Log files of unload/load processes; (for instance ’SAPAPPL1.log’).; SAP<tabart>.cmd Command files for unload/load processes; (for instance ’SAPAPPL1.cmd’).; These files contain 4 lines; to define the location of the required files,; the blocksize, and the filesize.; SAP<tabart>.sta Contains the number of bytes.; SAP<tabart>.TOC;; SAP<tabart>.STR Database-independent control files.; They contain metadescriptions for the objects to be; created (with owner sapr3 and defined in the R/3; data dictionary).; SAP<tabart>.EXT Database dependent files which contain the tables; and indices for a <tabart> with their sizes.; SAP<tabart>.001 Database-independet dump files.; DDL<dbs>.TPL Database dependent control files.; They contain database specific templates for; objects to be created.; R3INST.log R3INST log file.;;###############################################################
; The following sections and parameters control the load/unload process
; section [OPTIONS]; -----------------; The parameter PROCESSES controls the number; of parallel running R3load processes.
; section [DATA-LOCATION]; -----------------------; The GLOBAL parameter specifies

R3load Procedure on UNIX SAP AG
Exporting the Source Database
5–6 May 1998
; * the directory that the data is exported to or; * the directory from which the data is imported.; It is possible to export/import the tabart data to other; directories. To do this, you have to specify an additional directory; for every tabart that should not be exported/imported to the; GLOBAL directory (this may be necessary if there is insufficient; space in the GLOBAL directory).; R3inst creates a DATA and DB subdirectory for each directory youspecify.; The *.STR *.EXT *.TPL files are copied to these subdirectories.; Replace <drive> whith the according drive letter.
; section [ADVANCED]; ------------------; During the unload or load you can exclude a tabart by specifying; it in the EXCLUDE parameter.; With the MOUNTx parameter it is possible to divide the import into; phases. This may be necessary if the machine does not have enough; free disk space for the data to be imported.; If MOUNTx parameters are specified, R3inst stops after building the; database and then proceeds as follows:; - it prompts you to copy data to the directory specified by; the first MOUNT parameter (MOUNT1),; - it imports the data from the directory that the first MOUNT; parameter points to,; - it prompts you to copy data to the directory specified by; the second MOUNT parameter (MOUNT2),; - it imports the data from the directory that the second MOUNT; parameter points to,; .; .; .; This continues until the data from the directory that the last MOUNT; parameter points to has been imported.;; IMPORTANT: 1. Number the MOUNT points sequentially.; 2. The value specified for the MOUNT parameter MUST appear; in the DATA LOCATION section.;; If you do not want to divide the data import into phases do not specify; the MOUNT parameter.;; UNIX only; If you specify the target OS, the target DB and the R3ldctl option with; MIGRATE_TO_OS, MIGRATE_TO_DB, or R3LOADCTL, respectively, R3INST will; not prompt you for this information.; Possible values for these parameters are:;; MIGRATE_TO_OS = UNIX | NT | AS400; MIGRATE_TO_DB = ORA | INF | ADA | MSS | DB2/390 | DB2/400 | DB2/CS; R3LOADCTL = SAP_DDIC | DB_DDIC;; Explanation: R3LOADCTL = SAP_DDIC -> run R3ldctl<dbs> -s DD; R3LOADCTL = DB_DDIC -> run R3ldctl<dbs> -s DB; END UNIX only;
[OPTIONS];number of parallel processesPROCESSES=4
[DATA-LOCATION];FOR WINDOWS NT;GLOBAL=<drive>:<PATH_OF_DATA_DIR>
SAP AG R3load Procedure on UNIX
Exporting the Source Database
May 1998 5–7
;GLOBAL=c:\tmp;SAPAPPL0=<drive>:\tmp;FOR UNIX;GLOBAL=<PATH_OF_DATA_DIR>;GLOBAL=/usr/sap/data;SAPAPPL0=/tmp
[ADVANCED];EXCLUDE=SAPES30D,SAPEL30D;MOUNT1=SAPAPPL0
Copying the Tools and Starting R3INST
Copy the tool R3LDCTL from the Migration CD to the installation directory and rename itR3ldctl<dbs>, where dbs is your source database system (ada, db2, db4, db6, inf,mss, or ora).
Copy the tool R3INST from the Migration CD to the installation directory. Do not use aversion of R3INST from an Installation Kernel CD.
Set execute permissions for the tools.
Change to the installation directory and start R3INST:./R3INST
Choose 6\VWHP�→�2SHQ�6\VWHP�→�*(1�722/6�→�68%0(18��([SRUW�0LJUDWH�'%.
R3INST asks for a password. Enter the password given in the R/3 Note listed at thebeginning of Chapter “Introduction”.
The following list of steps appears:
* -> Update statistics * Create R3load-Control-Files * Generate Templates for DB-Sizes * Generate R3load-Command-Files * Unload Database with R3load * Exit Unload Database
Perform these steps in precisely this order.
Updating the Statistics (only UNIX and Windows NT)
Note
Carry out this step if you are performing a homogeneous system copy or an OSmigration. If you are migrating the database system, skip this step and continue withthe section “Creating the Control Files”.
Choose 8SGDWH�VWDWLVWLFV.

R3load Procedure on UNIX SAP AG
Exporting the Source Database
5–8 May 1998
Creating the Control Files
This step creates the following control files in the installation directory:
• SAP<TABART>.STR for tables and indexes and SAPVIEW.STR for views.SAP0000.STR refers to tables and indexes for the report loads.
• DDL<DBS>.TPL (replace <DBS> by ORA, ADA, MSS, DB2, DB4 or DB6)
• SAP<TABART>.EXT for each SAP<TABART>.STR file and SAP.EXT for tables whichare not defined in the ABAP/4 Dictionary but in the data dictionary of the databasesystem (only ORACLE, INFORMIX, DB2 for OS/390).
The *.STR files contain a description of the database objects (tables, indexes, views) thatare owned by user sapr3 and defined in the ABAP/4 Dictionary, and of tables that arevital for the R/3 System and are only defined in the database. This description isindependent of the database system.
The DDL<DBS>.TPL files are database-specific templates for creating commands used toset up a database. There is one DDL<DBS>.TPL file for every database system.
The *.EXT files contain a list of all the tables and indexes and their sizes. Theinformation from the *.EXT files is used to calculate the entries in the template file andset the initial extents for the tables and indexes on the target system.
Note
ORACLE only:
Make sure that the password for the Database User SAPR3 is SAP. Otherwise this stepwill fail. You can use R3INST to change the password if necessary. Choose 6<67(0→�23(1�6<67(0�→�'%�722/6�→�68%0(18��&KDQJH�3DVVZRUGV�IRU�25$&/(�8VHUV�LQ�'%.
The option &KDQJH�SDVVZRUG�IRU�25$&/(�XVHU�µ6$35�¶ does not work here sincepasswords require at least 5 characters. The�menu option 5HVHW�RI�DOO�25$&/(�XVHUV¶SDVVZRUGV�WR�GHIDXOWV automatically sets the value SAP for SAPR3’s password.
In R3INST, choose the step &UHDWH�5�ORDG�&RQWURO�)LOHV.
If the parameter MIGRATE_TO_DB is not specified in R3LOAD.PAR, a menu such as theone below appears:
* Target Database: Select a task * * * * -> Oracle from source DB: Oracle * * Informix from source DB: Oracle * * Adabas D from source DB: Oracle * * DB2/390 from source DB: Oracle * * DB2/400 from source DB: Oracle * * DB2/CS from source DB: Oracle * * MSS-Serv from source DB: Oracle *

SAP AG R3load Procedure on UNIX
Exporting the Source Database
May 1998 5–9
Select your target database system (only one system allowed).
If the parameter R3LOADCTL is not specified in R3LOAD.PAR, the following menuappears (<dbs> denotes the database system):
* Please select R3ldctl Options * * COMMAND INFO TO DO * * [ ] R3ldctl<dbs> -s DD -g <dbs> <dbparams> (change DATABASE) * [ ] R3ldctl<dbs> -s DB (don’t change DATABASE)
Choose whether or not you wish to migrate the database system. Choose only one option.If you opt to change the database system, you can overwrite the proposed text forchanging the parameters for the R3ldctl<dbs> command.
If you migrate the database system (change DATABASE), enter database-specificinformation with:
a) the -s and -g option to determine the size of tables and indexes defined in theABAP/4 Dictionary and to compute the target size. The result is written in the databasetables DDLOADD(tables and indexes) and DDLOADH (header information).
R3ldctl<dbs> -s DD -g <dbs> <dbparams>orb) the -go option (may not be combined with the -s option) to compute the target sizeusing a DDLOADD table already filled. Only the *.EXT files are created, not the *.TPLfiles and not the *.TPL files. You cannot use this option if you are generating the controlfiles for the first time, or if you have deleted the *.STR and *.TPL file to start over.
In both cases <dbs> is the database system and <dbparams> are the database-dependentparameters:
<dbs>:
ada ADABAS Ddb6 DB2 common serverdb4 DB2 for OS/400db2 DB2 for OS/390inf INFORMIXmss MS SQL Serverora ORACLE
<dbparams> (blocksize/pagesize):
ADABAS D 4 (UNIX and Windows NT)DB2 common server 4DB2 for OS/400 V3R6/V3R7DB2 for OS/390 32 (segment size)INFORMIX 2 (source system: UNIX),
4 (source system: AIX),4 (source system: Windows NT)
MS SQL Server 2048ORACLE 8 (UNIX and Windows NT), 4 (UNIX OPS)

R3load Procedure on UNIX SAP AG
Exporting the Source Database
5–10 May 1998
Note
AS/400 only:
You can check the size required for the database by looking at the databaseconfiguration file SAPFS.TPL. Only the values for the data are relevant, not thevalues for the access paths.
50 % more space is required than indicated by the file SAPFS.TPL.
Generating the Templates for the Target Database
Note
Target database DB2 for OS/390:
Split the STR files as described in the chapter “Target Database: DB2 for OS/390”before you generate the templates for the target database.
Choose *HQHUDWH�7HPSODWHV�IRU�'%�6L]HV.
If the parameter MIGRATE_TO_DB is not specified in R3LOAD.PAR, the following menuappears again:
* Target Database: Select a task * * * * -> Oracle from source DB: Oracle * * Informix from source DB: Oracle * * Adabas D from source DB: Oracle * * DB2/390 from source DB: Oracle * * DB2/400 from source DB: Oracle * * DB2/CS from source DB: Oracle * * MSS-Serv from source DB: Oracle *
Select your target database system.
Now R3INST creates a database-specific template file:
DB2 common server on AIX: SAPFS.TPL
DB2 on OS/400: SAPFS.TPL
DB2 on OS/390: No file is created.
INFORMIX on UNIX: INSTINF.PFL
ORACLE / ADABAS on UNIX: SAPFS.TPL
ORACLE/ADABAS/INFORMIX/DB2 common server/ MS SQL Serveron Windows NT: SAPFS.INF

SAP AG R3load Procedure on UNIX
Exporting the Source Database
May 1998 5–11
Note
Enable read and write access to the template file.
Caution
ORACLE only:
The code page of the source and target systems must be the same. Check if the line inSAPFS.TPL that begins with CHARACTER names the source system’s code page.
Creating the Command Files
Note
In this step, you can check and adapt the command files for R3load after they havebeen created by R3INST. If you skip this step, the command files are createdautomatically in the step 8QORDG�'DWDEDVH�ZLWK�5�ORDG.
Choose *HQHUDWH�5�ORDG�&RPPDQG�)LOHV.
R3INST uses the parameter file R3LOAD.PAR to create the command files. For everystructure definition file (*.STR) one command file (*.cmd) is created in the installationdirectory.
In this step, the control files *.STR, *.EXT, and DDL*.TPL are also copied to thesubdirectories DATA, DB/<DBS>, and DB, respectively. They are located in thedirectories GLOBAL or <TABART> defined in the parameter file R3LOAD.PAR. The fileSAP0000.STR is copied and renamed EX000.STR, and contains descriptions of tablesand indexes for the report loads.
Exporting the Database
Choose 8QORDG�'DWDEDVH�ZLWK�5�ORDG�
R3INST creates at least one export dump file (*.001) for each TABART and stores it inthe subdirectory DATA of the directory specified in R3LOAD.PAR. If an export dump fileexceeds the maximum file size defined in *.cmd (default: file size = 2G), a seconddump file (*.002) is created (and so on). R3INST generates the table of contents(directory) file (*.TOC) in the subdirectory DATA, and a log file (*.log) in theinstallation directory for each command file (*.cmd).

R3load Procedure on UNIX SAP AG
Preparing the Import on the Target Machine
5–12 May 1998
Troubleshooting
If there is not enough disk space in the export directories, the R3load database exportwill fail. You will then find corresponding error messages in the log filesSAP<TABART>.log.
To continue exporting the database, you can
• enlarge the available space for the file system
• specify or change the directories <TABART> in the parameter file R3LOAD.PAR for theTABART for which the corresponding files could not be exported successfully
In the first case, R3INST can be restarted at the step 8QORDG�'DWDEDVH�ZLWK�5�ORDG�
In the second case, you have to remove the command files (SAP<TABART>.cmd) and thelog files (SAP<TABART>.log) of the TABART first. The corresponding files will becompletely reexported.
Preparing the Import on the Target Machine
Note
AS/400 only:
For information on how to proceed on an AS/400 machine, refer to Chapter “R3loadProcedure on AS/400”.
Adapting the R3load Parameter File
If the path of the directory for the dump files (GLOBAL) differs between the source andtarget systems, you must adapt the parameter GLOBAL in the R3LOAD.PAR file so that itnow contains the path valid for the target system.
If you do not have enough disk space for all the dump files on your target system, youcan adapt the R3LOAD.PAR file so that the import is stopped after only part of thedatabase has been imported. You can then copy the next dump files to the target machine,restart the import, and so on (see the section “Creating the Parameter FileR3LOAD.PAR”).
Transporting the Files to the Target Machine
Copy the following files from the source machine to the target machine If you use ftp,make sure you use ASCII mode for transferring the template and parameter files fromUNIX to Windows NT or vice versa. Use binary mode for transferring all other files.

SAP AG R3load Procedure on UNIX
Preparing the Import on the Target Machine
May 1998 5–13
List of files required:
Source and TargetDirectory
Files Description
.../DATA SAP*.001, SAP*.002, etc., EX*.001 data files
SAP*.STR control files
SAP*.TOC table ofcontents files
.../DB DDL*.TPL control files
.../DB/<database> SAP*.EXT control files
installation directory SAPFS.TPL or INSTINF.PFL orSAPFS.INF
template file
R3LOAD.PAR parameter file
Note
Target database DB2 for OS/390:
There will be two template files in the installation directory:
• TBLSPACE.PFL
• INDEX.PFL
Note that there are no files called SAPFS.TPL, INSTINF.PFL or SAPFS.INF.
Copy the R3LOAD.PAR file from the source system to the installation directory on thetarget system. It is not possible to create a new R3LOAD.PAR file on the target systembecause R3INST stores information in this file during the export which is needed for theimport procedure.
Note
Enable read and write access to the parameter file R3LOAD.PAR.
R3load Procedure on UNIX SAP AG
Installing R/3 on the Target Machine
5–14 May 1998
Installing R/3 on the Target Machine
Getting and Setting the Migration Key
If you make a heterogenous system copy, you must first apply a migration key.
Note
Please order the migration key at least 5 working days before the system copy. If it isnot possible to do so for technical reasons, inform SAP about this problem via faxalso at least 5 working days before the system copy.
Note
Prerequisites for this step (in this order):
1. The step “Creating the Command Files” has been performed.
2. The file R3LOAD.PAR has been copied to the target host.
To get the migration key, start R3INST on the target system as user root.
Choose 6<67(0�→�23(1�RU�1(:�6<67(0�→�*(1�722/6 →�*HW�DQG�6HW�0LJUDWLRQ.H\�IRU�5�ORDG�3URFHGXUH��Enter the password given in the R/3 Note listed at thebeginning of Chapter “Introduction”.
The customer migration ID for the heterogeneous system copy/migration is displayed.Fax this ID to SAP as described in the OSS Note you have received from SAP. A faxform is supplied with the Migration CD. Enter the migration key you get from SAP onthe next screen.
Preparing the Installation
Install R/3 with R3INST. Follow the installation guide for your target database system.Ensure that you specify the right mount points for the dump files.
Note
Informix only:
We do not recommend that you change the value of the parameter FILLFACTOR inthe file $INFORMIXDIR/etc/$ONCONFIG. If you choose a value lower than 90 %,you must provide more space for the affected dbspaces.

SAP AG R3load Procedure on UNIX
Installing R/3 on the Target Machine
May 1998 5–15
Installing R/3 Using the Export of the Source System
After you have installed the database software (R3INST status SW-OK), choose3UHSDUH�GDWDEDVH
In the next menu, choose to load a customer export (R3load).
R3INST asks for a password. Enter the password given in the R/3 Note listed at thebeginning of Chapter “Introduction”. If you did not enter the correct customer key for theheterogeneous system copy, you get the error: 1R�YDOLG�0LJUDWLRQ�.H\.
Continue the installation as described in the installation guide.

SAP AG R3load Procedure on Windows NT
Contents
May 1998 6–1
Chapter 6: R3load Procedure on Windows NT
Contents
Overview.........................................................................................................................6–2Installing the Tools......................................................................................................6–2R3load Method ...........................................................................................................6–3
Exporting the Source Database ................................................................................... 6–5Adjust the Parameter File R3LOAD.PAR ...................................................................6–5R3INST: Export/Migrate DB .......................................................................................6–9Update Statistics.........................................................................................................6–9Create R3load Control Files .....................................................................................6–10Generate Templates for DB-Sizes............................................................................6–11Generate R3load Command-Files............................................................................6–11Unload Database with R3load ..................................................................................6–12
Preparing the Import on the Target Machine............................................................6–13Starting the R/3 Installation.......................................................................................6–13Adapting the R3load Parameter File.........................................................................6–13Transporting the Files to the Target Machine...........................................................6–14Get and Set the Migration Key..................................................................................6–15
Starting the Import....................................................................................................... 6–16
R3load Procedure on Windows NT SAP AG
Overview
6–2 May 1998
OverviewBeginning with R/3 version 3.0F, SAP offers a new method of system copy/migrationcalled R3load .
Using the R3load method you can:
• migrate the database
• migrate the operating system
• make a homogeneous system copy
Note
For the description of migration between NT-INTEL and DEC-ALPHA basedWindows NT (without migration of the database), see the guide 5���+RPRJHQHRXV6\VWHP�&RS\, Chapter “R3load Procedure on Windows NT”.
Installing the Tools
To be able to perform a heterogeneous system copy with R3load method, you must useversions of the programs R3LOAD.EXE, R3LDCTL.EXE, and R3INST.EXE that supportthe R3LOAD functionality.
Note
Order the newest Migration Set. On the relevant Migration CD you find the programR3INST version 3.1.8.2. The description in this chapter refers to this version ofR3INST.
Copy the programs R3LOAD.EXE, R3LDCTL.EXE, and R3INST.EXE if necessary:
• Actions on the source system (export machine):
The program R3INST is installed on the source system.
Copy the files relevant for your operating system (CPU type) and your databasesystem (DB type) from the Migration CD to the installation directory. Proceed asfollows:− Select the directory <CD_DRIVE>:\TOOLS\NT\<CPU_type>\<DB_type> on
the Migration CD.− Copy the files R3LOAD.EXE, R3LDCTL.EXE, and R3INST.EXE to the installation
directory of the source system.

SAP AG R3load Procedure on Windows NT
Overview
May 1998 6–3
• Actions on the target system (import machine):R3INST must first be installed on the target system. Proceed as follows:− Log on to the target system as user <SAPSID>ADM and start the installation tools
from the CD SAP KERNEL, for example by double-clicking on the fileR3INST.EXE in the :LQGRZV�17�([SORUHU.
Now copy the files relevant for your operating system (CPU type) and yourdatabase system (DB type) from the Migration CD to the installation directory.Proceed as follows:− Select the directory <CD_DRIVE>:\TOOLS\NT\<CPU_type>\<DB_type> on
the Migration CD.− Copy the files R3LOAD.EXE, R3LDCTL.EXE, and R3INST.EXE to the installation
directory of the target system.
R3load Method
The R/3 installation tool R3INST exports / imports your database in a database-independent format using the SAP tool R3load.
During the export, R3INST generates a database dump of all the R/3 objects that aredefined in the ABAP/4 Dictionary. The definition of the TABART which is used in theR3load method corresponds to the definition of the data class (ABAP/4 Dictionary:Technical Settings - data class).
The R3load method is the same for all database systems. The following steps have to beperformed:
1. Adjust the parameter file R3LOAD.PAR (manually).
This file is used by R3INST to create necessary control files and command files forR3load.
2. Update database statistics depending on the database system (using R3INST).
3. Create the following control files: SAPyyy.STR, DDLxxx.TPL, SAPyyy.EXT(using R3INST).
The control files contain information about the structure of database objects (such astables and indices).
4. Generate the database templates (SAP database configuration files) SAPFS.TPL orINSTINF.PFL or SAPFS.INF (using R3INST).
5. Create the command files SAP<TABART>.CMD (using R3INST).
R3load gets all its information from these files. The command files in turn refer tothe control files.
6. Export the database (using R3INST).
7. Transport the database export dump files and the other files to the target machine(manually).
8. Install R/3 with R3INST using your export instead of the data from the CD.

R3load Procedure on Windows NT SAP AG
Overview
6–4 May 1998
Note
R3INST generates a database dump of all the R/3 objects that are defined in theABAP/4 Dictionary. Other objects are not exported by R3INST.
Once the dump files, parameter files, command files and control files have been copiedto your target system, you are ready to import the data. The import differs only slightlyfrom a standard installation in that it uses the generated dump files instead of the datadelivered from SAP.
Caution
Before starting the system copy or migration please refer to the section ”GeneralRequirements and Restrictions” in the Chapter “Introduction” and to the Chapter”Preparations”.

SAP AG R3load Procedure on Windows NT
Exporting the Source Database
May 1998 6–5
Exporting the Source DatabaseThis section gives a detailed description of the export steps listed in the section “R3loadMethod”.
Caution
A complete migration requires that all the steps described below are performed oneafter the other (exception: step 8SGDWH�6WDWLVWLFV is required depending on yourdatabase system and is not required for a database migration).
Note
Target database DB2 for OS/390:
Create the file R3ldb2si.TPL as described in the chapter “Target Database: DB2 forOS/390” before you create the parameter file R3LOAD.PAR.
Adjust the Parameter File R3LOAD.PAR
On the source system, log on as the user who has installed the system (usually<SAPSID>ADM).
A sample paramter file R3LOAD.TPL is located on the Migration CD. Copy the file asfollows:
1. Select the directory <CD_DRIVE>:\TOOLS\NT\COMMON on the Migration CD.
2. Copy the file R3LOAD.TPL to the installation directory of your source system.
3. Rename the file R3LOAD.TPL to R3LOAD.PAR.
4. Adjust the file R3LOAD.PAR to meet your requirements. Make necessarymodifications to the file. On the basis of this file, the control files for the R3loadmethod are created.
Caution
Read the following model file carefully. Note especially the comments about theindividual sections.

R3load Procedure on Windows NT SAP AG
Exporting the Source Database
6–6 May 1998
Structure of the parameter file R3LOAD.PAR:
;###############################################################; README: Description for unload and load with R3INST;;; Parameter file to:; - create DB independent dump files; - load these indepent dump files again into a database.; This file MUST be moved to the installation directory.
;###############################################################; FILES:; The unload/load process creates the following files:;; SAP<tabart>.log Log files of unload/load processes; (for instance ’SAPAPPL1.log’).; SAP<tabart>.cmd Command files for unload/load processes; (for instance ’SAPAPPL1.cmd’).; These files contain 4 lines; to define the location of the required files,; the blocksize, and the filesize.; SAP<tabart>.sta Contains the number of bytes.; SAP<tabart>.TOC;; SAP<tabart>.STR Database-independent control files.; They contain metadescriptions for the objects to be; created (with owner sapr3 and defined in the R/3; data dictionary).; SAP<tabart>.EXT Database dependent files which contain the tables; and indices for a <tabart> with their sizes.; SAP<tabart>.001 Database-independet dump files.; DDL<dbs>.TPL Database dependent control files.; They contain database specific templates for; objects to be created.; R3INST.log R3INST log file.;;###############################################################
; The following sections and parameters control the load/unload process
; section [OPTIONS]; -----------------; The parameter PROCESSES controls the number; of parallel running R3load processes.
; section [DATA-LOCATION]; -----------------------; The GLOBAL parameter specifies; * the directory that the data is exported to or; * the directory from which the data is imported.; It is possible to export/import the tabart data to other; directories. To do this, you have to specify an additional directory; for every tabart that should not be exported/imported to the; GLOBAL directory (this may be necessary if there is insufficient; space in the GLOBAL directory).; R3inst creates a DATA and DB subdirectory for each directory youspecify.; The *.STR *.EXT *.TPL files are copied to these subdirectories.; Replace <drive> whith the according drive letter.

SAP AG R3load Procedure on Windows NT
Exporting the Source Database
May 1998 6–7
; section [ADVANCED]; ------------------; During the unload or load you can exclude a tabart by specifying; it in the EXCLUDE parameter.; With the MOUNTx parameter it is possible to divide the import into; phases. This may be necessary if the machine does not have enough; free disk space for the data to be imported.; If MOUNTx parameters are specified, R3inst stops after building the; database and then proceeds as follows:; - it prompts you to copy data to the directory specified by; the first MOUNT parameter (MOUNT1),; - it imports the data from the directory that the first MOUNT; parameter points to,; - it prompts you to copy data to the directory specified by; the second MOUNT parameter (MOUNT2),; - it imports the data from the directory that the second MOUNT; parameter points to,; .; .; .; This continues until the data from the directory that the last MOUNT; parameter points to has been imported.;; IMPORTANT: 1. Number the MOUNT points sequentially.; 2. The value specified for the MOUNT parameter MUST appear; in the DATA LOCATION section.;; If you do not want to divide the data import into phases do not specify; the MOUNT parameter.;; UNIX only; If you specify the target OS, the target DB and the R3ldctl option with; MIGRATE_TO_OS, MIGRATE_TO_DB, or R3LOADCTL, respectively, R3INST will; not prompt you for this information.; Possible values for these parameters are:;; MIGRATE_TO_OS = UNIX | NT | AS400; MIGRATE_TO_DB = ORA | INF | ADA | MSS | DB2/390 | DB2/400 | DB2/CS; R3LOADCTL = SAP_DDIC | DB_DDIC;; Explanation: R3LOADCTL = SAP_DDIC -> run R3ldctl<dbs> -s DD; R3LOADCTL = DB_DDIC -> run R3ldctl<dbs> -s DB; END UNIX only;
[OPTIONS];number of parallel processesPROCESSES=4
[DATA-LOCATION];FOR WINDOWS NTGLOBAL=<DRIVE>:<PATH_OF_DATA_DIR>SAPAPPL0=<DRIVE>:\TMP

R3load Procedure on Windows NT SAP AG
Exporting the Source Database
6–8 May 1998
;FOR UNIX;GLOBAL=<PATH_OF_DATA_DIR>;GLOBAL=/usr/sap/data;SAPAPPL0=/tmp
[ADVANCED];EXCLUDE=SAPES30D,SAPEL30D;MOUNT1=SAPAPPL0
Caution
Read the following notes carefully!
• Bear in mind that R3INST can only interpret the lines in R3LOAD.PAR that do notcontain a semicolon as the first character.
• Adjust the process number (section [OPTIONS]).
• Adjust the entries in [DATA-LOCATION] according to the directory structure on yoursource machine.
• Use the key GLOBAL only once. Otherwise R3INST reports an error message.
• You need the key MOUNT<N> only for the import.
• In the following the NT directories specified in the keys (GLOBAL and <TABART>)are named with <PATH>.

SAP AG R3load Procedure on Windows NT
Exporting the Source Database
May 1998 6–9
R3INST: Export/Migrate DB1. Choose 6WDUW → 3URJUDPV → 6$3�5�� → 5�,167 and press &RQWLQXH.
2. Choose an SAPSID and press 2..
3. Choose 722/6 → ([SRUW�0LJUDWH�'%.
The window ([SRUW/0LJUDWH�'% appears. R3INST marks all necessary stepsautomatically:
• Update Statistics
• Create R3load-Control-Files
• Generate Templates for DB-Sizes
• Generate R3load-Command-Files
• Unload Database with R3load
You also have to define the target operating system and the target database system in thiswindow.
In the next sections you find a description of all steps displayed in the window([SRUW/0LJUDWH�'%.
Update Statistics
Note
Perform this step if you are making a homogeneous system copy or an OS migration.If you are migrating the database system, skip this step and continue with the section“Create R3load Control Files”.
Choose 8SGDWH�VWDWLVWLFV.
ORACLE
The window 8SGDWH�6WDWLVWLFV�IRU�2UDFOH�'DWDEDVH appears. You can choosebetween (VWLPDWH and &RPSXWH.
Statistics updated with &RPSXWH��are much more exact than those updated with(VWLPDWH.
This step can take more than one hour, depending on the database size.
MS SQL Server
This step is not necessary for MS SQL Server.
ADABAS
If the database system on your target system is ADABAS no window appearsbecause statistics are updated automatically.
INFORMIX
No window appears because statistics are updated automatically. This step can takemore than one hour, depending on the database size and the amount of time since thelast update statistics process was performed.
R3load Procedure on Windows NT SAP AG
Exporting the Source Database
6–10 May 1998
DB2 common server
This step can take more than one hour, depending on the database size.
Create R3load Control Files
Choose &UHDWH�5�ORDG�&RQWURO�)LOHV.
If R3INST does not find the file R3LOAD.PAR, R3INST offers you to find the relevantfile on the CD or on hard disk. R3INST copies the file to the installation directory ofyour source system automatically. Adjust then the file R3LOAD.PAR to meet yourrequirements manually.
R3INST creates control files of the type:
File Description Example
SAPyyy.STR(replace yyy byTABART)
Description (independent of the databasesystem) of the database objects (tables, indices,views) that are owned by user sapr3 anddefined in the ABAP/4 Dictionary.
SAPAPPL0.STR
DDLxxx.TPL(replace xxx byora, ada, mss,inf or DB6)
Database-specific templates for creatingcommands used to set up a database. There isone DDL*.TPL file for every database system.
DDLinf.TPL
SAPyyy.EXT(replace yyy byTABART)
List of all the tables and indices together withtheir sizes. This information can be used tocheck the entries in SAPFS.INF.
SAPAPPL0.EXT
Note
Target database DB2 for OS/390:
There will be two template files in the installation directory:
• TBLSPACE.PFL
• INDEX.PFL
Note that there are no files called SAPFS.TPL, INSTINF.PFL or SAPFS.INF.
R3INST creates a subdirectory MIGRATION_EXPORT in the installation directory(<DRIVE>:\USERS\<SAPSID>ADM\INSTALL), in which these files are stored.
SAP AG R3load Procedure on Windows NT
Exporting the Source Database
May 1998 6–11
Generate Templates for DB-Sizes
Note
Target database DB2 for OS/390:
Split the STR files as described in the chapter “Target Database: DB2 for OS/390”before you generate the templates for the target database.
Choose *HQHUDWH�7HPSODWHV�IRU�'%�6L]HV.
R3INST creates a template file for the specific database and operating system.
UNIXORACLE / ADABAS: SAPFS.TPL
INFORMIX: INSTINF.PFL
DB2 common server: SAPFS.TPL
DB2 for OS/390: No file is created.
NTAll Databases: SAPFS.INF
DB2 for OS/390: No file is created.
The template files are created in the subdirectory MIGRATION_EXPORT in theinstallation directory.
Generate R3load Command-Files
Choose *HQHUDWH�5�ORDG�&RPPDQG�)LOHV.
Note
In this step, you can check and adapt the command files for R3load after they havebeen created by R3INST.
R3INST uses the parameter file R3LOAD.PAR to create the command files. For everyTABART, one SAP*.CMD command file is created.
Note
If you make a heterogeneous system copy, you must apply a migration key during theimport process. All necessary prerequisites to obtain this key are met after generatingthe command files. If you want you can get now the migration key as described insection “Get and Set the Migration Key”.

R3load Procedure on Windows NT SAP AG
Exporting the Source Database
6–12 May 1998
Note
Please order the migration key at least 5 working days before the system copy. If it isnot possible to do so for technical reasons, inform SAP about this problem via faxalso at least 5 working days before the system copy.
Unload Database with R3load
Choose 8QORDG�'DWDEDVH�ZLWK�5�ORDG�
R3INST creates the directory structure <PATH>\DATA, <PATH>\DB, <PATH>\DB\<DBname> (DB name is replaced by the name of the target database system) for eachdirectory <PATH> specified in the parameter file R3LOAD.PAR in the section [DATA-LOCATION] (GLOBAL and <TABART>).
R3INST copies the control files (SAP*.STR, SAP*.EXT and DDL*.TPL) from thesubdirectory MIGRATION_EXPORT to the relevant directories in this structure.
R3INST copies the necessary template file (SAPFS.INF/SAPFS.TPL depending on thedatabase and the operating system of your target system) from the subdirectoryMIGRATION_EXPORT to the installation directory to every root directory <PATH> givenin section [DATA-LOCATION].
R3INST creates one export dump file (SAP*.001) for each TABART and stores ittogether with the corresponding structure dump file (control file SAP*.STR) in the DATAsubdirectory of the directory named in R3LOAD.PAR (section [DATA-LOCATION]).
If an export dump file would exceed the maximum file size defined in the command fileSAP*.CMD (default: file size = 2G), a second dump file (SAP*.002) is created(and so on).
R3INST generates the table of contents (file SAP*.TOC), and one log file (SAP*.LOG)for each TABART.

SAP AG R3load Procedure on Windows NT
Preparing the Import on the Target Machine
May 1998 6–13
Preparing the Import on the Target Machine
Starting the R/3 Installation
Start the installation of the R/3 System on the target machine as described in the guide5���,QVWDOODWLRQ�RQ�:LQGRZV�17.
1. Install the database software according to your database system
2. Install the installation tools
3. Create the central instance
Adapting the R3load Parameter File
Adjusted part of the sample parameter file R3LOAD.PAR (see section “Adjust theParameter File R3LOAD.PAR”):
[OPTIONS];number of parallel processesPROCESSES=4
[DATA-LOCATION];FOR WINDOWS NTGLOBAL=<DRIVE>:<PATH_OF_DATA_DIR>SAPAPPL0=<DRIVE>:\TMP
[ADVANCED];EXCLUDE=SAPES30D,SAPEL30DMOUNT1=SAPAPPL0
Adjust the file R3LOAD.PAR to meet your requirements:
• Bear in mind that R3INST can only interpret the lines in R3LOAD.PAR that do notcontain a semicolon as the first character.
• Adjust the process number (section [OPTIONS]).
• Adjust the entries in [DATA-LOCATION] according to the directory structure on yourtarget machine.
• Use the key GLOBAL only once. Otherwise R3INST reports an error message.
• Use the key MOUNT<N> in section [Advanced] if you want to split the import.
If you have not enough disk space for all the dump files on your target system, youcan adapt the R3LOAD.PAR file so that the import is stopped after only a part of thedatabase has been imported. You can then copy the next dump files to the targetmachine, continue the import, and so on.
Enter lines beginning with MOUNT<N> in R3LOAD.PAR (see above example ofR3LOAD.PAR) to specify the parts of the database that are to be imported in one step.R3INST stops after having imported the files specified in MOUNT<N>. You can alsospecify the same directory for different import steps (for example, MOUNT1=GLOBAL,MOUNT2=GLOBAL) if you plan to copy new data to this directory between the steps.
If you don’t use the key MOUNT<N> R3INST checks the following: a single directorymay not be referenced by multiple keys. Otherwise you will get an error message.

R3load Procedure on Windows NT SAP AG
Preparing the Import on the Target Machine
6–14 May 1998
Note
Make sure that R3LOAD.PAR contains all the necessary entries. R3INST reads thisparameter file at the beginning of the creating database phase (starting the import).Changes that are made to R3LOAD.PAR after this step has been started cannot betaken into account by R3INST.
Transporting the Files to the Target Machine
Create the directories <PATH> specified in the parameter file R3LOAD.PAR in thesection [DATA LOCATION]. Each directory specified there must exist on the targetmachine.
These directories require the following structure:<PATH>\DATA
<PATH>\DB
<PATH>\DB\<DB name> (replace DB name with the appropriate database ID, e.g.ORA, INF, MSS, ADA, DB6 ...)
Copy the following files from the source machine to the target machine (if you use ftp,make sure you use binary mode). The following table shows the directories to which thefiles need to be copied on the target machine.
File Description Required Directory
SAP*.00<n> datafiles <PATH>\DATA
SAP*.STR
DDL*.TPL
SAP*.EXT
control files <PATH>\DATA
<PATH>\DB
<PATH>\DB\<DB name>
SAPFS.TPL,INSTINF.PFL,SAPFS.INF
template files installation directory<DRIVE>:\USERS\<SAPSID>ADM\INSTALL
SAP*.TOC table of contents <PATH>\DATA
R3LOAD.PAR paramter file installation directory<DRIVE>:\USERS\<SAPSID>ADM\INSTALL

SAP AG R3load Procedure on Windows NT
Preparing the Import on the Target Machine
May 1998 6–15
Note
It is not possible to create a new R3LOAD.PAR file on the target system becauseR3INST stores information in this file during the export which is needed for theimport procedure.
During the export, R3INST created a template file for the database sizes for the specificdatabase (SAPFS.INF/SAPFS.TPL) in the subdirectory MIGRATION_EXPORT. R3INSTcopied this file into all root directories <PATH> named in section [DATA-LOCATIONS] inR3LOAD.PAR.
The installation directory on the target machine contains a standard template, which mustbe overwritten with the relevant template file generated on the export machine.
Therefore copy the file from the source machine to the installation directory of the targetmachine.
Note
Target database DB2 for OS/390:
There will be two template files in the installation directory:
• TBLSPACE.PFL
• INDEX.PFL
Note that there are no files called SAPFS.TPL, INSTINF.PFL or SAPFS.INF.
Get and Set the Migration Key
If you make a heterogenous system copy, you must first apply a migration key.
Note
Please order the migration key at least 5 working days before the system copy. If it isnot possible to do so for technical reasons, inform SAP about this problem via faxalso at least 5 working days before the system copy.
1. To obtain the migration key, only the following prerequisites must be met: R3INSTis installed and R3LOAD.PAR has been copied to the target machine (no data filesneed to be copied to get the migration key). If you have carried out the stepsdescribed in the sections above correctly, these prerequisites will be met.
2. To get the migration key, start R3INST on the target system.
R3load Procedure on Windows NT SAP AG
Starting the Import
6–16 May 1998
In the program R3INST choose 7RROV�→�*HW�6HW�0LJUDWLRQ�NH\ . Enter the passwordgiven in the OSS Note for the Heterogeneous System Migration in the window3DVVZRUG�IRU�0LJUDWLRQ
3. In the next window you get your customer ID for the Heterogeneous SystemCopy/Migration.
4. You get the customer key for the Heterogeneous System Copy/Migration from SAP(as described in the notes). If you want to continue the migration you must enter thiskey in the next window &XVWRPHU�.H\�IRU�0LJUDWLRQ .
Starting the ImportYou can now continue with the installation of your R/3 System on the target machine.The central instance has already been created. Now create the database and import thedata into the R/3 System using the export of the source system.
1. Start R3INST. Choose a SAPSID and press 2..
2. Select 1HZ from the main menu item 6HUYHU. In the window 1HZ select 'DWDEDVHVHUYHU and press 2..
3. You can now specify which kind of installation you want to perform. R3INSTprovides the following possibilities:− Standard installation− Homogeneous system copy− Heterogeneous system migrationChoose +HWHURJHQHRXV�V\VWHP�PLJUDWLRQ to continue the migration process.
R3INST recommends again to refer to the information in the relevant SAP notes.Enter the password given in the OSS note.
If there are any problems (R3LOAD.PAR or other necessary files not found, migrationkey not set, see section “Preparing the Import on the Target Machine”) R3INSTterminates the process with an according error message. If R3INST finds allnecessary settings the installation process continues.
4. Window 'DWDEDVH�6HUYHU�RSWLRQV
According to your database system choose the relevant installation steps.
Cancel the selection which starts the import of the ABAP/4 report loads.
5. Window 5HTXLUHG�'LVN�6SDFH�IRU�WKH�'DWDEDVH�6HUYHUThe required directories and their sizes are listed in a window.a) Select a line by clicking on it. A selected line is indicated by an arrow.b) Choose a drive letter by pressing a character on the keyboard. Ensure that the
drive letter and the displayed path are valid. There must be enough disk spaceand the file system has to be NTFS . The window /RFDO�'ULYHV shows the localdrives of your computer. Use this information.
c) Repeat steps a) and b) until all directories are distributed on your local drives.
6. Select 'R�LW from the main menu item ,QVWDOO or click on the √ symbol.
7. If there are any lines starting with MOUNT<N> in the file R3LOAD.PAR you get nowa window with the information that you can copy the data you wish to import to the

SAP AG R3load Procedure on Windows NT
Starting the Import
May 1998 6–17
directories specified in R3LOAD.PAR. R3INST repeats this step for all lines startingwith MOUNT<N> definitions. Press 2. when ready.
If R3INST displays the message Database successfully loaded the import isfinished.
In case of problems check the log files to analyze the situation. If you are not sure how tosolve the problem please contact a specialist from your company or SAP.

SAP AG R3load Procedure on AS/400
Contents
May 1998 7–1
Chapter 7: R3load Procedure on AS/400
Contents
Overview.........................................................................................................................7–2
Requirements and Restrictions....................................................................................7–2
Preparation Phase .........................................................................................................7–3
Exporting a DB2/400 Database.....................................................................................7–3Updating the Statistics (Option 0) ...............................................................................7–6Creating the Control Files (Option 1) ..........................................................................7–6Generating the Templates for the Target Database (Option 2)..................................7–8Creating the Command Files (Option 3).....................................................................7–8Exporting the Database (Option 4) .............................................................................7–9Checking the Log Files ...............................................................................................7–9Exiting the Export Menu..............................................................................................7–9Transferring the Export Files to the Remote System via FTP ..................................7–10
Importing a DB2/400 Database................................................................................... 7–11Getting and Setting the Migration Key for R3load Procedure................................... 7–13Transferring the Export Files from the Remote System via FTP..............................7–14Transferring Files Manually ......................................................................................7–15Preparing to Install....................................................................................................7–15Preparing to Import the Database with R3MENU.....................................................7–16Installing....................................................................................................................7–18
Parameter File R3LOAD.PAR......................................................................................7–19

R3load Procedure on AS/400 SAP AG
Overview
7–2 May 1998
OverviewThe R/3 installation tool R3MIG allows you to export or import your database in adatabase-independent format using the R3load procedure. This procedure generates adatabase dump of all R/3 objects defined in the ABAP/4 Dictionary.
The R3load procedure gets all its information from a command file. This command filein turn refers to control files which contain the structure of the database, for example,information about table structure. Since the command and control files are used to exportand import the data, you must first create them using the parameter file R3LOAD.PAR. Anexample of this file is given at the end of the chapter.
You need to generate a database-dependent template file that contains the sizes of the filesystems and tablespaces on the target system. You can then export your data into dumpfiles. Once the dump, the parameter, the command and the control files have been copiedto your target system, you are ready to import the data.
The term “TABART” which is used in this chapter loosely corresponds to the term “dataclass” in the Technical Settings of the ABAP/4 Dictionary.
The R3load procedure is the same for all database systems:
1. Create the parameter file R3LOAD.PAR.
2. Create the control files SAP<TABART>.STR, DDL<DBS>.TPL, SAP<TABART>.EXT(where <DBS> is the database system type).
3. Generate a database-dependent template file (SAPFS.TPL, INSTINF.PFL orSAPFS.INF).
4. Create the command files (SAP<TABART>.cmd).
5. Export the database.
6. Transport the database export (dump files) and the other files to the target machine.
7. Install R/3 with R3MENU using your export instead of the data from the CD.
Requirements and Restrictions
R/3 Releases Supported
The R3MIG migration tools for DB2/400 database import are supported only for Rel.3.1H installations.
The R3MIG migration tools for DB2/400 database export are release-independent. TheR3loaddb4 and R3ldctldb4 programs that are contained in the R3INSTALL librarywhen it is restored have Release 3.1H. However, the migration tools for database exportare downwardly-compatible to other 3.x Releases.
If the source machine has R/3 Release 3.0D, it is essential that you upgrade to Release3.1H before migrating. (Release 3.0D is not supported for R/3 on AS/400.) If you areupgrading to a higher R/3 Release prior to migrating, SAP recommends that you upgradeto Rel. 3.1H.

SAP AG R3load Procedure on AS/400
Preparation Phase
May 1998 7–3
OS/400 Releases Supported
In the case of a migration to DB2/400, only OS/400 version V3R7 or higher is supported.OS/400 V3R6 is not supported for the migration tools.
See also the section ”General Requirements and Restrictions” in Chapter “Introduction”.
Note
R3MIG generates a database dump of all R/3 objects that are defined in the ABAP/4Dictionary. Other objects are not exported by R3MIG.
No indexes longer than 10+3 characters are allowed on the database to be exported.
Changes to database objects that cannot be maintained in the ABAP/4 Dictionary(SE14) are lost after the system copy.
Preparation PhaseSee the Chapter “Introduction”, section “General Preparations”, and the Chapter”Preparations”.
Exporting a DB2/400 Database1. Place the migration CD in the drive.
2. Log on as user <SID>OFR.
3. Enter LODRUN. For the LODRUN parameters, see OSS Note 82575.
The R/3 Migration menu is displayed.
R/3 Migration Menu

R3load Procedure on AS/400 SAP AG
Exporting a DB2/400 Database
7–4 May 1998
LODRUN calls a program that creates some directories, creates the file .sapconf, if itdoes not yet exist, loads the library R3INSTALL and fills it with all necessary objects(for example, r3loaddb4, r3ldctldb4).
4. Select option 1 (Export Database or Get Migration Key) from the R/3 Migrationmenu. The following screen is displayed.
Export Database and Get Migration Key Screen
5. In the field 6$3�6\VWHP�,' (SID), enter the name of the R/3 System whose databaseyou want to export.
6. In the field 'DWDEDVH�UHOHDVH, enter the database release, for example 3.1H.
7. In the field :RUNLQJ�GLUHFWRU\ , enter the name of the directory you want to use forthe log files and other files created by the migration tools. If it does not already exist,this directory will be created by program il4migrate. The default directory is/install.
8. In the field /RFDWLRQ�RI�5�ORDG�WSO�RQ�&', enter the directory location (that is, thepath) of R3load.tpl on the CD. Replace “vol” with the volume ID of themigration CD. The volume ID may be release-dependent. The default path is/QOPT/<vol>/TOOLS/OS400/COMMON.
il4migrate copies R3load.tpl to the working directory and renames itR3LOAD.PAR. If R3LOAD.PAR already exists in the working directory, no copyoperation will be performed. To see the template R3load.tpl for parameter fileR3load.par, see the section “Parameter File R3load.par”.
9. When you have entered all the parameters, press ENTER.

SAP AG R3load Procedure on AS/400
Exporting a DB2/400 Database
May 1998 7–5
The il4migrate program performs a number of tasks, one of which is to check ifthe file /usr/sap/trans/.sapconf contains the right information. il4migratealso creates links for R3ldctldb4, R3loaddb4 and R3load in the workingdirectory. The program looks for the executables in the R3INSTALL library whichwas loaded by LODRUN. il4migrate opens the log file migration.log in theworking directory. This file contains information about how the functions wereexecuted. If you did not update r3load.par manually, this is done automatically.Not all of the parameters are necessary for the AS/400, but entering unnecessaryparameters will not prevent the migration tools from proceeding.
After performing the actions mentioned before, il4migrate calls the standardmigration tools, which are similar on all platforms. First, however, the followingscreen appears. This screen is the AS/400 interface to the standard migration tools.
AS/400 Interface to the Standard Migration Tools
10. To export the database, press ENTER.
11. Enter 0 in the 7DVN�1XPEHU field and press ENTER.
A screen appears giving information on the OSS Notes to be read if you aremigrating.
12.To continue, press ENTER.
A screen appears asking for the migration password for the current release of themigration tools.
13. To find out the password, read the relevant OSS Notes for this release.

R3load Procedure on AS/400 SAP AG
Exporting a DB2/400 Database
7–6 May 1998
14. Enter the password at the beginning of the field observing upper/lower caseconventions and press ENTER.
The standard migration tools screen appears.
Export Database Screen
15.To select a task, press ENTER and type the option in the template that is displayed.
Note
Assuming you are starting an export from the beginning, you normally select theoptions in sequence starting with option 0. Depending on the platform involved andthe steps you have already taken, you may be able to skip some steps.
Updating the Statistics (Option 0)Option 0 (Update statistics) is not relevant for AS/400. If you are exporting aDB2/400 database, you can omit option 0.
Creating the Control Files (Option 1)
To create the control files, select option 1 (Create R3load-Control-Files).
This step creates the following control files in the working directory:
• SAP<TABART>.STR for tables and indexes and SAPVIEW.STR for views.SAP0000.STR refers to tables and indexes that cannot be assigned to any TABART.
• DDL<DBS>.TPL (substitute ORA, ADA, MSS, DB2, DB4 or DB6 for <DBS>)

SAP AG R3load Procedure on AS/400
Exporting a DB2/400 Database
May 1998 7–7
• SAP<TABART>.EXT for each SAP<TABART>.STR file and SAP.EXT for tablesthat are not defined in the ABAP/4 Dictionary but in the data dictionary of thedatabase system.
The *.STR files contain a description of the database objects (tables, indexes, views)defined in the ABAP/4 Dictionary, and of tables which are vital for the R/3 System andare only defined in the database. This description is independent of the database system.
The DDL<DBS>.TPL files are database-specific templates for creating commands used toset up a database. There is one DDL<DBS>.TPL file for every database system.
The *.EXT files contain a list of all the tables and indexes together with their sizes. Theinformation from the *.EXT files is used to calculate the entries in the template file andset the initial extents for the tables and indexes on the target system.
Option 1 (Create R3load-Control Files) runs R3ldctldb4. If you specified the targetoperating system and database in R3LOAD.PAR, no further screen is displayed andR3ldctldb4 starts running. If you have not yet entered this information, a new screen isdisplayed prompting you to specify the target database and operating system.
Select a target database and operating system. R3ldctldb4 runs with the defaultparameters ’-s DD -g <dbs> <OS_rel>’ where <dbs> stands for the databasesystem, for example “ora” if you are migrating to an ORACLE database, and <OS_rel>
for the operating system release. If these parameters are set, the ABAP/4 Dictionarystructure of your database is unloaded as files with the file extension STR. STR and TPLfiles are created in the working directory. Additionally, tables DDLOADD andDDLOADH are filled. These tables are used later to calculate target database sizes.Without parameters, R3ldctldb4 creates only STR and TPL files.
Target Database Screen

R3load Procedure on AS/400 SAP AG
Exporting a DB2/400 Database
7–8 May 1998
Generating the Templates for the Target Database (Option 2)
To generate the templates for the target database, select option 2 (Generate Templates forDB-Sizes).
This option generates a template file in the working directory. Information aboutdatabase target sizes will be written to this file. The name of the template file and theinformation it contains varies according to the target database involved.
Target Database Template File
DB2 common server on AIX SAPFS.TPL
DB2 on OS/400 SAPFS.TPL
DB2 on OS/390 not yet supported
INFORMIX on UNIX INSTINF.PFL
ORACLE / ADABAS on UNIX SAPFS.TPL
ORACLE/ADABAS/INFORMIX/DB2 common server/ MS SQLServer on Windows NT
SAPFS.INF
Creating the Command Files (Option 3)
To generate the command files needed by R3load for exporting the data, select option 3(Generate R3load-Command-Files).
R3MIG uses the parameter file R3LOAD.PAR to create the command files. For everystructure definition file (*.STR), one command file (*.cmd) is created in the workingdirectory.
In this step, the control files *.STR, *.EXT, and DDL*.TPL are also copied to thesubdirectories DATA, DB/<DBS>, and DB, respectively. They are located in thedirectories GLOBAL or <TABART> defined in the parameter file R3LOAD.PAR. The fileSAP0000.STR is copied and renamed EX000.STR, and contains descriptions of tablesand indexes for the report loads.

SAP AG R3load Procedure on AS/400
Exporting a DB2/400 Database
May 1998 7–9
Exporting the Database (Option 4)
To export the data, select option 4 (Unload Database with R3load).
R3MIG creates at least one export dump file (*.001) for each TABART and stores it inthe subdirectory DATA of the working directory. If an export dump file exceeds themaximum file size defined in *.cmd (default: file size = 2G), a second dump file(*.002) is created (and so on). R3MIG generates the table of contents (directory file)(*.TOC) in the subdirectory DATA, and a log file (*.log) in the installation directory foreach command file (*.cmd).
Option 4 runs the R3loaddb4 program to export the data.
The following parameters will be used: -r -c -e<working_directory/command_file> -p <working_directory/log_file>.
Parameter -c for converting from EBCDIC to ASCII is the default when exporting aDB2/400 database. On the target platform, no conversion will be needed. The R3loadlog files will be located in the working directory you chose at the beginning(R3MIGRATE command).
When option 4 (Unload Database with R3load) has run (after ca. 4 hours on a 53 S),check the log files to see if the whole database was exported correctly.
Checking the Log Files1. To look at your log files, call AS/400 command EDTF or DSPSTMF.
2. Go to the end of the file and look for information about your job.
3. If you find a message stating that your job ended successfully, there is no problem.
If you find an error message indicating that the job failed, repeat option 4. The jobwill be restarted.
If you prefer you can do this manually. In this case, you must correct the problem,delete the corresponding TOC and 001 files, and then restart the failed job manually.
To restart the job manually, enter the command:SBMJOB CMD(CALL PGM(R3INSTALL/R3LOADDB4) PARM(‘-c’ ‘-e’‘<working_directory/command_file>’ ‘-p’‘<working_directory/log_file>’))CPYENVVAR(*YES)
Exiting the Export Menu
To exit the export menu and return to the R/3 migration tools, selection option 5 (ExitUnload Database). After option 5 has run, the complete database has been exported.
To check if the export procedure was successful, look at the protocol filemigration.log in the working directory and see if all export files described in thedocumentation were created correctly. Additionally, you must check the export log filesfor each export job.
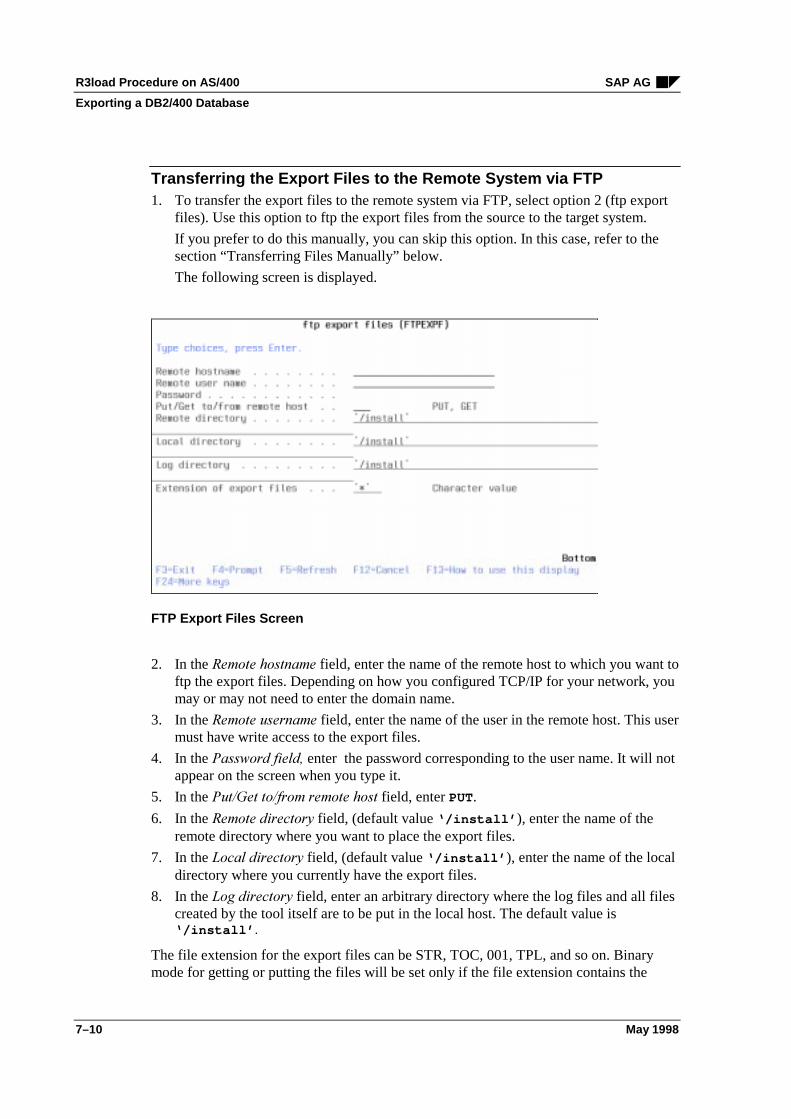
R3load Procedure on AS/400 SAP AG
Exporting a DB2/400 Database
7–10 May 1998
Transferring the Export Files to the Remote System via FTP1. To transfer the export files to the remote system via FTP, select option 2 (ftp export
files). Use this option to ftp the export files from the source to the target system.
If you prefer to do this manually, you can skip this option. In this case, refer to thesection “Transferring Files Manually” below.
The following screen is displayed.
FTP Export Files Screen
2. In the 5HPRWH�KRVWQDPH field, enter the name of the remote host to which you want toftp the export files. Depending on how you configured TCP/IP for your network, youmay or may not need to enter the domain name.
3. In the 5HPRWH�XVHUQDPH field, enter the name of the user in the remote host. This usermust have write access to the export files.
4. In the 3DVVZRUG�ILHOG� enter the password corresponding to the user name. It will notappear on the screen when you type it.
5. In the 3XW�*HW�WR�IURP�UHPRWH�KRVW field, enter PUT.
6. In the 5HPRWH�GLUHFWRU\ field, (default value ‘/install’ ), enter the name of theremote directory where you want to place the export files.
7. In the /RFDO�GLUHFWRU\ field, (default value ‘/install’ ), enter the name of the localdirectory where you currently have the export files.
8. In the /RJ�GLUHFWRU\ field, enter an arbitrary directory where the log files and all filescreated by the tool itself are to be put in the local host. The default value is‘/install’ .
The file extension for the export files can be STR, TOC, 001, TPL, and so on. Binarymode for getting or putting the files will be set only if the file extension contains the

SAP AG R3load Procedure on AS/400
Importing a DB2/400 Database
May 1998 7–11
string ’00’. The default is * (asterisk), which means that all files in the given directorywill be transferred. Take into account that all directories mentioned above must alreadyexist. Program IL4FTPEXPF, which processes the command FTPEXPF, will not createthese directories. The user you want to use to transfer the files must have authority forthe directories involved. Please note that the directory names are case-sensitive. Ideally,you should enclose the names in single quotation marks, for example’/usr/scratch’.
The il4ftpexpf program creates a log file in the log directory where the executedactions will be protocolled. Additionally, an ftp log file called ftpfile.log in the logdirectory will contain the specific ftp actions carried out. Some temporary files (EXP andEXPLOG) are also created in the QTEMP library.
Importing a DB2/400 Database1. Place the migration CD in the drive.
2. Log on as user QSECOFR.
3. Enter LODRUN . For the LODRUN parameters, see OSS Note 82575.
The R/3 Migration menu is displayed.
R/3 Migration Menu
LODRUN calls a program that creates some directories, creates the file .sapconf if itdoes not yet exist, loads the library R3INSTALL and fills it with all necessary objects.

R3load Procedure on AS/400 SAP AG
Importing a DB2/400 Database
7–12 May 1998
4. Select option 1 (Export Database or Get Migration Key) from the R/3 Migrationmenu. The following screen is displayed.
Export Database and Get Migration Key Screen
5. In the field 6$3�6\VWHP�,' (SID), enter the name of the R/3 System whose databaseyou want to install.
6. In the field 'DWDEDVH�UHOHDVH, enter the database release, for example 31H.
7. In the field :RUNLQJ�GLUHFWRU\ , enter the name of the directory you want to use forlog files and other files which are to be created by the migration tools. If it does notalready exist, this directory will be created by program il4migrate. As default,/install will be created.
8. Copy r3load.par manually from the source machine into the working directory onthe target machine.
9. In the field /RFDWLRQ�RI�5�ORDG�WSO�RQ�&', accept the default value as no copyoperation is performed.
10. When you have entered all the parameters, press ENTER.

SAP AG R3load Procedure on AS/400
Importing a DB2/400 Database
May 1998 7–13
The following screen appears. This screen is the AS/400 interface to the standardmigration tools.
AS/400 Interface to the Standard Migration Tools
11. To get the migration key, press ENTER.
12. Select option 1 in the 7DVN�1XPEHU�field.
Getting and Setting the Migration Key for R3load Procedure
Note
This function is currently still in development for AS/400. For more information, seeOSS Note 74282.
Select option 1 (Get and Set Migration Key for R3load Procedure).
Enter the password for the heterogeneous system copy. To find the password, refer to theOSS Note listed in the “Introduction”.
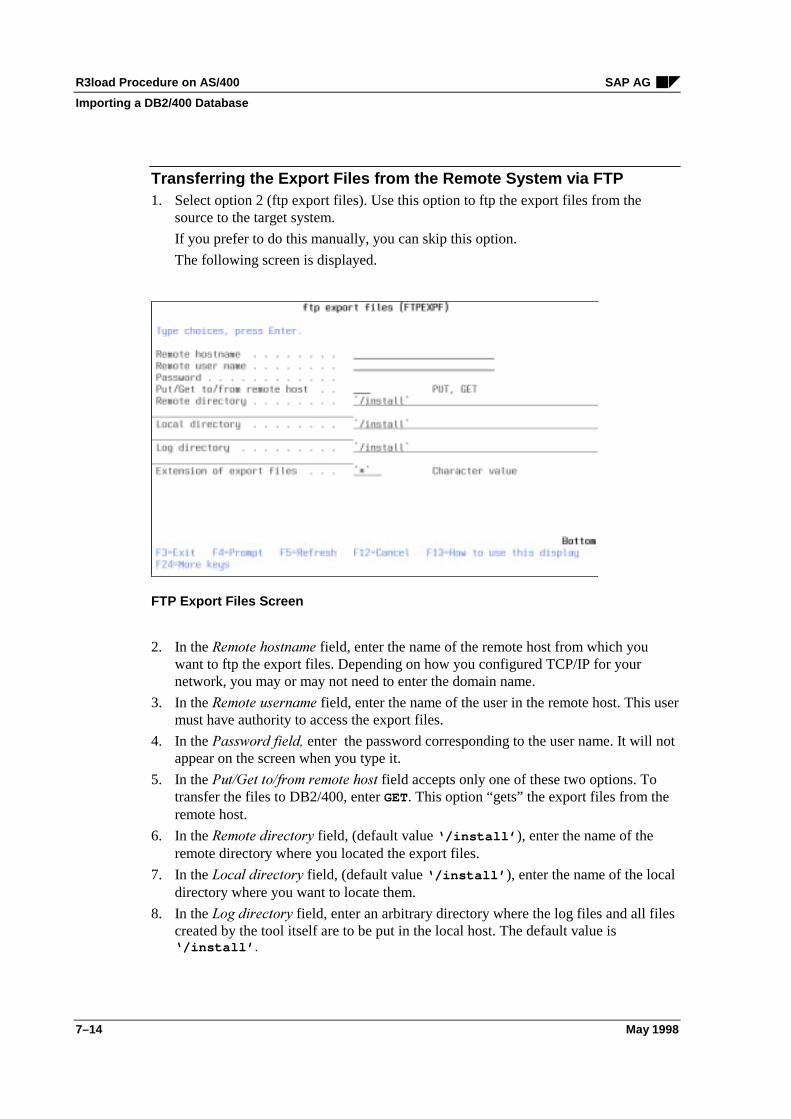
R3load Procedure on AS/400 SAP AG
Importing a DB2/400 Database
7–14 May 1998
Transferring the Export Files from the Remote System via FTP1. Select option 2 (ftp export files). Use this option to ftp the export files from the
source to the target system.
If you prefer to do this manually, you can skip this option.
The following screen is displayed.
FTP Export Files Screen
2. In the 5HPRWH�KRVWQDPH field, enter the name of the remote host from which youwant to ftp the export files. Depending on how you configured TCP/IP for yournetwork, you may or may not need to enter the domain name.
3. In the 5HPRWH�XVHUQDPH field, enter the name of the user in the remote host. This usermust have authority to access the export files.
4. In the 3DVVZRUG�ILHOG� enter the password corresponding to the user name. It will notappear on the screen when you type it.
5. In the 3XW�*HW�WR�IURP�UHPRWH�KRVW field accepts only one of these two options. Totransfer the files to DB2/400, enter GET. This option “gets” the export files from theremote host.
6. In the 5HPRWH�GLUHFWRU\ field, (default value ‘/install’ ), enter the name of theremote directory where you located the export files.
7. In the /RFDO�GLUHFWRU\ field, (default value ‘/install’ ), enter the name of the localdirectory where you want to locate them.
8. In the /RJ�GLUHFWRU\ field, enter an arbitrary directory where the log files and all filescreated by the tool itself are to be put in the local host. The default value is‘/install’ .

SAP AG R3load Procedure on AS/400
Importing a DB2/400 Database
May 1998 7–15
The file extension for the export files can be STR, TOC, 001, TPL, and so on. Only if theextension contains the string ’00’, binary mode will be set to get/put the files. The defaultis *, which means that all files in the given directory will be transferred. Take intoaccount that all directories mentioned above must already exist. Program il4ftpexpf,which processes the command FTPEXPF, will not create these directories. The user youwant to use to transfer the files must have authority for the directories involved. Pleasenote that the directory names are case-sensitive. Ideally, you should enclose the names insingle quotation marks, for example ’/usr/scratch’.
Program il4ftpexpf will create a log file in the log directory where the executedactions will be protocolled. Additionally, an ftp protocol file called ftpfile.log in thelog directory will contain the specific ftp actions carried out. Some temporary files (EXPand EXPLOG) will be created in library QTEMP as well.
Transferring Files Manually
If you opt to ftp your files manually, please note that files whose extension starts with“00” (for example, sapsdic.001) must be transferred in binary mode.
Apart from changing to binary mode where necessary, SAP recommends that you use theftp defaults.
Once you have transferred your files to AS/400, check, in the case of text files, that thecode page of the stream file corresponds to that of the text.
Example
You have transferred a file sapsdic.toc to AS/400.
When you look at the stream file with DSPSTMF sapsdic.toc, you receive awarning that the text is ASCII and will be converted. When you look at the code pageof the stream file, you find that it is code page 500. A problem exists as the text isnow ASCII, but the file itself is EBCDIC.
If this problem arises, delete the files involved and repeat the ftp transfer until theproblem is solved.
Preparing to Install
Options 3 (Prepare to import database with R3MENU) and 4 (Installation Menu) fromthe R/3 Migration main menu are import options, that is, they can be used only ifDB2/400 is the target database. If you are migrating to the AS/400, you have to re-installyour old R/3 System on the AS/400. The procedure is essentially the same as thestandard AS/400 installation procedure.
However, some preparatory steps are necessary first. On the other side, you will not useany export CDs but the directory (only 1) where you located your export files. At acertain point, the installation will ask whether or not you want to import your databasefrom CD. In this case, you have to answer that you want to import a customer database.

R3load Procedure on AS/400 SAP AG
Importing a DB2/400 Database
7–16 May 1998
For migrations, the installation assumes that all export files are located in the samedirectory. Other assumptions are made as well. This is the reason for Option 3 in R3MIG.
Before starting to install with R3MENU, option 3 will perform some preparatory stepsafter which you will already be able to install your R/3 System as described in theinstallation documentation.
Preparing to Import the Database with R3MENU1. From the R/3 Migration Menu menu, select option 3 (Prepare to import database with
R3MENU). The following screen appears:
Preparing to Install R/3 Screen
2. In the 'LUHFWRU\�RI�72&�ILOHV field, enter the directory containing the export fileswith the extension TOC, which you transferred from your source system to the targetone.
3. In the 'LUHFWRU\�RI�675�ILOHV field, enter the directory containing the files with theextension STR.
4. In the 'LUHFWRU\�RI�GDWD�ILOHV field, enter the data files with extension 001, 002, andso on.
5 In the 'LUHFWRU\�IRU�ORJ�ILOHV field, enter the directory where all log files coming fromprogram il4prepmig will be written. The directory must exist.
6. In the 'DWDEDVH�UHOHDVH�field, enter the release of the source database you exported,that is 31H.
SAP AG R3load Procedure on AS/400
Importing a DB2/400 Database
May 1998 7–17
Caution
The migration tools operate as described in this documentation only if the databaserelease is 3.1H. If you are exporting another a database with a different release, referto OSS Note 82575.
il4prepmig, which processes command prepmig, will write log fileprepimpmig.log in GLOBDIR. As mentioned before, the AS/400 installation toolsassume that the migration export files are located in one directory, which replacesexactly one export CD. Even if the transferred export files are located in onedirectory, a certain directory structure is expected by the il4install program,which must correspond to the directory structure of the export CDs. It has to be takeninto account that on the AS/400 there is always a directory (volume ID) under/QOPT, under which the standard CD structure hangs. The installation tools checkthe LABEL.EBC of the export CD as well, so that the right LABEL must exist in thedirectory which contains the export files. This is the reason why this option isneeded.
The following directories are created by il4prepmig:/qoptmig/qoptmig/dummy/qoptmig/dummy/data.
These directories are removed at the beginning of the prepare procedure if they exist.The user is not allowed to use them. They are reserved for the migration tools.label.ebc will be created in /qoptmig/dummy. label.ebc will contain the sameentries than label.ebc on the export CD. il4prepmig will add links in/qoptmig/dummy/data which point to the STR, TOC and data export files,wherever they are located. These locations were given as parameters for prepmigcommand. After these actions, everything is prepared to run the installation tools.The only difference from a normal installation is the following: When the installationasks if the user wants to load a customer database, the answer must be positive.
When asked about the path where the export files are located the answer must be’/qoptmig’.
You are prompted to specify whether conversion to EBCDIC is needed.
If the export procedure was carried out with conversion, the answer must be negative.
Otherwise it must be positive. In most of the cases the conversion must be carried outon the AS/400 side.

R3load Procedure on AS/400 SAP AG
Importing a DB2/400 Database
7–18 May 1998
Installing
The last option in R3MIG is a link to the installation menu R3MENU.
1. Before moving to option 4, enter the following at the command prompt:ADDLIBLE R3INSTALL
Note
LODRUN can be skipped because R3INSTALL is already on the AS/400 machine.
2. Select option 4.
The installation menu R3MENU is displayed.
3. From this point on, refer to the AS/400 installation manual ,QVWDOOLQJ�5���RQ�,%0$6������5HOHDVH����+, starting with the section “Configuring R/3 Systems andInstances”.
It is possible that the post-load steps in the installation tools may not work correctlyfor migration cases. In this case, the post-installation steps have to be performedindependently of the installation tools. The post-load steps are performed at the endof the installation procedure.

SAP AG R3load Procedure on AS/400
Parameter File R3LOAD.PAR
May 1998 7–19
Parameter File R3LOAD.PAR
# # @(#)r3load.tpl 97/01/14 20.2######################################################################### CHANGES:# WHO DATE WHY# us 21.11.96 First Version# bw 23.12.96 New Functions######################################################################### README: Description for unload and load with R3INST### Parameter file to create DB independent Dumpfiles. It is# also used for the DB independent Load.# This file must be moved to the installation directory:# for unload with the name R3LOAD.PAR (read write permissions)# for load with the name R3LOAD.PAR (read write permissions)## There are the following KEYWORDS###################################################################### FILES:# The unload/load create the following files:## <tabart>.log protocol of unload/load e.g. SAPAPPL1.log# <tabart>.cmd Commandfile for unload/load e.g. SAPAPPL1.cmd# it contains 4 lines per <tabart> to define the# locations of the required files, the blocksize and# the filesize# <tabart>.sta contains the number of bytes .....# SAP<tabart>.TOC
# SAP<tabart>.STR database-independent controlfiles# contains metadescriptions for the objects to be# created (with owner sapr3 and defined in the R/3# data dictionary)# SAP<tabart>.EXT database dependent file which contains the tables# and indices per <tabart> with their sizes# SAP<tabart>.001 database-independet dumpfile# DDL<dbs>.TPL database dependent controlfile# contains databasespecific templates for# objects to be created# R3INST.log Standard protocol for R3INST# R3INST.diag Debugging Logfile######################################################################controls the number of parallel running unload or load processes[OPTIONS]PROCESSES=4#[DATA-LOCATION]# GLOBAL = directory for all tabart# during export, the directories <GLOBAL>/DATA + <GLOBAL>/DB# will be created and the files *.STR *.EXT *.TPL will be copied# in these directories#GLOBAL=/oracle/SID/sapreorg#

R3load Procedure on AS/400 SAP AG
Parameter File R3LOAD.PAR
7–20 May 1998
# If you want to distribute the dump over more than 1 filesystem# you can specify a directory for every tabart. Then the# directories <tabart>/DATA + <tabart>/DB will also be created.
##SAPAPPL1=/install#SAPAPPL0=/tmp##[ADVANCED]# during unload or load you can exclude every tabart# with the keyword EXCLUDE#EXCLUDE=SAPES30D,SAPEL30D## with the MOUNTx keyword you can specify whether R3INST stops# during import.# If you specify the MOUNT option R3INST will stop after the BUILD of# of the database so that you have now the possibility to restore# your dump files in the affected directories. If you don’t want R3INST# to stop between DB-Build and import please don’t specify this option.## In this example, R3INST stops after the database build and ask you# to copy the files under the directory you have specified for# GLOBAL and SAPAPPL1. If the files are restored R3INST first imports# GLOBAL and SAPAPPL1, then it stops and ask you to copy the files# for MOUNT1.
#MOUNT1=SAPAPPL0
SAP AG Target Database: DB2 for OS/390
Contents
September 1997 8–1
Chapter 8: Target Database: DB2 for OS/390
Contents
Exporting the Source Database ................................................................................... 8–2Overview.....................................................................................................................8–2Creating the Parameter File R3ldb2si.TPL.................................................................8–2Splitting the STR Files ................................................................................................8–3Updating Statistics (Homogeneous System Copy only) .............................................8–3

Target Database: DB2 for OS/390 SAP AG
Exporting the Source Database
8–2 September 1997
Exporting the Source Database
Overview
This chapter provides you with additional information you need for the R3loadprocedure.
Creating the Parameter File R3ldb2si.TPL
You must create the parameter file R3ldb2si.TPL before you create the R3LOAD.PARfile.
Copy the parameter file R3LDB2SI.TPL from the CD to the installation directory andname it R3ldb2si.TPL. The file is located in the following directory on the CD:
Homogeneous system copy: Kernel CD, <CD-DIR>/UNIX/COMMON/INSTALL
Heterogeneous system copy: Migration CD, <CD-DIR>/TOOLS/UNIX/COMMON
The parameter file contains an entry for each table residing in a database/tablespace of itsown. (For details about the database layout, refer to the respective chapter in the manual%&�6$3�'DWDEDVH�$GPLQLVWUDWLRQ�*XLGH�'%��IRU�26����.) The R3ldb2si.TPL file isnecessary for the export and must be modified in accordance with the customer database.
Example
#@(#)R3ldb2si.TPL 20.2.4.1 SAP 97/07/31
#tabname dbname bp_tab bp_ind
ATAB ATAB BP2 BP3D301T D301T BP2 BP3DD03L DD03L BP2 BP3DOKCLU DOKCLU BP2 BP3DOKHL DOKHL BP2 BP3DOKIL DOKIL BP2 BP3FUNCT FUNCT BP2 BP3ANLZ ANLZ BP2 BP3APQD APQD BP32K BP3AUFK AUFK BP2 BP3AUSP AUSP BP2 BP3BKPF BKPF BP2 BP3BSEG BSEG BP2 BP3BTCCTL BTCCTL BP2 BP3...
Note
When editing the R3ldb2si.TPL file, do not use leading blanks.

SAP AG Target Database: DB2 for OS/390
Exporting the Source Database
August 1997 8–3
Splitting the STR Files
After you have created the R3load control files and before you generate the templates forthe target database, you should split the STR files to improve the balance of the (un)loadprocesses.
At this point the function is not included in R3ldctl, but in the awk scriptsplitstr.awk. This script is located on the Kernel CD, and on the Migration CD(<CD-DIR>/TOOLS/UNIX/AIX/DB2). Depending on the total number of tables and theentries in R3ldb2si.TPL, you must adapt the splitting parameter max=n. Thisparameter defines the maximum number of tables per STR file after the split. Bear inmind that n has to be multiplied by 100.
For example, n=2 means maximum 200 tables per STR file after the split.
To split the STR files, perform the following steps in the installation directory:
1. mkdir argstr
2. mv *.STR argstr
3. awk -f splitstr.awk tpl=DDLDB2.TPL max=n argstr/*.STR
The following output is generated:
• *.STR files
• extlnk.sh
• extrmlnk.sh
4. chmod 755 ext*.sh
5. extlnk.sh
Updating Statistics (Homogeneous System Copy only)
R3INST prompts you for the following information necessary for the JCL submissionservice:
• Host name
• User name
• Password
On the next screen, choose where to start within the update statistics process:
• 58167$76 or
• 67263$&(
If you choose 58167$76 RUNSTATS and STOSPACE will be performed. If you choose67263$&(��RUNSTATS will be skipped and only STOSPACE will be performed.
Use the 67263$&( option if you have already performed a RUNSTATS job on your DB2subsystem or if you want to restart the STOSPACE job.

SAP AG General Subsequent Actions
Contents
May 1998 9–1
Chapter 9: General Subsequent Actions
Contents
Subsequent Technical Actions .................................................................................... 9–2Subsequent Actions Required in the Source System................................................. 9–2Subsequent Actions Required in the Target System.................................................. 9–2

General Subsequent Actions SAP AG
Subsequent Technical Actions
9–2 May 1998
Subsequent Technical Actions
Subsequent Actions Required in the Source System
• Reschedule your canceled jobs:7RROV�→�$GPLQLVWUDWLRQ�→�-REV�→�6HOHFW�-REV (SM37).
• Using CCMS, adapt your operation mode timetable to the original status: 7RROV�→$GPLQLVWUDWLRQ�→�&RPSXWLQJ�&HQWHU�→�0DQDJHPHQW�6\VWHP�→�&RQILJXUDWLRQ�→�23PRGH�WLPHWDEOH (SM63).
Subsequent Actions Required in the Target System
Note
If your target system is DB2/400, perform all actions described in OSS note 87452.
Actions on Operating System Level
• Adapt the configuration files on operating system level to meet network and R/3requirements.
• Log on as OS user <sapsid>adm and adapt the parameter file TPPARAM in the SAPtransport directory.
• Adapt additional software components (e.g. RFC, CPIC, SAP ArchiveLink) if required.
• ORACLE: Adapt the database profiles init<SAPSID>.ora, init<SAPSID>.dba andinit<SAPSID>.sap.
Actions on Database Level
• Before starting the R/3 System, ensure that the logging mechanism of the database isactive.
• ORACLE: Delete all entries from the following tables: DBSTATHORA, DBSTAIHORA,DBSTATIORA, DBSTATTORA.
• ORACLE: Delete the user OPS$<SOURCE_SAPSID>ADM.
Actions on R/3 Level
• Run installation check: 7RROV�→�$GPLQLVWUDWLRQ�→�$GPLQLVWUDWLRQ�→�,QVWDOODWLRQ�&KHFN(transaction SICK).
• Configure the Workbench Organizer (SE06) with the option 'DWDEDVH�&RS\.
• Delete all entries from the following tables: MONI, PAHI, ALAMO, OSMON, DBSNP, SDBAH,SDBAD, SDBAP, SDBAR.

SAP AG General Subsequent Actions
Subsequent Technical Actions
May 1998 9–3
• Delete canceled and finished jobs.Execute ABAP/4 program RSBTCDEL� marking the field GHOHWH�ZLWK�IRUFHG�PRGH: 7RROV→�$%$3���:RUNEHQFK�→�$%$3���(GLWRU (SE38).
• Adapt all jobs needed in the target system1. copy the old jobs2. modify the new jobs3. delete the old jobs.
• Check the consistency of the 7HPSRUDU\�6HTXHQWLDO�2EMHFWV (TemSe) (“Are there files ofTemSe objects for which no TemSe objects exist?”): 7RROV�→�$GPLQLVWUDWLRQ�→ 6SRRO�→7HP6H�DGPLQLVWUDWLRQ�(SP12). For further information, see OSS note 16875.
• Adapt the definition of the printers (device types and character set definitions) to meet thenew system requirements.
• Delete entries in table DDLOG for buffer synchronization Synchronize the buffers asdescribed in OSS note 25380. Adapt the client information for the logical system.
• Adapt the RFC destination: 7RROV�→ $GPLQLVWUDWLRQ�→ $GPLQLVWUDWLRQ�→ 1HWZRUN�→5)&�GHVWLQDWLRQV�(SM59). Clean the transactional RFC: 7RROV�→ $GPLQLVWUDWLRQ�→0RQLWRULQJ → 7UDQVDFWLRQDO�5)& (SM58). See the relevant description in the 5���2QOLQH'RFXPHQWDWLRQ.
• Create new operation modes and remove old ones:1. Create new operation modes and instance definitions.2. Maintain the timetable using the new operation modes.3. Delete the old operation modes and old instance definitions.
• Adapt the operation mode time tables (CCMS): 7RROV�→ $GPLQLVWUDWLRQ�→�&RPSXWLQJ&HQWHU�→�0DQDJHPHQW�6\VWHP�→�&RQILJXUDWLRQ�→ 2SHUDWLRQ�PRGH�WLPHWDEOH�(SM63).
• Adapt the instances and profiles (CCMS): 7RROV�→ $GPLQLVWUDWLRQ�→ &RPSXWLQJ�&HQWHU→ 0DQDJHPHQW�6\VWHP�→ &RQILJXUDWLRQ�→ 23�0RGHV�6HUYHUV�→ ,QVWDQFH�3URILOHV(RZ04).
• Define or remove the R/3 users: 7RROV�→ $GPLQLVWUDWLRQ�→ 0DLQWDLQ�XVHUV�→ 8VHUV(SU01).
• Delete all entries from tables TPFET and TPFHT. These contain information about changesmade to the profile of your source system: 7RROV�→ $GPLQLVWUDWLRQ�→ &RPSXWLQJ�&HQWHU→ 0DQDJHPHQW�6\VWHP�→ &RQILJXUDWLRQ�→ 3URILOH�0DLQWHQDQFH�(RZ10).DB2/400: Use the commands CLRPFM R3<SID>DATA/TPFET and CLRPFMR3<SID>DATA/TPFHT.
• Adapt other CCMS settings (e.g. alert thresholds) if required.
• Delete all entries from table TLOCK which holds the repair requests from your sourcesystem.

General Subsequent Actions SAP AG
Subsequent Technical Actions
9–4 May 1998
• Make data archived in the source system (data that does not reside in the database but wasmoved to a different storage location using R/3 Archive Management) accessible in thetarget system. Adapt the file residence information in the target system. Refer to the 5��2QOLQH�'RFXPHQWDWLRQ �%DVLV�&RPSRQHQWV�→�6\VWHP�$GPLQLVWUDWLRQ�→�$SSOLFDWLRQ�'DWD$UFKLYLQJ�DQG�5HRUJDQL]DWLRQ��for help.
Checking the Target System
The following actions are suitable for checking the consistency of the target system:
• Perform initial consistency check (SM28).
• Check the system log (SM21).
• Check the consistency of the database (DB02).
• Perform server check (SM51).
• Test transactions frequently used by the customer.
• FI customers: Run the job SAPF190 (accounting reconciliation) and compare the results tothose gained on the source system before the system copy ($FFRXQWLQJ�→�)LQDQFLDO$FFRXQWLQJ�→�*HQHUDO�OHGJHU�→�3HULRGLF�3URFHVVLQJ�→�&ORVLQJ�→�&KHFN�FRXQW�→&RPSDULVRQ).
• FI customers: Run the jobs RFUMSV00 (tax on sales/purchases), RAGITT01 (asset historysheet), RAZUGA01 (asset acquisitions), RAABGA01 (fixed asset retirements) and comparethe results to those gained on the source system before the system copy.
• CO customers: Run the report group 1SIP and compare the results to those gained on thesource system before the system copy.