QuickBooks Enterprise Solutions 9 Official Guide
548
Intuit QuickBooks Enterprise Solutions 9.0 The Official Guide ®
Transcript of QuickBooks Enterprise Solutions 9 Official Guide
Intuit QuickBooksEnterprise Solutions 9.0
The Official Guide
®
Intuit QuickBooks®
Enterprise Solutions 9.0The Official Guide
Copyright © 2009 by The McGraw-Hill Companies. All rights reserved. Except as permittedunder the Copyright Act of 1976, no part of this publication may be reproduced or distributed inany form or by any means, or stored in a database or retrieval system, without the prior writtenpermission of the publisher, with the exception that the program listings may be entered, stored,and executed in a computer system, but they may not be reproduced for publication.
Intuit QuickBooks® Enterprise Solutions 9.0 The Official GuideISBN 978-0-07-162274-5MHID 0-07-162274-8
Information has been obtained by McGraw-Hill from sources believed to be reliable. However, becauseof the possibility of human or mechanical error by our sources, McGraw-Hill, or others, McGraw-Hilldoes not guarantee the accuracy, adequacy, or completeness of any information and is not responsiblefor any errors or omissions or the results obtained from use of such information.
New York Chicago San FranciscoLisbon London Madrid Mexico City Milan
New Delhi San Juan Seoul Singapore Sydney Toronto
274-8_Title.psP:\010Comp\QckBcks\274-8\274-8_Title.vpThursday, September 18, 2008 11:06:13 AM
Color profile: DisabledComposite Default screen

Acknowledgments
The Publisher would like to thank the following people for their contributions tothis project:
• Liane Freeman, for your ongoing support and expertise• Alvin Lee, for your extraordinary efforts to answer questions and/or find the
right person to ask as well as inbox inserts and cover review• Sharjeel Durrani and Ryan Glover, for your help with covers and inbox inserts• Jon Burt, for your help on the beta software front
Great thanks to Abdenour Bezzouh, Pranay Kapadia, Puja Ramani, Mark Russell,and Laurie Wood, for the time, goodwill, and energy spent on product andtechnical questions as well as feature demonstrations.
Special thanks to Pat Bhatt and Hal Schoolcraft for your help with the IntuitStatement Writer appendix; Kelsey Phillips, for your brand expertise and guidance;Jacob Harman, for making sure the art files arrived quickly and were correct.
ii
QckBcks TIGHT / QuickBooks 2009 The Official Guide / Ivens / 274-8 / Front Matter
P:\010Comp\QckBcks\274-8\2748fm.vpFriday, September 19, 2008 11:17:39 AM
Color profile: DisabledComposite Default screen
Introduction
How to Use This BookThis e-book is organized to match the way most businesses use QuickBookssoftware. You can consult the table of contents, where you’ll notice that the topicsstart with the tasks you perform immediately after installing the software, move onto the tasks you perform often, and then cover the tasks you perform lessfrequently.
The index guides you to specific tasks and features, so when you absolutely mustknow immediately how to do something, it’s easy to find the instructions.
What’s Provided in This Book to Help YouThere are some special elements in this book that you’ll find extremely useful:
• Tips Give you some additional insight about a subject or a task. Sometimesthey’re shortcuts, and sometimes they’re tricks I’ve learned from working withclients.
• Notes Provide extra information about a topic or a task. Sometimes theyprovide information about what happens behind the scenes when you performa task, and sometimes they have additional information I think you might becurious about.
• Cautions Are presented to help you avoid the traps you can fall into if a taskhas a danger zone.
• FYI boxes Are filled with facts you don’t necessarily need to perform a task,but the information may be helpful. Some FYI boxes help you understand theway QuickBooks “thinks” (all software applications have a predictable thinkingpattern); others are designed to point out the way certain procedures help yourun your business.
iii
QckBcks TIGHT / QuickBooks 2009 The Official Guide / Ivens / 274-8 / Front Matter
P:\010Comp\QckBcks\274-8\2748fm.vpFriday, September 19, 2008 11:17:39 AM
Color profile: DisabledComposite Default screen

You and Your AccountantOne of the advantages of double-entry bookkeeping software like QuickBooks isthat a great many simple bookkeeping tasks are performed automatically. If you’vebeen keeping manual books or using a check-writing program such as Quicken,your accountant will probably have less work to do now that you’re usingQuickBooks.
Many accountants visit clients regularly or ask that copies of checkbook registersbe sent to their office. Then, using the data from the transactions, a general ledgeris created, along with a trial balance and other reports based on the general ledger(Profit & Loss Statements and Balance Sheets).
Many of the bookkeeping chores that your accountant has been performing willnow be handled by QuickBooks, which keeps a general ledger and provides reportsbased on the data in the general ledger. Your accountant will check the totals andprepare your taxes. Don’t worry, your accountant won’t complain about losing theday-to-day, boring bookkeeping tasks. Most accountants prefer to handle moreprofessional chores, and they rarely protest when you tell them they no longer haveto be bookkeepers. Their parents didn’t spend all that money on their advanced,difficult education for that.
iv E N T E R P R I S E S O L U T I O N S 9 . 0 T H E O F F I C I A L G U I D E
QckBcks TIGHT / QuickBooks 2009 The Official Guide / Ivens / 274-8 / Front Matterr
P:\010Comp\QckBcks\274-8\2748fm.vpFriday, September 19, 2008 11:17:39 AM
Color profile: DisabledComposite Default screen
QckBcks TIGHT / QuickBooks 2009 The Official Guide / Ivens / 274-8 / Chapter 1
Par
tO
neP
art
One Getting Started
Congratulations on deciding to use QuickBooks to track yourbusiness finances. Accounting software such as QuickBooks,however, has to be set up, configured, and carefully tweaked beforeyou can begin using it. If you don’t do the preliminary work, thesoftware won’t work properly.
Part One of this book has two chapters. Chapter 1 introduces youto QuickBooks Premier and Enterprise Solutions editions, as well asthe new features you’ll find in QuickBooks 2009. Then, in Chapter 2,you’ll learn how to set up your company file and all the lists you’llneed. Lists are mini files that contain all the information about yourfinancial categories, customers, vendors, the things you buy and sell,and all the other information you need to track in QuickBooks.
P:\010Comp\QckBcks\274-8\ch01.vpThursday, September 11, 2008 5:17:12 PM
Color profile: DisabledComposite Default screen
Chapter
Chapter
11IntroducingQuickBooks
In this chapter:
• About Premier editions and Enterprise Solutions
• What’s new in QuickBooks 2009?
1
QckBcks TIGHT / QuickBooks 2009 The Official Guide / Ivens / 274-8 / Chapter 1
P:\010Comp\QckBcks\274-8\ch01.vpThursday, September 11, 2008 12:07:46 PM
Color profile: DisabledComposite Default screen

QuickBooks Premier editions and Enterprise Solutions contain all the basicfunctions found in QuickBooks Pro, along with a host of advanced features thathave been added to support growing businesses.
Industry-Specific EditionsBoth QuickBooks Premier Edition and QuickBooks Enterprise Solutions provideadvanced features not found in QuickBooks Pro. In addition, Intuit offers industry-specific editions that contain additional features and functions specifically designedfor the type of business you’re operating. The following industry-specific editionsare available for both Premier and Enterprise Solutions:
• Accountant Edition• Contractor Edition• Manufacturing and Wholesale Edition• Nonprofit Edition• Professional Services Edition• Retail Edition
Premier Editions FeaturesPremier editions have advanced functions that make it easier to sell products andservices, and track your business financials:
• Sales orders let you enter sales transactions on a deferred basis, which is usefulif you want to have management personnel approve the price of goods andservices before finalizing the sale. In addition, sales orders provide a way toreserve inventory items for a customer while you await the delivery of thoseitems in your warehouse. Sales orders don’t post amounts to your generalledger, so you won’t be declaring income (or paying taxes) until the sales orderturns into a real sale.
• Inventory Assemblies let you automate the process of combining existing itemsinto a new finished product.
• If you invoice customers for reimbursement of costs, the Premier editions makeit easier to create invoices for reimbursement by providing a single window thatlists all your current unbilled reimbursable costs.
Enterprise Solutions FeaturesEnterprise Solutions contains all the features and functions of QuickBooks Premiereditions, and builds on those with additional powers that make it easier to useQuickBooks as your business grows:
2 P A R T O N E G E T T I N G S T A R T E D
QckBcks TIGHT / QuickBooks 2009 The Official Guide / Ivens / 274-8 / Chapter 1
P:\010Comp\QckBcks\274-8\ch01.vpThursday, September 11, 2008 12:07:46 PM
Color profile: DisabledComposite Default screen
• The amount of data that can be held in QuickBooks lists is enlarged toaccommodate large businesses.
• Setting up user permissions to specify what each user can do and see is greatlyexpanded, making it easier to hide sensitive data without limiting the day-to-day work of each user.
• More users can access the company file simultaneously, and Enterprise Solutionshas built-in support for Windows Terminal Services and Linux servers.
New in QuickBooks 2009QuickBooks 2009 has added new features and improved some existing features.The following sections provide an overview of some of these changes.
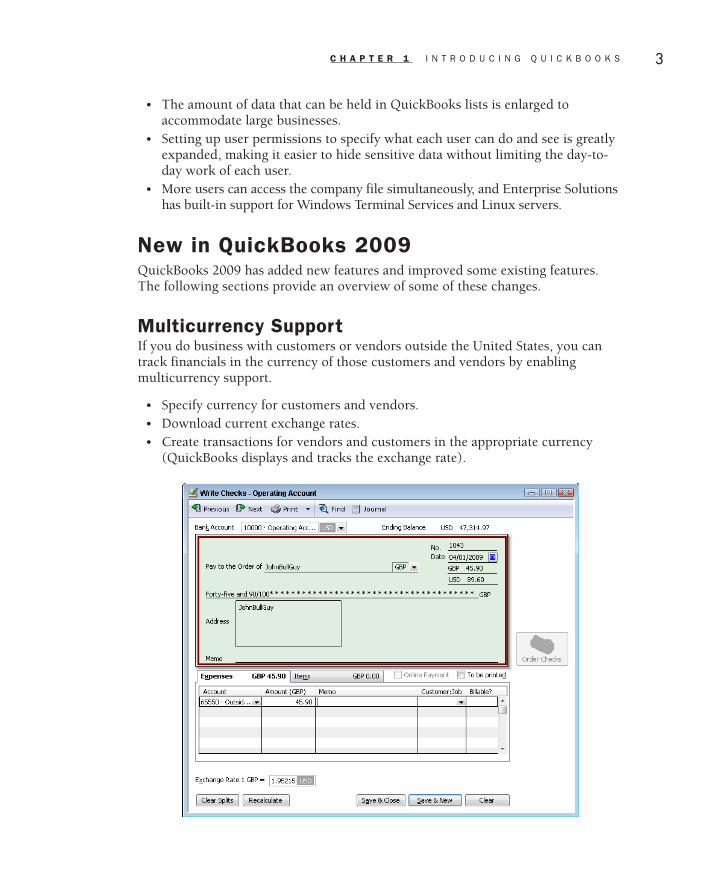
Multicurrency SupportIf you do business with customers or vendors outside the United States, you cantrack financials in the currency of those customers and vendors by enablingmulticurrency support.
• Specify currency for customers and vendors.• Download current exchange rates.• Create transactions for vendors and customers in the appropriate currency
(QuickBooks displays and tracks the exchange rate).
Ill 1-1
C H A P T E R 1 I N T R O D U C I N G Q U I C K B O O K S 3
QckBcks TIGHT / QuickBooks 2009 The Official Guide / Ivens / 274-8 / Chapter 1
P:\010Comp\QckBcks\274-8\ch01.vpThursday, September 11, 2008 12:07:46 PM
Color profile: DisabledComposite Default screen

Ill 1-2
The Multicurrency feature is robust and easy to use, with a variety of built-infunctions available on the Multicurrency menu.
Ill 1-3
Support for Larger NumbersQuickBooks now supports financial entries up to 99 billion (the previous limit was99 million). This is especially useful for businesses that enable the Multicurrencyfeature.
QuickBooks MessengerWhen you’re running QuickBooks in multi-user mode, use QuickBooks Messengerto communicate with other users on the network.
4 P A R T O N E G E T T I N G S T A R T E D
QckBcks TIGHT / QuickBooks 2009 The Official Guide / Ivens / 274-8 / Chapter 1
P:\010Comp\QckBcks\274-8\ch01.vpThursday, September 11, 2008 12:07:47 PM
Color profile: DisabledComposite Default screen

Ill 1-4
You can configure your status to let other users know that you’re not available.
Ill 1-5
In addition, the Admin user can log off another user when single-user mode isneeded. This is extremely useful for all those times that network users forget toclose the company file or exit QuickBooks when they leave the office.
Ill 1-6
C H A P T E R 1 I N T R O D U C I N G Q U I C K B O O K S 5
QckBcks TIGHT / QuickBooks 2009 The Official Guide / Ivens / 274-8 / Chapter 1
P:\010Comp\QckBcks\274-8\ch01.vpThursday, September 11, 2008 12:07:47 PM
Color profile: DisabledComposite Default screen

Access to Community ForumsThe new Live Community feature lets you connect to a QuickBooks communityforum. This forum is set up specifically for this feature. It’s not the same forum youcan access from the QuickBooks website; instead, the regular forum postings areexamined and culled for users who access Live Community from within QuickBooks.More information about Live Community is in Chapter 20.
Intuit Statement Writer for AccountantsAvailable in Accountant Edition, this new feature lets accountants preparecomprehensive and professional financial statements quickly and easily. This utilityintegrates with Microsoft Office and allows you to create templates that you can usefor multiple clients. See Appendix B for more information about ISW.
Company SnapshotThis feature provides a quick look at the state of your business, as well as remindersabout tasks you need to attend to. You can drill down into the data that’s displayedto see the details behind the numbers. More information about Company Snapshotis in Chapter 15.
Ill 1-7
6 P A R T O N E G E T T I N G S T A R T E D
QckBcks TIGHT / QuickBooks 2009 The Official Guide / Ivens / 274-8 / Chapter 1
P:\010Comp\QckBcks\274-8\ch01.vpThursday, September 11, 2008 12:07:47 PM
Color profile: DisabledComposite Default screen

External AccountantYou can create a user designated as an external accountant, and provide that username to your accountant or a bookkeeper. The user designated as an externalaccountant has access to all the data in your company file except customer creditcard information. In addition, when the external accountant logs in, QuickBooksprovides access to a new tool, Client Data Review, that makes it easy to findproblems in data entry.
Client Data ReviewClient Data Review is a powerful tool that lets accountants (including externalaccountants as described in the previous section) examine the company file forproblems or potential problems and fix them.
Ill 1-8
You can learn about the external accountant and Client Data Review in Chapter 15.In addition to these new features, you’ll find some changes in existing functions
that make QuickBooks 2009 more efficient. Online banking setup is easier andfaster, online services (many of which are free) are easier to sign up for with thenew Online Account Sign Up feature, and network performance is faster.
C H A P T E R 1 I N T R O D U C I N G Q U I C K B O O K S 7
QckBcks TIGHT / QuickBooks 2009 The Official Guide / Ivens / 274-8 / Chapter 1
P:\010Comp\QckBcks\274-8\ch01.vpThursday, September 11, 2008 12:07:48 PM
Color profile: DisabledComposite Default screen

QckBcks TIGHT / QuickBooks 2009 The Official Guide / Ivens / 274-8Blind 8
P:\010Comp\QckBcks\274-8\ch01.vpThursday, September 11, 2008 12:07:48 PM
Color profile: DisabledComposite Default screen

Chapter
Chapter
22Setting Up YourCompany File
In this chapter:
• Create a company file
• Create a full chart of accounts
• Enter data in lists
• Invent your own fields to make your lists more useful
9
QckBcks TIGHT / QuickBooks 2009 The Official Guide / Ivens / 274-8 / Chapter 2
P:\010Comp\QckBcks\274-8\ch02.vpTuesday, September 02, 2008 10:54:03 AM
Color profile: DisabledComposite Default screen

This chapter covers tasks you should perform as you set up your company file.Every time you enter a transaction or fill out a form, you’ll have to enter some basicdata at the same time. Take the time now to get the basic data into the system. Thisis the preparation stuff, the work that makes future work faster and more efficient.
Creating a Company FileYou can create as many companies in QuickBooks as you wish. You can have yourbusiness in one company and your personal finances in another company. If youhave enough time and energy, you can also volunteer to run the local communityassociation, open a second business, keep your mother-in-law’s books, or createcompanies for any of a zillion reasons.
To create a new company, choose File | New Company from the QuickBooksmenu bar. If you’re new to QuickBooks, when you open the software you see awindow named No Company Open, which has a button labeled Create A NewCompany (which is the same as choosing File | New Company).
Use the Wizard’s Questions to Configure Your FileCreating a new file starts with the EasyStep Interview, which is a wizard that walksyou through the steps to create a company file. Click the button labeled StartInterview to begin.
N O T E : If you’re familiar with QuickBooks, you can create the companymanually by clicking the button labeled Skip Interview. This provides a quickerway to create the company file, but you have to make sure you configure thecompany properly for the features you need (because you skipped the questionsfrom the wizard to take care of those tasks).
Fill in the data in each wizard window, clicking Next to move through thewindow. During the interview you’re asked about the type of business you have(your industry), and you’re also asked about the features you need (sales tax,inventory, and so on).
When you select the industry that comes closest to your company’s mission,QuickBooks uses the information to create a chart of accounts for the company(the right pane displays the accounts for the selected company type).
Saving the Company FileThe wizard asks you to save the company file. QuickBooks suggests a filenamebased on your company name, but you can change the filename if you wish. ClickSave to make this company a file in your QuickBooks system.
10 P A R T O N E G E T T I N G S T A R T E D
QckBcks TIGHT / QuickBooks 2009 The Official Guide / Ivens / 274-8 / Chapter 2
P:\010Comp\QckBcks\274-8\ch02.vpTuesday, September 02, 2008 10:54:04 AM
Color profile: DisabledComposite Default screen

By default, QuickBooks saves your company file in a shared (public) folderburied deep under the User Profiles section of your drive (named Documents andSettings in Windows XP; named Users in Windows Vista). This isn’t the mostconvenient location, and if you’re running multiple versions (different years) ofQuickBooks, it doesn’t work because you have to keep company files separatedby their versions (very important for accountants who support clients runningdifferent versions of QuickBooks).
Create a folder for your QuickBooks 2009 company file(s), such as C:\QB2009Files.If you’re running QuickBooks as a single user, or with only a few users who share thefile on a network, set permissions on the folder so that the group named Everyone hasFull Permissions. If you have a larger network, and not everyone on the network shouldbe able to see your company data, create a group (named QBUsers) and set FullPermissions for that group. Complete, easy-to-understand instructions for installingQuickBooks and setting up the folder for your company file can be found in the“Troubleshooting QuickBooks” section of www.cpa911.com.
After you save the file, the wizard walks you through a series of questions about theway you want to run your business. For example, you’re asked if you collect sales tax,create estimates, print checks, and so on. As you answer the questions, QuickBooks setsup your preferences. If you’re not sure how to respond to any of the questions, it’s okayto guess, because you can turn preferences on and off manually at any time in the future(and these preferences are covered in Chapter 20).
Creating Your ListsThis section covers the lists available to you for holding important data. You can setup your lists by entering the data manually, or by importing the data.
Entering Data ManuallyEntering your data directly into the QuickBooks List windows is a straightforwardmethod that makes sure all the data you need is available as you create transactionsin QuickBooks.
Manual data entry also provides a way to see all the available data fields in a list(some lists have optional fields), which lets you tweak your data in ways you maynot have thought of. To enter data into lists manually, choose Lists and select thelist you want to start with.
Importing Data from ExcelIf were keeping information in Excel (before you opted for real accounting software),you can use the Excel Import feature to transfer the data from your Excel spreadsheetto your QuickBooks lists.
C H A P T E R 2 S E T T I N G U P Y O U R C O M P A N Y F I L E 11
QckBcks TIGHT / QuickBooks 2009 The Official Guide / Ivens / 274-8 / Chapter 2
P:\010Comp\QckBcks\274-8\ch02.vpTuesday, September 02, 2008 10:54:04 AM
Color profile: DisabledComposite Default screen

C A U T I O N : The Excel import features are limited in the amount and typeof data they accept. To use every available field of information in your lists, youhave to open each record and add the needed data manually.
Copying Data to Preformatted Excel WorkbooksQuickBooks provides some preformatted Excel workbooks into which you cancopy your customer list, vendor list, or item list. To copy your data from Excel intoQuickBooks, open QuickBooks and load your company file, then open your Excelfile. In QuickBooks, choose File | Utilities | Import | Excel Files. In the next window(see Figure 2-1), select the type of data you want to import.
QuickBooks opens its preformatted worksheet and you can copy and paste data,one column at a time, from your Excel file into this worksheet. Follow the messagesand guidelines in the preformatted worksheet to perform this task properly.
12 P A R T O N E G E T T I N G S T A R T E D
QckBcks TIGHT / QuickBooks 2009 The Official Guide / Ivens / 274-8 / Chapter 2
FIGURE 2-1 If you’ve used Excel to track your business data, QuickBooks can import some ofthat data automatically.
P:\010Comp\QckBcks\274-8\ch02.vpTuesday, September 02, 2008 10:54:04 AM
Color profile: DisabledComposite Default screen

When you’ve finished pasting your data, QuickBooks walks you through theremaining steps, saves the data in the preformatted workbook, and then importsthat data into QuickBooks Lists.
Importing Lists From Your Excel File into QuickBooksYou can click the Advanced Import button to import the chart of accounts inaddition to the customer, vendor, and items lists. To use this feature, don’t openyour Excel file first; instead, when the Import A File dialog opens (see Figure 2-2),tell QuickBooks where to find your file.
QuickBooks launches Excel and opens the file. Select the worksheet in yourExcel file that has the list you want to import.
The next step is to create a “mapping” between your file and QuickBooks.QuickBooks has a label for each of the various fields available in a list record. Forexample, there are fields in a customer record for the company name, address,phone number, the payment terms, and so on. You may be tracking the sameinformation in your Excel workbook, but you don’t use the same text for labels thatQuickBooks uses. “Mapping” is the process of linking your column labels to thelabels QuickBooks uses.
To create a mapping, click the arrow to the right of the Choose a Mapping fieldand select Add New from the drop-down list. In the Mappings dialog that appears
C H A P T E R 2 S E T T I N G U P Y O U R C O M P A N Y F I L E 13
QckBcks TIGHT / QuickBooks 2009 The Official Guide / Ivens / 274-8 / Chapter 2
FIGURE 2-2 Use the Import A File feature to import your lists from Excel into QuickBooks.
P:\010Comp\QckBcks\274-8\ch02.vpTuesday, September 02, 2008 10:54:04 AM
Color profile: DisabledComposite Default screen

(see Figure 2-3), name your mapping. Select a name that describes the type of listyou’re working on, such as Customers (if you’re importing your customer list).Then select the type of list you’re importing from the drop-down list in the ImportType field. QuickBooks automatically lists the field labels it uses for the import typeyou selected in the left pane of the dialog.
Select a QuickBooks label in the left pane, and then click the right pane to seeyour own labels/column headings (see Figure 2-4). If your Excel file doesn’t havecolumn headings, the column letters appear. Choose the Excel label or column thatmatches the label QuickBooks uses.
Continue to match the QuickBooks labels to your own labels (although yourExcel file probably doesn’t have all the fields that QuickBooks offers). Click Savewhen you’ve finished mapping the labels.
Click the Preferences tab (see Figure 2-5) to specify how QuickBooks shouldmanage the data being imported. The options are self-explanatory, and the Helpbutton leads to detailed explanations.
Click Import to import the data. QuickBooks offers to create a backup of yourcompany file, and it’s a good idea to accept that offer. Then import your list. Iferrors occur, a dialog appears to notify you of that fact, and you can save the errorfile and examine it later.
14 P A R T O N E G E T T I N G S T A R T E D
QckBcks TIGHT / QuickBooks 2009 The Official Guide / Ivens / 274-8 / Chapter 2
FIGURE 2-3 Set up your mappings to match the list you’re importing.
P:\010Comp\QckBcks\274-8\ch02.vpTuesday, September 02, 2008 10:54:05 AM
Color profile: DisabledComposite Default screen

C H A P T E R 2 S E T T I N G U P Y O U R C O M P A N Y F I L E 15
QckBcks TIGHT / QuickBooks 2009 The Official Guide / Ivens / 274-8 / Chapter 2
FIGURE 2-4 Match your labels to QuickBooks’ labels.
FIGURE 2-5 Avoid problems by specifying the way imported data is handled.
P:\010Comp\QckBcks\274-8\ch02.vpTuesday, September 02, 2008 10:54:05 AM
Color profile: DisabledComposite Default screen
T I P : The quickest and most comprehensive way to import list data intoQuickBooks is to use IIF files, which are tab-delimited text files that you save inExcel. This method works for all QuickBooks Lists, and all fields in those lists,and provides a very quick way to set up all your lists in just a few moments. It’sbeyond the scope of this book to cover the advanced topic of creating IIF files,but a complete discussion is available in Running QuickBooks 2009 PremierEditions from CPA911 Publishing.
16 P A R T O N E G E T T I N G S T A R T E D
QckBcks TIGHT / QuickBooks 2009 The Official Guide / Ivens / 274-8 / Chapter 2
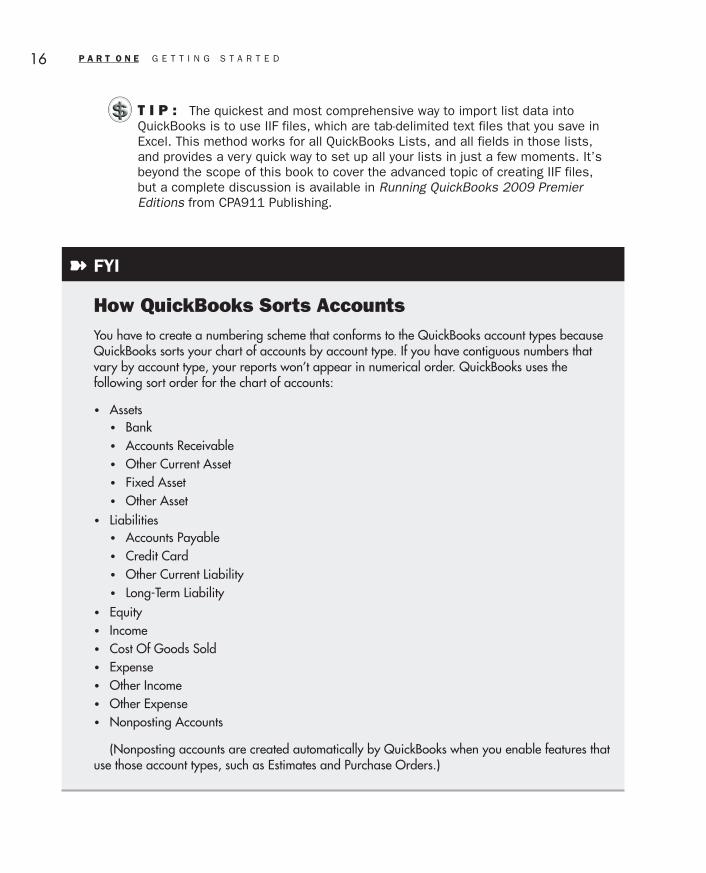
How QuickBooks Sorts AccountsYou have to create a numbering scheme that conforms to the QuickBooks account types becauseQuickBooks sorts your chart of accounts by account type. If you have contiguous numbers thatvary by account type, your reports won’t appear in numerical order. QuickBooks uses thefollowing sort order for the chart of accounts:
• Assets• Bank• Accounts Receivable• Other Current Asset• Fixed Asset• Other Asset
• Liabilities• Accounts Payable• Credit Card• Other Current Liability• Long-Term Liability
• Equity• Income• Cost Of Goods Sold• Expense• Other Income• Other Expense• Nonposting Accounts
(Nonposting accounts are created automatically by QuickBooks when you enable features thatuse those account types, such as Estimates and Purchase Orders.)
➽ FYI
P:\010Comp\QckBcks\274-8\ch02.vpTuesday, September 02, 2008 10:54:05 AM
Color profile: DisabledComposite Default screen

Creating a Full Chart of AccountsThe first priority is your chart of accounts. QuickBooks created some accounts foryou during the initial setup of your company, but most people need lots of additionalaccounts in order to keep books accurately. You do the chart of accounts first becausesome of the other lists you create require you to link the items in the list to accounts.For example, the items you sell are linked to income accounts.
Using Numbers for AccountsMany accountants (and users) prefer to use numbered accounts. Each account has aname in addition to the number, but the primary method of sorting the account listis by number (see the sidebar “How QuickBooks Sorts Accounts”). Even though theQuickBooks default is to use names, it’s a simple matter to change the default anduse numbers. Your accountant will be grateful, and you’ll find you have far fewermistakes in posting to the general ledger. If you prefer to stick to names, see thenext section for some hints about creating account names.
To switch to a number format for your accounts, you just need to spend a coupleof seconds changing the QuickBooks preferences:
� Choose Edit | Preferences from the menu bar to open the Preferences dialog.� Select the Accounting icon from the scroll bar in the left pane.� Click the Company Preferences tab.� Select the Use Account Numbers check box (see Figure 2-6).
C H A P T E R 2 S E T T I N G U P Y O U R C O M P A N Y F I L E 17
QckBcks TIGHT / QuickBooks 2009 The Official Guide / Ivens / 274-8 / Chapter 2
FIGURE 2-6 Enable numbers for the accounts in your chart of accounts.
P:\010Comp\QckBcks\274-8\ch02.vpTuesday, September 02, 2008 10:54:05 AM
Color profile: DisabledComposite Default screen

If you chose a prebuilt chart of accounts during the EasyStep Interview, thoseaccounts are switched to numbered accounts automatically. You may want tochange some of the numbers, and you can do so by editing the accounts (see“Editing Accounts” later in this chapter). Some accounts (those you add yourselfafter the initial company setup) have to be edited manually to add the accountnumber; QuickBooks doesn’t automatically number them.
When you select the option to use account numbers, the option Show LowestSubaccount Only becomes accessible (it’s grayed out if you haven’t opted for accountnumbers). This option tells QuickBooks to display only the subaccount on transactionwindows instead of both the parent account and the subaccount, making it easierto see precisely which account is receiving the posting. (Subaccounts, and detailsabout this feature to display them alone, are discussed later in the section “UsingSubaccounts.”)
If all your accounts aren’t numbered and you select Show Lowest SubaccountOnly, when you click OK QuickBooks displays an error message that you cannotenable this option until all your accounts have numbers assigned. After you’veedited existing accounts that need numbers (any accounts that QuickBooks didn’tautomatically number for you), you can return to this preferences window andenable the subaccount option.
After you’ve set up numbered accounts, you have a more efficient chart of accounts,so you, your bookkeeper, and your accountant will have an easier time. Numbers giveyou a quick clue about the type of account you’re working with. As you enter theaccounts, you must use the numbers intelligently, assigning ranges of numbers toaccount types. You should check with your accountant before finalizing the wayyou use the numbers, but the example presented here is a common approach.
• 1xxxx Assets• 2xxxx Liabilities• 3xxxx Equity• 4xxxx Income• 5xxxx Expenses• 6xxxx Expenses• 7xxxx Expenses• 8xxxx Expenses• 9xxxx Other Income and Expenses
N O T E : You can have as many as seven numbers (plus the account name)for each account.
Notice the amount of room (unused numbers) for further breakdowns, especially inthe expenses. (Most companies need more expense categories than income categories;however, many nonprofits need more income categories than expense categories.)
18 P A R T O N E G E T T I N G S T A R T E D
QckBcks TIGHT / QuickBooks 2009 The Official Guide / Ivens / 274-8 / Chapter 2
P:\010Comp\QckBcks\274-8\ch02.vpTuesday, September 02, 2008 10:54:06 AM
Color profile: DisabledComposite Default screen

You can, if you wish, have a variety of expense types and reserve the startingnumber for specific types. Many companies, for example, use 5xxxx for salesexpenses (they even separate the payroll postings between the salespeople andthe rest of the employees), then use 60000 through 79999 for general operatingexpenses, and 8xxxx for other specific expenses that should appear together inreports (such as taxes).
Some companies use one range of expense accounts, such as 70000 through79999 for expenses that fall into the “overhead” category. This is useful if you bidon work and need to know the total overhead expenses so you can apportion themto appropriate categories as you prepare your bid.
If you have inventory, you track cost of sales, and you can reserve a section ofthe chart of accounts for those account types. Some companies use 43000 through49999 for cost of sales; other companies use the numbers in the 50000 range.
Also, think about the breakdown of assets. You might use 10000 through 10099for cash accounts and 11000 through 11099 for receivables and other current assets,and then use 12000 through 12099 for tracking fixed assets such as equipment,furniture, and so on. Follow the same pattern for liabilities, starting with currentliabilities and moving to long term. It’s also a good idea to keep all the payrollwithholding liabilities together.
Usually, you should add accounts by increasing the previous account number by100 (or by 10 if you prefer to use four digits instead of five), so that if your first bankaccount is 10000, the next bank account is 10100, and so on. For expenses (whereyou’ll have many accounts), you might want to enter the accounts in intervals of 50(or 5). This gives you room to squeeze in additional accounts that belong in the samegeneral area of your chart of accounts when they need to be added later.
Naming AccountsEven if you enable account numbers, you have to give each account a name. Here’san important rule about naming accounts: memorize it, print it out in big letters,and post it all over the office: Create and Follow a Company Protocol for Namingand Using Accounts.
The company protocol is a system you invent for naming accounts. Your protocolmust be clear, so that when everyone follows the rules, the account naming conventionis consistent. Why is this important? Because without enforced protocols, you’llprobably end up with accounts with names such as the following:
• Telephone Exp• Exps-Telephone• Tele Expense• Telephone• Tele
You get the idea, and you’re probably not shocked to hear that every one of thoseaccounts had amounts posted to them. That’s because users “guess” at account
C H A P T E R 2 S E T T I N G U P Y O U R C O M P A N Y F I L E 19
QckBcks TIGHT / QuickBooks 2009 The Official Guide / Ivens / 274-8 / Chapter 2
P:\010Comp\QckBcks\274-8\ch02.vpTuesday, September 02, 2008 10:54:06 AM
Color profile: DisabledComposite Default screen
names and point and click on whatever they see that seems remotely related. If theydon’t find the account the way they would have entered the name, they invent anew account (using a name that seems logical to them). Avoid all of those errors byestablishing protocols about creating account names, and then make sure everyonesearches the account list before applying a transaction.
Here are a few suggested protocols—you can amend them to fit your own situationor invent different protocols that you’re more comfortable with. The important thingis consistency, absolute consistency.
• Avoid apostrophes.• Set the number of characters for abbreviations. For example, if you permit four
characters, telephone is abbreviated “tele”; a three-character rule produces “tel.”• Decide whether to use the ampersand (&) or a hyphen. For example, is it
“repairs & maintenance” or “repairs-maintenance”?• Make a rule about whether spaces are allowed. For example, would you have
“repairs & maintenance” or “repairs&maintenance”?
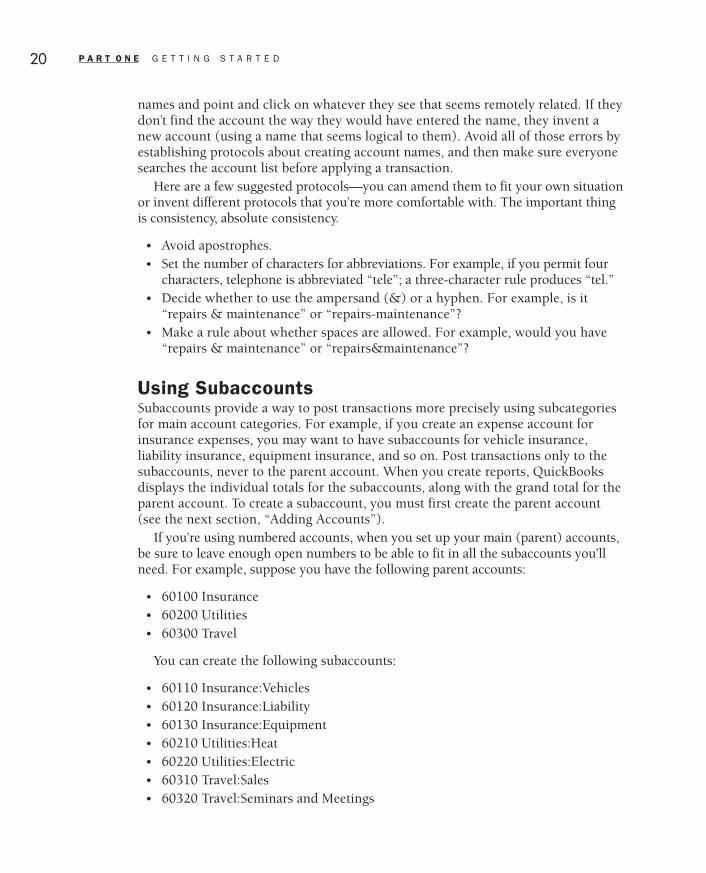
Using SubaccountsSubaccounts provide a way to post transactions more precisely using subcategoriesfor main account categories. For example, if you create an expense account forinsurance expenses, you may want to have subaccounts for vehicle insurance,liability insurance, equipment insurance, and so on. Post transactions only to thesubaccounts, never to the parent account. When you create reports, QuickBooksdisplays the individual totals for the subaccounts, along with the grand total for theparent account. To create a subaccount, you must first create the parent account(see the next section, “Adding Accounts”).
If you’re using numbered accounts, when you set up your main (parent) accounts,be sure to leave enough open numbers to be able to fit in all the subaccounts you’llneed. For example, suppose you have the following parent accounts:
• 60100 Insurance• 60200 Utilities• 60300 Travel
You can create the following subaccounts:
• 60110 Insurance:Vehicles• 60120 Insurance:Liability• 60130 Insurance:Equipment• 60210 Utilities:Heat• 60220 Utilities:Electric• 60310 Travel:Sales• 60320 Travel:Seminars and Meetings
20 P A R T O N E G E T T I N G S T A R T E D
QckBcks TIGHT / QuickBooks 2009 The Official Guide / Ivens / 274-8 / Chapter 2
P:\010Comp\QckBcks\274-8\ch02.vpTuesday, September 02, 2008 10:54:06 AM
Color profile: DisabledComposite Default screen

The colon in the account names listed here is added automatically by QuickBooksto indicate a parentaccount:subaccount relationship—you only have to create thesubaccount name and number.
Adding AccountsAfter you’ve done your homework, made your decisions, invented your protocols,and checked with your accountant, adding accounts is a piece of cake.
Follow these steps to add an account:
� Press CTRL-A (or click the Chart Of Accounts icon on the Home page) to openthe Chart Of Accounts window.
� Press CTRL-N to enter a new account. The Add New Account: Choose AccountType dialog opens where you select the type of account.
� Click Continue to open the Add New Account dialog for the account type youselected.
The dialog for entering a new account changes its appearance depending on theaccount type because different types of accounts require different information. Inaddition, if you’ve opted to use numbers for your accounts, there’s a field for theaccount number. Figure 2-7 shows a blank Add New Account dialog for an expenseaccount.
C H A P T E R 2 S E T T I N G U P Y O U R C O M P A N Y F I L E 21
QckBcks TIGHT / QuickBooks 2009 The Official Guide / Ivens / 274-8 / Chapter 2
FIGURE 2-7 The only required entry for an account is a name, unless you’ve enabled accountnumbers.
P:\010Comp\QckBcks\274-8\ch02.vpTuesday, September 02, 2008 10:54:06 AM
Color profile: DisabledComposite Default screen

The Description field is optional, and unless there’s a compelling reason toexplain the account, descriptions only make your account lists busier and harder toread. The Note field, which only appears on some account types, is also optional,and you may come up with a good reason to use it (or, maybe you won’t).
Some account types (for example, accounts connected to banks) have a field foran opening balance. Never enter data in that field when you’re creating an account,because it causes complications that your accountant won’t appreciate.
As you finish entering each account, click Save & New to move to another blankAdd New Account dialog. When you’re finished entering accounts, click Save &Close, and then close the Chart Of Accounts window by clicking the X in theupper-right corner.
Select From ExamplesIf you created your company file in QuickBooks 2009, some account types display abutton labeled Select From Examples in the Add New Account dialog. Clicking thebutton produces a list of accounts that QuickBooks thinks you might want toconsider adding to your chart of accounts. As you can see in Figure 2-8, the list ofaccounts matches the account type you selected when you started the process ofadding an account.
The accounts that are suggested are those accounts that were available for theindustry you selected when you created your company file but were not selectedfor inclusion in your chart of accounts, for one of the following reasons:
• If you used the EasyStep Interview to create your company file, you had anopportunity to select accounts that were not already selected, or to deselectaccounts that QuickBooks had selected by default. Accounts that remainedunselected appear in the list you see when you click Select From Examples.
22 P A R T O N E G E T T I N G S T A R T E D
QckBcks TIGHT / QuickBooks 2009 The Official Guide / Ivens / 274-8 / Chapter 2
FIGURE 2-8 QuickBooks suggests accounts to add to your chart of accounts.
P:\010Comp\QckBcks\274-8\ch02.vpTuesday, September 02, 2008 10:54:06 AM
Color profile: DisabledComposite Default screen

• If, during the EasyStep Interview, you selected accounts for which QuickBookssuggests subaccounts, the account appears in the list but is grayed out (becauseit was selected and does not need to be added to your chart of accounts). Thesuggested subaccounts are listed.
• If you skipped the EasyStep Interview, and did not have an opportunity toselect/deselect accounts, QuickBooks installed the accounts that were selectedby default for the industry you chose during company file setup. Accounts thatwere not selected by QuickBooks appear in the list displayed when you clickSelect From Examples.
If you add an account from the Select From Examples list, that account is removedfrom the list. If you delete the account from your chart of accounts, it is put backon the Select From Examples list.
If you did not select an industry during company file setup (instead, you selectedNone), the Select From Examples button is grayed out and inaccessible.
The following account types do not have the Select From Examples feature:
• Bank• Credit Card• Equity• Accounts Receivable• Accounts Payable• Long Term Liability
Editing AccountsIf you need to make changes to any account information (including adding anumber after you enable numbered accounts), select the account’s listing in theChart Of Accounts List window, and press CTRL-E. The Edit Account dialogappears; make your changes and click Save & Close to save them.
Creating SubaccountsTo create a subaccount, you must have already created the parent account. Thenfollow the same steps described in the previous section to add a new account. Enterthe account number (if you’re using numbers) and the account name. Then clickthe Subaccount check box to place a check mark in it. In the drop-down box nextto the check box, select the parent account, and click Save & Close (or Save & Newto add another account).
C H A P T E R 2 S E T T I N G U P Y O U R C O M P A N Y F I L E 23
QckBcks TIGHT / QuickBooks 2009 The Official Guide / Ivens / 274-8 / Chapter 2
P:\010Comp\QckBcks\274-8\ch02.vpTuesday, September 02, 2008 10:54:06 AM
Color profile: DisabledComposite Default screen

You can have multiple levels of subaccounts. For example, you may want totrack income in the following manner:
IncomeIncome:Consulting
Income:Consulting:Engineering
Income:Consulting:Training
Income:Product Sales
Creating the sub-subaccounts is as easy as creating the first level; just make sureyou’ve already created the first-level subaccounts (which are the parents of the sub-subaccounts). When you fill in the New Account dialog, after you check theSubaccount check box, select the appropriate subaccount to act as the parent account.
When you view the chart of accounts, subaccounts appear under their parentaccounts, and they’re indented (if they’re not indented, right-click anywhere in theaccount list and choose Hierarchical View). When you view a subaccount in atransaction window, it appears in the format: ParentAccount:Subaccount orParentAccount:Subaccount:Subaccount.
For example, if you create a parent account named Income with a subaccountConsulting, the Account field in transaction windows shows Income:Consulting.If you’ve used numbers, the Account field shows 40000-Income:40100-Consulting.Because many of the fields in transaction windows are small, you may not be ableto see the subaccount names without scrolling through each account. This can beannoying, and it’s much easier to work if only the subaccount name is displayed.That’s the point of enabling the preference Show Lowest Subaccount Only, discussedearlier in the section “Creating a Full Chart of Accounts.” When you enable thatoption, you see only the subaccounts in the drop-down list when you’re working ina transaction window, which makes it much easier to find the accounts you need.
Merging AccountsSometimes you have two accounts that should be one. For instance, you may haveaccidentally created two accounts for the same purpose (as discussed earlier in thissection), and posted transactions to both accounts. Those accounts badly need merging.
C A U T I O N : Accounts must be of the same account type in order to bemerged.
Take the following steps to merge two accounts:
� Open the Chart Of Accounts List window.� Select (highlight) the account that has the name you do not want to use.
24 P A R T O N E G E T T I N G S T A R T E D
QckBcks TIGHT / QuickBooks 2009 The Official Guide / Ivens / 274-8 / Chapter 2
P:\010Comp\QckBcks\274-8\ch02.vpTuesday, September 02, 2008 10:54:07 AM
Color profile: DisabledComposite Default screen

� Press CTRL-E to open the Edit Account dialog.� Change the account name and number to match the account you want to keep.� Click Save & Close.� QuickBooks displays a dialog telling you that the account number or name
you’ve entered already exists for another account and asks if you want to mergethe accounts. Click Yes to confirm that you want to merge the two accounts.
Customers and JobsIn QuickBooks, customers and jobs are handled together. You can create a customerand consider anything and everything you invoice to that customer a single job, oryou can have multiple jobs for the same customer.
Some businesses don’t worry about jobs; it’s just the customer that’s tracked. Butif you’re a building contractor or subcontractor, an interior decorator, a consultant,or some other kind of service provider who usually bills by the job instead of at anhourly rate for an ongoing service, you should track jobs.
Jobs don’t stand alone as an entity; they are attached to customers, and you canattach as many jobs to a single customer as you need to. If you are going to trackjobs, it’s a good idea to enter all the customers first (now), and then attach the jobssecond (later).
If you enter your existing customers now, when you’re first starting to useQuickBooks, all the other work connected to the customer is much easier. It’sbothersome to have to stop in the middle of every invoice you enter to createa new customer record.
N O T E : If you’ve enabled the Multicurrency feature (see Chapter 1), you seeadditional fields on some lists (for example, customers, vendors, price levels,and so on) where you enter the appropriate currency.
The Customers & Jobs ListTo access the Customers & Jobs List, you must open the Customer Center (seen inFigure 2-9).
You have several ways to get to the Customer Center:
• Press CTRL-J.• Choose Customers | Customer Center from the menu bar.• Click the Customer Center icon on the QuickBooks toolbar.• Click the Customers icon on the left side of the Home page.
C H A P T E R 2 S E T T I N G U P Y O U R C O M P A N Y F I L E 25
QckBcks TIGHT / QuickBooks 2009 The Official Guide / Ivens / 274-8 / Chapter 2
P:\010Comp\QckBcks\274-8\ch02.vpTuesday, September 02, 2008 10:54:07 AM
Color profile: DisabledComposite Default screen

Entering a New CustomerIf you didn’t import your customer list (as explained earlier in this chapter),entering all your existing customers into the system takes very little effort.
Follow these steps to enter a new customer:
� Open the Customer Center and select the Customers & Jobs tab to display yourlist of customers.
� Press CTRL-N to open the New Customer window (see Figure 2-10), and fill inthe information.
(If you’ve enabled the Multicurrency feature, you also have a field for enteringthe currency.)
26 P A R T O N E G E T T I N G S T A R T E D
QckBcks TIGHT / QuickBooks 2009 The Official Guide / Ivens / 274-8 / Chapter 2
FIGURE 2-9 The Customers & Jobs List is part of the Customer Center.
P:\010Comp\QckBcks\274-8\ch02.vpTuesday, September 02, 2008 10:54:07 AM
Color profile: DisabledComposite Default screen

Address Info TabThe New Customer window opens with the Address Info tab in the foreground. Thefirst field to enter information in is the Customer Name field. Consider this field acode rather than a customer name. It doesn’t appear on your invoices or other salestransactions. (The transactions use the data in the Company Name field.)
Customer Name FieldYou must invent a protocol for this Customer Name field so that you’ll enterevery customer in the same manner. Notice the Customer Name field you saw inFigure 2-10. This customer code entry has no apostrophe or space, although bothare part of the company name. Avoiding punctuation and spaces in codes is agood protocol for filling in code fields.
Each customer must have a unique entry in this field, so if you have a lot ofcustomers named Jack Johnson, you may want to enter them as JohnsonJack-MainSt, JohnsonJack-OakRd, and so on.
Opening Balance FieldQuickBooks makes an Opening Balance field available, along with the date forwhich this balance applies (by default, the current date is inserted). The field isdesigned to hold the amount this customer currently owes (if an open balanceexists for the customer).
C H A P T E R 2 S E T T I N G U P Y O U R C O M P A N Y F I L E 27
QckBcks TIGHT / QuickBooks 2009 The Official Guide / Ivens / 274-8 / Chapter 2
FIGURE 2-10 The customer record holds quite a lot of information.
P:\010Comp\QckBcks\274-8\ch02.vpTuesday, September 02, 2008 10:54:07 AM
Color profile: DisabledComposite Default screen

Never use this field. If you enter an amount, you’ll have no detailed recordson how the customer arrived at this balance, which makes it difficult to acceptpayments against specific invoices. It’s better to skip this field and then enter aninvoice or multiple invoices to post this customer’s balance to your books. Inaddition, QuickBooks posts the amount you enter to Accounts Receivable, intoan account named Opening Bal Equity. Your accountant will want to get rid of thebalance in Opening Bal Equity, and sometimes that’s a difficult job because it’s hardto tell how the balance was arrived at—is this the opening balance you enteredfrom past years? Is it from the current year? Is it a combination of both? Enteringindividual transactions that represent the customer’s current status is far moreaccurate than using the Opening Balance field.
Customer Address InfoIn the Company and Addresses sections of the window, enter the company name,optionally enter a contact, and enter the billing address. Add any other contactinformation you want to track for this customer (telephone, e-mail, and so on).
Ship To AddressesYou can maintain multiple shipping addresses for your customers. Each shippingaddress has a name (title), so you can select it from a drop-down list when you’reentering sales transactions. If the shipping address isn’t different from the billingaddress (or if you have a service business and never ship products), you can ignorethe shipping address field, or use the Copy button to copy the address block data.
To create a shipping address, click the Add New button under the Ship Toaddress block to open the Add Ship To Address Information dialog.
Give this Ship To address a name, and enter the address information. QuickBooksenters the name Ship To 1, but that’s merely a placeholder. Replace that text with aname that reminds you of the address location to make it easier to select this addressfrom a drop-down list when you have to ship goods to this address.
Specify whether this address should be the default Ship To address, and clickOK. Then, if necessary, enter another Ship To address for this customer.
Additional Info TabThe information you enter in the Additional Info tab of a customer card (seeFigure 2-11) ranges from essential to convenient. Prepopulating the fields withinformation makes your work go faster when you’re filling out transaction windows,and it makes it easier to create in-depth reports. It’s worth spending the time todesign some rules for the way data is entered. (Remember, making rules ensuresconsistency, without which you’ll have difficulty getting the reports you want.)
N O T E : The fields you see on the Additional Info tab may not be the sameas the fields shown in Figure 2-11. The preferences you configure (for example,whether you track sales tax) determine the available fields.
28 P A R T O N E G E T T I N G S T A R T E D
QckBcks TIGHT / QuickBooks 2009 The Official Guide / Ivens / 274-8 / Chapter 2
P:\010Comp\QckBcks\274-8\ch02.vpTuesday, September 02, 2008 10:54:08 AM
Color profile: DisabledComposite Default screen

Let’s spend a minute going over the fields in this tab. Most of the fields are alsoQuickBooks lists, and if you haven’t already entered items in those lists, you can doso as you fill out the fields in the customer card. Each field that is also a list has anentry named <Add New>, and selecting that entry opens the appropriate new blankentry window.
TypeUse the Type field to sort your customers by a type you find important (or convenient)when you create reports. QuickBooks maintains a Type list (see the section “CustomerType List” later in this chapter). For example, you may want to consider wholesaleand retail customers as your customer types. To use the field, click the arrow toselect a type that you already entered, or create a new type.
TermsTerms, of course, refers to payment terms. Click the arrow to the right of the textbox to see the terms that QuickBooks already defined, or choose <Add New> todefine a new one.
The terms in the Terms List are for both customers and vendors, and you mayneed additional terms to meet your customers’ and vendors’ needs. See the section“Terms List” later in this chapter to learn how to create different types of terms.
C H A P T E R 2 S E T T I N G U P Y O U R C O M P A N Y F I L E 29
QckBcks TIGHT / QuickBooks 2009 The Official Guide / Ivens / 274-8 / Chapter 2
FIGURE 2-11 Entering additional information makes your work in QuickBooks go faster.
P:\010Comp\QckBcks\274-8\ch02.vpTuesday, September 02, 2008 10:54:08 AM
Color profile: DisabledComposite Default screen

RepThis field is the place to track a sales representative, and it’s useful whether you paycommissions or you just want to know who is in charge of this customer. Sales repscan be employees, vendors, or “other names” (which means the name is enteredin the Other Names List). Select a rep from the list of reps or add a new rep bychoosing <Add New>. See the section “Sales Rep List” for more information onpopulating this list.
Preferred Send MethodThis field stores the default value for the way you want to send invoices, statements,or estimates to this customer. The choices are the following:
• None, which means no special features are used to send the documents. Youprint them and you mail them (the old-fashioned way).
• E-Mail, which means you e-mail the documents. This feature lets you attachthe documents as PDF files to an e-mail message. The processes involved aremanaged within QuickBooks, and Chapter 3 has the details.
• Mail, which lets you use a QuickBooks service to mail the invoices throughthe postal service. The data is reproduced on a form that has a tear-off yourcustomers enclose with their payment.
Regardless of the method you choose as your default, you can use any sendmethod when you’re creating a transaction.
Sales Tax InformationIf you’ve configured QuickBooks to collect sales tax, the sales tax information usesseveral fields. If the customer is liable for sales tax, select the appropriate sales taxitem for this customer, or create a new sales tax item. If the customer does not paysales tax, select Non and enter the resale number provided by the customer (thisis handy to have when the state tax investigators pop in for a surprise audit). SeeChapter 7 for a complete discussion of sales tax.
Price LevelPrice levels are a pricing scheme, usually involving special discounts that you wantto use for this customer’s purchases. Select an existing price level or create a newone. See the section “Price Level List” to learn about creating and assigning pricelevels.
Custom FieldsCustom fields provide an opportunity to invent fields (by clicking the Define Fieldsbutton) for sorting and arranging your QuickBooks lists. See the section “UsingCustom Fields” later in this chapter.
30 P A R T O N E G E T T I N G S T A R T E D
QckBcks TIGHT / QuickBooks 2009 The Official Guide / Ivens / 274-8 / Chapter 2
P:\010Comp\QckBcks\274-8\ch02.vpTuesday, September 02, 2008 10:54:08 AM
Color profile: DisabledComposite Default screen

Payment Info TabThis tab (see Figure 2-12) puts all the important information about customerfinances in one place.
Account No.This is an optional field you can use if you assign account numbers to yourcustomers.
Credit LimitA credit limit is a way to set a threshold for the amount of money you’ll extend toa customer’s credit. If a customer places an order, and the new order combinedwith any unpaid invoices exceeds the threshold, QuickBooks displays a warning.QuickBooks won’t prevent you from continuing to sell to and invoice the customer,but you should consider rejecting the order (or shipping it COD).
T I P : If you aren’t going to enforce the credit limit, don’t bother to use the field.
C H A P T E R 2 S E T T I N G U P Y O U R C O M P A N Y F I L E 31
QckBcks TIGHT / QuickBooks 2009 The Official Guide / Ivens / 274-8 / Chapter 2
FIGURE 2-12 Use the Payment Info tab to track details needed for this customer’s transactions.
P:\010Comp\QckBcks\274-8\ch02.vpTuesday, September 02, 2008 10:54:08 AM
Color profile: DisabledComposite Default screen

Preferred Payment MethodThis means the customer’s preferred method for payments, and a list of paymentmethods is offered in the drop-down list. You can select the appropriate item fromthe list or add a new one by selecting <Add New>. See the section “Payment MethodList” later in this chapter for more information.
T I P : The payment method you select automatically appears on the ReceivePayments window when you are using this customer in the transaction. You canchange the payment method at that time, if necessary.
Credit Card No.This field is intended to contain this customer’s credit card number, if that’s thecustomer’s preferred payment method. Don’t fill it in unless your computer andyour QuickBooks file are protected with all sorts of security. In fact, the laws (bothgovernment and merchant-card providers) about keeping credit card numbers onfile are changing, and it’s illegal for you to keep anything more than the last four orfive digits of the card number on file unless you’ve secured the customer’s record.
N O T E : QuickBooks provides enhanced security measures for user permissionsand user logins if you keep customer credit card information in your company file.It’s easy to set up this additional security, and the Help files provide the informationyou need.
When you have finished filling out the fields, choose Next to move to anotherblank customer card so you can enter the next customer. When you have finishedentering all of your customers, click OK.
Editing Customer DataYou can make changes to the information in a customer record quite easily. Openthe Customers & Jobs List (using the steps described earlier) and select thecustomer record you want to change. Double-click the customer’s listing (or selectthe listing and click the Edit Customer button in the Customer Information pane),to open the customer card in Edit mode.
When you open the customer card, you can change any information or fill indata you didn’t have when you first created the customer entry. In fact, you can fillin data you did have but didn’t bother to enter. (Some people find it’s faster to enterjust the customer name and company name when they’re creating their customerlists and then fill in the rest at their leisure or the first time they invoice thecustomer.)
32 P A R T O N E G E T T I N G S T A R T E D
QckBcks TIGHT / QuickBooks 2009 The Official Guide / Ivens / 274-8 / Chapter 2
P:\010Comp\QckBcks\274-8\ch02.vpTuesday, September 02, 2008 10:54:08 AM
Color profile: DisabledComposite Default screen

However, there are several things to note about editing the customer card:
• Don’t mess with the Customer Name field.• There’s a Notes button on the right side of the customer card.• You can’t enter an opening balance.
Unless you’ve reinvented the protocol you’re using to enter data in the CustomerName field, don’t change this data. Many high-end (translate that as “expensive andincredibly powerful”) accounting software applications lock this field and neverpermit changes. QuickBooks lets you change it, so you have to impose controls onyourself.
Click the Notes button to open a Notepad window that’s dedicated to thiscustomer, as shown in Figure 2-13. This is a useful feature.
The Notepad is a great marketing tool because you can use it to follow up on apromised order, track a customer’s special preferences, and notify the customerwhen something special is available. When you view the Customers & Jobs List, anEdit Notes button appears in the right pane of the Customer Center for easy accessto the Notepad. You can open the Notepad for the selected customer by clickingthat button; you don’t have to open the customer record to get to the note.
Entering JobsIf you plan to track jobs, you can enter the ones you know about during yourQuickBooks setup phase, or enter them as they’re needed in transactions. Jobs areattached to customers; they can’t stand alone. To create a job, press CTRL-J to open
C H A P T E R 2 S E T T I N G U P Y O U R C O M P A N Y F I L E 33
QckBcks TIGHT / QuickBooks 2009 The Official Guide / Ivens / 274-8 / Chapter 2
FIGURE 2-13 Each customer has a Notepad.
P:\010Comp\QckBcks\274-8\ch02.vpTuesday, September 02, 2008 10:54:09 AM
Color profile: DisabledComposite Default screen

the Customer Center (or click the Customer Center icon on the toolbar) and selectthe Customers & Jobs tab.
Right-click the listing of the customer for whom you’re creating a job, andchoose Add Job to open the New Job window, shown in Figure 2-14.
Create a name for the job (you can use up to 41 characters), and make itdescriptive enough for both you and your customer to understand.
If this job requires you to bill the customer at an address that’s different fromthe address you entered for this customer, or to ship goods to a different shippingaddress than the one that’s entered, make the appropriate changes. QuickBooksmaintains this information only for this job and won’t change the original shippingaddress in the customer record.
The Additional Info tab and the Payment Info tab are related to the customerrather than the job, so you can skip them.
Move to the Job Info tab (see Figure 2-15) to begin configuring this job. All ofthe information on the Job Info tab is optional; the job may not require this data.
34 P A R T O N E G E T T I N G S T A R T E D
QckBcks TIGHT / QuickBooks 2009 The Official Guide / Ivens / 274-8 / Chapter 2
FIGURE 2-14 To create a new job, enter the job name—all the basic information about thecustomer is already filled in.
P:\010Comp\QckBcks\274-8\ch02.vpTuesday, September 02, 2008 10:54:09 AM
Color profile: DisabledComposite Default screen

The Job Status drop-down list offers choices that you can change as the progressof the job moves along. You can change the text that describes each progress levelto suit your own business.
Follow these steps to change the text:
� Choose Edit | Preferences to open the Preferences dialog.� Click the Jobs & Estimates icon in the left pane.� Click the Company Preferences tab in the right pane to see the current
descriptive text for each status level (see Figure 2-16).� Change the text of any status levels if you have a descriptive phrase you like
better. For example, you may prefer “Working” to “In Progress.”� Click OK.� The new text is used on every job in your system.
When you finish entering all the data about this job, choose Next to createanother job for the same customer. Otherwise, click OK to close the New Jobwindow and return to the Customers & Jobs List. The jobs you create for acustomer become part of the customer listing.
C H A P T E R 2 S E T T I N G U P Y O U R C O M P A N Y F I L E 35
QckBcks TIGHT / QuickBooks 2009 The Official Guide / Ivens / 274-8 / Chapter 2
FIGURE 2-15 Track job details on the Job Info tab.
P:\010Comp\QckBcks\274-8\ch02.vpTuesday, September 02, 2008 10:54:09 AM
Color profile: DisabledComposite Default screen

VendorsThe vendors you purchase goods and services from have to be entered into yourQuickBooks system, and it’s far easier to do it now. Otherwise, you’ll have to gothrough the process of establishing the vendor and entering all the importantinformation when you want to enter a vendor bill or write a check.
To get to the Vendors List, open the Vendor Center by clicking its icon on thetoolbar, or choose Vendors | Vendor Center from the menu bar. Click the Vendorstab to display the list.
Creating VendorsPress CTRL-N (or click the New Vendor button above the list) to open a New Vendorcard and fill out the fields (see Figure 2-17).
(If you’ve enabled the Multicurrency feature, you also have a field for enteringthe currency.)
As with customers, you should have a set of rules about entering the informationin the Vendor Name field. This field doesn’t appear on checks or purchase orders;it’s used to sort and select vendors when you need a list or a report. Think of it asa code. Notice that in Figure 2-17, the vendor code is a telephone number, but thevendor is the telephone company. This is how you create separate checks for eachtelephone bill you receive.
36 P A R T O N E G E T T I N G S T A R T E D
QckBcks TIGHT / QuickBooks 2009 The Official Guide / Ivens / 274-8 / Chapter 2
FIGURE 2-16 Customize the text to match the jargon you use in your business.
P:\010Comp\QckBcks\274-8\ch02.vpTuesday, September 02, 2008 10:54:09 AM
Color profile: DisabledComposite Default screen

Do not enter data in the Opening Balance field; instead, enter a bill (or multiplebills) to represent the current open balance, so you have details about thetransaction(s).
Vendor Address Info TabThe Name And Address block is important if you’re planning to print checks andthe vendor doesn’t enclose a return envelope, making it necessary for you to put theaddress on the check. You can purchase window envelopes, and when you insertthe check in the envelope, the vendor name and address block is in the right spot.
Vendor Additional Info TabThe Additional Info tab (see Figure 2-18) for vendors has several importantcategories:
• Account No. Enter your account number with this vendor (to the vendor,it’s your customer number), and the number will appear in the memo field ofprinted checks.
C H A P T E R 2 S E T T I N G U P Y O U R C O M P A N Y F I L E 37
QckBcks TIGHT / QuickBooks 2009 The Official Guide / Ivens / 274-8 / Chapter 2
FIGURE 2-17 Vendor records are less complicated than customer records.
P:\010Comp\QckBcks\274-8\ch02.vpTuesday, September 02, 2008 10:54:10 AM
Color profile: DisabledComposite Default screen

• Type Select a type or create one. This optional field is handy if you want tosort vendors by type, which makes reports more efficient. For example, youcan create vendor types for inventory suppliers, tax authorities, and so on.
• Terms Enter the terms for payment this vendor has assigned to you.• Credit Limit Enter the credit limit this vendor has given you.• Tax ID Use this field to enter the social security number or EIN if this vendor
receives a Form 1099.• 1099 status If appropriate, select the check box for Vendor Eligible For 1099
(which appears only if you’ve enabled 1099 tracking in the Preferences dialog).• Custom Fields As with customers, you can create custom fields for vendors
(see the section “Using Custom Fields” later in this chapter).
Vendor Account Prefill TabYou can configure QuickBooks to pre-fill the posting account when you create atransaction for this vendor (see Figure 2-19). You can select multiple accounts ifthe vendor’s payment usually (or always) involves more than one account (such asa bank loan payment which posts to both the loan liability account and the interestexpense account).
38 P A R T O N E G E T T I N G S T A R T E D
QckBcks TIGHT / QuickBooks 2009 The Official Guide / Ivens / 274-8 / Chapter 2
FIGURE 2-18 Add data to this tab to make it easier to print checks and produce detailed reports.
P:\010Comp\QckBcks\274-8\ch02.vpTuesday, September 02, 2008 10:54:10 AM
Color profile: DisabledComposite Default screen

After you fill in the information, choose Next to move to the next blank card andenter the next vendor. When you’re finished, click OK.
When you view or edit a vendor card by selecting the vendor’s listing and pressingCTRL-E, you’ll find a Notes button just like the one in the customer card, discussedin the previous section. You can use it in the same way.
Entering ItemsIf you are a service business, this is going to be a snap. If you sell a few products,it’ll still be pretty easy. But if you have a large inventory, get a cup of coffee or a sodaor take a break, because this is going to take some time.
Understanding ItemsItems are the things that appear on your invoices when you send an invoice to acustomer. If you think about it, that’s a bit more complicated than it might sound.Do you charge sales tax? If you do, that’s an item. Do you subtotal sections of yourinvoices? That subtotal is an item. Do you show prepayments or discounts? They’reitems, too.
C H A P T E R 2 S E T T I N G U P Y O U R C O M P A N Y F I L E 39
QckBcks TIGHT / QuickBooks 2009 The Official Guide / Ivens / 274-8 / Chapter 2
FIGURE 2-19 Pre-filling accounts makes creating transactions much easier.
P:\010Comp\QckBcks\274-8\ch02.vpTuesday, September 02, 2008 10:54:10 AM
Color profile: DisabledComposite Default screen

While you can issue an invoice that says “Net amount due for services rendered”or “Net amount due for items delivered” and enter one total in the invoice, yourcustomers aren’t going to be very happy with the lack of detail. More important,when you try to analyze your business to see where you’re making lots of moneyand where you’re making less money, you won’t have enough information todetermine the facts.
This is another setup chore that requires some planning. Each of your itemsmust have a code, a unique identification (QuickBooks calls that the Item Name/Number). Try to create a system that has some logic to it so your codes arerecognizable when you see them listed.
Understanding Item TypesIt isn’t always clear how and when some of the item types are used (or why youmust define them). Here are some guidelines you can use as you plan to enter youritems:
Service A service you provide to a customer. You can create services that arecharged by the job or by the hour.
Inventory Part A product you buy for the purpose of reselling. This item typeisn’t available if you haven’t enabled inventory during the EasyStep Interview oractivated inventory in the Items & Inventory section of the Preferences dialog.
Non-Inventory Part A product you sell but don’t track as inventory.
Other Charge You’ll need this item type for things like shipping charges, or otherline items that appear on your invoices.
Subtotal This item type adds up everything that comes before it. It provides asubtotal before you add shipping charges or subtract any discounts or prepayments.
Group This item type is a clever device. You can use it to enter a group of items(all of which must exist in your Item List) all at once. For example, if you frequentlyhave a shipping charge accompanying another type of charge, you can create agroup item that includes those two items.
Assembly An assembly (available only in Premier editions and EnterpriseSolutions) is a product you assemble from parts. It’s tracked as an inventory itemin QuickBooks.
Discount You can’t give a customer a discount as a line item if this item typedoesn’t exist. You may have more than one item that falls within this item type—forexample, a discount for wholesale customers and a discount for a volume purchase.When you enter the item, you can indicate a flat rate or percentage.
Payment If you receive a prepayment (either a total payment or a partialpayment as a deposit), you must indicate it as a line item, using this item type.
40 P A R T O N E G E T T I N G S T A R T E D
QckBcks TIGHT / QuickBooks 2009 The Official Guide / Ivens / 274-8 / Chapter 2
P:\010Comp\QckBcks\274-8\ch02.vpTuesday, September 02, 2008 10:54:10 AM
Color profile: DisabledComposite Default screen
Sales Tax Item Create one of these item types for each sales tax authority forwhich you collect (available if sales tax is enabled).
Sales Tax Group This is for multiple sales taxes that appear on the same invoice(available if sales tax is enabled).
T I P : This section described all of the item types in terms of their use on yourinvoices, but many of them are used on your purchase orders too.
Entering the Data for ItemsTo put your items into the system, choose Lists | Item List from the menu bar.When the Item List window opens, any items that were created during yourEasyStep Interview are listed.
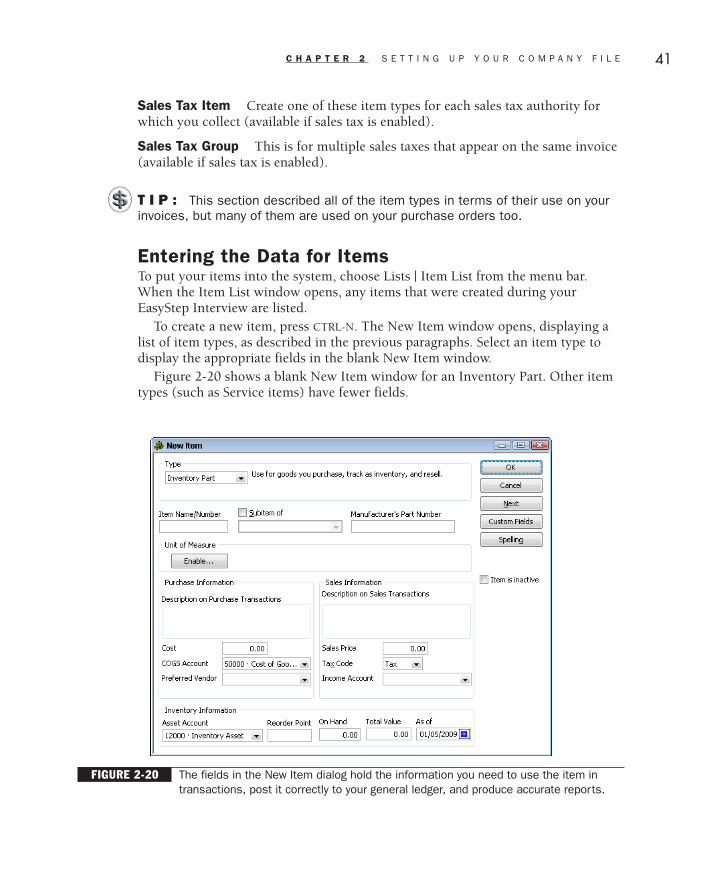
To create a new item, press CTRL-N. The New Item window opens, displaying alist of item types, as described in the previous paragraphs. Select an item type todisplay the appropriate fields in the blank New Item window.
Figure 2-20 shows a blank New Item window for an Inventory Part. Other itemtypes (such as Service items) have fewer fields.
C H A P T E R 2 S E T T I N G U P Y O U R C O M P A N Y F I L E 41
QckBcks TIGHT / QuickBooks 2009 The Official Guide / Ivens / 274-8 / Chapter 2
FIGURE 2-20 The fields in the New Item dialog hold the information you need to use the item intransactions, post it correctly to your general ledger, and produce accurate reports.
P:\010Comp\QckBcks\274-8\ch02.vpTuesday, September 02, 2008 10:54:11 AM
Color profile: DisabledComposite Default screen

The Item Name/Number field is the place to insert a unique identifying code forthe item. When you are filling out invoices (or purchase orders), this is the listingyou see in the drop-down list.
N O T E : After you’ve created an inventory item, you can create subitems. Forexample, if you sell shoes as an item, you can create subitems for dress shoes,sneakers, boots, and so on. Or use subitems for a parent item that comes in avariety of colors. Not all item types provide subitems.
Many of the rest of the fields in the New Item window change depending on theitem type you select. Most of them are self-explanatory, but some are importantenough to merit discussion:
• If you’re entering an inventory item, enter the account to which you post thecost of goods (COG). Optionally, fill in the name of the vendor from whom youpurchase the item.
N O T E : The item record window for inventory items has a field named Cost.It’s basically useless, because QuickBooks doesn’t use this data whencalculating the cost of goods or the value of your inventory. The costs thatQuickBooks uses are those that are posted when you receive inventory by payingthe vendor, or by making an inventory value adjustment. If you want to enter acost as a reminder of what you expect to pay the next time you purchase thisitem, you can, but if your actual purchase price differs from this amount, youcould get confused.
• In the Sales Price field, you can enter a rate for those items that you’ve priced;leave the rate at zero for the items you want to price when you are preparingthe invoice. Don’t worry—nothing is etched in stone. You can change any ratethat appears automatically when you’re filling out an invoice.
• In the Income Account field, link the item to an income account in your chartof accounts and indicate whether the item is taxable (choose Tax) or not(choose Non). (The tax option is only available if you’ve configured yourcompany to collect sales tax.)
When you complete the window, choose Next to move to the next blank NewItem window. When you finish entering items, click OK.
Entering Other ListsThere are a few items in the Lists menu that aren’t covered in detail. They don’trequire extensive amounts of data, and you may or may not choose to use them.If you do plan to use them, here’s an overview of the things you need to know.
42 P A R T O N E G E T T I N G S T A R T E D
QckBcks TIGHT / QuickBooks 2009 The Official Guide / Ivens / 274-8 / Chapter 2
P:\010Comp\QckBcks\274-8\ch02.vpTuesday, September 02, 2008 10:54:11 AM
Color profile: DisabledComposite Default screen

Some of these items are in the Lists menu, and some of them are in a submenu ofthe Lists menu called Customer & Vendor Profile Lists.
Fixed Asset Item ListUse the Fixed Asset Item List to store information about fixed assets. This list ismeant to track data about the assets you depreciate. As you can see in Figure 2-21,each asset’s record includes detailed information and even has fields to track thesale of a depreciated asset.
Unless you’re using Premier Accountant Edition or Enterprise Solutions AccountantEdition, this is an inert list that doesn’t provide any method for calculating depreciation,nor does it link to any depreciation feature in QuickBooks. It’s designed to let you useQuickBooks to track your fixed assets as a QuickBooks List instead of whatever listyou’re keeping outside of QuickBooks.
QuickBooks Premier and Enterprise Solutions Accountant Editions containa program called Fixed Asset Manager, which uses the Fixed Asset Item List topopulate the data needed to generate depreciation as part of the tax preparationchores for your company.
C H A P T E R 2 S E T T I N G U P Y O U R C O M P A N Y F I L E 43
QckBcks TIGHT / QuickBooks 2009 The Official Guide / Ivens / 274-8 / Chapter 2
FIGURE 2-21 Keep information about fixed assets in the Fixed Asset Item List.
P:\010Comp\QckBcks\274-8\ch02.vpTuesday, September 02, 2008 10:54:11 AM
Color profile: DisabledComposite Default screen

If tracking depreciation is an important financial task, consider upgrading tothe Accountant Edition. At the very least, make sure your accountant is usingQuickBooks Premier or Enterprise Solutions Accountant Edition, because thedepreciation processes can take place more quickly (which will probably reduceyour accounting fees expense).
Price Level ListThis list is only available if Price Levels are enabled in the Sales & Customerssection of your Preferences (choose Edit | Preferences). The Price Level List is anifty, easy way to connect special pricing to customers and jobs. Each price levelhas two components: a name and a formula. The name can be anything you wish,and the formula is based on the already-entered price of items (the formulaincreases or reduces that price by a percentage).
For example, you may want to give your favorite customers an excellent discount.Name the price level something like “Special” or “StarCustomer.” Then entera healthy percentage by which to reduce the price of items purchased by thiscustomer. Or you may want to create a discount price level for customers that arenonprofit organizations.
On the other hand, you may want to keep your regular prices steady (assumingthey’re competitive) and increase them for certain customers (perhaps customerswho don’t pay in a timely fashion). It’s probably politically incorrect to name theprice level “Deadbeat,” so choose something innocuous such as “StandardPrice.”You could also use numbers for the price-level names, perhaps making the highestnumbers the highest prices.
After you create price levels, you can apply a price level to customers. Open theCustomers & Jobs List and select a customer. Press CTRL-E to edit the customercard and select a price level on the Additional Info tab.
Per-Item Price LevelsIn addition to the price levels explained in the previous paragraphs, all Premier andEnterprise Solutions editions offer per-item price levels. Per-item price levels areprices, not percentages, which gives you a great deal of flexibility in chargingcustomers for products or services. You can use per-item price levels to set multipleprices for the same item; for example, assign a single item (a product or a service)prices of $50.00, $40.00, and $30.00.
You can assign a specific price for the item to a customer (or multiple customers),or to one or more jobs. In addition, if you wish, you can assign a specific price to anitem when you’re creating an invoice. If the invoice contains an item that has pricelevels assigned, a drop-down list containing all the price levels is available in theRate column of the invoice. Just select the price you want to charge for this item,for this invoice.
44 P A R T O N E G E T T I N G S T A R T E D
QckBcks TIGHT / QuickBooks 2009 The Official Guide / Ivens / 274-8 / Chapter 2
P:\010Comp\QckBcks\274-8\ch02.vpTuesday, September 02, 2008 10:54:11 AM
Color profile: DisabledComposite Default screen

Billing Rates Level ListThis list lets you set specific rates for each service provider for any service you sell.This means that a senior partner or journeyman who performs a service is billedout at a different rate than a junior partner or an apprentice performing the sameservice.
When you create a billing rate, you link the rate to a name (the person providingthe service) and a service. The service provider can exist in your Employee List,Vendor List, or Other Names List.
When you invoice your customers, the appropriate billing rate levels areautomatically added to the invoice from the Time and Costs dialog that’s availablein the Invoice window. You can also apply any customer’s percentage price level(usually a discount) to the billing rate invoice items.
N O T E : The Billing Rates Level List is only available in the Contractor,Professional Services, and Accountant editions of QuickBooks Premier andEnterprise Solutions.
Sales Tax Code ListThis list is available if you configured your business to collect sales tax. Mostbusinesses only need the two built-in sales tax codes: Tax and Non (meaningtaxable and nontaxable). You can learn more about using sales tax codes effectivelyin Chapter 7.
Class ListThe Class List appears in the Lists menu only if you’ve enabled the classes feature(in the Accounting category of the Preferences dialog). Classes provide a methodof organizing your activities (income and disbursement transactions) to producereports that you need.
You can use classes to track income and disbursements by branch office, location,subsidiary business, or any other separate entity your company needs to track.
Some business owners find it’s a good idea to work with QuickBooks for a whileand then, if they feel they need a report that can only be produced with the use ofclasses, they can create the class at that point. Chapter 20 covers the use of classes.
Workers Comp ListThis list, which appears if you’re using QuickBooks Enhanced Payroll and haveenabled workers comp tracking, contains the workers comp codes you create. Entera code, optionally enter a description, and specify the rate per $100.00 of gross wages.Also specify a start date for using the code.
C H A P T E R 2 S E T T I N G U P Y O U R C O M P A N Y F I L E 45
QckBcks TIGHT / QuickBooks 2009 The Official Guide / Ivens / 274-8 / Chapter 2
P:\010Comp\QckBcks\274-8\ch02.vpTuesday, September 02, 2008 10:54:11 AM
Color profile: DisabledComposite Default screen

Other Names ListQuickBooks provides a list called Other Names, which is the list of people whosenames come up in transactions but whose activity you don’t want to track. This listwill appear when you write checks, but the names are unavailable for invoices,purchase orders, and any other QuickBooks transaction type.
If your business is a proprietorship, put yourself on the list to make sure yourname is listed when you write your draw check. If there are several partners in yourbusiness, use this list for the checks you write to the partners’ draws.
When you press CTRL-N to open a New Name window, there are fields for theaddress (handy for printing checks), telephone numbers, and other contactinformation.
T I P : Many people overuse this category and end up having to move thesenames to the Vendor List because they do need to track the activity. Unlessyou’re a proprietor or partner, it’s totally possible to use QuickBooks efficientlyfor years without using this list.
Memorized Transaction ListThis list (which isn’t really a list, but rather a collection of transactions) is built asyou memorize transactions. You can tell QuickBooks to memorize any transactionat the time you create it, which adds the transaction to this list. You can learn howto memorize specific types of transactions throughout this book in the chaptersdevoted to creating transactions.
Sales Rep List(This list appears in the submenu of Customer & Vendor Profile Lists.) By commondefinition, a sales rep is a person who is connected to a customer, usually becausehe or she receives a commission on sales to that customer. However, it’s frequentlyadvantageous to track sales reps for other reasons: to know which noncommissionedperson is attached to a customer (some people call this a service rep) or to track thesource of referrals.
To enter a new sales rep, press CTRL-N to open a New Sales Rep form and selectthe person’s name from the drop-down list. If that name doesn’t already exist as anemployee, vendor, or other name, QuickBooks asks you to add the name to one ofthose lists.
Customer Type List(This list appears in the submenu of Customer & Vendor Profile Lists.) When youcreate your customer list, you may decide to use the Customer Type field as a way tocategorize the customer. This gives you the opportunity to sort and select customersin reports, perhaps to view the total income from specific types of customers.
46 P A R T O N E G E T T I N G S T A R T E D
QckBcks TIGHT / QuickBooks 2009 The Official Guide / Ivens / 274-8 / Chapter 2
P:\010Comp\QckBcks\274-8\ch02.vpTuesday, September 02, 2008 10:54:12 AM
Color profile: DisabledComposite Default screen

Vendor Type List(This list appears in the submenu of Customer & Vendor Profile Lists.) See thepreceding paragraph and substitute the word “vendor” for the word “customer.”
Job Type List(This list appears in the submenu of Customer & Vendor Profile Lists.) Use this listto set up categories for jobs by creating job types. For example, if you’re a plumber,you may want to separate new construction from repairs.
Terms List(This list appears in the submenu of Customer & Vendor Profile Lists.) QuickBookskeeps both customer and vendor payment terms in one list, so the terms you needare all available whether you’re creating an invoice, entering a vendor bill, orcreating a purchase order. To create a terms listing, open the Terms List windowand press CTRL-N to open the New Terms window.
Use the Standard section to create terms that are due at some elapsed time afterthe invoice date:
• Net Due is the number of days allowed for payment after the invoice date.• To create a discount for early payment, enter the discount percentage and the
number of days after the invoice date that the discount is in effect. For example,if 30 days are allowed for payment, enter a discount percentage that is in effectfor 10 days after the invoice date.
Use the Date Driven section to describe terms that are due on a particular date,regardless of the invoice date:
• Enter the day of the month the invoice payment is due.• Enter the number of days before the due date that invoices are considered
payable on the following month (but it’s not fair to insist that invoices be paidon the 10th of the month if you mail them to customers on the 8th of themonth).
• To create a discount for early payment, enter the discount percentage andthe day of the month at which the discount period ends. For example, if thestandard due date is the 15th of the month, you may want to extend a discountto any customer who pays by the 8th of the month.
T I P : Date-driven terms are commonly used by companies that send invoicesmonthly, usually on the last day of the month. If you send invoices constantly, assoon as a sale is completed, it’s very difficult to track and enforce date-driventerms.
C H A P T E R 2 S E T T I N G U P Y O U R C O M P A N Y F I L E 47
QckBcks TIGHT / QuickBooks 2009 The Official Guide / Ivens / 274-8 / Chapter 2
P:\010Comp\QckBcks\274-8\ch02.vpTuesday, September 02, 2008 10:54:12 AM
Color profile: DisabledComposite Default screen
Customer Message List(This list appears in the submenu of Customer & Vendor Profile Lists.) If you liketo write messages to your customers when you’re creating an invoice, you can entera bunch of appropriate messages ahead of time and then just select the one youwant to use. For example, you may want to insert the message “Thanks for doingbusiness with us” or “Pay on time or else.”
Press CTRL-N to enter a new message to add to the list. You just have to write thetext (which can’t be longer than 101 characters, counting spaces)—this is one ofthe easier lists to create.
Payment Method List(This list appears in the submenu of Customer & Vendor Profile Lists.) You can trackthe way payments arrive from customers. This not only provides some detail (in caseyou’re having a conversation with a customer about invoices and payments), butalso allows you to print reports on payments that are subtotaled by the method ofpayment, such as credit card, check, cash, and so on. (Your bank may use the samesubtotaling method, which makes it easier to reconcile the bank account.)
QuickBooks prepopulates the payment methods with common payment types. Ifyou have a payment method that isn’t listed, you can add that method to the list. Todo so, press CTRL-N to open the New Payment Method window. Name the paymentmethod and select the appropriate payment type.
Ship Via List(This list appears in the submenu of Customer & Vendor Profile Lists.) You candescribe the way you ship goods on your invoices (in the field named Via), whichmany customers appreciate. QuickBooks prepopulates the list with a variety ofshipment methods, but you may need to add a shipping method. To do so, pressCTRL-N to add a new Ship Via entry to the list. All you need to do is enter the name,for example Our Truck, or Sam’s Delivery Service.
If you use one shipping method more than any other, you can select a defaultShip Via entry, which appears automatically on your invoices (you can change it onany transaction where the shipping method is different). The option is in the Sales& Customers section of the Preferences dialog (choose Edit | Preferences to get tothe dialog).
Vehicle List(This list appears in the submenu of Customer & Vendor Profile Lists.) The VehicleList lets you track mileage for vehicles used in your business. You can use themileage information for tax deductions for your vehicles and to bill customers formileage expenses. However, even if you don’t bill customers for mileage or your
48 P A R T O N E G E T T I N G S T A R T E D
QckBcks TIGHT / QuickBooks 2009 The Official Guide / Ivens / 274-8 / Chapter 2
P:\010Comp\QckBcks\274-8\ch02.vpTuesday, September 02, 2008 10:54:12 AM
Color profile: DisabledComposite Default screen
accountant uses a formula for tax deductions, the Vehicle List is a handy way totrack information about the vehicles (yours or your employees) used for businesspurposes.
To add a vehicle to the list, press CTRL-N to open a New Vehicle dialog. The boxhas two fields:
• Vehicle, in which you enter a name or code for a specific vehicle. For example,you could enter BlueTruck, MikesToyota, FordMustangConvertible, or anyother recognizable name.
• Description, in which you enter descriptive information about the vehicle.
While the Description field is handy for standard description terms (such asblack, or blue/white truck), take advantage of the field by entering information youreally need. For example, the VIN, the license plate number, the expiration date forthe plate, the insurance policy number, or other “official” information are goodcandidates for inclusion. You can enter up to 256 characters in the field. You canlearn how to track mileage and bill customers for mileage in Chapter 6.
Using Custom FieldsYou can add your own fields to the Customer, Vendor, Employee, and Item records.Custom fields are useful if there’s information you just have to track but QuickBooksdoesn’t provide a field for it. For example, if it’s imperative for you to know whatcolor eyes your employees have, add an Eye Color field. If you maintain multiplewarehouses, you can create a field for items to indicate which warehouse stocks anyparticular item (you can do the same thing to track bins).
Adding a Custom Field for NamesTo add one or more custom fields to names, open one of the names lists (Customers& Jobs, Vendor, or Employee).
Follow these steps to create a custom field in a Names list:
� Select any name on the list.� Press CTRL-E to edit the name.� Move to the Additional Info tab.� Click the Define Fields button.� When the Define Fields dialog opens, name the field and indicate the list for
which you want to use the new field (see Figure 2-22).
That’s all there is to it, except you must click OK to save the information. Whenyou do, QuickBooks flashes a message reminding you that if you customize yourtemplates (forms for transactions, such as invoices), you can add these fields.(Instructions for adding fields to transaction windows are found throughout this
C H A P T E R 2 S E T T I N G U P Y O U R C O M P A N Y F I L E 49
QckBcks TIGHT / QuickBooks 2009 The Official Guide / Ivens / 274-8 / Chapter 2
P:\010Comp\QckBcks\274-8\ch02.vpTuesday, September 02, 2008 10:54:12 AM
Color profile: DisabledComposite Default screen

book in chapters covering invoices, estimates, purchase orders, and so on.) ClickOK to make the message disappear (and select the option to stop showing you themessage, if you wish). The Additional Info tab for every name in the list now showsthose fields.
To add data to the custom fields for each name on the list, select the name andpress CTRL-E to edit the name. Then add the appropriate data to the custom field.
Adding a Custom Field for ItemsYou can add custom fields to your items (except subtotal items and sales tax items)in much the same manner as you do for names.
Follow these steps to add a custom field to an item:
� Open the Item List and select any item.� Press CTRL-E to edit the item.� Click the Custom Fields button.� When a message appears telling you that there are no custom fields yet defined,
click OK.� When the Custom Fields dialog appears, it has no fields on it (yet). Choose
Define Fields.� When the Define Custom Fields For Items dialog opens, enter a name for each
field you want to add. You can add fields that fit services, inventory items, andso on, and use the appropriate field for the item type when you enter data in anitem’s record.
50 P A R T O N E G E T T I N G S T A R T E D
QckBcks TIGHT / QuickBooks 2009 The Official Guide / Ivens / 274-8 / Chapter 2
FIGURE 2-22 Custom fields appear on the records of the components in the list you indicate.
P:\010Comp\QckBcks\274-8\ch02.vpTuesday, September 02, 2008 10:54:12 AM
Color profile: DisabledComposite Default screen

� Click the Use box to use the field. (You can deselect the box later if you don’twant to use the field anymore.)
Click OK.
The first time you enter a custom field on an item, a dialog appears to tell youthat you can use these fields on templates (forms such as Invoices, PurchaseOrders, or Packing Slips). Click OK and select the option to stop displaying thismessage in the future.
When you click Custom Fields on the Edit Item dialog for any item, yourexisting custom fields appear. If you want to add more custom fields, click theDefine Fields button to open the Define Custom Fields For Items dialog and addthe additional custom field. You can create up to five custom fields for items.
To enter data for the custom fields in an item, open the item from the Item Listand click the Custom Fields button on the Edit Item window. Then enter theappropriate data.
Merging Records in ListsAfter you’ve been working in QuickBooks for a while, you may find that some listshave entries that should be combined. For example, a vendor was entered twice(with different spellings), or you realize that several items in your chart of accountsare covering similar expenses and should be merged. One common scenario is anItem List that’s far too large and complicated. For example, most accountants haverun into inventory items such as the following:
• Cable-cut to 2ft long• Cable-cut to 3ft long• Cable-cut to 4ft long
This makes the Item List too long and invites careless errors such as usersclicking the wrong item (because they all look alike at first glance). It would beeasier and smarter to have one item, named Cable, and then enter the length as aquantity (in the Qty field) or in the Description field. You can only merge entriesfrom the following lists:
• Chart of Accounts• Item• Customers & Jobs• Vendor• Other Names
C H A P T E R 2 S E T T I N G U P Y O U R C O M P A N Y F I L E 51
QckBcks TIGHT / QuickBooks 2009 The Official Guide / Ivens / 274-8 / Chapter 2
P:\010Comp\QckBcks\274-8\ch02.vpTuesday, September 02, 2008 10:54:12 AM
Color profile: DisabledComposite Default screen

Performing a Merge OperationFollow these steps to merge entries within a list:
� Select the list entry you want to get rid of and press CTRL-E to open the entry inEdit mode.
� Change the entry’s name to match the name of the entry you want to keep.� Click OK.� QuickBooks opens a message box to tell you the name is already in use and
asks if you want to merge them. Click Yes.
All the information, including transaction data, is merged into the entry you’rekeeping.
Guidelines and Restrictions for Merging List EntriesBear the following information in mind when you decide to merge entries:
• You cannot “unmerge”—the process is not reversible.• For accounts and items, you cannot merge entries that have subentries. Change
the subentries to parent entries by removing the Subaccount Of or Subitem Ofcheck mark. Merge the parent entries and then reapply the Subaccount Of orSubitem Of check mark (all of which will now be subentries of the new single,merged, parent entry).
• You can merge subentries of the same parent (which is in fact the mostcommon type of merge).
• You can merge jobs that are subentries of the same customer.
Now that all your lists exist and they’re fine-tuned, you can work quickly andeasily in QuickBooks transaction windows. The following chapters walk youthrough those tasks.
52 P A R T O N E G E T T I N G S T A R T E D
QckBcks TIGHT / QuickBooks 2009 The Official Guide / Ivens / 274-8 / Chapter 2
P:\010Comp\QckBcks\274-8\ch02.vpTuesday, September 02, 2008 10:54:12 AM
Color profile: DisabledComposite Default screen

QckBcks TIGHT / QuickBooks 2009 The Official Guide / Ivens / 274-8Blind Folio 53
P:\010Comp\QckBcks\274-8\ch02.vpTuesday, September 02, 2008 10:54:12 AM
Color profile: DisabledComposite Default screen

QckBcks TIGHT / QuickBooks 2009 The Official Guide / Ivens / 274-8 / Chapter 3
Par
tTw
oP
art
Two Bookkeeping
Part Two contains chapters about the day-to-day bookkeepingchores you’ll be performing in QuickBooks. The chapters are filledwith instructions, tips, and explanations. There’s even a lot ofinformation that you can pass along to your accountant, who willwant to know how QuickBooks and you are performing tasks.
The chapters in Part Two take you through everything you need toknow about sending invoices to your customers and collecting themoney they send back as a result. You’ll learn how to track and paythe bills you receive from vendors. There’s plenty of informationabout dealing with inventory—buying it, selling it, and counting it—and keeping QuickBooks up to date on those figures. Payroll is alsodiscussed, both in-house payroll systems and outside services.
All the reports you can generate to analyze the state of yourbusiness are covered in Part Two. So are the reports you run for youraccountant—and for the government (tax time is less of a nightmarewith QuickBooks). Finally, you’ll learn about budgets, general ledgeradjustments, and all the other once-in-a-while tasks you need toknow how to accomplish to keep your accounting records finelytuned.
P:\010Comp\QckBcks\274-8\ch03.vpTuesday, September 02, 2008 11:46:14 AM
Color profile: DisabledComposite Default screen

Chapter
Chapter
33Invoicing
In this chapter:
• Create and edit invoices
• Create and edit credit memos
• Print invoices and credit memos
• Create sales orders
• Create pick lists and packing slips
• Work with estimates
• Customize invoice forms
55
QckBcks TIGHT / QuickBooks 2009 The Official Guide / Ivens / 274-8 / Chapter 3
P:\010Comp\QckBcks\274-8\ch03.vpTuesday, September 02, 2008 11:46:14 AM
Color profile: DisabledComposite Default screen

For many businesses, the only way to get money is to send an invoice to a customer(the exception is retail, of course, where the customer’s payment is receivedimmediately). Creating an invoice in QuickBooks is easy once you understandwhat all the parts of the invoice do and why they’re there. In addition to invoices,you often have to create credits, packing slips, estimates, and other businessfinancial documents.
(If you’ve enabled the Multicurrency feature, you’ll see references to the customer’scurrency in the transaction windows.)
Creating Standard InvoicesQuickBooks offers several ways to open the Create Invoices window. You can selectCustomers | Create Invoices from the menu bar, press CTRL-I, or click the CreateInvoices icon in the Customers section of the Home page (there are additionalmethods, but three choices should be enough). Any of those actions opens theCreate Invoices window, which is a blank invoice form (see Figure 3-1).
There are several invoice templates built into QuickBooks, and you can use anyof them (as well as create your own, which is covered later in this chapter in the
56 P A R T T W O B O O K K E E P I N G
QckBcks TIGHT / QuickBooks 2009 The Official Guide / Ivens / 274-8 / Chapter 3
FIGURE 3-1 The Create Invoices window has all the fields you need to track sales.
P:\010Comp\QckBcks\274-8\ch03.vpTuesday, September 02, 2008 11:46:15 AM
Color profile: DisabledComposite Default screen

section “Customizing Templates”). The first thing to do is decide whether or notthe displayed template suits you. You should probably look at the other templatesbefore settling on the one you want to use. To do that, select another invoicetemplate from the drop-down list:
• The Professional and Service templates are almost identical. There’s a differencein the order of the columns, and the Service template has a field for a purchaseorder number.
• The Product template has more fields and different columns because it containsinformation about the items in your inventory.
• The Progress template, which is covered later in this chapter in the “CreatingProgress Billing Invoices” section, is designed specifically for progress billingagainst a job estimate. It doesn’t appear in the Template list unless you havespecified Progress Invoicing in the Company Preferences tab of the Jobs &Estimates category of the Preferences dialog.
• The Finance Charge template appears if you enable finance charges in theFinance Charge category of the Preferences dialog. Information about financecharges is in Chapter 5.
• The Packing Slip template is discussed in the section “Printing Packing Slips”later in this chapter.
This discussion uses the Product template, because it’s the most complicated. Ifyou’re using any other template, you’ll still be able to follow along, even thoughyour invoice form lacks some of the fields related to selling products.
The top portion of the invoice is for the basic information and is called theinvoice heading. The middle section, where the billing items are placed, is called theline item section. The bottom section, called the footer, holds the totals and otherdetails (such as customer messages). Each section of the invoice has fields intowhich you must enter data.
Entering Heading InformationTo create an invoice, start with the customer or the job. Click the arrow to the rightof the Customer:Job field to see a list of all your customers. If you’ve attached jobsto any customers, those jobs are listed under the customer name. Select the customeror job for this invoice. If the customer isn’t in the system, choose <Add New> to opena new customer window and enter all the data required for setting up a customer.Read Chapter 2 for information on adding new customers.
If you’ve charged reimbursable expenses or time charges to this customer,QuickBooks displays a message reminding you to add those charges to this invoice.You can learn how to do that in Chapter 6.
In the Date field, the current date is showing, which is usually appropriate.If you want to change the date, you can either type in a new date, or click thecalendar icon at the right side of the field to select a date.
C H A P T E R 3 I N V O I C I N G 57
QckBcks TIGHT / QuickBooks 2009 The Official Guide / Ivens / 274-8 / Chapter 3
P:\010Comp\QckBcks\274-8\ch03.vpTuesday, September 02, 2008 11:46:15 AM
Color profile: DisabledComposite Default screen

If you change the date, the new date appears automatically in each invoice youcreate during this session of QuickBooks (the current date returns after you close,and then reopen the software).
The first time you enter an invoice, fill in the invoice number you want to useas a starting point. Hereafter, QuickBooks will increment that number for eachensuing invoice.
The Bill To address is taken from the customer record, as is the Ship To addressthat’s available on the Product Invoice template. You can select another Ship Toaddress from the drop-down list, or add a new Ship To address by choosing <AddNew> from the list.
If you have a purchase order from this customer, enter it into the P.O. Numberfield (not available on the Professional template).
The Terms field is filled in automatically with the terms you entered for thiscustomer when you created the customer record. You can change the terms for thisinvoice if you wish. If terms don’t automatically appear, it means you didn’t enterthat information in the customer record. If you enter it now, when you save theinvoice, QuickBooks offers to make the entry the new default for this customer byadding it to the customer record.
T I P : If you enter or change any information about the customer while you’recreating an invoice, QuickBooks offers to add the information to the customerrecord when you save the invoice. If the change is permanent, click the Yesbutton in the dialog that displays the offer. This saves you the trouble of goingback to the customer record to make the changes. If the change is only for thisinvoice, click the No button.
The Rep field (only in the Product template) is for the salesperson attached to thiscustomer. If you didn’t indicate a salesperson when you filled out the customer record,you can click the arrow next to the field and choose a name from the drop-down list.
The Ship field (only in the Product template) is for the ship date, and the datadefaults to the invoice date.
The Via field (only in the Product template) is for the method of shipping. Clickthe arrow next to the field to see the available shipping choices. (See Chapter 2 forinformation about adding to this list.)
The F.O.B. field (only in the Product template) is used by some companies toindicate the point at which the shipping costs are transferred to the buyer and theassumption of a completed sale takes place. (That means if it breaks or gets lost, thecustomer owns it.) If you use FOB terms, you can enter the applicable data in thefield; it has no impact on your QuickBooks financial records and is there for yourconvenience only.
N O T E : FOB stands for Free On Board, and there’s probably some meaningfulreason for the term, although it seems to have been lost in history.
58 P A R T T W O B O O K K E E P I N G
QckBcks TIGHT / QuickBooks 2009 The Official Guide / Ivens / 274-8 / Chapter 3
P:\010Comp\QckBcks\274-8\ch03.vpTuesday, September 02, 2008 11:46:15 AM
Color profile: DisabledComposite Default screen

Entering Line ItemsNow you can begin to enter the items for which you are billing this customer. Clickin the first column of the line item section.
If you’re using the Product invoice template, that column is Quantity. (If you’reusing the Professional or Service invoice template, the first column is Item.) Enterthe quantity of the first item you’re selling.
In the Item Code column, an arrow appears on the right edge of the column—clickit to see a list of the items you sell. (See Chapter 2 to learn how to enter items.) Selectthe item you need. The description and price are filled in automatically, using theinformation you provided when you created the item. If you didn’t include theinformation when you created the item, you can enter it manually now.
QuickBooks does the math, and the Amount column displays the total of thequantity times the price. If the item and the customer are both liable for tax, theTax column displays “Tax.”
Repeat this process to add all the items that should be on this invoice. You canadd as many rows of items as you need; if you run out of room, QuickBooksautomatically adds pages to your invoice.
For line items that are inventory items, QuickBooks checks the Quantity onHand (QOH) and warns you if you don’t have enough inventory to fill the sale. It’sa warning only; QuickBooks lets you complete the sale anyway. It’s never a goodidea to sell into negative QOH; instead, record a backorder, which is covered in thesection “Managing Backorders,” later in this chapter.
Applying Price LevelsIf you’ve created items in your Price Levels List (explained in Chapter 2), you canchange the amount of any line item by applying a price level. Most of the time, yourprice levels are a percentage by which to lower (discount) the price, but you mayalso have created price levels that increase the price.
When your cursor is in the Price Each column, an arrow appears to the right ofthe price that’s entered for the item on this line. Click the arrow to see a list of pricelevel items, and select the one you want to apply to this item. QuickBooks hasalready performed the math, so you not only see the name of your price level, youalso see the resulting item price for each price level.
After you select a price level, QuickBooks changes the amount you’re chargingthe customer for the item and adjusts the amount of the total for this item (if thequantity is more than 1).
The customer sees only the price on the invoice; there’s no indication that you’veadjusted the price. This is different from applying a discount to a price (covered inthe next section), where a discrete line item exists to announce the discount.
C H A P T E R 3 I N V O I C I N G 59
QckBcks TIGHT / QuickBooks 2009 The Official Guide / Ivens / 274-8 / Chapter 3
P:\010Comp\QckBcks\274-8\ch03.vpTuesday, September 02, 2008 3:28:18 PM
Color profile: DisabledComposite Default screen

N O T E : You can apply price levels as you enter a line item, or finish all theline items and then return to the Price Each column for the items you want tochange with a price level. QuickBooks adjusts line totals and the final total asyou apply the price levels.
Entering DiscountsYou can also adjust the invoice by applying discounts. Discounts are entered as lineitems, so you must have created a discount item in your Items List.
When you enter a discount, its amount (usually a percentage) is applied basedon the line item immediately above it. For example, let’s suppose you have alreadyentered line items as follows:
• Qty of 1 for Some Item with a price of $100.00 for a total line item price of$100.00
• Qty of 2 for Some Other Item with a price of $40.00 for a total line item priceof $80.00
Now you want to give the customer a 10 percent discount (you created a 10percent discount item in your Items List). If you enter that item on the next line,QuickBooks will calculate its value as 10 percent of the last line you entered—an$8.00 discount.
If you want to apply the discount against all the line items, you must first enter aline item that subtotals those lines. To do this, use a subtotal item type that you’vecreated in your Items List. Then enter the discount item as the next line item, andwhen the discount is applied to the previous amount, that previous amount is theamount of the subtotal. The discount is based on the subtotal. You can use the sameapproach if you want to discount some line items but not others. Simply followthese guidelines:
� Enter all the items you’re planning to discount.� Enter a subtotal item.� Enter a discount item.� Enter the remaining items (the items you’re not discounting).
This method makes your discounts and your discount policies very clear tothe customer.
Checking the InvoiceWhen you’re finished entering all the line items, you’ll see that QuickBooks haskept a running total, including taxes (see Figure 3-2).
60 P A R T T W O B O O K K E E P I N G
QckBcks TIGHT / QuickBooks 2009 The Official Guide / Ivens / 274-8 / Chapter 3
P:\010Comp\QckBcks\274-8\ch03.vpTuesday, September 02, 2008 11:46:15 AM
Color profile: DisabledComposite Default screen

Check SpellingClick the Spelling icon on the toolbar of the Create Invoices window to run theQuickBooks spell checker. If the spell checker finds any word in your invoice formthat isn’t in the QuickBooks dictionary, that word is displayed. You can change thespelling, add the word to the QuickBooks dictionary (if it’s spelled correctly), or tellthe spell checker to ignore the word.
T I P : If you check the spelling when you create an item, you eliminate theneed to worry about spelling on an invoice—everything is prechecked before youinsert the items in the invoice form. (The spell check ignores the data in theheading section of the invoice.)
N O T E : The spell checker is turned on by default, which you may findannoying. If you want to control the spell checker, remove its automatic behaviorin the Spelling section of the Preferences dialog.
C H A P T E R 3 I N V O I C I N G 61
QckBcks TIGHT / QuickBooks 2009 The Official Guide / Ivens / 274-8 / Chapter 3
FIGURE 3-2 The invoice is complete, and there are no math errors because computers nevermake math errors.
P:\010Comp\QckBcks\274-8\ch03.vpTuesday, September 02, 2008 11:46:16 AM
Color profile: DisabledComposite Default screen
Add a MessageIf you want to add a message, click the arrow in the Customer Message field to seeall the available messages (which you created in the Customer Message List, asdescribed in Chapter 2). You can create a new message if you don’t want to use anyof the existing notes. To do so, choose <Add New> from the message drop-down listand enter your text in the New Customer Message window. Click OK to enter themessage in the invoice and automatically save the message in the Message list soyou can use it again. You can also type the message directly in the CustomerMessage window, which opens a Customer Message Not Found dialog that offersyou the chance to add your new message in the Customer Message list.
Add a MemoYou can add text to the Memo field at the bottom of the invoice. This text doesn’tprint on the invoice—it appears only on the screen (you’ll see it if you reopen thisinvoice to view or edit it). However, the memo text does appear on statements, nextto the listing for this invoice. Therefore, be careful about the text you use—don’tenter anything you wouldn’t want the customer to see.
Choose the Method for Sending the InvoiceAt the bottom of the invoice template are two options for sending the invoice: To BePrinted and To Be E-mailed. Select the appropriate method if you’re going to printor e-mail all your invoices after you finish entering them. If you select the e-mailoption, you have to provide more information, all of which is covered in the section“Sending Invoices and Credit Memos” later in this chapter.
You can also print or e-mail each invoice as you complete it. All of the optionsfor printing and sending invoices are explained later in this chapter, in the section“Sending Invoices and Credit Memos.”
Save the InvoiceChoose Save & New to save this invoice and move on to the next blank invoiceform. If this is the last invoice you’re creating, click Save & Close to save thisinvoice and close the Create Invoices window.
Editing InvoicesIf you want to correct an invoice (perhaps you charged the wrong amount or forgotyou’d promised a different amount to a particular customer), you can do so. Editingthe invoice that’s currently on the screen is quite easy. Click in the field or columnthat requires changing and make the changes (you probably figured this out).
62 P A R T T W O B O O K K E E P I N G
QckBcks TIGHT / QuickBooks 2009 The Official Guide / Ivens / 274-8 / Chapter 3
P:\010Comp\QckBcks\274-8\ch03.vpTuesday, September 02, 2008 11:46:16 AM
Color profile: DisabledComposite Default screen
Editing a Previously Entered InvoiceYou can open the Create Invoices window (or perhaps you’re still working there)and click the Previous button to move back through all the invoices in your system.However, if you have a great many invoices, it’s faster to open the Customer Centerand select the customer linked to the invoice you want to change. The right pane ofthe Customer Center displays that customer’s transactions and you can double-clickthe invoice of interest to open it. Use the following guidelines when you’re editing apreviously entered invoice:
• If a previously entered invoice has been paid, don’t edit the amount, date, oritems. However, it’s safe to edit the memo field. If a previously entered invoicehas not been paid, but has been mailed, you shouldn’t edit anything, althoughit’s probably safe to enter or modify text in the memo field if necessary.
• If the previously entered invoice has not yet been sent to the customer, you canmake any changes you wish.
When you click Save & Close, QuickBooks displays a message dialog askingwhether you want to save the changes you made. Click Yes.
Voiding and Deleting InvoicesThere’s an enormous difference between voiding and deleting an invoice. Voidingan invoice makes the invoice nonexistent to your accounting and customerbalances. However, the invoice number continues to exist (it’s marked “VOID”) soyou can account for it—missing invoice numbers are just as frustrating as missingcheck numbers.
Deleting an invoice, on the other hand, removes all traces of it from your transactionregisters and reports. It’s a dangerous act (unless you’re an embezzler, in which case theability to delete an invoice is a gift).
To void an invoice, open it and then choose Edit | Void Invoice from theQuickBooks menu bar.
N O T E : When you void an invoice, QuickBooks marks the status of the invoiceas Paid. This means nothing more than the fact that the invoice isn’t “open.” Ifyou’re discussing the status of open and paid invoices with a customer, rememberthat an invoice marked Paid may not really be paid; it may be a voided transaction.
Understanding the Postings for InvoicesIt’s important to understand what QuickBooks is doing behind the scenes, becauseeverything you do has an impact on your financial reports. Let’s look at the postingsfor an imaginary invoice that has these line items:
• $500.00 for services rendered• $30.00 for sales tax
C H A P T E R 3 I N V O I C I N G 63
QckBcks TIGHT / QuickBooks 2009 The Official Guide / Ivens / 274-8 / Chapter 3
P:\010Comp\QckBcks\274-8\ch03.vpThursday, September 18, 2008 10:46:40 AM
Color profile: DisabledComposite Default screen

Because QuickBooks is a full, double-entry bookkeeping program, there isa balanced posting made to the general ledger. For this invoice, the followingpostings are made to the general ledger:
Account Debit Credit
Accounts Receivable 530.00
Sales Tax 30.00
Income—Services 500.00
If the invoice includes inventory items, the postings are a bit more complicated.Let’s post an invoice that sold ten widgets to a customer. The widgets cost you$50.00 each and you sold them for $100.00 each. This customer was shipped tenwidgets and was also charged tax and shipping.
Account Debit Credit
Accounts Receivable 1,077.00
Income—Sales of Items 1,000.00
Sales Tax 70.00
Shipping 7.00
Cost of Goods Sold 500.00
Inventory Asset 500.00
There are two theories on posting shipping:
• Separate your own shipping costs (an expense) from the shipping you collectfrom your customers (revenue)
• Post everything to the shipping expense
To use the first method, create an income account for shipping and link thataccount to the shipping item you created to use in invoices.
If you use the latter method, don’t be surprised at the end of the year if you findyour shipping expense is reported as a negative number, meaning that you collectedmore than you spent for shipping. You won’t have a shipping expense to deductfrom your revenue at tax time, but who cares—you made money.
Using EstimatesFor certain customers or certain types of jobs, it may be advantageous to createestimates. An estimate isn’t an invoice, but it can be the basis of an invoice (in fact,you can create multiple invoices to reflect the progression of the job).
64 P A R T T W O B O O K K E E P I N G
QckBcks TIGHT / QuickBooks 2009 The Official Guide / Ivens / 274-8 / Chapter 3
P:\010Comp\QckBcks\274-8\ch03.vpTuesday, September 02, 2008 11:46:16 AM
Color profile: DisabledComposite Default screen
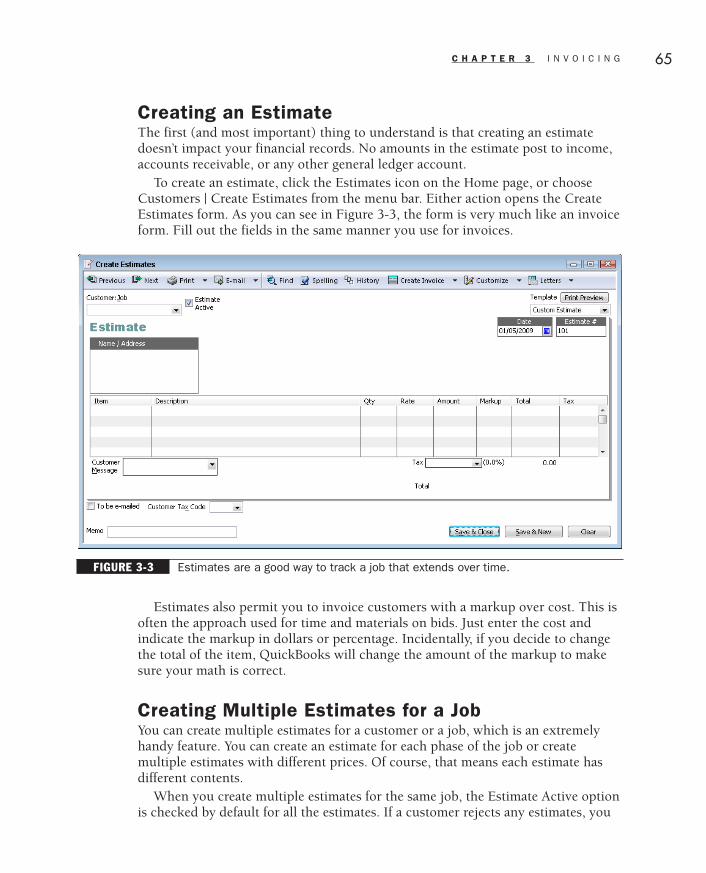
Creating an EstimateThe first (and most important) thing to understand is that creating an estimatedoesn’t impact your financial records. No amounts in the estimate post to income,accounts receivable, or any other general ledger account.
To create an estimate, click the Estimates icon on the Home page, or chooseCustomers | Create Estimates from the menu bar. Either action opens the CreateEstimates form. As you can see in Figure 3-3, the form is very much like an invoiceform. Fill out the fields in the same manner you use for invoices.
Estimates also permit you to invoice customers with a markup over cost. This isoften the approach used for time and materials on bids. Just enter the cost andindicate the markup in dollars or percentage. Incidentally, if you decide to changethe total of the item, QuickBooks will change the amount of the markup to makesure your math is correct.
Creating Multiple Estimates for a JobYou can create multiple estimates for a customer or a job, which is an extremelyhandy feature. You can create an estimate for each phase of the job or createmultiple estimates with different prices. Of course, that means each estimate hasdifferent contents.
When you create multiple estimates for the same job, the Estimate Active optionis checked by default for all the estimates. If a customer rejects any estimates, you
C H A P T E R 3 I N V O I C I N G 65
QckBcks TIGHT / QuickBooks 2009 The Official Guide / Ivens / 274-8 / Chapter 3
FIGURE 3-3 Estimates are a good way to track a job that extends over time.
P:\010Comp\QckBcks\274-8\ch03.vpTuesday, September 02, 2008 11:46:16 AM
Color profile: DisabledComposite Default screen
can either delete them or deselect the Estimate Active option (effectively closingthe estimate).
Duplicating EstimatesYou can also duplicate an estimate, which provides a quick way to create multipleestimates with slightly different contents. Choose Edit | Duplicate Estimate whilethe estimate is displayed in your QuickBooks window (or right-click anywhere inthe estimate form and choose Duplicate Estimate from the shortcut menu). TheEstimate # field changes to the next number, while everything else remains thesame. Make the required changes, and then click Save & Close.
Memorizing EstimatesIf you frequently present the same estimated items to multiple customers, you canuse the Memorize Estimate feature to create boilerplate estimates for future use.Memorized estimates do not contain the customer name (QuickBooks removes thename when memorizing the document).
Follow these steps to memorize an estimate:
� Create an estimate, filling in the items that belong on this type of estimate.Don’t fill in amounts (quantities, prices, or both) that usually change.
� Press CTRL-M to memorize the estimate.� Give the estimate a name that reminds you of its contents.� Select the option Don’t Remind Me.� Click OK.
To use the new boilerplate estimate, press CTRL-T, or choose Lists | MemorizedTransaction List. Double-click the estimate, fill in the Customer:Job information,fill in the prices, and save the transaction. The memorized estimate isn’t changed;only the new estimate is saved.
Changing EstimatesIf you’re running the Contractor or Accountant Edition, you can create change orderswithin existing estimates. Open an existing estimate and make whatever changes areneeded to items or prices. When you click Save & Close, QuickBooks displays amessage asking if you want to record your changes. Click Yes to bring up the AddChange Order dialog where you can opt to mark your modifications as a change order.
Creating Progress Billing InvoicesIf you’ve enabled estimates and progress billing in the Jobs & Estimates category ofthe Edit | Preferences dialog, you can use the Progress invoice template to invoiceyour customers as each invoicing plateau arrives.
66 P A R T T W O B O O K K E E P I N G
QckBcks TIGHT / QuickBooks 2009 The Official Guide / Ivens / 274-8 / Chapter 3
P:\010Comp\QckBcks\274-8\ch03.vpTuesday, September 02, 2008 11:46:16 AM
Color profile: DisabledComposite Default screen

Choosing the Estimated JobProgress invoices are just regular invoices that are connected to estimates. Open theCreate Invoices window, selectProgress Invoice from theTemplate drop-down list,and choose the appropriatecustomer or job. Becauseyou’ve enabled estimates inyour QuickBooks preferences,the system always checks thecustomer/job record to see ifyou’ve recorded any estimates,and if so, presents them.
Select the estimate you’re invoicing against and click OK. QuickBooks then asksyou to specify what to include on the invoice:
Ill 3-2
Fill out the dialog, using the following guidelines:
• You can bill for the whole job, 100 percent of the estimate. When the line itemsappear, you can edit any individual items.
• You can create an invoice for a specific percentage of the estimate. Thepercentage usually depends upon the agreement you have with your customer.For example, you could have an agreement that you’ll invoice the job in acertain number of equal installments, or you could invoice a percentage that’sequal to the percentage of the work that’s been finished.
T I P : You can use a percentage figure larger than 100 to cover overruns(make sure your customer has agreed to permit that option).
• You can create an invoice that covers only certain items on the estimate, oryou can create an invoice that has a different percentage for each item on theestimate. This is the approach to use if you’re billing for completed work on ajob that has a number of distinct tasks. Some of the work listed on the estimatemay be finished, other work not started, and the various items listed on theestimate may be at different points of completion.
C H A P T E R 3 I N V O I C I N G 67
QckBcks TIGHT / QuickBooks 2009 The Official Guide / Ivens / 274-8 / Chapter 3
Ill 3-1
P:\010Comp\QckBcks\274-8\ch03.vpTuesday, September 02, 2008 11:46:17 AM
Color profile: DisabledComposite Default screen

After you’ve created the first progress billing invoice for an estimate, a newoption is available for subsequent invoices. That option is to bill for all remainingamounts in the estimate (it replaces the Enter Estimate (100%) option). This isgenerally reserved for your last invoice, and it saves you the trouble of figuring outwhich percentages of which items have been invoiced previously.
As far as QuickBooks is concerned, the items and prices in the estimate are notetched in stone; you can change any amounts or quantities you wish while you’recreating the invoice. Your customer, however, may not be quite so lenient, andyour ability to invoice for amounts that differ from the estimate depends on youragreement with the customer.
Entering Line ItemsAfter you choose your progress billing method and click OK, QuickBooks automaticallyfills in the line item section of the invoice based on the approach you selected. Forexample, in Figure 3-4, the line items account for 50 percent of the estimate (becausehalf the work was done).
Changing Line ItemsIf you chose to invoice for a percentage of the estimate’s total, the amount of everyline item on the estimate reflects that percentage. This doesn’t work terribly well for
68 P A R T T W O B O O K K E E P I N G
QckBcks TIGHT / QuickBooks 2009 The Official Guide / Ivens / 274-8 / Chapter 3
FIGURE 3-4 QuickBooks automatically creates the line items based on your selections.
P:\010Comp\QckBcks\274-8\ch03.vpTuesday, September 02, 2008 11:46:17 AM
Color profile: DisabledComposite Default screen
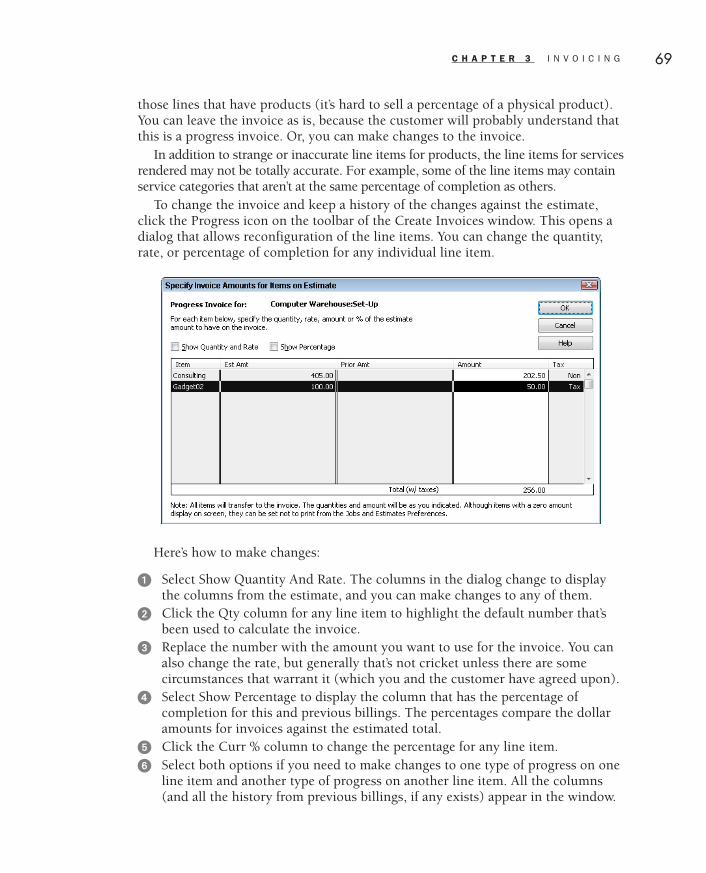
those lines that have products (it’s hard to sell a percentage of a physical product).You can leave the invoice as is, because the customer will probably understand thatthis is a progress invoice. Or, you can make changes to the invoice.
In addition to strange or inaccurate line items for products, the line items for servicesrendered may not be totally accurate. For example, some of the line items may containservice categories that aren’t at the same percentage of completion as others.
To change the invoice and keep a history of the changes against the estimate,click the Progress icon on the toolbar of the Create Invoices window. This opens adialog that allows reconfiguration of the line items. You can change the quantity,rate, or percentage of completion for any individual line item.
Ill 3-3
Here’s how to make changes:
� Select Show Quantity And Rate. The columns in the dialog change to displaythe columns from the estimate, and you can make changes to any of them.
� Click the Qty column for any line item to highlight the default number that’sbeen used to calculate the invoice.
� Replace the number with the amount you want to use for the invoice. You canalso change the rate, but generally that’s not cricket unless there are somecircumstances that warrant it (which you and the customer have agreed upon).
� Select Show Percentage to display the column that has the percentage ofcompletion for this and previous billings. The percentages compare the dollaramounts for invoices against the estimated total.
� Click the Curr % column to change the percentage for any line item.� Select both options if you need to make changes to one type of progress on one
line item and another type of progress on another line item. All the columns(and all the history from previous billings, if any exists) appear in the window.
C H A P T E R 3 I N V O I C I N G 69
QckBcks TIGHT / QuickBooks 2009 The Official Guide / Ivens / 274-8 / Chapter 3
P:\010Comp\QckBcks\274-8\ch03.vpTuesday, September 02, 2008 11:46:17 AM
Color profile: DisabledComposite Default screen

Click OK when you have finished making your adjustments. You return to theinvoice form, where the amounts on the line items have changed to match theadjustments you made. Click Save & New to save this invoice and move on tothe next invoice, or click Save & Close to save this invoice and close the CreateInvoices window.
Using this method to change a line item keeps the history of your estimate andinvoices intact (as opposed to making changes in the amounts directly on theinvoice form, which does not create a good history).
Issuing Credits and RefundsSometimes you have to give money to a customer. You can do this in the form ofa credit against current or future balances, or you can write a check and refundmoney you received from the customer. Neither is a lot of fun, but it’s a fact ofbusiness life.
Creating Credit MemosA credit memo reduces a customer balance. This is necessary if a customer returnsgoods, has been billed for goods that were lost or damaged in shipment, or wins anargument about the price of a service you provided.
The credit memo itself is usually sent to the customer to let the customer knowthe details about the credit that’s being applied. The totals are posted to youraccounting records just as the invoice totals are posted, except there’s an inherentminus sign next to the number. Creating a credit memo is similar to creating aninvoice.
Follow these steps to create a credit memo:
� Choose Customers | Create Credit Memos/Refunds from the menu bar to openthe Create Credit Memos/Refunds transaction window (see Figure 3-5).
� Select a customer or job, and then fill out the rest of the heading.� Move to the line item section and enter the item, the quantity, and the rate for
the items in this credit memo. Don’t use a minus sign—QuickBooks knowswhat a credit is.
� Remember to insert all the special items you need to give credit for, such asshipping.
� You can use the Customer Message field to add any short explanation that’snecessary.
� Click Save & Close to save the credit memo (unless you have more creditmemos to create—in which case, click Save & New).
When you save the credit memo, QuickBooks asks you to specify the way youwant to apply the credit amount. (See the next section, “Applying Credit Memos.”)
70 P A R T T W O B O O K K E E P I N G
QckBcks TIGHT / QuickBooks 2009 The Official Guide / Ivens / 274-8 / Chapter 3
P:\010Comp\QckBcks\274-8\ch03.vpTuesday, September 02, 2008 11:46:17 AM
Color profile: DisabledComposite Default screen

T I P : By default, the credit memo number is the next available invoicenumber. If you change the number because you want a different numberingsystem for credit memos, you’ll have to keep track of numbers manually.QuickBooks will use the next number (the one after this credit memo) for yournext invoice. Therefore, it’s easier to use the default procedure of having one setof continuous numbers for invoices and credit memos.
Applying Credit MemosWhen you save the credit memo, QuickBooks displays a dialog where you canchoose the way to apply this credit.
Ill 3-4
C H A P T E R 3 I N V O I C I N G 71
QckBcks TIGHT / QuickBooks 2009 The Official Guide / Ivens / 274-8 / Chapter 3
FIGURE 3-5 The Credit Memo template has all the fields needed to provide information to thecustomer about the credit.
P:\010Comp\QckBcks\274-8\ch03.vpTuesday, September 02, 2008 11:46:18 AM
Color profile: DisabledComposite Default screen
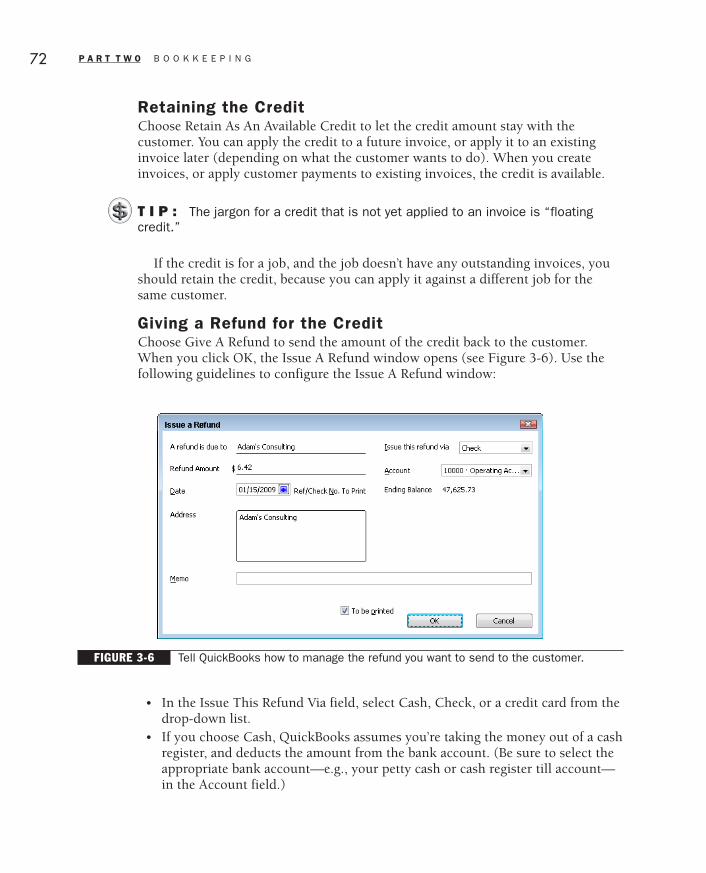
Retaining the CreditChoose Retain As An Available Credit to let the credit amount stay with thecustomer. You can apply the credit to a future invoice, or apply it to an existinginvoice later (depending on what the customer wants to do). When you createinvoices, or apply customer payments to existing invoices, the credit is available.
T I P : The jargon for a credit that is not yet applied to an invoice is “floatingcredit.”
If the credit is for a job, and the job doesn’t have any outstanding invoices, youshould retain the credit, because you can apply it against a different job for thesame customer.
Giving a Refund for the CreditChoose Give A Refund to send the amount of the credit back to the customer.When you click OK, the Issue A Refund window opens (see Figure 3-6). Use thefollowing guidelines to configure the Issue A Refund window:
• In the Issue This Refund Via field, select Cash, Check, or a credit card from thedrop-down list.
• If you choose Cash, QuickBooks assumes you’re taking the money out of a cashregister, and deducts the amount from the bank account. (Be sure to select theappropriate bank account—e.g., your petty cash or cash register till account—in the Account field.)
72 P A R T T W O B O O K K E E P I N G
QckBcks TIGHT / QuickBooks 2009 The Official Guide / Ivens / 274-8 / Chapter 3
FIGURE 3-6 Tell QuickBooks how to manage the refund you want to send to the customer.
P:\010Comp\QckBcks\274-8\ch03.vpTuesday, September 02, 2008 11:46:18 AM
Color profile: DisabledComposite Default screen
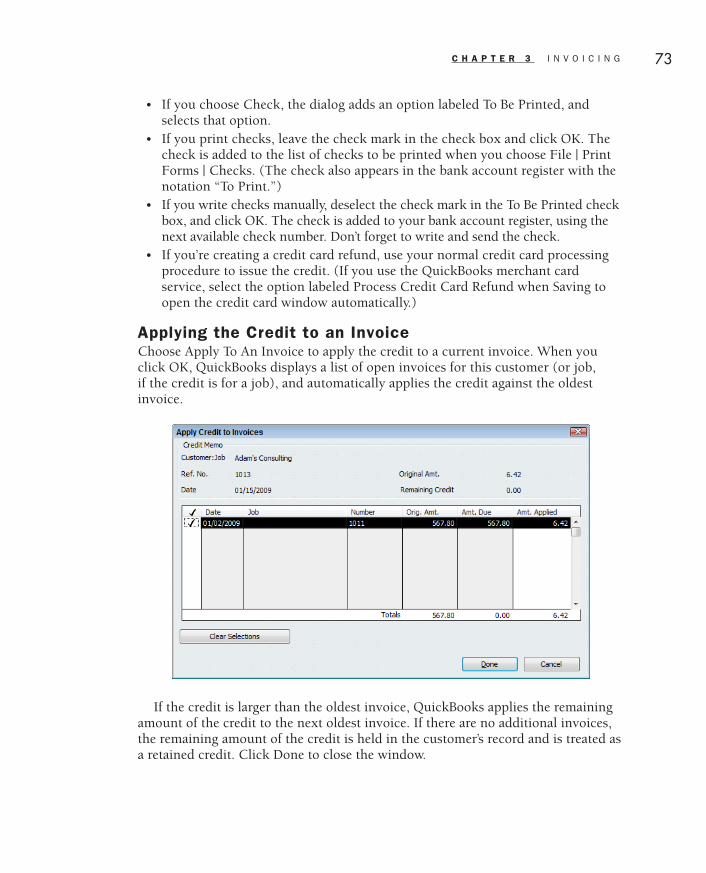
• If you choose Check, the dialog adds an option labeled To Be Printed, andselects that option.
• If you print checks, leave the check mark in the check box and click OK. Thecheck is added to the list of checks to be printed when you choose File | PrintForms | Checks. (The check also appears in the bank account register with thenotation “To Print.”)
• If you write checks manually, deselect the check mark in the To Be Printed checkbox, and click OK. The check is added to your bank account register, using thenext available check number. Don’t forget to write and send the check.
• If you’re creating a credit card refund, use your normal credit card processingprocedure to issue the credit. (If you use the QuickBooks merchant cardservice, select the option labeled Process Credit Card Refund when Saving toopen the credit card window automatically.)
Applying the Credit to an InvoiceChoose Apply To An Invoice to apply the credit to a current invoice. When youclick OK, QuickBooks displays a list of open invoices for this customer (or job,if the credit is for a job), and automatically applies the credit against the oldestinvoice.
Ill 3-5
If the credit is larger than the oldest invoice, QuickBooks applies the remainingamount of the credit to the next oldest invoice. If there are no additional invoices,the remaining amount of the credit is held in the customer’s record and is treated asa retained credit. Click Done to close the window.
C H A P T E R 3 I N V O I C I N G 73
QckBcks TIGHT / QuickBooks 2009 The Official Guide / Ivens / 274-8 / Chapter 3
P:\010Comp\QckBcks\274-8\ch03.vpTuesday, September 02, 2008 11:46:18 AM
Color profile: DisabledComposite Default screen

Creating Sales OrdersMany inventory-based businesses use sales orders as the first step in selling productsto a customer. A sales order is a tentative document, on hold until there is sufficientinventory to fill it or until prices and discounts are approved by management. Nothingon a sales order is posted to the general ledger.
All versions of QuickBooks Premier/Enterprise support sales orders. Sales ordersare as easy to create as invoices, and, in fact, they resemble invoices. To create asales order, choose Customers | Create Sales Orders to open the Create Sales Orderswindow.
When you save a sales order, the transaction isn’t posted to the normal accounts(A/R, Inventory, Income, Cost of Goods, etc.). Instead, QuickBooks posts thetransaction to a special account named Sales Orders.
When you’re ready to ship the products to the customer, you can turn the salesorder into an invoice automatically. Open the sales order and click the CreateInvoice icon on the toolbar.
Sales Order ReportsQuickBooks Premier/Enterprise editions offer two useful reports for tracking salesorders (the names of the reports clearly indicate the contents):
• Open Sales Orders by Customer• Open Sales Orders by Item
Both reports are available in the submenu you see when you choose Reports |Sales.
Generate Purchase Orders from Sales OrdersAutomaticallyIf you entered a sales order instead of an invoice because you were out of product,you have to order the product. Instead of opening a blank purchase order transactionwindow and filling in the data, you can tell QuickBooks Premier/Enterprise editionsto generate the purchase order from the sales order. This saves a lot of time andeffort, and, perhaps more importantly, avoids the possibility of typing errors. Tocreate the purchase order, open the sales order transaction and click the arrow tothe right of the Create Invoice icon on the toolbar. Then select Purchase Order fromthe drop-down menu.
T I P : QuickBooks Premier/Enterprise editions also offer the ability to createpurchase orders automatically from estimates if you need to order products tomove on to invoicing the customer.
74 P A R T T W O B O O K K E E P I N G
QckBcks TIGHT / QuickBooks 2009 The Official Guide / Ivens / 274-8 / Chapter 3
P:\010Comp\QckBcks\274-8\ch03.vpTuesday, September 02, 2008 11:46:19 AM
Color profile: DisabledComposite Default screen

Managing BackordersQuickBooks can keep track of the inventory items you couldn’t ship (and thereforecouldn’t include in an invoice) because you didn’t have enough of those items instock to fill the order.
If you’re preparing a sales order, QuickBooks doesn’t notify you of insufficientquantity until you attempt to convert the sales order to an invoice, unless you’rerunning one of following industry-specific editions: Manufacturing & WholesaleEdition, Retail Edition, or Accountant Edition.
If you can’t ship all the items the customer ordered, when you create the invoice youmust adjust the quantity in the Invoiced column to match the quantity you’re sellingand shipping. Do this for each item in the invoice that has insufficient quantities.
After you change the quantity in the Invoiced column, the invoice changesdepending on the Premier edition you’re using.
In the Accountant, Manufacturing & Wholesale, and Retail Premier editions,QuickBooks automatically enters the difference between the Ordered and Invoicedcolumns in the Backordered column.
In all other Premier editions, no Backorder column or calculation is available.Instead, QuickBooks saves the sales order with the number of units you invoicedrecorded in the sales order. The sales order remains “open.” When you view the salesorder, the products that were invoiced and shipped are marked closed (a check markappears in the Clsd column). The products that had insufficient quantity to ship arenot closed, and the sales order displays the original number of units ordered as wellthe number of units Invoiced. When you receive new products and can fill the salesorder, convert the still-open sales order into an invoice.
QuickBooks does not have the capacity to fill backorders automatically whenproduct arrives in your warehouse. You need to track the status of backordereditems manually. Two reports are available to help you in the Sales section of theReports menu:
• Open Sales Orders by Customer• Open Sales Orders by Item
The Open Sales Orders by Item report is more useful, because it’s sorted by Itemname. When you know that product is available, go to that product’s section of thereport and decide which customer’s order to fill (if sufficient quantity to fill all openorders didn’t arrive). Double-click the sales order you want to fill to open thetransaction window, and enter the quantity to ship. Then convert the sales order toan invoice.
Sending Invoices and Credit MemosYou have several choices about the method you use to send invoices and creditmemos. You can print and mail them, or send them via e-mail—and within thoseoptions are other options, which are discussed in this section.
C H A P T E R 3 I N V O I C I N G 75
QckBcks TIGHT / QuickBooks 2009 The Official Guide / Ivens / 274-8 / Chapter 3
P:\010Comp\QckBcks\274-8\ch03.vpTuesday, September 02, 2008 11:46:19 AM
Color profile: DisabledComposite Default screen

Printing Invoices and Credit MemosYou can print invoices and credit memos on blank paper, preprinted forms on asingle sheet of paper, preprinted multipart forms, or your company letterhead. Youhave to set up your printer in QuickBooks, but once you complete this task youdon’t have to do it again. There are several steps involved in setting up a printer,and they’re not terribly difficult.
Setting Up the Printer for FormsIf you have multiple printers attached to your computer or accessible through anetwork, you have to designate one of them as the invoice printer. If you usemultipart forms, you should have a dot matrix printer. Your printers are alreadyset up in Windows (or should be), so QuickBooks, like all Windows software, hasaccess to them.
Follow these steps to set up a printer for invoices:
� Choose File | Printer Setup from the menu bar to open the Printer Setup dialogand select Invoice from the Form Name drop-down list (you’ll have to performthese steps again for credit memos).
� In the Printer Setup dialog (see Figure 3-7), click the arrow next to the PrinterName box to choose a printer if you have multiple printers available. Thisprinter becomes the default printer for Invoice forms (you can assign differentprinters to different forms, which is a nifty time-saver).
76 P A R T T W O B O O K K E E P I N G
QckBcks TIGHT / QuickBooks 2009 The Official Guide / Ivens / 274-8 / Chapter 3
FIGURE 3-7 Specify the printer and type of paper for invoices.
P:\010Comp\QckBcks\274-8\ch03.vpTuesday, September 02, 2008 11:46:19 AM
Color profile: DisabledComposite Default screen

� In the bottom of the dialog, select the type of form you’re planning to use forinvoices from the following options:• Intuit Preprinted Forms Templates with all your company information,
field names, and row and column dividers already printed. These formsneed to be aligned to match the way your invoice prints. You can alsopurchase the forms from a company that knows about QuickBooks’ invoiceprinting formats, and everything should match just fine. Selecting thisoption tells QuickBooks that only the data needs to be sent to the printerbecause the fields are already printed.
• Blank Paper Selecting this option tells QuickBooks that everything,including your company name and address, field names, etc., must be sentto the printer. This is easiest, but it may not look as pretty as a printed form.Some of us don’t care about pretty—we just want to ship invoices andcollect the payments. But if you care about image this may not be a greatchoice.
• Letterhead This means you print your invoices on paper that has yourcompany name and address (and perhaps a logo) preprinted. Selecting thisoption tells QuickBooks not to print the company information when itprints the invoice.
Setting Up Form AlignmentYou have to test the QuickBooks output against the paper in your printer to makesure everything prints in the right place. To accomplish this, click the Align buttonin the Printer Setup dialog, select the invoice template you’re using (e.g., Service,Product, etc.), and then click OK. The dialog you see to set up alignment differs,depending on the type of printer you’ve selected.
Aligning Dot Matrix PrintersIf you’re using a continuous-feed printer (dot matrix using paper with sprocketholes), you’ll see a dialog that lets you perform both coarse and fine adjustments.This is necessary because you must set the placement of the top of the page, whichyou don’t have to do with a page printer (laser, inkjet).
Start by clicking the Coarse button. A dialog appears telling you that a sampleform is about to be printed and warning you not to make any physical adjustmentsto your printer after the sample has printed. QuickBooks provides another dialogwhere you can make any necessary adjustments. Make sure the appropriatepreprinted form, letterhead, or blank paper is loaded in the printer. Click OK.
The sample form prints to your dot matrix printer and QuickBooks displays adialog asking you to enter pointer line position. You can see the pointer line at thetop of the printed sample. Enter the line it’s on in the dialog and click OK (theprintout numbers the lines). Continue to follow the instructions as QuickBookstakes you through any adjustments that might be needed.
C H A P T E R 3 I N V O I C I N G 77
QckBcks TIGHT / QuickBooks 2009 The Official Guide / Ivens / 274-8 / Chapter 3
P:\010Comp\QckBcks\274-8\ch03.vpTuesday, September 02, 2008 11:46:19 AM
Color profile: DisabledComposite Default screen
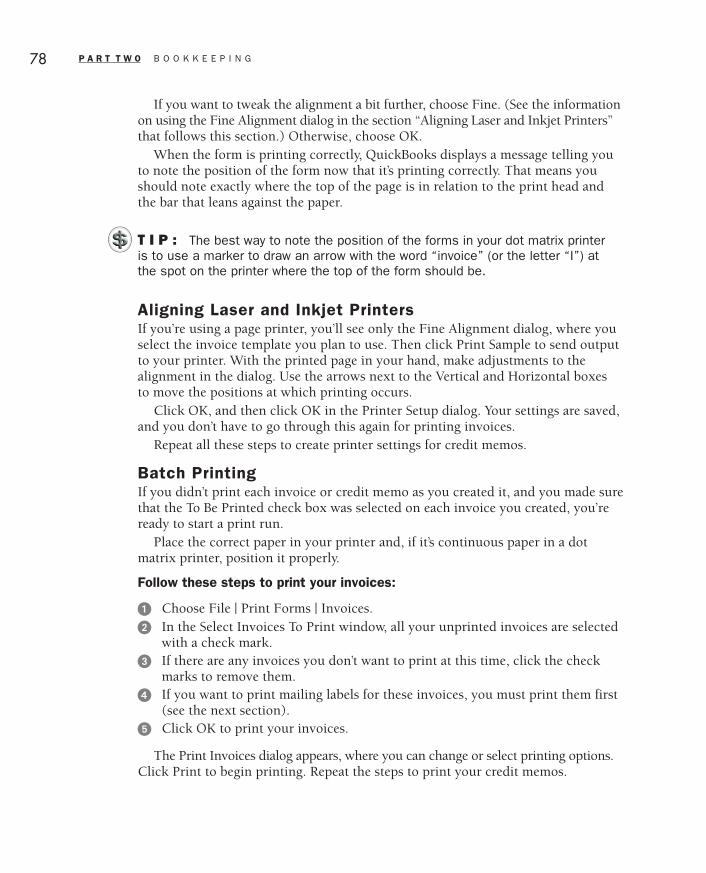
If you want to tweak the alignment a bit further, choose Fine. (See the informationon using the Fine Alignment dialog in the section “Aligning Laser and Inkjet Printers”that follows this section.) Otherwise, choose OK.
When the form is printing correctly, QuickBooks displays a message telling youto note the position of the form now that it’s printing correctly. That means youshould note exactly where the top of the page is in relation to the print head andthe bar that leans against the paper.
T I P : The best way to note the position of the forms in your dot matrix printeris to use a marker to draw an arrow with the word “invoice” (or the letter “I”) atthe spot on the printer where the top of the form should be.
Aligning Laser and Inkjet PrintersIf you’re using a page printer, you’ll see only the Fine Alignment dialog, where youselect the invoice template you plan to use. Then click Print Sample to send outputto your printer. With the printed page in your hand, make adjustments to thealignment in the dialog. Use the arrows next to the Vertical and Horizontal boxesto move the positions at which printing occurs.
Click OK, and then click OK in the Printer Setup dialog. Your settings are saved,and you don’t have to go through this again for printing invoices.
Repeat all these steps to create printer settings for credit memos.
Batch PrintingIf you didn’t print each invoice or credit memo as you created it, and you made surethat the To Be Printed check box was selected on each invoice you created, you’reready to start a print run.
Place the correct paper in your printer and, if it’s continuous paper in a dotmatrix printer, position it properly.
Follow these steps to print your invoices:
� Choose File | Print Forms | Invoices.� In the Select Invoices To Print window, all your unprinted invoices are selected
with a check mark.� If there are any invoices you don’t want to print at this time, click the check
marks to remove them.� If you want to print mailing labels for these invoices, you must print them first
(see the next section).� Click OK to print your invoices.
The Print Invoices dialog appears, where you can change or select printing options.Click Print to begin printing. Repeat the steps to print your credit memos.
78 P A R T T W O B O O K K E E P I N G
QckBcks TIGHT / QuickBooks 2009 The Official Guide / Ivens / 274-8 / Chapter 3
P:\010Comp\QckBcks\274-8\ch03.vpTuesday, September 02, 2008 11:46:19 AM
Color profile: DisabledComposite Default screen

Printing Mailing LabelsIf you need mailing labels, QuickBooks will print them for you. You must print themailing labels before you print the invoices.
In the Select Invoices To Print window, click the Print Labels button to bring upthe Select Labels To Print dialog.
Ill 3-6
The options have been preselected to match a label run for multiple customers,and the customers selected are those customers who have invoices waiting to beprinted. Make changes if you need to, then click OK to open the Print Labels dialog(see Figure 3-8).
C H A P T E R 3 I N V O I C I N G 79
QckBcks TIGHT / QuickBooks 2009 The Official Guide / Ivens / 274-8 / Chapter 3
FIGURE 3-8 Configure the label printing options you need.
P:\010Comp\QckBcks\274-8\ch03.vpTuesday, September 02, 2008 11:46:20 AM
Color profile: DisabledComposite Default screen

QuickBooks assumes you’ve loaded Avery labels into your printer. Select theappropriate printer, specify the label format you use (if you purchased preprintedlabels from QuickBooks, they’re in the drop-down list), and click Print.
After the labels are printed, you’re returned to the Select Invoices To Print dialog.Choose OK to open the Print Invoices dialog and begin printing your invoices.
After you’ve finished printing invoices, check the print job to make sure nothingwent wrong (the printer jammed, you had the wrong paper in the printer, whatever).If anything went amiss, you can reprint the forms you need when the followingdialog appears. (Use the invoice number as the doc number.)
Ill 3-7
If everything is hunky-dory, click OK.
Printing Packing SlipsQuickBooks provides a template for a packing slip, which is basically an invoicethat doesn’t display prices. The theory behind packing slips is that for thewarehouse personnel who manage and pack products, the cost of those productsfalls under the category “none of your business.”
Print the Default Packing SlipTo print the default packing slip, complete the invoice. Then click the arrow next tothe Print icon at the top of the Create Invoices window and select Print PackingSlip from the drop-down list. The Print Packing Slip dialog opens so you can selectyour printing options (which are the same as the options described earlier forprinting invoices).
Change the Default Packing SlipIf you create your own customized packing slip template, you can select it eachtime you print a packing slip. You can also make your own customized design thedefault packing slip by changing the preferences for packing slips.
80 P A R T T W O B O O K K E E P I N G
QckBcks TIGHT / QuickBooks 2009 The Official Guide / Ivens / 274-8 / Chapter 3
P:\010Comp\QckBcks\274-8\ch03.vpTuesday, September 02, 2008 11:46:20 AM
Color profile: DisabledComposite Default screen
Follow these steps to change your packing slip preferences:
� Choose Edit | Preferences to open the Preferences dialog.� Go to the Sales & Customers section and click the Company Preferences tab.� In the Choose Template For Invoice Packing Slip field, select your new packing
slip form from the drop-down list.� Click OK.
If you have multiple packing slips, you can choose any of them for printing.With the completed invoice in the Create Invoices window, instead of selectingPrint Packing Slip from the Print button’s drop-down list, select a packing sliptemplate from the drop-down list in the Template field. The Create Invoiceswindow changes to display the packing slip you select.
Don’t panic when you see prices on the packing slip you’re viewing. The PackingSlip template has one set of configuration options for the screen and another set forthe printed version (the version that omits the price columns). This is true for anypacking slip template you create, and it’s a handy feature, as you’ll learn when youread the section on customizing templates later in this chapter.
To see what the printed version of the packing slip looks like, click the arrownext to the Print icon on the Create Invoices window toolbar and choose Preview.Satisfied? Close the Preview window and return to the Create Invoices window.Now you can print the packing slip.
E-mailing Invoices and Credit MemosQuickBooks provides a way to e-mail invoices and credit memos to customers.(From here on, when you see the word “invoices” it also means credit memos andother customer forms.)
To e-mail an invoice, make sure the completed invoice is in the Create Invoiceswindow. (If you saved the invoice previously, open the Create Invoices window anduse the Previous button to move backward through saved invoices.)
If you’re using Outlook Express, Windows Mail, or Outlook, QuickBooks sendse-mail to your customers directly through your e-mail software. If you use e-mailsoftware other than the supported software, you can use QuickBooks BillingSolutions, which provides a server-based e-mail service. This is a free service, butyou have to sign up for it.
If QuickBooks finds a copy of one of the supported e-mail software applicationson your computer with an active profile installed, your QuickBooks e-mail isautomatically sent using that software. (An active profile is an e-mail accountestablished in the software, and the software is the default e-mail software on yourcomputer.) In that case, the Send Forms category of the Preferences dialog showsyour e-mail software as the default e-mail method. If that option isn’t displayed, youmust use the QuickBooks e-mail service.
C H A P T E R 3 I N V O I C I N G 81
QckBcks TIGHT / QuickBooks 2009 The Official Guide / Ivens / 274-8 / Chapter 3
P:\010Comp\QckBcks\274-8\ch03.vpTuesday, September 02, 2008 11:46:20 AM
Color profile: DisabledComposite Default screen

Using Your E-mail SoftwareIf QuickBooks is using your e-mail software to send transactions forms (or reports),the standard Create Message window appears.
• If the customer’s e-mail address is in the customer record, it’s automaticallyinserted into the To: field.
• If the customer’s e-mail address is not in the customer record, QuickBookssearches your e-mail software address book. If the customer is found, the entryin the To: field is underlined to indicate the name has been matched to anexisting address book entry.
• If the customer’s e-mail address is not available in either place, when you clickSend, your e-mail software opens a dialog so you can add this customer to youraddress book.
The Subject field is prefilled with the text “Invoice from <YourCompanyName>”(if the file you’re attaching isn’t an invoice, the correct form name is automaticallyinserted). The Attachment field is prefilled with the name of the PDF file of thetransaction form. The text of the message is prefilled by QuickBooks. You canchange the message by choosing Edit | Preferences | Send Forms, and clicking theCompany Preferences tab. Then, change the message body text.
Using QuickBooks Billing Solutions for E-mailIf you’re not using one of the supported e-mail applications, QuickBooks fills outthe message and attaches the document in the same way described for using yourown e-mail software.
When you click Send, QuickBooks opens a browser window and takes you tothe QuickBooks Billing Solutions website. If this is the first time you’re e-mailinginvoices, follow the prompts to complete the sign-up process (the service is free),and then QuickBooks sends the e-mail. Thereafter, your e-mail is sentautomatically.
T I P : If you use the QuickBooks Billing Solutions, enter your own name in theCC: field of the message window so you have a record of the e-mail. (If you useyour own software, you have a copy in the Sent Messages folder.)
If you click Send Now to e-mail this invoice immediately, QuickBooks opensa browser window and takes you to the Billing Solutions section, or opens youre-mail software.
If you click Send Later, QuickBooks saves the message, along with any othersyou save, until you’re ready to send all of them.
When you want to e-mail all the invoices, choose File | Send Forms to open theSelect Forms To Send dialog: Here are some guidelines for working with the SelectForms To Send dialog:
82 P A R T T W O B O O K K E E P I N G
QckBcks TIGHT / QuickBooks 2009 The Official Guide / Ivens / 274-8 / Chapter 3
P:\010Comp\QckBcks\274-8\ch03.vpTuesday, September 02, 2008 11:46:20 AM
Color profile: DisabledComposite Default screen

• By default, all e-mails are selected. Deselect an e-mail by clicking the check markin the leftmost column of its listing. Click again to put the check mark back.
• You can delete any item by selecting it and clicking Remove. You’re not deletingthe invoice, you’re deleting the e-mail. You can return to the invoice and send itanytime.
• To edit the message text of any e-mail, double-click its listing, or highlight itand click the Edit E-mail button. Make your changes and click OK.
Click Send Now to e-mail all the selected items.
The Customer Side of E-mailed InvoicesWhen the customer receives your e-mail invoice, the invoice is a PDF attachment.In addition to the message text you sent, below your signature, the e-mail messageincludes a statement that the recipient needs Acrobat Reader to open the attachedinvoice file.
If your customer doesn’t have Adobe Reader installed, the message contains alink that sends your customer to the Adobe website, where the software is availablefor downloading (and it’s free).
Additional Send Features for FormsThe Send drop-down list on the invoice form (and other forms) includes a choicenamed Mail Invoice. This refers to a feature you can sign up for (for a fee) to letQuickBooks print and mail your invoices. The printed form has a tear-offremittance slip, a return envelope, and other features.
You can also add power to your e-mail delivery options by adding a “pay online”feature for customers, available (for a fee) from QuickBooks.
Information about these additional services is available on the QuickBookswebsite (www.quickbooks.com).
Customizing TemplatesQuickBooks makes it easy to customize the forms you use to create transactions.(Forms such as invoices, purchase orders, statements, and so on, are calledtemplates in QuickBooks.)
You can use an existing template as the basis of a new template, copying whatyou like, changing what you don’t like, and eliminating what you don’t need.Templates can be customized in two ways:
• Basic customization Change the appearance by customizing the fonts, colors,and other output settings only—these are minor changes (a form of “windowdressing”) that can be made to built-in Intuit templates.
• Additional customization Customize the fields and columns that appearon the template—these are major changes and require you to create a newtemplate with a new template name.
C H A P T E R 3 I N V O I C I N G 83
QckBcks TIGHT / QuickBooks 2009 The Official Guide / Ivens / 274-8 / Chapter 3
P:\010Comp\QckBcks\274-8\ch03.vpTuesday, September 02, 2008 11:46:20 AM
Color profile: DisabledComposite Default screen

Templates that have the word “Intuit” in the template name are designed to workwith preprinted forms you purchase from Intuit (although you can use them withblank paper or letterhead). Except for the Intuit Packing Slip, you can only usebasic customization on these templates. To use Intuit templates as the basis ofadditional customization, you must make a copy of the template and create a newtemplate from that copy.
Basic Customization of TemplatesTo make minor changes to an existing template, select the template from the drop-down list in the Template field at the top right of the transaction window and clickthe Customize button on the template window toolbar. The Basic Customizationdialog opens (see Figure 3-9), offering a number of ways to change the appearanceof the template to suit your tastes.
84 P A R T T W O B O O K K E E P I N G
QckBcks TIGHT / QuickBooks 2009 The Official Guide / Ivens / 274-8 / Chapter 3
FIGURE 3-9 Change the appearance of a template in the Basic Customization dialog.
P:\010Comp\QckBcks\274-8\ch03.vpTuesday, September 02, 2008 11:46:20 AM
Color profile: DisabledComposite Default screen

Adding a Logo to a TemplateYou can add your company logo to a template by selecting the Use Logo check box.In the Select Image dialog, navigate to the folder that has your logo graphic file, andselect the file. Use the following guidelines to add a logo to a template:
• The logo should be a square shape to fit properly on the template.• QuickBooks accepts all the common graphic formats for your logo. However,
the graphic loads when you print the template, and graphic files saved with aBMP format tend to be larger than other formats and may take quite some timeto load each time you print. The most efficient format, in terms of size andresolution, is JPG.
• Your logo appears in the upper-left corner of the form, unless you open theLayout Designer (covered later in this chapter) to reposition it.
• You won’t see the logo on the screen version of the template.• If you can’t place the logo in the size and position you prefer, consider printing
stationary and using it as the paper source for the template.
Customizing Colors on a TemplateYou can change the color of the lines that appear on the template by selecting acolor scheme from the drop-down list in the Select Color Scheme field. Click ApplyColor Scheme to save the change and see its effect in the Preview pane on the rightside of the dialog.
You can also change the color of any text that’s printed on the form by using thefeatures for changing fonts (covered next) and selecting a color for the font.
Customizing Fonts on a TemplateTo change the fonts for any elements on the template, select the element in theChange Font For list and click Change Font. Select a font, size, effect (such as boldor italic), or color.
Customizing the Company Information on a TemplateYou can select and deselect the text that appears in the name and address block ofyour templates. The data is taken from the Company Information dialog, which youcan open by clicking Update Information, to make sure that the data exists.
Printing Status Stamps on TemplatesYou can select or deselect the option to print the status stamp on a transactiontemplate (PAID, RECEIVED, and so on). The status stamp prints at an angle acrossthe center of the header section of the template. If you deselect the status stamp,you are only removing it from the printed copy of the form; the screen copy alwaysshows the status.
C H A P T E R 3 I N V O I C I N G 85
QckBcks TIGHT / QuickBooks 2009 The Official Guide / Ivens / 274-8 / Chapter 3
P:\010Comp\QckBcks\274-8\ch03.vpTuesday, September 02, 2008 11:46:21 AM
Color profile: DisabledComposite Default screen

Additional Customization of TemplatesYou can make major changes in templates to suit your needs as well as your taste.QuickBooks calls this the “additional customization” feature. Start your customizationby selecting an existing template on which to base your new template.
Duplicating an Existing TemplateThe best (and fastest) way to create a new template based on an existing template isto make a copy of the template you want to use as the base.
Follow these steps to make a copy of the template:
� Choose Lists | Templates to open the Templates window, which displays a list ofall the available templates.
� Right-click the listing of the template you want to use and choose Duplicate.� In the Select Template Type dialog, choose the type of template you’re creating
(the available types differ depending on the type of template you selected), andclick OK.
� The duplicate appears in the list, with the title Copy Of: <name of selectedtemplate>.
Double-click the duplicate template to open it in the Basic Customization dialog.The first task is to give the template a better name, such as ProdInv-BOPref (ifyou’re adding a custom field for customer backorder preferences to the standardProduct Invoice).
86 P A R T T W O B O O K K E E P I N G
QckBcks TIGHT / QuickBooks 2009 The Official Guide / Ivens / 274-8 / Chapter 3
The List of TemplatesIf you’ve just started using QuickBooks, the template names you see in the Templates List mayconfuse you, because you’ll notice that several types of templates aren’t listed. The templates thatappear in the list depend on the preferences you set and the transactions you’ve created.
By default, QuickBooks installs Invoice templates, a Statement template, and a Packing Sliptemplate. You won’t see a Purchase Order template unless you enable Inventory & Purchase Ordersand also open the built-in Purchase Order template by choosing Vendors | Create PurchasesOrders. As soon as the Create Purchase Orders transaction window opens, the Custom PurchaseOrder template appears on the list (you can close the transaction window without creating a POif your only purpose was to add the template to the list). The same paradigm applies to SalesReceipts, Estimates, and other QuickBooks templates.
➽ FYI
P:\010Comp\QckBcks\274-8\ch03.vpTuesday, September 02, 2008 11:46:21 AM
Color profile: DisabledComposite Default screen

Click Manage Templates to open the Manage Templates dialog with yourduplicate template selected in the left pane—the Preview pane (on the right)displays a layout of the template as it currently looks and displays the templatename at the top.
In the Template Name field at the top of the Preview pane, delete the currentname and replace it with the name you want for your new template. Then click OKto return to the Basic Customization dialog.
In the Basic Customization dialog, click Additional Customization to open thedialog seen in Figure 3-10.
Notice that in Figure 3-10, the name of the template includes the text “BOPref,”which refers to a custom field that was created for tracking customer preferencesfor back orders. This field displays on the screen version of the template (becauseit’s a guideline for the user who is filling an order) but doesn’t appear on the printedversion that is sent to the customer.
C H A P T E R 3 I N V O I C I N G 87
QckBcks TIGHT / QuickBooks 2009 The Official Guide / Ivens / 274-8 / Chapter 3
FIGURE 3-10 The Additional Customization dialog lets you point and click to redesign atemplate.
P:\010Comp\QckBcks\274-8\ch03.vpTuesday, September 02, 2008 11:46:21 AM
Color profile: DisabledComposite Default screen

Here’s how custom fields work in transaction templates:
• Custom fields you create in a Names List appear in the Header section.• Custom fields you create in the Items List appear in the Columns section.
Customizing the Template HeaderThe Header section of the Additional Customization dialog includes all the fieldsthat appear above the line items in a transaction form. You can add or remove fieldson the screen form, the printed form, or both. The Preview pane on the right is apreview of the printed form, and as you add or remove fields from the printed formyou see the changes reflected there.
Following are some changes to the Header section that are often effected byQuickBooks users (the data for the fields is automatically filled in using the datain the customer or vendor record):
• If you assign account numbers to your customers, display the Account Numberfield (only available on the printed version).
• If you use Reps, either as commissioned salespersons or as customer supportcontacts, add the Rep field to both the screen and printed versions.
• If you’re tracking jobs for the majority of your customers, add the job nameto the form (only available in the printed version). QuickBooks uses the term“Project” because that’s the commonly used term in most businesses (theexception is the construction trade, where “Job” is a common term). If yourefer to jobs as “jobs” with your customers, you can change the text.
Customizing the Template ColumnsOn the Columns tab of the Additional Customization dialog (see Figure 3-11), youcan add or remove columns that appear in the line item section of the transactionform. If you created custom fields for items, they’re available for any template youdesign.
If progress invoicing is turned on, another columns tab, called Prog Cols, isavailable for customizing the transaction form you use when you create a progressinvoice against an estimate.
Customizing the Template FooterThe Footer tab (see Figure 3-12) contains the elements that appear at the bottomof the transaction form. If you want to add additional fields to this section of theprinted transaction form, you’ll have to use the Layout Designer to maneuver thepositioning, because you don’t have a lot of space to work with.
Using the Layout DesignerAs you customize the printed forms, you can see the effects in the Preview pane.QuickBooks warns you about overlapping fields, and you must fix that problem.
88 P A R T T W O B O O K K E E P I N G
QckBcks TIGHT / QuickBooks 2009 The Official Guide / Ivens / 274-8 / Chapter 3
P:\010Comp\QckBcks\274-8\ch03.vpTuesday, September 02, 2008 11:46:21 AM
Color profile: DisabledComposite Default screen

C H A P T E R 3 I N V O I C I N G 89
QckBcks TIGHT / QuickBooks 2009 The Official Guide / Ivens / 274-8 / Chapter 3
FIGURE 3-11 Add columns to specify details of the items you’re including in the transaction.
FIGURE 3-12 Add fields from the footer tab to add more information to the transaction form.
P:\010Comp\QckBcks\274-8\ch03.vpTuesday, September 02, 2008 11:46:22 AM
Color profile: DisabledComposite Default screen
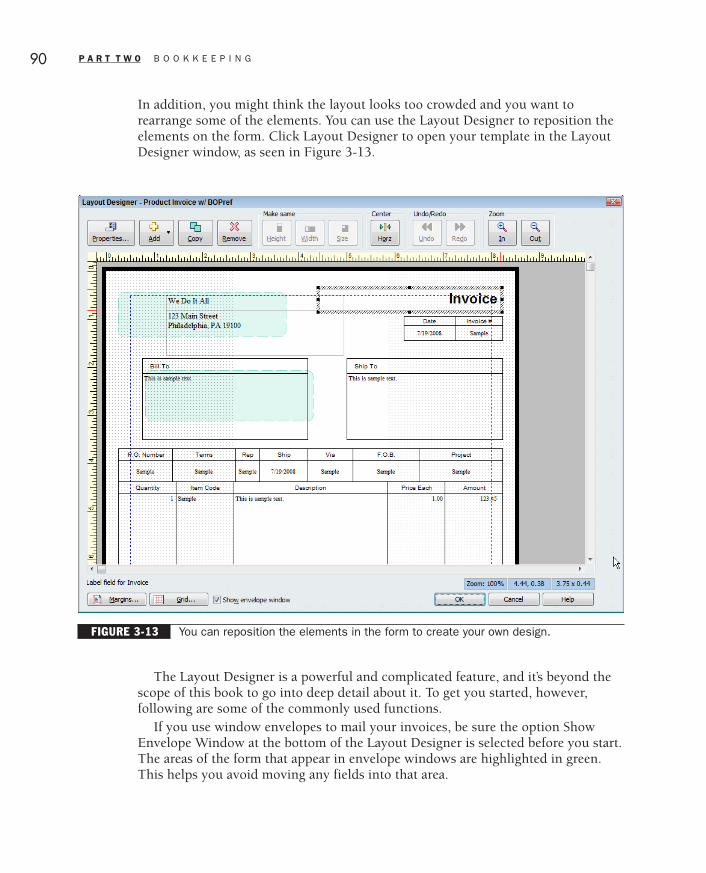
In addition, you might think the layout looks too crowded and you want torearrange some of the elements. You can use the Layout Designer to reposition theelements on the form. Click Layout Designer to open your template in the LayoutDesigner window, as seen in Figure 3-13.
The Layout Designer is a powerful and complicated feature, and it’s beyond thescope of this book to go into deep detail about it. To get you started, however,following are some of the commonly used functions.
If you use window envelopes to mail your invoices, be sure the option ShowEnvelope Window at the bottom of the Layout Designer is selected before you start.The areas of the form that appear in envelope windows are highlighted in green.This helps you avoid moving any fields into that area.
90 P A R T T W O B O O K K E E P I N G
QckBcks TIGHT / QuickBooks 2009 The Official Guide / Ivens / 274-8 / Chapter 3
FIGURE 3-13 You can reposition the elements in the form to create your own design.
P:\010Comp\QckBcks\274-8\ch03.vpTuesday, September 02, 2008 11:46:22 AM
Color profile: DisabledComposite Default screen

Select any element to put a frame around it. Now you can perform an action onthe frame, as follows:
• To change the size of the element, position your pointer on one of the sizinghandles on the frame, then drag the handle to resize the element.
• To move an element, position your pointer inside the frame and, when yourpointer turns into a four-headed arrow, drag the frame to a different locationon the form.
• Double-click an element’s frame to see a Properties dialog that permits all sortsof changes for the selected element.
Ill 3-8
• To change the margin measurements, click the Margins button at the bottom ofthe Layout Designer.
• Click the Grid button to open the Grid and Snap Settings dialog where you caneliminate the dotted line grid, change the spacing between grid lines, or turnoff the Snap To Grid option (automatically aligns objects to the nearest pointon the grid).
• Use the toolbar buttons to align, resize, and zoom into the selected elements.There’s also an Undo/Redo button, thank goodness.
When you finish with the Layout Designer, click OK to move back to theAdditional Customization window. If everything is just the way you want it, saveyour new template by clicking OK. This new template name appears on the drop-down list when you create transaction forms.
T I P : You can also use this new template as the basis for other customizations.
C H A P T E R 3 I N V O I C I N G 91
QckBcks TIGHT / QuickBooks 2009 The Official Guide / Ivens / 274-8 / Chapter 3
P:\010Comp\QckBcks\274-8\ch03.vpTuesday, September 02, 2008 11:46:23 AM
Color profile: DisabledComposite Default screen

Using Memorized InvoicesIf you have a recurring invoice (most common if you have a retainer agreementwith a customer), you can automate the process of creating it. Recurring invoicesare those that are sent out at regular intervals, usually for the same amount.
Create the first invoice, filling out all the fields. If there are any fields that willchange each time you send the invoice, leave those fields blank and fill them outeach time you send the invoice. Then press CTRL-M to open the MemorizeTransaction dialog.
Ill 3-9
Fill in the fields using the following guidelines:
• Change the title in the Name box to reflect what you’ve done. It’s easiest to adda word or phrase to the default title (which is the customer or job name), suchas Retainer. You can use up to 31 characters, including spaces, in the Name box.
• Choose Remind Me and specify how and when you want to be reminded in theHow Often and Next Date fields. The reminder will appear in the automaticQuickBooks Reminder window.
• Choose Automatically Enter if you want QuickBooks to issue this invoiceautomatically. If you opt for automatic issuing of this invoice, you must fillin the fields so that QuickBooks performs the task accurately, as follows:• The How Often field is where you specify the interval for this invoice, such
as monthly, weekly, or so on. Click the arrow to see the drop-down list andchoose the option you need.
• The Next Date field is the place to note the next instance of this invoice.• The Number Remaining field is a place to start a countdown for a specified
number of invoices. This is useful if you’re billing a customer for a finitenumber of months because you have a contract for a specified numberof years.
• The Days In Advance To Enter field is for specifying the number of days inadvance of the next date you want QuickBooks to create the invoice.
92 P A R T T W O B O O K K E E P I N G
QckBcks TIGHT / QuickBooks 2009 The Official Guide / Ivens / 274-8 / Chapter 3
P:\010Comp\QckBcks\274-8\ch03.vpTuesday, September 02, 2008 11:46:23 AM
Color profile: DisabledComposite Default screen

Click OK when you have finished filling out the dialog. Then click Save & Closein the Invoice window to save the transaction. Later, if you want to view, edit, orremove the transaction, you can select it from the Memorized Transaction List bypressing CTRL-T.
Additional Features in Some Editions ofQuickBooksSome industry-specific editions of QuickBooks Premier and Enterprise Solutionsoffer additional features to match the needs of the industries they’re designed for.
Sales Order Fulfillment WorksheetYou can use the Sales Order Fulfillment Worksheet to decide how to fill sales orderswhen there is insufficient stock to fill all sales orders waiting for inventory to arrive(backorders). This feature is available in the following industry-specific editions:
• Accountant• Mfg & Wholesale• Retail
To view the worksheet, choose Customers | Sales Order Fulfillment Worksheet,which opens with a list of sales orders that couldn’t be converted to invoicesbecause there was an insufficient quantity of inventory available.
In the sales order listing at the top of the window, QuickBooks uses symbols toindicate the fulfillment status of each sales order:
• A solid green circle means there is sufficient stock to fill the order.• A half filled amber circle means there is sufficient stock to ship a partial order.
This could mean that less stock than ordered is available for the items in thesales order, or one (or more) items on the sales order is out of stock (eventhough there is sufficient stock to fill the order on another item.
• A square with a red X means there is no stock available to fill the order.
Select any sales order to display stock status details for that order in the bottomof the window. QuickBooks uses the same symbols to indicate the fulfillmentcapabilities of each item in the sales order.
The fact that more than one sales order has a green circle doesn’t mean you canfulfill all the “green circle” sales orders. Depending on stock availability, it couldmean that you can fulfill one order, and when you do, the stock is used and theother sales orders won’t be filled (and their symbols will change appropriately).
Click the button labeled Choose For Me to display a drop-down list of choicesyou can select if you want QuickBooks to select the sales order(s) to fillautomatically.
C H A P T E R 3 I N V O I C I N G 93
QckBcks TIGHT / QuickBooks 2009 The Official Guide / Ivens / 274-8 / Chapter 3
P:\010Comp\QckBcks\274-8\ch03.vpTuesday, September 02, 2008 11:46:23 AM
Color profile: DisabledComposite Default screen

QckBcks TIGHT / QuickBooks 2009 The Official Guide / Ivens / 274-8Blind 94
P:\010Comp\QckBcks\274-8\ch03.vpTuesday, September 02, 2008 11:46:23 AM
Color profile: DisabledComposite Default screen

Chapter
Chapter
44Receiving Payments
In this chapter:
• Apply customer invoice payments
• Apply credits and discounts to invoices
• Handle cash sales
• Deposit income into your bank account
95
QckBcks TIGHT / QuickBooks 2009 The Official Guide / Ivens / 274-8 / Chapter 4
P:\010Comp\QckBcks\274-8\ch04.vpTuesday, September 02, 2008 11:49:55 AM
Color profile: DisabledComposite Default screen

The best part of accounts receivable chores is receiving the payments. However, youneed to make sure you apply customer payments correctly so that you and yourcustomers have the same information in your records.
(If you’ve enabled the Multicurrency feature, you see references to the customer’scurrency in the transaction windows, and you use the customer’s currency for thetransaction.)
Receiving Invoice PaymentsAs you create invoices and send them to your customers, there’s an expectation thatmoney will eventually arrive to pay off those invoices. And, in fact, it almost alwaysworks that way. In accounting, there are two ways to apply the receipts that pay offinvoices:
Balance Forward This is a system in which you consider the total of all theoutstanding invoices as the amount due from the customer, and you applypayments against that total. It doesn’t matter which particular invoice is being paidbecause it’s a running total of payments against a running total of invoices.
Open Item This is a system in which payments you receive are applied to specificinvoices. Most of the time, the customer either sends a copy of the invoice alongwith the check or notes the invoice number that is being paid on the check stub tomake sure your records agree with the customer’s records.
Recording an Invoice PaymentWhen a payment arrives from a customer who has received an invoice from you,you have to apply the payment to the customer’s invoice.
Follow these steps to apply a payment:
� Click the Receive Payments icon on the Home page (or choose Customers |Receive Payments from the menu bar), to bring up a blank Receive Paymentswindow, as shown in Figure 4-1.
� Click the arrow to the right of the Received From field and select the customeror job from the drop-down list as follows:• If the payment is from a customer for whom you’re not tracking jobs (or for an
invoice that wasn’t related to a job), select the customer. The current balance forthis customer automatically appears in the Customer Balance field.
• If the payment is for a job, select the job. The current balance for this jobautomatically appears in the Customer Balance field.
• If the payment covers multiple jobs, select the customer to see all invoicesfor all jobs. The current balance for this customer automatically appears inthe Customer Balance field.
� In the Amount field, enter the amount of this payment. (You can omit this stepand let QuickBooks calculate the amount of the payment—see the section“Calculating the Payment.”)
96 P A R T T W O B O O K K E E P I N G
QckBcks TIGHT / QuickBooks 2009 The Official Guide / Ivens / 274-8 / Chapter 4
P:\010Comp\QckBcks\274-8\ch04.vpTuesday, September 02, 2008 11:49:55 AM
Color profile: DisabledComposite Default screen

� Click the arrow to the right of the Pmt. Method field and select the paymentmethod:• If the payment method is a credit card, complete the Card No. and Exp.
Date fields. If you have a merchant account with the QuickBooks MerchantAccount Service, click the option Process <credit card name> Payment WhenSaving to start the credit card processing function automatically after yousave the transaction.
• If the payment method is a check, enter the check number in the Check # field.� The Memo field is optional, and you can use it to attach a note about the
payment if you think it’s necessary.
In the Deposit To field (if it exists), select the bank account for depositing thepayment, or select Undeposited Funds if you’re using that account to receivepayments (see the section “Depositing Income,” later in this chapter). If the DepositTo field doesn’t exist, you’ve set your Sales & Customers Preferences to depositpayments to the Undeposited Funds account.
N O T E : You can add any additional payment methods you need by choosing<Add New> in the Pmt. Method drop-down list (see Chapter 2 to learn aboutadding items to QuickBooks lists).
C H A P T E R 4 R E C E I V I N G P A Y M E N T S 97
QckBcks TIGHT / QuickBooks 2009 The Official Guide / Ivens / 274-8 / Chapter 4
FIGURE 4-1 The Customer Payment form has all the fields needed to apply payments accurately.
P:\010Comp\QckBcks\274-8\ch04.vpTuesday, September 02, 2008 11:49:56 AM
Color profile: DisabledComposite Default screen

Calculating the PaymentIf you’ve enabled the Automatically Calculate Payments option in the Sales &Customers category of the Preferences dialog, you can omit data entry in theAmount field in the heading section, and go directly to the list of invoices in theReceive Payments window. As you select each invoice for payment, QuickBookscalculates the total and places it in the Amount field. For some reason, when youclick the first invoice listing, QuickBooks opens a dialog asking you if you’d like toturn off this option.
If you haven’t enabled the option to calculate payments automatically, and youselect an invoice listing without entering the amount of the payment first,QuickBooks issues an error message. Enter the amount of the payment in theAmount field at the top of the window.
Applying Payments to InvoicesNow you have to apply the payment against the customer invoices. By default,QuickBooks automatically applies the payment to the oldest invoice, unless theamount of the payment exactly matches the amount of another invoice.
You can force QuickBooks to let you apply payments to specific invoices insteadof automatically heading for the oldest invoice, or matching an invoice for anamount equal to the payment, by changing the options in the Preferences dialog.Choose Edit | Preferences and click the Sales & Customers icon in the left pane. Onthe Company Preferences tab, deselect the option labeled Automatically ApplyPayments.
You could face several scenarios when receiving customer payments:
• The customer has one unpaid invoice, and the payment is for the same amountas that invoice.
• The customer has several unpaid invoices, and the payment is for the amountof one of those invoices.
• The customer has one or more unpaid invoices, and the payment is for anamount lower than any single invoice.
• The customer has several unpaid invoices, and the payment is for an amountgreater than any one invoice but not large enough to cover two invoices.
• The customer has one or more unpaid invoices, and the payment is for a lesseramount than the current balance. However, the customer has a credit equal tothe difference between the payment and the customer balance.
You have a variety of choices for handling any of these scenarios, but forsituations in which the customer’s intention isn’t clear, the smart thing to do is callthe customer and ask how the payment should be applied. You can manually enterthe amount you’re applying against an invoice in the Payment column. You must, ofcourse, apply the entire amount of the customer’s check.
98 P A R T T W O B O O K K E E P I N G
QckBcks TIGHT / QuickBooks 2009 The Official Guide / Ivens / 274-8 / Chapter 4
P:\010Comp\QckBcks\274-8\ch04.vpTuesday, September 02, 2008 11:49:56 AM
Color profile: DisabledComposite Default screen

If you are not tracking invoices and are instead using a balance forward system,just let QuickBooks continue to apply payments against the oldest invoices.
If the customer sent a copy of the invoice with the payment or indicated theinvoice number on the check or stub, always apply the payment to that invoice,even if it means an older invoice remains unpaid. Customers sometimes do thisdeliberately, usually because there’s a problem with the older invoice. The rule ofthumb is “apply payments according to the customer’s wishes.” Otherwise, whenyou and the customer have a conversation about the current open balance, yourbookkeeping records won’t match.
If the customer payment doesn’t match the amount of any invoice, check to seewhether the customer indicated a specific invoice number for the payment. If so,apply the payment against that invoice; if not, let the automatic selection of theoldest invoice stand.
Handling UnderpaymentsAfter you apply the customer’s payment, if it isn’t sufficient to pay off an existinginvoice, the Receive Payments window displays a message that asks whether you wantto leave the underpaid amount as an underpayment, or write it off (see Figure 4-2).
C H A P T E R 4 R E C E I V I N G P A Y M E N T S 99
QckBcks TIGHT / QuickBooks 2009 The Official Guide / Ivens / 274-8 / Chapter 4
FIGURE 4-2 You must decide how to handle the underpayment.
P:\010Comp\QckBcks\274-8\ch04.vpTuesday, September 02, 2008 11:49:56 AM
Color profile: DisabledComposite Default screen

If you opt to retain the underpayment, the invoice you selected for paymentremains as a receivable (an unpaid invoice balance), with a new balance (theoriginal balance less the payment you applied). When you click Save & Close (orSave & New if you’re entering more customer payments), QuickBooks makes theappropriate postings.
If you select the option to write off the underpayment, when you click Save &Close or Save & New, QuickBooks opens the Write Off Amount dialog so you canchoose the posting account, and, if applicable, apply a class to the transaction.
Discuss the account to use for a write off with your accountant. You can create anIncome or Expense account for this purpose, depending on the way your accountantwants to track receivables you’ve decided to forgive. Do not use this feature as a “baddebt” solution, because writing off bad debts for tax purposes is a more complicatedfunction than merely deciding, “Oh, what the heck, I’ll let this slide.”
Applying Credits to InvoicesYou can apply any existing floating credits to an open invoice, in addition to applyingthe payment that arrived. A floating credit is a credit you issued and did not apply toan existing invoice at that time. If you did apply the credit to an invoice, that invoiceis already reduced by the amount of the credit in the Receive Payments window.
If floating credits exist, customers usually let you know how they want themapplied, and it’s not unusual to find a note written on the copy of the invoice thatthe customer sent along with the check. To apply a credit balance to an invoice,click the Discount & Credits button on the Customer Payment window, whichopens the Discount And Credits dialog.
Ill 4-1
100 P A R T T W O B O O K K E E P I N G
QckBcks TIGHT / QuickBooks 2009 The Official Guide / Ivens / 274-8 / Chapter 4
P:\010Comp\QckBcks\274-8\ch04.vpTuesday, September 02, 2008 11:49:57 AM
Color profile: DisabledComposite Default screen

Select the credit you want to apply. Depending on the circumstances, here’s howQuickBooks handles the credits:
The Credit Total Is Equal to or Less Than the Unpaid Amount of the OldestInvoice This reduces the balance due on that invoice. If the customer sent apayment that reflects a deduction for the amount of his or her credits (a commonscenario), so that the credit total is equal to the unpaid amount, the invoice has noremaining balance.
If applying the existing credit along with the payment doesn’t pay off the invoice,the balance due on the invoice is reduced by the total of the payment and the credit.
The amount of the credit is added to the postings for the invoice. Don’t worry—this change only affects the invoice balance and the accounts receivable posting; itdoesn’t change the amount of the payment that’s posted to your bank account.
The Credit Total Is Larger Than the Amount Required to Pay Off an InvoiceIf the customer payment is smaller than the amount of the invoice, but the amountof credit is larger than the amount needed to pay off the invoice, the balance of thecredit is available for posting to another invoice.
To apply the unapplied credit balance to another invoice, click Done and selectthe next invoice in the Receive Payments window. Then click the Discount &Credits button and apply the credit balance (or as much of it as you need) againstthe invoice. Any unused credits remain available for the future.
You should send a statement to the customer to reflect the current, new invoicebalances as a result of applying the payments and the credits (even though thecustomer’s accounting software probably reflects the facts accurately).
Applying Credits to a Different JobYou may have a situation in which a customer has already paid the invoices for ajob when the credit is created, or has paid for part of the job, exceeding the amountof the credit. If the customer tells you to apply the credit balance to another job orto float the credit and apply it against the next job, you have a problem.
QuickBooks does not have a way to move a credit from one job to another job.You have the same problem if you created a credit for a customer that has one ormore jobs but you applied the credit directly to the customer instead of a job.However, there are some workarounds you can use.
If the credit balance is linked to Job A, but you want to post it to Job B, you haveto perform the following tasks:
� Create an invoice for the amount of the credit for Job A.� Apply the credit linked to Job A to this invoice (which washes the amounts so
you haven’t added or subtracted to your Profit & Loss statement).� Create a credit memo for the same amount for Job B (which puts that amount
back into your financial records).� Apply the credit memo for Job B to the appropriate open invoice for Job B.
C H A P T E R 4 R E C E I V I N G P A Y M E N T S 101
QckBcks TIGHT / QuickBooks 2009 The Official Guide / Ivens / 274-8 / Chapter 4
P:\010Comp\QckBcks\274-8\ch04.vpTuesday, September 02, 2008 11:49:57 AM
Color profile: DisabledComposite Default screen

Another technique is to wash the credit with a debit via a journal entry. To dothis, you need to have a “wash” account. You can create an account of the typeOther Expense named “Exchanges” and use it for this purpose.
Follow these steps to use journal entries:
� Choose Company | Make General Journal Entries to open the Make GeneralJournal Entries window.
� In the Account column, select the Accounts Receivable account and press TAB.� In the Debit column, enter the amount of the credit.� Optionally, enter a note to yourself in the Memo column (e.g., Moving CM #
xxx) and press TAB.� In the Name column, select the Customer:Job listing from which you are
removing the credit and press TAB to move to the next line.� In the Account column, select the “wash” account. QuickBooks automatically
puts the correct amount in the Credit column.� Click Save & New to open a new, blank General Journal Entry window. In the Account column, select the Accounts Receivable account and press TAB
twice to move to the Credit column. In the Credit column, enter the amount of the credit and press TAB.� Optionally, write a note to yourself in the Memo column (e.g., Moving CM #
xxx) and press TAB.� In the Name column, select the Customer:Job listing to which you are applying
the credit and press TAB. In the Account column, enter the “wash” account. QuickBooks automatically
puts the correct amount in the Debit column.� Click Save & Close.
You need to create separate journal entries instead of doing everything in one fellswoop because QuickBooks does not permit you to use the A/R or A/P accountmultiple times in the same journal entry.
Both of these workarounds create an audit trail that you can understand in thefuture and that your accountant will approve of.
C A U T I O N : Many of you will have figured out that merely deleting thecredit memo and creating a new one for the right job is easy (and that’s whatyou’ll do). The math works, but the potential problems are serious. You don’thave a logical trail to follow if you have to explain the sequence of events to yourcustomer or the IRS.
102 P A R T T W O B O O K K E E P I N G
QckBcks TIGHT / QuickBooks 2009 The Official Guide / Ivens / 274-8 / Chapter 4
P:\010Comp\QckBcks\274-8\ch04.vpTuesday, September 02, 2008 11:49:57 AM
Color profile: DisabledComposite Default screen

Applying Discounts for Timely PaymentsIf you offer your customers terms that include a discount if they pay their billspromptly (for instance, 2% 10 Net 30), you must apply the discount to the paymentif it’s applicable.
Figure 4-3 shows the Receive Payments window for a customer who has beenoffered a discount for timely payment and has taken it by reducing the amount ofthe payment. The only clue you have to explain the difference between the paymentamount and the invoice amount is the fact that the Disc. Date column shows thedate by which the invoice must be paid to receive the discount. For customers orinvoices without discount terms, that column is blank in the Receive Paymentswindow.
QuickBooks doesn’t apply the discount automatically, for instance, by offering acolumn with the discount amount and selecting that amount as part of thepayment. Instead, you must select the invoice (unless QuickBooks automatically
C H A P T E R 4 R E C E I V I N G P A Y M E N T S 103
QckBcks TIGHT / QuickBooks 2009 The Official Guide / Ivens / 274-8 / Chapter 4
FIGURE 4-3 A discount date appears for invoices that have terms with built-in discounts.
P:\010Comp\QckBcks\274-8\ch04.vpTuesday, September 02, 2008 11:49:57 AM
Color profile: DisabledComposite Default screen

selected it in order to apply the payment) and click the Discount & Credits buttonto see the Discount And Credits dialog connected to this invoice.
Ill 4-2
If the payment arrived by the discount date, QuickBooks inserts the amount ofthe discount to use. Accept the amount of discount and enter a Discount Account(see “Posting Discounts” later in this section). Click Done.
You can change the amount of the discount, which you may want to do if thecustomer only made a partial payment (less than is required to pay off the invoiceafter the discount is applied) and you want to give a proportionately smallerdiscount.
When you return to the Receive Payments window, you’ll see that QuickBookshas changed the Amt. Due column to reflect the discount. If the Amt. Due figureand the customer payment amount are the same, the invoice is now paid off.
Applying Discounts for Untimely PaymentsSometimes customers take the discount even if the payment arrives after thediscount date. (It’s probably more accurate to say that customers always take thediscount even if the payment arrives later than the terms permit.) You can apply thepayment to the invoice and leave a balance due for the discount amount that wasdeducted by the customer, if you wish. However, most companies give the customerthe discount even if the payment is late, as part of “good will.”
104 P A R T T W O B O O K K E E P I N G
QckBcks TIGHT / QuickBooks 2009 The Official Guide / Ivens / 274-8 / Chapter 4
P:\010Comp\QckBcks\274-8\ch04.vpTuesday, September 02, 2008 11:49:57 AM
Color profile: DisabledComposite Default screen

When you click the Discount Info button in that case, QuickBooks does notautomatically fill in the discount amount—it’s too late, and accounting software isnot forgiving, generous, or aware of the need to humor customers to preserve goodwill. Simply enter the amount manually and then click Done to apply the discountto the invoice.
Posting DiscountsTo track the amount of money you’ve given away with discounts, you should createa specific account in your chart of accounts. You could post discounts to yourstandard income account(s), which will be reduced every time you apply adiscount. The math is right, but the absence of specific information about discountsgiven bothers most accountants. It’s better to create an Income account to trackthese transactions, and the best name for the account is “Discounts Given.”
C A U T I O N : If there’s an account named “Discounts” in the part of yourchart of accounts that’s devoted to expenses or cost of goods, don’t use thataccount for your customer discounts. That account exists to track the discountsyou take with your vendors.
Understanding Customer Payment PostingsWhen you receive money in payment for customer invoices, QuickBooksautomatically posts all the amounts to your general ledger. The following tablesassume you’re using the Undeposited Funds account instead of depositing moniesyou receive directly into the bank account. See the section “Depositing Income” tolearn more about using the Undeposited Funds account.
Account Debit Credit
Undeposited Funds Total of cash receipts
Accounts Receivable Total of cash receipts
Here are the postings for a sale to a customer who has terms that permit a 1%discount. Let’s assume the sale was for $100.00. The original invoice posted thefollowing amounts:
Account Debit Credit
Accounts Receivable $100.00
Income $100.00
C H A P T E R 4 R E C E I V I N G P A Y M E N T S 105
QckBcks TIGHT / QuickBooks 2009 The Official Guide / Ivens / 274-8 / Chapter 4
P:\010Comp\QckBcks\274-8\ch04.vpTuesday, September 02, 2008 11:49:58 AM
Color profile: DisabledComposite Default screen

Notice that the postings are unconcerned with the discount amount. You don’taccount for the discount until it occurs (the customer reduces the payment amountby applying the discount amount).
When the customer’s payment arrived, the 1% discount was deducted from theinvoice total. When you enter the customer payment, which is in the amount of$99.00, the following postings occur:
Account Debit Credit
Undeposited Funds or Bank Account $99.00
Accounts Receivable $100.00
Discounts Given $1.00
Handling Cash SalesA cash sale is a sale for which you haven’t created an invoice, because the exchangeof product and payment occurred simultaneously, or you received money for anorder you’ll ship to the customer.
Cash sales are the same as invoiced sales insofar as an exchange of money forgoods or services occurs. The difference is that there’s no period of time duringwhich you have money “on the street.”
N O T E : QuickBooks uses the term “sales receipt” instead of “cash sale.”However, the term cash sale is the common jargon (a sales receipt is a piece ofpaper a cash customer receives).
N O T E : Don’t take the word “cash” literally, because a cash sale can involvea check or a credit card.
There are two methods for handling cash sales in QuickBooks:
• Record each cash sale as a discrete record. This is useful for tracking sales ofproducts or services to customers. It provides a way to maintain records aboutthose customers in addition to tracking income and inventory.
• Record sales in batches (usually one batch for each business day). This methodtracks income and inventory when you have no desire to maintain informationabout each customer that pays cash.
To record a cash sale, click the Create Sales Receipts icon on the Home page (orchoose Customers | Enter Sales Receipts from the menu bar) to open the EnterSales Receipts window shown in Figure 4-4.
106 P A R T T W O B O O K K E E P I N G
QckBcks TIGHT / QuickBooks 2009 The Official Guide / Ivens / 274-8 / Chapter 4
P:\010Comp\QckBcks\274-8\ch04.vpTuesday, September 02, 2008 11:49:58 AM
Color profile: DisabledComposite Default screen

Entering Cash Sale DataIf you want to track customer information, enter a name in the Customer:Job fieldor select the name from the drop-down list. If the customer doesn’t exist, you canadd a new customer by choosing <Add New>.
T I P : If you track customers who always pay at the time of the sale, you mightwant to consider creating a customer type for this group (“Cash” seems anappropriate name for the type). You can separate this group for reports or formarketing and advertising campaigns.
If you’re not tracking customers, invent a customer for cash sales (you can namethe customer “Cash Sale,” which is appropriate, if not creative).
T I P : Even if you don’t track individual cash customers, you can put thecustomer’s name and address in the Bill To box. After you print and save thetransaction, QuickBooks asks if you want to change the Bill To information in thecustomer record of your generic cash customer. Click No. In the future, when youview the transactions for that generic customer, the name and address of thespecific customer for each cash sale remain in the box.
C H A P T E R 4 R E C E I V I N G P A Y M E N T S 107
QckBcks TIGHT / QuickBooks 2009 The Official Guide / Ivens / 274-8 / Chapter 4
FIGURE 4-4 Use a sales receipt when you receive payment at the time of the sale—no invoiceexists.
P:\010Comp\QckBcks\274-8\ch04.vpTuesday, September 02, 2008 11:49:58 AM
Color profile: DisabledComposite Default screen

Every field in the Enter Sales Receipts window works exactly the way it works forinvoices and payments—just fill in the information. To save the record, click Save &New to bring up a new blank record, or click Save & Close if you’re finished.
Handling Batches of Cash SalesIf you sell products or services and receive instant payment on a more frequent basis,you might want to consider batching the transactions. This works only if you don’tcare about maintaining information about the customers and no customer expects areceipt. This technique also works if you have a business in which sales and servicepersonnel return to the office each day with customer payments in hand.
You can make this easier by creating a customized Sales Receipt transactiontemplate with the following guidelines:
• Name the form appropriately (for example, “Batch Sales” or “Sales Batch”).• On the Header tab, keep only the Date and Sale No fields in the heading.• On the Fields tab, deselect all the optional fields.• On the Footer tab, remove the Message field.
N O T E : Some Premier/Enterprise editions have a batch sale template,named Daily Sales Summary, built in. Select that template to record batch sales.
To batch-process cash sales, use the following guidelines:
• Use a customer named “Cash” or “CashSale.”• In the line item section, use a new line for each sale, regardless of whether the
same customer is purchasing each item, each item is purchased by a differentcustomer, or there’s a combination of both events.
• Use the Save & Close button at the end of the day. If you need to close thewindow during the day (perhaps you’d like to get some other work done inQuickBooks), open the Enter Sales Receipts window and click the Previousbutton to find your previous sales.
Understanding Cash Sale PostingsAccounting standards treat cash sales in the simplest, most logical manner. If you’vesold a service or a product that isn’t being tracked as inventory, the postings arevery straightforward:
Account Debit Credit
Undeposited Funds or Bank Account Total cash sales
Revenue Total cash sales
108 P A R T T W O B O O K K E E P I N G
QckBcks TIGHT / QuickBooks 2009 The Official Guide / Ivens / 274-8 / Chapter 4
P:\010Comp\QckBcks\274-8\ch04.vpTuesday, September 02, 2008 11:49:58 AM
Color profile: DisabledComposite Default screen

If the cash sale involved inventory items, here are the postings:
Account Debit Credit
Undeposited Funds or BankAccount
Total cash sales
Income Total cash sales
Cost of Goods Sold Total cost of items sold
Inventory Asset Total cost of items sold
Depositing IncomeIf you use the Undeposited Funds account, when it’s time to go to the bank youhave to tell QuickBooks about your bank deposit.
Understanding the Undeposited Funds AccountWhen you enable automatic use of the Undeposited Funds account (or manuallyselect that account in the transaction window), each payment you receive is enteredinto the account named Undeposited Funds (QuickBooks establishes this accountautomatically). It’s an account type of Other Current Asset. When you finishapplying customer payments in QuickBooks, and you’re ready to make your bankdeposit, you move the money from the Undeposited Funds account into a bankaccount.
If you don’t opt to use the Undeposited Funds account, and post each paymentyou receive directly into the bank account, you don’t have to take the extra stepinvolved in moving cash receipts from the Undeposited Funds account into thebank account (and you don’t have to read the rest of this section).
However, each payment you receive appears as a separate entry when youreconcile your bank account. If you receive six payments totaling $10,450.25 andtake the checks to the bank that day, your bank statement shows that total amountas the deposit; it does not show the individual payments. When you reconcile thebank statement, each deposit you posted (one for each individual payment youreceived) is listed in your bank register in the Reconcile window.
This is not an easy way to reconcile your bank account. You’ll have to select eachpayment individually, mark it as cleared, and make sure it matches the day’sdeposits on the bank statement (have a calculator handy, because you have to dothe math as you go).
Choosing the Payments to DepositAs you’ve been filling out the payment and cash sales forms, QuickBooks has beenkeeping a list in the Undeposited Funds account. That list remains designated asUndeposited Funds until you clear it by depositing the funds.
C H A P T E R 4 R E C E I V I N G P A Y M E N T S 109
QckBcks TIGHT / QuickBooks 2009 The Official Guide / Ivens / 274-8 / Chapter 4
P:\010Comp\QckBcks\274-8\ch04.vpTuesday, September 02, 2008 11:49:58 AM
Color profile: DisabledComposite Default screen

To tell QuickBooks to make a deposit, click the Record Deposits icon on theHome page (or choose Banking | Make Deposits from the menu bar), which bringsup the Payments To Deposit window, shown in Figure 4-5.
N O T E : You may have other deposits to make, perhaps refunds, loanproceeds, capital infusion, or some other type of deposit. Don’t worry—you cantell QuickBooks about them in the next transaction window. This window is onlydisplaying the cash receipts you’ve entered into QuickBooks through the ReceivePayments and Sales Receipts transaction windows.
Notice the following about the Payments To Deposit window:
• The Type column displays information about the payment type for eachtransaction—PMT for payment of an invoice and RCPT for a cash sale.
• The Payment Method column displays the specific payment method for eachtransaction, such as cash, check, a specific credit card, and so on.
This information is important because you should match it to the way your bankrecords deposits; otherwise, bank reconciliation becomes much more complicated.For example, your bank probably lists credit card deposits separately from a deposittotal for cash and checks, even if all the money was deposited the same day. That’s
110 P A R T T W O B O O K K E E P I N G
QckBcks TIGHT / QuickBooks 2009 The Official Guide / Ivens / 274-8 / Chapter 4
FIGURE 4-5 All the income you’ve collected since your last bank deposit is waiting to bedeposited.
P:\010Comp\QckBcks\274-8\ch04.vpTuesday, September 02, 2008 11:49:59 AM
Color profile: DisabledComposite Default screen

because your credit card deposits are made directly to your bank account by yourmerchant account bank. Even if you take deposit slips for credit card transactions tothe bank and hand them to the teller along with your regular (cash/checks) depositslip, the credit card deposits are probably listed separately on your bank statement.
Select the Deposit ItemsIf you only have a few transactions to deposit, select those you’re taking to the bank(or select those you just deposited if you’ve already visited the bank) by clickingtheir listings to place a check mark in the left column. Click Select All if you wantto select all the payments for deposit.
Separate Deposit Items by Payment MethodIf you have many individual deposits, separate your deposits by payment method tomake it easier to work with this window. Select a payment method from the drop-down list at the top of the Payments To Deposit window.
Choose Selected Types to open the Select Payment Types list and choose multiplepayment types to include in the same deposit. For example, you may use the Othercategory to signify a money order or a traveler’s check.
The listings on the Payments To Deposit window change to include only thedeposits that match the selected payment method.
Separate Cash from ChecksQuickBooks doesn’t provide separate payment methods for cash and checks.However, if you turn in a cash bag, select only the checks and deposit them; thenstart the process over to select only the cash (or do it the other way around). This isa common practice when depositing cash, because sometimes the bank notifies youthat their automatic counting machine produced a different total from the total onyour deposit slip (you probably don’t own counting machines for coins and papermoney). If that happens, you can edit the cash sales deposit item in your bankregister, and the cause of the edit will be obvious (and you’ll have a good audit trailin case you have to discuss the transaction with the bank).
Separate Deposits by Bank AccountIf you’re depositing money into multiple bank accounts, select only the transactionsthat go into the first account. After you complete the deposit, start this processagain and deposit the remaining transactions into the appropriate account.
Credit Card DepositsYou can’t deposit credit card payments until your merchant bank notifies you thatthe funds have been placed in your account.
• If you have QuickBooks online banking, the deposit shows up in the QuickReport(see Chapter 16 to learn about managing online banking transactions).
• If you have online access to your merchant card account, the transfer willappear on the activities report on the website.
C H A P T E R 4 R E C E I V I N G P A Y M E N T S 111
QckBcks TIGHT / QuickBooks 2009 The Official Guide / Ivens / 274-8 / Chapter 4
P:\010Comp\QckBcks\274-8\ch04.vpTuesday, September 02, 2008 11:49:59 AM
Color profile: DisabledComposite Default screen

• If you don’t have any form of online access, you’ll have to wait for the monthlystatement to arrive (or contact the bank periodically to see if anything showedup in your account).
If your merchant bank deducts fees before transferring funds, learn how todeposit the net amount in the section “Calculating Merchant Card Fees,” later inthis chapter.
Deselect Items to Delay Their DepositIf you want to hold back the deposit of any income, deselect it by clicking its listing(the check mark is a toggle). Only the items that have a check mark will be clearedfrom the undeposited payments list. There are several reasons to deselect deposititems:
• You received a payment in advance from a customer and don’t want to depositit until you’re sure you can fill the order.
• You’ve accepted a postdated check and it cannot yet be deposited.
After you make your selections, click OK.
Filling Out the Deposit SlipClicking OK in the Payments To Deposit window brings up the Make Depositswindow, shown in Figure 4-6.
112 P A R T T W O B O O K K E E P I N G
QckBcks TIGHT / QuickBooks 2009 The Official Guide / Ivens / 274-8 / Chapter 4
FIGURE 4-6 The Make Deposits window is a virtual bank deposit slip.
P:\010Comp\QckBcks\274-8\ch04.vpTuesday, September 02, 2008 11:49:59 AM
Color profile: DisabledComposite Default screen

Select the bank account you’re using for this deposit. Then make sure the datematches the day you’re physically depositing the money.
Adding Items to the DepositIf you want to add deposit items that weren’t in the Payments To Deposit window,click anywhere in the Received From column to make it accessible and select anexisting name by clicking the arrow, or click <Add New> to enter a name that isn’tin your system. If the source of the check is a bank or yourself or any other entitythat isn’t a customer or vendor, use the Other Name classification for the type ofname. If you don’t care about tracking the name, leave the column blank (a systemthat works well for monies received for rebates).
Press TAB to move to the From Account column and enter the account to whichyou’re posting this transaction. For example, if the check you’re depositingrepresents a bank loan, use the liability account for that bank loan (you can createit here by choosing <Add New> if you didn’t think to set up the account earlier). Ifthe check you’re depositing represents an infusion of capital from you, use theowner’s capital account in the Equity section of your chart of accounts. If the checkis a refund for an expense (perhaps you overpaid someone, and they’re returningmoney to you), use the vendor’s name, and post the deposit to that expense. Usethe TAB key to move through the rest of the columns, which are self-explanatory.
Calculating Merchant Card FeesIf your merchant card bank deposits the gross amount of each transaction andcharges your bank account for the total fees due at the end of the month, you don’thave to do anything special to deposit credit card payments. You can deal with thefees when you reconcile your bank account.
If your merchant card bank deducts fees from transactions and deposits the netproceeds to your account, you have to track credit card charges and deposit thecorrect amount.
Follow these steps to deduct credit card charges:
� Select the credit card transactions in the Payments To Deposit window. Theseare gross amounts.
� Click OK to move the deposits to the Make Deposits window.� In the first empty line, click the Account column and select the expense
account to which you post merchant card fees.� Move to the Amount column and enter the fee as a negative number.
The net matches the amount that is deposited in the bank.
Getting Cash Back from DepositsIf you’re getting cash back from your deposit, you can tell QuickBooks about itright on the virtual deposit slip, instead of making a journal entry to adjust the totalof collected payments against the total of the bank deposit.
C H A P T E R 4 R E C E I V I N G P A Y M E N T S 113
QckBcks TIGHT / QuickBooks 2009 The Official Guide / Ivens / 274-8 / Chapter 4
P:\010Comp\QckBcks\274-8\ch04.vpTuesday, September 02, 2008 11:49:59 AM
Color profile: DisabledComposite Default screen

N O T E : If you’re keeping the money for yourself and your business isn’t acorporation, use the Draw account to post the cash back. If your business is acorporation, you can’t keep the money for yourself.
In the field labeled “Cash Back Goes To,” enter the account to which you’reposting the cash (usually a petty-cash account), and enter the amount of cash youwant back from this deposit. Even though you can put the cash in your pocket, youmust account for it, because these are business funds. As you spend the cash forbusiness expenses, post the expense against a petty-cash account with a journal entry.
C A U T I O N : Many banks will not cash checks made out to a company, soyour ability to get cash back may be limited to checks made out to you,personally.
Printing Deposit SlipsIf you want to print a deposit slip or a deposit summary, click the Print button inthe Make Deposits window. QuickBooks asks whether you want to print a depositslip and summary, or just a deposit summary.
If you want to print a deposit slip that your bank will accept, you must orderprintable deposit slips from QuickBooks. The QuickBooks deposit slips areguaranteed to be acceptable to your bank. You must have a laser printer or inkjetprinter to use them. When you print the deposit slip, there’s a tear-off section at thebottom of the page that has a deposit summary. Keep that section for your ownrecords and take the rest of the page to the bank along with your money.
If you don’t have QuickBooks deposit slips, select Deposit Summary Only and fillout your bank deposit slip manually. Be sure to fill out the payment method field(cash or check), or QuickBooks won’t print the deposit slip. A Print dialog appearsso you can change printers, adjust margins, or even print in color. Choose Print tosend the deposit information to the printer. When you return to the Make Depositswindow, click Save & Close to save the deposit.
Handling the Over and Short ProblemIf you literally take cash for cash sales, when you count the money in the till at theend of the day, you may find that the recorded income doesn’t match the cash youexpected to find in the till. Or you may find that the money you posted to depositto the bank doesn’t match the amount of money you put into the bag you took tothe bank.
114 P A R T T W O B O O K K E E P I N G
QckBcks TIGHT / QuickBooks 2009 The Official Guide / Ivens / 274-8 / Chapter 4
P:\010Comp\QckBcks\274-8\ch04.vpTuesday, September 02, 2008 11:49:59 AM
Color profile: DisabledComposite Default screen

One of the problems you face is how to handle this in your bookkeeping system.QuickBooks is a double-entry bookkeeping system, which means the left side of theledger has to be equal to the right side of the ledger. If you post $100.00 in cashsales but only have $99.50 to take to the bank, how do you handle the missing50 cents? You can’t just post $100.00 to your bank account (well, you could, butyour bank account won’t reconcile).
The solution to the Over/Short dilemma is to acknowledge it in yourbookkeeping procedures. Track it. You’ll be amazed by how much it balances itselfout—short one day, over another. (Of course, if you’re short every day, and theshortages are growing, you have an entirely different problem, and the first place tolook is at the person who stands in front of the cash register.) To track Over/Short,you need to have some place to post the discrepancies, which means you have tocreate some new accounts in your chart of accounts.
Follow these steps to create two new accounts:
� Click the Chart Of Accounts icon on the Home page (or press CTRL-A) to openthe Chart Of Accounts list.
� Press CTRL-N to create a new account.� In the Add New Account window, select an account type of Income.� If you’re using numbered accounts, choose a number that’s on the next level
from your regular Income accounts; for example, choose 42900 if your regularIncome accounts are 40000, 40100, and so on.
� Name the account “Over.”� Click Save & New and repeat the processes, using the next number and naming
the account “Short.”
If you want to see a net number for Over/Short (a good idea), create threeaccounts: name the first account (the parent account) Over-Short, and then makethe Over and Short accounts subaccounts of Over-Short.
In addition, you need items to use for your overages and shortages (remember,you need items for everything that’s connected with entering income).
Follow these steps to create these new items:
� Choose Lists | Item List to open the Item List.� Press CTRL-N to create a new item.� Create an Other Charge item named Overage.� Don’t assign a price.� Make it nontaxable.� Link it to the account (or subaccount) named Over that you just created.
C H A P T E R 4 R E C E I V I N G P A Y M E N T S 115
QckBcks TIGHT / QuickBooks 2009 The Official Guide / Ivens / 274-8 / Chapter 4
P:\010Comp\QckBcks\274-8\ch04.vpTuesday, September 02, 2008 11:50:00 AM
Color profile: DisabledComposite Default screen

� Click Next to create another new, Other Charge item. Name this item Shortage and link it to the account (or subaccount) named
Short. Click OK to close the Item List window.
Now that you have the necessary accounts and items, use the Over and Shortitems right in the Enter Sales Receipts window to adjust the difference between theamount of money you’ve accumulated in the cash-sale transactions and the amountof money you’re actually depositing to the bank. It’s your last transaction of the day.Remember to use a minus sign before the figure when you’re using the Short item.
116 P A R T T W O B O O K K E E P I N G
QckBcks TIGHT / QuickBooks 2009 The Official Guide / Ivens / 274-8 / Chapter 4
P:\010Comp\QckBcks\274-8\ch04.vpTuesday, September 02, 2008 11:50:00 AM
Color profile: DisabledComposite Default screen

Chapter
Chapter
55Tracking AccountsReceivable
In this chapter:
• Run A/R aging reports
• Set up finance charges
• Send customer payment reminders
• Print customer statements
• Use the Customer Centers
117
QckBcks TIGHT / QuickBooks 2009 The Official Guide / Ivens / 274-8 / Chapter 5
P:\010Comp\QckBcks\274-8\ch05.vpTuesday, September 02, 2008 12:08:08 PM
Color profile: DisabledComposite Default screen

Collecting the money owed to you is one of the largest headaches in running abusiness. You have to track what’s owed and who owes it, and then expend timeand effort to collect it. All of the effort you spend on the money your customersowe you is called tracking accounts receivable (or, more commonly, tracking A/R).
(If you’ve enabled the Multicurrency feature, you’ll see references to thecustomer’s currency in most of the transaction windows and reports.)
Running Aging ReportsAging reports are lists of the money owed you by your customers. You run themwhenever you need to know the extent of your receivables. Many companies runan aging report every morning, just to keep an eye on the amount of money on thestreet (“on the street” is business jargon for uncollected receivables).
QuickBooks provides two standard aging reports, which you can open bychoosing Reports | Customers & Receivables, and then choose either the A/R AgingSummary report or the A/R Aging Detail report. You can also customize an agingreport to match the information you want to see.
A/R Aging Summary ReportThe quickest way to see how much money is owed to you is to select A/R AgingSummary, which produces a listing of customer balances (see Figure 5-1).
118 P A R T T W O B O O K K E E P I N G
QckBcks TIGHT / QuickBooks 2009 The Official Guide / Ivens / 274-8 / Chapter 5
A/R TotalsThe total amount of A/R is the value of your A/R asset. It can be an important asset, and, in fact,banks often use the A/R balance as part of the collateral when providing you with a line of creditor a loan.
When your accountant visits, you can bet one of the things he or she will ask to see is a reporton your receivables (an aging report). Another safe bet is that you’ll receive a request to see theamount posted to A/R in your general ledger. The general ledger A/R balance and the total onthe aging report must be the same (for the same date)—not close, not almost, but exactly thesame. If the figures are not identical, your general ledger isn’t “proved” (jargon for, “I’m sorry,we can’t trust your general ledger figures because they don’t audit properly”).
If your A/R account balance doesn’t prove to your A/R report, you’ve messed up sometransactions. Most of the time, this means you incorrectly used the A/R account in a journal entry,or accidentally dated an A/R transaction in the future. You or your accountant, or both of you,must find the bad entry and correct it, because your A/R report total must match the A/R accountbalance.
➽ FYI
P:\010Comp\QckBcks\274-8\ch05.vpTuesday, September 02, 2008 12:08:08 PM
Color profile: DisabledComposite Default screen

A/R Aging Detail ReportIf you choose Aging Detail from the Accounts Receivable reports menu, you seea much more comprehensive report, because the individual transactions for eachcustomer appear.
Customizing Aging Detail ReportsIf you don’t use (or care about) all of the columns in the aging detail report, oryou’d prefer to see the information displayed in a different manner, you cancustomize the report. Start by clicking the Modify Report button on the report tosee the Modify Report window shown in Figure 5-2.
Customizing the ColumnsThe most common customization is to get rid of any column you don’t care about.For example, if you use the classes feature but don’t care about that information inyour aging report, get rid of the column. Or you might want to get rid of the Terms
C H A P T E R 5 T R A C K I N G A C C O U N T S R E C E I V A B L E 119
QckBcks TIGHT / QuickBooks 2009 The Official Guide / Ivens / 274-8 / Chapter 5
FIGURE 5-1 A summary report provides totals for each customer, broken down by agingperiods.
P:\010Comp\QckBcks\274-8\ch05.vpTuesday, September 02, 2008 12:08:08 PM
Color profile: DisabledComposite Default screen

column since it doesn’t impact the totals. To remove a column, scroll through theColumns list and click to remove the check mark. The column disappears from thereport when you close the Modify Report dialog.
While you’re looking at the list of column names, you may find a columnheading that’s not currently selected but that contains information you’d like toinclude in your report. If so, click that column listing to place a check mark nextto it. The column appears on the report and the data linked to it is displayed.
T I P : If you’ve enabled the multicurrency feature, add the Foreign Amountcolumn to your report; and, you might also want to add the Currency column.
Filtering InformationIf you want to produce an aging report for a special purpose, you can easily filterthe information so it meets criteria important to you. To filter your aging report,click the Filters tab (see Figure 5-3).
Select a filter and then set the conditions for it. (Each filter has its own specifictype of criteria.) For example, you can use this feature if you want to see only thosecustomers with receivables higher than a certain figure or older than a certain agingperiod.
120 P A R T T W O B O O K K E E P I N G
QckBcks TIGHT / QuickBooks 2009 The Official Guide / Ivens / 274-8 / Chapter 5
FIGURE 5-2 Customize aging reports to get exactly the information you need.
P:\010Comp\QckBcks\274-8\ch05.vpTuesday, September 02, 2008 12:08:09 PM
Color profile: DisabledComposite Default screen

C A U T I O N : If you filter the report in a way that affects the amounts, yourreport total will not match your A/R account balance. Use this type of filter onlyto get certain types of information for yourself, not for an “official” aging report.
Configuring Header/Footer DataYou can customize the text that appears in the header and footer of the report bymaking changes in the Header/Footer tab shown in Figure 5-4.
You’ll probably find that your decisions about the contents of the header andfooter depend on whether you’re viewing the report or printing it. And, if you’reprinting it, some stuff is more important if an outsider (a banker or your accountant)will be the recipient of the report, rather than the employee responsible for collectingreceivables.
For example, the date and time of preparation is more important for outsidersthan for you. Incidentally, on the Header/Footer tab, the Date Prepared field has ameaningless date—don’t panic, your computer hasn’t lost track of the date. Thatdate is a format, not today’s date. Click the arrow to the right of the field to see theother formats for inserting the date. The Page Number field also has a variety offormats to choose from.
You can eliminate a Header/Footer field by removing the check mark from thefield’s check box. For fields you want to print, you can change the text. You can alsochange the layout by choosing a different Alignment option from the drop-down list.
C H A P T E R 5 T R A C K I N G A C C O U N T S R E C E I V A B L E 121
QckBcks TIGHT / QuickBooks 2009 The Official Guide / Ivens / 274-8 / Chapter 5
FIGURE 5-3 Filters let you specify criteria for displaying data.
P:\010Comp\QckBcks\274-8\ch05.vpTuesday, September 02, 2008 12:08:09 PM
Color profile: DisabledComposite Default screen

Customizing the AppearanceClick the Fonts & Numbers tab to change the format of the report. You can changethe way negative numbers are displayed, and you can change the fonts for any or allthe individual elements in the report.
When you close the report window, QuickBooks may ask if you want tomemorize the report with the changes you made (if you told QuickBooks to stopasking, you won’t see the message). Click Yes so you don’t have to go through allthe modifications again. If QuickBooks doesn’t ask, memorize the report using theinstructions in the next section.
Memorizing Aging ReportsIf you’ve customized a report and have the columns, data, and formatting you need,there’s no reason to reinvent the wheel the next time you need the same information.Instead of going through the customization process again next month, memorize thereport as you designed it. Then you can fetch it whenever you need it.
Click the Memorize button in the report window. When the Memorize Reportwindow appears, enter a new name for the report, optionally save it within a reportgroup, and click OK.
From now on, this report name will be on the list of memorized reports you canselect from when you choose Reports | Memorized Reports from the menu bar.
122 P A R T T W O B O O K K E E P I N G
QckBcks TIGHT / QuickBooks 2009 The Official Guide / Ivens / 274-8 / Chapter 5
FIGURE 5-4 Specify the text you want to display on the top and bottom of the report.
P:\010Comp\QckBcks\274-8\ch05.vpTuesday, September 02, 2008 12:08:09 PM
Color profile: DisabledComposite Default screen

N O T E : When you memorize a report, only the criteria and formatting arememorized. Each time you open the report, the data is generated from theQuickBooks transaction records, so you get current, accurate information.
Exporting and Importing Memorized ReportsIf you’re using a Premier/Enterprise edition of QuickBooks, you can export amemorized report (all versions of QuickBooks can import a memorized report).This is useful if you’ve designed a great report that you want to use in anothercompany file you maintain in QuickBooks. If you’re an accountant using a Premieredition, this means you can create and memorize a report that has exactly what youneed, laid out exactly the way you need it. Then, send the memorized report toyour client. You can open the report when you visit the client or have the clientopen the report, and then export the contents to Excel and send it to you. Whenyou export a memorized report, the exported document is called a template. Thetemplate can be imported into any edition of QuickBooks 2009.
Follow these steps to export a report:
� Choose Reports | Memorized Reports | Memorized Report List.� Click the Memorized Report button at the bottom of the window, and select
Export Template to open the Specify Filename For Export dialog.� Navigate to the drive or folder where you want to store the template file, and
click Save.
When you import a report template, the process of importing it converts thetemplate into a memorized report that’s added to the currently open company file.
Follow these steps to import a template:
� Choose Reports | Memorized Reports | Memorized Report List.� Click the Memorized Report button at the bottom of the window, and select
Import Template to open the Select File To Import dialog.� Navigate to the drive or folder that contains the template file you received, and
double-click its listing.� In the Memorize Report dialog, enter a name for the report or accept the displayed
name (which is the name used by the person who exported the template).
Printing ReportsWhether you’re using the standard format or one you’ve customized, you’ll probablywant to print the report. When you’re in a report window, click the Print button atthe top of the window to bring up the Print Reports window. If the report is wide,use the Margins tab to set new margins, and use the options on the Settings tab tocustomize other printing options.
C H A P T E R 5 T R A C K I N G A C C O U N T S R E C E I V A B L E 123
QckBcks TIGHT / QuickBooks 2009 The Official Guide / Ivens / 274-8 / Chapter 5
P:\010Comp\QckBcks\274-8\ch05.vpTuesday, September 02, 2008 12:08:09 PM
Color profile: DisabledComposite Default screen
Running Customer and Job ReportsCustomer and job reports are like aging reports, but they’re designed to give youinformation about the selected customers/jobs instead of providing information onthe totals for your business. There are plenty of customer reports available from themenu that appears when you choose Reports | Customers & Receivables:
• Customer Balance Summary Report Lists current total balance owed for eachcustomer.
• Customer Balance Detail Report Lists every transaction for each customerwith a net subtotal for each customer.
• Open Invoices Report Lists all unpaid invoices, sorted and subtotaled bycustomer and job.
• Collections Report A nifty report for nagging. Includes the contact name andtelephone number, along with details about invoices with balances due. You’reall set to call the customer and have a conversation, and you can answer anyquestions about invoice details.
• Accounts Receivable Graph Shows a graphic representation of the accountsreceivable. For a quick impression, there’s nothing like a graph.
• Unbilled Costs By Job Tracks job expenses you haven’t invoiced.• Transaction List By Customer Displays individual transactions of all types
for each customer.• Online Received Payments Shows payments received from customers who
pay you online (if you’ve signed up for online payments through QuickBooks).• Customer Phone List Displays an alphabetical list of customers along with
the telephone number for each (if you entered the telephone number in thecustomer record).
• Customer Contact List Displays an alphabetical list of customers along withthe telephone number, billing address, and current open balance for each. Givethis list to the person in charge of collections.
• Item Price List Lists all your items with their prices and preferred vendors.
Finance ChargesOne way to speed up collections is to impose finance charges for late payments.Incidentally, this isn’t “found money”; it probably doesn’t cover its own cost. Theamount of time spent tracking, analyzing, and chasing receivables is substantial,and in all businesses “time is money.”
Configuring Finance ChargesTo use finance charges, you have to establish the rate and circumstances underwhich they’re assessed. Your company’s finance charges are configured as part of
124 P A R T T W O B O O K K E E P I N G
QckBcks TIGHT / QuickBooks 2009 The Official Guide / Ivens / 274-8 / Chapter 5
P:\010Comp\QckBcks\274-8\ch05.vpTuesday, September 02, 2008 12:08:10 PM
Color profile: DisabledComposite Default screen

your company preferences. Choose Edit | Preferences to open the Preferenceswindow. Then click the Finance Charge icon in the left pane and select theCompany Preferences tab (see Figure 5-5).
Here are some guidelines for filling out this window:
• In the Annual Interest Rate field, replacing the default data (0.00%) with anypositive number enables the Finance Charges feature. The dialog does not havean “Enable” check box.
• Notice that the interest rate is annual. If you want to charge 1.5 percent amonth, enter 18% in the Annual Interest Rate field.
• You can assess a minimum finance charge for overdue balances. QuickBookswill calculate the finance charge, and if it’s less than the minimum, the amountwill be rolled up to the minimum charge you specify here.
• Use the Grace Period field to enter the number of days of lateness you permitbefore finance charges are assessed.
• During setup, QuickBooks probably created an account for finance charges. Ifso, select it. If not, enter (or create) the account you want to use to post financecharges (this is an income account).
C H A P T E R 5 T R A C K I N G A C C O U N T S R E C E I V A B L E 125
QckBcks TIGHT / QuickBooks 2009 The Official Guide / Ivens / 274-8 / Chapter 5
FIGURE 5-5 Configure the way in which you’ll impose finance charges on overdue balances.
P:\010Comp\QckBcks\274-8\ch05.vpTuesday, September 02, 2008 12:08:10 PM
Color profile: DisabledComposite Default screen

• The issue of assessing finance charges on overdue finance charges is a stickyone. The practice is illegal in many states. Selecting this option means that acustomer who owed $100.00 last month and had a finance charge assessed of$2.00 now owes $102.00. As a result, the next finance charge is assessed on abalance of $102.00 (instead of on the original overdue balance of $100.00).Regardless of state law, the fact is that very few businesses opt to use thiscalculation method.
• Specify whether to calculate the finance charge from the due date or the invoicedate.
• QuickBooks creates an invoice automatically when finance charges are assessedin order to have a permanent record of the transaction. By default, these invoicesaren’t printed; they’re just accumulated along with the overdue invoices so they’llprint as a line item on a monthly statement. You can opt to have the financecharge invoices printed, which you should do only if you’re planning to mailthem to nudge your customers for payment.
Click OK to save your settings after you’ve filled out the window.
Assessing Finance ChargesYou should assess finance charges just before you calculate and print customerstatements. Click the Finance Charges icon on the Home page (QuickBooks adds theicon when you turn on the feature), or choose Customers | Assess Finance Chargesfrom the menu bar. The Assess Finance Charges window opens (see Figure 5-6) witha list of all the customers with overdue balances.
126 P A R T T W O B O O K K E E P I N G
QckBcks TIGHT / QuickBooks 2009 The Official Guide / Ivens / 274-8 / Chapter 5
FIGURE 5-6 QuickBooks automatically assesses finance charges as of the assessment dateyou specify.
P:\010Comp\QckBcks\274-8\ch05.vpTuesday, September 02, 2008 12:08:10 PM
Color profile: DisabledComposite Default screen

Choosing the Assessment DateChange the Assessment Date field (which displays the current date) to the date onwhich you want the finance charge to appear on customer statements. It’s commonto assess finance charges on the last day of the month. When you press TAB to moveout of the date field, the finance charges are recalculated to reflect the new date.
Selecting the CustomersYou can eliminate a customer from the process by clicking in the Assess columnto remove the check mark. QuickBooks, unlike many other accounting softwarepackages, does not have a finance-charge assessment option on each customerrecord. Therefore, all customers with overdue balances are included when youassess finance charges.
N O T E : Some customers on the list may display a zero balance. Thesecustomers have an A/R balance, but the balance isn’t older than the graceperiod you specified when you configured finance charges. QuickBooks’automatic selection (a check mark) excludes these customers.
It can be time consuming to deselect each customer, so if you have only a fewcustomers for whom you reserve this process, choose Unmark All, then reselect thecustomers you want to include. Of course, this means you have to know off the topof your head which customers are liable for finances charges and which aren’t—oryou have to keep a list near your desk.
Changing the AmountsYou can change the calculated total if you wish (a good idea if there are creditmemos floating around that you’re not ready to apply against any invoices). Justclick the amount displayed in the Finance Charge column to activate that columnfor that customer. Then enter a new finance charge amount. If you need to calculatethe new figure (perhaps you’re giving credit for a floating credit memo), press theequal sign (=) on your keyboard to use the QuickBooks built-in calculator.
Checking the HistoryTo make sure you don’t assess a charge that isn’t really due, you can double-checkby viewing a customer’s history from the Assess Finance Charges window. Select acustomer and click the Collection History button to see a Collections Report forthe selected customer (see Figure 5-7). Your mouse pointer turns into a magnifyingglass with the letter “z” (for “zoom”) in it when you position it over a line item.Double-click any line item to display the original transaction window if you need toexamine the details.
C H A P T E R 5 T R A C K I N G A C C O U N T S R E C E I V A B L E 127
QckBcks TIGHT / QuickBooks 2009 The Official Guide / Ivens / 274-8 / Chapter 5
P:\010Comp\QckBcks\274-8\ch05.vpTuesday, September 02, 2008 12:08:10 PM
Color profile: DisabledComposite Default screen

Saving the Finance Charge InvoicesClick Assess Charges in the Assess Finance Charges window when all the figuresare correct. When you create your customer statements, the finance charges willappear. If you’ve opted to skip printing, there’s nothing more to do. (If you choseto print the finance charges, see the next paragraph.)
Selecting Printing OptionsIf you want to print the finance charge invoices (they really are invoices becausethey add charges to the customer balance), be sure to select the Mark Invoices“To Be Printed” check box in the Assess Finance Charges window. You can sendthe printed copies to your customers as a nagging reminder. If you just want thecustomer to see the finance charge on the monthly statement (the common methodfor most businesses), deselect the printing option.
To print the finance charge invoices, choose File | Print Forms | Invoices. The listof unprinted invoices appears, and unless you have regular invoices you didn’t printyet, the list includes only the finance charge invoices. If the list is correct, click OKto continue on to the printing process. Chapter 3 has detailed information aboutprinting invoices.
Sending StatementsOn a periodic basis, you should send statements to your customers. (Most businessessend statements monthly.) They serve a couple of purposes: they remind customersof outstanding balances, and they ensure that your records and your customers’records reflect the same information.
128 P A R T T W O B O O K K E E P I N G
QckBcks TIGHT / QuickBooks 2009 The Official Guide / Ivens / 274-8 / Chapter 5
FIGURE 5-7 You can check a customer’s history to make sure the finance charges are valid.
P:\010Comp\QckBcks\274-8\ch05.vpTuesday, September 02, 2008 12:08:11 PM
Color profile: DisabledComposite Default screen

If you’re coming to QuickBooks from a manual system, or a system in whichyou tracked invoices and payments in a spreadsheet, statements will seem likea miraculous tool. Creating statements from manual customer cards, or cells ina spreadsheet, is a nightmare. As a result, companies without real accountingsoftware generally don’t even bother to try.
Entering Statement ChargesBefore creating statements, you should create any transactions that should appearon the statements. Invoices and payments appear automatically, but you may wantto add statement charges. A statement charge is a charge you want to pass to acustomer for which you don’t create an invoice. You can use statement charges forspecial charges for certain customers, such as a general overhead charge, or a chargeyou apply instead of using reimbursements for expenses incurred on behalf of thecustomer.
You can also use statement charges for discounts for certain customers, suchas reducing the total due by a specific amount, instead of creating and applyingdiscount rates or price levels. Some companies use statement charges instead ofinvoices for invoicing regular retainer payments.
You must add statement charges before you create the statements (or else thecharges won’t show up on the statements). Statement charges use items from yourItem List, but you cannot use any of the following types of items:
• Items that are taxable, because the statement charge can’t apply the tax• Items that have percentage discounts, because the statement charge can’t look
up the discount percentage (and therefore can’t apply it)• Items that represent a payment transaction, because those are negative charges,
which a statement charge doesn’t understand
Statement charges are recorded directly in a customer’s register or in the registerfor a specific job. You can reach the register to enter a statement charge in either oftwo ways:
• Click the Statement Charges icon on the Home page (or choose Customers |Enter Statement Charges from the menu bar), and then select the customer orjob in the Customer:Job field at the top of the register that opens. (By default,QuickBooks opens the register for the first customer in your Customer:Job list.)
• Press CTRL-J to open the Customer Center, right-click the appropriate customerlisting on the Customers & Jobs tab, and choose Enter Statement Charges fromthe shortcut menu. QuickBooks opens the register for the selected customer.
C H A P T E R 5 T R A C K I N G A C C O U N T S R E C E I V A B L E 129
QckBcks TIGHT / QuickBooks 2009 The Official Guide / Ivens / 274-8 / Chapter 5
P:\010Comp\QckBcks\274-8\ch05.vpTuesday, September 02, 2008 12:08:11 PM
Color profile: DisabledComposite Default screen

When the Customer:Job register opens, it looks like Figure 5-8.
Use the TAB key to move through the register line as you enter data.
Follow these steps to enter the statement charge:
� Select the item for the statement charge from the Item drop-down list (or use<Add New> to create a new item).
� Enter a quantity in the Qty field if the item is invoiced by quantity.� Enter a rate (or accept the default rate if one exists) if you’re using the Qty
field.� Enter the amount charged if the Qty and Rate fields aren’t used (if they are, the
total amount is entered automatically).� Optionally, edit the item description.� Enter the billed date, which does not have to match the transaction date in the
first column of the register. Postdating or predating this field determines whichstatement it appears on.
� Enter the due date, which affects your aging reports and your finance chargecalculations.
Click Record to save the transaction.
If your statement charges are recurring charges, you can memorize them to haveQuickBooks automatically create them. After you create the charge, right-click itslisting in the register and select Memorize Stmt Charge from the shortcut menu.This works exactly like memorized invoices (covered in Chapter 3).
130 P A R T T W O B O O K K E E P I N G
QckBcks TIGHT / QuickBooks 2009 The Official Guide / Ivens / 274-8 / Chapter 5
FIGURE 5-8 Statement charges are entered directly in a customer or job register.
P:\010Comp\QckBcks\274-8\ch05.vpTuesday, September 02, 2008 12:08:11 PM
Color profile: DisabledComposite Default screen

Creating StatementsBefore you start creating your statements, be sure that all the transactions thatshould be included on the statements have been entered into the system. Did youforget anything? Applying credit memos? Applying payments? Assessing financecharges? Entering statement charges? When all customer accounts are up-to-date,click the Statements icon on the Home page (or choose Customers | CreateStatements from the menu bar) to open the Create Statements window, shownin Figure 5-9.
Selecting the Date RangeThe statement date range determines which transactions appear on the statement.The printed statement displays the previous balance (the total due before the“From” date) and includes all transactions that were created within the date range.The starting date should be the day after the last date of your last statement run. Ifyou do monthly statements, choose the first and last days of the current month; ifyou send statements quarterly, enter the first and last dates of the current quarter—and so on.
If you choose All Open Transactions As Of Statement Date, the printed statementjust shows unpaid invoices and charges and unapplied credits. You can narrow the
C H A P T E R 5 T R A C K I N G A C C O U N T S R E C E I V A B L E 131
QckBcks TIGHT / QuickBooks 2009 The Official Guide / Ivens / 274-8 / Chapter 5
FIGURE 5-9 Configure the specifications for selecting customers who receive statements.
P:\010Comp\QckBcks\274-8\ch05.vpTuesday, September 02, 2008 12:08:11 PM
Color profile: DisabledComposite Default screen

criteria by selecting the option to include only transactions overdue by a certainnumber of days (which you specify). However, this makes the printed statementmore like a list than a standard statement.
Selecting the CustomersIt’s normal procedure to send statements to all customers, but if that’s not the plan,you can change the default selection.
If you want to send statements to a group of customers, click the MultipleCustomers option to display the Choose button next to it. Then click the Choosebutton to bring up a list of customers and select each customer you want to include.You can manually select each customer, or select Automatic and then enter text totell QuickBooks to match that text against all customer names and select thematching customers. (The automatic match option isn’t efficient for multiplecustomers because it only matches exact text, not partial text, and therefore onlymatches one customer at a time.)
Click OK when all the appropriate customers are selected.If you’re sending a statement to one customer only, select One Customer, and
then click the arrow next to the text box to scroll through the list of your customersand select the one you want.
To send statements to customers who are designated with a specific customertype, select the Customers Of Type option, and then select the customer type youwant to include from the drop-down list. This works, of course, only if you createdcustomer types as part of your QuickBooks setup.
T I P : If you want to send statements to certain customers only, that’s a goodreason in itself to create a customer type for statement recipients (name thetype “Stmnts”).
Filtering for Send MethodsIf your customers vary in the way you send them statements (the option selectedin the Preferred Send Method field of the customer record), you can opt to handleyour statement delivery in batches, using one delivery method per batch. To dothis, select the Preferred Send Method option, and then select the send method forthis batch from the drop-down list that appears:
• E-mail Sends the statements by e-mail (discussed in Chapter 3).• Mail Sends the statements to QuickBooks services, where the invoice is
created with a tear-off slip that the customer can use to pay the invoice.QuickBooks mails the invoice. (This is a fee-based service.)
• None Means no special handling. You print the statements, put them inenvelopes, and mail them.
132 P A R T T W O B O O K K E E P I N G
QckBcks TIGHT / QuickBooks 2009 The Official Guide / Ivens / 274-8 / Chapter 5
P:\010Comp\QckBcks\274-8\ch05.vpTuesday, September 02, 2008 12:08:11 PM
Color profile: DisabledComposite Default screen

Specifying the Printing OptionsYou can specify the way you want the statements to print using the followingcriteria and options in the Select Additional Options section:
• You can print one statement for each customer, which lists all transactions forall that customer’s jobs, or you can print a separate statement for each job.
• You can opt to show invoice item details instead of just listing the invoice onthe statement. If your invoices have a lot of line items, this could make yourstatements very long (possibly too many pages to get away with a singlepostage stamp). There’s probably no particular reason to select this option,because most customers have copies of the original invoices—if they don’t,they’ll call you with questions and you can look up the invoice number andprovide details (or reprint the invoice and send it).
• Printing statements in order by ZIP code is handy if you’re printing labels thatare sorted by ZIP code. This option is also important if you have a bulk mailpermit, because the post office requires bulk mail to be sorted by ZIP code.
• By default, the original due date for each transaction listed on the statement isdisplayed on the statement. If you have some reason to hide this informationfrom your customers you can deselect the option.
Specifying the Statements to SkipYou may want to skip statement creation for customers who meet the criteria youset in the Do Not Create Statements section of the dialog. If statements are the onlydocuments you send to customers (you don’t send the individual invoices andcredits you create), selecting any of these options makes sense.
If, however, you use statements to make sure you and your customers havematching accounting records, you should create statements for all customers exceptinactive customers.
Last Call for Finance ChargesIf you haven’t assessed finance charges and you want them to appear on thestatements, click the Assess Finance Charges button. The Assess Finance Chargeswindow opens, showing customers who have been selected for finance charges.
If you’ve already assessed finance charges, QuickBooks will warn you that financecharges have already been assessed as of the selected date. Unfortunately, if youignore the message, QuickBooks is perfectly willing to add another round of financecharges (and you’ll have a lot of angry and distrustful customers). Therefore, thiswindow is useful only if you don’t assess finance charges as described earlier inthis chapter.
C H A P T E R 5 T R A C K I N G A C C O U N T S R E C E I V A B L E 133
QckBcks TIGHT / QuickBooks 2009 The Official Guide / Ivens / 274-8 / Chapter 5
P:\010Comp\QckBcks\274-8\ch05.vpTuesday, September 02, 2008 12:08:11 PM
Color profile: DisabledComposite Default screen

Previewing the StatementsBefore you commit the statements to paper, you can click the Preview button to getan advance look. This is not just to see what the printed output will look like; it’salso a way to look at the customer records and to make sure that all the customersyou selected are included.
Use the Zoom In button to see the statement and its contents close up. Click theNext Page button to move through all the statements. Click Close to return to theCreate Statements window.
Printing the StatementsWhen everything is just the way it should be, print the statements by clicking thePrint button in either the Print Preview window or the Create Statements window.If you click Close in the Preview window, you return to the Create Statementswindow—click Print to open the Print Statement(s) window. Change printingoptions as needed, then print the statements.
134 P A R T T W O B O O K K E E P I N G
QckBcks TIGHT / QuickBooks 2009 The Official Guide / Ivens / 274-8 / Chapter 5
P:\010Comp\QckBcks\274-8\ch05.vpTuesday, September 02, 2008 12:08:11 PM
Color profile: DisabledComposite Default screen
Chapter
Chapter
66Entering AccountsPayable Bills
In this chapter:
• Enter vendor bills
• Track reimbursable expenses
• Enter inventory item purchases
• Use purchase orders
• Enter vendor credit memos
• Enter recurring bills
• Manage mileage costs
135
QckBcks TIGHT / QuickBooks 2009 The Official Guide / Ivens / 274-8 / Chapter 6
P:\010Comp\QckBcks\274-8\ch06.vpTuesday, September 16, 2008 10:57:52 AM
Color profile: DisabledComposite Default screen

Entering your bills into QuickBooks, and then paying them in a separate transaction,is accrual accounting. That means an expense is posted to your Profit & Lossstatement when you enter the bill, not when you actually pay the bill. The totalof unpaid bills is the total amount posted to the Accounts Payable account.
However, if your taxes are filed on a cash basis, which means an expense isn’tposted until you actually pay the bill, be assured (and assure your accountant) thatQuickBooks understands how to report your financial figures on a cash basis. (SeeChapter 15 for information on financial reports.)
Some businesses don’t use A/P, they don’t enter vendor bills at all. They pay billsusing direct disbursements, which means using the Write Checks feature.
Most businesses use a combination of bills and direct disbursements. They enterbills when they receive a physical bill from a vendor, and use a direct disbursementto pay vendors that don’t send bills (such as rent, COD delivery charges, petty cash,and so on).
(If you’ve enabled the Multicurrency feature, you’ll see references to the vendor’scurrency in most of the transaction windows and reports.)
Recording Vendor BillsWhen the mail arrives, after you open all the envelopes that contain checks fromcustomers (which most people do first), you should tell QuickBooks about the billsthat arrived. Don’t worry—QuickBooks doesn’t automatically pay them. You decidewhen to do that.
To enter your bills, choose Vendors | Enter Bills from the menu bar. When theEnter Bills window opens (see Figure 6-1), you can fill out the information fromthe bill you received.
The window has two sections: the heading section, which contains informationabout the vendor and the bill, and the details section, which records the datarelated to your general ledger accounts. The details section has two tabs: Expensesand Items. This section covers bills that are posted to Expenses; entering Items iscovered later in this chapter in the section, “Managing Inventory Item Purchases.”
N O T E : The A/P Account field (and accompanying drop-down list of accounts)appears at the top of the Enter Bills window only if you have multiple AccountsPayable accounts.
Depending on the bill, you may be able to assign the entire bill to one expenseaccount, or you may have to split the bill among multiple expense accounts. Forexample, your utility bills are usually posted to the appropriate utility account(electric, heat, and so on). However, credit card bills may be split among numerousexpenses, and loan repayments are split between interest (an expense account) andprincipal (a liability account).
136 P A R T T W O B O O K K E E P I N G
QckBcks TIGHT / QuickBooks 2009 The Official Guide / Ivens / 274-8 / Chapter 6
P:\010Comp\QckBcks\274-8\ch06.vpTuesday, September 16, 2008 10:57:53 AM
Color profile: DisabledComposite Default screen

Easy One-account PostingIn the Vendor field, click the arrow to choose this vendor from the list that appears.If the vendor isn’t on the list, choose <Add New> to add this vendor to yourQuickBooks vendor list. Then enter the details.
Follow these steps to fill out the bill:
� Enter the bill date. The due date then fills in automatically, depending on theterms you have with this vendor. You can change this date if you wish. If youdidn’t set up terms for this vendor, the due date is automatically filled out usingthe default number of days for paying bills. QuickBooks sets this at ten days,but you can change the default by choosing Edit | Preferences and going to theBills section.
� Enter the vendor’s invoice number in the Ref. No. field.� Enter the amount due.� In the Terms field, click the arrow to display a list of terms, and select the one
you need. If the terms you have with this vendor aren’t available, choose <AddNew> to create a new Terms entry. The due date changes to reflect the terms.
C H A P T E R 6 E N T E R I N G A C C O U N T S P A Y A B L E B I L L S 137
QckBcks TIGHT / QuickBooks 2009 The Official Guide / Ivens / 274-8 / Chapter 6
FIGURE 6-1 The Enter Bills window has a heading section and a details section.
P:\010Comp\QckBcks\274-8\ch06.vpTuesday, September 16, 2008 10:57:53 AM
Color profile: DisabledComposite Default screen

� To enter the posting accounts, click in the Account column at the bottom of thewindow, and then click the arrow to display your chart of accounts. Select theaccount to which this bill should be assigned. QuickBooks automatically assignsthe amount you entered in the Amount Due field to the Amount column.
� If you wish, enter a note in the Memo column.� In the Customer:Job column, enter a customer or job if you’re paying a bill that
you want to track for job costing, or if this bill is a reimbursable expense. Seethe discussions on tracking and charging customers for reimbursable expensesin the section “Invoicing Customers for Reimbursable Expenses.”
If you’re tracking classes, a Class column appears; enter the appropriate class. When you’re finished, click Save & New to save this bill and bring up another
blank Enter Bills window. When you’ve entered all your bills, click Save & Close.
Splitting Expenses Among Multiple AccountsSome bills aren’t neatly assigned to one account in your general ledger; instead, they’resplit among multiple accounts. The most common example is a credit card bill.
N O T E : You can also manage credit card charges with the use of a CreditCard account in your chart of accounts, instead of entering bills or writingchecks. Chapter 11 has more information on this feature.
Follow these steps to split expenses among multiple accounts:
� Follow the first four steps in the instructions for entering bills in the previoussection.
� Click in the Account column to display your chart of accounts.� Select the first account to which you want to assign some portion of this bill.� If you’ve entered an amount in the Amount Due field in the heading section of
the bill, QuickBooks automatically applies the entire amount of the bill in theAmount column. Replace that data with the amount you want to assign to theaccount you selected.
� Click in the Account column to select the next account and enter theappropriate amount in the Amount column.
As you add each additional account to the column, QuickBooks assumes that theunallocated amount is assigned to that account (see Figure 6-2). Repeat the processof changing the amount and adding another account until the split transaction iscompletely entered.
138 P A R T T W O B O O K K E E P I N G
QckBcks TIGHT / QuickBooks 2009 The Official Guide / Ivens / 274-8 / Chapter 6
P:\010Comp\QckBcks\274-8\ch06.vpTuesday, September 16, 2008 10:57:53 AM
Color profile: DisabledComposite Default screen

Understanding the Postings for Vendor BillsWhen you enter a vendor bill, QuickBooks makes the following postings to yourgeneral ledger:
Account Debit Credit
Accounts Payable Total Amount of Bill
Expense (or other account type)you entered on a line
Amount linked to this lineitem on the bill
Other accounts (if applicable)you entered on a line
Amount linked to this lineitem on the bill
As you can see, no “real money” is posted; your bank account is ignored. If youhave terms with this vendor that include a discount, that’s ignored too. Thosepostings occur when you pay the bill.
C H A P T E R 6 E N T E R I N G A C C O U N T S P A Y A B L E B I L L S 139
QckBcks TIGHT / QuickBooks 2009 The Official Guide / Ivens / 274-8 / Chapter 6
FIGURE 6-2 QuickBooks keeps recalculating, so the last account posting entry automaticallyhas the correct amount.
P:\010Comp\QckBcks\274-8\ch06.vpTuesday, September 16, 2008 10:57:53 AM
Color profile: DisabledComposite Default screen
Reimbursable Expenses and Job CostingA reimbursable expense is one that you incurred on behalf of a customer. Even thoughyou pay the vendor bill, there’s an agreement with your customer that you’ll send aninvoice to recover your costs. There are two common types of reimbursable expenses:
• General expenses, such as long-distance telephone charges, parking and tolls, andother incidental expenses, are incurred on behalf of a client. Those portions of thevendor bill that apply to customer agreements for reimbursement are split outwhen you enter the bill.
• Specific goods or services (which you track as Items) are purchased on behalfof the customer.
Often, you may want to track the expense without sending an invoice forreimbursement to the customer. You just want to know how much it cost you toprovide services to the customer. This is called job costing, and it’s a powerfulQuickBooks feature.
Options for Managing Reimbursable ExpensesYou have two ways to manage reimbursable expenses:
• Post the charge to an expense account, and then let QuickBooks automaticallypost the customer’s reimbursement to the same expense account. This cancels theoriginal expense and reduces the expense total in your Profit & Loss statements.
• Pay the bill and then let QuickBooks automatically post the customer’sreimbursement to an income account that’s created for posting reimbursements.This lets you track totals for both the original expense and the reimbursement.
You may want to discuss these choices with your accountant. Many businessesprefer the second option—tracking the expenses and reimbursements separately—just because it’s more accurate when you’re analyzing your expenses and income.The following section explains the steps you have to take to configure reimbursementtracking. You can ignore the instructions if you prefer to reduce your expense totalsby posting reimbursements to the expense account you used when you entered thevendor’s bill.
Configuring Reimbursement TrackingTo track reimbursed costs from customers, you need to enable reimbursementtracking in QuickBooks, and you must also create income accounts that are usedfor collecting reimbursements.
Enable Reimbursement TrackingTo tell QuickBooks that you want to track reimbursable costs, you must enable thefeature in the Preferences dialog.
140 P A R T T W O B O O K K E E P I N G
QckBcks TIGHT / QuickBooks 2009 The Official Guide / Ivens / 274-8 / Chapter 6
P:\010Comp\QckBcks\274-8\ch06.vpTuesday, September 16, 2008 10:57:53 AM
Color profile: DisabledComposite Default screen

Follow these steps to enable reimbursement tracking:
� Choose Edit | Preferences to open the Preferences dialog.� Select the Time & Expenses icon in the left pane.� Click the Company Preferences tab.� Click the check box next to the option labeled Track Reimbursed Expenses As
Income to put a check mark in the box.� Click OK.
N O T E : You’ll notice a field to enter a markup percentage right below theoption to Track Reimbursed Expenses As Income. See the section “Marking UpReimbursable Expenses” later in this chapter to learn about the markup feature.
As a result of enabling this option, QuickBooks adds a new field to the dialogyou use when you create or edit an expense account. As you can see in Figure 6-3,you can configure an expense account to post reimbursements to an incomeaccount. Whenever you post a vendor expense to this account and also indicate
C H A P T E R 6 E N T E R I N G A C C O U N T S P A Y A B L E B I L L S 141
QckBcks TIGHT / QuickBooks 2009 The Official Guide / Ivens / 274-8 / Chapter 6
FIGURE 6-3 You can configure an expense account to post reimbursements to an incomeaccount.
P:\010Comp\QckBcks\274-8\ch06.vpTuesday, September 16, 2008 10:57:54 AM
Color profile: DisabledComposite Default screen

that the expense is reimbursable, the amount you charge to the customer when youcreate an invoice for that customer is automatically posted to the income accountthat’s linked to this expense account.
Set Up Income Accounts for ReimbursementYou may have numerous expense accounts that you want to use for reimbursableexpenses; in fact, that’s the common scenario. Portions of telephone bills, travelexpenses, subcontractor expenses, and so on are frequently passed on to customersfor reimbursement.
The easiest way to manage all of this is to enable those expense accounts to trackreimbursements and post the income from customers to one account. After all, it’sonly important to know how much of your total income was a result of reimbursements(separating that income from the income you generate as the result of sales).
QuickBooks insists on a one-to-one relationship between a reimbursable expenseand the reimbursement income from that expense. As a result, if you have multipleexpense accounts for which you may receive reimbursement (a highly likely scenario),you must also create multiple income accounts for accepting reimbursed expenses.
This is a one-time chore, however, so when you’ve finished setting up theaccounts, you can just enter transactions, knowing QuickBooks will automaticallypost reimbursed expenses to your new income accounts.
Because you probably only care about totals for income received as reimbursement,the best way to set up the income accounts you’ll need is to use subaccounts. Thatway, your reports will show the total amount of income due to reimbursed expenses,and you can ignore the individual account totals unless you have some reason toexamine a number.
Depending on the company type you selected during the EasyStep Interview,QuickBooks may have already created a Reimbursed Expenses account in theIncome section of your chart of accounts. If so, you already have a parent account,and you can skip this section on setting up the account and move directly to theinstructions for creating subaccounts.
Follow these steps to set up your reimbursement accounts:
� Open the chart of accounts by clicking the Accnt icon on the toolbar, or bypressing CTRL-A.
� Press CTRL-N to open a New Account window.� Select Income as the account type.� Enter an account number (if you use numbers) and name the account
Reimbursed Expenses (or something similar).� Click OK.
142 P A R T T W O B O O K K E E P I N G
QckBcks TIGHT / QuickBooks 2009 The Official Guide / Ivens / 274-8 / Chapter 6
P:\010Comp\QckBcks\274-8\ch06.vpTuesday, September 16, 2008 10:57:54 AM
Color profile: DisabledComposite Default screen

You’ve created the parent account—now create the subaccounts as follows:
� Press CTRL-N to open the New Account window.� Select Income as the account type.� If you’re using numbered accounts, use the next sequential number after the
number you used for the parent account. Also enter a name for the account,such as Telephone Reimbursements.
� Select the Subaccount check box and link it to the parent account you created.� Click Next to create the next account.
Repeat this process as many times as necessary (click OK instead of Next whenyou’re finished). For example, your chart of accounts could have the followingaccounts for this purpose:
• 40400 Reimbursed Expenses (Parent Account, never post to this account)• 40410 Equip Rental Reimbursements (subaccount)• 40420 Telephone Reimbursements (subaccount)• 40430 Travel Reimbursements (subaccount)• 40440 Subcontractor Reimbursements (subaccount)
Your reports show the individual account postings, and QuickBooksautomatically calculates the total of all the subaccounts and displays that total inthe parent account.
Don’t forget to edit your existing expense accounts if you’ll be invoicingcustomers for reimbursements for those accounts. Select the check box to trackreimbursed expenses and enter the appropriate income account.
Recording Reimbursable ExpensesIf you want to be reimbursed by customers for expenses you incurred on theirbehalf, you must enter the appropriate data while you’re filling out the vendor’s bill.After you enter the account and the amount, click the arrow in the Customer:Jobcolumn and select the appropriate customer or job from the drop-down list.
Entering data in the Customer:Job column automatically places a check mark inthe check box in the Billable column. The check mark indicates you want to bill thecustomer for the expense.
Sometimes, a vendor’s bill is for an amount that’s not entirely chargeable to acustomer. Some of the amount may be your own responsibility, and it may alsobe that multiple customers owe you reimbursement for the amount. (This is oftenthe case with telephone expenses when your customers reimburse you for long-distance charges.)
C H A P T E R 6 E N T E R I N G A C C O U N T S P A Y A B L E B I L L S 143
QckBcks TIGHT / QuickBooks 2009 The Official Guide / Ivens / 274-8 / Chapter 6
P:\010Comp\QckBcks\274-8\ch06.vpTuesday, September 16, 2008 10:57:54 AM
Color profile: DisabledComposite Default screen
Follow these steps to enter the transaction:
� Select the expense account, and then enter the portion of the bill that is yourown responsibility.
� In the next line, select the same account, and then enter the portion of the billyou are charging back to a customer.
� Enter an explanation of the charge in the Memo column. (When you create theinvoice for reimbursement, the text in the Memo column is the only descriptionthe customer sees.)
� In the Customer:Job column, choose the appropriate customer or job.� Repeat steps 2 through 4 to include any additional customers for this expense
account.
When you’re finished, the total amount entered should match the amount on thevendor’s bill.
Tracking Expenses for Job CostingIf you’re tracking expenses for the purpose of job costing, use the same stepsdescribed in the previous section for entering reimbursed expenses.
Click the check box in the Billable column to remove the check mark. Thisdisables the reimbursement feature, but the expense is still associated with thecustomer (which is how you track job costing).
T I P : You can enter both billable and nonbillable expenses in the same vendorbill, by selecting or deselecting the check mark appropriately.
Invoicing Customers for Reimbursable ExpensesWhen you save the vendor bill, the amounts you linked to a customer are savedin the customer file. If you placed a check mark in the Billable column, you cancollect the money by adding those amounts to the next invoice you create. Infact, you’re free to create an invoice specifically for the purpose of collectingreimbursable expenses.
Chapter 3 has complete information about creating invoices for customers, butthis section covers the particular steps you take when you want to create an invoicethat includes costs for which you’re seeking reimbursement.
Adding Reimbursable Costs AutomaticallyAs soon as you select a customer in the Invoice window, QuickBooks checks to seeif that customer has any outstanding billable time or costs. If so, you’re notified ofthat fact.
144 P A R T T W O B O O K K E E P I N G
QckBcks TIGHT / QuickBooks 2009 The Official Guide / Ivens / 274-8 / Chapter 6
P:\010Comp\QckBcks\274-8\ch06.vpTuesday, September 16, 2008 10:57:54 AM
Color profile: DisabledComposite Default screen

Ill 6-1
If you select the option to select the outstanding costs for this invoice,QuickBooks displays the Choose Billable Time And Costs dialog, where you canplace a check mark in the first column of each listing to use the reimbursable costin the invoice (see Figure 6-4).
If you don’t automatically add the reimbursable costs and change your mindlater, click the Add Time/Costs button in the Create Invoices window to open theChoose Billable Time And Costs dialog.
C H A P T E R 6 E N T E R I N G A C C O U N T S P A Y A B L E B I L L S 145
QckBcks TIGHT / QuickBooks 2009 The Official Guide / Ivens / 274-8 / Chapter 6
FIGURE 6-4 Select the reimbursable expenses you want to add to the invoice you’repreparing.
P:\010Comp\QckBcks\274-8\ch06.vpTuesday, September 16, 2008 10:57:54 AM
Color profile: DisabledComposite Default screen

If you select multiple reimbursable costs, QuickBooks enters an item calledReimb Group, lists the individual items, and enters the total for the reimbursableitems on the invoice (see Figure 6-5).
Notice that the description of the reimbursable items is taken from the text youentered in the Memo column when you entered the vendor’s bill. If you don’t usethat Memo column, you’ll have to enter text manually in the Description column ofthe invoice (which is a real test of your memory). Otherwise, the customer seesonly an amount and no explanation of what it’s for.
Adding Taxes to Reimbursable ExpensesIf an item is taxable and the customer is not tax exempt, choose the option SelectedExpenses Are Taxable. When the items are passed to the invoice, the appropriatetaxes are applied. If you select the taxable option and the customer is tax exempt,QuickBooks won’t add the sales tax to the invoice.
146 P A R T T W O B O O K K E E P I N G
QckBcks TIGHT / QuickBooks 2009 The Official Guide / Ivens / 274-8 / Chapter 6
FIGURE 6-5 QuickBooks creates a group item for reimbursable charges, and displays the totalon the invoice.
P:\010Comp\QckBcks\274-8\ch06.vpTuesday, September 16, 2008 10:57:55 AM
Color profile: DisabledComposite Default screen
If some items are taxable and others aren’t, you have to separate the process ofmoving items to the invoice. First, deselect each nontaxable item by clicking itscheck mark to remove it (it’s a toggle). Click OK to put those items on the invoice.Then return to the Choose Billable Time And Costs window, put a check mark nextto each nontaxable item, deselect the Selected Expenses Are Taxable option, andclick OK.
Omitting the Details on the InvoiceIf you have multiple reimbursable items, you can combine all of them into a singleline item on the invoice. Choose the option Print Selected Time And Costs As OneInvoice Item. When you click OK and view the results in the invoice, you still seeeach individual item. Don’t panic—you’re not losing your mind. The screen versionof the invoice continues to display the individual items. However, when you printthe invoice, you’ll see a line item named Total Reimbursable Expenses with thecorrect total in the Amount column.
T I P : You can preview the printed invoice by clicking the arrow next to thePrint icon on the invoice window and choosing Preview.
QuickBooks changes the format of the printed invoice to eliminate the detailsbut doesn’t change the data in the onscreen version of the invoice. This means youcan open the invoice later and see the detailed items, which is handy when thecustomer calls to ask, “What’s this reimbursable expense item on my bill?”
Excluding a Reimbursable ExpenseIf you have some reason to exclude one or more expenses from the current invoice,just avoid putting a check mark in the Use column. The item remains in the systemand shows up on the Choose Billable Time And Costs window the next time youopen it. You can add the item to the customer’s invoice in the future.
Removing a Reimbursable Expense from the ListAs explained earlier, when you’re entering a vendor’s bill and assigning expenses tocustomers and jobs, you can track the expense but not invoice the customer for itby clearing the check mark in the Billable column. Leaving the check mark in thecolumn automatically moves the expense to the category “reimbursable.”
But suppose when it’s time to invoice the customer, you decide that you don’twant to ask the customer to pay this expense; you’ve changed your mind. TheChoose Billable Time And Costs window has no Delete button and no method ofselecting an item and choosing a delete function. You could deselect the checkmark in the Use column, but afterwards, every time you open the window, the itemis still there—it’s like a haunting.
C H A P T E R 6 E N T E R I N G A C C O U N T S P A Y A B L E B I L L S 147
QckBcks TIGHT / QuickBooks 2009 The Official Guide / Ivens / 274-8 / Chapter 6
P:\010Comp\QckBcks\274-8\ch06.vpTuesday, September 16, 2008 10:57:55 AM
Color profile: DisabledComposite Default screen

The solution lies in the Hide column. If you place a check mark in the Hidecolumn, the item is effectively deleted from the list of reimbursable expenses thatyou see when you’re preparing invoices (but the amount is still in your system forjob costing purposes). This means you won’t accidentally invoice the customer forthe item, but the link to this expense for this customer continues to appear inreports about this customer’s activity for job costing.
Changing the Amount of a Reimbursable ExpenseYou’re free to change the amount of a reimbursable expense. To accomplish this,select (highlight) the amount in the Amount column of the Billable Time And Costswindow, and enter the new figure.
If you reduce the amount, QuickBooks does not keep the remaining amount onthe Billable Time And Costs window. You won’t see it again, because QuickBooksmakes the assumption you’re not planning to pass the remaining amount to yourcustomer in the future.
You may want to increase the charge for some reason (perhaps to coveroverhead), but if you’re increasing all the charges, it’s easier to apply a markup(covered next) than to change each individual item.
Marking Up Reimbursable ExpensesYou can mark up any expenses you’re invoicing, which many companies do tocover any additional costs incurred such as handling, time, or general aggravation.To apply a markup, select the items you want to mark up by placing a check markin the Use column in the Choose Billable Time And Costs window. Then enter amarkup in the Markup Amount or % field in either of the following ways:
• Enter an amount.• Enter a percentage (a number followed by the percent sign).
Specify the account to which you’re posting markups. You can create an accountspecifically for markups (which is a good idea because it lets you analyze the sourceof all income) or use an existing income account.
The item amounts and the total of the selected charges don’t change when youapply the markup; the change is reflected in the amounts for Total Expenses WithMarkup and Total Billable Time And Costs.
When you click OK to transfer the reimbursable expenses to the customer’sinvoice, you’ll see the reimbursable expenses and the markup as separate items (seeFigure 6-6).
148 P A R T T W O B O O K K E E P I N G
QckBcks TIGHT / QuickBooks 2009 The Official Guide / Ivens / 274-8 / Chapter 6
P:\010Comp\QckBcks\274-8\ch06.vpTuesday, September 16, 2008 10:57:55 AM
Color profile: DisabledComposite Default screen

Although it would be unusual for you to be marking up items without havingdiscussed this with your customer, if you don’t want your customer to see themarkup amounts, select the Print Selected Time And Costs As One Invoice Itemoption. You’ll see the breakdown on the screen version of the invoice, but theprinted invoice will contain only the grand total.
One big difference between using the markup function and just changing theamount of the reimbursable expense in the Amount column is the way the amountsare posted to your general ledger. If you use the markup function, the differencebetween the actual expense and the charge to your customer is posted to themarkup account. If you change the amount of the expense, the entire amount isposted to the income account you linked to the reimbursable expense account.
Quick Invoicing for Time and ExpensesPremier and Enterprise Solutions editions have an easy-to-use feature that lets youcreate customer invoices for time and reimbursable expenses from a single list. Thislist, named Invoice For Time & Expenses, displays all the charges waiting to be
C H A P T E R 6 E N T E R I N G A C C O U N T S P A Y A B L E B I L L S 149
QckBcks TIGHT / QuickBooks 2009 The Official Guide / Ivens / 274-8 / Chapter 6
FIGURE 6-6 The markup is clearly indicated—it has its own line item.
P:\010Comp\QckBcks\274-8\ch06.vpTuesday, September 16, 2008 10:57:55 AM
Color profile: DisabledComposite Default screen
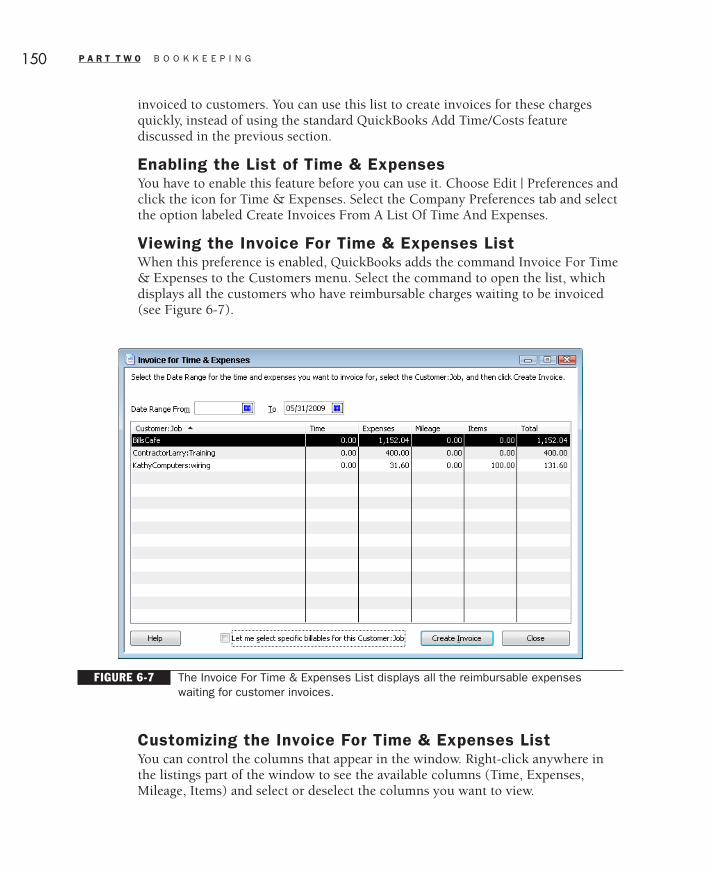
invoiced to customers. You can use this list to create invoices for these chargesquickly, instead of using the standard QuickBooks Add Time/Costs featurediscussed in the previous section.
Enabling the List of Time & ExpensesYou have to enable this feature before you can use it. Choose Edit | Preferences andclick the icon for Time & Expenses. Select the Company Preferences tab and selectthe option labeled Create Invoices From A List Of Time And Expenses.
Viewing the Invoice For Time & Expenses ListWhen this preference is enabled, QuickBooks adds the command Invoice For Time& Expenses to the Customers menu. Select the command to open the list, whichdisplays all the customers who have reimbursable charges waiting to be invoiced(see Figure 6-7).
Customizing the Invoice For Time & Expenses ListYou can control the columns that appear in the window. Right-click anywhere inthe listings part of the window to see the available columns (Time, Expenses,Mileage, Items) and select or deselect the columns you want to view.
150 P A R T T W O B O O K K E E P I N G
QckBcks TIGHT / QuickBooks 2009 The Official Guide / Ivens / 274-8 / Chapter 6
FIGURE 6-7 The Invoice For Time & Expenses List displays all the reimbursable expenseswaiting for customer invoices.
P:\010Comp\QckBcks\274-8\ch06.vpTuesday, September 16, 2008 10:57:56 AM
Color profile: DisabledComposite Default screen

You can also select a date range for viewing unbilled expenses by filling in theDate Range From and To fields. However, if there are unbilled reimbursableexpenses before the date you enter in the From field, the system omits them. In theTo field, enter the date you’ll be using for invoices.
Creating Invoices from the Time & Expenses ListThere are two methods for creating an invoice from the Time & Expenses List:
• Automatically create the invoice using the data displayed for the customer.• Select the option labeled Let Me Select Specific Billables For This
Customer:Job.
The second method lets you change the rate for expenses and also lets youchoose specific expenses for the invoice you’re preparing (leaving the remainingexpenses for a later invoice).
C H A P T E R 6 E N T E R I N G A C C O U N T S P A Y A B L E B I L L S 151
QckBcks TIGHT / QuickBooks 2009 The Official Guide / Ivens / 274-8 / Chapter 6
Time & Expenses List Calculated AmountsMay Confuse YouThe Invoice For Time & Expenses List is a convenience; a way to view the list of customers forwhom you assigned expenses that haven’t yet been added to invoices for those customers. Theamounts that appear in this list may not be the amounts you’ll add to their invoices.
It’s not unusual to find a listing that displays zero in every category. Why would the listingappear if there were no amounts posted for reimbursement? To understand the totals you see, youhave to understand the process that builds the list. This process varies according to the type ofreimbursable charge.
For Expenses and Items, the amount that appears is the amount you posted when you createdthe vendor transaction.
For Time and Mileage charges, the amount that appears is based on the price of the Time itemyou created when you view that item’s record in the Item list. It’s not unusual to omit data in thePrice record of items, because the price you charge customer may vary by some internal companypolicy (or by whim). However, the Invoice For Time & Expenses List totally relies on that Price fieldwhen calculating the amount for time and mileage.
When you select a listing that displays a zero amount, even though there are charges for unitsof time or mileage, you can manually enter the amount you want to use for this invoice.
The most efficient use of this list is to make sure you configure all items with price data. Thismay not work for your company, in which case you’ll have to understand that zero listings maynot make sense, but there’s data there upon which you can base an invoice charge.
➽ FYI
P:\010Comp\QckBcks\274-8\ch06.vpTuesday, September 16, 2008 10:57:56 AM
Color profile: DisabledComposite Default screen

To create an invoice automatically, select the appropriate Customer:Job listingand click Create Invoice. QuickBooks opens the Create Invoices transactionwindow with the customer or job and the invoice data already entered. You can addother items (services or products) to the invoice. Then click Save & Close to returnto the Invoice For Time & Expenses List.
If you select the option labeled Let Me Select Specific Billables For ThisCustomer:Job, selecting the listing and clicking Create Invoice opens a CreateInvoices transaction window and also opens the Choose Billable Time And Costsdialog. This is the same dialog you see when you’re creating invoices and click theAdd Time/Costs button on the transaction form (covered in the previous section).You can select the costs you want to include on the invoice, change the amounts ofbillable costs, and invoke the other options available in this dialog (enter separatelines for charges, combine charges, etc.).
In addition to the billable expenses, you can add services and products to theinvoice before saving it.
Managing Inventory Item PurchasesIf the vendor bill you’re recording is for inventory items, you need to take adifferent approach, because the accounting issues (the way you post amounts) aredifferent. Two transactions are involved when you buy items for your inventory:
• You receive the inventory products.• You receive the bill for the inventory products.
Once in a while, the bill comes before the products, and sometimes both eventsoccur at the same time. (In fact, you may find the bill pasted to the carton orincluded inside the carton.) This section covers the possible scenarios, includinghow to track purchase orders.
N O T E : To use the Inventory and Purchase Order features, you must enablethem in the Items & Inventory category of Preferences (choose Edit | Preferencesto open the Preferences dialog).
Using Purchase OrdersYou can use purchase orders to order inventory items from your suppliers. It’s not agreat idea to use purchase orders for goods that aren’t in your inventory, such as officesupplies or consulting services—that’s not what purchase orders are intended for.
Creating and saving a purchase order has no effect on your financial records. Noamounts are posted, because purchase orders exist only to help you track whatyou’ve ordered against what you’ve received.
152 P A R T T W O B O O K K E E P I N G
QckBcks TIGHT / QuickBooks 2009 The Official Guide / Ivens / 274-8 / Chapter 6
P:\010Comp\QckBcks\274-8\ch06.vpTuesday, September 16, 2008 10:57:56 AM
Color profile: DisabledComposite Default screen

T I P : When you enable the Inventory and Purchase Order features,QuickBooks creates a nonposting account named Purchase Orders. You candouble-click the account’s listing to view and drill down into the purchase ordersyou’ve entered, but the data in the register has no effect on your finances anddoesn’t appear in financial reports.
Follow these steps to create a purchase order:
� Choose Vendors | Create Purchase Orders from the menu bar to open a blankCreate Purchase Orders window.
� Fill in the purchase order fields, which are easy and self-explanatory (seeFigure 6-8).
� Click Save & New to save the purchase order and move on to the next blankpurchase order form, or click Save & Close if you have created all the purchaseorders you need right now.
T I P : If you’re purchasing something on behalf of a customer, you can use theCustomer column to treat the purchase as a reimbursable transaction when youenter the vendor’s bill for this purchase.
C H A P T E R 6 E N T E R I N G A C C O U N T S P A Y A B L E B I L L S 153
QckBcks TIGHT / QuickBooks 2009 The Official Guide / Ivens / 274-8 / Chapter 6
FIGURE 6-8 A purchase order looks like a vendor bill, but you don’t incur any accountspayable liability.
P:\010Comp\QckBcks\274-8\ch06.vpTuesday, September 16, 2008 10:57:56 AM
Color profile: DisabledComposite Default screen

You can print the purchase orders as you create them by clicking the Printbutton as soon as each purchase order is completed. If you’d prefer, you can printthem all in a batch by clicking the arrow to the right of the Print button on the lastpurchase order window and selecting Print Batch. If you want to print them later,be sure the option To Be Printed is selected on each PO. When you’re ready toprint, choose File | Print Forms | Purchase Orders.
You can also e-mail the purchase orders as you create them, or e-mail them as abatch by selecting Send Batch from the drop-down list next to the E-mail icon onthe transaction window’s toolbar.
T I P : Many companies don’t send purchase orders; instead, they notify thevendor of the purchase order number when they place the order over thetelephone, via e-mail, or by logging into the vendor’s Internet-based order system.
When the inventory items and the bill for them are received, you can use thepurchase order to automate the receiving and vendor bill entry processes.
Receiving Inventory ItemsSince this chapter is about accounts payable, it covers the steps involved in paying forthe inventory items. However, you don’t pay for items you haven’t received, so theprocesses involved in receiving the items without receiving the bill also merit attention.
If the inventory items arrive before you receive a bill from the vendor, you musttell QuickBooks about the new inventory, so the items can be brought into theinventory asset account and become available for sales.
Follow these steps to receive inventory items:
� Choose Vendors | Receive Items to open a blank Create Item Receipts window.� Enter the vendor name, and if open purchase orders exist for this vendor,
QuickBooks notifies you:
Ill 6-2
� If you know a purchase order exists for this shipment, or if you’re not sure, clickYes. QuickBooks displays all the open purchase orders for this vendor so you canput a check mark next to the appropriate PO (or multiple POs if the shipmentthat arrived covers more than one PO). If no PO for this shipment is listed on theOpen Purchase Orders list for this vendor, click Cancel on the Open PurchaseOrders window to return to the receipts window and fill in the data manually.
154 P A R T T W O B O O K K E E P I N G
QckBcks TIGHT / QuickBooks 2009 The Official Guide / Ivens / 274-8 / Chapter 6
P:\010Comp\QckBcks\274-8\ch06.vpTuesday, September 16, 2008 10:57:57 AM
Color profile: DisabledComposite Default screen

� If you know there isn’t a purchase order for this particular shipment, click No,and just fill out the Create Item Receipts window manually.
� If a PO exists and you select it, QuickBooks fills out the Create Item Receiptswindow using the information in the PO (see Figure 6-9). Check the shipmentagainst the PO and change any quantities that don’t match.
� Click Save & New to receive the next shipment into inventory, or click Save &Close if this takes care of all the receipts of goods.
QuickBooks posts the amounts in the purchase order to your Accounts Payableaccount. This is not the standard, Generally Accepted Accounting Procedure(GAAP) method for handling receipt of goods without a bill from the vendor, and ifyour accountant notices this QuickBooks action you can explain that QuickBookshas a workaround for this (see the section “Understanding the Postings” later inthis chapter).
One problem is that costs on the PO may not be the current costs for the items,and the vendor bill that shows up may have different amounts. The PO amountsyou filled in were taken from your inventory records or by your own manual entry(perhaps using an out-of-date price list from the vendor). It’s not uncommon for
C H A P T E R 6 E N T E R I N G A C C O U N T S P A Y A B L E B I L L S 155
QckBcks TIGHT / QuickBooks 2009 The Official Guide / Ivens / 274-8 / Chapter 6
FIGURE 6-9 Line items are auto-filled from the data in the PO, and the Memo fieldautomatically reminds you that the bill hasn’t arrived yet.
P:\010Comp\QckBcks\274-8\ch06.vpTuesday, September 16, 2008 10:57:57 AM
Color profile: DisabledComposite Default screen

purchasing agents to fill out a PO without calling the vendor and checking thelatest cost. The bill that arrives will have the correct costs, and those costs are theamounts that are supposed to be posted to the A/P account. If this situation occurs,QuickBooks changes the posting to A/P to match the bill.
In order to avoid double-posting the A/P liability when the bill does arrive, youmust use a special QuickBooks transaction window (discussed next). Becausewarehouse personnel frequently handle the receipt of goods, and receipt of bills ishandled by a bookkeeper, a lack of communication may interfere with using thecorrect transaction methods. QuickBooks prevents this problem by alerting thedata-entry person of a possible error. If the bookkeeper uses the standard Enter Billstransaction window, as soon as the vendor is entered, QuickBooks displays amessage stating that a receipt of goods record exists for this vendor and the billshould not be recorded with the standard Enter Bills window.
Recording Bills for Received ItemsAfter you receive the items, eventually the bill comes from the vendor. To enter thebill, do not use the regular Enter Bills icon in the Vendors Navigator window, whichwould cause another posting to Accounts Payable.
Follow these steps to record bills for received items:
� Choose Vendors | Enter Bill For Received Items to open the Select Item Receiptwindow. Choose the vendor, and you see the current items receipt informationfor that vendor.
Ill 6-3
� Select the appropriate listing and click OK to open an Enter Bills window. Theinformation from the items receipt is used to fill in the bill information.
� Change anything that needs to be changed: a different cost per unit, taxes andshipping costs that were added, and so on. If you make any changes, you mustclick the Recalculate button so QuickBooks can match the total in the AmountDue field to the changed line item data.
� Click Save & Close.
156 P A R T T W O B O O K K E E P I N G
QckBcks TIGHT / QuickBooks 2009 The Official Guide / Ivens / 274-8 / Chapter 6
P:\010Comp\QckBcks\274-8\ch06.vpTuesday, September 16, 2008 10:57:57 AM
Color profile: DisabledComposite Default screen

Whether or not you’ve made changes to the amounts, QuickBooks displays amessage warning you that the transaction is linked to other transactions and askingif you’re sure you want to save the changes. Say Yes. Even if you didn’t makechanges to the line items, you’ve changed the transaction from a receipt of goodstransaction to a vendor bill transaction, and QuickBooks replaces the originalposting to Accounts Payable that was made when you received the items.
Receiving Items and Bills SimultaneouslyIf the items and the bill arrive at the same time (sometimes the bill is in theshipping carton), you must tell QuickBooks about those events simultaneously.To do this, choose Vendors | Receive Items And Enter Bill. This opens the standardEnter Bills window, and when you enter the vendor’s name you see a messagetelling you an open PO exists for the vendor.
The message dialog asks if you want to receive these goods (and the bill) againstan open PO. Click Yes to see the open POs for this vendor and select the appropriatePO. The line items on the bill are filled in automatically, and you can correct anyquantity or price difference between your original PO and the actuals. When yousave the transaction, QuickBooks receives the items into inventory in addition toposting the bill to A/P.
Understanding the PostingsYou need to explain to your accountant (or warn your accountant) about the wayQuickBooks posts the receipt of goods and the bills for inventory items. It seems abit different from standard practices if you’re a purist about accounting procedures,but as long as you remember to use the correct commands for receiving items andbills (as described in the preceding paragraphs), it works fine.
QuickBooks makes the same postings no matter how, or in what order, youreceive the items and the bill. For example, suppose you receive $400.00 worth ofitems and fill out the Receive Items window:
Account Debit Credit
Accounts Payable $400.00
Inventory $400.00
Notice that the amount is posted to Accounts Payable, even if the bill hasn’t beenreceived. The entry in the Accounts Payable register is noted as a receipt of itemswith a transaction type ITEM RCPT.
When the vendor bill arrives, as long as you remember to use Vendors | EnterBill For Received Items, the amount isn’t charged to Accounts Payable again;
C H A P T E R 6 E N T E R I N G A C C O U N T S P A Y A B L E B I L L S 157
QckBcks TIGHT / QuickBooks 2009 The Official Guide / Ivens / 274-8 / Chapter 6
P:\010Comp\QckBcks\274-8\ch06.vpTuesday, September 16, 2008 10:57:57 AM
Color profile: DisabledComposite Default screen

instead, the A/P register entry is changed to reflect the fact that it is now a bill (theitem type changes to BILL). If you made changes to any amounts, the new amountsare posted, replacing the original amounts.
C A U T I O N : If you use the standard Enter Bills transaction, QuickBookswarns you that this vendor has receipts-pending bills and instructs you to use thecorrect command if this bill is for that receipt. If you ignore the listing, and thebill is indeed for items already received into QuickBooks, you’ll have doubleentries for the same amount in your Accounts Payable account.
In many accounting software applications, the receipt of items and the vendorbill are posted as separate transactions to a liability account called a receiptsholding account. Because the postings to the receipts holding account are washedbetween the receipt of goods and the receipt of the bill, the bottom-line effect toyour general ledger is the same when QuickBooks does it.
However, the QuickBooks approach denies you the ability to look at the amountcurrently posted to the receipts holding account to see where you stand in terms ofitems in but bills not received (or vice versa). In terms of bottom-line financials,however, as long as you use the correct commands on the Vendor menu to enterthese transactions, all the arithmetic works and you won’t have a problem.
Recording Vendor CreditsIf you receive a credit from a vendor, you must record it in QuickBooks. Then, youcan apply it against an open vendor bill or let it float until your next order from thevendor. (See Chapter 7 for information about paying bills, which includes applyingvendor credits to bills.)
QuickBooks doesn’t provide a discrete form for vendor credits; instead, you canchange a vendor bill form to a credit form with a click of the mouse.
Follow these steps to record vendor credits:
� Choose Vendors | Enter Bills from the menu bar to open the Enter Bills window.� Select the Credit option, which automatically deselects Bill and changes the
available fields in the form (see Figure 6-10).� Choose the vendor from the drop-down list that appears when you click the
arrow in the Vendor field.� Enter the date of the credit memo.� In the Ref. No. field, enter the vendor’s credit memo number (if one exists).� Enter the amount of the credit memo.� If the credit is not for inventory items, use the Expenses tab to assign an
account and amount to this credit.
158 P A R T T W O B O O K K E E P I N G
QckBcks TIGHT / QuickBooks 2009 The Official Guide / Ivens / 274-8 / Chapter 6
P:\010Comp\QckBcks\274-8\ch06.vpTuesday, September 16, 2008 10:57:57 AM
Color profile: DisabledComposite Default screen

If the credit is for inventory items, use the Items tab to enter the items, alongwith the quantity and cost, for which you are receiving this credit.
Click Save & Close to save the credit (unless you have more credits to enter—in which case, click Save & New).
N O T E : If you’ve agreed that the vendor pays the shipping costs to returnitems, don’t forget to enter that amount in the Expenses tab.
Here are the postings to your general ledger when you save a vendor credit:
Account Debit Credit
Inventory Asset Amount of returned items
Applicable expenseaccount(s)
Amounts of expenses in the credit
Accounts Payable Total credit amount
C H A P T E R 6 E N T E R I N G A C C O U N T S P A Y A B L E B I L L S 159
QckBcks TIGHT / QuickBooks 2009 The Official Guide / Ivens / 274-8 / Chapter 6
FIGURE 6-10 When you select the Credit option, the Enter Bills transaction window changes—the fields for terms and due date disappear.
P:\010Comp\QckBcks\274-8\ch06.vpTuesday, September 16, 2008 10:57:58 AM
Color profile: DisabledComposite Default screen

T I P : Don’t use an RA (Return Authorization) number you received on thetelephone as the basis for your credit. Wait for the credit memo to arrive and useits transaction number, so your records and the vendor’s records match. Thismakes it much easier to settle disputed amounts.
Entering Recurring BillsYou probably have quite a few bills that you must pay every month. Commonly, thelist includes your rent or mortgage payment, payments for assets you purchasedwith a loan (such as vehicles or equipment), or a retainer fee (for an attorney,accountant, or subcontractor).
You can make it easy to pay those bills every month without entering a bill eachtime. QuickBooks provides a feature called memorized transactions, and you can putit to work to make sure your recurring bills are covered.
Creating a Memorized BillTo create a memorized transaction for a recurring bill, first open the Enter Billswindow and fill out the information.
T I P : If the recurring bill isn’t always exactly the same—perhaps the amountis different each month (your utility bills, for instance)—it’s okay to leave theAmount Due field blank. You can fill in the amount each time you use thememorized bill.
Before you save the transaction, memorize it. To accomplish this, press CTRL-M(or choose Edit | Memorize Bill from the menu bar). The Memorize Transactionwindow opens.
Use these guidelines to complete the Memorize Transaction window:
• Use the Name field to enter a name for the transaction. QuickBooksautomatically enters the vendor name, but you can change it. Use a name thatdescribes the transaction (such as Rent) so you don’t have to rely on yourmemory.
• Select Remind Me (the default) to tell QuickBooks to issue a reminder that thisbill must be put into the system to be paid.
• Select Don’t Remind Me if you want to forego getting a reminder and managethe recurring bill yourself.
• Select Automatically Enter to have QuickBooks enter this bill as a payableautomatically, without reminders. Specify the number of Days In Advance ToEnter this bill into the system. At the appropriate time, the bill appears in theSelect Bills To Pay List you use to pay your bills (covered in Chapter 7).
160 P A R T T W O B O O K K E E P I N G
QckBcks TIGHT / QuickBooks 2009 The Official Guide / Ivens / 274-8 / Chapter 6
P:\010Comp\QckBcks\274-8\ch06.vpTuesday, September 16, 2008 10:57:58 AM
Color profile: DisabledComposite Default screen

• Select the interval for this bill from the drop-down list in the How Often field.• Enter the Next Date this bill is due.• If this payment is finite, such as a loan that has a specific number of payments,
use the Number Remaining field to specify how many times this bill must bepaid.
Click OK in the Memorize Transaction window to save it, and then click Save &Close in the Enter Bills window to save the bill.
T I P : If you created the bill only for the purpose of creating a memorizedtransaction and you don’t want to enter the bill into the system for payment atthis time, after you save the memorized transaction, close the Enter Bills windowand respond No when QuickBooks asks if you want to save the transaction.
C A U T I O N : When you select the reminder options for the memorized bill,the reminders only appear if you’re using reminders in QuickBooks. Choose Edit |Preferences and click the Reminders category icon to view or change remindersoptions.
Using a Memorized BillIf you’ve opted to enter the memorized bill yourself (either by asking QuickBooksto remind you to do this, or by trusting your memory), you must bring it up tomake it a current payable.
To use a memorized bill, press CTRL-T (or choose Lists | Memorized TransactionList from the menu bar). This opens the Memorized Transaction List window.
Double-click the appropriate listing to open the bill in the usual Enter Billswindow with the next due date showing.
If the amount is blank, fill it in. Click Save & Close to save this bill so it becomesa current payable and is listed as a bill that must be paid when you write checks topay your bills. (See Chapter 7 for information about paying bills.)
Creating Memorized Bill GroupsIf you have a whole bunch of memorized transactions to cover all the bills that aredue the first of the month (rent, mortgage, utilities, car payments, whatever), youdon’t have to select them for payment one at a time. You can create a group andthen invoke actions on the group (automatically invoking the action on every billin the group).
C H A P T E R 6 E N T E R I N G A C C O U N T S P A Y A B L E B I L L S 161
QckBcks TIGHT / QuickBooks 2009 The Official Guide / Ivens / 274-8 / Chapter 6
P:\010Comp\QckBcks\274-8\ch06.vpTuesday, September 16, 2008 10:57:58 AM
Color profile: DisabledComposite Default screen

Follow these steps to create a memorized bill group:
� Press CTRL-T to display the Memorized Transaction List.� Right-click any blank spot in the Memorized Transaction window and choose
New Group from the shortcut menu. In the New Memorized TransactionGroup window, give this group a name (such as FirstOfMonth).
� Fill out the fields to specify the way you want the bills in this group to behandled.
� Click OK to save this group.
Now that you’ve created the group, you can add memorized transactions to it asfollows:
� In the Memorized Transaction List window, select the first memorizedtransaction you want to add to the group.
� Right-click and choose Edit Memorized Transaction from the shortcut menu.� When the Schedule Memorized Transaction window opens with this
transaction displayed, select the option named With Transactions In Group.Then select the group from the list that appears when you click the arrow nextto the Group Name field.
� Click OK and repeat this process for each bill in the list.
As you create future memorized bills, select the same With Transactions InGroup option to place these new bills in the appropriate groups.
If you have other recurring bills with different criteria (perhaps they’re due on adifferent day of the month, or they’re due annually), create groups for them and addthe individual transactions to the group.
Now that all of your vendor bills are in the system, you have to pay them.Chapter 7 covers everything you need to know about accomplishing that task.
Tracking Mileage ExpenseQuickBooks provides a way to track the mileage of your vehicles. You can use themileage information to track the expenses connected to vehicle use, to use mileageas part of your job-costing efforts, or to bill customers for mileage expenses.
T I P : Your accountant may be able to use the vehicle mileage data on yourincome tax return. You can either deduct the actual mileage expense or yourother vehicle expenses; you can’t deduct both. Your accountant, working with thefigures you provide as a result of mileage tracking, will make the decision.
To track a vehicle, you must add that vehicle to your Vehicle List (covered inChapter 2). Once the vehicle is in your QuickBooks system, you can begin tracking
162 P A R T T W O B O O K K E E P I N G
QckBcks TIGHT / QuickBooks 2009 The Official Guide / Ivens / 274-8 / Chapter 6
P:\010Comp\QckBcks\274-8\ch06.vpTuesday, September 16, 2008 10:57:58 AM
Color profile: DisabledComposite Default screen

its mileage. Of course, you also need to make sure that everyone who uses a vehiclefor business is tracking the odometer. Create and print a form for this purpose, withthe following categories to fill in:
• Trip Start Date• Trip End Date• Starting Odometer• Ending Odometer• Customer:Job
Entering Mileage RatesTo track the cost of mileage, you must make sure you have accurate mileage rates inyour system. These change frequently, so you’ll have to keep up with the latest IRSfigures. QuickBooks calculates the cost of mileage based on the information youenter. To get the current rate, check with the IRS (www.irs.gov) or ask youraccountant.
Follow these steps to enter the rate:
� Choose Company | Enter Vehicle Mileage to open the Enter Vehicle Mileagewindow.
� Click the Mileage Rates button on the toolbar to open the Mileage Rateswindow.
� Select a date from the calendar as the Effective Date.� Enter the IRS rate for that date.� Click Close.
Notice that you can continue to add dates and rates and QuickBooks will use theappropriate rate, based on the date of your mileage entry, to calculate costs.
Creating a Mileage ItemIf you plan to use mileage expenses for job costing, or to bill customers for mileage,you must create an item (call it mileage, travel, or something similar). Use a Servicetype item for this feature. This is the item you select when you’re filling in amileage window.
Attach an income account to the item (for example, Mileage Invoiced). Youcould create another reimbursement income account to attach to this item becauseyou’re collecting reimbursements for travel expenses. However, don’t create anexpense account for mileage and link the reimbursement account to it, because youdon’t enter accounts payable expenses for mileage—this mileage item is just onepart of your existing vehicle expenses (such as vehicle fuel, travel, and so on).
C H A P T E R 6 E N T E R I N G A C C O U N T S P A Y A B L E B I L L S 163
QckBcks TIGHT / QuickBooks 2009 The Official Guide / Ivens / 274-8 / Chapter 6
P:\010Comp\QckBcks\274-8\ch06.vpTuesday, September 16, 2008 10:57:58 AM
Color profile: DisabledComposite Default screen

It’s important to understand that the mileage rate you entered in the MileageRates window (described in the previous section) is not automatically transferred tothe item you create for mileage. Therefore, you must independently fill in the ratefor the item and update it when the IRS rate changes. You can use the same rate youused in the Mileage Rates window or enter a different rate to create a markup (or amarkdown, if you wish to take that approach).
Entering MileageFollow these steps to enter mileage:
� Choose Company | Enter Vehicle Mileage to open the Enter Vehicle Mileagewindow.
� Select the vehicle from the drop-down list in the Vehicle field.� Enter the dates of the trip.� Enter the odometer readings—QuickBooks calculates the total miles.� If you want to bill the customer for mileage, place a check mark in the Billable
check box and select the Customer:Job, the item you created for mileage, andthe Class (if you’re tracking classes).
� If you don’t want to bill a customer but you want to track job costs, select theCustomer:Job, the item you created for mileage, and the Class (if you’retracking classes). Do not place a check mark in the Billable check box.
� Optionally, enter a note. Click Save & New to enter another trip, or click Save & Close if you’re finished
entering mileage.
To add the billable mileage to a customer’s invoice, follow the instructions forrecovering reimbursable expenses earlier in this chapter.
Creating Mileage ReportsQuickBooks includes four vehicle mileage reports, which you can access bychoosing Reports | Jobs, Time & Mileage and selecting the appropriate mileagereport from the submenu. If you’re working in the Enter Vehicle Mileage dialogbox, the reports are available in the drop-down list you see if you click the arrownext to the Mileage Reports button.
Mileage By Vehicle SummaryUse the Mileage By Vehicle Summary report to see the total miles and the mileageexpense for each vehicle you’re tracking. You can run this report for any date rangethat you want to check, which is a way to determine whether vehicles need servicing.For example, you may need to change the oil and filter every 6,000 miles, or schedulea 50,000-mile checkup. If you deduct mileage expenses on your income tax form,use the entire year as the date range.
164 P A R T T W O B O O K K E E P I N G
QckBcks TIGHT / QuickBooks 2009 The Official Guide / Ivens / 274-8 / Chapter 6
P:\010Comp\QckBcks\274-8\ch06.vpTuesday, September 16, 2008 10:57:58 AM
Color profile: DisabledComposite Default screen
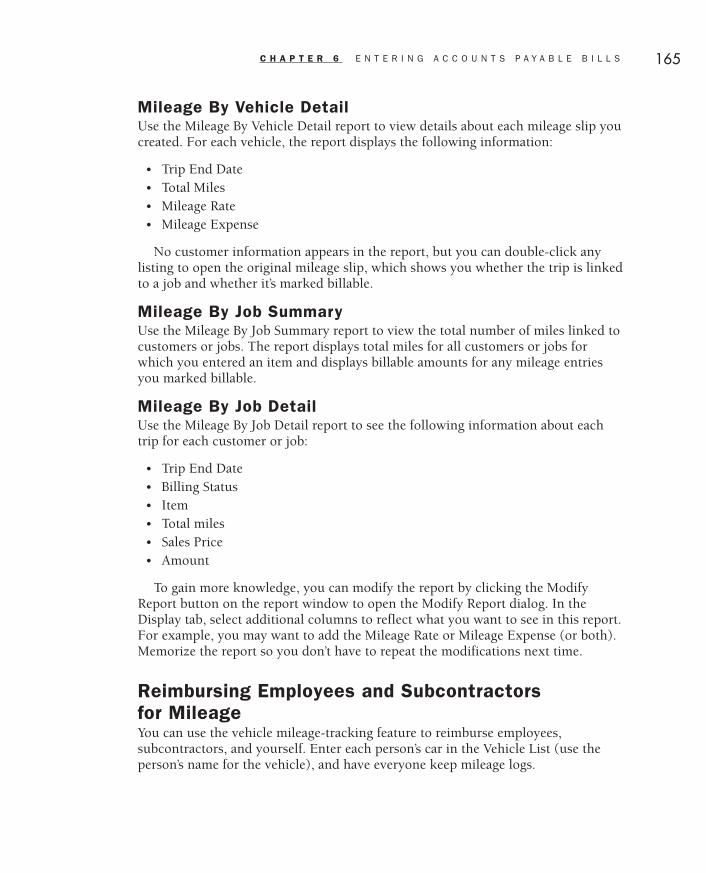
Mileage By Vehicle DetailUse the Mileage By Vehicle Detail report to view details about each mileage slip youcreated. For each vehicle, the report displays the following information:
• Trip End Date• Total Miles• Mileage Rate• Mileage Expense
No customer information appears in the report, but you can double-click anylisting to open the original mileage slip, which shows you whether the trip is linkedto a job and whether it’s marked billable.
Mileage By Job SummaryUse the Mileage By Job Summary report to view the total number of miles linked tocustomers or jobs. The report displays total miles for all customers or jobs forwhich you entered an item and displays billable amounts for any mileage entriesyou marked billable.
Mileage By Job DetailUse the Mileage By Job Detail report to see the following information about eachtrip for each customer or job:
• Trip End Date• Billing Status• Item• Total miles• Sales Price• Amount
To gain more knowledge, you can modify the report by clicking the ModifyReport button on the report window to open the Modify Report dialog. In theDisplay tab, select additional columns to reflect what you want to see in this report.For example, you may want to add the Mileage Rate or Mileage Expense (or both).Memorize the report so you don’t have to repeat the modifications next time.
Reimbursing Employees and Subcontractorsfor MileageYou can use the vehicle mileage-tracking feature to reimburse employees,subcontractors, and yourself. Enter each person’s car in the Vehicle List (use theperson’s name for the vehicle), and have everyone keep mileage logs.
C H A P T E R 6 E N T E R I N G A C C O U N T S P A Y A B L E B I L L S 165
QckBcks TIGHT / QuickBooks 2009 The Official Guide / Ivens / 274-8 / Chapter 6
P:\010Comp\QckBcks\274-8\ch06.vpTuesday, September 16, 2008 10:57:58 AM
Color profile: DisabledComposite Default screen

If you’re doing your own payroll, QuickBooks cannot transfer this moneydirectly to paychecks the way the system can transfer time, but you can run reportsto reimburse everyone.
Follow these steps to reimburse mileage:
� Open the Mileage By Vehicle Detail report.� Enter the date range for which you’re reimbursing individuals.� Click the Modify Report button to open the Modify Report dialog box.� In the Filters tab, select the first person’s car from the drop-down list in the
Vehicle field.� Click OK to return to the report window, which now displays information
about that person’s mileage only.� Memorize the report, naming it person mileage (substitute the real name for
person).� Repeat the process for each remaining person. Print each person’s report and attach it to the reimbursement check.
166 P A R T T W O B O O K K E E P I N G
QckBcks TIGHT / QuickBooks 2009 The Official Guide / Ivens / 274-8 / Chapter 6
P:\010Comp\QckBcks\274-8\ch06.vpTuesday, September 16, 2008 10:57:58 AM
Color profile: DisabledComposite Default screen
Chapter
Chapter
77Paying Bills
In this chapter:
• Choose bills to pay
• Apply discounts and credits
• Write checks
• Make direct disbursements
• Manage sales tax
167
QckBcks TIGHT / QuickBooks 2009 The Official Guide / Ivens / 274-8 / Chapter 7
P:\010Comp\QckBcks\274-8\ch07.vpFriday, September 12, 2008 9:37:20 AM
Color profile: DisabledComposite Default screen

168 P A R T T W O B O O K K E E P I N G
QckBcks TIGHT / QuickBooks 2009 The Official Guide / Ivens / 274-8 / Chapter 7
The expression “writing checks” doesn’t have to be taken literally. You can letQuickBooks do the “writing” part by buying computer checks and printing them.Except for signing the check, QuickBooks can do all the work.
(If you’ve enabled the Multicurrency feature, you’ll see references to the vendor’scurrency in most of the transaction windows and reports.)
Choosing What to PayYou don’t have to pay every bill that’s entered, nor do you have to pay the entireamount due for each bill. Your current bank balance and your relationships withyour vendors have a large influence on the decisions you make.
There are all sorts of rules that business consultants recite about how to decidewhat to pay when money is short, and here are the most important rules to follow:
• The government (taxes) comes first. Never, never, never use payrollwithholding money to pay bills.
• It’s better to send lots of vendors small checks than to send gobs of money to acouple of vendors who have been applying pressure. Vendors hate beingignored much more than they dislike small payments on account.
Viewing Your Unpaid BillsStart by examining the bills that are due. The best way to see that list is in detailedform instead of a summary total for each vendor. To accomplish this, chooseReports | Vendors & Payables | Unpaid Bills Detail. In the report window, set theDates field to All to make sure all of your outstanding vendor bills are displayed(see Figure 7-1).
Double-click any entry to drill down to the bill you entered, including all lineitems and notes you made in the Memo column.
You can filter the report to display only certain bills. To accomplish this, clickModify Report and go to the Filters tab in the Modify Report dialog. Use the filtersto change the display in any of the following ways:
• Filter for bills that are due today (or previously), eliminating bills due after today.• Filter for bills that are more or less than a certain amount.• Filter for bills that are more than a certain number of days overdue.
Print the report, and if you’re short on cash, work on a formula that willmaintain good relationships with your vendors.
Selecting the Bills to PayWhen you’re ready to tell QuickBooks which bills you want to pay, choose Vendors |Pay Bills. The Pay Bills window appears (see Figure 7-2), and you can begin to makeyour selections using the following guidelines.
P:\010Comp\QckBcks\274-8\ch07.vpFriday, September 12, 2008 9:37:20 AM
Color profile: DisabledComposite Default screen

C H A P T E R 7 P A Y I N G B I L L S 169
QckBcks TIGHT / QuickBooks 2009 The Official Guide / Ivens / 274-8 / Chapter 7
FIGURE 7-1 Check the current unpaid bills.
FIGURE 7-2 Paying bills starts in the Pay Bills window.
P:\010Comp\QckBcks\274-8\ch07.vpFriday, September 12, 2008 9:37:21 AM
Color profile: DisabledComposite Default screen
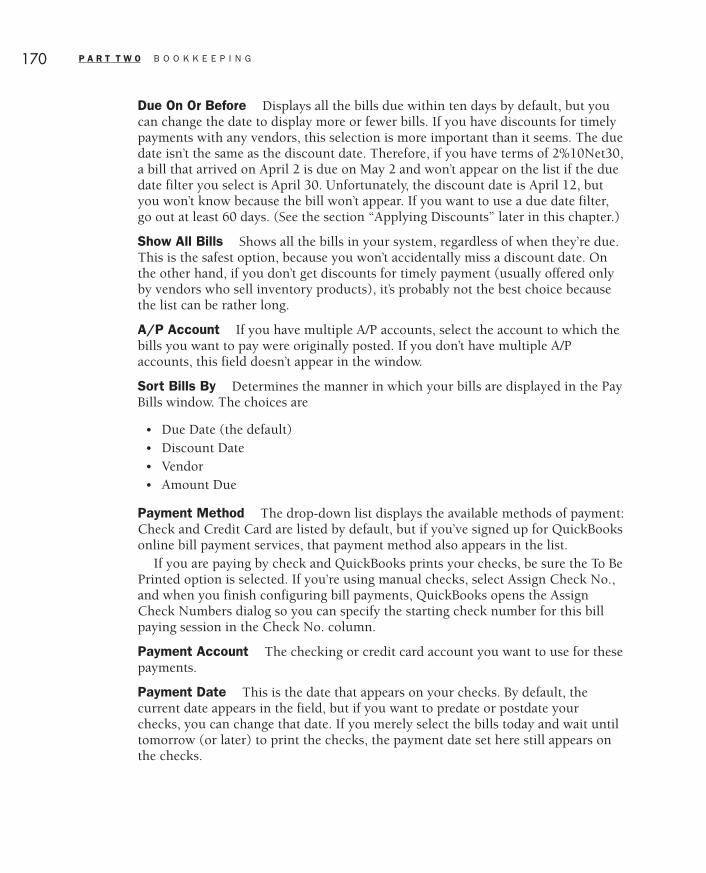
Due On Or Before Displays all the bills due within ten days by default, but youcan change the date to display more or fewer bills. If you have discounts for timelypayments with any vendors, this selection is more important than it seems. The duedate isn’t the same as the discount date. Therefore, if you have terms of 2%10Net30,a bill that arrived on April 2 is due on May 2 and won’t appear on the list if the duedate filter you select is April 30. Unfortunately, the discount date is April 12, butyou won’t know because the bill won’t appear. If you want to use a due date filter,go out at least 60 days. (See the section “Applying Discounts” later in this chapter.)
Show All Bills Shows all the bills in your system, regardless of when they’re due.This is the safest option, because you won’t accidentally miss a discount date. Onthe other hand, if you don’t get discounts for timely payment (usually offered onlyby vendors who sell inventory products), it’s probably not the best choice becausethe list can be rather long.
A/P Account If you have multiple A/P accounts, select the account to which thebills you want to pay were originally posted. If you don’t have multiple A/Paccounts, this field doesn’t appear in the window.
Sort Bills By Determines the manner in which your bills are displayed in the PayBills window. The choices are
• Due Date (the default)• Discount Date• Vendor• Amount Due
Payment Method The drop-down list displays the available methods of payment:Check and Credit Card are listed by default, but if you’ve signed up for QuickBooksonline bill payment services, that payment method also appears in the list.
If you are paying by check and QuickBooks prints your checks, be sure the To BePrinted option is selected. If you’re using manual checks, select Assign Check No.,and when you finish configuring bill payments, QuickBooks opens the AssignCheck Numbers dialog so you can specify the starting check number for this billpaying session in the Check No. column.
Payment Account The checking or credit card account you want to use for thesepayments.
Payment Date This is the date that appears on your checks. By default, thecurrent date appears in the field, but if you want to predate or postdate yourchecks, you can change that date. If you merely select the bills today and wait untiltomorrow (or later) to print the checks, the payment date set here still appears onthe checks.
170 P A R T T W O B O O K K E E P I N G
QckBcks TIGHT / QuickBooks 2009 The Official Guide / Ivens / 274-8 / Chapter 7
P:\010Comp\QckBcks\274-8\ch07.vpFriday, September 12, 2008 9:37:21 AM
Color profile: DisabledComposite Default screen

T I P : You can tell QuickBooks to date checks using the day of printing bychoosing Edit | Preferences and changing the configuration in the Checkingcategory.
If you made changes to the selection fields (perhaps you changed the due datefilter), your list of bills to be paid may change. If all the bills displayed are to bepaid either in full or in part, you’re ready to move to the next step. If there are stillsome bills on the list that you’re not going to pay, you can just select the ones youdo want to pay. Selecting a bill is simple—just click the leftmost column to place acheck mark in it.
If you want to pay in full all the bills that are listed in the Pay Bills window andthere aren’t any credits or discounts to worry about, the easiest thing to do is toclick the Select All Bills button at the bottom of the window. This selects all thebills for payment (and the Select All Bills button changes its name to ClearSelections, so you have a way to reverse your action).
After you’ve selected the bills you want to pay, and you’re paying each of thosebills in full, QuickBooks makes the following postings to your general ledger:
Account Debit Credit
Accounts Payable Total bill payments
Bank Total bill payments
Many users ask why they don’t see the expense accounts when they look at thepostings for bill paying. The answer is that the expenses were posted when theyentered the bills. That’s a major difference between entering bills and then payingthem, or writing checks without entering the bills into your QuickBooks system(called direct disbursement). If you just write checks, you enter the accounts towhich you’re assigning those checks. For that system (the cash-based system) ofpaying bills, the postings debit the expense and credit the bank account. See thesection “Using Direct Disbursements” later in this chapter for more information.
Making a Partial PaymentIf you don’t want to pay a bill in full, you can easily adjust the amount.
Follow these steps to make a partial payment:
� Click the check mark column on the bill’s listing to select the bill for payment.� Click in the Amt. To Pay column and replace the amount that’s displayed with
the amount you want to pay. The total will change to match your paymentwhen you save the window.
C H A P T E R 7 P A Y I N G B I L L S 171
QckBcks TIGHT / QuickBooks 2009 The Official Guide / Ivens / 274-8 / Chapter 7
P:\010Comp\QckBcks\274-8\ch07.vpFriday, September 12, 2008 9:37:21 AM
Color profile: DisabledComposite Default screen

When the transaction is posted to the general ledger, the amount of the paymentis posted as a credit to your bank account and as a debit to the Accounts Payableaccount (the unpaid balance remains in the Accounts Payable account).
Applying DiscountsBills that have terms for discounts for timely payment display the Discount Date (inthe Disc. Date column). Bills that have no data in that column do not have discountterms.
Select the bill by clicking the check mark column, and the discount isautomatically applied. You can see the amount in the Disc. Used column, and theAmt. To Pay column adjusts accordingly.
If the discount isn’t applied automatically, check the date in the Due On OrBefore field, which must be equal to or earlier than the discount date. (If it’s toolate, don’t worry, take the discount anyway—see the next section “Taking DiscountsAfter the Discount Date.”)
If you’re making a partial payment and want to adjust the discount, click the SetDiscount button to open the Discount And Credits window, and enter the amountof the discount you want to take. Click Done, and when you return to the Pay Billswindow, the discount is applied and the Amt. To Pay column has the correct amount.
Taking Discounts After the Discount DateMany businesses fill in the discount amount even if the discount period hasexpired. The resulting payment, with the discount applied, is frequently acceptedby the vendor. Businesses that practice this protocol learn which vendors willaccept a discounted payment and which won’t (most will). Seeing that the discountyou took has been added back in the next statement you receive is a pretty goodhint that you’re not going to get away with it.
To take a discount after the discount date, use the same steps explained in thepreceding section for applying a discount. When you click the Set Discount buttonto open the Discount And Credits window, the amount showing for the discount iszero. Enter the discount you would have been entitled to if you’d paid the bill in atimely fashion, and click Done.
Understanding the Discount AccountNotice that the Discount tab of the Discount And Credits window has a field for theDiscount Account. This account accepts the posting for the amount of the discount.If you don’t have an account for discounts taken (not to be confused with theaccount for discounts given to your customers), you can create one now by clickingthe arrow to the right of the field and choosing <Add New>.
The account for the discounts you take (sometimes called earned discounts) canbe either an income or expense account. There’s no right and wrong here, althoughsometimes accountants get into heated debates defending a point of view on this
172 P A R T T W O B O O K K E E P I N G
QckBcks TIGHT / QuickBooks 2009 The Official Guide / Ivens / 274-8 / Chapter 7
P:\010Comp\QckBcks\274-8\ch07.vpFriday, September 12, 2008 9:37:21 AM
Color profile: DisabledComposite Default screen

subject. If you think of the discount as income (money you’ve brought into yoursystem by paying your bills promptly), make the account an income account. If youthink of the discount as a reverse expense (money you’ve saved by paying your billspromptly), make the account an expense account (it posts as a minus amount,which means it reduces total expenses).
If the only vendors who offer discounts are those from whom you buy inventoryitems, you should put the discount account in the section of your chart of accountsthat holds the Cost Of Goods Sold accounts. In fact, the most efficient way to dothis is to have a parent account called Cost Of Goods Sold and then create twosubaccounts:
• Cost Of Goods• Discounts Taken
You’ll be able to see the individual amounts on your financial reports, and theparent account will report the net COGS.
T I P : QuickBooks may have created a Cost Of Goods Sold accountautomatically during your company setup. If not, create one and then create thesubaccounts.
Here’s what posts to your general ledger when you take a discount. For example,suppose the original amount of the bill was $484.00 and the discount was $9.68;therefore, the check amount was $474.32. (Remember that the original postingswhen you entered the bill were for the total amount without the discount.)
Account Debit Credit
Accounts Payable $484.00
Bank $474.32
Discounts Taken $9.68
Applying CreditsIf the list of bills includes vendors for whom you have credits, you can apply thecredits to the bill. Select the bill and, if credits exist for the vendor, the amount ofthe credit appears in the Credits Used column, and the Amt. To Pay column isadjusted.
If you don’t want to take the credit against this bill, click Set Credits to open theDiscount And Credits window. Make the appropriate changes (deselect the credit)and click Done to change the Amt. To Pay column in the Pay Bills to reflect youradjustments.
C H A P T E R 7 P A Y I N G B I L L S 173
QckBcks TIGHT / QuickBooks 2009 The Official Guide / Ivens / 274-8 / Chapter 7
P:\010Comp\QckBcks\274-8\ch07.vpFriday, September 12, 2008 9:37:21 AM
Color profile: DisabledComposite Default screen

If your total credits with the vendor are equal to, or exceed, the bill you select,QuickBooks displays a message telling you no check will be created, because thebill is paid in its entirety with credits.
Saving the Pay Bills InformationThere are two ways to save information about paying bills: save as you go or save atthe end. You can select a bill, make adjustments (make a partial payment, apply adiscount or a credit), and then click Pay Selected Bills to save that bill payment.That bill disappears from the list if it’s paid in total and reappears with the balanceowing if it’s partially paid. You can also select multiple bills (or all the bills), andmake any adjustments needed.
When you finish selecting the bills to pay, click Pay Selected Bills. QuickBookstransfers all the information to the general ledger and fills out your checkbook accountregister with the payments. If you selected the option to print checks, the PaymentSummary dialog appears (see Figure 7-3), offering several choices for your next step:
• Choose Pay More Bills to return to the Pay Bills window and select other billsto pay (you’ll print these checks later). Use this choice to pay bills withoutprinting checks, such as sending payments to vendors you’ve configured foronline payments.
• Choose Print Checks to print your checks now.• Click Done to close the Payment Summary dialog and close the Pay Bills
window, and print your checks later.
174 P A R T T W O B O O K K E E P I N G
QckBcks TIGHT / QuickBooks 2009 The Official Guide / Ivens / 274-8 / Chapter 7
FIGURE 7-3 You can print checks now, or wait until later.
P:\010Comp\QckBcks\274-8\ch07.vpFriday, September 12, 2008 9:37:21 AM
Color profile: DisabledComposite Default screen

When you defer printing, the checks are posted to the bank account register withthe notation To Print. Choose File | Print Forms | Checks to print your checks.
If you selected the Assign Check No. option because you manually write checks,QuickBooks displays the Assign Check Numbers dialog.
Ill 7-1
• If you select the option Let QuickBooks Assign Check Numbers, QuickBookslooks at the last check number in the bank register and begins numbering withthe next available number.
• If you select the option Let Me Assign The Check Numbers Below, enter thecheck numbers in the dialog.
If you’re paying bills online, select the Online Payment option. QuickBooksretains the information until you go online. You can only use this option if you’resigned up for online banking with a bank that can accept online bill paymentswhen you use online banking—your bank must offer Direct Connect onlinebanking. (See Chapter 16 to learn about online banking.)
Sending the Payments to VendorsAfter you’ve paid the bills in QuickBooks, the bills aren’t really paid; your vendorswon’t consider them paid until they receive the checks. You can write manualchecks or you can print checks.
Writing Manual ChecksIf you’re not printing checks, you must make sure the check numbers in the registerare correct. In fact, it’s a good idea to print the register and have it with you as youwrite the checks. To accomplish that, with the register open in the QuickBookswindow, click the Print icon at the top of the register window. When the PrintRegister dialog opens, select the date range that encompasses these checks (usually,
C H A P T E R 7 P A Y I N G B I L L S 175
QckBcks TIGHT / QuickBooks 2009 The Official Guide / Ivens / 274-8 / Chapter 7
P:\010Comp\QckBcks\274-8\ch07.vpFriday, September 12, 2008 9:37:22 AM
Color profile: DisabledComposite Default screen

they’re all dated the same day), and click OK to open the Print Lists dialog, whereyou can select print options before clicking Print to print. Then, as you write thechecks, use the check numbers on the printout.
Printing ChecksPrinting your checks is far easier and faster than using manual checks. Before youcan print, however, you have some preliminary tasks to take care of. You have topurchase computer checks and set up your printer.
C A U T I O N : Lock the room that has the printer with the checks in it whenyou’re not there.
Purchasing Computer ChecksMany vendors sell computer checks, and my own experience has been that there’snot a lot of difference in pricing or the range of styles. Computer checks can bepurchased for dot matrix printers (the check forms have sprocket holes) or for pageprinters (laser and inkjet). Investigate the prices and options at the followingsources:
• Intuit, the company that makes QuickBooks, sells checks through its Internetmarketplace, which you can reach at www.intuitmarket.com.
• Business form companies (there are several well-known national companies,such as Safeguard and NEBS).
• Office supply stores, such as Staples, Office Depot, and others.• Some banks have a computer-check purchasing arrangement with suppliers;
check with your bank.
If you purchase checks from any supplier except Intuit, you have to tell themyou use QuickBooks. All check makers know about QuickBooks and offer a line ofchecks that are designed to work perfectly with the software.
Computer checks come in several varieties (and in a wide range of colors anddesigns). For QuickBooks, you can order any of the following check types:
• Plain checks• Checks with stubs (QuickBooks prints information on the stub)• Checks with special stubs for payroll information (current check and year-to-
date information about wages and withholding)• Wallet-sized checks
176 P A R T T W O B O O K K E E P I N G
QckBcks TIGHT / QuickBooks 2009 The Official Guide / Ivens / 274-8 / Chapter 7
P:\010Comp\QckBcks\274-8\ch07.vpFriday, September 12, 2008 9:37:22 AM
Color profile: DisabledComposite Default screen

Setting Up the PrinterBefore you print checks, you have to go through a setup routine. Take heart: youonly have to do it once. After you select your configuration options, QuickBooksremembers them and prints your checks without asking you to reinvent the wheeleach time.
Your printer needs to know about the type of check you’re using, and you supplythe information in the Printer Setup window. To get there, choose File | PrinterSetup from the menu bar. Select Check/PayCheck as the form. Choose the printername and type that match the printer you’re using for checks. Your Printer Setupwindow should look similar to Figure 7-4.
Choosing a Check StyleYou have to select a check style, and it has to match the check style you purchased,of course. Three styles are available for QuickBooks checks, and a sample of eachstyle appears in the window to show you what the style looks like.
• Voucher checks These have a detachable section on the check form. QuickBooksprints voucher information if you have voucher checks, including the name ofthe payee, the date, and the individual amounts of the bills being paid by thischeck. The voucher is attached to the bottom of the check. The check is thesame width as the standard check.
C H A P T E R 7 P A Y I N G B I L L S 177
QckBcks TIGHT / QuickBooks 2009 The Official Guide / Ivens / 274-8 / Chapter 7
FIGURE 7-4 Set up your printer for check printing.
P:\010Comp\QckBcks\274-8\ch07.vpFriday, September 12, 2008 9:37:22 AM
Color profile: DisabledComposite Default screen

178 P A R T T W O B O O K K E E P I N G
QckBcks TIGHT / QuickBooks 2009 The Official Guide / Ivens / 274-8 / Chapter 7
• Standard checks These are just checks. They’re the width of a regularbusiness envelope (usually called a #10 envelope). If you have a laser printer,there are three checks to a page. A dot matrix pin-feed printer just keepsrolling, since the checks are printed on a continuous sheet with perforationsseparating the checks.
• Wallet checks These are narrower than the other two check styles (so they fitin your wallet). The paper size is the same as the other checks (otherwise,you’d have a problem with your printer), but there’s a perforation on the leftedge of the check, so you can tear off the check.
Adding a LogoIf your checks have no preprinted logo and you have a file of your company logo,select Use Logo or click the Logo button to open the Logo dialog. Click the Filebutton to locate the graphics file, which must be a bitmapped graphic (the fileextension is .BMP).
There’s also a selection box for printing your company name and address, butwhen you buy checks, you should have that information preprinted.
C A U T I O N : Dot matrix printers can’t handle graphics printing, so don’tbother choosing a logo if you’re using a dot matrix printer for your checks.
Changing FontsClick the Fonts tab in the Printer Setup window to choose different fonts for thecheck information, such as the spelled-out amounts or the payee’s address block.Click the appropriate button and then choose a font, a font style, and a size fromthe dialog that opens.
C A U T I O N : Before you change fonts, make a note of the current settings.No Reset or Default button exists in the Fonts tab. If you make changes and theydon’t work properly, without knowing the original settings you’ll have to messaround with fonts for a long time to get back to where you started.
Handling Partial Check Pages on Laser and Inkjet PrintersIf you’re printing to a laser or inkjet printer, you don’t have the advantage that apin-feed dot matrix printer provides—printing a check and stopping, leaving thenext check waiting in the printer for the next time you print checks. QuickBookshas a nifty solution for this problem, found on the Partial Page tab (see Figure 7-5).Click the selection that matches your printer’s capabilities.
P:\010Comp\QckBcks\274-8\ch07.vpFriday, September 12, 2008 9:37:22 AM
Color profile: DisabledComposite Default screen

C H A P T E R 7 P A Y I N G B I L L S 179
QckBcks TIGHT / QuickBooks 2009 The Official Guide / Ivens / 274-8 / Chapter 7
Printing the ChecksAfter your printer is configured for your checks, click OK in the Printer Setup windowto save the configuration data. Now you can print your checks. Choose File | PrintForms | Checks from the menu bar to bring up the Select Checks To Print window.
Ill 7-2
By default, all the unprinted checks are selected for printing. The first time youprint checks, the first check number is 1; just replace that number with the firstcheck number in the printer (QuickBooks remembers the numbering from nowon). When everything is correct, click OK to open the Print Checks window.
If you’re not using a dot matrix printer, QuickBooks asks how many checks areon the first page (in case you have a page with a check or two remaining). Fill inthe number and place the page with leftover blank checks in the manual feed tray
FIGURE 7-5 The Partial Page solution is based on the way your printer handles envelopes.
P:\010Comp\QckBcks\274-8\ch07.vpFriday, September 12, 2008 9:37:23 AM
Color profile: DisabledComposite Default screen
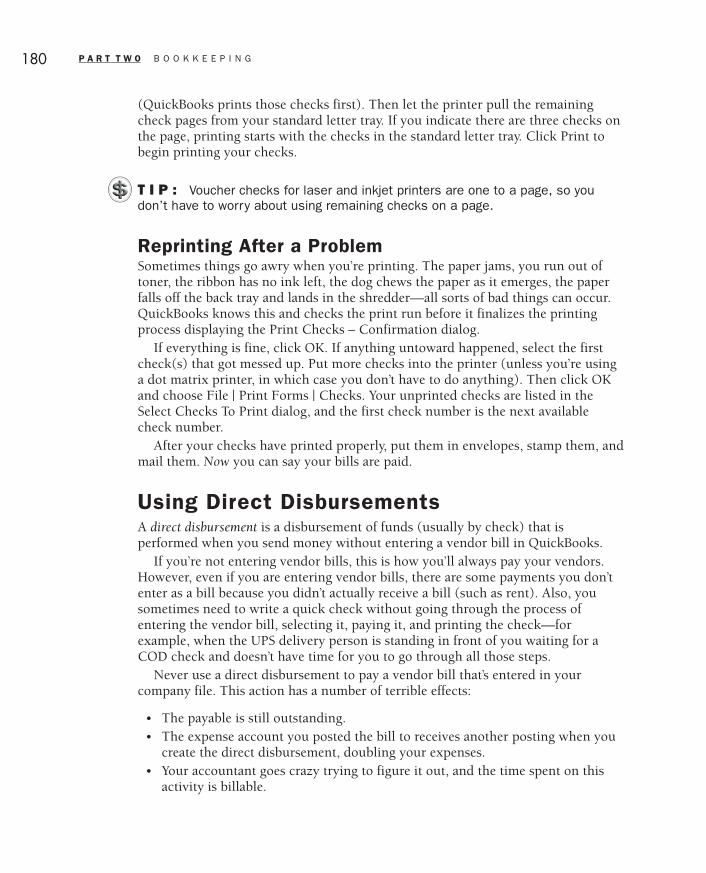
(QuickBooks prints those checks first). Then let the printer pull the remainingcheck pages from your standard letter tray. If you indicate there are three checks onthe page, printing starts with the checks in the standard letter tray. Click Print tobegin printing your checks.
T I P : Voucher checks for laser and inkjet printers are one to a page, so youdon’t have to worry about using remaining checks on a page.
Reprinting After a ProblemSometimes things go awry when you’re printing. The paper jams, you run out oftoner, the ribbon has no ink left, the dog chews the paper as it emerges, the paperfalls off the back tray and lands in the shredder—all sorts of bad things can occur.QuickBooks knows this and checks the print run before it finalizes the printingprocess displaying the Print Checks – Confirmation dialog.
If everything is fine, click OK. If anything untoward happened, select the firstcheck(s) that got messed up. Put more checks into the printer (unless you’re usinga dot matrix printer, in which case you don’t have to do anything). Then click OKand choose File | Print Forms | Checks. Your unprinted checks are listed in theSelect Checks To Print dialog, and the first check number is the next availablecheck number.
After your checks have printed properly, put them in envelopes, stamp them, andmail them. Now you can say your bills are paid.
Using Direct DisbursementsA direct disbursement is a disbursement of funds (usually by check) that isperformed when you send money without entering a vendor bill in QuickBooks.
If you’re not entering vendor bills, this is how you’ll always pay your vendors.However, even if you are entering vendor bills, there are some payments you don’tenter as a bill because you didn’t actually receive a bill (such as rent). Also, yousometimes need to write a quick check without going through the process ofentering the vendor bill, selecting it, paying it, and printing the check—forexample, when the UPS delivery person is standing in front of you waiting for aCOD check and doesn’t have time for you to go through all those steps.
Never use a direct disbursement to pay a vendor bill that’s entered in yourcompany file. This action has a number of terrible effects:
• The payable is still outstanding.• The expense account you posted the bill to receives another posting when you
create the direct disbursement, doubling your expenses.• Your accountant goes crazy trying to figure it out, and the time spent on this
activity is billable.
180 P A R T T W O B O O K K E E P I N G
QckBcks TIGHT / QuickBooks 2009 The Official Guide / Ivens / 274-8 / Chapter 7
P:\010Comp\QckBcks\274-8\ch07.vpFriday, September 12, 2008 9:37:23 AM
Color profile: DisabledComposite Default screen

C H A P T E R 7 P A Y I N G B I L L S 181
QckBcks TIGHT / QuickBooks 2009 The Official Guide / Ivens / 274-8 / Chapter 7
To avoid these calamities, QuickBooks issues a warning when you enter thename of a vendor that has bills in the system, but this warning appears only ifyou’re using the Write Checks window; you won’t see a warning if you use the bankaccount register to create the check.
Ill 7-3
If it’s too late and you’ve already used the register to record a direct disbursementcheck instead of using the Pay Bills feature, there’s a cure available. Go towww.cpa911.com and click the navigation button for the QuickBooks Tips section.In the article list, look for the article titled “Fixing Vendor Bills Paid with DirectDisbursements.”
Writing Direct Disbursement Manual ChecksIf you write checks manually, you can write your checks and then tell QuickBooksabout it later, or you can bring your checkbook to your computer and enter thechecks in QuickBooks as you write them. You have two ways to enter your checksin QuickBooks: in the bank register or in the Write Checks window.
Using the RegisterTo use the bank register, open the bank account register with either of the followingactions:
• Open the Chart Of Accounts window and double-click the bank account’slisting.
• Choose Banking | Use Register from the menu bar, and choose your bankaccount from the Select Account drop-down list.
When the account register opens, you can enter the check on a transaction line.
P:\010Comp\QckBcks\274-8\ch07.vpFriday, September 12, 2008 9:37:23 AM
Color profile: DisabledComposite Default screen

Follow these steps to create a check in the bank register:
� Enter the date.� Press the TAB key to move to the Number field. QuickBooks automatically fills
in the next available check number.� Press TAB to move through the rest of the fields, filling in the name of the
payee, the amount of the payment, and the expense account you’re assigning tothe transaction.
� Click the Record button to save the transaction.� Repeat the steps for the next check and continue until all the manual checks
you’ve written are entered into the register.
You cannot use the register if you’re writing a check to purchase an item, or ifyou need to track classes. The register doesn’t offer fields for those postings, so youmust use the Write Checks window.
Using the Write Checks WindowThe Write Checks window presents a graphical way to tell QuickBooks about a checkyou manually prepared. To get there, click the Write Checks icon on the Home page,or press CTRL-W. When the Write Checks window opens (see Figure 7-6), select thebank account you’re using to write the checks.
182 P A R T T W O B O O K K E E P I N G
QckBcks TIGHT / QuickBooks 2009 The Official Guide / Ivens / 274-8 / Chapter 7
FIGURE 7-6 Fill out the onscreen check the same way you’d fill out a paper check—they lookthe same.
P:\010Comp\QckBcks\274-8\ch07.vpFriday, September 12, 2008 9:37:23 AM
Color profile: DisabledComposite Default screen

The next available check number is already filled in unless the To Be Printedoption box is checked (if it is, click it to toggle the check mark off and put thecheck number in the window). QuickBooks warns you if you enter a check numberthat’s already been used (unfortunately, the warning doesn’t appear until you’vefilled in all the data and attempt to save the check).
Fill out the check, posting amounts to the appropriate accounts. If the check isfor inventory items, use the Items tab to make sure the items are placed intoinventory. When you finish, click Save & New to open a new blank check. Whenyou’re through writing checks, click Save & Close to close the Write Checkswindow. All the checks you wrote are recorded in the bank account register.
Printing Direct Disbursement ChecksIf you print checks, you can create and print a check immediately after you createit, or create all the checks you need and then print all of them in a batch.
Follow these steps to print a single check:
� Click the Write Checks icon on the Home page, or press CTRL-W to open theWrite Checks window. Make sure the To Be Printed option is selected.
� Fill in the fields in the check and when everything is ready, click Print.� A small Print Check window opens to display the next available check number.
Make sure that number agrees with the number of the check you’re loading inthe printer, and then click OK.
� When the Print Checks window opens, follow the instructions for printingdescribed earlier in this chapter.
� When you return to the Write Checks window, click Save & New to writeanother quick check, or click Save & Close if you’re finished printing checks.
Printing Direct Disbursement Checks in BatchesIf you have multiple checks to write, you can print checks in a batch instead of oneat a time. To do so, open the Write Checks window and make sure the To BePrinted option is selected.
Follow these steps to print checks in a batch:
� Fill out all the fields for the first check and click Save & New to move to thenext blank Write Checks window.
� Repeat Step 1 for every check you need to print.� Print the checks using one of the following methods:
• Click Save & Close when you are finished filling out all the checks, andthen choose File | Print Forms | Checks from the menu bar.
• In the last Write Checks window, click the arrow to the right of the Printbutton at the top of the Write Checks window, and choose Print Batch.
C H A P T E R 7 P A Y I N G B I L L S 183
QckBcks TIGHT / QuickBooks 2009 The Official Guide / Ivens / 274-8 / Chapter 7
P:\010Comp\QckBcks\274-8\ch07.vpFriday, September 12, 2008 9:37:23 AM
Color profile: DisabledComposite Default screen

Postings for Direct DisbursementsThe postings for direct disbursements are quite simple:
Account Debit Credit
Bank account Total of all checks written
An expense account Total of all checks assignedto this account
Another expenseaccount
Total of all checks assignedto this account
Another expenseaccount
Total of all checks assignedto this account
Managing Sales TaxIf you collect sales tax from your customers, you have an inherent accounts payablebill because you have to turn that money over to the state taxing authorities. (Thesame is true for payroll withholdings.)
N O T E : Even if you’ve enabled multicurrency, sales tax is tracked only in yourhome currency.
In order to print reports on sales tax (so you can fill out those complicatedgovernment sales tax forms), you have to configure your sales tax collections inQuickBooks. If you collect multiple sales taxes, that configuration effort can bemore complicated than the government forms.
While the following sections often use the term “state,” your tracking andreporting needs may not be limited to state-based activities. In recent years manystates have created multiple sales tax authorities within the state (usually a specificlocation such as a county or a group of ZIP codes, each having its own tax rate).Businesses in those states may have to remit the sales tax they collect to both thestate and the local sales tax authority (or to multiple local sales tax authorities). Asa result, tracking sales tax properly (which means in a manner that makes itpossible to fill out all the forms for all the authorities) has become a verycomplicated process.
Configuring Sales Tax SettingsIf you collect and remit sales tax, you need to configure the sales tax features inQuickBooks. You must set up tax codes to link to your customers, so you knowwhether a customer is liable for sales tax. You must also set up tax items, so youcan set a rate (a percentage rate) and link the item to a taxing authority.
184 P A R T T W O B O O K K E E P I N G
QckBcks TIGHT / QuickBooks 2009 The Official Guide / Ivens / 274-8 / Chapter 7
P:\010Comp\QckBcks\274-8\ch07.vpFriday, September 12, 2008 9:37:23 AM
Color profile: DisabledComposite Default screen
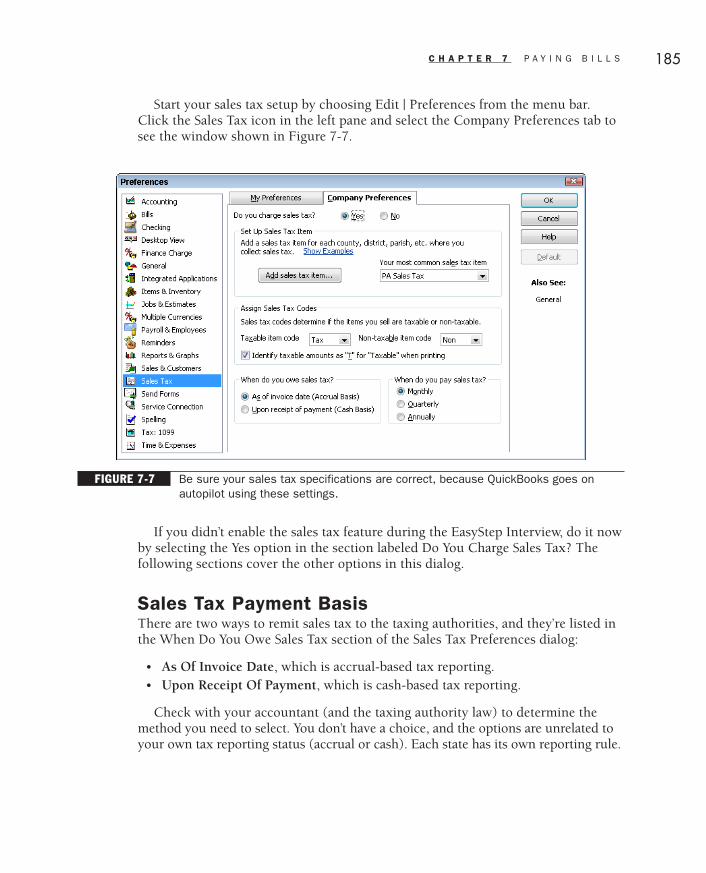
Start your sales tax setup by choosing Edit | Preferences from the menu bar.Click the Sales Tax icon in the left pane and select the Company Preferences tab tosee the window shown in Figure 7-7.
If you didn’t enable the sales tax feature during the EasyStep Interview, do it nowby selecting the Yes option in the section labeled Do You Charge Sales Tax? Thefollowing sections cover the other options in this dialog.
Sales Tax Payment BasisThere are two ways to remit sales tax to the taxing authorities, and they’re listed inthe When Do You Owe Sales Tax section of the Sales Tax Preferences dialog:
• As Of Invoice Date, which is accrual-based tax reporting.• Upon Receipt Of Payment, which is cash-based tax reporting.
Check with your accountant (and the taxing authority law) to determine themethod you need to select. You don’t have a choice, and the options are unrelated toyour own tax reporting status (accrual or cash). Each state has its own reporting rule.
C H A P T E R 7 P A Y I N G B I L L S 185
QckBcks TIGHT / QuickBooks 2009 The Official Guide / Ivens / 274-8 / Chapter 7
FIGURE 7-7 Be sure your sales tax specifications are correct, because QuickBooks goes onautopilot using these settings.
P:\010Comp\QckBcks\274-8\ch07.vpFriday, September 12, 2008 9:37:24 AM
Color profile: DisabledComposite Default screen

Sales Tax Payment DatesYou must indicate the frequency of your remittance to the taxing authority in theWhen Do You Pay Sales Tax section of the Preferences dialog. You don’t get tochoose—your sales tax license indicates the schedule you must use. Many statesbase the frequency on the amount of tax you collect, usually looking at yourreturns for a specific period of time—perhaps one specific quarter—which isusually referred to as the lookback period. If your sales tax liability changesdramatically during the lookback period, you may receive notice from the statethat your remittance interval has changed. If that occurs, don’t forget to return tothe Preferences window to change the interval.
Default Sales Tax CodesQuickBooks has two discrete entities for configuring sales tax: Tax Codes and TaxItems. Lots of people get them confused, so let’s clarify their definitions and use,starting with definitions:
• A tax code indicates tax liability, which means the entity to which it’s linked (acustomer or an item) is deemed to be taxable or nontaxable, depending on thecode. This is really a “yes” or “no” answer to the question, “Is this taxable?” Inaddition, if you take the trouble to do so, you can have tax codes that explainwhy an entity is taxable or nontaxable. Tax codes contain no information aboutthe tax rate or the taxing authority (the payee for the check you write whenyou remit the sales tax you collected).
• Tax items contain information about the tax rate and the taxing authority towhich you remit taxes and reports. Like all other items, they appear on salesforms, and the tax is calculated when you add the tax item to the taxable lineitems (products and services) on an invoice or sales receipt.
Linking a sales tax code to customers and items lets you (and the QuickBookssales feature) know whether sales tax should be calculated for that item for thiscustomer. If a customer is liable for sales tax, it doesn’t mean that every item yousell the customer is taxable, because some items aren’t taxable. If an item is taxable,it’s taxable only to customers whose tax code indicates they are liable for sales tax.
When you create items in your company file, you indicate whether the item istaxable under your state tax laws. If the item is taxable, the rate that’s applied isconnected to the customer, not to the item. Technically, a customer’s sales taxliability is like a light switch; it’s either on or off (techies call this scenario“Boolean,” which means the only possible answers or definitions are On/Off orYes/No). In the spirit of Boolean mathematics, QuickBooks prepopulates the SalesTax Preferences dialog with the following two tax codes:
• Tax Means liable for sales tax• Non Means not liable for sales tax
186 P A R T T W O B O O K K E E P I N G
QckBcks TIGHT / QuickBooks 2009 The Official Guide / Ivens / 274-8 / Chapter 7
P:\010Comp\QckBcks\274-8\ch07.vpFriday, September 12, 2008 9:37:24 AM
Color profile: DisabledComposite Default screen

For many businesses, that’s enough; they don’t need any additional tax codes forcustomers or for items. They can move on to creating tax items so their rates arecalculated on sales forms. However, for some companies, those two tax codes aren’tenough. Their state rules governing sales tax reports, and state reporting forms,may require more information.
For nontaxable customers, some states want to know why a nontaxablecustomer isn’t charged sales tax. Is a customer nontaxable because it’s out of stateand the rules say you don’t have to collect taxes for out-of-state sales? Is a customernontaxable because it’s a nonprofit organization? Is a customer nontaxable becauseit’s a government agency? Is a customer nontaxable because it’s a wholesalebusiness and collects sales tax from its own customers? (The last definition maydescribe your business, and your suppliers have you configured as nontaxable.) Ifyour state requires this information, you must create tax codes to match thereporting needs (covered in the next section, “Creating Sales Tax Codes”).
For taxable customers, you may want to use tax codes to specify customers astaxable in another state (if you collect taxes from out-of-state customers and remitthose taxes to that state’s taxing authority).
States that have instituted multiple tax rates depending on a customer’s locationwant to know which location within the state the customer occupies, because thatlocation determines the tax rate. Your reports on sales taxes have to subtotal yourcollections by location. In fact, in some states, you have to send individual sales taxreports to individual local tax authorities. If your state operates in this manner, youshould solve this with tax items, not tax codes, because part of your configurationtask is the tax rate (which isn’t part of a tax code, it’s only part of a tax item).
Creating Sales Tax CodesIt’s not difficult to create codes to track customer sales tax status in a manner moredetailed than “taxable” and “nontaxable.” You just add new sales tax codes to fityour needs.
Follow these steps to add a new sales tax code:
� Choose Lists | Sales Tax Code List.� Press CTRL-N to open the New Sales Tax Code window.� Enter the name of the new code, using up to three characters.� Enter a description to make it easier to interpret the code.� Select Taxable if you’re entering a code to track taxable sales.� Select Non-taxable if you’re entering a code to trace nontaxable sales.� Click Next to set up another tax code. Click OK when you’ve finished adding tax codes.
C H A P T E R 7 P A Y I N G B I L L S 187
QckBcks TIGHT / QuickBooks 2009 The Official Guide / Ivens / 274-8 / Chapter 7
P:\010Comp\QckBcks\274-8\ch07.vpFriday, September 12, 2008 9:37:24 AM
Color profile: DisabledComposite Default screen

188 P A R T T W O B O O K K E E P I N G
QckBcks TIGHT / QuickBooks 2009 The Official Guide / Ivens / 274-8 / Chapter 7
This procedure works nicely for specifying different types of nontaxable customers.For example, you could create the following tax codes for nontaxable categories:
• NPO for nonprofit organizations• GOV for government agencies• WSL for wholesale businesses• OOS for out-of-state customers (if you aren’t required to collect taxes from out-
of-state customers)
For taxable customers, the permutations and combinations are much broader, ofcourse. If you’re required to collect and remit sales tax for some additional states, justcreate codes for customers in those states, using the postal abbreviations for each state.
The problem is that QuickBooks’ tax code setup doesn’t work well forcategorizing taxable customers if you do business in a state with complicatedmultiple tax rates. Those states issue codes that match the rules and rates(frequently location-based), and the codes are almost always more than threecharacters—but three characters is all QuickBooks permits for a sales tax code. Theworkaround for this is in the ability to assign a sales tax item to a customer, as longas the customer’s configuration indicates “taxable” (using the built-in tax code orany taxable code you created). Sales tax items are discussed in the next section.
Sales Tax ItemsA sales tax item is a collection of data about a sales tax, including the rate and theagency to which the sales tax is remitted. QuickBooks uses sales tax items tocalculate the Tax field at the bottom of sales forms, and to prepare reports for taxauthorities. The Sales Tax Preferences dialog has a section named Set Up Sales TaxItem, and you can create sales tax items here or in the Item List (see the section“Creating Sales Tax Items”).
Most Common Sales TaxThe Sales Tax Preferences dialog has a field named Your Most Common Sales TaxItem, and you must enter a sales tax item in that field. Of course, to do that, youmust first create at least one sales tax item. This item becomes the default sales taxitem for any customers you create hereafter, but you can change any customer’sdefault sales tax item.
Creating Sales Tax ItemsYou can create a sales tax item in either of the following ways:
• In the Sales Tax Preferences dialog, click the Add Sales Tax Item button.• Choose Lists | Item List from the menu bar to open the Item List. Then
press CTRL-N.
Both actions open the New Item dialog.
P:\010Comp\QckBcks\274-8\ch07.vpFriday, September 12, 2008 9:37:24 AM
Color profile: DisabledComposite Default screen

Follow these steps to create a sales tax item:
� Select Sales Tax Item as the item type.� Enter a name for the item. If you’re in a state that has codes for each county,
ZIP code, or other regional tax area, use the state’s code for the specific sales taxrate and taxing authority.
� Optionally, enter a description.� Enter the tax rate. QuickBooks knows the rate is a percentage, so it
automatically adds the percent sign to the numbers you type (for instance,enter 6.5 if the rate is 6.5 percent).
� Select the tax agency (a vendor) to which you pay the tax from the drop-downlist, or add a new vendor by choosing <Add New>.
� Click OK.
Creating Tax GroupsIn some states, the tax imposed is really two taxes, and the taxing authority collectsa single check from you but insists on a breakdown in the reports you send. Forexample, in Pennsylvania, the state sales tax is 6 percent, but businesses inPhiladelphia and Pittsburgh must charge an extra 1 percent. The customer pays7 percent, a check for 7 percent of taxable sales is remitted to the state’s revenuedepartment, but the report that accompanies the check must break down theremittance into the individual taxes—the total for the 6 percent state tax, and thetotal for the 1 percent local tax. In other states, the customer pays a single tax, butthe portion of that tax that represents the basic state sales tax is remitted to thestate, and the locally added tax is remitted to the local taxing authority.
The challenge is to display and calculate a single tax for the customer and reportmultiple taxes to the taxing authorities. Tax groups meet this challenge. A taxgroup is a single entity that appears on a sales transaction, but it is really multipleentities that have been totaled. QuickBooks creates the tax amount by calculatingeach of the multiple entries and displaying its total (the customer is being chargedthe “combo” rate). For example, in Pennsylvania, a Philadelphia business woulduse a tax group (totaling 7 percent) that includes the 6 percent state sales tax andthe 1 percent Philadelphia sales tax.
To create a tax group, you must first create the individual tax items, and thenadd those items to the group item.
Follow these steps to create a tax group:
� Open the Item List by clicking the Item icon on the toolbar, or by choosingLists | Item List.
� Press CTRL-N to open the New Item dialog.� Select Sales Tax Group as the Type.� Enter a name for the group.
C H A P T E R 7 P A Y I N G B I L L S 189
QckBcks TIGHT / QuickBooks 2009 The Official Guide / Ivens / 274-8 / Chapter 7
P:\010Comp\QckBcks\274-8\ch07.vpFriday, September 12, 2008 9:37:24 AM
Color profile: DisabledComposite Default screen

190 P A R T T W O B O O K K E E P I N G
QckBcks TIGHT / QuickBooks 2009 The Official Guide / Ivens / 274-8 / Chapter 7
� Enter a description (which appears on your sales forms).� In the Tax Item column, choose the individual tax code items you need to
create this group. As you move to the next item, QuickBooks fills in the rate,tax agency, and description of each tax you already selected. The calculatedtotal (the group rate) appears at the bottom of the dialog (see Figure 7-8).
� When you’ve added all the required tax code items, click OK.
Select this item for the appropriate customers when you’re creating salestransactions. QuickBooks will offer to replace the current tax item for the customer(if a different tax item exists) with the new tax group.
Assigning Codes and Items to CustomersBy default, QuickBooks assigns the tax code to all customers, as well as the tax itemyou specify as the default in the Sales Tax Preferences dialog. These fields are on theAdditional Info tab of the customer’s record, and you can edit each customer’srecord to make changes to either field. Most of the time, it’s the default tax item(not the tax code) for a customer that requires changing, especially if you’re in astate that bases tax rates (and perhaps taxing authorities) on the delivery locationfor customers.
If you already created a great many customers, opening each record to makechanges can be onerous, and you might want to wait until you use a customer in asales transaction. Then, in the transaction window, select a new tax code or tax item(or both) from the drop-down list in the appropriate field. When you save the
FIGURE 7-8 This sales tax group applies multiple taxes to sales transactions.
P:\010Comp\QckBcks\274-8\ch07.vpFriday, September 12, 2008 9:37:24 AM
Color profile: DisabledComposite Default screen

C H A P T E R 7 P A Y I N G B I L L S 191
QckBcks TIGHT / QuickBooks 2009 The Official Guide / Ivens / 274-8 / Chapter 7
transaction, QuickBooks cooperates with this approach by asking you if you wantto change the customer’s tax information permanently. The customer recordchanges, and hereafter the new tax information appears in any transaction windowfor this customer.
Running Sales Tax ReportsAt some interval determined by your taxing authority, you need to report your totalsales, your nontaxable sales, and your taxable sales, along with any other requiredbreakdowns. Oh, yes, you also have to write a check to remit the taxes.
Sales Tax Liability ReportQuickBooks has reports to help you fill out your sales tax forms. Choose Vendors |Sales Tax | Sales Tax Liability. Use the Dates drop-down list to select an interval thatmatches the way you report to the taxing authorities. By default, QuickBookschooses the interval you configured in the Preferences dialog, but that interval mayonly apply to your primary sales tax. If you collect multiple taxes, due at differentintervals, you must create a separate report with the appropriate interval to displaythose figures. Figure 7-9 shows a Sales Tax Liability report for a monthly filer.
Tax Code ReportsIf you have to report specific types of taxable or nontaxable sales, you can obtainthat information by creating a report on the tax code you created to track thatinformation. Choose Lists | Sales Tax Code List and select (highlight) the tax codefor which you need a report. Press CTRL-Q to see a report on the sales activity withthis tax code.
FIGURE 7-9 The Sales Tax Liability report displays taxable and nontaxable sales for each taxcode.
P:\010Comp\QckBcks\274-8\ch07.vpFriday, September 12, 2008 9:37:25 AM
Color profile: DisabledComposite Default screen
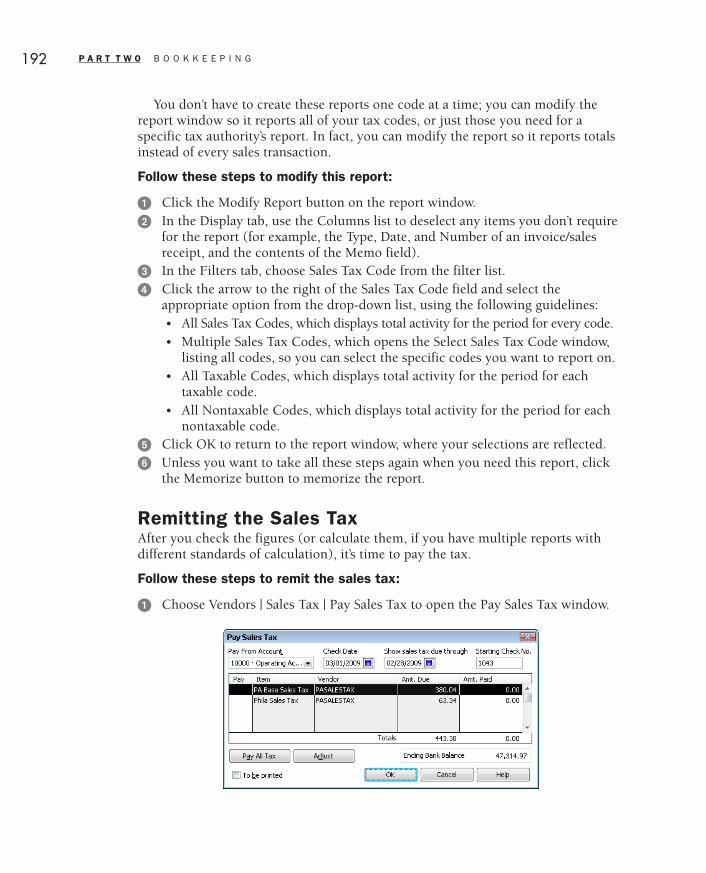
192 P A R T T W O B O O K K E E P I N G
QckBcks TIGHT / QuickBooks 2009 The Official Guide / Ivens / 274-8 / Chapter 7
You don’t have to create these reports one code at a time; you can modify thereport window so it reports all of your tax codes, or just those you need for aspecific tax authority’s report. In fact, you can modify the report so it reports totalsinstead of every sales transaction.
Follow these steps to modify this report:
� Click the Modify Report button on the report window.� In the Display tab, use the Columns list to deselect any items you don’t require
for the report (for example, the Type, Date, and Number of an invoice/salesreceipt, and the contents of the Memo field).
� In the Filters tab, choose Sales Tax Code from the filter list.� Click the arrow to the right of the Sales Tax Code field and select the
appropriate option from the drop-down list, using the following guidelines:• All Sales Tax Codes, which displays total activity for the period for every code.• Multiple Sales Tax Codes, which opens the Select Sales Tax Code window,
listing all codes, so you can select the specific codes you want to report on.• All Taxable Codes, which displays total activity for the period for each
taxable code.• All Nontaxable Codes, which displays total activity for the period for each
nontaxable code.� Click OK to return to the report window, where your selections are reflected.� Unless you want to take all these steps again when you need this report, click
the Memorize button to memorize the report.
Remitting the Sales TaxAfter you check the figures (or calculate them, if you have multiple reports withdifferent standards of calculation), it’s time to pay the tax.
Follow these steps to remit the sales tax:
� Choose Vendors | Sales Tax | Pay Sales Tax to open the Pay Sales Tax window.
Ill 7-4
P:\010Comp\QckBcks\274-8\ch07.vpFriday, September 12, 2008 9:37:25 AM
Color profile: DisabledComposite Default screen

� Select the bank account to use if you have more than one.� Check the date that’s displayed in the field named Show Sales Tax Due
Through. It must match the end date of your current reporting period (forinstance, monthly or quarterly).
� Click in the Pay column to insert a check mark next to those you’re payingnow. If you’re lucky enough to have the same reporting interval for all taxingauthorities—although it hardly ever seems to work that way—just click the PayAll Tax button (the name of which then changes to Clear Selections).
� If you’re going to print the check, be sure to select the To Be Printed check boxat the bottom of the dialog. If you write the check manually, or if you remitsales tax online using an electronic transfer from your bank, deselect the To BePrinted check box. (For electronic payment, open the bank account registerand change the check number QuickBooks inserted automatically to ACH oranother code indicating an electronic transfer.)
� Click OK when you’ve completed filling out the information. The next timeyou print or write checks, the sales tax check is in the group waiting to becompleted.
N O T E : QuickBooks doesn’t ask for a start date because it uses the periodduration defined in your Sales Tax Preferences.
Adjusting Sales Tax AmountsIf you need to adjust the amount of sales tax due (most states offer a discount fortimely payment), select the appropriate sales tax item and click the Adjust buttonto open the Sales Tax Adjustment dialog.
Ill 7-5
Specify the amount by which to reduce (or increase, if you’re late and paying apenalty) the tax amount. Specify an Adjustment Account (you can create a specificaccount for this adjustment), and click OK to return to the Pay Sales Tax window,where the amount has been changed to reflect your adjustment.
C H A P T E R 7 P A Y I N G B I L L S 193
QckBcks TIGHT / QuickBooks 2009 The Official Guide / Ivens / 274-8 / Chapter 7
P:\010Comp\QckBcks\274-8\ch07.vpFriday, September 12, 2008 9:37:25 AM
Color profile: DisabledComposite Default screen

QckBcks TIGHT / QuickBooks 2009 The Official Guide / Ivens / 274-8Blind 194
P:\010Comp\QckBcks\274-8\ch07.vpFriday, September 12, 2008 9:37:25 AM
Color profile: DisabledComposite Default screen

Chapter
Chapter
88Running Payroll
In this chapter:
• Choose a payroll service
• Set up payroll
• Set up employee information
• Enter historical data
• Issue payroll checks
• Use the Employee Center
195
QckBcks TIGHT / QuickBooks 2009 The Official Guide / Ivens / 274-8 / Chapter 8
P:\010Comp\QckBcks\274-8\ch08.vpFriday, September 12, 2008 9:37:52 AM
Color profile: DisabledComposite Default screen

If you plan to do your own payroll rather than employ a payroll service, theinformation you need to set up and run payroll is in this chapter.
QuickBooks Do-It-Yourself Payroll ServicesQuickBooks offers a variety of do-it-yourself payroll services, and if you want to doyour payroll in-house, here’s a brief overview of the offerings:
• Basic Payroll, which provides tax tables and automatic calculations of paycheckdeductions and employer expenses for up to three employees. No tax forms areincluded, so you either need to work with your accountant on tax filings orprepare your tax forms manually. QuickBooks makes it easy to prepare taxforms manually by providing detailed reports in Excel (covered in Chapter 9).
• Enhanced Payroll, which adds tax forms and e-filing for both federal and statereporting.
• Assisted Payroll, which lets you run payroll and then turns the job of depositingwithholdings, paying employer contributions, and printing and filing governmentforms over to QuickBooks.
Additional plans are available based on these payroll offerings, such as EnhancedPayroll for Accountants, which lets you prepare payroll for up to 50 companies.
Updating with an Existing Payroll SubscriptionIf you’re updating to QuickBooks 2009 and currently subscribe to Standard Payroll(no longer offered for new subscribers), which provides tax tables, automaticcalculations of paycheck deductions, and automatic creation of federal forms (941,W-2, and so on), you can continue your Standard Payroll subscription.
Direct DepositWith any of the payroll services, you can purchase direct deposit services for youremployees. Employees must sign a form giving permission for direct deposit, andyou can print those forms directly from your QuickBooks software (QuickBooksprovides a link to display and print the forms during the sign-up process). Employeescan opt to deposit their entire paychecks into one bank account or split the amountbetween two bank accounts.
N O T E : Unless you’ve signed up for QuickBooks payroll services, nocalculations occur against the gross amount of any paycheck you create. Nowithholding appears, no amounts are posted to employee and employer liabilityaccounts, and there is no net amount. You can, if you wish, use your own printedtax table (Employer’s Circular E from the IRS), calculate the deductions manually,and then issue a paycheck for the net amount to each employee. If you don’twant to face that, you must sign up for payroll services.
196 P A R T T W O B O O K K E E P I N G
QckBcks TIGHT / QuickBooks 2009 The Official Guide / Ivens / 274-8 / Chapter 8
P:\010Comp\QckBcks\274-8\ch08.vpFriday, September 12, 2008 9:37:52 AM
Color profile: DisabledComposite Default screen

Signing Up for Payroll ServicesTo learn about the QuickBooks payroll offerings, choose Employees | Payroll andthen, from the submenu, choose either Learn About Payroll Options or OrderPayroll Service (both menu choices produce the same result).
After you’ve used the links on the Payroll Services website to learn about all thepayroll offerings, follow the prompts to sign up.
When the sign-up process is completed, you download the files you need to runpayroll. The new files are automatically added to your QuickBooks system; youdon’t have to do anything to install them. In addition to the payroll software, thecurrent tax table is added to your system. After payroll is installed, your Employeesmenu has all the commands you need to run payroll.
Configuring Payroll ElementsTo produce accurate paychecks, you need to complete setup tasks, including addingaccounts to your chart of accounts, creating payroll items (salary, wages, and soon), identifying the payroll taxes you have to withhold, the payroll taxes you haveto pay as an employer, and the deductions or company contributions for benefits.And you also need to set up tax information for each employee, such as dependentsand deductions.
You can set up payroll in either of two ways:
• Manually• Using the Payroll Setup Wizard
The following sections cover all the elements and components involved insetting up payroll manually, and later in this chapter there’s a “walk-through” of thePayroll Setup Wizard. You can read both to decide the way you want to approachsetup.
AccountsYou may need to create new accounts in your chart of accounts for payroll. If youwant to use a bank account specifically for payroll instead of using your main bankaccount (generally a good idea), you must open the account at your bank and alsoadd the new bank account to your chart of accounts. In addition, you’ll need atleast the following accounts:
• Payroll Liabilities, which tracks the deductions from paychecks• Payroll Expenses, which tracks company payroll expenses (company Social
Security, Medicare, pension, medical, and so on)
C H A P T E R 8 R U N N I N G P A Y R O L L 197
QckBcks TIGHT / QuickBooks 2009 The Official Guide / Ivens / 274-8 / Chapter 8
P:\010Comp\QckBcks\274-8\ch08.vpFriday, September 12, 2008 9:37:52 AM
Color profile: DisabledComposite Default screen

QuickBooks automatically adds the Payroll Liabilities and Payroll Expensesaccounts when you enable payroll. You can use each account for all payrolltransactions, or create subaccounts to track individual payroll liabilities and expenses.
You should use subaccounts for payroll liabilities and payroll expenses, becauseit’s much easier to determine the current status of individual liabilities and expenses(see Figure 8-1). Link your payroll items to the subaccounts and never post to theparent account. (When you create reports, any balances in the subaccount aretotaled in the parent account.)
VendorsRunning payroll creates liabilities for payroll taxes, other deductions that yourcompany must remit, and possibly employer benefits that must be paid. To be ableto send the money you owe to the appropriate vendors, set up those vendors beforeyou set up payroll items so that you can assign the payroll items to the propervendors. (Payroll items are discussed in the next section.)
For withholding of federal income taxes, Medicare, FICA, and the matchingemployer Medicare and FICA payments, the vendor you use depends on the wayyou transmit the funds. If you use electronic transfer of funds, the vendor is theUnited States Treasury Department. If you use a physical check (along withcoupons provided by the IRS), the vendor is the bank that has the checking accountfor your payroll checks.
For local and state income tax, unemployment, disability, workers comp, anddeductions for benefits such as health insurance, set up a vendor for each agencyyou need to pay. Most states now offer electronic payments for payroll remittanceson their websites, but if you use checks you probably have forms or coupons for therequired payment interval (usually monthly or quarterly).
Payroll ItemsA QuickBooks payroll item is any element that is part of a payroll check. Thenumber of individual elements that go into a paycheck may be more than youthought. Consider this list, which is typical of many businesses:
198 P A R T T W O B O O K K E E P I N G
QckBcks TIGHT / QuickBooks 2009 The Official Guide / Ivens / 274-8 / Chapter 8
FIGURE 8-1 It’s easy to track payroll financial data if you use subaccounts.
P:\010Comp\QckBcks\274-8\ch08.vpFriday, September 12, 2008 9:37:53 AM
Color profile: DisabledComposite Default screen

• Salaries• Wages (hourly)• Overtime (time and a half)• Double-time• Federal tax withholdings (including FIT, FICA, and Medicare)• State tax withholdings• State unemployment and disability withholdings• Local tax withholdings• Pension plan deductions• Medical insurance deductions• Life insurance deductions• Garnishes• Union dues• Reimbursement for auto expenses• Bonuses• Commissions• Vacation pay• Sick pay• Advanced Earned Income Credit
Whew! And don’t forget that you also have to track company-paid payroll items,such as matching FICA and Medicare, employer contributions to unemployment(both state and federal), state disability funds, pension and medical benefit plans,and more!
You can view your payroll items and create new payroll items by choosing Lists |Payroll Item List to open the Payroll Item List seen in Figure 8-2. QuickBooks addssome items to the list automatically when you enable payroll services. Usually, localtaxes, medical benefits deductions, and other payroll items are missing (and theitems that do exist may be missing information about the vendor, so you’ll have toedit them to add that information).
C H A P T E R 8 R U N N I N G P A Y R O L L 199
QckBcks TIGHT / QuickBooks 2009 The Official Guide / Ivens / 274-8 / Chapter 8
FIGURE 8-2 The payroll items created automatically don’t include everything you need.
P:\010Comp\QckBcks\274-8\ch08.vpFriday, September 12, 2008 9:37:53 AM
Color profile: DisabledComposite Default screen
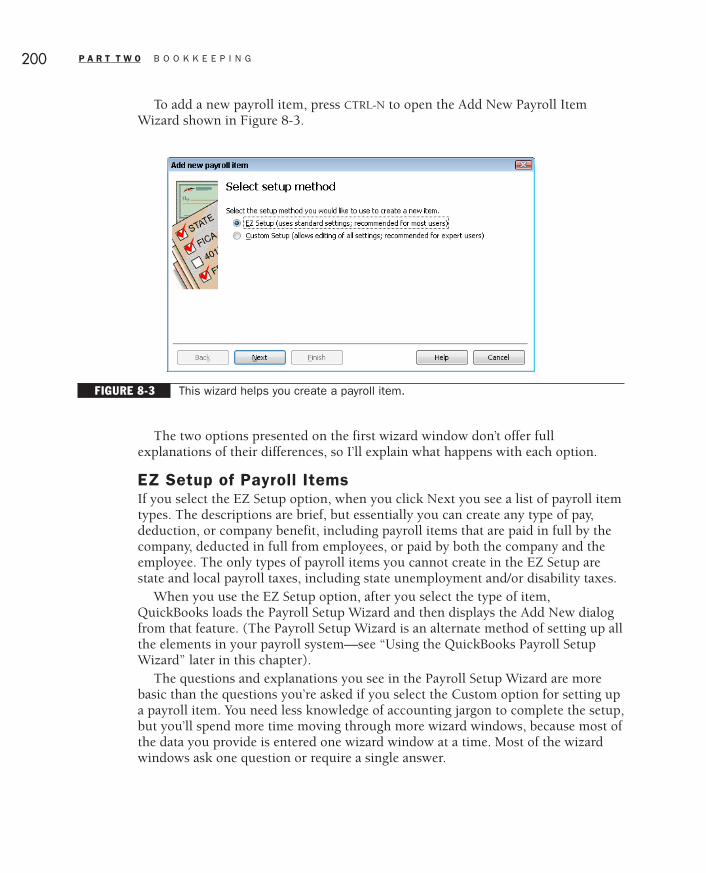
To add a new payroll item, press CTRL-N to open the Add New Payroll ItemWizard shown in Figure 8-3.
The two options presented on the first wizard window don’t offer fullexplanations of their differences, so I’ll explain what happens with each option.
EZ Setup of Payroll ItemsIf you select the EZ Setup option, when you click Next you see a list of payroll itemtypes. The descriptions are brief, but essentially you can create any type of pay,deduction, or company benefit, including payroll items that are paid in full by thecompany, deducted in full from employees, or paid by both the company and theemployee. The only types of payroll items you cannot create in the EZ Setup arestate and local payroll taxes, including state unemployment and/or disability taxes.
When you use the EZ Setup option, after you select the type of item,QuickBooks loads the Payroll Setup Wizard and then displays the Add New dialogfrom that feature. (The Payroll Setup Wizard is an alternate method of setting up allthe elements in your payroll system—see “Using the QuickBooks Payroll SetupWizard” later in this chapter).
The questions and explanations you see in the Payroll Setup Wizard are morebasic than the questions you’re asked if you select the Custom option for setting upa payroll item. You need less knowledge of accounting jargon to complete the setup,but you’ll spend more time moving through more wizard windows, because most ofthe data you provide is entered one wizard window at a time. Most of the wizardwindows ask one question or require a single answer.
200 P A R T T W O B O O K K E E P I N G
QckBcks TIGHT / QuickBooks 2009 The Official Guide / Ivens / 274-8 / Chapter 8
FIGURE 8-3 This wizard helps you create a payroll item.
P:\010Comp\QckBcks\274-8\ch08.vpFriday, September 12, 2008 9:37:53 AM
Color profile: DisabledComposite Default screen

This does not mean you can set up a payroll item accurately if you know nothingabout deductions, benefits, or about the accounting and legal issues involved withpayroll benefits and deductions; it merely means the explanations you see whenyou’re asked to provide information are rather user-friendly.
For example, if you’re setting up a benefit such as health insurance, pensionbenefit, or any form of a benefit in a cafeteria plan, the wizard asks you if thebenefit cost is borne entirely by the company, entirely by the employee, or sharedbetween both parties. Depending on your answer, the wizard moves through theensuing windows to set up the necessary payroll item (or multiple items if yourequire the employee deduction and the employer contribution). If the employeecontributes some or all of the cost, you have to know whether it’s a pre-tax or after-tax deduction, and you have to know how the deduction affects the employee’s W-2form. This means that even if you choose the EZ Setup option you can’t do thisproperly if you have no information about payroll issues; it is imperative that youdiscuss the payroll items required for your company with your accountant.
Custom Setup of Payroll ItemsIf you select the Custom Setup option, the list you see when you click Next is allinclusive, because you can set up all the payroll item types offered in the EZ Setuplist of payroll types, and you can also set up state and local payroll items.
When you select a payroll item type, the wizard moves through informationwindows without asking the kind of easy-to-understand questions the EZ Setuppresents; on the other hand, each window contains all the fields for the requiredinformation instead of walking you through multiple windows to answer questionsand fill out a single field.
For example, if you have a health benefit with costs shared between thecompany and the employee, the wizard isn’t going to remind you that you have toset up two items, one for the company payment and another for the employeededuction. You just have to know that both tasks must be completed (they areseparate items). In the second wizard window, you select Deduction and establishthe employee contribution (and you have to know which types of deductions arepre-tax and which are after-tax, and whether it affects the W-2 form). Then youhave to start the wizard again to select Company Contribution in the second wizardwindow to set up the company side of the health benefits item. If you have detailedinstructions from your accountant, the Custom option is a quicker way to set up allyour payroll items.
Use the wizard to create all the payroll items you need.
Setting Up EmployeesThe information about your employees must be perfectly, pristinely accurate, oryou may hear about it in a very unfriendly manner. Your employees won’t be happyif the deductions are incorrect, and the IRS won’t be happy if your payroll recordsdon’t accurately reflect employee tax status categories and withholding data.
C H A P T E R 8 R U N N I N G P A Y R O L L 201
QckBcks TIGHT / QuickBooks 2009 The Official Guide / Ivens / 274-8 / Chapter 8
P:\010Comp\QckBcks\274-8\ch08.vpFriday, September 12, 2008 9:37:53 AM
Color profile: DisabledComposite Default screen

Create an Employee TemplateThere is a great deal of information to fill out for each employee, and some of it isprobably the same for all or most of your employees. For example, you may havemany employees who share the same type of pay (salary or hourly wage) or thesame deductions for medical insurance.
To avoid entering the same information over and over, you can create a templateand then apply the information to all the employees who match that data. You’llsave yourself lots of time, even if you have to edit one or two entries for someemployees because their data differs from the template.
To get to the template, you have to open the Employee Center by choosingEmployees | Employee Center from the menu bar.
Click the button labeled Manage Employee Information at the top of thewindow, and choose Change New Employee Default Settings from the submenuthat appears. This opens the Employee Defaults window, where you can enter thedata that applies to most or all of your employees.
Ill 8-1
The information you put into the template is automatically added to the PayrollInfo tab for each employee you create hereafter (discussed in the next section,“Creating Employees”). You can skip any field for which there isn’t a commonpayroll item.
• Click in the Item Name column of the Earnings box, and then click the arrowto see a list of earnings types that you’ve defined as Payroll Items. Select the onethat is common enough to be suitable for a template.
• In the Hourly/Annual Rate column, enter a wage or salary figure if there’s onethat applies to most of your employees. If there’s not, just skip it and enter eachemployee’s rate in the individual employee record later.
• Use the arrow to the right of the Payroll Schedule field and select a schedule (ifyou’ve established payroll schedules). See the section “Payroll Schedules” laterin this chapter for more information.
202 P A R T T W O B O O K K E E P I N G
QckBcks TIGHT / QuickBooks 2009 The Official Guide / Ivens / 274-8 / Chapter 8
P:\010Comp\QckBcks\274-8\ch08.vpFriday, September 12, 2008 9:37:53 AM
Color profile: DisabledComposite Default screen
• Select a pay frequency (if you created schedules and selected one, QuickBooksautomatically uses that schedule to fill in the Pay Frequency field).
• Use the Class field if you’ve enabled classes to track data.• If you’re using QuickBooks’ time-tracking features to pay employees, you also
see a check box labeled Use Time Data To Create Paychecks. Put a check markin the check box to enable the feature.
• If all or most of your employees have the same additional adjustments (such asinsurance deductions, 401(k) deductions, or reimbursement for car expenses),click in the Item Name column in the Additions, Deductions, And CompanyContributions box, and then click the arrow to select the appropriateadjustments.
• Click the Taxes button to open the Taxes Defaults dialog, and select those taxesthat are common and therefore suited for the template. The State tab and theOther tab (usually local payroll taxes) contain tax data that probably applies toall or most of your employees.
• Click the Sick/Vacation button to set the terms for accruing sick time andvacation time if your policy is similar enough among employees to include it inthe template.
When you are finished filling out the template, click OK to save it.
Creating EmployeesNow you’re ready to tell QuickBooks about your list of employees. Open theEmployee Center and click New Employee to open a New Employee form.
The New Employee form opens with the Personal Info tab selected in theChange Tabs drop-down list at the top of the form. This selection displays threetabs: Personal, Address And Contact, and Additional Info.
Additional tab sets exist, and you use the drop-down list in the Change Tabsfield at the top of the window to access them. The following tab categories areavailable in the drop-down list:
• Personal Info A three-tab dialog where you enter personal information aboutthe employee.
• Payroll And Compensation Info Where you enter information aboutearnings, taxes, deductions, and other financial data.
• Employment Info Where you enter information about the employee’s hiringdate and other employment history.
• Workers Compensation Only available if you signed up for EnhancedPayroll. If so, workers comp is automatically enabled (you can disable it in thePayroll & Employees category of the Preferences dialog).
All of these tabs are covered in the following sections.
C H A P T E R 8 R U N N I N G P A Y R O L L 203
QckBcks TIGHT / QuickBooks 2009 The Official Guide / Ivens / 274-8 / Chapter 8
P:\010Comp\QckBcks\274-8\ch08.vpFriday, September 12, 2008 9:37:53 AM
Color profile: DisabledComposite Default screen

Personal Info Tab SetThe Personal Info tab set (see Figure 8-4) is the place to record personalinformation about this employee. It has three tabs because the information isdivided into three categories.
Personal Tab Enter the employee’s name, social security number, and the waythe name should be printed on paychecks. Enter the gender and/or date of birth ifyou have a company policy of recording this information, or if any tax or benefitsagency requires it. For example, your state unemployment form may require you tonote the gender of all employees; your medical or life insurance carrier may requirethe date of birth.
Address And Contact Tab Use this tab to record the employee’s address, as wellas information about contacting the employee (phone number, e-mail, fax, and soon). The address is required for W-2 forms.
Additional Info Tab Use this tab to enter the employee number (if your companyuses employee numbers). This tab also contains a Define Fields button, so you cancreate custom fields for employee records.
204 P A R T T W O B O O K K E E P I N G
QckBcks TIGHT / QuickBooks 2009 The Official Guide / Ivens / 274-8 / Chapter 8
FIGURE 8-4 Start by entering personal information about the employee.
P:\010Comp\QckBcks\274-8\ch08.vpFriday, September 12, 2008 9:37:54 AM
Color profile: DisabledComposite Default screen

Payroll And Compensation Info Tab SetThis tab set has only one tab, and it contains the information QuickBooks needs topay employees (see Figure 8-5). Where the employee’s payroll items and amountsmatch information already filled in from the default template, just accept the items.Otherwise, make additions and changes as necessary for this employee.
If the amount of the earnings or the deduction is the same every week, enter anamount. If it differs from week to week, don’t enter an amount on the employeecard. Instead, you’ll enter that information when you create the payroll check.
Employee Tax Information Click the Taxes button to open the Taxes dialog,which starts with Federal tax information, as seen in Figure 8-6. Fill in any datathat wasn’t automatically filled in from the Employee Template, and modify datathat is different for this employee.
Move to the State tab and configure the employee’s status for the state. Thisvaries from state to state, of course, and you should check with your accountant ifyou aren’t sure of something you find there.
C H A P T E R 8 R U N N I N G P A Y R O L L 205
QckBcks TIGHT / QuickBooks 2009 The Official Guide / Ivens / 274-8 / Chapter 8
FIGURE 8-5 Enter information about this employee’s compensation and deductions (excludingtax deduction).
P:\010Comp\QckBcks\274-8\ch08.vpFriday, September 12, 2008 9:37:54 AM
Color profile: DisabledComposite Default screen

N O T E : QuickBooks has built in a great deal of state information. Dependingon the state, you should see the appropriate withholdings and company-paiditems. For example, states that don’t deduct SUI from employees have a checkbox for SUI (Company Paid); while states that collect disability funds fromemployees will display the appropriate check box.
In the Other tab, apply any local payroll tax that applies to this employee. If youhaven’t already configured that tax in the Payroll Item List, you can click <AddNew> in the Item column to enter it now.
Click OK to save the tax status information and return to the Payroll Info tab.
Sick and Vacation Pay Information Click the Sick/Vacation button and enterthe configuration for this employee (which may include data from the EmployeeTemplate). When you are finished, click OK to return to the employee card.
Direct Deposit The Payroll Info tab has a Direct Deposit button, which you canuse to establish direct deposit of the employee’s paycheck to his or her bankaccount. If you haven’t signed up for direct deposit, the window that opens offersthe chance to enroll.
Employment Info Tab SetSelect Employment Info in the Change Tabs drop-down list to see the Employmenttab, which lets you track the following information about the employee:
• Hire date• Release date (fill this in when an employee leaves your company)• Employee type
206 P A R T T W O B O O K K E E P I N G
QckBcks TIGHT / QuickBooks 2009 The Official Guide / Ivens / 274-8 / Chapter 8
FIGURE 8-6 Configure the employee’s tax information.
P:\010Comp\QckBcks\274-8\ch08.vpFriday, September 12, 2008 9:37:54 AM
Color profile: DisabledComposite Default screen

For more information on employee types, see the section “UnderstandingEmployee Types.”
Workers Compensation Tab SetFor Enhanced Payroll subscribers, if you haven’t disabled workers comp tracking inthe Payroll & Employees category of the Preferences dialog, choose WorkersCompensation from the Change Tabs drop-down list. Assign the workers compcode that applies to the employee, or select Exempt if this employee is exempt fromworkers comp.
Understanding Employee TypesThe Type field on the Employment Info tab offers four choices, which are explainedin this section. The selection you make has an impact on the way your tax returnsare prepared. You must check with your accountant if you have any questions aboutthe type you should assign to any employee.
Regular EmployeeA Regular employee is exactly what it seems to be: a person you hired for whomyou deduct withholdings, issue a W-2, and so on. It’s important to have everyemployee fill out a W-4 form every year (don’t accept “I did that last year, nothinghas changed”).
T I P : If you need extra W-4 forms, you can download them from the IRS atwww.irs.ustreas.gov. Go to the forms section, select W-4, and print or downloadthe form and print as many copies as you need.
Officer EmployeeAn officer is someone who is an officer of a corporation. If your business isn’tincorporated, you have no officers. On federal corporate tax returns, you arerequired to report payroll for officers of the corporation separately from the regularpayroll amounts. Selecting Officer as the type has no impact on running yourpayroll (calculations, check printing, and so on); it only affects reports.
Statutory EmployeeA statutory employee is someone who works for you that the IRS has decidedqualifies as an employee instead of as an independent contractor. The list of the jobtypes that the rules cover and the definition of independent contractor is the subjectof much debate (especially in IRS audit hearings). The IRS has a list of criteria thatmust be met in order to qualify as an independent contractor (which means youdon’t have to put that person on your payroll, you don’t have to withhold taxes, andyou don’t have to pay employer taxes). The rules that govern this change frequently,so it’s important to check the rules in Circular E or with your accountant.
C H A P T E R 8 R U N N I N G P A Y R O L L 207
QckBcks TIGHT / QuickBooks 2009 The Official Guide / Ivens / 274-8 / Chapter 8
P:\010Comp\QckBcks\274-8\ch08.vpFriday, September 12, 2008 9:37:54 AM
Color profile: DisabledComposite Default screen

Owner EmployeeOwner and Employee are mutually exclusive terms to the IRS. If you own acompany, that means the company is a proprietorship; it’s not a corporation (acorporation doesn’t have owners; it has officers and directors). The same thing istrue of a partnership, which has multiple owners. You cannot put yourself on thepayroll; when you draw checks they cannot be paychecks. Post the checks against aDraw account in the Equity section of your chart of accounts.
QuickBooks puts this type in the list in case it’s too late and you’ve already listedthe proprietor or partners in the Employee List. The QuickBooks payroll programwon’t perform payroll tasks for any employee of this type. If you did add a proprietoror partner name to the Employee List, delete it rather than assign this type.
Entering Historical DataIf you’re not starting your use of QuickBooks at the very beginning of the year, youmust enter all the historical information about paychecks. This is the only way toperform all those tasks required at the end of the year. You cannot give youremployees two W-2 forms, one from your manual system and another fromQuickBooks, nor can you file your annual tax reports on a piecemeal basis.
No matter what your fiscal year is, your payroll year is the calendar year. Eventhough you can start using payroll for the current period before you enter thehistorical data, remember that the absence of historical data may affect some taxcalculations. If there are withholding amounts that cease after a certain maximum(perhaps your state only requires SUTA/SUI for the first $8,000.00 in gross payroll),you’ll have to adjust the deductions on the current paychecks manually. If thehistorical data is entered, QuickBooks can calculate the maximum deductionproperly and stop deducting these amounts.
T I P : To make historical data entry easier, go live with payroll at the beginningof a calendar quarter.
Understanding Historical DataThe historical data is the payroll you issued before the date on which you letQuickBooks take over your payroll chores (which is called the go live date). Startingwith the go live date, you’ll be entering payroll checks in QuickBooks; those checksare not part of the historical data. It’s important to understand how the go live dateaffects the task of entering historical data, so here are some guidelines:
• Payroll records are summarized quarterly, because your 941 reports are duequarterly.
• You can’t enter summarized data for the quarter that’s current (the quarter thatthe go live date falls in). Instead, for the current quarter, you must enter datafor each individual pay period (weekly, biweekly, semimonthly, or monthly).For previous quarters, you can enter quarterly totals.
208 P A R T T W O B O O K K E E P I N G
QckBcks TIGHT / QuickBooks 2009 The Official Guide / Ivens / 274-8 / Chapter 8
P:\010Comp\QckBcks\274-8\ch08.vpFriday, September 12, 2008 9:37:55 AM
Color profile: DisabledComposite Default screen

• If your go live date is any date in the first quarter, you have to enter historicaldata for each pay period, because you don’t have a full quarter to summarize.
• If your go live date is in the second quarter, enter a quarterly total for the firstquarter and then enter the individual pay period numbers for the secondquarter, up to the go live date.
• If your go live date is in the third quarter, enter quarterly totals for the first twoquarters and then enter each pay period up to the go live date.
• If your go live date is in the fourth quarter, you can follow the same pattern, butit might be just as easy to wait until next year to begin using QuickBooks payroll.
Entering the History ManuallyThe truth is, payroll is so easy to do if everything is set up properly that enteringeach historical payroll run individually isn’t difficult; and, it’s great training forcreating payroll checks. For the first couple of pay periods, stop to look at thedetails (the postings to general ledger accounts) after you enter historical totals,and compare them to your manual records. This gives you an opportunity tounderstand what QuickBooks is doing, in addition to checking accuracy.
However, if it’s close to the end of the year, this is a lot of work. You can enter thehistory in batches, using the “secret” Payroll History feature (“secret” because it’snot documented in QuickBooks but a lot of accountants know about it), or use theQuickBooks Payroll Setup Wizard (covered in the section, “Using the QuickBooksPayroll Setup Wizard”), which walks you through all payroll setup processes,including payroll history, using easy-to-understand wizard windows.
Manually Entering Payroll History in BatchesHere’s an undocumented shortcut for entering year-to-date payroll information (youmust have created all your employees to use it).
Choose Help—About QuickBooks to display the Product Information window.Then press the keyboard combination CTRL-SHIFT-Y. The Setup YTD AmountsWizard opens to walk you through the steps of entering year-to-date summaryinformation for each employee (see Figure 8-7).
Click Next to begin. The wizard replicates the historical balance entryinformation that the QuickBooks Payroll Setup Wizard offers, but most people findthis easier to use, especially if they’ve chosen to enter basic components manually.
The wizard asks you to specify three dates:
• The date your payroll liability and expense accounts are affected. That means,“When should the data you’re entering be posted to liability and expenseaccounts that are associated with payroll items?”
• The date your payroll bank accounts are affected. That means, “When shouldthe net paycheck amounts be posted to your payroll bank account?”
• The check date of the first paycheck you’ll create using QuickBooks payroll.This paycheck posts to all relevant accounts; there are no historical balances.
C H A P T E R 8 R U N N I N G P A Y R O L L 209
QckBcks TIGHT / QuickBooks 2009 The Official Guide / Ivens / 274-8 / Chapter 8
P:\010Comp\QckBcks\274-8\ch08.vpFriday, September 12, 2008 9:37:55 AM
Color profile: DisabledComposite Default screen

The correct dates might not be the same for all three categories. Following aresome examples of possible scenarios that should help you understand how to enterthe dates in these categories. For the purpose of these explanations, let’s assumeyou’re entering historical information as of the end of April; your first QuickBooks-produced paychecks will be the first payday in May.
If you’ve been doing payroll manually or through an outside service, and you’veremitted your liabilities and expenses, those amounts should have been postedwhen you set up your opening QuickBooks balances. You don’t want QuickBooksto post the liabilities, expenses, and net check amounts again; instead, you’reentering historical data for the purpose of producing accurate reports and W-2forms. Tell QuickBooks that the first date of your liability, expense, and bankaccounts is the day of your first May paychecks. Enter the first quarter payroll totalsfor each employee, and then enter the individual payroll data for April (so you haverunning totals for your quarterly reports). Your “first paycheck using QuickBooks”date is the first payday in May.
If you’ve been using an outside payroll service, you’ve certainly posted thepayroll totals to the bank account you use for payroll, but you might not have beenposting liabilities and expenses to date, because the payroll service was taking careof it and you wait for the quarterly reports to post amounts. Your last journal entryfor liabilities and expenses was at the end of the quarter (March 31). Your firstposting of liabilities and expenses should be April 1, and your first posting of bankaccount amounts should be May (the date of the first QuickBooks-producedpaycheck). Your “first paycheck using QuickBooks” date is the first payday in May.
These “rules for entering historical payroll totals” also apply when you use theQuickBooks Payroll Setup Wizard.
210 P A R T T W O B O O K K E E P I N G
QckBcks TIGHT / QuickBooks 2009 The Official Guide / Ivens / 274-8 / Chapter 8
FIGURE 8-7 This is a quick way to use your manual payroll records to summarize year-to-datepayroll information.
P:\010Comp\QckBcks\274-8\ch08.vpFriday, September 12, 2008 9:37:55 AM
Color profile: DisabledComposite Default screen

Using the QuickBooks Payroll Setup WizardQuickBooks provides assistance for setting up payroll in the form of a wizard. Youcan use the wizard to set up all the components required for payroll, or set up yourpayroll items and employees manually, and then use the wizard to enter yourhistorical data.
Regardless of whether you use the Payroll Setup Wizard to set up all yourcomponents or to enter historical data only, be sure to set up all the vendors andaccounts you need to remit payroll withholding and employer payroll expensesbefore using the wizard.
To use the wizard, choose Employees | Payroll Setup from the QuickBooks menu bar.The wizard window opens with all the tasks listed in the left pane (see Figure 8-8).
If you’re using the wizard to set up your payroll from scratch (you didn’tpreconfigure any of the components as described in the previous sections of thischapter), the setup process can take more time than it takes to perform those tasksmanually, but the wizard is rather user-friendly, demanding no knowledge ofaccounting jargon, so you may prefer to use it. The wizard has a Finish Later
C H A P T E R 8 R U N N I N G P A Y R O L L 211
QckBcks TIGHT / QuickBooks 2009 The Official Guide / Ivens / 274-8 / Chapter 8
FIGURE 8-8 The QuickBooks Payroll Setup Wizard is divided into logical sets of tasks.
P:\010Comp\QckBcks\274-8\ch08.vpFriday, September 12, 2008 9:37:55 AM
Color profile: DisabledComposite Default screen

button, which you can click if you have to do other work, get tired, or get bored.When you open the wizard again, you pick up where you left off.
The first few wizard screens are informational, indicating the data you need tocomplete the wizard (the same information about employees, payroll items, deductions,etc., discussed earlier in this chapter). The real work starts with Section 2, where thewizard starts configuring payroll for your company.
Company Setup for PayrollIn the Company Setup section, the wizard starts with compensation, which meanspayroll items that are compensation—salary, hourly wages, and so on. When you’vefinished with that section, the wizard moves on to other payroll item types.
If you’ve configured payroll items manually, they appear in the wizard window,and you can click Edit to view or change the settings.
If you haven’t yet set up payroll items, click Add New to open a mini-wizard thatwalks you through the process (the same process initiated if you choose EZ Setupof Payroll Items, which is covered earlier in this chapter).
The types of payroll items the wizard offers to set up include the following:
• Types of compensation, such as salary, hourly wages, overtime, bonuses,commissions, tips, and so on.
• Benefits, such as insurance, pension, and so on. For each benefit you select,you configure the employee/employer contribution rates.
• Paid time off, such as sick leave and vacations. You can configure your formulasfor calculating vacation time and sick time (if you let employees accrue timeaccording to time worked).
• Other additions and deductions, such as workers comp, auto expensereimbursement, garnishments, union dues, and so on.
Setting Up Employees in the WizardIn Section 3, the wizard moves on to the task of setting up employees. If you didn’tset up your employees manually, you can add each employee in the wizard, movingthrough a series of windows in which you enter information about the employee’spersonal information, pay structure, and tax status. For each employee, youdesignate the taxes and benefits that affect the employee.
When you finish entering your employee information, the wizard displays thelist of employees. If any employee is missing information, the wizard indicates theproblem (if you entered your employees manually, the wizard automatically findsthe employee records and displays the same list if problems exist).
Some missing information isn’t critical to issuing paychecks (for example, thehire date), but QuickBooks requires the information in the employee record. If anyemployee in the list has the notation Fix This Error Now, it means critical
212 P A R T T W O B O O K K E E P I N G
QckBcks TIGHT / QuickBooks 2009 The Official Guide / Ivens / 274-8 / Chapter 8
P:\010Comp\QckBcks\274-8\ch08.vpFriday, September 12, 2008 9:37:55 AM
Color profile: DisabledComposite Default screen

information is missing, and the system either won’t be able to issue a paycheck orwon’t be able to issue a W-2 form at the end of the year. Regardless of whether themissing information is critical or not, select the employee and click Edit to movethrough the wizard and fix the problem.
Incidentally, if you use the wizard to set up employees, when you fail to fill inrequired information the wizard displays a reminder, something that doesn’t happenwhen you set up employees manually.
Setting Up Payroll Taxes in the WizardIn Section 4, you tell the wizard about the federal, state, and local taxes you’reresponsible for. These are payroll items, so if you haven’t set up all these itemsbeforehand, you can use the wizard.
If you’re setting up your taxes in the wizard, as you finish each section, thewizard displays a list of all the taxes for that section. If you set up your taxes aspayroll items manually, the wizard finds those entries and uses them to populatethe list.
If the wizard finds anything amiss in your setup of any tax, the problem isdisplayed in the Description column. Choose Edit to make the needed changes.
Entering Payroll History in the WizardIn Section 5, you enter your historical payroll data. The wizard presents a set ofwindows, starting with a window that asks if you’ve issued paychecks this year(meaning outside of QuickBooks, of course). If you answer Yes, the wizard walksyou through each appropriate quarter, asking about the following for the quarter:
• Did you create paychecks?• Did you remit your payroll tax liabilities?• Did you remit your nontax payroll liabilities (company contributions to
benefits, and so on)?
Depending on the date you perform this setup, you may be asked for weeklytotals instead of quarterly totals.
The wizard walks you through multiple windows to ascertain the details forthose categories. It starts with the paychecks, where the wizard presents eachemployee and walks you through the steps required to enter the payroll history.
In the ensuing windows, you’ll enter the batch totals for employer contributionsand other employer payments (which depend on the benefits you offer and the stateor local municipality in which your business operates).
When you finish entering the batch totals for completed quarters, the wizardasks for the financial information about the paychecks in the current quarter. If youare performing this task in the second month of the current quarter, the wizard asks
C H A P T E R 8 R U N N I N G P A Y R O L L 213
QckBcks TIGHT / QuickBooks 2009 The Official Guide / Ivens / 274-8 / Chapter 8
P:\010Comp\QckBcks\274-8\ch08.vpFriday, September 12, 2008 9:37:55 AM
Color profile: DisabledComposite Default screen
for batch information for the first month of the quarter and then individualpaycheck information for the current month.
After the paycheck data is entered, the wizard walks you through the process ofentering employer payments (withholding remittances, employer taxes, paymentsto pension and benefit plans, and so on).
Payroll CheckupStep 6 is the Data Review, which you can run if you choose. QuickBooks asks ifyou’d like to go over your payroll settings, and if you select Yes, the wizard runs apayroll checkup. You can also run a Payroll Checkup whenever you make changesto your payroll components (employees, taxes, etc.) by choosing Employees | MyPayroll Service | Run Payroll Checkup.
The QuickBooks Payroll Checkup is a wizard that walks through all the elementsrequired for running payroll (a task list). Each section of the wizard’s task list ischecked for errors. The errors the checkup may find include missing information,invalid information (the format of an EIN number or state reporting number maybe incorrect), or any other data that doesn’t match the standards built into theQuickBooks payroll feature.
The program displays a report on the integrity of the data for prior quarters(unless you’re working in the first quarter, of course), and then, separately, theintegrity of the data for the current quarter.
Then, the program asks you about the federal and state forms you’ve filed toremit withholdings and pay employer taxes. After you’ve filled in the information,the program reconciles the totals against the payroll totals you entered previously.If there are errors, the specifics are displayed, and you can correct the problem andre-run the checkup.
Payroll SchedulesA payroll schedule is a way to separate different payroll intervals. For example, ifyour company pays salaried employees and officers on a weekly basis and payshourly workers on a biweekly basis, you can run payroll by selecting theappropriate schedule in order to make sure you pay the right employees on theright dates.
When you create a payroll schedule you define how often you pay youremployees (weekly, biweekly, semimonthly, and so on), the pay period (theworkdays covered by the paycheck), the date on the paycheck, and the date youprepare the payroll.
N O T E : The date you prepare the payroll differs from the paycheck date ifyou’re using direct deposit, which requires you to transfer payroll information twodays before the paycheck date.
214 P A R T T W O B O O K K E E P I N G
QckBcks TIGHT / QuickBooks 2009 The Official Guide / Ivens / 274-8 / Chapter 8
P:\010Comp\QckBcks\274-8\ch08.vpFriday, September 12, 2008 9:37:56 AM
Color profile: DisabledComposite Default screen

The number of payroll schedules you have to create depends on the manner inwhich you issue paychecks; following are some common scenarios:
• If all your employees are paid on the same frequency, and all of them receivephysical paychecks, you don’t need payroll schedules.
• If all your employees are paid on the same frequency, and all of them havesigned up for direct deposit, you don’t need payroll schedules.
• If all your employees are paid on the same frequency but some are signed upfor direct deposit and others receive physical paychecks, you may want to setup two payroll schedules (because preparation for direct deposit is two daysearlier than the date on which you’d normally print paychecks). On the otherhand, you can omit payroll schedules, print the paychecks early while you’repreparing the direct deposit checks, and put the paychecks away until payday.
• If your employees are paid on different frequency sets (for example, someweekly, some monthly), you can eliminate the need to select/deselect theappropriate employees for a given pay date by creating payroll schedules.
Creating a Payroll ScheduleTo create a payroll schedule, choose Employees | Add Or Edit Payroll Schedules.When the Payroll Schedule List window opens, press CTRL-N to create a new payrollschedule. In the New Payroll Schedule dialog, fill out the required information asfollows:
• A name for this schedule. Use descriptive text if you’re setting up multiplepayroll schedules, such as “weekly-checks,” “weekly-DirDep,”“CommissionsOnly,” and so on.
• The pay period frequency for this schedule.• The next pay period end date. This is the time period covered by the paycheck,
which often is not the same as the paycheck date. For example, you may issuepaychecks on Thursday for the period ending the previous Friday.
• The next paycheck date.
If your payroll is monthly or semimonthly, the dialog includes additional fields.For example, if you issue paychecks semimonthly, you can select specific dates,such as the 10th and the 25th, or you can select one midmonth date and then selectLast Day Of Month for the second check in that month.
After you create the schedule, QuickBooks offers to assign the scheduleautomatically to any employees who are configured for the same pay frequency asthe new schedule.
C H A P T E R 8 R U N N I N G P A Y R O L L 215
QckBcks TIGHT / QuickBooks 2009 The Official Guide / Ivens / 274-8 / Chapter 8
P:\010Comp\QckBcks\274-8\ch08.vpFriday, September 12, 2008 9:37:56 AM
Color profile: DisabledComposite Default screen

Assigning Payroll Schedules to EmployeesEach employee record has a field for the applicable payroll schedule in the Payrolland Compensation Info tab. When you link the payroll schedule to the appropriateemployees, those employees appear when you select the schedule on the day you’repreparing paychecks.
Special Payroll RunsQuickBooks offers a way to issue a paycheck, or multiple paychecks, outside of theschedules you create. When you choose Employees | Pay Employees, in addition tothe subcommand Scheduled Payroll, you see two commands you can use for specialpayroll runs:
• Unscheduled Payroll• Termination Check
Unscheduled Payroll Select this special payroll category if you need to createbonus checks, commission checks, or any other type of paycheck that differs from aregularly scheduled payroll run. You also have the option of adding the additionalcompensation to a “regular” paycheck instead of running an unscheduled payroll.
Termination Checks Selecting this special payroll type, the use of which is ratherobvious from its name, opens the Enter Payroll Information dialog. Select theterminated employee (put a check mark in the column to the left of the employeename), the pay period ending date, the check date, the termination date, and thehours (or amount if the employee is salaried). Click Continue, approve or changethe paycheck details; then print the check, assign a check number for a manualcheck, or issue a direct deposit check.
216 P A R T T W O B O O K K E E P I N G
QckBcks TIGHT / QuickBooks 2009 The Official Guide / Ivens / 274-8 / Chapter 8
The Paycheck Date Is All That Really CountsAll the information in the payroll schedule except the paycheck date is for your convenience inrunning payroll and has no impact on your finances or tax liabilities. For direct depositemployees, the deposit date is the paycheck date.
Your QuickBooks reports are based only on the paycheck dates, and your 941/W-2 forms useonly the paycheck dates. For example, if you issue a paycheck dated October 5, 2007 for theperiod ending September 29, 2007, that paycheck is not included in your third-quarter reports,nor in your September reports for any tax reports that are due monthly.
➽ FYI
P:\010Comp\QckBcks\274-8\ch08.vpFriday, September 12, 2008 9:37:56 AM
Color profile: DisabledComposite Default screen
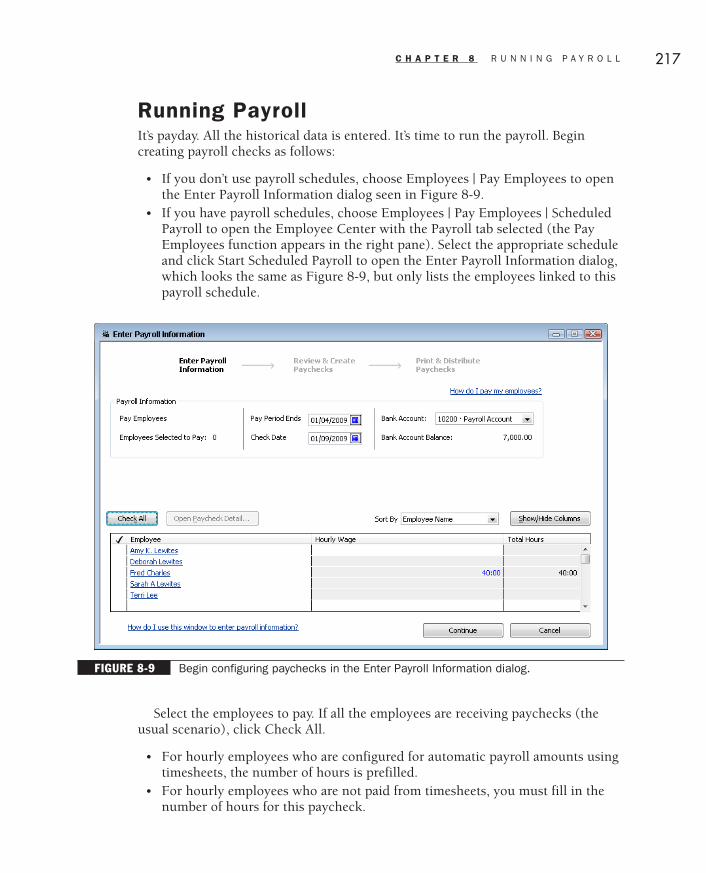
Running PayrollIt’s payday. All the historical data is entered. It’s time to run the payroll. Begincreating payroll checks as follows:
• If you don’t use payroll schedules, choose Employees | Pay Employees to openthe Enter Payroll Information dialog seen in Figure 8-9.
• If you have payroll schedules, choose Employees | Pay Employees | ScheduledPayroll to open the Employee Center with the Payroll tab selected (the PayEmployees function appears in the right pane). Select the appropriate scheduleand click Start Scheduled Payroll to open the Enter Payroll Information dialog,which looks the same as Figure 8-9, but only lists the employees linked to thispayroll schedule.
Select the employees to pay. If all the employees are receiving paychecks (theusual scenario), click Check All.
• For hourly employees who are configured for automatic payroll amounts usingtimesheets, the number of hours is prefilled.
• For hourly employees who are not paid from timesheets, you must fill in thenumber of hours for this paycheck.
C H A P T E R 8 R U N N I N G P A Y R O L L 217
QckBcks TIGHT / QuickBooks 2009 The Official Guide / Ivens / 274-8 / Chapter 8
FIGURE 8-9 Begin configuring paychecks in the Enter Payroll Information dialog.
P:\010Comp\QckBcks\274-8\ch08.vpFriday, September 12, 2008 9:37:56 AM
Color profile: DisabledComposite Default screen

N O T E : The column names are deceiving; you’d expect to see the wage ratein a column named Hourly Wage, but that column is for the number of hoursworked.
Changing Paycheck DataIf you want to make changes to the paycheck, click the employee’s name to openthe Preview Paycheck dialog. You can add a payroll item such as a bonus, assign thepaycheck to a customer or job, or add a deduction such as a repayment of a loan orgarnishment. Click Save & Next to move to the next employee or click Save &Close to return to the Enter Payroll Information dialog. (There’s also a Save &Previous button in case you think you should go back to a previous check.)
Reviewing the Payroll RunClick Continue in the Enter Payroll Information dialog to display the Review AndCreate Paychecks window (see Figure 8-10), which displays all the financialinformation for this payroll run. If anything is amiss, click Back to reconfigure thepaychecks or make other needed corrections.
218 P A R T T W O B O O K K E E P I N G
QckBcks TIGHT / QuickBooks 2009 The Official Guide / Ivens / 274-8 / Chapter 8
FIGURE 8-10 The details for each paycheck have been entered.
P:\010Comp\QckBcks\274-8\ch08.vpFriday, September 12, 2008 9:37:56 AM
Color profile: DisabledComposite Default screen

Fill out the options for producing the paychecks (print the checks orautomatically assign check numbers in the bank account register for manualchecks), and then click Create Paychecks. QuickBooks creates the checks anddisplays the Confirmation And Next Steps dialog.
Ill 8-2
If you’re printing paychecks you can click Print Paychecks, or you can wait andprint them from the Print Forms command in the File menu (in case you have
C H A P T E R 8 R U N N I N G P A Y R O L L 219
QckBcks TIGHT / QuickBooks 2009 The Official Guide / Ivens / 274-8 / Chapter 8
Net to Gross Calculationsfor Enhanced Payroll SubscribersIf you subscribe to Enhanced Payroll you can enter the net amount of a check and let QuickBookscalculate the gross amount. This is useful for bonus checks or another special payroll check forwhich you need to make sure the employee receives a net check of a certain amount.
During the payroll run (either a regular payroll, or a special payroll for this individual paycheck),select the employee for this payroll run. In the Preview Paycheck window, select the option EnterNet/Calculate Gross, and then enter the net amount for this paycheck. QuickBooks automaticallycalculates the gross amount and the deductions to arrive at the net amount you entered.
➽ FYI
P:\010Comp\QckBcks\274-8\ch08.vpFriday, September 12, 2008 9:37:57 AM
Color profile: DisabledComposite Default screen

another payroll schedule to process today, and you want to load the payroll checksand process them in one fell swoop).
If you have direct deposit employees, click Print Pay Stubs. When the pay stubsare printed, click the Send Payroll Data button on the Confirmation And Next Stepsdialog. This opens the Send Center window, and you can upload the direct depositdata to Intuit for processing.
If you have another payroll schedule to run today (perhaps both weekly andbiweekly employees are paid today), repeat all the processes enumerated here.
The Employee CenterThe Employee Center, seen in Figure 8-11, contains all the information about yourpayroll components and also provides links to all the functions in the payrollsystem. It’s a central location for everything you need to do or need to know. Toopen this window, choose Employees | Employee Center.
N O T E : Users who do not have QuickBooks permissions to see payroll orother sensitive information do not see payroll financial information when theyopen the Employee Center.
220 P A R T T W O B O O K K E E P I N G
QckBcks TIGHT / QuickBooks 2009 The Official Guide / Ivens / 274-8 / Chapter 8
FIGURE 8-11 The Employee Center is the repository of all payroll information and functions.
P:\010Comp\QckBcks\274-8\ch08.vpFriday, September 12, 2008 9:37:57 AM
Color profile: DisabledComposite Default screen
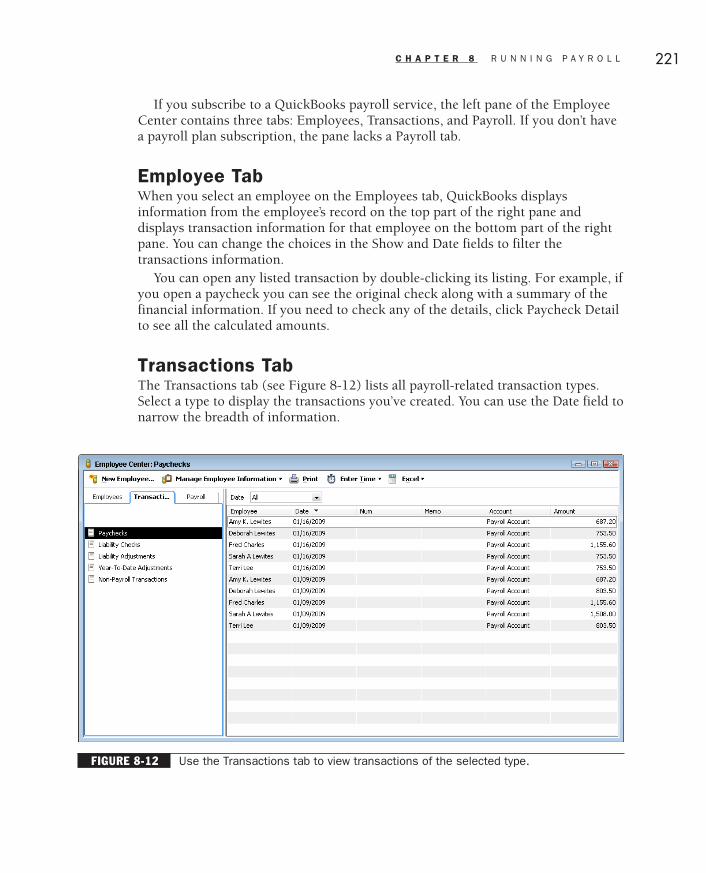
If you subscribe to a QuickBooks payroll service, the left pane of the EmployeeCenter contains three tabs: Employees, Transactions, and Payroll. If you don’t havea payroll plan subscription, the pane lacks a Payroll tab.
Employee TabWhen you select an employee on the Employees tab, QuickBooks displaysinformation from the employee’s record on the top part of the right pane anddisplays transaction information for that employee on the bottom part of the rightpane. You can change the choices in the Show and Date fields to filter thetransactions information.
You can open any listed transaction by double-clicking its listing. For example, ifyou open a paycheck you can see the original check along with a summary of thefinancial information. If you need to check any of the details, click Paycheck Detailto see all the calculated amounts.
Transactions TabThe Transactions tab (see Figure 8-12) lists all payroll-related transaction types.Select a type to display the transactions you’ve created. You can use the Date field tonarrow the breadth of information.
C H A P T E R 8 R U N N I N G P A Y R O L L 221
QckBcks TIGHT / QuickBooks 2009 The Official Guide / Ivens / 274-8 / Chapter 8
FIGURE 8-12 Use the Transactions tab to view transactions of the selected type.
P:\010Comp\QckBcks\274-8\ch08.vpFriday, September 12, 2008 9:37:58 AM
Color profile: DisabledComposite Default screen

Payroll TabThe Payroll tab provides a one-stop center for all your payroll tasks (see Figure 8-13).You can view transactions, create transactions, and generate the payroll forms youneed. Visit this tab periodically to make sure you don’t miss any deadlines.
Customizing the Employee CenterYou can tailor the way the Employee Center displays information. Resize thepanes by moving your mouse pointer over the edge of any pane; when thepointer changes to a vertical bar with right and left arrows, drag the pane ineither direction.
222 P A R T T W O B O O K K E E P I N G
QckBcks TIGHT / QuickBooks 2009 The Official Guide / Ivens / 274-8 / Chapter 8
FIGURE 8-13 The Payroll tab is the place to access the tasks involved in payroll—the links andmessages change depending on the QuickBooks Payroll Service you purchased.
P:\010Comp\QckBcks\274-8\ch08.vpFriday, September 12, 2008 9:37:58 AM
Color profile: DisabledComposite Default screen

You can customize the columns that QuickBooks displays in the left pane of theEmployees tab by right-clicking anywhere on the list and choosing CustomizeColumns.
Ill 8-3
You can also customize the information displayed in the right pane when youselect an employee’s name in the Employees tab. Right-click anywhere in the rightpane and select Customize Columns.
Ill 8-4
Of course, after you create and deliver paychecks to employees, you have to sendthe government agencies, insurance companies, and other vendors the moneyyou’re holding for them. Instructions for those tasks are in Chapter 9.
C H A P T E R 8 R U N N I N G P A Y R O L L 223
QckBcks TIGHT / QuickBooks 2009 The Official Guide / Ivens / 274-8 / Chapter 8
P:\010Comp\QckBcks\274-8\ch08.vpFriday, September 12, 2008 9:37:58 AM
Color profile: DisabledComposite Default screen

QckBcks TIGHT / QuickBooks 2009 The Official Guide / Ivens / 274-8Blind 224
P:\010Comp\QckBcks\274-8\ch08.vpFriday, September 12, 2008 9:37:58 AM
Color profile: DisabledComposite Default screen

Chapter
Chapter
99Payroll Reports andRemittances
In this chapter:
• Confirm payroll liability payment schedules
• Remit liabilities
• Prepare quarterly and annual returns
• Print W-2 forms
225
QckBcks TIGHT / QuickBooks 2009 The Official Guide / Ivens / 274-8 / Chapter 9
P:\010Comp\QckBcks\274-8\ch09.vpFriday, September 12, 2008 9:38:20 AM
Color profile: DisabledComposite Default screen
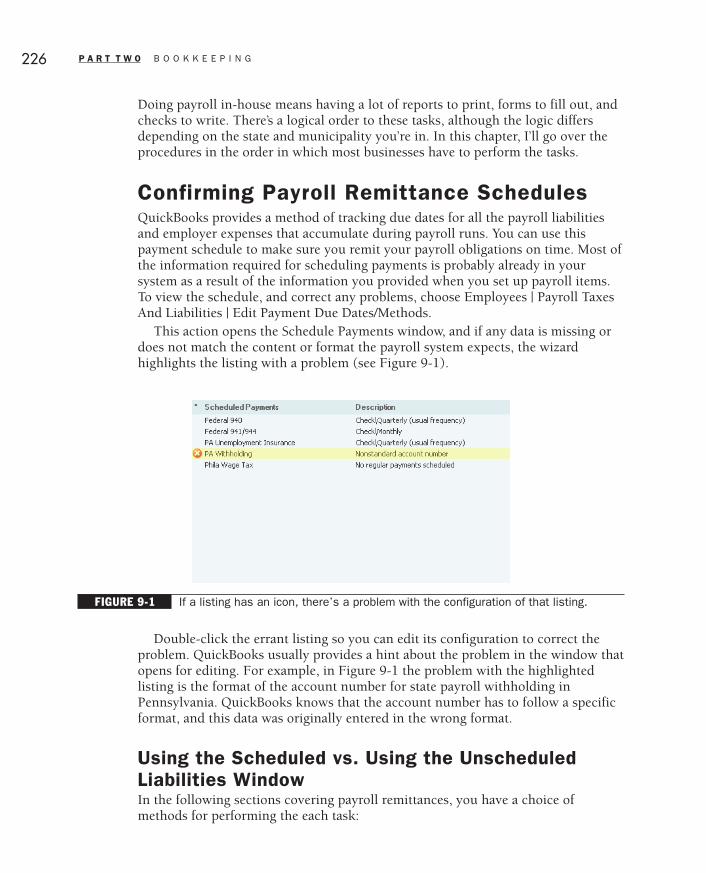
Doing payroll in-house means having a lot of reports to print, forms to fill out, andchecks to write. There’s a logical order to these tasks, although the logic differsdepending on the state and municipality you’re in. In this chapter, I’ll go over theprocedures in the order in which most businesses have to perform the tasks.
Confirming Payroll Remittance SchedulesQuickBooks provides a method of tracking due dates for all the payroll liabilitiesand employer expenses that accumulate during payroll runs. You can use thispayment schedule to make sure you remit your payroll obligations on time. Most ofthe information required for scheduling payments is probably already in yoursystem as a result of the information you provided when you set up payroll items.To view the schedule, and correct any problems, choose Employees | Payroll TaxesAnd Liabilities | Edit Payment Due Dates/Methods.
This action opens the Schedule Payments window, and if any data is missing ordoes not match the content or format the payroll system expects, the wizardhighlights the listing with a problem (see Figure 9-1).
Double-click the errant listing so you can edit its configuration to correct theproblem. QuickBooks usually provides a hint about the problem in the window thatopens for editing. For example, in Figure 9-1 the problem with the highlightedlisting is the format of the account number for state payroll withholding inPennsylvania. QuickBooks knows that the account number has to follow a specificformat, and this data was originally entered in the wrong format.
Using the Scheduled vs. Using the UnscheduledLiabilities WindowIn the following sections covering payroll remittances, you have a choice ofmethods for performing the each task:
226 P A R T T W O B O O K K E E P I N G
QckBcks TIGHT / QuickBooks 2009 The Official Guide / Ivens / 274-8 / Chapter 9
FIGURE 9-1 If a listing has an icon, there’s a problem with the configuration of that listing.
P:\010Comp\QckBcks\274-8\ch09.vpFriday, September 12, 2008 9:38:20 AM
Color profile: DisabledComposite Default screen

• For liabilities that have a schedule configured, choose Employees | PayrollTaxes And Liabilities | Pay Scheduled Liabilities. Select the payments to remitfrom the schedule that displays.
• For liabilities that don’t have a schedule configured, choose Employees | PayrollTaxes And Liabilities | Create Custom Liability Payments. Select the paycheckdate range you need, and then select the payments to remit. All your liabilities(both scheduled and unscheduled) are included in the list.
• If you set up a schedule for most liabilities, but one or more of your paymentsdidn’t match the options available in the schedule, it’s easier to use the CreateCustom Liability Payments command than to use the scheduled liabilitiescommand and then use the unscheduled liabilities command.
Remitting LiabilitiesWhen you create payroll checks, QuickBooks tracks the liabilities you accrue as aresult of those checks. To see your scheduled liabilities, choose the appropriatecommand (as described in the preceding section). QuickBooks displays thecurrently owed liabilities (see Figure 9-2).
C H A P T E R 9 P A Y R O L L R E P O R T S A N D R E M I T T A N C E S 227
QckBcks TIGHT / QuickBooks 2009 The Official Guide / Ivens / 274-8 / Chapter 9
FIGURE 9-2 QuickBooks tracks your payroll liabilities automatically.
P:\010Comp\QckBcks\274-8\ch09.vpFriday, September 12, 2008 9:38:21 AM
Color profile: DisabledComposite Default screen

Select the liability you want to pay and click View/Pay. The first time you payliabilities, QuickBooks asks you to select the right bank account (if you have morethan one bank account).
Ill 9-1
The payment transaction window opens, as seen in Figure 9-3.
Continue to view and pay until all the current liabilities are remitted. Thefollowing sections cover the details involved in remitting common payroll liabilitypayments.
228 P A R T T W O B O O K K E E P I N G
QckBcks TIGHT / QuickBooks 2009 The Official Guide / Ivens / 274-8 / Chapter 9
FIGURE 9-3 This liability check is posted to the right accounts and is ready to print.
P:\010Comp\QckBcks\274-8\ch09.vpFriday, September 12, 2008 9:38:21 AM
Color profile: DisabledComposite Default screen

Sending Federal Tax PaymentsPayments to the federal government involve two payroll taxes:
• 941/944/943 taxes, which cover withholding, Social Security, and Medicare• 940 taxes, which are the federal unemployment taxes
N O T E : This section is specific to liabilities payments made by companiesthat file Form 941/943 on a quarterly basis. If you use Form 944, you fileannually.
941/943 PaymentsThe federal government requires you to deposit the withheld amounts, along withthe matching employer contributions, at a specified time. That time period isdependent upon the size of the total withholding amount you’ve accumulated. Youmay be required to deposit monthly, semimonthly, weekly, or within three days ofthe payroll. Check the current limits with the IRS or your accountant.
There’s a formula for determining the size of the 941/943 payment—it’s the sumof the following amounts for the period:
• Federal withholding• FICA withholding• Medicare withholding• FICA matching contribution from employer• Medicare matching contribution from employer
You don’t have to do the math—QuickBooks does it for you. But it’s a good ideato know what the formula is so you can check the numbers yourself (and makesure you have sufficient funds in your bank account to cover the next payment).
Creating a Check for 941/943 PaymentsIf you write or print the 941/943 payment check and deposit it at the bank in whichyou have your payroll account, use the coupons the federal government sent you(Form 8109). Fill out a coupon and take it, along with your check, to the bank inwhich you have your payroll account. Make the check payable to the bank. Don’tforget to fill in the little bullets on the coupon: one to indicate the type of deposit(941 or 943), the other to indicate the quarter for which this payment is remitted.
E-Paying 941/943 PaymentsIf you remit your payments electronically (either through QuickBooks EnhancedPayroll or by using the Electronic Federal Tax Payment System (EFTPS) operatedby the IRS), the payee is the IRS. The payment appears in your bank register as an
C H A P T E R 9 P A Y R O L L R E P O R T S A N D R E M I T T A N C E S 229
QckBcks TIGHT / QuickBooks 2009 The Official Guide / Ivens / 274-8 / Chapter 9
P:\010Comp\QckBcks\274-8\ch09.vpFriday, September 12, 2008 9:38:21 AM
Color profile: DisabledComposite Default screen

e-payment, either automatically (if you’re using QuickBooks e-pay), or manually(if you use EFTPS).
Employers who e-pay directly through EFTPS usually enter text in the checknumber field such as “ACH,” which is the method the IRS uses to take the paymentout of your bank account. ACH stands for Automated Clearing House, which is anetwork operated by the Federal Reserve and the Electronic Payments Networkthat provides a way for financial institutions to exchange funds electronically. Youcan also leave the check number field blank.
940 PaymentsThe Federal Unemployment Tax Act (FUTA) provides unemploymentcompensation to workers who have lost their jobs, usually after the workers’ statebenefits have been exhausted. The FUTA tax is paid by employers; no deductionsare taken from employee wages. Companies must make FUTA payments if either ofthe following scenarios exist:
• During this year or last year you paid wages of at least $1,500 in any calendarquarter.
• During this year or last year you had one or more employees for at least part ofa day for a period of 20 weeks (the weeks do not have to be contiguous).
If you print the check, use Form 8109 (the same coupon you use to depositfederal withholding and employer matching contributions for Form 941/943) andmark the coupon for 940 Tax and the quarter in which you are making yourdeposit. You don’t have to make the deposit until you owe the entire amount, butyou can make deposits until you reach that amount if you wish.
C A U T I O N : Always use a separate coupon and check for FUTA; don’t mixthe payment with your other federal liabilities payment.
Technically, FUTA tax is 6.2 percent of gross wages up to $7,000.00 peremployee, but the federal government gives employers a 5.4 percent credit forpaying their state unemployment taxes. Therefore, unless you deliberately ignoreyour state unemployment payments, you can calculate FUTA at the rate of .8percent of gross wages (.008 × $7,000.00), which is $56.00 per employee whoreaches the $7,000.00 goal. QuickBooks assumes you’re paying your stateunemployment taxes and calculates your FUTA liability accordingly.
Remitting State and Local LiabilitiesYour state and local payroll liabilities vary depending upon where your business islocated and where your employees live (and pay taxes). Besides income taxes, youmay be liable for unemployment insurance and disability insurance.
230 P A R T T W O B O O K K E E P I N G
QckBcks TIGHT / QuickBooks 2009 The Official Guide / Ivens / 274-8 / Chapter 9
P:\010Comp\QckBcks\274-8\ch09.vpFriday, September 12, 2008 9:38:21 AM
Color profile: DisabledComposite Default screen

Remitting State and Local Income TaxesMost states have some form of an income tax, which might be calculated in any oneof a variety of ways:
• A flat percentage of gross income• A sliding percentage of gross income• A percentage based on the federal tax for the employee
Local (municipal or county) taxes are also widely varied in their approach:
• Some cities have different rates for employees of companies that operate in thecity. There may be one rate for employees who live in the same city and adifferent rate for nonresidents.
• Your business might operate in a city or town that has a payroll head tax (aonce-a-year payment that is a flat amount per employee).
• You may have a head tax for the town in which your business operates and stillbe required to withhold local taxes for employees who live in another city.
State and local taxing authorities provide coupons or forms or an online servicefor remitting income tax withholding. The frequency with which you must remitmight depend on the size of your payroll, or it might be quarterly, semiannual, orannual, regardless of the amount. Some municipal authorities have e-pay available.
Remitting Other State LiabilitiesIf your state has SUI or SDI or both, you have to pay those liabilities when they’redue. Commonly, these are quarterly payments.
T I P : It’s a good idea to create different vendor names for SUI, SDI, and stateincome tax withholding to make sure you don’t accidentally send checks for the wrongcomponent and to prevent QuickBooks from issuing a single check for the grandtotal. The vendor record for each vendor name may have the same payee (StateDepartment of Revenue), but the vendor names are different.
Not all states have SUI or SDI, and some have one but not the other. Some statescollect SUI and SDI from the employee and the company; some collect only fromthe company. Check the rules for your state.
Remitting Other Payroll LiabilitiesThe rules for remitting the paycheck deductions and employer contributions forother reasons—such as health benefits, pension, and workers compensation—arespecific to your arrangements with those vendors.
C H A P T E R 9 P A Y R O L L R E P O R T S A N D R E M I T T A N C E S 231
QckBcks TIGHT / QuickBooks 2009 The Official Guide / Ivens / 274-8 / Chapter 9
P:\010Comp\QckBcks\274-8\ch09.vpFriday, September 12, 2008 9:38:22 AM
Color profile: DisabledComposite Default screen

There are a great many ways to handle the way these payments are posted, andyou have to decide what makes sense to you (or to your accountant). For example,if you pay a monthly amount to a medical insurer, you may want to post theemployee deductions back to the same expense account you use to pay the bill.That way, only the net amount is reported as an expense on your taxes.
Workers CompQuickBooks Enhanced Payroll offerings include workers comp, and the setupoptions are available in the Payroll & Employees category of the Preferences dialog.Click Workers Compensation on the Company Preferences tab to open the WorkersComp Preferences dialog. Select Track Workers Comp to enable the feature.
When workers comp is enabled, you can also opt to see reminder messages toassign workers comp codes when you create paychecks or timesheets. In addition,you can select the option to exclude an overtime premium from your workers compcalculations (check your workers comp insurance policy to see if you can calculateovertime amounts as regular pay).
Preparing Your 941/943 FormUnless you’ve been notified that you’re a Form 944 filer, you must file a 941 or 943form every quarter to report the total amount you owe the federal government forwithheld taxes, FICA, and Medicare. If you have been paying the deposits regularly,no check is remitted with the 941/943. Instead, it’s a report of amounts due andamounts paid, and they should match so that Line 12 is $0.00.
• If you underpaid, use the payment voucher to send your check for theunderpaid amount. The vendor for the check is United States Treasury (you donot take this check to the bank; only deposits accompanied by Form 8109 aredeposited at your bank). Use the address provided on the form instructions(QuickBooks prints the instruction page).
• If you overpaid, you can select the option to take a credit toward the next 941/943 or you can select the option for a refund.
The 941/943 is concerned with the following data:
• Gross wages paid• Federal income tax withholding• FICA (social security) withholding and matching employer contributions• Medicare withholding and matching employer contributions
Creating a 941/943 FormQuickBooks will prepare your 941/943 report using the information in yourQuickBooks registers.
232 P A R T T W O B O O K K E E P I N G
QckBcks TIGHT / QuickBooks 2009 The Official Guide / Ivens / 274-8 / Chapter 9
P:\010Comp\QckBcks\274-8\ch09.vpFriday, September 12, 2008 9:38:22 AM
Color profile: DisabledComposite Default screen

If QuickBooks isn’t preparing your federal forms (either because you’re doingpayroll manually or you subscribed to the QuickBooks Basic Payroll service), youcan prepare your forms manually with the use of Excel worksheets that QuickBooksprovides. See the section “Tax Form Worksheets in Excel” at the end of this chapter.Creating the form is quite easy.
Follow these steps to create a 941/943 form:
� Choose Employees | Payroll Tax Forms & W-2s | Process Payroll Forms.� In the Select Form Type dialog, select Federal Form and click OK.� In the Select Payroll Form dialog, select (highlight) Quarterly Form 941 or
Annual Form 943.� Select the filing period and click OK.
The Payroll Tax Form window opens with Form 941 or 943 selected. Thisprocess is a wizard, so you fill out information and click Next to move through allthe steps in the process. The first window is an interview; enter the appropriatedata (see Figure 9-4) and click Next to continue.
C H A P T E R 9 P A Y R O L L R E P O R T S A N D R E M I T T A N C E S 233
QckBcks TIGHT / QuickBooks 2009 The Official Guide / Ivens / 274-8 / Chapter 9
FIGURE 9-4 Start by answering questions; the answers are transferred to the form in theappropriate places.
P:\010Comp\QckBcks\274-8\ch09.vpFriday, September 12, 2008 9:38:22 AM
Color profile: DisabledComposite Default screen

N O T E : Schedule B is the Employer’s Record of Federal Tax Liability. If youare a semiweekly depositor or your payroll tax liability on any day in the quarterexceeds the standard amount for a monthly depositor, you must file Schedule Bwith Form 941/943.
Move through the wizard, following the prompts, using the guidelines presentedin the following sections.
Filling in Blank FieldsTo enter information in a blank field, click your cursor in the field to activate it,then type the data. The typed text appears blue, but that’s just a signal to you thatthe data was entered manually; QuickBooks doesn’t print the form in color.
Editing Prefilled DataFollow these steps to edit data:
� Right-click the field and choose Override from the menu that appears.� Enter the replacement data in the Override box, and press the TAB key.� The new data replaces the original data in the field, and it’s green (to remind
you that you manually replaced the data that was exported from QuickBooks).
If you change your mind and decide that the data automatically supplied byQuickBooks should remain in the form, right-click in the field and choose CancelOverride.
Data You Cannot ChangeDo not edit the following types of data on the 941 form (or on any payroll tax formfor that matter):
• Federal Employer Identification Number (EIN)• Filing period (if you’re trying to change the filing period, start the process again
and select the appropriate date range)• Totals (these are calculated by QuickBooks; if a total is wrong, edit the
erroneous number and QuickBooks will recalculate the total)
Checking for ErrorsBefore you finalize the contents of Form 941/943, click the Check For Errors button.QuickBooks examines the content and displays any errors in the Errors box thatopens at the top of the form. If there aren’t any problems, the Errors box reports this.
Click the error to move automatically to the field that’s causing the problem, andcorrect the information:
• If the problem is in a field you filled out, correct the data and press TAB.
• If the problem is in a field that was prefilled, but you changed the content byoverriding the data, right-click the field and select Cancel Override.
234 P A R T T W O B O O K K E E P I N G
QckBcks TIGHT / QuickBooks 2009 The Official Guide / Ivens / 274-8 / Chapter 9
P:\010Comp\QckBcks\274-8\ch09.vpFriday, September 12, 2008 9:38:22 AM
Color profile: DisabledComposite Default screen

When you press TAB to replace the data in the field, the error listing shoulddisappear from the Error box. If it doesn’t, you have to do some homework to figureout what’s wrong with the data in the affected field and then correct it.
Close the Error box by clicking the Close Errors button.
Saving and Re-opening an Unfinished FormIf you get interrupted or confused while you’re preparing your 941, 943, or 940form, you can save the form with the data you already filled in, so you don’t have tostart from scratch when you resume your work. Click Save and Close to save theform with its current contents. To return to work on the saved form, go through thesteps enumerated earlier in this section to select the form and its date range.QuickBooks asks if you want to use the saved draft.
If you open a saved draft, QuickBooks does not examine your files and refreshthe data, so if you made changes to payroll data, you have to start a new forminstead of opening a saved draft. Changes could include an additional paycheckbeing issued within the date range for some reason, or a payment you made to thebank or IRS as a remittance deposit for this report period.
Printing Form 941/943You can print the form from QuickBooks and send it to the IRS if you use theseprinting criteria:
• The form must be printed with black ink on white or cream paper.• The paper must be 8"×11" or 8.5"×11".• The paper must be 18-lb. weight or heavier.
The printed report doesn’t look exactly like the blank form you received, but it’sclose. More importantly, it’s perfectly acceptable to the government. Print twocopies: one to mail and one for your files.
N O T E : You could also use the information in the printed report to fill in theblank 941/943 form you receive if you don’t want to send the QuickBooksprintout. Save the printed report as your file copy.
If you’re signed up for e-payments, you can e-file your 941/943. Save the printedreport as your file copy.
N O T E : If you subscribe to an Enhanced Payroll service, you can archive acopy of the form as a PDF file by clicking the Save As PDF button on the form.This is handy for people who believe that using computers creates a paperlessenvironment and therefore use the hard drive as a file cabinet. This works ifthose people are religious about backing up every day to an external drive.
C H A P T E R 9 P A Y R O L L R E P O R T S A N D R E M I T T A N C E S 235
QckBcks TIGHT / QuickBooks 2009 The Official Guide / Ivens / 274-8 / Chapter 9
P:\010Comp\QckBcks\274-8\ch09.vpFriday, September 12, 2008 9:38:22 AM
Color profile: DisabledComposite Default screen
Preparing Annual ReturnsAll taxing authorities want annual returns. The feds, state, and local folks needreports in the form of coupons or longer forms. Some of them want money; some justwant reports because the remittances were made earlier in the year. You can get all theinformation you need from QuickBooks; all the standard QuickBooks payroll reportswork just fine, as long as you remember to set the Dates field to the entire year.
Preparing State and Local Annual ReturnsThe state and local taxing authorities usually send you a form that asks for areconciliation for the year. You may have to present quarterly totals as you fill outthe form, which you can accomplish by changing the date range in the QuickBookspayroll reports. For example, if your state returns require totals for each quarter, runpayroll reports for Jan 1 through March 31, followed by April 1 through June 30,and so on.
Finish your State Unemployment annual report or 4th Quarter report as soon aspossible, because the payments you make to the state are relevant to the FederalUnemployment report (Form 940). In many states, the year-end or 4th Quarterreport doesn’t require a check because there’s a limit to the wages that are eligiblefor applying the unemployment contribution rate, and it’s common to meet thatlimit fairly early in the year.
Preparing the 940 FormThe 940 Form (FUTA) is filed annually; there are no quarterly forms to file. Tocreate your Form 940, choose Employees | Payroll Tax Forms & W-2s | ProcessPayroll Forms from the QuickBooks menu bar. Select Federal Form, then select 940and fill in the year.
The Payroll Tax Form window (it’s the first window of a wizard) opens with theForm 940 Interview. The top section of the interview window asks about your stateand federal unemployment payments. Your answers determine whether you can useForm 940EZ.
Below that section are a series of questions aimed at determining whether any ofyour payroll expenses covered exempt payment types. Exempt payments are wagesyou paid that are exempt from FUTA taxes. QuickBooks checks your payroll items totrack several categories of exempt payments, and if you’ve used these payroll itemsQuickBooks fills in the amounts. If you had any exempt payments that are not in thepayroll items that QuickBooks automatically checks, select them from the drop-downlists, and fill in the amount. The drop-down list is long and can be complicated.Check the IRS rules for preparing Form 940, or check with your accountant.
Click Next to see the form itself. Fill out any fields that aren’t automaticallyprefilled by QuickBooks from your payroll records. Continue to click Next andfollow the instructions that appear on the screen.
236 P A R T T W O B O O K K E E P I N G
QckBcks TIGHT / QuickBooks 2009 The Official Guide / Ivens / 274-8 / Chapter 9
P:\010Comp\QckBcks\274-8\ch09.vpFriday, September 12, 2008 9:38:23 AM
Color profile: DisabledComposite Default screen

Preparing the 944 FormIf you were notified by the IRS that you should file Form 944 instead of Form 941,follow the instructions in the previous sections to open the federal form list andselect Form 944. You can remit your liabilities when you send the form, or, if youwish, you can make deposits against your 944 liability by using the deposit coupon(8109), filling in the circle for Form 944, and taking the check to the bank.
You cannot use Form 944, even if you qualify financially, unless you’ve beennotified by the IRS that you are a Form 944 filer. This form is shorter than Form941, has no additional schedules, and has an annual filing frequency, all of whichcombine to make this a desirable filing method. If you think you qualify financially,but you didn’t receive a notification to use Form 944, you can contact the IRS torequest a notification at 800-829-0115.
C A U T I O N : If the IRS notified you to file Form 944, use it even if yourpayroll liabilities exceed the Form 944 threshold. The IRS will notice and willswitch you back to Form 941/943. You cannot make the decision on your own.
Printing W-2 FormsYou must print W-2 forms for your employees, the government agencies, and yourown files. You start by selecting the form and the employees, and then move to theprocess of creating and printing the forms.
Follow these steps to produce W-2 forms:
� Choose Employees | Payroll Tax Forms & W-2s | Process Payroll Forms to openthe Select Form Type dialog.
� Select Federal Form and click OK (if you subscribe to an Enhanced Payrollservice, state forms are also listed).
� In the next dialog, make sure the filing period year is correct, select AnnualForm W-2/W-3, and then click OK.
Ill 9-2
C H A P T E R 9 P A Y R O L L R E P O R T S A N D R E M I T T A N C E S 237
QckBcks TIGHT / QuickBooks 2009 The Official Guide / Ivens / 274-8 / Chapter 9
P:\010Comp\QckBcks\274-8\ch09.vpFriday, September 12, 2008 9:38:23 AM
Color profile: DisabledComposite Default screen

The Select Employees For Form W-2/W-3 window opens, listing all youremployees (see Figure 9-5). By default all employees are selected, and the currentstatus of the W-2 printing process is noted.
Click Review/Edit to display the Payroll Tax Form window, which explains thesteps you’ll go through as you step through the wizard (see Figure 9-6). Click Nextto move through the wizard.
Each employee’s W-2 form is presented on the screen. If there is nonfinancialdata missing (such as an address or ZIP code), you must fill it in. If prefilledinformation is incorrect, right-click the appropriate field and select Override. Enterthe correct information, and press TAB to put that information into the field.
N O T E : Changes you make to nonfinancial information are not written backto the employee record. You must make the same changes there.
Because the financial information is prefilled from your payroll records, thereshould be no reason to make changes to those fields.
Click Check For Errors to see if anything is amiss on any employee’s form. Iferrors appear in the Error Box at the top of the form, click the error’s listing andQuickBooks automatically takes you to the appropriate field to correct theinformation.
238 P A R T T W O B O O K K E E P I N G
QckBcks TIGHT / QuickBooks 2009 The Official Guide / Ivens / 274-8 / Chapter 9
FIGURE 9-5 When you begin, none of the W-2s have been reviewed or printed.
P:\010Comp\QckBcks\274-8\ch09.vpFriday, September 12, 2008 9:38:23 AM
Color profile: DisabledComposite Default screen

When everything is correct, load your W-2 forms in the printer and click SubmitForm to open the Print Form dialog. The Print W-2s window opens so you canchoose a printer and print the forms. Click OK and click Print.
You must also print the W-3 form, which is a summary of your W-2 forms. Itmust be in the package you send to the IRS when you transmit the W-2 forms.
N O T E : The IRS requires e-filing of W-2/W-3 forms if you have 250 or moreemployees, which is not common in small businesses. However, some states arenow requiring e-filing for a much smaller number of employees. Check with yourstate’s revenue department to determine the number of employees that kicks offthe e-filing requirement.
C H A P T E R 9 P A Y R O L L R E P O R T S A N D R E M I T T A N C E S 239
QckBcks TIGHT / QuickBooks 2009 The Official Guide / Ivens / 274-8 / Chapter 9
FIGURE 9-6 The wizard takes you through an interview to produce your W-2/W-3 forms.
P:\010Comp\QckBcks\274-8\ch09.vpFriday, September 12, 2008 9:38:24 AM
Color profile: DisabledComposite Default screen

All these payroll reports are time consuming, but you have no choice: these tasksare legally necessary. At least it’s easier because QuickBooks keeps the records anddoes the math.
Tax Form Worksheets in ExcelIf QuickBooks isn’t preparing your payroll forms (either because you’re doingpayroll manually or you subscribed to the QuickBooks Basic Payroll service), youcan prepare your forms manually with the use of Excel worksheets that areavailable from QuickBooks.
To access the worksheets, choose Reports | Employees & Payroll | Tax FormWorksheets In Excel. Because this Excel file has macros (programming code toaccomplish the required tasks), you might have to tell Excel to let the macros run(depending on how you’ve configured Excel’s security options):
• In Excel 2003 and earlier, if you see a dialog warning you that the file containsmacros, click Enable Macros to open the file with macros enabled. Dependingon your version of Excel, you may have to choose Always Trust Macros FromThis Source before the Enable Macros button becomes available.
• In Excel 2007, the file opens without a warning dialog. However, if you haven’tchanged the default Excel setting which disables all macros, a Security Warningmessage bar appears under the toolbar to tell you that macros have beendisabled. Click Options and enable macros for this worksheet.
When the QuickBooks Tax Worksheets dialog appears, select the form and daterange you need.
Ill 9-3
240 P A R T T W O B O O K K E E P I N G
QckBcks TIGHT / QuickBooks 2009 The Official Guide / Ivens / 274-8 / Chapter 9
P:\010Comp\QckBcks\274-8\ch09.vpFriday, September 12, 2008 9:38:24 AM
Color profile: DisabledComposite Default screen

Setting Report OptionsClick Options/Settings on the QuickBooks Tax Worksheets dialog to configure thereport using the guidelines discussed in the following sections.
Ill 9-4
Configuring Worksheet HeadersBy default, the option to update headers is selected. This means that the header of aprintout of the worksheet contains the company name and address information, aswell as the date range of the report (the date range you selected in the previousdialog). If you are planning to print the report, it’s important to know the daterange, so make sure this option is selected.
Configuring the Level of DetailBy default, the option Hide Detailed Data Returned From QuickBooks is selected,which means that the workbook displays only the information connected to thereport you selected. For example, Figure 9-7 displays a workbook with a singleworksheet (the 941 report).
If you deselect the option to hide the detail, you must choose the detail level youwant to see, as explained next.
Return Full Transaction Detail from QuickBooks—For TroubleshootingIf you select this option, QuickBooks adds a second worksheet named Data tothe workbook. This worksheet contains all detailed information about the employees(every field on the employee record), the payroll items, and the job costing links(if you use timesheets to do job costing for payroll, which is discussed inChapter 19).
This is an enormous amount of information and should be used only if you needto troubleshoot the numbers you saw when you produced a report without detaileddata. In fact, most of the information is available through other QuickBooks
C H A P T E R 9 P A Y R O L L R E P O R T S A N D R E M I T T A N C E S 241
QckBcks TIGHT / QuickBooks 2009 The Official Guide / Ivens / 274-8 / Chapter 9
P:\010Comp\QckBcks\274-8\ch09.vpFriday, September 12, 2008 9:38:24 AM
Color profile: DisabledComposite Default screen

reports, such as the detail reports available in the Employees & Payroll section ofthe Reports menu. Details on the employee records are available by customizing theEmployee Contact List report available in the List section of the Reports menu (addadditional columns to the report to display detailed information).
Minimize Detail from QuickBooks—For Speedin Excel and Large QuickBooks FilesIf you select this option, QuickBooks adds a second worksheet named Data to theworkbook. This worksheet contains detailed information about the paychecksinvolved in the date range you selected.
The detail data includes the details of payroll items and the amount of eachpayroll item in each individual paycheck.
242 P A R T T W O B O O K K E E P I N G
QckBcks TIGHT / QuickBooks 2009 The Official Guide / Ivens / 274-8 / Chapter 9
FIGURE 9-7 Hide detailed data to produce only the report.
P:\010Comp\QckBcks\274-8\ch09.vpFriday, September 12, 2008 9:38:24 AM
Color profile: DisabledComposite Default screen

Chapter
Chapter
1010Setting Up Inventory
In this chapter:
• Set up inventory options
• Create inventory items
• Create assemblies
• Deal with physical inventory counts
• Adjust inventory numbers
243
QckBcks TIGHT / QuickBooks 2009 The Official Guide / Ivens / 274-8 / Chapter 10
P:\010Comp\QckBcks\274-8\ch10.vpFriday, September 12, 2008 9:38:46 AM
Color profile: DisabledComposite Default screen
Tracking inventory can be complicated and time consuming. You can make dealingwith inventory issues easier by setting up the QuickBooks inventory featurecarefully, and using the appropriate functions to track purchases and sales.
What Is an Inventory Item?An inventory item is a product you manufacture, assemble, or purchase for thepurpose of selling it to a customer.
Items that you store to use in the normal course of business that are resold tocustomers as part of other services being involved are not inventory. This meansthat if you’re a plumber and you store valves, pipes, and other plumbing parts touse when you perform a job, you don’t track those parts as inventory. If you’re aconsultant who uses consumables or supplies in the course of your consultingwork, and you keep those products on hand to sell to customers, don’t track thosesupplies as inventory.
The hallmark of an item that is configured as an inventory part is that it is madeor purchased solely for the purpose of resale; the trade your business engages in isthe sale of products. Usually, the only types of businesses that track inventory aremanufacturers (who may use inventory parts to create other inventory parts),wholesale distributors, and retailers.
Setting Up QuickBooks for InventoryTrackingTo track inventory, you must enable the inventory function in QuickBooks (whichyou might have done during the EasyStep Interview when you set up yourcompany file). In addition, QuickBooks adds accounts to your chart of accountsthat are earmarked for tracking inventory.
Enabling Inventory TrackingTo enable inventory tracking, choose Edit | Preferences and select the Items &Inventory category in the left pane. Move to the Company Preferences tab (seeFigure 10-1) to see the inventory options.
When you turn on the inventory feature, you also turn on the purchase orderfeature (although you don’t have to use purchase orders to use the inventoryfeature). You can also opt to be warned if you use a PO number that’s alreadyin use.
Configuring Inventory AvailabilityYou can configure the way QuickBooks counts available inventory, and the way thatavailable number is used when you’re creating sales transactions.
244 P A R T T W O B O O K K E E P I N G
QckBcks TIGHT / QuickBooks 2009 The Official Guide / Ivens / 274-8 / Chapter 10
P:\010Comp\QckBcks\274-8\ch10.vpFriday, September 12, 2008 9:38:46 AM
Color profile: DisabledComposite Default screen

The option labeled When Calculating Quantity Available tells QuickBooks whatto take into consideration before warning you about insufficient quantities whenyou create a sales transaction (if you select a warning option). The available optionsvary depending on the QuickBooks edition you’re using. The options displayed inFigure 10-1 appear in the following editions:
• Accounting• Manufacturing & Wholesale• Retail
All other editions lack the option labeled Quantity Reserved For Pending Builds.You can enable warning messages about insufficient quantity, and also choose the
scenario that kicks off a warning. If you select the option to be warned when thequantity on hand is insufficient, QuickBooks counts the number of items in stock.If you select the option to be warned when the quantity available is insufficient,QuickBooks uses the guidelines you set for calculations to determine the quantityavailable for sale.
Configuring Unit of MeasureThe Unit of Measure feature lets you set up a system of buying goods in onemanner and selling them in a different manner. For example, you may buy soda bythe case and sell it by the bottle. In this case, you’d set the U/M to bottle. If you sell
C H A P T E R 1 0 S E T T I N G U P I N V E N T O R Y 245
QckBcks TIGHT / QuickBooks 2009 The Official Guide / Ivens / 274-8 / Chapter 10
FIGURE 10-1 Enable inventory and set the protocols to use for inventory tracking.
P:\010Comp\QckBcks\274-8\ch10.vpFriday, September 12, 2008 9:38:46 AM
Color profile: DisabledComposite Default screen

the soda by the six-pack, then the six-pack is your U/M. If you sell the soda bothways, you need to set up two U/Ms for your soda (called Multiple U/Ms). In fact,you could use Multiple U/M settings to add a half-case unit of sale. You can also usea U/M for the services you sell if you want to provide services in units of minimumnumbers of hours or in days.
Here are the basic guidelines for using the Unit of Measure feature:
• Don’t use U/M for products that are bought and sold in identical units.• Don’t use U/M for services you sell by the hour—instead, set the hourly rate for
the service item and use the Qty column in sales transactions.
Enabling Unit of MeasureTo enable U/Ms, choose Edit | Preferences and select the Items & Inventorycategory in the left pane. Move to the Company Preferences tab and click theEnable button. In the Unit Of Measure dialog (see Figure 10-2), select the U/Mmethod you want to use.
For your edition, the Multiple U/M option may be grayed out and inaccessible.Not all editions of QuickBooks provide multiple U/Ms, and Table 10-1 displays thetype of U/M supported by each edition.
Click Finish to return to the Preferences dialog, and then click OK. QuickBooksadds the U/M field to all the following item types so you can begin establishing U/Ms:
• Inventory Part• Inventory Assembly
246 P A R T T W O B O O K K E E P I N G
QckBcks TIGHT / QuickBooks 2009 The Official Guide / Ivens / 274-8 / Chapter 10
FIGURE 10-2 Choose the U/M you need for the products and services you sell.
P:\010Comp\QckBcks\274-8\ch10.vpFriday, September 12, 2008 9:38:47 AM
Color profile: DisabledComposite Default screen

• Non-inventory Part• Service
Creating Units of Measure
N O T E : Multiple U/Ms work by creating a base U/M and then creatingmultiple conversions of that base U/M for sales of different quantities.
To create one or more U/Ms, open the Items List and double-click the item forwhich you want to create a U/M. It doesn’t matter which item you select to create aU/M (this works similarly to setting up custom fields; the entries you create can beused for all items). You need to create enough U/Ms to cover all the scenarios foritems you want to sell by U/M.
In the U/M field, select <Add New> from the drop-down list to open the Unit ofMeasure Wizard, and follow the prompts in the wizard to set up the U/M. Thechoice you make depends on the way you usually buy, store, and sell the item. Forexample, a product might be purchased by the case and each case contains 48individual units. If most customers buy some number of widgets, and the numberof units per sale varies greatly, create a base U/M of “each.” However, if theseproducts come in a case of 48 that is packed with four cartons of 12, you mightoffer the product for sale in the quantity of a dozen.
For service items, it’s common to create U/Ms based on time, because services areusually sold by the hour or by the day. Some professionals have a minimum 10-minute or 12-minute time block, so you should create a U/M for that minimum unit.
The unit of measure you create becomes available for every item that can be soldvia a U/M. It’s probable that not all items are able to use this U/M, so you must repeatthis process to create additional U/Ms until you’ve designed sufficient variations to
C H A P T E R 1 0 S E T T I N G U P I N V E N T O R Y 247
QckBcks TIGHT / QuickBooks 2009 The Official Guide / Ivens / 274-8 / Chapter 10
E d i t i o n U / M S u p p o r t e d
Premier (not industry specific) Single U/M only
Professional Services Single U/M only
Nonprofit Single U/M only
Accountant Both Multiple and Single U/M
Contractor Both Multiple and Single U/M
Manufacturing & Wholesale Both Multiple and Single U/M
Retail No U/M available
TABLE 10-1 Support for Unit of Measure for Premier/Enterprise Editions
P:\010Comp\QckBcks\274-8\ch10.vpFriday, September 12, 2008 9:38:47 AM
Color profile: DisabledComposite Default screen

cover all the items and item types you want to sell by U/M. If you create U/Ms that arefairly generic, you probably only have to create a handful of U/Ms.
Assigning a U/M to ItemsAfter you’ve created the U/Ms you need, you can assign a U/M to every item thatyou want to sell by U/M.
C A U T I O N : For a Single U/M, each item can only be linked to one U/M. Ifyou want to be able to sell an item from a choice of U/Ms, you must use theMultiple U/M feature, if it’s available in your edition of QuickBooks.
Open each item and select the appropriate U/M from the drop-down list. If youfind an item for which you haven’t created an appropriate U/M, select <Add New>and create the U/M you need.
Selling an Item with a U/MWhen you select an item that has been assigned a single U/M in a sales transaction,the U/M automatically appears on the line in which you’ve selected the item. Youcan’t switch between it and any other U/M. For multiple U/Ms, you can selectanother U/M measurement when you’re selling the item.
Creating Inventory ItemsTo create an inventory item, open the Items List (choose Lists | Item List from themenu bar). Then press CTRL-N to open the New Item dialog and select InventoryPart from the drop-down list as the item type.
Fill in the information using the guidelines that follow (Figure 10-3 is anexample of an inventory item record):
• The Item Name/Number is your code for the item. This field must be unique inyour Items List.
• The Manufacturer’s Part Number (useful if you’re a distributor or retailer) letsyou include the part number on your purchase orders. If you purchase from adistributor instead of a manufacturer, enter the distributor’s part number. Thismakes creating an accurate purchase order much easier.
• The text you enter in the Description On Purchase Transactions fieldautomatically appears when you create a purchase order. The text you enter inthe Description On Sales Transactions field automatically appears in salestransaction forms, such as invoices, estimates, and sales receipts.
• You can enter a cost, but it’s really a convenience for creating purchase orders(the cost appears automatically in the PO, which is useful if the cost doesn’tchange often). QuickBooks does not use this figure for posting cost of goodssold; instead it uses the average cost of this item based on your item receipt andinventory adjustment transactions (all covered later in this chapter).
248 P A R T T W O B O O K K E E P I N G
QckBcks TIGHT / QuickBooks 2009 The Official Guide / Ivens / 274-8 / Chapter 10
P:\010Comp\QckBcks\274-8\ch10.vpFriday, September 12, 2008 9:38:47 AM
Color profile: DisabledComposite Default screen

• If you enter a sales price, that amount is automatically entered when you createsales transactions (and you can change the price on an individual salestransaction).
• Choose the tax code for this item, which indicates whether the item is taxableto customers.
• Select the appropriate posting accounts for Cost of Goods and Income.• Enter a number in the Reorder Point field that reflects the minimum quantity you
want to have in stock. When this quantity is reached, QuickBooks will issue areminder about reordering if you’ve enabled the Reminders feature. To turn onthe Reminders feature, choose Edit | Preferences and click the Reminderscategory. On the My Preferences tab, check Show Reminders List When OpeningA Company File check box. On the Company Preferences tab, choose eitherShow Summary or Show List For The Inventory To Reorder option.
• Don’t enter anything in the On Hand or Total Value fields, because the data won’tprovide the accurate financial trail your accountant needs. Instead, let QuickBookstrack these values as you receive items into inventory and/or use the inventoryadjustment feature. (Inventory adjustments are covered later in this chapter.)
Chapter 6 has information about receiving items into inventory from yourvendors so that your costs of goods sold numbers are accurate.
C H A P T E R 1 0 S E T T I N G U P I N V E N T O R Y 249
QckBcks TIGHT / QuickBooks 2009 The Official Guide / Ivens / 274-8 / Chapter 10
FIGURE 10-3 An inventory item record contains all the information you need to use it intransactions.
P:\010Comp\QckBcks\274-8\ch10.vpFriday, September 12, 2008 9:38:47 AM
Color profile: DisabledComposite Default screen
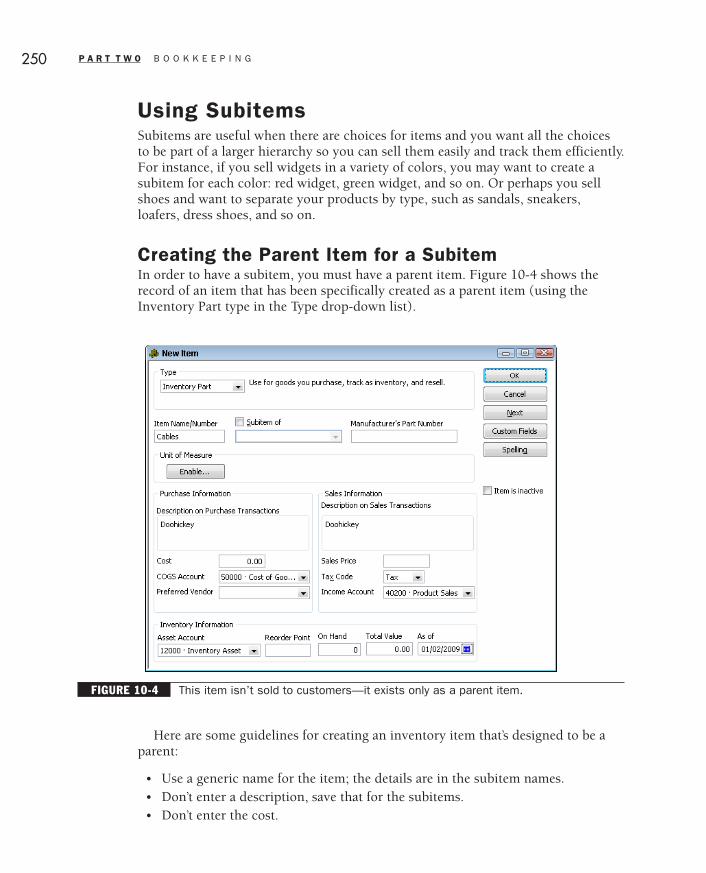
Using SubitemsSubitems are useful when there are choices for items and you want all the choicesto be part of a larger hierarchy so you can sell them easily and track them efficiently.For instance, if you sell widgets in a variety of colors, you may want to create asubitem for each color: red widget, green widget, and so on. Or perhaps you sellshoes and want to separate your products by type, such as sandals, sneakers,loafers, dress shoes, and so on.
Creating the Parent Item for a SubitemIn order to have a subitem, you must have a parent item. Figure 10-4 shows therecord of an item that has been specifically created as a parent item (using theInventory Part type in the Type drop-down list).
Here are some guidelines for creating an inventory item that’s designed to be aparent:
• Use a generic name for the item; the details are in the subitem names.• Don’t enter a description, save that for the subitems.• Don’t enter the cost.
250 P A R T T W O B O O K K E E P I N G
QckBcks TIGHT / QuickBooks 2009 The Official Guide / Ivens / 274-8 / Chapter 10
FIGURE 10-4 This item isn’t sold to customers—it exists only as a parent item.
P:\010Comp\QckBcks\274-8\ch10.vpFriday, September 12, 2008 9:38:47 AM
Color profile: DisabledComposite Default screen

• Don’t enter the price.• Don’t enter a reorder point.• Don’t enter the quantity on hand.• Enter the Inventory Asset, COG, and Income accounts because they are
required fields for all inventory items.
Creating SubitemsHaving created the parent item, subitems are easy to create. Open a blank New Itemwindow (press CTRL-N).
Follow these steps to create a subitem:
� In the Item Name/Number field, enter the code for this item. It can be a color, asize, a manufacturer name, or any other code that makes this subitem uniquewhen compared to other subitems under the same parent item.
� Check the box named Subitem Of, and then select the parent item from thedrop-down list that appears when you click the arrow to the right of the field.
� Enter the Manufacturer’s Part Number (for creating purchase orders).� Optionally, enter any descriptions you want to appear on purchase orders and
sales transactions.� Optionally, enter the cost and price.� Enter the general ledger account information (Inventory Asset, Cost of Goods,
and Income accounts).� Enter the reorder point if you’re using that feature. Click Next to enter another inventory item, or click OK if you’re finished.
Inventory AssembliesAssemblies are products you create using existing items (usually inventory items).Creating an assembly item that you can sell involves two tasks: creating theassembly item and building the assembly item.
Create the Assembly Item This means putting together the components that gointo the assembly (the component list is called the Bill of Materials and is usuallyabbreviated BOM). This action is performed in the New Item dialog. Creating anassembly item doesn’t make it available for sale; it’s just the design phase. What youhave is a BOM, not an item.
Build the Assembly Item This means taking the components out of inventoryand putting them into the assembly item. This action is performed in the BuildAssemblies dialog.
After an assembly item has been created and built, you can sell it. Details aboutall these steps are in the following sections.
C H A P T E R 1 0 S E T T I N G U P I N V E N T O R Y 251
QckBcks TIGHT / QuickBooks 2009 The Official Guide / Ivens / 274-8 / Chapter 10
P:\010Comp\QckBcks\274-8\ch10.vpFriday, September 12, 2008 9:38:48 AM
Color profile: DisabledComposite Default screen

Creating an Assembly ItemTo create an assembly, choose Lists | Item List to open the Item List window, andthen press CTRL-N to open the New Item dialog. Select Inventory Assembly as thetype of item, and the New Item dialog displays all the fields you need to create anassembly (see Figure 10-5).
The assembly must have a Cost of Goods Sold account, an Inventory Assetaccount, an Income account, and a tax code (if you’ve enabled the sales taxfeature). QuickBooks autofills the COGS and Inventory Asset account.
The Cost field in the middle of the dialog is optional. You can use it to create a costfor the assembly and use that amount to determine the price. The data you enter inthis field does not affect the postings to your COG account, which continues to postthe real cost (the total cost of the items in the Bill of Materials List).
Fill in the Sales Price field if you always charge the same amount for thisassembly item; or you can enter a price when you sell the item.
252 P A R T T W O B O O K K E E P I N G
QckBcks TIGHT / QuickBooks 2009 The Official Guide / Ivens / 274-8 / Chapter 10
FIGURE 10-5 The New Item dialog holds all the information you need for assemblies.
P:\010Comp\QckBcks\274-8\ch10.vpFriday, September 12, 2008 9:38:48 AM
Color profile: DisabledComposite Default screen

N O T E : The dialog has a field for entering a vendor from whom you purchasethis assembly, which you probably won’t use. If you subcontract the work to avendor, you purchase the completed item the way you’d purchase any other item.That makes this an item, not an assembly.
In the Bill Of Materials section, select the component items that this assemblycontains and enter the quantity for each component.
Using Non-Inventory Items in an AssemblyBy default, QuickBooks won’t let you add any item that isn’t an inventory part tothe Bill of Materials for an assembly. That’s because the items in the Bill of Materialseach carry a cost, and the total cost becomes the posting to Cost of Goods whenyou sell the assembly.
You can edit the records of non-inventory items that you want to add to theassembly so that those items have a cost attached (or create new non-inventory itemsspecifically for this purpose). To create or edit a non-inventory item so it can be usedin an assembly, select the option with a label that begins “This item is used inassemblies...” (the remainder of the label text changes depending on the item type).
When you select that option, the item’s record changes to include informationabout cost (see Figure 10-6).
C H A P T E R 1 0 S E T T I N G U P I N V E N T O R Y 253
QckBcks TIGHT / QuickBooks 2009 The Official Guide / Ivens / 274-8 / Chapter 10
FIGURE 10-6 Configure a non-inventory item so it can be used in an assembly.
P:\010Comp\QckBcks\274-8\ch10.vpFriday, September 12, 2008 9:38:48 AM
Color profile: DisabledComposite Default screen

N O T E : When you use a non-inventory item in a build, QuickBooks treats theitem as if it were an inventory item. The cost is included when the build is postedto the inventory asset account and is applied to COGS when you sell theassembly.
The following item types can be used in assemblies if they’re properlyconfigured:
• Service Useful for adding the cost of labor. Create a service item that’ssuitable for this if your Items List doesn’t already contain one.
• Non-inventory part Useful for adding the cost of parts that you don’t track asinventory items. This could include boxes, tape, consumable goods (such asnails, screws, etc.), or other things involved in putting an assembly together.
• Other Charge Another item type that’s useful for adding the cost of almostanything, and you can choose this type instead of non-inventory part.
Building an AssemblyAfter your assembly item is in your Items List, you can build it. During this process,the component inventory items are removed from inventory, and the finishedassembly item is received into inventory.
Choose Vendors | Inventory Activities | Build Assemblies to open the BuildAssemblies dialog, and then select the assembly item. QuickBooks automaticallyfills in the components required for the assembly item, along with the Quantity onHand (QOH) for each inventory component (see Figure 10-7).
C A U T I O N : Non-inventory components aren’t tracked for QOH, so ifthey’re not service items, you must make sure you have sufficient supplies.
The Qty Needed column remains at zero for each component until you indicatethe number of builds you’re creating. The dialog displays the maximum number ofbuilds you can create with the current QOH of inventory parts.
N O T E : You can build more than the maximum number you have componentparts for, but builds that are missing parts are recorded as pending builds (seethe section “Managing Pending Builds”).
Enter the quantity to build, and press TAB. The data in the Qty Needed column isincreased to match the number of builds you indicated.
Click Build & New if you want to build another assembly, or click Build & Closeif you’re finished. The Qty On Hand column is decremented for the components,the assembly is moved into inventory, and you can sell it.
254 P A R T T W O B O O K K E E P I N G
QckBcks TIGHT / QuickBooks 2009 The Official Guide / Ivens / 274-8 / Chapter 10
P:\010Comp\QckBcks\274-8\ch10.vpFriday, September 12, 2008 9:38:48 AM
Color profile: DisabledComposite Default screen

Managing Pending BuildsIf you don’t have enough of the components to build the number of assemblies youneed, you can continue with the build process, but the build is marked Pending.You finalize pending builds when all the components are available.
Creating a Pending BuildWhen you specify a number of builds that exceeds the available quantity ofcomponents, QuickBooks displays a dialog to warn you that you don’t have enoughcomponents (see Figure 10-8).
• Click Cancel to return to the Build Assemblies window, and reduce the numberof builds to match your available components.
• Click Make Pending if you want to leave the number of builds as is. The buildis marked pending, and you can finalize the build when the missingcomponents arrive.
The entire build is marked pending. No assemblies are brought into inventory,and no components are decremented from inventory (even if sufficient quantities ofsome of the components exist to complete a fewer number of builds). You can thinkof this as “backordering from yourself.”
C H A P T E R 1 0 S E T T I N G U P I N V E N T O R Y 255
QckBcks TIGHT / QuickBooks 2009 The Official Guide / Ivens / 274-8 / Chapter 10
FIGURE 10-7 QuickBooks automatically provides QOH data for the assembly and for theinventory component parts.
P:\010Comp\QckBcks\274-8\ch10.vpFriday, September 12, 2008 9:38:49 AM
Color profile: DisabledComposite Default screen
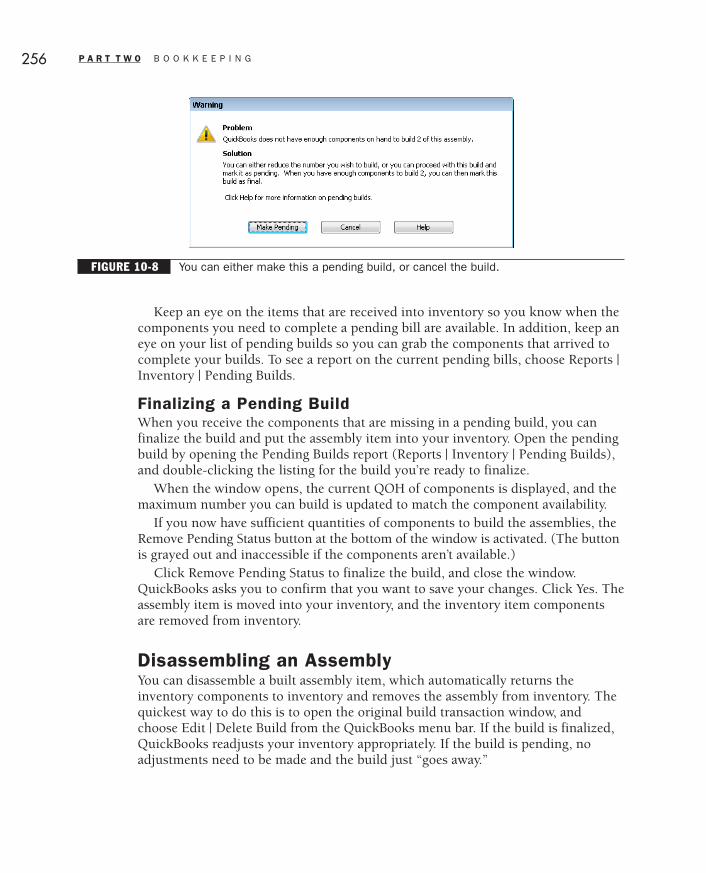
Keep an eye on the items that are received into inventory so you know when thecomponents you need to complete a pending bill are available. In addition, keep aneye on your list of pending builds so you can grab the components that arrived tocomplete your builds. To see a report on the current pending bills, choose Reports |Inventory | Pending Builds.
Finalizing a Pending BuildWhen you receive the components that are missing in a pending build, you canfinalize the build and put the assembly item into your inventory. Open the pendingbuild by opening the Pending Builds report (Reports | Inventory | Pending Builds),and double-clicking the listing for the build you’re ready to finalize.
When the window opens, the current QOH of components is displayed, and themaximum number you can build is updated to match the component availability.
If you now have sufficient quantities of components to build the assemblies, theRemove Pending Status button at the bottom of the window is activated. (The buttonis grayed out and inaccessible if the components aren’t available.)
Click Remove Pending Status to finalize the build, and close the window.QuickBooks asks you to confirm that you want to save your changes. Click Yes. Theassembly item is moved into your inventory, and the inventory item componentsare removed from inventory.
Disassembling an AssemblyYou can disassemble a built assembly item, which automatically returns theinventory components to inventory and removes the assembly from inventory. Thequickest way to do this is to open the original build transaction window, andchoose Edit | Delete Build from the QuickBooks menu bar. If the build is finalized,QuickBooks readjusts your inventory appropriately. If the build is pending, noadjustments need to be made and the build just “goes away.”
256 P A R T T W O B O O K K E E P I N G
QckBcks TIGHT / QuickBooks 2009 The Official Guide / Ivens / 274-8 / Chapter 10
FIGURE 10-8 You can either make this a pending build, or cancel the build.
P:\010Comp\QckBcks\274-8\ch10.vpFriday, September 12, 2008 9:38:49 AM
Color profile: DisabledComposite Default screen

Running Inventory ReportsYou’ll probably find that you run reports on your inventory status quite often. Formany inventory-based businesses, tracking the state of the inventory is the secondmost important set of reports (right behind reports about the current accountsreceivable balances).
QuickBooks provides several useful, significant inventory reports, which you canaccess by choosing Reports | Inventory. The available reports are discussed in thissection.
N O T E : Very few customization options are available for inventory reports—you can change the date range and the headers/footers, and some reports letyou filter some of the items. You can’t add or remove columns.
Inventory Valuation Summary ReportThis report gives you a quick assessment of the value of your inventory. By default,the date range is the current month to date, but you can change that to suit yourneeds. Each item is listed with the following information displayed in columns:
Item Description The description of the item, if you entered a description forpurchase transactions.
On Hand The current quantity on hand, which is the net number of receiveditems and sold items. Because QuickBooks permits you to sell items you don’t havein stock (usually, you really do have them but you haven’t used a QuickBookstransaction to bring them into stock), it’s possible to have a negative number in thiscolumn.
U/M U/M information (if it exists).
Avg Cost QuickBooks uses the totals from each transaction for receipt ofinventory to calculate this figure.
Asset Value The value posted to your Inventory account in the general ledger.The value is calculated by multiplying the number on hand by the average cost.
% of Tot Asset The percentage of your total inventory assets that this itemrepresents.
Sales Price The price you’ve set for this item. This figure is obtained by looking atthe item’s configuration window. If you entered a price when you set up the item, thatprice is displayed. If you didn’t enter a price (because you chose to determine theprice at the time of sale), $0.00 displays. QuickBooks does not check the sales recordsfor this item to determine this number, so if you routinely change the price whenyou’re filling out a customer invoice, those changes aren’t reflected in this report.
C H A P T E R 1 0 S E T T I N G U P I N V E N T O R Y 257
QckBcks TIGHT / QuickBooks 2009 The Official Guide / Ivens / 274-8 / Chapter 10
P:\010Comp\QckBcks\274-8\ch10.vpFriday, September 12, 2008 9:38:49 AM
Color profile: DisabledComposite Default screen

Retail Value The current retail value of the item, which is calculated bymultiplying the number on hand by the retail price (if the retail price is set).
% of Tot Retail The percentage of the total retail value of your inventory that thisitem represents.
Inventory Valuation Detail ReportThis report lists each transaction that involved each inventory item. The reportshows no financial information about the price charged to customers, because yourinventory value is based on cost. You can double-click any sales transaction line tosee the details of that transaction (including the amount you charged for the item).
Inventory Stock StatusThere are two Stock Status reports: Inventory Stock Status By Item and InventoryStock Status By Vendor. The information is the same in both reports, but the orderin which information is arranged and subtotaled is different. You can use theseStock Status reports to get quick numbers about inventory items, including thefollowing information:
• The preferred vendor• The reorder point• The number currently on hand• A reminder (a check mark) for ordering items that are below the reorder point• The number currently on order (a purchase order exists but the order has not
yet been received)• The next delivery date (according to the data in the purchase orders)• The average number of units sold per week
Physical Inventory WorksheetThis is the report you print when it’s time to take an inventory count. See thesection “Counting Inventory,” later in this chapter, for more information.
Inventory QuickReportsQuickBooks provides a reporting feature called QuickReports that provides salesand purchase information about an individual inventory item. QuickReports areavailable from the Item List window.
In the Item List window, select an item and press CTRL-Q to open a QuickReportthat shows you the bills (purchases) and sales transactions. You can change the daterange for the report, and you can double-click any transaction line to drill down tothe transaction details.
258 P A R T T W O B O O K K E E P I N G
QckBcks TIGHT / QuickBooks 2009 The Official Guide / Ivens / 274-8 / Chapter 10
P:\010Comp\QckBcks\274-8\ch10.vpFriday, September 12, 2008 9:38:49 AM
Color profile: DisabledComposite Default screen

Counting InventoryNo matter how careful you are with QuickBooks transactions, no matter howpristine your protocols are for making sure everything that comes and goes isaccounted for, it’s not uncommon to find that your physical inventory does notmatch your QuickBooks figures.
To make sure your inventory records are correct, you must periodically countyour inventory. Once a year is mandatory, but if you have a high volume ofinventory activity, counting inventory quarterly is a good idea.
Printing the Physical Inventory WorksheetThe first thing you must do is print a Physical Inventory Worksheet (see Figure 10-9),which is one of the choices on the Inventory reports submenu. This report lists yourinventory items and subitems in alphabetical order, along with the current quantity onhand, which is calculated from your QuickBooks transactions. In addition, there’s acolumn that’s set up to record the actual count as you walk around your warehousewith this printout (and a pen) in hand.
C H A P T E R 1 0 S E T T I N G U P I N V E N T O R Y 259
QckBcks TIGHT / QuickBooks 2009 The Official Guide / Ivens / 274-8 / Chapter 10
FIGURE 10-9 The most important column is the one with blank lines, which is where you enterthe physical count.
P:\010Comp\QckBcks\274-8\ch10.vpFriday, September 12, 2008 9:38:49 AM
Color profile: DisabledComposite Default screen

C A U T I O N : The Physical Inventory Worksheet displays only the inventoryitems that are active. If you made any items inactive and you think (or know)there are units in stock, make the items active before creating this report.
If you have a large number of inventory items, you may have some problemswith this worksheet:
• You cannot change the way the worksheet is sorted, so you cannot arrange theitems to match the way you’ve laid out your warehouse.
• If you use bins, rows, or some other physical entity in your warehouse,QuickBooks has no feature to support it, so you cannot enter or sort on thelocation on this worksheet.
• The Pref Vendor column, which usually isn’t needed (or even useful) for aphysical count can’t be removed. However, if you drag the diamond to the rightof the column all the way to the left, you can close the column so it won’t print.
Click the Print button in the worksheet window to bring up the Print Reportswindow. In the Number Of Copies box, enter as many copies as you need.
T I P : If the report fills multiple pages, you don’t have to give every personwho is counting a full report—cut the report apart to give each person the pageshe or she needs, and keep one full copy to use as a master.
Planning the Physical CountQuickBooks lacks an automatic “freeze” feature like the one found in manyinventory-enabled accounting software applications. Freezing the inventory meansthat after you’ve printed the worksheet and begun counting, any transactionsinvolving inventory are saved to a holding file in order to avoid changing the totals.When you’ve finished your physical count, you unfreeze the inventory count andprint a report on the holding file. You make your adjustments to the count usingthe information in that file, and then you can fill your orders.
In QuickBooks, you can perform these actions manually. After you print theworksheet (which you don’t do until you’re ready to start counting), be sure that allsales transactions will be handled differently until after the inventory count isadjusted. There are a number of ways to do this:
• Print an extra copy of each invoice and save the copies in a folder. Don’t pickand pack the inventory for the invoices until after the count.
• Prepare a form for salespeople to fill out the name and quantity of inventoryitems sold during the freeze, and delay picking and packing the inventory untilafter the count.
260 P A R T T W O B O O K K E E P I N G
QckBcks TIGHT / QuickBooks 2009 The Official Guide / Ivens / 274-8 / Chapter 10
P:\010Comp\QckBcks\274-8\ch10.vpFriday, September 12, 2008 9:38:50 AM
Color profile: DisabledComposite Default screen

• Delay entering invoices until after the count is over. (This is not a good idea ifcounting takes a couple of days.)
• Don’t receive inventory in QuickBooks (don’t fill out a Receive Items or EnterBill for Received Items form) until after the count.
• If inventory arrives in the warehouse during the count, don’t unpack the boxesuntil after the count.
When you start counting the inventory, be sure there’s a good system in place.The most important element of the system is having somebody in charge. Oneperson, with a master inventory worksheet in hand, must know who is countingwhat. When each counter is finished, his or her sheet should be handed to theperson in charge and the numbers should be copied onto the master inventoryworksheet. (This is why you print multiple copies of the worksheet.) Note the dateand time the count was reported.
After the count, bring in any inventory that’s arrived during the count. Then startpicking and packing your orders so you can generate income again.
Making Inventory AdjustmentsAfter you’ve finished counting the inventory, you may find that the numbers on theworksheet don’t match the physical count. In fact, it’s almost a sure bet that thenumbers won’t match.
Most of the time the physical count is lower than the QuickBooks figures. This iscalled shrinkage. Shrinkage is jargon for “stuff went missing for an unexplainedreason,” but most of the time the reason is employee theft. Unfortunately, that’s awell-documented fact. Another reason for shrinkage is breakage, but most of thetime that’s reported by employees, and you can adjust your inventory because youknow about it. When you don’t know about it, suspect the worst, because statisticsprove that suspicion to be the most accurate.
Adjusting the CountYou have to tell QuickBooks about the results of the physical count, and youaccomplish that by choosing Vendors | Inventory Activities | Adjust Quantity/ValueOn Hand. The Adjust Quantity/Value On Hand window opens, which is shown inFigure 10-10.
N O T E : Inactive items appear on the Adjust Quantity/Value On Hand window.
Here are the guidelines for filling out this window:
• Enter the date (usually inventory adjustments are made at the end of themonth, quarter, or year, but there’s no rule about that).
• Use an optional reference number to track the adjustment.
C H A P T E R 1 0 S E T T I N G U P I N V E N T O R Y 261
QckBcks TIGHT / QuickBooks 2009 The Official Guide / Ivens / 274-8 / Chapter 10
P:\010Comp\QckBcks\274-8\ch10.vpFriday, September 12, 2008 9:38:50 AM
Color profile: DisabledComposite Default screen

• In the Adjustment Account field, enter the inventory adjustment account inyour chart of accounts. (See the section “About the Inventory AdjustmentAccount” for important information about the type of account.)
• The Customer:Job field is there in case you’re sending stuff to a customer butdidn’t include the items on any invoices for that customer or job. This is a wayto effect a transfer of the inventory; the inventory count is changed and the costis posted to the customer or job.
• If you’ve enabled the class tracking feature, a Class field appears.• This window doesn’t differentiate between parent items and subitems. The
parent items have a current quantity of zero, but some subitems might alsohave a zero count. Be careful about the item you’re adjusting.
• Use either the New Qty column or the Qty Difference column to enter thecount (depending on how you filled out the worksheet and calculated it).Whichever column you use, QuickBooks fills in the other columnautomatically.
• Anything you enter in the Memo field appears on your Profit & Loss Detailreport, which eliminates the question “what’s this figure?” from youraccountant.
When you complete the entries, the total value of the adjustment you made isdisplayed below the Qty Difference column. That value is calculated by using theaverage cost of your inventory. For example, if you received ten widgets into
262 P A R T T W O B O O K K E E P I N G
QckBcks TIGHT / QuickBooks 2009 The Official Guide / Ivens / 274-8 / Chapter 10
FIGURE 10-10 Correct the quantity to match the physical count.
P:\010Comp\QckBcks\274-8\ch10.vpFriday, September 12, 2008 9:38:50 AM
Color profile: DisabledComposite Default screen

inventory at a cost of $10.00 each and later received ten more at a cost of $12.00each, your average cost for widgets is $11.00 each. If your adjustment is for minusone widget, your inventory asset value is decreased by $11.00.
You can use the inventory adjustment window anytime you need to adjust eitherthe quantity or the value; this is not just for correcting quantities after a physicalcount. For example, if you send a sample to a customer or you donate an item to acharitable organization, you can use the inventory adjustment feature.
Adjusting the ValueYou can be more precise about your inventory valuation; in fact, you can overridethe average cost calculation and enter a true value when you fill out this transactionwindow.
Click the Value Adjustment check box at the bottom of the window. Twonew columns named Current Value and New Value appear in the window (seeFigure 10-11).
The value of the total adjusted count is displayed for each item, and you canchange the value to eliminate the effects of averaging costs up to this point(although as you continue to receive inventory items, QuickBooks continues to useaverage costing taking this new value into consideration). You can change thecurrent value of any item.
C H A P T E R 1 0 S E T T I N G U P I N V E N T O R Y 263
QckBcks TIGHT / QuickBooks 2009 The Official Guide / Ivens / 274-8 / Chapter 10
FIGURE 10-11 Adjust the costs of inventory to reflect actual purchases.
P:\010Comp\QckBcks\274-8\ch10.vpFriday, September 12, 2008 9:38:50 AM
Color profile: DisabledComposite Default screen

Of course, in order to enter the correct total value, you must have theinformation you need and then make the appropriate calculations. To obtain theinformation, choose Reports | Purchases | Purchases By Vendor Detail. This reportpresents a history of your purchases so you can make the necessary calculations.
Return to the Adjust Quantity window and enter the data. When you’ve finishedmaking your changes, click Save & Close to save your new inventory numbers.
QuickBooks does not support FIFO or LIFO costing for inventory. Essentially,when you use current figures to update the cost, you’re updating the currentaverage cost, you are not creating FIFO/LIFO inventory costing.
About the Inventory Adjustment AccountQuickBooks automatically creates an expense account named InventoryAdjustment when you enable inventory tracking. However, most accountants preferto have the Inventory Adjustment account configured as a cost of goods soldaccount, not as an expense account. Check with your accountant, and if you needto change the account type, edit the account to change the Account Type field toCost of Goods Sold. If you’re using account numbers, change the number to reflectthe numbers you’re using for COGS.
If you use a COGS account when you use the Adjust Quantity/Value On Handwindow, QuickBooks issues a warning message when you enter your adjustmentaccount in the Adjustment Account field.
Ill 10-1
Ask your accountant about the account type for your inventory adjustments, andif he or she wants you to use a cost of goods account, be sure to select the option tostop showing this message before you click OK to continue working in thiswindow.
Most of the accountants who don’t agree with this paradigm are especiallyemphatic about not posting an increase in inventory value to an income account.They explain that while an adjustment of inventory may increase or decrease profit,that is not the same thing as recorded income from selling the inventory andshouldn’t be posted as such (some call it “unrealized income” and “unrealizedexpense”). In addition (and terribly important), if your local government imposes agross receipts tax, posting an inventory adjustment as if it were income willincrease your taxable gross receipts without any real sales-based income beingreceived.
264 P A R T T W O B O O K K E E P I N G
QckBcks TIGHT / QuickBooks 2009 The Official Guide / Ivens / 274-8 / Chapter 10
P:\010Comp\QckBcks\274-8\ch10.vpFriday, September 12, 2008 9:38:51 AM
Color profile: DisabledComposite Default screen

T I P : If you adjust inventory quantity to reflect sending a sample to a potentialcustomer, you can use a Marketing or Advertising expense account as theadjustment account. Similarly, sending an item to a charity would use theCharitable Contributions expense account. Check with your accountant beforemaking the decision.
Understanding the PostingsWhen you adjust the inventory count, you’re also changing the value of yourinventory asset. After you save the adjustment, the inventory asset account registerreflects the differences for each item.
But this is double-entry bookkeeping, which means there has to be an equal andopposite entry somewhere else. For example, when you sell items via customerinvoices, the balancing entry to the decrement of your inventory account is made tocost of goods sold. When you’re adjusting inventory, however, there is no saleinvolved (nor is there a purchase involved). In this case, the balancing entry ismade to the inventory adjustment account, which must exist in order to adjustyour inventory.
If your inventory adjustment lowers the value of your inventory, the inventoryasset account is credited and the adjustment account receives a debit in the sameamount. If your adjustment raises the value of your inventory, the postings areopposite.
Making Other Adjustments to InventoryYou can use the Adjust Quantity/Value On Hand window to make adjustments toinventory at any time and for a variety of reasons unconnected to the periodicphysical count:
• Breakage or other damage• Customer demo/sample units• Gifts or bonuses for customers or employees
The important thing to remember is that tracking inventory isn’t just to makesure that you have sufficient items on hand to sell to customers (although that’scertainly an important point). Equally important is the fact that inventory is asignificant asset, just like your cash, equipment, and other assets. It affects yourcompany’s worth in a substantial way.
C H A P T E R 1 0 S E T T I N G U P I N V E N T O R Y 265
QckBcks TIGHT / QuickBooks 2009 The Official Guide / Ivens / 274-8 / Chapter 10
P:\010Comp\QckBcks\274-8\ch10.vpFriday, September 12, 2008 9:38:51 AM
Color profile: DisabledComposite Default screen

QckBcks TIGHT / QuickBooks 2009 The Official Guide / Ivens / 274-8Blind 266
P:\010Comp\QckBcks\274-8\ch10.vpFriday, September 12, 2008 9:38:51 AM
Color profile: DisabledComposite Default screen

Chapter
Chapter
1111Managing Cashand Credit CardTransactions
In this chapter:
• Make deposits that aren’t from customers
• Transfer funds between accounts
• Deal with bounced checks
• Void disbursements
• Manage cash
• Balance credit card statements
267
QckBcks TIGHT / QuickBooks 2009 The Official Guide / Ivens / 274-8 / Chapter 11
P:\010Comp\QckBcks\274-8\ch11.vpTuesday, September 16, 2008 10:59:30 AM
Color profile: DisabledComposite Default screen

Before you started using accounting software, did your checkbook register haveentries crossed out? Pencil notes next to inked-in entries? Inked notes next topenciled entries? Transactions that were made in April entered in the middle of astring of June transactions (“The statement came—I forgot about that transaction”)?Lots of corrections for math errors? If so, relax; QuickBooks can take care of all ofthose problems.
Making a Deposit That’sNot from a CustomerEven though QuickBooks takes care of depositing money into your bank accountwhen you receive money from customers (covered in Chapter 4), there are timeswhen you receive money that’s unconnected to a customer payment.
Entering a deposit (one that’s not a customer payment) into your QuickBookscheck register isn’t much different from entering a deposit into a manual checkbookregister. Actually, it’s easier because you don’t have to make any calculations—QuickBooks takes care of that.
Press CTRL-A to open the chart of accounts and double-click the bank accountyou want to work with. Fill in the date, delete the check number if one automaticallyappears, and then click in the Deposit column to enter the amount. Assign the depositto an account. You should use the Memo field for an explanation because youraccountant will probably ask you about the deposit later. Click the Record button.That’s it!
You can, if it’s necessary, enter a payee name in the Payee column, butQuickBooks doesn’t require that. Most of the time, you use this method of directentry to record deposits that are unconnected to customers for whom you need totrack activity. For example, you may receive a rebate on a purchase you made.
If you want to enter a payee that doesn’t exist in any of your name lists,QuickBooks displays a Name Not Found message offering you the followingselections:
• Quick Add, which lets you enter a name without any additional information• Set Up, which lets you create a new name using the regular New Name window• Cancel, which returns you to the account register so you can either choose
another name or delete the nonexistent Payee entry
If you select Quick Add or Set Up, you’re asked which type of name you’re adding:Vendor, Customer, Employee, or Other. Unless this payee will become a Vendor orCustomer (we can eliminate Employee from this procedure), choose Other.
If you’re depositing your own money into the business, that’s capital; you shouldpost the deposit to a capital account (it’s an equity account). If you’re depositing theproceeds of a loan (from yourself or from a bank), post the deposit to the liability
268 P A R T T W O B O O K K E E P I N G
QckBcks TIGHT / QuickBooks 2009 The Official Guide / Ivens / 274-8 / Chapter 11
P:\010Comp\QckBcks\274-8\ch11.vpTuesday, September 16, 2008 10:59:31 AM
Color profile: DisabledComposite Default screen

account for the loan (you may have to create the liability account). If you’re makinga deposit that’s a refund from a vendor, you can post the amount to the expenseaccount that was used for the original expense.
When in doubt, post the amount to the most logical place and call youraccountant. You can always edit the transaction later or make a journal entry topost the amount to the right account.
T I P : QuickBooks provides an account named “Ask my accountant,” which isa good place to “park” entries when you’re not sure what the posting accountshould be. After your accountant answers your question, edit the transaction toput the money into the right account.
Transferring Funds Between AccountsMoving money between bank accounts is a common procedure in business. If youhave a bank account for payroll, you have to move money out of your operatingaccount into your payroll account every payday (actually, you usually do this theday before payday). Some people deposit all the customer payments into a moneymarket account (which pays interest) and then transfer the necessary funds to anoperating account when it’s time to pay bills. Others do it the other way around,moving money not immediately needed from the business operating account to amoney market account. Lawyers, agents, real estate brokers, and other professionalshave to maintain escrow accounts and move money between them and theoperating account.
The difference between a regular deposit and a transfer isn’t clear if you thinkabout the end result as being nothing more than “money was disbursed from oneaccount and deposited into another account.” However, that’s not the way to thinkabout it. When you work with accounting issues, every action has an effect on yourgeneral ledger, which means there’s an effect on your financial reporting (and yourtaxes). A transfer isn’t a disbursement (which is an expense that’s assigned to aspecific account), and it isn’t a regular deposit (income received). A transfer has noeffect on your profit and loss. If you don’t use the transfer protocol, you run the riskof posting a deductible expense or taxable income to your profit and loss reports.
Follow these steps to transfer funds between bank accounts:
� Choose Banking | Transfer Funds from the menu bar to open the TransferFunds Between Accounts dialog (see Figure 11-1).
� Fill out the fields.� Click Save & Close (or Save & New if you have another transfer to make).
QuickBooks posts the transaction (you’ll see it marked as TRANSFR in bothbank accounts if you open their registers) without affecting any totals in your
C H A P T E R 1 1 M A N A G I N G C A S H A N D C R E D I T C A R D T R A N S A C T I O N S 269
QckBcks TIGHT / QuickBooks 2009 The Official Guide / Ivens / 274-8 / Chapter 11
P:\010Comp\QckBcks\274-8\ch11.vpTuesday, September 16, 2008 10:59:31 AM
Color profile: DisabledComposite Default screen

financial reports. All the work is done on the balance sheet, but the bottom line ofyour balance sheet doesn’t change as the following postings are made to the generalledger:
Account Debit Credit
Sending Bank Account Amount of Transfer
Receiving Bank Account Amount of Transfer
Handling Bounced ChecksCustomer checks sometimes bounce. When that happens, you face the followingtasks:
1. Configure items to manage bounced checks and service charges.2. Deduct the amount of the bounced check from your checking account.3. Recover the money from the customer, including any service charge you
incurred from your bank.4. Record any bank service charges you incurred as a result of the bounced check.
Following are the instructions to accomplish these tasks in a manner that israther easy and logical (especially when compared to some of the complicatedinstructions found in some books and articles).
270 P A R T T W O B O O K K E E P I N G
QckBcks TIGHT / QuickBooks 2009 The Official Guide / Ivens / 274-8 / Chapter 11
FIGURE 11-1 It’s incredibly easy to transfer money between bank accounts.
P:\010Comp\QckBcks\274-8\ch11.vpTuesday, September 16, 2008 10:59:31 AM
Color profile: DisabledComposite Default screen

Configuring Items to Manage Bounced ChecksYou need items to use in the transactions you create to notify the customer andattempt to collect the money still owed to you.
For the amount of the check, create an Other Charge item named NSF Check(NSF stands for NonSufficient Funds, the bank’s term for a bounced check). Theitem is nontaxable and is linked to the bank account into which you depositcustomer checks (instead of using an income account). Don’t enter an amount;when you create a transaction you use the amount of the bounced check.
Ill 11-1
N O T E : Some of the complicated instructions for managing bounced checksinsist that creating a vendor for bounced checks, special expense accountsfor bounced checks, and so on, are needed in order to track and report on thebounced checks you encounter. None of that is necessary—If you want to see ahistory of bounced checks and the customers that bounced them, just select thisitem in the Item List and press CTRL-Q to see a quick report on the transactionsattached to this item.
You also have to have an item to use when you charge the customer for theservice charge from your bank. Use an Other Charge item named NSF BankServChg,with the description “Service Charge for Returned Check.” Use the bank servicecharges expense account as the income account.
Create an Invoice to Recover the Amounts OwedCreate an invoice (service or professional works best) that includes the items youcreated to handle bounced checks (see Figure 11-2). When (or if) the paymentarrives, you use Receive Payments to record the amounts.
When you enter the NSF item on the invoice, it credits the bank account, whichwashes the amount of the original deposit of the check. It also provides bothtransactions in the Reconcile window when your statement arrives, so you can
C H A P T E R 1 1 M A N A G I N G C A S H A N D C R E D I T C A R D T R A N S A C T I O N S 271
QckBcks TIGHT / QuickBooks 2009 The Official Guide / Ivens / 274-8 / Chapter 11
P:\010Comp\QckBcks\274-8\ch11.vpTuesday, September 16, 2008 10:59:31 AM
Color profile: DisabledComposite Default screen

select the original deposit (if that’s all that shows up on your statement) or bothtransactions (if all of these transactions occurred in time to appear on thestatement).
The amount you enter for the service charge item can be larger than the amountyour bank charged (check your state’s laws on this matter). If you have a lot ofcustomers who bounce checks, you could end up with a negative expense total forthe bank service charge account—nothing wrong with that.
Record the Bank ChargeIf your bank imposed a charge for the returned check, you have to enter that chargein your bank register. The easiest way to do that is to open the register and enterthe amount in the Payment column. Post the transaction to your bank chargesexpense account. You don’t need a check number or a payee. The charge will appearin the reconciliation window when you reconcile your account.
272 P A R T T W O B O O K K E E P I N G
QckBcks TIGHT / QuickBooks 2009 The Official Guide / Ivens / 274-8 / Chapter 11
FIGURE 11-2 An invoice for a bounced check takes care of all the postings you need to adjustyour accounting totals.
P:\010Comp\QckBcks\274-8\ch11.vpTuesday, September 16, 2008 10:59:32 AM
Color profile: DisabledComposite Default screen

Ill 11-2
The bank charge included in the invoice you created credited your bank chargesexpense account. This entry in the register debits the account and also puts thecharge in the reconciliation window.
Voiding DisbursementsSometimes you have to void a check that you’ve written. Perhaps you decided notto send it for some reason, or perhaps it was lost in the mail. Whatever the reason,if a check isn’t going to clear your bank, you should void it.
The process of voiding a check is quite easy, and the only trouble you can causeyourself is deleting the check instead of voiding it. Deleting a check removes allhistory of the transaction, and the check number disappears into la-la land. This isnot a good way to keep financial records. Voiding a check keeps the check numberbut sets the amount to zero.
C H A P T E R 1 1 M A N A G I N G C A S H A N D C R E D I T C A R D T R A N S A C T I O N S 273
QckBcks TIGHT / QuickBooks 2009 The Official Guide / Ivens / 274-8 / Chapter 11
Redepositing Bounced ChecksAs part of your design for managing bounced checks you also must decide whether you’re goingto redeposit the check. Most banks permit you to redeposit a bounced check, but only once—youcannot keep depositing against the hope that the customer’s bank balance will grow largeenough to cover the check.
Many business owners don’t redeposit bounced checks; instead, they insist on receiving a newcheck, a certified check, or an envelope filled with cash. If your bank charges a service fee forbounced checks, it’s probably not a good idea to redeposit the check and risk incurring anothercharge you may not be able to collect from your customer.
➽ FYI
P:\010Comp\QckBcks\274-8\ch11.vpTuesday, September 16, 2008 10:59:32 AM
Color profile: DisabledComposite Default screen

To void a check, open the bank account register and click anywhere on thecheck’s transaction line to select the transaction. Right-click to open the shortcutmenu and choose Void Check. The corresponding posting in the account (ormultiple accounts) to which the check was written is automatically adjusted. ClickRecord to save the transaction.
Tracking CashAren’t those ATM gadgets wonderful? They’re everywhere, even at the supermarketcheckout! It’s so easy to take cash out of your bank account. And it’s so easy toforget to enter the transaction in your account register!
Another wonderful device is the petty cash box, which many businessesmaintain to dispense cash to employees (or owners) who need cash to recovermoney they’ve spent for the company or as an advance against future expenditures.
When you take cash, whether it’s cash from the petty cash box or a withdrawalvia an ATM machine, you have to account for it. That means you have to accountfor the portion of it you spend and the portion that’s still in your pocket. The cashbelongs to the business. This section covers the accounting procedures involvedwith petty cash transactions.
Creating a system that ensures your ATM and petty cash withdrawals areaccounted for is your problem—QuickBooks cannot help you remember to entertransactions. (Well, you could set up a QuickBooks reminder that appearsfrequently with the message “Did you ATM today????”)
Creating a Petty Cash AccountIf you spend cash for business expenses, your chart of accounts should have a pettycash account. This account functions like a cash register till: you put money in it,then you account for the money that’s spent, leaving the rest in the till until it too isspent. Then you put more money into the till. The petty cash account doesn’trepresent a real bank account; it just represents that portion of the money in thereal bank account that moved into the till.
Follow these steps to create a petty cash account:
� Click the Chart Of Accounts icon on the Home page, or press CTRL-A.� When the Chart Of Accounts window appears, press CTRL-N to open a blank
New Account window.� Fill in the account information using the following guidelines:
• The Account Type is Bank.• If you number your accounts, use a number that places your new petty cash
account near the other (real) bank accounts in your chart of accounts.• Leave the opening balance at zero.
274 P A R T T W O B O O K K E E P I N G
QckBcks TIGHT / QuickBooks 2009 The Official Guide / Ivens / 274-8 / Chapter 11
P:\010Comp\QckBcks\274-8\ch11.vpTuesday, September 16, 2008 10:59:32 AM
Color profile: DisabledComposite Default screen

Putting Cash into Petty CashYou have to put money into your petty cash till, both literally (get cash) andfiguratively (record a withdrawal from your bank account to your petty cashaccount). Most of the time you’ll write a check for petty cash using the followingguidelines:
• Create a name in the Other Names list for the payee (usually the name is“cash”).
• Post the check to the petty cash account.
You can use the Write Checks window to accomplish the task, or enter thetransaction directly in the bank account register.
T I P : Don’t post a petty cash check to an expense, nor to a class. Thosepostings are recorded when you account for the spent funds, not for the momentat which you withdraw the cash (see “Recording Petty Cash Disbursements”).
Recording ATM WithdrawalsWhen you withdraw money from your bank account with your ATM card, it’s notan expense, it’s just cash. You’ve put cash into a till (literally, the till is your pocket,but to QuickBooks it’s a petty cash container). It becomes an expense when youspend it (remember to get a receipt so you can enter the expense into your system).
Bring the ATM receipt (and receipts for any stuff you purchased with the ATMcash) back to the office. Now you’re ready to perform the procedures necessary totrack the cash you took and the part of it you spent.
The first thing you have to do is take the cash out of your QuickBooks bankaccount because you stood in front of an ATM dispenser and took cash out of youractual bank account. However, this is double-entry bookkeeping, and there has tobe an equal and opposite posting to another account. That’s what the petty cashaccount is for. You have a choice of methods for performing this task: transfer thefunds between accounts, or enter a transaction in your bank account.
Follow these steps to transfer funds between the bank account and the pettycash account:
� Choose Banking | Transfer Funds.� In the Transfer Funds Between Accounts window, fill out the information
needed: the two accounts and the amount you withdrew.� Click Save & Close.
C H A P T E R 1 1 M A N A G I N G C A S H A N D C R E D I T C A R D T R A N S A C T I O N S 275
QckBcks TIGHT / QuickBooks 2009 The Official Guide / Ivens / 274-8 / Chapter 11
P:\010Comp\QckBcks\274-8\ch11.vpTuesday, September 16, 2008 10:59:32 AM
Color profile: DisabledComposite Default screen

Follow these steps to enter the withdrawal as a transaction:
� Open the bank account register and enter the transaction date.� Delete the check number QuickBooks automatically enters in the Number field.� Skip the Payee field.� Enter the amount of the transaction in the Payment column.� In the Account field, post the transaction to the petty cash account.
QuickBooks automatically assigns the type TRANSFR to the transaction.
Some bookkeepers are uneasy about skipping the Payee field. If you fall in thatcategory, create a payee named PettyCash in the Other Names list and use thatname for petty cash transactions.
Recording Petty Cash DisbursementsAs you spend the cash you’ve obtained, you must record those expenditures inthe petty cash register. Use the receipts you’ve collected to post the petty cashtransactions.
T I P : Don’t let anyone take money out of the petty cash till without a receipt.If the money is an advance against a purchase instead of payment for a receipt,use an IOU. Later, replace the IOU with the purchase receipt.
N O T E : If you spent less than the amount of cash you withdrew from the till,the balance stays in the petty cash account while it’s in your pocket. You’llprobably spend it later, and at that point you’ll repeat this task to account forthat spending.
276 P A R T T W O B O O K K E E P I N G
QckBcks TIGHT / QuickBooks 2009 The Official Guide / Ivens / 274-8 / Chapter 11
ATM Withdrawals Vs. ATM PaymentsThe discussion on using an ATM card to withdraw cash, and tracking that cash through a pettycash account refers to the action of withdrawing cash (literally). If you use the company ATM cardto purchase something for your business, you don’t move the payment to petty cash; instead youtreat the purchase as a check. You can use the Write Checks window or the bank account registerto enter the amount and the expense account. Optionally, enter a vendor name (if you’re trackingthe place of purchase as a vendor, which isn’t really necessary unless this is a vendor for whomyou track bills and payments). Do not enter a check number; either leave the Chk # field blank orenter a code (such as ATM).
➽ FYI
P:\010Comp\QckBcks\274-8\ch11.vpTuesday, September 16, 2008 10:59:32 AM
Color profile: DisabledComposite Default screen

Recording Petty Cash Expenses in the Bank RegisterIf you want to enter each receipt separately, posting it to a specific expense account,and you don’t have to post anything to a class, or link it to a customer, it’s easiest touse the petty cash bank register. Delete the check number QuickBooks automaticallyinserts in the Number field (if you leave the number there, it’s okay, because you’llnever reconcile the petty cash account). You can either skip the Payee field or use apayee named PettyCash (in the Other Names list).
Recording Petty Cash Expenses with a CheckIf you want to enter a group of receipts that post to a variety of expense accounts,or you have to post the expense to a class, or link it to a customer, it’s easiest to usethe Write Checks window (CTRL-W).
Select the petty cash bank account at the top of the Write Checks window. Youdon’t have to enter a payee, just enter the amounts and post them to the appropriateaccount, class, and customer (see Figure 11-3).
C H A P T E R 1 1 M A N A G I N G C A S H A N D C R E D I T C A R D T R A N S A C T I O N S 277
QckBcks TIGHT / QuickBooks 2009 The Official Guide / Ivens / 274-8 / Chapter 11
FIGURE 11-3 Enter your petty cash expenses quickly in the Write Checks window.
P:\010Comp\QckBcks\274-8\ch11.vpTuesday, September 16, 2008 10:59:33 AM
Color profile: DisabledComposite Default screen

Managing Your Credit CardsWhen you use a business credit card, you have a number of choices for trackingand paying the credit card bill. You can either pay the entire bill every month, orpay part of the bill and keep a running credit card balance. For either approach,QuickBooks provides the right method:
• Treat the credit card bill as an ordinary vendor and enter the bill when itarrives.
• Treat the credit card bill as a liability and enter each transaction as it’s made,then reconcile the entries against the bill that arrives.
Treating Credit Cards as VendorsYou can set up your credit card as an ordinary vendor (instead of a liabilityaccount) and enter the bill into QuickBooks when it arrives, or use the WriteChecks function to create a direct disbursement. Most of the time, the expenses areposted to multiple accounts, so the credit card bill transaction is a split transaction(see Figure 11-4).
If you don’t pay off the card balance, each month you’ll have a new bill to enterthat has interest charges in addition to your purchases. Post the interest charges toan interest expense account.
If you enter the bill in the Enter Bills window, and then use the Pay Bills windowto write the checks, enter the amount you want to pay against each bill in the system.Always start bill payments with the oldest bill, making a partial payment or payingit in full. Then move to the next oldest bill, making a partial payment or paying itin full.
278 P A R T T W O B O O K K E E P I N G
QckBcks TIGHT / QuickBooks 2009 The Official Guide / Ivens / 274-8 / Chapter 11
Don’t Enter Payees/Vendors for Petty Cash ExpensesMost of the time, the store in which you spent the cash doesn’t have to be entered in thetransaction (“Joe’s Hardware Store,” “Mary’s Office Supplies,” and so on). If you don’t have areal vendor relationship with the recipient of your cash, leave the vendor field blank. Otherwise,your company file grows larger than it needs to because the system is carrying the weight of allthese vendors. These vendors end up appearing in all your vendor reports, crowding thosereports with extraneous names that nobody has any interest in tracking.
Reserve vendors for those payees from whom you receive bills or to whom you disburse checksand for whom you want to track activity. If it’s so important to know that you spent a buck eightyfor a screwdriver at Joe’s Hardware Store, enter that information in the Memo field.
➽ FYI
P:\010Comp\QckBcks\274-8\ch11.vpTuesday, September 16, 2008 10:59:33 AM
Color profile: DisabledComposite Default screen

Treating Credit Cards as Liability AccountsYou can also treat credit cards as liability accounts, tracking each transactionagainst the account as it occurs. Then when the bill arrives, you match thetransactions against the bill and decide how much to pay. Your running balance istracked specifically against the credit card, instead of being part of your AccountsPayable balance.
Creating a Credit Card AccountTo use credit cards in this manner, you must have an account for each credit card inyour chart of accounts. If you don’t have such an account as a result of the EasyStepInterview, you can create one now, using an account type of Credit Card. Check outChapter 2 for information about adding items to your chart of accounts.
C A U T I O N : QuickBooks arranges the chart of accounts by account types.If you’re using numbers for your accounts, the numbering is ignored in favor ofaccount types. To make sure your credit card accounts are displayed in the rightorder, use account numbers that fit into the right section of the chart ofaccounts—credit card accounts come right after accounts payable accounts.
C H A P T E R 1 1 M A N A G I N G C A S H A N D C R E D I T C A R D T R A N S A C T I O N S 279
QckBcks TIGHT / QuickBooks 2009 The Official Guide / Ivens / 274-8 / Chapter 11
FIGURE 11-4 Credit card bills are usually posted to multiple accounts.
P:\010Comp\QckBcks\274-8\ch11.vpTuesday, September 16, 2008 10:59:33 AM
Color profile: DisabledComposite Default screen

Entering Credit Card ChargesIf you want to track your credit card charges as they’re assumed, instead of waitingfor the bill, you have to treat your credit card transactions like ATM transactions—enter them as you go. QuickBooks offers two methods to accomplish this:
• Set up your credit card account for online banking and download thetransactions (covered in Chapter 16).
• Enter transactions manually, using the receipt you get at the time of purchase.
If your credit card account is enabled for online banking, these are not mutuallyexclusive methods. You can enter the transactions manually and download datafrom your credit card server to match those transactions. Or, you can download thetransactions and then add each transaction to the credit card register (instructionsare in Chapter 16).
To enter credit card charges manually, choose Banking | Enter Credit CardCharges to open the Enter Credit Card Charges window seen in Figure 11-5.
Select the appropriate credit card account and then use the store receipt as areference document to fill in the transaction. Here are some guidelines for makingthis transaction easy and quick to complete:
280 P A R T T W O B O O K K E E P I N G
QckBcks TIGHT / QuickBooks 2009 The Official Guide / Ivens / 274-8 / Chapter 11
FIGURE 11-5 To track credit card charges as liabilities, enter each transaction.
P:\010Comp\QckBcks\274-8\ch11.vpTuesday, September 16, 2008 10:59:33 AM
Color profile: DisabledComposite Default screen

• You can skip the Purchased From field (or, if you’re compulsive about avoidingblank fields, enter a generic vendor—create a vendor named Credit Card Purchaseor something similar). Then use the Memo field for each transaction to note thename of the real vendor, if that information is important to you. If you type avendor name in the Purchased From field, QuickBooks will force you to add thevendor to your vendor list. You’ll end up with a gazillion vendors with whom youdon’t have a real vendor relationship (they don’t send you bills and you never needto discuss A/P balances with them), and you won’t be able to delete them from yourQuickBooks file because they have transactions. Your vendor is your credit card.
• If the transaction is a return, be sure to select the Refund/Credit option at thetop of the window.
• Enter the receipt number in the Ref No. field.• Enter the date of the purchase.• Use the Expenses tab for general expenses; use the Items tab if you used the
credit card to buy inventory items for resale.• If you use the credit card for an expense or an item for a customer, enter the
customer information so you can bill the customer for reimbursement (seeChapter 6 for details about entering reimbursable expenses).
Click Save & New to save the record and move to another blank credit cardentry window to enter another credit card transaction, or click Save & Close ifyou’re finished entering credit card charges.
T I P : You can also enter these charges directly in the register of your creditcard account. (Some people find it faster to work in the register than in atransaction window.)
Reconciling the Credit Card BillEventually, the credit card bill arrives, and you have to perform the following chores:
• Reconcile the bill against the entries you recorded.• Decide whether to pay the entire bill or just a portion of it.• Write a check.
Choose Banking | Reconcile from the QuickBooks menu bar to open the BeginReconciliation window. In the Account field, select the credit card from the drop-down list. In the Begin Reconciliation dialog enter the following data:
• The ending balance from the credit card bill• Any finance charges on the bill in the Finance Charge box, along with the date
on which the charges were assessed• The account you use to post finance charges (create one if you don’t have
one—it’s an expense)
C H A P T E R 1 1 M A N A G I N G C A S H A N D C R E D I T C A R D T R A N S A C T I O N S 281
QckBcks TIGHT / QuickBooks 2009 The Official Guide / Ivens / 274-8 / Chapter 11
P:\010Comp\QckBcks\274-8\ch11.vpTuesday, September 16, 2008 10:59:34 AM
Color profile: DisabledComposite Default screen

N O T E : The first time you do this, the beginning balance is zero.
Click Continue to open the Reconcile Credit Card window, which displays thepurchases you entered into QuickBooks and the payments you made. Click thecheck mark column for each transaction on your window that has a matchingtransaction on the credit card bill (make sure the amounts match, too). Thatincludes payments, credits, and charges.
T I P : If the list of transactions is very long, select the option HideTransactions After The Statement’s End Date. This removes transaction listingspast that date, none of which could have cleared.
Add any transactions you forgot to enter by opening the credit card register andentering the transactions. (To find the receipts, search your pockets, desk, pocketbook,the floor of your car, and the kitchen junk drawer.) When you return to the ReconcileCredit Card window, the new transactions are automatically added and you can checkthem off. (You can also click the Go To button to open the Enter Credit Card Chargeswindow, if you prefer to work in that window.)
T I P : Finance charges for businesses are tax deductible; the finance chargesyou incur for your personal credit cards, or for personal expenses, aren’t.
Now look at the box at the bottom of the window where the totals are displayed.If the difference is $0.00, congratulations! Everything’s fine. Click Reconcile Now.
If the difference is not $0.00, you have to figure out the problem and makecorrections. Read Chapter 12, which is dedicated to the subject of reconciling bankaccounts, to learn how to troubleshoot reconciliations.
Paying the Credit Card BillWhen you finish working in the reconciliation window, QuickBooks moves on topay the bill by asking you whether you want to write a check now, or create avendor bill that you’ll pay the next time you pay your bills.
Select the appropriate response and click OK. QuickBooks offers congratulationsand also offers to print a reconciliation report (see Chapter 12 to learn aboutprinting reconciliation reports). Select the report type you want, or click Cancel toskip the report.
If you opted to pay the bill, a transaction window that matches your response topaying the bill opens, so you can either enter a vendor bill or write a check. Fill inall the fields and save the transaction.
T I P : All the detailed information you need to create vendor bills is covered inChapter 6, and information about paying bills and printing checks is in Chapter 7.
282 P A R T T W O B O O K K E E P I N G
QckBcks TIGHT / QuickBooks 2009 The Official Guide / Ivens / 274-8 / Chapter 11
P:\010Comp\QckBcks\274-8\ch11.vpTuesday, September 16, 2008 10:59:34 AM
Color profile: DisabledComposite Default screen

Chapter
Chapter
1212Reconciling BankAccounts
In this chapter:
• Get ready to reconcile
• Use the QuickBooks reconciliation windows
• Adjust the beginning balance for your first reconciliation
• Troubleshoot differences in the beginning balance
283
QckBcks TIGHT / QuickBooks 2009 The Official Guide / Ivens / 274-8 / Chapter 12
P:\010Comp\QckBcks\274-8\ch12.vpTuesday, September 16, 2008 11:01:38 AM
Color profile: DisabledComposite Default screen

Reconciling bank accounts is fancy terminology for “I have to balance my checkbook,”which is one of the most important tasks connected with financial record keeping.
Getting Ready to ReconcileAfter your bank statement arrives, you must find some uninterrupted moments tocompare it to the information in the QuickBooks account register.
If your bank sends your canceled checks in the envelope along with thestatement (many banks don’t include the physical checks), you can arrange thechecks in numerical order before you start this task.
However, instead of sorting and collating the physical checks, it’s much easier touse the list of check numbers that appears on your statement. An asterisk or someother mark usually indicates a missing number. The missing number is usually acheck that hasn’t cleared yet (which includes any checks you voided), or a checkthat cleared previously.
Checking the RegisterOpen the register for the bank account you’re about to reconcile by pressing CTRL-Rto open the Use Register dialog and selecting the account. Then compare the bankregister to the statement.
If the bank statement shows deposits or checks (or both) that are absent fromyour bank register, add them to the register. If you miss any, don’t worry; you canadd transactions to the register while you’re working in the Reconcile window, butit’s usually quicker to get this task out of the way before you start the reconciliationprocess.
Interest payments and bank charges don’t count as missing transactions becausethe bank reconciliation process treats those transactions separately. You’ll have achance to enter those amounts in the bank reconciliation windows.
Adding Missing Disbursements to the RegisterThe way you add missing disbursements to the register depends on whether thechecks were payments of vendor bills you entered into your QuickBooks file ordirect disbursements.
• To enter a payment, use the Pay Bills command on the Vendors menu.• To enter a direct disbursement, use the Write Checks window (press CTRL-W)
or enter the check directly into the register.
Adding Missing Deposits to the RegisterCheck for payments that were deposited to the Undeposited Funds account, whichyou neglected to move to the bank account. Choose Banking | Make Deposits fromthe menu bar and select any deposits that appear on your statement. If you havemultiple transactions listed, deposit the funds in amounts (batches of transactions)that match the statement.
284 P A R T T W O B O O K K E E P I N G
QckBcks TIGHT / QuickBooks 2009 The Official Guide / Ivens / 274-8 / Chapter 12
P:\010Comp\QckBcks\274-8\ch12.vpTuesday, September 16, 2008 11:01:38 AM
Color profile: DisabledComposite Default screen
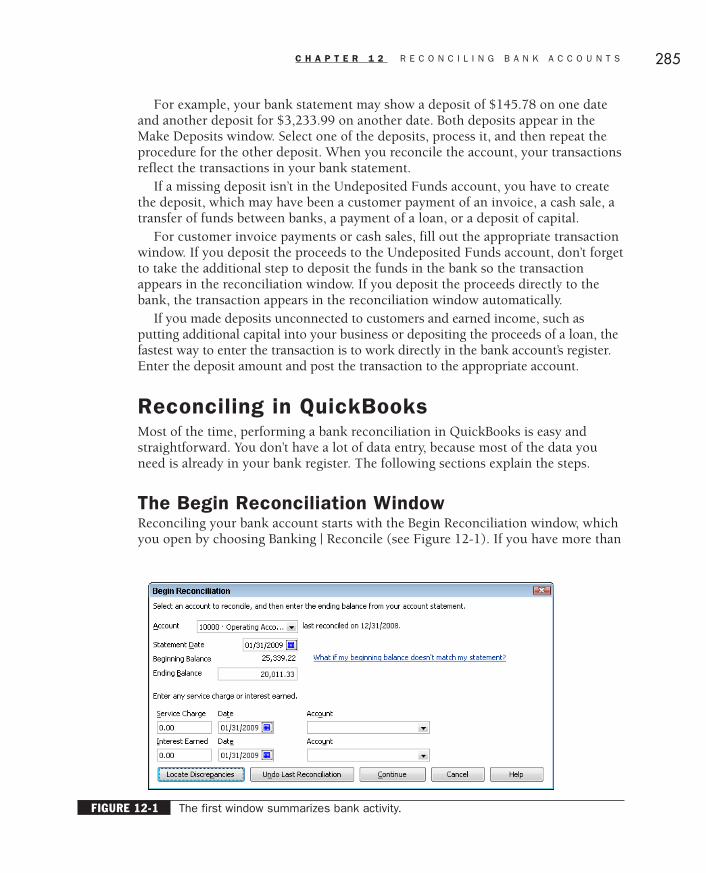
For example, your bank statement may show a deposit of $145.78 on one dateand another deposit for $3,233.99 on another date. Both deposits appear in theMake Deposits window. Select one of the deposits, process it, and then repeat theprocedure for the other deposit. When you reconcile the account, your transactionsreflect the transactions in your bank statement.
If a missing deposit isn’t in the Undeposited Funds account, you have to createthe deposit, which may have been a customer payment of an invoice, a cash sale, atransfer of funds between banks, a payment of a loan, or a deposit of capital.
For customer invoice payments or cash sales, fill out the appropriate transactionwindow. If you deposit the proceeds to the Undeposited Funds account, don’t forgetto take the additional step to deposit the funds in the bank so the transactionappears in the reconciliation window. If you deposit the proceeds directly to thebank, the transaction appears in the reconciliation window automatically.
If you made deposits unconnected to customers and earned income, such asputting additional capital into your business or depositing the proceeds of a loan, thefastest way to enter the transaction is to work directly in the bank account’s register.Enter the deposit amount and post the transaction to the appropriate account.
Reconciling in QuickBooksMost of the time, performing a bank reconciliation in QuickBooks is easy andstraightforward. You don’t have a lot of data entry, because most of the data youneed is already in your bank register. The following sections explain the steps.
The Begin Reconciliation WindowReconciling your bank account starts with the Begin Reconciliation window, whichyou open by choosing Banking | Reconcile (see Figure 12-1). If you have more than
C H A P T E R 1 2 R E C O N C I L I N G B A N K A C C O U N T S 285
QckBcks TIGHT / QuickBooks 2009 The Official Guide / Ivens / 274-8 / Chapter 12
FIGURE 12-1 The first window summarizes bank activity.
P:\010Comp\QckBcks\274-8\ch12.vpTuesday, September 16, 2008 11:01:39 AM
Color profile: DisabledComposite Default screen

one bank account, or you have credit card accounts you reconcile in addition tobank accounts, select the account you want to reconcile from the drop-down list inthe Account field.
Check the Beginning Balance field in the window against the beginning balanceon the bank statement. (Your bank may call it the starting balance.) If yourbeginning balances match, enter the ending balance from your statement in theEnding Balance field and enter the statement date.
If the beginning balances don’t match because this is the first time you’rereconciling the bank account in QuickBooks, read the section, “Adjusting theBeginning Balance for the First Reconciliation,” and then return to this section ofthe chapter to finish reconciling.
If the beginning balances don’t match and this is not the first time you’rereconciling the bank account in QuickBooks, read the section “TroubleshootingDifferences in the Beginning Balance” later in this chapter, and then return to thissection of the chapter to perform the reconciliation.
Enter Interest Income and Service ChargesYour bank statement lists interest and bank service charges if either or both areapplicable to your account. Enter those numbers in the Begin Reconciliationwindow and choose the appropriate account for posting.
If you have online banking and the interest payments and bank charges havealready been entered into your register as a result of downloading transactions, donot enter them again in the Begin Reconciliation window—they’ll be in the registerlist you see in the next window, and you can clear them the way you clear checksand deposits.
By “bank charges,” I mean the standard charges banks assess, such as monthlycharges that may be assessed for failure to maintain a minimum balance. Bankcharges do not include special charges for bounced checks, fees for electronic banktransfers, or any purchases you made that are charged to your account (such as thepurchase of checks or deposit slips). Those should be entered in your bank registeras discrete transactions (using the Memo field to explain the transaction), whichmakes them easier to find in case you have to talk to the bank about your account.
Clearing TransactionsAfter you’ve filled out the information in the Begin Reconciliation dialog, clickContinue to open the Reconcile window, shown in Figure 12-2.
Configuring the Reconcile WindowYou can configure the way transactions are displayed to make it easier to work inthe window by changing the way the data is displayed.
286 P A R T T W O B O O K K E E P I N G
QckBcks TIGHT / QuickBooks 2009 The Official Guide / Ivens / 274-8 / Chapter 12
P:\010Comp\QckBcks\274-8\ch12.vpTuesday, September 16, 2008 11:01:39 AM
Color profile: DisabledComposite Default screen

Sorting the DataBy default, QuickBooks sorts transactions by date, with a subsort by transactionnumber. For example, in the Checks And Payments pane, if multiple checks havethe same date, those checks are sorted in numerical order.
Reconciling is easier if you sort the data to match the way your bank arrangesthe statement. For instance, if you have a lot of electronic payments in addition tochecks, and your bank lists the electronic payments separately from checks, clickthe Chk # column to list withdrawals without check numbers separately fromchecks.
Eliminating Future TransactionsIf the list is long, you can shorten it by selecting the option Hide Transactions AfterThe Statement’s End Date. Theoretically, transactions that weren’t created before theending date couldn’t have cleared the bank. Removing them from the windowleaves only those transactions likely to have cleared. If you select this option andyour reconciliation doesn’t balance, deselect the option so you can clear thetransactions in case one of the following scenarios applies:
• You issued a postdated check and the recipient cashed it early. Since it’s rare fora bank to enforce the date, this is a real possibility.
• You made a mistake when you entered the date of the original transaction. Youmay have entered a wrong month or even a wrong year, which resulted inmoving the transaction date into the future.
C H A P T E R 1 2 R E C O N C I L I N G B A N K A C C O U N T S 287
QckBcks TIGHT / QuickBooks 2009 The Official Guide / Ivens / 274-8 / Chapter 12
FIGURE 12-2 Uncleared transactions appear in the Reconcile window.
P:\010Comp\QckBcks\274-8\ch12.vpTuesday, September 16, 2008 11:01:39 AM
Color profile: DisabledComposite Default screen

Clearing TransactionsNow you must tell QuickBooks which transactions have cleared. All thetransactions that are on your bank statement are cleared transactions. If thetransactions are not listed on the statement, they have not cleared.
In the Reconcile window, click each transaction that cleared. A check markappears in the leftmost (Cleared) column to indicate that the transaction hascleared the bank. If you clear a transaction in error, click again to remove the checkmark—it’s a toggle.
Use the following shortcuts to speed your work:
• If all, or almost all, of the transactions have cleared, click Mark All. Thendeselect the transactions that didn’t clear.
• Mark multiple, contiguous transactions by dragging down the Cleared column.• If the account you’re reconciling is enabled for online access, click Matched to
automatically clear all transactions that were matched in the QuickStatementsyou’ve downloaded over the month. QuickBooks asks for the ending date onthe statement and clears each previously matched transaction up to that date.
As you check each cleared transaction, the Difference amount in the lower-rightcorner of the Reconcile window changes. The goal is to get that figure to 0.00.
Adding Transactions During ReconciliationWhile you’re working in the Reconcile window, if you find a transaction on thestatement that you haven’t entered into your QuickBooks software (probably one ofthose ATM transactions you forgot to enter), you don’t have to shut down thereconciliation process to remedy the situation. You can just enter the transactioninto your register.
To open the bank account register, right-click anywhere in the Reconcile windowand choose Use Register from the shortcut menu. When the account register opens,record the transaction. Return to the Reconcile window, where that transaction isnow listed. Pretty nifty! Check it off as cleared, of course, because it was on thestatement.
You can switch between the Reconcile window and the register for the accountyou’re reconciling all through this process. Use the Window menu on theQuickBooks Menu bar to move between them.
Adding Undeposited Funds During ReconciliationIf the statement shows a deposit that doesn’t appear in your Reconcile window,don’t add the deposit to your register until you check the Payments To Depositwindow (choose Banking | Make Deposits). Most of the time you’ll find thepayments listed there, still awaiting deposit, even though you obviously went to
288 P A R T T W O B O O K K E E P I N G
QckBcks TIGHT / QuickBooks 2009 The Official Guide / Ivens / 274-8 / Chapter 12
P:\010Comp\QckBcks\274-8\ch12.vpTuesday, September 16, 2008 11:01:39 AM
Color profile: DisabledComposite Default screen

the bank and deposited those checks. Select the payments that match the totalshown on the bank statement and go through the Make Deposits function. Whenyou’re finished, the deposit appears in the Reconcile window. If the deposit isn’t inthe Payments To Deposit window, then you forgot to enter a transaction. Enter thetransaction now, using the appropriate transaction window. Make sure you depositit into the bank account, to have it appear in the Reconcile window.
Deleting Transactions During ReconciliationSometimes you find that a transaction that was transferred from your accountregister to this Reconcile window shouldn’t be there. This commonly occurs if youentered an ATM withdrawal twice. Or perhaps you forgot that you’d entered adeposit, and a couple of days later you entered it again. Whatever the reason,occasionally there are transactions that should be deleted.
To delete a transaction, double-click its listing in the window, which opens theoriginal transaction. Then, right-click and select delete (QuickBooks asks you toconfirm the deletion). The transaction disappears from the Reconcile window andthe bank register.
Editing Transactions During ReconciliationSometimes you’ll want to change some of the information in a transaction. Forexample, when you see the real check, you realize the amount you entered inQuickBooks is wrong. You might even have the wrong date on a check. (Thesethings only happen, of course, if you write checks manually; they don’t happen toQuickBooks users who let QuickBooks take care of printing checks.)
Whatever the problem, you can correct it by editing the transaction. Double-click the transaction’s listing in the Reconcile window to open the originaltransaction window. Enter the necessary changes and close the window. AnswerYes when QuickBooks asks if you want to record the changes, and you’re returnedto the Reconcile window where the changes are reflected.
Resolving Missing Check NumbersMost bank statements list your checks in order and indicate a missing number withan asterisk. For instance, you may see check number 1234 followed by checknumber *1236 or 1236*. When a check number is missing, it means one of threethings:
• The check cleared in a previous reconciliation.• The check is still outstanding.• The check number is unused and is probably literally missing.
C H A P T E R 1 2 R E C O N C I L I N G B A N K A C C O U N T S 289
QckBcks TIGHT / QuickBooks 2009 The Official Guide / Ivens / 274-8 / Chapter 12
P:\010Comp\QckBcks\274-8\ch12.vpTuesday, September 16, 2008 11:01:39 AM
Color profile: DisabledComposite Default screen

If a missing check number on your bank statement is puzzling, you can check itsstatus. To see if the check cleared in the last reconciliation, open the PreviousReconciliation report (discussed later in this chapter) by choosing Reports |Banking | Previous Reconciliation.
To investigate further, right-click anywhere in the Reconcile window and chooseMissing Checks Report from the shortcut menu. When the Missing Checks dialogopens, select the appropriate account (if you have multiple bank accounts). You’llsee asterisks indicating missing check numbers, as seen in Figure 12-3.
If the check number is listed in your Missing Checks Report, it’s truly missing; itdoesn’t exist in the register. Investigate the following possible causes:
• You deleted the check that was assigned that number.• The check is physically missing (usually because somebody grabbed one or
more checks to carry around).• Checks jammed while printing, and you restarted the print run with the
number of the first available check (QuickBooks doesn’t mark checks as void inthat case; it just omits the numbers in the register so they show up in theMissing Checks Report).
290 P A R T T W O B O O K K E E P I N G
QckBcks TIGHT / QuickBooks 2009 The Official Guide / Ivens / 274-8 / Chapter 12
FIGURE 12-3 Quite a few checks are missing.
P:\010Comp\QckBcks\274-8\ch12.vpTuesday, September 16, 2008 11:01:39 AM
Color profile: DisabledComposite Default screen

Finishing the ReconciliationIf this isn’t the first reconciliation you’re performing, there’s a good chance that theDifference figure at the bottom of the Reconcile window displays 0.00. If this is thefirst reconciliation and you changed the opening balance in the account register (asexplained earlier in this chapter), you probably also see 0.00 as the difference.
Click Reconcile Now and read the section “Printing the Reconciliation Report”later in this chapter. If the Difference amount is an amount other than 0.00, readthe following sections.
Pausing the Reconciliation ProcessIf the account doesn’t reconcile (the Difference figure isn’t 0.00), and you don’t havethe time, energy, or emotional fortitude to track down the problem at the moment,you can stop the reconciliation process without losing all the transactions youcleared.
Click the Leave button in the Reconcile window and do something else for awhile. Have dinner, play with the cat, go to the movies, whatever. When you restartthe reconciliation process, all the entries you made are still there.
Finding and Correcting ProblemsWhen you’re ready to investigate the cause of a difference between the endingbalance and the cleared balance, follow the guidelines presented here to find theproblem.
Count the number of transactions on the bank statement. Then look in thelower-left corner of the Reconcile window, where the number of items you havemarked cleared is displayed. Mentally add another item to that number for each ofthe following:
• A service charge you entered in the Begin Reconciliation box• An interest amount you entered in the Begin Reconciliation box
If the numbers differ, the problem is in your QuickBooks records; there’s atransaction you should have cleared but didn’t, or a transaction you cleared thatyou shouldn’t have.
If you’re sure you didn’t make any mistakes clearing transactions, do the following:
• Check the amount of each transaction against the amount in the bankstatement.
• Check your transactions and make sure a deposit wasn’t inadvertently enteredas a payment (or vice versa). A clue for this is a transaction that’s half thedifference. If the difference is $220.00, find a transaction that has an amount of$110.00 and make sure it’s a deduction if it’s supposed to be a deduction (or theother way around).
C H A P T E R 1 2 R E C O N C I L I N G B A N K A C C O U N T S 291
QckBcks TIGHT / QuickBooks 2009 The Official Guide / Ivens / 274-8 / Chapter 12
P:\010Comp\QckBcks\274-8\ch12.vpTuesday, September 16, 2008 11:01:39 AM
Color profile: DisabledComposite Default screen

• Check for transposed figures. Perhaps you entered a figure incorrectly in theregister, such as $549.00 when the bank clears the transaction as $594.00. Aclue that a transposed number is the problem is that the reconciliationdifference can be divided by nine.
If you find the problem, correct it. When the Difference figure is 0.00, clickReconcile Now.
T I P : You might want to let somebody else check over the statement and theregister, because sometimes you can’t see your own mistakes.
Permitting an Adjusting EntryIf you cannot find the problem, you can tell QuickBooks to make an adjusting entryto force the reconciliation to balance. The adjusting entry is placed in the bankaccount register and is offset in an expense account named ReconciliationDiscrepancies (the account is created automatically the first time you encounterthis problem). If you ever figure out what the problem is, you can make the properadjustment transaction and delete the adjusting entry.
To force a reconciliation, click Reconcile Now, even though there’s a difference. Amessage appears to offer the opportunity to make an adjusting entry. Click EnterAdjustment.
Printing the Reconciliation ReportWhen you have a balanced reconciliation (even if it results from an adjustingentry), QuickBooks offers congratulations and also offers to print a reconciliationreport. (The dialog has a Close button to skip the report, but you should keep acopy of all your reconciliation reports.)
Ill 12-1
QuickBooks saves the report whether you print it, view it, or cancel it. You canview it in the future by choosing Reports | Banking | Previous Reconciliation.
292 P A R T T W O B O O K K E E P I N G
QckBcks TIGHT / QuickBooks 2009 The Official Guide / Ivens / 274-8 / Chapter 12
P:\010Comp\QckBcks\274-8\ch12.vpTuesday, September 16, 2008 11:01:40 AM
Color profile: DisabledComposite Default screen

Deciding on the Type of ReportQuickBooks offers two reconciliation report types: Detail and Summary. Here arethe differences between them:
• The Detail Report shows all the transactions that are cleared and all thetransactions that haven’t cleared (called in transit transactions) as of thestatement closing date. Any transactions dated after the statement closing dateare listed as new transactions.
• The Summary Report breaks down your transactions in the same way, but itdoesn’t list the individual transactions; it shows only the totals for eachcategory: Cleared, Uncleared (in transit), and New.
Selecting the Detail Report makes it easier to resolve problems in the future. Youhave a list of every check and deposit and when it cleared.
Print vs. DisplayYou also have to decide whether to print or to display the report. Make yourdecision according to how you think you might use the report.
Printing a Reconciliation ReportIf you opt to print both reports, the Print Reports dialog opens so you can select theprinter. If you select either the Summary or Detail Report, the Print Reports dialogoffers options, as follows:
• Print the report to the selected printer. You can file the printout in case youever need to refer to it.
• Print the report to a file. The file option offers several formats in a drop-downlist, so you can load the resulting file into the software of your choice. Thisgives you the opportunity to store multiple reports in one application (or evenone file) and sort the data as you wish. The following file options are available:• ASCII text Is straight, unformatted text.• Comma delimited Automatically puts a comma between each field
(column). Select this option if you want to use the file in a spreadsheet ordatabase program capable of importing comma-delimited files. Mostspreadsheet software can handle comma-delimited files.
• Tab delimited Is the same as comma delimited, but the field delimiter is atab marker instead of a comma. All spreadsheet and database software canhandle tab-delimited files.
When you print a report to a disk file, QuickBooks opens a Create Disk Filewindow with the folder that holds your QuickBooks software as the target folder.The file extension matches the file type you selected.
C H A P T E R 1 2 R E C O N C I L I N G B A N K A C C O U N T S 293
QckBcks TIGHT / QuickBooks 2009 The Official Guide / Ivens / 274-8 / Chapter 12
P:\010Comp\QckBcks\274-8\ch12.vpTuesday, September 16, 2008 11:01:40 AM
Color profile: DisabledComposite Default screen

You can change the container to any other folder in the system—you might wantto create a subfolder in your My Documents folder to hold these files. Hereafter,that folder becomes the default container for your reconciliation reports. Be sure tosave each month’s reconciliation report file with a unique name—the date and theaccount name (if you reconcile more than one bank account) are good selectionsfor filenames.
Displaying the Reconciliation ReportIf you choose to display a report (or both reports), you see the usual QuickBooksreport format. You can modify the report to change the font, the columns, and soon. In addition, you can click the Export icon at the top of the report window andsend the report to Excel, where you can manipulate the data to match your needs.
Adjusting the Beginning Balancefor the First ReconciliationThe beginning balance in the Begin Reconciliation window probably doesn’t matchthe opening balance on your bank statement the first time you reconcile theaccount. The beginning balance should be 0.00.
The bank, of course, is using the last ending balance as the current beginningbalance. The last ending balance represents a running total that began way backwhen, starting when you first opened that bank account. The only QuickBooksusers who have it easy are those who opened their bank accounts the same day theystarted to use QuickBooks. (A minuscule number of people, if any, fit thatdescription.)
To get your QuickBooks bank reconciliation in sync with your bank balance, youhave to create a “fake previous reconciliation.”
Follow these steps to create a previous reconciliation:
� Set the Statement Date field in the Begin Reconciliation dialog to the day beforethe date of the bank statement.
� In the Ending Balance field (see Figure 12-4), enter the amount of the closingbalance on the bank statement.
� Click Continue to move to the Reconcile dialog.� Select all the transactions dated on or before the date of the statement.� The Difference figure (in the lower-right corner of the Reconcile dialog) should
now be zero (see Figure 12-5).� Click Reconcile Now.
QuickBooks announces a successful, balanced reconciliation, and you can print areport if you wish. Now you can return to the bank reconciliation feature and use
294 P A R T T W O B O O K K E E P I N G
QckBcks TIGHT / QuickBooks 2009 The Official Guide / Ivens / 274-8 / Chapter 12
P:\010Comp\QckBcks\274-8\ch12.vpTuesday, September 16, 2008 11:01:40 AM
Color profile: DisabledComposite Default screen

the real statement date to reconcile your bank account. This time, you have thesame amounts for the opening and closing balances, and you don’t have to selectany transactions to set the Difference figure to 0.00. Finish the reconciliation to setthe previous date and opening balance for future months.
C H A P T E R 1 2 R E C O N C I L I N G B A N K A C C O U N T S 295
QckBcks TIGHT / QuickBooks 2009 The Official Guide / Ivens / 274-8 / Chapter 12
FIGURE 12-4 Use an earlier statement date to catch up to your real bank statements.
FIGURE 12-5 Clear all the earlier transactions to match the current statement to QuickBooks.
P:\010Comp\QckBcks\274-8\ch12.vpTuesday, September 16, 2008 11:01:40 AM
Color profile: DisabledComposite Default screen

Troubleshooting Differencesin the Beginning BalanceIf this isn’t the first time you’ve reconciled the bank account, the beginning balancethat’s displayed on the Begin Reconciliation window should match the beginningbalance on the bank statement. That beginning balance is the ending balance fromthe last reconciliation, and nothing should change its amount.
If the beginning balance doesn’t match the statement, you have to find out why.Search your memory, because you probably performed one of the following actions(these are all things you should never do, and you need to undo the damage):
• You changed the amount on a transaction that had previously cleared.• You voided a transaction that had previously cleared.• You deleted a transaction that had previously cleared.• You removed the cleared check mark from a transaction that had previously
cleared.• You manually entered a cleared check mark on a transaction that had not
cleared.
You have to figure out which one of those actions you took after you lastreconciled the account, and luckily, QuickBooks has a tool to help you. Clickthe Locate Discrepancies button on the Begin Reconciliation window to open theLocate Discrepancies dialog seen in Figure 12-6.
296 P A R T T W O B O O K K E E P I N G
QckBcks TIGHT / QuickBooks 2009 The Official Guide / Ivens / 274-8 / Chapter 12
FIGURE 12-6 You have tools to help you track down the reason for an incorrect startingbalance.
P:\010Comp\QckBcks\274-8\ch12.vpTuesday, September 16, 2008 11:01:41 AM
Color profile: DisabledComposite Default screen

Viewing the Discrepancy ReportClick Discrepancy Report to see if any transactions that were cleared during a pastreconciliation were later changed or deleted (see Figure 12-7).
This report shows you the details of the transactions that cleared during aprevious reconciliation if any changes were made to those transactions since thatreconciliation. If the Reconciled Amount column shows a positive number, theoriginal cleared transaction was a deposit; a negative number indicates adisbursement. The Type Of Change column provides a clue about the action youmust take to correct the unmatched beginning balances.
• Uncleared Means you removed the check mark in the Cleared column of theregister (and you persisted in this action even though QuickBooks issued astern warning about the dangers).
• Deleted Means you deleted the transaction.• Amount Means you changed the amount of the transaction. The difference
between the amount in the Reconciled Amount column and the amount in theEffect Of Change column is the amount of the change.
This report doesn’t offer a Type Of Change named “Void,” so a voided transactionis merely marked as changed, and the text in the Type Of Change column is Amount.A transaction with a changed amount equal to and opposite of the original amountwas almost certainly a transaction you voided after it cleared.
C H A P T E R 1 2 R E C O N C I L I N G B A N K A C C O U N T S 297
QckBcks TIGHT / QuickBooks 2009 The Official Guide / Ivens / 274-8 / Chapter 12
FIGURE 12-7 Someone voided a transaction that was cleared during a previous reconciliation.
P:\010Comp\QckBcks\274-8\ch12.vpTuesday, September 16, 2008 11:01:41 AM
Color profile: DisabledComposite Default screen

Correcting Opening Balance DifferencesUse the information in the Discrepancy Report to correct the problems you createdby changing previously cleared transactions.
Correcting Changed TransactionsIf you cleared or uncleared a transaction manually, open the bank register and undoyour erroneous action. If you changed the amount of a transaction that had cleared,and the transaction still exists in the register with an amount (it’s not markedVOID), change the amount back to the original amount for that transaction.
Replacing Voided or Deleted Cleared TransactionsIf the beginning balance is incorrect because you removed a transaction that hadcleared (either by voiding or deleting it), you have to put the transaction back intoyour register. You can get the information you need from the Discrepancy Report.
• If a transaction is there but marked VOID, re-enter it, using the data in thereconciliation report. That transaction wasn’t void when you performed the lastreconciliation, it had cleared. Therefore, it doesn’t meet any of the reasons tovoid a transaction.
• If a transaction appears in the reconciliation report but is not in the register, itwas deleted. If it cleared, it can’t be deleted. Re-enter it, using the data in thereconciliation report.
• Check the amounts on the printed check reconciliation report against the datain the register to see if any amount was changed after the account wasreconciled. If so, restore the original amount.
Making these changes is safe because you’re undoing your own mistake. Youcan’t justify changing a cleared transaction—a transaction that cleared cannot havethe amount changed, be voided, be deleted, or be uncleared.
If you re-enter a transaction that was voided or deleted after it cleared, and youput a check mark into the Cleared Column (the column with a check mark as thecolumn title), QuickBooks adds it to your Reconcile window, with a check markalready in place. This is a nifty feature, probably born from need as the QuickBooksprogrammers realized how often people improperly void or delete previouslycleared transactions. This action doesn’t adjust your opening balance on the BeginReconciliation window, but it does readjust the math so the current reconciliationworks and next month’s opening balance will be correct.
T I P : You don’t have to be in the Begin Reconciliation window to see aDiscrepancy Report. You can view the contents at any time by choosing Reports |Banking | Reconciliation Discrepancy.
298 P A R T T W O B O O K K E E P I N G
QckBcks TIGHT / QuickBooks 2009 The Official Guide / Ivens / 274-8 / Chapter 12
P:\010Comp\QckBcks\274-8\ch12.vpTuesday, September 16, 2008 11:01:41 AM
Color profile: DisabledComposite Default screen

Viewing the Last Reconciliation ReportEven if you don’t display or print a reconciliation report after you reconcile anaccount, QuickBooks saves the report. If you’re trying to track down a discrepancyin the beginning balance, viewing the last reconciliation report may be helpful.
Click Previous Reports to open the Select Previous Reconciliation Report dialog,and select the options for the type and format of the report you want to see.
T I P : You can view the Previous Reconciliation Report at any time by choosingReports | Banking | Previous Reconciliation.
Undoing the Last ReconciliationQuickBooks lets you undo the last reconciliation, which means that all transactionscleared during the reconciliation are uncleared. This is a good way to start over ifyou’re mired in difficulties and confusion during the current reconciliation, and theproblems seem to stem from the previous reconciliation (especially if you’d forcedreconciliation by having QuickBooks make an adjusting entry).
Click the Undo Last Reconciliation button on the Begin Reconciliation dialog.QuickBooks suggests you click Cancel and back up your company file beforecontinuing, which is an excellent idea (just in case this process doesn’t work properly,so you can restore the data in its reconciled state). Then, begin reconciling, clickUndo Last Reconciliation, and click Continue.
QuickBooks performs the following actions:
• Removes the cleared status of all transactions you cleared during the lastreconciliation.
• Leaves the amounts you entered for interest and bank charges (so don’t re-enterthem).
When the process completes, QuickBooks displays a message to describe thoseactions and tell you they were performed. Click OK to clear the message and returnto the Begin Reconciliation dialog.
If QuickBooks made an adjustment entry during the last reconciliation (whichalmost certainly is the case; otherwise, you wouldn’t have to undo and redo thereconciliation), click Cancel to close the Begin Reconciliation dialog. Open theaccount’s register and delete the adjustment entry—it’s the entry posted to theReconciliation Adjustment account. Hopefully, this time the reconciliation willwork and you won’t need another adjusting entry.
Start the reconciliation process again for the same month you just “undid.”When the Begin Reconciliation window opens, the data that appears is the samedata that appeared when you started the last reconciliation—the last reconciliationdate, the statement date, and the beginning balance are back.
C H A P T E R 1 2 R E C O N C I L I N G B A N K A C C O U N T S 299
QckBcks TIGHT / QuickBooks 2009 The Official Guide / Ivens / 274-8 / Chapter 12
P:\010Comp\QckBcks\274-8\ch12.vpTuesday, September 16, 2008 11:01:41 AM
Color profile: DisabledComposite Default screen

Enter the ending balance from the bank statement. Do not enter the interestand bank charges again; they were not removed when QuickBooks undid the lastreconciliation. Instead, find them in the Reconcile window and clear them (they’renot labeled, so you have to look for the appropriate date and amount).
Good luck!
Giving Up the Search for a ReasonYou may not be able to find a reason for the difference in the beginning balances.There’s a point at which it isn’t worth your time to keep looking, so just give up andperform the reconciliation. If your bank account doesn’t balance, QuickBooks willmake an adjusting transaction at the end of the reconciliation process, and if youever learn the reason, you can remove that transaction.
300 P A R T T W O B O O K K E E P I N G
QckBcks TIGHT / QuickBooks 2009 The Official Guide / Ivens / 274-8 / Chapter 12
P:\010Comp\QckBcks\274-8\ch12.vpTuesday, September 16, 2008 11:01:41 AM
Color profile: DisabledComposite Default screen

Chapter
Chapter
1313Using Budgets
In this chapter:
• Configure a budget
• Report on budgets versus actual figures
• Export budgets
301
QckBcks TIGHT / QuickBooks 2009 The Official Guide / Ivens / 274-8 / Chapter 13
P:\010Comp\QckBcks\274-8\ch13.vpTuesday, September 16, 2008 9:40:20 AM
Color profile: DisabledComposite Default screen

A budget is a tool for tracking your progress against your plans. A well-preparedbudget can also help you draw money out of your business wisely, because knowingwhat you plan to spend on staff, overhead, or other expenses in the future preventsyou from carelessly withdrawing profits and living high on the hog whenever youhave a good month.
How QuickBooks Handles BudgetsBefore you begin creating a budget, you need to know how QuickBooks managesbudgets and the processes connected to budgets. This section presents an overviewof the QuickBooks budget features, so you can understand them and bear them inmind when you create your budgets.
Types of BudgetsQuickBooks offers several types of budgets:
• Budgets based on your Balance Sheet accounts• P&L budgets based on your income and expense accounts• P&L budgets based on income and expense accounts and a customer or job• P&L budgets based on income and expense accounts and a class (if you’ve
enabled class tracking)
P&L budgets can be created from scratch or by using the actual figures from theprevious year. The latter option, of course, only works if you’ve upgraded toQuickBooks 2009 from an earlier version.
Budgets Aren’t Really DocumentsIn QuickBooks, a budget is the data you enter in a budget window. Once you begincreating a budget, the data you record is more or less permanently ensconced in thebudget window and reappears whenever you open that budget window. You create abudget by choosing Company | Planning & Budgeting | Set Up Budgets.
You can only create one of each type of budget. For example, if you create a P&Lbudget, enter and record some figures, and then decide to start all over by launchingthe Create New Budget Wizard, you can’t create a new P&L budget. Instead of creatinga new budget, the wizard displays the data you already configured. You have no wayof telling QuickBooks, “Okay, save that one, I’m going to do another one with differentfigures.” You can change the figures, but the changes replace the original figures.You’re editing a budget; you’re not creating a new budget document.
Creating Multiple BudgetsOnce you’ve created your first budget, regardless of type, the next time you selectCompany | Planning & Budgeting | Set Up Budgets, the budget window opens withthe last budget you created.
302 P A R T T W O B O O K K E E P I N G
QckBcks TIGHT / QuickBooks 2009 The Official Guide / Ivens / 274-8 / Chapter 13
P:\010Comp\QckBcks\274-8\ch13.vpTuesday, September 16, 2008 9:40:21 AM
Color profile: DisabledComposite Default screen

If the budget is a P&L or Balance Sheet budget, you cannot create a secondbudget of the same type. However, you can create a budget of a different type (P&LCustomer:Job or P&L Class). To do so, click the Create New Budget button in thebudget window and go through the wizard to select different criteria (Customer:Jobor Class).
After you’ve created a Customer:Job budget or a Class budget, you can createanother budget using a different customer or job, or a different class. See thesections “Customer:Job Budgets” and “Class Budgets” for instructions on creatingmultiple budgets of those types.
Deleting a BudgetQuickBooks lets you delete a budget. This means if you want to create multiplebudgets of the same type (perhaps you feel better if you have a “Plan B”), you havea workaround to the “no two budgets of the same type” rule.
However, you can export the original budget to Excel, and then delete theoriginal budget and start the process again. See the section “Exporting Budgets,”later in this chapter.
To delete a budget, choose Edit | Delete Budget from the QuickBooks menu barwhile the budget window is open.
Understanding the Budget WindowBefore you start entering figures, you need to learn how to manage your work usingthe buttons on the budget window.
• Clear Deletes all figures in the budget window—you cannot use this buttonto clear a row or column.
• Save Records the current figures and leaves the window open so you cancontinue to work.
• OK Records the current figures and closes the window.• Cancel Closes the window without any offer to record the figures.• Create New Budget Starts the budget process anew, opening the Create New
Budget Wizard. If you’ve entered any data, QuickBooks asks if you want torecord your budget before closing the window. If you record your data (or havepreviously recorded your data with the Save button), when you start anew, thebudget window opens with the same recorded data.
The other buttons in the budget window are used when you’re entering data, andare covered later in this chapter in the section “Entering Budget Data.”
C H A P T E R 1 3 U S I N G B U D G E T S 303
QckBcks TIGHT / QuickBooks 2009 The Official Guide / Ivens / 274-8 / Chapter 13
P:\010Comp\QckBcks\274-8\ch13.vpTuesday, September 16, 2008 9:40:21 AM
Color profile: DisabledComposite Default screen
Tasks to Perform Before You Start Your BudgetBefore you create a budget, you need to check the following details:
• The accounts you need must be available; you cannot add accounts whileyou’re working in a budget.
• Make sure all the accounts you want to include on the budget are active;inactive accounts are not available.
• The first month that’s displayed in the budget window must be the first monthof your fiscal year, or your budget won’t work properly. If you don’t run yourcompany on a calendar year (or if you want to create a budget that’s not basedon your fiscal year), you must make sure your company configuration has thecorrect starting month. Choose Company | Company Information to view andedit the first month of your fiscal year.
P&L BudgetsThe most common (and useful) budget is based on your income and expenses.After you’ve set up a good chart of accounts, creating a budget is quite easy.
Create the Budget and Its CriteriaTo create a P&L budget, choose Company | Planning & Budgeting | Set Up Budgets.If this is the first budget you’re creating, the Create New Budget Wizard opens towalk you through the process. (If you’ve already created a budget, the Set UpBudgets window appears with your existing budget loaded—click Create NewBudget to open the Create New Budget Wizard.) Enter the year for which you’recreating the budget and select the P&L budget option.
304 P A R T T W O B O O K K E E P I N G
QckBcks TIGHT / QuickBooks 2009 The Official Guide / Ivens / 274-8 / Chapter 13
A Word About Balance Sheet BudgetsIt’s highly unusual to have a need to create a Balance Sheet budget because you can’t predict theamounts for most Balance Sheet accounts. Even if you want to keep an eye on the few accountsover which you have control (fixed assets and loans), there’s little reason to use a budget to do so.The transactions for fixed assets and loans are usually planned and therefore don’t need budget-to-reality comparisons to allow you to keep an eye on them.
➽ FYI
P:\010Comp\QckBcks\274-8\ch13.vpTuesday, September 16, 2008 9:40:21 AM
Color profile: DisabledComposite Default screen

Ill 13-1
N O T E : If you’re not operating on a calendar year, the budget year fieldspans two calendar years, for instance 2009–10, to accommodate your fiscalyear.
Click Next to select any additional criteria for this budget. You can includecustomers (and jobs) or classes in your budget.
Ill 13-2
(This discussion covers regular P&L budgets—unconnected to customers orclasses—and the following sections explain how to budget for customers and jobsand for classes.)
Click Next to choose between creating a budget from scratch or from the figuresfrom last year’s activities (this discussion is about creating a budget from scratch).Click Finish to open the budget window, where all your income and expenseaccounts are displayed (see Figure 13-1).
C H A P T E R 1 3 U S I N G B U D G E T S 305
QckBcks TIGHT / QuickBooks 2009 The Official Guide / Ivens / 274-8 / Chapter 13
P:\010Comp\QckBcks\274-8\ch13.vpTuesday, September 16, 2008 9:40:21 AM
Color profile: DisabledComposite Default screen

Entering Budget DataTo create budget figures for an account, select the account and then click in thecolumn of the first month you want to budget. Enter the budget figure, press TAB tomove to the next month, and enter the appropriate amount. Repeat until all themonths for this account have your budget figures. As you enter each monthlyamount and press TAB, QuickBooks automatically calculates and displays theannual total for the account (see Figure 13-2).
Using Budget Entry ShortcutsTo save yourself from contracting a case of terminal ennui, QuickBooks providessome shortcuts for entering budget figures.
Copy Numbers Across the MonthsTo copy a monthly figure from the current month (the month where your cursor is)to all the following months, enter the figure and click Copy Across. The numbersare copied to all the rest of the months of the year.
306 P A R T T W O B O O K K E E P I N G
QckBcks TIGHT / QuickBooks 2009 The Official Guide / Ivens / 274-8 / Chapter 13
FIGURE 13-1 All active income and expense accounts are available for your budget.
P:\010Comp\QckBcks\274-8\ch13.vpTuesday, September 16, 2008 9:40:21 AM
Color profile: DisabledComposite Default screen

You can perform this shortcut as soon as you enter an amount (but before youpress TAB), or you can return to the month you want to designate the first month byclicking its column (useful if you’ve entered figures for several months and thenremember this shortcut).
This is handier than it seems at first glance. It’s obvious that if you enter yourrent in the first month and choose Copy Across, you’ve saved a lot of manual dataentry. However, suppose your landlord sends you a notice that your rent isincreasing beginning in July? To adjust the July–December budget figures, justmove your cursor to July, enter the new rate, and click Copy Across.
The Copy Across button is also the way to clear a row. Delete the figure in thefirst month (or enter a zero) and click Copy Across. The entire row is now blank(or filled with zeros).
Automatically Increase or Decrease Monthly FiguresAfter you’ve entered figures into all the months on an account’s row (manually, byusing the Copy Across button, or by bringing in last year’s figures), you can raise orlower monthly figures automatically. For example, you may want to raise an incomeaccount by an amount or a percentage starting in a certain month because youexpect to sign a new customer or a new contract.
C H A P T E R 1 3 U S I N G B U D G E T S 307
QckBcks TIGHT / QuickBooks 2009 The Official Guide / Ivens / 274-8 / Chapter 13
FIGURE 13-2 QuickBooks takes care of tracking the running totals.
P:\010Comp\QckBcks\274-8\ch13.vpTuesday, September 16, 2008 9:40:22 AM
Color profile: DisabledComposite Default screen

Select the first month that needs the adjustment and click Adjust Row Amountsto open the Adjust Row Amounts dialog.
Ill 13-3
Choose 1st Month or Currently Selected Month as the starting point for thecalculations.
• You can choose 1st Month no matter where your cursor is on the account’s row.• You must click in the column for the appropriate month if you want to choose
Currently Selected Month (you can click the first month to make that thecurrently selected month).
• To increase or decrease the amount in the selected month and all the monthsfollowing by a specific amount, enter the amount.
• To increase or decrease the amount in the selected month and all columns tothe right by a percentage, enter the percentage rate and the percentage sign.
Compound the ChangesIf you select Currently Selected Month, the Adjust Row Amounts dialog adds anadditional option named Enable Compounding.
Ill 13-4
308 P A R T T W O B O O K K E E P I N G
QckBcks TIGHT / QuickBooks 2009 The Official Guide / Ivens / 274-8 / Chapter 13
P:\010Comp\QckBcks\274-8\ch13.vpTuesday, September 16, 2008 9:40:22 AM
Color profile: DisabledComposite Default screen

T I P : Although the Enable Compounding option appears only when you selectCurrently Selected Month, if your cursor is in the first month and you select theCurrently Selected Month option, you can use compounding for the entire year.
When you enable compounding, the calculations for each month are increasedor decreased based on a formula starting with the currently selected month andtaking into consideration the resulting change in the previous month.
For example, if you entered $1,000.00 in the current month and indicated a$100.00 increase, the results differ from amounts that are not being compounded.
CompoundingEnabled?
CurrentMonth
OriginalFigure
CurrentMonth
NewFigure
NextMonth
NextMonth
NextMonth
NextMonth
Yes 1,000.00 1,000.00 1,100.00 1,200.00 1,300.00 1,400.00
No 1,000.00 1,100.00 1,100.00 1,100.00 1,100.00 1,100.00
Create a Budget from Last Year’s DataIf you used QuickBooks last year, you can create a budget based on last year’sfigures. To use last year’s real data as the basis of your budget, open the Create NewBudget Wizard by choosing Company | Planning & Budgeting | Set Up Budgets.When the Create New Budget Wizard opens, enter the year for which you’recreating the budget, and select the P&L budget option. In the next window, selectany additional criteria, such as a customer, job, or class. In the next window, selectthe option to create the budget from the previous year’s actual figures, and clickFinish.
The budget window opens with last year’s actual data displayed (see Figure 13-3).For each account that had activity, the ending monthly balances are entered in theappropriate month.
You can change any figures you wish using the procedures and shortcutsdescribed earlier in this chapter.
Customer:Job BudgetsIf you have a customer or a job that warrants it, you can create a P&L budget totrack the financials for that customer or job against a budget. Usually, you only dothis for a project that involves a substantial amount of money and/or covers a longperiod of time.
C H A P T E R 1 3 U S I N G B U D G E T S 309
QckBcks TIGHT / QuickBooks 2009 The Official Guide / Ivens / 274-8 / Chapter 13
P:\010Comp\QckBcks\274-8\ch13.vpTuesday, September 16, 2008 9:40:22 AM
Color profile: DisabledComposite Default screen

Creating the First Customer:Job BudgetTo create your first budget for a customer or a job, choose Company | Planning &Budgeting | Set Up Budgets. (This discussion assumes you’re creating the budgetfrom scratch, not from last year’s P&L figures for the selected customer/job.)
• If you already created another budget of a different type (P&L or Class), thebudget window opens with the last budget you created. Click the Create NewBudget button in the budget window to launch the Create New Budget Wizard.
• If this is your first-ever budget, the Create New Budget Wizard appearsautomatically.
Select the year for your budget and choose P&L as the type. In the next wizardwindow, select the option Customer:Job. Specify whether you want to create thebudget from scratch, or by using last year’s financial data (this discussion assumesyou’re creating a budget from scratch).
When you click Finish, the budget window opens and displays an additionalfield labeled Current Customer:Job. Select the Customer:Job for this budget fromthe drop-down list.
310 P A R T T W O B O O K K E E P I N G
QckBcks TIGHT / QuickBooks 2009 The Official Guide / Ivens / 274-8 / Chapter 13
FIGURE 13-3 Start your budget by looking at last year’s figures.
P:\010Comp\QckBcks\274-8\ch13.vpTuesday, September 16, 2008 9:40:23 AM
Color profile: DisabledComposite Default screen

Select the account, or multiple accounts, for which you want to budget thisjob—these will probably be only expense accounts (the anticipated income isusually already known). The expenses you track depend on the scope of the job.For example, you may only want to budget the cost of outside contractors orsupplies, so if prices rise you can have a conversation with the customer aboutoverruns.
You can enter a monthly budget figure for each account or for each month theproject exists, or enter a total budget figure in the first month. The latter option letsyou compare accumulated data for expenses against the total budgeted figure bycreating modified reports (where you change the report date to reflect the elapsedtime for the project and filter the report for this job only).
If the project is lengthy, you may budget some accounts for some months andother accounts for other months. For example, if you have a project that involvespurchases of goods, followed by installation of those goods, or training for thecustomer’s employees, you might choose to budget the purchases for the first fewmonths and then the cost of the installation or training (either by tracking payrollor outside contractors) for the months in which those activities occur.
If you want to track payroll costs against a job, use the QuickBooks Time andBilling features that are discussed in Chapter 18. If you do your own payroll, alsoread Chapter 19 to learn how to move the Time and Billing features to your payrollcomputations. It’s nerve-wracking to attempt payroll job-costing manually.
C A U T I O N : Customer:Job budgets don’t work unless you’re faithful aboutassigning transactions to the customer or job. If you’ve only been filling in theCustomer:Job fields when the customer is billable, you won’t have accuratebudget-to-reality reports.
Creating Additional Customer:Job BudgetsAfter you’ve created one budget based on a customer or job, creating a budget for adifferent customer or job requires different steps.
To create a budget for another customer immediately while the Customer:Jobbudget you just created is still in the budget window, select another customer fromthe drop-down list. Begin entering data and click Yes when QuickBooks asks if youwant to record the budget you just finished.
Class BudgetsYou can link your budget to any class you’ve created (if you’re using class tracking).This works well for certain types of classes and not for others. If you’re usingclasses to track branch offices, company divisions, or company departments, youcan create useful budgets. If, on the other hand, you’re using classes to divide yourtransactions in some esoteric way, budgeting may not work well.
C H A P T E R 1 3 U S I N G B U D G E T S 311
QckBcks TIGHT / QuickBooks 2009 The Official Guide / Ivens / 274-8 / Chapter 13
P:\010Comp\QckBcks\274-8\ch13.vpTuesday, September 16, 2008 9:40:23 AM
Color profile: DisabledComposite Default screen
Look at your class-based reports, and if you find yourself asking, “Aren’t thoseexpenses higher than they should be?” or “Why is one class less profitable than theother classes?”, you might want to budget each month to get a handle on where andwhen expenses got out of hand. Also, if you ask, “Is this department contributingthe income I expected?”, include income accounts in your budget. You can useincome accounts in class budgets to provide incentives to your employees—perhaps a bonus to a manager if the reality is better than the budget.
To create a class-based budget, use the steps described earlier to create a budgetand choose Class in the Additional Profit And Loss Budget Criteria Wizard window.When the budget window opens, a Current Class field appears. Select the class forwhich you’re creating a budget from the drop-down list. Then begin entering data.
To create additional class budgets (for other classes, of course), use the sameapproach discussed in the previous section on creating additional customer or jobbudgets.
Budget ReportsQuickBooks provides a number of budget reports you can use to see how you’redoing. To get to the reports, choose Reports | Budgets & Forecasts and then selectone of the following reports:
• Budget Overview• Budget vs. Actual• Profit & Loss Budget Performance• Budget vs. Actual Graph
Each report has a short wizard that lets you select the budget you want toexamine.
Budget OverviewThis report shows the accounts you budgeted and the amounts you budgeted foreach month. Accounts that you didn’t include in the budget aren’t displayed.
Profit & Loss Budget OverviewIf you created a P&L budget, select Profit & Loss By Account in the first BudgetReport window and click Next. In the next window, you’re asked to select a reportlayout, but the only option available in the drop-down list is Account By Month.Click Next, and then click Finish. The report opens and looks like the P&L budgetreport in Figure 13-4. Essentially, the Overview report type produces the displayyou’d see if the window you use to create a budget had a button labeled Print TheBudget.
312 P A R T T W O B O O K K E E P I N G
QckBcks TIGHT / QuickBooks 2009 The Official Guide / Ivens / 274-8 / Chapter 13
P:\010Comp\QckBcks\274-8\ch13.vpTuesday, September 16, 2008 9:40:23 AM
Color profile: DisabledComposite Default screen

If you use subaccounts in your budget, you can click the Collapse button at thetop of the report window to see only the parent account totals. The button namechanges to Expand, and clicking it puts the subaccount lines back into the display.
To condense the numbers, use the Columns drop-down list to select a differentinterval. The default is Month, but you can choose another interval and QuickBookswill calculate the figures to fit. For example, you might want to select Quarter tosee four columns of three-month subtotals.
If you want to tweak the budget, or play “what if” games by experimenting withdifferent numbers, click the Export button to send the report to Microsoft Excel.
Balance Sheet Budget OverviewIf you created a Balance Sheet budget, select Balance Sheet By Account in the firstwindow and then click Next. QuickBooks displays a graphical representation of thereport’s layout (it’s a monthly layout similar to the layout for the P&L budget).Click Finish to see the report.
Customer:Job Budget OverviewIf you created one or more budgets for a customer or a job, select Profit & LossBy Account And Customer:Job in the first window and click Next. Select a report
C H A P T E R 1 3 U S I N G B U D G E T S 313
QckBcks TIGHT / QuickBooks 2009 The Official Guide / Ivens / 274-8 / Chapter 13
FIGURE 13-4 The P&L Budget Overview is an easy-to-read display of your budget.
P:\010Comp\QckBcks\274-8\ch13.vpTuesday, September 16, 2008 9:40:23 AM
Color profile: DisabledComposite Default screen

layout from the drop-down list (as you select each option from the list, QuickBooksdisplays a diagram of the layout). The following choices are available:
• Account By Month Lists each account you used in the budget and displaysthe total budget amounts (for all customer budgets you created) for eachmonth that has data. No budget information for individual customers appears.
• Account By Customer:Job Lists each account you used in the budget anddisplays the yearly total for that account for each customer (each customer hasits own column).
• Customer:Job By Month Displays a row for each customer that has a budgetand a column for each month. The budget totals (for all accounts—individualaccounts are not displayed) appear under each month. Under each customer’srow is a row for each job that has a budget.
T I P : The name of each layout choice is a hint about the way it displays in thereport. The first word represents the rows, and the word after the word “by”represents the columns.
Class Budget OverviewIf you created a Class budget, select Profit & Loss By Account And Class in the firstwindow and click Next. Select a report layout from the drop-down list. You havethe following choices:
• Account By Month Lists each account you used in the budget and displaysthe total budget amounts (for all Class budgets you created) for each monththat has data. No budget information for individual classes appears.
• Account By Class Lists each account you used in the budget and displays theyearly total for that account for each class (each class has its own column).
• Class By Month Displays a row for each class that has a budget and a columnfor each month. The total budget (not broken down by account) appears foreach month.
Budget vs. ActualThis report’s name says it all—you can see how your real numbers compare to yourbudget figures. For a straight P&L budget, the report displays the following data foreach month of your budget, for each account:
• Amount posted• Amount budgeted• Difference in dollars• Difference in percentage
314 P A R T T W O B O O K K E E P I N G
QckBcks TIGHT / QuickBooks 2009 The Official Guide / Ivens / 274-8 / Chapter 13
P:\010Comp\QckBcks\274-8\ch13.vpTuesday, September 16, 2008 9:40:23 AM
Color profile: DisabledComposite Default screen

The choices for the budget type are the same as the Budget Overview, so you cansee account totals, customer totals, or class totals to match the budgets you’vecreated.
The first thing you’ll notice in the report is that all the accounts in your generalledger are listed, regardless of whether or not you included them in your budget.However, only the accounts you used in your budget show budget figures. You canchange that by customizing the report to include only your budgeted accounts.
Click the Modify Report button at the top of the budget report window. In theModify Report window, click the Advanced button to open the Advanced Optionswindow. Click the option labeled Show Only Rows And Columns With Budgets.
Click OK to return to the Modify Report window, and then click OK again toreturn to the Budget Vs. Actual Report window. The data that’s displayed is onlythat data connected to your budgeted accounts.
You can also use the options in the Modify Report window to make otherchanges:
• Change the report dates.• Change the calculations from Accrual to Cash (which means that unpaid
invoices and bills are removed from the calculations, and only actual incomeand expenses are reported).
You should memorize the report so you don’t have to make these modificationsthe next time you want to view a comparison report. Click the Memorize button atthe top of the report window and then give the report a meaningful name. Only theformatting changes you make are memorized, not the data. Every time you openthe report, it displays current data. To view the report after you memorize it, chooseReports | Memorized Reports from the QuickBooks menu bar.
Profit & Loss Budget PerformanceThis report is similar to the Budget vs. Actual report, but it’s based on the currentmonth and the year to date. For that time period, the report displays your actualincome and expenses compared to what you budgeted.
By default, the date range is the current month, but you can change that to seelast month’s figures or the figures for any previous month. This report is also availablefor all types, as described in “Budget Overview,” earlier in this section, and can alsobe modified to customize the display.
Budget vs. Actual GraphThis report just opens; you have no choices to select first. All the choices are in thegraph that displays, in the form of buttons across the top of the report window.Merely click the type of report you want to see.
C H A P T E R 1 3 U S I N G B U D G E T S 315
QckBcks TIGHT / QuickBooks 2009 The Official Guide / Ivens / 274-8 / Chapter 13
P:\010Comp\QckBcks\274-8\ch13.vpTuesday, September 16, 2008 9:40:23 AM
Color profile: DisabledComposite Default screen

Exporting BudgetsIf you need to manipulate your budgets, export them to other software applications.However, you can’t select specific budgets to export—it’s all or nothing.
You can export the budgets to any software program that supports documentsthat contain delimited fields (this usually means spreadsheet or database programs).
Follow these steps to export a budget:
� Choose File | Utilities | Export | Lists To IIF Files from the QuickBooks menubar.
� When the Export dialog opens, it displays all the QuickBooks lists. Select theitem named Budgets and click OK.
� Another Export dialog opens (this one looks like the Save dialog you’re used toseeing in Windows software). Select a folder in which to save this exported file,or leave it in your QuickBooks folder (the default location). It’s best to changethe folder to the location where you keep files for the program you’re going touse for the exported file (usually, My Documents).
� Give the exported list a filename (for example, 2009Budgets). QuickBooks willautomatically add the extension .IIF to the filename.
� Click Save. QuickBooks displays a message telling you that your data has beenexported successfully. Click OK.
Importing Budgets Back into QuickBooksThe only circumstances under which you’d import budgets back into QuickBooks isto copy a budget to another year. If you wanted to edit figures, you’d work in theQuickBooks budget window. To play “what if” games or to sort the budget differently,you’d work in the appropriate software (such as Excel) because QuickBooks doesn’tprovide those features.
If you changed the dates to next year, import the file so you can use the data inbudget reports, or edit data right in the QuickBooks budget window.
Follow these steps to import a budget back into QuickBooks:
� Choose File | Utilities | Import | IIF Files from the menu bar.� When the Import dialog opens, locate and double-click the file you saved.� QuickBooks displays a message to tell you the import was successful. Click OK.
You can view the imported budgets in any budget report or in the budgetwindow. QuickBooks checks the dates and changes the budget’s name to reflect thedates. Budget names start with FYxxxx, where xxxx is the fiscal year.
When you select a budget report or choose a budget to edit in the budgetwindow, the available budgets include both the budgets you created in QuickBooks(FY2009) and the budgets you imported after changing the date (FY2010). Nextyear, you can delete the FY2009 budgets.
316 P A R T T W O B O O K K E E P I N G
QckBcks TIGHT / QuickBooks 2009 The Official Guide / Ivens / 274-8 / Chapter 13
P:\010Comp\QckBcks\274-8\ch13.vpTuesday, September 16, 2008 9:40:23 AM
Color profile: DisabledComposite Default screen

Chapter
Chapter
1414Using Journal Entries
In this chapter:
• The QuickBooks journal entry window
• Enter the opening trial balance
• Make adjustments to the general ledger
• Depreciate fixed assets
• Journalize outside payroll services
317
QckBcks TIGHT / QuickBooks 2009 The Official Guide / Ivens / 274-8 / Chapter 14
P:\010Comp\QckBcks\274-8\ch14.vpTuesday, September 16, 2008 9:44:04 AM
Color profile: DisabledComposite Default screen

As you work in QuickBooks, the amounts involved in the financial transactions youcomplete are transferred to your general ledger. In addition to transaction data,numbers can be placed into the general ledger directly. This action is called ajournal entry.
Journal entries shouldn’t be used without a specific purpose, and usually thatpurpose is to enter figures that cannot be added to an account via a standardtransaction. The most common reason to create a journal entry is to adjust existingnumbers for some purpose. Check with your accountant when you think you needto adjust numbers with a journal entry.
N O T E : The standard jargon for this transaction type is journal entry, usuallyabbreviated JE. However, QuickBooks refers to the transaction as general journalentry and uses GJE as the abbreviation.
The QuickBooks Journal Entry WindowFor journal entries, QuickBooks provides the Make General Journal Entrieswindow, seen in Figure 14-1. The format of the transaction window matches thestandard approach to viewing the general ledger: columns for account numbers,debit amounts, and credit amounts (called a T-Account format). In addition,QuickBooks provides columns you can use to link the GJE data to customers andclasses, and also enter a memo.
318 P A R T T W O B O O K K E E P I N G
QckBcks TIGHT / QuickBooks 2009 The Official Guide / Ivens / 274-8 / Chapter 14
FIGURE 14-1 The QuickBooks GJE window has more columns than the standard T-Accountformat, so you can track additional information.
P:\010Comp\QckBcks\274-8\ch14.vpTuesday, September 16, 2008 9:44:05 AM
Color profile: DisabledComposite Default screen

Follow these steps to create a journal entry:
� Choose Company | Make General Journal Entries. QuickBooks displays a messagetelling you that automatic numbers are now assigned to journal entries. (Select theoption Do Not Display This Message In The Future, and then click OK.)
� Click in the Account column, and then click the arrow to see a drop-down listof your chart of accounts. Choose the account you need.
� Move to the Debit or Credit column (depending on the data you’re entering)and enter the amount for that account.
� Repeat for all the accounts in the journal entry.
As you enter each amount, QuickBooks presents the offsetting total in the next line.For example, if the line items you’ve entered so far have a higher total for the credit sidethan the debit side, the next entry presents the balancing offset (see Figure 14-2).
Here are the guidelines for using the columns QuickBooks adds to a traditionaljournal entry window:
• Use the Memo column to write a comment about the reason for the journalentry. By default, QuickBooks Premier and Enterprise Solutions editionsautomatically copy the text you enter in the first line to all the other lines in theJE. The memo text appears in the entry of the account’s register and on reports,so you can see the explanation of this transaction no matter which accountregister you’re viewing.
C H A P T E R 1 4 U S I N G J O U R N A L E N T R I E S 319
QckBcks TIGHT / QuickBooks 2009 The Official Guide / Ivens / 274-8 / Chapter 14
FIGURE 14-2 QuickBooks tracks the arithmetic to make sure your JE balances.
P:\010Comp\QckBcks\274-8\ch14.vpTuesday, September 16, 2008 9:44:05 AM
Color profile: DisabledComposite Default screen

• Use the Name column to assign a customer, vendor, employee, or other nameto the amount on this line of the entry, if you’re linking the entry to a name. Ifthe account you’re posting to is an A/R or A/P account, an entry in the Namecolumn is required.
• The column with the icon is a “billable” flag, which means that the amount isbillable to the name in the Name column. Click the column to insert the“billable” icon if you are using an expense account and you enter a customername in the Name column.
• If you’re using the Classes feature, a Class column is present, and you can linkthe entry to a class. (See Chapter 20 for information about classes.)
The Premier/Enterprise Accountant Editions have a different GJE window, withadditional features. See the section, “Additional GJE Power in the AccountantEditions,” later in this chapter.
N O T E : If you’re running QuickBooks in a nonprofit organization, your journalentries are almost always linked to classes (programs) and sometimes linked to jobs(grants) in addition to classes. In fact, assigning journal entry transaction lines toclasses is the best way to move money in and out of programs, or allocate overheadexpenses among multiple programs. For more information and tips about usingQuickBooks for nonprofit organizations, see Running QuickBooks in Nonprofits fromCPA911 Publishing (www.cpa911publishing.com). You can buy the book at yourfavorite bookstore.
Opening Trial BalanceIf you opted to skip entering opening balances during your EasyStep Interview, orwhen you created new accounts, you need to enter the opening balances for youraccounts. All that’s necessary is the opening balances for the balance sheetaccounts. Then you can add all the transactions that took place since the beginningof the year to create a thorough history of transactions.
Entering the Opening BalancesQuickBooks does not have an item or feature called the “opening balance,” per se.However, every account register is sorted by date, so using the first day of yourfiscal year creates an opening balance automatically.
Confer with your accountant to develop the opening balance, and then enter itas a journal entry. Some of the accounts in the balance sheet can’t be entered in aQuickBooks journal entry, and the next section explains the problems and offerssome workarounds.
320 P A R T T W O B O O K K E E P I N G
QckBcks TIGHT / QuickBooks 2009 The Official Guide / Ivens / 274-8 / Chapter 14
P:\010Comp\QckBcks\274-8\ch14.vpTuesday, September 16, 2008 9:44:05 AM
Color profile: DisabledComposite Default screen
T I P : Create a separate equity account for your previous retained earnings(name it Previous Retained Earnings); and create a JE to move the current retainedearnings amount into that account at the end of the year. QuickBooks will postprofit (or loss) to the retained earnings equity account during the next year, butyou’ll have historical numbers in the Previous Retained Earnings account.
Workarounds for QuickBooks LimitationsThere are a couple of QuickBooks idiosyncrasies you may run into when workingwith journal entries.
In QuickBooks, a journal entry can contain only the A/P account or the A/Raccount; you cannot use both of those accounts in the same journal entry (and theodds are good that both accounts appear in your opening balance). You’ll get anerror message that says, “You cannot use more than one A/R or A/P account in thesame transaction” (which is not a clear explanation). Unfortunately, QuickBooksdoesn’t issue the error message until after you enter all the data and try to save thejournal entry (and an opening balance JE can contain a great many rows).
This restriction does not have its roots in accounting standards. It’s an arbitraryrule built into the QuickBooks software.
Another problem is that QuickBooks insists you attach a single customer orvendor name to the entry if you’re making a journal entry that involves either theA/R or the A/P account. You can’t just enter an A/R or A/P balance against yourprevious equity (or against income or expenses, for that matter). If you’re keepingcustomer info outside of QuickBooks (perhaps you have a retail business and keepcustomer charges elsewhere), you’re out of luck.
If you decide that’s okay, and you’re willing to enter customer opening balances inyour JE, you have another problem: you can’t enter A/R for more than one customerin the JE. QuickBooks won’t permit more than one A/R line in the journal entry, andthat A/R line has to have one customer (the same restrictions apply to A/P).
QuickBooks’ approach is to enter the opening balance when you create acustomer or vendor. Both the New Customer and New Vendor windows have a fieldfor this purpose. Those totals are posted to A/R and A/P as of the date you enter,which should be the first day of the fiscal year if you’re trying to create an openingtrial balance.
As a special “trick” to drive accountants into a frenzy, when you enter anopening balance for a customer or vendor as you create the entity, QuickBooks usesthe Opening Bal Equity account as the offset account. That’s not a standard equityaccount; it’s another QuickBooks invention that’s needed because the softwareoffers the opportunity to enter opening balances when you create customers,vendors, and accounts. Most accountants don’t want to see any balance in theOpening Bal Equity account, ever.
C H A P T E R 1 4 U S I N G J O U R N A L E N T R I E S 321
QckBcks TIGHT / QuickBooks 2009 The Official Guide / Ivens / 274-8 / Chapter 14
P:\010Comp\QckBcks\274-8\ch14.vpTuesday, September 16, 2008 9:44:05 AM
Color profile: DisabledComposite Default screen

Neither of these data entry methods—A/R lines or opening balances duringcustomer setup—is a good idea. The entry is only a total, and you don’t havediscrete invoices or bills, saddling you with several annoying drawbacks, such as:
• You can’t easily deal with disputes over specific invoices or bills (you’ll have totry to find the original paperwork).
• Customer payments have to be applied as partial payments against the total youentered. This makes it more difficult to have conversations with customersabout their accounts.
• You don’t have the opportunity to enter memos on invoices or bills.• It makes it difficult to track those amounts that are for reimbursed expenses.
The solution is to enter your opening trial balance without the A/R and A/Pentries (and always avoid entering an opening balance when you set up customersand vendors).
Then, enter the open invoices for customers and the open bills from vendors,using your opening balance date for the transactions, and let QuickBooks post thetotals to the general ledger.
You can create one comprehensive invoice for the entire open balance percustomer/vendor and pay it off if you don’t want to bother with the individualinvoices that created the opening balance.
Making Journal Entries for Changedor New AccountsAfter you’ve used QuickBooks for a while, you may find that you want to trackincome differently. Instead of one income account, you may decide to createseparate income accounts that are more specific. For example, having an incomeaccount for consulting fees, and another income account for products sold, makesbusiness analysis easier.
This transaction is quite simple. Create the new account and then take theappropriate amount of funds out of the original account and put it into the newaccount. Revenue is a credit-side item, so that means
• Debit the original account for the amount that belongs in the new account.• Credit the new account for that same amount.
Then, of course, you’ll have to go to the items list and change the necessaryitems to reflect the new income account so you don’t have to keep making journalentries.
The same decision is frequently made about expenses, as business owners decideto split heretofore comprehensive accounts. Perhaps you feel your insurance
322 P A R T T W O B O O K K E E P I N G
QckBcks TIGHT / QuickBooks 2009 The Official Guide / Ivens / 274-8 / Chapter 14
P:\010Comp\QckBcks\274-8\ch14.vpTuesday, September 16, 2008 9:44:05 AM
Color profile: DisabledComposite Default screen

accounts should be separated for car insurance, equipment insurance, buildinginsurance, malpractice insurance, and so on.
For expense accounts, the journal entry goes to the opposite side of the ledgerbecause expenses are a debit-side item, so do the following:
• Credit the original expense account for the amount you’re taking out of it andputting into the new account(s).
• Debit the new account(s) for the appropriate amount(s).
This logic also applies to a fixed-asset account named Vehicles that you want todivide into more specific accounts (to track the truck separately from the car, forinstance, especially if they were purchased in different years). This means you canalso separate out any accumulated depreciation so it’s assigned to the correct asset.(You can get that information from your tax returns, or ask your accountant.)
Making Depreciation EntriesDepreciation is a way to track the current value of a fixed asset that loses value as itages. The basis of an asset’s depreciation from an accounting point of view isdetermined by a complicated set of rules. The IRS makes these rules, and the ruleschange frequently.
Depreciation is a journal entry activity. Most small businesses enter thedepreciation of their assets at the end of the year, but some companies performdepreciation tasks monthly or quarterly.
Depreciation is a special journal entry because the accounts involved are veryrestricted—this is not a free choice where you can use whichever account strikesyour fancy. The account that is being depreciated must be a fixed asset. The offsetentry is to an account named Depreciation in the expense section of your chart ofaccounts.
Creating Accounts for Tracking DepreciationThis discussion assumes that you’ve created your fixed-asset account and that theassets you’ve purchased have been posted there. You might have multiple fixed-asset accounts if you want to track different types of fixed assets separately. (Forinstance, your chart of accounts may have three fixed-asset account sections:Equipment, Furn & Fixtures, and Vehicle.)
When it comes to accounting procedures that have a direct bearing on your taxesand for which you might need information at a glance (especially if you’re called onto explain it), you should be very explicit in the way you enter transactions. Therefore,for every fixed-asset account in your chart of accounts, create families of accountsfor depreciation; using a parent (account) and children (subaccounts) for each type
C H A P T E R 1 4 U S I N G J O U R N A L E N T R I E S 323
QckBcks TIGHT / QuickBooks 2009 The Official Guide / Ivens / 274-8 / Chapter 14
P:\010Comp\QckBcks\274-8\ch14.vpTuesday, September 16, 2008 9:44:06 AM
Color profile: DisabledComposite Default screen

of fixed asset. For example, the fixed-asset section of a chart of accounts might looklike this:
Parent Accounts Subaccounts
Equipment Assets
Equipment Purchases
AccumDepr-Equipment
Furn & Fixtures Assets
Furn & Fixtures Purchases
AccumDepr-Furn & Fixtures
Vehicle Assets
Vehicle Purchases
AccumDepr-Vehicles
If you use numbers for your chart of accounts, create a numbering system thatmakes sense for this setup. For example, if Equipment is 1600, the subaccountsstart with 1601; Furn & Fixtures starts with 1620, and the subaccounts start with1621; Vehicle starts with 1640, and so on.
Don’t post to the parent account. Post asset purchases to the Purchasessubaccount, and make the journal entry for depreciation in the AccumDeprsubaccount. There are several reasons for this:
• Both the purchase subaccount and the depreciation asset subaccount are“pure.” You can look at either one to see a running total instead of a calculatednet total.
• Tracing the year-to-year depreciation is easy; just open the depreciation assetsubaccount register—each line represents a year.
• It’s easier and quicker to open the depreciation asset subaccount if you’re askedabout the depreciation total (handy if you sell the asset and have to add backthe depreciation).
• Your Balance Sheet report shows the details and displays the total of thesubaccounts next to the parent account.
You can further refine this paradigm by creating subaccounts for specific fixedassets. For instance, you may want to create a subaccount for each vehicle asset andits accompanying accumulated depreciation. Or, you might want a subaccount forall cars and a different subaccount for all trucks.
If your equipment falls under a variety of depreciation rules (for example,manufacturing equipment vs. computer equipment), you may want to have a set ofsubaccounts for each type.
324 P A R T T W O B O O K K E E P I N G
QckBcks TIGHT / QuickBooks 2009 The Official Guide / Ivens / 274-8 / Chapter 14
P:\010Comp\QckBcks\274-8\ch14.vpTuesday, September 16, 2008 9:44:06 AM
Color profile: DisabledComposite Default screen

If you’re really obsessive, you can create a different subaccount for each year ofdepreciation; for instance, under your AccumDepr-Vehicle subaccount, you couldhave Vehicle-Depr 2006, Vehicle-Depr 2007, Vehicle-Depr 2008, and so on. Thenyour balance sheet shows a complete year-by-year depreciation schedule instead ofaccumulated depreciation—and the math still works properly. However, after anumber of years, you’ll have destroyed an entire forest with all the paper it takes toprint your balance sheet.
Creating a Depreciation EntryTo depreciate fixed assets, you must first have a depreciation offset account in theExpense section of your chart of accounts.
Follow these steps to make your depreciation entry:
� Choose Company | Make General Journal Entries from the menu bar.� Choose the first asset depreciation subaccount.� Enter the depreciation amount in the Credit column.� Choose the next asset depreciation subaccount and enter its depreciation
amount in the Credit column. (QuickBooks automatically puts the offsettingamount in the Debit column, but just keep moving to the Credit column as youwork.)
� Continue until all your depreciation figures are entered in the Credit column.� Choose the Depreciation Expense account. The total amount of the credits is
automatically placed in the Debit column.� Click Save & Close.
For example, here’s a typical journal entry for depreciation:
Account Debit Credit
Equipment:AccumDepr-Equip 5,000.00
Furn & Fix:AccumDepr-Furn & Fix 700.00
LeaseholdImprov:AccumDepr-LeasImprov 1,000.00
Depreciation Expense 6,700.00
Notice the colon in the account names for the asset accounts—that’s the QuickBooksindication of a subaccount.
Reversing EntriesYour accountant may enter, or tell you to enter, reversing entries. These are generaljournal entries that are applied on one date and then reversed on another (later)date. For example, on 12/31/09, you may have a journal entry that adjusts an
C H A P T E R 1 4 U S I N G J O U R N A L E N T R I E S 325
QckBcks TIGHT / QuickBooks 2009 The Official Guide / Ivens / 274-8 / Chapter 14
P:\010Comp\QckBcks\274-8\ch14.vpTuesday, September 16, 2008 9:44:06 AM
Color profile: DisabledComposite Default screen

account, and on 1/1/10, the entry has to be reversed. When both journal entries aresaved, the totals you see are dictated by the dates selected in report windows.
To create a reversing entry, enter the first (earlier) JE and then click the Reverseicon on the GJE window. QuickBooks creates another JE and automatically entersthe first day of the following month as the reversal date, but you can change thatdate if you have some reason to do so.
Journalizing Outside Payroll ServicesIf you have an outside payroll service, you have to tell QuickBooks about thepayroll transactions that took place. You get a report from the service, so all thenumbers are available. It’s just a matter of entering them.
It’s common for businesses to perform this task via a journal entry. Like all otherjournal entries, this one is just a matter of entering debits and credits. There arethree parts to recording payroll:
• Transferring money to the payroll account• Entering the payroll figures• Entering the employer expense figures
Transferring Money to the Payroll AccountYou should have a separate bank account for payroll if you have an outside payrollservice—in fact, a separate payroll account is a good idea even if you do your ownpayroll. Outside payroll services reach into your checking account; in fact, theyhave checks, and you certainly don’t want to give away checks for your regularoperating account.
Another reason for a separate payroll account, even if you do your own payroll,is the discipline involved in holding on to your employee withholdings until youpass them along to insurance companies, other vendors, and the government—especially the government. The money you withhold and leave in your bankaccount until you’re ready to transmit it to the government is not your money. Youcannot spend it. It doesn’t matter if you need the money to save your business fromtotal bankruptcy—you cannot spend the money. People have done that and gotteninto serious trouble, including going to jail. Keeping all the money associated withpayroll in a separate bank account makes it more difficult to “inadvertently” usethat money to run your business.
To transfer the money you need for this payroll, choose Banking | TransferFunds. Then, transfer the money from your regular operating account to yourpayroll account. Be sure to transfer enough money for the gross payroll plus theemployer payroll expenses, which include the following:
• Employer-matching contributions to FICA and Medicare• Employer-matching contributions to pension plans• Employer-matching contributions to benefits
326 P A R T T W O B O O K K E E P I N G
QckBcks TIGHT / QuickBooks 2009 The Official Guide / Ivens / 274-8 / Chapter 14
P:\010Comp\QckBcks\274-8\ch14.vpTuesday, September 16, 2008 9:44:06 AM
Color profile: DisabledComposite Default screen

• Employer state unemployment assessments• Employer FUTA• Any other government or benefit payments paid by the employer
Even though some of these aren’t transmitted every payday, you should transferthe amounts at that time anyway. Then, when it’s time to pay them, the correctamount of money will have been amassed in the payroll account.
Recording the PayrollThe payroll run (jargon for “printing the paychecks”) produces a fairly complicatedset of debits and credits. Many businesses record a journal entry for the run, then aseparate journal entry for the employer expenses when they’re transmitted.
If your payroll service takes care of remitting employer expenses, you canjournalize the payments. If you do the employer reports yourself and send thechecks directly, your check-writing activity will record the payments, so you don’tneed a journal entry for that part of your payroll tasks.
It’s possible that you don’t have all the expenses shown in this list (for instance,not all states have employee unemployment assessments). And you may haveadditional withholding categories such as union dues, garnishments against wages,and so on. Be sure you’ve created a liability account in your chart of accounts for eachwithholding category you need and a vendor for each transmittal check. Table 14-1shows a typical template for recording the payroll run as a journal entry.
C H A P T E R 1 4 U S I N G J O U R N A L E N T R I E S 327
QckBcks TIGHT / QuickBooks 2009 The Official Guide / Ivens / 274-8 / Chapter 14
A c c o u n t D e b i t C r e d i t
Salaries and Wages (Expense) Gross payroll
FWT (liability) Total federal withheld
FICA (liability) Total FICA withheld
Medicare (liability) Total Medicare withheld
State Income Tax (liability) Total state tax withheld
Local Income Tax (liability) Total local tax withheld
State SDI (liability) Total state SDI withheld
State SUI (liability) Total state SUI withheld
Benefits Contrib. (liability) Total benefits withheld
401(k) Contrib. (liability) Total 401(k) withheld
Other Deductions (liability) Total other deductions withheld
Payroll Bank Account (asset) Total of net payroll
TABLE 14-1 Typical Journal Entry to Record Payroll by an Outside Service
P:\010Comp\QckBcks\274-8\ch14.vpTuesday, September 16, 2008 9:44:06 AM
Color profile: DisabledComposite Default screen
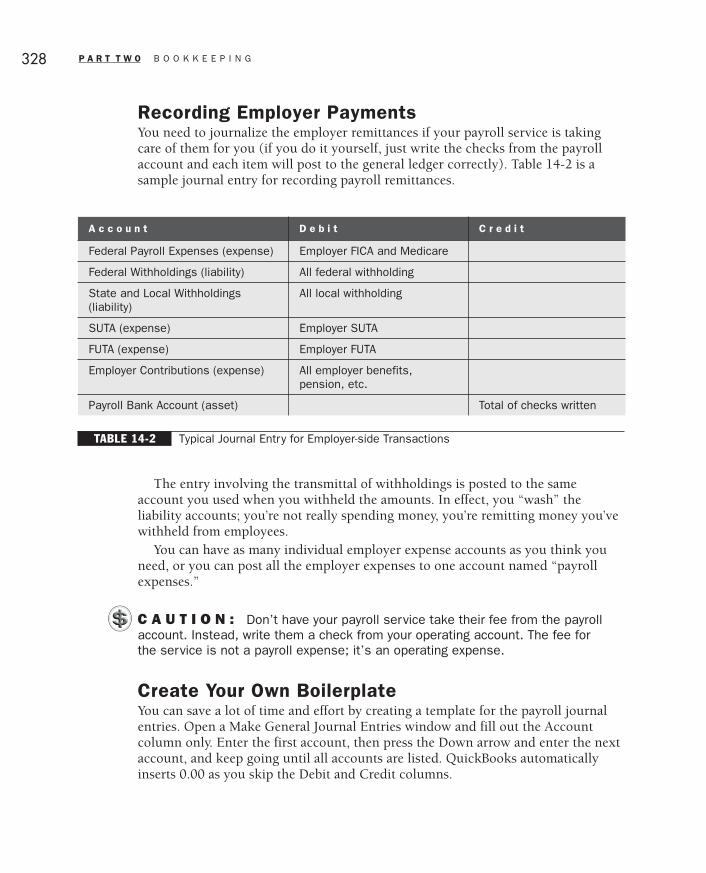
Recording Employer PaymentsYou need to journalize the employer remittances if your payroll service is takingcare of them for you (if you do it yourself, just write the checks from the payrollaccount and each item will post to the general ledger correctly). Table 14-2 is asample journal entry for recording payroll remittances.
The entry involving the transmittal of withholdings is posted to the sameaccount you used when you withheld the amounts. In effect, you “wash” theliability accounts; you’re not really spending money, you’re remitting money you’vewithheld from employees.
You can have as many individual employer expense accounts as you think youneed, or you can post all the employer expenses to one account named “payrollexpenses.”
C A U T I O N : Don’t have your payroll service take their fee from the payrollaccount. Instead, write them a check from your operating account. The fee forthe service is not a payroll expense; it’s an operating expense.
Create Your Own BoilerplateYou can save a lot of time and effort by creating a template for the payroll journalentries. Open a Make General Journal Entries window and fill out the Accountcolumn only. Enter the first account, then press the Down arrow and enter the nextaccount, and keep going until all accounts are listed. QuickBooks automaticallyinserts 0.00 as you skip the Debit and Credit columns.
328 P A R T T W O B O O K K E E P I N G
QckBcks TIGHT / QuickBooks 2009 The Official Guide / Ivens / 274-8 / Chapter 14
A c c o u n t D e b i t C r e d i t
Federal Payroll Expenses (expense) Employer FICA and Medicare
Federal Withholdings (liability) All federal withholding
State and Local Withholdings(liability)
All local withholding
SUTA (expense) Employer SUTA
FUTA (expense) Employer FUTA
Employer Contributions (expense) All employer benefits,pension, etc.
Payroll Bank Account (asset) Total of checks written
TABLE 14-2 Typical Journal Entry for Employer-side Transactions
P:\010Comp\QckBcks\274-8\ch14.vpTuesday, September 16, 2008 9:44:06 AM
Color profile: DisabledComposite Default screen
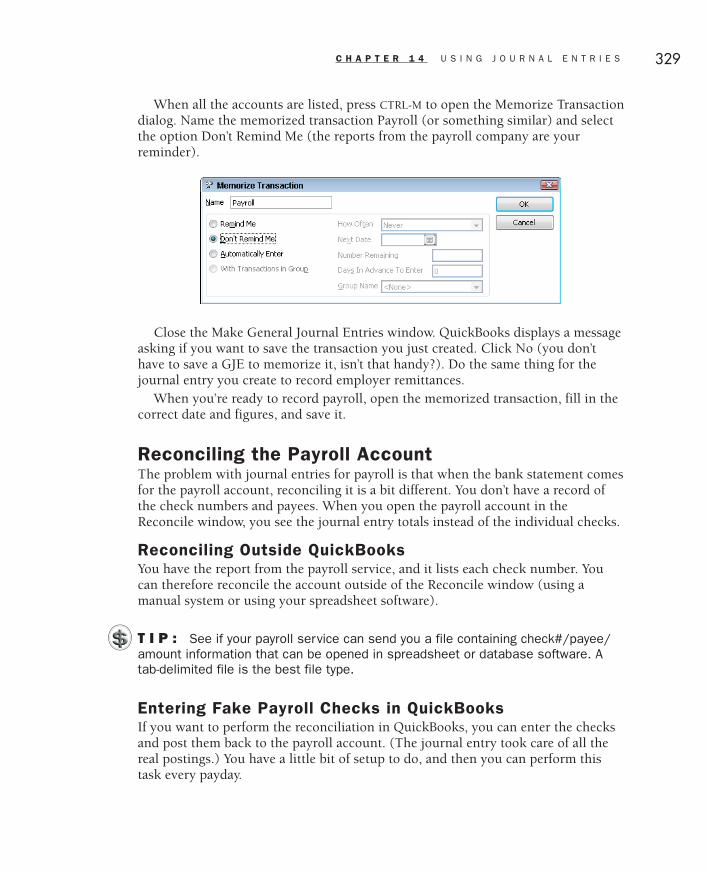
When all the accounts are listed, press CTRL-M to open the Memorize Transactiondialog. Name the memorized transaction Payroll (or something similar) and selectthe option Don’t Remind Me (the reports from the payroll company are yourreminder).
Ill 14-1
Close the Make General Journal Entries window. QuickBooks displays a messageasking if you want to save the transaction you just created. Click No (you don’thave to save a GJE to memorize it, isn’t that handy?). Do the same thing for thejournal entry you create to record employer remittances.
When you’re ready to record payroll, open the memorized transaction, fill in thecorrect date and figures, and save it.
Reconciling the Payroll AccountThe problem with journal entries for payroll is that when the bank statement comesfor the payroll account, reconciling it is a bit different. You don’t have a record ofthe check numbers and payees. When you open the payroll account in theReconcile window, you see the journal entry totals instead of the individual checks.
Reconciling Outside QuickBooksYou have the report from the payroll service, and it lists each check number. Youcan therefore reconcile the account outside of the Reconcile window (using amanual system or using your spreadsheet software).
T I P : See if your payroll service can send you a file containing check#/payee/amount information that can be opened in spreadsheet or database software. Atab-delimited file is the best file type.
Entering Fake Payroll Checks in QuickBooksIf you want to perform the reconciliation in QuickBooks, you can enter the checksand post them back to the payroll account. (The journal entry took care of all thereal postings.) You have a little bit of setup to do, and then you can perform thistask every payday.
C H A P T E R 1 4 U S I N G J O U R N A L E N T R I E S 329
QckBcks TIGHT / QuickBooks 2009 The Official Guide / Ivens / 274-8 / Chapter 14
P:\010Comp\QckBcks\274-8\ch14.vpTuesday, September 16, 2008 9:44:06 AM
Color profile: DisabledComposite Default screen

Create a name in the Other Names list, and name the new entity Payroll. You canuse this name for every check (and put the employee’s name in the memo field).
Alternatively, you can create a name for each employee in the Other Names list,using initials, last name only, or some other name that isn’t the same as the originalemployee name. The reason you have to create these fake names is that QuickBookswill not let you write a check directly to an employee. Employee checks can bewritten only via the real Payroll feature.
Now that you have a payee name for the payroll checks, grab the report from thepayroll service and enter the individual checks.
Use the following steps to enter the checks:
� Press CTRL-A to open the chart of accounts and double-click the Payroll accountto open the register.
� On the next available transaction line, enter the payroll check date.� Tab to the Number field and enter the first check number on the payroll service
report.� Enter the payee Payroll (unless you’ve entered all your employee names as
Other Names, in which case enter the appropriate name).� Enter the amount of the net paycheck.� In the Account field, choose the Payroll account (the account you’re currently
working in). QuickBooks will flash a message warning you that you’re postingthe payment to the source account.
� Click OK (because that’s what you want to do in order to “wash” thetransaction), and then click the check box that tells QuickBooks to omit thiswarning in the future.
Click the Record button to save this check, and then enter the next check.
You can also enter the checks the payroll service wrote to transmit yourwithholdings or pay your taxes. As long as each entry you make was enteredinto the journal entry, you can post everything back to the payroll account. You’re“washing” every transaction, not changing the balance of the account. Then, whenyou want to reconcile the payroll account, the individual checks are in the Reconcilewindow. The fact is, this procedure is quite easy and fast, and you have to do it onlyon payday (or once a month if you want to wait until the bank statement comes in).
Additional GJE Powerin the Accountant EditionsThe Premier and Enterprise Solutions Accountant Editions offer additional featuresfor journal entries.
330 P A R T T W O B O O K K E E P I N G
QckBcks TIGHT / QuickBooks 2009 The Official Guide / Ivens / 274-8 / Chapter 14
P:\010Comp\QckBcks\274-8\ch14.vpTuesday, September 16, 2008 5:58:44 PM
Color profile: DisabledComposite Default screen

GJE Reports in the Transaction WindowWhen you open a GJE transaction window, the bottom of the window displaysexisting GJEs. By default, the window displays the previous month’s transactions,but you can change the selection to match your needs (last year, this quarter, and soon). This provides access to earlier GJEs without the need to click the Previousbutton multiple times. Selecting a GJE from the list moves it into the transactionwindow if you need to make changes.
If you don’t want to see the previous transactions, click Hide List Of Entries (thebutton’s name changes to Show List Of Entries so you can reverse your decision).
T I P : Hiding the previous transactions enlarges the transaction window you’reworking on, which makes it easier to see all your entry lines when you’re creatinga large GJE.
GJE Adjusting EntriesFrequently, a GJE is an adjustment, made to correct a problem, or “clean up” anaccount. However, when you examine account registers and see a GJE, you have torely on your memory for the reason behind the entry. Sometimes, even the text youput into the Memo field doesn’t jog your memory sufficiently—it made sense whenyou wrote it, but not anymore. If you can’t remember, you have to use all thoseextra keystrokes to open the original transaction window, and even then, you maynot find enough information to determine the reason for the transaction.
Some GJEs are easy to figure out later; an entry in a fixed asset is almost certainlya depreciation or amortization entry. You don’t even have to bother opening theoriginal transaction window, because you know you’ll find a depreciation expenseaccount among the listings.
But what if the entry affects an income or expense account? Was this anadjustment, or did it represent some major change in the way books are kept? Mostaccountants want to know (and an auditor definitely wants to know).
In the Premier Accountant edition, you can specifically mark a GJE as anadjusting entry, via a check box available at the top of the GJE window. In fact, theAdjusting Entry check box has a check mark in it by default (because the majorityof GJEs are created to make an adjustment).
To make this feature even more efficient, the Accountant Editions have a reportnamed Adjusting Journal Entries (in the Accountant & Taxes Reports submenu).As you’d expect, it’s a display of the adjusting GJEs you created.
C H A P T E R 1 4 U S I N G J O U R N A L E N T R I E S 331
QckBcks TIGHT / QuickBooks 2009 The Official Guide / Ivens / 274-8 / Chapter 14
P:\010Comp\QckBcks\274-8\ch14.vpTuesday, September 16, 2008 9:44:06 AM
Color profile: DisabledComposite Default screen

QckBcks TIGHT / QuickBooks 2009 The Official Guide / Ivens / 274-8Blind 332
P:\010Comp\QckBcks\274-8\ch14.vpTuesday, September 16, 2008 9:44:06 AM
Color profile: DisabledComposite Default screen

Chapter
Chapter
1515Running FinancialReports
In this chapter:
• Trial balance
• Balance Sheet
• Profit & Loss statement
• Accountant’s copy
• Consolidating financial reports for multiple company files
333
QckBcks TIGHT / QuickBooks 2009 The Official Guide / Ivens / 274-8 / Chapter 15
P:\010Comp\QckBcks\274-8\ch15.vpMonday, September 15, 2008 7:47:29 PM
Color profile: DisabledComposite Default screen

The real power in accounting software is the reporting power. The reports youcreate in QuickBooks are reports you’d have to spend hours on if you’re using amanual bookkeeping system or tracking amounts in a spreadsheet. Additionally, inQuickBooks you can change, customize, and manipulate these reports to get allsorts of information about your business.
Trial BalanceA trial balance is a list of all your general ledger accounts and their current balances. It’sa quick way to see what’s what on an account-by-account basis. In fact, you can use theindividual totals and subtotal them to create a Balance Sheet and a Profit & Loss (P&L)statement. However, you don’t have to do that because both of those important reportsare also available in QuickBooks. Most accountants ask to see a trial balance whenthey’re preparing your taxes or analyzing the health of your business.
To see a trial balance, choose Reports | Accountant & Taxes | Trial Balance. Yourcompany’s trial balance is displayed on your screen and looks similar (in form, notcontent) to Figure 15-1. You can scroll through it to see all the account balances.
334 P A R T T W O B O O K K E E P I N G
QckBcks TIGHT / QuickBooks 2009 The Official Guide / Ivens / 274-8 / Chapter 15
FIGURE 15-1 A trial balance reports the current balance of every account.
P:\010Comp\QckBcks\274-8\ch15.vpMonday, September 15, 2008 7:47:29 PM
Color profile: DisabledComposite Default screen
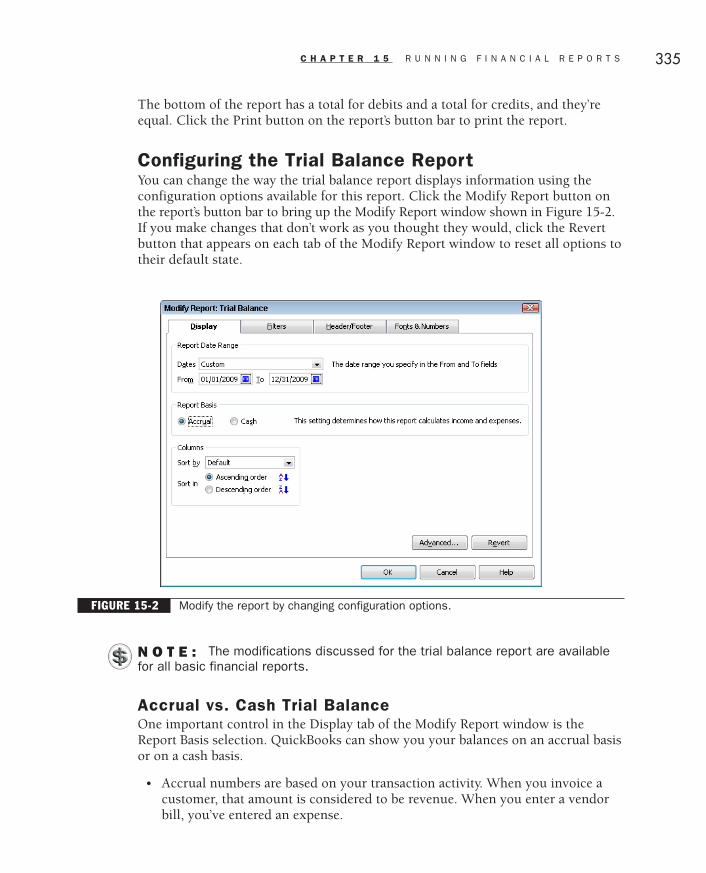
The bottom of the report has a total for debits and a total for credits, and they’reequal. Click the Print button on the report’s button bar to print the report.
Configuring the Trial Balance ReportYou can change the way the trial balance report displays information using theconfiguration options available for this report. Click the Modify Report button onthe report’s button bar to bring up the Modify Report window shown in Figure 15-2.If you make changes that don’t work as you thought they would, click the Revertbutton that appears on each tab of the Modify Report window to reset all options totheir default state.
N O T E : The modifications discussed for the trial balance report are availablefor all basic financial reports.
Accrual vs. Cash Trial BalanceOne important control in the Display tab of the Modify Report window is theReport Basis selection. QuickBooks can show you your balances on an accrual basisor on a cash basis.
• Accrual numbers are based on your transaction activity. When you invoice acustomer, that amount is considered to be revenue. When you enter a vendorbill, you’ve entered an expense.
C H A P T E R 1 5 R U N N I N G F I N A N C I A L R E P O R T S 335
QckBcks TIGHT / QuickBooks 2009 The Official Guide / Ivens / 274-8 / Chapter 15
FIGURE 15-2 Modify the report by changing configuration options.
P:\010Comp\QckBcks\274-8\ch15.vpMonday, September 15, 2008 7:47:29 PM
Color profile: DisabledComposite Default screen

• Cash numbers are based on the flow of cash. Revenue isn’t real until thecustomer pays the bill, and your vendor bills aren’t expenses until you paythem.
By default, QuickBooks, like most accounting software, displays accrual reports.Accrual reports are generally more useful for analyzing your business. However,unless you pay taxes on an accrual basis (most small businesses don’t), youraccountant may want to see a cash basis trial balance.
In the Columns section of the Display tab you can select the sort criterion. Forthe trial balance the choices are
• Default, which sorts the accounts in the usual order (assets, liabilities, and so on)• Total, which sorts the accounts depending on the current balance (rather
useless for this report)
N O T E : The report window itself has a field labeled Sort By, which you canuse to change the sorting scheme.
Setting Advanced OptionsClick the Advanced button on the Display tab to see the Advanced Options window,where you have two choices for changing the criteria for displaying informationand a choice for determining the calendar basis of the report.
The two display choices (Rows and Columns) change the criteria for displayinginformation.
• Select Active to display only those accounts in which financial activityoccurred. This includes accounts that have current balances of $0.00, becausethey had financial activity during the time period selected in the date range.
• Select All to see all accounts, irrespective of whether they had activity or have abalance of $0.00.
• Select Non-Zero to see only those accounts that had activity and have a balanceother than $0.00.
C A U T I O N : The term “Active” has nothing to do with the account’s statusas active or inactive (hidden). Accounts marked Inactive always appear on thereport, because their balances are part of your trial balance.
T I P : Most accountants want to see zero-balance accounts, because it’s away to see all the accounts in your system and because sometimes the fact thatan account has a zero balance is significant.
336 P A R T T W O B O O K K E E P I N G
QckBcks TIGHT / QuickBooks 2009 The Official Guide / Ivens / 274-8 / Chapter 15
P:\010Comp\QckBcks\274-8\ch15.vpMonday, September 15, 2008 7:47:30 PM
Color profile: DisabledComposite Default screen

The Reporting Calendar option determines the calendar basis of the report. Youcan change the option if your company preferences are not set for a fiscal and taxyear that coincides with the calendar year:
• Fiscal Year sets the reporting calendar to start at the first month of yourcompany’s fiscal year.
• Calendar Year sets the reporting calendar to start at January 1.• Income Tax Year sets the reporting calendar to start on the first day of the first
month of your company’s tax year.
Click OK to return to the Modify Report window.
Filtering the DataClick the Filters tab in the Modify Report window to filter the contents of the report(see Figure 15-3). Select a filter from the list in the Choose Filter section and decidehow it should be displayed. Different categories have different filtering criteria. Forinstance, you can filter amounts that are less or greater than a certain amount.
C A U T I O N : Once you start filtering accounts and amounts, you probablywill have a trial balance that no longer balances. At that point, you can’t call it atrial balance; you’re merely creating a list of certain account balances.
C H A P T E R 1 5 R U N N I N G F I N A N C I A L R E P O R T S 337
QckBcks TIGHT / QuickBooks 2009 The Official Guide / Ivens / 274-8 / Chapter 15
FIGURE 15-3 Change what’s reported by filtering the data to meet your criteria.
P:\010Comp\QckBcks\274-8\ch15.vpMonday, September 15, 2008 7:47:30 PM
Color profile: DisabledComposite Default screen

Changing the Header and FooterYou can customize what appears on the header and footer of your report bychanging the options on the Header/Footer tab, shown in Figure 15-4.
The options you configure here have no bearing on the figures in the report; thisis just the informational stuff. Most of the fields are self-explanatory, but the DatePrepared field may confuse you. The date you see in this tab has nothing to do withthe current date; it’s just a sample format. Click the arrow to the right of the field tosee other formats for displaying the date.
Changing the Fonts and Number DisplayThe Fonts & Numbers tab, shown in Figure 15-5, lets you change the font you usefor the various elements in the report. Select any part of the report from the list onthe left side of the dialog and click Change Font. Then select a font, a style (bold,italic, etc.), a size, and special effects such as underline.
On the right side of the dialog, you can configure the way numbers display andprint on your report. Select a method for showing negative numbers. If you wish,you can also select a method for displaying all the numbers on the report:
• Divided By 1000 reduces the size of the numbers by showing them as multiplesof 1000. This is useful for companies that report seven- and eight-digit numbers.
338 P A R T T W O B O O K K E E P I N G
QckBcks TIGHT / QuickBooks 2009 The Official Guide / Ivens / 274-8 / Chapter 15
FIGURE 15-4 Configure the top and bottom of the report page in the Header/Footer tab.
P:\010Comp\QckBcks\274-8\ch15.vpMonday, September 15, 2008 7:47:30 PM
Color profile: DisabledComposite Default screen

• Except Zero Amounts removes all instances of $0.00 and leaves the entry blank.• Without Cents eliminates the decimal point and the two digits to the right of
the decimal point from every amount. Only the dollars show, not the cents.QuickBooks rounds the cents to the nearest dollar.
Memorizing a Customized ReportYou may find that it’s useful to glance at the trial balance report occasionally, just tosee what certain totals are. Calling up the trial balance to view five or six accountbalances is faster than opening five or six accounts individually to see the currentbalance. You may want to see only the accounts that have a balance; youraccountant, on the other hand, likes to see all the accounts.
T I P : Balance Sheet accounts (assets, liabilities, and equity) display theircurrent balances in the Chart Of Accounts List window, so you don’t have to printa report to view those numbers.
The solution to providing both you and your accountant with the desired reportwithout going through all the modifications discussed in the previous sections is tomemorize each modified version of the report. After you’ve configured the report todisplay the information you want in the manner in which you want it, click the
C H A P T E R 1 5 R U N N I N G F I N A N C I A L R E P O R T S 339
QckBcks TIGHT / QuickBooks 2009 The Official Guide / Ivens / 274-8 / Chapter 15
FIGURE 15-5 Change the appearance of the data in the report.
P:\010Comp\QckBcks\274-8\ch15.vpMonday, September 15, 2008 7:47:30 PM
Color profile: DisabledComposite Default screen

Memorize button on the report’s button bar. The Memorize Report window appearsso you can give this customized format a name.
Ill 15-1
T I P : Be sure to use a reference to the report type in the memorized name. Ifyou use a name such as My Report, you’ll have no idea what the report displays.
Open a memorized report by choosing Reports | Memorized Reports from theQuickBooks menu bar and selecting the report name from the submenu.
Balance SheetQuickBooks offers several Balance Sheet reports, and each of them is explained inthis section. Select the one you want to see by choosing Reports and selecting theBalance Sheet you want to see from the Company & Financial menu.
A Balance Sheet report is specifically designed to show only the totals of theBalance Sheet accounts (assets, liabilities, and equity) from your chart of accounts.It’s really a report on your financial health. The reason a Balance Sheet balances isthat it’s based on a formula:
Assets = Liabilities + Equity
When you generate a Balance Sheet report, the equity number is a calculatednumber, not an account balance that’s stored. Here’s how the equity is calculated:
1 All the income accounts are added up.2 All the expense accounts are added up.3 The expense total is subtracted from the income total.4 The result of the calculation in Step 3 is the current equity that’s displayed in
the Balance Sheet.
If you have more expenses than you have income, you’re operating at a loss;consequently, it’s a negative number that is combined with the existing equity accounts.
Balance Sheet Standard ReportThe Balance Sheet Standard reports the balance in every Balance Sheet account(unless the account has a zero balance) and subtotals each account type: asset,liability, and equity. The report is automatically configured for year-to-date figures,
340 P A R T T W O B O O K K E E P I N G
QckBcks TIGHT / QuickBooks 2009 The Official Guide / Ivens / 274-8 / Chapter 15
P:\010Comp\QckBcks\274-8\ch15.vpMonday, September 15, 2008 7:47:31 PM
Color profile: DisabledComposite Default screen

using your fiscal year and the current date. (The fiscal year is the same as thecalendar year for most small businesses.)
Balance Sheet Detail ReportThis report displays every transaction in every Balance Sheet account. By default,the report covers a date range of the current month to date. Even if it’s early in themonth, this report is lengthy. If you change the date range to encompass a longerperiod (the quarter or year), the report goes on forever.
If you want to see a Balance Sheet only to get an idea of your company’s financialhealth, this is probably more than you wanted to know.
Balance Sheet Summary ReportThis report is a quick way to see totals, and it’s also the easiest way to answer thequestion, “How am I doing?” All the Balance Sheet accounts are listed andsubtotaled by type, as shown in Figure 15-6.
C H A P T E R 1 5 R U N N I N G F I N A N C I A L R E P O R T S 341
QckBcks TIGHT / QuickBooks 2009 The Official Guide / Ivens / 274-8 / Chapter 15
FIGURE 15-6 Check your financial health with the Summary Balance Sheet.
P:\010Comp\QckBcks\274-8\ch15.vpMonday, September 15, 2008 7:47:31 PM
Color profile: DisabledComposite Default screen

Balance Sheet Prev Year Comparison ReportThe comparison Balance Sheet is designed to show you what your financialsituation is compared to a year ago. There are four columns in this report:
• The year-to-date balance for each Balance Sheet account• The year-to-date balance for each Balance Sheet account for last year• The amount of change between last year and this year• The percentage of change between last year and this year
If you’ve just started using QuickBooks this year, there’s little reason to run thisreport. Next year, however, it’ll be interesting to see how you’re doing compared tothis year.
Customizing and Memorizing a Balance SheetWhen your Balance Sheet is on the screen, you can use all of the customizationfeatures covered earlier in this chapter for the trial balance report. Then, when youhave the configuration you need, memorize the report by clicking the Memorizebutton in the report window.
Profit & Loss StatementYour P&L report is probably the one you’ll run most often, because it’s natural towant to know if you’re making any money. A P&L report is sometimes called anincome report. It shows all your income accounts (and displays the total), all yourexpense accounts (displaying the total), and then puts the difference between thetwo totals on the last line. If you have more income than expenses, the last line is aprofit.
All of the P&L reports are available by choosing Reports | Company & Financialand are explained in this section.
Profit & Loss Standard ReportThe standard P&L report is a straightforward document, following the normalformat for an income statement:
• The income is listed and totaled.• The Cost of Goods Sold accounts are listed (if any exist), and the total is
deducted from the income total in order to show the gross profit.• The expenses are listed and totaled.• The difference between the gross profit and the total expenses is displayed as
your Net Ordinary Income (or Loss).
N O T E : If you don’t sell inventory items, you probably don’t have a Cost ofGoods Sold section in your P&L.
342 P A R T T W O B O O K K E E P I N G
QckBcks TIGHT / QuickBooks 2009 The Official Guide / Ivens / 274-8 / Chapter 15
P:\010Comp\QckBcks\274-8\ch15.vpMonday, September 15, 2008 7:47:31 PM
Color profile: DisabledComposite Default screen
While the format is that of a normal income statement, the date isn’t. The defaultdate range for the QuickBooks standard P&L is the current month to date. This isnot a year-to-date figure; it uses only the transactions from the current month, andit’s almost certainly not what you want to see. Click the arrow to the right of theDates field and change the date range to This Fiscal Year-To-Date. The resultingdisplay is what you want to see—a normal income statement for your business sofar this year.
Profit & Loss Detail ReportThe Profit & Loss Detail report is for terminally curious people. It lists everytransaction for every account in the P&L format. It goes on and on.
This report is almost like an audit trail, and it’s good to have if you notice somenumbers that seem “not quite right” in the standard P&L. It’s probably not thereport to run when you just need to know if you’re making money.
Profit & Loss YTD Comparison ReportThe YTD (year-to-date) comparison report compares the current month’s incomeand expense totals with the year-to-date totals. Each income and expense account islisted.
Profit & Loss Prev Year Comparison ReportIf you’ve been using QuickBooks for more than a year, this is a great report! If yourecently started with QuickBooks, next year you’ll say, “This is a great report!”
This is an income statement for the current year to date, with a column thatshows last year’s figure for the same period. This gives you an instant appraisal ofyour business growth (or ebb). So that you don’t have to tax your brain doing themath, there are two additional columns: the difference between the years in dollarsand in percentage.
Profit & Loss By Job ReportThis report presents a year-to-date summary of income and expenses posted tocustomers and jobs. In effect, it’s a customer P&L. Each customer or job gets itsown column, and the bottom row of each column is the net income (or loss) forthis customer or job.
Profit & Loss By Class ReportIf you’ve enabled class tracking, this report appears on the Reports menu. Eachclass is subtotaled for its own P&L. If you use classes for branch offices or companydivisions, this is the way to get a separate P&L for each class.
Profit & Loss Unclassified ReportIf you’ve enabled class tracking, you should run the Profit & Loss Unclassifiedreport, which displays a P&L generated from transactions that had no classassignment. Even if you think you don’t care about assigning classes to these
C H A P T E R 1 5 R U N N I N G F I N A N C I A L R E P O R T S 343
QckBcks TIGHT / QuickBooks 2009 The Official Guide / Ivens / 274-8 / Chapter 15
P:\010Comp\QckBcks\274-8\ch15.vpMonday, September 15, 2008 7:47:31 PM
Color profile: DisabledComposite Default screen
transactions, you should examine the report and drill down (double-click thelisting) to view the individual transactions. If any transaction should have beenassigned a class, you can add the class and click Yes when QuickBooks asks if youwant to save the changes you made to the transaction.
T I P : Because this report uses filtered accounts and transactions, instead ofall the transactions in your system, it isn’t really a P&L, and you can ignore thebottom line profit/loss figure.
Customizing and Memorizing P&L ReportsUse the QuickBooks Customize features discussed earlier in this chapter to tailorP&L reports so they print exactly the way you want to see the information. Youmight want to customize several formats: for you, for your accountant, and perhapsfor your bank (if you have a loan or line of credit, or are applying for either, yourbank probably wants to see both your Balance Sheet and P&L reports). Then, whena report is perfect, memorize it.
Voided and Deleted Transactions ReportsQuickBooks offers two reports you can use to track voided and deleted transactions.Both reports are available by choosing Reports | Accountant & Taxes and thenselecting either of these reports: Voided/Deleted Transactions Summary or Voided/Deleted Transactions Detail.
Voided/Deleted Transactions Summary ReportThis report displays a summary of all voided and deleted transactions in theselected period (the default period is Last Month). The report shows the currentstate (void or deleted) and the original state (including the amount) of eachaffected transaction.
Voided/Deleted Transactions Detail History ReportThis report provides more information about both the original transaction and thechange. In addition to the information provided by the Voided/Deleted TransactionsSummary report, this report displays the credit and debit postings and the postingaccounts. If items (including payroll items) were involved in the transaction,they’re also displayed.
Exporting Memorized ReportsQuickBooks Premier and Enterprise Solutions editions offer an Export function formemorized reports. This enables the use of your perfectly designed customized,memorized report in another company file.
344 P A R T T W O B O O K K E E P I N G
QckBcks TIGHT / QuickBooks 2009 The Official Guide / Ivens / 274-8 / Chapter 15
P:\010Comp\QckBcks\274-8\ch15.vpMonday, September 15, 2008 7:47:31 PM
Color profile: DisabledComposite Default screen

If you’re an accountant, it means that after you develop memorized reports thatprovide the information you need, exactly the way you need it, you can exportthose reports to a file, and e-mail the file to your clients (with instructions on howto import the report, of course). If you’re a bookkeeper, you can travel to client siteswith the memorized reports you’ve created on a flash drive and import them intoyour clients’ files (the exported report files are quite small).
The real beauty of this feature is that all QuickBooks editions can import theexported memorized reports (only the Export feature, not the Import feature, islimited to Premier/Enterprise editions). Because the Import Memorize Reportfeature is a standard QuickBooks function, clients running QuickBooks Pro (and, ofcourse, Premier or Enterprise Solutions) can add these reports to their MemorizedReports list with the click of a mouse.
Memorized reports are templates and contain no data, so each QuickBooksinstallation that imports your exported reports will produce reports that use localdata, but are based on the format, filters, and sorting designs you memorized andexported.
Accountant’s CopyMany accountants support QuickBooks directly, which means they have a copy ofQuickBooks on their own computer systems, and they understand the software.
At various times during the year, your accountant might want to look at yourbooks. There might be quarterly reports and adjustments, a physical inventory thatresulted in serious changes in your Balance Sheet, expenses that should be postedto different accounts, or any of a hundred other reasons to examine your transactions.This is also part of the end-of-year process as your accountant prepares your taxreturn.
To work on your company file, your accountant could come to your office andsit at your computer, making the necessary changes, moving this, reversing that,and generally making sense out of your daily transaction postings (puttingtransaction postings into categories that fit your tax reporting needs).
While your accountant is using the software, you can’t get much accomplished.You could say, “Excuse me, could you move? I have to enter an invoice.” Butremember, you’re paying for the accountant’s time.
If your accountant doesn’t want to visit, he or she may request printouts ofvarious reports, then write notes on those printouts: “Move this, split that, creditthis number here, debit that number there.” Or you might receive a spreadsheet-like printout with a complicated journal entry, which means you have to stopentering your day-to-day transactions to make all those changes.
Some accountants ask for a copy of the company file, a backup of your companyfile (which they restore), or a portable company file (covered in Chapter 21). Whilethe accountant has the file and is tweaking transactions or making journal entries,
C H A P T E R 1 5 R U N N I N G F I N A N C I A L R E P O R T S 345
QckBcks TIGHT / QuickBooks 2009 The Official Guide / Ivens / 274-8 / Chapter 15
P:\010Comp\QckBcks\274-8\ch15.vpMonday, September 15, 2008 7:47:31 PM
Color profile: DisabledComposite Default screen

you can’t do any work. If you continue to work, the transactions you enter won’t bein the company file you restore when your accountant returns it to you, because itoverwrites the company file you’d continued to use.
QuickBooks has a better solution. Give your accountant a specially designedcopy of your company file. Let your accountant do the work back at his or heroffice, while you continue to work in your copy. When the file comes back to you,with the accountant’s changes, QuickBooks can merge the changes into your copyof the company file, which means you don’t lose the work you did while theaccountant was working in your company file.
When you create the accountant’s copy, QuickBooks imposes restrictions on thetype or extent of transactions you and your accountant can perform (to make sureyou don’t work at cross purposes). All of this is discussed in this section.
N O T E : All editions of QuickBooks can create an accountant’s copy; however,only the Accountant Edition can use the accountant’s copy.
Creating an Accountant’s CopyQuickBooks provides two methods for delivering an accountant’s copy to youraccountant:
Send the File to Your Accountant You can save an accountant’s copy onremovable media (CD, DVD, or flash drive) and send or deliver it to youraccountant. Depending on the size limits imposed by your ISP and youraccountant’s ISP, you can e-mail the file, but most accountant’s copies are too largeto e-mail.
Upload the File to a QuickBooks Secure Server You can upload anaccountant’s copy to a secure server provided by QuickBooks and have youraccountant download the file (this is a free service). QuickBooks notifies theaccountant of the existence of the file by e-mail and the e-mail message provides alink to download the file.
N O T E : Only the Admin user can create an accountant’s copy, and thecompany file must be operating in Single-User mode to accomplish this task.
Saving the Accountant’s Copy on Removable MediaTo create an accountant’s copy and save it on removable media, choose File |Accountant’s Copy | Save File, to open the Create Accountant’s Copy dialog. Be surethe option labeled Accountant’s Copy is selected.
Click Next to move to the window in which you set the dividing date for thisaccountant’s copy (see the section “Choosing the Dividing Date” for moreinformation about the significance of the dividing date).
346 P A R T T W O B O O K K E E P I N G
QckBcks TIGHT / QuickBooks 2009 The Official Guide / Ivens / 274-8 / Chapter 15
P:\010Comp\QckBcks\274-8\ch15.vpMonday, September 15, 2008 7:47:32 PM
Color profile: DisabledComposite Default screen

Click Next to save the file in the Save Accountant’s Copy dialog. The defaultfilename incorporates your company filename as well as the date and time of thefile’s creation and has the file extension .QBX. That’s an excellent filename andthere’s no reason to change it.
By default QuickBooks saves the accountant’s copy to your desktop. You canchange the location of the saved file from the desktop to a folder of your ownchoosing, and QuickBooks will remember the new location for future accountantcopy files you create.
If you’re sending the file on a flash drive, change the location by choosing theflash drive in the Save In field at the top of the dialog. If you’re planning to send thefile on a CD or DVD, save the file to your hard drive and then transfer the file to theCD/DVD.
C A U T I O N : You must tell your accountant the Admin password so youraccountant can open the file.
Sending an Accountant’s Copyto the QuickBooks ServerTo create an accountant’s copy that is uploaded to a secure server maintained byQuickBooks, from which your accountant can download the file, choose File |Accountant’s Copy | Send To Accountant, which opens the Send Accountant’s Copydialog that explains the process. Step through the wizard, clicking Next to movethrough the windows.
The first step is to select the dividing date (covered in the next section,“Choosing the Dividing Date”).
In the next window, enter your accountant’s e-mail address (twice, to confirm thedata), your name, and your e-mail address. If an e-mail address exists in the e-mailfield of the Company Info dialog (in the Company menu) window, that address isautomatically entered in this dialog, but you can change the e-mail address if youneed to.
In the next window (see Figure 15-7), enter a password for the upload/downloadof this file. This is not the password your accountant needs to open the companyfile; it’s a password required to download the file from the server. It must be a strongpassword, which means it contains at least eight characters, mixes letters andnumbers, and at least one letter must be in a different case from the other letters(usually this means one letter is uppercase).
You can also enter a message for your accountant that will appear in the body ofthe e-mail message notifying your accountant that you’ve uploaded the file. E-mailtext is not encrypted as it travels around the Internet, so don’t use this message togive your accountant the password.
C H A P T E R 1 5 R U N N I N G F I N A N C I A L R E P O R T S 347
QckBcks TIGHT / QuickBooks 2009 The Official Guide / Ivens / 274-8 / Chapter 15
P:\010Comp\QckBcks\274-8\ch15.vpMonday, September 15, 2008 7:47:32 PM
Color profile: DisabledComposite Default screen

Click Send to upload the file to the server. QuickBooks displays a message tellingyou it must close all windows to create an accountant’s copy; click OK to continue.When the accountant’s copy has been created and uploaded, QuickBooks displays asuccess message.
Ill 15-2
If you’ve password-protected your QuickBooks data file, you must give youraccountant the Admin password (in addition to providing the required password todownload the file). If your Admin password is a strong password, as defined earlierin this section, you can use the same password for both purposes.
QuickBooks sends an e-mail to your accountant (see Figure 15-8) and to you(see Figure 15-9). (The text in both of the messages displayed in these figures hasbeen edited to protect secure information.)
348 P A R T T W O B O O K K E E P I N G
QckBcks TIGHT / QuickBooks 2009 The Official Guide / Ivens / 274-8 / Chapter 15
FIGURE 15-7 Secure the file’s transfer over the Internet with a strong password.
P:\010Comp\QckBcks\274-8\ch15.vpMonday, September 15, 2008 7:47:32 PM
Color profile: DisabledComposite Default screen
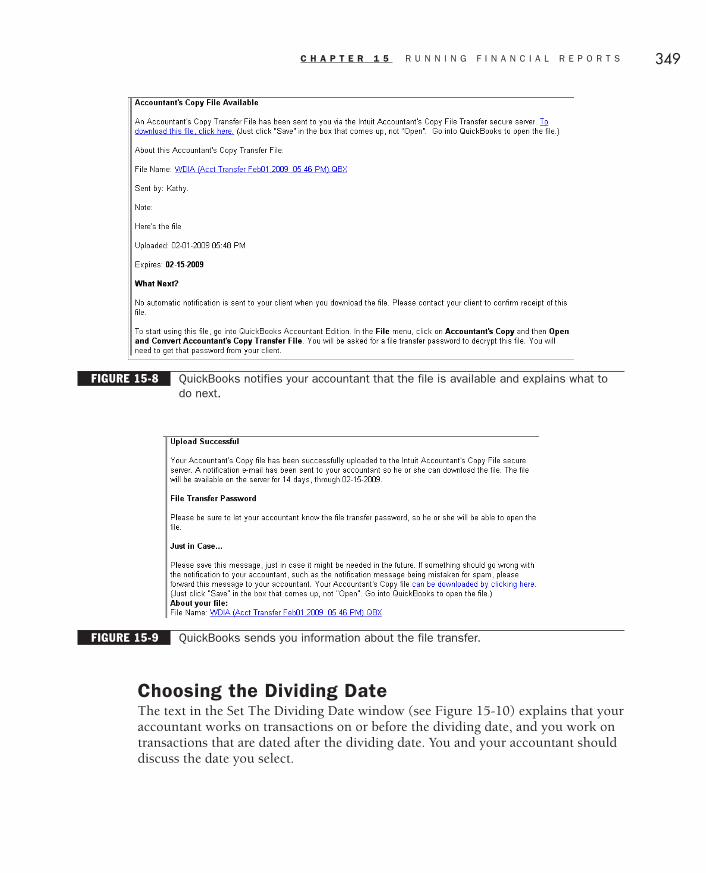
Choosing the Dividing DateThe text in the Set The Dividing Date window (see Figure 15-10) explains that youraccountant works on transactions on or before the dividing date, and you work ontransactions that are dated after the dividing date. You and your accountant shoulddiscuss the date you select.
C H A P T E R 1 5 R U N N I N G F I N A N C I A L R E P O R T S 349
QckBcks TIGHT / QuickBooks 2009 The Official Guide / Ivens / 274-8 / Chapter 15
FIGURE 15-8 QuickBooks notifies your accountant that the file is available and explains what todo next.
FIGURE 15-9 QuickBooks sends you information about the file transfer.
P:\010Comp\QckBcks\274-8\ch15.vpMonday, September 15, 2008 7:47:33 PM
Color profile: DisabledComposite Default screen

The dividing date you select should be the period for which you need youraccountant to examine your books and make needed changes, which may not be ayear-end date.
Some people send an accountant’s copy with a dividing date matching the date ofa report they need for a special reason—such as an income statement and/or balancesheet the bank wants to see because of an existing or potential line of credit. Otherusers may need an “accountant-approved” detailed report of transactions for thecompany’s partners or a nonprofit association’s board (usually a month, quarter, oryear-end date).
T I P : To give your accountant a period in which to insert changes such asadjusting journal entries or reversing journal entries, set the dividing date abouttwo weeks after the end date you need. For example, if the report you need is asof the end of the last quarter, set the dividing date for two or three weeks afterthe last quarter end date.
Merging the Accountant’sChanges into Your FileThe file your accountant sends back is not a complete QuickBooks company file; itcontains only the changes made by your accountant. The file is encrypted so it canonly be imported into the company file you used to create it.
350 P A R T T W O B O O K K E E P I N G
QckBcks TIGHT / QuickBooks 2009 The Official Guide / Ivens / 274-8 / Chapter 15
FIGURE 15-10 The dividing date establishes boundaries and limits for the type of work you andyour accountant can perform.
P:\010Comp\QckBcks\274-8\ch15.vpMonday, September 15, 2008 7:47:33 PM
Color profile: DisabledComposite Default screen

Follow these steps to import the accountant’s copy:
� Be sure the company file from which you created the accountant’s copy is open.� Choose File | Accountant’s Copy | Import Accountant’s Changes.� Navigate to the location where you saved the file your accountant sent and
double-click the file listing; the file has the naming format <CompanyName>(Acct Changes).QBY.
� The Incorporate Accountant’s Changes window opens so you can preview thechanges that will be merged into your company data file and read any notesyour accountant wrote. (Before you import the changes, you can save the reportas a PDF file or print it).
N O T E : The printed report includes the accountant’s notes, but the PDF filedoesn’t.
� Click Incorporate Accountant’s Changes. QuickBooks walks you through theprocess of backing up your current file before importing the changes and thenmerges the changes into your company data file.
After the changes have been incorporated into your file, QuickBooks displays areport that looks like the Incorporate Accountant’s Changes report that wasdisplayed before you selected the option to incorporate the file (except the windowindicates that the transactions are “incorporated” instead of “pending”). If anytransactions failed to merge with your company file, a message appears to informyou of the failure.
The report window has buttons you can click to save or print the report. It’s agood idea to print the report so you know where to look in your file to see thechanges.
Click Close (if you didn’t save or print the report, QuickBooks urges you torectify your mistake). QuickBooks displays a message asking if you’d like to set aclosing date and password-protect the closed period, as of the dividing date you set.
If the dividing date on this accountant’s copy was the last day of the previousfiscal year, this is a good idea, so click Yes; but if not, it depends on your ownjudgment. (You can learn about setting a closing date to protect data in the previousfiscal year in Chapter 20.)
QuickBooks opens your company file, the text on the title bar changes back toits normal contents (instead of displaying a notice that an accountant’s copy isoutstanding), and you can work in the file with no restrictions.
T I P : After you’re up and running again normally, you can delete the file youraccountant sent you, and you can also delete the accountant’s copy file youcreated and saved.
C H A P T E R 1 5 R U N N I N G F I N A N C I A L R E P O R T S 351
QckBcks TIGHT / QuickBooks 2009 The Official Guide / Ivens / 274-8 / Chapter 15
P:\010Comp\QckBcks\274-8\ch15.vpMonday, September 15, 2008 7:47:33 PM
Color profile: DisabledComposite Default screen

Canceling the Accountant’s CopyIf you’re not going to get a file back from your accountant, you can cancel theaccountant’s copy in order to work normally in your company file.
Sometimes accountants report that they have no changes to make, sometimesaccountants send you e-mail to notify you of a small change and ask you to enterthe transaction manually, and sometimes you decide you made the accountant’scopy in error and don’t want to wait for a file to come back (don’t forget to tell theaccountant about your decision).
T I P : Another reason to cancel the accountant’s copy is because you don’twant to import the changes you saw in the Import Accountant’s Changes window.Call your accountant and discuss the problem. If the end result is that you prefernot to import the changes, close the Import Accountant’s Changes windowwithout importing the changes, and cancel the accountant’s copy.
To return everything to normal, choose File | Accountant’s Copy | RemoveRestrictions. QuickBooks asks you to confirm your decision. Select the optionlabeled Yes, I Want To Remove The Accountant’s Copy Restrictions, and click OK.
Using the Accountant’s Copy (for Accountants)An Accountant’s Copy can only be opened in the Accountant Editions. The file hasto be opened (as a transfer file) and then saved (as a working file). The working fileis loaded in the QuickBooks window so you can begin using it.
Follow these steps to open an accountant’s copy:
� Choose File | Accountant’s Copy | Open & Convert Transfer File. QuickBooksdisplays a window that provides an overview of the way the Accountant’s copyworks.
� Click Next to see an explanation of the permitted transactions. The messageincludes the statement that if you want to do more than the Accountant’s Copypermits, you can convert the Transfer File to a full company file and doanything you wish.
� Click Next and navigate to the folder that contains the file you received fromthe client.
� Double-click the file’s listing. QuickBooks displays a message explaining thatthe file is about to be converted to an Accountant’s Copy Working File. ClickOK.
� Click Save to have QuickBooks save the file in the same folder you selected toretrieve the file. By default QuickBooks retains the filename, changing theextension to .QBA.
352 P A R T T W O B O O K K E E P I N G
QckBcks TIGHT / QuickBooks 2009 The Official Guide / Ivens / 274-8 / Chapter 15
P:\010Comp\QckBcks\274-8\ch15.vpMonday, September 15, 2008 7:47:33 PM
Color profile: DisabledComposite Default screen

� QuickBooks converts the file, which takes a few minutes, and then opens thefile. If the file contains users and passwords, the Login dialog appears with theAdmin user entered in the User Name field. You must enter the Adminpassword to continue.
� QuickBooks displays another message reminding you that this is anAccountant’s Copy. Click OK to begin working.
The title bar of the QuickBooks window displays the company filename alongwith the parenthetical text “Acct Copy, Div Date DD/MM/YYYY”. You can begindata entry according to the “can do/cannot do” rules.
As soon as you begin working in a transaction window or a dialog, QuickBooksdisplays a message explaining how the transaction windows appear in order to letyou know what you can and cannot do (see Figure 15-11).
After the file has been converted to an Accountant’s Copy working file, you canclose and open it as needed. To open the file choose File | Open or RestoreCompany, and click Next. Navigate to the folder that contains the file and open it.
Creating the Accountant’s Copy Change FileWhile you’re working in the Accountant’s Copy, you can review the work you’vedone by choosing File | Accountant’s Copy | View/Export Changes For Client.
When you’ve completed your work, and you’re ready to send the file back toyour client, open this window and click Create Change File For Client.
The Save Accountant Change File To dialog opens, offering to save the file to thedesktop (you can change the location if you wish). The file is renamed with the
C H A P T E R 1 5 R U N N I N G F I N A N C I A L R E P O R T S 353
QckBcks TIGHT / QuickBooks 2009 The Official Guide / Ivens / 274-8 / Chapter 15
FIGURE 15-11 It’s easy to tell which part of a transaction window can accept data that “takes”and will be merged into your client’s file.
P:\010Comp\QckBcks\274-8\ch15.vpMonday, September 15, 2008 7:47:33 PM
Color profile: DisabledComposite Default screen

format <CompanyFileName> (Acct Changes).QBY. QuickBooks issues a successmessage when you save the file. Send the file to your client via e-mail (it’s a smallfile), or on a CD.
T I P : Save the working file until you make sure the client has received andsuccessfully imported the file. If there’s a problem, you can work with the fileand resend the corrected merge file.
Company SnapshotYou can get a quick answer to the question, “How’s Business?” in the companysnapshot window (see Figure 15-12). Choose Company | Company Snapshot toopen this window.
In addition to displaying an easy-to-understand summary of the money that’smoved in and out, this window provides information on tasks you should perform,account balances, and A/R and A/P data by customer/vendor.
354 P A R T T W O B O O K K E E P I N G
QckBcks TIGHT / QuickBooks 2009 The Official Guide / Ivens / 274-8 / Chapter 15
FIGURE 15-12 View a summary of your financial status.
P:\010Comp\QckBcks\274-8\ch15.vpMonday, September 15, 2008 7:47:34 PM
Color profile: DisabledComposite Default screen

Need details? Double-click an element in this window to see the particulars. Forexample, to see details about a customer’s A/R balance, click the listing to display anOpen Balance report for that customer, sorted and totaled by job (see Figure 15-13).
The data displayed in the Company Snapshot window is always appropriate for thepermissions granted to the current user. If the user does not have permission to seesensitive financial data, no bank balances appear in the Account Balances section ofthe window. Additionally, the Income And Expense Trend Graph section has no data;instead, the user sees a message explaining that he or she needs permission to viewthe area. Various elements of the window are displayed or hidden depending on thecurrent user’s permissions. (Learn about configuring users and permissions inChapter 20.)
Client Data ReviewClient Data Review (see Figure 15-14) provides a central place for investigatingproblems, or potential problems, in a company file. Your accountant can use theClient Data Review tool to drill down into the data postings and troubleshoot dataentry problems.
C H A P T E R 1 5 R U N N I N G F I N A N C I A L R E P O R T S 355
QckBcks TIGHT / QuickBooks 2009 The Official Guide / Ivens / 274-8 / Chapter 15
FIGURE 15-13 It’s easy to see the details behind the figures in the Company Snapshot; and, youcan continue to drill down for more details.
P:\010Comp\QckBcks\274-8\ch15.vpMonday, September 15, 2008 7:47:34 PM
Color profile: DisabledComposite Default screen

The Client Data Review command is on the Company menu, but it’s onlyavailable under the following circumstances:
• You are running QuickBooks Premier/Enterprise Solutions Accountant Edition(the command exists in both the Accountant and Company menus).
• You are running QuickBooks Pro, QuickBooks Premier (not AccountantEdition), or Enterprise Solutions (not Accountant Edition) and have logged inas an External Accountant (the command is on the Company menu). See thesection “External Accountant” for information about setting up this specialtype of user.
In the Client Data Review (CDR) Center, listings that display the CDR tool iconare CDR tools, providing functions that are only available in the CDR utility.Listings that don’t display the CDR icon provide convenient access to existingQuickBooks functions and reports (eliminating the need to open those functionsfrom the Menu bar).
Some of the tools provide a way to correct existing transactions that were createdincorrectly, such as remitting sales tax or payroll liabilities through a “regular”
356 P A R T T W O B O O K K E E P I N G
QckBcks TIGHT / QuickBooks 2009 The Official Guide / Ivens / 274-8 / Chapter 15
FIGURE 15-14 Review existing data to make sure financial information is correct.
P:\010Comp\QckBcks\274-8\ch15.vpMonday, September 15, 2008 7:47:35 PM
Color profile: DisabledComposite Default screen
check instead of using the Pay Liabilities functions. Other tools provide a way tolink existing transactions, such as applying credits to customer invoices or bills.
External AccountantAn External Accountant is a type of user that the QuickBooks Admin can create.
The External Accountant user type has the same rights as the QuickBooks Adminexcept the following:
• The External Accountant cannot create, edit, or remove users.• The External Accountant cannot view customer credit card numbers if the
QuickBooks Credit Card Protection feature is enabled (covered in Chapter 20).
When a user configured as an External Accountant logs in to the company file,the Client Data Review command is available on the Company menu, regardless ofthe QuickBooks edition. (The Client Data Review command is only available in theAccountant Edition unless an External Accountant is logged in.)
T I P : Even if you’re running Accountant Edition, create an ExternalAccountant user so that changes made by this user are differentiated fromchanges made by the Admin in the Audit Trail report.
Creating an External AccountantTo create a user who is an External Accountant, log in to your company file asAdmin (only the QuickBooks Admin can create users).
Follow these steps to create an External Accountant user:
� Choose Company | Set Up Users And Passwords | Set Up Users.� In the User List dialog, select Add User.� Enter the User Name and Password and click Next.� Select External Accountant and click Next.� QuickBooks asks you to confirm this action—click Yes.� Click Finish to create the External Accountant.
Editing a Current User to Become an External AccountantMany companies have already set up user names for their accountants. You can edityour accountant’s user account to convert it to an External Accountant to add theClient Data Review feature to the company file.
Select the accountant’s user account and click Edit User. Skip the user name andpassword data, and click Next. In the next window, select External Accountant andfollow the prompts to save this user name as an External Accountant.
C H A P T E R 1 5 R U N N I N G F I N A N C I A L R E P O R T S 357
QckBcks TIGHT / QuickBooks 2009 The Official Guide / Ivens / 274-8 / Chapter 15
P:\010Comp\QckBcks\274-8\ch15.vpWednesday, September 17, 2008 11:43:35 AM
Color profile: DisabledComposite Default screen

Consolidated Reports for MultipleCompaniesThis feature is only available in QuickBooks Enterprise Solutions editions.
If you have separate QuickBooks company files for multiple companies (or totrack multiple locations, divisions, and so on in discrete company files), use theCombine Reports feature to get a consolidated view of all the data files. You cancreate the following reports as consolidated reports:
• Balance Sheet Standard• Balance Sheet Summary• Profit & Loss Standard• Statement of Cash Flows• Trial Balance
The configuration of the consolidated reports is performed in QuickBooks(selecting the companies and selecting the report types). However, the data is sentto Microsoft Excel for consolidation, so you must have Excel installed on yourcomputer to use this feature.
358 P A R T T W O B O O K K E E P I N G
QckBcks TIGHT / QuickBooks 2009 The Official Guide / Ivens / 274-8 / Chapter 15
P:\010Comp\QckBcks\274-8\ch15.vpMonday, September 15, 2008 7:47:35 PM
Color profile: DisabledComposite Default screen

Chapter
Chapter
1616Using Online BankingServices
In this chapter:
• Understand online banking
• Set up online bank accounts
• Download account activity into QuickBooks
• Use renaming rules to match payee names
• Create online payments to vendors
• Transfer funds between banks electronically
359
QckBcks TIGHT / QuickBooks 2009 The Official Guide / Ivens / 274-8 / Chapter 16
P:\010Comp\QckBcks\274-8\ch16.vpTuesday, September 16, 2008 9:55:11 AM
Color profile: DisabledComposite Default screen

You can use your Internet connection to access a wide range of online services thatQuickBooks offers to financial institutions, including the following:
• Transaction download, which means you can view the status of your bankaccounts, see which transactions have cleared, and generally keep an eye onyour accounts via your Internet connection.
• Online payments, which means you send vendor checks through your bank,directly from QuickBooks, instead of writing checks.
Another online service is access to your credit card accounts, so you candownload credit card transactions and enter them in your credit card accountregister. To take advantage of online credit card tracking, you must set up yourcredit cards as credit card accounts in your chart of accounts (all of which isdiscussed in Chapter 11). Some financial institutions offer online banking forliability accounts you’ve established in QuickBooks, such as lines of credit.
Understanding Online BankingOnline banking is nothing more than using the Internet to move funds and accessinformation about your accounts from your financial institution. The financialinstitution’s computer is a server, configured for secure exchange of data, thatprovides information and services related to your accounts. QuickBooks supportstwo methods for online banking services, and your financial institution selects themethod it wants to use:
• Web Connect This is the method you use when your financial institutiondoesn’t provide a way to connect your QuickBooks data directly to the data ontheir own server. Actually, this means your financial institution chose not toinstall the software required to work interactively with QuickBooks. Instead,there’s a page on its website that lets you view and download your transactionsand import the downloaded file into QuickBooks.
• Direct Connect Your financial institution exchanges data interactively withQuickBooks. This allows you to take advantage of all types of additionalonline banking services, such as transaction data downloads directly into yourQuickBooks bank register, transfers between bank accounts, electronic messagesbetween you and the financial institution, and online bill payments (optional atsome financial institutions). Some financial institutions charge a fee for some orall of the services available through Direct Connect.
N O T E : Some financial institutions offer both Web Connect and DirectConnect and you can choose the method you prefer. Usually, banks that offerboth methods charge a fee for Direct Connect.
360 P A R T T W O B O O K K E E P I N G
QckBcks TIGHT / QuickBooks 2009 The Official Guide / Ivens / 274-8 / Chapter 16
P:\010Comp\QckBcks\274-8\ch16.vpTuesday, September 16, 2008 9:55:12 AM
Color profile: DisabledComposite Default screen

Setting Up Online BankingTo use online banking, your bank must support at least one QuickBooks onlineaccess feature. There are three online banking services available:
• Transaction download• Online bill paying• Online credit card services
You can sign up for any or all of these services. If your bank supports only onlineaccount access and doesn’t support online bill paying or online credit card services,you can work directly with the QuickBooks online banking services. See “Using theQuickBooks Bill Pay Service” later in this chapter.
The process of enabling online banking has three steps (all of which are coveredin this section):
1 Apply for online services with your bank.2 Receive a personal identification number (PIN) or password from your bank to
make sure your online account is secure.3 Enable a QuickBooks account (or multiple accounts) for online services.
Once a QuickBooks bank account is enabled for online banking, you candownload transaction information from your bank and match it to your bankregister.
To get started, choose Banking | Online Banking from the menu bar. Thesubmenu has four commands related to online banking services:
• Set Up Account For Online Services• Participating Financial Institutions• Import Web Connect File• Learn About Online Bill Payment
Finding Your Bank OnlineIf you haven’t signed up for (or discussed) online services with your bank, andyou’re not sure if your bank has online services, choose Participating FinancialInstitutions to see if your bank participates. QuickBooks may display a dialogtelling you it has to open a browser to travel to the Internet. Click OK, and whenyou’re connected to the Internet, you see the Financial Institutions Directorywebsite (see Figure 16-1).
The four choices at the top of the left pane determine the contents of theFinancial Institutions Directory list that QuickBooks displays. The window openswith the choice labeled Any Services preselected, and all the banks listed providesome type of online service.
C H A P T E R 1 6 U S I N G O N L I N E B A N K I N G S E R V I C E S 361
QckBcks TIGHT / QuickBooks 2009 The Official Guide / Ivens / 274-8 / Chapter 16
P:\010Comp\QckBcks\274-8\ch16.vpTuesday, September 16, 2008 9:55:12 AM
Color profile: DisabledComposite Default screen

If you’re interested in a particular online service (for example, you only careabout bank account access to download transactions), select that option, and thelist of banks changes to those banks that offer the selected service.
Scroll through the list to find your bank and click its listing. The right pane ofthe Financial Institutions Directory window displays information about your bank’sonline services (see Figure 16-2). If your bank isn’t listed, you cannot set up anyQuickBooks online banking services.
Click the Apply Now button if you want to start the application process here andnow. If no Apply Now button exists, follow the instructions for setting up onlineservices at the bank—usually the bank displays a phone number. If onlineapplications are available, fill out the form and submit the information. Your bankwill send you information about using its online service, a login name (sometimescalled a company ID), and a PIN or a password. This is the information you need toenable the bank account for online access.
N O T E : Most banks that support Direct Connect provide a PIN (a four-digitnumber), and most banks that support Web Connect use a password.
362 P A R T T W O B O O K K E E P I N G
QckBcks TIGHT / QuickBooks 2009 The Official Guide / Ivens / 274-8 / Chapter 16
FIGURE 16-1 Select the type of online service you want, and then scroll through the list to seeif your bank is included.
P:\010Comp\QckBcks\274-8\ch16.vpTuesday, September 16, 2008 9:55:12 AM
Color profile: DisabledComposite Default screen

After you’ve completed the paperwork at your bank and received your login IDand a PIN or a password, QuickBooks walks you through the process of enablingyour bank account for online banking in QuickBooks.
Those steps differ depending on whether your bank uses Direct Connect or WebConnect. The following sections cover both scenarios.
N O T E : Banks that are enabled for online access have a symbol that lookslike a lightning bolt in the Online Access column of your chart of accounts—thecolumn heading doesn’t say “Online Access,” it just has the lightning boltsymbol.
Enabling Online Access for Direct ConnectAfter you receive your ID and PIN, you can enable a bank account for online accesswith Direct Connect in any of the following ways:
• Choose Banking | Online Banking | Setup Account For Online Services andselect the bank account you want to configure for online services in the Set UpAccount For Online Services dialog.
• Open an existing bank account (select the account in the Chart of AccountsList and press CTRL-E) and click Set Up Online Services.
• Click Yes in the Setup Online Services dialog that appears when you create anew bank account.
C H A P T E R 1 6 U S I N G O N L I N E B A N K I N G S E R V I C E S 363
QckBcks TIGHT / QuickBooks 2009 The Official Guide / Ivens / 274-8 / Chapter 16
FIGURE 16-2 This bank has Direct Connect.
P:\010Comp\QckBcks\274-8\ch16.vpTuesday, September 16, 2008 9:55:12 AM
Color profile: DisabledComposite Default screen

QuickBooks opens the Set Up Account For Online Services For <Name you usedfor your bank account in the chart of accounts> dialog seen in Figure 16-3. Selectyour bank from the drop-down list of participating financial institutions. (You don’thave to scroll through the list; instead, as you type the characters for the name ofyour bank, QuickBooks moves to the appropriate listing.)
N O T E : If your bank has a nationwide presence with regional headquarters,after you select the bank you may see a second dialog asking you to select theappropriate bank region. For example, if your bank is BigAsTheNation, you may haveto select BigAsTheNation-Pennsylvania-NJ if the bank you use is part of that division.
QuickBooks contacts the bank over the Internet (to determine the informationyour bank requires to configure your bank account for online access), and thendisplays information about the bank’s online access. As you can see in Figure 16-4,this bank requires a PIN (it offers Direct Connect). QuickBooks reminds you that ifyou signed up for your bank’s own website-based online banking features, the UserID and password required to enter that website may be different from the User IDand PIN/password required for access via QuickBooks (your financial institutionsets these rules).
Click Next and use the information the bank sent you to fill in the fields for yourCustomer ID and PIN/password (see Figure 16-5). Depending on the way yourbank maintains account information to configure online services, you may be askedto enter a routing number for the bank and the account number for your bankaccount instead of only the Customer ID and PIN.
364 P A R T T W O B O O K K E E P I N G
QckBcks TIGHT / QuickBooks 2009 The Official Guide / Ivens / 274-8 / Chapter 16
FIGURE 16-3 The first step is to select your bank.
P:\010Comp\QckBcks\274-8\ch16.vpTuesday, September 16, 2008 9:55:13 AM
Color profile: DisabledComposite Default screen

C H A P T E R 1 6 U S I N G O N L I N E B A N K I N G S E R V I C E S 365
QckBcks TIGHT / QuickBooks 2009 The Official Guide / Ivens / 274-8 / Chapter 16
FIGURE 16-4 This bank requires a PIN for Direct Connect.
FIGURE 16-5 Enter the data the bank mailed to you.
P:\010Comp\QckBcks\274-8\ch16.vpTuesday, September 16, 2008 9:55:13 AM
Color profile: DisabledComposite Default screen

Click Sign In to access your bank account online. QuickBooks contacts the bankover the Internet and downloads the transactions for your bank account, displaying adialog that tells you how many transactions were downloaded. Click Finish to openthe Online Banking Center automatically, where you can view the downloadedtransactions (using the Online Banking Center and matching transactions are coveredlater in this chapter in the section “Using the Online Banking Center”).
Enabling Online Access for Web ConnectAfter you receive your login information from your bank, you can enable a bankaccount for online access with Web Connect in any of the following ways:
• Choose Banking | Online Banking | Setup Account For Online Services andselect the bank account you want to configure for online services.
• Open an existing bank account (select the account in the Chart of AccountsList and press CTRL-E) and click Set Up Online Services.
• Click Yes in the Setup Online Services dialog that asks you whether you wantto enable this new account for online services.
QuickBooks opens the Set Up Account For Online Services For <Name you usedfor your bank account in the chart of accounts> dialog. Select your bank from thedrop-down list. You don’t have to scroll through the list; instead, as you type thecharacters for the name of your bank, QuickBooks moves to the appropriate listing.
Click Next to have QuickBooks travel to your bank’s website to check the bank’stype of online services (which will be Web Connect). QuickBooks displays thedialog seen in Figure 16-6.
366 P A R T T W O B O O K K E E P I N G
QckBcks TIGHT / QuickBooks 2009 The Official Guide / Ivens / 274-8 / Chapter 16
FIGURE 16-6 To enable a bank account for Web Connect online services, you must download atransactions file from the bank’s website.
P:\010Comp\QckBcks\274-8\ch16.vpTuesday, September 16, 2008 9:55:13 AM
Color profile: DisabledComposite Default screen

Click the button labeled Go To My Bank’s Web Site. QuickBooks opens its Helpfiles with instructions, information, and explanations about connecting to banksthat offer Web Connect.
If you see a message telling you that QuickBooks must launch a browser andtravel to the Internet, click OK (no, wait, click the option labeled Do Not DisplayThis Message In the Future, then click OK).
When QuickBooks connects to your bank’s website, use the login informationthe bank gave you when you signed up for online services. Depending on the typeof software the bank uses, you may be asked for a company ID and a User ID (orboth), as well as a password. Some bank software doesn’t present the password fieldon the same web page as the sign-in IDs; instead, you must click Continue or Nextto move to the web page that asks for your password.
Click the button or link that connects you to your account transactions. Thelabel might be Reports, Reporting, Download Statements, Download Transactions,Exports, or any other terminology that indicates, “Get a report on the transactionsthat have passed through your bank account.”
In the options or criteria page, select a QuickBooks File as the report type. Yourbank may have several choices for QuickBooks files, for instance, according to theversion (year). Some banks use a file named “QBO file” instead of “QuickBooks File.”
Ill 16-1
Your bank probably displays criteria selections for a date range (yesterday, today,or a From Date–To Date range of dates) and may also offer an option labeled SinceLast Download (which you can select after this initial download).
After you make your selections and click the appropriate button (Generate,Download, or some other similar label), your bank generates the file and displays a
C H A P T E R 1 6 U S I N G O N L I N E B A N K I N G S E R V I C E S 367
QckBcks TIGHT / QuickBooks 2009 The Official Guide / Ivens / 274-8 / Chapter 16
P:\010Comp\QckBcks\274-8\ch16.vpTuesday, September 16, 2008 9:55:14 AM
Color profile: DisabledComposite Default screen

File Download dialog asking whether you want to open the file or save it to yourcomputer.
• If you click Save, QuickBooks downloads the file to your computer and saves itin a folder you select. When you’re ready to import the file and view it in theOnline Banking Center, choose File | Utilities | Import | Web Connect Files andselect the file you saved.
• If you click Open, QuickBooks asks if you want to import the file into yourbank account now, or save it and import it later.
Ill 16-2
The first time you import your Web Connect file into QuickBooks, you mustlink the file to a QuickBooks bank account.
Ill 16-3
• If you’ve already created this bank account in QuickBooks, select the option UseAn Existing QuickBooks Account, and select the account from the drop-downlist. Click Continue and QuickBooks enables the account for online access.
• If you haven’t created this bank account in QuickBooks, select the optionCreate A New QuickBooks Account, and then click Continue. QuickBookscreates a new bank account automatically, naming it Checking At <Name ofBank> and enables the account for online access.
368 P A R T T W O B O O K K E E P I N G
QckBcks TIGHT / QuickBooks 2009 The Official Guide / Ivens / 274-8 / Chapter 16
P:\010Comp\QckBcks\274-8\ch16.vpTuesday, September 16, 2008 9:55:14 AM
Color profile: DisabledComposite Default screen
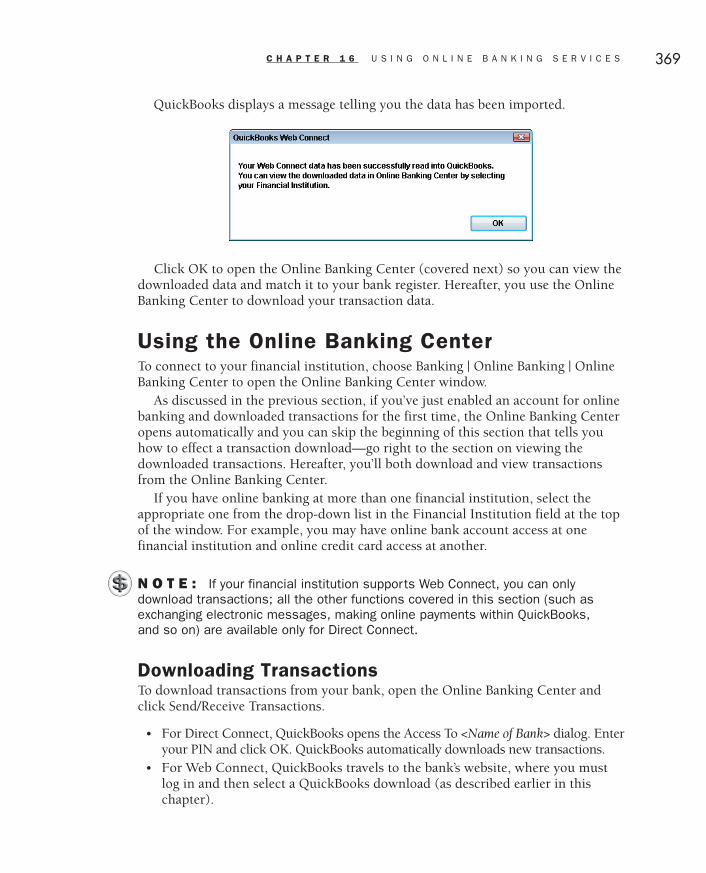
QuickBooks displays a message telling you the data has been imported.
Ill 16-4
Click OK to open the Online Banking Center (covered next) so you can view thedownloaded data and match it to your bank register. Hereafter, you use the OnlineBanking Center to download your transaction data.
Using the Online Banking CenterTo connect to your financial institution, choose Banking | Online Banking | OnlineBanking Center to open the Online Banking Center window.
As discussed in the previous section, if you’ve just enabled an account for onlinebanking and downloaded transactions for the first time, the Online Banking Centeropens automatically and you can skip the beginning of this section that tells youhow to effect a transaction download—go right to the section on viewing thedownloaded transactions. Hereafter, you’ll both download and view transactionsfrom the Online Banking Center.
If you have online banking at more than one financial institution, select theappropriate one from the drop-down list in the Financial Institution field at the topof the window. For example, you may have online bank account access at onefinancial institution and online credit card access at another.
N O T E : If your financial institution supports Web Connect, you can onlydownload transactions; all the other functions covered in this section (such asexchanging electronic messages, making online payments within QuickBooks,and so on) are available only for Direct Connect.
Downloading TransactionsTo download transactions from your bank, open the Online Banking Center andclick Send/Receive Transactions.
• For Direct Connect, QuickBooks opens the Access To <Name of Bank> dialog. Enteryour PIN and click OK. QuickBooks automatically downloads new transactions.
• For Web Connect, QuickBooks travels to the bank’s website, where you mustlog in and then select a QuickBooks download (as described earlier in thischapter).
C H A P T E R 1 6 U S I N G O N L I N E B A N K I N G S E R V I C E S 369
QckBcks TIGHT / QuickBooks 2009 The Official Guide / Ivens / 274-8 / Chapter 16
P:\010Comp\QckBcks\274-8\ch16.vpTuesday, September 16, 2008 9:55:14 AM
Color profile: DisabledComposite Default screen

Viewing the Downloaded TransactionsWhen your data has been downloaded, the Online Banking Center dialog displays asummary of the items received from your bank in the Items Received section.
(For Direct Connect, you can select the electronic messages listing, read themessages and delete those you don’t care to save. It would be unusual to want tosave any, since most of the time the messages contain information about upcomingbank holiday closings or announcements about new mortgage or CD rates.)
N O T E : After the first time you download transactions, QuickBooks checksyour company file to see which transactions were already downloaded, and onlydownloads transactions not downloaded previously. This means you don’t haveto worry about duplicate transactions.
Matching TransactionsTo match downloaded transactions to your QuickBooks bank register, click thebutton labeled Add Transactions To QuickBooks and select the account.QuickBooks displays the downloaded transactions (see Figure 16-7).
370 P A R T T W O B O O K K E E P I N G
QckBcks TIGHT / QuickBooks 2009 The Official Guide / Ivens / 274-8 / Chapter 16
FIGURE 16-7 All the downloaded transactions are available in the Online Banking Center.
P:\010Comp\QckBcks\274-8\ch16.vpTuesday, September 16, 2008 9:55:15 AM
Color profile: DisabledComposite Default screen

QuickBooks automatically tries to match the transactions in the file to thetransactions in your register and marks the status of each transaction with one ofthe following conditions:
• Matched Means the downloaded transaction matches a transaction in theregister.
• Unmatched Means no match was found in your register for the downloadedtransaction.
By default, only the unmatched transactions are listed in the left pane of thewindow. The top of the left pane displays the number of matched transactions butdoesn’t display the details. To see the details, click the link labeled Show andQuickBooks displays the matched transactions. To hide the matched transactionslistings, click the Hide link at the top of the window. (Since you don’t need to doanything with matched transactions, it’s easier to work with the list of thosetransactions removed.)
The top of the left pane also displays the number of transactions matched viaRenaming Rules (see “Using Renaming Rules to Match Online Transactions” laterin this chapter).
If all the downloaded transactions are matched, you have nothing else to do.QuickBooks inserts a lightning bolt in the Cleared column of your bank register(the column with a check mark heading) for every matched transaction, indicatingthe fact that the transaction has cleared the bank. Whenever you open the register,you know which transactions have been matched with downloaded transactions:
• A check mark indicates a transaction has been through bank reconciliation.• A lightning bolt indicates a transaction has been downloaded as cleared, but
has not been through a bank reconciliation.
(Chapter 12 covers the topic of bank reconciliations.)
Adding Transactions to the Bank RegisterMany users (those that don’t print checks in QuickBooks) don’t bother to enter alltransactions in the bank register. They use the download file to accomplish thetask. This isn’t a good way to keep accounting records, because you don’t knowwhich transactions are outstanding.
Even if you enter all your checks and customer receipts in QuickBooks,sometimes you have to wait for your bank to tell you whether the transaction hascleared to learn the amount of the transaction (such as merchant card receipts, orpayments taken out of your bank automatically by a vendor).
To add an unmatched transaction to the bank register, select its listing in the AddTransactions To QuickBooks window. Depending on the type of transaction(payment or deposit), the right pane displays options for adding the transaction tothe bank register.
C H A P T E R 1 6 U S I N G O N L I N E B A N K I N G S E R V I C E S 371
QckBcks TIGHT / QuickBooks 2009 The Official Guide / Ivens / 274-8 / Chapter 16
P:\010Comp\QckBcks\274-8\ch16.vpTuesday, September 16, 2008 9:55:15 AM
Color profile: DisabledComposite Default screen

Adding a Downloaded Payment to the RegisterWhen you select an unmatched payment, QuickBooks opens the Record AnExpense window in the right pane (see Figure 16-8).
If the vendor exists in your company file, select the vendor from the drop-downlist in the Payee field (there is no <Add New> listing, so you cannot add vendors inthe Online Banking window).
If the vendor name on the downloaded transactions doesn’t exist in yourcompany file, you have several options:
• Enter the transaction without a vendor name (which is appropriate only for thosepayments to vendors you don’t care about tracking, such as monthly paymentsfor merchant account charges, or your bank’s monthly service charges).
• Enter the transaction without a vendor name, and create the vendor after you’refinished with the Online Banking window. Then edit the transaction to add thevendor name.
372 P A R T T W O B O O K K E E P I N G
QckBcks TIGHT / QuickBooks 2009 The Official Guide / Ivens / 274-8 / Chapter 16
FIGURE 16-8 A downloaded payment is assumed to be an expense.
P:\010Comp\QckBcks\274-8\ch16.vpTuesday, September 16, 2008 9:55:15 AM
Color profile: DisabledComposite Default screen

• Link the vendor name on the downloaded transaction to a vendor name in yourcompany file via a renaming rule.
If the payment is posted to multiple accounts, or should be linked to a customer(or both), click the link “Show splits, memo, date, number” to open an entrywindow that looks like Figure 16-9.
If the downloaded payment represents a check or online payment you created topay a vendor bill that is entered in your system, click the link “Not an expense?”and select the option Select Open Bills To Pay In QuickBooks.
In the Vendor field, select the vendor with an open A/P bill that this downloadedpayment is linked to. QuickBooks displays the open bills for the vendor (seeFigure 16-10).
Select the bill to pay with this transaction, and change the paid amount if thetransaction represented a partial payment. You can also select multiple bills for thisvendor, if you paid more than one bill with this payment. QuickBooks does somequick arithmetic to make sure that all the bills you select total up to match thedownloaded amount.
C H A P T E R 1 6 U S I N G O N L I N E B A N K I N G S E R V I C E S 373
QckBcks TIGHT / QuickBooks 2009 The Official Guide / Ivens / 274-8 / Chapter 16
FIGURE 16-9 Enter the payment with the details you need.
P:\010Comp\QckBcks\274-8\ch16.vpTuesday, September 16, 2008 9:55:15 AM
Color profile: DisabledComposite Default screen

Adding a Downloaded Deposit to the RegisterWhen you select a downloaded deposit, the right pane of the online banking centerdisplays the Record A QuickBooks Deposit window, which could have either orboth of the following tabs:
• Undeposited Funds, which contains all the current transactions waiting fordeposit (the transactions you see when you open the Make Deposits window).If no entries exist in Undeposited Funds, the tab isn’t displayed.
• Open Invoices, which lists all the current open invoices in your company file. Ifno open invoices exist, the tab isn’t displayed.
Choose the appropriate tab, and then choose the matching transaction (ormultiple transactions that total up to the amount of the downloaded transaction).As you can see in Figure 16-11, the selected downloaded transaction matches acredit card sale transaction that was waiting for the merchant bank to deposit thefunds.
If the merchant card company deducts fees before depositing the sale, thedownloaded transaction amount is lower than the amount received for the sale. Tomatch the amount, enter those fees in this window, in the next blank row. Click theFrom Account column and select the merchant account fees expense account.Then, in the Amount column, enter the difference between the original transactionand the downloaded deposit (it’s a minus amount). The net amount matches the
374 P A R T T W O B O O K K E E P I N G
QckBcks TIGHT / QuickBooks 2009 The Official Guide / Ivens / 274-8 / Chapter 16
FIGURE 16-10 This downloaded transaction was a bill payment.
P:\010Comp\QckBcks\274-8\ch16.vpTuesday, September 16, 2008 9:55:16 AM
Color profile: DisabledComposite Default screen
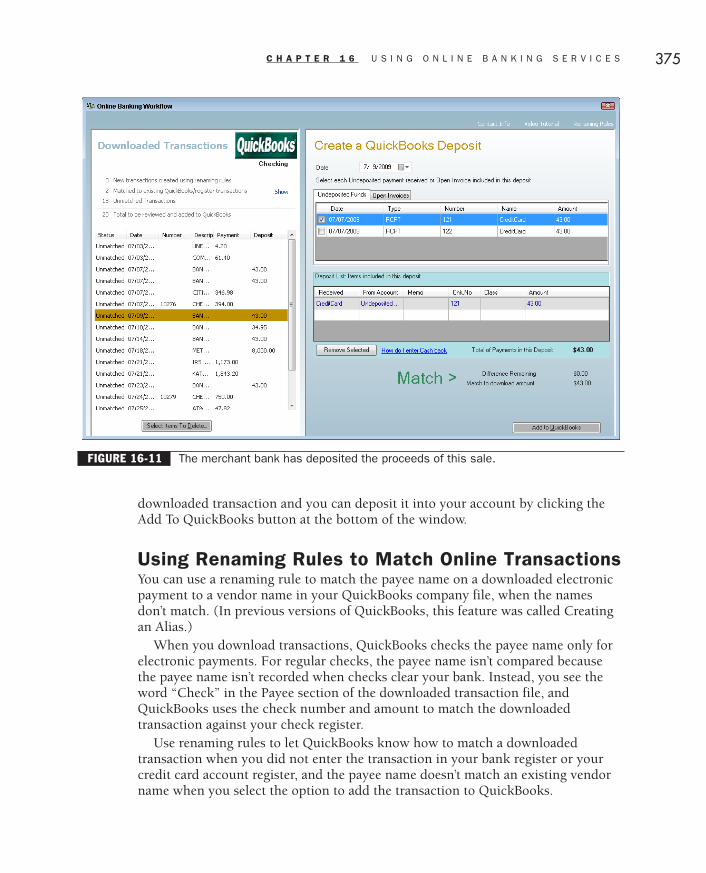
downloaded transaction and you can deposit it into your account by clicking theAdd To QuickBooks button at the bottom of the window.
Using Renaming Rules to Match Online TransactionsYou can use a renaming rule to match the payee name on a downloaded electronicpayment to a vendor name in your QuickBooks company file, when the namesdon’t match. (In previous versions of QuickBooks, this feature was called Creatingan Alias.)
When you download transactions, QuickBooks checks the payee name only forelectronic payments. For regular checks, the payee name isn’t compared becausethe payee name isn’t recorded when checks clear your bank. Instead, you see theword “Check” in the Payee section of the downloaded transaction file, andQuickBooks uses the check number and amount to match the downloadedtransaction against your check register.
Use renaming rules to let QuickBooks know how to match a downloadedtransaction when you did not enter the transaction in your bank register or yourcredit card account register, and the payee name doesn’t match an existing vendorname when you select the option to add the transaction to QuickBooks.
C H A P T E R 1 6 U S I N G O N L I N E B A N K I N G S E R V I C E S 375
QckBcks TIGHT / QuickBooks 2009 The Official Guide / Ivens / 274-8 / Chapter 16
FIGURE 16-11 The merchant bank has deposited the proceeds of this sale.
P:\010Comp\QckBcks\274-8\ch16.vpTuesday, September 16, 2008 9:55:16 AM
Color profile: DisabledComposite Default screen
Understanding How and When Payee Names DifferIt’s not uncommon for the payee name on a downloaded electronic payment todiffer from the vendor name you’re using in your company file. For example, youmay have a vendor named BigBank that automatically deducts payments from youraccount, but the bank uses BB4445 (representing your loan account number) whencreating online payments. In that case, you have two options for matching (oradding) the transaction in the Online Banking Center dialog:
• Use a renaming rule to create an alias to match BB4445 to BigBank when apayment appears in a downloaded file. You can create additional renaming rulesfor any other loans or other types of payments made to this vendor.
• Close the online banking center and change the name of the vendor to BB4445in your QuickBooks file. This works if the only payments to this bank are forthis loan. If you have multiple loans from the bank (or other types of paymentsto the bank), and you’re tracking them in different accounts, using a loannumber as the vendor name doesn’t work, so you must create a renaming rule.
The first option is easier and quicker.The same problem occurs when the difference in the payee name is inadvertent.
For example, you may have a vendor named Backstroke, with a company nameArthur Backstroke, but when you create the vendor on your bank’s online paymentwebsite, you may fill in the payee name as Art Backstroke, or Artie Backstroke. Ifyou aren’t consistent about the way you fill in payee names when you create onlinevendor accounts, creating a renaming rule for the payee means that transactions arematched (although a better solution is to be careful about the way you enter data).
In the future, when you download transactions with this payee name,QuickBooks recognizes the renaming rule and matches the transaction if it exists inthe register. If the transaction doesn’t exist in the register, select the downloadedtransaction and click Add To QuickBooks. QuickBooks automatically adds it to theregister, using the renaming rule to link the transaction to the right vendor name.
Creating a Renaming RuleYou cannot create a renaming rule in QuickBooks the way you can create othercomponents in your company file (by adding it to a list). The QuickBooks onlinebanking center lets you create the renaming rule when you run into a problemmatching or adding an online transaction that’s been downloaded. Even if youknow that your vendor named BigBank is automatically taking money out of yourchecking account every month, and you also know the loan number the bank usesas Payee, you can’t set this up ahead of time. You have to wait for the firstunmatched transaction to create the rule.
One commonly encountered need for a renaming rule is the downloadedtransaction you see when you remit taxes (especially payroll or sales tax) on the taxauthority’s website, using an ACH transfer from your bank account. For example, in
376 P A R T T W O B O O K K E E P I N G
QckBcks TIGHT / QuickBooks 2009 The Official Guide / Ivens / 274-8 / Chapter 16
P:\010Comp\QckBcks\274-8\ch16.vpTuesday, September 16, 2008 9:55:17 AM
Color profile: DisabledComposite Default screen

Figure 16-12, a payroll liability transaction doesn’t match the vendor name in thecompany file.
Select the vendor to whom this transaction should be linked. QuickBooksautomatically fills in the account, based on your configuration settings for thatvendor, but you can change the account if necessary. When you click Add ToQuickBooks, the renaming rule is automatically saved.
Ill 16-5
C H A P T E R 1 6 U S I N G O N L I N E B A N K I N G S E R V I C E S 377
QckBcks TIGHT / QuickBooks 2009 The Official Guide / Ivens / 274-8 / Chapter 16
FIGURE 16-12 Create a naming rule by selecting the transaction in the left pane and selectingthe QuickBooks vendor name in the right pane.
P:\010Comp\QckBcks\274-8\ch16.vpTuesday, September 16, 2008 9:55:17 AM
Color profile: DisabledComposite Default screen

Managing Renaming RulesYou can view, edit, and delete renaming rules by clicking the Renaming Rules linkat the top right of the Online Banking Center or the Add Transactions ToQuickBooks window.
Ill 16-6
If downloaded transactions from a vendor have differing payee names forindividual transactions, you can create a special renaming rule instead of creatingmultiple renaming rules for that vendor. For example, suppose you have monthlyauto-payments from a vendor that includes a unique internal reference as part ofthe payee name on each transaction. (Some companies include the invoice numberof the invoice being paid by electronic transfer in the payee name.)
In the Renaming Rules window, specify the way you want QuickBooks toexamine the name, and enter the appropriate text in the name field. Then clickSave.
378 P A R T T W O B O O K K E E P I N G
QckBcks TIGHT / QuickBooks 2009 The Official Guide / Ivens / 274-8 / Chapter 16
P:\010Comp\QckBcks\274-8\ch16.vpTuesday, September 16, 2008 9:55:17 AM
Color profile: DisabledComposite Default screen

Ill 16-7
The following choices for creating a wildcard are available, and for each vendoryou should select the choice that’s appropriate to the way the vendor names thepayee:
• Begins With• Ends With• Contains (this is the default matching specification)• Exactly Matches
Skipping Renaming RulesYou don’t have to create or use a renaming rule for an unmatched transaction.Ignoring this feature can be helpful if your unmatched downloaded paymentsalways fall into one of three categories:
• The payee is your bank (service charge) or your credit card merchant bank (themonthly sweep of your account to collect the fees). You don’t really need totrack these payees as vendors; you don’t create vendor reports for them and youdon’t care if the vendor doesn’t appear on the vendor list in the Vendor Center.The only thing you care about is the account to which the transaction is posted(which is where you can get a report on the totals posted).
C H A P T E R 1 6 U S I N G O N L I N E B A N K I N G S E R V I C E S 379
QckBcks TIGHT / QuickBooks 2009 The Official Guide / Ivens / 274-8 / Chapter 16
P:\010Comp\QckBcks\274-8\ch16.vpTuesday, September 16, 2008 9:55:18 AM
Color profile: DisabledComposite Default screen

• The payee is one that changes the payee name with every payment. It’s silly tocreate a renaming rule for every downloaded name, because the payee namewon’t ever appear again. Some debit card transactions include the name of thestore and the date in the payee name, some delivery/courier services add theinvoice number to the payee name, and so on and so on. These payee names,because they’re based on a unique transaction, will never appear in the future;therefore, there’s no point in collecting a slew of renaming rules that will neverbe used again.
To post a downloaded transaction without creating a renaming rule, merely fill inthe posting account in the Record An Expense dialog in the right pane of the AddTransactions To QuickBooks window and click Add To QuickBooks. Later, you canedit the transaction in the register to add a payee name, or you can leave thetransaction “payee-less” if it’s your bank, merchant card account, or anotherexpense you don’t track by vendor.
Although you’ll have transactions in your bank register that have no payee name,that omission doesn’t interfere with keeping accurate books and getting the reportsyou need. The reason this all works so efficiently is that QuickBooks only requirestwo things to create a direct transaction (a direct transaction is one that isn’tposting to A/R or A/P):
• An amount• An account
This makes perfect sense in terms of business bookkeeping, because sometimesthe only thing you care about for certain transactions is the posting account.
Deleting Unmatched TransactionsSometimes the download file contains transactions that can’t be matched. Thisusually occurs when you don’t download transactions frequently, and some of thetransactions you download have already been cleared during a reconciliation. (Afterthe first time you download transactions, QuickBooks omits cleared transactions.)
You should delete these transactions; otherwise they’ll be there waiting for youevery time you download new transactions. Click the button labeled Select Items ToDelete at the bottom of the left pane. QuickBooks opens the Select Items To Deletedialog, where you can get rid of the transactions you don’t want to see again.
The top of the dialog offers two options:
• Select Individual Transactions, which leaves the selection check boxesunchecked until you manually click each box to delete its transaction.
• Select All Download Transactions Older Than <Date>, which automaticallyadds check marks to the check boxes of transactions that are older than thespecified date.
380 P A R T T W O B O O K K E E P I N G
QckBcks TIGHT / QuickBooks 2009 The Official Guide / Ivens / 274-8 / Chapter 16
P:\010Comp\QckBcks\274-8\ch16.vpTuesday, September 16, 2008 9:55:18 AM
Color profile: DisabledComposite Default screen

C A U T I O N : The Select Items To Delete dialog includes matchedtransactions, so pay attention to the Status column to avoid deletingtransactions you’ve matched.
Paying Bills OnlineOnline bill payments are a wonderful invention. You save the costs of checks,envelopes, and stamps, and, if you don’t print checks in QuickBooks, you save thetime and energy required to write a check.
C H A P T E R 1 6 U S I N G O N L I N E B A N K I N G S E R V I C E S 381
QckBcks TIGHT / QuickBooks 2009 The Official Guide / Ivens / 274-8 / Chapter 16
Vendors and Renaming Rules for Credit CardDownloads: Are They Necessary?The QuickBooks support documentation (Help files or website articles) often explains theadvantage of creating renaming rules by using downloaded credit card transactions asexamples. For instance, suppose you use your credit card at your local famous gourmet coffeeshop? The downloaded transaction has a payee name similar to “CoffeePlace 098,” where 098is the store number. The vendor CoffeePlace doesn’t exist in your system (unless you’ve opened acharge account at the store and they send you monthly bills). QuickBooks wants you to add thevendor when you match the transactions to your credit card register.
A couple of days later you use your credit card at the same coffee chain, but a different store(Store #876), and the downloaded transaction has a payee name like “CoffeePlace 876,” so youcreate an alias for the vendor you created.
Given the fact that this chain may have six or seven stores between your house, your office,and the local football stadium where you have season tickets, you can add a renaming rule foreach store as it appears in the credit card download file and eventually every downloadedtransaction will be matched with one of the rules.
Here’s a question to ask yourself: “Why are you entering the coffee place as a vendor andcreating renaming rules?” The credit card company is the vendor, you do not have a customer-vendor relationship with the store that accepts your credit card. Adding the stores where you useyour credit card as vendors unnecessarily takes up a vendor slot (remember, except for theEnterprise editions, QuickBooks permits a finite number of “names” in the Names lists). Unlessyou have some reason to track these transactions by linking them to a vendor, enter the vendor’sname in the Memo field, don’t create the vendor or renaming rule.
➽ FYI
P:\010Comp\QckBcks\274-8\ch16.vpTuesday, September 16, 2008 9:55:18 AM
Color profile: DisabledComposite Default screen

Today, most banks offer online bill payments either on their websites, or bysupporting online bill payments directly through QuickBooks:
• If your bank supports Direct Connect for QuickBooks and offers online billpayment as part of its Direct Connect feature, you can enter checks in QuickBooksand send them to your bank electronically via the Online Banking Center.
• If your bank supports Web Connect for QuickBooks (offering a download fileinstead of interacting directly with your QuickBooks bank account register),you can use your bank’s website online bill payment feature (if one exists).
• If your bank doesn’t support online payments of checks created in QuickBooks,and you want to enter checks in QuickBooks and have them automaticallytransfer to an electronic bill payment service, you can sign up for theQuickBooks Bill Pay service (covered later in this chapter).
Some vendors (almost always large companies) accept payments via electronictransfers. These vendors are registered in a database, and that database is checkedwhen an online payment is being processed. If the vendor is in the database, withe-pay information, the online payment service electronically transfers the fundsdirectly into the vendor’s bank account instead of writing and mailing a check.
QuickBooks Bill Pay vs. Bank Website Bill PayIf your bank supports bill payment through Direct Connect, you can enter checksin QuickBooks (in the Pay Bills window or the Write Checks window) and markthem as online bill payments so they are automatically uploaded to your bank.Detailed instructions for performing this task appear later in this chapter in thesection, “Paying Bills Online in QuickBooks.”
Banks that support QuickBooks Direct Connect almost always also providewebsite features for paying bills online (after all, regardless of the immensepopularity of QuickBooks, some businesses choose other accounting software). Youcan go to the bank’s website, and create online vendors and initiate online checks tothose vendors from the website.
If your bank offers both methods of paying bills online, you have to determinewhether you want to create your online payments in QuickBooks and upload them, orgo to the bank’s website, enter the payments, and then add them to your QuickBooksfile (either manually, or by adding them during a direct connect download). You shouldweigh the pros and cons by deciding on your own priorities.
Setup Processes are the Same for QuickBooksand Bank Website PaymentsFor both methods, you have to set up the vendor for online payments. This meansthe vendor information has to include the vendor name (the payee), address,
382 P A R T T W O B O O K K E E P I N G
QckBcks TIGHT / QuickBooks 2009 The Official Guide / Ivens / 274-8 / Chapter 16
P:\010Comp\QckBcks\274-8\ch16.vpTuesday, September 16, 2008 9:55:18 AM
Color profile: DisabledComposite Default screen

telephone number, and your account number with that vendor (in QuickBooks,your account number is entered in the Additional Info tab of the vendor record).
For both methods, if the payee is registered in the database of e-pay recipients,the online payment is automatically sent electronically instead of mailing a check.
The reason you have to provide your customer account number with the vendoris that the payment the vendor receives doesn’t come from you or your bank account.It comes from the bank’s bank account. The payment includes your customer accountnumber so the vendor knows which account to credit with the payment. (See thesection, “Following the Money Trail: How Online Payments Work” later in thischapter for a complete explanation.)
Now that you know what’s the same, let’s look at what’s different. You can decidewhich of the differences are pros and which are cons as you decide how you wantto manage online payments.
Data Entry ConsiderationsUsing QuickBooks means you only have to enter check data once. Using the bank’swebsite means you enter the amount while you’re connected to the bank, and thenyou have to enter the check in QuickBooks (not as an online payment). If you failto enter the check in QuickBooks, you won’t have an accurate running balance untilyou download transactions and see the payment, and then you’ll have to enter it inthe bank register anyway, using the Add To QuickBooks function described in theprevious section of this chapter. If you don’t add the transaction when it’s downloaded,you’ll have to add it when your statement arrives or your reconciliation fails. This isdouble work, but once the vendor exists in your QuickBooks file, you only have toenter the date and amount when you duplicate the online transaction.
Elapsed Time ConsiderationsUsing the bank’s website means the bank begins processing the payment almostimmediately (unless you configure the payment for a future date).
Using QuickBooks means a delay in processing because QuickBooks gives thebank several days to process the payment and additional days to create and mail thecheck. For example, if you enter a check dated July 27, as soon as you select theOnline Payment option QuickBooks changes the processing date to July 31 (whichmeans the bank won’t even look at the uploaded check until that date), andchanges the check date to August 3 (which is the date the bank will use to send thepayment).
Paying Vendors ElectronicallyMany banks let you convert any payee you’ve created on the bank’s website to ane-pay vendor, so you can transfer funds electronically for every transaction when
C H A P T E R 1 6 U S I N G O N L I N E B A N K I N G S E R V I C E S 383
QckBcks TIGHT / QuickBooks 2009 The Official Guide / Ivens / 274-8 / Chapter 16
P:\010Comp\QckBcks\274-8\ch16.vpTuesday, September 16, 2008 9:55:18 AM
Color profile: DisabledComposite Default screen

you use the bank’s website to create the online payment. To do this, you mustprovide the bank with the vendor’s bank information (routing number, bankaccount number, and bank account name). Most banks have a form for this.
QuickBooks only sends e-payments to vendors registered in the “official” e-paydatabase.
In addition, many banks are equipped to handle ACH files for the transfer offunds directly from your bank account to the bank accounts of all the payees in theACH file (this is the technology QuickBooks uses for payroll direct deposits).
N O T E : ACH stands for Automated Clearing House, which is a paymenttransfer system that connects all financial institutions in the United States. TheACH network is the central clearing facility for all Electronic Fund Transfer (EFT)transactions. ACH transfer files are text files that contain all the informationrequired to move money from an account in one financial institution to anaccount in another financial institution. The data in an ACH file must follow strictrules about layout and formatting to ensure accuracy.
If your bank doesn’t accept ACH file transfers, it probably will add that servicesoon, because this is a very popular service and banks are marketing electronicservices to lure customers—electronic banking is a hot issue! QuickBooks does notoffer ACH file creation (at least not yet). If you don’t know how to build an ACHfile from scratch, there is software available that will read your QuickBooks file andcreate an ACH file from the checks you prepare. You upload that ACH file to yourbank by going to the bank’s website and using the ACH transfer functions availableon that site; you cannot send the file through QuickBooks.
Following the Money Trail:How Online Payments WorkWhen you send your own checks to vendors, the money isn’t removed from yourbank account until the check is presented to your bank for payment by the payee’sbank. This means the payee has received, endorsed, and deposited the check.
When you create an online payment (either in QuickBooks or on your bank’swebsite), the money is immediately removed from your checking account andplaced into the bank’s checking account.
The bank sends the check to the payee, and after the vendor deposits it in itsown bank account, the check is sent to the bank’s checking account for paymentand clearance. No notification is sent to you when the check is presented forpayment.
384 P A R T T W O B O O K K E E P I N G
QckBcks TIGHT / QuickBooks 2009 The Official Guide / Ivens / 274-8 / Chapter 16
P:\010Comp\QckBcks\274-8\ch16.vpTuesday, September 16, 2008 9:55:18 AM
Color profile: DisabledComposite Default screen

N O T E : It’s important to know that very few banks manage online paymentsdirectly; instead they outsource this process (as well as most other software-based processes including setting up online bank accounts for customers,statement preparations, etc.) to large, high-tech software companies thatspecialize in bank “back-end” processes. These companies are “bankprocessors” and are usually referred to as “processors” by bank personnel. Thismeans when you contact your bank about a problem with an online payment, thebank has to contact the processor to get you the information you need (whichmay delay the response). In this section, when you see the word “bank” youshould think “processor.” For example, when the discussion in this chapter saysthat money is removed from your bank account and placed in the bank’s bankaccount, it’s almost certainly placed in a bank account that belongs to theprocessor, not into a bank account that belongs to your bank.
When you download bank transactions, you see the deduction for the onlinepayment. However, unlike deductions you see for the checks you create and send,this doesn’t mean that the vendor has received and deposited your payment; insteadit means the bank has moved the money from your account to its account.
N O T E : If you create an online payment that is an e-payment, the sameprocess applies; that is, the money is removed from your account before thee-payment is transmitted.
When you get your statement from the bank, you don’t see physical checks orpictures of checks (depending on the way your bank sends you checks with thestatement) that were online payments. Those checks are sent to, and retained by,the bank (because it’s the bank’s checking account that processed the check).
What to Do When Vendors Don’tReceive Online Payment ChecksIf you create and mail your own checks, when a vendor calls to say that the checkwasn’t received, you can check with your bank to see if the check cleared. If itdidn’t clear, you can stop payment and issue a new check. If it cleared, you canrequest a copy of the back of the check in order to see the endorsement. When yousend the endorsement information to the vendor (a copy of the back of the check),the vendor can correct its records to apply your payment. If the vendor claims theendorsement is bogus, your bank has procedures for recovering the funds and youcan send another check to the vendor.
It’s not quite as straightforward when the check is an online payment, but yourbank has procedures that cover this situation. However, when you talk to yourbank’s personnel about problems with online services, the banker you speak to
C H A P T E R 1 6 U S I N G O N L I N E B A N K I N G S E R V I C E S 385
QckBcks TIGHT / QuickBooks 2009 The Official Guide / Ivens / 274-8 / Chapter 16
P:\010Comp\QckBcks\274-8\ch16.vpTuesday, September 16, 2008 9:55:18 AM
Color profile: DisabledComposite Default screen
almost certainly has to convey your query or complaint to the processor, whichmeans you may not get an answer immediately (although the delay should neverexceed a business day).
N O T E : You can determine the current status of an online payment youuploaded from QuickBooks by choosing Banking | Online Banking | Inquire AboutOnline Banking Payment. The message you see tells you whether the payment isin process (which means the bank has it but has not yet created the check) orhas been processed (the check has been created and mailed). This informationdoes not tell you whether the check has been deposited by the payee, or whetherit has cleared the bank’s bank account.
If an online payment check is not presented for payment to the bank’s bankaccount within 90 days, a flag goes up in the bank’s software (some processors mayuse a different number of elapsed days, but 90 days is the common interval). Themoney is automatically returned to your bank account, and a “stop payment” orderis issued within the bank’s bank account (not your bank account).
Ninety days is a long time, and well before this automatic stop payment isissued, you’re being dunned by the payee. You have to remit payment immediately.Go to your bank and explain the problem. Your bank should offer you the followingoptions:
• The bank will reissue the check and send it to the payee using the funds thatwere removed for the original payment. The money doesn’t have to bewithdrawn from your account again because the bank still has it, since thecheck wasn’t presented for payment by the payee’s bank. (Most banks call youor the vendor to check the vendor’s address in case a bad address is theproblem; if so, the check is reissued to the corrected address.)
• The bank will return the money to your account so you can issue your owncheck (or cash) to the vendor.
If the bank discovers that the check it sent was presented for payment, theprocedures are the same as if this happened with your own check. The bank willprovide a picture of the endorsement that you can send to the vendor. The vendorwill either discover its mistake in entering your payment, or will claim theendorsement is bogus (and the same remedies are available as for your own checksthat have forged endorsements).
Paying Bills Online in QuickBooksYou can pay your bills in QuickBooks, then use the Online Banking Center to sendthe payments to the payees. You can either use your own bank (if it provides DirectConnect and also offers QuickBooks online payments), or use the QuickBooks BillPay service. In this section, when you see the word “bank,” you can mentally
386 P A R T T W O B O O K K E E P I N G
QckBcks TIGHT / QuickBooks 2009 The Official Guide / Ivens / 274-8 / Chapter 16
P:\010Comp\QckBcks\274-8\ch16.vpTuesday, September 16, 2008 9:55:18 AM
Color profile: DisabledComposite Default screen

substitute “the QuickBooks Bill Pay service” instead of your own bank, if that’swhat you’re using. (See the section, “Using the QuickBooks Bill Pay Service,” laterin this chapter.)
If the vendor is set up to receive electronic payments (the company appears inthe national e-pay database), the money is transferred directly from your bankaccount to the vendor’s bank account. If the vendor’s account is not accessible foronline payments, your bank writes a check and mails it.
There are three methods for creating the transaction in QuickBooks, explained indetail in this section.
Using the Write Checks Transaction Formfor Online PaymentsIf there’s no bill in the system for this vendor and you’re preparing a directdisbursement in the Write Checks window, complete the check as usual, and thenselect the option labeled Online Payment.
N O T E : If you have multiple bank accounts, you must select the bankaccount that’s enabled for online bill payments from the drop-down list in theBank Account field at the top of the Write Checks window. If the selected bankaccount is not enabled for online bill payments, the Online Payment optiondoesn’t appear on the check form.
If you usually print checks, the To Be Printed option is preselected, and youmust deselect it by clicking the check box to remove the check mark in order tomake the Online Payment check box available. As soon as you deselect the To BePrinted option, QuickBooks inserts the next available check number in the No.field.
When you select the Online Payment option, QuickBooks displays a messageabout the date of your check. Remember, the processing date (when the bank isnotified of the transaction) is delayed, and the check date (when the check isactually mailed) is delayed until after the processing date. (If the vendor is in thenational e-pay vendor database, the date is changed to three days from the currentdate.)
When you click OK, QuickBooks makes the following changes to the WriteChecks window:
• Displays a lightning bolt symbol in the top left corner of the check.• Replaces the check number with the word SEND (later, when the payment is
sent to the bank from the Online Banking Center, the word SEND is replacedwith a check number that QuickBooks chooses).
• Replaces the label on the Date field from Date to Delivery Date.
C H A P T E R 1 6 U S I N G O N L I N E B A N K I N G S E R V I C E S 387
QckBcks TIGHT / QuickBooks 2009 The Official Guide / Ivens / 274-8 / Chapter 16
P:\010Comp\QckBcks\274-8\ch16.vpTuesday, September 16, 2008 9:55:19 AM
Color profile: DisabledComposite Default screen

• Replaces the label on the Memo from Memo to Transmit Memo, and puts acheck box next to the field.
• Places your account number with this vendor at the bottom of the check(where the signature line would be for a regular check).
If you want to add a memo to the transaction, select the Transmit Memo checkbox and enter the text you want to include on this check. If you use this option,your payment can only be delivered as a voucher or stub attached to a physicalcheck. This means that your payment will not be made electronically if the vendoris able to accept electronic payments. Instead, a check is sent, which delays thepayment.
Click Save & Close or Save & New (if you have another check to write) to savethe payment. QuickBooks displays a message telling you that you’ve created anonline payment that will appear in the Online Banking Center. (See the section“Uploading Online Payments” to learn how to transfer the payment to your bank.)
Using the Pay Bills Window for Online PaymentsIf this vendor has a bill in your system, you must use the Pay Bills function tocreate the payment, not the Write Checks transaction. Select the appropriate billand then choose Online Bank Pmt from the drop-down list in the Payment Methodfield.
N O T E : If you have multiple bank accounts, you must select the bankaccount that’s enabled for online bill payments from the Payment Account field atthe bottom of the Pay Bills window. If the selected bank account is not enabledfor online bill payments, the Online Bank Pmt option doesn’t appear in thePayment Method drop-down list.
When you choose the online payment option, QuickBooks automaticallychanges the date in the Payment Date field at the bottom of the window asdescribed earlier for the Write Checks window.
When you click Pay Selected Bills, QuickBooks displays the usual PaymentSummary dialog message, where your payment is noted as an online bank payment.(See the section “Uploading Online Payments” to learn how to transfer the paymentto your bank.)
Using the Bank Register for Online PaymentsYou can use the register for the bank account you use for online payments insteadof the Write Checks transaction form to create an online payment.
Follow these steps to create an online payment:
� Open the register and go to the next blank line to create the payment.� The Date field has the current date, which you should accept.
388 P A R T T W O B O O K K E E P I N G
QckBcks TIGHT / QuickBooks 2009 The Official Guide / Ivens / 274-8 / Chapter 16
P:\010Comp\QckBcks\274-8\ch16.vpTuesday, September 16, 2008 9:55:19 AM
Color profile: DisabledComposite Default screen

� Press TAB to move to the Number field and enter the text SEND.� QuickBooks displays a message telling you it has to change the check date;
click OK.� Finish filling out the check information and click Record.
QuickBooks displays a message telling you that you’ve created an onlinepayment.
Uploading Online PaymentsTo send your online payments to your bank, open the Online Banking Center(choose Banking | Online Banking | Online Banking Center). In the Online BankingCenter window, you can see your payments in the Items Ready To Send section,along with the request to download bank transactions.
You can perform any of the following actions on the online payments that arelisted:
• Deselect the check mark to prevent the payment from being uploaded (you canselect it for upload another time).
• Select the payment and click Edit to view or change the transaction.• Select the payment and click Delete to remove the payment from your system
(clicking Delete doesn’t just delete the payment from the upload, it deletes thetransaction from your company file). QuickBooks asks you to confirm youraction.
Click Send/Receive Transactions to begin uploading your payments along withthe request for a download transaction file.
Sending Electronic Messages to the BankIf your bank supports Direct Connect, you can send a message to your bank bychoosing Banking | Online Banking | Create Online Banking Message. QuickBooksopens the Online Banking Message transaction window where you can enter yourmessage.
The message appears in the Online Banking Center in the list of items to beuploaded.
Using the QuickBooks Bill Pay ServiceIf your bank doesn’t participate in online bill payment services directly fromQuickBooks, and you want to pay your bills online using QuickBooks, you can signup for online payments directly with QuickBooks. This is a fee-based service.
C H A P T E R 1 6 U S I N G O N L I N E B A N K I N G S E R V I C E S 389
QckBcks TIGHT / QuickBooks 2009 The Official Guide / Ivens / 274-8 / Chapter 16
P:\010Comp\QckBcks\274-8\ch16.vpTuesday, September 16, 2008 9:55:19 AM
Color profile: DisabledComposite Default screen

From the Online Banking submenu, choose Participating Financial Institutions.When the Financial Institutions list is displayed in your browser window, scrollthrough the list to find QuickBooks Bill Pay Service in the left pane.
You’ll see two listings:
• QuickBooks Bill Pay—New!, which is the listing you should select• QuickBooks Bill Pay-TM, which is the listing for existing customers of this
older service (for users of older versions of QuickBooks) and doesn’t provideonline signup anymore
When you select QuickBooks Bill Pay—New!, the right pane displaysinformation about this service (see Figure 16-13).
To sign up, click Apply Now. After you answer a couple of questions about yourbusiness, click the Continue button. An application form appears on your screen.Follow the prompts and instructions to complete the enrollment process. QuickBookswill send you the information you need to begin using the service for online billpayments.
390 P A R T T W O B O O K K E E P I N G
QckBcks TIGHT / QuickBooks 2009 The Official Guide / Ivens / 274-8 / Chapter 16
FIGURE 16-13 If your bank doesn’t offer online bill paying within QuickBooks, you can sign upwith QuickBooks Bill Pay.
P:\010Comp\QckBcks\274-8\ch16.vpTuesday, September 16, 2008 9:55:19 AM
Color profile: DisabledComposite Default screen

Transferring Money BetweenAccounts OnlineIf you have multiple accounts at your financial institution, and the financialinstitution uses Direct Connect, you can transfer money between those accountswithin QuickBooks. For example, you may have a money market account for yourbusiness in addition to your checking account.
To transfer money online, you must have applied at your financial institution foronline banking for both accounts. You’ll probably have a unique PIN for eachaccount. (To make your life less complicated, you should make changes whileyou’re online to ensure both accounts have the same PIN, so you don’tinadvertently enter the wrong PIN). In addition, you must have enabled bothaccounts for online access within QuickBooks.
There are two methods you can use to transfer funds between online accounts:the transfer funds function or direct data entry in the register for either account.
Using the Transfer Funds FunctionThe simplest way to move money between your online accounts is to use theQuickBooks Transfer Funds Between Accounts window, which you reach bychoosing Banking | Transfer Funds from the menu bar.
Specify the sending and receiving accounts (remember, both must be enabled forDirect Connect online access) and enter the amount you want to transfer. Be sure toselect the option for Online Funds Transfer. Click Save & Close. Then chooseBanking | Online Banking Center, make sure the transaction has a check mark, andclick Go Online.
Using the Bank Register to Transfer FundsYou can enter a transfer directly into the account register of the bank account fromwhich you are sending the money. The significant data entry is the one in theCheck Number column; instead of a check number, type the word SEND. Don’tenter a payee; enter the amount, and enter the receiving bank account in theAccount field. Then choose Banking | Online Banking | Online Banking Center,make sure the transaction is listed in the Items To Send section and has a checkmark, and click Send/Receive Transactions.
Receiving Customer Payments OnlineBesides the online activities that permit you to track your own bank accountactivity, transfer money, and pay your own bills, QuickBooks offers a way for yourcustomers to pay you online. This is a fee-based service provided by theQuickBooks Online Billing Solutions service.
C H A P T E R 1 6 U S I N G O N L I N E B A N K I N G S E R V I C E S 391
QckBcks TIGHT / QuickBooks 2009 The Official Guide / Ivens / 274-8 / Chapter 16
P:\010Comp\QckBcks\274-8\ch16.vpTuesday, September 16, 2008 9:55:19 AM
Color profile: DisabledComposite Default screen

If you sign up for this service, you can notify your customers about this featureby e-mailing the invoice with the online service URL in the cover note, or by snail-mailing the invoice and sending an e-mail message with the online service URL.The customer clicks the link to the URL to travel to the QuickBooks website andarrange for payment (usually by filling out a form with a credit card number—thesite is secure).
QuickBooks notifies you when the payment is made, and you can download thepayment into your bank register using the standard online banking procedures.
To learn more about this service or to sign up, go to http://quickbooks.intuit.com/product/add_ons/getting_paid_faster.jhtml.
392 P A R T T W O B O O K K E E P I N G
QckBcks TIGHT / QuickBooks 2009 The Official Guide / Ivens / 274-8 / Chapter 16
P:\010Comp\QckBcks\274-8\ch16.vpTuesday, September 16, 2008 9:55:19 AM
Color profile: DisabledComposite Default screen

Chapter
Chapter
1717Year-end Procedures
In this chapter:
• Run reports on your financial condition
• Print 1099 forms
• Make year-end journal entries
• Get ready for tax time
• Close the books
393
QckBcks TIGHT / QuickBooks 2009 The Official Guide / Ivens / 274-8 / Chapter 17
P:\010Comp\QckBcks\274-8\ch17.vpTuesday, September 16, 2008 10:03:13 AM
Color profile: DisabledComposite Default screen

The end of the year is a madhouse for bookkeepers, and that’s true for majorcorporations as well as for small businesses. There is so much to do: so many reportsto examine, corrections to make, entries to create, adjustments to apply—whew!
You can relax a bit. You don’t have to show up at the office on January 1 (or thefirst day of your new fiscal year if you’re not on a calendar year). Everything doesn’thave to be accomplished immediately. QuickBooks is date-sensitive so you cancontinue to work in the new year. As long as the dates of new transactions are afterthe last day of your fiscal year, the transactions won’t work their way into your year-end calculations.
Running Year-end Financial ReportsThe standard financial reports you run at year-end provide a couple of services for you:
• You can see the economic health of your business.• You can examine the report to make sure everything is posted correctly before
you organize information for paying taxes.
To run financial reports, click the Reports menu listing. For year-end reports,you’ll need to access several types of reports (see Chapter 15 for information aboutmodifying and customizing the standard financial reports).
Don’t forget that reports have date ranges like “current year” and “last fiscalyear.” If you perform these tasks before the end of your fiscal year, you’re still in thecurrent year. However, if you’re working after the last date of your fiscal year, thecurrent year isn’t the year of interest.
Year-end P&L ReportStart with a Profit & Loss Standard report (also called an income statement), bychoosing Reports | Company & Financial | Profit & Loss Standard. When the reportopens, change the date range to the entire fiscal year (last year, if you’re doing thisafter your fiscal year-end date).
The report displays the year-end balances for all the income and expenseaccounts in your general ledger that had any activity this year. Examine the report,and if anything seems out of whack, double-click the line to see the postings forthat account. If the data you see doesn’t reassure you, double-click any of theposting lines to see the original transaction.
If there’s a transaction that seems to be in error, you can take corrective action.You cannot delete or void a bill you paid or a customer invoice for which youreceived payment, of course. However, you might be able to talk to a customer orvendor for whom you’ve found a problem and work out a satisfactory arrangementfor credits. Or you may find that you posted an expense or income transaction tothe wrong general ledger account. If so, make a journal entry to correct it (seeChapter 14 for information on creating journal entries). Then run the year-endP&L report again and print it.
394 P A R T T W O B O O K K E E P I N G
QckBcks TIGHT / QuickBooks 2009 The Official Guide / Ivens / 274-8 / Chapter 17
P:\010Comp\QckBcks\274-8\ch17.vpTuesday, September 16, 2008 10:03:13 AM
Color profile: DisabledComposite Default screen

Year-end Balance SheetYour real financial health is demonstrated in your Balance Sheet. To run a year-endbalance sheet, choose Reports | Company & Financial | Balance Sheet Standard. TheBalance Sheet figures are more than a list of numbers; they’re a list of chores. Checkwith your accountant first, but most of the time you’ll find that the following adviceis offered:
• Pay any payroll withholding liabilities with a check dated in the year in whichthey were accumulated in order to clear them from the Balance Sheet. Also payemployer contributions.
• If you have an A/P balance, pay some bills ahead of time. For example, payyour rent or mortgage payment that’s due the first day of the next fiscal yearduring the last month of this fiscal year. Enter and pay vendor bills earlier thantheir due dates (if those dates fall in the next year) in order to pay them thisyear and gain the expense deduction for this year.
Issuing 1099 FormsIf any vendors are eligible for 1099 forms, you need to print and mail the forms tothem. First, make sure your 1099 setup is correct by choosing Edit | Preferencesand selecting the Tax: 1099 icon. Click Company Preferences to see your settings(see Figure 17-1).
C H A P T E R 1 7 Y E A R - E N D P R O C E D U R E S 395
QckBcks TIGHT / QuickBooks 2009 The Official Guide / Ivens / 274-8 / Chapter 17
FIGURE 17-1 Make sure your 1099 options are configured correctly.
P:\010Comp\QckBcks\274-8\ch17.vpTuesday, September 16, 2008 10:03:14 AM
Color profile: DisabledComposite Default screen

Check the latest IRS rules and make any changes to the threshold amounts forthe categories you need. Also assign an account to each category for which you’ll beissuing Form 1099 to vendors. You can assign multiple accounts to a 1099 category,but you cannot assign any accounts to more than one 1099 category.
For example, if you have an expense account “subcontractors” and an expenseaccount “outside consultants,” both of the accounts can be linked to the same 1099category (Nonemployee Compensation). However, once you link those accounts tothat category, you cannot use those same accounts in any other 1099 category.
To assign a single account to a category, click the category to select it. Click thetext in the Account column (it probably says “None”), and then click the arrow toselect the account for this category.
To assign multiple accounts to a category, instead of selecting an account afteryou click the arrow, choose the Multiple Accounts option (at the top of the list). Inthe Select Account dialog, click each account to put a check mark next to its listing.Click OK to assign all the accounts you checked. Then click OK to close thePreferences dialog.
Run a 1099 ReportBefore you print the forms, you should print a report on your 1099 vendors. To dothis, choose Reports | Vendors & Payables and select one of the following 1099reports:
• 1099 Summary, which lists each vendor eligible for a 1099 with the totalamount paid to the vendor.
• 1099 Detail, which lists each transaction for each vendor eligible for a 1099.
You can make adjustments to the original transactions, if necessary, to make sureyour 1099 vendors have the right totals. For example, if you mistakenly posted asubcontractor’s payment to an expense account not linked to the 1099 setup,change the account (don’t change the amount or the link to a customer/class if thatdata exists).
Print 1099 FormsTo print the 1099 forms, choose Vendors | Print 1099s/1096. QuickBooks opens awizard that walks you through the process to make sure every step is covered andevery amount is correct (see Figure 17-2).
This isn’t a standard wizard, because you don’t walk through a series of windows.Instead, as you check each item in the window, QuickBooks opens the appropriatesystem window so you can check and, if necessary, change the data. When youclose the window, you’re returned to the wizard window.
396 P A R T T W O B O O K K E E P I N G
QckBcks TIGHT / QuickBooks 2009 The Official Guide / Ivens / 274-8 / Chapter 17
P:\010Comp\QckBcks\274-8\ch17.vpTuesday, September 16, 2008 10:03:14 AM
Color profile: DisabledComposite Default screen

When all the data is correct, click Print 1099s in the wizard window. The wizardasks you to confirm the year for which you’re printing (usually you’re performingthis task in January of the next year).
Click OK to move to the Select 1099s To Print dialog. QuickBooks displays thevendors for whom you should be printing 1099s.
Ill 17-1
C H A P T E R 1 7 Y E A R - E N D P R O C E D U R E S 397
QckBcks TIGHT / QuickBooks 2009 The Official Guide / Ivens / 274-8 / Chapter 17
FIGURE 17-2 The 1099 and 1096 Wizard makes it easy to issue end-of-year forms to 1099vendors.
P:\010Comp\QckBcks\274-8\ch17.vpTuesday, September 16, 2008 10:03:14 AM
Color profile: DisabledComposite Default screen

Click Preview 1099 to see what the form will look like when it prints. Zoom into make sure your company name, address, and EIN number are correct, and alsocheck the vendor’s information. Click Close on the Print Preview window to returnto the Select 1099s window.
Then load the 1099 forms into your printer and click Print 1099. If you’re usinga laser or inkjet printer, set the number of copies at three. Dot matrix printers usethree-part forms.
When the forms are printed, click Print 1096 in the Select 1099s To Print dialog.Enter the name of the contact person in your company that can answer questionsabout these forms (the name is printed on the 1096 Form). Print two copies of the1096, so you have one for your files.
Send each vendor a copy of his or her 1099 by January 31. Send the governmenta copy of each 1099, along with a 1096 Transmittal Form.
Making Year-end Journal EntriesYour accountant may want you to make some journal entries before you close yourbooks for the year:
• Depreciation entries• Prior retained earnings moved to a different account or retained earnings
moved to owner or partner equity accounts• Any adjustments needed for cash versus accrual reporting (these are usually
reversed on the first day of the next fiscal year)• Adjustment of prepaid expenses from asset accounts to expense accounts
N O T E : See Chapter 14 for detailed information about creating journalentries.
You can send the P&L and Balance Sheet reports to your accountant byexporting the reports to Excel. Ask your accountant for journal entry instructions.
You can also send your accountant an Accountant’s Copy of your company dataand let your accountant make the journal entries. You import the changes when thereview copy is returned. (See Chapter 15 to learn how to use the Accountant’s Copyfeature.)
Running Tax ReportsMost small businesses turn over the tax preparation chores to their accountants,but some business owners prepare their own taxes manually or by using a taxsoftware program like TurboTax.
398 P A R T T W O B O O K K E E P I N G
QckBcks TIGHT / QuickBooks 2009 The Official Guide / Ivens / 274-8 / Chapter 17
P:\010Comp\QckBcks\274-8\ch17.vpTuesday, September 16, 2008 10:03:14 AM
Color profile: DisabledComposite Default screen

No matter which method you choose for tax preparation, you should run thereports that tell you whether your QuickBooks data files are ready for tax preparation.Is all the necessary data entered? Do the bottom-line numbers call for some specialtax planning or special tax considerations? Even if your taxes are prepared by youraccountant, the more organized your records are, the less time the accountant spendson your return (which makes your bill from the accountant smaller).
Check Tax Line InformationIf you’re going to do your own taxes, every account in your chart of accounts thatis tax related must have the right tax form in the account’s tax line assignment. Tosee if any tax line assignments are missing, choose Reports | Accountant & Taxes |Income Tax Preparation. When the report appears, all your accounts are listed,along with the tax form assigned to each account. If you created your own chartof accounts, instead of accepting a chart of accounts during company setup, thenumber of accounts that lack a tax form assignment is likely to be quite large.
Before you can prepare your own taxes, you must edit each account to add thetax information. To do so, open the chart of accounts and select an account. PressCTRL-E to edit the account and select a tax form from the Tax-Line Mapping drop-down list.
Your selections vary depending upon the organizational type of your company(proprietorship, partnership, S corp, C corp, and so on).
N O T E : Be sure the Income Tax Form Used field is filled out properly on yourCompany Information dialog (on the Company menu). If it’s blank, you won’t seethe tax information fields on any accounts.
If you don’t know which form and category to assign to an account, there’s a wayto get that information.
Follow these steps to gather tax line information:
� Choose File | New Company to open the EasyStep Interview Wizard.� Click Skip Interview.� In the Enter Your Company Information, enter a name in the Company Name
field (it doesn’t matter what name you use; you’re not creating a company fileyou’re going to use).
� In the next wizard window, be sure to select the correct organizational typefrom the drop-down list in the Income Tax Form Used field, then click Next.
� In the next wizard window, select the type of company that best describes yourbusiness. (If nothing comes close to matching your business, select GeneralBusiness.)
� Click Next, and save the new company file.
C H A P T E R 1 7 Y E A R - E N D P R O C E D U R E S 399
QckBcks TIGHT / QuickBooks 2009 The Official Guide / Ivens / 274-8 / Chapter 17
P:\010Comp\QckBcks\274-8\ch17.vpTuesday, September 16, 2008 10:03:14 AM
Color profile: DisabledComposite Default screen

When the new company file is loaded into the QuickBooks window, open thechart of accounts list and press CTRL-P to print the list. The printed list has the taxform information you need. Open your real company, open the chart of accounts,and use the information on the printed document to enter tax form information.
Calculate Other Important Tax InformationThere are some taxable numbers that aren’t available through the normalQuickBooks reports. One of the most common is the report on company officercompensation if your business is incorporated.
If your business is a C corporation, you file tax form 1120, while a Subchapter Scorporation files tax form 1120S. Both of these forms require you to separatecompensation for corporate officers from the other employee compensation. Youhave to calculate those totals from payroll reports (either QuickBooks payroll or anoutside payroll service).
You can avoid the need to calculate this by creating a separate Payroll item calledOfficer Compensation and assigning it to its own account (which you’ll also have tocreate). Then open the Employee card for each officer and change the Earningsitem to the new item. Do this for next year; it’s probably too late for this year’s end-of-year process.
Using TurboTaxIf you purchase TurboTax to do your taxes, you don’t have to do anything special inQuickBooks to transfer the information. Open TurboTax and tell it to import yourQuickBooks company file.
Almost everything you need is transferred to TurboTax. There are some detailsyou’ll have to enter directly into TurboTax (for example, home-office expenses for aSchedule C form). You can learn more about TurboTax at www.turbotax.com.
Closing Your BooksAfter all the year-end reports have been run, any necessary journal entries havebeen entered, and your taxes have been filed (and paid), it’s traditional to gothrough the exercise of closing the books. Typically, closing the books occurs sometime after the end of the fiscal year, usually within the first couple of months of thenext fiscal year, as soon as your business tax forms have been filed.
The exercise of closing the books is performed to lock the books, so no user canadd, remove, or change any transactions. After taxes have been filed based on theinformation in the system, nothing should ever be changed. It’s too late. This is it.The information is etched in stone.
400 P A R T T W O B O O K K E E P I N G
QckBcks TIGHT / QuickBooks 2009 The Official Guide / Ivens / 274-8 / Chapter 17
P:\010Comp\QckBcks\274-8\ch17.vpTuesday, September 16, 2008 10:03:15 AM
Color profile: DisabledComposite Default screen

Understanding Closing in QuickBooksQuickBooks doesn’t use the traditional accounting software closing procedures. Inmost other business accounting software, closing the year means you cannot posttransactions to any date in that year, nor can you manipulate any transactions in theclosed year. Closing the books in QuickBooks does not set the information in cement;it can be changed and/or deleted by users with the appropriate permissions.
QuickBooks does not require you to close the books in order to keep working in thesoftware. You can work forever, year after year, without performing a closing process.However, many QuickBooks users prefer to lock the transactions for a year as a way toprevent any changes to the data except by users with the appropriate permissions.
Closing the YearIn QuickBooks, you close the year by entering a closing date. This inherently doesnothing more than lock users out of the previous year’s transactions. At the sametime, you can configure user rights to enable or disable a user’s ability to see ormanipulate closed transactions.
Follow these steps to enter a closing date:
� Choose Edit | Preferences to open the Preferences dialog.� Click the Accounting icon.� Select the Company Preferences tab.� Click the Set Date/Password button to open the Set Closing Date And Password
dialog.� Enter the closing date, which is the last date of the prior fiscal year (see
Figure 17-3).
C H A P T E R 1 7 Y E A R - E N D P R O C E D U R E S 401
QckBcks TIGHT / QuickBooks 2009 The Official Guide / Ivens / 274-8 / Chapter 17
FIGURE 17-3 Entering the closing date is the first step in locking down the previous year’s data.
P:\010Comp\QckBcks\274-8\ch17.vpTuesday, September 16, 2008 10:03:15 AM
Color profile: DisabledComposite Default screen

T I P : If your fiscal year is different from a calendar year, don’t worry aboutpayroll. The payroll files and features (including 1099s) are locked into a calendaryear configuration, and closing your books doesn’t have any effect on your abilityto work with payroll transactions.
Preventing Access to Closed BooksTo prevent users from changing transactions in the closed year, and to permit certainusers to access those transactions when needed, assign a password for manipulatingclosed data. Click Set Password and enter the password in the Set Closing Date AndPassword dialog. Press TAB and enter it again in the Confirm Password field.
C A U T I O N : If you’ve set up users and passwords for access to yourQuickBooks data file, only the QuickBooks administrator can set the closing dateand password.
Creating a Year-end BackupAfter all the numbers are checked, all the journal entries are made, and the bookshave been closed by entering a closing date as described in the previous section, doa separate backup in addition to your normal daily backup. Burn this backup to anew, unused, CD/DVD disk, label it “Year-end Backup 2009,” and put it in a safeplace. See Chapter 21 to learn about backing up your QuickBooks files.
Closing Date Exception ReportWant to drive an accountant crazy? Create a report that shows opening balances foraccounts as of the current year, where those opening balances don’t match last year’sclosing balances for the same accounts. The “rule” is that this year’s opening balancesshould be exactly the same as last year’s closing balances. When they’re not, accountantsgo into a frenzy, and sometimes they won’t leave your office until they’ve found thereason the balances don’t match. They don’t have an easy time in their quest for theanswer to the question, “What changed, and why did it change?” The business owneris usually interested in the answer to the question, “Who changed it?”
It can be difficult to find the cause of these mismatched balances, but luckilyQuickBooks Premier editions and Enterprise Solutions editions offer a Closing DateException Report, which lists all transactions that were added or changed after theclosing date. (A transaction that was changed shows the date and amount of themodification, as well as the date and amount of the original transaction.) If yourQuickBooks configuration includes user logins, the report displays the login nameof the user who created the transaction.
To view the Closing Date Exception Report, choose Reports | Accountant &Taxes | Closing Date Exception Report. Any transactions that occurred after theclosing date appear in the report.
402 P A R T T W O B O O K K E E P I N G
QckBcks TIGHT / QuickBooks 2009 The Official Guide / Ivens / 274-8 / Chapter 17
P:\010Comp\QckBcks\274-8\ch17.vpTuesday, September 16, 2008 10:03:15 AM
Color profile: DisabledComposite Default screen

QckBcks TIGHT / QuickBooks 2009 The Official Guide / Ivens / 274-8Blind Folio 403
P:\010Comp\QckBcks\274-8\ch17.vpTuesday, September 16, 2008 10:03:15 AM
Color profile: DisabledComposite Default screen

QckBcks TIGHT / QuickBooks 2009 The Official Guide / Ivens / 274-8 / Chapter 18
Par
tTh
ree
Par
tTh
ree Tracking Time
Most service businesses sell time; it’s the most important commoditythey have. Actually, most service businesses are really sellingknowledge and expertise, but nobody’s ever figured out how to puta value on those talents. The solution, therefore, is to charge forthe time it takes to pass along and use all that expertise (thatexplanation was originally voiced by Abraham Lincoln as heexplained why and how attorneys charge for time). Evenbusinesses that are product-based might need to track time foremployees or outside consultants.
Part Three of this book covers all the steps you need to take to setyour system up for tracking time with maximum efficiency andaccuracy.
P:\010Comp\QckBcks\274-8\ch18.vpTuesday, September 16, 2008 10:06:59 AM
Color profile: DisabledComposite Default screen

Chapter
Chapter
1818Using Time Tracking
In this chapter:
• Configure time tracking
• Fill out timesheets
• Edit timesheets
405
QckBcks TIGHT / QuickBooks 2009 The Official Guide / Ivens / 274-8 / Chapter 18
P:\010Comp\QckBcks\274-8\ch18.vpTuesday, September 16, 2008 10:06:59 AM
Color profile: DisabledComposite Default screen

QuickBooks includes a time-tracking feature that lets you record the amount oftime you and your staff spend completing a project, working for a customer, orworking for your company (administrative tasks). You can use that information toinvoice customers for time.
In addition to tracking billable time, you can also use this information to analyzeyour business. For example, if you charge retainer fees for your services, timetracking is a terrific way to figure out which customers may need to have theretainer amount raised.
Configuring Time TrackingWhen you create a company in QuickBooks, one of the EasyStep Interviewwindows queries you about your desire to track time. If you respond affirmatively,QuickBooks turns on the time-tracking features. If you opt to skip time tracking,you can turn it on later if you change your mind. In fact, if you turn it on, you canturn it off if you find you’re not using it.
If you’re not sure whether you turned on time tracking when you installed yourcompany, choose Edit | Preferences from the QuickBooks menu bar. Select the Time& Expenses icon and click the Company Preferences tab. Make sure the Yes optionis selected. The top section of the dialog contains the options for tracking time.(The bottom section is concerned with invoicing for that time, and those tasks arecovered in other chapters in this book.)
Ill 18-1
406 P A R T T H R E E T R A C K I N G T I M E
QckBcks TIGHT / QuickBooks 2009 The Official Guide / Ivens / 274-8 / Chapter 18
P:\010Comp\QckBcks\274-8\ch18.vpTuesday, September 16, 2008 10:06:59 AM
Color profile: DisabledComposite Default screen
Configuring Your WorkweekBy default, QuickBooks assumes your workweek starts on Monday. However, ifyour business is open every day of the week, you might want to use a Sunday-to-Saturday pattern for tracking time.
If you’re tracking time for employees and you plan to use the timesheets forpayroll, it’s a good idea to match the workweek to the week your pay period covers.Of course, this only works if your pay periods are weekly.
Configuring WorkersYou can track time for your employees, outside contractors, or yourself; however,everybody who must keep track of his or her time has to exist in the system. Inaddition, each person must fill out timesheets.
Tracking Employee TimeIf you’re running the QuickBooks payroll feature, you already have employees inyour QuickBooks system. You can track the time of any employee who fills out atimesheet (timesheets are covered later in this chapter).
You can also use the timesheet data to pay an employee, using the number ofhours reported in the time-tracking system to determine the number of hours forwhich the employee is paid. For this to work, however, the employee must belinked to his or her timesheet. This means you have to modify employee records tolink timesheets to paychecks.
Follow these steps to link employees to time tracking:
� Open the Employee Center by choosing Employees | Employee Center.� Click the Employees tab to display the list of employees.� Double-click the listing of the employee you want to link to time tracking.� In the Change Tabs field at the top of the window, select Payroll And
Compensation Info from the drop-down list.� Select the Use Time Data To Create Paychecks check box (see Figure 18-1).� Click OK.
You don’t have to link employees to time tracking in order for them to use thetimesheets to record their time—the time-tracking configuration for the employeeis required only if you want to create the paychecks automatically using timesheets.
If you do link an employee to time tracking, while that employee is filling outtimesheets, a QuickBooks message may appear saying that the activity the employeeis reporting is not linked to an hourly rate. QuickBooks will report the rate at$0.00/hour, which is fine (especially if your employees are on salary).
C H A P T E R 1 8 U S I N G T I M E T R A C K I N G 407
QckBcks TIGHT / QuickBooks 2009 The Official Guide / Ivens / 274-8 / Chapter 18
P:\010Comp\QckBcks\274-8\ch18.vpTuesday, September 16, 2008 10:06:59 AM
Color profile: DisabledComposite Default screen

Tracking Vendor TimeAny vendor in your system who is paid for his or her time can have that timetracked for the purpose of billing customers. Most of the time, these vendors areoutside contractors or subcontractors. You don’t have to do anything to the vendorrecord to effect time tracking; you merely need to record the time used as thevendor sends bills.
Tracking Other Worker TimeYou may need to track the time of people who are neither employees nor vendors.The word employee means you have enabled do-it-yourself payroll in QuickBooks.If you have employees but you don’t use QuickBooks payroll, they’re not employeesto your QuickBooks software.
QuickBooks provides a system list called Other Names, and you can use this listto collect names that don’t fit in the other QuickBooks lists. Following are somesituations in which you’ll need to use the Other Names list:
• You have employees and use QuickBooks payroll, but you are not an employeebecause you take a draw instead of a paycheck. In this case, you must add yourname to the Other Names list if you want to track your own time.
408 P A R T T H R E E T R A C K I N G T I M E
QckBcks TIGHT / QuickBooks 2009 The Official Guide / Ivens / 274-8 / Chapter 18
FIGURE 18-1 Link employees to time tracking if you want to use timesheets to preparepaychecks.
P:\010Comp\QckBcks\274-8\ch18.vpTuesday, September 16, 2008 10:06:59 AM
Color profile: DisabledComposite Default screen

• You have employees and are not using QuickBooks payroll, so there is noEmployees list in your system. You must add each employee name to the OtherNames list to track employee time.
• You have no employees and your business is a proprietorship or a partnership.Owner or partner names must be entered into the Other Names list in order totrack time.
Configuring the TasksMost of the tasks you track already exist in your system as service items. These arethe items you use when you invoice customers for services. However, because youcan use time tracking to analyze the way people in your organization spend theirtime, you may want to add service items that are relevant to noncustomer tasks.
For example, if you want to track the time people spend performing administrativetasks for the business, you can add a service item called Administrative to your itemslist. If you want to be more specific, you can name the particular administrativetasks you want to track (for example, bookkeeping, equipment repair, new salescalls, public relations, and so on).
To enter new items, click the Items & Services icon on the Home page (orchoose Lists | Item List from the menu bar). When the Item List window opens,press CTRL-N to open a new item form. Select Service as the item type (only serviceitems are tracked in timesheets) and name the new item. Here are some guidelinesfor administrative items:
• If you’re specifying administrative tasks, create a service item namedAdministration, and then make each specific administrative task a subitemof Administration.
• Don’t put an amount in the Rate box. You’re not charging a customer for thisservice, and you can calculate the amount you’re paying the recipient when youmake the payment (via payroll or vendor checks).
• Because QuickBooks insists that you assign an account to a service, choose orcreate an innocuous revenue account (such as Other Revenue, or TimeTracking Revenue). Don’t worry, no money is ever posted to the accountbecause you don’t ever sell these services to customers.
The option to configure the item for subcontractors, owners, or partners isn’timportant if you’re creating a service for the purpose of tracking time, becauseyou’re entering time on the timesheets; you’re not entering amounts.
N O T E : When you actually pay a subcontractor, owner, or partner for work,you must create specific accounts for those payments. For subcontractors, youpost payments to an expense account that is linked to your 1099 configuration(covered in Chapter 17). For owners and partners, payments must be posted to adraw account (which is an equity account).
C H A P T E R 1 8 U S I N G T I M E T R A C K I N G 409
QckBcks TIGHT / QuickBooks 2009 The Official Guide / Ivens / 274-8 / Chapter 18
P:\010Comp\QckBcks\274-8\ch18.vpTuesday, September 16, 2008 10:06:59 AM
Color profile: DisabledComposite Default screen

Because time tracking can be linked to customers, in order to track administrativework, you must also create a customer for the occasions when no real customer isbeing tracked (those administrative tasks). The easiest way to do that is to createa new customer to represent your company. For example, you may want to createa customer named House, or InHouse.
Configuring User PermissionsIf you’re using user and password features in QuickBooks, you must make sureeach user who uses timesheets has permission to do so. See Chapter 20 for detailedinformation about setting user permissions.
Using TimesheetsQuickBooks offers two methods for recording the time you spend on tasks: SingleActivity and Weekly Timesheet.
• Single Activity is a form you use to enter what you did when you performed asingle task at a specific time on a specific date. For example, a Single Activityform may record the fact that you made a telephone call on behalf of acustomer, you repaired some piece of equipment for a customer, or youperformed some administrative task for the company.
• Weekly Timesheet is a form in which you indicate how much time and onwhich date you performed work. Each Weekly Timesheet entry can also includethe name of the customer for whom the work was performed.
Your decision about which method to use depends on the type of work you doand on the efficiency of your workers’ memories. People tend to put off filling inWeekly Timesheets and then attempt to reconstruct their activities in order tocomplete the timesheets. This frequently ends up being a less-than-accurateapproach. The method works properly only if everyone remembers to open thetimesheets and fill them in as soon as they complete each task. Uh huh, sure.
T I P : When you fill out a Single Activity form, every time you open a WeeklyTimesheet form, any single activity within that week is automatically inserted intothe Weekly Timesheet.
Tracking a Single ActivityTo track one event or task with a Single Activity form (see Figure 18-2), click theEnter Time icon on the Home page and choose Time/Enter Single Activity from themenu that appears, or choose Employees | Enter Time | Time/Enter Single Activityfrom the menu bar. Use the guidelines in this section to fill out the form.
410 P A R T T H R E E T R A C K I N G T I M E
QckBcks TIGHT / QuickBooks 2009 The Official Guide / Ivens / 274-8 / Chapter 18
P:\010Comp\QckBcks\274-8\ch18.vpTuesday, September 16, 2008 10:07:00 AM
Color profile: DisabledComposite Default screen

The Date field is automatically filled in with the current date. If this activity tookplace previously, change the date.
Click the arrow to the right of the Name field and select the name of the personwho performed the work from the list that appears (usually, the person who isfilling out the form). The list contains vendors, employees, and names from theOther Names list. (You can use <Add New> to add a new name.)
If this time was spent working on a task for a customer rather than performingan administrative task, select the customer in the Customer:Job field. Do thiswhether or not the customer is going to be billed for the time. If the task is specificto a job, select the job instead of the customer.
In the Service Item field, select the task, and in the Duration box, enter theamount of time you’re reporting, using the format hh:mm.
If this time is billable to the customer, the Billable check box should be marked(it is by default). If the time is not going to be billed to the customer, click the boxto remove the check mark.
If the Payroll Item field appears, select the payroll item that applies to this time(for example, salary or hourly wages). This field appears only if the name (in theName field) is an employee, and the employee record has been linked to the time-tracking system (explained earlier in this chapter).
Use the Notes box to enter any comments or additional information you want torecord about this activity.
When you finish creating the activity, click Save & New to fill out another SingleActivity form, or click Save & Close to finish.
C H A P T E R 1 8 U S I N G T I M E T R A C K I N G 411
QckBcks TIGHT / QuickBooks 2009 The Official Guide / Ivens / 274-8 / Chapter 18
FIGURE 18-2 Fill out the details to indicate how you spent your time.
P:\010Comp\QckBcks\274-8\ch18.vpTuesday, September 16, 2008 10:07:00 AM
Color profile: DisabledComposite Default screen

N O T E : If an employee is not configured for using time data to createpaychecks, QuickBooks asks if you’d like to change that configuration. If theemployee is just tracking time for job-costing purposes and is not paid fromthese timesheets, click No.
Using the StopwatchYou can let QuickBooks track the time you’re spending on a specific task. Click theStart button in the Duration box of the Activity window when you begin the task.QuickBooks tracks hours and minutes as they elapse.
• To pause the counting when you’re interrupted, click Pause.• To pick up where you left off click Start.• To stop timing, click Stop. The elapsed time is displayed.
You can set the format for reporting time, both on the activity sheet and in thestopwatch window. Some companies prefer the hh:mm format; others prefer adecimal format (such as 1.5 hours). To establish a default based on your preference,choose Edit | Preferences and click the General category. Then select the CompanyPreferences tab and use the options in the Time Format section of the dialog toselect the appropriate format.
Ill 18-2
Using Weekly TimesheetsA Weekly Timesheet records the same information as the Single Activity form,except that the information is recorded in week-at-a-time blocks. To use this form,
412 P A R T T H R E E T R A C K I N G T I M E
QckBcks TIGHT / QuickBooks 2009 The Official Guide / Ivens / 274-8 / Chapter 18
P:\010Comp\QckBcks\274-8\ch18.vpTuesday, September 16, 2008 10:07:00 AM
Color profile: DisabledComposite Default screen

click the Enter Time icon on the Home page, and choose Use Weekly Timesheet (orchoose Employees | Enter Time | Use Weekly Timesheet from the menu bar). TheWeekly Timesheet window opens (see Figure 18-3).
Follow these steps to fill out the timesheet:
� Select your name from the list that appears when you click the arrow to theright of the Name field. (If you’re filling out a timesheet for a subcontractorwho reported time to you, select the subcontractor’s name.)
� If you want to enter time for a different week, click the calendar button andenter the first day of any week for which you want to enter activities. (The firstday of your company workweek is set in Edit | Preferences | Time & Expenses,as explained earlier in this chapter.)
� Click in the Customer:Job column to display an arrow that you click to see theCustomer List. Select the customer connected to the activity (or select the in-house listing if you’re performing administrative work unconnected to acustomer).
� Enter the service item that describes your activity.� If you’re an employee whose paycheck is linked to your timesheets, select the
Payroll Item that fits the activity. If your name is attached to the Other Namesor Vendor List, or you’re an employee who is not paid from the timesheets, youwon’t see a Payroll Item column.
� In the Notes column, enter any comments you feel are necessary.
C H A P T E R 1 8 U S I N G T I M E T R A C K I N G 413
QckBcks TIGHT / QuickBooks 2009 The Official Guide / Ivens / 274-8 / Chapter 18
FIGURE 18-3 You may find it easier to enter information on a weekly basis.
P:\010Comp\QckBcks\274-8\ch18.vpTuesday, September 16, 2008 10:07:00 AM
Color profile: DisabledComposite Default screen

� Click the column that represents the day for which you are entering thisactivity and enter the number of hours worked on this task. Repeat for each daythat you performed this activity. If you’re linking the activity to a customer, allthe days you indicate must be for this activity for this customer.
Move to the beginning of the next row to enter the next timesheet entry (adifferent activity, or the same activity for a different customer), repeating untilyou’ve accounted for your time for the week.
For each row, indicate whether the time is billable in the rightmost column.� By default, all time entries linked to a customer are billable. Deselect the
Billable check box if the time on this row is not billable.� Click Save & New to use a timesheet for a different week, or click Save & Close
if you’re finished entering time.
Copying Previous TimesheetsYou can copy the previous week’s timesheet by clicking the Copy Last Sheet buttonafter you enter the current date in the timesheet window and select a name. This isuseful for employees who have the similar timesheet data every week, a descriptionthat frequently applies to your office staff. Because many staff tasks aren’t chargedagainst a customer or job, the timesheet may be identical from week to week. Formany staff employees, the only entry is the administrative service you created forin-house work, and the only customer is your own company. The only reason to fillin the data is to make sure every hour worked is transferred to the payroll data.
T I P : If timesheets are similar, but not identical, from week to week, it’sefficient to copy the previous week’s timesheet and then make adjustments.
Reporting Timesheet InformationBefore you use the information on the timesheets to bill customers or pay workers,check the data on the timesheet reports. You can view and customize reports, editinformation, and print the original timesheets.
Running Timesheet ReportsTo run reports on timesheets, choose Reports | Jobs, Time & Mileage. You’ll see a longlist of available reports, but the following reports provide information on time tracking:
• Time By Job Summary Reports the amount of time spent for each service onyour customers and their jobs.
• Time By Job Detail Reports the details of the time spent for each customerand job, including dates and whether or not the time was marked as billable(see Figure 18-4). A billing status of Unbilled indicates the time is billable buthasn’t yet been transferred to a customer invoice.
414 P A R T T H R E E T R A C K I N G T I M E
QckBcks TIGHT / QuickBooks 2009 The Official Guide / Ivens / 274-8 / Chapter 18
P:\010Comp\QckBcks\274-8\ch18.vpTuesday, September 16, 2008 10:07:01 AM
Color profile: DisabledComposite Default screen

• Time By Name Reports the amount of time each user tracked.• Time By Item Provides a quick analysis of the amount of time spent
performing services your company is providing and to whom.
If you’ve made it a practice to encourage people to enter comments in the Notessection of the timesheet, you should customize the report format so it includesthose comments. You can do this only in the Time By Job Detail report, which youmust modify to select Notes in the Columns list
To make sure you always see the notes, you should memorize this report. Clickthe Memorize button on the report button bar to open the Memorize Report dialog,and enter a name for the report (such as Time by Job with Notes). Hereafter, it willbe available in the Memorized Reports list.
C H A P T E R 1 8 U S I N G T I M E T R A C K I N G 415
QckBcks TIGHT / QuickBooks 2009 The Official Guide / Ivens / 274-8 / Chapter 18
FIGURE 18-4 Generate a report to check everything before billing customers or entering payrollinformation.
P:\010Comp\QckBcks\274-8\ch18.vpTuesday, September 16, 2008 10:07:01 AM
Color profile: DisabledComposite Default screen

Editing Entries in a ReportWhile you’re browsing the report, you can double-click an activity listing to see theoriginal entry, an example of which is seen in Figure 18-5. You can make changes inthe original entry, such as selecting or deselecting the billable option or changingthe note field by adding a note or editing the content of the existing note.
If you make changes, when you click Save & Close to return to the reportwindow, QuickBooks displays a message to ask whether you want to refresh thereport to accommodate the changes. Click Yes to see the new, accurate informationin the report. In fact, it’s a good idea to select the option to stop asking you thequestion, because any time you make changes in transactions that you accessedfrom a report window, you want to see the effect on the report.
Editing the Original TimesheetsBefore you use the timesheets for customer billing or payroll, make sure youexamine them and make any needed corrections. In fact, you may want to take thisstep before you view any of the Time reports.
The most common revision is the billable status. If you have outside contractorsor employees filling out timesheets, it’s not unusual to have some confusion aboutwhich customers receive direct time billings. In fact, you may have customers towhom you send direct time bills only for certain activities and provide theremaining activities as part of your basic services.
416 P A R T T H R E E T R A C K I N G T I M E
QckBcks TIGHT / QuickBooks 2009 The Official Guide / Ivens / 274-8 / Chapter 18
FIGURE 18-5 You can open any entry listed on the report to view the details.
P:\010Comp\QckBcks\274-8\ch18.vpTuesday, September 16, 2008 10:07:01 AM
Color profile: DisabledComposite Default screen
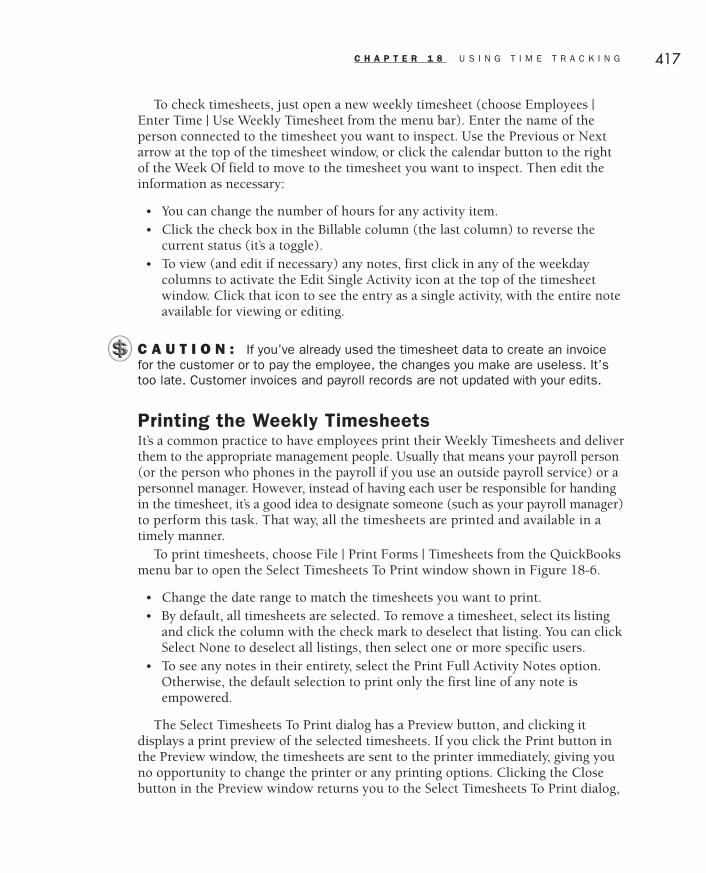
To check timesheets, just open a new weekly timesheet (choose Employees |Enter Time | Use Weekly Timesheet from the menu bar). Enter the name of theperson connected to the timesheet you want to inspect. Use the Previous or Nextarrow at the top of the timesheet window, or click the calendar button to the rightof the Week Of field to move to the timesheet you want to inspect. Then edit theinformation as necessary:
• You can change the number of hours for any activity item.• Click the check box in the Billable column (the last column) to reverse the
current status (it’s a toggle).• To view (and edit if necessary) any notes, first click in any of the weekday
columns to activate the Edit Single Activity icon at the top of the timesheetwindow. Click that icon to see the entry as a single activity, with the entire noteavailable for viewing or editing.
C A U T I O N : If you’ve already used the timesheet data to create an invoicefor the customer or to pay the employee, the changes you make are useless. It’stoo late. Customer invoices and payroll records are not updated with your edits.
Printing the Weekly TimesheetsIt’s a common practice to have employees print their Weekly Timesheets and deliverthem to the appropriate management people. Usually that means your payroll person(or the person who phones in the payroll if you use an outside payroll service) or apersonnel manager. However, instead of having each user be responsible for handingin the timesheet, it’s a good idea to designate someone (such as your payroll manager)to perform this task. That way, all the timesheets are printed and available in atimely manner.
To print timesheets, choose File | Print Forms | Timesheets from the QuickBooksmenu bar to open the Select Timesheets To Print window shown in Figure 18-6.
• Change the date range to match the timesheets you want to print.• By default, all timesheets are selected. To remove a timesheet, select its listing
and click the column with the check mark to deselect that listing. You can clickSelect None to deselect all listings, then select one or more specific users.
• To see any notes in their entirety, select the Print Full Activity Notes option.Otherwise, the default selection to print only the first line of any note isempowered.
The Select Timesheets To Print dialog has a Preview button, and clicking itdisplays a print preview of the selected timesheets. If you click the Print button inthe Preview window, the timesheets are sent to the printer immediately, giving youno opportunity to change the printer or any printing options. Clicking the Closebutton in the Preview window returns you to the Select Timesheets To Print dialog,
C H A P T E R 1 8 U S I N G T I M E T R A C K I N G 417
QckBcks TIGHT / QuickBooks 2009 The Official Guide / Ivens / 274-8 / Chapter 18
P:\010Comp\QckBcks\274-8\ch18.vpTuesday, September 16, 2008 10:07:01 AM
Color profile: DisabledComposite Default screen
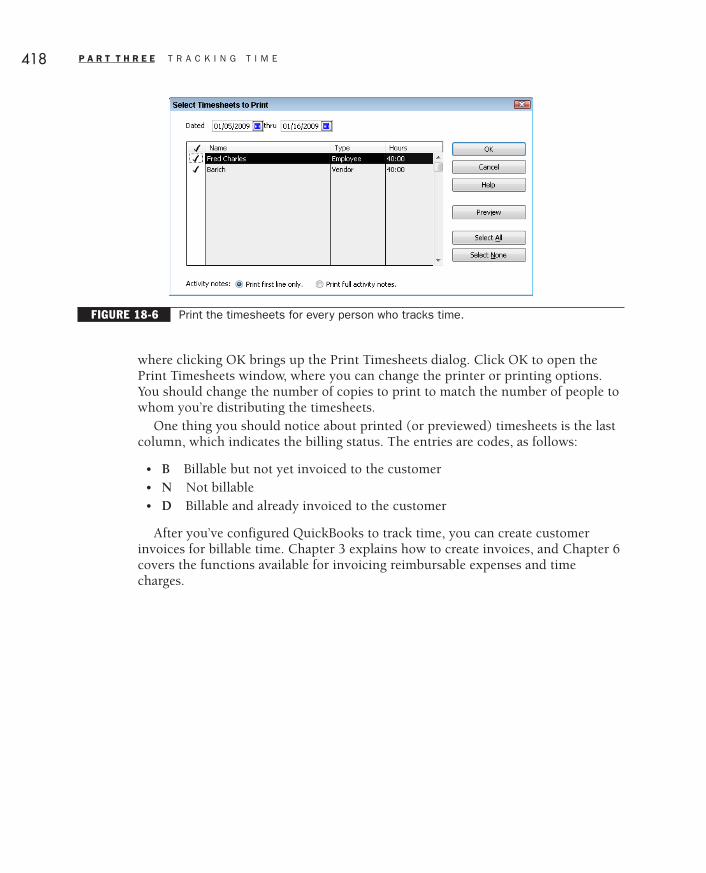
where clicking OK brings up the Print Timesheets dialog. Click OK to open thePrint Timesheets window, where you can change the printer or printing options.You should change the number of copies to print to match the number of people towhom you’re distributing the timesheets.
One thing you should notice about printed (or previewed) timesheets is the lastcolumn, which indicates the billing status. The entries are codes, as follows:
• B Billable but not yet invoiced to the customer• N Not billable• D Billable and already invoiced to the customer
After you’ve configured QuickBooks to track time, you can create customerinvoices for billable time. Chapter 3 explains how to create invoices, and Chapter 6covers the functions available for invoicing reimbursable expenses and timecharges.
418 P A R T T H R E E T R A C K I N G T I M E
QckBcks TIGHT / QuickBooks 2009 The Official Guide / Ivens / 274-8 / Chapter 18
FIGURE 18-6 Print the timesheets for every person who tracks time.
P:\010Comp\QckBcks\274-8\ch18.vpTuesday, September 16, 2008 10:07:01 AM
Color profile: DisabledComposite Default screen

Chapter
Chapter
1919Using Timesheetsfor Payroll Job Costing
In this chapter:
• Configure payroll from timesheets
• Configure services and reports for job costing
419
QckBcks TIGHT / QuickBooks 2009 The Official Guide / Ivens / 274-8 / Chapter 19
P:\010Comp\QckBcks\274-8\ch19.vpTuesday, September 16, 2008 10:09:43 AM
Color profile: DisabledComposite Default screen

When you turn on time tracking (covered in Chapter 18), you can connect it toyour QuickBooks payroll functions. You just move the information about eachemployee’s time into the employee’s paycheck. In addition to speeding up theprocess of creating paychecks, this means you can improve job costing by trackingyour payroll expenses against jobs.
Setting Up Payroll DataIf you want to link employee time to payroll or job costing, you must configureyour QuickBooks system for those features.
Configuring the Employee RecordTo link an employee to time tracking, select the time-tracking option on the PayrollInfo tab of the employee record.
Follow these steps to link an employee to time tracking:
� Open the Employee Center by clicking the Employees icon on the left side ofthe Home page, or by clicking the Employee Center icon on the toolbar.
� Select the Employees tab to display the Employee list.� Double-click the listing for an employee you want to link to time tracking (or
select the listing and click the Edit Employee button in the right pane).� In the Change Tabs drop-down list, choose Payroll And Compensation Info.� Select the option Use Time Data To Create Paychecks.� Click OK to close the employee record and return to the Employee list.
Opting to link paychecks to time-tracking data doesn’t mean that the employee’spaycheck is absolutely and irrevocably linked to the employee’s timesheets. Itmeans only that when you prepare paychecks, QuickBooks checks timesheetsbefore presenting the employee’s paycheck form. You have total control over thefinal hours and pay rate for the paycheck.
For hourly workers, if the employee’s payroll information includes the hourlyrate (and, optionally, the overtime hourly rate), that information is automaticallyinserted in that employee’s timesheet.
If you haven’t configured the employee’s hourly rate during the data entryprocess in the timesheet, QuickBooks displays a message that no hourly rate exists,so the system will use a rate of $0.00. You can enter a rate when you’re creatingpaychecks, or you can go through the employee information and set a rate for eachhourly worker.
For salaried workers, the QuickBooks message about the lack of an hourly rateisn’t “fixable.” In fact, while the link to time tracking is advantageous for creatingpaychecks for hourly workers, the only reason to link salaried employees to timetracking is to track job costing.
420 P A R T T H R E E T R A C K I N G T I M E
QckBcks TIGHT / QuickBooks 2009 The Official Guide / Ivens / 274-8 / Chapter 19
P:\010Comp\QckBcks\274-8\ch19.vpTuesday, September 16, 2008 10:09:43 AM
Color profile: DisabledComposite Default screen

Configuring Payroll Preferences for Job CostingIf your time tracking is just as important for job-costing analysis as it is for makingpayroll easier, you can configure your payroll reporting for that purpose.
Follow these steps to configure payroll preferences:
� Choose Edit | Preferences from the menu bar.� Click the Payroll & Employees icon, and then click the Company
Preferences tab.� At the bottom of the window (see Figure 19-1), be sure the option Job Costing,
Class And Item Tracking For Paycheck Expenses is selected. (QuickBookspreselects the option as the default setting.)
� If you’re using classes, specify the way to assign a class (see the next section,“Using Classes for Payroll Job Costing”).
� Click OK to save your preferences.
Using Classes for Payroll Job CostingIf you’ve established classes, you may be able to use those classes for the payrollexpenses you’re tracking as part of your job costing. The class feature won’t work
C H A P T E R 1 9 U S I N G T I M E S H E E T S F O R P A Y R O L L J O B C O S T I N G 421
QckBcks TIGHT / QuickBooks 2009 The Official Guide / Ivens / 274-8 / Chapter 19
FIGURE 19-1 Configure QuickBooks to track payroll for job costing and class tracking.
P:\010Comp\QckBcks\274-8\ch19.vpTuesday, September 16, 2008 10:09:44 AM
Color profile: DisabledComposite Default screen

422 P A R T T H R E E T R A C K I N G T I M E
QckBcks TIGHT / QuickBooks 2009 The Official Guide / Ivens / 274-8 / Chapter 19
for payroll unless your classes match the available options in the Payroll &Employees Preferences dialog. QuickBooks makes the following choices available:
• Entire Paycheck Means you assign a class to all payroll expenses on a check(including company-paid taxes) instead of assigning a class to individualpayroll items.
• Earnings Item Means you can assign a class to each payroll item (in theEarnings section of the paycheck) that’s used in the paycheck.
If your classes provide a tidy way to fit each employee into a class, the entirepaycheck option will work. For example, if you have branch offices, each of whichis a class, you can assign the paychecks according to the location of the employee.If your classes divide your company by the products or services you provide, thenyou’ll have to track classes by payroll earnings items to produce useful reports.
Using Timesheets EfficientlyIf your employees only keep timesheets to indicate the billable work they do, that’snot going to do much to automate the payroll process. Few employees fill everyhour of their workday with billable activity, and you’ll have to fill in the remaininginformation manually when you create the paycheck.
• Create at least one payroll item to cover nonbillable work. You can call itAdministration, In-Office, or any other designation. The customer attached tothis work is your own company (create a customer named InHouse orsomething similar).
• Make sure employees account for every hour of the day and every day ofthe week.
• Have employees fill in days for sick pay or vacation pay on their timesheets.Those items are probably already part of your payroll items.
Running Payroll with Timesheet DataWhen it’s time to run the payroll, you can use the data from the timesheets tocreate the paychecks. Choose Employees | Pay Employees to open the EnterPayroll Information window, which displays the number of hours that employeesaccounted for in their timesheets (see Figure 19-2).
If the timesheet data that is transferred to the paycheck doesn’t account for allthe time the employee is entitled to, you’ll have to fill in the hours by addingadministrative items.
P:\010Comp\QckBcks\274-8\ch19.vpTuesday, September 16, 2008 10:09:44 AM
Color profile: DisabledComposite Default screen

Follow these steps to fill in the hours on a paycheck:
� Select the employee in the Enter Payroll Information window by clicking in thecheck mark column to enter a check mark next to the name.
� Click Open Paycheck Detail.� Click the Item Name column in the Earnings section, and enter a nonbillable
(administrative) payroll item.� In the Rate column, enter this employee’s pay rate.� In the Hours column, enter the number of hours needed to complete this
employee’s workweek.� Click Save & Close.
Changes you make in the payroll window are not updated on the timesheet. Ifyou want accurate historical timesheets to match against this payroll run in thefuture, exit the payroll window, open the timesheets, and fill them in. Then start thepayroll run again. Chapter 8 has all the information you need to create paychecks.
C H A P T E R 1 9 U S I N G T I M E S H E E T S F O R P A Y R O L L J O B C O S T I N G 423
QckBcks TIGHT / QuickBooks 2009 The Official Guide / Ivens / 274-8 / Chapter 19
FIGURE 19-2 Paychecks are created automatically for employees who fill out time sheets properly.
P:\010Comp\QckBcks\274-8\ch19.vpTuesday, September 16, 2008 10:09:44 AM
Color profile: DisabledComposite Default screen
424 P A R T T H R E E T R A C K I N G T I M E
QckBcks TIGHT / QuickBooks 2009 The Official Guide / Ivens / 274-8 / Chapter 19
Running Payroll Reportsfor Cost InformationWhen you use time tracking, you can see reports on your payroll expenses as theyrelate to customers and jobs. The one I find most useful is the Payroll TransactionDetail report. To get to it, choose Reports | Employees & Payroll | Payroll TransactionDetail. When the Payroll Transaction Detail report appears, enter the date range youwant to examine.
This report probably has more information than you really need, but thecustomer and job data is there. However, I’ve found that this report needs abit of customization to make it useful. Click the Modify Report button to startcustomizing the report.
Follow these steps to customize the Payroll Transaction Detail report:
� On the Display tab, make the following changes in the Columns section:• Deselect the Wage Base column, because it’s not important.• Make sure both Name (the customer) and Source Name (the employee) are
selected.� Change the way the data is sorted by clicking the arrow next to the Sort By text
box and selecting a different category. Sorting by Name and Source Name andare both useful views.
� Click the Filters tab, and in the Filter list, select Payroll Item.� Click the arrow to the right of the Payroll Item field and choose Multiple
Payroll Items.� Select the payroll items you want to track for customers and jobs (Salary,
Hourly Rate, and Overtime Hourly Rate are the ones I find useful).� Click OK twice to return to the report window with its new configuration (see
Figure 19-3).� Click the Memorize button to make this configuration permanent, giving it a
name that reminds you of why you need the report (for example, Payroll JobCosting).
P:\010Comp\QckBcks\274-8\ch19.vpWednesday, September 17, 2008 11:45:41 AM
Color profile: DisabledComposite Default screen

You can use the Sort By drop-down list on the report to change the Sort Byselection every time you use the memorized report, to see totals by employee(Source Name) or totals by customer (Name).
Use similar customization steps to create a payroll report that sorts eachemployee’s payroll expense by class (see Figure 19-4):
• In the Columns list, select Class (and, if you wish, eliminate Name).• In the Filters list, select Payroll Items as described above.
N O T E : When you create a P & L by Class report, you see your payrollexpenses totaled on a class basis.
C H A P T E R 1 9 U S I N G T I M E S H E E T S F O R P A Y R O L L J O B C O S T I N G 425
QckBcks TIGHT / QuickBooks 2009 The Official Guide / Ivens / 274-8 / Chapter 19
FIGURE 19-3 This customized report presents a quick view of payroll job costs.
P:\010Comp\QckBcks\274-8\ch19.vpTuesday, September 16, 2008 10:09:45 AM
Color profile: DisabledComposite Default screen

426 P A R T T H R E E T R A C K I N G T I M E
QckBcks TIGHT / QuickBooks 2009 The Official Guide / Ivens / 274-8 / Chapter 19
FIGURE 19-4 This report presents class information for employee payroll costs.
P:\010Comp\QckBcks\274-8\ch19.vpTuesday, September 16, 2008 10:09:45 AM
Color profile: DisabledComposite Default screen

QckBcks TIGHT / QuickBooks 2009 The Official Guide / Ivens / 274-8Blind Folio 427
P:\010Comp\QckBcks\274-8\ch19.vpTuesday, September 16, 2008 10:09:45 AM
Color profile: DisabledComposite Default screen

QckBcks TIGHT / QuickBooks 2009 The Official Guide / Ivens / 274-8 / Chapter 20
Par
tFo
ur
Par
tFo
ur Managing QuickBooks
All software needs TLC, and accounting software needs regularmaintenance to ensure its accuracy and usefulness.
In Part Four of this book, you’ll learn how to customizeQuickBooks so it works more efficiently. The chapters in Part Fourcover the features and tools you can use to make QuickBooks evenmore powerful. In addition, you’ll learn how to maintain the filesystem, create additional company files, and use QuickBooks innetwork mode (so more than one person can work in QuickBooks atthe same time).
Of course, this part covers backing up your data, which is the mostimportant maintenance task in the world. Once you put youraccounting data into QuickBooks, your business life depends on it.Hard drives die, motherboards freak out, power supplies go to la-laland, and all sorts of other calamities are just waiting to happen.Backing up saves your life (at least your business life).
P:\010Comp\QckBcks\274-8\ch20.vpTuesday, September 16, 2008 10:20:29 AM
Color profile: DisabledComposite Default screen

Chapter
Chapter
2020CustomizingQuickBooks
In this chapter:
• Configure preferences
• Manage users
• Create classes
• Customize the QuickBooks window
429
QckBcks TIGHT / QuickBooks 2009 The Official Guide / Ivens / 274-8 / Chapter 20
P:\010Comp\QckBcks\274-8\ch20.vpTuesday, September 16, 2008 10:20:29 AM
Color profile: DisabledComposite Default screen
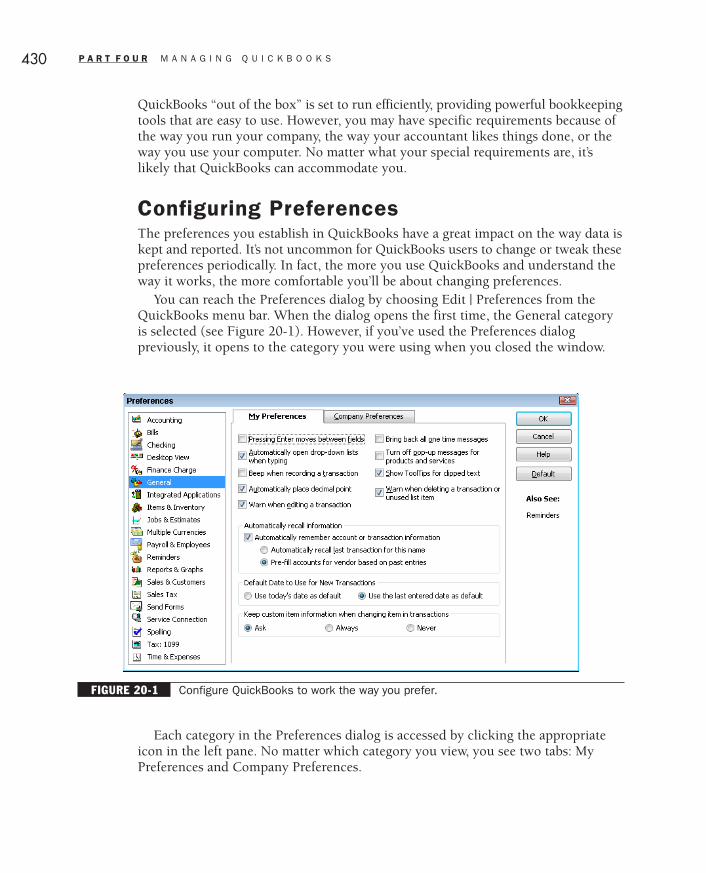
QuickBooks “out of the box” is set to run efficiently, providing powerful bookkeepingtools that are easy to use. However, you may have specific requirements because ofthe way you run your company, the way your accountant likes things done, or theway you use your computer. No matter what your special requirements are, it’slikely that QuickBooks can accommodate you.
Configuring PreferencesThe preferences you establish in QuickBooks have a great impact on the way data iskept and reported. It’s not uncommon for QuickBooks users to change or tweak thesepreferences periodically. In fact, the more you use QuickBooks and understand theway it works, the more comfortable you’ll be about changing preferences.
You can reach the Preferences dialog by choosing Edit | Preferences from theQuickBooks menu bar. When the dialog opens the first time, the General categoryis selected (see Figure 20-1). However, if you’ve used the Preferences dialogpreviously, it opens to the category you were using when you closed the window.
Each category in the Preferences dialog is accessed by clicking the appropriateicon in the left pane. No matter which category you view, you see two tabs: MyPreferences and Company Preferences.
430 P A R T F O U R M A N A G I N G Q U I C K B O O K S
QckBcks TIGHT / QuickBooks 2009 The Official Guide / Ivens / 274-8 / Chapter 20
FIGURE 20-1 Configure QuickBooks to work the way you prefer.
P:\010Comp\QckBcks\274-8\ch20.vpTuesday, September 16, 2008 10:20:29 AM
Color profile: DisabledComposite Default screen

• The My Preferences tab is where you configure your preferences as a QuickBooksuser. Each user you create in QuickBooks can set his or her own preferences.QuickBooks will apply the correct preferences as each user logs into the software.(Many categories lack options in this tab.)
• The Company Preferences tab is the place to configure the way the QuickBooksaccounting features work for the current company, regardless of which userlogs in. You must be logged into QuickBooks as the QuickBooks administratorto make changes in the Company Preferences tab.
As you select options and move from one category of the Preferences window toanother, you’ll be asked whether you want to save the changes in the section youjust left.
General PreferencesSince the Preferences dialog starts us in the General section, let’s begin there.
Setting My Preferences for the General CategoryThe My Preferences tab of the General category offers a number of options you canselect. They’re all designed to let you control the way QuickBooks behaves whileyou’re working in transaction windows.
Pressing Enter Moves Between FieldsThis option exists for people who constantly forget that the default (normal, usual)key for moving from field to field in Windows software is the TAB key. Of course,when they press ENTER instead of TAB, the record they’re working on is saved eventhough they haven’t finished filling out all the fields. Rather than force you to getused to the way Windows works, QuickBooks lets you change the procedure.
Automatically Open Drop-down Lists When TypingThis is a handy option that’s used when you’re making selections from drop-downlists. When you begin typing the first few letters of the listing you need, the drop-down list appears and you move to the first listing that matches the characters youtyped.
Beep When Recording A TransactionIf you don’t want to hear sound effects as you work in QuickBooks, you can deselectthe option. On the other hand, you can configure the sounds so that some actionsproduce sound effects and other actions don’t. You can even specify which soundyou want for the actions that you’ve configured to play sounds. To learn how tochange the sound schemes, see the section “Desktop View Preferences,” later inthis chapter.
C H A P T E R 2 0 C U S T O M I Z I N G Q U I C K B O O K S 431
QckBcks TIGHT / QuickBooks 2009 The Official Guide / Ivens / 274-8 / Chapter 20
P:\010Comp\QckBcks\274-8\ch20.vpTuesday, September 16, 2008 10:20:29 AM
Color profile: DisabledComposite Default screen

Automatically Place Decimal PointThis is a handy feature once you get used to it. When you enter monetary charactersin a field, a decimal point is placed automatically to the left of the last two digitswhen you enable this feature. Therefore, if you type 5421, when you move to thenext field the number changes to 54.21. If you want to type in even dollar amounts,type a period after you enter 54, and QuickBooks will automatically add two zerosto the right of the period (or you can enter the zeros, as in 5400, which automaticallybecomes 54.00).
Warn When Editing A TransactionThis option, which is selected by default, tells QuickBooks to flash a warning messagewhen you change any transaction and try to close the transaction window withoutexplicitly saving the changed transaction. This means you have a chance to abandonthe edits. If you deselect the option, the edited transaction is saved as changed,unless it is linked to other transactions (in which case, the warning message explainingthat problem appears).
Bring Back All One-Time MessagesOne-time messages are those informational dialogs that include a Don’t Show ThisMessage Again option. If you’ve selected the Don’t Show option, select this checkbox to see those messages again (and you can once again select the Don’t Showoption for those messages you don’t need).
Turn Off Pop-up Messages For Products And ServicesSelecting this option stops pop-up messages from QuickBooks that are connectedto products and services available from Intuit. For example, when creating checks,Intuit displays a pop-up message explaining that you can buy checks at the IntuitMarketplace.
Show ToolTips For Clipped TextThis option (enabled by default) means that if there is more text in a field than youcan see, hovering your mouse over the field causes the entire block of text to display.Very handy!
Warn When Deleting A Transaction Or Unused List ItemWhen selected, this option produces a warning when you delete a transaction ora list entry that has not been used in a transaction—it’s a standard message askingyou to confirm your action.
If you try to delete an item or a name that has ever been used in a transaction,QuickBooks won’t permit you to complete the deletion.
432 P A R T F O U R M A N A G I N G Q U I C K B O O K S
QckBcks TIGHT / QuickBooks 2009 The Official Guide / Ivens / 274-8 / Chapter 20
P:\010Comp\QckBcks\274-8\ch20.vpTuesday, September 16, 2008 10:20:29 AM
Color profile: DisabledComposite Default screen

Automatically Recall InformationSelect the option Automatically Remember Account Or Transaction Informationto have QuickBooks prefill the data for a transaction. Enabling this option tellsQuickBooks to prefill information in a transaction window, based on previoustransactions for the same name. If this option is enabled, you can choose eitherof the suboptions:
• Automatically Recall Last Transaction For This Name, which duplicates theinformation in the last transaction. This preference works with bills, checks,credit card charges, invoices, and sales receipts.
• Pre-Fill Accounts For Vendor Based On Past Entries, which examines the historyof transactions for the current vendor. If the same information appears in all ormost of the historical transactions, QuickBooks autofills the transaction window(same as the previous option). If historical transactions differ, QuickBooks doesnot prefill the transaction window, saving you the trouble of removing the dataif it doesn’t match this transaction.
T I P : In addition to these “memory tricks” that QuickBooks provides forcreating transactions, you can prefill accounts for vendors right in the vendorrecord, which is a really nifty feature. See Chapter 2 for details.
Default Date To Use For New TransactionsUse this option to tell QuickBooks whether you want the Date field to show thecurrent date or the date of the last transaction you entered, when you open atransaction window. If you frequently enter transactions for the same date over aperiod of several days (for example, you start preparing invoices on the 27th of themonth, but the invoice date is the last day of the month), select the option to usethe last entered date so you can just keep going.
Keep Custom Item Information When ChangingItem In TransactionsThe selection you make for this option determines what QuickBooks does when youchange the description text or the price for an item you insert in a sales transactionform, and then change the item. For example, you select an item named Widget,and then in the Description field, you type text to describe this widget, changingthe default description that displayed when you selected the item. Or, perhaps theitem had no default description, and you entered text to correct that omission. Then,you realize that you didn’t really mean to sell the customer a Widget, you meanta Gadget, and the descriptive text you just typed was meant for the item namedGadget (which you thought you’d selected in the Item column). You return to theItem column (on the same line), click the arrow to see your item list, and selectGadget. Now, you think you have to type all that descriptive text again, becauseGadget has its own descriptive text, and it will automatically replace your work.
C H A P T E R 2 0 C U S T O M I Z I N G Q U I C K B O O K S 433
QckBcks TIGHT / QuickBooks 2009 The Official Guide / Ivens / 274-8 / Chapter 20
P:\010Comp\QckBcks\274-8\ch20.vpTuesday, September 16, 2008 10:20:29 AM
Color profile: DisabledComposite Default screen

This option prevents that work going to waste. If you select Always, QuickBookswill keep the descriptive text you wrote, even though you changed the item. Thisdescriptive text is linked to this different item only for this invoice; no changes aremade to any item’s record.
If you select Never, QuickBooks just fills in the description that goes with thenew item you selected.
If you select Ask, as soon as you change the item, QuickBooks asks if you wantto change only the item and keep your customized description on the invoice. Youcan answer Yes (or No), and you can also tell QuickBooks to change thisPreferences option permanently to match your answer.
The same thing happens if you entered a different price (instead of, or inaddition to, the description), and then changed the item.
Setting Company Preferences for the General SectionThe Company Preferences tab in the General section has four choices, explainedhere.
Time Format Select a format for entering time, choosing between decimal (forexample, 11.5 hours) or minutes (11:30).
Always Show Years As 4 Digits If you prefer to display the year with four digits(01/01/2009 instead of 01/01/09), select this option.
Never Update Name Information When Saving Transactions By default,QuickBooks asks if you want to update the original information for a name whenyou change it during a transaction entry. For example, if you’re entering a vendorbill and you change the address, QuickBooks offers to make that change back onthe vendor record. If you don’t want to be offered this opportunity and want therecord to remain as is, select this option.
Save Transactions Before Printing The rule that a transaction must be savedbefore it’s printed is a security device. This thwarts one of the most often usedemployee schemes to purloin products (employees print an invoice and packingslip to have products shipped to friends or relatives and no record exists if thesoftware doesn’t insist on saving first). Almost all accounting software providesthis safeguard, but QuickBooks permits you to turn off this option.
Accounting PreferencesClick the Accounting icon on the left pane of the Preferences dialog to move to theAccounting category. The My Preferences tab offers the option Autofill Memo InGeneral Journal Entry, which means that the text you enter in the Memo columnof a GJE is repeated on every line of the transaction.
434 P A R T F O U R M A N A G I N G Q U I C K B O O K S
QckBcks TIGHT / QuickBooks 2009 The Official Guide / Ivens / 274-8 / Chapter 20
P:\010Comp\QckBcks\274-8\ch20.vpTuesday, September 16, 2008 10:20:29 AM
Color profile: DisabledComposite Default screen

The Company Preferences tab has a number of options, as seen in Figure 20-2.
Use Account NumbersChoose this option if you want to use numbers for your chart of accounts inaddition to names. Chapter 2 has detailed information about using accountnumbers.
Show Lowest Subaccount OnlyThis option, which is available only if you use account numbers, is useful because itmeans that when you see an account number in a drop-down list (in a transactionwindow), you only see the subaccount. If the option is not selected, you see theparent account followed by the subaccount, and since the field display doesn’t showthe entire text unless you scroll through it, it’s hard to determine which account hasbeen selected.
Require AccountsWhen enabled, this option means that every item and transaction you create inQuickBooks has to be assigned to an account. If you disable this option, transactionamounts that aren’t manually assigned to an account are posted to UncategorizedIncome or Uncategorized Expense. It’s almost impossible to produce a tax returnor a report that analyzes your business if you don’t post transactions to accounts.
C H A P T E R 2 0 C U S T O M I Z I N G Q U I C K B O O K S 435
QckBcks TIGHT / QuickBooks 2009 The Official Guide / Ivens / 274-8 / Chapter 20
FIGURE 20-2 Set basic configuration options for performing all those accounting tasks.
P:\010Comp\QckBcks\274-8\ch20.vpTuesday, September 16, 2008 10:20:30 AM
Color profile: DisabledComposite Default screen

Use Class TrackingThis option turns on the Class feature for your QuickBooks system (which isdiscussed later in this chapter in the section “Configuring Classes”). The PromptTo Assign Classes suboption for this setting is to have QuickBooks prompt you tofill in the Class field whenever you close a transaction window without doing so.
Automatically Assign General Journal Entry NumberWith this option selected, every time you create a general journal entry,QuickBooks automatically assigns the next available number to it.
Warn When Posting A Transaction To Retained EarningsBy default, QuickBooks issues a warning if you use the Retained Earnings accountin a general journal entry. It doesn’t stop you from performing this action; it justissues a warning.
Date WarningsHaving QuickBooks warn you if a date is 90 days in the past or 30 days in thefuture is a good way to avoid problems due to typos. The wrong date on atransaction has a big impact on your financial reports.
Closing DateEnabling this option lets you set a password-protected closing date for yourQuickBooks data file. Once you set the date and create a password, users can’tmanipulate any transactions that are dated on or before the closing date unlessthey know the password. See Chapter 17 to learn about closing your company file.
Bills PreferencesIn the Bills category, you have the opportunity to set options for the way you enterand pay vendor bills. If you get discounts for timely payment (usually only offeredin manufacturing and distribution companies), you can tell QuickBooks to takethem automatically. Be sure to enter the account in which you post those discounts.
Checking PreferencesThis category has options in both the My Preferences and Company Preferencestabs. On the My Preferences tab you can select default bank accounts for differenttypes of transactions. You can skip these options if you only have one bank account.
The Company Preferences tab (see Figure 20-3) offers several options concernedwith check printing, which are described in the following paragraphs.
436 P A R T F O U R M A N A G I N G Q U I C K B O O K S
QckBcks TIGHT / QuickBooks 2009 The Official Guide / Ivens / 274-8 / Chapter 20
P:\010Comp\QckBcks\274-8\ch20.vpTuesday, September 16, 2008 10:20:30 AM
Color profile: DisabledComposite Default screen

Print Account Names On VoucherThis option is useful only if you print your checks and the check forms you purchasehave vouchers (stubs). If so, selecting this option means that the text on the stubwill display posting accounts.
Change Check Date When Check Is PrintedSelecting this option means that at the time you print checks, the current date becomesthe check date. If you don’t select this option, the check date you specified whenyou filled out the check window is used (even if that date has already passed).
Start With Payee Field On CheckEnabling this option forces your cursor to the Payee field when you first bring upthe Write Checks window. If the option is not enabled, the bank account field is thefirst active field. If you always write checks from one specific bank account, enablethe option to save yourself the inconvenience of pressing TAB.
Warn About Duplicate Check NumbersThis option means that QuickBooks will warn you if a check number you’re fillingin already exists.
Autofill Payee Account Number In Check MemoMost vendors maintain an account number for their customers, and your accountnumber can be automatically printed when you print checks. In order for this to
C H A P T E R 2 0 C U S T O M I Z I N G Q U I C K B O O K S 437
QckBcks TIGHT / QuickBooks 2009 The Official Guide / Ivens / 274-8 / Chapter 20
FIGURE 20-3 Specify default settings to make working in QuickBooks more efficient.
P:\010Comp\QckBcks\274-8\ch20.vpTuesday, September 16, 2008 10:20:30 AM
Color profile: DisabledComposite Default screen

occur, you must fill in your account number in the Vendor card (on the AdditionalInformation tab). The printout appears on the lower-left section of the check.
Select Default Accounts To UseYou can set the default bank accounts for different types of payroll transactions. Then,when you print these checks, you don’t have to select the bank account from adrop-down list in the transaction window. This avoids the common error of printingthe payroll checks on operating account checks, screaming “Eek!,” voiding the checks,and starting again with the right account.
Desktop View PreferencesThis is where you design the way the QuickBooks window looks. The My Preferencestab (see Figure 20-4) contains basic configuration options.
In the View section, you can specify whether you always want to see oneQuickBooks window at a time or view multiple windows.
• Choose One Window to limit the QuickBooks screen to showing one windowat a time, even if you have multiple windows open. The windows are stackedatop each other, and only the top window is visible (you cannot resize anywindow). To switch between multiple windows, use the Window menu.
438 P A R T F O U R M A N A G I N G Q U I C K B O O K S
QckBcks TIGHT / QuickBooks 2009 The Official Guide / Ivens / 274-8 / Chapter 20
FIGURE 20-4 Configure the look and behavior of the QuickBooks window.
P:\010Comp\QckBcks\274-8\ch20.vpTuesday, September 16, 2008 10:20:30 AM
Color profile: DisabledComposite Default screen

• Choose Multiple Windows to make it possible to view multiple windows onyour screen. Selecting this option activates the arrangement commands on theWindow menu item, which allow you to stack or arrange windows so that morethan one window is visible at a time.
In the Desktop section, you can specify what QuickBooks should do when youclose the company file, choosing among the following options:
• Save When Closing Company Means that the state of the desktop is rememberedwhen you close the company (or exit QuickBooks). Whatever QuickBookswindows were open when you left will reappear when you return. You can pickup where you left off. If you select the option Show Home Page When OpeningA Company File, that option overrides this option, so if you close the companyfile after closing the Home page, the Home page appears on top of any openwindows when you open the company file.
• Save Current Desktop Displays the desktop as it is at this moment everytime you open QuickBooks. Select this option after you’ve opened or closed theQuickBooks windows you want to see when you start the software. If you selectthe option Show Home Page When Opening A Company File, that optionoverrides this option if you close the Home page.
• Don’t Save The Desktop Tells QuickBooks to display an empty QuickBooksdesktop (unless you enable the Show Home Page When Opening A CompanyFile option) when you open this company file or when you start QuickBooksagain after using this company file. The desktop isn’t really empty—the menubar, Icon Bar, and any other navigation bars are on the desktop, but notransaction or list windows are open.
• Keep Previously Saved Desktop Available only when you select Save CurrentDesktop, this option tells QuickBooks to display the desktop as it was the lasttime you used the Save Current Desktop option.
• Show Home Page When Opening A Company File Tells QuickBooks todisplay the Home page when you open the company file. When this option isselected, the option to display the Coach works (select Show Coach WindowAnd Features).
• Show Live Community Tells QuickBooks to open a Help File window witha tab named Live Community whenever you open a company file. The LiveCommunity tab has links to a QuickBooks user forum (see the sidebar on LiveCommunity), and displays forum messages connected to the current openQuickBooks window. You can also open the Live Community window at anytime by selecting the Live Community command from the Help menu.
In the Color Scheme section, you can select a scheme from the drop-down list.In addition, buttons are available to configure Windows Settings for Display andSounds. Clicking either button opens the associated applet in your Windows
C H A P T E R 2 0 C U S T O M I Z I N G Q U I C K B O O K S 439
QckBcks TIGHT / QuickBooks 2009 The Official Guide / Ivens / 274-8 / Chapter 20
P:\010Comp\QckBcks\274-8\ch20.vpTuesday, September 16, 2008 10:20:30 AM
Color profile: DisabledComposite Default screen

Control Panel. The display and sounds configuration options you change affectyour computer and all your software, not just QuickBooks.
In the Company Preferences tab, you can customize the contents of the Homepage. If you want to add an icon on the home page for a particular feature (suchas Estimates), this tab shows you whether that feature has been enabled in yourcompany file. If the feature hasn’t been enabled, click the feature’s name to open itscategory in the Preferences dialog. Turn the feature on (which adds the feature’sicon to the Home page), and then click the Desktop View icon to return to thiswindow.
Finance Charge PreferencesClick the Finance Charge icon (which has only Company Preferences available) toenable/disable and configure finance charges. Finance charges can get complicated,so read the complete discussion about this topic in Chapter 5.
Integrated Applications PreferencesYou can let third-party software have access to the data in your QuickBooks files.Click the Integrated Applications icon and move to the Company Preferences tabto specify the way QuickBooks works with other software programs. You can givepermission to access all data, no data, or some data.
Items & Inventory PreferencesThe Company Preferences tab for this category has configuration options formanaging inventory (see Figure 20-5).
440 P A R T F O U R M A N A G I N G Q U I C K B O O K S
QckBcks TIGHT / QuickBooks 2009 The Official Guide / Ivens / 274-8 / Chapter 20
QuickBooks Live CommunityThe QuickBooks Live Community is a user forum where QuickBooks users can ask questions andget answers from other users (and sometimes from Intuit experts). You can read all the questionsand answers without joining the community, but if you want to post a question or answer youmust join. Joining is free, and all you have to do is provide a user name and your e-mail address.
It’s important to be aware that some of the answers and explanations you see may not beaccurate; users who provide advice do not necessarily know QuickBooks well (and theysometimes write “guesses” instead of trying their advice by actually performing the tasks theydiscuss). These users may also lack accounting knowledge. Don’t rush to follow advice you findon the forum; instead, check with your accountant or create a test company file to experimentwith the advice you find on the forum.
➽ FYI
P:\010Comp\QckBcks\274-8\ch20.vpTuesday, September 16, 2008 10:20:30 AM
Color profile: DisabledComposite Default screen

Inventory And Purchase Orders Are ActiveSelect this option to tell QuickBooks that you want to enable the inventory features;purchase orders are automatically enabled with that action, but using POs is optional.
Warn About Duplicate Purchase Order NumbersWhen this option is enabled, any attempt to issue a purchase order with a PO numberthat already exists will generate a warning.
Calculating Quantity AvailableIf some units of an inventory item are on sales orders, you can choose to haveQuickBooks take those orders into consideration when calculating the quantityavailable as you create a sales transaction. If you disable this option, QuickBookswill report the physical quantity on hand (QOH) when you create an invoice or asales receipt (and the person who created the sales order may be out of luck whenit’s time to turn the sales order into an invoice and ship the product). An additionaloption to take the quantity needed for pending builds into consideration appears inthe following Premier/Enterprise editions:
• Accountant• Manufacturing & Wholesale• Retail
C H A P T E R 2 0 C U S T O M I Z I N G Q U I C K B O O K S 441
QckBcks TIGHT / QuickBooks 2009 The Official Guide / Ivens / 274-8 / Chapter 20
FIGURE 20-5 Set up inventory management options.
P:\010Comp\QckBcks\274-8\ch20.vpTuesday, September 16, 2008 10:20:31 AM
Color profile: DisabledComposite Default screen

Warn If Not Enough Inventory To SellThis option turns on the warning feature that is useful during customer invoicing.If you sell ten widgets but your stock of widgets is fewer than ten, QuickBooksdisplays a message telling you there’s insufficient stock to fill the order. You canstill complete the invoice—it’s just a message, not a functional limitation—but youshould order more widgets immediately.
You can enable warning messages about insufficient quantity, and also choose thescenario that kicks off a warning. If you select the option to be warned when thequantity on hand is insufficient, QuickBooks counts the number of items in stock.If you select the option to be warned when the quantity available is insufficient,QuickBooks uses the guidelines you set for calculations (whether to consider salesorders or pending builds) to determine the quantity available for sale.
Configuring Units of MeasureUnits of measure (U/M) is a feature that lets you set up a system of buying goodsin one manner, and selling them in a different manner. For example, you may buyitems by the case and sell each item as an individual unit. Information on setting upand using units of measure is in Chapter 10.
Jobs & Estimates PreferencesUse the Company Preferences tab to configure the way your estimates and invoiceswork, as shown in Figure 20-6. The options are self-explanatory. Read Chapter 3 tolearn about creating estimates and invoices.
442 P A R T F O U R M A N A G I N G Q U I C K B O O K S
QckBcks TIGHT / QuickBooks 2009 The Official Guide / Ivens / 274-8 / Chapter 20
FIGURE 20-6 Set up and configure estimates.
P:\010Comp\QckBcks\274-8\ch20.vpTuesday, September 16, 2008 10:20:31 AM
Color profile: DisabledComposite Default screen

Multiple Currencies PreferencesThis is where you enable the ability to do business in multiple currencies (seeChapter 1 for an overview of this new feature). The available options are Yes andNo, but if you select Yes, QuickBooks prompts you to make a backup of yourcompany file before finalizing your decision.
Ill 20-1
Even if you’re sure you want to work in multiple currencies in QuickBooks,make a backup, and use a name for the backup file that indicates what you’re doing(such as <Company Name>PreMulticurrency.QBB). Then, if you decide you don’twant to use this feature, you can restore your backup file and proceed as before.
Payroll & Employees PreferencesUse the Company Preferences tab of this category to set all the configurationoptions for payroll. Read Chapter 8 to understand the selections in this dialog.
Reminders PreferencesThe Reminders category of the Preferences dialog has options on both tabs. The MyPreferences tab has one option, which turns on the Reminders feature. When theReminders feature is enabled, QuickBooks displays a Reminders list when you opena company file.
The Company Preferences tab enumerates the available reminders, and you canselect the ones you want to use (see Figure 20-7). Of course, these selections aremeaningless unless you enabled Reminders in the My Preferences tab.
For each reminder, decide whether you want to see a summary (just a listing andthe total amount of money involved), a complete detailed list, or nothing at all. Youcan also determine the amount of lead time you want for your reminders. (Some ofthe items are grayed out because they’re only available in QuickBooks Premiereditions.)
N O T E : If you choose Show Summary, the Reminders List window has anExpand All button you can click to see the details.
C H A P T E R 2 0 C U S T O M I Z I N G Q U I C K B O O K S 443
QckBcks TIGHT / QuickBooks 2009 The Official Guide / Ivens / 274-8 / Chapter 20
P:\010Comp\QckBcks\274-8\ch20.vpTuesday, September 16, 2008 10:20:31 AM
Color profile: DisabledComposite Default screen

Reports & Graphs PreferencesThis is another section of the Preferences window that has choices on both tabs,so you can set your own user preferences and then set those options that affect thecurrent company.
The My Preferences tab configures performance issues for reports and graphs,as described here.
Prompt Me To Modify Report OptionsBefore Opening A ReportIf you find that almost every time you select a report you have to customize it, youcan tell QuickBooks to open the Modify Report window whenever a report is broughtto the screen. If you find this feature useful, click the check box next to Prompt MeTo Modify Report Options Before Opening A Report.
Reports and Graphs SettingsWhile you’re viewing a report or a graph, you can make changes to the format, thefilters, or to the data behind it (by opening the appropriate transaction window andchanging data). Most of the time, QuickBooks automatically changes the report/graph to match the changes. However, if there is anything else going on (perhapsyou’re also online, or you’re in a network environment and other users aremanipulating data that’s in your report or graph), QuickBooks may not makechanges automatically. The reason for the shutdown of automatic refreshing is tokeep your computer running as quickly and efficiently as possible. At that point,QuickBooks has to make a decision about when and how to refresh the report orgraph. You must give QuickBooks the parameters for making the decision to refresh.
444 P A R T F O U R M A N A G I N G Q U I C K B O O K S
QckBcks TIGHT / QuickBooks 2009 The Official Guide / Ivens / 274-8 / Chapter 20
FIGURE 20-7 Decide which tasks you want to be reminded about.
P:\010Comp\QckBcks\274-8\ch20.vpTuesday, September 16, 2008 10:20:32 AM
Color profile: DisabledComposite Default screen

• Choose Prompt Me To Refresh to see a message asking you whether you wantto refresh the report or the graph after you’ve made changes to the data behindit. When the reminder appears, you can click Yes to refresh the data in the report.
• Choose Refresh Automatically if want up-to-the-second data, and don’t wantto bother to click the Refresh button. If you work with QuickBooks across anetwork, this could slow down your work a bit because whenever any usermakes a change to data that’s used in the report/graph, it will refresh itself.
• Choose Don’t Refresh if you want to decide for yourself, without any reminderfrom QuickBooks, when to click the Refresh button on the report window.
Graphs OnlyGive QuickBooks instructions about creating your graphs, as follows:
• Choose Draw Graphs In 2D (Faster) to have graphs displayed in two dimensionsinstead of three. This doesn’t impair your ability to see trends at a glance; it’sjust not as “high-tech.” The main reason to consider this option is that the 2-Dgraph takes less time to draw on your screen.
• Choose Use Patterns to draw the various elements in your graphs with black-and-white patterns instead of colors. For example, one pie wedge may bestriped, another speckled. This is handy if you print your graphs to a black-and-white printer.
Move to the Company Preferences tab of the Reports & Graphs category to setcompany preferences for reports (see Figure 20-8).
C H A P T E R 2 0 C U S T O M I Z I N G Q U I C K B O O K S 445
QckBcks TIGHT / QuickBooks 2009 The Official Guide / Ivens / 274-8 / Chapter 20
FIGURE 20-8 Set the default options for reports.
P:\010Comp\QckBcks\274-8\ch20.vpTuesday, September 16, 2008 10:20:32 AM
Color profile: DisabledComposite Default screen

Summary Reports BasisSpecify whether you want to see summary reports as accrual-based or cash-based.You’re only setting the default specification here, and you can always change thebasis in the Modify Report dialog when you actually display the report.
Aging ReportsSpecify whether you want to generate A/R and A/P aging reports using the due dateor the transaction date.
Reports—Show Accounts BySpecify whether you want reports to display account names, account descriptions,or both.
Setting Report Format DefaultsYou can set the default formatting for reports by clicking the Format button andmaking changes to the default configuration options for parts of reports that aren’tdata related but instead control the look of the reports. Use this feature if you findyourself making the same modifications to the formats over and over. See Chapter 15for information on creating and customizing reports.
Configuring the Cash Flow ReportA cash flow report is really a complicated document, and before the days of accountingsoftware, accountants spent many hours creating such a report (and charged a lot ofmoney for doing so). QuickBooks has configured a cash flow report format that isused to produce the cash flow reports available in the list of Company & Financialreports.
You can view the format by clicking the Classify Cash button, but you shouldn’tmess around with the selections in the window that appears until you check withyour accountant. You can learn about cash flow reports in Chapter 15.
Sales & Customers PreferencesYou can set options in the Sales & Customers category on both the My Preferencesand Company Preferences tabs.
On the My Preferences tab, set the options for invoicing customers for reimbursableexpenses and billable time.
Prompt For Time/Costs To AddChoosing this option tells QuickBooks to open a dialog that displays the currentreimbursable expenses whenever you create an invoice or sales receipt for acustomer with outstanding reimbursable costs. This is the option to select ifyou always (or almost always) collect reimbursable costs from customers.
446 P A R T F O U R M A N A G I N G Q U I C K B O O K S
QckBcks TIGHT / QuickBooks 2009 The Official Guide / Ivens / 274-8 / Chapter 20
P:\010Comp\QckBcks\274-8\ch20.vpTuesday, September 16, 2008 10:20:32 AM
Color profile: DisabledComposite Default screen

Don’t Add AnySelecting this option prevents the automatic display of any dialogs about reimbursableexpenses when you create a sales transaction. Choose this option if you rarely(or never) seek reimbursement from your customers. If you do want to collectreimbursable expenses during invoice creation, you can click the Add Time/Costsbutton on the sales transaction form.
Ask What To DoSelect this option to tell QuickBooks to ask you what you want to do wheneveryou create a sales transaction for a customer with outstanding reimbursable costs.Depending on your selection in that dialog (discussed in the next section), youcan add the costs to the sales transaction or omit them. You can learn how to billcustomers for expenses and time in Chapter 6.
On the Company Preferences tab, set the default options for sales transactionsas follows:
Usual Shipping MethodUse this to set the default shipping method, if you use the same shipping methodmost of the time. This saves you the trouble of making a selection from the drop-down list unless you’re changing the shipper for a particular invoice.
Usual FOBSet the FOB language for invoices. FOB (Free On Board) is the location from whichshipping is determined to be the customer’s responsibility. This means more thanjust paying for freight; it’s a statement that says, “At this point you have become theowner of this product.” The side effects include assigning responsibility if goods arelost, damaged, or stolen. FOB settings have no impact on your financial records.(Don’t let the size of the text box fool you; you’re limited to 13 characters.)
Warn About Duplicate Invoice NumbersThis option tells QuickBooks to warn you if you’re creating an invoice with aninvoice number that’s already in use.
Choose Template For Invoice Packing SlipSelect a default packing slip to use when you print packing slips. If you’ve createdcustomized packing slips, you can make one of them the default.
Use Price LevelsThis option turns on the Price Level feature, which is explained in Chapter 2.
Sales OrdersUse this section of the dialog to turn on the sales orders feature. Once enabled, youcan opt to be warned about duplicate sales order numbers and specify whether zero
C H A P T E R 2 0 C U S T O M I Z I N G Q U I C K B O O K S 447
QckBcks TIGHT / QuickBooks 2009 The Official Guide / Ivens / 274-8 / Chapter 20
P:\010Comp\QckBcks\274-8\ch20.vpTuesday, September 16, 2008 10:20:32 AM
Color profile: DisabledComposite Default screen

amounts on sales orders are transferred to the invoice you create by converting thesales order. You can learn about creating sales orders and converting them intoinvoices in Chapter 3.
Choose Templates for Sales Order DocumentsSpecify the templates you want to use to print a packing slip and a pick list.
Automatically Apply PaymentsThis option tells QuickBooks to apply payments automatically to open invoices.If the payment amount is an exact match for an open invoice, it is applied to thatinvoice. If the payment amount is smaller than any open invoice, QuickBooksapplies the payment to the oldest invoice. If the payment amount is larger than anyopen invoice, QuickBooks applies payments, starting with the oldest invoice, untilthe payment amount is used up.
Without this option, you must manually apply each payment to an invoice.That’s not as onerous as it may sound, and in fact, is quite common because thecustomer’s check almost always indicates the invoice the customer wants to pay(even if the check doesn’t cover the entire amount of that invoice). Sometimescustomers don’t mark the invoice number on the check and instead enclose acopy of the invoice in the envelope. Read Chapter 4 to learn about receiving andapplying customer payments.
Automatically Calculate PaymentsWhen this option is enabled, you can begin selecting invoices to pay in the ReceivePayment window before entering the amount of the customer’s payment check.When you’ve finished selecting invoices, either paying them entirely or applying apartial payment, the amounts you’ve applied should equal the amount of the checkyou received.
This is efficient if a customer has many invoices (some of which may have creditsor may have an amount in dispute) and has attached instructions about the way toapply the checks.
Use Undeposited Funds As A Default Deposit To AccountSelecting this option automates the process of depositing all cash received intothe Undeposited Funds account. If the option isn’t selected, each cash receipttransaction window (customer payment and sales receipt) offers the choice ofdepositing the cash into a bank account or into the Undeposited Funds account.
Sales Tax PreferencesIf you collect sales tax, you must set your sales tax options. These options are easyto configure because most of the selections are predefined by state tax laws andstate tax report rules. Check with your accountant and read the information thatcame with your state sales tax license. For more information about managing salestaxes (a very complicated issue in many states), see Chapter 7.
448 P A R T F O U R M A N A G I N G Q U I C K B O O K S
QckBcks TIGHT / QuickBooks 2009 The Official Guide / Ivens / 274-8 / Chapter 20
P:\010Comp\QckBcks\274-8\ch20.vpTuesday, September 16, 2008 10:20:32 AM
Color profile: DisabledComposite Default screen

Send Forms PreferencesIf you send transactions to customers via e-mail, the My Preferences tab offers theopportunity to automatically select the To Be E-mailed option on a sales transactionif the current customer is configured for e-mail as the preferred send method.
On the Company Preferences tab you can design the message that accompaniesthe e-mailed document.
Service Connection PreferencesIf you use QuickBooks services on the Internet, use this category to specify the wayyou want to connect to the Internet for those services.
The My Preferences tab contains options related to online banking if your bankuses the Web Connect method of online access. (Chapter 16 has detailed informationabout online banking services.)
• Give Me The Option Of Saving A File Whenever I Download Web ConnectData Select this option if you want QuickBooks to provide a choice to saveWeb Connect data for later processing instead of automatically processing thetransactions. QuickBooks provides the choice by opening a dialog that lets youchoose whether to import the data immediately, or save it to a file so you canimport it later (you have to supply a filename). The QuickBooks dialog alsoincludes an option to reset this option. This option only works when you selectOpen on the File Download dialog. If you disable this option, the data isautomatically imported into QuickBooks.
• If QuickBooks Is Run By My Browser, Don’t Close It After Web ConnectIs Done Selecting this option means that when QuickBooks is launchedautomatically when you download Web Connect data from your FinancialInstitution (after selecting Open on the Download dialog), QuickBooks remainsopen after you process the data. If you deselect this option, QuickBooks closesautomatically as soon as your data is processed.
The following connection options are available on the Company Preferences tab(these don’t apply to online banking or payroll services):
• Automatically Connect Without Asking For A Password Lets all users loginto the QuickBooks Business Services network automatically.
• Always Ask For A Password Before Connecting Forces users to enter a loginname and password in order to access QuickBooks Business Services.
• Allow Background Downloading Of Service Messages Lets QuickBookscheck the Intuit website for updates and information periodically when you’reconnected to the Internet.
C H A P T E R 2 0 C U S T O M I Z I N G Q U I C K B O O K S 449
QckBcks TIGHT / QuickBooks 2009 The Official Guide / Ivens / 274-8 / Chapter 20
P:\010Comp\QckBcks\274-8\ch20.vpTuesday, September 16, 2008 10:20:32 AM
Color profile: DisabledComposite Default screen

Spelling PreferencesThe Spelling section presents options only on the My Preferences tab. This is whereyou control the way the QuickBooks spell checker works. You can instruct QuickBooksto check spelling automatically before saving or printing any form. In addition, youcan specify those words you want the spelling checker to skip, such as Internetaddresses, numbers, and solid capital letters that probably indicate an abbreviation.
Tax:1099 PreferencesUse the Company Preferences window to establish the 1099 form options you need.For each type of 1099 payment, you must assign an account from your chart ofaccounts. See Chapter 17 for more information about configuring and issuing1099 forms.
Time & Expenses PreferencesUse the Company Preferences tab to turn on Time Tracking and to tell QuickBooksthe first day of your workweek (which becomes the first day listed on your timesheets).Read all about tracking time in Chapter 18.
Managing UsersMany businesses have multiple users accessing their QuickBooks company files.You can have multiple users who access QuickBooks on the same computer (takingturns using QuickBooks), or in a multi-user network environment.
Creating, Removing, and Changing User InformationWhen you want to create or modify users, choose Company | Set Up Users AndPasswords | Set Up Users from the QuickBooks menu bar. You must be logged into QuickBooks as the administrator to manage all the user tasks.
The administrator determines who can use the various features in QuickBooks,adding, deleting, and configuring permissions for users. It’s a good idea to leave theadministrator’s name as Admin. To password-protect the administrator’s login, moveto the Administrator’s Password box and enter a password. Enter the same passwordin the Confirm Password box to confirm it. You won’t see the text you’re typing;instead, the system shows asterisks as a security measure (in case someone iswatching over your shoulder). You don’t have to use a password, but omitting thisstep could put your QuickBooks files at risk because an intruder could examine ormanipulate your files.
C A U T I O N : If you forget the administrator’s password, you can callQuickBooks support and arrange to have them recover the password—for a fee.
450 P A R T F O U R M A N A G I N G Q U I C K B O O K S
QckBcks TIGHT / QuickBooks 2009 The Official Guide / Ivens / 274-8 / Chapter 20
P:\010Comp\QckBcks\274-8\ch20.vpTuesday, September 16, 2008 10:20:32 AM
Color profile: DisabledComposite Default screen

Creating a New UserWhen you click OK in the Set Up QuickBooks Administrator dialog (or if you setup the configuration option to have multiple users during the EasyStep Interview),you see the User List window.
To add a new user to the list, click Add User. This launches a wizard that assistsyou in setting up the new user.
Follow these steps to create a user:
� Enter the user name, which is the name this user must type to log intoQuickBooks.
� If you want to establish a password for this user (it’s optional), enter andconfirm the user’s password.
� If you need to add a QuickBooks license to accommodate this new user, selectthe option labeled Add This User To My QuickBooks License. (To see howmany licenses you’ve purchased, press F2 in QuickBooks and look for thenumber of licenses in the upper left of the Information window. If you needanother license, choose Help | Manage My License, where you’ll find all theutilities you need to purchase and synchronize your licenses.)
� Click Next to set up the user’s access to QuickBooks features. See the upcoming“Setting User Permissions” section in this chapter.
T I P : Make a note of all user passwords and keep that list in a secure (hiddenand locked) place. Inevitably, a user will come to you because he or she cannotremember a password.
Summary of the QuickBooksCredit Card Protection FeatureIt’s very convenient to maintain credit card information about customers, becauseit’s easy to take an order over the telephone or by a purchase order and processit quickly. However, keeping credit card information on your computer can bedangerous. In fact, the laws (both government and merchant-card providers) aboutkeeping credit card numbers on file are getting stricter, and it’s almost certainlyagainst the rules for you to keep anything more than the last four or five digits ofthe card number on file unless you can prove you’ve set up strong securityparadigms for keeping the information private.
QuickBooks provides security functions for companies that store customer creditcard data in the company file. These functions are designed to meet the requirementsset by the payment card industry (PCI) that are known as Payment Application BestPractices (PABP). If you configure your company file to meet the PABP securitystandards, you can meet PCI requirements for the security standards required forthe handling and storage of credit card information.
C H A P T E R 2 0 C U S T O M I Z I N G Q U I C K B O O K S 451
QckBcks TIGHT / QuickBooks 2009 The Official Guide / Ivens / 274-8 / Chapter 20
P:\010Comp\QckBcks\274-8\ch20.vpTuesday, September 16, 2008 10:20:32 AM
Color profile: DisabledComposite Default screen

The QuickBooks credit card protection feature is designed to secure customercredit card information with security safeguards that meet the Payment ApplicationBest Practices standards of the Payment Card Industries. The following basicsafeguards are implemented in QuickBooks:
• All users who have permission to view full credit card detail in the customerrecord must set up a complex password (see the section, “Managing ComplexPasswords”).
• The password must be changed every 90 days. Users who don’t change theirpasswords cannot open the file. If the Admin fails to change his or her password,the credit card protection feature is disabled (and you see messages about yourfailure to comply with the rules set for businesses that accept credit cards).
• Users cannot reuse any of the last four passwords.• If a user enters an incorrect password three times (users sometimes “guess
different passwords when they can’t remember their password), the companyfile closes for that user.
• Only the user named Admin can configure the functions in this feature.• The QuickBooks credit card security audit log tracks all actions that involve
credit cards (including viewing customer credit card information).
Enabling Credit Card ProtectionTo enable the credit card protection feature, choose Company | Enable Credit CardProtection. Select Enable Protection and follow the prompts to set up a complexpassword (covered next) for the QuickBooks administrator. Any user givenpermission to view or use customer credit card data will automatically be forced tocreate a complex password the next time he or she logs into QuickBooks.
Managing Complex PasswordsComplex passwords (sometimes called strong passwords) are passwords that can’teasily be discovered by hacker software that uses permutations and combinations ofletters and numbers to break into password-protected files. This software “plays theodds” that it can break the password.
The more complex a password is, the higher the odds are against breaking in.For example, a password that contains seven characters and includes one uppercaseletter and six lowercase letters is harder to break than a password that is entirelyuppercase or lowercase (the odds are somewhere in the range of one in many millions).When you mix numbers with letters, and at least one letter is in a different casethan the others, the odds grow even longer. If you add characters (such as insistingon a password that is at least nine characters long), and insist that at least two ofthose characters are numbers, and at least two of the letters are in a different casethan the other letters, the odds of breaking in grow to astronomical levels (in therange of one in many billions).
452 P A R T F O U R M A N A G I N G Q U I C K B O O K S
QckBcks TIGHT / QuickBooks 2009 The Official Guide / Ivens / 274-8 / Chapter 20
P:\010Comp\QckBcks\274-8\ch20.vpTuesday, September 16, 2008 10:20:33 AM
Color profile: DisabledComposite Default screen

Another hallmark of software (or an operating system) that requires strongpasswords is the requirement to change the password periodically, to limit accessby an intruder in case another person learns the current password.
Of course, the more complicated a password is, the harder it is to remember.In fact, in a system that requires you to mix letters, numbers, and case and alsorequires you to invent a new password periodically, it’s very difficult to rememberyour password. Therefore, users write them down and store them. A note pinnedto a monitor or lying on a desk or placed in an unlocked desk draw that says “MyQuickBooks password – MyNaMeisJoe99” is an obviously ludicrous way to make apassword secret and secure, but that’s what happens in many businesses. Make it anabsolute rule that password notes have to be kept in a locked drawer.
Deleting a UserIf you want to remove a user from the User List, select the name and then click theDelete User button. QuickBooks asks you to confirm your decision. You can’t deletethe administrator.
Editing User InformationYou can change the configuration options for any user. Select the user name in theUser List window and click Edit User. This launches a wizard similar to the AddUser Wizard, and you can change the user name, password, and access permissions.
Setting User PermissionsWhen you’re adding a new user or editing an existing user, the wizard walks youthrough the steps for configuring the user’s permissions. Click Next on each wizardwindow after you’ve supplied the necessary information.
The first permissions window asks if you want this user to have access to selectedareas of QuickBooks or all areas. If you give the user full permission to do everything,when you click Next, you’re asked to confirm your decision, and there’s no furtherwork to do in the wizard. Click Finish to return to the User List window.
N O T E : In Accountant Edition, you have the option to select ExternalAccountant in addition to the options for all or selected areas of QuickBooks.An External Accountant automatically has full permissions to everything exceptsensitive customer data (such as credit card information). Your accountant cancreate this user when loading your company file into Accountant Edition, whichmakes it easier to work on your file.
If you want to limit the user’s access to selected areas of QuickBooks, select thatoption and click Next. The ensuing wizard windows take you through all theQuickBooks features (Accounts Receivable, Check Writing, Payroll, and so on) so
C H A P T E R 2 0 C U S T O M I Z I N G Q U I C K B O O K S 453
QckBcks TIGHT / QuickBooks 2009 The Official Guide / Ivens / 274-8 / Chapter 20
P:\010Comp\QckBcks\274-8\ch20.vpTuesday, September 16, 2008 10:20:33 AM
Color profile: DisabledComposite Default screen

you can establish permissions on a feature-by-feature basis for this user. You shouldconfigure permissions for every component of QuickBooks. Any component notconfigured is set as No Access for this user. For each QuickBooks component, youcan select one of the following permission options:
No Access The user is denied permission to open any windows in that sectionof QuickBooks.
Full Access The user can open all windows and perform all tasks in that sectionof QuickBooks.
Selective Access The user will be permitted to perform tasks as you see fit.
N O T E : With credit card protection enabled, when you set up users and givethem Full Access to the Sales And Accounts Receivable area, those users arenot given permission to view customer credit card information unless youspecifically select that option. Users who do not have permission to view creditcard information see only the last four numbers of the credit card when theyopen the Payment Information tab of a customer’s record.
If you choose to give selective access permissions, you’re asked to specify therights this user should have. Those rights vary slightly from component tocomponent, but generally you’re asked to choose one of these permission levels:
• Create transactions only• Create and print transactions• Create transactions and create reports
T I P : You can select only one of the three levels, so if you need to give theuser rights to more than one of these choices, you must select Full Accessinstead of configuring Selective Access.
Configuring Special Areas of QuickBooksThere are two wizard windows for setting permissions that are not directly relatedto any specific area of the software: sensitive accounting activities and sensitivefinancial reports.
Sensitive accounting activities are those tasks that aren’t directly related toQuickBooks transactions, such as
• Making changes to the chart of accounts• Manipulating the register for any balance sheet account• Using online banking• Transferring funds between banks
454 P A R T F O U R M A N A G I N G Q U I C K B O O K S
QckBcks TIGHT / QuickBooks 2009 The Official Guide / Ivens / 274-8 / Chapter 20
P:\010Comp\QckBcks\274-8\ch20.vpTuesday, September 16, 2008 10:20:33 AM
Color profile: DisabledComposite Default screen

• Reconciling bank accounts• Creating journal entries• Preparing an accountant’s review• Working with budgets
Sensitive financial reports are those reports that reveal important financialinformation about your company, such as
• Profit & Loss reports• Balance Sheet reports• Budget reports• Cash flow reports• Income tax reports• Trial balance reports• Audit trail reports
Configuring Rights for Existing TransactionsIf a user has permissions for certain areas of QuickBooks, you can limit his or herability to manipulate existing transactions within those areas. This means the usercan’t change or delete a transaction, even if he or she created it in the first place.
When you have finished configuring user permissions, the last wizard page presentsa list of the permissions you’ve granted and refused. If everything is correct, clickFinish. If there’s something you want to change, use the Back button to back up tothe appropriate page.
User Roles in Enterprise SolutionsEnterprise Solutions offers “roles” so you can set up users and define permissionsby assigning roles to them. Enterprise Solutions comes with 14 predefined roles.You can use them as they are, or modify them to match your needs. You can evencopy an existing role, change the permissions, and give it a new name to create yourown new role. The following predefined roles are built into Enterprise Solutions:
• Accountant• Accounts Payable• Accounts Receivable• Admin• Banking• Finance• Full Access• Inventory
C H A P T E R 2 0 C U S T O M I Z I N G Q U I C K B O O K S 455
QckBcks TIGHT / QuickBooks 2009 The Official Guide / Ivens / 274-8 / Chapter 20
P:\010Comp\QckBcks\274-8\ch20.vpTuesday, September 16, 2008 10:20:33 AM
Color profile: DisabledComposite Default screen

• Payroll Manager• Payroll Processor• Purchasing• Sales• Time Tracking• View-Only
Roles provide tighter security levels, which is necessary as companies grow andhave employees in more specialized roles. It’s important to be able to limit users’access to only the areas they need to perform their job. The increased permissionsgranularity in the Roles feature gives you much more control over customizedaccess levels for each employee, because you can specify distinct access levels (view,create, modify, delete, print, and so on). For example, a user could be given createand print access to sales orders, but view-only access to invoices. You can use rolesto control access to individual bank accounts (for example, a user could be givenaccess to the operating account but not the payroll account).
The roles concept makes it much easier to set up and maintain permissions fora larger number of users. Users can be assigned multiple roles to make sure theirpermissions match their tasks, and a single role can be assigned to multiple usersto reduce the effort of defining permissions.
Configuring ClassesQuickBooks provides a feature called Class Tracking that permits you to groupitems and transactions in a way that matches the kind of reporting you want toperform. Think of this feature as a way to “classify” your business activities. To useclasses, you must enable the feature, which is listed in the Accounting section ofthe Preferences window.
Some of the common reasons to configure classes include
• Reporting by location if you have more than one office• Reporting by division or department• Reporting by business type (perhaps you have both retail and wholesale
businesses under your company umbrella)
You should use classes for a single purpose; otherwise, the feature won’t workproperly. For example, you can use classes to separate your business into locationsor by type of business, but don’t try to do both. If you need to further define a classor narrow its definition, you can use subclasses.
When you enable classes, QuickBooks adds a Class field to transaction forms.For each transaction or each line of any transaction, you can assign one of theclasses you created.
456 P A R T F O U R M A N A G I N G Q U I C K B O O K S
QckBcks TIGHT / QuickBooks 2009 The Official Guide / Ivens / 274-8 / Chapter 20
P:\010Comp\QckBcks\274-8\ch20.vpTuesday, September 16, 2008 10:20:33 AM
Color profile: DisabledComposite Default screen

Creating a ClassTo create a class, choose Lists | Class List from the QuickBooks menu bar to displaythe Class List window. Remember that you must enable the feature in the AccountingPreferences dialog to have access to the Class List menu item.
Press CTRL-N to add a new class. Fill in the name of the class in the New Classwindow. Click Next to add another class, or click OK if you are finished.
T I P : It’s a good idea to create a class called “Other.” This gives you a way tosort reports in a logical fashion when a transaction has no link to one of yourreal classes.
Creating a SubclassSubclasses let you post transactions to specific subcategories of classes, and theywork similarly to subaccounts in your chart of accounts. If you set up a subclass,you must post transactions only to the subclass, never to the parent class. However,unlike the chart of accounts, classes have no option to force the display of only thesubclass when you’re working in a transaction window. As a result, if you’re usingsubclasses you must keep the name of the parent class short, to lessen the need toscroll through the field to see the entire class name.
You create a subclass using the same steps required to create a class.
Follow these steps to create a subclass:
� Choose Lists | Class List from the QuickBooks menu bar.� Press CTRL-N to open the New Class dialog box.� Enter a name for the subclass in the Class Name box.� Click the check box next to the option Subclass Of to insert a check mark.� Click the arrow next to the field at the bottom of the dialog and choose the
appropriate parent class from the drop-down list.
Editing, Deleting, and Merging ClassesYou can change, remove, and merge classes right from the Class List window, whichyou open by choosing Lists | Class List.
To edit a class, double-click the class listing you want to modify. You can enter anew name, turn a parent class into a subclass, turn a subclass into a parent class, ormark the class Inactive.
To delete a class, select its listing in the Class List window and press CTRL-D. Ifthe class has been used in transactions or has subclasses, QuickBooks won’t let youdelete it. (If the problem is subclasses, delete the subclasses and then you can deletethe class.)
C H A P T E R 2 0 C U S T O M I Z I N G Q U I C K B O O K S 457
QckBcks TIGHT / QuickBooks 2009 The Official Guide / Ivens / 274-8 / Chapter 20
P:\010Comp\QckBcks\274-8\ch20.vpTuesday, September 16, 2008 10:20:33 AM
Color profile: DisabledComposite Default screen
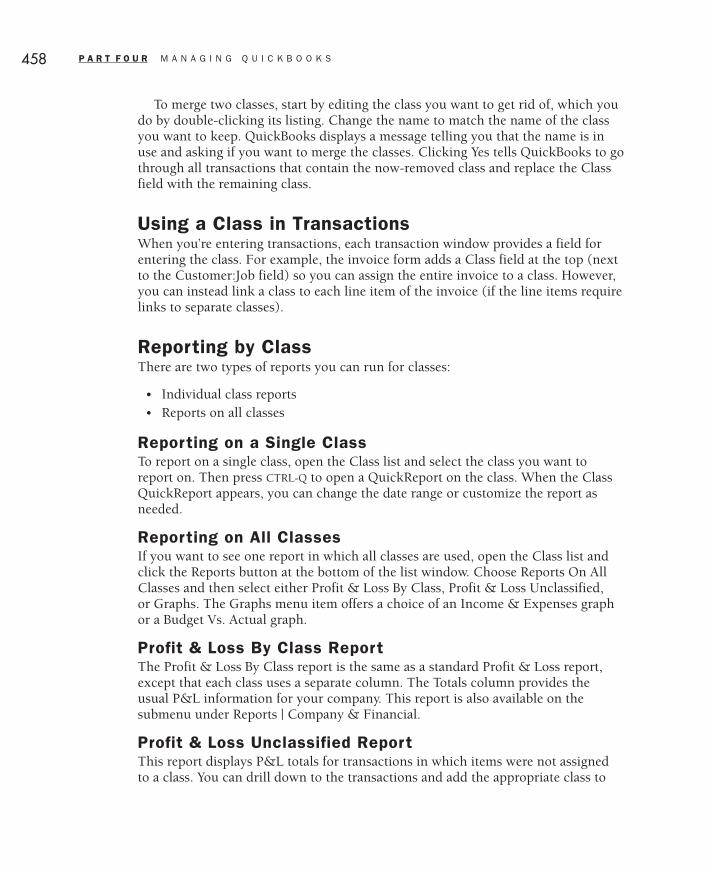
To merge two classes, start by editing the class you want to get rid of, which youdo by double-clicking its listing. Change the name to match the name of the classyou want to keep. QuickBooks displays a message telling you that the name is inuse and asking if you want to merge the classes. Clicking Yes tells QuickBooks to gothrough all transactions that contain the now-removed class and replace the Classfield with the remaining class.
Using a Class in TransactionsWhen you’re entering transactions, each transaction window provides a field forentering the class. For example, the invoice form adds a Class field at the top (nextto the Customer:Job field) so you can assign the entire invoice to a class. However,you can instead link a class to each line item of the invoice (if the line items requirelinks to separate classes).
Reporting by ClassThere are two types of reports you can run for classes:
• Individual class reports• Reports on all classes
Reporting on a Single ClassTo report on a single class, open the Class list and select the class you want toreport on. Then press CTRL-Q to open a QuickReport on the class. When the ClassQuickReport appears, you can change the date range or customize the report asneeded.
Reporting on All ClassesIf you want to see one report in which all classes are used, open the Class list andclick the Reports button at the bottom of the list window. Choose Reports On AllClasses and then select either Profit & Loss By Class, Profit & Loss Unclassified,or Graphs. The Graphs menu item offers a choice of an Income & Expenses graphor a Budget Vs. Actual graph.
Profit & Loss By Class ReportThe Profit & Loss By Class report is the same as a standard Profit & Loss report,except that each class uses a separate column. The Totals column provides theusual P&L information for your company. This report is also available on thesubmenu under Reports | Company & Financial.
Profit & Loss Unclassified ReportThis report displays P&L totals for transactions in which items were not assignedto a class. You can drill down to the transactions and add the appropriate class to
458 P A R T F O U R M A N A G I N G Q U I C K B O O K S
QckBcks TIGHT / QuickBooks 2009 The Official Guide / Ivens / 274-8 / Chapter 20
P:\010Comp\QckBcks\274-8\ch20.vpTuesday, September 16, 2008 10:20:33 AM
Color profile: DisabledComposite Default screen

each transaction. (This is likely to be a rather lengthy report if you enable classtracking after you’ve already begun using QuickBooks.)
Graphs That Use Class DataYou can also display graphs for income and expenses sorted by class, or one thatcompares budget versus actual figures sorted by class.
Customizing Other Reports for Class ReportingMany of the reports you run regularly can also be customized to report classinformation (for example, aging reports). Use the Filters tab to configure thereport for all, some, or one class.
Customizing the Icon BarQuickBooks put icons on the Icon Bar, but the icons QuickBooks chose may notmatch the features you use most frequently. Putting your own icons on the Icon Barmakes using QuickBooks easier and faster.
To customize the Icon Bar, choose View | Customize Icon Bar to open theCustomize Icon Bar dialog, which displays a list of the icons currently occupyingyour Icon Bar.
Ill 20-2
T I P : If you log into QuickBooks, either because a single computer is set upfor multiple users, or because you’re using QuickBooks on a network, thesettings you establish are linked to your login name. You are not changing theIcon Bar for other users.
C H A P T E R 2 0 C U S T O M I Z I N G Q U I C K B O O K S 459
QckBcks TIGHT / QuickBooks 2009 The Official Guide / Ivens / 274-8 / Chapter 20
P:\010Comp\QckBcks\274-8\ch20.vpTuesday, September 16, 2008 10:20:33 AM
Color profile: DisabledComposite Default screen

Changing the Order of IconsYou can change the order in which icons appear on the Icon Bar. The list of iconsin the Customize Icon Bar dialog reads top to bottom, representing the left-to-rightdisplay on the Icon Bar. Therefore, moving an icon’s listing up moves it to the lefton the Icon Bar (and vice versa).
To move an icon, click the small diamond to the left of the icon’s listing, holddown the left mouse button, and drag the listing to a new position.
Changing the Icon Bar DisplayYou can change the way the icons display in several ways, which are covered inthis section.
Display Icons Without Title TextBy default, icons and text display on the Icon Bar. You can select Show Icons Onlyto remove the title text under the icons. As a result, the icons are much smaller(and you can fit more icons on the Icon Bar). Positioning your mouse pointer overa small icon displays the icon’s description as a Tool Tip.
Change the Icon’s Graphic, Text, or DescriptionTo change an individual icon’s appearance, select the icon’s listing and click Edit.Then choose a different graphic (the currently selected graphic is enclosed in abox), change the label (the title), or change the description (the Tool Tip text).
Separate IconsYou can insert a separator between two icons, which is an effective way to creategroups of icons (after you move icons into logical groups). The separator is a grayvertical line. In the Customize Icon Bar dialog, select the icon that should appear tothe left of the separator bar and click Add Separator. QuickBooks inserts the separatoron the icon bar and “(space)” in the listing to indicate the location of the separator.
Removing an IconIf there are any icons you never use or use so infrequently that you’d rather usethe space they take up for icons representing features you use a lot, remove them.Select the icon in the Customize Icon Bar dialog and click Delete. QuickBooks doesnot ask you to confirm the deletion; the icon is just zapped from the Icon Bar.
Adding an IconYou can add an icon to the Icon Bar in either of two ways:
• Choose Add in the Customize Icon Bar dialog.• Automatically add an icon for a window (transaction or report) you’re
currently using.
460 P A R T F O U R M A N A G I N G Q U I C K B O O K S
QckBcks TIGHT / QuickBooks 2009 The Official Guide / Ivens / 274-8 / Chapter 20
P:\010Comp\QckBcks\274-8\ch20.vpTuesday, September 16, 2008 10:20:34 AM
Color profile: DisabledComposite Default screen

Using the Customize Icon Bar Dialog to Add an IconTo add an icon from the Customize Icon Bar dialog, click Add. If you want to positionyour new icon at a specific place within the existing row of icons (instead of at theright end of the Icon Bar), first select the existing icon that you want to sit to theleft of your new icon. Then click Add to display the Add Icon Bar Item dialog.
Ill 20-3
Scroll through the list to select the task you want to add to the Icon Bar. Thenchoose a graphic to represent the new icon. If you wish, you can change the label(the title that appears below the icon) or the description (the text that appears inthe Tool Tip when you hold your mouse pointer over the icon).
Adding an Icon for the Current WindowIf you’re currently working in a QuickBooks window, and it strikes you that it wouldbe handy to have an icon for fast access to this window, you can accomplish thedeed quickly. While the window is active, choose View | Add Name Of WindowTo Icon Bar (substitute the name of the current window for Name Of Window).A dialog appears so you can choose a graphic, name, and description for thenew icon.
C H A P T E R 2 0 C U S T O M I Z I N G Q U I C K B O O K S 461
QckBcks TIGHT / QuickBooks 2009 The Official Guide / Ivens / 274-8 / Chapter 20
P:\010Comp\QckBcks\274-8\ch20.vpTuesday, September 16, 2008 10:20:34 AM
Color profile: DisabledComposite Default screen

QckBcks TIGHT / QuickBooks 2009 The Official Guide / Ivens / 274-8Blind 462
P:\010Comp\QckBcks\274-8\ch20.vpTuesday, September 16, 2008 10:20:34 AM
Color profile: DisabledComposite Default screen

Chapter
Chapter
2121Managing YourQuickBooks Files
In this chapter:
• Delete a company file
• Back up and restore company files
• Use a portable company file
• Clean up data
• Use the audit trail
• Update QuickBooks software
463
QckBcks TIGHT / QuickBooks 2009 The Official Guide / Ivens / 274-8 / Chapter 21
P:\010Comp\QckBcks\274-8\ch21.vpTuesday, September 16, 2008 10:25:28 AM
Color profile: DisabledComposite Default screen
In addition to performing bookkeeping chores in QuickBooks, you need to takecare of some computer file housekeeping tasks. It’s important to keep your softwareup-to-date and to make sure your data is accurate and available.
Deleting Company FilesSometimes you have a valid reason to get rid of a company file. Perhaps you createda company file to experiment with and you no longer use it, or you sent a copy ofthe local community association’s file to another QuickBooks user who is takingover your job as treasurer.
QuickBooks doesn’t have a way to delete a company file within the software; thatis, there’s no command that will remove the file from your hard drive, remove attendantfiles and folders connected to that company file, and automatically remove the filefrom the previously opened file list and the list that appears in the No CompanyOpen dialog when you close the file you were working on.
You can delete the file from your hard drive through My Computer, but that maypresent some problems the next time you use QuickBooks. This section explainshow to avoid trouble when you delete a company file.
How QuickBooks Loads Company FilesQuickBooks automatically opens the company file that was loaded when you lastexited the software. If it can’t find that file it gets confused, and when software getsconfused it sometimes slows down or stops working properly. Even if QuickBooksaccepts the fact that the file it’s trying to open is missing and displays the NoCompany Open dialog, it’s cleaner to make sure you don’t have the about-to-be-deleted company file loaded when you close QuickBooks. Use File | Open OrRestore Company or File | Open Previous Company to select another company file.
You’re probably asking, “Why would I have that file open if I no longer use it?”The answer is, “Because most users who want to delete a company file open the fileto make sure it doesn’t contain anything important, close QuickBooks, and thendelete the file.” That last-minute check to make sure it’s okay to delete the file isthe quicksand many people wander into.
It takes QuickBooks longer to load when it can’t find the last-used company file(the one you deleted), and when the No Company Open dialog appears to ask youto select a company file to open, the deleted file is still listed. For some reason,many people select that file (perhaps they’re checking to see if they really did deletethe file—they did). QuickBooks displays an error message explaining that the filecould not be found, and when you click OK, you’re returned to the No CompanyOpen dialog. Open another file. (To remove the listing in the No Company Opendialog, see the section “Eliminating Deleted Files from the Company File List.”)
464 P A R T F O U R M A N A G I N G Q U I C K B O O K S
QckBcks TIGHT / QuickBooks 2009 The Official Guide / Ivens / 274-8 / Chapter 21
P:\010Comp\QckBcks\274-8\ch21.vpTuesday, September 16, 2008 10:25:28 AM
Color profile: DisabledComposite Default screen

Deleting a Company FileTo delete a company file, open My Computer or Windows Explorer and navigate tothe folder that holds your company files. Then delete the file companyname.QBW, aswell as the files named companyname.ND and companyname.TLG.
You can also delete the file while you’re working in QuickBooks, as long as thefile you want to delete isn’t the currently open file. To accomplish this, choose File |Open Or Restore Company and click through the wizard to get to the Open ACompany dialog. Click the file’s listing to highlight it, and press the Delete key.QuickBooks asks you to confirm your action. Then, from the same Open ACompany dialog, open the company file you want to work on.
Eliminating Deleted Files from the Company File ListQuickBooks tracks the company files you’ve opened and lists the most recentlyopened files on the File menu to make it easier to open those files. You don’t haveto open a dialog to select one of those files; you just point to the appropriate listingon the submenu under the File | Open Previous Company command. The submenulists the company files you’ve opened starting with the most recent (it’s a duplicateof the listing displayed in the No Company Open dialog).
After you delete a company file, if its listing appears on the submenu, or in theNo Company Open dialog, a user could inadvertently select it, which produces adelay followed by an error message.
To eliminate this possibility, open another company file and then choose File |Open Previous Company | Set Number Of Previous Companies. Change the data
C H A P T E R 2 1 M A N A G I N G Y O U R Q U I C K B O O K S F I L E S 465
QckBcks TIGHT / QuickBooks 2009 The Official Guide / Ivens / 274-8 / Chapter 21
Force QuickBooks to Openwith No Company File LoadedSometimes you need QuickBooks to open without loading the last-used company file. This helpsavoid delays and error messages if you deleted a company and you aren’t sure whether it wasthe company file that was loaded when you last closed QuickBooks, and also avoids delays anderror messages when the last-used file is damaged and won’t open.
To force QuickBooks to open without any company file (the software opens with the NoCompany Open dialog displayed), press and hold the CTRL key and then launch QuickBooks(using your desktop shortcut or the listing on the Programs menu). Continue to hold the CTRL keyuntil QuickBooks opens.
➽ FYI
P:\010Comp\QckBcks\274-8\ch21.vpTuesday, September 16, 2008 10:25:28 AM
Color profile: DisabledComposite Default screen
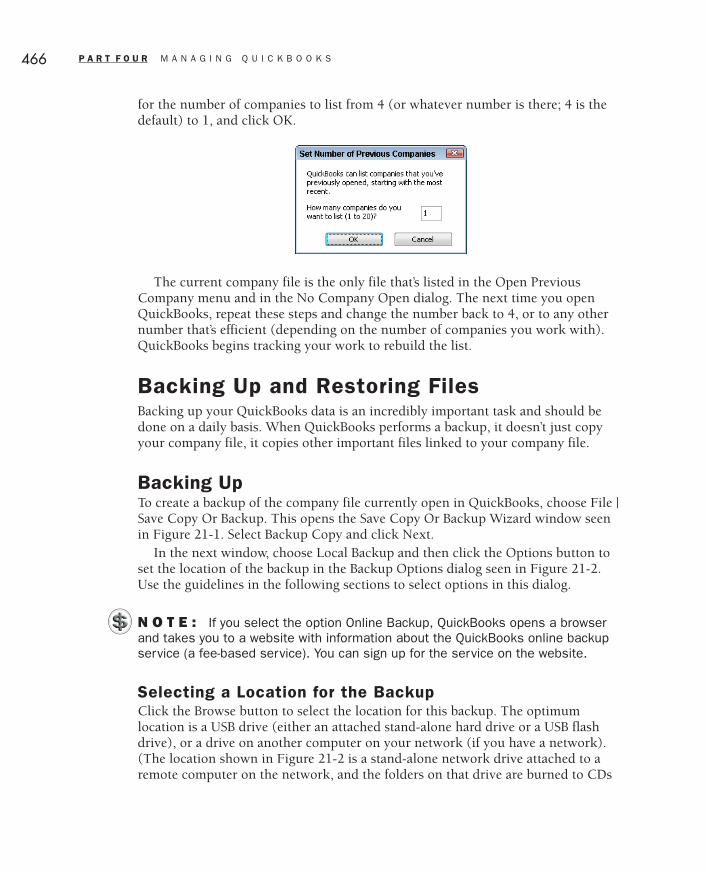
for the number of companies to list from 4 (or whatever number is there; 4 is thedefault) to 1, and click OK.
Ill 21-1
The current company file is the only file that’s listed in the Open PreviousCompany menu and in the No Company Open dialog. The next time you openQuickBooks, repeat these steps and change the number back to 4, or to any othernumber that’s efficient (depending on the number of companies you work with).QuickBooks begins tracking your work to rebuild the list.
Backing Up and Restoring FilesBacking up your QuickBooks data is an incredibly important task and should bedone on a daily basis. When QuickBooks performs a backup, it doesn’t just copyyour company file, it copies other important files linked to your company file.
Backing UpTo create a backup of the company file currently open in QuickBooks, choose File |Save Copy Or Backup. This opens the Save Copy Or Backup Wizard window seenin Figure 21-1. Select Backup Copy and click Next.
In the next window, choose Local Backup and then click the Options button toset the location of the backup in the Backup Options dialog seen in Figure 21-2.Use the guidelines in the following sections to select options in this dialog.
N O T E : If you select the option Online Backup, QuickBooks opens a browserand takes you to a website with information about the QuickBooks online backupservice (a fee-based service). You can sign up for the service on the website.
Selecting a Location for the BackupClick the Browse button to select the location for this backup. The optimumlocation is a USB drive (either an attached stand-alone hard drive or a USB flashdrive), or a drive on another computer on your network (if you have a network).(The location shown in Figure 21-2 is a stand-alone network drive attached to aremote computer on the network, and the folders on that drive are burned to CDs
466 P A R T F O U R M A N A G I N G Q U I C K B O O K S
QckBcks TIGHT / QuickBooks 2009 The Official Guide / Ivens / 274-8 / Chapter 21
P:\010Comp\QckBcks\274-8\ch21.vpTuesday, September 16, 2008 10:25:28 AM
Color profile: DisabledComposite Default screen

C H A P T E R 2 1 M A N A G I N G Y O U R Q U I C K B O O K S F I L E S 467
QckBcks TIGHT / QuickBooks 2009 The Official Guide / Ivens / 274-8 / Chapter 21
FIGURE 21-1 Select the type of copy you want to create—in this case, it’s a backup.
FIGURE 21-2 Configure the options for this backup.
P:\010Comp\QckBcks\274-8\ch21.vpTuesday, September 16, 2008 10:25:28 AM
Color profile: DisabledComposite Default screen

daily and taken offsite). If you select a local drive, QuickBooks issues a warningmessage when you click OK.
Ill 21-2
Unless you’re saving the file to a folder on this computer that is going to be backedup later in the day or at night, heed the warning. Putting a backup on your harddrive is asking for disaster, because the whole purpose of a backup is to restore datawhen (not “if”) the hard drive (or the computer) dies.
Adding Time Stamps to Backup FilenamesYou can select the option to append a date/time stamp to the filename, which letsyou tell at a glance when the backup file was created. The backup filename has thefollowing format:
L 21-1 CompanyFilename(Backup Jun 01,2009 04 36 PM).QBB
If you select the time stamp option, you can also create multiple backups in thesame location, and you can limit the number of backups you save in a specificlocation. Multiple backups over continuous days provide an option to restore abackup from two days ago (or longer) if you think the backup you made yesterdaymay have some corrupted data. During backup, QuickBooks notes the number ofbackups you opted to keep and when a backup is made that exceeds that number,QuickBooks deletes the extra backup (always choosing the oldest backup as theone to delete).
Setting Backup RemindersYou can ask QuickBooks to remind you about backing up when you close acompany file by selecting that option and then indicating the frequency. Thisshouldn’t be necessary, because you should be backing up every day; you need todevelop a habit, not ask for reminders. However, if you think you won’t develop anobsessive compulsion to back up your business data (a very healthy compulsion),use this option to be reminded. In fact, set the frequency to 1 to change the featurefrom “reminder” to “nagging.”
Choosing File Verification OptionsIf you wish, you can ask QuickBooks to verify the data in your company file beforebacking up (by selecting either verification option). This can increase the amount
468 P A R T F O U R M A N A G I N G Q U I C K B O O K S
QckBcks TIGHT / QuickBooks 2009 The Official Guide / Ivens / 274-8 / Chapter 21
P:\010Comp\QckBcks\274-8\ch21.vpTuesday, September 16, 2008 10:25:28 AM
Color profile: DisabledComposite Default screen

of time it takes to complete the backup, so if you’re performing a quick backupbecause you want to make configuration changes in your file, or you’re about toperform some other action that makes you think you want a safety backup, selectthe option No Verification.
You can also verify your data file by selecting File | Utilities | Verify Data. See thesection “Verifying and Rebuilding a Company File,” later in this chapter, for moreinformation on verification.
Choosing When to Save the BackupClick OK to close the Options dialog, and then click Next to choose when to createthis backup. You have three choices:
• Save It Now• Save It Now And Schedule Future Backups• Only Schedule Future Backups
The second and third choices are concerned with scheduling automatic andunattended backups, a subject that’s covered later in this chapter in the section“Scheduling Backups.”
Assuming you’re creating a backup now (the option chosen by default), clickNext. QuickBooks opens the Save Backup Copy dialog with your location selected,and the backup filename in the File Name field. Click Save.
Backing Up to a CDIf you’re using QuickBooks on a computer running Windows XP, Windows 2003Server, or Windows Vista, you can select your CD drive as the backup target (assumingyour CD drive is capable of writing CDs).
QuickBooks actually saves the backup to the default folder on the hard drive thatholds files waiting to be written to a CD, and the software displays a message tellingyou your data has been backed up successfully to that location. When you clickOK, QuickBooks displays a dialog in which you can choose to burn the CD usingthe Windows CD Wizard (Burn Now), or using your own CD burning software(Burn Later).
(In fact, you can burn the CD later through the Windows CD Wizard; you don’thave to use CD burning software.)
If you choose Burn Now, QuickBooks creates the backup in the folder Windowsuses to save files for CD transfers (a subfolder in your user profile reserved for thistask). A balloon appears over the notification area of your taskbar, telling you thatfiles are waiting to be written to the CD (the standard notification when you burnCDs in Windows). You don’t have to click the balloon to open the folder that holdsthe file, because the QuickBooks backup feature automatically opens the Windows CDWriting Wizard, where you click Next to copy the file to the CD.
C H A P T E R 2 1 M A N A G I N G Y O U R Q U I C K B O O K S F I L E S 469
QckBcks TIGHT / QuickBooks 2009 The Official Guide / Ivens / 274-8 / Chapter 21
P:\010Comp\QckBcks\274-8\ch21.vpTuesday, September 16, 2008 10:25:29 AM
Color profile: DisabledComposite Default screen

If you choose Burn Later, QuickBooks creates the backup file in the folderWindows uses to save files for CD transfers (look in the folders under your namein C:\Documents and Settings). You can open your CD burning software or theWindows CD Writing Wizard and direct it to that location to create the backup.
Scheduling BackupsQuickBooks offers both automatic backups and unattended backups (which arealso automatic). You can schedule either or both of these types of backups from thesame wizard that walks you through the backup process (described in the previoussections). Click through the wizard windows until you get to the window titledSave Copy Or Backup:
• Select Save It Now And Schedule Future Backups if you want to create a manualbackup and also set up automatic and/or unattended backups.
• Select Only Schedule Future Backups if you just want to set up automaticand/or unattended scheduled backups.
Clicking Next after either selection brings you to the wizard window shown inFigure 21-3.
470 P A R T F O U R M A N A G I N G Q U I C K B O O K S
QckBcks TIGHT / QuickBooks 2009 The Official Guide / Ivens / 274-8 / Chapter 21
FIGURE 21-3 Set up automatic backup procedures to make sure your data is always safe.
P:\010Comp\QckBcks\274-8\ch21.vpTuesday, September 16, 2008 10:25:29 AM
Color profile: DisabledComposite Default screen

Configuring Automatic BackupsAn automatic backup is one that takes place when you close the company file, anaction that can take place under any of the following circumstances:
• You open another company file.• You choose File | Close Company (or File | Close Company/Logoff if you’ve set
up users for the company).• You close QuickBooks with this company file loaded.
Set the frequency of automatic backups to match the way you use QuickBooksand the way you work in this company file. For example, if you open QuickBookswith this company file loaded in the morning and keep QuickBooks open all daywithout changing companies, set a frequency of 1 to make sure you have at leastone backup each day (and you can also set up another scheduled backup for thatevening). The automatic backup is created using the settings, including the location,you configured in the Options dialog.
Configuring Scheduled BackupsYou can configure QuickBooks to perform a backup of your company files at anytime, even if you’re not working at your computer. This is a cool feature, but itdoesn’t work unless you remember to leave your computer running when you leavethe office. Before you leave, make sure QuickBooks is closed so all the files areavailable for backing up (open files are skipped during a scheduled backup).
To create the configuration for an unattended backup, click New to open theSchedule Backup dialog seen in Figure 21-4.
You can give the backup a descriptive name (it’s optional), but if you’re going tocreate multiple unattended backup configurations, it’s a good idea to identify eachby name. For example, if you’re backing up to a USB stick drive that’s had its driveletter assigned as F:, a good description of a backup scheduled for 10 P.M. is “10PMto F.”
Enter a location for the backup file. In Figure 21-4, the location is a mappednetwork drive, but another backup scheduled later at night is sent to a local USBflash drive.
C A U T I O N : Be sure the target drive is available—insert the Zip, USB,or other removable drive before leaving the computer; or be sure the remotenetwork computer you’re using for backup storage isn’t shut down at night.
If you don’t want to overwrite the last backup file every time a new backup fileis created, select the option Number Of Backup Copies To Keep, and specify thenumber. QuickBooks saves as many discrete backup files as you specify, each timereplacing the first file with the most recent backup and copying older files tothe next highest number in the filename. These backup files are saved with the
C H A P T E R 2 1 M A N A G I N G Y O U R Q U I C K B O O K S F I L E S 471
QckBcks TIGHT / QuickBooks 2009 The Official Guide / Ivens / 274-8 / Chapter 21
P:\010Comp\QckBcks\274-8\ch21.vpTuesday, September 16, 2008 10:25:29 AM
Color profile: DisabledComposite Default screen

filename pattern SBU_0_<CompanyFilename><Date/Time Stamp>. If you specifytwo backup files in the Number Of Backup Copies To Keep field, the second filenamestarts with SBU_1_. This pattern continues for the number of backups you specified.
Create a schedule for this unattended backup by selecting a time and a frequency.For example, create a daily schedule to make sure a backup is made every night.
If you’re on a network, QuickBooks displays the Store Windows Passworddialog. The password in question is not to your QuickBooks user and passwordconfiguration; it’s your Windows logon name and password, or the logon name andpassword of a user on the remote computer (if your user name isn’t already set upon the remote computer).
You can create multiple unattended backups and configure them for specialcircumstances. For instance, in addition to a nightly backup, you may want toconfigure a backup every four weeks on a Saturday or Sunday (or during your lunchhour on a weekday) to create a backup on a removable drive that is earmarked foroff-site storage. Be sure to bring the office backup media to the office on that dayand take it back to the off-site location when the backup is finished.
Mapped drives are unique to your Windows login name. If you log off of Windowsbefore you leave the office (not the same as shutting down the computer, whichwould prevent the backup from running), you cannot use a mapped drive to createyour backup. While it’s not common to take the trouble to log off of Windows, if
472 P A R T F O U R M A N A G I N G Q U I C K B O O K S
QckBcks TIGHT / QuickBooks 2009 The Official Guide / Ivens / 274-8 / Chapter 21
FIGURE 21-4 Configure the specifications for an unattended backup.
P:\010Comp\QckBcks\274-8\ch21.vpTuesday, September 16, 2008 10:25:29 AM
Color profile: DisabledComposite Default screen

you do normally log off, use the full path to the remote folder you’re using as thetarget location instead of the mapped drive letter. The format of the full path (calledUniversal Naming Convention or UNC) is
L 21-2 \\ComputerName\ShareName
C H A P T E R 2 1 M A N A G I N G Y O U R Q U I C K B O O K S F I L E S 473
QckBcks TIGHT / QuickBooks 2009 The Official Guide / Ivens / 274-8 / Chapter 21
The QuickBooks Transaction Log and BackupsQuickBooks keeps a transaction log file that tracks changes to the data in your company file datasince the last good backup. The filename is <YourCompanyFilename>. TLG. The transaction file isin the same folder as your company file (the QBW file).
(Rumor has it that if you have a company file that becomes corrupt or disappears, IntuitTechnical Support can use the log file and your most recent backup to recover data up to thepoint of the transactions saved at the time of the backup file you supply.)
The TLG file can grow quite large; in fact, it can become larger than your company file.Because the TLG file is active while you’re working in QuickBooks, the combination of a largecompany file and a large TLG file can cause QuickBooks to perform quite slowly.
QuickBooks documentation articles, including the online Knowledge Base, tell you that the TLGfile is reset (emptied, and then built again from scratch as you work in QuickBooks) each time yousuccessfully do a manual backup in QuickBooks. (Performing automatic backups when you closethe file, or performing scheduled backups, does not impact the TLG file.)
The statement regarding manual backups resetting the TLG file is not exactly accurate. The TLGfile is reset when you perform a good backup, and the definition of a good backup is a backupthat is performed with the Verify option enabled.
Because the verification process makes the backup process much longer, many users deselectthe Verify option when they create a manual backup. The truth is, if you have an apparentlysuccessful backup with Verify deselected, you could very well be backing up corrupted data,which won’t be a welcome discovery if you have to restore the backup file after your QBW filebecomes so corrupted that it won’t open, or produces errors when you create transactions.
If you don’t have the patience to wait for a backup with Verify enabled to complete,compromise; back up manually every three or four days (this is safe as long as you’re usingautomated and/or scheduled backups daily) and enable the Verify option every other time (or, ifyou’re really impatient, every third time). This will prevent the TLG file from growing large enoughto impede performance.
It’s also a good idea to verify the integrity of your company file by choosing File | Utilities |Verify Data. If everything is fine, then the automatic and scheduled backups you’re creating arefine. If QuickBooks finds problems with the data, you can check the QuickBooks support site, orcall technical support to get information about fixing the problems. However, you still have toperform a verified manual backup periodically to reset the TLG file.
➽ FYI
P:\010Comp\QckBcks\274-8\ch21.vpTuesday, September 16, 2008 10:25:29 AM
Color profile: DisabledComposite Default screen

Restoring a BackupIf your computer or hard drive dies, or if you update your equipment by buying anew computer, or if your QuickBooks file isn’t working properly (or at all), you’llneed to restore your last backup to get back to work in QuickBooks. (If you buya new computer, you have to install QuickBooks, and then update to the currentrelease.)
Follow these steps to restore a backup file:
� Start QuickBooks. If the opening window tells you there’s no company openand suggests you create one (this happens if this is a new installation of thesoftware), ignore that message.
� If you backed up to removable media, put the media that contains your lastbackup into its drive. If you backed up to a network share, be sure the remotecomputer is running. If you purchased the QuickBooks Online backup service,be sure you’ve configured your Internet connection in QuickBooks.
� Choose File | Open Or Restore Company from the QuickBooks menu bar tostart the wizard that walks you through file backups and restores.
� Choose Restore A Backup Copy and click Next.� Select Local Backup if your backup files are on removable media or on a remote
computer on the network. Select Online Backup if you subscribe to thatQuickBooks service. Then click Next. (If you use the QuickBooks onlinebackup service, at this point follow the prompts to restore your backup.)
� If you selected Local Backup, the Open Backup Copy dialog appears. Navigateto the folder or drive where your backup is stored.
� Select the backup file—if you store multiple backups with time stamps embeddedin the filename, select the most recent backup.
Click Open, and then click Next to continue with the Restore Wizard. In the Save Company File As dialog, select the folder to which you’re restoring
the file and click Save.� If you’re restoring to an existing company (because the problem was a corrupt
data file), QuickBooks asks if you want to replace the existing file. Click Yes.Then, just to make sure, QuickBooks displays a warning that you’re about tooverwrite/delete the existing file. That’s fine; it’s what you want to do, so typeYes in the dialog and click OK.
QuickBooks displays a message that your data files have been restored successfullyand opens the file.
T I P : If this backup wasn’t saved yesterday, you must re-create everytransaction you made between the time of this backup and the last time youused QuickBooks.
474 P A R T F O U R M A N A G I N G Q U I C K B O O K S
QckBcks TIGHT / QuickBooks 2009 The Official Guide / Ivens / 274-8 / Chapter 21
P:\010Comp\QckBcks\274-8\ch21.vpTuesday, September 16, 2008 10:25:29 AM
Color profile: DisabledComposite Default screen

The restored file isn’t exactly the same as the original file, and you should use MyComputer or Windows Explorer to open the folder into which you restored the file.You’ll find a folder named Restored_<CompanyFilename>_Files, and the foldercontains the following components:
• A folder named Letters_Templates, which contains subfolders for all the lettersyou can create using the QuickBooks feature called Prepare Letters With Envelopes.
• A folder named Printer_Settings, which contains the files that track yourQuickBooks printer configuration settings.
• A folder named Spell_Checker, which contains your spell-check settings andthe dictionary (the words added to the spell checker) of the user logged on atthe time the backup was created.
• A text file named HowToRestoreExternalFiles.txt. Double-click this file to openit in Notepad. It contains information about the way restored files are saved andhow to move the files to the appropriate folders so you can use them.
Using a Portable Company FileA portable company file is a copy of your QuickBooks company file that has beencondensed to save disk space, to make it “portable.” Portable files are designed tomove data between computers (such as your home computer and your office), soyou can work at home and then bring the updated file back to the office. You couldalso send the file to your accountant, but if the accountant is going to makechanges and return the file to you, you cannot work in your own copy of thecompany file while your accountant has your portable file (because when yourestore the portable file it replaces/overwrites the file you’ve been working on).
Creating a Portable Company FileTo create a portable company file, choose File | Save Copy Or Backup, selectPortable Company File, and click Next. In the Save Portable Company File dialog,select a location for the file (by default, QuickBooks selects the Desktop as thelocation).
If you’re taking the file to another computer (perhaps you’re taking it home),choose removable media such as a Zip or USB flash drive, and take the media withyou. Or, save the file on your hard drive and then send it to the person who will beworking with the file (such as your accountant), either by e-mail or by burning it toa CD and sending the CD to the recipient.
C A U T I O N : If your company file is very large, the portable file, eventhough it’s condensed, could be too large to e-mail. Many users have sizelimitations on their mailboxes or have slow connections. In that case, burningand mailing a CD is a better method.
C H A P T E R 2 1 M A N A G I N G Y O U R Q U I C K B O O K S F I L E S 475
QckBcks TIGHT / QuickBooks 2009 The Official Guide / Ivens / 274-8 / Chapter 21
P:\010Comp\QckBcks\274-8\ch21.vpTuesday, September 16, 2008 10:25:30 AM
Color profile: DisabledComposite Default screen

QuickBooks automatically names the file using the following format:
L 21-3 CompanyFilename (Portable).QBM
Click Save. QuickBooks displays a message telling you it has to close and re-openthe company file to create the portable file. Click OK.
It takes a while to create the file, and when it’s done, QuickBooks issues a successmessage and then re-opens the company file.
Ill 21-3
Restoring a Portable Company FileQuickBooks uses the word “restore” for the process of installing a portablecompany file on a computer. That term is generally reserved for the process ofreplacing a file with a backed up version of that file, and a portable file is not abackup and isn’t usually used for the reasons you use a backup file.
When you restore a backup, it’s because you know the original file is either bador missing. If the file is bad, it’s OK to overwrite (delete and replace) the originalfile with the restored file. In fact, QuickBooks has utilities that can recover lost ordamaged data from a backup file, but there are no such utilities available when youinstall a portable company file.
When you restore a portable company file to a computer that has an existing filefor the same company, replacing the existing file may cause you to lose any workyou’ve performed in the existing file. The process of overwriting the existing filewith the portable company file deletes the existing file and replaces it with theportable company file.
If you’re the only person who works in the company file, and you take a portablefile to another computer (such as your home computer), work on the file and bringit back to the office, it’s safe to overwrite the office copy with the portable companyfile. Nobody has created any transactions since you created the portable companyfile, so deleting the original file doesn’t delete any new transactions.
However, if you send a portable company file to someone else, and then continueto work in the original file, you can’t restore the portable company file when it’sreturned unless you’re prepared to lose all the work you did in the meantime. Youhave two ways to avoid this potential disaster:
476 P A R T F O U R M A N A G I N G Q U I C K B O O K S
QckBcks TIGHT / QuickBooks 2009 The Official Guide / Ivens / 274-8 / Chapter 21
P:\010Comp\QckBcks\274-8\ch21.vpTuesday, September 16, 2008 10:25:30 AM
Color profile: DisabledComposite Default screen

• Stop working on the file until the portable company file is returned. Then,when you restore the portable company file, you don’t lose any data.
• Have the person who performs work in the portable company file send you alist of the transactions that were entered, instead of returning the file, and enterthose transactions in the existing company file.
• Restore the file to a different location, or use a different filename (or both). Youcan open the restored company file and see what’s new, then manually add thatdata to your real company file.
To restore a portable company file, follow these steps to use the wizard that guidesyou through the process:
� Choose File | Open Or Restore Company.� In the Open Or Restore Company: Type window, select Restore A Portable File
and click Next.� In the Open Portable Company File dialog, navigate to the folder or removable
media drive that holds the file, select the file, and click Open.� In the next window, click Next and then use one of the following guidelines to
select a location and filename:• If you’re deliberately replacing a company file, select the folder that holds
the original company file and use the same filename as your company file.QuickBooks displays a warning that you’re about to overwrite the existingfile and asks if you want to replace it; click Yes. To make sure you reallyunderstand what you’re about to do, QuickBooks displays the Delete EntireFile dialog and asks you to confirm your action. Type Yes and click OK tocontinue.
• If you want to create a separate company file to avoid overwriting the workyou did in your real company file, change the location or the filename (orboth) before you click Save.
After the portable company file is uncompressed, it’s loaded in the QuickBookswindow so you can work in it.
Verifying and Rebuilding a Company FileQuickBooks includes utilities to verify and rebuild the data in your company file.They’re both found on the File | Utilities submenu.
Verifying a company file checks the data and the accuracy of the file’s contents.If any problems are found, they’re written to a log file named QBWin.log. You canview the contents of the log within QuickBooks by pressing F2 to open the Product
C H A P T E R 2 1 M A N A G I N G Y O U R Q U I C K B O O K S F I L E S 477
QckBcks TIGHT / QuickBooks 2009 The Official Guide / Ivens / 274-8 / Chapter 21
P:\010Comp\QckBcks\274-8\ch21.vpTuesday, September 16, 2008 10:25:30 AM
Color profile: DisabledComposite Default screen

Information window, and then pressing F3 to open the QuickBooks Tech Helpwindow. Click the tab named Open File and select QBWIN.LOG.
Ill 21-4
Click Open File to view the contents. Sometimes the log file has clear, helpfulinformation about the problem and you can remove the troublesome record fromthe data file. However, it’s common to have to call Intuit support for help. If you do,the support technician may ask you to send the log file, along with other filesavailable in the QuickBooks Tech Help window, using the button labeled Send LogFiles To Intuit Support on the Open File tab.
Rebuilding a company file can be a long, complicated process that shouldn’t beperformed unless a QuickBooks support technician asks you to do so.
N O T E : When you perform a backup with the option to verify the file enabled,any problems QuickBooks finds are also written to the QBWIN.LOG file.
Cleaning Up DataQuickBooks provides a feature that enables you to remove certain data in yourcompany file in order to remove elements that you no longer use or need. Using thisfeature does not make your file smaller, but it does get rid of some list items andtransaction details you no longer want to wade through as you work in QuickBooks.While this seems to be a handy feature, it carries some significant side effects in theloss of details about transactions.
478 P A R T F O U R M A N A G I N G Q U I C K B O O K S
QckBcks TIGHT / QuickBooks 2009 The Official Guide / Ivens / 274-8 / Chapter 21
P:\010Comp\QckBcks\274-8\ch21.vpTuesday, September 16, 2008 10:25:30 AM
Color profile: DisabledComposite Default screen
Understanding the Data Removal ProcedureThe data removal process deletes closed transactions and replaces them with a journalentry that shows totals posted to accounts. (If you subscribe to any QuickBookspayroll services, no current year transactions are condensed.) Open transactions(such as unpaid invoices and bills and estimates that are not marked “Closed”) arenot removed. Before removing the data, QuickBooks creates a backup, and thencreates an archive copy of your company file (which you can open to see theoriginal transactions that were removed).
Choosing a DateQuickBooks asks you for the date you want to use as the cutoff date. Everythingyou no longer need before that date is removed, if it can be safely removed withoutinterfering with transactions that remain. No open transactions are removed; onlythose data items that are completed, finished, and safe to remove are targeted. Also,any transactions before the cutoff date that affect current transactions are kept, sothe details are maintained in the file.
Understanding Summary TransactionsThe transactions that fall within the parameters of the condensing date are deletedand replaced with summary transactions. Summary transactions are nothing butjournal entry transactions that show the totals for the removed transactions, one foreach month. The account balances are not changed by removing data, because thesummary transactions maintain those totals.
Understanding the AftereffectsAfter you clean up the file, you won’t be able to run detail reports for those periodsbefore the cutoff date. However, summary reports will be perfectly accurate in theirfinancial totals. You will be able to recognize the summary transactions in theaccount registers because they will be marked with a transaction type GENJRNL.You can open the archived file if you need to see the original transaction details.
Running the File Cleanup UtilityTo run the File Cleanup utility, choose File | Utilities | Clean Up Company Data.The Clean Up Company Data Wizard opens, offering two cleanup methods (seeFigure 21-5). You may see a warning about losing your budget data when your fileis condensed, because some budgets are based on detailed postings. Click Yes.
For this discussion, select the option Remove Transactions As Of A Specific Date.(Read “Removing All Transactions with the Cleanup Wizard,” later in this section,to learn about that option.) By default, QuickBooks inserts the last day of theprevious fiscal year as the date. You can change that date, but if you do it’s a goodidea to use an end-of-year date—if you’ve been using QuickBooks for several years,you might want to choose the last day of 2007 instead of 2008. Click Next whenyou’ve entered the cutoff date.
C H A P T E R 2 1 M A N A G I N G Y O U R Q U I C K B O O K S F I L E S 479
QckBcks TIGHT / QuickBooks 2009 The Official Guide / Ivens / 274-8 / Chapter 21
P:\010Comp\QckBcks\274-8\ch21.vpTuesday, September 16, 2008 10:25:30 AM
Color profile: DisabledComposite Default screen

Selecting Additional Transactions to RemoveIn the next wizard window, you can select one or more types of existing transactionsto remove, even though they wouldn’t be removed automatically during a filecleanup process (see Figure 21-6). For example, if you have a transaction marked“To Be Printed” that’s more than a year old, you probably aren’t planning to print it(and you probably forgot you ever created it). When you’ve made your selections,click Next.
480 P A R T F O U R M A N A G I N G Q U I C K B O O K S
QckBcks TIGHT / QuickBooks 2009 The Official Guide / Ivens / 274-8 / Chapter 21
FIGURE 21-5 You can choose to clean up your file, or empty it.
FIGURE 21-6 You can remove transactions that QuickBooks would normally keep, but makethese selections thoughtfully.
P:\010Comp\QckBcks\274-8\ch21.vpTuesday, September 16, 2008 10:25:31 AM
Color profile: DisabledComposite Default screen

Removing Unused List ElementsIn the next window you can select the lists that may have elements that won’t beused after old transactions are removed (see Figure 21-7). Click the list(s) you wantQuickBooks to examine to determine whether there are unused listings, and if so,remove them.
Click Next to see an informational window in which the cleanup process isexplained. Click Begin Cleanup to start the process. QuickBooks displays a messagetelling you that first your data file needs to be backed up. This is not an everydaybackup, it’s the last backup of a full data file before information is removed. Therefore,add text to the name of the backup file to indicate that it’s special (for instance,MyCompanyFile-BeforeCleanupJun2009.QBB). Click Save to begin the backup.
As soon as QuickBooks finishes backing up, it starts removing data. You’ll seeprogress bars on your screen as each step completes. When the job is complete,you’re given the name of the archive copy of your data file.
The archive copy is intact, just the way your file was before you ran the cleanupfeature. This means you can open it if you need to see transaction details the nexttime a customer or vendor calls to discuss an old, old transaction.
Removing All Transactions with the Cleanup WizardThe Clean Up Company Data feature offers an option to strip the file of alltransactions, leaving behind only the lists and the configuration settings youcreated for printers and Edit | Preferences categories.
C H A P T E R 2 1 M A N A G I N G Y O U R Q U I C K B O O K S F I L E S 481
QckBcks TIGHT / QuickBooks 2009 The Official Guide / Ivens / 274-8 / Chapter 21
FIGURE 21-7 Empty lists of elements you created but never used.
P:\010Comp\QckBcks\274-8\ch21.vpTuesday, September 16, 2008 10:25:31 AM
Color profile: DisabledComposite Default screen

Often, this function is used shortly after you start using QuickBooks as a way to“start all over.” Accountants tend to recommend this as a quicker way to straightenout misposted transactions than forming a new company file. Other reasons to usethis function include the following:
• Start a new file at the beginning of a new year when the current company filehas become so large that working in it is slower than you’d like.
• A company has changed its legal structure (from a proprietorship to a corporationor to an LLC). Payroll, equity accounts, and other elements of the file must bechanged to reflect the new organization type.
QuickBooks creates a backup of the file before beginning the process and createsan archive of the file before clearing the transactions, so you don’t really wipe outthe company’s history.
N O T E : This function won’t run if you have payroll transactions for thecurrent year.
Using the Audit TrailQuickBooks automatically tracks all the additions, deletions, and modificationsof transactions in your data file. This record is called an audit trail, and it lets youkeep an eye on the activity in your data file. You can view the report by choosingReports | Accountant & Taxes | Audit Trail.
The report lists each transaction, along with the action that affected that transaction,the user who performed the action (if you enabled user login), and the financialinformation. The transaction action is displayed in bold type, for example, DeletedInvoice, ID#643. (The ID# is an internal QuickBooks number.)
N O T E : After you perform a file cleanup, all audit-trail data for removedtransactions is removed.
Updating QuickBooksQuickBooks provides an automatic update service you can use to make sure yourQuickBooks software is up-to-date and trouble-free. This service provides you withany maintenance releases of QuickBooks that have been created since you purchasedand installed your copy of the software. A maintenance release is distributed whena problem is discovered and fixed, or when a new feature is added to the software.
N O T E : This service does not provide upgrades to a new version; it justprovides updates to your current version.
482 P A R T F O U R M A N A G I N G Q U I C K B O O K S
QckBcks TIGHT / QuickBooks 2009 The Official Guide / Ivens / 274-8 / Chapter 21
P:\010Comp\QckBcks\274-8\ch21.vpTuesday, September 16, 2008 10:25:31 AM
Color profile: DisabledComposite Default screen

You can enable automatic updates, which means QuickBooks periodically checksthe Intuit update site on the Internet for updates to your version of QuickBooks.If new files exist, they’re downloaded to your hard drive. If you turn off automaticupdates, you should periodically check for new software files manually. ChooseHelp | Update QuickBooks and go to the Update Now tab to select and downloadupdated files.
Configuring QuickBooks Update ServiceChoose Help | Update QuickBooks and move to the Options tab to configure theUpdate feature. You can enable or disable the automatic check for updates. If youenable automatic updates, set the download location for storing update files.
If you’re using QuickBooks on a network, you can configure the update serviceto share downloaded files with other users. When this option is enabled, QuickBookscreates a subfolder on the computer that holds the shared QuickBooks data files,and the other computers on the network use that subfolder as the source of updatedfiles (instead of going online and downloading files).
For this to work, every user on the network must open his or her copy ofQuickBooks and configure the Update options for Shared Download to reflectthe folder location on the host computer. The folder location is displayed on theOptions tab when you select the Shared Download option.
C H A P T E R 2 1 M A N A G I N G Y O U R Q U I C K B O O K S F I L E S 483
QckBcks TIGHT / QuickBooks 2009 The Official Guide / Ivens / 274-8 / Chapter 21
P:\010Comp\QckBcks\274-8\ch21.vpTuesday, September 16, 2008 10:25:31 AM
Color profile: DisabledComposite Default screen

QckBcks TIGHT / QuickBooks 2009 The Official Guide / Ivens / 274-8 / Appendix A
Par
tFi
veP
art
Five Appendices
P:\010Comp\QckBcks\274-8\appA.vpTuesday, September 16, 2008 10:26:09 AM
Color profile: DisabledComposite Default screen

Appendix
Appendix
AAFixed Asset Manager
The values of fixed assets decline over time,and calculating the decline is a thornyundertaking. The calculations fordepreciation or amortization are extremelycomplicated, mostly due to the vast numberof IRS regulations on the subject. To make itworse, the regulations change frequently, sokeeping up with current rules is acomplicated task.
485
QckBcks TIGHT / QuickBooks 2009 The Official Guide / Ivens / 274-8 / Appendix A
P:\010Comp\QckBcks\274-8\appA.vpTuesday, September 16, 2008 10:26:09 AM
Color profile: DisabledComposite Default screen

In addition to making sure your depreciation calculations don’t cause a problemwith the IRS, the amounts involved in depreciation transactions have a direct effecton your business:
• The amount by which an asset is depreciated affects the worth of a businessbecause the net (reduced) current value is used on the balance sheet
• The depreciation amount affects the business’ tax bill (depreciation isdeductible)
The QuickBooks Fixed Asset Manager makes it easier to track and depreciateassets, and enter the resulting calculations in both the tax return and theQuickBooks company file.
N O T E : The Fixed Asset Manager is included in QuickBooks PremierAccountant Edition and in all editions of QuickBooks Enterprise Solutions.
Overview of Fixed Asset ManagerFixed Asset Manager is a robust, complex program, and this appendix provides anoverview of its features. Here’s a laundry list that should help you find your way asyou discover all sorts of innovative ways to use the program’s power:
• A detailed asset entry screen that you can customize• Up to five user-defined classifications for tracking assets• Six depreciation bases (Book, State, Federal, Other, AMT, and ACE)• Projected depreciation calculations• Disposition tracking• Onscreen queries and custom sorting options for the asset list• Full calculation overrides (also applies when linking to Pro Series)• A report list feature that allows you to group commonly-used reports for easy
access and printing• An export feature that allows you to transfer asset information into ProSeries
federal tax products• A desktop workspace you can customize• A toolbar for quick access to common tasks
QuickBooks Files and Fixed Asset ManagerWhen you open Fixed Asset Manager in QuickBooks (choose Accountant | ManageFixed Assets), the currently loaded QuickBooks company file links to the FixedAsset Manager. You can create a new Fixed Asset Manager client file for thiscompany, transfer prior year clients from QuickBooks Fixed Asset Manager or
486 P A R T F I V E A P P E N D I C E S
QckBcks TIGHT / QuickBooks 2009 The Official Guide / Ivens / 274-8 / Appendix A
P:\010Comp\QckBcks\274-8\appA.vpTuesday, September 16, 2008 10:26:09 AM
Color profile: DisabledComposite Default screen

ProSeries Fixed Asset Manager to the current year, reconnect Accountant’s ReviewCopy with Fixed Asset Manager or restore a previous QuickBooks Fixed AssetManager file from a backup.
QuickBooks Company InformationFixed Asset Manager must know the type of tax form this business files. To makesure the right tax form is configured for the company file (or, for that matter, tomake sure the tax form information isn’t blank, which is often the case), chooseCompany | Company Information and check the data in the dialog box.
Fixed Asset Manager uses other company information (such as the address, EINor Social Security number, and so on) when it creates the Fixed Asset Manager file,and you can view that information within Fixed Asset Manager. However, you can’tedit the information in Fixed Asset Manager, so you must make sure the data iscorrect in the Company Information dialog box.
Company Fixed Assets ListQuickBooks provides a Fixed Asset Item list, which tracks the purchase date, thedescription, and the cost of each fixed asset the company owns. When your clientsuse this list within QuickBooks, the list is inert; that is, it performs no calculationsand is not automatically linked to transaction data entry in QuickBooks. Whenclients purchase or sell a fixed asset, and create the appropriate transaction entry(a check, a loan, or a cash receipt), the information is not automatically transferredto the Fixed Asset Item list.
Even though the Fixed Asset Item list is nothing more than a list, with no abilityto interact with standard QuickBooks software calculations, Fixed Asset Managercan read (import) this list. If the Fixed Asset Item list exists in the company file,your work in Fixed Asset Manager is faster and easier. Another advantage of usingthe Fixed Asset Item list in QuickBooks is that assets in the list are linked to aFixed Asset account. In a roundabout way, this ensures the QuickBooks companyfile has one or more Fixed Asset accounts. Fixed Asset Manager can use thataccount information, which is another efficient time saver.
Fixed Asset Manager Client File SetupYou must create a Fixed Asset Manager client file for each company, and if no fileexists for the currently loaded company when you open Fixed Asset Manager, theprocess of creating the file begins automatically.
If you’d previously set up a Fixed Asset Manager client file for this company, butthe currently open company file is an Accountant’s Copy, select the option toreconnect the Accountant’s Copy to Fixed Asset, and a wizard walks you throughthe task of opening the file.
A P P E N D I X A F I X E D A S S E T M A N A G E R 487
QckBcks TIGHT / QuickBooks 2009 The Official Guide / Ivens / 274-8 / Appendix A
P:\010Comp\QckBcks\274-8\appA.vpTuesday, September 16, 2008 10:26:09 AM
Color profile: DisabledComposite Default screen

When you choose to create a new client, the Fixed Asset Manager New ClientWizard launches, and you click Next to move through each wizard window. Thefirst wizard windows display the company information for the client, and youcannot edit that information (see the previous sections on making sure the companyinformation is correct before running Fixed Asset Manager). The wizard then asksyou to respond to queries about the following data:
• Current fiscal year• Prior short years• Qualification for the “small corporation” exemption from AMT• Depreciation bases• Default depreciation method for each selected basis
The wizard offers the chance to import the fixed assets for this companyautomatically, using the information in the Fixed Asset Item list in the companyfile. You can also enter the fixed assets manually.
A client summary is displayed on the last wizard window—click Finish to endthe client set up and begin using Fixed Asset Manager. (If you automaticallysynchronized the fixed assets from the client company Fixed Asset Item list, a logappears to report the fixed assets that were imported.)
When you opt to transfer information from client files for the prior-year versionof QuickBooks Fixed Asset Manager, or from ProSeries Fixed Asset Manager, intothis year’s version, the Transfer Client Wizard launches. Click Next to movethrough each wizard window. Select the client you want to transfer on the firstwizard window that appears. The wizard then asks you to respond to the queriesabout the following data:
• Calculation options• Qualification for the “small corporation” exemption from AMT• QuickBooks Asset Synchronization
When a client summary appears on the last wizard window, click Finish tocomplete the transfer and begin using Fixed Asset Manager.
Importing Data from Other SoftwareIf you or your client have been keeping depreciation records in another softwareapplication, you can import the data to Fixed Asset Manager. Once your FixedAsset Manager client file is set up, the software can import data from a CommaSeparated Value (CSV) format file. You must map the fields in the import file tothe fields in Fixed Asset Manager. Fixed Asset Manager provides help for this taskduring the import.
488 P A R T F I V E A P P E N D I C E S
QckBcks TIGHT / QuickBooks 2009 The Official Guide / Ivens / 274-8 / Appendix A
P:\010Comp\QckBcks\274-8\appA.vpTuesday, September 16, 2008 10:26:09 AM
Color profile: DisabledComposite Default screen

T I P : If the other program can’t save to a file in CSV format, but can savedata in a file format that is readable by Microsoft Excel, open the file in Excel,and then save the file in CSV format.
If you’ve been managing fixed assets in ProSeries tax software, you can importdata directly from that software to Fixed Asset Manager.
Working in Fixed Asset ManagerAfter the client file is set up, the Fixed Asset Manager software window opens soyou can begin your work. By default, the software window opens with the Scheduletab selected. The tabs at the bottom of the window represent the bases you selectedfor depreciation. Select the Schedule Tab, and as you select each basis tab the datachanges appropriately.
Schedule TabIn the Schedule tab, Fixed Asset Manager identifies the assets using the text in thePurchase Description field of the QuickBooks Fixed Asset Item list—not the text inthe Name field. In fact, Fixed Asset Manager doesn’t even import the name fieldfrom the QuickBooks Fixed Asset Item list.
Fixed Asset Manager assigns a number to each asset, and that number becomesthe asset’s name (you can think of it as a code) in the Fixed Asset Manager clientfile. To arrive at the number (code), Fixed Asset Manager reads the text in thePurchase Description field and appends a hyphen surrounded by spaces, followedby the next available number. For example, if the Description text is WorkstationComputer, the Fixed Asset Manager name becomes “Workstation Computer - 1.”If another asset has the same description (in QuickBooks, only the Name must beunique, and the Name field isn’t used by Fixed Asset Manager, so duplicates canoccur when synchronizing with Fixed Asset Manager), the next number isappended to the text (“Workstation Computer - 2”). Asset numbers are appendedin the order in which they are sorted in the Fixed Asset Item List in QuickBooks(which sorts on the QuickBooks Name field).
You can sort assets differently by changing the criteria in the sort set. In addition,you can choose to edit an existing sort set or create a custom sort set. You can alsochange the asset list and the columns in the Schedule tab using the View ColumnSet, Sort Assets By and Apply Query Criteria controls on the Asset toolbar. To viewamounts for any basis supported in a client’s file, click the corresponding tab at thebottom of the Schedule tab. The Schedule tab lists all the assets in the Fixed AssetManager client file. The asset that’s currently selected is the asset used when youvisit any of the other tabs at the top of the software window.
A P P E N D I X A F I X E D A S S E T M A N A G E R 489
QckBcks TIGHT / QuickBooks 2009 The Official Guide / Ivens / 274-8 / Appendix A
P:\010Comp\QckBcks\274-8\appA.vpTuesday, September 16, 2008 10:26:09 AM
Color profile: DisabledComposite Default screen

Asset TabUse the Asset tab to enter information about tax forms, the QuickBooks chart ofaccounts, and other items for the asset you selected in the Schedule tab.
The upper section of the tab is the place to enter general information for theselected asset, including any classification fields. The bottom section of the Assettab is the Basis Detail section. Enter the cost, date acquired, tax system, depreciationmethod, recovery period, and other information needed to calculate the asset’sdepreciation. You can also configure Section 179 deductions here, if appropriatefor this asset.
Disposal TabUse the disposal tab to dispose of assets. Fixed Asset Manager displays the costbasis, and any Section 179 deductions. Enter the sales price, the expense of sale,and any other relevant information about the Disposal.
Select a property type from the drop-down list to determine where the disposalinformation will appear on Form 4797, Sales of Business Property (for ProSeriesclient file exports).
Projection TabUse the Projection tab to determine the best depreciation method for the selectedasset by reviewing its projected depreciation. Use the Bases tabs at the bottom of thewindow to see the projections.
T I P : You can change information in the Asset tab to alter the projectionsavailable in the Projection tab.
N O T E : The other tabs on the Fixed Asset Manager window are informational.The Notes tab is a blank window where you can write notes and reminders. TheCalendar tab displays information about an asset on the selected date (selectdate acquired, date of disposal, or both).
Using the Section 179/40% TestTo determine whether the Section 179 deductions claimed for the current year arewithin allowed limits, or to calculate the percentage of assets acquired in the last threemonths of the year, use the Section 179/40% test. Perform these diagnostics after youenter client asset information and before you print reports or link the file to theclient’s tax return. To perform these tests, choose Tools | 179/40% Test. Review theSection 179 test, then click the 40% test tab to review mid-quarter totals.
490 P A R T F I V E A P P E N D I C E S
QckBcks TIGHT / QuickBooks 2009 The Official Guide / Ivens / 274-8 / Appendix A
P:\010Comp\QckBcks\274-8\appA.vpTuesday, September 16, 2008 10:26:09 AM
Color profile: DisabledComposite Default screen

Reviewing Section 179 LimitationsThe Section 179 test determines the total cost of all eligible Section 179 property,the total Section 179 expense deduction made, and how much of the deductionexceeds federal limits for the active year.
Reviewing the Mid-quarter 40% TestFixed Asset Manager totals the cost of all assets purchased in the active year and allassets purchased in the last quarter of the active year. If the percentage of assetspurchased in the last quarter is greater than 40%, you can convert these assets tothe mid-quarter convention.
Using the Client Totals SummaryUse the Client Totals Summary to review the accumulated cost and depreciationbefore and after current-year calculations for each basis supported in a client file.To see the Client Totals Summary, choose View | Client Totals.
Calculating DepreciationWhen the selected asset is properly configured, go to the Asset tab and chooseAsset | Calculate Asset. If the command is grayed out, Fixed Asset Manager doesnot have all the information it needs to perform the calculation. Check all the fieldsto make sure you’ve entered the required information about this asset.
You can set Fixed Asset Manager to automatically calculate assets after makingmodifications using the Program Options window. To select this setting, chooseTools | Program Options. Select the Automatically Calculate Assets option, andclick OK to save the change.
Posting the Journal Entry to QuickBooksFixed Asset Manager automates the process of creating a journal entry fordepreciation expense and/or accumulated depreciation. Choose QuickBooks | PostJournal Entry to QuickBooks, and then enter the appropriate information.
Producing ReportsFixed Asset Manager provides a variety of report options, including pre-configuredreport templates. You can sort and select the information you want to print, and theorder in which you print it. Table A-1 describes the purpose of each predefined report.
You can select the reports you want to associate with your client using theReport List Organizer and create a custom report list. Having a custom report listallows you to batch print reports. To organize a report list, choose Reports | ReportList Organizer.
A P P E N D I X A F I X E D A S S E T M A N A G E R 491
QckBcks TIGHT / QuickBooks 2009 The Official Guide / Ivens / 274-8 / Appendix A
P:\010Comp\QckBcks\274-8\appA.vpTuesday, September 16, 2008 10:26:09 AM
Color profile: DisabledComposite Default screen

492 P A R T F I V E A P P E N D I C E S
QckBcks TIGHT / QuickBooks 2009 The Official Guide / Ivens / 274-8 / Appendix A
U s e t h i s r e p o r t F o r t h i s p u r p o s e
ACE Adjustment Calculation To determine the total ACE adjustment needed to compute a taxreturn for a corporation. Assets are grouped by category andsorted by asset number within each group.
Amortization Schedule by G/LAccount Number
To see a summary of the activity of the amortized assets. Assetsare grouped by general ledger account number and sorted byasset number within each group.
Amortization Schedule byUser Defined(1 to 5)
To see a summary of the activity of the amortized assets,grouped by one user-defined classification. (There is a report foreach user-defined field that you use.) Assets are grouped by theuser-defined field and sorted by asset number within each group.
AMT Adjustment Calculation To print the necessary information for AMT depreciationadjustment reporting (Federal depreciation − AMT depreciation =AMT adjustment). Assets are grouped by categoryand sorted by asset number within each group.
Asset Disposition by AssetSale Description
To see a summary of disposition information according to the saledescription assigned to each asset. Assets are grouped by assetsale description and sorted by asset number within each group.
Asset, Basis and DisposalDetail Report
To print the asset details for each asset in the Asset and Disposaltabs that you see on-screen.
Assets Acquired in the CurrentYear
To see a summary of each asset purchased in the current year.Assets are grouped by general ledger account number and sortedby acquisition date within each group.
Depreciation Schedule by G/LAccount Number
To see an activity summary for each asset, grouped by generalledger account number. Assets are sorted by acquisition datewithin each group.
Depreciation Schedule byUser Defined(1 to 5)
To see an activity summary for each asset, grouped by oneuser-defined category. (There is a report for each user-definedfield that you use.) Assets are sorted by asset number withineach group.
Lead Schedule by Category To see an activity summary for each asset, grouped by category,in a traditional lead schedule format. Assets are sorted by assetnumber within each group.
Lead Schedule by G/L AssetAccount
To see an activity summary for each asset, grouped by generalledger account number, in a traditional lead schedule format.Assets are sorted by asset number within each group.
Lead Schedule by Location To see an activity summary for each asset, grouped by location, ina traditional lead schedule format. Assets are sorted by assetnumber within each group.
TABLE A-1 Fixed Asset Manager Predefined Reports
P:\010Comp\QckBcks\274-8\appA.vpTuesday, September 16, 2008 10:26:09 AM
Color profile: DisabledComposite Default screen

Exporting Depreciation DataFixed Asset Manager has built-in tools for exporting depreciation data. The exportfile you create is imported to the appropriate software. The following file formatsare supported:
• ProSeries• Microsoft Word• Microsoft Excel• ASCII (text) file• CSV file
A P P E N D I X A F I X E D A S S E T M A N A G E R 493
QckBcks TIGHT / QuickBooks 2009 The Official Guide / Ivens / 274-8 / Appendix A
U s e t h i s r e p o r t F o r t h i s p u r p o s e
Lead Schedule by Tax Formand Property Description
To see an activity summary for each asset, grouped by tax formand property description, in a traditional lead schedule format.Assets are sorted by asset number within each group.
Monthly G/L AccumulatedAccount Summary
To see the total monthly cost additions and deletions and theirbeginning and ending balances. This report is grouped by GeneralLedger Asset Account. Assets without assigned account numbersare grouped by “No Account Number.”
Monthly G/L Asset AccountSummary
To see the total monthly accumulated depreciation/amortizationadditions, and deletions and their beginning and ending balances.This report is grouped by General Ledger Accumulated Depreciationand Amortization account. Assets without assigned account numbersare grouped by “No Account Number.”
Monthly G/L Expense AccountSummary
To see the total monthly depreciation/amortization expenseadditions and deletions, and beginning and ending accumulateddepreciation and amortization balances. This report is grouped byGeneral Ledger Depreciation and Amortization Expense account.Assets without assigned account numbers are grouped by “NoAccount Number.”
Personal Property Schedule byYear of Acquisition
To see a summary of depreciation amounts for assets that youmarked as personal property. Assets are grouped by the yeareach asset was placed in service, and sorted by acquisition datewithin each group.
Projection by Category To see a five-year projection for each asset. Assets are groupedby category, and sorted by asset number within each group.
Remaining Basis OverRemaining Life Report
To identify assets that were not fully depreciated. Assets withinthis report are grouped and subtotaled by category.
TABLE A-1 Fixed Asset Manager Predefined Reports (Continued )
P:\010Comp\QckBcks\274-8\appA.vpTuesday, September 16, 2008 10:26:10 AM
Color profile: DisabledComposite Default screen

Tax WorksheetsFixed Asset Manager provides the following tax worksheets that can help youcomplete the depreciation-related portions of your clients’ returns:
• Form 4562 Part I—Section 179 Summary Copy• Form 4562 Part II & III—Lines 15, 16, and 17• Form 4562 Part III—Lines 19 and 20• Form 4562 Part IV—Summary• Form 4562 Part V—Listed Property• Form 4562 Part VI—Amortization• Form 4797 Part I—Property Held More Than One Year• Form 4797 Part II—Ordinary Gains and Losses• Form 4797 Part III—Gains from Disposition of Depreciable Property• Form 4626—Depreciation Adjustments and Tax Preferences• Form 4626—ACE Worksheet• Form 4626—Gain/Loss Adjustments
Fixed Asset Manager completes each worksheet automatically using theinformation in the client’s file.
494 P A R T F I V E A P P E N D I C E S
QckBcks TIGHT / QuickBooks 2009 The Official Guide / Ivens / 274-8 / Appendix A
P:\010Comp\QckBcks\274-8\appA.vpTuesday, September 16, 2008 10:26:10 AM
Color profile: DisabledComposite Default screen

Appendix
Appendix
BBIntuit StatementWriter
The Intuit Statement Writer (ISW) gives youthe power to customize financial statementsthat are directly linked to a client’sQuickBooks data. You don’t have to exportthe data to other programs to create acustomized statement; instead, you canproduce exactly what you wantimmediately. QuickBooks includes ISW inall editions of QuickBooks EnterpriseSolutions. ISW can be purchased separatelyto run in conjunction with QuickBooksPremier Accountant Edition. ISW requiresMicrosoft Office 2003 or later.
495
QckBcks TIGHT / QuickBooks 2009 The Official Guide / Ivens / 274-8 / Appendix B
P:\010Comp\QckBcks\274-8\appB.vpWednesday, September 17, 2008 11:46:12 AM
Color profile: DisabledComposite Default screen

Overview of FeaturesThe Intuit Statement Writer is a program that runs inside of Microsoft Excel andadds additional commands and capabilities to control the importation ofQuickBooks data into the Excel spreadsheet for manipulation.
ISW includes the following features, all of which provide more control of yourfinancial statements than is provided with standard QuickBooks reports:
• Start from any one of 23 Financial Statement templates, including BalanceSheets, Income Statements, and Budget-to-Actual Statements.
• Customize statements by inserting columns or rows to show prior yearbalances, percentages and variances between other columns, subtotals, andmore.
• Use your customized statements for any client.• Format the statement any way you want using familiar Excel spreadsheet
capabilities.• Save your financial statements for each client to separate file locations.• Insert rows for subtotals, group accounts in any way that you want, or add
blank rows for spacing.• Update your client’s statement for the following period in seconds.• Create custom Appearances that specify all of the font characteristics (font
name, size, bold, italic, etc.) for each element of your financial statement. TheseAppearances can then be used across all of your financial statements to producea customized statement look.
N O T E : With the Intuit Statement Writer you can create a standard set offinancial statements that are in accordance with Generally Accepted AccountingPrinciples (GAAP).
ISW and QuickBooks Data FilesAs a built-in program, ISW opens from within QuickBooks, by choosing Reports |Intuit Statement Writer or Accountant | Intuit Statement Writer. The data in thecurrently open QuickBooks company file is automatically connected to ISW, soopen the client company file you want to work with before you launch ISW.
Your client’s statement data is always connected to the source. This meansupdating financial statements is easy and efficient, because the balances updateautomatically when the file is opened. While you’re viewing an ISW financialstatement, you can use the QuickZoom feature to view and/or edit the details of asource transaction. When you return to the financial statement, your ISW statementcan be updated instantly by pressing the Refresh button on one of the ISW toolbars.
496 P A R T F I V E A P P E N D I C E S
QckBcks TIGHT / QuickBooks 2009 The Official Guide / Ivens / 274-8 / Appendix B
P:\010Comp\QckBcks\274-8\appB.vpTuesday, September 16, 2008 12:20:54 PM
Color profile: DisabledComposite Default screen

ISW OperationCreation/Opening of Financial StatementsThe first couple of dialog boxes that appear upon the launch of ISW will guide youthrough the creation of a new financial statement, or the opening of an existingstatement.
• Create a new set of financial statements.• Edit saved financial statements.• View the list of available financial statement templates.• Select a template for the new financial statement (see the section “ISW
Templates,” later in this appendix).• Select a period for which a statement needs to be generated.• Set the statement basis.
By default, each new financial statement that is created will be saved in adirectory that is specifically created and associated with the currently opencompany file. If desired, you may use the normal Excel Save As command to saveyour statement to the location of your choosing.
ISW TemplatesISW comes with a large selection of customizable financial statement templates.Choose from a wide variety of balance sheets, income statements, and budget-to-actual reports.
While you can easily create a financial statement from scratch, it’s quicker to useone of the financial statement templates as your starting point. You can easily makechanges to the template to customize it for your client’s needs or your ownpreferences. Give your altered template a new name so you can use it in the future.
Editing Financial StatementsOnce a financial statement has been created or opened, then the contents aredisplayed within the Excel spreadsheet. In addition, ISW provides add-incomponents to Excel to provide additional QuickBooks-specific functionality.
ISW MenuISW inserts an additional special Statement Writer menu into the Excel menutoolbar. This menu provides direct access to ISW-specific functionality.
ISW ToolbarsIn addition to the Statement Writer menu, ISW inserts its own toolbar into theExcel toolbar area. This toolbar provides specific New, Open, Save, and Save As
A P P E N D I X B I N T U I T S T A T E M E N T W R I T E R 497
QckBcks TIGHT / QuickBooks 2009 The Official Guide / Ivens / 274-8 / Appendix B
P:\010Comp\QckBcks\274-8\appB.vpTuesday, September 16, 2008 12:20:54 PM
Color profile: DisabledComposite Default screen

operations (since ISW files are slightly different from normal Excel files), plus RollUp, Refresh, QuickZoom, and Help buttons. There is also a button to force theredisplay of the Action Panel in case it is accidentally (or intentionally) closedduring operation.
Action PanelThe Intuit Statement Writer Action Panel will appear to the one side or the other ofthe Excel spreadsheet with a title bar that says Document Actions. This panel canbe moved to either side of Excel, or it can be detached and allowed to float freely.This panel consists of five different sections: Statement Properties, Row Properties,Column Properties, General, and Help. You can use the Properties panels to quicklyview or change the properties for a particular area of the financial statement. If theproperties you want to view do not appear in the Properties panel, click the arrowsto expand the section.
The Statement Properties section allows you to view and/or alter the overall daterange and reporting basis for the current financial statement.
The Row Properties section is used primarily for the viewing and editing ofwhich accounts are assigned to which rows of the report. ISW will initially assignall accounts to their respective locations within the report, based on the selectedstatement template. If you wish to display more or less detail in your statement, youmay combine multiple accounts into a single row by selecting the rows in Excel,then pressing the Roll Up button in the ISW toolbar. Inversely, individual accountsmay be split out from an existing row via the Split Out button in the RowProperties section to display more detail in the statement.
The Column Properties are used to set the date range for account balancesdisplayed in that column. For example, you can configure one column for the priorperiod balances and the next column for the current period balances.
The General section provides an alternative method of accessing severaladditional ISW functions that can also be invoked via the Intuit Statement Writermenu. The Accountant Information allows you to specify your firm’s name, address,and any additional desired information, so that it can be retrieved by ISW andinserted into template headers automatically. The Edit Appearance function givesyou the ability to create a specification as to the overall look of your financialstatement from a font and size perspective. These appearances can then be savedand used across multiple statements to provide a common professional look andfeel for your company’s financial statements.
The Help section gives you direct access to ISW-specific help information.
Excel SpreadsheetThe Excel spreadsheet displays the account descriptions, balances, report headersand footers, column headers, and the results of the formulas you’ve entered. Thislets you customize statements by inserting columns or rows to show prior year
498 P A R T F I V E A P P E N D I C E S
QckBcks TIGHT / QuickBooks 2009 The Official Guide / Ivens / 274-8 / Appendix B
P:\010Comp\QckBcks\274-8\appB.vpTuesday, September 16, 2008 12:20:54 PM
Color profile: DisabledComposite Default screen

balances, percentages, and variances between other columns and subtotals. You canalso insert rows for subtotals to group accounts in any way you prefer, or add blankrows for spacing.
In addition to all of the fields that Excel supports for insertion into yourdocument, you can also add more information to a financial statement by insertingone of the special ISW-defined fields:
• Statement Date Prints the statement ending date.• Statement Basis Prints the statement basis (cash or accrual).• Client Information Prints the selected field from the Client Information
window; includes such fields as company name, e-mail address, URL for thecompany’s website, and so on.
• Accountant Information Prints the selected field from the AccountantInformation window; includes such fields as firm name, e-mail address, URLfor the accounting firm’s website, and so on.
Previewing and Printing FinancialStatementsYou can preview and print all of your financial statements using the normalcapabilities of Microsoft Excel.
Export Financial StatementsYour ISW financial statements are contained in an Excel file, along with additionalinformation that is only accessible to ISW. If you wish to create a normal Excel(XLS) file, you can export your financial statements to a plain Excel format. Theplain Excel file (XLS) will not contain any of the ISW information, such as whichaccounts are contained in each row, and all of the numbers contained in thedocument will be static; i.e., they cannot be updated at the push of a button fromthe QuickBooks company file.
E-mailing Financial StatementsYou have the convenience of e-mailing financial statements to another accountantfrom the Intuit Statement Writer, just by using the normal Microsoft Excel e-mailfacilities.
A P P E N D I X B I N T U I T S T A T E M E N T W R I T E R 499
QckBcks TIGHT / QuickBooks 2009 The Official Guide / Ivens / 274-8 / Appendix B
P:\010Comp\QckBcks\274-8\appB.vpTuesday, September 16, 2008 12:20:54 PM
Color profile: DisabledComposite Default screen
Supporting DocumentsISW offers the ability to create supporting documents to accompany your financialstatements. A number of predefined Microsoft Word document templates areavailable, and you can customize them to meet your needs. To access this feature,choose Create Supporting Documents, and then select the appropriate template.
ISW fills the merge field definitions with the client’s company name, your firmname, the statement date, and other client and accountant data that is available toauto-fill fields in the template. This makes it easy to create title pages and coverletters to accompany your financial statements.
500 P A R T F I V E A P P E N D I C E S
QckBcks TIGHT / QuickBooks 2009 The Official Guide / Ivens / 274-8 / Appendix B
P:\010Comp\QckBcks\274-8\appB.vpTuesday, September 16, 2008 6:01:20 PM
Color profile: DisabledComposite Default screen

Index
Symbols
& (ampersand), 20* (asterisk), 289: (colon), 21- (hyphen), 20
40% test (Section 179 deductions),490–491
940 forms and payments, 230, 235, 236941/943 forms
archiving as PDF, 235checking for errors, 234–235due quarterly, 208paycheck dates and, 216preparing, 232–234printing, 235saving and re-opening unfinished, 235Schedule B, 233, 234
941/943 payments, 229–230, 235944 forms, 229, 2371099 And 1096 Wizard, 3971099 forms, 395–3981120/1120S forms, 4008109 forms, 230
A
Account Detail Report Criteria, 367account numbers
assigning customer, 31chart of accounts, 16, 17–19, 435displaying only lowest
subaccount, 435your vendor, 37
Account Prefill tab (New Vendor window),38–39
Accountant Editionadditional journal entries in,
330–331Client Data Review in, 356External Accountant option in,
357, 453running ISW with, 6, 495using Accountant’s Copy in,
346, 352–353accountants
creating External Accountant users, 7,357, 453
dealing with closing date exceptionreports, 402
developing opening trial balanceentries, 320–321
501
QckBcks TIGHT / QuickBooks 2009 The Official Guide / Ivens / 274-8 / Index
P:\010Comp\QckBcks\274-8\Index.vpThursday, September 18, 2008 11:25:14 AM
Color profile: DisabledComposite Default screen
accountants (cont.)merging changes in company file from,
350–351preference for zero-balance
accounts, 336saving questions for, 269using Client Data Review, 355–357using Inventory Adjustment account,
264–265working with, 345–346
accountant’s copy, 345–354about, 345–346canceling, 352creating, 346dividing date for, 349–350merging changes into file from,
350–351opening, 352–353password for, 347, 348saving changes to, 353–354saving on removable media, 346–347sending to QuickBooks server,
347–349accounting. See accrual accounting;
bookkeeping; cash accountingAccounting section (Preferences dialog),
434–436accounts. See also bank accounts; chart of
accounts; sensitive account dataactive and inactive, 336adding, 21–22Ask my accountant, 269creating Discounts Given, 105GJEs for changed or new, 322–323handling over/short problems, 115Inventory Adjustment, 264–265merging, 24–25
naming, 19–20needed for tracking depreciation,
323–325petty cash, 274–275pre-filling vendor, 38–39, 433printing name on vouchers, 437requiring for transactions, 435selecting from examples, 22–23specifying appearance in reports, 446subaccounts, 20–21, 23–24transferring money between, 391troubleshooting balances in, 357Undeposited Funds, 109zero-balance, 336
accounts payable (A/P).See also vendor bills
A/P Account field with multiple A/Paccounts, 136, 137
limits on journal entries for, 321postings to for vendor bills paid in
full, 171receiving inventory items, 154–156recording vendor bills, 136–137selecting vendor bills to pay for, 170
accounts receivable (A/R). See also invoicesaging reports for, 118–122applying credits to invoices, 100–101applying payments to invoices, 98–99calculating invoice payments
automatically, 98cash sales, 106–109crediting invoice payment to different
job, 101–102depositing income, 109–114discounting timely payments, 103–104finance charges, 124–128, 133limits on journal entries for, 321
502 I N D E X
QckBcks TIGHT / QuickBooks 2009 The Official Guide / Ivens / 274-8 / Index
P:\010Comp\QckBcks\274-8\Index.vpThursday, September 18, 2008 11:25:14 AM
Color profile: DisabledComposite Default screen

matching totals and balance for, 118methods for applying invoice
payments, 96running customer and job reports, 124sending customer statements, 128–134tracking, 118underpayments, 99–100
accrual accountingconfiguring trial balance for, 335–336paying sales tax, 185recording vendor bills with, 136specifying summary reports for, 446
ACH (Automated Clearing House),230, 384
Action Panel (Intuit Statement Writer), 498active accounts, 336active e-mail account profile, 81activities. See tasksAdd Icon Bar Item dialog, 461Add New Account dialog, 21Add New Payroll Item Wizard, 200Add Your Excel Data To QuickBooks
window, 12Additional Customization window, 87, 89Additional Info tab
New Customer window, 28–30New Vendor window, 37–38
Address Info tabNew Customer window, 27–28New Vendor window, 37
addressesadding vendor, 37configuring customer, 28
Adjust Quantity/Value On Hand window,261–264
Adjust Row Amounts dialog, 308
Admin userscreating accountant’s copy, 346, 347implementing year-end closing
password, 402recovering password for, 450
aging reportsA/R Aging Detail, 119–122A/R Aging Summary, 118–119about, 118exporting and importing
memorized, 123memorizing, 122–123printing, 123specifying date for, 446
aligning printed forms, 77–78ampersand (&), 20A/P. See accounts payableA/P Account field, 136, 137apostrophes, 20Apply Credit To Invoices dialog, 73A/R. See accounts receivableA/R Aging Detail report, 119–122A/R Aging Summary report, 118–119archiving 941/943 form, 235Ask my accountant account, 269assemblies. See inventory assembliesAssess Finance Charges window, 126Asset tab (Fixed Asset Manager), 490assets. See also depreciation; Fixed Asset
ManagerA/R balance as, 118tracking depreciation for fixed, 43
Assign Check Numbers dialog, 175asterisk (*), 289ATM transactions, 275–276audit trails, 482
I N D E X 503
QckBcks TIGHT / QuickBooks 2009 The Official Guide / Ivens / 274-8 / Index
P:\010Comp\QckBcks\274-8\Index.vpThursday, September 18, 2008 11:25:14 AM
Color profile: DisabledComposite Default screen

autofillediting 941 form using, 234payee account number in check
memo, 437–438pre-filling vendor accounts,
38–39, 433using for general journal entries, 434
Automated Clearing House (ACH),230, 384
automatic backups, 471Available Credit dialog, 71Available Estimates dialog, 67
B
backing upabout, 466automatically, 471data to CD, 469–470file verification options when,
468–469Online Backup option, 466reminders for, 468restoring company files, 474–475scheduling, 470–473selecting location for backup, 466–468selecting when to backup files, 469time stamps in filenames when, 468transaction logs and, 473year-end data, 402
Backup Options dialog, 467balance forward systems, 96Balance Sheets, 340–342
Budget Overview report, 313budgets, 304customizing and memorizing, 342Detail report, 341displaying in Chart Of Accounts List
window, 339
formula for, 340Prev Year Comparison report, 342reports, 340–342running year-end, 395Standard report, 340–341Summary report, 341
bank accounts. See also petty cash account;reconciling bank accounts
adjusting entries for, 292bounced check procedures for,
270–273choosing for online bill payments,
387, 388deposit slips for, 112–113, 114funds transfer between, 269–270giving up on reconciliation of, 300making deposits to multiple, 111non-customer deposits to, 268–269postings to for vendor bills paid in
full, 171reconciling, 284, 291–292recording ATM withdrawals at,
275–276recording petty cash expenses with
check, 277redepositing bounced checks, 273selecting default, 438selecting for vendor bill payment, 170tracking cash in, 274–278transferring funds between, 391treating ATM payments as checks, 276undoing last reconciliation, 299–300voiding disbursements, 273–274
bank chargesfees for Direct Connect, 360recording for bounced checks,
272–273bank deposit slips, 112–113, 114
504 I N D E X
QckBcks TIGHT / QuickBooks 2009 The Official Guide / Ivens / 274-8 / Index
P:\010Comp\QckBcks\274-8\Index.vpThursday, September 18, 2008 11:25:14 AM
Color profile: DisabledComposite Default screen
bank register. See also bank accountsadding downloaded transactions
to, 371downloading deposit to, 374–375downloading payment to, 372–374entering checks in, 181–182making online bill payments in,
388–389matching downloaded transactions
with, 370–371recording petty cash expenses in, 277transferring funds between
accounts, 391banks. See financial institutionsBasic Customization dialog, 84Basic Payroll service, 240–242batching
cash sales, 108direct disbursement check
printing, 183invoice printing, 78manual payroll history entry, 209–210
beeping, 431Begin Reconciliation window,
285–286, 295beginning balances
adjusting for first reconciliation,294–295
correcting opening balancedifferences, 298
journal entries for opening trialbalance, 320–321
troubleshooting differences in,296–300
Billable Time Costs dialog, 145billing rate levels, 45
bills. See also vendor billsentering credit cards as split
transactions, 278–279reconciling credit card, 281–282
Bills section (Preferences dialog), 436bonuses, 265bookkeeping. See also GAAP; year-end
proceduresabout year-end closing, 400–401handling over/short problems with
double-entry, 114–116inventory postings in general
ledger, 265matching A/R totals and balance, 118preventing access to closed books, 402
bounced checksbank charges for, 272–273configuring items for managing, 271recovering amount owed for, 271–272redepositing, 273tasks involved with, 270
breakage, 265Budget Overview report, 312Budget vs. Actual reports, 314–315budgets
Balance Sheet, 304buttons in Budget window, 303class-based, 311–312compounding changes for, 308–309creating from last year’s data, 309, 310Customer:Job, 309–311defined, 302deleting, 303exporting, 316importing, 316
I N D E X 505
QckBcks TIGHT / QuickBooks 2009 The Official Guide / Ivens / 274-8 / Index
P:\010Comp\QckBcks\274-8\Index.vpThursday, September 18, 2008 11:25:14 AM
Color profile: DisabledComposite Default screen

budgets (cont.)making multiple, 302–303nature of data in, 302P&L, 304–309preparing to create, 304reports for, 312–315shortcuts for data entry, 306–309types of, 302
building inventory assemblies, 251,254–255
buttons in Budget window, 303
C
calendarfiscal vs. calendar year, 402setting reporting, 337
canceling accountant’s copy, 352cash. See also cash accounting; cash sales
ATM withdrawal records for, 275–276creating petty cash account, 274depositing to Undeposited Funds
accounts, 448disbursement records for, 276getting back from deposits, 113–114handling deposits for checks and, 111putting in petty cash till, 275recording expense in bank
register, 277solving over/short problems, 114–116types of transactions with, 274
cash accountingconfiguring trial balance report,
335–336paying sales tax, 185recording vendor bills with, 136specifying summary reports for, 446
cash flow report, 446
cash salesdefined, 106entering data for, 107–108general ledger postings for, 108–109handling batches of, 108recording with sales receipts, 106–107
CDsbacking up data on, 469–470copying portable company file to,
475–477charges. See finance charges; service
charges; statement chargeschart of accounts
adding accounts to, 21–22checking tax line information for,
399–400creating Discounts Given account, 105editing, 23merging two accounts, 24–25naming, 19–20numbering scheme for, 16, 17–19placement for discount account
in, 173selecting accounts from examples,
22–23sorting, 16subaccounts in, 20–21, 23–24types of payroll accounts needed in,
197–198checking accounts. See bank accountsChecking section (Preferences dialog),
436–438checks. See also bounced checks;
paychecks; payrolladding logos to, 178assigning numbers to, 175cash sales and, 106
506 I N D E X
QckBcks TIGHT / QuickBooks 2009 The Official Guide / Ivens / 274-8 / Index
P:\010Comp\QckBcks\274-8\Index.vpThursday, September 18, 2008 11:25:14 AM
Color profile: DisabledComposite Default screen

changing date when printing, 437choosing style of, 177–178configuring preferences for, 436–438creating for 941/943 payments, 229depositing cash and, 111editing data for paychecks, 218entering in bank register, 181–182fake payroll, 329–330fonts for printing, 178handling partial pages of, 178–179making separate FUTA, 230options for printing vendor, 174–175payment dates for bills on, 170–171printing, 177, 179–180purchasing computer, 176reconciling missing, 289–290recording petty cash expenses
with, 277reprinting, 180starting cursor in payee field, 437treating ATM payments as, 276using Write Checks window to create,
182–183voiding, 273–274writing manually, 175–176, 181–183
Choose Bank Account dialog, 228Choose Billable Time And Costs
dialog, 145Class Budget Overview report, 314Class List, 45class tracking, 436, 456class-based budgets, 311–312classes
configuring, 456–459creating, 457editing, deleting, and merging,
457–458
enabling, 45payroll job costing using, 421–422preparing budgets for, 311–312reporting by, 458–459running P&L reports by, 343, 425, 458subclasses of, 457tracking, 436, 456using in transactions, 458
Clean Up Company Data Wizard, 479–481cleaning up data, 478–482Client Data Review, 7, 355–357Client Totals Summary report, 491clients
reviewing cost and depreciationsummary for, 491
setting up Fixed Asset Manager filesfor, 487
closing. See also year-end proceduresabout, 400–401exception reports for, 402passwords for year-end, 401, 402setting dates for, 402–403, 436
COGS (cost of goods sold)placing discount account under, 173sale of inventory assembly builds
applied to, 254colon (:), 21color
changing template’s use of, 85configuring scheme for, 439–440
columnscustomizing A/R Aging Detail,
119–120customizing template, 88, 89modifying Employee Center, 223types of QuickBooks journal entries,
319–320
I N D E X 507
QckBcks TIGHT / QuickBooks 2009 The Official Guide / Ivens / 274-8 / Index
P:\010Comp\QckBcks\274-8\Index.vpThursday, September 18, 2008 11:25:14 AM
Color profile: DisabledComposite Default screen

Comma Separated Value (CSV) files, 488community forums, 6company address information, 28company files
about, 10adding inventory items, 39–42backing up, 466–473canceling accountant’s copy, 352closing and saving desktop state
for, 439configuring with EasyStep
Interview, 10creating accountant’s copy from, 346custom item fields, 50–51customer messages, 48customizing fields, 49–51customizing template info for, 85deleting, 464–466enabling classes, 45entering customer data, 26–33entering job data, 33–36establishing billing rates, 45fixed assets information in, 43–44gathering tax line information for,
399–400how they are loaded, 464importing Excel data, 11–16list of sales tax codes, 45loading in Fixed Asset Manager,
486–487manually creating, 10, 11merging accountant’s copy changes
into, 350–351opening QuickBooks without
loading, 465Other Names List for, 46payment method list, 48
payroll data setup for, 212per-item price levels, 44portable, 475–477price levels for, 44removing from company file list,
465–466restoring, 474–475sales rep list in, 46saving, 10–11setting up vendors, 36–39shipping methods list, 48showing home page when
opening, 439terms list, 47types of customers, 46using memorized transactions, 46vehicle list, 48–49vendor and job type lists, 47verifying and rebuilding, 477–478workers comp list in, 45
Company Preferences tab (Preferencesdialog), 17, 36, 434, 435
Company Snapshot, 6, 354–355complex passwords, 452–453compounding calculations for P&L
budgets, 308–309computer checks
purchasing, 176setting up printing for, 177
Confirmation And Next Steps dialog, 219consolidated company reports, 338copying
Excel data to preformatted workbooks,12–13
portable company file to CD, 475–477previous timesheets, 414templates, 86–88
508 I N D E X
QckBcks TIGHT / QuickBooks 2009 The Official Guide / Ivens / 274-8 / Index
P:\010Comp\QckBcks\274-8\Index.vpThursday, September 18, 2008 11:25:14 AM
Color profile: DisabledComposite Default screen

corporate officer compensation, 400cost of goods sold. See COGScounting inventory, 259–265
about Inventory Adjustment account,264–265
adjusting item count, 261–263making inventory adjustments,
261–264overview, 259planning physical count, 260–261printing Physical Inventory
Worksheet, 259–260value adjustments for, 263–264
Create Credit Memos Refunds window, 71Create Estimates window, 65Create Invoices window, 56, 68, 272Create Items Receipts window, 155Create New Budget dialog, 305Create Progress Invoice Based On Estimate
dialog, 67Create Statements window, 131credit. See also credit memos
applying to invoices, 100–101applying to vendor bills, 173–174defining customer’s limits, 31recording vendor, 158–160retaining for later, 72using with customer’s invoice, 73
credit cardscash sales and, 106creating accounts for, 279deducting charges from deposits, 113entering account charges for, 280–281managing deposits from merchant
bank, 111–112methods for managing, 138, 278online services for, 360, 361
protecting, 451–452, 454reconciling bill for, 281–282renaming rules with online
transactions for, 381security for customer information,
32, 454selecting for vendor bill payment, 170treating as vendors, 278–279using, 138using account as liability, 279–282
credit memos. See also formsapplying, 71creating, 70–71crediting payment to different job, 102e-mailing, 81–83printing, 76–78using transaction number from, 160
CSV (Comma Separated Value) files, 488Custom Setup option (Add New Payroll
Item Wizard), 200, 201Customer:Job budgets, 309–311
about, 309Budget Overview report, 313–314cautions using, 311creating, 310–311making additional, 311
Customer Center, List, 25–26Customer Payment form, 97customer payment reminders. See
statementscustomers. See also jobs
about jobs and, 25account numbers for, 31adding new, 26–27assessing finance charges for, 127cash, 107company and ship to addresses for, 28
I N D E X 509
QckBcks TIGHT / QuickBooks 2009 The Official Guide / Ivens / 274-8 / Index
P:\010Comp\QckBcks\274-8\Index.vpThursday, September 18, 2008 11:25:14 AM
Color profile: DisabledComposite Default screen
customers. See also jobs (cont.)credit card number for, 32credit limits for, 31custom fields for, 30deleting reimbursable expenses from
invoice, 147–148editing data for, 32–33e-mailing invoices to, 81–83entering information on invoice
heading, 57–58invoicing reimbursable expenses to,
144–149jobs attached to, 33linking sales tax code to, 186–187list of messages for, 48managing backorders for, 75method for sending invoice, 30name of, 27Notepad for, 33opening balances field for, 27–28paying invoices online, 83, 391–392payment terms for, 29preferred payment method for, 32pricing level for, 30receiving invoice as PDF
attachment, 83reimbursing to special income
account, 140reports for jobs and, 124sales reps for, 30sales tax codes and items assigned to,
190–191sales tax information for, 30saving edited invoice for, 58sending statements to, 128–134skipping statement creation for
some, 133
statement charges for, 129–130tracking cash sales, 107types of, 29, 46, 107viewing payment history of, 127–128
Customers & Jobs List, 25–26Customize Columns dialog, 223Customize Icon Bar dialog, 459–461customizing
A/R Aging Detail reports, 119–122Accounting preference settings,
434–436class reports, 459customer fields, 30Employee Center, 222–223fields, 49–51General preference settings, 431–434header, columns, and footer for
template, 88, 89Icon Bar, 459–461inventory reports, 257item fields, 50–51keystroke for moving between
fields, 431P&L reports, 344Preferences dialog, 430–431reports on opening, 444templates, 83–84text of job status levels, 35–36
D
data. See also sensitive account dataadvanced display options for reports,
336–337audit trails, 482automatically adjusting budget’s
monthly, 306–307backing up to CD, 469–470
510 I N D E X
QckBcks TIGHT / QuickBooks 2009 The Official Guide / Ivens / 274-8 / Index
P:\010Comp\QckBcks\274-8\Index.vpThursday, September 18, 2008 11:25:15 AM
Color profile: DisabledComposite Default screen

cleaning up, 478–482copying to preformatted Excel
workbooks, 12–13display options for numbers in
reports, 338–339editing customer, 32–33exporting depreciation, 493filtering report, 337importing from Excel, 11–16importing into Fixed Asset Manager,
488–489limitations when importing Excel, 12making P&L budget from last year’s,
309, 310merging records in lists, 51–52multicurrency support, 3–4nature of budget, 302QuickBooks files used by ISW, 496sorting reconciliation transaction,
7, 287support for larger numbers, 4
data entryadding for jobs, 33–36beeping when recording
transactions, 431inputting items, 41–42manually entering data, 11moving between fields during, 431online bill paying, 383opening drop-down lists
automatically, 431placing decimal points
automatically, 432shortcuts for budgets, 306–309warning when editing
transactions, 432
dateschanging when printing check, 437choosing for assessing finance
charges, 127closing, 402–403, 436default for new transactions, 433formatting time and, 434selecting range for statements,
131–132setting accountant’s copy dividing,
349–350setting for File Cleanup utility, 479specifying for aging reports, 446used in Pay Sales Tax window, 193warnings for past or future, 436
decimal points, 432deductions
40% test for Section 179, 490–491deducting credit card charges from
deposits, 113manually calculating payroll, 196tax deductible finance charges, 282
default settingschanging packing slip, 80–81editing item without changing,
433–434new transaction date, 433preferences for e-mail software, 81report formatting, 446sales tax, 186–188selecting default bank account, 438
Define Fields dialog, 50delaying payment deposits, 112deleting
accountant’s copy after merging, 351budgets, 303
I N D E X 511
QckBcks TIGHT / QuickBooks 2009 The Official Guide / Ivens / 274-8 / Index
P:\010Comp\QckBcks\274-8\Index.vpThursday, September 18, 2008 11:25:15 AM
Color profile: DisabledComposite Default screen

deleting (cont.)classes, 457–458company files, 464–466invoices, 63transactions while reconciling bank
accounts, 289user information, 450users, 453warning when deleting transaction or
unused list item, 432deposit slips, 112–113, 114deposits. See also direct deposit
about Undeposited Fundsaccount, 109
adding in check register, 284–285adding while reconciling bank
accounts, 288choosing invoice payments for,
109–111credit card, 111–112deducting credit card charges
from, 113delaying, 112downloading to bank register,
374–375filling out bank deposit slip, 112–113getting cash back from, 113–114handling cash and checks for, 111including items in, 113making non-customer, 268–269making to multiple bank
accounts, 111selecting items for, 111separating by payment method, 111
depreciationaccounts for tracking, 323–325calculating, 491
exporting data for, 493general journal entries for, 323–325reviewing Client Totals Summary
report for, 491tracking for fixed assets, 43
Desktop View section (Preferences dialog),438–440
Direct Connectdefined, 360enabling access for, 363–366making online bill payments via, 382PIN for, 362, 363, 364, 365sending messages to bank via, 389transferring money between
accounts, 391direct deposit
designating employee’s paycheckas, 206
paycheck date and date preparingpayroll for, 214
printing pay stubs for, 220purchasing service, 196
direct disbursements, 180–184about, 180–181defined, 171postings to general ledger, 184printing checks for, 183writing with manual checks, 181–183
disablingdisplay of reimbursable expenses, 448pop-up messages, 432sales orders, 447–448
disassembling inventory assemblies, 256disbursements
adding in check register, 284adjusting before reconciling bank
accounts, 284–285
512 I N D E X
QckBcks TIGHT / QuickBooks 2009 The Official Guide / Ivens / 274-8 / Index
P:\010Comp\QckBcks\274-8\Index.vpThursday, September 18, 2008 11:25:15 AM
Color profile: DisabledComposite Default screen

direct disbursement payments, 171,180–184
printing checks for direct, 183recording petty cash, 276voiding, 273–274
Discount account, 172–173discounts
about Discount account, 172–173applying on invoices, 60applying to vendor bills, 172creating special account for
posting, 105giving for timely invoice payment,
103–104giving for untimely payments,
104–105postings in general ledger for, 173taking after discount date, 172
Discounts And Credits dialog, 100, 104Discounts Given account, 105Disposal tab (Fixed Asset Manager), 490dividing date for accountant’s copy,
349–350dot matrix printers, 77–78, 178double-entry bookkeeping. See
bookkeepingdownloading
deposit to bank register, 374–375extra W-4 forms, 207payment to bank register, 372–374service messages in background, 449transactions from bank, 369
drive for backup files, 469, 471drop-down lists, 431due date
selecting vendor bills to pay by, 170tracking for payroll remittances, 226
duplicatecheck number warnings, 437estimates, 66invoice number warnings, 447purchase order numbers, 441
E
earned discounts, 172EasyStep Interview
configuring company file with, 10gathering tax line information from,
399–400opening trial balances after, 320selecting/deselecting accounts in,
22–23Edit Account dialog, 141Edit Item dialog, 190, 253Edit Renaming Rules dialog, 378, 379editing
chart of accounts, 23classes, 457–458customer data, 32–33estimates, 66file from company file list, 465–466finance charge amounts, 127financial statements in ISW, 497–499invoices, 62–63item without changing default,
433–434original timesheets, 416–417prefilled data in 941 form, 234reimbursable expense amount, 148renaming rules, 378–379timesheet reports, 416user information, 450, 453warning messages during
transaction, 432
I N D E X 513
QckBcks TIGHT / QuickBooks 2009 The Official Guide / Ivens / 274-8 / Index
P:\010Comp\QckBcks\274-8\Index.vpThursday, September 18, 2008 11:25:15 AM
Color profile: DisabledComposite Default screen

editions of QuickBooks. See alsoAccountant Edition; Enterprise SolutionsEdition; Premier Edition
about, 2features of, 2–3support for unit of measure in, 247varying inventory options in, 245
e-filing W-2/W-3 forms, 239EFT (Electronic Fund Transfer), 384EFTPS (Electronic Federal Tax Payment
System), 229–230e-mailing
configuring preferences for, 449credit memos, 81–83designated as preferred invoice
method, 30financial statements, 499invoices, 30, 62, 81–83software for, 81, 82using QuickBooks Billing Solutions,
81, 82–83Employee Center, 220–223
about, 220–221customizing, 222–223Employees tab of, 221illustrated, 220opening New Employee form, 203Payroll tab, 222Transactions tab, 221
Employee Defaults window, 202employees
assigning payroll schedules to, 216configuring record for time
tracking, 420creating, 203–207direct deposit services for, 196mileage reimbursements for, 165–166
officer, 207, 400other workers vs., 408–409pay stubs for direct deposit, 220printing W-2 forms for, 237–240recording employer’s payments to, 328running payroll for, 217–220, 422–423setting up payroll data for, 201–208,
212–213sick and vacation pay for, 206template setup for, 202–203time tracking for, 407–408types of, 207–208
Employees tab (Employee Center), 221Employment Info tab set (New Employee
form), 203, 206–207enabling
chart of accounts numbers, 17, 435class tracking, 436compounding for P&L budgets,
308–309credit card protection, 452Direct Connect access, 363–366display of reimbursable expenses, 448inventory tracking, 244invoices using Time & Expenses
list, 150purchase orders, 152, 441reimbursement tracking, 140–142sales orders, 447–448unit of measure, 246–247Web Connect access, 366–369workers comp options, 232
Enhanced Payrollabout, 196archiving 941/943 form as PDF, 235net to gross calculations for, 219workers comp options in, 232
514 I N D E X
QckBcks TIGHT / QuickBooks 2009 The Official Guide / Ivens / 274-8 / Index
P:\010Comp\QckBcks\274-8\Index.vpThursday, September 18, 2008 11:25:15 AM
Color profile: DisabledComposite Default screen

Enter Bills window, 137, 161Enter Credit Card Charges window, 280Enter Payroll Information dialog, 217, 423entering data. See data entryEnterprise Solutions Edition
availability of Client Data Reviewin, 356
Billing Rate Level List option in, 45features of, 2–3Fixed Asset Manager in, 486Fixed Asset Manager option, 43more journal entries in Accountant
Editions of, 330–331quick time and expenses invoicing in,
149–151Sales Order Fulfillment Worksheet
option, 93support for unit of measure in, 247user roles in, 455–456
envelopes, 90e-payments
941/943 payments, 229–230, 235about, 385
equipment depreciation, 323–325error checking
Form 941/943 for, 234–235reviewing invoices, 60–61W-2 forms, 238
estimatesabout, 64changing, 66choosing for progress billing invoices,
67–68creating, 65duplicating, 66generating purchase orders from, 74memorizing, 66using multiple job, 65–66
Excelcopying and pasting data from, 12–13editing financial statements from ISW
in, 498–499importing lists into QuickBooks,
13–16limitations importing data from, 12preparing tax worksheets in, 240–242
excluding reimbursable expenses, 147expense accounts
handling earned discounts in,172–173
Inventory Adjustment, 264–265posting reimbursable expenses to, 140using Reconciliation
Discrepancies, 292expenses. See mileage expenses;
reimbursable expensesexporting
budgets, 316depreciation data, 493ISW financial statements, 499memorized reports, 123, 344–345
External Accountant users, 7, 357, 453EZ Setup option (Add New Payroll Item
Wizard), 200
F
federal income tax withholding.See 941/943 forms
federal taxesdata you cannot change on forms, 234making 941/943 payments, 229–230paying 940 payments, 230Schedule B of 941/943 forms, 233, 234types of, 229
Federal Unemployment Tax Act. See FUTAFICA. See 941/943 forms
I N D E X 515
QckBcks TIGHT / QuickBooks 2009 The Official Guide / Ivens / 274-8 / Index
P:\010Comp\QckBcks\274-8\Index.vpThursday, September 18, 2008 11:25:15 AM
Color profile: DisabledComposite Default screen
fieldscursor in Write Checks starts in
payee, 437customizing customer, 30customizing name, 49–51modifying transaction templates, 88moving between, 431
File Cleanup utility, 479files. See also company files
choosing time to backup, 469deleting company, 465IIF, 16minimizing tax detail for large, 242naming pattern for backup, 471–472portable company, 475–477restoring company, 474–475selecting location for backup, 466–468sending accountant copy of, 346setting up Fixed Asset Manager
client, 487tab-delimited payroll service, 329time stamping backup, 468transaction log (TLG), 473using ISW with data, 496verifying backup, 468–469
filteringA/R Aging Detail report, 120–121reports, 168, 337statements by send methods, 132
finalizing pending builds, 256Finance Charge section (Preferences
dialog), 440finance charges, 124–128
assessing, 126, 133choosing assessment date for, 127configuring, 124–126
modifying amounts of, 127printing invoices having, 128saving invoice with, 128selecting customers to receive, 127tax deductible, 282viewing history before assessing,
127–128financial institutions
connecting via Online BankingCenter, 369
finding online, 361–362how online payments works for,
384–385icon for online, 363making online payments to, 382–384online banking options for, 360sending messages electronically
to, 389Financial Institutions Directory,
361–362, 390financial statements
creating and opening ISW, 497editing ISW, 497–499e-mailing, 499exporting, 499previewing and printing ISW, 499setting permissions for, 455
fiscal vs. calendar year, 402Fixed Asset Item List, 43–44Fixed Asset Manager, 43
40% test for Section 179 deductions,490–491
about, 485–486Asset tab, 490calculating depreciation, 491client file setup for, 487company information used in, 487
516 I N D E X
QckBcks TIGHT / QuickBooks 2009 The Official Guide / Ivens / 274-8 / Index
P:\010Comp\QckBcks\274-8\Index.vpThursday, September 18, 2008 11:25:15 AM
Color profile: DisabledComposite Default screen

Disposal tab, 490exporting depreciation data, 493importing data into, 488–489loading company files in, 486–487posting depreciation journal entry, 491Projection tab, 490reports for, 491–493Schedule tab for, 489tax worksheets for, 494
FOB (Free On Board), 58, 447fonts
customizing report, 122, 338–339editing template, 85using for check printing, 178
footerschanging report, 338configuring for A/R Aging Detail
report, 121–122customizing template, 88, 89
formattingcash flow report, 446company time and date
preferences, 434defaults for report, 446negative numbers, 122, 338stopwatch, 412
forms. See also W-2/3/4 forms; and specificnumbered forms
1120/1120S, 400aligning, 77–78checking Form 941/943 for errors,
234–235Customer Payment, 97customizing templates for, 83–91data you cannot change on, 234framing template elements, 91preparing 941/943, 232–234
preparing 944, 237preparing tax worksheets in Excel,
240–242preprinted Intuit, 77, 84printing 941/943, 235printing status stamps on template, 85repositioning with Layout Designer,
88, 89–91saving and re-opening unfinished 940/
941/943, 235setting up printer for, 76W-2, 216, 237–240
framing template elements, 91Free On Board (FOB), 58, 447FUTA (Federal Unemployment Tax Act)
paying, 230preparing 940 form, 236
G
GAAP (Generally Accepted AccountingProcedures)
financial statements from ISW, 496posting inventory on POs and, 155
general journal entries (GJEs)about, 318Accountant Edition features for,
330–331adjusting entries with, 331applying credits to different job,
101–102autofilling memo in, 434automatically assigning numbers
to, 436creating template for payroll, 328–329defined, 318depreciation entries, 323–325, 491entering, 318–320
I N D E X 517
QckBcks TIGHT / QuickBooks 2009 The Official Guide / Ivens / 274-8 / Index
P:\010Comp\QckBcks\274-8\Index.vpThursday, September 18, 2008 11:25:15 AM
Color profile: DisabledComposite Default screen

general journal entries (GJEs) (cont.)making for changed or new accounts,
322–323opening trial balance entries, 320–321outside payroll services, 326–330reversing entries, 325–326viewing GJE reports in transaction
window, 331workarounds for limitations, 321–322year-end, 398
general ledgercash sales postings to, 108–109customer payment postings in,
105–106direct disbursements postings to, 184discounts postings in, 173inventory postings in, 265invoices postings in, 63–64matching A/R totals and balance
in, 118postings for vendor bills paid in
full, 171running payroll from outside payroll
services, 327vendor bill postings in, 139vendor credit postings for, 159
General section (Preferences dialog),431–434
gifts, 265go live date for payroll, 208–209graphs
class data in, 459refreshing, 444–445settings for, 444–445types of Budget vs. Actual, 315
groupscreating memorized bill, 161–162defining tax, 189–190
H
Header/Footer tab (Modify Report dialog),121–122, 338
headerschanging report, 338configuring A/R Aging Detail report,
121–122customizing template, 88tax form worksheets, 241
headings for invoice, 57–58hiding
detailed tax data for Excel worksheet,241–242
reimbursable expenses, 147–148historical payroll data
entering, 213–214importance of, 208manually entering, 209–210setting go live date, 208–209
history. See also historical payroll dataviewing customer’s payment, 127–128viewing for bounced checks, 271voided and deleted transaction, 344
Hourly Wage column (Enter PayrollInformation dialog), 218
hyphen (-), 20
I
iconsadding to current window, 461adjusting display of, 460changing order of, 460customizing Icon Bar, 459–461lightning bolt, 363removing and adding, 460
IIF files, 16Import A File dialog, 13, 15
518 I N D E X
QckBcks TIGHT / QuickBooks 2009 The Official Guide / Ivens / 274-8 / Index
P:\010Comp\QckBcks\274-8\Index.vpThursday, September 18, 2008 11:25:15 AM
Color profile: DisabledComposite Default screen

importingbudgets into QuickBooks, 316data into Fixed Asset Manager,
488–489Excel data, 11–16memorized aging reports, 123
inactive accounts, 336income. See depositsincome accounts
handling earned discounts in,172–173
posting customer’s reimbursement tospecial, 140
setting up reimbursement, 142–143income statements. See P&L reportsincome tax. See taxesindependent contractors, 207industry-specific QuickBooks, 2inkjet printers
aligning forms for, 78handling partial check pages, 178–179voucher checks from, 180
insufficient inventory quantities, 442Integrated Applications section
(Preferences dialog), 440interest income, 286Internal Revenue Service. See IRSInternet. See also Direct Connect; online
banking servicesconfiguring service connections
for, 449Web Connect, 360, 362, 366–369website bill pay, 382–384
Intuit preprinted formsaligning printing for, 77templates designed for, 84
Intuit Statement Writer (ISW)about, 6, 495–496creating financial statements, 497data files for, 496editing financial statements, 497–499exporting financial statements, 499financial statements in, 496previewing and printing
statements, 499templates for, 497
inventoryabout inventory items, 244adding items to customer invoice, 59adjusting after physical count,
261–264calculating quantity available,
244–245, 441cash sales postings, 109company preferences for, 441–442counting, 259–265creating inventory items, 248–249disassembling inventory
assemblies, 256enabling, 152entering item data for, 41–42general ledger postings for, 265getting items and bills
simultaneously, 157insufficient quantity warnings, 442inventory assemblies, 251–256invoicing general ledger postings,
63–64managing backorders, 75ordering with purchase orders,
152–154other adjustments to, 265
I N D E X 519
QckBcks TIGHT / QuickBooks 2009 The Official Guide / Ivens / 274-8 / Index
P:\010Comp\QckBcks\274-8\Index.vpThursday, September 18, 2008 11:25:15 AM
Color profile: DisabledComposite Default screen
inventory (cont.)postings for receipt and bills for items
in, 157–158printing packing slips, 80–81receiving items, 154–156recording bills for received, 156–157running reports, 257–258subitems within, 250–251tracking, 244transactions when buying, 152unit of measure for, 245–248, 442
Inventory Adjustment account, 264–265inventory assemblies, 251–256
about, 2building, 251, 254–255creating, 251, 252–253disassembling, 256finalizing pending builds, 256non-inventory items in, 253–254pending builds and, 254
inventory items. See also inventoryassemblies
about, 244adjusting count of, 261–263bill received simultaneous with, 157counting, 259–265creating, 248–249displayed on Physical Inventory
Worksheet, 260manually freezing, 260–261options for calculating quantity
available, 244–245QOH data for, 254, 255receiving, 154–156selling with unit of measure, 248unit of measure for, 247–248, 442
using subitems, 250–251value adjustments for, 263–264
Inventory Stock Status report, 258Inventory Valuation Detail report, 258Inventory Valuation Summary report,
257–258Invoice For Time & Expenses List dialog.
See also reimbursable expensescreating custom invoices from,
150–151enabling invoices using, 150found in Premier and Enterprise
Solutions Editions, 149–150methods for creating invoices,
151–152viewing, 150
invoices. See also receiving invoicepayments; templates
adding line items to, 59allowing customer payment online, 83applying payments to, 98–99, 448batch printing, 78billing for reimbursable expenses,
150–151built-in templates for, 56–57calculating payments automatically, 98cash sales and, 106–109changing amount of reimbursable
expenses, 148checking, 60–61choosing payments for deposit,
109–111combining customer’s reimbursable
expenses, 147credit memos, 70–73credits applied to, 100–102
520 I N D E X
QckBcks TIGHT / QuickBooks 2009 The Official Guide / Ivens / 274-8 / Index
P:\010Comp\QckBcks\274-8\Index.vpThursday, September 18, 2008 11:25:15 AM
Color profile: DisabledComposite Default screen

customer charges for reimbursableexpenses, 144–149
customer payment postings in generalledger, 105–106
customizing templates for, 56–57,83–84
discounts, 103–105editing, 62–63e-mailing, 30, 62, 81–83entering customer information in
heading, 57–58fitting to window envelope, 90general ledger postings for, 63–64including message on, 62issuing refunds, 72–73letting QuickBooks mail, 83mailing label printing, 79–80managing backorders, 75memorizing, 92–93memos on, 62methods of applying
receipts to, 96paying sales tax on date of, 185previewing printed, 147price levels for, 59–60printing, 76–78printing packing slips, 80–81progress billing, 66–70prompting for reimbursable
expenses, 446receiving as PDF attachment, 83recording payments for, 96–97recovering bounced check amount
with, 271–272retaining credits for future, 72saving, 62saving with finance charges, 128
selecting send method for, 30, 62, 83spell checking, 61standard, 56–62time and expenses, 149–151underpayments of, 99–100using discounts on, 60voiding and deleting, 63
IOUs for petty cash payments, 276IRS (Internal Revenue Service)
downloading extra W-4s from, 207e-filing W-2/W-3 forms to, 239e-paying 941/943 payments to,
229–230instructing use of 944 form, 237statutory employees vs. independent
contractors, 207Issue A Refund dialog, 72ISW. See Intuit Statement Writeritem types, 40–41items. See also inventory items
adding line items to invoices, 59changing progress invoice line, 68–70checking spelling on, 61creating for overages and shortages,
115–116customizing fields for, 50–51defined, 39–40editing, 433–434entering data for, 41–42entering progress billing line, 68item types, 40–41maintaining per-item price levels
for, 44reviewing with magnifying glass, 127subitems, 42
Items & Inventory section (Preferencesdialog), 440–442
I N D E X 521
QckBcks TIGHT / QuickBooks 2009 The Official Guide / Ivens / 274-8 / Index
P:\010Comp\QckBcks\274-8\Index.vpThursday, September 18, 2008 11:25:15 AM
Color profile: DisabledComposite Default screen

J
job costing. See also reimbursable expensesconfiguring employee record for
payroll, 420invoicing reimbursable expenses,
144–149payroll reports for, 424–426preferences for payroll, 421quick time and expenses invoicing for,
149–151reimbursable expenses and, 140tracking reimbursable expenses
for, 144using classes for payroll, 421–422
jobsabout customers and, 25crediting invoice payment to different,
101–102customizing job status levels, 35–36entering, 33–36entering statement charges for,
129–130list of types of, 47percentages for cost overruns, 67types of reports for, 124using estimates, 64–66
Jobs & Estimates section (Preferencesdialog), 442
journal entries (JEs). See general journalentries
L
laser printersaligning forms for, 78handling partial check pages, 178–179voucher checks from, 180
Layout Designer, 88, 89–91
liabilities. See also federal taxes; state taxesmethods for configuring payroll,
226–227other kinds of payroll, 231–232preparing 941/943 forms, 232–234preparing annual returns for tax,
236–242remitting payroll, 227–232treating credit card accounts as,
279–282Liability Payment - Payroll Account
dialog, 228lightning bolt icon, 363Linux servers support, 3lists. See also Time & Expenses list
Billing Rate Level, 45Class, 45customer messages, 48Customers & Jobs, 25–26Fixed Asset Item, 43–44importing Excel, 13–16manually entering data in, 11memorized transaction, 46merging records in, 51–52missing names on Templates List, 86Other Names, 46removing unused elements from, 481sales rep, 46Sales Tax Code, 45shipping methods, 48terms, 47types of vendors, 47understanding charges of Time &
Expenses, 151vehicle, 48–49vendor and job type, 47
522 I N D E X
QckBcks TIGHT / QuickBooks 2009 The Official Guide / Ivens / 274-8 / Index
P:\010Comp\QckBcks\274-8\Index.vpThursday, September 18, 2008 11:25:15 AM
Color profile: DisabledComposite Default screen

warning messages when deleting itemson, 432
Workers Comp, 45Live Community, 6, 439, 440local taxes
preparing annual returns for, 236remitting, 230–231
Locate Discrepancies dialog, 296login with/without passwords, 449logos
adding to templates, 85on checks, 178
M
magnifying glass, 127mailing
designating preferred invoicingmethod, 30
invoices, 62using QuickBooks invoice printing
and, 83mailing labels, 79–80Make Deposits window, 112Make General Journal Entries window, 318manual checks
writing direct disbursements with,181–183
writing vendor, 175–176manually creating company files, 10, 11mapping Excel data to QuickBooks, 13–14Mappings dialog, 14, 15marking up reimbursable expenses,
148–149Medicare withholding. See 941/943 formsMemorize Report dialog, 340Memorize Transaction window, 92,
160–161, 329
memorized billscreating recurring vendor bills,
160–162making groups for, 161–162saving without paying, 161using, 161
memorized reportscustomizing, 339–340exporting, 123, 344–345importing, 123P&L, 344
memorized transaction list, 46memorizing
estimates, 66invoices, 92–93payroll journal entries, 328–329
memos, invoice, 62merging
accounts, 24–25classes, 457–458records in lists, 51–52
messages. See also warning messagesbackground downloading of
service, 449disabling pop-up, 432editing during transactions, 432invoice, 62list of customer, 48restoring one-time, 432sending to bank electronically, 389showing during transaction
edits, 432Mileage By Job Detail report, 165Mileage By Job Summary report, 165Mileage By Vehicle Detail report, 165, 166Mileage By Vehicle Summary report, 164
I N D E X 523
QckBcks TIGHT / QuickBooks 2009 The Official Guide / Ivens / 274-8 / Index
P:\010Comp\QckBcks\274-8\Index.vpThursday, September 18, 2008 11:25:15 AM
Color profile: DisabledComposite Default screen

mileage expenses, 162–166adding vehicles to track, 162–163creating mileage items, 163–164entering mileage, 164rates for mileage, 163reimbursements for, 165–166reports for, 164–165understanding Time & Expenses list
charges, 151missing check numbers, 289–290Modify Report: A/R Aging Detail dialog,
120, 122Modify Report: Trial Balance dialog, 335,
337, 338monitoring. See time tracking; trackingmulticurrency support, 3–4, 443multiple budget creation, 302–303Multiple Currencies section (Preferences
dialog), 443My Preferences tab (Preferences dialog),
430, 431
N
namesaccount, 19–20customer, 27customizing fields for, 49–51pattern of backup file, 471–472portable company file, 476updating when saving
transactions, 434vendor, 37
negative number format, 122, 338New Customer window
Additional Info tab, 28–30Address Info tab of, 27–28opening, 26–27Payment Info tab, 31–32
New Employee formEmployment Info tab set, 203,
206–207illustrated, 204Payroll and Compensation Info tab
set, 205–206Personal Info tab set, 203, 204tabs of, 203Workers Compensation tab set,
203, 207New Item dialog, 249, 271New Item window, 41–42, 43New Job window, 34New Vendor window, 36–37, 38No Company Open dialog, 464, 465non-inventory assembly items,
253–254nonprofit organizations, 320Notepad, 33NSF checks. See bounced checksnumbers
adding to chart of accounts, 16,17–19, 435
assigning customer account, 31assigning to checks, 175autofilling check memo with payee
account, 437–438automatically assigning to journal
entries, 436configuring for reports, 338–339creating duplicate invoice, 447customizing format of report’s
negative, 122duplicate purchase order, 441placing decimal points automatically
in, 432warnings about duplicate
check, 437
524 I N D E X
QckBcks TIGHT / QuickBooks 2009 The Official Guide / Ivens / 274-8 / Index
P:\010Comp\QckBcks\274-8\Index.vpThursday, September 18, 2008 11:25:16 AM
Color profile: DisabledComposite Default screen

O
officer employees, 207, 400Online Backup option, 466Online Banking Center
paying bills through, 386–387sending messages to bank, 389using, 369viewing transactions downloaded
from, 370online banking services. See also Direct
Connect; Web Connectabout, 360accessing Web Connect, 366–369configuring Web Connect preferences
for, 449enabling Direct Connect access,
363–366finding bank online, 361–363QuickBooks Bill Pay Service,
389–390setting up, 361transferring money between
accounts, 391online payments, 381–390
about, 360, 361, 382Bank Register, 388–389delays processing, 383how it works, 384–385making to vendors, 383–384making via QuickBooks vs. bank
website, 382–384outsourcing of, 385Pay Bills window for, 388paying bills through Online Banking
Center, 386–387receiving from customers, 391–392uploading, 389
using Write Checks window for,387–388
when vendors don’t receive, 385–386online transactions
adding to bank register, 371deposits downloaded to bank register,
374–375downloading payment to bank
register, 372–374matching downloaded items with
bank register, 370–371paying vendor bills as, 175renaming rules to match, 375–380viewing downloaded, 370
Open Bills Exist dialog, 181open item systems, 96Open Sales Orders by Customer report, 74Open Sales Orders by Item report, 74opening
accountant’s copy, 352–353drop-down lists automatically, 431QuickBooks without loading company
files, 465opening balances
correcting differences in, 298customer, 27–28journal entries for opening trial
balance, 320–321Other Names List, 46outside payroll services, 326–330
entering fake checks in payroll,329–330
journal entries for, 326–330paying from operating account, 328recording data from, 326recording employer payments, 328recording payroll for, 327signing up for, 197
I N D E X 525
QckBcks TIGHT / QuickBooks 2009 The Official Guide / Ivens / 274-8 / Index
P:\010Comp\QckBcks\274-8\Index.vpThursday, September 18, 2008 11:25:16 AM
Color profile: DisabledComposite Default screen

overages, cash, 114–116owner employees, 208
P
P&L budgets, 304–309automatically adjusting monthly
figures, 307–308Budget Overview report, 312–313Budget Performance report, 315compounding changes for, 308–309copying numbers across months,
306–307creating, 304–306entering data for, 306making from last year’s data, 309, 310
P&L reports, 342–344about, 342appearance of vendor bills on, 136Budget Overview report, 312–313Budget Performance report, 315By Class report, 343, 425, 458By Job report, 343customizing and memorizing, 344Detail report, 343Prev Year Comparison report, 343running year-end, 394Standard report, 342–343, 394types of, 342–344Unclassified report, 343–344, 458–459YTD Comparison report, 343
PABP (Payment Application Best Practice),451–452
packing slipschoosing template for, 80, 447printing, 80–81
PAID status stamp, 85parent accounts
about, 20, 21creating subaccounts for, 23–24
parent itemsabout, 42creating, 250–251
partial payments, 171–172passwords
establishing time tracking, 410implementing year-end closing,
401, 402login with/without, 449managing complex, 452–453noting all user, 451protecting credit card detail, 452recovering administrator’s, 450required to open accountant’s copy,
347, 348Web Connect, 362
pausing bank reconciliation, 291Pay Bills window
fields of, 170illustrated, 169making online bill payments via, 388
Pay Sales Tax window, 192–193payables. See accounts payablepaychecks
changing data for, 218dates of direct deposit preparation
vs., 214linking time tracking to employee, 420printing, 219–220reports and forms based on date
of, 216termination, 216
526 I N D E X
QckBcks TIGHT / QuickBooks 2009 The Official Guide / Ivens / 274-8 / Index
P:\010Comp\QckBcks\274-8\Index.vpThursday, September 18, 2008 11:25:16 AM
Color profile: DisabledComposite Default screen

payeesautofilling account number in check
memo, 437–438don’t enter petty cash expenses
for, 278skipping renaming rules for, 379–380understanding differences in names
for, 376paying bills online. See online paymentsPayment Application Best Practice (PABP),
451–452payment card industry (PCI), 451–452Payment Info tab (New Customer
window), 31–32Payment Summary dialog, 174payments. See also online payments;
receiving invoice paymentsadding vendor payments to check
register, 284allowing online customer invoice, 83applying to open invoices, 448calculating automatically, 448customer’s preferred method of, 32dates on checks, 170–171direct disbursement, 180–184downloading to bank register,
372–374frequency of sales tax, 186list of methods, 48making online bill, 381–390manual vendor check, 175–176methods for vendor, 170Online Banking Center for, 386–387online vendor, 175from operating account for outside
payroll services, 328partial vendor, 171–172
recording employer’s payroll, 328remitting payroll liabilities, 227–228saving bill without, 161saving information on, 174–175selecting vendor bills for, 168–171sending federal tax, 229–230setting terms for customer, 29using printed checks, 176, 179–180
Payments To Deposit window, 110payroll. See also Enhanced Payroll; outside
payroll servicesaccounts needed for, 197–198annual tax liability returns for,
236–242assigning schedules for, 216calculating sick and vacation pay, 206changing data for paychecks, 218checkup for, 214configuring, 197cost information reports for, 424–426creating check without subscribing to
services, 196creating liabilities for, 226–227Employee Center features for,
220–223employer payments for, 328entering historical data, 208–210,
213–214fake checks in, 329–330go live date for, 208–209job costing with classes, 421–422kinds of services for, 196preparing tax worksheets in Excel,
240–242purchasing direct deposit services, 196reconciling, 329–330
I N D E X 527
QckBcks TIGHT / QuickBooks 2009 The Official Guide / Ivens / 274-8 / Index
P:\010Comp\QckBcks\274-8\Index.vpThursday, September 18, 2008 11:25:16 AM
Color profile: DisabledComposite Default screen

payroll. See also Enhanced Payroll; outsidepayroll services (cont.)
recording for outside payrollservices, 327
remittance schedules for, 226remitting liabilities for, 227–232reviewing payroll run, 218–220running, 217–220scheduling, 214–215, 216setting up employees, 201–208termination checks, 216timesheet data for, 422–423tracking employee time for, 420types of payroll items, 198–200unscheduled runs, 216updating existing Standard Payroll
subscriptions, 196using Payroll Setup Wizard, 211–214vendor setup for, 198workers comp options, 232
Payroll & Employees section (Preferencesdialog), 443
Payroll - Class Tracking report, 425Payroll and Compensation Info tab set
(New Employee form), 205–206Payroll Expenses account, 197, 198payroll head tax, 231Payroll Item List, 199payroll items
adding, 200Custom Setup option, 200, 201defined, 198–200EZ Setup option for, 200–201
Payroll Liabilities account, 197, 198Payroll Services website, 197Payroll tab (Employee Center), 222Payroll Tax Form window, 233
Payroll Transaction Detail report, 424–425PCI (payment card industry), 451–452PDF files
archiving 941/943 forms as, 235receiving customer invoice as, 83
pending buildsabout, 254creating, 255–256finalizing, 256
percentages for cost overruns, 67permissions
access rights for existingtransactions, 455
configuring for sensitive accounts,454–455
Enterprise Solutions and expanded, 3establishing for time tracking, 410financial report, 455options for, 454protecting payroll information, 220setting up, 453–454user roles and, 455–456
Personal Info tab set (New Employeeform), 203, 204
petty cash accountcreating, 274leaving payees/vendor field blank for
expenses, 278recording expenses in bank
register, 277recording petty cash
disbursements, 276using check to record petty cash
expenses, 277Physical Inventory Worksheet
about, 258illustrated, 259
528 I N D E X
QckBcks TIGHT / QuickBooks 2009 The Official Guide / Ivens / 274-8 / Index
P:\010Comp\QckBcks\274-8\Index.vpThursday, September 18, 2008 11:25:16 AM
Color profile: DisabledComposite Default screen

printing, 259–260using, 260
pick lists, 448PIN for Direct Connect, 362, 363, 364, 365pop-up messages, 432portable company files, 475–477postal service. See mailingpostings. See general ledgerPreferences dialog
Accounting preferences, 434–436Bills preferences, 436Checking preferences, 436–438customizing QuickBooks, 430–431Desktop View preferences, 438–440enabling chart of accounts numbers,
17, 435Finance Charge preferences, 124–126,
440General preference settings, 431–434Integrated Applications
preferences, 440Items & Inventory preferences,
440–442Jobs & Estimates preferences, 442Multiple Currencies preferences, 443Payroll & Employees preferences, 443Reminders preferences, 443–444Reports & Graphs preferences,
444–446Sales & Customers preferences,
446–448Sales Tax preferences, 184–185, 448Send Forms preferences, 449Service Connection preferences, 449setting up inventory tracking, 245Spelling preferences, 61, 450Tax:1099 preferences, 395–396, 450
Time & Expenses preferences, 450time tracking preferences,
406–410, 421pre-filling vendor accounts, 38–39, 433Premier Edition
Billing Rate Level List option in, 45Client Data Review in, 356features of, 2Fixed Asset Manager option, 43, 486more journal entries in Accountant
Editions, 330–331quick time and expenses invoicing in,
149–151Sales Order Fulfillment Worksheet
option, 93support for unit of measure in, 247
preprinted Intuit forms, 77, 84previewing
ISW financial statements, 499printed invoices, 147statements, 134
Previous Reconciliation Discrepancyreport, 297
previous retained earnings, 321Price Level List, 44price levels
applying for invoice, 59–60creating, 44, 447maintaining per-item, 44setting customer’s, 30
Print Invoices—Confirmation dialog, 80Print Labels dialog, 79Printer Setup dialog, 76, 177, 179printers
aligning forms for, 77–78configuring for check printing, 177dot matrix pin-feed, 178
I N D E X 529
QckBcks TIGHT / QuickBooks 2009 The Official Guide / Ivens / 274-8 / Index
P:\010Comp\QckBcks\274-8\Index.vpThursday, September 18, 2008 11:25:16 AM
Color profile: DisabledComposite Default screen
printers (cont.)handling partial check pages, 178–179setting up for forms, 76
printing941/943 forms, 2351099 forms, 396–398account name on vouchers, 437aging reports, 123bank deposit slip, 114changing date when running check
for, 437credit memos, 76–78direct deposit pay stubs, 220direct disbursement checks, 183invoices, 62, 76–78, 128ISW financial statements, 499mailing labels, 79–80packing slips, 80–81paychecks, 219–220Physical Inventory Worksheet,
259–260reconciliation reports, 292–294reprinting checks, 180saving transactions before, 434selected checks, 179–180statements, 133, 134status stamps on template forms, 85timesheets, 417–418vendor checks, 174–175W-2 forms, 237–240
Profit & Loss. See P&L budgets; P&Lreports
progress billing invoices, 66–70changing line items, 68–70choosing estimates for, 67–68enabling, 66entering line items for, 68
Projection tab (Fixed Asset Manager), 490Properties dialog, 91purchase orders
enabling, 152, 441generating from sales orders, 74illustrated, 153ordering inventory with, 152–154warnings for duplicate order
numbers, 441purchasing computer checks, 176
Q
QBWIN.LOG file, 478.QBX files, 347QOH (quantity on hand), 254, 255QuickBooks. See also editions of
QuickBooksClient Data Review, 7, 355–357closing in, 401communicating with QuickBooks
Messenger, 4–5Company Snapshot feature, 6credit cards protection, 451–452, 454customizing preferences for, 430–431Enterprise Solutions features, 2–3external accountant users, 7, 357, 453handling voided invoices, 63how company files are loaded, 464industry-specific editions of, 2Intuit Statement Writer, 6invoice printing and mailing
service, 83Live Community feature, 6,
439, 440mapping imported Excel data to,
13–14multicurrency support, 3–4
530 I N D E X
QckBcks TIGHT / QuickBooks 2009 The Official Guide / Ivens / 274-8 / Index
P:\010Comp\QckBcks\274-8\Index.vpThursday, September 18, 2008 11:25:16 AM
Color profile: DisabledComposite Default screen
opening without loading companyfiles, 465
Premier editions features, 2sort order for chart of accounts, 16support for larger numbers, 4transaction logs, 473updating, 482–483workarounds for GJE limitations,
321–322QuickBooks Bill Pay Service, 389–390QuickBooks Billing Solutions, 81, 82–83QuickBooks Messenger, 4–5QuickBooks Payroll Setup Wizard
about, 197, 211–212Company Setup section, 212entering payroll history, 213–214EZ Setup option and, 200illustrated, 211payroll tax setup in, 213running payroll checkup, 214setting up employees in, 212–213Setup YTD Amounts Wizard vs., 209
QuickBooks Tax Worksheets dialog,240–241
QuickReports, Inventory, 258
R
RA (Return Authorization) numbers, 160rebuilding company files, 477–478receipts for petty cash payments, 276Receive Payments window
applying invoice payments in, 96, 97customer’s preferred payment method
in, 32discount date in, 103handling underpayments from, 99
RECEIVED status stamp, 85
receiving invoice paymentsapplying credits to invoices, 100–101applying payments to invoices, 98–99calculating payments automatically, 98cash over/short problems, 114–116cash sales, 106–109crediting payment to different job,
101–102customer payment postings in general
ledger, 105–106depositing income, 109–114discounts, 103–105handling underpayments, 99–100methods of applying receipts, 96recording payments, 96–97
Reconcile window, 286, 295reconciling bank accounts
adding transactions while, 288adjusting beginning balance for first
reconciliation, 294–295clearing transactions, 286, 288completing reconciliation, 291configuring Reconcile window,
286–287correcting opening balance
differences, 298deleting transactions while, 289disbursement and deposit adjustments
prior to, 284–285editing transactions while, 289entering interest income and service
charges, 286finding and correcting problems,
291–292giving up on, 300pausing while, 291permitting adjusting entries, 292
I N D E X 531
QckBcks TIGHT / QuickBooks 2009 The Official Guide / Ivens / 274-8 / Index
P:\010Comp\QckBcks\274-8\Index.vpThursday, September 18, 2008 11:25:16 AM
Color profile: DisabledComposite Default screen

reconciling bank accounts (cont.)printing report, 292–294resolving missing check numbers,
289–290troubleshooting beginning balances
differences, 296–300undeposited funds added while, 288undoing last reconciliation, 299–300using Begin Reconciliation window,
285–286viewing last reconciliation report, 299
reconciling payroll, 329–330recording employer’s payroll payments, 328recovering
administrator’s password, 450amount of bounced checks, 271–272
recurring vendor bills, 160–162redepositing bounced checks, 273re-entering voided, deleted, or cleared
transactions, 298refreshing reports and graphs, 444–445refunds, 70, 72–73regular employees, 207reimbursable expenses
automatically added to invoice,144–146
changing amount of, 148combining on invoice, 147creating from Invoice For Time &
Expenses list, 149–152excluding, 147invoicing customer for, 144–149job costs and tracking, 144marking up, 148–149prompting for, 446recording, 143–144removing temporarily, 147–148
setting up reimbursement accounts,142–143
taxes added to, 146–147tracking reimbursements, 140–143types of, 140ways for managing, 140
reimbursement income accounts,142–143
remindersfor adding recurring bills to system,
160, 161setting backup, 468
Reminders section (Preferences dialog),443–444
remittancesconfiguring payroll liabilities, 226–227other kinds of payroll liability,
231–232paying 940 payments, 230remitting payroll liabilities, 227–232sales tax, 192–193sending federal tax payments,
229–230state and local liabilities, 230–231tracking due dates for payroll, 226
removingicons, 460transactions with data cleanup, 479,
480, 481–482Renaming Rule Created dialog, 377renaming rules, 375–380
about, 375creating, 376–377managing, 378–379skipping, 379–380understanding differences in payee
names, 376
532 I N D E X
QckBcks TIGHT / QuickBooks 2009 The Official Guide / Ivens / 274-8 / Index
P:\010Comp\QckBcks\274-8\Index.vpThursday, September 18, 2008 11:25:16 AM
Color profile: DisabledComposite Default screen
using for credit card transactions, 381viewing transactions matched
with, 371reports
1099, 396accountant’s copy, 345–354accrual vs. cash, 335–336advanced options for, 336–337aging, 118–122Balance Sheets, 340–342, 395budget, 312–315calendar settings for, 337changing headers and footers, 338class use in, 458–459closing date exception, 402Company Snapshot, 354–355configuring header/footer data,
121–122consolidating for multiple
companies, 358custom columns in, 119–120custom fonts for, 122, 338–339customer and job, 124customizing for class reporting, 459default format for, 446displaying reconciliation, 293, 294editing entries in timesheet
reports, 416effect of File Cleanup utility on, 479exporting memorized, 344–345filtering A/R Aging Detail, 120–121Fixed Asset Manager, 491–493format for cash flow, 446inventory, 257–258job cost information for payroll,
424–426
listing outstanding vendor bills,168, 169
memorizing, 122–123, 339–340mileage, 164–165modifying appearance of A/R Aging
Detail, 122negative number formats in, 122, 338P&L, 342–344permissions for financial, 455Physical Inventory Worksheet, 258,
259–260Previous Reconciliation
Discrepancy, 297printing, 123, 293–294QuickReports, 258reviewing Client Totals Summary, 491sales order, 74sales tax, 191–192selecting type of reconciliation, 293settings for, 444–445specifying account appearance in, 446tax, 398–399timesheet, 414–418trial balance, 334–340using filters for, 168, 337viewing history of bounced
checks, 271viewing last reconciliation, 299viewing summaries as accrual- or
cash-based, 446voided and deleted transaction, 344when opening, 444year-end, 394–395
Reports & Graphs settings (Preferencesdialog), 444–446
reprinting checks, 180
I N D E X 533
QckBcks TIGHT / QuickBooks 2009 The Official Guide / Ivens / 274-8 / Index
P:\010Comp\QckBcks\274-8\Index.vpThursday, September 18, 2008 11:25:16 AM
Color profile: DisabledComposite Default screen

restoringcompany files, 474–475one-time messages, 432portable company file, 476–477
retained earningssetting up account for previous, 321warning when transaction posted
to, 436Return Authorization (RA) numbers, 160reversing general journal entries, 325–326reviewing
client’s cost and depreciationsummary, 491
invoices, 60–61items with magnifying glass, 127payroll run, 218–220
revising original timesheets, 416–417running payroll. See also payroll
checking up on run, 214for employees, 217–220making unscheduled runs, 216from outside payroll services, 327reviewing run, 218–220using timesheet data for, 422–423
S
sales. See cash salesSales & Customers section (Preferences
dialog), 446–448Sales Order Fulfillment Worksheet, 93sales orders
backorders on, 75choosing template for, 448creating, 74defined, 74filling, 93generating purchase orders from, 74
reports for tracking, 74turning on/off, 447–448
sales receiptsentering cash sale data, 107–108entering data for, 107–108handling batches of, 108prompting for reimbursable
expenses, 446recording cash sales with, 106–107
sales reps, 30, 46sales tax
about Sales Tax Code List, 45about state, 184adjusting amounts of, 193assigning tax codes and items to
customers, 190–191configuring settings for, 184–185creating sales tax codes, 187–188customer configuration for, 30default codes for, 186–187defining tax groups, 189–190indicating frequency of payments, 186payment basis for, 185remitting, 192–193running reports for, 191–192sales tax items, 188–189setting default sales tax items, 188
Sales Tax Adjustment dialog, 193Sales Tax Code List, 45sales tax items, 188–189Sales Tax Liability report, 191Sales Tax section (Preferences dialog), 448sales transactions
asking about reimbursable costsfor, 447
turning off display of reimbursableexpenses, 448
534 I N D E X
QckBcks TIGHT / QuickBooks 2009 The Official Guide / Ivens / 274-8 / Index
P:\010Comp\QckBcks\274-8\Index.vpThursday, September 18, 2008 11:25:16 AM
Color profile: DisabledComposite Default screen

Save Accountant’s Copy window, 349–350Save Copy Or Backup dialog, 467, 470saving
accountant’s copy on removablemedia, 346–347
bill payment information, 161,174–175
changes to accountant’s copy, 353–354company file, 10–11desktop state when closing
company, 439invoices, 58, 62, 128memorizing bills when, 161transactions before printing, 434
Schedule Backups dialog, 472Schedule tab (Fixed Asset Manager), 489schedules
making backup, 470–473payroll, 214–215, 216tracking due dates for payroll
remittances, 226security. See also sensitive account data
advantages of user roles, 455–456credit card protection, 220, 451–452maintaining credit card, 32preventing access to closed books, 402protecting payroll data with
permissions, 220user roles and, 456
Select 1099s To Print dialog, 397Select Bank Account dialog, 368Select Checks To Print window, 179Select From Examples feature, 22–23Select Item Receipt window, 156Select Labels To Print dialog, 79Select Reconciliation Report window, 292Select Timesheets To Print dialog, 418
Send Accountant’s Copy dialog, 348Send Forms section (Preferences
dialog), 449send methods
federal tax payments, 229–230filtering statements by, 132invoice, 30, 62, 83
sensitive account dataconfiguring permissions for, 454–455payroll information protection, 220protecting credit cards, 451–452, 454sensitive financial reports, 455
service chargesbounced check, 273entering during reconciliation, 286
Service Connection section (Preferencesdialog), 449
service reps, 46Set Closing Date And Password dialog, 401Set Up Account For Online Services For
Payroll Account, 364, 365, 366Set Up Budgets dialog, 306, 310Setup YTD Amounts Wizard, 209–210shipping
configuring preferred, 447entering addresses for, 28list of methods, 48ways to post in general ledger, 63–64
shortages, cash, 114–116sick pay, 206Single Activity form, 410–412skipping renaming rules, 379–380sorting
bills for Pay Bills display, 170data in Reconcile window, 7order for chart of accounts, 16reconciliation transactions, 287
I N D E X 535
QckBcks TIGHT / QuickBooks 2009 The Official Guide / Ivens / 274-8 / Index
P:\010Comp\QckBcks\274-8\Index.vpThursday, September 18, 2008 11:25:16 AM
Color profile: DisabledComposite Default screen

Specify Invoice Amount For Items OnEstimates dialog, 69
spell checking, 61, 450split transactions
credit card bills entered as, 278–279vendor bills entered as, 138–139
standard checks, 178Standard Payroll subscriptions, 196state taxes
information used for, 206preparing annual returns for, 236remitting, 230–231state sales tax, 184
statement chargesdefined, 129entering, 129–130
statementsassessing finance charges for, 126, 133creating, 131–132entering statement charges, 129–130filtering by send methods, 132previewing, 134printing, 133, 134sending to customers, 128–129skipping creation for some
customers, 133statutory employees, 207stopwatch, 412strong passwords, 452–453subaccounts
creating, 23–24Over and Short, 115with payroll liabilities and
expenses, 198setting up reimbursement
account, 143showing only lowest, 435using, 20–21
subclasses, 457subcontractors, 165–166subitems
about, 42within inventory, 250–251
T
tab-delimited payroll service files, 329T-Account format, 318tasks
formatting stopwatch for, 412recording on weekly timesheets, 410,
412–414time tracking for single, 410–412tracking time for, 409–410
Tax:1099 section (Preferences dialog), 450tax codes
assigning tax codes and items tocustomers, 190–191
creating reports for, 191–192creating sales, 187–188defined, 186linking to customers, 186–187
tax groups, 189–190tax items, 186tax worksheets for Fixed Asset
Manager, 494tax-deductible finance charges, 282taxes. See also sales tax
40% test for Section 179 deductions,490–491
adding to customer’s reimbursableexpenses, 146–147
checking tax line information,399–400
configuring sales, 184–185hiding/showing detail for Excel
worksheet, 241–242
536 I N D E X
QckBcks TIGHT / QuickBooks 2009 The Official Guide / Ivens / 274-8 / Index
P:\010Comp\QckBcks\274-8\Index.vpThursday, September 18, 2008 11:25:16 AM
Color profile: DisabledComposite Default screen

preparing annual returns for liabilities,236–242
preparing tax worksheets in Excel,240–242
saving vehicle mileage data for, 162sending federal tax payments,
229–230setting up payroll, 205–206, 213setting up vendors for income, 198using TurboTax for, 400writing off underpayments, 100year-end procedures for, 398–400
Tech Help window, 478templates
adding logo to, 85built-in invoice, 56–57changing fonts and color scheme
for, 85Credit Memo, 71custom header, columns, and footer,
88, 89customizing, 83–84duplicating, 86–88employee, 202–203exporting and importing memorized
aging reports, 123framing elements on, 91missing names on Templates List, 86modifying company information
on, 85packing slip, 80, 447payroll journal entry, 328–329printing status stamps on, 85repositioning forms with Layout
Designer, 88, 89–91selecting sales orders, 448using with preprinted Intuit forms, 84
termination checks, 216terms, company’s, 47text
changing font and color ontemplate, 85
showing ToolTips for clipped, 432time. See also time tracking; timesheets
configuring stopwatch, 412delays in online bill payments, 383setting preference for, 434setting up company workweek, 407understanding Time & Expenses
list, 151Time & Expenses list
calculated amounts on, 151customizing invoices that have,
150–151enabling, 150methods for creating invoices using,
151–152Premier and Enterprise Solutions
invoicing with, 149–150Time & Expenses section (Preferences
dialog), 450Time By Item report, 415Time By Job Detail report, 414, 415Time By Job Name report, 415Time By Job Summary report, 414time stamping backup files, 468time tracking. See also tasks; timesheets
about, 406configuring, 406–410establishing for other workers,
408–409formatting stopwatch for tasks, 412preference settings for payroll, 421
I N D E X 537
QckBcks TIGHT / QuickBooks 2009 The Official Guide / Ivens / 274-8 / Index
P:\010Comp\QckBcks\274-8\Index.vpThursday, September 18, 2008 11:25:16 AM
Color profile: DisabledComposite Default screen

time tracking. See also tasks; timesheets(cont.)
recording time for single activities,410–412
running timesheet reports, 414–415setting up for employees, 407–408tasks for, 409–410tips for timesheet efficiency, 422user permissions for, 410using classes for job cost, 421–422using for payroll, 420vendor, 408Weekly Timesheet method for, 410,
412–414Time/Enter Single Activity dialog, 411timesheets
copying previous, 414editing entries in reports, 416efficiency tips for, 422printing weekly, 417–418reporting information from, 414–418revising original, 416–417running payroll using, 422–423time tracking with weekly, 410,
412–414TLG (transaction log) files, 473ToolTips for clipped text, 432Track Reimbursed Expenses As Income
check box (Edit Account dialog), 141tracking. See also time tracking
accounts receivable, 118cash sales customers, 107depreciation, 323–325enabling class, 436enabling inventory, 244mileage expenses, 162–166reimbursements, 140–143
Tracking Multiple Currencies dialog, 443transaction log (TLG) files, 473transactions. See also split transactions
adding downloaded items to bankregister, 371
adding while reconciling bankaccounts, 288
ATM, 275–276automatically remembering, 433beeping when recording, 431clearing, 286, 288correcting changed, 298creating template for payroll journal
entries, 328–329deleting unmatched downloaded,
380–381deleting while reconciling bank
accounts, 289downloading, 360, 361, 369editing during reconciliation, 289editing item without changing default
in, 433–434entering credit card, 280–281hiding, 282, 287matching downloaded items with
bank register, 370–371posted to retained earnings, 436pre-filling vendor accounts, 433removed by data cleanup, 479, 480,
481–482replacing voided or deleted
cleared, 298reports of voided and deleted, 344requiring account for, 435saving before printing, 434selecting for clean up, 480setting default date for new, 433
538 I N D E X
QckBcks TIGHT / QuickBooks 2009 The Official Guide / Ivens / 274-8 / Index
P:\010Comp\QckBcks\274-8\Index.vpThursday, September 18, 2008 11:25:17 AM
Color profile: DisabledComposite Default screen

sorting reconciliation, 287transit and new, 293using class in, 458using renaming rules for credit
card, 381viewing downloaded, 370warning messages for, 432when to re-create for restored file, 474
Transactions tab (Employee Center), 221transferring money between accounts,
269–270, 391transit transactions, 293trial balance, 334–340
about, 334–335changing header and footer of, 338configuring accrual vs. cash, 335–336filtering report data for, 337memorizing customized, 339–340setting advanced options for, 336–337
troubleshootingbeginning balance differences,
296–300status of online payments to vendors,
385–386TurboTax, 400
U
unclassified P&L report, 343–344,458–459
Undeposited Funds accounts, 109, 448underpayments, 99–100undoing last reconciliation, 299–300unemployment compensation. See FUTA;
state taxesunit of measure
about, 245–246assigning to items, 248
configuring, 442creating, 247–248editions support for, 247enabling, 246–247selling items with, 248
United States Treasury Department, 198Unpaid Bills Detail report, 168, 169updating
existing Standard Payrollsubscriptions, 196
QuickBooks, 482–483uploading
accountant copy to secure server, 346online bill payments, 389
usersAdmin, 346, 347, 402, 450creating new, 450, 451deleting, 453editing information for, 453external accountant, 7, 357, 453managing information for, 450noting passwords for all, 451setting permissions for, 453–456types of roles for, 455–456
V
vacation pay, 206vehicles
list of, 48–49mileage expenses for, 162–166
vendor bills. See also reimbursableexpenses
adding payments to checkregister, 284
applying credits, 173–174billable and nonbillable expenses on
same, 144
I N D E X 539
QckBcks TIGHT / QuickBooks 2009 The Official Guide / Ivens / 274-8 / Index
P:\010Comp\QckBcks\274-8\Index.vpThursday, September 18, 2008 11:25:17 AM
Color profile: DisabledComposite Default screen

vendor bills. See also reimbursableexpenses (cont.)
choosing what to pay, 168credits toward, 158–160direct disbursements to pay, 180–181discounts for, 172general ledger postings for, 139managing inventory item purchases,
152–158mileage expenses on, 162–166one-account posting for, 137–138overview, 136–137partial payments of, 171–172payment methods for, 170printing checks for, 176receiving inventory with, 157recording for received inventory,
156–157recording reimbursable expenses,
143–144recurring, 160–162saving without paying, 161selecting for payment, 168–171splitting expenses among multiple
accounts, 138–139taking discounts after discount
date, 172using memorized, 161viewing unpaid, 168, 169, 170working with reimbursable
expenses, 140writing manual checks for, 175–176
vendorsconfiguring time tracking for, 408creating, 36–37defined, 36
don’t enter petty cash expensesfor, 278
don’t receive online bill payments,385–386
entering name and address for, 37list of types of, 47ordering inventory with purchase
orders, 152–154paying electronically, 383–384pre-filling accounts for, 38–39, 433providing 1099 forms for, 395–398renaming rules for credit card
payments to, 381setting up for payroll, 198treating credit cards as, 278–279using different names for state tax
offices, 231verifying
backup files, 468–469and rebuilding company files,
477–478viewing
customer’s payment history, 127–128discrepancy reports, 297downloaded Online Banking Center
transactions, 370last reconciliation report, 299multiple windows on screen, 438–439reconciliation reports, 293, 294Time & Expenses list, 150transactions matched with renaming
rules, 371unpaid bills, 168, 169, 170
voided and deleted transaction reports, 344voiding
checks, 273–274invoices, 63
540 I N D E X
QckBcks TIGHT / QuickBooks 2009 The Official Guide / Ivens / 274-8 / Index
P:\010Comp\QckBcks\274-8\Index.vpThursday, September 18, 2008 11:25:17 AM
Color profile: DisabledComposite Default screen

replacing voided transactions, 298reports of voided transactions, 344
voucher checks, 177vouchers, 437
W
W-2 formsbased on paycheck dates, 216e-filing, 239printing, 237–240
W-3 formse-filing, 239printing, 237–240
W-4 forms, 207wallet checks, 178warning messages
creating duplicate invoicenumbers, 447
date warnings, 436deleting transaction or unused list
item, 432duplicate check numbers, 437duplicate purchase order
numbers, 441insufficient inventory quantities, 442transaction posted to retained
earnings, 436when editing transactions, 432
“wash” accounts, 102Web Connect
configuring preferences for, 449defined, 360enabling access to, 366–369password for, 362
websitesbill paying at bank, 382–384Payroll Services, 197
windows, viewing multiple, 438–439Windows Terminal Services, 3workers comp
list for, 45options for, 232
Workers Compensation tab set (NewEmployee form), 203, 207
worksheetsFixed Asset Manager tax, 494preparing tax worksheets in Excel,
240–242printing Physical Inventory,
259–260Sales Order Fulfillment, 93
workweek, 407Write Checks window
making online bill payments via,387–388
posting credit cards to multipleaccounts, 279
recording petty cash expenses withcheck, 277
starting cursor in payee field, 437using, 182–183
Y
year display, 434year-end procedures
backing up year-end data, 402closing, 400–402closing date exception report, 402closing dates, 402–403, 436fiscal vs. calendar year, 402issuing 1099 forms, 395–398making year-end journal entries, 398preparing tax reports and information,
398–400
I N D E X 541
QckBcks TIGHT / QuickBooks 2009 The Official Guide / Ivens / 274-8 / Index
P:\010Comp\QckBcks\274-8\Index.vpThursday, September 18, 2008 11:25:17 AM
Color profile: DisabledComposite Default screen

year-end procedures (cont.)running year-end reports, 394year-end Balance Sheet, 395year-end P&L reports, 394
Your Most Commons Sales Tax Itemfield, 188
Z
zero-balance accounts, 336zoom (z), 127
542 I N D E X
QckBcks TIGHT / QuickBooks 2009 The Official Guide / Ivens / 274-8 / Index
P:\010Comp\QckBcks\274-8\Index.vpThursday, September 18, 2008 11:25:17 AM
Color profile: DisabledComposite Default screen