QUICK START MANUAL - Smartrise 2.0 Quick Start Guide 4 4.0 Connecting to Smartview2.0 SmartView 2.0...
19
QUICK START MANUAL Version 1.1 www.smartrise.us | 2601 Fair Oaks Blvd., Sacramento, CA 95864 | 916.457.5129
Transcript of QUICK START MANUAL - Smartrise 2.0 Quick Start Guide 4 4.0 Connecting to Smartview2.0 SmartView 2.0...

QUICK START MANUAL
Version 1.1
www.smartrise.us | 2601 Fair Oaks Blvd., Sacramento, CA 95864 | 916.457.5129

SmartView 2.0 Quick Start Guide
1
Contents
1.0 Introduction ......................................................................................................................................... 2
2.0 Requirements ....................................................................................................................................... 2
2.1 Software .......................................................................................................................................... 2
2.2 Hardware ......................................................................................................................................... 2
3.0 Installation............................................................................................................................................ 3
3.1 Simplex ............................................................................................................................................ 3
3.2 Group .............................................................................................................................................. 3
4.0 Connecting to Smartview2.0 ................................................................................................................ 4
4.1 Inside the Machine room ................................................................................................................ 4
4.2 Outside the Machine room ............................................................................................................. 5
5.0 The Smartview2.0 Portal ...................................................................................................................... 6
5.1 Dashboard ....................................................................................................................................... 6
5.2 Cars View ......................................................................................................................................... 8
5.2.1 Hall Calls ..................................................................................................................................... 10
5.2.2 Car Calls ...................................................................................................................................... 10
5.2.3 Reports ....................................................................................................................................... 11
5.2.4 Faults .......................................................................................................................................... 13
6.0 Subscription Extras ............................................................................................................................. 15
6.1 Map View....................................................................................................................................... 15
6.2 Account Page ................................................................................................................................. 16
6.2.1 User Information ........................................................................................................................ 17
6.2.2 Notification Rules ....................................................................................................................... 18
6.2.3 Current Rules .............................................................................................................................. 18

SmartView 2.0 Quick Start Guide
2
1.0 Introduction The SmartView 2.0 is designed to provide users an easy to use tool to track specific or multiple cars across job sites from any web connected device.
The user can access the Data Acquisition Device (D.A.D) from inside the machine room and outside the machine room.
Access from inside the Machine room only:
Wi-Fi for viewing within 15 ft. of D.A.D. via Smartview local network (internet connection not required)
Can view one Simplex (Single car not connected to a dispatcher) or Group (Any number of cars connected to a dispatcher) at a time.
Views are limited to which job you are connected to.
No subscription required.
Map View & Fault /Alarm alerts not supported
Access from outside the machine room:
A Web Portal is used for accessing the D.A.D outside of the machine room (Internet connection required in the machine room)
All views available including map view with all jobs connected to Smartview 2.0.
Receive SMS or Email notifications for faults and alarms.
Subscription required.
To get subscription information go to http://www.smartrise.us/smartview.
2.0 Requirements 2.1 Software
SmartView 2.0 access requires an HTML5 compatible browser. This is available on all major platforms
both computer and hand held. Please ensure that the browser is updated to the latest release when
accessing SmartView website.
2.2 Hardware
The Smartrise Data Acquisition Device( D.A.D)
Wi-Fi capable Tablet, Smartphone, or PC for viewing.
Figure 1: Data Acquisition Device (D.A.D)
SmartView 2.0 Quick Start Guide
3
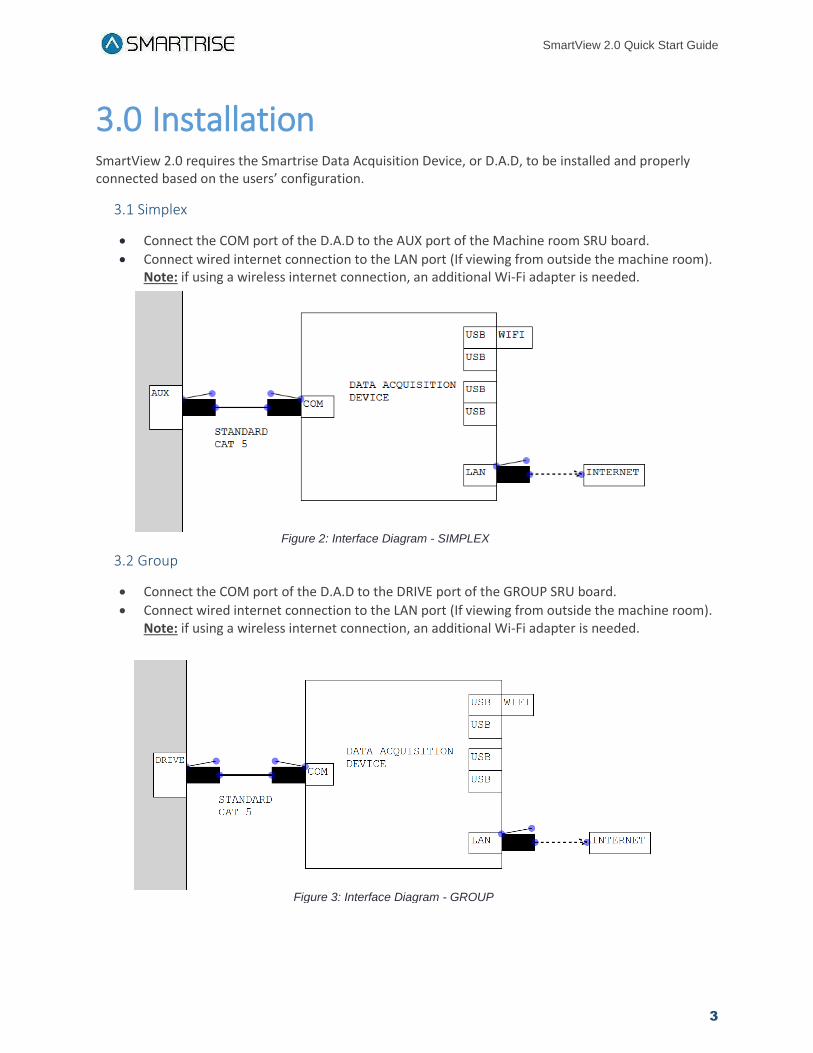
3.0 Installation SmartView 2.0 requires the Smartrise Data Acquisition Device, or D.A.D, to be installed and properly connected based on the users’ configuration.
3.1 Simplex
Connect the COM port of the D.A.D to the AUX port of the Machine room SRU board.
Connect wired internet connection to the LAN port (If viewing from outside the machine room). Note: if using a wireless internet connection, an additional Wi-Fi adapter is needed.
3.2 Group
Connect the COM port of the D.A.D to the DRIVE port of the GROUP SRU board.
Connect wired internet connection to the LAN port (If viewing from outside the machine room). Note: if using a wireless internet connection, an additional Wi-Fi adapter is needed.
Figure 2: Interface Diagram - SIMPLEX
Figure 3: Interface Diagram - GROUP

SmartView 2.0 Quick Start Guide
4
4.0 Connecting to Smartview2.0 SmartView 2.0 requires the user to access its features using a web browser. There are two different ways to connect to a Smartview2.0 enabled system, either inside the machine room, or outside of the machine room.
4.1 Inside the Machine room
When inside of the Machine room, Smartview 2.0 utilizes a wireless network connection for
access to the system. The system can be viewed on any Wi-Fi enabled device. The Wireless
network will reach approximately 15ft from the D.A.D
Step 1: Connecting to the Smartview 2.0 Wireless network: On your Wi-Fi enabled
device, open your wireless network options and navigate to the network labeled
(SmartriseMRM_JobID). You may be asked for a password to access the network, please
enter “SmartriseWebMRM” for the password.

SmartView 2.0 Quick Start Guide
5
Step 2: Logging into Smartview2.0: Open a web browser and navigate to the following
URL http://192.168.42.1:3000. The login page should be displayed. The Job Number is set
up as the username and “smartrise” as the password by default.
1. Enter http://192.168.42.1:3000 in the address bar.
2. Enter the job number under username.
3. Enter “smartrise” without the quotes for password.
4.2 Outside the Machine room
Access to the Web portal from outside of the Machine Room requires a subscription. When
obtaining your subscription you will be sent information about accessing the Web portal from
outside the Machine room. For subscription information visit
http://www.smartrise.us/smartview/
1
2
3

SmartView 2.0 Quick Start Guide
6
5.0 The Smartview2.0 Portal 5.1 Dashboard
The Dashboard Page is the first page when entering Smartview 2.0. This is a general overview for all
cars equipped with the Smartview product. This view will give you a general overview of the status
for each job.
This page shows:
Name of the job
Location
Number of cars
Status of the car
Note: The status will change if any car is faulted or offline.

SmartView 2.0 Quick Start Guide
7
Smartview shows the status for a group of elevators utilizing three distinct icons. These icons change
with the status of the cars.
Online: The car is running and communicating with no faults.
Offline: The car is powered down or not communicating with Smartview.
Fault: One or more of the cars are in a Faulted condition and shut down. Enter into the “Cars View”
page to determine the fault code.
Job Name
Location
No. of Cars
Status

SmartView 2.0 Quick Start Guide
8
5.2 Cars View
The Cars View page is displayed by selecting “Cars View” from the Dashboard Page or by selecting
“Cars View” from the Map View page. The Cars View page provides you with status for each car
within the group.

SmartView 2.0 Quick Start Guide
9
The left hand side of the Car Views screen, shows an in depth status of each car on the job. It
displays the car name, mode of operation, direction of travel, destination floor, along with the door
data.
1. Car label
2. Number of Floors the Car Services
3. The mode of operation the elevator is currently in
4. The destination floor
5. Direction the car is traveling in
6. The position of the car in feet and inches
7. The floor the car is currently located
8. The current door position
1
3
7
5
8
6
4
2
SmartView 2.0 Quick Start Guide
10
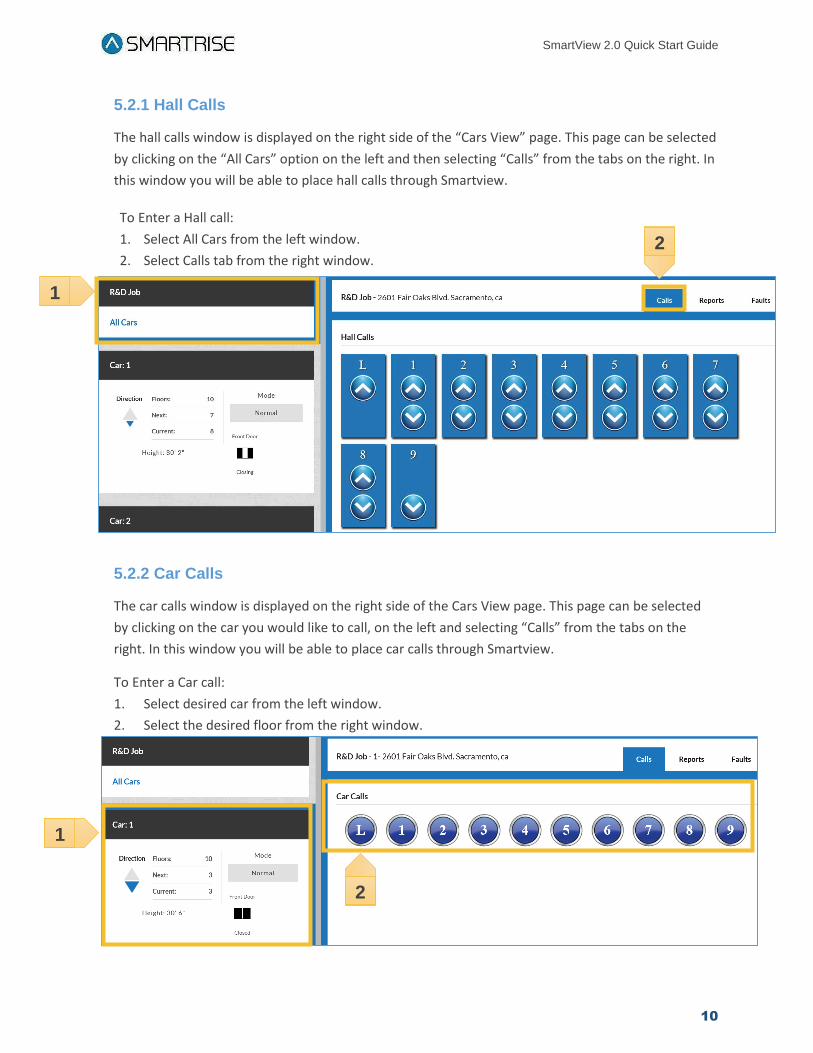
5.2.1 Hall Calls
The hall calls window is displayed on the right side of the “Cars View” page. This page can be selected
by clicking on the “All Cars” option on the left and then selecting “Calls” from the tabs on the right. In
this window you will be able to place hall calls through Smartview.
To Enter a Hall call:
1. Select All Cars from the left window.
2. Select Calls tab from the right window.
5.2.2 Car Calls
The car calls window is displayed on the right side of the Cars View page. This page can be selected
by clicking on the car you would like to call, on the left and selecting “Calls” from the tabs on the
right. In this window you will be able to place car calls through Smartview.
To Enter a Car call:
1. Select desired car from the left window.
2. Select the desired floor from the right window.
1
2
1
2

SmartView 2.0 Quick Start Guide
11
5.2.3 Reports
Smartview offers a variety of reporting tools. The reports can be found in the Cars View page under
the “Reports” tab. These reports can be viewed on a per car basis or as a group.
To run a report:
1. Select “All Cars” from the left window.
2. Select the Reports tab.
3. Select the desired report from the drop down menu.
4. Click submit to run the report.
5.2.3.1 Types of Reports
Smartview currently offers the following reports. Hall Calls per hour, Hall Calls per floor, Car calls per
hour, Car calls per floor, Door time per hour, and Door time per floor.
Note: To run reports per
car select the car you
wish to run the report on.
1
3 2
4

SmartView 2.0 Quick Start Guide
12
Hall Calls, Car Calls, or Door Times per Hour: These reports will display the
amount of calls and door cycles per hour. It is broken down in one hour intervals on the left and the
amount of calls located at the bottom. Scrolling over a bar will give the actual count.
Hall Calls, Car Calls, or Door Times per Floor: These reports will display
the calls per floor. It also displays the Minimum Wait Time, Maximum Wait Time, and Average Wait
Time. The floor number is located on the left side of the graph, the wait time is at the bottom of the
graph in seconds. Scrolling over a bar will give the actual count.
SmartView 2.0 Quick Start Guide
13
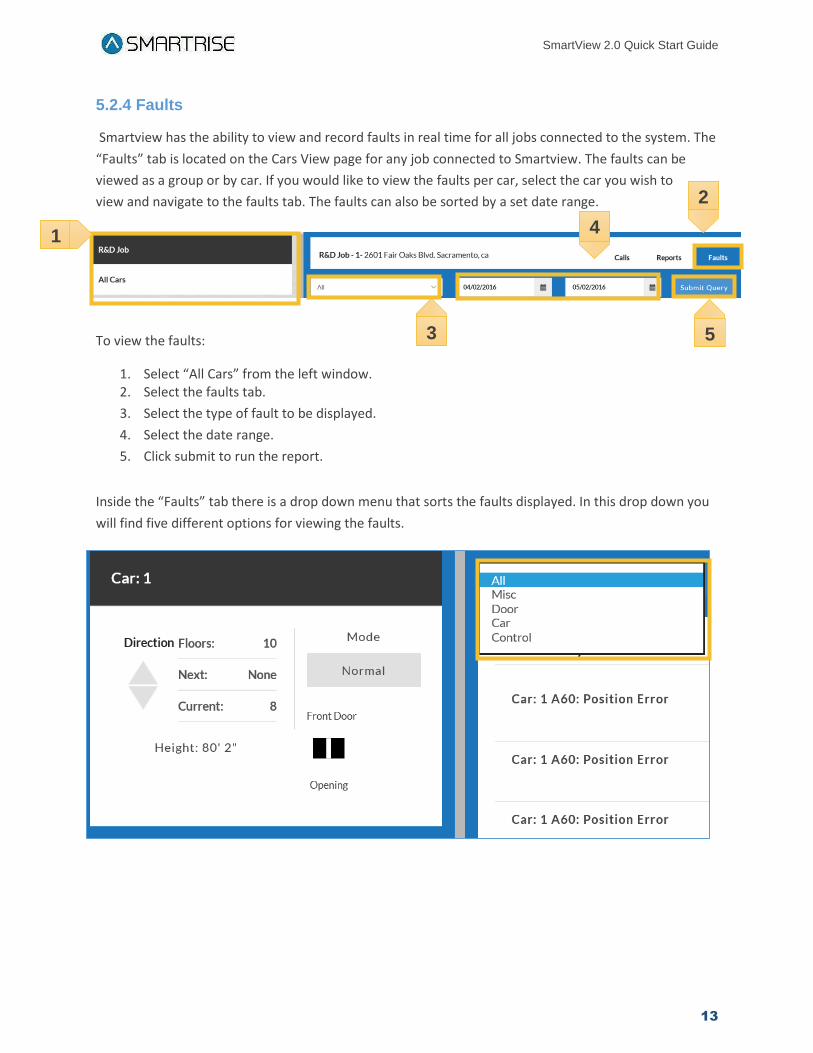
5.2.4 Faults
Smartview has the ability to view and record faults in real time for all jobs connected to the system. The
“Faults” tab is located on the Cars View page for any job connected to Smartview. The faults can be
viewed as a group or by car. If you would like to view the faults per car, select the car you wish to
view and navigate to the faults tab. The faults can also be sorted by a set date range.
To view the faults:
1. Select “All Cars” from the left window. 2. Select the faults tab.
3. Select the type of fault to be displayed.
4. Select the date range.
5. Click submit to run the report.
Inside the “Faults” tab there is a drop down menu that sorts the faults displayed. In this drop down you
will find five different options for viewing the faults.
1
2
3
4
5

SmartView 2.0 Quick Start Guide
14
All: All the faults logged will be displayed.
Misc: Miscellaneous faults are usually alarms, or event changes such as Independent Service or Re-Leveling. These usually have no effect on the operation of the elevator and can generally be ignored.
Door: These faults are door related faults, including things like an open Gate Switch or open Hall Locks.
Car: These faults are car specific including faults with the positioning system.
Control: These faults have to deal with control of the elevator these can include communication problems as well as faults that would prevent the car from running.
5.2.4.1 Analyzing results
While viewing the results you are able to click on any of the listed faults.
The results will include:
Date that the fault occurred
Position in the hoist way
Speed the car was traveling when the fault occurred
Description of the fault
Recommended troubleshooting steps to resolve the fault

SmartView 2.0 Quick Start Guide
15
6.0 Subscription Extras With the yearly subscription the following options are available.
6.1 Map View
The Map View page takes the dashboard a step further. With the location information provided by the
customer, each Smartview equipped job is represented on an actual map of the area.
The left hand side of the map view displays the same information as the dashboard. The jobs are listed
in the order they were added to the Smartview system.
The job is
displayed on an
actual map

SmartView 2.0 Quick Start Guide
16
The right hand side of the map view
page will display a map containing all
the job’s connected to Smartview.
Each Pin represents a different job. The
icons above the pin display the status
of the elevators at that particular job.
The status is displayed utilizing the
same three status icons as the
dashboard.
By clicking on the pin name, location,
and status of the elevator are brought
up. You can access the Cars View page
from the map directly.
6.2 Account Page
The Account page allows you to configure and edit the information utilized for notifications, as well as to
set up fault notifications. To access the Account page, select the Account tab at the top of the main
page.

SmartView 2.0 Quick Start Guide
17
6.2.1 User Information
The User Information window allows you to configure or edit the contact information used for
notifications.
In the Account window, select Edit.
This will bring up a window that will allow you to enter the users contact information. Enter the name,
phone number, and email address you would like to receive notifications on.
Note: A verification
number will be sent to
the phone number
entered.
SmartView 2.0 Quick Start Guide
18
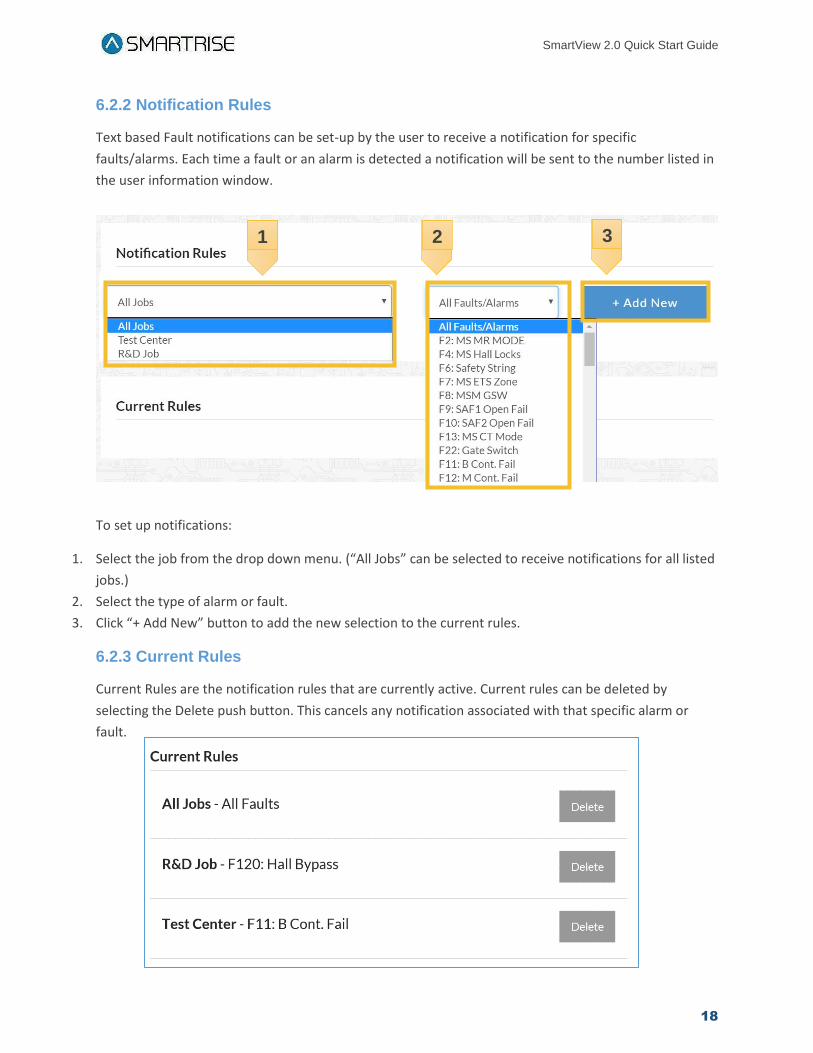
6.2.2 Notification Rules
Text based Fault notifications can be set-up by the user to receive a notification for specific
faults/alarms. Each time a fault or an alarm is detected a notification will be sent to the number listed in
the user information window.
To set up notifications:
1. Select the job from the drop down menu. (“All Jobs” can be selected to receive notifications for all listed
jobs.)
2. Select the type of alarm or fault.
3. Click “+ Add New” button to add the new selection to the current rules.
6.2.3 Current Rules
Current Rules are the notification rules that are currently active. Current rules can be deleted by
selecting the Delete push button. This cancels any notification associated with that specific alarm or
fault.
1 2 3