Quick Start Guide ZEN 2 core - Hitech Instruments Imaging Software/Zen2 Core... · ZEN 2 core is...
32
Quick Start Guide ZEN 2 core Imaging Software
Transcript of Quick Start Guide ZEN 2 core - Hitech Instruments Imaging Software/Zen2 Core... · ZEN 2 core is...
Quick Start GuideZEN 2 core
Imaging Software

01
Table of Contents
1 Welcome 03
1.1 Introduction 04
1.2 Workflows 05
1.3 User Roles 06
1.4 Starting the Software and Logging In 07
2 Creating a Job Template 09
2.1 Workflow 10
2.2 Creating a New Job Template 12
2.3 Adding Tools and Modifying Parameter Privileges 13
2.4 Acquiring an Image 14
2.5 Processing the Image 15
2.6 Analyzing the Image 16
2.7 Configuring the Input Form 17
2.8 Configuring the Job Report 18
2.9 Saving and Completing the Job Template 19
3 Running a Job 21
3.1 Workflow 22
3.2 Selecting a Job 23
3.3 Acquiring an Image 24
3.4 Processing the Image 25
3.5 Analyzing the Image 26
3.6 Completing the Form and Checking the Report 27
3.7 Saving and Completing a Job 28
4 Performing a Free Examination 29
4.1 Overview 30
4.2 Performing a Free Examination 31
4.3 Creating a Report 32
4.4 Exporting Results 33

1 W
ELC
OM
E
03
1 WELCOME

04
1 WELCOME
1.1 Introduction
Welcome to the ZEN 2 core Quick Start Guide.
ZEN 2 core is designed for analyzing various kinds of samples using a wide range of ZEISS microscopes. The modern and intuitive user interface guides you through all the steps needed to examine your sample.
This Quick Start Guide introduces you to the most important features, functions, and information you need to know to start using ZEN 2 core quickly.
For the complete documentation refer to the Online Help (click the icon in the user interface).

OK? ?Jobs (Routine Examinations) Free Examinations
1 W
ELC
OM
E
05
1.2 Workfl ows
ZEN 2 core is designed to support two fundamental ways of using your microscope:
• Working with jobs(creating, running, editing and managing jobs)
• Performing free examinations
Jobs: A collection of examination tasks that can be created to ensure that the same examination tasks are carried out each time the job is run, in the same manner, and with the same settings.
Jobs can be used in routine quality control examinations where repetitive identical examinations are performed for each sample.
Free examinations: Used to inspect a sample quickly, easily, and fl exibly. A typical use is to examine a faulty sample where the cause of the fault is unknown or for one-off examinations that will not be repeated.

1 WELCOME
2 CREATING A
JOB TEMPLATE
3 RUNNING A JOB
4 PERFORMING A
FREE EXAMINATION
OPERATORSUPERVISOR
Relevant Sections of Quick Start
06
1 WELCOME
1.3 User Roles
The user management described in this guide is optional and can be activated in the software.
How you work with ZEN 2 core depends on your user role in the system:
• SupervisorSupervisors are experienced microscope users. They cancreate jobs for routine examinations or perform freeexaminations.
• OperatorOperators are the typical category of user. They run jobs thathave been created by a supervisor.
• System AdministratorSystem administrators manage and confi gure the software,including user accounts, global settings, and calibration.These tasks are not described in this Quick Start Guide.
The described user roles are pre-confi gured. The integrated user management enables you to confi gure user groups, user roles, and user privileges according to your needs.
The graphic indicates which sections of this Quick Start Guide are relevant to you.

1 4
3
2
1 W
ELC
OM
E
07
1.4 Starting the Software and Logging In
To start working with ZEN 2 core:
1 On your Windows Desktop, double-click ZEN 2 core.
2 Click your name in the list of users. You can see your user role (for example supervisor or operator) below your name.
3 Enter your password and click Login.
4 Click the icon of the operating mode you wish to use.
For help on any tool or function, click the icon and select the item.
If the software is not installed or the hardware is not configured, contact your system administrator.
2 C
REA
TIN
G A
JO
B T
EMPL
ATE
09
2 CREATING A JOB TEMPLATE(This chapter only applies to supervisors)

10
2 CREATING A JOB TEMPLATE
2.1 Workflow
When creating a job template, you specify the following:
• Tasks the operator has to perform
• Tools that are available or locked for each task
• Upper and lower limits for the tool parameters
• Expected values and tolerances for measurements
Supervisors have the following typical workflow when creating a job template:
1 Select Create Job Template mode from the Home Screen.
2 Acquire an image.
3 Process the image. Enhance the image and configure which parameters can be modified.
4 Analyze the image. Define the measurements to be performed and configure the acceptable measurement tolerances. If desired, repeat steps 2 – 4.
5 Configure the input form.
6 Configure the job report.
7 Save the job.
Note: The following tutorial assumes your microscope has a motorized stage.

1
3 4
5
7
6
2
2 C
REA
TIN
G A
JO
B T
EMPL
ATE
11

1
2 3
Workbench
Task List
Tools
12
2 CREATING A JOB TEMPLATE
2.2 Creating a New Job Template
A job template contains all the examination tasks to be performed when the job is run; from acquiring an image, through to processing it, analyzing it, and creating a report.
1 Select Create Job Template mode from the Home Screen.
2 Select the Acquisition category.
3 Select a workbench, for example 2D Acquisition and click Add.
Each task to be performed by the operator is represented by an icon in the Task List. By adding and structuring tasks you can create the workflow for the operator when running the job.
The workbench and tools for a task are displayed in the Workbench Panel.

3
1 2
2 C
REA
TIN
G A
JO
B T
EMPL
ATE
13
3 You can specify the user‘s privileges for each parameter when running the job. Click the icon until the parameter has the desired state:
• Parameter can be seen and changed
• Parameter can be seen but not changed
• Parameter is invisible and cannot be changed
Each workbench loads with a pre-configured set of tools visible (e.g. the Camera tool in the 2D Acquisition workbench). The visible tools are available to the user who runs the job. For example, to enable the user to focus and navigate the sample, you have to add the Focus and Stage tools.
1 Click Add Tool.
2 Double-click Focus and Stage.
2.3 Adding Tools and Modifying Parameter Privileges

2
1
3
14
2 CREATING A JOB TEMPLATE
2.4 Acquiring an Image
Acquiring an image is the first step when working with the microscope. After you have acquired an image you can process and analyze it, and, if desired, add it to a report.
1 Scroll to the Stage tool and click the segments of the Navigation Circle until the desired region of the sample is visible. If available, you can use the hardware joystick to navigate to the desired sample region.
2 Drag the Navigation Bar in the Focus tool until the sample is sharp. Alternatively, you can use the focus knob of your microscope.
3 Click Snap to acquire an image.
1
3
2
45
6
2 C
REA
TIN
G A
JO
B T
EMPL
ATE
15
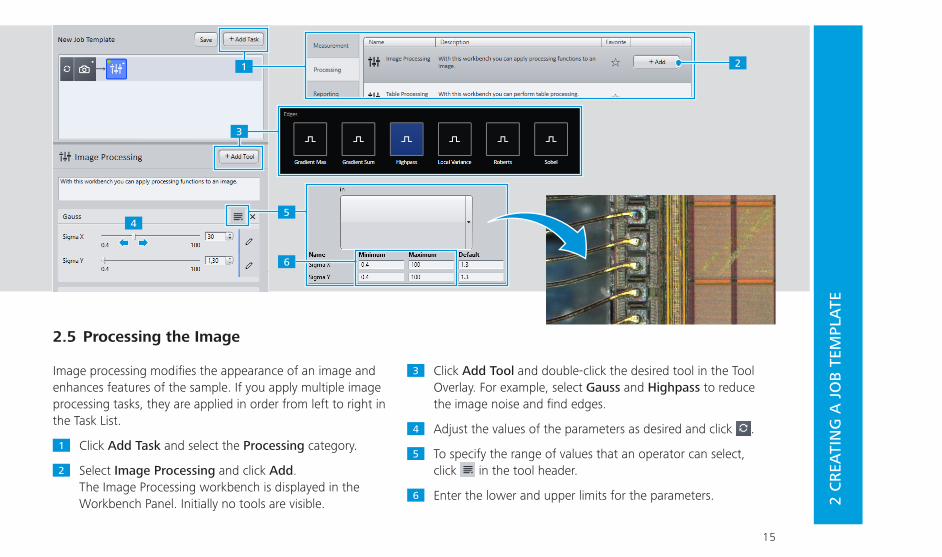
2.5 Processing the Image
Image processing modifies the appearance of an image and enhances features of the sample. If you apply multiple image processing tasks, they are applied in order from left to right in the Task List.
1 Click Add Task and select the Processing category.
2 Select Image Processing and click Add. The Image Processing workbench is displayed in the Workbench Panel. Initially no tools are visible.
3 Click Add Tool and double-click the desired tool in the Tool Overlay. For example, select Gauss and Highpass to reduce the image noise and find edges.
4 Adjust the values of the parameters as desired and click .
5 To specify the range of values that an operator can select, click in the tool header.
6 Enter the lower and upper limits for the parameters.

2
4
1
3
16
2 CREATING A JOB TEMPLATE
2.6 Analyzing the Image
Once you have acquired an image you can analyze its properties by performing various types of measurements.
1 Select an analysis workbench.Add Task > Measurement > Interactive Measurement > Add.The four most common tools are visible. For further tools, click Add Tool.
2 Select a tool and click in the image to measure the sample.
3 To specify measurement tolerances click the icon.
• Expected valueTypically the theoretical value contained in the CADdata or sample specifi cations.
• Upper and lower boundaryLimits between which the measurement must lie, e.g.to fulfi ll quality control criteria.
4 Enter instructions about how to perform the task, for example which part of the sample should be measured.

1
3
2
4
2 C
REA
TIN
G A
JO
B T
EMPL
ATE
17
2.7 Configuring the Input Form
Forms provide a simple way to enter information when a job is run. Information can be entered into a form automatically (e.g. current time and date) or manually (e.g. current sample number).
1 Click Add Task > Reporting > Forms > Add.
2 Click and select the desired form template, for example Form Extended.
3 Click Edit.
4 Click a field and use the Field settings tool to customize the information to be entered for each field.
You can also specify how the information is entered:
• Manually (e.g. sample ID), Data target = This form
• Automatically (e.g. current date).

3
1
4
25
18
2 CREATING A JOB TEMPLATE
2.8 Configuring the Job Report
Reports enable you to collate all the information from your examination, for example images, measurement data, and hardware setup, in a single document as a protocol of your examination.
Reports contain placeholders to enable you to collate the information easily. The placeholders also ensure that each time the job is run, the same information is added to the report.
1 Click Add Task > Reporting > Reports > Add.
2 Click .
3 Activate the checkbox of the desired report template, for example Report Form, and click Select.
4 Select the report template in the Add Template tool to display the available placeholders.
5 Click in a placeholder and select the corresponding measurement information that you wish to add. You can add multiple items to a single placeholder.
21
3
4
2 C
REA
TIN
G A
JO
B T
EMPL
ATE
19
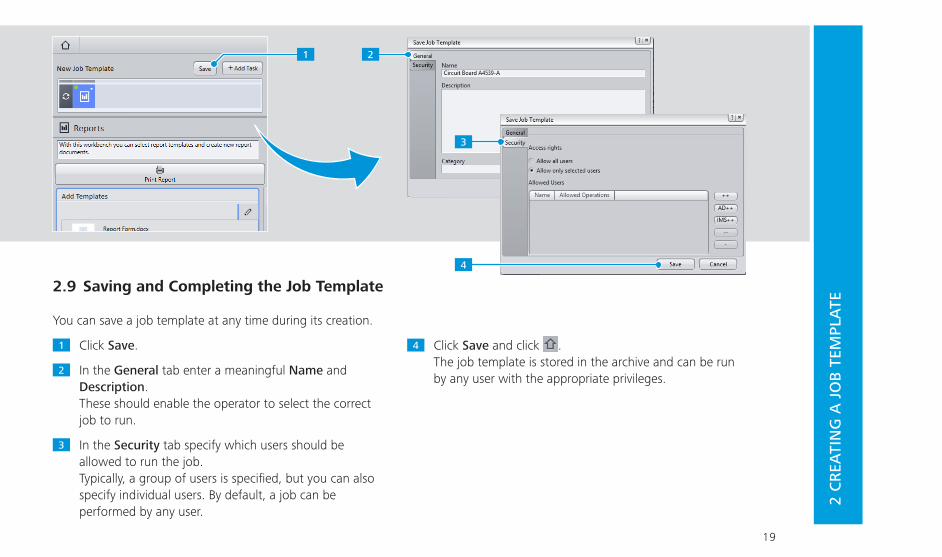
4 Click Save and click . The job template is stored in the archive and can be run by any user with the appropriate privileges.
2.9 Saving and Completing the Job Template
You can save a job template at any time during its creation.
1 Click Save.
2 In the General tab enter a meaningful Name and Description. These should enable the operator to select the correct job to run.
3 In the Security tab specify which users should be allowed to run the job. Typically, a group of users is specified, but you can also specify individual users. By default, a job can be performed by any user.

3 R
UN
NIN
G A
JO
B
21
3 RUNNING A JOB(This chapter applies to supervisors and operators. However, for the sake of simplicity, this chapter is described from the operator‘s perspective.)
1 2
43 5 6
3 RUNNING A JOB
22
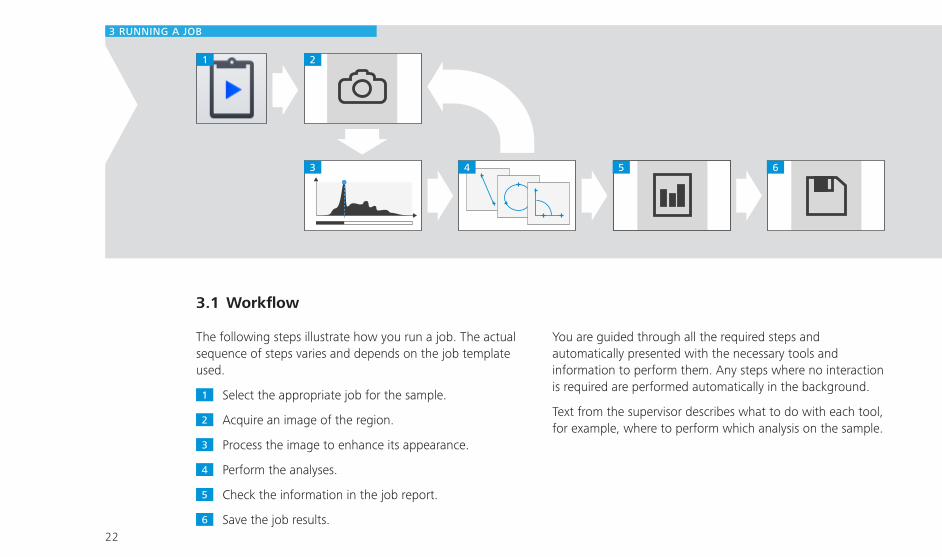
3.1 Workflow
The following steps illustrate how you run a job. The actual sequence of steps varies and depends on the job template used.
1 Select the appropriate job for the sample.
2 Acquire an image of the region.
3 Process the image to enhance its appearance.
4 Perform the analyses.
5 Check the information in the job report.
6 Save the job results.
You are guided through all the required steps and automatically presented with the necessary tools and information to perform them. Any steps where no interaction is required are performed automatically in the background.
Text from the supervisor describes what to do with each tool, for example, where to perform which analysis on the sample.
1
3
2
3 R
UN
NIN
G A
JO
B
23
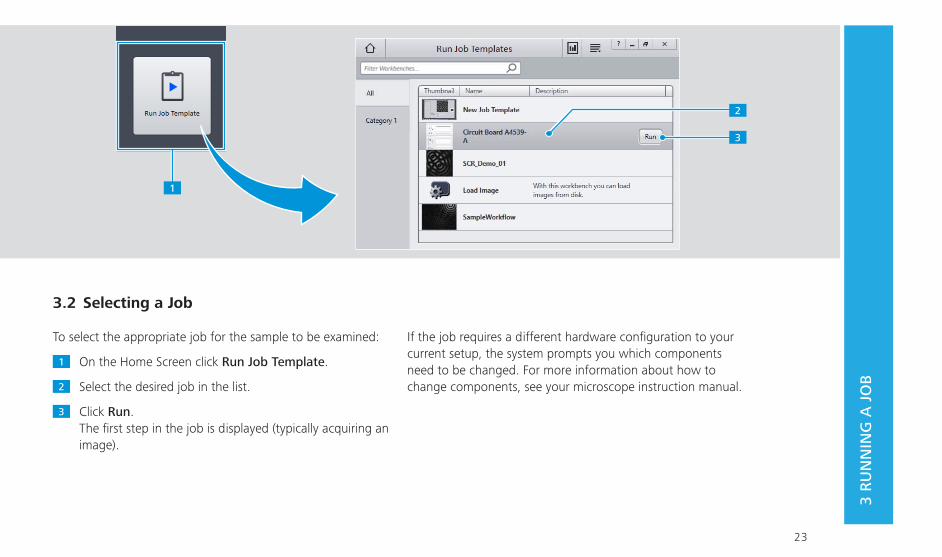
3.2 Selecting a Job
To select the appropriate job for the sample to be examined:
1 On the Home Screen click Run Job Template.
2 Select the desired job in the list.
3 Click Run. The first step in the job is displayed (typically acquiring an image).
If the job requires a different hardware configuration to your current setup, the system prompts you which components need to be changed. For more information about how to change components, see your microscope instruction manual.

4
5
2
1
3
3 RUNNING A JOB
24
2 Drag the Focus Bar in the Focus tool until the sample is sharp.
3 If desired, adjust the acquisition parameters so that the features of the sample are clearly identifiable.
4 Click Snap. If you are not satisfied with the image, click Live and repeat the above steps.
5 When you are satisfied with the image, click Next.
3.3 Acquiring an Image
The first task is typically to acquire an image. Ensure that you acquire the same area of the sample as the supervisor. The instructions at the top of the Task Panel explain which region of the sample to acquire.
1 Move the stage until the desired region of the sample is visible (e.g. click the segments of the Navigation Circle in the Stage tool, if available). Otherwise, move the sample on the stage by hand and focus manually. For more information, see your microscope instruction manual.
1
3
2
3 R
UN
NIN
G A
JO
B
25
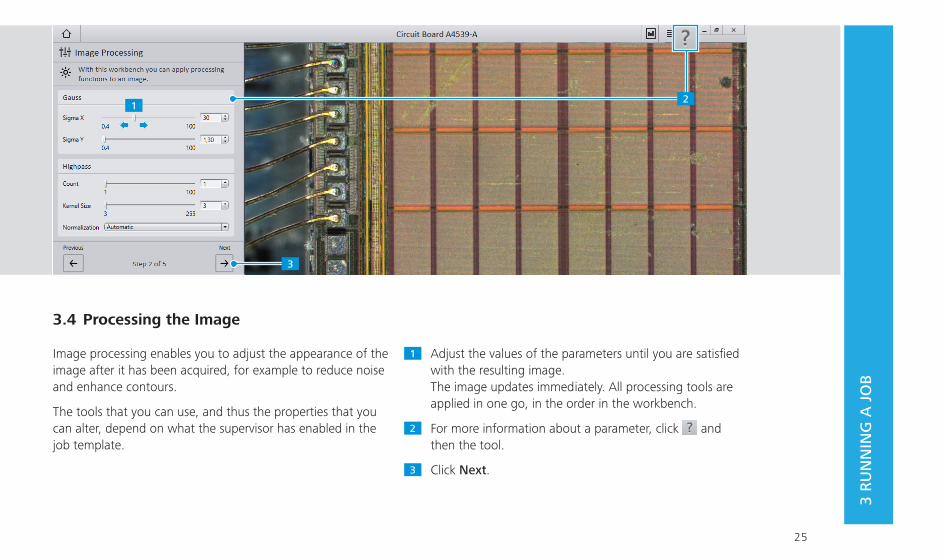
1 Adjust the values of the parameters until you are satisfied with the resulting image. The image updates immediately. All processing tools are applied in one go, in the order in the workbench.
2 For more information about a parameter, click and then the tool.
3 Click Next.
3.4 Processing the Image
Image processing enables you to adjust the appearance of the image after it has been acquired, for example to reduce noise and enhance contours.
The tools that you can use, and thus the properties that you can alter, depend on what the supervisor has enabled in the job template.

4
1
32
3 RUNNING A JOB
26
3.5 Analyzing the Image
Interactive measurements enable you to extract data from the image, such as distances, angles, areas, or intensities of pixels. All the measurements to be performed in the current image are displayed in the Center Screen Area at the locations specifi ed by the supervisor.
1 Follow any instructions added by the supervisor in the Workbench Panel.
2 Drag each tool to the correct location.
3 To edit an individual measurement, click it and drag the nodes as desired.The measurement value is displayed in the Workbench Panel.
4 Click Next.
2
4
3
51
3 R
UN
NIN
G A
JO
B
27
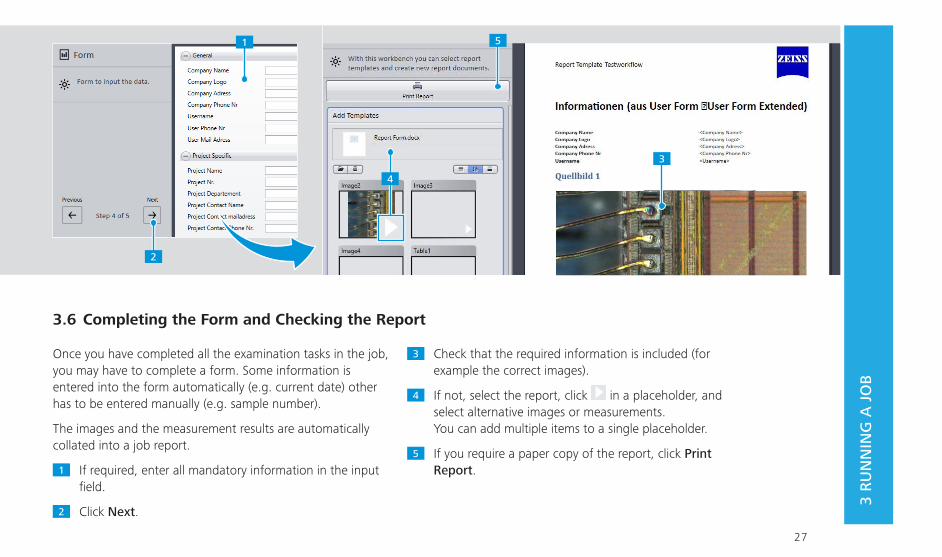
Once you have completed all the examination tasks in the job, you may have to complete a form. Some information is entered into the form automatically (e.g. current date) other has to be entered manually (e.g. sample number).
The images and the measurement results are automatically collated into a job report.
1 If required, enter all mandatory information in the input field.
2 Click Next.
3 Check that the required information is included (for example the correct images).
4 If not, select the report, click in a placeholder, and select alternative images or measurements. You can add multiple items to a single placeholder.
5 If you require a paper copy of the report, click Print Report.
3.6 Completing the Form and Checking the Report

1 2
3 RUNNING A JOB
28
3.7 Saving and Completing a Job
When you have completed the last examination task, the icon is displayed.
Ensure that you are satisfied with all the measurements. You can click to return to a previous step, for example to change the values of a tool or the location of an analysis.
Note: If you make a change in a previous step, all tasks you performed in subsequent steps are discarded and must be repeated.
1 To complete the job, click . The measurement results and report are saved automatically.
2 Choose what you want to do next:
• Repeat the same job with a new sample
• Return to the Home Screen
4 PE
RFO
RM
ING
A F
REE
EX
AM
INA
TIO
N
29
4 PERFORMING A FREE EXAMINATION(This chapter only applies to supervisors)
1 2
4 PERFORMING A FREE EXAMINATION
30
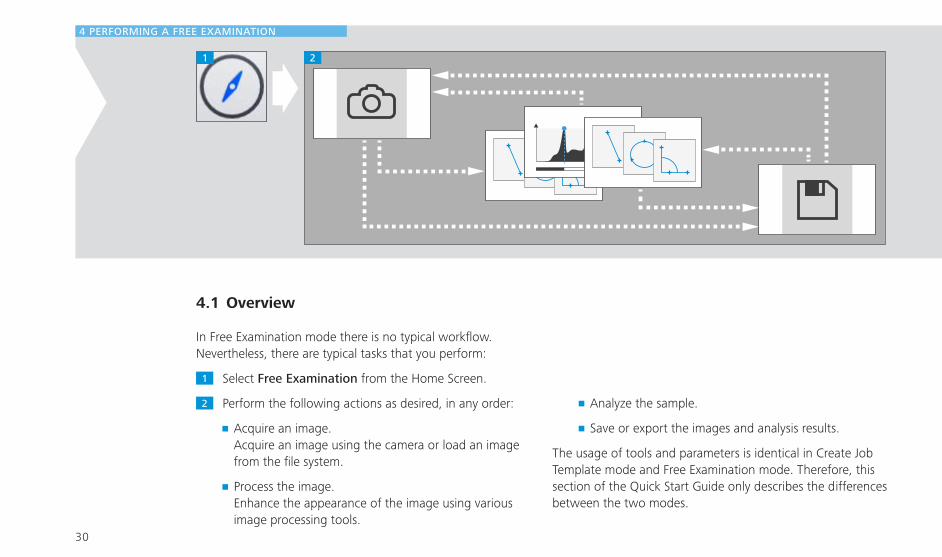
4.1 Overview
In Free Examination mode there is no typical workflow. Nevertheless, there are typical tasks that you perform:
1 Select Free Examination from the Home Screen.
2 Perform the following actions as desired, in any order:
• Acquire an image.Acquire an image using the camera or load an imagefrom the file system.
• Process the image.Enhance the appearance of the image using variousimage processing tools.
• Analyze the sample.
• Save or export the images and analysis results.
The usage of tools and parameters is identical in Create Job Template mode and Free Examination mode. Therefore, this section of the Quick Start Guide only describes the differences between the two modes.

1
4
2
3
7
5
6
4 PE
RFO
RM
ING
A F
REE
EX
AM
INA
TIO
N
31
4.2 Performing a Free Examination
To perform a free examination, you have to select the workbenches and tools you require.
1 Select Free Examination mode from the Home Screen. Initially, no workbenches are displayed.
2 Click Add Workbench.
3 Select the desired category, for example Acquisition.
4 Select a workbench, for example 2D Acquisition, and click Add.
5 To acquire an image, click Snap.
6 To add tools to a workbench, click Add Tool.
7 To add another workbench, click Add Workbench.
The following applies in Free Examination mode:
• You can switch between workbenches as desired.
• Each time you apply a tool, a new image is generated in theDocuments Area.
• You can apply any number of workbenches and tools in anyorder.

4
6
5
3
2
1
4 PERFORMING A FREE EXAMINATION
32
4.3 Creating a Report
Once you have obtained results from your free examination that you wish to keep, you can create a report to store the relevant information. Reports contain placeholders to enable you to collate the information easily, for example images or measurement data.
To generate a report:
1 Add the Reports workbench from the Reporting category.
2 Click .
3 Activate the checkbox of the desired report template and click Select.
4 Select the report template in the Add Template tool to display the available placeholders.
5 Click in a placeholder and select the corresponding measurement information that you wish to add. You can add multiple items to a single placeholder.
6 Finish by clicking the Create Report button.

2
3
1
4
4 PE
RFO
RM
ING
A F
REE
EX
AM
INA
TIO
N
4.4 Exporting Results
You can export images or measurement results, e.g. to publish them or to archive them on an external storage device.
1 Click Add Workbench and select the Documents category.
2 Select the Save File workbench and click Add.
3 Select the image to be exported, specify a filename in the Save Image tool, and click Apply.
4 To export a measurement result, specify a filename in the Save Table tool, and click Apply.
Alternatively, you can right-click a document (such as an image or report) in the Documents Area and use the context menu to export it.

Carl Zeiss Microscopy GmbH
Carl-Zeiss-Promenade 10
07745 Jena
Germany
www.zeiss.com/microscopy
© Jena 2015 by Carl Zeiss Microscopy GmbH - all rights reserved
Document 000000-2140-497; February 2015