Quick Start Guide - iiNethelp.iinet.net.au/sites/default/files/2019-12/BoB2... · Welcome to...
32
Internet and Phone in One Quick Start Guide Start here!
Transcript of Quick Start Guide - iiNethelp.iinet.net.au/sites/default/files/2019-12/BoB2... · Welcome to...

Internet and Phone in One
Quick StartGuide
Start here!


3
Welcome to BoB2™ This guide provides easy, step-by-step instructions on settings up your new hardware and getting online.
If you’re just here for a refresher course on getting connected to your wireless network, skip to page 18.
If you’re online but still need to get your VoIP Netphone service set up, head to page 28.
Need a full User Manual?
Once you’re online with the instructions in this guide, you can download the full BoB2™ User Manual or Handset Manual from:
• www.iinet.net.au/hardware/bob/manuals or
• www.westnet.com.au/hardware/bob/manuals

BoB2™ Checklist Before you get started, check that the following items are in your box along with your BoB2™ Handset and stand.
4
Line Ethernet Phone Cable Power Pack Filter Cable x 2
BoB2™
Got NBN? If you’ve got any kind of NBN or other fibre service, then you’ll have an additional blue ethernet cable instead of 2 x phone cables and a line filter.
Quick Start Guide

Getting Started
First, you’ll need to get the BoB2™ plugged in. There are a few different ways to do that, depending on which type of internet service you have.
Which internet service do you have?
ADSL1/ADSL2+ Broadband You have a copper landline connected to your house with an active phone service. Hop to page 6.
Naked DSL Broadband You have a copper landline connected to your house, but it’s been stripped of a phone service to function only as an internet line. Skip to page 8.
NBN or other Fibre Internet You have a fibre line connected to your house, with an NBN box or some other kind of fibre unit or smart wiring installed in your home that you need to connect to. Jump to page 10.
NBN Satellite You have a satellite modem, and you just want BoB2™ to take care of the wireless internet in your home. Jump to page 10.
5

Physical Setup Setting up BoB2™ for ADSL1/ADSL2+ Broadband
ADSL
LINE
PHONE
Line Filter
Phone Socket
Phone Cable
Power Cord Phone Cable
6

1. Connect BoB2™ to an electrical outlet with the black power adapter and turn him on by pressing the button next to the power port. A green light will illuminate around the edge of the power button.
2. Plug one of the supplied phone cables into the port labelled ‘adsl’, located to the left of the four yellow sockets. Take your line filter out of the box, and plug the other end of the phone cable into socket marked ‘adsl’ on the filter.
3. Standard phone services: If your phone is plugged into the phone socket on your wall, you’ll need to plug it into the socket marked ‘phone’ on the filter.
Netphones (VoIP): Plug your phone into the green port marked ‘phone’ on the side of BoB2™. Then plug one end of a white phone cable into the black ‘PSTN fail over’ port and the other end into the ‘phone’ socket on your filter.
4. All done! You can put away any unused cables in a safe place, but you will need your yellow ethernet cable to connect to a computer for a wired connection.
Head to page 14 to learn how to get online.
3
2
4
1
7

ADSL
LINE
PHONE
Phone Socket
Phone Cable
Power Cord
Setting up BoB2™ for Naked DSL
8

1. Connect BoB2™ to an electrical outlet with the black power adapter and turn him on by pressing the button next to the power port. A green light will illuminate around the edge of the power button.
2. Plug one of the supplied phone cables into the port labelled ‘adsl’, located to the left of the four yellow sockets. Plug the other end of the phone cable straight into the phone socket on your wall. You won’t need the line filter that came in the box, so keep it somewhere safe.
3. Almost done! You can put away any unused cables in a safe place, though you will need your yellow ethernet cable to connect to a computer for a wired connection.
Head to page 14 to learn how to get online.
2
1
9

ADSL
LINE
PHONE
Fibre unit or smart socket
Power Cord
Setting up BoB2™ for NBN or Fibre
10

If you have any kind of fibre or NBN service (excluding NBN satellite), then you’ll have a unit that connects to the fibre network. This unit can be referred to as an NBN Box, NTU, NTD or ONT. To make things simple, we’ll call it a fibre unit from now on.
You may also have smart wiring that connects to this fibre unit and gives you a wall socket to plug BoB2™ in to, just like a phone socket.
1. Connect BoB2™ to an electrical outlet with the black power adapter and turn him on by pressing the button next to the power port. A green light will illuminate around the edge of the power button.
2. Plug your blue ethernet cable into the leftmost yellow ‘wired’ port on the side of BoB2™ – it’s the one numbered ‘1’.
3. If you have smart wiring, plug the other end of the blue ethernet cable straight into your smart wall socket. If not, you’ll need to plug it into your fibre unit. The name of the port can vary depending on which type of fibre unit you have, but for NBN fibre connections you’ll usually need to use the ‘UNI-D1’ port.
4. Almost done! You will need your yellow ethernet cable to connect to a computer for a wired connection.
Head to page 14 to learn how to get online.
1
2
Got Satellite? If you have satellite, you’ll have a satellite modem with a LAN port to plug in to instead of a fibre unit. Once you get BoB2™ connected and logged in (see pages 12 and 15), you can learn how to go wireless on page 18. 11

Connecting BoB2™ to a Computer
Once you’ve got BoB2™ plugged in, you’ll need to get him talking to a device that can connect to the internet. The easiest way to do this is to connect him to a desktop or laptop computer with your yellow ethernet cable.
Wired
You can connect one or several computers to BoB2™ using the yellow ethernet cable that came in the box.
Plug one end of the cable into yellow ‘wired’ port on BoB2™, then plug the other end of the cable into the network port on your computer. On most desktop computers, this port will be on the back of the CPU tower. On laptops, you’ll usually find the network port on the sides of the keyboard.
Once you’re connected, you can stay wired or learn how to go wireless on page 18.
Wireless
If you don’t have any devices that you can plug an ethernet cable into, don’t panic! You can still connect. BoB2™ has a default wireless network already set up in his memory.
You’ll find your unique network name (WPA) and password (SSID) on the sticker on the back of BoB2™. You can use these to connect wirelessly with the instructions on page 19.
12

Connecting BoB2™ to a computer
Back of PC tower
Ethernet Cable
13

Getting BoB2™ Online
Once you’ve got BoB2™ plugged in and turned on, take a breather and let him do his thing for 10-15 minutes. In most cases, he’ll be able to communicate with your Internet Service Provider and retrieve the username and password he needs to get online. Once this is done, he’ll save those settings and you’ll be able to view web pages on your computer or other connected devices.
Help! I can’t view webpages.
Don’t panic. Doing things the manual way is still really easy. All you need to do is log in to BoB2™’s home page and put in your username and password. Check the next page to learn how to do this.
If you can’t view webpages and there are any red or flashing lights on BoB2™, please call our friendly Support Team for assistance using the contact information on the back cover of this guide.
14

Logging in to BoB2™
BoB2™ has a home page that you can use to manage BoB2™’s settings manually, from getting connected to personalising your wireless network.
How to browse to the BoB2™ home page
1. Open your computer’s web browser and in the address bar type http://10.1.1.1 –Make sure your computer is connected to BoB2™ either wirelessly or with an ethernet cable.
2. This is the BoB2™ home page. From here you can get a snap shot of BoB2™’s connection status and statistics.
3. Once you’ve arrived at the home page, type the default password ‘admin’ in the box at the top of the screen, then click ‘log in’.
15

Getting online the manual way – ADSL1/ADSL2+ services
1. After logging in, you will see the Wizard page. Here, you can enter the basic information needed to get your internet connection running.
2. Enter your ADSL username and password (you’ll find these in the letter that came with your BoB2™) in the first two boxes on the Wizard page, located to the right of the subheading ‘ADSL Setting’.
3. Click the ‘Save settings’ button on the upper right of the page to finish. After a few moments, you’ll see a countdown as BoB2™ saves your changes.
4. If you have a Netphone VoIP service, check page 28 to learn how to get talking.
16

Getting online the manual way – NBN or other fibre services
If you have an internet service that connects to the National Broadband Network or any other fibre network, you’ll need to set your BoB2™ up a little differently:
1. On the Wizard page, scroll down to the subheading ‘Modem is currently configured for’.
2. Select ‘FTTH/NBN’ from the drop-down menu to the right of this heading.
3. Click the ‘Save Settings’ button on the upper right of the page to finish. After a few moments, you’ll see a countdown as BoB2™ saves your changes.
4. If you have a Netphone VoIP service, check page 28 to learn how to get talking.
17

Getting Wireless with BoB2™
BoB2™ can broadcast your wired connection signal over a short range, allowing devices to access the internet without being physically attached. A wireless internet signal is often called ‘WiFi’.
To connect to your wireless network, a device must have a built-in antenna to receive this wireless signal. Most smartphone, tablets and laptops have these, but many desktop computers don’t. You may need to buy an attachable antenna known as a wireless adapter.
Wireless Security
It’s good to love your neighbour, but not enough to give them free internet. You should always have a password on your wireless network to prevent unauthorised access, and only give it to people you trust.
Depending on the software you use, your WiFi password may be referred to as a security key, a pre-shared key, a WPA key or WPA2 key.
To learn how to change your wireless password, hop to page 20.
18

Connecting with the BoB2™ default network
Your BoB2™ comes with a wireless network already set up in his memory, which can be handy if you don’t have a computer that you can connect him to with an ethernet cable. You can find the default network name (SSID) and password (WPA) on the sticker on the back of BoB2™.
WPA SSID
If you’d rather use your own network name and password, check the next page.
If you’d like to get going using this default network, write down your network name and password on page 22.
19

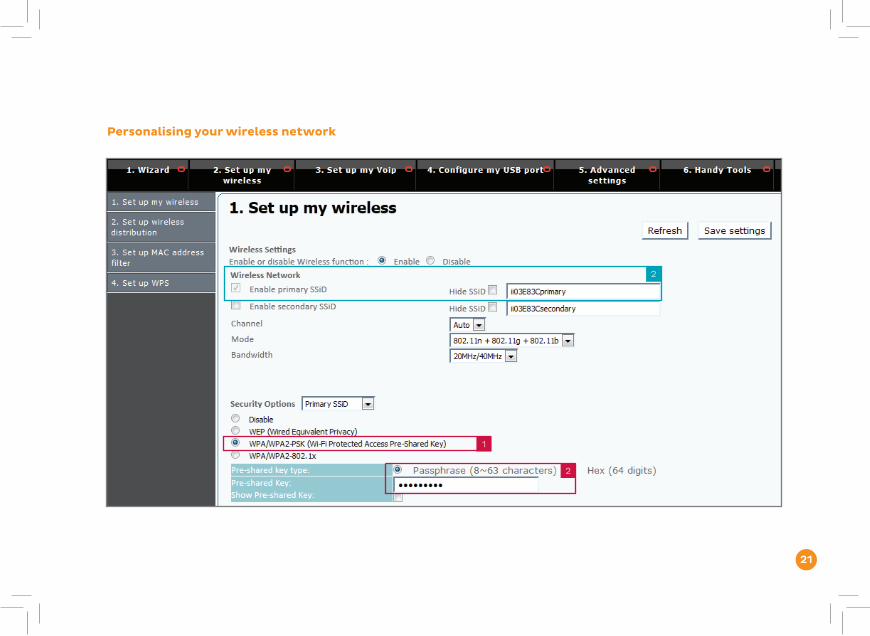
Personalising your wireless network
Everyone likes their own personal touch, and it’s great to have a password that’s easy to remember. You can set your own network name and password for your wireless network from the BoB2™ home page. Check page 15 if you’re not sure how to log in.
Changing your network name (SSID)
1. After logging in, select ‘2. Set up my Wireless’ from the black bar running across the top of the page.
2. Underneath the ‘Wireless Network’ heading, ensure ‘Enable primary SSiD’ is ticked. In the text box to the right of this tick, replace the default network name with the name you’d like your wireless network to have.
3. Once you’re done, click the ‘Save Settings’ button to finish up.
Changing your password (WPA)
1. On the ‘2. Set up my Wireless’ page, you’ll find the ‘Security Options’ heading. Make sure that ‘WPA/ WPA2-PSK’ is selected in the list of options.
2. For ‘Pre-shared key type’, select ‘Passphrase (8~63 characters)’. You can then type your desired password in the text box below, but it must be at least 8 characters long.
3. Click the ‘Save Settings’ button to finish. We recommend writing your new name and password down on page 22.
20
Personalising your wireless network
2
1
2
21

Connecting to BoB2™ wirelessly
It’s best to keep your wireless details somewhere safe in case you need them in the future, so write them down in the boxes below. They’re case sensitive, so make sure to include any capital letters that were used.
Wireless Security Key (WPA) Wireless Network Name (SSID)
22

Your Operating System
Different operating systems have different instructions for connecting to a wireless network. For all smartphone and tablets, please consult their user manuals for help. This guide contains instructions for the following:
Windows 7 – page 24 Windows 8 – page 25
Windows XP – page 26 MAC OSX – page 27
23

1
2
3
Wireless Setup for Windows 7
1. On your desktop, click the Wireless Network icon in the system tray on the bottom right-hand corner of your screen. This will bring up a list of available connections.
2. Find the name (SSiD) of your wireless network and click on it. Ensure ‘Connect Automatically’ is ticked and then click the ‘Connect’ button.
3. You’ll be asked to enter your ‘Security key’, which is your wireless password (WPA). Type it in, then click ‘OK’. Your computer should remember your password for you from now on.
24

Wireless Setup for Windows 8
1. On your desktop, click the Network icon in the system tray on the bottom right-hand corner of your screen. This will bring up a list of available network connections.
2. Find the name (SSiD) of your wireless network and click on it. Ensure ‘Connect Automatically’ is ticked and then click the ‘Connect’ button.
3. You’ll be asked to enter your password. Type it in, then click ‘OK’. Your computer should remember your password for you from now on.
1
2
25
3

1
2
3
Wireless Setup for Windows XP
1. Open the Start Menu with the button in the bottom left-hand corner of your screen, then select the ‘Connect To’ option from the right-hand column. Click on ‘Wireless Network Connection’.
2. Select the name (SSiD) of your wireless network from the list of available connections and click the ‘Connect’ button.
3. You’ll be asked to enter your ‘Network key’, which is your wireless password (WPA). Type it in, then click ‘OK’. Your computer should remember your password for you from now on.
26

1
2
3
27
Wireless Setup for MAC OSX
1. In the upper right-hand corner of your screen, click the AirPort icon and select ‘Turn AirPort On’.
2. Clicking the AirPort icon will now bring up a list of available wireless networks. Select your network name (SSiD) from this list.
3. You’ll be asked to enter your password. Type it in, then tick ‘Remember this network’ to ensure your computer remembers your password for you from now on. Click ‘OK’ to finish.

Get Talking with BoB2™
If your BoB2™ handset screen is flashing with the message ‘Please register’, jump to page 30 to register your handset before setting up your Netphone service.
If you have an Netphone (VoIP) service, you’ll need to give BoB2™ your service settings so he can direct incoming and outgoing phone calls for your Netphone number. Just grab your account details from the email we sent you, and follow these instructions:
1. Log in to the BoB2™ home page. Check page 15 if you’re not sure how.
2. On the Wizard page, find the ‘VoIP Setting’ heading. Type your Netphone VoIP number (with no spaces) in the box next to ‘4. My VoIP phone line 1 username is’.
3. Next, type your Netphone VoIP password in the box next to ‘5. My VoIP phone line 1 password is’. Your password is case-sensitive, so make sure to include any capital letters in your password.
4. Skip the ‘Line 2’ section and then choose your state from the drop down menu next to ‘8. Select the state you are in’.
5. Click the ‘Save Settings’ button in the top right-hand corner of the page to finish up. You should then see ‘[VoIP Registration: Up]’ next to ‘Line 1’ on the Wizard page. Here’s a list of everything you might find on this line and what it means:
Idle – No VoIP service has been registered
Up – VoiP service registered successfully
Initializing – VoiP service is initializing, or the internet connection is down
Incorrect Password – VoiP password entered incorrectly
Incorrect Username – VoiP phone number entered incorrectly
28

Setting up VoIP
29

BoB2™ Handset Registration
To register your BoB2™ handset to the modem, you’ll need to do the following:
On the BoB2™ handset
1. Press on the right side of the control key as shown to bring up the main menu.
2. Scroll down to ‘Settings’ using the control key and press the display button below ‘OK’.
3. In this menu, scroll down to the ‘Handset’ option and press ‘OK’.
4. Scroll down again until you hit ‘Register H/Set’, then press ‘OK’.
5. Using the keypad, enter the handset PIN number (the default is 0000) and press ‘OK’.
6. You’ll see a message on the display screen that reads ‘Regstr. Procedure Base 1’. You can then complete the final step below.
On the BoB2™ modem
7. Within 60 seconds of completing the above steps, press and hold the centre button of the back of BoB2™ for about three seconds. It’s the one labelled ‘add extra h/set’.
Following successful registration, the handset will display ‘Base 1’ on the screen. If you don’t see this message on the display screen, repeat the above steps.
1
7
30

31
All Done! You should now be up and running with the basics for your internet connection.

If you have any issues with your set up or technology just isn’t your strong point, you can
always call our friendly staff for a hand.
iiNet Support
Available 24/7 13 22 58 [email protected]
iiNet Business Support
6am to 6pm (WST) Mon-Fri 13 24 49 [email protected]
Westnet Support
Available 24/7 1300 786 068 [email protected]
Westnet Business Support
8:30am to 5pm (WST) Mon - Fri 1300 786 006 [email protected]