Quick Start Guide - University of Rhode Islandweb.uri.edu/gsc/files/ZEN-Blue_First_Steps.pdf ·...
24
Quick Start Guide First steps with ZEN 2011 (blue edition) Printed 06/2012
-
Upload
trinhkhanh -
Category
Documents
-
view
214 -
download
0
Transcript of Quick Start Guide - University of Rhode Islandweb.uri.edu/gsc/files/ZEN-Blue_First_Steps.pdf ·...
Quick Start Guide
First steps with ZEN 2011 (blue edition)
Printed 06/2012

Content
1 Concept 41.1 Image Acquisition 4
1.2 Image Processing 4
1.3 Image Analysis 4
1.4 Documentation 4
2 Start ZEN blue software 5
3 Program interface 63.1 Title bar 6
3.2 Menu bar 7
3.3 Workspace configuration 7
3.4 Tool bar 7
3.5 Left Tool Area 8
3.6 Center Screen Area 8
3.7 Document bar 9
3.8 Status Bar 9
4 Adjust workspace appearance 124.1 Set user language 12
4.2 Select design 12
4.3 Zoom in/out workspace 12
4.4 Show/hide areas 13
4.5 Undock/dock tool window 13
4.6 Show all mode of tool windows 14
5 Step by step to the first image 155.1 Configure Microscope Components 15
5.2 Create manual scaling 16
5.3 Acquire a first image with ZEN blue 19
5.4 Optimize Live Image Settings 20
5.5 Add Annotations 21
6 Close ZEN blue software 23
Content Quick Start Guide
Carl Zeiss Microscopy GmbH 3
ConceptZEN is a modular image-processing and analysis software for modern microscopy from CarlZeiss. In addition to basic functionality for image acquisition and microscope definitions, ele‐mentary image processing and annotations, image analysis and documentation optional mod‐ules for specific tasks are available.
Image AcquisitionA range of different camera types can be used with ZEN, from simple TV cameras through tohigh-resolution and high-sensitivity cameras. The cameras of the Carl Zeiss AxioCam familyguarantee optimum integration.
Image ProcessingThe acquired image is immediately displayed on the monitor. It can then be optimized using awide range of techniques:
▪ Contrast, brightness and color adjustment
▪ Noise suppression, smoothing and contour enhancement
▪ Sharpness enhancement/emphasizing of details
▪ Correction of illumination influences and white balance
ZEN can also be used to add any annotations that you may require to the images. All elements,from scale bars and colored markings through to text and graphics, have been integrated intothe program.
Image AnalysisYou are able to perform simple interactive measurements in the basic program. The measuredvalues (e.g. lengths, areas and perimeters) are made available in a data table, and can be pro‐cessed further using spreadsheet programs. The interactive measurement can be executed viathe Graphics menu from the menu bar, or via the Graphics tab in the view controls of the Meas‐urement View.
DocumentationBesides the image itself, the ZEN image format CZI also saves additional data, such as the im‐age number, date of acquisition, microscope settings, exposure values, size and scale details,contrast procedures used etc. Annotations and measured values are also saved with the image.
1
1.1
1.2
1.3
1.4
Quick Start GuideConcept
Image Acquisition
4 Printed 06/2012

Start ZEN blue software➢ Your Microsoft operating system is ready for operation.
➢ You have successfully installed ZEN blue on your computer.
1. Double click on ZEN blue program icon on your desktop.
2. Alternatively click on Start | All Programs | Carl Zeiss | ZEN 2011 | ZEN 2011 (blue edition)entry (blue icon).
⇨ The software starts. After a while you see the ZEN blue login screen.
3. Activate checkbox Don´t show this dialog next time if you don’t want to see the login dialogwith the next start of the software. If you want to see the dialog again, got to menu bar andclick on File | Login.
4. Click on Start System button to start ZEN blue with full software functionality.
5. Click on Image Processing button to start ZEN blue with image processing functions only.
⇨ You successfully started ZEN blue software.
2
Start ZEN blue software Quick Start Guide
Carl Zeiss Microscopy GmbH 5
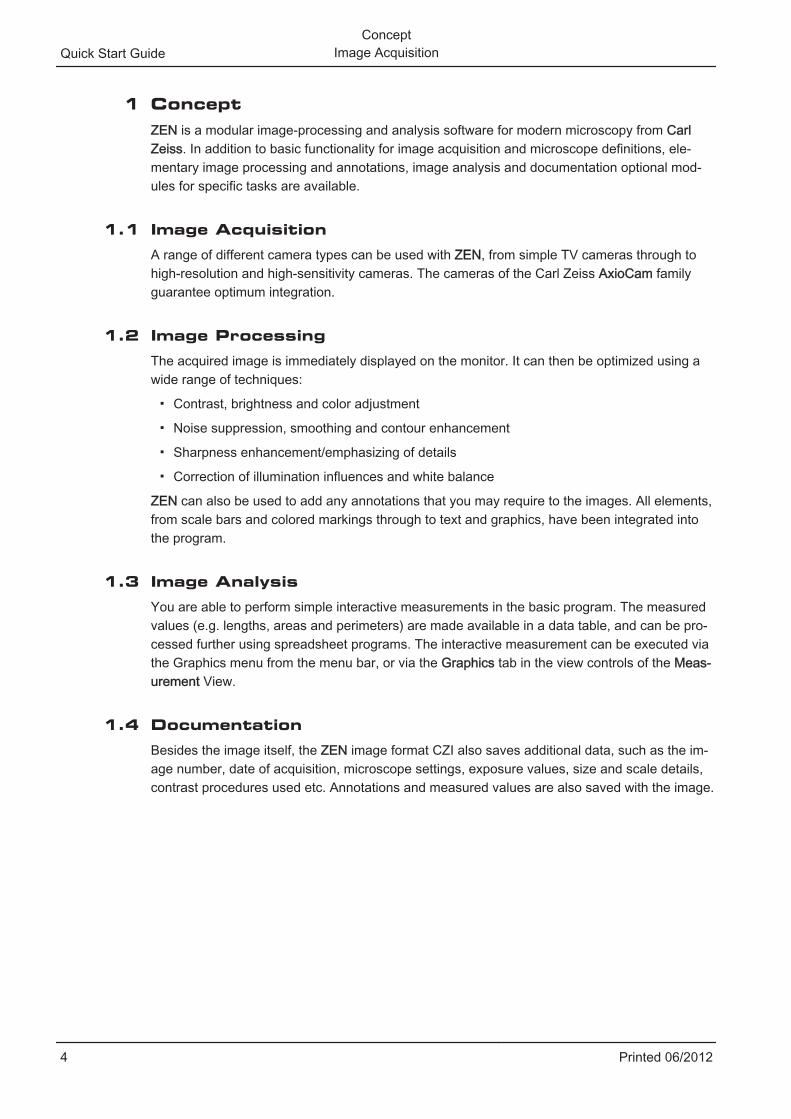
Program interfaceThe ZEN (blue edition) program interface is divided into three main areas. Via the tabs in theLeft Tool Area (5) you can access all the main tools for microscope control (Locate tab), acquisi‐tion (Acquisition tab), image processing (Processing tab), image analysis (Analysis tab) and re‐port generation (Reporting tab). The Center Screen Area (6) is used to display your images,while the Right Tool Area (7) provides you with an overview of all open documents and is usedfor advanced file management.
12
34
5
6
7
8
Fig. 1: Program interface (ZEN lite)
1 Title bar 5 Left Tool Area
2 Workspace Configuration 6 Center Screen Area
3 Menu bar 7 Right Tool Area
4 Tool bar 8 Status bar
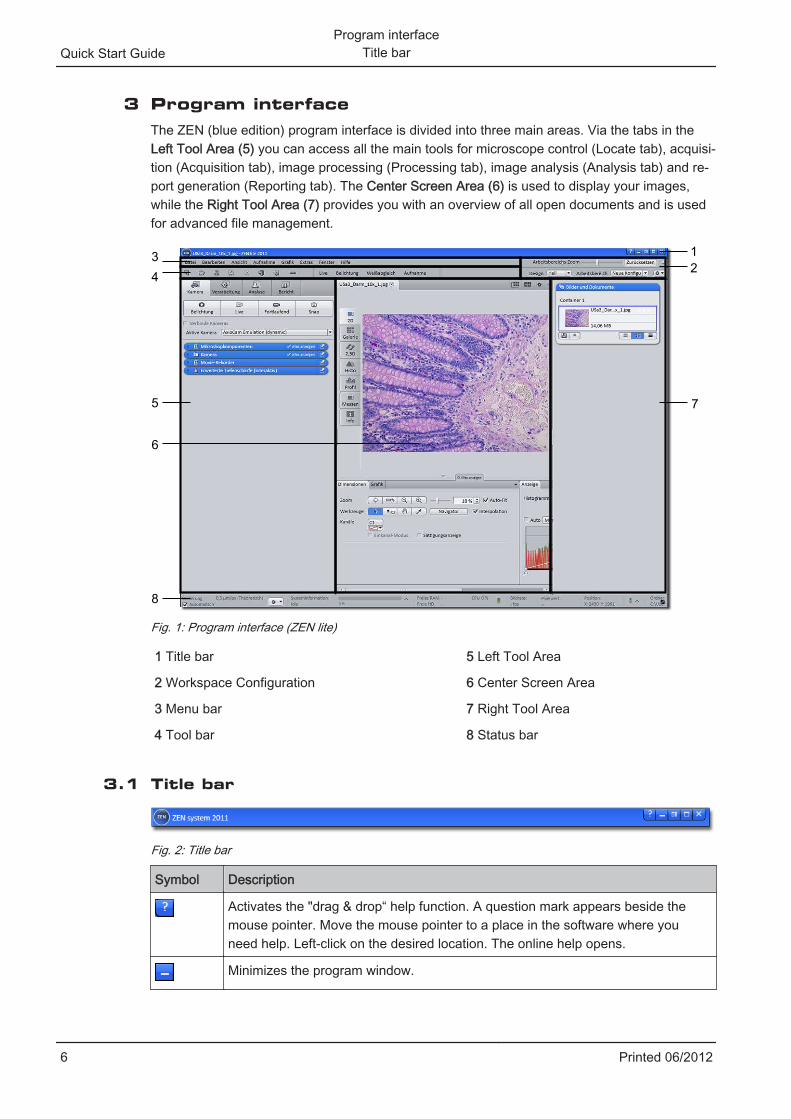
Title bar
Fig. 2: Title bar
Symbol Description
Activates the "drag & drop“ help function. A question mark appears beside themouse pointer. Move the mouse pointer to a place in the software where youneed help. Left-click on the desired location. The online help opens.
Minimizes the program window.
3
3.1
Quick Start GuideProgram interface
Title bar
6 Printed 06/2012
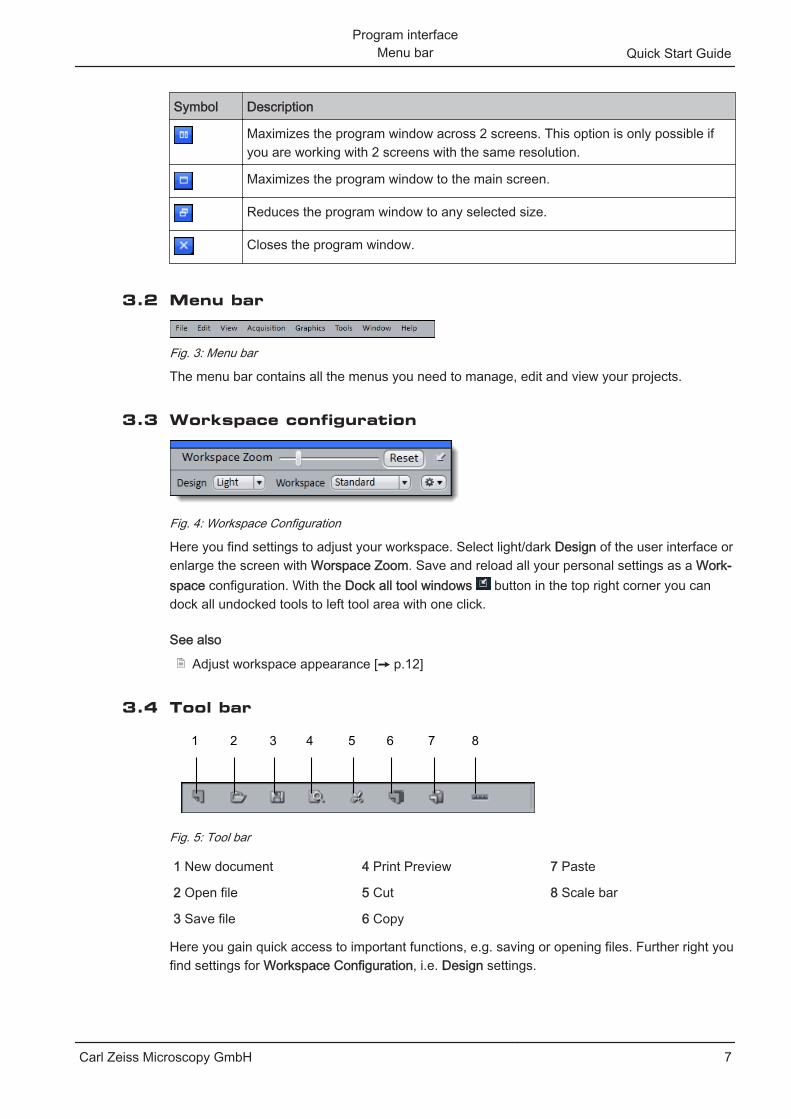
Symbol Description
Maximizes the program window across 2 screens. This option is only possible ifyou are working with 2 screens with the same resolution.
Maximizes the program window to the main screen.
Reduces the program window to any selected size.
Closes the program window.
Menu bar
Fig. 3: Menu bar
The menu bar contains all the menus you need to manage, edit and view your projects.
Workspace configuration
Fig. 4: Workspace Configuration
Here you find settings to adjust your workspace. Select light/dark Design of the user interface orenlarge the screen with Worspace Zoom. Save and reload all your personal settings as a Work‐space configuration. With the Dock all tool windows button in the top right corner you candock all undocked tools to left tool area with one click.
See also
2 Adjust workspace appearance [➙ p.12]
Tool bar
1 2 5 87643
Fig. 5: Tool bar
1 New document 4 Print Preview 7 Paste
2 Open file 5 Cut 8 Scale bar
3 Save file 6 Copy
Here you gain quick access to important functions, e.g. saving or opening files. Further right youfind settings for Workspace Configuration, i.e. Design settings.
3.2
3.3
3.4
Program interface
Menu bar Quick Start Guide
Carl Zeiss Microscopy GmbH 7
InformationYou can adapt the tool bar to your personal requirements in the Extras menu | CustomizeToolBar.
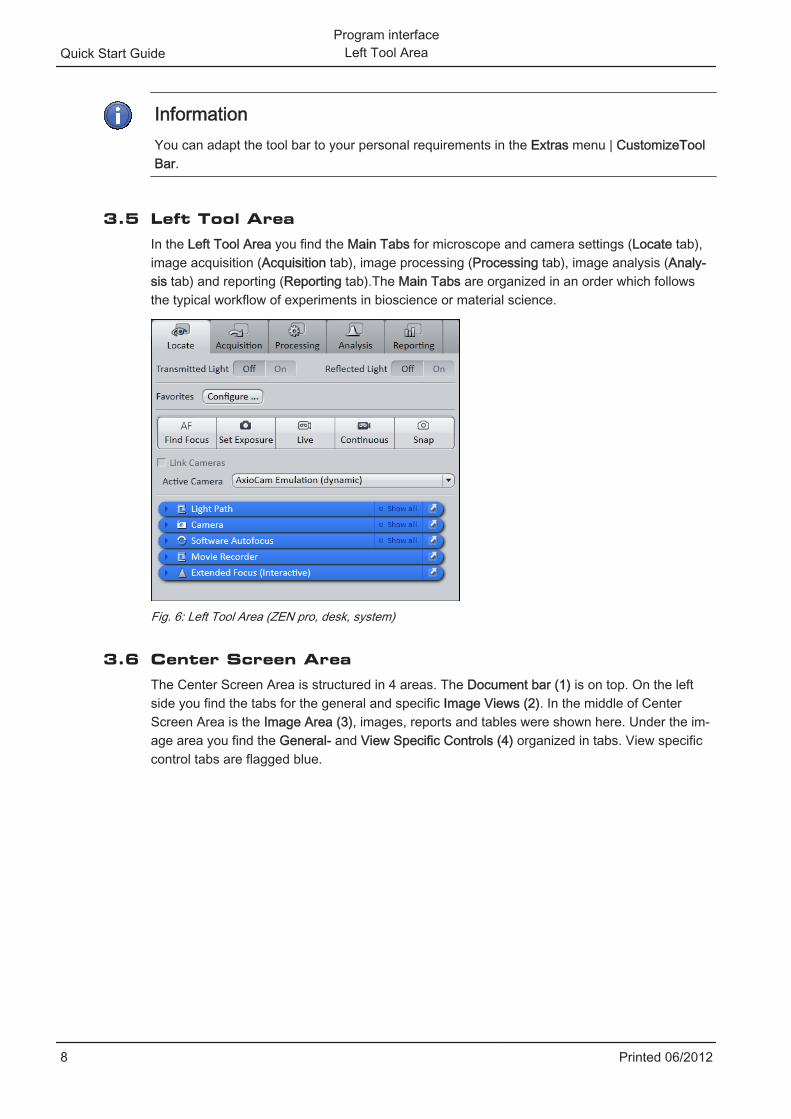
Left Tool AreaIn the Left Tool Area you find the Main Tabs for microscope and camera settings (Locate tab),image acquisition (Acquisition tab), image processing (Processing tab), image analysis (Analy‐sis tab) and reporting (Reporting tab).The Main Tabs are organized in an order which followsthe typical workflow of experiments in bioscience or material science.
Fig. 6: Left Tool Area (ZEN pro, desk, system)
Center Screen AreaThe Center Screen Area is structured in 4 areas. The Document bar (1) is on top. On the leftside you find the tabs for the general and specific Image Views (2). In the middle of CenterScreen Area is the Image Area (3), images, reports and tables were shown here. Under the im‐age area you find the General- and View Specific Controls (4) organized in tabs. View specificcontrol tabs are flagged blue.
3.5
3.6
Quick Start GuideProgram interface
Left Tool Area
8 Printed 06/2012
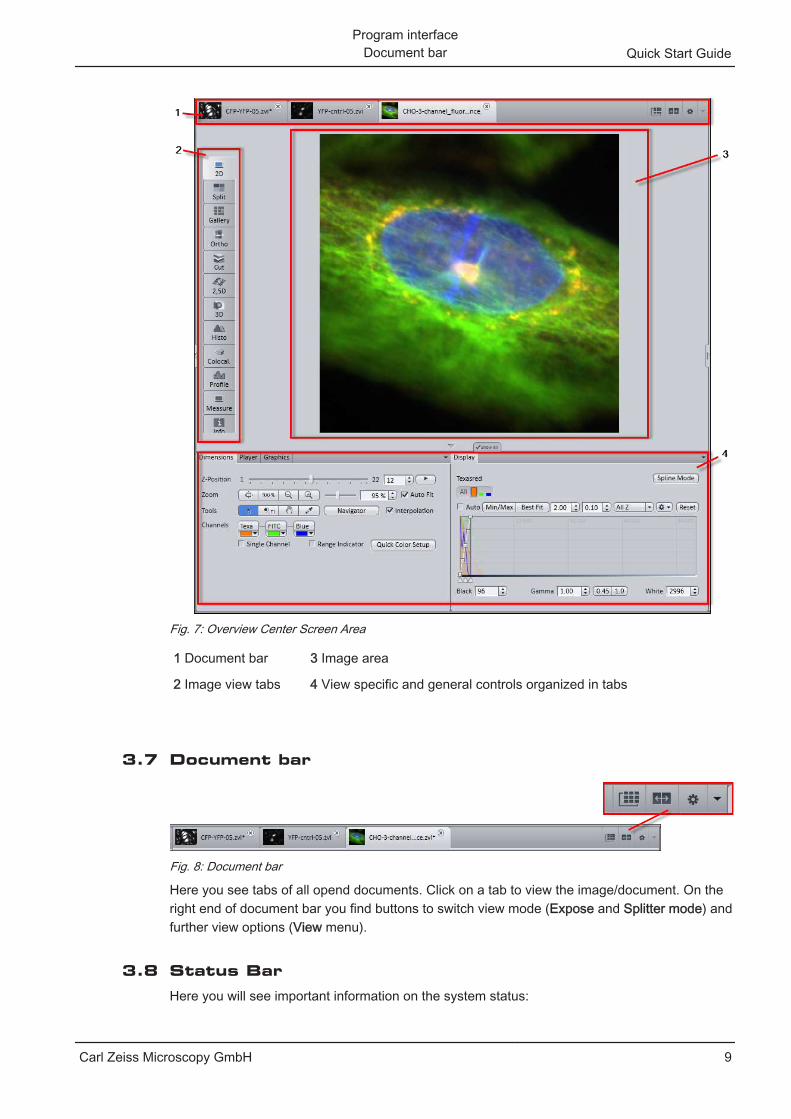
Fig. 7: Overview Center Screen Area
1 Document bar 3 Image area
2 Image view tabs 4 View specific and general controls organized in tabs
Document bar
Fig. 8: Document bar
Here you see tabs of all opend documents. Click on a tab to view the image/document. On theright end of document bar you find buttons to switch view mode (Expose and Splitter mode) andfurther view options (View menu).
Status BarHere you will see important information on the system status:
3.7
3.8
Program interface
Document bar Quick Start Guide
Carl Zeiss Microscopy GmbH 9
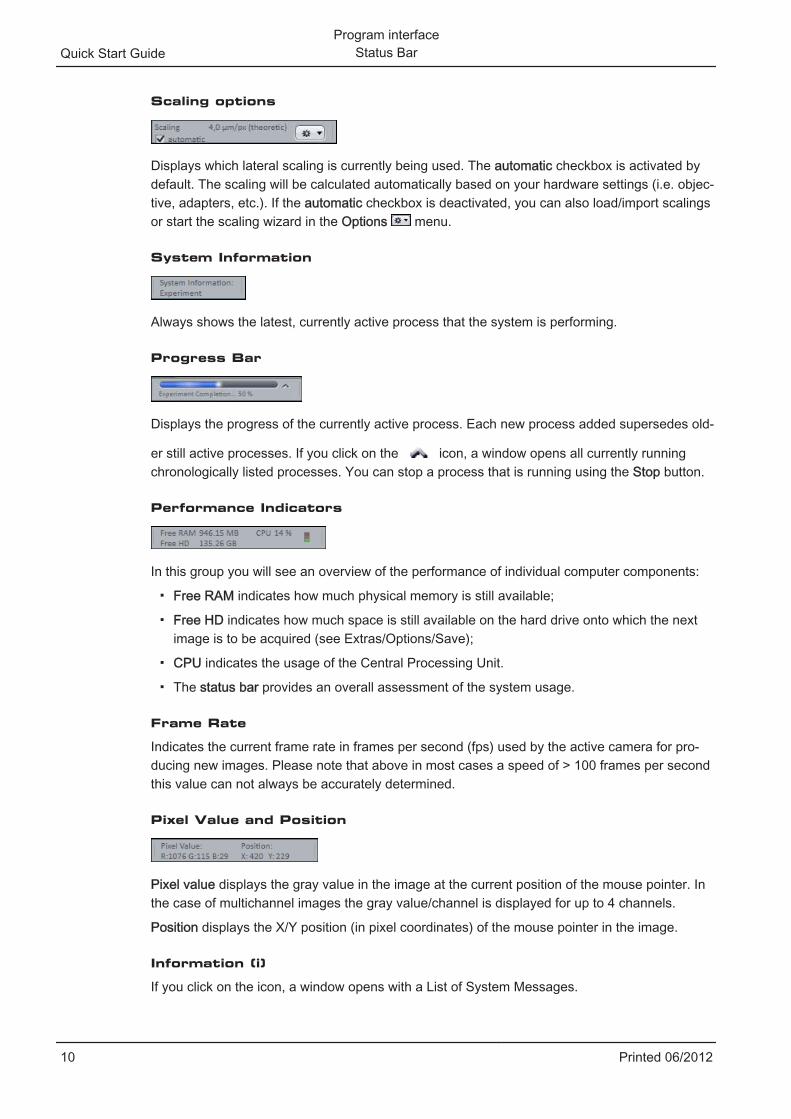
Scaling options
Displays which lateral scaling is currently being used. The automatic checkbox is activated bydefault. The scaling will be calculated automatically based on your hardware settings (i.e. objec‐tive, adapters, etc.). If the automatic checkbox is deactivated, you can also load/import scalingsor start the scaling wizard in the Options menu.
System Information
Always shows the latest, currently active process that the system is performing.
Progress Bar
Displays the progress of the currently active process. Each new process added supersedes old‐
er still active processes. If you click on the icon, a window opens all currently runningchronologically listed processes. You can stop a process that is running using the Stop button.
Performance Indicators
In this group you will see an overview of the performance of individual computer components:
▪ Free RAM indicates how much physical memory is still available;
▪ Free HD indicates how much space is still available on the hard drive onto which the nextimage is to be acquired (see Extras/Options/Save);
▪ CPU indicates the usage of the Central Processing Unit.
▪ The status bar provides an overall assessment of the system usage.
Frame Rate
Indicates the current frame rate in frames per second (fps) used by the active camera for pro‐ducing new images. Please note that above in most cases a speed of > 100 frames per secondthis value can not always be accurately determined.
Pixel Value and Position
Pixel value displays the gray value in the image at the current position of the mouse pointer. Inthe case of multichannel images the gray value/channel is displayed for up to 4 channels.
Position displays the X/Y position (in pixel coordinates) of the mouse pointer in the image.
Information (i)
If you click on the icon, a window opens with a List of System Messages.
Quick Start GuideProgram interface
Status Bar
10 Printed 06/2012
Storage Folder
Displays the location where new images are automatically saved. This path can be changed inthe menu Tools | Options | Saving.
User
Shows the Windows user name of the logged in user.
Time
Shows the current Windows system time.
Program interface
Status Bar Quick Start Guide
Carl Zeiss Microscopy GmbH 11
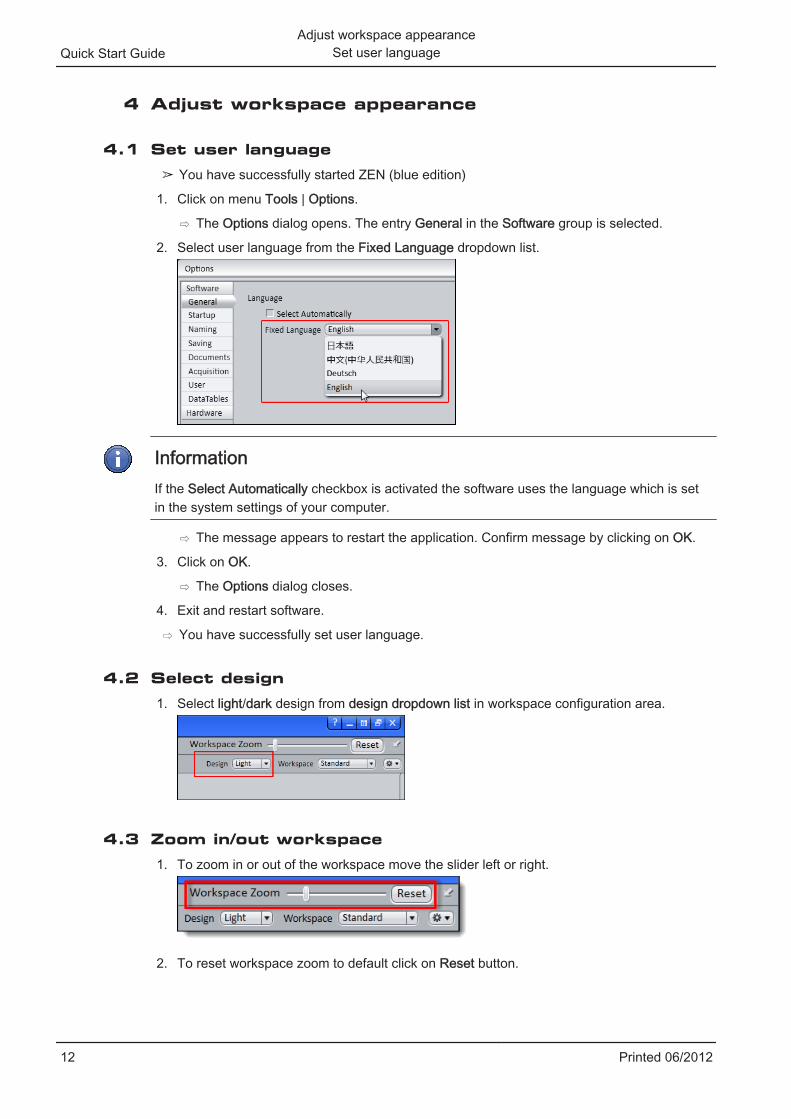
Adjust workspace appearance
Set user language➢ You have successfully started ZEN (blue edition)
1. Click on menu Tools | Options.
⇨ The Options dialog opens. The entry General in the Software group is selected.
2. Select user language from the Fixed Language dropdown list.
InformationIf the Select Automatically checkbox is activated the software uses the language which is setin the system settings of your computer.
⇨ The message appears to restart the application. Confirm message by clicking on OK.
3. Click on OK.
⇨ The Options dialog closes.
4. Exit and restart software.
⇨ You have successfully set user language.
Select design1. Select light/dark design from design dropdown list in workspace configuration area.
Zoom in/out workspace1. To zoom in or out of the workspace move the slider left or right.
2. To reset workspace zoom to default click on Reset button.
4
4.1
4.2
4.3
Quick Start GuideAdjust workspace appearance
Set user language
12 Printed 06/2012
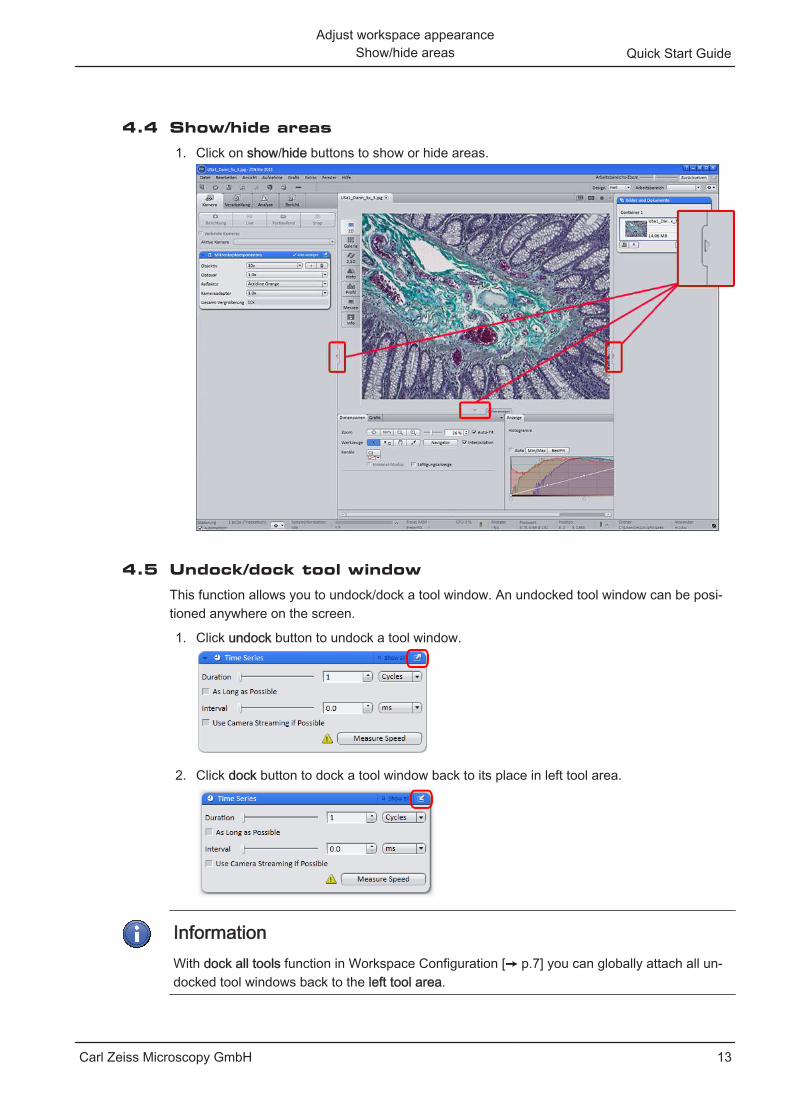
Show/hide areas1. Click on show/hide buttons to show or hide areas.
Undock/dock tool windowThis function allows you to undock/dock a tool window. An undocked tool window can be posi‐tioned anywhere on the screen.
1. Click undock button to undock a tool window.
2. Click dock button to dock a tool window back to its place in left tool area.
InformationWith dock all tools function in Workspace Configuration [➙ p.7] you can globally attach all un‐docked tool windows back to the left tool area.
4.4
4.5
Adjust workspace appearance
Show/hide areas Quick Start Guide
Carl Zeiss Microscopy GmbH 13
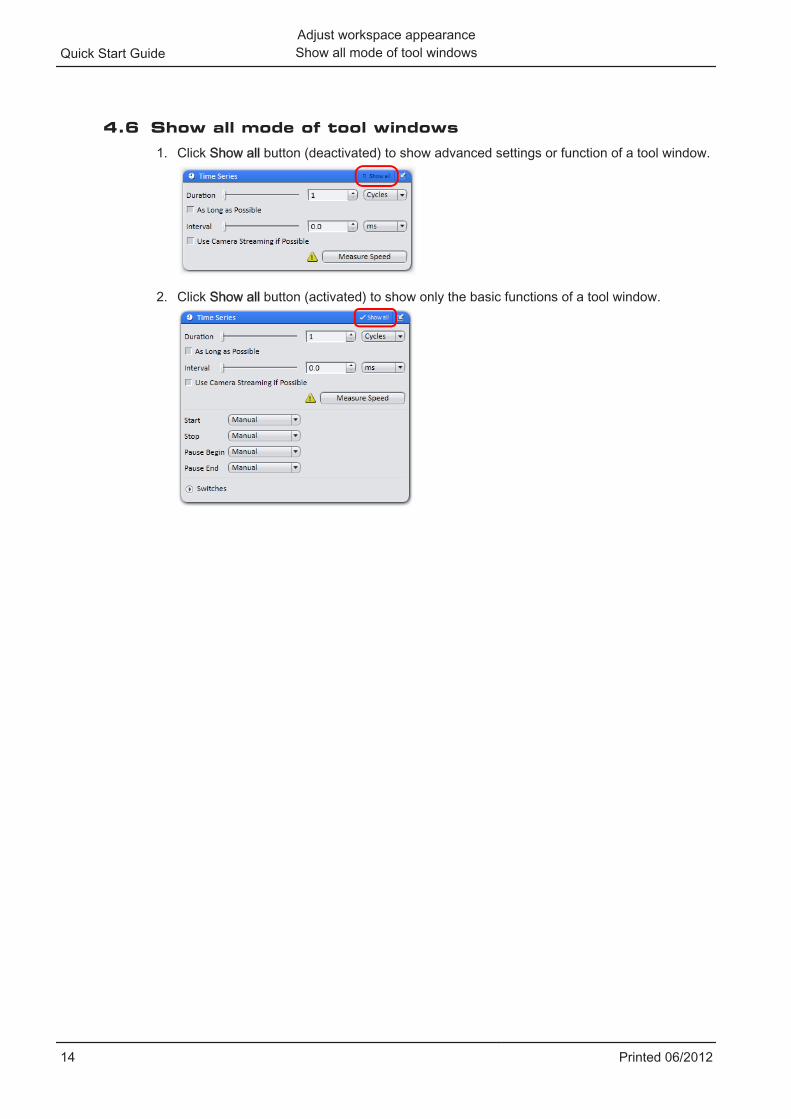
Show all mode of tool windows1. Click Show all button (deactivated) to show advanced settings or function of a tool window.
2. Click Show all button (activated) to show only the basic functions of a tool window.
4.6
Quick Start GuideAdjust workspace appearanceShow all mode of tool windows
14 Printed 06/2012
Step by step to the first image
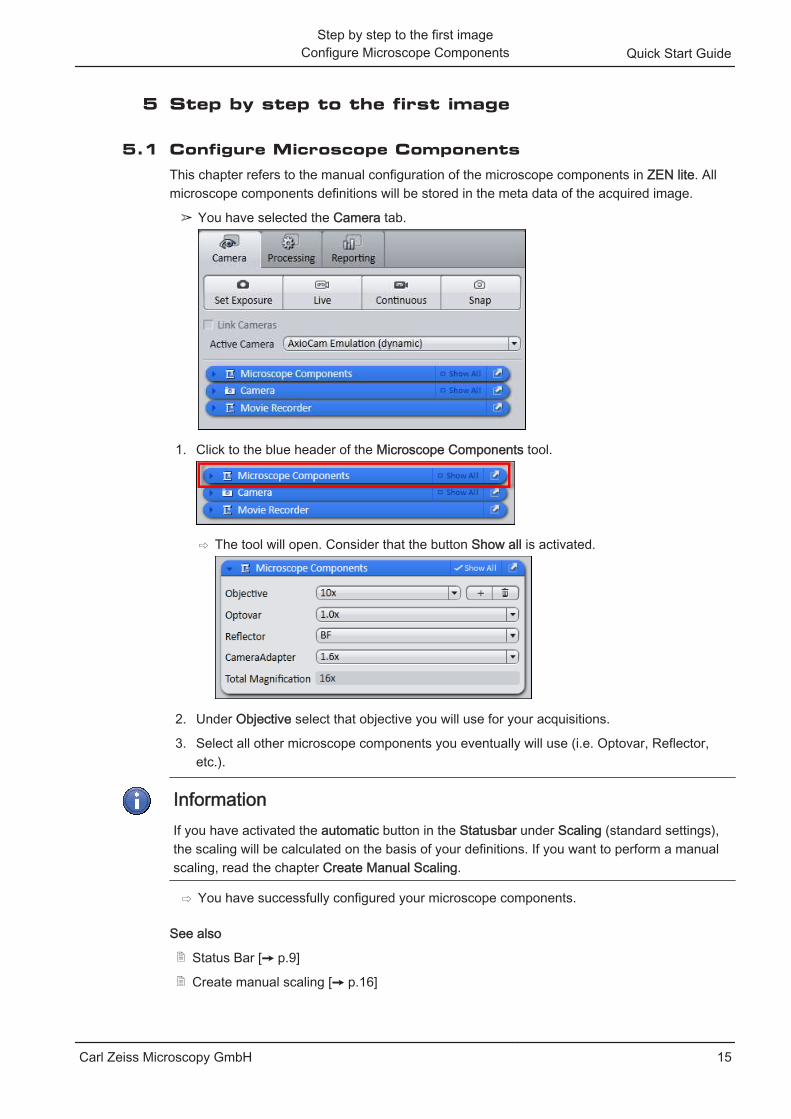
Configure Microscope ComponentsThis chapter refers to the manual configuration of the microscope components in ZEN lite. Allmicroscope components definitions will be stored in the meta data of the acquired image.
➢ You have selected the Camera tab.
1. Click to the blue header of the Microscope Components tool.
⇨ The tool will open. Consider that the button Show all is activated.
2. Under Objective select that objective you will use for your acquisitions.
3. Select all other microscope components you eventually will use (i.e. Optovar, Reflector,etc.).
InformationIf you have activated the automatic button in the Statusbar under Scaling (standard settings),the scaling will be calculated on the basis of your definitions. If you want to perform a manualscaling, read the chapter Create Manual Scaling.
⇨ You have successfully configured your microscope components.
See also
2 Status Bar [➙ p.9]
2 Create manual scaling [➙ p.16]
5
5.1
Step by step to the first image
Configure Microscope Components Quick Start Guide
Carl Zeiss Microscopy GmbH 15
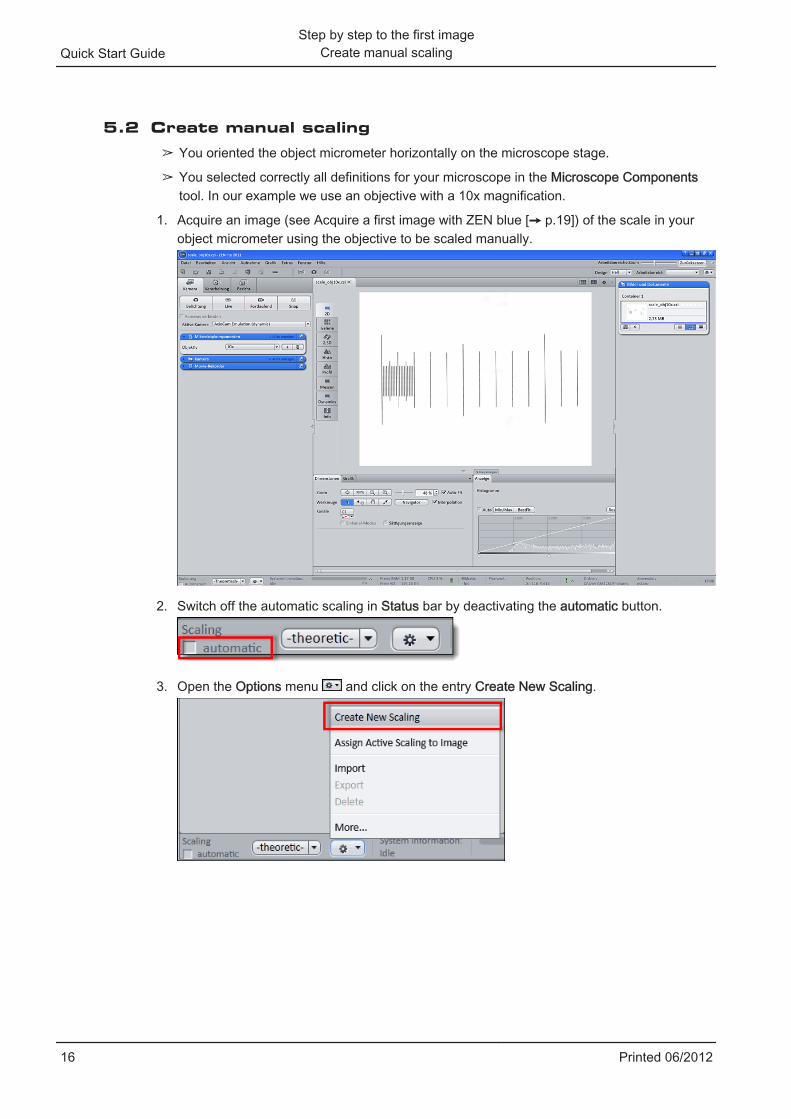
Create manual scaling➢ You oriented the object micrometer horizontally on the microscope stage.
➢ You selected correctly all definitions for your microscope in the Microscope Componentstool. In our example we use an objective with a 10x magnification.
1. Acquire an image (see Acquire a first image with ZEN blue [➙ p.19]) of the scale in yourobject micrometer using the objective to be scaled manually.
2. Switch off the automatic scaling in Status bar by deactivating the automatic button.
3. Open the Options menu and click on the entry Create New Scaling.
5.2
Quick Start GuideStep by step to the first image
Create manual scaling
16 Printed 06/2012
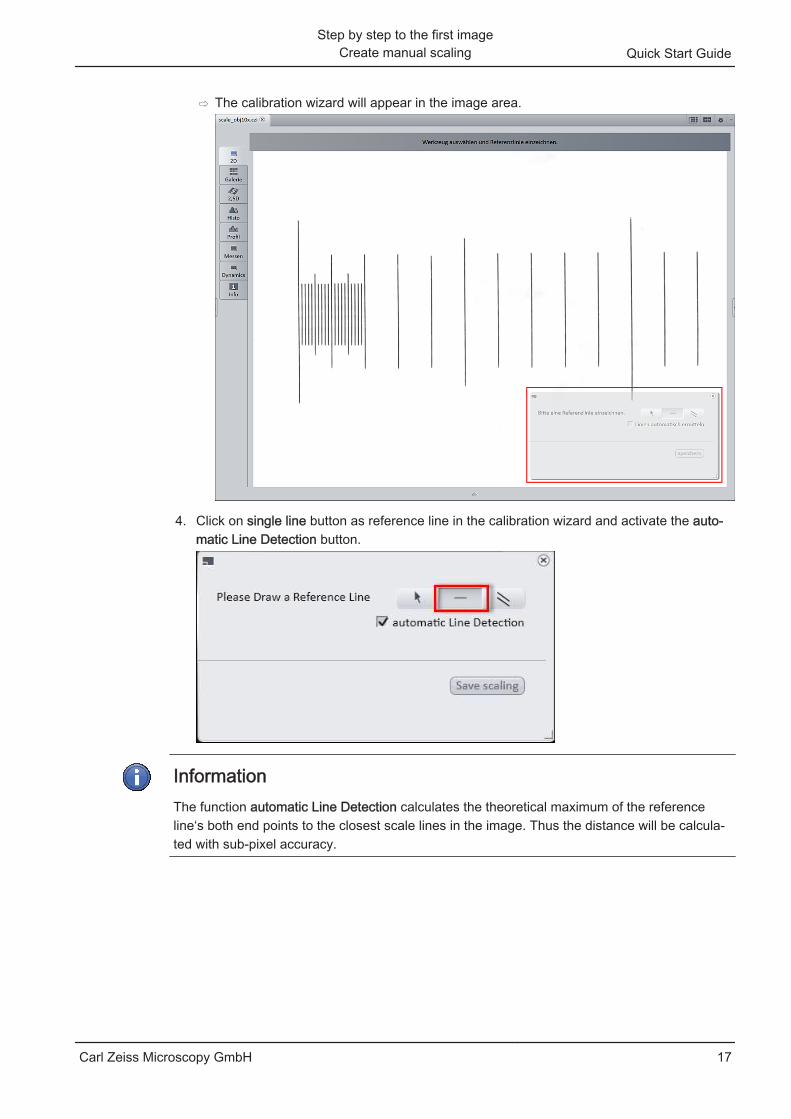
⇨ The calibration wizard will appear in the image area.
4. Click on single line button as reference line in the calibration wizard and activate the auto‐matic Line Detection button.
InformationThe function automatic Line Detection calculates the theoretical maximum of the referenceline‘s both end points to the closest scale lines in the image. Thus the distance will be calcula‐ted with sub-pixel accuracy.
Step by step to the first image
Create manual scaling Quick Start Guide
Carl Zeiss Microscopy GmbH 17

5. Draw in the reference line along the scale.
6. Enter the true distance between both scale lines in the calibration wizard. In our examplethis is 500 micrometer.
7. Enter a name for the scaling (i.e. Obj 10x) and click the Save scaling button.
Quick Start GuideStep by step to the first image
Create manual scaling
18 Printed 06/2012
⇨ You performed a manual scaling for your objective. Repeat this sequence for all objectivesyou will need a manual scaling for. Always ensure that you did select the correct objectivein the tool Microscope Components and for this performed and selected the matching scal‐ing in the status bar.
InformationIf you defined manual scalings for your available objectives, and if you activate in the Statusbar under Scaling the checkbox Automatic again, the system will use the measured scalingsinstead of the theoretic ones. You will recognize this via the label "measured" instead of "theo‐retic" beside the pixel size.
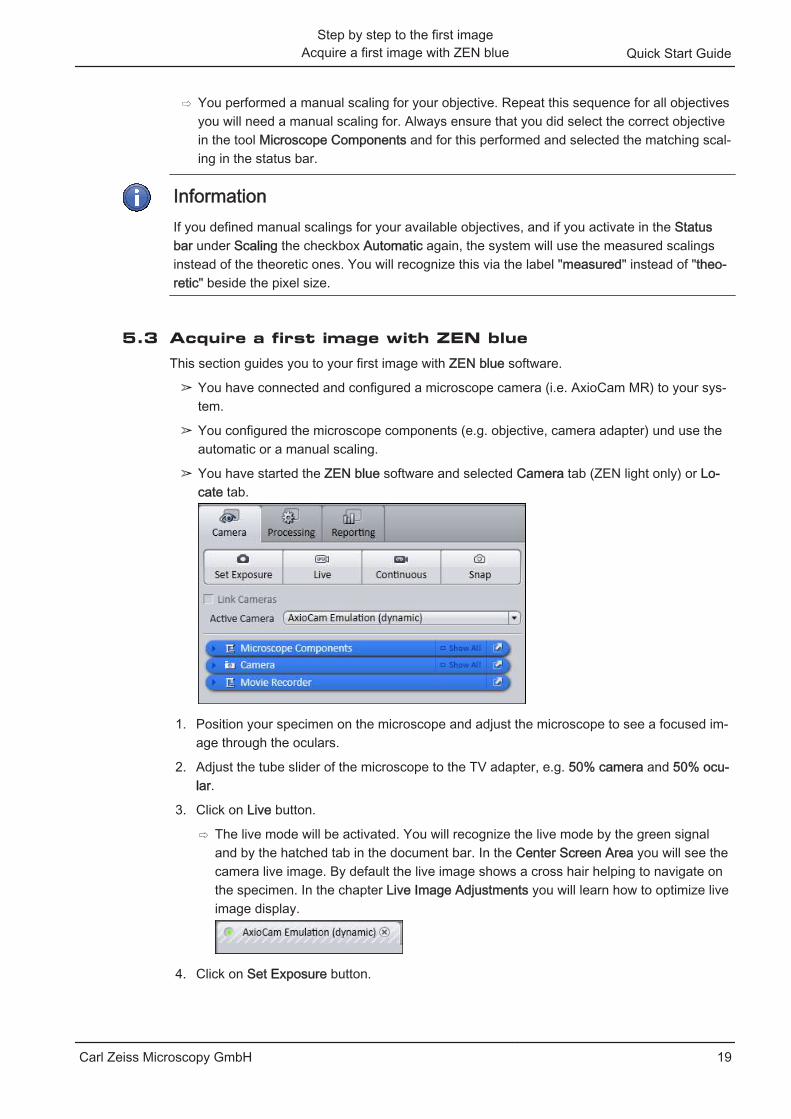
Acquire a first image with ZEN blueThis section guides you to your first image with ZEN blue software.
➢ You have connected and configured a microscope camera (i.e. AxioCam MR) to your sys‐tem.
➢ You configured the microscope components (e.g. objective, camera adapter) und use theautomatic or a manual scaling.
➢ You have started the ZEN blue software and selected Camera tab (ZEN light only) or Lo‐cate tab.
1. Position your specimen on the microscope and adjust the microscope to see a focused im‐age through the oculars.
2. Adjust the tube slider of the microscope to the TV adapter, e.g. 50% camera and 50% ocu‐lar.
3. Click on Live button.
⇨ The live mode will be activated. You will recognize the live mode by the green signaland by the hatched tab in the document bar. In the Center Screen Area you will see thecamera live image. By default the live image shows a cross hair helping to navigate onthe specimen. In the chapter Live Image Adjustments you will learn how to optimize liveimage display.
4. Click on Set Exposure button.
5.3
Step by step to the first image
Acquire a first image with ZEN blue Quick Start Guide
Carl Zeiss Microscopy GmbH 19
⇨ The exposure time will be automatically determined and set.
InformationIf you do not see a focused image please refocus the specimen on the microscope. You mayactivate the focus bar as an additional aid. Open the context menu in the Center Screen Areavia the right mouse key. There select the entry Focus Bar. The focus bar will be shown.
5. Click Snap button.
⇨ You successfully acquired your first image with ZEN blue. Save the image in the file sys‐tem via the menu File | Save as.
See also
2 Optimize Live Image Settings [➙ p.20]
2 Document bar [➙ p.9]
Optimize Live Image Settings➢ You started the live display via the Live button and see the camera’s live image in the Cen‐
ter Screen Area.
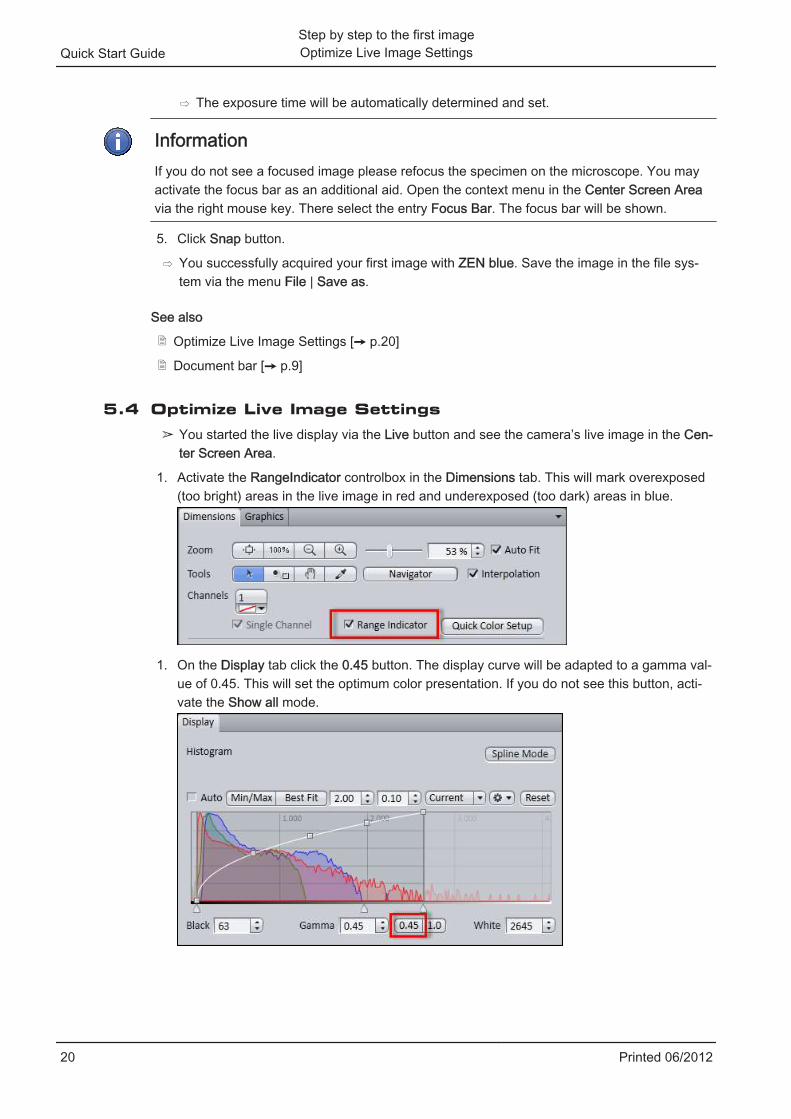
1. Activate the RangeIndicator controlbox in the Dimensions tab. This will mark overexposed(too bright) areas in the live image in red and underexposed (too dark) areas in blue.
1. On the Display tab click the 0.45 button. The display curve will be adapted to a gamma val‐ue of 0.45. This will set the optimum color presentation. If you do not see this button, acti‐vate the Show all mode.
5.4
Quick Start GuideStep by step to the first imageOptimize Live Image Settings
20 Printed 06/2012
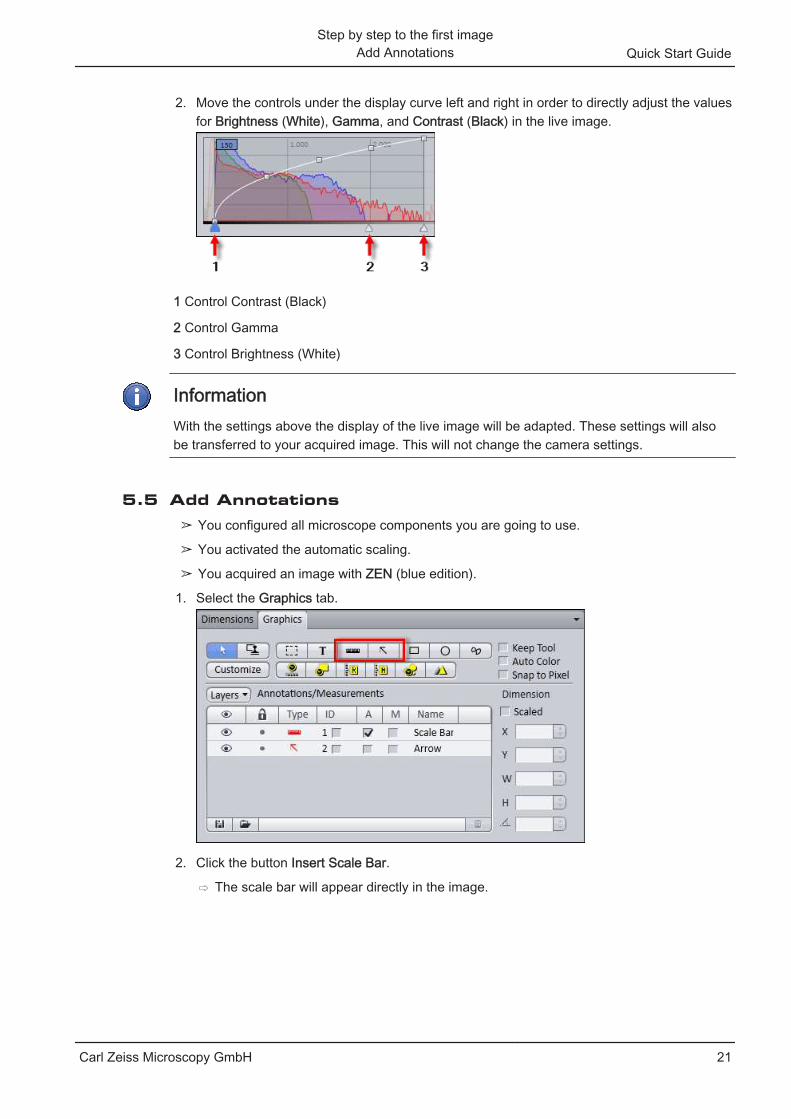
2. Move the controls under the display curve left and right in order to directly adjust the valuesfor Brightness (White), Gamma, and Contrast (Black) in the live image.
1 Control Contrast (Black)
2 Control Gamma
3 Control Brightness (White)
InformationWith the settings above the display of the live image will be adapted. These settings will alsobe transferred to your acquired image. This will not change the camera settings.
Add Annotations➢ You configured all microscope components you are going to use.
➢ You activated the automatic scaling.
➢ You acquired an image with ZEN (blue edition).
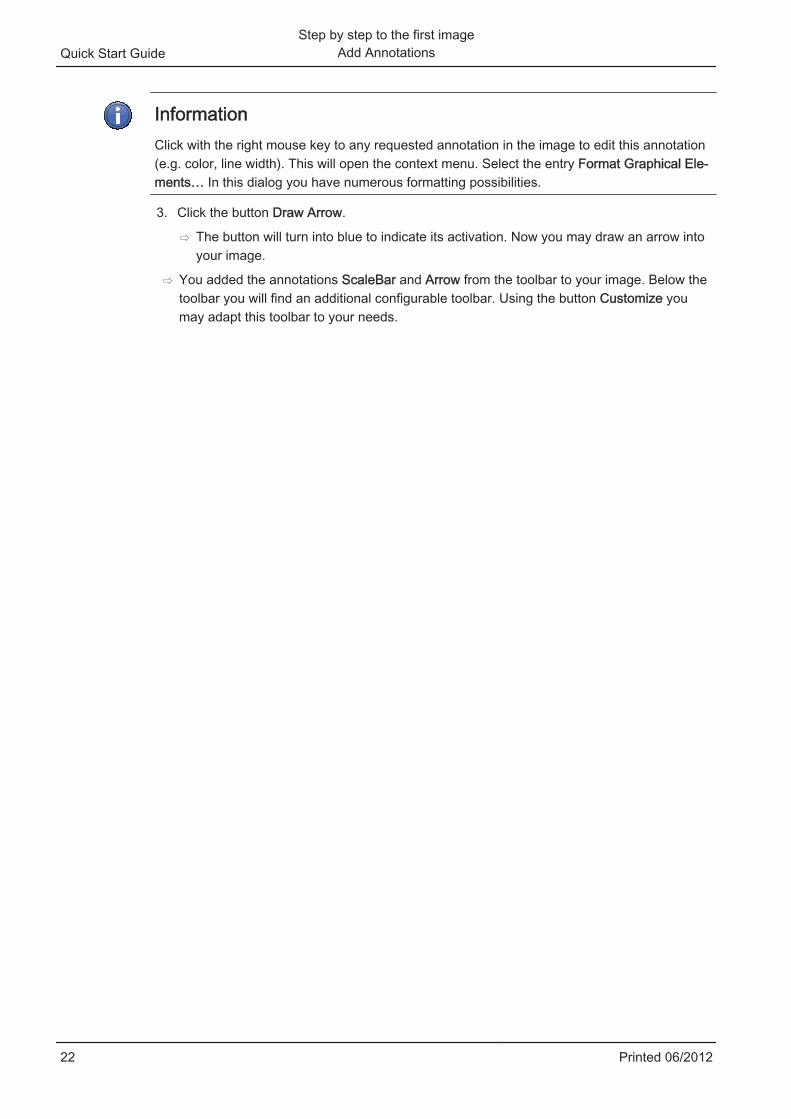
1. Select the Graphics tab.
2. Click the button Insert Scale Bar.
⇨ The scale bar will appear directly in the image.
5.5
Step by step to the first image
Add Annotations Quick Start Guide
Carl Zeiss Microscopy GmbH 21
InformationClick with the right mouse key to any requested annotation in the image to edit this annotation(e.g. color, line width). This will open the context menu. Select the entry Format Graphical Ele‐ments… In this dialog you have numerous formatting possibilities.
3. Click the button Draw Arrow.
⇨ The button will turn into blue to indicate its activation. Now you may draw an arrow intoyour image.
⇨ You added the annotations ScaleBar and Arrow from the toolbar to your image. Below thetoolbar you will find an additional configurable toolbar. Using the button Customize youmay adapt this toolbar to your needs.
Quick Start GuideStep by step to the first image
Add Annotations
22 Printed 06/2012
Close ZEN blue software➢ You have acquired or processed an image, created a table or a report with ZEN blue.
1. Click on File | Exit to end ZEN blue software. Alternatively you can press ALT+F4 on yourkeyboard or click on Close icon in program bar.
InformationIf you haven’t saved your files the save/keep documents dialog will open before the programcloses. Select files you want to save or unselect files you don’t want to save.
6
Close ZEN blue software Quick Start Guide
Carl Zeiss Microscopy GmbH 23
ImprintCarl Zeiss Microscopy GmbH
Carl-Zeiss-Promenade 10
07740 Jena, Germany
www.zeiss.com/microscopy
Carl Zeiss Microscopy GmbH
Königsallee 9-21
37081 Göttingen, Germany
© Carl Zeiss Microscopy GmbH, 2011
Quick Start Guide Imprint
24 Printed 06/2012