![sjdih.sidoarjokab.go.idsjdih.sidoarjokab.go.id/sjdih/webadmin/webstorage/produk_hukum/peraturan-bupati/22_TH...Author: Administrator [ DOK_HUKUM1 ] Created Date: 3/13/2003 5:04:58](https://static.fdocuments.us/doc/165x107/5e47a4891d899148821b09eb/sjdih-author-administrator-dokhukum1-created-date-3132003-50458.jpg)
Quick Start Guide - Sophos · IP address: 192.168.0.1 Network mask: 255.255.255.0 Default gateway:...
16
Quick Start Guide UTM 110/120
Transcript of Quick Start Guide - Sophos · IP address: 192.168.0.1 Network mask: 255.255.255.0 Default gateway:...

Quick Start GuideUTM 110/120

Sophos UTM 110/120 Quick Start Guide

Sophos UTM 110/120 Quick Start Guide
1. PreparationCongratulations on your purchase of the Sophos UTM appliance to protect your data networks and computers. This Quick Start Guide describes in short steps how to assemble the appliance and explains how to open the web-based WebAdmin configuration tool on the security system from your administration client PC. WebAdmin allows you to configure every aspect of the security system.
Scope of supply: Sophos UTM 110/120
License
The security appliances are delivered with a 30-day trial version. During or after the trial period, you can activate either a) full subscription functionality, by uploading the Sophos UTM licence file you purchase from your Sophos partner, or b) base firewall functionality, by creating an account at https://my.astaro.com and activating the Essential Firewall (EF) key found printed on the bottom label of your appliance. Please note that the Essential Firewall key is only used for base firewall functionality: you do not need it to use your purchased licence.
Before you begin please confirm that you have a working Internet connection and make sure you have the account information available that was provided by your ISP.
Sophos UTM This Quick Start Guide Power supply RJ45 Ethernet cable Appliance and Security Notes and cable
Security Notes and
Regulatory Compliance
Sophos UTM hardware appliances
Support and documentation
For more information and technical support please visit www.sophos.com/en-us/support or contact your local reseller.
Sophos UTM 110/120 Quick Start Guide
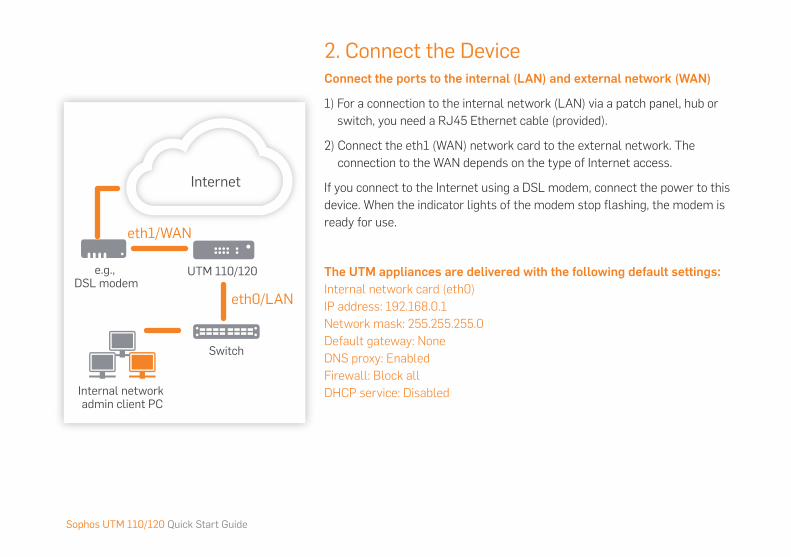
2. Connect the DeviceConnect the ports to the internal (LAN) and external network (WAN)
1) For a connection to the internal network (LAN) via a patch panel, hub or switch, you need a RJ45 Ethernet cable (provided).
2) Connect the eth1 (WAN) network card to the external network. The connection to the WAN depends on the type of Internet access.
If you connect to the Internet using a DSL modem, connect the power to this device. When the indicator lights of the modem stop flashing, the modem is ready for use.
The UTM appliances are delivered with the following default settings:Internal network card (eth0)IP address: 192.168.0.1Network mask: 255.255.255.0Default gateway: NoneDNS proxy: EnabledFirewall: Block allDHCP service: Disabled
e.g., DSL modem
UTM 110/120
Switch
Internal network admin client PC
Internet
eth1/WAN
eth0/LAN

Sophos UTM 110/120 Quick Start Guide
3. Power it onConnect the devices to the power supply and turn it on
Connect the appliance to the power supply. Use the power cable from the scope of supply.Turn the appliance on. The power switch is on the back side of the housing next to the power supply plug. Once the security system has booted completely, you’ll hear an acoustic signal: five beeps in a row.
4. Configure the deviceUse your browser to make the initial connection to the WebAdmin GUI
You will need to configure a workstation with the necessary LAN properties to access WebAdmin. You can change these settings to match your existing network. The location of the menu for these settings depends on the operating system of your client. Example: With Windows 7, the menu can be found under Start >> Control Panel >> Network and Sharing Center. Start the browser and enter the management IP address of the appliance: https://192.168.0.1:4444 Accept the security notice by clicking OK (Mozilla Firefox) or Yes (MS Internet Explorer). For configuration you can follow the initial setup wizard described in the WebAdmin Quick Start Guide** or cancel it and perform a manual setup (see the UTM Administration Guide*).
** Available at www.sophos.com/en-us/support
Power switchDC in
Workstation connection properties:
IP address: Any address in the range 192.168.0.2 through 192.168.0.254
Netmask: Enter 255.255.255.0
Standard gateway: Enter the IP address of the appliance’s internal network card (eth0): 192.168.0.1
DNS server: Enable this option and enter the IP address of the internal network card (eth0): 192.168.0.1

Sophos UTM 110/120 Quick Start Guide
1. VorbereitungWir beglückwünschen Sie zum Kauf einer UTM Appliance zum Schutz Ihres Netzwerkes und Ihrer Computer. Dieser Quick Start Guide beschreibt in kurzen Schritten den Aufbau der Appliance sowie den Zugang zum web-basierten Konfigurationstool WebAdmin von ihrem Administrations-PC.
Lieferumfang: Sophos UTM 110/120
Lizenz
Die Sicherheits-Appliances werden mit einer 30 Tage gültigen Testversion ausgeliefert. Während oder nach der Probezeit können Sie entweder a) Ihre Sophos UTM Subscriptions aktivieren, indem Sie die Sophos UTM Lizenzdatei hochladen, die Sie von Ihrem Sophos Partner erworben haben, oder b) Basis-Firewall-Funktionalität aktivieren, indem Sie ein Benutzerkonto auf https://my.astaro.com anlegen und dort den Essential-Firewall-Schlüssel (EF Key) aktivieren, der auf der Unterseite der Appliance aufgedruckt ist. Bitte beachten Sie, dass der Essential-Firewall-Schlüssel nur für die Basis-Firewall-Funktionalität benötigt wird: Sie benötigen ihn nicht für Ihre käuflich erworbene Lizenz.
Bevor Sie beginnen, stellen Sie bitte sicher, dass Sie eine funktionsbereite Internetverbindung sowie die Zugangsinformationen Ihres ISP zur Verfügung haben.
Support & Documentation
Weitere Information und technischen Support finden Sie unter www.sophos.com/de-de/support oder kontaktieren Sie Ihren lokalen Sophos Partner.
Sophos UTM Dieser Quick Start Guide Netzteil RJ45 Ethernet Kabel Appliance + Sicherheitshinweise mit Kabel
Security Notes and
Regulatory Compliance
Sophos UTM hardware appliances

Sophos UTM 110/120 Quick Start Guide
2. Verbindung herstellenVerbinden Sie die Ports zum internen Netz (LAN) und externen Netz (WAN)
1) Verbinden Sie den eth0 (LAN)-Anschluss über einen Hub oder Switch mit dem internen Netz. Verwenden Sie hierfür das mitgelieferte RJ45 Ethernetkabel.
2) Verbinden Sie den eth1 (WAN)-Anschluss mit dem externen Netz. Die Art der Verbindung hängt von Ihrem Internetanschluss ab.
Falls Sie ein DSL-Modem verwenden, Schalten Sie dieses nun ein. Sobald die Kontrollleuchten des Modems aufhören zu blinken, ist es bereit.
UTM Appliances werden mit folgenden Einstellungen ausgeliefert:Internal Network Card (eth0)IP Adresse: 192.168.0.1Netzwerk Maske: 255.255.255.0Default Gateway: NoneDNS Proxy EnabledFirewall Block allDHCP Service Disabled
e.g., DSL modem
UTM 110/120
Switch
Internal network admin client PC
Internet
eth1/WAN
eth0/LAN
Sophos UTM 110/120 Quick Start Guide
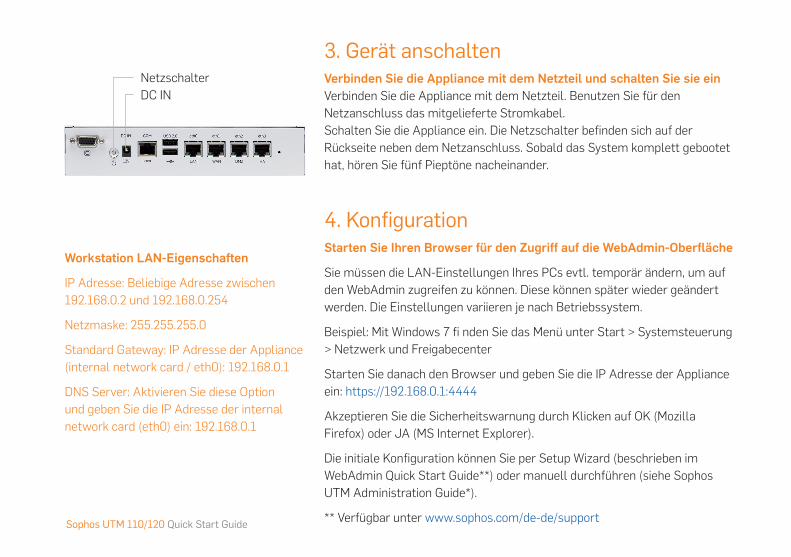
3. Gerät anschaltenVerbinden Sie die Appliance mit dem Netzteil und schalten Sie sie ein Verbinden Sie die Appliance mit dem Netzteil. Benutzen Sie für den Netzanschluss das mitgelieferte Stromkabel. Schalten Sie die Appliance ein. Die Netzschalter befinden sich auf der Rückseite neben dem Netzanschluss. Sobald das System komplett gebootet hat, hören Sie fünf Pieptöne nacheinander.
4. KonfigurationStarten Sie Ihren Browser für den Zugriff auf die WebAdmin-Oberfläche
Sie müssen die LAN-Einstellungen Ihres PCs evtl. temporär ändern, um auf den WebAdmin zugreifen zu können. Diese können später wieder geändert werden. Die Einstellungen variieren je nach Betriebssystem.
Beispiel: Mit Windows 7 fi nden Sie das Menü unter Start > Systemsteuerung > Netzwerk und Freigabecenter
Starten Sie danach den Browser und geben Sie die IP Adresse der Appliance ein: https://192.168.0.1:4444
Akzeptieren Sie die Sicherheitswarnung durch Klicken auf OK (Mozilla Firefox) oder JA (MS Internet Explorer).
Die initiale Konfiguration können Sie per Setup Wizard (beschrieben im WebAdmin Quick Start Guide**) oder manuell durchführen (siehe Sophos UTM Administration Guide*).
** Verfügbar unter www.sophos.com/de-de/support
NetzschalterDC IN
Workstation LAN-Eigenschaften
IP Adresse: Beliebige Adresse zwischen 192.168.0.2 und 192.168.0.254
Netzmaske: 255.255.255.0
Standard Gateway: IP Adresse der Appliance (internal network card / eth0): 192.168.0.1
DNS Server: Aktivieren Sie diese Option und geben Sie die IP Adresse der internal network card (eth0) ein: 192.168.0.1

Sophos UTM 110/120 Quick Start Guide
1. 准备工作祝贺您购买 Sophos安全服务器 设备来保护您的数据网络和 计算机。
本“快速入门指南”简要地分步介绍了设备的组装,并对 如何通过您的管
理客户端 PC 打开安全系统中基于 web 的 WebAdmin 配置工具进行了说
明。WebAdmin 可用于配置安全 系统的各个方面
供货范围:Sophos安全服务器 110/120
许可证
此设备包含了30天的试用许可。在试用期内或之后,您可以选择使用 a)
全套功能,这需要从您的Sophos供应商处购买全套Sophos UTM功能使用许
可,并上传到设备 b)基本防火墙功能,这需要您通过https://my.astaro.
com注册一个帐号,并激活随机附带的基本防火墙注册码。请注意,基本防
火墙仅仅提供最基础的防火墙功能:您不必为之购买使用许可。
在您开始前,请先确认您的ISP提供了使用
Internet链路的详细信息,并确保Internet
链路可用。
Sophos 本“硬件快速入门指南” 电源 RJ45 以太网电缆
安全服务器 设备 (桌面式) 安全说明 电源电缆
Security Notes and
Regulatory Compliance
Sophos UTM hardware appliances
支持与文档
有关详细信息和技术支持,请访问
www.sophos.com/en-us/support
或联系您的本地分销商。

Sophos UTM 110/120 Quick Start Guide
2. 连接设备将端口与内部网络 (LAN) 和外部网络 (WAN) 相连
1) 要通过接线板、集线器或交换机连接到内部网络 (LAN),需使用 RJ45
以太网电缆(已提供)。
2) 将 eth1 (WAN) 网口连接到外部网络。连接 WAN 的方式 取决于
Internet 访问的类型。
如果您用 DSL 调制解调器连接到 Internet,需将电源连接 到此设备上。
当调制解调器的指示灯停止闪烁时,调制解调 器准备就绪可供使用。
所交付的 Sophos安全服务器 设备具有以下默认设置:
内网口 (eth0)
IP 地址:192.168.0.1
网络掩码:255.255.255.0
默认网关:无
DNS 代理 已启用
防火墙 全部阻止
DHCP 服务 已禁用
如,DSL 调制解调器 内部网络
交换机
管理员客户端 PC
Internet
eth1/WAN
eth0/LAN

Sophos UTM 110/120 Quick Start Guide
3. 打开电源将设备连接到电源并将其打开
将设备连接到电源。 ! 使用供应范围中的电源电缆。
打开设备。 电源开关位于壳体背面的电源插头旁。安全系统完全启动后,
您将听到声音信号:连续五声哔哔响。
4. 配置设备利用您的浏览器创建到 WebAdmin GUI 的初始连接
您需要为工作站配置必要的 LAN 属性以访问 WebAdmin。稍后可更改这些属
性以匹配您现有 的网络。这些设置的菜单位置取决于您的客户 端的操作系
统。
示例:在 Windows 7 中,可在“开始”>>“控制面板”>>“ 网络和共
享中心”下找到该菜单 启动浏览器,然后输入该设备的管理 IP 地址:
https://192.168.0.1:4444
单击“确定”(Mozilla Firefox) 或“是” (MS Internet Explorer) 接受
安全声明。 https://192.168.0.1:4444
在配置时,您可以遵循“WebAdmin 快速入门指南”** 中所 述的初始设置
向导进行操作,或将其取消进行手动设置(请 参见“Sophos UTM 管理指
南”*)。
** 可从 www.sophos.com/en-us/support 获取
电源开关
直流输入
工作站连接属性:
IP 地址:192.168.0.2 至 192.168.0.254
范围内的任何 地址
网络掩码:输入 255.255.255.0
标准网关:输入该设备内网口 (eth0) 的
IP 地 址:192.168.0.1
DNS 服务器:启用此选项,然后输入内网口
(eth0) 的
IP 地址:192.168.0.1

Sophos UTM 110/120 Quick Start Guide
1. 使用前の準備Sophos UTM アプライアンスをご購入いただきありがとうございます。本製品
は、お客様のデータネットワークとコンピュータを保護します。このクイック スタ
ート ガイドでは、アプライアンスの接続方法と、お客様の管理クライアント PC
から、セキュリティシステム上の Web ベースの WebAdmin 設定ツールを開く方
法について説明しています。WebAdmin では、セキュリティシステムに関するあ
らゆる設定が可能です。
Sophos UTM 110/120 に含まれる内容
ライセンス
セキュリティ アプライアンスは 30日間の無償評価版として提供されます。評価
期間中または期間後に、(a) ソフォスパートナーから Sophos UTM のライセン
スファイルを購入してアップロードいただき、すべての機能を有効にするか、(b)
https://my.astaro.com でアカウントを作成していただき、 アプライアンスの裏
側に印刷されている Essential Firewall (EF) のキーを有効にすることで基本的
なファイアウォール機能を有効にすることが可能です。Essential Firewall キー
は基本的なファイアウォール機能を有効にする場合にのみ使用します。ライセ
ンスを購入していただいた場合には、使用する必要はありません。
作業を始める前に、有効なインターネット接
続と ISP から提供されたアカウント情報があ
ることを確認してください。
Sophos UTM 本書クイック スタート ガイド 電源アダプタ RJ45 イーサネットケーブル
アプライアンス およびセキュリティ ノート および電源ケーブル
Security Notes and
Regulatory Compliance
Sophos UTM hardware appliances
サポートおよびドキュメント
詳細情報およびテクニカルサポート
については、www.sophos.com/ja-jp/
support またはソフォス営業部にお問
い合わせください。

Sophos UTM 110/120 Quick Start Guide
2. デバイスを接続するポートを内部ネットワーク (LAN) および外部ネットワーク (WAN) に接続する
1) パッチパネル、ハブ、またはスイッチによって内部ネットワーク (LAN) に接続
する場合、 RJ45 イーサネットケーブル (本製品に付属) が必要です。
2) 外部ネットワークの場合、eth1 (WAN) ネットワークカードに接続します。WAN
への接続はインターネットアクセスの種類によって異なります。
DSL モデムを使用してインターネットに接続している場合、デバイスを電源に接
続します。モデムのインジケータが点滅を停止すると、モデムが使用可能の状
態になります。
UTM アプライアンスは以下のデフォルト設定で提供されます。
内部ネットワークカード (eth0)
IPアドレス: 192.168.0.1
ネットワークマスク: 255.255.255.0
デフォルトゲートウェイ: なし
DNSプロキシ: 有効
ファイアウォール: すべてをブロック
DHCP サービス: 無効
e.g., DSL modem
UTM 110/120
Switch
Internal network admin client PC
Internet
eth1/WAN
eth0/LAN

Sophos UTM 110/120 Quick Start Guide
3. 電源を入れるデバイスを電源ユニットに接続してスイッチを入れる
アプライアンスを電源ユニットに接続します。製品に含まれている電源ケーブ
ルを使用します。
アプライアンスの電源をオンにします。
電源スイッチはデバイス背面、電源接続口の横にあります。セキュリティシステ
ムが完全に起動するとビープ音が連続して 5回鳴ります。
4. デバイスを設定するブラウザを使用して WebAdmin GUI への初期接続を行う
WebAdmin にアクセスするには、クライアントコンピュータで必要な LAN プロパ
ティを設定する必要があります。既存のネットワークに合わせてこれらの設定
を変更できます。これらの設定のメニューの場所は、クライアントの OS によっ
て異なります。
例: Windows 7 の場合、メニューは「スタート」-「コントロール パネル」-「ネット
ワークと共有センター」の下にあります。ブラウザを起動し、以下のアプライア
ンスの管理 IP アドレスを入力します。https://192.168.0.1:4444
セキュリティに関する確認があった場合、「OK」 (Mozilla Firefox の場合) また
は「はい」 (MS Internet Explorer の場合) をクリックします。
設定に関しては、WebAdmin のクイックスタートガイド (英語)** に説明されて
いる初期セットアップウィザード従うか、ウィザードをキャンセルして手動セット
アップを実行できます (「UTM 管理ガイド」* を参照)。
** www.sophos.com/ja-jp/support から取得可能
電源スイッチ
DC 接続口
クライアントコンピュータの接続プロパティ:
IPアドレス: 192.168.0.2 ~ 192.168.0.254 の範
囲内のアドレス
ネットマスク: 255.255.255.0 を入力
標準ゲートウェイ: アプライアンスの内部
ネットワークカード (eth0) の IP アドレス:
192.168.0.1 を入力
DNS サーバー: 内部ネットワークカード (eth0)
の IP アドレス: 192.168.0.1 を入力

Sophos UTM 110/120 Quick Start Guide

Sophos UTM 110/120 Quick Start Guide
Sales DACH Deutschland, Österreich, Schweiz Tel: +49 (0) 611 5858-0 Tel: +49 (0)721 255 16-0 E-Mail: [email protected]
Japan Sales: Tel: +81 3 3568 7550 Email: [email protected]
China Sales: Tel: +86-10 - 6567 5820
Shanghai Sales: Tel: +86-21-32517160
United Kingdom Sales: Tel: +44 (0)8447 671131 Email: [email protected]
North American Sales: Toll Free: 1-866-866-2802 Email: [email protected]
Australia & New Zealand Sales Tel: +61 2 9409 9100 Email: [email protected]
Boston, USA | Oxford, UK © Copyright 2013. Sophos Ltd. All rights reserved. All trademarks are the property of their respective owners.
Sophos Quick Start Guide 03.13v1.dNA