Quick Start Guide - Department of Communication Systems - IJS
14
Jožef Stefan Institute, Ljubljana, Slovenija Department of Communication Systems (E-6) GRASS-RaPlaT Radio Planning Tool for GRASS Quick Start Guide V1.0a Igor Ozimek, Andrej Hrovat, Andrej Vilhar, Tomaž Javornik Ljubljana, September 2013
Transcript of Quick Start Guide - Department of Communication Systems - IJS

Jožef Stefan Institute, Ljubljana, Slovenija Department of Communication Systems (E-6)
GRASS-RaPlaT
Radio Planning Tool for GRASS
Quick Start Guide V1.0a
Igor Ozimek, Andrej Hrovat, Andrej Vilhar, Tomaž Javornik
Ljubljana, September 2013
i
Contents
1. INTRODUCTION ............................................................................................................... 1
2. USING UBUNTU_GRASS_RAPLAT VIRTUAL APPLIANCE ..................................... 2
3. INSTALLING RAPLAT .................................................................................................... 10 3.1. RAPLAT_MODULES.TAR.GZ ........................................................................................ 10 3.2. RAPLAT_ETC_RADIO_COVERAGE.TAR.GZ .................................................................. 11 3.3. RAPLAT_DEMOLOCS.TAR.GZ ...................................................................................... 11 3.4. RAPLAT_CMDS.TAR.GZ .............................................................................................. 11
Figures
Fig. 1: Start Terminal (Ubuntu 12.04 - Unity interface) .................................................................... 3
Fig. 2: Start GRASS in the Terminal window ..................................................................................... 4
Fig. 3: GRASS Welcome window. ..................................................................................................... 4
Fig. 4: GRASS is running (command line interface) .......................................................................... 5
Fig. 5: GRASS GUI - The Layer Manager window and the first Map Display window .................... 5
Fig. 6: Running RaPlaT demo - r.radcov ........................................................................................... 6
Fig. 7: Selecting two maps for the display ......................................................................................... 8
Fig. 8: Displaying the maps - radio coverage on top of DEM ........................................................... 8
Fig. 9: The radio coverage map, zoomed in, with the legend (in [dBm]) .......................................... 9

1
1. Introduction
This Quick Start Guide for RaPlaT (Radio Planning Tool for GRASS) contains the most
basic information about:
How to use the virtual machine (virtual appliance) with the preinstalled Ubuntu OS,
GRASS with RaPlaT and the demo location Slovenia, MySQL and PostgreSQL.
How to install RaPlaT on a Ubuntu machine.
Detailed information about RaPlaT, its installation and use can be found in the RaPlaT
User Manual.

2
2. Using Ubuntu_GRASS_RaPlaT virtual appliance
The Ubuntu_GRASS_RaPlaT virtual appliance is a virtual machine (VM) with the
following main software preinstalled:
Ubuntu 12.04 LTS (Precise Pangolin) desktop 32-bit.
MySQL 5.5.
PostgreSQL 9.1.
GRASS 6.4.3RC2, a development installation from the source distribution, with
support for MySQL and PostgreSQL. A number of other packages (libraries), either
required or optionally used by GRASS, are also installed. This GRASS version is
officially a “Release Candidate” version, but marked as stable and recommended. (It
has some bugs corrected, which makes it a better choice compared to 6.4.2.)
RaPlaT GRASS add-on.
It is distributed in the OVF format (Open Virtualization Format) which is compatible with
VM hypervisors from various vendors (e.g. with VMware Player and other VMware
hypervisor products, or with VirtualBox). The distribution contains three file:
*.ovf file. It contains the description of the virtual machine (number of CPU’s,
memory size, and many other things) in the XML text format.
*.vmdk (Virtual Machine Disk) file. It contains the VM disk image (in compressed
form). This file format was originally developed by VMware but is now an open
format.
*.mf (Manifest File). This file is optional. It contains the SHA1 digest of the two
previously described files, and if present serves to check their integrity.
The VM disk size is 40 GB, the memory size is 1 GB, and only one processor (one
processor core) is used. The configured memory size and the number of CPU’s (or CPU
cores) are very modest so that VM can run on a host computer with limited resources. These
settings can be easily changed in a VM hypervisor (e.g. in VMware Player). It is
recommended to set a larger memory size and more CPU’s (CPU cores) if sufficient host
computer resources are available, especially if one wants to use the r.radcov’s parallel
execution support.
For personal desktop use, a suitable VM hypervisor is VMware Player
(http://www.vmware.com/products/player), which is free for non-commercial use and can run
on Linux or MS Windows operating systems. Another popular option is VirtualBox
(http://www.virtualbox.org/, http://www.oracle.com/us/technologies/virtualization/virtualbox/
overview/). For better integration of virtual machines with the host machine (mouse, display
etc.), VM hypervisors are accompanied by additional software (VMware Tools for VMware
Player, Virtual Box Guest Additions for VirtualBox) that has to be installed on each virtual
machine (installation is performed on a running virtual machine, not on the host machine).
The Ubuntu_GRASS_RaPlaT VM was prepared with WMware Player and has VMware Tools
installed (in case of troubles it may help to reinstall them, Player→Manage→Reinstall
VMWare Tool...). For use with VirtualBox, Virtual Box Guest Additions should be installed.
The Ubuntu_GRASS_RaPlaT virtual appliance is distributed as three files:
Ubuntu_GRASS_RaPlaT.ovf, Ubuntu_GRASS_RaPlaT-disk1.vmdk and Ubuntu_GRASS_
RaPlaT.mf. They must be imported into the VM hypervisor, which then builds its own native
format VM files. The three files must reside in the same directory. In VMware Player,
importing is started by selecting Player→File→Open and then the .ovf file. After importing

3
has finished, the new Ubuntu_GRASS_RaPlaT virtual machine is available and can be
selected and started (Play virtual machine in VMware Player). The Ubuntu booting process
starts and from then on everything is very similar to a physical machine, except that the
Ubuntu screen is shown in a window on the desktop of the host operating system (e.g. MS
Windows).
Two Ubuntu user accounts are preconfigured, user1 and grassuser, with passwords equal
to the usernames. The user1 account is the primary Ubuntu account (with the administrative
sudo rights) and is also used for GRASS administration (GRASS database setup etc.). The
grassuser account is an example of a general (non-privileged) Ubuntu account for GRASS
users. It is strongly recommended to change both passwords as soon as possible,
especially when (and before) enabling the remote access over the network. (The only
exception could be if the virtual machine is only accessible locally on a single-user host
machine where the user login session is protected by a password.)
Both installed database management systems, MySQL and PostgreSQL, have an empty
database, grass, prepared for use with GRASS-RaPlaT, with necessary permissions granted to
user1 and grassuser. A password is preconfigured for the MySQL root user (administrator). It
is equal to the Ubuntu user1 account password (i.e. user1). Again, it is strongly
recommended to change it, otherwise any user with an Ubuntu account can potentially login
to MySQL as root.
You first login as user1. To start GRASS, you first open a Terminal window: click Dash
Home (upper left square) and click the Terminal icon (if the icon is not there yet, type
‘terminal’ first), Fig. 1.
Fig. 1: Start Terminal (Ubuntu 12.04 - Unity interface)
4
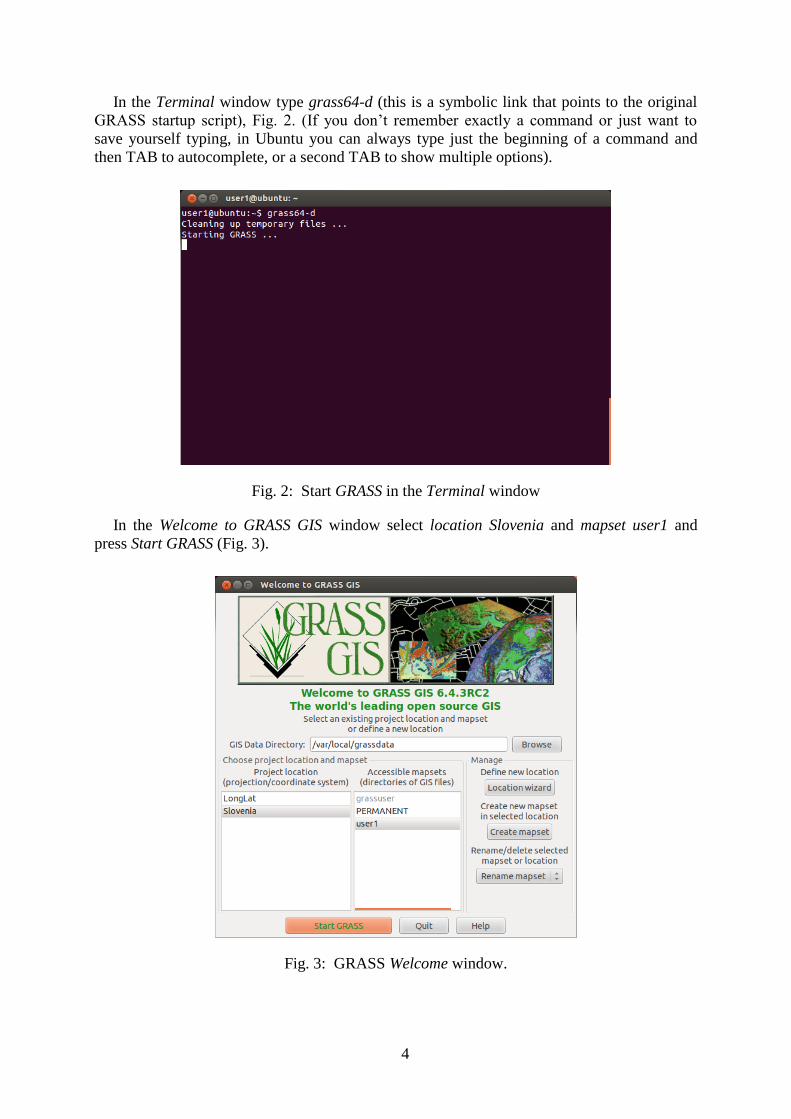
In the Terminal window type grass64-d (this is a symbolic link that points to the original
GRASS startup script), Fig. 2. (If you don’t remember exactly a command or just want to
save yourself typing, in Ubuntu you can always type just the beginning of a command and
then TAB to autocomplete, or a second TAB to show multiple options).
Fig. 2: Start GRASS in the Terminal window
In the Welcome to GRASS GIS window select location Slovenia and mapset user1 and
press Start GRASS (Fig. 3).
Fig. 3: GRASS Welcome window.

5
GRASS starts running. The GRASS run-time environment is established for the existing
Terminal window, which now serves also as the GRASS command line interface (in addition
to its normal system use), Fig. 4.
Fig. 4: GRASS is running (command line interface)
In addition to the command line interface, the GRASS graphical user interface (GUI) is
automatically started. It consists of two windows: the GRASS GIS Layer Manager window
and the first GRASS GIS MAP Display window (Fig. 5). (Additional Map Display windows
can be opened later as needed.)
Fig. 5: GRASS GUI - The Layer Manager window and the first Map Display window
We can now change to the RaPlaT directory and run the demo radio coverage computation
by executing the following command (Fig. 6):
r.radcov csv_file=cell_list_ijs.csv dem_map=Slo_DEMsrtm_100@PERMANENT
out_map=IJS_ABC frequency=900 --o

6
Fig. 6: Running RaPlaT demo - r.radcov
The radio transmitter network configuration together with the corresponding radio signal
propagation models and their parameters is defined by the table in the cell_list_ijs.csv file (a
CSV-format text file, which can be opened and edited either with a general text editor, or
more conveniently with a spreadsheet application such as OpenOffice Spreadsheet). The
following is printed on the screen during the demo r.radcov command execution:
GRASS 6.4.3RC2 (Slovenia):~/RaPlaT > r.radcov csv_file=cell_list_ijs.csv
dem_map=Slo_DEMsrtm_100@PERMANENT out_map=IJS_ABC frequency=900 --o
Number of detected processors = 1
READING AND CHECKING THE ANTENNAS-MAPPING CSV TABLE ...
Number of .MSI files found: 1
READING AND CHECKING THE RADIO SECTOR CSV TABLE ...
Standard CSV file format detected
GETTING THE LIST OF EXISTING MODEL AND SECTOR FILES
FROM PREVIOUS SIMULATION RUNS IN THE CURRENT MAPSET...
DELETING UNNEEDED MODEL AND SECTOR FILES FROM
PREVIOUS SIMULATION RUNS IN THE CURRENT MAPSET...
STARTING RADIO COVERAGE COMPUTATION...
----- PROCESSING MODELS -----
Temporarily changing the existing current region:
N = 195000.0
W E = 370000.0 630000.0
S = 25000.0
res E-W/N-S = 100.0/100.0
to the extended computation region:
N = 194950.0
W E = 370050.0 629950.0
S = 25050.0
res E-W/N-S = 100.0/100.0
> IJS-A-1 (1./1)
r.hata inputDEM=Slo_DEMsrtm_100@PERMANENT
output=_hata_urban_460697_99918_20_10_900 area_type=urban
coordinate=460697,99918 ant_height=20 radius=10 frequency=900 --overwrite
< (1./_)

7
----- PROCESSING SECTORS -----
> IJS-A-1 (1./3)
r.sector pathloss_raster=_hata_urban_460697_99918_20_10_900@user1
inputDEM=Slo_DEMsrtm_100@PERMANENT
output=IJS-A-1_hata_urban_460697_99918_20_10_900_30_0_0_COS-21
ant_data_file=/usr/local/src/grass-6.4.3RC2/dist.i686-pc-linux-
gnu/etc/radio_coverage/antenna_diagrams/_demo_/COS_21.MSI
beam_direction=30 mech_tilt=0 height_agl=20 radius=10 east=460697
north=99918 --overwrite
< (1./_)
> IJS-B-2 (2./3)
r.sector pathloss_raster=_hata_urban_460697_99918_20_10_900@user1
inputDEM=Slo_DEMsrtm_100@PERMANENT
output=IJS-B-2_hata_urban_460697_99918_20_10_900_135_0_0_COS-21
ant_data_file=/usr/local/src/grass-6.4.3RC2/dist.i686-pc-linux-
gnu/etc/radio_coverage/antenna_diagrams/_demo_/COS_21.MSI
beam_direction=135 mech_tilt=0 height_agl=20 radius=10 east=460697
north=99918 --overwrite
< (2./_)
> IJS-C-3 (3./3)
r.sector pathloss_raster=_hata_urban_460697_99918_20_10_900@user1
inputDEM=Slo_DEMsrtm_100@PERMANENT
output=IJS-C-3_hata_urban_460697_99918_20_10_900_270_0_0_COS-21
ant_data_file=/usr/local/src/grass-6.4.3RC2/dist.i686-pc-linux-
gnu/etc/radio_coverage/antenna_diagrams/_demo_/COS_21.MSI
beam_direction=270 mech_tilt=0 height_agl=20 radius=10 east=460697
north=99918 --overwrite
< (3./_)
----- GENERATING FINAL RESULTS - RASTER MAP AND DB (OPTIONALLY) -----
Temporarily changing current region to the computation region:
N = 194950.0
W E = 370050.0 629950.0
S = 25050.0
res E-W/N-S = 100.0/100.0
> WRITE RASTER MAP ONLY
r.MaxPower 'cell_input=/tmp/tmpOOZBfy' output=IJS_ABC table=out_db
driver=none 'database=$GISDBASE/$LOCATION_NAME/$MAPSET/dbf' dbperf=1
cell_num=5 --overwrite
Processing 3 cells...
Sorting receive power values
100%
Finished sorting receive power values
Processing of 1 model(s) took 1.95[s], i.e. 1.95[s/model]
Processing of 3 sector(s) took 6.69[s], i.e. 2.23[s/sector]
Writing of output raster map took 4.44[s]
Processing finished
GRASS 6.4.3RC2 (Slovenia):~/RaPlaT >
The computation uses the DEM map Slo_DEMsrtm_100 from the PERMANENT mapset
(Slo_DEMsrtm_100@PERMANENT) and generates the resulting radio coverage map
IJS_ABC in the user1 mapset (IJS_ABC@user1). Additionally, it generates four intermediate
radio propagation path loss GRASS maps - one by r.hata (a radio propagation model) and
three by r.sector (with antenna radiation patterns applied):
_hata_urban_460697_99918_20_10_900@user1
IJS-A-1_hata_urban_460697_99918_20_10_900_30_0_0_COS-21@user1
IJS-B-2_hata_urban_460697_99918_20_10_900_135_0_0_COS-21@user1
IJS-C-3_hata_urban_460697_99918_20_10_900_270_0_0_COS-21@user1
We will now display the IJS_ABC and Slo_DEMsrtm_100 maps (Fig. 8). In the Layer
Manager window we add them to the Map Display Window, using the Add Raster Map Layer
button, in the following order (so that the DEM map is behind the radio coverage map, their
order can also be changed later in the Layer Manager window), Fig. 7:

8
Slo_DEMsrtm_100@PERMANENT
IJS_ABC@user1
Fig. 7: Selecting two maps for the display
Fig. 8: Displaying the maps - radio coverage on top of DEM

9
The zoomed-in radio coverage map only (without the background DEM map) and with the
color legend added (the received signal strength in [dBm]) is shown in Fig. 9.
Fig. 9: The radio coverage map, zoomed in, with the legend (in [dBm])
While GRASS starts its GUI automatically, it does not close it on exit (i.e. when the user
finishes using GRASS by typing the command exit in its Terminal window). The GRASS
GUI (which is useless without the running GRASS application that started it) must be closed
manually by closing its Layer Manager window.

10
3. Installing RaPlaT
The complete RaPlaT distribution consists of four tar.gz archive files:
RaPlaT_modules.tar.gz
RaPlaT_etc_radio_coverage.tar.gz
RaPlaT_demolocs.tar.gz
RaPlaT_cmds.tar.gz
RaPlaT_modules.tar.gz is the main archive file and contains the source code of all RaPlaT
modules (C and Python), with each module in its own subdirectory.
For radio coverage computation, RaPlaT needs information about the transmit antennas
radiation patterns. Each type of antenna is specified in a MSI-format file (for antennas with
multiple electrical tilts there is an MSI file for each of the possible electrical tilt values). In
addition to the MSI files, RaPlaT needs an antenna types table, i.e. a CSV-format file
containing the MSI file names and some basic characteristics of all supported antenna types
(see RaPlaT User Manual for details). RaPlaT_etc_radio_coverage.tar.gz contains a minimal
set of data required to run the demo examples: a MSI file for one (artificially created) antenna,
and the corresponding antenna types file.
RaPlaT_demolocs.tar.gz contains GRASS demo locations (see the previous chapter and
the RaPlaT User Manual for details):
Slovenia, used for demo radio coverage computations. It contains Slovenia DEM
(based on the publicly available global SRTM maps).
LongLat, used for processing of the SRTM maps.
RaPlaT_cmds.tar.gz contains commands and CSV-format files used to run the demo
RaPlaT computations (see the previous chapter and RaPlaT User Manual).
The following installation procedures presume the existence of the user accounts user1 (the
primary Ubuntu account with sudo permissions) and grassuser (a generic non-privileged
GRASS user), and the group grass (all GRASS users should become its members). Both,
user1 and grassuser should be members of grass. The following commands would create the
grassuser account, the grass group and configure group membership, presuming that user1
already exists:
sudo addgroup grass
sudo adduser user1 grass
sudo adduser grassuser
sudo adduser grassuser grass
3.1. RaPlaT_modules.tar.gz
This archive contains RaPlaT modules - C (source code) and Python modules. The
procedure to install them is as follows:
Extract the archive to the doc subdirectory in the main GRASS source directory
($GISBASE/../doc, e.g. /usr/local/src/grass-6.4.3RC2/doc):
cd /usr/local/src/grass-6.4.3RC2/doc
tar -xvzf /home/user1/Downloads/RaPlaT_modules.tar.gz

11
The modules directories will be created in the raster and python subdirectories.
Build all modules (change the grass_src_dir variable value in the RaPlaT_make script
properly if your main GRASS source directory is different):
cd /usr/local/src/grass-6.4.3RC2/doc
./RaPlaT_make
If successful, the script execution finishes with the message:
Script finished successfully
3.2. RaPlaT_etc_radio_coverage.tar.gz
This archive contains the radio_coverage directory containing the demo antenna files.
Extract it to the etc subdirectory in the GRASS dist… subdirectory, i.e. $GISBASE/etc, e.g.
/usr/local/src/grass-6.4.3RC2/dist.i686-pc-linux-gnu/etc ($GISBASE is an environment
variable defined by the running GRASS application in its Terminal window):
cd /usr/local/src/grass-6.4.3RC2/dist.i686-pc-linux-gnu/etc
tar -xvzf /home/user1/Downloads/RaPlaT_etc_radio_coverage.tar.gz
3.3. RaPlaT_demolocs.tar.gz
This archive contains two RaPlaT GRASS demo locations, Slovenia and LongLat.
If the GRASS database directory does not exist yet (e.g. the GRASS application has just be
installed and not used yet), it must first be created:
cd /var/local
sudo mkdir grassdata
sudo chown user1:grass grassdata
Extract the archive file to the GRASS database directory (/var/local/grassdata in our case):
cd /var/local/grassdata
tar -xvzf /home/user1/Downloads/RaPlaT_demolocs.tar.gz
Set the ownership of the GRASS mapset grassuser of GRASS location Slovenia (to
grassuser):
sudo chown -R grassuser /var/local/grassdata/Slovenia/grassuser
In the example above, the main database directory is named grassdata and located in
/var/local. When GRASS is run for the first time, its database directory must be defined in its
GUI Welcome window (Fig. 3, GIS Data Directory).
3.4. RaPlaT_cmds.tar.gz
This archive contains user files for the RaPlaT demo computations:
cmds.txt - various RaPlaT commands,
cell_list_ijs.csv - cell list file for r.radcov,

12
pwmx_cell_list - cell list file for r.MaxPower (it is used only for the demo execution of
r.MaxPower when it is called directly; it is not used with r.radcov since it generates
this file automatically from its input cell list file, but as a temporary file with a different
auto-generated name).
Extract the archive file to your RaPlaT working directory, e.g. $HOME/RaPlaT,
/home/user1/RaPlaT. The following commands create a RaPlaT working directory and extract
the archive (cd is equivalent to cd $HOME):
cd
mkdir RaPlaT
cd RaPlaT
tar -xvzf /home/user1/Downloads/RaPlaT_cmds.tar.gz