Quick Reference Guide QRG How to get Started using the...
17
Quick Reference Guide QRG How to get Started using the iClicker Titanium Integration Last Revised: 08/20/13 Page 1 of 17 The iClicker Titanium integration allows grades from iClicker sessions to be uploaded into a Titanium course. Please email [email protected] if you need assistance with this process. Processing Steps Screen Shots Step 1: Browse to the main page of the course you want to enable the iClicker block in. Click the “Turn Editing on” button. Step 2: Under “Add a block”, in the bottom left of the page, click “Add…”. Step 3: Select “i>clicker” from the “Add a block” menu list.
Transcript of Quick Reference Guide QRG How to get Started using the...

Quick Reference Guide QRG How to get Started using the
iClicker Titanium Integration
Last Revised: 08/20/13 Page 1 of 17
The iClicker Titanium integration allows grades from iClicker sessions to be uploaded into a Titanium course. Please email [email protected] if you need assistance with this process.
Processing Steps Screen Shots Step 1: Browse to the main page of the course you want to enable the iClicker block in. Click the “Turn Editing on” button.
Step 2: Under “Add a block”, in the bottom left of the page, click “Add…”.
Step 3: Select “i>clicker” from the “Add a block” menu list.

QRG How to get Started using the iClicker Titanium Integration FINAL
Last Revised: 08/20/13 Page 2 of 17
Processing Steps Screen Shots Step 4: Instruct students to register their clickers by clicking “Remote Registration” in the iClicker block in the course.
Note that instructions for students registering their clickers are available in Titanium after they click “Remote Registration” in the iClicker block.
Step 5: Confirm that students have registered their clickers. Click “Instructor Report”.

QRG How to get Started using the iClicker Titanium Integration FINAL
Last Revised: 08/20/13 Page 3 of 17
Processing Steps Screen Shots Step 6: Download the “CSUF iclicker for Windows v6.3.0.zip” file from the IT website to your PC. Open the zip file and copy the “iclicker Win v6.3.0” folder to the computer or thumb drive you will run the iClicker application from.
Step 7: Open the iClicker application by double-clicking the “iclicker.exe” file. The iclicker.exe file is located in the “iclicker Win v6.3.0” folder that you copied to your computer or thumb drive in step 6.
Some computers hide the 3 digit file extension, so the file may simply appear as “iclicker”.

QRG How to get Started using the iClicker Titanium Integration FINAL
Last Revised: 08/20/13 Page 4 of 17
Processing Steps Screen Shots Step 8: Click the “New” button to create a new iClicker course.
Step 9: Fill in the “Course Name”, “Course Number”, and “Section Number” fields.
The course name does not have to match the Titanium course name exactly, however it is recommended to pick a name that clearly identifies the course. Click the “Create” button to create the course.
QRG How to get Started using the iClicker Titanium Integration FINAL
Last Revised: 08/20/13 Page 5 of 17
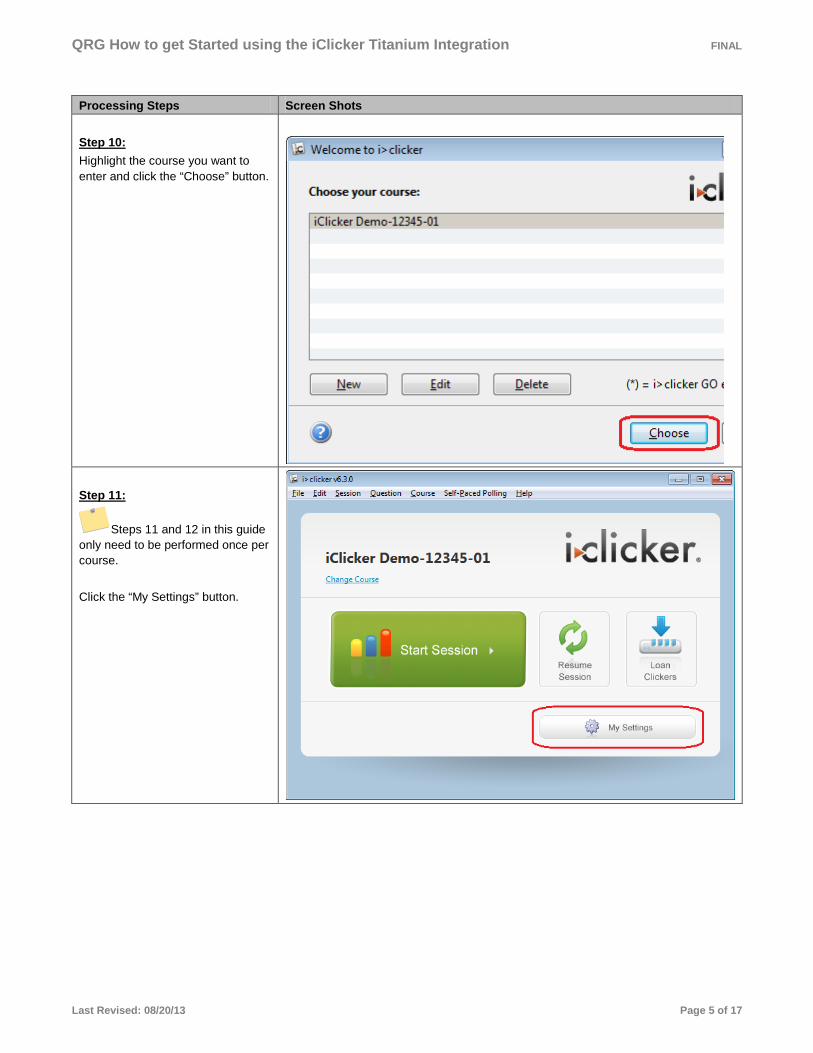
Processing Steps Screen Shots Step 10: Highlight the course you want to enter and click the “Choose” button.
Step 11:
Steps 11 and 12 in this guide only need to be performed once per course. Click the “My Settings” button.

QRG How to get Started using the iClicker Titanium Integration FINAL
Last Revised: 08/20/13 Page 6 of 17
Processing Steps Screen Shots Step 12:
Stesp 11 and 12 in this guide only need to be performed once per course. Click the “LMS/Reg” tab. Select “Moodle”. Click the “Set for Course” button.
Step 13:
Steps 13 through 15 are only necessary if a new question list is needed for an upcoming iClicker session. Click the “Question” tab. Click “New Question List”.

QRG How to get Started using the iClicker Titanium Integration FINAL
Last Revised: 08/20/13 Page 7 of 17
Processing Steps Screen Shots Step 14:
Steps 13 through 15 are only necessary if a new question list is needed for an upcoming iClicker session. Create a new question and click the “Save” button. Click the “Close” button when you are finished creating and editing questions.
Step 15:
Steps 13 through 15 are only necessary if a new question list is needed for an upcoming iClicker session. You will be prompted to name the question file. Click Save.

QRG How to get Started using the iClicker Titanium Integration FINAL
Last Revised: 08/20/13 Page 8 of 17
Processing Steps Screen Shots Step 16: When you are ready to start an iClicker session with your class, click the “Start Session” button.
You will need to be running the application on a PC connected to an iClicker base.
Step 17: If your course has a question list (like the one create in steps 13 through 15), you will be prompted to open the question list. Click the “Yes” button.

QRG How to get Started using the iClicker Titanium Integration FINAL
Last Revised: 08/20/13 Page 9 of 17
Processing Steps Screen Shots Step 18: Select a question list file. Click the “Open” button.
Step 19: Click the green arrow button to start the session.
Step 20: Click the “stop” button when the responses have been gathered.
Step 21: Click the “X” button to close the iClicker session.

QRG How to get Started using the iClicker Titanium Integration FINAL
Last Revised: 08/20/13 Page 10 of 17
Processing Steps Screen Shots Step 22: Click the “File” menu. Select “Open i>grader”.
iGrader is used to upload scores from iClicker sessions into Titanium.
Step 23: Select the course and click the “Choose” button.

QRG How to get Started using the iClicker Titanium Integration FINAL
Last Revised: 08/20/13 Page 11 of 17
Processing Steps Screen Shots Step 24: You will be prompted to download your Moodle roster. Click the “Download Roster” button.
Moodle is the software platform that Titanium runs on.
Step 25: Instructions regarding the session summary may appear. Click the “Close” button.
Step 26: If this is your first time syncing grades with Titanium, you will need to fill out the LMS Username and Security Key fields. The LMS username is your CWID (campus wide ID). This is a 9 digit number starting with an “8”. The Security Key needs to be generated and copied from the iClicker block in Titanium.

QRG How to get Started using the iClicker Titanium Integration FINAL
Last Revised: 08/20/13 Page 12 of 17
Processing Steps Screen Shots Step 26: Log in to the Titanium course you added the i>clicker block to. Click “Admin Control” in the iClicker block.
Step 27: Select the “Single Sign-On Security Key” tab. Copy your security key, so it can be pasted into the iClicker application.
Step 28: Enter your CWID into the “LMS Username:” field. Enter your security key into the “Security Key:” field. Click the “Log In” button.

QRG How to get Started using the iClicker Titanium Integration FINAL
Last Revised: 08/20/13 Page 13 of 17
Processing Steps Screen Shots Step 29: Select the name of your Titanium course from the “Course:” menu. Click the “Import Roster” button.
Step 30: You will be prompted to Restart iGrader. Click the “Restart i>grader” button.

QRG How to get Started using the iClicker Titanium Integration FINAL
Last Revised: 08/20/13 Page 14 of 17
Processing Steps Screen Shots Step 31: A summary of the sessions will be displayed. Click the export icon.
Step 32: Check the box next to the date of the session(s) you would like to sync with Titanium. Click the “Export” button.

QRG How to get Started using the iClicker Titanium Integration FINAL
Last Revised: 08/20/13 Page 15 of 17
Processing Steps Screen Shots Step 33: You will be prompted that the export is complete. Click the “OK” button.
Step 34: You will be prompted to confirm the upload of grades to Titanium. Click the “Yes” button.

QRG How to get Started using the iClicker Titanium Integration FINAL
Last Revised: 08/20/13 Page 16 of 17
Processing Steps Screen Shots Step 35: Click the “Log In” button.
Step 36: Click the “Upload Scores” button.

QRG How to get Started using the iClicker Titanium Integration FINAL
Last Revised: 08/20/13 Page 17 of 17
Processing Steps Screen Shots Step 37: You will be prompted that data uploaded successfully. Click the “OK” button.
Step 38: Entering the grader report in the Titanium course will show the uploaded scores.