Quick Reference Guide - Panasonic Reference Guide Model No. KX-DT333/KX-DT343/KX-DT346 Digital...
24
<KX-DT346> Thank you for purchasing a Digital Proprietary Telephone (DPT). Please read this manual carefully before using this product and save this manual for future use. For more details, please refer to the manuals of the PBX. Note: In this manual, the suffix of each model number is omitted unless necessary. Accessories (included) *1 This telephone comes with the wall mounting adaptor already attached. To remove the adaptor, refer to step 1 on page 17. Handset: 1 Handset Cord: 1 Wall Mounting Adaptor *1 : 1 Screws for wall: 2 Telephone Line Cord: 1 Quick Reference Guide Model No. KX-DT333/KX-DT343/KX-DT346 Digital Proprietary Telephone
Transcript of Quick Reference Guide - Panasonic Reference Guide Model No. KX-DT333/KX-DT343/KX-DT346 Digital...

<KX-DT346>
Quick Reference Guide Digital Proprietary Telephone
Thank you for purchasing a Digital Proprietary Telephone (DPT). Please read this manual carefully before using this product and save this manual for future use. For more details, please refer to the manuals of the PBX.Note: In this manual, the suffix of each model number is omitted unless necessary.
Accessories (included)
*1 This telephone comes with the wall mounting adaptor already attached. To remove the adaptor, refer to step 1 on page 17.
Handset: 1 Handset Cord: 1 Wall Mounting Adaptor*1: 1
Screws for wall: 2 Telephone Line Cord: 1
Model No. KX-DT333/KX-DT343/KX-DT346

2
This unit supports the following optional devices and features:
Q: Available*1 The availability of the Bluetooth Module depends on the software version of
the connected PBX. Consult your dealer for more details.*2 For information on connecting, refer to the each included manual.*3 When connecting DPTs via Digital XDP, this optional device cannot be
used.
Trademark: The Bluetooth® word mark and logos are owned by the Bluetooth SIG, Inc. and any use of such marks by Matsushita Electric Industrial Co., Ltd. is under licence.
KX-DT333 KX-DT343 KX-DT346Features
Display 3-Line 3-Line 6-LineFlexible Buttons 24 24 24LCD Backlight Q Q
OptionsKX-NT303 Add-on 12 Key Module Q Q
KX-NT307 (PSLP1528) Bluetooth® Module*1 *2 *3
Q Q
KX-DT301 USB Module*3 Q Q
KX-DT390 DSS Console (with 60 keys)*2 Q Q Q

Location of Controls
3
Location of Controls
A LCD (Liquid Crystal Display)
B PAUSE: Used to insert a pause when storing a telephone number. This button is also used for programming this unit.
C FWD/DND (Call Forwarding/Do Not Disturb): Used to set Call Forwarding or Do Not Disturb on your extension.
D CONF (Conference): Used to establish a multiple party conversation.
E INTERCOM: Used to make or receive intercom calls.
F AUTO ANS (Auto Answer)/MUTE: Used to receive an incoming call in hands-free mode or mute the microphone/handset during a conversation.
G AUTO DIAL/STORE: Used for System/Personal Speed Dialling or storing programme changes.
R
U
Q
L M N
G
H
I
K
A
EF
B
D
J
S
V
O P<KX-DT346>
T
C

Location of Controls
4
H TRANSFER: Used to transfer a call to another party.
I REDIAL: Used to redial the last dialled number.
JMESSAGE: Used to leave a message waiting indication or call back the party who left the message waiting indication.
K Headset JackL FLASH/RECALL: Used to
disconnect the current call and make another call without hanging up.
M HOLD: Used to place a call on hold.
N SP-PHONE (Speakerphone): Used for performing hands-free operations.
O ENTER: Used to assign the selected item.
PMicrophone: Used for hands-free conversations.
Q Navigator Key: Used to adjust the volume and the display contrast or select desired items.
R CANCEL: Used to cancel the selected item.
S Flexible Buttons: Used to seize an outside line or perform a feature that has been assigned to the key.
T LCD Panel: Can be adjusted to the desired angle.
U Soft Buttons (S1-S4): S1-S4 (located from left to right) are used to select the item displayed on the bottom line of the display.
VMessage/Ringer Lamp: When you receive an intercom call, the lamp flashes green, and on an outside call, the lamp flashes red. When someone has left you a message, the lamp stays on red.

Settings
5
Settings
*1 If you hear your own voice through the handset or headset, decrease the volume.
*2 For KX-DT343/KX-DT346 only.
Speaker volume While in a hands-free conversation
Press Up to increase or Down to decrease the volume.
Handset/Headset volume*1
While using the handset or headset
Ringer volume While on-hook or receiving a call
LCD Contrast While on-hook
Ring Tone
LCD Backlight*2 While on-hook
PAUSE PAUSE
OR
Press 2 times.
OR
(CO)
ORPAUSE
STORE
INTERCOM AUTO DIAL
PAUSE
Automatic
Always ON
Always OFF
PAUSE
PAUSE
OR
STORE
AUTO DIAL
OR
STORE
AUTO DIAL

Features List
6
Features List
Icon Meanings
= Flexible button = Off-hook = On-hook
= Feature number = Talk = Confirmation Tone
Making CallsCalling
To an extension To an outside party
Redial
Quick Dialling
One-touch Dialling
To store
To dial
Personal Speed Dialling
To store
To dial
(CO)
C. Tone
extension no. (CO) outside phone no.
REDIAL
quick dialling no.
(CO) desired no.* (max. 32 digits)
* Enter outside line access number before outside phone number.
STORE
AUTO DIALPAUSE PAUSE
assigned as a One-touch Dialling button(One-touch Dialling)
personal speed dialling no. (2 digits)
desired phone no.* (max. 32 digits)
* Enter outside line access number before outside phone number.
C. Tone
STORE
AUTO DIALpersonal speed
dialling no. (2 digits)

Features List
7
During a Conversation
Useful Features
System Speed Dialling
To dial
Doorphone Call
Call Hold
To hold To retrieve a call at the holding extension
To retrieve an outside call from another extension
Call Transfer
Multiple Party Conversation
To add other parties during a conversation (i.e., conference)
To leave a conference
STORE
AUTO DIALsystem speed
dialling no. (3 digits)
doorphone no. (2 digits)C. Tone
C. Tone
HOLD(CO) /
INTERCOM
(CO)
C. Toneoutside
phone no.
To an extension
To an outside party
extension no.
(CO)
TRANSFER
desired phone no.
Talk to the new party.
Talk with multiple parties.
C. Tone C. Tone
CONF CONF
C. Tone
CONF

Features List
8
Setting the Telephone According to Your Needs
Before Leaving Your Desk
Do Not Disturb
Timed Reminder
To set
To cancel To stop or answer the ring back
Call Forwarding
Both Calls
Outside Calls
Intercom Calls
Set
Cancel C. Tone
AM
PM24 H
12 Hhour/minute
(4 digits)
hour/minute(4 digits)
Once
Daily C. Tone
C. Tone /INTERCOM
Busy
Cancel
No answerBusy/ No answer
outside line access no.
All calls extension no.
outside phone no.
Both Calls
Outside Calls
Intercom Calls
C. ToneOR

Features List
9
Making Use of the Voice Mail ServiceListening to a message
From your own extension
* If you have no password, you can skip the last step.
Note: VPS = Voice Processing System
From someone else’s extension
* If you have no password, you can skip the last step.
Leaving a message
Mailbox Password*
VPS extension no.
End Call
KX-TVM series
KX-TVP series
Listen to Message
Deliver Message
Mailbox Management
Automated Attendant
Message Notification
Other Features
End Call
Listen to Message
Deliver Message
Check Mailbox Distribution
Automated Attendant
Mailbox Management
Other Features
mailbox no.
VPS extension no.
Mailbox Password*
mailbox no.
From your own extension
From someone else’s extension
* If you have no password, you can skip the last step.
Enter the desired mailbox number Leave a message
To send the message immediately
To set the delivery time Follow the guidance
(KX-TVM series)
(KX-TVP series)
VPS extension no.
Mailbox Password*
Mailbox Password*

Features List
10
• Consult your dealer for more details regarding feature numbers.• It is possible to assign flexible buttons as feature buttons.• Control panel/button names and descriptions can be found in "Location
of Controls" on page 3.
Accessing Features Using the Display
Using the LCD DisplayIt is possible to access the following directories, logs, and menus by pressing left or right on the Navigator Key while this unit is idle:
Entering CharactersYou can enter alphabetic characters and digits using the dialling buttons. Pressing a dialling button repeatedly displays different characters, as shown in the following tables. While entering characters, you can move the cursor with the left and right Navigator keys and delete characters with the TRANSFER button. To toggle between Table 1 and Table 2, press the Soft button (S1) at any time while entering characters. For a list of available characters, refer to the next page.
During playback Repeat Voice Guidance
Exit
Incoming Call LogOutgoing Call LogPersonal Speed Dialling DirectorySystem Speed Dialling DirectoryExtension Number DirectoryFeature Access

Acessing Features Using the Display
11
Acessing Features Using the Display
Table 1 (Standard mode)
Table 2 (Option mode)
!
A
D
G
J
M
P
T
W
(space)
$
? 1"
B C a b c 2
E F d e f 3
H I g h i 4
K L j k l 5
N O m n 6o
Q R S p q r s 7
U V t 8u v
X Y Z w x y z 9
. , : ; 0
% & ( ) #
/ + — = < >
£
’
Times
Buttons
@
TimesButtons
!
A
D
G
J
M
P
T
W
$
? ä"
B C a b c À
E F d e f Ð
H I g h i Ì
K L j k l 5
N O m n Ño
Q R S p q r s
U V t u v
X Y Z w x y z ý 9
. 0
% & ( ) #£
ö 1ü
/ + — = < >
10 11 12 13 14 15
Á Â Ã Ä Å Æ Ç 2
È É Ê Ë 3
Í Î Ï 4
Ò Ó Ô Õ Ö Ø Œ 6
ß 7
Ù Ú Û Ü 8
, : ;’(space)
Š
Z
@

Operation Board Angle Adjustment
12
Operation Board Angle Adjustment
The angle of the operation board can be set to one of eight angles (level 1 = 0°, level 8 = 45°).
CAUTION:Hold the operation board until the operation board is secured at the desired angle. Make sure you do not pinch your fingers when raising or lowering the operation board.
To raise:Gently lift the operation board one level at a time.To lower:Raise the operation board to level 8. Next, with one hand on the base of the unit, lift the operation board again to release the latch, then slowly push the operation board down to level 1. If the operation board cannot be lowered to level 1, repeat this step.
Locking the Handset HookPull down the handset hook until it locks to prevent the handset from falling off the handset cradle when the unit is mounted to a wall or set at a high angle. To temporarily place the handset down during a conversation, hook it over the top edge of the unit as shown.
1
23
45
678

Connection
13
Connection
• Consult your dealer for more details about XDP and Digital XDP.
CAUTION:When connecting a headset• Ensure that the headset cord is wound around the hook to prevent
damage to the connector.
When connecting cords• Ensure the cords are inserted in the grooves, and are clamped to
prevent damage to the connectors.
<Back view>
HeadsetRecommended: KX-TCA89
Connect to a digital proprietarytelephone — Digital XDP connection
Connect to a single line telephone— XDP or parallel connection
Pass through the grooves.
Connect to a PBX.
The telephone line cord (included)
Clamp

Installing KX-DT301/KX-NT303
14
Installing KX-DT301/KX-NT303
1. Open the cover. 2. Attach the KX-NT303 to your unit with the screws (included with KX-NT303).
3. Plug the flat cable into the connector (A), then bend the cable slightly as shown (B).
4. Close the cover.
CAUTION:• To prevent damage to the telephone, be sure to unplug the
extension line before you set up or remove the KX-DT301 (USB Module) or the KX-NT303 (Add-on 12 Key Module).
• Connect the KX-NT303 first when installing both the KX-DT301 and the KX-NT303.
KX-NT303The Add-on 12 Key Module allows 12 additional flexible buttons to be added to this unit. These buttons are used to seize an outside line, make a call using One-touch Dialling, or perform a feature that has been assigned to the key. <with a KX-DT346>

Installing KX-DT301/KX-NT303
15
1. Open the cover. 2. Plug the flat cable into the connector as shown.
3. Close the cover. 4. Connect the USB cable to the USB port.
• Ensure that the USB cable goes through the cable guide.
• Please use a USB cable shorter than 3 m.
KX-DT301The USB Module can be connected between the DPT and the personal computer through USB interface toimplement personal CTI (Computer Telephony Integration).
Connect to a PC

Installing KX-DT301/KX-NT303
16
5. Insert the protrusions on the KX-DT301 into the 2 holes in the unit.
6. Attach the KX-DT301 to your unit with the screws (included with KX-DT301).
7. Install the USB driver. Refer to Installation Manual on the CD-ROM included with KX-DT301.

Wall Mounting
17
Wall Mounting
• For information on locking the handset hook, refer to page 12.
1. Remove the wall mounting adaptor from the unit as shown.
2. Set the operation board to level 1, then connect and secure the telephone line cords.• The cords can also be run from
the top of the unit (page 13).
3. Attach the wall mounting adaptor as shown.• Make sure the cords are not
pinched by the wall mounting adaptor. When running the cords from the top of the unit, look through the opening in the wall mounting adaptor (A) to confirm that the cords are not being pinched.
4. Drive the 2 screws (included) into the wall either 83 mm or 100 mm apart, and mount the unit on the wall.• You can find a wall mounting
template on page 23.• Make sure that the wall that the
unit will be attached to is strong enough to support the unit (approx. 1.65 kg).
• Make sure the cords are securely fastened to the wall.
• When this unit is no longer in use, make sure to detach it from the wall.
Slide the wallmounting adaptorup to this point.
83 mm
100 mm
Washer
Drive the screwto this point.

Important Information
18
Important Information
When using KX-DT300 series DPTs, keep the following conditions in mind.• If you are having problems making calls, unplug the extension line and
connect a known working telephone. If the known working telephone operates properly, have the defective telephone repaired by an authorised Panasonic factory service centre. If the known working telephone does not operate properly, check the PBX and the internal extension wiring.
• Wipe the unit with a soft cloth. Do not clean the unit with abrasive powders or with chemical agents such as benzene or thinner.
• Use only the correct Panasonic handset.• Do not disassemble this unit. Dangerous electrical shock could result.
The unit must only be disassembled and repaired by qualified service technicians.
• If damage to the unit exposes any internal parts, immediately disconnect the cable or cord.
• Never attempt to insert wires, pins, etc. into the vents or other holes of this unit.
• This unit is designed to aid the visually handicapped to locate dial keys and buttons.
• This unit is designed to be installed under controlled conditions of ambient temperature and a relative humidity.
• Avoid installing the unit in damp or humid environments, such as bathrooms or swimming pools.
• 999 and 112 can be dialled on the product after accessing the outside line for the purpose of making outgoing calls to the BT emergency (999) and (112) services (United Kingdom only).
Important Information
19
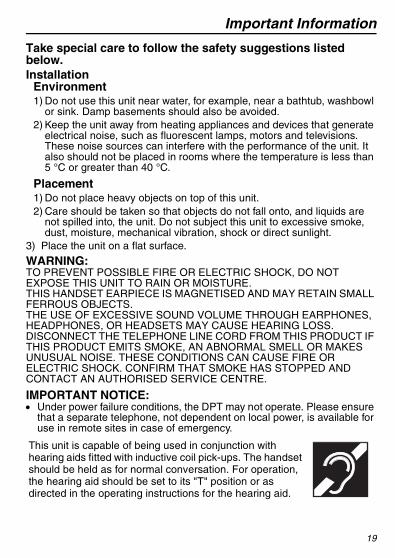
Take special care to follow the safety suggestions listed below. Installation
Environment1) Do not use this unit near water, for example, near a bathtub, washbowl
or sink. Damp basements should also be avoided.2) Keep the unit away from heating appliances and devices that generate
electrical noise, such as fluorescent lamps, motors and televisions. These noise sources can interfere with the performance of the unit. It also should not be placed in rooms where the temperature is less than 5 °C or greater than 40 °C.
Placement 1) Do not place heavy objects on top of this unit.2) Care should be taken so that objects do not fall onto, and liquids are
not spilled into, the unit. Do not subject this unit to excessive smoke, dust, moisture, mechanical vibration, shock or direct sunlight.
3) Place the unit on a flat surface.
WARNING:TO PREVENT POSSIBLE FIRE OR ELECTRIC SHOCK, DO NOT EXPOSE THIS UNIT TO RAIN OR MOISTURE.THIS HANDSET EARPIECE IS MAGNETISED AND MAY RETAIN SMALL FERROUS OBJECTS.THE USE OF EXCESSIVE SOUND VOLUME THROUGH EARPHONES, HEADPHONES, OR HEADSETS MAY CAUSE HEARING LOSS.DISCONNECT THE TELEPHONE LINE CORD FROM THIS PRODUCT IF THIS PRODUCT EMITS SMOKE, AN ABNORMAL SMELL OR MAKES UNUSUAL NOISE. THESE CONDITIONS CAN CAUSE FIRE OR ELECTRIC SHOCK. CONFIRM THAT SMOKE HAS STOPPED AND CONTACT AN AUTHORISED SERVICE CENTRE.
IMPORTANT NOTICE:• Under power failure conditions, the DPT may not operate. Please ensure
that a separate telephone, not dependent on local power, is available for use in remote sites in case of emergency.
This unit is capable of being used in conjunction with hearing aids fitted with inductive coil pick-ups. The handset should be held as for normal conversation. For operation, the hearing aid should be set to its "T" position or as directed in the operating instructions for the hearing aid.

Important Information
20
Information for Users on Collection and Disposal of Old Equipment and used Batteries
These symbols on the products, packaging, and/or accompanying documents mean that used electrical and electronic products and batteries should not be mixed with general household waste. For proper treatment, recovery and recycling of old products and used batteries, please take them to applicable collection points, in accordance with your national legislation and the Directives 2002/96/EC and 2006/66/EC.By disposing of these products and batteries correctly, you will help to save valuable resources and prevent any potential negative effects on human health and the environment which could otherwise arise from inappropriate waste handling.For more information about collection and recycling of old products and batteries, please contact your local municipality, your waste disposal service or the point of sale where you purchased the items.Penalties may be applicable for incorrect disposal of this waste, in accordance with national legislation.For business users in the European UnionIf you wish to discard electrical and electronic equipment, please contact your dealer or supplier for further information. Information on Disposal in other Countries outside the European UnionThese symbols are only valid in the European Union. If you wish to discard these items, please contact your local authorities or dealer and ask for the correct method of disposal.Note for the battery symbol (bottom two symbol examples):This symbol might be used in combination with a chemical symbol. In this case it complies with the requirement set by the Directive for the chemical involved.

Important Information
21
This product is intended to be connected to a Panasonic PBX only.Panasonic Communications Company (U.K.) Ltd. declares that this equipment is in compliance with the essential requirements and other relevant provisions of Radio & Telecommunications Terminal Equipment (R&TTE) Directive 1999/5/EC.Declarations of Conformity for the relevant Panasonic products described in this manual are available for download by visiting: http://www.doc.panasonic.de
Contact to Authorised Representative:Panasonic Testing CentrePanasonic Marketing Europe GmbHWinsbergring 15, 22525 Hamburg, Germany
1731

Note
22
Note

23
WALL MOUNTING TEMPLATE1. Drive the screws into the wall as indicated.2. Hook the unit onto the screw heads. Note: Make sure to set the print size to correspond with the size of this page. If the dimensions of the paper output still deviate slightly from the measurements indicated here, use the measurements indicated here.
100 mm
83 m
m
for base unit
One screw at either point
One screw here

PSQX4679ZA-GQ KK0708YH0 (UK)
Panasonic Business Systems U.K.Panasonic House, Willoughby Road, Bracknell, Berkshire RG12 8FP
Copyright:This material is copyrighted by Panasonic Communications Co., Ltd., and may be reproduced for internal use only. All other reproduction, in whole or in part, is prohibited without the written consent of Panasonic Communications Co., Ltd.
© 2008 Panasonic Communications Co., Ltd. All Rights Reserved.