
Quick RefeRence Guide PACS ADMIN - iPro, Inc · · 2010-11-22Quick RefeRence Guide PACS ADMIN ......
43
[email protected] 877-668-2723 www.novarad.net QUICK REFERENCE GUIDE PACS ADMIN Creating Domain Users . . . . . . . . . . . . . . . . . . . . . . . . . . . . . . . . . . . . . . . . . . . . . . . . . . . . . . . . . . Adding NOVARAD Users . . . . . . . . . . . . . . . . . . . . . . . . . . . . . . . . . . . . . . . . . . . . . . . . . . . . . . . . . Adding Console - Editing / Merging Patients . . . . . . . . . . . . . . . . . . . . . . . . . . . . . . . . . . . . . Web Based PAC’s Viewer . . . . . . . . . . . . . . . . . . . . . . . . . . . . . . . . . . . . . . . . . . . . . . . . . . . . . . . . . Editing Series Names . . . . . . . . . . . . . . . . . . . . . . . . . . . . . . . . . . . . . . . . . . . . . . . . . . . . . . . . . . . . Studies Tab . . . . . . . . . . . . . . . . . . . . . . . . . . . . . . . . . . . . . . . . . . . . . . . . . . . . . . . . . . . . . . . . . . . . . . Assigning Patients to Referring Physicians . . . . . . . . . . . . . . . . . . . . . . . . . . . . . . . . . . . . . . . . Importing / Exporting User Preferences . . . . . . . . . . . . . . . . . . . . . . . . . . . . . . . . . . . . . . . . . . 2 9 11 14 19 20 29 30 REV. 1 1-25-2010
Transcript of Quick RefeRence Guide PACS ADMIN - iPro, Inc · · 2010-11-22Quick RefeRence Guide PACS ADMIN ......

877-668-2723 www.novarad.net
Q u i c k R e f e R e n c e G u i d e
PACS ADMIN
Creating Domain Users . . . . . . . . . . . . . . . . . . . . . . . . . . . . . . . . . . . . . . . . . . . . . . . . . . . . . . . . . . Adding NOVARAD Users . . . . . . . . . . . . . . . . . . . . . . . . . . . . . . . . . . . . . . . . . . . . . . . . . . . . . . . . . Adding Console - Editing / Merging Patients . . . . . . . . . . . . . . . . . . . . . . . . . . . . . . . . . . . . . Web Based PAC’s Viewer . . . . . . . . . . . . . . . . . . . . . . . . . . . . . . . . . . . . . . . . . . . . . . . . . . . . . . . . . Editing Series Names . . . . . . . . . . . . . . . . . . . . . . . . . . . . . . . . . . . . . . . . . . . . . . . . . . . . . . . . . . . . Studies Tab . . . . . . . . . . . . . . . . . . . . . . . . . . . . . . . . . . . . . . . . . . . . . . . . . . . . . . . . . . . . . . . . . . . . . . Assigning Patients to Referring Physicians . . . . . . . . . . . . . . . . . . . . . . . . . . . . . . . . . . . . . . . . Importing / Exporting User Preferences . . . . . . . . . . . . . . . . . . . . . . . . . . . . . . . . . . . . . . . . . .
29111419202930
ReV. 1 1-25-2010

[email protected] • 877-668-2723
c R e a t i n G d o m a i n u s e R s
This first step is only for users accessing their server through a remote connection such as Remote Desktop.
Launch the preferred remote application (eg. Remote Desktop or VNC) to connect and type in your server’s IP address.
From the server or any other managed NOVARAD viewer, you will need to:
1. Type in your username.2. Type in your password, then click OK.
2
c R e a t i n G d o m a i n u s e R s

c R e a t i n G d o m a i n u s e R s
accessinG actiVe diRectoRY
From the desktop navigate to:1. Start.2. All Programs.3. Administrative Tools.4. Active Directory Users & Computers or if there is a desktop shortcut you can click there or drag and drop from this location to create a shortcut for future access.
From the (1) Activate Directory Users and Computers click on the small [+] next toyour (2) site. This will break out several subfolders. Next click on the (3) Users folderand all of the users for your facility will be listed on the right.
877-668-2723 • [email protected] 3

c R e a t i n G d o m a i n u s e R s
coPYinG useRs
Find an account that has identical privileges to the user you want to add that is already created and working. Then right-click on that user and select copy.
Fill out the First name, Last name and User logon name fields then select Next.
Note: It is suggested that you use a standard naming scheme for all of your users so it will be easy for you to assist them when needed. A good naming scheme for user-names is to use the first initial of their first name and their entire last name. If there is more than one user with the same name then use the first two letters of their first name and their entire last name.
[email protected] • 877-668-27234
c R e a t i n G d o m a i n u s e R s
coPYinG useRs
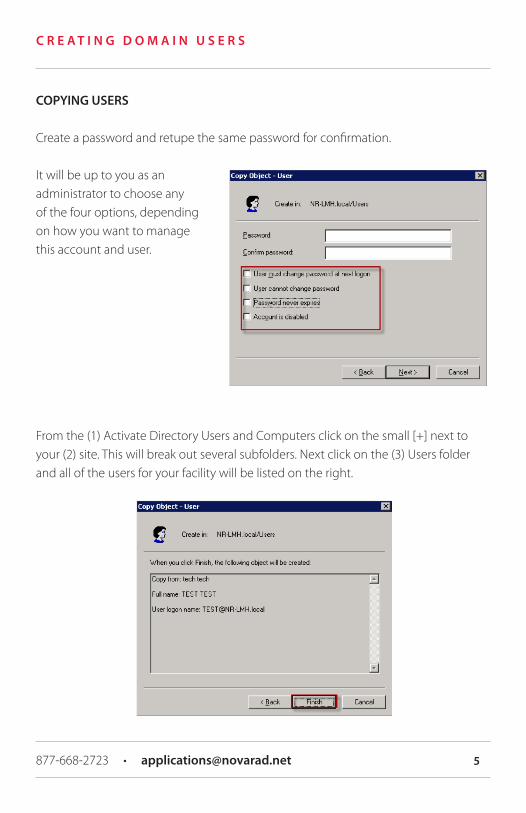
Create a password and retupe the same password for confirmation.
It will be up to you as anadministrator to choose any of the four options, dependingon how you want to managethis account and user.
From the (1) Activate Directory Users and Computers click on the small [+] next toyour (2) site. This will break out several subfolders. Next click on the (3) Users folderand all of the users for your facility will be listed on the right.
877-668-2723 • [email protected] 5

c R e a t i n G d o m a i n u s e R s
noVaRad administRation consoLe
From the desktop you will open the NovaRad Administration Console.
From the Users tab click Add.
From the first radio button titled Existing domain user you will click on the small box with three dots in it […].
[email protected] • 877-668-27236
c R e a t i n G d o m a i n u s e R s
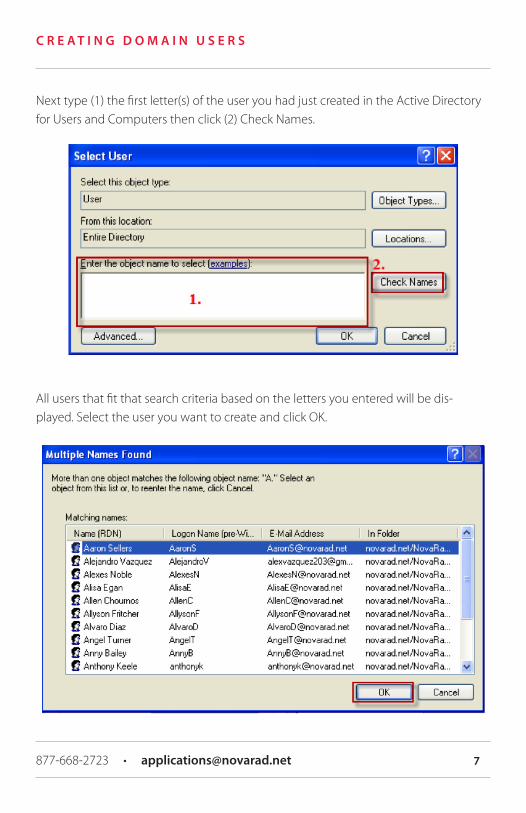
Next type (1) the first letter(s) of the user you had just created in the Active Directory for Users and Computers then click (2) Check Names.
All users that fit that search criteria based on the letters you entered will be dis-played. Select the user you want to create and click OK.
877-668-2723 • [email protected] 7

assiGninG medicaL GRouPs and RoLes
You will then need to assign a medical group (where applicable) and a role.
1. Select the Roles tab.2. Select Add.
Select the role or roles that user needs. First select multiple roles by holding Ctrl+left click.
3. Select OK. The domain user will be created.
c R e a t i n G d o m a i n u s e R s
[email protected] • 877-668-27238

a d d i n G n o V a R a d u s e R s
To add a new user.
1. Select Add at the far right of the Users Page.
2. The User Editor dialog will appear.
To set a new user’s profile.
3. The default settings on the General tab page are for an Enabled user login, and Existing domain users.4. Select whether or not the new user must change his/her password at the next login.5. Enter the new user’s personal information in the fields provided.
a d d i n G n o V a R a d u s e R s
877-668-2723 • [email protected] 9

a d d i n G n o V a R a d u s e R s
autHoRiZinG useRs
Once a user is created in one product you do not need to then recreate the user for the other product. You only need to authorize them in the second product.
1. Open the Admin Console.2. Select Authorize.
From the box on the left select the user that you would like to authorize.
1. Select Add - The user will move to the box on the right.2. Select OK.
The user will now be authorized in both products.
For roles that do not exist between products such as receptionists, billers or physicians you will need to be sure and assign them a valid role in the new product.
[email protected] • 877-668-272310

a d m i n c o n s o L e - e d i t i n G / m e R G i n G P a t i e n t s
1. From the Patients tab use the filters to find the patient that needs to edited or merged.
2. Double-click on the patients name or click on the edit button.
3. Change the information that is incorrect for the patient or put the ID in for the patient you wish to merge with and click OK.
When merging patients, a window prompt will ask you if you would like to merge the patients. Read the prompt carefully and make sure it’s the desired patient before proceeding.
a d m i n c o n s o L e - e d i t i n G / m e R G i n G Pat i e n t s
877-668-2723 • [email protected] 11

a d m i n c o n s o L e - e d i t i n G / m e R G i n G P a t i e n t s
assiGninG medicaL GRouPs
To assign Medical Groups to a user.
1. Select the Medical Groups tab on the User Editor dialog box.2. Select Add.
The Medical Groups dialog box will appear.
Ctrl + Left click will select multiple groups.
Note: A medical group is not necessary to assign to every user. Some facilities do not use medical groups and some users do not need to be limited.
[email protected] • 877-668-272312

a d m i n c o n s o L e - e d i t i n G / m e R G i n G P a t i e n t s
addinG RoLes
To assign a role to a user.
1. Select the Roles tab on the User Editor dialog.2. Select Add.
Select a role from the list.
1. To remove a role from the user’s profile select Remove. Ctrl+Left click will allow you to select multiple roles.
877-668-2723 • [email protected] 13
W e b b a s e d P a c s V i e W e R
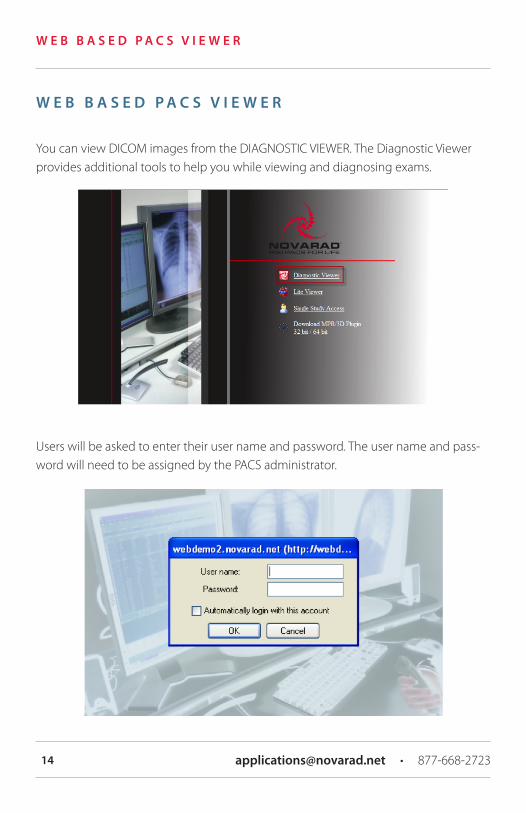
You can view DICOM images from the DIAGNOSTIC VIEWER. The Diagnostic Viewer provides additional tools to help you while viewing and diagnosing exams.
Users will be asked to enter their user name and password. The user name and pass-word will need to be assigned by the PACS administrator.
W e b b a s e d P a c s V i e W e R
[email protected] • 877-668-272314

W e b b a s e d P a c s V i e W e R
Once the user is signed in they will have access to the NovaPACS Diagnostic Viewer – Study Browser. From the study browser users will be able to select the patient and exam that they would like to view.
Lite VieWeR
The Lite Viewer allows images to come across in a JPEG 2000 format. The JPEG 2000 format allows images to come across quickly. You can view the Lite Viewer on a variety of operating systems with very few hardware requirements. JPEG 2000 images are not diagnostic quality but will be quick and sufficient for most needs.
877-668-2723 • [email protected] 15

W e b b a s e d P a c s V i e W e R
Users will be asked to enter their user name and password. The user name and password will need to be assigned by the PACS administrator.
Once the user is signed in they will have access to the NovaPACS Lite Viewer – Study Browser. From the study browser users will be able to select the patient and exam that they would like to view.
sinGLe studY access
Single study access will allow you to assign a temporary password to a selectedpatient’s exam.
[email protected] • 877-668-272316

W e b b a s e d P a c s V i e W e R
The password will need to be assigned by an employee who has access to the study browser.
Select the patient / exam that you would to like assign a password to then select:
Study - Assign Password.
PACS will automatically assign a password to the selected study. You can change the expiration date by using the drop-down arrow. Select new password if you would like the PACS system to regenerate a new password for you. Users cannot create their own password.
The user will need to enter their email address and assigned password in order to access the patient they would like to view.
877-668-2723 • [email protected] 17

W e b b a s e d P a c s V i e W e R
The user will be able to view the patient’s images in the Lite Viewer.
admin consoLe
Users can access the Admin Console by typing defaultadmin.aspx after theURL address.
An example would be: http://webdemo2.novarad.net/novaweb/defaultadmin.aspx.
Only users with administration access will be able to view the admin console.
[email protected] • 877-668-272318
e d i t i n G s e R i e s n a m e s
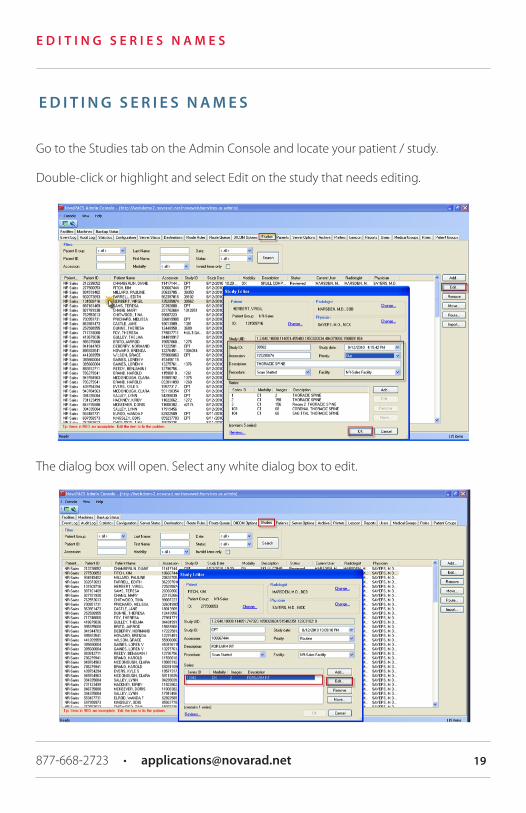
Go to the Studies tab on the Admin Console and locate your patient / study.
Double-click or highlight and select Edit on the study that needs editing.
The dialog box will open. Select any white dialog box to edit.
e d i t i n G s e R i e s n a m e s
877-668-2723 • [email protected] 19

s t u d i e s t a b
If you choose something in section 1 you will need to double-click to open it and edit it.
You will then be able to rename the series, change certain series to new series by using the buttons on the right.
1. Access the Studies tab by logging into the NOVAPACS Admin Console. Across the top of the page will be various tabs. Click on the Studies tab.2. Use the white boxes to narrow the search, once the filters are set click on Search.3. Select the desired study from the list.
The next step is to choose an option from the far right. The options are Add, Edit,Remove, Move, Route, and Import.
s t u d i e s ta b
[email protected] • 877-668-272320
s t u d i e s t a b
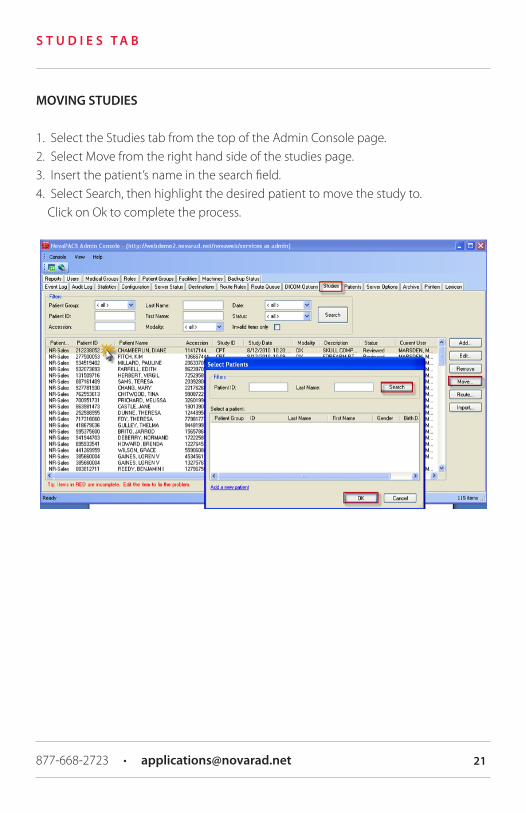
moVinG studies
1. Select the Studies tab from the top of the Admin Console page.2. Select Move from the right hand side of the studies page.3. Insert the patient’s name in the search field.4. Select Search, then highlight the desired patient to move the study to. Click on Ok to complete the process.
877-668-2723 • [email protected] 21
s t u d i e s t a b
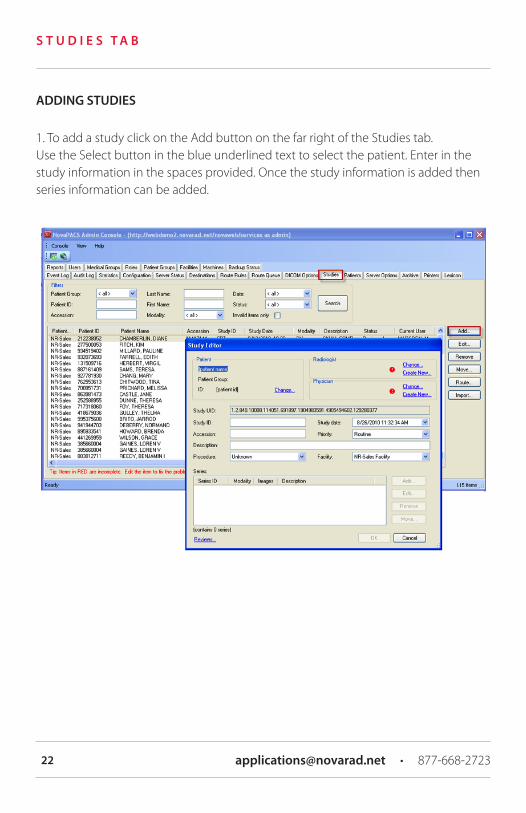
addinG studies
1. To add a study click on the Add button on the far right of the Studies tab.Use the Select button in the blue underlined text to select the patient. Enter in the study information in the spaces provided. Once the study information is added then series information can be added.
[email protected] • 877-668-272322

s t u d i e s t a b
addinG a studY to a Patient tHat Has not been cReated
1. If the patient does not exist, it is still necessary to click on the Change button next to the ID.
2. Click on Add a New Patient.
Enter in the patient demographics and then click OK.
877-668-2723 • [email protected] 23

s t u d i e s t a b
editinG studies
1. Click on Edit from the far right on the Studies tab.
2. Select the patient for the study which you wish to edit if not already loaded.
3. Enter in the study description.
4. Edit the series, including Adding, Editing, Removing and Moving a series.
Click on the Review link in the bottom left-hand corner to see which reviews are available for the selected study.
[email protected] • 877-668-272324

s t u d i e s t a b
moVinG studies
1. Click on Move from the far right of the studies tab.2. Search for the Patient ID or Last Name of the patient to which the study will be moved to.3. Select the patient from the list and then click on ok.
If the patient does not exist in the PACS, click on the Add a New Patient button.
877-668-2723 • [email protected] 25

s t u d i e s t a b
RemoVinG studies
1. Highlight the desired study to be removed and click on the Remove button on the far right side of studies tab.
Read the prompting carefully and click Yes to remove the study.
[email protected] • 877-668-272326

s t u d i e s t a b
RoutinG studies
1. Click on the Route button from the far right side of the studies tab.2. Select the studies, series or images to route.3. Choose the Destination and the Priority (the lower the number the higher thepriority in queue.)4. Add To Queue.
877-668-2723 • [email protected] 27

s t u d i e s t a b
imPoRtinG studies
1. First open the Disc Drive on the PACS and insert the Patient CD into the drive.From the far right of the studies tab click on Import. Navigate to the CD Drive Icon to select. Once the images are imported edit the patient/exam information.
[email protected] • 877-668-272328

a s s i G n i n G P a t i e n t s t o R e f e R R i n G P H Y s i c i a n s
Note: That referring physicians can only access patients which they are labeled as the referring provider or if they are assigned to a medical group that can access the patient as part of a patient group.
1. Assigning the referring physician should be done from the modality prior to sending the exam to PACS. The referring provider’s username or last name, first name should be used in the exact way as it was setup in PACS. It is usu-ally helpful to print a list of usernames at each modality for ease of entry into PACS.
To reassign the referring physician from the studies tab in Admin Console:
1. Login to the Admin Console.
2. Click on the Studies tab.
3. Click on Edit from the far right menu.
4. Select the correct referring physician or click on the create new button.
a s s i G n i n G Pat i e n t s t o R e f e R R i n G P H Y s i c i a n s
877-668-2723 • [email protected] 29

i m P o R t i n G / e x P o R t i n G u s e R P R e f e R e n c e s
i m P o R t i n G / e x P o R t i n G u s e R P R e f e R e n c e s
imPoRtinG:
Navigate to the settings drop-down menu and select Preferences. Then highlight and select Import Preferences.
A Windows Explorer box will open making it possible to navigate through the file directories to find preferences to import. Preferences can only be imported that share the same PACS version as the PACS that created the preference. Select the Preference for Import and click on Open.
exPoRtinG:
Navigate to the settings drop-down menu and select Preferences. Then highlight and select Export Preferences.
Note: The first time a user with that specific role assigned logs in they will inherit the preferences that have been set. If any changes are made to the account, the user’s settings will override the default settings.
[email protected] • 877-668-272330

i m P o R t i n G / e x P o R t i n G u s e R P R e f e R e n c e s
1. A Windows Explorer box will open making it possible to type in the name of the preference file for export. Preferences must be saved in the defaulted .xml file format.
Type in the name and navigate to the desired location for saving the file and click on Save.
saVinG defauLt PRefeRences bY RoLe
Navigate to the settings drop-down menu and select Preferences and then highlight and select Save as Default.
Note: User must have administrative rights to set default preference for the role.
1. Select a role from the drop-down menu.2. Click on Ok to continue or cancel.
877-668-2723 • [email protected] 31
i m P o R t i n G / e x P o R t i n G u s e R P R e f e R e n c e s
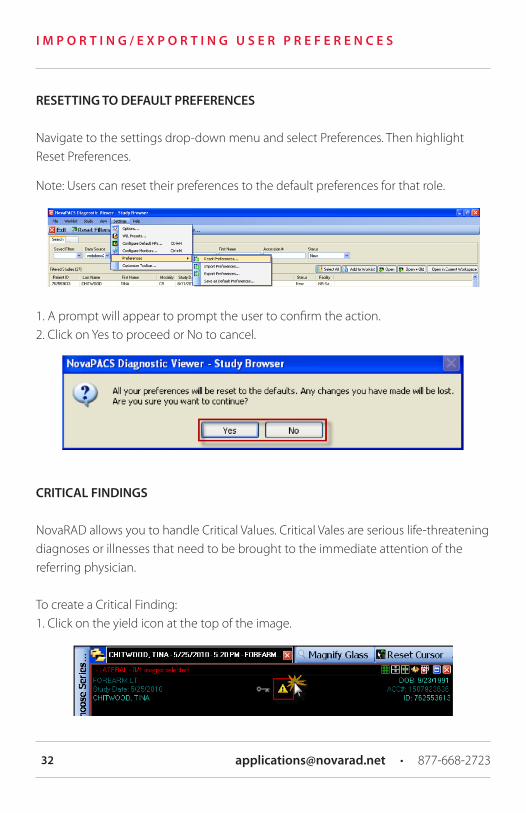
ResettinG to defauLt PRefeRences
Navigate to the settings drop-down menu and select Preferences. Then highlight Reset Preferences.
Note: Users can reset their preferences to the default preferences for that role.
1. A prompt will appear to prompt the user to confirm the action.2. Click on Yes to proceed or No to cancel.
cRiticaL findinGs
NovaRAD allows you to handle Critical Values. Critical Vales are serious life-threatening diagnoses or illnesses that need to be brought to the immediate attention of the referring physician.
To create a Critical Finding:1. Click on the yield icon at the top of the image.
[email protected] • 877-668-272332

i m P o R t i n G / e x P o R t i n G u s e R P R e f e R e n c e s
2. Select a Critical Finding.
3. Select Record Findings.
To create a new critical finding select Add a new Critical Finding value.
4. Select Add.
5. Select the magnifying glass to search for a physician.6. Enter in the Physicians First or Last Name then select Search.7. Select OK once you have selected the Physician.
877-668-2723 • [email protected] 33

i m P o R t i n G / e x P o R t i n G u s e R P R e f e R e n c e s
5. Select the magnifying glass to search for a physician.
6. Enter in the Physicians First or Last Name then select Search.
7. Select OK once you have selected the Physician.
8. Check the box next to the attempted method of notification.
You must check Personal contact or Unable to contact in order to add a Critical Finding.
[email protected] • 877-668-272334

i m P o R t i n G / e x P o R t i n G u s e R P R e f e R e n c e s
9. The Critical Finding is now a permanent part of the patient’s record. The yield icon will stay yellow as a notification that the image has a Critical Finding.
To review critical findings reports:
1. Go to the Admin Console.
2. Select the Reports tab.
3. Select Critical Findings from the Select Reports drop-down menu.
4. Filter for the date that you would like to review Critical Findings. Custom Range allows you to select specific dates and times.
877-668-2723 • [email protected] 35

i m P o R t i n G / e x P o R t i n G u s e R P R e f e R e n c e s
To view the exam reports that is associated with the critical finding exam:
1. Select the patient you would like to view.2. Select View Exam Report.
To view critical finding details:
1. Select the patient you would like to view.2. Select View Details.
[email protected] • 877-668-272336

i m P o R t i n G / e x P o R t i n G u s e R P R e f e R e n c e s
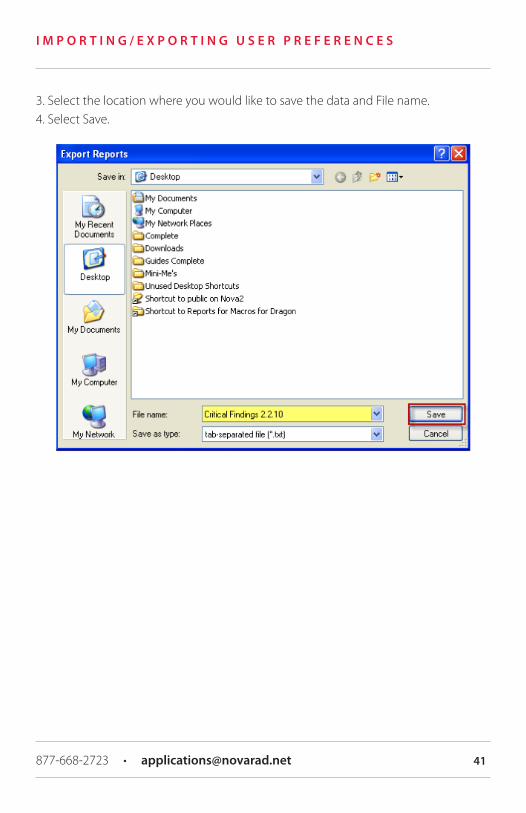
To export Critical Findings data:
1. Select Console.2. Select Export.
3. Select the location where you would like to save the data and File name.4. Select Save.
877-668-2723 • [email protected] 37

i m P o R t i n G / e x P o R t i n G u s e R P R e f e R e n c e s
ResettinG to defauLt PRefeRences
To review a peer’s report:
1. Select the patient that you would like to review.2. Select Study.3. Select Collaboration.4. Select Peer Review.
[email protected] • 877-668-272338

i m P o R t i n G / e x P o R t i n G u s e R P R e f e R e n c e s
5. Select the Peer Review Feedback by using the Position drop-down menu.
6. (Optional) Enter in Comment.
7. Select OK.
To review Peer Review reports:
1. Go to the Admin Console.2. Select the Reports tab.3. Select Peer Review from the Select Reports drop-down menu.4. Filter by the date that you would like to review.
877-668-2723 • [email protected] 39

i m P o R t i n G / e x P o R t i n G u s e R P R e f e R e n c e s
Exam reports and Images can be viewed by selecting the patient you would like to view and the correlating button on the right side of the screen.
To export Peer Review data:
1. Select Console.2. Select Export.
[email protected] • 877-668-272340
i m P o R t i n G / e x P o R t i n G u s e R P R e f e R e n c e s
3. Select the location where you would like to save the data and File name.4. Select Save.
877-668-2723 • [email protected] 41

i m P o R t i n G / e x P o R t i n G u s e R P R e f e R e n c e s
deLetinG saVed annotations
Annotations can only be deleted if the study is in a New status. If the exam is in any other status the exam will need to be reset to New. Only administrators or the user who changed the study status can reset exams to a New status.
1. Select the study that you want reset to a New Status.2. Select Study at the top of the Study Browser.3. Select Collaboration.
5. Open the selected study.6. Select Menu in upper-right corner of the Image Viewer.7. Select Image.8. Select Annotations.9. Select History.
[email protected] • 877-668-272342

i m P o R t i n G / e x P o R t i n G u s e R P R e f e R e n c e s
The Annotation History box will appear:
10. Highlight the annotation that you wish to delete.11. Select Delete.
877-668-2723 • [email protected] 43