QUICK REFERENCE GUIDE - Bank of Hawaii - Homepage · · 2018-05-11Positive Pay Import Bankoh...
7
QUICK REFERENCE GUIDE Positive Pay Import Importing Issues and Voids BANKOH BUSINESS CONNECTIONS 3.0
Transcript of QUICK REFERENCE GUIDE - Bank of Hawaii - Homepage · · 2018-05-11Positive Pay Import Bankoh...

QUICK REFERENCE GUIDE
Positive Pay Import
Importing Issues and Voids
BANKOH BUSINESS CONNECTIONS 3.0

Positive Pay ImportBankoh Business Connections (BBC) 3.0
1
Positive Pay Import
Importing Issues and Voids
The primary action function Import Check Issue/Void File in Check Issue Management allows you to
submit check issue information originating from your accounting system. Using the export capability
of your accounting system, you can create a file of check reports and import the check data into BBC.
Creating a Positive Pay Import
1. Create a Check Issue or Check Void file from your accounting system.
2. Export the file to CSV format. The fields must be in the following order:
Sample File – Check Date, Check Number, Amount, Account Number
CSV (Excel) CSV (Notepad)
Note: The first row of the CSV file will not be imported but is required in order to import all records.
The second line of the import file is the first row to be imported.
Required Data Definition Valid Data Format Example
Check Date The date the check was issued. MMDDYYYY (Requires leading “01012017”
zero, no dash or slash allowed)
Check Number The serial number of the check. Numeric (10 character max) “1234567890”
Amount The amount of the check in Numeric (No leading dollar sign, “1000.00”
currency format. no comma separator)
Account Number The account the check was Numeric (10 character max, “1234567890”
written against. no dashes)

Positive Pay ImportBankoh Business Connections (BBC) 3.0
2
Importing a Positive Pay File
1. Select Fraud / Risk Management.
2. Scroll to Check Issue Management.
3. On the Check Issues/Voids tab, click Import Check Issue/Void File.
Positive Pay Import
4. On File Import > Format Name, select CheckIssueFormat to import an issue file.
5. Select CheckVoidFormat to import a void file.
1
3
2
4
5

Positive Pay ImportBankoh Business Connections (BBC) 3.0
3
Positive Pay Import
7. Click File Import.
Importing a Positive Pay File (continued)
6. In File Section > Select Import File, click Browse and select the CSV file for import.
8. A message will indicate that the file is queued for import.
IMPORTANT: The file has been queued but not processed. Go to Administration and Settings >
File Import History to validate all records were successfully processed.
6
7

Positive Pay ImportBankoh Business Connections (BBC) 3.0
5. You can also check the checkbox and click the Approve or Delete button.
6. A confirmation message will appear in greenbar.
Positive Pay Import
Approving a Positive Pay Import
1. Go to Fraud / Risk Management and scroll to Check Issue Management.
2. Click on Imported Files tab.
3. Select Approve from the Actions column to approve each individual file.
4. Or click the drop-down icon in the Actions column to Delete the imported file.
1
2
4
5
5
3
4
FAQFrequently Asked Questions
5
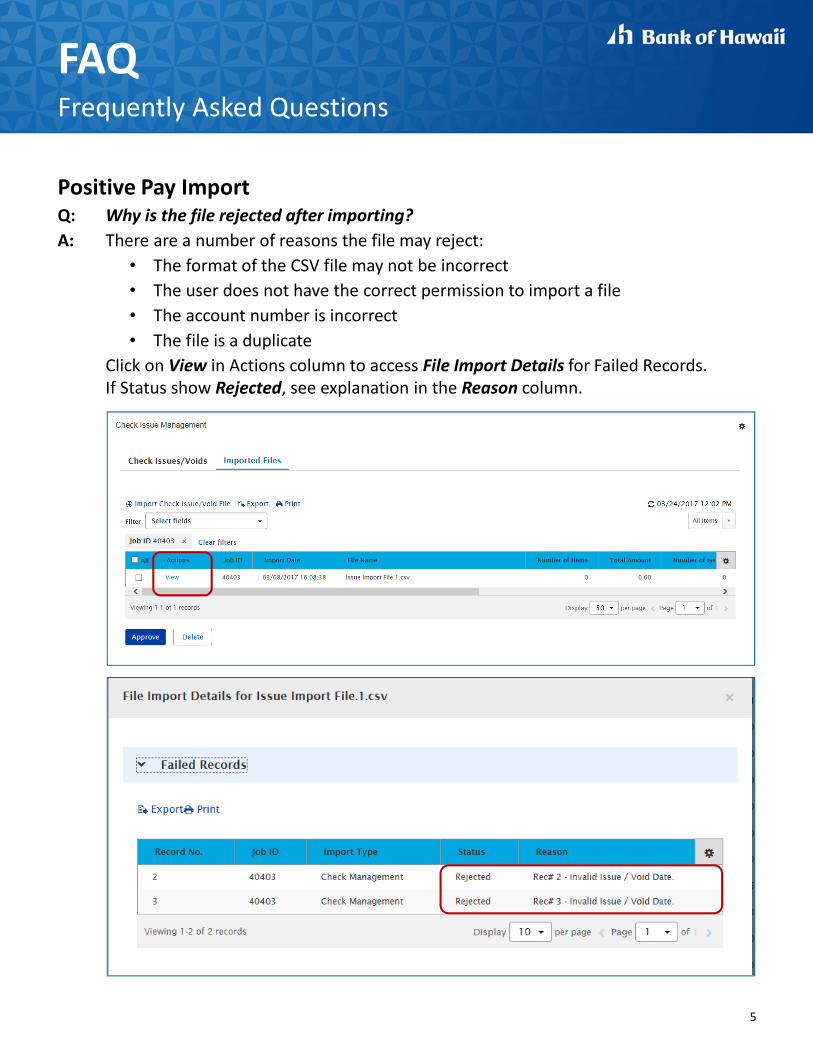
Positive Pay Import
Q: Why is the file rejected after importing?
A: There are a number of reasons the file may reject:
• The format of the CSV file may not be incorrect
• The user does not have the correct permission to import a file
• The account number is incorrect
• The file is a duplicate
Click on View in Actions column to access File Import Details for Failed Records.
If Status show Rejected, see explanation in the Reason column.

Contact Information
6
For more information, contact Cash Management Services at the following:
Hawaii: (808) 694-8021
Toll-free: (877) 232-0118
Guam: (671) 479-3629 or (671) 479-3633
Email: [email protected]


![Welcome [] · Zülküf Küçüközer TriangleCanvas.java import javax.microedition.lcdui.Graphics; import javax.microedition.lcdui.game.*; import javax.microedition.m3g.*;](https://static.fdocuments.us/doc/165x107/5d31f91d88c9937a3b8ccf67/welcome-zuelkuef-kuecuekoezer-trianglecanvasjava-import-javaxmicroeditionlcduigraphics.jpg)

![TOTO [ IMPORT ] RR [ IMPORT ] INAX [ JAPAN ] … · toto [ import ] rr [ import ] inax [ japan ] rbm - s 302 rzj - 11041 a-580 wc piston valve [ for rr brand ] toto [ import ] rr](https://static.fdocuments.us/doc/165x107/5b8fccf509d3f2c7748cde70/toto-import-rr-import-inax-japan-toto-import-rr-import-inax.jpg)