QualysGuard(R) Evaluator’s Guide - Europe5 | … QualysGuard QualysGuard UI 6 QualysGuard Quick...
46
QUALYSGUARD® QUICK TOUR VERSION 6.16 January 6, 2011
Transcript of QualysGuard(R) Evaluator’s Guide - Europe5 | … QualysGuard QualysGuard UI 6 QualysGuard Quick...

QUALYSGUARD®QUICK TOURVERSION 6.16January 6, 2011
Verity Confidential

Copyright 2007-2011 by Qualys, Inc. All Rights Reserved.
Qualys, the Qualys logo and QualysGuard are registered trademarks of Qualys, Inc. All other trademarks are the property of their respective owners.
Qualys, Inc. 1600 Bridge Parkway Redwood Shores, CA 94065 1 (650) 801 6100

Contents
QualysGuard Quick Tour 3
Table of Contents
Introducing QualysGuard ............................................................................... 4
QualysGuard UI ...................................................................................................................................... 4Your Account ........................................................................................................................................... 8A Look at How QualysGuard Works................................................................................................... 9
Map................................................................................................................. 10
Launch Maps.......................................................................................................................................... 10View Map Results ................................................................................................................................. 11Print and Download Map Results ...................................................................................................... 12View Map Results in Graphic Mode .................................................................................................. 13Perform Workflow Actions.................................................................................................................. 14Manage Approved Hosts ..................................................................................................................... 14
Scan ................................................................................................................ 15
Authentication Setup............................................................................................................................ 15Launch Vulnerability Scans ................................................................................................................. 16View Scan Results ................................................................................................................................. 16Print and Download Scan Results ...................................................................................................... 19Current Host Information.................................................................................................................... 20Asset Search ........................................................................................................................................... 21Scan Settings .......................................................................................................................................... 22Launch Compliance Scans ................................................................................................................... 24Launch Web Application Scans .......................................................................................................... 24Launch FDCC Scans ............................................................................................................................. 24
Schedule......................................................................................................... 25
Report............................................................................................................. 27
Report Templates Provided................................................................................................................. 28Report Share........................................................................................................................................... 30Launch New Report with Report Share............................................................................................. 31Report Storage with Report Share ...................................................................................................... 31Vulnerability Scorecard Reports ......................................................................................................... 33Qualys Patch Reports ........................................................................................................................... 34Custom Report Templates ................................................................................................................... 36
Remediation................................................................................................... 38
Payment Card Industry (PCI) Compliance................................................... 40
Policy Compliance (PC) ................................................................................. 41
Web Application Scanning (WAS) ............................................................... 43
FDCC............................................................................................................... 45
Contact Support ............................................................................................ 46

Introducing QualysGuardQualysGuard UI
Introducing QualysGuard
Welcome to QualysGuard® Security and Compliance Suite. QualysGuard is delivered on demand using an innovative Software-as-a-Service (SaaS) approach that requires no software to install or manage.
QualysGuard UI
Here’s a first glance at the QualysGuard UI. You’ll notice the main application window has a consistent look and feel throughout the application with distinct sections.
A. Main Navigation Pane — The Navigation pane (on the left) gives you access to distinct sections of the application where you can perform key tasks using primary features.
B. Top Menu Bar — Lists menus, module icons, your user login, and the logout link.
C. Data List — The data list changes dynamically for each section. See Searchable Data Lists.
D. Preview Pane — The preview pane provides a quick look at important details about a selected item in the data list.
E. Open/Close Icons — Click to open/close the navigation pane (vertical bar icon) and the preview pane (horizontal bar icon). You can also take these actions using the View menu.
A
B
C
D
E
4 QualysGuard Quick Tour

Introducing QualysGuardQualysGuard UI
The menu options shown in your account depend on the service modules enabled for your subscription and your individual account settings, including your user role. A Manager user has full rights, while other users (Unit Managers, Scanners, Readers, Auditors) have limited rights.
Navigation Menu
The Navigation menu is used to launch scans and view scan results, schedule scans to run sometime in the future or on a recurring schedule (daily, weekly, monthly), run reports on the scan data available in your account, manage exceptions for policy compliance, and perform other security risk and analysis tasks.
Tools Menu
Tools for managing scan targets: Host Assets (for vulnerability scans and compliance scans), Domain Assets (for network maps), and Web Applications (for web application scans).
Tools for managing scan settings: Option Profiles identify scan settings (one profile is applied to each scan), Authentication records and authentication vaults for authenticated scans, Scanner Appliances for internal network scanning may be available.
Tools for asset and user management: User Accounts have assigned user roles (one per account) and access privileges. Asset Groups and Business Units identify logical groupings of users and assets.
Tools for viewing and searching resources: KnowledgeBase identifies vulnerabilities, Controls identifies compliance controls.
The Activity Log identifies user actions recorded for the account.
QualysGuard Modules
The QualysGuard Security and Compliance Suite consists of multiple service modules. A red lock appears when a module is enabled for your subscription.
Vulnerability Management (VM) module is enabled
Payment Card Industry (PCI) Compliance module is enabled
Policy Compliance (PC) module is enabledFDCC module may be enabled (optional)
Web Application Scanning (WAS) module is enabled
QualysGuard Quick Tour 5

Introducing QualysGuardQualysGuard UI
Searchable Data Lists
Searchable data lists allow you to easily find and take action on data in your account.
Actionable Columns. The data list columns display current, context sensitive information that’s actionable. Click to view a data list item. For example when you click for an item on the the scan history list, you’ll see the scan results for a completed task or the scan status summary for a running task. To cancel a running scan, click . You can take other actions appropriate for other data lists. For example, when viewing many data lists, click in the Edit column to edit a data list item, like a report template or schedule. In many data lists you can click in the Info column to view information on a data list item.
View Options. Using the View menu you can customize the data list view to deselect columns, sort by a particular column, make the data list page longer by adding more rows, and select a quick filter to restrict the data list content. Changes you make to a particular data list are sticky across sessions.
Select column titles to add/remove them from the data list.
If you select “My Scans” the filter appears in the data list title.
Navigation Options. The controls in the upper right corner of the data list allow you to navigate through pages. Use the page selector drop-down menu to jump to a data list page with a range of items. The right and left arrows take you to the next page, previous page, first and last page.
6 QualysGuard Quick Tour

Introducing QualysGuardQualysGuard UI
Search Options. Select Search on the top menu bar to search the data list that is currently displayed. The search options appear in a pop-up window so that you do not lose your place while using the data list. The search options are context sensitive, and thus are different for each data list. For example, when viewing the scan history list with your saved scans, the Search pop-up displays scan related search options.
Actions. Take action on selected items using the check boxes in the left column. Selected items are highlighted for easy identification. The item tracker in the lower left corner of the window identifies selections like this: “20 of 42 items shown, 5 selected”. You can jump to multiple pages and select multiple items. After selecting items, select an action from the Actions drop-down menu and click Apply.
Layout Options. The Open/Close layout options allow you to control the real estate in the application window. Toggle these options using the Open/Close icons (see below), or by going to View—>Layout and selecting an option. When the preview pane is open, fewer items are visible in the data list (see below). When the navigation pane is open, the menu titles appear in the left Navigation pane; and when closed, icons appear instead of titles.
Download Option. You can download data lists to these formats: CSV, XML, ZIP and MHT. To download a data list, go to New—>Download on the top menu bar, and then select a format.
Item Tracker
Open/Close Preview Pane
Open/Close Navigation Pane
QualysGuard Quick Tour 7

Introducing QualysGuardYour Account
Your Account
The Setup menu and Help menu are available at all times, from wherever you are in the application.
The Setup menu gives you a central location to view and configure subscription-level settings. Manager users have the ability to make settings that affect all users in the same subscription. Also, the Setup menu gives you the ability to customize your own personal dashboard, specify your home page and change your password. The Home Page and Change Password options are available to all users.
The Help menu provides several forms of assistance to ensure your success with QualysGuard, including online help options, a link to contact support, resources like user guides and API samples, account settings and current product versions.
8 QualysGuard Quick Tour

Introducing QualysGuardA Look at How QualysGuard Works
A Look at How QualysGuard Works
The following diagram depicts the QualysGuard Global Infrastructure for security and compliance scanning.
Security Operations Centers (SOCs) — SOCs at remote locations provide secure storage and processing of vulnerability data on an n-tiered architecture of load-balanced application servers. All computers and racked equipment are isolated from other systems in a locked vault.
Internet Scanners — These scanners carry out perimeter scanning for customers. These scanners are located in various worldwide locations, and they communicate with our SOCs through secure (SSL) links. These remote scanners begin by building an inventory of protocols found on each machine undergoing an audit. After discovering the protocols, the scanner detects which ports are attached to services, such as Web servers, databases, and e-mail servers. At that point, the scanners initiate an inference-based assessment, based on target hosts.
QualysGuard Scanner Appliances — These client-side, plug-in devices are installed by customers, in a distributed manner, for global enterprise scanning behind the firewall. These appliances use a hardened operating-system kernel designed to prevent any attacks. They provide secure communications with our SOCs, and they poll the SOCs for software updates and new vulnerability signatures, and process job requests. They do not retain scan results; instead, the results are securely encrypted with unique customer keys, transmitted, and stored at redundant SOCs.
Secure Web Interface — Users interact with QualysGuard through its Secure Web Interface. Any standard Web browser permits users to navigate the QualysGuard user interface, launch scans, examine audit report data, and manage the account. Secure communications are assured via HTTPS (SSLv3) encryption. All security and compliance report data is encrypted with unique customer keys to guarantee confidentiality of information and make them unreadable by anyone other than those with proper customer authorization.
QualysGuard Quick Tour 9

MapLaunch Maps
Map
The Map section is where you manage network maps in your account. From here, you can check map status, view and download saved maps and cancel maps in progress. Using the New menu, you can launch new on demand maps. Using the Search and View menus, you can customize the map history list.
To view the Map section, select Map on the left menu. This is the starting point for map tasks.
You can take actions on maps in the map history list. Click to cancel a running map. Click to relaunch a previous map.
Launch Maps
When the map history list is displayed you can launch a map. To launch a map, go to New—> Map. The Launch Map page appears in a pop-up window.
10 QualysGuard Quick Tour

MapView Map Results
Specify map task attributes including title, option profile containing map configuration settings and target domains. Select a scanner appliance when you’re mapping an internal network and there are scanner appliances in your account.
For the map target, users can specify any combination of assets, including domain names, IPs and/or IP ranges. When IPs are specified, the service uses an internal domain to process the map. In the case where there are multiple domains, each domain is processed as a separate map. You can cancel Queued and Running maps from the map history list.
Click Launch to start the map. The map task appears instantly on the map history list in the main window where you can track the status. The map status “Queued” indicates a map is waiting to be processed, and the status “Running” indicates a map is in progress. When the map is complete, the map status changes to “Finished” and you can view the results.
View Map Results
To view map results, select Map on the left menu. From the map history list, click for the map you want to view. The map results appear in an HTML report with hosts sorted by IP address.
QualysGuard Quick Tour 11

MapPrint and Download Map Results
Scroll down to the Results section to view results of the network discovery. The Results section provides direct access to information on discovered hosts.
• View a list of open services on a host by clicking the right arrow next to the host. For each service detected, the discovery method that was used to identify the service is listed along with the port the service was found to be running on.
• View host status at a glance using the indicators in the right columns: A – approved host for the domain, S – scannable host, already in subscription, L – host was alive at the time of the discovery, N – host defined for the domain’s netblock.
• For a host already in your account, view detailed host information by clicking the IP address link provided. Host information includes host attributes and current vulnerability information based on the latest host scan.
• Select hosts and take actions on them using the check boxes in the left column and the Actions drop-down menu (at the top of the map results window). You can print and download map results, view map results in graphic mode, and perform workflow actions to manage hosts.
Print and Download Map Results
Print and download map results from the File menu in your report.
To print your results, select File—>Print. Your printed report will appear as it does online.
To download your results, select File—>Download. These download formats are available: PDF, ZIP, XML, MHT and CSV.
You can generate custom map reports based on saved map data from the Report section. Map reports are template-based so you can customize reports to best suit your needs. Report template settings allow you to specify how much information to include in a report and how you want that information displayed. To learn more about map report templates, see the Report section.
12 QualysGuard Quick Tour

MapView Map Results in Graphic Mode
View Map Results in Graphic Mode
To view your map results in graphic mode, select View—>Graphic Mode in your report. The graphic map appears in a separate window so you can still reference the HTML report.
A sample graphical map is shown below.
When you double click on any host, you will see a table with additional information about the discovered host, such as the operating system detected, the discovery method used to identify the host, and whether the host is scannable. A host is considered scannable when it is available in your account in the host assets list.
QualysGuard Quick Tour 13

MapPerform Workflow Actions
Perform Workflow Actions
Workflow actions appear in a drop-down menu at the top of the report. Workflow actions include adding hosts to multiple asset groups and removing hosts from multiple asset groups. You can also now purge hosts directly from your map results.
To add hosts to one or more asset groups, select the check box next to each host you want to add, select “Add to Asset Groups” from the drop-down menu and then click Apply. A pop-up page appears listing the asset groups in your account. Choose the asset groups you want to add the selected hosts to and then click Save. Note that you can also create a new asset group with selected hosts.
To remove hosts from one or more asset groups, follow the same steps for adding hosts but select “Remove from Asset Groups” from the drop-down menu.
To purge hosts, select the check box next to each host you want to purge, select “Purge” from the drop-down menu and then click Apply. Read the important information that appears on screen and click Purge again to confirm the action. Host information deleted includes information gathered on the host such as its host name and OS, remediation tickets for the host, and comments added to the host. Once purged, host information does not appear in scan reports based on automatic host scan data and it is not recoverable. Note, however, scan results are not removed.
Manage Approved Hosts
The approved hosts list includes hosts approved for a domain according to your security policy. When defined, this list is used to identify “rogue” devices in the Unknown Device Report.
Managing approved hosts for domains in your account is done from the domain assets list. To configure an approved hosts list for a particular domain, select Domain Assets under Tools. Click for the domain you’re interested in. If you are a Manager, the Edit Domain page appears and you simply click Configure under Approved Hosts. When the Configure Approved Hosts page appears, add IP addresses to the approved hosts list and follow the online prompts to save this configuration for your account.
14 QualysGuard Quick Tour

ScanAuthentication Setup
Scan
The Scan section is where you manage vulnerability scans and compliance scans. From here you can check scan status, view and download saved scan results, and pause or cancel scans in progress. Using the New menu, you can launch new scans. Using the Search and View menus, you can customize the scan history list.
To view scans, select Scan on the left menu. The vulnerability scans and compliance scans in your account appear. The Type is for a vulnerability scan and is for a compliance scan.
(Other scan options may be available in your account. Select WAS Scan or FDCC Scan to manage other scans.)
You can take actions on scans in the scan history list. Click to cancel a running scan or to pause a running scan. For a paused scan, click to resume it. Click to relaunch a previous scan. (The pause, resume and relaunch features are not available for web application scans.)
Authentication Setup
Authentication to scan targets is required for compliance scans and optional for other scans. Before launching a scan, add authentication records for your account:
For an IP based scan, go to Authentication Records and add records for these authentication types: Windows, Unix, Oracle, SNMP, and MS SQL Server (compliance scans only). Use of a password vault is supported for Windows and Unix authenticated scans using Cyber-Ark EPV.
For a web application scan, go to Web Applications and add records to the target web application for these authentication types: Form, NTLM, HTTP Basic, and Digest.
QualysGuard Quick Tour 15

ScanLaunch Vulnerability Scans
Launch Vulnerability Scans
When the scan history list is displayed you can launch a vulnerability scan. Go to New—>Scan. If multiple modules are enabled for your account, go to New—>Scan—>Vulnerability.
Specify a title (optional) and scan task settings:
Option Profile — An Option Profile is a set of scan configuration settings. For an authenticated vulnerability scan, the option profile you select must have authentication types enabled and there must be corresponding authentication records defined for the selected types.
Target Hosts — Select target hosts for an IP based scan; these hosts must be defined in your account. Select a target web application for a web application scan.
Scanner Appliance — To scan your internal network, select a Scanner Appliance option.
Click Launch to start the scan. The scan task appears instantly on the scan history list in the main window where you can track the status. When the scan is complete, the scan status is “Finished”.
View Scan Results
From the scan history list, click for the finished scan you want to view. The scan results appear in an HTML report. Note that the service uses predefined settings for displaying scan results and those settings are not customizable. To create custom reports, use report templates.
The first section of your scan results includes a report summary.
16 QualysGuard Quick Tour

ScanView Scan Results
Next, the Summary of Vulnerabilities detected appears with the total number of vulnerabilities detected and the average security risk. This section appears for a vulnerability scan.
After the summary, there are graphs showing vulnerabilities by severity, operating systems detected and services detected. This section appears within vulnerability scan results (not compliance scan results).
QualysGuard Quick Tour 17
ScanView Scan Results
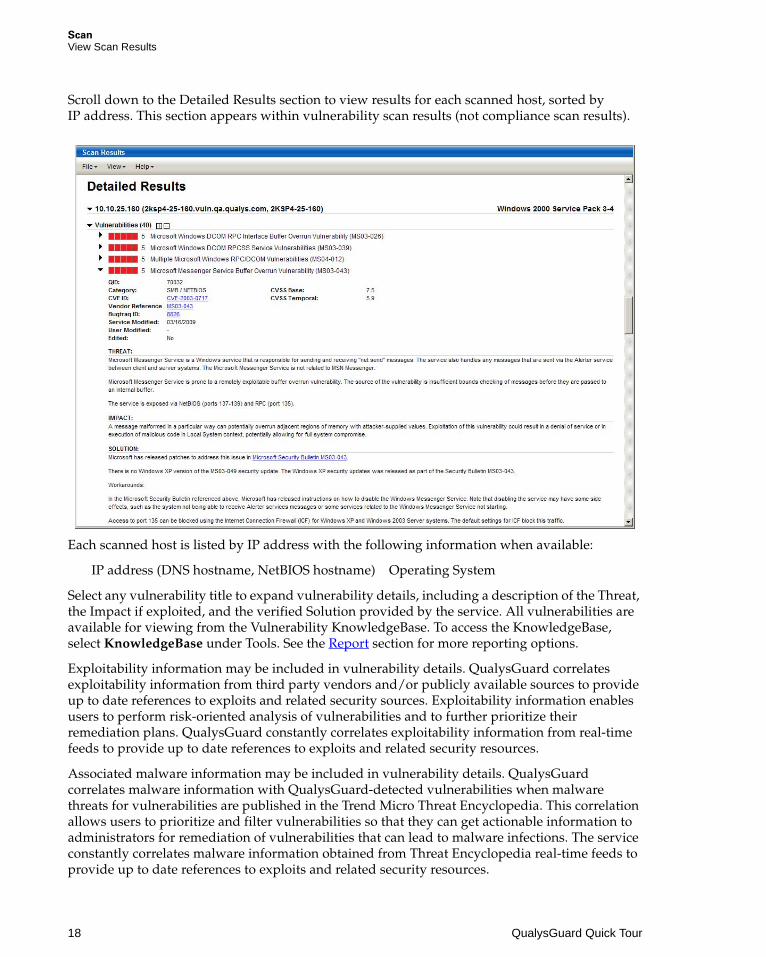
Scroll down to the Detailed Results section to view results for each scanned host, sorted by IP address. This section appears within vulnerability scan results (not compliance scan results).
Each scanned host is listed by IP address with the following information when available:
IP address (DNS hostname, NetBIOS hostname) Operating System
Select any vulnerability title to expand vulnerability details, including a description of the Threat, the Impact if exploited, and the verified Solution provided by the service. All vulnerabilities are available for viewing from the Vulnerability KnowledgeBase. To access the KnowledgeBase, select KnowledgeBase under Tools. See the Report section for more reporting options.
Exploitability information may be included in vulnerability details. QualysGuard correlates exploitability information from third party vendors and/or publicly available sources to provide up to date references to exploits and related security sources. Exploitability information enables users to perform risk-oriented analysis of vulnerabilities and to further prioritize their remediation plans. QualysGuard constantly correlates exploitability information from real-time feeds to provide up to date references to exploits and related security resources.
Associated malware information may be included in vulnerability details. QualysGuard correlates malware information with QualysGuard-detected vulnerabilities when malware threats for vulnerabilities are published in the Trend Micro Threat Encyclopedia. This correlation allows users to prioritize and filter vulnerabilities so that they can get actionable information to administrators for remediation of vulnerabilities that can lead to malware infections. The service constantly correlates malware information obtained from Threat Encyclopedia real-time feeds to provide up to date references to exploits and related security resources.
18 QualysGuard Quick Tour

ScanPrint and Download Scan Results
At the end of the vulnerability details section, the results section appears when scan test results were returned by the scanning engine.
Print and Download Scan Results
Print and download scan results from the File menu in your report.
QualysGuard Quick Tour 19

ScanCurrent Host Information
Current Host Information
Current host security information is displayed in reports and other online views throughout the web application including custom reports, asset search results and remediation tickets.
You can also view current host information from the host assets list. To do this, select Host Assets under Tools and then click for any host. The Host Information pop-up appears.
At the top is the general information about the host. You can expand sections to view more information. In the example above, the Vulnerabilities section is expanded to view the most up-to-date vulnerability information for the host. When Policy Compliance is enabled, additional sections appear. The Compliance section displays the current compliance information for the host and the Exception section displays the exception requests associated with the host.
20 QualysGuard Quick Tour

ScanAsset Search
Asset Search
The asset search feature enables you to search through scan results to find hosts based on scan information available in your account. You can search for hosts based on several attributes.
The asset search feature searches through vulnerability scan results. It also searches limited compliance scan information, including DNS name, NetBIOS name and tracking method. Scan information from web application scans is not searched.
To perform an asset search, select Asset Search on the left menu, specify your search target and any host attributes (optional) you want to search for, and then click Search.
The Asset Search Report identifies hosts that match your query. To view current security information for a particular host, click the IP address. To perform workflow actions on hosts use the check boxes (see Perform Workflow Actions).
QualysGuard Quick Tour 21

ScanScan Settings
Scan Settings
Option Profile
The option profile specifies configuration options for a vulnerability scan, on demand or scheduled. It’s best practice to use the same profile/configuration options for your scans to ensure compliance with existing security policies and accuracy in trend reporting. For a vulnerability scan, it’s recommended you select “Initial Options” to get started.
All settings are configurable from the option profiles list. The service provides some predefined option profiles in your account, and more are available for import from the Option Profile Library. To go to your option profiles list, select Option Profiles under Tools. From the option profiles list, you can search and view your profiles, edit profiles, create new ones, and import profiles from the Library.
A profile must be applied to every scan type. The profile “Payment Card Industry (PCI) Options” must be selected for a PCI scan. For a compliance scan you must select a compliance option profile, and for a web application scan you must select a web application profile.
Scanner Appliance
QualysGuard Scanner Appliances may be installed inside your corporate network to scan the internal network. See the QualysGuard Scanner Appliance User Guide for further information on the scanner appliance, including installation steps. To view the appliances in your account, select Scanner Appliances under Tools.
22 QualysGuard Quick Tour

ScanScan Settings
The Scanner Appliance drop-down menu appears when there are one or more scanner appliances in your account. To scan external devices, select “External” for the external scanners. To scan internal devices, select one of these options: “Default” for the default scanner in each asset group, “All Scanners in Asset Group” for scanner parallelization, or a scanner appliance name.
The scanner appliances list (Tools—>Scanner Appliances) tells you about each scanner appliance in your account, including the number of asset groups it belongs to. Columns show whether the appliance status is online (blank) or offline (yellow warning icon) based on the latest heartbeat check (every 4 hours), whether the appliance is busy running maps and/or scans, and whether its software is up to date. Click to view more information on an appliance.
Scanner Parallelization
The scanner parallelization feature is available for vulnerability scans and compliance scans and increases scan speed. When scanner parallelization is enabled at run time for a scan task, the scan is distributed to multiple scanner appliances in parallel. The scanner appliances in each target asset group are used to scan the asset group’s IP addresses. At the completion of the scan, the service compiles a single report with scan results.
QualysGuard Quick Tour 23

ScanLaunch Compliance Scans
Launch Compliance Scans
To launch a compliance scan, select Scan on the left menu. Then go to New—>Scan—> Compliance. This scan option is available when the Policy Compliance (PC) module is enabled for your account. See Policy Compliance (PC).
Launch Web Application Scans
To launch a web application scan, select WAS Scan on the left menu. Then go to New—> Scan. This scan option is available when the Web Application Scanning (WAS) module is enabled for your account. See Web Application Scanning (WAS).
Launch FDCC Scans
To launch an FDCC scan, select FDCC Scan on the left menu. Then go to New—> Scan. This scan option is available when the FDCC module is enabled for your account. See FDCC.
24 QualysGuard Quick Tour

Schedule
Schedule
Setup scheduled tasks to run automatically on a regular basis so you always have access to up-to-date security information. The scheduling is very granular; allowing you to reduce time spent launching maps and scans and freeing time for other tasks like remediation and reporting.
The Schedule section is where you manage scheduled maps and scans. Using the New menu, you can create new schedules. Using the Search and View menus, you can customize the schedules list.
To view the Schedule section, select Schedule on the left menu. This is the starting point for all schedule related tasks.
The Type column identifies the type of schedule: for a map, for a vulnerability scan, for a compliance scan, for a web application scan, and for an FDCC scan.
If a schedule is active, meaning that it will run at the next scheduled launch time, a lit clock appears ( ). If a schedule is inactive, then a dimmed clock appears ( ). Edit a scheduled task to make it active or inactive.
To create a new scheduled scan, select Schedule on the left menu, and go to New—> Schedule Scan.
QualysGuard Quick Tour 25

Schedule
You are prompted to select the scan type when multiple modules are enabled in your account and you have privileges for scanning. Select Vulnerability for a vulnerability scan, Compliance for a compliance scan, FDCC for an FDCC compliance scan, or Web Application for a web application scan. The new scheduled scan page appears in a pop-up window, ready for you to select the scan target and add your schedule.
For a new scheduled vulnerability scan, go to New—>Schedule Scan (or New—>Schedule Scan —>Vulnerability when multiple modules are enabled for your subscription). The new scheduled scan page appears where you will specify schedule attributes including title, option profile and target hosts. Select the Scheduling tab to define scheduling details like start date and time, duration, max running time and occurrence. Note that you can click the calendar image ( ) to view a calendar pop-up to assist in scheduling the start time.
You can choose to receive an email notification each time this scheduled task is scheduled to run. To do so, go to the Notifications tab and select Notify task owner. Then identify when you’d like the notification sent out, enter a list of email recipients, and provide custom email text.
When you have defined all schedule attributes, click Save. The new scheduled scan appears on your schedules list in the main navigation window where you can edit or deactivate the task.
You have the option to download schedules from your schedules list to iCalendar format (ICS). iCalendar is a standard (RFC 2445) for calendar data exchange from the IETF (Internet Engineering Task Force) Calendaring and Scheduling Working Group.
• To download one schedule, find the schedule you want in the list and click to see scheduled task information. Then go to File—>Download as iCalendar.
• To download multiple schedules, select the check box next to each schedule you want to download, and then select Download as iCalendar on the Actions menu and click Apply.
• To download all schedules, go to New—>Download. Then select the iCalendar (ICS) format and click Download.
26 QualysGuard Quick Tour

Report
Report
Several reporting options are offered through scan reports, patch reports, compliance reports, map reports, remediation reports, and web application reports. Scan, patch, map and compliance policy reports are fully customizable through templates, allowing you to specify the exact type of information you want in the report.
Report Share functionality provides enhanced reporting capabilities for customers with large amounts of report data, and promotes collaboration and sharing of reports. Users can run reports once and share them with other users. Each report is saved for 7 days in Report Share, after which it expires. Report Share is enabled for Enterprise accounts automatically, and is not available for Express accounts. Please contact Customer Support if you would like to upgrade your subscription account to use Report Share.
To view the available report templates:
When Report Share is enabled, select Report Templates on the left menu, under Tools.
When Report Share is not enabled, select Report on the left menu.
The Type column shows the report type: for a scan report, for a patch report. for a compliance report, for a map report, and for a remediation report.
To run a report click next to the title.
When Report Share is enabled, users launch reports, view report status and completed reports from the report history list according to their user roles and account settings.
QualysGuard Quick Tour 27

ReportReport Templates Provided
Report Templates Provided
QualysGuard provides several predefined report templates for all report types, and you can import others from the Template Library. You can use these templates to generate reports, download them, and print them to multiple formats for easy distribution. For additional scan reports, see Vulnerability Scorecard Reports.
Scan Templates
Executive Report. Provides a global view of your network security, including trend information, suitable for overall security management.
Technical Report. Provides host vulnerability data from the most recent scans, suitable for individuals responsible for taking action on vulnerabilities and their management.
High Severity Report. Identifies all severity 4 and 5 vulnerabilities on your network.
Patch Template
Qualys Patch Report. Identifies the patches that need to be applied to fix the detected vulnerabilities on hosts in your account.
Compliance Templates
Qualys Top 20 Report. Indicates whether hosts are compliant with the Qualys Top 20 real-time vulnerabilities, including the Top 10 internal vulnerabilities and the Top 10 external vulnerabilities.
SANS Top 20 Report. Indicates whether hosts are compliant with the SANS Top 20 vulnerabilities, published by The SANS Institute.
Payment Card Industry (PCI) Executive Report. Identifies whether target hosts are compliant with the PCI Data Security Standard. (See Payment Card Industry (PCI) Compliance).
Payment Card Industry (PCI) Technical Report. Indicates whether target hosts are compliant with the PCI Data Security Standard. Vulnerability details are included. This report is suitable for individuals responsible for remediatiation. (See Payment Card Industry (PCI) Compliance).
Authentication Report. Indicates the authentication status of hosts in your account. Authentication to hosts is required for compliance scans. Note that this is a hidden report template, which is not visible on the report templates list. This template is only available when the Policy Compliance module is enabled for the subscription.
Policy Report. Requires a user-created policy report template. Identifies compliance status for a specific policy and compliance trend information over time.
Map Template
Unknown Device Report. Identifies whether hosts included in saved map results are approved according to your security policy. Hosts in your map results which are not in your approved hosts list are identified as “rogue”.
28 QualysGuard Quick Tour

ReportReport Templates Provided
Remediation Templates
Executive Remediation Report. Provides a ticket status summary, and ticket trends over the past 12 weeks – state changes, open tickets, suitable for security management.
Tickets per Vulnerability Report. Lists tickets by vulnerability.
Tickets per User Report. Lists tickets by ticket owner (user).
Tickets per Asset Group Report. Lists tickets by asset group.
Report Template Library
QualysGuard provides a library of pre-configured report templates that you can import and use as is or customize as needed.
To import report templates, go to New—>Import from Library.
Select the templates you want and click Import. The imported templates will be saved to your report templates list for future use. If the imported templates have associated search lists, the search lists will be saved to your search lists data list.
QualysGuard Quick Tour 29

ReportReport Share
Report Share
Report Share is a subscription option that is enabled automatically for Enterprise accounts.
With Report Share, the Report option on the left menu takes you to the report history list where you view and download completed reports, launch reports (just like scans), view report status, and cancel reports in progress. To download a saved report, just click next to the report. The Report Templates option on the left menu takes you to your report templates list.
Users view reports based on their access privileges, which are defined by their account settings. The service automatically publishes reports in a user’s report history list when the user has privileges to access/view the report and its content.
Additional reporting features give managers (Managers and Unit Managers) the ability to distribute reports to the right people at the right time.
Grant Users Access to Reports — Managers can grant users access to certain reports when users do not have access privileges to these reports. This is a way, for example, for managers to share reports with users who do not have access privileges to all IPs included in the reports. Managers define a user access list for an individual report (click next to a completed report in the report history list) or for a report template (see Custom Report Templates).
Secure PDF Distribution — Managers can select a one step solution to generate encrypted PDF reports and securely distribute them to users outside of the application via email. Managers select this option when launching a new report, as described below.
30 QualysGuard Quick Tour

ReportLaunch New Report with Report Share
Launch New Report with Report Share
To launch a report using Report Share, select Report on the left menu. Go to the New menu and select the report type. Enter the report title and select a report template, output format and source. Click Run to launch the report. The report runs in the background and you can view the report status on the report history list. A report summary notification is sent when the report completes (when this notification is enabled in your account).
When the PDF format is selected, Managers and Unit Managers may click the link “Add Secure Distribution” for a one step solution to generate an encrypted PDF report and securely distribute the report to a list of users outside of the application via email (see the Report Share Setup page).
Report Storage with Report Share
By default each report is saved in Report Share for 7 days after its creation date. The automatic expiration of reports makes room for new reports in Report Share. Each user is assigned a report storage space limit in Report Share. Note that map and scan results are not stored in Report Share and thus do not consume Report Share storage space.
Managers set the user limit on the Report Share Setup page (go to Setup—>Report Share). The same user limit applies to all users in the subscription.
QualysGuard Quick Tour 31

ReportReport Storage with Report Share
Statistics on space used and remaining free space are displayed. The Secure PDF Distribution option, when enabled, allows Managers to generate encrypted PDF reports and securely distribute them to users outside of the application via email.
You can view the user limit, the space used, and the free space on the Account Info page (go to Help—> Account Info). The user limit is also displayed on the user accounts list.
32 QualysGuard Quick Tour

ReportVulnerability Scorecard Reports
Vulnerability Scorecard Reports
Scorecard reports provide vulnerability data and statistics appropriate for different business groups and functions. By configuring scorecard reports to use different views and groupings of assets, you can create multiple reports based on the same data satisfying both security operations personnel and business line leaders. You can then share each generated report with the people who need it in a format that is meaningful to them.
The Report section is where you manage scorecard reports (select Report on the left menu). From the New menu, select the scorecard report option.
The service provides 5 different scorecard reports:
• Asset Group Vulnerability Report. Identifies vulnerabilities with severity levels 3 through 5.
• Ignored Vulnerabilities Report. Identifies vulnerabilities that are currently ignored.
• Most Prevalent Vulnerabilities Report. Identifies vulnerabilities with the highest number of detected instances.
• Most Vulnerable Hosts Report. Identifies hosts with the highest number of critical vulnerabilities.
• Patch Report. Identifies hosts that are missing patches and software.
You are prompted to select a report format (PDF, HTML, MHT, XML or CSV). For the report source, select asset groups by asset group title or business information, such as all asset groups in a business unit (Managers only) and/or business information tags (as defined for asset groups). For the Patch Report, you must also select QIDs for missing patches and software.
After launching a scorecard report, the report appears in the report history list when Report Share is enabled in your account, and from there you can check its status to completion. When not enabled, a pop-up window appears with the report status and then the completed report.
QualysGuard Quick Tour 33

ReportQualys Patch Reports
Qualys Patch Reports
The Qualys Patch Report helps you streamline the patching process and improve remediation efficiency. The patch report provides accurate, actionable and focused reports so you can quickly and efficiently remediate vulnerabilities without applying unneeded, redundant patches.
The service provides a pre-configured patch template “Qualys Patch Report”. Using this template you can run a patch report right away and view the patches you need to apply.
For the most accurate results in your patch report, be sure that authenticated scanning was used to scan the hosts selected for the report. Using authenticated scanning allows the scanning engine to collect the most detailed information about each target host including the host’s operating system. As a result, the most appropriate missing patch(es) will be identified in your report.
Your patch report can be saved in these formats: PDF, CSV and Online Report. The Online Report format provides a feature-rich user interface including numerous ways to navigate through your report content. HTML content is displayed in your browser using Ext, a client-side Java framework.
A sample Online Patch Report is shown below. The report summary section shows: 196 total patches need to be applied to fix the vulnerabilities on the target hosts, 14 hosts require patches to be applied in order to fix the vulnerabilities, and 318 vulnerabilities in the user’s account are addressed in the report.
(1) To view the target asset groups and/or IPs: Click “View Report Targets”.
(2) To sort the HOSTS list by a host attribute: Click a host attribute (column title) in the HOSTS list. The arrow next to the column title indicates the sort order: ascending (Up arrow) or descending (Down arrow). Click the column title again to toggle the sort order.
34 QualysGuard Quick Tour

ReportQualys Patch Reports
(3) To view the missing patches for a particular host: Move your mouse pointer over a host in the HOSTS list and click the host row. The missing patches for the host appear in the PATCHES list (on the right). In the PATCHES header you’ll see the number of missing patches for the selected host. In this case, there are 13 missing patches for host 10.10.24.47.
(4) To page through the HOSTS list: Use the arrow keys (under the list area) to page forward and backward through the list. Enter a number in the field provided to jump to a certain page.
(5) To apply a filter to the HOSTS list: Enter a string in the Filter field (under the list area). The HOSTS list will be updated to display only hosts with attributes matching the string you enter. For example, if you enter “10.10.25.6” the report will display only IP addresses including that string.
(6) To read the vendor’s security bulletin related to a patch: Click the vendor ID link for a patch in the PATCHES list.
(7) To view the vulnerabilities that will be fixed after applying a patch on a host: Refer to the Vulns column for a patch in the PATCHES list. If “Table of QIDs” is included in the patch template used to generate the report, click the number of vulnerabilities link to view a list of vulnerabilities which the patch will fix. You’ll notice instance data for the detection if applicable, and the age of the detection. If you click the QID, you will see the vulnerability information from the KnowledgeBase.
QualysGuard Quick Tour 35

ReportCustom Report Templates
Custom Report Templates
To create custom report templates, go to your report templates list. Then select the type of template you want to create from the New menu.
Scan Report Templates
Go to New—>Scan Template to create a new scan report template.
Patch Report Templates
Go to New—>Patch Template to create a new patch report template.
36 QualysGuard Quick Tour
ReportCustom Report Templates
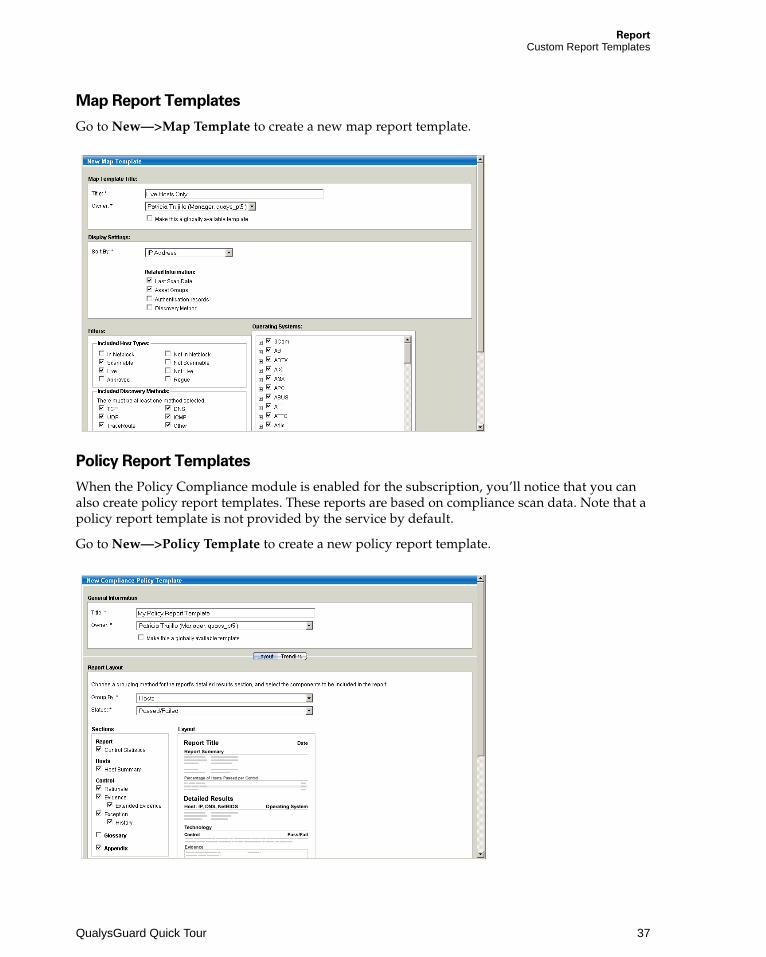
Map Report Templates
Go to New—>Map Template to create a new map report template.
Policy Report Templates
When the Policy Compliance module is enabled for the subscription, you’ll notice that you can also create policy report templates. These reports are based on compliance scan data. Note that a policy report template is not provided by the service by default.
Go to New—>Policy Template to create a new policy report template.
QualysGuard Quick Tour 37

Remediation
Remediation
The Remediation section is where you manage remediation tickets for vulnerabilities detected by vulnerability scans. From here you can view ticket status and edit tickets to reassign to different users, mark as “resolve” or “ignore” and add comments for tracking purposes. Using the New menu, you can add policy rules. Using the Search and View menus, you can customize the tickets list.
To view the Remediation section, select Remediation on the left menu. This is the starting point for viewing tickets and taking action on them. By default, only tickets modified within the last 30 days are displayed. A message appears across the top of the page to alert you to this. Use the search functionality to find all tickets with certain attributes, including tickets that have been modified more than 30 days ago.
Select View from the top menu and select (check) a quick filter to apply to the tickets list.
Select a quick filter to view your own tickets or tickets with a particular state/status
38 QualysGuard Quick Tour

Remediation
Set Remediation Policies
Remediation policies identify rules used to create and update tickets based on most recent scan results. Managers and Unit Managers may view, create and edit remediation policies in the subscription. To view remediation policies, select Remediation Policy on the left menu under Tools. From here you can manage policy rules. Rules are listed in priority order, where the first rule is applied to new scan results first. To add a new rule, go to New—>Policy.
Set Remediation Options
To set remediation options, go to Setup—>Remediation. Transition options, which can be set by Managers, allow ticket state transitions by users and by the service. The transition options apply to the subscription. The timeframe option allows any user to configure the timeframe for which tickets are displayed in their tickets list. Only tickets modified within the selected timeframe will be displayed.
Options that allow ticket transitions
Tickets modified within a timeframe will be displayed
QualysGuard Quick Tour 39

Payment Card Industry (PCI) Compliance
40 QualysGuard Quick Tour
Payment Card Industry (PCI) Compliance
QualysGuard® PCI Compliance provides businesses, online merchants and Member Service Providers the easiest, most cost-effective and highly-automated way to achieve compliance with the Payment Card Industry Data Security Standard (PCI DSS).
The PCI Compliance module is enabled for your subscription when appears in the top menu bar. All users are granted PCI permissions automatically based on their assigned user role. Managers have full rights for scanning and reporting on all IPs in the subscription.
Workflows
A. Scan — Launch PCI scans to gather PCI compliance data from hosts. Click the “Share with PCI” button in the preview pane to share a completed PCI scan with your PCI Merchant account (go to New—>PCI Account Links to setup your account). After sharing the scan, select the PCI login option within QualysGuard to log into your PCI account so you can generate a PCI network report and complete the required actions for PCI certification.
B. Schedule — Schedule PCI compliance scans to run in the future or on a recurring schedule.
C. Report — Run PCI reports to review PCI compliance status and vulnerability details. These reports are designed to assist with the remediation process.
D. Option Profiles — A predefined option profile called “Payment Card Industry (PCI) Options” must be applied to each PCI scan. Its settings test compliance with the PCI DSS requirements.
E. KnowledgeBase — The KnowledgeBase includes vulnerability checks performed for PCI scans (all vulnerabilities with the compliance type “PCI”).
More Information
Refer to the QualysGuard online help to become familiar with the PCI module. Go to Help—> Online Help and navigate to the Payment Card Industry (PCI) section.
A
BC
DE

Policy Compliance (PC)
Policy Compliance (PC)
QualysGuard® Policy Compliance (PC) gives customers the ability to audit host configurations and document compliance to internal and external auditors to meet corporate security policies, laws and regulations.
Policy Compliance provides a policy editor for creating and editing policies and assigning assets, automated compliance scanning, technical controls libraries created based on CIS and NIST standards and mapped to frameworks and regulations (such as COBIT, ISO, ITIL, SOX etc.), and automated exception and trend reporting.
The PC module is enabled for your subscription when appears in the top menu bar. Managers are granted PC permissions automatically. Sub-account users (Readers, Scanners, Unit Managers) must be granted these permissions in their account settings.
Workflows
A. Scan — Launch compliance scans to gather compliance data from hosts in asset groups.
B. Schedule — Schedule compliance scans to run in the future or on a recurring schedule.
C. Report — Run reports with multiple views to review compliance status with a particular policy by business unit, asset group or host. (Note Report Share is enabled.)
D. Exceptions — Exception requests submitted by users. Each request is for hosts/controls in a certain policy. Managers and Auditors may approve exceptions. Unit Managers may approve exceptions when granted this permission.
ABCD
E
FG
QualysGuard Quick Tour 41

Policy Compliance (PC)
E. Option Profiles — A compliance profile with user-defined scan settings must be applied to each compliance scan. A compliance profile must be defined by the user before launching a scan.
F. Policies — A policy is a written statement of a rule that is applied to operating systems and applications, referred to as technologies, in the network environment.
G. Controls — Technical controls based on CIS and NIST standards measure compliance against numerous frameworks and regulations such as COBIT, ISO, ITIL, FFIEC, NERC, etc.
Auditor User Role
The Auditor user role is specific to Policy Compliance for performing compliance management tasks.
The first time an Auditor logs in they will see the Quick Start with links to setup options. On the left menu, options are provided for compliance reporting, managing exception requests, creating policy report templates, and managing policies.
More Information
If you would like to enable the Policy Compliance (PC) module for your subscription, please contact Technical Support or your Account Manager.
Refer to the QualysGuard Policy Compliance Getting Started Guide to become familiar with the PC module. Go to Help—>Resources on the top menu bar to download.
42 QualysGuard Quick Tour

Web Application Scanning (WAS)
Web Application Scanning (WAS)
The QualysGuard® Web Application Scanning (WAS) provides customers with automated crawling and testing for custom web applications. The module identifies most web application vulnerabilities such as those in the OWASP Top 10 and the WASC Threat Classification including SQL Injection and Cross-Site Scripting. Users have the ability to manage the security of their web applications by launching scans and generating reports using the familiar QualysGuard UI.
The WAS module is enabled for your subscription when appears in the top menu bar. Managers are granted WAS permissions automatically. Sub-account users (Readers, Scanners, Unit Managers) must be granted these permissions in their account settings.
Workflows
A. WAS Scan — Launch web application scans to analyze the security of your web applications and identify detected vulnerabilities, sensitive content, and information gathered.
B. Schedule — Schedule web application scans to run in the future or on a recurring schedule.
C. Report — Run reports with multiple views to review web application vulnerability status and verified solutions. Both scorecard reports and interactive reports for remediation and testing are provided.
D. Option Profiles — A web application profile with scan settings must be applied to each web application scan. A user may configure settings for crawling, sensitive content search, and vulnerability detection. A predefined profile called “Initial WAS Options” is provided by the
QualysGuard Quick Tour 43

Web Application Scanning (WAS)
service. This profile performs a crawl only scan that does not scan for vulnerabilities. To perform a vulnerability scan, you can rename this profile and un-check the Crawl only option to get started.
E. Web Applications — A web application is the target of a web application scan. It is defined by the location where crawling starts: virtual host (FQDN or IP address), port number, and starting URI (by default the web application root directory). User access is managed per web application by access rights: read (view), write (edit), and execute (launch a scan). Full rights are given to all Managers and the web application owner; other users may be granted rights.
F. KnowledgeBase — The KnowledgeBase includes vulnerability checks performed for web application scans (all vulnerabilities in the Web Application category).
More Information
If you would like to enable the Web Application Scanning (WAS) module for your subscription, please contact Technical Support or your Account Manager.
Refer to the QualysGuard Web Application Scanning Getting Started Guide to become familiar with the WAS module. Go to Help—>Resources on the top menu bar to download.
44 QualysGuard Quick Tour

FDCC
FDCC
The QualysGuard® FDCC Module is the first certified cloud-based computing solution for Federal Desktop Core Configuration compliance. The solution is delivered as a service, making it easy and cost effective to implement on a global scale.
The FDCC module allows customers to audit host configurations and document compliance with Federal Desktop Core Configuration, an OMB (U.S. Office of Management and Budget) mandate. FDCC requires federal agencies to standardize the configuration of computer systems to strengthen IT security.
The FDCC module supports these products and technologies: Windows XP, Windows XP Firewall, Windows Vista, Windows Vista Firewall, and Internet Explorer 7.
The FDCC module is enabled for your subscription when the FDCC Scan option appears on the left navigation menu. Managers are granted FDCC permissions automatically. Sub-account users (Readers, Scanners, Unit Managers) must be granted permissions in their account settings.
Workflows
A. FDCC Scan — Launch FDCC scans to analyze the FDCC compliance status of hosts assigned to an FDCC policy. When launching or scheduling an FDCC scan, select a scanner appliance that has the FDCC scan option enabled and compliance hosts that are available in your account.
ABC
D
F
E
QualysGuard Quick Tour 45

Contact Support
B. Schedule — Schedule FDCC scans to run at some time in the future or on a recurring schedule.
C. Report — Run reports with multiple views to identify FDCC compliance status. The FDCC Policy XML report is suitable for submission to overseeing agencies and organizations. Interactive reports support FDCC compliance testing per host and per rule.
D. Option Profiles — A compliance option profile with user-defined scan settings is applied to each FDCC scan. A compliance profile must be defined by the user before launching a scan. This list includes the option profiles in your account for all your QualysGuard scans.
E. Scanner Appliances — FDCC scanning is supported using scanner appliances that have the FDCC option enabled. The FDCC option can be enabled on a scanner appliance when it is running Scanner Appliance software version 2.4 or later. To enable the FDCC option, edit any scanner appliance in your account. When FDCC is enabled on a scanner appliance, standard scanning is also enabled so the appliance can be used for FDCC scanning, vulnerability scanning, compliance scanning (when the compliance module is enabled), and web application scanning (when the WAS module is enabled).
F. Policies — An FDCC policy is applied to each FDCC scan. Each policy consists of FDCC content files for one FDCC policy version, one FDCC benchmark, and one technology. This list includes all policies available in your account. The service provides a library of FDCC policies, and users may upload custom FDCC policies.
More Information
If you would like to enable the FDCC module for your subscription, please contact Technical Support or your Account Manager.
Refer to the QualysGuard FDCC Module Getting Started Guide to become familiar with the FDCC module. Go to Help—>Resources on the top menu bar to download.
Contact Support
Qualys is committed to providing you with the most thorough support. Through online documentation, telephone help, and direct email support, Qualys ensures that your questions will be answered in the fastest time possible. We support you 7 days a week, 24 hours a day. Access online support information at www.qualys.com/support/.
46 QualysGuard Quick Tour