Qu ick-sta rt Gui de - Gas Detectors NZ · thesis. nt case uge Chamber without pump;-installed pull...
25
Qu Gas D for MS ick-sta Detection Kit SHA-approve art Gui ed Refuge C 1 Ent 2 Ope WI Rem Clo 3 Loc of t rem batt 4 Pre sec inst 5 Mo 6 Go Inst ide Chambers ter Airlock. en case labele ITHOUT PU move the instru ose the case. cate pull tab he instrument. move it and acti tery. Wait 15 ess and ho conds to power trument. onitor the gas to page 4, “U tructions”. d UMP. ument. on the back Pull to ivate the seconds. ld for three r on the s readings. Use
Transcript of Qu ick-sta rt Gui de - Gas Detectors NZ · thesis. nt case uge Chamber without pump;-installed pull...

QuGas Dfor MS
ick-staDetection KitSHA-approve
art Gui ed Refuge C
1 Ent
2 Ope
WIRem
Clo
3 Locof trem
batt
4 Presecinst
5 Mo
6 Go Inst
ide
Chambers
ter Airlock. en case labele
ITHOUT PUmove the instru
ose the case.
cate pull tab he instrument.
move it and acti
tery. Wait 15
ess and hoconds to powertrument.
onitor the gas
to page 4, “Utructions”.
d
UMP. ument.
on the back Pull to
ivate the
seconds.
ld for three r on the
s readings.
Use

© 2013 Industrial Scientific Corporation All rights reserved. Published 2013, 2014 Revision 5

WITH(right)
Gfor
R
OUT PUMP” instr); battery case (no
Gas Der MSHARefuge
Use and
rument case (left);ot shown); service
etectionA-approe Cham
Service Ins
Part number
Februa
“WITH PUMP” in containers (not sh
n Kit oved
mbersstruction
r: 17148420 Edition: 4
ary 14, 2014
strument case hown).

Contents PageApplication Description 1
Refuge Chamber 1
Supplies 2
Use Instruction 4
Service 14
Supplies 14
Service Instruction 14
Warnings and Cautionary Statements 18

Refuge Chamber
1
Application Description The kit enables gas monitoring with a deployed MSHA-approved refuge chamber, and equipment service during periods of storage.
Refuge Chamber Kit Chamber Supplies The kit contains three cases. All three cases are to be stored in the refuge chamber’s storage area and all three are to be used with a deployed chamber.
Two of the cases each contain a gas-monitoring instrument and supplies. One contains a without-pump instrument to monitor for gases in the “interior atmosphere”, the livable space inside the chamber. The other contains a with-pump instrument. This unit is used – in the livable space – to periodically sample for gases in the “exterior atmosphere”, the air outside the chamber.
The third case contains spare batteries.
Service Supplies The kit also contains two accessory containers. The accessory containers are not used with a deployed chamber. They are used for equipment service during periods of storage (see “Service”).

Refuge
2
SUPPInstrum
Note: ISC
“WITH
Not pictu
a See “Wsensor a
e Chamber
PLIES ment and batte
C Part numbers ar
HOUT PUMP
ured.
Warnings and Cautnd battery-type re
ery case conte
re shown in paren
P” instrume
MX6 Refmonitora
a factorybattery a
Note: A torxthe instrum
83 alkalininstalled
This docu
ionary Statementsequirements.
ents are listed
thesis.
ent case
fuge Chamberwithout pump;-installed pull ctivation.
x screw-head tool ent.
ne batteriesa; tand 80 spare
ument (17148
s” for details abou
below.
r multigas ; features tab for
is tethered to
three items.
420).
t installed

“WITH
MX6 Rfeature
Note: A t
Not pictua See “Winstalled
Batter
Not pictu
H PUMP” in
Refuge Chambes a factory-ins
torx screw-head to
ured.
Warnings and Cad sensor and batt
ry case
ured.
nstrument c
ber multigas mstalled pull tab
ool is tethered to th
59 alkalininstalled
Two 10’ ptubing (17
Three pu(1705815two spare
Two exha
This docu
utionary Statemetery-type require
104 spare
Refug
ase
onitora with pub for battery ac
he instrument.
ne batteriesa; tand 56 spare
pieces of ureth7065970).
mp inlet filters57); one instale items.
aust fittings (1
ument (171484
ents” for details aments.
e alkaline batt
ge Chamber
3
ump; ctivation.
three items.
hane
s led and
7067026).
420)
about
teries.
Pull tab

Refuge
4
USE IThe folsetup a
See thecorrect
IN TH
1. Op
2. Ac
e Chamber
INSTRUCTIOllowing instrucand use.
e refuge chamtly enter, exit,
HE CHAMBE
pen the cas
ctivate the b
ON ctions guide th
mber manufactand use the c
ER’S AIRLO
se labeled “W
Remove
Close the
battery pack
Locate thto the ba
Pull the tthen pull remove it
Wait app
e user through
turer’s instructhamber.
OCK COMPA
WITHOUT P
the instrumen
e case.
k
he pull tab thatck of the instr
ab to release the tab straigt. Discard the
proximately 15
h instrument
tions to
ARTMENT
PUMP”
nt.
t is taped ument.
the tape, ht out to tab.
seconds.

3. P
IN TH
4. Mo
Excepunit cgases
Chec
ower on the
HE LIVABLE
onitor air qu
pt during batteontinuously tos.
k the gas read
e without-p
Press seconds
After a sescreens, display ga
E SPACE
uality
ery replacemeo monitor the in
dings periodica
In the eveto the refmanufactinstructiobreathab
The sensalarm conreading in
Refug
ump instrum
for approximthen release.
eries of start-uthe instrumenas readings.
nt, run the withnterior atmosp
ally.
ent of a gas aluge chamber turer’s operatinns for maintaile interior atm
sor that is prodndition will disn red.
ge Chamber
5
ment
mately 3
up display nt will
hout-pump phere for
larm, refer
ng ning a osphere.
ducing the play its

Refuge
6
5. Op
6. Ac
e Chamber
pen the cas
ctivate the b
In the evewarning, See “Part
se labeled “W
Remove
Close the
battery pack
Locate thto the ba
Pull the tthen pull remove it
Wait app
ent of a low bareplace the bat replacement
WITH PUMP
the instrumen
e case.
k
he pull tab thatck of the instr
ab to release the tab straigt. Discard the
proximately 15
attery atteries. ”.
P”
nt.
t is taped ument.
the tape; ht out to tab.
seconds.

7. Po
8. Co
ower on the
omplete pum
e with-pump
Press seconds
After a sescreens, message
No action
mp check
Place a fiinlet to bl
Refug
p instrumen
for approximthen release.
eries of start-uthe unit will di
e, “pump on”.
n necessary.
inger over the ock the flow o
ge Chamber
7
nt
mately 3
up display splay the
pump of air.

Refuge
8
9. Se
For port lconnectiothe refugmanufac
e Chamber
et up the wi
location and on instruction, see
ge chamber turer’s instruction.
Removeinlet, the
No actio
After a bgas read
th-pump in
There a
Attach othe pumcalled th
e
.
Attach tsample port in t
e the finger froen press .
on necessary.
brief waiting pedings will disp
strument
are two pieces
one piece of tump inlet nipple.he “sample tub
he other end otubing to the she livable spa
om the
eriod, the lay.
of tubing.
ubing to This is
bing”.
of the sample ce.

For port lconnectiothe refugmanufac
10a. M
Operatwhen n
Power
location and on instruction, see
ge chamber turer’s instruction.
Monitor air q
te the with-pumnecessary – to
off the with-pu
Gask
Gasket
The exhpart, theTo avoiditem, uswith the
Attach texhaustback of upper lescrew thThe fittinthe nut.
Attach ttubing tonipple, tarm. Thtubing”.
e
.
Attach texhaustport in t
Ensure connect
Sample tuExhaust fi
quality outs
mp instrumento sample the e
ump instrumen
et
Refug
haust fitting is e fitting and itsd the loss of e
se caution whese items.
he exhaust fittt port located othe instrumen
eft corner. Usehe item into thng swivels; tig
he second pieo the exhaust the fitting’s nohis is called th
he other end ot tubing to the he livable spa
all noted-abovtions are airtig
ubing tting and tubing
side the cha
t in the livable exterior atmosp
nt after each u
ge Chamber
9
a two-item s gasket. either small en working
ting to the on the
nt in the e fingers to e port.
ghten it at
ece of fitting nthreaded e “exhaust
of the exhaust ce.
ve ght.
amber
space – phere.
use.

Refuge
10
10b. P
Press ascreen
11. M
e Chamber
Power off
and hold displays (sho
onitor batte
until the shutdown below).
Press .
ery power le
From the gaspress onbacklight.
Press aoperation mo
Press tomenu, “View
Press ▼to h“Battery”.
Press toremaining ba
The number indicates theremaining.
Press ▼to hPress to
down confirma
The unit will p
evels
s monitoring snce to activate
again to activaode menu bar.
o activate the dw”.
ighlight the me
o activate the dattery life.
in the verticale percentage o
ighlight the exo “Exit”.
ation
power off.
screen, e the
te the .
drop-down
enu item,
display of
bar of power
xit bar.

Note: Tybattery reNote: Shatmosphremovingatmosph
PART
1. Pow
Batte
pical battery run tieplacement instru
hould the without-pere can be monitog the sample tubinere, simply reatta
T REPLACEM
wer off
ery replacem
ime for each instructions, see “Part R
pump unit becomeored for gases using from the instrumch the sample tub
MENT IN TH
Press anshutdowdisplays
Press off.
ment
Power o
Use the the threebattery c
Removeaside.
Refug
ument is one to twReplacement” beloe inoperable, the inng the with-pump
ment. To monitor tbing.
HE LIVABLE
nd hold uwn confirmations.
. The unit w
off the instrume
tool provided e captive screcompartment c
e the cover and
ge Chamber
11
wo hours. For ow. nterior unit by the exterior
E SPACE
ntil the n screen
will power
ent.
to loosen ws on the cover.
d set it

Refuge
12
e Chamber
Removethe batte
Insert ththe posit(bottom)
Note: Do n
Replace
Use the the covescrews.
e all three batteery compartme
hree new battetive (top) and ) orientation sh
not mix old and ne
e the cover.
tool provided er’s three capt
eries from ent.
eries using negative hown here.
ew batteries.
to tighten ive

Filter only)
replaceme
◄Blue
◄Clear
nt (with-pum
Power o
Turn thecountercSet the
Removebarrel. D
Place thinlet baris blue ablue endinstrume
Reattacclockwis
Refug
mp instrum
off the instrum
e pump inlet cclockwise to recap aside.
e the filter fromDiscard the us
he new filter inrrel. One end oand one is clead should face ent user.
ch the cap andse to tighten.
ge Chamber
13
ment
ent.
ap emove it.
m the inlet sed filter.
nside the of the filter ar. The the
d turn it

Service
14
ServThe kitstored nonhaz
SUPPAccess
Note: ISC
Acces
Not pic
SERVCompleknown for eac
Prep
e
vice t contains two and used abo
zardous.
PLIES sory container
C Part numbers ar
ssory conta
ctured.
VICE INSTRUete the followito be nonhaza
ch instrument.
paration
accessory conove ground in a
r contents are
re shown in paren
ainer
These do
MX6 (1713
MX6 (1713
Calibratioand calibruse with w
UCTION ng service proardous. Perfor
At the seeach inst(without
ntainers. Theyan area known
listed below.
thesis.
ocuments:
iBrid Product 30279-1) iBrid Quick St
34552-1)
on tubing (1704ration cup (17without-pump
ocedures in anrm all tasks ev
ervice locationtrument from ipump shown)
y are to be n to be
Manual
tart Guide
44157) 128489); instrument
n area very 31 days
, remove ts case .
Calib
CaStaUsma
Notfailu
BuStaUsma
Po Un
set
bration and
alibrate the unatements” for se a compatiblanually (see th
te: If any sensor faure persists, see a
ump test the unatements” for se a compatiblanually (see th
ower off the unninstall the litht them aside fo
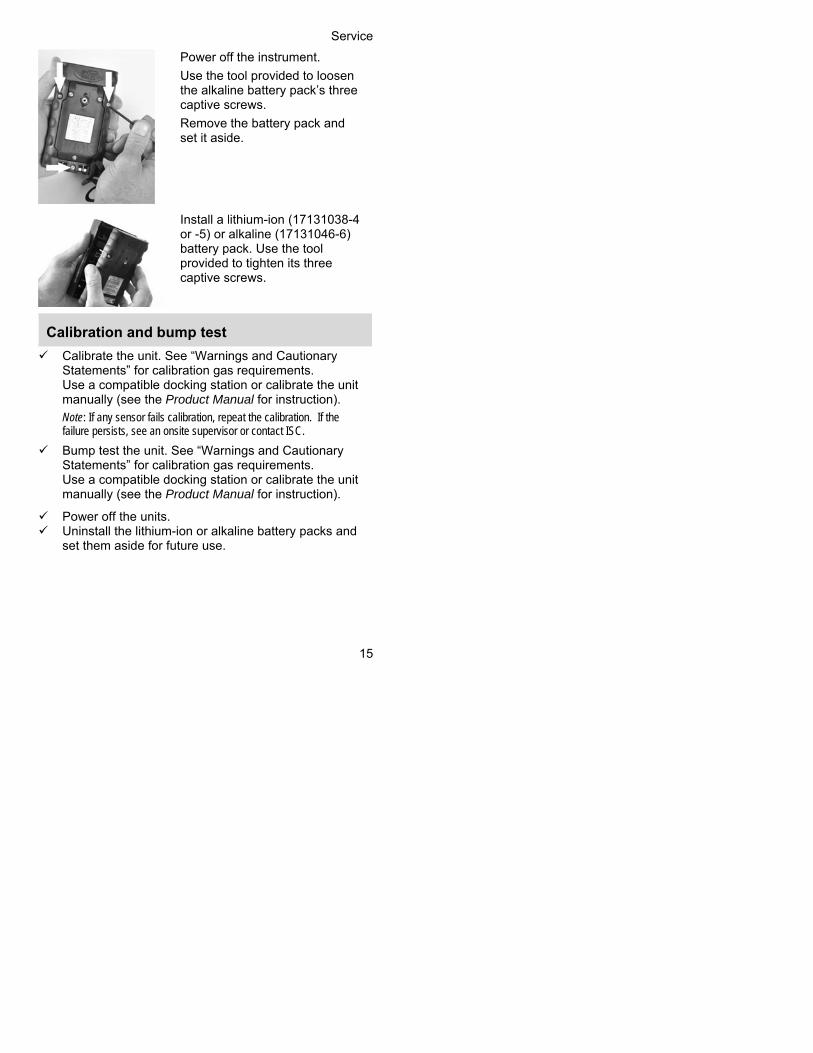
Power of
Use the tthe alkalicaptive s
Remove set it asid
Install a lor -5) or battery pprovidedcaptive s
bump test
it. See “Warnicalibration gase docking stat
he Product Ma
ails calibration, repan onsite supervis
nit. See “Warncalibration gase docking stat
he Product Ma
nits. ium-ion or alkaor future use.
ff the instrume
tool provided tine battery pac
screws.
the battery pade.
lithium-ion (17alkaline (1713
pack. Use the t to tighten its t
screws.
ngs and Cautis requirementtion or calibrat
anual for instru
peat the calibratioor or contact ISC.
nings and Caus requirementtion or calibrat
anual for instru
aline battery p
Service
15
ent.
to loosen ck’s three
ack and
7131038-4 31046-6) tool three
ionary s. te the unit uction).
n. If the
utionary s. te the unit uction).
packs and

Service
16
Alka
Not pictu
*Whenspare ain the ifor a rebatterie
e
aline battery
ured.
the battery paalkaline batternstrument cas
eplacement baes.
y pack inspe
Inspect the athere is any scorrosion, orthe battery p
Inspect the pthe battery pline on the taare visible, dpack*.
Check the badate. This is coded label tbattery pack digits on the Y= year and example, 130pack was ma2013. If the bold, discard i
ack is discarderies. This incluses and the baattery pack an
ection
alkaline batterysign of dust, wr discoloration,ack*.
pull tab near thack. Ensure o
ab is visible. If discard the bat
attery pack malocated on the
that is affixed interior. The flabel are YYMM = month. F09 indicates thanufactured Sebattery pack isit*.
ed, also discades the spare
attery case. Cond replacemen
y pack. If water, , discard
he edge of only one
two lines ttery
anufacture e bar to the first four MM, where For he battery eptember
s five years
rd all e batteries ontact ISC nt spare

Service
17
Storage
Place all kit contents into the approved cases. Close the cases and ensure they are properly sealed. Return the cases to the chamber.
Notes
Warning and Cautionary Statements
Use one with-pump instrument and one without-pump instrument together as instructed.
Both instruments must be equipped with these sensors: CO/H2-low, O2, CH4, and CO2.

Warnings and Cautionary Statements
18
Alarms must be set as follows:
Without pump
Alarm settings
Gas Low High TWA STEL
O2 18.5% 23.0% N/A N/A
CO 25 ppm
CO2 1%
CH4 1.0% N/A N/A
With pump
Alarm settings
Gas Low High TWA STEL
O2 18.5% 23.0% N/A N/A
CO 999 ppm
CO2 1%
CH4 1.0% N/A N/A
Note: Because the with-pump unit can be used to monitor the interior atmosphere for gases (should the without-pump unit become inoperable), instrument operators should be aware of the differences in alarm settings as shown above.
Service the instrument using the following gas concentrations:
Gas concentration by task
Sensor Zero Calibration Bump test
O2 Zero Air Zero Air 18%
CO Zero Air 250 ppm 250 ppm
CO2 Zero Air 2.5% 2.5%
CH4 Zero Air 2.5% 2.5%
After the instrument leaves the factory, the MSHA approval is negated when any change is made to any of these settings, components, or requirements:

Warnings and Cautionary Statements
19
Alarm settings Installed battery type
Sensor settings Pull tab
Calibration gas concentrations
Instrument case contents
Calibration frequency Faceplate or label
Use only these AA alkaline batteries: Duracell MN1500. The following apply to the alkaline battery replacement task:
Replace all three batteries at the same time. The replacement task can be completed in a
gassy area. Do not allow dust to enter the battery
compartment.
The battery pack must be replaced in fresh air only.
Substitution of components may impair intrinsic safety and may cause an unsafe condition.
Always store and transport case contents in the supplied and approved dust-tight case.
The pull tab is factory installed. Do not reinstall a pull tab that has been removed from the instrument; contact ISC.
Remove the pull tab only for instrument use with a deployed refuge chamber.
The MX6 refuge chamber instruments do not meet IP64 or IP65 ratings.
Replace the instruments after they are used with a deployed chamber.
Specifications are subject to change without notice. Refer to the ISC website for the most current information.


ContacIndustria1001 OaOakdaleUSA Phone: +11-800-DETe-mail: info
ct Informatial Scientific Coakdale Rd. e, PA 15071-1
412-788-4353 TECTS ([email protected]
on orporation
500
7)