Qt Designer and KDevelop-3.0 for beginnersread.pudn.com/downloads86/ebook/331696/Qt Designer...
44
Qt Designer and KDevelop-3.0 for beginners Anne-Marie Mahfouf <[email protected]> German Translation : Andreas Nicolai Russian Translation : Marina Soboleva Revision 0.4 Copyright 2001, 2003 Anne-Marie Mahfouf Permission is granted to copy, distribute and/or modify this document under the terms of the GNU Free Documentation License, Version 1.1 or any later version published by the Free Software Foundation; with no Invariant Sections, with no Front-Cover Texts, and with no Back-Cover Texts. A copy of the license is included in the section entitled "GNU Free Documentation License". Qt is the toolkit used by the KDE project for developing graphical applications. This paper shows a beginner how to create a simple application using Qt Designer 3.2 and KDevelop-3.0 (aka Gideon at the moment). This tutorial is based on an application written by Jono Bacon and has been reviewed by Daniel Molkentin (for the KDevelop2 version) and Thomas Nagy. Table of Contents 1. 1. Introduction 2. 2. Requirements How to get Qt Designer From your distribution Tarball or anonymous cvs How to get KDevelop 3 From your distribution From tarball cvs HEAD Lexicon
-
Upload
duongxuyen -
Category
Documents
-
view
228 -
download
2
Transcript of Qt Designer and KDevelop-3.0 for beginnersread.pudn.com/downloads86/ebook/331696/Qt Designer...
Qt Designer and KDevelop-3.0 for beginners Anne-Marie Mahfouf <[email protected]>
German Translation : Andreas Nicolai
Russian Translation : Marina Soboleva
Revision 0.4
Copyright 2001, 2003 Anne-Marie Mahfouf
Permission is granted to copy, distribute and/or modify this document under the terms of the GNU Free Documentation License, Version 1.1 or any later version published by the Free Software Foundation; with no Invariant Sections, with no Front-Cover Texts, and with no Back-Cover Texts. A copy of the license is included in the section entitled "GNU Free Documentation License".
Qt is the toolkit used by the KDE project for developing graphical applications. This paper shows a beginner how to create a simple application using Qt Designer 3.2 and KDevelop-3.0 (aka Gideon at the moment). This tutorial is based on an application written by Jono Bacon and has been reviewed by Daniel Molkentin (for the KDevelop2 version) and Thomas Nagy.
Table of Contents
1. 1. Introduction 2. 2. Requirements
How to get Qt Designer From your distribution Tarball or anonymous cvs
How to get KDevelop 3 From your distribution From tarball cvs HEAD
Lexicon

3. Creating the application Starting the project Creating the framework with KDevelop Using Qt Designer Designing the program Adding widgets Getting spaced out Signals and slots Generating the source Implementing the slot
1. 4. In short 2. 5. Make the translations for a simple kde project First install a gettext patched for kde Prepare the translations Make the translations Compile and install the translations files Reference 3. 6. A few general tips
General hints Your application name Coding practice
Importing your project in KDE CVS How do I release my application as a tarball? Useful links
1. 7. Generating the source (alternate) Without using the KDevelop subclassing capability Implementing the slot 2. 8. Credits and License Chapter 1. Introduction
To get us started doing something useful with Qt Designer, we are going to build a simple program that will show you the power of Qt Designer and KDevelop. I hope that this will help you to create your first "real" KDE application.
If you are already familiar with KDevelop and Qt Designer and you only want to know how they work together, go straight to the last chapter where the procedure is explained very quickly.
KDevelop will help you to build a complete KDE application. The KDE project uses the autoconf and automake tools and KDevelop will provide you all the necessary files (admin directory, Makefile.cvs, Makefile.am,...).

Chapter 2. Requirements
You will need Qt Designer and KDevelop for this tutorial, as well as the KDE 3.1. x libraries installed. We will build a simple KDE3 program that takes a name, an email address and a comment and generates a signature for an email.
How to get Qt Designer
From your distribution
Qt Designer is part of the qt-3.1.x package and above. If you have an older Qt on your system, you should get at least this version. At the time of writing, Qt version is 3.2.
Please remember to check if you have all the qt-related packages installed. You need the qt headers in order to compile this tutorial application. These headers usually come in the devel package. You also need to be sure you have designer. In some distributions, it comes in a separate package.
To check if you have everything, do a
locate qstring.h
If you get something like /usr/lib/qt3/include/qstring.h then you can set your QTDIR variable to /usr/lib/qt3/. In bash environment, this is done by typing
export QTDIR= /usr/lib/qt3
Tarball or anonymous cvs You can download the tarball from the Trolltech website or also get the qt-copy module from cvs. Please note that Qt for Linux is GPL.
For an explanation for how to use anonymous cvs, get the qt-copy and kde modules and compile them, please see a great documentation here.
You must then set the QTDIR environment variable. This should point to the directory into which you installed Qt. In bash, for example, you would type:

export QTDIR= /usr/local/qt
provided that /usr/local/qt is the directory into which you installed Qt. Please read the INSTALL file for more details.
You then compile by issuing the following commands, here is the recommended compile line:
The command make install is not needed.
Qt Designer is located in the bin directory of your Qt installation directory. You can run it by typing
/usr/local/qt/bin/designer
in a console.
Please see here for a detailed explanation of how to compile Qt from a tarball.
How to get KDevelop 3
From your distribution
KDevelop 3 is nicknamed Gideon and will reverse to the kdevelop name when there is a stable release. That means that the binary file is named Gideon. In some distributions, you will find the package under the name of Gideon or the name of KDevelop-3.

If you cannot find KDevelop-3 for your distribution, please see the next section to get it from source and to compile it.
From tarball
KDevelop can be downloaded from the KDevelop website in the section Download to find the nearest mirror. At the time of writing, latest KDevelop 3.0 source version is Alpha4a. Latest packages are Alpha 4. See the KDevelop website, download section, to get them.
To compile KDevelop 3: you need qt-3.1.0 or higher and kdelibs-3.1.0 or higher. The environment variables QTDIR and KDEDIR should point to those directories.
Don't forget to set up the KDE and QT paths. The most common errors while using KDevelop come from the environment variables not set up properly. Check in a console by issuing the command 'set' to see all your environment variables. You should set your PATH variable as follow as well as your LD_LIBRARY_PATH: If you have any problem getting KDevelop running, please follow the forum link from the KDevelop website to find the answer of your problem.
If you never used KDevelop before, try to create a new project and to compile it to get used to the interface and the icons.
cvs HEAD
A brief section for those you would like to get the last thing available! And KDevelop from CVS is really worth the download. You need qt-3.1.0 or higher and kdelibs-3.1.0 or higher.

When the download is finished:
Please see the compiling instructions on the KDevelop website to get more details.
Lexicon
. ● Widget: a widget is an element of an graphical interface such as a container window, a button or a field for entering text. . ● Layout management: this term describes the way in which widgets are arranged in a window. In its simplest form, an element may be placed at a specific position and given a specific height and width. But when the user resizes the window, the widgets should stay in their position and change their size accordingly. Linux allows to do that by using layouts to place the widgets in. . ● Signal and slot: Signals and slots are used for communication between objects. The signal/slot mechanism is a central feature of Qt. Signals are emitted by objects when they change their state in a way that may be interesting to the outside world. Slots can be used for receiving signals, but they are normal member functions. You can connect as many signals as you want to a single slot, and a signal can be

connected to as many slots as you desire. Please see the TrollTech documentation on signals
and slots for more details. In the (excellent) online documentation that comes with Qt you'll find the signals and the public slots that go with each class. You can then implement your own slots.
Chapter 3. Creating the application
Starting the project Creating the framework with KDevelop
The framework in which our program will sit in (i.e. the main window) can be done easily and quickly by using KDevelop. Start KDevelop and select New Project in the Project menu. The Application Wizard appears then. Choose a C++ -> KDE -> Simple KDE Application. Fill in the blank lines with the project name (SigCreate), your name as author, your email (see Picture 1).

Click on Next, have a look to the CVS option and to the header templates. Then click on Finish on the last screen. KDevelop creates all the files that you need to compile your project. You can use the file selector to view the code of the 3 files which are main.cpp, sigcreate.cpp and sigcreate.h (picture 2).


Once the Application Wizard has created your application, compile it to ensure that everything is fine. To do that, select Build -> Run automake & friends then
Build -> Run configure. The Messages output window should say
so you can run "make" with Build -> Build Project (or using the F8 shortcut). Then Build -> Install. Then Build -> Execute program (or F9). The result is shown in Picture 3.
Picture 3: The KDE Simple Application
We now have our framework and are ready to start developing our program.
If KDevelop does not recognize your QTDIR and KDEDIR variables, you can set them
in Project -> Project Options... in Configure Options.

Picture 6: Project Options
Using Qt Designer
Qt Designer is a tool for designing and implementing user interfaces. It helps you arranging your widgets on a form and adding a proper layout so your interface can be resized properly. I recommand that you read the Qt Designer manual to know everything about Qt Designer. Qt Designer includes a code editor but we'll use KDevelop to edit and modify all code.
We will now create the interface of our application using Qt Designer. A form from Qt Designer is saved with a .ui extension because it is then processed by the uic program to generate a .h and .cpp files. KDevelop takes care of that, the only thing we need to do is to create the form.

Note
Each time you add or remove a file (now we will add a .ui file) in your KDevelop project, the Makefile.am will be changed. KDevelop does that itself but you will need to Run automake & friends after such changes.
In KDevelop, click on File -> New and fill the dialog window that appears. First write the file name: sigcreatedlg and select what new file you want in the combobox: here we want a Widget (.ui). Please be sure that "Add to project" is checked, this ensures that the Makefile.am is updated.
Click the Ok button. The Automake manager dialog then pops up.
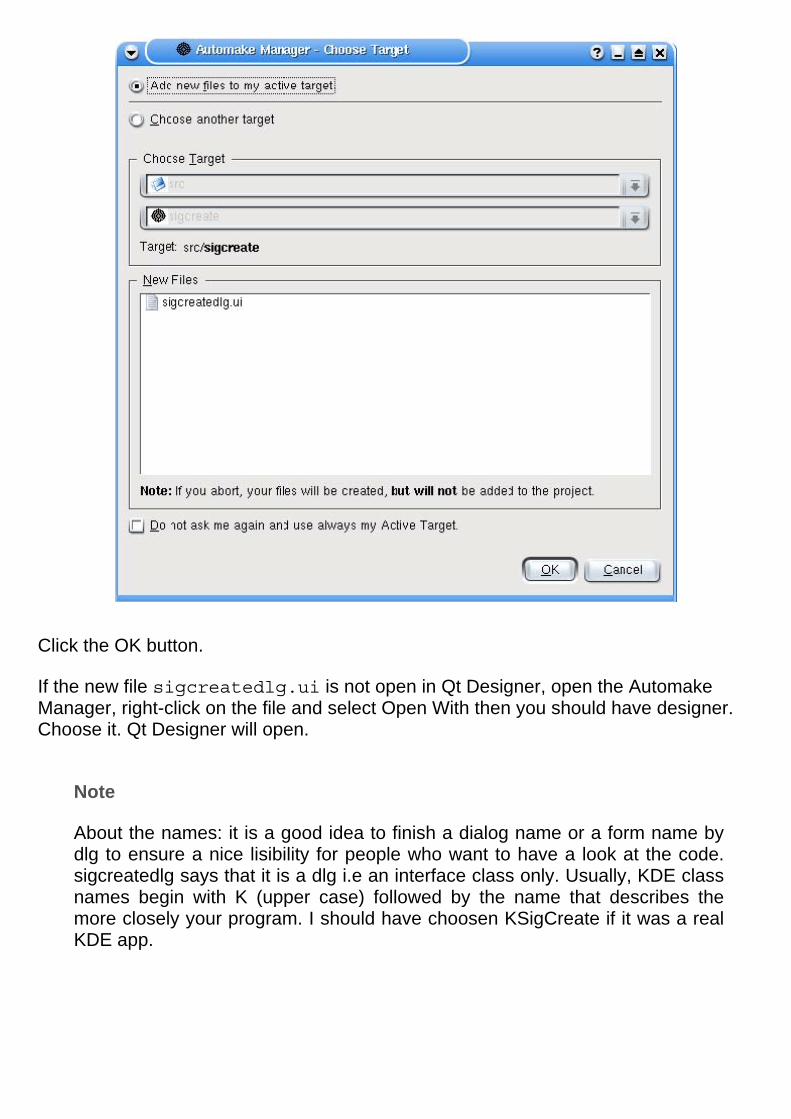
Click the OK button.
If the new file sigcreatedlg.ui is not open in Qt Designer, open the Automake Manager, right-click on the file and select Open With then you should have designer. Choose it. Qt Designer will open.
Note
About the names: it is a good idea to finish a dialog name or a form name by dlg to ensure a nice lisibility for people who want to have a look at the code. sigcreatedlg says that it is a dlg i.e an interface class only. Usually, KDE class names begin with K (upper case) followed by the name that describes the more closely your program. I should have choosen KSigCreate if it was a real KDE app.


Qt Designer interface is essentially split into three areas. On the left is the toolbox, i.e you can select your widgets here. On the right, several dialogs can be selected, I'll keep only the Property Editor dialog (I close the 2 others). Your widgets can be fine tuned to behave how you want them to. You can choose there the size of the widget, its background color (palette) and so on. Between those 2 windows is the Form which is your program window, within which you will design your user interface.
Note
After adding the sigcreatedlg.ui file, you will have to run Automake & friends and to Run configure before building the program, this ensures that the Makefile.am which has been updated is now read.
Designing the program
Each time you want to use Qt Designer, you should have a precise visual idea of the design of your interface. You can see in Picture 8 what the program will be like. It is a window with a number of different items (or widgets) on it, designed so that the user puts the right information in the right boxes. You should always design your program from the user point of view as it must be easy to use.

This application creates an email signature that is then displayed on the screen. The user should enter her/his name, email address and then select a comment among three. When you click the Create! button the generated signature is shown in a MultiLineEdit. When you click Cancel, the program quits.
Note
Note that this project is meant as a tutorial so this is somewhat far away from practical use.
Go back to the Qt Designer window with the new dialog open. You will see that the property editor has been filled with details about the form you have created. The first line in the Property Editor shows the name of the form which is Form1. Click on the field with this name to change it and type SigCreateDlg. This will form the class name of the dialog so you should name it something useful.
This is how properties are changed: select the property you wish to change then change its setting on the right. Change the caption property into "SigCreateDlg v.01".

We will now begin to add widgets on our dialog.
Adding widgets
To start we will insert the text at the top of the program window which can be seen in Picture 4. This text tells the user how to operate the program. This type of widget is called a Label and you can put one on your program like this:
. ● Select the in ToolBox dialog: Common Widgets->TextLabel or from the menubar Tools->Display->TextLabel; . ● The cursor will become a crosshair over the form. Draw a box for the label, just as you would in a paint program, and you will see that the label is created with some dummy text in it; . ● To change this text, double click on the label and type in the text instead of "TextLabel1". The text you should type is "This program will create an email signature

for you. Just fill in the boxes and hit the Create! button." Select Align Center to have the text positionned nicely. . ● Finally, resize the widget using the handles so it is the correct size and at the top of the box. Try to center the label by moving it with the mouse. This is just a temporary measure. Later on we will look at a more elegant layout management technique.
You follow pretty much the same procedure for embedding any type of widget that is supported by Qt Designer: select it, drag it and finally change its properties and size.
An interesting concept in Qt Designer is that widgets can act as containers for other

widgets. This will be demonstrated in our next task, which is to create the input fields inside the frame. You can see that in Picture 8 we have a bunch of labels and text boxes inside a frame.This frame is called a Group Box and acts as a container for the labels and text boxes inside it. Let's first create the frame by selecting the GroupBox in the Toolbox dialog->Containers or Tools->Containers->GroupBox from the menubar. You can drag the mouse to create the box just below the Label you put before. In the Property Editor you can change the title property to alter the text in the frame. Put Details in the title text field. You may notice a + symbol in this entry in the Property Editor. This indicates that the property has subproperties that can also be changed.
Once you have created the frame (i.e the GroupBox), create three more labels as before but when you draw them, draw them inside the GroupBox frame. You can then see in the Object Explorer box (Windows menu -> Views -> Object Explorer) to the right that the labels have become children of the GroupBox frame. See Picture 12 below.
Change the text of labels by double-clicking on it.
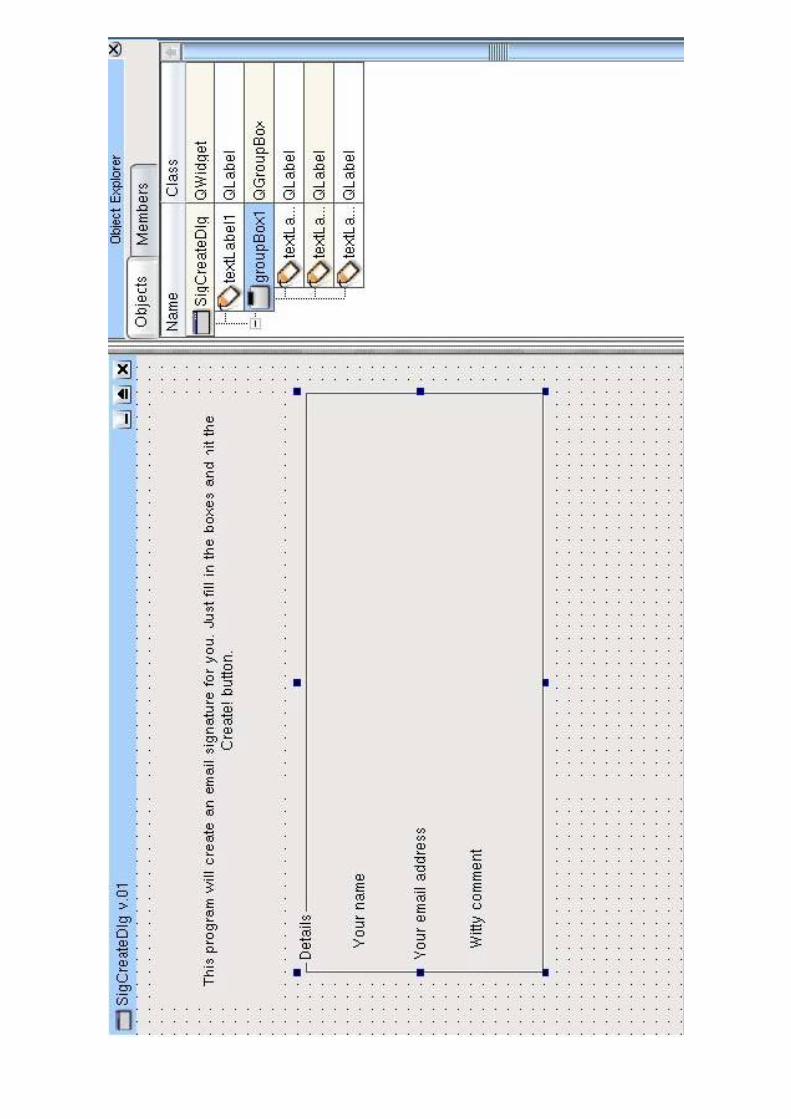

Once you have done this you can then create the text boxes. They will allow the user to type in text like his(her) name and email address. We use the simplest type of text boxes: a widget called QLineEdit which allows the user to enter one line of text only. You have to create two QLineEdit widgets for the name and the email address. You choose the menu Tools then the entry Input then LineEdit and you draw it beside the 'Your Name' Label. Do the same below for the address.
The witty comment will be selected by the user. We use a ComboBox which will present the user with three comments. Click on the ComboBox icon or select it via the Tools-> Input-> ComboBox menu. Draw it beside the Witty Comment label. Then double-click on it. You will be presented with a box into which you can add the contents of the combo box. Click on the 'New Item' button and type in your comment in the text box at the right. Then click again on 'New Item' for the second and third comments. Click on OK when you have finished.
Adjust the size of the different widgets so they are nicely placed.
Naming our widgets: Up to now we have not named any of the widgets that are being placed in our program. It is useful to set an internal name for widgets so we can call them after in the program. Labels don't perform any action so they don't need to be named but other widgets do. It is the case now for our text boxes. We'll need to manipulate the data from the three input widgets (i.e. read the text) so we should give them a name. Names should be easily recognized later and they should make sense. The names are assigned via the name property on the top of the Property Editor. We name the top LineEdit nameBox and the second one mailBox. We name the ComboBox commBox. This will allow us to access the comments. So click on each LineEdit and then besides Name in the Property Editor write nameBox and mailBox. Then click on the ComboBox and name it commBox.
We finish the graphical design by adding a label with 'Generated Signature' as text. Below it, we put a TextEdit (Tools->Input->TextEdit) where the generated signature will be displayed. We name it 'sigBox'. And then we add two PushButtons at the bottom ('Create!' and 'Cancel'). They don't need names but you can give them some if you want.
Save your form. You can now have a quick preview by selecting the menu Preview-> Preview Form.

Picture 13: The Form before layout management
Getting spaced out
This section describes the layout management. If you resize the preview window you will then notice that the widgets do not adjust appropriately. They are not resized. To improve things, we need to use a feature in Qt called spacers. Spacers are like virtual springs that push the widgets on each side apart.
Note
Having a good layout is essential for your application as when the strings are translated, they might be longer than the English ones and they need to fit on your widgets. The geometry of the widgets has to be nice if the user resize your window application. Layouts are done by trial and error so use Preview->Preview Form to see the result of your layout management and to achieve the best layout.
The use of spacers and layout management is a skill that is developed through trial and error. The main thing to remember when dealing with spacers is that you work horizontally first and then vertically.
We will first use spacers to center the text in the top box. Resize your label so that it only get the size of the text. Then we add two spacers, one at each side. Choose the 'spring' icon or menu Layout-> Add Spacer. You just each the spacer horizontally. Click the space to the left of the text and the blue spacer will appear (see Picture 14). Repeat the same procedure for the right. Then add a spacer on the right of the 'Generated Signature' label and a last one on the left of the the 'Create!' pushbutton.

Picture 14: Adding the spacers
Now that we have spacers to fill blank space, we need a proper layout management. This will allow the widgets to be nicely resized whenever the main window is resized. It is really compulsory to have a good layout management. Again, try to resize several times to see if everything is in place. We can use Vertical or horizontal layout or grid management. The top row of widget is horizontal (spacer + label + spacer) so we need Horizontal management. We need to select the three widgets alltogether: click on the first spring, then click on the label while holding down Shift then on the second spring while holding down Shift. Then click on the Horizontal Layout icon or menu Layout-> Lay Out Horizontally. You will then see a resizable red line around the three objects to indicate that their layout is being managed. Resize the red box if it needs to.
We can now repeat this procedure for the three labels inside the GroupBox, this time

using vertical layout management. The same vertical management for the two LineEdit and the ComboBox. It is better to use vertical management to keep the object aligned. If we use horizontal management for each label + text box then they will not stay aligned and equally sized. Horizontal management is needed for the label with the spacer and another one for the two pushbuttons and the spacer.
To finish the layout, we need to let the form look after the laid-out boxes. We put everything in a grid. This is done by right clicking the form and selecting "Lay Out in a Grid" from the menu. The final design with layout lines should resemble something similar to Picture 15.
Picture 15: The complete layout management
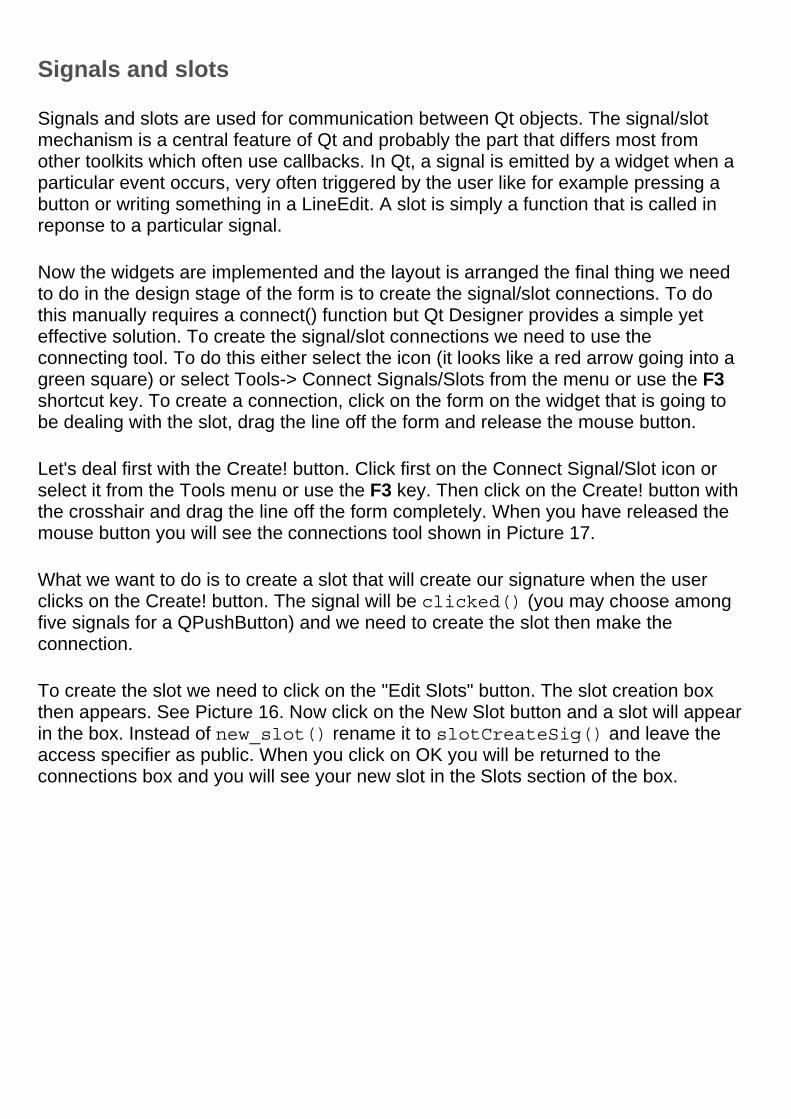
Signals and slots
Signals and slots are used for communication between Qt objects. The signal/slot mechanism is a central feature of Qt and probably the part that differs most from other toolkits which often use callbacks. In Qt, a signal is emitted by a widget when a particular event occurs, very often triggered by the user like for example pressing a button or writing something in a LineEdit. A slot is simply a function that is called in reponse to a particular signal.
Now the widgets are implemented and the layout is arranged the final thing we need to do in the design stage of the form is to create the signal/slot connections. To do this manually requires a connect() function but Qt Designer provides a simple yet effective solution. To create the signal/slot connections we need to use the connecting tool. To do this either select the icon (it looks like a red arrow going into a green square) or select Tools-> Connect Signals/Slots from the menu or use the F3 shortcut key. To create a connection, click on the form on the widget that is going to be dealing with the slot, drag the line off the form and release the mouse button.
Let's deal first with the Create! button. Click first on the Connect Signal/Slot icon or select it from the Tools menu or use the F3 key. Then click on the Create! button with the crosshair and drag the line off the form completely. When you have released the mouse button you will see the connections tool shown in Picture 17.
What we want to do is to create a slot that will create our signature when the user clicks on the Create! button. The signal will be clicked() (you may choose among five signals for a QPushButton) and we need to create the slot then make the connection.
To create the slot we need to click on the "Edit Slots" button. The slot creation box then appears. See Picture 16. Now click on the New Slot button and a slot will appear in the box. Instead of new_slot() rename it to slotCreateSig() and leave the access specifier as public. When you click on OK you will be returned to the connections box and you will see your new slot in the Slots section of the box.

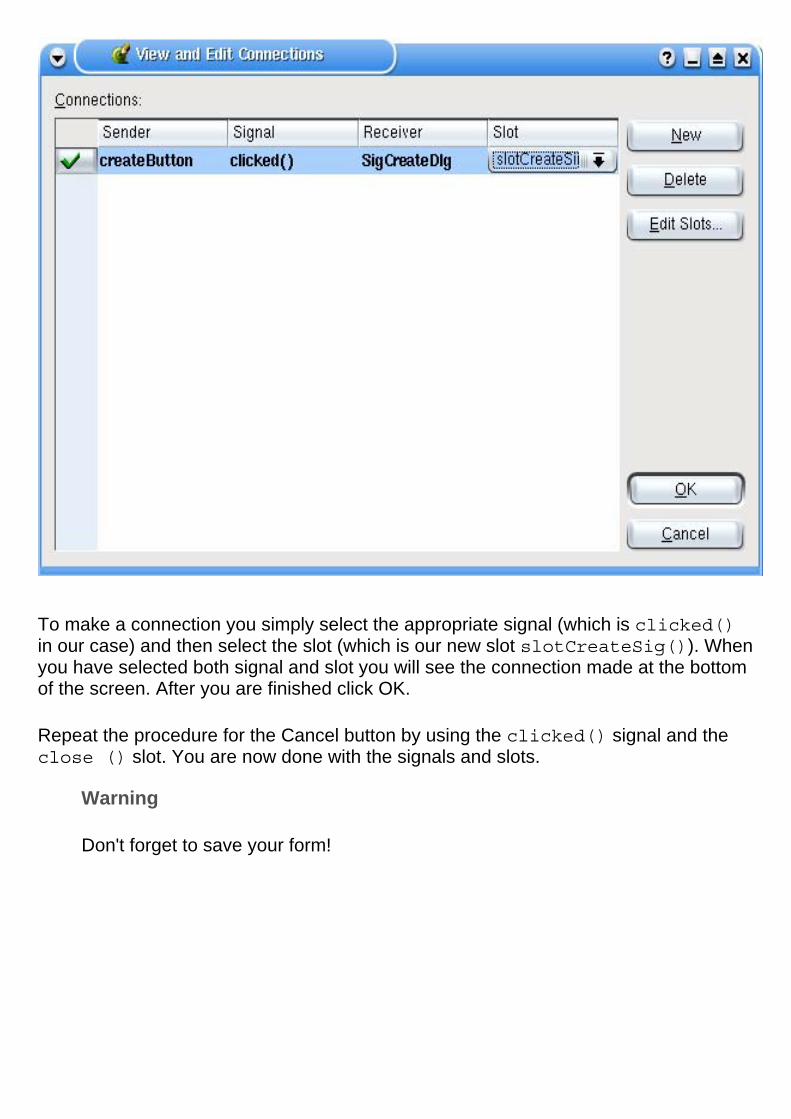
To make a connection you simply select the appropriate signal (which is clicked() in our case) and then select the slot (which is our new slot slotCreateSig()). When you have selected both signal and slot you will see the connection made at the bottom of the screen. After you are finished click OK.
Repeat the procedure for the Cancel button by using the clicked() signal and the close () slot. You are now done with the signals and slots.
Warning
Don't forget to save your form!

Generating the source
In this tutorial, we use KDevelop subclassing tool in Automake Manager. If you have KDevelop version which has not that capability, then please go to Chapter 7 where I explain this step without the subclass tool.
Here we start with the KDE simple project named SigCreate and the sigcreatedlg.ui that we have added in our project. In the Automake Manager, in the section sigcreate (Program in bin) you must have three files: sigcreatedlg.ui, sigcreate.cpp and main.cpp. The project must compile and give the main window as in picture 3 (creating. html).
As the sigcreate class is no use for use, we will remove it and use it for subclassing the sigcreatedlg.ui file. In the Automake Manager, right click on sigcreate.cpp and select Remove and a dialog pops up. Please check 'Also Remove it from disk'. Then do the same with sigcreate.h. This is the way to remove obsolete files from your project and the Makefile.am will be updated. Remember to run automake & friends and configure before compiling your project again. We will not do it right now because we will make other changes. We will now use the class name SigCreate for the subclass.
In the Automake Manager, in sigcreate (program in bin), right click on sigcreatedlg. ui and choose Subclass Widget... from the context menu that appears. Then fill in the subclass name which is SigCreate. Check the box: Reformat source and click on OK. Say No then about adding these files in cvs as we did not enable this in our project.
Note
You can see that the slot we created in designer is listed here and checked, the method will be implemented in the generated files. If you uncheck it, the code will not be generated in your class.
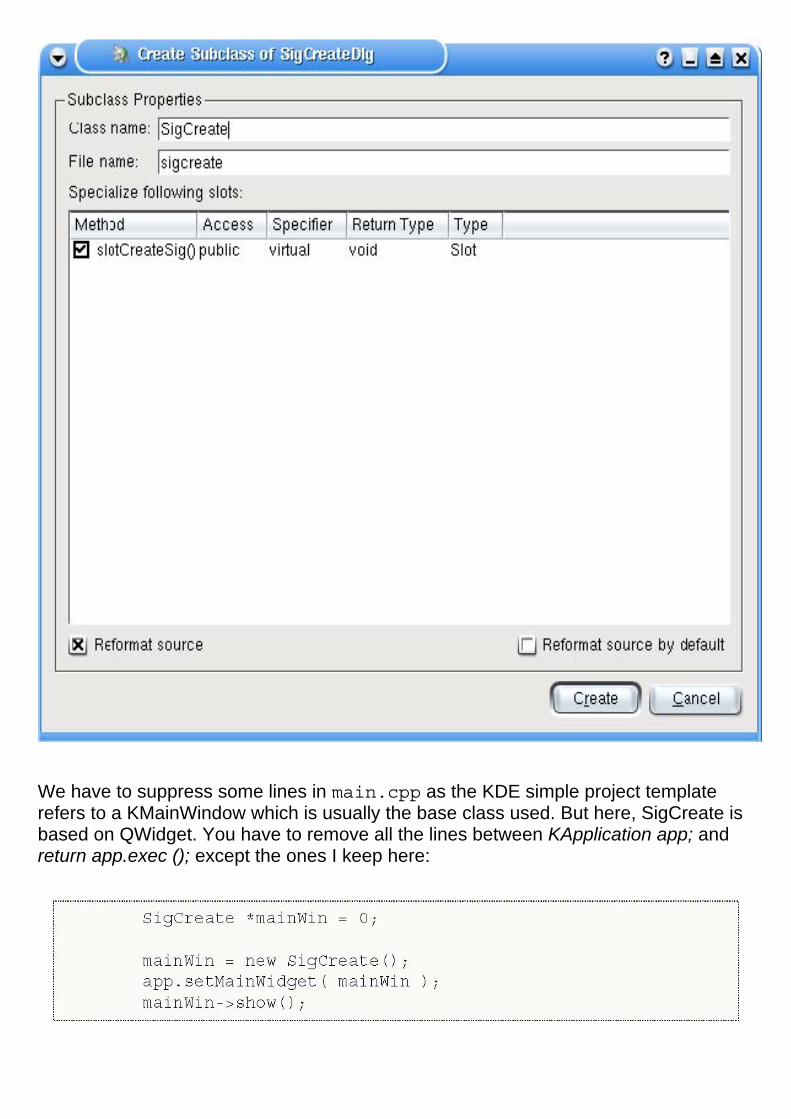
We have to suppress some lines in main.cpp as the KDE simple project template refers to a KMainWindow which is usually the base class used. But here, SigCreate is based on QWidget. You have to remove all the lines between KApplication app; and return app.exec (); except the ones I keep here:

Implementing the slot
Then you implement the slot by adding the following lines in the parenthesis of:
to implement the slot
and also the corresponding headers of course:
Run Build -> Run automake & friends, Build-> Run Configure, Build -> Build Project, Build -> Install (or Build->Install as root user), Build -> Execute Program. That's it! The program is working! See Picture 20 below.
A few more words about signals and slots. The signals and slots mechanism is type safe: the signature of a signal must match the signature of the receiving slot (for example, you will connect valueChanged(int) with a slot having an int as argument). And another thing to keep in mind is that all classes that inherit from QObject or one of its subclasses (e.g. QWidget) can contain signals and slots.
All the strings that you use in your KDE program must be wrapped in the i18n() function (klocale.h as header) because all KDE projects are translated. Please see the KDE Translation HowTo to learn more about i18n and Chapter 5 of this tutorial to make your own translations for your application.
If you need any help you can either send me a mail or come and have a chat with me (irc.openprojects.net, join channel #kde-women or #kde-devel and my nickname is annma).

You can download the source code of the SigCreate project by clicking on sigcreate-0.1.tar.gz. Please note that you need Qt-3.2.0 or higher to build it. Chapter 4. In short
This is a short resume on how to work with KDevelop and QtDesigner.
. ● In the KDevelop menu File->New, select a Widget (.ui) file and give it a name (kprojectdlg for that example), check add to Project. Click OK. . ● Qt Designer starts. Work on your form in Qt Designer then save your file and close designer. The designer file appears then in KDevelop under User Interface (kprojectdlg.ui). . ● Create a new class (KProject as name for example) (Project menu then New class...) that inherits from your dialog file (kprojectdlg) and is a QWidget-childclass. . ● Add your slots and others signals or member functions in the inherited class KProject. Chapter 5. Make the translations for a simple kde project
When your own project is finished, you may like to have one or several translations for the GUI. Here is how you can do that.
First install a gettext patched for kde
Install a patched gettext that you can find on developer.kde.org and install it in your home directory. The patched gettext can be found there : http://public.kde. planetmirror.com/pub/kde/devel/gettext-kde/
Prepare the translations
Then, go into your project directory :

Set KDEDIR to match your kde installation - on my Mandrake it is /usr This path can also be found by doing "kde-config --prefix"
Then create the translations files :
Make the translations
Translate the .po files using kbabel These files are in the po directory of your project.
Warning
Do not touch the .pot file!
Compile and install the translations files
Reference
Please see the original version of this chapter here, thanks to Thomas Nagy. Chapter 6. A few general tips
General hints
Your application name
KDE application names generally start with the letter K followed by a name suggesting what the program does. For example, KMail is very simple and tells the user that this is indeed a KDE application and about email. A good practice is to choose an english name for the name that follows the K. Of course, this is just an indication and you are free to do what you want. But a good name can help to get your program known quicker.
Note
Run a search in Google (in Konqueror, write gg:your_app_name) to see if the name you want to use is not the name of a copyrighted program. If this is the case or if in doubt, change it.
Coding practice
Comments should be in English as it is really easier if someone else has a look at your code.
Class names usually are also in English and the names must indicate what the class does. Good examples: TopLevel, CursorInterface, TaskManager. Note the upper case letters and remember that C++ is case-sensitive.
Function names usually begin with a lower case letter and here are examples of good names: Code indentation can be whatever you like as long as the code is lisible for other developers. Always keep in mind that other people will have a look in your code and try to make it easy to read.
Importing your project in KDE CVS
Your program interests people, you feel you have time to really work on it, you need more feedback and help for improving it. You also agree to release it under the GPL license or equivalent. You can ask for a cvs account to import it in kdenonbeta. The kdenonbeta module is quite big and is not distributed with the official KDE. It is not packaged nor translated and feature freeze does not apply to kdenonbeta. Its purpose is to allow other developers to work on your application and to test it. Of course, you

will need qt-copy, arts and kdelibs from cvs HEAD at least. Please see a tutorial here on how to get started for compiling KDE from cvs HEAD.
Note
When your application has the most important features, when it's totally KDE compatible (i18n, xml GUI, ect.), you will be able to ask for moving it in a KDE official package.
In order to get a cvs account, please follow theses instructions. Send a mail to sysadmin (at) kde (dot) org to justify why you need cvs access. Tell that you want to import your application (app_name) in the kdenonbeta module. Make sure to specify your full name and e-mail address, if the From field in your mails doesn't specify them. You can also choose a nickname for your user login. You can currently choose between the standard non-encrypted CVS protocol (pserver) and the encrypted CVS-over-ssh. If you choose pserver, send also an encrypted password (for instance using useradd dummy ; passwd dummy ; grep dummy /etc/passwd /etc/shadow). If you choose CVS-over-ssh, send a public ssh key (e.g. ~/.ssh/id_dsa.pub).
Wait for the answer from a KDE sysadmin.
Once you have compiled at least qt-copy, arts and kdelibs, you need to check out kdenonbeta files. Log in the cvs server with your login user and password.
You copy your project main dir with everything in kdenonbeta and then, in your project main dir, you issue a:
$ make disclean
All the .o files must be gone. You can also remove by hand all Makefile, Makefile. in (not Makefile.am) and all kdevelop related files. Remove the admin, autom4te. cache, debug, doc, po and templates folders. You must just keep some files and the src subdir. Then, you cd .. to go back in kdenonbeta and you type:
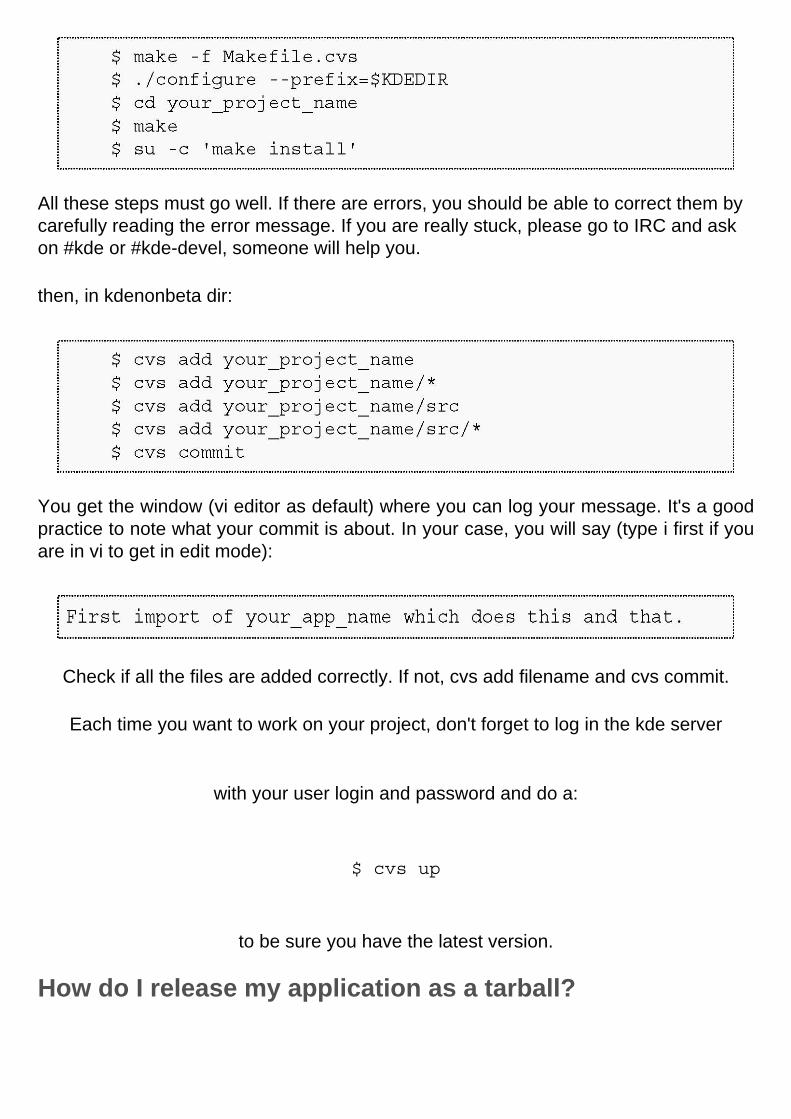
All these steps must go well. If there are errors, you should be able to correct them by carefully reading the error message. If you are really stuck, please go to IRC and ask on #kde or #kde-devel, someone will help you.
then, in kdenonbeta dir:
You get the window (vi editor as default) where you can log your message. It's a good practice to note what your commit is about. In your case, you will say (type i first if you are in vi to get in edit mode):
Check if all the files are added correctly. If not, cvs add filename and cvs commit.
Each time you want to work on your project, don't forget to log in the kde server
with your user login and password and do a:
$ cvs up
to be sure you have the latest version.
How do I release my application as a tarball?

You need to have the kdesdk module on your machine. In this module, kdesdk/ scripts/cvs2dist is a script to extract an application from the kde source tree and package it as a standalone application.
From the command cvs2dist --help, you get:
Provided that your application is in the kdenonbeta module, that your application name is KMyApp, the command you will issue is:
where you replace kmyapp by your program name and 0.1 by your program current version.
This will create two packages kmyapp-0.1.tar.gz and kmyapp-0.1.tar. bz2, in the directory where you issued your command. Useful links
●
The KDE Developer FAQ
❍ http://developer.kde.org/documentation/other/developer-faq.html
●
KDE Application Developer's Checklist
❍ http://developer.kde.org/documentation/other/checklist.html
●
How to get KDE3.x.x and KDE3.2 (from cvs HEAD) working on the same machine
❍ http://women.kde.org/articles/tutorials/howtocvs.php

●
The KDE API reference (for CVS HEAD)
❍ http://developer.kde.org/documentation/library/cvs-api/
●
The KDE User Interface Guidelines
❍ http://developer.kde.org/documentation/standards/kde/style/basics/ index.html
●
The online Qt reference
❍ http://doc.trolltech.com/3.2/index.html
●
Qt Quartely: newsletters for C++ and Qt developers
❍ http://doc.trolltech.com/qq/
●
The C++ FAQ Lite
❍ http://www.parashift.com/c++-faq-lite/index.html
●
How to Implement "User Defined Settings" using KDE3 and QtDesigner 3
❍ http://www.kdevelop.org/doc/tutorial_settings/ Chapter 7. Generating the source (alternate)
Without using the KDevelop subclassing capability
Step 1 - Be sure you saved your form with the name sigcreatedlg.ui and close Qt

Designer. If you open this file with your favorite editor you will see that it is not C++ code but XML code. A special command line tool called uic is included with Qt Designer. This command is used to convert the .ui file into .h and .cpp files. This is handled automatically by KDevelop.
Note
If for some reason KDevelop does not generate the .h and .cpp files from sigcreatedlg.ui, here are the two commands you can use in konsole to do it manually, in ~/sigcreate/src:
Step 2 - You now have to inherit the class that KDevelop generated for you (the SigCreate class) from that new Qt Designer dialog class. In KDevelop, view the sigcreate.h file by selecting it in the File Selector and add
#include "sigcreatedlg.h"
at the top of the sigcreate.h file, with all the headers you need.

Replace public KMainWindow by public SigCreateDlg because SigCreate inherits from SigCreateDlg.
You should have the following lines in sigcreate.h :
The file sigcreate.cpp should look like this:
Step 3 - You have to add manually the include files as well. In sigcreate.h, you add the three following headers, one for each of the class we used:
#include <qmultilineedit.h>
Step 4 - Comment out a few lines in the main.cpp file:

as the project was intended to be based on a KMainWindow which offers a lot of facilities.
Note
As this program is intended for a tutorial, it does not reflect the "real" life of programming. What you would do after having include the .ui file is to create a new class SigCreate. To do that, right click on Classes, select New Class... and then the Class Generator dialog box appears. Enter the class name (SigCreate) and the baseclass name (SigCreateDlg). Don't forget to check the box "generate a QWidget-childclass". Then click OK. We did not follow that step as the SigCreate class is our main window.
Warning
The derived class cannot be named as the .ui file. From the .ui file, a . cpp and a .h files are automatically generated so you must have different names. You can indicate a interface file by having dlg in its name. The derived .ui class can be named for example mainWindowDlg.
You can then run the project to see if everything is fine. First Build->Run automake & friends, then Build-> Run configure then Build->Build Project and Build->Install (or Install as root user) and Build->Execute Program (or Shift+F9). Please note that depending on your configuration, you might want to do Build->Install as root user instead of Build->Install if your user has no write access in your KDEDIR. You also can skip the install step, it's OK for the tutorial but might lead to problems in real world). The interface should appear but the Create! button does not work for the moment. We do that now by implementing the slot slotCreateSig(). See picture 19 below.
If you get the following error when compiling: Syntax error before `{' token" referring to the opening brace right /before/ the Q_OBJECT line in sigcreate.h, then you forgot to add
#include "sigcreatedlg.h"

or the sigcreatedlg.h file is not created (cf note above).
Picture 19: Almost done Implementing the slot
For the program to work, we want to click on the Create! button and that should display the signature in the TextEdit field. It is worth to look at the Qt documentation for each widget to see what are the already available sign als and slots. For example, have a look at the QPushButton class documentation. It inherits from QButton and in the QButton doc you can easily see the signals that are already available.
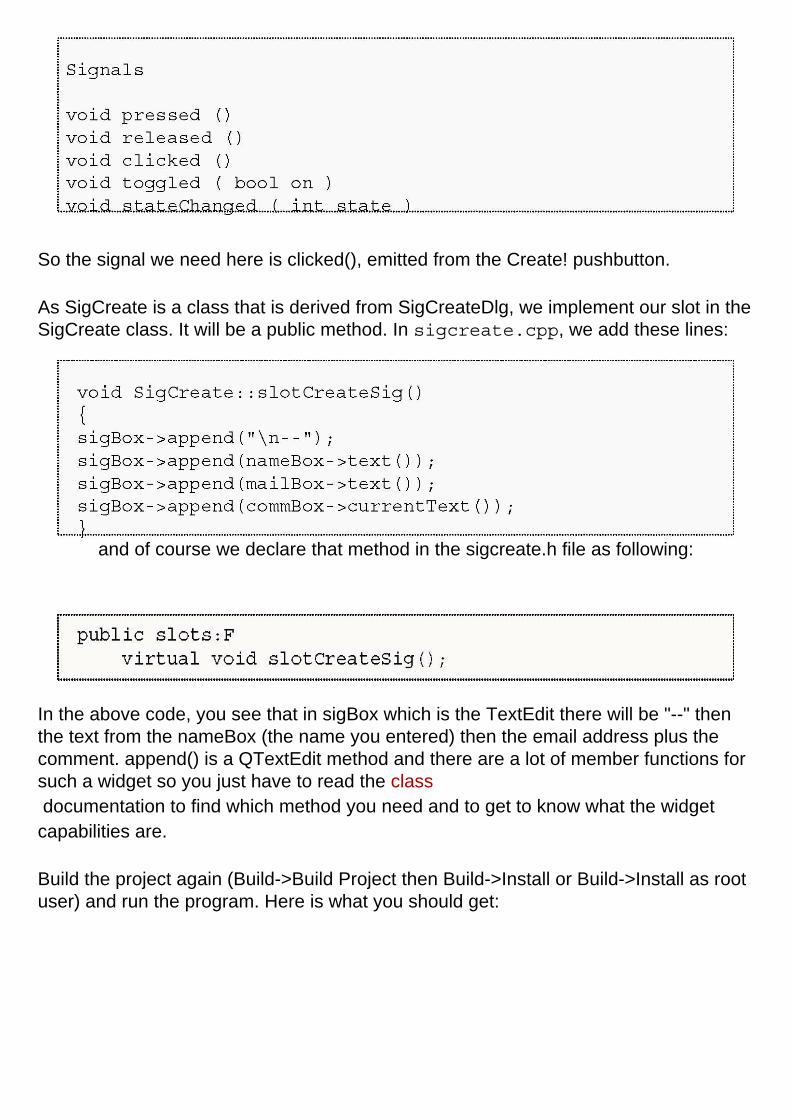
So the signal we need here is clicked(), emitted from the Create! pushbutton.
As SigCreate is a class that is derived from SigCreateDlg, we implement our slot in the SigCreate class. It will be a public method. In sigcreate.cpp, we add these lines:
and of course we declare that method in the sigcreate.h file as following:
In the above code, you see that in sigBox which is the TextEdit there will be "--" then the text from the nameBox (the name you entered) then the email address plus the comment. append() is a QTextEdit method and there are a lot of member functions for such a widget so you just have to read the class documentation to find which method you need and to get to know what the widget capabilities are.
Build the project again (Build->Build Project then Build->Install or Build->Install as root user) and run the program. Here is what you should get:

Picture 20: It's working!