Q-CashSitePrep(EK-WITTW-IG)
86
Q-Cash™ Dispenser Site Preparation, Unpacking and Installation Guide EK-WITTW-IG.A04
-
Upload
cenovski-filip -
Category
Documents
-
view
16 -
download
0
description
Q-CashSite (broshura za tip na bankomat, dimenzii i vgraduvanje)
Transcript of Q-CashSitePrep(EK-WITTW-IG)

Q-Cash™ Dispenser
Site Preparation, Unpackingand Installation Guide
EK-WITTW-IG.A04


Contents i
MANUFACTURERS
DECLARATION
Document Number: Q000571
This is to certify that the Digital Equipment BCFI AB, products indicated below complieswith the requirements on the EEC-Directives and/or other Standards as indicated belowand has been officially released for normal delivery to customers and equipped with theCE-mark.
PRODUCT DESCRIPTION: FBS Interior/Lobby/Exterior Cash Dispenser
DIGITAL MODEL NUMBER: WB25E-BA, WB25F-BA, WB25G-BA, WB25Z-BA,WB25Q-BA, WB25H-BA, WB25J-BA, WB25K-BA, WB25P-BA, WB25L-BA, WB25M-BA, WB25N-BA WB25R-BA.
This certificate is a confirmation of full compliance with the following regulations:
x EEC-directive 89/336/EEC: ”Electromagnetic Compatibility”*EN 50081-1 (Emission EN 55022/1994)*EN 50082-1 (Immunity IEC 801-2, -3, -4)
x FCC Class A
x EEC-Low Voltage Directive (LVD) 73/23/EEC of February 19, 1973*EN60950, 1992 + A1 + A2 +A3, ”Safety of Information technology equipmentincluding electrical business equipment”
Järfälla, 1999-02-25
DIGITAL EQUIPMENT BCFI ABBox 904175 29 JÄRFÄLLA

ii Contents
CONTENTSchapter 1General Description
Product Presentation ............................................................................................................................. 1-1General Design ..................................................................................................................................... 1-2
chapter 2Floor Requirements
General Requirements .......................................................................................................................... 2-1External Cabling ................................................................................................................................... 2-1
Floor Templates ............................................................................................................................... 2-1Q-Cash Dispenser Dual installation ..................................................................................................... 2-2Q-CashInterior 12mm Safe ................................................................................................................... 2-3
Space Requirements ........................................................................................................................ 2-3Q-CashInterior (12 mm Safe) hole in the wall ................................................................................ 2-4Securing Methods ............................................................................................................................ 2-5Preparing the Bolt Holes ................................................................................................................. 2-5Levelling - Q-CashInterior 12mm Safe ........................................................................................... 2-6Dimension Drawing ........................................................................................................................ 2-7
Q-CashInterior Cen3 Safe .................................................................................................................... 2-8Space Requirements ........................................................................................................................ 2-8Q-CashInterior (Cen3 Safe) hole in the wall ................................................................................... 2-9Securing Methods .......................................................................................................................... 2-10Preparing the Bolt Holes ............................................................................................................... 2-10Levelling - Q-CashInterior Cen3 Safe ........................................................................................... 2-11Dimension drawing Q-CashInterior, Cen3 Safe ............................................................................ 2-12
Q-CashLobby Cen3 Safe .................................................................................................................... 2-13Space Requirements ...................................................................................................................... 2-13Securing Methods .......................................................................................................................... 2-14Preparing the Bolt Holes ............................................................................................................... 2-14Dimension drawing Q-CashLobby, Cen3 Safe ............................................................................ 2-15
Q-CashLobby Cen4 Safe .................................................................................................................... 2-16Space Requirements ...................................................................................................................... 2-16Securing Methods .......................................................................................................................... 2-17Preparing the Bolt Holes ............................................................................................................... 2-17Dimension drawing Q-CashLobby, Cen4 Safe ............................................................................ 2-18
Q-CashLobby 12mm Safe .................................................................................................................. 2-19Space Requirements ...................................................................................................................... 2-19Securing Methods .......................................................................................................................... 2-20Preparing the Bolt Holes ............................................................................................................... 2-20Dimension drawing Q-CashLobby 12mm Safe ............................................................................ 2-21
Q-CashExterior 12mm Safe 330mm wall .......................................................................................... 2-22Space Requirements ...................................................................................................................... 2-22Q-CashExterior (12mm safe) hole in the wall (330mm wall) ....................................................... 2-23Securing Methods .......................................................................................................................... 2-24Preparing the Bolt Holes ............................................................................................................... 2-24Dimension drawing Q-CashExterior, 12mm Safe, to fit a 330mm wall ....................................... 2-25
Q-CashExterior 12mm Safe 250mm wall .......................................................................................... 2-26Space Requirements ...................................................................................................................... 2-26Q-CashExterior (12mm Safe) hole in the wall (250mm wall) ...................................................... 2-27Securing Methods .......................................................................................................................... 2-28

Contents iii
Preparing the Bolt Holes ............................................................................................................... 2-28Dimension drawing Q-CashExterior, 12mm Safe, to fit a 250mm wall ....................................... 2-29
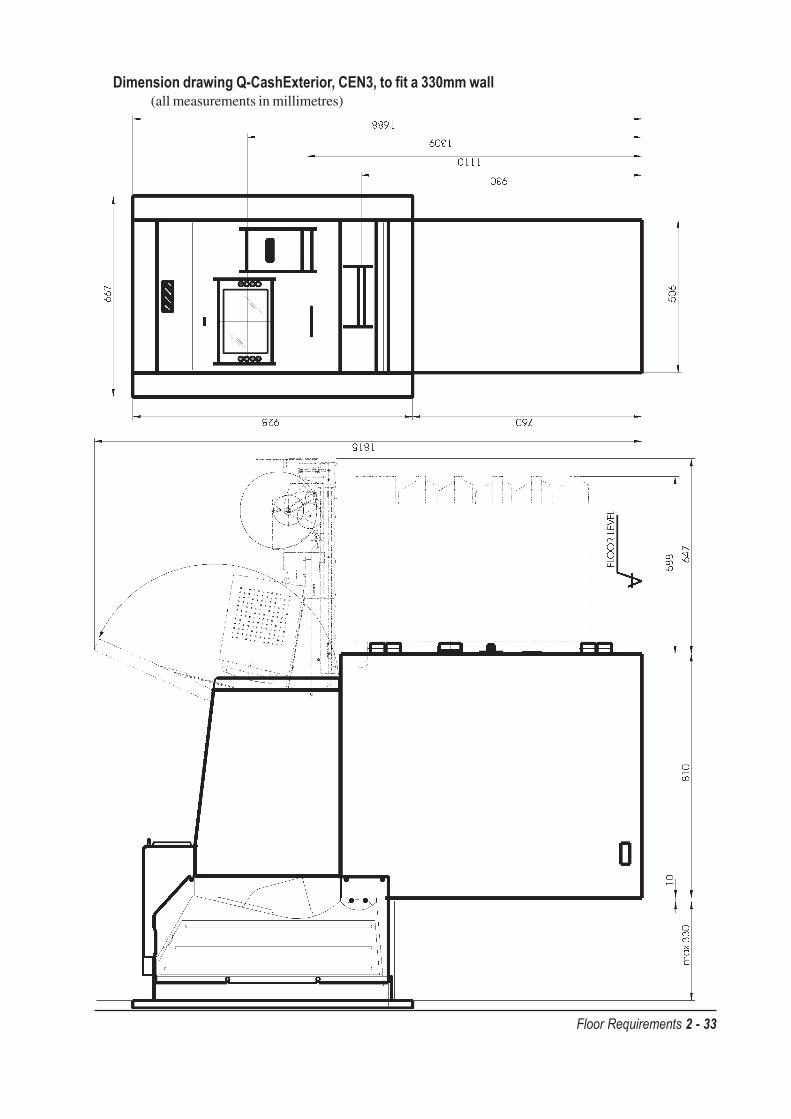
Q-CashExterior CEN3 Safe 330mm wall ........................................................................................... 2-30Space Requirements ...................................................................................................................... 2-30Q-CashExterior (CEN3 Safe) hole in the wall (330mm wall) ...................................................... 2-31Securing Methods .......................................................................................................................... 2-32Preparing the Bolt Holes ............................................................................................................... 2-32Dimension drawing Q-CashExterior, CEN3, to fit a 330mm wall ................................................ 2-33
Q-CashExterior CEN3 Safe 250mm wall ........................................................................................... 2-34Space Requirements ...................................................................................................................... 2-34Q-CashExterior (CEN3 Safe) hole in the wall (250mm wall) ...................................................... 2-35Securing Methods .......................................................................................................................... 2-36Preparing the Bolt Holes ............................................................................................................... 2-36Dimension drawing Q-CashExterior, CEN3, to fit a 250mm wall ................................................ 2-37
chapter 3Technical data
Specifications ....................................................................................................................................... 3-1Weight ............................................................................................................................................. 3-1Environment .................................................................................................................................... 3-2Power Supply, Terminal .................................................................................................................. 3-2Standards ......................................................................................................................................... 3-2
chapter 4Unpacking
Transport Package ................................................................................................................................ 4-1Packaging ............................................................................................................................................. 4-2
Q-Cash Dispenser Cabinet packaging ............................................................................................. 4-2Cassettes packaging......................................................................................................................... 4-2Transport Status Indicators on Q-Cash Dispenser packaging ......................................................... 4-3Humidity absorbing bags ................................................................................................................ 4-3
General Unpacking ............................................................................................................................... 4-4Unpacking ....................................................................................................................................... 4-4Door Key Locks .............................................................................................................................. 4-7
chapter 5Installation
Terminal Preparation Activities ....................................................................................................... 5-1Placing Terminal on Site ................................................................................................................. 5-2
Terminals with Dial Lock ..................................................................................................................... 5-9General Instructions ........................................................................................................................ 5-9
Securing the Terminal to the Floor ..................................................................................................... 5-10Q-Cash Dispenser Base Design..................................................................................................... 5-10
Connecting Mains Power Supply and Signal Cables ......................................................................... 5-14All CD’s ........................................................................................................................................ 5-14
Installation of Seismic Detector (Optional) ....................................................................................... 5-18All Q-Cash Dispenser Safes .......................................................................................................... 5-18
Installation of Adapter Boards in the System Controller (or PC) ...................................................... 5-19Digiboard PC/8e (may be already factory installed) ..................................................................... 5-19Host Communication Board .......................................................................................................... 5-19Mounting Procedure ...................................................................................................................... 5-19System Controller (or PC) Communication Connection............................................................... 5-19

iv Contents
Parameter Settings (Strapping) and Adjustment ................................................................................ 5-21Placement of PDB 02, LINK 01 and CB 02.................................................................................. 5-21PDB 02 Board ............................................................................................................................... 5-21LINK 01 Board .............................................................................................................................. 5-22CB 02 Board .................................................................................................................................. 5-24KBC 01- Board .............................................................................................................................. 5-25Printer Control Board - CBM 606 ................................................................................................. 5-26Digiboard ....................................................................................................................................... 5-27LINK 02 Board .............................................................................................................................. 5-28Shutter Handling Board SHB01 .................................................................................................... 5-30
Security Units (Options) ..................................................................................................................... 5-31Encrypting Alternative .................................................................................................................. 5-31Installation of Security Module (SM) ........................................................................................... 5-31Battery in Security and Encrypting Modules ................................................................................ 5-32
BCR Instruction Label ........................................................................................................................ 5-33Designated logo areas ......................................................................................................................... 5-34
Q-CashInterior/Q-CashExterior .................................................................................................... 5-34Q-CashLobby ................................................................................................................................ 5-34

General Description 1 - 1
Product Presentation
Q-Cash Dispenser’s are BANQIT’s solution for rapid and economical cash delivery, and amember of the BANQIT Self Service Product family range. Solely through its excellent cashhandling, the Q-Cash Dispenser is a Self Service Product that can meet the requirements of over60% of branch consumers. When delivering cash and other documents of value, the Q-CashDispenser does it fast, with a low cost of ownership that leads the industry.
Depending on configuration, the customer is given rapid access to a wide range of cost-effectiveservices, not only to cash but also to other documents of value, such as stamps, coupons, travel-ler checks, or even promotional documents.
GE N E R A L DE S C R I P T I O N
chapter 1

1 - 2 General Description
General Design
The Q-Cash Dispenser consists of an Upper and Lower Cabinet. The Upper Cabinet containsCustomer dialogue devices such as a Display (with four Menu Keys on each side), Keyboard,and Badge Card Reader. The Lower Cabinet is a safe containing the Note Dispenser mecha-nism and System Controller (or PC).
The Dispenser Safe is according to National and International security standards.
Replenishment and Service, for each version of the Q-Cash Dispenser, is carried out as follows :
Q-CashLobby - from the front only.Q-CashInterior (Through The Wall) - from the rear only.Q-CashExterior (Through The Wall ) - from the rear only.
Maximum wall thickness:Q-CashInterior - 150 mmQ-CashExterior - 330 mm
For data security purposes, the Q-Cash Dispenser can, optionally, be equipped with eitheran encrypting Security Module, located in the Lower Cabinet (Safe), or an Encrypting Keyboard.

Floor Requirements 2 - 1
Floor Requ i rementsGeneral Requirements
The Q-Cash Dispenser terminal must be properly aligned (level) to ensure proper operation ofthe Note Dispenser Guide Rails (when pulling the Dispenser in and out of the Safe) and toguarantee that the Upper Cabinet and Safe Doors stay open during replenishment and serviceactivities. If the floor surface inclination exceeds 0.3 % (3 mm per metre), the Q-Cash Dis-penser terminal alignment can be adjusted with a Levelling Kit (bolts and shims).
Warning!Due to the heavy weight of the terminal, make sure that the floor can with-stand the resulting surface load. (See technical data, page 3 - 1)
External CablingIf the external cables have to be installed in the building prior to the arrival of the Q-Cash Dis-penser terminal, use the table below to decide how much extra cable will be required for routinginside the safe.The terminating connectors are usually fitted, by Service personnel, during the terminal prepara-tion stage.
Cable Q-Cash Dispenser4-cassettes
Signal cable (e.g. Host communication) 2.8 m
Seismic alarm cable 2.3 m
UPS cable (logical signal) 2.8 m
A power cable of 2.5 m is supplied with the Q-Cash Dispenser terminal as standard.The signal cable to the System Controller (or PC) is to be supplied locally.The signal cable connector (on System Controller side) is to be fitted during the physical installa-tion of the equipment.
Floor TemplatesAll Q-Cash Dispenser’s, except for the Q-CashLobby version, have a Floor Template for easyplacement of the machine. The Template is delivered in a paper tube.
chapter 2

2 - 2 Floor Requirements
������ ���
����
Q-Cash Dispenser Dual installation
When installing multiple Q-Cash Dispenser’s, make sure there is enough space between eachTerminal. The dimension in the drawing is the absolute minimum space required between twomachines. We recommend, however, that this distance is made greater to ease Service require-ments and to increase the privacy of the customers.(All measurments in millimetres)

Floor Requirements 2 - 3
Space RequirementsThere must be enough free space around the Terminal for note replenishment and service.(All measurements in millimetres)
Q-CashInterior 12mm Safe

2 - 4 Floor Requirements
Q-CashInterior (12 mm Safe) hole in the wall(all measurments in millimetres)

Floor Requirements 2 - 5
Securing MethodsThe terminal must be secured to a concrete floor using the following method (local regulationsshould be followed):Terminal secured with bolts tightend into expansion shells. The shells are placed in the holes inthe floor before the terminal is moved to its final position.Expandable bolt:HILTI type HKD M16x150Depth of hole: 150 mmInstallation kit WBXHA-NB includes 4 pcs expansion anchor HSL-TZ M16/25.
150
Preparing the Bolt HolesThe figure below shows the Hole pattern for the Q-CashInterior with 12 mm Safe.Bolt hole diameter = 24 mm.(All measurements in millimetres)

2 - 6 Floor Requirements
Levelling - Q-CashInterior 12mm Safe
Level the machine using the Levelling Bolts and Shims provided with each machine.
Note: Once the machine is level and secured in place, the Levelling Bolts must be re-moved.

Floor Requirements 2 - 7
Dimension DrawingQ-CashInterior 12mm Safe(all measurements in millimetres)

2 - 8 Floor Requirements
Space RequirementsThere must be enough free space around the terminal for note replenishment and service.(All measurements in millimetres)
Q-CashInterior Cen3 Safe

Floor Requirements 2 - 9
Q-CashInterior (Cen3 Safe) hole in the wall(all measurments in millimetres)

2 - 10 Floor Requirements
Securing MethodsThe terminal must be secured to a concrete floor using the following method (local regulationsshould be followed):Terminal secured with bolts tightend into expansion shells. The shells are placed in the holes inthe floor before the terminal is moved to its final position.Expandable bolt:HILTI type HKD M16x150Depth of hole: 150 mmInstallation kit WBXHA-NB includes 4 pcs expansion anchor HSL-TZ M16/25.
150
Preparing the Bolt HolesThe figure below shows the Hole pattern for the Q-CashInterior with Cen3 safe.Bolt hole diameter = 24 mm.(All measurements in millimetres)

Floor Requirements 2 - 11
Levelling - Q-CashInterior Cen3 Safe
Level the machine using the Shims provided with each machine.

2 - 12 Floor Requirements
Dimension drawing Q-CashInterior, Cen3 Safe(all measurements in millimetres)

Floor Requirements 2 - 13
Space RequirementsThere must be enough free space around the terminal for note replenishment and service.(All measurements in millimetres)
Q-CashLobby Cen3 Safe

2 - 14 Floor Requirements
Securing MethodsThe terminal must be secured to a concrete floor using the following method (local regulationsshould be followed):Terminal secured with bolts tightend into expansion shells. The shells are placed in the holes inthe floor before the terminal is moved to its final position.Expandable bolt:HILTI type HKD M16x150Depth of hole: 150 mmInstallation kit WBXHA-NB includes 4 pcs expansion anchor HSL-TZ M16/25.
150
Preparing the Bolt HolesThe figure below shows the Hole pattern for the Lobby with Cen3 Safe.Bolt hole diameter = 24 mm.(All measurements in millimetres)

Floor Requirements 2 - 15
Dimension drawing Q-CashLobby, Cen3 Safe(all measurements in millimetres)

2 - 16 Floor Requirements
Space RequirementsThere must be enough free space around the terminal for note replenishment and service.(All measurements in millimetres)
Q-CashLobby Cen4 Safe

Floor Requirements 2 - 17
Securing MethodsThe terminal must be secured to a concrete floor using the following method (local regulationsshould be followed):Terminal secured with bolts tightend into expansion shells. The shells are placed in the holes inthe floor before the terminal is moved to its final position.Expandable bolt:HILTI type HKD M16x150Depth of hole: 150 mmInstallation kit WBXHA-NB includes 4 pcs expansion anchor HSL-TZ M16/25.
150
Preparing the Bolt HolesThe figure below shows the Hole pattern for the Q-CashLobby with Cen4 Safe.Bolt hole diameter = 24 mm.(All measurements in millimetres)

2 - 18 Floor Requirements
Dimension drawing Q-CashLobby, Cen4 Safe(all measurements in millimetres)

Floor Requirements 2 - 19
Space RequirementsThere must be enough free space around the terminal for note replenishment and service.(All measurements in millimetres)
Q-CashLobby 12mm Safe

2 - 20 Floor Requirements
Securing MethodsThe terminal must be secured to a concrete floor using the following method (local regulationsshould be followed):Terminal secured with bolts tightend into expansion shells. The shells are placed in the holes inthe floor before the terminal is moved to its final position.Expandable bolt:HILTI type HKD M16x150Depth of hole: 150 mmInstallation kit WBXHA-NB includes 4 pcs expansion anchor HSL-TZ M16/25.
150
Preparing the Bolt HolesThe figure below shows the Hole pattern for the Lobby with 12mm Safe.Bolt hole diameter = 24 mm.(All measurements in millimetres)

Floor Requirements 2 - 21
Dimension drawing Q-CashLobby 12mm Safe(all measurements in millimetres)

2 - 22 Floor Requirements
Space RequirementsThere must be enough free space around the terminal for note replenishment and service.(All measurements in millimetres)
Q-CashExterior 12mm Safe 330mm wall

Floor Requirements 2 - 23
Q-CashExterior (12mm safe) hole in the wall (330mm wall)(all measurments in millimetres)

2 - 24 Floor Requirements
Securing MethodsThe terminal must be secured to a concrete floor using the following method (local regulationsshould be followed):Terminal secured with bolts tightend into expansion shells. The shells are placed in the holes inthe floor before the terminal is moved to its final position.Expandable bolt:HILTI type HKD M16x150Depth of hole: 150 mmInstallation kit WBXHA-NB includes 4 pcs expansion anchor HSL-TZ M16/25.
150
Preparing the Bolt HolesThe figure below shows the Hole pattern for the Q-CashExterior, with 12mm safe, through a330mm wall.Bolt hole diameter = 24 mm.(All measurements in millimetres)

Floor Requirements 2 - 25
Dimension drawing Q-CashExterior, 12mm Safe, to fit a 330mm wall(all measurements in millimetres)

2 - 26 Floor Requirements
Space RequirementsThere must be enough free space around the terminal for note replenishment and service.(All measurements in millimetres)
Q-CashExterior 12mm Safe 250mm wall

Floor Requirements 2 - 27
Q-CashExterior (12mm Safe) hole in the wall (250mm wall)(all measurments in millimetres)

2 - 28 Floor Requirements
Securing MethodsThe terminal must be secured to a concrete floor using the following method (local regulationsshould be followed):Terminal secured with bolts tightend into expansion shells. The shells are placed in the holes inthe floor before the terminal is moved to its final position.Expandable bolt:HILTI type HKD M16x150Depth of hole: 150 mmInstallation kit WBXHA-NB includes 4 pcs expansion anchor HSL-TZ M16/25.
150
Preparing the Bolt HolesThe figure below shows the Hole pattern for the Q-CashExterior, with 12mm Safe, through a250mm wall.Bolt hole diameter = 24 mm.(All measurements in millimetres)

Floor Requirements 2 - 29
Dimension drawing Q-CashExterior, 12mm Safe, to fit a 250mm wall(all measurements in millimetres)

2 - 30 Floor Requirements
Space RequirementsThere must be enough free space around the terminal for note replenishment and service.(All measurements in millimetres)
Q-CashExterior CEN3 Safe 330mm wall

Floor Requirements 2 - 31
Q-CashExterior (CEN3 Safe) hole in the wall (330mm wall)(all measurments in millimetres)

2 - 32 Floor Requirements
Securing MethodsThe terminal must be secured to a concrete floor using the following method (local regulationsshould be followed):Terminal secured with bolts tightend into expansion shells. The shells are placed in the holes inthe floor before the terminal is moved to its final position.Expandable bolt:HILTI type HKD M16x150Depth of hole: 150 mmInstallation kit WBXHA-NB includes 4 pcs expansion anchor HSL-TZ M16/25.
150
Preparing the Bolt HolesThe figure below shows the Hole pattern for the Q-CashExterior, with CEN3 safe, through a330mm wall.Bolt hole diameter = 24 mm.(All measurements in millimetres)
Floor Requirements 2 - 33
Dimension drawing Q-CashExterior, CEN3, to fit a 330mm wall(all measurements in millimetres)

2 - 34 Floor Requirements
Space RequirementsThere must be enough free space around the terminal for note replenishment and service.(All measurements in millimetres)
Q-CashExterior CEN3 Safe 250mm wall

Floor Requirements 2 - 35
Q-CashExterior (CEN3 Safe) hole in the wall (250mm wall)(all measurments in millimeters)

2 - 36 Floor Requirements
Securing MethodsThe terminal must be secured to a concrete floor using the following method (local regulationsshould be followed):Terminal secured with bolts tightend into expansion shells. The shells are placed in the holes inthe floor before the terminal is moved to its final position.Expandable bolt:HILTI type HKD M16x150Depth of hole: 150 mmInstallation kit WBXHA-NB includes 4 pcs expansion anchor HSL-TZ M16/25.
150
Preparing the Bolt HolesThe figure below shows the Hole pattern for the Q-CashExterior, with CEN3 Safe, through a250mm wall.Bolt hole diameter = 24 mm.(All measurements in millimetres)

Floor Requirements 2 - 37
Dimension drawing Q-CashExterior, CEN3, to fit a 250mm wall(all measurements in millimetres)

2 - 38 Floor Requirements

Technical Data 3 - 1
Techn ica l da taSpecifications
WeightQ-CashLobby
Transport weight Business hour1/2 inch (12mm) CEN3 CEN4
Basic configuration- without PC and incl.dispenser mechanismexcl. cassettes 4-den 450 kg 650 kg 710 kg
Maximum configuration including PC and dispenser- 4 denominations 463 kg 663 kg 723 kg
Note cassette (empty) 2.8 kg
Reject vault (empty) 1.8 kg
Q-CashInterior/Q-CashExterior
Transport weight Business hour1/2 inch CEN3
Basic configuration- without PC and incl.dispenser mechanismexcl. cassettes 4-den 450 kg 650 kg
Maximum configuration including PC and dispenser- 4 denominations 463 kg 663 kg
Note cassette (empty) 2.8 kg
Reject vault (empty) 1.8 kg
chapter 3

3 - 2 Technical Data
EnvironmentTemperature during operation 10 - 35°CTemperature during storage –40 - 70 °CHumidity during operation, non-condensing 20 - 80% RHHumidity during storage,non-condensing 20 - 90% RH
Power Supply, TerminalPower supply 100-120V / 200-240V 50-60HzCurrent operation Typical 6.0A / 3.0ACurrent standby Typical 1.0A / 0.5A
StandardsThe Q-Cash Dispenser series terminal is certified according to the following standards:
Safety IEC 60950, 1991 incl. A1,A2 and A3, (CB Certificate)
The terminal complies, in relevant parts, with the following standards:
Acoustical noise ISO 7779EMC EN55022 :1994
EN 50082–1, 1992FCC part 15 class A
The Q-CashInterior CEN3 safe is the certifiied by VdS Germany.

Unpacking 4 - 1
Unpack ingTransport Package
The Q-Cash Dispenser terminal is delivered, from the factory, on one pallet. The Note Cas-settes, Reject Vault and System Controller (optional) are delivered on a separate pallet.The optional Seismic Detector and the UPS units, are all to be supplied locally. Installation must,however, be handled by authorised personnel. The Seismic Detector should be installed by thelocal supplier.
The Q-Cash Dispenser is delivered in two packages:The Cabinet Package includes:
• Fully assembled Upper Cabinet. (All internal cables are installed)• Dispenser Safe, including Dispenser, Frame, Guide Rails and cables to the Upper Cabinet.• Keys• Digiboard (may be factory installed) and Mains Power cable are delivered in the Dis-
penser Safe.
The Cassettes Package includes:• Note Cassettes (to be installed in the Dispenser).
The Note Cassettes are delivered, from the factory, set for the specified Currency andDenomination.
• Reject Vault• System Controller Package• Hand-held terminal (optional)
The Hand-held Terminal is to be installed in the Upper Cabinet.
chapter 4

4 - 2 Unpacking
PackagingQ-Cash Dispenser Cabinet packaging
Cassettes packagingStandard packaging EuropeVacuum packaging Indonesia, Malaysia
Note: Label on vacuum packaging : Do not break the packaging before installation.

Unpacking 4 - 3
Transport Status Indicators on Q-Cash Dispenser packaging
TILTWATCH
Indicator grey No tipping has occurred
Indicator red Tipping has occurred. Inspection of content requiredTransport damage inspection and claim to insurancecompany might be required.
SHOCKWATCH
Indicator blank No tipping has occurred
Indicator red Red indicates rough transport handling. Inspection of contentrequired. Transport damage inspection and claim to insurancecompany might be required.
Humidity absorbing bags
Bags with Silica Gel are located in the cabinet to absorb humidity and condensation duringtransport.3 Silica Gel bags in top cabinet2 Silica Gel bags in safe

4 - 4 Unpacking
General UnpackingUnpacking
When unpacking any of the delivered packages, check that the contents are according to thePacking List that is delivered with each package.- Inspect every detail for transport damage.

Unpacking 4 - 5

4 - 6 Unpacking

Unpacking 4 - 7
Door Key LocksQ-CashInterior/Q-CashExteriorThe Key for the Upper Cabinet Door is unique.The Key for the Card Capture Bin is unique.
The following list describes the different Key types used for the Q-CashDispenser terminals.See also the following figures showing where to find the respective keys.
A. Upper Cabinet Door. A unique Key lock for each Terminal.B. Card Capture Bin. A unique Key lock for each Terminal.
(The Key is placed in the Card Capture Bin for delivery).C. Optional Key Lock, instead of Dial Combination Lock.
(Unique Key for each Terminal).D. Optional Key Lock, instead of Dial Combination Lock.
(Unique Key for each Terminal).E. ‘Change Key’ for the Dial Combination Lock.

4 - 8 Unpacking
Q-CashLobbyThe Key for the front Upper Cabinet Door is unique.The Key for the Card Capture Bin is unique.
The following list describes the different Key types used for the Q-CashDispenser terminals.See also the following figures showing where to find the respective Keys.
A. Upper Cabinet Door. A unique Key Lock for each Terminal.B. Optional Safe Key Lock instead of Dial Combination Lock.
(Unique Key for each Terminal).C. Optional Safe Key Lock instead of Dial Combination Lock.
(Unique Key for each Terminal).D. ‘Change Key’ for Dial Combination Lock.E. Lower Cabinet (Safe) Cover Door. A unique Key for each Terminal.
(Same as Key ‘A’).F. Card Capture Bin. A unique Key Lock for each Terminal.
(The Key is placed in the Card Capture Bin for delivery).

Unpacking 4 - 9
Q-CashLobby Cen4
The following list describes the different Key types used for the Q-CashDispenser terminals.See also the figure showing where to find the respective Keys.
A. Upper Cabinet Door. A unique Key Lock for each Terminal.B. Lower Cabinet (Safe) Door Lock. A unique Key Lock for each Terminal.C. Lower Cabinet (Safe) Cover Door Lock. Same Key lock as for ‘A’.D. ‘Change Key’ for Dial Combination Lock.E. Card Capture Bin. A unique Key lock for each Terminal.
(The Key is placed in Card Capture Bin for delivery).

4 - 10 Unpacking

Installation 5 - 1
Terminal Preparation ActivitiesTo be able to perform the installation, as described below, you must have the correct tools andtraining.
The recommended PC (if required), Seismic Detector (optional) and UPS unit (optional) are tobe supplied locally for installation in the Q-Cash Dispenser terminal.
We recommend that the preparation activities are carried out in the following order:• Place the Q-Cash Dispenser on site.
The Q-CashInterior/Q-CashExterior comes with an Installation Template. The template isused to mark, on the floor, the position of the four Chest Anchorage Points.The template can also be used to mark, on the floor, the outline of the Q-CashInterior/Q-CashExterior chest, relative to the wall. This will help the final positioning of the machine.
• Position the Terminal through the ‘hole in the wall’ (Q-CashInterior/Q-CashExterior only).• Fit the Frame to the Fascia (Q-CashInterior/Q-CashExterior only).• Open the safe.• Remove the dispenser.• After ensuring it is correctly aligned, secure the Q-Cash Dispenser to the floor.• Connect the mains cable to the Q-Cash Dispenser.
Note! Ensure that the mains cable is disconnected from the mains outlet in the buildingbefore connection to the Q-Cash Dispenser.
• Clamp the external communication cables inside the safe.• Connect the external UPS device (optional).• Install the Seismic Detector (optional). This should be handled by the supplier.• Re-mount the dispenser.• If not already fitted, install the Digiboard board into the System Controller (or recom-
mended PC).• Connect cables at the back of the System Controller (or PC).• Install the System Controller (or PC) inside the CD Safe.• Fit the BCR instruction label (locally made), if required.
* Trained by BANQIT or by ‘local training’ arranged by BANQIT Partner.
Ins ta l la t ion
Caution!The installation must be performed by skilled personnel* using appropriate tools andin accordance with good workmanship.
chapter 5

5 - 2 Installation
Placing Terminal on Site
Locally arrangedmaterial
�����
�����
�����
���
������
������
������
�����
��������
���������
�
�����
�������
�����
�������
�����
��� �����
Warning!Due to the heavy weight, be careful to prevent the terminal from tipping and falling down, whichmight cause severe injury. (See technical data.)

Installation 5 - 3

5 - 4 Installation

Installation 5 - 5

5 - 6 Installation
When you have reached this position, make sure that the Q-CashInterior/Q-CashExterior is properly aligned to the hole inthe wall.
After the rolls are removed, push the Q-CashInterior/Q-CashExterior forward until it is through the holesufficiently to fit the frame without gaps between itand the wall.

Installation 5 - 7
Make sure that the three bolts have agap of approx. 4 mm to the fascia.
Mount the frame on the fascia.
Tighten the three bolts while pressingthe frame against the fascia.

5 - 8 Installation
Tighten the nuts at the top firmly.
Check to see that there are no gapsbetween the frame and the wall.
Finally put the cover back on and secure it.

Installation 5 - 9
See the Q-Cash Dispenser User’s Guide for• how to open the lock using other pre-set combinations• how to lock the door• how to change the combination
1 2 3 4
Terminals with Dial LockGeneral Instructions
To be able to secure the Q-Cash Dispenser to the floor, and to remove any items packed insidethe safe, you have to open the safe door.The following instructions apply if the Q-Cash Dispenser safe has a Dial CombinationLock.What you see of the Dial Lock is the dial at the front of the safe door and a hole for a ChangeKey at the rear of the door.The Change Key is placed in the Badge Card Reader Card Capture Bin, when the terminal isdelivered (see User’s Guide).The dial has fixed changing and opening marks.
Business Hour SafeThe business hour safe Dial Lock has the factory-set combination 50.
1. Starting with the dial in any position, turn it LEFT (counter-clockwise) slowly and steadilyso that the number 50 on the dial passes the opening mark four times and stops with the50 exactly opposite the mark on the fifth turn.
2. Turn to the RIGHT (clockwise) until the dial stops. You should now be able to open thesafe with the hand wheel. If the lock does not open, repeat from step 1.
Summary• Turn LEFT to 50 five times• Turn RIGHT to STOP• OPEN
�
�
1. Changing mark2. Opening mark
Dial lock

5 - 10 Installation
Securing the Terminal to the FloorQ-Cash Dispenser Base Design
See Section 2.1.2 for more information.
Before placing the terminal in place, drill the holes andinsert the anchor bolts.
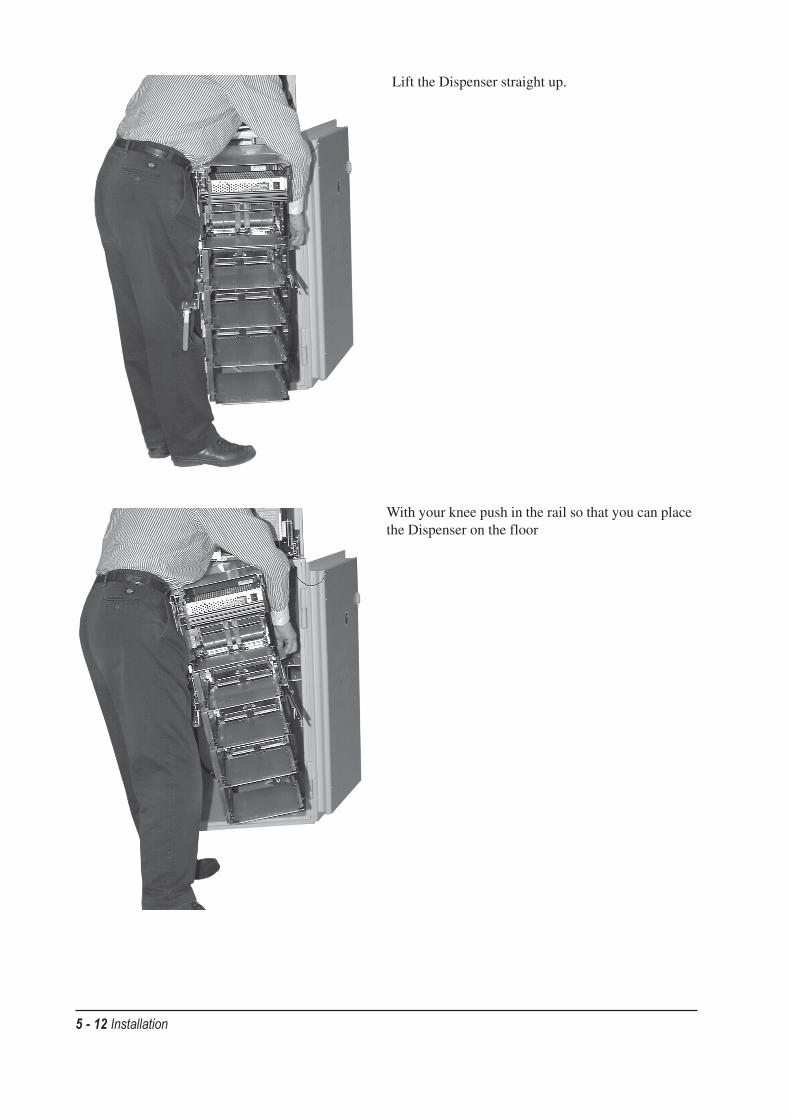
Loosen the screws holding the Dispen-ser to the Guide Rails (two on eachside).

Installation 5 - 11
5 - 12 Installation
Lift the Dispenser straight up.
With your knee push in the rail so that you can placethe Dispenser on the floor

Installation 5 - 13
When the Dispenser is placed on the floor, makethe last position adjustments (and level adjust-ments if necessary).
Secure the terminal to the floor.

5 - 14 Installation
Connecting Mains Power Supply and Signal Cables
All CD’sWith the Q-Cash Dispenser you can choose on which side, of the Safe, you want the cables toenter (either from the left or right side of the Safe). The Q-Cash Dispenser is delivered with theCable Inlet installed on the left side (as viewed from the Safe Door).If you want the cables to enter from the other side, you need to exchange the Cover Plates.
Warning!Dangerous voltage. Make sure that the mains power is disconnected before commencing theelectrical installation.Make sure that the mains outlet connector in the building is a Class 1 outlet with protective earthand installed near the Q-Cash Dispenser and easily accessible. The fuse in the building protectsagainst earth fault.The modules in the Q-Cash Dispenser are protected against overcurrent.
Cable inlet, standard position. Cable inlet cover plate, standard position.

Installation 5 - 15
Install the Power cable and the Signal cable, from the Host computer, into the Installation Box.The Installation Box is situated at the rear of the Safe, on the left hand side.Under the Cover, of the Installation Box, is an opening (in the Safe), where the external cablescan be brought in.• Loosen the screw to take away the Cover, over the Installation Box, by sliding the Cover
upwards until the keyhole can pass over the screw-head (see figures).

5 - 16 Installation
Signal Cables ConnectionExternal low-voltage cables for data communication, Seismic Alarm and UPS device (Un-interruptible Power Supply) should be clamped to the Clamping Plate inside the Installation Box.This is for ‘earthing’ and ‘strain relief’ purposes.
• Remove 20 mm of the Signal cable insulation so the screen is visible and can make contactwith the chassis.
• Clamp the cable at the stripped point to the Installation Plate (1).• Secure the cable with another clamp (2).
The figure below shows how the cables should be stripped and clamped to the plate.The connection of other cables is described under separate headings.
Clamping. Data com., UPS and Seismic Alarm cables1. Shielding clamp2. Strain relieve clamp
�
�

Installation 5 - 17
Power Cable Connection1. Remove the protective plate covering the power cable entrance.
2. Loosen the hexagonal spacers holding the connector plate.
3. Remove the rubber grommet from theprotective plate
4. Put the cable through the grommet. Approx.30 cm from the connector.If you have moved the inlet to the other side,add the appropriate length.
5. Put the cable through the inlet in the safe and slide theprotective plate over the grommet. Place the protectiveplate to its original position and fasten it with two nuts.Connect the power cable to the mains filter inlet.

5 - 18 Installation
Installation of Seismic Detector (Optional)Installing a seismic detector is a very accurate procedure and should be carried out by thesupplier.The safes are prepared for installation of a seismic detector type Arrowhead GM 550 distributedby Alarmcom Security Products, Austria.
All Q-Cash Dispenser Safes1. Mount the seismic detector on the support plate.
2. Insert the seismic alarm signal cable through the safe wall and clamp the cable.
Installing seismic detector in the safe

Installation 5 - 19
Installation of Adapter Boards in the System Controller (or PC)
Digiboard PC/8e (may be already factory installed)Before installing the PC/8e board make sure it is set up correctly.See the next page for I/O portaddress setting or see “Installing PC/Xe Boards” in the Digiboard Installation Guide deliveredtogether with the PC/8e board.
Host Communication BoardFor set up of the host communication board refer to the communication board manual.
Mounting Procedure1. Remove the cover (refer to your computer’s manual for instructions on cover removal, optionboard installation and cautions).2. Locate one available 16–bit slot for each board to mount in your computer and remove theslot plates.3. Plug the PC/8e board into the slot and screw the end plate to the computer chassis (use thescrew you removed from the slot plate). The end plate must be screwed into the computerchassis to remain in compliance with Part 5 of the FCC rules.4. Do as in previous step with the host communication board and with additional boards.5. Put back the computer cover.
System Controller (or PC) Communication ConnectionMake an initial set-up if this is not made in advance. A PC keyboard must be used for thisactivity.1. Connect communication cable to Digiboard.2. Connect the signal cable from the host computer to the System Controller (or PC) port.3. Connect the mains cable to the System Controller (or PC).
Note!Before installation, see the relevant PC Manual for cover removal and board in-stallation.The mounting procedure only applies to machines when the Digiboard is notmounted at the factory.

5 - 20 Installation
I/O Port AddressAddress DS 1 DS 1 DS 1 DS 1
Switch 1 Switch 2 Switch 3 Switch 4100h-103h OFF OFF ON ON WB 25 (default)110h-123h OFF ON ON ON200h-203h ON OFF OFF ON220h-223h ON OFF ON ON300h-303h ON ON OFF ON320h-323h ON ON ON ON
The fourth switch should always be in the ON position (towards the circuit board).
�������
Digiboard PC8e

Installation 5 - 21
DigiboardParameter Setting
See the Digiboard manual.

5 - 22 Installation
Basic Security Module High Tamper Resistant Module
Security Units (Options)Encrypting Alternative
Security Module (High Tamper Resistant Module or Basic Security Module)The Security module is installed in the safe from factory.The two module types are connected to the Digiboard in the same way.
Encrypting KeyboardAlso the encrypting keyboard is installed from the factory.
Installation of Security Module (SM)Install the security module in the safe at the left side, viewed from the rear:1. Mount the insulation plate in the metal box. (For the High Tamper Resistant Module only)2. Mount the SM unit in the metal box.3. Install the SM module in the safe with cable connectors downwards (use the four spotwelded screws).4. Connect the cables.

Installation 5 - 23
Battery in Security and Encrypting Modules
High Tamper Resistant ModuleThe lithium battery life length is 7 years for the Security Module (SM) and En-crypting Key-board (EK).A label on the SM/EK holds a date code, indicating when the SM/EK was initiated, i.e. when the7 years battery time started.When the battery time is up the cryptographic keys or other sensitive data in the SM/EK modulewill be destroyed. The module cannot be used any more and has to be replaced.To avoid SM/EK battery stop (which will cause an extra service call) the date code should bechecked during preventive maintenance of the Q-Cash Dispenser.Type label on short-side of module (see fig. on page 5–31).
Basic Security ModuleThe lifetime of the battery in the Basic Security Module is >5 years and it is re-placeable.Battery Type: Lithium battery size 1/2 AA 3.6 VOLT.
Caution!Danger of explosion if battery is incorrectly replaced.Replace only the same or equivalent type recommended by the manufacturer.Dispose of used batteries according to the manufacturer’s instructions.

5 - 24 Installation
BCR Instruction Label
The Q-Cash Dispenser is equipped with a symbol (pictogram) for the BCR.Locally made BCR Instruction Labels (pictograms) can be placed in the label area below theBCR slot.
100 mm
45 mm

Installation 5 - 25
Designated logo areasQ-CashInterior/Q-CashExterior
Q-CashLobby

5 - 26 Installation


Part number: EK-WITTW-IG.A04


![5500 Adams Farm Ln Flyer JM · 2020. 9. 18. · O ^` æ D[pehv R`^lks`oq`_ î Tdo`` Blj]ek`_ Blk_ljekerj Ukeqp Td[q B[k ]` C`jep`_ î @jmh` Ok ãSeq` P[ogekc î Arehq ek ¿ R`kls[q`_](https://static.fdocuments.us/doc/165x107/60bd2f3fdea81a057c23a9a6/5500-adams-farm-ln-flyer-jm-2020-9-18-o-dpehv-rlksoq-tdo-bljek.jpg)


![Shiv Ganga Vidya Mandir 2016-17.pdf · Hindi ikB&5 ls 8 rdA ek=k,a m ¼ q ½ o Å ¼ w ½] ek=k _ ¼ ` ½] ek=k,¡ , ... Shiv Ganga Vidya Mandir Syllabus Break-Up of Session 2016-17](https://static.fdocuments.us/doc/165x107/5a791a2d7f8b9a43758d9c0a/shiv-ganga-vidya-2016-17pdfhindi-ikb5-ls-8-rda-ekka-m-q-o-w-ekk-ekk.jpg)