Puppet on the AWS Cloud - aws … · Amazon Web Services – Puppet on the AWS Cloud May 2017 Page...
26
Puppet on the AWS Cloud Quick Start Reference Deployment AWS Quick Start Reference Team March 2016 Last update: May 2017 (revisions) This guide is also available in HTML format at https://docs.aws.amazon.com/quickstart/latest/puppet/.
Transcript of Puppet on the AWS Cloud - aws … · Amazon Web Services – Puppet on the AWS Cloud May 2017 Page...
Puppet on the AWS Cloud
Quick Start Reference Deployment
AWS Quick Start Reference Team
March 2016
Last update: May 2017 (revisions)
This guide is also available in HTML format at
https://docs.aws.amazon.com/quickstart/latest/puppet/.
Amazon Web Services – Puppet on the AWS Cloud May 2017
Page 2 of 26
Contents
Overview .................................................................................................................................... 3
Puppet on AWS ...................................................................................................................... 3
Quick Links ............................................................................................................................ 4
Cost and Licenses ................................................................................................................... 5
Architecture ............................................................................................................................... 5
Implementation Details ............................................................................................................ 7
AWS Services.......................................................................................................................... 7
Puppet Master Installation .................................................................................................... 7
Certificates and DNS Names .................................................................................................8
Puppet Agent Installation ...................................................................................................... 9
Managing AWS Resources with Puppet ................................................................................ 9
Deployment and Configuration Steps ..................................................................................... 10
What We’ll Cover ................................................................................................................. 10
Prerequisites ........................................................................................................................ 10
Step 1. Prepare an AWS Account .......................................................................................... 11
Step 2. Launch the Puppet Stack ......................................................................................... 14
Step 3. Configure Puppet Agents ......................................................................................... 16
Review Modules and Manifests........................................................................................ 16
Connect to Puppet Agents ............................................................................................... 20
Apply Configurations........................................................................................................ 21
Troubleshooting ...................................................................................................................... 24
Security .................................................................................................................................... 24
Additional Resources .............................................................................................................. 25
GitHub Repository .................................................................................................................. 26
Document Revisions................................................................................................................ 26
Amazon Web Services – Puppet on the AWS Cloud May 2017
Page 3 of 26
About This Guide This Quick Start reference deployment guide discusses the steps for deploying and testing a
Puppet master and Puppet agents on the Amazon Web Services (AWS) Cloud. It also
provides links for viewing and launching AWS CloudFormation templates that automate
the deployment, and a walkthrough on how you can configure Amazon Elastic Compute
Cloud (Amazon EC2) instances that act as Puppet agents.
The guide is for IT infrastructure architects, administrators, and DevOps professionals who
are planning to implement or extend their Puppet workloads on the AWS Cloud.
Quick Starts are automated reference deployments for key workloads on the AWS Cloud.
Each Quick Start launches, configures, and runs the AWS compute, network, storage, and
other services required to deploy a specific workload on AWS, using AWS best practices for
and security.
Overview
Puppet on AWS Puppet is a declarative, model-based configuration management solution from Puppet that
lets you define the state of your IT infrastructure, and automatically enforces that desired
state on your systems. Every step of your software delivery process, from provisioning
instances to orchestration and reporting, including production release of software and
updates, can be automated. Configuration management tools like Puppet can help you get
more done in less time, and can help ensure consistency and reliability across the state of
your infrastructure. Puppet uses a client/server model where agent nodes get configuration
profiles from the Puppet master, which is a server that controls the configuration
information. For more information, see the architecture overview on the Puppet website.
Using this Quick Start, you can launch a Puppet master with a single click to get instant
access to the following features:
Puppet enables you to define configurations that are idempotent, meaning they can
be run multiple times without any risks. Once you’ve developed your configurations,
your agents can apply the configuration on a regular interval (30 minutes by
default), which will keep your systems in their desired state. If your system state
drifts out of the desired configuration, the Puppet agent will re-apply your
configuration.
Puppet gives you cross-platform support for multiple agent types running on a
variety of operating systems. For example, if you’re already using Puppet for
Amazon Web Services – Puppet on the AWS Cloud May 2017
Page 4 of 26
configuration management of Linux systems, you can use Puppet to manage your
Microsoft Windows servers as well. This includes EC2 instances running Linux or
Windows, and even physical machines you have running in your own data center.
In addition to using native Puppet modules to configure your systems, you can use
code from the Puppet Forge to extend the capabilities of Puppet. Puppet Forge is a
repository of modules contributed by the Puppet community. It provides you with
reusable code that can automate tasks such as setting up various databases, web
servers, and mail servers.
This Quick Start is for users who are looking to move to AWS, or are already running their
systems on AWS, and also want to deploy and manage their own Puppet master
infrastructure. The goal of this guide is to help you get started with Puppet on AWS, even if
you have absolutely no experience with Puppet.
This Quick Start automates the launch of the Puppet master, performs the initial server
setup, and creates both Linux and Windows-based Puppet agents within a virtual private
cloud (VPC). You can follow the walkthrough included in this guide to learn how to apply
configurations to Puppet agents and to install a basic web server. The walkthrough will
show you the benefits of automating software installation and configuration, and will help
you understand how to ensure that your system settings are repeatable, consistent, and
always in their desired state.
Quick Links If you have an AWS account and you’re already familiar with
AWS and Puppet, you can use the Launch Quick Start button
to build the architecture shown in Figure 1. The deployment
takes approximately 20 minutes. If you’re new to AWS or
Puppet, please review the implementation details and
follow the step-by-step instructions provided later in this guide
to launch the Quick Start.
If you want to take a look under the covers, you can choose
View template to see the AWS CloudFormation template that
automates this deployment. The default configuration deploys
three servers that use the t2.medium instance type by default,
but you can customize the template if you’d like.
View template
Launch Quick Start
Amazon Web Services – Puppet on the AWS Cloud May 2017
Page 5 of 26
Cost and Licenses You are responsible for the cost of the AWS services used while running this Quick Start
reference deployment. There is no additional cost for using the Quick Start. See the pricing
pages for each AWS service you will be using for full details.
This Quick Start deploys Open Source Puppet version 3.8.6 by default. Open Source Puppet
is available to download and use under the Apache 2.0 license. You can upgrade to Puppet
Enterprise by registering with Puppet and downloading a free trial to manage 10 nodes.
Architecture Deploying this Quick Start with the default parameters builds the following
environment in the AWS cloud.
Amazon Web Services – Puppet on the AWS Cloud May 2017
Page 6 of 26
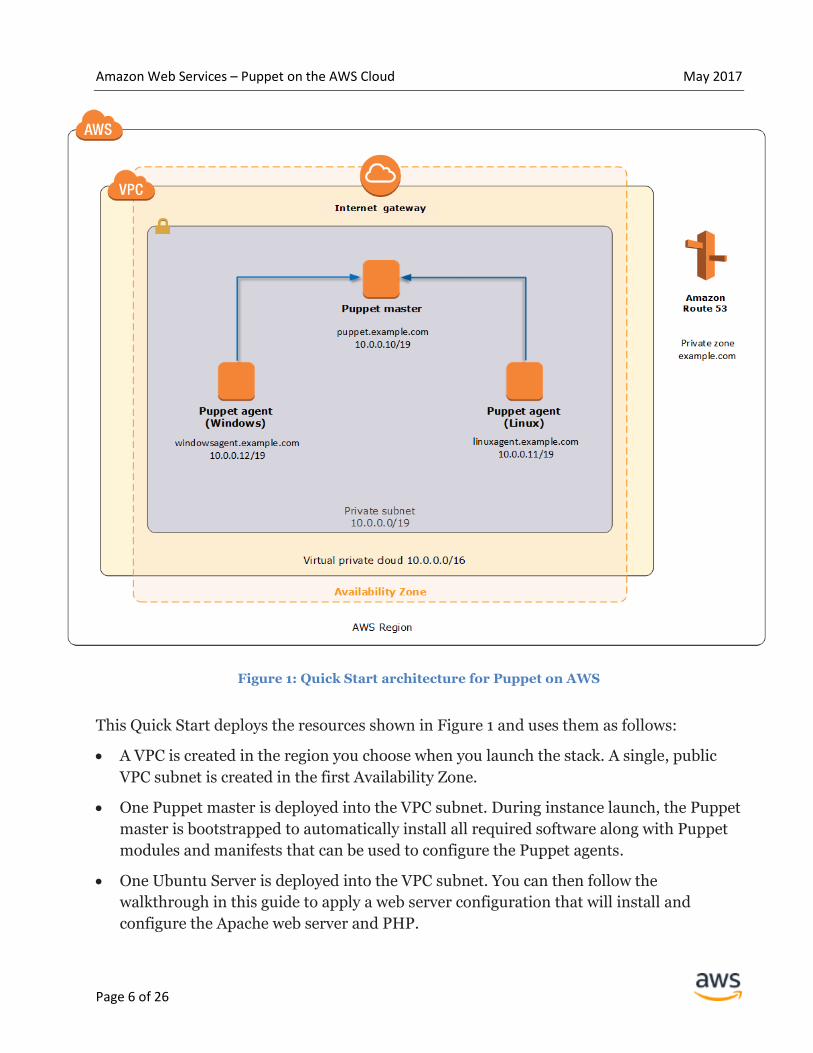
Figure 1: Quick Start architecture for Puppet on AWS
This Quick Start deploys the resources shown in Figure 1 and uses them as follows:
A VPC is created in the region you choose when you launch the stack. A single, public
VPC subnet is created in the first Availability Zone.
One Puppet master is deployed into the VPC subnet. During instance launch, the Puppet
master is bootstrapped to automatically install all required software along with Puppet
modules and manifests that can be used to configure the Puppet agents.
One Ubuntu Server is deployed into the VPC subnet. You can then follow the
walkthrough in this guide to apply a web server configuration that will install and
configure the Apache web server and PHP.
Amazon Web Services – Puppet on the AWS Cloud May 2017
Page 7 of 26
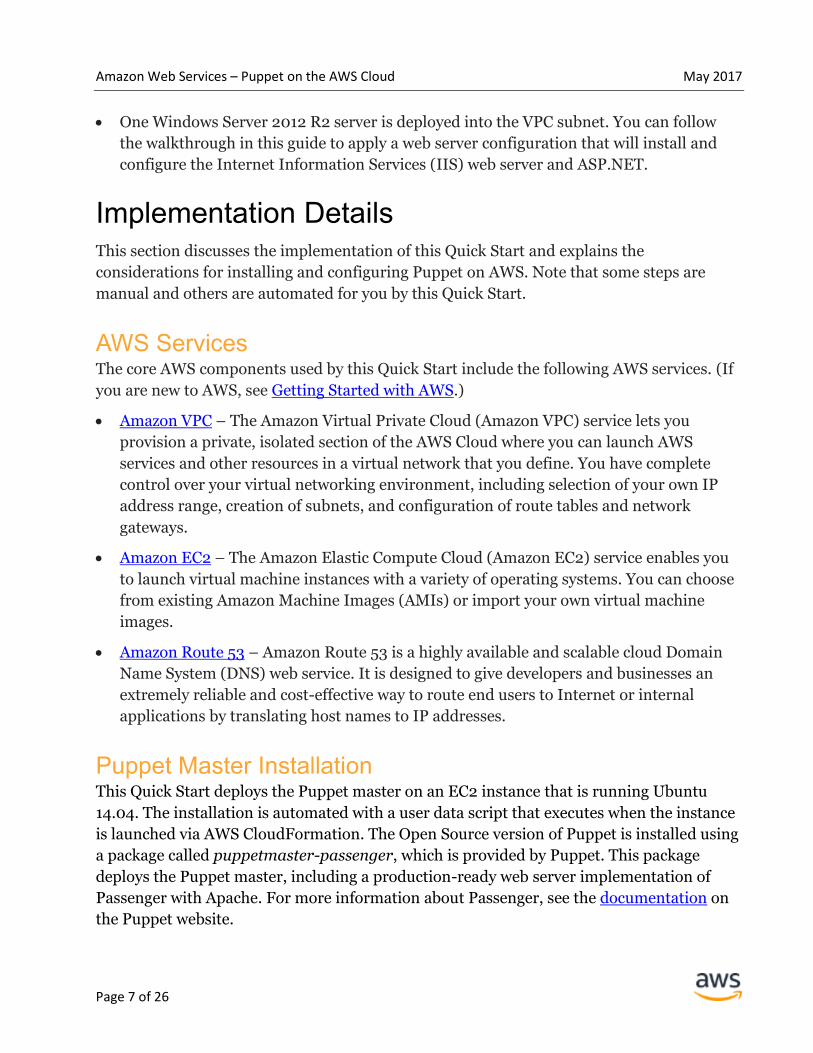
One Windows Server 2012 R2 server is deployed into the VPC subnet. You can follow
the walkthrough in this guide to apply a web server configuration that will install and
configure the Internet Information Services (IIS) web server and ASP.NET.
Implementation Details This section discusses the implementation of this Quick Start and explains the
considerations for installing and configuring Puppet on AWS. Note that some steps are
manual and others are automated for you by this Quick Start.
AWS Services The core AWS components used by this Quick Start include the following AWS services. (If
you are new to AWS, see Getting Started with AWS.)
Amazon VPC – The Amazon Virtual Private Cloud (Amazon VPC) service lets you
provision a private, isolated section of the AWS Cloud where you can launch AWS
services and other resources in a virtual network that you define. You have complete
control over your virtual networking environment, including selection of your own IP
address range, creation of subnets, and configuration of route tables and network
gateways.
Amazon EC2 – The Amazon Elastic Compute Cloud (Amazon EC2) service enables you
to launch virtual machine instances with a variety of operating systems. You can choose
from existing Amazon Machine Images (AMIs) or import your own virtual machine
images.
Amazon Route 53 – Amazon Route 53 is a highly available and scalable cloud Domain
Name System (DNS) web service. It is designed to give developers and businesses an
extremely reliable and cost-effective way to route end users to Internet or internal
applications by translating host names to IP addresses.
Puppet Master Installation This Quick Start deploys the Puppet master on an EC2 instance that is running Ubuntu
14.04. The installation is automated with a user data script that executes when the instance
is launched via AWS CloudFormation. The Open Source version of Puppet is installed using
a package called puppetmaster-passenger, which is provided by Puppet. This package
deploys the Puppet master, including a production-ready web server implementation of
Passenger with Apache. For more information about Passenger, see the documentation on
the Puppet website.
Amazon Web Services – Puppet on the AWS Cloud May 2017
Page 8 of 26
In addition to installing the Puppet master, this Quick Start downloads preconfigured
Puppet modules from Amazon Simple Storage Service (Amazon S3), which will enable you
to apply a web server configuration to both the Windows and Linux nodes.
Certificates and DNS Names The Puppet master acts as a certificate authority (CA), and SSL certificates are used to
authenticate communications between the master and agent nodes. Since the Puppet
master is a CA, it will generate its own certificates, which will be used to sign agent
certificate requests.
Because this Quick Start pre-provisions record sets for each EC2 instance in Amazon Route
53, the Puppet master will use the host name puppet.example.com by default. During the
automated setup of Puppet, the master’s CA certificates will be generated using this host
name. This ensures that clients that connect to the master using its predetermined host
name will see the correct host name on the certificate. Using the default host name
eliminates the need to regenerate the certificates after a typical installation to include the
appropriate name.
Puppet agents need to be configured to connect to your Puppet master, and the Quick Start
automates that work. If you want to use different host names, you can simply download a
copy of the templates, modify them to use your desired host names, and then launch the
stack to automatically configure your master and agents. Keep in mind that the Quick Start
downloads configuration files, modules, and manifests from Amazon S3 that include these
names, so you’ll also want to download and modify those if you want to customize your
deployment.
The first time the Puppet agent runs on a node, it will send a certificate signing request to
the master. Typically, this is not done automatically, and you must sign the agent certificate
on the master server before you can start controlling the node.
In this Quick Start, certificate signing requests from the Linux and Windows agents are
whitelisted by using the autosign.conf configuration file on the Puppet master. This file
includes the names linuxagent.example.com and windowsagent.example.com. As with
DNS name resolution, the Quick Start provisions record sets for these names for you in an
Amazon Route 53 private hosted zone, and configures the agents to use these host names
within the operating system. Using the autosigning configuration file with this Quick Start
enables you to get up and running quickly. However, for production environments you’ll
likely want to manually sign agent requests, or use Puppet’s policy-based interface for
autosigning certificates.

Amazon Web Services – Puppet on the AWS Cloud May 2017
Page 9 of 26
Puppet Agent Installation The Linux agent deployed by this Quick Start also runs Ubuntu 14.04, like the master. The
installation of the agent takes place after the master has been deployed. The Quick Start
runs a simple user data script when it launches the agent via AWS CloudFormation. This
script installs the agent and configures it to point to the master at puppet.example.com, and
the server automatically requests and signs the agent certificate.
The Windows agent is deployed on an instance running Windows Server 2012 R2. As with
Linux, the Quick Start runs a simple user data script to install and configure the agent at
launch, after the master has already been deployed. In addition, the Quick Start
automatically downloads and installs the puppetlabs-powershell and puppetlabs-
windowsfeature modules from the Puppet Forge. These modules are used within a module
manifest that installs the IIS web server with all required components and support for
ASP.NET websites.
Managing AWS Resources with Puppet You can use the AWS module from Puppet to provision, configure, and manage AWS
resources in a consistent and repeatable manner. You can use this module to audit AWS
resources, launch Auto Scaling groups in the VPC, perform unit testing, and more. The
module supports the following AWS services:
Amazon EC2
Amazon VPC
Elastic Load Balancing
Auto Scaling
Security groups
Amazon Route 53 DNS
To learn more, see Accelerate Migration to AWS Cloud with Puppet on the Puppet website.
Amazon Web Services – Puppet on the AWS Cloud May 2017
Page 10 of 26
Deployment and Configuration Steps The AWS CloudFormation template provided with this Quick Start bootstraps the AWS
infrastructure and automates the deployment of a Puppet master and Puppet agents on the
AWS cloud from scratch. Follow the step-by-step instructions in this section to set up your
AWS account, customize the template, and deploy the software into your account.
What We’ll Cover The procedure for deploying Puppet on AWS consists of the following steps. For detailed
instructions, follow the links for each step.
Prerequisites
Set up and enable name resolution via DNS. Make sure you can use Secure Shell (SSH) or
Remote Desktop Protocol (RDP) for remote connections.
Step 1. Prepare an AWS account
Sign up for an AWS account, choosing a region, creating a key pair, and requesting
increases for account limits, if necessary.
Step 2. Launch the stack
Launch the AWS CloudFormation template into your AWS account, specify parameter
values, and create the stack.
Step 3. Configure Puppet agents
Review the module manifests for the Linux and Windows agents, connect to the agents via
SSH or RDP, and apply the configurations.
Prerequisites To enable communication between the Puppet master and Puppet agents, you must set up
and enable name resolution via DNS. Agents reach the Puppet master by using a fully
qualified DNS name such as puppet.example.com.
To provide name resolution within the Amazon VPC created by this Quick Start, the AWS
CloudFormation template creates an Amazon Route 53 private hosted zone and provisions
record sets for each EC2 instance based on the IP addresses provided through the template
parameters at launch.
Using Amazon Route 53 is not a requirement. You can utilize your own DNS server
infrastructure and manually create records and configure your instances. If you decide to
Amazon Web Services – Puppet on the AWS Cloud May 2017
Page 11 of 26
use your own DNS server, make sure that your EC2 instances will resolve names against
your own DNS server infrastructure, and create host (A) records that correspond to each
EC2 instance IP address.
In addition to name resolution, a small number of network ports must be open to allow
communication between the agents and the Puppet master. The Puppet master must be
reachable by agents via TCP port 8140. For this Quick Start, the Puppet master is associated
with an EC2 security group that permits inbound access to TCP port 8140 from any address
within the VPC CIDR range.
To manage your agents, you must be able to connect remotely via SSH or RDP. This Quick
Start creates and associates EC2 security groups for remote agent access. The inbound rules
include access to TCP port 22 for SSH, and TCP port 3389 for RDP. Additionally, an
inbound rule for TCP port 80 is permitted by the CIDR address you define for remote
access. This will allow you to verify that your web servers are functional after applying your
Puppet configurations on the agents.
Step 1. Prepare an AWS Account 1. If you don’t already have an AWS account, create one at https://aws.amazon.com by
following the on-screen instructions. Part of the sign-up process involves receiving a
phone call and entering a PIN using the phone keypad.
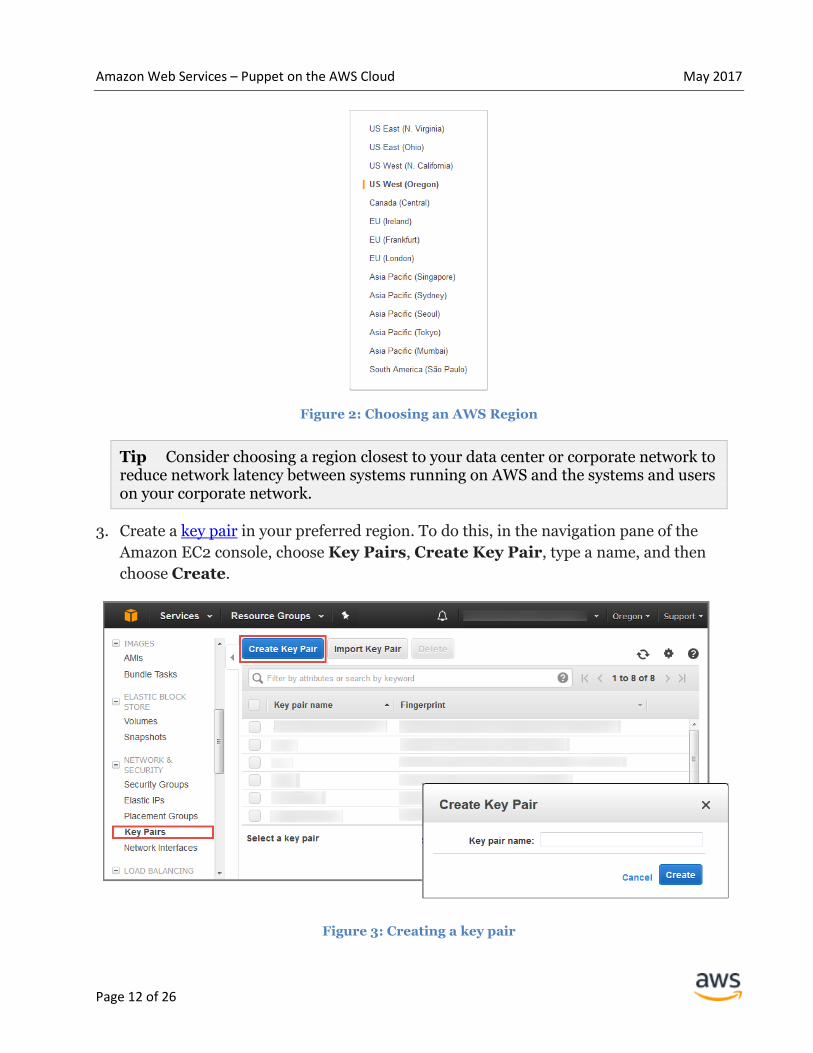
2. Use the region selector in the navigation bar to choose the AWS Region where you want
to deploy Puppet on AWS.
Amazon EC2 locations are composed of Regions and Availability Zones. Regions are
dispersed and located in separate geographic areas.
Amazon Web Services – Puppet on the AWS Cloud May 2017
Page 12 of 26
Figure 2: Choosing an AWS Region
Tip Consider choosing a region closest to your data center or corporate network to reduce network latency between systems running on AWS and the systems and users on your corporate network.
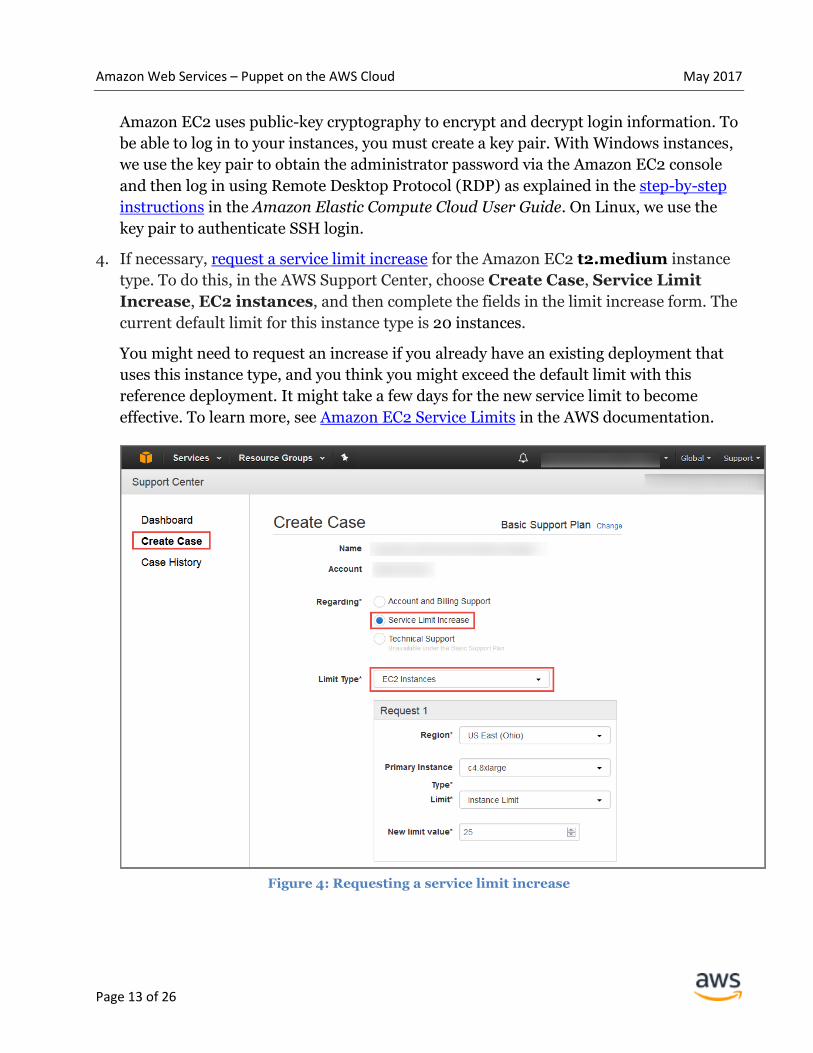
3. Create a key pair in your preferred region. To do this, in the navigation pane of the
Amazon EC2 console, choose Key Pairs, Create Key Pair, type a name, and then
choose Create.
Figure 3: Creating a key pair
Amazon Web Services – Puppet on the AWS Cloud May 2017
Page 13 of 26
Amazon EC2 uses public-key cryptography to encrypt and decrypt login information. To
be able to log in to your instances, you must create a key pair. With Windows instances,
we use the key pair to obtain the administrator password via the Amazon EC2 console
and then log in using Remote Desktop Protocol (RDP) as explained in the step-by-step
instructions in the Amazon Elastic Compute Cloud User Guide. On Linux, we use the
key pair to authenticate SSH login.
4. If necessary, request a service limit increase for the Amazon EC2 t2.medium instance
type. To do this, in the AWS Support Center, choose Create Case, Service Limit
Increase, EC2 instances, and then complete the fields in the limit increase form. The
current default limit for this instance type is 20 instances.
You might need to request an increase if you already have an existing deployment that
uses this instance type, and you think you might exceed the default limit with this
reference deployment. It might take a few days for the new service limit to become
effective. To learn more, see Amazon EC2 Service Limits in the AWS documentation.
Figure 4: Requesting a service limit increase

Amazon Web Services – Puppet on the AWS Cloud May 2017
Page 14 of 26
Step 2. Launch the Puppet Stack
Note You are responsible for the cost of the AWS services used while running this
Quick Start reference deployment. There is no additional cost for using this Quick Start.
See the pricing pages for each AWS service you will be using for full details.
1. Launch the AWS CloudFormation template into your AWS
account.
The template is launched in the US West (Oregon) Region by
default. You can change the region by using the region selector
in the navigation bar.
This stack takes approximately 20 minutes to create.
You can also download the template to use it as a starting point for your own
implementation.
2. On the Select Template page, keep the default URL for the AWS CloudFormation
template, and then choose Next.
3. On the Specify Details page, review the parameters for the template. These are
described in the following table.
Provide a value for the KeyPairName parameter. This parameter require your input.
For all other parameters, the template provides default settings that you can customize.
Security Configuration:
Parameter label
(name)
Default Description
Select a key pair
(KeyPairName)
Requires input Public/private key pair, which enables you to connect
securely to your instance after it launches. When you
created an AWS account, this is the key pair you created
in your preferred region.
Source IP for remote access
(RemoteAdminCIDR)
Requires input CIDR block or IP address for SSH and RDP access (e.g.,
1.1.1.1/32).
AWS Quick Start Configuration:
Parameter label
(name)
Default Description
Quick Start S3 Bucket
Name
(QSS3BucketName)
aws-quickstart S3 bucket where the Quick Start templates and scripts are
installed. Use this parameter to specify the S3 bucket
name you’ve created for your copy of Quick Start assets, if
Launch Quick Start
Amazon Web Services – Puppet on the AWS Cloud May 2017
Page 15 of 26
Parameter label
(name)
Default Description
you decide to customize or extend the Quick Start for your
own use. The bucket name can include numbers,
lowercase letters, uppercase letters, and hyphens, but
should not start or end with a hyphen.
Quick Start S3 Key Prefix
(QSS3KeyPrefix)
quickstart-
puppet/
The S3 key name prefix used to simulate a folder for your
copy of Quick Start assets, if you decide to customize or
extend the Quick Start for your own use. This prefix can
include numbers, lowercase letters, uppercase letters,
hyphens, and forward slashes, but should not start with a
forward slash (which is automatically added).
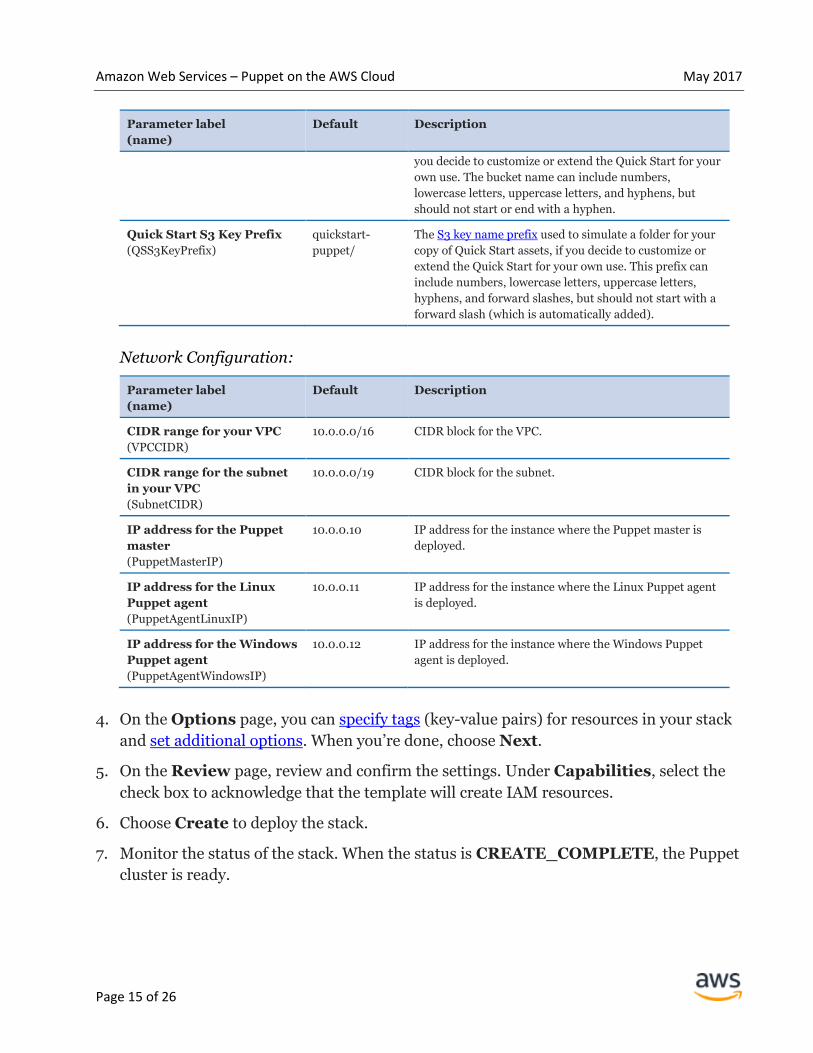
Network Configuration:
Parameter label
(name)
Default Description
CIDR range for your VPC
(VPCCIDR)
10.0.0.0/16 CIDR block for the VPC.
CIDR range for the subnet
in your VPC
(SubnetCIDR)
10.0.0.0/19 CIDR block for the subnet.
IP address for the Puppet
master
(PuppetMasterIP)
10.0.0.10 IP address for the instance where the Puppet master is
deployed.
IP address for the Linux
Puppet agent
(PuppetAgentLinuxIP)
10.0.0.11 IP address for the instance where the Linux Puppet agent
is deployed.
IP address for the Windows
Puppet agent
(PuppetAgentWindowsIP)
10.0.0.12 IP address for the instance where the Windows Puppet
agent is deployed.
4. On the Options page, you can specify tags (key-value pairs) for resources in your stack
and set additional options. When you’re done, choose Next.
5. On the Review page, review and confirm the settings. Under Capabilities, select the
check box to acknowledge that the template will create IAM resources.
6. Choose Create to deploy the stack.
7. Monitor the status of the stack. When the status is CREATE_COMPLETE, the Puppet
cluster is ready.
Amazon Web Services – Puppet on the AWS Cloud May 2017
Page 16 of 26
Step 3. Configure Puppet Agents You can follow this instructions in this section to test your Puppet setup on AWS. We’ll take
a look at the module manifests for the Puppet agents, apply the configurations, and verify
that the configurations were applied successfully.
Review Modules and Manifests There are a number of ways to apply configurations to your agent nodes (see the Puppet
documentation). This Quick Start uses modules for each Linux and Windows node, and
downloads the modules from Amazon S3 to the master during the bootstrapping phase.
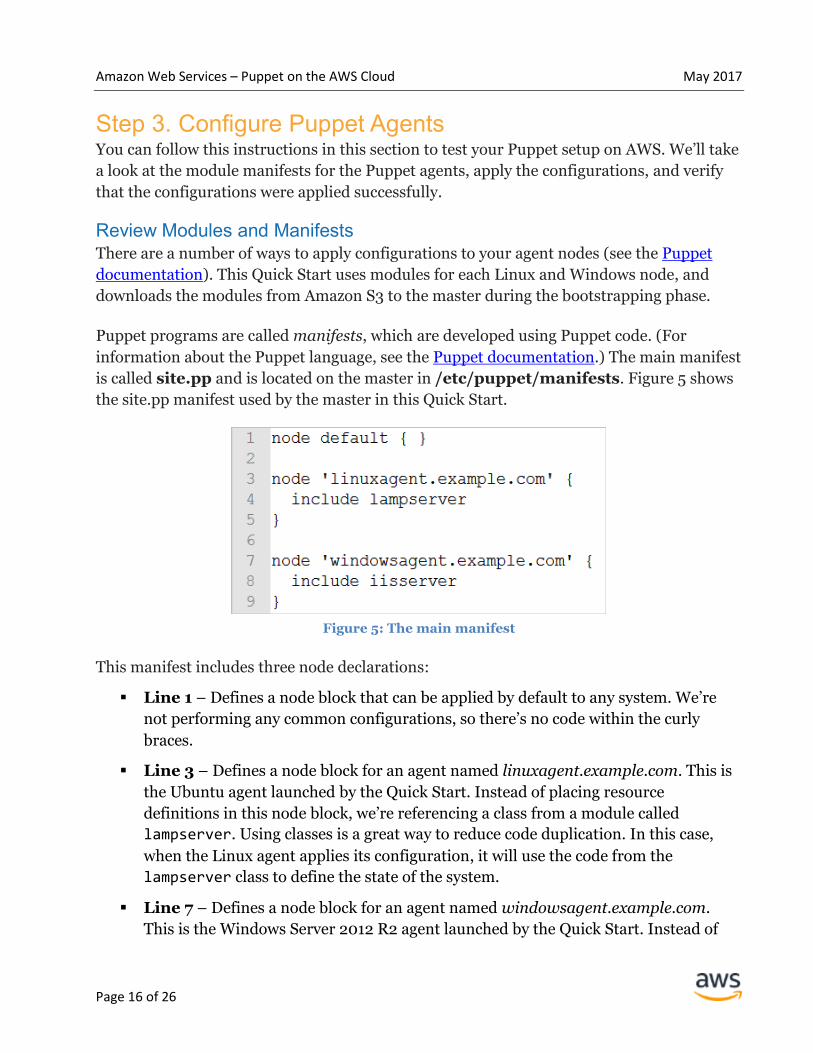
Puppet programs are called manifests, which are developed using Puppet code. (For
information about the Puppet language, see the Puppet documentation.) The main manifest
is called site.pp and is located on the master in /etc/puppet/manifests. Figure 5 shows
the site.pp manifest used by the master in this Quick Start.
Figure 5: The main manifest
This manifest includes three node declarations:
Line 1 – Defines a node block that can be applied by default to any system. We’re
not performing any common configurations, so there’s no code within the curly
braces.
Line 3 – Defines a node block for an agent named linuxagent.example.com. This is
the Ubuntu agent launched by the Quick Start. Instead of placing resource
definitions in this node block, we’re referencing a class from a module called
lampserver. Using classes is a great way to reduce code duplication. In this case,
when the Linux agent applies its configuration, it will use the code from the
lampserver class to define the state of the system.
Line 7 – Defines a node block for an agent named windowsagent.example.com.
This is the Windows Server 2012 R2 agent launched by the Quick Start. Instead of
Amazon Web Services – Puppet on the AWS Cloud May 2017
Page 17 of 26
placing resource definitions in this node block, we’re referencing a class from a
module called iisserver. When the Windows agent applies its configuration, it will
use the code from the iisserver class to define the state of the system.
Next, let’s look at the lampserver and iisserver classes to see what they do.
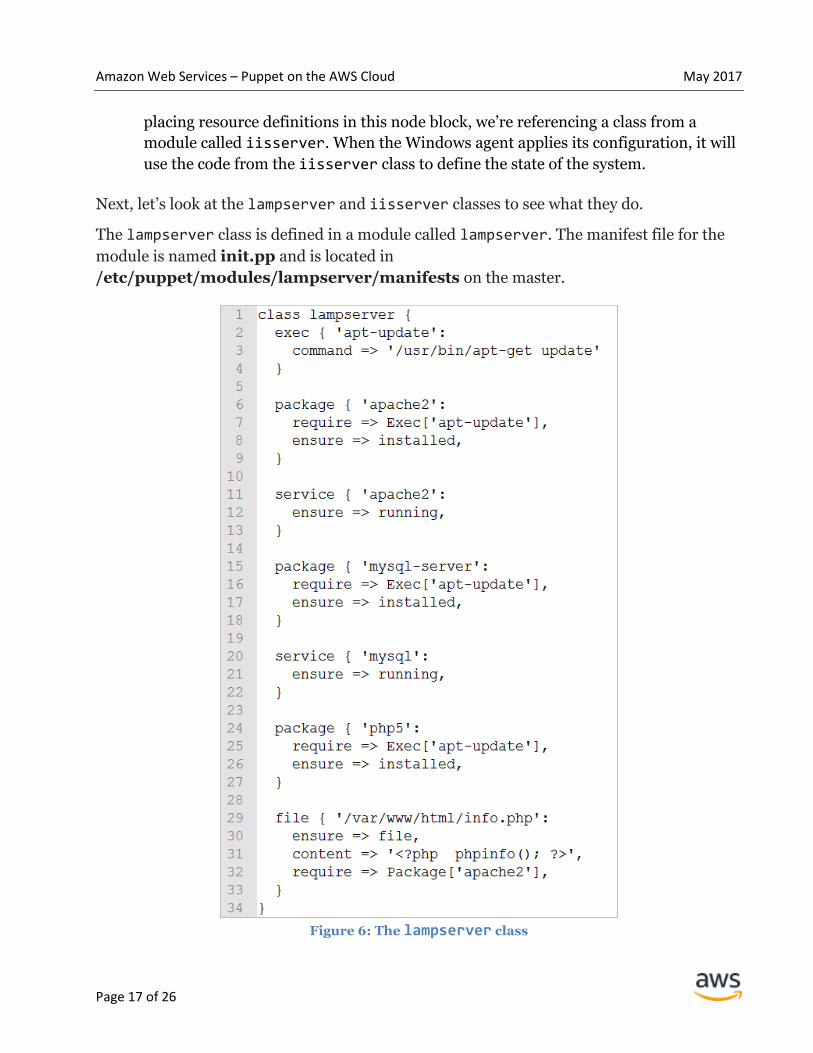
The lampserver class is defined in a module called lampserver. The manifest file for the
module is named init.pp and is located in
/etc/puppet/modules/lampserver/manifests on the master.
Figure 6: The lampserver class
Amazon Web Services – Puppet on the AWS Cloud May 2017
Page 18 of 26
Note the following about the lampserver code shown in Figure 6:
Line 1 – This is the class definition for lampserver, which is referenced in our main
manifest file.
Line 2 – The exec keyword defines a resource declaration. You use resources to
describe the desired state of the system. Here we’re using the exec resource to
execute the apt-update command on the node.
Line 6 – The package resource is used to install Apache 2 on the node. Notice that
the require statement ensures that apt-update has already been run before this
resource can be installed.
Line 11 – The service resource ensures that the Apache 2 service is running.
Line 15 – The package resource ensures that the MySQL server is installed, as long
as apt-update has been executed successfully.
Line 20 – The service resource ensures that MySQL is running.
Line 24 – The package resource ensures that PHP 5 is installed, as long as apt-
update has been executed successfully.
Line 29 – The file resource ensures that a new file called info.php is created in
the default apache root directory. This requires Apache 2 to be installed. PHP code
is added to the content of the file to provide an informational page about the web
server when the user visits the site in a web browser.
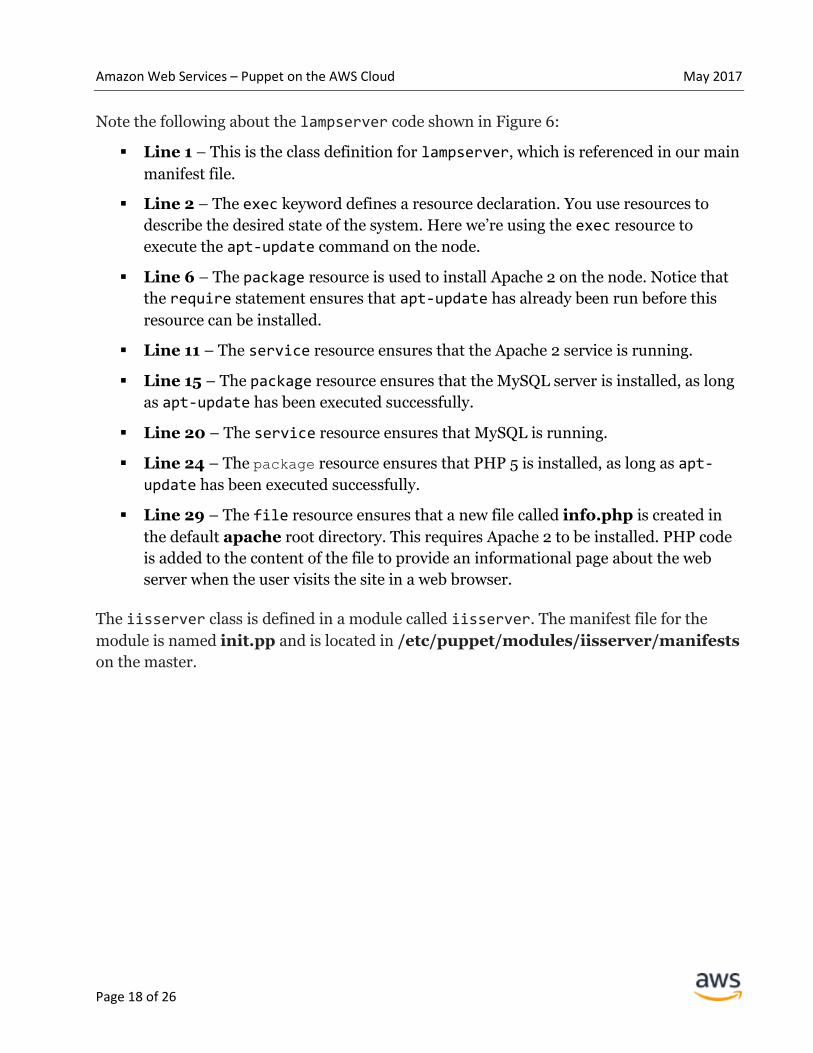
The iisserver class is defined in a module called iisserver. The manifest file for the
module is named init.pp and is located in /etc/puppet/modules/iisserver/manifests
on the master.
Amazon Web Services – Puppet on the AWS Cloud May 2017
Page 19 of 26
Figure 7: The iisserver class
Note the following about the iisserver code shown in Figure 7:
Line 1 – This is the class definition for iisserver, which is referenced in our main
manifest file.
Line 15 – The windowsfeature resource leverages Windows PowerShell to ensure
that all the required components for IIS and ASP.NET are installed.
Line 19 – The windowsfeature resource installs the management tools for IIS
administration.
Line 25 – The file resource ensures that an informational ASP.NET web page
called info.aspx is present in the web server root directory. The content of this web
page is truncated in Figure 7 because of space constraints, but it contains a single
page directive that provides information about the server, just like info.php on the
Linux node.

Amazon Web Services – Puppet on the AWS Cloud May 2017
Page 20 of 26
In addition to creating your own modules, you can use manifests directly, or you can
leverage pre-existing modules from the Puppet Forge. For details on writing modules and
manifests, see Module Fundamentals and the training classes on the Puppet website.
Connect to Puppet Agents Now that you understand what the sample modules are intended to do, you’re ready to
connect to your agents remotely.
Linux Agent
You’ll need to use SSH to connect to your Linux agent from outside the VPC. In the Amazon
EC2 console, select the EC2 instance tagged LinuxAgent, as shown in Figure 8.
Figure 8: Selecting the LinuxAgent instance
Retrieve the public DNS name for LinuxAgent, and follow the instructions in the Amazon
EC2 User Guide for Linux Instances to connect your SSH client to the instance. You’ll need
to have your key pair available to establish a remote SSH connection.
Windows Agent
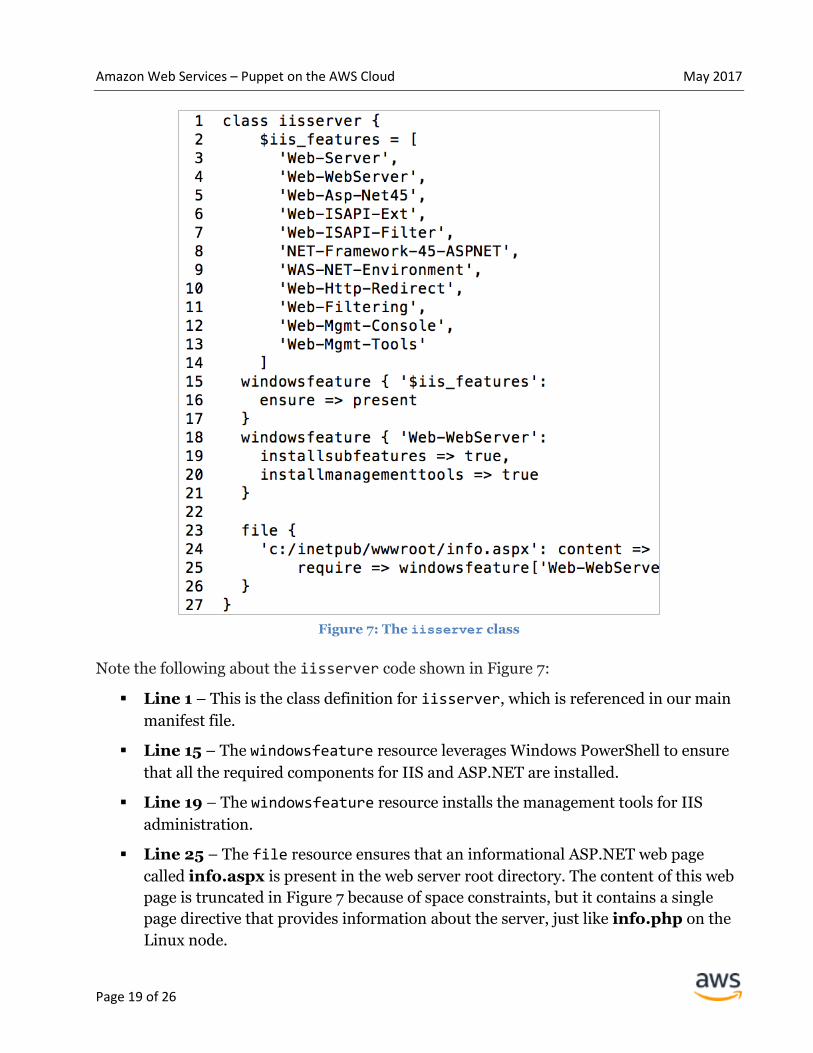
You can use RDP to connect to the Windows agent over the Internet. In the Amazon EC2
console, select the EC2 instance tagged WindowsAgent, as shown in Figure 9.
Amazon Web Services – Puppet on the AWS Cloud May 2017
Page 21 of 26
Figure 9: Selecting the WindowsAgent instance
Retrieve the public DNS name for WindowsAgent, and follow the instructions in the
Amazon EC2 User Guide for Microsoft Windows Instances to get connected. You’ll need to
have your key pair available to decrypt the Windows administrator password and establish
a remote connection.
Apply Configurations In this section, you’ll apply node configurations and verify that everything was configured
successfully.
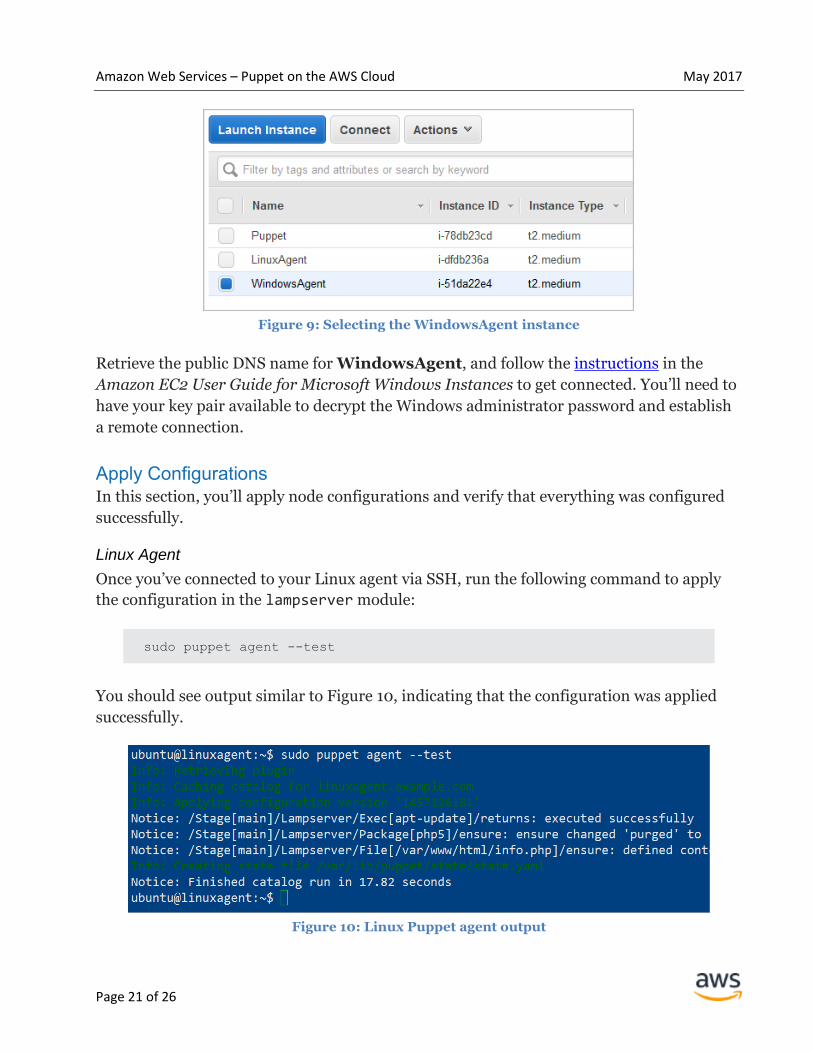
Linux Agent
Once you’ve connected to your Linux agent via SSH, run the following command to apply
the configuration in the lampserver module:
sudo puppet agent --test
You should see output similar to Figure 10, indicating that the configuration was applied
successfully.
Figure 10: Linux Puppet agent output
Amazon Web Services – Puppet on the AWS Cloud May 2017
Page 22 of 26
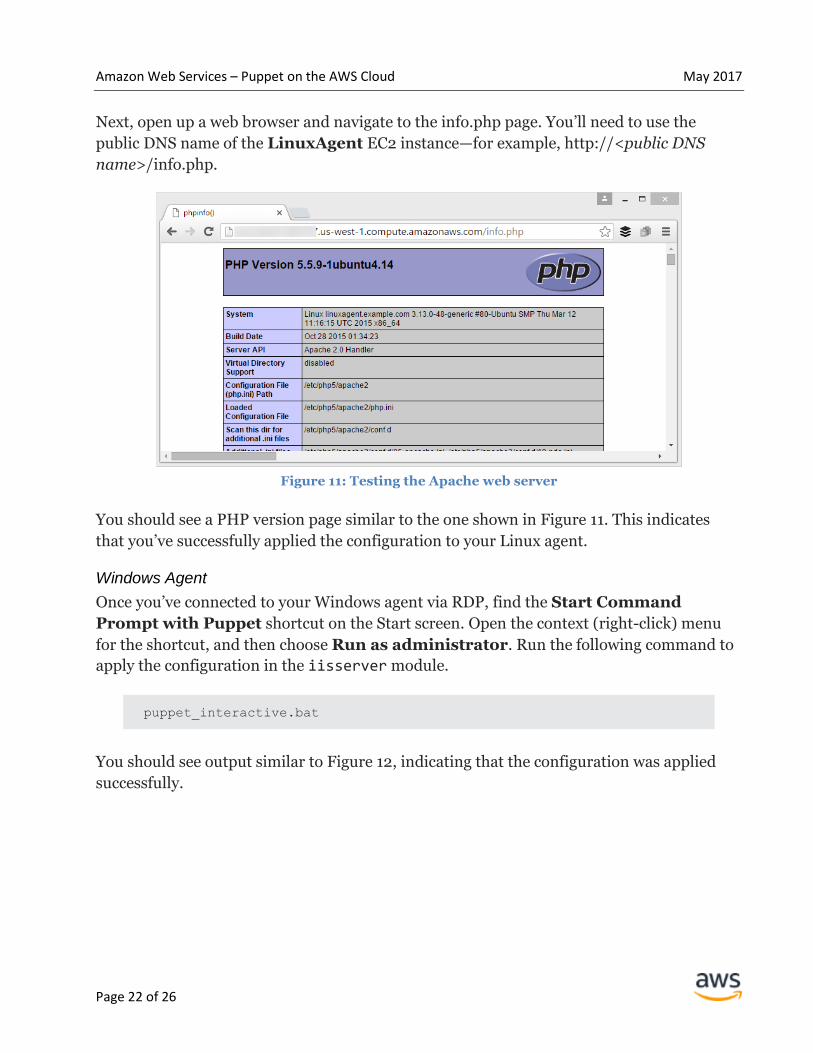
Next, open up a web browser and navigate to the info.php page. You’ll need to use the
public DNS name of the LinuxAgent EC2 instance—for example, http://<public DNS
name>/info.php.
Figure 11: Testing the Apache web server
You should see a PHP version page similar to the one shown in Figure 11. This indicates
that you’ve successfully applied the configuration to your Linux agent.
Windows Agent
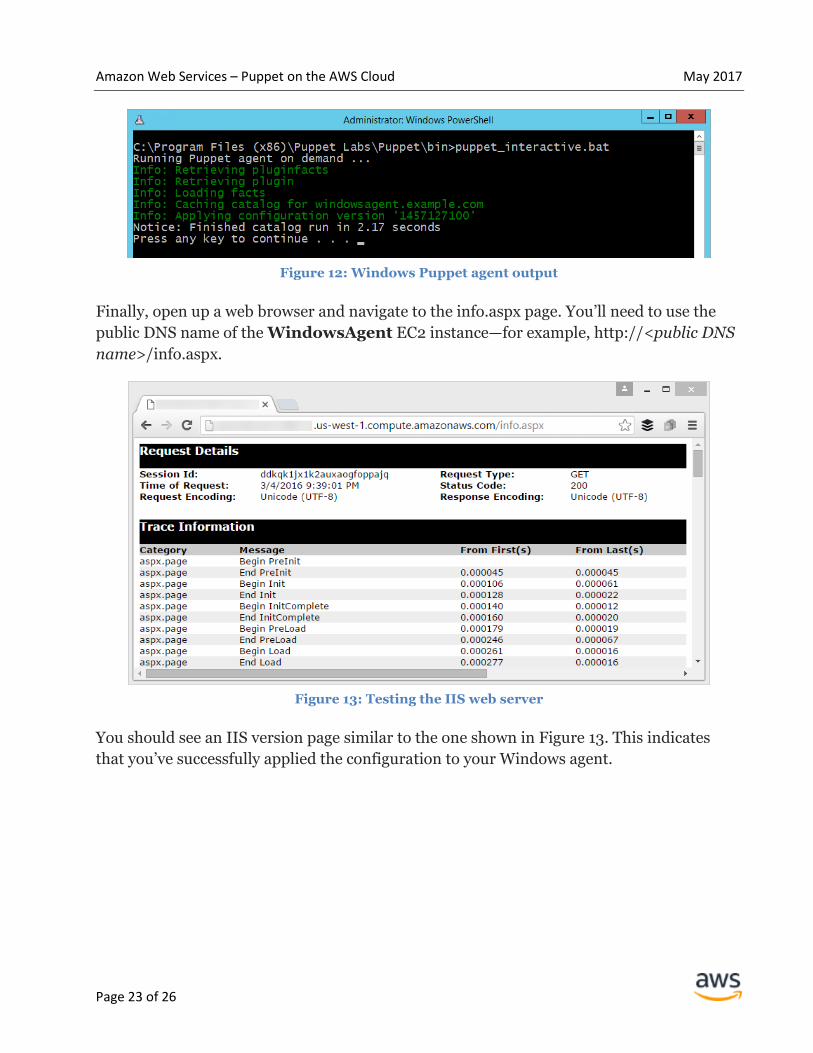
Once you’ve connected to your Windows agent via RDP, find the Start Command
Prompt with Puppet shortcut on the Start screen. Open the context (right-click) menu
for the shortcut, and then choose Run as administrator. Run the following command to
apply the configuration in the iisserver module.
puppet_interactive.bat
You should see output similar to Figure 12, indicating that the configuration was applied
successfully.
Amazon Web Services – Puppet on the AWS Cloud May 2017
Page 23 of 26
Figure 12: Windows Puppet agent output
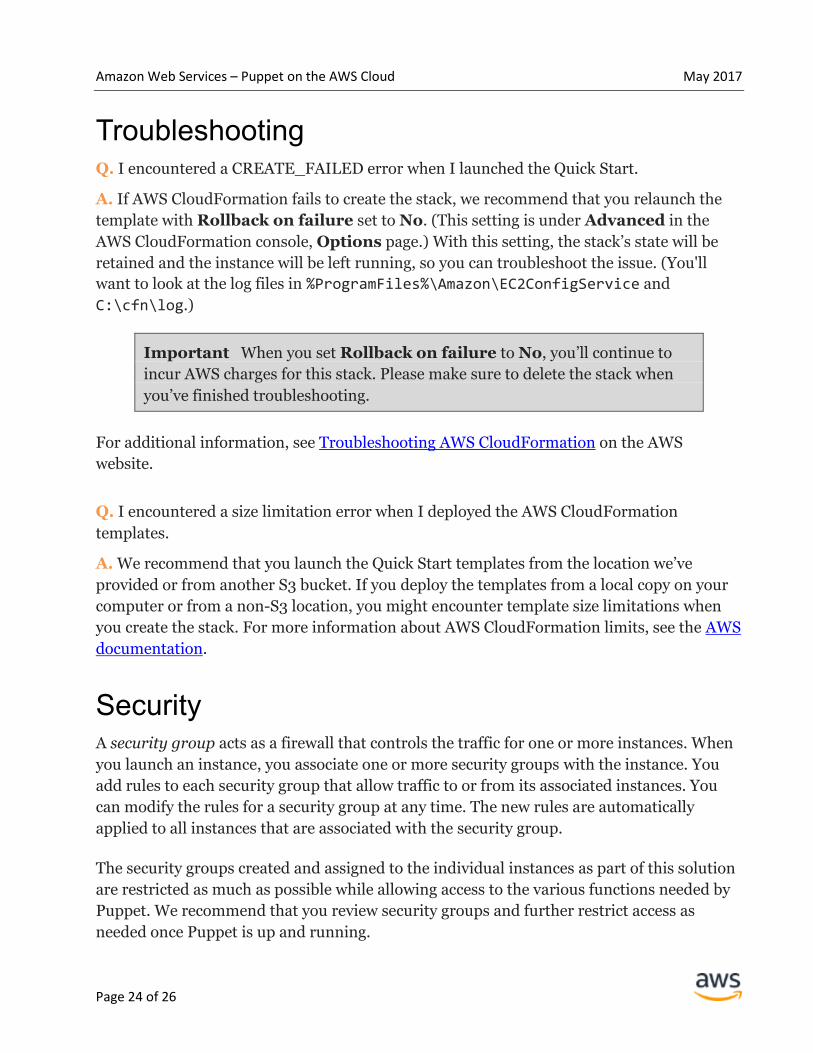
Finally, open up a web browser and navigate to the info.aspx page. You’ll need to use the
public DNS name of the WindowsAgent EC2 instance—for example, http://<public DNS
name>/info.aspx.
Figure 13: Testing the IIS web server
You should see an IIS version page similar to the one shown in Figure 13. This indicates
that you’ve successfully applied the configuration to your Windows agent.
Amazon Web Services – Puppet on the AWS Cloud May 2017
Page 24 of 26
Troubleshooting Q. I encountered a CREATE_FAILED error when I launched the Quick Start.
A. If AWS CloudFormation fails to create the stack, we recommend that you relaunch the
template with Rollback on failure set to No. (This setting is under Advanced in the
AWS CloudFormation console, Options page.) With this setting, the stack’s state will be
retained and the instance will be left running, so you can troubleshoot the issue. (You'll
want to look at the log files in %ProgramFiles%\Amazon\EC2ConfigService and
C:\cfn\log.)
Important When you set Rollback on failure to No, you’ll continue to
incur AWS charges for this stack. Please make sure to delete the stack when
you’ve finished troubleshooting.
For additional information, see Troubleshooting AWS CloudFormation on the AWS
website.
Q. I encountered a size limitation error when I deployed the AWS CloudFormation
templates.
A. We recommend that you launch the Quick Start templates from the location we’ve
provided or from another S3 bucket. If you deploy the templates from a local copy on your
computer or from a non-S3 location, you might encounter template size limitations when
you create the stack. For more information about AWS CloudFormation limits, see the AWS
documentation.
Security A security group acts as a firewall that controls the traffic for one or more instances. When
you launch an instance, you associate one or more security groups with the instance. You
add rules to each security group that allow traffic to or from its associated instances. You
can modify the rules for a security group at any time. The new rules are automatically
applied to all instances that are associated with the security group.
The security groups created and assigned to the individual instances as part of this solution
are restricted as much as possible while allowing access to the various functions needed by
Puppet. We recommend that you review security groups and further restrict access as
needed once Puppet is up and running.
Amazon Web Services – Puppet on the AWS Cloud May 2017
Page 25 of 26
Additional Resources
AWS services
Amazon EC2
http://aws.amazon.com/documentation/ec2/
AWS CloudFormation
http://aws.amazon.com/documentation/cloudformation/
Amazon VPC
http://aws.amazon.com/documentation/vpc/
Amazon Route 53
https://aws.amazon.com/documentation/route53/
Puppet resources
Puppet documentation
https://puppet.com/docs
Puppet training
https://puppet.com/support-services/training
Puppet on AWS
https://puppet.com/products/managed-technology/aws
Provision AWS Infrastructure Using Puppet (blog post)
https://puppet.com/blog/provision-aws-infrastructure-using-puppet
Automating AWS with Puppet (video)
https://youtu.be/eyR0LVjxJAs
Puppet and AWS: Getting the Best of Both Worlds (video)
https://puppet.com/presentations/puppet-and-aws-getting-best-both-worlds
Puppet Forge
https://forge.puppet.com/
Puppet Community
https://puppet.com/community
Quick Start reference deployments
AWS Quick Start home page
https://aws.amazon.com/quickstart/
Amazon Web Services – Puppet on the AWS Cloud May 2017
Page 26 of 26
GitHub Repository You can visit our GitHub repository to download the templates and scripts for this Quick
Start, and to share your customizations with others.
Document Revisions
Date Change In sections
May 2017 Added AWS CloudFormation signaling for the
Puppet master; added Quick Start portability
improvements
Template updates and changes
throughout guide
March 2016 Initial publication —
© 2017, Amazon Web Services, Inc. or its affiliates. All rights reserved.
Notices
This document is provided for informational purposes only. It represents AWS’s current product offerings
and practices as of the date of issue of this document, which are subject to change without notice. Customers
are responsible for making their own independent assessment of the information in this document and any
use of AWS’s products or services, each of which is provided “as is” without warranty of any kind, whether
express or implied. This document does not create any warranties, representations, contractual
commitments, conditions or assurances from AWS, its affiliates, suppliers or licensors. The responsibilities
and liabilities of AWS to its customers are controlled by AWS agreements, and this document is not part of,
nor does it modify, any agreement between AWS and its customers.
The software included with this paper is licensed under the Apache License, Version 2.0 (the "License"). You
may not use this file except in compliance with the License. A copy of the License is located at
http://aws.amazon.com/apache2.0/ or in the "license" file accompanying this file. This code is distributed on
an "AS IS" BASIS, WITHOUT WARRANTIES OR CONDITIONS OF ANY KIND, either express or implied.
See the License for the specific language governing permissions and limitations under the License.