PUA(LMS) Stuff Guide...PUA (LMS) is online learning mangment system and mobile application ,...
75
PUA(LMS) Stuff Guide Page | 1 Prepared by : Eng.sheren A.sherif Table of Content Content Page Introduction ……………..………………………………………………… 2 URL ………..…….……….…………………..…………………………….. 3 PUA(LMS)Mobile Application …………………………………………….… 4 1. Home Page ………………………… .…………………………................ 5 2. Login Page ..…………………………….………………………………… 6 3. Rest password ......…………………...……………………..………........ 8 4. Edit Profile ………………………..…….………………………………. 10 5. Dashboard ………………………….…………………………………….. 16 5.1.User Dropdeown Menu ..……………………………………………..… 17 5.1.1.Profile ………………..………….……………………………… 18 5.1.2.Grades ………………….……………………………….……... 19 5.1.3.Messages ………………….……………………………….…… 20 5.1.4.Preferences ……………………………………………………… 21 5.2.Blocks …………………………………………………………..…… 22 5.2.1 Customise Dashboard ……………………………….………… . 24 5.2.1. Navigation block …………………………………………..… … 28 5.2.2. Private file …………………………………................................ 28 5.2.3. Online User ……………….…………………….………………. 29 5.2.4.Calendar …………………………………………………………… 30 5.2.5.Upcomping Event …………... ………...………………………… 30 5.2.6. Course overview ………………………..……………………….. 31 6. Add Activity or resources: 6.1. Resources …………………………………………………………….. 32 6.1.1. File ………………………………..…………………………… 33 6.1.4. URL ………………………..…………………………………... 38 6.1.2. Folder ……………..…………….……………………………….. 41 6.2. Activites ……………………………………………………..……… 46 6.2.1. Assgment ...…………….……………………………………….. 46 6.2.2. Quiz …………………………….…………………………...…. 60
Transcript of PUA(LMS) Stuff Guide...PUA (LMS) is online learning mangment system and mobile application ,...

PUA(LMS) Stuff Guide
Page | 1 Prepared by : Eng.sheren A.sherif
Table of Content Content Page
Introduction ……………..………………………………………………… 2
URL ………..…….……….…………………..…………………………….. 3
PUA(LMS)Mobile Application …………………………………………….… 4
1. Home Page ………………………… .…………………………................ 5
2. Login Page ..…………………………….………………………………… 6
3. Rest password ......…………………...……………………..………........ 8
4. Edit Profile ………………………..…….………………………………. 10
5. Dashboard ………………………….…………………………………….. 16
5.1.User Dropdeown Menu ..……………………………………………..… 17
5.1.1.Profile ………………..………….……………………………… 18
5.1.2.Grades ………………….……………………………….……... 19
5.1.3.Messages ………………….……………………………….…… 20
5.1.4.Preferences ……………………………………………………… 21
5.2.Blocks …………………………………………………………..…… 22
5.2.1 Customise Dashboard ……………………………….………… . 24
5.2.1. Navigation block …………………………………………..… … 28
5.2.2. Private file …………………………………................................ 28
5.2.3. Online User ……………….…………………….………………. 29
5.2.4.Calendar …………………………………………………………… 30
5.2.5.Upcomping Event …………... ………...………………………… 30
5.2.6. Course overview ………………………..……………………….. 31
6. Add Activity or resources:
6.1. Resources …………………………………………………………….. 32
6.1.1. File ………………………………..…………………………… 33
6.1.4. URL ………………………..…………………………………... 38
6.1.2. Folder ……………..…………….……………………………….. 41
6.2. Activites ……………………………………………………..……… 46
6.2.1. Assgment ...…………….……………………………………….. 46
6.2.2. Quiz …………………………….…………………………...…. 60

PUA(LMS) Stuff Guide
Page | 2 Prepared by : Eng.sheren A.sherif
Introduction
This document is quick start guides for instractor , It offers a selection of the most
important features and tools.
PUA (LMS) is online learning mangment system and mobile application , enabling
educators to create their own private website filled with dynamic courses that extend learning,
any time, anywhere. replace with old PUA web sit for upload lecture and Allows interaction
and discussion between the lecturer and students, The heart of PUA(LMS) is courses that
contain activities and resources. The main power of this Activity based model comes in
combining the activities into sequences and groups, which can help you guide participants
through learning paths.it improved Assignment features, easily create and manage Quiz.
PUA(LMS) Stuff Guide
Page | 3 Prepared by : Eng.sheren A.sherif
PUA(LMS) URL
elearning.pua.edu.eg

PUA(LMS) Stuff Guide
Page | 4 Prepared by : Eng.sheren A.sherif
PUA(LMS) Mobile Application
How to Download PUA(LMS)Application fom Mobile ?
1. Open "Playstore OR App store" then Search “ Moodle mobile” , Select orange icon
2. Install “moodle mobile” and install application .
3. Write (URL) for LMS then click connect click “Connect “.
4. Insert your username and password then click login
Step (1) Step (2)
Step (4) Step (3)
Select Moodle
mobile
Click on
Install
Write (URL) for LMS
then click connect
click Connect Insert your username and
password then click
login
PUA(LMS) Stuff Guide
Page | 5 Prepared by : Eng.sheren A.sherif
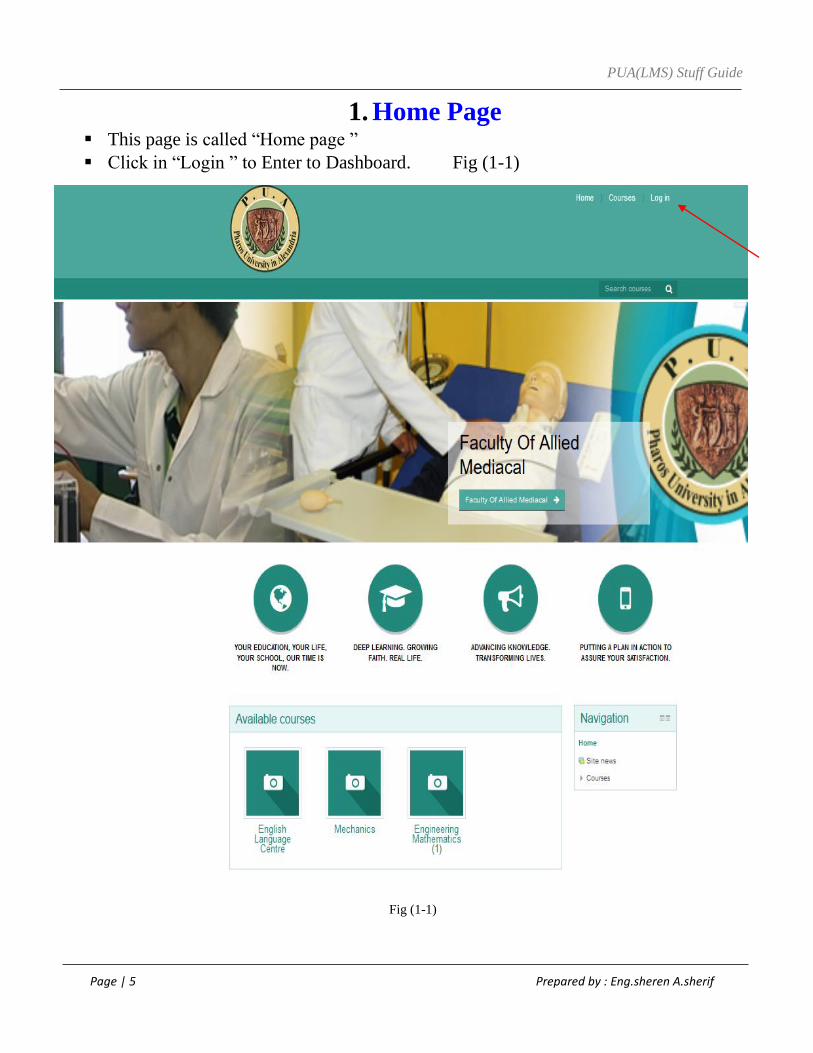
1. Home Page This page is called “Home page ”
Click in “Login ” to Enter to Dashboard. Fig (1-1)
Fig (1-1)

PUA(LMS) Stuff Guide
Page | 6 Prepared by : Eng.sheren A.sherif
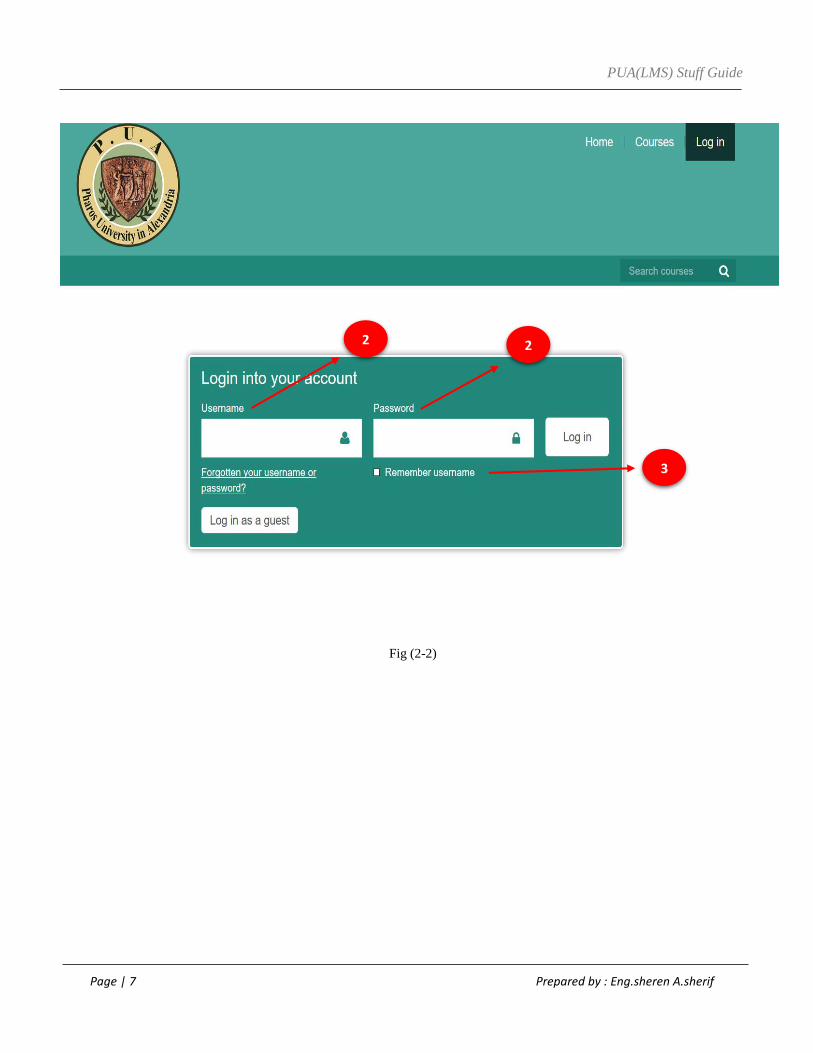
2. Login Page:
How to Login into your dashboard
1. Click on login button ,login page will appear . shown in Fig (2.1)
2. Enter your username and password . shown in Fig (2.2)
3. If you need to save password Put tick in check box shown in Fig (2.2)
Fig (2-1)
1
PUA(LMS) Stuff Guide
Page | 7 Prepared by : Eng.sheren A.sherif
Fig (2-2)
2 2
3

PUA(LMS) Stuff Guide
Page | 8 Prepared by : Eng.sheren A.sherif
3.Rest password
Change Password Page will Appear :
1. You should Put your current password.
2. Then enter new password
3. At last confirm new password
4. Finally click “save change”
All 4 steps shown in Fig (3.1)
Fig (3-1)
1
2
3
4
PUA(LMS) Stuff Guide
Page | 9 Prepared by : Eng.sheren A.sherif
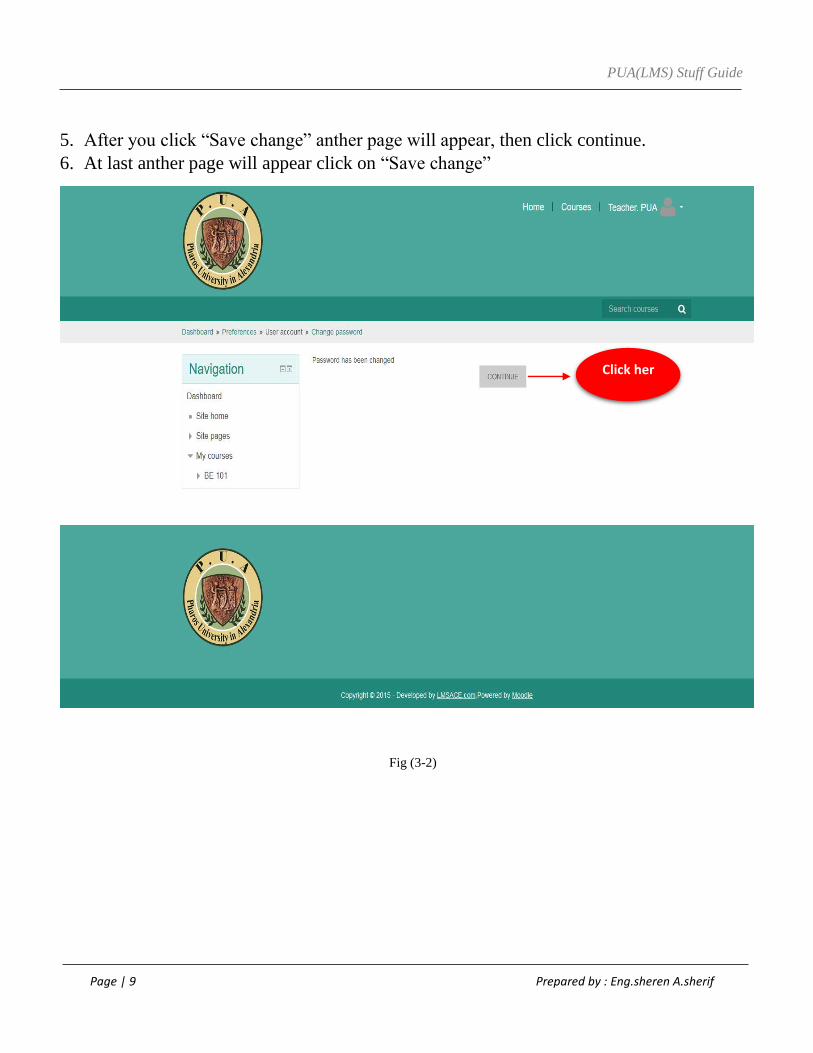
5. After you click “Save change” anther page will appear, then click continue.
6. At last anther page will appear click on “Save change”
Fig (3-2)
Click her
PUA(LMS) Stuff Guide
Page | 10 Prepared by : Eng.sheren A.sherif
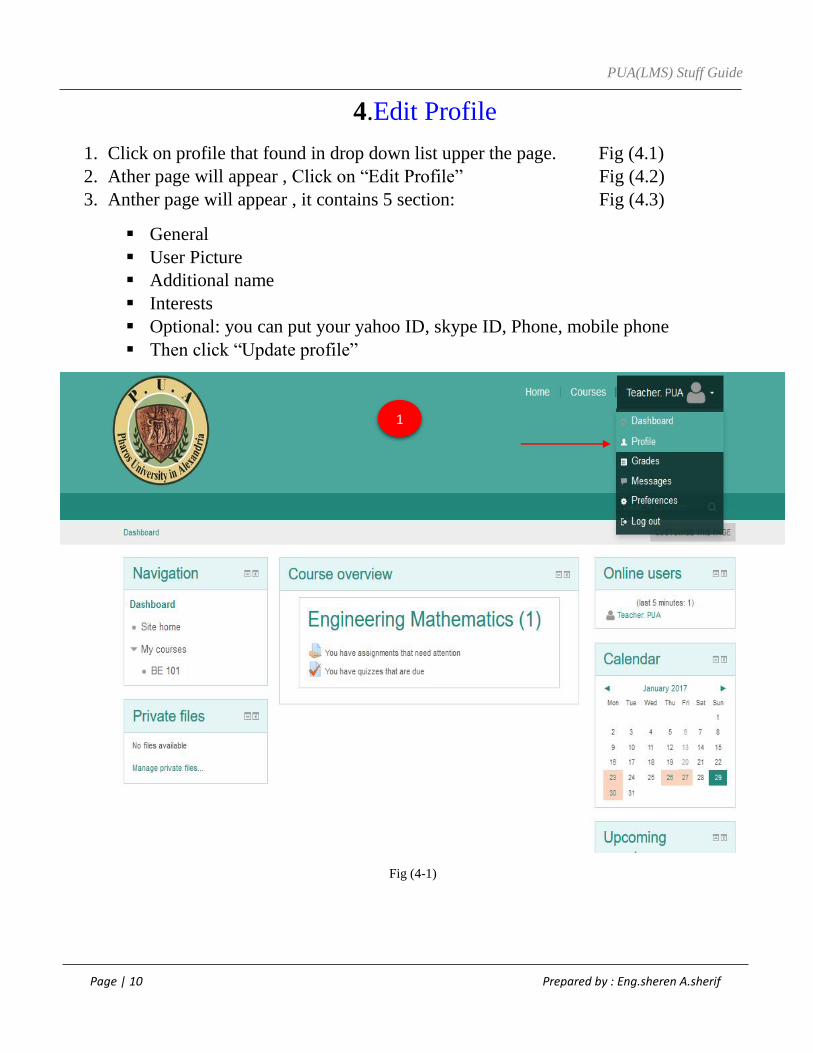
4.Edit Profile
1. Click on profile that found in drop down list upper the page. Fig (4.1)
2. Ather page will appear , Click on “Edit Profile” Fig (4.2)
3. Anther page will appear , it contains 5 section: Fig (4.3)
General
User Picture
Additional name
Interests
Optional: you can put your yahoo ID, skype ID, Phone, mobile phone
Then click “Update profile”
Fig (4-1)
1

PUA(LMS) Stuff Guide
Page | 11 Prepared by : Eng.sheren A.sherif
Click on Edit profile
Fig (4-2)
2

PUA(LMS) Stuff Guide
Page | 12 Prepared by : Eng.sheren A.sherif
This page will appear after click on “Edit profile”
Fig (4-3)
PUA(LMS) Stuff Guide
Page | 13 Prepared by : Eng.sheren A.sherif
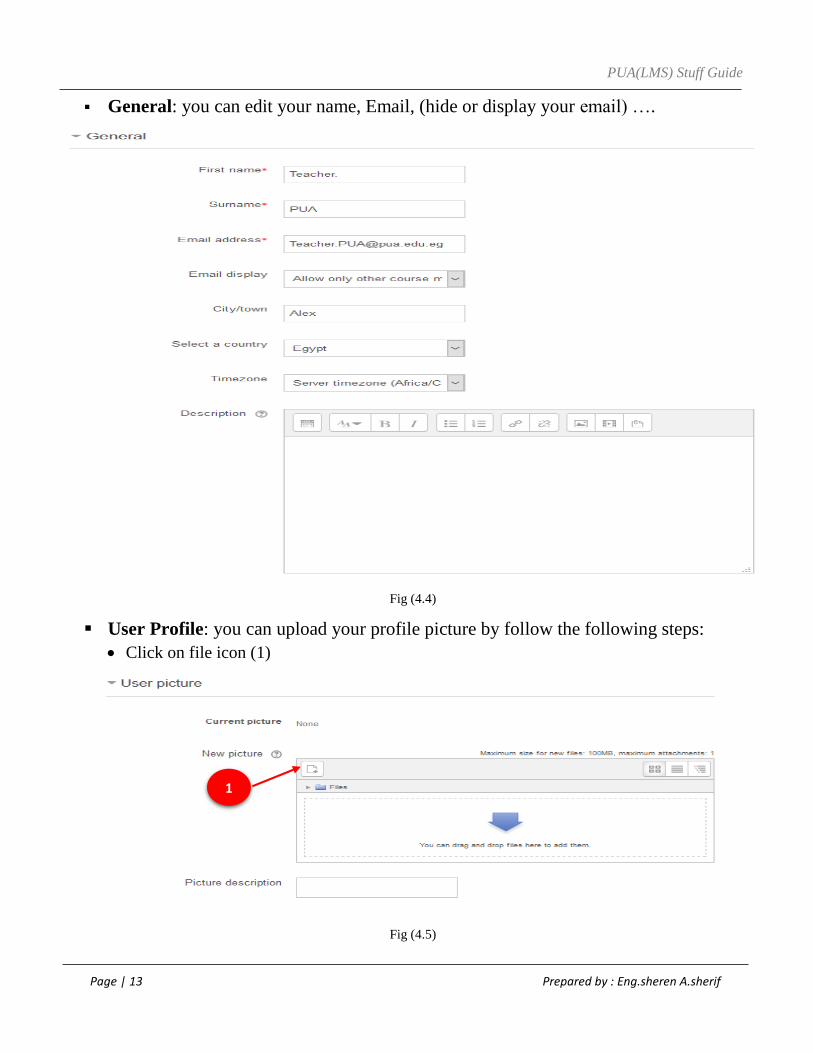
General: you can edit your name, Email, (hide or display your email) ….
Fig (4.4)
User Profile: you can upload your profile picture by follow the following steps:
Click on file icon (1)
Fig (4.5)
1

PUA(LMS) Stuff Guide
Page | 14 Prepared by : Eng.sheren A.sherif
New Pop up will appear called “File Picker” as shown in Fig (4.6)
To upload photo from PC, click on “upload a file” --- (2)
Then click on “Browser” --- (3)
Fig (4.6)
The following window will appear, select photo from you PC then click “Open” -- (4)
2
3
4
PUA(LMS) Stuff Guide
Page | 15 Prepared by : Eng.sheren A.sherif
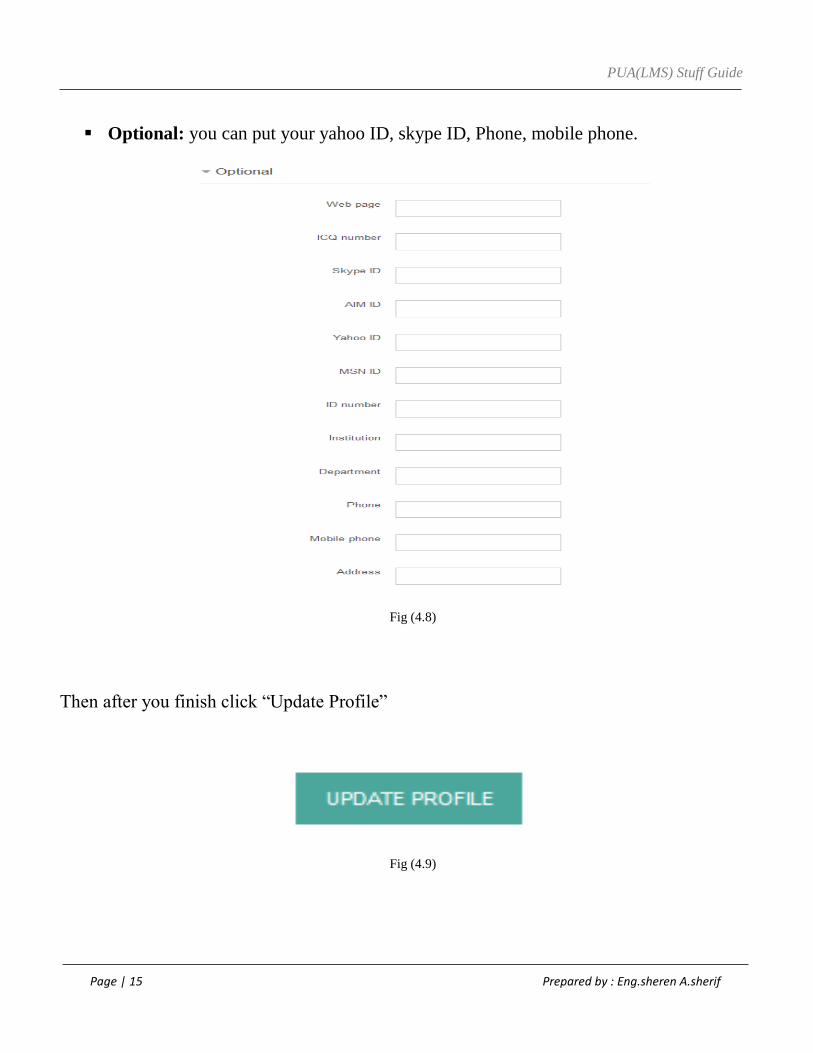
Optional: you can put your yahoo ID, skype ID, Phone, mobile phone.
Fig (4.8)
Then after you finish click “Update Profile”
Fig (4.9)
PUA(LMS) Stuff Guide
Page | 16 Prepared by : Eng.sheren A.sherif
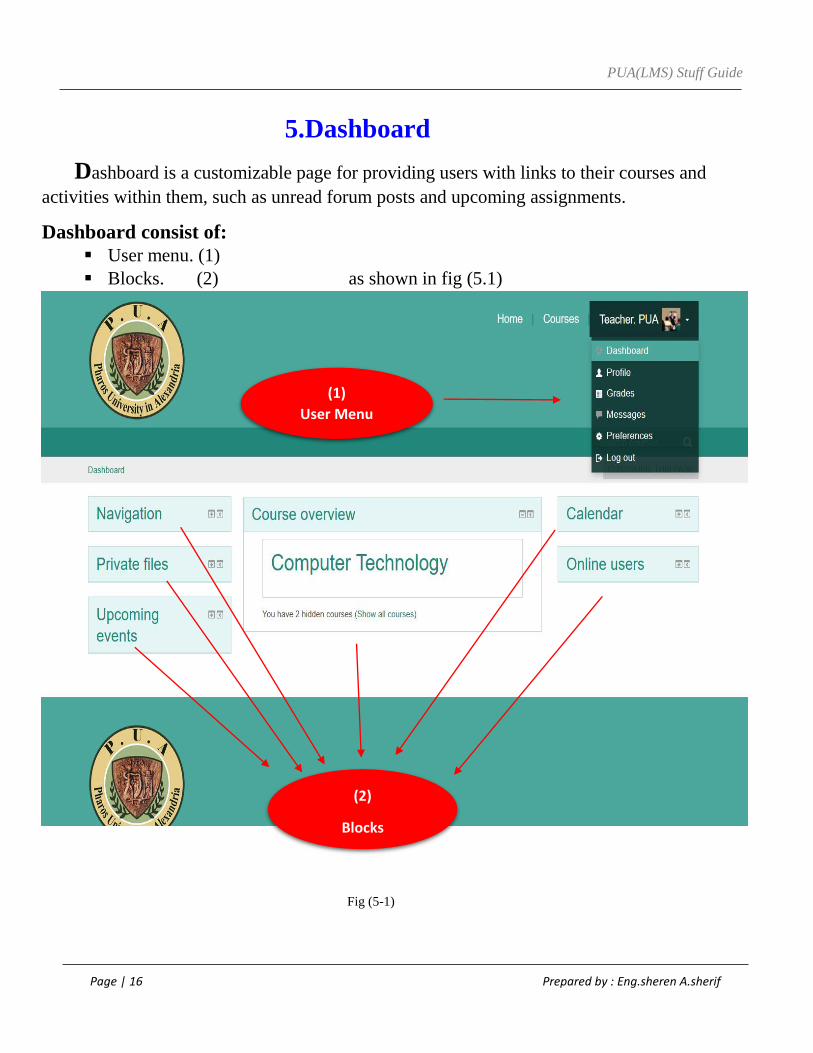
5.Dashboard
Dashboard is a customizable page for providing users with links to their courses and
activities within them, such as unread forum posts and upcoming assignments.
Dashboard consist of:
User menu. (1)
Blocks. (2) as shown in fig (5.1)
Fig (5-1)
(1)
User Menu
(2)
Blocks

PUA(LMS) Stuff Guide
Page | 17 Prepared by : Eng.sheren A.sherif
5.1.User Dropdown Menu
When User open Dropdown menu , He will found five section
5.1.1 Profile
5.1.2 Grades.
5.1.3 Messages.
5.1.4 Preferences.
5.1.5 Log Out .
fig (5.1.1)

PUA(LMS) Stuff Guide
Page | 18 Prepared by : Eng.sheren A.sherif
5.1.1 Profile :
This section (Edite profile) is explain before.
PUA(LMS) Stuff Guide
Page | 19 Prepared by : Eng.sheren A.sherif
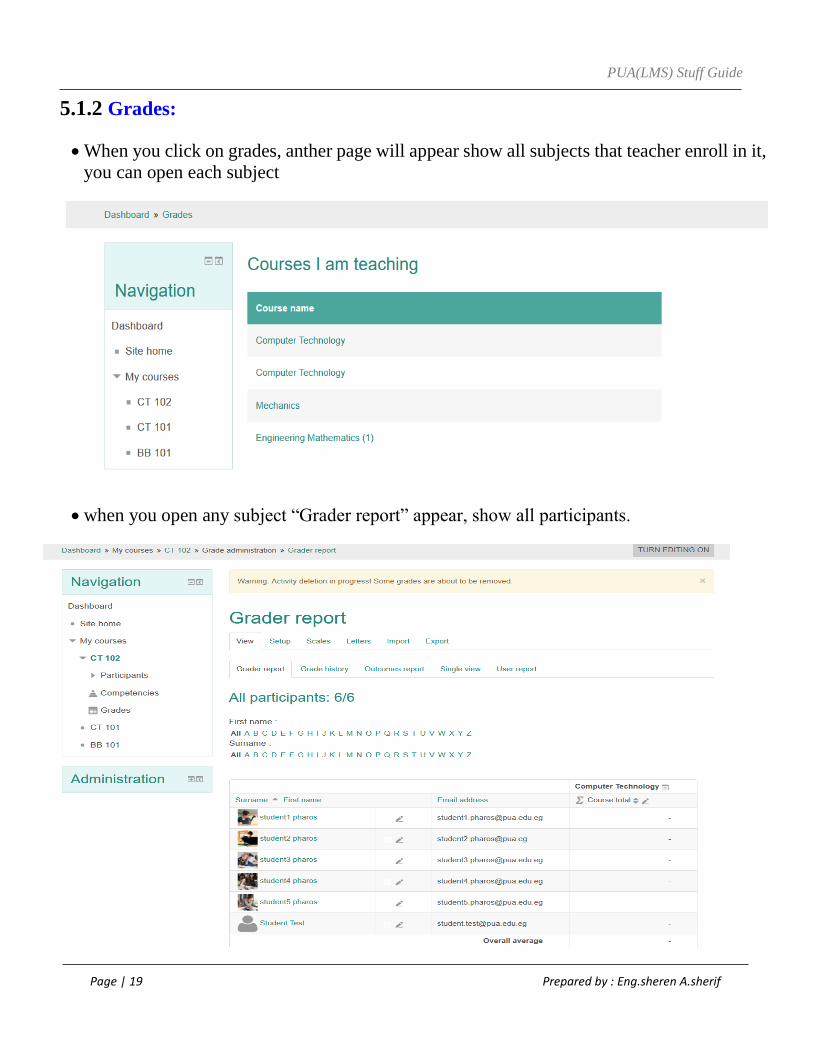
5.1.2 Grades:
When you click on grades, anther page will appear show all subjects that teacher enroll in it,
you can open each subject
when you open any subject “Grader report” appear, show all participants.

PUA(LMS) Stuff Guide
Page | 20 Prepared by : Eng.sheren A.sherif
5.2.3.Message:
When you click on ‘message “anther page will appear show all message from all user in
different subjects.

PUA(LMS) Stuff Guide
Page | 21 Prepared by : Eng.sheren A.sherif
5.1.4.Preferences
The Preferences page gives users quick access to various settings they might wish to
edit. It can be accessed directly from the user menu top right. What is displayed on the
Preferences page may vary according to the permissions of each individual.
You can edit you profile from “Edit profile”
You can change password from “Change Password”
You can control in time display format (24hr ,12hr) and start day in week from
Calendar preferences
You can Prevent non-contacts from messaging me.

PUA(LMS) Stuff Guide
Page | 22 Prepared by : Eng.sheren A.sherif
5.2.Blocks:
Blocks are items which may be added to the left or right or Centre column of any page in
PUA(LMS).
There are two type of blocks:
fixed blocks (can’t remove from dashboard), In PUA(LMS) there are one fixed bocks is
“Navigation block”.
Add / remove blocks.
You can add bocks from “Add blocks” from add block
You can remove blocks by click on icon that found in each blocks then delete
Block.
Fig (5-2)
PUA(LMS) Stuff Guide
Page | 23 Prepared by : Eng.sheren A.sherif
Personal Dashboard contain six blocks (by default):
1. Navigation blocks contain:
Dashboard.
Sit home: when you click it you will return to home page
My courses: contain courses
2. Private files.
3. Online users
4. Calendar
5. Upcoming events
6. Course overview
You can add or remove blocks from dashboard

PUA(LMS) Stuff Guide
Page | 24 Prepared by : Eng.sheren A.sherif
Customise Dashboard
Each block has 2 icons :
First icon for hide block
Second icon for Duck block
When Click on icon (1) :
When Click on icon (2) :
1 2
Navigation block is hide to
expand it click on it again
Navigation block is Duck
PUA(LMS) Stuff Guide
Page | 25 Prepared by : Eng.sheren A.sherif
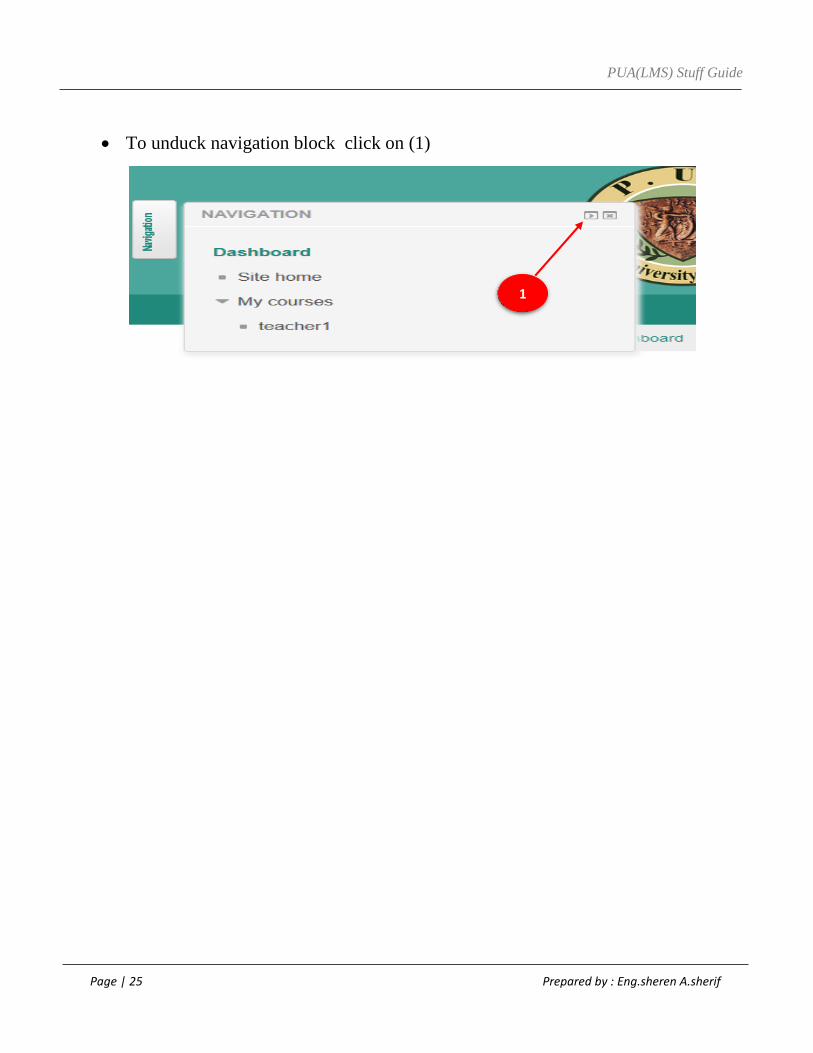
To unduck navigation block click on (1)
1

PUA(LMS) Stuff Guide
Page | 26 Prepared by : Eng.sheren A.sherif
How to Add or Delete any block
1- Click on Customise this page button (1)
2- Anther two Buttons will appear :
Resst page to default Return page to defult. (Button 2)
Stop Customing this page click when you finished (Button3)
3- When click on button (1) two icons will appear in each block Icon (1) , Icon(2)
Button (1)
Button (2) Button (3)
Icon (1) Icon (2)

PUA(LMS) Stuff Guide
Page | 27 Prepared by : Eng.sheren A.sherif
Icon (1) : Drage and Drop Blocks .
Icon (2) :When openthis icon you will find three options :
Configure block :when open it you can control block postision in dashbord
Hide block : to hide certain block from dashbord
Delete block : to delete certain block from dashbord , you can add it again in dashbord
from “Add block”
Note : Only navigation and administration blocks are fixed block we cant delete from
dashbord
To Add any block :
After you click on “Customise this page” Add block will Appear in dashbord then select any
bock you need from drop down list

PUA(LMS) Stuff Guide
Page | 28 Prepared by : Eng.sheren A.sherif
5.2.1. Navigation Block:
The Navigation block is fixed block. It contains an expanding tree menu which
includes My Home (Dashboard), Site home that return you to home page, My Courses
This expands to show courses the user is enrolled in.
5.2.2. Private files:
The private files block enables access to a user's private files area.
How to upload files in private files?
Click on Manage private files this page will appear

PUA(LMS) Stuff Guide
Page | 29 Prepared by : Eng.sheren A.sherif
Then click in icon (1)
Then upload file from
5.2.3. Online users:
The Online users block shows a list of users who have been logged into the current
course.
1
PUA(LMS) Stuff Guide
Page | 30 Prepared by : Eng.sheren A.sherif
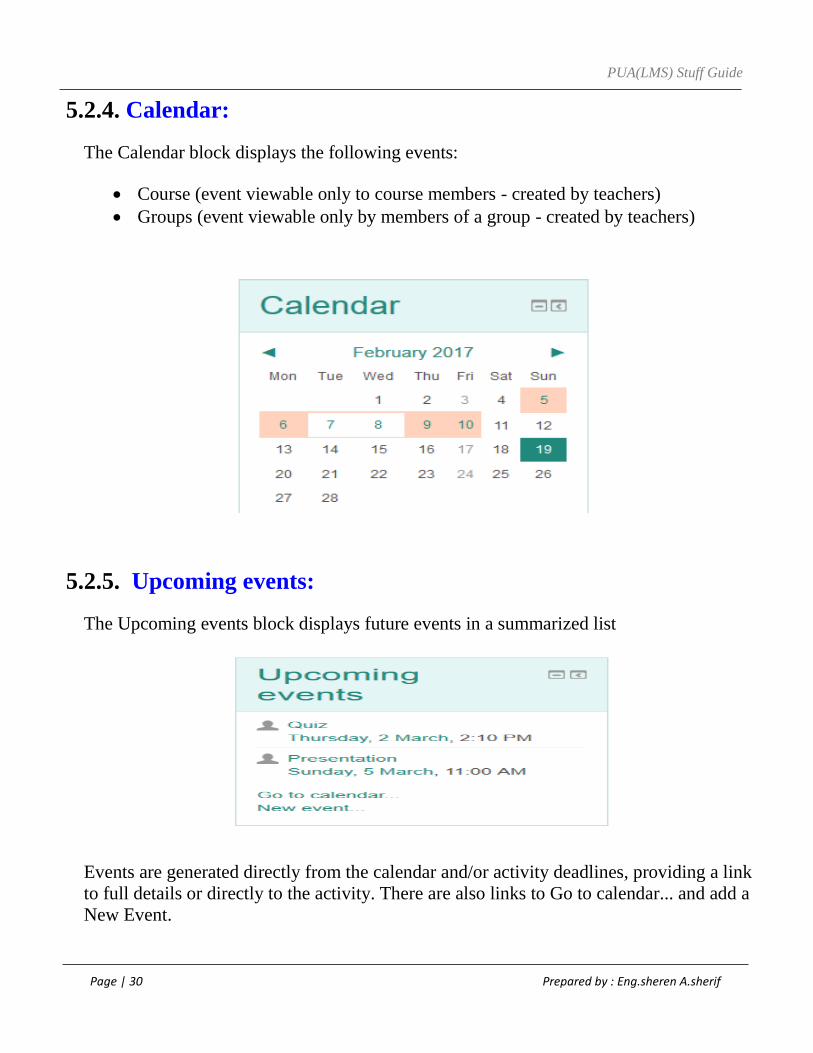
5.2.4. Calendar:
The Calendar block displays the following events:
Course (event viewable only to course members - created by teachers)
Groups (event viewable only by members of a group - created by teachers)
5.2.5. Upcoming events:
The Upcoming events block displays future events in a summarized list
Events are generated directly from the calendar and/or activity deadlines, providing a link
to full details or directly to the activity. There are also links to Go to calendar... and add a
New Event.
PUA(LMS) Stuff Guide
Page | 31 Prepared by : Eng.sheren A.sherif
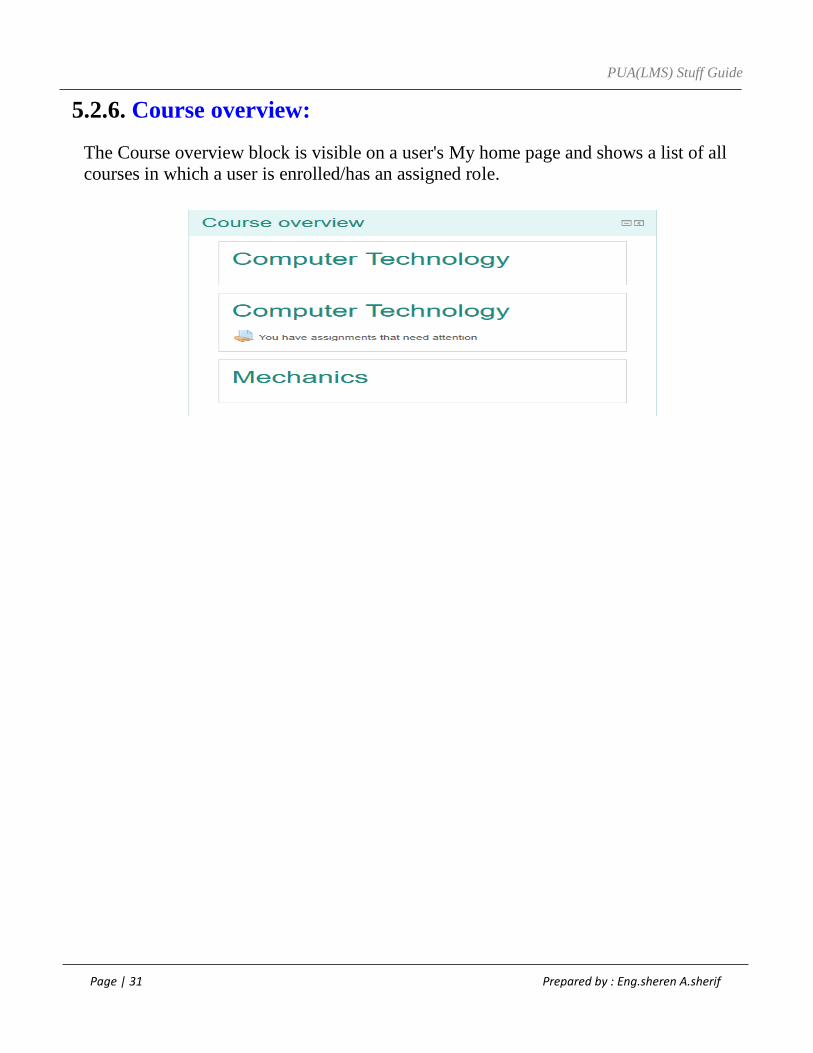
5.2.6. Course overview:
The Course overview block is visible on a user's My home page and shows a list of all
courses in which a user is enrolled/has an assigned role.

PUA(LMS) Stuff Guide
Page | 32 Prepared by : Eng.sheren A.sherif
6. Add Activity or resources:
PUA(LMS) supports a range of different resource types that allow you to insert almost
any kind of web content into your courses. You can also add a wide range of activities.
6.1. Resources:
A resource is an item that a teacher can use to support learning, such as a file or link.
PUA(LMS) supports a range of resource types which teachers can add to their courses.

PUA(LMS) Stuff Guide
Page | 33 Prepared by : Eng.sheren A.sherif
6.1.1. Adding files to your course:
One of the ways to share a file with your students on PUA(LMS) is to add it to your
course page as a Resource. File types you can add to Moodle include PDF, Word and other
text documents, PowerPoint presentations, spreadsheets, zip files, and media such as image,
video, and audio files.
Step 1:
On your main course page, click Turn editing on (top right).
Step 2:
Locate the Topic or Weekly Section where you will add the file.
Step 3:
At the bottom right of the section, click + Add an activity or resource. The Activity chooser will open.

PUA(LMS) Stuff Guide
Page | 34 Prepared by : Eng.sheren A.sherif
Step 4:
In the Activity chooser, scroll down to the Resources heading and select File. Then
click Add. The Adding a new file page will open.
Step 5:
On the Adding a new File page, enter a title for your file in the Name field
(required). The name you enter will display as a link to the file on your main course
page.

PUA(LMS) Stuff Guide
Page | 35 Prepared by : Eng.sheren A.sherif
Step 6:
Under the Content heading, in the Select files area, click the Add ... ( ) icon or the Blue
Arrow. The File picker will open.
Enter a title
for your file

PUA(LMS) Stuff Guide
Page | 36 Prepared by : Eng.sheren A.sherif
Step 7:
To search for a file on your computer, select Upload a file (at left), then click Browse or
Choose File (depending on your browser). Double-click to select the file to upload. You will
be returned to the File picker window.
After you click her file
picker will appear
1
2
PUA(LMS) Stuff Guide
Page | 37 Prepared by : Eng.sheren A.sherif
Step 8:
In the File picker window, leave the Save as field blank and click Upload this file. You
will be returned to the Adding a new file page.
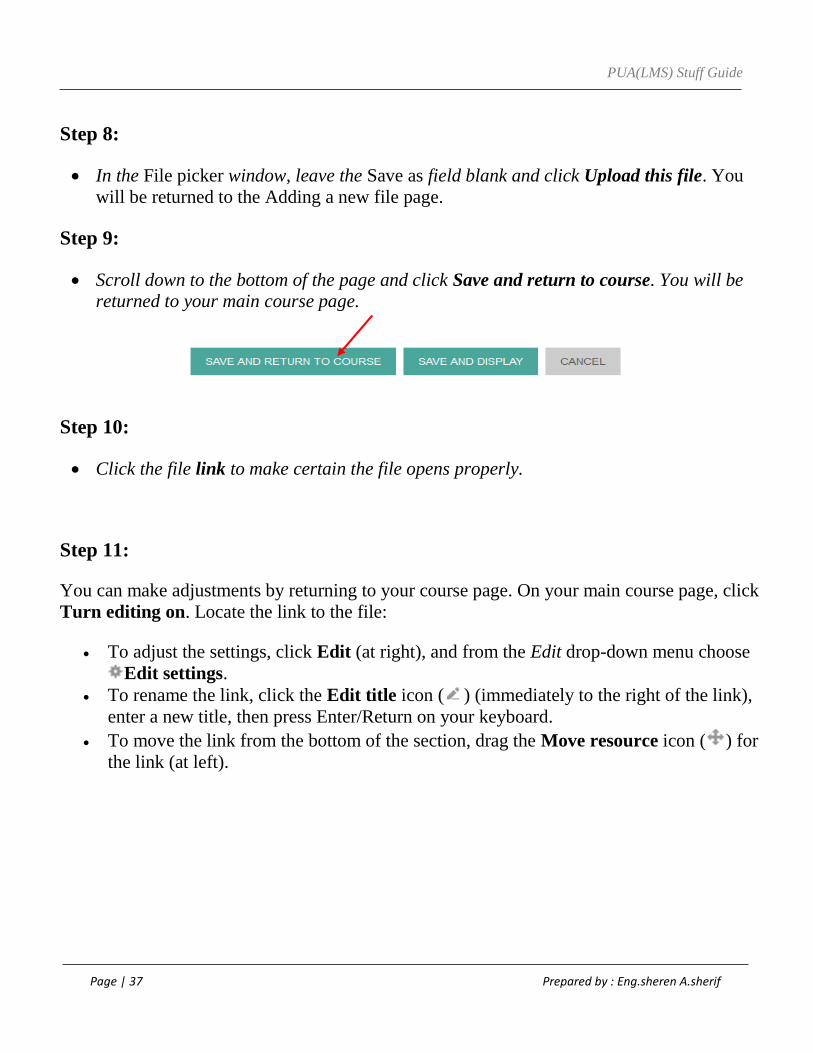
Step 9:
Scroll down to the bottom of the page and click Save and return to course. You will be returned to your main course page.
Step 10:
Click the file link to make certain the file opens properly.
Step 11:
You can make adjustments by returning to your course page. On your main course page, click
Turn editing on. Locate the link to the file:
To adjust the settings, click Edit (at right), and from the Edit drop-down menu choose
Edit settings.
To rename the link, click the Edit title icon ( ) (immediately to the right of the link),
enter a new title, then press Enter/Return on your keyboard.
To move the link from the bottom of the section, drag the Move resource icon ( ) for
the link (at left).
PUA(LMS) Stuff Guide
Page | 38 Prepared by : Eng.sheren A.sherif
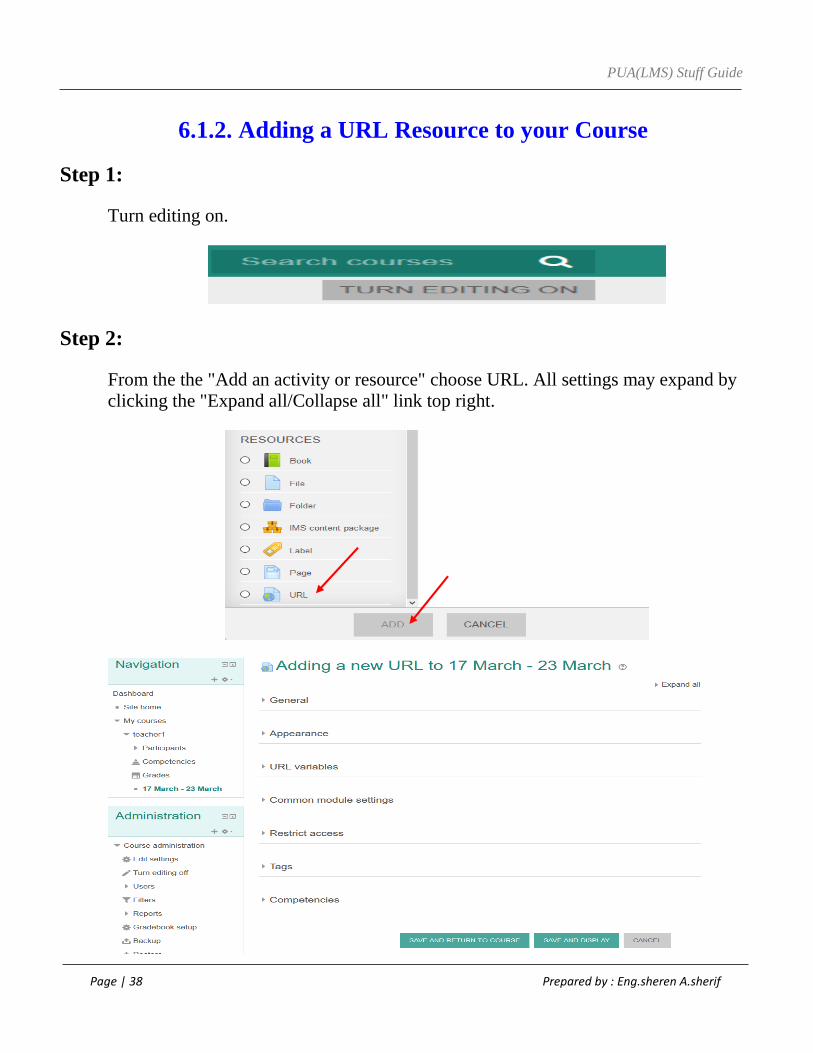
6.1.2. Adding a URL Resource to your Course
Step 1:
Turn editing on.
Step 2:
From the the "Add an activity or resource" choose URL. All settings may expand by
clicking the "Expand all/Collapse all" link top right.

PUA(LMS) Stuff Guide
Page | 39 Prepared by : Eng.sheren A.sherif
Step 3:
General
Give your URL a name and type (or copy/paste) the URL into the External URL box. If
you need to search for the correct URL, click the Choose a link button. When you find
and select your link, it will be automatically pasted into the box.
Give the URL a description if you wish, and tick the box to display that description on
the course page if needed.
Step 4: Appearance
Automatic - Make the best guess at what should happen (probably what is wanted 99%
of the time).
URL Name
URL Search
URL Description
Tick the Box to display
the descrition
PUA(LMS) Stuff Guide
Page | 40 Prepared by : Eng.sheren A.sherif
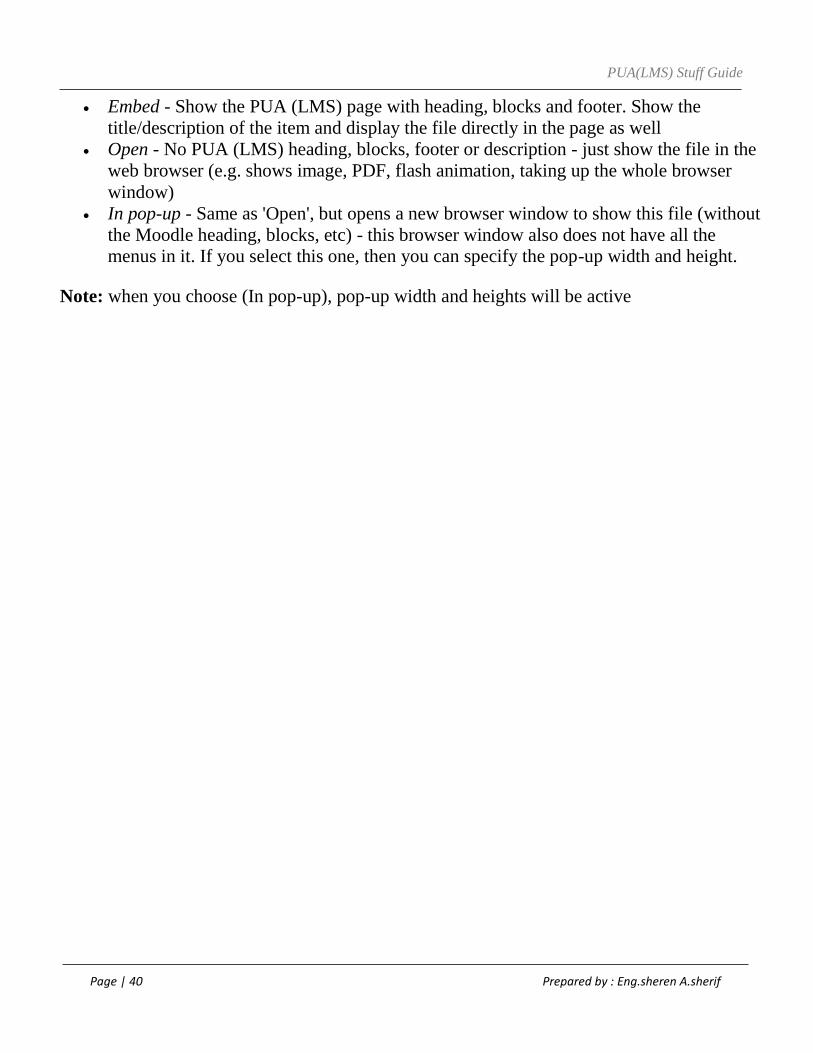
Embed - Show the PUA (LMS) page with heading, blocks and footer. Show the
title/description of the item and display the file directly in the page as well
Open - No PUA (LMS) heading, blocks, footer or description - just show the file in the
web browser (e.g. shows image, PDF, flash animation, taking up the whole browser
window)
In pop-up - Same as 'Open', but opens a new browser window to show this file (without
the Moodle heading, blocks, etc) - this browser window also does not have all the
menus in it. If you select this one, then you can specify the pop-up width and height.
Note: when you choose (In pop-up), pop-up width and heights will be active
PUA(LMS) Stuff Guide
Page | 41 Prepared by : Eng.sheren A.sherif
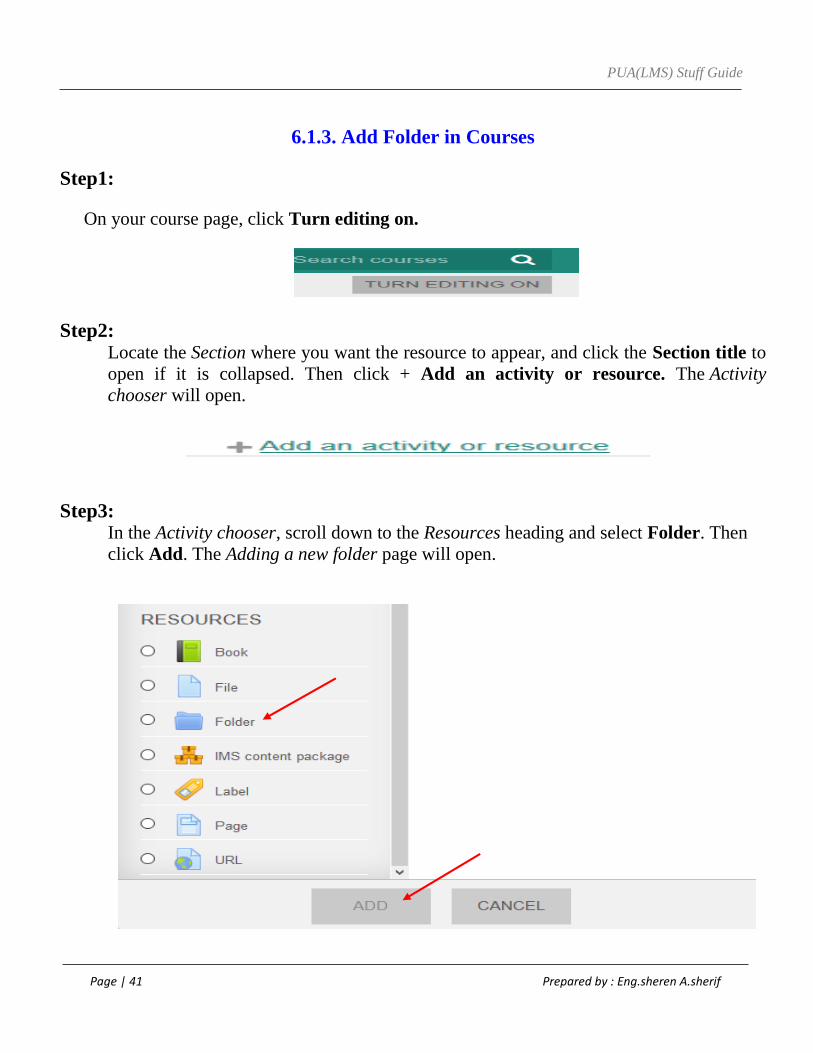
6.1.3. Add Folder in Courses
Step1:
On your course page, click Turn editing on.
Step2: Locate the Section where you want the resource to appear, and click the Section title to
open if it is collapsed. Then click + Add an activity or resource. The Activity
chooser will open.
Step3: In the Activity chooser, scroll down to the Resources heading and select Folder. Then
click Add. The Adding a new folder page will open.
PUA(LMS) Stuff Guide
Page | 42 Prepared by : Eng.sheren A.sherif
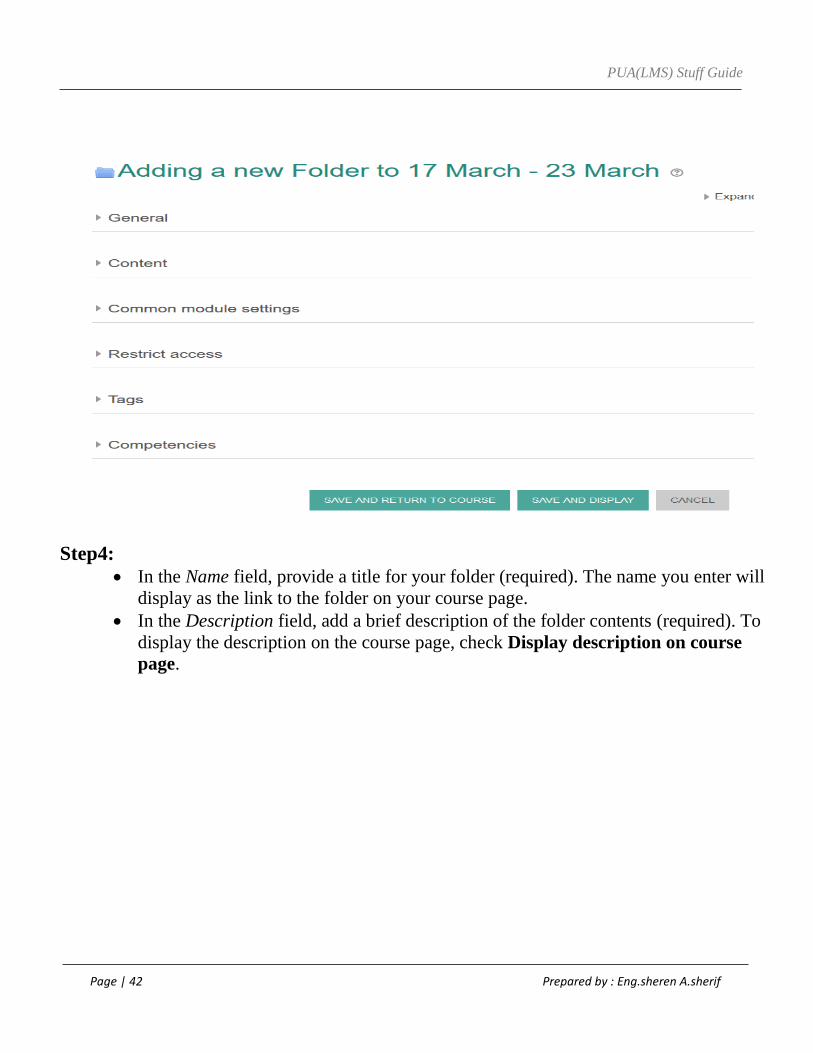
Step4:
In the Name field, provide a title for your folder (required). The name you enter will
display as the link to the folder on your course page.
In the Description field, add a brief description of the folder contents (required). To
display the description on the course page, check Display description on course
page.

PUA(LMS) Stuff Guide
Page | 43 Prepared by : Eng.sheren A.sherif
Step5: Add files under the Content heading. The easiest way to add files is using drag-and-
drop:
Arrange your computer's windows so that you can view both the Files area in
PUA(LMS) and the files on your computer.
Drag files from your computer onto the large blue arrow in the PUA(LMS) Files area.
Note: To upload multiple files at once, hold down the CTRL key on your keyboard
(Windows), or the COMMAND key (MAC) as you click each of the files you wish
to upload. Then drag the files into the Files area in Moodle.
Add a Brief
Description of the
folder contents
Tick the Box to display
the descrition
Drage and Drop
Here
Provide a title for f
your folder
PUA(LMS) Stuff Guide
Page | 44 Prepared by : Eng.sheren A.sherif
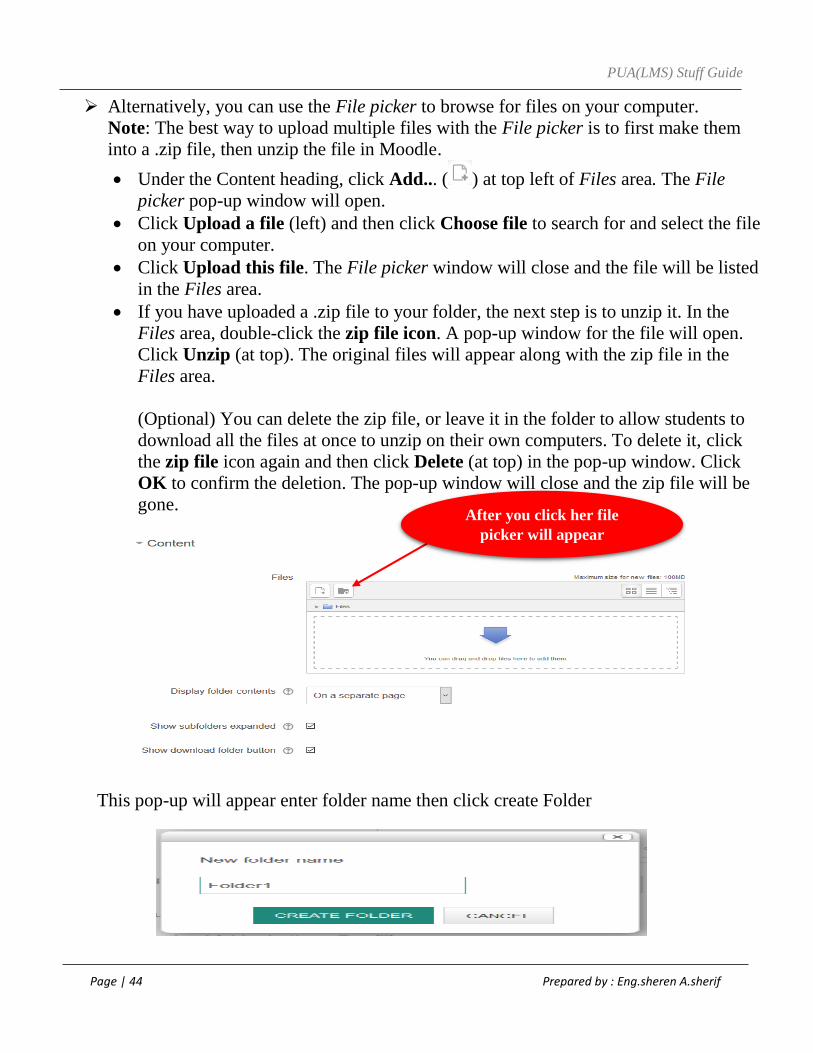
Alternatively, you can use the File picker to browse for files on your computer.
Note: The best way to upload multiple files with the File picker is to first make them
into a .zip file, then unzip the file in Moodle.
Under the Content heading, click Add... ( ) at top left of Files area. The File
picker pop-up window will open.
Click Upload a file (left) and then click Choose file to search for and select the file
on your computer.
Click Upload this file. The File picker window will close and the file will be listed
in the Files area.
If you have uploaded a .zip file to your folder, the next step is to unzip it. In the
Files area, double-click the zip file icon. A pop-up window for the file will open.
Click Unzip (at top). The original files will appear along with the zip file in the
Files area.
(Optional) You can delete the zip file, or leave it in the folder to allow students to
download all the files at once to unzip on their own computers. To delete it, click
the zip file icon again and then click Delete (at top) in the pop-up window. Click
OK to confirm the deletion. The pop-up window will close and the zip file will be
gone.
This pop-up will appear enter folder name then click create Folder
After you click her file
picker will appear
PUA(LMS) Stuff Guide
Page | 45 Prepared by : Eng.sheren A.sherif
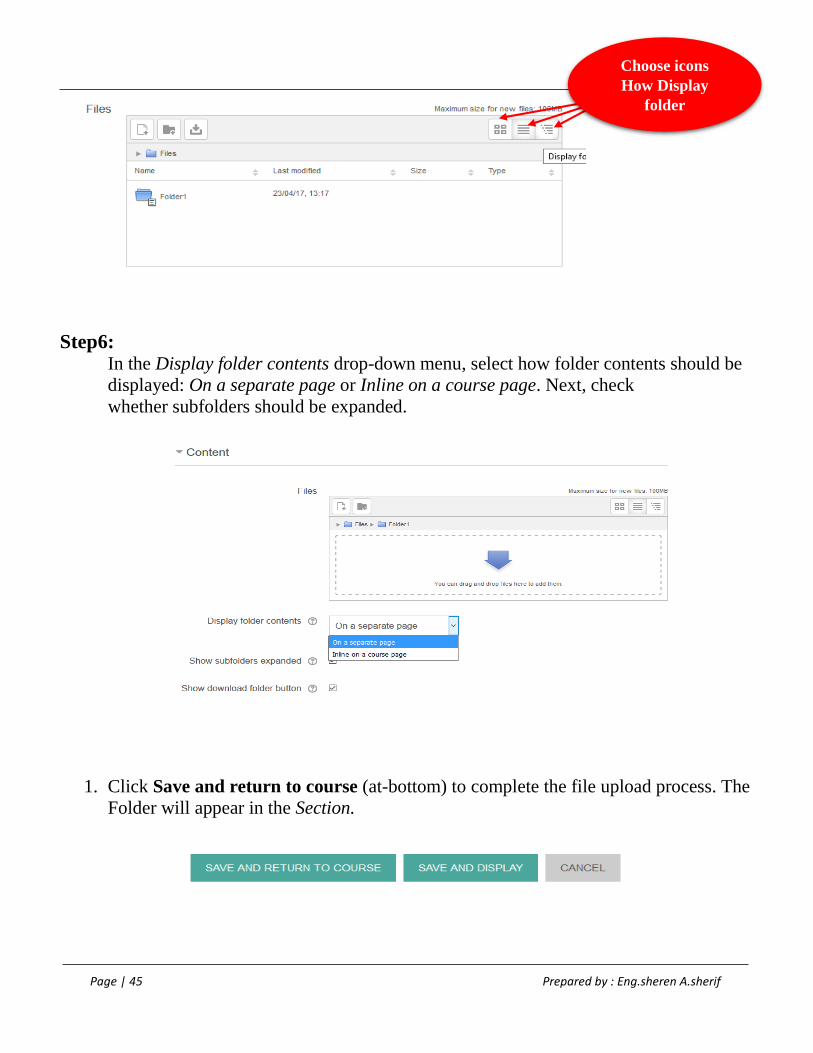
Step6: In the Display folder contents drop-down menu, select how folder contents should be
displayed: On a separate page or Inline on a course page. Next, check
whether subfolders should be expanded.
1. Click Save and return to course (at-bottom) to complete the file upload process. The
Folder will appear in the Section.
Choose icons
How Display
folder
PUA(LMS) Stuff Guide
Page | 46 Prepared by : Eng.sheren A.sherif
6.2. Activity:
6.2.1. Assignment:
The assignment activity provides a space into which students can submit work for teachers to grade and
give feedback on. This saves on paper and is more efficient than email. It can also be used to remind students
of 'real-world' assignments they need to complete offline, such as art work, and thus not require any digital
content.
(Submission) types: There are two type of submission:
Online text: Text typed into the Auto editor is automatically saved and the teacher can set a word limit which will
display a warning if students exceed it.
File submissions: Students can upload files of any type. The teacher can specify the maximum number of files which may
be uploaded and a maximum size for each file.
Note: Students may be able to add a note (comment) to their teacher when the submit their work.
PUA(LMS) Stuff Guide
Page | 47 Prepared by : Eng.sheren A.sherif
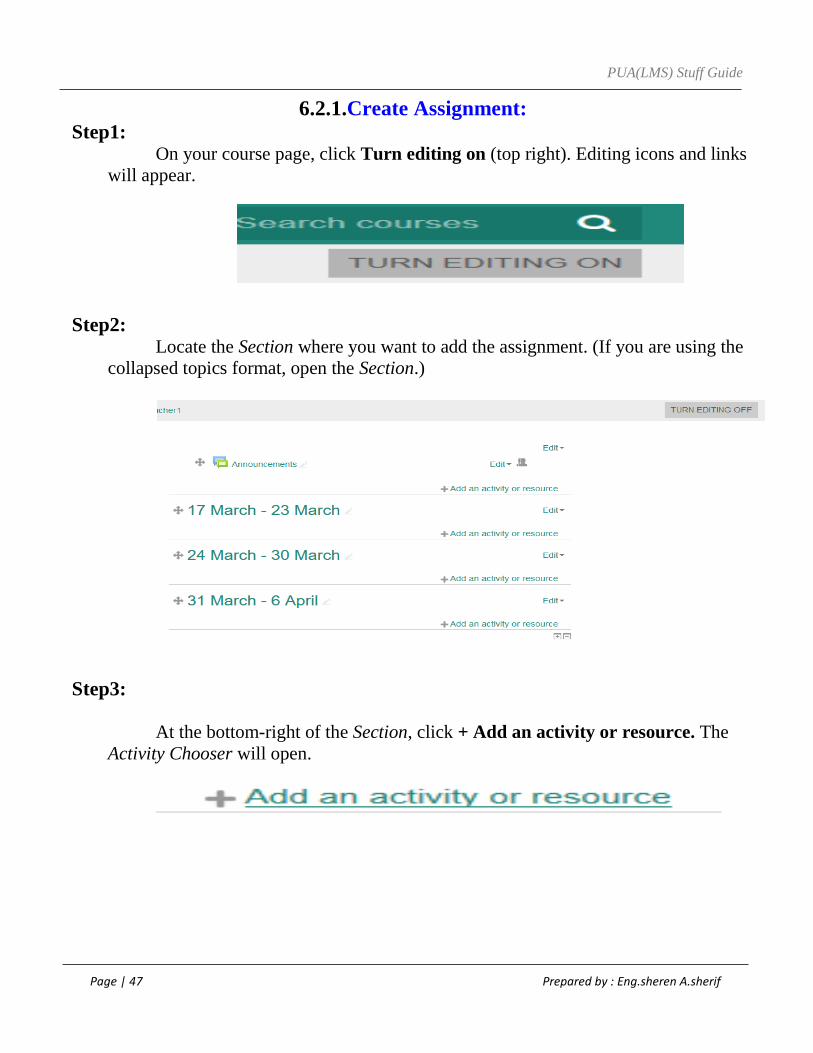
6.2.1.Create Assignment: Step1:
On your course page, click Turn editing on (top right). Editing icons and links
will appear.
Step2: Locate the Section where you want to add the assignment. (If you are using the
collapsed topics format, open the Section.)
Step3:
At the bottom-right of the Section, click + Add an activity or resource. The
Activity Chooser will open.

PUA(LMS) Stuff Guide
Page | 48 Prepared by : Eng.sheren A.sherif
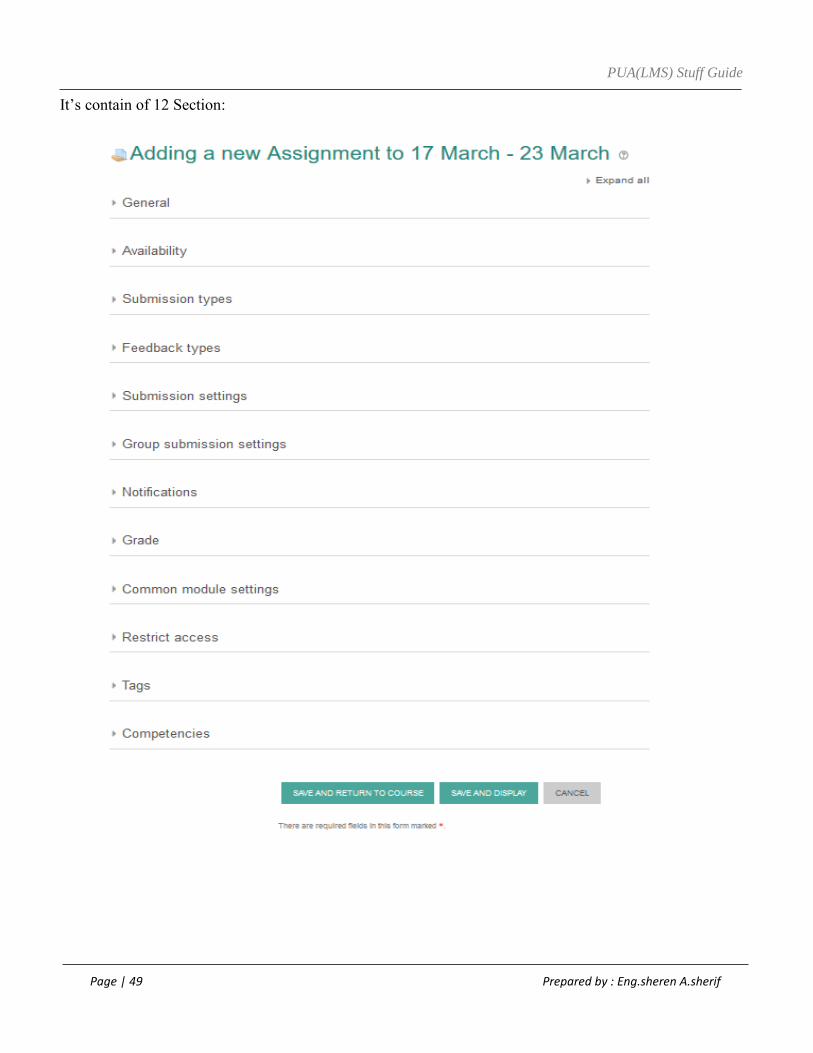
Step4:
In the Activity Chooser, select Assignment and click Add. The Adding a new
Assignment page will open.
PUA(LMS) Stuff Guide
Page | 49 Prepared by : Eng.sheren A.sherif
It’s contain of 12 Section:

PUA(LMS) Stuff Guide
Page | 50 Prepared by : Eng.sheren A.sherif
General
Assignment name (required)
This name displays as a link on your course page. Use something unique that clearly
identifies this assignment from other course activities. We also recommend keeping the
name short.
Description (optional)
Enter a summary of the assignment and instructions. You can also Display description
on course page. Select this option to display the description underneath the assignment
link on your course page. (This works best if the description is very concise).
Additional files Drag and drop files into the upload field to append the file to the assignment
Description.

PUA(LMS) Stuff Guide
Page | 51 Prepared by : Eng.sheren A.sherif
Availability
Select Enable checkboxes to set a date and time for:
Allow submissions from Determines when students can begin to submit to the assignment.
Due date Determines when the assignment will be due. The due date will show in the course
Calendar and within the Activities Block.
Cut-off date Determine when the assignment will no longer accept submissions.
PUA(LMS) Stuff Guide
Page | 52 Prepared by : Eng.sheren A.sherif
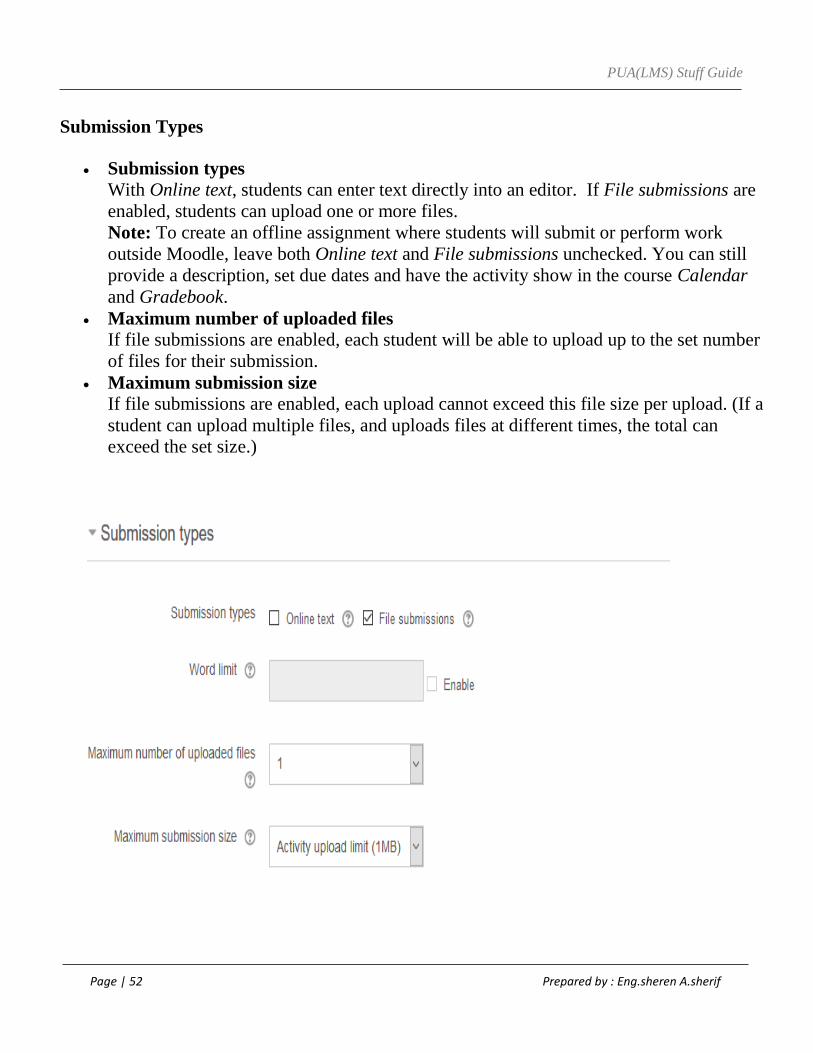
Submission Types
Submission types
With Online text, students can enter text directly into an editor. If File submissions are
enabled, students can upload one or more files.
Note: To create an offline assignment where students will submit or perform work
outside Moodle, leave both Online text and File submissions unchecked. You can still
provide a description, set due dates and have the activity show in the course Calendar
and Gradebook.
Maximum number of uploaded files If file submissions are enabled, each student will be able to upload up to the set number
of files for their submission.
Maximum submission size If file submissions are enabled, each upload cannot exceed this file size per upload. (If a
student can upload multiple files, and uploads files at different times, the total can
exceed the set size.)

PUA(LMS) Stuff Guide
Page | 53 Prepared by : Eng.sheren A.sherif
Feedback Types
Feedback comments
If enabled, graders can provide written feedback for each submission. These comments
are from the grader to the student.
Feedback files If enabled, graders can upload files containing feedback when marking assignments.
For example, you can upload marked up student submissions, documents with
comments, or spoken audio feedback.
Offline grading worksheet If enabled, graders can download a spreadsheet to enter grades without having to be
logged in to Moodle. This can be useful if you anticipate grading while disconnected
from the Internet. For more, see Offline Grading for Moodle Assignment Submissions.
Comment inline If enabled, the submission text will be copied into the feedback comment field during
grading, making it easier to comment inline or to edit the original text.
PUA(LMS) Stuff Guide
Page | 54 Prepared by : Eng.sheren A.sherif
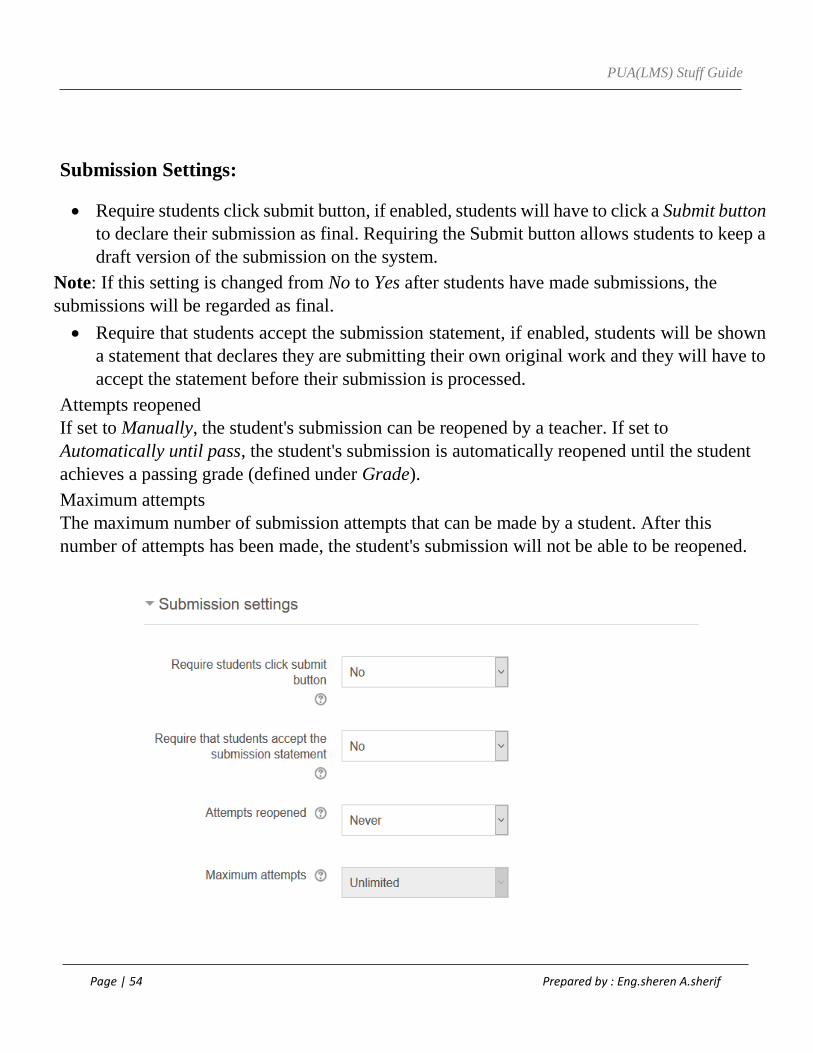
Submission Settings:
Require students click submit button, if enabled, students will have to click a Submit button
to declare their submission as final. Requiring the Submit button allows students to keep a
draft version of the submission on the system.
Note: If this setting is changed from No to Yes after students have made submissions, the
submissions will be regarded as final.
Require that students accept the submission statement, if enabled, students will be shown
a statement that declares they are submitting their own original work and they will have to
accept the statement before their submission is processed.
Attempts reopened
If set to Manually, the student's submission can be reopened by a teacher. If set to
Automatically until pass, the student's submission is automatically reopened until the student
achieves a passing grade (defined under Grade).
Maximum attempts
The maximum number of submission attempts that can be made by a student. After this
number of attempts has been made, the student's submission will not be able to be reopened.
PUA(LMS) Stuff Guide
Page | 55 Prepared by : Eng.sheren A.sherif
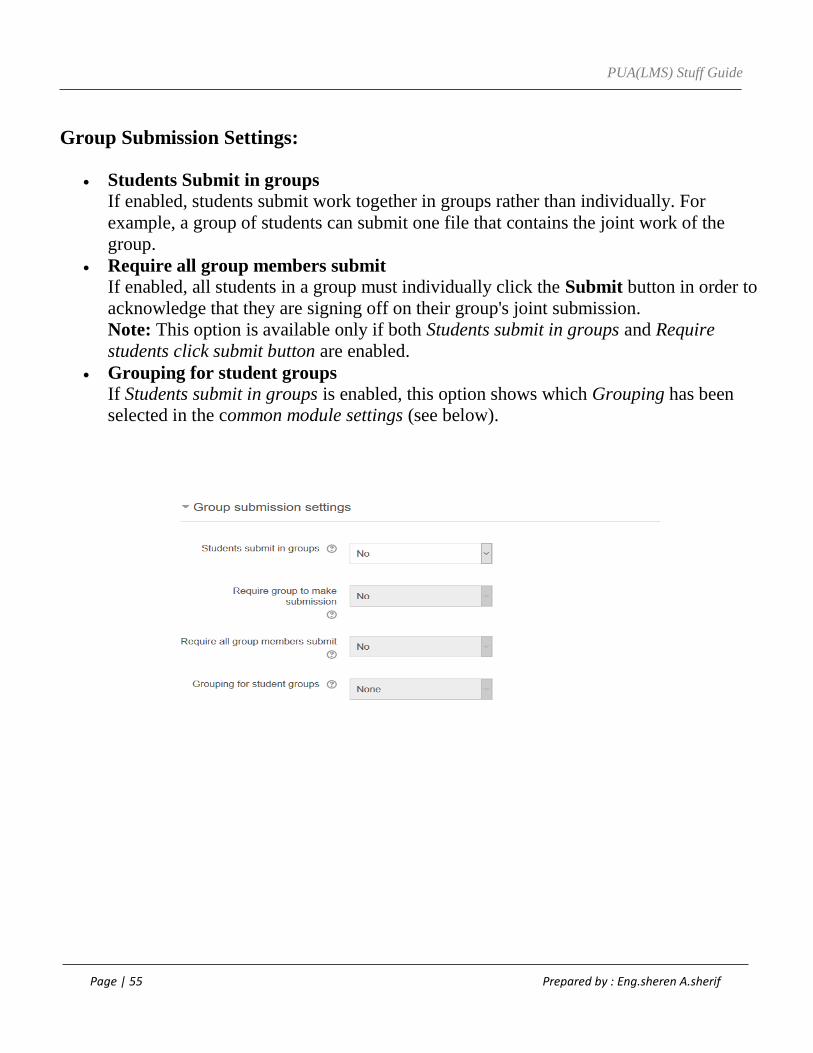
Group Submission Settings:
Students Submit in groups If enabled, students submit work together in groups rather than individually. For
example, a group of students can submit one file that contains the joint work of the
group.
Require all group members submit If enabled, all students in a group must individually click the Submit button in order to
acknowledge that they are signing off on their group's joint submission.
Note: This option is available only if both Students submit in groups and Require
students click submit button are enabled.
Grouping for student groups If Students submit in groups is enabled, this option shows which Grouping has been
selected in the common module settings (see below).

PUA(LMS) Stuff Guide
Page | 56 Prepared by : Eng.sheren A.sherif
Notifications
Notify graders about submissions
If enabled, instructors and TAs will receive an email alert whenever a student makes a
submission. (This may not be manageable in a class with a large number of students.)
Notify graders about late submissions If enabled, instructors and TAs will receive an email alert whenever a submission is
made after the due date.
Default setting for "Notify students" If enabled, the default setting for notifying students when grades are released will be set
in the assignment grading interface. This can be changed manually during grading. For
more information,
Note: Students always receive an email confirmation when a submission is successfully made.

PUA(LMS) Stuff Guide
Page | 57 Prepared by : Eng.sheren A.sherif
Grade:
Grade
Select the Grade Type:
None - The assignment will be ungraded and worth no points.
Point - Grade out of a simple number of maximum points. Enter the maximum possible
score for the assignment in the Maximum points field.
Common Module Settings
Visibility to students Set whether or not an assignment is visible to students. By default, new assignments are
set to Show. (This is comparable to using the Hide/show icon for the activity on your
course page.)
Group mode, Grouping These options let you restrict the assignment to particular groups of students you have
already created in Moodle. For more information,
PUA(LMS) Stuff Guide
Page | 58 Prepared by : Eng.sheren A.sherif
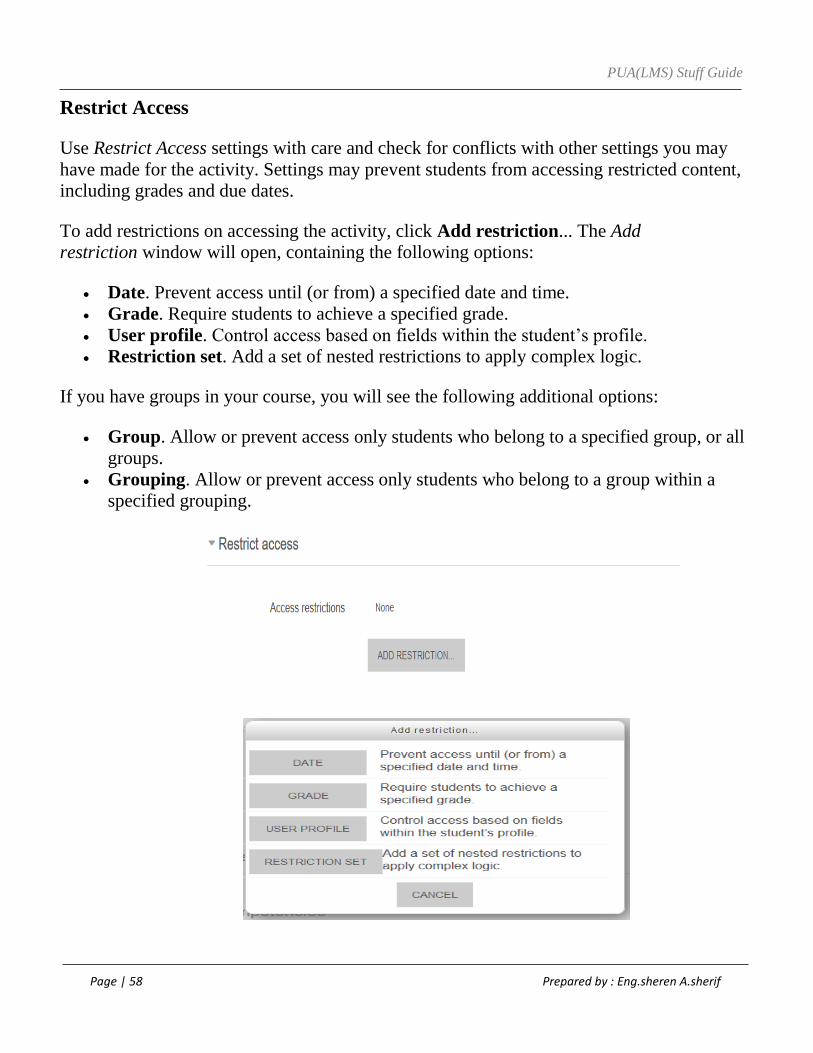
Restrict Access
Use Restrict Access settings with care and check for conflicts with other settings you may
have made for the activity. Settings may prevent students from accessing restricted content,
including grades and due dates.
To add restrictions on accessing the activity, click Add restriction... The Add restriction window will open, containing the following options:
Date. Prevent access until (or from) a specified date and time.
Grade. Require students to achieve a specified grade.
User profile. Control access based on fields within the student’s profile.
Restriction set. Add a set of nested restrictions to apply complex logic.
If you have groups in your course, you will see the following additional options:
Group. Allow or prevent access only students who belong to a specified group, or all
groups.
Grouping. Allow or prevent access only students who belong to a group within a
specified grouping.

PUA(LMS) Stuff Guide
Page | 59 Prepared by : Eng.sheren A.sherif
Edit an Assignment
While it is possible to edit the content or setup options for an existing assignment, proceed
with caution if the assignment has already been released to students -- especially if students
have already submitted work. Changing some options, such as changing participants when
working with groups, may result in student confusion and the loss of work that has already
been submitted.
To change the content or options for an assignment you have already created:
1. On your course page, click Turn editing on.
2. Next to the Assignment to update, click Edit, then select Edit Settings. The
assignment's settings page will open.
3. The Updating Assignment page shows you the same options available on the Adding a
new Assignment page. Here you may change your assignment options as needed,
including changing the due date, grading information, and availability of the
assignment.
4. Once you have finished making the necessary changes, click Save and return to
course at the bottom of the page.

PUA(LMS) Stuff Guide
Page | 60 Prepared by : Eng.sheren A.sherif
6.2.2.How to create Quiz
Four steps to create Quiz:
Step1: Create Categories.
Step2: Create Questions
Step3: Create Quiz
Step4: Add Questions into quiz.
Step1:
Create Categories.
Click on Course that found in navigation block, anther block will appear called
“Administration block” at the end of this block you will found “”
Click on
your Course Open Question
Bank
Select
Categories
PUA(LMS) Stuff Guide
Page | 61 Prepared by : Eng.sheren A.sherif
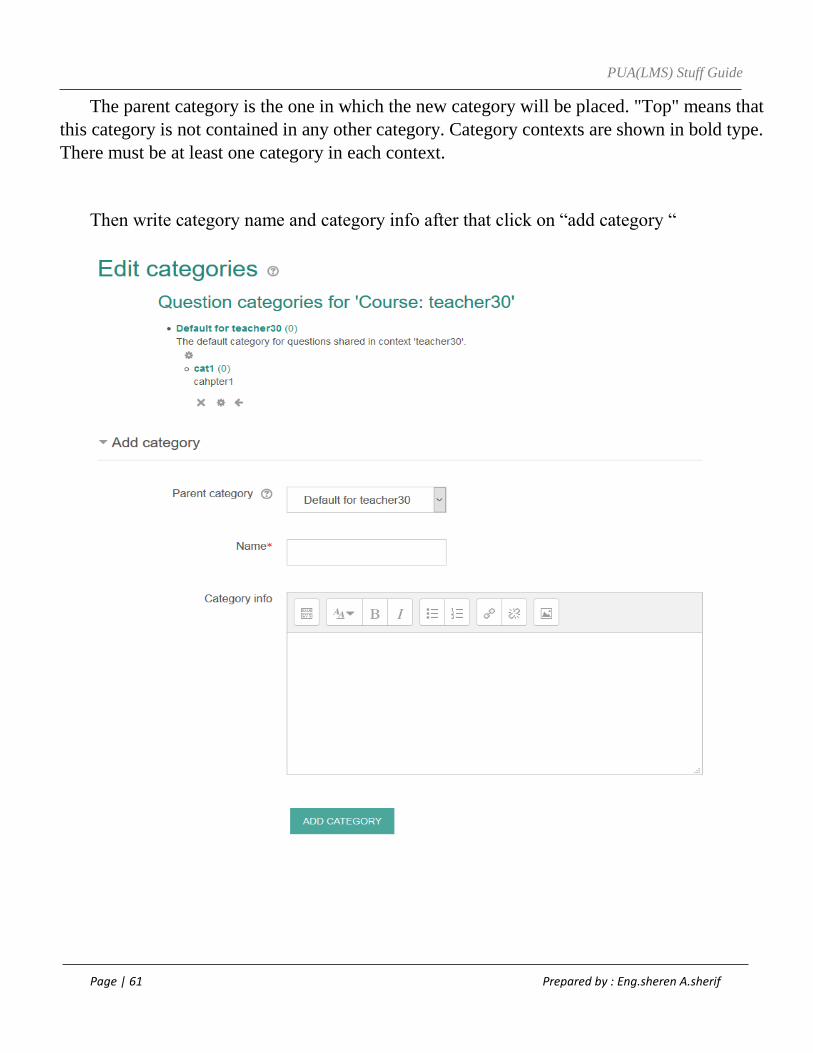
The parent category is the one in which the new category will be placed. "Top" means that
this category is not contained in any other category. Category contexts are shown in bold type.
There must be at least one category in each context.
Then write category name and category info after that click on “add category “

PUA(LMS) Stuff Guide
Page | 62 Prepared by : Eng.sheren A.sherif
Step2:
Create Questions
Add a new question
Click the Questions tab to access the Question Bank page, if not there already.
From the Category drop-down menu, select a category you want to add a question to.
The page will change to show the questions already in that category
Select the question type you want to create from the Create new question drop-down
menu.
Fill in the form for the question type you are creating. Each question type has its own
form and has its own options.
Click Save Changes at the bottom of the form.
Click on
Question Click to Add
New Question
Select category
Select Question

PUA(LMS) Stuff Guide
Page | 63 Prepared by : Eng.sheren A.sherif
For Example, (True and False Question)
A student is given only two choices for an answer in this kind of question: True or
False. The question content can include an image or html code.
When feedback is enabled, the appropriate feedback message is shown to the student
after the answer. For example, if the correct answer is "False", but they answer "True"
(getting it wrong) then the "True" feedback is shown.
Select true false then click 3 section will appear
Add Button
1
2

PUA(LMS) Stuff Guide
Page | 64 Prepared by : Eng.sheren A.sherif

PUA(LMS) Stuff Guide
Page | 65 Prepared by : Eng.sheren A.sherif
Multiple tries :
In this case (True & false) student has no tries.
Tag :
You can tag any group or students in certain question
Now Question is created
PUA(LMS) Stuff Guide
Page | 66 Prepared by : Eng.sheren A.sherif
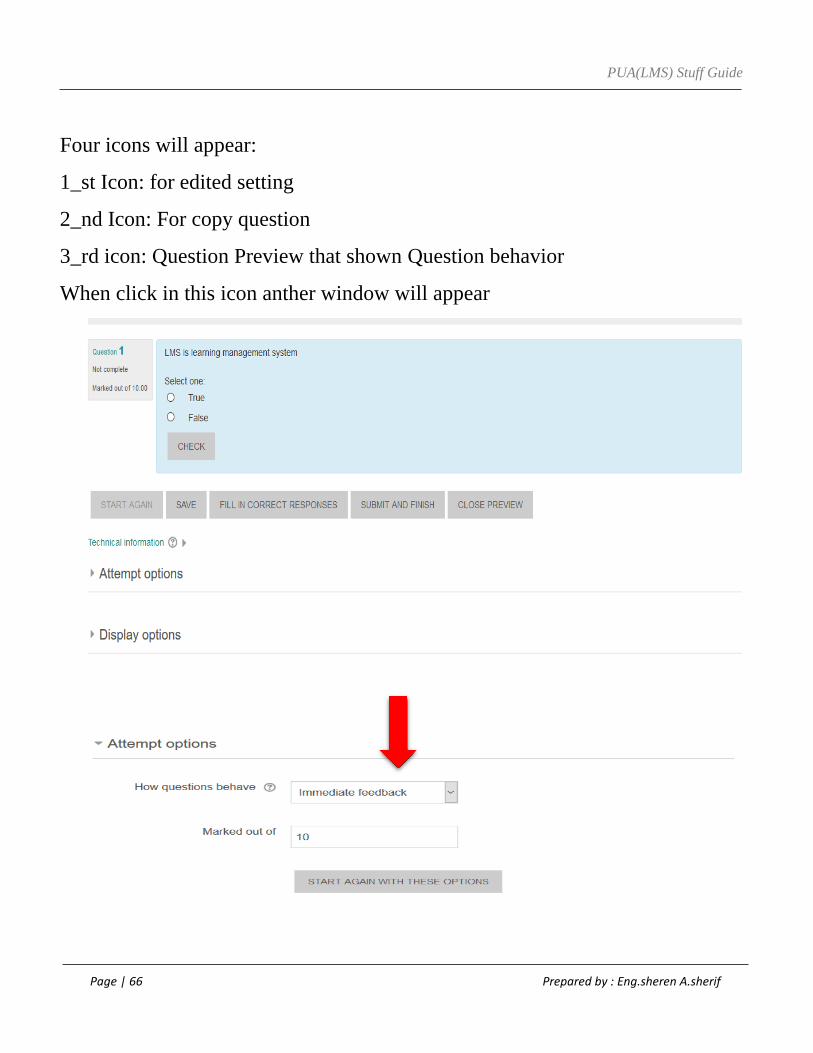
Four icons will appear:
1_st Icon: for edited setting
2_nd Icon: For copy question
3_rd icon: Question Preview that shown Question behavior
When click in this icon anther window will appear
PUA(LMS) Stuff Guide
Page | 67 Prepared by : Eng.sheren A.sherif
Question Behavior
1. Adaptive mode and Adaptive mode (no penalties)
Check button is appearing, allows students to have multiple attempts at the question
before moving on to the next question. This behavior requires that the "Whether correct" box is
ticked under "During the attempt" in the "Review options" section, at a minimum.
2. Deferred feedback
Students must enter an answer to each question and then submit the entire quiz,
before anything is graded or they get any feedback.
3. Deferred feedback or Immediate feedback with Certainty-based marking
(CBM)
With CBM, the student does not only answer the question, but they also indicate how sure
they are they got the question right. The grading is adjusted by the choice of certainty, so that
students have to reflect honestly on their own level of knowledge in order to get the best mark.
4. Interactive mode
After submitting one answer, and reading the feedback, the student has to click a 'Try again'
button before they can try a new response. They can be given hints to help them. Once the
student has got the question right, they can no longer change their response. Once the student
has got the question wrong too many times, they are just graded wrong (or partially correct) and
get shown the feedback and can no longer change their answer. There can be different feedback
after each try the student makes. The number of tries the student gets is the number of hints in
the question definition plus one.
PUA(LMS) Stuff Guide
Page | 68 Prepared by : Eng.sheren A.sherif
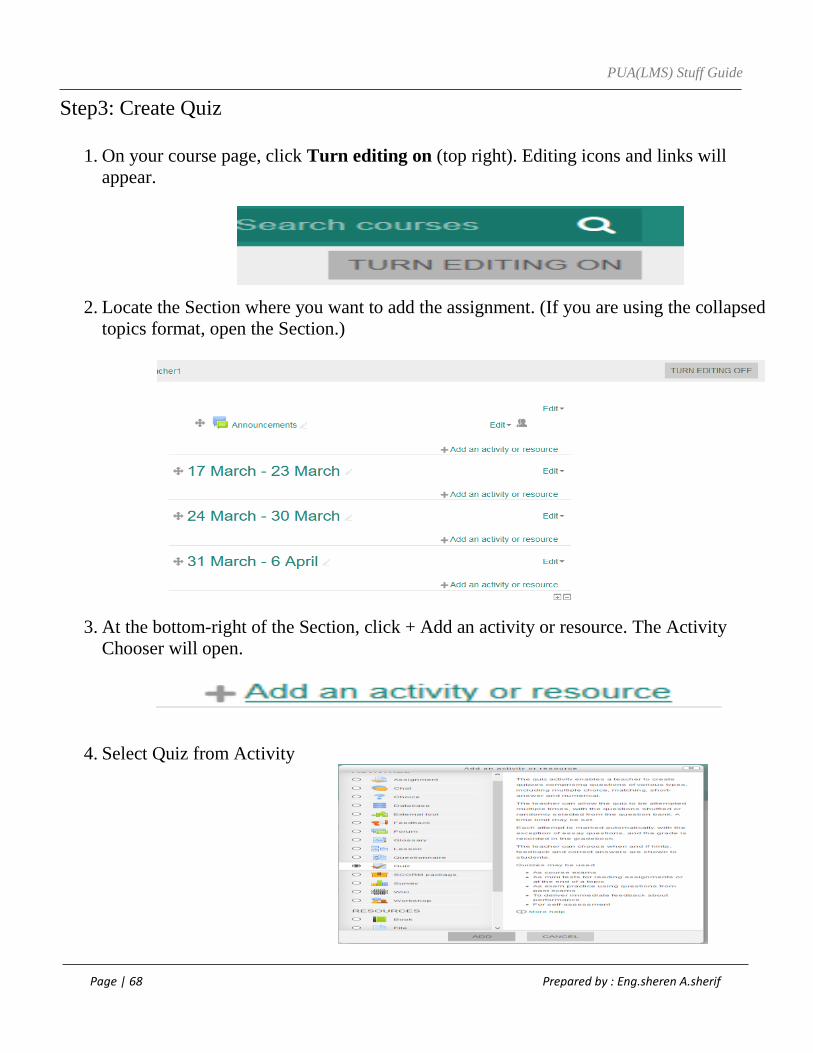
Step3: Create Quiz
1. On your course page, click Turn editing on (top right). Editing icons and links will
appear.
2. Locate the Section where you want to add the assignment. (If you are using the collapsed
topics format, open the Section.)
3. At the bottom-right of the Section, click + Add an activity or resource. The Activity
Chooser will open.
4. Select Quiz from Activity
PUA(LMS) Stuff Guide
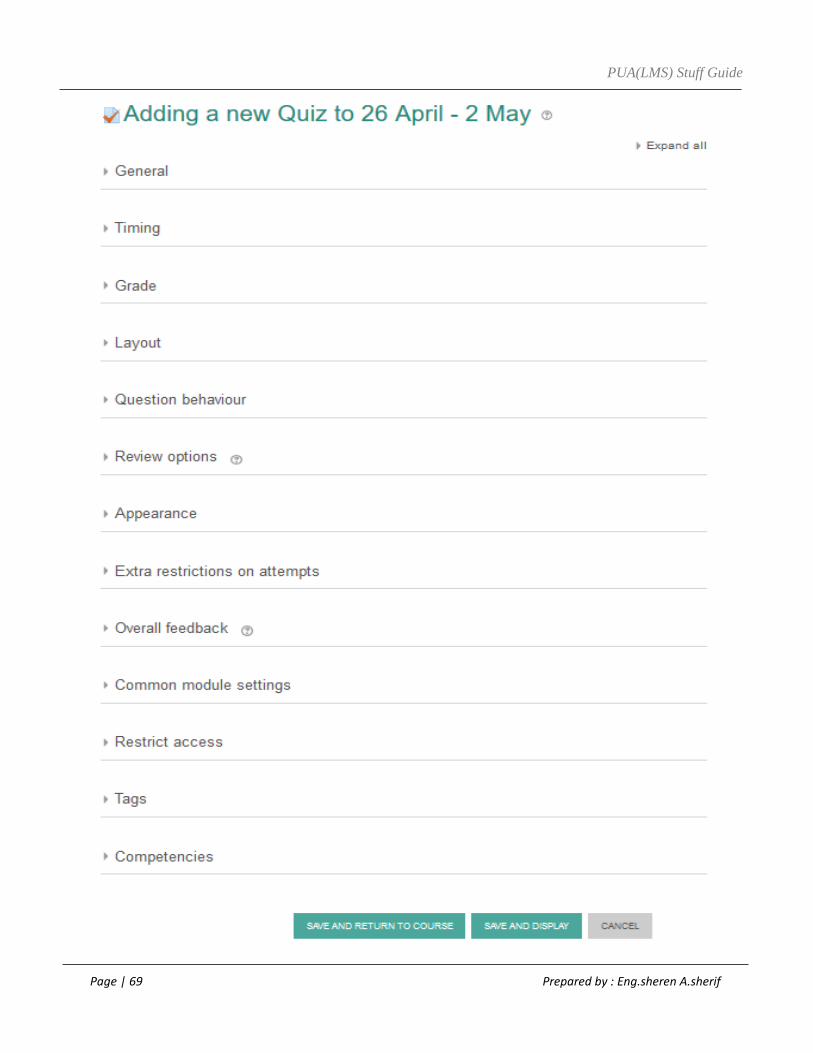
Page | 69 Prepared by : Eng.sheren A.sherif
PUA(LMS) Stuff Guide
Page | 70 Prepared by : Eng.sheren A.sherif
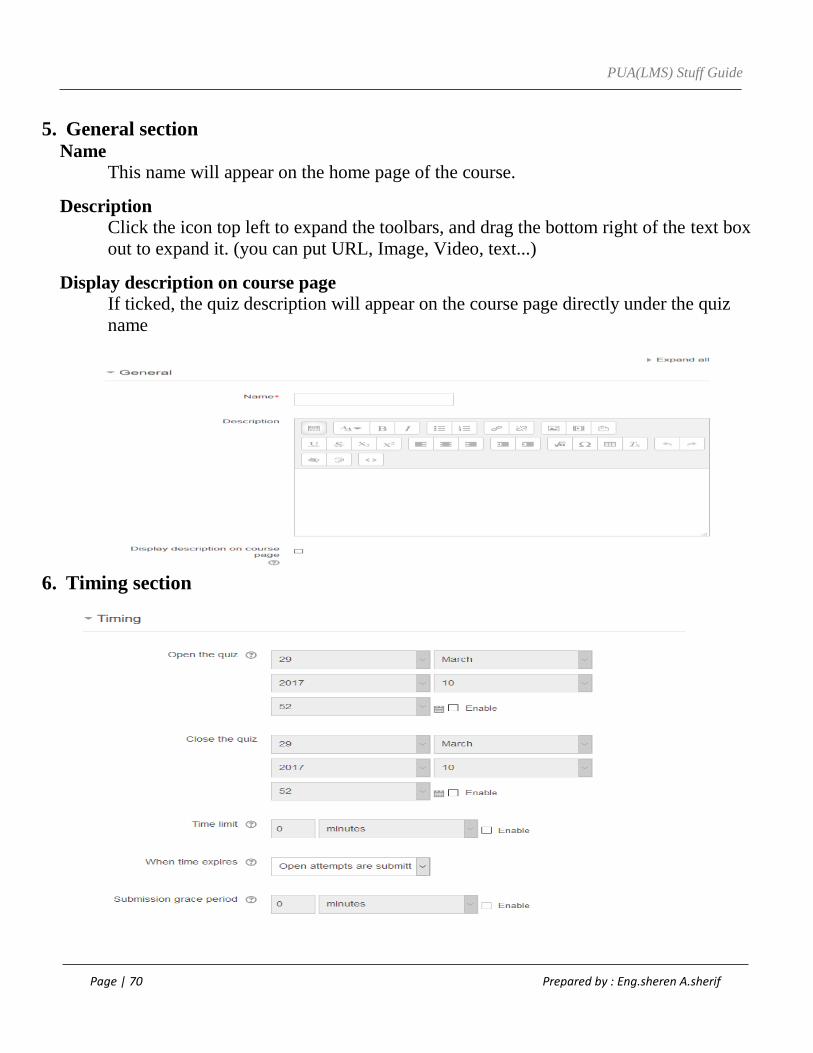
5. General section Name
This name will appear on the home page of the course.
Description
Click the icon top left to expand the toolbars, and drag the bottom right of the text box
out to expand it. (you can put URL, Image, Video, text...)
Display description on course page If ticked, the quiz description will appear on the course page directly under the quiz
name
6. Timing section

PUA(LMS) Stuff Guide
Page | 71 Prepared by : Eng.sheren A.sherif
Open the quiz
You can specify times when the quiz is accessible for people to make attempts. Before the opening
time the quiz will be unavailable to students. They will be able to view the quiz introduction but will
not be able to view the questions. Quizzes with start times in the future displays both the open and
close date for students.
Close the quiz
After the closing time, the students will not be able to start new attempts. Answers that the student
submits after the quiz closing date will be saved but they will not be marked.
Time limit
By default, quizzes do not have a time limit, which allows students as much time as they need to
complete the quiz. If you do specify a time limit, several things are done to try and ensure that quizzes
are completed within that time:
When time expires:
This setting controls what happens if the Student fails to submit their quiz attempt before
time expires. If the student is actively working on the quiz at the time, then the countdown timer
will always automatically submit the attempt for them, but if they have logged out, then this
setting controls what happens.

PUA(LMS) Stuff Guide
Page | 72 Prepared by : Eng.sheren A.sherif
There are three options as to what will happen when the time limit is up. Choose the one you
need from the dropdown menu:
1. Open attempts are submitted automatically (This is the default)
الوقت مباشره من االمتحان بانتهاء خروج الطالبيتم انهاء المحاوالت و الحالةفي هذه
The quiz has a time limit of 1 min. Time will count down from the moment you start your
attempt and you must submit before it expires. Are you sure that you wish to start now?
االمتحان:من عند الدخول كطالب سوف يظهر بهذا الشكل ونالحظ وجود العداد للوقت الذي يتغير لونه الى األحمر عند القرب من االنتهاء
سوف يخرج الطالب من االمتحان مباشره بعد انتهاء الوقت المحدد:

PUA(LMS) Stuff Guide
Page | 73 Prepared by : Eng.sheren A.sherif
2. There is a grace period when open attempts can be submitted, but no more questions
answered
انة المتاحة ولكن ال تنسى المقصود بهذا االختيار هو إعطاء فتره زمنيه بعد انتهاء الوقت المحدد لالمتحان، يتم تحديد الفترة الزمنية اإلضافي
enable
مره أخرى الى المحددة لالمتحان، ولكن سوف يكون متاح للطالب الدخولسوف يتم خروج الطالب مباشره فور االنتهاء من الفترة الزمنية
االمتحان ألنهائه ولكن في حدود الوقت اإلضافي المعطى.
3. Attempts must be submitted before time expires, or they are not counted (default)

PUA(LMS) Stuff Guide
Page | 74 Prepared by : Eng.sheren A.sherif
7. Layout:
Select number of question in page that will appear in page
Then click save and display
Click on Click Quiz
Put Quiz Grad
and click save
Click her to add
Question

PUA(LMS) Stuff Guide
Page | 75 Prepared by : Eng.sheren A.sherif
From question bank you can select questions that you create before
And click on Add select question to the course
Then return to course and Now Quiz is ready to open attempt


![Performance Mangment [Autosaved]](https://static.fdocuments.us/doc/165x107/577d1d7d1a28ab4e1e8c5ee5/performance-mangment-autosaved.jpg)