prscm OP - ed
112
ill) 188 824 / 'AUTROP TTTLE' _INSTITUTION, ,00q0NR.NT titONE RC 012 093 , Kudlas, Joht A The PockClimbing Teacting Guide. American 'Alliance for Health Physi611 Education* Pecreatiol4nd Dance (AARPEPD) ., p013 DATE- 79 . /V NOTE. - 112p.: Not available in prip4r copy due to.publisher,a . preference. . :AVAILABLE-FPOM: Americat.Ailiance for.HealA, Physical tducation, Recreation, and Dance, 1201 SiXeenth Street, N.M*, Washirtaton, DC-20036 ($6.-95) EDPS ptI MF01-.Plus.Postage. PC Not Ayailable frpm EDPS. prscm OP .*Advetture-Educat:ton.:* *Cout%e Content: Course Ob.lect.ives: Educaticnal Philosophy: Environmental Eduction: *Egepment: Experiential Learning; Illustfations: *Outdoor Education: *Safety Educatior: SecOlidary tducation: Self concept:* Skill DeveloPment:" ,*Teachl,na Guides IDENTIFIERS *Ro0, Cli;lbina. . ABSTPACT ,- Thd vroduct of TO years of rock climbing.instructic")n, this guide prcvides,;material from which at instructor aan teach basic climbing concepts..and safety skills as well as conduct a safe, enloyable rockCiimbing class in a higlschool setting. It is .desigted.for.an'instructor with.kimiteTexperiencein climbing: 114614ever, the neekfor teacher erttusiasm And patiende is effiphisized'. Also acCented are.'the positive aspects Pf psychological and physical skill d;e4elopmen-e: For instance., rock 'climbing can provide a moderate emountiotstress:which can lead.to personal insight c1 promote self-cbnfidence.: Safety aspects 4re dealt With it depth, eTphasizing "wliy-.s6methinVihas tb be done. Equipment reeds and care.are, .discussed ir tepms of both school budlets atd.safety. The 13-sess'ion. - course includes.1 class on the uThree--Roint Pule which retiustres students to crawi or walk.while,movirg only 1 limb at a time. Each -.class session tas a' sever.7poirt,format. This guide also includes,i .iong-segbent On constructing artificial climbing walls to provide experience it Anty locale. (A.N1 "0"--RepItAmptions'supplied by PDPS are the best that can be made * -.from the original document. *. ************************A********************************************* 0
Transcript of prscm OP - ed

ill) 188 824 /
'AUTROPTTTLE'_INSTITUTION,
,00q0NR.NT titONE
RC 012 093 ,
Kudlas, JohtA
The PockClimbing Teacting Guide.American 'Alliance for Health Physi611 Education*Pecreatiol4nd Dance (AARPEPD) .,
p013 DATE- 79 .
/VNOTE. - 112p.: Not available in prip4r copy due to.publisher,a
. preference. .
:AVAILABLE-FPOM: Americat.Ailiance for.HealA, Physical tducation,Recreation, and Dance, 1201 SiXeenth Street, N.M*,Washirtaton, DC-20036 ($6.-95)
EDPS ptI MF01-.Plus.Postage. PC Not Ayailable frpm EDPS.prscm OP .*Advetture-Educat:ton.:* *Cout%e Content: Course
Ob.lect.ives: Educaticnal Philosophy: EnvironmentalEduction: *Egepment: Experiential Learning;Illustfations: *Outdoor Education: *Safety Educatior:SecOlidary tducation: Self concept:* Skill DeveloPment:",*Teachl,na Guides
IDENTIFIERS *Ro0, Cli;lbina..
ABSTPACT ,-
Thd vroduct of TO years of rock climbing.instructic")n,this guide prcvides,;material from which at instructor aan teach basicclimbing concepts..and safety skills as well as conduct a safe,enloyable rockCiimbing class in a higlschool setting. It is.desigted.for.an'instructor with.kimiteTexperiencein climbing:114614ever, the neekfor teacher erttusiasm And patiende is effiphisized'.Also acCented are.'the positive aspects Pf psychological and physicalskill d;e4elopmen-e: For instance., rock 'climbing can provide a moderateemountiotstress:which can lead.to personal insight c1 promoteself-cbnfidence.: Safety aspects 4re dealt With it depth, eTphasizing"wliy-.s6methinVihas tb be done. Equipment reeds and care.are,
.discussed ir tepms of both school budlets atd.safety. The 13-sess'ion.- course includes.1 class on the uThree--Roint Pule which retiustresstudents to crawi or walk.while,movirg only 1 limb at a time. Each
-.class session tas a' sever.7poirt,format. This guide also includes,i.iong-segbent On constructing artificial climbing walls to provideexperience it Anty locale. (A.N1
"0"--RepItAmptions'supplied by PDPS are the best that can be made *-.from the original document.*.
************************A*********************************************0

0c\t
0S IsAlt MI N V 01 141 Al IIII MI( A flop I Al I I "WINAli()N4i1 INcr trot! Or
I f)II(ArION
"s A 111 I II PP,.s I 11 I WA1 I 41,4 ti tuoIm'ssl PI 14 ., '11 ,0 .\114 ,sk4(1I4,(,.4.4A ,4() n4, .. 110I1 (111 "4,, 44$ I 4'1 lir 4141, .
A ,, A,/, .1,1 ,rUI if
III
"PERMISSION TO FWPRODUCE THISMATERIAL IN MICROFICA ONLY.HAS BEEN GRANTED BY
(111) L.TO IHE. EDUCATIONAL RESOURCESINFDIIMATION CENTER (ERIC),"

. .
A
To MoM and Dad Vanderhoof
Who Belayed Me Well
and
Encouraged Me to Climb Higher
Without My Getting Too Aloft
Masculine nouns and pronouns are used in this,Guidefor both sexes.
Endorsements of brand name pl-oducts represent theopinions of the author only.
-Copyright 1970 01
American Alliake for Health', Phytical Educationv 4 Recreatron and Dante
.
,
I.
ti
4
t,t t
1261 Sixteenth Street, N.W.. ' Washington, D.C. 20036
. .
,
ACKNOWLEDGMENTS'ANNOTATED BIBLIOGRAPHY.
APPENDIX. P4rental Permtssion Form
.
Student Check Sheet,
CONTENTS
Climbing Record Card (Sheet). . Platfonil Braces and Emergency Ladder Drawing
Clinibing Certifieate ,
Rock Climbing--Written Test- '
INTRODUCTION1
PH'ILOSOPHY. 3
OBJECTIVES. 3
SAFETY.
Instructional,Attitude: 6
Equipment ,, 7First Aid
Decision Making.,' 1. 8 .
Weather)10...
, Areas, 0
10ffules . , v
,.. 10
'PREFACEvii
viii88
97
98
99 ,
106101
102
EQUIPMENT NEEDS AND CARErisehtials 0
t 12Inventory 0
13First Aid Kit Contents . 15Cost Analys)s
17Rope Care '. 1
18,
OURSE orSTUDY , 21Session I=.-Introducing Rock Climbing 21Session II--Teachin4, Three-Point Rule , 22
or-Session III--Teaching Friction Climbing ., 23Session IV--Teaching'Equipment Maintenance., f 4 25Session V--Teaching The Becsic Knots 1. 27Session VI--Teaching Support Systems And Delaying 32Session VII--Teaching Climbing Signals
, 39Session VIII--Preparing For lhe Climbing Trip 41Seision IX--The Climbing Trip..,, 42Session X--Teaching The Rappelling Basics , 45Session XI--The Rappelling Outing 51Session XII--Student Conducted Trip-
. 53Session XIII--Course Evaluation 0 54
,
1

OUTING PROCEDURES
%ARTIFICIAL CLIMBING WALLS,History
Advantages .
Precautions ;
Rifles For Wa111 Use
.
.
' . i
55
58
58
58
59
61The PlyWood Option 61The Particle Wood Option 62
\ Concrete Rocks. 62
Sandbox Mold 65 .
.Fiberglas's Mold' 65Latek Mold 66Plastic.:Sheet-Plywood Mold
4
66;Attaching Rocks to the Wall 72Slab Construction -,.
. 75Platform Construction
, 78The Emergency'Ladder '7
/ ADVANCED INSTRUCTION OPPORTUNITIES,
82
4
6
*
e.
4.
THEROCKCLIMBINGUSACHINOGUIDU
1.
RREFACE V
The exodus of the many pewle, especially young people, to the out-doors has*offdred physical educatiop a new challe4ge fo l. outdoor leisureeducation. Rock climbing is only one of the many Outdoor activities that'can be taught safely within tbe public schools. This with an air ofenvironmental responsibility. \
The enclosed material is the result of 10 years of rock climbinginstruction at the high school level with More than 1000 students,receiviiig ins;ruction. This, in addjtion to the many state and national.'tdacher workshbps Plie conducted over the past several 'years. Instruction,such as. this, based on simplicity has proven to be safe.' With this safety
....in mind, I've attempted to make this material simple, easy.to Understand,4nd functional. It is ty hope that thismaterial will be used in its*errtirety and considered a total prbgram. That is, the total instructfonalsegment should be read before an attempf is made to teach the program. This
.011 help develop the attitude necessary to successfully and safely teach .
the exhilarating sport of.rodk climbing..
included.a segment on artificial climbing wallS so tha.t.a
.
Climbing facility could be constructed to enhance instruction anclprovidea. climbing experience; regdrdless of your locale. Here, again, you will'need to devote eXtra time and effort to insure a safe climbing facillityand successful.experiences for students.
c<.
.,. .
, Welcome', good luck and good climbing.,
0
PRIFACII
1.
4
go
v11

.ACKNOWLEOGMENT$.-
II would.like to take this oppt
so
ortunity4o.tharit several' people.fortheir encouragement, expertise and assistance. Wi0out'their help, thismanual would not be possible. First, my wife, Donna, for her patience'with my projects and willingness to type "just one one more pate."
.
Withbut her smile and support this wouIdlhave.bgen a Much more diffitulttask. Next, Ed Johnson, a former student of-mine who drew all the'illustratiOns.' And Mr. Bob Robinson, who was willingitb take the timefrom his busy schedule to.proofread thi's manual. Ahd the many climbersI've hadithe pieasure to work with, including Bill agd.Mike Jackson andOr. Don Deaton: .And 'Dr. Dale Cruse,.of,the University of Utah, who firstgave me ihe in'spiration for this project in his seminar class. FinPly,Lwould like to .thank the Rochester 'Public Schools for thC.oppOrtunityto develop a cllmbing.pc-ogram and climbing facilities. All these'peoplethould be Consideved prime contributors to the Rock Climbins TeachthgGuide. Thank you all.
4
a .N.,
THE !um CLIMBING TEACHING GUIDE

IINTRODUCTION
01:
Rock .climbing is-by no means a new sport. Enjoytng a heritagethat antedates mountaineering, rdck climbing was regarded as a healthysport by the Romans. / EmperorHadrian, for example, climbed up thees,ca-rpments of Mount/Etna in 104 A.D. In the 14th century, Petrarch
, often'climbed in Provence,
, The first climbing school was established at a monastery in France'sDordogne Valleysin 1426. In additidn, King Charles VIII of France, in1496, established a climbing school and appointed Jean.de Beaupre' as theclimiking instructor. In gngland, John Atkinson, in l82.5 devised 'a method,of rock.climbing to remit lost,sheep. These latter two men mere des.-tined to become the "fathers of rock climbing."
Even though climbing equipment and techniques of the mid-1800'scan surely be questioned, this period is referred to.as the "golden heof climbing" with,manY European tourists seeking:to reach the summits'near'Zermatt. The ropei were shorter and made-of_ioterior material sixthas hemp, flax and cotton. The techniques of."looping the rope" aroundboulders to anchor climbs and "btidy arrests" to prevent a partner's fallcertainly-contributed to the many multiple tragedies.
In the United States, Seattle has ledthe wty in rock climbing,with tpe first climbing'wall constructed in 1941 at the William G. LongCamp. Since 1950, the French hove included rack climbing in,thOr cur-riculum on a limited basis, and a decade later the English began incor-porating the sport i5to many of their elementary aad secondary schocils.
'During the past few years there 4isbeen a vast amount of interestin ecology, precipitating the environmental movement and an exodus ofadventurous people to,the outddors to discover and investigate more fullyand personally nature's wonders. There hat been an attempt to affectivelyfeel this phenomenasand to cognitively understand it and man's 'inter-relations.
One of thellWoities that has exploded with its number of partic-ipants is the subject of this-text--rock'climbing. 'No longer is-thisinvigorating activity limited to a few mountaineers. All age groups andsexes can how part*cipate, depending 'upon their,ability And training.With prctper instructions most individuals can reach the emotional ful-fillment and "environmental discovery" offered by rock climbing. Thegoal laf this. text is.to provide the instrucpr with a guide so thatihemight better be able to teach these concepts safely and efficientlY.
Some public., as well as private, institutions have ncludedirock'climbing into their elementary, junior,high school, and/or secondarycurriculums. Several colleges and universities, as well, +lave providedclimbing instructton. Several outdoor adventure organizations, suCh asOutward Bound, National Outdoor Leadership School, aS wall as otherspontaneous climbing schools teach indepth coUrses in rock climbing.
INTROOCTiON 4 e.
A

.
There has been, hbwever, littYe communication among these groups and eachis biased-toward its own Method of instruction, confusing neophyteinstructors at publit school levels.. However it should be emphasized
. that many techniques have been developed by these organiiations which-; Are safe and suciessful,rthe.two most important.criteria for, inclusion
( of any innovation in cliMbing.- This text will 'attempt to describeseveral methods with their advantages.and disadvantages in an attempt'to provide the instructor Agith an oblectiVe choice. Emphasis wfllhowever,-upon simplicity 'and safety.
The intentbof this text is to provide material' from.which theo' ft
instructor could teach basic climbing concepts and safety skills thatwould enable him to conduct safe and,enjoyable rock,climbing'classes inschoolatmospherel Ihis.text is designed for the instructor with lim-
-'ited experience Who wts4es to teach rock climbing classes. Mountains are. not necessary to rock climb, although their presente should be capitalizedupon,,and any outcropping of hard rock can be utilized.
A
This guide is not designed' to "book-teach" mountaineering from "Ato Z.". Many texts attempteto do this dnd,many oelhave learned viathe 151bok-tr$al-error" method, Which is-dangerous bet. This isnot to imply that the many fine texts as.listed within the bibliography
'
are not useful.,they are all excellent resource material, but they arenot desi§ned fOi, instruction within the school environment.'
Some concepts learned in roek climbing can be appliedto many.otherfacets of life. One such concept is the Ability to function under stress.Stress is when there is sufficient apprehension on the part of,the ptici-pant to require extraordinary measures to maintain an organized function-ing. When in a stressful situation,-the climber has an opportunity tOre-evaluate and discover'himself,and his potentialities. This processcan be uMized in everyday life. Some studies have revealed the poten-tial importance of rock climbing:
Smith's study Of the Outward Bound Program, although more than ,arOck climbing dburse, showed'a positive impact on the participants' self-
,
esteem..
4
-Davis discovered that overcoming fear during rock climbing resultedin new levels of self-awareness and self-cbnfidence: He noted, however,that the fear must be overcoMe and transformed into enthusiasm before, I;
self-awareness and self-actualization would occur.
:There haVe been Many studies conducted relative to the effects of_outdoor adventure programs, but few limited to rock climbing. Researchis desperately needed in this Area.
10
TIM ROCK CLIMBING TEACIkNO GUIDE
0
.44
PHILOSOPk.
To 'engage in a rock climbing endeavor necessitates making someserious decisions. It has been this author's experience that.it is mucheasier, mbre functional end safer to teach a fewconcepts well,than many supeficially. .That is, it is.safer end less.compliCated toknow.two or three basic kdots welltthan many vaguely. Prime is always a,problem id conduttingla course like rotk climbing, -Aich requires flexi-bility within the structured framewoq of e school day. The.teachingrate'can only be ,as fast as the individual student's assimilation; theinstructton must be "open-ended" to provide additional challenge-for
:the accelerated ttudent'as well as additionarassistance for less skilledparticipants. SUccesS of any program will be proportional to the en-thusiasm of the instructor. This is nOt only true of rock climbinginstruction, INt of.all areas of education. Hence, the prerequisiteifor; such e task is.teachi6r enthusiasm.
4 .
OBJECTIVES
The readers should ev,.aluate their motiations for reading this text.7rue introspection will reveal if they should proceed with actively
I/teaching rock Climbing, or if they should continue with more faMiliarteaching endeavors. That is, is rock climtpirg the vogue thing to do or_does it offer meaningf0 experienceS for .students? If the movement ofactivities to the outdoors is simply the-"in" thing to do, then perhapsthe efforts of the reader and subsequent-financial support by the'lnsti-
o'tution Might better,be allocated elsewhere.
Let's examine possible psychologital and physiCal skills Conceptslearned through rock climbing. Concepts, for our.pdrposes°, are ideas theparticipant might apply to other activities of life. It has been theauthor's experience that climbing does contribute to the realization ofthese concepts to varying degrees.,
Psychological Conceps
". l. Develop'moderate amounts of stress to'gain iniight about oneselfand others. Modera e emounts of stress edcourage self-evaluation and the'reappraisal of relatIonships with others. Hence, a certain amount of adversestimuli 'functionsasf an aid for an individual to reach the "homeostatic"
0
state with his envi onment. . .. .
- . 2. Overcoming fear opens horizons for new learning. Golant andBurton, in a surVey study, found that most people avoided environmentsAn which they had no experience with its pbssible hazards; people areafraid of the unknown. People who come through the fear may lesgen their
, .
perception,of vulnerability.t
3. ,Developing self-confidence is possible by overcoming personal -,.
fear% This was one of the conclusions as brought forth by the Davis(previously mentiged). study.
4. Self-co4cepts can be improved through new outdoor discoveries.1Koepke discovered that 44 participants' serf\concepts improved and they
mosOPHYANDowscrigs.
viewed themSelves more po%itively after the Colorado Outward Boundexperience. .
-In terms of life=time contributionsstudents according to specific criterio
,
ebck climbing Will benefittasks:
-1. In situations of vocationaT/ vocatiOnal u es of the outdoor ,
.environment, the student will be abl tb:Jdentify appropriate:and in-:.appropriate.actions and indicate tIé.ir responsib4lity in the sitUatiOn..bOed upcin personal Values, safety, alternativ aud consequences. :..
2.' In.situations.of vocatiohalfavocatjp. al: usesof the oUtdoOr:enviroment, the students Will be able-to re ogn(ze situattans'in,whichlegal responsibilities which protects the e,rIvironment wiWdoMinate oVerpersonaldesires. . . . .
3. In situations of Vocational/aVb tional uses of the outdoors,the students will be able to enjoy and preciate the outdoor environment.
*4. In situations of.vocational/ayocational Uses of the outdoors,the,students will utilizeskills whityHwill-reflectAheir positive Value-and appreciation for the:environment, resulting in.apinimum of physicalimpact.on the environmeht, :
.
5. In situations Of vocation41/avbcational uses Of the outdoors,the students will be able to identify'conflict situations and react under.stress using open communication,/problem sOlving skills and share respOn,
b.
,
sfilities.-, .
, . ...
6. Students will recognize vbcational opportunitits.within the area:of the outdoor environment. - c . . ,
. 7. In situations:of voCational/avocatibnal uses of the outdoors,thestudents Will recOgnize the -haimony and thedelicate balancede theoutdOor world. . ,.
.9.- ir
Spedific Rod; Climbing Skill Concepts 1, ,,
1.. Properly learned sicillssand. proper equipment are necessary for. safe:participgtion.'
2...,Cont1itioning, balance, strength, and logic are necessary:for.safe and enjoyable participation. ..
3. SiMplicity.within a systemhinsure maximmtecurity, less'equip-Ment and fewer human errors. 7 ,
4. A.wide base will moresecurely support the climber. This concepkis especially important in'preventing the;body fromoirouetting/twistingfroOts means of support, .
5. 4LoOking down at the feet will reveal more means' of support for, .,thp.legs.. lostonovicec,climbers'ry 11 focus their attention upward,at their
hands. fr. ' .. p- * ,
,6, Security is often procur d mo're easily by, direCting the upper..,.body,Weight aLwa,y from the means o1f support. The neophyte will attempt to:--4grasp" the rock face,'thereby reducing the.ahgle of his feet on.the.
. ..
supportive structure. . .
0.. : ..
, .
.
. '7. The morévthe means of support, the greater' the securqy for thee climber. Thit is; bast011y the climber has four means of support; two
, arms .ancktwo legs. Climbing'necessitates movinT these appendages one at
THE HOCK CLIMBING TEACHING GUIDE).
7...
90'
H .
a time in a rhythmical fashion. This is referred to as the "three-pointrule." Only -one arM or leg -is moved at one'time; insuring...three otherpoints rbf support. This isTespecially infportant for beginner4.
B. The "larger the muscle group, the more strength and fipportproved. Simply, the.feet and legs otfer.more support than the handsand'arms. A climbèr can support hmself.for hours on his feet; but forsome people only several-seconds by their finger tips. . This might seemobviatis,. but an, amazing number of people-will attempt to climb using .nosqy their hands and arms
"Tpe greater the- surface area, the tore the- support and friction..scoricept js cmportant.,forsnot only friction %limbing, but.for hiking
and ackpackirig as-well. For any friction movement, particularly on rockslabs, the. entire foot should -be placed flatly on the rock surface. s
Standing, or wal king on the toes wi 11 only prosluce. tatigtie and fall s ;'using the heel to VW' tubercles shoulq be discouraged.in that it isdifficult thmfeel"ythe. rock'surface from this 'foot- position...
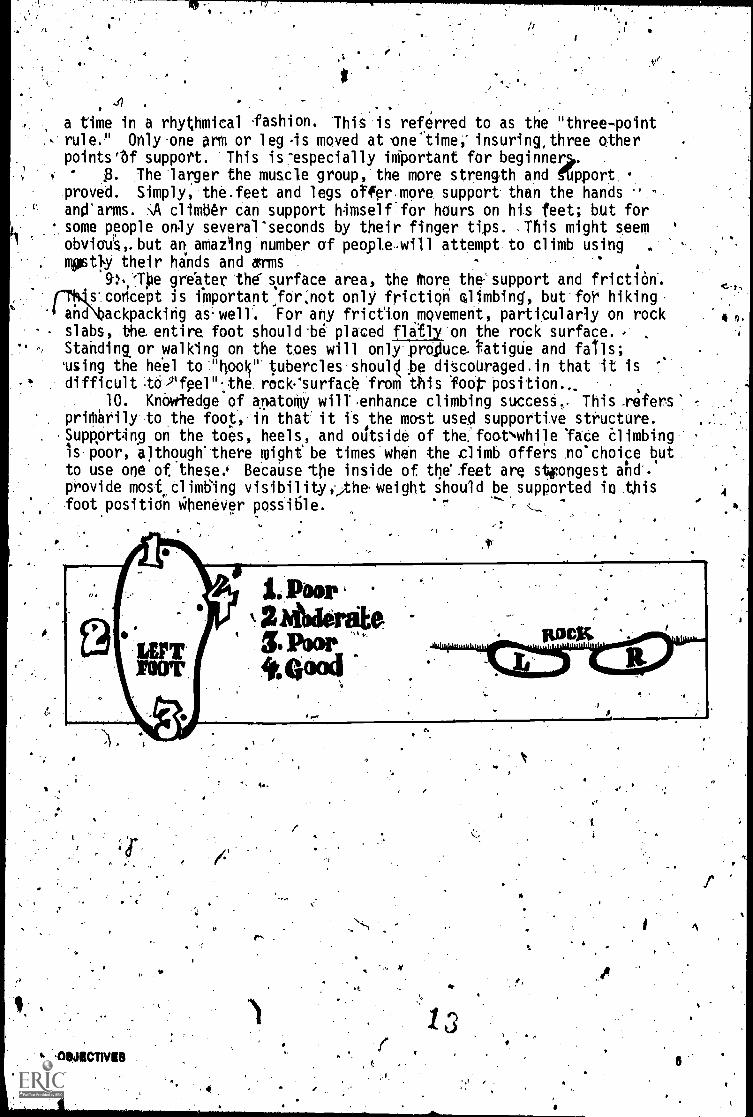
10. Knbwtedge of ariatoMy wilTenhance climbing succesS.. This .refers'printhrily to:the foot, in that it is the most usecl supportive structure.SupRort.in.g on the toes, heels, and otitside of the.' footNwhile 'face alimbingis poor, although' there wight be times when the climb offers .no'choice butto use one of these.. Because Vie inside of tne feet are stfongest and'.provide most climbing visibility,>th weight should be supported in .thisfoot position vihenever possitile.
-
.1
4
4 9..

0
. SAFETY
It ill paramount thit safety concepts, rules, and procedures bestrictly taught and adhered to. Before embarking upon,the taSk of teaching .
rock climbing to beginners) the nstructor must ask himself severalquestions:
1.' Are the benefits of the concepts imputant enough for the'students to warranf instructional physical riFks for the teacher?"
2, Is the'instructor wfllInTto teach all the safety aspects aswell as 011 the "fun" Concepts?'
1. Is the instruCtor willing to take total" command of the -
instruction to insure safetyr4. Is he instructor milling to risk his own safety before taking
student risks?5. Is the instructor willing to spend extra time to inventory
and inspect equipment? 06. Is the instructor willing to extend his patience with slower
.
and more cautious students., k
, 4. Finally,,does the instructor reallywant to go through with this?
. If the instructdr's answers to the above questions are "yes," thenhe should proceed. This might Appear to be a dIscouraging approach toa new iFtivity, and it PoSsibly is for those who'are not fully sincere/cognizant!of rock climbing "reality. )3bvigusly, the writer feels strong)yconcerning the need for these inquiries; however each sessjon necessitates
're-evaluation and recommitment. It perchance the jnstrucfor rebctsnegatively, then heshould Proceed no further in that students' Securitymight be in question.
fr
. A poov approach to teaching safety is to sermonize to the studentson the.opening day of class as to what the rules are. First, they willnot be familiar with,the equipment and might not even know the names ofclimbing paraphernalia; hence, confusion will occur. A better apProachis to emphasiZe safety as.the students become.familiar with the equipMentand the concept goals; the'students will understAnd the safety rationalemore fullj/., learn the safety concepts more quicgly, and cooperate more
..effectively. Students are not necessattly interested in "what has to bebul more Interested in "why something has to bd done." There-
fore demonstrations and a reasoning approach is more functional..
. It is imperative that climbing not be taught on a "one-shotb oreXpeMential basis, Several.seSslons will be required'before an adtualclimb with any degrt of exposure is-attempted; patience on the part ofthe instructor is n .esSary. 'Before venturing fO the outdoors for an
.! "actual" rock climb', all the safety aspects should be,well described by' the ingructor and fully aSsimilated by the students. Safety mustbecome a teader and pupil,habit.
.1
Maximum security .can only be insured by safe equipment, proper'instruction, reasonable rules, and.safe outing procedures. . The presenti=.tion of each one of the safety cOncepts should reveal their importance toOats safety..
1 f THB ROCK CLIMBING TBACHING GUIDG

. There are six distinct times when eqUipment should be checked.This is especially true if other instructors are using the same equip-ment with other classes. (Specific equipment inspection will be coveredlater in this manual when equipm'ent per se is discussed.) Thelfirst time
the equipment should be inspected is when it arrives from the dealer.Make.sure all'carabiners close and lock securely; ropes have no flaws,cuts or frays; webbing has eo flaws, cuts, frays or tape on it. A
Mtnnesota.climber was killed recently when the webbin'g he was using,broke.qt a joinfthat was taped together at the factory; therefore remove any.tape.that ls not on the ends of the rope/webbing. Next, the equipmentshould be checked immediately after class use, particularly after anouting. Before leaving on an outing with a class, the equipment shouldbe quickly checked also. Inventory time., or after the season, as well
as before beginning anew, necessitates checking. Finally, if any of the
gear' has received any hard use, such as.supporting a climber's fall, ,-
then that system should receive careful attentitin before being used again.If for any easOn a piece of equipment is questionable, it should bediscarded. The price-of equipment can never justify taking unnecessatv
A first aid kit is standard equipment for any unit involving leavingthe school campus. Although serious accidents do occur, this text wil
discuss bow to limit their loccurfence. Nevertheless, be prepared.
Ignoring the ppssibility will not eliminate the probability. The contents
of the first aid kit will not be discussed at this time,.but cautionshould be relaYed to the reader, that "stock" first aid kits from drug. .
stores' function only in aiding blisters, scratches and minor cuts. A
good first aid kit will have tp be con'structed.. Many students_haveserious allergies that require shots. The instructor should not only beskilled in first aid,d but should also learn from a physician how toadminister emergency 'shots. Bee stings can be especially dangerous; theinstructor shoUld survey bis class before embarktng tediseover if thispotential hazard exists. If so, the antidote should be kept in the first
aid-kit or with the student! The simplest method to transpqrt a firstaid kit is to put it in a day pack and have a reliable student or aidecarry the pack.
On'an outing, it's most benbficiar to have anotherottfaculty member
th the clAss in addition to the rock climbing instructor. This will
4ci1itatematters if an accident does,occur since someone with authorityc ld help the victim obtain proper care. 5eldom,is there a problem '
procuring this type of help. 'Most faculty members, as well as admin-
istrators, welcoull the opportunity to participate in the activity.
A helmet for each climber and belayer is'imperative., It isequallyimportant the belayer hAve a helmet in that the belayer will oft& beshowered by pebbles and rocks. If the class has to share helmets, it
should be nd-to-hand passing, and not by tossing. An injury due to
a flying Ifelmet surely would be difficult to explain. For that matter,
no equlp nt should,be.thrown because it could become losft, broken, or
cause injury.
The method of instruction, of course, should always have etone of
t
a
I.
safety. For example, all instruction should be kept simple and easy to,understand. ,Therg is 6 need for,an instructor to "dazzle" the student'with knowledgi; this only confuses and discourages students. This
. manual will emphasize the concept that simplicity enhances learning andinsures safety..
One of the most complicated aspects of this sport .is that of knottying; many people have no concept of "what makes a.knot work." There,/are several things the inStructor can do to simplify this task, such atusing'only one or two types of knots. This could be referred to as thePone-knot system." Next, diagrams help greatly. -Thirdly, and as asafety precaution as well, everyone should tie his own knots; this
'cannot be overemphasized. The student should be taught to tie a swamibelt or.a bowline around his.own waist without anyone else touching therope/webbing. Only then will'success, pride and security be evident onthe face of the student.
.
_
The'instructor mus;t exercise some logic when progressing with hisclass, depending upon the locale of instruction. Some areas may offer .
very little relative to climbin potential; this will necessitate limiting.the 'instruction to match the area. Very soft, sedimentary rock areas willnot offer much safe.climbing, hence the emphasis in these areas,should beupon rappeling, knots, and'rope techniques. Seldom is this the casesince careful ,inspection wtll reveal a safe area.for climbing.
.
.tt's important, no matter what aredis used for instrUction, thatproper rappeling and climbing procedures and signals are used. Eachstudent should be individually checked to insure safety. Without proper'communication, climbing will be confusing, discouraging, and dangerous. .
The proper procedures and'signals will be detailed later. It is only'mentione now beCause of its.safety,implication.
Be use. climbing i§ a decision-making process,-the student shOuld be.the one who makes the decition Whether to climb/rappel or not. No-4nethod fcoeinion Or force will make a climber of an individual; manystuden s requtre additional time for introspection before attempting to_climb/ appel. Teacher patience is a prime-importance; allowing studentsto th nk things out and review their own motivations will build the stu-dents' character more than forcing them to'climb/rappel. The psychologicalconcepts sought should be instilled'in the mind of,the instructor. Re--lated to this.is the problem of "over-teaching° or rover-coaching" the
, student. Often, the instructor is'overly intent on providing success forthe student apd insists On telling the student where to place each hand pndfoot as the Uddent progresses up the obstacle: Again, the teacher would bemaking all'the decisions. When a "top appe" (that will be discussed/later) is u4ed and the student loses his'hipport, the fall willsonly beabout two fept. This "fall",and recovery will provide more,instruction \than-an entire session of verbal commands. Students' decisions willresult in irproved self-awareness.
For safety sal$p, the area to bvisited by a climbing'class should
kop,1
'TH4OCK CLIMBING TEACHING GUIDE*
"004.4011411wIrlmill17

.4.
41%,
\carefully analyze a topographical map and deteemine how far from the
i
come under close 'Scrutiny, 0ne approach an instructor might usels to
Institution the climbing facility is, how long it will take to reach thearea, the potential'hazards of the area, and climbing variety of the area .
Obviously, the instructor will have:to pre-vjsit and, pre-climb the areato fully understand an3ipossible problems. Qtten the most dangerousaspect of any'Climb'is the.bus/car ride tothat-area; every effort shotild.be-made to reduce htghway travel time.
Bus transportation is always the safest and easiest in terms of main-taining superviSion and is least'susceptible to.liability.problems. ThtOost is more, of Course, but the advantages of safety, supervision, and
'..
-tegality always SOuld supersede costs.. Regardless of who owns the. dipmbing area, perhlission should be procured. If perchance this ateaIt located upon schobl,..city, state, or federal property, there is gener-ally little problem lgcating the properofficial and obtaining.permission
:4.10wever,' on private ptoperty the-problem bkomes more'complex. To dis-. cOVer who owns the property might necessitate a trip to the county court
hOuse and an:investtgAtion of the plat bo,iks to find the owner. ,Oncethis is done, a -personal Visit with that owner kill btnecessary. 'Allproperty rights should be honored... Therefore, if the owners response
.1$ negative, another area will.haVe to be used.. Students' insuranceshould be chetked sinte fullx inSmred students (either by th4ljr parents .or by the'institution) will increase the chances of obtaininglvermjssiontb climb on private phperty,
.
, .
It is imperatiVe that somebody know where the climbing is taking'place; perferably some fOrm of authority. If the climbing class isenturing to, an area under the jurisdiction of the city, $tate or federalauthority, contact-should be made wiTh'them concerning the approximate
. time:of participation, the exact area,.and what precautions have beenmade. Although-telephone and personal contacts are good, it's best:to.sOnd them a stamped form letter which is to be signed and returnedindicating that'permission to climb in that area 'has been procured. Onprivate property, the same.procedure might 'be followed, except more'personAl -contact and emphasis upon.insurance might.be made'. Studentsshould be instructed not to frequent private artas which are used forclass use. Explaining that this extracurricalar activity might jeop-ardize future .claSs use will usually discourage unauthbrized,climbing.
Some authority.atthe institutiontshobld also be aware of the climb-.tng class' locale. Thi's might be the deportment chairpersori, principalor dean. This might be imporfant if there,is a bus breakdown,AncleMentweather, or some form otf.emergency message'commUnioue. With 'students
below the legal adult age, a perthissionoslip from home to be signed by',the parent aad returned by the student is important. This does not relin-' quish the school's legal,responsibilit,y, but does provide the parent with*portant information relative-t0 time, place, type of activity, pre-piredness, and safety procedures of the outing. The permIssion formshowlA include a telephone nuMber and time of day When the inStructor canbe reachedlor questions.' This nrocess also has the,positive effect.ofstimulati*parental interest. (See Appendix, page 97.)
SAFETY
s'

Weather often dictates the climbing activity, An alternaee'actiyityshould be prepared in case of inclefvnt weather, This might be a film, .
slides, video tape, new knots or sombthing enhancing rock climbing otherthan actual outdoor climbing.. The most dangerous weather factor islfghtning; under no circumstances shOuld a'class be climbing during a
storm; the firs1 sight of lightning should terminate furtherclimbing plans\. In a light drizzle some cliMbing can be accompliShed if'the students are prepared with rain gear. Remember that rain will actas a lubricant, sb climbing will be slippery; be prepared for more poten-tial "falls." The instructor should be awdct_of illnesses such as frost-bite, hypothermia, hypoxia, pulmonary edema, asphyxiation, pulmonarytoxemia, sunburn, and dehydration. For classwork, most potential dangerresults from the occurrence of hypothermia. This occurs when the core.body, temperature drops due tO a lack of insulation, dampness, and insuf-ficTent food consumption. 'The students will'need to be reminded to weerwarm clothing,'hats, and gloves when not climbing. "Shivering" studentsre showing the first signs of hypothermia and should be attended toimmediately by giving them hot liquids and warm insulation.
Attempting to teach climbing in the midwestern "flat" sWes is aproblem and some teachers might be tempted to use liwstone quarries.This should be.discouraged because many such quarrie's have deep water intheir interior Ind these preseq addi.tional\hazards. Also, many quarrieshave been blasted wiiiidNamite'rnrpossessAmany loose rocks that might
. fall or showertudents. Natural outcroppings,,cliffs and chimneys aresafer since they exist because of their,naturatofiard qualities; theseareas stlould be pursued by the instructor.1/4,If quarries must be used,
." they should be "hard-rock" quarries, suf0 as granite. Dolomite is perhapsthe least qualitysof rock that could be used for class work Limestoneand sandstone shouTdIonly be used with caution.
There might be other natural hazards about which the instructorshould,be Cogniant, such as.snakes and poison ivy. Again., a discussionwith antauthority familiar with the area will reveal these risks. Ifthese na*al hazards do exist, every attempt should b made to avoidthem. It is not in the best interest of the enviTonment to'attempt toeraacate them in thae they fit into the scheme of thAs habitat. Theirpresence might'require climbing in apother area.
In establishing rules, f the class, the instructor shouldrememberto rationalizt tfte rules to s dents. These rules should besafety and.logistitally-orientated and. for the sake of maintaining aulhority.Students should be instructed to sit down and await i,nstructidn uponreaching the climbing site; Under no-circumstances should students besolo climbing/scrambling unprotected: Most students will want to.beginclimbing.immediately; this enthusiasm ts good and should be capitalizedupon by.the instructor. 'After all, that% the wholle idea of the venture.Time tan be saved.by having people put on their support devices (such asswami belts) While on the bus and by the instructor's assembling,the
elanchors and ropes before the class begins.11
10THO ROCK CLIMBING 'MACHIN() GUIDE
.4,For beginners, the 'three-point rule" (pages 4'-5) should be insisted
upon. After several climbs, the students will utilize this safety concepthabitually. Students should be on belay; attached to an anchor, or atthe security area beyond the climbing vicinity, at all ttmes. They
should not be climbing without a woe and a trained belayer Or standingthe summit/bn a ledge without tome form of protection,
Permanent, strong, and massive anchors should be used. This mightbe in the form of a tree, boulder, cemented pipe or some other permanentstructure. If not available, then artificial anchors (pitons, nuts;chocks),placed only by theteacher can-be used. All anchors should bedauble checked for_stability and support. Familiaritymith readilyaccessible anchors-are essenttal for a safe climbing class.
. Top-roping, which-is a climbitig method that eliminates the hazardoas'process of lead climbing, should be practiced by a student climber forat least two years before any lead climbing is attemptpd. The "top-rope"
method, if properly used and assembled, will provide safe practice cli.mbingby a class of avehge students. The wonderful feature of this techniqueis that students can learn all the psychological and physical conceptswithout risk. The task of teaching lead climbing is material for anothertext.and will not be discussed.here. The mechanics of assembling thistype of belay, or the related "over-head belay" will be thoroughlydescribed in the instruCtional Phase of this material.
If students, after.being taughtare permitted to place any rigging,.sueh as the top-rope,that rigging should be thoroughly checked.by theinstructor before its use.. "The`anchor point, It should be reemphasized,is to be only a natural anchor (such as a tree). 'and not aniartificial e- ,
anchor (suth'as a piton) .for ttudent placement.
Before progressing to the equipmentphase of the manual, student"rules' shatild be reexamined:
1. Solo climbing and scrainbling (without protection) is to be dis-*
couraged. .
2. Beginners should utilixe the three-point rule consistently.3. All students dtrectly engaged in the activity should be either.
on belay or anchored at all times.4% "Natural" anchors are to be used os much as-possible.5. Top-roping/over-head belay are to be used exclusively for the
first two years of instruction, Lead climbing by the students is'to b0
discourage0..
6. 'Any student assembled anchors should be doublerchecked by theinstructor.. Only "natu 1" anchors are to be used by students.
SAFETY
.,
'
11
=NIM11
EQUI41ENT NEEDS 'AND, CARE
Normally any institution is plagued with the problem of 4 fixed -budget. Therefore, the cliMbiag ins ructor will have to justify the .
equipment he purchases as being abs utely necesSary. There are manypieces of equ' ent that are expen ve and too sophisticated for a classof beginners; rem'itnbering that sim licity4enhances learning will alsoajd in coping. with the budget limitations. Caution should be exercisedin purchasing anchors; there will be little need for many anchors, hammerg,and jumars at the beginning levels of climbing. It would be more func-tional to purchase, more "basic" equipment initially anchadd more advancedequipment later. The general trend-is to hastily purchase several ,use.,less "gadgets" rather than many of the badly needed%essentials.
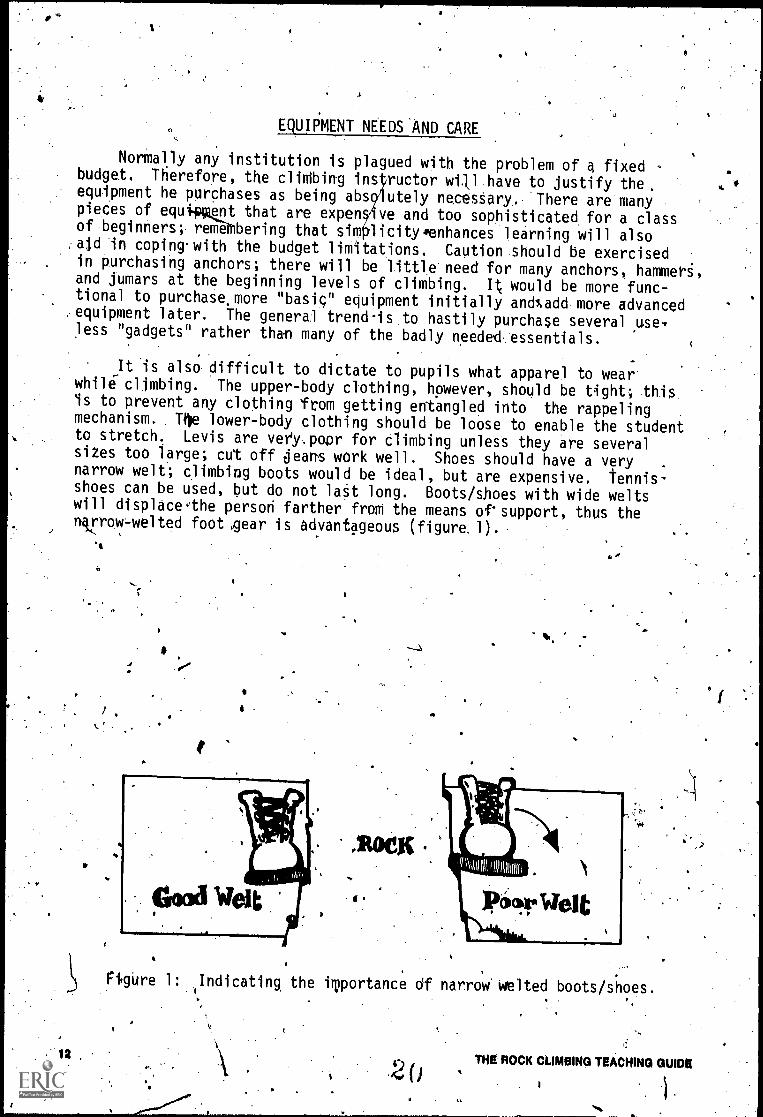
It is also difficult to dictate to pupils what apparel to wearwhile' climbing. The upper-body clothing, however, should be tight; thisIs to prevent any clothing from getting entangled into the rappelingmechanism. The lower-body clothing should be loose to enable the studentto stretch. Levis are very.popr for climbing unless they are severalsizes too large; cut off eans work well. Shoes should have a very .
narrow welt; climbing boots would be ideal, but are expensive, tennis-shoes can be used, but do not laSt long. Boots/shoes with wide weltswill displace,the person farther from the means of-support, thus thenvrow-welted foot igrear is advantageous (figure.1).
0
is
4
,g1Ph011i[1111'11111111111
F$gUre IndicatIng the iwortance df narrow'Welted boots/shoes.1
IV
THE ROCK CLIMBING TEACHING autos
s
.,00
f. , ,
After the equipment has been procured, the instructor is delegatedthe responsibility of maintaining the equipment.... This will be important
in providing4adequate amounts of equipment for fu ure classes and keeping
t
the gear functtonally sah: All equipment should be marked with an)
identifiable schooTmark (oriname), the date of p rchase, and a numberindicating the sequence in which It was purchased. For exampre, cara-.biners might be marked near the trade name with: U. of U./77/1, Thiswould indicate that the carabiner was the property of the University ofUtah, purchased tn 1977, and was the. first carabiner unpacked in 1977.The succeeding.carabiners would be marked, using an electric-engraver,
. in order of unpaCking as: U. of U./77/2, U. of U./77/3 and so on.1 Thisprocess not only provides ownership infórmation, but also is a "running"inventory and proviojes mortality'information about the equipment. Felt
tip marks and paint do not work well on metal gear because they tend.to', ,rub qff the aluminum easily. Ropes are generally marked with coded
tape on.the ends which tell when they were purchased. Webbing should bepurchased. in bright colors and marked, using a lelt maning pen, utilizingthe same scheme as with the aluminum equipment. .
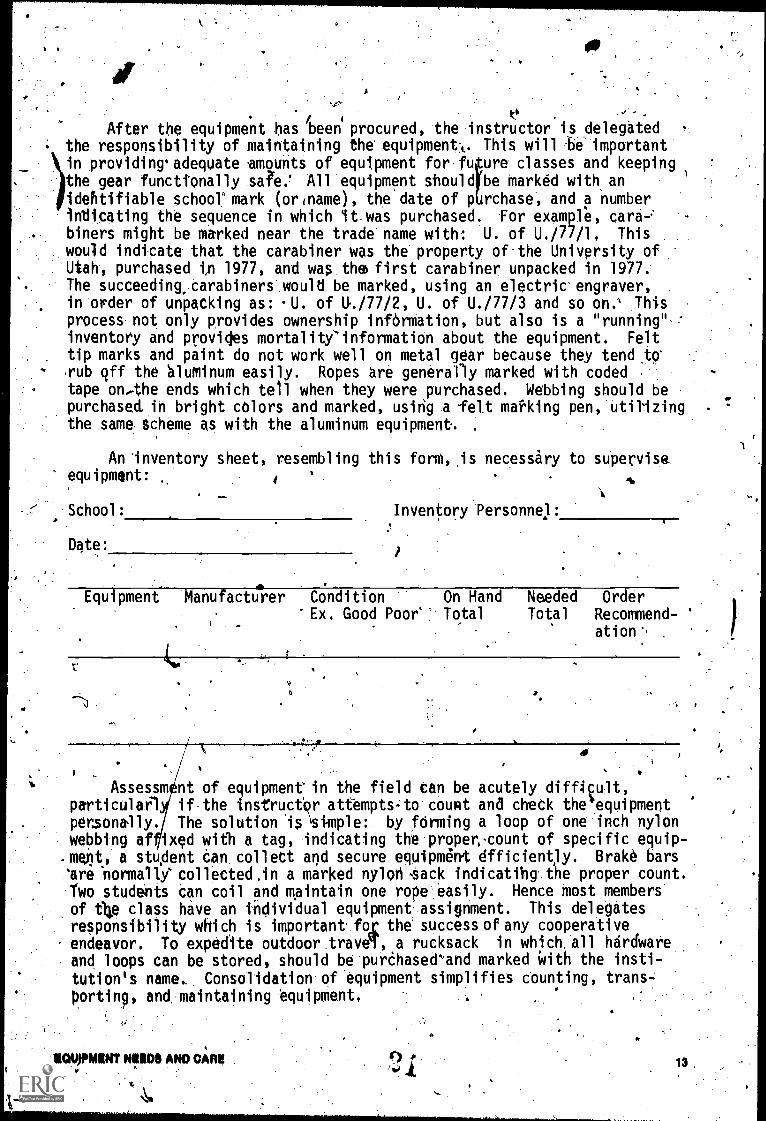
An inventory sheet, resembling this form,.is necessary to superviseequipment: i '
-%
s%
School: Inventory Personnel:
Date:
Equipment Manufacturer Condition On Hand Needed OrderEx. Good Poor' Total Total Recommend-
.
i0.1
4I
Assessm nt of equipmentin the field can be acutely difficult,p&rt1cular1f if the instAuctor attempts-to count and cheCk theequipmentpensonally. The solution issimple: by fOrming a loop of one inch nylonwebbing af ixed with a tag, indicating the proper,-count of specific equip--Mt, a student can collect and secure equipment efficiently. Brake barsmare 'normallYcollected.in a marked nylon-sack indicatihg the proper count.Two students can coil and maintain one rope easily. Hence must members
of f4e class have an individual equipment assignment. This delegatesre$ponsibility which is importantfor the success of any cooperative
endeavor. To expedite outdoor traveT, a rucksack in which,all hardware
and loops can be stored, should be purChase&and marked With the insti-
tution's name. Consolidation of equipment simplifies counting, trans-.
porting, and maintaining equipment,
11C14PIAIDITNI,INSANDOARN 13 .
. . .
.4 The rope is the most basic piece of equ, ipment and should.be the first.purchased, Ropes, may bepurchased that are manufactured in twb basicstyles:
..
4, t .
. l' ,
.Twisted nylon, which is commonly called by'the trade name "Gold...Line,"is the less expensive type and,-until broken in, resists easy-un- .
raveling.: The Kermantle roPe is superior in its ability to stretch -
and inrandling; however.it is more expensive. T6e. fibers of this' .,
Pylon rope are straightand covered, hence no^coAling or uncoiling problenfs. occUr. Generil1yAhe rope is a 7/16" or llmm diameter. For,class Climb-ing the rope lengtkkhould be three times the height of the practice
_climbs, however the Alpe length should not exceed 150- feet.. That is., if.the pitch of the climb is 50', thep thelength of the rope slicluid be150. This will provide enough rope for,the "top-roping' procedure plusan anchor for the belayer. This will be outlined more clearly in theteaching progression. Enough rope should be provided for each climbingstatiOn, not to'exceed seven; ideally, one rope for every three students'ell provide'maximum actiVity. Care needs to be taken in-purchasing ropebecaase there are several "off brands" that ao dot provide the-pecessary.strength. Insist upon Gold-Line/Kernmantle rOpe: Pe wgry of any cheapand limp Gold-Line'type of rope.
1
:Next, enaugh one-inch nylon webbing material will nee'd,to be purchased.to provide foe swami belts, seat qings and.loops,lbr.a class.. Slingsand sWami belts will require about-20' for each student-( total feet),loops,(ttnners) eeqUire about five feet each. Swami and s ing belts aresupp6et devices which are comfortable to wear for climbing a d rappeling.Loops are used'oVer eock horns, around treés', and chockstone's as points,of seturity, Loops also are used to storeand transport earabiners.6 .
.
-.....
1 Probably'the most éxpensive equipment necessalv Wi117be the cara-.binets.which are either made of aluminum or steel and are manufaCtured.in oval; "D", and locking HDL. Aluminum l's the mo4 deasirablecarabiner materiaidue to its lighter weight, Although there are several -,
br,ands of,these attdthment devites,,the. .S.M.C. and Eiger brands are mostprIzed for their dependability. .For maximum efficiency a typical classwill require two oval and one locking aarabiner for eath climber andthree ovals and one 'locking "D" for each climb.: 1 4 .
. ...Brake bars, which are used fOr controlling desCenti have been the ,
. , . .
subjictW myth debate. This is primarily, due to their habit of.openingup when the.rope ienot.plked ovethem properly; this'iS Anothee eeasonfor jnsisting upon belays as A back-up sYsteme If brake bp's are.used,'each student will need one. If the older method Orusing crossed,oval..,carabiners is used, then four more carabiners for each'pupil will need tobe purchasedk. Figure "8" descenders, an innOvhtion; are excellent if-used with Kernmantle 'rope. ..
Belaying does not require specialized equipment; however, theinstructor mightseriously consider the Figure "8" descender.or tshe StitchBelay. Plate with Kernmantle rope for the novice stnce they insure proper
o'
4.
4.4 Kilo THE ROCK CLIMBING TE4HING GUIDE
t'
beaying safety.. Ifthey are required, one per student or per Climb ondrappet will be needed. Helmets, .at least two for each climbing staiion,are required, preferably one for each student%I
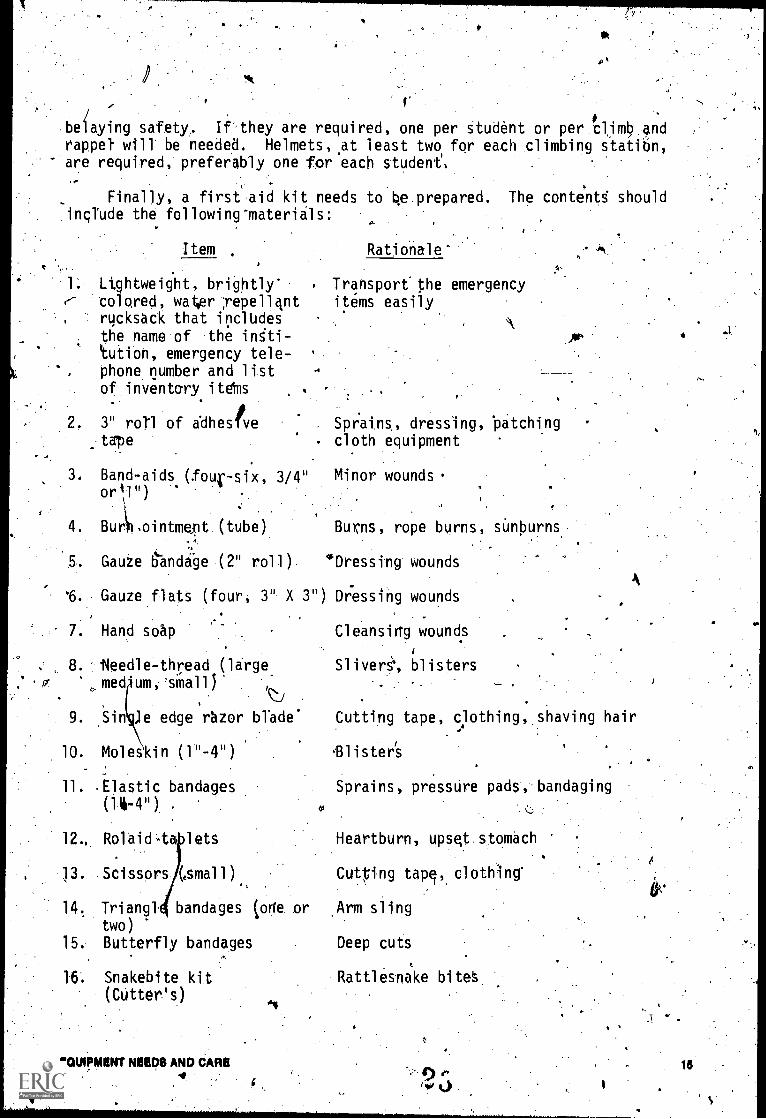
Finally, a first aid kit needs to e prepared. The contents shouldinciude the following-materials:
Item
Lightweight, brightly-,- colored, waVr xepellet
rucksack that inclUdes
the name of the infti-tution, emergency tele-phone number and listof inventory iWnis
2. 3" roll of ddhestetape
Band-aids (fouf-six, 3/4"oril")
4. Bukointmept (tube)
5. Gauze 6ndage (2" roll)
6. Gauze flats (four, 3" )( 3")
7. Hand soap
8. fleedle-thread (largemed'um 'small).
9. .Sin )e edge razor blade'
10. Moleskin (1 -4")
11. .Elastic bandages(14-4") .
12., Rolaid-t lets
13. Scissors (small)
14. Triangl bandages (one ortwo)
15. Butterfly bandages
16. Snakebite kit(Cutter's)
NOWNINT Naps AND CARE4
01
Rationale° .
Transport the emergencyitems easily
Sprains, dressing, 'patching -
cloth equipment
Minor wounds
Burns, rope burns, sünburns
'Dressing wounds
Dressing wounds
Cleansing wounds
Slivers°, blisters
Cutting tape, clothin
.Blister's
Sprains, pressure pads
Heartburn, upset.s.tomach
Cutpng taps, clothing'
,Arm sling
Deep cuts
Ratt1esT4ke bitet.
0
shaving hair
bandaging
15
.,2

) r ,4 S.
(Firtt'aid kipicon)
17. :Thermometer(with case)
, Pliers (smallnpedle npse)
4
gody and 'water tempgratures,
Removing needles, fishOoks VP!!
Ntional Other Equipment To-Be Considered
I
Tf
4.
19. ,Blow-up splint . Fractures. toese do not work welli'1-arm, 1-leg in the cOld.
, -
20. ,Space blanket (1S 'Emergency 'llelter.
21. Chemical ice-paCk 'Sprains and minor injuries/
22 ' TwOarge ghrbige. Hypothermia victims'bags (heavy gauge).
23. Coins (dimes, nickles) Pay telephone calls'
24. Matches (in water:- For."hypothermie/firesproof container)
25. Water purification For emergency-watertablets
26. Sierra cup For heating and-drinkin§, watera
27. Swiss' Army knife ., Has tweezert, awl, saw and
a
I. ,
4
cutting'blades for many uses
fb
Blisteri, a common climbing.and baapacking problem.
IMO ROCK CLIMBING TEACHING GUIDE
Belpw tsof a class of
Item
He l mer.,
!We,
Rucksack/
1" Webbin0
0.4
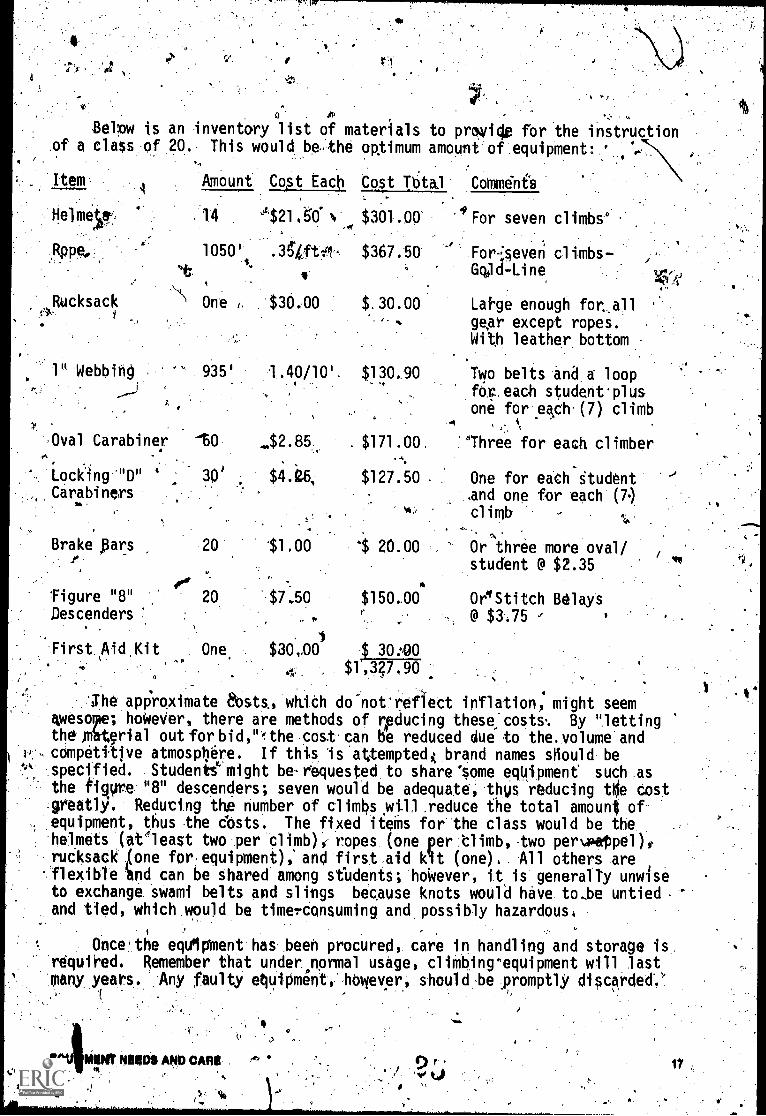
an inventory list of materlals to prewicle f'or the instruction20. This would be,the optimum amount of equipment:
Amount Cost Each Cost TOtal Commdnfs
, 14 s.'$2l 0. N $301.00
1050' .3,4ftel. $367.50$
''t t
One i $30.00 $ 30.00'
935' 1.40/10'. $130,90
Oval Carabiner 'BO
Locking '"D" 30'
Carabiners
_$2.85.
Brake pars 20 $1.00
figure "8"
Descenders
Fi rst ,Ai d Ki t
""
For seven climbs°
Forlseven cl imbsd-Li ne,
Lahge enough forallgear except ropes. .
With leather bottom
WA'
Two belts and a loopfor, each student pl us
,
one for .each. (7) climbA
$171.00 °Three for each climber
$127.50 . One for each Studentand one for each (7.)cl imb
0
$ 20.00 Or three more oval/ ,
student @ $2.35
20 $7.50 $150..00 OrlStitch Belays@ $3.75
One. $30,.00 $ 30:00
4 $1,3?7,90
apProximate ants, whiCh do-noVreffett inflation; might seemawesolye; hoWeVer, there are methods of rpducing these:costs.. By "lettingthe Oterial out for bid,"*qhe cost can be reduced due to the. vol ume' andcOmpetitive atmospf*re. If th$s is 'a1tempted4.brand naMes sliould bespecified. . Students'Imight be- eequested to share 'Some eqUipment such .as
the figure: ".8"- descenders.; seven would be adequate; thus rtiducing t)e Costgireatly. Reducing the nuMber of climbs will .redUce the total amount of-
..equipment, thus the dOsts. The ftxed iteiiis for-the class would be the'helmets (at'l east two Ter cl imb) 0- ropes (one pet :Climb, -two per4ibeippel ) t
ruCksaCk.(one for equipMent) and fi rst ,ai d (One) ... Al 1 others ate.JleXible 'and can be Shared' among stUdents; hoWever, it is generalTy unwiseto exchange. SWami belts apd slings because knots would have to,be untiedand tied, which mould be timerConsuming and:posSibly hazardous.
I-
Oncethe eqUi went has..been procured, care in handling and.storage isrequined. Remember that under normal usage, climbing"equipment will last'many ,years..: .Any faulty etluipment.t.,hOwever, shou1d be Jromptly di scarded,'.
4A.
it ,
r

Under. no circumstances should improvised or homemadet'eqUiplitent;be used. .
. ) ..% IP. . .,Equipment purchased in volume is less-expensive. With ropes and -
.yebbing, this will mean a method-for-cutting.and Securing the &kis will''--have to be developed. There are five technlques'that miAt be used tO ...Iaccomplish thisitask of preventing. the' ends from fraying, .
.1. The ends might'b'e simpiy.cut and taped. 'kis is'nqt,a'Oesirable. techniqUe because the tape'will peel off and-the rope/webbing.wijr startto fray. ' ,
..
tiL. 2. The ends'may be cut and knotted. This generally hoTds;,however,
the' knots make tying other knots very difficult ahd sOumsy. i.S. Rope ends may'be whipped. . This works very well; except that it
is time7Tonsuming (figure 2). . -,..(- _.'
Figure 2: Whipping the rope with lirght nylon thread/line. ......
4. 'Another technique that kirks well -IS tO cut4he ends, fuse themwith some,heat source such-as a match, lighter or tarch, and bape theends with plastic electrician's tape,. Webbing need pot be taped if the:-ends are well fused.
-5. Another method is similar to number four, except the heat sourceis safer 'and the process is-faster. An electrical device, shown Dn'page 19,can-'be constructed that will cut and mel,t the ends.of the Tope/webbingsimulfaneouslyc ropes only need an addiVonal wrap.of :plastic electrital ,tapeto complete the process. Allthe materials needed art: 4 .
' a. Piece of nichrome wire about-one-foot longb. 110 vol t switch.c. Two electrfc fence insulators. . ..
,0. Coml.-and plug -
e. Transformer - efther an o,ld electric car ot"model train version,will work well , .f. A box to house fhe apparatus - ,.
g. Two screws

-4016 G A E 'G. C
, e
r..
goS
q
Ropes, are the most important piece of equipment since they link '
climbers together; normally they,will support approximately 4,575 pounds.Thergfore,, their care shobld'be meticulous in order tb maintain thisstrenkith. '-Several very important rules should,be thoroughly instillted11y the instructor./
,.. .
..
. 1, Ropes should never be walked urvp. This might destroy same of"the fibers within the rope.
2. RopeS should not be dragged along the ground.because rockcrystals will work their'way into the fibers and cutthe small strands ofrope
.
..
.
3. Rope should'not de stored near heat Rr on a sharp hook.4. Ropes shoulebe kept dry and dOled before storing,
. 5. Ropes should not be kept under tension for long periods' of time.6, Ropes shoul0 not be "run" over sharp edges. . - i
.
7. 'All klots should be Temoved before stortng a rope. ' 4 .
8. A climbing eope should not be usl,for any other purpose thanfar. climbing.
9. A ropeshould.be examined tfter any.serious climbing,fall.1Q.- A ropeshould be examined regularly. Retire the rope-if anyt
suSpicions frays or bulges lppear.11:: A Tope should be inspected after,beitiOtruckloy any siiable
falling rock.
LWashing.rope and webbing is recommended to rembve the dirt and tarp
rock crystiOs. This maibe sdfely,accompl1she0 by using detergent retow ,mended for ny)on materials and setting the automatic'whsher's heat controlufor'Vnylon" or !'gentreaction," 'then dtylng in the shade. Direct-sun-light over long 'periodt'of time, as well as oils,-spirits, gasolineand lacquer.thinners, is destrustive to nylon.
1,ICIUIPS1111W11111109 5ND CAR!
, Care of wpbbing,'because tt is made of.nylon,'a1to requires a visual ,It II
..019

ihtpection'to insure that knots.(such'as on runner?) are mtll tied, nofrkys,7ex1stl and no tape is present. IfTa piece of faulty.obbing'is dis-
/ coVered, it_should oe cut into small Oeces, lest somebody attemptt to .
uss it. Nylon is the only acceptable webbing material and .no substitutes .
can functionally be utilized. Cotton webbing looks similar, but will.'.,only support aftut 200 pounds.
Carabiners should "snap closed without hesitation. If for somereason they become deformed, they wip not close broperly,,thus causinga safety pc1441em. Often carabiners are deformed by,individual's hammerihg.on anchors with the, carabiner attached; this'practite should be discour-aged. A cqrabiner that does not function well should be immediatelyreturned to the manufacturer who generally will replacd the item if. ithasn't;been abulpd. Another reason for returning a faulty'piece of equip-
\ ment is to enligNiten the manufacturer that something might be amiss with.,the item's design. '
Because helmets will be used by several individuals,.they should beadiustable and washable. The headgear will become sofled, therefore ,
proper hygiene dictate's occasional washing in Mild soap. Helmet straps1TROe-a.habi4 of wearing out quickly and.breaking, therefore the straps,4ould be Checked and replaced a.s. needed to eep the helmet on the stu-nt's 4ead Acurely.
,Anytime equipment is broken, lost, or Stolen, the techniqUes/methodsof de activity should be re-evaluated. Generally, with iclose investigas,tion, the reason for the broken or missing equipment can be discovered. \
&Iv
?ft. °'"
1 THE ROCK CLIMBINQ.TIACHINCI GUNN
-41
COURSE Of STUDY
. The neophyte instructor"need to be r4Min4ed'at this point that prb-gression is contingent upon several limiting'factors.. This proposedcourse of,study is designed to allow for instructional flexibility in aneffort to'accommodate ,these'factors. Among these factors are: ability ofindividuals in'the class, area of instruction, amount of equipment, abilityof the instructor,oclass time length, weather Conditions and length of unit.
Each daily plan will Jnelude tertain daily activities that will notbe repeated im a redundant manner, but need to be understood. Fdr exaMple,each day should include some form of physical, and psychological fitness'activities. A review period should ,also be tqed daily, not only'toreinforte learning but also to enlighten the instrUctor aS to theretention of the class. This also allows the previous day's absentees,an opportunity to catch-Up.
-
It should be noted that there is no mison a" climbing class casnnotfunctior coeducationally. This fohlat has worked well' with many agegroups, but requirRs instructional.patience. Students.who learn quicklyneed pot be bored; they can assist the instructor in teaching the day's
,task, such as helping teach a new knot to,the remainder of the class.Generally,.after learning a skill, the student becomes an aid, developing
Icomradeship with others;
'The format forthe class presentations will be conducted utilizingA the followin9 format, H6wever, if the instructor discovers a more'efficient seluence/combination, then it should be utilized. There is no.
'Asecret formula other than enthusiasm, P atience and common sense.
. 1. Objectives and rationale2. Areas '3. EquiOnent4. Conditioning exercises5.1 Teaching sequence6. Student evaluation7. Helpful hints-, 4 w
Session i--Introducing the Unit
1. Objectives and rationale. To introduce the rock climbing Ait,a film or a series of slide's might b useful. Rules as they pertain shouldbe emphasized, such'as dressing properly, beineprepared for Oie activityon time and using rational judgement.
2. Area: Any confined area Where the class might feel "together", would be appropeIate.
.
,* 3. Equipment needed as required:4 Projector' and film, are usuAllyhelpful but most films must be ordered well in advance of the des-1HWshowing date.
4. Coditioning exercises: Students Lisally will not be prepared for. physical activity on the first day. HoweVer, the instructor should,be
) .4 . . 61 r)
0
CO \ -. MM OP ploY ../.
21

Cr
;0-exp1icit in announcing tHat activities will commence as scheduled.5. After the' film, a question and answer period is recommended. ,
Ignorance is iihe most clongeroul aspect of climbing.6. EvalUation: The instructor should ask queStions to gain an 4.
understanding!of the students' retention and interest.7. Hints: Films can be grossly overused. To teach rock climbing
necessitates being "on the rocks." One or two films/slide-sets will be -
adequate; if,this is an'elective class', the students obviously wish tolearn to climb; not watch someone else perform. Any films shown shouldbe in good taste and no attempt should-be made to frighten students--per-haps there is enough apprehension already.
:,,
Session 4I--T1.-Point Rule
1.! Objectives and rationale: Rock climbing'requires building a newconcept of coordination. The goal 'is to teach the three-poInt rule(refer to pages 4-5)-and will require the students to learn to crawland walk' while moving only one appendage. This is not easy to do in thatmost individuals wa)k/crawl in appendage opposition.
2.. Area:-, Any floor-area where the students can "spread out" isadequafe. A wall will also be required.
3.. Equipment: Wine.. 4. Conditioning egkrise : 'The instructor shbuld be sure the legs,
arms and lungs are exerMed ily. Runntng §tairs is excellent forclimbing preparation fbr seve6l reasons. FiNt, the students are forcedto watch their feet. Next, stair running keeps the runners on their toes,;literally, forcing dd\telopment of the.climbing muscles of the lower legsand feet. ghe concept of "going up" and "coming down" is learned. Theincreased "hup anp down" stepping will enhance cardiovascular 'Fitness aswell as any other type of running. 'Stair running for daily. exercises Willsbe excellent but the distance ant lenpth of exercise time should be at theinstructor's discretion and sho61111'not exceed five minutes.
5. Sequence: A wrestling mat is ideal for having students crawl ontheir hands end feet. Care shoulibe taken so as fb ut rush the studentsin this elementary acti'vity; studfts)aill have to thia about doing.this.On command they should "crawl" across the mat frontwards, then backwards,followed by sideways. Remember, only one tand or foot moves at a time
3) ,
22
4 \.'figUre 3: Practicing the thsee-pointorule,Ambving only one
hand or one foot it a time.
34'
THO ROCK CLIMBING TBACHING QUIN
I,
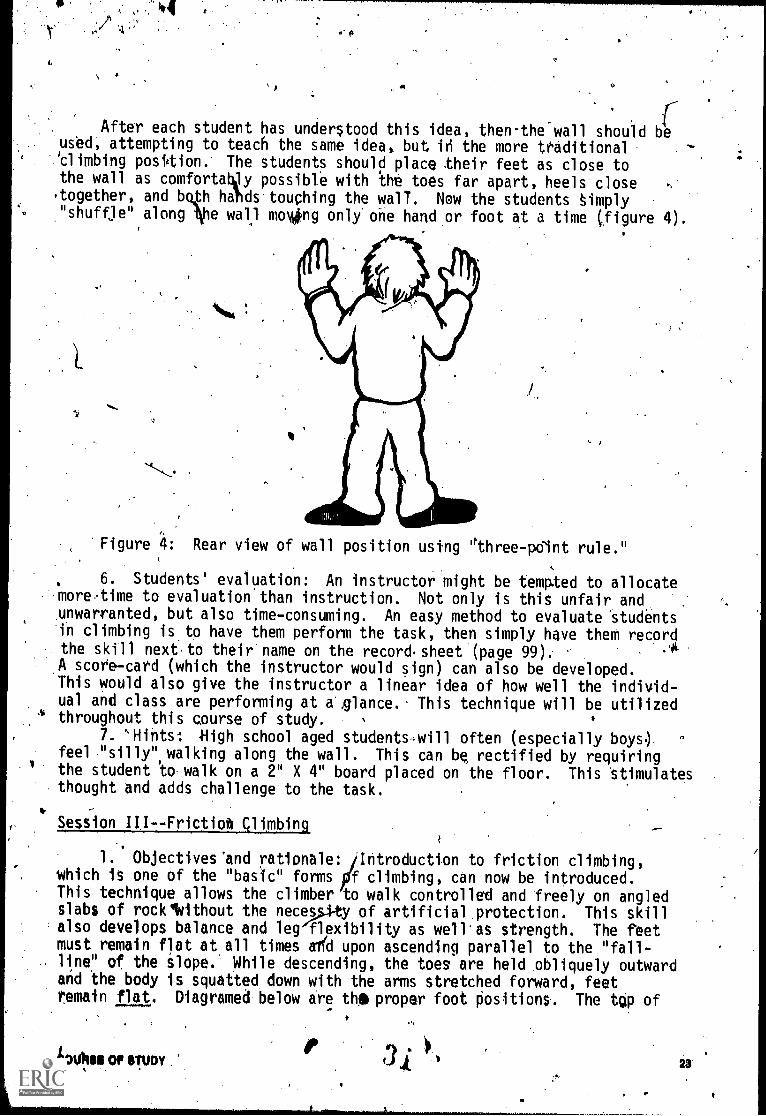
f-After each student has understood this idea, then-the wall should beused, attempting to teach the same idea, but in the more traditional -'climbing posittion. The students should place their feet as close tothe wall as comfortallily possible with 'the toes far apart, heels close'together, and boph habds touching the walT. New the students §imply"shuffle" along Ahe wall mong only one hand or foot at a time (figure 4).
Figure 4: Rear view of wall position using °three-point rule."
6. Students' evaluation: An instructor might be tempted to allocatemore,time to evaluation than instruction. Not only is this unfair and
.
unwarranted, but also time-consuming. An easy method to evaluate 'studentsin climbing is to have them perform the task, then simply have them recordthe skill next to their name on the record'sheet (page 99). .
A score-card (which the instructor would sign) can also be developed.This would also give the instructor a linear idea of how well the individ-ual and class are performing at a )glance. This technique will be utilized
' throughout this course of study. %
7. "Hints: Bigh school aged students-will often (especially boys) -
feel "silly" walking along the wall. This can be rectified by requiringthe student Ito walk on a 2" X 4" board placed on the floor. This stimulatesthought and adds challenge to the task.
*
Session III--Frictioa glimbing
1. Objectives'and to friction climbing,which is one of the "basic" forms f climbing, can now be introduced.This technique allows the climber to walk controlled and freely on angledslabs of rocklWithout the neces.0-ty of artificial protection. This skillalso develops balance and leg'flexibility as well.as strength. The feetmust remain flat at all times a6 upon ascending parallel to the "fall-line!' of the slope. While descending, the toes are held obliquely outwardand the body is squatted down with the arms stretched forward, feetremain flat. Diagramed below are the proper foot Positions. The tgp of
60101111 OF STUDY
e
23
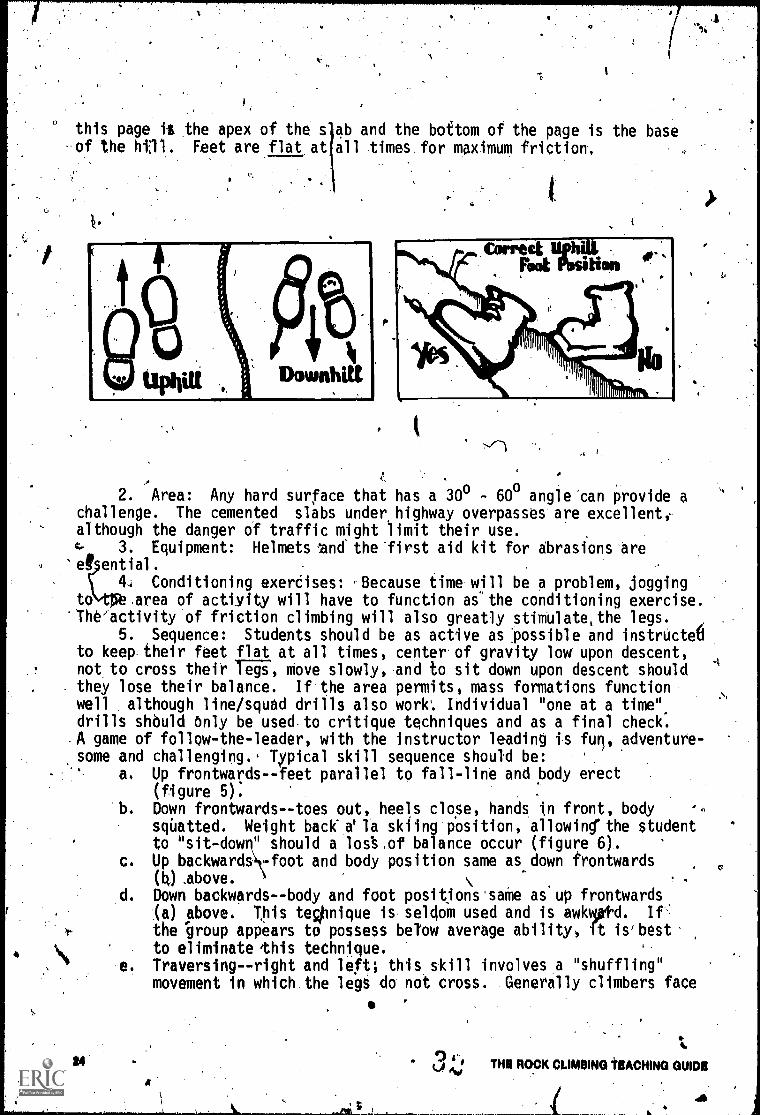
this page is the apex of the s 0 and the boitom of the page is the baseof the hal. Feet are flat at all times for maximum friction. 9
Cwrttct,tinsi,
'1117"ii
2. Area: Any hard surface that has a 300 - 600 angle can provide achallenge. The cemented slabs under highway overpasses are excellent;although the danger of traffic might limit their use.c- 3. Equipment: Helmets zndthe first aid kit for abrasions are
9 'et ential.4. Conditioning exerdises: 'Because time will be a problem, jogging
to area of actiyity will have to function as"the conditioning exercise.The/activity of friction climbing will also greatly stimulate,the legs.
5. Sequence: Students should be as active as *possible and instructetto keep their feet flat at all times, center of gravity low upon descent,not to cross their legs, move slowly, and to sit down upon descent shouldthey lose their balance. If the area permits, mass formations functionwell although line/squad drills also work'. Individual "one at a time"drills should Only be used to critique techniques and as a final check:A game of follow-the-leader, with the instructor leading is furl, adventure-some and challenging. Typical skill sequence should be:
a. Up frontwards--feet parallel to fall-line and body erect(figure 5):
b. Down frontwards--toes out, heels close, hands in front, bodysquatted. Weight back. a'la skiing position, allowing'the studentto "sit-downshould a los of balance occur (figure 6).
c. Up backwards -foot and body position same as down frontwards's,
(4) .above. \d. Down backwards--body and foot positjons'saMe as up frontwards
(a) above. This teOnique is seldom used and is awkvotd. If
the 'group appears to possess below average ability, ft is'best
4 to eliminate this technique.e. Traversing--right and left; this skill involves a "shuffling"
movement in which the legs do not cross. Generally climbers face
cotwit 41- MB ROOK CLIMBING *MACHIN GUIDO
_

down the slope whenktraversing, utilizing "down frontwards"movements. -
,f. Combinationsr-any combination of a-e listed above.g. Teacher-led "follow-the-TeaderA
4
j.rigure Peoper Uphill friction
climbing position with- feet flat, body erectand,arms* outstretched
forward.
'
Figure 6; Properdownhill. friction climbihg
position with feetflat and toes out,weight back, kneesbentiand arms extended
^ forward. ,
6. Evaluation: Students will self-check each of the movements ontheir record sheet.
7. Hints: Students should watch their feet at all times, partic-ularly when moving backwards so fhey are not moving blindly in any direction.
..Cari.should be taken that the sloped area is not grassy or sandy since this'will Increase the number,of falls.
P Session IVEquipment Maintena
A1. Objectives and rationale: Introduction and care of equipment'
is paramount. After this session the students should be responsible tormaintaining, securing, counting and packing gear. Time will not allot./ the
instructor to accommodate all these tasks. Respopsibility is an integral
aspect of climbing; hence, the students need the practice of equipmentmaintenance, not the instructor.
2. Area: Any area that will allow the ropes to be stretched comrp4etely out will serve nicely. When the weather cooperates, this mightbe accomplished outside on a grassy area under pme trees. The instructorshould attempt, however, to secure an area where thereatre not many dis-tractions such as other classes and/or highways.
I, .'
(*WW1 OP STUDY
\
0
p.

3. .gquipment: .A11, the equipment must be examihed. This includes '
ropes, webbings, oopTTbrake bars., locking "D" carabiners, and ovalcarabiners. All items,should:be inventoried before the first Vass.
- 4. Conditioning.exerci5es: Utilization of the stairs can he usedonce again as. well as ftnger-tip push-ups-and overhand pull-ups to developthe arms in preparation for face and jam climbing.. . 5. Teaching sequence: It's imperative that all ciass members knowhow to coil and whip a rope. Save all other aspects of equipment main-tenance forlinotber session, itneed be, to insure that everyone has anopportunity to poil'and,whip a rope. A tangled rope'is impossible tothrow/carry correctly. If a rope is not secured properly-, the student'should attempt the chore again until succe§s is achieved. It is easierto.coil a rope that is stretched odW, otherw'se it will tend to coils ihithe .same manner in which it left the factory spool. The students might!find it more'feasible to coil the rope left-handed or twist the rope-with the right wrist while coiling tt. The Instructor needs to continuallyremind his students about equipment "rules",, especially about not walkingon the rope and Other equipment. The recommended sequence.for:equipmentintroduction is:
a. Care and handling of ropes as listed in equipment section:b.'/ Coiling and. whipping the ropes. Loops should be large enough to
carry. The simplest method of-coiling is shown below (figure 7).
Figure 7: Sequence for coiling the rope.
c. Care and handling of carabiners as recommended in the equipmentsection. CarabineWshould be secured on a loop with a tag at-tached that willindicate the inventoried number of carabiners.
Si
MR ROCK CLIMBINGilACHINCCOUIOR .
,,

. ,Storage of brake bars for rappelli g--stored ih a nylon bag vaitha tag attached that will indicate the inventoried number of trakebars.
.f
o' *
Method of webbing storagefolded several times and simply tiedith an overhand knot and tied lag-ether on One loop with a tdg,Andic4ing the'inventoried number,of webbing pieces.
r.
Introduction Of contents of first aid kit and safety yules thatmight pertain to this area and class actilvities.
g. Method of packing backpack for storage of all gear exCept ropesand,first atOkit.
6. Eva1uation4 Students should Check the appropriate "box" forcmpleting the rope cOiling and webbing tying tasks.
7. Hints: Students should be allowed to make some mistakes and seek'help from the instructor or-another student. This"interaction is gratify-,ing for both individuals. For a rope to be properly coiled, it should betight with thg coils just large enough to fit over one arm and the head.The coil should never be allowed to "drag" on the ground. To handle theequipment pack properly, it should be handled and placed on,the back bythe lanyard and not by the shoulder straps. The lanyard is closer to thecente. of gravity.andpicking up the kick by its strap might result in itsaccidental removh1., "
Session y-TBasic Knots
1. Objectives and Ohtionale: This $ession is devoted to the intro-duction of Orpona4 support equipment; basically, tie equipment to them-
, selves. .It's essential that each student .know the fundamentals of support4 ,

i
el/:0Systems to provide self/partner.protection. A re-emphasis should be maderegarding the importance of simplicity. The class coUld digress to.a.Boy Scout'knot tying class unle$s the instructortakes necessary'pre-cautions. Only two essential knotpatterns' will be discussed. The firstis the simple overhand.knot with WO most students are familiar and thesecond.is the old, reliable bbt4line. KnOwing these two knot patterns; a:c/imber can protect himself and his pairty adequately.1 .
The overhand knot (figure 8) is the basic knot upon, which the over,hand loop, the overhand follow-through and the overhand follow-through"tte-on" are .built. The students will be familiarmith.the overhand knot.because they have been usipg it most of their lives.
Figure 8: The simple overhand knot, t'lle basic knot forbuilding other knots, H,
The.overhand loop (figure 9),is a looped piece of rope which is tiedwith the same overhand technique as the simple overhand knot. This loopedoverhand knot is used for''attaching students to the rope with a carabiner.for fast exchanges of climbs, anchors and rappels.
26
alb
A
figure The overhand lobp knot.'
-
I
THE ROCK CLIMBING TEACHING GUIDO

r
The overhand follow-thpugh (figure 10) iS a very important knot,because it is used for tieing ;the webbiqg around the climber/belayers'waist. This knot will require moreyatience due to its apparent difficulty.The knot is based upon the simple overhand knot, which is first tied loosely'.Then the other end simply follows where the firs't end exited. With allends pulled tightly, the overhand f011ow-through provides an excellent andsecure knot.
A:
Figure 10: The overhand follow-through knot.
The overhand follow-through "tie-on" knot(figure 11) is also basedt upon the simple overhand knot, but is used for tieing the 'rope to theWebbing, therefore linking the climber/belayers/anchors. To tie this knot, .one loosely tied overhand knot is tied about 18" from the end. Then theend is laced around the support webbing, and follows the rope back fromwhere it came. This knot is used to fasten climber/belayers/anchors which'are not frequently exchanged.' Another advantage to this system is-that acarabiner is not used, thereby eliminating the use of an expensive piec4of equipment. For students with lesser ability, the "tie-on" method isbest because they will be less likely to remove equipment accidentallywhem they become excited. Nevertheless, this knot is easy to tie, strong,and functional.
Figure 1.1: The overhand follow-through "tie-on" knot.
COURSE OF STUDY 20

The bowline (figure 12) is an ancient knot that wa used by Marinersas well as climbers in the past. This knot is important as a means forottaching a rope to one's self or to an object such as a tree or boulder.To ti-e this kRot, the end 9f the rope is brought around the waist.c Thena small loop is made close to the body with the long end of the rope.The short end of the rope, which was brought around the body is placedthrough this loop; study.figure 12 carefully to understand what directionthe rope goes through;, Pull the 5hort end until the knot js,close to thebody. There are several "games"-which can be used to teach this knot;however, this shoyld be discouraged beCause the ?game" does not work wellin the dark or in the reverse position of tieing the bowline around a tree/other anchor. The functional aspect of the bowline is' that none ofIthe,ends will move and therefore it will not form a slip knbt which would"strangle" the falling clfter. ftviously, thetowline attachment iseconomical since no webbing or carabiners are used. However, the knotwill have to-be tied and retied after each elimb/rappel.
Figure 12: The =bowl in tied around an object,
The secure knot (figurekeep the bowline and the overnoccur because Rylon s very. sli
climber/belayer has walkedor clreason.why knots should bp frequefor a secure knot is to consume al
3) is used for several reasons. First, tond knots from.uhtleing. Iptieing mightery and will tend to loosen after thebed 0 long distance': This is anothertly phecked. The second major reason
t Te extra webbing and rope after thebowline or the overhand.knot has bee tied. This is importanttecauseany extra webbing or ropit, might get c ught in the rappelling mechanismwhile descending or in a crack oR the ck surface while climbing. Itshould be emphagized that the secure kno is only used as4a means ofseCuring majoh knot and for consuming xtra material, not as a means.--of support,
Secwe Knot 0 POINTING AWA1)
'Overland ronowlhaigh
Figure 13: The seciire knot t16 after the overhand ollow-through.
IOCK CLIMD G TEACHING GUIDE
_

4
2. Area: An area where students can converse and discuss bot prob-lems should 'be used. Again, an outdoor area works well.
,
3. Equipmeni: Students are responsible for maintenance of webbingmaterial and ropes.
.i
4. Oonditioning!exerctses: On days when no physical climbing takesplace, a strenuous workoueshould be utilized..
5. Sequence: NG roped climbing can oecur until all students under-.stand and can efficiently tie the bowline and qurioverhand knot variations.
-KnotS should be taught in the fbllowing sequence, using the.appropriate.
t equipment: ..
. ...
.
a. OverhAnd knotusing webbing or rope.
,,b. Overhand loop--with rope .
7c. Overhand follow-through--using webbingd. Tying on with overhand follow:throughy-around partner's wrist
4
e. Bowline.around self--using ropef. Bowline-around an Gbject--using rope'6. Evaluation:- Each student needs to show the instructor ihat he
knows how to tie the appropriate knot. The.instructor should then record.the student's performance. This is one time 'when the sibudeptS do.notrecord their own performance.
7. Helpfulthints: Each student always ties his own Olots. Thisconcept might be timerconsuming, but is necessary. Students who progressrapidly may helpcotheestudents or learn more advanced "optional" knotssUch as the ftgure "8" follow-through, figure "8" loop and the clove'hitch,
. Knots that are tied together "end for end" (coierhand follow-through) aregenerally easier to teach.using.two different colored pieces of webbing.All support systems should be tied with the knots,close to the object.The knot is always the weakest part of the systerk.-7-61: example, the bow-line will tetain 65% bf the rope strengthvand the overhand loop will re-tain only 49% of the original rope strelibth.
A.
Students in a knot tying session. Students are responsible for.tying their bwn knot. AO all knots should be visible. A
. 14COMICS OF STUDY., 31
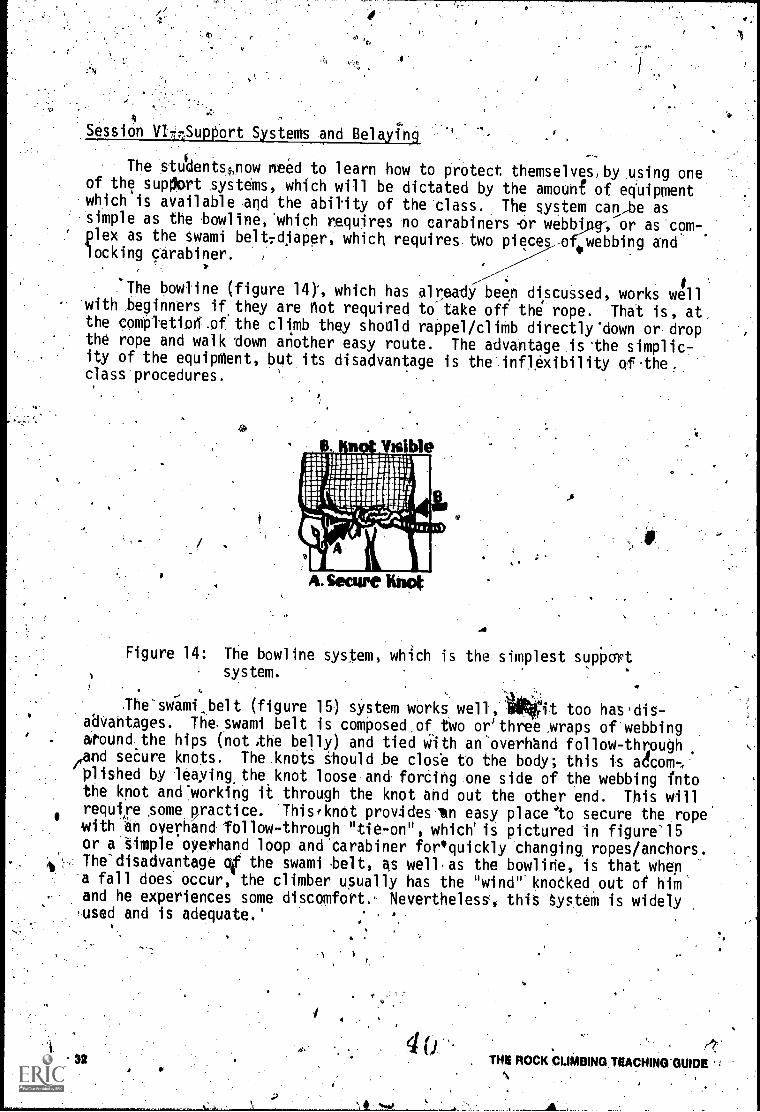
Session VlimSupport Systems and Belaying
The studentsoow need to learn how to protect themselves,by using oneof the supOort systems, which will be dictated by the amouhf of equipmentwhichbis available and the ability of the class. The system can,be assimple as the bowline,'which requires no carabiners .or webbjp, or as com-.plex as the swami belt:diaper, which requires two pieces-o owebbing andlocking carabiner.
'The bowline (figure 14), which has alreadibeen discussed, works wellwith teginners if,they are not required to-take off the rope. That is, atthe completion of the climb they shoald rappel/climb directly'down or dropthe rope and walk down another easy route. The advantage is.the simplic-ity of the equipMent, but its disadvantage is the inflexibility of.the,class procedures.
;
4
Figure 14: The bowline system, wh4ch is the simplest supportsystem.
,
he'svi-ami,belt (figure 15) system works well it too has.dis-advantages. Theswami belt is composed of two orithree wraps of webbing&round the hips (not the belly) and tied With an.overMnd follow-thrpughan dcd seCure knots. The knots should be close to the body; this is aomh,
/plished by leaying.the knot loose and forcing one side of the webbing intothe knot and-working it through the knot and out the other end. This willreq titre 5ome practice. Thisfknot provides In easy place'to secure the ropewith 'en overhand follow-through "tie-on", which'is pictured in figure'15or a Simple oyerhand loop and'carabiner foequickly changing ropes/anchors.The-disadvantage qf the swami belt, as well,as the bowline, is that whep,-a fall does occur, the climber usually has the "wind" knocked out of himand he experiences some discomfort.. Nevertheless, this system is widely.used and is adequate.' : *,
- 32
4
4.-mu ROCK CLIMBING TBACHING*GUIDE I

...
111,
.41 a'ai
A
.0 t
Figure 1 : Swami belt tystem, which is economical butuncomfortable when falls odcur,
.4
The leg. loop (figure 16). *stem offers several advantages. First,since it-suppOrts the entire hip girdle Alich ft the largest bone mass ofthe body, itsupplies the maximum support.: .Next,.it Isan integral system:which can quickly be.changod from belarto rappel to belay positions'quitk-.:,ly. Its.major disadvantages are-that it takes.a long time to fit the web.-.bing to the person properly.ind once the leg.lpops are tied (with overhand..1..00ps)1,,they are'difficult to untie.
k
a
The knot is tied by takirtg abobt a 26-foot section of webbing andtying two loops just:large A/lough for the thighs, then bringing the.extra.
:-'webbilig up in front of the body, wrapping At around the maistand tying,an overhand follow-through 1!tie-on" or an overhand loop and locking-carabine. Thisls almost a harness.systeWwhich is safe and functional:
.
'1
I ,
Figure 16: The,leg loop syMem, which is comOlicatedbut comfortable.4 a
Couivo STUDY
it
.
33 1

se,
.4% sYstem' which has been found toi)e very functional'is the combi-nation tystem (figure 17) which.intorporates both the swami belt and thediaper. This system is Very siMple to put.on and offers easp.attachment:for anchorSiropes; 4however,thesystern requires two pieces.of webbing(about 13' each) and a locking Carabiner. The $wami belt has already
,been described.
The diaper is.normally used for rappelling and-involves "sitting" 16,
Into a doybled-over strand of, webbing, adjusting,.and tyingthe knot so asto-make the-diaper comfortable and supportive. The easiest method of" 1
4-determining where.the knot should be tied is to "sqUat" between the twoslIrands, reach down between thelegs and'grabc.the bottom piece Of webbing
..with the right hand. .Retain a grasp on the two loose ends.and keep themeJeven with theft handsome "wiggling" 011.help to wive the Webbing in,
to the-correct,position. Pull the twoloose ends toward thecrotchthe:gosition Wherre,the knot should be placed is whereiall the webbing comettogether. Mark thii spot -.rvith your left thumb an'd forefinger and refease
thrOugh with the other end, Ihe reason for keepingthe webbing ends at .
'the:webbing with the right hand, tie a loose overhand knat,"and.a follow-
equal length-is to help it Aetermining how far through the webbing should, go befOre the knot is tightened and secured. Normally this knot is not
tied while being held onto the climber._
ft
The combination sYstem (ffgure 17) Includes both a swami belt and adiaper which are,attached with.a locking carablner. This provide4s for ;
maximum-support if a fall.ShouldJoccur, because theentire hip girdle iscradled. Also,.anchors are easily attached for belaying and, foreMost inimportance, is the ease in which students can change from climbing activ-itiep to,rappelling activities. -This i important because students shouldbe dittouraged from tyingAnots and changing equipment at the suMMit of:any dangerout.area, RemeOber,'each student should be either pn belay or .
onchored, by-a:"back*up" sYsteM,'never unprOtected.4
A4-4
Thi 1109k,CLOABRICCTIACHINCI GUIDO
r

_Ffgure 17: The combinatien systeM, whichltfsimple,
safe and:comfortgile...!,. '. , ,..., ...
. 1. Objectives.and ratto41: Instruct 'the student to.place one ofthe safetysystems upon himself. Thris Provides 0 meant of attachMent toprevent falls while not climbing and a form ofprotecti.on whth a fall 4occurs while climbing. Also, tdlich the student the essentials of belaying.
.
'Belaying is the technique' used in rock411mbing4mOuntaineee'ing whereby onemember protects another member from a Serious fall.by using an attached
. ,rope system.I
s 4
There are four basic types of hafTesses.that might be used. The,sim-,
'plest is the bowline and the most coMfortable are the leg loop and com-bination systems. The instructor might wishlto teach only one simple
,'method, tw000r all four.2. Area: An area that will allow students to converse and move
about is reqUired. An outdoor area will mirk ftne, although an Jpdoorarea should be available in cdse of inclément weather.
3. Equipment: Webbing and ropes are necessary.4. Conditioning exercises: Use the same exercises as prpvious day.5. Sequence: Each student should be instructed to place one of the
systems upon his body. Then each rope end shduld be tied (using the.over-hand follow-through knot or an overhand ltlowand carabiner), to one of the"students. Thisinow places students into climbinq'pdrtners. Yith an over-'hand loop in the rope, one student (tke pelaftr) dan now be protected andand he, in turn, can protect his parper, (the, climber) uiing the'body belay \technique. Osing a mock (level) climbtng area and an improvised anchor,,students are now ready to practiceOthe %belay technique. The apparatusshou14,resemble the following illusgation.
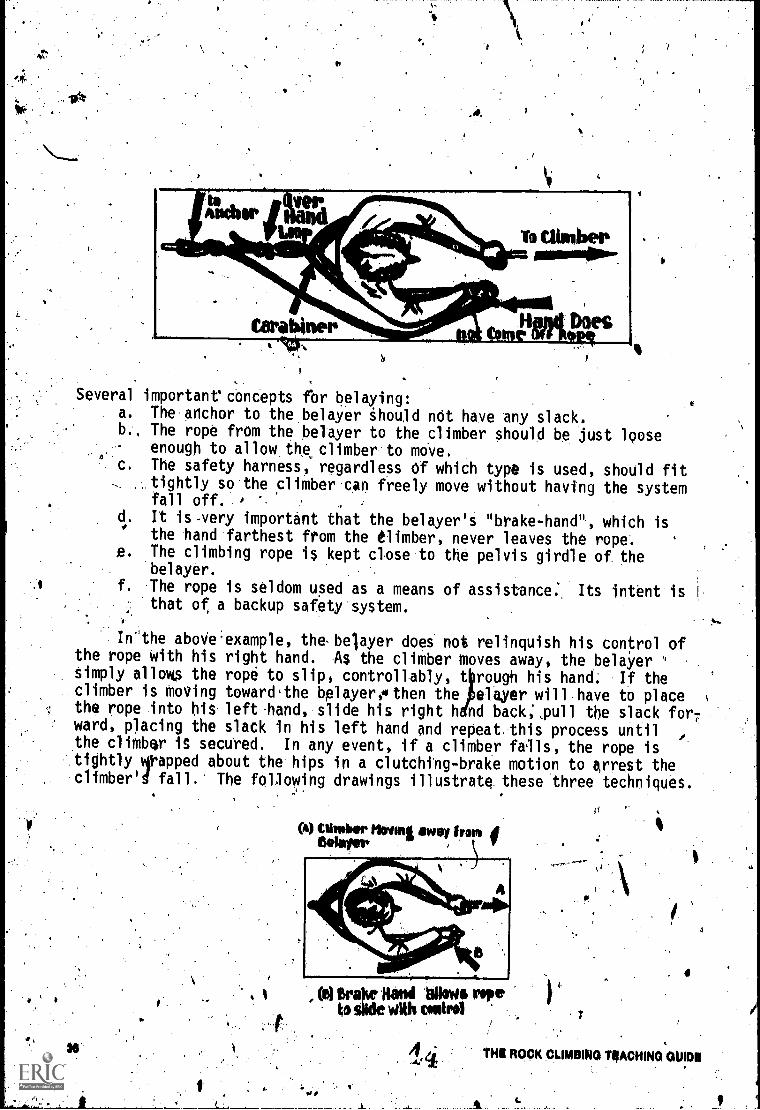
Several important'concepts for belaying:a. The anchor to the belayer Should mit have any slack.b The rope from the belayer to the climber should be just loose
enough to allow thes,climber to move.4 c. The safety harness, regardless Of which type is used, should fit
tightly so the climber can freely move without having the systemfall off. , . -
d, It is-very important that the belayer's "brake-hand", which isthe hand farthest from the Climber, never leaves the rope.
B. The climbing rope is kept close to the pelvis girdle of thebelayer.
f. The rope is seldom used as a means of assistance: Its intent isthat of a backup safety system.
In"the aboVe.example, th&belayer does not relinquish his control ofthe rope with his right hand. A4 the climber moves away, the belayer 4
simply allfts the rot:06 to slip, controllably, t rough his hand. If theclimber is moving toward,the bplayerethen the elayer will have to placethe rope into his left.hand, slide his right h nd back;,pull the slack for.7ward, placing the slack in his left hand and repeat this process untilthe climber iS secured. In any event, if a climber fa11s, the rope istightly %tapped about the hips in a clutching-brake motion to arrest theclimber'd fall. The following drawings illustrate these three techniques.
(A) Ctuebor MIMI away ironWafer
it
_
, (B) Brake Nand Wawa ropet. siide with antral
4.1'
. 4
MB ROCK CLIMBING TRACHING'Gthol

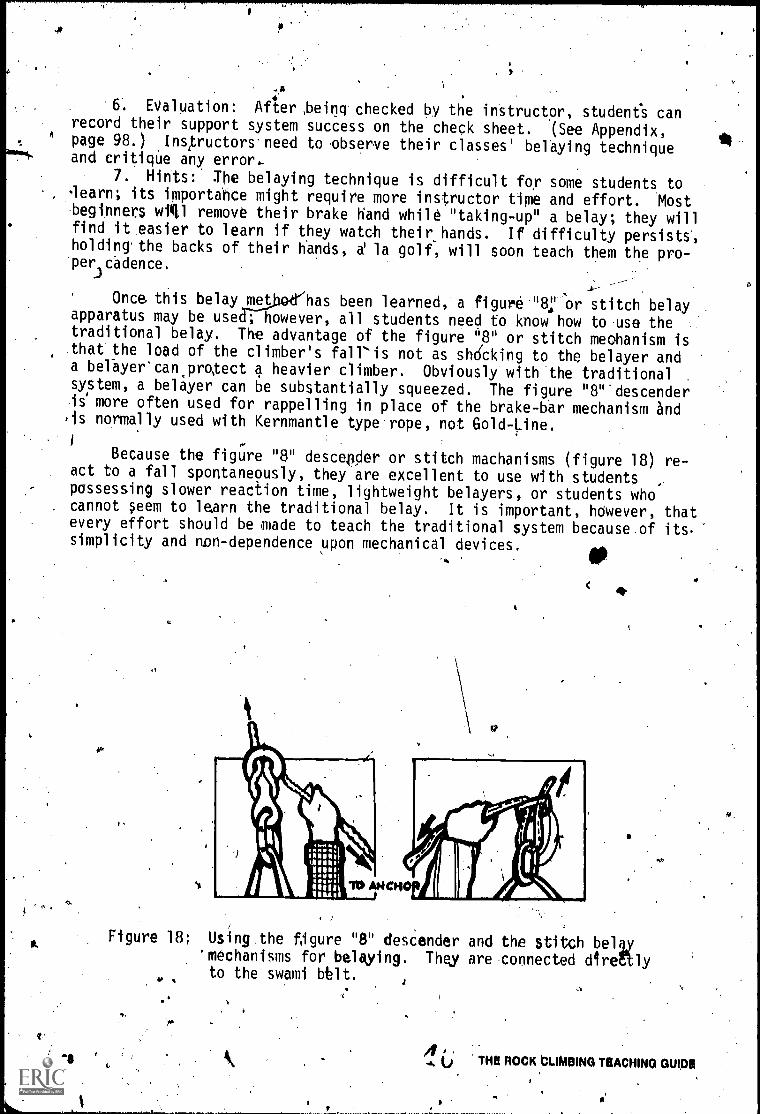
6. EValuation: After,beinq checked by the instructor, student's canrecord their support system success on the check sheet. (See Appendix,page 98.) Inqructors.need to observe their classes' belaying techniqueand critique any error..
7. Hints: The belaying technique is difficult for some students to.learn; its importance might require more instructor time and effort. Mostbeginners Oil remove their brake hand while "taking-up" a belay; they willfind it easier to learn if they watch their_hands. If difficulty persists,holding the backs of their hands, d la golf, will soon teach them the pro-per cadence.
Once this belay met has been learned, a figure "8: or stitch belayapparatus may be use ; however, all students need to know how to use thetraditional belay. The advantage of the figure "8" or stitch meohanism isthat the load of the climber's fall'is not as shldcking to the belayer anda belayer'can,pro,tect a heavier climber. Obviously with the traditional
,
system, a belayer can be substantially squeezed. The figure "8"'descenderis'more often used for rappelling in place of the brake-bar mechanism andis normally used with Kernmantle type rope, not Gold-One.
Because the figure 1I8" descepder or stitch machanisms (figure 18) re-act to a fall spontaneously, they are excellent to use with studentspossessing slower reaction time, lightweight belayers, or students who
. cannot seem to learn the traditional belay. It is important, hOwever, thatevery effort should be 'made to teach the traditional system because of its.simplicity and non-dependence upon mechanical devices.
. 1110
"lb MICH
Figure 18; Using the figure "8" descender and the stitch belly'mechanisms for belaying. They are connected direEtlyto the swami Wt.
THEROCK,WAINNOTEACHINAGUIDE
91
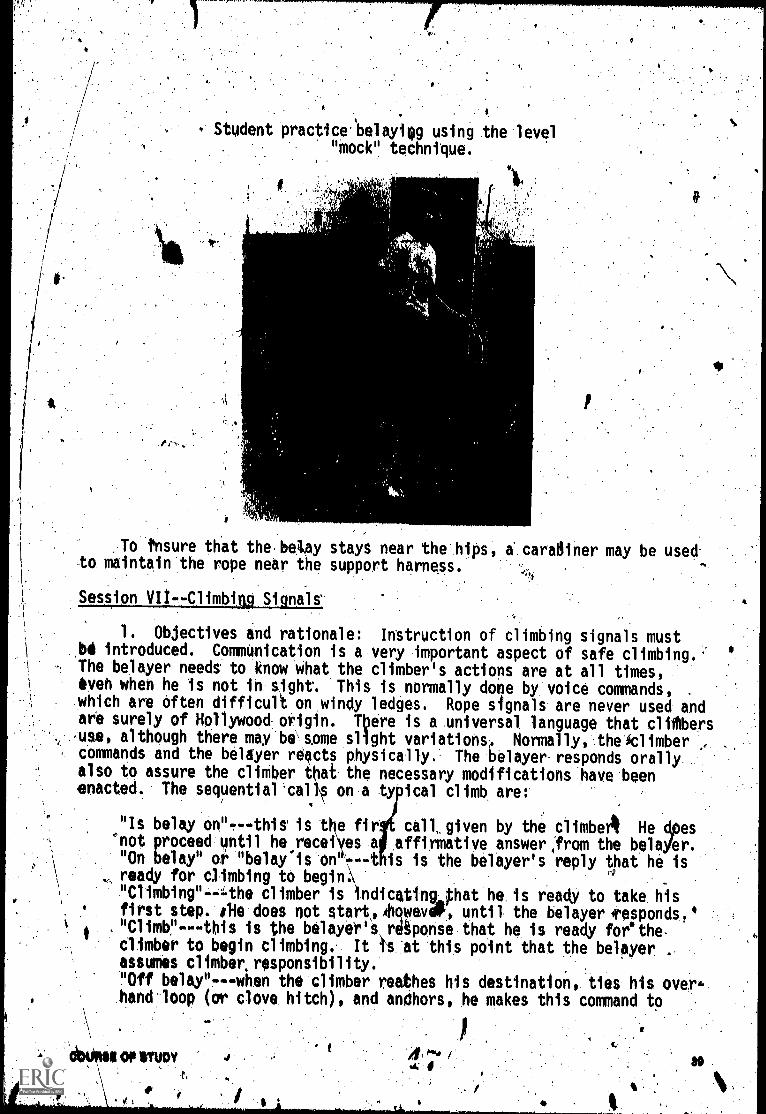
. Student practice'belayiog using the level"mock" technique.
0 6k,4At!
. To tnsure that the-belay stays near the hips,to maintain the rope near the support harness.
Session VII--Climbino Signals'
caradiner may be used
1. Objectives and rationale: Instruction of climbing signals must,bd introduced. Communication is a very important aspect of safe climbing.'The belayer needs to know what the climber's actions are at all times,ven when he is not in sight% This is normally done by voice commands,which are often difficult on windy ledges. Rope signals are never used andare surely of Hollywood origin. Ibere is a universal language that cltfters,use, although there may be' some slight variations,. Normally, theklimbercommands and the beldyer reacts physically. The belayer responds orallyalso to assure the climber t at the necessary modifications have beenenacted. The sequential call on a ty ical climb are:
"Is belay on"...--this is the fir call, given by the climbe04 He dpes°not proceed 4ntil he recefves a affirmative answer,from the belaYer."On belay" or "belay'is oe.---t is is the belayer's reply that he is
, ready for c3imbing to begin
"Climbing"--qhe climber is indicating3hat he is ready to take hisfirst step. Ole does not startohowevalP, until the belayeriresponds,'"Climb"---this is the belayet'S,r4gponse that he is ready forathe,climber to begin climbing. It ts at this point that the belayer .
assumes climber.responsibility.
"Off belay"---when the climber reathes his destination, ties his over-hand loop (or clove hitch), and andhors, he makes this command to
At
I OP STUDYe,

indicate that he no longer needs a belay."Belay is off"---is the belayer's respopse. The climber's respon-sibility is now his own. The belayer ik free to remove the belay.
, The end of a successful climb.."
Other signals that will need ;tote learned are:
"Testing"---used by a climber if he wishes to test a belay*his might be necessary.if it appears that.the rope mighmuch drag br a questionable anchor. ;.
"Test"---the belayer's response. He generally releases a small ampuntof rope and waits for, the test "tug.""Op rope"---if there is tooMuch slack, the climber will make thiscommand, whereby the belayer pulls the rope.,
"That's me", ",O.K.", or "thank you"the climber anriounces enough. slack/has been retrieved. Care needs to be taken.by the belayer so \
he does not pull the climber off his support during the slack re-trieval. '4
"Slack"---if the climber needs some rope for a tricky move/traverse \he vould'make this command. The belayer"gnly releases a small amount \
of rope at one time. When the'climber is/again ready to climb, heshould announce--"climbing.""Tension"--:-is used by the climber to diect the belaylr to pull the.rope with all his strenith. This is for rest stops, tricky moves, orto develop climber conffdence. This call is rarely, used."Falling"--'-the call used by the climber if a fall is imminent. Thebelayer should "set" the belay immediately! Once a fall occurs, thebelayer will have to listen intently for further directions becausethe climber will have to swing, pull bp, or be lowered to some form: *
1 1of support.
"Rope"---is used anytime a rape is thr wn to warntanyone below. Thisis n rmally usedin setting up a belay rappel.2. ea: Seqpre an area where as. man belay systems can be con-
structed a ropes are available. An outdoor wooded area works well since°trees can act as anchors.
.
Equipment: Ropes, webbing and oval carpbiners are required.4. Conditioning exercises: Same sequence br some other equally
invigorating*exercises for variety ciantbe introduced.5. Sequence:* The class should be arranged to provide for conducive
st4dent signalt learnipg; after they have learned all the signals and move-merits, then the,alternative devices (figure "froand stitch) may be used.Once the movements and signals ire, well established, blindfolding belayersand adding mock falls teaches necessary belayer alertness.
6. Evaluation: Students..evaluate their partners and check them '
accordingly on the check sheet. Chances arethey will be partners when theactual *climbing begins; therefore, they usually critique each other weltin their quest for"safety.
7. Hirits: "Slack"'and "rope" commands are frequently confusing. 'The
instructor might use "take up ropen'and "give slack" to help studentsbetter understand the meanings. Once the tiggals and belay techniques atelearned, the students are ready to climbs but nobody should proceed to
IHS ROKCL41111)NG 'TEACHING Almon.
.1 V
climb until belaying and signals are habitual.
Session VIIITrepdring for the Climbing_ TOp11
, 1. Objectives and rationale: Before actually engaging in a cTimbingvqpture, students need to know the different types of climbs and how climbsare rated. As previously stated, students need not be told whdre to placeeach hand and foot, but only what options are available. Also, when begin- tners read cljmbinq routes,' they should know the meaning of the terms.There are nine standard types of climbs. These are described below;
, .
Face climbina is the classic forM of climbing that incorporates a.iTiEfer climbing movement. Issential to this style of climbing iskeepingdtheweight on the Pbet. Students should use the three:.point rule (pages 4-5) and the inside (strongest) portion of 6ie.feetwhenever possible. Holds with- the hands include climb holds such ashand-holds, and-finger-holds. foot-holds, toe-holds and pressure-"holds are also used with the feet.
b. Jam climbs involves expanding a.part of the body (finger, hand,Tba, arm,Ieg or body) inside a crack, crevice or fissure.
c. Cp4moty climbing is descriptive of the technique of stemming thebody'upward asthough it. were inside a smoke stack.'
.
11. Lay-back climbing involves grasping a vertical crack and pulling,while the feet push. the climber simply lays-back and ascends thevertical ceack.
.
e. Bridging or open-book climbing requires applying pressure:outwardwhi e climbing up a corner. Similar Ao chimney climbing but maredifficult to obtain equ41 opposition forces..
f., Slab Climbing'it similar to friction climbing except the angle is,extreme enough to require the use of the hands.
g. FrictiOn climbing: has already been discussed..h. Mantling is a method of ascenqapg onto a small ledge Pontle) by
placing.the finger-tips of botff hands toward one another and.stemming uphrd until one leg can be placed on the mahtle. Thenext leg follows, completing the movement.Under rip c3imbi'ng is one of the more neglected forms of climbing.
ten the most a vantageous hold i from below, initiating an up-ward force with the hands and a..downward force with the feet whichresults ln a supportive counterforce position.
Obviously mast climbsincorporate many of these techniques, ,The moretechniqu4s a climber is aware of, the easier and mare dfficieht 'the climb-
,
ing procedure. k
2. Area: It would be most advantageous for, thl instructor to, take,
Pe class:to an area where most of these movements could be demonstrated.Since this is not,usually possible, slides with examples of each would be .
helpful. 1 ....
3. Equipmeht: The necessary components to grapically descrilie theabove-Mentioned climbs will be required. ,
4. Exercises: Inasmuch a this will be primarily a discussion periodin pnfparation for the advancing c114, exercises Viould be vigorous and .'
COUSS Of ST UDY
1 11A
41
organic;
5. Teaching sequence: Introduce the climbing techniques as describedabove and organize,the next session's climb. Thi instructor should be wellacquainted with the "tripping" procedures. Students are responsible forequipment maintenance. 6ch student should have a task.
One of the many questions that arise is: "How are climbs rated?"This is an impoript question for beginners since) they need to be surethey do hot attekt climbs beyond their abilities. Without this knowledge,they might unknowingly jeopardize their safety. These rates should not beconfused with mountain climbing difficulty rates; Obly rock climbing dif-ficulty will be considered within this text. For the most Raft, the SierraClub has established route classifications to be used in the'United States.These ratings are not universal; the Europeans have their own system. The,Sierra system is a rating for the average climber's rate:
#
RATING:
1. Walking with specialized shoes such as hiking boots2. Scrambling, sometimes usoing hands3. Easy climbing with some exposure, rope sometimes worn 1 .
4. Moderate climbing, exposed and belay essential5. Difficult climbing, yery exposed; piton/anchors normally useld to
protect the leader'6. E4treme difficulty; equipment is used foi direct aid .
, 7. Ithpossible, perhaps supernatural .ald reqdired
Most of the class' work will include climbing one through five'clas'sdifficulty with a focus on predominately class five and the use of topbelay or the top-roping technique. .
The class. ffve is also subdiVided into "10ths" with 5.1 being easierthan 5.2. The climbing clast should not progress beyond 5.5 or 5.7,de ending on their ability. After some experience, it'. fun to rate and .
naie climbs; usually the first ascending climber has thestonor of rating
an naming "his" climb. Normally this requires a "Iead" climber; however,the method recommended here eliminNtes the "lead" climber, For classenthusidsm, the fiest climber shoul1 have the option of name and rate.
Evaluation;) There is no evaluation at this time. Remind studentsto be responsible foe the information in order.to be prepared adequatelYfor-the imminent climb and written examination.
, 7. Helpful hints: Any form of'visual aidt will help stbdents to under-stand climbing techniques. A cement block works well,to demons rate most ofthese concepts, especially jams, -
,4ession IXClimbing Trip. .
. t I.. 1: Objective and rationale: The Itudents now should be w 11-prfMed
.and conditioned mentally and,physically for a climb. They wt 1 b most .
el
Anxious to begin with the more realistic aspects of climbing., P par'ationsshould be madh ,(refer to the outing procedufts) to actively' imb 'oa therocks" foe at least one -.and'a half hOurso longerif time permits. .
L42 . 5 0 .
,
THE.ROCK CLIMBING TEACHING GUIDE
.''
.M...
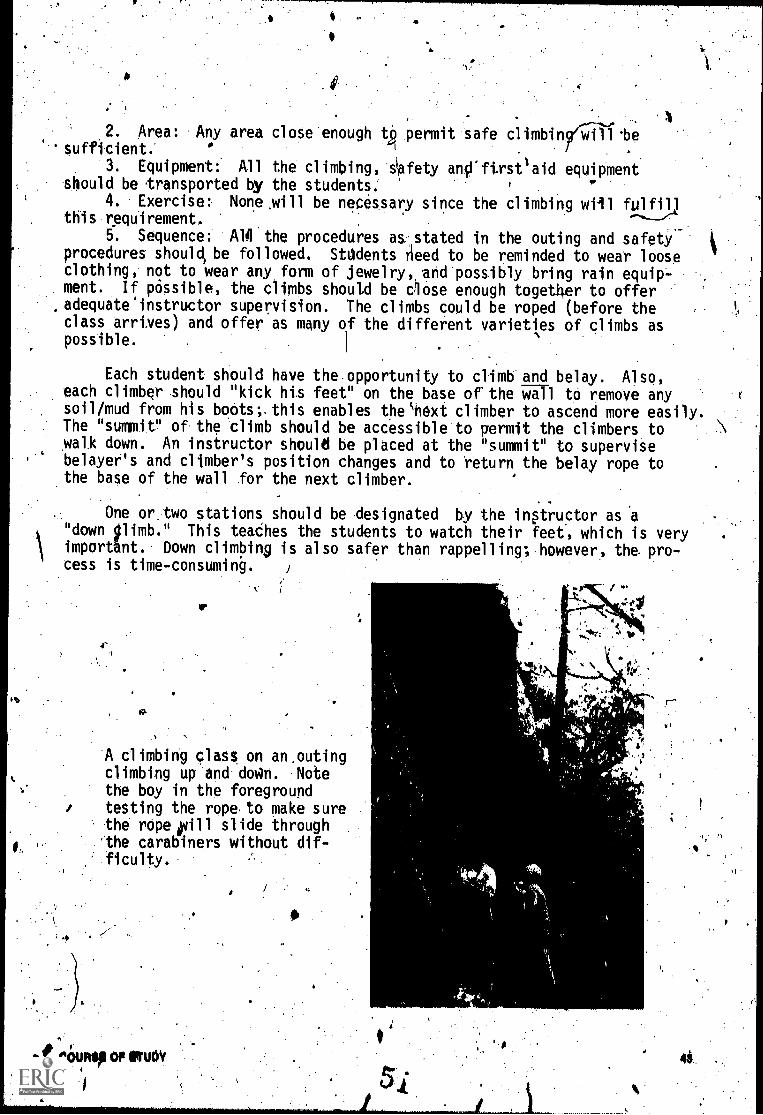
p.
p.
49
,
.2. Area: .Any area cloSe enough t, permit tafe climbin te'Sufficient:
3. Equipment: All the climbingpfety anfrfirst'aid equiPmentshould be transported Qs/ the students:
4. Exercise:- None mill be neoessary since the climbing will fulfil)this requirement.
.
5. Sequence: Al41 the procedures as stated in the outing and safetyprocedures should, be followed. StOdents And to be reminded to wear looseclothing, not to wear any form of jewelry, and possibly bring rain equip-ment. If possible, the climbs should be chose enough together to offer
.adequate'instructor supervision. The climbs could be roped (before theclass arrives) and offer as many of the different varieties of climbs aspossible.
Each student should have the opportunity to climb and belay. Also,each climber should "kick his feet" on the base of-the Wall to remove anysoil/mud from his boots; this enables thecnext climber to ascend more easily.The "summit" of the climb should be accessible to permit the climbers towalk down. An instructor should be placed at the "summit" to supervisebelayer's and climber's position changes and to return the belay rope tothe base of the wall for the next climber.
One or_two stations should be esignated by the inWuctor as a"down Olimb." This teadhes the students to watch their feet, which is veryimportAnt.. Down climbing is also safer than rappelling; however, the pro-cess is time-consumin.g. /
¶J.
-v.
'A climbing class on an.outingclimbing up and.doWn. .Notethe boy in the foregroundtesting the rope to make surethe rOperill slide through
. .-the carabiners without dif-liculty.
1.Si
' r

6. .Evaluation: Students should be encouraged 0 atpmpt as manyclimbs as possible. Upon climbing and belaying each climb4.they shouldcheck their score sheet.
$
7. Hints: The toprope system (figure 19) is a "pulley-type" ofaffair to protect the climbers. Basically it involves some webbing, agood anchor and locking carabiner (or two oval carabillirs with opposinggates). The,ivebbing should be long enough to allow tOcarabiner to hangover the edgg. This will.prevent the rope from rubbing excessively on the'edge of the summit.
:11
:L,
,)A "':-1 \
t-N1.\
a
Figure 19: A top rowystem anchored to a tree. Note that therope will"not '.'rub" on the edge.
1/4
The belayer at the bottom (figure 20) should be well anchored andinstructed to keep the rope relatively tight. Because the rope will'berunning up from the belayer, he should place An oval carabiner on hisswami belt and allbw the rope to "run" through it, lest he lose controlof the rope if a fall,should occur? If one of the mechanicalOelay deKicesare used, this problem will not occur.
A
Figure 20: Belayer anchored to a tree. The belay is "ruethrough a carabiner to preVent the rope from Workingup the belayer's body if a fall occurred.
1
t I
.--THE ROCK CLIMBING TBACgING GUIDE
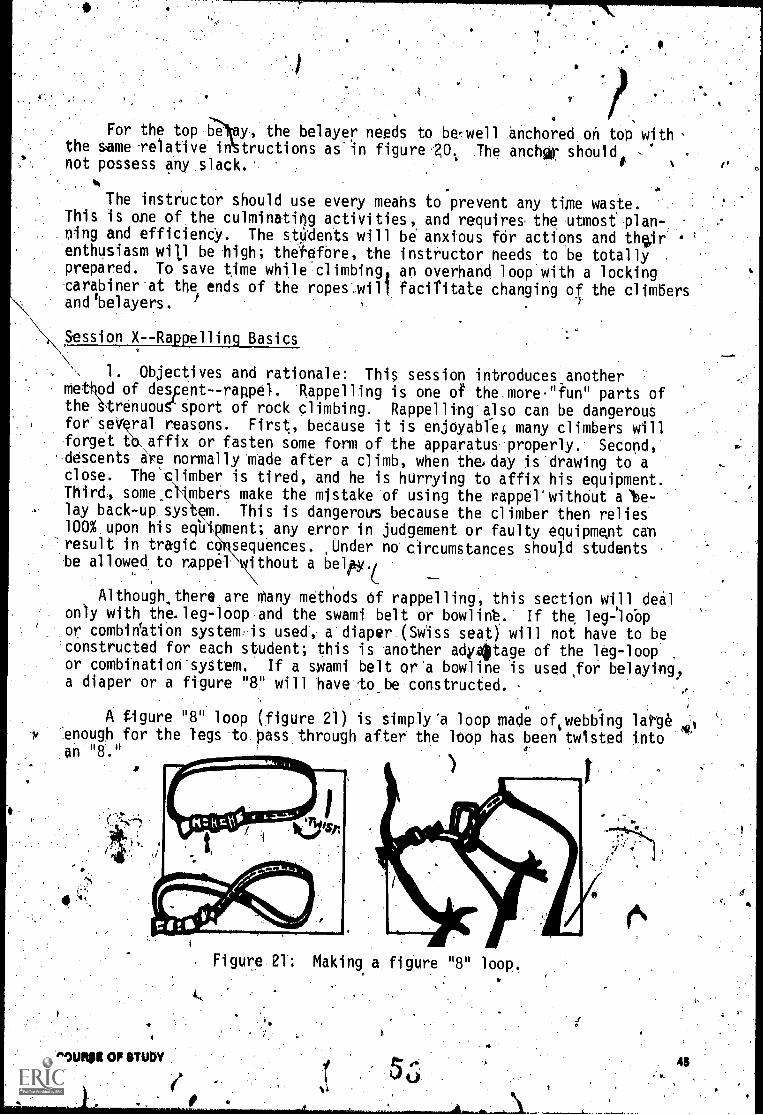
For the top the belayer needs to be-well anchored on top with -
the same relative in tructions as'in figure 201 The anchgr should,not possess any slack..
The instructor should use every meahs to prevent any time waste.This is one of the culminating activities, and require& the utmost plan-ning and efficiency. The stUdents will be anxious for actions and thgjrenthusiasm will be high; theefore, the instructor needs to be totallyprepared. To save time while'climbing, an overhand loop with a lockingcarabiner at the ends of the ropes.will faciTitate changing of the climbers
1andtbelayers. /
\Session X--Rappelling Basics
1. Objectives and rationale: This session introduces anotherme. od of despent--rappel. Rappelling is one of the more."fun" parts ofthe trenuous'sport of rock climbing. Rappelling also can be dangerousforseVeral reasons. First, because it is enjoyabfe4 many climbers willforget 6.. affix or fasten some form of the apparatus properly. Second,
'descents are normally made after a climb, when the,day is drawing to aclose. The'climber is tired, and he is hurrying to affix his equipment.Third, somesl'tmbers make the mistake of using the rappel'without aloe-lay back-up system. This is dangerous because the climber then relies100% upon his eqb1 ment; any error in judgement or faulty equipment can
'result in tragic co sequences. Under no circumstances should studentsbe allowed to rappel ithout a 6113,ir.(
Although,there are Many methods Of rappelling, this section will dealonly with the.leg-loop and the swami belt or bowline. If the leg-lobpor combiKation system.is used, a'diaper (Swiss seat) will not have to beconstructed for each student; this is another adyorage of the leg-loopor combination system. If a wami belt or'a bowline is used,for belaying,a diaper or a figure "8" will have to be constructed.
.
z
A figure "8" loop (figure 21) is simply 'a loop made of,webbing le* .1enough for the legs to pass through after the loop has been twisted into 'on "8." ,
P ) 1
, COMM OF STUDY
Figure 21: Making a figure "8" loop.
45

4
Si
I.
The ovrhand follow-through kilgt is used to tie and adjmst the two- ends. One disiadvantage to this' method iS that thelharness.tends to "'fall..down" when the climber attempts to walk.
0
The dfaper, which has been descifeed with the combination'climbingsystem,,dan be used for rappelling with the bowline or the swamt belt. 'If
,a bOwl4ne or swami belt is used for climbing, then Winexpensive tech-nique.for rappelling would be the-figure "8" loop-because'it can be'easily shared1
A
V
Regai.dless of what harm,* system is utilized--the figure "8", the ,
diaper, leg-loop system, or the, combination systeea locking "D" cara-biner is attached. The6 a desCending 'unit such as a brake bar, dbublecarabiner, or a figure "8" descender t's attacfied to the locking "D."
If a bral4bar system is'used, it's i'mperative that the rope is onthe correct sid of thepbrake bar! If not, the rope's pre5sure will.release theibrak bar; and offer no resistance for the desCent: This is.,another reason f r the belay back'-dp system. Basically, the simplifiedsystem wtth the ope correctly placed, should look.Iike this:
,
,.
THE NOCK WONG TEACHING GUIDE
221.
tS
.4

?14
If the carabinerbrake is-tefected, it shOuld'resemble the following 'system whi,ch uses oval carabiners With opposing gates. (opening in opposite .
-directions),3 hlowever, :the rope should never "run'...toot a .gate. Obviously'. ad"'this system requires many expensive carabiners.
.
." .7°
: -°'.° ts:
d `.0. 0
C` . . '71'
' .-
41:st ent practicliq ,t he
"walk-rapper whai c h. a)lows. 4,.(
theStddent to, practice -0;.sevOal rappellInptech-,zrkirgifes safely. No 1.etheeis no'bel ay forthis OractUe., A)
t7.
A '6r` , A
'Z1 7-
"
d.
4

dim00701.
A student practicing the static htng in the rappel ,positionas a means of checking for braking ablity..
0,
The safest, but most expensive, descending unit ts the figure '18" .
des6ender. This unit hai no gate to worry about andyill descend begin-.riert slowly.: It works best with Kernmantle-type rope,, but aTto vill ,function well with Gold-Line. The figute"8" descender is especiallyfunctional wfth.very heaVy or.apprehensive students. TO atOch the de-vice to the rope; the 'descender is released frowthe carabineN. the, ropeis then hooked and pulled through the large hole and looped over the end;-.the deScender it then reattached to thecarabiner. A properly attached'Ainit should reSemble,the following diagram:
I "-__
MR ROCK CLONING TRACH1NOI GUIDO
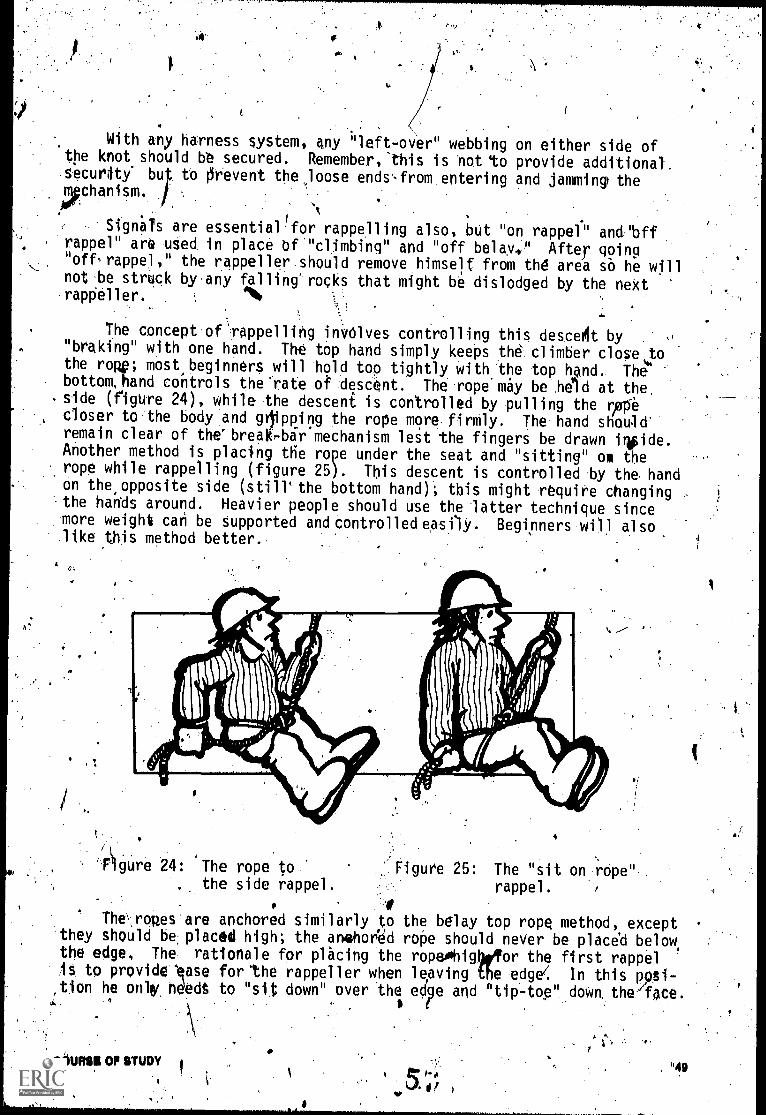
t
. ..: .
With any harness system, 4ny "left-over" webbing on either side ofthe knot shoUld be secured. Remember,"this is ot to provide additiOnal.security bu
it
to Prevent the,loose ends,from entering and jamming the);pchanism.
,
,
Sign'als are essential'for rappelling also, but "on rappel" anCbffrappel" are -uSed, in place bf."climbing" and "off belay," After going"off,rappel," the rappeller should remove himself from the area so he wjllnot,be struck by,any falling'rocks that might be dislodged by the neXt-rapPeller.
. \
The concept orrappelling invOlves controlling this descat by"braking" with one hand. The top hand simply keeps the climber clove tothe row; most beginners will hold top tightly with the top hand. The"bottom,hand controls the'rate of descent. The rope' may be held at theside (figure 24), while the descent is controlled by pulling the TOcloser to the body and 0009 the rope more firmly. The hand should'remain clear of the'breakrbar mechanism let the fingers be drawn ivide.Another method is placing tHe rope under the seat and "sitting" om therope while rappelling (figure 25). This descent is controlled by the handon the opposite side (still' the bottom hand); this might require changingthe han'ds around. Heavier people should use the latter technique sincemore weight can be supported and controlled easily. Beginners will alsolike this method better.
4
1 .
'F,
igure 24: The rope to Figure 25: The "sit on rope".. the side rappel. rappel. /
The" roues are anchored similarly to the belay top rope method, except'they shoOd be.placed high; the anehorted roge should never be place'd below,the edge. The rationale for placing the ropeohigWor the first rappells to provide 'ease forithe rappeller when leaving the edge< In this poi-,tion he onlii weed to "sit down" over the ed'pe and "tip-top" down. the'face.
t 5 fr "49

/..,
, . v
If the 'ripe islOw, the rappeller has,two choices: either leave the-edge'on hands and knees. while easing himself over the edge or leapback ards (controlled) fromthe edge (figure/26 " Although.students.sh .d not attempt to leapbackwards during.t10011, first low'rope rappel,.th .,1.4.11buld.attemp-t rappelling using both techniques.rY .5
...0 ffffff I.e.04,,,,,,-'''' 7 II,
. NOt.
f;;41'w
w # 0
Figure 26: The "leap" rappel using a low anchor which is to'be attempted with cau ion.
There are two things to remember hen rappelling. One. ts to keep thelegs well spread in the "sifting" position. This will prevent the body,frOm pirouetting and'"slamming" inp the wall, The other is'to remember,that equipment will become hot while descending, therefore caution needs
' to be conveyed by the instructor. Some people use gloves to rappel; thisshould.be discouraged because gloves only enhance'speed. Atter proficiency'is learned, gloves may be optional.
All rappellers should be on one,rope doubled or two ropes tied to-gether with the knot at the apex for all class work. The double rope:willprOvide adeqtiate friction for the descent. If one doubled Pope is used,it should be.tied with an overhand loop in the middle'and attached tO theanchor by a lockinvcarabiner; a mark (with a felt.marking.peh) halfwat onthe ope will expedite this Matter. This will insure the student'ss y. if he should attach to. only one_rope. Both ends of the rappel
.
rope 'should be long enough to reach the base; an inSurance 'treasure to pre-
iven tpe students rappelling Off the ettd of the-rope is to tteon over-han knot on the ends. Also, in tossin§ a rope, the climber should ell"rOpe" to alert.others. A top belay or top rope belay is always used.
ii.2. Area: An indoor or outdoor level aria that will proVide "anchor§",,
such as trees, is necessary..\
3. ,Equioment. All ropes', webbing and carabiners will Ile required.4, Conditioning: This is the:instructor's'Option.'
It
THIVROCK CLIMBING TEACHING GUIDE

5. --Sequence: The stOdents lieed to learn one of the harness systemsnlesilthe leg .loop or combioation method has been-taught earlier.
The concepts as*specified above need to be emphasized with thekttudents. After the harness'and concepts are understood, actual rappelling!action:should begin. The simplest way td teach rappelling is with a "walIC1rappel." The ropes are anchored low in a level area; without a belay, thespidents attach their brake system, and walk backwards to the end of:the
. 4rope. While Walking, they arelinstructed to try various hand' placementand braking techniques. Thlis allows several students to use the same rope.Next, belays and signals are! added.
6. Evaluation: Each student should be checked by the instructorand hisscore recorded on the check-sheet (page 98).
, 7. Hints: This session might require two-or more days; everyone must'understand the rappelling process before an outing can safely proceed. If,during the walk rappel, Students place the rope on the wrong side of thebrake bar or 'the ropes are placed "upside down", allow them to proceed.Students will's000esee the,.consequences of their errors. This trauma willmake them think out their problem and motivate them to investigate andcorrect their errors. It's' better to have them make and correct errorson this level than for the instrUctor to do it for them during an outingiiexperience. 4 .
Session XfRappelling Outing.
1. Objectives and rationale: This session will provide an outingfor students to experience the rappelling process. The format for thisventure should be similar to the climbing outing. It's generally best toisolate these two skil's (climbing and rappelling) for the tudents'introductory outing:. This allows Ahem to prepare for one cbncentratedeffort in eacP area.
.
2. -Area Use the same area that was used for climbing.. 3. -Equi ent: All first aid safety and climbing equipment will beneeded. Stu ents should maintain, count, and pack equipment.
4. COditioning: The activity will provide the necessary exercise.5. Siquence: The same anchors that were used to belay in climbing can
be utilii'ed in rappelling. All rappels-should have.belays'anchored.to otherstructurIA if possible (figure 27). The rationale for this is if the r7iiiT4Trope anchor fails, the belay anchor has to hold.' As many rappels as pos-sible (usually six) should be establishedo With half (three) utilized in theeasy "high" position.
. It woo44 be advantageous for the 'instructor to stationhimself at the sumMit And visually survey the rappelling process to insyreproper equipment ulation at the onset of the activity. Once a studenthas succeeded with th high anthor rappel, he should proceed to the crawl(handi and knees) rap el and finally to the leaprappel. All.the safety
. have many opportunities to rappel down the rope; this should not -
'couraged since/the students will develop proficiency, skill, and
.90URSI OF STUDY.
1
.
1
concepts/rules should be closely followed. Belays and helmets are alwaysrequired. ' - ,i,'
.
6. Eva1uation:.1Siudents should be-"checked",by the imstructorrelative to.their high and loWinappel.- Time will probably permit them to
be dis
51
I

.sk knowledge through.practice,
Figure 27: Rappelling with a back-up top belay for safety.
- 7. Hints: Again, if the students do not attach themselves Prop-,.to_the descent mechanism, they should be allowed to continUe as
.4.,long".as they have a'reHable belay and 'a high rappel anchor. The traumaof a "popped." brake bar or a tangled "upside down" rope will v:astlyimprOve their care on succeeding trips. Befdre attempting any "leap",rappels,they should be stopped and alerted to the fauity nature of theireqUipmentlest they become injured. All students should attach all.thigjr own gear and rely on themselves. Since time is valuable, the.instructor should attempt to have as mUch equipment prepared in advanceas possfble. 'Students should be encouraged to tuck in all clothing to'avoid its jaMming in the brake-bar. .
Rappelling can be taught well in a gymnasium by usitng the bleachersas ,platforms. bnchors will have to be carefully' installed/checked if a'gymnasium is used. ,
. The bleachers can be used as a means of checking-out studerits'rappelling abilitg. lotiCe all students are belayed and havehelmets on. All safety concepts need to become habitual.
TM ROCK CLIMBING TUCKING QUIDS
fr
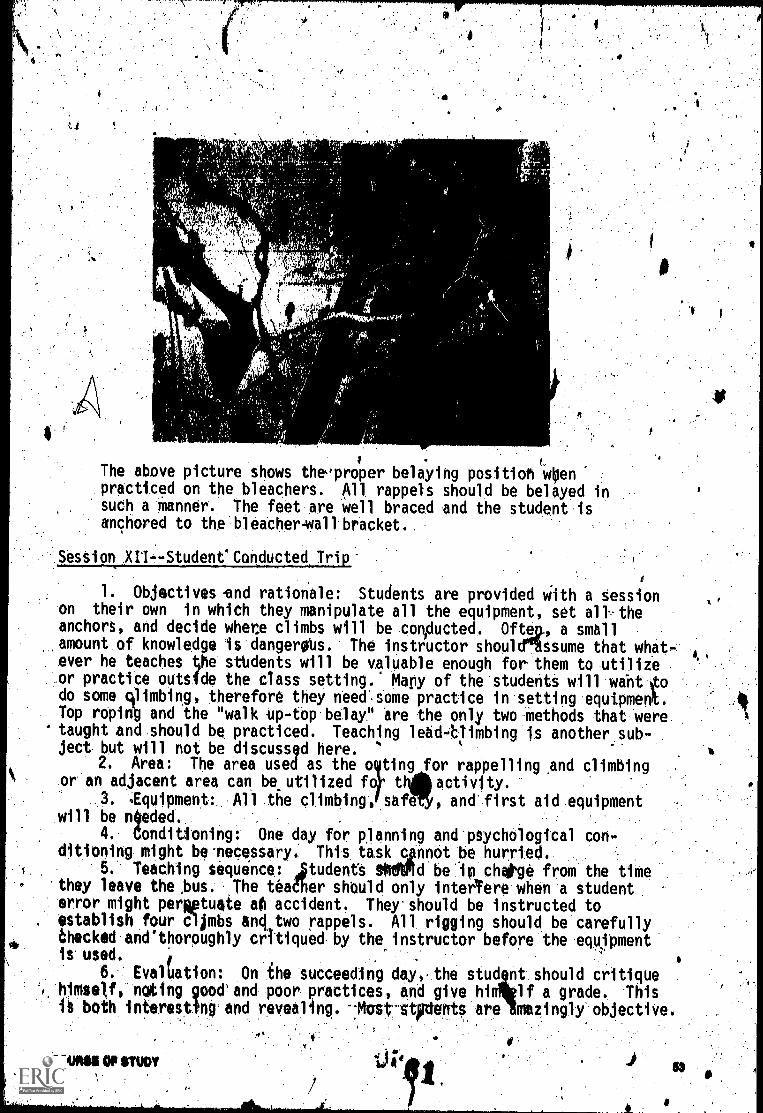
41. 1
,
The above picture shows theoproper belaying position %ripenpracticed on the bleachers. All rappels should be belayed insuch a Manner. The feet are Well braced and the student isanchored to the bleacher-wall bracket..
Session XII -Student4 Conducted Trip
1. Objectives end rationale: Students are provided With a Sessionon their own in which they manipulate all the equipment, set all. theanchors, and decide wher.e climbs will be conoducted. Ofte , a smallamount of knowledge is dangerOus. The instructor shoul ssume that what- ,
ever he teaches Vle stbdents will be valuable enough for them to utilize.
.or practice outside the class setting. Mapy of the students will waht odo some qlimbing, therefore they need".some practice in setting equipment.Top ropinb and the "walk up-top belay" are the only two -Methods that were
* taught and should be practiced. Teaching lehdatlimbing is another sub-ject but will not be discussed here. '
2. Area: The area used as the for rappelling ,and climbingor an adjacent area can be utilized fo thilt activity.
3. 'Equipment:. Ali tfle climbing, taf , and first aid equipmentwill be needed. .
4. Conditioning: One day for planning and psychological con-ditioning might be-necessary, This task cInnot be hurried.
5. Teaching sequence: Itudents 9,0Md be'in chatge from the timethey leave the ,bus. The teadher shOuld only interTere when a studenterror might peraptuate 0 accident. They should be instructed toestablish four Cljrnbs anCtwo rappels. All rigging should be carefully6hecked andethoroughly critiqued by the instructor before 'the equipmentis used. '.
.
6. EvalUation: On the succeeding day,, the stud nt should critiquehimself,' noting good' and poor practices, and give hi lf a grade. Thisit both interesttng and revealing. --Most-stittiefrts are mazingliobjective.
. r
NUM OP STUDY\

01
*
7. Hints: Thls,is.4n opportunity for the instructomito "sit 4own"and evaluate the class froM a distance. Leaders will everve from thesituation and.lake cgomand." iThis is not only interesting, but Alsogoad to note for futuAd project!. Thls will probably prove to be one .ofthe clasi's,favorite ventures simply becaue most of the,responsibilitytias been passed to them and they'feel'they have to prove . they can haridleit.
.
Session XIII--COrse Evaluation4
1. Objectives and rationale: The last day of the'course should bereserved f mintrospection, recommendations, cautions, and a final exam-
1
inatian..
2. A ea: If weather permits, this canlbe accomplished outdoors.Equipment: Pencils, final tests and check sheets will be
heeded. . .
4. Ekercises: No exercise will be required.5. Sequence: The written test needs to.be administered first,
followed by a discussion of the values of the course, of any criticisms,and of ideas to improve it for.the next'year.
6. boluation: The written test should emphasize concepts ratherthan memorization, with rules of climbing being the only exception.See Appdhdix, pages 102-104(test enclosed).
. .
7, Hints: It's'important that the instructor does not reactdefensively to criticism. .He should carefully analyze the suggestionsin the hopes of improving succeeding classes. The written examination0ould also be rpoarded as a "teacher evaluation" in whicAbstudent reten-tion will be proportional to the thoroughness and importance of theinstruction.
61
4
6
-)4:Ty
THE ROCK CLIMBING TEACHING GUIDE /-
411
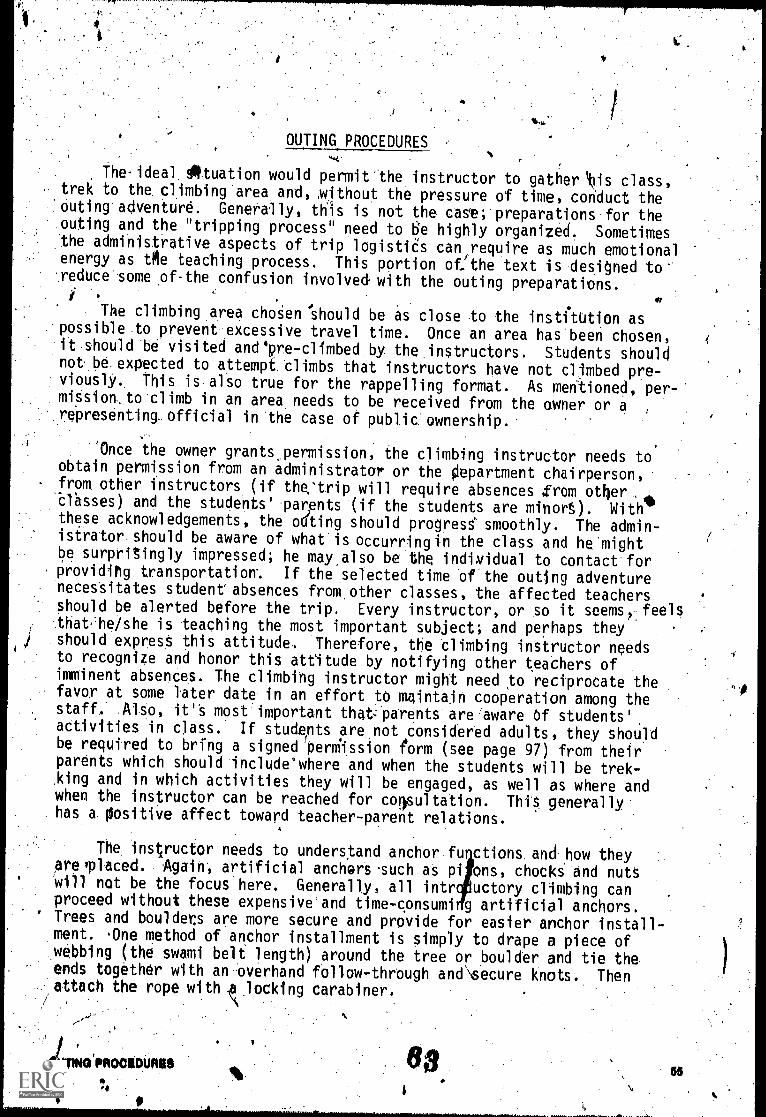
OUTING PROCEDURES
The-ideal Otuation would permit'the instructor to gather 4-is class,. trek to the climbing area and, without the pressure of time, conduct the'outing adventure. Generally, tnis is not the ca5e;'preparations for theouting and the "tripping process" need to tie highly organized. Sometimesthe administrative aspects of trip logistids can require as much emotionalenergy as le teaching process. This portion oethe text is designed to'reduce some pf-the confusion involve& with the outing preparations.
The climbingarea chogen 'should be as close to the institution as.possible.to. prevent-excessive travel time. Once an area has'been chosen,ft.should'be visited and'pre-climbed by. the.instructors. Students shouldnot.be.expected to attempt. tlimbs-that instructors have not cljmbed.pre-viously. This is also true for the rappelling format. As mentioned, per-'mitsionjo-climb in an area.needs to be received from the owner or a ,
.representing. official in'the case of public:ownership.
'Once the owner grants,.permission, the climbing instructor needs toobtain permission from an administrator or the Oepartment chairperson,from other instructors (if the'trip will require absences Xrom other,'Ohsses) and the students' 'parents '(if the students are minort). With'these acknowledgements, the ofting should progress' smoothly. The admin-isfrator.should be aware of whatis occurringin the class and he'mightbe surprisingly impressed; he may,also be the indimidual to contact.forprovidihg transportation. If the telected time f'the outing adventurenecestitates student absences from,other classes, the affected teachersshould be alerted before the trip. Every instructor, or so it seems,Jeels..that,The/she is teaching the most important subject; and perhaps theyshould exprest this attitude, Therefore, the tlimbing instructor needsto recognize and honor this attitude by notifying other teachers of
.
imminent absencet. The climbing instructor might need to reciprocate thefavor at some later date in an effort tO maintain cooperation among thestaff; .Alto, it't most important thatparents'are'aware Of students'attivities in class. If studepts are not considered adults, they shouldbe required to brfng a signed perditsion lorm (see page 97) from theirparents which should 'include'where and when the students will be trek-king and in which activities they will be engaged, as well as where andwhen'the instructor can be reached foP awultation. ThiS generally.has a. Oositive affect toward teacher-parent relations.
The instructor needs to understand anchor furjctlons. and.how theyarevplaced.- Again; artificial anchorS -such as pi ons, chocks and nutg
'will not be the focus here. Generally, all intr uctory climbing can.
proceed without these expensive'and time-consumirfg artificial anchors.' Trees and boulders are more secure and provide for easier anchor install-
ment. 'One method of anchor installment is simply to drape a piece ofwebbing (the swami belf length) around 'the tree or boulder and tie theends together with an-overhand follow-through ands.ecure knots. Then
-.,attach the rope with 1,.lotking Carabiner.
PROCROURBS
e
83.
Ale
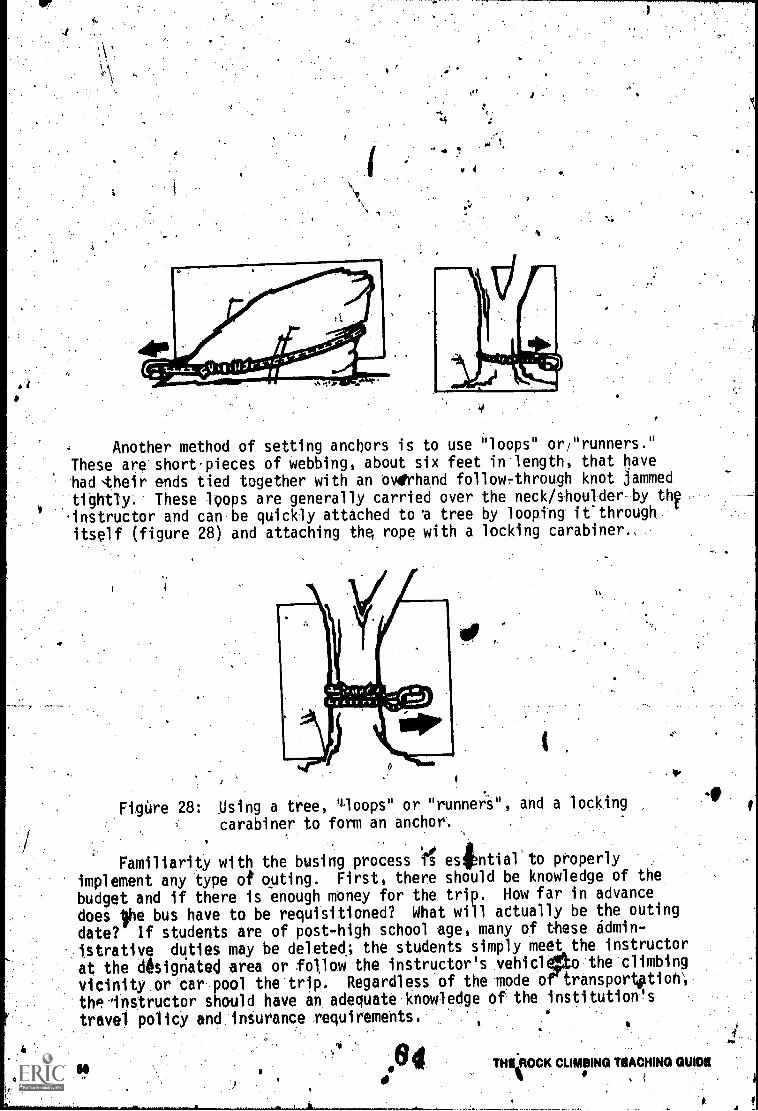
4i
Another method of setting anchors is to use loops" or/prunners."
These are short-pieces of webbing, about six feet in length, that have
had 'their ends tied together with an overhand followthrough knot jammed
tightly. These 19ops are generally carried over the neck/shoulder by thvinstructor and can be quickly attached to 'a tree by looping ifthroughitself (figure 28) and attaching thq rope with a locking carabiner.,
Figure 28: Using a tree, %loops" or "runner-s", and a locking
carabiner to form an anchor.
Familiarity with the busing process ',r5 estntialto properly
implement any type o# outing. First, there should be knowledge of the
budget and if there is enough money for the trip. How far in advance
does lhe bus have to be requfsitioned? What will aetually be the outing
date? If students are of post-high school age, many of these tidmin-
Astrative duties may be deleted.; the students simply meet the instructor
at the designated area or follow the instructor's veniclao:the'climbing
vicinity.or carixol thertrip. Regardless of the =de o transpor4tion',
thstrinstructor should have an adequate.knowledge of the institution's
travel policy andAnturance requirements..-
HictOCK CUMBING TIACHINO OWN
4 s
Another instructor, on location, would be most helpful,. Thts mouldexPedite.matters should an accident occur. Also, one instructor at the.base of the climbing area and the other at its pummit will enhdhce climb-
. .ingsactivities. It would be helpful, but not Ossqptial, for both to have. .1111some climbing experience. ,The instructor might qgapider "Oring thecourse" to a faculty member who would be willing fulfill thijs obliga-tion. ,This offers an opportunity for members of the academic disciplines
.to participate and experience the benefits of outdoor adventure. ;Thisalso provides an ideal gpportunity for faculty members to take some out-standing photographs that'could enhance the activity.
With a scheduied climbing outing, or any other outdoor activity,an alternate activity should be prepared. The weather.can always changeand "forcing" an outing through badweather can discourage any furthuroutdoor adventures. Movies are one of the better activities sihce they
, can be sh6wn in a confined area and offer climbin'cl appeal. Movies, how-.ever, can rarely be retained on a rental basis for more than threedays; therefore, one good purchased film can be saved for this purpose.
The class sessioM.preceding the climbing/rappelling tri, shoUldinclude a thorough student briefing. Not only should rules and conceptsbe re--emphasized, but also equipmOnt responsibilities need to be del-egated. A student needs to be astigned the duty of supervising tthe
equipment pack, another for the first aid kit, another to transport thehelmets, and several students to carry the ropes. The first aid kit tsan easy item to forget; this is an essential piece of equipment andshould automatically accompany any field trip which leaves the schoolcampus. The trip might alw) require food, certainly water; therefore,a pack should be prepared accordingly.
The instructor wijl also need to prepare for proper sanitationof the area, should h,é or one of the students need to urinate/defecate.An area should be selected at some distance from the climbing area andoff the trail. An accompanying shbvel to djg the necessary. 8-inch hole -
and some white toilet paper should remain at the site. Before leaving,the ilsed,paper should be burned, provided there is no fire danger, andthe hole filled. The students need to have atasic knowledge of environ-mental etiquette to fully understand and respect the natural surroundings.
.
. The importance of an emergency evacuation should be re-emphasized.. That is., if an injury does occbr, what are the procedures? Is there a.citizen-bandoradio-aboard the bus? Where is the nearest,phone? Does.
:the instructor possets endugh batic first aid training to .attend mostinjuries? Without being overly pessimistic, Always-expect the worstand be partiCularly thankful whenpothing serious occurs; caution andpreparation willeeliminate most accidents. .
,
Every outing shobld include a student and teacher evaluation assdpn as possible after.the trip-while the experience can beremembiped.It's important.that the observations and feelings-pre recorded-befdre'the crNal tssues are.forgotten.
OUTING PROCIIIDUR 57

ARTIFICIAL CLIMAG WALLSIP
A defelopment that has greatly enhanced the sport of rock cliMbingin ,schoOls has leri the manufacture of artificial climbing walls. How-ever, artificial climbing walls are not a reeent innovation. TheWilliam G.%Long Camp outSide Seattle holds the distinction of being.the first.institution to ,build an^artificial climbing facility, in 1941,known as the Scharmann Rock. The French developed adjustable woodeniclimbing ells,dio4ng the 1950s, but the British, in the 1960's'developed most of the climbing facilities, with well-known walls atGlenmore Lodge, Penrith, and Cumberland. Adjustable walls weremarketed in 1963; presently there are-four manufacturers of climbingwalls in Britain. However, many of the British Walls are built outdoorsat very accessible heights, which are invitations to disaster. Alsd,many of the walls were built by rembving mortar and bricks, a praCticethat'would seem to be disfjguring and permanent. However, with the con-sent of the architect and building.engineer, this would be an economicaloption.
' Walls have Many advantages; although certaq precautions and rulesshould prevail. This chapter will emphasize these precautions and rulesas well as instruction on how tb-build a wall, what materials to use, andhow, tp conduct classes using artifical climbng. walls. FirstiAlowever,the *vantages.
The many advantages of climbing walls fit well into the limitedbudtet of a public school* smIgm and, once built, can be of service formany years. Other advantages-Tritlude:
1. A relatively small and seldom used room can be utilized. This'provides more flexibility in programing as well as increasing the speCtruof the curriculum.
2. Provided the room can be locOed, climbing equipment can remainintact and ready for use. Therefore, more climbing time is provided andless equipment maintenance is required.
3. There is no cost of transportation in .erms of money and/ortime. One of the problems with any outing is that it often interfereswith other programs/classes; the climbing wall enables a rock climbing,unit to function well within the traditionaT'scheduling system. Thecost of building a climbing wall can be justified rationally by thetransportation savings alone.
,4. A 'Variety of climbs 6an be designed closely to enhance super-' '
vision. This is an ideal situation which the/outdoor 'environmentseldom provides. For example, good chimney climbs are often 4ifficultto fiN, but one or two can be simply cogstructed on the wall adjacent
f! to other climbt, providing optimum learAng situationsbind supervision.5. The cost-of a wall can be inexpensive, providdd the instructor .
is willing to spend some time in its design and construction. One of.
'the functions of this chapter'is to aid in climbing wall design andconstruction, therefore reducing some of the research, design, andconsftuction time. This is not,to imply that the instructor should not
THO ROCK CLIMBIRO 'RUCHING QUIDS

seek help from local contractors, building engineers, and architects;they should be tontacted for their expertise and guidance.
6. Weather is not a faetor Mien ear:A climbing indoors. Obviously, .
' this is an important advantage because scheduling is easier and absencesfrom (Aker classe's, due to outings, are less frequent. Therefore, thefactors of weather instability and differing-seasons are eliminated,whidh provide for a relaxed teachtng-learning situationz
Before continuing with the options of buildiJ4matertals for 0 wall,*thin precautions and guidelines need to be emphasized. The instructorneeds to be aware of these before proceeding, or a'disfunctional, un-sightly mess will result on the wall. Listed here are the most importantpretautions the instructor shOuld consider:
1.. The structure should be well pldnned, on paper, with costrequirements. That is, the cost of steel and woOd for platforms,1 con- . .
crete and bolts for the rocks, and anchors should be calculated. very-thing that is needed for the wall needs to-be iteMized, so a realis icscost factor can be presented to the administration. This is veryimportant because the conceptdof a climbing wall will need to beexplained in detail to the administration.
2. The instruct& needs to be totally familiar, with th1e wall spacethat he intends to use. He needs to vilsit the building engi eer andinspect the building,plans to determine what's behind the wa I add what
')1 other activities and structures might be affected. He also needs to visit,\\ the architect to determine if the wall space will support a climbing wall.
That is, is the ceiling.high enough? Is the wall made of cinder blocks;for,concrete blpcks? Does the'room have a''false ceiling? Is the wallitself false? These are questions Only the engineer or,achitect cananswer. No building should proceed without their written permission.
3. When the artificial rocks are ready to be anchored, some of themlipuld be placed in positions which provide creative climbling. That is, ,
'he rocks shoUld not be placed ladder-style, whtclvAt too obvious and,
simple. Useless rocks need to be placed att.fieme-pOints to:stimulatethought, 4tt"
4. ,Every attempt needs to be made to maintain security. The ropesshould always be pulled.up or stored to eliminate the possibili.ty'ofunscheduled climbs. Also,.the room'needs to bOocked or the wall madeinaccessible.
If the wall is placed in a gymnasiutn where activities often takesplace, the first rocks should be placed high enough to inhibitclimbing.
0When the climbing claSs is scheduled, the rocks can be reached by usingmovable plywood sheets with r4cks placed on them. Or: the rocks can be`covered with a plywood sheet, docked in position when climbing is not -
scheduled.
5., The wall should be planned and constructed so that all stations. will be accessible by the instructor in case of an emergency. That is,
if a student should become entangled ill the ropes or needed assistancewith a knot, the i'nstructot should have no difficulty reaching the student.
. ARTIFICIAL CLIMIIINCI WALLS. , 8 7. ,

,, Here is a,typical:rock climbing class with all student's actively ..
cliMbing and belaying,under the watchful eye,of the instructor.Note that all belayers are, anchored to. gymnastios.apparatus., all-climbers arelielmeted and top-yoped. .The studelit'at the top ofhe platform isonchorea With a carabiner o the horizontal,rope.Stations, from left.to right, are chimney .climb (next'to wall),teacher's emergency ladder, open-book climb, overhang climb,mantle shelf climb,'a rappelling station, zig-zag cliMb, anotherappeiling station, lay-back,or.jamb climb and.a face climb.f. . .^
*,
. . .
car
6. 6
!Al
BleaOhers can be improyised uPfor a climbing, wall. 'Notethe climber practicing the,
three-point rule (pages 41-5)ald thi belayer, whq isanchored, alertly witching.
*11
89e,
THE HOCK CLIMBING TEACHING GUM!

...A platform' Connecting all Stations:morks ex' a moveable ladder wil.l'.also Work.. Nevertheless', the instructor-should expect to, monitor the'students
Ali .wallsshOuld include some. type 'of .sign indicating the rules.Large block letters on white,tag-board covered with plexiglass works',
well. ',Among these rul es should, be;
1,o unsupervised climbing.
All cliMbers:must wear helmets.3.:;..' 'All belays Mast be 6nchored..
A. When Climbipq, youmust be belayedlandhore, at all- qmes.5.--Shap onto anchor before .going off belay:
. 6.;.:.,:Try.to use tbe three-point rule at all.. times.,..
-,7: -411%. raPpel s 'must be bblayed.... .
Don' t :m,hot4o4;.
. :..
NOticetPat-these .rules are easy to read -and.'understand. Any.'
':student w'ho._refUses:.to follow-thees-s,houl-dLbe prollibi ted -from
enterlit4, into futVier' climbing activities. Students generally are soAnxfOuS-to.CliMb.,that they el.clomarea discipline,problem. ..S000timesin their excltemenWThey.:,simply for,get;the rules and need tb 'be
.
-reminded .. . .
Once =the-.ipitructor:is committe0 tO:a wall blinding proSect, he. .. .
fll.peed to be' totally dedtCate4 o its completion; It will take al'Opg:Ame and a lft of work to *cOMpletp the project, therefore the
.
instruCtor: sho4ld'attempt to get as .many staff. members as possible tn-'Aolved. -,"',4-.:..,,, '''' .,i
,. ,
.. .
... ,, .
...," -.:there-ark several avenues that:cdn' be taken in the selection ofF;0154Uctiarillaterials. ' This. CleCision should' be based 'on the' budget,
area:4o, be used,tinie _Oat can Wdedicated to the .project, and exper-tise OfAheAndivIdUals or the persons inVolved,-
The .ConstrUctiOn of, the wall ciOn be made of ',plywood, pArticle,
.,board, IpanwfacWed'roCkSv or a COMbipation 'of these., All walls-. .
*.should includeiome:type -.of platform from .which the students 'can.-..raPpel and. belay, And fromhwhich the teacher can monitor these,
:attiVItiev::Each:typ47of constructfor1 material2has pertain advantagesand' asadVantageS
. _.,
:- 7 -
',.
Since plywodd is very economical and can be made'Portable, ittbUT4-0-att4ched to'bleachers, a concrete wall, or aby other stablestructUte., Blocks bf hardwood can be' bolted to the board for hand
:. and foot 'Sq.ipports. Holes"'can be cut' with a saber 'saw, intp the, board
'.for similar suOports'i40, jambs... Manufactured rocks, 'which will be dis-
.6issed later, can ,alsZibe boltea to the wall. This type of wall can-be conitogted very quilFkly and offers'a variety of climbs. Marineplywood 1/41,"to 1 :Inch thick works the best. 'If there is no chance thatthçstruturewl getiet, then a lesser grade of plywood could be used.
'4!

One of the major disadvantages of a plywood wall is that the'woo.d.Thts can roduce painful slivers in the hands and knees.
Splintering will also tause the desirable corners and edgeslo wear-."round%.therefore neductng the support area. Slilintering.can'be reducedby sanding the surface with a power-sander and sealing it with a com-mercial sealer. If the supports are made of hardwood blotks or manu-facturedrocks, the sliver problem will also be reduced.. ,
,A simple wall constructed ofplywood and hardwood blocks.'Note the rappelling plat-form. Students, howevershould heve helmets an.
1
1
Particle band is similar to plywood except that the grain of the.wbod fibers in particle board is in many directions. This is advan--tageous because the edges of particle board supports and jambs willretain their sharpness for a longer period of time. Particle board isOot as strong as plyilood; therefore, the particle board should alwaysPe mounted flush against the wall or bleachers. -Again, there might bea Oroblem with slivers unless it is sanded and sealed.
4he most desirable type of wall is constructed of manufacturedrocks and slabs. Tho advantages they offer are that they are strong,when constructed properly, offer a vartety of climbing experience's,are durable, and are realistic. Because of the complei nature of con-strutting this type of wall, this chapter, w41] discuss, in detail, itsplanning and construction..
. Concrete is the basis for making the rocks and slabs; therefore, -
some general concepiSmeed to be understood relative to available con-'cretes, the'mixing process,, the curing time, MethOds of fastening;:andtechniques.for making molds. Each concelit is important in developinga stfiong, wellAesigned rock that can, easily be attached to the wall..Wconstruction should proceed until the .instructor.has experimented,0-some extent, and has become proficient-with.handling concrete..
There are several types of contrete that can.be usedJor makingrocka.and slabs.' There.is no reason ,that the nstructor should attempttormix raW sand, gravel, cement, and water in concrete. Pre-measur'ed
MB ROCK CLIMBING TBAOHING:GUIDB

contreti, which ii sold In Small bags, will nfake*the task easier and there1011 be less. ofe 'chance of error. A 90-pound sack of packaged concretpWill make mahy rocks. Hewever, you must still do'a horough job.Ofing the ingredients in each bag and add wateras inStructed. 'If only a''portion.of a:bag is needed, the entire dry contents pust be poured into a
.tontainer and thoroughly mixed first. Then, the portimneeded may belneasured and mixed With the correct proportion Of water,.agd the mixturepoured-intothe mold. This isiverY. important. because a poftion taken .
dtrectly from the sack will result in incorreCt proportions of gravel,.. sand, and concrete. The rocks Made from Such a. poor-mixture will be
.
vscift,- crumbly, and daiggerous. Make sure ell mixtures are in proper .
proportions(follow dlrections on the sack closelY)2to insure safe.rocks..;
. If extra-strong rocks ere necessary, one of the special formula:- patheged concretes may be utilized. Generally, these are 'referred to as
: "patching" concretes. These have latex, vinyl, or epoxy added which makesthem stronger, but much more expensive.
Latex cOncrite is available in two forms. One form contains a canor box of cement powder and a can of the liquid latex which, are mixed.Another form.of latex concrete, as well as vinyl concrete, involves abox or sack of 5, 10, or 40 pounds of dty latex, (or vinyl) 'to which onlywater is addech. The directions on the box or sack shouldmpe followed. .
closely.
.Epoxy concrete contists of an epoxy resin,.i hardener, acK1 sand;The:resin apd haedener are packaged separately. They are all 'mixed
4.together to makeepoXy concrete.. Epou;toncrete, is the strongest choice,.but is gxtremely.expensive.', Again, f6Tlow2the'direttiens carefully, Work::'In a well-ventilated room,,and do'not let the compoland,come in directcontact' With the skin. -
';tbring.of any concrete mixture.is very important. This is esecially4jmportant with the conventional sacked premix because improper cuting willyield weak, tracked, or 'llakey' roIçs. Ifflatex vinyl, Or epoxy4aterialsate useC then simply,follow the directions. The latex2type sets-Up fas,t,
-So' haVe thejorms readyAnd be prepared to work quickly. .When referring tocuring Within, the context of this text, I arreferring.to the standttrdhigh densiiy preimixed material that ts 01-d,in 40-80 pound sa0s at.hard-Ware storesend lumber.yards,
) )
Af only a portion of the pre-mixed concrete it usol, the entire--Conlintt-must-be-biended-fIrlt fh-a-watiate conta4ne4----Then---the---port4on--------
needed is(measuredtnd mixed. Read the directions on'the sack garefully--.and folloW 'them for proper curing.
to
.1
,, , 2
For the mist part, tOnciiete should,be poured Within 45 min4es from. . .
the time.it was mixed: Otherwise, curing begins and the concrete may .
(,,' beccime too thick to handle and will notjill the mold: Mix only as muchas you cam use within 45 minutes.' Do not try to aompensate by adding more
V I '. c Ar
IP
water; this will make the resultant concrete wetk--fallow directions.Pour the concrete into the mold and tap aneshake the mold to insure thatdll the 1/oil's arefilIed and that there are no air pockets remaining.Time 'is important, so follow the directions carefully and strong rockswill result.
Curing involves the process of hydration, whidh is the hardeningchemical-reaction between the water and the cement and takes place overa long period of ttme. Generally, the longer1the cUring.time; the hardertpe'resulting concrete:-. This curing time requires aboat five days. It'svery important to prevent the water from evaporatin,9 too quickly. Thismight Mean.covertng.or Moistening the mixture at regular intervals. Theconcrep should not be cOered for two to five hours, or before it can
, hold a scratch mark. If an "open"Jorm is used, the exghsed surface should,be sprinikled wifh water after a.2-5 hour wait;.then roll a plasttc.sheetover the:surface and tack it down. After five da9s, the concrete will beready to remOve.
.
.
Weather ts-very important during the five day curing period._
Temperature is .especially-tritichl..; if ;the temperature is too,hot,.the
cement will cure too.fast; /nd if it's'too.cold, (it will' cure too slowly.Since the best temperature for curing is about 729F, it is best to pourthe concrete into the molds indoors where the temperature can.be controlled.If the pixture must be poured outdoors, keep tfle'molds in the shade.
Molds can be made in several ways. .Among these methods are using asand-box and plastic bags, copstructing fiberglass molds, cons.tructingilatex Molds, and constucting.molds Oom plywood'and.plastic sheets.Eachtthod has its advantages and.disadvantages and the person. who is 14char of construttion must weigh them carefully.based upon-the budgetedAmount,. the time available for construetion,.and how'elaborate the wall isto be.
Regardless orwhat.method of mold construction is used, all artificial,rock shoUld have Amilar charatteristici. For example, all rocks shouldbe f st size or slightly larger. Making thefftoo large wastes concreteand iakes them cumbersome to Rlace, iAlso,.all artificial rgcks should.have
, some type of anchorplaced in them. &VA:inch eyebolt works'wellbecause.it will support a large lodti, will! not twiqt inside the hardenedrock when the rock is screwed tpto the wall, and wfll offer some rein-forcement.to the rock and prev.ent, to,some extent, breakage. Also, all .
rocks.should possess a flat surface at right anglps to the anchortolt.Thisis important because.the rocks Will need to be-glued-to the Oiall using
, One f the newiglues, that will be discussed later. All rocks slcould be
anchored with both bolts and glue. In addition, rocks should be ofinteresting shapes. They shoald be irreguThrand "naturel".looking,. art' ''''bricks or ..blocks. The 'eyes" of the eyebolts:are placed inside theartificialrocks and do'nbt protrude., If "eyes" were.exposed, students -Wbuld be tempted to place their fihgers'Thtide them'artd tf a fall ocgurrgd,a serious finger injury would resOlt. Tne finished.rock..(figure19)should have an eyebolt anchor; preferably' VA4ach, a flat'eurface
,
. .
. ./
Mi. ROCK, DLIMOING.TIACHING GUIDO.;
_ f X

perpendicular to the anchor eyebolt for giuing to the"wall, be of reason,able size, and have an interesting shape.
Figure 29: A cross-section of a typical manufactured rsck_ for artifictal climbing walls. . \
--Anylargtv_....
used for making "artificial rocks with plastic bags. The ba is simplyfilled with concrete and placed into a similarly sized hole n the sand'.Then an ey,ebolt with a board fastened to'it is immersed into the cement -
and allowed to dry. After curing, the cpmpleted rock is plucked from the-sand and the,board twisted Off the shaft of the eyebolt' and the plasticremoved. Interesting rocks can be made this way very economically. How-ever, it usually requires an outdoor area at the mercy of the weather andthe shape of the rocks cannot be controlled effectively.
`,_
.0
p4AOOD.0111-EYEIVAT
ofW me
wila/////p/m/v/////apahNolo
0401- SAND
coNcRETE
PLASTICBAG
The fiberglass mold works well and is very durable. To make thisfold, a good size natural rock with the desirable shape is selected. Therock is draped with fiberglass cloth and resin ori the face side, whichis the stde facing away from the wall. The fiberglass and resin that isusedIfor boat repairs works well. Care should be taken so that theedgii are even to insure a flat surface for wall placement. When theflberglasi has hardened, 'bile rock is removed. If the rock Cannot berempved because the inside surface ,slant's toward the middle (a desirablefeature), then the mold is' carefully sawed )n half with a hacksaw. Once
*
.AIMPKBAL CLIMBING WALs

I
the rock has been removed, thd mold is taped together and is ready for use.'To make,the artifjcial rocks, the taped mold is.completely filled With.thecement mixture, an eyebolt is screwed into a 5)iece of wOod and placed on
.top of ,tbe mold_with the eye of the.eyebOlt immersed.tn the-cementmixture'. After curing, the tape is pulled off the mold, the mold removed,and after curing, the rock is ready for placement.
FLVOOD
E YEBOLT
CONCRETE
FIBERGLASS
TAPE-}
The most unique rocks can be made with latex molds. Onique, because'the col be made into any three-dimensional shape desired, with indentationsand grooves whiCh can act as jambs and finger-holds. However, these molds .
are very difficult and.expensive to make and should .not be attempted, unlessyou re experienced with plaster casting. It might be possible, hOwever,to ha e a lotal statuette manufacturing firm make the molds.
ihe molds are made by first designing the rock from clay withindentations and grooves placed where desired. After drying, the clayrock is brushed with latex and allowed to dry; this is repeated until itis strobg enough to support the cementfrock. After the final coat hasdried, the latex form is peeled froethe clay rock and it is ready foruse. The form might still require some support from the bottom when thecement is poured. Generally a "box" is used to support the entire con-struction with the el)olt placed in a board before it is placed into themold. , 7
One of the quickeSt and most economical methods which yields uniquerocks is the'plastic-sheet-plywood method. By, using this method, avariety ofwocks can be made using the same mold. And, in this case,grooves and inger-jambs can be tncorporated into the rocks easily. Themajor tisad antage ofthis method is that some planning is necessary,.aswell as plylood and disposable sheets of plastic.
N
To Conruct the plastic-sheet-plywood mold, holes, the size of thedesirable rpcyl, are cut through a 4/410nch plywood spaced 4.5 inches
#
\ \ I( 74 THE ROCK CLIMBING TRACKING GUIDE
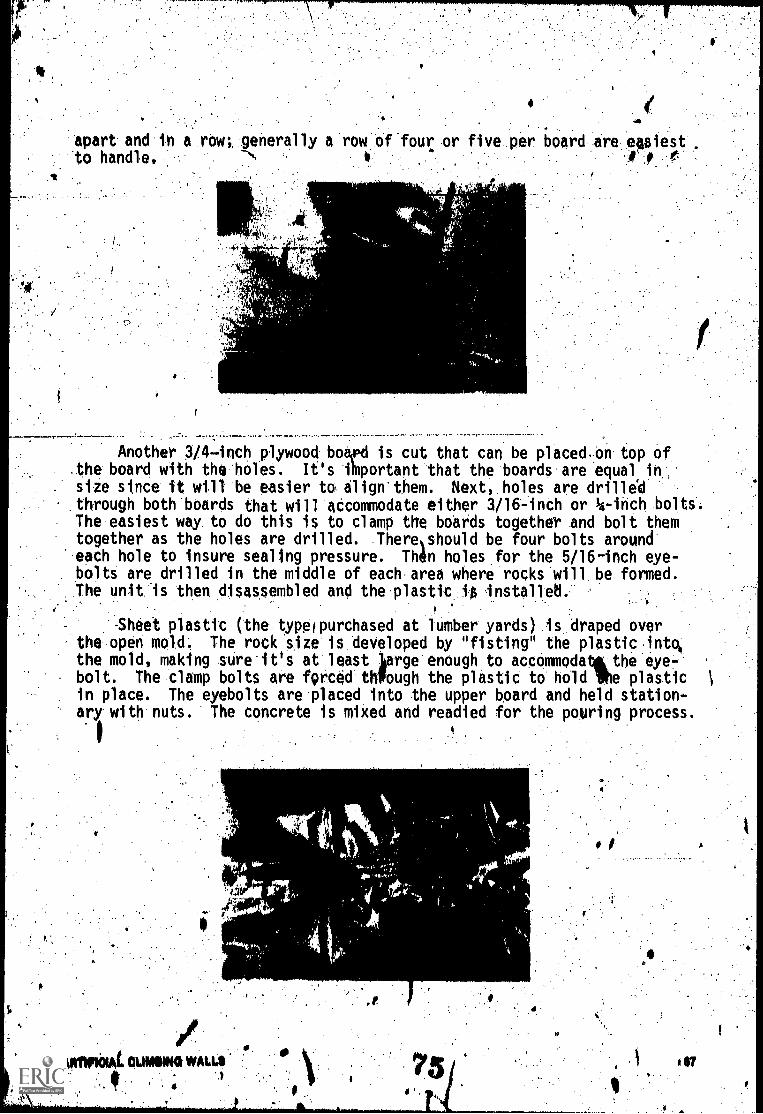
apart and in a rowl, generally a row of four or five per board are eflaiest .
to handle, -\ 4 e
1
Another 3/4-inch plywood bowl is cut that can be placed.on top of.the board with the holes. It's *portant that the boards are equal in ,
size since it will be easier tG aliwthem. Next, holes are drilled.through both boards that will aftommodate either 3/16-inch or 4-inch bolts.The easiest way to do this is to clamp the boards together and bolt themtogether as the holes are drilled. Thereohould be four bolts aroundeach hole to insure sealing pressure. Th4n holes for the 5/16-inch eye-bolts are drilled in the middle of each-area where rocks.will be formed.The unit 'is then disas.sembled and the.plastic,iA
,
:Sheet plastic (the typelpurchased at lumber yards) is draped overthe open mold. The rock 'size is developed by "fisting' the plastic.intolthe mold, making sureit's at least large enough to accommodalithe eye-bolt. The clamp bolts are fprced thWough the plastic to hold !he plastic 1
in place. The eyebolts are placed into the upper board and held station-ary with nuts. The concrete is mixed and readied for the pouring process.
faWkitAL, CUMMINO WALLS k

The UPOer-boand nOw needs ume special.attention. Any areat-where..Wiiter.-Might comeinto,c04act.with the board should be paineciwith.dior'kerotene. Clean.potor oil...works best 'beCause it has no offenive odor
Aowever4.:ker*Oene it..mpre economical. If this is not:done, the-roCks.will:be:difficult to move and the board. will deteriorate quicklY. The.boardwill need toliere-oiled befOre each ute andthe plastic replaced. Nowthe cement Can be.prepee&
Mt ROCK CLIMBING TBACHING QUIN
. .

The mixed cement is poured:into the molds. It is important that.04 molds are completely full: After pouring', the oiled boetd w-ith the. eyebolts in position are 'clamped in place. -
Airdemaniaw
A
,e1.010,
ttt
, 6
RING WALLS 'to C 0

After tightening the clamp bolts, the entire mold is turned upsi.deldOWni' this 'will insure a flat wall surface, ' The plastic surface. Canthen be manipulated with grooves or holevfPrAambs..; omething_beavyIitth-VOlarp-00 .can be placed. pn the. plastic to develop an .interesting'shape.
THII ROOK CLIMBING TORCHING GUIDE
t .

5. .
the mold should tfjp4obe retired for curing in an area. which has theapprOrtatertemperWIre.. tkaere 1$4a temptation to inspect the moldsbut beit to leftve them alone, or they will develop cracks, splits. or -chips. When thf mold is filled and before it is turned over, it shouldlook 1 ike
CLAtipBOLT &RUT
Towl)NUT'
INV III A.*radrd /7 /7 /N7 // riv f. fit
CiCRETE'PLASTICSHEET <
figure' 30: 'The plastic;heetllywood molding method:,After 'curing, the clamp bolts and outer eyebolt nuts are removed.The upper bawd is them removed nettle plastic sheet cut around the rock.Now the rocks, can be carefully remo4d through,the bulged side.. Thisbulge is impttant because it acts is the- finget/foot-hold and there-. fore is an advantageouS function of this %old.
A
4
ARTIFICIAL. CLIMBING WA14,6'
War.* A%
I.
71
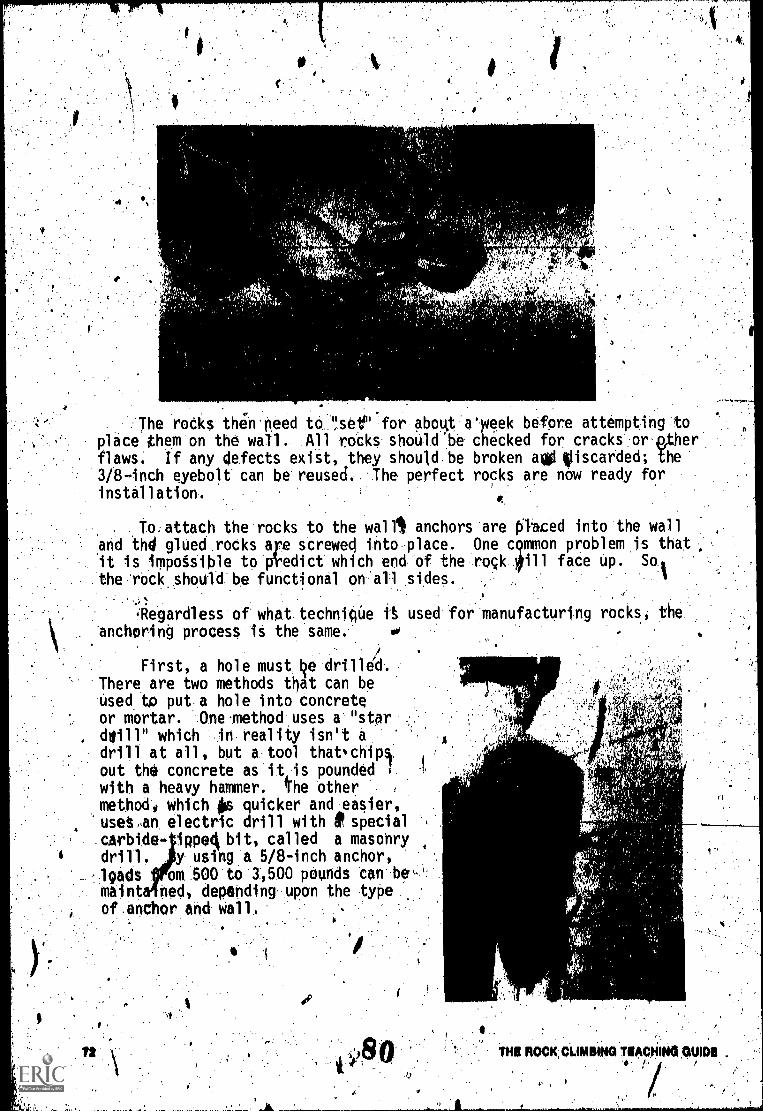
. .
4k1t?,,: 4'
.14 ''.4.0511
. :The roCks then-need to.. 1:see.for abogt a'yeek before attempting-toplace them-on the wall. All mat shoUlOpe checked for cracks-:or-prther.flaws: If any defects exitt, they should.be broken ag0 Cscarded; the'3/8-inch eyebolt can be reused.,..The perfect rocks are now ready forinstallation, A
. Toattach the.rocks to the walTt anchors are Owed into the wall'land thd glUed,roCks are sCrewed into-place. One problemLis that'it is impots-ible 0 0.g-edict which end-of the rock. ill face Up, Sa
'I:the.:rock_thould:be functional
4iegard1ess'of'what.techn1qüe A used for manufacturing roCks, OefAnchoring process it the same.. 0
First, a hole must 4e drilled.There are two methods tnat can beUsed to put.a hole into concreteor mortar. One-method uses a "starddill" which in reality isn't adrill at all, but a tool thatch1p4out the concrete as it, is pounded 1
with a heavy hammer. The Othermethodi which Os quicker and easier,.uset,an electric drill with it specialcarbide ippedl bit, called a masonry
drill. y using a 5/8-inch anchor,
_ leads om 500 to 1,500 pounds can be-hmainta ned, depending. upon the typeof:anchor and wall.

'16
.
Drillirig Into mortar i quite easy, especially with a slow speeddrill. Concrete, on the other hand, is more difficult to drill into andrequires,,a great deal of pressure. However, care needs to be exercised to .preyent'rib injuries; the drill should not be placed,against the rib cage.
Once the hole has been drilled into the concrete or mortar., the dustwill need to be blown out. The safest way to do this is to use a shortpiece of plastic or rubber tubing. Otherwise, there is a possibility ofgetting dust.into the eyes if an attempt is made to blow directly intothe,hole. For all the drilling and anchoring procedures, safety,glassesare essential. if.
It is easier-to drill,.holes into mortar between the bricks than intotheAwicks themselves. With the.proper anchors, the artificial rocks can bemade as secure as needed, therefore drilling holes in bricks is notrecommended. . 1
,. -.. .
, -4'It's also important-that-the hole be as deep as the full length of '
the screw/the anchor. Otiletwi 'the anchor or bolt will not draw the rock.tightly to.the:wall.
The fastener which wqr tt with the 5/16-inch eyebolt is themachind-screw anchor,*which sometimes known as the "Ackerman-Johrlson"anchor, named after the oeiginal manufacturer. It is made of a hardmetal inner core which is threaded on the inside to accommodate themaChing screw (eyebolt) and tapered at One end; the other part is a leadsleeve. A driving tool isIneeded to place this anchor. Tne.anchor isscrewed onto'the tool and'then placed in the hol with the tapered endinside the hole. Hammering on the end of the driving tool expands thelead sleeve over thg tapered end of the hard inner core, forcing the .
anchor to lock sideways into the wall. The driving tool is then unscrewedfrom the anchor and an artificial rock can then be glued and screwed into 1
its'pl'aceh The machine-screw anchor, when properly placed, will hold moresecurely fhan any of the others.
.
Its
11A1r1CIAL CLIMBING WALLS. .
it
r
,A4.1
73

Now the rO4s erelNlby for gluing and placement. ,The Wall:and:roCks7:'need to be.Ary:'and:.clean;,obviously, the rocks need to be,t6tpliyl'Ored.''A wire brushNoirks.fine
fOr'cleaning.the rocks and theAMmedfatewall. sur-:----facesumundint-theanchor:The Bj. Goodrich P.4-200 and.thePlaStic work very Wellt.bUtimost any oflthe construction.
adhestve& thai2aresold intubes:and.applied with caulking .guns will.work..
4,
1
When'these glues are used, the area. should be well'ventilatedand-rubbe'r.07- e,- preferably ap entire climb;-
A gloves and.safety glasses usek
veral anchors
The glue dries quicklysolt is best todrill several holes and place. before proceeding with the gluing process. To glue the rock, simply.quirt a.small amountv f thelglue on the.will4acing rock. surface;:do-not
i
Use too mutt): or It Wil...leave a mess on the wall.-::. Then quickly.screwitintOthe,ftppropriate a c hor. Some:glue will ooze out of the joint.H.A3/4-inch dowel tab be Aed to pull-and move the glueto the open.craCks ', and completely seal:the rock to-the wall (figureln:Because the glue..will tend to "run" to the bottom of'the rock fOtnt, it shoUld be chededseveral titmes and resealed by Using the dowel. Although the rook would .probably be ready for'use as soon as the glue hardens, it should not beused for two or three days to-insUre
proper*glue curing time. By boltingand,gluing the rock, the resultgntfoot4nd handholds willoffer an inter-
.,esting.and safe climbingexperfInce..
Eigure 3.11 A cross-section of an artificial rock properlYanchorel'andllued to the well.
4
THI,ROCK OLIMISIWOIRACHKKI GUN*
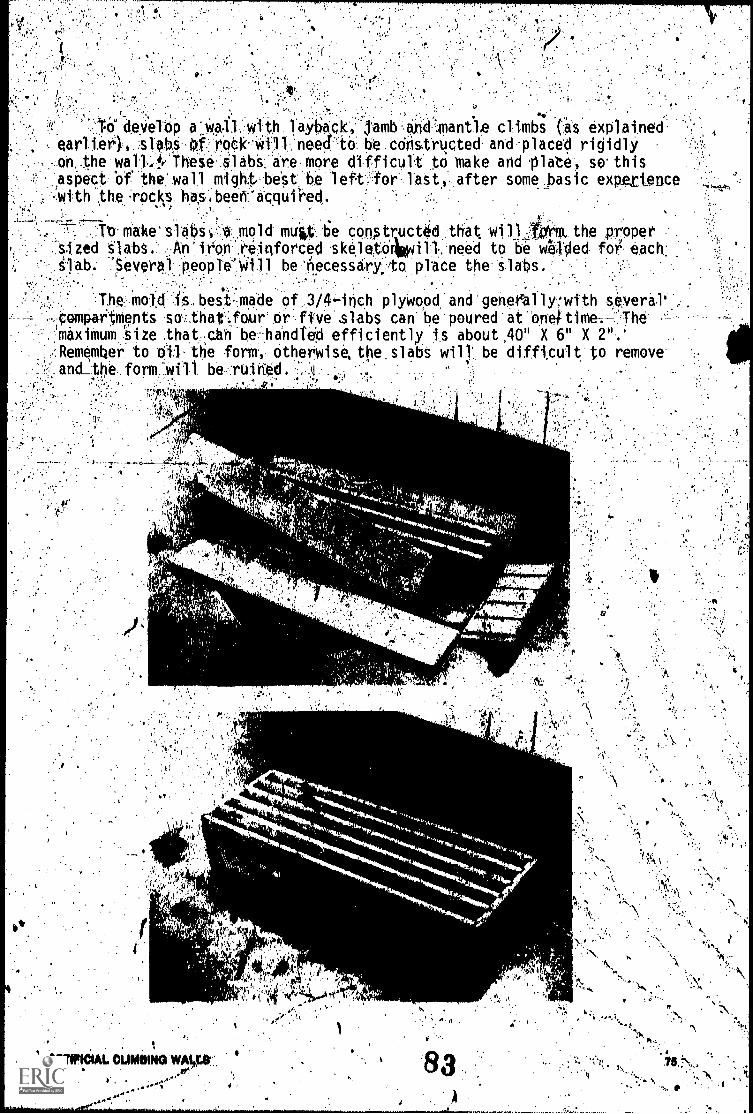
,
To e:velOP.a,.Wal.:1 with layiiack, jamb ,axid:*antle climbs .(as explainedearl ier), subs if rgci< will need to be cdristructed and placed risjidlY
wall.t/Theie.Slabs, are Mpre difficult to make arid 'plate, so thisasPect of the wall might beSt'be left:'-for last., after some basic experiencewith the .rpcsks has,been-acqufred.
make"slab.i;.."*.,mold mui.t tie con1struct4d that willAcirm, the prOper. sized Slabs.* :.An'ir'on...reirtforced .skeleXPririll:,.need to 'be wtacied for.' each:glab. .'$everal; peopIeWill be-'necessary.,:to place the slabs.'
The mold *is. bes.i..made of 3/4-inch plywood and geneeallvwith several',icompar'tments so.thaEfour or five slabs can be poured at onel-time-'The.maximum size .that can be handled efficiently is about ,40" X 6" X 2".`
.-Rememlaer to oil the form, otherwise, the slabs will' be difftcult to removeanci±pt)e form will be ruiried
-
,
42
), 7.
0/11
ARTIFICIAL CLIMBING WAY*jp.
X
44,
,41-41iti&
,51ke:At."!
cc:4 7444_
1
1' I
I
A
141-,Fer,

As-previously mentioned, the-slabs will need to be fortified withforcemerit rod and Steel tubing. Half-inch concrete reinforcement.rod
and steel, conduit with pin inside dlameter;-of 1/2-inch works well. Three. pieces Of tubing 6 inches long are "tack" welded to three pieces of re-
inforceMent rod 39 inches* long. One 6-inch piece of pipe is tacked in'the middle and the two end pieces 'lacked about13 inches from each. 'hearend. It might be advantageous to lieterraine exactly where they go by,Measuring the nicker cracks in the wall.
0,1g:4'eloir.prcemenf,'skeletph An the foym, the ipe .(COnduit) orknings)imust, be, taped shut: 0:th: lipaskin§ tape... Then-it is'placed;into ithe!fortif,And,OrOperlimixed the, mold.
. 4
'04,0
f?
Aso 4 A
k" y
..4 ' t! , ti, ...,A '1
..:,,0,4' :
'.. W ..:.'. t`.
Ni'..... 4
i s necessa,"3;?wwmake§firoy-the 'fiftek'4S1,.com04y filled.',anck tti,.?
,..the skeleton r'eliTforcefflektt rod 'I i'i,oLexpb-se& '1hls, s.:',Wcompl i%h4tri-b'61anstent,l)rodditlfiaroun'd't,titk skelet.0;:ivhlte.tit4iOndree '',I,S pp..0 red ;'llip \ imold can e(tso .belAgped to s...ttle ttIV c'encie,teAtipiterfal .- ...:: *,:,..- . 1..; ;,.. ' -it ... ily. .`
'... *.
4', , ft. corislant aird*timel J'end 'al %wed to -cure:'kftemenibie:t6:1:reviiw :ttie :prool i,Next, .the\mold 'ilk i ts.: Co4fenrs.-,4tioura., \91 a ciest*ore tlie3wperal.
of.'..mcii nth i ming' "bow damp90 on th'ecohchte tr Ths.wf:P.M..kr ciliing ..,:?..After,.4he 'uigel . fiV.4,,4ays'f' tfit el etki.7are riedy ,to lie' remociiiit::, 4...P' . '', , ..:: ''',1.. , , -., .. . ,.., 1. .
'''' The, sUbs .mUst be ..iiniRveci Carquilyii:ox tlieSt.-wfl L be4broken,....
\
d,
aire. 4,1.,.t.,
r4
a...;;
"A
". :

the form bra es areleased. n the,boards are lightly tapped and,if .they. were properly oiled,ItheIoards will release and expbse'the slabs.,-,Caution peed to be exercisesi.tecause the. slabs are very heavy. 'Staff andm intenance ersonnel shOald be the only peo le handling ahd plactng the's abs because of the danger involved in hand ing thelheavy weight. NQWthe wall needs to be ffiarked for drilling.
t
Because three slab bolts (5/16".X 8") must be lined up with holesin'the wall, S'pecial care 'needs to be "exercised when drilling 'for anchorplacements A hole for the center bolt c n be drilled and an anchor put, .
approximately where:the MIddre of the s1abTs10 be plate-.--The slab isthen put,in placi and bolted down with the center bplt. Glue is not used.yet. .The othen2holes,now need to be marked.
A 1/2".X 8" bolt is used to. lark the. anchor holes on the two ends.
This bolt should.be sharpened 011 the theeaded end and the bolt is used asa center-punch. By inserting the bolt thitough the tubes and tapping itwith a heavy hammer, an ihdex mark will reilt that williindicate exaCtlywhere the anchor holes-should be drilled. The slab ig OW turned 900,the holes drilled,' and anchors.placeON Now the slab ls rdady for finalplacement,
To sectre the slab, thecenter bolt is removed whiletwo other peopleare holding-\the ends of-the tlab,,remem-'bering that the slabs arv..,.very hea4y. Glue is platedon the ete-o2f-the-stab-
mated to the wall and anchors.
ea
-cp;-
Then-th'e,.slab is quickly
placed in PosItion and three,5/16" X 8" bolts with washers.on them are used to draw theslab securly against the 4.
wall. .
.
AIMPICIAC CLIMIING WALLS
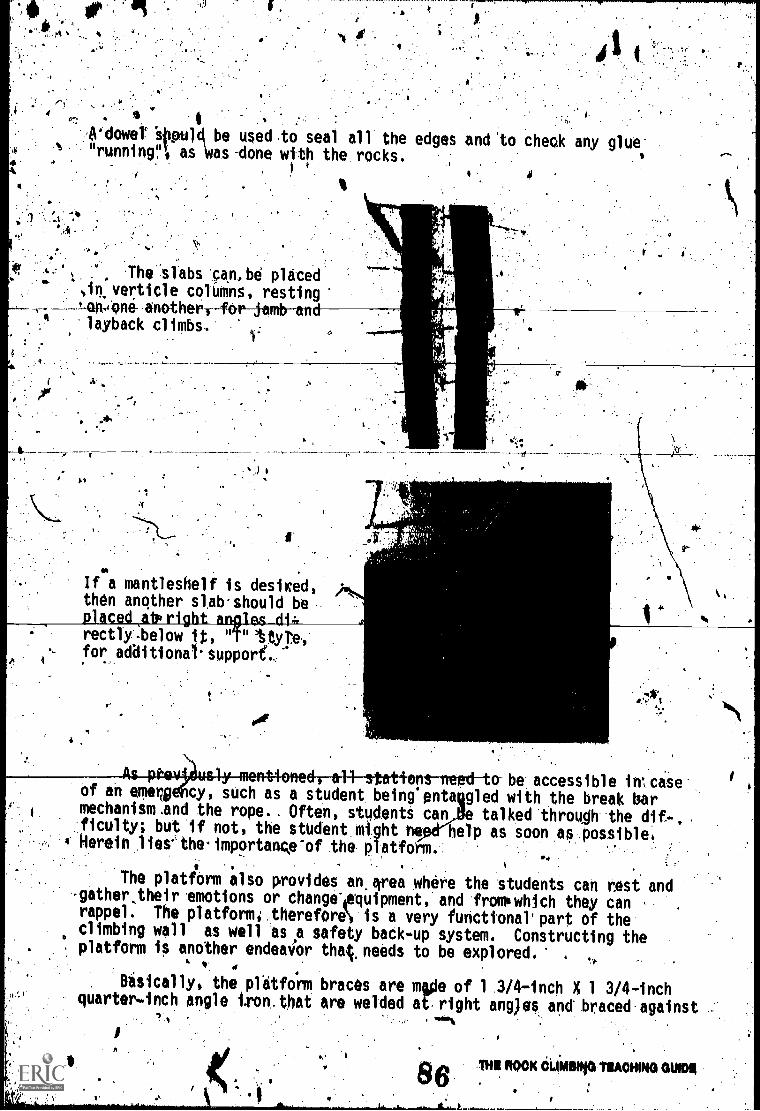
Adowet '44404 be used .to seal all the edges and 'to cheek any glue."running"; as Ws -done with the rocks.
.
." The slabs *can,,be placed
verticle colUmns, resting, .±en:,one anothery-for-jamb-an
layback climbs.
A
If a mantleshelf is desited,then another slab-should beplaced ,atprigbt angl.A.s 414-rectly -below it, "T" tyro,for additional. support..
1,
:As phav usly ment4eneel-r-a-1-1-statters-need-to be. accessible in; case
of an emery) cy, such as a student being enta gled with the break barmechanism .and the rope.. Often, students can e talked 'through theficulty; but if not, the stUdent.mtght he help as soon as ,poss1ble4Herein the importance"of the platform.
The platform also provides an.area where the students can rest and-gatherjheir 'emotions or change-Aquipment, and fromwhich they canrappel. The platfom,therefore\ is a very functional part of theclimbing wall as well as a safety back-up system. Constructing theplatform is another endeatior thatneeds to be explored.
. Bisically, the platfoErm braces are mide of 1 .314-inch X 1 3/4-inchquarter-inch angle ian.. that are welded at, right ang)es and braced.against
,
v
86 THII ROCK CLIMB* TEACHING GUIDE

....thtfwaiii. With three 2-inch %X 6-inch plankS placed acrois the braces;students willhave an ampleorea to move. It is recommended that thefastening bolts pass entirFlY through the wall and the platform.brace'to insure stabflity._ And these bolts should be at'least 3/8 inches in _
diameter' with'tWo.bolts per bop. It isialso recommended that thebraces be. spaced three feet aparik That is, for an 18-fbotspant.
.seven braces wquld be requtred;.this includes the:extra brace npces-sary for...one etid. .4
Whenever the platform is erected, it should, be as high as'possible
Yet allow enough headroomcfor studentsftto function well. This will
provide for maximum wall usage.\
--StWents c1imb4ng and rappeTti-ng.,Note slabs constructed into a Jamb-
., climbing station", the rock place-ment and the platform braces.
. An emergency'ladder, chimney
. climbing station, and "open book"climbing station can all be incor-porated into one unit.. This unit,'
made Of 11/2" X 11/2" three-sixteenth
angle ii46nnd 3/4-inch highAbali-- plywood whic an be'taper d at the top or o om, or
dhall ge. Chimn climbing is,,strai t to provit the desired
.strenuqus, so narrowing the top--of the structure will make the
climb easier. The same concept.1it true for the "open boorsclimb which Can 6e placed Orppo-sit, the chimney climbing-area.The cross (horizontal) support-ing bars between the structuresmake an ideal emergency ladder,for the instructor to quicklyreach the top.
AMAMI CLING WALLS
,
al&

If a tapered Combination'unit involving a ladder, chimney, and"open book"lis contructed, it should be designed with a minimum ofone-foot width at-the-top., Also.the bottom needs to be high enoughto prevent tempted students from climbing up the ladder or individuals\'from bumping their heads when,they pasS below the structure. The unitgenerally is not built'freM the floor "for security and safety reasonsand to save space in the room. Obviously'a unit.this large will be Very
,heavy, therefore a wall crew of adults will be required to fasten it(preferably with 3/T-inch bolts) through the wall.
Although it wil) eventually wear off, textured paint can be added tothe wood to increase friction. Rocks can also be fastened easily toboards by drillivg a 3/8-inch hole through the board, gluing_the rock-andfasteni-nga--wers-her and nut on the inside. It is important not to con-struct a'unit thatt too easy to climb; it should bg challenging.
The anchors that will support the belays and rappel ropes are mostimportpt because they are the final back-up anchors. These should be
-5/8-inch-ejebolts- either bolted through the wall*, through the bedm, Drfused to the beam by a competent welder. Carabiners are not-used toattach ropes to thes anchors. Instead, the ropes.are threaded directlythrough the eyebolts., This eliminates the possibility of students' "un-snapping" anchors. This method will allow the.belay'ropes to "feed" prop-erly through the eyebolts and yet eliminpte.the need for additional,expensive carabichers.
Rappel ropes are knotted together at the top, next to the eyebolt,with an overhand knot, to insufee against falls if. a student mistakenlyrappelswithronly one rope. All rappels are belayed from a differentanchor. These techniques pr.ovide additional security for rappelling,
When students reach the top, there should be somepl'ace for them joanclpr. In the sample wall design used throughout this text, the an orwas a horizontal rope with each end attached to anchors at the opposite
- ends pf,the platform. After reaching the top, the student simply "snaps"onto the horizontal rope with a locking carabiner before going off belay.Then the student may walk to the rappelling,statiOn, protected by the"gliding" carabiner. Students need to be r'iliftida to go on belay beforesnapping off the rope anchor. Remember, students are always belay
or anchored when on the wall. ,
To secure all the ropes when the climbing wall is not in us is a
their ends with one of the middle belays. Then, thether eAd-_,o the
very simpl
lbtprocedure.
First, all the ropes are tied together, c ose tO
belay rope is pulled until all ropes are up to the ceiling and in essible,and the bele; tied high on the emergency ladder or other difficu]t-to-reachstructure. When almbing'is to resume, the belay is simply untied and therope duster lowered. 'This is a quick, easy and safe method of securingthe ropes.
Once a climbing wall is constructed, the instructor may be tempted to
THO ROCK CLIrING TOACHIPIO GUIDE41,

7--
teach the climbingclimbing wall is ofi
an outdoor adventurscheduled:
5JclTls on the wall .and neglect-an outdoor Climb. The.
.intendectto be'a teaching aid and not to supplante. If at'all possible, an Outdoor climb should be
Whether an outdoor climb and/or a climbing wall is utilized, arecord sheet (page 99) is a good recording and motivational tool.Thts can beused to describe the-cltmb, the climbs difficulty, the rules,and places to record up-climbs, down-climbs, and rappels. A certificate(page 101) is also a nice item for students to take with_them, proAded
_ . ,
they have performed safely and appropriately,
A climbing wall will prove to be a very satisfying and functionalproject,that will give years of seryice while providing an-ideal teach-ing situation.
,
1
,
ARTWICIAL OLIMSINg WALLS
r
9
ADVANC6 INSTRUCTION OPPORTUNITIES
An aspiring climbing instructof will naturally desire the best pos--sible training for himself. And, as,indicated at the opset, this text is
ndlt intended to supply instrUctor instruction, but to act as an instryc-tional guide. Also, once engaged in teaching rock climbing, the instruc-ttor will become inspired to learn more advanced techniques. Herein liesthe importance of private schools. and public institutions which offerprograms in rock climbing. A mountaineering experience involving rockclimbing will develop ',insight and wisdom which no text can provide.
Techniques used by the private schools and public institutions mayvary from those uggested in this text; the schools will generally usetechnique# they h ve,found successful, ones they have developed, ortechniques based on newly developed equtpment. Remember that thesetechniques will be based on very small Oroup sessions conducted duringflexible periods of time,'a luxury not often.found in the public schools.However, the aspiring instructor should always be open to new techniquesbased dh new equipment and reparch findings, especially when they willenhance safety.
Listed here are private climbing school's and clubs that Wet/practical, rcick climbing instruction; schools which, emphasize snow and iceclimbing are not listed. Most schools offer beginner through advancedprograms and costs range from $15.00.to several hundred dollars persession depending uponLthe program, equipment provided, and selectedclimb., No attempt is made to ctitique or endorse any of the programs;however, When contacting a sChool, be sure to ask for references. Mostschools have been inexistence for some time and have good reputationsand outstandinj instructor
Alpine Crafts ttd.Box 85697
,
North Vancouver, Boitish Columbia,Canada
Appalach-iary Climbing School
MouataineerlOng. South, Inc.344 :Tunnel Road
Asheville, North Carolina-28805
Appalachian Mountain Club,5 Joy Street
Boston, Massachusetts 02108
Arizona Mountaineering Clubc/o Bob Coraf
1 8418 East Roanoke Avenue
Scotddale, Arizona 85257".
',004.04.0411111111110111111111111.11V----
* 9 INS NOOK COMBING TEACHIN9OUIPS*

Base Camp Climbing School121 North Mole StreetPhiladelphia, Pennsylvania 19102
Blazed/Trail 'climbing School, TheAbercrombie Pitch360 Madison AvenueNew York, New York 10017
Bob Culp Climbing School1329 BroadwayBoulder, Colofado 80302
-Camper's Corner2050 Elvis Presley BoulevardMemphis, Tennessee 38106
Canadian School of Mountaineering Ltd..,P.0.-Box 1552
. Banff, Alberta TOL OCOCanada
Climb High, Inc., Mountaineering School227 Main StreetBurlington, Vermoli3O401
Colorado Mountait School2402 totsera-Avernue--Loveland, Colorado 80537 ,
Dartmouth-Outward Bound-CenterBox 50Hanover, New Hampshire 03755
Eastern Mountain Sports Climbing SchoolMlain Street
North Conway, New Hampshire 03860
EE-OA-HOW Mountaineering and GufdeServiceP.O. Box 207 .
Ucon, Idaho 834544
Exum-Mountain Guide Service and School of American MountaineeringMoose, Wyoming 93012
,Fantasy Rid4e Schooj of AlpinismBox 2106 .
Estes Park, Colorado 80517
Fc;rward School of Aountaineering Thak
1432 Tweed StfeetColorado SpPlog4,-ColoradO 80909'
,
A4 ,A04ANORD INIaUCTION OPPORTyNITIBS
; 4
s

.Harvey T.'Carter Climbing School'Box'962
Aspen,:CoTorado 81611
'Herbert Cretton Roch MoOntain Climbing. SCh8o1 and GOO ServiceBox 769:
Estes:,Park,:Colorado,80517"'
High Adventure Techniques .
62 Livingston AvenueDobbs Ferry, New York 10522
High WaysBox 1744
Boulder,. Colerado 80302
,
.Institute of Mountain Edueation*P.O. Box1,336
Eldorado.Springs, Colprado 80025
International Mountain Equipment, Inc.sMitn StreetBox 494
North ConWay, NOW Hampshire 03860
. Iowa Mountaineers. P.O. Box 163
_Iowa Ctty,_dowa 52240
Jackson Hole Mountain GuidesTeton Village, Wyoming 83025-
Mazamas
909 Northwest 19th StreetPortland, .0regon 97209
Mount Whitney Guide Service and.Sierra Nevada School of Mountaineering
Lone Pine, California 93545
Mountain Affair Mounta4neering School-idyliwild Mountaineering Instltute.64414 North Circle DriveP.O.-Box 369
Idyllwild, California 92349
, Mountain CraftP.O. Box 622
Davis, California 95616.41,
THEMOCK'CLIMEING TEACHING GUIDE
MoUntaineering School of Vail, Inc.P.O. Box 931
Vail, Colorado 81657.
ilountaineers, The11719 Pike Street.
:Seattle, Washington 98107 ,
4tional Ouidoor Leadership SchoolF.O. Box AA
Lander, Wyoming 82520
Nord Alp, Inc..
ree
buffalo, New.York 14214
North Country Mountaintering, Inc.P.O. Box 951
Hanover, New Hampshire 03755
Outdoor Leadership Training Seminars2200 Birch StreetDenver, Colorado 80207
Palisade School of Mountatneering1398 Solano Avenue
' Albany, California 94706
nt.P.O. Box 5622Washington, D.C. 20016
Recreation UnlimitedJackson, Wyoming 83001
Rockcraft609 Durant S
1
Netornla 0
Rudi Gertsch/Mountaineering SchoO1Box 543
Banff, Afberta TOL OCOCanada.
4
Sawtooth Mountaineering, Inc.5200 Fairview Avenue. Mini MallBoise, Idaho 83704
1/4.
'Sierra aub, TheRock-Climbing Section, San Francisco Chapterc/0 Vern Muhr, Chairmap 6
.6500 Tremont StreetOakland, Califorbia 94609
ADVANCED INSTRUCTION OPPORTUNITIESN\ e
a.
s,1
05
tk,
Telluride Mountaineering SchoplBox, 4
Aspen, Colorado 81611
Too Distant Horizon Climbing School3401 Valley'Vfew Drive '
Morietia; Georgia 33006
Wolfcreek WildernessP.O. Box 596
Blairs011e, Georgia 30512
Yosemite MountaineeringYosemite, Californfa 95389
A delightful way to spend a summer is to receive academic creditfor completing a college or university climbing course. q6ome of thecourses are offerterby the private schools listed above. Cost obviouslyvaries with the program content, so it is recommended that prospectiveStudents contact the.registrar's office of the institution(s)in which'I 4
they are J9terested. This list is not an endorsement, but most of theprograms ate well developed.
f
Memph4s State University
Continuing Education Department '-Memphis. Tennessee 38111
Missouri Western CollegeSt. Joseph, Missouri 64506
Northern Arizonaflagttaff, Arizona 86001
OlympiC College
Brellerton, Washington .98310
Outward Bound, Inc.Natidnal Headquarters
West.Putnam Avenueich,Connecticut 06830
Plym uth StatesCo11ege, Plymouth, Newtiampshire 03264,
Prescott College'Challenge/Discovery .
Prestott, Arizona 86301
THI! ROCK CLIMBING TEACHING GUIDE

.4
State 6iversity Colfege.at PotsdamWilderness WorkshopEnglish DeOrtmentPotsdam, New York 13676:
Ulster Community.College of theiSpte Un1versity of New YOrkStone Aidge',,New'York.12484
'University. of,Colorado
.
Boul de r0 orado_80302
, Universitp-of IowaThe Iowa. Mountaineers
P.O. Box 163jOwa City, loWe 52240
Univei.sity of Southern CaliforniaLos Ange1es,, Cdlifbillia 90007
Universtty of UtahSalt Lake City,Atah 84112
Washington State University'Pullman) Washington 99163 .
:ADVANCE:I-INSTRUCTION irPO TuNno
4
.4
1,
(
IP

ANNOTATED BIBLIOGRAPHY
,
Book's.'
.
Aleith 11, C. Bergsteiten-;Basic Rock,Climbing. New York: Charles..,
Scribner's Sons) 1975. .This is one 'of the most up-to7date books
on all asOects of rock climbing. Aleith cleaHy'discusses. and('. ,
,.1
graphically 'explains the import:Ante of the cl imber ' s body -and foot
angle on the climbing surface, which is an essential prerequisite
'for rock climbing,
,.
:BUnting, James'. LeiwreguideS imbtng. New York: Thomas y .crowell
Company, 1973: This is a .good),all-aroune,mountaineering book
that includes 'the *portant aspects,Of orienteering. ancL map reading_.
,The introduction1inc1udes kbrief but tnteresting:. history of rock
cl imbing, ',..1
Department,of th0 Army ,Field' Manuato 4
1
11^ 11'1
Mountain. Operations. Washingtft. .
-The-un4qupeof this .
f) 4manual ts that it.;contains many methodt Of utilizing rope courses.,,
methods of ,transporttng matertal , ancrApjured vtctim evacuation.,'. ,
.,
':1'his ls a vetircomplete.text that could be utili/ed by the cliiiibln r'
instructof; howevser,:.the reader should realize the tnaterial .is -
(
preseAtéd1na regimented military fashion: Can be Obtained., free*
from mostearmy recruiters.
Dezettel; Louis M. Do- t-Ybursel WfthtPacka 'ed °Concrete and Mortar.'
New August.sa, Indiana: E ors and. Engineers Ltd., 1968. Thi7s is
ve6/ easy toread mid understand booklet the would be very useful
forYartifical roll 'building,
i...
THE RODICOleIMOIN TEAMING GUIDE..
4
61.

s..
4
Griffin, Larry. Practice Climbing. Englewood, Colorado; Pt-Onto Print,
.1973. This is a very smallt6 page) pamphlet that inclOes some
very, brief recommendations that would be useful to the 4ginner.
It might be a good text for students in that it,is bri9f and
-economical. ;
<
Mandolf, Henry I. Basic Mountaineering. San Diego, California:
Neyenesch Printers, 1974. The,San Diego chapter of:the Sierra
Club has once more printed an excellent Manual. for,outdoor use.
.The book'contains an excellent section of first aisf-an0 'survival
. for mountaineers.,
Manning; Harvey, Chairman Of EditorS, Mountaineering, Freedom of the:
BinghaMton, New York: Vail-Ballou Press,/Inc. This text
is often and torrectly referred to as:the."cliMberis
The book contains about 500 pages on all facets of'climbing and
should'be'the Wtructor's first literary purchase; it is an
extellent resource. Included is information on'equipment, food,
travel, belaying techsniques, rappelling techniques, safety and
food/meal information. This book is expensiv.e14ut is well worth
the price. .
Mariner, Wastl. Mountain Rescue Techniques. Binghamton, New York:
Vail-Ballou 'Press, Inc: Although this is a tecpnical 'text, a
clinibiig instructor should be'briefed on rescue methodology
bdfore engaginq 'in any outdoor climbing.. Depending on the ability
of the class, this book coulsl be used'to help instruct a portion
of the rock climbing suk/ival unit.
ANNOTATED IIIELIOGVPHY .
kA89
1{1
.0
4
Meldrum, Kim and Royle, Brian. Artificial Climbing Walls. London,
W.C. 1: Pelham Books ,Ltd.,1970. An exciting book on the'new
age of rocic climbing walls. 'England has had artificial climbing
for some years, but is a recent innovation in America. Ailygm3
wishing to build such a structure would find this text Most4
.informative.
M.I.T. 'Outing Club. Fundamentals of Rock Climbing. Cambridge,
-Massachusetts: Massachusetts Institute of Technology, 1971.
This monual is in easy-to-read form:thawould make,it functional
in the school library for student use or. perhaps as a text in
class. The knot tying section,is large and easy to understand.
Paulcle/Dumler. Translated, from German by E. Noel Bowman, F.R.G.S.
hazards in Mountaineering, New York: Oxford University.Pres,
1973. This book covers many of .the mountaineering hazards,
particularly those- involved with snow/ice climbing and sit-ling.
.Included is an excellent section on rock climbing. Rock formation
:hazards, weather, and lightning are covered in detail.
Perrin, Alwyn T., Editor.. Explorers Ltd. Source Book. New York:
Harpel & Row Publishers, Inc., 1977. Although rock climbing is-.
'only a small part of this book, any climber would enjoy reading'
about the many sources of outing equipment and critiques. Included
in the chapter on wilderness travel are pathfinding, traVel by
land, travel by water, travel in winter, provisioning in the field,,
and living in the field. Other Appters include sea travel, air travel,
emergencies, vagabonding, and exploring.
90
s
THE ROCK CLIMBING TBACHING Gym
1
Petzoldt, Paul. Petzoldt',:s Teton Trails. Salt ,Lake Utah:
Wasatch Publishers, Inc., 1976. Although tiis book is 'bore of a
A
Teton trail guide., everypotential rock climber should read Paul's
stories. Petzoldt's description of his first Grand Teton climb
is most.hUmorous, revealing and enlightening..4
Robbins, Royal. 'Advanced Rockcraft. Glendale, Califdrnta: La Siesta
Press, 1973: As the title implies, this small book is intended
for advanced work. The text, however, includes material that ari
instructor could use, such as how to place chocks, placing chock
oppositions, chock removal, useoof runners (loops) with chocks,
nesting pitons, jumar use, descender USR, arid tying the grapevine
knot as well as safety hints,which the instruCtor Of a novice group
will find beneficial.,
Schneider, Anne and Schneider, Steven. ThetClimber's Sourcebook.
Garden City, New York: Anchor Press/Doubleday, 1976. A large .
(340 pages) book which contains sources for every rock climbing
need. Chapters include: where.to learn to climb, technical
mountaineering equipment', climbing equipment retail,stores,,
technical rockland ice-climbing areas and local guidebooks, and
,mountain media.
Smith, George Allan'. Introduction to Mouritain ering. kanbury,
New.Jersey: A.S. Barnes and Co,,,Inc :1..96\. Although Smith' .
equipmerit, methodology, and techniques might be questionable,
Jhis cilapte r on photography, cltmbing organizations and book
r eviews are excellent.
ANNOTItr IllaLlOORAPHY
14.2.
at
.1.111/E
' Tyndall, John. Mountaineer4ng in 1861. 'London: Longman, Green,
Longman and Roberts, 1862. This is a historit-book which describes,
the. duthor's4climbing 'experience in the Swits The book ish
wilitten tn dramatic and descriptive terms and i5.a good text on
past methods of moutaineering. The book offers no aid'in teachi.ng,
however.
Wheelock, Walt. Ropes, Knots and Slings for liters. Glendale,
California: La Siesta Press, 1567. Wheelock-includes all the
4necessary information relatixe to ropes, slings and techniques
of knot tying. AnY doubt as to how a knot ishould be tied would
-he clarified by this text.
Wilkerson, James A M.D:, Editor. Medicine for Mountaineering, Revised
edition. Binghamton, New Yo4: Vail-Ballou Press, Inc., 1977. ;
Written by climber-physicians, this text is a must for any climber.'
instructor. This is the first book that refers to medical treatment,
as distinguished from first aid. About 300 pages.
°Magazines
Crenshaw, Jene M. and-Kilness, H.V.J.,. Co-publishers and Editors.
Summit. Editorial Office: ft0. Box 1889, Big Bear l?ake,
California, 92315. 'The magazine is similar to Ascent, however-
. Summit concentrales on climbs in the 'United States and the rest
of NOrth America, Also included is a section on new bbok reviews,
new equipment. and a list of climbing guides.
Direr, Gene, Editor and Publisher. Teton. Editoriail Office: Box 1903,
Jackson, Wyoming 83001. Published twice annually, this magazine
covers all \recreational endeavors encountered in the Jackson Hole
1,2 1 00 THE ROCK MIMING TEACHING GUIDE
k
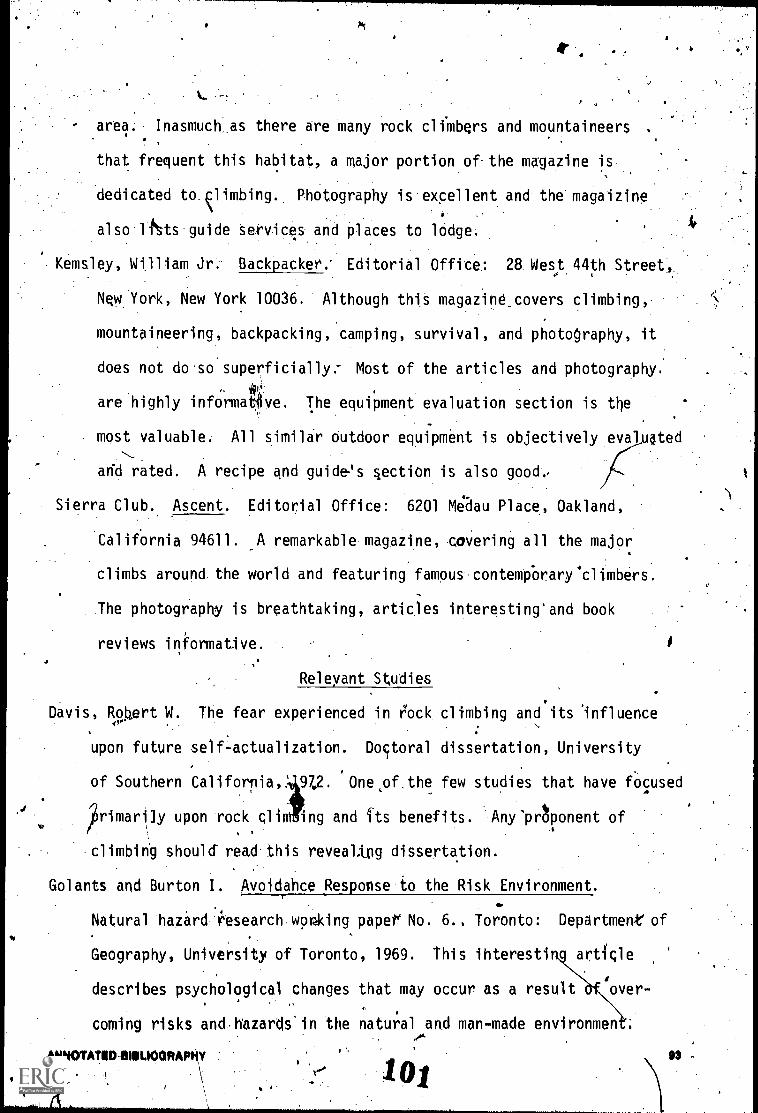
area. Inasmuch_as there are many rock clfmbers and mountaineers
that frequent this habitat, a major portion of-the magazine is
dedicated to klimbing. Photography is excellent and the magaizine
also lftts guide servics and places to lodge.
Kemsley, William Jr. Backpacker.* Editorial Office: 28 West 44th Street,.
New York, New York 10036. Although this magazine_covers climbing,
mountaineering, backpacking, camping, survival, and photography, it
does not do so superficially: Most of the articles and photography.
are highly informative. The equipment evaluation section is the
most valuable. All similar outdoor, equipment is objectively evaloted
and rated. A recipe and guide's section is also good.,
Sierra Club.. Ascent. Editorial Office: 6201 Meaau Place, Oakland,
California 94611. A remarkable magazine, covering all the major
climbs around the world and featuring famous contempbrary'climbers.
The photography is breathtaking, articles interesting'and book
reviews informative.
Releyant Studies
Davis, Robtert W. The fear experienced in i'ock climbing and its 'influence
upon future self-actualization. Doctoral dissertation, University
11)
of Southern California,: 97.2. One,of.the few studies that have focused
;rimari)y upon rock qli ing and fts benefits. Any'prtponent of
climbing should read.this reveallpg dissertation.
Golants and Burton I. Avoidahce Response to the Risk Environment.
Natural hazard 4^0search.wonking paper No. 6.. Toronto: Department of
Geography, University of Toronto, 1969. This ihterestin article
describes psychological changes that may occur as a result over-41
coming risks and.hazards'in the natural and man-made environment;
ANNOTATIO-11191.10ORAPIty
101
1

t
litelson, W.;,'Proshansky; Aivlin L.; Winkel, G. An introduCtion to
,.- Environmental Psychology. New York, New York: Holt, Rinehart and.
Winston, Ind., 1974. A text that is involved with the conceA of
environmental influ6ces.- The historic as well 0, man-made and
natural environenAal phenomena ai-e investigated. I
'
Koepke, Sharon. The effect of Outward Bound participation upon anxiety
and self-cOncept. Mther's Thesis, Pennsylvania State University,
1972. Another interesting study regarding.self-concept and
actualization improvement'through outdoor adventure programs.
This study, however, Is not limited to rock.climbing,
Smith, Many L.; Gabniel, Roy; Schott, James; and Padia, Williath L.
Evaluation of the Effects of Outward Bound. Boulder, Colorado:
7 Bureau.of Educational Field Service, School of Education,
University of Colorado, 1975. One of the most comprehensive and
revealing studies of the Outward Bound progc'am involving 600 sub-
jects. Surely worthy of investigation.
Other Informative Informatip
Often times information can be procured from other resources.
Commercial'firms bre generally happy to fulfill this obligation
and below are, just several that have been found particularly
valuable.
Furst, Ro§er, Editor. .Eastern Mountairl_Sports, (EMS). Editorial Offide:,$
-1047 Commonwealth Avenue, BostondMassachusetts 02215., This
company has extensively tested climbing gee and reported the
. results in technical terms in their catalog. The catalom also
covers important aspects of selection/maintenence of all equipment,
.102 THE ROCK CLIMBING TEACHING GUIDE

' N
'
including_boots and ropes.
. Penberthy, Larry, Editor. Multain Safety Research.(MSR), 'Newsletter
and Catalog. Editorial OffiC:P. '631 South 96th Street, Seattle,
Washington,98108, This is one of the.most tharough,equipment testing
organi2ations;known. Lately they have been doing muchwork in
physiologyand climbing. AS a result of their many years of.
testing, they now manuitctune some climbing equipment.
Summary
As with any new-endeavor, the success of a rock climbing unit will
depend.upon planning, patience, simplicity, and- fbnesight. This manual
has attempted-tostate the disadvantages of beginning such an activity
as well as'the advantages. Time judges all programs ano0he success of ,
a rock. climbing unit will be indicativcof the number of student
participants and the lack of student injurfes. Hopefully, this material
will aid the instructor in his quest to achieve ihese goals. Off Belay.
0
ANNOYAYBO BIBLIOGRAPHY103

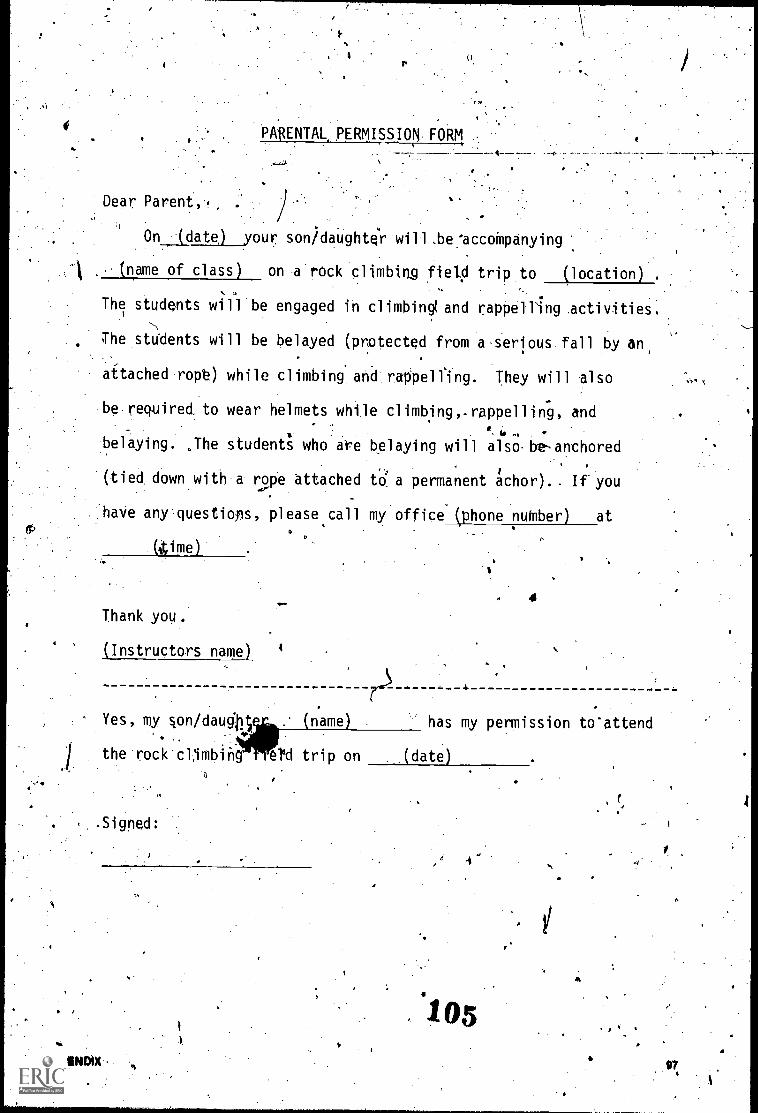
V.
PARENTAL PERMISSION FORM.
Dear Parento
On (date) your sonidaaghte.'r will,be'accoMpanyin
.- (name of class) on a rock climbing field trip to (location) .
The students will be engaged in climbingt and rappelling activities.
The stadents will be belayed (protected from a-serious fall by an,
aftached ropb) while climbing'and raPpelflng. They will also
be required,to wear helmets while climbing,-rappelling, and
belaying. :The students who are belaying will also-be-anchored
(tied downswith a rope Attached td a permanent achor).. If you
'have any questiops, please call my office (phone nuftiber) at
(Atime)
Thank you.
(Instructors name) 4
Yes,-my (name) .
the-rock-cljmbiii-g elsd trip on .(41ate)
4
has my permission to'attend
*105
4

STUDENT CHECK SHEET'
1. Exercises2.. 3-point slab climb3. 3-point wall'climb4. Friction climbing
0. Up frontwardsb. Down frontwardsc. Up backwardid. Down backwardse. Traversing
5. Rope coiling.6. Webbing tie7. Overhand loop8. Overhand follow-through9. Tying in with oikrhand
follow-through10. Bowline around self11. Bowline around object12. Figure "8" follow-through13. Figure "8" loop.14. Clove.hitch15, Swami belt16; Leg loop hgrness17. Belaying18. Signals19. Climb and belay #120. Climb and belay #221. Climb and belay #322. Climb and belay #423. Climb and belay #524. Climb and belay #6
.25. Walk rappel26. Outing rappel-high anchor27. Outing rappel-low anchor28. Self-eva1 uation-29... Final written. test,30. Final grade
4
1
. STRENT NME:
e.
THE ROCK CLIMBING TEACHING caikm,

-.0
CLIMBIlsio RECORD CARD (SHEET)
Rules.You must be supervised to climb.All knots should be doublchocked.Wear helMet when.climbity.All belayers mutt be anchored.All climbers must be AnchorAd or on belay.Use the 3-point rule when climati.
.
Snap in on tope at top Wore getting off belay.Do not open locRingtarabiners.at top.Use proper signals.All rappels min( be belayed.Don't "1:lot,DoV1
Marne
%.
4 - E.4 a
1. Chimney climb 5.-1----,
-2715-pari_ -__boott clime . 5.1 ,3, Overhang climb 4_ r 5.3 I
,..4,_Mentla climb i ..,, 5-.37---rL5 . Rappeltgigure if -
6,47-Rapp. ,.. iiikliat :.___ ___,O.-Jain :7"
,5q 1 -8. Layback 5,59.- rice climb
".-4-
to se.c
P ts? &,
. A
AION111111111111111111111111111MMIIIIIIIIII
1
AtIONDIX 4
a
rk
Olt
401
0
a
At
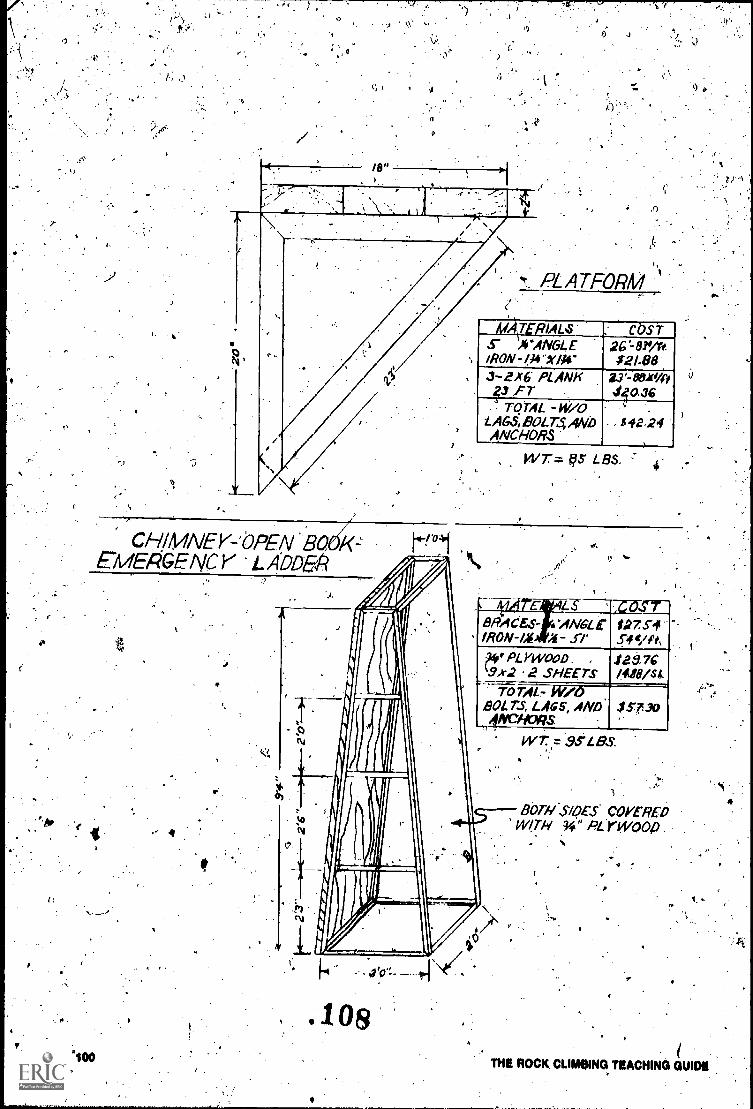
)
.;.;
17
18")
A
PLATFORM
,MATERIALS. ,. COST
S- AltANot,EIRON- 04..X/44. 121.88-3-2A6 PLANK
.. TOTAL -W/OLAGS,80LT4410ANCHORS-
'' -
. .. $4224 .
Wr BS LBS.
CHIMAIEY-'6PEN BOEMEPGENCK LAOD&I
2.)
$.2714544/Its
' PLYWOOD .
3,t2 2 SHEETSTOTAL- r /
BOLTS. LAGS, AND .15730!whoops
128.761.4449/S4
W7 9 S LBS.
BOTH....SVES. COVEREDWITH 94" etrwoop
ME NOCK CLIPMENG TEACHING GUIDE

4.'axva
r eimantdsaa au supii >.
Omv mva mpg HUMsv 'aomvu malsvp aNx NI
MI70 aNVHVHAO aNv 'AMMO 'MOHtacTO 'yovaxyr 'roya mu grinsambaav,alavusmowaa oplv syx RAM
MX HaaNgOSHQ 080 awn(amv 'moms "Ivmcwavmx Uum
ma 31 TUNIENHORMAIangromp 47twsporis sr(
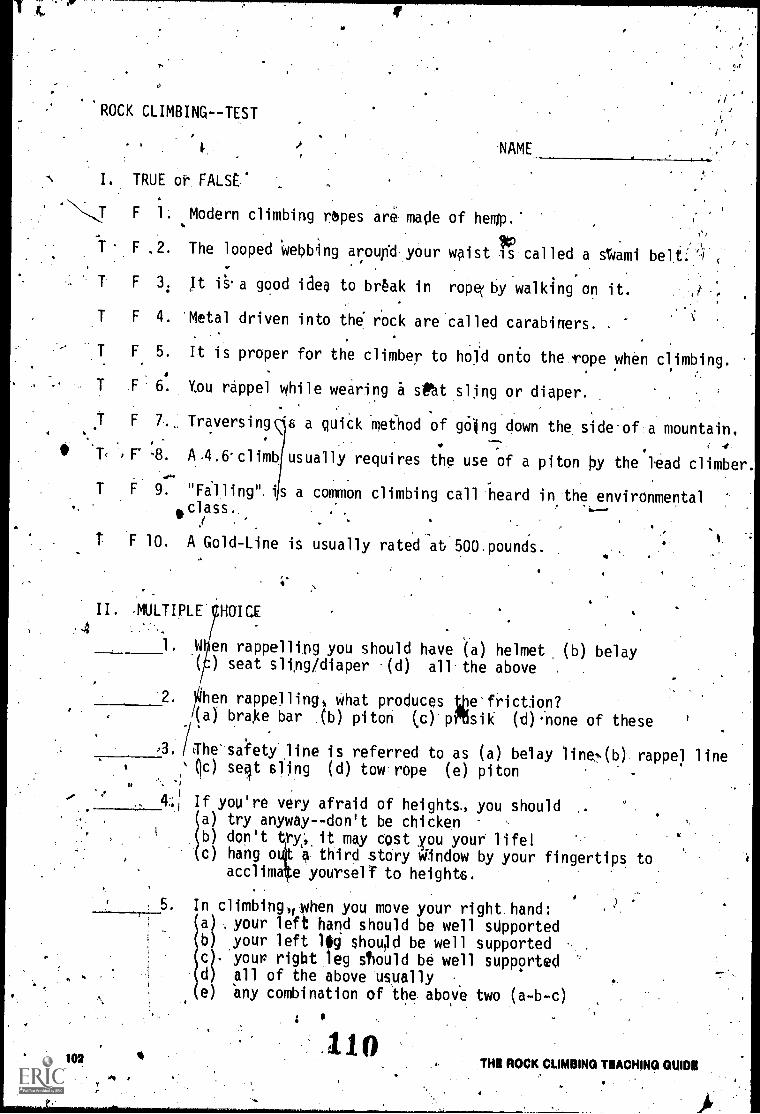
*ROCK CLIMBING--TEST
I. TRUE FALSE'
NAME
F 1. Modern climbing rapes are made of hemp.'
F ,2. The looped Webbing aroupA your waist tcalled a Aami
T F 3; jt i.a good idea to break in rope( by.walking on it. .
T F 4. 'Metal driven into the' rock are'called carabiners.
F. 5. It is proper for the climber to hold onto the rope when climbing.
1' F1 6. Xou rappel while wearing a seht sling or diaper.
4T F 7., Traversing 8 a quick method of góing down the sideof a mountain... 4,8. A .4.6-climb usually requires the use of a piton by the lead climber.
9. "Filling" s a common climbing call heard in the environmentalco lass.
.
F 10. A Gold-Line is usually rated at 500.pounds.
tis
II. -MULTIPLE HOICE.
.4 .,
1. W en rappelling you should have (a) helmet, (b) belay.( ) seat sltng/diaper (d) all the above .
, 2. )4hen rappelling, what produces tbe'friction?(a) brOe bar .(b) piton (c) 05sik (d)none of these
, . /The' sa:fety line is referred to as (a) belay line,(b) rappel line' AC) seat sling (d) tow rope (e) piton
, i 70
:.
;
If you're very afraid of heights, you should ,.
a) try anyway--don't be chickenb) don't try
, it may cost you your life!-c) hang o a third story Ondow by your fingertips to
acclima e yourself to heights.
In climbing,,when you move your right hand:a) , your left hand should be well supportedb) .your left llig shoqd be well supportedc). your rigbt leg ehould be well supportedd) all of the above usually ..
,
e) 'any combination of the aboye two (a-b-c)
102110
,)
THOROOK.CLIMBINGTIACHINOGUIDE
6. Sliding down the rope: (a) ,belaying (b) conjectorimg,(c)'.reliefing (d) .rappelling (e) carabinering 1
Usually driven'into rock cracks ,for safety gr supports:(a) Swiss chisels (b) ice screws (c) ice axe(d) pitons (%) impossible: rocks are too hard
8. Snaps commonly used in cltmbing:(a) seat sling (b) haftless strap (c) farmer carrier(d) swiss seat (e) carabiner
9. Most commonly used rope in mountain climbing:(a), "Gold-Lihe" (b) emp (t) cotton .(d) flax(e) Any line that dpesn't stretch
. -
10. Used in mechanical rappelling: (a) brake bar.(b) carabinêr (c) rope (d) Swiss seat (e). all'of the above
1.
11. Wfiich type of rock formations are hard to climb becausethey.crumble? .(a) metamorphic (b) igneous (c) sedimentary(d) weird (0 any of the above if too soft
°
Most climbing boots: (a) have smooth bottom (b) have 4
soles (c) haveno special,featuros (d) must 6ome as h gh asrP
calves (e) must be waterproof
13.4012hich is ut tfor direcaid climbing only?(a) pitons (b) carabiner (c) stirrups (01 diaper(e) rappel harness
s.
14. Climbers usually use this type of support: *(a) 1 point(b) 2 point (c) 3 point (d) 4 point
15. For probing on rocWris best to have (a) narrow welt
'(L4) wide welt (6) burned. welt (d) felt welt
. Which puts more strain'on muscles? (a) toe supporyk(b) sidejoot suppott, (c) they are the same
1
17. When traersing you should: (a) shuffle(b) cross-over (c) skip (d) hop
0
18. The p0son on ihe end of the rope securing the cl,ilnber is:appeller (b) security guard (c) c1imbe atcher
0 belayer (e) prusik/
t /
,
APPOO
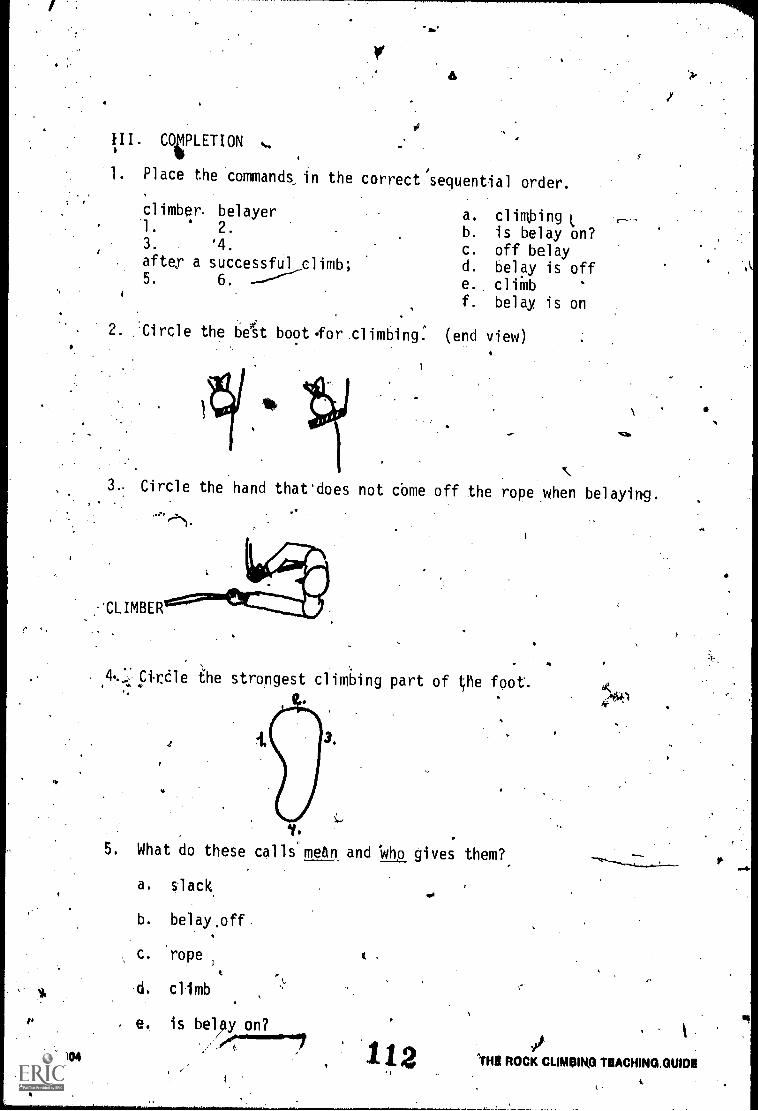
104
a
tI I . COgPLETION
1. P1 ace the commands_ in the correct sequential order.
cl imber, belayer1. 2.
3. '4.
after a successful cl imb;5. 6.
a. cl ngb. is bel ay on?c. off belayd. bel ay is offe. cl imb
f. belay i s on
2. 'Ci rcle the be#st boot .for cl imbi ng : end view)
SMit,
3.: Circle the hand that 'does not cbme off the rope 2when bel aying.
..'CLIMBER
irdle ale strongest cl imbi ng part of Vle foot.
What do these cal mean and 'who gives them?,
a. slack,
b. belay:off
c. 'rope,
d. cl imb
e. is belipy on?
112
A.
'"THEI ROCK CLIMOIRO TOACHING,GUIDI