Providing Your School’s - ssphelp.education.gov.au · With the exception of the Commonwealth Coat...
30
Providing Your School’s Data to the Student Attendance Collection (STATS) Non-Government Schools User Guide for the SchoolsHUB Opportunity through learning Version 1.0 2019 Collection
Transcript of Providing Your School’s - ssphelp.education.gov.au · With the exception of the Commonwealth Coat...
Providing Your School’s Data
to the Student Attendance Collection
(STATS)
Non-Government Schools User Guide for
the SchoolsHUB
Opportunity through learning
Version 1.0
2019 Collection

With the exception of the Commonwealth Coat of Arms, the Department’s logo, any material
protected by a trade mark and where otherwise noted all material presented in this document is
provided under a Creative Commons Attribution 3.0 Australia
(http://creativecommons.org/licenses/by/3.0/au/) licence.
The details of the relevant licence conditions are available on the Creative Commons website
(accessible using the links provided) as is the full legal code for the CC BY 3.0 AU licence
(http://creativecommons.org/licenses/by/3.0/au/legalcode).
The document must be attributed as the Procedure Manual for the Student Attendance Collection
(STATS) 2019: Non-Government Schools

Contents
1 About this Document ...................................................................................................................... 5
1.1 Audience ................................................................................................................................. 5
1.2 Purpose ................................................................................................................................... 5
1.3 Document Design .................................................................................................................... 5
1.4 Related References ................................................................................................................. 6
1.5 Meaning of the term ‘data’ ..................................................................................................... 6
2 Collection Overview ........................................................................................................................ 7
3 About the Data Collection ............................................................................................................... 8
3.1 Counting Students ................................................................................................................... 8
3.2 Data Collection Level............................................................................................................... 9
3.3 Data Submission Dates ........................................................................................................... 9
3.4 Required Data ......................................................................................................................... 9
3.5 What are Non-School days? .................................................................................................... 9
3.6 The STATS Manual Data Entry Screen Explanation ............................................................... 10
3.7 Options for Providing Data ................................................................................................... 11
3.7.1 The STATS Data Collection Tool .................................................................................... 11
4 Appendix A: Preparing to provide your school’s data .................................................................. 12
5 Appendix B: Providing your data using a CSV upload file ............................................................. 13
5.1 Uploading a CSV file in the STATS module ............................................................................ 13
5.1.1 Log into SchoolsHUB and access the STATS collection ................................................. 13
5.1.2 Upload your CSV file...................................................................................................... 15
5.2 Unsuccessful Upload ............................................................................................................. 16
5.3 Declare the data .................................................................................................................... 16
6 Appendix C: Manually entering your Data into the STATS module .............................................. 17
6.1 Manually entering data in the Data Entry Screen ................................................................ 17
6.2 Declare the data .................................................................................................................... 19
7 Appendix D: Completing Your Schools Declaration ...................................................................... 21
7.1 Completing Your School’s Declaration .................................................................................. 21
7.2 Declaration Warning Screen ................................................................................................. 21
7.3 Declaring the Data ................................................................................................................ 22
7.4 Requesting data to be undeclared ........................................................................................ 25
8 Appendix E: Who do I call for help? .............................................................................................. 26
9 Appendix F: How to view previous STATS data............................................................................. 27

9.1 Log into SchoolsHUB ............................................................................................................. 27
9.2 Enter the STATS collection .................................................................................................... 27
9.3 Navigate towards Select Period ............................................................................................ 27
9.4 Choose the required period .................................................................................................. 28
9.5 Go to the Data Entry screen to view the data ...................................................................... 28
9.6 Return to the most recent year’s data .................................................................................. 29
10 Attachment 1: Undo Declaration Request Template ................................................................ 30

Providing Your School’s Data for the Student Attendance Collection 2019
Last updated: 27 June 2019 Version 1.0
Page 5 of 30
1 About this Document
1.1 Audience The audience for this document is:
Staff, Principals and Approved Authorities at non-government schools who are providing
their data directly to the Australian Government Department of Education (the Department)
for the Student Attendance Collection (STATS).
This guide is NOT used by systemic schools providing their data for the collection to their system
office or diocese office.
1.2 Purpose The purpose of this document is to describe how to provide data for the 2019 STATS collection
either by:
Creating a Comma-Separated Value (CSV) file for a location and uploading it into the
SchoolsHUB on the location record for the reference period; or
Manually entering a location’s data into the STATS collection on the location record for the
reference period.
1.3 Document Design This document is designed for easy use when reading online. Hyperlinks are used throughout this
document to help you find information within and external to the user guide. You can move around
this document online by clicking on View in the navigation tabs at the top of the screen and then
choosing Navigation Pane. This will show you the table of contents which you can click on to jump to
the required part of the document.
The document is structured to provide:
Key information about the STATS (see Section 2 and Section 3)
Important information to help you correctly provide your school’s attendance data
Step-by-step instructions for providing data to the collections and screenshots of what you
should see in SchoolsHUB are provided in the appropriate appendices
IMPORTANT!
The Student Attendance Collection (STATS) gathers data at a location level. For the purposes of
this document a campus is called a location. If a school has multiple locations, then the relevant
attendance data must be uploaded/entered to each location’s record (identified by the location’s
AGEID).
Access to Student Attendance is now via SchoolsHUB at https://schools.education.gov.au.
Information about how to register for SchoolsHUB is available on the SchoolsHUB website under
the Using SchoolsHUB navigation item, or by calling 1800 677 027 and dialling option 1.
Providing Your School’s Data for the Student Attendance Collection 2019
Last updated: 27 June 2019 Version 1.0
Page 6 of 30
Things to check before you provide your school’s data (Appendix A)
Using a CSV upload file to provide your data to the STATS module (Appendix B)
Entering your school’s data directly into the STATS module (Appendix C)
Declaring your school’s data in the STATS module (Appendix D)
Who to contact if you need help meeting the requirements of the STATS (Appendix E)
How to view your school’s previous STATS data (Appendix F)
1.4 Related References Readers of this document may want to refer to the following related information:
National Standard for Student Attendance Data Reporting 2015
Australian Education Act 2013
Australian Education Regulation 2013
Australian Curriculum, Assessment and Reporting Authority Act 2008
1.5 Meaning of the term ‘data’ For the purpose of this guide, the word ‘data’ means the answers provided to the information sought
for the STATS collection.
IMPORTANT!
All applications available in the Schools Service Point (SSP) are now accessed through
SchoolsHUB – https://schools.education.gov.au
You must have a SchoolsHUB Username and password to be able to provide your
STATS data. These are allocated to a person, not a school. You must also have
requested access to your school’s locations and the correct role as part of registering
for the SchoolsHUB. For help to register please see the SchoolsHUB website Using
SchoolsHUB navigation item.
For the STATS, a person providing the data must have the Data Reporting role in the
SchoolsHUB at a minimum. A person with the Data Reporting role in the SchoolsHUB
can declare the data provided to the STATS collection.

Providing Your School’s Data for the Student Attendance Collection 2019
Last updated: 27 June 2019 Version 1.0
Page 7 of 30
2 Collection Overview
The Australian Government Department of Education (the Department) collects student attendance
data from non-government schools for Semester 1 and Term 3 each year. Schools are required to
complete the Student Attendance Collections (STATS) for EACH of their locations as part of their
obligations under the Australian Education Act 2013 .
The STATS Collections (Semester 1 and Term 3) gather information on full-time enrolled school
students in Years 1 through to 10 in Primary, Secondary and Special Schools (including ungraded
students who are in the typical age group of students in Years 1 through to 10) at a location level.
Data is supplied to the Department by Year Level, Gender and Indigeneity.
The data from these collections are supplied to the Australian Curriculum, Assessment and Reporting
Authority (ACARA) and are used for several reporting purposes; including reporting student
attendance rates on the My School website and at National, State/Territory and school sector
levels in various national reports (e.g. the National Report on Schooling in Australia and the
Productivity Commission's Report on Government Services).
IMPORTANT: Overview
1. The Internet address for SchoolsHUB is https://schools.education.gov.au
2. The STATS has an initialisation and two separate collection periods:
Obligation Acknowledged: Users log into SchoolsHUB and confirm they understand the collection requirements and that their school’s contact details are up-to-date.
Semester 1: Users log into SchoolsHUB and provide the required student attendance data for Semester 1 (Typically Term 1 and Term 2 of the Australian school year).
Term 3: Users log into SchoolsHUB and provide the required student attendance data for Term 3.
3. Catholic systemic schools are advised to check with their system office about how they are to provide their school’s STATS data to the collection.
4. Schools using technology systems to record student attendance should ensure their technology provider is aware of the STATS Data Technical Specification. This is made available early in the school year in Student Attendance Help.
5. It is highly recommended that small schools, or schools that have low technology support to record student attendance, use the STATS Collection Tool. This tool is used by locations to record attendance data and generate the required data for submission to the collection. This tool removes the need for manually calculating attendance data.

Providing Your School’s Data for the Student Attendance Collection 2019
Last updated: 27 June 2019 Version 1.0
Page 8 of 30
3 About the Data Collection
3.1 Counting Students Student data is counted by reference period (Semester 1 or Term 3) and by cohort:
Year Level, Gender and all students (including Indigenous students); and
Year Level, Gender and Indigenous students ONLY.
Each Year Level has up to four cohorts of students:
All male students (including Indigenous students)
Male Indigenous students only
All female students (including Indigenous students)
Female Indigenous students only
The following students are NOT counted in the STATS:
students in Foundation Year (Year 1 minus 1) and earlier programs Years 11 and 12 part-time students distance education students home schooled students expelled students (after they have been expelled) and exchange students and/or full-fee paying overseas students that were enrolled and active at
a school overseas immediately prior to coming to Australia, and are in Australia for less than 12 months.
IMPORTANT: Students
1. The STATS collects attendance information on full-time enrolled students in Years 1
through to 10 and ungraded students in the typical age group of students in Years 1
to 10. Data is to be collected at a location level for Primary, Secondary and
Special schools. Part-time students are not in scope of the STATS collection.
2. A student who attends one school but is formally enrolled at another must be
counted only at the school at which they are formally enrolled.
3. A student can only be counted more than once if the student is a full-time student
at state level but attends as a part-time student at more than one school.
4. Ungraded students are included in the STATS collection as either Ungraded Primary
(UP) or Ungraded Secondary (US), according to the typical age level in each State or
Territory.
5. Ungraded students (UP or US) can only be reported as ungraded if the school is a
Special School, Special Support Unit or a Special Assistance School. Generally,
regular schools cannot report a student as an ungraded student.

Providing Your School’s Data for the Student Attendance Collection 2019
Last updated: 27 June 2019 Version 1.0
Page 9 of 30
3.2 Data Collection Level The STATS collection is set at location level. This means the data submitted to the collection must be
entered for each individual location of the school. Where a school has one location all data will be
supplied under their school AGEID. Where a school has multiple location each location must submit
their attendance data through their individual AGEID.
3.3 Data Submission Dates There are two data submission periods for the STATS collection:
Semester 1: Friday 28 June 2019 to Friday 02 August 2019; and
Term 3: Friday 20 September 2019 to Friday 18 October 2019.
The STATS module opens to receive data on the first date associated with each time period. Data
cannot be provided prior to that time and must be provided by the end date.
3.4 Required Data The STATS collection requires data on the following, aggregated into cohorts (see section 3.1):
Possible School Days;
Attendance Days;
Counts of Students with Less than 90% Attendance;
Counts of Students with Equal to, or Greater than 90% Attendance;
Possible School Days for Students with Equal to, or Greater than 90% Attendance; and
School Days in Reference Period.
3.5 What are Non-School days? A non-school day is a day that the school is closed or lessons are not held for reasons other than a
whole-of-school event (e.g. the school sport or swimming carnival). When calculating the number of
school days for your location and possible school days for a cohort of students, you must exclude the
following non-school days:
Unexpected temporary school closure;
Strike action/industrial action;
All classes cancelled for the day;
Grade specific non-school days (for example, pupil free days and moderation days);
Natural disaster/event where students are unable to travel to school and school is closed
(e.g. tropical cyclones, bush fires and other related severe weather event school closures);
Public holidays;
Religious holidays; and
Pupil-free days.

Providing Your School’s Data for the Student Attendance Collection 2019
Last updated: 27 June 2019 Version 1.0
Page 10 of 30
3.6 The STATS Manual Data Entry Screen Explanation
Diagram 1: STATS Data Entry screen with inputted student data
Year Level: This is the year level to whom the data relates; represented as YXX where Y is Year and XX is the cohort year level (e.g. Y01 is Year 1).
Gender: This is the sex of the cohort of students to whom the data relates; at present, this is Male (M) or Female (F).
Student Type: This is either all students (T), or Indigenous students (I) in the cohort to whom the data relates.
Possible School Days: This is the sum of the number of days each student in the cohort was enrolled in the reference period.
Attendance Days: This is the sum of the number of days each student in the cohort attended school.
Attendance %: This is automatically calculated by dividing Attendance Days by Possible School Days and expressing the result as a percentage.
Counts of Students with Less Than 90% Attendance: This is the number of students in the cohort who attended school less than 90% of the possible
school days in the reference period.
Counts of Students with Equal to, or Greater than 90% Attendance: This is the number of students in the cohort who attended school equal to, or
greater than 90% of the possible school days in the reference period.
Possible School Days for Students with Equal to, or Greater than 90% Attendance: This is the sum of the number of days each student in the cohort
with greater than 90% attendance was enrolled in the reference period
School Days in Reference Period: This is the total amount of days that the school was open to conduct lessons or other official activities for the
school’s students in Semester 1, or Term 3. This figure may be the same or different for each year level. Note: weekends, public holidays, pupil free
days, school holidays and other days on which student attendance is not required (called non-school days) must not be included.
Providing Your School’s Data for the Student Attendance Collection 2019
Last updated: 27 June 2019 Version 1.0
Page 11 of 30
3.7 Options for Providing Data
Data can be provided to the STATS module in one of two ways:
1. Uploading a CSV file on a location’s record (see Appendix B for detailed instructions); or
2. Manually entering a location’s data on the individual location’s record (see Appendix C for detailed instructions)
It is recommended, wherever possible, users upload location data using a CSV file
3.7.1 The STATS Data Collection Tool
The Department has a Microsoft Excel tool available for use by schools with low technology support
for student attendance that enables staff at the school to:
Enter information about the school;
Enter information about its students and their attendance; and
Generate the required data for upload for each of the STATS reference periods.
This tool, the STATS Collection Tool, is available in Student Attendance Help under Student
Attendance. The tool can cater for up to 1500 students.
This tool is updated early in the school year to enable users to prepare and generate the required
attendance data over an extended time period. The tool contains an instruction page on how to
correctly use it.
IMPORTANT
Catholic systemic schools are advised to check with their system office about how they are to provide their STATS data to the Department.
It is easier and less time consuming to upload a CSV file than to manually enter data into the STATS module.
Please Note:
1. Data entered in the columns in the STATS Collection Tool marked ‘optional’ is not
provided to the Department in the data you generate from the tool for submission to
the department. These columns are provided for school convenience only.
2. The tool is updated each year to meet the requirements of the STATS collection for
that year. It is important, that if your school uses the tool, that you download the
current year’s tool for use.

Providing Your School’s Data for the Student Attendance Collection 2019
Last updated: 27 June 2019 Version 1.0
Page 12 of 30
4 Appendix A: Preparing to provide your school’s data
The following are things you should check before providing your school’s data to the collection. Checking these will make providing your data to the collection quicker and easier.
If you are providing your school’s data directly to the collection, then it is recommended you do the following checks.
1. If you are going to download a report from your school’s technology to then upload to the STATS module; check with your system provider that your school’s system meets the data requirements for the STATS collection as described in the STATS Data Technical Specification.
2. If your school/campus is a small school/campus with low technology support for student attendance, we recommend you use the STATS Collection Tool (available in the Student Attendance Help section) to quickly and accurately generate the required student attendance data. This tool caters for up to 1500 students and has been designed to collate your entered student data and generate the required data in a format you can upload to the STATS module. Please note: any data you put in the columns marked optional does not get submitted to the Department; these data are for school/location reference only. Please ensure you read the Instructions tab in this file.
3. Check that you have a SchoolsHUB Username and password. SchoolsHUB Usernames and passwords are allocated to individuals, not schools. If you don’t have a Username and password, or you have them but they don’t work, please contact the Schools IT Support Helpdesk on 1800 677 027 (Option 1).
4. Check you have linked the required schools/locations to your SchoolsHUB account. For information on this, see the registration help information (for new users) on the SchoolsHUB website.
5. Check that you have access to the STATS module through SchoolsHUB. To provide the STATS data, you must have access to the STATS module in the SchoolsHUB. If you log into SchoolsHUB and can’t access the Student Attendance Collection box on the screen, then you don’t have access to the module and you will need to request it. To do this, see the Using SchoolsHUB navigation item on the SchoolsHUB website or call 1800 677 027 (Option 1).
6. Are your school's details up-to-date? The STATS module in the SchoolsHUB uses your school’s characteristic details (recorded in the Department’s Client Record system) to identify your school to the collection. Inaccurate or out-of-date information in this system can affect your ability to provide data to the collection or result in reminder emails being sent to an email account that is not checked regularly or is defunct. You should check that your school has up-to-date details, including contact details, recorded for your school. You can do this by calling the Schools IT support desk on 1800 677 027 (Option 1).
NEED HELP?
For help with SchoolsHUB user registration and/or access please contact 1800 677 027 (Option 1)
For help with entering, uploading or declaring STATS data please contact 1800 677 027 (Option 5).

Providing Your School’s Data for the Student Attendance Collection 2019
Last updated: 27 June 2019 Version 1.0
Page 13 of 30
5 Appendix B: Providing your data using a CSV upload file
STATS data can be uploaded with a CSV file to the STATS module via SchoolsHUB. Education
Authorities can upload multiple schools’/locations’ using a CSV file through SchoolsHUB. The CSV file
must meet the requirements of the STATS Data Technical Specification. The file must not contain
any headings, or other notes. That is, it must only contain the rows of cohort data.
5.1 Uploading a CSV file in the STATS module The following steps describe how to upload a CSV file to the STATS module. It is assumed you have
already completed the STATS initialisation step.
5.1.1 Log into SchoolsHUB and access the STATS collection
1. Log into SchoolsHUB using your Username and password.
2. Click on Student Attendance in the Data Collections box If you cannot access Student
Attendance in the collection box, please call 1800 677 027 (Option 1).
3. You should be taken to the screen shown in Diagram 2 (see next page).
IMPORTANT
1. The STATS process is not finished until your location’s status says ‘Declared’.
2. DO NOT USE THE BACK BUTTON in your browser to go back to the previous screen.
To move around in the STATS module, use the words on the navigation ribbon (the
list going across the top of the screen).
3. Help information is available from the Help link at the bottom right hand side of the
screen in the STATS module. When you click on the link it will open a new browsing
session so that you can have Help and the STATS module open at the same time.
4. The AGEID of your campus, name of your campus and your locations’ STATS data
status will appear on all screens in the STATS module, usually at the top of the
screen.
5. You can change your school’s data provided you have not completed the declaration.
6. When the status for your school shows as ‘Declared’ you cannot change any data on
the Data Entry page. If you realise you have made an error and want to change your
data, please see Appendix D.
7. When uploading your CSV file, your location AGEID should be in the left hand column
in Excel. You may have issues uploading your file if you’re uploading location level
data with a different AGEID in the left hand column of your Excel spreadsheet.
Providing Your School’s Data for the Student Attendance Collection 2019
Last updated: 27 June 2019 Version 1.0
Page 14 of 30
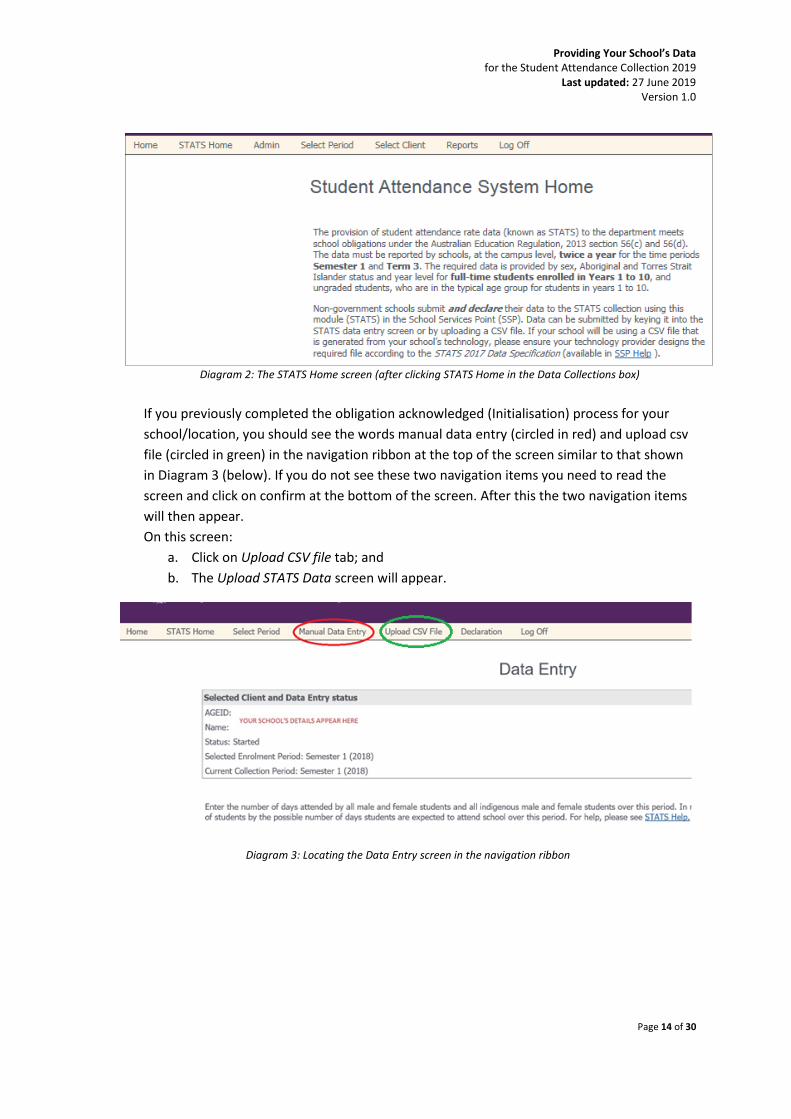
Diagram 2: The STATS Home screen (after clicking STATS Home in the Data Collections box)
If you previously completed the obligation acknowledged (Initialisation) process for your
school/location, you should see the words manual data entry (circled in red) and upload csv
file (circled in green) in the navigation ribbon at the top of the screen similar to that shown
in Diagram 3 (below). If you do not see these two navigation items you need to read the
screen and click on confirm at the bottom of the screen. After this the two navigation items
will then appear.
On this screen:
a. Click on Upload CSV file tab; and
b. The Upload STATS Data screen will appear.
Diagram 3: Locating the Data Entry screen in the navigation ribbon

Providing Your School’s Data for the Student Attendance Collection 2019
Last updated: 27 June 2019 Version 1.0
Page 15 of 30
5.1.2 Upload your CSV file
To upload your CSV file, in the Upload STATS Data screen:
1. Click Browse (circled in green in the diagram below). A window will appear to allow you to select a file to upload from the files stored on your computer;
2. Navigate to the CSV file to upload;
3. Double click the CSV file that you wish to upload. The location and name of the file will appear in the Selected File field (circled in blue in the diagram below);
4. Click Upload (circled in red in the diagram below). This will upload your file to the STATS module; and
Diagram 4: Example of Upload STATS Data dialogue box
5. If the upload has been successful, you will see the message “Your upload has been successfully completed”… (Circled in grey in the diagram below).
Diagram 5: Example of Data Upload screen showing a successful upload
6. If the upload is successful then click Manual Data Entry in the navigation ribbon, review your data and click save.

Providing Your School’s Data for the Student Attendance Collection 2019
Last updated: 27 June 2019 Version 1.0
Page 16 of 30
5.2 Unsuccessful Upload Error messages may appear when uploading a CSV file; these are typically due to your STATS CSV file
not meeting the STATS Data Technical Specification. All error messages in the STATS are defined by
the CSV line number (where an error has been detected), then by the affected Year Level, Gender,
then Total Students (T) or Indigenous Students (I).
For example: “At Line 2, Y03, M,T” means at Line 2 of the upload file which is for Year 3 (Y03), Males (M), all students (T).
The error description will be provided in the message that appears next to the above reference. You need to open the upload file, check the data in the line and column identified and make any corrections, save your file and upload it again.
Common problems include:
- The data in your CSV file is not according to the STATS Data Technical Specification - Possible School Days for Students with greater than or equal to 90% attendance are
presented with decimal points. Remove the decimal point by rounding up or down as appropriate and then try uploading again
- The file contains headings or words that should not be there. The only words in the file should appear on each row of data at Column B and be either Semester 1 or Term 3
After correcting the errors within your CSV file repeat step 5.1.2. For further assistance, please feel free to consult Manually Calculating Attendance Rates for in-depth background on each piece of data, or call the Student Attendance Helpdesk on 1800 677 027 (Option 5).
5.3 Declare the data Please see Appendix D Completing Your Schools Declaration for instructions on declaring your data.
You have now finished the requirements for this request and can log off by choosing Log Off in the
navigation ribbon at the top right of the screen.
Please Note:
Error Messages:
If there are any errors in your file, you will see error messages in red at the top of the upload screen. You will need to address the errors in the file and then repeat the Upload your CSV file steps 1 to 4. Most errors relate to calculation/logic errors in the file.
Replacing a CSV file:
If you wish to replace the chosen file in the Selected File field, highlight and delete the file name and start the upload process again. Until you click on Upload, the file will not upload to the STATS module.
After uploading your CSV file your data will need to be declared for. Your STATS submission is not finished until your school/campus Data Entry status says ‘Declared’.
Providing Your School’s Data for the Student Attendance Collection 2019
Last updated: 27 June 2019 Version 1.0
Page 17 of 30
6 Appendix C: Manually entering your Data into the STATS module
You can manually enter (type) your school’s data directly into the STATS module. Manually entering
your school’s data directly into the STATS module is slower than uploading a CSV file to the STATS
module. The following pages explain how to manually enter your school’s data. Each step contains a
screenshot of what you should see when you are on the identified screen in SchoolsHUB.
If you opted to use a CSV file for uploading your data to the STATS module please go to Appendix B.
6.1 Manually entering data in the Data Entry Screen This step assumes you have logged into SchoolsHUB and have chosen the Student Attendance
collection from the Data Collections box on the SchoolsHUB home page. You should see the STATS
Home screen similar to the one on the next page. The box in the screen will have your school’s
details in it and the reporting period of 2019. You will see the words below if you have not yet
obligation acknowledged your school’s location. If you have already seen this page, the status at the
top of the page where your school’s details are will say “Obligations Acknowledged”.
IMPORTANT!
1. Your STATS submission is not finished until your school/location Data Entry status
says ‘Declared’.
2. DO NOT USE THE BACK BUTTON in your browser to go back to the previous screen.
To move around in the STATS module, use the words on the navigation ribbon (the
list going across the top of the screen).
3. Help information is available from the Help link at the bottom right hand side of the
screen in the STATS module. When you click on the link it will open a new browsing
session so that you can have Help and the STATS module open at the same time.
4. The AGEID of your location, name of your location and your locations’ STATS data
status will appear on all screens in the STATS module, usually at the top of the
screen.
5. You can change your school’s data provided you have not completed the declaration.
6. When the status for your school shows as ‘Declared’ you cannot change any data on
the Data Entry page. If you realise you have made an error and want to change your
data, please see Appendix D.
Providing Your School’s Data for the Student Attendance Collection 2019
Last updated: 27 June 2019 Version 1.0
Page 18 of 30
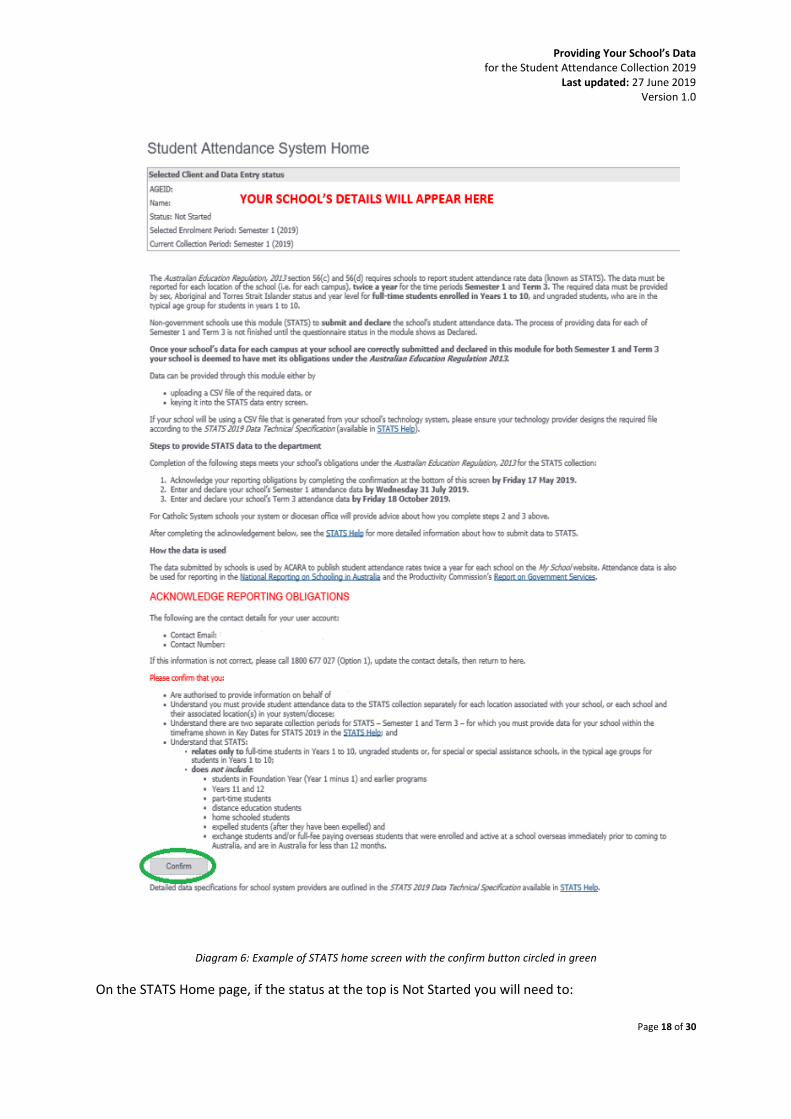
Diagram 6: Example of STATS home screen with the confirm button circled in green
On the STATS Home page, if the status at the top is Not Started you will need to:
Providing Your School’s Data for the Student Attendance Collection 2019
Last updated: 27 June 2019 Version 1.0
Page 19 of 30
1. Read the information on the page; and
2. Click the box (circled in green above) to confirm that you have read and understood the
information on the page.
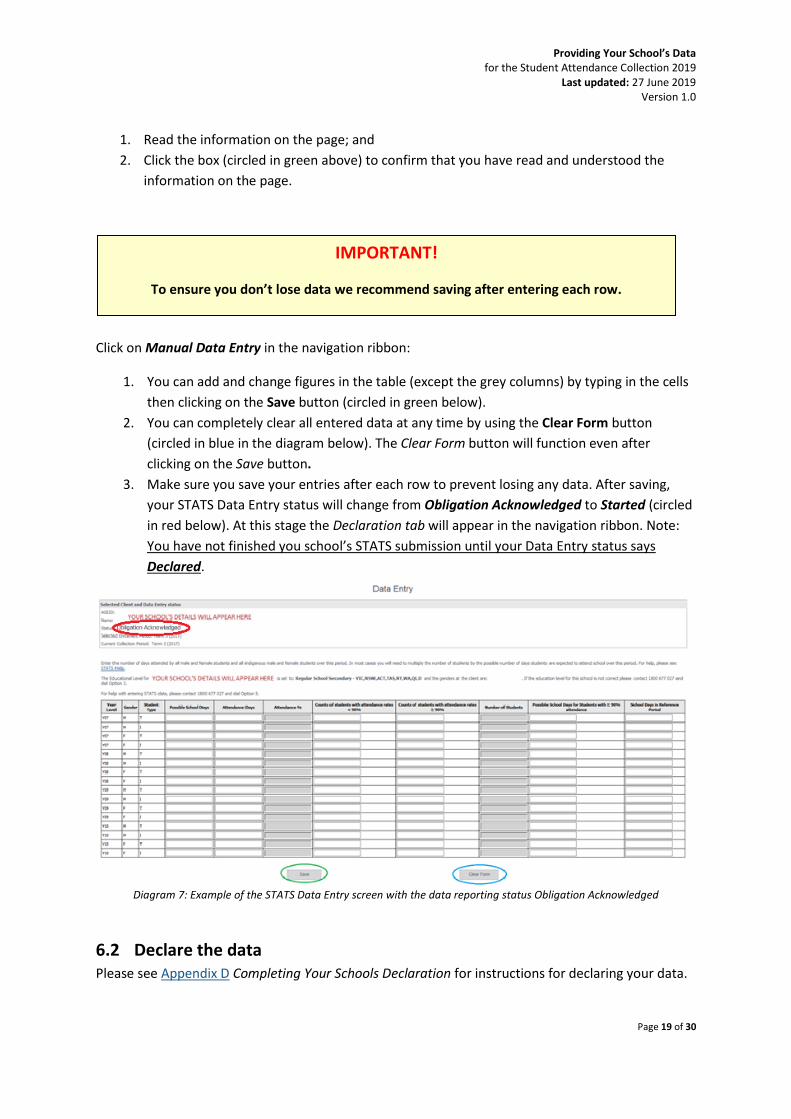
Click on Manual Data Entry in the navigation ribbon:
1. You can add and change figures in the table (except the grey columns) by typing in the cells
then clicking on the Save button (circled in green below).
2. You can completely clear all entered data at any time by using the Clear Form button
(circled in blue in the diagram below). The Clear Form button will function even after
clicking on the Save button.
3. Make sure you save your entries after each row to prevent losing any data. After saving,
your STATS Data Entry status will change from Obligation Acknowledged to Started (circled
in red below). At this stage the Declaration tab will appear in the navigation ribbon. Note:
You have not finished you school’s STATS submission until your Data Entry status says
Declared.
Diagram 7: Example of the STATS Data Entry screen with the data reporting status Obligation Acknowledged
6.2 Declare the data Please see Appendix D Completing Your Schools Declaration for instructions for declaring your data.
IMPORTANT!
To ensure you don’t lose data we recommend saving after entering each row.
Providing Your School’s Data for the Student Attendance Collection 2019
Last updated: 27 June 2019 Version 1.0
Page 20 of 30
You have now completed the requirements for this request and can log off by choosing Log Off in
the navigation ribbon at the top right of the screen.

Providing Your School’s Data for the Student Attendance Collection 2019
Last updated: 27 June 2019 Version 1.0
Page 21 of 30
7 Appendix D: Completing Your Schools Declaration
7.1 Completing Your School’s Declaration The final stage of the STATS submission is to complete your school’s declaration. Click on the
Manual Data Entry item in the navigation ribbon (do not click on Upload at this stage), here you will
see a table of the attendance data you have uploaded or manually entered, (Note, you might already
be on the Manual Data Entry page). We recommend that you check that the data within this table is
complete and accurate. When fully statisfied with your submitted data press the save button at the
bottom of the page and the Declaration tab will show in the navigation ribbon (to the right of the
Manual Data Entry item).
7.2 Declaration Warning Screen After selecting the Declaration tab in the navigation ribbon the below warning page may display.
Diagram 8: Declaration Warning Page
The Declaration Warning Screen will appear when expected entries are missing, or if an entry is well
above or below expected results.
Common warnings include:
- Missing entries for a cohort
- High, or low amount of days in a reference period (Semester 1 or Term 3)
- Higher or lower than expected attendance percentage
- Variations in the amount of days in a reference period between cohorts
Providing Your School’s Data for the Student Attendance Collection 2019
Last updated: 27 June 2019 Version 1.0
Page 22 of 30
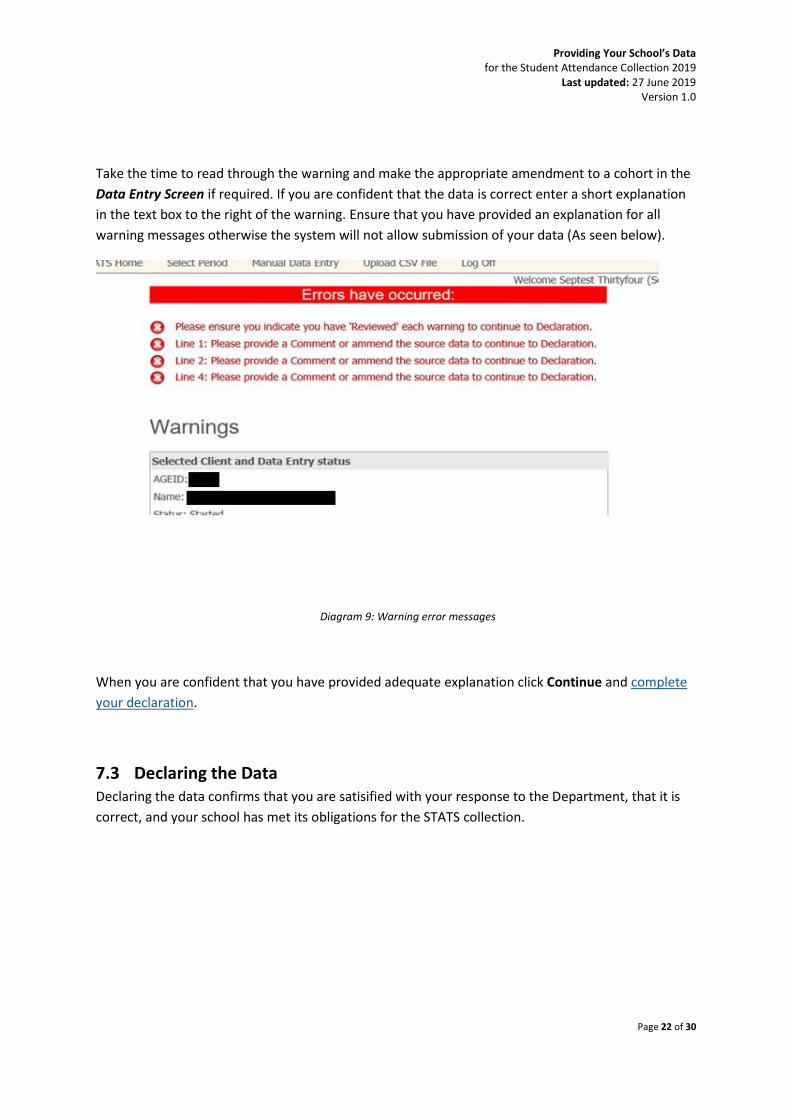
Take the time to read through the warning and make the appropriate amendment to a cohort in the
Data Entry Screen if required. If you are confident that the data is correct enter a short explanation
in the text box to the right of the warning. Ensure that you have provided an explanation for all
warning messages otherwise the system will not allow submission of your data (As seen below).
Diagram 9: Warning error messages
When you are confident that you have provided adequate explanation click Continue and complete
your declaration.
7.3 Declaring the Data Declaring the data confirms that you are satisified with your response to the Department, that it is
correct, and your school has met its obligations for the STATS collection.
Providing Your School’s Data for the Student Attendance Collection 2019
Last updated: 27 June 2019 Version 1.0
Page 23 of 30
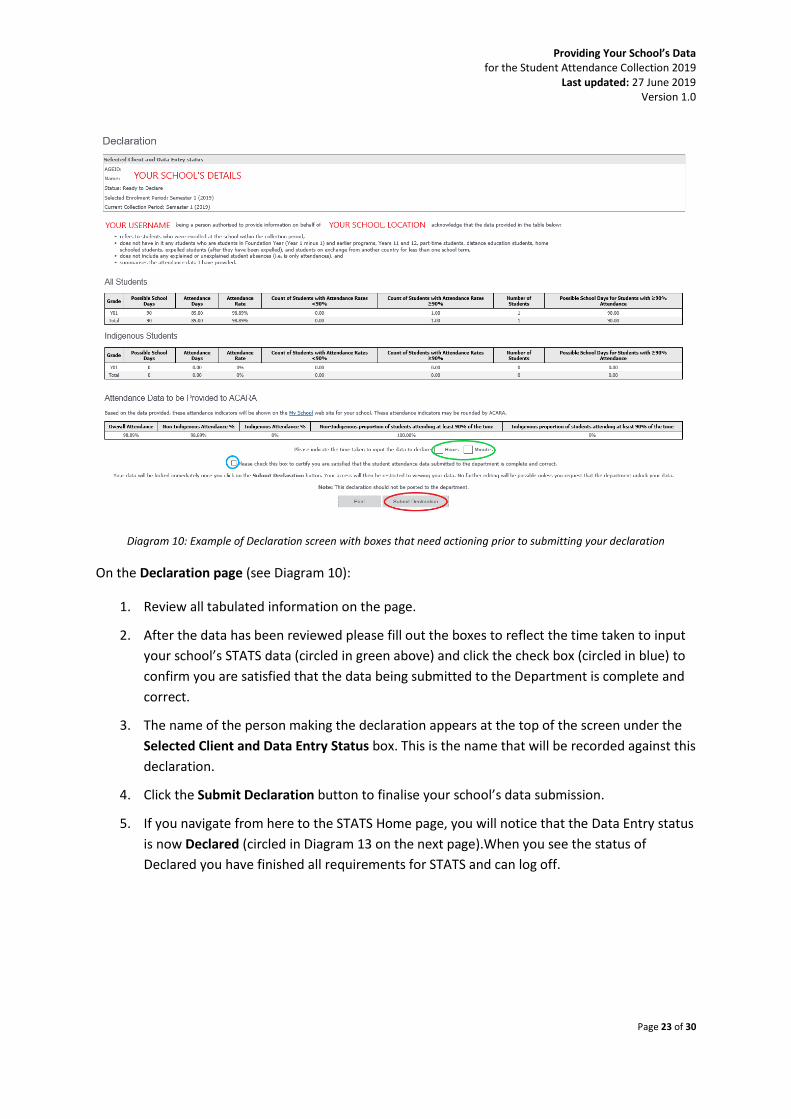
Diagram 10: Example of Declaration screen with boxes that need actioning prior to submitting your declaration
On the Declaration page (see Diagram 10):
1. Review all tabulated information on the page.
2. After the data has been reviewed please fill out the boxes to reflect the time taken to input
your school’s STATS data (circled in green above) and click the check box (circled in blue) to
confirm you are satisfied that the data being submitted to the Department is complete and
correct.
3. The name of the person making the declaration appears at the top of the screen under the
Selected Client and Data Entry Status box. This is the name that will be recorded against this
declaration.
4. Click the Submit Declaration button to finalise your school’s data submission.
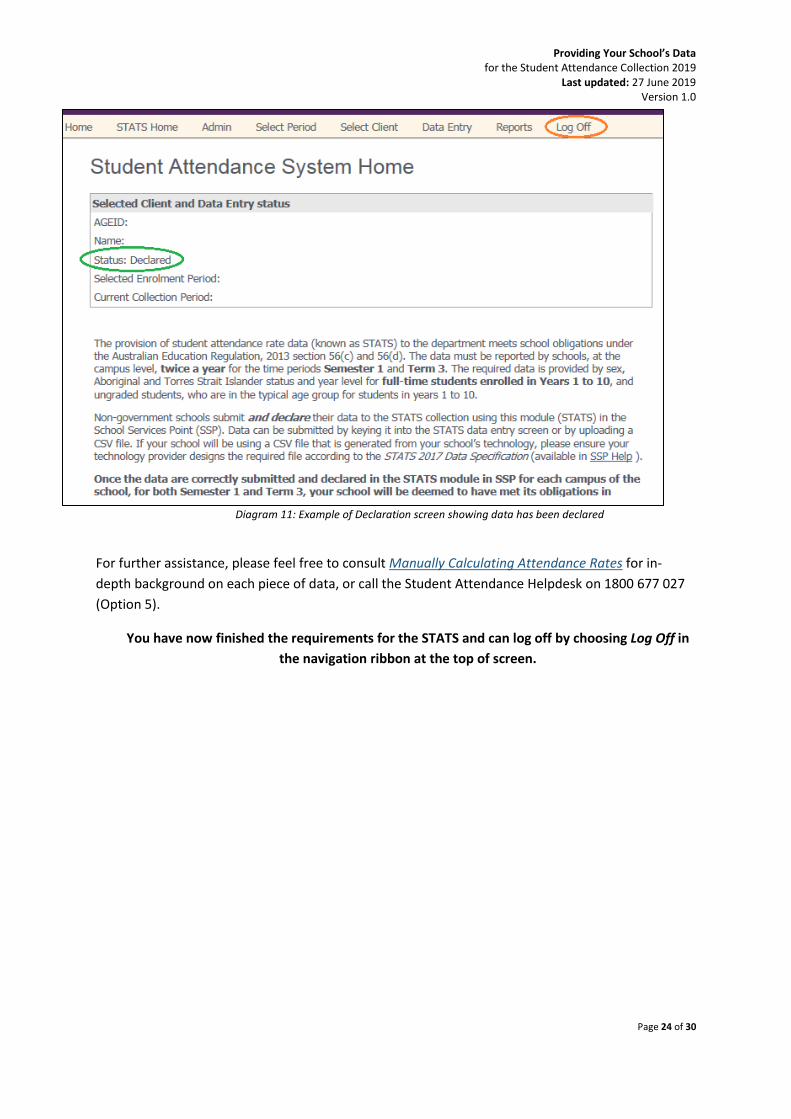
5. If you navigate from here to the STATS Home page, you will notice that the Data Entry status
is now Declared (circled in Diagram 13 on the next page).When you see the status of
Declared you have finished all requirements for STATS and can log off.
Providing Your School’s Data for the Student Attendance Collection 2019
Last updated: 27 June 2019 Version 1.0
Page 24 of 30
Diagram 11: Example of Declaration screen showing data has been declared
For further assistance, please feel free to consult Manually Calculating Attendance Rates for in-
depth background on each piece of data, or call the Student Attendance Helpdesk on 1800 677 027
(Option 5).
You have now finished the requirements for the STATS and can log off by choosing Log Off in
the navigation ribbon at the top of screen.
Providing Your School’s Data for the Student Attendance Collection 2019
Last updated: 27 June 2019 Version 1.0
Page 25 of 30
7.4 Requesting data to be undeclared If you believe there is an issue with your school’s data, you can arrange to have your STATS
submission undeclared. Once your submission is undeclared, you will be able to make any required
corrections and then resubmit your data to the collection.
7.4.1 Contacting the Department
All requests to undo a STATS declaration must be made in writing and sent to
[email protected]. This easiest way to complete this is to fill out the Undo
Request Template. This is available as an automated Microsoft Outlook Template on the Undeclaring
STATS Data help page. The template can also be copied into the body of an email (See Attachment
1).
When emailing the Department please include your school name, AGEID, the reason why your data
needs to be undeclared and some contact information so we can respond to you.
If you have any further questions, please feel free to contact us on 1800 677 027 (Option 5).
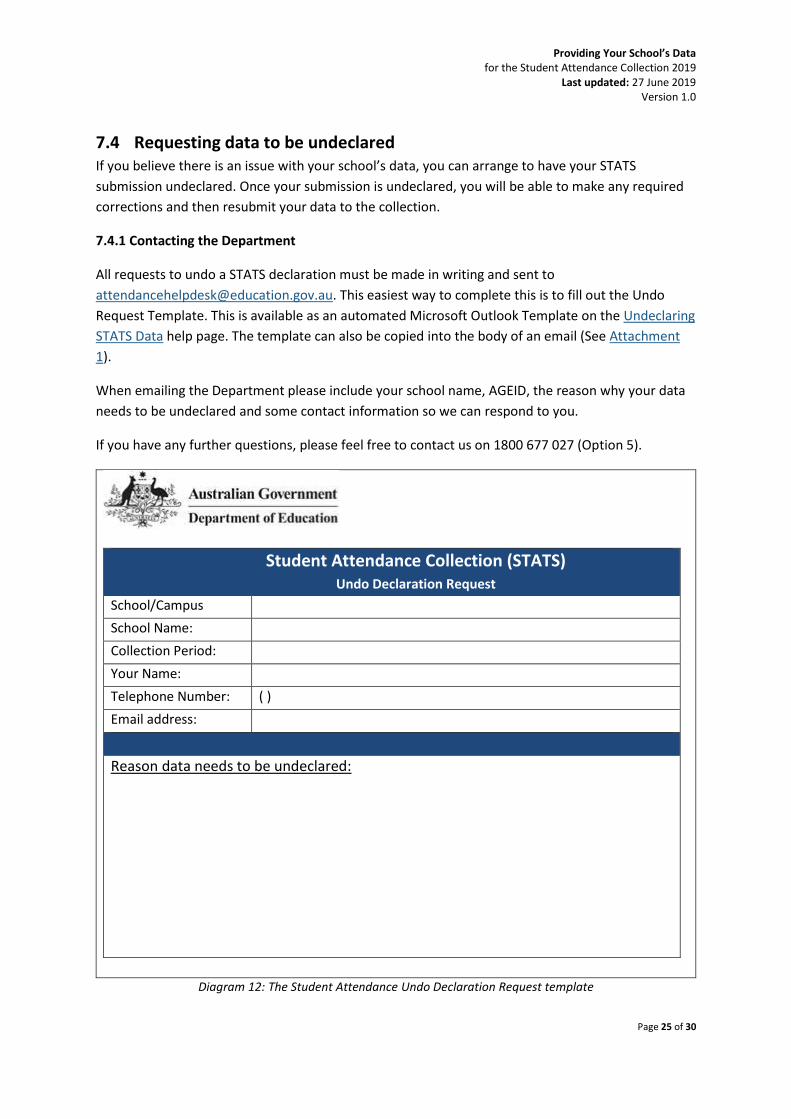
Student Attendance Collection (STATS) Undo Declaration Request
School/Campus
AGEID:
School Name:
Collection Period:
Your Name:
Telephone Number: ( )
Email address:
Reason data needs to be undeclared:
Diagram 12: The Student Attendance Undo Declaration Request template

Providing Your School’s Data for the Student Attendance Collection 2019
Last updated: 27 June 2019 Version 1.0
Page 26 of 30
8 Appendix E: Who do I call for help?
The table below will help you work out the contact for the problem you are experiencing.
Situation Who to Contact
How to provide my location’s data?
1. Uploading a CSV file on the location’s record (see
Appendix B for detailed instructions) 2. Manually entering an individual locations’ data on the
individual locations’ record (see Appendix C for detailed instructions)
When do I have to provide the data by?
Please see https://ssphelp.education.gov.au/student-attendance/key-dates for STATS collection key dates.
I can access the STATS module, but I am having difficulty putting the data in/aren’t sure if I’ve finished putting data in.
Contact the Attendance Helpdesk: [email protected], or 1800 677 027 (Option 5)
I can’t access the STATS collection in SchoolsHUB.
Contact the Schools IT Help Desk: [email protected],or 1800 677 027 (Option 1)
I am an education authority and I can’t see some of my schools in the STATS module.
Contact the Schools IT Help Desk: [email protected],or 1800 677 027 (Option 1)
My school has different education levels, but I can only see one education level (e.g. can only see primary but should also be able to see secondary).
Contact the Schools IT Help Desk: [email protected],or 1800 677 027 (Option 1)
My CSV file won’t upload.
Contact the Attendance Helpdesk: [email protected], or 1800 677 027 (Option 5)
I have questions about the STATS data and school funding.
Recurrent Assistance for Schools Section (RASS): [email protected]

Providing Your School’s Data for the Student Attendance Collection 2019
Last updated: 27 June 2019 Version 1.0
Page 27 of 30
9 Appendix F: How to view previous STATS data
If your school/campus has participated in previous STATS collections, you can view these
submissions through the STATS module in SchoolsHUB.
9.1 Log into SchoolsHUB Log into SchoolsHUB using your Username and password.
9.2 Enter the STATS collection module Once you have logged in, you should see the SchoolsHUB Home page. Choose Student Attendance in
the Data Collections box. You should see the STATS Home screen with your school location’s details
shown in Selected Client and Data Entry status box.
9.3 Navigate towards Select Period Click Select Period in the navigation ribbon at the top of the screen.
Diagram 13: Finding Select Period
You should be presented with a screen similar to the one below showing the STATS collection
periods.
Diagram 14: STATS Select Period Screen
Providing Your School’s Data for the Student Attendance Collection 2019
Last updated: 27 June 2019 Version 1.0
Page 28 of 30
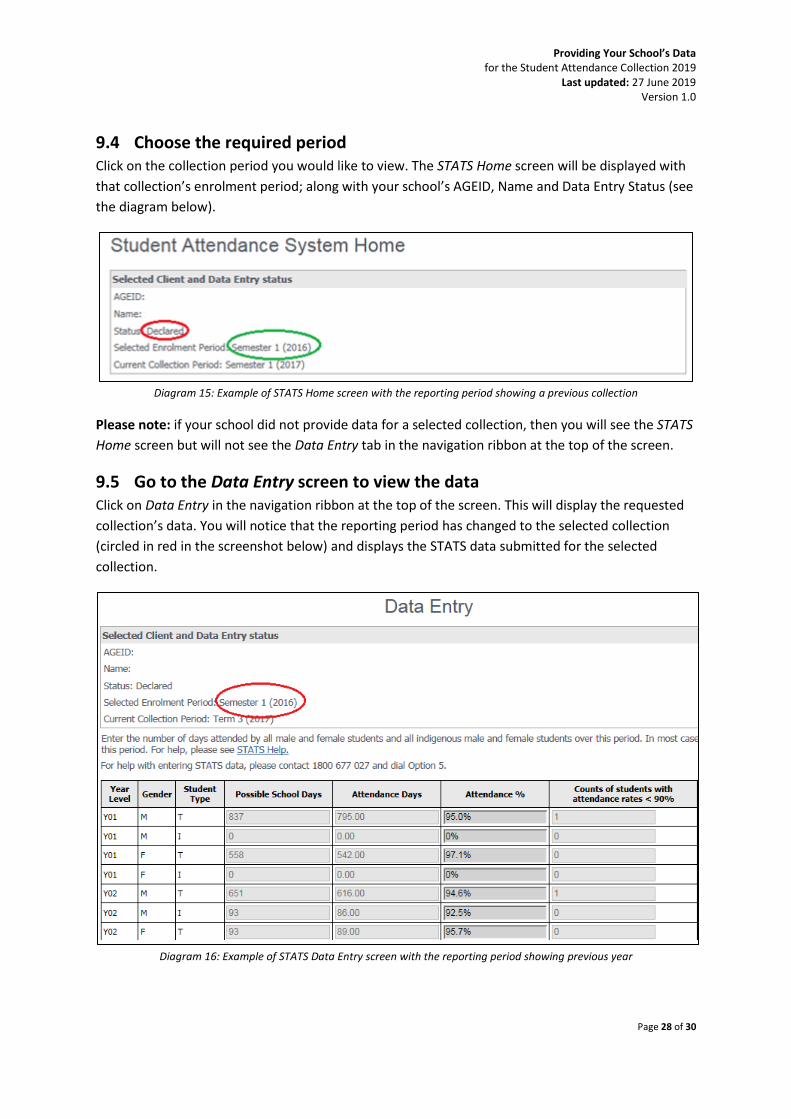
9.4 Choose the required period Click on the collection period you would like to view. The STATS Home screen will be displayed with
that collection’s enrolment period; along with your school’s AGEID, Name and Data Entry Status (see
the diagram below).
Diagram 15: Example of STATS Home screen with the reporting period showing a previous collection
Please note: if your school did not provide data for a selected collection, then you will see the STATS
Home screen but will not see the Data Entry tab in the navigation ribbon at the top of the screen.
9.5 Go to the Data Entry screen to view the data Click on Data Entry in the navigation ribbon at the top of the screen. This will display the requested
collection’s data. You will notice that the reporting period has changed to the selected collection
(circled in red in the screenshot below) and displays the STATS data submitted for the selected
collection.
Diagram 16: Example of STATS Data Entry screen with the reporting period showing previous year

Providing Your School’s Data for the Student Attendance Collection 2019
Last updated: 27 June 2019 Version 1.0
Page 29 of 30
9.6 Return to the most recent year’s data Once you have finished viewing the selected collection, to go to the most recent data, click on Select
Period in the navigation ribbon and choose the most recent period. Check you are in the correct
period by looking at the Selected Enrolment Period in the Selected Client and Data Entry Status box.

Providing Your School’s Data for the Student Attendance Collection 2019
Last updated: 27 June 2019 Version 1.0
Page 30 of 30
10 Attachment 1: Undo Declaration Request Template
Student Attendance Collection (STATS) Undo Declaration Request
School/Campus
AGEID:
School Name:
Collection Period:
Your Name:
Telephone Number: ( )
Email address:
Reason data needs to be undeclared:
Diagram 17: Undo declaration request form


![OSANNA ABOR AND THE MINISTERIAL EXCEPTION · No. 3] The Ministerial Exception 843 ing.21 The school’s initial response was to carry her on the pay‐ roll and try to preserve her](https://static.fdocuments.us/doc/165x107/5e7f2f2a6a6dbf6066372604/osanna-abor-and-the-ministerial-exception-no-3-the-ministerial-exception-843-ing21.jpg)