Provides Full HD and USB extension up to 426 feet (130 m ... · Provides Full HD and USB extension...
36
Provides Full HD and USB extension up to 426 feet (130 m) over CATx. Supports resolution up to 1920 x 1200. CATx DVI/HDMI + USB Extender EC ACX300 ACX300-T ACX300-R Order toll-free in the U.S.: Call 877-877-BBOX (outside U.S. call 724-746-5500) • FREE technical support 24 hours a day, 7 days a week: Call 724-746-5500 or fax 724-746-0746 www.blackbox.com • [email protected] Customer Support Information
Transcript of Provides Full HD and USB extension up to 426 feet (130 m ... · Provides Full HD and USB extension...

Provides Full HD and USB extension up to 426 feet (130 m) over CATx.
Supports resolution up to 1920 x 1200.
CATx DVI/HDMI + USB Extender EC
ACX300 ACX300-T ACX300-R
Order toll-free in the U.S.: Call 877-877-BBOX (outside U.S. call 724-746-5500) • FREE technical support 24 hours a day, 7 days a week: Call 724-746-5500 or fax 724-746-0746 www.blackbox.com • [email protected]
Customer Support
Information

724-746-5500 | blackbox.com Page 2
Trademarks Used in this Manual/Disclaimer
Trademarks Used in this Manual
Black Box and the Double Diamond logo are registered trademarks of BB Technologies, Inc.
HDMI is a registered trademark of HDMI Licensing, L.L.C.
UL is a registered trademark of Underwriters Laboratories.
Windows is a registered trademark of Microsoft Corporation.
Any other trademarks mentioned in this manual are acknowledged to be the property of the trademark owners.
Disclaimer
Black Box Network Services shall not be liable for damages of any kind, including, but not limited to, punitive, consequential or cost of cover damages, resulting from any errors in the product information or specifications set forth in this document and Black Box Network Services may revise this document at any time without notice.

724-746-5500 | blackbox.com Page 3
FCC RFI and NOM Statements
FEDERAL COMMUNICATIONS COMMISSION AND INDUSTRY CANADA RADIO FREQUENCY INTERFERENCE STATEMENTS
This equipment generates, uses, and can radiate radio-frequency energy, and if not installed and used properly, that is, in strict accordance with the manufacturer’s instructions, may cause inter ference to radio communication. It has been tested and found to comply with the limits for a Class A computing device in accordance with the specifications in Subpart B of Part 15 of FCC rules, which are designed to provide reasonable protection against such interference when the equipment is operated in a commercial environment. Operation of this equipment in a residen-tial area is likely to cause interference, in which case the user at his own expense will be required to take whatever measures may be necessary to correct the interference.
Changes or modifications not expressly approved by the party responsible for compliance could void the user’s authority to operate the equipment.
This digital apparatus does not exceed the Class A limits for radio noise emis sion from digital apparatus set out in the Radio Interference Regulation of Industry Canada.
Le présent appareil numérique n’émet pas de bruits radioélectriques dépassant les limites applicables aux appareils numériques de classe A prescrites dans le Règlement sur le brouillage radioélectrique publié par Industrie Canada.
Normas Oficiales Mexicanas (NOM)Electrical Safety StatementINSTRUCCIONES DE SEGURIDAD
1. Todas las instrucciones de seguridad y operación deberán ser leídas antes de que el aparato eléctrico sea operado.
2. Las instrucciones de seguridad y operación deberán ser guardadas para referencia futura.
3. Todas las advertencias en el aparato eléctrico y en sus instrucciones de operación deben ser respetadas.
724-746-5500 | blackbox.com Page 4
NOM Statement
4. Todas las instrucciones de operación y uso deben ser seguidas.
5. El aparato eléctrico no deberá ser usado cerca del agua—por ejemplo, cerca de la tina de baño, lavabo, sótano mojado o cerca de una alberca, etc.
6. El aparato eléctrico debe ser usado únicamente con carritos o pedestales que sean recomendados por el fabricante.
7. El aparato eléctrico debe ser montado a la pared o al techo sólo como sea recomendado por el fabricante.
8. Servicio—El usuario no debe intentar dar servicio al equipo eléctrico más allá a lo descrito en las instrucciones de operación. Todo otro servicio deberá ser referido a personal de servicio calificado.
9. El aparato eléctrico debe ser situado de tal manera que su posición no interfiera su uso. La colocación del aparato eléctrico sobre una cama, sofá, alfombra o superficie similar puede bloquea la ventilación, no se debe colocar en libreros o gabinetes que impidan el flujo de aire por los orificios de ventilación.
10. El equipo eléctrico deber ser situado fuera del alcance de fuentes de calor como radiadores, registros de calor, estufas u otros aparatos (incluyendo amplificadores) que producen calor.
11. El aparato eléctrico deberá ser connectado a una fuente de poder sólo del tipo descrito en el instructivo de operación, o como se indique en el aparato.
12. Precaución debe ser tomada de tal manera que la tierra fisica y la polarización del equipo no sea eliminada.
13. Los cables de la fuente de poder deben ser guiados de tal manera que no sean pisados ni pellizcados por objetos colocados sobre o contra ellos, poniendo particular atención a los contactos y receptáculos donde salen del aparato.
14. El equipo eléctrico debe ser limpiado únicamente de acuerdo a las recomendaciones del fabricante.
15. En caso de existir, una antena externa deberá ser localizada lejos de las lineas de energia.

724-746-5500 | blackbox.com Page 5
NOM Statement
16. El cable de corriente deberá ser desconectado del cuando el equipo no sea usado por un largo periodo de tiempo.
17. Cuidado debe ser tomado de tal manera que objectos liquidos no sean derramados sobre la cubierta u orificios de ventilación.
18. Servicio por personal calificado deberá ser provisto cuando:
A: El cable de poder o el contacto ha sido dañado; u
B: Objectos han caído o líquido ha sido derramado dentro del aparato; o
C: El aparato ha sido expuesto a la lluvia; o
D: El aparato parece no operar normalmente o muestra un cambio en su desempeño; o
E: El aparato ha sido tirado o su cubierta ha sido dañada.
724-746-5500 | blackbox.com Page 6
Table of Contents
Table of Contents
1. Specifications ....................................................................................................8
2. Overview ....................................................................................................9 2.1 Introduction .............................................................................................9 2.2 Features ....................................................................................................9 2.3 What’s Included .......................................................................................9 2.4 Hardware Description ............................................................................12 2.4.1 Transmitter (Local Unit) .............................................................12 2.4.2 Receiver (Remote Unit)..............................................................14
3. Installation ..................................................................................................16 3.1 Cable Requirements ...............................................................................16 3.2 Installing the Transmitter and the Receiver ............................................17
4. Operation ..................................................................................................19 4.1 Startup ..................................................................................................19 4.2 Menu Settings ............................................................................................ 4.2.1 Menu Item “U” — Update Flash FW ........................................19 4.2.2 Menu Item “M” — Option Overview .......................................19 4.2.3 Menu Item “D” — DDC Option ...............................................20 4.2.4 Menu Item “W” — Network Settings ......................................21 4.2.5 Menu Item “G” — Extender Settings .......................................21 Menu Item “S” — Show Last Image ........................................21 Menu Item “I” — Monitor Sync ...............................................21 Menu Item “L” — Lock Menu ..................................................22 Menu Item “P” — Power Source .............................................22 Menu Item “N” — Noise Filter .................................................22 4.2.6 Menu Item “K” — Keyboard Locale .........................................23 4.2.7 Menu Item “Q” — Close Extender Menu ................................23
5. Switching Menu Guide/Settings ......................................................................24 5.1 Switching Item “R” — Reset to Factory Default....................................25 5.2 Switching Item “P” — Passwords Disabled ...........................................25 5.3 Switching Item “T” — Set Timeout .......................................................25 5.4 Switching Item “C” —Auto Connect ....................................................25 5.5 Switching Item “V” — Private Connections ..........................................25 5.6 Switching Item “B” — User-PC Binding ................................................25 5.7 Switching Item “D” — Disconnect on PC Power Down .......................26

724-746-5500 | blackbox.com Page 7
Table of Contents
5.8 Switching Item “M” — Master View (Network Configuration) ............26 5.8.1 Master View Item “C” — Connections Overview ....................26 5.8.2 Master View Item “U” — User List ...........................................27 5.8.3 Master View Item “W” — Console Extender List ....................29 5.8.4 Master View Item “S” — PC Extender List ...............................30 5.8.5 Master View Item “H” — Multi-Head Config ..........................30 5.9 Switching Between Different Computers ..............................................32
6. Troubleshooting ...............................................................................................33 6.1 Contacting Black Box .............................................................................33 6.2 Shipping and Packaging.........................................................................33

724-746-5500 | blackbox.com Page 8
Chapter 1: Specifications
1. Specifications
Approvals CE, CSA, FCC, RoHS2, TUV, UL®, WEEE
Connectors Transmitter: (2) HDMI F with HDMI to DVI-D adapter cable, (1) USB Type B F, (1) RJ-45 F, (1) 2.1-mm barrel connector; Receiver: (1) HDMI F with HDMI to DVI-D adapter cable, (4) USB Type A F, (1) RJ-45 F, (1) 2.1-mm barrel connector
Operating System Windows®
Computer Interface HDMI® video, USB
Distance From CPU to TX: 16 feet (5 m), maximum, DVI-D and USB limita-tions, Between TX and RX: 426 feet (130 m), maximum
Leads Supported HDMI/DVI video, USB HID
Encryption No
DDC Support Internal DDC table
Cascadable No
Power Source: External in-line power supply, Input Voltage: 100–240 VAC, 50/60 Hz, Input Current: 0.5 A, Output Voltage: 12 V, Output Current: 1 A Consumption: 12 W max. (5 W nominal), Output Connector Type: 2.1 x 5.5 x 11 mm, Input Connector Type: Wallmount plug, Power Supply Cord Length: 5-ft. (1.5-m)

724-746-5500 | blackbox.com Page 9
Chapter 1: Specifications
Heat Dissipation 40.91 BTU/hr. maximum
Indicators Each unit (Transmitter or Receiver): (1) Power/Status LED
Environmental Operating Temperature: 32 to 113° F (0 to 45° C); Storage Temperature: -4 to +158° F (-20 to +70° C); Operating Humidity: 80% noncondensing; Altitude: 10,000 ft. maximum
Dimensions Each unit (Transmitter or Receiver): 1.6"H x 3.85"W x 4.17"D (4.1 x 9.8 x 10.6 cm)
Weight Each unit (Transmitter or Receiver): 0.61 lb. (0.27 kg)

724-746-5500 | blackbox.com Page 10
Chapter 2: Overview
2. Overview2.1 IntroductionThe CATx DVI/HDMI + USB Extender EC provides lossless Full HD and USB extension up to 426 feet (130 m) over CATx cable. It consists of two units: a transmitter and a receiver.
2.2 Features• Supports full HD 1080p and resolutions up to 1920 x 1200.
• Provides lossless video transmission up to 426 feet (130 meters).
• Supports USB keyboard/mouse, USB touchscreen, and other Human Interface Devices (HIDs).
NOTE: Storage devices such as external hard drives/flash drives will require the USB 2.0 license (ACX300-U2).
• Uses just one USB CAT5e/6/7 cable.
• Provides local monitoring.
• Includes optional upgrade (ACX300-U2) for extending USB storage media.
• Sound and RS-232 expandable via external USB adapters.
• Plug-and-play installation with DDC/EDID reading.
• An optional mounting option for 19" racks with four units in (1) rack unit (RU) is available.
• Can also be wall-, table-, or DIN-rail-mounted. Mounting options accessories are:
- ACX300-DRM (Desk mount kit for a single unit).
- ACX300-DRM (Din Rail Mount Kit for a single unit).
- ACX300-RMK (19" Rackmount kit for up to 4 units).
• Extender pair (ACX300-T and ACX300-R) works with a network switch to connect several PCs with several monitors, or to control several PCs from one workstation.
• When used with a network switch, the extender supports up to 48 devices. For example, you can use 30 PCs from 18 workstations.
2.3 What’s IncludedYour package should include the following items. If anything is missing or damaged, contact Black Box Technical Support at 724-746-5500 or [email protected].

724-746-5500 | blackbox.com Page 11
Chapter 2: Overview
ACX300:
• (1) transmitter
• (1) receiver
• (2) HDMI to DVI-D adapter cables
• (2) 12-VDC, 1-A power supplies w/US, UK, EU, and AU power clips
• (2) packs of (4) rubber feet
• (2) packs of self-adhesive pads
• (1) USB Type A to B Cable
• This user’s manual
ACX300-T:
• (1) transmitter
• (1) HDMI to DVI-D adapter cables
• (1) 12-VDC, 1-A power supplies w/US, UK, EU, and AU power clips
• (1) pack of (4) rubber feet
• (1) pack of self-adhesive mounting pads
• (1) USB Type A to B Cable
• This user’s manual
ACX300-R:
• (1) receiver
• (1) HDMI to DVI-D adapter cables
• (1) 12-VDC, 1-A power supplies w/US, UK, EU, and AU power clips
• (1) pack of (4) rubber feet
• (1) pack of self-adhesive mounting pads
• This user’s manual
ACX300-RMK: • 19" Rackmounting Kit
ACX300-DRM
• DIN-Rail Mounting Kit
ACX300-TMK: • Deskmount Option

724-746-5500 | blackbox.com Page 12
Chapter 2: Overview
ACX300-U2: • Enables USB 2.0 External Storage Device Support
ACX3-SW: • Receiver Switching License
NOTE: The ACX3xx can also support matrix switching if you purchase the ACX3-SW switching license. The license is applied to the receiver only and will allow it to communicate and switch among multiple transmitters. You can have at maximum 48 endpoints in a matrix system (i.e. 1 receiver, 47 transmitters or 47 receivers and 1 transmitter). The matrix MUST reside on a single network switch only, and each port on the network switch must support link speeds up to 1 Gbps.
2.4 Hardware Description2.4.1 Transmitter (Local Unit)Front Panel
The transmitter‘s front panel is blank except for a Power Status LED, which is described in Table 2-1.
Back Panel
The transmitter’s back panel is shown in Figure 2-1. Table 2-1 describes its components.
2 3 4 5 6
Figure 2-1. Transmitter’s back panel.

724-746-5500 | blackbox.com Page 13
Chapter 2: Overview
Table 2-1. Transmitter’s components.
Number Component Description
1Power Status LED (not shown in Figure 2-1, located on the front panel of the transmitter)
Lights when power to the transmitter is on.
2 (1) HDMI connector Connects to the PC.
3 (1) barrel connector Links to 12-VDC, 1-A power.
4 (1) HDMI connector Connects to PC IN port.
5 (1) USB Type B connector Links to USB port on the PC.
6 (1) RJ-45 connectorConnects one end of the 426-foot (130-m) link between the transmitter and receiver.

724-746-5500 | blackbox.com Page 14
Chapter 2: Overview
2.4.2 Receiver (Remote Unit)
Front Panel
The receiver’s front panel is blank except for a Power Status LED, which is described in Table 2-2.
Back Panel
The receiver’s back panel is shown in Figure 2-2. Table 2-2 describes its components.
2 3 4 5
Figure 2-2. Receiver’s back panel.

724-746-5500 | blackbox.com Page 15
Chapter 2: Overview
Table 2-2. Receiver’s components.
Number Component Description
1Power Status LED (not shown in Figure 2-2, located on the front panel of the receiver)
Lights when power to the receiver is on.
2 (1) HDMI connectorConnects to DVI monitor with FA790 or to HDMI monitor.
3 (1) barrel connector Links to 12-VDC, 1-A power.
4 (4) USB Type A connectorsLink to keyboard/mouse and two USB peripheral devices.
5 (1) RJ-45 connectorConnects one end of the 426-foot (130-m) link between the receiver and transmitter.
724-746-5500 | blackbox.com Page 16
Chapter 3: Installation
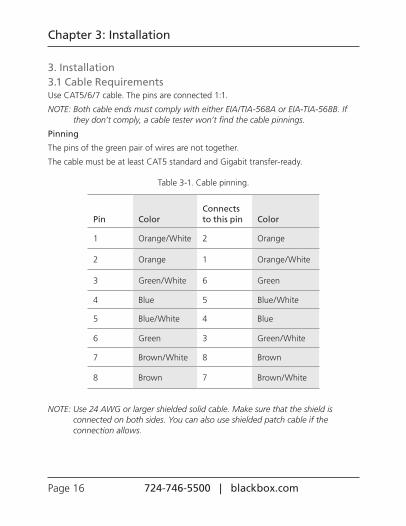
3. Installation3.1 Cable RequirementsUse CAT5/6/7 cable. The pins are connected 1:1.
NOTE: Both cable ends must comply with either EIA/TIA-568A or EIA-TIA-568B. If they don’t comply, a cable tester won’t find the cable pinnings.
Pinning
The pins of the green pair of wires are not together.
The cable must be at least CAT5 standard and Gigabit transfer-ready.
Table 3-1. Cable pinning.
Pin ColorConnects to this pin Color
1 Orange/White 2 Orange
2 Orange 1 Orange/White
3 Green/White 6 Green
4 Blue 5 Blue/White
5 Blue/White 4 Blue
6 Green 3 Green/White
7 Brown/White 8 Brown
8 Brown 7 Brown/White
NOTE: Use 24 AWG or larger shielded solid cable. Make sure that the shield is connected on both sides. You can also use shielded patch cable if the connection allows.

724-746-5500 | blackbox.com Page 17
Chapter 3: Installation
3.2 Installing the Transmitter and ReceiverConnect all the cables from your PC as shown in Figure 3-1.
DVI
PC
Transmitter (Local Unit) DVI
DVI
MonitorMouse
Keyboard
Receiver (Remote Unit)
Monitor
LGB5052A Network Switch
CATx before switch, max.
328 feet (100 m)
CATx after switch, max.
328 feet (100 m)
Distance total 656 feet (200 m)
Figure 3-1. Connecting the extender units.
Connect the respective workstations (via Remote Extenders) and computers (via Local Extenders) with the network switch.
ACX300-T
ACX300-T
ACX300-T
ACX300-R
ACX300-R
LGB5052A Network Switch
PC
PC
PC
Workstation
Workstation
Figure 3-2. Switching application.

724-746-5500 | blackbox.com Page 18
Chapter 3: Installation
NOTES:
The entire switching network system requires its own dedicated network. For security reasons, it cannot be integrated into an existing company network.
The network switch must have true port-to-port transfer rates of 1 Gbps.
Black Box switches that we have tested with the extenders include:
• LGB5028A
• LGB5052A

724-746-5500 | blackbox.com Page 19
Chapter 4: Operation
4. Operation4.1 StartupSwitch on all devices. Both extenders start working automatically. For about five seconds, the LED will blink red. When the LED turns green, the device is ready to use.
4.2 Menu SettingsTo enter the menu, press the ScrollLock key on the attached keyboard five times quickly.
The on-screen display (OSD) menu appears on the attached display (see Figure 4-1). You can access sub-menus by pressing the appropriate key. The currently installed firmware version is displayed below the menu.
Figure 4-1. OSD menu.
4.2.1. Menu Item “U” — Update Flash FWThis option is used to update the firmware. Download the latest version of the firmware from blackbox.com. Go to blackbox.com, type in the part number "ACX300", and navigate to the proper device. Once on the product page of the device you need firmware for, click on the "Resources" tab to view all available firmware. Each update includes a detailed description of the update process.
4.2.2 Menu Item “M” – Option OverviewThis option displays the extender’s activated options. The status is indicated by the colors green (activated), and red (not activated).
If the memory option on the extender is activated, this can be enabled or disabled at any point in this menu.

724-746-5500 | blackbox.com Page 20
Chapter 4: Operation
Figure 4-2. Options Overview menu.
The menu displays the device ID.
1. Contact Black Box Technical Support at 724-746-5500 or [email protected] to get the activation code for the option you want to use. Compile a list of all Request Keys/Device IDs from each ACX300 Receiver unit. The request key/ device ID is found in the Option Overview menu (M). Once you have the list of request keys/device IDs, determine which license you need (switching: ACX300-SW/storage devices: ACX300-U2). Once you have determined which license you need, contact Black Box at 724-746-5500, or send an email to [email protected]. Include all of the Request Keys, Device IDs, and the license you would like to purchase so that the proper activation codes can be generated.
2. Enter this activation code by pressing the “M” key. This will not alter options that have already been activated.
3. Press “Esc” to return to the main menu.
4.2.3 Menu Item “D” – DDC OptionIn this menu, you can define the DDC information used by the PC.

724-746-5500 | blackbox.com Page 21
Chapter 4: Operation
Figure 4-3. DDC Option menu.
Press “0“ to use the DDC information from the monitor attached to the remote Extender.
Press “1“ to use the DDC information from the monitor attached to the local Extender.
Press “2“ to save the current DDC information.
Use keys “4“ through “8“ to use a predefined saved resolution.
Press “ESC” to return to the main menu.
4.2.4 Menu Item “W” – Network SettingsThe menu includes the preferences and settings for the switching option.
4.2.5 Menu Item “G” – Extender SettingsThis menu presents more preferences. Three of the selections (VGA, Audio, and RS-232) take you to more menus, while the other four toggle on and off when you press the marked key.
Figure 4-4. Extender Settings menu.

724-746-5500 | blackbox.com Page 22
Chapter 4: Operation
Menu Item “S” – Show Last ImageWhen this option is enabled, the console extender will not show a black screen when it is no longer connected to a PC extender. Instead it will keep the last image that it received. To indicate that this image is no longer current, the edges of the screen will flash red.
Menu Item “I” – Monitor SyncYou can turn the monitor synchronization on or off. When enabled, the refresh rate of the graphics card of the PC and that of the remote monitor are adjusted to match one another. This ensures smooth transmission when the screen content changes rapidly (e.g, when using multimedia applications).
Not all monitors support this method, so by default this option is disabled. If the monitor starts to flicker, then it does not support this feature and should be disabled again.
Menu Item “L” – Lock MenuYou can lock the extender OSD menu from this menu. When enabled, access to the menu will be locked 5 minutes after start up. This prevents unauthorized access to the extender menu. To enter the main menu again, restart the extender (turn the power supply off and on).
Figure 4-5. Lock menu.
To enable or disable the menu from this screen, by press “0“ or “1“ respectively. To return to the main menu, press “ESC.“

724-746-5500 | blackbox.com Page 23
Chapter 4: Operation
Menu Item “P” – Power SaveWhen in power saving mode, the remote extender will turn its video off when it receives no video for more than a minute. This enables the monitor to enter sleep mode if supported. To wake, press any key on keyboard.
Menu Item “N” – Noise FilterThis feature improves video performance in very specific circumstances: when viewing moving video with very high levels of noise (particularly along the horizontal axis) then the frame rate of the extender will drop below a critical level, and artifacts may begin appearing in the image.
When this feature is enabled, a filter will be activated whenever the frame rate falls below the critical frame rate, and deactivated once the frame rate is sufficiently high. This filter applies a blur to the image to reduce the noise, enabling the frame rate to rise above the critical level.
We recommend enabling monitor synchronization when using this feature with a compatible monitor.
4.2.6 Menu Item “K” — Keyboard LocaleSelect between layouts for navigating the OSD. Choose from French (Azerty), English (Qwerty), and German (Qwertz).
4.2.7 Menu Item “Q”To close the extender menu, press the “Q” key.

724-746-5500 | blackbox.com Page 24
Chapter 5: Switching Menu Guide/Settings
5. Switching Menu Guide/SettingsPress “W” in the main menu of the OSD to access the Switching Option settings and configure your network.
NOTE: This menu item is only active when the Switching Option is unlocked on the Remote Extender. The ACX300-SW is the license to support the Switching Option.
To unlock an Option, see Section 4.1.2.
To prevent unauthorized access to the Network Settings, this item is protected by a user/password. Access is only allowed for users with administrator rights.
The default settings for an administrator user are:
User: admin
Password: admin.
Figure 5-1. Enter User/Password screen.
Figure 5-2. Network Settings screen.

724-746-5500 | blackbox.com Page 25
Chapter 5: Switching Menu Guide/Settings
5.1 Switching Item “R” – Reset to Factory DefaultThis will reset the extenders to factory settings.
ATTENTION: All user/console/computer tables will be deleted.
5.2 Switching Item “P” – Passwords DisabledEnter the passwords to activate user groups and rights and login access.
For more information about user groups and rights, see Section 5.8.2, User List.
Access to the network settings is always protected by a login and password, even when the password system is disabled.
5.3 Switching Item “T” – Set TimeoutWhen the password system is activated, you can define under what circumstances the user will required to enter their login details when switching.
I – Immediately: User and password must be entered for each switch.
N – Never: User and password are not required until the current user logs out.
T – Time in min: You define the number of minutes since the last switch before the user and password details are required again.
5.4 Switching Item “C” – Auto ConnectIf your connection is interrupted by another user, the switching system will automat-ically connect you with a free computer when the Auto Connect setting is active.
This function is unavailable while using the Password System.
5.5 Switching Item “V” – Private ConnectionsBy activating the private connection function, users can set up a private connection with a computer, which can’t be interrupted by other users.
To establish a private connection, hold down “<Shift>” while you select a new con-nection (either in the switching menu or by pressing the hotkey combination).
5.6 Switching Item “B” – User-PC BindingWhen in the User-PC Binding mode, the switching system behaves quite differently. Each console starts disconnected and displays the log in screen. The switching menu and switching hot keys are not available. The admin must configure each user to have a specific PC bound to them. When a user logs on they will be automatically connected to their bound PC. If another user wishes to use the console, the first user must disconnect and logout with the key combination Ctrl-Alt-F11.

724-746-5500 | blackbox.com Page 26
Chapter 5: Switching Menu Guide/Settings
Users with Master or Admin rights can access the switching menu as usual once they enter their login details.
5.7 Switching Item “D” – Disconnect on PC Power DownWhen enabled, any local extender connected to a PC that is powered down will automatically break its connection, allowing the remote extender to find a different local extender to connect to.
5.8 Switching Item “M” – Master View (Network Configuration)The master view menu provides the administrator with the ability to view, add, edit or remove user, console, and computer information.
Figure 5-3. Master View menu.
5.8.1 Master View Item “C” – Connections OverviewThis option provides an overview of the current connections as well as the free PCs and consoles on the network.
You may break a connection remotely or assign a PC to a new console, or vice versa.

724-746-5500 | blackbox.com Page 27
Chapter 5: Switching Menu Guide/Settings
Figure 5-4. Master View connections overview screen.
Figure 5-5. Master View connections detail screen.
5.8.2 Master View Item “U” – User ListWith this menu item, you can manage user details, rights and groups.
Press the “a” key to add a new user. Press the “r” key to delete a user. Press “i” to display details about the user that you can edit.
Figure 5-6. Master View user list screen.

724-746-5500 | blackbox.com Page 28
Chapter 5: Switching Menu Guide/Settings
Figure 5-7. Master View user list screen.
User: Assign each user a login name with max. 16 characters.
Full Name: For clarity, you can enter a user's full name. This name is displayed when informing other users who interrupted their connection.
Password: Each user requires a password (max. 16 characters) for login.
Rights: There are three types of rights: USER, MASTER, and ADMIN. Press the “+” key to change the rights of the selected user.
The rights control access to the Network Settings menu (only ADMIN), and which users may interrupt the connection of which other users.
Admin: May interrupt connections of Masters and Users. If an Admin interrupts the connection of another Admin, the interrupted Admin can reclaim the original connection. Private connections can’t be interrupted.
Master: May interrupt connections of Users. If a Master interrupts the connection of another Master, the interrupted Master can reclaim the original connection. Admins and private connections can’t be interrupted.
User: If a User interrupts the connection of another User, the interrupted User may reclaim the original connection. Admins, Masters ,and private connections can’t be interrupted.
Groups: Each user can join up to 8 user groups. Each computer is defined as belonging to one user group. By default, all computers are in the same user group. This system makes it possible to allow or deny different users access to a computer. The user’s group access is set by pressing the buttons 1–8.

724-746-5500 | blackbox.com Page 29
Chapter 5: Switching Menu Guide/Settings
Bound PC: When in User-PC Binding mode (see Section 5.6), each user must have a PC bound to them. That user will only be able to connect to that PC. To select the User Details for a specific PC, press “RETURN” and a list of PCs on the network will be displayed to select from.
Figure 5-8. Master View user detail screen.
5.8.3 Master View Item “W” – Console Extender ListIn the console list, you can view all console extenders (remote extenders) in the switching network and their current status.
“this” defines the extender you are currently using.
“in use” indicates that the extender is in use.
“free” indicates that this extender is not busy.
Each console extender (remote extender) can be assigned a name.
Press the “i” key to bring up the submenu.
Figure 5-9. Master View console extender list.
724-746-5500 | blackbox.com Page 30
Chapter 5: Switching Menu Guide/Settings
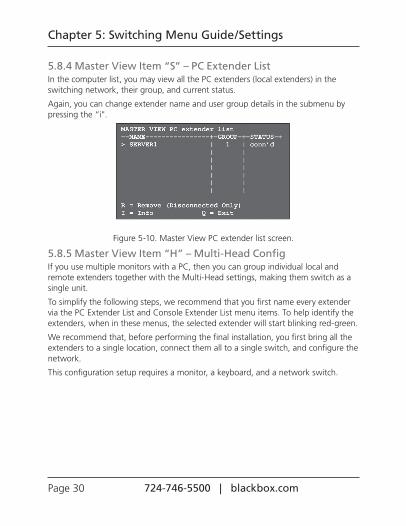
5.8.4 Master View Item “S” – PC Extender ListIn the computer list, you may view all the PC extenders (local extenders) in the switching network, their group, and current status.
Again, you can change extender name and user group details in the submenu by pressing the “i".
Figure 5-10. Master View PC extender list screen.
5.8.5 Master View Item “H” – Multi-Head ConfigIf you use multiple monitors with a PC, then you can group individual local and remote extenders together with the Multi-Head settings, making them switch as a single unit.
To simplify the following steps, we recommend that you first name every extender via the PC Extender List and Console Extender List menu items. To help identify the extenders, when in these menus, the selected extender will start blinking red-green.
We recommend that, before performing the final installation, you first bring all the extenders to a single location, connect them all to a single switch, and configure the network.
This configuration setup requires a monitor, a keyboard, and a network switch.
724-746-5500 | blackbox.com Page 31
Chapter 5: Switching Menu Guide/Settings
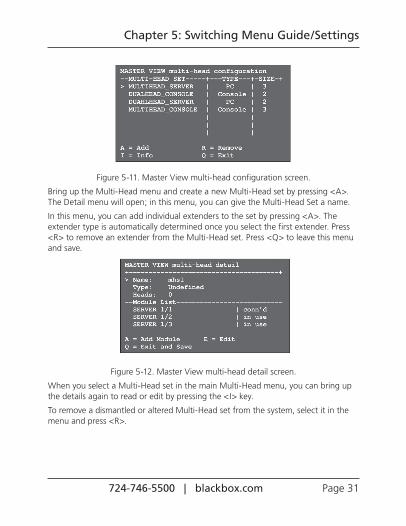
Figure 5-11. Master View multi-head configuration screen.
Bring up the Multi-Head menu and create a new Multi-Head set by pressing <A>. The Detail menu will open; in this menu, you can give the Multi-Head Set a name.
In this menu, you can add individual extenders to the set by pressing <A>. The extender type is automatically determined once you select the first extender. Press <R> to remove an extender from the Multi-Head set. Press <Q> to leave this menu and save.
Figure 5-12. Master View multi-head detail screen.
When you select a Multi-Head set in the main Multi-Head menu, you can bring up the details again to read or edit by pressing the <I> key.
To remove a dismantled or altered Multi-Head set from the system, select it in the menu and press <R>.

724-746-5500 | blackbox.com Page 32
Chapter 5: Switching Menu Guide/Settings
5.9 Switching Between Different ComputersYou can access the menu for the switching option via a USB keyboard on the Remote Extender. Press “Ctrl+Alt+F12” to display the switching menu (see Figure 5-13).
The switching menu will list all the computers (Local Extenders) connected to the switching network.
Blue indicates the computer with which you are currently connected. The status is listed as “conn’d”.
White indicates a computer that is currently connected to another workstation (Remote Extender). The status is listed as “in use.”
Green indicates a computer in the switching network that isn’t connected to any workstation (Remote Extender). The status is listed as “free."
Red indicates a computer that was once in the switching network but isn’t currently available. This usually indicates that the Extender has been disconnected from the network. In this case, you can remove the computer from the switching menu with the “delete” key.
Figure 5-13. Computer switching screen.
Use the “arrow up” and “arrow down” keys to navigate through the list. The cur-rently selected computer is indicated by the “greater than” symbol on the left edge of the OSD (On Screen Display). Press the “Return” key to switch to the selected computer.
The left column defines the favorites menu, and provides each computer with a favorite number. You can change the order of the favorite numbers when desired. Select the relevant computer and press a key “1” through “8” to select that computer’s favorite number.

724-746-5500 | blackbox.com Page 33
Chapter 6: Troubleshooting
6. Troubleshooting
6.1 Contacting Black BoxIf you determine that your CATx DVI + USB Extender EC is malfunctioning, do not attempt to alter or repair the unit. It contains no user-serviceable parts. Contact Black Box Technical Support:
• Email in the US: [email protected] in the UK: [email protected]
• Phone in the US: 724-746-5500 in the UK: +44 (0)118 965 6000
Before you do, make a record of the history of the problem. We will be able to provide more efficient and accurate assistance if you have a complete description, including:
• the nature and duration of the problem.
• when the problem occurs.
• the components involved in the problem.
• any particular application that, when used, appears to create the problem or make it worse.
6.2 Shipping and PackagingIf you need to transport or ship your CATx DVI + USB Extender EC:
• Package it carefully. We recommend that you use the original container.
• If you are returning the unit, make sure you include everything you received with it. Before you ship for return or repair, contact Black Box to get a Return Authorization (RA) number.

724-746-5500 | blackbox.com Page 34
NOTES

724-746-5500 | blackbox.com Page 35
NOTES

Chapter
Page 900 724-746-5500 | blackbox.com
Great tech support is just 60 seconds away at 724-746-5500 or blackbox.com.
Black Box Tech Support: FREE! Live. 24/7.
Tech support the way it should be.
ACX300, version 5
About Black BoxBlack Box provides an extensive range of networking and infrastructure products. You’ll find everything from cabinets and racks and power and surge protection products to media converters and Ethernet switches all supported by free, live 24/7 Tech Support available in 60 seconds or less.
© Copyright 2015. Black Box Corporation. All rights reserved.