Proslat 88107 8' x 4' PVC Wall Panels and Trims (Light … · Afin d’installer le premier...
8
1 INSTRUCTIONS 8 x 4 ft Proslat panel section/Section de panneaux Proslat 8 x 4 pi 8PRO001-MAY2017 YOUR BOX CONTAINS/ VOTRE BOÎTE CONTIENT 8 ft Proslat panels (10 pcs) Panneaux Proslat de 8 pi (2,44 m) (10 morceaux) 88 x 2’’ (5 cm) screws (Dual Robertson & Phillips Pan head #8) It is strongly recommended to use a drill with the included square-head bit for all driving. Vis de 2 po (5 cm) (Tête bombée n°8 carrée et étoile) Pour visser, il est fortement recommandé d’utiliser une perceuse avec l’embout carré inclus. 2 x 97 ½ in J-trims Moulures en J de 97,5 po (2,49 m) 1 x 8 ft L-trim Moulure en L de 8 pi (2,44 m) Snips/Ciseaux Level/Niveau Drill/Perceuse Stud finder/ Détecteur de montant Mitre saw/Scie à onglet Jig saw/Scie sauteuse TOOLS REQUIRED OUTILS REQUIS Hook channel DO NOT PUT SCREWS HERE Cavité du crochet NE PAS VISSER ICI IF YOU PLAN ON CUTTING YOUR PANELS SI VOUS PLANIFIEZ DE COUPER VOS PANNEAUX
Transcript of Proslat 88107 8' x 4' PVC Wall Panels and Trims (Light … · Afin d’installer le premier...

1
INSTRUCTIONS8 x 4 ft Proslat panel section/Section de panneaux Proslat 8 x 4 pi
8PRO001-MAY2017
YOUR BOX CONTAINS/ VOTRE BOÎTE CONTIENT
8 ft Proslat panels (10 pcs)Panneaux Proslat de 8 pi (2,44 m) (10 morceaux)
88 x 2’’ (5 cm) screws (Dual Robertson & Phillips Pan head #8) It is strongly recommended to use a drill with the included square-head bit for all driving. Vis de 2 po (5 cm) (Tête bombée n°8 carrée et étoile) Pour visser, il est fortement recommandé d’utiliser une perceuse avec l’embout carré inclus.
2 x 97 ½ in J-trims Moulures en J de 97,5 po (2,49 m)
1 x 8 ft L-trim Moulure en L de 8 pi (2,44 m)
Snips/Ciseaux
Level/Niveau
Drill/Perceuse
Stud finder/ Détecteur de montant
Mitre saw/Scie à onglet
Jig saw/Scie sauteuse
TOOLS REQUIRED OUTILS REQUIS
Hook channelDO NOT PUT SCREWS HERE
Cavité du crochetNE PAS VISSER ICI
IF YOU PLAN ON CUTTING YOUR PANELS
SI VOUS PLANIFIEZ DE COUPER VOS PANNEAUX
2
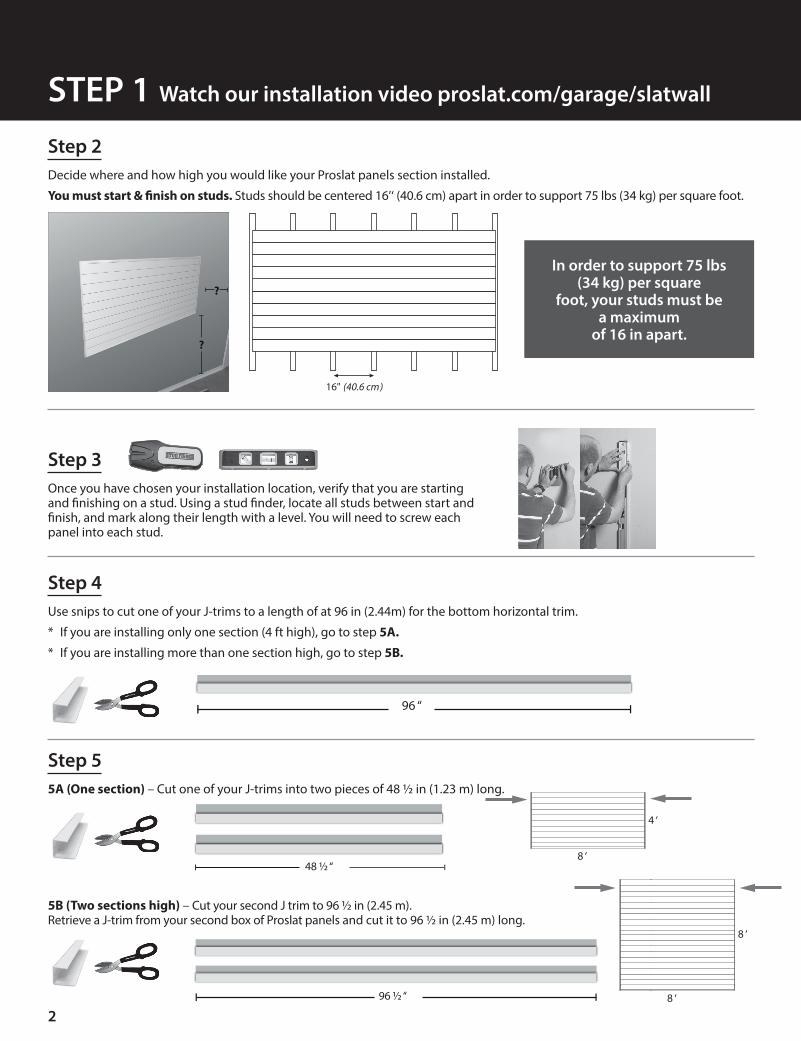
Step 3Once you have chosen your installation location, verify that you are starting and finishing on a stud. Using a stud finder, locate all studs between start and finish, and mark along their length with a level. You will need to screw each panel into each stud.
STEP 1 Watch our installation video proslat.com/garage/slatwall
Step 55A (One section) – Cut one of your J-trims into two pieces of 48 ½ in (1.23 m) long.
5B (Two sections high) – Cut your second J trim to 96 ½ in (2.45 m). Retrieve a J-trim from your second box of Proslat panels and cut it to 96 ½ in (2.45 m) long.
In order to support 75 lbs (34 kg) per square
foot, your studs must be a maximum
of 16 in apart.
Step 4Use snips to cut one of your J-trims to a length of at 96 in (2.44m) for the bottom horizontal trim.
* If you are installing only one section (4 ft high), go to step 5A.
* If you are installing more than one section high, go to step 5B.
Step 2Decide where and how high you would like your Proslat panels section installed.
You must start & finish on studs. Studs should be centered 16’‘ (40.6 cm) apart in order to support 75 lbs (34 kg) per square foot.
?
?
16" (40.6 cm)
96 ‘‘
48 ½ ‘‘
96 ½ ‘‘
4 ‘
8 ‘
8 ‘
8 ‘

3
Step 6For this step, it is best to have the help of a second person. Install your bottom horizontal J-trim at desired starting height (the wider side installs against the wall), level and screw into the middle five studs. Do not screw into the first and last studs.
Step 7Overlap your vertical trim with your horizontal trim (the wider side installs against the wall) and screw through both. Level vertical trim and install one screw at the top to hold vertical J-trims in place*. Repeat on the other side. Your panels will be screwed through the J-trims holding both in place.
Step 8To install the first panel, insert one end of your panel (left or right) into the vertical J-trim and slightly curve the panel so it will insert into the other vertical J-trim. Make sure your panel is seated into bottom J-trim and is level. Screw through the upper channel of the panel and into each stud (16’’ apart). Drive screws at either end of the panel through the J-trim and into your stud. This will hold your vertical J trims to the wall.
x 5
front side
wall side
x 4
TOP VIEW
x 7
Step 9Insert the next Proslat panel into one of your vertical J-trims, interlocking the panel with the one below it. Curve your panel and insert into the J-trim on the other side, again interlocking the panel with the one below it. Push down on the panel to overlap with the panel below it, making sure it is properly seated and level. Make sure you screw into every stud before installing the next panel.
Repeat until your section is done, verifying level every three panels.
Properly interlocked panels will conceal previous panel’s installation screws.
x 63 x 9Properly overlapped
96 ‘‘
*Screws installed at the top of the vertical J-trims may have to be removed to complete clean installation of top panels.

4
Step 10Install your top L-trims by simply clipping them into the lip above the screw cavity.
Installing wider than 8 ft (2.44 m)Some kits contain an extra J & L to install in a 2’ x 16’ configuration.
If you are installing two 4 ft (1.2 m) panels side by side, you will need to use two J-trims back to back to hide the joint.
Or, you can order additional H-trims from our website.
Top panel cutIf you have done a complete wall and you have had to cut your top panel to fit, you will need to use silicone to install your top trim.
section 1 section 2
FREQUENTLY ASKED QUESTIONS
CONCRETE OR BLOCKWALL INSTALLATION
METAL STUDS INSTALLATION
If your walls are made of concrete or blocks, you will need to fasten 2”x 3” studs or furring strips vertically using a cement screw and then install your Proslat to the studs.
If you have metal studs the installation is the same. Make sure to use self tapping screws instead of wood screws.
Our product is designed to hold 75 lbs (34 kg) per square foot when the studs are 16” (40.6 cm) apart. If your studs are wider apart. Please apply some adhesive to the back of the panel if installing over drywall.
24’’ STUD CENTER
IF YOU HAVE ANY QUESTIONS AFTER READING THESE INSTRUCTIONS
Please call our customer service • 1.888.691.2944 • Monday to Friday • 8:00 am to 5:00 pm EDT
PROSLAT.COM
5
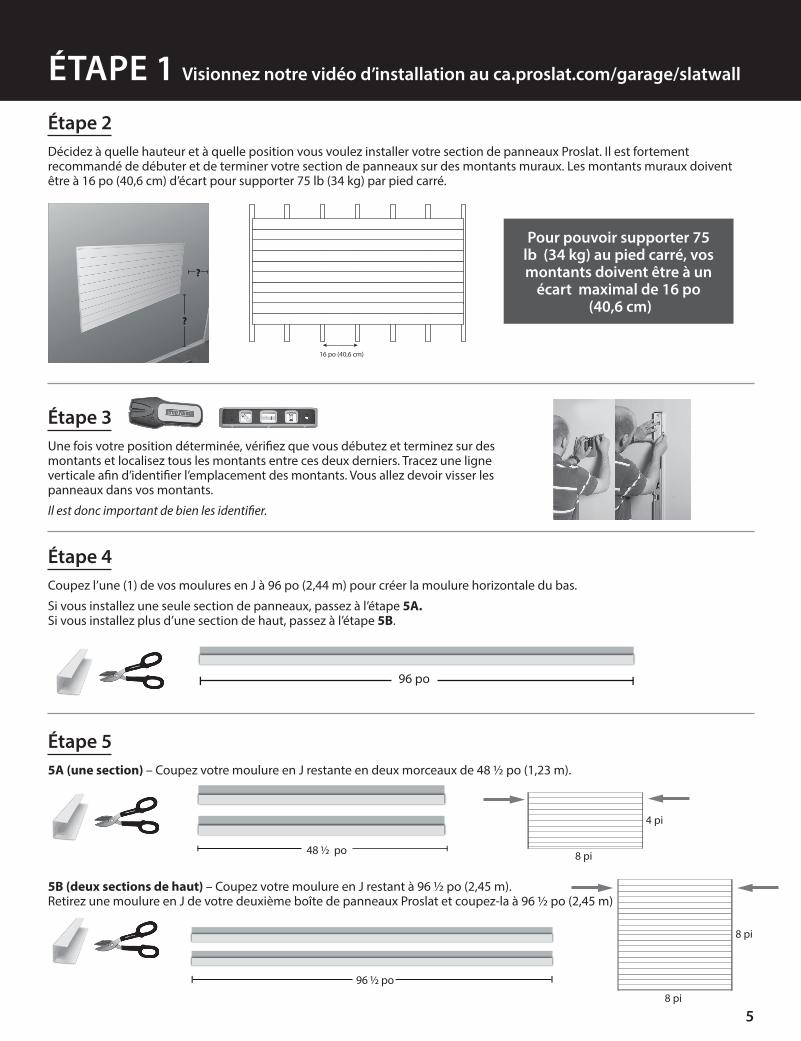
Étape 3Une fois votre position déterminée, vérifiez que vous débutez et terminez sur des montants et localisez tous les montants entre ces deux derniers. Tracez une ligne verticale afin d’identifier l’emplacement des montants. Vous allez devoir visser les panneaux dans vos montants.
Il est donc important de bien les identifier.
ÉTAPE 1 Visionnez notre vidéo d’installation au ca.proslat.com/garage/slatwall
Étape 55A (une section) – Coupez votre moulure en J restante en deux morceaux de 48 ½ po (1,23 m).
5B (deux sections de haut) – Coupez votre moulure en J restant à 96 ½ po (2,45 m). Retirez une moulure en J de votre deuxième boîte de panneaux Proslat et coupez-la à 96 ½ po (2,45 m)
Pour pouvoir supporter 75 lb (34 kg) au pied carré, vos montants doivent être à un
écart maximal de 16 po (40,6 cm)
Étape 4Coupez l’une (1) de vos moulures en J à 96 po (2,44 m) pour créer la moulure horizontale du bas.
Si vous installez une seule section de panneaux, passez à l’étape 5A. Si vous installez plus d’une section de haut, passez à l’étape 5B.
Étape 2Décidez à quelle hauteur et à quelle position vous voulez installer votre section de panneaux Proslat. Il est fortement recommandé de débuter et de terminer votre section de panneaux sur des montants muraux. Les montants muraux doivent être à 16 po (40,6 cm) d’écart pour supporter 75 lb (34 kg) par pied carré.
?
?
16 po (40,6 cm)
96 po
96 ½ po
48 ½ po
4 pi
8 pi
8 pi
8 pi

6
Étape 6Pour cette étape, il est préférable d’avoir l’aide d’une deuxième personne. Installez votre moulure en J du bas à la hauteur de départ désirée (le côté le plus large vers le mur), nivelez et vissez dans les cinq montants centraux. Ne pas visser dans le premier et dernier montant.
Étape 7Superposez vos moulures verticales avec votre moulure du bas et vissez au travers les deux. Nivelez vos moulures verticales et installez une vis dans le haut de chacune pour les faire tenir en place*. Lors de l’installation des panneaux, des vis traverseront vos moulures verticales, ce qui les fera tenir en place.
Étape 8Afin d’installer le premier panneau, insérez une extrémité de votre panneau (gauche ou droit) dans la moulure en J verticale et courbez légèrement le panneau pour l’insérer dans l’autre moulure en J verticale. Assurez-vous que votre panneau est bien assis dans la moulure en J du bas. Vissez dans la cavité supérieure du panneau dans chaque montant (16 po/40,6 cm d’écart) . Les vis aux extrémités du panneau doivent traverser le panneau, la moulure en J et le montant mural. Ceci tiendra vos moulures en J au mur.
x 5
x 4
TOP VIEW
x 7
Étape 9Emboîtez une extrémité de votre panneau dans le précédent. Insérez-le dans l’une de vos moulures en J verticales, courbez votre panneau et insérez-le dans la moulure opposée. Avant de visser, appuyez légèrement sur le panneau pour vous assurez qu’il soit emboîté correctement. Assurez-vous que vous vissez chaque panneau dans tous les montants.
Répétez jusqu’à ce que votre section soit terminée.
Des panneaux emboîtés correctement cacheront les vis du panneau précédent.
x 63 x 9Correctement emboîté
face
dos (au mur) 96 po
*Les vis installées dans le haut des moulures verticales devront être retirées pour compléter l’installation des derniers panneaux.
x 2

7
Correctement emboîté
Étape 10Installez votre moulure en L du haut en la clippant simplement à la lisière du dessus de la cavité supérieur du panneau. Si vous avez fait un mur complet et que vous avez eu à couper le haut de votre dernier panneau, vous aurez besoin de silicone pour installer votre moulure en L.
INSTALLATION DE PLUS DE 8 pi (2,4 m) DE LARGE
Certains ensemble contiennent une moulure en J et en L supplémentaire pour installer vos panneaux dans une configuration de 2 x 16 pi.
Si vous installez plus d’une section de 8-pi (2.4m) de panneaux Proslat de large, utilisez deux (2) moulures en J dos à dos pour camoufler le joint.
Vous pouvez aussi commander des moulures en H sur notre site web.
Coupe du panneau du hautSi vous avez installé un mur complet et que vous avez à couper votre panneau du haut par manque d’espace, vous allez avoir besoin d’utiliser du silicone pour installer votre moulure.
section 1 section 2
INSTALLATION SUR DU CIMENT OU MUR DE BLOC
Si vos murs sont faits de ciment ou de blocs, vous aurez besoin d’installer des montants de 2 x 3 po (verticalement) en utilisant des vis à ciment pour ensuite installer votre Proslat sur les montants.
Notre produit est conçu pour supporter 75 lb (34 kg) par pied carré lorsqu’il
est installé sur des montants à 16 po d’écart. Si vos montants sont à un plus
grand écart, veuillez appliquer de l’adhésif au derrière de vos panneaux.
MONTANTS À PLUS DE 16 PO D’ÉCART
SI VOUS AVEZ DES QUESTIONS SUITE À LA LECTURE DE CES INSTRUCTIONS
Appelez notre service à la clientèle1.888.691.2944
Du lundi au vendredi8 h à 17 h HNE
VISITEZ PROSLAT.COM
FOIRE AUX QUESTIONSINSTALLATION SUR
MONTANTS EN MÉTAL
Si vous avez des clous métalliques, l’installation est la même. Assurez-vous d’utiliser des vis autotaraudeuses au lieu de vis à bois.
8
Proslat PVC panels warranty
This document details the Solutions Murales Proslat Inc Warranty for all new Proslat Panels purchased anywhere in North America. This Lifetime Warranty extends only to the first retail purchaser of the wall panel. Lifetime Warranty. Solutions Murales Proslat Inc (hereafter Proslat) warrants its wall panels against defects in material or workmanship for a lifetime period. Proslat will replace any defective panel as long as it was installed and maintained according to the printed instructions. Any Proslat panel replaced under the terms of the Lifetime Warranty inherits the remaining warranty period from the original purchase. Exclusions. The Proslat Warranty does not cover the following: - Damage that results from improper installation or misuse or abuse; – Damage due to acts of God, fire, or accident; – Damage created by non-Proslat accessories such as hooks, baskets, cabinets and shelving; - Damage that results from loading accessories beyond the stated maximum weight capacity; – The cost of labor or accessory materials; and shipping cost to return defective products. Limitations of Warranty. The above Lifetime Warranty is the exclusive warranty for Proslat Panels. Proslat disclaims all other warranties, express or implied, including any implied warranties or merchantability, fitness for particular purpose or otherwise. If you live in an area where consumer law prohibits this disclaimer, the above Lifetime Warranty will not extend the time period of any such implied warranty. Obtaining Lifetime Warranty Service. For warranty service, call 1.888.691.2944. You will need your original proof of purchase and photos to illustrate the claimed defect.
DISCLAIMER OF LIABILITY
Solutions Murales Proslat Inc. and its successors, distributors and dealers (hereafter SELLER) shall in no way be responsible for the product’s proper use and service. THE BUYER HEREBY WAIVES ALL LIABILITY CLAIMS. The BUYER acknowledges that he/she is not relying on the SELLER’s skill or judgment to select or furnish goods suitable for any particular purpose and that there are no liabilities which extend beyond the description on the face hereof and the BUYER hereby waives all remedies or liabilities, expressed or implied, arising by law or otherwise, (including without any obligations of the SELLER with respect to merchantability and consequential damages) or whether or not occasioned by the SELLER’s negligence. The SELLER disclaims any warranty and expressly disclaims any liability for personal injury or damages. The BUYER acknowledges and agrees that the disclaimer of any liability for personal injury is a material term for this agreement and the BUYER agrees to indemnify the SELLER and to hold the SELLER harmless from any claim related to the item of the equipment purchased. Under no circumstances will the SELLER be liable for any damages or expenses by reason of use or sale of any such equipment. The SELLER assumes no liability regarding the improper installation or misapplication of its products. It is the installer’s responsibility to check for proper installation and if in doubt, contact the manufacturer. These assembly guidelines will direct you through the process of assembling a section of Solutions Murales Proslat Inc product. Please keep in mind that they may not cover every assembly or installation scenario you may encounter. Since each installation is unique in its performance requirements, the ultimate installation method used is the sole responsibility of the installer. Proslat Inc. disclaims any liability or responsibility for the improper installation of this product. The purchaser is solely responsible for compliance with applicable local codes. Solutions Murales Proslat Inc. recommends that all designs be reviewed by a licensed architect, engineer or local building official before installation.
Panneaux de PVC
Nous garantissons nos panneaux de PVC contre tout défaut de matériau et de fabrication aussi longtemps que l’acheteur initial est propriétaire et utilisateur du produit. Cette garantie ne couvre pas les frais et les coûts associés à l’installation, le démontage et/ou le transport relié au retour des panneaux pour fin de garantie.
Cette garantie est valide seulement si la capacité maximale de 75 lb (34 kg) par pied carré du panneau est respectée. Le client, distributeur et/ou l’installateur s’engage à ne pas tenir PROSLAT responsable en cas d’une réclamation concernant les panneaux si le poids a dépassé la capacité maximale de celui-ci ou que l’installation n’a pas été effectuée selon les instructions du fabricant. Les panneaux DOIVENT ÊTRE installés selon les instructions.
Cette garantie ne couvre pas la corrosion, la décoloration de la peinture ou autres problèmes reliés à un mauvais usage, un mauvais traitement, une installation non-conforme ou une modification du concept original.
Pour réclamer votre garantie, téléphonez-nous au 1-888-691-2944 (450-691-2944). Vous aurez besoin d’une preuve originale d’achat ainsi que des photos illustrant les défauts réclamés.
LIMITATION DE RESPONSABILITÉ
Proslat Inc. et ses successeurs, distributeurs, et revendeurs (dans l’avenir VENDEUR) ne doivent en aucun cas être responsables pour l’utilisation et le service de ce produit. L’ACHETEUR décline toute réclamations en responsabilité. L’ACHETEUR reconnaît qu’il/elle ne se fonde pas sur la compétence ou le jugement du vendeur pour sélectionner ou fournir des biens appropriés à un usage particulier et qu’il n’y a pas de responsabilités qui s’étendent au-delà de la description de garantie et l’acheteur renonce par la présente tous les recours ou responsabilités, explicite ou implicite, découlant de la loi ou autrement, (y compris, sans aucune obligation du VENDEUR par rapport à la qualité marchande et les dommages indirects) ou si occasionné par la négligence du vendeur ou pas. Le vendeur décline de manière explicite ou implicite toute garantie et responsabilité pour les dommages corporels. L’ACHETEUR reconnaît et accepte que l’exclusion de toute responsabilité pour les dommages corporels est une condition importante de cet accord et il s’engage à indemniser et soustraire le vendeur de toute réclamation liée à l’élément de l’équipement acheté. En aucun cas, le vendeur ne sera responsable d’aucun dommage ou frais en raison de l’utilisation ou de la vente d’un tel équipement. Le VENDEUR n’assume aucune responsabilité quant à la mauvaise installation ou utilisation de ses produits. Il est de la responsabilité de l’installateur de vérifier la bonne installation et en cas de doute, contacter le fabricant. Ces instructions d’assemblage vous dirigeront à travers du processus d’assemblage d’un produit Proslat Inc. S’il vous plaît gardez à l’esprit qu’ils ne peuvent pas couvrir l’assemblage ou l’installation de tous les scénarios que vous pourriez rencontrer. Comme chaque installation est unique dans ses exigences de performance, la méthode originale d’installation utilisée est de la seule responsabilité de l’installateur. Proslat Inc. décline toute responsabilité pour la mauvaise installation de ce produit. L’acheteur est seul responsable du respect des réglementations locales en vigueur. Proslat Inc. recommande que tous les modèles soient examinés par un architecte, un ingénieur ou responsable local avant l’installation.