
PROJECT - Janome · Place 12½” block right side up. Next, lay piping along top edge of the...
4
Janome - AOTM Project - November 2019 1 Accessory of the Month November 2019 PROJECT Throw Cushion Overlocker Piping Foot WHAT YOU WILL NEED Janome Overlocker (we used AirThread 2000D) Janome Needles #14 ballpoint needles Janome Overlocker Piping foot 3/16” 4 x Overlocking Threads 1 x Decorave thread (for rolled hem) Scissors or thread snips Fabric marking pen or chalk pen Cung Mat, Rotary cuer and Quilt ruler Quilng clips Ironing board and iron Template (included on last page of instrucons) FABRIC & NOTIONS (makes 1 cushion) 3½ metres x 1/8” piping cord Fabric 1 - Blue 60cm x fabric width (112cm) Fabric 2 - Floral ½ Mtre (50cm) x fabric width (112cm) Fabric 3 - Deep blue (piping fabric) ½Mtre (50cm) x fabric width (112cm) Backing fabric ½ Mtre (50cm) x fabric width (112cm) Cushion insert 14” + 1 x self covered buon 25mm/1” CUTTING INSTRUCTIONS 3 x 42” (107cm) length of 1/8” piping cord Fabric 1 - Blue 1 x 12.5” square main panel 1 x 2¾” strip cut the fabric width 1 x 2½” strip cut the fabric width Scrap to cover buon for rosee Fabric 2 - Floral 1 x 2½” strip cut the fabric width 1 x 2¾” strip cut the fabric width 1 x 4½” strip x 10” long 1 x 3½” strip cut the fabric width (Rosee) Fabric 3 - Deep blue (piping fabric) 3 x 1” strip cut the fabric width 2 x 1¼” strip cut the fabric width (Borders) Backing fabric Only cut when cushion front secon is complete - Step 12 INSTRUCTIONS Step 1 Cut fabric pieces according to requirements list using rotary cuer and quilters ruler. The last page of these instrucons is a template of the piping and fabric layout we used. Step 2 Seng up Overlocker Set the machine up for 4 thread overlocking Standard overlocking sengs Stch length 3 Differenal feed 1 All tensions 3 Aach the piping foot 3/16” to overlocker Tip: When sewing this project ensure your fabric remains inside the blade, we are not trimming fabric edges as they are all cut straight for easy quick stching. This image shows the piping cord sing in the channel on the under side of the Overlocker Piping Foot.
Transcript of PROJECT - Janome · Place 12½” block right side up. Next, lay piping along top edge of the...

Janome - AOTM Project - November 2019 1
Accessory of the Month November 2019
PROJECT
Throw Cushion Overlocker Piping Foot
WHAT YOU WILL NEED
Janome Overlocker (we used AirThread 2000D)
Janome Needles #14 ballpoint needles
Janome Overlocker Piping foot 3/16”
4 x Overlocking Threads
1 x Decorative thread (for rolled hem)
Scissors or thread snips
Fabric marking pen or chalk pen
Cutting Mat, Rotary cutter and Quilt ruler
Quilting clips
Ironing board and iron
Template (included on last page of instructions)
FABRIC & NOTIONS (makes 1 cushion)
3½ metres x 1/8” piping cord
Fabric 1 - Blue 60cm x fabric width (112cm)
Fabric 2 - Floral ½ Mtre (50cm) x fabric width (112cm)
Fabric 3 - Deep blue (piping fabric)
½Mtre (50cm) x fabric width (112cm)
Backing fabric ½ Mtre (50cm) x fabric width (112cm)
Cushion insert 14” + 1 x self covered button 25mm/1”
CUTTING INSTRUCTIONS 3 x 42” (107cm) length of 1/8” piping cord
Fabric 1 - Blue 1 x 12.5” square main panel 1 x 2¾” strip cut the fabric width 1 x 2½” strip cut the fabric width Scrap to cover button for rosette
Fabric 2 - Floral 1 x 2½” strip cut the fabric width 1 x 2¾” strip cut the fabric width 1 x 4½” strip x 10” long 1 x 3½” strip cut the fabric width (Rosette)
Fabric 3 - Deep blue (piping fabric) 3 x 1” strip cut the fabric width 2 x 1¼” strip cut the fabric width (Borders)
Backing fabric Only cut when cushion front section is complete - Step 12
INSTRUCTIONS
Step 1
Cut fabric pieces according to requirements list using
rotary cutter and quilters ruler.
The last page of these instructions is a template of the
piping and fabric layout we used.
Step 2 Setting up Overlocker
Set the machine up for 4 thread overlocking
Standard overlocking settings
Stitch length 3 Differential feed 1 All tensions 3
Attach the piping foot 3/16” to overlocker
Tip: When sewing this project ensure your fabric remains
inside the blade, we are not trimming fabric edges as they
are all cut straight for easy quick stitching.
This image shows the
piping cord sitting in the
channel on the under side
of the Overlocker Piping
Foot.
Janome - AOTM Project - November 2019 2
Accessory of the Month August 2019
Step 3 Making the Piping
Place the piping in the middle of the 1” fabric strip
fold over use quilting clips to hold edges of fabric
together. Overlock the edges to create fabric
coated piping.
Tip: Stop and adjust the 1” fabric strip around the cord as
required, as the fabric may slip.
Step 4 Creating strips with piping inserted
Take the 2¾” fabric strips and piping.
Place the blue fabric right side up.
Lay piping on top matching edges.
Place 2¾” floral fabric on top, right side down.
Match edges and overlock the strip.
You are created a fabric sandwich with the piping in the
middle, all raw edges on the right.
Do the same with 2½” blue and floral strips of fabric.
You now have 2 strips that have piping in between.
One strip is approx. 5½” wide the other strip is 5” wide
Step 6
Trim the excess overhanging the main fabric block, to
align with the outer edge of the main fabric block.
Tip: You may have to unpick part of the overlocked edge on
the other end to allow for the other adjacent side to be
added. Refer to diagram below
Now repeat the process, with the remaining 5½” piped
strip and piping to the adjacent edge. See below image.
Trim any excess at end of main fabric block, when
sewn.
Below image has arrow showing overlocking stitch direction.
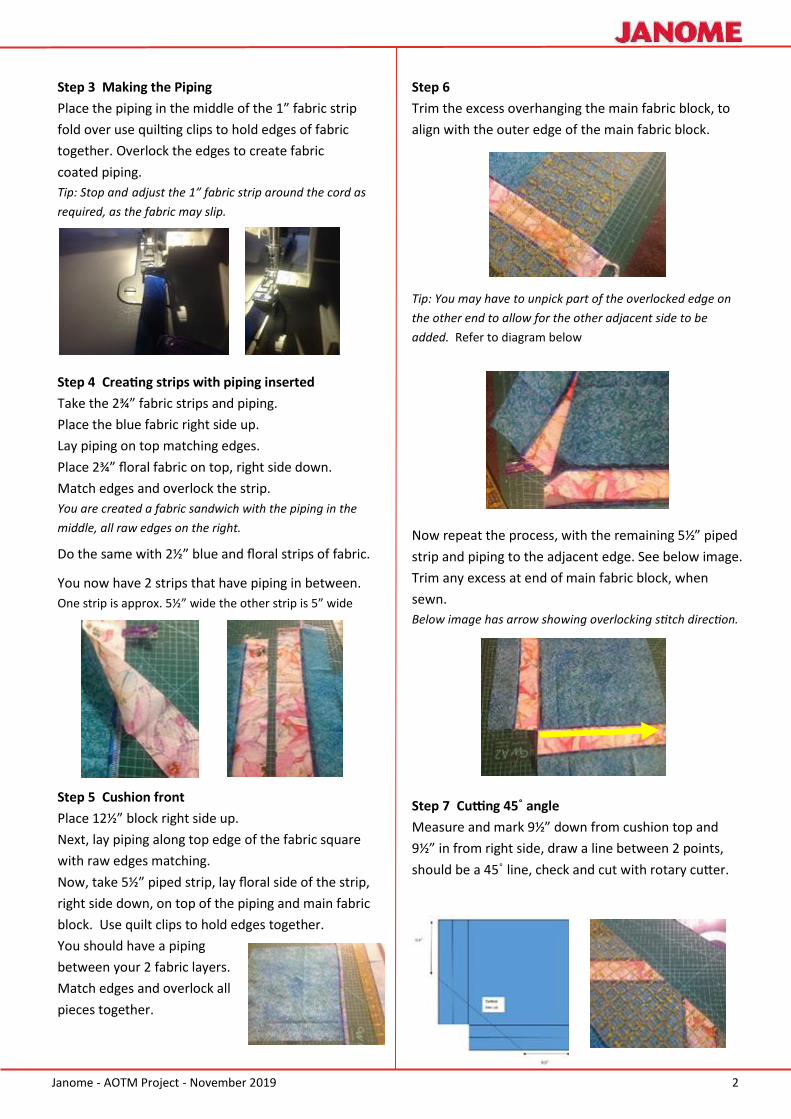
Step 7 Cutting 45˚ angle
Measure and mark 9½” down from cushion top and
9½” in from right side, draw a line between 2 points,
should be a 45˚ line, check and cut with rotary cutter.
Step 5 Cushion front
Place 12½” block right side up.
Next, lay piping along top edge of the fabric square
with raw edges matching.
Now, take 5½” piped strip, lay floral side of the strip,
right side down, on top of the piping and main fabric
block. Use quilt clips to hold edges together.
You should have a piping
between your 2 fabric layers.
Match edges and overlock all
pieces together.

Janome - AOTM Project - November 2019 3
Accessory of the Month August 2019
Step 8
Using the 5” piped strips and piping, place them on
the edge of the 45˚ angle cut. The floral side of the 5”
piping is on the seam line and the piping in between
the 2 fabric layers. Use quilt clips to hold together.
Overlock together.
Do not trim the access at this time, only piping, if
required.
Step 9
4½”x 10” strip, add to outer edge of angled piece just
added in previous step. Insert piping between 2
layers, hold all layers with quilt clips, overlock pieces
together. Trim back, so cushion front is a square.
Step 10 Adding borders
Change foot to standard
overlock foot.
Using the 2 x 1¼” strips
Overlock to each side of the
cushion top, one side at a
time. Trim, so cushion front
is square.
Tip: No need to trim off any
excess fabric while overlocking,
use needle plate edge as your fabric guide.
Step 11 Cushion back
Measure top to bottom of your cushion top. (approx. 18”)
Take backing fabric and cut a piece the width of the
fabric by the measurement of your cushion top.
From the selvedge measure in and cut a 12” piece.
From the other selvedge measure in 10” and cut.
Note: both cut pieces are
Height of cushion front x 12” (salvaged edge is the height)
Height of cushion front x 10” (salvaged edge is the height)
On the selvage edge, fold in 1” and press with the iron.
Then, fold over again so you have a 1” hem with the
selvage inside the fold . Press.
Tip: You can use two sided fusible interfacing to iron into
your hem to hold it closed.
Step 12
Lay you cushion front right side up.
Lay your cushion backs right side down on top of the
cushion front with the hemmed edges in the centre.
The 2 back pieces should overlap.
Quilt clip around the outer edges, then overlock around
all sides. When completed, turn through and press.
Step 13 Making the rosette
Change your overlocker to rolled hem
(refer to your overlocker instruction book for rolled hem settings)
Use decorative thread in the upper looper/overlocking
thread for right needle and lower looper.
Roll hem one edge of the 3” strip of floral fabric.
Step 14 Gathering
Set the machine up to 4 thread gathering.
Right and left needle tension 8, stitch length 5,
differential feed 1.5
Overlock gather the other edge of the rolled hem 3”
strip. To join the ends, set overlocker to 4 thread
overlock settings or you can use rolled hem. Rosette is
hand stitched onto cushion
Cover the self covered
button with blue scrap
fabric and hand stitch
to the centre of
rosette.
Finish.

Janome - AOTM Project - November 2019 4
IMAGES FOR LAYOUT AND CUTTING REFERENCE