


![Albertus Magnus. Opera omnia [Borgnet Ed.]. 1890. Volume 8.](https://static.fdocuments.us/doc/165x107/577d28e31a28ab4e1ea57d6a/albertus-magnus-opera-omnia-borgnet-ed-1890-volume-8.jpg)
Project IT PortfolioNPWP 1 HARI CAIR RIO 081282841114 Albertus Kelvin Email: [email protected]...
98
Transcript of Project IT PortfolioNPWP 1 HARI CAIR RIO 081282841114 Albertus Kelvin Email: [email protected]...

Albertus Kelvin Email: [email protected] Page 2
“miniZIPXX”, Compression and Decompression
Application
Working year : 2016
Type of project : Group project
Purpose of project : To create an application that can compress any files so that the file
delivery process can be more efficient with the lower file size.
Brief information : This project is named “miniZIPXX” where the compressed file will
have an extension “zipxx”. The file that will be compressed can be any
single file or multiple files. This project was created using C++ as the
programming language and Visual Studio as the IDE.
How it works :
01. User can choose the type of action that will be executed on the file, whether it is
compressing or decompressing.
02. If user choose compressing, then user will choose the file (single or multiple files)
and all of them will be displayed by the application for confirmation purpose. User
will also choose the destination directory for saving the compressed file.
Afterwards, user can start the compression by pressing button “Compress”.
Application will display the compression status in a table and progress bar. After the
compression process is finished, application will display information regarding the
value of entropi, the bit’s average, ratio, and the compression time required.
03. If user choose decompressing, then user will choose the compressed file (which
have “zipxx” as its extension) and the destination directory for saving the
decompressed file. User can start the decompression process by pressing button
“Decompress”. Application will display the status of decompression in a table and
the time required to decompress the files.

Albertus Kelvin Email: [email protected] Page 4
“SAIMemo”, A Cloud Storage Application
Working year : 2016
Type of project : Individual
Purpose of project : To create a cloud storage which allows users to do any basic
processes towards their files, such as uploading, downloading,
creating a new folder, removing file, etc. All saved files can be
accessed again even when the user has already logged out.
Information : This cloud storage is named “SAIMemo”. Here are the features it has
and the brief explanation about them.
General information:
Programming Tools:
- PHP Framework: Codeigniter - Bootstrap - jQuery - HTML, CSS, and Javascript
Features Feature details Brief explanation
User authentication
Login
• There is service called Forgot password which is used to retrieve a new password for the user
• The user will be given a unique token which can be used to change the password.
o The token has limited time as it will be the validation checker
o The token will be sent to the user’s email
Register There are 2 stage of registration for creating a
new account:

Albertus Kelvin Email: [email protected] Page 5
• First stage o The user enters his/her first and
last name
o The user enters an email address
which also becomes his/her
username
o The user will received a unique
token that can be used to
proceed to the next stage
▪ The token has limited
time as its validation
checker
▪ The token will be sent to
the user’s email
o The user’s status at this stage is
pending
• Second stage
o The user enters his/her
password and then confirms it
▪ Only the valid token can
access this step
o The user’s status at this stage is
approved o The user’s role after
successfully creating a new
account is subscriber
Superadmin
&
Admin
Superadmin The very first user to be in the cloud.
Capabilities:
• Choosing admin • Adding and removing any
subscribers • Editing user’s profile (username and
password). The included users are superadmin, admin, and subscriber
• Seeing the activities of admin and subscriber (monitoring activities)
• Specifying the location to save the files
• Promoting any users to become an admin

Albertus Kelvin Email: [email protected] Page 6
• Demoting any users from their role as an admin
Admin • Determined by superadmin • Capabilities:
o Adding and removing subscribers
o Editing user’s profile (username and password). The included users are superadmin, admin, and subscriber
o Seeing the activities of subscribers
o Specifying the location to save the files
o Promoting subscribers to become an admin
o Demoting subscribers from their role as an admin
Subscriber
Status: pending Can not access SAIMemo if they haven’t
created any password yet at the second
stage
Status: approved • Subscriber can access SAIMemo • If there is not any promotion done by
superadmin or admin, then the role is subscriber
• If there is any promotion done by superadmin or admin, then the role is admin
• Capabilities: o Editing profiles (username
and password) o Creating new folders o Uploading files o Downloading files o Removing files o Doing a sorting towards saved
file based on the file name, modified time, and file size
Session - SAIMemo uses session to keep the

Albertus Kelvin Email: [email protected] Page 7
Log activity
- • Only can be accessed by superadmin and admin
• Displays all logged activities (histories) that were committed towards SAIMemo and also the activities time. The examples of activities:
o Login and registration actions o Profile modifications o Creation of new folders o Uploading, downloading,
removing, etc • The logged activities can also be
sorted
Project display:
01.First display of SAIMemo. The user can choose button “Explore” to login or create a new
account. The user can also choose the arrow button to see all explanations about the application.
Image 1
synchronization among the main page,
authentication, and user page

Albertus Kelvin Email: [email protected] Page 8
02.Part that explains what SAIMemo is
Image 2
03.Part that explains how to use SAIMemo
Image 3

Albertus Kelvin Email: [email protected] Page 9
Image 4
04. User authentication page: Login and registration
Image 5

Albertus Kelvin Email: [email protected] Page 10
05.Reset password
Image 6
06.Main page for superadmin and admin (the same for subscriber except for one feature,
namely Admin Panel)
Image 7

Albertus Kelvin Email: [email protected] Page 11
Page inside superadmin00 directory
Image 8
Page inside superadmin00/super00/ directory
Image 9

Albertus Kelvin Email: [email protected] Page 12
07.Main page for Admin Panel
07a. The contents of the menu Users that displays the list of username from all the SAIMemo’s
users. The promoting action is done by choosing the green upward arrow option. The action for
editing profile is done by choosing the blue pencil option. The action for removing users is done by
choosing the red garbage option. And the action for adding user is done by choosing the + Add User
option below the list.
Image 10
07b. The contents of the menu Settings that displays the file configuration, including the storage
location, allowed file extension, overwrite action, and the maximum size of uploaded file.
Image 11

Albertus Kelvin Email: [email protected] Page 13
07c. The contents of the menu Logs that displays the history of activities done by all users. The
information displayed are user ID, session type where the action is done (it will be cloud if the
session is all about the user page, and it will be auth if the session is all about the user
authentication), action type, modified elements (the name of created folders, uploaded,
downloaded, or removed files, and also the username of the user who logged in or logged out, or it
also can be the user who was promoted, demoted, etc) and the time of action.
Image 12
08. Main page of edit profile for superadmin and admin (the same for subscriber except for
one feature, namely Admin Panel)
Image 13

Albertus Kelvin Email: [email protected] Page 14
“SPAMDetection100”, Short Message Service SPAM
Detector
Working year : 2016
Type of project : Individual
Purpose of project : To create an application that can detect SPAM. This application
will be receiving input of Short Message Service (SMS) text and then determining whether
that SMS is categorized as SPAM or not.
Keterangan : This application is named SPAMDetection100. Here are several information
about it.
Programming Tools : Java + GUI
Development environment : IDE NetBeans
Algorithm scope : Machine Learning
For this application uses machine learning, then it needs a data set and data train. The
language used for the data train is Bahasa Indonesia.
Other information:
Algorithm/ Classifier: NaiveBayes
Evaluation method: 4-fold cross-validation
Predicted class: SPAM or BUKAN_SPAM (in Bahasa Indonesia) => SPAM or NOT SPAM
Name of data set relation: my_sms
Attributes: spamclass which contains SPAM and BUKAN_SPAM; text which holds String as
its data type
Data train format (@data): [SPAM/BUKAN_SPAM],[TEXT] -> without []
Number of data train: 256 (spam 97; bukan-spam 159)

Albertus Kelvin Email: [email protected] Page 15
How it works in general way:
- Application consists of two parts, namely Model Learning and SPAM Detection
- Model Learning creates a model from the data train that will be used by SPAM Detection
- SPAM Detection specifies the category of a text whether it is a SPAM or not based on the created
model
Project display:
01.The learning process and model creation by the specified classifier
The user will be directed towards the SPAMDetection page after clicking button “Test
Input”. The following are some examples to test the program validity.

Albertus Kelvin Email: [email protected] Page 16
Test 0
Input text: AYO! Menangkan hadiah jutaan rupiahhh langsung aja HUB.0819182378483 sk
berlaku! DIJAMIN PUASSSSSS!!!
Test 1
Input text: Masalah Keuangan? Bunga 0.9% Agunan BPKB Mobil/Truk/Bus Syarat Ringan
KTP+NPWP 1 HARI CAIR RIO 081282841114

Albertus Kelvin Email: [email protected] Page 17
Test 2
Input text: Anda sering sakit2an? Sering khawatir? BEROBATLAH KE PARANORMAL KI
GENDENG di daerah Gn. Sentosa. Hubungi 081283739283 utk ALAMAT JELASNYA.
DIJAMIN SEMUA PENYAKIT ANDA TEMBUSSSSS 1000%
Test 3
Input text: Slmt siang, maaf bu lewat sms. Ttg kontrakan THI kalo mau lanjut lgsg hubungi
adik saya aja ya di 081739282226 krn skrg dia yg urus. Thx.

Albertus Kelvin Email: [email protected] Page 18
Test 4
Input text: Sori cyn gw ud ada janji ketemuan jam 4 sore ntar. Lain kali aja gmn? Hehehe
Test 5
Input text: CONGRATZZZ BROOO!!! Semoga sukses terus ya startup baru nya :)))
MANTAP!!

Albertus Kelvin Email: [email protected] Page 19
Test 6
Input text: Penghasilan 30% perbulan duduk manis, dr modal anda. Tdk jualan tdk
rekrut2an! 350 rb member seindonesia! REVOLUSI EKONOMI ANDA MENJADI LBH BAIK
Add BB 5206B100
Test 7
Input text: [KUMPUL PERDANA] Hai guysss, jgn lupa ya bsk jam 19.00 di gedung CAS lt.1
kita bakalan kumpul bareng pertama kali :) Jgn lupa bw SEMANGAT nya. Konfirm di sini
yaaa. Thx!

Albertus Kelvin Email: [email protected] Page 20
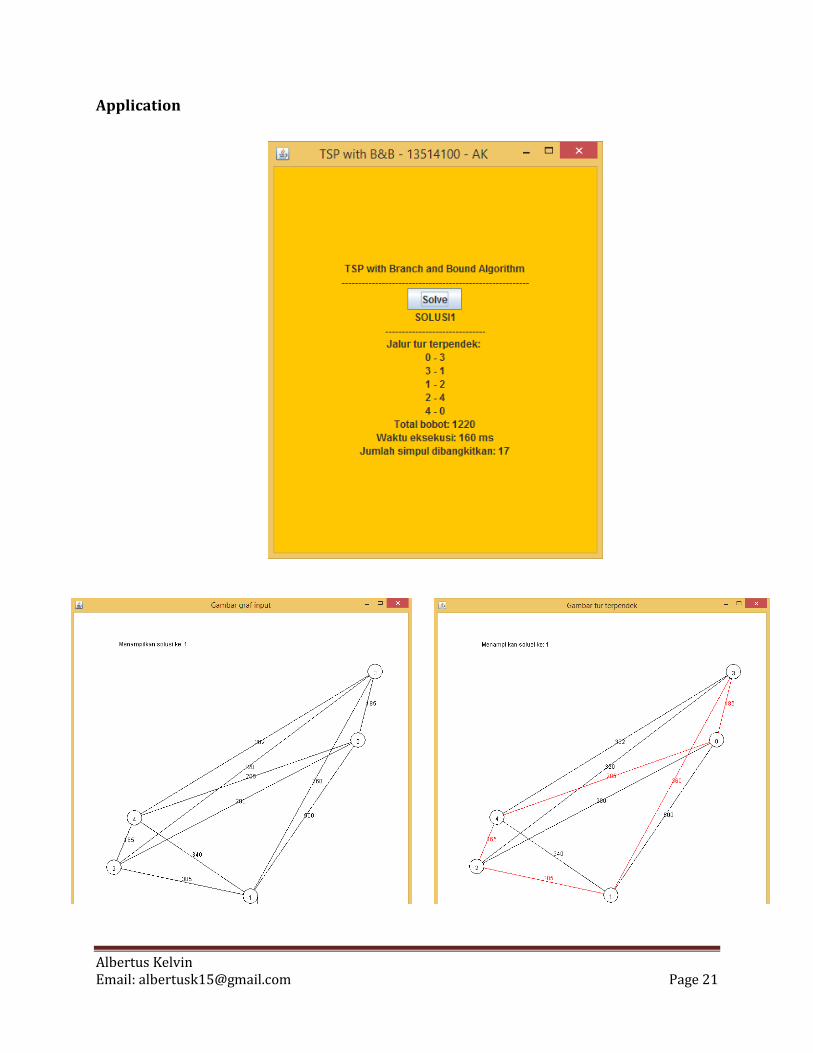
Searching for The Shortest Path with Branch and Bound
Algorithm
Working year : 2016
Type of project : Individual
Purpose of project : To create an application that can read matrix as an input where that
matrix shows the relation among all the dots in a graph. Application will be searching for
any solutions in the form of the shortest path that connects all the dots in that graph by
using Branch and Bound algorithm.
Information :
Programming Tools : Java + GUI
Project display :
01.Application receives an input file which contains a matrix that represents relation
among the dots in a certain graph. The relation is all about the distance or load between
two dots.
02.Then application will try to find any solutions in the form of the shortest path needed to
visit all dots in the graph. Moreover, application will give an image displaying the graph
with the solution path marked with a red color.
Here are some test case to test the validity of the application.
Test 0
Input file:
-1 500 200 185 205
500 -1 305 360 340
200 305 -1 320 165
185 360 320 -1 302
205 340 165 302 -1

Albertus Kelvin Email: [email protected] Page 22
Test 1
Input file:
-1 16 27 89 34 65 12 10
16 -1 56 78 32 16 64 32
27 56 -1 82 57 35 80 25
89 78 82 -1 34 51 19 47
34 32 57 34 -1 42 59 41
65 16 35 51 42 -1 76 82
12 64 80 19 59 76 -1 38
10 32 25 47 41 82 38 -1
Application

Albertus Kelvin Email: [email protected] Page 23
Test 2
Input file:
-1 1 2 3 4 5 6 7 8 9
1 -1 11 12 13 14 15 16 17 18
2 11 -1 21 22 23 24 25 26 27
3 12 21 -1 31 32 33 34 35 36
4 13 22 31 -1 41 42 43 44 45
5 14 23 32 41 -1 51 52 53 54
6 15 24 33 42 51 -1 61 62 63
7 16 25 34 43 52 61 -1 71 72
8 17 26 35 44 53 62 71 -1 81
9 18 27 36 45 54 63 72 81 -1

Albertus Kelvin Email: [email protected] Page 25
Hyper Sudoku Solver
Working project : 2016
Type of project : Individual
Purpose of project : To create an application that can find a solution from a Hyper
Sudoku
How it works in general way:
- When the application is executed, it will read the contents of an external file and fill the 9x9 Hyper
Sudoku small square with the values retrieved from the external file.
- The user only needs to press the button “Solve” which will give an order to the application to find
the solution
- The solution is marked with a red color
- The square of 3x3 which is amounted to 4 pieces will look different after the application is
executed
Test 0

Albertus Kelvin Email: [email protected] Page 28
LEGO Maze Solver Application with BFS and DFS
Working year : 2016
Type of project : Group
Purpose of project : To create an application using LEGO Mindstorms simulation
software where robot will find the way out from a maze. This
application implements BFS and DFS algorithm in finding the solution.
Information :
Programming tools : C language + ROBOTC for LEGO Mindstorms
This project implements BFS and DFS algorithm, where there are
two separate application, namely the first one which uses BFS
algorithm and the second one which uses DFS algorithm.
DEMO Video : Using BFS algorithm
https://www.youtube.com/watch?v=M2SjEteCZEM
Using DFS algorithm
https://www.youtube.com/watch?v=VWb1WbO0Pfk
How it works in general way :
1. Maze consists of important parts such as blue dot (indicates the start and
finish), red dot (indicates the dead end), green dot (indicates the branch),
and black line (indicates the robot motion path).
2. After the user clicking button “Start”, the robot will start to find the path to
the finishing point with BFS or DFS algorithm. During the search process, the
robot will memorize all path connecting the starting and finishing point. The
sequence of that memorized path includes the great angle selected by the
robot when it spins in place to find the next path.
3. After successfully finding the finishing point, the robot will go back to the
starting point with the memorized path. That memorized path is the solution
to the problem.

Albertus Kelvin Email: [email protected] Page 29
4. After successfully arriving at the starting point, the robot will go back to the
finishing point with the solution path. This procedure is the final step for this
maze solver.
Project display :
1. When the robot is in the branching point to detect all the existing branching points.
The value of red, green, and blue is an intensity value from RGB retrieved by the
robot when it detects the existing branching points.
Image 1

Albertus Kelvin Email: [email protected] Page 30
2. Overall appearance of the maze
Image 2
3. When the robot is moving on the black line.
Image 3

Albertus Kelvin Email: [email protected] Page 31
OpenGLPro100 Application
Working year : 2016
Type of project : Individual
Purpose of project : To create a simple game application using OpenGL
Information :
Programming tools : C++ programming language and IDE Visual Studio 2013
Operating system : Windows
DEMO Video : https://www.youtube.com/watch?v=NPggBSrDQzo
How it works and description:
Description
Introduction
This application is named OpenGLPro100. The basic concept for this application is contained in a simple game concept, where the player will be given limited time (12 secs) to achieve the total point more than or equals to a certain value. That certain value comes from a simple calculation, namely the number of objects appeared in the game multiplied by 3, where 3 is a load for every object. The objects available in this application is divided into two parts, namely the objects that generated by user request and the objects that generated by the application. The objects from user request can be circles, squares, and octagons. Whereas the objects from application can be straight and dotted lines, rectangles, and squares. Another fact is that the objects in this application has their own name, such as we can call rectangle as box reflector, then the straight and dotted line can also be referred as border line and the square is referred by game text box.
How it works in general way
The player must exceed the certain value in 12 secs to be a winner. The initial point is 0. To increase the point, the player must reflect the objects with the box reflector where the speed of objects will be increased during the game. If the reflection is successfully done, then the player’s point will be increased by 3. Otherwise, the player’s point will be decreased by 1. The game ends with the status YOU WIN or YOU LOSE and displays the total point achieved by the player.

Albertus Kelvin Email: [email protected] Page 32
Objects
- User generated: circle, square, octagon - Apps generated: straight and dotted line, rectangle, and square
Object coloring system
At the beginning of the game, the player will be given the option to choose one coloring system, namely random system (apps generated) or manual (user generated). If the player choose random, then each object will be marked with random RGB code. Otherwise, every object will be marked with the RGB code chosen by the player. The valid RGB code for this application is from 0 till 1, where the value of R, G, and B should not be all equal to 0 or 1.
Animation
- Bouncing • All the user generated objects will bounce if strike the left, right, and bottom of
the application window • All the user generated objects will bounce if strike the box reflector and border
line, either from the top or bottom of the border line • All the user generated objects will bounce if collide with another user generated
objects • The border lines can bounce in the opposite direction based on the x-axis if
strike the left and right side of the application window • The bounces generated by user generated objects will increase the speed of that
object - Translation
• The box reflector can move to the left and right based on the x-axis, where the y-axis is fixed
• The border line can move to the left and right based on the x-axis, where the direction is changed when there is a collision with the application window
- Rotation • The game text box can rotate in place
- Free style • All the user generated objects can move based on x-axis or y-axis simultaneously • The speed of user generated objects will be increased during the game
- Resize • The size of some user generated object like circle and square can be changed to
be bigger or smaller

Albertus Kelvin Email: [email protected] Page 33
Interaction with the player
- Mouse • The player can give input from mouse in the form of one click to pause and
resume the game - Keyboard
• The button KEY LEFT is used to drive the box reflector to the left side • The button KEY RIGHT is used to drive the box reflector to the right side • The button PAGE UP is used to increase the size of circle and square • The button PAGE DOWN is used to decrease the size of circle and square • The button F1 is used to change the window mode to full screen or windowed • The button ESC is used to exit the application
Project display :
1. When the application is executed, there are some instructions about the required
total point, keyboard button and mouse click that can be used during the game

Albertus Kelvin Email: [email protected] Page 34
2. In case of the player is requesting for 1 square, 2 circles, and 1 octagon, the
minimum total point that must be achieved is 12. As we can see, the current total
point is 66 and the remaining time is 6.12 secs

Albertus Kelvin Email: [email protected] Page 35
3. When the player presses button PAGE UP to increase the size of circle and square

Albertus Kelvin Email: [email protected] Page 36
4. When the game is finished and the total point acquired by the player is 95. The final
status of the game is YOU WIN
To see the game process with more details, please visit the demo video:
https://www.youtube.com/watch?v=NPggBSrDQzo

Albertus Kelvin Email: [email protected] Page 37
Sentiment Analysis coupled with Semantic Analysis
Application
Working year : 2016
Type of project : Individual
Purpose of project : To create an application that analyzes any tweets from Twitter’s
users. The analysis includes sentiment (positive or negative) and
semantic (context of tweet)
Information :
Application name : SaiTweet
Programming language : Java Server Pages (servlet), HTML, CSS, Javascript
Framework : AngularJS
Other tools : WEKA
How it works in general way :
1. The user can choose one from three search categories, namely hashtag, keyword,
and account
2. The user gives a query based on the selected category
3. The application fetches data from Twitter by using Twitter API and then display
them in the dashboard area
4. The user can see a brief explanation about the tweets along with its analysis result
which is done by the application. This can be done by accessing option show details
and show analysis
5. To see the analysis with more details, the user can go into the SENTIMENT area to
see the sentiment analysis, and into the SEMANTIC area to see the semantic analysis

Albertus Kelvin Email: [email protected] Page 38
Project display:
1. Main page
2. Dashboard page shows the retrieved tweets from Twitter along with their
details and brief analysis result

Albertus Kelvin Email: [email protected] Page 39
3. SENTIMENT area shows the details of the sentiment analysis

Albertus Kelvin Email: [email protected] Page 40
4. SEMANTIC area shows the details of the semantic analysis
5. Visual page shows the distribution of the sentiment analysis

Albertus Kelvin Email: [email protected] Page 41
“SaleProject”, A Web Based Marketplace Application
Working year : 2016
Type of project : Group
Purpose of project : To create a web based marketplace application that enables a user to
buy and sell products. To use this application, the user must be logged
in first. The user can buy and sell with the same account.
Information :
Application name : SaleProject
Programming language : Front-end: HTML, CSS, Javascript
Back-end: PHP
Database: MySQL
Specification:
1. Login

Albertus Kelvin Email: [email protected] Page 42
This is the first page that will be loaded when the user visits the website.
2. Registration
The user can register to create a new account. The valid username and email is that
they have not been registered yet before. After successfully creating the account, the
user will be directed to the catalog page.

Albertus Kelvin Email: [email protected] Page 43
3. Catalog
This page will be displayed after the user logged in successfully. Catalog shows all
the products sold by all the users. The products is displayed based on their sold time (the
newest will be on the top).
There is also a search bar so that the user can find certain products based on their
username (store) or product’s name.
Moreover, there is also an information that shows the number of LIKES and
PURCHASES for the product. The user can give a LIKE just by clicking the option LIKE, or
they also can BUY the product by clicking the option BUY. The LIKE functionality
implements AJAX so that the page does not refresh when the user clicks on the option LIKE.
After the user clicking the option, it will be changed into LIKED and marked with red color.
The application will also increment the LIKE number by one.

Albertus Kelvin Email: [email protected] Page 44
When the user choose option BUY, he/she will be directed into the confirmation
purchase page.

Albertus Kelvin Email: [email protected] Page 46
5. Your Products
It lists all the user’s sold products. The user can edit or remove the product.

Albertus Kelvin Email: [email protected] Page 47
6. Add Product
The user can add products to be sold.
The application will redirect the user into the Your Products page after the user
submitting the request.

Albertus Kelvin Email: [email protected] Page 48
7. Edit Product
The user can change the information of the product.
The application will redirect the user into the Your Products page after the user
submitting the request.

Albertus Kelvin Email: [email protected] Page 49
8. Sales
This page shows the history of the sales done by the corresponding user.
If the products was edited or removed, then it will not give any effects to the history.

Albertus Kelvin Email: [email protected] Page 50
9. Purchases
This page shows the history of the purchases done by the corresponding user.
If the products was edited or removed, then it will not give any effects to the history.

Albertus Kelvin Email: [email protected] Page 51
Web Based Lectures Scheduling Application
Working year : 2016
Type of project : Group
Purpose of project : To create an application that can arrange a schedule for lectures
based on the given information, including the lectures start and finish
time, lectures room, lectures day, rooms time and rooms day. These
information will be stored in an external file and the application will
read them and create the best schedule with the minimum number of
time collision.
Information :
Programming language : Front end -> HTML, CSS, Javascript
Back end -> Java (JSP, Servlet)
IDE : Eclipse
How it works in general way:
1. The application will receive an input file containing the information about the
lectures slot (time and room) and the rooms slot (time)
2. The application will give three algorithms which will be chosen by the user, namely
Hill Climbing, Simulated Annealing, and Genetic Algorithm
3. The application will create the best schedule based on the chosen algorithm. It will
also display the number of colliding schedule and the percentage of effectiveness for
the usage of the room

Albertus Kelvin Email: [email protected] Page 52
Project display:
1. Browse the file
2. Choose the algorithm

Albertus Kelvin Email: [email protected] Page 53
3. The generated schedule
Algorithm: Hill Climbing
The user can choose another algorithm

Albertus Kelvin Email: [email protected] Page 54
Algorithm: Simulated Annealing
Algorithm: Genetic Algorithm
Albertus Kelvin Email: [email protected] Page 55
“SayHI”, A Simple Chat Application using Java
Working year : 2016
Type of project : Individual
Purpose of project : To create a simple chat application using socket programming in
Java. The flow of the system functionality is similar like another chat
application, such as storing the conversations in a database and
retrieving them back when the user is logged in, storing the end to
end conversations in a database, adding new friends, removing
friends, etc.
Information :
Programming language : Java + GUI
IDE : NetBeans
How it works in general way:
1. There are two types of users, namely admin and subscriber. The admin and
subscriber can be more than one person. The admin can specify the host name and
the listening port so that the server can receive connection requests from clients.
2. The subscriber must insert their username and password in order to use this
application.
3. Once successfully logged in, the subscriber will be directed to the main page
displaying the list of subscribers, the chat history, and the controlling options.
4. The subscriber can create a conversation to another subscriber by selecting the chat
history (if any) or the targeted subscriber. They also can manipulate the chat data
with the controlling options.

Albertus Kelvin Email: [email protected] Page 56
Project display:
1. Admin main page
2. Subscriber authentication

Albertus Kelvin Email: [email protected] Page 57
3. Subscriber main page (logged in as hello123 and another registered subscribers in
the database are myjava and firstchat)
4. When selecting the chat history between hello123 and firstchat

Albertus Kelvin Email: [email protected] Page 58
5. Selecting a global friend (highlighted) to be added into the friends list. It can be done
just by clicking button Add in the Global friends control frame
And the result is…

Albertus Kelvin Email: [email protected] Page 59
6. Removing chat history by using Delete option from Chat’s history control. As an
example we will remove the chat from myjava (highlighted)
And the result is…

Albertus Kelvin Email: [email protected] Page 61
“TAS”, An Automatic Scheduler for Final Project
Presentation
Working year : 2016
Type of project : Group
Purpose of project : To create an application that can generate a schedule for final project
presentation. This application can help the final project team to build
an optimum schedule easily as they just give all initial information
related to the lecturers, students, and rooms to the system and they
will get the schedule.
Information :
Programming language : DHTMLX, CSS, Javascript
Library : jQuery
How it works in general way:
1. There are 4 (four) types of user, namely students, lecturers, final project team, and
faculty administrator. Each of them has different access level.
2. For students, they only can view their presentation schedule.
3. For lecturers, they can view the whole schedule for presentation, their individual
schedule, their schedule for supervising students, and their schedule for examining
students. They can also make an entry for their available schedule. Moreover, they
also can send a request to the system to change the presentation schedule in case of
they can not attend the arranged schedule.
4. For final project team, they can view the list of supervisor, examiner, and students
presenting their final project.
5. For faculty administrator, they can input the lecturers information (supervisors and
examiners), all students who will be attending the presentation. Moreover, they can
also change the presentation’s room and schedule.
6. Besides the access level, this application also has a notification feature that can be
used to remind the user about the presentation schedule. It also has an advanced
search feature to find the certain users.

Albertus Kelvin Email: [email protected] Page 63
LOGGED IN AS STUDENT
1. Main page
View the schedule based on the month
View the schedule based on the day

Albertus Kelvin Email: [email protected] Page 64
View the schedule in list mode
LOGGED IN AS LECTURER
1. Main page

Albertus Kelvin Email: [email protected] Page 65
2. The page where lecturers can enter their available schedule
When they choose to edit their available schedule

Albertus Kelvin Email: [email protected] Page 66
3. When they want to edit the student’s schedule. They can do it just by dragging and
dropping the current schedule to the selected schedule. Same as before, they can
view the schedule in three modes, namely month, day, and list.
4. When they send a request to choose another examiner

Albertus Kelvin Email: [email protected] Page 67
LOGGED IN AS FINAL PROJECT TEAM
1. View the list of examiners
2. View the list of students

Albertus Kelvin Email: [email protected] Page 68
LOGGED IN AS FACULTY ADMINISTRATOR
1. Enter the lecturers information
2. Change the presentation’s room information

Albertus Kelvin Email: [email protected] Page 69
Note: For another features, they have similar view like the other user
SEARCH FEATURE
When they want to find a student named Catherine
NOTIFICATION FEATURE

Albertus Kelvin Email: [email protected] Page 70
“SaleProject 2”, A Web Based MarketPlace Application –
With Implementation of Web Services, Chat Service, and
Firebase
Working year : 2016
Type of project : Group
Purpose of project : To create a marketplace web application that can communicate with
web services and Firebase (Backend as a Service). This application is an extension of the
first same application which make all CRUD operations in one application. On this project,
the server side is divided into two parts where each of them will act as a web service.
Moreover, this application will also communicate with a Chat server and it will be
implemented on the Catalog page. We use Firebase Cloud Messaging to process the data for
the chatting application.
Development tools:
Programming language Java (JSP, Servlet), HTML, CSS, Javascript
Framework AngularJS
Cloud Service Firebase (Cloud Messaging)
A brief explanation for the additional features:
The additional features for this application are Chat REST Service and the
component of Chat’s Front-end. The Chat Service will be responsible for receiving
the message from client and proceed it to the Firebase for the next process. The
Front-end’s component will be responsible for sending the request to the Chat
Service through AJAX and show the chat box to the user.

Albertus Kelvin Email: [email protected] Page 71
General concept:
1. A user can send messages to another user in a real time environment on the
Catalog page. This feature will be implemented by AngularJS
2. REST Service will connect the client and Firebase Cloud Messaging.
3. The user must be logged in to send any messages through the chatting feature.
4. Application will be able to show all users who are online (active user). The active
user will be signed by a little green circle on the left side of his/her name. When
the name of user is clicked, the chat box will be shown up.
5. Any users with different IP address can not use the same access token.
6. Any users with different user-agent can not use the same access token. In this
case, the defined user-agent is the web browser use to access the application.
The general architecture

Albertus Kelvin Email: [email protected] Page 72
The Details of The Chat Architecture
The process of communication between two clients are:
1. When the client is executed, client will ask for a token from Firebase Cloud
Messaging (FCM). This is a different token with the one given by Identity Service.
2. FCM will send the token to the client.
3. After the token is successfully received, client will send the token and its identity
(name/ email) to the chat server. The client’s identity is used to identify the token
ownership.
4. To send a message to another client, the first client will send a message containing
the sender’s identity, the receiver’s identity, and the message to the chat server.

Albertus Kelvin Email: [email protected] Page 73
5. Then Chat server will be searching for the token which has the relation with the
receiver’s identity.
6. Chat server will send the request to the FCM to send the message to the desired
client.
7. FCM will send the message to the receiver.
The general scenario for the chatting process are:
Assume that the sender is A and the receiver is B.
1. A and B do the login process to the application.
2. A and B open the Catalog page. In this stage, their online status has been recorded in
the chat server.
3. A open the chat box by clicking the name of B in the Catalog page.
4. A chat box will be shown up on the A’s browser screen.
5. A types a message and presses the Send button.
6. The message will be sent to B through the Chat server and FCM.
7. When the message is received by B, a cha box will be shown up on the B’s browser
screen.
8. B can send a message to A.
9. If A would like to end the conversation, A can press the button to close the chat box.
The same thing can be done by B.
The validation processes done by Identity Service are:
1. Has the corresponding access token already expired?
2. Is the corresponding access token being used by the different browser?
3. Is the corresponding access token being used by the different internet connection?

Albertus Kelvin Email: [email protected] Page 74
The mechanism of token generation
The token must have all information related to the user agent (browser) and the user’s IP
address. Identity service must be able to extract those information. For example, the token
can have a format like this: ‘some_random_string#user_agent#ip_address’.
Project display:
1. Catalog page

Albertus Kelvin Email: [email protected] Page 76
HACK bandung
Working year : 2017
Type of project : Individual
Purpose of project : Create an application that utilizes crowd sourcing concept to help the
Bandung government in improving the city’s quality in several aspects, such as
environment, transportation, sanitary, security, social, health and so on. This app will be a
medium connecting the Bandung citizens and government so that both of them can get
benefits with the same proportion. This app provides opportunity for the government in
working more effective and efficient as well as making decision faster as they have already
known the real matters happening in the field. On the other hand, the citizens can give their
aspirations and protests to the government. Moreover, they can also monitor the
government’s performance through how their reports are responded by the government.
Development tools :
IDE : Android Studio
Platform : Android
Programming language : Java
Database : Firebase Realtime Database
Authentication : Firebase Authentication
Data mining toolkit : WEKA
Supporting method : Machine Learning (Multinomial Naïve Bayes)
Supporting API : Google Maps API

Albertus Kelvin Email: [email protected] Page 77
Description
1. When the user opens the app, it will show the first page providing the app’s title (HACK
bandung) and the options that can be used to create a new account or sign in to the
account.
Design:
Image 1. The first page of the app

Albertus Kelvin Email: [email protected] Page 78
2. Sign up is used for registering a new account, whereas sign in is used for accessing the
registered account.
Design:
Image 2. Sign up Image 3. Sign in

Albertus Kelvin Email: [email protected] Page 79
3. Suppose that the user register a new account. The application will be asking for the user’s role,
namely as the citizens or government.
Design:
Image 4. User role

Albertus Kelvin Email: [email protected] Page 80
4. [CITIZENS]. To simplify the navigation, application provides a drawer showing all features that
can be accessed by the user.
Design:
Image 7. The list of features for the citizens
In the context of citizens, the provided features are Write new report (write a new report with a
picture to verify the truth), All reports (the list of all sent reports), Waiting reports (the list of all
reports waiting to be processed by the agency), In progress reports (the list of all reports that is
being processed by the agency), and Completed reports (the list of all reports that has been
processed successfully by the agency).
Albertus Kelvin Email: [email protected] Page 81
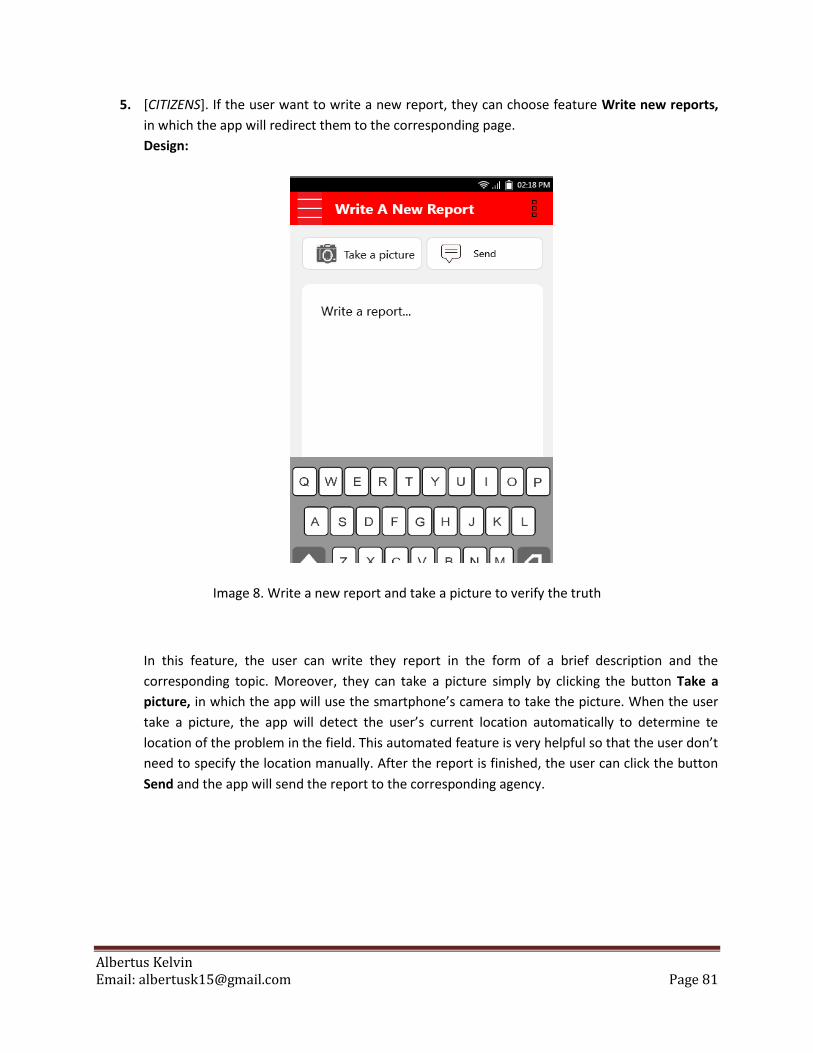
5. [CITIZENS]. If the user want to write a new report, they can choose feature Write new reports,
in which the app will redirect them to the corresponding page.
Design:
Image 8. Write a new report and take a picture to verify the truth
In this feature, the user can write they report in the form of a brief description and the
corresponding topic. Moreover, they can take a picture simply by clicking the button Take a
picture, in which the app will use the smartphone’s camera to take the picture. When the user
take a picture, the app will detect the user’s current location automatically to determine te
location of the problem in the field. This automated feature is very helpful so that the user don’t
need to specify the location manually. After the report is finished, the user can click the button
Send and the app will send the report to the corresponding agency.

Albertus Kelvin Email: [email protected] Page 82
6. [CITIZENS]. After signing up or signing in, the user will be redirected to the main page that shows
all the reports sent to the government.
Design:
Image 5 Image 6
All reports sent by the citizens All reports sent by the citizens
Each reports provided in the format of grid contains several information, such as the picture,
topic of report, time of report, and three information stating the state of the report, namely
Waiting (the report is waiting to be processed by the agency), Work In Progress (the report is
being processed by the agency), and Done (the reports has been processed successfully by the
agency).
Moreover, there is the name of the corresponding agency handling the problem. For example, in
this case the report about “Sampah sungai” will be handled by the Sanitary agency. The location
in the field is also provided automatically by the app.

Albertus Kelvin Email: [email protected] Page 83
The information about the corresponding agency that will handle the problem and the location
of the problem in the city will be handled automatically by the app which means that the user
don’t need to provide the targeted agency and the location manually.
7. [CITIZENS]. The user can monitor the reports being processed by the agency through the feature
of In progress reports.
Design:
Image 7. The list of reports being processed by the agency
Several information will be assigned to each report, such as the picture, problem’s topic, time of
report, the agency that will be responsible, the location of the problem, and an option to see
more details.

Albertus Kelvin Email: [email protected] Page 84
8. [CITIZENS]. The user can check all reports that have been processed successfully by the agency
through the feature of Completed reports.
Design:
Image 8 Image 9
The list of reports that have been processed The more detail information
The provided information is similar with the information on the feature of In progress reports.
Moreover, the user can see more details of a report, including the condition before and after
the work done by the agency, as well as the duration needed by the agency to complete the
task.

Albertus Kelvin Email: [email protected] Page 85
9. [GOVERNMENTS]. From the context of government, after registering a new account, the app will
ask for the role of each user. There are several agencies in Bandung, such as PDAM, Satpol PP,
Disdik, Diskominfo, Kebersihan, dispora, DISBUDPAR, distarcip, and so on.
Design:
Image 10. Choose the corresponding agency
Afterwards, the user will be redirected to the main page.

Albertus Kelvin Email: [email protected] Page 86
10. [GOVERNMENTS]. Same as the user in the context of citizens, the app also provides a drawer to
simplify the navigation among features in the app.
Design:
Image 11. The list of features for the context of governments
The features are All reports (the list of reports sent by the citizens), In progress reports (the list
of reports which are being processed by the agency), and Completed reports (the list of reports
that have been processed successfully).

Albertus Kelvin Email: [email protected] Page 87
11. [GOVERNMENTS]. For the feature of All reports, the user can see the list of all reports sent to
the his/her agency.
Design:
Image 12 Image 13
All the reports sent to his/her agency All the reports sent to his/her agency
Each report is provided in the form of grid which shows a picture as the verifier, the topic of problem,
the body of report, the name of reporter, the time of report, and three options that can be used to
process the report further, namely Forward (the report is sent to the mayor because it is not the
agency’s responsibility), Work In Progress (to process the corresponding report by looking at the detail
information of the report, including the map showing the exact location of the problem in the field), and
Done (to report the work).
The purpose of the feature of Forward is so that each agency can send the any reports to the mayor as
there is a fault in assigning the responsibility which is done by the machine learning algorithm. The

Albertus Kelvin Email: [email protected] Page 88
deployment process of report will be done automatically using machine learning algorithm, so that to
handle the possibility of fault done by the system, this feature is really needed.
12. [GOVERNMENTS]. To see the on going reports, the user can choose the feature of In progress
reports, in which the app will redirect them to the page providing the list of all reports that are
being processed by the agency.
Design:
Image 14 Image 15
The list of reports that are being processed The information about the location of problem
The user can see the more detail information, including the location of the problem which is
shown in a map. The user can also send a request to get the direction to the destination by

Albertus Kelvin Email: [email protected] Page 89
choosing an option of Get directions using Google Map. The app will use Google Maps to find
the direction.
This page can also be accessed through the option of Work In Progress on the feature of All
reports.
13. [GOVERNMENTS]. To see the list of reports that have been processed successfully, the user can
go to the feature of Completed reports.
Design:
Image 16
The list of reports that have been successfully processed
The user can also see the more detail information from a completed report. The information includes
the picture showing the condition before and after the work done by the agency.

Albertus Kelvin Email: [email protected] Page 90
The page containing those detail information can also be accessed through the option of Done on the
feature of All reports, in which in this case the user must take a picture showing the condition after
being processed by the agency.
The other information is telling about the time of work starting from the initial action to the completed
condition.
After writing a report about their work, the agency can send the report to the mayor and the reporter
(citizens).
The page for writing the report about the result of work done by the agency:
Image 17 Image 18
The report about the result of work The report about the result of work

Albertus Kelvin Email: [email protected] Page 91
DeepEnglish
Working year : 2017
Type of project : Individual
Purpose of project :
These two research papers are very interesting:
• http://www.r.dl.itc.u-tokyo.ac.jp/~nakagawa/academic-res/ACL2005hosino.pdf • http://www.r.dl.itc.u-tokyo.ac.jp/~nakagawa/academic-res/hoshino-HLT.pdf
The primary concern is how to build a system that really understands the content of an article, including its semantic relationship and context. From that point, the system knows whether a question is good enough to examine the user's understanding on the article. The approach used by the researchers is by utilizing machine learning technology to determine the qualification score of the generated question. The implemented technique is semi-supervised learning as there might be a qualified question yet labelled as the unqualified one.
I tried to built an implementation of this approach in the form of chatbot running on LINE platform. If you'd like to try, just add this LINE ID as your friend: @uob3969d
Hi, I'm DeepEnglish. Let's get acquainted!
[ WHO AM I ? ]
1. I'm here to help you in improving your English reading comprehension skill.
2. You'll learn through a reading quiz in the form of multiple choice questions.

Albertus Kelvin Email: [email protected] Page 92
[ THE BASIC IDEA ]
1. You can read any articles written in English and try to understand what the article is all about.
2. Then, just give me that article and I'll generate several multiple choice questions based on it.
3. I'll try to understand the topic of the article and provide you with qualified questions.
4. I'll also try to create the 4 possible answers which can probably be tricky for you. I do this to examine your understanding on the article you gave to me beforehand.
[ WHAT YOU CAN DO ]
Here are the main process you can do to get the maximum learning value:
1. Search any articles written in English. The topic can be anything.
2. Read that article and try to understand its primary topic.
3. Afterwards, simply send that article to me. You can do it in two ways, namely provide me the URL (link) of that article OR the original article directly as a text message.
4. I'll try to understand the article and then generate several multiple choice questions based on it. This process may take a few seconds, so I hope that you can be patient.
5. If I successfully found the eligible questions, I'll show a message notifying the next process. Vice versa, I'll also show a message notifying that the process of question generation can't be executed successfully. For the latter case, there's a possibility that I couldn't find any questions that are good enough to examine your understanding. Just try to provide me with another article :)
6. For the success condition, I'll provide the question one by one and move on to the other when you've submitted an answer for the corresponding question.
7. You can choose to complete all questions generated by me OR end the quiz while it's running. For the latter case, just type 'end quiz' and I'll stop the quiz.
8. After the quiz is finished (or ended in the middle session), I'll show your quiz result. It includes the total number of correct answers, the completion time, and the answer history.

Albertus Kelvin Email: [email protected] Page 93
Image 1. Provide the source of your article Image 2. Generated question with four possible answers

Albertus Kelvin Email: [email protected] Page 94
Here are several examples of generated questions and their possible answers:

Albertus Kelvin Email: [email protected] Page 95

Albertus Kelvin Email: [email protected] Page 96
[ SPECIAL FEATURES ]
Wait. Besides my main capability to generate questions based on your article, I also provides these special features that can be used to speed up your study:
1. Summarizer: Got a good article in a website yet too long to read? Simply give your article and the number of summarized text you want to this feature and it will give you the only important information of the article. Noted that you can only provide the link containing the article, so you can't copy the article and paste it as a request. To use it, you need to provide a valid request format in order to get the desired result.
Format:
- @desummary<SPACE><number_of_summarized_text><SPACE><URL>
Example:
- Query: @desummary 3 http://www.example.com
- Result: Text 1. Text 2. Text 3.
Image 3. Provide the source of article and it’ll give you the summary

Albertus Kelvin Email: [email protected] Page 97
2. Spider: Got a good website and wanted to search for a keyword in it? Just use this feature as it can give you all the pages in the website containing your search keyword.
Format:
- @defind<SPACE><keyword><SPACE><source_url>
Example:
- Query: @defind fruit http://www.example.com
- Result:
1. http://www.example.com/page1
2. http://www.example.com/page2
3. http://www.example.com/page3
Image 4. Provide the URL and the keyword you’d like to search for

Albertus Kelvin Email: [email protected] Page 98
[ TECHNICAL STUFFS ]
I was built with these following awesome technologies:
1. Java, with Spring as the framework
2. Machine learning. I use it to determine whether the questions are good enough to examine your understanding in reading the article you submitted.
3. Distractor generator algorithm. I use it to generate 4 (four) options as the possible answers. They can be tricky and I think it's good to check whether you really understand the main concept of the article.
4. Content extractor. I use it to extract only the important and suitable parts of an article that comes from the URL you submitted.
5. Text summarizer. It is a part of Classifier4J, a Java library for text classification. I use it to create a summary of your article.
6. Web crawler (spider). I use it to find all pages in a website that contain your requested keyword.


![Albertus Magnus. Opera omnia [Borgnet Ed.]. 1890. Volume 4.](https://static.fdocuments.us/doc/165x107/577d28e31a28ab4e1ea57d6b/albertus-magnus-opera-omnia-borgnet-ed-1890-volume-4.jpg)