ProHelp EPM User's Manual - Mattec MES Help Desk® EPM Production & Process Monitoring System...
204
ProHelp® EPM Production & Process Monitoring System User’s Manual For ProHelp® EPM, Release 6.1.0 MANUAL #810-0001 Revision – C March 17, 2004
Transcript of ProHelp EPM User's Manual - Mattec MES Help Desk® EPM Production & Process Monitoring System...

ProHelp® EPM
Production & Process Monitoring System
User’s Manual For ProHelp® EPM, Release 6.1.0
MANUAL #810-0001
Revision – C
March 17, 2004

ATTENTION You can obtain service support by visiting Mattec’s web site at http://www.mattec.com, by emailing the help desk at [email protected], or by telephone at (513) 683–1802. This manual is intended for all users of the ProHelp® EPM system.

Copyright © 1983-2004 Mattec Corporation
1-1 810-0001 Rev - C
TABLE OF CONTENTS 1. Introduction To ProHelp® EPM........................................................................................... 1-4
1.1 Overview ........................................................................................................................ 1-4 1.2 System Components ....................................................................................................... 1-5
1.2.1 Server Computer ......................................................................................................... 1-5 1.2.2 Machine Interface Unit (MIU) .................................................................................... 1-5 1.2.3 RocketPort Serial Communication Board And Buffer Box........................................ 1-5 1.2.4 Client Computers......................................................................................................... 1-6
1.3 Shut Down Procedure..................................................................................................... 1-6 1.4 Additional Training ........................................................................................................ 1-7
2. Main Menu ............................................................................................................................ 2-9 3. Real-Time Display .............................................................................................................. 3-10
3.1 Color Coding ................................................................................................................ 3-12 3.2 Filtering Data................................................................................................................ 3-15 3.3 Last 500 Chart .............................................................................................................. 3-19 3.4 Scrap Pareto Chart ........................................................................................................ 3-21 3.5 Downtime Pie Chart ..................................................................................................... 3-23 3.6 Process Exception Log ................................................................................................. 3-25 3.7 Document Control Center............................................................................................. 3-27 3.8 Enter Scrap And Packed Parts ...................................................................................... 3-28 3.9 Select Downtime Reasons ............................................................................................ 3-30 3.10 Change Active Cavities ................................................................................................ 3-32 3.11 Cancel (Acknowledge) Help Calls ............................................................................... 3-33 3.12 Additional Functionality............................................................................................... 3-34 3.13 Operator Efficiency Display......................................................................................... 3-35 3.14 Cost Display ................................................................................................................. 3-36 3.15 Launching Other Applications...................................................................................... 3-37
4. Reports ................................................................................................................................ 4-38 4.1 Shift Reports ................................................................................................................. 4-39 4.2 Job Reports ................................................................................................................... 4-42 4.3 Overall Equipment Effectiveness (OEE) Reports ........................................................ 4-45 4.4 Preventive Maintenance Reports .................................................................................. 4-47 4.5 Operator Tracking and Efficiency Reports................................................................... 4-50 4.6 Audit Trail Reports....................................................................................................... 4-53 4.7 Log Reports .................................................................................................................. 4-55 4.8 Launching Other Applications...................................................................................... 4-57
5. Edit Facilities....................................................................................................................... 5-58 5.1 Job Descriptor............................................................................................................... 5-60 5.2 Part ID........................................................................................................................... 5-62 5.3 Tool ID ......................................................................................................................... 5-65 5.4 Sample Sheet ................................................................................................................ 5-69 5.5 Process Sheet ................................................................................................................ 5-74 5.6 Machine Maintenance Log ........................................................................................... 5-79 5.7 Tool Maintenance Log.................................................................................................. 5-81

Copyright © 1983-2004 Mattec Corporation
1-2 810-0001 Rev - C
5.8 Enter Scrap And Packed Parts ...................................................................................... 5-83 5.9 Job Setup Notes ............................................................................................................ 5-85 5.10 Material Lot Edit .......................................................................................................... 5-87 5.11 Downtime Edit.............................................................................................................. 5-88 5.12 Production History Edit ................................................................................................ 5-92 5.13 Launching Other Applications...................................................................................... 5-94
6. Job Schedule........................................................................................................................ 6-95 6.1 Family Molding ............................................................................................................ 6-98 6.2 Creating And Scheduling Bachelor Jobs .................................................................... 6-101 6.3 Creating And Scheduling Family Jobs ....................................................................... 6-103 6.4 Tool Conflicts ............................................................................................................. 6-107 6.5 Gantt-In-Gantt Schedule............................................................................................. 6-109 6.6 Schedule Reports ........................................................................................................ 6-111 6.7 Scheduled Jobs List .................................................................................................... 6-112 6.8 Unscheduled Jobs List ................................................................................................ 6-114 6.9 Advanced Settings ...................................................................................................... 6-116
6.9.1 Personal Preference Settings ................................................................................... 6-119 6.10 Job Control ................................................................................................................. 6-122 6.11 Job Status Override..................................................................................................... 6-125 6.12 Launching Other Applications.................................................................................... 6-126
7. ProStat® SPC/SQC........................................................................................................... 7-127 7.1 Enabling Data Collection............................................................................................ 7-130 7.2 Entering Data - ProStat® Sample Data Edit............................................................... 7-131 7.3 Selecting Data For Analysis ....................................................................................... 7-133
7.3.1 Selecting Data For Multiple Jobs............................................................................ 7-135 7.4 Scrap Pareto Chart ...................................................................................................... 7-137 7.5 Downtime Pie Chart ................................................................................................... 7-139 7.6 Overview Tab ............................................................................................................. 7-141 7.7 Production Tab ........................................................................................................... 7-142 7.8 Process Alarm Tab...................................................................................................... 7-144 7.9 X-Bar Chart and Range Chart (R) .............................................................................. 7-146
7.9.1 Chart of Individuals (X) and Moving Range Chart (MRx)..................................... 7-151 7.10 X-Bar Chart and Standard Deviation Chart (S).......................................................... 7-153 7.11 Median Chart .............................................................................................................. 7-157 7.12 Histogram Chart (Capability Analysis) ...................................................................... 7-161 7.13 Linear Regression Analysis (Scatter Diagram) .......................................................... 7-164 7.14 Calculating Control Limits ......................................................................................... 7-168 7.15 SPC/SQC Summary Report........................................................................................ 7-171 7.16 Process Exception Log ............................................................................................... 7-174 7.17 Real-Time SPC/SQC Alarms ..................................................................................... 7-176 7.18 Part Qualification........................................................................................................ 7-177 7.19 Attribute SQC............................................................................................................. 7-178
7.19.1 Attribute SQC Chart Options............................................................................... 7-179 7.19.2 p Chart.................................................................................................................. 7-181 7.19.3 np Chart................................................................................................................ 7-182

Copyright © 1983-2004 Mattec Corporation
1-3 810-0001 Rev - C
7.19.4 c Chart .................................................................................................................. 7-183 7.19.5 u Chart.................................................................................................................. 7-184
7.20 Launching Other Applications.................................................................................... 7-185 8. Miscellaneous Applications .............................................................................................. 8-186
8.1 Shift Time Utility........................................................................................................ 8-186 8.2 System Configuration ................................................................................................. 8-186 8.3 System Names Edit..................................................................................................... 8-186 8.4 Data Import/Export..................................................................................................... 8-186
9. Glossary Of Terms ............................................................................................................ 9-187

Copyright © 1983-2004 Mattec Corporation
1-4 810-0001 Rev - C
1. Introduction To ProHelp® EPM The following sections provide a brief introduction to the ProHelp® EPM Production and Process Monitoring System. 1.1 Overview MATTEC Corporation's ProHelp® EPM Production and Process Monitoring System is specifically designed for real-time monitoring of all types of production equipment. It is used extensively in the plastics injection molding, extrusion, blow molding, blown film, metal stamping, die casting, printing, painting, and assembly industries. The basis behind the benefits from the ProHelp® EPM system is the rationale that plant managers and operational people will take corrective actions to solve problems on production equipment when they are aware of such problems. ProHelp® EPM is the device to alert employees to problems immediately when the problems occur. Therefore, tremendous savings can occur in increased productivity and decreased scrap parts. The ProHelp® EPM system combines computer hardware, computer software, and Machine Interface Units (MIUs) into an efficient system to provide real-time production monitoring, production reports, process alarms, plant scheduling aids, and SPC/SQC process and part capability analysis. Floor personnel can make use of the machine-mounted terminals to signal different departments for help, to view production results at the machine site, and to enter downtime reasons or scrap reasons. Production, downtime, and scrap reports can be generated on a shift and daily basis, or the user can generate these reports for extended time periods by specifying a start and end date for the desired report. Job history data is continuously summarized and available for management's review. ProHelp® EPM utilizes the Microsoft Windows 2000 operating system and the Microsoft SQL Server 2000 database. Users can connect to the system from most Microsoft Windows operating systems. This manual describes the basic functions in ProHelp® EPM and is intended as a reference for all system users.

Copyright © 1983-2004 Mattec Corporation
1-5 810-0001 Rev - C
1.2 System Components The following sections provide a brief overview of those components that comprise the ProHelp® EPM system. 1.2.1 Server Computer The main ProHelp® EPM computer is referred to as the “server”, “host”, or “monitoring node” computer. This is the only computer that is required to run the ProHelp® EPM system. This computer contains all of the configuration files, data files, and ProHelp® EPM software. The server computer runs Microsoft’s Windows 2000 Server operating system and Microsoft’s SQL Server 2000 database. All MIUs connect to the server computer. All data from MIUs is automatically recorded at the server and can be viewed from other computers in real-time. 1.2.2 Machine Interface Unit (MIU) The Machine Interface Unit (MIU) is an industrial-strength data collection device that has been designed and manufactured by MATTEC. It is used to collect production and process information from the manufacturing machine and transmits that data in real-time to the server computer. There are a wide variety of MIUs. Most have a graphical interface that allows the machine operator to view data about the current job and input relevant information (e.g., scrap parts). Many MIUs have both analog and digital inputs. Many MIUs have an optional PLC interface that can be used to extract data directly from supported machine controllers. 1.2.3 RocketPort Serial Communication Board And Buffer Box MIUs are connected to the server computer via RS-485 cabling. Up to 16 MIUs can be daisy-chained together on a single channel. Multiple channels can be used in order to reach the maximum 4,096 MIUs per system. The Buffer Box is a small device that has been designed and manufactured by MATTEC. It is usually located with a few feet of the server computer. The Buffer Box converts the RS-485 signal to an RS-232 signal and “conditions” the signal. A channel of MIUs (RS-485) is wired into the Buffer Box on one side. On the other side, the Buffer Box outputs an RS-232 signal that is connected to a serial communication port on the server computer.

Copyright © 1983-2004 Mattec Corporation
1-6 810-0001 Rev - C
In most applications, MATTEC will have installed a RocketPort Serial Communication Board in the server computer. The RS-232 signal from the Buffer Box is connected to one of the channels on the RocketPort board. The RocketPort board contains multiple communication ports and is a “smart” device that improves the communication process. 1.2.4 Client Computers Although the server computer is a fully functioning “client” system, most users will want to connect to the system from their own computer. To do so, they will need to have an approved Microsoft operating system loaded on their computer. The System Manager will load the ProHelp® EPM Client software on that computer and configure it to connect to the server computer. The user will be given permissions to access or modify data, as appropriate. These users with then be able to view data for the entire facility in real-time. 1.3 Shut Down Procedure ProHelp® EPM is intended to run 24 hours per day, every day. When it does become necessary to reboot the system, use this procedure. It will bring the system to an orderly shut down.
• Announce to all users that you will be taking the system down. Have all users exit the ProHelp® EPM software.
• Ensure that no ProHelp® EPM job changes are under way. • Ensure that a shift change is not in progress. • Login to the server computer as an authorized user. • Using the mouse, click on the Microsoft Windows Start Menu and select Shut
Down. The Shut Down Windows dialog box will be displayed. • Select Shut Down the computer? and press Yes.

Copyright © 1983-2004 Mattec Corporation
1-7 810-0001 Rev - C
1.4 Additional Training Mattec offers several comprehensive seminars for customers who wish to sharpen their ProHelp® EPM system skills. These seminars are held in a “hands-on” classroom environment at Mattec’s headquarters in Cincinnati, Ohio. A Mattec trainer can also conduct any of these seminars in your plant using your system. For details and current pricing information, contact the Mattec Customer Service Department. Classes include the following: ProHelp® EPM Basic User (2 Days) This course is designed for the beginner/intermediate user who never had any training or who needs to brush up on basic ProHelp® EPM functionality. Topics will include an overview of all ProHelp® EPM software screens and various Machine Interface Units (MIUs). This class will not get into the specifics of ProStat® (ProHelp® EPM’s SPC/SQC option) or System Administration functions. Who should attend: New employees, current employees who are assigned new ProHelp® EPM responsibilities, or anyone who wants a basic understanding of the ProHelp® EPM system. ProHelp® EPM System Administration (2-3 Days) This course is designed for users who wish to gain a deeper understanding of the ProHelp® EPM Production and Process Monitoring system. Topics will include a detailed overview of the ProHelp® EPM system hardware and software and how they make the system tick, how to maximize system performance, common software troubleshooting techniques, file transfers, and techniques for overall system implementation and control. Who should attend: ProHelp® EPM system administrators/managers. Those who have the responsibility to ensure that ProHelp® EPM is being used to its full potential. ProStat® SPC/SQC (2 Days) This course is designed specifically to teach users how to implement ProStat® (ProHelp® EPM’s SPC/SQC option) and begin to collect and monitor data for statistical analysis. Topics covered include manual and automatic process parameter data collection, part variable data input, and attribute data entry. This class does not teach basic statistics nor basic ProHelp® EPM. It is recommended for users who have a working knowledge of SPC/SQC theory and ProHelp® EPM. Who should attend: SPC/SQC coordinators, quality control personnel, and users who are responsible for implementing the SPC/SQC program in your company.

Copyright © 1983-2004 Mattec Corporation
1-8 810-0001 Rev - C
Maintenance, Calibration, and Troubleshooting (2 Days) This course is designed to teach the maintenance technician how to locate hardware problems throughout the system. This class begins with a basic system overview followed by a basic “how to” use ProHelp® EPM. Topics such as proper installation and troubleshooting techniques on the various system components along with analog setup and calibration will be covered. Component level troubleshooting of PC boards will not be covered. Who should attend: Maintenance technicians. Those users who are responsible for the hands-on analog calibration and overall system hardware maintenance/troubleshooting.
Copyright © 1983-2004 Mattec Corporation
2-9 810-0001 Rev - C
2. Main Menu The Main Menu is used to launch most other applications in the system. To launch an application using the Main Menu program, follow these steps:
• Start the Main Menu. To do this, click on the Microsoft Windows Start Menu. Click on the Programs menu, click on the Mattec menu, and select ProHelp EPM. The Main Menu will be displayed.
• Single-click the icon that represents the application that you wish to start.
The Main Menu
Advanced Tip #1 To determine which program will be launched when you press an icon on the Main Menu, simply “hover” the mouse cursor over that icon. A “tool tip” will be displayed. Advanced Tip #2 If you have two or more facilities that each have their own ProHelp® EPM system, the System Manager can configure your PC to connect to each facility. After this has been done, the Main Menu will display a prompt asking you to select which facility to connect to whenever the program is started. Configuring a PC to connect to multiple facilities is generally a simple process that can take less than 5 minutes. Contact the Mattec Customer Service Department if you need assistance.

Copyright © 1983-2004 Mattec Corporation
3-10 810-0001 Rev - C
3. Real-Time Display The Real-Time Display shows you the status of all machines at a glance, including machines that are running out of specification limits, machines that are down, and operators who have called for help. Data on the display is updated automatically and in real-time. Several displays shipped with your system and the System Manager can easily create custom displays using the Real-Time Display Writer. To launch the Real-Time Display, follow these steps:
• Start the Main Menu and press the Launch Real-Time Display icon. The Real-Time Display will be displayed.
Standard Real-Time Display
More than 200 fields are available for display, including the following:
• Job Standards • Part Standards • Tool Standards • Current Process Parameter Values • Shift Production History • Job Production History • Next Job Data

Copyright © 1983-2004 Mattec Corporation
3-11 810-0001 Rev - C
Double-click on a specific machine/job to see detailed shift and job production information, detailed process parameter information, the Material ID, Color ID, and Material Lot(s) in use, access setup sheets, and see detailed information for the next job to be run.
Machine Status Display

Copyright © 1983-2004 Mattec Corporation
3-12 810-0001 Rev - C
3.1 Color Coding Fields on the Real-Time Display are color-coded to draw your attention to those items that need immediate attention. The following is a general overview of the color-coding on the Real-Time Display:
Color Typical Meaning GREEN The machine in running within acceptable limits for all processes
being monitored. Green is good. OFF-GREEN The value of a process parameter can not be determined. This is
usually associated with a newly-configured machine. RED Red typically indicates that a monitored process parameter has
exceeded the user-specified upper specification limit. WHITE White typically indicates that a monitored process parameter has
fallen below the user-specified lower specification limit. YELLOW Yellow typically indicates that the machine is not cycling and is
down. CYAN (Lt. Blue) A machine number shown in cyan indicates that the machine is
idle and no job is currently running on the machine. Other fields are shown in cyan to indicate that there is no color-coding for this field.
PURPLE Purple typically indicates that the MIU is not communicating with the Server computer. If you can not resolve this situation, please contact the Mattec Customer Service Department immediately.
Machine operators and Shop Foremen should concentrate on keeping all machines in the green. Advanced Tip #1 You can double-click on many of the fields on the Real-Time Display to see additional information about that field. This information will generally explain why the field is color-coded. For example, you can double-click on a process parameter to see the last 500 chart for that specific parameter. You can overlay the user-specified specification limits and/or control limits on the chart. If the process parameter was within the user-specified specification limits, then the field will be colored green on the Real-Time Display. If the process parameter was out-of-specification, then the field will be colored red or white on the Real-Time Display, as appropriate.

Copyright © 1983-2004 Mattec Corporation
3-13 810-0001 Rev - C
The following table lists many of the fields that can be displayed on the Real-Time Display and the color-coding that is applied to those fields:
Field(s) Color Coding Father Job Number Job Number Machine Number Part Number Status Internal MachNo Internal JobSeq Internal FatherJobSeq
These fields are green when all process parameters are within the user-specified specification limits. These fields are red when one or more process parameters are out-of-specification. These fields are yellow when the machine is down. These fields are cyan when no job is running and the machine is idle. These fields are purple if the MIU is not communicating with the server computer. If you can not resolve this situation, please contact the Mattec Customer Service Department immediately.
Down Description Down Description (with Elapsed Time) Internal DownNo
These fields are yellow if the machine is down otherwise they are cyan.
Help (HP) Help Description Help Start Time Internal HelpNo
These fields are red when a help call is active otherwise they are cyan. You can double-click on these fields to see additional information regarding the help call and to acknowledge (cancel) the help call.
Process Parameters These fields are green when the process parameter is within the user-specified specification limits, red if the process parameter exceeds the user-specified upper specification limit, and white if the process parameter falls below the user-specified lower specification limit. These fields are off-green if the value of the process parameter can not be determined. This is usually the result of setting up a new process parameter or some type of configuration error.
PLC/AIU Indicator This field is purple if a PLC or AIU communication error exists otherwise it is cyan. You can double-click on this field to see additional information regarding the failure. If you can not resolve this situation, please contact the Mattec Customer Service Department immediately.
Attribute SQC Flag Automatic SPC Flag Manual SPC Flag Variable SQC Flag
These fields are green if all observations for the last SPC/SQC sample where within limits and red if one or more observations were out-of-limits. These fields are cyan if there has been no SPC/SQC sample taken.
Hours To Go Total Parts To Go
These fields are yellow if the job has reached the “End Of Job Warning” and red if the job has reached the “End of Job Alert” otherwise these fields are cyan. You can double-click on these fields to see additional information regarding the end of job.

Copyright © 1983-2004 Mattec Corporation
3-14 810-0001 Rev - C
Field(s) Color Coding The “End of Job Warning” and “End of Job Alert” times are configured by the System Administrator. Reference the System Administration Manual, #810-0014, for additional information.
Cycles Out-Of-Spec Percent Out-Of-Spec
These fields are red if 5% or more of the cycles are out-of-specification otherwise they are green.
Cycle Efficiency Yield Efficiency
These fields are red if the efficiency falls below 95%, white if the efficiency exceeds 105%, otherwise they are green.
Percent Scrap Scrap Parts
These fields are red if the percent scrap exceeds 5% otherwise they are green.
Percent Down Run Efficiency
These fields are red if the percent down exceeds 5% otherwise they are green.

Copyright © 1983-2004 Mattec Corporation
3-15 810-0001 Rev - C
3.2 Filtering Data The Real-Time Display can be a valuable tool to many employees throughout your facility, in part because employees can easily customize the display to show only those machines that they are interested in. This is accomplished by “filtering” the display. To filter the data that is displayed on the Real-Time Display, follow these steps:
• Start the Main Menu and press the Launch Real-Time Display icon. The Real-Time Display will be displayed.
• Click on the File menu and select Filter Data. The Real-Time Display
Options dialog will be displayed.
Real-Time Display Options Dialog
Alternate Methods The Real-Time Display’s toolbar contains icons that allow you to display all machines, any machine that is out-of-specification, any machine that is down, or any machine that is calling for help. If you press one of these icons, all existing filter conditions will be reset and only the new filter condition will be applied.

Copyright © 1983-2004 Mattec Corporation
3-16 810-0001 Rev - C
Advanced Tip #1 The current filter condition is displayed in the lower-right-hand corner of the Status bar. The following table describes the fields that are available on the Real-Time Display Options dialog:
Field Description Real-Time Display This field displays the list of all available custom Real-
Time Displays. Several displays shipped with your system and the System Manager can easily create custom displays using the Real-Time Display Writer.
Refresh Rate The field controls how often the Real-Time Display is automatically refreshed. If the Refresh Rate is 0, the display will not refresh automatically and will only be refreshed when the user manually refreshes the display. When in Automatic Paging mode, the “Refresh Rate” is used to determine how frequently the Real-Time Display should page down to see more machines.
Multiple Display Refresh The Real-Time Display allows several displays to be open at one time. For example, when you double-click on a machine number, the Machine Status display is opened. When “Multiple Display Refresh” is enabled, all of the open displays will update automatically. This will consume additional system resources and is not recommended. When “Multiple Display Refresh” is disabled, only the top screen that is displayed will be refreshed automatically (provided that automatic refresh is enabled for that display).
Department This field allows you to filter the Real-Time Display to view all machines that are assigned to a specific department. Set this field to “All Departments” to disable department filtering.
Down Reason This field allows you to filter the Real-Time Display to view any machines that are down for any downtime reason or any machines that are down for one specific downtime reason. Set this field to “All Machines” to disable down reason

Copyright © 1983-2004 Mattec Corporation
3-17 810-0001 Rev - C
Field Description filtering.
Help Call Reason This field allows you to filter the Real-Time Display to view any machines that are calling for help for any help call reason or any machines that are calling for help for one specific help call reason. Set this field to “All Machines” to disable help call reason filtering.
Machines Nearing End Of Job This field allows you to filter the Real-Time Display to view any machines that are nearing the end of job. Uncheck this field to disable end of job filtering.
Machines That Are Out-Of-Specification
This field allows you to filter the Real-Time Display to view any machines that have one or more process parameters that are out-of-specification. Uncheck this field to disable out-of-specification filtering.
Machines That Are Not Communicating
This field allows you to filter the Real-Time Display to view any machines that are not communicating with the server computer. These machines are colored purple on the Real-Time Display. Uncheck this field to disable not communicating filtering. This filter condition exists primarily for use by the Mattec Customer Service Department.
Machine Group Filters 1-4 These fields allow you to filter the Real-Time Display to view any machines that meet the specified criteria. The System Administrator assigns the Machine Group filters to machines via the Machine Configuration program. The Mattec Customer Service Department can manually configure the names of each filter and the values in each group.

Copyright © 1983-2004 Mattec Corporation
3-18 810-0001 Rev - C
Advanced Tip #2 Filter conditions are cumulative. You can specify one or more filter conditions on the Real-Time Display Options dialog and all of those filter conditions must be met for the machine (and related data) to be displayed on the Real-Time Display. Advanced Tip #3 You can easily cancel the current filter condition(s) by pressing the All Machines icon on the Real-Time Display’s toolbar.

Copyright © 1983-2004 Mattec Corporation
3-19 810-0001 Rev - C
3.3 Last 500 Chart The Last 500 Chart displays the last 500 machine cycles for any monitored process parameter in real-time. Many MIUs are capable of monitoring up to 32 distinct process parameters. To generate a Last 500 Chart for a machine, follow these steps:
• Start the Real-Time Display. To do this, start the Main Menu and press the Launch Real-Time Display icon.
• Right-click on the desired machine and select Last 500 Chart. The Last 500 Chart will be displayed.
Last 500 Chart

Copyright © 1983-2004 Mattec Corporation
3-20 810-0001 Rev - C
Alternate Methods You can start the Last 500 Chart for a process parameter by double-clicking on a machine number or job number to display the Machine Status display. Press the Process Alarm tab and the value for the last machine cycle for all monitored process parameters will be displayed. Double-click on any process parameter to display the Last 500 Chart. You can start the Last 500 Chart by double-clicking on any process parameter (e.g., “Actual Speed” is available on the “Standard” Real-Time Display) on the display. Specification limits and control limits (if specified in the Process Sheet) are displayed on the chart and make it easy to determine if the machine is running within limits. The Last 500 Chart updates automatically and in real-time. The refresh rate is specified on the Options dialog. If the refresh rate is 0, the display will not refresh automatically and will only be refreshed when the user presses the Refresh button. It is safe to press the Refresh button even when automatic refreshes are enabled. You can press the Zoom button to magnify the points on the chart, and press the Zoom button a second time to return to the original display. When the charted is zoomed, you can scroll to the left or the right to see additional data on the chart. The number of points that are displayed when the chart is zoomed is specified on the Options dialog. You can control whether new machine cycles (data points) are added to the left side of the chart or the right side of the chart. You can display the chart in 2-Dimensions or 3-Dimensions. These settings are specified on the Options dialog. Advanced Tip #1 The calculated values on the bottom of the Last 500 Chart (e.g., Cpk, Cp, k) are calculated from the last 500 machine cycles and are not based on statistical sampling nor the “Shift Engineering” nor “Job Engineering” data.

Copyright © 1983-2004 Mattec Corporation
3-21 810-0001 Rev - C
3.4 Scrap Pareto Chart The Scrap Pareto Chart displays the scrap that has been entered for the job. It quickly identifies the most significant causes of scrap parts and helps you to focus your attention on resolving those problems. To generate a Scrap Pareto Chart for a running job, follow these steps:
• Start the Real-Time Display. To do this, start the Main Menu and press the Launch Real-Time Display icon.
• Right-click on the desired job and select Scrap Pareto Chart. The Scrap Pareto Chart will be displayed.
Job Scrap Pareto Chart

Copyright © 1983-2004 Mattec Corporation
3-22 810-0001 Rev - C
Alternate Methods You can start the Scrap Pareto Chart by double-clicking on the Scrap Parts or Percent Scrap fields on the Real-Time Display. The Scrap Pareto Chart is available in the ProStat® program. This allows you to view the chart for jobs that have been ended. The Scrap Pareto Chart updates automatically and in real-time. The refresh rate is specified on the Options dialog. If the refresh rate is 0 the display will not refresh automatically and will only be refreshed when the user presses the Refresh button. It is safe to press the Refresh button even when automatic refreshes are enabled. Scrap Reasons are always displayed in order of scrap parts that have been entered, with the Scrap Reasons with the most quantity displayed on the left-hand side of the display. You can scroll to the left or right to see additional data on the chart. You can display the chart in 2-Dimensions or 3-Dimensions. These settings are specified on the Options dialog. Advanced Tip #1 Scrap can be entered by authorized users at the MIU, on the Real-Time Display, or via Edit Facilities. Advanced Tip #2 The scrap reasons that are displayed in the Scrap Pareto Chart include all scrap reasons that are configured in the Scrap Map for this machine, including reasons from the Advanced Scrap Map and the Simple Scrap Map. The Scrap Map is specified in the Machine Configuration program. Advanced Tip #3 If you have entered scrap for a scrap reason that is not defined in the Scrap Map, that scrap reason will be displayed in the Scrap Pareto Chart.

Copyright © 1983-2004 Mattec Corporation
3-23 810-0001 Rev - C
3.5 Downtime Pie Chart The Downtime Pie Chart displays the downtime that has been accumulated for the job. It quickly identifies the most significant causes of machine downtime and helps you to focus your attention on resolving those problems. To generate a Downtime Pie Chart for a running job, follow these steps:
• Start the Real-Time Display. To do this, start the Main Menu and press the Launch Real-Time Display icon.
• Right-click on the desired job and select Downtime Pie Chart. The Downtime Pie Chart will be displayed.
Job Downtime Pie Chart

Copyright © 1983-2004 Mattec Corporation
3-24 810-0001 Rev - C
Alternate Methods You can start the Downtime Pie Chart by double-clicking on downtime-related fields on the Real-Time display, including the Downtime, Weighted Downtime, Down Occurrences, Weighted Down Occurrences, and Percent Down fields. The Downtime Pie Chart is available in the ProStat® program. This allows you to view the chart for jobs that have been ended. The Downtime Pie Chart updates automatically and in real-time. The refresh rate is specified on the Options dialog. If the refresh rate is 0, the display will not refresh automatically and will only be refreshed when the user presses the Refresh button. It is safe to press the Refresh button even when automatic refreshes are enabled. You can optionally display run time along with downtime. You may want to disable the display of run time if the percentage of downtime is very low (and thus, the display would show mostly run time). This is specified on the Options dialog. You control the number of “slices” that will be displayed in the pie. When more downtime reasons exist than there are slices to the pie, the smallest downtime reasons are accumulated and displayed in the last slice of the pie. The number of downtime reasons that were accumulated into that last slice of the pie is displayed in parenthesis. By controlling the number of slices in the pie, you can minimize the visual impact of having a lot of downtime reasons that have very little downtime accumulated. This is specified on the Options dialog. You can display the chart as a doughnut chart and display the chart in 2-Dimensions or 3-Dimensions. These settings are specified on the Options dialog. Advanced Tip #1 Downtime is automatically accumulated by the MIU. The user can specify the current downtime reason at the MIU or via the Real-Time Display. If a mistake is made, the System Manager can edit this data via Edit Facilities. Advanced Tip #2 Any downtime reason that has accumulated downtime for the job will be displayed in the Downtime Pie Chart.

Copyright © 1983-2004 Mattec Corporation
3-25 810-0001 Rev - C
3.6 Process Exception Log The Process Exception Log will record any machine cycles that result in a violation of specification limits, control limits, and/or part qualification limits for any monitored process parameter. WARNING: The Process Exception Log has the potential to grow very rapidly and should only be turned on if the data collected will be used. The Process Exception Log is intended to be a short-term debugging tool and should not be used in place of statistical analysis of data. To view the Process Exception Log for a running job, follow these steps:
• Start the Real-Time Display. To do this, start the Main Menu and press the Launch Real-Time Display icon.
• Right-click on the desired job and select Process Exception Log. The Process Exception Log will be displayed.
Process Exception Log

Copyright © 1983-2004 Mattec Corporation
3-26 810-0001 Rev - C
Alternate Methods A “Process Exception Log Report” is available in System Reports. This report can be used to view process exceptions for any job. The Process Exception Log can be viewed in ProStat®. This allows you to view process exceptions for any job. Advanced Tip #1 Process Exception Logging is enabled in the Machine Configuration program. When enabled, all exceptions to any process parameter are automatically recorded by the system.

Copyright © 1983-2004 Mattec Corporation
3-27 810-0001 Rev - C
3.7 Document Control Center The Document Control Center allows you to easily browse the web-based setup sheets that have been configured for a job. You can easily switch between running jobs or scheduled jobs. To view the Document Control Center for a running job, follow these steps:
• Start the Real-Time Display. To do this, start the Main Menu and press the Launch Real-Time Display icon.
• Right-click on the desired job and select Document Control Center. The Document Control Center will be displayed.
Document Control Center
Advanced Tip #1 Web-based Setup Sheets is an optional feature. You may purchase this feature at any time by contacting the Mattec Sales Department.

Copyright © 1983-2004 Mattec Corporation
3-28 810-0001 Rev - C
3.8 Enter Scrap And Packed Parts Authorized users can use the Real-Time Display to enter scrap parts (or cases) and packed parts (or cases). Alternate Methods Users can enter scrap parts (or cases) and packed parts (or cases) for the current shift at the MIU. Users can enter scrap parts and packed parts for the current shift or any prior shift via Edit Facilities. Reference Section 5.8 for additional information. To enter scrap parts or cases for a running job, follow these steps:
• Start the Real-Time Display. To do this, start the Main Menu and press the Launch Real-Time Display icon.
• Right-click on the desired job and select Enter Scrap Parts. The Scrap Parts Entry dialog will be displayed.
Scrap Parts Entry Dialog
• Enter the scrap part quantity and press Apply.

Copyright © 1983-2004 Mattec Corporation
3-29 810-0001 Rev - C
To enter packed parts or cases for a running job, follow these steps:
• Start the Real-Time Display. To do this, start the Main Menu and press the Launch Real-Time Display icon.
• Right-click on the desired job and select Enter Packed Parts. The Packed Parts Entry dialog will be displayed.
Packed Parts Entry
• Enter the packed part quantity and press Apply.
Advanced Tip #1 Scrap and packed parts can be entered as parts or cases. The number of parts per case is defined in the Part IDs Edit Facility. Advanced Tip #2 The System Manager defines the system-wide scrap codes, creates the simple and advanced scrap maps, and assigns a Scrap Map to each MIU. Reference the System Administration Manual, #810-0014, for additional information. Advanced Tip #3 The scrap reasons that are displayed in the Scrap Entry dialog are chosen from the Advanced Scrap Map or the Simple Scrap Map, but not both. The map that is used by the MIU is the map that the Scrap Parts Entry dialog uses. The Scrap Map is specified in the Machine Configuration program.

Copyright © 1983-2004 Mattec Corporation
3-30 810-0001 Rev - C
3.9 Select Downtime Reasons Authorized users can use the Real-Time Display to select a downtime reason for the MIU. Selecting a downtime reason has the following effect:
• If the MIU is currently down, all future downtime will be collected to the specified reason.
• If the MIU is currently running, the MIU will be forced down if the selected
downtime reason is a “force down” downtime reason.
• If the MIU is currently running, the downtime selection will be ignored if the selected downtime reason is not a “force down” downtime reason.
Alternate Methods Users can select a downtime reason at the MIU. To select a downtime reason for an MIU, follow these steps:
• Start the Real-Time Display. To do this, start the Main Menu and press the Launch Real-Time Display icon.
• Right-click on the desired machine and select Remote Downtime. The Remote Downtime dialog will be displayed.
Remote Downtime Selection Dialog
• Select the downtime reason in the New Downtime Reason picklist and press Apply.
The Real-Time Display will contact the monitoring engine to request that the new downtime reason be applied to the MIU.

Copyright © 1983-2004 Mattec Corporation
3-31 810-0001 Rev - C
Advanced Tip #1 You can only select the downtime reason for an MIU via the Real-Time Display if the MIU supports this functionality. Contact the Mattec Customer Service Department to determine if your MIU supports this functionality. Advanced Tip #2 The System Manager defines the system-wide down codes, creates the simple and advanced downtime maps, specifies which down codes are “force down” reasons, and assigns a Down Map to each MIU. Reference the System Administration Manual, #810-0014, for additional information. Advanced Tip #3 The downtime reasons that are displayed in the Remote Downtime Selection dialog are chosen from the Advanced Down Map or the Simple Down Map, but not both. The map that is used by the MIU is the map that the Remote Downtime Selection dialog uses. The Down Map is specified in the Machine Configuration program.

Copyright © 1983-2004 Mattec Corporation
3-32 810-0001 Rev - C
3.10 Change Active Cavities Authorized users can use the Real-Time Display to change the active number of cavities for a tool. Alternate Methods Users can change the number of active cavities at the MIU. Users can change the number of active cavities via the Tool ID Edit Facility. Reference Section 5.3 for additional information. To change the active number of cavities for a running tool (job), follow these steps:
• Start the Real-Time Display. To do this, start the Main Menu and press the Launch Real-Time Display icon.
• Right-click on the desired machine and select Change Active Cavities. The Change Active Cavities dialog will be displayed.
Change Active Cavities Dialog
• Enter the new number of cavities in the Active Cavities field and press Apply.
The change will take effect immediately.

Copyright © 1983-2004 Mattec Corporation
3-33 810-0001 Rev - C
3.11 Cancel (Acknowledge) Help Calls Authorized users can use the Real-Time Display to cancel (acknowledge) a help call. Alternate Methods Users can cancel help calls at the MIU. To cancel (acknowledge) a help call for an MIU, follow these steps:
• Start the Real-Time Display. To do this, start the Main Menu and press the Launch Real-Time Display icon.
• Locate the desired machine. Double-click on a help call-related field. (For example, the field “HP” on the “Standard” Real-Time Display is a help-call related field.)
Help Call Acknowledge Dialog
• Press the Ack Help button. The help call will be cancelled.
Advanced Tip #1 There is no feedback at the MIU to indicate to the machine operator that you have cancelled the help call.

Copyright © 1983-2004 Mattec Corporation
3-34 810-0001 Rev - C
3.12 Additional Functionality The following table describes the selections that are available on the Real-Time Display’s View menu:
Field Description Refresh This option allows you to manually refresh the Real-Time
Display. This is especially useful if automatic refreshes have been disabled. When the “Refresh Rate” is set to a number that is greater than 0, the Real-Time Display will refresh automatically. Reference Section 3.2 for additional information.
Automatic Paging This options enables/disables “Automatic Paging” mode. When in Automatic Paging mode, the Real-Time Display will automatically page down through multiple pages of machines. When in Automatic Paging mode, the “Refresh Rate” is used to determine how frequently the Real-Time Display should page down to see more machines. Reference Section 3.2 for additional information.
High Contrast This mode causes the Real-Time Display to translate colored fields to shades of black, white, and gray to facilitate use by the visually disabled.
Touchscreen Mode This mode causes the Real-Time Display to translate many fields into a larger size that may be appropriate for use in a touchscreen environment.
Toolbar Shows or hides the Real-Time Display’s toolbar. Status Shows or hides the Status bar at the bottom of the display.

Copyright © 1983-2004 Mattec Corporation
3-35 810-0001 Rev - C
3.13 Operator Efficiency Display The Operator Efficiency Display shows login and performance information for all users throughout the plant who have logged in at the MIU for Operator Efficiency. A default Operator Efficiency Display shipped with your system and the System Manager can easily create custom displays using the Real-Time Display Writer. To start the Operator Efficiency Display, follow these steps:
• Start the Real-Time Display. To do this, start the Main Menu and press the Launch Real-Time Display icon.
• Press the Operator Efficiency Display icon on the toolbar. The Operator Efficiency Real-Time Display will be displayed.
Operator Efficiency Real-Time Display Advanced Tip #1 Operator Efficiency logging is an optional feature. You may purchase this feature at any time by contacting the Mattec Sales Department. Advanced Tip #2 You must have appropriate security permissions to view the Operator Efficiency Real-Time Display. Contact the System Administrator for additional information. Advanced Tip #3 The Operator Efficiency Real-Time Display is resizable. If the original display is too small to view all of the data, simply drag the sides of the dialog box to make the window larger.

Copyright © 1983-2004 Mattec Corporation
3-36 810-0001 Rev - C
3.14 Cost Display The Cost Display shows scrap and downtime costs for all machines in the plant in real-time. A default Cost Display shipped with your system and the System Manager can easily create custom displays using the Real-Time Display Writer. To start the Cost Display, follow these steps:
• Start the Real-Time Display. To do this, start the Main Menu and press the Launch Real-Time Display icon.
• Press the Cost Display icon on the toolbar. The Cost Real-Time Display will be displayed.
Cost Real-Time Display
Advanced Tip #1 Cost (“Cost Manager”) is an optional feature. You may purchase this feature at any time by contacting the Mattec Sales Department. Advanced Tip #2 You must have appropriate security permissions to view the Cost Real-Time Display. Contact the System Administrator for additional information. Advanced Tip #3 The Cost Real-Time Display is resizable. If the original display is too small to view all of the data, simply drag the sides of the dialog box to make the window larger.

Copyright © 1983-2004 Mattec Corporation
3-37 810-0001 Rev - C
3.15 Launching Other Applications The Real-Time Display, like the Main Menu, can be used to launch most other applications in the system. To launch an application using the Real-Time Display, follow these steps:
• Start the Real-Time Display. To do this, start the Main Menu and press the Launch Real-Time Display icon. The Real-Time Display will be displayed.
• Single-click the icon on the toolbar that represents the application that you wish to
start. Advanced Tip #1 To determine which program will be launched when you press an icon on toolbar, simply “hover” the mouse cursor over that icon. A “tool tip” will be displayed. In addition to the toolbar, the Real-Time Display provides special shortcuts to the Job Control and ProStat® programs. These shortcuts allow the programs to be started with the Machine Number, Job Number, and other relevant information already selected. To launch the Job Control program or the ProStat® program from the Real-Time Display, follow these steps:
• Start the Real-Time Display. To do this, start the Main Menu and press the Launch Real-Time Display icon. The Real-Time Display will be displayed.
• To start the Job Control program, right-click on a machine and select Job Control.
The Job Control program will be started with the machine number already selected.
• To start the ProStat® program, right-click on a machine and select ProStat®. The ProStat® program will be started with the machine number and job number already selected.
Advanced Tip #2 When you launch the ProStat® program via the Real-Time Display, the ProStat® program defaults to select All Dates for the specified Machine Number and Job Number and the program defaults to the Data Type “Automatic SPC” and the Parameter “Cycle Time”.

Copyright © 1983-2004 Mattec Corporation
4-38 810-0001 Rev - C
4. Reports ProHelp® EPM provides more than 50 built-in reports. New users should plan to spend some time executing each of the reports in the system in order to familiarize themselves with the reports. Advanced Tip #1 Mattec Corporation can write custom reports for you. These reports can then be easily integrated into your system. Contact the Mattec Customer Service Department for additional information. Advanced Tip #2 Advanced users can create their own custom reports using an approved version of Seagate’s Crystal Reports. These reports can then be easily integrated into your system. Contact the Mattec Customer Service Department for additional information or training. To start System Reports, follow these steps:
• Start the Main Menu and press the Launch System Reports icon.
• Select the report that you wish to execute. Fill in the report data selection interface as appropriate. Press OK. The selected report will be displayed.
Advanced Tip #3 Mattec provides an optional Web Reporting feature with ProHelp® EPM. This feature allows system reports to be run through a supported web browser. The user interface for these reports differs only slightly from the user interface in the standard System Reports program. Advanced Tip #4 Web Reporting is an optional feature. You may purchase this feature at any time by contacting the Mattec Sales Department. Advanced Tip #5 If you have purchased the Web Reporting option, the installation program will configure your computer to launch either the Web Reporting interface or the standard System Reports interface when you press the Launch System Reports icon on the Main Menu.

Copyright © 1983-2004 Mattec Corporation
4-39 810-0001 Rev - C
4.1 Shift Reports ProHelp® EPM offers approximately 20 “shift” reports that show production or process information for a specific machine, job, part, or tool. As a general rule, these reports show detailed information for jobs by day and by shift. Shift reports are ideal if you would like to view data for a very precise time range. To generate a “Shift” Report, follow these steps:
• Start System Reports. To do this, start the Main Menu and press the Launch System Reports icon.
• Click on the Shift menu and select the desired report. The report data selection interface will be displayed.
Typical “Shift” Report Interface
• Fill in the report data selection interface as appropriate. Press OK. The selected report
will be displayed.

Copyright © 1983-2004 Mattec Corporation
4-40 810-0001 Rev - C
Advanced Tip #1 Options in the “Select Shift” dialog will be enabled or disabled depending on the machines that have been selected. For example, you can only specify “Current Shift” if all machines that have been selected share the same shift configuration.
Daily Production Report
Shift reports are divided into the following categories:
Shift Report Category Description Production Reports in this category primarily show production-related
information for a machine, job, part, or tool. Downtime Reports in this category show machine downtime, and
include the “Period Downtime Report” and the “Detailed Downtime Report”.
Scrap Reports in this category show scrap that has been entered for each job and include the “Period Scrap Report” and the “Detailed Scrap Report”.
Analysis Reports in this category show detailed information that may be of interest to managers or Process Engineers.

Copyright © 1983-2004 Mattec Corporation
4-41 810-0001 Rev - C
Shift Report Category Description Cost Reports in this category show cost-related information and
include the “Shift Downtime Cost Report” and the “Shift Scrap Cost Report”.
Advanced Tip #2 The Shift Overall Equipment Effectiveness Report is an optional feature. You may purchase this feature at any time by contacting the Mattec Sales Department. Reference Section 4.3 for additional information regarding this report. Advanced Tip #3 You must have appropriate security permissions to view the results of the cost-related reports. Reference the System Administration Manual, #810-0014, for additional information. In many of the shift reports, if you disable the display of “Individual Records”, you will see only totals for a Machine, Department, or the entire facility. This can change the nature of these reports from “detailed” reports to “big picture” reports. For example, the Daily Production Report normally shows detailed production information for all machines on a shift-by-shift basis. However, when “Individual Records” are turned off, this report shows production totals for each department by shift.

Copyright © 1983-2004 Mattec Corporation
4-42 810-0001 Rev - C
4.2 Job Reports ProHelp® EPM offers approximately 15 “job” reports that show production or process information for a specific machine, job, part, or tool. As a general rule, these reports show detailed information for jobs. Job reports are ideal if you would like to view all data for a job without regard to time ranges. To generate a “Job” Report, follow these steps:
• Start System Reports. To do this, start the Main Menu and press the Launch System Reports icon.
• Click on the Job menu and select the desired report. The report data selection interface will be displayed.
Typical “Job” Report Interface
• Fill in the report data selection interface as appropriate. Press OK. The selected report
will be displayed.

Copyright © 1983-2004 Mattec Corporation
4-43 810-0001 Rev - C
Job Engineering Report
Job reports are divided into the following categories:
Shift Report Category Description Production Reports in this category primarily show production-related
information for a machine, job, part, or tool. Downtime Reports in this category show job downtime and include
the “Job Downtime Report”. Scrap Reports in this category show scrap that has been entered
for each job and include the “Job Scrap Report”. Analysis Reports in this category show detailed information that
may be of interest to managers or Process Engineers. Cost Reports in this category show cost-related information and
include the “Job Downtime Cost Report” and the “Job Scrap Cost Report”.

Copyright © 1983-2004 Mattec Corporation
4-44 810-0001 Rev - C
Advanced Tip #2 The Job Overall Equipment Effectiveness Report is an optional feature. You may purchase this feature at any time by contacting the Mattec Sales Department. Reference Section 4.3 for additional information regarding this report. Advanced Tip #3 You must have appropriate security permissions to view the results of the cost-related reports. Reference the System Administration Manual, #810-0014, for additional information. In many of the job reports, if you disable the display of “Individual Records”, you will see only totals for a Machine, Department, or the entire facility. This can increase the usability for all of these reports. For example, the Job Production Report can be selected for all currently running jobs and normally shows detailed production information for these jobs. However, when “Individual Records” are turned off, this report shows production totals, by department, for these jobs. Advanced Tip #4 Job reports show data for jobs that meet the criteria that is specified on the report interface. For example, you can often select to view data for all currently running jobs. Shift reports typically allow you to select one or more machines and to specify a very precise date range that you wish to view. For this reason, shift reports may be easier to use if you want to view production totals for a department or for the entire facility. Reference Section 4.1 for additional information. Advanced Tip #5 Some job reports allow you to specify a date range. For example, when you specify “Jobs Within Time Range”, you are prompted to enter a “From” date/time and a “To” date/time. This may behave differently than expected. Specifically, the “Jobs Within Time Range” filter will select all jobs that likely ran during the specified time range. However, the data on the report is not limited to data that was collected during the specified time range. Rather, the data on the report is the job data that was collected for any job that likely ran during the specified time range. Jobs that were suspended during the specified time range may also be included in these reports, even if the jobs did not actually run during the specified time range. Shift reports are ideal if you would like to view data for a very precise time range. Reference Section 4.1 for additional information.

Copyright © 1983-2004 Mattec Corporation
4-45 810-0001 Rev - C
4.3 Overall Equipment Effectiveness (OEE) Reports OEE is a simple way of measuring and improving the utilization of the machines in your plant. It differs from the Cycle Efficiency and Yield Efficiency calculations that are common in ProHelp® EPM. OEE is commonly used in Total Productive Maintenance (TPM) programs. Ideally, your factory would operate 100% of the time at 100% capacity and with 100% good parts. In reality, however, this rarely occurs. OEE provides a measure of the difference between the ideal and what is actually happening on your shop floor. OEE data is collected in Real-Time by the ProHelp® EPM system. This data can be seen in the Shift OEE Report and the Job OEE Report. This provides you with the information that you need to improve the asset utilization in your plant. To generate an OEE Report, follow these steps:
• Start System Reports. To do this, start the Main Menu and press the Launch System Reports icon.
• To generate the Shift OEE Report, click on the Shift menu, click on the Analysis menu, and select Shift Overall Equipment Effectiveness. Fill in the report data selection interface as appropriate. Press OK. The Shift OEE Report will be displayed.
• To generate the Job OEE Report, click on the Job menu, click on the Analysis menu, and select Job Overall Equipment Effectiveness. Fill in the report data selection interface as appropriate. Press OK. The Job OEE Report will be displayed.

Copyright © 1983-2004 Mattec Corporation
4-46 810-0001 Rev - C
Shift OEE Report
Advanced Tip #1 Overall Equipment Effectiveness is an optional feature. You may purchase this feature at any time by contacting the Mattec Sales Department. Advanced Tip #2 Mattec’s OEE calculation uses industry-standard calculations to measure machine downtime, machine cycle time (i.e., speed), and scrap parts. Specifically: OEE = (Percent Uptime) * (Percent Good Parts) * (Cycle Efficiency) A setting in the System Configuration program allows the System Manager to change the calculation to the following: OEE = (Percent Uptime) * (Percent Good Parts) * (Yield Efficiency) This latter calculation would actually double count the effect of scrap on the system. Reference the System Administration Manual, #810-0014, for additional information. Both calculations ignore the effect of downtime when a machine is idle (that is, when a job is not running.)

Copyright © 1983-2004 Mattec Corporation
4-47 810-0001 Rev - C
4.4 Preventive Maintenance Reports ProHelp® EPM assists in forecasting and tracking machine and tool preventive maintenance. The System Manager defines maintenance codes and how often the maintenance is performed. ProHelp® EPM automatically tracks machine and tool run time and cycles and accurately predicts when maintenance will be due. Preventive Maintenance Reports are available to show when preventive maintenance is next due for a machine or tool, to display maintenance history for a machine or tool, and to display other useful information. To generate a Preventive Maintenance Report, follow these steps:
• Start System Reports. To do this, start the Main Menu and press the Launch System Reports icon.
• To generate a Machine PM Report, click on the Planning menu, click on the Machine Maintenance menu, and select the desired report. Fill in the report data selection interface as appropriate. Press OK. The selected report will be displayed.
• To generate a Tool PM Report, click on the Planning menu, click on the Tool Maintenance menu, and select the desired report. Fill in the report data selection interface as appropriate. Press OK. The selected report will be displayed.
Machine PM Due Report

Copyright © 1983-2004 Mattec Corporation
4-48 810-0001 Rev - C
Advanced Tip #1 Preventive Maintenance is an optional feature. You may purchase this feature at any time by contacting the Mattec Sales Department. The following table describes the available Machine Preventive Maintenance reports:
Machine PM Report Description Machine PM Due This reports forecasts when preventive maintenance will
be due for all selected machines and all selected PM Codes for the given timeframe.
Machine Maintenance History This report lists all preventive maintenance history (i.e., preventive maintenance that has been performed) for all selected machines and all selected PM Codes for the given timeframe.
Machine Odometer This reports lists the cumulative machine cycles and cumulative run hours for all selected machines.
The following table describes the available Tool Preventive Maintenance reports:
Tool PM Report Description Tool PM Due This reports forecasts when preventive maintenance will
be due for all selected tools and all selected PM Codes for the given timeframe.
Tool Maintenance History This report lists all preventive maintenance history (i.e., preventive maintenance that has been performed) for all selected tools and all selected PM Codes for the given timeframe.
Tool Odometer This reports lists the cumulative machine cycles and cumulative run hours for all selected tools.
Advanced Tip #2 Preventive Maintenance history for a specific PM Code can be entered from an MIU or via Edit Facilities. Reference Section 5.6 or Section 5.7 for additional information. Advanced Tip #3 The System Manager defines Preventive Maintenance Reasons (Codes). Up to 100 Machine PM Codes and 100 Tool PM Codes can be created. Each PM Code specifies when it is due in terms of “run hours” or “machine cycles” or both.

Copyright © 1983-2004 Mattec Corporation
4-49 810-0001 Rev - C
Advanced Tip #4 The ProHelp® EPM system will not forecast that preventive maintenance is due for a specific machine or tool for a specific PM Code unless maintenance history has been entered for that machine/tool for that specific code at least one time. Thus, although the PM Codes are defined system-wide, they do not necessarily apply to all machines and all tools. Advanced Tip #5 The Machine Odometer can be adjusted in the Machine Configuration program. The Odometer is used by the Machine PM Due Report to determine when preventive maintenance will next be due for a machine. The Machine Odometer is updated automatically and in real-time by the ProHelp® EPM system. Manual changes to the Machine Odometer should be made with care. Reference the System Administration Manual, #810-0014, for additional information. Advanced Tip #6 The Tool Odometer can be adjusted in the Tool IDs Edit Facility. The Odometer is used by the Tool PM Due Report to determine when preventive maintenance will next be due for a tool. The Tool Odometer is updated automatically and in real-time by the ProHelp® EPM system. Manual changes to the Tool Odometer should be made with care. Reference Section 5.3 for additional information.

Copyright © 1983-2004 Mattec Corporation
4-50 810-0001 Rev - C
4.5 Operator Tracking and Efficiency Reports Most MIUs allow machine operators (and other users) to login and logout at the MIU. The system records the date/time of these events and this information is available in the Operator Login Report. To generate the Operator Login Report, follow these steps:
• Start System Reports. To do this, start the Main Menu and press the Launch System Reports icon.
• Click on the Planning menu, click on the Operator menu, and select Operator Login. Fill in the report data selection interface as appropriate. Press OK. The Operator Login Report will be displayed.
Operator Login Report

Copyright © 1983-2004 Mattec Corporation
4-51 810-0001 Rev - C
Advanced Tip #2 The Operator Login report includes information for all machine operators, whether they logged in for Operator Tracking or Operator Efficiency. The Operator Efficiency Report includes information only for machine operators who logged in for Operator Efficiency. An unlimited number of users can login for Operator Efficiency and an unlimited number of users can login for Operator Tracking, per machine. When a user logs in for Operator Efficiency, performance information is automatically collected by the system. The system records the percent down, percent scrap, percent of machine cycles that are out-of-specification, yield efficiency, and more. This information is available on the Real-Time Display (reference Section 3.13) and in the Operator Efficiency Report. To generate the Operator Efficiency Report, follow these steps:
• Start System Reports. To do this, start the Main Menu and press the Launch System Reports icon.
• Click on the Planning menu, click on the Operator menu, and select Operator Efficiency. Fill in the report data selection interface as appropriate. Press OK. The Operator Efficiency Report will be displayed.

Copyright © 1983-2004 Mattec Corporation
4-52 810-0001 Rev - C
Operator Efficiency Report
Advanced Tip #2 Operator Tracking is a standard feature that is included with the ProHelp® EPM system. Operator Efficiency is an optional feature. You may purchase this feature at any time by contacting the Mattec Sales Department. Advanced Tip #3 Operator Tracking and Operator Efficiency data is available for export to external time-tracking systems via the Data Import/Export program. Reference the Data Exchange Manual, #810-0002, for additional information. Advanced Tip #4 Operators can be automatically logged out of the MIU at shift change, if desired. The System Manager establishes this setting via the System Configuration program. Reference the System Administration Manual, #810-0014, for additional information.

Copyright © 1983-2004 Mattec Corporation
4-53 810-0001 Rev - C
4.6 Audit Trail Reports Audit Trail reports exist to help users achieve FDA CFR 21 Part 11 Compliance with their ProHelp® EPM software. Selected areas of the system provide detailed logs of changes to existing data. These logs are known as “Audit Trails”. The Audit Trail reports display the information in these logs in an easy-to-read format. To generate an Audit Trail Report, follow these steps:
• Start System Reports. To do this, start the Main Menu and press the Launch System Reports icon.
• Click on the Planning menu, click on the Audit Trail menu, and select the desired report. Fill in the report data selection interface as appropriate. Press OK. The selected report will be displayed.
Login Failure Report

Copyright © 1983-2004 Mattec Corporation
4-54 810-0001 Rev - C
Alternate Methods Some Audit Trail data can be viewed from within the applications that created the Audit Trail. For example, Process Sheet-related Audit Trails can be viewed by pressing the Audit Trail button in the Process Sheet Edit Facility. SPC/SQC-related Audit Trails can be viewed by pressing the Audit Trail button in ProStat® Sample Data Edit. Advanced Tip #1 Audit Trails is an optional feature. You may purchase this feature at any time by contacting the Mattec Sales Department. The following table describes the available Audit Trail reports:
Audit Trail Report Description Login Failure This Audit Trail report shows MIU login failures
(Operator Tracking, Operator Efficiency, Machine PM, and Tool PM) for MIUs that support this functionality. This requires the MIU Security option.
Manual SPC Audit Trail This Audit Trail report shows modifications to Manual SPC samples. These modifications can be made using the ProStat® Sample Data Edit program.
Variable SQC Audit Trail This Audit Trail report shows modifications to Variable SQC samples. These modifications can be made using the ProStat® Sample Data Edit program.
Attribute SQC Audit Trail This Audit Trail report shows modifications to Attribute SQC samples. These modifications can be made using the ProStat® Sample Data Edit program.
Process Sheet Basic Audit Trail
This Audit Trail report shows modifications to fields on the “Basic” tab of the Process Sheet in Edit Facilities.
Process Sheet Specification Limit Audit Trail
This Audit Trail report shows modifications to fields on the “Specification” tab of the Process Sheet in Edit Facilities.
Process Sheet Control Limits Audit Trail
This Audit Trail report shows modifications to fields on the “Control” tab of the Process Sheet in Edit Facilities.
Advanced Tip #2 MIU Security and ProStat® SPC/SQC are optional features. You may purchase either of these features at any time by contacting the Mattec Sales Department.

Copyright © 1983-2004 Mattec Corporation
4-55 810-0001 Rev - C
4.7 Log Reports Log Reports can help with troubleshooting production and process problems and can even be useful to users who are trying to achieve FDA CFR 21 Part 11 Compliance with their ProHelp® EPM software. To generate a Log Report, follow these steps:
• Start System Reports. To do this, start the Main Menu and press the Launch System Reports icon.
• Click on the Planning menu, click on the Logs menu, and select the desired report. Fill in the report data selection interface as appropriate. Press OK. The selected report will be displayed.
Scrap Log Report
Advanced Tip #1 Most logs in ProHelp® EPM are always enabled, and in fact, can not be disabled. For example, the Help Call Log, the Scrap Entry Log, the Downtime Log, and the Material Lot Entry Log are always enabled.

Copyright © 1983-2004 Mattec Corporation
4-56 810-0001 Rev - C
The following table describes the available Log reports:
Log Report Description Help Call Log This report shows detailed information about every call
for help from an MIU. Downtime Log This report shows detailed information about every
downtime occurrence that was monitored by an MIU. Scrap Log This report shows detailed information about every scrap
entry that was made anywhere in the system. Material Lot This report shows detailed information about all material
lot changes related to a job. Detailed Operator Log This reports shows detailed information about numerous
logs related to a job or a machine. Process Exception Log This report shows detailed information about all process
exceptions that were recorded by an MIU. This log is disabled by default.
WARNING: The Process Exception Log has the potential to grow very rapidly and should only be turned on if the data collected will be used. The Process Exception Log is intended to be a short-term debugging tool and should not be used in place of statistical analysis of data. Advanced Tip #2 Process Exception Logging is enabled in the Machine Configuration program. When enabled, all exceptions to any process parameter are automatically recorded by the system. Reference the System Administration Manual, #810-0014, for additional information.

Copyright © 1983-2004 Mattec Corporation
4-57 810-0001 Rev - C
4.8 Launching Other Applications The System Reports program, like the Main Menu, can be used to launch most other applications in the system. To launch an application using System Reports, follow these steps:
• Start System Reports. To do this, start the Main Menu and press the Launch System Reports icon. The System Reports program will be displayed.
• Single-click the icon on the toolbar that represents the application that you wish to
start. Advanced Tip #1 To determine which program will be launched when you press an icon on toolbar, simply “hover” the mouse cursor over that icon. A “tool tip” will be displayed.

Copyright © 1983-2004 Mattec Corporation
5-58 810-0001 Rev - C
5. Edit Facilities Edit Facilities is a program that allows you to maintain various “standards” that are needed for ProHelp® EPM, including the following:
• Create and maintain Tool IDs using the Tool ID Edit Facility. • Create and maintain Part IDs using the Part ID Edit Facility. • Create and maintain Sample Sheets using the Sample Sheet Edit Facility. • Create and maintain Process Sheets using the Process Sheet Edit Facility.
Additionally, Edit Facilities can be used to enter or modify data, including the following:
• Enter or modify Variable SQC and Attribute SQC samples and view or modify Manual SPC samples via the ProStat® Sample Data Edit Program. Reference Section 7.2 for additional information.
• Enter or modify Machine Maintenance History via the Machine Maintenance Log Edit Facility.
• Enter or modify Tool Maintenance History via the Tool Maintenance Log Edit Facility.
• Enter or modify scrap parts or packed parts via the Scrap and Packed Parts Edit Facility.
• Create notes regarding the setup for a specific job via the Job Setup Notes Edit Facility.
• Reclassify downtime that was recorded by the MIU from one downtime reason to another downtime reason or directly modify the amount of downtime that was recorded by the MIU via the Downtime Edit Log Edit Facility.
• Directly modify the total parts, machine cycles, or time that was recorded by the MIU via the Production History Edit Facility.
To launch Edit Facilities, follow these steps:
• Start the Main Menu and press the Launch Edit Facilities icon. The Edit Facilities program will be displayed.

Copyright © 1983-2004 Mattec Corporation
5-59 810-0001 Rev - C
Edit Facilities

Copyright © 1983-2004 Mattec Corporation
5-60 810-0001 Rev - C
5.1 Job Descriptor A job descriptor represents a work order. Most production and process information that is collected by the system is stored to the job descriptor. A bachelor job or son job is comprised of a Process Sheet, which in turn is comprised of a Machine ID, a Part ID, a Tool ID, and a Sample Sheet (optional). When a job is moved from one machine to another machine (via the Job Schedule program), it will continue to produce the same part with the same tool, but it will necessarily use a different process sheet. This allows your Process Engineer(s) to define different standards (e.g., specification and control limits) for jobs, depending on which machines the job will run on. If a particular machine does not have a Process Sheet defined (that would permit that job to run on the machine), an error is displayed and the person is prevented from moving the job to that machine. This allows your Process Engineer(s) to define rules that prevent jobs from being scheduled on machines that aren’t capable of running the job! For ProHelp® EPM to monitor production and process information for a specific job, several things must occur:
1. A Machine ID must exist. The System Administrator creates Machine IDs with the assistance of the Mattec Customer Service Department when your system is installed and configured. A Machine ID defines the physical characteristics of the MIU that will monitor a machine, including the specific process parameters that will be collected.
2. A Tool ID must be created. A Tool ID defines information for the tool that will be
used to create a part, including the number of cavities that the tool has. Tool IDs are created via Edit Facilities.
3. A Part ID must be created. A Part ID defines information for the part that will be
produced, including the material(s) that will be used, the part weight, costs, etc. Part IDs are created via Edit Facilities.
4. A Process Sheet must be created. A Process Sheet defines the machine-specific
process limits (e.g., specification limits and control limits) that will be used. Process Sheets are created via Edit Facilities.
5. A Job must be created and scheduled. This can be done via the Job Schedule or via
the Data Import/Export program. Reference Section 6.2 for additional information.
6. The job must be started and ended. This can be done at the MIU or via the host-based Job Control program. Reference Section 6.10 for additional information.
Job history data is available in real-time (while the job is running) and after the job is ended.

Copyright © 1983-2004 Mattec Corporation
5-61 810-0001 Rev - C
The System Administrator determines the amount of time that the job history data will be kept on-line in the system. Advanced Tip #1 Job standards, including the user-specified specification and control limits, are specified in a Process Sheet, not in the job descriptor. Other standards are specified in the appropriate Part ID, Tool ID, or Machine ID. Advanced Tip #2 Family jobs are comprised of one or more son jobs. Each son job has its own Process Sheet that includes user-specified specification and control limits. When two or more son jobs are running on the same machine, the ProHelp® EPM system will dynamically determine the specification and control limits that are sent to the MIU for process monitoring purposes. The specification limits and control limits are determined by selecting the lowest upper limit and the highest lower limit for each process parameter for each running son job. That is, the “tightest” specification and control limits, as determined by combining all of the running son job’s Process Sheets together, are used. Thus, when you end one son job and start running another, related son job, the specification and control limits that are in use may change slightly.

Copyright © 1983-2004 Mattec Corporation
5-62 810-0001 Rev - C
5.2 Part ID A Part ID defines information for the part that will be created by a job, including the material(s) that will be used, the part weight, and costs. The Part ID Edit Facility is used to maintain and identify all available parts. To launch the Part ID Edit Facility, follow these steps:
• Start the Main Menu and press the Launch Edit Facilities icon. The Edit Facilities program will be displayed.
• Click on the Edit menu and select Part ID. The Part ID Edit Facility will be
displayed.
Part ID Edit Facility

Copyright © 1983-2004 Mattec Corporation
5-63 810-0001 Rev - C
• To edit an existing Part ID, locate the desired Part ID using the selection facilities on the left-hand side of the display. Press the Edit button. Modify the Part ID as appropriate. Press Save to save your changes.
• To create a new Part ID, press the New button. Specify a unique Part Number and
fill in the fields on the display as appropriate. Press Save to save your changes. Alternate Methods You can click on the Edit Part IDs icon on the toolbar to launch the Part ID Edit Facility. Part IDs can also be created or modified via the Data Import/Export program. Reference the Data Exchange Manual, #810-0002, for additional information. Advanced Tip #1 A Part ID is associated with a job by being included in a Process Sheet. The following table describes the fields that are available in the Part ID Edit Facility:
Field Description Part Number A unique identifier that identifies the part. Description A description for the part. This field is frequently
displayed throughout the system to help you to identify a part.
Group A descriptive field to identify a part group. The Mattec Customer Service Department can manually configure the names of each group. This selection is ignored by the system.
Color ID The Color ID (or other material) that is used to make the part.
Material ID The primary material that is used to make the part. Part Information An additional description for the part. Comment 1 Comment 2
Descriptive fields used for adding notes about the part.
Last Update The date/time of the last time this specific Part ID was modified by a user.
Part Weight The estimated total part weight for each part. Part Cost The estimated part cost for each part. Percent Regrind The estimated percentage of total material that will be
used that will be regrind material. Parts Per Case The number of parts per case. Material Cost The estimated material cost for each part.

Copyright © 1983-2004 Mattec Corporation
5-64 810-0001 Rev - C
Field Description Web Setup Document The web address (URL) of a setup sheet that is associated
with this Part ID. This web-based setup sheet can be viewed using the Document Control Center or by pressing the View Document button.
Advanced Tip #2 Web-based Setup Sheets is an optional feature. You may purchase this feature at any time by contacting the Mattec Sales Department. Advanced Tip #3 You must have appropriate security permissions to view the Part Cost and Material Cost fields. Contact the System Administrator for additional information. Advanced Tip #4 The Material ID, Color ID, Part Weight, and Percent Regrind fields are used throughout the ProHelp® EPM system. These fields can be viewed on numerous displays. To modify the standard Part Setup Sheet, press the Setup Sheet button. Modify the Setup Sheet as appropriate. Press OK to temporarily save your changes. You will be returned to the Part ID Edit Facility. Press Save to save your changes. Advanced Tip #5 Most MIUs are not capable of viewing the standard Part Setup Sheet.

Copyright © 1983-2004 Mattec Corporation
5-65 810-0001 Rev - C
5.3 Tool ID A Tool ID defines information for the tool that will be used to create a part, including the number of cavities that the tool has. The Tool ID Edit Facility is used to maintain and identify all available tools. To launch the Tool ID Edit Facility, follow these steps:
• Start the Main Menu and press the Launch Edit Facilities icon. The Edit Facilities program will be displayed.
• Click on the Edit menu and select Tool ID. The Tool ID Edit Facility will be
displayed.
Tool ID Edit Facility

Copyright © 1983-2004 Mattec Corporation
5-66 810-0001 Rev - C
• To edit an existing Tool ID, locate the desired Tool ID using the selection facilities on the left-hand side of the display. Press the Edit button. Modify the Tool ID as appropriate. Press Save to save your changes.
• To create a new Tool ID, press the New button. Specify a unique Tool Number and
fill in the fields on the display as appropriate. Press Save to save your changes. Alternate Methods You can click on the Edit Tool IDs icon on the toolbar to launch the Tool ID Edit Facility. Tool IDs can also be created or modified via the Data Import/Export program. Reference the Data Exchange Manual, #810-0002, for additional information. Advanced Tip #1 A Tool ID is associated with a job by being included in a Process Sheet. The following table describes the fields that are available in the Tool ID Edit Facility:
Field Description Tool Number A unique identifier that identifies the tool. Description A description for the tool. This field is frequently
displayed throughout the system to help you to identify a tool.
Group A descriptive field to identify a tool group. The Mattec Customer Service Department can manually configure the names of each group. This selection is ignored by the system.
Machine Type A descriptive field to identify a required machine type for the tool. This field is ignored by the system.
Maker A descriptive field to identify the tool maker for the tool. This field is ignored by the system.
Location A descriptive field to identify the present location of the tool. This field is ignored by the system.
Last Update The date/time of the last time this specific Tool ID was modified by a user.
Total Cavities The total number of cavities for the tool.

Copyright © 1983-2004 Mattec Corporation
5-67 810-0001 Rev - C
Field Description Active Cavities The current number of cavities for the tool. This value
affects the number of parts that are produced with each machine cycle and cannot exceed the Total Cavities in the Tool. This number should be modified any time a cavity is “plugged”.
Runner Weight The amount of excess material that is consumed during a machine cycle and that does not go into the resulting part.
Setup Time An estimate of the amount of time that is required to setup this tool before the job will be ready to produce parts. The Job Schedule uses this value to adjust forecasted start/end times for non-running jobs.
Comment 1 Comment 2
Descriptive fields used for adding notes about the tool.
Web Setup Document The web address (URL) of a setup sheet that is associated with this Tool ID. This web-based setup sheet can be viewed using the Document Control Center or by pressing the View Document button.
Tool/Machine Compatibility Values
These fields allow you to specify requirements to determine the compatibility between tools and machines. These requirements are not enforced by the ProHelp® EPM software. Similar compatibility requirements can be specified in the Machine Configuration program. Reference the System Administration Manual, #810-0014, for additional information.
Advanced Tip #2 Web-based Setup Sheets is an optional feature. You may purchase this feature at any time by contacting the Mattec Sales Department. Advanced Tip #3 The Active Cavities in the Tool ID affects the number of parts that are produced with each machine cycle and cannot exceed the Total Cavities in the Tool. This number should be modified any time a cavity is “plugged”. This number is typically modified via the MIU or the Real-Time Display, but can be modified using the Tool ID Edit Facility.

Copyright © 1983-2004 Mattec Corporation
5-68 810-0001 Rev - C
Advanced Tip #4 The Setup Time in the Tool ID is used by the Job Schedule to adjust when scheduled jobs are expected to start/end. It’s important to keep this value up-to-date. Advanced Tip #5 Father jobs can optionally specify a “base tool”. This is used for Preventive Maintenance calculations only. All other fields in the Tool ID for father jobs are for reference purposes only. Advanced Tip #6 The Tool Odometer can be adjusted in the Tool IDs Edit Facility. The Odometer is used by the Tool PM Due Report to determine when preventive maintenance will next be due for a tool. The Tool Odometer is updated automatically and in real-time by the ProHelp® EPM system. Manual changes to the Tool Odometer should be made with care. To modify the standard Tool Setup Sheet, press the Setup Sheet button. Modify the Setup Sheet as appropriate. Press OK to temporarily save your changes. You will be returned to the Tool ID Edit Facility. Press Save to save your changes. Advanced Tip #7 Many MIUs are capable of viewing all or part of the standard Tool Setup Sheet. For example, the TSMIU is capable of displaying the entire Tool Setup Sheet for the currently running job(s) and for all scheduled jobs.

Copyright © 1983-2004 Mattec Corporation
5-69 810-0001 Rev - C
5.4 Sample Sheet A Sample Sheet is used to enable Manual SPC, Variable SQC, and Attribute SQC data entry for a job. The Sample Sheet Edit Facility is used to maintain and identify all available Sample Sheets. To launch the Sample Sheet Edit Facility, follow these steps:
• Start the Main Menu and press the Launch Edit Facilities icon. The Edit Facilities program will be displayed.
• Click on the Edit menu, click on the ProStat® SPC/SQC menu, and select Sample
Sheet. The Sample Sheet Edit Facility will be displayed.
Sample Sheet Edit Facility
• To edit an existing Sample Sheet, locate the desired Sample Sheet using the
selection facilities on the left-hand side of the display. Press the Edit button. Modify the Sample Sheet as appropriate. Press Save to save your changes.
• To create a new Sample Sheet, press the New button. Specify a unique Sample

Copyright © 1983-2004 Mattec Corporation
5-70 810-0001 Rev - C
Sheet ID and fill in the fields on the display as appropriate. Press Save to save your changes.
Alternate Methods You can click on the Edit Sample Sheets icon on the toolbar to launch the Sample Sheets Edit Facility. Advanced Tip #1 Sample Sheets are related to ProStat®. ProStat® SPC/SQC is an optional feature. You may purchase this feature at any time by contacting the Mattec Sales Department. Advanced Tip #2 A Sample Sheet is associated with a job by being included in a Process Sheet. The following table describes the fields that are available in the Sample Sheet Edit Facility:
Field Description Sample Sheet ID A unique identifier that identifies the Sample Sheet. Description A description for the Sample Sheet. Last Update The date/time of the last time this specific Sample Sheet
was modified by a user. Period This field allows you to specify the frequency (machine
cycles or minutes) that you expect a Manual SPC sample, Variable SQC sample, and/or Attribute SQC sample to be taken. This field is ignored by the system.
Number Of Cycles This field is used to define the number of machine cycles that comprise a sample. Valid values are 1 to 30. However, this value must be set between 1 and 9 for data entry for Variable SQC data and Attribute SQC data to be performed at an MIU. If this field is greater than 9, it is treated as if it were 9 for Manual SPC sampling.
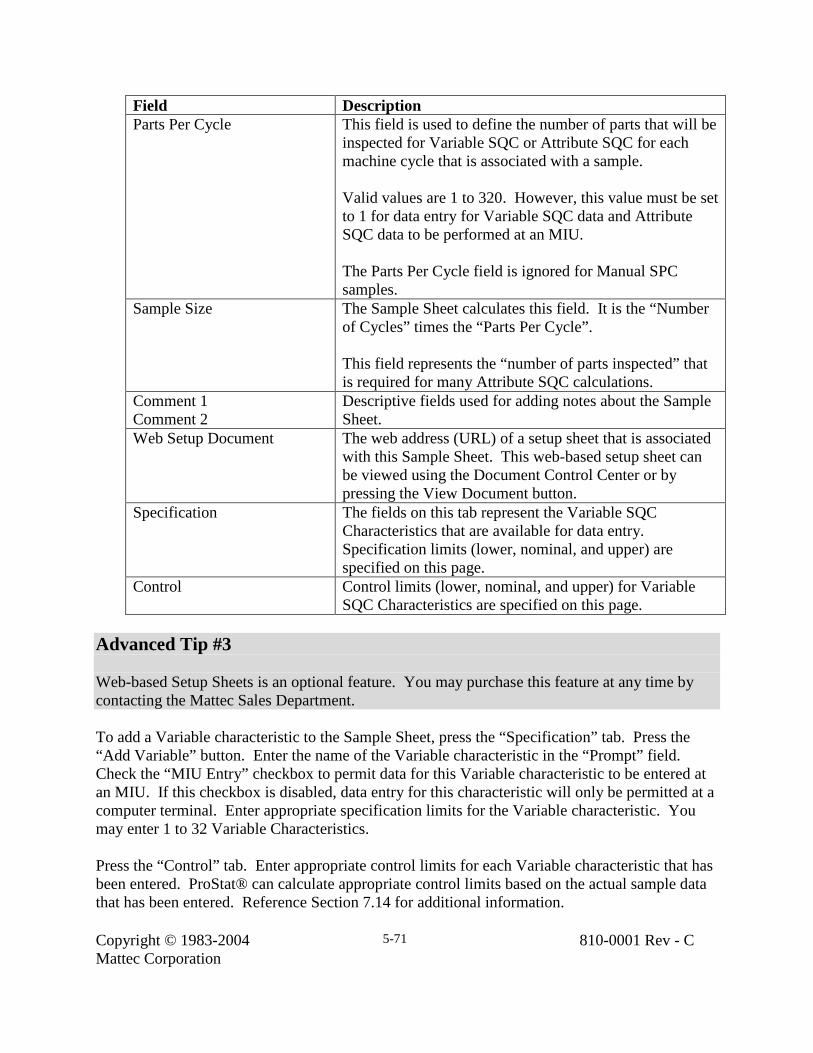
Copyright © 1983-2004 Mattec Corporation
5-71 810-0001 Rev - C
Field Description Parts Per Cycle This field is used to define the number of parts that will be
inspected for Variable SQC or Attribute SQC for each machine cycle that is associated with a sample. Valid values are 1 to 320. However, this value must be set to 1 for data entry for Variable SQC data and Attribute SQC data to be performed at an MIU. The Parts Per Cycle field is ignored for Manual SPC samples.
Sample Size The Sample Sheet calculates this field. It is the “Number of Cycles” times the “Parts Per Cycle”. This field represents the “number of parts inspected” that is required for many Attribute SQC calculations.
Comment 1 Comment 2
Descriptive fields used for adding notes about the Sample Sheet.
Web Setup Document The web address (URL) of a setup sheet that is associated with this Sample Sheet. This web-based setup sheet can be viewed using the Document Control Center or by pressing the View Document button.
Specification The fields on this tab represent the Variable SQC Characteristics that are available for data entry. Specification limits (lower, nominal, and upper) are specified on this page.
Control Control limits (lower, nominal, and upper) for Variable SQC Characteristics are specified on this page.
Advanced Tip #3 Web-based Setup Sheets is an optional feature. You may purchase this feature at any time by contacting the Mattec Sales Department. To add a Variable characteristic to the Sample Sheet, press the “Specification” tab. Press the “Add Variable” button. Enter the name of the Variable characteristic in the “Prompt” field. Check the “MIU Entry” checkbox to permit data for this Variable characteristic to be entered at an MIU. If this checkbox is disabled, data entry for this characteristic will only be permitted at a computer terminal. Enter appropriate specification limits for the Variable characteristic. You may enter 1 to 32 Variable Characteristics. Press the “Control” tab. Enter appropriate control limits for each Variable characteristic that has been entered. ProStat® can calculate appropriate control limits based on the actual sample data that has been entered. Reference Section 7.14 for additional information.

Copyright © 1983-2004 Mattec Corporation
5-72 810-0001 Rev - C
Advanced Tip #4 If you have the ProStat® SPC/SQC option, Automatic SPC sampling is always enabled for all jobs. Advanced Tip #5 A Sample Sheet is used to enable Manual SPC, Variable SQC, and Attribute SQC sampling. Advanced Tip #6 The System Administrator defines the process parameters that are associated with Manual SPC sampling in the Machine Configuration program. If a job’s Process Sheet has a Sample Sheet then Manual SPC sampling is enabled. Specification and control limits for the Manual SPC process parameters are stored in the Process Sheet. Advanced Tip #7 Variable SQC characteristics are defined on the “Specification” and “Control” tabs in the Sample Sheet. You must manually define these characteristics by pressing the “Add Variable” button. If a job’s Process Sheet has a Sample Sheet then Variable SQC sampling will have been enabled if you have added one or more Variable characteristics to the “Specification” or “Control” tabs. Specification and control limits for the Variable SQC characteristics are stored in the Sample Sheet. Advanced Tip #8 Attribute SQC sampling uses the system-wide scrap reasons as “defect” reasons for Attribute SQC purposes. If a job’s Process Sheet has a Sample Sheet, then Attribute SQC sampling is enabled. The ten (10) “scrap/defect” reasons that are configured in the “Simple Scrap Map” are used to enable Attribute SQC data entry at an MIU. The System Manager creates the “Simple Scrap Map” and the “Advanced Scrap Map” and assigns these maps to an MIU via the Machine Configuration program. Reference the System Administration Manual, #810-0014, for additional information. There is no place in the ProHelp® EPM software to enter specification or control limits for Attribute SQC defects. However, the ProStat® software is capable of dynamically calculating control limits for Attribute SQC data and displaying these control limits on the appropriate charts. Reference Section 7.19.1 for additional information.

Copyright © 1983-2004 Mattec Corporation
5-73 810-0001 Rev - C
Advanced Tip #9 It is possible to create a configuration for Variable SQC data entry or Attribute SQC data entry that would prohibit the data entry from being performed at an MIU. In this case, all data entry must be performed at a computer terminal. For example, “Parts Per Cycle” must be equal to 1 in order to perform Variable SQC data entry and Attribute SQC data entry at an MIU. If “Parts Per Cycle” is greater than 1, this data entry must be performed at a computer terminal. Advanced Tip #10 ProHelp® EPM allows the user to specify different subgroup sizes for Automatic SPC sampling and Manual SPC/Variable SQC/Attribute SQC sampling. Most MIUs, however, do not support this functionality. As such, it is a good idea to use the same subgroup size throughout the system. To modify the standard Sample Sheet Sheet, press the Setup Sheet button. Modify the Setup Sheet as appropriate. Press OK to temporarily save your changes. You will be returned to the Sample Sheet Edit Facility. Press Save to save your changes. Advanced Tip #11 Many MIUs are capable of viewing all or part of the standard Sample Sheet Setup Sheet. For example, the TSMIU is capable of displaying the entire Sample Sheet Setup Sheet for the currently running job(s) and for all scheduled jobs.

Copyright © 1983-2004 Mattec Corporation
5-74 810-0001 Rev - C
5.5 Process Sheet A Process Sheet defines the machine-specific process limits (e.g., specification limits and control limits) that will be used when a job is run on a specific machine. The Process Sheet Edit Facility is used to maintain and identify all available Process Sheets. A bachelor job or son job is comprised of a Process Sheet, which in turn is comprised of a Machine ID, a Part ID, a Tool ID, and a Sample Sheet (optional). When a job is moved from one machine to another machine (via the Job Schedule program), it will continue to produce the same part with the same tool, but it will necessarily use a different process sheet. This allows your Process Engineer(s) to define different standards (e.g., specification and control limits) for jobs, depending on which machines the job will run on. If a particular machine does not have a Process Sheet defined (that would permit that job to run on the machine), an error is displayed and the person is prevented from moving the job to that machine. This allows your Process Engineer(s) to define rules that prevent jobs from being scheduled on machines that aren’t capable of running the job! To launch the Process Sheet Edit Facility, follow these steps:
• Start the Main Menu and press the Launch Edit Facilities icon. The Edit Facilities program will be displayed.
• Click on the Edit menu and select Process Sheet. The Process Sheet Edit
Facility will be displayed.
• To edit an existing Process Sheet, locate the desired Process Sheet using the selection facilities on the left-hand side of the display. Press the Edit button. Modify the Process Sheet as appropriate. Press Save to save your changes.
• To create a new Process Sheet, press the New button. Select an existing Machine
Number, Part Number, and Tool Number. The combination that is selected must be unique. Fill in the fields on the display as appropriate. Press Save to save your changes.

Copyright © 1983-2004 Mattec Corporation
5-75 810-0001 Rev - C
Process Sheet Edit Facility
Alternate Methods Process Sheets can also be created or modified via the Data Import/Export program. Reference the Data Exchange Manual, #810-0002, for additional information. Advanced Tip #1 A Machine ID, Part ID, Tool ID, and Sample Sheet (optional) are associated with a job by being included in a Process Sheet. A job must specify a Process Sheet when it is created, either in the Job Schedule or the Data Import/Export program. Advanced Tip #2 You must have appropriate security permissions to view the Labor Cost field. Contact the System Administrator for additional information.

Copyright © 1983-2004 Mattec Corporation
5-76 810-0001 Rev - C
The following table describes the fields that are available in the Process Sheet Edit Facility:
Field Description Machine Number Part Number Tool Number
The Machine Number, Part Number, and Tool Number uniquely identify the Process Sheet. These settings can not be modified once the Process Sheet has been saved.
Sample Sheet This field allows you to associate a Sample Sheet with the Process Sheet. A Sample Sheet is used to enable Manual SPC, Variable SQC, and Attribute SQC sampling. Reference Section 5.4 for additional information.
Last Update The date/time of the last time this specific Process Sheet was modified by a user.
Percent Down This field allows you to specify the expected percent down for the machine. The Job Schedule uses the “standard” value for non-running jobs when calculating forecasted end dates. The “historical” value is for display purposed only.
Percent Scrap This field allows you to specify the expected percent scrap for the part. The Job Schedule uses the “standard” value for non-running jobs when calculating forecasted end dates. The “historical” value is for display purposed only.
Cycle Time This field allows you to specify the expected cycle time for the machine. The Job Schedule uses the “standard” value for non-running jobs when calculating forecasted end dates. The “historical” value is for display purposed only.
Non-Production Limit The non-production limit is used by the MIU to determine that the machine is down and is not cycling. After a machine cycle, the MIU expects to another machine cycle to occur within a certain period of time. If the next machine cycle does not occur before the non-production limit is reached, the machine is determined to be down.
Cavity PSI Transfer This field allows you to specify a value for use with the Cavity Pressure Transfer feature in the MIU. When the monitored cavity pressure reaches this value, the MIU will ignite a digital contact. This digital contact can be connected to the machine to cause the machine to transfer from injection pressure to hold pressure. The System Manager defines the analog channel that is used for cavity pressure transfer (and monitoring) in the Machine Configuration program.
Labor Hour Factor This field allows you to identify the number of machine operators that are required per shift. This field is ignored by the system.

Copyright © 1983-2004 Mattec Corporation
5-77 810-0001 Rev - C
Field Description Labor Cost This field allows you to specify the standard labor cost for
the machine operators that are required per shift. This field is ignored by the system.
Comment 1 Comment 2
Descriptive fields used for adding notes about the Process Sheet.
Web Setup Document The web address (URL) of a setup sheet that is associated with this Process Sheet. This web-based setup sheet can be viewed using the Document Control Center or by pressing the View Document button.
Specification The fields on this tab represent the process parameters that will be monitored by the MIU. The System Administrator defines these process parameters in the Machine Configuration program. Specification limits (lower, nominal, and upper) are specified on this page.
Control Control limits (lower, nominal, and upper) monitored process parameters are specified on this page.
Advanced Tip #3 Web-based Setup Sheets is an optional feature. You may purchase this feature at any time by contacting the Mattec Sales Department. Advanced Tip #4 Cavity Pressure Transfer is an optional feature. You may purchase this feature at any time by contacting the Mattec Sales Department. Audit Trails Changes to existing Process Sheets will automatically receive an “Audit Trail”, provided that you have purchased the Audit Trail option from Mattec. This Audit Trail can be viewed by pressing the Audit Trail button in the Process Sheet Edit Facility. This data is also available in System Reports. Reference Section 4.6 for additional information. Audit Trails is an optional feature. You may purchase this feature at any time by contacting the Mattec Sales Department.

Copyright © 1983-2004 Mattec Corporation
5-78 810-0001 Rev - C
To modify the standard Process Sheet Sheet, press the Setup Sheet button. Modify the Setup Sheet as appropriate. Press OK to temporarily save your changes. You will be returned to the Process Sheet Edit Facility. Press Save to save your changes. Advanced Tip #5 Many MIUs are capable of viewing all or part of the standard Process Sheet Setup Sheet. For example, the TSMIU is capable of displaying the entire Process Sheet Setup Sheet for the currently running job(s) and for all scheduled jobs. A job’s specification limits and control limits are specified in the Process Sheet. These values are used by the MIU for real-time process monitoring. These specification limits and control limits are also used for Automatic SPC and Manual SPC purposes. If you make changes to the Process Sheet for a running job, these changes are updated automatically at the MIU when you press Save. ProStat® can calculate appropriate control limits based on actual Automatic SPC or Manual SPC sample data that has been collected. Reference Section 7.14 for additional information. Advanced Tip #6 Family jobs are comprised of one or more son jobs. Each son job has its own Process Sheet that includes user-specified specification and control limits. When two or more son jobs are running on the same machine, the ProHelp® EPM system will dynamically determine the specification and control limits that are sent to the MIU for process monitoring purposes. The specification limits and control limits are determined by selecting the lowest upper limit and the highest lower limit for each process parameter for each running son job. That is, the “tightest” specification and control limits, as determined by combining all of the running son job’s Process Sheets together, are used. Thus, when you end one son job and start running another, related son job, the specification and control limits that are in use may change slightly.

Copyright © 1983-2004 Mattec Corporation
5-79 810-0001 Rev - C
5.6 Machine Maintenance Log The Machine Maintenance Log in Edit Facilities allows you to create new Machine Preventive Maintenance History and view/edit existing history records. To enter preventive maintenance activity for a machine, follow these steps:
• Start the Main Menu and press the Launch Edit Facilities icon. The Edit Facilities program will be displayed.
• Click on the Edit menu, click on the Logs menu, and select Machine Maintenance
Log. The select Machine Maintenance Log Edit Facility will be displayed.
Machine Maintenance Log Edit Facility
• To edit an existing machine maintenance entry, locate the desired entry using the
selection facilities on the left-hand side of the display. Press the Edit button. Modify the machine maintenance entry as appropriate. Press Save to save your changes.

Copyright © 1983-2004 Mattec Corporation
5-80 810-0001 Rev - C
• To create a new machine maintenance entry, press the New button. Select an existing
Machine Number and Maintenance Code. Select the appropriate Run Time and Machine Cycles when the maintenance was performed. Fill in the fields on the display as appropriate. Press Save to save your changes.
Alternate Methods Users can log preventive maintenance activity as it occurs at the MIU. When this is done, the system will automatically calculate the amount of time that it took to perform the maintenance activity. Advanced Tip #1 Preventive Maintenance is an optional feature. You may purchase this feature at any time by contacting the Mattec Sales Department. Advanced Tip #2 The System Manager defines Preventive Maintenance Reasons (Codes). Up to 100 Machine PM Codes can be created. Each PM Code specifies when it is due in terms of “run hours” or “machine cycles” or both. Advanced Tip #3 The ProHelp® EPM system will not forecast that preventive maintenance is due for a specific machine for a specific PM Code unless maintenance history has been entered for that machine for that specific code at least one time. Thus, although the PM Codes are defined system-wide, they do not necessarily apply to all machines. You can include notes with each preventive maintenance activity that is performed. To include detailed notes about the maintenance activity, press the Notes button. Modify the Maintenance Notes as appropriate. Press OK to temporarily save your changes. You will be returned to the Machine Maintenance Log Edit Facility. Press Save to save your changes.

Copyright © 1983-2004 Mattec Corporation
5-81 810-0001 Rev - C
5.7 Tool Maintenance Log The Tool Maintenance Log in Edit Facilities allows you to create new Tool Preventive Maintenance History and view/edit existing history records. To enter preventive maintenance activity for a tool, follow these steps:
• Start the Main Menu and press the Launch Edit Facilities icon. The Edit Facilities program will be displayed.
• Click on the Edit menu, click on the Logs menu, and select Tool Maintenance Log.
The select Tool Maintenance Log Edit Facility will be displayed.
Tool Maintenance Log Edit Facility
• To edit an existing tool maintenance entry, locate the desired entry using the selection
facilities on the left-hand side of the display. Press the Edit button. Modify the tool maintenance entry as appropriate. Press Save to save your changes.

Copyright © 1983-2004 Mattec Corporation
5-82 810-0001 Rev - C
• To create a new tool maintenance entry, press the New button. Select an existing Tool Number and Maintenance Code. If the tool was running in a machine at the time that the maintenance was performed, select the Machine Number. Select the appropriate Run Time and Cycles when the maintenance was performed. Fill in the fields on the display as appropriate. Press Save to save your changes.
Alternate Methods Users can log preventive maintenance activity as it occurs at the MIU. When this is done, the system will automatically calculate the amount of time that it took to perform the maintenance activity. Advanced Tip #1 Preventive Maintenance is an optional feature. You may purchase this feature at any time by contacting the Mattec Sales Department. Advanced Tip #2 The System Manager defines Preventive Maintenance Reasons (Codes). Up to 100 Tool PM Codes can be created. Each PM Code specifies when it is due in terms of “run hours” or “machine cycles” or both. Advanced Tip #3 The ProHelp® EPM system will not forecast that preventive maintenance is due for a specific tool for a specific PM Code unless maintenance history has been entered for that tool for that specific code at least one time. Thus, although the PM Codes are defined system-wide, they do not necessarily apply to all machines. You can include notes with each preventive maintenance activity that is performed. To include detailed notes about the maintenance activity, press the Notes button. Modify the Maintenance Notes as appropriate. Press OK to temporarily save your changes. You will be returned to the Tool Maintenance Log Edit Facility. Press Save to save your changes.

Copyright © 1983-2004 Mattec Corporation
5-83 810-0001 Rev - C
5.8 Enter Scrap And Packed Parts The Scrap and Packed Parts Log in Edit Facilities allows you to enter new scrap or packed parts for any job and to view/edit existing scrap or packed parts entries. To enter scrap or packed parts for a job, follow these steps:
• Start the Main Menu and press the Launch Edit Facilities icon. The Edit Facilities program will be displayed.
• Click on the Edit menu, click on the Logs menu, and select Scrap and Packed
Parts. The Scrap and Packed Parts Edit Facility will be displayed.
Scrap and Packed Parts Edit Facility
• To edit an existing scrap or packed parts entry, locate the desired entry using the
selection facilities on the left-hand side of the display. Press the Edit button. Modify the scrap or packed parts entry as appropriate. Press Save to save your changes.

Copyright © 1983-2004 Mattec Corporation
5-84 810-0001 Rev - C
• To create a new scrap or packed parts entry, press the New button. Select an existing
Machine Number and Job Number. Select the appropriate Date and Shift. Select the appropriate Transaction Type - Scrap Entry or Packed Quantity. Fill in the fields on the display as appropriate. Press Save to save your changes.
Alternate Methods Users can enter scrap parts (or cases) and packed parts (or cases) for the current shift at the MIU. Users can enter scrap parts (or cases) and packed parts (or cases) for the current shift via the Real-Time Display. Reference Section 3.8 for additional information. Audit Trail Changes to existing scrap entries or packed parts entries automatically receive an Audit Trail. This Audit Trail can be viewed in the “Scrap Log Report” in System Reports. This Audit Trail is created even if you have not purchased the Audit Trail optional feature from Mattec. Advanced Tip #1 Scrap and packed parts can be entered as parts only. Advanced Tip #2 The scrap reasons that are displayed in the Scrap Entry dialog are not chosen from the Advanced Scrap Map or the Simple Scrap Map. Rather, the scrap reasons that are displayed are the system-wide scrap reasons that were created by the System Manager.

Copyright © 1983-2004 Mattec Corporation
5-85 810-0001 Rev - C
5.9 Job Setup Notes The Job Setup Notes Edit Facility is useful for creating notes regarding the setup for a specific job. Unlike other “setup sheets”, the Job Setup Notes are probably more useful to record “what” was done rather than to instruct the user “how” to setup the job. To create or modify a setup note for a specific job, follow these steps:
• Start the Main Menu and press the Launch Edit Facilities icon. The Edit Facilities program will be displayed.
• Click on the Edit menu, click on the Logs menu, and select Job Setup Notes. The
Job Setup Notes Edit Facility will be displayed.
Job Setup Notes Edit Facility
• To edit an existing Job Setup Note, locate the desired job using the selection
facilities on the left-hand side of the display. Press the Edit button. Press the Setup Sheet button. The existing Job Setup Note will be displayed.

Copyright © 1983-2004 Mattec Corporation
5-86 810-0001 Rev - C
• To create a new Job Setup Note, press the New button. Select the Machine Number
that the job ran on (or that the job is scheduled on). Select the Job Number. Press the Setup Sheet button. A blank Job Setup Note will be displayed.
Creating a New Job Setup Note
• Modify the Job Setup Note as appropriate. Press OK to temporarily save your
changes. You will be returned to the Job Setup Notes Edit Facility. Press Save to save your changes.
Advanced Tip #1 Setup sheets are also available in the following: • Machine ID • Tool ID • Part ID • Process Sheet • Sample Sheet These setup sheets may be more appropriate than the Job Setup Notes if you wish to create instructions for “how” to setup a job.

Copyright © 1983-2004 Mattec Corporation
5-87 810-0001 Rev - C
5.10 Material Lot Edit The Material Lot Edit program in Edit Facilities is a legacy application. This program is very limited in its functionality and may be removed in future releases of software. Alternate Methods Users can enter material lot changes as they occur at the MIU. This is the preferred method for entering material lots. Advanced Tip #1 The Material Lot Edit program does not allow you to create new material lot entries. Advanced Tip #2 The Material Lot Edit program in Edit Facilities works directly on existing material lot entries in the dbo.IdTrack database table. Material lot entries in this database table are not displayed anywhere in the ProHelp® EPM software. The Material Lot Edit program does not modify material lot entries in the dbo.OperLog database table. Material lot entries in this table are the material lots that are displayed on the “Material Lot Report”, in ProStat® on the “Production” tab, and elsewhere in the system.

Copyright © 1983-2004 Mattec Corporation
5-88 810-0001 Rev - C
5.11 Downtime Edit The Downtime Edit program in Edit Facilities allows you to reclassify downtime from one downtime reason to another or to edit the amount of downtime that was collected by the MIU. Reclassifying downtime (via the Reclassify button) is a normal operation that can be safely performed at any time. Editing downtime (via the Edit button) is a non-standard operation and should be avoided unless absolutely necessary. To reclassify downtime from one downtime reason to another downtime reason for a specific job, follow these steps:
• Start the Main Menu and press the Launch Edit Facilities icon. The Edit Facilities program will be displayed.
• Click on the Edit menu, click on the Logs menu, and select Downtime Edit. The
Downtime Edit Edit Facility will be displayed.
Downtime Edit Edit Facility

Copyright © 1983-2004 Mattec Corporation
5-89 810-0001 Rev - C
• To reclassify an existing downtime entry from one downtime reason to another
supported downtime reason, locate the desired job, shift, and downtime reason using the selection facilities on the left-hand side of the display. Press the Reclassify button. The Reclassify Downtime dialog will be displayed.
Reclassify Downtime Dialog
• Select the new Downtime Reason from the picklist. All downtime reasons that exist
in the “Down Map” for this machine will be displayed. You can reclassify all of the downtime and all down counts (downtime occurrences) that are associated with the original downtime reason or only a subset of the downtime and/or down counts. Make your changes as appropriate. Press Save.
Advanced Tip #1 Reclassifying downtime (via the Reclassify button) is a normal operation that can be safely performed at any time. Editing downtime (via the Edit button) is a non-standard operation and should be avoided unless absolutely necessary. Editing downtime can cause inconsistent data throughout the system and may negatively affect reports.

Copyright © 1983-2004 Mattec Corporation
5-90 810-0001 Rev - C
Advanced Tip #2 The downtime reasons that are displayed in the Reclassify Downtime dialog are chosen from the Advanced Down Map or the Simple Down Map, but not both. The map that is used by the MIU is the map that the Reclassify Downtime dialog uses. The System Manager creates the “Down Map” and assigns the map to a machine via the Machine Configuration program. Reference the System Administration Manual, #810-0014, for additional information. Advanced Tip #3 You can not reclassify more downtime or down counts (downtime occurrences) than have been collected by the MIU. Advanced Tip #4 Downtime data is stored internally in seconds, not minutes. When you reclassify downtime from one downtime reason to another downtime reason, if you do not reclassify 100% of the existing downtime, a “best guess” algorithm is used to make appropriate changes to the “weighted” downtime-related fields, including weighted downtime and weighted down count. To directly edit downtime for a specific job, follow these steps:
• Start the Main Menu and press the Launch Edit Facilities icon. The Edit Facilities program will be displayed.
• Click on the Edit menu, click on the Logs menu, and select Downtime Edit. The
Downtime Edit Edit Facility will be displayed.
• To directly an existing downtime entry, locate the desired job, shift, and downtime reason using the selection facilities on the left-hand side of the display. Press the Edit button. Make your changes as appropriate and press Save.
Advanced Tip #5 If you need to edit downtime data, you should investigate “why”. What caused the incorrect recording of data in the first place? What can be done to eliminate these errors in the future? Advanced Tip #6 When you edit downtime data, changes are applied equally to the related job tables (dbo.JobProd and dbo.JobDown) and the related shift tables (dbo.ShiftProd and dbo.ShiftDown). This helps to maintain data consistency.

Copyright © 1983-2004 Mattec Corporation
5-91 810-0001 Rev - C
Advanced Tip #7 When you edit downtime data, you are only given an opportunity to edit the “standard” downtime-related fields, including downtime and down count. A “best guess” algorithm is used to make appropriate changes to the “weighted” downtime-related fields, including weighted downtime and weighted down count. These weighted fields are used to calculate the “totals” line in reports.
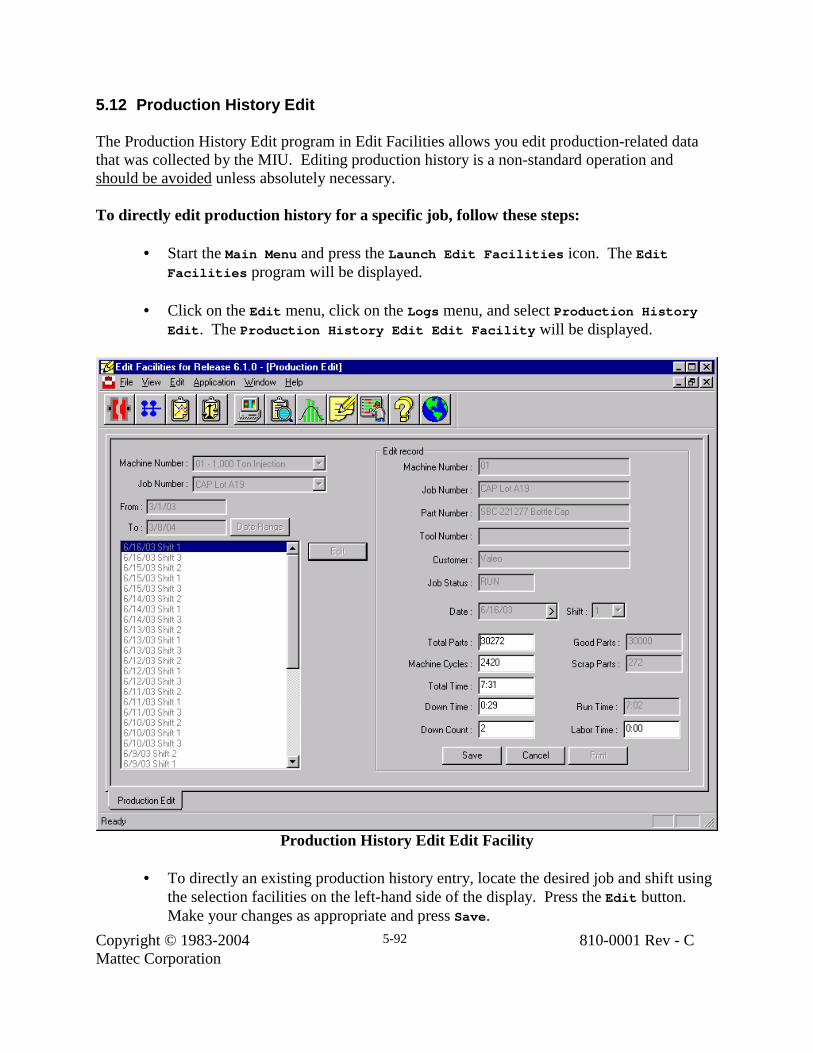
Copyright © 1983-2004 Mattec Corporation
5-92 810-0001 Rev - C
5.12 Production History Edit The Production History Edit program in Edit Facilities allows you edit production-related data that was collected by the MIU. Editing production history is a non-standard operation and should be avoided unless absolutely necessary. To directly edit production history for a specific job, follow these steps:
• Start the Main Menu and press the Launch Edit Facilities icon. The Edit Facilities program will be displayed.
• Click on the Edit menu, click on the Logs menu, and select Production History
Edit. The Production History Edit Edit Facility will be displayed.
Production History Edit Edit Facility
• To directly an existing production history entry, locate the desired job and shift using
the selection facilities on the left-hand side of the display. Press the Edit button. Make your changes as appropriate and press Save.

Copyright © 1983-2004 Mattec Corporation
5-93 810-0001 Rev - C
Advanced Tip #1 If you need to edit production history data, you should investigate “why”. What caused the incorrect recording of data in the first place? What can be done to eliminate these errors in the future? Advanced Tip #2 If you need to modify downtime and/or down count, it is better to make these changes using the Downtime Edit Edit Facility. Reference Section 5.11 for additional information. Advanced Tip #3 When you edit production history data, changes are applied equally to the related job tables (dbo.JobProd) and the related shift tables (dbo.ShiftProd). This helps to maintain data consistency. Advanced Tip #4 When you edit time-related data, you are only given an opportunity to edit the “standard” fields (e.g., total time, downtime, and down count). A “best guess” algorithm is used to make appropriate changes to the “weighted” fields (e.g., weighted total time, weighted downtime, and weighted down count). These weighted fields are used to calculate the “totals” line in reports.

Copyright © 1983-2004 Mattec Corporation
5-94 810-0001 Rev - C
5.13 Launching Other Applications The Edit Facilities program, like the Main Menu, can be used to launch most other applications in the system. To launch an application using Edit Facilities, follow these steps:
• Start Edit Facilities. To do this, start the Main Menu and press the Launch Edit Facilities icon. The Edit Facilities program will be displayed.
• Single-click the icon on the toolbar that represents the application that you wish to start.
Advanced Tip #1 To determine which program will be launched when you press an icon on toolbar, simply “hover” the mouse cursor over that icon. A “tool tip” will be displayed.

Copyright © 1983-2004 Mattec Corporation
6-95 810-0001 Rev - C
6. Job Schedule ProHelp® EPM allows users to create and schedule jobs several years in advance for 4,096 machines. Changes in actual cycle times, downtime, scrap, etc. can extend the amount of time it will take for a job to run and are reflected in real-time. Jobs that will finish on-time are colored green; jobs that will finish late are colored red. Advanced Tip #1 The Job Schedule represents a real-time “snapshot” of your plant. Data for running jobs is collected when the Job Schedule is started and is not updated in real-time. To update the data for running jobs, click on the View menu and select Refresh. Your schedule personnel can drag a job from one machine to another in an attempt to get all jobs to finish on-time. If a particular machine does not have a Process Sheet defined (that would permit that job to run on the machine), an error is displayed and the person is prevented from moving the job to that machine. This allows your Process Engineer(s) to define rules that prevent jobs from being scheduled on machines that aren’t capable of running the job! Advanced Tip #2 When you click on a job (as if dragging that job to another machine), all machines that have a valid Process Sheet for that job will be highlighted. Thus, you can quickly determine which machines are capable of running that job and which machines are not capable of running that job. This functionality (highlighting supported machines when a job is dragged in the Job Schedule) can be enabled/disabled on the Properties dialog. Reference Section 6.9.1 for additional information. To launch the Job Schedule, follow these steps:
• Start the Main Menu and press the Launch Job Schedule icon.
• Select the Machine(s) that you wish to modify. Press OK. The Job Schedule program will be displayed.

Copyright © 1983-2004 Mattec Corporation
6-96 810-0001 Rev - C
Job Schedule
Alternate Methods Jobs can also be created and scheduled via the Data Import/Export program. Reference the Data Exchange Manual, #810-0002, for additional information. Advanced Tip #3 A large, but finite, number of jobs (15,000) can be scheduled at the same time. By default, your system is configured to permit the user to schedule up to 150 machines with up to 100 jobs per machine at one time. If this is not sufficient for your needs, contact the Mattec Customer Service Department for assistance reconfiguring your system. The registry setting HKLM\Software\Mattec\ProHelp\JobSchedLimit defines the number of jobs that are permitted per machine, thus it also controls the number of machines that can be scheduled at one time. By default, this value is set to 100.

Copyright © 1983-2004 Mattec Corporation
6-97 810-0001 Rev - C
Each job that is scheduled is represented by a color-coded bar on the display. Family jobs have a single bar that represents the father job. The user can display a variety of information on the job bar, including:
• Job Number • Part Number • Tool Number • Customer ID • Material ID • Color ID • Forecasted End Date • Desired End Date • Forecasted Start Date • Desired Start Date • Job Duration
To change the text that is displayed in the job bar, right-click in the white area of the display and select Bar Labels. All of the available text choices will be displayed. Advanced Tip #4 If any son job in a family job is colored red, the father job’s bar is colored red. You can double-click on the father job to view the “Gantt-in-Gantt” schedule. Reference Section 6.5 for additional information.

Copyright © 1983-2004 Mattec Corporation
6-98 810-0001 Rev - C
6.1 Family Molding Family Molding is a powerful feature in ProHelp® EPM that allows you to monitor production and process information for distinctly different jobs (parts) that are running on the same machine at the same time. Definitions Bachelor Job – A bachelor job is often referred to simply as a “job”. A bachelor job is any job that produces one distinct part and that is not related to any other job. (Bachelor jobs can have multiple cavities.) A bachelor job can be “adopted” into a family job. When this is done, the bachelor job becomes a son job. Father Job – A father job is often referred to as a “family” job. A father job is a collection of one (1) or more related son jobs that will be scheduled as a single unit. The father job is the bar that is displayed in the job schedule. Son Job – A son job is often referred to as a “component” job. Each son job represents one distinct part that will be created when a family job is run. Most data that is collected by the system for a family job is stored to the son job, not the father job. A son job can be “orphaned” from a family job. When this is done, the son job becomes a bachelor job. The following offers a brief description of Family Molding features in ProHelp® EPM:
• Each family (father) job is made up of one (1) or more son (component) jobs. • Each family job can have up to 1,000 total son jobs. Of those, up to 100 son jobs can
be running simultaneously on a single machine. • The family is scheduled as a unit, but production and process history is stored to each
son job individually. • The family has a forecasted end date in the Job Schedule, and the system will also
forecast the end date for each individual son job. • Most MIUs allow you to enter scrap parts and packed parts for each individual son
job and/or for the entire family. • You can have different process limits (specification and control limits) depending on
which combination of son jobs is currently running. • Mattec’s unique Gantt-in-Gantt Job Schedule allows you to double-click on the
family job to see a Gantt chart for the individual son jobs in that family job. You can then drag and drop the individual son jobs in order to schedule them in a manner that will allow each son job to finish on-time. Reference Section 6.5 for additional information.

Copyright © 1983-2004 Mattec Corporation
6-99 810-0001 Rev - C
Advanced Tip #1 Family Molding is an optional feature. You may purchase this feature at any time by contacting the Mattec Sales Department. Mattec’s Family Molding software works great in a variety of applications, including the following: Left/Right and Front/Rear Parts For example, you may be making one front bumper and one rear bumper every machine cycle. Although the parts are related, you can make different quantities of each or have a need to track SPC, scrap, and other data individually. With Family Molding, each part will be its own son job with its own SPC history, scrap parts, lot size, forecasted end date, etc. Color Changes for the Same Part For example, you may plan to make 50,000 black pen casings, 30,000 grey pen casings, and 20,000 red pen casings. All will be made with the same tool and on the same machine. With Family Molding, each color can be its own son job. The jobs will be scheduled as a unit (that is, as a family), but each son job will have its own lot size, forecasted end date, production history, and process history. The system will accurately forecast when each son job will end and when the next son job will start. Multiple Releases of a Part For example, your customer has ordered 200,000 parts, but wants 50,000 parts delivered May 1st, 50,000 parts delivered June 1st, etc. With Family Molding, each delivery can be considered its own son job. As such, each son job will have its own lot size and desired end date. The jobs will be scheduled as one unit (that is, as a family), but each son job will have its own lot size and forecasted end date. If desired, you can even give each son job the same Job Number and still track the son jobs individually. Unrelated Parts made with the Same Base Mold For example, you have 10 different “insert molds” (parts) that can be plugged into the same “base mold” in different combinations. Each part’s mold can have a different number of cavities, and you have the need to track Preventive Maintenance for the base mold and/or the individual molds that can be inserted into the base mold.

Copyright © 1983-2004 Mattec Corporation
6-100 810-0001 Rev - C
As an example, today you might be making 3 key chains and 5 luggage tags with each machine cycle now, but this evening you will be making 3 key chains and 2 plastic toys with each machine cycle. With Family Molding, this type of application is easily accomplished. Each part (insert mold) will be its own unique son job. You can control the number of son jobs that will be running simultaneously (up to 100 per machine) and the total number of son jobs in the family (up to 1,000 per family). ProHelp® EPM will individually forecast when each son job will start/end and you can easily rearrange the order in which son jobs will run using Mattec’s unique Gantt-In-Gantt Schedule (see Section 6.5). Production and process history for each son job is maintained separately for easy retrieval. Advanced Tip #2 Family Molding allows the user to create up to 1,000 son jobs per family. Up to 100 of those son jobs can be running simultaneously on a single machine. However, many MIUs will only display data for 20 total son jobs per family and/or 10 running son jobs. Data will be collected properly for the remaining son jobs, but the user must use the host-based software to perform job changes or to view data.

Copyright © 1983-2004 Mattec Corporation
6-101 810-0001 Rev - C
6.2 Creating And Scheduling Bachelor Jobs A job descriptor represents a work order. A bachelor job is often referred to simply as a “job”. Most production and process information that is collected by the system is stored to the job descriptor. To create and schedule a bachelor job, follow these steps:
• Start the Main Menu and press the Launch Job Schedule icon. Select the appropriate machine(s) and press OK. The Job Schedule program will be displayed.
• Click on the Tools menu, click on the New Job menu, and select Single. The Job Descriptor dialog will be displayed.
Job Descriptor Dialog (Bachelor Job)
• Fill in the Job Descriptor page as appropriate. Press OK. The new bachelor job
will be created and added to the machine schedule. Alternate Methods You can click on the New Job icon on the toolbar to create a new bachelor job. Jobs can also be created and scheduled via the Data Import/Export program. Reference the Data Exchange Manual, #810-0002, for additional information.

Copyright © 1983-2004 Mattec Corporation
6-102 810-0001 Rev - C
The following table describes the fields that are available in the bachelor Job Descriptor dialog:
Field Description Job Number An identifier that identifies the bachelor job. ProHelp®
EPM allows the user to specify duplicate Job Numbers, but each job is treated as a unique unit.
Machine Number Part Number Tool Number
The Machine Number, Part Number, and Tool Number determine the Process Sheet that will be used by the job. When you make a selection in any of these picklists, the remaining picklists will be adjusted as appropriate. For example, if you select a Part ID from the Part Number picklist, the Machine Number and Tool Number picklists will automatically adjust to only include Machine Numbers and Tool IDs that have a Process Sheet defined for that Part ID. The job can be dragged to another machine via the Job Schedule provided that a Process Sheet exists for the Part Number and Tool Number on that new machine.
Customer The customer name. Comment 1 Comment 2
Descriptive fields used for adding notes about the job.
Lot Size The quantity of (good) parts to be produced for the job. Desired Start Desired End
The date/time that you desire the job to be started or ended. You can only enter one of these dates. Reference Section 6.9 for additional information.
ProHelp® EPM calculates additional fields on the Job Descriptor dialog. For example, the system will accurately forecast when a scheduled job will end. Other fields on the Job Descriptor dialog are read from Edit Facilities. For example, the Material ID and Color ID are read from the appropriate Part ID in Edit Facilities. When the bachelor job is created, the job is added to the machine schedule as configured in the “Insert Jobs By” setting on the Properties dialog. Reference Section 6.9 for additional information. Advanced Tip #1 You can double-click on a scheduled job in the Job Schedule to see the Job Descriptor dialog for that job. This allows you to modify data for running or scheduled jobs.

Copyright © 1983-2004 Mattec Corporation
6-103 810-0001 Rev - C
6.3 Creating And Scheduling Family Jobs A job descriptor represents a work order. A family job is comprised of a father job and one or more son jobs and is used to monitor production and process information for distinctly different jobs (parts) that are running on the same machine at the same time. Most production and process information that is collected by the system is stored to the son job descriptor(s). To create and schedule a family job (father job and sons jobs), follow these steps:
• Start the Main Menu and press the Launch Job Schedule icon. Select the appropriate machine(s) and press OK. The Job Schedule program will be displayed.
• Click on the Tools menu, click on the New Job menu, and select Family. The Job Descriptor dialog will be displayed.
Job Descriptor Dialog (Family Job)
• Fill in the Family tab of the Job Descriptor page as appropriate. • Fill in the Component tab of the Job Descriptor page for each son job as
appropriate. • Press OK. The new family job (father job and son jobs) will be created and added to
the machine schedule.

Copyright © 1983-2004 Mattec Corporation
6-104 810-0001 Rev - C
Alternate Methods You can click on the New Family Job icon on the toolbar to create a new family job. Jobs can also be created and scheduled via the Data Import/Export program. Reference the Data Exchange Manual, #810-0002, for additional information. Advanced Tip #1 Family Molding is an optional feature. You may purchase this feature at any time by contacting the Mattec Sales Department. The following table describes the fields that are available on the Family tab of the Job Descriptor dialog. These fields apply to the father job descriptor.
Field Description Job Number An identifier that identifies the father job. Machine Number The Machine Number that the family job is expected to
run on. The family job can be dragged to another machine via the Job Schedule provided that a Process Sheet exists for the Part Number and Tool Number on that new machine for all son jobs.
Tool Number The Tool Number for the father job. This field is optional. This field allows for accurate preventive maintenance forecasting for the father job’s “base mold”.
Active Components The number of son jobs that will be run simultaneously when the family job is started.
ProHelp® EPM calculates additional fields on the Family tab of the Job Descriptor dialog. For example, the system will accurately forecast when the entire family job will start and when the last son job will end. When the family job is created, the job is added to the machine schedule as configured in the “Insert Jobs By” setting on the Properties dialog. Reference Section 6.9 for additional information. If son jobs have been created, they are listed in the spreadsheet on the bottom of the Family tab of the Job Descriptor dialog. The son jobs are listed in the order in which they will be run. The system will accurately forecast each son job’s start and end date. You can double-click on any son job in this spreadsheet to go to that son job’s corresponding entry on the Component tab of the Job Descriptor dialog.

Copyright © 1983-2004 Mattec Corporation
6-105 810-0001 Rev - C
Advanced Tip #2 You can double-click on a scheduled job in the Job Schedule to see the Job Descriptor dialog for that job. This allows you to modify data for running or scheduled jobs. Advanced Tip #3 A father job can optionally specify a Tool Number. This allows for accurate preventive maintenance forecasting for both the father job’s “base mold” and the “insert mold” for each son job. All other data in the father’s Tool ID is ignored, including the “active cavities”. Advanced Tip #4 You can not change the “Active Components” for a running family job. This is usually only necessary if a problem has occurred with the father job’s “base mold”. In the event that the father job’s “base mold” is temporarily unable to run the maximum number of insert molds (son jobs), you must “Suspend” the entire family job using Job Control, modify the “Active Components” using the Job Schedule, and re-“Start” the family job using Job Control. The following table describes the fields that are available on the Components tab of the Job Descriptor dialog. These fields apply to individual son job descriptors.
Component Tab Field Description Job Number An identifier that identifies the son job. Machine Number Part Number Tool Number
The Machine Number, Part Number, and Tool Number determine the Process Sheet that will be used by the son job. The Machine Number is initially specified in the father job (on the Family tab of the Job Descriptor dialog) and is modified any time the family job is dragged to another machine. When you make a selection in any of these picklists, the remaining picklists will be adjusted as appropriate. For example, when you specify a Machine Number for the father job, the Part Number and Tool Number picklists will automatically adjust to only include Part IDs and Tool IDs that have a Process Sheet defined for that Machine Number. The family job can be dragged to another machine via the Job Schedule provided that a Process Sheet exists for the

Copyright © 1983-2004 Mattec Corporation
6-106 810-0001 Rev - C
Component Tab Field Description Part Number and Tool Number on that new machine for all son jobs.
Customer The customer name. Comment 1 Comment 2
Descriptive fields used for adding notes about this son job.
Lot Size The quantity of (good) parts to be produced for this son job.
Desired Start Desired End
The date/time that you desire the job to be started or ended. You can only enter one of these dates. Reference Section 6.9 for additional information.
The following table describes the function of some of the buttons that are available on the Component tab of the Job Descriptor dialog:
Component Tab Button Description Add New This button allows you to add a new son job to the family
job. You must then fill in all of the fields on the display, as appropriate.
Add Copy This button allows you to add a copy of the son job that is currently displayed. The son job’s name will be modified as configured in the “Copy” setting on the Properties dialog. Reference Section 6.9.1 for additional information.
Delete This button allows you to delete the son job that is currently displayed.
Adopt This button allows you to “adopt” an existing bachelor job into the family job. The bachelor job then becomes a son job.
Orphan This button “orphans” the son job that is currently displayed. The son job will be removed from the family job and becomes a bachelor job.
Advanced Tip #4 If you double-click on a scheduled family job in the Job Schedule, you will notice that the Job Descriptor dialog has three (3) tabs labeled “Family”, “Component”, and “Schedule”. The “Schedule” tab is the Gantt-In-Gantt Job Schedule and allows you to see a Gantt chart for the individual son jobs in that family job. You can then drag and drop the individual son jobs in order to schedule them in a manner that will allow each son job to finish on-time. Reference Section 6.5 for additional information.

Copyright © 1983-2004 Mattec Corporation
6-107 810-0001 Rev - C
6.4 Tool Conflicts Tool Conflicts can be automatically highlighted and resolved interactively from within the Job Schedule. Users can easily see which tools conflict and the length of the conflict. To view all tool conflicts, follow these steps:
• Start the Job Schedule. To do this, start the Main Menu and press the Launch Job Schedule icon. Select the Machine(s) that you wish to modify. Press OK. The Job Schedule program will be displayed.
• Click on the Tools menu and select Tool Conflicts. All tool conflicts will be displayed individually.
• To view the next tool conflict, press the Find Next button.
Tool Conflict Utility
Alternate Methods You can launch the Tool Conflict locator by clicking on the Tool Conflicts icon on the toolbar. To eliminate a tool conflict, drag one of the jobs to a different machine or time slot that will eliminate the conflict. This can be done while the Tool Conflict locator is still on the display.

Copyright © 1983-2004 Mattec Corporation
6-108 810-0001 Rev - C
Advanced Tip #1 The Tool Conflict Report allows you to see all tool conflicts at once and to print them. To run this report, click on the Reports menu and select Tool Conflict. The Tool Conflict Report will be displayed. Advanced Tip #2 It is possible to have a tool conflict between son jobs of a family job. In this case, only one job (the father job) will be highlighted when the Tool Conflict locator is run.

Copyright © 1983-2004 Mattec Corporation
6-109 810-0001 Rev - C
6.5 Gantt-In-Gantt Schedule Mattec’s unique Gantt-In-Gantt Job Schedule allows you to double-click on a family job to see a Gantt chart for the individual son jobs in that family job. You can then drag and drop the individual son jobs in order to schedule them in a manner that will allow each son job to finish on-time. To view the Gantt-In-Gantt Job Schedule for a family job, follow these steps:
• Start the Job Schedule. To do this, start the Main Menu and press the Launch Job Schedule icon. Select the Machine(s) that you wish to modify. Press OK. The Job Schedule program will be displayed.
• Double-click on a family job. Press the Schedule tab.
Gantt-In-Gantt Schedule For Family Jobs
All son jobs will be displayed in the Gantt-In-Gantt Job Schedule with their appropriate color-coding. You can drag and drop the individual son jobs in order to re-arrange their order within the family job.

Copyright © 1983-2004 Mattec Corporation
6-110 810-0001 Rev - C
Alternate Methods The order that son jobs will be run can be adjusted on the “Family” tab by moving the son jobs up or down. Advanced Tip #1 Family Molding is an optional feature. You may purchase this feature at any time by contacting the Mattec Sales Department. Advanced Tip #2 The field Active Components on the Family tab controls the number of son jobs that are scheduled to run simultaneously. This field typically corresponds to the number of “insert molds” that can be inserted into the father job’s “base mold”. Advanced Tip #3 Regardless of the Schedule Method that is being used (Gaps, No Gaps, or Smart Gaps), the son jobs in a family job are scheduled using the No Gaps method. This is due to the nature of a family job where it is expected that when one son job ends, the next son job will start. Advanced Tip #4 If any son job in a family job is colored red, the father job’s bar is colored red.

Copyright © 1983-2004 Mattec Corporation
6-111 810-0001 Rev - C
6.6 Schedule Reports Several reports are available from within the Job Schedule, including:
• Schedule Summary Report • List of Unscheduled Jobs Report • Performance Against Schedule Report • Tool Conflict Report
These reports are accessed from inside the Job Schedule. There is no need to exit the application to view and print these reports. To view a schedule-related report, follow these steps:
• Start the Job Schedule. To do this, start the Main Menu and press the Launch Job Schedule icon. Select the Machine(s) that you wish to modify. Press OK. The Job Schedule program will be displayed.
• Click on the Reports menu and select the desired report. The report will be displayed.
Schedule Summary Report
• To print the report, click on the File menu and select Print. • To close the report and return to the Job Schedule, click on the File menu and
select Close.

Copyright © 1983-2004 Mattec Corporation
6-112 810-0001 Rev - C
6.7 Scheduled Jobs List The Scheduled Jobs list is a convenient way to view all of the jobs that are scheduled for one specific machine or for all machines. To view the Scheduled Jobs list, follow these steps:
• Start the Job Schedule. To do this, start the Main Menu and press the Launch Job Schedule icon. Select the Machine(s) that you wish to modify. Press OK. The Job Schedule program will be displayed.
• Click on the Tools menu and select scheduled Jobs. The Scheduled Jobs list will be displayed.
Schedule Jobs List
Alternate Methods You can launch the Scheduled Jobs list by pressing the Scheduled Jobs icon on the toolbar. You can launch the Scheduled Jobs list for a specific machine by right-clicking on the machine number and selecting Scheduled Jobs. The Scheduled Jobs list will display detailed information about all of the jobs that are scheduled

Copyright © 1983-2004 Mattec Corporation
6-113 810-0001 Rev - C
for one specific machine or for all machines. You can limit the amount of data that is displayed by selecting a specific machine number in the Machine Number picklist. To remove a job from the schedule and place it in the Unscheduled Jobs list, simply highlight the job(s) and press the Unschedule button. You can highlight multiple jobs by holding down the CTRL key while you use the mouse to click on each job. To permanently delete a job and remove it entirely from the database, simply highlight the job(s) and press the Delete button. You can highlight multiple jobs by holding down the CTRL key while you use the mouse to click on each job. You should delete jobs with caution; this action can not be undone after the schedule has been saved. Son jobs appear in the Schedule Jobs list, but father jobs do not. If you highlight a son job in the Scheduled Jobs list, all related son jobs will be highlighted automatically. To locate a specific job in the Scheduled Jobs list, press the Find button. You will be permitted to search only on those fields that are displayed in the Scheduled Jobs list. To print the Scheduled Jobs list, press the Print button. Advanced Tip #1 It can be hard to double-click on a job in the graphical Job Schedule if that job has a very small lot size. The Scheduled Jobs list can be used to accomplish this.

Copyright © 1983-2004 Mattec Corporation
6-114 810-0001 Rev - C
6.8 Unscheduled Jobs List The Unscheduled Jobs list is a convenient way to view all of the jobs that are available to be run but that have not been placed in the Job Schedule. To view the Scheduled Jobs list, follow these steps:
• Start the Job Schedule. To do this, start the Main Menu and press the Launch Job Schedule icon. Select the Machine(s) that you wish to modify. Press OK. The Job Schedule program will be displayed.
• Click on the Tools menu and select Unscheduled Jobs. The Unscheduled Jobs list will be displayed.
Unscheduled Jobs List
Alternate Methods You can launch the Unscheduled Jobs list by pressing the Unscheduled Jobs icon on the toolbar. You can launch the Unscheduled Jobs list for a specific machine by right-clicking on the machine number and selecting Unscheduled Jobs. The Unscheduled Jobs list will display detailed information about all of the jobs that exist but

Copyright © 1983-2004 Mattec Corporation
6-115 810-0001 Rev - C
that are not scheduled. These jobs can be displayed for one specific machine or for all machines. You can limit the amount of data that is displayed by selecting a specific machine number in the Machine Number picklist. Advanced Tip #1 Jobs in the Unscheduled Jobs list are not scheduled, but they do have a Machine Number that is associated with the Job. A job must have a Machine Number, Part Number, and Tool Number assigned to it in order for the job to be created. Thus, all jobs, including jobs that are not scheduled, have a Machine Number. To schedule a job from the Unscheduled Jobs list, simply highlight the job(s) and press the Schedule button. You can highlight multiple jobs by holding down the CTRL key while you use the mouse to click on each job. Advanced Tip #2 A “suspended” job can only be re-scheduled and re-run on the same machine that the job initially ran on. To permanently delete a job and remove it entirely from the database, simply highlight the job(s) and press the Delete button. You can highlight multiple jobs by holding down the CTRL key while you use the mouse to click on each job. You should delete jobs with caution; this action can not be undone after the schedule has been saved. The system will prevent you from deleting a job that has been “suspended” (and, thus, has job data that has been collected.) Father jobs appear in the Unscheduled Jobs list but son jobs do not. If you schedule a father job via the Unscheduled Jobs list, all related son jobs that are available will be scheduled too. To locate a specific job in the Unscheduled Jobs list, press the Find button. You will be permitted to search only on those fields that are displayed in the Unscheduled Jobs list. To print the Unscheduled Jobs list, press the Print button. Advanced Tip #3 Only “pending” or “suspended” jobs that are not currently scheduled will be displayed in the Unscheduled Jobs list. Jobs that have been “completed” will not be displayed. Advanced Tip #4 If you want to re-schedule a job that has been “completed”, you must first override the job’s status and set the job to “suspended”. The job will then be placed in the Unscheduled Jobs list and can be re-scheduled. Reference Section 6.11 for additional information.

Copyright © 1983-2004 Mattec Corporation
6-116 810-0001 Rev - C
6.9 Advanced Settings The Job Schedule is highly configurable. There are some settings that all users in your facility should have set the same way. Other settings are based on personal preference. All advanced settings that most users will have in common are described in this section. To set advanced settings for the Job Schedule, follow these steps:
• Start the Job Schedule. To do this, start the Main Menu and press the Launch Job Schedule icon. Select the Machine(s) that you wish to modify. Press OK. The Job Schedule program will be displayed.
• Click on the Tools menu and select Properties. The Properties dialog will be displayed.
Properties Dialog
• Press the Rules tab. Modify the settings on this tab as desired and press OK to save
your changes.

Copyright © 1983-2004 Mattec Corporation
6-117 810-0001 Rev - C
The following table describes the “Schedule Method” selections that are available on the Rules tab of the Properties dialog:
Schedule Method Properties Tab Description Gaps Rules Jobs are scheduled “strictly” according to the
desired date. Idle time (gaps) is allowed between jobs.
Smart Gaps (Default)
Rules Jobs are scheduled “loosely” according to the desired date. Idle time (gaps) is allowed between jobs, but the Job schedule will prevent a job from being late if idle time is available anywhere preceding the job. The late job will “push forward” jobs that are scheduled before it until no gaps are left or until the job will finish on-time.
No Gaps Rules The next job is started immediately after the previous job. Idle time (gaps) is not permitted between jobs.
The following table describes the “Schedule From” selections that are available on the Rules tab of the Properties dialog:
Schedule From Properties Tab Description Start Date Rules Allows you to enter a Desired Start Date, but
not a Desired End Date, in the job descriptor. A job is late (and is colored red) if its forecasted start date is later than its desired start date. Once the job is running, the desired start date is automatically translated by the Job Schedule into a desired end date to permit color-coding changes.
End Date (Default)
Rules Allows you to enter a Desired End Date, but not a Desired Start Date, in the job descriptor. A job is late (and is colored red) if its forecasted end date is later than its desired end date.

Copyright © 1983-2004 Mattec Corporation
6-118 810-0001 Rev - C
The following table describes the “Insert Jobs By” selections that are available on the Rules tab of the Properties dialog:
Insert Jobs By Properties Tab Description Last In First Out Rules Newly created jobs are inserted at the
beginning of the machine schedule. First In First Out (Default)
Rules Newly created jobs are inserted at the end of the machine schedule.
Desired Date Rules Newly created jobs are inserted into the Job Schedule according to their desired date. A job is inserted as close as possible to the desired date. If another job is scheduled during that time, the new job is inserted immediately before the scheduled job.
First Available Gap Rules Newly created jobs are inserted into the Job Schedule in the first gap that is large enough to fit the job (+/- the Slack Tolerance). If no gap is available, the job is inserted at the end of the machine schedule.
Before/After Prompt Rules After creating a new job, the user is prompted to select the location in the Job Schedule where the job will be inserted. The user can choose to insert the job before or after any other job in the Job Schedule. Note: You can not schedule a job before a job that is currently running.
Remain Unscheduled Rules Newly created jobs are placed in the Unscheduled Jobs list.
Advanced Tip #1 Some settings that impact the Job Schedule are configured in System Configuration. For example, the “Scrap Predictor Limit” minimizes the impact of the actual scrap percent when calculating a job’s forecasted end date. The “Cycle Time Predictor Limit” minimizes the impact of fast or slow average cycle times when calculating a job’s forecasted end date. Reference the System Administration Manual, #810-0014, for additional information.

Copyright © 1983-2004 Mattec Corporation
6-119 810-0001 Rev - C
6.9.1 Personal Preference Settings Many settings that affect the Job Schedule can be set based purely on personal preference. Those settings are described in this section. To set personal preference settings for the Job Schedule, follow these steps:
• Start the Job Schedule. To do this, start the Main Menu and press the Launch Job Schedule icon. Select the Machine(s) that you wish to modify. Press OK. The Job Schedule program will be displayed.
• Click on the Tools menu and select Properties. The Properties dialog will be displayed.
Properties Dialog
• Modify the settings as desired and press OK to save your changes.
Advanced Tip #1 Advanced settings that all users should have set the same way are described in Section 6.9.

Copyright © 1983-2004 Mattec Corporation
6-120 810-0001 Rev - C
Advanced Tip #2 If you have modified any Job Schedule properties, you can restore the properties for a single tab by right-clicking on the tab and selecting Restore Defaults. This will only restore the values for the currently selected tab. Advanced Tip #3 You can restore the default settings for all Job Schedule properties by clicking on the Tools menu and selecting Restore Defaults. This should be done with care, because this will also restore the Advanced Settings that have been modified. The following table describes many of the personal preference settings that are available for modification:
Properties Tab Description Jobs Fields on this tab modify the text that is displayed in a job bar and the
formatting for that text. Rules Fields on this tab modify advanced settings that should probably
be standardized throughout your facility. Changes to this tab should be made with care. Reference Section 6.9 for additional information.
Schedule Fields on this tab modify the formatting for miscellaneous areas on the Job Schedule display.
Machines Fields on this tab modify the formatting for miscellaneous areas on the Job Schedule display.
General Timescale
Fields on this tab modify miscellaneous settings on the Job Schedule display related to dates and times. The “End Date” field on this tab temporarily limits the last date that will be displayed in the Job Schedule. This field will be reset the next time the Job Schedule is started.
Major/Minor Timescale
Fields on this tab allow you to “zoom” the Job Schedule display. This may be necessary, for example, if you have a lot of short-run jobs and are more interested in viewing just a day’s worth of jobs instead of several months worth of jobs.
Copy Fields on this tab modify the behavior of the Job Schedule when you copy an existing job. For example, the Job Schedule can always prompt you to enter a new job number or it can dynamically create a job number for you.
Date/Time Fields on this tab modify the vertical reference lines that are shown on the Job Schedule display.
Colors Fields on this tab modify the color settings for the majority of the fields on the Job Schedule display. You can click on any color to

Copyright © 1983-2004 Mattec Corporation
6-121 810-0001 Rev - C
Properties Tab Description display a palette of supported colors. You can select a new color by clicking the desired color from the color palette, then press OK.
Fonts Fields on this tab modify the fonts for miscellaneous text fields on the Job Schedule display. You can click on any displayed font on this tab to display a font selector dialog. You can select a new font and point size, then press OK.
Print Fields on this tab modify the behavior of the Job Schedule when you press the Print button. When “Print Screen” is specified, only that portion of the Job Schedule that is visible when you press the Print button will be printed. When “Print Chart” is specified, the entire Job Schedule, including those portions that can not be currently seen, will be printed when you press the Print button.
General Fields on this tab modify miscellaneous behavior of the job Schedule. You can click on any Color field on the Properties dialog to display a palette of supported colors. You can select a new color by clicking the desired color, then press OK.
Color Palette

Copyright © 1983-2004 Mattec Corporation
6-122 810-0001 Rev - C
6.10 Job Control Job Control is used to keep ProHelp® EPM synchronized with the monitored machines. ProHelp® EPM must be directed to “start” collecting data for a job and to “end” collecting data when the job is done. It is very important that the commands to start and end be given at the same time job changes are taking place on the actual machine. Users can perform these commands directly at the Machine Interface Units (MIUs) or at a computer that is connected to the system. A job can have one of four (4) basic states, including:
State Description PENDING A pending job is a new job that has never been run before. This job
may have been created via the Job Scheduler or it may have been imported into the system via the Data Import/Export application.
RUNNING A running job is the job that is currently running on a machine and automatically collecting data via the MIU. If the current job is a “bachelor” job, there can be only one running job on the machine. If the current job is a “family” job, there can be up to 100 “son” jobs that are running simultaneously on the machine (and up to 1000 “son” jobs that are waiting to be run on the machine.)
SUSPENDED A suspended job is a job that has previously been run and was temporarily “suspended” to allow a different job to run. Suspended jobs are expected to be re-run.
COMPLETE A completed job is a job that has previously been run and has run to completion. A completed job will not be re-run.
Advanced Tip #1 Unlike earlier ProHelp® systems, suspended jobs can only be re-run on the same machine that they initially ran on. This is necessary to preserve the integrity of the data that has been collected by the system. If you need to “suspend a job and restart that job on a different machine”, you should end the original job, create a copy of that job (with a modified lot size), and schedule the copied job to run on a different machine. The copied job can have the same Job Number as the original job.

Copyright © 1983-2004 Mattec Corporation
6-123 810-0001 Rev - C
To perform Job Control for a specific machine, follow these steps:
• Start the Job Control program. To do this, start the Main Menu and press the Launch Job Control icon.
• Select the Machine that you wish to modify.
• If a job is currently running, you must select the Job in the Job Number picklist. This job will either be ended or suspended.
• If you wish to start running another job, you should select the appropriate job in the
Next Job Number picklist. If you do not wish to start running another job, select None (Don’t Start Another Job) in the Next Job Number picklist.
• To end the job in the Job Number picklist and start the job in the Next Job Number
picklist, press the End Job button. To suspend the job in the Job Number picklist and start the job in the Next Job Number picklist, press the Suspend Job button.
Job Control Program
Alternate Methods You can start the Job Control program by right-clicking on a machine in the Real-Time Display and selecting Job Control, or by right-clicking on a machine in the Job Schedule and selecting Job Control. In both cases, the Job Control program will be started with the machine number already selected.

Copyright © 1983-2004 Mattec Corporation
6-124 810-0001 Rev - C
Advanced Tip #2 The jobs in the Next Job Number picklist include all jobs that have been scheduled for the selected machine using the Job Scheduler. Advanced Tip #3 If no job is currently running on the machine when you start the Job Control program, you can still select a job in the Next Job Number picklist, then press the Start Job button to start that job. Advanced Tip #4 When a job is suspended, it can be rescheduled or left unscheduled. This is determined by a setting in System Configuration. Reference the System Administration Manual, #810-0014, for additional information. Advanced Tip #5 If a family job is running when you perform job control, you will have the option of selecting the father job or any running son job in the Job Number picklist. If you select the father job in the Job Number picklist, the action (suspend or end) will be performed on all running son jobs. Thus, if you select the father job, you can only select scheduled bachelor or family jobs in the Next Job Number picklist. If you select a running son job in the Job Number picklist, the action (suspend or end) will be performed on that specific son job. Thus, if you select a son job, you can only select related, pending son jobs in the Next Job Number picklist. Advanced Tip #6 If a family job is running when you perform job control, and you select a running son job in the Job Number picklist, then you must select a pending son job in the Next Job Number picklist, if a related son job is pending. That is, you can not select “None (Don’t Start Another Job)” unless there are no pending son jobs for the family. Advanced Tip #7 It’s possible to make mistakes and to suspend a job when you intended to end it, or to end a job when you intended to re-run the job. You can override a job’s status in the Job Scheduler. Reference Section 6.11 for additional information.

Copyright © 1983-2004 Mattec Corporation
6-125 810-0001 Rev - C
6.11 Job Status Override It’s possible to make mistakes and to suspend a job when you intended to end it, or to end a job when you intended to re-run the job (and therefore intended to suspend it). In such cases, you will need to override the job’s status. To override a job’s status, follow these steps:
• Start the Job Schedule. To do this, start the Main Menu and press the Launch Job Schedule icon. Select the Machine(s) that you wish to modify. Press OK. The Job Schedule program will be displayed.
• Click the Tools menu and select Status Override. The Status Override screen
will be displayed.
• Locate the job to be modified. Press the Suspend button to suspend a job that has been mistakenly ended. Press the End button to end a job that has been mistakenly suspended.
Status Override Screen
Advanced Tip #1 The Status Override function in the Job Scheduler is used to correct mistakes. The Job Control program (Section 6.10) should be used for normal starting and stopping of jobs. Advanced Tip #2 When you use the Status Override function to suspend a job that was mistakenly ended, the job is placed in the Unscheduled Jobs list for the appropriate machine. You must then manually reschedule the job before you can re-run the job.

Copyright © 1983-2004 Mattec Corporation
6-126 810-0001 Rev - C
6.12 Launching Other Applications The Job Schedule, like the Main Menu, can be used to launch most other applications in the system. To launch an application using the Job Schedule program, follow these steps:
• Start the Job Schedule. To do this, start the Main Menu and press the Launch Job Schedule icon. Select the Machine(s) that you wish to modify. Press OK. The Job Schedule program will be displayed.
• Single-click the icon on the toolbar that represents the application that you wish to start.
Advanced Tip #1 To determine which program will be launched when you press an icon on the toolbar, simply “hover” the mouse cursor over that icon. A “tool tip” will be displayed. In addition to the toolbar, the Job Schedule provides special shortcuts to the Document Control Center and the Job Control programs. These shortcuts allow the programs to be started with the Machine Number and other relevant information already selected. To launch the Document Control Center or the Job Control program from the Job Schedule program, follow these steps:
• Start the Job Schedule. To do this, start the Main Menu and press the Launch Job Schedule icon. Select the Machine(s) that you wish to modify. Press OK. The Job Schedule program will be displayed.
• To start the Document Control Center program, right-click on a machine and select Document Control Center. The Document Control Center program will be started with the machine number already selected.
• To start the Job Control program, right-click on a machine and select Job Control. The Job Control program will be started with the machine number already selected.

Copyright © 1983-2004 Mattec Corporation
7-127 810-0001 Rev - C
7. ProStat® SPC/SQC ProStat® is ProHelp® EPM’s real-time Statistical Process Control / Statistical Quality Control program. It is designed to assist the user in implementing a program of process control and quality control for all monitored machines. ProStat® allows the user to collect process data and quality data for specified jobs throughout the entire job run. ProStat® is the tool that is then used to analyze this data by applying statistical methods. To launch ProStat®, follow these steps:
• Start the Main Menu and press the Launch ProStat® icon. The ProStat® program will be displayed.
ProStat® SPC/SQC

Copyright © 1983-2004 Mattec Corporation
7-128 810-0001 Rev - C
Alternate Methods You can start the ProStat® program by right-clicking on a machine in the Real-Time Display and selecting “ProStat® SPC/SQC”. The ProStat® program will be started with the job number already selected. You can start the ProStat® program by clicking the ProStat® icon in the ProStat® Sample Data Edit program. The ProStat® program will be started with the job number already selected. The following table provides a brief overview of the four SPC/SQC data types:
Data Type Description Automatic SPC Automatic SPC data is automatically collected by the
MIU at random intervals. This data is limited to the machine process parameters (e.g., Cycle Time, Injection Pressure) that are being monitored by the MIU.
Manual SPC Manual SPC data is collected by the MIU whenever instructed by the user. This data is limited to the machine process parameters (e.g., Cycle Time, Injection Pressure) that are being monitored by the MIU. The parts that are associated with a Manual SPC sample are usually gathered by the machine operator or quality control personnel to be used for Variable SQC and/or Attribute SQC data entry. Manual SPC data is closely related to Variable SQC data. For example, the user can perform Linear Regression Analysis between a Manual SPC process parameter and a Variable SQC characteristic. Reference Section 7.13 for additional information.
Variable SQC Variable SQC data is entered by the user, either at an MIU, a PC, or both. This data is limited to user-specified part “characteristics” (e.g., Height, Weight) Variable SQC data is closely related to Manual SPC data. For example, the user can perform Linear Regression Analysis between a Variable SQC characteristic and a Manual SPC process parameter. Reference Section 7.13 for additional information.

Copyright © 1983-2004 Mattec Corporation
7-129 810-0001 Rev - C
Data Type Description Attribute SQC Attribute SQC data is entered by the user, either at an
MIU, a PC, or both. This data is limited to the system-wide part “defects” (i.e., Scrap Codes defined in System Configuration.) Attribute SQC data is loosely related to Manual SPC data and Variable SQC data.
Advanced Tip #1 ProStat® is an optional feature. You may purchase this feature at any time by contacting the Mattec Sales Department. Mattec offers a comprehensive 2-3 day seminar on ProStat®. Reference Section 1.4 for additional information.

Copyright © 1983-2004 Mattec Corporation
7-130 810-0001 Rev - C
7.1 Enabling Data Collection SPC and SQC data can not be collected for a job until it has been enabled. There are several ways this data collection may be enabled:
Data Type Enabling Method Automatic SPC Automatic SPC data collection is enabled in the System
Configuration program and can be overridden on a machine-by-machine basis in the Machine Configuration program. Automatic SPC sampling is always enabled for all process parameters for all machines. Reference the System Administration Manual, #810-0014, for additional information.
Manual SPC Variable SQC Attribute SQC
Manual SPC, Variable SQC, and Attribute SQC data collection are enabled in a Sample Sheet. A Sample Sheet is associated with a job by being included in a Process Sheet. Reference Section 5.4 for additional information.
Advanced Tip #1 ProHelp® Millennium allows the user to enable/disable Automatic SPC data collection on a job-by-job basis. This functionality does not exist in ProHelp® EPM. If you have the ProStat® SPC/SQC option, Automatic SPC sampling is always enabled for all jobs. Advanced Tip #2 ProHelp® Millennium allows the user to individually enable/disable process parameters for Automatic SPC sampling. This functionality does not exist in ProHelp® EPM. Advanced Tip #3 ProHelp® EPM allows the user to specify different subgroup sizes for Automatic SPC sampling and Manual SPC/Variable SQC/Attribute SQC sampling. Most MIUs, however, do not support this functionality. As such, it is a good idea to use the same subgroup size throughout the system.

Copyright © 1983-2004 Mattec Corporation
7-131 810-0001 Rev - C
7.2 Entering Data - ProStat® Sample Data Edit The ProStat® Sample Data Edit program can be used to create/modify Variable SQC and Attribute SQC samples. It can be used to view/modify Manual SPC samples. To launch ProStat® Sample Data Edit, follow these steps:
• Start the Main Menu and press the Launch ProStat® icon. The ProStat® program will be displayed. Press the Launch ProStat® Sample Data Edit icon.
• Select the Job you wish to modify. To do this, select the Machine the job ran on, then select the Job.
• Use the Previous and Next buttons to locate an existing SPC/SQC sample. To edit
an existing sample, press the Edit button. To create a new SPC/SQC sample, press the New button.
ProStat® Sample Data Edit

Copyright © 1983-2004 Mattec Corporation
7-132 810-0001 Rev - C
Alternate Methods The ProStat® Sample Data Edit program can be launched from Edit Facilities. To launch ProStat® Sample Data Edit from within Edit Facilities, click on the Edit menu, click on the ProStat® SPC/SQC menu, and select Enter Data. Manual SPC samples are “initiated” at an MIU and the data is automatically collected by the MIU. After initiating a Manual SPC sample, Variable SQC and Attribute SQC samples can be entered at most MIUs. Advanced Tip #1 The ProStat® Sample Data Edit program allows the user to modify Manual SPC samples. However, this data is automatically collected by the MIU (when “initiated” by the user at the MIU), and thus, changes should only be made manually in unusual circumstances. Audit Trails Changes to existing Manual SPC, Variable SQC, or Attribute SQC samples will automatically receive an “Audit Trail”, provided that you have purchased the Audit Trail option from Mattec. This Audit Trail can be viewed by pressing the Audit Trail button in the ProStat® Sample Data Edit program. This data is also available in System Reports. Reference Section 4.6 for additional information. Audit Trails is an optional feature. You may purchase this feature at any time by contacting the Mattec Sales Department.

Copyright © 1983-2004 Mattec Corporation
7-133 810-0001 Rev - C
7.3 Selecting Data For Analysis You must select the data to be analyzed before you can access any of the functions of ProStat®. Typically, data is selected for one specific job. Advanced Tip #1 ProStat® can be used to analyze data for multiple jobs by selecting a Part and/or Tool. Reference Section 7.3.1 for additional information. To select data for a specific job for use by ProStat®, follow these steps:
• Start the Main Menu and press the Launch ProStat® icon. The ProStat® program will be displayed.
• Press the Select Data icon. The Select Data dialog will be displayed.
Select Data Dialog
• Select the desired Job Number in the Job Number picklist. If you need assistance
locating a specific job, press the Find button.

Copyright © 1983-2004 Mattec Corporation
7-134 810-0001 Rev - C
• To analyze all data that has been collected for the job, press the All Dates checkbox.
To analyze only a subset of the data that has been collected, uncheck the All Dates checkbox and enter the desired date/time range for the data to be analyzed.
• Select the appropriate Data Type and Parameter to be analyzed. The Parameter
picklist will change depending on the Data Type that has been selected.
• Press OK. The job data will be retrieved from the database and the ProStat® program will be displayed. You can now view any of the available charts or perform any data analysis, as appropriate.
Alternate Methods You can start the ProStat® program by right-clicking on a machine in the Real-Time Display and selecting ProStat. The ProStat® program will be started with the job number already selected. You can start the ProStat® program by clicking the ProStat® icon in the ProStat® Sample Data Edit program. The ProStat® program will be started with the job number already selected. Advanced Tip #1 When analyzing data for a job, you can press the Select Data icon at any time to select a different Data Type and/or Parameter for analysis.

Copyright © 1983-2004 Mattec Corporation
7-135 810-0001 Rev - C
7.3.1 Selecting Data For Multiple Jobs ProStat® allows data to be analyzed for multiple jobs for Automatic SPC or Manual SPC data types. This is sometimes refered to as “SPC By Part” or “SPC By Tool”. Advanced Tip #1 ProStat® can not analyze data for multiple jobs for the Variable SQC or Attribute SQC data types. To select data for multiple jobs for use by ProStat®, follow these steps:
• Start the Main Menu and press the Launch ProStat® icon. The ProStat® program will be displayed.
• Press the Select Data icon. The Select Data dialog will be displayed.
• Check the Advanced checkbox.
Select Data Dialog - Advanced

Copyright © 1983-2004 Mattec Corporation
7-136 810-0001 Rev - C
• Select the desired Part Number in the Part Number picklist. You can then optionally
specify a Tool Number and/or Machine Number. -OR- Select the desired Tool Number in the Tool Number picklist. You can then optionally specify a Part Number and/or Machine Number.
• To analyze all data that has been collected for the job(s), press the All Dates
checkbox. To analyze only a subset of the data that has been collected, uncheck the All Dates checkbox and enter the desired date/time range for the data to be analyzed.
• Select the appropriate Data Type and Parameter to be analyzed. The Parameter
picklist will change depending on the Data Type that has been selected.
• Press OK. The data for the job(s) will be retrieved from the database and the ProStat® program will be displayed. You can now view any of the available charts or perform any data analysis, as appropriate.

Copyright © 1983-2004 Mattec Corporation
7-137 810-0001 Rev - C
7.4 Scrap Pareto Chart The Scrap Pareto Chart displays the scrap that has been entered for the job. It quickly identifies the most significant causes of scrap parts and helps you to focus your attention on resolving those problems. To generate a Scrap Pareto Chart for a job, follow these steps:
• Start the Main Menu and press the Launch ProStat® icon. The ProStat® program will be displayed. Select the appropriate job, as described in Section 7.3.
• Press the Scrap Pareto Chart icon. The Scrap Pareto Chart will be displayed.
Job Scrap Pareto Chart
Alternate Methods The Scrap Pareto Chart is available in the Real-Time Display program. This allows you to easily view the chart for running jobs.
Copyright © 1983-2004 Mattec Corporation
7-138 810-0001 Rev - C
The Scrap Pareto Chart will not refresh automatically and will only be refreshed when the user presses the Refresh button. It is safe to press the Refresh button at any time. Scrap Reasons are always displayed in order of scrap parts that have been entered, with the Scrap Reasons with the most quantity displayed on the left-hand side of the display. You can scroll to the left or right to see additional data on the chart. You can display the chart in 2-Dimensions or 3-Dimensions. These settings are specified on the Options dialog. Advanced Tip #1 Scrap can be entered by authorized users at the MIU, on the Real-Time Display, or via Edit Facilities. Advanced Tip #2 The scrap reasons that are displayed in the Scrap Pareto Chart include all scrap reasons that are configured in the Scrap Map for this machine, including reasons from the Advanced Scrap Map and the Simple Scrap Map. The Scrap Map is specified in the Machine Configuration program. Advanced Tip #3 If you have entered scrap for a scrap reason that is not defined in the Scrap Map, that scrap reason will be displayed in the Scrap Pareto Chart. Advanced Tip #4 The Scrap Pareto Chart is not available if you are analyzing data for multiple jobs (i.e., “SPC By Part” or “SPC By Tool”.)

Copyright © 1983-2004 Mattec Corporation
7-139 810-0001 Rev - C
7.5 Downtime Pie Chart The Downtime Pie Chart displays the downtime that has been accumulated for the job. It quickly identifies the most significant causes of machine downtime and helps you to focus your attention on resolving those problems. To generate a Downtime Pie Chart for a job, follow these steps:
• Start the Main Menu and press the Launch ProStat® icon. The ProStat® program will be displayed. Select the appropriate job, as described in Section 7.3.
• Press the Downtime Pie Chart icon. The Downtime Pie Chart will be displayed.
Job Downtime Pie Chart

Copyright © 1983-2004 Mattec Corporation
7-140 810-0001 Rev - C
Alternate Methods The Downtime Pie Chart is available in the Real-Time Display program. This allows you to easily view the chart for running jobs. The Downtime Pie Chart will not refresh automatically and will only be refreshed when the user presses the Refresh button. It is safe to press the Refresh button at any time. You can optionally display run time along with downtime. You may want to disable the display of run time if the percentage of downtime is very low (and thus, the display would show mostly run time). This is specified on the Options dialog. You control the number of “slices” that will be displayed in the pie. When more downtime reasons exist than there are slices to the pie, the smallest downtime reasons are accumulated and displayed in the last slice of the pie. The number of downtime reasons that were accumulated into that last slice of the pie is displayed in parenthesis. By controlling the number of slices in the pie, you can minimize the visual impact of having a lot of downtime reasons that have very little downtime accumulated. This is specified on the Options dialog. You can display the chart as a doughnut chart and display the chart in 2-Dimensions or 3-Dimensions. These settings are specified on the Options dialog. Advanced Tip #1 Downtime is automatically accumulated by the MIU. The user can specify the current downtime reason at the MIU or via the Real-Time Display. If you make a mistake, the System Manager can edit this data via Edit Facilities. Reference Section 5.11 for additional information. Advanced Tip #2 Any downtime reason that has accumulated downtime for the job will be displayed in the Downtime Pie Chart. Advanced Tip #3 The Downtime Pie Chart is not available if you are analyzing data for multiple jobs (i.e., “SPC By Part” or “SPC By Tool”.)

Copyright © 1983-2004 Mattec Corporation
7-141 810-0001 Rev - C
7.6 Overview Tab The Overview tab in ProStat® displays basic information for the currently selected job(s). To display the Overview tab, follow these steps:
• Start the Main Menu and press the Launch ProStat® icon. The ProStat® program will be displayed. Select the appropriate job, as described in Section 7.3.
• Press the Overview tab. The Overview tab will be displayed.
ProStat® - Overview Tab
Advanced Tip #1 When analyzing data for multiple jobs (i.e., “SPC By Part” or “SPC By Tool”), the Overview tab will show data that is common to all of the jobs being analyzed. The Overview tab simply displays information about the currently selected job. To select a different job, date range, or data type and parameter, press the Select Data icon. Reference Section 7.3 for additional information.

Copyright © 1983-2004 Mattec Corporation
7-142 810-0001 Rev - C
7.7 Production Tab The Production tab in ProStat® displays job production and material lot data for the currently selected job(s). To display the Overview tab, follow these steps:
• Start the Main Menu and press the Launch ProStat® icon. The ProStat® program will be displayed. Select the appropriate job, as described in Section 7.3.
• Press the Production tab. The Production tab will be displayed.
Production Tab
Alternate Methods Production-related information is available in the Real-Time Display program. This allows you to easily view this data for running jobs. Material Lots for a job can be viewed in the “Material Lot Report” in System Reports.

Copyright © 1983-2004 Mattec Corporation
7-143 810-0001 Rev - C
Data in the Material Lot display can be sorted by lot number (1-4) or chronologically. To modify the current setting, press the Options button and select the Production tab. Advanced Tip #1 When analyzing data for multiple jobs (i.e., “SPC By Part” or “SPC By Tool”), the Production tab will show the combined job production data for all jobs being analyzed. The Efficiency fields will not be displayed.

Copyright © 1983-2004 Mattec Corporation
7-144 810-0001 Rev - C
7.8 Process Alarm Tab The Process Alarm tab in ProStat® displays “Job Engineering” data for the currently selected job(s). This data is automatically collected for all monitored process parameters. It includes calculated data, including Cpk, Standard Deviation, Cp, and k. To display the Overview tab, follow these steps:
• Start the Main Menu and press the Launch ProStat® icon. The ProStat® program will be displayed. Select the appropriate job, as described in Section 7.3.
• Press the Production tab. The Production tab will be displayed.
ProStat® Process Alarm Tab

Copyright © 1983-2004 Mattec Corporation
7-145 810-0001 Rev - C
Alternate Methods Shift Engineering data can be viewed in the “Shift Engineering Report” in System Reports. Job Engineering data can be viewed in the “Job Engineering Report” in System Reports. Advanced Tip #1 The Job Engineering data on the Process Alarm tab is collected for all monitored process parameters on a cycle-by-cycle basis. This data is always collected and is not associated with Automatic SPC or Manual SPC samples. As such, calculated values (e.g., Cpk) may differ from the values that are calculated based on statistical samples. There is a degree of error in the Job Engineering data that is not present in SPC samples. Advanced Tip #2 When analyzing data for multiple jobs (i.e., “SPC By Part” or “SPC By Tool”), the Process Alarm tab will show the combined process alarm data for all jobs being analyzed. The specification limits and control limits are determined by selecting the lowest upper limit and the highest lower limit for each process parameter. That is, the “tightest” specification and control limits, as determined by combining all of the jobs together, are used.

Copyright © 1983-2004 Mattec Corporation
7-146 810-0001 Rev - C
7.9 X-Bar Chart and Range Chart (R) An X-Bar chart displays the average of the observations in a sample. A Range Chart (R Chart) displays the range of the observations in each sample. Compatibility The X-Bar/Range Charts are available for Automatic SPC, Manual SPC, or Variable SQC Data. They are not available for Attribute SQC data. If the number of observations per sample for the job equals 1, the Chart of Individuals and Moving Range Chart are automatically selected instead of the X-Bar/Range Charts. To display the X-Bar/Range Charts, follow these steps:
• Start the Main Menu and press the Launch ProStat® icon. The ProStat® program will be displayed. Select the appropriate job, as described in Section 7.3.
• Press the X-Bar/R Chart tab. The X-Bar/Range Charts will be displayed.
X-Bar Chart and Range Chart

Copyright © 1983-2004 Mattec Corporation
7-147 810-0001 Rev - C
Advanced Tip #1 If the number of observations per sample for the job equals one (1), the Chart of Individuals and Moving Range chart will be automatically selected instead of the X-Bar/Range Charts. You can force the Chart of Individuals and Moving Range Chart to be displayed by selecting the “Moving Range” option on the R/MRx Chart tab on the Options dialog. Reference Section 7.9.1 for additional information. You can double-click on any point in either the X-Bar or Range Charts to see additional data for that sample, including the observations that comprised the sample, the date/time that the sample was taken, and the X-Bar, Range, Standard Deviation, and Median for the sample. Advanced Tip #2 The X-Bar/Range Charts are available when performing analysis for multiple jobs (i.e., “SPC By Part” or “SPC By Tool”.) Data for the jobs are arranged in chronological order by job, starting with the job that ran first. You can double-click on any point in either chart to see which job is associated with the sample. A number of options are available to control the behavior of the charts. To modify the behavior of the X-Bar/Range Charts, follow these steps:
• Press the Options button. The Options dialog will be displayed.
• Press the X-Bar Chart tab or the R/MRx Chart tab.

Copyright © 1983-2004 Mattec Corporation
7-148 810-0001 Rev - C
X-Bar Chart Options
Range / Moving Range Chart Options

Copyright © 1983-2004 Mattec Corporation
7-149 810-0001 Rev - C
The following table describes the options that affect the X-Bar and Range Charts:
Option Options Tab Description Upper Boundary X-Bar Chart This value controls the maximum value that is
displayed on the Y-Axis. If both “Upper Boundary” and “Lower Boundary” are 0, the chart will automatically chose appropriate values for scaling.
Lower Boundary X-Bar Chart This value controls the minimum value that is displayed on the Y-Axis.
Number of points visible on chart X-Bar Chart This value controls the approximate number of points that will be displayed on the chart. Additional points can be viewed by scrolling the chart to the left or the right. The X-Bar Chart, the Range Chart, and the Standard Deviation Chart use this value.
Display user-defined specification limits
X-Bar Chart This value controls whether the user-entered specification limits will be displayed on the chart. Specification limits for Automatic SPC and Manual SPC are entered in the Process Sheet. Specification limits for Variable SQC are entered in the Sample Sheet.
Display user-defined control limits X-Bar Chart This value controls whether the user-entered control limits will be displayed on the chart. Control limits for Automatic SPC and Manual SPC are entered in the Process Sheet. Control limits for Variable SQC are entered in the Sample Sheet.
Calculate and display control limits from sample data
X-Bar Chart This value causes ProStat® to dynamically calculate X-Bar control limits and display them on the chart.
Display X-Bar for each sample X-Bar Chart When selected, this value will cause the chart to display the X-Bar value for each sample above the sample marker.
Display point markers X-Bar Chart Displays a large marker for each point on the chart. This makes it easier to double-click on a sample, but makes the chart harder to read if you have specified a large “number of points visible on chart”.
Display horizontal grid lines X-Bar Chart Controls whether horizontal grid lines are displayed on the chart.
Display vertical grid lines X-Bar Chart Controls whether vertical grid lines are displayed on the chart.
3-Dimensional X-Bar Chart Controls whether the chart is displayed in 2-D or 3-D.

Copyright © 1983-2004 Mattec Corporation
7-150 810-0001 Rev - C
Option Options Tab Description Upper Boundary R/MRx Chart This value controls the maximum value that is
displayed on the Y-Axis. If both “Upper Boundary” and “Lower Boundary” are 0, the chart will automatically chose appropriate values.
Lower Boundary R/MRx Chart This value controls the minimum value that is displayed on the Y-Axis.
Moving Range R/MRx Chart This value forces ProStat® to use special calculations for the X-Bar and Range Charts, even if the number of observation per sample is greater than one (1). When selected a Chart of Individuals will be displayed in place of the X-Bar chart and a Moving Range Chart will be displayed in place of the Range Chart.
Observations Per Range R/MRx Chart This value specifies the number of observations that are grouped together when creating a Chart of Individuals and a Moving Range Chart. This value is only used if “Moving Range” is selected or if the number of observations per sample for the job is one (1).
Display user-defined control limits R/MRx Chart This value controls whether the user-entered control limits will be displayed on the chart. Control limits for Automatic SPC and Manual SPC are entered in the Process Sheet. Control limits for Variable SQC are entered in the Sample Sheet.
Calculate and display control limits from data
R/MRx Chart This value causes ProStat® to dynamically calculate Range control limits and display them on the chart.
Display range for each sample R/MRx Chart When selected, this value will cause the chart to display the Range value for each sample above the sample marker.
Display point markers R/MRx Chart Displays a large marker for each point on the chart. This makes it easier to double-click on a sample, but makes the chart harder to read if you have specified a large “number of points visible on chart”.
Display horizontal grid lines R/MRx Chart Controls whether horizontal grid lines are displayed on the chart.
Display vertical grid lines R/MRx Chart Controls whether vertical grid lines are displayed on the chart.
3-Dimensional R/MRx Chart Controls whether the chart is displayed in 2-D or 3-D.

Copyright © 1983-2004 Mattec Corporation
7-151 810-0001 Rev - C
7.9.1 Chart of Individuals (X) and Moving Range Chart (MRx) A Chart of Individuals (X Chart) is a special case of an X-Bar Chart where the number of observations per sample equals one (1). A Moving Range Chart (MRx Chart) is a special case of a Range Chart where the number of observations per sample equals one (1). Compatibility The Chart of Individuals and Moving Range Chart are available for Automatic SPC, Manual SPC, or Variable SQC Data. They are not available for Attribute SQC data. If the number of observations per sample for the job equals 1, the Chart of Individuals and Moving Range Chart are automatically selected instead of the X-Bar/Range Charts. To force a Chart of Individuals and Moving Range Chart to be displayed (in place of the X-Bar/Range Charts), follow these steps:
• Start the Main Menu and press the Launch ProStat® icon. The ProStat® program will be displayed. Select the appropriate job, as described in Section 7.3.
• Press the Options button. The Options dialog will be displayed.
• Press the R/MRx Chart tab.
• Place a checkmark in the Moving Range checkbox.
• Enter a value in the Number of Observations field.
• Press OK. The Chart of Individuals and Moving Range Chart will be displayed. Advanced Tip #1 If the number of observations per sample for the job equals one (1), the Chart of Individuals and Moving Range chart will be automatically selected instead of the X-Bar/Range Charts. Advanced Tip #2 You can force the Chart of Individuals and Moving Range Chart to be displayed by selecting the “Moving Range” option on the R/MRx Chart tab on the Options dialog.

Copyright © 1983-2004 Mattec Corporation
7-152 810-0001 Rev - C
Chart of Individuals and Moving Range Chart
Advanced Tip #3 Notice that the first several points on the Moving Range chart do not exist. The first point that is graphed on the Moving Range chart is the nth point, where n equals “Observations Per Range” from the Options dialog. The Chart of Individuals behaves in a manner similar to the X-Bar Chart. The Moving Range Chart behaves in a manner similar to the Range Chart. Reference Section 7.9 for additional information. Advanced Tip #4 The X-Bar/Range Charts are available when performing analysis for multiple jobs (i.e., “SPC By Part” or “SPC By Tool”.) Data for the jobs are arranged in chronological order by job, starting with the job that ran first. You can double-click on any point in either chart to see which job is associated with the sample.

Copyright © 1983-2004 Mattec Corporation
7-153 810-0001 Rev - C
7.10 X-Bar Chart and Standard Deviation Chart (S) An X-Bar Chart displays the average of the observations in a sample. A Standard Deviation Chart (S Chart) displays the standard deviation of the observations in each sample. Compatibility The X-Bar/Standard Deviation Charts are available for Automatic SPC, Manual SPC, or Variable SQC Data. They are not available for Attribute SQC data. To display the X-Bar/Standard Deviation Charts, follow these steps:
• Start the Main Menu and press the Launch ProStat® icon. The ProStat® program will be displayed. Select the appropriate job, as described in Section 7.3.
• Press the X-Bar/S Chart tab. The X-Bar/Standard Deviation Charts will be displayed.
X-Bar Chart and Standard Deviation Chart

Copyright © 1983-2004 Mattec Corporation
7-154 810-0001 Rev - C
Advanced Tip #1 If the number of observations per sample for the job equals one (1), the X-Bar / Standard Deviation Charts will not be displayed. However, if you have forced ProStat® to display a Chart of Individuals and Moving Range chart (by selecting “Moving Range” on the R/MRx tab of the Options dialog), then the standard X-Bar / Standard Deviation Charts will be displayed. You can double-click on any point in either the X-Bar or Standard Deviation Charts to see additional data for that sample, including the observations that comprised the sample, the date/time that the sample was taken, and the X-Bar, Range, Standard Deviation, and Median for the sample. Advanced Tip #2 The X-Bar/Standard Deviation Charts are available when performing analysis for multiple jobs (i.e., “SPC By Part” or “SPC By Tool”.) Data for the jobs are arranged in chronological order by job, starting with the job that ran first. You can double-click on any point in either chart to see which job is associated with the sample. A number of options are available to control the behavior of the charts. To modify the behavior of the X-Bar/Standard Deviation Charts, follow these steps:
• Press the Options button. The Options dialog will be displayed.
• Press the X-Bar Chart tab or the s Chart tab.

Copyright © 1983-2004 Mattec Corporation
7-155 810-0001 Rev - C
s Chart Options
Options that affect the X-Bar Chart are described in Section 7.9. The following table describes the options that affect the Standard Deviation Chart:
Option Options Tab Description Upper Boundary s Chart This value controls the maximum value that is
displayed on the Y-Axis. If both “Upper Boundary” and “Lower Boundary” are 0, the chart will automatically chose appropriate values for scaling.
Lower Boundary s Chart This value controls the minimum value that is displayed on the Y-Axis.
Number of points visible on chart X-Bar Chart This value controls the approximate number of points that will be displayed on the chart. Additional points can be viewed by scrolling the chart to the left or the right.
Calculate and display control limits from sample data
s Chart This value causes ProStat® to dynamically calculate standard deviation control limits and display them on the chart.
Display standard deviation for each sample
s Chart When selected, this value will cause the chart to display the standard deviation value for each sample above the sample marker.
Display point markers s Chart Displays a large marker for each point on the chart. This makes it easier to double-click on a sample, but makes the chart harder to read if you have specified a large “number of points visible on chart”.
Display horizontal grid lines s Chart Controls whether horizontal grid lines are displayed on the chart.

Copyright © 1983-2004 Mattec Corporation
7-156 810-0001 Rev - C
Option Options Tab Description Display vertical grid lines s Chart Controls whether vertical grid lines are
displayed on the chart. 3-Dimensional s Chart Controls whether the chart is displayed in 2-D
or 3-D. Advanced Tip #3 There is no place in the ProHelp® EPM software to enter standard control limits for standard deviation. However, the ProStat® software is capable of calculating these control limits dynamically and displaying them on the s Chart.

Copyright © 1983-2004 Mattec Corporation
7-157 810-0001 Rev - C
7.11 Median Chart A Median Chart displays the median of the observations in each sample. Compatibility The Median Chart is available for Automatic SPC, Manual SPC, or Variable SQC Data. It is not available for Attribute SQC data. To display the Median Chart, follow these steps:
• Start the Main Menu and press the Launch ProStat® icon. The ProStat® program will be displayed. Select the appropriate job, as described in Section 7.3.
• Press the Median Chart tab. The Median Chart will be displayed.
Median Chart

Copyright © 1983-2004 Mattec Corporation
7-158 810-0001 Rev - C
Advanced Tip #1 If the number of observations per sample for the job equals one (1), the Median Chart will not be displayed. However, if you have forced ProStat® to display a Chart of Individuals and Moving Range chart (by selecting “Moving Range” on the R/MRx tab of the Options dialog), then the standard Median Chart will be displayed. You can double-click on any point in the Median Chart to see additional data for the sample, including the observations that comprised that sample, the date/time that the sample was taken, and the X-Bar, Range, Standard Deviation, and Median for the sample. Advanced Tip #2 The Median Chart is available when performing analysis for multiple jobs (i.e., “SPC By Part” or “SPC By Tool”.) Data for the jobs are arranged in chronological order by job, starting with the job that ran first. You can double-click on any point in the chart to see which job is associated with the sample. A number of options are available to control the behavior of the chart. To modify the behavior of the Median Chart, follow these steps:
• Press the Options button. The Options dialog will be displayed.
• Press the Median Chart tab.

Copyright © 1983-2004 Mattec Corporation
7-159 810-0001 Rev - C
Median Chart Options
The following table describes the options that affect the Median Chart:
Option Options Tab Description Upper Boundary Median Chart This value controls the maximum value that is
displayed on the Y-Axis. If both “Upper Boundary” and “Lower Boundary” are 0, the chart will automatically chose appropriate values for scaling.
Lower Boundary Median Chart This value controls the minimum value that is displayed on the Y-Axis.
Number of points visible on chart Median Chart This value controls the approximate number of points that will be displayed on the chart. Additional points can be viewed by scrolling the chart to the left or the right.
Calculate and display control limits from sample data
Median Chart This value causes ProStat® to dynamically calculate median control limits and display them on the chart.
Display median for each sample Median Chart When selected, this value will cause the chart to display the median value for each sample above the sample marker.
Display individual observations for each sample
Median Chart When selected, this value will cause the chart to display all of the observations for each sample, in addition to the calculated median.

Copyright © 1983-2004 Mattec Corporation
7-160 810-0001 Rev - C
Option Options Tab Description Display value of each observation Median Chart When selected, this value will cause the chart
to display the Median value for each observation above the observation’s marker. This value requires you to enable the “display individual observations for each sample” option.
Display point markers Median Chart Displays a large marker for each point on the chart. This makes it easier to double-click on a sample, but makes the chart harder to read if you have specified a large “number of points visible on chart”.
Display horizontal grid lines Median Chart Controls whether horizontal grid lines are displayed on the chart.
Display vertical grid lines Median Chart Controls whether vertical grid lines are displayed on the chart.
3-Dimensional Median Chart Controls whether the chart is displayed in 2-D or 3-D.
Advanced Tip #3 There is no place in the ProHelp® EPM software to enter standard control limits for medians. However, the ProStat® software is capable of calculating these control limits dynamically and displaying them on the Median Chart.

Copyright © 1983-2004 Mattec Corporation
7-161 810-0001 Rev - C
7.12 Histogram Chart (Capability Analysis) A Histogram Chart is a graphical representation of a frequency distribution of the sample data. The widths of the bars on the chart represent class intervals whose areas are proportional to the corresponding frequencies. Compatibility The Histogram Chart and Capability Analysis data are available for Automatic SPC, Manual SPC, or Variable SQC Data. They are not available for Attribute SQC data. To display the Histogram Chart, follow these steps:
• Start the Main Menu and press the Launch ProStat® icon. The ProStat® program will be displayed. Select the appropriate job, as described in Section 7.3.
• Press the Histogram Chart tab. The Histogram Chart and Capability Analysis data will be displayed.
Histogram Chart and Capability Analysis

Copyright © 1983-2004 Mattec Corporation
7-162 810-0001 Rev - C
Advanced Tip #1 If the number of observations per sample for the job equals one (1), the Histogram Chart automatically adjusts its calculations as appropriate. The Histogram Chart will use “Moving Range Calculations” to calculate a value for R-Bar, which is used to calculate Sigma (Estimated). In this case, the “Observations Per Range” field from the Options dialog is used to determine the number of observations per sample. Advanced Tip #2 The Histogram Chart is available when performing analysis for multiple jobs (i.e., “SPC By Part” or “SPC By Tool”.) Data for the jobs are combined together to perform this analysis. The specification limits and control limits are determined by selecting the lowest upper limit and the highest upper limit for each process parameter. That is, the “tightest” specification and control limits, as determined by combining all of the jobs together, are used. A number of options are available to control the behavior of the chart. To modify the behavior of the Histogram Chart, follow these steps:
• Press the Options button. The Options dialog will be displayed.
• Press the Histogram Chart tab.
Histogram Chart Options

Copyright © 1983-2004 Mattec Corporation
7-163 810-0001 Rev - C
The following table describes the options that affect the Histogram Chart:
Option Options Tab Description Number of Cells Calculate Number of Cells
Histogram This value controls the number of cells (i.e., classes) for the chart. This value may range from 1 to 30. Check the “Calculate number of cells” field to instruct the software to automatically calculate the number of cells.
Sigma Multiplier Histogram This value is used to draw reference lines on the Histogram chart. The user-specified Sigma Multiplier is a +/- value, so a Sigma Multiplier of 3 equals “6 Sigma”.
Reference Lines Histogram This value controls the reference lines that are displayed on the chart.
Moving Range Histogram This value forces ProStat® to use special Moving Range calculations for the Histogram Chart, even if the number of observation per sample is greater than one (1).
Observations Per Range Histogram This value specifies the number of observations that are grouped together when performing Moving Range calculations. This value is only used if “Moving Range” is selected or if the number of observations per sample for the job is one (1).
Display reference lines for mean Histogram This value causes ProStat® to dynamically calculate the mean and display it on the chart.
Display curve showing normal distribution (Gaussian)
Histogram The value causes a bell curve to be overlaid on the chart. The bell curve represents a normal distribution.
Display number of observations in each cell
Histogram When selected, this value will cause the chart to display the number of observations for each cell on the chart.
Display horizontal grid lines Histogram Controls whether horizontal grid lines are displayed on the chart.
Display vertical grid lines Histogram Controls whether vertical grid lines are displayed on the chart.
3-Dimensional Histogram Controls whether the chart is displayed in 2-D or 3-D.
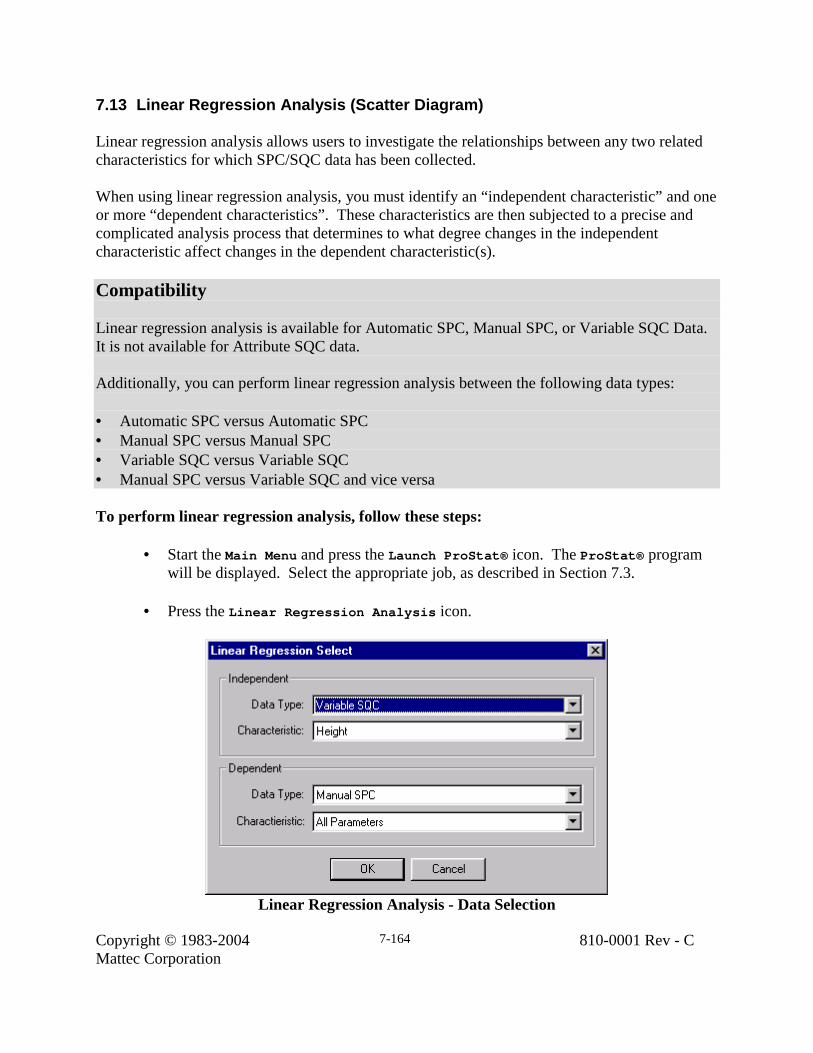
Copyright © 1983-2004 Mattec Corporation
7-164 810-0001 Rev - C
7.13 Linear Regression Analysis (Scatter Diagram) Linear regression analysis allows users to investigate the relationships between any two related characteristics for which SPC/SQC data has been collected. When using linear regression analysis, you must identify an “independent characteristic” and one or more “dependent characteristics”. These characteristics are then subjected to a precise and complicated analysis process that determines to what degree changes in the independent characteristic affect changes in the dependent characteristic(s). Compatibility Linear regression analysis is available for Automatic SPC, Manual SPC, or Variable SQC Data. It is not available for Attribute SQC data. Additionally, you can perform linear regression analysis between the following data types: • Automatic SPC versus Automatic SPC • Manual SPC versus Manual SPC • Variable SQC versus Variable SQC • Manual SPC versus Variable SQC and vice versa To perform linear regression analysis, follow these steps:
• Start the Main Menu and press the Launch ProStat® icon. The ProStat® program will be displayed. Select the appropriate job, as described in Section 7.3.
• Press the Linear Regression Analysis icon.
Linear Regression Analysis - Data Selection

Copyright © 1983-2004 Mattec Corporation
7-165 810-0001 Rev - C
• Specify the Independent Characteristic to be analyzed.
• Select the Dependent Characteristic(s) to be analyzed. You may select one Dependent Characteristic or select All Parameters. The list of Dependent Characteristics that can be chosen will be adjusted to show only those characteristics that are valid with the selected Independent Characteristic.
• Press OK. If you have selected only one Dependent Characteristic, the Scatter
Diagram will be displayed. If you have selected multiple Dependent Characteristics (i.e., All Parameters), a spreadsheet will be displayed listing relevant information for each Dependent Characteristic. Double-click on any row in the spreadsheet to see the Scatter Diagram for that Dependent Characteristic.
Linear Regression Analysis Results for Multiple Dependent Characteristics
Advanced Tip #1 If you are performing linear regression analysis for more than one dependent characteristic, you will see the results of the analysis in a spreadsheet (see above). Double-click on any row in the spreadsheet to see the corresponding Scatter Diagram. Alternately, you can highlight the row in the spreadsheet that is of interest, then press the Select button. The Scatter Diagram will be displayed.

Copyright © 1983-2004 Mattec Corporation
7-166 810-0001 Rev - C
Linear Regression Scatter Diagram
Interpreting Results: Numerous books and articles are available to assist you in interpreting the results of linear regression analysis, including the “Statistical Quality Control Handbook” published by AT&T (Select Code 700-444). As a quick guide, however, the following are commonly accepted: • A Correlation Coefficient of 1 indicates a strong positive correlation between the
independent characteristic and the dependent characteristic. • A Correlation Coefficient of –1 indicates a strong negative correlation between the
independent characteristic and the dependent characteristic. • A Correlation Coefficient of 0 indicates no correlation between the independent
characteristic and the dependent characteristic. • A Significance greater than 3 is considered “significant”.

Copyright © 1983-2004 Mattec Corporation
7-167 810-0001 Rev - C
Can I Perform Linear Regression Analysis Between Automatic SPC Data And Variable SQC Data? No. Linear regression analysis requires the independent characteristic and the dependent characteristic(s) to be from the same machine cycle to be statistically valid. By their very nature, Automatic SPC samples are initiated without user interaction and without the user’s knowledge. Thus, it would not be reasonably possible to enter Variable SQC data and know with any certainty that it could be correlated with Automatic SPC data. In fact, the entire reason for Manual SPC sampling to exist is to permit correlation between the machine’s process parameters and the part’s variable characteristics. The machine operator instructs the MIU to sample the machine’s process parameters so the corresponding parts that are produced can be collected and used for Variable SQC and/or Attribute SQC data entry.

Copyright © 1983-2004 Mattec Corporation
7-168 810-0001 Rev - C
7.14 Calculating Control Limits ProHelp® EPM allows users to directly enter control limits for process parameters (Automatic SPC and Manual SPC) and part characteristics (Variable SQC). You can optionally calculate these control limits via the ProStat® program. The following table describes the location of control limits for the four SPC/SQC data types:
Data Type Control Limits Automatic SPC Manual SPC
Control Limits for process parameters are specified in the Process Sheet. These limits are used for Automatic SPC, Manual SPC, and for real-time monitoring by the MIU.
Variable SQC Control Limits for part characteristics are specified in the Sample Sheet.
Attribute SQC N/A. To calculate control limits, follow these steps:
• Start the Main Menu and press the Launch ProStat® icon. The ProStat® program will be displayed. Select the appropriate job, as described in Section 7.3.
• Press the Calculate Control Limits icon.
Calculate Control Limits – Data Selection
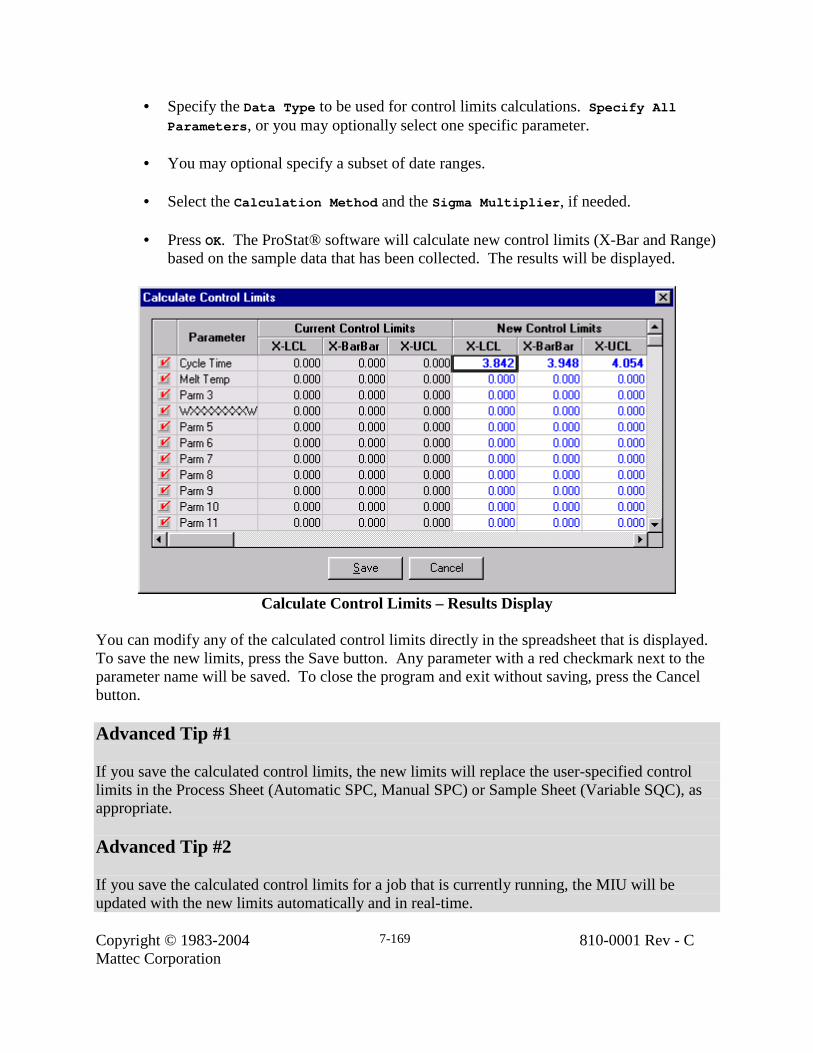
Copyright © 1983-2004 Mattec Corporation
7-169 810-0001 Rev - C
• Specify the Data Type to be used for control limits calculations. Specify All Parameters, or you may optionally select one specific parameter.
• You may optional specify a subset of date ranges.
• Select the Calculation Method and the Sigma Multiplier, if needed.
• Press OK. The ProStat® software will calculate new control limits (X-Bar and Range)
based on the sample data that has been collected. The results will be displayed.
Calculate Control Limits – Results Display
You can modify any of the calculated control limits directly in the spreadsheet that is displayed. To save the new limits, press the Save button. Any parameter with a red checkmark next to the parameter name will be saved. To close the program and exit without saving, press the Cancel button. Advanced Tip #1 If you save the calculated control limits, the new limits will replace the user-specified control limits in the Process Sheet (Automatic SPC, Manual SPC) or Sample Sheet (Variable SQC), as appropriate. Advanced Tip #2 If you save the calculated control limits for a job that is currently running, the MIU will be updated with the new limits automatically and in real-time.

Copyright © 1983-2004 Mattec Corporation
7-170 810-0001 Rev - C
The following table briefly describes the calculation methods that are available:
Calculation Method Description Table Of Constants Control limits are calculated using X-BarBar and R-Bar
values and the standard SPC Table of Constants. Sigma (Individuals) Control limits are calculated using the actual standard
deviation “Sigma (Individuals)” and the user-specified Sigma Multiplier. The user-specified Sigma Multiplier is a +/- value, so a Sigma Multiplier of 3 equals “6 Sigma”.
Sigma (Estimated) Control limits are calculated using an estimate of the standard deviation “Sigma (Estimated)” and the user-specified Sigma Multiplier. The user-specified Sigma Multiplier is a +/- value, so a Sigma Multiplier of 3 equals “6 Sigma”.
Advanced Tip #3 Several charts allow the user to overlay “calculated control limits” on the chart. These control limits are calculated on the fly for display purposes only and can not be saved to the Process Sheet or Sample Sheet. If you wish to calculate control limits and save those limits to the Process Sheet or Sample Sheet, you must use the Calculate Control Limits function that is described in this section. Advanced Tip #4 The Standard Deviation Chart and Median Chart allow the user to overlay “calculated control limits” on the chart. There is no corresponding location for the user to specify standard deviation or median control limits. Thus, it is not possible to calculate standard deviation or median control limits and to save those control limits. Advanced Tip #5 The Attribute SQC charts (p Chart, np Chart, c Chart, and u Chart) allow the user to overlay “calculated control limits” on the charts. There is no corresponding location for the user to specify Attribute SQC control limits. Thus, for Attribute SQC data it is not possible to calculate control limits and to save those control limits.

Copyright © 1983-2004 Mattec Corporation
7-171 810-0001 Rev - C
7.15 SPC/SQC Summary Report The SPC/SQC Summary Report displays detailed information for each sample being analyzed. Compatibility The SPC/SQC Summary Report is only available for Automatic SPC, Manual SPC, or Variable SQC data. It is not available for Attribute SQC data. To display the SPC/SQC Summary Report, follow these steps:
• Start the Main Menu and press the Launch ProStat® icon. The ProStat® program will be displayed. Select the appropriate job, as described in Section 7.3.
• Press the SPC/SQC Summary Report icon. The SPC/SQC Summary Report will be displayed.
SPC/SQC Summary Report (Report Format)
You can print the report by clicking on the File menu and selecting Print. You can save the report to disk by clicking on the File menu and selecting Save As.

Copyright © 1983-2004 Mattec Corporation
7-172 810-0001 Rev - C
The SPC/SQC Summary Report is available in two formats, Report and Export. These formats are described below:
Report Format Description Report This format presents all samples and related data
(including the observations that comprised the samples) in an easy-to-read display.
Export This format presents all samples and related data in an ASCII-text format that would be appropriate for use with exporting this data out of the ProHelp® EPM system to an external system. This feature requires the Data Import/Export option.
To change the format of the SPC/SQC Summary Report, follow these steps:
• Click on the View menu and select Report to display the Report format. • Click on the View menu and select Export to display the Export format.
SPC/SQC Summary Report (Export Format)
Advanced Tip #1 The Export format of the SPC/SQC Summary Report requires the Data Import/Export option. Data Import/Export is an optional feature. You may purchase this feature at any time by contacting the Mattec Sales Department.

Copyright © 1983-2004 Mattec Corporation
7-173 810-0001 Rev - C
When in “Report” format, the report can be saved in the following file formats:
• Microsoft Excel • Web Page
When in “Export” format, the export can be saved in the following file formats:
• CSV (comma delimited) • Unicode CSV (comma delimited) • Text (tab delimited) • Unicode Text (tab delimited) • Microsoft Excel • Web Page

Copyright © 1983-2004 Mattec Corporation
7-174 810-0001 Rev - C
7.16 Process Exception Log The Process Exception Log will record any machine cycles that result in a violation of specification limits, control limits, and/or part qualification limits for any monitored process parameter. WARNING: The Process Exception Log has the potential to grow very rapidly and should only be turned on if the data collected will be used. The Process Exception Log is intended to be a short-term debugging tool and should not be used in place of statistical analysis of data. To view the Process Exception Log for a job, follow these steps:
• Start ProStat®. To do this, start the Main Menu and press the Launch ProStat® Display icon. Select the appropriate job, as described in Section 7.3.
• Press the Process Exception Log icon. The Process Exception Log will be displayed.
Process Exception Log

Copyright © 1983-2004 Mattec Corporation
7-175 810-0001 Rev - C
Alternate Methods A “Process Exception Log Report” is available in System Reports. This report can be used to view process exceptions for any job. The Process Exception Log is available in the Real-Time Display program. This allows you to easily view this data for running jobs. Advanced Tip #1 Process Exception Logging is enabled in the Machine Configuration program. When enabled, all exceptions to any process parameter are automatically recorded by the system. Reference the System Administration Manual, #810-0014, for additional information.

Copyright © 1983-2004 Mattec Corporation
7-176 810-0001 Rev - C
7.17 Real-Time SPC/SQC Alarms ProHelp® EPM is a very powerful tool that is capable of alerting you to process parameter problems and part quality problems before these problems occur. This allows you to take steps to adjust the machine before you start making scrap parts. Definitions Run – A Run indicates that a “Trend” or a “Shift” has occurred in SPC or SQC sampling. Shift – A Shift indicates that the last “n” consecutive SPC or SQC samples, where “n” equals the “Number of Samples Per Run” from System Configuration, were above the upper control limit or below the lower control limit. A Shift may indicate that a fundamental change has occurred to the machine. Trend – A Trend indicates that the last “n” consecutive SPC or SQC samples, where “n” equals the “Number of Samples Per Run” from System Configuration, were all increasing or all decreasing. A Trend may indicate that the machine will soon be exceeding the job’s specification limits and may be about to start producing bad parts. When a Run (Shift or Trend) is detected by the MIU, an alarm condition is displayed on the MIU’s SPC/SQC Results screen. This can be used to alert the machine operator or quality control personnel that a change needs to be made to the machine before scrap parts are produced. The status of the last SPC sample (Automatic SPC and Manual SPC) or SQC sample (Variable SQC or Attribute SQC) can be seen on the Real-Time Display. The System Manager can add these fields to any custom Real-Time Display. These fields exist in the “Basic Data” category and are available via the Real-Time Display Writer. Reference the System Administration Manual, #810-0014, for additional information. Advanced Tip #1 The system will only display Run alarms (at the MIU) or the status of the last sample (on the Real-Time Display) for SPC/SQC data that is collected by the MIU or that is input by the user at the MIU. Samples that are entered by the user via the ProStat® Sample Data Edit program are ignored for alarming purposes. Advanced Tip #2 ProHelp® Millennium allows the user to display SPC/SQC Run Alarms (Shifts and Trends) on the Real-Time Display. This functionality does not exist in ProHelp® EPM.

Copyright © 1983-2004 Mattec Corporation
7-177 810-0001 Rev - C
7.18 Part Qualification The ProHelp® EPM system is capable of qualifying 100% of parts during production based on the specification and control limits of all monitored process parameters. When a part is produced during a cycle where any process parameter exceeds its limits (upper or lower), the MIU will ignite a digital contact that can be connected to a diverter or robot to place these parts away from good production. Parts are qualified based upon two criteria:
• Specification limits that are specified in the Process Sheet. • Control Limits (X-UCL and X-LCL) that are specified in the Process Sheet.
Each cycle of the machine will be monitored against both types of limits for 100% part qualification. Part qualification is an automatic way to monitor bad parts based on specification and control limits. The user should be cautious in specifying these limits. Use only those parameters that you know from experience and careful studies always produce a bad part when their limits are exceeded. Indiscriminate use of this feature could produce a large quantity of quarantined parts that are acceptable or could allow bad parts to go undetected. Advanced Tip #1 ProHelp® Millennium allows the user to automatically scrap parts that do not pass part qualification criteria. This functionality does not exist in ProHelp® EPM. Advanced Tip #2 ProHelp® Millennium allows the user to individually enable/disable process parameters for part qualification for specific jobs. This functionality does not exist in ProHelp® EPM. Advanced Tip #3 ProHelp® Millennium allows the user to individually enable/disable upper limit checking and lower limit checking for each process parameter for each machine. This functionality does not exist in ProHelp® EPM.

Copyright © 1983-2004 Mattec Corporation
7-178 810-0001 Rev - C
7.19 Attribute SQC Attribute SQC data analysis is performed to analyze non-conformities (defects) of parts. Data entry can be performed via the ProStat® Sample Data Edit program or from supported MIUs. Advanced Tip #1 An Attribute (defect) does not necessarily mean that the part is scrap. Thus, scrap entry and Attribute SQC data entry are separate functions in ProHelp® EPM. Advanced Tip #2 ProHelp® Millennium allows the user to configure Attribute names for each job. ProHelp® EPM uses the system-wide scrap reasons as the Attribute names. Advanced Tip #3 Some Attribute Charts (p Chart and u Chart) need to know the “number of parts inspected” for each sample in order to perform calculations. ProHelp® Millennium allows the user to enter this number and to record it with each sample. ProHelp® EPM does not have this functionality. The “Sample Size” from the Sample Sheet is used by ProStat® to represent the “number of parts inspected”. If Attribute SQC data entry is performed from an MIU, the user is prompted to enter the “number of parts inspected”. This data is discarded and is not recorded. Advanced Tip #4 ProHelp® Millennium allows the user to specify “U” type or “P” type data entry. “U” attributes measure the number of non-conformities per sample. “P” attributes measure the proportion of non-conformities in a sample. ProHelp® EPM’s Attribute SQC feature is slightly different than ProHelp® Millennium’s feature and permits the user to perform both “U” and “P” type data analysis on the same job. Advanced Tip #5 There is no place in the ProHelp® EPM software to enter standard control limits for Attributes. However, the ProStat® software is capable of calculating these control limits and displaying them on the related charts.

Copyright © 1983-2004 Mattec Corporation
7-179 810-0001 Rev - C
7.19.1 Attribute SQC Chart Options A number of options are available to control the behavior of the Attribute SQC charts. To modify the behavior of any Attribute SQC Chart, follow these steps:
• Start the Main Menu and press the Launch ProStat® icon. The ProStat® program will be displayed. Select the appropriate job, as described in Section 7.3. Select Attribute SQC in the Data Type field.
• Press the Options button. The Options dialog will be displayed.
• Press the Attribute tab.
Attribute SQC Chart Options
The following table describes the options that affect Attribute SQC Charts:
Option Options Tab Description Upper Boundary Attribute This value controls the maximum value that is
displayed on the Y-Axis. If both “Upper Boundary” and “Lower Boundary” are 0, the chart will automatically chose appropriate values for scaling.
Lower Boundary Attribute This value controls the minimum value that is displayed on the Y-Axis.

Copyright © 1983-2004 Mattec Corporation
7-180 810-0001 Rev - C
Option Options Tab Description Number of points visible on chart Attribute This value controls the approximate number
of points that will be displayed on the chart. Additional points can be viewed by scrolling the chart to the left or the right.
Calculate and display control limits from sample data
Attribute This value causes ProStat® to dynamically calculate Attribute control limits and display them on the chart.
Display attribute value for each sample
Attribute When selected, this value will cause the chart to display the Attribute value for each sample above the sample marker.
Display point markers
Attribute Displays a large marker for each point on the chart. This makes it easier to double-click on a sample, but makes the chart harder to read if you have specified a large “number of points visible on chart”.
Display horizontal grid lines Attribute Controls whether horizontal grid lines are displayed on the chart.
Display vertical grid lines Attribute Controls whether vertical grid lines are displayed on the chart.
3-Dimensional Attribute Controls whether the chart is displayed in 2-D or 3-D.
Advanced Tip #1 There is no place in the ProHelp® EPM software to enter standard control limits for Attributes. However, the ProStat® software is capable of calculating these control limits and displaying them on Attribute SQC Charts.
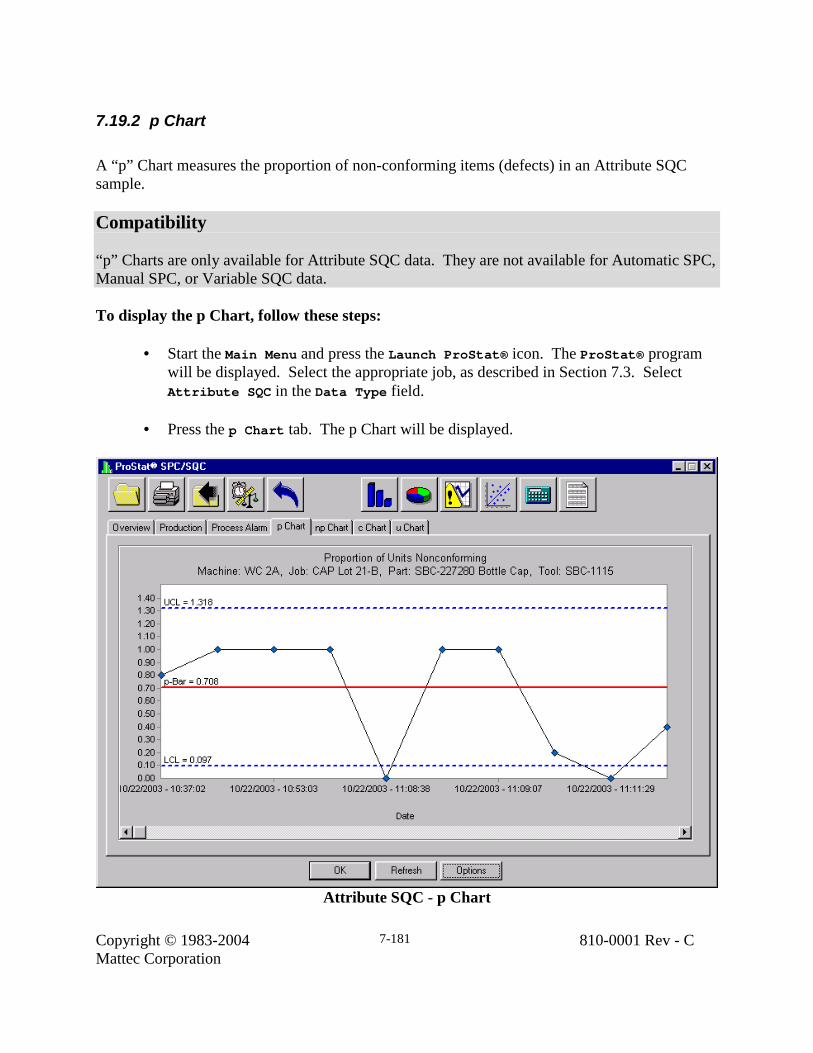
Copyright © 1983-2004 Mattec Corporation
7-181 810-0001 Rev - C
7.19.2 p Chart A “p” Chart measures the proportion of non-conforming items (defects) in an Attribute SQC sample. Compatibility “p” Charts are only available for Attribute SQC data. They are not available for Automatic SPC, Manual SPC, or Variable SQC data. To display the p Chart, follow these steps:
• Start the Main Menu and press the Launch ProStat® icon. The ProStat® program will be displayed. Select the appropriate job, as described in Section 7.3. Select Attribute SQC in the Data Type field.
• Press the p Chart tab. The p Chart will be displayed.
Attribute SQC - p Chart

Copyright © 1983-2004 Mattec Corporation
7-182 810-0001 Rev - C
7.19.3 np Chart An “np” Chart measures the number of non-conforming items (defects) in an Attribute SQC sample. Compatibility “np” Charts are only available for Attribute SQC data. They are not available for Automatic SPC, Manual SPC, or Variable SQC data. To display the np Chart, follow these steps:
• Start the Main Menu and press the Launch ProStat® icon. The ProStat® program will be displayed. Select the appropriate job, as described in Section 7.3. Select Attribute SQC in the Data Type field.
• Press the np Chart tab. The np Chart will be displayed.
Attribute SQC - np Chart

Copyright © 1983-2004 Mattec Corporation
7-183 810-0001 Rev - C
7.19.4 c Chart A “c” Chart measures the total number of non-conformities (defects) in an Attribute SQC sample. Compatibility “c” Charts are only available for Attribute SQC data. They are not available for Automatic SPC, Manual SPC, or Variable SQC data. To display the c Chart, follow these steps:
• Start the Main Menu and press the Launch ProStat® icon. The ProStat® program will be displayed. Select the appropriate job, as described in Section 7.3. Select Attribute SQC in the Data Type field.
• Press the c Chart tab. The c Chart will be displayed.
Attribute SQC - c Chart

Copyright © 1983-2004 Mattec Corporation
7-184 810-0001 Rev - C
7.19.5 u Chart A “u” Chart measures the average number of non-conformities (defects) in an Attribute SQC sample. Compatibility “u” Charts are only available for Attribute SQC data. They are not available for Automatic SPC, Manual SPC, or Variable SQC data. To display the u Chart, follow these steps:
• Start the Main Menu and press the Launch ProStat® icon. The ProStat® program will be displayed. Select the appropriate job, as described in Section 7.3. Select Attribute SQC in the Data Type field.
• Press the u Chart tab. The u Chart will be displayed.
Attribute SQC - u Chart

Copyright © 1983-2004 Mattec Corporation
7-185 810-0001 Rev - C
7.20 Launching Other Applications ProStat® can be used to launch the Data Import/Export program or the ProStat® Sample Data Edit program. To launch ProStat® Sample Data Edit, follow these steps:
• Start the Main Menu and press the Launch ProStat® icon. The ProStat® program will be displayed. Press the Launch ProStat® Sample Data Edit icon.
To launch the Data Import/Export program, follow these steps:
• Start the Main Menu and press the Launch ProStat® icon. The ProStat® program will be displayed. Press the Launch Data Import / Export icon.
Advanced Tip #1 To determine which program will be launched when you press an icon on toolbar, simply “hover” the mouse cursor over that icon. A “tool tip” will be displayed.

Copyright © 1983-2004 Mattec Corporation
8-186 810-0001 Rev - C
8. Miscellaneous Applications The following sections describe miscellaneous applications that are part of the ProHelp® EPM system. 8.1 Shift Time Utility The Shift Time Utility is used to convert a “time_t” value to a readable date/time string and to assist the user in determining where the present week would fall within a multi-week shift configuration. Details of the Shift Time Utility are available in the System Administration Manual, #810-0014. 8.2 System Configuration The System Configuration program is to configure ProHelp® EPM in an appropriate manner for your facility. Caution: It is a good idea to contact the MATTEC Customer Service Department for assistance when you need to modify an area of system configuration with which you are unfamiliar. Settings in the System Configuration application control the behavior of your ProHelp® EPM system, and deleting some settings can cause a permanent loss of data! Details of the System Configuration program are available in the System Administration Manual, #810-0014. 8.3 System Names Edit The System Names Edit program is used to configure the software when you are performing an installation on a client PC. Details of the System Names Edit program are available in the System Administration Manual, #810-0014. 8.4 Data Import/Export ProHelp® EPM is very powerful in its ability to share data with external systems such as ERP or accounting systems. The Data Import/Export program and the DTR Data Export program have been created to simplify this process for you. Details of the Data Import/Export program and the DTR Data Export program are available in the Data Exchange Manual, #810-0002.

Copyright © 1983-2004 Mattec Corporation
9-187 810-0001 Rev - C
9. Glossary Of Terms
Active Cavities The number of cavities in a Tool ID that are currently being used to make parts. This number affects the number of parts that are produced with each machine cycle and cannot exceed the Total Cavities in the Tool.
Active Components The number of son jobs that will be run simultaneously in a family job.
Actual End The actual end date/time for a job.
Actual Start The actual start date/time for a job.
Attribute SQC The use of statistical techniques to analyze the non-conformities (i.e., attributes or “defects”) of a part.
Audit Trails Audit Trails exist to help users achieve FDA CFR 21 Part 11 Compliance with their ProHelp® EPM software by providing logs of changes to existing data in selected areas of the system. Audit Trails is an optional feature.
Automatic SPC The use of statistical techniques to analyze machine process parameters that are collected automatically by the MIU.
Bachelor Job A bachelor job is often referred to simply as a “job”. A bachelor job is any job that produces one distinct part and that is not related to any other job.
Buffer Box A small device that has been designed and manufactured by MATTEC that converts the RS-485 signal from a channel of MIUs to an RS-232 signal and “conditions” the signal.
c Chart A graphical representation of the total number of non-conformities (defects) in an Attribute SQC sample
Calculated Production “Calculated Production” is an obsolete term. See Good Parts or Total Parts.
Cavities See Active Cavities or Total Cavities.

Copyright © 1983-2004 Mattec Corporation
9-188 810-0001 Rev - C
Cavity PSI Transfer This field is specified in a Process Sheet and allows you to specify a value for use with the Cavity Pressure Transfer feature in the MIU. When the monitored cavity pressure reaches this value, the MIU will ignite a digital contact. This digital contact can be connected to the machine to cause the machine to transfer from injection pressure to hold pressure. Cavity Pressure Transfer is an optional feature.
Cell Width Cell width is associated with Histogram charts. The widths of the bars on the chart represent class intervals whose areas are proportional to the corresponding frequencies.
Channel A collection of up to 16 MIUs that are daisy-chained together and are physically wired into the server computer for communication purposes. Each channel corresponds to one physical COMM port on the server computer (often on a RocketPort board) and one port on the buffer box.
Chi Squared A measure of the variance in a given statistical distribution (Histogram Chart) in relation to normal.
Coefficient Variable A measure of the ratio of the Standard Deviation (Sigma) and the Mean for a frequency distribution (Histogram Chart).
CV = (Standard Deviation / Mean)
Color ID The Color ID (or other material) that is used to make the part.
Component Job See Son Job.
Control Limit Statistical limits that are applied to measure the significance of the variation of a process parameter or part characteristic. Control limits can be calculated from process data.
See Lower Control Limit and Upper Control Limit.

Copyright © 1983-2004 Mattec Corporation
9-189 810-0001 Rev - C
Correlation Coefficient Pearson product-moment. The correlation coefficient is associated with Linear Regression Analysis and numerically measures to what degree changes in the independent characteristic affect changes in the dependent characteristic(s).
Cost Manager An optional feature that allows authorized users to view scrap and downtime costs for jobs in real-time.
Cp Cp is a measure of process capability, or the repeatability of a process, that relates the variation of the process to the specification limits.
Cp = (USL – LSL) / (6 * Standard Deviation)
Cpk Cpk is a measure of process capability, or the repeatability of a process, that relates the variation of the process to the specification limits and the mean. A Cpk greater than 1 is generally considered capable.
Cpk equals the lesser of the following two equations:
(USL – Mean) / (3 * Standard Deviation)
(Mean – LSL) / (3 * Standard Deviation)
Cr Cr is a measure of process capability, or the repeatability of a process, and is the inverse of Cp.
Cr = 1 / Cp
Customer The customer for a job.
Cycle Efficiency The ratio of the expected cycle time to the average cycle time as accumulated by the MIU.
CE = (Standard Cycle Time) / (Average Cycle Time)
Cycle Time Predictor Limit A value that minimizes the impact of fast or slow average cycle times when calculating a job’s forecasted end date.
Cycles Out-Of-Spec The number of machine cycles that are out of specification as accumulated by the MIU.

Copyright © 1983-2004 Mattec Corporation
9-190 810-0001 Rev - C
Data Import/Export An optional feature that is designed to facilitate the sharing of data between ProHelp® EPM and external ERP applications. Reference the Data Exchange Manual, #810-0002, for additional information.
Defect A part “attribute” that is associated with Attribute SQC.
Desired End The user-specified desired end date for a job.
Desired Start The user-specified desired start date for a job.
Distribution A method of describing the output of a collection of statistical data.
Document Control Center An application that allows the user to view web-based setup sheets for Process Sheets, Part IDs, Tool IDs, and other standards in the ProHelp® EPM system.
Down Code A descriptive reason that is selected by the machine operator at the MIU to specify the reason for machine downtime.
Down Map A subset of the system-wide Down Codes that are available for use for a particular machine. The System Manager specifies a Down Map in the machine configuration program.
Down Occurrences The number of times a machine/job went down.
Downtime Time when the machine is not cycling or has been “forced” down (e.g., for machine setup). Downtime is automatically accumulated by the MIU, but the Machine Operator must select a valid Down Code for this data to be recorded properly.
DTR Data Export An optional feature that is implemented in the Data Import/Export program for the purpose of exporting ProHelp® EPM data into DTR’s The Manufacturing Manager™ software.
Expected Cycle Time See Standard Cycle Time.

Copyright © 1983-2004 Mattec Corporation
9-191 810-0001 Rev - C
Expected Parts The expected number of parts to be produced based on standards in the Process Sheet. This value is commonly expressed as a component of Yield Efficiency.
EP = (Total Time) * (Standard Percent Up / 100) * (Total Cavities) * (Standard Percent Good / 100) / (Standard Cycle Time)
See Yield Efficiency.
Expected Percent Down See Standard Percent Down.
Expected Percent Scrap See Standard Percent Scrap.
Expected Production See Expected Parts.
Family Molding An optional feature that allows you to monitor production and process information for distinctly different jobs (parts) that are running on the same machine at the same time.
Father Job A father job is often referred to as a “family” job. A father job is a collection of one (1) or more related son jobs that will be scheduled as a single unit
Forecasted End The end date for a job that is forecasted by the Job Schedule.
Forecasted Start The start date for a job that is forecasted by the Job Schedule.
Good Parts Parts that are associated with a job that are good or that have been reworked into good parts.
Good Parts To Go The number of good parts that need to be produced for a job. ProHelp® EPM calculates this value in real-time.
Help Code A descriptive reason that is entered by the machine operator at the MIU to request help. Calls for help can be seen on the Real-Time Display.
Help Map A subset of the system-wide Help Codes that are available for use for a particular machine. The System Manager specifies a Help Map in the machine configuration program.

Copyright © 1983-2004 Mattec Corporation
9-192 810-0001 Rev - C
Histogram Chart A graphical representation of a frequency distribution of the SPC or SQC sample data. The widths of the bars on the chart represent class intervals whose areas are proportional to the corresponding frequencies.
Historical Cycle Time The historical cycle time for a job. This value is for display purposes only.
Historical Percent Down The historical percent down for the machine. This value is for display purposes only.
Historical Percent Scrap The historical percent scrap for a job. This value is for display purposes only.
Host Computer See Server Computer.
Hours To Go The number of hours to go in order to produce the parts that are needed for a job. ProHelp® EPM calculates this value in real-time.
Job A job descriptor represents a work order. Most production and process information that is collected by the system is stored to the job descriptor.
Job Change A job change is performed to keep ProHelp® EPM synchronized with the monitored machines. ProHelp® EPM must be directed to “start” collecting data for a job and to “end” collecting data when the job is done. Job changes are performed via the Job Control program.
Job ID See Job.
Job Number An identifier that identifies a job. ProHelp® EPM allows the user to specify duplicate Job Numbers, but each job is treated as a unique unit.
Job Status The current disposition for a job, including PENDING, RUNNING, SUSPENDED, and COMPLETE.
k k is an index of process centering that is associated with measuring process capability.
Cpk = Cp * (1 – k)

Copyright © 1983-2004 Mattec Corporation
9-193 810-0001 Rev - C
Kurtosis A measure of a given statistical distribution’s (Histogram Chart) asymmetry. A normal distribution with a symmetrical bell curve has a Kurtosis of 0.
Labor Cost This field is specified in a Process Sheet and allows you to specify the standard labor cost for the machine operators that are required per shift.
Labor Hour Factor This field is specified in a Process Sheet and allows you to identify the number of machine operators that are required per shift. This field is ignored by the system.
Last Update The date/time that a record was last updated. This field appears in many locations throughout the system.
LCL See Lower Control Limit.
LCL See Lower Control Limit.
Loop See Channel.
Lot Size The quantity of (good) parts to be produced for a job.
Lower Control Limit The lower bound of the statistical limits that are applied to measure the significance of the variation of a process parameter or part characteristic. Control limits can be calculated from process data.
Lower Specification Limit The lower bound of the engineering limit that defines the range of acceptable values for a monitored process parameter or part characteristic to produce a good part.
LSL See Lower Specification Limit.
Machine Cycles The number of times that the machine has cycled as accumulated by the MIU.
Machine ID A Machine ID defines the physical characteristics of the MIU that will monitor a machine, including the specific process parameters that will be collected. A Machine ID is specified in a Process Sheet.
Machine Interface Unit See MIU.
Machine Number A descriptive identifier that uniquely identifies a Machine ID.

Copyright © 1983-2004 Mattec Corporation
9-194 810-0001 Rev - C
Machine Odometer The accumulated run time and machine cycles for a machine. The Machine Odometer is used in Preventive Maintenance calculations to determine when a PM Action is next due.
Machine Operator An employee who is responsible for operating a machine. The machine operator can play an important role in the ProHelp® EPM system by being responsible for entering scrap, selecting downtime reasons, and performing job changes.
Machine PM Code A Machine Preventive Maintenance Code. The maintenance operator enters this code at the MIU when preventive maintenance is performed on a machine.
Machine Status The current status of a monitored machine.
Manual SPC The use of statistical techniques to analyze machine process parameters that are collected automatically by the MIU when initiated by the user. Manual SPC is closely related to Variable SQC (and Attribute SQC) and allows for linear regression analysis between machine process parameters and part variable characteristics.
Material ID The primary material that is used to make the part.
Maximum Simultaneous Sons See Active Components.
Median A value in a statistical sample or a collection of samples above and below which there is an equal number of values (or which is the average of the two middle values if there is no middle number).
MIU Machine Interface Unit. An industrial-strength data collection device that has been designed and manufactured by MATTEC that is used to collect production and process information from the manufacturing machine and transmits that data in real-time to the server computer.
MIU Operator Security An optional feature that adds User ID and password validation to all MIU functions.
Mold See Tool ID.
Monitoring Node See Server Computer

Copyright © 1983-2004 Mattec Corporation
9-195 810-0001 Rev - C
Nominal The target value for a monitored process parameter that is specified in a Process Sheet.
Non-Production Limit The non-production limit is used by the MIU to determine that the machine is down and is not cycling. After a machine cycle, the MIU expects to another machine cycle to occur within a certain period of time. If the next machine cycle does not occur before the non-production limit is reached, the machine is determined to be down. The non-production limit is specified in the Process Sheet.
Normal Distribution A symmetrical, bell-shaped frequency distribution (Histogram Chart).
np Chart A graphical representation of the number of non-conforming items (defects) in an Attribute SQC sample.
OEE Overall Equipment Effectiveness. OEE is a simple way of measuring and improving the utilization of machines in your plant. OEE is commonly used in Total Productive Maintenance (TPM) programs.
Mattec’s standard OEE calculation is:
OEE = (Percent Uptime) * (Percent Good Parts) * (Cycle Efficiency)
A setting in the System Configuration program allows the calculation to be changed to the following:
OEE = (Percent Uptime) * (Percent Good Parts) * (Yield Efficiency)
OEE is an optional feature in ProHelp® EPM.
Operator Efficiency A form of operator login in which performance information is automatically collected by the system. Operator Efficiency is an optional feature.
Operator Tracking A form of operator login similar to a time clock.
Overall Equipment Effectiveness
See OEE.
p Chart A graphical representation of the proportion of non-conforming items (defects) in an Attribute SQC sample.

Copyright © 1983-2004 Mattec Corporation
9-196 810-0001 Rev - C
Packed Parts The number of parts that have been packed into boxes, prepared for shipment, etc. This value is entered by the machine operator and can be used in a variety of manners. A setting in System Configuration allows Packed Parts to be used in place of Scrap Parts in Parts to Go calculations.
Part ID A Part ID defines information for the part that will be created, including the material(s) that will be used, the part weight, and costs. A Part ID is specified in a Process Sheet.
Part Number An identifier that uniquely identifies a Part ID.
Parts To Go See Total Parts To Go.
Pearson Product-Moment Correlation Coefficient
See Correlation Coefficient.
Percent Down See Historical Percent Down and Standard Percent Down.
Percent Out-Of-Spec The percent of machine cycles that are outside of the user-specified specification limits.
Percent Scrap The ratio of scrap parts to total parts for a job.
See Historical Percent Scrap and Standard Percent Scrap.
PM Code See Machine PM Code or Tool PM Code.
Preventive Maintenance An optional feature that assists in forecasting and tracking machine and tool preventive maintenance.
Process Parameter A machine value that is automatically monitored by an MIU. Process Parameters may include digital inputs, analog inputs, and PLC inputs.
Process Sheet A Process Sheet defines the machine-specific process limits (e.g., specification limits and control limits) that will be used when a job is run on a specific machine.
Production Efficiency “Production Efficiency” is an obsolete term. See Cycle Efficiency.

Copyright © 1983-2004 Mattec Corporation
9-197 810-0001 Rev - C
ProStat® ProHelp® EPM’s real-time Statistical Process Control / Statistical Quality Control program. ProStat® is designed to assist the user in implementing a program of process control and quality control for all monitored machines.
R Chart See Range Chart.
Range Chart A graphical representation of the range of the observations in an SPC or SQC sample.
Range = Absolute Value (Biggest Obs – Smallest Obs)
The expected Range increases both with sample size and with the standard deviation.
R-Bar The average of the Range values.
Real-Time Display An application that shows you the status of all machines at a glance, including machines that are running out of specification limits, machines that are down, and operators who have called for help. Data on the display is updated automatically and in real-time.
Reduction Method A technique for reducing raw digital or analog inputs into a monitored process parameter value.
R-LCL The Lower Control Limit for Range. See Lower Control Limit.
RocketPort Board A “smart” serial I/O board that is often installed in the server computer to improve the MIU communication process and to expand the number of COMM ports that are available for communications.
R-UCL The Upper Control Limit for Range. See Upper Control Limit.
Run A Run indicates that a “Trend” or a “Shift” has occurred in SPC or SQC sampling.
Run Time The amount of time for a job when the machine was running and was not down. Run Time is automatically accumulated by the MIU.

Copyright © 1983-2004 Mattec Corporation
9-198 810-0001 Rev - C
Runner Weight The weight of excess material that is consumed during a machine cycle but does not go into the resulting part. This value is used in material usage calculations.
Sample Sheet A Sample Sheet is used to enable Manual SPC, Variable SQC, and Attribute SQC for a job. A Sample Sheet is specified in a Process Sheet.
Scrap Code A descriptive reason that is entered by the machine operator to specify the scrap reason for a part.
Scrap Map A subset of the system-wide Scrap Codes that are available for use for a particular machine. The System Manager specifies a Scrap Map in the machine configuration program.
Scrap Parts Parts that are associated with a job that are not good and that can not be reworked into good parts.
Scrap Predictor Limit A value that minimizes the impact of the actual scrap percent when calculating a job’s forecasted end date.
Server Computer The main ProHelp® EPM computer that contains the configuration files, data files, and ProHelp® EPM software. All MIUs are wired into this computer.
Setup Time An estimate of the amount of time that is required to setup a tool before the job will be ready to produce parts. This value is specified in the Tool ID. The Job Schedule uses this value to adjust forecasted start/end times for non-running jobs.
Shift A shift defines the normal day-to-day working schedule for one or more machines. Most data in ProHelp® EPM is collected for a machine or job in units that correspond to shifts.
Shift (SPC Terminology) A Shift indicates that the last “n” consecutive SPC or SQC samples, where “n” equals the “Number of Samples Per Run” from System Configuration, were above the upper control limit or below the lower control limit.
Shift Change The transition that occurs automatically in ProHelp® EPM when one shift ends and another shift starts.

Copyright © 1983-2004 Mattec Corporation
9-199 810-0001 Rev - C
Shift Exception An exception to the standard shift schedule. For example, holidays are “non-working” shift exceptions and overtime days are “working” shift exceptions.
Sigma (σ) The Greek letter used to designate a standard deviation.
Sigma (Estimate) The estimated standard deviation.
Sigma (Individuals) The actual standard deviation.
Significance A measure of the significance between the Independent Characteristic and the Dependent Characteristic(s) when performing linear regression analysis. A significance greater than 3 is often considered significant.
Skewness A measure of a given statistical distribution’s (Histogram Chart) asymmetry. A normal distribution that is symmetrical has a skewness of 0.
Son Job A son job is often referred to as a “component” job. Each son job represents one distinct part that will be created when a family job is run. Most data that is collected by the system for a family job is stored to the son job, not the father job.
SPC Statistical Process Control. The use of statistical techniques such as control charts to analyze a process or its outputs and to take appropriate actions to achieve and maintain a state of statistical control and to improve the process capability.
Specification Limit An engineering limit that defines the range of acceptable values for a monitored process parameter or part characteristic to produce a good part.
See Lower Specification Limit and Upper Specification Limit.
SQC Statistical Quality Control. The use of statistical techniques to analyze the variable and attribute characteristics of a manufactured part.
Standard Cycle Time The expected cycle time for a job. The Job Schedule uses this value for non-running jobs when calculating forecasted end dates. This value is also used to determine Cycle Efficiency.

Copyright © 1983-2004 Mattec Corporation
9-200 810-0001 Rev - C
Standard Deviation A measure of the variability of a statistical sample.
Standard Percent Down The expected percent down for the machine. The Job Schedule uses this value for non-running jobs when calculating forecasted end dates.
Standard Percent Scrap The expected percent scrap for a job. The Job Schedule uses this value for non-running jobs when calculating forecasted end dates.
Status See Job Status or Machine Status.
Subgroup Size The number of observations per sample for an Automatic SPC sample or a Manual/Variable/Attribute SQC sample.
System Administrator A person who is appointed to be the expert on the ProHelp® EPM system.
Theoretical Production “Theoretical Production” is an obsolete term. See Cycle Efficiency, Yield Efficiency, or OEE.
Tool ID A Tool ID defines information for the tool that will be used to create a part, including the number of cavities that the tool has. A Tool ID is specified in a Process Sheet.
Tool Number An identifier that uniquely identifies a Tool ID.
Tool Odometer The accumulated run time and machine cycles for a tool. The Tool Odometer is used in Preventive Maintenance calculations to determine when a PM Action is next due.
Tool PM Code A Tool Preventive Maintenance Code. The maintenance operator enters this code at the MIU when preventive maintenance is performed on a running tool.
Total Cavities The total number of cavities in a Tool ID.
Total Parts The total number of parts for a job as accumulated by the MIU.
Total Part = Good Parts + Scrap Parts

Copyright © 1983-2004 Mattec Corporation
9-201 810-0001 Rev - C
Total Parts To Go The total number of parts that need to be produced for a job. This value differs from Good Parts To Go in that it takes into account the actual percent scrap for the job (if the job is running) or the standard percent scrap (if the job is scheduled). ProHelp® EPM calculates this value in real-time.
Trend A Trend indicates that the last “n” consecutive SPC or SQC samples, where “n” equals the “Number of Samples Per Run” from System Configuration, were all increasing or all decreasing.
u Chart A graphical representation of the average number of non-conformities (defects) in an Attribute SQC sample.
UCL See Upper Control Limit.
Upper Control Limit The upper bound of the statistical limits that are applied to measure the significance of the variation of a process parameter or part characteristic. Control limits can be calculated from process data.
Upper Specification Limit The upper bound of the engineering limit that defines the range of acceptable values for a monitored process parameter or part characteristic to produce a good part.
USL See Upper Specification Limit.
Variable SQC The use of statistical techniques to analyze the variable characteristics (e.g., height, weight) of a manufactured part.
Variance A measure of the spread or dispersion of an SPC/SQC sample distribution.
Web Reports An optional feature that allows reports to be run through a supported web browser.
Web Setup Sheets An optional feature that allows documents on a web server or other computer to be linked to Process Sheets, Part ID, Tool IDs and other standards in the ProHelp® EPM system. These documents may be viewed via the Document Control Center.
Copyright © 1983-2004 Mattec Corporation
9-202 810-0001 Rev - C
X-Bar The average of the observations in a sample.
X-Bar = (Observation1 + Observation 2 + … + Observation N) / N
X-Bar Chart A graphical representation of the average of the observations in an SPC or SQC sample.
X-BarBar The average of the averages (the average of the X-Bar values).
X-LCL The Lower Control Limit for X-Bar. See Lower Control Limit.
X-LSL The Lower Specification Limit for X-Bar. See Lower Specification Limit.
X-UCL The Upper Control Limit for X-Bar. See Upper Control Limit.
X-USL The Upper Specification Limit for X-Bar. See Upper Specification Limit.
Yield Efficiency The ratio of the good parts made compared to the standard parts that should have been made.
YE = (Good Parts) / (Expected Parts)
See Expected Parts.
Yield Efficiency in ProHelp® EPM differs slightly from the same calculation in ProHelp® Millennium. ProHelp® EPM uses (Total Time) * (Standard Percent Up / 100) in calculations for Expected Parts, whereas ProHelp® Millennium uses the monitored Run Time.
A job in ProHelp® EPM would have a higher Yield Efficiency than a job in ProHelp® Millennium if that job had less downtime than the standard downtime (in the Process Sheet). A job in ProHelp® EPM would have a lower Yield Efficiency than a job in ProHelp® Millennium if that job had more downtime than the standard downtime (in the Process Sheet). In both cases, the job in ProHelp® Millennium would have the same Yield Efficiency.


![Untitled-5 [] · 2020. 9. 15. · AMMETER EPM-4A 1 EPM-4C / EPM-4D / EPM-4P EPM-4D (Ammeter with Demand) : EPM-4D is designed to measure RMS value of AC current which flows from the](https://static.fdocuments.us/doc/165x107/60389b94586a40652f159b94/untitled-5-2020-9-15-ammeter-epm-4a-1-epm-4c-epm-4d-epm-4p-epm-4d-ammeter.jpg)