
object-oriented programming in the beta programming language
Programming inR:BASE

Programming In R:BASE
by R:BASE Technologies, Inc.
Welcome to Programming In R:BASE!
This is a guide to the R:BASE programming language. It is organized, asmuch as possib le, in the order of information you need to programapplications in R:BASE. It will describe good program structure, includingphysical appearance, program sections, documentation, and exit methods.
"Using Variab les" explains the nature of variab le use in R:BASEprogramming. "Program Communication" describes all of the R:BASEcommands that allow you to communicate with a program. "ManipulatingText Strings" describes the commands you use to manipulate and structuretext. "Control Structures" describes the two R:BASE looping structures-IF...ENDIF and WHILE.. .ENDWHILE. "Accessing Rows in a Table" explainshow you use the SET POINTER command to process rows in a program."Error Handling" describes the R:BASE error handling commands andvariab les. "Creating and Using Menus" describes the different options forcreating a menu system for your R:BASE application. "Debugging YourProgram" explains how you use the error handling techniques and othermethods to make sure your program executes correctly. "OptimizationTechniques" provides some concepts for optimizing your application filecode. "Executing External Programs" describes how you can use theLAUNCH command to execute non-R:BASE programs from a program andas an application menu option.
If you are new to R:BASE, work through the R:BASE Tutorial in the mainR:BASE program for a basic overview. Then, read this entire document. Ifyou are an experienced programmer, read through this document, lookingfor new information and for procedures specific to R:BASE programming.Once you become familiar with the commands and how to use them, referto the Command Index section in the main R:BASE Help for morecommands.
Information in this document, including URL and other Internet web site references, is subject to change withoutnotice. The example companies, individuals, products, organizations and events depicted herein are completelyfictitious. Any similarity to a company, individual, product, organization or event is completely unintentional. R:BASETechnologies, Inc. shall not be liable for errors contained herein or for incidental consequential damages inconnection with the furnishing, performance, or use of this material. This document contains proprietary information,which is protected by copyright. Complying with all applicable copyright laws is the responsibility of the user. Withoutlimiting the rights under copyright, no part of this document may be reproduced, stored in or introduced into a retrievalsystem, or transmitted in any form or by any means (electronic, mechanical, photocopying, recording, or otherwise),or for any purpose, without the express written consent of R:BASE Technologies, Inc. We reserve the right to makechanges from time to time in the contents hereof without obligation to notify any person of such revision or changes.We also reserve the right to change the specification without notice and may therefore not coincide with the contentsof this document. The manufacturer assumes no responsibilities with regard to the performance or use of third partyproducts.
Products that are referred to in this document may be either trademarks and/or registered trademarks of therespective owners. The publisher and the author make no claim to these trademarks.
The software described in this document is furnished under a license agreement. The software may be used orcopied only in accordance with the terms of that agreement. Any unauthorized use or duplication of the software isforbidden.
R:BASE Technologies, Inc. may have patents, patent applications, trademarks, copyrights, or other intellectualproperty rights covering subject matter in this document. Except as expressly provided in any written licenseagreement from R:BASE Technologies, Inc., the furnishing of this document does not give you any license to thesepatents, trademarks, copyrights, or other intellectual property.
Programming In R:BASE
Copyright © 1982-2022 R:BASE Technologies, Inc.
Trademarks
R:BASE®, Oterro®, RBAdmin®, R:Scope®, R:Mail®, R:Charts®, R:Spell Checker®, R:Docs®, R:BASE Editor®, R:BASEPlugin Power Pack®, R:Style®, RBZip®, R:Mail Editor®, R:BASE Dependency Viewer®, R:Archive®, R:Chat®, RDCCClient®, R:PDF Form Filler®, R:FTPClient®, R:SFTPClient®, R:PDFWorks®, R:Magellan®, R:WEB Reports®, R:WEBGateway®, R:PDFMerge®, R:PDFSearch®, R:Documenter®, RBInstaller®, RBUpdater®, R:AmazonS3®, R:GAP®, R:MailViewer®, R:Capture®, R:Synchronizer®, R:Biometric®, R:CAD Viewer®, R:DXF®, R:Twain2PDF®, R:Tango®,R:Scheduler®, R:BASE Backup®, R:Scribbler®, R:SmartSig®, R:OutLink®, R:HASH®, R:JobTrack®, R:TimeTrack®,R:Syntax®, R:WatchDog®, R:Manufacturing®, R:Merge®, R:GeoCoder®, R:Code®, R:Fax®, R:ReadyRoute®,R:QBDataDirect®, R:QBSynchronizer®, R:QBDBExtractor®, and Pocket R:BASE® are trademarks or registeredtrademarks of R:BASE Technologies, Inc. All Rights Reserved. All other brand, product names, company names andlogos are trademarks or registered trademarks of their respective companies.
Windows, Windows 11, Windows 10, Windows 8.x, Windows 7, Vista, Windows Server 2008-2019, Bing Maps, MapPoint,Excel, Access, SQL Server, and Outlook are registered trademarks of Microsoft Corporation.
Printed: January 2022 in Murrysville, PA
First Edition

Programming In R:BASE4
Copyright © 1982-2022 R:BASE Technologies, Inc.
Table of ContentsPart I Introduction to Programming in R:BASE 7
................................................................................................................................... 91 Program Structure
................................................................................................................................... 102 Setting the Execution Environment
.......................................................................................................................................................... 10Connecting to a Database
.......................................................................................................................................................... 10Setting Message Status
.......................................................................................................................................................... 10Setting Variables
................................................................................................................................... 113 Documenting the Program
................................................................................................................................... 114 Executing a Command File or Application
.......................................................................................................................................................... 12Passing Parameters
................................................................................................................................... 135 Exiting from the Program
Part II Using Variables 15
................................................................................................................................... 161 Variable Names
................................................................................................................................... 172 Defining and Deleting Variables
................................................................................................................................... 193 Variable Data Types
.......................................................................................................................................................... 19Implicit Data Typing
.......................................................................................................................................................... 19Explicit Data Typing
.......................................................................................................................................................... 20Changing a Variable Data Type
................................................................................................................................... 204 System Variables
................................................................................................................................... 215 Expressions
................................................................................................................................... 226 R:BASE Functions
................................................................................................................................... 227 R:BASE Commands
Part III Program Communication 23
................................................................................................................................... 241 The OUTPUT Command
................................................................................................................................... 242 The PRINT Command
................................................................................................................................... 253 The PAUSE Command
................................................................................................................................... 284 The DIALOG Command
Part IV Manipulating Text Strings 32
................................................................................................................................... 331 Concatenating Text Strings
................................................................................................................................... 332 Using the Text Functions
................................................................................................................................... 343 Moving Text Between Variables
Part V Control Structures 36
................................................................................................................................... 371 IF...ENDIF Processing
................................................................................................................................... 392 WHILE...ENDWHILE Processing
................................................................................................................................... 413 SWITCH...ENDSW Processing
................................................................................................................................... 424 Passing Control with GOTO and LABEL
................................................................................................................................... 435 Nesting Considerations
5Contents
Copyright © 1982-2022 R:BASE Technologies, Inc.
Part VI Accessing Rows in a Table 45
................................................................................................................................... 461 SELECT
................................................................................................................................... 492 INSERT
................................................................................................................................... 513 UPDATE
................................................................................................................................... 544 DECLARE CURSOR
................................................................................................................................... 585 LOAD
................................................................................................................................... 646 SET VARIABLE
Part VII Executing External Programs 68
Part VIII Error Handling 71
................................................................................................................................... 721 Setting and Using Error Variables
................................................................................................................................... 732 Displaying an Error Message
Part IX Creating and Using Menus 74
................................................................................................................................... 751 Command Files
.......................................................................................................................................................... 78OPTION parameters
......................................................................................................................................................... 79Title
......................................................................................................................................................... 80List
......................................................................................................................................................... 81Buttons
................................................................................................................................... 812 Application Files
................................................................................................................................... 813 Forms/Variable Forms/External Form Files
.......................................................................................................................................................... 83Group Bar
.......................................................................................................................................................... 83Tree View
.......................................................................................................................................................... 84Buttons
.......................................................................................................................................................... 85Drop-Down Menu Buttons
.......................................................................................................................................................... 85Design Menu Bar
Part X Debugging Your Program 86
................................................................................................................................... 871 Trace Debugger
.......................................................................................................................................................... 88Using the Trace Debugger
.......................................................................................................................................................... 89Breakpoints
.......................................................................................................................................................... 89Watch Variables
......................................................................................................................................................... 89Adding/Removing Watch Variables
......................................................................................................................................................... 90Modifying Watch Variable Values
......................................................................................................................................................... 91Clearing Watch Variables
......................................................................................................................................................... 91Saving Watch Variables
......................................................................................................................................................... 91Loading Watch Variables
.......................................................................................................................................................... 91Changing Variable Values
.......................................................................................................................................................... 92Debugging CodeLocked Files and Blocks
.......................................................................................................................................................... 92Debugging EEP's
.......................................................................................................................................................... 92Debugging Nested RUN Commands
Part XI Using Optimizing Techniques 93
Part XII Useful Resources 95

Programming In R:BASE6
Copyright © 1982-2022 R:BASE Technologies, Inc.
Part XIII Feedback 97
Index 99

Part
I

Programming In R:BASE8
Copyright © 1982-2022 R:BASE Technologies, Inc.
1 Introduction to Programming in R:BASE
The main purpose of programming in R:BASE is to save complex database management tasks in a formwhich may be repeated as needed. Essentially, all of the tasks you might want to accomplish with yourdatabase can be done by typing the commands at the R> Prompt. A program, whether it is a stand-alonecommand file, a form containing button menus, or an application file (.RBA), has a single purpose: torecord the steps needed to accomplish a task so that the task may be repeated whenever necessary.
To fulfill the need to repeat tasks, R:BASE provides many different methods to store your series ofR:BASE commands, which can be used to create a program of sorts:
· Command Files· Application Files· Forms· Stored Procedures· External Form Files
R:BASE provides a complement of structural commands which help you design and write the applicationsthat make accomplishing these tasks far easier.
This chapter briefly describes some of the tools R:BASE provides to help you fulfill the requirements ofyour particular application.
The following figure illustrates the basic requirements for all tasks you want to perform with yourdatabase.
· Input commands provide R:BASE with the basic information it needs to perform the task.· Variables carry data and instructions from the input commands to R:BASE.· Control structure commands route execution through the various steps needed to accomplish the task.
The control structure commands are used to control the input commands, the data modificationcommands, the variable setting commands, and the output commands.
· Data modification commands add to or change the data in the database.· Variable setting commands fill variables with the information to be used by the program.· Output commands display or print the data in a usable format.

Introduction to Programming in R:BASE 9
Copyright © 1982-2022 R:BASE Technologies, Inc.
You are probably familiar with some or many of the commands. For example, you may already befamiliar with the ENTER command for using forms or the LOAD command for direct entry into adatabase. These are examples of input commands. You also probably already know how to use the EDITcommand for using forms or the UPDATE command. These are data modification commands. The SETVARIABLE command is the most common variable setting command and the PRINT and SELECTcommands are data output commands.
1.1 Program Structure
A command file (program, macro, etc.) or application file is a logical set of instructions which causes aspecific task to be performed. Both command and application files must have a logical flow and astructure that fulfills a few basic requirements. First, the environment must be defined; second, the actualtask must be performed; and third, the environment should be reset to its original configuration.
The following figure shows the basic program structure; defining the logical flow of a command file orapplication:
First, you should outline the general shape of a program. This can be done using any standard flowchartmethod. The most common appears similar to the above flowchart. Each task is written in a box withlines and arrows indicating the flow of the program as it executes. While there are formal flowchartingmethods you can use, the method is not as important as the planning. Even a written outline is betterthan just starting to enter code. It is important to define what a program is to do and to organize how it isto go about doing it.
Keep in mind these general concepts when you actually begin to enter code:
· Document your program with comments (see Documenting the Program)· Indent code and leave blank lines for easier reading (see the coding examples in this chapter)· Spell out commands until you can easily recognize all commands by their abbreviations or use the full
command names· Use the debugging techniques described in this chapter (see Debugging Your Program)· Before testing, make backup copies of tables affected by your program

Programming In R:BASE10
Copyright © 1982-2022 R:BASE Technologies, Inc.
1.2 Setting the Execution Environment
1.2.1 Connecting to a Database
When you run an application, the required database may not always be connected. If you are not surewhether the correct database will be open every time a program is used, it is a good idea to connect tothe database in each program you expect to execute; otherwise, the program will abort when a requireddatabase is not connected.
There are exceptions to this practice. If, for example, your main application program executes otherprograms using the RUN or INPUT commands, you may wish to omit the CONNECT command from thesubsidiary programs since this command causes the program to read the disk for the databaseinformation. This may also change the R:BASE environment by resetting the default environment. Anytime you can avoid disk access in your programs, you allow your program to execute faster.
Your program may be a general purpose program that can operate with more than one database. In thiscase, you may want the operator to provide the database name. To do this, you use a DIALOGcommand to accept entry of the database name and place the database name in a variable. Use thefollowing commands to do this:
DIALOG 'Enter the database name: ' vDBName VEndKey 1
CONNECT .vDBName
Notice the dotted variable used in the CONNECT command to refer to the contents of the variable.
1.2.2 Setting Message Status
Once you have connected to the database or determined that the database is already connected, youshould set the message status commands. These two commands are:
SET MESSAGES OFF
SET ERROR MESSAGES OFF
The first command suppresses display of normal system messages. These messages are not errormessages; they note the result of the execution of an R:BASE command. For example, if you execute aPROJECT command, the system responds with the message, "Successful project operation n rowsgenerated". This type of message is not displayed if you SET MESSAGES OFF.
The second command suppresses the display of error messages. You might think that you would want todisplay error messages when a program is executing. If you want R:BASE to display error messages foryou, you can leave error message display on. However, if you need to closely control your screendisplay positions, you should turn off error message display and capture errors in an error variable. See"Error Handling" in this document.
When you first test your program, you may wish to enable these commands until you are relativelycertain that your program is executing properly. The displayed messages and error messages can helpyou to correct (debug) your program.
1.2.3 Setting Variables
The next step in setting the execution environment is to define and set the data types for variables youuse in the program. Not all variables need definition at the beginning of the program. However, enteringall of your variable definitions in one place in the program helps keep track of variable names and theirpurposes. Of course, you may not know what all of the variables are until you have written the code toperform the task. But you can add the variable definitions to the top of the program as you go along.

Introduction to Programming in R:BASE 11
Copyright © 1982-2022 R:BASE Technologies, Inc.
1.3 Documenting the Program
It is a good idea to internally document your program by adding comments within the text of the code asyou go along. To do this, you can use several available R:BASE comment formats as shown in thefollowing syntax.
-- comment{comment}*(comment)
R:BASE does not process comments in any manner except to check for double hyphens, matchingsquiggly brackets, or parentheses. Therefore, you can use the full ASCII character set. You can continuecomments onto second and subsequent lines.
As complex expressions are built with parentheses, or even several sets of parentheses, it isrecommended that you use either of the first two comment methods. The first option, using 2 hyphenswould be used for single line comments. The second option, using the squiggly brackets, would be usedfor multiline comments.
The following examples are all valid comments:
-- Comment on a single line*( Comment on a single line)
{Comment spread across two lines by continuing the texton a second or subsequent line}
Comments can appear anywhere in a program. However, if you are using CODELOCK, the first or secondline cannot be used for comments. Comments should not be included in screen or menu blocks or files.Be sure you do not embed an executable command in a multiline comment because the command willnot execute. For example, in the following lines, the embedded SET VARIABLE command is ignored:
{ set the following variable to hold a counter
SET VARIABLE ctr INTEGER for the WHILE loop}
When you are using the R:BASE Editor, you will notice the changes in the font when commenting is usedin your command files. The text color for commented lines with turn pink and the text will becomeitalicized. The above valid comments will actually look like this:
-- Comment on a single line
*( Comment on a single line)
{Comment spread across two lines by continuing the text
on a second or subsequent line}
This highlighting can be altered by changing the R:BASE Editor settings. There are also several otherhighlighting options for keywords, identifiers, numbers, and more.
1.4 Executing a Command File or Application
Use the RUN command to execute command and procedure files. The format of the command dependson the type of file being executed. This is the syntax of the RUN command:

Programming In R:BASE12
Copyright © 1982-2022 R:BASE Technologies, Inc.
· A command file: Cmdfile is a complete file specification including a drive letter and directory if needed.The In procfile clause is not used. Use the USING parmlist clause if the program requires specialparameter passing not handled by global variables.
· A procedure file: Cmdfile is the main command block name. The IN procfile clause is used if the blockbeing executed is not in the currently open procedure file. Procfile is a complete file specification,including a drive letter and directory if needed. The USING parmlist clause may be used if theprocedure requires parameter passing.
If you are using a CODELOCK application, you cannot use the RUN command to execute menu or screenblocks or files. Execute menu blocks with the CHOOSE command and screen blocks with the DISPLAYcommand. The INPUT command can be used to execute independent command files in either ASCII orcompiled format but cannot be used to execute a command block in a procedure file.
While you are at the Database Explorer screen, under Command Files, clicking on the "Run File" optionwill run the command file which is currently selected in the right pane. You can also press the [Enter] keyto run the command file, which is currently selected in the right pane.
1.4.1 Passing Parameters
Parameters are values passed to a command file when it is executed using the RUN command.Parameters are assigned to a special variable type in the form %n where n is a number from one (1) toeighteen (18) designating the relative position of the parameter in the optional USING clause of the RUNcommand. The INPUT command cannot pass parameters.
The following is an example of a simple command file to run at the R> Prompt, which expectsparameters to be passed:
--simple.cmdSET VARIABLE concat = (.%1 + .%2) SHOW VARIABLE concatCLEAR ALL VARIABLES
The command file may be executed using the RUN command like this:
RUN simple.cmd USING param1 param2
The two passed values held in the system variables %1 and %2 after the RUN command is executedmay be any data types. The following table shows possible RUN commands and the result.
RUN Command Result
RUN simple.cmd USING 5 10 15
RUN simple.cmd USING Ann Baxter AnnBaxter
RUN simple.cmd USING 13.2 $1.98 $15.18
RUN simple.cmd USING 99.9 14.205 114.105
RUN simple.cmd USING ABC 12.2 Error condition; the data types aredifferent

Introduction to Programming in R:BASE 13
Copyright © 1982-2022 R:BASE Technologies, Inc.
R:BASE includes parameter variables in the global variable list and displays them using the SHOWVARIABLE command. Each parameter variable name ends with a suffix representing the nesting level ofthe program using the variable. See "Nesting Considerations" in this chapter for a discussion of programnesting.
The datatype of a parameter variable is determined internally each time a value is passed. Parametervariables cannot be pre-datatyped.
Global variables are accessible to any program. If you run a program from another program, you canuse the same variable names, if the variable values are already set, rather than passing the variabledata in a parameter list.
1.5 Exiting from the Program
Before you complete the task portion of a program, you can write the code used to exit from theprogram. This consists of resetting message displays and clearing the variables used in the program. Youcan also close the database if you connected to it in the program.
There are five ways to exit from an executing program:
1. RETURN passes control back either to a calling program or to the R> Prompt, whichever initiatedthe RUN command.
2. QUIT exits to the R> Prompt unless the TO filespec clause is added. In this case, control is passedto the program file specified by filespec. QUIT TO filespec cannot be used to execute a commandblock in a procedure file. It clears all currently open IF and WHILE blocks and resets the nestinglevels to -1. See "Nesting Considerations" in this chapter.
3. INPUT TERMINAL or INPUT SCREEN returns control to the R> Prompt.4. When the program has no more code to execute, control returns to a calling program or the R>
Prompt, whichever initiated the RUN command.5. EXIT exits from R:BASE, disconnecting the currently connected database and terminating all
command file nesting levels.
These methods are illustrated in program examples used in this chapter. See especially "ControlStructures."
The following illustrates an example of what a program might look like after you have entered thecommands to set the environment and exit the program.
{ MVPROG.CMD-Statement of program purpose }SET MESSAGES OFFCONNECT ConCompSET ERROR MESSAGES OFFSET VARIABLE vToday = .#DATE----Task section of program--CLEAR vTodaySET MESSAGES ONSET ERROR MESSAGES ON RETURN
1. Comment line identifies the program and its purpose (allowed only in the command file format).2. Sets the program environment by turning off messages, connects to the database, and turning
off error messages. Error messages are not suppressed until after opening the database to seeif any error results from the CONNECT command.
3. Defines any variables needed in the program. 4. Resets the environment to normal R:BASE operations by clearing the variables used in the
program and turning on messages and error messages.
Now that you have a general idea of how a program is structured, you can use the next chapter as areference for dealing with specific tasks. The next section provides more information on using variablesin R:BASE. This is followed by sections discussing the use of specific commands. Read "The R:BASE

Programming In R:BASE14
Copyright © 1982-2022 R:BASE Technologies, Inc.
Commands" section for an overview of the programming commands. Then, see individual sections forspecific information and examples on each command's use.

Part
II

Programming In R:BASE16
Copyright © 1982-2022 R:BASE Technologies, Inc.
2 Using Variables
In R:BASE programs, variables are either global or error. This section discusses the use of globalvariables in programming. See "Error Handling" and "Accessing Rows in a Table" for information on errorvariables.
Variables are symbols used to identify a value that can change or vary. You determine variable valuesby equating a variable to an expression or by using a variable in a command that automatically defines avariable. Once a global variable is defined, it remains in existence until it is deleted using the CLEARcommand or until R: BASE is exited. The contents of a variable may be derived from a constant value,an arithmetic equation, a string expression, or a column value. The following points define the nature ofvariables used in R:BASE.
· Use variables to hold the results of:· A constant value· Another variable's contents· A column value· An arithmetic expression· A string expression· The value of a system variable
· The data type of a variable is either explicitly defined by the user or implicitly determined by thenature of the data used to set the variable value.
· TEXT type variables may be concatenated (combined with other TEXT variables), constructed(from another TEXT variable using the string functions), or manipulated with the TEXT functions.
2.1 Variable Names
A variable name may be up to 18 characters long in R:BASE X.5. In R:BASE X.5 Enterprise, a variablename may be up to 128 characters long. The name should not include any of the arithmetic operators (+,-, /, *, **, %) or concatenation operators (+, &) because R:BASE may mistake the variable name for anexpression or as an & variable. There are three different formats for using variable names:
1. Use VarName to set a variable value or check the value of a variable as in an IF...ENDIF loop.2. Use .VarName if you "want the value" of the variable. For example:
SET VAR vDB TEXT = 'MyDB'CONNECT .vDB
The dot in front of the variable name indicates that R:BASE is to use the "value" of the variable, inthis case MyDB, in the CONNECT command.
3. Use &VarName to hold a list of items. Each item in the list acts independently. When R:BASE seesthe &, it assumes the variable contains at least a portion of an executable command. This is usefulwhen you want to include a list of column names an operator selects in a command. Briefly, an &variable can be used in the following manner:
SET VAR vColName TEXT = NULLSET VAR vColName = 'X'SET VAR vList TEXT = NULLWHILE vColName <> 'END' THENDIALOG 'Enter a column name (or END): ' vColName vEnd 1IF vColName <> 'END' THENSET VAR vlist = (.vlist & .vColName)
ENDIF ENDWHILE IF SLEN(.vList) > 0 THENSELECT &vList FROM tblname
ENDIF

Using Variables 17
Copyright © 1982-2022 R:BASE Technologies, Inc.
This sequence of commands repetitively requests a column name and adds that name to variable vListuntil the operator enters END. When the process is stopped by the operator entering END, then vList ischecked to make sure it is not null (at least one column name has been entered) by using the SLENfunction. The SELECT command is executed using the column names entered into vList as the columns todisplay from the table. Notice that vList is used as a dotted variable when the names are being addedwith the concatenation operator & and as an & variable when the SELECT command is executed.
Use variables in command code to hold and manipulate values needed to accomplish whatever task aprogram was designed to perform.
In the following commands, the variable name is used without the dot or & because you are setting ordisplaying the value of the variable and are not using the already assigned value.
CLEAR VarName. . .CHOOSE VarName. . . SELECT colname INTO VarName. . .DIALOG 'Message' VarName. . .SET VARIABLE VarName. . . SET ERROR VARIABLE ErrVar SHOW ERROR ErrVar. . . SHOW VARIABLE VarName
If a variable is being compared to a value, it is used without the dot (Examples 1 and 3), as in the controlstructure commands. If a variable is the value being compared against (Examples 2 and 4), the dot isused. The "op" below represents operator (e.g. >, <, =, etc.).
(Example 1)
IF VarName op Value THEN taskENDIF
(Example 2)
IF VarName1 op .VarName2 THEN taskENDIF
(Example 3)
WHILE VarName op Value THEN taskENDWHILE
(Example 4)
WHILE VarName1 op .VarName2 THEN taskENDWHILE
2.2 Defining and Deleting Variables
You can define variables by using any of the commands shown in the table below. The data type of avariable is established after the command is executed unless the variable is explicitly typed by a SETVARIABLE command or is used in a CHOOSE or SET ERROR VARIABLE command. The commandsshown in the table set variable data types by interpreting the result of the calculation.
Command Purpose Examples of Use
CLEAR Removes variables from theglobal variable list.
CLEAR varname
SELECT Calculates on a column andsets the value of varname.The data type depends on thecomputation that is being
SELECT SUM(col) INTO varname FROMtblname

Programming In R:BASE18
Copyright © 1982-2022 R:BASE Technologies, Inc.
done and the data type of thecolumn.
CHOOSE Draws a menu and enters theoperator's choice intovarname. The data typedepends on the type of menu.Vertical menus set thevariable to INTEGER.Horizontal menus set thevariable to TEXT.
CHOOSE varname FROM #LIST
DIALOG Accepts operator input andenters the value into variablename. The data type must beset to TEXT before thecommand is issued.
DIALOG 'message' varname vend 1
SET ERROR VARIABLE Defines a variable to hold thestatus value of the currentoperation. The data type isINTEGER.
SET ERROR VARIABLE errvar
SET VARIABLE value Defines a variable and setsthe data type to the typeimplied by the data.
SET VARIABLE varname = 10.1 SET VARIABLE varname = 'Text string'
SET VARIABLE datatype Defines a variable with a nullvalue and sets the data typeas specified. If the variable isalready defined, changes thevariable's data type.
SET VARIABLE varname CURRENCY SET VARIABLE varname DATESET VARIABLE varname DOUBLE SET VARIABLE varname INTEGERSET VARIABLE varname NOTE SET VARIABLE varname REAL SET VARIABLE varname TEXT SET VARIABLE varname TIME
The other commands that use variables do not set the value of the variable. The IF. . . ENDIF andWHILE. . . ENDWHILE commands use variables whose value is set to determine whether to performother actions. The SHOW VARIABLE and SHOW ERROR commands display the current value of avariable.
The SET VARIABLE command is most commonly used to define a variable. This is the syntax for theSET VARIABLE command:
Following are examples of each form of the SET VARIABLE command:
SET VARIABLE var1 INTEGER *(see "Explicit Data Typing")
SET VARIABLE var1 = 10SET VARIABLE var1 = .var2

Using Variables 19
Copyright © 1982-2022 R:BASE Technologies, Inc.
SET VARIABLE var1 = &var2SET VARIABLE var1 = colname1 IN tblname WHERE colname2 = 1234 SET VARIABLE var1 = colname1 IN #2SET VARIABLE var1 = ((.var1 + 1) * 12)SET VARIABLE var1 = 'This is a character string'SET VARIABLE var1 = ('This is a' & 'concatenation.')
Global variables may be deleted individually or all currently defined variables may be deleted together.You can even delete all defined variables and include an exception list. To delete variables, you use theCLEAR command. CLEAR completely removes the variable, not just the value of the variable. This is thesyntax for the CLEAR command:
2.3 Variable Data Types
2.3.1 Implicit Data Typing
In addition to defining a variable value, the SET VARIABLE command is used to establish the data typeof a variable. Quite often the data type is implied by the variable contents.
R:BASE uses the following rules in the order listed to determine the implicit data type of a variable.
· A TEXT data type results if the variable has more than 30 characters or has zero characters (nullvariable).
· An INTEGER data type results if a variable value is a non-decimal number and has nine or lessdigits.
· A DOUBLE data type results if the variable value is numeric with 15 or less digits and one of thefollowing:
· The variable value contains a decimal point· The variable value is a decimal point (interpreted as 0.0)· The variable value is in scientific notation using a decimal point (for example, 1.0E6)
· A DATE data type results if the variable value matches the current date input format and contains avalid date value.
· A TIME data type results if the variable value matches the current time input format and contains avalid time value.
· A DATETIME data type results if the variable value matches the current date/time input format andcontains a valid date / time value.
· A CURRENCY data type results if either of the following is true:· The variable value contains the current currency symbol followed by numerals· The value is 10 to 17 numeric places
· A TEXT data type results if the variable value cannot be assigned any other data type based on theabove rules.
2.3.2 Explicit Data Typing
Some variable definitions may not be obvious from the value assigned. You might, for example, use thefollowing SET VARIABLE command.
SET VARIABLE var4 = 100.50

Programming In R:BASE20
Copyright © 1982-2022 R:BASE Technologies, Inc.
This value could represent a real number, a double-precision number, a currency figure, or a text string.In cases like this, R:BASE has difficulty determining the type of variable you are defining. It is safest,therefore, to preset the data type of a variable whose type may be in question. You cannot assign datatypes to parameter variables. To explicitly set a variable data type, use the SET VARIABLE command inthe following form before defining the variable value:
SET VARIABLE var4 CURRENCY
2.3.3 Changing a Variable Data Type
You can change the current data type of a variable to another type. When you change a variable datatype, R:BASE restores the value in the correct internal format for the new type. If the new data type isincompatible with the variable value, R:BASE stores the variable with a null value. The following tableillustrates the result of some data type changes:
Original Data Type New Data Type Original Variable Value New Variable Value
TEXT * any type other than TEXT This is a string null value
TEXT INTEGER 5555.11 5555
TEXT REAL ** 5555.11 5555.11
TEXT CURRENCY 5555.11 $5,555.11
TEXT TIME 5555.11 null value
TIME TEXT 12:30:30 12:30:30
TEXT DATE 5555.11 null value
DATE TEXT 03/12/2005 03/12/2005
DATE INTEGER 01/01/2006 null value
INTEGER TEXT 5555 5555
INTEGER REAL 5555 5555.0
REAL DOUBLE 5555.11 5555.11000000000
* The NOTE data type may be used instead of TEXT** The DOUBLE data type may be used instead of REAL
2.4 System Variables
R:BASE presets certain variables, which always exist while the program is running. These variables aredescribed in the following table:
Variable Name Use Example of Use
#DATE Holds the current system date. SET VAR vToday = .#DATE
#TIME Holds the current system time. SET VAR vTimer = (.#TIME + 10)
#PI Holds the value of as a DOUBLE datatype (3.14159265358979)
SET VAR vNum = (.#PI *.rad**2)
SQLCODE Holds the result of the previous SQLcommand
SELECT netamount FROM transmaster +
WHERE netamount IS NULL
IF SQLCODE <> 100 THEN
--Perform Task here
ENDIF
The IF...ENDIF condition checks if any rowsexist. If valid rows are found, SQLCODE isset to 100, and the control passes to thecommand after ENDIF. If data is found,SQLCODE is set to 0.
SQLSTATE Holds a 5-character long return codestring that indicates the status of theprevious SQL statement
#NOW Holds the current system date andtime
SET VAR vRightNow = .#NOW
You can verify these values by typing SHOW VARIABLES at the R> Prompt.
Using Variables 21
Copyright © 1982-2022 R:BASE Technologies, Inc.
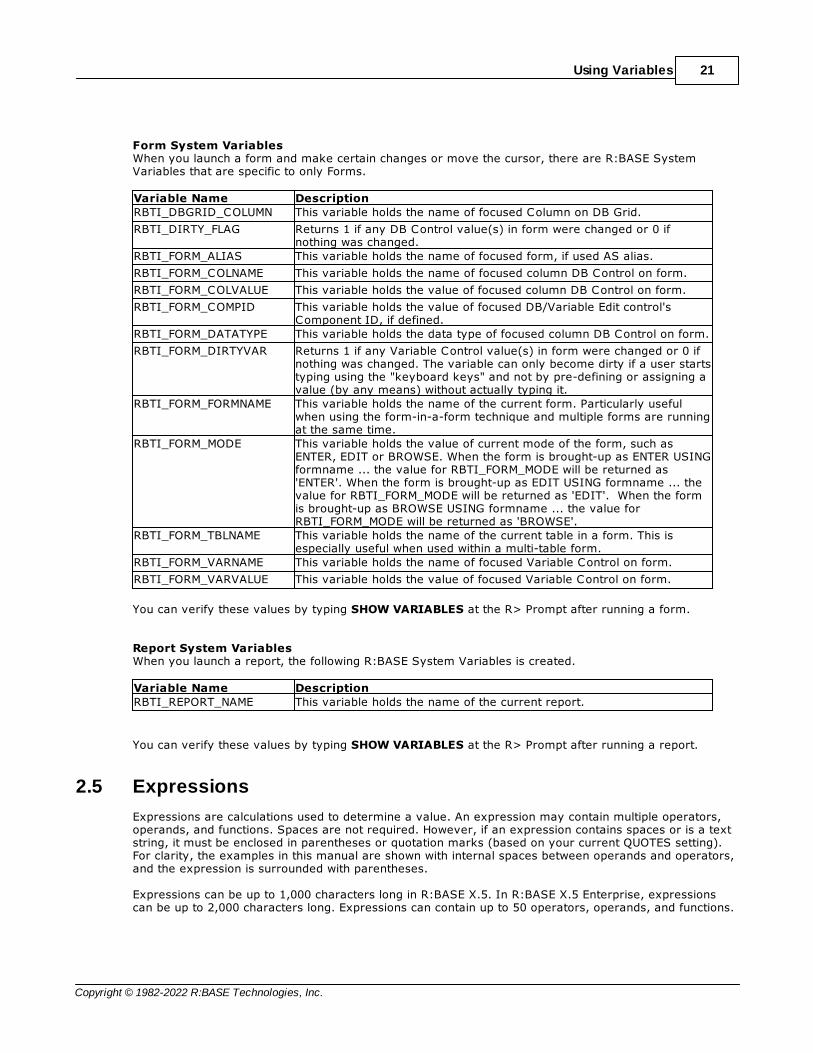
Form System VariablesWhen you launch a form and make certain changes or move the cursor, there are R:BASE SystemVariables that are specific to only Forms.
Variable Name Description
RBTI_DBGRID_COLUMN This variable holds the name of focused Column on DB Grid.
RBTI_DIRTY_FLAG Returns 1 if any DB Control value(s) in form were changed or 0 ifnothing was changed.
RBTI_FORM_ALIAS This variable holds the name of focused form, if used AS alias.
RBTI_FORM_COLNAME This variable holds the name of focused column DB Control on form.
RBTI_FORM_COLVALUE This variable holds the value of focused column DB Control on form.
RBTI_FORM_COMPID This variable holds the value of focused DB/Variable Edit control'sComponent ID, if defined.
RBTI_FORM_DATATYPE This variable holds the data type of focused column DB Control on form.
RBTI_FORM_DIRTYVAR Returns 1 if any Variable Control value(s) in form were changed or 0 ifnothing was changed. The variable can only become dirty if a user startstyping using the "keyboard keys" and not by pre-defining or assigning avalue (by any means) without actually typing it.
RBTI_FORM_FORMNAME This variable holds the name of the current form. Particularly usefulwhen using the form-in-a-form technique and multiple forms are runningat the same time.
RBTI_FORM_MODE This variable holds the value of current mode of the form, such asENTER, EDIT or BROWSE. When the form is brought-up as ENTER USINGformname ... the value for RBTI_FORM_MODE will be returned as'ENTER'. When the form is brought-up as EDIT USING formname ... thevalue for RBTI_FORM_MODE will be returned as 'EDIT'. When the formis brought-up as BROWSE USING formname ... the value forRBTI_FORM_MODE will be returned as 'BROWSE'.
RBTI_FORM_TBLNAME This variable holds the name of the current table in a form. This isespecially useful when used within a multi-table form.
RBTI_FORM_VARNAME This variable holds the name of focused Variable Control on form.
RBTI_FORM_VARVALUE This variable holds the value of focused Variable Control on form.
You can verify these values by typing SHOW VARIABLES at the R> Prompt after running a form.
Report System VariablesWhen you launch a report, the following R:BASE System Variables is created.
Variable Name Description
RBTI_REPORT_NAME This variable holds the name of the current report.
You can verify these values by typing SHOW VARIABLES at the R> Prompt after running a report.
2.5 Expressions
Expressions are calculations used to determine a value. An expression may contain multiple operators,operands, and functions. Spaces are not required. However, if an expression contains spaces or is a textstring, it must be enclosed in parentheses or quotation marks (based on your current QUOTES setting).For clarity, the examples in this manual are shown with internal spaces between operands and operators,and the expression is surrounded with parentheses.
Expressions can be up to 1,000 characters long in R:BASE X.5. In R:BASE X.5 Enterprise, expressionscan be up to 2,000 characters long. Expressions can contain up to 50 operators, operands, and functions.

Programming In R:BASE22
Copyright © 1982-2022 R:BASE Technologies, Inc.
Be sure that constants that contain any separator characters ( +, -, *, /, **, &, %, (, ), or comma) arecontained within quotes marks. This includes text strings. For example, use the following format toinclude text in an expression.
SET VAR vDueDateMess TEXT = ('The Due Date is: ' + (CTXT(.#DATE + 30)))
2.6 R:BASE Functions
R:BASE provides a wide range of predefined functions. A function differs from an operator in that afunction provides a predefined complex expression to evaluate standard mathematical, trigonometric,financial, or logical functions without requiring the user to enter the formula in a complete R:BASEexpression. Function names are reserved words.
For a complete list of R:BASE Functions, please refer to the "Function Index" located within the main Helpand in your R:BASE program directory (default: C:\RBTI\RBGX5 or C:\RBTI\RBGX5E). The file name isFunctionIndex.PDF.
2.7 R:BASE Commands
All R:BASE commands are programming commands. Most can be used independently at the R> Prompt,some are used only in define mode, and those discussed in this chapter are generally used only inprograms.
For a complete list of R:BASE Commands, please refer to the "Command Index" located within the mainHelp, or in your R:BASE program directory (default: C:\RBTI\RBGX5 or C:\RBTI\RBGX5E). The file nameis CommandIndex.PDF.

Part
III

Programming In R:BASE24
Copyright © 1982-2022 R:BASE Technologies, Inc.
3 Program Communication
3.1 The OUTPUT Command
Most programs must communicate in some manner with one or more output devices. These devices arethe computer screen, a printer attached to the computer, or a file. The default output device is thecomputer screen. To redirect output, enter one or more valid output devices as shown in the syntax. Thisis the syntax of the OUTPUT command:
Suppose you want to send table data to the printer in your program. You first set the output device to theprinter, capture the data records, and then reset the output device to the screen. The sequence ofcommands is:
OUTPUT PRINTER
SELECT firstname, lastname, homephone FROM employee
OUTPUT SCREEN
3.2 The PRINT Command
Suppose you want to print a report in your program. The PRINT command offers many different outputoptions for your reports. The following list of output options are available with the PRINT command:
· SCREEN· PRINTER· BMP· EMF· ETXT (Report Emulation Text)

Program Communication 25
Copyright © 1982-2022 R:BASE Technologies, Inc.
· GIF· HTML· JPG· PDF· RTF· TIFF· TXT· WMF· XHTML· XLS
Using the OPTION parameter in your PRINT command, you would specify the output options, along withany additional optional parameters for the particular output.
Some command examples are:
PRINT reportname WHERE clause... + ORDER BY clause ... + OPTION SCREEN|WINDOW_STATE MAXIMIZED
PRINT reportname WHERE clause ... + ORDER BY clause ... + OPTION PRINTER|COPIES 2|PRINTER_NAME hp laserjet 1230
PRINT reportname WHERE clause ... + ORDER BY clause ... + OPTION PDF|FILNAME Report.PDF|TITLE My PDF Report
This is the same technique you use to print a report from the R> Prompt. In a program you may want toprovide more flexibility by allowing the operator to select which output device or devices to use. In thiscase, you can use a DIALOG or CHOOSE to provide various output options and then, based on the valueof the returned variable, issue a specific OPTION command parameter to the PRINT command. To dothis, you need to know how an IF. . .ENDIF structure operates. See the chapter on Control Structures.
3.3 The PAUSE Command
Use the PAUSE command to display a message and can also suspend the running of the command file.For assistance with building your PAUSE commands, refer to the R:Pause Builder Plugin.
Options
0Pauses without a message.
1Displays "Press OK to continue" or any message using the USING option in a dialog box. The R> Promptscreen then clears with the next keystroke.
Programming In R:BASE26
Copyright © 1982-2022 R:BASE Technologies, Inc.
2Same as the 1 option, except the R> Prompt screen does not clear with the next keystroke.
3Does not pause the running of the command file and therefore does not wait for the next keystroke.
4If a PAUSE 3 dialog already exists only the message will be repainted to avoid flickering. Otherwise, thisis exactly like the PAUSE 3 option.
FOR nSets the pause duration in seconds; n must be a positive integer. Any keystroke interrupts the pause,regardless of duration. In the absence of a USING clause, no message is displayed. With a USING clause,the message is displayed in a dialog box. When using subsequent PAUSE FOR n USING commands, theCLS command is needed between the PAUSE commands to ensure optional parameters do not carry overfrom one dialog to the next.
USING 'message'Displays the specified message in a dialog box. This value can also be passed as a variable.
Using this default parameter the message text is limited to one line. However, if you need to display amulti-line PAUSE window, you can create separate lines with the ASCII characters for a carriage returnand indent ([Tab] key). A sample is provided below.
=widthSpecifies the wrap width for the dialog box message.
CAPTION 'message'Specifies the text of the message to display in the dialog box caption. The value can also be passed as avariable.
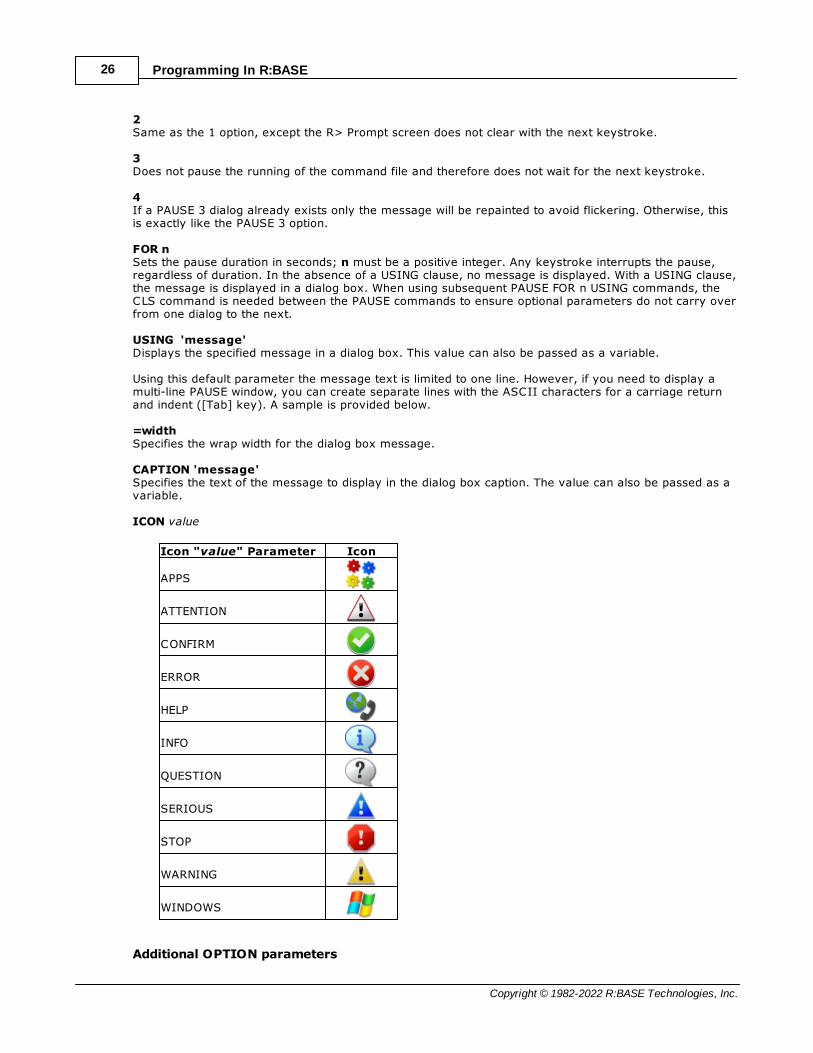
ICON value
Icon "value" Parameter Icon
APPS
ATTENTION
CONFIRM
ERROR
HELP
INFO
QUESTION
SERIOUS
STOP
WARNING
WINDOWS
Additional OPTION parameters

Program Communication 27
Copyright © 1982-2022 R:BASE Technologies, Inc.
Additional parameters are available to increase the visual display of the PAUSE window. To use thegraphic PAUSE Builder, choose "Utilities" > "Plugins" > "Internal Plugins" > "PAUSE Builder" from themain Menu Bar. All OPTION parameters and values must be separated by the "|" (pipe) character.
CMPAUSE SettingIn instances where several PAUSE dialogs will appear, perhaps within a loop, the CMPAUSE setting isavailable to display the messages in a cascade modal mode.
Examples:
PAUSE 2 USING 'PAUSE window with the APPS icon.' CAPTION 'PAUSE Command' ICON APPS
PAUSE 2 USING 'You can customize the button message!' CAPTION 'PAUSE Command' ICONINFO BUTTON 'Your customized message here...'
-- Standard PAUSE Command with ICON
PAUSE 2 USING 'Message Text' +CAPTION 'Caption Text' +ICON HELP OPTION +BUTTON 'Button Text' +|BACK_COLOR WHITE +|MESSAGE_COLOR WHITE +|MESSAGE_FONT_COLOR GREEN +|BUTTON_COLOR WHITE +|BUTTON_FONT_COLOR GREEN +|TRANSPARENCY 255
-- Standard PAUSE Command with custom ICON
PAUSE 2 USING 'Message Text' +CAPTION 'Caption Text' +BUTTON 'Button Text' +OPTION ICON_FILE path\directory\filename.bmp +|BACK_COLOR WHITE +|MESSAGE_COLOR WHITE +|MESSAGE_FONT_COLOR GREEN +|BUTTON_COLOR WHITE +|BUTTON_FONT_COLOR GREEN +|TRANSPARENCY 255
-- Multi-Line PAUSE Command
-- (CHAR(009)) = Tab Key (Indent)-- (CHAR(013)) = Carriage Return
SET VAR vMsg = +('Line 1:'+(CHAR(009))+(CHAR(009))&'Contents of Line 1'+(CHAR(009))+(CHAR(013))+ + 'Line 2:'+(CHAR(009))+(CHAR(009))&'Contents of Line 2'+(CHAR(009))+(CHAR(013))+ + 'Line 3:'+(CHAR(009))+(CHAR(009))&'Contents of Line 3'+(CHAR(009))+(CHAR(013))+ + 'Line 4:'+(CHAR(009))+(CHAR(009))&'Contents of Line 4'+(CHAR(009))+(CHAR(013))+ + 'Line 5:'+(CHAR(009))+(CHAR(009))&'Contents of Line 5'+(CHAR(009))+(CHAR(013))+ + 'Line 6:'+(CHAR(009))+(CHAR(009))&'Contents of Line 6'+(CHAR(009))+(CHAR(013))+ + 'Line 7:'+(CHAR(009))+(CHAR(009))&'Contents of Line 7'+(CHAR(009))+(CHAR(013))+ + 'Line 8:'+(CHAR(009))+(CHAR(009))&'Contents of Line 8'+(CHAR(009))+(CHAR(013))+ + 'Line 9:'+(CHAR(009))+(CHAR(009))&'Contents of Line 9'+(CHAR(009))+(CHAR(013)))
PAUSE 2 USING .vMsg +CAPTION 'Caption Text' +ICON APP +

Programming In R:BASE28
Copyright © 1982-2022 R:BASE Technologies, Inc.
BUTTON 'Button Text' +OPTION BACK_COLOR WHITE +|MESSAGE_COLOR WHITE +|MESSAGE_FONT_COLOR GREEN +|BUTTON_COLOR WHITE +|BUTTON_FONT_COLOR GREEN +|TRANSPARENCY 255
-- Standard PAUSE Command with custom ICON with Themes
PAUSE 2 USING +'Now you can add themes to PAUSE windows!' +CAPTION 'New PAUSE Command' ICON INFO +OPTION themename Longhorn
-- PAUSE Command with Meter Progress Bar
PAUSE 3 USING +'PAUSE Command Text with More OPTIONS - Imagine the Possibilities!' +CAPTION ' ' +OPTION METER_VISIBLE ON +|METER_VALUE .vProgress +|METER_TYPE BAR3D +|METER_BACK_COLOR WHITE +|METER_BAR_COLOR NAVY +|METER_FONT_COLOR RED +|BACK_COLOR WHITE +|MESSAGE_COLOR WHITE +|MESSAGE_FONT_COLOR GREEN
-- PAUSE Command with GAUGE Progress Bar
PAUSE 3 USING 'Calculating ... Please Stand By ...' +CAPTION ' Pause 3 with Gauge ' +ICON WINDOWS OPTION GAUGE_VISIBLE ON +|GAUGE_COLOR RED +|GAUGE_INTERVAL 10 +|MESSAGE_FONT_NAME VERDANA +|MESSAGE_FONT_SIZE 10 +|MESSAGE_FONT_COLOR WHITE +|THEMENAME Steel Blue
3.4 The DIALOG Command
Use the DIALOG command to display a dialog box on the screen to accept text entry from a user. Forassistance with building your DIALOG commands, refer to the R:Dialog Builder Plugin, or the R:Dialogwith Buttons Builder Plugin.

Program Communication 29
Copyright © 1982-2022 R:BASE Technologies, Inc.
Options
'message'Specifies the text of the message to display in the dialog box. The value can also be passed as avariable.
||formatAlso known as EditMask. You can apply the mask specified by the EditMask parameter to the text stringspecified by the Value parameter.
=wSpecifies the wrap width for the dialog box message.
responseSpecifies the variable that will contain the dialog box entry.
=wSpecifies the width for the dialog box entry.
endkeySpecifies the variable containing the final keystroke ([Enter] or [Esc]) in a dialog box.
linesSpecifies the number of lines to display for the text entry in a dialog box.
passwordDisplays the dialog box entry as asterisks.
YESCreates a Yes/No dialog box and sets the default response to Yes.
NOCreates a Yes/No dialog box and sets the default response to No.
CAPTION 'message'Specifies the text of the message to display in the dialog box caption. The value can also be passed as avariable.
ICON value
Icon "value" Parameter Icon
APPS
ATTENTION
CONFIRM
ERROR
HELP
INFO
QUESTION
SERIOUS
STOP

Programming In R:BASE30
Copyright © 1982-2022 R:BASE Technologies, Inc.
WARNING
WINDOWS
Additional OPTION parametersAdditional parameters are available to increase the visual display of the DIALOG window. To use thegraphic DIALOG Builder, choose "Utilities" > "Plugins" > "Internal Plugins" > "DIALOG Builder" from themain Menu Bar. All OPTION parameters and values must be separated by the "|" (pipe) character.
Examples
Example 01: (Dialog with custom button text)
CLSDIALOG 'Enter Last Name' vLastName=26 vEndKey 1 +CAPTION 'Search Employee by Last Name' +ICON 'APP' +OPTION MESSAGE_FONT_COLOR BLACK +|TRANSPARENCY 255 +|WINDOW_BACK_COLOR WHITE +|BUTTON_OK_CAPTION '&Search' +|BUTTON_CANCEL_CAPTION '&Cancel'
Example 02: (Dialog with PASSWORD option)
CLSDIALOG 'Enter Password' vPassword=26 vEndKey PASSWORD +CAPTION 'Database Maintenance' +ICON 'APP' +OPTION MESSAGE_FONT_COLOR BLACK +|TRANSPARENCY 255 +|WINDOW_BACK_COLOR WHITE +|BUTTON_OK_CAPTION '&Process' +|BUTTON_CANCEL_CAPTION '&Cancel'
Example 03: (Dialog with Multi-Line Message with the TOP LEFT parameters)
-- (CHAR(009)) = Tab Key (Indent)-- (CHAR(013)) = Carriage ReturnCLSSET VAR vMsg = +('Line 1:'+(CHAR(009))+(CHAR(009))&'Contents of Line 1'+(CHAR(013))+ + 'Line 2:'+(CHAR(009))+(CHAR(009))&'Contents of Line 2'+(CHAR(013))+ + 'Line 3:'+(CHAR(009))+(CHAR(009))&'Contents of Line 3'+(CHAR(013))+ + 'Line 4:'+(CHAR(009))+(CHAR(009))&'Contents of Line 4'+(CHAR(013))+ + 'Line 5:'+(CHAR(009))+(CHAR(009))&'Contents of Line 5'+(CHAR(013))+ + 'Line 6:'+(CHAR(009))+(CHAR(009))&'Contents of Line 6'+(CHAR(013))+ + 'Line 7:'+(CHAR(009))+(CHAR(009))&'Contents of Line 7'+(CHAR(013))+ + 'Line 8:'+(CHAR(009))+(CHAR(009))&'Contents of Line 8'+(CHAR(013))+ + 'Line 9:'+(CHAR(009))+(CHAR(009))&'Contents of Line 9'++(CHAR(013)))DIALOG .vMsg vYesNo vEndKey YES +CAPTION ' Your Dialog Caption Here ...' +ICON 'APP' +OPTION MESSAGE_FONT_COLOR BLACK +|TRANSPARENCY 255 +
Program Communication 31
Copyright © 1982-2022 R:BASE Technologies, Inc.
|WINDOW_BACK_COLOR WHITE +|BUTTON_YES_CAPTION '&Start' +|BUTTON_NO_CAPTION '&Cancel' +|BUTTON_YES_COLOR GREEN +|BUTTON_NO_COLOR RED +|BUTTON_YES_FONT_COLOR WHITE +|BUTTON_NO_FONT_COLOR WHITE +|TOP 50 +|LEFT 50
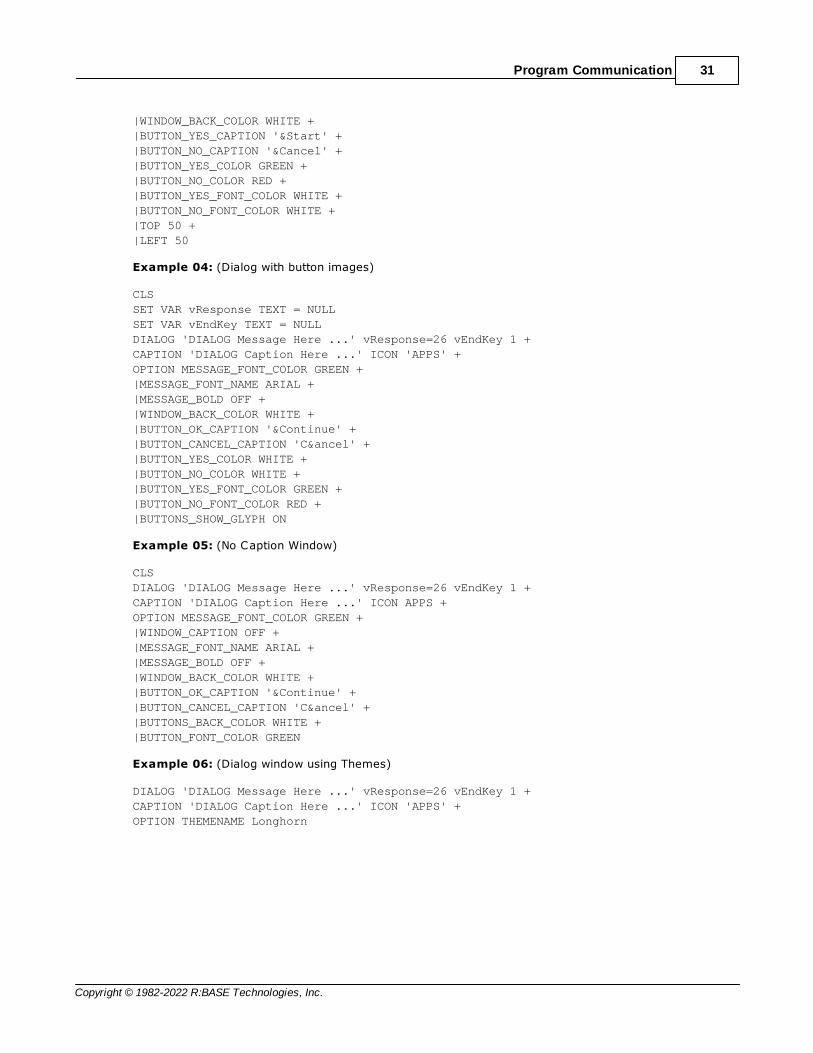
Example 04: (Dialog with button images)
CLSSET VAR vResponse TEXT = NULLSET VAR vEndKey TEXT = NULLDIALOG 'DIALOG Message Here ...' vResponse=26 vEndKey 1 +CAPTION 'DIALOG Caption Here ...' ICON 'APPS' +OPTION MESSAGE_FONT_COLOR GREEN +|MESSAGE_FONT_NAME ARIAL +|MESSAGE_BOLD OFF +|WINDOW_BACK_COLOR WHITE +|BUTTON_OK_CAPTION '&Continue' +|BUTTON_CANCEL_CAPTION 'C&ancel' +|BUTTON_YES_COLOR WHITE +|BUTTON_NO_COLOR WHITE +|BUTTON_YES_FONT_COLOR GREEN +|BUTTON_NO_FONT_COLOR RED +|BUTTONS_SHOW_GLYPH ON
Example 05: (No Caption Window)
CLSDIALOG 'DIALOG Message Here ...' vResponse=26 vEndKey 1 +CAPTION 'DIALOG Caption Here ...' ICON APPS +OPTION MESSAGE_FONT_COLOR GREEN +|WINDOW_CAPTION OFF +|MESSAGE_FONT_NAME ARIAL +|MESSAGE_BOLD OFF +|WINDOW_BACK_COLOR WHITE +|BUTTON_OK_CAPTION '&Continue' +|BUTTON_CANCEL_CAPTION 'C&ancel' +|BUTTONS_BACK_COLOR WHITE +|BUTTON_FONT_COLOR GREEN
Example 06: (Dialog window using Themes)
DIALOG 'DIALOG Message Here ...' vResponse=26 vEndKey 1 +CAPTION 'DIALOG Caption Here ...' ICON 'APPS' +OPTION THEMENAME Longhorn

Part
IV
Manipulating Text Strings 33
Copyright © 1982-2022 R:BASE Technologies, Inc.
4 Manipulating Text Strings
R:BASE offers a variety of methods for manipulating the contents of TEXT variables. You can perform thefollowing text manipulation functions with R:BASE:
· Combine variables using the concatenation operators + or &· Fill, locate, retrieve, strip, and otherwise manipulate text strings using the R:BASE text and string
manipulation functions (see the Functions Index for a complete list of functions)· Move text or any portion of text from one variable to another· Use a variable to contain a list of items such as two or more column names
4.1 Concatenating Text Strings
You can combine two or more text strings into a single variable using either of the concatenationoperators + or &. The table below illustrates the use of concatenation. Parentheses are not required aslong as the expression has only two operands.
Variable Values Concatenation Result
var1 = gas SET VAR vCombine = (.var1 + .var2) combine = gaslight
var2 = light SET VAR vCombine = (.var1 & .var2) SET VAR vCombine = (.var2 + 'bulb')SET VAR vCombine = ('sees the' & .var2)SET VAR vCombine = (.var1 + "," & .var2)
combine = gas light combine = lightbulb combine = sees the light combine = gas, light
The concatenation operators allow complex expressions; that is, more than one operator may be used inan expression. You can mix and match the + and & operators as shown in the last example above.
4.2 Using the Text Functions
R:BASE provides the following text manipulation functions:
Function Description
CHAR Returns the TEXT value of an ASCII decimal code
CTR Centers a string by padding with blanks on either side
CTXT Converts various non-text values into TEXT characters
FORMAT Applies picture format to text strings
ICAP Converts only the first word in a text string with an initial capital letter
ICAP1 Converts a text string to lower case with an initial capital letter on the first word
ICAP2 Converts a text string to lower case with an initial capital letter on each word
ICHAR Returns the ASCII decimal code for single text characters
IHASH Creates an INTEGER value from a text string
ISALPHA Checks for an alphanumeric value within the first character of a text string
ISDIGIT Checks for a numeric value within the first character of a text string
ISLOWER Checks for a lower case letter within the first character of a text string
ISSPACE Checks for a space within the first character of a text string
ISTR Returns the ASCII integer value for a specified value in a text string

Programming In R:BASE34
Copyright © 1982-2022 R:BASE Technologies, Inc.
ISUPPER Checks for a upper case letter within the first character of a text string
ITEMCNT Counts the number of items in a text string separated by the current delimiter
LJS Left-justifies a string by padding with blanks on the right
LTRIM Trims leading blanks from text, returning a text string
LUC Converts a text string to upper case
RJS Right-justifies a string by padding with blanks on the left
RTRIM Trims trailing blanks from text, returning a text string
SFIL Fills a character string with a specified character
SGET Returns a selected set of characters from a text string
SKEEP Keeps characters within the source string, using case sensitivity
SKEEPI Keeps characters within the source string, without using case sensitivity
SLEN Returns the length of a character string
SLOC Returns the position of a substring within a text string
SLOCP Locates the exact position of a given string and occurrence in a text string
SMOVE Moves a substring of a specified length from one text string beginning at any position toanother text string at any position
Refer to the Functions Index for a description and examples of all R:BASE Functions. This section showsan example using the CTXT and SLEN functions.
CTXT and SLEN are single operand functions. CTXT converts various non-text values into TEXTcharacters. SLEN returns an INTEGER value equivalent to the length of a text string. The following syntaxshows an example of how to use these two functions to determine the length of a TEXT string. Assumethe largest value contained in column col1 in table tbl1 is the INTEGER value 3642960.
SELECT MAX(col1) INTO var1 FROM tbl1 -- 1.
SET VAR tvar1 = (CTXT(.var1)) -- 2.
SET VAR tlen = ((SLEN(.tvar1)) + 1) -- 3.
SET VAR tcol = ('col1=' + CTXT(.tlen)) -- 4.
SELECT &tcol col2 col3 FROM tbl1 ORDER BY col1 -- 5.
This sequence of commands does the following:
1. Finds the greatest value of col1: 3642960.2. Converts that value to text: "3642960".3. Finds the length of the text value and adds 1 to allow a space between columns: 8. 4. Concatenates the column name and length (converted to text) in variable tcol.5. Executes the SELECT command. If the maximum value in col1 is seven characters long then tcol
contains the value col1 = 8. The ampersand (&) before the variable tcol instructs R:BASE to parsethe variable-that is, to see it as three parts (col1, =, and 8) and not merely as a text string.
4.3 Moving Text Between Variables
The SMOVE function is used to take text from any position in a TEXT variable and to move that text toany position in another TEXT variable. The syntax of the SMOVE function is:
SMOVE(text,pos1,nchar,string,pos2)

Manipulating Text Strings 35
Copyright © 1982-2022 R:BASE Technologies, Inc.
Text is the text string containing the characters to copy, pos1 is the position of the first character of thetext string to copy, nchar is the number of characters to copy, string is the text string to which thecharacters are to be copied, and pos2 is the position to which to copy the characters.
For example, suppose the TEXT variable textvar1 has the value ABCXXXDEF and textvar2 containsGHIJKL. If you want to move the XXX from textvar1 into the first through third positions of textvar2, useSMOVE like this:
SET VAR textvar2 = (SMOVE(.textvar1,4,3,.textvar2,1))
The three characters XXX begin in the fourth position of variable textvar1. These three characters aremoved to variable textvar2 beginning at character position 1. After this command is executed, textvar1still contains ABCXXXDEF and textvar2 contains XXXJKL.
If you do not want to change the value of the original variable textvar2, you can assign the new textvalue to another variable like this:
SET VAR textvar3 = (SMOVE(.textvar1,4,3,.textvar2,1))
After this command is executed, textvar1 and textvar2 are unchanged and textvar3 contains XXXJKL.
The SMOVE function may be used with dates if the date is first converted to a TEXT data type. Thefollowing commands show how the month and year are separated from the full date format and thenused to select dates falling in the same month. This example assumes that the date format isMM/DD/YYYY.
SET VAR thismnth = .#DATE
SET VAR thismnth TEXT
SET VAR thismnth = ((SMOVE("??",1,2,.thismnth,4))+ 1)
SELECT ALL FROM mthtbl WHERE coldate = .thismnth
1. Places the current date in variable thismnth.2. Converts the date value to TEXT.3. Moves two question marks into the day position in variable thismnth so that it looks like this:
06/??/2004.4. Selects rows from mthtbl using thismnth as a mask to compare the dates in coldate against those
in June 2004.

Part
V

Control Structures 37
Copyright © 1982-2022 R:BASE Technologies, Inc.
5 Control Structures
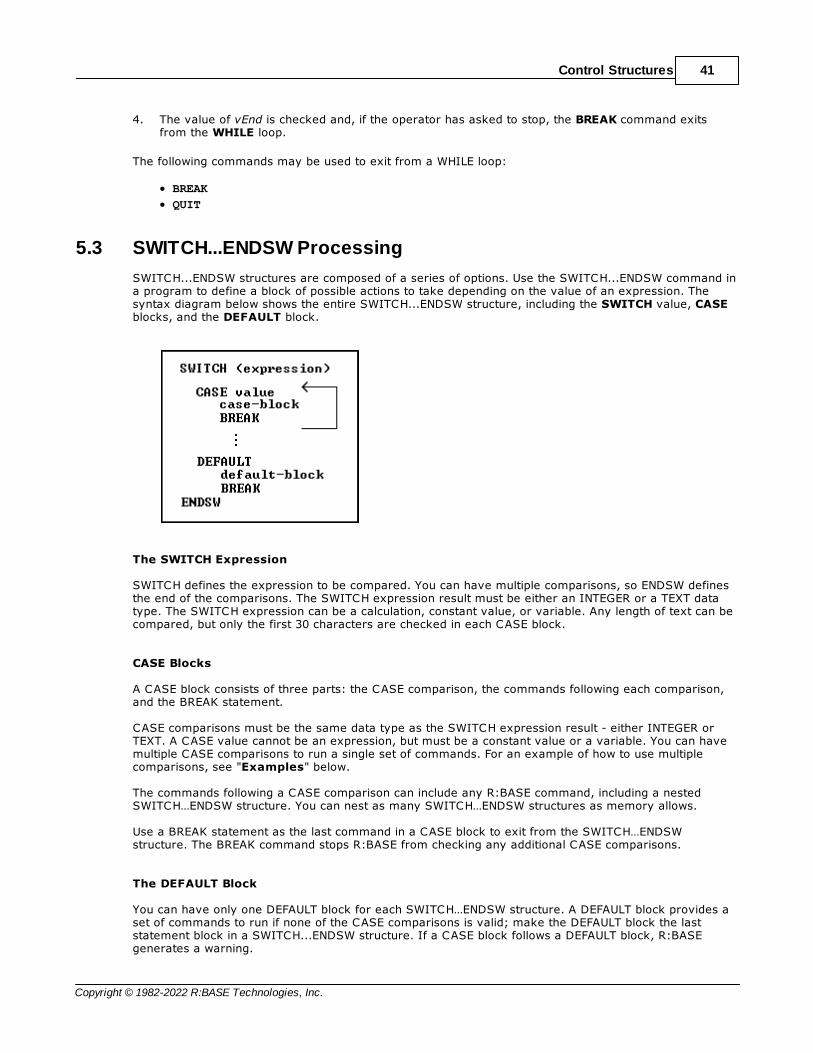
Unlike other R:BASE commands, whose purpose is to manipulate data, control structure commands areused to control the execution of a program. R:BASE programming language has four control structures:IF...ENDIF, WHILE...ENDWHILE, SWITCH...ENDSW, and GOTO and LABEL. In addition, external callsusing the RUN command may be considered a control structure.
The IF...ENDIF structure allows you to determine whether or not to execute a sequence of commands.The WHILE...ENDWHILE structure allows you to repeat a sequence of commands until a specified set ofconditions is no longer true. These structures provide conditional execution of commands.SWITCH...ENDSW define a block of possible actions to take depending on the value of an expression.The fourth control structure, GOTO, passes control from one part of the program to a specific labeledpart of the program.
5.1 IF...ENDIF Processing
Use an IF...ENDIF structure in a command file to cause a block of commands to be run when thespecified conditions are met. IF structures can be nested within other IF and WHILE structures. See"Nesting Considerations" for more information.
This is the syntax of the IF. ..ENDIF structure:
IF condlist THEN
then-blockENDIF
IF condlist THEN
then-blockELSE
else-blockENDIF
The simplest form of the structure contains only the then-block command sequences. These commandsare executed if the conditions specified in the condlist are true. There may be up to 10 conditions in thecondlist with AND, OR, AND NOT, or OR NOT separating the conditions. The IF...ENDIF conditions areprocessed in the same way as WHERE clause conditions.The following table lists the possible conditions that may be used in an IF structure.
Condition Description
varname IS NULL The value of the variable is null.
varname IS NOT NULL The value of the variable is not null.
varname CONTAINS 'string' The variable has a TEXT data type and contains a 'string'as a substring in the variable value.
varname NOT CONTAINS 'string' The variable has a TEXT data type and a 'string' is notcontained as a substring in the variable value.
varname LIKE 'string' The variable equals a 'string.' A 'string' can containwildcards.
varname NOT LIKE 'string' The variable does not equal the 'string'. A 'string' cancontain wildcards.
varname BETWEEN value1 AND value2 The value of the variable is greater than or equal to value1and less than or equal to value2. The variable and thevalues must be the same data type.
varname NOT BETWEEN value1 AND value2 The value of the variable is less than value1 or greaterthan value2. The variable and the values must be thesame data type.
varname IN (valuelist) The value of the variable is in the value list.
varname NOT IN (valuelist) The value of the variable is not in the value list.
item1 op item2 Item1 has the specified relationship to item2. Item1 can bea column name, value, or expression; item2 can be acolumn name, value, or expression.
The valid operators (op) for the conditions in an IF...ENDIF structure are listed in the table below. Donot use wildcard characters with these operators.
Programming In R:BASE38
Copyright © 1982-2022 R:BASE Technologies, Inc.
Operator Description
= Equals
<= Less than or equal to
>= Greater than or equal to
< Less than
> Greater than
<> Not equal
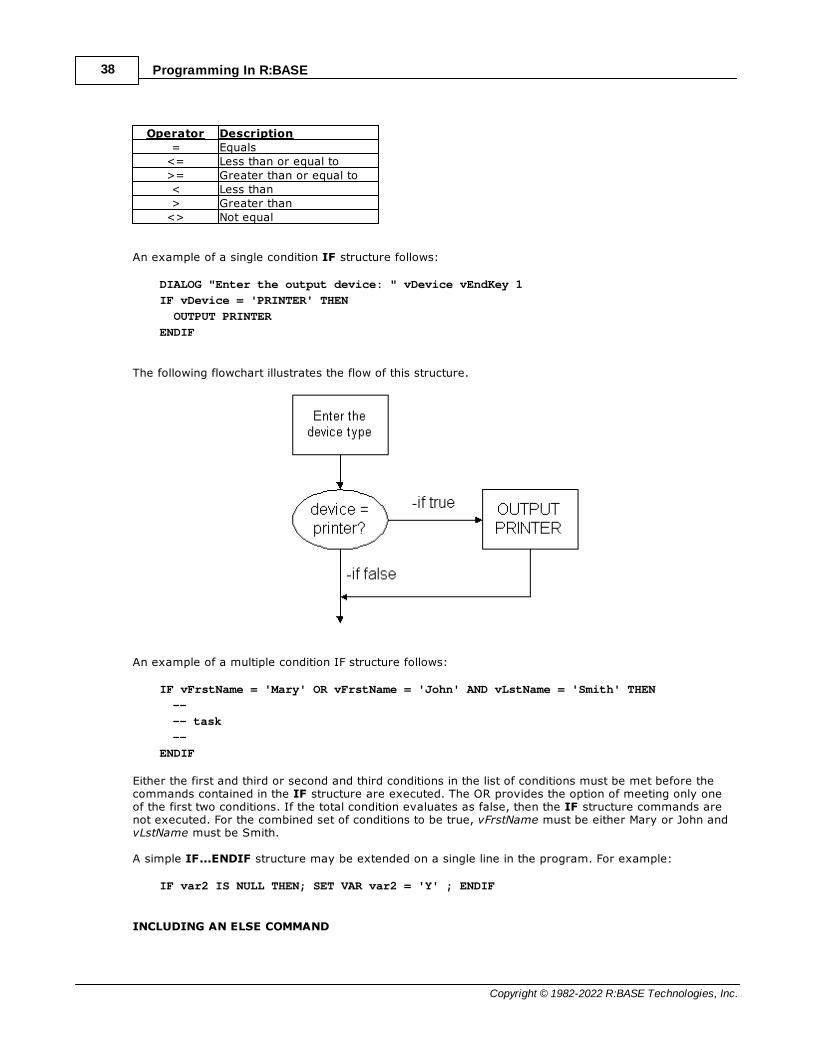
An example of a single condition IF structure follows:
DIALOG "Enter the output device: " vDevice vEndKey 1
IF vDevice = 'PRINTER' THEN
OUTPUT PRINTER
ENDIF
The following flowchart illustrates the flow of this structure.
An example of a multiple condition IF structure follows:
IF vFrstName = 'Mary' OR vFrstName = 'John' AND vLstName = 'Smith' THEN
--
-- task
--
ENDIF
Either the first and third or second and third conditions in the list of conditions must be met before thecommands contained in the IF structure are executed. The OR provides the option of meeting only oneof the first two conditions. If the total condition evaluates as false, then the IF structure commands arenot executed. For the combined set of conditions to be true, vFrstName must be either Mary or John andvLstName must be Smith.
A simple IF...ENDIF structure may be extended on a single line in the program. For example:
IF var2 IS NULL THEN; SET VAR var2 = 'Y' ; ENDIF
INCLUDING AN ELSE COMMAND

Control Structures 39
Copyright © 1982-2022 R:BASE Technologies, Inc.
If an ELSE is included in the IF structure, then control is passed through either of two mutually exclusivecommand blocks. This allows you to retain absolute control no matter what occurs during execution. Thefollowing command syntax shows an example of an IF structure with an ELSE block:
DIALOG "Enter the output device: " vDevice vEndKey 1
IF vDevice = 'PRINTER' THEN
OUTPUT PRINTER -- if PRINTER entered
ELSE
OUTPUT SCREEN -- all other cases
ENDIF
The following flowchart illustrates the flow of this structure.
The conditions for execution of the then-block are the same as the simple IF structure used without anELSE. The difference is that you also provide commands for execution if the conditions are false. In theabove example, if the operator enters any value for device except the word PRINTER, the commandOUTPUT SCREEN is executed. This construct allows you to determine a default entry value. The sametechnique can be used for any operator prompt.
When an ELSE is included in the IF...ENDIF structure, you must enter each part of the command onseparate lines as shown in the syntax diagram.
5.2 WHILE...ENDWHILE Processing
Use WHILE...ENDWHILE structures when you want to repeat a group of command lines until a conditionor set of conditions is no longer true. This is sometimes referred to as looping. This is the syntax of theWHILE structure:
WHILE condlist THEN
while-block
ENDWHILE
Up to 10 conditions can be included in the condlist with the conditions separated by AND, OR, AND NOT,or OR NOT. These conditions are of the same type as in the IF...ENDIF structure.
Programming In R:BASE40
Copyright © 1982-2022 R:BASE Technologies, Inc.
Condition Description
varname IS NULL The value of the variable is null.
varname IS NOT NULL The value of the variable is not null.
varname CONTAINS 'string' The variable has a TEXT data type and contains a 'string'as a substring in the variable value.
varname NOT CONTAINS 'string' The variable has a TEXT data type and a 'string' is notcontained as a substring in the variable value.
varname LIKE 'string' The variable equals a 'string.' A 'string' can containwildcards.
varname NOT LIKE 'string' The variable does not equal the 'string'. A 'string' cancontain wildcards.
varname BETWEEN value1 AND value2 The value of the variable is greater than or equal to value1and less than or equal to value2. The variable and thevalues must be the same data type.
varname NOT BETWEEN value1 AND value2 The value of the variable is less than value1 or greaterthan value2. The variable and the values must be thesame data type.
item1 op item2 Item1 has the specified relationship to item2. Item1 can bea column name, value, or expression; item2 can be acolumn name, value, or expression.
WHILE loops can be nested within other WHILE or IF loops. See "Nesting Considerations" for moreinformation.
BREAKING OUT OF A WHILE LOOP
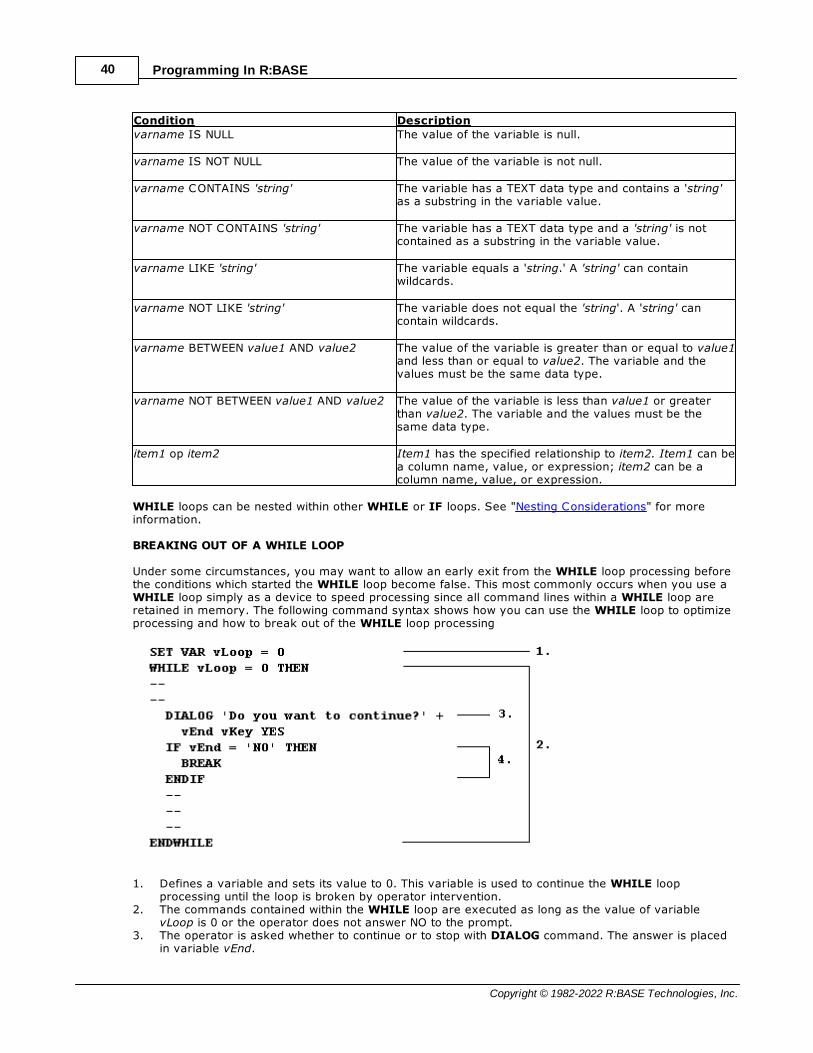
Under some circumstances, you may want to allow an early exit from the WHILE loop processing beforethe conditions which started the WHILE loop become false. This most commonly occurs when you use aWHILE loop simply as a device to speed processing since all command lines within a WHILE loop areretained in memory. The following command syntax shows how you can use the WHILE loop to optimizeprocessing and how to break out of the WHILE loop processing
1. Defines a variable and sets its value to 0. This variable is used to continue the WHILE loopprocessing until the loop is broken by operator intervention.
2. The commands contained within the WHILE loop are executed as long as the value of variablevLoop is 0 or the operator does not answer NO to the prompt.
3. The operator is asked whether to continue or to stop with DIALOG command. The answer is placedin variable vEnd.
Control Structures 41
Copyright © 1982-2022 R:BASE Technologies, Inc.
4. The value of vEnd is checked and, if the operator has asked to stop, the BREAK command exitsfrom the WHILE loop.
The following commands may be used to exit from a WHILE loop:
· BREAK
· QUIT
5.3 SWITCH...ENDSW Processing
SWITCH...ENDSW structures are composed of a series of options. Use the SWITCH...ENDSW command ina program to define a block of possible actions to take depending on the value of an expression. Thesyntax diagram below shows the entire SWITCH...ENDSW structure, including the SWITCH value, CASEblocks, and the DEFAULT block.
The SWITCH Expression
SWITCH defines the expression to be compared. You can have multiple comparisons, so ENDSW definesthe end of the comparisons. The SWITCH expression result must be either an INTEGER or a TEXT datatype. The SWITCH expression can be a calculation, constant value, or variable. Any length of text can becompared, but only the first 30 characters are checked in each CASE block.
CASE Blocks
A CASE block consists of three parts: the CASE comparison, the commands following each comparison,and the BREAK statement.
CASE comparisons must be the same data type as the SWITCH expression result - either INTEGER orTEXT. A CASE value cannot be an expression, but must be a constant value or a variable. You can havemultiple CASE comparisons to run a single set of commands. For an example of how to use multiplecomparisons, see "Examples" below.
The commands following a CASE comparison can include any R:BASE command, including a nestedSWITCH…ENDSW structure. You can nest as many SWITCH…ENDSW structures as memory allows.
Use a BREAK statement as the last command in a CASE block to exit from the SWITCH…ENDSWstructure. The BREAK command stops R:BASE from checking any additional CASE comparisons.
The DEFAULT Block
You can have only one DEFAULT block for each SWITCH…ENDSW structure. A DEFAULT block provides aset of commands to run if none of the CASE comparisons is valid; make the DEFAULT block the laststatement block in a SWITCH...ENDSW structure. If a CASE block follows a DEFAULT block, R:BASEgenerates a warning.

Programming In R:BASE42
Copyright © 1982-2022 R:BASE Technologies, Inc.
Example
The following SWITCH...ENDSW structure uses a date entered in a DIALOG command in the expression.The TDWK function calculates day of the week as text from the date stored in vDay.
DIALOG 'Enter a date: ' vDay vEndKey 1
SWITCH (TDWK(.vDay))
CASE 'Saturday'
CASE 'Sunday'
PAUSE 2 USING 'This is a weekend day.'
BREAK
DEFAULT
PAUSE 2 USING 'This is a weekday.'
BREAK
ENDSW
If you entered 12/22/2007 when prompted for the date, the first CASE comparison would check whetherthe day of the week is the word Saturday. Because the word is Saturday, R:BASE would display thePAUSE message window stating you picked a weekend day. The BREAK command prevents R:BASE fromprocessing the rest of the commands in the SWITCH...ENDSW structure.
If the date entered is not Saturday or Sunday - for example, 12/21/2007 - the information in theDEFAULT block would display the PAUSE message window stating you picked a weekday.
5.4 Passing Control with GOTO and LABEL
The GOTO and LABEL commands work together to transfer control from one part of the program toanother. GOTO specifies a label name which is repeated in the LABEL command. The LABEL commandonly indicates the point to which control is passed. It has no other effect on processing. The label name isa text string 1-18 characters long. This is the syntax of the GOTO and LABEL commands:
GOTO lblname
LABEL lblname
Use a WHILE loop whenever possible either in place of or surrounding a GOTO/LABEL to speedprocessing. When a GOTO is executed, R:BASE starts searching for the corresponding GOTO label fromthe next line following the GOTO. If it reaches the bottom of the file without finding it, R:BASE continuesits search at the top of the file. Preferably, your program should execute a GOTO command only onceand should not use it for looping. Most commonly, GOTO is used to:
· Return to the beginning of execution· Bypass code under specified conditions· Pass control to the exit commands under specified conditions
The LABEL may precede or follow the GOTO command but must be in the same file as the GOTO thatreferences it. The following command syntax shows an example of the GOTO command.
LABEL lbl_top
.
.
.
DIALOG 'Do you wish to quit?' vChoice VKey NO
IF vChoice = 'NO' THEN
GOTO lbl_top
ENDIF
.

Control Structures 43
Copyright © 1982-2022 R:BASE Technologies, Inc.
.
In this example, R:BASE must search down through the rest of the file and then start searching from thetop of the file to find its matching LABEL. This construction, although valid, could be replaced by a WHILEloop structure which would process much more quickly. The following command syntax shows apreferable construction for prompting repetitively.
SET VAR vChoice = 'NO'
WHILE vChoice = 'NO' THEN
.
.
.
DIALOG 'Do you wish to quit?' vChoice VKey NO
IF vChoice = 'YES' THEN
BREAK
ENDIF
.
.
ENDWHILE
5.5 Nesting Considerations
Nesting means locating a control structure within a similar control structure-for example, an IF structurewithin another IF structure or an IF within a WHILE structure. Command files, IF structures and WHILEloops can be nested.
For command files, the maximum number of nesting levels depends on your FILES setting in thedatabase settings. SET FILES sets the maximum number of files that can be open at a time. Themaximum, depending on available memory, is 255. These levels are nested RUN commands. Keep trackof the nesting level so that the appropriate exit method is chosen.
For example, if you run another command file from within a command or procedure file, R:BASE addsone to the nesting level for the RUN command. If you exit from that nesting level using QUIT, controldoes not return to the command following the RUN command in the first program, where you might havewanted it, because QUIT clears all nesting levels. More appropriately, RETURN is the exit command touse. Control is returned to the next line in the calling command file and the nesting counter isdecremented by one. If you are chaining files rather than nesting them, you are not limited in thenumber of RUN commands you can use.
These nesting levels increase until a command is processed that decreases the nesting level. Thecommands that increase and decrease the nesting level are shown in the following table.
Command Effect onWHILE Level
Effect on IF Level
Effect on Command File Level
WHILE +1
ENDWHILE -1
BREAK -1
IF +1
ENDIF -1
INPUT +1
RUN +1
RETURN -1
QUIT -all -all -all
QUIT TO -all -all -all
End of file -all -all -1*
+1 - increase one nesting level -1 - decrease one nesting level-all - clear all nesting levels

Programming In R:BASE44
Copyright © 1982-2022 R:BASE Technologies, Inc.
* In the executing file only
The GOTO command can also affect nesting levels under certain circumstances. As R:BASE searchesthrough the file for the matching label, each WHILE or IF encountered increases the nesting level andeach ENDWHILE or ENDIF encountered decreases the nesting level. This occurs even though thecontrol structures passed over are not executed.
The following command syntax shows some nesting examples with a discussion of what occurs in each.
1. The WHILE nesting level increases by 1 to 1 if this is the first WHILE. The ENDWHILE decreasesthe level by 1. (A nesting level value of 0 means that no loops or structures are open).
2. The nesting level increases by 1 at the IF to 1 and decreases by 1 at the ENDIF back to 0. 3. QUIT clears all nesting levels and the file is exited. 4. The WHILE nesting level increases by 1 to 2. When the BREAK command is executed, the WHILE
nesting level decreases to 1 and this WHILE loop is exited.5. All nesting levels decrease to 0 and the file is exited.

Part
VI

Programming In R:BASE46
Copyright © 1982-2022 R:BASE Technologies, Inc.
6 Accessing Rows in a Table
An especially useful feature of the R:BASE programming language is used to access and update data inyour database. You will find it to be the foundation of many of the R:BASE programs you write. Thisfeature is available using several different commands:
· SELECT
· INSERT
· UPDATE
· DECLARE CURSOR
· LOAD
· SET VARIABLE
Some of these commands can be used in combination with others. For example, DECLARE CURSOR usesSELECT, INSERT can use SELECT as one of the options, and SELECT can use itself as a sub-SELECT.
The commands INSERT and LOAD are used to specifically "add" data to an R:BASE table. The UPDATEcommand is used to "alter" the values of data in tables. The SELECT, and SET VARIABLE commands areused to capture data so you can perform additional tasks, although SELECT is more powerful and is morecommonly used. The DECLARE CURSOR command is used to create a cursor that points to a row in atable.
6.1 SELECT
Use the SELECT command to display rows of data from a table or view. To display the data in the orderyou want, modify the SELECT command by using various clauses.
The SELECT command is a very powerful data retrieval command. By learning this command, and all ofit's parts you can greatly enhance your ability to work with any other R:BASE command that uses thosesame portions. For example, learning to use a WHERE clause with SELECT will help you work with WHEREclauses on other commands.
You can use the SELECT command to do the following:
· Display rows of information from a table or view· Extract information from a table or view by using a nested SELECT command (a sub-SELECT
statement) in a WHERE command· Extract information from a table or view by using a SELECT clause in another command
A SELECT command is essentially a process of elimination. A SELECT command can contain a number ofclauses (two are required), each of which begins with a keyword, such as "FROM" or "WHERE."
The diagram below shows the different clauses in a SELECT command.
Each of the SELECT clauses has a specific purpose for determining what data you want. The operatorsare processed in the order in which they appear in the preceding diagram.
Note: Many of the SELECT clauses use the same options, such as expression or colname. These commonoptions are described only once in "SELECT Command Clause" below.
SELECT Command Clause

Accessing Rows in a Table 47
Copyright © 1982-2022 R:BASE Technologies, Inc.
The required SELECT command clause specifies which columns to include. You can:
· Select all columns by entering SELECT with an asterisk.· Name the columns you want to select.· Use expressions and SELECT functions to perform calculations whose results will also appear as
a column in the final result.· Select the column or expression values and load them into variables.
Syntax:
Options
* Specifies all columns.
, Indicates that this part of the command is repeatable.
ALL Specifies all rows returned by the other clauses.
#c Specifies a column, where #c is the column number shown in the output of the LIST TABLES command.You can enter a table or correlation name before the #c.
colname Specifies a column name. In a command, you can enter #c, where #c is the column number shown whenthe columns are listed with the LIST TABLES command. In an SQL command, a column name can bepreceded by a table or correlation name and a period (tblname.colname). You can enter tblname.* tospecify all columns in the table.
corr_name Correlation name. A nickname or alias for a table or view name. Use corr_name to refer to the sametable twice within the command, or to explicitly specify a column in more than one table. An example isprovided below.
dbname
Programming In R:BASE48
Copyright © 1982-2022 R:BASE Technologies, Inc.
Currently connected database name, plus the drive and directory if the database is not on the currentdirectory. It has the form D:\PATHNAME\DBNAME where D: is the optional drive letter, /PATHNAME is theoptional directory path, and /DBNAME is the database name.
DISTINCT Eliminates duplicate rows from the resulting data set.
(expression) Determines a value using a text or arithmetic formula. The expression can include other columns fromthe table, constant values, functions, or system variables such as #date, #time, and #pi.
FROM Lists the tables from which data is to be displayed.
ind_var Specifies a variable result indicator to be used with an INTO clause in a SELECT command. This variablestores the status of the variable: non-null (0) or null (-1).
INDICATOR Indicates the following variable is an indicator variable, which is used to indicate if a null value isretrieved.
INTO Selects information directly from a table and puts it into variables. You must include a WHERE clause sothe SELECT command finds only one row.
into_var Specifies a variable whose value is assigned with an INTO clause in a SELECT command.
ORDER BY clause Sorts rows of data. See "ORDER BY Clause" later in this entry.
=S Calculates the sum of a column that has CURRENCY, DOUBLE, INTEGER, NUMERIC, or REAL data typevalues, or the results of an expression using CURRENCY, DOUBLE, INTEGER, NUMERIC, or REAL datatype values.
tblview Specifies a table or view name.
USER Retrieves the current user as a constant.
=w Specifies a display width.
WHERE clause Limits rows of data. See "WHERE Clause" later in this entry.
Examples
The following command selects the company name and ID for companies in Washington state:
SELECT custid, company FROM customer +WHERE custstate = 'WA' ORDER BY company
custid company122 Data Solutions119 Datacrafters Infosystems130 MIS by Design114 Softech Database Design

Accessing Rows in a Table 49
Copyright © 1982-2022 R:BASE Technologies, Inc.
The following command selects the transaction amounts for model number by ID, and uses t1 and t2 ascorrelation names for the tables:
SELECT t1.transid, t1.netamount, t2.model +FROM transmaster t1, transdetail t2 +WHERE t1.transid = t2.transid
6.2 INSERT
Use the INSERT command to add data to a table or view without using a data-entry form.
Options
(collist) Specifies a list of one or more column names, separated by a comma (or the current delimiter). In anSQL command, any column name in the list can be preceded by a table or correlation name and a period(tblname.colname).
INTO tblview Specifies the table or view name (views must be updatable).
NUM NONUM NUM specifies that autonumbering columns will be numbered as they are inserted. NONUM turns offautonumbering while inserting, thereby allowing inserting of a specific value for autonumber columns.The default is NUM.
SELECT clause Finds values in a table, tables, or view to insert into the table or view specified by the INTO tblview optionand the columns specified by the collist option.
VALUES (vallist) Specifies a list of values to insert into the table specified by the INTO tblview option and the columnsspecified by the collist option. Separate values with a comma or the current delimiter.
For these data types... Use this format for vallist
All data types except BIT, BITNOTE,LONG VARBIT, and VARBIT
'string' or value
BIT, BITNOTE, LONG VARBIT, LONGVARCHAR, VARBIT, and VARCHAR
['filename.ext'] or ['filename.ext', filetype, offset, length]Note: When you use VARCHAR, the filetype is alwaysTXT. When you use VARBIT, BIT, and BITNOTE, filetyperefers to the standard graphical file types.
About the INSERT Command
The INSERT command assigns a default value of null to any column not named in the collist unless adefault value has been assigned to a column with the CREATE TABLE or ALTER TABLE command.
To ensure that rules are checked while adding data with the INSERT command, set RULES on beforerunning the INSERT command.
The setting of the SET ZERO command affects the calculation of numeric computed columns. To have nullvalues treated as zeros in expressions, set ZERO on. When ZERO is set off, if the value of a column usedin a expression is null, the computed value will be null.
Programming In R:BASE50
Copyright © 1982-2022 R:BASE Technologies, Inc.
You cannot insert values into the table used in the SELECT clause.
To ensure that data is placed in the intended column, use the following guidelines:
· Do not embed commas within entries for CURRENCY, DOUBLE, INTEGER, NUMERIC, or REALdata types. R:BASE automatically inserts commas and the current currency symbol.
· When values for CURRENCY, DOUBLE, NUMERIC, or REAL or data types are decimal fractions,you must enter the decimal point. When values are whole numbers, R:BASE adds a decimalpoint for you at the end of the number. R:BASE adds zeros for subunits in whole currencyvalues; For example, using the default currency format, R:BASE loads an entry of 1000 as$1,000.00.
· When values for NOTE or TEXT data types contain commas, you can either enclose the entrieswithin quotes, or use SET DELIMIT to change the default delimiter (comma) to anothercharacter.
· When values for NOTE or TEXT data types contain single quotes ('), and you are using thedefault QUOTES character ('), use two single quotes ('') in the text string. For example, 'WalterFinnegan''s order.'
· When a value you specify for a column is not the same data type as the column's data type,R:BASE displays an error message and you need to re-enter the entire row.
· When values for NOTE or TEXT data types exceed the maximum length of a column, R:BASEtruncates the value and adds it to the table. A message is displayed that tells you which row hasbeen truncated.
Inserting an Autonumbered Column
When you use INSERT to add a row, INSERT assigns the next available number to autonumberedcolumns in the table. Therefore, omit autonumbered columns and their values from a collist.Also, if youuse the SELECT option, omit an autonumbered column from the collist. If a value is included for anautonumbered column that was omitted from the column list, R:BASE does not run the commandbecause it cannot identify which column to load.
Inserting a Computed Column
Because a computed column's value is calculated, you cannot insert a new value. Omit computedcolumns from a collist or, if you are adding data to all columns, do not use a collist and do not specify avalue for the computed column. R:BASE will skip the computed column when the row is inserted.
Examples
In the following example, the sales table has three columns, col1, col2, and col3; and col2 is a computedcolumn. To insert a row, you would only specify values for col1 and col3. In this example, the value forcol1 is 100, and the value for col3is 200.
If the expression for col2 was (col1 + 200), then col2 would have the value 300 when the row is inserted.
INSERT INTO sales VALUES (100, 200)
In the following example, a vallist adds a new row to the product table, filling the model, prodname,proddesc, and listprice columns.
INSERT INTO product (model, prodname, proddesc, listprice) + VALUES ('PB3060', 'Portable Advanced PC', 'System-Single + Drive w/Hard Disk-Portable', 3795)
The following command uses a vallist with global variables to insert the values from variables v1, v2, andv3 into the bonusrate table.
SET VARIABLE v1 CURRENCY = 50000, v2 CURRENCY = 75000, + v3 REAL = .10INSERT INTO bonusrate VALUES (.v1, .v2, .v3)
The following example adds rows to customer table selected from temp table. It adds data into thecompany and custphone columns. The columns taken from the temp table can have different column

Accessing Rows in a Table 51
Copyright © 1982-2022 R:BASE Technologies, Inc.
names, the data types must be the same, and the order and number of columns in the column list of thesource table (designated by SELECT) must match the column list of the destination table (designated byINTO).
INSERT INTO customer (company, custphone) + SELECT cname, phone FROM temp
6.3 UPDATE
Use the UPDATE command to change the data in one or more columns in a table or a view.
Options, Indicates that this part of the command is repeatable.
(expression) Determines a value using a text or arithmetic formula. The expression can include other columns fromthe table, constant values, functions, or system variables such as #date, #time, and #pi.
FROM tbllist Specifies a list of tables from which data can be retrieved and updated.
NULL Sets the values in the column equal to null.
SET colname Specifies the column to update.
table Specifies a table.
tblview Specifies a table or view. If no table or view name is included, columns will be updated in all tablescontaining the specified columns, according to the conditions of the WHERE clause.
value Specifies a value to enter in the specified column.
.varname Specifies a global variable that provides a value for a column.
WHERE clause Limits rows of data. For more information, see the "WHERE" entry.
WHERE CURRENT OF cursor Specifies a cursor that refers to a specific row to be affected by the UPDATE command. With this option,you must specify tblview.
About the UPDATE Command
The UPDATE command is useful for adjusting values in columns that require uniform changes.

Programming In R:BASE52
Copyright © 1982-2022 R:BASE Technologies, Inc.
The UPDATE command only modifies data in columns in one table or view. You can also update a tableby referencing values from another table. You can modify a column's value by doing the following:
· Entering a new value for the column as a constant or variable· Entering an expression that calculates a value for the column· Entering a null value
Only users that have been granted rights to update the table(s) or column(s) can run the UPDATEcommand.
R:BASE complies with defined rules, even for columns not affected by the update. If an update breaks arule, the update is not processed.
You cannot use UPDATE with computed or autonumbered columns. To change a computed column value,change the values in the columns to which the computed column refers.
Notes:
· The UPDATE command will not update data in a multi-table View (a View based on multiple tables),as the data is not editable.
· A View with a GROUP BY parameter is also not editable.
Updating Column Values
You can update a column with a specific value. The value you use must meet the requirements of thecolumn's data type, for example, a numeric column cannot be loaded with a text value.
Use the current delimiter character (the default is a comma) to separate each column and its new valuefrom the next column and value.
Use the following guidelines when modifying data with UPDATE:
· Do not embed commas within entries for CURRENCY, DATE, DATETIME, DOUBLE, INTEGER,NUMERIC, or REAL data types. R:BASE automatically inserts commas and the current currencysymbol.
· When values for CURRENCY, DOUBLE, NUMERIC, or REAL or data types are decimal fractions,you must enter the decimal point. When values are whole numbers, R:BASE adds a decimalpoint for you at the end of the number. R:BASE adds zeros for subunits in whole currencyvalues. For example, using the default currency format, R:BASE loads an entry of 1000 as$1,000.00.
· When values for NOTE or TEXT data types contain commas, you can either enclose the entrieswithin quotes, or use SET DELIMIT to change the default delimiter (comma) to anothercharacter.
· When values for NOTE or TEXT data types contain single quotes ('), and you are using thedefault QUOTES character ('), use two single quotes ('') in the text string. For example, 'WalterFinnegan''s order.'
· When values for NOTE or TEXT data types exceed the maximum length of a column, R:BASEtruncates the value and adds it to the table. A message is displayed that tells you which row hasbeen truncated.
Using an Expression or Variable
Enclose expressions in parentheses. If you use global variables in an expression, dot the variable(.varname). If expressions contain values that have a TEXT data type, enclose the values within quotes.The default QUOTES character is the single quote (').
If you attempt to use a null value in an expression or computed column, the result of the expression isnull. However, if you set ZERO to on, R:BASE treats null values as zeros and processes expressions as ifthe null value were zero.
Using the WHERE Clause

Accessing Rows in a Table 53
Copyright © 1982-2022 R:BASE Technologies, Inc.
If an UPDATE command includes a table or view name, you do not need to specify a WHERE or WHERECURRENT OF clause. All rows will be updated.
If you use a WHERE CURRENT OF clause, you must include a table or view name in the command.
If you omit a table or view name, you must use a WHERE clause with the UPDATE command so that youdo not change values in more rows than you intended to change. The WHERE clause pinpoints the rowsyou want to change. If any columns exist in more than one table, all occurrences are changed if thecolumn value meets the WHERE clause conditions. Test the WHERE clause by using the SELECT commandbefore using the clause with UPDATE command. By using a WHERE clause with a SELECT command, youcan view the rows you want to change before changing them.
R:BASE takes significantly less time to process a WHERE clause if one of the columns specified in theclause is an indexed column.
Using UPDATE with Transaction Processing
If more than one person at a time executes an UPDATE command and transaction processing is on,R:BASE might not execute the command concurrently. If you hold an UPDATE lock, you can read,modify, or delete any row in a table. R:BASE blocks any additional requests for UPDATE until otherSELECT or UPDATE locks are cleared.
Examples
The following command changes values in the company and custphone columns of the customer table forthe row where custid equals 100.
UPDATE customer SET company = 'Quality Computers', +custphone = '617-341-3762' WHERE custid = 100
The following command changes the invoicetotal column in the transmaster table to the value of theexpression (invoicetotal * .9) for rows where transid is greater than 5000.
UPDATE transmaster SET invoicetotal = ( invoicetotal * .9) +WHERE transid > 5000
The following command changes the listprice column to the value of the expression (1.1 * listprice) forevery row in the prodlocation table containing an entry in the listprice column.
UPDATE prodlocation SET listprice = (1.1 * listprice) +WHERE listprice IS NOT NULL
The following command adds to the set of conditions in the above command. The command belowextracts all of the selling prices from the transdetail table and requires that listprice be changed only if itmatches a current selling price in the table.
UPDATE product SET listprice = (1.1 * listprice) +WHERE listprice IS NOT NULL AND model = 'CX3000' +AND listprice IN (SELECT price FROM transdetail +WHERE model = 'CX3000')
The following command changes the onhand column in the prodlocation table (specified by cursor curs1)to the value of the expression (onhand - 100). The changes are made only in the row currentlyreferenced by the cursor.
UPDATE prodlocation SET onhand = (onhand - 100) +WHERE CURRENT OF curs1
The following example shows interactive data updating in an application file. The value of var1 is used inthe expression that is assigned to the onhandcolumn of the prodlocation table. The UPDATE commandchanges values in onhand to the value of the expression (onhand - .var1) for all rows containing model

Programming In R:BASE54
Copyright © 1982-2022 R:BASE Technologies, Inc.
numbers that begin with the letter C. The wildcard character % indicates one or more additionalcharacters.
SET VARIABLE var1 TEXTDIALOG 'Enter quantity by which to reduce inventory: ' var1 vend 1SET VARIABLE var1 INTEGERUPDATE prodlocation SET onhand = (onhand - .var1) +WHERE model LIKE 'C%'
The following command changes the last names of two employees. This command omits the table name,thereby causing a global change to all tables that meet the WHERE clause criteria.
UPDATE SET emplname = 'Smith-Simpson' WHERE +(empfname = 'Mary' AND emplname = `Simpson') OR +(empfname = 'John' AND emplname = 'Smith')
The following example corrects a problem that can occur with an incorrect date sequence setting. Forexample, assume that you had the date sequence set to a four-digit year when you entered transactions,and you entered dates with a two-digit year (3/1/93). The dates would be stored as 3/1/0093. And, if youwanted the date to be in the 20th century, you could use the UPDATE command to modify the existingdates to 20th century dates by adding 1900 years to each date, with the ADDYR function.
The SET DATE command makes sure that you are using a four-digit year. The UPDATE commandchanges all transdate values to 20th century dates, where the current value of the column is less than1/1/1900. The last SET DATE command returns to a two-digit date sequence and format.
SET DATE MM/DD/YYYYUPDATE transmaster SET transdate = (ADDYR(transdate,1900)) + WHERE transdate < 1/1/1900 SET DATE MM/DD/YY
Assume that you wanted to update the inventory table with the sum of the units sold from the orderstable. Because there are many rows in the orders table for each part number, you cannot do this directlywith the UPDATE command. The CREATE VIEW command creates a view containing the sum of the unitssold from the orders table. The UPDATE command updates the inventory table by extracting the totalsoldvalue from the view named orders_view for each part number.
CREATE VIEW orders_view (partid,totalsold) AS SELECT +partid, sum(sold) FROM orders GROUP BY partid
UPDATE inventory SET onhand = (T1.onhand - T2.totalsold) + FROM inventory T1, orders_view T2 +WHERE T1.partid = T2.partid
6.4 DECLARE CURSOR
Use the DECLARE CURSOR command to create a cursor that points to a row in a table or view.
Options
cursorname Specifies a 1 to 18 character cursor name.
CURSOR FOR SELECT clause

Accessing Rows in a Table 55
Copyright © 1982-2022 R:BASE Technologies, Inc.
Specifies the columns and rows from the table whose values you want to use. You may include theDISTINCT modifier as well as WHERE clauses and ORDER BY clauses.
SCROLL Defines a cursor that moves forwards and backwards through a table. If this option is omitted, the cursorcan only move forward.
About the DECLARE CURSOR Command
In the SELECT clause, specify the columns that contain the values you want to use from the row.Specifying the columns makes the column values accessible to the FETCH and SET VARIABLE commands.Once a cursor is declared, use the OPEN command to initialize the cursor and position it before the firstrow specified by DECLARE CURSOR.
Use DECLARE CURSOR to define a path through a table or view. You can move through the defined rowsusing the FETCH command by using either multiple FETCH commands or embedded FETCH commandswithin a WHILE loop. You only need to point to specific columns with DECLARE CURSOR, then FETCH canretrieve those columns by placing their values into variables. You can define a scrollable cursor, which isa cursor that moves backwards and forwards through a table.
DECLARE CURSOR defines a temporary view in memory; R:BASE does not store the view definition inthe sys_views table. The SELECT clause defines columns, tables, rows, sort order, and potential groupingfor the rows. When DECLARE CURSOR executes, it validates the syntax and names of columns andtables. The OPEN command can evaluate variables, create a copy of the cursor based on those values,then position the cursor before the first row.
Listing Cursors
Use LIST CURSOR to list all currently defined cursors and their status, open or closed.
Using Cursor Names in Commands
You can use the cursor name instead of a table name in commands. The following table providesexamples of using the cursor name instead of a table name in commands.
To do this... Use the cursor name like this...
Set a variable to a column value FETCH cursorname INTO varlist SET VARIABLE varname = colname WHERE CURRENT OFcursorname
Change a column value to a constant UPDATE tblname SET colname + = value WHERECURRENT OF cursorname
Change a column value to a variable value UPDATE tblname SET colname + = .varname WHERECURRENT OF cursorname
Change a column value to an expression UPDATE tblname SET colname + = (expression) WHERECURRENT OF cursorname
Delete the pointed-to row DELETE FROM tblname + WHERE CURRENT OF cursorname
Modifying Data Using a Cursor
If you use a cursor in commands that modify data (the UPDATE and DELETE commands), only thecurrent row is modified. To modify all referenced rows, include FETCH in a WHILE loop to move thecursor through the rows.
Checking for End-of-Data Conditions
End-of-data conditions determine whether you have reached the end of the data declared with theDECLARE CURSOR command. The three ways to check for end-of-data conditions are:
· Use an error variable defined with the SET ERROR VARIABLE command· Use the sqlcode variable· Include a WHENEVER NOT FOUND command
Closing Cursors
The following commands close cursors.

Programming In R:BASE56
Copyright © 1982-2022 R:BASE Technologies, Inc.
Command Name Description
CLOSE Closes the open cursor but does not remove the cursor definition. Howeverusing CLOSE frees most of the memory used when a cursor is opened. CLOSEalso frees any file handles used by DECLARE CURSOR.
COMMIT Closes any open cursors
CONNECT Removes any cursor definitions from memory
DISCONNECT Removes any cursor definitions from memory
DROP CURSOR Entirely removes the cursor definition. Dropping a cursor definition frees allmemory used by the definition.
ROLLBACK Closes any open cursors
Examples
The following example uses the SCROLL option with DECLARE CURSOR.
DECLARE c1 SCROLL CURSOR FOR SELECT empid, transid, transdate, custid, netamount FROMtransmaster
Checking End-of-Data Conditions Using sqlcode
The following example uses sqlcode to check end-of-data conditions, which is the recommended programstructure for DECLARE CURSOR. The sqlcode system variable holds values only for specific types ofstatus.
Type of Error SQLCODE
Data found 0
Data not found 100
In the following example, the WHILE statement checks the value of sqlcode.
1) DECLARE cursor1 CURSOR FOR SELECT custid, netamount + FROM transmaster ORDER BY netamount2) OPEN cursor13) FETCH cursor1 INTO vcustid INDICATOR vi1, vnetamt + INDICATOR vi24) WHILE sqlcode <>100 THEN SHOW VARIABLE vcustid SHOW VARIABLE vnetamt5) FETCH cursor1 INTO vcustid INDICATOR vi1, vnetamt + INDICATOR vi2 ENDWHILE6) DROP CURSOR cursor1
1. DECLARE CURSOR defines the cursor path.2. OPEN opens the cursor, evaluates variables, and positions the cursor before the first row.3. The first FETCH command retrieves the first set of values. The indicator variables vi1 and vi2
capture the status values, -1 for null and 0 for a value. If you omit indicator variables in FETCHcommands, R:BASE displays a message if it encounters a null value, but continues processing rows.
4. The WHILE loop processes the rows until there are no more rows. At that point, sqlcode is set to100, and the WHILE loop ends. Control passes to the command after ENDWHILE. If the first FETCHretrieved no data, the WHILE loop is not entered.
5. FETCH retrieves all succeeding rows and sets sqlcodeeach time. When it does not find any moredata, sqlcode is set to 100 and the WHILE loop ends.
6. DROP CURSOR removes the cursor definition from memory.
Using the WHENEVER Command with DECLARE CURSOR
The following example shows the use of the WHENEVER command, which checks the value of sqlcode. Asingle WHENEVER command can start a status-checking cycle that remains in operation until a commandor procedure file finishes running. As in the first two examples, an indicator variable is included with each

Accessing Rows in a Table 57
Copyright © 1982-2022 R:BASE Technologies, Inc.
variable in FETCH. Without the indicator variables, R:BASE displays a message if it encounters a nullvalue, but continues processing rows.
1) WHENEVER NOT FOUND GOTO skiploop2) DECLARE cursor1 CURSOR FOR SELECT custid, netamount + FROM transmaster ORDER BY netamount3) OPEN cursor14) FETCH cursor1 INTO vcustid INDICATOR vi1, vnetamt + INDICATOR vi25) WHILE #DATE IS NOT NULL THEN SHOW VARIABLE vcustid SHOW VARIABLE vnetamt FETCH cursor1 INTO vcustid INDICATOR vi1, vnetamt + INDICATOR vi2 ENDWHILE6) LABEL skiploop7) DROP CURSOR cursor1
1. WHENEVER NOT FOUND tells R:BASE to execute GOTO if a command that searches for data, such asFETCH, cannot find more rows. If the first FETCH command does not find any rows, control passes tothe command following LABEL skiploop. WHENEVER automatically checks any command thatsearches for data. If a data-not-found condition occurs, control passes to the command following thespecified label.
2. DECLARE CURSOR defines the cursor path.3. OPEN opens the cursor, evaluates the variables, and positions the cursor before the first row.4. The first FETCH command retrieves the first set of values. If no rows match, control passes to LABEL
skiploop. Indicator variables vi1 and vi2 capture the status values (-1 for null and 0 for a value). Ifyou omit indicator variables in FETCH commands, R:BASE displays a message if it encounters a nullvalue, but continues processing rows. (WHENEVER instructs R:BASE to exit the WHILE loop onlywhen sqlcode is 100.)
5. The WHILE loop processes rows until WHENEVER stops execution.6. This label defines where to pass control if a data-not-found condition occurs before the WHILE loop
begins executing. WHENEVER includes this label name.7. DROP CURSOR removes the cursor definition from memory.
Visit the From The Edge Web site to download the "R:BASE Cursors Explained" technical document.
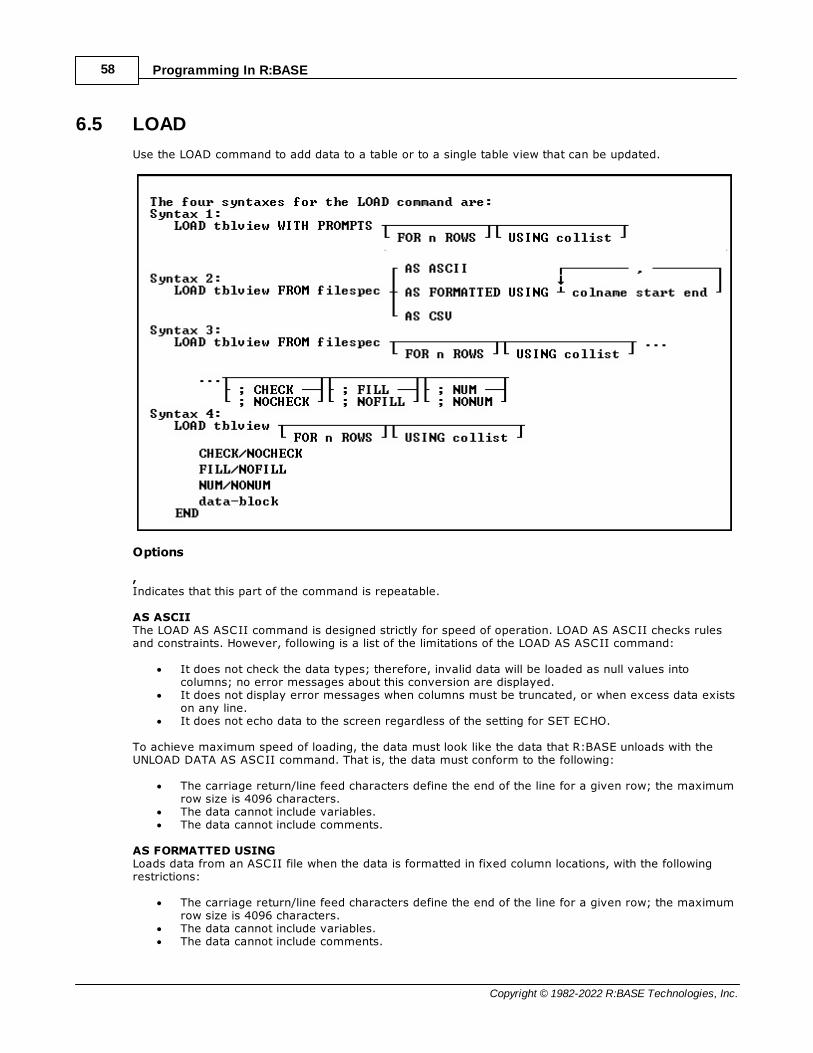
Programming In R:BASE58
Copyright © 1982-2022 R:BASE Technologies, Inc.
6.5 LOAD
Use the LOAD command to add data to a table or to a single table view that can be updated.
Options
, Indicates that this part of the command is repeatable.
AS ASCII The LOAD AS ASCII command is designed strictly for speed of operation. LOAD AS ASCII checks rulesand constraints. However, following is a list of the limitations of the LOAD AS ASCII command:
· It does not check the data types; therefore, invalid data will be loaded as null values intocolumns; no error messages about this conversion are displayed.
· It does not display error messages when columns must be truncated, or when excess data existson any line.
· It does not echo data to the screen regardless of the setting for SET ECHO.
To achieve maximum speed of loading, the data must look like the data that R:BASE unloads with theUNLOAD DATA AS ASCII command. That is, the data must conform to the following:
· The carriage return/line feed characters define the end of the line for a given row; the maximumrow size is 4096 characters.
· The data cannot include variables.· The data cannot include comments.
AS FORMATTED USING Loads data from an ASCII file when the data is formatted in fixed column locations, with the followingrestrictions:
· The carriage return/line feed characters define the end of the line for a given row; the maximumrow size is 4096 characters.
· The data cannot include variables.· The data cannot include comments.

Accessing Rows in a Table 59
Copyright © 1982-2022 R:BASE Technologies, Inc.
· You must specify the name of each column of the table to be loaded, and the starting and endingposition of its data in the line, which is specified in the USING clause of this command.
CHECK NOCHECK CHECK turns on rule checking. When rule checking is on, R:BASE checks input against data validationrules. NOCHECK turns off rule checking. CHECK and NOCHECK override the current setting of the SETRULES command. The default is CHECK.
colname start end Specifies the name of a column in the table and the starting and ending position of its data in the line;this option is used with the AS FORMATTED option.
data-block Includes lines of data to be loaded, as well as the LOAD subcommands.
For these data types... Use this format for data-block
All data types except BIT, BITNOTE,LONG VARBIT, and VARBIT
'string' or value
BIT, BITNOTE, LONG VARBIT, LONGVARCHAR, VARBIT, and VARCHAR
['filename.ext'] or ['filename.ext', filetype, offset, length]Note: When you use VARCHAR, the filetype is alwaysTXT. When you use VARBIT, BIT, and BITNOTE, filetyperefers to the standard graphical file types.
FILL NOFILL FILL makes null any columns that have not been assigned values. All of the missing values must be atthe end of the row. If a rule specifies that a column requires an entry other than null, do not use FILL.NOFILL turns off FILL and requires a value for each column. The default is NOFILL.
FOR n ROWS Directs R:BASE to stop processing after loading n rows, where n is a positive whole number. In the fourthsyntax diagram, END is not used if FOR n ROWS is included.
FROM filespec Loads data into the specified table with data from an external ASCII delimited file.
NUM NONUM NUM specifies that autonumbering columns will be numbered as they are loaded. NONUM turns offautonumbering while loading, thereby allowing loading of a specific value for autonumber columns. Thedefault is NUM.
tblview Specifies a table or view name to load.
USING collist Specifies the column(s) to use with the command.
WITH PROMPTS Loads data into the specified table from keyboard entries. R:BASE asks for the values of each column bydisplaying the column name and its data type. To end the loading session, press [Esc].
About the LOAD Command
You cannot load data into a multi-table view.
Instead of using LOAD, you can also use INSERT, the Data Editor, or a form to add data to a table.
You can use the LOAD command to load data into R:BASE from a file that was not created by R:BASE.The file must be an ASCII file, either delimited or fixed.
The LOAD command will differentiate between END and 'END'; FILL and 'FILL'; NOFILL and 'NOFILL';CHECK and 'CHECK'; NOCHECK and 'NOCHECK'; NUM and 'NUM'; NONUM and 'NONUM'. So, make sureto use the proper syntax when creating LOAD statements.
Programming In R:BASE60
Copyright © 1982-2022 R:BASE Technologies, Inc.
To ensure that data is placed in the intended column, use the following guidelines:
· Do not embed commas within entries for CURRENCY, DATE, DATETIME, DOUBLE, INTEGER,NUMERIC, or REAL data types. R:BASE automatically inserts commas and the current currencysymbol.
· When values for CURRENCY, DOUBLE, NUMERIC, or REAL or data types are decimal fractions,you must enter the decimal point. When values are whole numbers, R:BASE adds a decimalpoint for you at the end of the number. R:BASE adds zeros for subunits in whole currencyvalues. For example, using the default currency format, R:BASE loads an entry of 1000 as$1,000.00.
· When values for NOTE or TEXT data types contain commas, you can either enclose the entrieswithin quotes, or use SET DELIMIT to change the default delimiter (comma) to another character.
· When values for NOTE or TEXT data types contain single quotes ('), and you are using thedefault QUOTES character ('), use two single quotes ('') in the text string. For example, 'WalterFinnegan''s order.'
· When a value you specify for a column is not the same data type as the column's data type,R:BASE displays an error message and you need to re-enter the entire row.
· When values for NOTE or TEXT data types exceed the maximum length of a column, R:BASEtruncates the value and adds it to the table. A message is displayed that tells you which row hasbeen truncated.
Loading with a USING ClauseA USING clause is helpful when you do not have all the information that is to be added to a table. Thefollowing example lets you enter some information for a product but does not require that all columns beentered. The model and listprice columns are the first and last columns in the product table. Theprodname and proddesc columns are not included in the command and are loaded with null values. Youcan later edit the product table to enter data into the columns that have null values.
LOAD product USING model listprice
Loading with the CHECK OptionThe SET RULES command does not have any effect on the CHECK option because CHECK hasprecedence over a RULES setting. When RULES is set off, the CHECK option still verifies data entryagainst existing rules.
When a user identifier has been assigned to the database owner, you must enter the owner's useridentifier with the CONNECT or SET USER command before you use the CHECK or NOCHECK option.R:BASE does not accept the CHECK or NOCHECK option unless the owner's user identifier has beenentered.
Loading Computed ColumnsYou cannot load data directly into a computed column. After you load the column values that are used tocalculate the computed column, R:BASE fills the computed column with the computed value.
The setting of the SET ZERO command affects the calculation of numeric computed columns. To have nullvalues treated as zeros in expressions, set ZERO on. When ZERO is set off, if the value of a column usedin a expression is null, the computed value will be null.
Loading Negative CURRENCY valuesWhen loading negative CURRENCY values into a table, the format must include the hyphen, i.e -$500.00.Negative CURRENCY values encased in parenthesis are not recognized, e.g. ($500.00).
Loading with PromptsWhen you run the LOAD command using prompts, you load one row of data at a time into the table youspecified. (See Syntax 1). For each new row you add, R:BASE displays the name and data type of therow's column as prompts. At each prompt, you enter the value that you want the column to contain. Youare prompted for each column in the row beginning with the first column, unless you used a USING collistclause to limit the number of the columns to load, or to change the order in which the columns areloaded. Any columns not listed in the collist are given null values when the rows are entered.
When you load data with prompts, the default length for a text entry is 80 characters. To enter columnswith a NOTE or TEXT data types that contain more than 80 characters, load the data without prompts,make a custom data-entry form, or set the WIDTH so you can enter more characters.
Accessing Rows in a Table 61
Copyright © 1982-2022 R:BASE Technologies, Inc.
R:BASE does not prompt you for computed or autonumbered column values.
Loading without PromptsLoading without prompts (See Syntax 4) is faster but requires that you remember the order of thecolumns in the table. When you load without using prompts and not from an ASCII file, the LOADcommand provides its own distinctive prompt, which is L>. The following options can be entered at thisprompt: CHECK, NOCHECK, FILL, NOFILL, NUM, and NONUM.
Loading from an ASCII FileUse the LOAD command from the R> Prompt or a command file to load data into an existing table fromboth delimited and fixed field ASCII files. (See Syntax 2 and 3 diagrams.) Each record in the ASCII filecorresponds to one row of data in a table, and each item of data in a record corresponds to one columnvalue in a row. Therefore, organize data in the file in the same order as the columns in the table to beloaded.
Items of data in a line of the ASCII file must be delimited to be properly placed within the columns of arow. The delimiter character must be the same as the current delimiter character specified with the SETDELIMIT command. (The default delimiter is a comma.) R:BASE also accepts a blank space as adelimiter, regardless of the setting of the SET DELIMIT command.
Data can be loaded in a fixed-field formatted ASCII file with the AS FORMATTED option. The columnname and the start and end positions within the file must be specified for each value in the row of datathat is to be loaded. When the start and end positions are specified, the delimiter character does nothave any effect because the start and end positions for each column identify the data.
When loading from a file, be sure that the current null symbol is not a blank. If the first four characters ofa field in a file are blank, R:BASE adds the column as a null column and does not read any additionalcharacters that make up the field value.
When loading data from an ASCII file, make sure the file meets the following requirements listed in thetable below.
Elements in an ASCII File Requirement
INTEGER data types Items of data to be loaded into columns with INTEGER data typescannot contain internal commas unless the item is enclosed in quotes.The default QUOTES character in R:BASE is a single quote ('); if yourASCII file uses double quotes ("), change the QUOTES setting beforeyou load the file. If the file does not have quotes around the integervalues containing commas, you must edit the ASCII file to remove anycommas from the integer values, or enclose each integer value inquotes.
Embedded punctuation Items of data containing ampersands, commas, embedded blanks, plussigns, equal signs, or semicolons must be enclosed in quotes if they areto be loaded into columns with a TEXT or NOTE data type. The defaultQUOTES character in R:BASE is a single quote ('); if your ASCII fileuses double quotes ("), change the QUOTES setting before you load thefile.
Embedded quotes Items of data requiring quotes can also contain embedded quotes. Forexample, the item 'Basic' Keyboard contains both a blank space andembedded quotes. Using single quotes ('), which is the default QUOTESsetting, to add enclosing quotes, the item would looks like this: '''Basic''Keyboard'
Currency R:BASE automatically adds a currency symbol, commas, and zeros forcurrency units. For example, using the default currency format, R:BASEloads an entry of 1000 as $1,000.00.
Dates The SET DATE sequence command sets the sequence for the date-datesin the file are loaded if the dates match the current date sequenceestablished with the SET DATE command.
Computed columns If the table being loaded has computed columns and the file containsvalues for the computed columns, R:BASE tries to load the computedcolumn's value from the file into the column following the computedcolumn. This results in an error because the data type of the nextcolumn might not be the correct data type, or the file will have too

Programming In R:BASE62
Copyright © 1982-2022 R:BASE Technologies, Inc.
many values for the table because R:BASE does not load the computedcolumn's value from the file.
Rules processing Unless you run the SET RULES OFF command before loading the file,rules processing is in effect. When an incoming data item violates arule, R:BASE does not load the row. Instead, R:BASE displays themessage for the rule that has been violated. To see the data thatcauses a rule violation, set ECHO on when loading a table and use the[Pause] key to stop the screen from scrolling when the rule violationoccurs.
Loading a Data BlockThe data block shown in the Syntax 4 diagram can include lines of data and any of the options availablewith LOAD-CHECK/NOCHECK, FILL/NOFILL, and NUM/NONUM. You can intersperse the options with datalines, and you can enter more than one option on a line if you separate the options with semicolons.However, you cannot combine data and options on the same line.
R:BASE displays the L> prompt to accept data-block entry. LOAD adds data to a table, row by row,without using a data-entry form and without prompting for each data item.
You can enter the options for the LOAD command at the L> prompt at any time during data loading. Oryou can include them on the command line, separated from the command by semicolons, as shown inthe example below. (Do not use this format in command or procedure files. All options must follow theLOAD command on separate lines in command or procedure files.)
LOAD transdetail ; CHECK ; NUM
You can use global or system variables instead of constant values in the data block.
To enter values properly, use the following guidelines.
· Enter column values in the order that columns are defined in the table, and separate the valueswith a delimiter character. The default delimiter character is the comma.
· You can enter up to 75 characters on a single line. If a row is longer than 75 characters, continueon to the next line by typing past the end of the current line or by entering a plus (+) sign at anypoint on the current line. The plus sign must be the last entry on the line. The new line will beginwith a +> prompt to indicate the continuation of the current line. If you are using this form of theLOAD command in a command file, you must use a + to continue on the next line; the lines willnot automatically wrap.
· For other requirements on loading data, see "Loading from an ASCII File" earlier in this entry.
Examples
The following command lines allow you to load rows containing new customer information to thecustomer table. R:BASE asks with prompts for each column by column name and data type. Two columnsin the table, custid and custphone, are omitted from the list. R:BASE automatically supplies a number forthe custid column because it is an autonumbered column. R:BASE leaves the custphone column empty(null) when data is loaded, and does not prompt for either column.
LOAD customer WITH PROMPTS USING company, +custaddress, custcity, custstate, custzip
After the above command is run, the WITH PROMPTS option displays the message below. If you press[Esc] before you have finished entering data in a row, the row is not added to the table. When you areprompted to exit, press [Esc].
Press Esc to end, Enter to continuecompany (TEXT):
The following command loads five rows of data into the customer table from CUST.DAT, a delimitedASCII file. The data in the ASCII file must be in the same order as the columns in the customer table.Only the first five lines from the file will be loaded:
LOAD customer FROM cust.dat FOR 5 ROWS

Accessing Rows in a Table 63
Copyright © 1982-2022 R:BASE Technologies, Inc.
In the following example, the first command line starts the loading process. When loading begins, an L>prompt is displayed for each new line. The second command line, which contains the FILL option, tellsR:BASE to give any additional columns at the end of the row null values. The third command line loadsthe values from three global variables into a new row. The values fill the first three columns of the newrow, while the remaining columns (if any) are given null values. The last command line tells R:BASE toend the loading session:
R>LOAD bonusrate L>FILLL>.v1, .v2, .v3L>END
In the following example, the first command line tells R:BASE to start loading data for the customertable. The second command line tells R:BASE to number any defined autonumbered columns in the table.A value for the autonumbered column is not designated because the row might not be loaded if a value isincluded.
R>LOAD customerL>NUM
After the command line in the following example is run, R:BASE expects the next five lines entered at theL> prompt to contain data to be loaded into the customer table. After the fifth line of data is entered, theR> Prompt returns and loading ends. To end loading before five rows of data are entered, enter END.
R>LOAD customer FOR 5 ROWS
The following command lines show you how to load data into the company, custaddress, custcity,custstate, and custzip columns of the customer table. The custid and custphone columns in the customertable will not have data loaded and will be given null values.
LOAD customer FROM customer.fix AS FORMATTED +
USING company 11 50, custaddress 51 80, +
custcity 81 100, custstate 101 102, custzip 103 112
When you use the LOAD command, you must omit values for computed or autonumbered columns.Instead, enter the value for the next column in the data list. In the following example, to add a row to thetransdetail table, which has a computed column, you would only enter data for the first five columns; thesixth column is a computed column based on the fourth and fifth columns. The columns entered aretransid, detailnum, model, units, and price. The computed column is extprice and has the expression(units * price).
R>LOAD transdetail
L>6000,1,'CX3000',100,$1900
L>END

Programming In R:BASE64
Copyright © 1982-2022 R:BASE Technologies, Inc.
6.6 SET VARIABLE
Use the SET VARIABLE command to define or redefine a variable value and/or data type.
Options
, Indicates that this part of the command is repeatable.
colname Specifies a column name. In R:BASE X.5, the column name is limited to 18 characters. In R:BASE X.5Enterprise, the column name is limited to 128 characters. In a command, you can enter #c, where #c isthe column number shown when the columns are listed with the LIST TABLES command. In an SQLcommand, a column name can be preceded by a table or correlation name and a period(tblname.colname).
datatype Specifies an R:BASE data type for the variable.
(expression) Determines a value using a text or arithmetic formula. The expression can include other columns fromthe table, constant values, functions, or system variables such as #date, #time, and #pi.
IN tblview Specifies a table or view.
NULL Sets the variable equal to NULL.
value Sets the variable equal to a specified value. A value is a constant amount, text string, date, or time, orthe value assigned to varname.
varname Specifies a 1 to 18 character variable name.
&varname Sets the first variable equal to the exact contents of a second variable; the ampersand tells R:BASE toevaluate the contents of the variable first.
For example, if varname is the text string (2+3), then &varname is the value 5.
.varname Sets the first variable equal to the exact contents of a second variable.
For example, if varname is the text string (2+3), then .varname is (2+3).
Accessing Rows in a Table 65
Copyright © 1982-2022 R:BASE Technologies, Inc.
WHERE clause Limits rows of data. For more information, see the "WHERE" entry.
About the SET VARIABLE Command
Variables identify a changeable value. R:BASE provides three kinds of variables: global, error, andsystem. The SET VARIABLE command defines global variables, which are temporary variables that existwithin R:BASE, but are not part of any database. Global variables remain in memory until you clear themor exit from R:BASE. R:BASE sets error and system variables internally.
Global variables have several uses: they can provide a temporary value in a command, hold the result ofa calculation, act as a counter, or capture keyboard entries for use with menus or screens. The mostcommon method of defining variables is to assign the variable value with the SET VARIABLE command.For information about defining global variables, see the "Variables" entry.
Variable names have the following restrictions:
· The variable name is limited to 18 characters in R:BASE X.5 and 128 characters in X.5 Enterprise. · The variable name is not an R:BASE reserved word. · The variable name begins with a letter, contains only letters, numbers, and the following special
characters: #, $, _ , and %.
It is good programming practice to always define the data type for the variable before assigning it avalue, unless you are setting a variable to a column value or using the variable in the CHOOSEcommand.
When defining an variable as a text string, enclose the text string in single quote marks (or the currentQUOTES character); otherwise, it might be interpreted as an arithmetic expression.
Assigning a Data Type to a Variable
The datatype option refers to one of the valid R:BASE data types: BIT, BITNOTE, CURRENCY, DATE,DATETIME, DOUBLE, INTEGER, LONG VARBIT, LONG VARCHAR, NOTE, NUMERIC, REAL, TIME, VARBIT,OR VARCHAR. You can define a variable to have a NOTE data type, but R:BASE treats it as TEXT formost uses. You can also specify the precision and scale for NUMERIC data types.
The datatype option creates a variable, determines its data type, and sets its value to null. Use thisoption to define a variable's data type before assigning a value to the variable. To set multiple variablesin the same command, separate the variables by a comma or the current delimiter.
For an existing variable, you can use the datatype option to change the data type, but it is recommendedto use one of the conversion functions. If you change the data type, the new data type must becompatible with the current variable value; if the variable is not compatible, R:BASE displays an errormessage and leaves the value and data type unchanged. If you change a variable with a TEXT data typeto a non-compatible data type, R:BASE changes the value to null.
Assigning a Value to a Variable
The value option is a data value or constant, such as 10, TOM, 3.1416, or $17.23. If the variable alreadyexists, any new value must have a data type that is compatible with that variable. If the variable doesnot exist, R:BASE defines the variable's data type.
You can also define the variable's data type in this command before assigning it a value.
Setting the Value of a Variable to Another Variable
When you set the variable to the value of another variable, the second variable must be a dot variable(.) or an ampersand (&) variable.
When you precede a variable with a dot (.), R:BASE uses the value stored in the variable as if it were aconstant.
When you precede a variable with an ampersand (&), R:BASE first evaluates the value contained in theampersand variable. For example, consider the following uses of the command:

Programming In R:BASE66
Copyright © 1982-2022 R:BASE Technologies, Inc.
SET VARIABLE v1 TEXT = '(A + B)'SET VARIABLE v2 = .v1SET VARIABLE v3 = &v1
When the first command line runs, variable v1 will contain (A + B). When the second command line runs,variable v2 will also contain (A + B) because the dot tells R:BASE to set the value as an exact match tothe contents of variable v1. When the third command line runs, variable v3 will contain AB (theconcatenation of A and B) because the ampersand tells R:BASE to compute the contents of variable v1.
As shown in the example above, an ampersand variable can contain one command or part of onecommand, such as an expression. The first variable is set to the computed value of the ampersandvariable. Below is an example:
1. SET VARIABLE v1 TEXT2. SET VARIABLE v2 INTEGER3. SET VARIABLE v1 = '((50 + 100) / 2)'4. SET VARIABLE v2 = &v15. SHOW VARIABLE
· Sets the data types for variables v1 and v2 to TEXT and INTEGER, respectively. · Sets variable v1 to a text value that is a valid arithmetic expression. · Sets variable v2 to &v1. · Displays the value of all variables, including the system variables.
R:BASE computes the expression contained in v1 and assigns the calculated value to v2. When R:BASEsees a variable name preceded by ampersand, it treats the contents of the variable as if it was enteredfrom the keyboard. The SHOW VARIABLE display would like the following:
Variable = Value Type
#date = 04/12/94 DATE
#time = 22:52:52 TIME
#pi = 3.14159265358979 DOUBLE
sqlcode = 0 INTEGER
v1 = ((50 + 100) / 2) TEXT
v2 = 75 INTEGER
Setting a Variable to an Expression
An (expression) can be either an arithmetic operation that combines two or more items in an arithmeticcomputation, or a string expression that concatenates two or more text items, or uses a TEXT function.The items can be values or the values contained in variables.
If you do not predefine the data type of a variable, the original data type of each item determines thedata type of the result. For example, if you add a variable that has an INTEGER data type to a variablethat has a REAL data type, the resulting variable has a REAL data type unless you define the result to bean INTEGER data type.
If any item in an arithmetic expression is null, the result will be null unless you specify SET ZERO ON.
Assigning Column Values in a Table or View
If you specify a table or view in a SET VARIABLE command, you can include an optional WHERE clause toindicate which row to use. If you do not include the WHERE clause, R:BASE uses the value for the columnin the first row.
You must have SELECT privileges on the table to use this form of SET VARIABLE.
You must use an ampersand variable in place of a column or table name, for example:
CHOOSE vtab FROM #TABLES

Accessing Rows in a Table 67
Copyright © 1982-2022 R:BASE Technologies, Inc.
CHOOSE vcol FROM #COLUMNS IN &vtabSET VARIABLE vnewpr = &vcol IN &vtab
Enter the table and column names into the vtab and vcol variables first. You can do this by using theCHOOSE #TABLES and CHOOSE #COLUMNS commands, as shown in the above example. The CHOOSEcommand displays a menu of tables or columns from which to choose. By using ampersand variables tohold the table and column names, you can use the same SET VARIABLE command to get values fromdifferent columns in a table or from different tables. Each time SET VARIABLE requests a column, itretrieves information from the first row in the table stored in &vtab.
You can define multiple variables with a single SET VARIABLE command when you set the value of thevariables to the value of columns in a table. However, when capturing column data into variables, it isbetter to use the SELECT command; specifically, SELECT INTO. SELECT INTO is the SQL compliantcommand when capturing table data into variables.
Examples
The following table provides examples of the SET VARIABLE command.
SET VARIABLE Examples
Examples Description
SET VARIABLE vtext TEXT Defines the vtext variable to have a TEXT data type.
SET VARIABLE vreal REAL = 100.9 Defines vreal variable to have a REAL data type, andassigns it the value 100.9.
SET VARIABLE vnumer NUMERIC (9,3) Defines the vnumer variable to have a NUMERIC datatype having a precision of 9 and scale of 3.
SET VARIABLE vnum = 14322 Assigns the integer value 14322 to the vnum variable.
SET VARIABLE VTWO =.VNUM Assigns the value of the vnum variable to the vtwovariable.
SET VARIABLE V3 = &V4 Assigns the computed value of v4 to the v3 variable.
SET VARIABLE vltdate = ('12/25/93' + 90) Assigns the value 03/25/94 to the vltdate variable.
SET VARIABLE vfulln = + (.VFIRSTN &.VLASTN)
Assigns to the vfulln variable the value of the full nameformed by concatenating the values in the vfirstn andvlastn variables The ampersand inserts a space betweenthe two values.
SET VARIABLE v1 = col1, v2 = col2, v3= col3IN tbl1 WHERE col1 = 'Smith' OR SQL compliant variation:SELECT col1, col2, col3 INTO v1 INDI iv1, v2INDI iv2, v3 INDI iv3 FROM tbl1 WHERE col1 ='Smith'
Assigns Smith to the variable v1; the value of columncol2 to v2; and the value of column col3 in tbl1, from therow where col1 contains Smith, to variable v3.

Part
VII

Executing External Programs 69
Copyright © 1982-2022 R:BASE Technologies, Inc.
7 Executing External Programs
The LAUNCH command allows you to execute (or LAUNCH), from within R:BASE or an R:BASE program,any associated files along with required programs.
LAUNCH allows you to add the features of just about any other program to R:BASE. For example, youcan access a word processor without exiting from R:BASE. This is the syntax for the LAUNCH command:
The LAUNCH command follows the corresponding file association registered within the Windows operatingsystem. This means that the file name specified can be set to "any" file that has a correspondingassociation. For example, launching the file MyText.TXT will display the contents of the file with WindowsNotePad, Wordpad, or some other text editor, based upon the file associated with the .TXT file extension.If a full path is not specified, the current search path is used. The LAUNCHed application will start in thesame directory as the executable file or in the directory referenced, if specified.
The LAUNCH command also allows you to specify additional "parameters" based upon the file you arelaunching. When listing program parameters, the selected program will start when the LAUNCH commandis used.
A "Wait" parameter |W is also availble within the LAUNCH commnad, which allows you to specifywhether or not you want R:BASE to sleep while the launched program executes. This basically, tellsR:BASE to "wait until finished". If the Wait parameter is not specified, the launched process is executed inits own thread, and the R:BASE will continue to execute.
Examples
Example 01: (LAUNCH command with Parameters and Wait option)
LAUNCH C:\WordDocuments\TestFile.DOC|/MacroName|W
This will invoke the MS Word with the TestFile.DOC file using the MacroName as a main window whileR:BASE sleeps in the background. You will have to Exit MS Word in order to give control back toR:BASE.
Example 02: (To automate emails via R:BASE)
If you know the email tags of your default email program, use the LAUNCH command to easilyachieve email automation.
SET VAR vMailTo TEXT = NULL
SET VAR vCustID INTEGER = 2001
SELECT ('mailto:'+EMailAddress) INTO vMailTo INDIC IvMailTo +
FROM Contacts WHERE CustId = .vCustID
LAUNCH .vMailTo
This will launch default e-mail programs with filled in To: You could follow the same scenario for other e-mail tags, such as: Subject:Cc:Bcc:Attached:Message:
Example 03: (To automatically print a PDF file using Adobe Reader 7.0)

Programming In R:BASE70
Copyright © 1982-2022 R:BASE Technologies, Inc.
SET VAR vPDFFilename TEXT = '800023.pdf'
SET VAR vQuotes TEXT = (CVAL('QUOTES'))
SET VAR vPrintString = +
(.vQuotes+'C:\Program Files\Adobe\Acrobat 7.0\Reader\AcroRd32.exe|/p /h'
&.vPDFFilename+.vQuotes)
LAUNCH &vPrintString
RETURN

Part
VIII
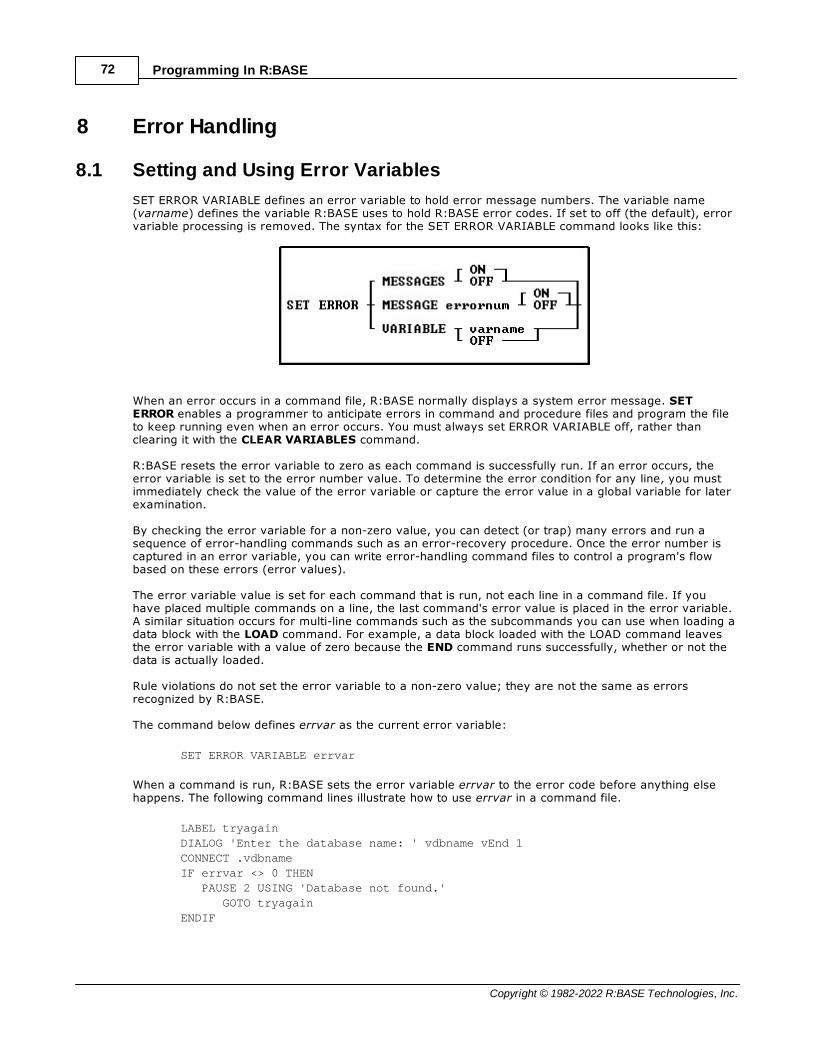
Programming In R:BASE72
Copyright © 1982-2022 R:BASE Technologies, Inc.
8 Error Handling
8.1 Setting and Using Error Variables
SET ERROR VARIABLE defines an error variable to hold error message numbers. The variable name(varname) defines the variable R:BASE uses to hold R:BASE error codes. If set to off (the default), errorvariable processing is removed. The syntax for the SET ERROR VARIABLE command looks like this:
When an error occurs in a command file, R:BASE normally displays a system error message. SETERROR enables a programmer to anticipate errors in command and procedure files and program the fileto keep running even when an error occurs. You must always set ERROR VARIABLE off, rather thanclearing it with the CLEAR VARIABLES command.
R:BASE resets the error variable to zero as each command is successfully run. If an error occurs, theerror variable is set to the error number value. To determine the error condition for any line, you mustimmediately check the value of the error variable or capture the error value in a global variable for laterexamination.
By checking the error variable for a non-zero value, you can detect (or trap) many errors and run asequence of error-handling commands such as an error-recovery procedure. Once the error number iscaptured in an error variable, you can write error-handling command files to control a program's flowbased on these errors (error values).
The error variable value is set for each command that is run, not each line in a command file. If youhave placed multiple commands on a line, the last command's error value is placed in the error variable.A similar situation occurs for multi-line commands such as the subcommands you can use when loading adata block with the LOAD command. For example, a data block loaded with the LOAD command leavesthe error variable with a value of zero because the END command runs successfully, whether or not thedata is actually loaded.
Rule violations do not set the error variable to a non-zero value; they are not the same as errorsrecognized by R:BASE.
The command below defines errvar as the current error variable:
SET ERROR VARIABLE errvar
When a command is run, R:BASE sets the error variable errvar to the error code before anything elsehappens. The following command lines illustrate how to use errvar in a command file.
LABEL tryagainDIALOG 'Enter the database name: ' vdbname vEnd 1 CONNECT .vdbnameIF errvar <> 0 THEN PAUSE 2 USING 'Database not found.' GOTO tryagainENDIF

Error Handling 73
Copyright © 1982-2022 R:BASE Technologies, Inc.
The first command establishes a label to return to, the second requests that the user enter the name of adatabase, and the third opens the specified database using the global variable defined by the DIALOGcommand.
The IF...ENDIF structure checks the error variable value. If the value is not zero (that is, if the databasewas not opened successfully), then it sends a message to the screen and passes control to the labeltryagain so that the user is asked to enter the database name again.
You can also write a separate command file specifically designed to handle a variety of errors. In thiscase, the above code might look like this:
DIALOG 'Enter the database name: ' vdbname vEnd 1
CONNECT .vdbname
SET VARIABLE verr1 = .errvar
IF verr1 <> 0 THEN
RUN errhandl.cmd USING .verr1
ENDIF
This series of commands captures the error value in the global variable verr1 so that it can be passedthrough the USING clause of the RUN command to an error-handling routine. The routine itselfdetermines the nature of the error and how to take care of the problem.
You can use the WHENEVER command to run status-checking routines for SQL commands. WHENEVERuses the special R:BASE variable SQLCODE.
8.2 Displaying an Error Message
You can display an error variable's message value by using the PAUSE 2 command. If you want todisplay ErrVar as used in the above program, enter the following command:
PAUSE 2 USING .ErrVar
This command allows you to display the actual error message text rather than writing your own as shownin the earlier program example.
If you have the WINBEEP set ON when executing applications, you may want to use the BEEP commandto sound the bell when you display error messages with SHOW ERROR. To do this, you enter the singleword BEEP on the line before you display the error message.

Part
IX

Creating and Using Menus 75
Copyright © 1982-2022 R:BASE Technologies, Inc.
9 Creating and Using Menus
As described in the introduction page of this document, R:BASE provides many different methods to storeyour series of R:BASE commands, which can be used to create your program. The same applies to howand where you wish to store your application menus.
· Command Files· Application Files· Forms/Variable Forms/External Form Files · All, or some, of the above
Put it Down on Paper
Regardless of the above method(s) that you will use to contain your application, you have likely startedto plan what your application will be based upon and what your requirements consist of. Before creatingany menu system, you should write down a diagram of the menu structure of the application, and itsassociated actions, so that the whole process can be done in a logical manner.
1. Start by identifying the tasks that your application will perform. Consider the tables located withinyour database and include any tasks required to maintain the data within them. Also, include anydata reports or mailing labels you will need to print.
2. Next consider how you can best organize these tasks into menus. You can organize your menus byany one, or a combination, of the ways identified here.
· Do the tasks have to be performed in a certain order? If so, organize them by function.· Are some tasks performed more often than others? If so, organize them by their frequency of
use.· Are the tasks related to the structure of the database? If so, organize them by table.
3. Using the menu titles and the tasks as the options under each menu, turn your list of tasks into amenu tree. A menu tree shows the order and hierarchy of menus in your application.
4. Be sure to add a menu action to exit the application.
Once you are ready to start building your application menus, review the available methods to see whichsuits your application requirements.
9.1 Command Files
Using only the R:BASE command syntax, specifically CHOOSE, an application can be entirely written inone or many RMD, APP, CMD, and/or DAT files. This method would place all of your work into ASCII textfiles, that any other text editor would also be allowed to open. If you anticipate that your application willrequire security measures to prevent users from tampering with your command syntax, then either"Application Files" or "Forms/External Form Files" would be better suited for your needs.
In legacy R:BASE versions, application files also used the CHOOSE command, only selecting from amenuname in a procedure file, which is no longer supported.
You will display your menus using the CHOOSE command. The CHOOSE command displays a formattedmenu and enters the operator's selection into the variable specified in the command. That resultingvariable will allow you to apply the user's selection to a Control Structure where your application canbegin taking different directions.
This is the "complete" available syntax for the CHOOSE command:

Programming In R:BASE76
Copyright © 1982-2022 R:BASE Technologies, Inc.
With the intent of using the CHOOSE command to display your menu option list, you will be specifying the#LIST parameter, and the fewer following options would require your direct attention.
varnameSpecifies the variable name that will hold the selected value from the menu.
#LIST valuelistAllows you to specify a list of values in a comma delimited format. You can also use a variable thatcontains comma delimited values. The group of values MUST be encapsulated in quotes UNLESS avariable is used.
CHKBOXDisplays a check_box menu
CHKSORTDisplays a sort check_box menu
nn is an optional positive integer specifying the maximum number of options on that menu that can bechecked. If n is zero or is greater than the number of menu options, all options can be checked. If n isunspecified, the default value is zero. The maximum value of n is 9999.
TITLE 'title' Displays a title in the window box

Creating and Using Menus 77
Copyright © 1982-2022 R:BASE Technologies, Inc.
CAPTION 'text' Displays text in the window box caption
LINES n Determines the number of lines, n, to display in the listbox. The default is 10. If the number of itemslisted is greater than the values for LINES, a scroll bar will appear.
FORMATTED Displays the CHOOSE box using a monospace font.
OPTION parametersThese parameters can be used to change a "look and feel" of CHOOSE window. All parameters for valuesmust be separated by "|" (pipe) symbol.
Notes:
· CHOOSE will always be displayed at the center of your screen, unless specified using the TOP nnLEFT nn parameters.
· Do not pre-assign the data type for the CHOOSE variable, because the resulting variable willalways be TEXT.
· The resulting variable will be left justified without leading spaces.· If a user selects the "x" button or presses the "[Esc]" key, the CHOOSE variable value will be
[Esc]. Checking the CHOOSE variable value after issuing the CHOOSE command will be useful fordefining exits or help screens in your control structure.
Displaying the CHOOSE
When R:BASE executes a CHOOSE command, it draws the menu on the screen. The following shows anexample of how you might use a menu in a program for the higher positions in your applicationhierarchy.
CHOOSE vPick FROM #LIST +
'Customer Menu,Employee Menu,Orders and Quotes,Maintenance,Exit' +
TITLE 'Make a Selection:' CAPTION 'Main Menu' LINES 5
The window displayed would look like this:
After selecting the first option, the result value of vPick would be "Customer Menu".
A menu like the above will suit the needs of initial testing environment, but be sure to explore all of theadditional OPTION parameters to make more appealing menus. The following CHOOSE command usesseveral OPTION parameters to enhance the menu display:
CHOOSE vPick FROM #LIST +
'Customer Menu,Employee Menu,Orders and Quotes,Maintenance,Exit' +
TITLE 'Make a Selection:' CAPTION 'Main Menu' LINES 5 +
OPTION List_Font_Color NAVY|List_Back_Color WHITE +
|List_Font_Size 12|LIST_BOLD ON +
|Title_Font_Color NAVY |Title_Back_Color LIGHT GRAY +
|Window_Back_Color LIGHT GRAY|Title_Font_Size 12 +
|Title_Font_Name ARIAL

Programming In R:BASE78
Copyright © 1982-2022 R:BASE Technologies, Inc.
The window displayed would look like this:
9.1.1 OPTION parameters
These parameters can be used to change the "look and feel" of a CHOOSE window. In addition to theparameters below, you can also alter the CHOOSE Title, List, and Buttons.
Parameter Value Description
WINDOW_CAPTION OFFSMALL
Customizes the window caption. The OFF valuemakes window caption invisible. The SMALL valuemakes window caption small (tool window).
WINDOW_BACK_COLOR AQUABLACKBLUECREAMDARK GRAYFUCHSIAGRAYGREENLIMELIGHT GRAYMAROONMEDIUM GRAYMINT GREENNAVYOLIVEPURPLEREDSILVERSKY BLUETEALWHITEYELLOW
Changes the color of the window background area.User can specify the integer value or type one ofthe predefined values.
TOP value Moves the CHOOSE box location, in pixels, from thetop of the screen down.
LEFT value Moves the CHOOSE box location, in pixels, from theleft of the screen right.
WHERE_CLAUSE value Allows you to pre-load a WHERE Clause into theWHERE Builder window when using "#WHERE INtblview".
SHOW_ALL_BUTTON ONOFF
Displays a "Select All" button when using theCHKBOX option.
SINGLE_CLICK ONOFF
Limits the user to select a single option from thedisplayed list, and then immediately close. Thisoption works only when user can select single itemfrom a list. For multiple item selection this featurewill be ignored.
THEMENAME value Specifies one of 86 pre-defined Themes, or acustom Theme loaded into R:BASE.

Creating and Using Menus 79
Copyright © 1982-2022 R:BASE Technologies, Inc.
NOTE: All previously defined CHOOSE commandswhich are redefined to use Themes should bethoroughly checked prior to putting into productionas objects and text may look substantially different.
9.1.1.1 Title
These parameters are specific to changing how the CHOOSE "title" is displayed.
Parameter Value Description
TITLE_BACK_COLOR AQUABLACKBLUECREAMDARK GRAYFUCHSIAGRAYGREENLIMELIGHT GRAYMAROONMEDIUM GRAYMINT GREENNAVYOLIVEPURPLEREDSILVERSKY BLUETEALWHITEYELLOW
Changes the background color of the title area. Usercan specify the integer value or use one of thepredefined values.
TITLE_FONT_NAME value Specifies a font name for the title area. Values wouldconsist of the fonts available on the computer.
TITLE_FONT_SIZE value Specifies a font size in title area.
TITLE_FONT_COLOR AQUABLACKBLUECREAMDARK GRAYFUCHSIAGRAYGREENLIMELIGHT GRAYMAROONMEDIUM GRAYMINT GREENNAVYOLIVEPURPLEREDSILVERSKY BLUETEALWHITEYELLOW
Changes the font color of the title area. User canspecify the integer value or type one of the predefinednames.
TITLE_BOLD ONOFF
Makes font in title area bold style.
TITLE_ITALIC ONOFF
Changes the font in title area italic style.
TITLE_UNDERLINE ONOFF
Changes the font in title area underlined.
TITLE_STRIKEOUT ON Makes the font in title area strikeout.

Programming In R:BASE80
Copyright © 1982-2022 R:BASE Technologies, Inc.
OFF
9.1.1.2 List
These parameters are specific to changing how the CHOOSE "list" is displayed.
Parameter Value Description
LIST_BACK_COLOR AQUABLACKBLUECREAMDARK GRAYFUCHSIAGRAYGREENLIMELIGHT GRAYMAROONMEDIUM GRAYMINT GREENNAVYOLIVEPURPLEREDSILVERSKY BLUETEALWHITEYELLOW
Changes the background color of the list area. User canspecify the integer value or type one of the predefinedvalues.
LIST_FONT_NAME value Specifies a font name in the list area. Values wouldconsist of the fonts available on the computer.
LIST_FONT_SIZE value Specifies a font size in the list area.
LIST_FONT_COLOR AQUABLACKBLUECREAMDARK GRAYFUCHSIAGRAYGREENLIMELIGHT GRAYMAROONMEDIUM GRAYMINT GREENNAVYOLIVEPURPLEREDSILVERSKY BLUETEALWHITEYELLOW
Changes font color of the list area. User can specify theinteger value or type one of the predefined values.
LIST_BOLD ONOFF
Makes the font in the list area bold style.
LIST_ITALIC ONOFF
Makes the font in the list area italic style.
LIST_UNDERLINE ONOFF
Makes the font in the list area underlined.
LIST_STRIKEOUT ONOFF
Makes the font in the list area strikeout

Creating and Using Menus 81
Copyright © 1982-2022 R:BASE Technologies, Inc.
9.1.1.3 Buttons
These parameters are specific to changing how the CHOOSE "buttons" is displayed.
Parameter Value Description
BUTTON_OK_CAPTION value Changes the caption for the "OK" button.
BUTTON_CANCEL_CAPTION value Changes the caption for the "Cancel" button.
BUTTONS_SHOW_GLYPH ONOFF
Places images on the OK and Cancel buttons.
BUTTONS_BACK_COLOR AQUABLACKBLUECREAMDARK GRAYFUCHSIAGRAYGREENLIMELIGHT GRAYMAROONMEDIUM GRAYMINT GREENNAVYOLIVEPURPLEREDSILVERSKY BLUETEALWHITEYELLOW
Changes the color of the button area. User canspecify the integer value or type one of thepredefined values.
9.2 Application Files
Using the Application Builder interface, your menus can be stored in an .RBA file, separate from thedatabase files. Within this interface you can store your menu structure and the underlining command filesthat are associated with each menu. Application files can be password protected, which offers additionalsecurity over using command files.
If you have completed the Tutorial, you will recall that you can add an Action to your application andinstruct the Action to run a command file. In the Tutorial, the command file, MyProg.rmd, was added tothe "Calculate Total for Date Range" Action.
In addition to assigning an Action to run an outside command file, you can also store your command filecontents within the Application File itself by using the "Custom Action" option.
For additional information to fully understand setting up an application menu structure in the ApplicationBuilder, refer to Application Help and the Tutorial documentation.
9.3 Forms/Variable Forms/External Form Files
A menu structure can be stored in Forms, Variable Forms, and/or External Form Files. Using the manyvarious controls available in the R:BASE designers, you can create an appealing hierarchy for yourapplication.
Before going into detail regarding the available controls, review the following differences between Forms,Variable Forms, and External Form Files.
Functionality Form Variable Form External Form File
Stored within the database files Yes Yes No
Has a Database Explorer Menu Option Yes Yes (Forms) Yes
Programming In R:BASE82
Copyright © 1982-2022 R:BASE Technologies, Inc.
Has its own designer interface Yes Yes (Form Designer) Yes
Can contain table objects Yes No No
Can contain variable objects Yes Yes No
Can be launched when disconnected from a database
No No Yes
The difference between a Form and Variable Form is that when you create a new Form, you omitspecifying a table name. This automatically creates a Variable Form. When you open the Variable Form inthe Form Designer, the "Database Controls" tool bar that contains table controls will be disabled withother table driven options on the Menu Bar. When you open an External Form File in the External FormDesigner, the "Database Controls" tool bar is also disabled.
The more commonly used objects used for displaying a menu in Forms, Variable Forms, and ExternalForm Files include the following objects:
· Group Bar· Tree View· Buttons· Drop-Down Menu Buttons· Design Menu Bar
Each of these controls allow you to display an object with descriptive text and then place some method ofunderlying command syntax behind it to perform a task when the end users selects it. Like in theApplication Designer, you can run a command file that is stored in the same directory as the database, oryou can store your command syntax in the Form/Externals Form File. The underlying command syntaxwill be referred to as an EEP.
What is an EEP?
The letters E-E-P represent the term Entry and Exit Procedure. An EEP is basically a command file thatcan be run within forms (Forms/Variable Forms/External Form Files). An EEP can represent a commandfile that uses the .EEP file extension, or you can store the command syntax in the form, which is thenreferred to as a "Custom EEP". The only difference between an EEP and a Custom EEP is that the CustomEEP is stored in the form, whereas a regular EEP must be stored in a command file with the .EEP fileextension.
Custom EEPs were introduced in an effort to decrease the amount of command files stored in a databasefolder, and to increase portability of a database application. In fact, if you locate all of your EEPs incustom EEPs, you can limit your database folder to just one command file as the startup file.
If you have taken the time to review the sample applications, which is highly recommended, you willnotice that nearly all of the command syntax is stored in Custom EEPs.
There is no right or wrong way to store your command syntax, but storing your EEPs in the databasedirectory may leave the syntax open to tampering by users. A Custom EEP will hide your code. Additionalsecurity is even available for you to password protect your forms.
To place your command syntax from a command file into a Custom EEP, simply select all ([Ctrl]+[A]) ofyour command file text in your file and use the "Copy & Paste" functionality of your operating system todrop the code into the Custom EEP. Whenever code is placed into a Custom EEP, you will notice that the"Custom EEP" button will turn yellow.
For additional information on the Form Designer and External Form Designer, refer to the Help files thatare specific to each of these modules. To launch the Forms Help, select [Shift]+[F1] from within the FormDesigner, or launch the Forms.chm file from within the R:BASE program directory. To launch the ExternalForm File Help, select [Shift]+[F1] from within the External Form Designer, or launch the EForms.chm filefrom within the R:BASE program directory.

Creating and Using Menus 83
Copyright © 1982-2022 R:BASE Technologies, Inc.
9.3.1 Group Bar
Use the Group Bar control to create a collection of user interface command groups. A command grouptypically contains a list of clickable items that invoke commands. These clickable items will run yourEEPs. The Group Bar is a single control that supports all of these types of display styles. In particular, theStyle property can be set to Category View, Task List, and Outlook. The default is set to Category View.
Typical examples of group bars include the navigational bar (e.g. Outlook Bar) in Microsoft Outlook andthe category view in Windows XP's Control Panel (also called the Explorer Bar). If you have launched theRRBYW14 sample application, the Main Menu form displays an R:BASE Group Bar control listed on the leftside.
9.3.2 Tree View
The Tree View control displays an object containing a hierarchical list of static items (nodes), such as theheadings in a document, the entries in an index, or the files and directories on a disk. Each node consistsof a label and an optional image, where each node can have a list of subitems associated with it. Byselecting the tree structure, the user can expand or collapse the associated list of subitems. R:BASEcommand syntax can be stored or referenced within the item properties to accomplish a task.
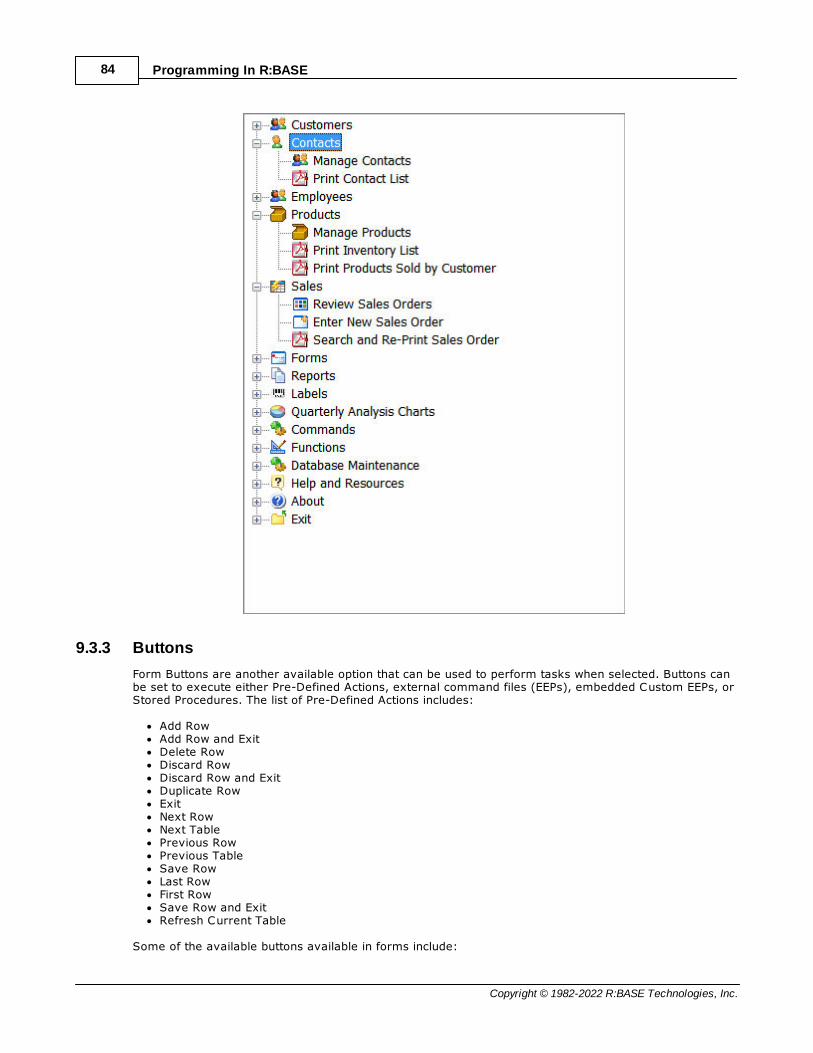
Programming In R:BASE84
Copyright © 1982-2022 R:BASE Technologies, Inc.
9.3.3 Buttons
Form Buttons are another available option that can be used to perform tasks when selected. Buttons canbe set to execute either Pre-Defined Actions, external command files (EEPs), embedded Custom EEPs, orStored Procedures. The list of Pre-Defined Actions includes:
· Add Row· Add Row and Exit· Delete Row· Discard Row· Discard Row and Exit· Duplicate Row· Exit· Next Row· Next Table· Previous Row· Previous Table· Save Row· Last Row· First Row· Save Row and Exit· Refresh Current Table
Some of the available buttons available in forms include:

Creating and Using Menus 85
Copyright © 1982-2022 R:BASE Technologies, Inc.
· Bit Button - a push button object, which can load image files to be displayed on the button· Speed Button - a push button object, which can load image files, but does not become part of the
field tab order· Office Button - a push button object that has a unique visually interactive behavior· Enhanced Speed Button - a push button object, which can load image files and includes additional
visual effects, but does not become part of the field tab order
Here are some Bit Buttons in a group:
9.3.4 Drop-Down Menu Buttons
The Drop-Down Menu Button is a push button object which presents a drop-down list of static values(menu items) that can execute either external command files (EEPs) or embedded Custom EEPs. Thiscontrol is ideal for designing menu-driven applications on your forms. The Drop-Down Menu Button alsoallows you to load image files to be displayed on the button and listed menu items.
9.3.5 Design Menu Bar
The Design Menu Bar is an interface that allows you to build a "Menu Bar" for your R:BASE form. Theinterface presents you with the Menu Designer dialog for designing an embedded menu bar for the form.The menu items added can execute either external command files (EEPs), or embedded Custom EEPs.
To open the "Menu Designer", select "Layout" > "Design Menu Bar" from within the Form Designer.
What is a Menu Bar?
A Menu Bar is commonly provided in nearly all computer software programs as a means to offer "wordtext" menu selections to users. The Menu Bar is usually the tool bar that is displayed in the top portion ofan application. The Menu Bar in R:BASE starts with the word "Database" and ends with "Help".

Part
X
Debugging Your Program 87
Copyright © 1982-2022 R:BASE Technologies, Inc.
10 Debugging Your Program
The debugging phase of programming is usually the most time-consuming part of developing anapplication. This section describes some techniques you can use when testing and debugging yourapplication programs.
If you plan on using CODELOCK, always test your program as an ASCII command file first. Bythoroughly testing a command file in ASCII, you can save a great amount of time spent converting andreconverting your programs.
Either omit the SET MESSAGES OFF and SET ERROR MESSAGES OFF commands you would normallyplace at the beginning of your program, or enter the commands but format them as comments like this:
-- SET MESSAGES OFF
-- SET ERROR MESSAGES OFF
Leave them as comments until you have fully tested all of your command files.
10.1 Trace Debugger
The best way to debug your command files is to use the interactive R:BASE Trace Debugger. The TraceDebugger is a way for your to view your command files and scripts as your application runs, allowing youto find programming errors and problems. The Trace Debugger pinpoints exactly where errors occur byallowing you to do the following:
· View the results of commands· Find problems in application logic or command syntax· Process individual commands, one at a time· Process blocks of commands· Display variables and monitor their values· Change variable values· Save debugging configurations for the next debugging session
As opposed to the RUN command, which just executes the instructions in a command file, the TraceDebugger opens a command file and lets you observe the commands and variables as the instructionsare processed. After the command(s) have executed or when the debugger pauses, the Trace Debuggerupdates variables you are monitoring and displays the command file code. Error messages appear whenapplicable.
The interactive Trace Debugger works with ASCII, command, or application files encrypted withCodeLock. The source files must be located in the same directory as the CodeLocked files. If you aregoing to Trace a CodeLocked application, then you must also follow the same R:BASE standard of (.APP)for the source files, and (.APX) for the CodeLocked files.
You can also debug Entry/Exit Procedures (EEPs) and ASCII files with any name.
Certain commands used in applications require keyboard input as the Trace Debugger processes them.You cannot return to the Trace Debugger when the system is processing the input. You must first exit theform, menu, dialog, or edit screen.
Here is a list of commands that require user input:
· BROWSE· CHOOSE· DIALOG· EDIT· EDIT USING· ENTER· FILLIN· GATEWAY· LBLPRINT· PAUSE
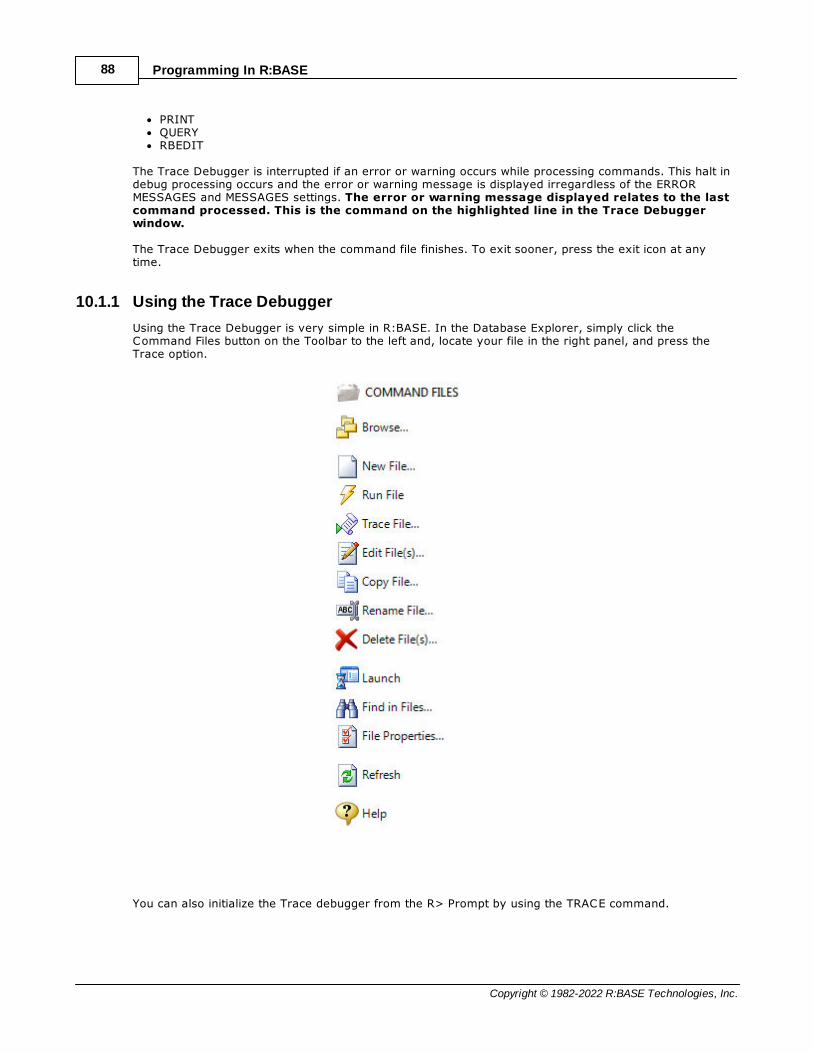
Programming In R:BASE88
Copyright © 1982-2022 R:BASE Technologies, Inc.
· PRINT· QUERY· RBEDIT
The Trace Debugger is interrupted if an error or warning occurs while processing commands. This halt indebug processing occurs and the error or warning message is displayed irregardless of the ERRORMESSAGES and MESSAGES settings. The error or warning message displayed relates to the lastcommand processed. This is the command on the highlighted line in the Trace Debuggerwindow.
The Trace Debugger exits when the command file finishes. To exit sooner, press the exit icon at anytime.
10.1.1 Using the Trace Debugger
Using the Trace Debugger is very simple in R:BASE. In the Database Explorer, simply click theCommand Files button on the Toolbar to the left and, locate your file in the right panel, and press theTrace option.
You can also initialize the Trace debugger from the R> Prompt by using the TRACE command.
Debugging Your Program 89
Copyright © 1982-2022 R:BASE Technologies, Inc.
10.1.2 Breakpoints
You can interrupt the Trace Debugger at specific points as the command file is processed by setting upbreakpoints. A breakpoint is a command in the command file that interrupts processing.
To execute the file between the present position and the next breakpoint, press the [F5] key.
Breakpoints are useful in the following situations:
· To advance to a specific part of a command file, such as an area that needs more debugging, withoutstepping through the whole file.
· To watch the results of each iteration through a WHILE loop--set a breakpoint near the end of the loop.· To watch the results of an IF...ENDIF statement--place a breakpoint inside the IF...ENDIF block and
processing stops when the condition(s) are true.
Follow these guidelines when using breakpoints:
· You can have a maximum of 25 breakpoints per session.· If a command spans more than one line, you must set the breakpoint on the last line of the multi-line
command.· You cannot set a breakpoint on a comment. The Trace Debugger does not recognize breakpoints on
non-executable lines.· Breakpoints set on commands that start with DEBUG work only when DEBUG is set to ON.
NOTE: If you set a breakpoint inside a WHILE loop, the Trace Debugger will only stop on the breakpointif the WHILE loop condition(s) are met. The same is true for IF...ENDIF and SWITCH...CASE blocks.
Setting Breakpoints
To set a breakpoint in the Trace Debugger, scroll to the place in the command file being debugged whereyou want the debug process to break, place your cursor on that line by clicking on it, and press the [F9]
key or icon from the toolbar. The line will highlight in red when the breakpoint is set.
Clearing Breakpoints
To clear a particular breakpoint, place the focus on the line by clicking on it, and press the [SHIFT] +
[F11] keys or the icon on the toolbar.
You can also clear all the breakpoints by pressing the [SHIFT] + [F7] keys or the icon on thetoolbar.
10.1.3 Watch Variables
A Watch Variable is a variable that you can monitor as the command file is processed in the TraceDebugger. Use Watch Variables to provide debugging information. After you add Watch Variables to yourWatch Variable list, they appear in list fashion within a panel on the right side of the Trace Debuggerwindow. Every time control returns to the Trace Debugger, the Watch Variable list refreshes.
10.1.3.1 Adding/Removing Watch Variables
Using the Add/Remove Variable(s) dialog, you can add, remove, and reorder your Watch Variables.
To access the Add/Remove Variable(s) dialog, press the [F6] key or the icon on the toolbar.
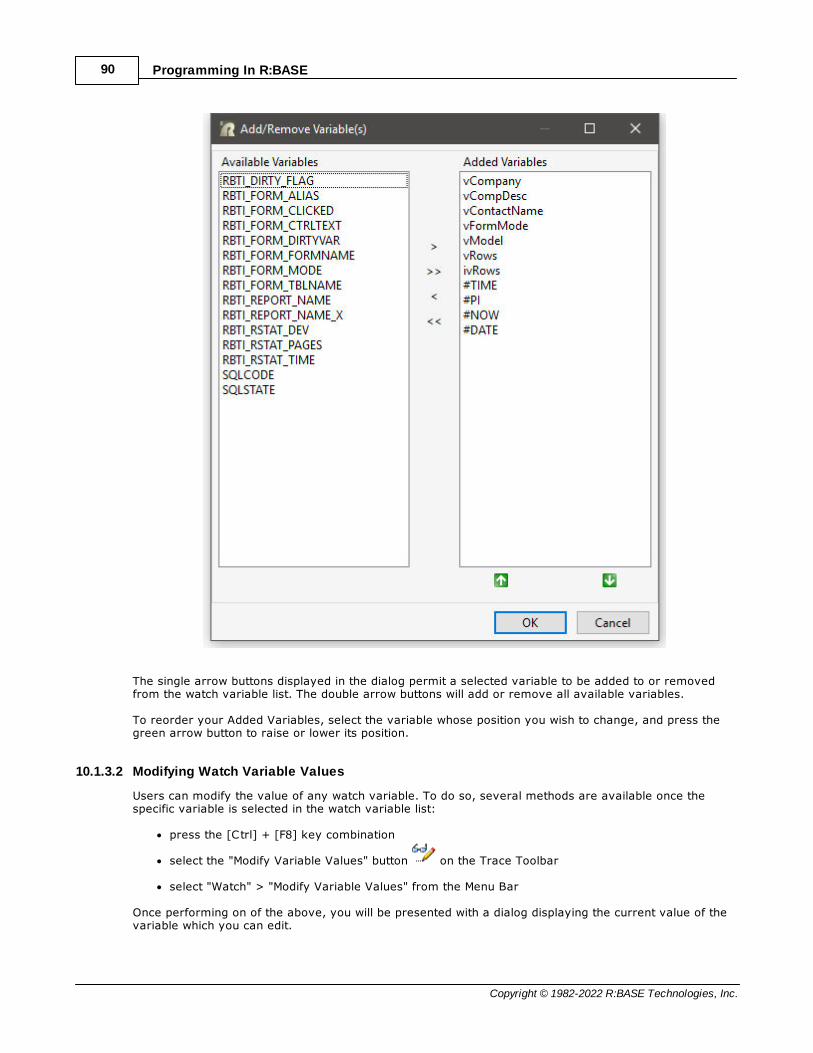
Programming In R:BASE90
Copyright © 1982-2022 R:BASE Technologies, Inc.
The single arrow buttons displayed in the dialog permit a selected variable to be added to or removedfrom the watch variable list. The double arrow buttons will add or remove all available variables.
To reorder your Added Variables, select the variable whose position you wish to change, and press thegreen arrow button to raise or lower its position.
10.1.3.2 Modifying Watch Variable Values
Users can modify the value of any watch variable. To do so, several methods are available once thespecific variable is selected in the watch variable list:
· press the [Ctrl] + [F8] key combination
· select the "Modify Variable Values" button on the Trace Toolbar
· select "Watch" > "Modify Variable Values" from the Menu Bar
Once performing on of the above, you will be presented with a dialog displaying the current value of thevariable which you can edit.

Debugging Your Program 91
Copyright © 1982-2022 R:BASE Technologies, Inc.
NOTE: Pay attention to the variable's data type because you will be able to type any alpha-numericcharacters in the dialog, but only values matching the variable's current data type will be accepted.
10.1.3.3 Clearing Watch Variables
Users can clear all the currently selected variables from the watch variable list. To do so, severalmethods are available:
· press the [Ctrl] + [F7] hot key combination
· select the "Modify Variable Values" button on the Trace Toolbar
· select "Watch" > "Modify Variable Values" from the Menu Bar
WARNING: By clearing the watch variables, you are not only removing the variables from the WatchVariable toolbar list, but you are also clearing the variables from the instance of R:BASE. Therefore, ifthe variables are needed at a later point in the processing, they will need to be redefined.
10.1.3.4 Saving Watch Variables
Users can save the watch variable list to an outside file for use at a later time. This allows the ability toaccess your list without needing to reselect the variables again.
To save your watch variable list, select the "Save Watch Variable(s)" button on the Trace Toolbar.You will be prompted to save the file name to store the list, with the .DBG file extension. By default, thefilename will be the same as the file being traced, only with a (.DBG) extension.
10.1.3.5 Loading Watch Variables
After saving a watch variable list, the list can be loading into an instance of the Trace Debugger.
To load watch variables from a saved list, press the "Load Watch Variables" button on the TraceToolbar. Then, when prompted, and browse to the (.DBG) file that you wish to load and select the"Open" button. All variables in the saved list, which are not currently in the watch variable list, will beadded.
10.1.4 Changing Variable Values
Changing variable values can produce unexpected results. When using statements such as IF, WHILE,and SWITCH, changing the value of the variable will not cause R:BASE to re-evaluate the conditions.Changing a variable does not update previous uses of the variable. For instance, if a DECLARE CURSORcommand uses a variable, changing the value after the DECLARE command processes does not causethe CURSOR definition to change.

Programming In R:BASE92
Copyright © 1982-2022 R:BASE Technologies, Inc.
In certain R:BASE commands, variables are produced at the pre-parsing stage, while R:BASE issearching for the next command in the file. Since the Trace Debugger also uses the pre-parsing functionto locate the next command, the value of some variables might already be in the command. In this case,R:BASE does not use the new value for the variable in the processing of the current command.
Also, the Trace Debugger does not allow you to change the data type of a variable. To change a datatype, you must exit the Trace Debugger and insert the appropriate command in the command file.
10.1.5 Debugging CodeLocked Files and Blocks
It legacy R:BASE versions, it was supported to use $COMMAND, $MENU, and $SCREEN blocks in a singlefile and use CodeLock to produce a single application file. This process decreases the number of files tomaintain and introduces code security to the application. Using CodeLock to encode an applicationprevents unauthorized access to the source code. The Trace Debugger can process applicationsdeveloped in this manner only if the ASCII version (.APP) of the command file is present. Otherwise, itruns that portion of the application (.APX), rather than displaying the source code.
Unlike $COMMAND blocks, the Trace Debugger ignores $MENU and $SCREEN blocks. They are parsedinternally by the CHOOSE and DISPLAY commands. When using the Trace Debugger on applications thatuse either of these commands, an ASCII version of $MENU or $SCREEN blocks is not required. R:BASEreads the CodeLocked files as needed.
10.1.6 Debugging EEP's
To execute your application until the point of a particular EEP, insert the string DEBUG TRACE as the firstline of the EEP and make sure that DEBUG is set to ON (SET DEBUG ON). This will cause the TraceDebugger to initialize when it hits the DEBUG TRACE line in the EEP code.
10.1.7 Debugging Nested RUN Commands
You can use a RUN command in a command file when you want to control the program flow, tomodularize application development, or to improve application speed. The Trace Debugger can debugthese command files each time it finds a RUN command.
Using RUN commands affects the number of files open at one time in R:BASE. If you have your FILESsetting at 5, once a sixth RUN command processes, the first file opened will not be accessible. The TraceDebugger does not change the number of RUN commands that can be called. You can, however, changethe number of RUN commands that can be called with the SET FILES command.
Each time the RUN command processes, R:BASE opens an additional file. Each file is displayed as aseparate tab in the Trace Debugger.
When an ASCII command file is called by a RUN command, R:BASE displays it automatically in the TraceDebugger. When you develop applications using CodeLocked files (.APX), R:BASE only displays acommand file called by a RUN command if the ASCII version is present (.APP).
If the RUN command executes a $COMMAND block within a CodeLocked file, the Trace Debuggerhighlights the first executable line of the command block. If R:BASE does not find the ASCII version ofthe CodeLocked file, R:BASE runs the command block from the CodeLocked file and returns to the TraceDebugger when the RUN command finishes.
Combining ASCII and CodeLocked files during development will not affect the Trace Debugger. Any timethe ASCII file is available, the Trace Debugger screen appears. ASCII files run from CodeLocked filesappear in the Trace Debugger even if the ASCII version of the CodeLocked file is not available.

Part
XI
Programming In R:BASE94
Copyright © 1982-2022 R:BASE Technologies, Inc.
11 Using Optimizing Techniques
Use the following techniques in your command files and EEPs to speed up processing:
· Group similar commands
R:BASE loads into memory the information needed to process each command. If the command isalready in memory, R:BASE does not need to read the disk again. For example, try grouping separateSET VARIABLE commands into one SET VARIABLE whenever possible.
· Minimize disk access
Minimize disk access by using Custom EEPs, which run from the computer's memory, and bycombining small command files into command blocks within a procedure file.
· Use WHILE loops
Use WHILE loops instead of IF structures or GOTO processing whenever possible. All the commandscontained within a WHILE loop are completely read and are retained in memory as long as the WHILEloop is processing. Use BREAK or change the condition for a natural exit rather than using GOTO to exitfrom a WHILE loop.
· Use forward GOTO searches
Use forward GOTO searches whenever possible. When R:BASE encounters a GOTO, it performs aforward search for the matching label more efficiently than by seeking it in memory, even though thelabels are retained internally.
· Predefine variables
Make sure that the data type of each variable is unambiguous by explicitly assigning the data typewhen the variable is defined.
· Reduce redundancy
Eliminate duplication of command sections where possible. If you have a set of commands duplicatedin several places within a form, use a "Custom Form Action" which can be called upon at any place inthe form. If you have a set of commands duplicated in several places within the entire application, use"Stored Procedures", which can be called upon from almost any place within the application.
For multiple commands duplicated in a file, put those commands in a separate command block in theprocedure file and use RUN to execute the commands where needed.
· Eliminate rules checking
Set RULES OFF when not needed for data verification. This saves time by preventing R:BASE fromchecking the data for rule violations.
· Experiment with Manual Table-Order Optimization
By default, R:BASE uses its own internal algorithm optimizer that determines the best order for joiningtables. You can turn off the automatic optimizer using the MANOPT setting. MANOPT (default:OFF)disables the automatic table-order optimization that R:BASE performs when running queries. This givesmaximum control over the order in which columns and tables are assembled in response to a query.With MANOPT set to ON, R:BASE uses the order of the tables in the FROM clause and the order of thecolumns in the column list of the SELECT clause to construct the query.

Part
XII

Programming In R:BASE96
Copyright © 1982-2022 R:BASE Technologies, Inc.
12 Useful Resources
. R:BASE Home Page: https://www.rbase.com
. Up-to-Date R:BASE Updates: https://www.rbaseupdates.com
. Current Product Details and Documentation: https://www.rbase.com/rbgx5
. Support Home Page: https://www.rbase.com/support
. Product Registration: https://www.rbase.com/register
. Official R:BASE Facebook Page: https://www.facebook.com/rbase
. Sample Applications: https://www.razzak.com/sampleapplications
. Technical Documents (From the Edge): https://www.razzak.com/fte
. Education and Training: https://www.rbase.com/training
. Product News: https://www.rbase.com/news
. Upcoming Events: https://www.rbase.com/events
. R:BASE Online Help Manual: https://www.rbase.com/support/rsyntax
. Form Properties Documentation: https://www.rbase.com/support/FormProperties.pdf
. R:BASE Beginners Tutorial: https://www.rbase.com/support/rtutorial
. R:BASE Solutions (Vertical Market Applications): https://www.rbase.com/products/rbasesolutions

Part
XIII

Programming In R:BASE98
Copyright © 1982-2022 R:BASE Technologies, Inc.
13 Feedback
Suggestions and Enhancement Requests:
From time to time, everyone comes up with an idea for something they'd like a software product to dodifferently.
If you come across an idea that you think might make a nice enhancement, your input is alwayswelcome.
Please submit your suggestion and/or enhancement request to the R:BASE Developers' Corner Crew(R:DCC) and describe what you think might make an ideal enhancement. In R:BASE, the R:DCC Client isfully integrated to communicate with the R:BASE development team. From the main menu bar, choose"Help" > "R:DCC Client". If you do not have a login profile, select "New User" to create one.
If you have a sample you wish to provide, have the files prepared within a zip archive prior to initiatingthe request. You will be prompted to upload any attachments during the submission process.
Unless additional information is needed, you will not receive a direct response. You can periodically checkthe status of your submitted enhancement request.
If you are experiencing any difficulties with the R:DCC Client, please send an e-mail to [email protected].
Reporting Bugs:
If you experience something you think might be a bug, please report it to the R:BASE Developers'Corner Crew. In R:BASE, the R:DCC Client is fully integrated to communicate with the R:BASEdevelopment team. From the main menu bar, choose "Help" > "R:DCC Client". If you do not have a loginprofile, select "New User" to create one.
You will need to describe:
· What you did, what happened, and what you expected to happen· The product version and build · Any error message displayed· The operating system in use · Anything else you think might be relevant
If you have a sample you wish to provide, have the files prepared within a zip archive prior to initiatingthe bug report. You will be prompted to upload any attachments during the submission process.
Unless additional information is needed, you will not receive a direct response. You can periodically checkthe status of your submitted bug.
If you are experiencing any difficulties with the R:DCC Client, please send an e-mail to [email protected].

Index 99
Copyright © 1982-2022 R:BASE Technologies, Inc.
Index
- # -#DATE 20
#NOW 20
#PI 20
#TIME 20
- & -& variable 16
- A -action 81
Adding/Removing Watch Variables 89
APP 75
application 8, 75, 81
application file 75, 81
- B -BEEP 73
Bit Button 84
BREAK 39, 41
Breakpoints 89
button 84
button settings 81
- C -CASE 41, 43
Changing Variable Values 91
CHOOSE 17, 75
CLEAR 12, 13, 17
Clearing Watch Variables 91
CMD 75
command 8, 22, 46, 49, 51, 58, 64
command files 8, 75
comment 11
concatenate 21, 33
condition 37, 39, 41, 42
CONNECT 13, 72
CTXT 33
- D -DAT 75
data types 17, 20
data typing 19
Debugging CodeLocked Files and Blocks 92
Debugging EEP's 92
Debugging Nested RUN Commands 92
DEFAULT 41, 43
Design Menu Bar 85
DIALOG 17, 28, 37, 39, 41, 42, 72
dotted variable 16
Drop-Down Menu Button 85
- E -EEP 75, 81, 83, 84, 85
ELSE 37, 43
ENDIF 37, 43
ENDSW 41, 43
ENDWHILE 39, 43
Enhanced Speed Button 84
environment 9
EXIT 13
explicit 19
expressions 21
external form file 75, 81
- F -feedback 98
form 75, 81
form system variables 20
functions 22
- G -glyph 81
GOTO 37, 42, 43
Group Bar 83
- I -IF 37, 43
IF/ENDIF 37

Programming In R:BASE100
Copyright © 1982-2022 R:BASE Technologies, Inc.
implicit 19
INPUT 8, 11, 12, 13
INSERT 49
- L -LABEL 37, 42, 43
LAUNCH 69
list settings 80
LOAD 58
Loading Watch Variables 91
logical flow 9
- M -menu 75, 81
menu bar 85
message status 10
Modifying Watch Variable Values 90
- O -Office Button 84
operator 37, 39, 41, 42
OUTPUT 8, 24
- P -parameters 12, 78
PAUSE 25, 73
Pre-Defined Action 84
PRINT 24
program structure 9
- Q -QUIT 13, 39, 43
- R -RBA 8, 81
RETURN 13, 43
RMD 75
RUN 11, 12, 43
- S -Saving Watch Variables 91
SELECT 17, 34, 46
Select All 78
SET 12, 13, 43
SET ERROR 72
SET ERROR MESSAGES 10
SET ERROR VAR 17
SET MESSAGES 10
SET VAR 17, 19, 21, 34, 42, 64
SET VARIABLE 19, 64
SHOW 12
single click 78
SLEN 33
SMOVE 34
Speed Button 84
SQLCODE 20
SQLSTATE 20
structures 37, 39, 41, 42
SWITCH 41, 43
SWITCH/ENDSW 37
system variables 20
- T -task 75, 81
TDWK 41
text function 33
Theme 78
title settings 79
TRACE 87
Tree View 83
- U -UPDATE 51
USING 12
Using the Trace Debugger 88
- V -variable form 81
variables 8, 10, 16, 17, 20
clearing 17
defining 17

Index 101
Copyright © 1982-2022 R:BASE Technologies, Inc.
variables 8, 10, 16, 17, 20
global 12
length 16
name 16
parameter 12
- W -Watch Variables 89
WHERE Clause 78
WHILE 39, 42, 43
WHILE/ENDWHILE 37
WINBEEP 73

Notes


![Functional Programming—a php[architect] Guide · Functional Programming in PHP 69 Patterns In functional programming there are repeating patterns just as in any other programming](https://static.fdocuments.us/doc/165x107/5e72b727b20fc659da36e70c/functional-programmingaa-phparchitect-guide-functional-programming-in-php-69.jpg)