Programming Guide - PDF.TEXTFILES.COMpdf.textfiles.com/manuals/TELECOM-F-R/Nitsuko NVM-2...
47
NVM-2 Voice Mail with Automated Attendant Programming Guide Part No. 17690INS02 Issue 1-0, December 1997 (2412) 4 FOREST PARKWAY, SHELTON, CONNECTICUT 06484 TEL: 203-926-5400 FAX: 203-929-0535
Transcript of Programming Guide - PDF.TEXTFILES.COMpdf.textfiles.com/manuals/TELECOM-F-R/Nitsuko NVM-2...
NVM-2Voice Mailwith Automated Attendant
Programming Guide
Part No. 17690INS02Issue 1-0, December 1997 (2412)
4 FOREST PARKWAY, SHELTON, CONNECTICUT 06484 TEL: 203-926-5400 FAX: 203-929-0535

This manual has been developed by Nitsuko America. It is intended for the use of its customers andservice personnel, and should be read in its entirety before attempting to install or program the system.Any comments or suggestions for improving this manual would be appreciated. Forward your remarks to:
Nitsuko America, Telecom Division4 Forest Parkway
Shelton, CT 06484
Attention: Manager, Technical Publications
Nothing contained in this manual shall be deemed to be, and this manual does not constitute, a warranty of,or representation with respect to, any of the equipment covered. This manual is subject to change withoutnotice and Nitsuko America has no obligation to provide any updates or corrections to this manual.Further, Nitsuko America also reserves the right, without prior notice, to make changes in equipmentdesign or components as it deems appropriate. No representation is made that this manual is complete oraccurate in all respects and Nitsuko America shall not be liable for any errors or omissions. In no eventshall Nitsuko America be liable for any incidental or consequential damages in connection with the use ofthis manual. This document contains proprietary information that is protected by copyright. All rights arereserved. No part of this document may be photocopied or reproduced without prior written consent ofNitsuko America.
1997 by Nitsuko America. All Rights Reserved
Printed in U.S.A.
Table of Contents
Issue 1-0 i
Chapter 1 Introducing NVM-2About NVM-2 .....................................................................................1About the Automated Attendant ..........................................................1About the Voice Mail System..............................................................1NVM-2 Specifications.........................................................................1About the NVM-2 Documents.............................................................2
Chapter 2 Understanding and Changing the DefaultSetupProgramming NVM-2 Using the System Administrator Extension..................................................................3The Default Automated Attendant Setup.............................................3The Default Mailbox Types and Numbering.......................................5The Default Subscriber Mailbox Features...........................................6
Chapter 3 Customizing Automated Attendant FeaturesSetting Up Schedules for the Main Greetings......................................8Recording the Main Greetings...........................................................10Temporarily Overriding All Main Greetings.....................................12Setting Up a Dialing Options Menu ..................................................14Recording an Announcement Message..............................................21
Chapter 4 Customizing Subscriber Mailbox FeaturesCreating a System Administrator Programming Extension ...............22Enabling or Disabling a Message Lamp............................................24Blocking Automated Attendant Calls ................................................25Using Forced Unscreened Transfer ...................................................26Assigning a Mailbox Name ...............................................................27Re-routing a Subscriber’s Callers......................................................28Setting the Message Limit for a Subscriber Mailbox ........................30
Chapter 5 Using Administrative and MaintenanceFeaturesRemoving a Subscriber Extension.....................................................32Deleting a Subscriber Mailbox Security Code ..................................33Erasing All Subscriber Messages ......................................................34Recording a Subscriber Mailbox Name.............................................35Changing the FAX Extension............................................................36Setting the System Time....................................................................37Setting the System Date.....................................................................38Getting the System Version Number .................................................39Initializing (Erasing) All System Messages.......................................40Restoring the Initial (Default) System Settings .................................41Changing the Phone System Integration............................................42


Chapter 1: Introducing NVM-2
Issue 1-0 1
About NVM-2NVM-2 provides an Automated Attendant and Voice Mail system forthe Portrait Phone System.
About the Automated Attendant
The NVM-2 Automated Attendant does the following:• Answers your incoming calls.• Provides dialing instructions to callers and enables them to direct
their own calls to a desired extension, department or companyoperator by dialing digits on their Touch-Tone telephone.
When the Automated Attendant answers, the caller hears a recordedMain Greeting (also called an Instruction Menu). The Main Greetingtypically begins with Thank you for calling ABC Company followedby a list of dialing options. A typical list of dialing options is asfollows: If you know the extension number you wish to reach, pleaseenter it now. For Sales, press 1. For Customer Service, press 2. etc.
About the Voice Mail System
The NVM-2 Voice Mail System does the following:• Lets an Automated Attendant caller leave a recorded message at an
extension when it is busy, unanswered, or in Do Not Disturb mode.If the caller does not wish to leave a message, they can return to theAutomated Attendant Main Greeting.
• Provides a Subscriber (Voice) Mailbox for each extension in thephone system extension. This Subscriber Mailbox holds therecorded messages, lets the extension users record and sendmessages to each other, plus more.
NVM-2 Specifications
Number of Ports: 2 (or 4)
Voice Storage Capacity: 2 hours (or 4, if 4 Voice Mail ports are installed)
Subscriber Mailboxes: Up to 24 Subscriber Mailboxes(with a FAX machine, 23Subscriber Mailboxes)
Telephone System Voice Mail Interface (via ASI andInterface: Voice Interface Mail Unit,
depending on phone system)
Programming Interface: A Phone SystemExtension
Electrical Requirements: 120V, 60 Hz
Environmental Requirements: 50-104 deg F, 10-40 deg C

Chapter 1: Introducing NVM-2
2 Issue 1-0
About The NVM-2 Documents
• User’s Guide This guide explains how to use the NVM-2 Subscriber Mailboxes.
It is for the extension users. (The Subscriber Mailboxes arereferred to as Voice Mailboxes in the User’s Guide.)
• Setup Guide This guide explains how to get the NVM-2 system up and running
with the Portrait Phone System. When the installer is done with thesetup procedure, each Portrait Phone System extension will have aSubscriber Mailbox and the Automated Attendant will answer callsusing the default Main Greeting and dialing options. To customizeNVM-2, see the Programming Guide.
• Programming Guide
This is a detailed explanation of the NVM-2 system programmablefeatures. These features customize the Subscriber Mailboxes, theAutomated Attendant, and the NVM-2 system-wide features. Thisguide is intended for the installer and/or the person who maintainsthe NVM-2 on a daily basis.
Chapter 2: Understanding and Changing the Default Setup
Issue 1-0 3
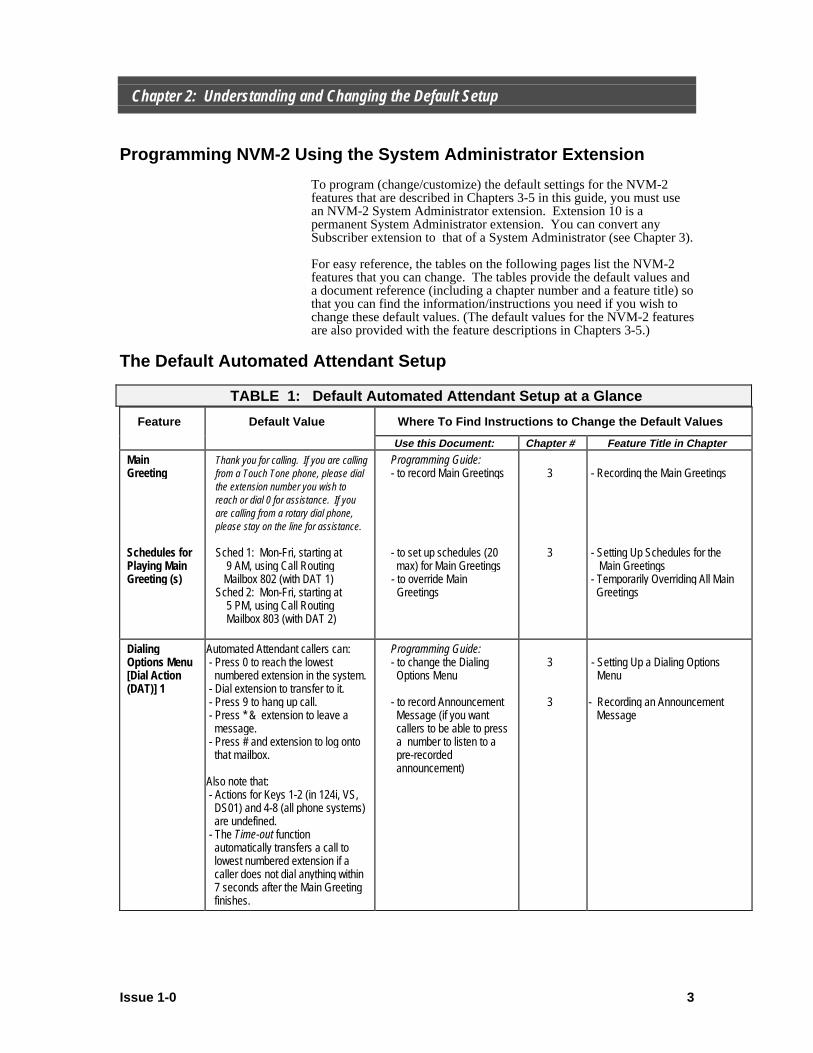
Programming NVM-2 Using the System Administrator Extension
To program (change/customize) the default settings for the NVM-2features that are described in Chapters 3-5 in this guide, you must usean NVM-2 System Administrator extension. Extension 10 is apermanent System Administrator extension. You can convert anySubscriber extension to that of a System Administrator (see Chapter 3).
For easy reference, the tables on the following pages list the NVM-2features that you can change. The tables provide the default values anda document reference (including a chapter number and a feature title) sothat you can find the information/instructions you need if you wish tochange these default values. (The default values for the NVM-2 featuresare also provided with the feature descriptions in Chapters 3-5.)
The Default Automated Attendant Setup
TABLE 1: Default Automated Attendant Setup at a Glance
Feature Default Value Where To Find Instructions to Change the Default Values
Use this Document: Chapter # Feature Title in Chapter
MainGreeting
Schedules forPlaying MainGreeting (s)
Thank you for calling. If you are callingfrom a Touch Tone phone, please dialthe extension number you wish toreach or dial 0 for assistance. If youare calling from a rotary dial phone,please stay on the line for assistance.
Sched 1: Mon-Fri, starting at 9 AM, using Call Routing Mailbox 802 (with DAT 1)Sched 2: Mon-Fri, starting at 5 PM, using Call Routing Mailbox 803 (with DAT 2)
Programming Guide:- to record Main Greetings
- to set up schedules (20 max) for Main Greetings- to override Main Greetings
3
3
- Recording the Main Greetings
- Setting Up Schedules for the Main Greetings - Temporarily Overriding All Main Greetings
DialingOptions Menu[Dial Action(DAT)] 1
Automated Attendant callers can: - Press 0 to reach the lowest numbered extension in the system. - Dial extension to transfer to it. - Press 9 to hang up call. - Press * & extension to leave a message. - Press # and extension to log onto that mailbox.
Also note that: - Actions for Keys 1-2 (in 124i, VS, DS01) and 4-8 (all phone systems) are undefined. - The Time-out function automatically transfers a call to lowest numbered extension if a caller does not dial anything within 7 seconds after the Main Greeting finishes.
Programming Guide:- to change the Dialing Options Menu
- to record Announcement Message (if you want callers to be able to press a number to listen to a pre-recorded announcement)
3
3
- Setting Up a Dialing Options Menu
- Recording an Announcement Message

Chapter 2: Understanding and Changing the Default Setup
4 Issue 1-0
TABLE 1: Default Automated Attendant Setup at a Glance (cont’d)
Feature Default Value Where To Find Instructions to Change the Default Values
Use this Document: Chapter # Feature Title in Chapter
DialingOptions Menu[Dial ActionTables (DATs)]2, 3
Automated Attendant callers can: - Press 0 to leave a message for the lowest numbered extension. - Dial extension to transfer to it. - Press 9 to hang up call. - Press * & extension to leave a message. - Press # and extension to log onto that mailbox.
Also note that: - Keys 1-2 (in 124i, VS, DS01) and 4-8 (all phone systems) are undefined. - The Time-out function automatically gives the option to record a message for lowest numbered extension if a caller does not dial anything within 7 seconds after the Main Greeting finishes.
Programming Guide:- to change the Dialing Options Menu
- to record Announcement Message (if you want callers to be able to press a number to listen to a pre-recorded announcement)
3
3
- Setting Up a Dialing Options Menu
- Recording an Announcement Message
Chapter 2: Understanding and Changing the Default Setup
Issue 1-0 5
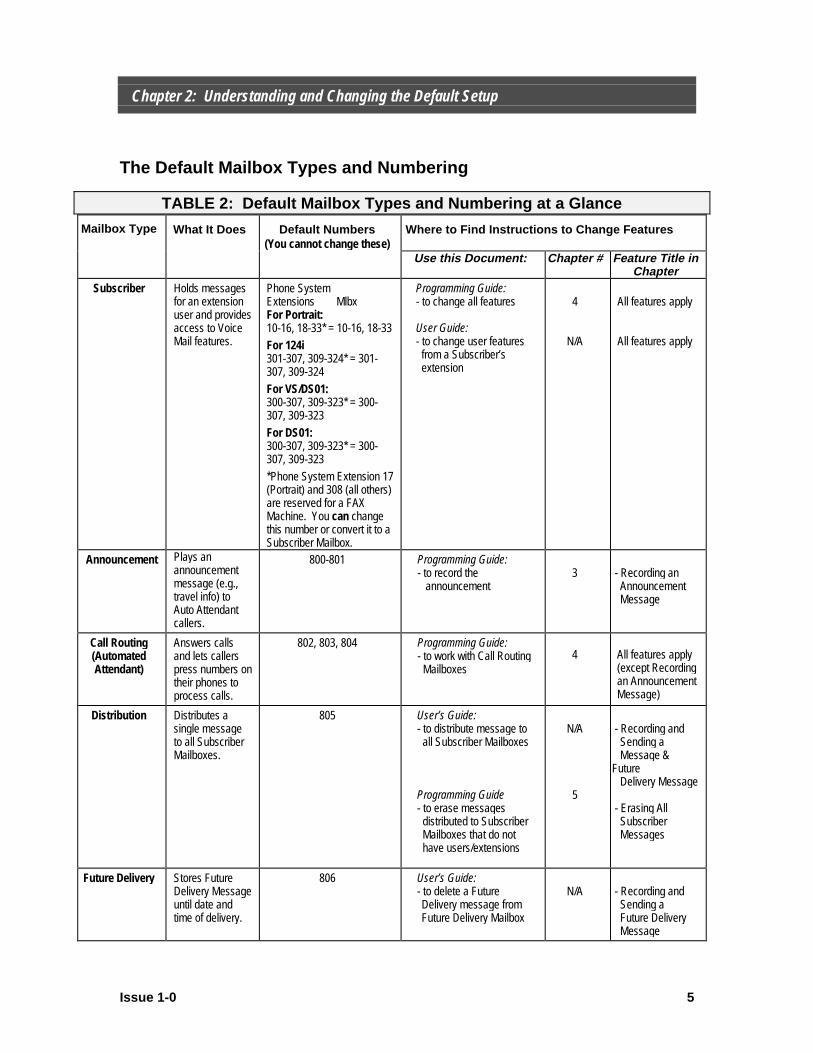
The Default Mailbox Types and Numbering
TABLE 2: Default Mailbox Types and Numbering at a Glance
Mailbox Type What It Does Default Numbers(You cannot change these)
Where to Find Instructions to Change Features
Use this Document: Chapter # Feature Title inChapter
Subscriber Holds messagesfor an extensionuser and providesaccess to VoiceMail features.
Phone SystemExtensions MlbxFor Portrait:10-16, 18-33* = 10-16, 18-33For 124i301-307, 309-324* = 301-307, 309-324For VS/DS01:300-307, 309-323* = 300-307, 309-323For DS01:300-307, 309-323* = 300-307, 309-323*Phone System Extension 17(Portrait) and 308 (all others)are reserved for a FAXMachine. You can changethis number or convert it to aSubscriber Mailbox.
Programming Guide:- to change all features
User Guide:- to change user features from a Subscriber’s extension
4
N/A
All features apply
All features apply
Announcement Plays anannouncementmessage (e.g.,travel info) toAuto Attendantcallers.
800-801 Programming Guide:- to record the announcement
3 - Recording an Announcement Message
Call Routing(AutomatedAttendant)
Answers callsand lets callerspress numbers ontheir phones toprocess calls.
802, 803, 804 Programming Guide:- to work with Call Routing Mailboxes
4 All features apply (except Recording an Announcement Message)
Distribution Distributes asingle messageto all SubscriberMailboxes.
805 User’s Guide:- to distribute message to all Subscriber Mailboxes
Programming Guide- to erase messages distributed to Subscriber Mailboxes that do not have users/extensions
N/A
5
- Recording and Sending a Message &Future Delivery Message
- Erasing All Subscriber Messages
Future Delivery Stores FutureDelivery Messageuntil date andtime of delivery.
806 User’s Guide:- to delete a Future
Delivery message from Future Delivery Mailbox
N/A - Recording and Sending a Future Delivery Message
Chapter 2: Understanding and Changing the Default Setup
6 Issue 1-0
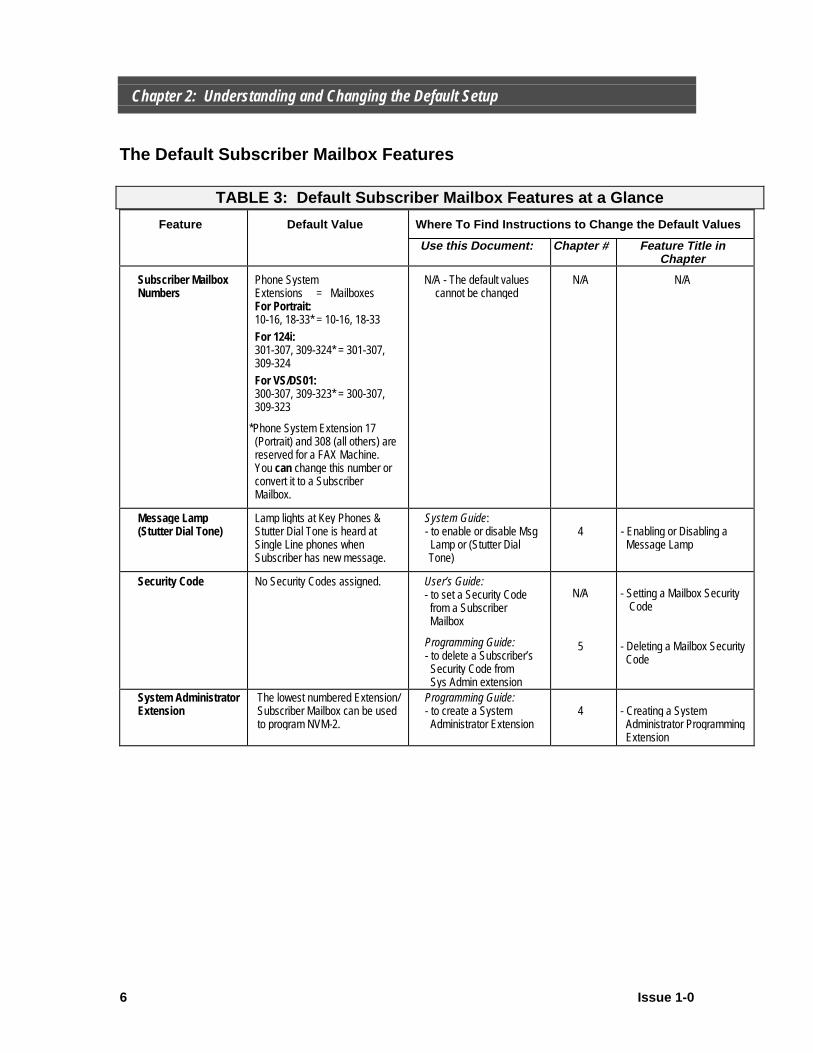
The Default Subscriber Mailbox Features
TABLE 3: Default Subscriber Mailbox Features at a Glance
Feature Default Value Where To Find Instructions to Change the Default Values
Use this Document: Chapter # Feature Title inChapter
Subscriber MailboxNumbers
Phone SystemExtensions = MailboxesFor Portrait:10-16, 18-33* = 10-16, 18-33For 124i:301-307, 309-324* = 301-307,309-324For VS/DS01:300-307, 309-323* = 300-307,309-323
*Phone System Extension 17(Portrait) and 308 (all others) arereserved for a FAX Machine.You can change this number orconvert it to a SubscriberMailbox.
N/A - The default valuescannot be changed
N/A N/A
Message Lamp(Stutter Dial Tone)
Lamp lights at Key Phones &Stutter Dial Tone is heard atSingle Line phones whenSubscriber has new message.
System Guide:- to enable or disable Msg Lamp or (Stutter Dial
Tone)
4 - Enabling or Disabling a Message Lamp
Security Code No Security Codes assigned. User’s Guide:- to set a Security Code from a Subscriber Mailbox
Programming Guide:- to delete a Subscriber’s Security Code from Sys Admin extension
N/A
5
- Setting a Mailbox Security Code
- Deleting a Mailbox Security Code
System AdministratorExtension
The lowest numbered Extension/Subscriber Mailbox can be usedto program NVM-2.
Programming Guide:- to create a System Administrator Extension
4 - Creating a System Administrator Programming Extension

Chapter 2: Understanding and Changing the Default Setup
Issue 1-0 7
TABLE 3: Default Subscriber Mailbox Features at a Glance (cont’d)
Feature Default Value Where To Find Instructions to Change the Default Values
Use this Document: Chapter # Feature Title in ChapterBlock AutomatedAttendant Calls
Disabled (No extension isblocked from receiving AutoAttendant Calls).
Programming Guide:- to enable Block Auto Attendant calls
4 - Blocking Automated Attendant Calls
Re-routing aSubscriber’s Callers(Next Call RoutingMailbox)
- After leaving a message for a Subscriber, a caller can press 0 to get the lowest numbered extension. - Blocked Automated Attendant callers are automatically re- routed to lowest numbered extension.
Technically, this means: CallRouting Mailbox 802 with DialAction Table (DAT) 1 is assignedto each Subscriber Mailbox. Key0 in DAT 1 is set up forunscreened (blind) transfer tolowest numbered extension.
Programming Guide:- to assign a different Next Call Routing Mailbox
- to re-route a caller to a different extension (this is where the Dial Action Table programming comes in)
4
3
- Re-Routing a Subscriber’s Callers
- Setting Up a Dialing Options Menu
Mailbox Name No Mailbox Names areprogrammed (assigned) orrecorded.
Programming Guide:- to program a name- for Administrators to record names
User’s Guide:- for users to record names
45
N/A
- Assigning a Mailbox Name - Recording a Subscriber’s Mailbox Name
- Recording a Mailbox Name
Setting the MessageLimit
25 Messages. The SystemAdministrator can set themaximum number of messagesallowed in a Subscriber Mailbox(0-300 is the range.)
Programming Guide- for System Administrators to change the number of messages in a Subscriber Mailbox.
4 - Setting the Message Storage Limit for a Subscriber’sMailbox
Message Notification No Message Notification is setup. Message Notification allowsusers to set up their mailboxes sothat NVM-2 notifies them whenthey have new messages. Theyspecify the type of number thatthey want NVM-2 to call: outside,extension or digital pager.
User’s Guide- for Users to set up Message Notification at their phones.
N/A N/A
Forced Unscreened(blind) Transfer
This feature does notapply to the PortraitPhone System
Disabled . (Extensions receivescreened transfers and NVM-2handles incomplete transfers.)
System Guide:- To force unscreened transfers
4 - Using Forced Unscreened Transfer

Chapter 3: Customizing Automated Attendant Features
8 Issue 1-0
Setting Up Schedules for the Main Greetings
DescriptionThe Automated Attendant can answer calls with different recordedMain Greetings (technically called “Instruction Menus”). For example,you can have one Main Greeting for business hours and another MainGreeting for off-hours. But you have to set up schedules for the MainGreetings so they will play when you want them to play. Hence theNVM-2 term “Answering Schedules.”
When you program an Answering Schedule, NVM-2 will want you toenter the following four items:• A schedule number (1-20). In other words, NVM-2 allows you to
set up 20 different schedules.• Day, date, or range of days that the desired Main Greeting should
play (for example, Monday through Friday).• Time of day that the Main Greeting should start playing (for
example 8:30 AM)• Call Routing Mailbox number (802, 803, 804) that should answer
the call. Remember: in essence a Call Routing Mailbox is theNVM-2 Automated Attendant Mailbox. It answers an outside calland lets callers press numbers on their Touch Tone phone to send(route) their own call to the desired extension (or other pre-programmed destination).
Default• Schedule 1: Monday to Friday, Starting at 9:00 AM, using Call
Routing Mailbox 802.• Schedule 2: Monday to Friday, Starting at 5:00 PM, using Call
Routing Mailbox 803. (Saturday and Sunday follow Schedule 2since another schedule has not taken over. A new schedule will nottake over until Monday at 9:00 AM.)
ExampleFor example, suppose your company is on a 4-day work week schedule.• Schedule 1 can be for Monday-Thursday, starting at 8 AM, using
Call Routing Mailbox 802.• Schedule 2 can be for Thursday, starting at 5 PM, using Call
Routing Mailbox 803.
NotesTo record a Main Greeting (Instruction Menu) for a schedule, you haveto enter the Call Routing Mailbox number that you assigned to theschedule.
Chapter 3: Customizing Automated Attendant Features
Issue 1-0 9
Setting Up Schedules for the Main Greetings (cont’d)
Programming InstructionsTo set up Answering Schedules:1. Log onto System Administrator Mailbox (lowest numbered
extension) as follows:From outside: Lift handset, dial NVM-2 phone number, wait forthe Main Greeting (Instruction Menu), dial #, dial extensionnumber, dial Security code if requested.From your 124i extension: Press Voice Mail key. (Or, pressCALL key, dial *8. On Single Lines, dial *8).From your Portrait extension: Press SPK, press ICM, dialNVM-2 Direct Log-On Number (98) (or press Mailbox Logonkey).From your VS/DS01 extension: Press Intercom key, press MSGkey. On Single Lines, dial *6.
2. Wait for NVM-2 to answer. Dial Security Code, if requested.3. Press DM for Database Management Menu.4. Press AN for Answering Schedules.5. Follow the voice prompts.
Related Programming• To record a Main Greeting (Instruction Menu), see Recording the
Main Greetings in this chapter.• To temporarily override all Main Greetings and play a different
one, see Temporarily Overriding All Main Greetings in thischapter.

Chapter 3: Customizing Automated Attendant Features
10 Issue 1-0
Recording the Main Greetings
DescriptionA Main Greeting (technically called an “Instruction Menu”) is therecorded message that plays when the Automated Attendant answers acall. The Main Greeting should do the following:• Welcome the caller (Thank you for calling).• List the available dialing options (e.g., Press 1 for Sales, Press 2
for Technical Support).
DefaultThank you for calling. If you are calling from a Touch Tone phoneplease dial the extension number you wish to reach or dial zero forassistance. If you are calling from a Rotary Dial Phone, please stayon the line for assistance.
ExampleThank you for calling ACME Auto Parts. If you are calling from aTouch Tone phone and know the extension number you wish toreach, please enter it now. For Sales, press 1. For TechnicalSupport, press 2. If you are calling from a rotary dial phone, pleasestay on the line for assistance.
Notes• NVM-2 can accommodate more than one Main Greeting, but you
must set up (or check) the Answering Schedules before you recordthe Main Greeting (see Setting Up Answering Schedules For theMain Greetings) in this chapter. This is because the AnsweringSchedule includes a Call Routing Mailbox number and you mustenter that number when you record a Main Greeting (InstructionMenu).
• The recorded dialing options that belong in a Main Greeting comefrom the Dial Action Table that is assigned to the Call RoutingMailbox (see the Note above).
For your convenience, the Call Routing Mailbox numbers and theirDial Action Table assignments are shown below:Call Routing Mailbox 802 has Dial Action Table 1.Call Routing Mailbox 803 has Dial Action Table 2.Call Routing Mailbox 804 has Dial Action Table 3.
So: If you set up an Answering Schedule that uses Call RoutingMailbox 804, you will have to enter 804 when you go to record theMain Greeting (Instruction Menu) for that schedule. And, thatMain Greeting must include instructions for using the dialingoptions that you set up in Dial Action Table 3. For details on theDial Action Tables, see Setting Up a Dialing Options Menu in thischapter.
Chapter 3: Customizing Automated Attendant Features
Issue 1-0 11
Recording the Main Greetings (cont’d)
Programming Instructions
To record a Main Greeting (Instruction Menu):1. Log onto System Administrator Mailbox (lowest numbered
extension) as follows:From outside: Lift handset, dial NVM-2 phone number, wait forthe Main Greeting (Instruction Menu), dial #, dial extensionnumber, dial Security code if requested.From your 124i extension: Press Voice Mail key. (Or, pressCALL key, dial *8. On Single Lines, dial *8).From your Portrait extension: Press SPK, press ICM, dialNVM-2 Direct Log-On Number (98) (or press Mailbox Logonkey).From your VS/DS01 extension: Press Intercom key, press MSGkey. On Single Lines, dial *6.
2. Wait for NVM-2 to answer. Dial Security Code, if requested.3. Press SA for System Administrator Menu.4. Press I for Instruction Menu.5. Follow the voice prompts.
Related Programming• To let NVM-2 know when you want the Main Greeting to play
(day/date and time), see Setting Up Schedules For the MainGreetings in this chapter.
• To set up the dialing options for your system, see Setting Up aDialing Options Menu in this chapter.

Chapter 3: Customizing Automated Attendant Features
12 Issue 1-0
Temporarily Overriding All Main Greetings
DescriptionThis feature lets you temporarily override all answering schedules andhave the Automated Attendant answer calls with a substitute MainGreeting (Instruction Menu). This feature is technically calledAnswering Schedule Override. This is how it works:• Select one of NVM-2’s Call Routing Mailbox numbers (802, 803,
or 804) to be the “override” mailbox. Keep in mind that a CallRouting Mailbox [“Automated Attendant Mailbox”] is the actualNVM-2 mailbox that answers a call. These Call RoutingMailboxes may already be part of the existing AnsweringSchedules, but you must pick one anyway. Ideally, you arecurrently using only two of the Call Routing Mailboxes in theAnswering Schedules and there is an unused Call Routing Mailbox.
• Record the substitute Main Greeting (Instruction Menu) for theoverride Call Routing Mailbox number.
• Turn on Answering Schedule Override.
DefaultAnswering Schedule Override is off.
ExampleSuppose there was a violent storm and you had to close your business inthe middle of the afternoon. You could pick a Call Routing number andrecord an Instruction Menu something like this: Thank you for callingXYZ company. Due to the storm we will be closed for the rest of theday. Then you simply turn on Answering Schedule Override.
NotesThe override Call Routing Mailbox (with its substitute InstructionMenu) will answer calls every day and around the clock UNTIL YOUTURN OFF Answering Schedule Override.
Programming Instructions
To use Answering Schedule Override:1. Log onto System Administrator Mailbox (lowest numbered
extension) as follows:From outside: Lift handset, dial NVM-2 phone number, wait forthe Main Greeting (Instruction Menu), dial #, dial extensionnumber, dial Security code if requested.From your 124i extension: Press Voice Mail key. (Or, pressCALL key, dial *8. On Single Lines, dial *8).From your Portrait extension: Press SPK, press ICM, dialNVM-2 Direct Log-On Number (98) (or press Mailbox Logonkey).From your VS/DS01 extension: Press Intercom key, press MSGkey. On Single Lines, dial *6.
2. Wait for NVM-2 to answer. Dial Security Code, if requested.3. Press SA for System Administrator Menu.4. Press SO for Answering Schedule Override.5. Follow the voice prompts.
Chapter 3: Customizing Automated Attendant Features
Issue 1-0 13
Temporarily Overriding All Main Greetings (cont’d)
Related Programming• To record a Main Greeting (Instruction Menu), see Recording the
Main Greetings in this chapter.• For information on Answering Schedules, see Setting Up the
Schedules for the Main Greetings in this chapter.
Chapter 3: Customizing Automated Attendant Features
14 Issue 1-0
Setting Up a Dialing Options Menu
DescriptionNVM-2 lets you set up a menu of dialing options for AutomatedAttendant callers who are using Touch Tone phones. Callers simplypress a Touch Tone key (during the recorded Main Greeting/InstructionMenu) to direct their own call to a pre-programmed destination. Forexample, you could set up it up so that a caller can “Press 2 for JohnSmith.”
You program the dialing options in a Dial Action Table. In this tableyou assign an action and number to each Touch Tone key (0-8). Whenthe caller dials (presses) the key, the Automated Attendant performs theaction and dials the number. The available actions and their associatednumbers are listed under the gray box.
Example: Suppose you want callers to press Key 5 to listen torecorded directions to your company. First, you record anAnnouncement Message for Announcement Mailbox 800 (or 801). TheAnnouncement Message is simply the directions to your company.Then, in the Dial Action Table, you assign the MG action (Go to a Pre-Defined Mailbox) and the number 800 (or 801) to Key 5.
An NVM-2 Dial Action Table also lets you assign an action andnumber to the Time-out function. The Time-out function determineshow NVM-2 handles a call if the caller does not press a valid TouchTone digit within 7 seconds of the end of the Main Greeting(Instruction Menu). The Time-out function is primarily for callers whoare using rotary dial phones. It is also used when a FAX machine isconnected to an extension. (By default, this is extension 17 in thePortrait and 308 in the other phone systems. You can change thisnumber.) Seven seconds is required to give the Voice Mail enoughtime to detect FAX calling tone (CNG 1100 Hz).
NVM-2 provides 3 Dial Action Tables. They are numbered 1, 2, and 3.Dial Action Tables (1-3) are associated with Call Routing (AutomatedAttendant) Mailboxes 802, 803 and 804 respectively. So if CallRouting Mailbox 802 is answering calls, NVM-2 will let callers use theoptions in Dial Action Table 1. To let callers know which actions youhave selected, include them in the Main Greeting (Instruction Menu)that you record for Call Routing Mailbox 802. For more informationon how a Call Routing (Automated Attendant) Mailbox answers calls,see Setting Up Schedules for the Main Greetings in this chapter. Formore information on Recording Main Greetings (Instruction Menus),see Recording the Main Greetings in this chapter.
Actions and Numbers for Touch Tone Keys
The bold letters in parentheses (next to the action’s name) areprogramming codes. You must enter these codes to assign the action toa key when you program a Dial Action Table. In addition, at the end ofthis list are special codes that you can enter if you need them.
Chapter 3: Customizing Automated Attendant Features
Issue 1-0 15
Setting Up a Dialing Options Menu (cont’d)
Hear Current Parameters For Keys (HP)This plays the current Dial Action Table assignments for the TouchTone keys. (This is not an action for a key.)
Go to a Pre-Defined Mailbox (MG)This lets the caller press a key to go to a pre-defined mailbox. You canenter the following mailbox numbers:• Announcement Mailbox (800, 801). NVM-2 plays the
Announcement that you record for the Announcement Mailbox.Using the example: Suppose you want callers to press Key 5 tolisten to recorded directions to your company. First, you record thedirections in a Announcement Message for AnnouncementMailbox 800 (or 801). Then, in the Dial Action Table, you assignthe MG action (Go to a Pre-Defined Mailbox) and the number 800to Key 5.
• Call Routing Mailbox (802, 803, 804). NVM-2 plays the Main
Greeting (Instruction Menu) that you record for the Call RoutingMailbox, then lets the caller use the dialing options in theassociated Dial Action Table. Keep in mind that Call RoutingMailboxes 802, 803, and 804 have Dial Action Tables 1, 2 and 3respectively.
• Distribution Mailbox (805). NVM-2 lets the caller record a
message that will automatically be distributed to all SubscriberMailboxes.
Caller-Dialed Go to a Mailbox (CG)This lets the caller dial mailbox numbers to go to those mailboxes.Assign CG to Key 8, which is the first digit of the available mailboxnumbers in the system. There is no need to assign a number to the CGaction. See action GM (above) for the types of mailboxes that thecaller can dial.
The CG action is frequently used to let a caller dial 800 or 801 (duringthe Main Greeting) to listen to the Announcement Message that isrecorded for Announcement Mailbox 800 or 801. If you use CG in thisway, make sure you record an Announcement for the AnnouncementMailbox.

Chapter 3: Customizing Automated Attendant Features
16 Issue 1-0
Setting Up a Dialing Options Menu (cont’d)
Pre-Defined Extension Transfer [Screened] (ET)
This feature is not used when integrating with a Portrait phone system.
In the other phone systems, this lets the caller press one key to make ascreened transfer to a pre-defined Subscriber extension.
If the transfer is incomplete, NVM-2 retrieves the call after 3 rings andlets the caller leave a message or return to the Automated AttendantInstruction Menu. A screened transfer will not ring an extension at allif:• The extension’s Subscriber Mailbox has Auto Attendant Do Not
Disturb on. To turn it off, see Recording a Mailbox Greeting inthe User’s Guide.
• The Subscriber extension blocks Automated Attendant Transfers.See Blocking Automated Attendant Calls in this guide.
• The extension is busy, not installed, or in Do Not Disturb. If theextension is busy, NVM-2 says Extension XXX (or recordedmailbox name) is busy. To leave a message, press 1. For otheroptions, press 2. If the extension is in Do Not Disturb, NVM-2says Extension XXX is not available. To leave a message, press1. For other options, press 2 (for the Automated AttendantInstruction Menu).
Caller-Dialed Extension Transfer [Screened] (CT)
This feature is not used when integrating with a Portrait phone systems..
This lets the caller dial extension numbers to transfer to thoseextensions. By default, CT is assigned to Key 3 which corresponds tothe 1st digit of the phone system extension numbers (the digit 3). Thereis no need to assign a number to the CT action. To keep it simple,assigning CT to Key 3 lets a caller dial 3XX to make a screenedtransfer to extensions 3XX.
If the transfer is incomplete, the Voice Mail retrieves the call after 3rings and lets the caller leave a message or return to the AutomatedAttendant Instruction Menu. A screened transfer will not ring anextension at all if:• The extension has Auto Attendant Do Not Disturb on. To turn it
off, see Recording a Mailbox Greeting in the User’s Guide.• The Subscriber extension blocks Automated Attendant Calls. See
Blocking Automated Attendant Calls For An Extension in thisguide.
The extension is busy, not installed, or in Do Not Disturb. If theextension is busy, the Voice Mail says Extension XXX (or recordedmailbox name) is busy. To leave a message, press 1. For otheroptions, press 2. If the extension is in Do Not Disturb, the Voice Mailsays Extension XXX is not available. To leave a message, press 1.For other options, press 2.

Chapter 3: Customizing Automated Attendant Features
Issue 1-0 17
Setting Up a Dialing Options Menu (cont’d)
Unscreened (Blind) Transfer to a Pre-Defined Extension (UX)This lets the caller press one key to make an unscreened transfer to aspecific Subscriber extension. If the transfer is incomplete, the phonesystem handles the call.
Unscreened Transfers to Caller-Dialed Extensions (UC)This lets the caller dial extension numbers to make unscreened transfersto those extensions. Assign UC to the 1st digit of the extensionnumbers. There is no need to assign a number to the UC action. If thetransfer is incomplete, the phone system handles the call.
In the Portrait phone system, by default, UC is assigned to Keys 1, 2, 3which corresponds to the 1st digit of the phone system extensionnumbers (the digits 1, 2, 3). There is no need to assign a number to theUC action.
Message Recording For a Pre-Defined Subscriber Mailbox (MR)This lets the caller press one key to leave a message in a specificSubscriber Mailbox. The number for this action is simply the desiredSubscriber Mailbox number.
Directory Dialing Using First Names (DF) or Last Name (DL)This lets the caller press one key to access Directory Dialing either byFirst Names or by Last Names. There is no need to assign a number tothe DF or DL action. After pressing the key, NVM-2 lets the caller dialthe first few letters of a Subscriber’s first name or last name to transferto the Subscriber’s extension. NVM-2’s voice prompts guide the callerthrough the name-dialing process. (You can have one DirectoryDialing per system, so you can select Direct Dialing either by First orby Last Names. You cannot use both.)
When integrating with the 124i, VS or DS01, NVM-2 makes the type oftransfer (screened or unscreened) that you have selected in the DialAction Table. With the Portrait, NVM-2 makes an unscreened (blind orunsupervised) transfer.
Make sure you assign (program) a name for each Subscriber Mailbox.Otherwise Directory Dialing simply will not work.
In addition, if you assign the same name to two or more SubscriberMailboxes, you will also have to record a name for each SubscriberMailbox. Then, if someone dials one of these names, NVM-2 will sayFor person A, dial ___ For person B, dial ___, where person A andperson B are the recorded names for each Subscriber’s Mailbox.
Undefined Key (UK)This removes the action and number assigned to a key.
Restore Default Parameters (RD)This restores the default actions to the keys. See default settings on thenext page.
Chapter 3: Customizing Automated Attendant Features
18 Issue 1-0
Setting Up a Dialing Options Menu (cont’d)
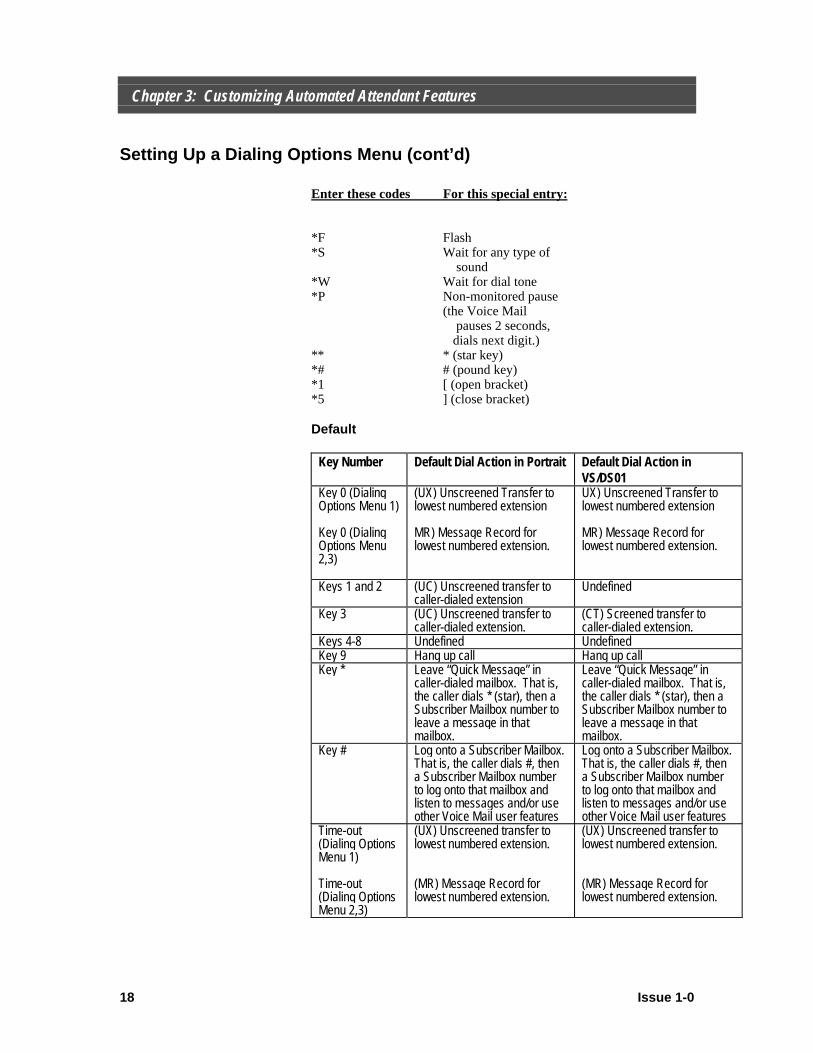
Enter these codes For this special entry:
*F Flash*S Wait for any type of
sound*W Wait for dial tone*P Non-monitored pause
(the Voice Mail pauses 2 seconds, dials next digit.)
** * (star key)*# # (pound key)*1 [ (open bracket)*5 ] (close bracket)
Default
Key Number Default Dial Action in Portrait Default Dial Action inVS/DS01
Key 0 (DialingOptions Menu 1)
Key 0 (DialingOptions Menu2,3)
(UX) Unscreened Transfer tolowest numbered extension
MR) Message Record forlowest numbered extension.
UX) Unscreened Transfer tolowest numbered extension
MR) Message Record forlowest numbered extension.
Keys 1 and 2 (UC) Unscreened transfer tocaller-dialed extension
Undefined
Key 3 (UC) Unscreened transfer tocaller-dialed extension.
(CT) Screened transfer tocaller-dialed extension.
Keys 4-8 Undefined UndefinedKey 9 Hang up call Hang up callKey * Leave “Quick Message” in
caller-dialed mailbox. That is,the caller dials * (star), then aSubscriber Mailbox number toleave a message in thatmailbox.
Leave “Quick Message” incaller-dialed mailbox. That is,the caller dials * (star), then aSubscriber Mailbox number toleave a message in thatmailbox.
Key # Log onto a Subscriber Mailbox.That is, the caller dials #, thena Subscriber Mailbox numberto log onto that mailbox andlisten to messages and/or useother Voice Mail user features
Log onto a Subscriber Mailbox.That is, the caller dials #, thena Subscriber Mailbox numberto log onto that mailbox andlisten to messages and/or useother Voice Mail user features
Time-out(Dialing OptionsMenu 1)
Time-out(Dialing OptionsMenu 2,3)
(UX) Unscreened transfer tolowest numbered extension.
(MR) Message Record forlowest numbered extension.
(UX) Unscreened transfer tolowest numbered extension.
(MR) Message Record forlowest numbered extension.

Chapter 3: Customizing Automated Attendant Features
Issue 1-0 19
Setting Up a Dialing Options Menu (cont’d)
ExampleYou have a Portrait phone system. Extension 24 is for your Salesperson, and you want callers to be able to press 2 to make a transfer tothat extension. To set this up in Dial Action Table programming youwould do the following:1. Select the action UX. The code UX is for Unscreened (Blind)
Transfer to a Pre-Defined Extension.2. Select the number: 24.3. Press the key for the action: 2The result is as follows: When the caller presses key 2, the AutomatedAttendant transfers the call to extension 24. In the Instruction Menu,you would typically say, For Sales, press 2.
Notes• The actions for Keys 9, * and # cannot be changed.• To assign an action and number to the Time-out function, you must
press the * key when NVM-2 asks you to Please press the key for this action.• If a caller records a message using a Distribution Mailbox, the
message will go into each Subscriber Mailbox whether or not thereis an associated extension. You should set the Message StorageLimit to 0 (zero) for Subscriber Mailboxes that do not haveextensions.
• The default actions for Key 0 and Time-Out are different in DialAction Table 1 than in Dial Action Tables 2 and 3. In Dial ActionTable 1, Key 0 is set up so that when callers press Key 0, they aretransferred to extension 0. The Time-Out function is set up so thatif callers do not press a Touch Tone digit within 7 seconds at theend of the Main Greeting, they are transferred to the lowestnumbered extension.
Dialing Options Menus 2 and 3 are used with Call RoutingMailboxes 803 and 804. The schedule for playing the MainGreeting for these Call Routing Mailboxes is Monday-Friday,starting at 5 PM. This is after regular business hours for manycompanies. And, as a result, an operator may not be present toanswer the phone. For this reason, in Dial Action Tables 2 and 3,Key 0 is set up so that when callers press the key, they can record amessage for the lowest numbered extension. The Time-Outfunction is set up so that if callers do not dial a Touch Tone digitwithin 7 seconds at the end of the Main Greeting, they can record amessage for the lowest numbered extension.
Chapter 3: Customizing Automated Attendant Features
20 Issue 1-0
Setting Up a Dialing Options Menu (cont’d)
Programming Instructions
To set up the dialing options in a Dial Action Table:1. Log onto System Administrator Mailbox (lowest numbered
extension) as follows:From outside: Lift handset, dial NVM-2 phone number, wait forthe Main Greeting (Instruction Menu), dial #, dial extensionnumber, dial Security code if requested.From your VS/DS01 extension: Press Intercom key, press MSGkey.From your Portrait extension: Press SPK, press ICM, dialNVM-2 Direct Log-On Number (98)(or press Mailbox Logon key).From your 124i extension: Press Voice Mail key. (Or, pressCALL key, dial *8. On Single Lines, dial *8).
2. Wait for NVM-2 to answer. Dial Security Code, if requested.3. Press DM for Database Management Menu.4. Press DA for Automated Attendant Dial Action Tables.5. Select a Dial Action Table number (1, 2, or 3).6. Follow the voice prompts.
Related Programming• To record the Announcement Message for an Announcement
Mailbox (that is part of the CM or CG action), see Recording anAnnouncement Message in this chapter.
• For Directory Dialing, make sure you have assigned a name to eachSubscribers Mailbox. See Assigning a Mailbox Name in this guide.For Directory Dialing by First Names, assign a Subscriber’s firstname to their mailbox. For Directory Dialing by Last Names,assign the Subscriber’s last name to their mailbox. If you assignthe same name to two or more mailboxes, record a name for eachSubscriber Mailbox. See Recording a Subscriber’s Mailbox Namein this guide.
• To let callers know about the options in a Dial Action Table, youmust record a Main Greeting (Instruction Menu) for thecorresponding Call Routing Mailbox. See Recording the MainGreetings in this chapter.
Chapter 3: Customizing Automated Attendant Features
Issue 1-0 21
Recording an Announcement Message
DescriptionAn Announcement Message is recorded for an Announcement Mailbox.An Announcement Message typically plays some type of information(movie schedules, sales promos, insurance rates, directions) forAutomated Attendant callers. When the Announcement finishesplaying, the caller goes back to the Automated Attendant InstructionMenu.
DefaultNo Announcement Messages
ExampleIt is common to record your business hours or directions to yourbusiness in an Announcement Message.
Notes• There are two Announcement Mailboxes in the system: 800 and
801.• The Announcement Message can be up to 5 minutes long.
Programming Instructions
To record an Announcement Message:1. Log onto System Administrator Mailbox (lowest numbered
extension) as follows:From outside: Lift handset, dial NVM-2 phone number, wait forthe Main Greeting (Instruction Menu), dial #, dial extensionnumber, dial Security code if requested.From your VS/DS01 extension: Press Intercom key, press MSGkey. On Single Lines, dial *6.From your Portrait extension: Press SPK, press ICM, dialNVM-2 Direct Log-On Number (98)(or press Mailbox Logon key).From your 124i extension: Press Voice Mail key. (Or, pressCALL key, dial *8. On Single Lines, dial *8).
2. Wait for NVM-2 to answer. Dial Security Code, if requested.3. Press SA for System Administrator menu.4. Press AN for Announcement Message.5. Follow voice prompts.
Related ProgrammingTo let an Automated Attendant caller access the Announcement, youmust assign the Announcement Mailbox to a key in a Dial ActionTable. See Setting Up a Dialing Options Menu in this chapter.

Chapter 4: Customizing Subscriber Mailbox Features
22 Issue 1-0
Creating a System Administrator Programming Extension
DescriptionNVM-2 lets you convert any Subscriber extension into an NVM-2System Administrator extension. (By default extension 17 in thePortrait and 308 for the other phone systems is reserved for a FAX.You can change this number). A System Administrator extension canbe used to program all the NVM-2 system features (that is, all thefeatures in this guide). In addition, a System Administrator extensionhas access to all the features of a Subscriber Mailbox.
DefaultThe following Subscriber extensions are permanent SystemAdministrator extensions:Portrait - Extension 10124i - Extension 301VS and DS01 - Extension 300
ExampleYou have a Portrait phone systems, and it is more convenient toprogram NVM-2 from extension 23 than extension 10. Simply use theprogramming instructions below to make extension 23 into a SystemAdministrator. Then you can log onto Subscriber Mailbox 23 (in thenormal way), and use the instructions in this guide to access theprogramming menus. These menus let you record Main Greetings(instruction menus), assign names to mailboxes, set up dialing menusfor callers, etc.
Notes• You cannot remove the System Administrator capabilities from
extension 10 in the Portrait, extension 301 in the 124i and 300 inthe VS/DS01.
• Extension 17 in the Portrait or extension 308 in 124i/VS/DS01 isreserved for a FAX machine and does not have a mailbox. Youcan make this extension into a System Administrator.
Programming Instructions
To set up a System Administrator extension fromextension 10:1. Log onto System Administrator Mailbox (lowest numbered
extension) as follows:From outside: Lift handset, dial NVM-2 phone number, wait forthe Main Greeting (Instruction Menu), dial #, dial extensionnumber, dial Security code if requested.From your 124i extension: Press Voice Mail key. (Or, pressCALL key, dial *8. On Single Lines, dial *8).From your Portrait extension: Press SPK, press ICM, dialNVM-2 Direct Log-On Number (98) (or press Mailbox Logonkey).From your VS/DS01 extension: Press Intercom key, press MSGkey. On Single Line, dial *6.
2. Wait for NVM-2 to answer. Dial Security Code, if requested.
Chapter 4: Customizing Subscriber Mailbox Features
Issue 1-0 23
Creating a System Administrator Programming Extension (cont’d)
3. Press DM for Database Management Menu.4. Press MP for Subscriber Mailbox Programming.5. Press SA for System Administrator.6. Follow the voice prompts.
Related ProgrammingTo assign a Security Code to any Subscriber Mailbox (including onethat has been converted into a System Administrator), see the User’sGuide.
Chapter 4: Customizing Subscriber Mailbox Features
24 Issue 1-0
Enabling or Disabling a Message Lamp
DescriptionThis feature determines if NVM-2 will inform Subscribers that theyhave received new messages in their mailboxes. NVM-2 lights theMessage Lamp on Key phones. When the handset of a Single Linephone is lifted, the Subscriber hears stutter dial tone to indicate that themailbox has new messages.
DefaultMessage Lamp is enabled for all Subscriber extensions.
ExampleIf you disable the Message Lamp at an extension, that extension userwill not know they have new messages. Extension users will have toperiodically log onto their mailbox to check their messages.
NotesIn order for the Message Lamp to light or stutter dial tone to bereceived (when enabled in programming), a port from the PortraitPhone System must be connected to Voice Mail port 2 on the NVM-2cabinet. See the Setup Guide for details.
Programming Instructions
To enable or disable the Message Lamp (and stutter dialtone):1. Log onto System Administrator Mailbox (lowest numbered
extension) as follows:From outside: Lift handset, dial NVM-2 phone number, wait forthe Main Greeting (Instruction Menu), dial #, dial extensionnumber, dial Security code if requested.From your 124i extension: Press Voice Mail key. (Or, pressCALL key, dial *8. On Single Lines, dial *8).From your Portrait extension: Press SPK, press ICM, dialNVM-2 Direct Log-On Number (98) (or press Mailbox Logonkey).From your VS/DS01 extension: Press Intercom key, press MSGkey. On Single Lines, dial *6.
2. Wait for NVM-2 to answer. Dial Security Code, if requested.3. Press DM for Database Management Menu.4. Press MP for Subscriber Mailbox Programming.5. Press MW for Message Wait Lamp.6. Follow the voice prompts.
Related ProgrammingNone
Chapter 4: Customizing Subscriber Mailbox Features
Issue 1-0 25
Blocking Automated Attendant Calls
DescriptionThis feature prevents an Automated Attendant caller from reaching theSubscriber extension. NVM-2 lets the caller leave a message. Or,NVM-2 can automatically re-route the blocked caller to anotherextension.
DefaultAutomated Attendant calls are not blocked.
ExampleYou may want to block Automated Attendant calls to the companypresident’s extension and re-route them to an assistant’s phone.
Notes• NVM-2 will re-route the blocked caller only if you assign a Next
Call Routing Mailbox to the Subscriber extension. See RelatedProgramming below.
• When a Next Call Routing Mailbox is set up for the Subscriberextension, NVM-2 re-routes the caller using the Key 0 (zero)assignment in the Next Call Routing Mailbox’s Dial Action Table.See Related Programming below.
Programming Instructions
To Block Auto Attendant calls for an extension:1. Log onto System Administrator Mailbox (lowest numbered
extension) as follows:From outside: Lift handset. dial NVM-2 phone number, wait forthe Main Greeting (Instruction Menu), dial #, dial extensionnumber, dial Security code if requested.From your 124i extension: Press Voice Mail key. (Or, pressCALL key, dial *8. On Single Lines, dial *8).From your Portrait extension: Press SPK, press ICM, dialNVM-2 Direct Log-On Number (98)(or press Mailbox Logon key).From your VS/DS01 extension: Press Intercom key, press MSGkey. On Single Lines, dial *6.
2. Wait for NVM-2 to answer. Dial Security Code, if requested.3. Press DM for Database Management Menu.4. Press MP for Subscriber Mailbox Programming.5. Press BA for Block Auto Attendant Calls.6. Follow the voice prompts.
Related Programming• To assign a Next Call Routing mailbox to a Subscriber extension,
see Re-routing a Subscriber’s Callers in this chapter.• To assign Key 0 to reach another extension, see Setting Up a
Dialing Options Menu in this guide.

Chapter 4: Customizing Subscriber Mailbox Features
26 Issue 1-0
Using Forced Unscreened Transfer
DescriptionIn a Voice Mail system that is set up for screened Automated Attendanttransfers to all extensions, you can use the Forced Unscreened Transferfeature to force an extension to receive unscreened (blind) AutomatedAttendant transfers instead.
This feature is not applicable to systems integrating with the Portraitphone system.
DefaultForced Unscreened Transfers are disabled.
ExampleYou may want to assign Forced Unscreened Transfers to thereceptionist’s extension or to an extension that is connected to a faxmachine.
NotesThe difference between screened and unscreened transfers is in how anincomplete transfer is handled. An incomplete unscreened transfer (forexample, an unanswered transfer) is handled by phone system. Anincomplete screened transfer is handled by the Voice Mail. In otherwords, the caller hears the voice prompts, To leave a message, press 1.For other options, press 2.
This feature is not available when integrating with the Portrait phonesystem.
Programming Instructions
To enable or disable Forced Unscreened Transfer for anextension:1. Log onto System Administrator Mailbox (lowest numbered
extension) as follows:From outside: Lift handset. dial NVM-2 phone number, wait forthe Main Greeting (Instruction Menu), dial #, dial extensionnumber, dial Security code if requested.From your 124i extension: Press Voice Mail key. (Or, pressCALL key, dial *8. On Single Lines, dial *8).From your Portrait extension: Press SPK, press ICM, dialNVM-2 Direct Log-On Number (98)(or press Mailbox Logon key).From your VS/DS01 extension: Press Intercom key, press MSGkey. On Single Lines, dial *6.
2. Wait for NVM-2 to answer. Dial Security Code, if requested.3. Press DM for Database Management Menu.4. Press MP for Subscriber Mailbox Programming.5. Press UX for Forced Unscreened Transfer.6. Follow the voice prompts.
Related ProgrammingTo set up unscreened or screened Automated Attendant transfers on asystem-wide basis, see Setting Up a Dialing Options Menu in thisguide.
Chapter 4: Customizing Subscriber Mailbox Features
Issue 1-0 27
Assigning a Mailbox Name
DescriptionThis feature assigns a name to a Subscriber’s Voice Mailbox. Thename is used for Directory Dialing (name-dialing). That is, AutomatedAttendant callers can simply dial the first few letters of a mailbox nameto transfer to that corresponding extension.
DefaultNo Subscriber Mailboxes have names.
ExampleSuppose you have a Portrait phone system, and Directory Dialing byfirst name is set up in your NVM-2 System. If you assign the nameMichael to extension 24, Automated Attendant callers can dial M I Con the dial pad to transfer to his extension.
NotesIf Directory Dialing by first name is enabled, make sure to assign theextension users’ first names to their mailboxes. Likewise, if DirectoryDialing by last name is enabled, assign extension users’ last names totheir mailboxes.
Programming Instructions
To assign a name to a Subscriber Mailbox:1. Log onto System Administrator Mailbox (lowest numbered
extension) as follows:From outside: Lift handset, dial NVM-2 phone number, wait forthe Main Greeting (Instruction Menu), dial #, dial extensionnumber, dial Security code if requested.From your 124i extension: Press Voice Mail key. (Or, pressCALL key, dial *8. On Single Lines, dial *8).From your Portrait extension: Press SPK, press ICM, dialNVM-2 Direct Log-On Number (98) (or press Mailbox Logonkey).From your VS/DS01 extension: Press Intercom key, press MSGkey. On Single Lines, dial *6.
2. Wait for NVM-2 to answer. Dial Security Code, if requested.3. Press DM for Database management Menu.4. Press MP for Subscriber Mailbox Programming.5. Press NP for Mailbox Name Programming.6. Follow the voice prompts.
Related ProgrammingTo enable Directory Dialing, see Setting Up a Dialing Options Menu inthis guide.

Chapter 4: Customizing Subscriber Mailbox Features
28 Issue 1-0
Re-Routing a Subscriber’s Callers
DescriptionNVM-2 can re-route a caller who tries to reach a Subscriber extension.There are two different scenarios:• If the caller tries to reach a Subscriber extension and that extension
has blocked Automated Attendant calls, NVM-2 can automaticallyre-route the caller to another extension.
• If the caller actually enters the Subscriber Mailbox to leave amessage, NVM-2 can let the caller manually dial 0 (before or afterthe beep) to re-route their call to another extension.
NVM-2 allows this type of re-routing only if a Call Routing (802, 803,804) Mailbox is assigned to the Subscriber Mailbox. This Call RoutingMailbox is referred to as a Next Call Routing Mailbox. Then you mustwork with the Next Call Routing Mailbox’s Dial Action Table (1, 2, or3, respectively). NVM-2 will re-route the caller using the action andnumber that is assigned to Key 0 in that Dial Action Table.
Default• NVM-2 will automatically re-route a blocked Automated Attendant
caller to the lowest numbered extension.• If a caller enters the Subscriber Mailbox to leave a message, NVM-
2 will let a caller manually dial 0 to re-route their call to the lowestnumbered extension.
Call Routing Mailbox 802 (with Dial Action Table 1) is assigned as theNext Call Routing Mailbox for each Subscriber Mailbox. Key 0 is setup for unscreened transfer (which is the ET action) to the lowestnumbered extension.
ExampleIf you assign Call Routing Mailbox 803 as the Next Call RoutingMailbox, you will have to program Key 0 in Dial Action Table 2.
Notes• If the same Call Routing Mailbox is used in an Answering
Schedule and as a Next Call Routing Mailbox, the Key 0 actionwill be available for incoming Automated Attendant callers as wellas callers who try to reach the Subscriber who has the Next CallRouting Mailbox.
• To prevent both re-routing scenarios described above, make surethat Key 0 is undefined in the Next Call Routing Mailbox’s DialAction Table.

Chapter 4: Customizing Subscriber Mailbox Features
Issue 1-0 29
Programming InstructionsTo assign a different Next Call Routing Mailbox to aSubscriber extension:1. Log onto System Administrator Mailbox (lowest numbered
extension) as follows:From outside: Lift handset, dial NVM-2 phone number, wait forthe Main Greeting (Instruction Menu), dial #, dial extensionnumber, dial Security code if requested.
From your Portrait extension: Press SPK, press ICM, dial NVM-2 Direct Log-On Number (98) (or press Mailbox Logonkey).From your 124i extension: Press Voice Mail key. (Or, pressCALL key, dial *8. On Single Lines, dial *8).From your VS/DS01 extension: Press Intercom key, press MSGkey. On Single Lines, dial *6.
2. Wait for NVM-2 to answer. Dial Security Code, if requested.3. Press DM for Database Management Menu.4. Press MP for Subscriber Mailbox Programming.5. Press NC for Next Call Routing Mailbox.6. Follow the voice prompts.
Related ProgrammingTo assign an action and number to Key 0 in a Dial Action Table, seeSetting Up a Dialing Options Menu in this guide.
To block Automated Attendant calls to a Subscriber extension, seeBlocking Automated Attendant Calls in this guide.

Chapter 4: Customizing Subscriber Mailbox Features
30 Issue 1-0
Setting the Message Limit for a Subscriber’s Mailbox
DescriptionThis feature allows the System Administrator to change the maximumnumber of messages that are allowed in a Subscriber Mailbox. Thisfeature is useful when you have a mailbox that does not have anextension associated with it. You should set a mailbox (which does nothave an associated extension) with a message limit of 0 (zero). This isbecause the Distribution Mailbox is set up to distribute a message to allSubscriber Mailboxes (even those without corresponding extensions).Setting the Message Limit to 0 (zero) will prevent unused mailboxesfrom receiving these messages.
You can specify from 0 (zero) to 300 messages as the limit. However,25 is the typical number used.
Default25 Messages
ExampleA Subscriber Mailbox is not used and does not have an extension.Setting the Message Limit to 0 (zero) will prevent this mailbox fromreceiving messages. When the mailbox is used and a Subscriber logson for the first time, the mailbox will not have old messages from theDistribution Mailbox.
NotesWhen the mailbox is finally used, remember to change the messagelimit from 0. Otherwise, the mailbox will not be able to receivemessages.
If you use a FAX machine other than 17(for the Portrait) or 308(124i/VS/DS01), be sure to set the Message Limit to 0 (zero) for thisextension.
Programming InstructionsTo change the message limit of a particular SubscriberMailbox:1. Log onto System Administrator Mailbox (lowest numbered
extension) as follows:From outside: Lift handset, Dial NVM-2 phone number, wait forthe Main Greeting (Instruction Menu), dial #, dial extensionnumber, dial Security code if requested.From your 124i extension: Press Voice Mail key. (Or, pressCALL key, dial *8. On Single Lines, dial *8).From your Portrait extension: Press SPK, press ICM, dialNVM-2 Direct Log-On Number (98) (or press Mailbox Logonkey).From your VS/DS01 extension: Press Intercom key, press MSGkey. On Single Lines, dial *6.
2. Wait for NVM-2 to answer. Dial Security Code, if requested.3. Press DM for Database Management Menu.4. Press MP for Subscriber Mailbox Programming.5. Press ML for Message Limit.6. Follow the voice prompts.
Chapter 4: Customizing Subscriber Mailbox Features
Issue 1-0 31
Setting the Message Limit for a Subscriber’s Mailbox (cont’d)
Related ProgrammingTo erase all of a Subscriber’s messages by logging onto their mailbox,see Logging Onto Your Mailbox and Using the Listening Options in theUser’s Guide.
To prevent an invalid extension from receiving Automated Attendantcalls, see Blocking Automated Calls in this guide.
To change the number for the FAX machine, see Changing the FAXExtension in this guide.

Chapter 5: Using Administrative and Maintenance Features
32 Issue 1-0
Removing a Subscriber Extension
DescriptionIf you no longer have a need for a particular Subscriber extension, youshould do a few things before you unplug the phone. Someone (you orthe Subscriber) should log onto the Subscriber Mailbox and erase therecorded Mailbox Greeting and Mailbox Name, if any. If there are anymessages in the Subscriber Mailbox, they should be erased. Themailbox message length should be changed to 0. Then you can unplugthe phone. The Subscriber Mailbox will still be associated with theport. In other words, removing a Subscriber extension does not removethe Subscriber Mailbox from the NVM-2 system. DefaultN/A
ExampleIn the Portrait, if you unplug a phone that corresponds to extension 23,Subscriber Mailbox 23 is still associated with extension 23.
NotesFor any invalid (uninstalled) extension, you should enable Block AutoAttendant for that extension, and assign Key 0 to transfer calls to theoperator (in the Next Call Routing Mailbox’s Dial Action Table). Thatway, callers who dial invalid mailbox numbers are routed to theoperator (the lowest numbered extension).
Programming InstructionsN/A
Related ProgrammingTo erase all of a Subscriber’s messages without logging onto theirmailbox, see Erasing All Subscriber Messages in this guide.
To erase all of a Subscriber’s messages by logging onto their mailbox,see Logging Onto Your Mailbox and Using the Listening Options inNVM-2 User’s Guide.
To prevent an invalid extension from receiving Automated Attendantcalls, see Blocking Automated Attendant Calls in this guide.
To re-route a caller who has dialed an extension, see Re-routing aSubscriber’s Callers in this guide.
To set up Key 0 to route to the operator, see Setting Up a DialingOptions Menu, in this guide.
Chapter 5: Using Administrative and Maintenance Features
Issue 1-0 33
Deleting a Subscriber Mailbox Security Code
DescriptionThis feature lets you delete the Security Code of a Subscriber Mailbox.
DefaultNo Subscriber Mailboxes have a Security Code.
ExampleYou will need to delete Mailbox Security Codes if Subscribers forget it,and therefore cannot log onto their mailbox. Once you delete theSecurity Code, the Subscriber can log onto the mailbox and select anew Security Code.
NotesNot applicable
Programming Instructions
To delete a Mailbox Security Code:1. Log onto System Administrator Mailbox (lowest numbered
extension) as follows:From outside: Lift handset, dial NVM-2 phone number, wait forthe Main Greeting (Instruction Menu), dial #, dial extensionnumber, dial Security code if requested.From your 124i extension: Press Voice Mail key. (Or, pressCALL key, dial *8. On Single Lines, dial *8).From your Portrait extension: Press SPK, press ICM, dialNVM-2 Direct Log-On Number (98) (or press Mailbox Logonkey).From your VS/DS01 extension: Press Intercom key, press MSGkey. On Single Lines, dial *6.
2. Wait for NVM-2 to answer. Dial Security Code, if requested.3. Press DM for Database Management Menu.4. Press MP for Subscriber Mailbox Programming.5. Press DS for Delete Security Code.6. Follow the voice prompts.
Related ProgrammingTo assign a Security Code to a Subscriber Mailbox, see the User’sGuide.
Chapter 5: Using Administrative and Maintenance Features
34 Issue 1-0
Erasing All Subscriber Messages
DescriptionThis feature erases all the messages in a specific Subscriber Mailbox.
DefaultNot applicable
Example• This feature is handy when an installed extension is no longer
needed, or a new person is taking over the mailbox. If there areany messages left in its Subscriber Mailbox, you can erase them tofree up message storage space.
• You can also use this feature to erase all the messages that are inSubscriber Mailboxes that do not have associated extensions/users.Unless the Message Limit is set to 0 (zero), these SubscriberMailboxes, even though not associated with a extension/user, willreceive messages if someone sends a message to the DistributionMailbox. (The Distribution Mailbox distributes a message to eachSubscriber Mailbox regardless of whether an extension isassociated with it).
NotesNot applicable
Programming Instructions
To erase all the messages in a Subscriber Mailbox:1. Log onto System Administrator Mailbox (lowest numbered
extension) as follows:From outside: Lift handset, dial NVM-2 phone number, wait forthe Main Greeting (Instruction Menu), dial #, dial extensionnumber, dial Security code if requested.From your 124i extension: Press Voice Mail key. (Or, pressCALL key, dial *8. On Single Lines, dial *8).
From your Portrait extension: Press SPK, press ICM, dialNVM-2 Direct Log-On Number (98) (or press Mailbox Logonkey).From your VS/DS01 extension: Press Intercom key, press MSGkey. On Single Lines, dial *6.
2. Wait for NVM-2 to answer. Dial Security Code, if requested.3. Press SA for System Administrator Menu.4. Press EM for Erase All Subscriber Messages.5. Follow the voice prompts
Related ProgrammingTo erase all messages (including Instruction Menus, AnnouncementMessages, etc.), see Initializing (Erasing) All System Messages in thisguide.
To set a limit on the number of messages, see Setting the Message Limitfor a Subscriber’s Mailbox in this guide.

Chapter 5: Using Administrative and Maintenance Features
Issue 1-0 35
Recording a Subscriber Mailbox Name
DescriptionYou can record a name for a Subscriber Mailbox. A mailbox namereplaces the mailbox number (or corresponding extension number) inNVM-2 voice prompts. Subscribers should record their own namesthrough their mailboxes (see the User’s Guide). However, you maywant to record their names for them.
DefaultNo names are recorded.
ExampleIf you have a Portrait and you record the name John Smith for extension23, and John does not answer an Automated Attendant call, NVM-2will say John Smith does not answer instead of Extension 23 does notanswer.
NotesThe name can be up to 10 seconds long.
Programming Instructions
To record a name for a Subscriber Mailbox:1. Log onto System Administrator Mailbox (lowest numbered
extension) as follows:From outside: Lift handset, dial NVM-2 phone number, wait forthe Main Greeting (Instruction Menu), dial #, dial extensionnumber, dial Security code if requested.From your 124i extension: Press Voice Mail key. (Or, pressCALL key, dial *8. On Single Lines, dial *8).From your Portrait extension: Press SPK, press ICM, dialNVM-2 Direct Log-On Number (98) (or press Mailbox Logonkey).From your VS/DS01 extension: Press Intercom key, press MSGkey. On Single Lines, dial *6.
2. Wait for NVM-2 to answer. Dial Security Code, if requested.3. Press SA for System Administrator Menu.4. Press N for Mailbox Names.5. Follow the voice prompts.
Related ProgrammingNone
Chapter 5: Using Administrative and Maintenance Features
36 Issue 1-0
Changing the FAX Extension
DescriptionYou can connect a FAX machine to one of the phone system extensions(if your phone system allows it). When an outside party calls in and theVoice Mail detects FAX calling tone (CNG 1100Hz), the FAX call istransferred to the extension connected to the FAX machine. Sevenseconds is required to give the Voice Mail enough time to detect FAXcalling tone.
DefaultWith the Portrait phone system, extension 17 is the default extensionassigned for connecting a FAX. With all other phone systems (124i,VS, and DS01), the default extension is 308.
ExampleYou have a Portrait phone system, and want to connect extension 12 tothe FAX machine instead of extension 17.
NotesYou can use only one extension for a FAX machine.
If you use an extension other than 17 (or 308) for a FAX machine, youcan make 17 (or 308) into a Subscriber Mailbox. Extension 17 can beused for a Subscriber. Enter *0 for the FAX string.
If you use a number other than 17 for the FAX machine, be sure to setthe Message Storage Limit to 0 for this extension.
Programming Instructions
To change the extension that is connected to a FAXmachine:1. Log onto System Administrator Mailbox (lowest numbered
extension) as follows:From outside: Lift handset, dial NVM-2 phone number, wait forthe Main Greeting (Instruction Menu), dial #, dial extensionnumber, dial Security code if requested.From your 124i extension: Press Voice Mail key. (Or, pressCALL key, dial *8. On Single Lines, dial *8).From your Portrait extension: Press SPK, press ICM, dial NVM-2 Direct Log-On Number (98) (or press Mailbox Logon key).From your VS/DS01 extension: Press Intercom key, press MSGkey. On Single Lines, dial *6.
2. Wait for NVM-2 to answer. Dial Security Code, if requested.3. Press DM for Database Management Menu.4. Press FT for FAX Transfer.5. Follow the voice prompts.
Related ProgrammingTo change the Message Storage Limit, see Setting the Message StorageLimit of a Subscriber’s Mailbox in this guide.
Chapter 5: Using Administrative and Maintenance Features
Issue 1-0 37
Setting the System Time
DescriptionThis feature sets the time in the NVM-2 system.
DefaultThe System Time is not set.
ExampleThe System Time must be set when the NVM-2 is first installed and/orthe system batteries are so low that the system time is lost. See theSetup Guide for details.
NotesThe System Time in the NVM-2 and the phone system must be thesame.
Programming Instructions
To set the System Time:1. Log onto System Administrator Mailbox (lowest numbered
extension) as follows:From outside: Lift handset, dial NVM-2 phone number, wait forthe Main Greeting (Instruction Menu), dial #, dial extensionnumber, dial Security code if requested.From your 124i extension: Press Voice Mail key. (Or, pressCALL key, dial *8. On Single Lines, dial *8).From your Portrait extension: Press SPK, press ICM, dial NVM-2 Direct Log-On Number (98) (or press Mailbox Logon key).From your VS/DS01 extension: Press Intercom key, press MSGkey. On Single Lines, dial *6.
2. Wait for NVM-2 to answer. Dial Security Code, if requested.3. Press SA for System Administrator Menu.4. Press TI for System Time.5. Follow the voice prompts
Related ProgrammingTo set the System Date, see Setting the System Date in this chapter.

Chapter 5: Using Administrative and Maintenance Features
38 Issue 1-0
Setting the System Date
DescriptionThis feature sets the date in the NVM-2 system.
DefaultThe System Date is not set.
ExampleThe System Date must be set when the NVM-2 is first installed and/orthe system batteries are so low that the system date is lost. See theSetup Guide for details.
NotesThe System Date in the NVM-2 and the phone system must be thesame.
Programming Instructions
To set the System Date:1. Log onto System Administrator Mailbox (lowest numbered
extension) as follows:From outside: Lift handset, dial NVM-2 phone number, wait forthe Main Greeting (Instruction Menu), dial #, dial extensionnumber, dial Security code if requested.From your 124i extension: Press Voice Mail key. (Or, pressCALL key, dial *8. On Single Lines, dial *8).From your Portrait extension: Press SPK, press ICM, dial NVM-2 Direct Log-On Number (98) (or press Mailbox Logon key).From your VS/DS01 extension: Press Intercom key, press MSGkey. On Single Lines, dial *6.
2. Wait for NVM-2 to answer. Dial Security Code, if requested.3. Press SA for System Administrator Menu.4. Press DT for System Date.5. Follow the voice prompts.
Related ProgrammingTo set the System Time, see Setting the System Time in this chapter.
Chapter 5: Using Administrative and Maintenance Features
Issue 1-0 39
Getting the System Version Number
DescriptionThis features plays the system version number for your NVM-2 system.
DefaultThe System Version is 1.02.
ExampleYou may need to know the System Version Number for troubleshootingpurposes.
NotesNot applicable
Programming Instructions
To get the System Version Number:1. Log onto System Administrator Mailbox (lowest numbered
extension) as follows:From outside: Lift handset, dial NVM-2 phone number, wait forthe Main Greeting (Instruction Menu), dial #, dial extensionnumber, dial Security code if requested.From your 124i extension: Press Voice Mail key. (Or, pressCALL key, dial *8. On Single Lines, dial *8).From your Portrait extension: Press SPK, press ICM, dial NVM-2 Direct Log-On Number (98) (or press Mailbox Logon key).From your VS/DS01 extension: Press Intercom key, press MSGkey. On Single Lines, dial *6.
2. Wait for NVM-2 to answer. Dial Security Code, if requested.3. Press SA for System Administrator Menu.4. Press SV for System Version.5. Follow the voice prompts.
Related ProgrammingNone

Chapter 5: Using Administrative and Maintenance Features
40 Issue 1-0
Initializing (Erasing) All System Messages
DescriptionThis feature initializes (erases) the message database. All personal(Subscriber) messages and system recordings (e.g., MainGreeting/Instruction Menu) will be erased, and the default prompt, ifany, will be replaced.
DefaultNot applicable
ExampleIf you initialize the system messages, your customized Main Greetingwill be erased, and NVM-2 will replace it with the default MainGreeting (Thank you for calling. If you are calling from a TouchTone phone...).
NotesThe System Administrator’s mailbox must have a security code in orderto initialize the message database.
Programming Instruction
To initialize the system messages:1. Log onto System Administrator Mailbox (lowest numbered
extension) as follows:From outside: Lift handset, dial NVM-2 phone number, wait forthe Main Greeting (Instruction Menu), dial #, dial extensionnumber, dial Security code if requested.From your 124i extension: Press Voice Mail key. (Or, pressCALL key, dial *8. On Single Lines, dial *8).From your Portrait extension: Press SPK, press ICM, dial NVM-2 Direct Log-On Number (98) (or press Mailbox Logon key).From your VS/DS01 extension: Press Intercom key, press MSGkey. On Single Lines, dial *6.
2. Wait for NVM-2 to answer. Dial Security Code, if requested.3. Press DM for Database Management Menu.4. Press SI for System Initialization.5. Follow the voice prompts for initializing the message database.
Related ProgrammingTo erase only the messages in a specific Subscriber Mailbox, see EraseAll Subscriber Messages in this guide.

Chapter 5: Using Administrative and Maintenance Features
Issue 1-0 41
Restoring the Initial (Default) System Settings
DescriptionThis initializes the entire NVM-2 database. All personal (Subscriber)messages and system recordings (e.g., Main Greeting/Instruction Menu)will be erased, and the default prompt, if any, will be replaced. Inaddition, all programmable options will be set to their default values.
DefaultNot applicable
ExampleYou may have to initialize the system if it does operate correctly due toimproper programming.
NotesThe System Administrator’s mailbox must have a security code in orderto initialize the Voice Mail database.
Programming Instruction
To restore the initial (default) system settings:1. Log onto System Administrator Mailbox (lowest numbered
extension) as follows:From outside: Lift handset, dial NVM-2 phone number, wait forthe Main Greeting (Instruction Menu), dial #, dial extensionnumber, dial Security code if requested.From your 124i extension: Press Voice Mail key. (Or, pressCALL key, dial *8. On Single Lines, dial *8).From your Portrait extension: Press SPK, press ICM, dial NVM-2 Direct Log-On Number (98) (or press Mailbox Logon key).From your VS/DS01 extension: Press Intercom key, press MSGkey. On Single Lines, dial *6.
2. Wait for NVM-2 to answer. Dial Security Code, if requested.3. Press DM for Database Management Menu.4. Press SI for System Initialization.5. Follow the voice prompts.
Related ProgrammingTo initialize (erase) only the personal (Subscriber) and systemmessages, see Initializing (Erasing) All System Messages in thischapter.

Chapter 5: Using Administrative and Maintenance Features
42 Issue 1-0
Changing the Phone System Integration
DescriptionThis changes the phone system that integrates with the NVM-2. NVM-2 integrates with the Portrait, Nitsuko 124i, the Onyx VS orBusinesscom DS01.
DefaultIn a new installation, the default phone system is the Portrait.
ExampleYou are installing a new system with a Nitsuko 124i. The systemdefaults to Portrait. You must change the phone system to 124i.
NotesA System Administrator with a Security Code is required for changingthe phone system integration.
If the system is a new installation, you must set a security code forextension 10 (lowest extension in the Portrait), and use extension 10 tochange the integration from the Portrait to one of the other phonesystems (124i, VS/DS01).
Programming Instruction
To change the phone system integration:1. Log onto System Administrator Mailbox (lowest numbered
extension) as follows:From outside: Lift handset, dial NVM-2 phone number, wait forthe Main Greeting (Instruction Menu), dial #, dial extensionnumber, dial Security code if requested.From your 124i extension: Press Voice Mail key. (Or, pressCALL key, dial *8. On Single Lines, dial *8).From your Portrait extension: Press SPK, press ICM, dial NVM-2 Direct Log-On Number (98) (or press Mailbox Logon key).From your VS/DS01 extension: Press Intercom key, press MSGkey. On Single Lines, dial *6.
2. Wait for NVM-2 to answer. Dial Security Code, if requested.3. Press DM for Database Management Menu.4. Press SI for System Initialization.5. Press 3 to Initialize the Voice Mail database for a particular phone
system.6. Enter the number corresponding to the phone system you wish to
enter: 1 - Portrait 2 - 124i 3 - VS/DSThe system asks for a security code.
7. Enter the security code, and follow the voice prompts.
Related ProgrammingTo initialize (erase) only the personal (Subscriber) and systemmessages, see Initializing (Erasing) All System Messages in thischapter.

Nitsuko America, Telecom Division4 Forest ParkwayShelton, CT 06484
TEL: 203-926-5400FAX: 203-929-0535
Other Important Telephone Numbers
Sales...............................................................................203-926-5450Customer Service...........................................................203-926-5444Customer Service FAX:.................................................203-926-5454Technical Service...........................................................203-925-8801Discontinued Product Service........................................900-990-2541Technical Training:........................................................203-926-5430Emergency Technical Service (After Hours).................203-929-7920 (Excludes discontinued products)