PRODUCT SPECIFICATIONS - Matco Tools
7
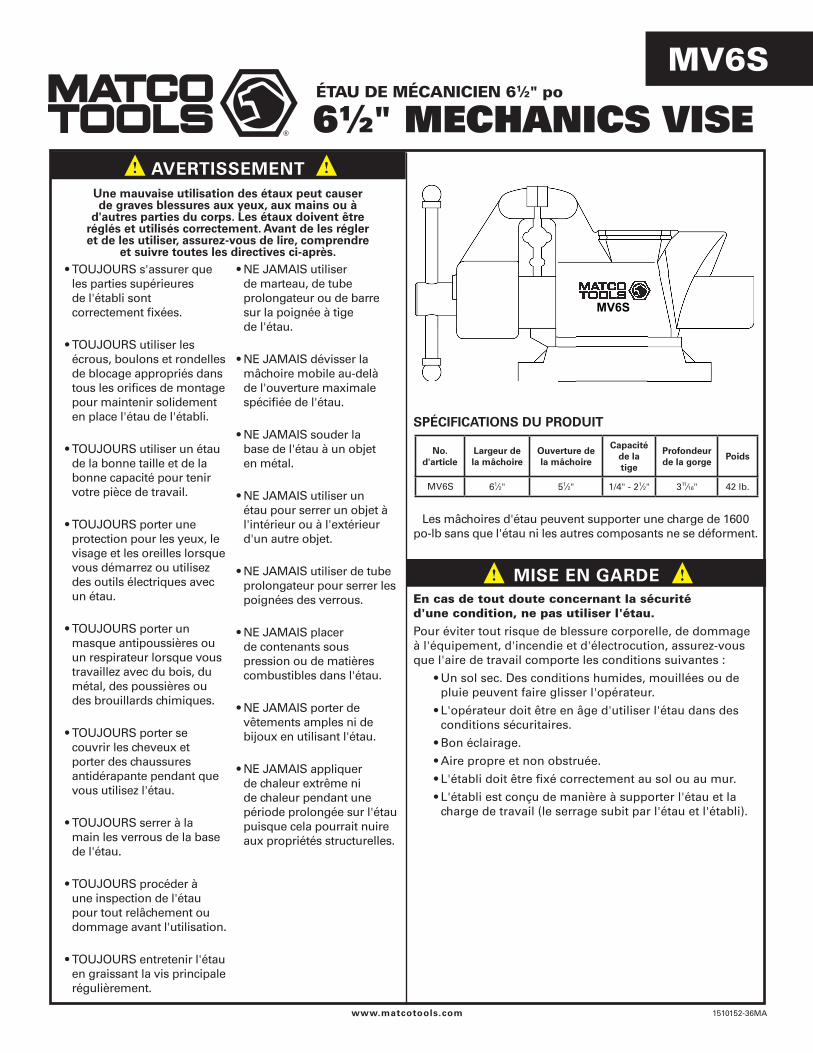
1510152-36MA 6 1 ⁄2" MECHANICS VISE MV6S ! ! ! ! www.matcotools.com WARNING CAUTION Misuse of vises can cause serious injury to eyes, hands and/or other body parts. Vises must be set up and used properly. Before setup and use, read, understand and follow all instructions outlined below. Jaws able to withstand a load of 1600" lbs. without distortion of the vise or any components. If there is any question about a condition being safe or unsafe, do not operate the vise. To avoid risk of personal injury, equipment damage, fire and shock, make sure work area has the following conditions: • Floor is dry. Damp, wet or rainy conditions can cause operator to slip. • Operator must be of sufficient age to operate vise in a safe condition. • Well lit. • Clean and unobstructed. • Workbench is properly secured to floor or wall. • Workbench is designed sufficiently to handle vise and work load (torque placed upon the vise and workbench). • ALWAYS make sure bench tops are properly secured. • ALWAYS use proper nuts, bolts and lock washers in all mounting holes, to hold bench vise down. • ALWAYS use vise of proper size and capacity to hold work object. • ALWAYS wear eye, face and ear protection when striking or using power tools with a vise. • ALWAYS wear dust mask or respirator when working with wood, metal, chemical dusts or mists. • ALWAYS wear restrictive hair covering and anti-slip footwear while operating vise. • ALWAYS hand tighten handles of lockdowns for swivel base. • ALWAYS inspect vise for stress fatigue or damage to the vise before using. • ALWAYS maintain the vise by greasing the main screw regularly. • NEVER use a hammer, extension pipe or cheater bar on spindle handle of vise. • NEVER unscrew movable jaw beyond maximum specified opening of vise. • NEVER weld base of vise to any metal object. • NEVER use a vise to press an object into or out of another object. • NEVER use and extension pipe to tighten handles of lockdowns. • NEVER place pressurized containers or combustible materials in vise. • NEVER wear loose clothing or jewelry while operating vise. • NEVER apply extreme or prolonged heat to the vise as it may alter structural properties. MV6S PRODUCT SPECIFICATIONS Item No. Jaw Width Jaw Opening Pipe Capacity Throat Depth Weight MV6S 6 1 ⁄2" 5 1 ⁄2" 1/4" - 2 1 ⁄2" 3 11 ⁄16" 42 lbs. 6 1 ⁄2" PRENSA PARA MECÁNICOS
Transcript of PRODUCT SPECIFICATIONS - Matco Tools

1510152-36MA
61⁄2" MECHANICS VISE
MV6S
!!
! !
www.matcotools.com
WARNING
CAUTION
Misuse of vises can cause serious injury to eyes, hands and/or other body parts. Vises must be set up and used properly. Before setup and use, read,
understand and follow all instructions outlined below.
Jaws able to withstand a load of 1600" lbs. without distortion of the vise or any components.
If there is any question about a condition being safe or unsafe, do not operate the vise. To avoid risk of personal injury, equipment damage, fire and shock, make sure work area has the following conditions:
•Floor is dry. Damp, wet or rainy conditions cancause operator to slip.
•Operator must be of sufficient age to operate visein a safe condition.
•Well lit.•Clean and unobstructed.•Workbench is properly secured to floor or wall.•Workbench is designed sufficiently to handle viseand work load (torque placed upon the vise andworkbench).
•ALWAYS make surebench tops are properlysecured.
•ALWAYS use propernuts, bolts and lockwashers in all mountingholes, to hold benchvise down.
•ALWAYS use vise ofproper size and capacityto hold work object.
•ALWAYS wear eye, faceand ear protection whenstriking or using powertools with a vise.
•ALWAYS wear dustmask or respiratorwhen working withwood, metal, chemicaldusts or mists.
•ALWAYS wear restrictivehair covering andanti-slip footwearwhile operating vise.
•ALWAYS hand tightenhandles of lockdownsfor swivel base.
•ALWAYS inspect visefor stress fatigue ordamage to the visebefore using.
•ALWAYS maintain thevise by greasing themain screw regularly.
•NEVER use a hammer,extension pipe orcheater bar on spindlehandle of vise.
•NEVER unscrewmovable jaw beyondmaximum specifiedopening of vise.
•NEVER weld base ofvise to any metal object.
•NEVER use a viseto press an object intoor out of another object.
•NEVER use andextension pipe totighten handles oflockdowns.
•NEVER placepressurized containersor combustiblematerials in vise.
•NEVER wear looseclothing or jewelrywhile operating vise.
•NEVER apply extremeor prolonged heat tothe vise as it may alterstructural properties.
MV6S
PRODUCT SPECIFICATIONS
Item No.
Jaw Width
Jaw Opening
Pipe Capacity
Throat Depth
Weight
MV6S 61⁄2" 51⁄2" 1/4" - 21⁄2" 311⁄16" 42 lbs.
61⁄2" PRENSA PARA MECÁNICOS
MV6S
1510152-36MAwww.matcotools.com
1. Place vise on the workbench to identify locationof mounting holes.
2. For added strength to the workbench prior toinstalling and securing vise, place an 18" x 18"x 2" piece of wood (18" x 18" x ¼" metal plate)to the bottom side of the workbench.
3. Mark and drill holes through the workbenchand wood / metal plate using the swivel base asthe template for the mounting holes. Prior todrilling, make sure area is free and clear of anyhazards.
4. Install proper length and diameter bolts intothe swivel base of the vise. The followingconfiguration is recommended at a minimum:
a. Install proper length and diameter boltsalong with flat washer through the swivelbase of the vise. The bolt should be longenough to protrude at least 1" beyondthe underside of the workbench andwood / metal plate. On the bottom sideof the workbench and wood / metal plate,place a flat washer, lock washer andlocking nut to the bolt. Securely tightenvise to the workbench. Periodically,recheck and re-tighten the nuts.
Make sure vise selection (size and type) is appropriate for use and application. Larger vise options are available. Never force or use cheater bars, pipe extensions on the screw handle of the vise as this places excessive pressure on the vise components and they may fail resulting in severe bodily injury.
1. Make sure vise is securely mounted to theworkbench.
2. Make sure the swivel base lockdowns aresecure.
3. Open the vise by turning the vise handlecounterclockwise. Do not open beyond thevises rated capacity (jaw opening).
4. Place item between the serrated jaws of thevise.
5. Close the vise by turning the vise handleclockwise until the item is snug between theserrated jaws.
The vise is generally operated perpendicular to the workbench, enabling work to be performed from either side of the vise. In some cases, the vise may need to be rotated to allow better and safer access to the item. In order to change the position of the vise, please follow the steps below:
1. After item is securely mounted in the vise,slowly loosen each lockdown located on bothsides of the vise. Care should be taken not toover-loosen or remove the lockdowns as thismay cause the vise to tip over and cause bodilyinjury. Loosen (turn counterclockwise) each lockdown about ¼ of a turn until the vise is able toswivel from the base.
2. Swivel the vise to allow better and safer accessto the item.
3. Tighten (turn clockwise) each lockdown so thatthe vise is securely clamped to the base.
6. Continue to tighten the screw handle until youcan no longer move (twist) the clamped item.Do not over tighten as this may damage itemand / or the vise.
7. When finished working on the item, slowly turnscrew handle counterclockwise to release theitem.
MOUNT VISE TO A SECURE WORKBENCH (SEE ILLUSTRATION)
VISE OPERATION
SWIVEL BASE OPERATION
61⁄2" MECHANICS VISE61⁄2" PRENSA PARA MECÁNICOS

1510152-36MA
MV6S
! !
! !
61⁄2" MECHANICS VISE
www.matcotools.com
ADVERTENCIA
PRECAUCIÓN
El mal uso de una prensa puede causar lesiones graves a los ojos, manos y otras partes del cuerpo. Las
prensas deben instalarse y usarse adecuadamente. Antes de instalarla y usarla, lea, comprenda y siga todas las instrucciones indicadas a continuación.
Las quijadas pueden soportar una carga de hasta 1600" lb sin ninguna distorsión a la prensa o ninguno de sus componentes.
Si tiene alguna duda sobre la seguridad, no opere en la prensa. Para evitar riesgos de lesiones personales, daños a los equipos, incendio e impactos, asegúrese de que el área de trabajo esté bajo las siguientes condiciones:
•El piso debe estar seco. Condiciones húmedas o bajola lluvia pueden causar que el operador se resbale.
•El operador debe tener la edad suficiente para operaruna prensa de manera segura.
•Buena iluminación.
•Limpio y sin obstrucciones.
•La mesa de trabajo está asegurada adecuadamentea la pared o al piso.
•La mesa de trabajo esta diseñada lo suficientementesólida para manejar la prensa y la carga de trabajo (latorsión que se ha efectuado sobre la prensa y la mesade trabajo).
•SIEMPRE asegúrese de quelas partes superiores de lasmesas estén aseguradasadecuadamente.
•SIEMPRE use las tuercas,tornillos y arandelasadecuadas en todos losagujeros de montaje parafijar bien la prensa.
•SIEMPRE use una prensadel tamaño y capacidadadecuada para sostener elobjeto de trabajo.
•SIEMPRE use protecciónpara los ojos, rostro y oídocuando este golpeandoo usando herramientasmotorizadas conuna prensa.
•SIEMPRE use unamáscara o respiradorcontra el polvo cuandoesté trabajando conmadera, metal, polvos orociados químicos.
•SIEMPRE use protecciónpara el cabelloy zapatos anti-derrapantesmientras esté operandola prensa.
•SIEMPRE aprietelas agarraderas delos fijadores de labase giratoria.
•SIEMPRE inspeccione laprensa por si tiene fatigade estrés o daños antesde usarla.
•SIEMPRE prestemantenimiento a la prensaengrasando el tornilloprincipal con regularidad.
•NUNCA use un martillo,tubos de extensión o barraen el mango de la partemovible de la prensa.
•NUNCA desatornille laquijada movible a másde la apertura máximaespecificada de la prensa.
•NUNCA suelde la basede la prensa a ningúnobjeto metálico.
•NUNCA use una prensapara extraer o instalar apresión un objeto dentrode otro objeto.
•NUNCA use un tubo deextensión para apretar losmangos de los fijadores.
•NUNCA coloquerecipientes bajo presión omateriales combustiblesen la prensa.
•NUNCA use vestimentasflojas ni tampoco joyasmientras usa la prensa.
•NUNCA aplique un calorextremo o prolongado ala prensa ya que puedealterar sus propiedadesestructurales.
MV6S
ESPECIFICACIONES DEL PRODUCTO
Artículo Nº
Ancho de la
quijada
Apertura de la
quijada
Capacidad del tubo
Profundidad de la
gargantaPeso
MV6S 61⁄2" 51⁄2" 1/4" - 21⁄2" 311⁄16" 42 lb
61⁄2" PRENSA PARA MECÁNICOS

MV6S
1510152-36MAwww.matcotools.com
61⁄2" MECHANICS VISE
1. Coloque la prensa sobre la mesa de trabajo paraidentificar la ubicación de los agujeros de montaje.
2. Para agregar resistencia a la mesa de trabajo antesde instalar y asegurar la prensa, coloque una pieza demadera de 18" x 18" x 2" (placa de metal de 18" x 18" x¼") en la parte inferior de la mesa de trabajo.
3. Marque y taladre agujeros a través de la mesa detrabajo y de la placa de metal o pieza de maderausando la base giratoria como plantilla para losagujeros de montaje. Antes de taladrar, asegúrese deque el área esté libre de cualquier peligro.
4. Instale pernos de la longitud y ancho adecuado enla base giratoria de la prensa. Se recomienda lasiguiente configuración como mínimo:
a. Instale pernos de longitud y ancho adecuadojunto a una arandela plana a través de la basegiratoria de la prensa. El perno debe tener lalongitud necesaria para sobresalir por lo menos1" por debajo de la mesa de trabajo y de lapieza de madera o la placa de metal. En la parteinferior de la mesa de trabajo y de la placa demetal o pieza de madera, coloque una arandelaplana, una arandela de presión y una tuercade bloqueo en el perno. Apriete la prensacon seguridad contra la mesa de trabajo.Periódicamente, verifique y apriete de nuevolos pernos.
Asegúrese de que la selección de la prensa (tamaño y tipo) es la adecuada para el uso y la aplicación. Hay disponibilidad de opciones de prensas más grandes. Nunca fuerce o use barras, extensiones de tubos sobre el mango del tornillo de la prensa ya que esto presenta una presión excesiva a los componentes de la prensa y podrían fallar, lo que resulta en lesiones corporales graves.
1. Asegúrese de que la prensa esté fija con seguridad ala mesa de trabajo.
2. Asegúrese de que los fijadores de la base giratoriaestén apretados.
3. Abra la prensa girando el mango de la prensa endirección contraria a las manecillas del reloj. No lasabra a más de la capacidad clasificada de la prensa(apertura de la quijada).
4. Coloque el artículo entre las quijadas serradasde la prensa.
5. Cierre la prensa girando el mango a favor de lasmanecillas del reloj hasta que el artículo estéfijamente colocado entre las quijadas serradas.
La prensa esta generalmente colocada de manera perpendicular para trabajar sobre la mesa de trabajo, lo que permite que se pueda trabajar desde cualquier lado de la prensa. En algunos casos, la prensa puede tener que girarse para permitir un acceso más fácil y seguro al artículo. Para poder cambiar la posición de la prensa, siga los siguientes pasos:
1. Después de haber asegurado el artículo en la prensa,afloje lentamente cada uno de los fijadores ubicadosen ambos lados de la prensa. Debe ir con cuidado deno aflojar demasiado ni extraer los fijadores ya queesto puede causar que la prensa se voltee y causealguna lesión. Afloje (gire en contra de las manecillasdel reloj) cada uno de los fijadores la cuarta partede una vuelta hasta que la prensa pueda girar sobresu base.
2. Gire la prensa para permitir un acceso más fácil yseguro al artículo.
3. Apriete (gire a favor de la manecillas del reloj) cadafijador para que la prensa esté sólidamente fijada ala base.
6. Continué apretando el mango del tornillo hastaque ya no puede seguir girando o mover el artículoagarrado. No apriete demasiado ya que esto puedecausar daños al artículo o la prensa.
7. Cuando haya terminado de trabajar con el artículo,gire lentamente el mango del tornillo en contra de lasmanecillas del reloj para soltar el artículo.
MONTE LA PRENSA SOBRE UNA MESA DE TRABAJO SEGURA (OBSERVE LA ILUSTRACIÓN)
OPERACIÓN DE LA PRENSA
OPERACIÓN DE LA BASE GIRATORIA
61⁄2" PRENSA PARA MECÁNICOS
1510152-36MA
MV6S
! !
! !
www.matcotools.com
61⁄2" MECHANICS VISEÉTAU DE MÉCANICIEN 61⁄2" po
AVERTISSEMENT
MISE EN GARDE
Une mauvaise utilisation des étaux peut causer de graves blessures aux yeux, aux mains ou à
d'autres parties du corps. Les étaux doivent être réglés et utilisés correctement. Avant de les régler et de les utiliser, assurez-vous de lire, comprendre
et suivre toutes les directives ci-après.
Les mâchoires d'étau peuvent supporter une charge de 1600 po-lb sans que l'étau ni les autres composants ne se déforment.
En cas de tout doute concernant la sécurité d'une condition, ne pas utiliser l'étau.Pour éviter tout risque de blessure corporelle, de dommage à l'équipement, d'incendie et d'électrocution, assurez-vous que l'aire de travail comporte les conditions suivantes :
•Un sol sec. Des conditions humides, mouillées ou depluie peuvent faire glisser l'opérateur.
•L'opérateur doit être en âge d'utiliser l'étau dans desconditions sécuritaires.
•Bon éclairage.
•Aire propre et non obstruée.
•L'établi doit être fixé correctement au sol ou au mur.
•L'établi est conçu de manière à supporter l'étau et lacharge de travail (le serrage subit par l'étau et l'établi).
• TOUJOURS s'assurer queles parties supérieuresde l'établi sontcorrectement fixées.
• TOUJOURS utiliser lesécrous, boulons et rondellesde blocage appropriés danstous les orifices de montagepour maintenir solidementen place l'étau de l'établi.
• TOUJOURS utiliser un étaude la bonne taille et de labonne capacité pour tenirvotre pièce de travail.
• TOUJOURS porter uneprotection pour les yeux, levisage et les oreilles lorsquevous démarrez ou utilisezdes outils électriques avecun étau.
• TOUJOURS porter unmasque antipoussières ouun respirateur lorsque voustravaillez avec du bois, dumétal, des poussières oudes brouillards chimiques.
• TOUJOURS porter secouvrir les cheveux etporter des chaussuresantidérapante pendant quevous utilisez l'étau.
• TOUJOURS serrer à lamain les verrous de la basede l'étau.
• TOUJOURS procéder àune inspection de l'étaupour tout relâchement oudommage avant l'utilisation.
• TOUJOURS entretenir l'étauen graissant la vis principalerégulièrement.
• NE JAMAIS utiliserde marteau, de tubeprolongateur ou de barresur la poignée à tigede l'étau.
• NE JAMAIS dévisser lamâchoire mobile au-delàde l'ouverture maximalespécifiée de l'étau.
• NE JAMAIS souder labase de l'étau à un objeten métal.
• NE JAMAIS utiliser unétau pour serrer un objet àl'intérieur ou à l'extérieurd'un autre objet.
• NE JAMAIS utiliser de tubeprolongateur pour serrer lespoignées des verrous.
• NE JAMAIS placerde contenants souspression ou de matièrescombustibles dans l'étau.
• NE JAMAIS porter devêtements amples ni debijoux en utilisant l'étau.
• NE JAMAIS appliquerde chaleur extrême nide chaleur pendant unepériode prolongée sur l'étaupuisque cela pourrait nuireaux propriétés structurelles.
MV6S
SPÉCIFICATIONS DU PRODUIT
No. d'article
Largeur de la mâchoire
Ouverture de la mâchoire
Capacité de la tige
Profondeur de la gorge
Poids
MV6S 61⁄2" 51⁄2" 1/4" - 21⁄2" 311⁄16" 42 lb.

1510152-36MA
Made in China to Matco specifications
Matco Tools Stow, Ohio 44224
www.matcotools.com
61⁄2" MECHANICS VISE
MV6S
TO SCALE. FOR REFERENCE ONLY Do not drill holes into the work table until
you have received your vise and marked the holes using the mounting tabs on the vise.
61⁄2" PRENSA PARA MECÁNICOS
A ESCALA. PARAR REFERENCIAS SOLAMENTE No realice ninguna perforación a la mesa de trabajo hasta que haya recibido su prensa y marcado los agujeros usando las pestañas de montaje en la prensa.
Made in China to Matco specifications
Matco Tools Stow, Ohio 44224
www.matcotools.com
1510152-36MA
MV6S
61⁄2" MECHANICS VISE
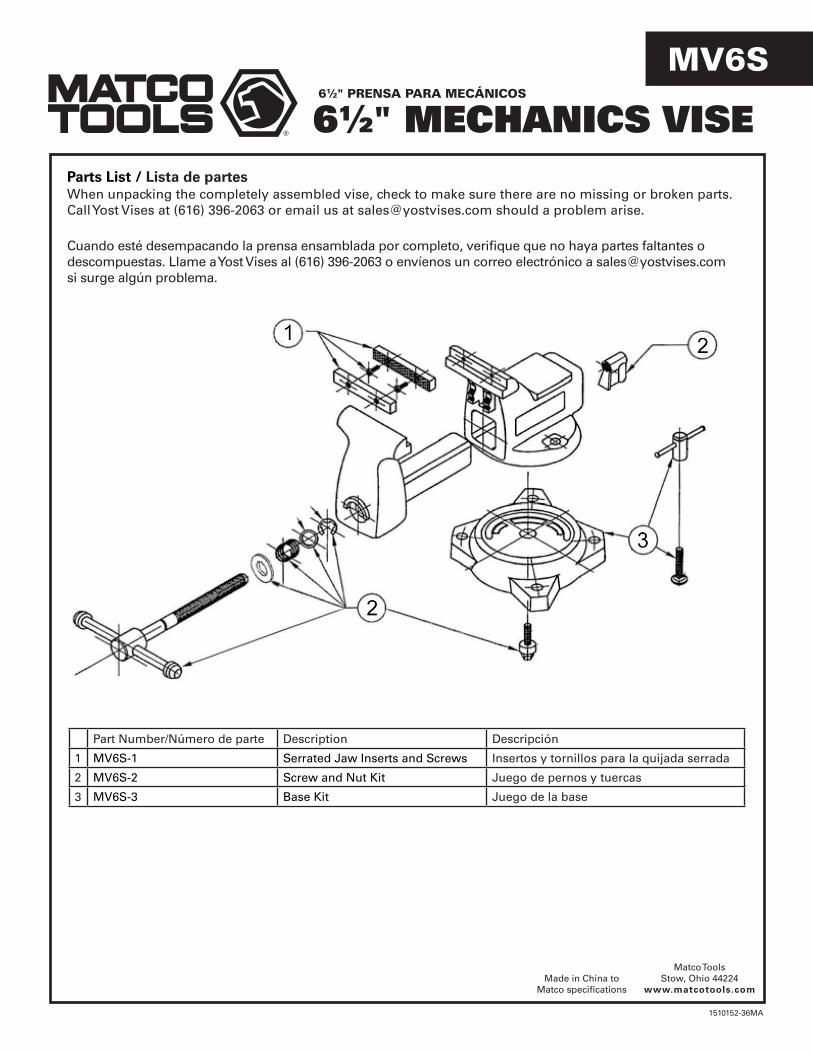
When unpacking the completely assembled vise, check to make sure there are no missing or broken parts. Call Yost Vises at (616) 396-2063 or email us at [email protected] should a problem arise.
Parts List / Lista de partes
61⁄2" PRENSA PARA MECÁNICOS
Cuando esté desempacando la prensa ensamblada por completo, verifique que no haya partes faltantes o descompuestas. Llame a Yost Vises al (616) 396-2063 o envíenos un correo electrónico a [email protected] si surge algún problema.
Part Number/Número de parte Description Descripción
1 MV6S-1 Serrated Jaw Inserts and Screws Insertos y tornillos para la quijada serrada
2 MV6S-2 Screw and Nut Kit Juego de pernos y tuercas
3 MV6S-3 Base Kit Juego de la base