Product Manual (PDF, 2MB) - TEAC
22
USER MANUAL WARRANTY INFORMATION INSIDE. PLEASE READ www.teac.com.au IMPORTANT ! HMX900iP Home Music System for iPhone/iPod Trademark of TEAC Corporation JAPAN
Transcript of Product Manual (PDF, 2MB) - TEAC

USER MANUAL
WARRANTY INFORMATION INSIDE. PLEASE READ
www.teac.com.au
IMPORTANT !
HMX900iP
Home Music System for iPhone/iPod
Trademark of TEAC Corporation JAPAN

WARRANTY PROCEDURE
v1.5.2: DEC 2011
Please read the owner’s manual carefully and ensure that you have followed the correct installation and operating procedures.
1. Please read this warranty card.2. Keep your purchase receipt to enable you to proceed quickly in the event of a Warranty Service.
3. If you require Warranty Service, please contact the TEAC Customer Support Hotline at 1300 553 315 for assistance. Please ensure that you have the model number, serial number and purchase receipt ready when you call.
Please complete the section below and keep this information for your own records.
Owner’s Name
Owner’s Address
Postcode
Model Name/No. Serial No.
Dealer’s Name
Dealer’s Address
Postcode
Authorised Service Centres in Major Australian Cities
NSW151 Arthur StreetHomebush West, NSW 2140
QueenslandUnit 1, 320 Curtin Ave WestEagle Farm, QLD 4009
Western AustraliaUnit 2, 50 Pilbara StreetWelshpool, WA 6106
South Australia11 McInnes Street
Ridleyton, SA 5008
Victoria282 Normanby Road
South Melbourne, VIC 3205
Thank you for selecting a TEAC product.If you should require assistance with your product regarding its setup
or operation, or if any difficulties arise, please call us directly for advicebetween Monday to Friday at 8.30AM – 6PM AEST at the
TEAC Customer Support Hotline
1300 553 [email protected]
www.teac.com.au
1

WARRANTY INFORMATION
v1.5.2: DEC 2011
Our goods come with guarantees that cannot be excluded under the Australian Consumer Law. You are ent it led to a replacement or refund for a major failure and for compensation for any other reasonably foreseeable loss or damage. You are also ent itled to have the goods repaired or replaced if the goods fail to be of acceptable quality and the failure does not amount to a major failure.
Warranty Terms & Conditions
1. TEAC warrants that this product is free from defects in material and workmanship under normal domestic use with
reasonable care and skill. Maintenance and cleaning (i.e. laser head) is not covered by this warranty. The TEAC warranty only applies to TEAC products purchased, used and serviced in Australia.
2. The benefits to the consumer given by this Warranty are in addition to other rights and remedies of the consumer under a law in relation to goods or services to which the warranty relates, being the Australian Consumer Law.
3. Refund or replacement via your retailer is available for a period of 14 days after purchase for goods that have been inspected and determined to have a major failure. Refund and exchange is not applicable for change of mind.
4. Subject to the terms herein, this warranty effectively covers the equipment as specified in the Warranty Periods Table below from the date of purchase.
TEAC PRODUCT WARRANTY PERIOD
LED/LCD TV 32” (80 cm) and above 1 Year (In-Home Service/ Pick up Available)*
All other TEAC products 1 Year (Carry-in Service)
5. This service will only be provided as part of this warranty if all the following conditions are met;
In Home Service/Pick up* Service
a) The product is indicated in the Warranty Period Table.b) The product is within the warranty period.c) The product is located within the normal service area of the local TEAC Authorised Service Centre.
If TEAC determines that the product is not repairable on site, TEAC can complete the repair by taking the product to a TEAC Authorised Service Centre.
Where In-Home service/Pick up* is not available, the purchaser is required to send the product to the nearest TEAC Authorised Service Centre for repair. In this event, proof of purchase is required to support a warranty claim. After
the repair, the product will be available for collection by or return to the purchaser at a fee upon request. TEAC in-home service can be made available at a fee upon request.
Carry-in Service
6. A 12-month replacement warranty is applicable to all Accessories such as Remote, Power Adaptors and Cables.
7. TEAC will ensure to the best of its abilities that all required parts are made available for any required service/repair.
8. TEAC Australia Pty Ltd and its Authorised Service Centres will use their best endeavours to complete product repairs within a reasonable period based on available resources and workload during the time when service is
requested and performed.
9. Refurbished parts may be used to repair the product. In the case of a replacement, the product may be replaced,
with a refurbished unit of the same type or, if one is unavailable, a similar refurbished model with equal or better features & specifications.
10. Please be advised that if the product presented for repair is capable of retaining user-generated data, the data may be lost during servicing. Customers are strongly encouraged to back up all important information/data before sending the product in for service/repair.
11. Service will be provided only during normal business hours and under safety conditions and circumstances. TEAC and its authorised service agents can refuse any repair if safety, in relation to OH&S, becomes a concern to its staff
or authorised service agents’ personnel.
12. The warranty is void and warranty claims may be refused, subject to the Australian Consumer Law, if:
a) The product was not transported, installed, operated or maintained according to manufacturer instruction, or b) The product was abused, damaged, tampered, altered or repaired by any unauthorised persons, orc) Product failure is due to accidents during use, installation or transit, power surges, use of defective or
incompatible external devices, exposure to abnormal conditions such as excessive temperatures or humidity, or entry of liquids, objects or creatures into the product.
13. No one is authorised to assume any liability on behalf of TEAC or impose any obligation on it, in connection with the sale of any equipment other than as stated in this warranty and outlined above.
14. TEAC reserves the right to inspect and verify whether the product is exhibiting a major failure as claimed bycustomers/retailers.
15. LCD dead pixel policy, please contact TEAC Customer Support Hotline on 1300 553 315 for assistance.
2
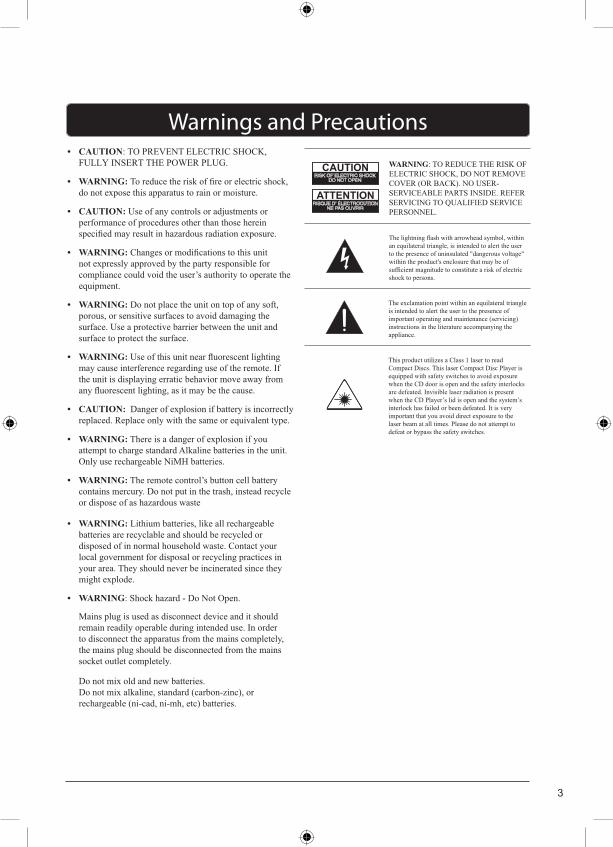
• CAUTION: TO PREVENT ELECTRIC SHOCK,
FULLY INSERT THE POWER PLUG.
• WARNING:
do not expose this apparatus to rain or moisture.
• CAUTION: Use of any controls or adjustments or
performance of procedures other than those herein
• WARNING:
not expressly approved by the party responsible for
compliance could void the user’s authority to operate the
equipment.
• WARNING: Do not place the unit on top of any soft,
porous, or sensitive surfaces to avoid damaging the
surface. Use a protective barrier between the unit and
surface to protect the surface.
• WARNING:
may cause interference regarding use of the remote. If
the unit is displaying erratic behavior move away from
• CAUTION: Danger of explosion if battery is incorrectly
replaced. Replace only with the same or equivalent type.
• WARNING: There is a danger of explosion if you
attempt to charge standard Alkaline batteries in the unit.
Only use rechargeable NiMH batteries.
• WARNING: The remote control’s button cell battery
contains mercury. Do not put in the trash, instead recycle
or dispose of as hazardous waste
Warnings and Precautions
an equilateral triangle, is intended to alert the user
to the presence of uninsulated "dangerous voltage"
within the product's enclosure that may be of
shock to persons.
WARNING: TO REDUCE THE RISK OF
ELECTRIC SHOCK, DO NOT REMOVE
COVER (OR BACK). NO USER-
SERVICEABLE PARTS INSIDE. REFER
SERVICING TO QUALIFIED SERVICE
PERSONNEL.
ATTENTION
CAUTION
The exclamation point within an equilateral triangle
is intended to alert the user to the presence of
important operating and maintenance (servicing)
instructions in the literature accompanying the
appliance.
This product utilizes a Class 1 laser to read
Compact Discs. This laser Compact Disc Player is
equipped with safety switches to avoid exposure
when the CD door is open and the safety interlocks
are defeated. Invisible laser radiation is present
when the CD Player’s lid is open and the system’s
interlock has failed or been defeated. It is very
important that you avoid direct exposure to the
laser beam at all times. Please do not attempt to
defeat or bypass the safety switches.
• WARNING: Lithium batteries, like all rechargeable
batteries are recyclable and should be recycled or
disposed of in normal household waste. Contact your
local government for disposal or recycling practices in
your area. They should never be incinerated since they
might explode.
• WARNING: Shock hazard - Do Not Open.
Mains plug is used as disconnect device and it should
remain readily operable during intended use. In order
to disconnect the apparatus from the mains completely,
the mains plug should be disconnected from the mains
socket outlet completely.
Do not mix old and new batteries.
Do not mix alkaline, standard (carbon-zinc), or
rechargeable (ni-cad, ni-mh, etc) batteries.
3

12. Unplug this apparatus during lightning storms or when
unused for long periods of time.
13.
Servicing is required when the apparatus has been
damaged in any way, such as power-supply cord or
plug is damaged, liquid has been spilled or objects
have fallen into the apparatus, the apparatus has been
exposed to rain or moisture, does not operate normally,
or has been dropped.
• The apparatus shall not be exposed to dripping or splashing and
apparatus.
• Main plug is used as disconnect device and it should remain readily
operable during intended use. In order to disconnect the apparatus
from the mains completely, the mains plug should be disconnected
form the mains socket outlet completely.
•
or the like.
• Caution marking is located at the rear or back of the apparatus.
• The marking information is located at the rear or back of apparatus.
Additional Warnings1. Read these Instructions.
2. Keep these Instructions.
3. Heed all Warnings.
4. Follow all instructions.
5. Do not use this apparatus near water.
6. Clean only with a dry cloth.
7. Do not block any ventilation openings. Install in
accordance with the manufacturer’s instructions.
8. Do not install near any heat sources such as radiators,
heat registers, stoves, or other apparatus (including
9. Protect the power cord from being walked on or
pinched particularly at plugs, convenience receptacles,
and the point where they exit from the apparatus.
10.
manufacturer.
11.
Important Safety Instructions
This symbol indicates that this product
incorporates double insulation between
hazardous mains voltage and user
accessible parts.
Use only with a cart, stand, tripod,
manufacturer, or sold with the apparatus.
When a cart is used, use caution when
moving the cart/apparatus combination to
avoid injury from tip-over.
4

• Works with iPhone• Made for iPod• Plays and charges docked iPhone
and iPod• CD player: CD, CD-R/RW• FM stereo radio• Station memory presets (10 FM)• LCD display with amber backlight• Digital clock• Stereo speakers• 3.5mm audio input• Composite video output• Remote control: requires 1
CR2025 battery (included)• Last user setting• Digital volume control• Preset EQ• • DC power input: requires an AC/DC
power adapter (included)
• Remote control: requires 1 CR2025 battery (included)
• AC/DC power adapter• Docking brackets for iPhone and
• User manual• Contact card
iPod
Home Music System for iPhone and iPod
Features
Accessory List
5
Remote control CR2025 button cell battery
DC power adaptor
User manual Contact card
iPod/iPhone adaptors

TABLE OF CONTENTS
Warnings and Precautions . . . . . . . . . . . 3
Warranty . . . . . . . . . . . . . . . 1
Important Safety Instructions . . . . . . . . . . 4• Additional Warnings
Home Music System for iPhone and iPod . . . . . . . 5• Features• Accessory List
Introduction . . . . . . . . . . . . . . 7
Setup . . . . . . . . . . . . . . . . 9• Power• Battery Power• Connecting the speakers
Clock and Sleep Timer . . . . . . . . . . . . 10• Setting the Clock• Using the Sleep Timer
Timer . . . . . . . . . . . . . . . . 11• Setting the Timer• Activating or Deactivating the Timer
iPod and iPhone . . . . . . . . . . . . . 12• Docking an iPod and iPhone• Playing an iPod and iPhone
CD . . . . . . . . . . . . . . . . . 14• Loading a CD• Playing a CD• Programming a CD• Cancelling a Programmed CD
FM Radio . . . . . . . . . . . . . . . 15• Tuning the FM Radio• Saving an FM Radio Station• Playing a Saved Radio Station
Video Output . . . . . . . . . . . . . . 16• Using the Video Output
3.5mm Audio Input. . . . . . . . . . . . . 17• Using the 3.5mm Audio Input
Troubleshooting . . . . . . . 18
Technical specifications . .
.
.
.
.
.
.
...
. . . . . . 20
6

Introduction
OPEN/CLOSEPress to open or close
the CD door.
SLEEPPress repeatedly to set the sleep timer or turn
TIMERPress to view, set, and activate or deactivate
the timer.
SKIP/SEARCHTUNE (+/-)/TIME(+/-)Press to skip between
tracks on a docked iPod, iPhone, or loaded CD.
Press and hold to search through an individual
track.Press to tune the FM
radio.Press to adjust the time when setting the clock
or timer.
POWERPress to power the
EQPress to adjust the preset EQ to Rock,
Classic, Jazz, Pop, or Normal.
FM WIRE ANTENNA
COMPOSITE VIDEO OUTPUT
STOPPress to stop a CD during play.
CLK SET/MEMPress to set the clock or save a radio station. Press to program a CD.
REPEAT/MEM-Press to repeat the current track or an entire album/playlist.Press to cycle through saved radio stations.
PLAY/PAUSE/MEM+Press to play or pause a docked iPhone or iPod or a loaded CD. Press the cycle through saved radio stations.
SOURCEPress to switch to radio, CD, Aux, or iPod modes.
iPodPress to switch to iPod mode.
VOLUMETurn to adjust the volume.
DOCK for iPhone and iPod
3.5MM AUDIO INPUT
DC POWER INPUT
7
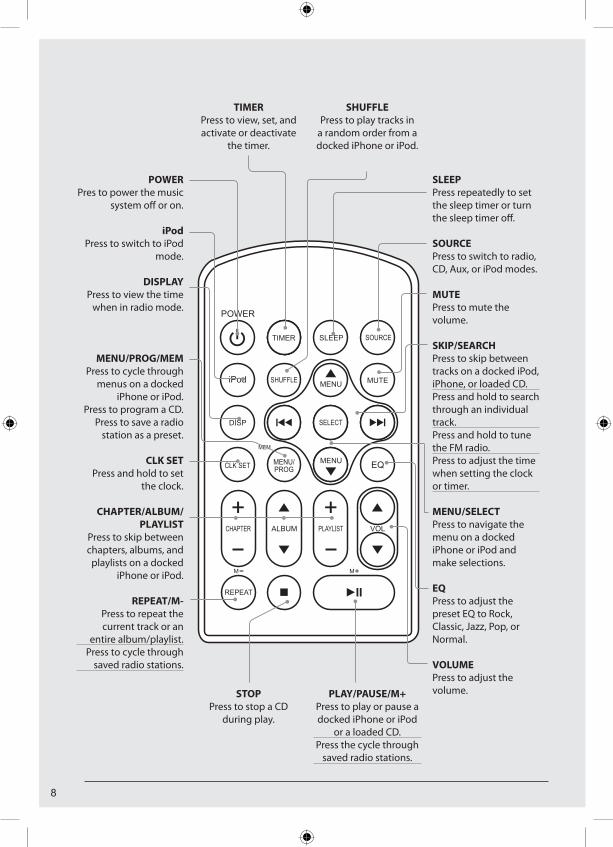
POWERPres to power the music
iPodPress to switch to iPod
mode.
DISPLAYPress to view the time
when in radio mode.
MENU/PROG/MEMPress to cycle through
menus on a docked iPhone or iPod.
Press to program a CD.Press to save a radio
station as a preset.
CLK SETPress and hold to set
the clock.
CHAPTER/ALBUM/PLAYLIST
Press to skip between chapters, albums, and
playlists on a docked iPhone or iPod.
REPEAT/M-Press to repeat the current track or an
entire album/playlist.Press to cycle through
saved radio stations.
SLEEPPress repeatedly to set the sleep timer or turn
SOURCEPress to switch to radio, CD, Aux, or iPod modes.
MUTEPress to mute the volume.
SKIP/SEARCHPress to skip between tracks on a docked iPod, iPhone, or loaded CD.Press and hold to search through an individual track.Press and hold to tune the FM radio.Press to adjust the time when setting the clock or timer.
MENU/SELECT Press to navigate the menu on a docked iPhone or iPod and make selections.
EQPress to adjust the preset EQ to Rock, Classic, Jazz, Pop, or Normal.
VOLUMEPress to adjust the volume.STOP
Press to stop a CD during play.
PLAY/PAUSE/M+Press to play or pause a docked iPhone or iPod
or a loaded CD. Press the cycle through
saved radio stations.
TIMERPress to view, set, and activate or deactivate
the timer.
SHUFFLEPress to play tracks in
a random order from a docked iPhone or iPod.
8

Plug the included AC/DC power adapter into the DC POWER INPUT on the music system and an AC power outlet to power the music system.
Requires 1 CR2025 battery (pre-installed).
Power
Battery Power
Connecting the speakers
LITHIUM
BATTERY
CR 2025
3V
CR2025
PUSH
OPENLITHIU
M BATTERY
CR 2025 3V
CR2
025
PUSH
OPE
N
Setup
9

1. Press the POWER button to turn
2. Press and hold the CLK SET/MEMbutton on the music system.
“12 Hr” will appear on the display.3. Press the SKIP/SEARCH buttons to
switch between 12 and 24 hour.
4. Press the CLK SET/MEM button to select 12 or 24 hour.
The hour will begin to blink on the display.
5. Press the SKIP/SEARCH buttons to adjust the hour.
An “AM” indicator will appear on the display when the time is set to the AM. A “PM” indicator will appear on the display when the time is set to the PM.
6. Press the CLK SET/MEM button to set the adjusted hour.
The minute will begin to blink on the display.
7. Press the SKIP/SEARCH buttons to adjust the minute.
8. Press the CLK SET/MEM button to
1. Press the POWER button to turn the music system on.
2. While listening to music in iPod mode, radio mode, aux mode, or CD mode, press the SLEEP button repeatedly to set the sleep timer to the desired time.
3. After the selected time has expired, the music system will
Setting the Clock Using the Sleep Timer
Clock and Sleep Timer
10

Timer
1. Press the POWER button to turn
2. Press the TIMER button.
The current timer settings will appear on the display.
3. Press and hold the TIMER button while the timer settings are on the display.
The “On Timer” hour will begin to blink. “On Timer” refers to the time that the music system will power on.
4. Press the SKIP/SEARCH buttons to adjust the “On Timer” hour. Press the TIMER button.
The “On Timer” minute will begin to blink.
5. Press the SKIP/SEARCH buttons to adjust the “On Timer” minute. Press the TIMER button.
6. Press the SKIP/SEARCH buttons to
the TIMER button.
blink. 7. Press the SKIP/SEARCH buttons to
the TIMERthe timer.
8. Follow the instructions for Activation or Deactivating the Timer.
1. Press the POWER button to turn
2. Press and hold the TIMER button.
“TIMER” will appear on the display, indicating the timer is activated.
3. To deactivate the timer, press and hold the TIMER button again until “TIMER” on the display disappears.
Setting the Timer Activating or Deactivating the Timer
11

iPod and iPhone
Docking an iPod and iPhone
Playing an iPod and iPhone
1. Follow the instructions for Docking an iPod and iPhone.
2. Press the POWER button to power on the music system.
3. Press the iPod button to switch to iPod/iPhone mode.
“iPod” and an iPod icon will appear on the display.
4. Press the PLAY/PAUSE button to begin playing music from the docked iPhone or iPod.
1. Locate the numbered bracket that
be docked.
Each included bracket has a number on it, indicating which iPhone/iPod model that bracket is compatible with. See the separate bracket chart page to identify which bracket is needed.
2. Push the face of the dock to open the dock for iPhone and iPod.
3. Snap the bracket into place over the iPhone/iPod connector in the dock for iPhone/iPod.
4. Connect the iPhone or iPod to the connector inside the Dock for iPhone/iPod.
When the tower speaker is plugged in, using AC power, the docked iPhone or iPod will charge.
12

13
M O D E L C A PA C I T Y P L AY & C H A R G E V I D E O O U T P U T B R A C K E T
iPhone
iPhone 4 / iPhone 4S 16GB 32GB
iPhone 3GS 8GB 16GB 32GB • •• •
12iPhone 3G 8GB 16GB • • 12iPhone 4GB 8GB 16GB • • 12
iPod touch
iPod touch 4th generation 8GB 32GB 64GB
iPod touch 3rd generation 32GB 64GB • •• •
14iPod touch 2nd generation 8GB 16GB 32GB 64GB • • 14iPod touch 1st generation 8GB 16GB 32GB • • 14
iPod nano
iPod nano 6th generation 8GB 16GB
iPod nano 5th generation (video camera) 8GB 16GB • •• •
8iPod nano 4th generation (video) 8GB 16GB • • 8iPod nano 3rd generation (video) 4GB 8GB • • 13iPod nano 2nd generation (aluminum) 2GB 4GB 8GB • 8iPod nano 1st generation 1GB 2GB 4GB • 8
iPod classic
iPod classic (2009) 120GB 160GB • • 10iPod classic (2007) 160GB • • 10iPod classic 80GB • • 10
iPod, and iPhone Compatibility Information

14
1. Press the OPEN/CLOSE button on the top of the music system to open the CD door.
2. Load a CD into the music system, label side facing up.
3. Close the CD door.
1. Follow the instructions for Loading a CD.
2. Press the POWER button to power the music system on.
3. Press the SOURCE button to switch to CD mode.
The track number will appear on the display, to the right of the time, when the music system is in CD mode.
4. Press the PLAY/PAUSE button to begin playing the loaded CD.
1. Follow the instructions for Playing a CD.
2. Press the STOP button.
The loaded CD must be stopped to create a program.
3. Press the MENU/PROG./MEMbutton on the remote.
“PROG” and a number, indicating the order in which the next selected track will play, will appear on the display.
4. Press the SKIP/SEARCH buttons to select a track.
5. Press the MENU/PROG./MEMbutton on the remote to save the selected track to the program.
6. Repeat steps 4 and 5 to program up to 20 tracks to play in the order they were selected.
1. After programming the CD, press the STOP button twice to cancel the program.
Loading a CD
Playing a CD
Programming a CD
Cancelling a Programmed CD
CD

15
1. Press the POWER button to power the music system on.
2. Press the SOURCE button to switch to FM radio mode.
“Radio” will appear on the display.3. Press or hold the TUNE +/- buttons
4. Press the TUNE +/- buttons formanually tune. Hold the TUNE +/- buttons for autoscan.
to tune the FM radio.
Adjust the position of the FM wire antenna to improve FM radio reception.
1. Follow the instructions for Tuning the FM Radio and Saving an FM Radio Station.
2. Press the MEM± or M± buttons to cycle through saved radio stations.
1. Follow the instructions for Tuning the FM Radio.
2. Press or hold the TUNE +/- buttons to tune the FM radio to the desired station.
3. Press and hold CLK SET/MEMbutton on the music system or the MENU/PROG./MEM button on the remote.
A preset number (P01) will appear on the display, indicating which preset the current station will be saved to.
4. Press the TUNE +/- buttons to adjust the preset number (P01 - P10).
5. Once the desired preset is selected, press the CLK SET/MEM button on the music system or the MENU/PROG./MEM button on the remote to save the current FM radio station to the selected preset.
Tuning the FM Radio
Playing a Saved Radio Station
Saving an FM Radio Station
FM Radio

16
Video Output
The COMPOSITE VIDEO OUTPUTwill only output video from a docked iPhone or iPod with video capabilities.
Requires a composite RCA video cable (not included).
1. Follow the instructions for Docking an iPod or iPhone and Playing an iPod or iPhone.
2. Check your iPod or iPhone video settings to make sure “TV OUT” is set to “ON” or “ASK”.
3. Connect a composite RCA video cable to the COMPOSITE VIDEO OUTPUT on the music system and a composite video input on a television.
4. Adjust the connected television to the input setting used when connecting the two devices.
5. Video played through the docked iPod or iPhone will now be output to the connected TV.
Using the Video Output

17
3.5mm Audio Input
Requires a 3.5mm audio cable (not included).
1. Connect a 3.5mm audio cable to the 3.5MM AUDIO INPUT on the music system and the headphone jack or 3.5mm audio output on an MP3 player or other audio source.
2. Press the POWER button to power on the music system.
3. Press the SOURCE button to switch to AUX mode.
4. Use the native controls on the connected MP3 player or other audio source to control the music played through the music system.
Using the 3.5mm Audio Input

18
Troubleshooting Guide
Problem Possible Cause Solution
GENERALNo sound is heard. Power is not on.
VOLUME Control is set to minimum.
Mute is on.
Press the POWER button.
Adjust the VOLUMEControl.
Press Mute on remote.
RADIOStation has not been tuned properly.
Radio reception is weak.
Wrong function isselected.
Press the SOURCE buttonto the radio position.
No sound is heard. Tune station properly.
Extend the FM cord or movethe unit.
CD
All or part of the CDwill not play.
CD is inserted incorrectly.
Make sure that the CD isplaced in the tray with thelabel side up.
CD is scratched. Try another CD.
CD is dirty Clean the CD with soft cloth
CD is warped Try another CD.
Condensation has formedinside your CD player.
Remove the CD and leavethe CD tray open for aboutone hour to let the CD playerdry out.
Function swtich is notset to CD. Set Function switch to CD
CD compartment not closed
Close CD compartment door.

19
Problem Possible Cause Solution
iPod/iPhone does not dock properly
Using no or wrong iPod/iPhone insert
Make sure that the dock is compatible with your iPod/iPhone.
iPod/iPhone does not respond to the unit
iPod/iPhone is not installed properly
Remove your iPod/iPhone from the dock and check for obstruction on the connectors in the dock and on your iiPod/iPhone. Then reseat it in the dock.
iPod/iPhone didn’t charge up
iPod/iPhone is not installed properly
Remove your iPod/iPhone from the dock and check for obstruction on the connectors in the dock and on your iPod/iPhone. Then reseat it in the dock.
iPod/iPhone is locked up Please make sure your iPod/iPhone is working properly before docking into the unit. Please refer to your iPod/iPhone manual for details.
Using 1st or 2nd generation iPod®, iPod® Shuffle or other devices.
This unit is not compatible with these devices.
iPod/iPhone is not installed properly
Remove your iPod/iPhone from the dock and check for obstruction on the connectors in the dock and on youriPod/iPhone. Then reseat it in the dock.

20
Technical Specifications
CD: compatible discs/files CD, CD-R/RWRadio: Frequency range FM: 87.5 - 108 MHz Antenna FM: wire antennaGeneralMusic power 40 W (2 x 20 W)Output power (RMS) 20 W (2 x 10 W)Power consumption 44 WStandby power 2 WSpeakers 2 x 5”, 8 OhmsAC adapter Input: AC 100–240V ~ 50/60Hz Output: DC 15VDimensions Main unit: 277 (H) x 171 (W) x 268 (D) mm Speaker: 315 (H) x 171 (W) x 238 (D) mm Weight 5.6 Kg
* Technical specifications are subject to change without notice.* Weight and dimensions are approximate.

TEAC CUSTOMER SUPPORT HOTLINE (TCS) 1300 553 315
Between Monday to Friday – AEST 8.30AM to 6PM