Product Manual for TRAILER MOUNTED, HOT … · About Your Pressure Washer 4 Thank you for...
64
M157595AP Owner's Manual Instructions for Set-up, Operation, Maintenance & Storage TRAILER MOUNTED, HOT WATER PRESSURE WASHER 4000 PSI / 4 GPM Portable Outdoor-Use Only This pressure washer produces both cold and hot water high pressure spray. Cleaning chemicals may be incorporated into the spray if desired. The pressure pump for this equipment is powered by a gasoline internal combustion engine and the water is heated by a kerosene/fuel-oil fired, open flame burner. WARNING – READ THIS MANUAL READ and UNDERSTAND this Owner's Manual and the Engine Owner's Manual completely before attempting to set up and use the pressure washer! Failure to properly set up, operate, and maintain this pressure washer could result in serious injury or death to operator or bystanders. WARNING – SPECIAL HAZARDS CO Poisoning Exhaust from both the engine and burner contains carbon monoxide, a poisonous gas that can cause carbon monoxide poisoning and possible death if inhaled. ONLY run pressure washer OUTDOORS and at least 20 feet from the home, away from windows, vents and air intakes, to allow proper ventilation. If you start to feel sick, dizzy, or weak while using the pressure washer, shut off the engine and get to fresh air RIGHT AWAY. Skin/Eye Injury High-pressure spray can cause serious skin or eye injury, including injection injury if fluid pierces the skin. Injection injury can result in blood poisoning and/or severe tissue damage. Burns Hot spray can scald and burn skin. Hot surfaces of wand, engine and burner, as well as hot exhaust from both the engine and burner can cause burns. Slips/Falls Spray discharge can cause puddles and slippery surfaces. Spray-gun kickback can cause operator loss of balance and falls. Flying Debris High-pressure spray can cause surface damage and flying debris. Fire/ Explosion Engine and burner sparking can ignite fuel or other flammable liquids or vapors in the vicinity. Hot exhaust from engine and burner can ignite combustible materials. Chemical Exposure Cleaning chemical vapors or contact with skin may be hazardous. Electric shock Spray contact with electrical sources can cause electric shock. Trailer tip over Sudden stopping or turning while towing the pressure washer with a filled water tank can result in driving instability and/or trailer tip over. A summary of important safety information is provided at the end of the manual. Any Questions, Comments, Problems, or Parts Orders Call NorthStar Product Support 1-800-270-0810 ITEM NUMBER: 157595 SERIAL NUMBER: _____________
Transcript of Product Manual for TRAILER MOUNTED, HOT … · About Your Pressure Washer 4 Thank you for...

M157595AP
Owner's Manual Instructions for Set-up, Operation, Maintenance & Storage
TRAILER MOUNTED, HOT WATER PRESSURE WASHER 4000 PSI / 4 GPM
Portable Outdoor-Use Only This pressure washer produces both cold and hot water high pressure spray. Cleaning chemicals may be
incorporated into the spray if desired. The pressure pump for this equipment is powered by a gasoline internal
combustion engine and the water is heated by a kerosene/fuel-oil fired, open flame burner.
WARNING – READ THIS MANUAL
READ and UNDERSTAND this Owner's Manual and the Engine Owner's Manual completely before
attempting to set up and use the pressure washer! Failure to properly set up, operate, and maintain this
pressure washer could result in serious injury or death to operator or bystanders.
WARNING – SPECIAL HAZARDS
CO Poisoning
Exhaust from both the engine and burner contains carbon monoxide, a poisonous gas
that can cause carbon monoxide poisoning and possible death if inhaled. ONLY run
pressure washer OUTDOORS and at least 20 feet from the home, away from
windows, vents and air intakes, to allow proper ventilation. If you start to feel sick,
dizzy, or weak while using the pressure washer, shut off the engine and get to fresh air
RIGHT AWAY.
Skin/Eye Injury
High-pressure spray can cause serious skin or eye injury, including injection injury if
fluid pierces the skin. Injection injury can result in blood poisoning and/or severe
tissue damage.
Burns
Hot spray can scald and burn skin.
Hot surfaces of wand, engine and burner, as well as hot exhaust from both the engine
and burner can cause burns.
Slips/Falls Spray discharge can cause puddles and slippery surfaces.
Spray-gun kickback can cause operator loss of balance and falls.
Flying Debris High-pressure spray can cause surface damage and flying debris.
Fire/
Explosion
Engine and burner sparking can ignite fuel or other flammable liquids or vapors in the
vicinity.
Hot exhaust from engine and burner can ignite combustible materials.
Chemical
Exposure Cleaning chemical vapors or contact with skin may be hazardous.
Electric shock Spray contact with electrical sources can cause electric shock.
Trailer
tip over
Sudden stopping or turning while towing the pressure washer with a filled water tank
can result in driving instability and/or trailer tip over.
A summary of important safety information is provided at the end of the manual.
Any Questions, Comments, Problems, or Parts Orders
Call NorthStar Product Support 1-800-270-0810
ITEM NUMBER: 157595
SERIAL NUMBER: _____________

Hazard Signal Word Definitions
2
Equipment Protection Quick Facts
Inspect Upon
Delivery
STOP! Closely inspect to make sure no components are missing or damaged. See the
"Assembly and Initial Set-Up" section for instructions on whom to contact to report
missing or damaged parts.
Fill with
Engine Oil
STOP! Engine is shipped without oil. DO NOT start pressure washer without adding oil
to engine. Please refer to Engine Manual shipped with unit for acceptable grade motor
oils.
Check Pump
Oil
Pump is shipped with oil. Remove shipping tape and black vent plug (if present) from
oil fill cap.
Battery
Required
A battery is not included. The engine will not run and the burner will not fire unless a
battery is installed. Purchase a standard 12VDC, 18 Ah automotive battery (Group 75).
Water Flow
Requirements
Make sure your supply water flow rate is 20% higher than the pressure washer's flow
rate (see "Specifications" section for detail), and that your water is clean and particle
free.
Storage Do not allow water to freeze in the pump, hose, coil, or spray gun(s).
Chemical
Spraying
Use only NorthStar brand or equivalent washer chemicals designed for high-pressure
use. Use soap adjustment knob to regulate cleaning power.
Maintenance
Schedule
Engine: See Engine Owner's manual.
Pump: Change oil after first 40 hours, then every 3 months or 500 hours.
Burner fuel filter
/water separator:
Drain water as needed.
Change filter after every 500 hours of use.
Coil:
Descale coil annually or more frequently as
conditions/performance require.
Inspect coil for soot build-up annually and desoot if needed.
Electrodes: Inspect electrodes annually and clean/adjust as needed

Table of Contents
3
About Your Pressure Washer ............................................................................................ 4
Specifications ......................................................................................................................... 5
Component Identification .................................................................................................... 6
Safety Labeling ..................................................................................................................... 8
Special Equipment Safety Features .................................................................................... 10
Assembly and Initial Set-Up ............................................................................................... 11
Step 1. Unpacking & Delivery Inspection ................................................................... 11
Step 2. Trailer Assembly .............................................................................................. 13
Step 3. Initial Pump, Engine & High Pressure Hose Preparation ................................ 15
Step 4. Battery Installation ........................................................................................... 16
Moving and Towing ............................................................................................................. 17
Before Each Use ................................................................................................................... 19
Step 1. Check Equipment ............................................................................................. 19
Step 2. Add Fuel(s) ...................................................................................................... 20
Step 3. Select a Suitable Worksite ............................................................................... 22
Operation ............................................................................................................................... 24
Step 1. Connect Hose(s), Water Supply, and Spray Nozzle(s) .................................... 24
Step 2. Set Up for Chemical Spray (if desired) ............................................................ 28
Step 3. Spraying ........................................................................................................... 30
Step 4. Stopping ........................................................................................................... 36
Storage ................................................................................................................................... 37
Burner Adjustment .............................................................................................................. 40
Maintenance and Repair ...................................................................................................... 42
Troubleshooting .................................................................................................................... 50
Parts Explosion ..................................................................................................................... 51
Pump Explosion .................................................................................................................... 55
Wiring Diagram .................................................................................................................... 56
Summary of Important Safety Information ....................................................................... 57
Limited Warranty ................................................................................................................ 63

About Your Pressure Washer
4
Thank you for purchasing a NorthStar hot water pressure washer! Your machine is designed for long life,
dependability, and the top performance you demand. This pressure washer is designed to:
1) Produce a high-pressure spray of heated or unheated water (up to 7 gallons per minute at 4000 psi).
2) Incorporate cleaning chemicals into a low-pressure water spray.
Water is supplied via the pressure washer's water tank or via standard tap water through a garden hose. In either
case, the water supply must have a flow rate of at least 4.8 gallons per minute. If using tap water, the use of a
backflow preventer on the water supply hose is recommended, and may be required by local code. Any cleaning
chemicals that are used must be specifically approved for use in pressure washers.
The pressure washer is trailer mounted and towable.
The pump is powered by a gasoline-fueled engine. The spray water is heated (when desired) by a kerosene/fuel-
oil fired, spark-ignited, open flame burner. Normal operation of this equipment will require you to supply:
Gasoline fuel and lubrication oil for the engine
Pump oil
Fuel for the burner (kerosene, diesel, or fuel oil)
A 12-volt standard automotive battery
See the "Specifications" section of this manual for more detail.
Gasoline powered pressure washers are for OUTDOOR USE ONLY. Be sure to read about site selection
for running this pressure washer in the "Installation & Initial Set-up" section of this manual.
The user should plan to acquire and wear safety apparel during operation of this pressure washer. Safety apparel
includes waterproof insulated gloves, safety glasses with side and top protection, and non-slip protective
footwear. Some cleaning chemicals may require the use of a respirator mask (as instructed on chemical label).
Before using this washer, the user shall determine the suitability of this product for its intended use
and assumes liability therein.
Read this Manual
WARNING Carefully read and follow all instructions and safety information for using this pressure washer.
Improper use or maintenance of the pressure washer can result in serious injury or death to the
operator or bystanders from:
Carbon monoxide poisoning Fire/explosion Chemical exposure
Skin/eye injury from high pressure spray
Burns Slips/falls Electric shock Flying objects/debris
Keep this manual for reference and review. A summary of important safety information can be found at the end
of the manual.
Proper preparation, operation, and maintenance of this pressure washer will result in optimal performance and a
long life for this equipment. For detailed Engine operation and maintenance information, always refer to the
Engine Owner's Manual furnished with the pressure washer.
ATTENTION:
Rental Companies and Private Owners who loan this equipment to others! All persons to whom you rent/loan this pressure washer must have access to and read this manual. Keep this
owner's manual with the pressure washer at all times and advise all persons who will operate the machine to
read it. You must also provide personal instruction on how to safely set-up and operate the pressure washer
and remain available to answer any questions a renter/borrower might have.

Specifications
5
MODEL
Model # 157595
FLOW OUTPUT
Pressure Rating 4000 psi
Flow Rate 4 gpm
Maximum Temperature 210 F
DIMENSIONS / COMPONENTS
Length 129"
Width 76"
Height 60"
Weight 970 lbs. – dry
2500 lbs. – water tank full
Pump Type CAT 66DX
Engine Displacement 630cc
High Pressure Discharge Hose 3/8" x 150'
Chemical Injector Maximum dilution ratio 13-to-1
Trailer GVWR 3500 lbs.
Hitch Ball Size 2"
SUPPLIES REQUIRED (not included)
Engine Fuel Regular, Unleaded Gasoline
Engine Oil See Engine Owner's Manual
Burner Fuel
#1 or #2 Diesel, B5 or lower Biodiesel, Kerosene,
or Fuel Oil
(Capacity: 4 Gal.)
Pump Oil
(shipped with oil, but refills required)
SAE 30 non-detergent oil
18 oz. capacity
Battery 12 Volt, minimum 18 Amp/Hr.
Automotive Battery (Group 75)
Input Water Supply
Tap: Standard tap water @ 20-75 psi
Water feed tank (included): Flow rate must be
maintained at 4.8 gpm
Input Water Supply Hose
For Tap: Standard garden hose with inside
diameter at least 5/8"
(at least 3/4" diameter if hose longer than 100 ft.)
For Tank: Hose and fittings included with tank.

Component Identification
6
Ref # Description Ref # Description Ref # Description
1 Unloader 8 Ball Valve (feed tank) 15 Engine Key Switch
2 Engine (see engine manual) 9 Ball Valve (city tap water) 16 Circuit Breaker
3 Inlet Plumbing 10 Water Filter 17 Heat Switch
4 Diesel Tank 11 Control Panel 18 Thermostat
5 Gasoline Tank 12 Battery Box (battery not included) 19 Indicator Light (pressure sw.)
6 Pump 13 Pressure Switch 20 Indicator Light (thermostat)
7 Water Inlet (feed tank) 14 Water Outlet (high pressure)

Component Identification
7
REFERENCE GUIDE 1. Unloader Valve that regulates pressure and directs flow into bypass
when trigger is closed.
2. Engine The air-cooled engine powers the pump.
3. Inlet Plumbing Means of connecting garden hose to pump inlet.
4. Diesel Tank Diesel fuel storage container.
5. Gasoline Tank Gasoline fuel storage container.
6. Pump A device that moves fluid through a combination of suction
and displacement.
7. Water Inlet (feed tank) Used to connect water from the feed tank to the inlet
plumbing.
8. Ball Valve (feed tank) Used to open or close the water line from feed tank.
9. Ball Valve (city tap water) Used to open or close the water line from city tap.
10. Water Filter Filters water prior to entering the pump.
11. Control Panel Flat surface for mounting switches.
12. Battery Box Storage place to house the battery.
13. Pressure Switch Controls burner.
14. Water Outlet Connect high pressure hose here.
15. Engine Key Switch Start engine by turning clockwise.
16. Circuit Breaker Push to reset circuit breaker to protect against electrical
overloads.
17. Heat Switch On/off device for power to burner components.
18. Thermostat Adjust the water temperature.
19. Indicator Light (pressure
switch)
Instrument used to monitor unit operation. Should be
illuminated when the gun is in use.
20. Indicator Light (thermostat) Instrument used to monitor unit operation. Should be
illuminated when the gun is in use and the burner is firing.

Safety Labeling
8
Always make sure safety labels are in place and in good condition. If a safety label is
missing or not legible, order new labels or unsafe operation could result. To order replacement
safety labels, call NorthStar Product Support at 1-800-270-0810.
1
2
5
6
3
4

Safety Labeling
9
On-Product Warning Labels
Ref # Part # Description
1 782325 Danger & Warning
2 305410 Caution Hot
3 777721 Operating Instructions
4 777778 Towing/Moving Instructions
5 786633 Towing Warning
6 782397 Battery Hazard
En
gin
es
Ho
nd
aP
OW
ER
ED
by
NEVER use inside any building, structure or
garage, EVEN IF doors and windows are open.
DANGER
WARNING
FOR OUTDOOR USE ONLY ! Using this pressure washer indoors CAN KILL YOU IN MINUTES.
Engine exhaust and burner exhaust contain carbon monoxide. This is a poison you cannot
see or smell.
High pressure spray can cause injection injury, eye injury, and
loss of balance. Hot discharge fluid and hot surfaces can burn.
NEVER direct discharge stream at or near any person. Do not
allow any part of the body to come in contact with the fluid stream.
Gun kicks back - hold with two hands. Keep good footing and
balance at all times.
Surfaces of engine, burner, and wand can become very hot. Use
only designated gripping area of wand. Avoid contact with hot
engine and burner.
Spraying flammables can cause explosion. Fuel is flammable
and explosive. Exhaust can ignite combustible materials.
NEVER spray flammable liquids. Operate only where open flame
or torch is permitted.
NEVER fuel a running or hot engine or oil burner.
Ensure there are no fuel leaks before starting. Keep sources of
sparks and flames away.
Use approved container only for transferring fuel. Clean up fuel
spills immediately.
Keep engine and burner exhaust at least 7 feet from all
combustible objects. Situate on heat-resistant flooring when
using burner.
Understand all safety hazards and first aid measures for chemicals
being used.
Follow chemical manufacturer's directions when handling and
cleaning with chemicals. Wear safety gear as directed.
Keep spray away from electrical wiring, or electric shock /
electrocution could occur.
CAUTION: To Reduce Risk of Injury, Read Operating Instructions Carefully Before Using.782325
Chemical Exposure Hazard
Electric Shock Hazard
Only use OUTSIDE and far away from
windows, doors, and vents.
Fire / Explosion Hazard
High Pressure Fluid Forces / Burn Hazards
ALWAYS use eye protection. Caustic acid and explosive
gases can cause blindness or severe burns.
NO smoking, sparks, or flames.
NEVER touch both battery terminals at the same time with your
hand or any non-insulated tools.
FLUSH immediately with water if battery acid contacts eyes,
skin, or clothing.
CONNECT cables in correct sequence: FIRST RED to POSITIVE
terminal, then BLACK to NEGATIVE terminal. When disconnecting,
DISCONNECT BLACK cable first, then RED.
NEVER charge a visibly damaged or frozen battery. ALWAYS
read and follow charger instructions.
BATTERIES:
1) contain caustic acid, 2) emit explosive gases,
3) can cause electric shock
WARNING - BATTERY HAZARDS
782397
MO
VIN
G/T
OW
ING
IN
ST
RU
CT
ION
S
To
win
g t
rail
er:
-La
tch
co
up
ler
se
cu
rely
to
cla
ss 3
or
hig
her
hitch
with
2"
ba
ll.
-Ma
ke
su
re h
itch
ed
tra
iler
sits le
ve
l.
-Cra
nk ja
ck t
o U
P p
ositio
n a
nd
re
mo
ve
ca
ste
r w
he
el.
-Att
ach
sa
fety
ch
ain
s t
o t
he
to
w v
eh
icle
.
-Ch
eck lo
ca
l, s
tate
an
d f
ed
era
l re
qu
ire
me
nts
be
fore
to
win
g o
n p
ub
lic r
oa
ds.
Mo
vin
g t
rail
er
by
ha
nd
:
-Att
ach
ca
ste
r w
he
el to
jack.
-Cra
nk ja
ck d
ow
n.
-Do
no
t a
tte
mp
t to
mo
ve
tra
iler
up
or
do
wn
slo
pe
by h
an
d.
1
2
5
6
3 4

Special Equipment Safety Features
10
High Pressure
Safety Device
(Rupture Disc)
WARNING: If the high-pressure safety device ever discharges water,
turn the engine off and do not use the machine. The device will no longer
function properly. See a dealer or call
Product Support at 1-800-270-0810.
This unit is equipped with a high pressure
safety device, which acts as a backup safety
feature. If the unloader malfunctions, the
high-pressure safety device will open and
relieve excess system pressure.
High
Temperature
Limit
This unit is equipped with a high
temperature limit that measures
discharge spray temperature and
automatically turns the burner off
when the temperature setting is
reached. When the discharge spray
temperature drops, the burner
automatically reignites.
Thermal Relief
Valve
This unit is equipped with a thermal
relief valve to protect the pump from
overheating. The pump continues to
work in bypass mode when you are not
spraying. If high temperatures are
developed during bypass mode, the
thermal relief valve will open and
discharge hot water onto the ground,
protecting the pump from overheating.
The thermal relief valve is located on
the unloader.
Spray Gun Safety
Latch
The spray gun is equipped with a
built-in trigger safety latch to
guard against accidental trigger
actuation.
00417
Safety Latch
Guard
removed
for clarity
High pressure
safety device
High
temperature
limit
Assembly and Initial Set-Up
11
Steps for Assembly / Initial Set-Up
Step 1. Unpacking & Delivery Inspection
Step 2. Trailer Assembly
Step 3. Initial Pump & Engine Preparation
Step 4. Battery Installation
Each of these steps is discussed in the below:
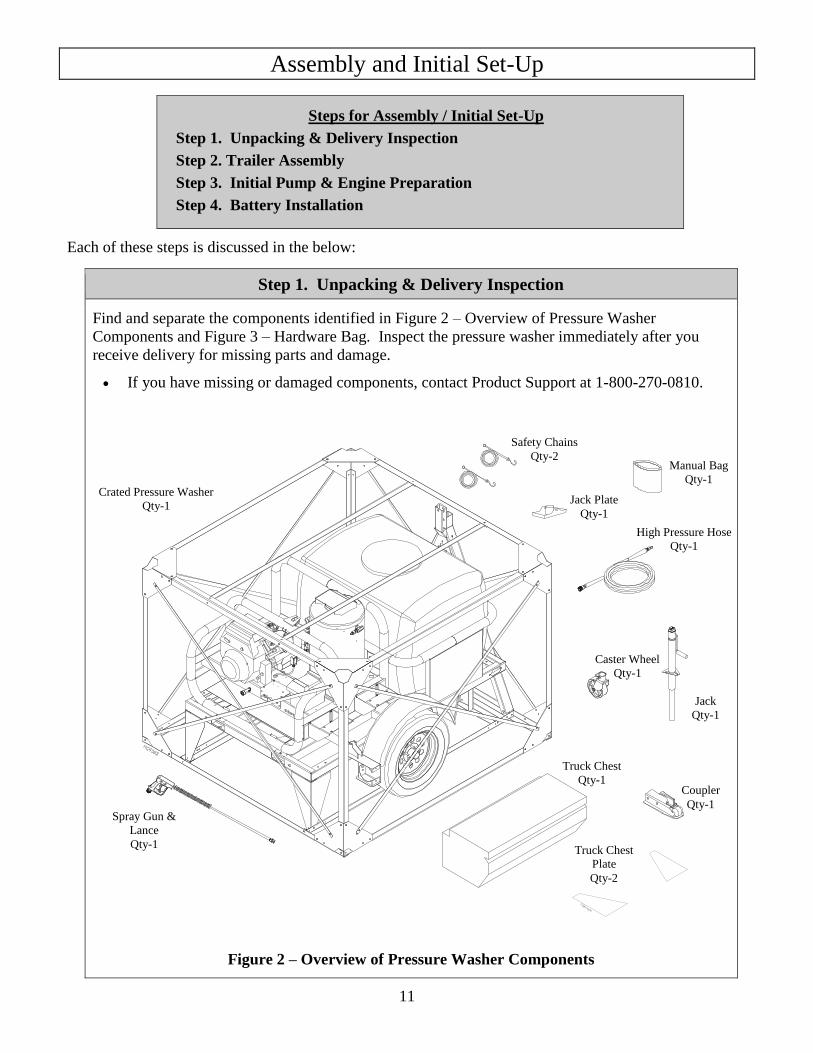
Step 1. Unpacking & Delivery Inspection
Find and separate the components identified in Figure 2 – Overview of Pressure Washer
Components and Figure 3 – Hardware Bag. Inspect the pressure washer immediately after you
receive delivery for missing parts and damage.
If you have missing or damaged components, contact Product Support at 1-800-270-0810.
Figure 2 – Overview of Pressure Washer Components
Crated Pressure Washer
Qty-1
Coupler Qty-1
Safety Chains
Qty-2
Jack
Qty-1
Caster Wheel
Qty-1
Truck Chest
Qty-1
Manual Bag
Qty-1
Spray Gun &
Lance
Qty-1
High Pressure Hose
Qty-1
Jack Plate
Qty-1
Truck Chest
Plate
Qty-2

Assembly and Initial Set-Up
12
Figure 3 – Hardware Bag contents
5/16 Flat Washer
Qty-8
Part # 82099
1/2" Flat Washer
Qty-2
Part # 82122
1/2" Class G Nut
Qty-3
Part # 82291
1/2 x 5" Bolt
Qty-1
Part # 82119
1/2 x 4" Bolt
Qty-2
Part # 82250
5/8 x 1-1/2" Bolt
Qty-4
Part # 82251
5/8" Class G Nut
Qty-4
Part # 82288
3/8 x 1" Bolt
Qty-3
Part # 82023
3/8" Flat Washer
Qty-3
Part # 82028
3/8" Lock Nut
Qty-3
Part # 82027
5/16 x 1-1/4" Bolt
Qty-4
Part # 82480
5/16" Lock Nut
Qty-4
Part # 82020
Suction Hose Assembly
Qty-1
Part # 221222 and 777165 5/8" Flat Washer
Qty-4
Part # 82286

Assembly and Initial Set-Up
13
Step 2. Trailer Assembly
WARNING: The pressure washer is heavy. It can crush and cause serious injury if it rolls
out of control or tips over. Follow all assembly instructions exactly as presented below.
1.) Remove the top and four sides of the
steel crate.
2.) Remove A-frame from trailer frame.
(Keep fasteners for step 7)
3.) Slide A-frame into holders under
trailer frame (built into the front posts).
4.) Install jack onto A-frame with 3/8x1"
bolts, 3/8" lock nuts, and washers
provided. Tighten to 37 ft.-lbs.
5.) Slide caster wheel onto jack and secure
with pin.
6.) Crank jack down until A-frame
becomes level (parallel to ground).
7.) Attach A-frame to trailer frame with
six 5/8" bolts, Class G nuts and
washers. Tighten to 180 ft.-lbs. Use a
torque wrench.
8.) Check trailer light wire routing though
A-frame, make sure wires are not
pinched, stretched, or pass any rough
edges.
9.) Crank jack down farther (so A-
frame goes up) to take weight
off front shipping posts.
10.) Remove front shipping posts.
11.) Crank jack up as far as it will
go (so A-frame goes down and
weight is applied to wheels)
12.) Disconnect rear shipping posts
from frame (remove only the
bolts at the top of the rear
shipping posts)
13.) Roll trailer forward until it is
free of the rear shipping posts.
Front Shipping
Posts
Rear Shipping Posts
(one on each corner)
Caster
wheel
Jack
Trailer
Frame
Front post
A-frame
Trailer
Frame
A-frame
Class G Nuts

Assembly and Initial Set-Up
14
Step 2. Trailer Assembly (continued)
14.) Attach coupler to a-frame with two
1/2x4" bolts and Class G lock nuts.
Tighten each bolt to 90ft.-lbs. Use a
torque wrench.
15.) Attach safety cables to the a-frame with
1/2" x 5" bolt and Class G lock nut.
Place a flat washer next to the head of
the bolt, slide the bolt through the cable
and the A-frame. Then slide the other
cable onto the bolt, followed by another
washer then the lock nut. Tighten to
37ft.-lbs.
16.) Attach truck chest to A-frame with four
5/16 x 1-1/4" bolts, lock nuts, and
washers. Align two tool box plates with
holes in bottom of tool box. Place a flat
washer onto the bolt, then insert bolts
down though holes in plate, truck chest
and A-frame. Place washers under wall
of A-frame and fasten with lock nuts.
Tighten each bolt to 20ft.-lbs.
Truck chest
Coupler
Safety Cables
1/2" x 5" Bolt
Tow Bar
Tube
Safety Cable
Flat Washer
Class G Lock Nut
Flat Washer
Safety Cable
5/16" x1-1/4"
bolt
Toolbox
A-frame Lock Nut
Flat Washer
Flat Washer
Toolbox Plate

Assembly and Initial Set-Up
15
Step 3. Initial Pump, Engine & High Pressure Hose Preparation
Prepare
Water Pump
Verify pump oil level.
Note: The pump is shipped with oil. *Change oil after first 40 hours, then every 3
months or 500 hours
1. Verify oil level:
a. Remove shipping tape
and black vent plug (if
present) from oil fill cap.
Verify that oil level is half
way up the sight glass (or at
the indicator line on the dip
stick, if equipped).
2. If oil level is low, fill using
SAE30 non-detergent oil or Cat
Pump Oil Item #22158.
3. Replace oil fill cap.
Prepare
Engine
Fill the engine with oil.
Note: The engine is shipped without oil.
Refer to the Engine Manual to locate oil-fill port and for instructions on filling.
Use the oil grade and quantity specified in the Engine Manual.
Prepare High
Psi Hose on
Hose Reel
Completely unwrap / unwind the high pressure hose from the hose reel. Note: New hose will “grow” when charged for the first time and should always be
charged one time before being wrapped on the reel.
Sight Glass
Oil drain
Oil fill cap

Assembly and Initial Set-Up
16
Step 4. Battery Installation
Install a 12-volt standard automotive battery (Group 75) with a minimum 18 amp-hour rating.
The engine will run but the burner will not fire unless a battery is installed.
The battery is to be supplied by the customer and should be installed in the protective battery
compartment located near the engine. The inside dimensions of the battery compartment are 11-
1/8"L x 7-3/4"W x 10-1/8"H.
Follow the steps below for connecting and disconnecting the battery.
WARNING: Battery Hazards
Batteries are hazardous because they contain caustic acid, can emit explosive gases, and can
cause electric shock. Caution must be exercised when making connections to a battery to
avoid shock and contact with the acid, and to prevent any sparking that could lead to an
explosion. ALWAYS follow the general battery safety rules and instructions listed below.
General
Battery
Safety Rules
ALWAYS use eye protection and protective clothing when handling
batteries.
NEVER smoke or work near sparks or other sources of ignition.
NEVER touch both battery terminals at the same time with your hand or any
non-insulated tools.
If battery acid contacts skin or clothing, flush immediately with water and
neutralize with baking soda.
Connecting
the battery
Always connect the cables in the following sequence to avoid possible shock:
1. Find the battery cables located inside the battery compartment.
2. Connect the red cable to the positive (+) terminal of the battery.
3. Then connect the black cable to the negative (-) terminal of the battery.
Disconnecting
the battery
Always disconnect cables in the following sequence to avoid possible shock.
1. First, disconnect the black cable from the negative (-) terminal of the
battery.
2. Next, disconnect the red cable from the positive (+) terminal of the battery.
3. Remove the battery from the battery compartment.

Moving and Towing
17
WARNING
The filled pressures washer is heavy. It can crush and cause serious injury if it rolls out of
control or tips over.
ALWAYS keep the jack cranked down to help balance the trailer when it is not
connected to a vehicle hitch.
FOLLOW all the instructions below for safely connecting and towing the pressure
washer.
Connecting Trailer and Towing
Inspect
trailer
Always inspect the trailer before hitching it to your vehicle.
1. Make sure tires are fully inflated and in good repair. See tire sidewall for
recommended pressure.
2. Check to make sure that trailer is in safe working condition. Make sure all
nuts, bolts, and connections are tight. If a part needs replacement, only use
parts that meet the manufacturer's specifications.
WARNING:
Do not over-inflate tires. Serious injury can occur if tire explodes.
Damaged or missing components, or replacement parts that do not meet
specifications, may result in a safety hazard or poor operation of the
trailer.
Move
pressure
washer to
vehicle
When moving the pressure washer by hand, always keep the jack cranked
down to provide support if needed.
Attach trailer
to hitch
Attach trailer to vehicle hitch.
When filled, the pressure washer trailer has a tongue weight of 500 lbs. Ensure the
towing vehicle is properly equipped to handle the load.
1. Attach trailer coupler to vehicle's class 3 or higher hitch with 2" ball (only).
2. Ensure trailer is level, with A-frame tow bar parallel to the ground. You
may need to adjust your coupler height or purchase the proper hitch to
achieve the correct tongue height so trailer is level.
WARNING:
Vehicle handling may be adversely affected while towing if the trailer is not
level.
3. Adjust coupler to ball by raising locking lever and turning lock nut with
fingers. Proper adjustment is obtained when coupler is as tight as possible
on ball and locking lever can still be opened and closed.
4. Lock lever closed to secure the attachment.
5. An optional locking pin or padlock may be inserted in the locking lever
hole for extra security.

Moving and Towing
18
Attach safety
cables
Two safety cables must be used while towing.
Cross safety cables under the coupler, allowing only enough slack for vehicle
turns.
Plug in lights Plug light pin connector into vehicle.
Raise the jack Always crank the jack into the UP position before towing.
Tow Tow the pressure washer to your desired work location.
When towing, always adhere to the following safety rules.
Read vehicle instructions. Review towing safety instructions in your towing
vehicle manual.
Driving skills. Special attention and driving skills are necessary for towing
any type of trailer.
Vehicle handling. Be aware that vehicle handling will be affected when
towing the filled pressure washer. Exercise caution to avoid loss of control or
pressure washer overturning:
o Keep speed to a minimum so you can maintain control at all times.
Reduce speed prior to turns.
o Allow for wider turns and for more distance to stop.
o Avoid any sudden steering maneuvers, starts, or stops that could create
sway.
Rough or sloped terrain. Slow down and exercise extra caution on rough or
sloped terrain in order to reduce risk of rollover. Pick the most level route
possible when transporting across fields. Drive up and down slopes that
cannot be avoided, rather than across. Use a vehicle equipped with a Roll
Over Protection System (ROPS) if you will be operating on non-level terrain.
Added length. Be aware of the added length of the pressure washer.
Reduced visibility. Be aware that visibility may be reduced with pressure
washer attached. Be extra cautious when backing up or turning.
Ride / transport. Never ride or transport cargo on the pressure washer.
On public roads. If towing on a public road, make sure to comply with all
local, state, and federal towing requirements. It is the sole responsibility of
the purchaser to obtain licensing, trailer lights, safety chains or signage as
needed to comply.
Under the influence. Never tow or operate this pressure washer while under
the influence of alcohol, drugs, or medication
If leaving
unattended
Turn off the vehicle and block the trailer wheels if leaving the pressure washer
unattended.

Before Each Use
19
Follow the steps below prior to each use of the pressure washer.
Steps to Follow Before Each Use
Step 1. Check Equipment
Step 2. Add Fuel(s)
Step 3. Select Suitable Worksite
Step 1. Check Equipment
Check/add
pump oil
Check/add pump oil. *Change oil after first 40 hours, then every 3 months or
500 hours
Caution: Never run the pump without sufficient lubrication!
1. Check oil level. Verify that oil level is half way up the sight glass.
2. If oil level is low, fill using SAE30 non-detergent oil or Cat Pump Oil Item
#22158.
3. Replace oil fill cap.
Check/add
engine oil
Check the engine oil level and add oil as needed.
Use the recommended oil type for your engine and expected ambient conditions.
(See engine Owner's Manual for oil type and capacity, and more detailed oil
check/fill instructions.)
WARNING: Burn hazard
Never open oil port while engine is running. Hot oil can spray over face
and body. ˙
Notes:
o Low oil shutdown feature prevents the engine from starting or running
without sufficient oil.
o Engine is shipped without oil. You must add oil before first use.
Inspect spray
system
Always inspect spray system for damage and leaks before each use.
Do not start pressure washer until all needed repairs have been completed.
WARNING: High pressure fluid injection hazard High-pressure fluid discharge from leaks (even pin-sized) or ruptured
components can pierce skin and inject fluid into the body. Injection
injury can result in blood poisoning and/or severe tissue damage leading
to infection, gangrene, and possibly amputation.
Never use a finger or skin to check for leaks.
Never operate machine with damaged or missing hoses/parts.

Before Each Use
20
Never attempt to repair a high-pressure hose or component – Always
replace it with a part that is rated at or above the pressure rating of this
machine.
1) Check hoses, fittings, wand, trigger gun and connections for signs of wear,
cracks, looseness, or leaks. Replace as required.
2) Check and clean the nozzle orifice.
3) Clean inlet filter. (See Maintenance instructions)
Inspect fuel
system
Always inspect (engine and burner) fuel systems & check for leaks
BEFORE starting pressure washer.
Do not start pressure washer until all needed repairs have been completed.
WARNING: Fuel leak hazard
Gasoline and burner fuels are highly explosive and fuel leaks can result in
fire or explosions. You can be burned and seriously injured if the fuel
system is not properly hooked up or there is a fuel leak when you start the
engine.
Inspect the entire fuel system. Look for:
signs of leaks or deterioration,
chafed or spongy fuel hose,
loose connections,
loose or missing fuel hose clamps,
damaged gasoline tank, or
defective gasoline shut-off valve.
Perform other
scheduled
maintenance as
needed
Make sure that any other regular maintenance has been performed as
prescribed in this manual in the "Maintenance & Repair" section.
1. Refer to the engine owner's manual for engine maintenance instructions.
2. Make sure battery is charged. Charge as needed according to your battery
manufacturer's instructions.
Step 2. Add Fuel(s)
WARNING: Fuel fire/explosion hazard Gasoline is highly flammable and explosive. Burner fuels are
combustible at warm temperatures. Heat, sparks, and flames can
ignite fuel vapors, which can become widespread during fueling. A
flash fire and/or explosion could result and cause serious injury or
death. Always use extreme care when handling fuels. Carefully
follow all instructions to avoid the following conditions which could
result in fuel ignition:
gas vapor collection inside enclosures
static electric sparks
sparks from electric wiring, batteries, or running engines
sources of heat (such as a hot engine, burner or exhaust)
open flames, including pilot lights

Before Each Use
21
Always follow these general safety rules when fueling:
1) Turn pressure washer off and allow to cool for at least two minutes before removing any fuel cap.
Note: A running or still-hot engine or burner is hot enough to ignite fuel.
2) Fill fuel tank OUTDOORS – never indoors. Fuel vapors can ignite if they collect inside and
enclosure and explosion can result.
3) Stay away from all sources of heat, sparks, and flames. Do not smoke.
4) Never pump fuel directly into the gas tank or burner at a gas station – it could cause a static
electric spark. Follow these steps to avoid static electric sparking during fueling:
Use an approved portable container to transfer fuel to the pressure washer's tank. (A
portable container made of metal or conductive plastic is preferred because it dissipates
charge to ground more readily.)
Always place container on the ground to be filled. Never fill the portable gas container
while it is sitting inside a vehicle, trailer, trunk, or pick-up truck bed.
Dissipate static charge from your body before beginning the fueling process by touching a
grounded metal object at a safe distance from fuel sources.
Keep nozzle in contact with container while filling. Do not use a nozzle lock-open device.
5) Clean up fuel spills /splashes immediately.
If possible, move the pressure washer away from spilled fuel on the ground.
Wipe up spilled fuel and wait 5 minutes for excess fuel to evaporate before starting engine.
Fuel soaked rags are flammable and should be disposed of properly.
If fuel is spilled on your skin or clothes, change clothes and wash skin immediately.
Fill engine fuel
tank
Check the gasoline tank level. If needed, fill tank with fresh unleaded
gasoline from a portable container:
1) Remove engine gas cap.
2) Add gasoline through the fill opening:
- Use only a UL-approved portable gasoline container to transfer the gasoline
to engine's tank.
- Do NOT overfill the gasoline tank. Allow at least 1/2" of empty space
below the fill neck to allow for fuel expansion.
3) Replace gas cap securely before starting engine.
4) Store extra gasoline in a cool, dry place in an UL-approved, tightly sealed
container.
Fill burner fuel
tank
(if planning to
use heated
water)
If you are planning to use heated water, fill burner fuel tank with #1 or #2
diesel, B5 or lower biodiesel, kerosene, or fuel oil.
1) Remove burner fuel cap.
2) Add fuel through the fill opening. Do not overfill. Allow at least 1/2" of
empty space below fill neck to allow for fuel expansion.
3) Replace fuel cap securely before starting engine.

Before Each Use
22
4) Wipe any excess fuel from unit before starting
Step 3. Select Suitable Outdoor Worksite
Before using the pressure washer, you must understand the criteria for selecting a suitable location
for operation. Note that this pressure washer is for OUTDOOR USE only.
WARNING:
You must choose a suitable site for operating your pressure washer to avoid equipment
damage and/or injury and possible death from carbon monoxide poisoning, fire/explosion,
uncontrolled equipment movement/tip over, or slips and falls. Choose a site that meets all
of the following five criteria:
1. OUTDOORS only, and away from all building windows and air intakes.
2. Where no flammable vapors, dusts, and gases are present.
3. Where there is adequate, unobstructed ventilation airflow.
4. With adequate clearance from combustible materials.
5. On a firm, level, heat-resistant surface with good drainage.
Details regarding each of these criteria are provided below.
1. Outdoors
ONLY
DANGER: Carbon monoxide poisoning hazard
Exhaust fumes from both the engine and the burner contain carbon
monoxide (CO), a poisonous gas you cannot see, smell, or taste. The CO
generated by the pressure washer can rapidly accumulate, even in areas
that appear to be well ventilated, resulting in dangerous and fatal
concentrations within minutes. Follow the directions below for choosing
a location to operate your pressure washer in order to avoid carbon
monoxide poisoning.
The location you choose to operate the pressure washer must be
OUTDOORS and at least 20 feet from the home, away from windows, vents
and air intakes, to allow proper ventilation. If you start to feel sick, dizzy, or
weak while using the pressure washer, shut off the engine and get to fresh
air RIGHT AWAY.
Never run the pressure washer in an enclosed or partially enclosed location
such as a building, garage, barn, shed, or house. These spaces can trap
poisonous gases. Running a fan or opening windows will not provide
adequate ventilation to prevent dangerous CO build-up.
Only use the pressure washer outdoors and far away from open windows,
doors, and building or vehicle vents.
Place the pressure washer so that the exhaust fumes will not be directed
towards people or building air intakes.
Ensure that working, battery-operated or battery back-up carbon monoxide
alarms are used in any dwelling/structure that is in close proximity to the
running pressure washer.
Note that this pressure washer is NOT designed or approved for use in
vehicles or marine applications. Never run the pressure washer inside RVs

Before Each Use
23
or other vehicles, on boats, or on pick-up truck beds.
WARNING:
Never attempt to attach ductwork to the engine muffler or burner exhaust
to allow for installation inside an enclosure. This could cause hot air
deflection, heat build-up, and increased exhaust back-pressure, resulting
in possible exhaust leakage or overheating and damage to the pressure
washer.
2. Away from
combustible
dust, liquids,
or vapors
Do not locate and use the pressure washer in the presence of flammable
vapors, dust, gases, or other potentially combustible materials. Burner is an
open flame, which can ignite airborne dusts and flammable vapors. Operate only
where open flame or torch is permitted.
3. Adequate
ventilation
airflow
The pressure washer needs adequate, unobstructed flow of air to allow for
proper combustion and adequate cooling. Proper combustion can only be
obtained when there is a sufficient supply of oxygen available for the amount of
fuel being burned. Cooling ventilation is required to prevent overheating of the
pressure washer and possible fire.
Situate so there is adequate clearance around pressure washer to allow for
airflow – at least 7 feet from any non-combustible wall or obstruction.
Never place any objects against or on top of the pressure washer.
Do not operate with a tarp, blanket, or cover surrounding the pressure
washer.
4. Hot exhaust
clearance
The exhaust gas from your pressure washer is extremely hot and can cause
combustible materials to catch on fire.
Make sure both the engine exhaust and burner exhaust are at least 7 feet
from all combustible materials and structures during operation.
Equip the engine with a spark arrestor if the pressure washer will be used
near any ignitable forest, brush, or grassy land. (See the engine manual
provided with this equipment to determine if the engine is already
equipped.) Make sure you comply with applicable local, state, and federal
codes.
Keep a fire extinguisher rated "ABC" nearby. Keep it properly charged and
be familiar with its use.
5. Firm, level,
heat-resistant
surface with
nearby water
supply
The pressure washer should be positioned on a firm, level (less than 3 degree
slope), heat-resistant surface with good drainage and a nearby water supply. The pressure washer should be placed within garden hose distance of a
continuous water supply. Ensure that the pressure washer sits level and will not
slide or shift during operation. If applicable, block the pressure washer's wheels
to prevent movement. Surface should be heat resistant if you will be using the
burner for heated spray.
Operation
24
After you have checked and fueled the equipment and positioned it in a suitable worksite, it is
time to start your pressure washer. The following are the procedures necessary for safe,
successful operation of your pressure washer.
WARNING Carefully read and follow all instructions and safety information for using this pressure washer.
Improper use or maintenance of the pressure washer can result in serious injury or death to the
operator or bystanders from:
Carbon monoxide poisoning Fire/explosion Chemical exposure
Skin/eye injury from high pressure spray
Burns Slips/falls Electric shock Flying objects/debris
Operating Instructions
Step 1. Connect Hoses, Water Supply, and Spray Nozzle
Step 2. Set Up for Chemical Spray (if desired)
Step 3. Spraying
Step 4. Stopping
Each of these procedures is discussed in detail below:
Step 1. Connect Hoses, Water Supply, and Spray Nozzle
Position
pressure
washer for use
Place pressure washer in a suitable location for use, as directed in the "Before
Each Use, Step 3: Select Suitable Worksite" section of this manual. A suitable
location is:
OUTDOORS only, away from all building air intakes.
Where no flammable vapors, dusts, and gases are present.
Where there is adequate, unobstructed ventilation airflow.
With adequate clearance from combustible materials.
On a firm, level, heat-resistant surface with good drainage and
nearby access to a continuous water supply.
DANGER: Carbon monoxide poisoning hazard Exhaust fumes from both the engine and the burner contain carbon
monoxide (CO), a poisonous gas you cannot see, smell, or taste. The CO
generated by the pressure washer can rapidly accumulate, even in areas that
appear to be well ventilated, resulting in dangerous and fatal concentrations
within minutes. ONLY run pressure washer OUTDOORS and at least 20
feet from the home, away from windows, vents and air intakes, to allow
proper ventilation. If you start to feel sick, dizzy, or weak while using the
pressure washer, shut off the engine and get to fresh air RIGHT AWAY.
NEVER run pressure washer inside any enclosed or semi-enclosed spaces,
including homes, garages, basements, sheds, boxes, pick-up truck beds,
RVs, or boats. These spaces can trap poisonous gases, EVEN if you run a
fan or open windows.

Operation
25
Connect your
water supply
If using tap water:
Follow these instructions when supplying water from a pressurized source such
as city tap water:
Acquire a suitable garden hose and attach to the water supply:
1. Acquire a suitable garden hose:
a. The water supply garden hose must have an inside diameter of at least
5/8". If the hose is more than 100 ft. long, the diameter must be at least
3/4".
b. Always use a flexible rubber hose for your water supply. Do not use
rigid piping.
c. The use of a backflow preventer on the water supply hose is
recommended and may be required by local code.
2. Attach garden hose to water supply. Make sure it is not kinked.
Check adequacy of water supply:
1. Water supply should be standard tap water.
2. Make sure the water is clean. Debris can cause excess pump wear and
reduce performance.
3. Make sure the water supply is steady and capable of flowing at a rate 20%
over the rated flow of your pump. An insufficient water supply will damage
your pump. Use a stopwatch to time how long it takes to fill a 5 gallon
bucket with your garden hose. It should take less than 62 seconds.
Attach garden hose to the water inlet on the pump:
1. Attach garden hose to the water inlet on the pump for city tap water. See
"Machine Component Identification" section of this manual for location of
water inlet.
2. Confirm rubber washer and inlet screen are in the pump inlet before attaching
the garden hose.
3. OPEN the city tap water ball valve and CLOSE the tank feed ball valve, as
illustrated in the diagram below.
Open this ball valve
Close this ball
valve

Operation
26
If using water tank:
Follow these instructions when supplying water from the feed tank:
1. Ensure that you have the tank feed ball valve OPEN, and the city tap water
ball valve CLOSED, as indicated in the diagram below.
2. Make sure the water in your tank is clean. Debris can cause excess pump
wear and reduce performance.
Attach high
pressure hose
Attach the high pressure hose to the pressure washer's water outlet.
WARNING: NEVER operate this pump with components (such as hose, connections,
and spray gun) rated for lower pressure and/or temperature limits than the
machine's maximum rated pressure and temperature, or component could
rupture and cause serious personal injury from escaping high pressure
fluids.
1. See "Machine Component Identification" section of this manual for location
of the pressure washer's water outlet.
2. Your pressure washer hose is equipped with quick couplers. Simply pull the
collar back and push the coupler onto the water outlet nipple. (Figure 8a).
The collar should slide over the ball bearings.
Figure 8a
Open this
ball valve Close this ball valve
Collar
Coupler
High Pressure Output

Operation
27
3. Release the collar, making sure it springs back and re-seats to its original
(non-retracted) position. (Figure 8b). Check the connection by pulling on
the hose to ensure a positive connection.
Figure 8b
Select spray
nozzle
Your pressure washer is equipped with four high-pressure nozzles and one
low-pressure nozzle. Generally, the wider the spray angle of the nozzle, the
lower the spray pressure produced. Select the appropriate nozzle for the job
based on the following table:
Color of Nozzle: Spray Angle Used For:
Red 0 Highest Impact
Yellow 15 Tough Stains/Stripping
Green 25 General
White 40 Light Cleaning
Black-Low pressure 65 Chemicals
NOTE: You must use the low pressure black nozzle for spraying chemicals.
Attach nozzle Attach nozzle to the spray gun.
WARNING: Depressurize first
Any time you remove/install/change a nozzle, you must depressurize hose
line by squeezing the spray gun trigger while the engine is off. Even if
the engine has been off for a long period of time, the hose may remain
dangerously pressurized.
Correct Insertion Not Fully Inserted
Collar Seated Collar NOT Seated
Nozzle
Trigger
Operation
28
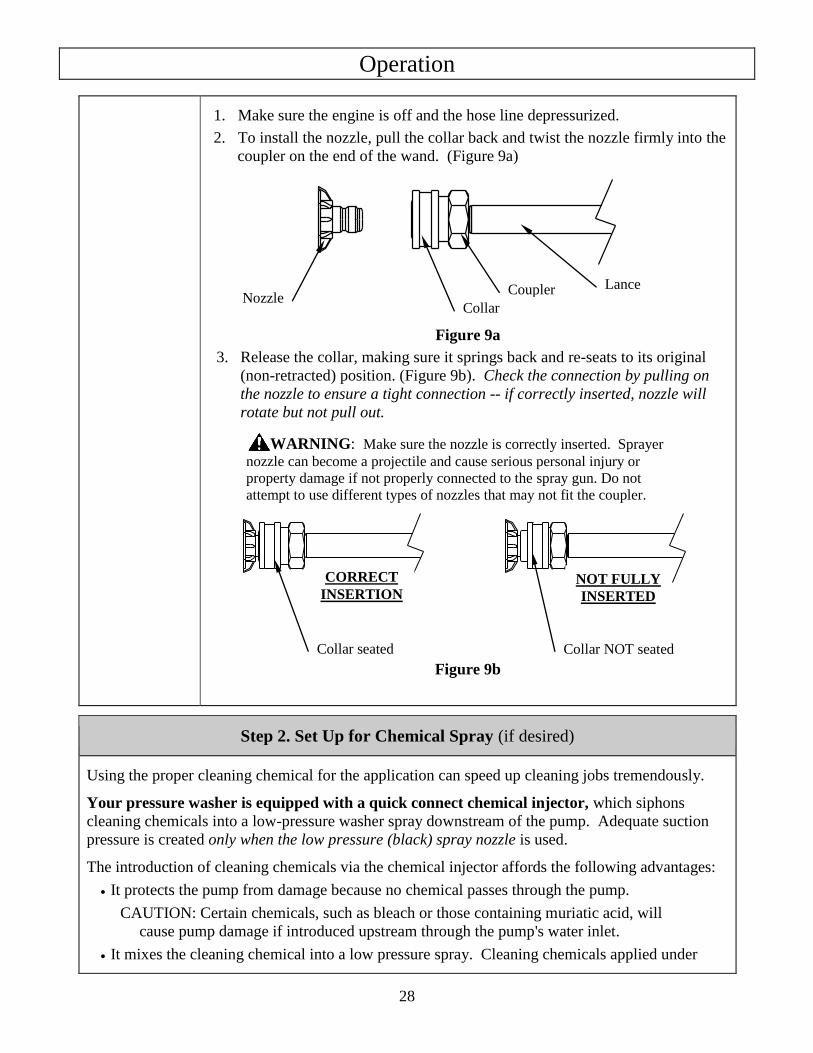
1. Make sure the engine is off and the hose line depressurized.
2. To install the nozzle, pull the collar back and twist the nozzle firmly into the
coupler on the end of the wand. (Figure 9a)
Figure 9a
3. Release the collar, making sure it springs back and re-seats to its original
(non-retracted) position. (Figure 9b). Check the connection by pulling on
the nozzle to ensure a tight connection -- if correctly inserted, nozzle will
rotate but not pull out.
WARNING: Make sure the nozzle is correctly inserted. Sprayer
nozzle can become a projectile and cause serious personal injury or
property damage if not properly connected to the spray gun. Do not
attempt to use different types of nozzles that may not fit the coupler.
Figure 9b
Step 2. Set Up for Chemical Spray (if desired)
Using the proper cleaning chemical for the application can speed up cleaning jobs tremendously.
Your pressure washer is equipped with a quick connect chemical injector, which siphons
cleaning chemicals into a low-pressure washer spray downstream of the pump. Adequate suction
pressure is created only when the low pressure (black) spray nozzle is used.
The introduction of cleaning chemicals via the chemical injector affords the following advantages:
It protects the pump from damage because no chemical passes through the pump.
CAUTION: Certain chemicals, such as bleach or those containing muriatic acid, will
cause pump damage if introduced upstream through the pump's water inlet.
It mixes the cleaning chemical into a low pressure spray. Cleaning chemicals applied under
Nozzle Collar
Coupler Lance
Collar seated Collar NOT seated
CORRECT
INSERTION NOT FULLY
INSERTED

Operation
29
low pressure adhere better to the surface being cleaned, allowing the formula time to react
and remove dirt more effectively.
Note: An external chemical injector pump is not recommended for use with this pressure washer.
WARNING: Chemical spraying
Never spray acids, corrosives, or abrasive or flammable liquids. Breathing hazards, surface
burns/corrosion, or fire/explosion could result.
Follow the chemical manufacturer's label instructions for proper use and handling of the
chemical. Understand all safety hazards and first aid for all chemicals being used. Always
wear protective gloves when handling and cleaning with chemicals, and wear other
protective gear as directed by chemical manufacturer. Always dispose of hazardous fluids
per local, state, and national guidelines.
Acquire cleaning chemical Use only NorthStar pressure washer chemicals or chemicals
specifically formulated for use with pressure washers.
CAUTION: Non-approved chemicals can damage pressure washer
components (seals, wand, hoses, pump, etc.) and be harmful to
the environment.
Prepare for chemical
spray (if planning to use)
Prepare the pressure washer for chemical spraying using the
following steps:
1. Prepare (dilute) the chemical cleaning solution as required for
the job.
(Note: The chemical injector is adjustable and will mix the
chemical solution into the spray up to a maximum ratio of 1 part
chemical solution to 13 parts water.)
2. Disconnect the high pressure hose from the water outlet.
3. Snap the quick couple chemical injector onto the water outlet,
then snap the high pressure hose onto the chemical injector. See
Figure 10.
Figure 10
Strainer Chemical Injector
High Pressure Hose
Water Outlet
Diluted
Chemical
Adjustment Knob
Operation
30
4. Submerge the suction strainer connected to the braided chemical
hose into a bucket containing the chemical solution. See Figure
10.
Step 3. Spraying
Safety rules for
operation
Before starting the pressure washer, review the following general safety
rules for operation:
Conditions for Use
Know how to stop. Be thoroughly familiar with proper use of the equipment and
all controls and connections. Know how to stop the pressure washer and
depressurize system quickly if needed (see "Step 4. Stopping").
Instruct all operators. The pressure washer's owner must instruct all operators and
potential renters in safe set-up and operation. Do not allow anyone to operate
the pressure washer who has not read the Owner's Manual and been instructed on
its safe use.
Adult control only. Only trained adults should set up and operate the pressure
washer. Do not let children operate. Pressure washers can generate forces
greater than children can control and require judgment beyond what can be
expected of children.
Under the influence. Never operate, or let anyone else operate, the pressure
washer while fatigued or under the influence of alcohol, drugs, or medication.
Safety equipment / controls in place. Do not operate the pressure washer unless
all safety covers, guards, and barriers are in place and in good working order,
and all controls are properly adjusted for safe operation.
Damaged. Do not operate the pressure washer with damaged, missing, or broken
parts. Never attempt to repair a high pressure hose or component. Always
replace it with a part that is rated at or above the pressure rating of the machine.
Modifications. Do not modify the pressure washer in any way or deactivate any
safety device. Do not change or add to fuel tank, fuel lines, or exhaust system.
Modifications can result in hazards related to carbon monoxide poisoning, fuel
leaks, fire, explosion or other serious safety hazards, and will also void the
warranty.
During Use Stay alert. Watch what you are doing at all times.
Clear work area. Clear the work area of all bystanders. Keep children and pets
away.
Keep spray away from electrical wiring. Spray contact with electrical wiring
will likely result in severe electrical shock or electrocution.
Hot exhaust/parts. Stay clear of engine and burner exhausts. Never touch hot engine
muffler, burner/heating coil, or other hot surfaces. All are very hot and will burn you.
Do not direct spray at this machine. Do not attempt to clean this machine with its
own spray. Engine damage will result. Cleaning should be done with a damp
sponge with the engine OFF.
Let engine cool at least two minutes before refueling.
Avoid inhalation of exhaust. This product emits CO and chemicals known to the
State of California to cause cancer, birth defects or other reproductive harm.
Never pull by hose. Do not move this machine by pulling on the hose. Hose or
connections could fail and result in catastrophic high pressure release of fluid as
Operation
31
well as hose whipping.
Avoid sharp objects. Keep hose away from sharp objects. Bursting hoses may
cause injury.
No load bearing. Do not use the pump to support other items of equipment that
impose unacceptable loads on the pump. Do not attempt to use this machine as a
prop.
Lock trigger safety latch when not spraying. Spray gun is equipped with a built-
in trigger safety latch to guard against accidental trigger release. Rotate safety
latch to the locked position when not spraying.
Leaving unattended. Always turn off the pressure washer and relieve system
pressure before leaving the sprayer unattended.
Prompt Emergency Response Seek medical aid for suspected injection injury. If injured by high-pressure
fluid, no matter how small the wound is, see a doctor at once. A typical injection
injury may be a small puncture wound that does not look serious. However,
severe infection or reaction can result if proper medical treatment is not
administered immediately by a doctor who is familiar with injection injuries.
Seek medical aid for suspected carbon monoxide poisoning. The running
engine gives off carbon monoxide, a poisonous gas that can kill you. If you start
to feel sick, dizzy, or weak while using the pressure washer, shut off the engine
and get to fresh air RIGHT AWAY. See a doctor. You may have carbon
monoxide poisoning.
Put on personal
protective gear
WARNING: Use personal protective gear to prevent:
- Eye and skin injection injury from high pressure spray
- Burns from hot water or steam
- Eye injury from flying debris
1. Wear waterproof, thermally insulated gloves, safety glasses with side
and top protection, face protection, and protective clothing when
operating the machine. If spraying pressure washer specific chemicals,
wear a respirator mask to avoid inhalation of vapors if directed on the
chemical label.
2. Wear non-slip, protective footwear. Use of pressure washer can create
puddles and slippery surfaces. Wear footwear capable of maintaining a
good grip on wet surfaces.
Prime the water
supply
CAUTION: Never run the pump without the water supply connected and
primed. Operating the pressure washer without a sufficient incoming flow of
water will damage the pump.
If using city tap water:
Ensure that the city tap water ball valve is OPEN, and the tank feed ball
valve is CLOSED. (The ball valve you are not using must be closed
before starting the engine or pump cavitation could occur.)
Turn on the tap. Make sure the water supply is steady and flowing at a
rate 20% over the rated flow of your pump. (See Step 1 above, "Connect
Hoses, Water Supply, and Nozzle").

Operation
32
Purge air from the water supply hose by squeezing the trigger until a
steady stream of water flows out of the nozzle at low pressure. (Air in
the hoses can cause damage to the pump, so always make sure all the air
is out of the hoses before starting the pressure washer engine.)
Make sure the water supply hose is not kinked. A kinked hose will
provide insufficient water supply to the pump and reduce its life. Make
sure the hose remains unkinked after moving the pressure washer.
If using water feed tank:
Ensure that the tank feed ball valve is OPEN, and the city tap water ball
valve is CLOSED. (The ball valve you are not using must be closed
before starting the engine or pump cavitation could occur.)
Make sure the supply hose from the tank is not kinked. A kinked hose
will provide insufficient water supply to the pump and reduce its life.
Make sure the hose remains unkinked after moving the pressure washer.
Purge air from the water supply hose by squeezing the trigger until a
steady stream of water flows out of the nozzle at low pressure. (Air in
the hoses can cause damage to the pump, so always make sure all the air
is out of the hoses before starting the pressure washer engine.)
Start engine Start the engine to power the pump.
1. Make sure water supply is connected and primed.
CAUTION: Running the pump dry will cause damage and void the
warranty.
2. To prevent accidental spraying, engage the safety latch on spray gun
trigger by rotating it to the locked position.
3. Follow the instructions in the Engine Manual for starting the engine.
- If the engine doesn't start on the first try, pressure may build up in
the pump. Relieve pressure by squeezing the spray gun trigger
before attempting to start engine again. This will make starting
easier.
DANGER:
Do not inhale engine exhaust. It contains dangerous carbon monoxide
that can kill you.
Apply cleaning
chemical
(if desired)
If desired, spray cleaning chemical at low pressure (with or without
heated water).
1. Make sure the chemical injector is properly set up according to the
instructions in Step 2, "Set Up for Chemical Spraying".
2. Make sure the low pressure BLACK nozzle is attached before
beginning to spray chemicals -- Only the low pressure black nozzle will
allow chemicals to be drawn through the chemical injector into the
water stream.

Operation
33
3. You can apply chemicals with either warm or cold water. Check
chemical label. If warm water is specified, start burner according to
instructions provided below.
4. Apply chemicals by squeezing the spray gun trigger. The chemical
injector will draw the chemical into the water stream.
5. The chemical concentration of the spray can be changed by turning the
chemical adjustment knob located on the chemical injector.
6. Apply chemicals evenly to the cleaning surface. Never use more
chemical than is necessary to clean the surface.
7. Allow the chemicals time to react with the dirt before rinsing.
8. Prepare to rinse by changing to a high-pressure nozzle. Changing the
nozzle from the low-pressure black nozzle to a high-pressure nozzle
will stop the flow of chemicals into the water stream.
Refer to instructions for selecting and changing the nozzle in Step1,
"Connect Hoses, Water Supply, and Nozzle".
9. Rinse with high-pressure spray, either hot or cold, as instructed below.
Turn on burner
(If hot spray or
steam is desired)
If HOT spray or steam is desired, turn on the burner:
1. First make sure vicinity is free of flammable vapors, dust, gases, or
other potentially combustible materials. Operate only where open
flame or torch is permitted.
2. Make sure there is fuel in the burner fuel tank.
CAUTION: Do not run the machine in hot mode without fuel in the
burner's fuel tank, or damage can occur.
3. Make sure the engine throttle is all the way open. If it is not, the engine
will not supply adequate voltage to the burner, resulting in smoke
coming from the heat exchanger during operation.
Turn the heat switch ON and adjust the thermostat to the desired
temperature.
WARNING:
NEVER attempt to immediately run or re-light the burner if it
doesn't ignite the first time. Unburned oil or gas may have
accumulated, causing potential explosion or fire hazard.
Do not attempt to set temperature limit above the preset limit.
Never touch hot burner surfaces and stay clear of burner exhaust.
All are very hot and will burn you.
Do not inhale burner exhaust. It contains dangerous carbon
monoxide that can kill you.
4. The burner will fire when the trigger is squeezed – follow instructions
for spraying.
Note:
If burner exhaust is white, adjust burner for peak performance. See
Operation
34
the "Oil Burner Adjustment Instructions" step in the "Set-Up"
section of this manual.
5. When the trigger is released, a pressure switch automatically turns the
burner off. Also, when the temperature setting is reached, the
thermostat automatically turns the burner off.
WARNING:
It is important that the burner stops firing when the trigger is
released. If the burner remains firing, discontinue use until the
pressure washer is serviced. Extremely high temperatures can
result in serious injury and equipment damage.
Begin high pressure
spray
High Pressure Spray Procedure
WARNING: High pressure spraying safety
Keep spray away from people. Never direct discharge stream at or near any
person. Do not allow any part of the body to come in contact with the fluid
stream. High-pressure spray can cause serious skin, eye, or falling injuries,
and hot water can burn. Injection injury will occur if high-pressure spray
pierces the skin, injecting liquid under the skin. Injection injury can result in
blood poisoning and/or severe tissue damage leading to infection, gangrene
and possibly amputation. Seek medical attention.
Do not secure trigger open. To reduce risk of injury, do not attempt to
secure the spray gun open by blocking or tying the spray gun in the open
position.
Prevent slips / loss of balance. High-pressure spray could cause you to lose
balance from kickback forces, and wet surfaces can be slippery.
- Keep good footing and balance at all times. Do not overreach.
- Do not stand on unstable support when spraying.
- If spraying from an elevated surface, use fall protection because
spray gun kickback can propel you off the elevated surface. When
spraying from a ladder or scaffolding, ensure it is firmly anchored
from sway or tip-over.
- Be aware of puddles and slippery surfaces. Ensure there is adequate
drainage to prevent pooling of water.
Prevent surface damage & flying debris – Surfaces being sprayed must be
strong enough to withstand high-pressure spray or damage may result. In
addition, high-pressure spray will dislodge unsecured objects as well as
surface chips and debris, resulting in hazardous flying objects that can cause
personal injury or property damage. Do not spray brittle surfaces or
breakable, fragile, or unsecured objects such as:
o stucco or laminar flagstone
o some painted surfaces
o windows or glass doors (because they may break)
o light fixtures, flowerbeds, mailboxes
o unsecured, lightweight objects
Procedure:
1. Put on one of the high-pressure spray nozzles (always relieve system

Operation
35
pressure first and follow instructions for attaching a nozzle).
2. Clear the cleaning area of all persons. Keep children and pets away.
3. Hold the spray gun firmly with two hands and a sturdy stance -- Gun
kicks back when triggered.
CAUTION: Spray gun metal gets extremely hot when using
the burner and can burn you on contact. Never touch the metal
screw or any metal parts of the spray gun when the heater is being
used. Use only designated grip areas.
4. Wash from the bottom to the top, using side-to-side motions. This
washes away heavy dirt and allows the detergent to soak as you work
toward the top.
5. Use the width of the spray pattern to wash a wide path. Overlap spray
paths for complete coverage.
6. The nozzle should be 12" to 24" from the work, closer for tough areas.
7. Small parts should be washed in a basket so the pressure does not push
them away. Larger, lightweight parts should be clamped down.
8. The pressure washer is set and locked to the maximum rated pressure
when it leaves the factory. To reduce the pressure, turn the unloader
knob counterclockwise. (See Figure 11 below)
WARNING: Do not attempt to alter the unloader valve's maximum
pressure. Excess pressure could cause serious injury from escaping high-
pressure fluids and/or pump damage. Any alteration other than turning the
adjustment knob will void your warranty.
00417
Safety Latch
Unloader
Figure 11

Operation
36
9. If temporarily interrupting spraying, rotate trigger safety latch
downward to the locked position to guard against accidental trigger
release.
10. Always turn off the engine and activate spray gun trigger to relieve
system pressure when:
the sprayer is unattended, or
disconnecting hoses, installing/cleaning nozzles, or servicing
the pump.
WARNING: Always turn off the engine and relieve system pressure when finished
spraying or when leaving sprayer unattended. Serious injury could
result from unintentional release of high-pressure spray.
Step 4. Stopping
Stop the engine using the following steps:
WARNING: Never disconnect the high-pressure hose from the pump or spray gun while the system is
pressurized. Relieve pressure by squeezing the spray gun trigger after the engine is turned
OFF.
1. If the heater was used, turn heat switch OFF and run cold water through the coil for at least 3
minutes while spraying.
2. Turn engine OFF.
3. Turn water supply OFF.
4. Actuate spray gun trigger to relieve system pressure.
5. Remove garden hose.
Remove pressure hose. If chemicals were used, remove quick connect chemical injector
from the pressure hose and water outlet.
6. Remove nozzle from spray gun.
7. Turn gasoline line valve to the OFF position.
8. Cool engine at least five minutes before storing – A hot engine is a fire hazard.

Storage
37
Storage
When you are finished using the pressure washer, you must prepare the sprayer for storage and store
it in a proper location. Note:
o If you will be storing the sprayer in freezing conditions, follow the instructions for
preparing the sprayer for storage in freezing conditions.
o If you will not be using the sprayer again for 30 days or more, follow the instructions for
preparing the engine for long-term storage.
WARNING
Fuel and its vapors can ignite and cause a fire. Select a well-ventilated storage area
away from sources of heat, flame, or sparks.
A hot engine can ignite flammable materials. Always let engine cool at least five
minutes before storing.
Detailed instructions are provided below.
Choose a storage
location
Choose a storage location that is:
o Clean and dry.
o Away from sources of heat, open flames, sparks, or pilot lights, even
if the pressure washer's engine and burner fuel tanks are empty.
Residual fuel fumes from tank can ignite.
o Away from extreme high or low temperatures. Do not store the
pressure washer in freezing conditions unless it is prepared as
directed below for those conditions.
Perform regular
maintenance
Perform periodic maintenance as directed in this manual to keep the
pressure washer in safe working condition.
Prepare pressure
washer for freezing
conditions (if
needed)
If you will be storing the pressure washer in freezing temperatures, you
must properly prepare the pressure washer to prevent water from
freezing in the system.
CAUTION:
Do not allow water to freeze in the pressure washer, high
pressure hose, or spray gun. Freezing water can cause damage
to the equipment and cause the spray gun to fail in the open
position. A spray gun that has failed in the open position can
whip around and cause personal injury when the pressure
washer is started.
Short Term freeze protection: (if storing less than 30 days)
1. Drain water from the feed tank if applicable.
2. Drain water from the heating coil by extending the high pressure hose
straight. Place the end of the hose at a level below the pressure washer.
Remove the spray gun from the hose.

Storage
38
3. Using a wrench, disconnect the plumbing that connects to the heating
coil inlet. The water will flow out of the heating coil. This will protect
the coil from freeze damage.
4. Open both water inlet ball valves and remove the cap from the water
filter. This will drain the pump and water inlet plumbing.
Long Term freeze protection: (if storing more than 30 days)
The RV antifreeze will save the components from freeze damage and keep
them lubricated.
1. Fill attached feed tank or a separate bucket with 5 gallons of RV
antifreeze.
a. If feed tank has been used, drain water from it first.
b. If using a bucket, submerge one end of a short garden hose in the
bucket and connect the other end to the water supply inlet on the
pump.)
2. Disconnect the high pressure hose from the high pressure water outlet.
3. Run the engine (with burner off) until RV antifreeze comes out of the
high pressure water outlet.
4. Make sure excess antifreeze is disposed of safely.
Prepare engine for
long term storage
(if storing more than
30 days)
First prepare the engine for long term storage if you will not be using
the pressure washer again for more than 30 days.
Fuel can become stale when stored over 30 days. Stale fuel causes acid and
gum deposits to form in the fuel system which can cause malfunction of the
engine.
1. Prepare fuel system for storage:
o Drain all gasoline from the tank and carburetor. This is most easily
accomplished by running the pressure washer with the high pressure
hose until the engine stops from lack of fuel.
OR
o Add fuel stabilizer to the gasoline (following manufacturer's
instructions)
Fuel stabilizer steps:
a. Ensure gas tank is full.
b. Add fuel stabilizer to fuel tank.
c. Run pressure washer with high pressure hose at least 5
minutes after adding stabilizer to allow it to enter the fuel
system.
d. Shut off engine
2. Lubricate cylinder and piston:
a. Disconnect spark plug wire and remove spark plug
b. Add one teaspoon oil through spark plug hole
c. Place rag over spark plug hole and turn starter (or pull the recoil) a
few times to lubricate the combustion chamber.

Storage
39
d. Replace spark plug, but do not reconnect the spark plug wire.
Prepare pressure
washer for storage
Prepare the pressure washer for storage.
1. Disconnect the battery, remove it from the battery compartment, and
store it indoors.
2. Make sure the engine start switch is OFF and fuel valve is OFF.
3. Disconnect the engine spark plug wire if you haven't already done so.
4. Disconnect the high-pressure hose, garden hose, and spray gun.
Move pressure
washer to storage
location
Let engine cool for 5 minutes before moving the pressure washer to its
storage location.

Burner Adjustment
40
Oil Burner Adjustment (only needed if white exhaust smoke appears)
The oil burner is preset and performance tested at the factory (elevation 1100 feet). Different
altitudes may require a one-time initial burner adjustment.
CAUTION:
If white smoke appears from the burner exhaust vent during start-up or operation,
discontinue use and readjust air bands.
Specific steps for burner correction are given below.
Burner
Correction
Adjusting the burner will require you to access the burner from underneath the
pressure washer while someone else is operating the spray gun.
Detailed instructions:
1. Make sure burner is cool to the touch before attempting to adjust.
WARNING: The burner adjustment procedure requires part of
an individual's body to be underneath the pressure washer while it is
elevated. Always ensure the pressure washer is securely elevated
before working on the burner underneath.
2. Begin operation of the pressure washer and switch on the burner, as instructed
in the "Operation" section of the manual. Have someone operate the spray
gun so the burner fires.
3. Locate the air intake adjustment band as shown in Figure 13 below. Observe
the position of the arrow on the air band relative to the calibration numbers
directly to the right. (Note: Factory calibration starts out at close to "1".)
4. Loosen the locking screw and rotate the air band closed until black smoke
appears from the burner exhaust vent. Note which number the arrow now
points to.
Figure 13
Rotatable Air
Intake Adjustment
Band
Arrowhead
Burner

Burner Adjustment
41
5. Slowly open the air band until white smoke just starts to appear.
6. Turn air band halfway back to the black smoke position previously noted.
Tighten the locking screw.
7. Now fine tune the burner air by adjusting the shutter:
a. Locate the shutter as shown in Figure 14 below. The shutter is a thin
circular metal plate located on the outside of the air band. The shutter
adjusts independently from the air band and is used to fine-tune the
amount of intake air.
b. Observe that the aluminum pointer attached to the shutter. It points to the
same set of calibration numbers as the air band arrow. Observe which
number it points to at the start of this adjustment step.
c. Loosen the shutter lock screw. Turn the shutter using the aluminum
pointer until the exhaust is cleanest. Tighten the shutter lock screw.
Figure 14
Shutter Lock
Screw
Shutter

Maintenance & Repair
42
Inspect and maintain your pressure washer as specified below in order to keep it in safe
and optimal working order. Follow all safety rules and recommended maintenance
instructions.
WARNING
ALWAYS shut off water supply, bleed water pressure, turn off engine and disconnect the
spark plug before cleaning, adjusting, or servicing the pressure washer. After servicing,
make sure all guards and cover shields are replaced before using.
Maintenance Schedule
Item Frequency
Remove dust/debris accumulation As needed
Inspect fuel system Each use
Inspect spray system Each use
Clean water filter Each use
Check tire pressure Each use
Recharge and maintain battery As specified in Battery Manufacturer's
instructions
Perform engine maintenance As specified in Engine Owner's manual
Change pump oil After first 40 hours of use
Every 3 months or 500 hours of use after that
Maintain burner's fuel filter / water separator Drain water as needed
Change filter after every 500 hours of use
Descale coil Annually or more frequently as use and
performance require (see instructions)
Inspect and desoot coil if needed Annually
Inspect/clean/adjust electrodes Annually
See detailed instructions for each maintenance item below.
(Note: For end-of-the-season storage instructions, see the "Storage" section of this
manual.)
Maintenance & Repair-Detailed Instructions
Follow safety rules Read and follow these safety rules whenever you will be servicing the
pressure washer: Turn off / relieve pressure first. Always turn off pressure washer and
relieve system pressure before inspection or maintenance. Remove spark
plug or spark plug wire to prevent accidental starting.
Fuel valve off. Turn fuel shut-off valve to OFF position before transporting
or servicing the pressure washer.
Replace guards. Make sure all guards and cover shields are replaced after
servicing the pressure washer.
Major repair. Major service, including the installation or replacement of
parts, should be performed only by a qualified electrical service technician.
Obtain factory approved parts from Northern Tool Product Support at 1-800-
Maintenance & Repair
43
270-0810.
Replacement parts. If a part needs replacement, only use factory approved
repair parts. Replacement parts that do not meet specifications may result in
a safety hazard or poor operation of the pressure washer and will void the
warranty.
Keep pressure
washer clean
Keep pressure washer clean.
If dust or debris accumulates on the pressure washer, clean the pressure
washer with a damp cloth or soft bristle brush. Do not allow air intakes to
become blocked.
CAUTION: Do not spray pressure washer with a garden hose or
pressure washer. Water may enter the pressure washer and cause
damage.
Inspect fuel
system(s)
Inspect the fuel systems (of both engine and burner) and check for leaks
before each use.
Do not start pressure washer until all needed repairs have been completed.
WARNING: Fuel leak hazard
Gasoline and burner fuel are highly explosive and fuel leaks can
result in fire or explosions. You can be burned and seriously injured
if the fuel system is not properly hooked up or there is a fuel leak
when you start the engine.
Inspect the entire fuel system, for both engine and burner. Look for:
signs of leaks or deterioration,
chafed or spongy fuel hose,
loose connections,
loose or missing fuel hose clamps,
damaged fuel tank, or
defective gasoline shut-off valve.
Inspect spray
system
Inspect spray system for damage and leaks before each use.
Do not start pressure washer until all needed repairs have been completed.
WARNING: High pressure fluid injection hazard High pressure fluid discharge from leaks (even pin-sized) or
ruptured components can pierce skin and inject fluid into the body.
Injection injury can result in blood poisoning and/or severe tissue
damage leading to infection, gangrene, and possibly amputation.
Never use a finger or skin to check for leaks.
Never operate machine with damaged or missing hoses/parts.
Never attempt to repair a high-pressure hose or component –
Always replace it with a part that is rated at or above the
pressure rating of this machine.
1) Check hoses, fittings, wand, trigger gun and connections for signs of
wear, cracks, looseness, or leaks. Replace as required.
2) Check and clean the nozzle orifice.

Maintenance & Repair
44
Clean water filter Clean the water filter before each use.
WARNING:
When cleaning filters, check whether dangerous chemicals have
been used with the filter and take any precautions that may be
recommended by the manufacturer of these chemicals. Always
dispose of hazardous fluids per local, state, and national
guidelines.
1) Locate water filter on pump inlet fitting. (See Components section of
this manual.)
2) Remove water filter cap.
3) Remove filter screen.
4) Run water through screen to clean.
5) Reassemble.
Check tires/ trailer Check tires and trailer before each use.
1. Make sure tires are fully inflated and in good repair. See tire sidewall
for recommended pressure and fill as needed.
2. Check to make sure that trailer is in safe working condition. Make sure
all nuts, bolts, and connections are tight. If a part needs replacement,
only use parts that meet the manufacturer's specifications.
WARNING:
Do not over-inflate tires. Serious injury can occur if tire
explodes.
Damaged or missing components, or replacement parts that do
not meet specifications, may result in a safety hazard or poor
operation of the trailer.
Bad
Exposed wire mesh due
to wear
Water dripping or spraying,
or localized moisture
Good
Bad
Figure 15

Maintenance & Repair
45
Recharge and
maintain battery
Inspect, recharge, and maintain battery according to your battery
manufacturer's instructions.
Do not store with battery charger always connected. Batteries that are over-
charged can boil themselves dry and produce excessive amounts of
hydrogen, an explosive gas.
Perform engine
maintenance
Perform engine maintenance as specified in the engine owner's manual.
Engine maintenance items include:
1. Changing oil and oil filter
2. Air filter check/replacement
3. Spark plug cleaning and replacement
4. Fuel filter check/replacement
5. Inspecting and cleaning muffler (and spark arrestor if equipped)
Change pump oil Change the pump oil after the first 40 hours of use, and then after every 3
months or 500 hours of use after that.
1. Open oil drain valve on pump.
2. Drain pump oil into suitable container and dispose of responsibly.
3. Close oil drain valve.
4. Make sure unit is sitting level. Fill pump with 18 oz. of SAE30 non-
detergent oil or Cat Pump Oil Item #22158 to middle of sight glass (or at
the indicator line on the dip stick if equipped).
5. Replace oil fill cap.
Figure 16
Oil fill cap
Sight glass
Oil drain

Maintenance & Repair
46
Maintain burner's
fuel filter/water
separator
Drain water from burner's filter bowl as needed, and replace filter after
every 500 hours of use or as needed.
1) After each use of the burner, visually check the filter bowl. If any water
has accumulated, drain it via the water drain at the bottom of the bowl.
2) After every 500 hours of operation, empty the burner's fuel tank in order
to remove the filter bowl and inspect the fuel filter/water separator.
Replace filter as needed.
Important: Always empty
the burner's fuel tank
before removing the filter
bowl. There is no shut-
off valve between fuel
filter/water separator
and burner's fuel tank.
Descale heating coil Descale coil tubing annually or more frequently as needed.
In hard water areas, scale can build up inside the heating coil tubing. Scale
deposits will decrease the output pressure and temperature of heated spray,
and may eventually clog water flow through the heating coil.
Descale the coil tubing at least annually and more frequently if you detect a
decrease in output pressure or temperature.
To descale the coil:
1) Mix a commercial coil cleaner in a 5-gallon bucket and elevate the
bucket so it is higher than the unloader.
2) Attach the high-pressure hose(s) to the high-pressure water outlet on the
machine. Do not hook up the spray gun.
3) Place the other end of the high-pressure hose(s) in the 5-gallon bucket.
4) Attach a short length of garden hose to the garden hose inlet on the
pump.
5) Prime the pump by filling the hose with water, then placing the end of
the hose in the bucket.
6) Run the pressure washer in cold mode for 1 to 3 hours, recirculating the
cleaning solution. CAUTION: Do not run the burner.
7) Dispose of the cleaning solution where it is not harmful to animals or the
environment.
8) Flush with fresh water and clean the inlet strainer when finished.
Water drain
Filter bowl
Figure 17

Maintenance & Repair
47
Figure 18
Inspect heating coil
and desoot as
needed
Inspect and desoot coil annually.
Most coils never require desooting. However, poor grades of fuel oil or
inadequate combustion air will cause heavy soot build-up on the outside
surface of the heating coil tubing. These deposits will insulate the coil,
which then restricts air flow through the heat exchanger and further
aggravates the soot build-up.
If soot has built up on the exterior of the coil tubing, clean as follows:
1) Wear protective clothing,
goggles, and gloves.
2) Disconnect high-pressure
hose on inlet side of coil
and thermostat on outlet
side of coil.
3) Remove the lid and
insulation lid from the
heating chamber and hoist
the coil out. Be careful, the
coil weighs 125 lbs.
4) Clean the coil.
5) Reassemble the coil and lids
to the machine. Make sure
the white insulation remains
in place.
6) Reattach high-pressure hose
and thermostat and make
sure all fittings are tight
before using the machine.
Outlet
Inlet
Figure 19
Lid
Insulation
lid
Heating
Coil
Heating
Chamber

Maintenance & Repair
48
Inspect electrodes Inspect electrodes yearly and make adjustments as needed.
1) Remove the 4 nuts that attach the burner to the heating chamber. You
do not have to disconnect the fuel lines or the electric cords.
Figure 20
2) Pull the burner out from underneath the heat exchanger.
3) Clean off carbon deposits, which may have accumulated on the tips of
the electrodes.
4) Reset the spacing as shown below in Figure 21.
1/16"
1/8"
7/16"
Electrodes
Figure 21
Heating chamber
Nuts
Burner

Maintenance & Repair
49
NOTE TO COMMERCIAL USERS:
All mechanical equipment, no matter how well designed, will need maintenance and
repairs. A Northstar pressure washer is no exception. At times, a Northstar pressure
washer may become inoperable because repairs are required. Northstar Product
Support will assist in these repairs as needed, but if an inoperable pressure washer
creates a major expense to your business, then we strongly recommend the
following:
Have a staff person become familiar with the mechanical operation of the
pressure washer and capable of making minor repairs and performing all
preventative maintenance procedures.
Keep a stock of recommended service parts for maintenance and minor
repairs.
IMPORTANT:
If a part needs replacement, only use parts that meet the manufacturer's part number
specifications. Replacement parts that do not meet specifications may result in a safety
hazard or poor operation of the pressure washer.
Contact NorthStar Product Support at 1-800-270-0810 for any
questions, problems, or parts orders.
Troubleshooting
50
Any Questions, Comments, Problems, or Parts Orders
Call NorthStar Product Support 1-800-270-0810
Engine Will Not Start Causes Solutions
Low Oil Shutdown Fill engine with the adequate amount of oil.
Cold Engine Choke engine to start.
No Fuel Add gas to engine, make sure fuel shutoff valve is open.
Dead Battery Recharge/Replace battery.
Spark plug wire not attached Attach spark plug wire to spark plug.
Pressure Washer Runs But Burner Doesn't Fire Causes Solutions
Heat switch turned OFF Turn heat switch ON.
Thermostat set too low or off Set thermostat to desired temp.
Fuel tank empty Fill fuel tank with kerosene, diesel, or fuel oil.
Defective Pressure Switch Call Product Support.
Defective Burner Call Product Support.
Pressure Washer Runs But No Pressure Causes Solutions
Partially clogged or damaged nozzle Clean or replace nozzle.
Clogged water filter Clean water filter.
Low water flow Make sure the water supply is more than 4 gpm.
Pressure Washer Surges Or Cycles While In Bypass Causes Solutions
Leak between unloader and gun. Check all connections between unloader and gun for leaks. Tighten loose
components and replace damaged components.
Gun leaking internally Replace spray gun.
Smoke From Heat Exchanger Causes Solutions
Air band not adjusted properly Adjust the air band until the burner burns cleanly. See Installation
Instructions
Poor quality fuel Use kerosene for the cleanest burn.
Water Not Heating Sufficiently Causes Solutions
Scale build-up in coil See Coil Descaling under Maintenance Instructions.
Coil is full of soot See Coil Desooting under Maintenance Instructions.
Poor Or No Detergent Supply Causes Solutions
Soap control knob set too low. Adjust soap control knob.
Inadequate detergent supply Refill detergent container. Make sure chemical strainer is fully
submerged.
High pressure hose too long Use less hose. Move machine closer to the work.
Chemical strainer or injector clogged Clean the strainer and injector. Always start with a clean detergent
container. Run clean water through the injector after each use.

Parts Explosion 157595 – Rev AP
51

Parts Explosion 157595 – Rev AP
52
REF PART # DESCRIPTION QTY REF PART # DESCRIPTION QTY
1 783394 Honda engine 18hp
1 66 792433 Grommet 1” 2
783396 Honda muffler kit 67 790561 Thermostat 1
3 777837 3/8" NPT plug 1 68 777855 Toggle switch 1
4 38198 CAT pump, 4gpm 1 69 31085 Circuit breaker, 20A 1
5 777347 3/8" NPT tee 1 70 777644 Control box cover 1
6 792407 Hose, 2’ 6000 PSI 1 71 777646 Red LED, 12VDC 2
9 777410 Elbow 3/8" NPT MxF 1 72 777660 Decal, control panel 1
10 17141 Hose clamp 3/4 hose 8 73 777643 Control box panel 1
11 791252 Hose, 3/4" ID PVC Suction 0.66’ 74 791375 Relay 12VDC 2
12 777671 Hose barb 1/2" NPT M x 3/4"hose 1 75 792432 Trim-Loc 1/16” 1’
13 778829 HB elbow 3/4"NPT M x 3/4" hose 1
79
778946 Nozzle 0 degree #4, red 1
14 797209 Strainer, 3/4" NPT FxF 1 25309 Nozzle 15 degree #4, yellow 1
15 780413 Nipple 3/4" NPT x 3/4" NPT MxM 1 778948 Nozzle 25 degree #4, green 1
16 39206 Tee 3/4" NPT MxFxF 3 778947 Nozzle 45 degree #4, white 1
17 35442 Ball valve 3/4" NPT FxF 2 778949 Nozzle, chemical, black 1
18 5023 Hose barb 3/4" NPT x 3/4" hose 2 80 777111 Grommet, nozzles 5
19 35443 Elbow 3/4" NPT x 3/4" NPT MxM 1 81 38578 Knob, 5/16" thread 2
20 82220 U-bolt 2 83 794071 Rupture Disc-8500#, Kit 1
21 779269 Elbow 3/4" NPT M x 1/2" HB 1 85 5027 Elbow, 1/2" NPT MxF 1
22 17141 3/4" Hose clamp 2 86 777652 Lid w/ rain cap 1
23 791252 Hose, 3/4" ID PVC Suction 6.08’ 88 777119 ½” hose clamp 1
25 30289 Hose, 3/4" ID Suction 3.83’ 89 38398 Insulation, cap 1
28 777340 Hose barb 1/4" NPT M x 1/4" hose 2 90 779228 Heating coil 1
29 38584 Easy start valve, 3/8" NPT M 1 91 30501 Split loom 24"
30 777834 Hose clamp 1/4" hose 7 92 305208 Tee 1/2" NPT FxFxF 1
31 777165 Clear PVC hose, 1/4" 16" 93 777915 Quick couple nipple, 3/8" NPT F 1
32 777375 Unloader 1 94 779614 Injector, quick couple 1
33 777337 Nipple 1/2" NPT x 3/8" NPT MxM 1 95 777165 Clear PVC hose, 1/4" 48"
34 792431 Reducer, ¾” NPT x ½” NPT 1 96 221222 Strainer, chemical hose 1
35 777656 Pressure switch 1 97 787130 Wire harness, burner 1
37 777667 Battery cable, black 1 98 22502 Strain relief 1
38 777668 Battery cable, red 1 99 792322 Burner DC 1
39 31881 Reflective sleeve 14" 100 777345 Fuel line, 1/4" 22"
40 777345 Fuel line, 1/4" 42" 101 777345 Fuel line, 1/4" 15.5"
42 777423 Reducer, 3/8”NPT x ¼”NPT 1 102 32308 Fuel filter, water separator 1
45 777836 Thermal protector, 1/2" NPT 1 103 305239 Nipple 1/4" NPT MxM 3" long 1
46 791274 Quick coupler, 1/4" NPT F 1 104 38120 Insulation gasket 1
47 777421 Spray lance 1 105 36180 Stainless wrap 1
48 777420 Spray gun 1 106 779232 Fire chamber 1
49 777422 Quick coupler, 3/8" NPT M 1 107 33387 Insulation, can 1
54 777488 Heat shield, tanks 1 108 783036 390cc carbon canister 1
55 777486 Heat shield, battery 1 109 783037 Carbon canister strap 1
56 783035 Tank clamp 1 110 784769 Sealed fuel cap 1
57 777666 Decal, gasoline only 1 111 785755 3/8” fuel line hose 40”
59 777647 Battery box 1 112 783212 1/4" MPT hose barb elbow 2
60 777489 Battery strap 1 113 785337 4mm fuel line hose 37”
61 82233 Carriage bolt, 5/16" threads 2 114 785937 Bracket, thermostat guard 1
62 KEL201071 Cap, fuel tank 1 115 785928 Tie plate, thermostat guard 2
63 791573 Tank, Diesel 1 116 785941 Metal tube, thermostat guard 1
64 791585 Gasoline tank 1 117 785949 Tube clamp, thermostat guard 1
65 783034 Tank support 1 120 30511 1/2" NPT plug 1
63 791573 Tank, Diesel 1 121 793836 3/4” Hose 1
64 791585 Gasoline tank 1 122 777838 1/4” NPT Plug 1
65 783034 Tank support 1 123 796379 ¼” Coupler O-ring 1

Parts Explosion 157595 – Rev AP
53
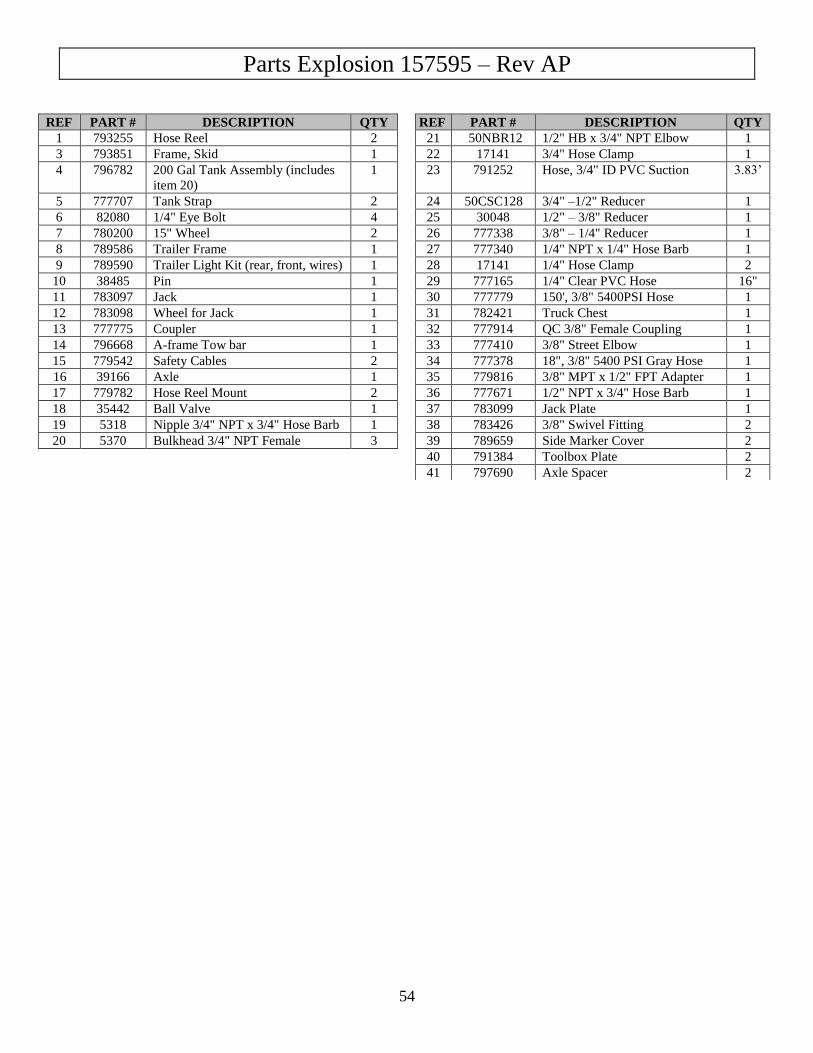
Parts Explosion 157595 – Rev AP
54
REF PART # DESCRIPTION QTY REF PART # DESCRIPTION QTY
1 793255 Hose Reel 2 21 50NBR12 1/2" HB x 3/4" NPT Elbow 1
3 793851 Frame, Skid 1 22 17141 3/4" Hose Clamp 1
4 796782 200 Gal Tank Assembly (includes
item 20)
1 23 791252 Hose, 3/4" ID PVC Suction 3.83’
5 777707 Tank Strap 2 24 50CSC128 3/4" –1/2" Reducer 1
6 82080 1/4" Eye Bolt 4 25 30048 1/2" – 3/8" Reducer 1
7 780200 15" Wheel 2 26 777338 3/8" – 1/4" Reducer 1
8 789586 Trailer Frame 1 27 777340 1/4" NPT x 1/4" Hose Barb 1
9 789590 Trailer Light Kit (rear, front, wires) 1 28 17141 1/4" Hose Clamp 2
10 38485 Pin 1 29 777165 1/4" Clear PVC Hose 16"
11 783097 Jack 1 30 777779 150', 3/8" 5400PSI Hose 1
12 783098 Wheel for Jack 1 31 782421 Truck Chest 1
13 777775 Coupler 1 32 777914 QC 3/8" Female Coupling 1
14 796668 A-frame Tow bar 1 33 777410 3/8" Street Elbow 1
15 779542 Safety Cables 2 34 777378 18", 3/8" 5400 PSI Gray Hose 1
16 39166 Axle 1 35 779816 3/8" MPT x 1/2" FPT Adapter 1
17 779782 Hose Reel Mount 2 36 777671 1/2" NPT x 3/4" Hose Barb 1
18 35442 Ball Valve 1 37 783099 Jack Plate 1
19 5318 Nipple 3/4" NPT x 3/4" Hose Barb 1 38 783426 3/8" Swivel Fitting 2
20 5370 Bulkhead 3/4" NPT Female 3 39 789659 Side Marker Cover 2
40 791384 Toolbox Plate 2
41 797690 Axle Spacer 2
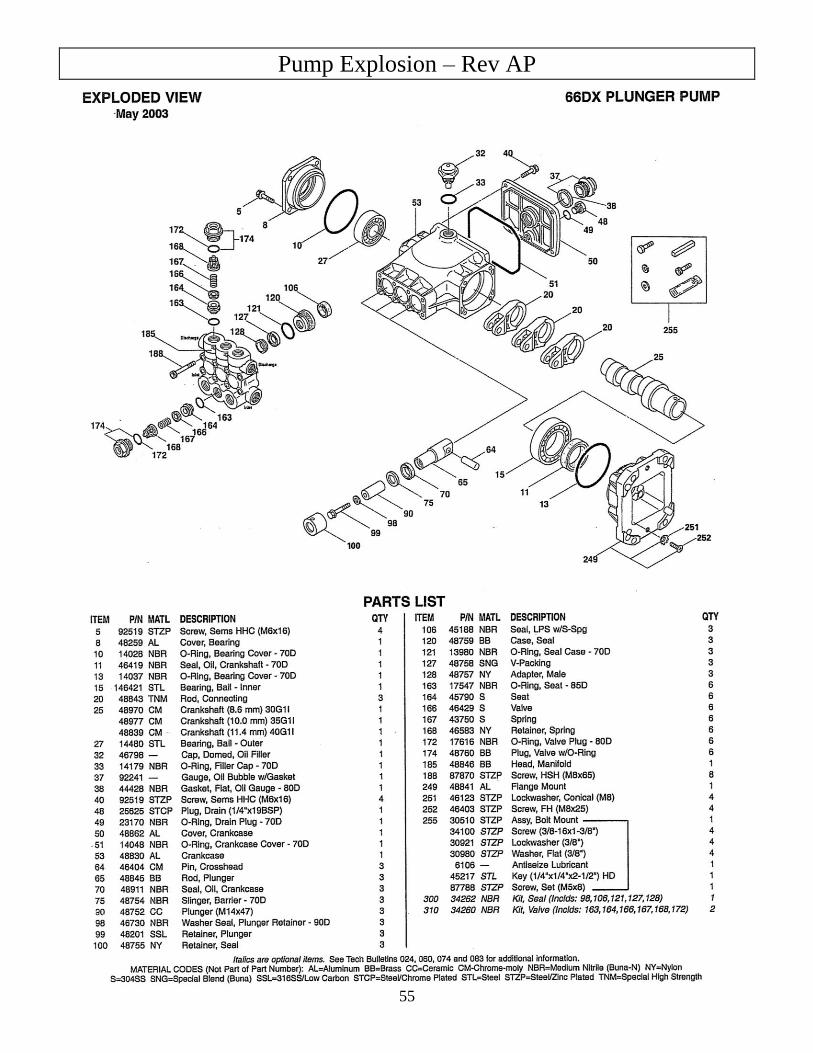
Pump Explosion – Rev AP
55
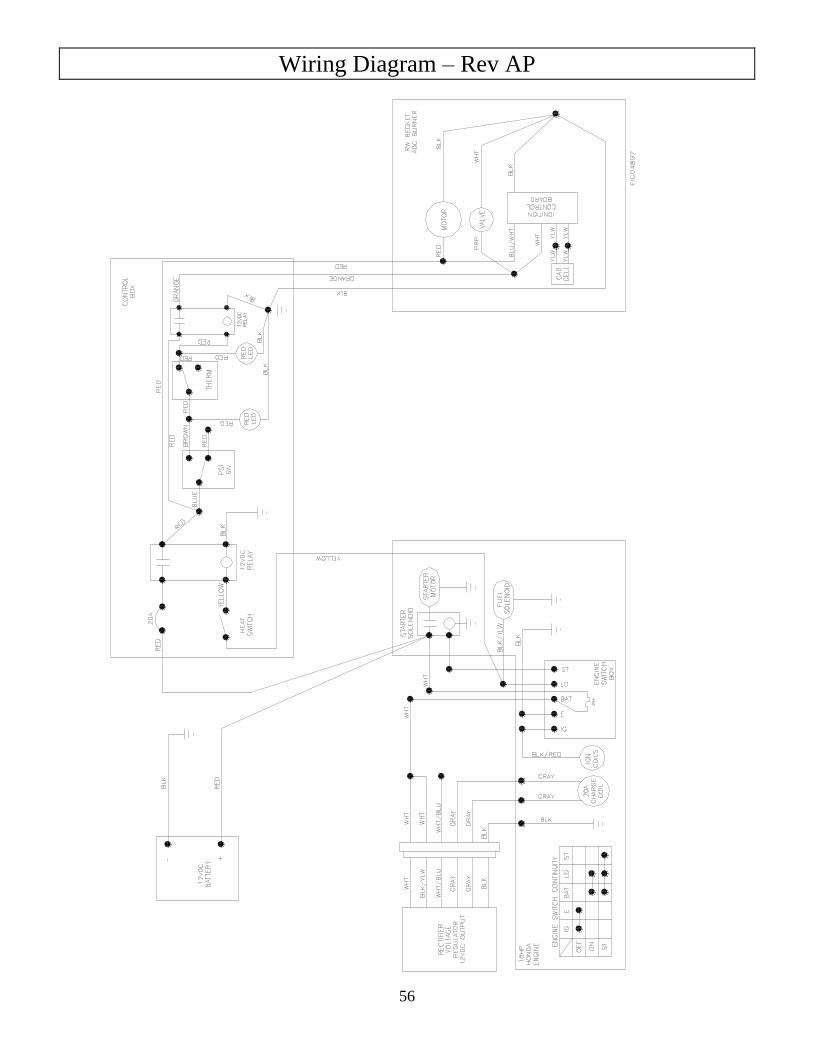
Wiring Diagram – Rev AP
56

Summary of Important Safety Information
57
This section provides a summary of the various safety procedures and measures that
have been presented throughout the manual. Keep this summary handy and refer to it to
refresh your memory about how to safely use your pressure washer.
WARNING
Carefully read and understand the following safety information before using the pressure
washer. Improper use or maintenance of the pressure washer can result in serious injury or
death to the operator or bystanders from:
Carbon monoxide poisoning Fire/explosion Chemical exposure
Skin/eye injury from high pressure spray
Burns Slips/falls
Electric shock Flying objects/debris
General Read all instructions. Read and understand this Owner's Manual and the engine Owner's Manual completely before
attempting to set-up and use the pressure washer. Serious injury or death can result if safety and other instructions are
not followed.
Instruct all operators. The pressure washer's owner must instruct all operators and potential renters in safe pressure
washer set-up and operation. Do not allow anyone to operate the pressure washer who has not read the Owner's Manual
and been instructed on its safe use. Owner's Manuals are available from North Star at 1-800-270-0810.
Adult control only. Only trained adults should set up and operate the pressure washer. Do not let children operate.
Pressure washers can generate forces greater than children can control and require judgment beyond what can be
expected of children.
Under the influence. Never operate, or let anyone else operate, the pressure washer while fatigued or under the
influence of alcohol, drugs, or medication.
Understand intended use. Carefully read about and understand the intended use of this pressure washer. Do not use for
other purposes, as unforeseen hazards or equipment damage may result.
Prohibition Against Modifications Never modify or alter the pressure washer in any way, or deactivate any safety device. Modifications can create serious
safety hazards and will also void the warranty.
Fuel/exhaust system. Never add to or modify the exhaust system, fuel tank, or fuel lines. Carbon monoxide poisoning,
fuel leaks, fire or explosion could result.
Unloader valve. Do not attempt to alter the unloader valve's maximum pressure. Excess pressure could cause serious
injury from escaping high-pressure fluids and/or pump damage. Any alteration other than turning the adjustment knob
will void your warranty.
Guards. Do not operate pressure washer unless all guards and cover shields are in place.
Safety – Installation & Set-up
Battery Safety Batteries are hazardous because they contain caustic acid, can emit explosive gases, and can cause electric shock. Caution
must be exercised when making connections to a battery to avoid shock and contact with the acid, and to prevent any
sparking that could lead to an explosion. Follow these and other safety rules carefully when connecting battery to pressure
washer:
Eye/skin protection. Always wear eye protection and protective clothing when connecting or disconnecting battery.
Sparks/Smoking. Never smoke or work near sparks or other sources of ignition.
Electric shock. Never touch both battery terminals at the same time with your hand or any non-insulated tools.
Connection/disconnection sequence. ALWAYS connect and disconnect cables to the correct battery terminals in the
proper sequence:
o When CONNECTING the battery, connect the RED cable to the POSITIVE terminal FIRST.
o When DISCONNECTING the battery, disconnect the BLACK cable from the NEGATIVE terminal FIRST
Acid/skin contact. If battery acid contacts skin or clothing, flush immediately with water and neutralize with baking
soda.

Summary of Important Safety Information
58
Installation / Initial Set-up Level, heat-resistant surface. Situate pressure washer on a firm, level, and heat-resistant surface with good drainage.
Ensure it sits level and will not slide or shift during operation. Block wheels to prevent movement.
Prevent carbon monoxide poisoning – Use outside only! Exhaust fumes from both the engine and the burner contain
carbon monoxide (CO), a poisonous gas you cannot see, smell, or taste. The CO generated by the pressure washer can
rapidly accumulate, even in areas that appear to be well ventilated, resulting in dangerous and fatal concentrations within
minutes. To prevent dangerous CO build-up:
ONLY use pressure washer outdoors and at least 20 feet from the home, away from windows, vents and air
intakes, to allow proper ventilation. If you start to feel sick, dizzy, or weak while using the pressure washer, shut
off the engine and get to fresh air RIGHT AWAY.
NEVER run pressure washer in an enclosed or partially enclosed location such as a building, garage, shed, or
vehicle. Running a fan or opening windows will not provide adequate ventilation to prevent dangerous CO build-
up.
Adequate ventilation. The pressure washer needs adequate, unobstructed flow of air to allow for proper combustion
and cooling. Situate so there is adequate clearance around pressure washer to allow for airflow – at least 7' from any
non-combustible wall or obstruction. Never place any objects against or on top of pressure washer.
CO alarms. Ensure that working, battery-operated or battery back-up carbon monoxide alarms are used in any
dwelling/structure that is in close proximity to the running pressure washer.
Hot exhaust - fires. Exhausts from engine and burner can be extremely hot and cause fire. Position sprayer so engine
and burner exhausts are at least 7' away from combustible objects during operation.
Spark arrestor usage. Equip engine with a spark arrestor if pressure washer will be used near any ignitable forest,
brush, or grassy land. See the "Specifications" section of this manual to determine if your pressure washer is already
equipped. In such conditions, make sure you comply with applicable local, state and federal codes.
Fuel Safety Gasoline is highly flammable and explosive; and burner fuels are combustible at warm temperatures. You can be burned or
seriously injured when handling fuel. Using extreme care when handling fuel, including these preventative measures:
Fuel outdoors. Fill fuel tank outdoors – never indoors. Fuel vapors can ignite if they collect inside an enclosure.
Explosion can result.
Use approved container. Never pump fuel directly into fuel tank at gas station. Static charge can build and ignite fuel.
Use an UL approved fuel container to transfer fuel to the engine.
Running / hot engine. A hot engine or burner is hot enough to ignite fuel. Never add fuel or remove fuel cap if engine
or burner are running or still hot. Allow engine to cool at least two minutes before adding fuel.
Heat / flames / sparks. Stay away from sources of heat, flame, or sparks while adding fuel.
Don't overfill. DO NOT overfill the fuel tank. Allow at least 1/2" of empty space below the fill neck to allow for fuel
expansion.
Replace cap. Replace fuel cap securely before starting engine.
Spills. Clean up fuel spills immediately. Move pressure washer away from spilled fuel on the ground. Wipe fuel off
engine and wait 5 minutes for excess fuel to evaporate before starting engine. Fuel soaked rags should be disposed of
properly.
On skin / clothes. If fuel is spilled on your skin or clothes, change clothes and wash skin immediately.
Inspect fuel system. Check fuel tanks and fuel system on a regular basis. Look for signs of leaks, deterioration, chafed
or spongy fuel hose, loose or missing fuel hose clamps, damaged fuel tank, or a defective fuel shut-off valve. Do not
start pressure washer until needed repairs have been completed.
Fuel storage. Store fuel in a cool, dry place in an UL-approved, tightly sealed container.
Safety – Towing Maintain trailer for safe operation. Follow all instructions to make sure the trailer is in good working order and tires
are fully inflated in order to prevent loss of control while towing.
Hitch trailer properly. Follow all instructions for hitching trailer to towing vehicle. Make sure hitched trailer sits
level
Jack. Keep jack cranked down to help balance the trailer when it is not connected to a vehicle hitch. Crank jack up
before towing.
Read vehicle instructions. Review towing safety instructions in your towing vehicle manual.
Driving skills. Special attention and driving skills are needed for towing any type of trailer.
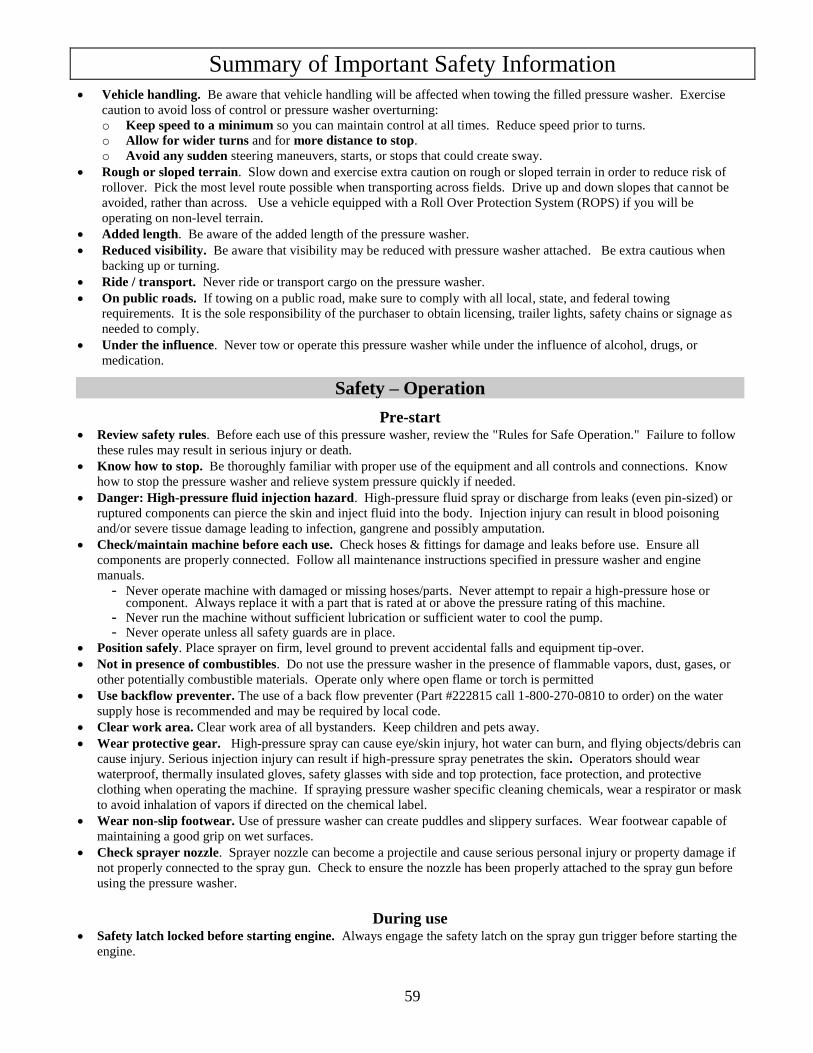
Summary of Important Safety Information
59
Vehicle handling. Be aware that vehicle handling will be affected when towing the filled pressure washer. Exercise
caution to avoid loss of control or pressure washer overturning:
o Keep speed to a minimum so you can maintain control at all times. Reduce speed prior to turns.
o Allow for wider turns and for more distance to stop.
o Avoid any sudden steering maneuvers, starts, or stops that could create sway.
Rough or sloped terrain. Slow down and exercise extra caution on rough or sloped terrain in order to reduce risk of
rollover. Pick the most level route possible when transporting across fields. Drive up and down slopes that cannot be
avoided, rather than across. Use a vehicle equipped with a Roll Over Protection System (ROPS) if you will be
operating on non-level terrain.
Added length. Be aware of the added length of the pressure washer.
Reduced visibility. Be aware that visibility may be reduced with pressure washer attached. Be extra cautious when
backing up or turning.
Ride / transport. Never ride or transport cargo on the pressure washer.
On public roads. If towing on a public road, make sure to comply with all local, state, and federal towing
requirements. It is the sole responsibility of the purchaser to obtain licensing, trailer lights, safety chains or signage as
needed to comply.
Under the influence. Never tow or operate this pressure washer while under the influence of alcohol, drugs, or
medication.
Safety – Operation
Pre-start Review safety rules. Before each use of this pressure washer, review the "Rules for Safe Operation." Failure to follow
these rules may result in serious injury or death.
Know how to stop. Be thoroughly familiar with proper use of the equipment and all controls and connections. Know
how to stop the pressure washer and relieve system pressure quickly if needed.
Danger: High-pressure fluid injection hazard. High-pressure fluid spray or discharge from leaks (even pin-sized) or
ruptured components can pierce the skin and inject fluid into the body. Injection injury can result in blood poisoning
and/or severe tissue damage leading to infection, gangrene and possibly amputation.
Check/maintain machine before each use. Check hoses & fittings for damage and leaks before use. Ensure all
components are properly connected. Follow all maintenance instructions specified in pressure washer and engine
manuals.
- Never operate machine with damaged or missing hoses/parts. Never attempt to repair a high-pressure hose or component. Always replace it with a part that is rated at or above the pressure rating of this machine.
- Never run the machine without sufficient lubrication or sufficient water to cool the pump. - Never operate unless all safety guards are in place.
Position safely. Place sprayer on firm, level ground to prevent accidental falls and equipment tip-over.
Not in presence of combustibles. Do not use the pressure washer in the presence of flammable vapors, dust, gases, or
other potentially combustible materials. Operate only where open flame or torch is permitted
Use backflow preventer. The use of a back flow preventer (Part #222815 call 1-800-270-0810 to order) on the water
supply hose is recommended and may be required by local code.
Clear work area. Clear work area of all bystanders. Keep children and pets away.
Wear protective gear. High-pressure spray can cause eye/skin injury, hot water can burn, and flying objects/debris can
cause injury. Serious injection injury can result if high-pressure spray penetrates the skin. Operators should wear
waterproof, thermally insulated gloves, safety glasses with side and top protection, face protection, and protective
clothing when operating the machine. If spraying pressure washer specific cleaning chemicals, wear a respirator or mask
to avoid inhalation of vapors if directed on the chemical label.
Wear non-slip footwear. Use of pressure washer can create puddles and slippery surfaces. Wear footwear capable of
maintaining a good grip on wet surfaces.
Check sprayer nozzle. Sprayer nozzle can become a projectile and cause serious personal injury or property damage if
not properly connected to the spray gun. Check to ensure the nozzle has been properly attached to the spray gun before
using the pressure washer.
During use Safety latch locked before starting engine. Always engage the safety latch on the spray gun trigger before starting the
engine.

Summary of Important Safety Information
60
Incoming water supply on. Do not run the pump without the water supply connected and turned on. Operating the
pressure washer without an incoming flow of water will damage the pump.
Wait before re-lighting burner. NEVER attempt to immediately run or re-light the burner if it doesn't ignite the first
time. Unburned oil or gas may have accumulated, causing potential explosion or fire hazard.
Use two hands. Pressure washer spray gun kicks back when triggered. Firmly grasp with two hands.
Stay alert. Watch what you are doing at all times.
Prevent slips / loss of balance. High-pressure spray could cause you to lose balance from kickback forces, and wet
surfaces can be slippery.
Keep good footing and balance at all times.
Do not overreach.
Do not stand on unstable support when spraying.
Use extreme caution when spraying from a ladder or scaffolding, ensure it is firmly anchored from sway or
tip-over. Use extreme caution to avoid falling as spray gun kick can propel you off the ladder or scaffolding.
Be aware of puddles and slippery surfaces. Ensure there is adequate drainage to prevent pooling of water.
Keep spray away from people. Never direct discharge stream at or near any person. Do not allow any part of the body
to come in contact with the fluid stream. High-pressure spray will cause serious skin, eye, or falling injuries, and hot
water can burn. Injection injury will occur if high-pressure spray pierces the skin, injecting liquid under the skin.
Injection injury can result in blood poisoning and/or severe tissue damage leading to infection, gangrene and possibly
amputation.
Prevent surface damage & flying debris – Surfaces being sprayed must be strong enough to withstand high-pressure
spray, or damage may result. In addition, high-pressure spray will dislodge unsecured objects as well as surface chips
and debris, resulting in hazardous flying objects that can cause personal injury or property damage. Do not spray brittle
surfaces or breakable, fragile, or unsecured objects such as:
o stucco or laminar flagstone
o some painted surfaces
o windows or glass doors (because they may break)
o light fixtures, flowerbeds, mailboxes
o unsecured, lightweight objects
Do not lock spray gun trigger in ON position. To reduce risk of injury, do not attempt to secure the spray gun open by
blocking or tying the spray gun in the open position.
Keep spray away from electrical wiring. Spray contact with electrical wiring will likely result in severe electrical
shock or electrocution.
Use only approved cleaning chemicals. Only chemicals specifically designed for use in pressure washers may be used.
Never spray acids, corrosives, or abrasive or flammable liquids. Breathing hazards, surface burns/corrosion, or
fire/explosion could result.
Follow cleaning chemical manufacturer's instructions. Follow the chemical manufacturer's label instructions when
handling or spraying chemicals. Understand all safety hazards and first aid for all chemicals being used. Wear protective
gear as directed. Always wear protective gloves when handling and cleaning with chemicals. When cleaning filters,
check whether dangerous chemicals have been used with the filter and take any precautions that may have been
recommended by the supplier of these chemicals. Always dispose of hazardous fluids per local, state, and national
guidelines.
Do not exceed pressure and or temperature limits. Do NOT operate this pump with components (such as hose,
connections, and spray gun) rated for lower pressure and or temperature limits than the machine's maximum rated
pressure and temperature, or component could rupture and cause serious personal injury from escaping high pressure
fluids. Do not set the pressure safety device above the rated pressure. If the high-pressure safety device ever
discharges water, turn the engine off and do not use the machine. The device will no longer function properly.
See a dealer or call Product Support at 1-800-270-0810.
Never pull by hose. Do not move this machine by pulling on the hose. Hose or connections could fail and result in
catastrophic high-pressure release of fluid as well as hose whipping.
Avoid sharp objects. Keep hose away from sharp objects. Bursting hoses may cause injury.
No load bearing. Do not use the pump to support other items of equipment that impose unacceptable loads on the pump.
Do not attempt to use this machine as a prop.
Hot exhaust/parts. Stay clear of engine and burner exhausts. Never touch hot engine muffler, burner/heating coil, or
other hot surfaces. All are very hot and will burn you.
Hot spray gun metal when using burner. Never touch the metal screw or any metal parts of the spray gun when the
heater is being used – the metal gets very hot and will burn you.

Summary of Important Safety Information
61
Smoking/sparks. Never smoke near the running engine, and never operate near sources of sparks or flames as
flammable fuel vapors are in the vicinity of the pressure washer.
Lock trigger safety latch when not spraying. Spray gun is equipped with a built-in trigger safety latch to guard
against accidental trigger release. Rotate safety latch to the locked position when not spraying.
Relieve water pressure. Always stop the product and relieve system pressure before leaving the sprayer unattended, or
when disconnecting hoses, removing nozzles, or servicing the pump.
Refueling. Never add gasoline to the engine or fuel to the burner unless unit is off and has cooled.
Do not direct spray at this machine. Do not attempt to clean this machine with its own spray. Engine damage will
result. Cleaning should be done with a damp sponge with the engine OFF.
Seek medical aid for suspected carbon monoxide poisoning. The running engine gives off carbon monoxide, a
poisonous gas that can kill you. If you start to feel sick, dizzy, or weak while using the pressure washer, shut off the
engine and get to fresh air RIGHT AWAY. See a doctor. You may have carbon monoxide poisoning.
Seek medical aid for suspected injection injury. If injured by high-pressure fluid, no matter how small the wound is,
see a doctor at once. A typical injection injury may be a small puncture wound that does not look serious. However,
severe infection or reaction can result if proper medical treatment is not administered immediately by a doctor who is
familiar with injection injuries.
Other exhaust dangers. This product contains or emits chemicals known to the State of California to cause cancer,
birth defects or other reproductive harm. Avoid inhalation of exhaust.
After use Cool engine before storing. Let engine cool for at least five minutes before storing. A hot engine is a fire hazard. Prevent accidental starting. When pressure washer is not in use, remove spark plug or spark plug wire in order to
ensure that pressure washer cannot be started in a storage location or by untrained persons.
Storage location. Store the pressure washer in a dry location away from sources of heat, open flames, sparks or pilot
lights – such as water heaters, space heaters, furnaces, clothes dryers, or other gas appliances – EVEN IF the pressure
washer's gas tank is empty, residual vapors or fuel could ignite.
Periodic maintenance. Perform periodic maintenance as directed in this manual to keep the pressure washer in safe
working condition.
Safety - Inspection/Maintenance Inspect and maintain your pressure washer on a regular basis and repair as needed to keep it in safe working condition:
Turn off / relieve pressure first. Turn off pressure washer and relieve system pressure before inspection or
maintenance. Remove spark plug or spark plug wire before working on the engine or pressure washer to prevent
accidental starting.
Fuel valve off. Turn fuel shut-off valve to OFF position before transporting or servicing the pressure washer.
Follow maintenance schedule. Follow all maintenance instructions in this pressure washer manual and the engine
manual.
Replace guards / shields. Make sure all guards and shields are replaced after servicing the pressure washer.
Replacement parts. If a part needs replacement, only use factory approved repair parts. Replacement parts that do
not meet specifications may result in a safety hazard or poor operation of the pressure washer and will void the warranty.

62
This page has intentionally been left blank.

Limited Warranty
63
Dear Valued Customer:
The NorthStar Product you just purchased is built with the finest material and craftsmanship. Use this product properly and enjoy the
benefits from its high performance. By purchasing a NorthStar product, you show a desire for quality and durability. Like all
mechanical equipment this unit requires a due amount of care. Treat this unit like the high quality piece of machinery it is. Neglect
and improper handling may impair its performance. Please thoroughly read the instructions and understand the operation before using
your product. Always contact NorthStar Product Support at 1-800-270-0810 prior to having any service or warranty work performed,
as some services performed by parties other than NorthStar approved service centers may void this warranty. This warranty is in lieu
of any other warranty expressed or implied and NorthStar assumes no other responsibility or liability outside that expressed within this
warranty.
Limited Warranty
NorthStar shall warranty any piece of equipment manufactured, or parts of equipment manufactured, to be free from defects in
material or workmanship for a period of:
NorthStar Warranty
Item # Consumer Warranty Period Commercial Warranty Period
157595 2 years from date of purchase by user 2 years from date of purchase by user
Engine Warranty
Item # Consumer Warranty Period Commercial Warranty Period
157595 3 years from date of purchase by user 3 years from date of purchase by user
“Consumer use” means personal residential household use by a consumer. “Commercial use” means all other uses, including use for
commercial, income producing or rental purposes or when purchased by a business.
This warranty applies to the original purchaser of the equipment (verification of purchase, in the form of a receipt, is the responsibility
of the buyer), is non-transferable, and covers parts and labor. Parts will be replaced or repaired at no charge, except when the
equipment has failed due to lack of proper maintenance. If a part is no longer available, the part may be replaced with a similar part of
equal function. Any misuse, abuse, alteration or improper installation or operations will void warranty. Determining whether a part is
to be replaced or repaired is the sole decision of NorthStar. NorthStar will not provide for replacement of complete products due to
defective parts. Any costs incurred due to replacement or repair of items outside of a NorthStar approved facility is the responsibility
of the buyer and not covered under warranty. Transportation costs to and from service center is the responsibility of the customer.
In addition to the normal warranty, NorthStar shall warrant any normal wear item from defects in material or workmanship for a
period of 90 days from the date of purchase by user. Normal wear items include, but are not limited to, nozzles, quick connect
fittings, valves, high and low pressure water seals/packing, high and low pressure hoses, O-rings, unloader valves and filter elements.
This warranty specifically excludes the following; failure of parts due to damage caused by accident, fire, flood, windstorm, acts of
God, applications not approved by NorthStar in writing, corrosion caused by chemicals, use of replacement parts which do not
conform to manufacturer’s specifications, damage related to the use of biodiesel fuel, damage to accessory parts such as starting
batteries, damage related to rodent and/or insect infestation and damage caused by vandalism. Additional exclusions: loss of running
time, inconvenience, loss of income, or loss of use, including any implied warranty of merchantability of fitness for a specific use.
Also, Outdoor Power Equipment needs periodic parts and service to perform well, and this warranty does not cover instances when
normal use has exhausted the life of a component or the engine.
This warranty does not cover any personal injury or damage to surrounding property caused by failure of any part. Repair or
replacement of parts does not extend the warranty period.
Normal burner maintenance such as cleaning and adjusting electrodes, descaling the coil, desooting the coil, air adjustments, fuel
system cleaning and obstruction due to build up is not covered by this NorthStar warranty.
The engine warranty is covered under the terms and conditions as outlined by the engine manufactures warranty contained herein and
is the sole responsibility of the engine manufacture. Normal engine maintenance such as spark plugs, air filters, adjustments, fuel
system cleaning and obstruction due to build up is not covered by this NorthStar warranty.
Please fill in the following information and have it on hand when you call in on a warranty claim.
Customer Number: ______________________________________________________________
Date of Purchase: _______________________________________________________________
NorthStar Serial Number: _________________________________________________________
Item Number: __________________________________________________________________

64
Manufactured by
Northern Tool + Equipment Co., Inc.
Burnsville, MN 55306
NorthernTool.com