
Proceptor Tech Manual V6.1rev-30.9.14 body - Green … · V6.1 Rev.30.9.14 1 1 Product Overview...
56
Transcript of Proceptor Tech Manual V6.1rev-30.9.14 body - Green … · V6.1 Rev.30.9.14 1 1 Product Overview...


V6.1 Rev.30.9.14
[This page was intentionally left blank]

© 2014 b G T l T h l i | G T l A i All i h d
Technical Manual
Version 6.1 Rev.30.9.14
Patent # 5,746,912 (US); 2,195,822 (CDN)

V6.1 Rev.30.9.14
[This page was intentionally left blank]
V6.1 Rev.30.9.14 i
Table of Contents
1 PRODUCT OVERVIEW ................................................................................................................................................ 1
1.1 THE PROCEPTOR SEPARATOR ADVANTAGE .................................................................................................................... 2 1.2 APPLICATIONS .............................................................................................................................................................. 2 1.3 WARRANTY INFORMATION .............................................................................................................................................. 3 1.4 CONTACT GREEN TURTLE .............................................................................................................................................. 5
2 DESIGN AND OPERATION .......................................................................................................................................... 6
2.1 COMPONENTS AND CONFIGURATIONS ............................................................................................................................. 6 2.2 PRINCIPLES OF OPERATION ........................................................................................................................................... 6
3 SIZING GUIDELINES ................................................................................................................................................... 8
3.1 STANDARD SIZING CONSIDERATIONS ............................................................................................................................... 8 3.2 OTHER DESIGN CONSIDERATIONS ................................................................................................................................... 8 3. 3 GREASE SEPARATORS ............................................................................................................................................... 10
3.3.1 Manufacturer Sizing Guidelines - For all Proceptor GMC models EXCEPT GMC-xxx PDI & CSA ............. 10 3.3.2 Manufacturer Grease Separator Sizing Chart ............................................................................................. 12 3.3.3 Proceptor PDI & CSA Sizing ....................................................................................................................... 13 3.3.4 Standard Grease Separator Capacity and Dimensions ............................................................................... 15 3.3.5 UPC | IAPMO | Florida Grease Separator Capacity and Dimensions .......................................................... 18
3.4 OIL SEPARATORS ...................................................................................................................................................... 19 3.4.1 Sizing Guidelines ......................................................................................................................................... 19 3.4.2 Oil Separator Sizing Chart ........................................................................................................................... 20 3.4.3 Standard Oil Standard Capacity and Dimensions........................................................................................ 21 3.4.4 UPC / IAPMO Oil Separator Capacity and Dimensions ............................................................................... 24
4 ACCESSORIES AND OPTIONS ................................................................................................................................ 25
4.1 ALARM .................................................................................................................................................................. 25 4.2 COALESCING FILTER FOR SMALL DIAMETER OIL GLOBULES (>20 µM) .......................................................................... 25 4.3 SUCTION PIPE FOR INDOOR INSTALLATIONS .............................................................................................................. 26 4.4 DOUBLE WALL ....................................................................................................................................................... 26 4.5 LEVEL MONITOR FOR DOUBLE WALL OR OIL RESERVOIR ............................................................................................ 26 4.6 AUTOMATIC PUMP-OUT SYSTEM .............................................................................................................................. 26 4.7 SHUT-OFF VALVE SYSTEM WITH ALARM ................................................................................................................... 26 4.8 FIBERGLASS PRODUCTS ......................................................................................................................................... 27
5 INSTALLATION AND MAINTENANCE ...................................................................................................................... 28
5.1 INSTALLATION ........................................................................................................................................................ 28 5.2 MAINTENANCE ....................................................................................................................................................... 28 5.3 IMPORTANCE OF MAINTENANCE ............................................................................................................................... 28 5.4 MAINTENANCE FREQUENCY ..................................................................................................................................... 29 5.5 INSPECTION PROCEDURES ...................................................................................................................................... 30 5.6 MAINTENANCE METHODS ........................................................................................................................................ 30 5.7 SPILLS .................................................................................................................................................................. 31 5.8 DISPOSAL .............................................................................................................................................................. 31
6 SPECIFICATION SHEETS
Grease Separator Specification Sheet Oil Separator Specification Sheet Standard Proceptor Oil / Grease Point Alarm Specification Sheet Drawing: Oil or Grease Point Alarm System
7 INSTALLATION
Alarm Installation Proceptor Installation

V6.1 Rev.30.9.14 ii
[This page was intentionally left blank

V6.1 Rev.30.9.14 1
1 Product Overview Drainage and wastewater contaminated with oils, fuels, grease and suspended solids are common in many commercial, institutional, and industrial businesses due to the products produced, used, distributed, and/or stored. Increasingly, stringent environmental regulations require that oil, grease and suspended solids be restricted to certain levels prior to being discharged into receiving sewer systems. In addition, increasing sewer-use surcharges for effluent exceeding regulatory limits (i.e., oil, grease, BOD, pH, and suspended solids) means discharging over-strength wastewater is more costly.
Proceptor oil, grease and solids separator effectively remove floatables (i.e., free oil, grease) and allow solids to settle resulting in reduced and/or eliminated sewer-use surcharges and penalties to end users. Developed by Green Turtle® (GT), Proceptor separators achieve maximum removal treatment efficiency of free oil, grease, and suspended solids from wastewater flows because of the unique hydraulic flow patterns. The controlled hydraulic flow patterns further ensure that captured contaminants will not scour or re-suspend. Proceptor is ideal as a point-source spill control device, eliminating the possibility of soil and/or ground water contamination and costly remediation. The elliptical design of the unit allows for enhanced treatment efficiency and ease of cleaning.
The large capacity volume of the Proceptor ensures that adequate wastewater retention time is achieved for maximum contaminant removal efficiency. The large storage capacity also reduces the need for frequent cleaning, thereby saving the operator/owner significant maintenance expenses. Proceptor separators are constructed from Fiberglass Reinforced Plastics (FRP). Fiberglass is the preferred material for industrial and commercial waste streams since FRP is chemically inert, and impermeable to retained waste. The fiberglass construction eliminates the concern for internal and external corrosion of the tank that can result in leakage to the surrounding soil and causing contamination. Fiberglass has a longer projected life span (50+ years) as compared to concrete and/or steel. As the manufacturer of Proceptor separators, GT ensures maximum manufacturing quality using computer controlled rotational molding, strand roving reinforcement and hand lay-up with various types of woven and non-woven reinforcements. A 30-year Proceptor warranty is standard protection against leakage, corrosion, and structural failure.
Proceptor units are available in a variety of sizes and configurations to meet site and performance requirements. Accessories and options include suction pipes, oil draw-off fittings, custom wall reinforcements for deep burial and double wall design. Electronic monitoring devices and automatic shutdown systems can be installed to ensure that appropriate cleaning cycles are implemented and to notify the owner/operator of any operational problems (large spills or high oil content in effluent discharge). The systems are also available with parallel plate style coalescers, which are designed to increase the efficiency of free oil separation for certain applications. For over a decade, Green Turtle has helped thousands of commercial, institutional and industrial customers meet local effluent requirements.

V6.1 Rev.30.9.14 2
1.1 The Proceptor Separator Advantage
Short payback period – eliminates or reduces sewer-use surcharges Engineered systems – ensure better separation efficiency of oil, grease, and solids Engineered hydraulics to ensure compliance with sewer discharge regulations Variable wastewater flows accommodated Prevents scouring or re-suspension of contaminants during peak flows (when adequately
sized) Enhanced removal of free or mechanically dispersed mineral oil with coalescer option Larger storage capacity significantly reduces waste disposal/maintenance frequency
lowering operational costs Easy-to-maintain by vacuum or pump truck Easy-to-install and handle due to its light weight Non-corrosive, inert, and impermeable fiberglass material Sound structure – units built to withstand pressures for below ground installation; and can
be installed above ground Models available from 50 to 10,000 US gallons (190 L to 37,850 L). Custom-designed
separators are available Accessories and options such as alarms, monitors and remote suction are available Industry leading 30-year warranty against corrosion, leaks, and structural failures
For more information, please visit our web site www.greenturtletech.com/proceptor
Cutaway View of Single Manway Proceptor

V6.1 Rev.30.9.14 3
1.2 Applications
Proceptor can be used in various commercial, institutional, and industrial settings including: Restaurants (including fast food outlets
and cafeterias) Automotive and truck repair shops
Hospitals, senior facilities and schools Service stations Wholesale food outlets Car washes Food processing plants Factories Grocery stores Spill control applications Hotels Light and heavy industrial operations
1.3 Warranty Information
This warranty is provided by Green Turtle Technologies Ltd. for products sold in Canada, and by Green Turtle Americas Ltd. for products sold in the continental U.S. Although the companies are collectively referred to herein as “Green Turtle,” each company only warrants products sold in its respective market. Proceptor oil and grease separators are not intended for residential or consumer use, and may not be purchased or sold for those applications. Green Turtle warrants to the original purchaser that all Proceptor oil and grease separators purchased from Green Turtle will be free from defects in materials and workmanship for a period of one (1) year following the date of initial delivery to the purchaser, subject to the terms and conditions below. Green Turtle further warrants that if the Proceptor separators are installed, operated, and maintained in accordance with Green Turtle instructions and applicable state/provincial and federal regulatory requirements, the Proceptor devices:
1. Will not leak for a period of 30 years from date of initial delivery due to natural external corrosion. 2. Will not leak for a period of 30 years from date of initial delivery due to internal corrosion, provided
the Proceptor is used solely in respect of the treatment of commercial/institutional wastewater (other applications, including but not limited to residential, and consumer not being covered by the warranty).
3. Will not leak for a period of 30 years from date of original delivery due to structural failure, which shall be defined as spontaneous breaking or collapse.
All of the warranties herein are subject to the following conditions:
1. The Proceptor is used in the manner described in the warranty. 2. Oil Multi-Cell (OMC) and Grease Multi-Cell (GMC) models up to 4000 gallons are installed as
shallow burial having a maximum depth of 6 feet from the top of the tank to grade. Models 4000 gallons or more have a maximum depth of 4 feet from the top of the tank to grade. (For deeper installation, a custom reinforced Proceptor must be authorized and stamped by Green Turtle.)
3. Extension collars supplied by Green Turtle Technologies Ltd. must be installed where applicable. 4. There are no post-installations or repairs of the original Proceptor separator. 5. The original installation has been carried out in Canada or the Continental United States. 6. The original installation was performed following the Proceptor installation procedures by a trained
contractor with all his/her required registrations, certificates and/or licenses, to complete the installation, repair or alteration in accordance with recognized industry practices and applicable regulatory requirements.
7. The Proceptor has been operated and maintained in accordance with regulatory requirements designed to minimize the possibility of structural failures and releases of regulated substances.
8. The Proceptor shall not be installed or used in any application other than commercial, industrial, or institutional use.
9. If the Proceptor is remanufactured, moved, or removed from the ground for any reason prior to the expiration of this warranty, the structural warranty protections will terminate unless the Proceptor is inspected, repaired (as necessary), and re-certified by Green Turtle and, upon reinstallation, the purchaser continues to satisfy the other conditions of the warranty.
V6.1 Rev.30.9.14 4
GREEN TURTLE’S LIABILITY UNDER THIS WARRANTY IS LIMITED, AT GREEN TURTLE’S DISCRETION, TO REPAIR THE DEFECTIVE PROCEPTOR, TO REPLACE PROCEPTOR IN EXCHANGE FOR THE DEFECTIVE TANK, OR TO REFUND OF THE ORIGINAL PURCHASE PRICE. GREEN TURTLE IS NOT LIABLE FOR ANY LABOR, SHIPPING, OR OTHER INSTALLATION COSTS, AND SHALL NOT BE LIABLE FOR ANY SPECIAL, INDIRECT, PUNITIVE, CONSEQUENTIAL OR OTHER DAMAGES IN CONNECTION WITH SUCH PROCEPTOR INCLUDING, WITHOUT LIMITATION, COSTS, EXPENSES, OR LIABILITIES ASSOCIATED WITH ENVIRONMENTAL CONTAMINATION, FINES OR PENALTIES, FIRES, EXPLOSIONS, OR ANY OTHER CONSEQUENCES ALLEGEDLY ATTRIBUTABLE TO A BREACH OF THE WARRANTY OR DAMAGES UNDER DECEPTIVE TRADE PRACTICES OR SIMILAR CONSUMER PROTECTION ACTS. THE FOREGOING CONSTITUTES GREEN TURTLE’S EXCLUSIVE OBLIGATION AND GREEN TURTLE MAKES NO EXPRESS OR IMPLIED REPRESENTATION OR WARRANTY, OR ANY WARRANTY OF NON-INFRINGEMENT, MERCHANTABILITY OR FITNESS FOR ANY PARTICULAR PURPOSES WHATSOEVER. NO EMPLOYEE OF GREEN TURTLE OR ANY OTHER PARTY IS AUTHORIZED TO MAKE ANY OTHER REPRESENTATIONS OR WARRANTIES OTHER THAN THE WARRANTY SET FORTH HEREIN.
10. The sole warranty for accessories, including but not limited to frames and covers, extension collars, alarms, pumps, valves coalescers, suction pipes, sludge judge, draw-off pipes strainers, etc. is that they are warranted for a period of one (1) year against defects in materials and workmanship from date of shipment.
11. Customer assumes the risk of and agrees to indemnify Green Turtle against and hold Green Turtle
harmless from all liability relating to (i) assessing the suitability for Customer’s intended use of the Proceptor and of any system design or drawing and (ii) determining the compliance of Customer’s use of the Proceptor with applicable laws, regulations, codes and standards. For Proceptors resold by Customer, Customer retains and accepts full responsibility for all warranty and other claims relating to, or arising from, Customer’s Proceptor system which includes or incorporate Proceptor or components thereof manufactured or supplied by Green Turtle, and Customer is solely responsible for any and all representations and warranties regarding the Proceptor system made or authorized by Customer. Customer will indemnify Green Turtle and hold Green Turtle harmless from any liability, claims, loss, cost or expenses (including reasonable legal fees) attributable to Customer’s Proceptor system or representations or warranties concerning same.

V6.1 Rev.30.9.14 5
1.4 Contact Green Turtle At Green Turtle, we understand that our customers would rather focus on their business, not their wastewater. Contact us today to learn more on how Proceptor separators can help your business, please visit www.greenturtletech.com or contact a Green Turtle Representative at: Green Turtle (USA) Green Turtle Technologies (Canada) Five Lake Pointe Plaza 2709 Water Ridge Parkway 880 Rangeview Road Suite 410 Mississauga ON Charlotte NC 28217 L5E 1G9 T 704 295 1733 T 416 966 9400 T 877 428 8187 T 877 966 9444 F 704 295 1734 F 416 966 3439
V6.1 Rev.30.9.14 6
2 Design and Operation
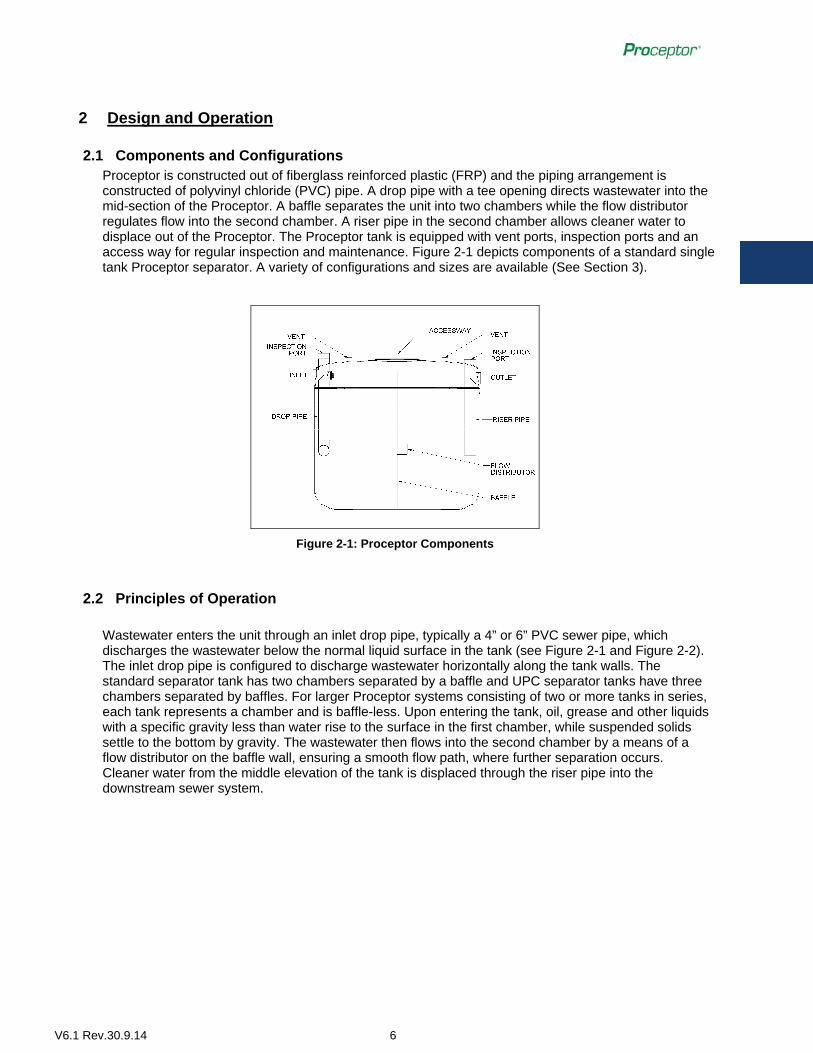
2.1 Components and Configurations Proceptor is constructed out of fiberglass reinforced plastic (FRP) and the piping arrangement is constructed of polyvinyl chloride (PVC) pipe. A drop pipe with a tee opening directs wastewater into the mid-section of the Proceptor. A baffle separates the unit into two chambers while the flow distributor regulates flow into the second chamber. A riser pipe in the second chamber allows cleaner water to displace out of the Proceptor. The Proceptor tank is equipped with vent ports, inspection ports and an access way for regular inspection and maintenance. Figure 2-1 depicts components of a standard single tank Proceptor separator. A variety of configurations and sizes are available (See Section 3).
Figure 2-1: Proceptor Components
2.2 Principles of Operation
Wastewater enters the unit through an inlet drop pipe, typically a 4” or 6” PVC sewer pipe, which discharges the wastewater below the normal liquid surface in the tank (see Figure 2-1 and Figure 2-2). The inlet drop pipe is configured to discharge wastewater horizontally along the tank walls. The standard separator tank has two chambers separated by a baffle and UPC separator tanks have three chambers separated by baffles. For larger Proceptor systems consisting of two or more tanks in series, each tank represents a chamber and is baffle-less. Upon entering the tank, oil, grease and other liquids with a specific gravity less than water rise to the surface in the first chamber, while suspended solids settle to the bottom by gravity. The wastewater then flows into the second chamber by a means of a flow distributor on the baffle wall, ensuring a smooth flow path, where further separation occurs. Cleaner water from the middle elevation of the tank is displaced through the riser pipe into the downstream sewer system.

V6.1 Rev.30.9.14 7
Figure 2-2: Proceptor in Operation
Proceptor separators are engineered to ensure a smooth flow path. This is accomplished by the use of elliptical chambers, which is critical in minimizing the formation of turbulent eddy currents. A non-turbulent state within the separator promotes the separation of oil, grease, and solids from process wastewater. The separator design also minimizes the potential for short-circuiting, ensuring the required wastewater retention time within the separator. Furthermore, the configuration of Proceptor separators reduces the potential for influent wastewater from passing through the oil/grease or sludge layers at the top. This feature prevents scouring and/or re-suspension of contaminants if actual flow rates exceed the design flow rate.
A standard Proceptor contains two 3” diameter PVC vent connections (one per chamber) for venting gases to the outside (see Figure 2-3). The contractor installing a Proceptor is required to provide piping from the vent connections to the venting system. A 24” diameter extension collar located at the center or at both ends of the separator provides access for maintenance. Maintenance is performed by a liquid disposal company using a vacuum or pump truck. The curved bottom design on the Proceptor promotes easy maintenance including removal of contaminants.
Figure 2-3: Typical Proceptor Profile
Proceptor separators are available with an extension collar, a frame and cover (cast iron for traffic loading, fiberglass composite for pedestrian conditions or above ground applications). All other external piping, including pipes required for inlet and outlet connections, venting, suction piping (optional), etc.,must be supplied by the contractor unless otherwise stated.

V6.1 Rev.30.9.14 8
3 Sizing Guidelines Proceptor sizing information is based on best available data including laboratory testing (in-house), field testing, theoretical modeling, and monitoring studies. Proceptor sizing information is continually being updated with the most accurate available information to assist in sizing a proper unit for a specific application. Incorrect sizing, improper installation and/or inefficient maintenance will affect the performance of Proceptor separators.
3.1 Standard Sizing Considerations The following are standard sizing considerations for typical sites. If the site conditions are different from the below, please contact a Green Turtle Representative for assistance.
1. Flow Type. The separator must be gravity fed. 2. Pollutant. Proceptor separators remove free oil, grease and settleable solids. The standard
sized separator cannot remove chemically emulsified or dissolved oils. Consult a Green Turtle Representative for sizing assistance if emulsified oil/grease are present.
3. Temperature. The inlet water temperature must be between 4ºC (39ºF) and 60ºC (140ºF). For
industrial applications, please contact a Green Turtle Representative for assistance. 4. Specific Gravity. The oil and grease specific gravity must be less than 0.95. Specific gravity of
the wastewater must be equal to or greater than 1.0. 5. Detergent Use. For equipment wash-down, car wash, or any other applications where soaps
and detergents will be used, oil and grease emulsification may be a problem and can reduce the effectiveness of the separator. It is recommended that “Quick Break Soaps” be used since the chemical emulsification will break quickly thus allowing the oil and grease separator to perate as designed.
6. Wastewater Strength. Notify a Green Turtle Representative if chemicals of any kind are
expected to be present in the process water or if the effluent is high temperature. A special resin may be required in tank manufacturing.
7. Discharge Limits. Many local authorities have minimum size requirements or very
conservative factors. Please verify with your local municipal sewer authority and plumbing code regulations.
8. Installation Depth. Separators up to 3000 gallons buried more than 6’ from the top of the tank to
grade, and separators 4000 gallons or more buried more than 4’ from the top of the tank to grade will require reinforcement at an additional charge.
3.2 Other Design Considerations Gravity separators rely on retention time (the amount of time wastewater is retained in the separator) to allow oil and grease to float to the top and solids to settle to the bottom.
The retention time required to meet regulated discharge limits is a function of the type of contaminants present in the wastewater, initial loading rates, particulate size, specific gravity, and the interactive potential of certain pollutants and the separator design. Although flow rates are important design criteria for the selection of a separator, they are not the only criteria.

V6.1 Rev.30.9.14 9
Other factors need to be considered as well, a few of which are listed below:
1. Monitoring Oil/Grease Level. Manual monitoring must be performed before a regular cleaning schedule can be established. If and when increased activity occurs, the cleaning schedule must be adjusted accordingly. Green Turtle takes the guesswork out of servicing the separator when an electronic alarm is used to indicate when the system needs maintenance.
2. Remote Suction Maintenance. Remote suction pipe are available for indoor application where the
maintenance cover is not easily accessible by pump trucks, or where opening the maintenance cover is undesirable due to odor issues. The Proceptor can be equipped with a factory installed suction pipe which extends from the bottom of the tank. The suction pipe is connected to a camlock fitting on an exterior wall for pump truck access.
3. High Contaminant Loading. High contaminant loading in processed wastewater requires a larger
separator to allow for a longer retention time and more storage capacity. 4. Reduce Frequency of Maintenance. Increasing the size of the separator may reduce the
frequency of maintenance, a cost-effective solution for many applications. 5. Light Emulsification. Larger capacity separators should be used in wash-down or car wash
applications where oil globule sizes are quite small as a result of the interaction with high pressure water. Also, the soaps or detergents used will chemically emulsify oil and a longer retention time is required for the oil emulsion to break down.
6. Space Restriction. Coalescers can be used to reduce the size of the separator for the same
treatment flow rate (oil applications only). Solids must be separated prior to entry into the coalescer since solids tend to plug coalescing filters quickly. Coalescers are not recommended for high solids/sediment wastewater applications due to the frequency of maintenance.
7. Above Ground Installation in Cold Climate. Separators intended to be installed above the frost
line may be required to be insulated and/or equipped with explosion proof heaters.
V6.1 Rev.30.9.14 10
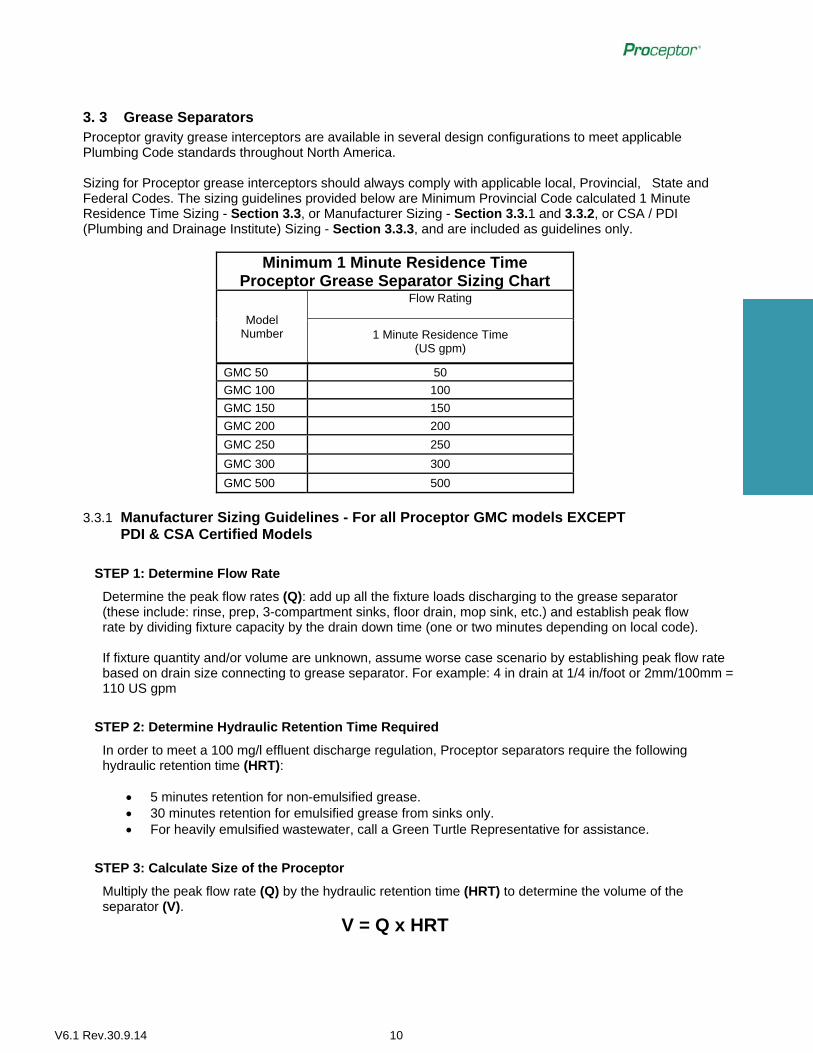
3. 3 Grease Separators Proceptor gravity grease interceptors are available in several design configurations to meet applicable Plumbing Code standards throughout North America. Sizing for Proceptor grease interceptors should always comply with applicable local, Provincial, State and Federal Codes. The sizing guidelines provided below are Minimum Provincial Code calculated 1 Minute Residence Time Sizing - Section 3.3, or Manufacturer Sizing - Section 3.3.1 and 3.3.2, or CSA / PDI (Plumbing and Drainage Institute) Sizing - Section 3.3.3, and are included as guidelines only.
Minimum 1 Minute Residence Time Proceptor Grease Separator Sizing Chart
Model Number
Flow Rating
1 Minute Residence Time (US gpm)
GMC 50 50
GMC 100 100
GMC 150 150
GMC 200 200
GMC 250 250
GMC 300 300
GMC 500 500
3.3.1 Manufacturer Sizing Guidelines - For all Proceptor GMC models EXCEPT
PDI & CSA Certified Models
STEP 1: Determine Flow Rate
Determine the peak flow rates (Q): add up all the fixture loads discharging to the grease separator (these include: rinse, prep, 3-compartment sinks, floor drain, mop sink, etc.) and establish peak flow rate by dividing fixture capacity by the drain down time (one or two minutes depending on local code). If fixture quantity and/or volume are unknown, assume worse case scenario by establishing peak flow rate based on drain size connecting to grease separator. For example: 4 in drain at 1/4 in/foot or 2mm/100mm = 110 US gpm
STEP 2: Determine Hydraulic Retention Time Required
In order to meet a 100 mg/l effluent discharge regulation, Proceptor separators require the following hydraulic retention time (HRT):
5 minutes retention for non-emulsified grease. 30 minutes retention for emulsified grease from sinks only. For heavily emulsified wastewater, call a Green Turtle Representative for assistance.
STEP 3: Calculate Size of the Proceptor
Multiply the peak flow rate (Q) by the hydraulic retention time (HRT) to determine the volume of the separator (V).
V = Q x HRT

V6.1 Rev.30.9.14 11
STEP 4: Choose a Proceptor Size
Choose the Proceptor size equal or closest to the value of V. Please refer to Grease Separator Sizing Chart in Section 3.3.2.
For example:
1. Restaurant with wash sink (30 US Gal) at one minute drain down time = 30 US gpm Recommendation: 30 US gpm x 5 minutes = Proceptor GMC 150 US Gal 2. Restaurant with 3-pot sink (30 US Gal) with soaps at one minute drain down time = 30 US gpm Recommendation: 30 US gpm x 30 minutes = 900 US Gal = Proceptor GMC 1000 US Gal For high flow rates or high grease content in wastewater such as from large commercial and industrial applications, please call for a Green Turtle representative for support.

V6.1 Rev.30.9.14 12
3.3.2 Manufacturer Grease Separator Sizing Chart
Proceptor Grease Separator Sizing Chart
Model Number
Flow Rating
Non-Emulsified Grease Emulsified Grease from Sinks Only (1)
(US gpm) (US gpm)
GMC 50 10 2
GMC 100 20 3
GMC 150 30 5
GMC 200 40 7
GMC 300 60 10
GMC 500 100 17
GMC 750 150 25
GMC 1000 & GMC 1000(2) 200 33
GMC 1300 260 43
GMC 1500 & GMC 1500(2) 300 50
GMC 2000(2) 400 67
GMC 2600(2) 520 87
GMC 3000(2) 600 100
GMC 4000(2) 800 133
GMC 5000(2) 1,000 167
GMC 6000(2) 1,200 200
GMC 7000(2) 1,400 233
GMC 8000(3) 1,600 267
GMC 9000(3) 1,800 300
GMC 10000(3) 2,000 333
Pipe sizes shown in standard drawings reflect the lowest flow scenario in all cases. Larger pipe sizes are available. It is the responsibility of the designer to inform Green Turtle of the design flow rate and pipe size for each project. Caution: For larger units, or applications involving degreasers, surfactants, emulsifiers, corrosive wastewater, pumped effluent (not gravity fed), contact a Green Turtle Representative. Notes: (1) Based on 30 minute retention time (ref: Metcalf & Eddy, Inc., Revised by George Tchobanoglous and Franklin L. Burton, Wastewater Engineering: Treatment, Disposal and Reuse. 3rd Ed., 1991).

V6.1 Rev.30.9.14 13
3.3.3 Proceptor PDI & CSA Sizing For Proceptor GMC-100, GMC-150, GMC-200, GMC-250, GMC-300 – as published in PDI- G101 standard – revised March 2010

V6.1 Rev.30.9.14 14
Sizing by known compartment Sizing
Table 8.3.3 is included as a selection chart for standard PDI Certified grease interceptors applicable to various size fixtures commonly used in domestic, commercial and institutional installations. The selections listed are based on the sizing formula covered in Table 8.3.2 by GPM.
PDI & CSA(1) Certified Grease Interceptors
PDI Certified Proceptor
Model
CSA Certified Proceptor
Model
Rated Capacity
Grease Capacity
Height Top of Tank
Inlet Invert, D1
Outlet Invert, D2
(GPM) (pounds) (inches) (inches) (inches)
-- GMC 50 50 100 62 x 32 x 24 12 11
GMC 100 GMC 100 100 200 62 x 32 x 28 20 19
GMC 150 GMC 150 100 200 62 x 32 x 32 28 27
GMC 200 GMC 200 100 200 62 x 32 x 44 36 35
GMC 250 GMC 250 100 200 62 x 32 x 52 44 43
GMC 300 GMC 300 100 200 62 x 32 x 60 52 51
GMC 500 IAP -- 100 200 96 x 62 x 47 32 30 (1) Certified to PDI-G101 and CSA B481.1, respectively.
V6.1 Rev.30.9.14 15
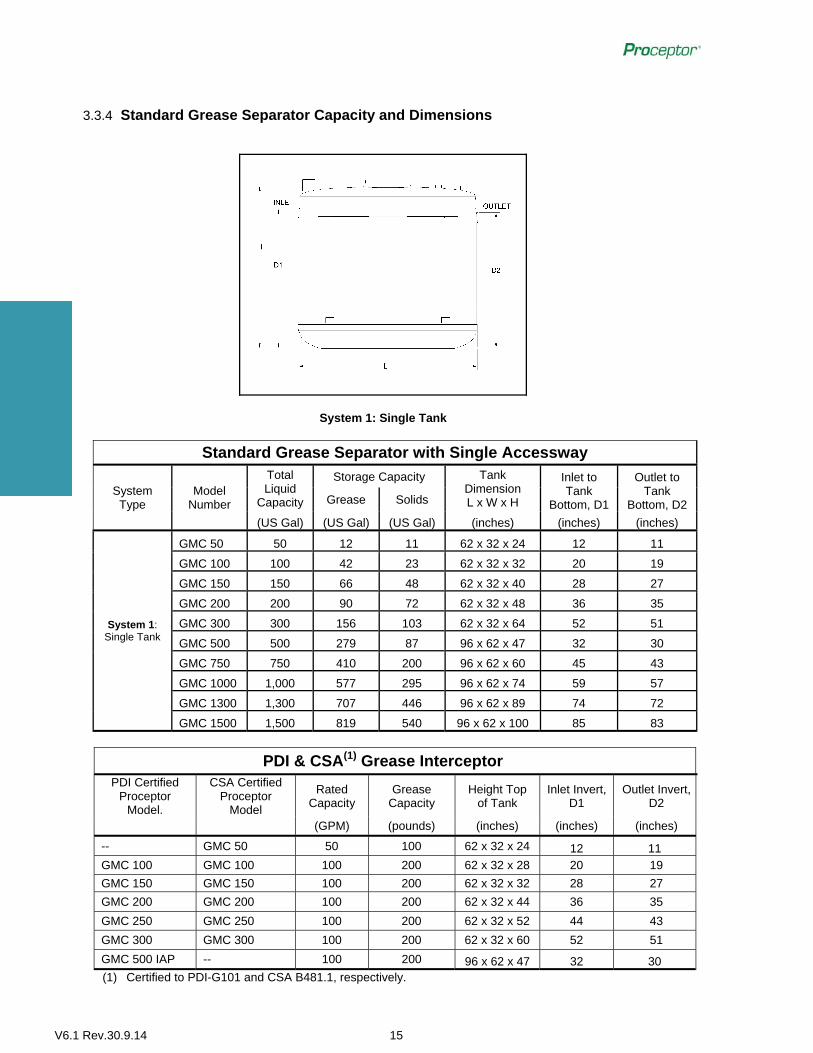
3.3.4 Standard Grease Separator Capacity and Dimensions
System 1: Single Tank
Standard Grease Separator with Single Accessway
System Type
Model Number
Total Liquid
Capacity
Storage Capacity Tank Dimension L x W x H
Inlet to Tank
Bottom, D1
Outlet to Tank
Bottom, D2 Grease Solids
(US Gal) (US Gal) (US Gal) (inches) (inches) (inches)
System 1: Single Tank
GMC 50 50 12 11 62 x 32 x 24 12 11
GMC 100 100 42 23 62 x 32 x 32 20 19
GMC 150 150 66 48 62 x 32 x 40 28 27
GMC 200 200 90 72 62 x 32 x 48 36 35
GMC 300 300 156 103 62 x 32 x 64 52 51
GMC 500 500 279 87 96 x 62 x 47 32 30
GMC 750 750 410 200 96 x 62 x 60 45 43
GMC 1000 1,000 577 295 96 x 62 x 74 59 57
GMC 1300 1,300 707 446 96 x 62 x 89 74 72
GMC 1500 1,500 819 540 96 x 62 x 100 85 83
PDI & CSA(1) Grease Interceptor
PDI Certified Proceptor
Model.
CSA Certified Proceptor
Model
Rated Capacity
Grease Capacity
Height Top of Tank
Inlet Invert, D1
Outlet Invert, D2
(GPM) (pounds) (inches) (inches) (inches)
-- GMC 50 50 100 62 x 32 x 24 12 11 GMC 100 GMC 100 100 200 62 x 32 x 28 20 19
GMC 150 GMC 150 100 200 62 x 32 x 32 28 27
GMC 200 GMC 200 100 200 62 x 32 x 44 36 35
GMC 250 GMC 250 100 200 62 x 32 x 52 44 43
GMC 300 GMC 300 100 200 62 x 32 x 60 52 51
GMC 500 IAP -- 100 200 96 x 62 x 47 32 30 (1) Certified to PDI-G101 and CSA B481.1, respectively.

V6.1 Rev.30.9.14 16
System 2: Two Tanks in Series
Standard Grease Separator with Single Accessway
System Type
Model Number
Total Liquid
Capacity
Storage Capacity Tank Dimension L x W x H
Inlet to Tank
Bottom, D1
Outlet to Tank
Bottom, D2 Grease Solids
(US Gal) (US Gal) (US Gal) (inches) (inches) (inches)
System 2: Two
Tanks in Series
GMC 1000(2) 1,000 559 174 2 (96 x 62 x 47) 32 30
GMC 1500(2) 1,500 819 401 2 (96 x 62 x 60) 45 43
GMC 2000(2) 2,000 1,154 589 2 (96 x 62 x 74) 59 57
GMC 2600(2) 2,600 1,415 891 2 (96 x 62 x 89) 74 72
GMC 3000(2) 3,000 1,638 1,080 2 (96 x 62 x 100) 85 83
GMC 4000(2) 4,000 1,712 1,315 2 (94 x 94 x 109) 79 77
GMC 5000(2) 5,000 2,226 1,776 2 (94 x 94 x 126) 96 94
GMC 6000(2) 6,000 2,883 2,092 2 (94 x 94 x 143) 113 111
GMC 7000(2) 7,000 3,396 2,611 2 (94 x 94 x 161) 131 129

V6.1 Rev.30.9.14 17
System 3: Three Tanks in Series
Standard Grease Separator with Single Accessway
System Type
Model Number
Total Liquid
Capacity
Storage Capacity Tank Dimension
L x W x H
Inlet to Tank
Bottom, D1
Outlet to Tank
Bottom, D2
Grease Solids
(US Gal) (US Gal) (US Gal) (inches) (inches) (inches)
System 3: Three
Tanks in Series
GMC 8000(3) 8,000 3,810 2,707 3 (94 x 94 x 132) 102 100
GMC 9000(3) 9,000 4,324 3,139 3 (94 x 94 x 143) 113 111
GMC 10000(3) 10,000 4,795 3,700 3 (94 x 94 x 155) 125 123

V6.1 Rev.30.9.14 18
3.3.5 UPC | IAPMO | Florida Grease Separator Capacity and Dimensions
System 4: UPC | IAPMO Approved (Dual Accessway, Single Tank or Two Tanks in Series Design)
UPC / IAPMO / Florida Grease Separator (US only)
System Type
Model Number
Total Liquid
Capacity
Storage Capacity Tank Dimension Inlet to Tank
Bottom, D1
Outlet to Tank
Bottom, D2 Grease Sediment L x W x H
(US Gal) (US Gal) (US Gal) (inches) (inches) (inches)
System 4: UPC /
IAPMO Approved
GMC 100 100 42 23 62 X 32 X 32 20 19
GMC 150 150 66 48 62 X 32 X 40 28 27
GMC 200 200 90 72 62 X 32 X 48 36 35
GMC 250 250 119 91 62 X 32 X 56 44 43
GMC 300 300 156 103 62 X 32 X 64 52 51
GMC 500 UPC 500 279 125 96 x 62 x 55 33 30
GMC 750 UPC 750 521 125 96 x 62 x 68 46 43
GMC 1000 UPC 1,000 782 125 96 x 62 x 82 60 57
GMC 1300 UPC 1,300 1,061 125 96 x 62 x 97 75 72
GMC 2000(2) UPC 2,000 1,564 250 2 (96 x 62 x 82) 60 57
GMC 2600(2) UPC 2,600 2,122 250 2 (96 x 62 x 97) 75 72
System 4: Florida
Approved
GMC 750 FL 750 596 53 96 x 62 x 68 46 43
GMC 1000 FL 1,000 856 53 96 x 62 x 82 60 57
GMC 1250 FL 1,300 1,136 53 96 x 62 x 97 75 72

V6.1 Rev.30.9.14 19
3.4 Oil Separators
3.4.1 Sizing Guidelines
STEP 1: Determine the Flow rate
Determine peak flow rates (Q): add up all fixtures (e.g., hose bibs) and other sources of liquid discharge to oil separator and establish peak flow rate. If fixture quantity and/or volume are unknown, assume worse case scenario by establishing peak flow rate based on drain size connecting to oil separator. (For example: 4 in drain at 1/4 in/foot or 2mm/100mm = 110 gpm (US))
STEP 2: Determine the Retention Time Required
In order to meet the 10 mg/l effluent discharge regulation enforced by most pre-treatment authorities, Proceptor requires the following retention times (HRT):
10 minutes retention for non-emulsified oil with the use of a coalescer 30 minutes retention for non-emulsified oil without the use of a coalescer 60 minutes retention for light emulsified oil (mechanical mixing)
STEP 3: Calculate the Size of the Proceptor
Multiply the peak flow rate (Q) by the hydraulic retention time (HRT) to determine the volume of the separator (V).
V = Q x HRT
STEP 4: Choose a Proceptor Size
Choose the Proceptor size equal or closest to the value of V. Please refer to Oil Separator Sizing Chart in Section 3.4.2.
For example:
1. Spills containment 10 US gpm of potential flow from spills
Scenario 1: 10 US gpm x 10 min. = Proceptor OMC 100 US gallon with a coalescer Scenario 2: 10 US gpm x 30 min = Proceptor OMC 300 without coalescer
2. Mechanics shop rinsing floor lightly with soap and using two (2) 1/2” hose bibs = 2 X 5 US gpm =
10 US gpm (30 psi)
Scenario 1 (if continuous flow exist for more than 60 minutes): 10 US gpm x 60 min. = Proceptor OMC 750 US gallon Scenario 2 (if it is a batch flow where wash time is less than 60 minutes): Wash time = 30 minutes, 10 US gpm x 30 min. wash time = Proceptor OMC 300 without coalescer
If flow rate is unknown, assume worse case scenario by establishing peak flow rate based on size of drain size connecting to the oil separator. For example: 4in drain at 1/4 in/foot = 110 gpm).
V6.1 Rev.30.9.14 20
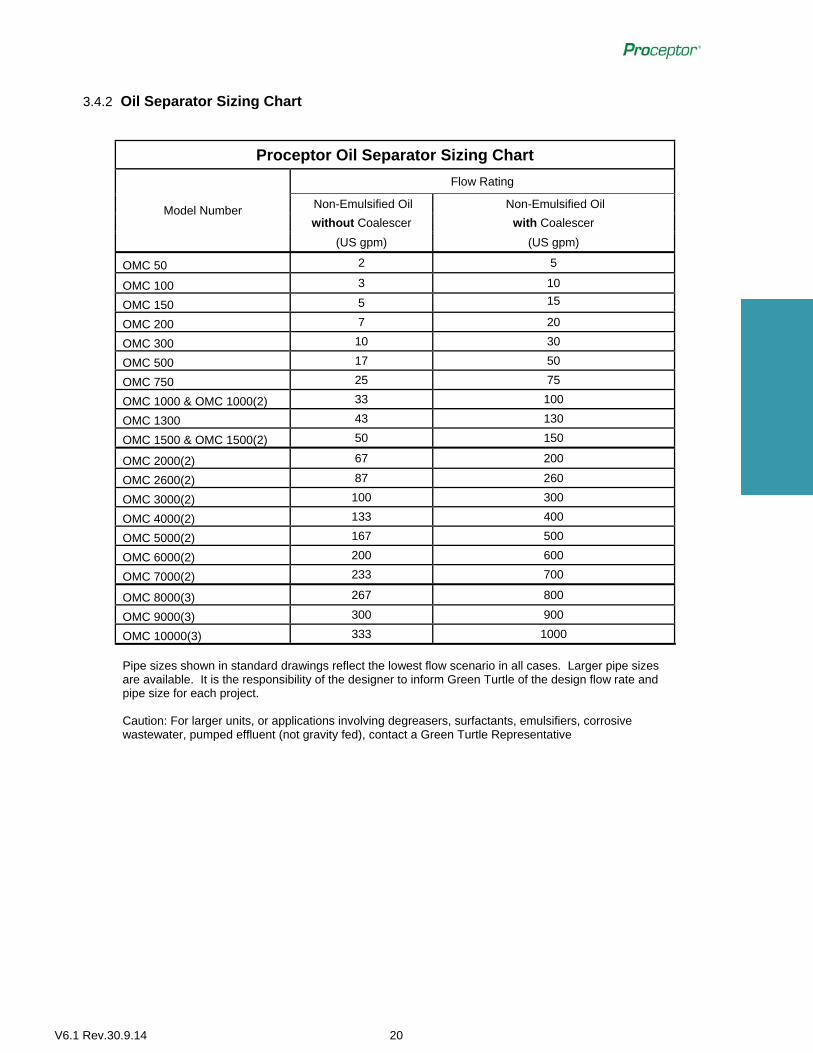
3.4.2 Oil Separator Sizing Chart
Proceptor Oil Separator Sizing Chart
Model Number
Flow Rating
Non-Emulsified Oil Non-Emulsified Oil
without Coalescer with Coalescer
(US gpm) (US gpm)
OMC 50 2 5
OMC 100 3 10
OMC 150 5 15
OMC 200 7 20
OMC 300 10 30
OMC 500 17 50
OMC 750 25 75
OMC 1000 & OMC 1000(2) 33 100
OMC 1300 43 130
OMC 1500 & OMC 1500(2) 50 150
OMC 2000(2) 67 200
OMC 2600(2) 87 260
OMC 3000(2) 100 300
OMC 4000(2) 133 400
OMC 5000(2) 167 500
OMC 6000(2) 200 600
OMC 7000(2) 233 700
OMC 8000(3) 267 800
OMC 9000(3) 300 900
OMC 10000(3) 333 1000
Pipe sizes shown in standard drawings reflect the lowest flow scenario in all cases. Larger pipe sizes are available. It is the responsibility of the designer to inform Green Turtle of the design flow rate and pipe size for each project. Caution: For larger units, or applications involving degreasers, surfactants, emulsifiers, corrosive wastewater, pumped effluent (not gravity fed), contact a Green Turtle Representative

V6.1 Rev.30.9.14 21
3.4.3 Standard Oil Standard Capacity and Dimensions
System 1: Single Tank
Standard Oil Separator with Single Accessway
System Type
Model
Number
Total Liquid Capacity
Storage Capacity Tank Dimension L x W x H
Inlet to Tank Bottom, D1
Outlet to Tank
Bottom, D2 Oil Sediment
(US Gal) (US Gal) (US Gal) (inches) (inches) (inches)
System 1: Single Tank
OMC 50 50 12 11 62 x 32 x 24 12 11
OMC 100 100 42 23 62 x 32 x 32 20 19
OMC 150 150 66 48 62 x 32 x 40 28 27
OMC 200 200 90 72 62 x 32 x 48 36 35
OMC 300 300 156 103 62 x 32 x 64 52 51
OMC 500 500 279 87 96 x 62 x 47 32 30
OMC 750 750 410 200 96 x 62 x 60 45 43
OMC 1000 1,000 577 295 96 x 62 x 74 59 57
OMC 1300 1,300 707 446 96 x 62 x 89 74 72
OMC 1500 1,500 819 540 96 x 62 x 100 85 83

V6.1 Rev.30.9.14 22
System 2: Two Tanks in Series
Standard Oil Separator with Single Accessway
System Type
Model Number
Total Liquid Capacity
Storage Capacity Tank Dimension L x W x H
Inlet to Tank Bottom, D1
Outlet to Tank
Bottom, D2 Oil Sediment
(US Gal) (US Gal) (US Gal) (inches) (inches) (inches)
System 2: Two
Tanks in Series
OMC 1000(2) 1,000 559 174 2 (96 x 62 x 47) 32 30
OMC 1500(2) 1,500 819 401 2 (96 x 62 x 60) 45 43
OMC 2000(2) 2,000 1,154 589 2 (96 x 62 x 74) 59 57
OMC 2600(2) 2,600 1,415 891 2 (96 x 62 x 89) 74 72
OMC 3000(2) 3,000 1,638 1,080 2 (96 x 62 x 100) 85 83
OMC 4000(2) 4,000 1,712 1,315 2 (94 x 94 x 109) 79 77
OMC 5000(2) 5,000 2,226 1,776 2 (94 x 94 x 126) 96 94
OMC 6000(2) 6,000 2,883 2,092 2 (94 x 94 x 143) 113 111
OMC 7000(2) 7000 3,396 2,611 2 (94 x 94 x 161) 131 129

V6.1 Rev.30.9.14 23
System 3: Three Tanks in Series
Standard Oil Separator with Single Accessway
System Type
Model Number
Total Liquid
Capacity
Storage Capacity Tank Dimension L x W x H
Inlet to Tank
Bottom, D1
Outlet to Tank
Bottom, D2 Oil Sediment
(US Gal) (US Gal) (US Gal) (inches) (inches) (inches)
System 3: Three
Tanks in Series
OMC 8000(3) 8,000 3,810 2,707 3 (94 x 94 x 132) 102 100
OMC 9000(3) 9,000 4,324 3,139 3 (94 x 94 x 143) 113 111
OMC 10000(3) 10,000 4,795 3,700 3 (94 x 94 x 166) 125 123

V6.1 Rev.30.9.14 24
3.4.4 UPC / IAPMO Oil Separator Capacity and Dimensions
System 5: UPC / IAPMO Approved (Triple Accessway Design, Single Tank or Two Tanks in Series)
UPC / IAPMO Oil Separator with Triple Accessway (US only)
System Type
Model Number Total Liquid
Capacity
Storage Capacity Tank Dimension
L x W x H
Inlet to Tank
Bottom, D1
Outlet to Tank
Bottom, D2 Oil Sediment
(US Gal) (US Gal) (US Gal) (inches) (inches) (inches)
System 5: UPC /
IAPMO Approved
OMC 500 UPC 500 279 125 96 x 62 x 55 33 30
OMC 750 UPC 750 521 125 96 x 62 x 68 46 43
OMC 1000 UPC 1,000 782 125 96 x 62 x 82 60 57
OMC 1300 UPC 1,300 1,061 125 96 x 62 x 97 75 72
OMC 2000 UPC 2,000 1,564 250 2 (96 x 62 x 82) 60 57
OMC 2600 UPC 2,600 2,122 250 2 (96 x 62 x 97) 75 72

V6.1 Rev.30.9.14 25
4 Accessories and Options
4.1 Alarm The alarm is an electronic monitoring system designed to trigger a visual and audible alarm when a pre-set level of oil or grease is reached within the treatment chamber. The feature acts as a safeguard against spills caused by exceeding the oil/grease storage capacity of the separator and eliminates the need for manual inspection.
Figure 4-1: Alarm Mounted in Proceptor
4.2 Coalescing Filter for Small Diameter Oil Globules (>20 µm) Coalescing elements cause fine free oil droplets to agglomerate into larger droplets, thus enhancing gravity separation. According to Stokes’ Law, the rise velocity of a droplet of oil is directly proportional to the square of its diameter. Coalescers will not remove chemically emulsified or dissolved oil. Solids must be separated prior to entry into the coalescer since solids tend to plug coalescing filters quickly. The addition of a coalescer within the separator can allow for a reduction in the required sizing of the separator. For sizing information for Proceptor oil separators with coalescers refer to Section 0. (Not recommended where soaps are present in wastewater). Not for food grease applications.
Figure 4-2: Coalescer Option with Proceptor

V6.1 Rev.30.9.14 26
4.3 Suction Pipe for Indoor Installations A suction pipe is used when remote tank cleanout is desired. Internal piping allows the system to be maintained if a servicing vehicle logistically cannot access the top of the tank. The schedule pipe extends to the bottom of the separator to permit for all liquid and solid waste to be suctioned out. This piping is to be plumbed to an exterior wall allowing for a pumping truck to attach to the wall port instead of opening the frame and cover for traditional servicing.
Figure 4-3: Suction Pipe Accessory with Proceptor
4.4 Double Wall Proceptor separators can be supplied with a secondary wall made from durable fiberglass for added protection against leaks.
4.5 Level Monitor for Double Wall or Oil Reservoir The system uses an ultrasonic level sensor field installed in the interstitial space between the tank walls or within an oil reservoir at a pre-set level for cleanout. Once the sensor comes into contact with liquid, it sends a signal through an externally mounted relay controller and indicator panel, to alert personnel that there is fluid in the interstitial space or a high level within the oil reservoir.
4.6 Automatic Pump-Out System Proceptor units can be installed with an automatic pump-out system to remove oil from the system once it reaches a predetermined depth. The system, custom designed for each specific application, involves the use of a level sensor, 1” suction line (typical), a relay controller, and an electric or pneumatic pump.
4.7 Shut-Off Valve System with Alarm Proceptor separators may be equipped with an actuated shut-off valve. A valve chamber upstream of the separator is the recommended configuration. By using both a shut-off valve and oil alarm, optimal protection against spills is achieved by ensuring oil is not discharged into the sewer system. The alarm is configured to automatically close the shut-off valve and stop flow into the separator when the oil reaches a pre-set depth within the separator.
V6.1 Rev.30.9.14 27
4.8 Fiberglass Products Large capacity and custom oil separators are available for special applications. To compliment its oil and grease separators, Green Turtle also manufactures a wide range of fiberglass products including above-ground tanks, holding tanks, emergency spill holding tanks, surge tanks, catch basins, sump tanks, neutralizing systems, valve chambers, sample chambers and other. For more information, please visit www.greenturtletech.com or contact a Green Turtle Representative.
V6.1 Rev.30.9.14 28
5 Installation and Maintenance
5.1 Installation Proceptor separators must be installed in accordance with the provided installation instructions. The installer must ensure that all Federal, State/Provincial, and local codes such as the National Fire Code, Municipal Building and/or Plumbing codes and municipal pretreatment sewer-use regulations are followed. Refer to Drawings: Installation Section for detailed installation procedures, and drawings.
5.2 Maintenance Proceptor separators have no moving parts and are constructed of materials that are non-reactive in their intended environment. Regularly scheduled removal of captured materials and cleaning of the internal surfaces are the only forms of maintenance required. If the Proceptor installed at your facility contains a coalescing filter, it will be necessary for the filter to be removed and pressure washed whenever the Proceptor is pumped out or if testing indicates non-compliance with local effluent standards. See Owner’s manual for detailed instructions. If the Proceptor contains an oil draw off pipe, it may need to be adjusted post-installation based on the operating conditions, in order to capture the oil and not the water. The maximum normal operating flow / water level in the tank will govern the setting. See the Owner’s Manual for detailed instructions.
5.3 Importance of Maintenance Maintenance of a Proceptor unit is critical to ensure that separation efficiency is not compromised. The build-up of floatables and solids within the separator reduces the potential treatment volume and could, therefore, reduce the water retention time within the separator resulting in reduced separation efficiency. Furthermore, if contaminants are allowed to accumulate, the maximum storage capacities may be exceeded, resulting in the release of previously captured oil, grease, and solids.

V6.1 Rev.30.9.14 29
5.4 Maintenance Frequency The frequency of maintenance depends on the application and the model of the Proceptor. Some applications have very little oil, grease and/or solids in the waste stream and, therefore, reaching the maximum storage capacities will take a longer period of time. For other applications, the maximum storage capacities will be reached in a shorter period of time. Maintenance should be performed when the storage capacity reaches 50% or annually, whichever comes first. The following table describes when maintenance should be performed on the various standard Proceptor models.
Proceptor Maintenance Schedule
System Type
Model Number Total Liquid
Capacity
Storage Capacity Maintenance
Recommended
Oil/ Grease
Solids/ Sediment Oil/ Grease
Solids/ Sediment
(US Gal) (US Gal) (US Gal) (inches) (inches)
System 1: Single Tank
GMC 50 OMC 50 50 12 11 1.0 1.5
GMC 100 OMC 100 100 42 23 4 3
GMC 150 OMC 150 150 66 48 6 5
GMC 200 OMC 200 200 90 72 8 7
GMC 250 OMC 250 250 119 91 10 8
GMC 300 OMC 300 300 156 103 13 9
GMC 500 OMC 500 500 279 87 8 3
GMC 750 OMC 750 750 410 200 11 6
GMC 1000 OMC 1000 1,000 577 295 16 9
GMC 1300 OMC 1300 1,300 707 446 19 13
GMC 1500 OMC 1500 1,500 819 540 22 15 System 2: Two Tanks in Series
GMC 1000(2) OMC 1000(2) 1,000 559 174 8 3
GMC 1500(2) OMC 1500(2) 1,500 819 401 11 6
GMC 2000(2) OMC 2000(2) 2,000 1,154 589 16 9
GMC 2600(2) OMC 2600(2) 2,600 1,415 891 19 13
GMC 3000(2) OMC 3000(2) 3,000 1,638 1,080 22 15
GMC 4000(2) OMC 4000(2) 4,000 1,712 1,315 15 15
GMC 5000(2) OMC 5000(2) 5,000 2,226 1,776 20 19
GMC 6000(2) OMC 6000(2) 6,000 2,883 2,092 25 22
GMC 7000(2) OMC 7000(2) 7,000 3,396 2,611 30 26
System 3: Three Tanks
in Series
GMC 8000(3) OMC 8000(3) 8,000 4,508 3,032 22 19
GMC 9000(3) OMC 9000(3) 9,000 5,115 3,542 25 22
GMC 10000(3) OMC 10000(3) 10,000 5,672 4,205 28 25

V6.1 Rev.30.9.14 30
5.5 Inspection Procedures Measurements must be taken of the oil/grease and/or solids levels in order to determine if maintenance is required. See the Owner’s Manual for detailed instructions. There are two main methods of inspecting a Proceptor separator to determine if maintenance is required:
Manual Sludge Level Inspection
Manual Sludge Level Inspection measures the depth of solids or sludge within a Proceptor using a transparent dipstick tube equipped with a built-in ball check valve to hold the sludge sample. The tube should be graduated to indicate the depth of sludge, water level, and grease or oil layer in the Proceptor separator. Follow the manufacturer’s instructions which generally will tell you to slowly lower the device to the bottom of the tank. Do NOT plunge it to the bottom, which will result in an inaccurate reading and possibly damage the ball check valve. Keep the unit as vertical as possible when raising it up, without allowing it to bend or bounce while it is full of water. Look at the sample through the markers on the device and then empty it before further use.
Manual Oil/Grease Level Inspection
Manual oil/grease level inspection can be performed with a dip stick, measuring tape or gauge rod. Spread a thin coating of a water level indicator paste on the dip stick, measuring tape, or gauge rod in the area where water is likely to appear. Slowly lower the measuring device into the tank to where the oil/water interface is anticipated. Slowly remove the measuring device from the tank. The absence of color change by the water paste indicates that the measuring device did not reach the oil/water interface therefore re-measurement is necessary. A change in color by the water paste indicates where the oil/water interface occurs and the depth of oil can be determined.
Automatic Oil/Grease Alarm
An automatic oil/grease level sensor can be installed within any Proceptor unit to indicate, via an audio and visual alarm, when the oil/grease level has reached a preset storage volume. The oil alarm can be used in conjunction with a shutoff valve or an automatic oil removal system.
5.6 Maintenance Methods Proceptor units are normally serviced by a vacuum or pumping removal technique. The Vacuum or Pumping Service Industry that cleans underground tanks, sewers and catch basins is a well-established sector of the service industry. Costs to clean a Proceptor vary based on the size of unit and transportation distances. Consult your local Waste Management Authority for an approved list of licensed “Liquid Waste Handlers”. Maintenance of a Proceptor separator is simple. The 24-inch diameter manhole cover is removed and the vacuum hose is inserted into the unit. OMC models with a reservoir, which should contain only oil if adjusted properly, may be pumped out via the 6-inch pump-out port by a liquid waste removal or oil recycling company. For models with suction pipes, maintenance can be performed without lifting the manhole cover. Always fill the interceptor with clean water after cleaning the unit for optimum treatment efficiency.

V6.1 Rev.30.9.14 31
5.7 Spills Should an oil or grease spill occur that drains into the interceptor, it must be cleaned immediately. The appropriate governing agency should also be notified in the event of a spill.
5.8 Disposal The disposal of oil, grease and sediment collected in Proceptor separators will be included in the price from the vacuum service industry. Some wastes generated by food facilities are acceptable for farm disposal or use as biodiesel feedstock. Transporting and disposing of accumulated oil, grease, and solids should be carried out in accordance with the authority having jurisdiction.

V6.1 Rev.30.9.14
6 SPECIFICATION SHEETS

GREASE WASTE INTERCEPTORS
GREASE WASTE INTERCEPTORS
PART 1 - GENERAL
1.1 RELATED DOCUMENTS
A. Drawings and general provisions of the Contract, including General and Supplementary Conditions and Division 01 Specification Sections, apply to this Section.
1.2 SUMMARY
A. Section Includes:
1. Grease interceptors.
1.3 DEFINITIONS
A. FRP: Fiberglass-reinforced plastic.
1.4 ACTION SUBMITTALS
A. Product Data: Include materials of fabrication, dimensions, rated capacities, retention capacities, operating characteristics, size and location of each pipe connection, furnished specialties, and accessories.
B. Shop Drawings: For each type and size of interceptor indicated.
1. Include materials of construction, dimensions, rated capacities, retention capacities, location and size of each pipe connection, furnished specialties, and accessories.
1.5 INFORMATIONAL SUBMITTALS
A. Coordination Drawings: Interceptors, drawn to scale, on which the following items are shown and coordinated with each other, based on input from Installers of the items involved:
1. Grease Interceptors. 2. Piping connections. Include size, location, and elevation of each. 3. Interface with underground structures and utility services.
1.6 PROJECT CONDITIONS
A. Interruption of Existing Sewer Services: Do not interrupt services to facilities occupied by Owner or others unless permitted under the following conditions and then only after arranging to provide temporary sewer services according to requirements indicated:

GREASE WASTE INTERCEPTORS
1. Notify [Architect] [Construction Manager] [Owner] no fewer than [seven] <Insert number> days in advance of proposed interruption of service.
2. Do not proceed with interruption of sewer services without [Architect's] [Construction Manager's] [Owner's] written permission.
PART 2 - PRODUCTS
2.1 GREASE INTERCEPTORS
A. Basis of Design: Elliptical Fiberglass (FRP) grease interceptor construction, as supplied by Green Turtle Americas Ltd. or Green Turtle Technologies Ltd., with inlet piping and baffle penetration designed to introduce wastewater in a tangential laminar flow pattern, to be appropriately sized based on anticipated usage and flow rates to meet applicable sanitary sewer discharge limits, incl. municipal by-laws.
1. Include accessways, tanks, and piping and baffle openings to retain grease and solids and to permit tangential laminar wastewater flow.
2. Factory installed Schedule 40 PVC cement welded type socket ports, or straight pipe, fitted into interceptor walls for each pipe connection.
3. Accessway Extension Collar: a. Fiberglass risers (EC2), 24-inch (610-mm). 36-inch (915-mm) optional
alternate.
4. Accessway Frames and Covers: Round cover with non slip cover finish, gasketed and non vented top design with “Proceptor” lettering cast into cover.
a. Cast Iron: AASHTO M306 Traffic load rated. 24 inch- (610-mm-) diameter cover with 0.25” (6-mm-) gasket. Two closed pickholes. Non Bolted or Bolted option. Weight 249 lbs. ASTM A48 CL35B. 36-inch (915-mm) optional alternate is acceptable to match fiberglass risers.
b. Fiberglass: Pedestrian loading 24” diameter bolted and gasketed.
5. Watertight Flexible Caulking: Sikaflex 255 or Sikaflex 221 or approved alternate to
provide watertight seal at extension collar joints.
B. Capacities and Characteristics:
1. Number of Compartments: <x cells> 2. Grease Retention Capacity: <xxx USG> 3. Solids Retention Capacity: <xxx USG > 4. Inlet and Outlet Schedule 40 PVC Pipe Size: <4”/6”>
a. Centerline of Inlet to Floor: <Insert inches (mm)>. b. Centerline of Outlet to Floor: <Insert inches (mm)>.
5. Vent Pipe Size: <3”>. 6. Installation Position: Above grade or Underground with accessway collar riser to
grade. 7. OPTIONS as required:

GREASE WASTE INTERCEPTORS
a. 4” Side or Top Suction port for remote pump-out. b. Alarm for high oil accumulation. Includes alarm probe to be installed in top
of tank accessway and alarm panel for indoor wall mount. 8. Green Turtle Proceptor Model: : <GMC XXX>.
2.2 FIBERGLASS ACCESSWAY RISERS
A. Fiberglass accessway extensions: Fiberglass wound pipe.
1. Length: From top of underground tank to underside of access frame at grade. 2. Extension Sections: 0.25-inch (6-mm) minimum thickness and [24-inch (610-mm)
diameter as a single continuous piece, without joints unless approved by the manufacturer. a. Sealant: Watertight Flexible Caulking, Sikaflex 255 or Sikaflex 221 or
approved alternate to provide watertight seal at extension collar joining to tank on bottom and access frame at top.
PART 3 - EXECUTION
3.1 EARTHWORK
A. Excavating, trenching, and backfilling are to meet local Building Code.
B. Backfill per Green Turtle Installation Instructions. Pea gravel is preferred backfill material.
3.2 INSTALLATION
A. Install fiberglass interceptors according to manufacturer’s installation instructions.
3.3 CONNECTIONS
A. Piping installation requirements are to meet local code for Sanitary Waste and Vent Piping. Drawings indicate general arrangement of piping, fittings, and specialties.
B. Make piping connections between interceptors and piping systems.
END OF SECTION

OIL SEDIMENT WASTE INTERCEPTORS
OIL SEDIMENT WASTE INTERCEPTORS
PART 4 - GENERAL
4.1 RELATED DOCUMENTS
A. Drawings and general provisions of the Contract, including General and Supplementary Conditions and Division 01 Specification Sections, apply to this Section.
4.2 SUMMARY
A. Section Includes:
1. Oil interceptors.
4.3 DEFINITIONS
A. FRP: Fiberglass-reinforced plastic.
4.4 ACTION SUBMITTALS
A. Product Data: Include materials of fabrication, dimensions, rated capacities, retention capacities, operating characteristics, size and location of each pipe connection, furnished specialties, and accessories.
B. Shop Drawings: For each type and size of interceptor indicated.
1. Include materials of construction, dimensions, rated capacities, retention capacities, location and size of each pipe connection, furnished specialties, and accessories.
4.5 INFORMATIONAL SUBMITTALS
A. Coordination Drawings: Interceptors, drawn to scale, on which the following items are shown and coordinated with each other, based on input from Installers of the items involved:
1. Interceptors. 2. Piping connections. Include size, location, and elevation of each. 3. Interface with underground structures and utility services.
4.6 PROJECT CONDITIONS
A. Interruption of Existing Sewer Services: Do not interrupt services to facilities occupied by Owner or others unless permitted under the following conditions and then only after arranging to provide temporary sewer services according to requirements indicated:
OIL SEDIMENT WASTE INTERCEPTORS
1. Notify [Architect] [Construction Manager] [Owner] no fewer than [seven] <Insert number> days in advance of proposed interruption of service.
2. Do not proceed with interruption of sewer services without [Architect's] [Construction Manager's] [Owner's] written permission.
PART 5 - PRODUCTS
5.1 OIL INTERCEPTORS
A. Oil Interceptors: Fiberglass, to be appropriately sized based on anticipated usage and flow rates to meet applicable sanitary sewer discharge limits, incl. municipal by-laws.
1. Include accessways, cells or baffles, and piping or openings to retain hydrocarbon and solids and to permit wastewater flow.
2. PVC cement welded type socket ports, or straight pipe, fitted into interceptor walls for each pipe connection.
3. Accessway Extension Collar: a. Fiberglass risers (EC2), 24-inch (610-mm).
4. Accessway Frames and Covers: Round cover with non slip cover finish, gasketed
and non vented top design with “Proceptor” lettering cast into cover.
a. Cast Iron: AASHTO M306 Traffic load rated. 24 inch- (610-mm-) diameter cover with 0.25” (6-mm-) gasket. Two closed pickholes. Non Bolted or Bolted option. Weight 249 lbs. ASTM A48 CL35B.
b. Fiberglass: Pedestrian loading 24” diameter bolted and gasketed.
5. Watertight Flexible Caulking: Sikaflex 255 or Sikaflex 221 or approved alternate to
provide watertight seal at extension collar joints.
B. Capacities and Characteristics:
1. Number of Compartments: <x cells> 2. Oil Retention Capacity: <xxx USG>. 3. Solids Retention Capacity: <xxx USG >. 4. Inlet and Outlet Pipe Size: <4”/6”>.
a. Centerline of Inlet to Floor: <Insert inches (mm)>. b. Centerline of Outlet to Floor: <Insert inches (mm)>.
5. Vent Pipe Size: <3”>. 6. Installation Position: Underground with accessway collar riser to grade. 7. OPTIONS as required:
a. Suction port for remote pump-out. b. Alarm for high oil accumulation. Includes alarm probe to be installed in top
of tank accessway and alarm panel for indoor wall mount. 8. Green Turtle Proceptor Model: : <OMC XXX>.

OIL SEDIMENT WASTE INTERCEPTORS
5.2 FIBERGLASS ACCESSWAY RISERS
A. Fiberglass accessway extensions: Fiberglass wound pipe.
1. Length: From top of underground tank to underside of access frame at grade. 2. Extension Sections: 0.25-inch (6-mm) minimum thickness and [24-inch (610-mm)]
diameter single continuous piece, without joints unless approved by the manufacturer.
3. Sealant: Watertight Flexible Caulking, Sikaflex 255 or Sikaflex 221 or approved alternate to provide watertight seal at extension collar joining to tank on bottom and access frame at top.
PART 6 - EXECUTION
6.1 EARTHWORK
A. Excavating, trenching, and backfilling are to meet local Building Code.
B. Backfill per Green Turtle Installation Instructions. Pea gravel is preferred backfill material.
6.2 INSTALLATION
A. Install fiberglass interceptors according to manufacturer’s installation instructions.
6.3 CONNECTIONS
A. Piping installation requirements are to meet local code for Sanitary Waste and Vent Piping." Drawings indicate general arrangement of piping, fittings, and specialties.
B. Make piping connections between interceptors and piping systems.
END OF SECTION
V6.1 Rev.30.9.14
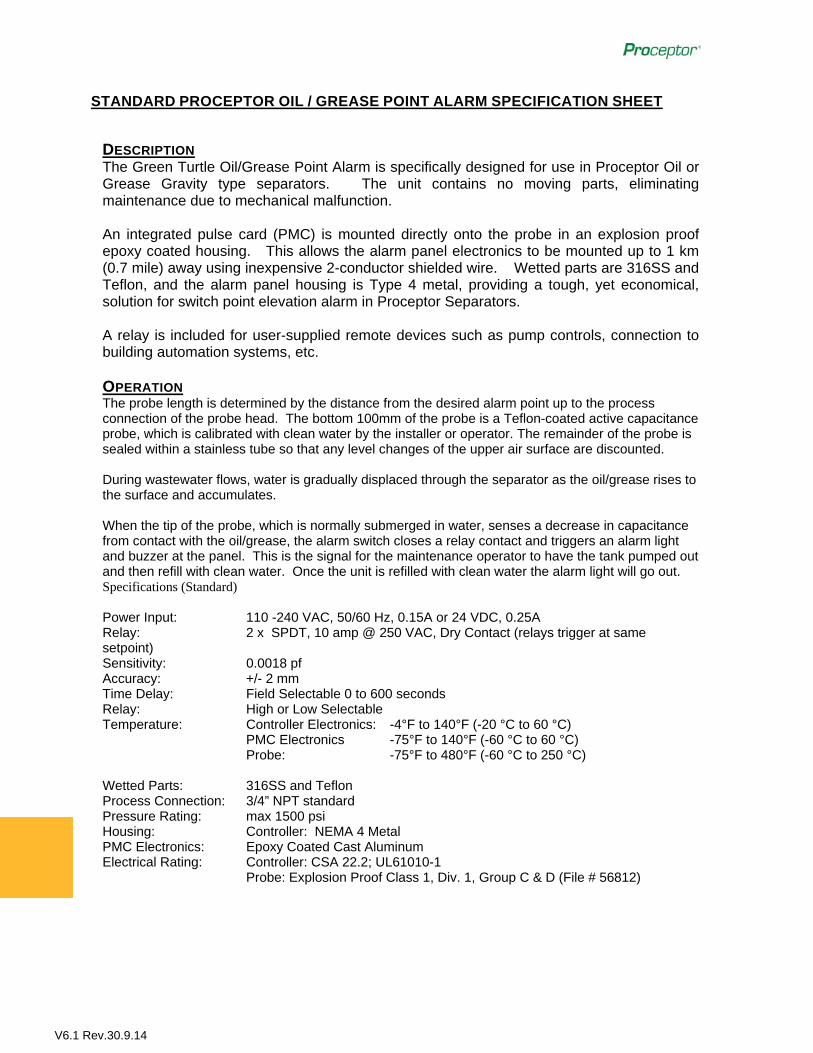
STANDARD PROCEPTOR OIL / GREASE POINT ALARM SPECIFICATION SHEET
DESCRIPTION The Green Turtle Oil/Grease Point Alarm is specifically designed for use in Proceptor Oil or Grease Gravity type separators. The unit contains no moving parts, eliminating maintenance due to mechanical malfunction. An integrated pulse card (PMC) is mounted directly onto the probe in an explosion proof epoxy coated housing. This allows the alarm panel electronics to be mounted up to 1 km (0.7 mile) away using inexpensive 2-conductor shielded wire. Wetted parts are 316SS and Teflon, and the alarm panel housing is Type 4 metal, providing a tough, yet economical, solution for switch point elevation alarm in Proceptor Separators. A relay is included for user-supplied remote devices such as pump controls, connection to building automation systems, etc. OPERATION The probe length is determined by the distance from the desired alarm point up to the process connection of the probe head. The bottom 100mm of the probe is a Teflon-coated active capacitance probe, which is calibrated with clean water by the installer or operator. The remainder of the probe is sealed within a stainless tube so that any level changes of the upper air surface are discounted. During wastewater flows, water is gradually displaced through the separator as the oil/grease rises to the surface and accumulates. When the tip of the probe, which is normally submerged in water, senses a decrease in capacitance from contact with the oil/grease, the alarm switch closes a relay contact and triggers an alarm light and buzzer at the panel. This is the signal for the maintenance operator to have the tank pumped out and then refill with clean water. Once the unit is refilled with clean water the alarm light will go out. Specifications (Standard) Power Input: 110 -240 VAC, 50/60 Hz, 0.15A or 24 VDC, 0.25A Relay: 2 x SPDT, 10 amp @ 250 VAC, Dry Contact (relays trigger at same setpoint) Sensitivity: 0.0018 pf Accuracy: +/- 2 mm Time Delay: Field Selectable 0 to 600 seconds Relay: High or Low Selectable Temperature: Controller Electronics: -4°F to 140°F (-20 °C to 60 °C) PMC Electronics -75°F to 140°F (-60 °C to 60 °C) Probe: -75°F to 480°F (-60 °C to 250 °C) Wetted Parts: 316SS and Teflon Process Connection: 3/4” NPT standard Pressure Rating: max 1500 psi Housing: Controller: NEMA 4 Metal PMC Electronics: Epoxy Coated Cast Aluminum Electrical Rating: Controller: CSA 22.2; UL61010-1 Probe: Explosion Proof Class 1, Div. 1, Group C & D (File # 56812)

V6.1 Rev.30.9.14
7 INSTALLATION

V6.1 Rev.30.9.14
[This page was intentionally left blank]

Alarm Installation
V6.1 Rev.30.9.14
ALARM INSTALLATION Note: Alarms are sensitive instruments and all care is taken to ensure they are shipped without damage. Please examine the instrument for possible shipping damage. IMPORTANT: If for any reason it is determined that parts need to be returned to the factory, please notify a Green Turtle Representative prior to shipment for a return authorization number.
1. Thread the sensing probe into the bracket of the separator access way. The elevation of the probe tip will determine the alarm point of the system. (The exposed white portion of the probe tip is the actual sensing area.) The probe length will depend on the tank model.
2. The probe is rated for Class I, Div. 1, Group C & D. If the probe is mounted in one of these
designated areas, the contractor must use approved explosion proof installation techniques. If the location is non-classified, then local regulations should be followed in installing proper electrical conduit.
3. Wire the probe to the main control unit using the three-wire shielded instrument cable supplied
(25 feet). Ensure vapours cannot travel up the wiring conduit from the interceptor into the alarm panel. If the main controller is mounted further than 25 feet up the line from the top of the probe, the contractor must supply an electrically approved junction box or splitter box. The contractor then must supply 18-20 gauge 3 conductor shielded cable (ie., Belden 8772) or 2 conductor shielded with a separate ground wire. DO NOT run these wires along side of high voltage wires. DO NOT coil or wrap the extra length of instrument cable. Connect the red, black and cable shield to the +/- terminals respectively at the controller. Connect the shield to electronic ground. See the electrical connection drawing in the back of the manual for further instruction. Make sure that the probe is electrically grounded to the controller box by connecting the clear wire supplied to the ground stud on the sub-plate.
4. Connect 100-240 VAC power to the main control unit. After powering on the unit, the STATUS
LED on the 2800 circuit board should be green, indicating that power is on with no fault conditions. If the status LED is red, the unit is showing fault. Check to make sure that the probe wires are correctly wired to the controller for continuity and proper polarity.
5. Fill the separator with water up to the level of the outlet pipe. Ensure the bottom tip of the
alarm probe is submerged.
6. Calibrate the alarm according to the Alarm Manual instructions included with the unit.

Alarm Installation
V6.1 Rev.30.9.14
The Sensor, Control Box and Control Panel:
A. Control box mounts inside the interceptor extension collar (riser) with provided mounting bracket and mounting bolts.
B. The sensor is attached to the control box with ¾” PVC pipe supplied by installer.
C. The control box antenna is attached to the control box and secured into ground surface near the manway cover with clear silicone supplied by installer.
D. Control Panel typically installed inside the facility building / supervisor or manager’s office
E. Connects to 110V outlet with supplied power supply
Operation:
Oil or grease level as well as bottom solids level is monitored throughout the day. Levels are transmitted wirelessly via a radio frequency signal to the control panel inside the building. The control panel can be programmed to read and report levels in inches or as percent of interceptor capacity. When a predetermined level of oil, grease, and solids is reached, the control panel is programmed to visually alarm and notify facility manager that it is time to pump out the interceptor.
Installation Overview – Components
1. Install control panel on office wall as close to grease interceptor as possible, plug power connector into standard 110V outlet
2. Attach mounting bracket to extension collar with mounting bolts (provided) – drill mounting holes approximately 15” from top of riser
3. Cut ¾” SCH40 PVC pipe to length (A + ½ B) – see Figure 1
4. Thread probe wire through PVC pipe
5. Solvent weld probe to bottom of PVC pipe with primer and PVC cement to make waterproof seal
6. Connect probe wires to control box with waterproof connectors provided
7. Secure pipe to control box with silicone rubber and screw provided
8. Drill 1” conduit hole for antenna at 45 degree angle from concrete surface to top of mounting bracket area inside extension collar and run conduit through hole
9. Run antenna from mounting bracket area through conduit to surface
10. Create 1” wide x 9” long x 1” deep groove in concrete surface for antenna
11. Insert antenna in groove and fill to cover and seal with clear silicone caulk
12. Proceed to calibration procedure
FIGURE 1


Proceptorby greenturtle US 877 428 8187 CAN 877 966 9444
www.greenturtletech.com
R
R
DETAIL "C"
PVC BRACKET
WATER
LIQUID LEVEL
GREASEOR OIL
DRAWN DATE JULY 09, 2012
10
9
8
7
6
3
4
2
5
SIZE DWG. NO.
SCALE:NTS
S. MANGAT
DRAWNREVDATE
DRAWN BY: S. MANGATA
DO NOT SCALE DRAWING
REV.
1 FEBRUARY 21, 2013
AUTOATTR1
WO:PROJECT:
CUT TO LENGTH
FOR ABOVE GROUND INSTALLATION
3/4" PVC PIPE
1
PROCEPTOR SEPARATOR
ACCESS
TITLE:
SEE INSTRUCTION MANUAL
COIL CORDAND WEDGE ANTENNAINSIDE BRACKET
FLOOR
SEWER
SEE INSTRUCTION MANUAL
OUTLET
WIRING DETAIL
WIRELESS ALARM SYSTEM
FOR CALIBRATION PROCEDURE
OIL OR GREASE
TO SANITARY
FRAME & COVER
TO BE INSTALLED
INLET
EMBEDDED ON
WASTEWATERFROM BUILDING
CONFIGURATIONOUTLET SIDE
SURFACE OFFINISHED GRADE
MULTIPLE TANK SYSTEMS THE ALARMIN PROCEPTOR OMC OR GMC SEPARATOR
INSTALLED ON INSIDE OF
LAST TANK IN SERIESIS USUALLY MOUNTED IN MANWAY OF THE
BATTERY PACK
OIL OR GREASEDETECTS PRESENCE OFTRANSDUCER
EXTENSION COLLAR
ANY ADJUSTMENT OTHER THAN
AND PUSHING POWER BUTTONCONNECTING BATTERY PLUG
BATTERY INPUT
BATTERY PLUG
POWER BUTTON
IT DOES NOT REQUIRE
TRANSDUCER USING SCOTCH LOCK CONNECTORS
DETAIL "A"
CONNECT TO MATCHING WIRES FROMWHITE, RED, BLUE, YELLOW, ORANGE, BLACK6 COLOURED WIRES
AND WIREDFACTORY ASSEMBLED
BRACKET (SEE DETAIL "C")
APPROX. 10 FEETCORD LENGTH
DETAIL "B"
ALARM OFFNEXTPREVIOUSSELECT
DIGITAL DISPLAY
Smartpro
POWER ADAPTOR INCLUDEDPOWER INPUT
ANTENNA
THIS SIDE FACES DOWN INTO GREASE INTERCEPTOR
CIRCUIT BOARD
CONTROL BOX (SEE DETAIL "A")NEMA 4 RATEDWATER PROOFCORROSION RESISTANT
GT0442
SMARTPRO WIRELESS ALARMFOR ABOVE GROUND

Proceptor Installation
V6.1 Rev.30.9.14
PROCEDURE
Use this procedure together with the applicable installation drawing.
A) Excavation
1. Excavation for the installation of a Proceptor separator must conform to OSHA and/or local excavation codes and standards. Topsoil removed during excavation should not be used as approved backfill material.
2. Excavation should include an allowance for shoring and bracing where required. For multiple tank units, ensure adequate space between tanks for performing compaction when required and making connections between tanks.
3. In areas with a high water table, continuous dewatering must be provided to ensure that the excavation is stable and free of water.
B) Install and Level Granular Base
1. A 6" layer of pea gravel (or approved equivalent backfill compacted to 98% S.P.D.) must be installed and leveled at the bottom of the excavation to the proper elevation for the installation of the separator base.
2. For installations where the subsurface water level may rise above the bottom of the tank at
any time, continue to step C. Otherwise, install and level the tank(s) and go to step D.
C) Anti-Buoyancy Slab for High Subsurface Water Levels
An anti-buoyancy slab is required for installations where the subsurface water level may rise above the bottom of the tank at any time. There is potential for significant buoyancy forces on empty fiberglass tanks during periods of high subsurface water levels. Accordingly, 20 MPa (3000 psi) concrete must be poured around the lower portion of the tank as an anti-buoyancy backfill. 1. If material other than pea gravel is used, install a geo-textile filter fabric in the excavation to
prevent migration and compact backfill in 6" to 8" layers to 98% S.P.D. The contractor is responsible for purchasing and installing the filter fabric.
2. Install and level the tank on the backfill. Use metal lifting lugs on upper sides of tank for
handling, if equipped. Do not use any of the pipe fittings on the tank for lifting purposes. When lifting with slings, use load level beams.
3. The contractor must fill the separator with water up to the outlet pipe prior to pouring
concrete around the unit.
4. Pour concrete ready mix buoyancy slab all around the separator cells to the weight shown on the Installation Procedure Drawing. Ensure that the anchor brackets (if equipped) on the side of the tank are covered.
D) ballast tank
If continuing from Step B), fill the separator with water up to the outlet pipe.

Proceptor Installation
V6.1 Rev.30.9.14
E) Granular Backfill to the Inlet and Outlet Pipes
Pea Gravel (or an approved equivalent backfill compacted to 98% of Standard Proctor Density in each layer) must be placed in uniform layers of 150 mm (6”) to not more than 200 mm (8") in depth up to the bedding for the inlet and outlet pipes.
Note: Backfill is not to contain topsoil. See end of document for backfill specification.
F) Inlet, Outlet and Vent Pipes
1. Install standard pipe bedding for the inlet and outlet pipes per the sewer design. Attach inlet and outlet pipes to the Proceptor unit. If this is a PDI installation, install the flow control provided on the inlet of the tank, with the vent up. Connect the flow control vent according to local plumbing code and PDI requirements.
2. Vent ports are provided on the top of all Proceptor separators. The vent ports should be extended to above grade per the Plumbing Codes governing the installation location. Vents maintain equilibrium with the atmosphere and prevent the creation of a vacuum within the Proceptor. A goose neck must be provided at the top of the venting system to help prevent foreign particles and storm water from entering the Proceptor or plugging the vents.
G) Connect Extension Collar to Tank Body
Proceptor separators are manufactured with a short neck at the top, which is marginally less in diameter than the extension collar. The fiberglass extension collar slides over the neck. Use only Green Turtle fiberglass extension collar (EC2 for 24” dia accessways and EC3 for 36” dia accessways). This collar is designed to fit physically and perform structurally for this application.
1. To trim the extension collar to fit, dry fit on the tank and measure from bottom of
collar to Final Finished Grade. (= A). 2. Measure the height that the frame and cover will add to the collar (= B). Note that
the cast iron covers bell fit over the collar. If the frame and cover is fiberglass, it should be factory bonded to the extension collar already.
3. If the frame and cover is cast iron, allow for a gap (prox 1”) between the frame and extension collar so that loading at grade is not transferred to the extension collar. This gap should be filled with flexible sealant after installation. (Gap =C)
4. Calculate the required collar height: A – B – C = Final extension height. 5. Measure and cut the fiberglass extension collar with a grinder or other appropriate
cutting tool. Suggested grinding wheel material is zirconia alumina grit 24. 6. Place the extension collar on the tank. 7. Seal the joint between the tank and collar from the inside, with SIKAFLEX 221 or
255. A standard caulking gun will hold a 300 mL tube of Sikaflex. This joint is normally dry on the inside, but if the sewer line backs up the oil or grease may rise in the extension. Sealing the joint at the time of installation prevents backed up oil or grease from leaking into the ground.
H) Cleanout and Sample Ports
Extend to grade or cap as required by customer, design engineer or local code.

Proceptor Installation
V6.1 Rev.30.9.14
I) Accessories (Optional)
1. Suction Line - If a suction line has been provided as an option on the Proceptor separator, the contractor is responsible for extending the line to above top of grade using SCH 40 PVC pipe (or equivalent pipe as specified in the plans). The pipe must be suitable for use as a suction pipe. Limit to four bends. Do not use 90° elbows - use < 45° elbows. The maximum horizontal run recommended is 200 ft, and maximum vertical rise recommended is 15 ft. Install a quick disconnect fitting (i.e., Type “D” cam lock fitting) at the outside termination of the suction line for easy connection to a vacuum truck hose. Ensure that the exposed suction port is protected from damage, ie. use bollards.
2. Oil/Grease Point Alarm – Information is provided as a separate document.
3. Coalescer – Tanks shipped on their sides with coalescers will have retaining tabs to keep
the coalescer in place while tank is being moved. If equipped, remove the bolts and tabs once the tank is set in place. If left installed, they may impede removal of coalescer pack(s) for maintenance. Further information on the coalescer is provided as a separate document.
4. Double Wall - Connect interstitial leak monitor conduit. Extend conduit with water tight
seal. Install accessible port directly above bottom of tank so probe can be pulled out for inspection in the future. See tank detail and installation drawings. To install leak monitor device, see Level Monitor wiring instructions provided as a separate document.
J) Backfill to above the Base of the Extension Collar
Backfill with pea gravel (or an approved equivalent compacted to 98% S.P.D.) to 18” above the base of the extension collar.
K) Backfill to the Surface Relieving Slab
Pea gravel (or an approved equivalent backfill compacted to 98% S.P.D. in each layer) must be placed around the extension collar to the bottom of the concrete bearing slab, surface grade or pavement sub-grade in layers 150 mm (6”) to 200 mm (8”) thick.
L) Frame and Cover
Place the frame above the extension collar with the cover at finished grade elevation. Leave a gap between frame and top of extension of approx. 1 inch to prevent the vertical load transfer from the frame to the tank. Pour concrete around the frame to secure it in place, size to be determined by Engineer or local code based on site use. If necessary, seal any small gaps between collar and frame with flexible watertight material, i.e. Sikaflex.

Proceptor Installation
V6.1 Rev.30.9.14
M) Reinforcing (Bearing) Slab - For Traffic Loading Only
Pour concrete relieving slab, 25 MPa (3600 psi), at the surface with traffic loading frame and cover embedded in slab and centered over extension collar to secure the frame and transfer live loads to the surrounding soil around the tank. The design of the slab shall be based on AASHTO H-20 loading; 16,000-pound dynamic wheel load. Pour the concrete slab in place with steel reinforcing bars as shown on the Proceptor installation drawings. Slab designs for standard Proceptors are available from Green Turtle. The contractor must verify that the concrete relieving slab design is suitable for the application and conforms to local codes and standards.
GRANULAR BACKFILL SPECIFICATION
Pea Gravel
Pea Gravel is a naturally rounded aggregate with a particle size not less than 3mm (1/8”) and not greater than 18mm (3/4”). Gravel must be clean and free flowing, free from large rocks, dirt, sand, roots, organic materials or debris. Upon screening, analysis of the backfill material must have no more than 3% of its weight passing through a #8 sieve (2.38 mm square screen opening). Dry density must be a minimum of 96.3 lbs/ft3.
Crushed Stone (Approved Equivalent to Pea Gravel)
Crushed stone or gravel is not less than 3 mm (1/8”) and not greater than 12mm (1/2”). Aggregate must be clean and free flowing, free from large rocks, dirt, sand, roots, organic materials or debris. Materials should be washed or screened to remove fine particles. Upon screening, analysis of the backfill material shall have no more than 3% of its weight passing through #8 sieve (2.38 mm square screen opening). Dry density must be a minimum of 95 lbs/ft2.
Coarse GRAVEL
Coarse sand or gravel is containing rocks no larger than 36 mm (1 ½”) in dimension. Backfill must be clean and free flowing, free from large rocks, dirt, sand, roots, organic materials, or debris. Upon screening, analysis of the backfill material must have no more than 5% of its weight passing through a #200 sieve (0.074 mm square screen opening).


![Netex learningCentral | What's New v6.1 [EN]](https://static.fdocuments.us/doc/165x107/55a62ef51a28ab636d8b46de/netex-learningcentral-whats-new-v61-en.jpg)


