Pro Tools HD: Advanced Techniques and Workflows · Pro Tools HD: Advanced Techniques and Workflows...
35
Pro Tools HD: Advanced Techniques and Workflows Edouard Camou Chapter No. 2 "Editing Techniques"
Transcript of Pro Tools HD: Advanced Techniques and Workflows · Pro Tools HD: Advanced Techniques and Workflows...

Pro Tools HD: Advanced Techniques and Workflows
Edouard Camou
Chapter No. 2 "Editing Techniques"

In this package, you will find: A Biography of the author of the book
A preview chapter from the book, Chapter NO.2 "Editing Techniques"
A synopsis of the book’s content
Information on where to buy this book
About the Author Edouard Camou is a French sound engineer and the founder of the Sinewavz sound services in London. He has many years' experience in the studio and the live music industry, supported by a Recording Arts degree (with a first class) and an Avid Pro Tools certification. He studied and worked at SAE for a while and then redesigned and upgraded Musicland Studios in London, which now has two live rooms and a bigger control room to focus on band recording, album mixing and mastering. Edouard has been involved on many different projects for artists, labels, post-production companies, video games, acoustics, and live venues. He also mastered a single that became a 2012 favorite on national UK radio.
For More Information: www.packtpub.com/pro-tools-hd-11/book

Pro Tools HD: Advanced Techniques and Workflows Pro Tools is a very powerful software full of functionalities. This book is designed as a comprehensive guide for advanced user techniques to improve workflow and creative use of the software.
What This Book Covers Chapter 1, System Optimization, helps you understand the technology behind Pro Tools to get the best out of it.
Chapter 2, Editing Techniques, discusses the advanced use of editing tools, Beat Detective, and Elastic Audio to improve and manipulate audio.
Chapter 3, Advanced Mixing, helps you integrate analog equipment into your mix and learn how to use internal routing and automations to increase creative output.
Chapter 4, Importing and Exporting Options, highlights good file management practices to import, export, recover, and also help the workflow of our mix.
For More Information: www.packtpub.com/pro-tools-hd-11/book

Editing TechniquesIn this chapter, we will look at how to make better use of Pro Tools' editing tools and techniques. Editing is a very important part of today's music productions tools and can be used to improve, clean, rearrange, correct, and even get creative with the performance.
Vocal editing preparationsVocal editing is an essential skill for any producer or engineer and Pro Tools offers few settings that we should confi gure before going any further.
First let's not forget to disable the Link Timeline and Edit Selection and Insertion Follows Playback options, to be able to modify the waveform without losing the timeline selection and be able to press stop/play and audition from the same start point.
We should also disable window scrolling by selecting None from Option | Edit Window Scrolling.
Insertion Follows Playback/Link Timeline and Edit Selection
The following shortcuts can be used:Link Timeline and Edit Selection: Shift + /Insertion Follow Playback: N
For More Information: www.packtpub.com/pro-tools-hd-11/book

Editing Techniques
[ 28 ]
Zero crossingEditing vocal in Pro Tools can be a bit tricky, since the software does not provide a "snap to zero crossing" option. Therefore, every time we make a cut on an audio clip, we are at a risk of creating a click like the example below:
A typical click as a result of clip cut
To avoid clicks, we can perform either of the following:
• Manually cut at zero crossing:
A cut at zero crossing
For More Information: www.packtpub.com/pro-tools-hd-11/book

Chapter 2
[ 29 ]
• Create a fade:
Fade to avoid click
There is another option if we are looking at doing some quick editing without being too self-conscious about our cuts; we can use the clip auto fade option by navigating to Preferences | Operation | Misc. Here, we can adjust the length of the fade in milliseconds. The fades will not show up on the clips, but will be bounced with the Bounce To Disk feature. Because this is an automatic option, we should also try a few settings and audition the project because even very fast fades can affect the feel of a drum performance.
Clip auto fades settings are local and saved with our project, so we can adjust this option without affecting other projects.Because it is a real-time feature, we have to use the Bounce To Disk feature to render Automatic Fades. AudioSuite and clip consolidation will not render any of them.
Relative gridMany clicks arise while editing directly on the grid, but the waveform is almost never in the right place unless we are working with pre-edited samples. Let's say that I have edited a few vocal recordings for chorus 1, and I would like to copy them to chorus 2. The problem is that my audio clip is beginning slightly before the grid. We could separate the clips on the grid, move them, and then drag the beginning of the clip to recover the entire waveform. This technique is very time consuming. Let's use a relative grid instead. To enable relative grid, press the F4 key to toggle between Grid and Relative Grid.
For More Information: www.packtpub.com/pro-tools-hd-11/book

Editing Techniques
[ 30 ]
Relative grid moves clips across the Edit window keeping their relative position to the grid instead of snapping to every grid subdivisions. So if a clip is beginning 20 ms before a grid subdivision, moving it or copying it across the project will keep it at the same relative position from any other subdivision. Once selected, we can copy and paste clips to the next chorus without having to worry about timing issues; everything will be where it should.
Notice the clip beginning and the thick yellow line where the clip will be dragged. They keep their relative position to the grid.
For More Information: www.packtpub.com/pro-tools-hd-11/book
Chapter 2
[ 31 ]
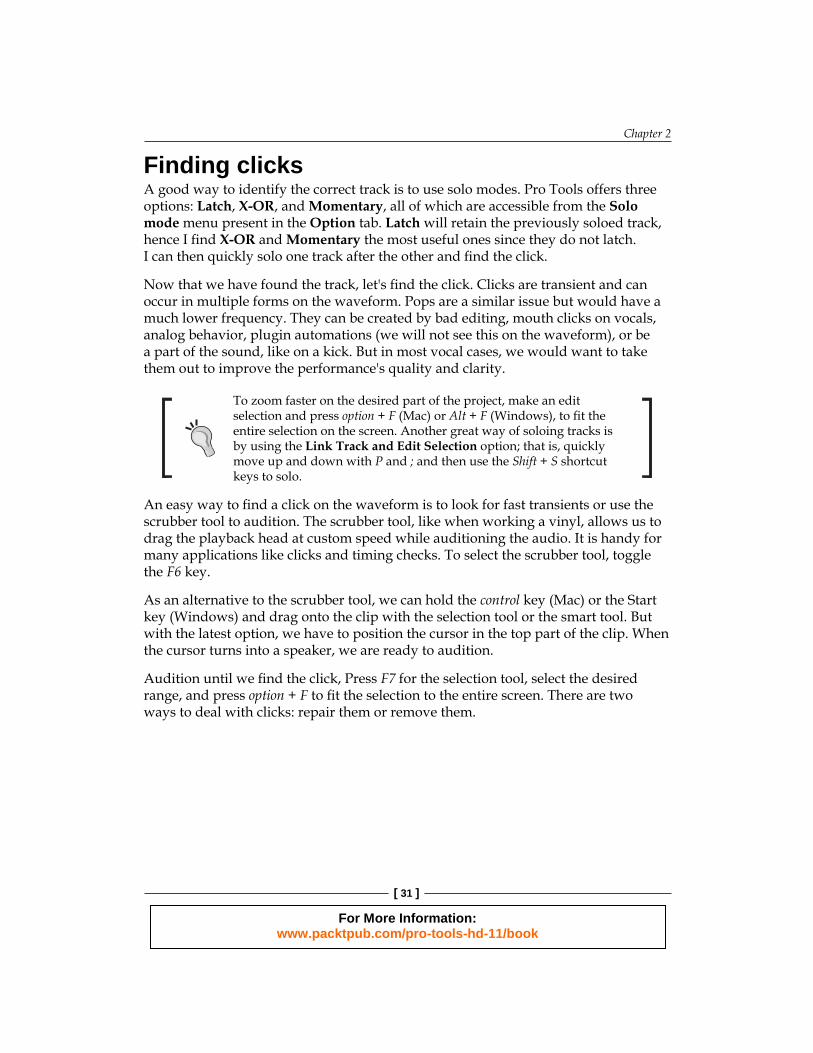
Finding clicksA good way to identify the correct track is to use solo modes. Pro Tools offers three options: Latch, X-OR, and Momentary, all of which are accessible from the Solo mode menu present in the Option tab. Latch will retain the previously soloed track, hence I fi nd X-OR and Momentary the most useful ones since they do not latch. I can then quickly solo one track after the other and fi nd the click.
Now that we have found the track, let's fi nd the click. Clicks are transient and can occur in multiple forms on the waveform. Pops are a similar issue but would have a much lower frequency. They can be created by bad editing, mouth clicks on vocals, analog behavior, plugin automations (we will not see this on the waveform), or be a part of the sound, like on a kick. But in most vocal cases, we would want to take them out to improve the performance's quality and clarity.
To zoom faster on the desired part of the project, make an edit selection and press option + F (Mac) or Alt + F (Windows), to fi t the entire selection on the screen. Another great way of soloing tracks is by using the Link Track and Edit Selection option; that is, quickly move up and down with P and ; and then use the Shift + S shortcut keys to solo.
An easy way to fi nd a click on the waveform is to look for fast transients or use the scrubber tool to audition. The scrubber tool, like when working a vinyl, allows us to drag the playback head at custom speed while auditioning the audio. It is handy for many applications like clicks and timing checks. To select the scrubber tool, toggle the F6 key.
As an alternative to the scrubber tool, we can hold the control key (Mac) or the Start key (Windows) and drag onto the clip with the selection tool or the smart tool. But with the latest option, we have to position the cursor in the top part of the clip. When the cursor turns into a speaker, we are ready to audition.
Audition until we fi nd the click, Press F7 for the selection tool, select the desired range, and press option + F to fi t the selection to the entire screen. There are two ways to deal with clicks: repair them or remove them.
For More Information: www.packtpub.com/pro-tools-hd-11/book

Editing Techniques
[ 32 ]
Repairing a click using the pencil tool is very easy and should be used as much as possible since it is the most discrete option. It is also a destructive edit, so we should create a new audio fi le of the portion to edit with the consolidated features by pressing option + shift + 3 (Mac) or Alt + Shift + 3 (Windows). The pencil tool can be very tedious at fi rst, but there is no equivalent to it.
Repairing a click with the pencil tool. Original waveform (top) and after pencil editing (bottom).
Sometimes, it is desirable to correct a longer part of the audio fi le. In the next example, a few pops and mouth clicks are present on the silent part. We could remove that part altogether or copy paste the audio in order to keep the background noise consistent. Since this is a quiet middle eight, I will replace that part with another and crossfade them.
Downloading the color images of this bookWe also provide you a PDF fi le that has color images of the screenshots/diagrams used in this book. The color images will help you better understand the changes in the output. You can download this fi le from http://www.packtpub.com/sites/default/files/downloads/8160OT_Graphics.pdf.
For More Information: www.packtpub.com/pro-tools-hd-11/book

Chapter 2
[ 33 ]
Removing low level pop or replacing it with another portion of audio. Before (top) and after replacing the audio (bottom).
Cuts and fadesCuts and fades are used all the time to improve performances and remove unwanted parts. We can cut and fade in different ways to give different feels. In this example, I will show some techniques that can improve a vocal performance.
The Fades windowThis window offers a few important settings . Fades can be created two ways: by dragging the top clip corner with the smart tool, or by making a selection and pressing command + F (Mac) or Ctrl + F (Windows). Open the Fades window by double-clicking on the fade itself.
For More Information: www.packtpub.com/pro-tools-hd-11/book

Editing Techniques
[ 34 ]
The most important option for us is the slope settings. Equal Power and Equal Gain will create two different types of curves. While this option can be creative for fades, it is most important for crossfades; Equal Power is more suited for different signals, and Equal Gain for similar material. In our case, we would choose the Equal Gain option to crossfade the vocals together.
The Fades window
Every time we create a fade or crossfade, Pro Tools will follow the default settings from Preferences | Editing. From this window, we can edit those settings; this is very useful when coming back to the same fade over and over.
Linear fades (Equal Gain) and logarithmic fades (Equal Power) sound a lot different. When it comes to editing vocals, using one or the other type can change the performance. I like using fades to smooth out breathing, adjust performance, and clean up tracks. Many singers breathe heavily right before singing. This can be very unpleasant during the performance, especially when high compression and make up gain is applied. In most cases, we would just cut the breathing altogether, but sometimes it sounds more natural to keep it. A quick fade before the line can make a real difference to the performance.
I like using Equal Power with rhythmic vocals because they rise and fall faster, whereas linear fades can be more suited for quiet or more melodic passages. Choosing fade settings appropriately can be very benefi cial.
For More Information: www.packtpub.com/pro-tools-hd-11/book

Chapter 2
[ 35 ]
Cutting can also be very useful. Sometimes, busy arrangements require very tight timing in order to make space for other instruments. A typical chorus line with rhythmical singing can almost always be improved by cutting in between the words. While this might sound unnatural at fi rst, within the mix, it will not be perceived in the same way (especially if using reverbs or delays which create artifi cial tails) and create invaluable space for other instruments to improve the general performance and clarity. In fact, this has been turned into an effect and we can hear the effect of this technique all the time; especially in dance music. As an example, I have a vocal line where the singer is breathing a bit too heavily between words, but this might as well be any other unpleasant sound, such as the background noise. Everything makes a difference and even small tiny details like a breath can take away the impact and clarity of many background instruments. By cutting in between, we can enhance the overall performance.
Creating many different clips can add extra workload on the CPU and graphics card, redrawing more and rendering more fades. A good trick at the end of our editing is to copy the edited clips to a new playlist and consolidate this newly created playlist, so we can always go back to the edit if needed. To consolidate clips, make an edit selection and press option + shift + 3 (Mac) or Alt + Shift + 3 (Windows). Consolidate works across multiple tracks by selecting in the Edit window.
For quicker manual editing, the Fade to Start or Fade to End options are also very useful; here are their shortcuts:
Mac Windows
Fade to Start option + D Alt + D
Fade to End option + G Alt + G
Clip gainClip gain is a new feature of Pro Tools 10. It allows changing the audio gain from the clip itself. This can be benefi cial in many ways: speeding up workfl ow by not having to create complex automations instead; as a fade alternative for complex envelopes and giving us more control over compression plugins placed after on the inserts. The signal fl ow is as follows: Clip gain → Track Inserts → Track volume faders.
For More Information: www.packtpub.com/pro-tools-hd-11/book

Editing Techniques
[ 36 ]
Clip gain comes in two styles: a general clip gain at the bottom left of the clip and a clip gain line to create complex breakpoint envelopes. To display the clip gain settings, navigate to View | Clip, and select Clip Gain Line or Clip Gain Info. We can also right-click on a clip and select from the Clip Gain menu or use the shortcuts explained a little bit later in this chapter.
Using clip gain, we can create more complex envelopes and because they are as editable as any other automation, we can use the smart tool and modifi er keys to copy clip gain (control + shift + C on a Mac or Start + Shift + C on Windows) and paste it using the regular paste shortcut. This can lead to better and faster sound design effects, using the shape tool to create repetitive patterns.
Complex clip gain envelope
Here is an essential shortcut for the smart tool modifi er, which can be used for many other edits:
• command + click (Mac) or Ctrl + click (Windows): add marker points• option + click (Mac) or Alt + click (Windows): remove marker points
As a general rule of thumb, command/Ctrl modifies the default tool state and option/Alt makes the opposite action.
To trim a clip gain, make a selection with the smart tool and place it on the clip gain line (when the cursor changes to a horizontal line), then use the trim function by holding the clip and dragging it up or down.
We can create gradual changes by holding the Shift key while trimming the clip gain, but we have to make sure to create breakpoints outside the area fi rst.
For More Information: www.packtpub.com/pro-tools-hd-11/book

Chapter 2
[ 37 ]
The Clip Gain Nudge Value option found by navigating to Pro Tools Preferences | Editing allows nudging an entire clip gain by the user-defi ned increment. You will fi nd more clip gain shortcuts under the shortcut list within the Help menu, but here are the ones I use most often:
Mac Windows
Show/hide clip gain line control + shift + - Start + Shift + -Show/hide clip gain control + shift + = Start + Shift + =Nudge up/down clip gain control + shift + Up or Down
arrowStart + Shift + Up or Down arrow
Nudge forward/backward clip gain
control + shift + - or + Start + Shift + - or +
Copy/ cut control + shift + C or X Start + Shift + C or XClear control + shift + B Start + Shift + BPaste command + V Ctrl + V
Elastic AudioManipulating a vocal performance is becoming a very easy job using Elastic Audio. Introduced in Pro Tools 7.4, Elastic Audio is a powerful tool for time-stretching audio, especially vocal. There are currently three ways of correcting vocal timing with Pro Tools:
• Separate clips and move them manually around the timeline using the mouse or the nudge function
• Separate clips and time stretch them using the Time Compression Expansion (TCE) tool
• Use Elastic Audio
Separating, clips can be just what we need; however, in some cases, they can sound very unnatural in quiet passages.
The TCE tool is most convenient when a single word falls too short or too long; however, TCE fails at solving complex time stretching. Using this tool we can select different TCE algorithms and settings by navigating to Preferences | Processing. Pro Tools comes with some TCE plugins, but also supports algorithms from other manufacturers. Check the TCE options by navigating to Preferences | Processing | TC/E to select and choose available plugins.
Elastic Audio is the most convenient of the three techniques because it allows for subtle and also more complex time stretching changes in audio fi les in a much more user-friendly way. To enable Elastic Audio, select an algorithm from the Elastic Audio Plugin Selector in the Edit window track header.
For More Information: www.packtpub.com/pro-tools-hd-11/book

Editing Techniques
[ 38 ]
The selector gives us the choice between Polyphonic, Rhythmic, Monophonic, Varispeed, and X-Form. They can all (except X-Form) be used in real time, but they can all be used offl ine (rendered) too.
Depending on which plugin is selected, we can adjust its options. To display the Option window, just click on the track's Elastic Audio plugin selector's header. There are no golden settings, the defaults almost always work well but fi ne-tuning parameters will make you wonder why you never tried before. Here is a summary of the different available plugins:
Polyphonic Rhythmic Monophonic Varispeed X-FormReal-time
Yes Yes Yes Yes No
Options • Follow• Window
size
• Decay rate
No No • Quality• Formant
Best for All polyphonic material
Rhythmic and transient audio
Monophonic sources (vocals, synth, bass, and so on)
• Everything where pitch is not a concern
• Effects
Everything
Correcting vocal with Elastic Audio includes the following steps:
1. Select Monophonic from the Elastic Audio plugin list.2. Select Analysis from the track view selector and create or correct markers
to be at the important places, such as beginning of words or transients.1. Once the analysis is complete, with the smart tool, double-click on
the clip to create a marker, hold option (Mac) or Alt (Windows) to remove markers.
2. With the pencil tool, click to create, press option (Mac) or Alt (Windows) to remove the marker.
3. Select Warp from the track view selector. With the smart tools, double-click on an analysis marker from the bottom half of the clip to transform it into a warp marker. Hold option (Mac) or Alt (Windows) to remove it.
4. Dragging a warp marker will stretch the audio before and after the marker to the next one, so it is necessary to activate one before and after or create new ones or activate the existing ones to anchor the audio in the right place. Holding the Shift key while dragging a warp marker will automatically activate the analysis markers in the neighborhood for you.
For More Information: www.packtpub.com/pro-tools-hd-11/book

Chapter 2
[ 39 ]
X-form is the only non real-time plugin and should be used for fi nal processing. It takes quite some time to compute (especially with the best quality settings), but after that it does not take any processing power. If you would like to stick to the real-time algorithm but still render them, just select Rendered Processing from the Elastic Audio plugin selector. To commit Elastic Audio processing to the audio fi le, just select None from the Elastic Audio plugin selector and then select Commit.
Using AudioSuiteAudioSuite, accessible from the AudioSuite menu, is a Pro Tools offl ine plugin format, which allows to process clips without sacrifi cing processing power. I use AudioSuite all the time to process a small portion of audio, such as individual syllables, to balance my frequency content. Recording with any type of cardioid or fi gure of eight microphones will bring a varying amount of proximity effect. This can be desirable to enhance the low frequency content of a vocal or play with the effect to add sound texture to the voice, but most often, many singers begin their line too close to the microphone, adding an unnecessary amount of low end.
In most situations, we could just reduce the level of the affected part by separating the clip and using the gain plugin to create a crossfade; we could also create a fade. Using clip gain is a much more convenient way of performing those kinds of edit tasks, but in most cases, I prefer applying a high-pass fi lter to the audio fi le with AudioSuite.
As an example, if our fi rst plugin is a compressor, the proximity effect can trigger a lot more compression, so it is better to reduce it directly from the audio fi le. On an aesthetic side, breathing with low end in it sounds very heavy, so fi ltering those portions can also add to the "breathiness" of the performance and make the vocal lighter. I also use this technique for vocal matching after comping Some takes might sound slightly different from one others, often within the reach of a few dBs on the equalizer.
To use AudioSuite, make an edit selection and select the AudioSuite plugin from the AudioSuite menu. We can open multiple AudioSuite plugins by holding the Shift key.
When using AudioSuite, the selected portion of the clip will be separated and a new audio fi le (and related clip) will be created on top. If we need to crossfade after or before the edit, Pro Tools 10 has introduced a new "handle" feature, which greatly improves the AudioSuite workfl ow by processing the audio outside the edit selection, so we can trim the beginning and ending of a clip after processing. The length of those handles can be customized by navigating to Preferences | Processing. We can either choose a defi ned length or process the entire fi le every time we use AudioSuite.
For More Information: www.packtpub.com/pro-tools-hd-11/book

Editing Techniques
[ 40 ]
We can also adjust the handle length from the bottom of the AudioSuite window.
Once we have defi ned the default handle settings, we should make sure that our audition path is set correctly in Setup | I/O | Outputs | Audition Path. AudioSuite audition can therefore be rooted to any output of the audio interface.
One of the AudioSuite fl aws is its inability to provide a processing history; processing the same clip or edit selection many times over will replace the audio clip every time. It is then diffi cult to revert back to the previous version. One workaround is to create a new playlist for each processing, but this process can be tedious. Right now, the only way to recover the original audio fi le is by fi nding it inside the clip list. Each AudioSuite processing will add AS (plugin name abreviation) to the original clip name. The following screenshot is a lead vocal example I processed with the Avid Channel Strip:
Using the AudioSuite plugin can also be slow and tedious if we repeatedly use the same processing over and over. Many times when I fi nd a good setting, I tend to re-use it. Pro Tools can help on this side with the Window Confi guration List:
1. Display favorite AudioSuite plugin (we can display multiple plugins by holding the Shift key when selecting a plugin).
2. Modify settings as per preference and navigate to Window | Confi guration and click on New Confi guration.
3. Name it, select Window Layout and click on OK.4. We can now access this confi guration via the Window Confi guration List
option (command + option + J on Mac or Ctrl + Alt + J on Windows).5. Now, every time we recall a confi guration, AudioSuite plugins will
be shown with their settings as well as the entire window layout.
To recall a window confi guration, on the numeric keypad, press ., then type the window confi guration number followed by *. For example, . 8 *.Even though window confi gurations are stored with our session, we can transfer them via the import session data function from File | Import | Session Data (option + shift + I on Mac or Alt + Shift + I on Windows).
For More Information: www.packtpub.com/pro-tools-hd-11/book

Chapter 2
[ 41 ]
Take compingPro Tools comping features are very well implemented and with a bit of preparation, we can really speed up workfl ow as well as improve any vocal performance easily and creatively. First, let's make sure to match playlist numbers and take count. Let me explain.
If I create an audio track called Vocal and begin recording on it, my fi rst clip will be called Vocal_01. Now I create a new playlist and my second take will have the suffi x 01 to refl ect the playlist number 1, which in reality should be called playlist number 2.
This is because Avid thought that the fi rst take should be the comp (or main playlist), and therefore, take 1 should be recorded on playlist 1. To avoid any confusion, at the recording stage, we should fi rst create a new playlist and begin recording there.
Create new playlist shortcut for the fi rst selected track or grouped tacks:
control + \ (Mac) or Start + \ (Windows)
We now have matching take numbers and automatic playlist numbering. This will remove a lot of confusion during the recording and also make the note taking process easier. Another way of keeping track of the best takes is to use clip rating. Each clip can be given a rating of 1 to 5, corresponding to our own interpretation. For me, 5 is a keeper.
• To rate a clip, select it and navigate to Clip | Rating or, use the shortcut command + option + control and number 1 to 5 on Mac. On Windows, press Ctrl + Start + Alt.
• To display clip rating navigate to View | Clip | Rating.
For faster compositing, use the Separate Clips Operates on All Related Takes option available in Preferences | Editing | Clips. This will separate all the related takes with the same user timestamps.
By default, Pro Tools will play the main playlist. To audition the alternate playlists, click on their solo button. Now a good trick to solo the different playlists is to use a few key commands:
1. On the main playlist, make the edit selection with Link Timeline and Edit Selection enabled for the section we would like to replace.
For More Information: www.packtpub.com/pro-tools-hd-11/book

Editing Techniques
[ 42 ]
2. Select Loop Playback (number 4 on the numeric keypad).3. Navigate to the playlist below by pressing ;, or above with P.4. Solo the take with Shift + S and Link Track and Edit Selection enabled.5. To promote the best take to the main playlist, just press option + control + V
(Mac) or Alt + Start + V (Windows). We can also press the up arrow icon next to the solo button.
Drum editingDrum editing is also a very nice skill to develop. Ever since I have been an engineer, Pro Tools has always been in the lead in this type of work because of its very good group editing features and Beat Detective. Beat Detective is a very good and versatile tool and we will see some its advanced uses later in this chapter.
With Pro Tools 7.4, we saw the arrival of Elastic Audio, which had a very different approach than Beat Detective, using time stretching algorithms to make editing audio feel a lot more like MIDI. But as always, fi rst, let's see how we can organize ourselves better to edit drums more comfortably.
Edit and Mix groupsWhen it comes to editing drums, we usually work with quite a few tracks, so grouping becomes really important. Pro Tools offers three kinds of groups: Edit, Mix, and Mix/Edit.
Creating a group is easy; just select the tracks from the Edit or Mix window and press command + G (Mac) or Ctrl + G (Windows). The Create Group window opens and contains the following options:
• Attributes: Choose the group type you would like to create. To edit drums, I would choose to create an Edit group, but I could also choose Mix/Edit. The ID number is the letter we can use when our key focus is on the group window to enable or disable the group. VCA allows us to assign a VCA track to a Mix group. We will see more about VCA mixing in the next chapter.
For More Information: www.packtpub.com/pro-tools-hd-11/book

Chapter 2
[ 43 ]
To toggle keyboard focus between Edit (1), Mix (2), and Group (3) window, use the following key commands:
On Mac: command + option and keyboard numbers 1 to 3.
On Windows: Ctrl + Alt and keyboard numbers 1 to 3.
• Tracks: Within this tab, we are able to choose the track that will be part of the group. One track can be part of multiple groups. The Edit group always follows the global attribute from the Global tab; Mix and Edit/Mix groups can either follow the global attribute, or have their own from the Attributes tab. To enable or disable global attributes, click on Follow Global.
• Global: These attributes can follow many confi guration settings and combinations. We can save up to six different templates from the bottom of the window. We can also select different track settings to link for Track Inserts on the left of the window and Track Sends on the right.
Track Insert allows linking plugin parameter controls as well as bypass
Track Sends allows linking volume, mute, pan, and LFE (Low Frequency Effects) settings
Mix attributes allows linking Record Enable, Input Monitoring, Solos, and Automation Modes
For now, let's just create an Edit group for our entire Drums ID "D" and subgroups for my kicks "K", snare "S", toms "T", and overheads "O". Now, if my key focus is on the group window, I can just press the D, K, S, T, or O keys to enable or disable each one of them.
A bit of navigationZooming in and out of the project is an essential DAW feature. We can use the standard R and T keys to zoom in and out, but sometimes they are not enough. Here are a few other options that Pro Tools can offer:
Project overviewTo fi t the entire project inside the Edit window, use the following two shortcuts:
• command + option + control + Down arrow (Mac), or Ctrl + Start + Alt + Down arrow (Windows) to resize the entire project's track height to a minimum
For More Information: www.packtpub.com/pro-tools-hd-11/book

Editing Techniques
[ 44 ]
• option + A (Mac) or Alt + A (Windows) will fi t the entire project timeline inside the Edit window, giving a real quick way of zooming out for a project overview
Zoom presets and zoom toggleWhen working with high track counts, it can be benefi cial to quickly zoom in and zoom out. Pro Tools offers zoom presets accessible from the main toolbar linked from numbers 1 to 5 above the letter keys. To set a new zoom preset, just hold command (Mac) and Ctrl (Windows) and click on the zoom preset icon number available in the top-left area of the Edit window.
Zoom presets are very handy but limited to zoom on the current selection cursor and not on ranges, so we cannot select the whole chorus and hit 5 to zoom on it. Instead, we have to use two more shortcuts:
• option + A (Mac) or Alt + A (Windows), as seen earlier• option + F (Mac) or Alt + F (Windows) will allow you to fi t an edit selection to
the Edit window
Another good method is the Zoom Toggle function accessible with the key command E when the key command focus is enabled for the Edit window. Zoom Toggle has its own settings, accessible by navigating to Preferences | Editing | Zoom Toggle. The default settings are not very useful to me; use the following settings to confi gure as described earlier:
Zoom Toggle preferences
Toggling between zoom presets or zoom toggle will allow for quick zooms inside the project and back to an arrangement overview. As the next screenshot shows, we can zoom in or zoom out a small edit selection at the press of a key.
For More Information: www.packtpub.com/pro-tools-hd-11/book

Chapter 2
[ 45 ]
Toggling between arrangement and part focus, zooming on the selected range. The right screenshot is the fit to screen of the left screenshot selection.
Clip groupsClips groups is Pro Tools way of aggregating clips together for easier editing. It works with audio, MIDI, and video tracks on consecutive or non-adjacent tracks. They become very useful when it comes to moving around chunks of edited clips across the timeline and working on both audio and MIDI tracks.
Let's create a clip group on the selected range across all the drum tracks. We can also interact with clip groups with the following key commands:
Mac WindowsGroup command + option + G Ctrl + Alt + GUngroup command + option + U Ctrl + Alt + URegroup command + option + R Ctrl + Alt + R
Clip group is shown in the middle
For More Information: www.packtpub.com/pro-tools-hd-11/book

Editing Techniques
[ 46 ]
Before moving anything across the timeline, if we have created automation already, let's not forget to enable the Automation Follow Edit option to copy our automations with the clip group. We can access it by navigating to Option | Automations Follows Edit or the toolbar icon.
Automation Follow Edit toolbar icon
Clip group is non-destructive, meaning that all the edits, clip gains, and fades are preserved and the clip group can be dissolved for further editing with the delete group function. We cannot delete a part of a clip group and would have to dissolve the entire clip every time, or separate the clip group and then dissolve it.
Moving clip groups around follows the same logic as any other normal clip. We can use all the regular copy, paste, and cut shortcuts as well as key modifi ers. They can also be faded and processed with AudioSuite, but with this latest option, we would not be able to revert it except with the undo function, as Pro Tools will create new audio fi les and replace the fi le.
Selection techniquesThere are many ways to make selections in Pro Tools, and also a few shortcuts to improve workfl ow:
Tab to Transient or Tab to clip edgesDepending on whether the Tab to Transient option is enabled or not, pressing the Tab key (with or without modifi ers) will either jump to the next transient or to the next clip edge.
Tab to Transient icon
Here are the Tab to Transient shortcuts:
Mac WindowsGo to next transient tab TabGo to previous transient/clip edge
option + tab Alt + Tab
Extend selection to the next transient/clip edge
shift + tab Shift + Tab
For More Information: www.packtpub.com/pro-tools-hd-11/book

Chapter 2
[ 47 ]
Mac WindowsExtend selection to the previous transient/clip edge
option + shift + tab Alt + Shift + Tab
Toggle Tab to Transient ON or OFF
command + option + tab Ctrl + Alt + Tab
Select to previous transient option + shift + tab Alt + Shift + Tab
Enable Tab to Transient with a grouped track, this will help you to cut your drum performance manually very fast and also avoid false triggers when using Beat Detective to automate the process instead. We will see what Beat Detective can do for us later in this chapter.
Disable Tab to Transient to jump to the next clip edge. This is very useful when editing a batch of fades.
Other selection techniquesIf we modifi ed our selection to the previous or next transient, we might want to fi ne tune the edit to avoid clicks. We can easily do it using the nudge value key commands after setting the appropriate nudge units and values; I usually set this to 1 ms.
Mac WindowsExtend/trim selection beginning
option + shift + + or - on numeric keypad
Alt + Shift + + or - on numeric keypad
Extend/trim selection end
command + shift + + or - on numeric keypad
Ctrl + Shift + + or - on numeric keypad
If we were working with an already edited audio and would like to select a range, we can use the / key to make a timeline selection, assuming that the Link Timeline and Edit selection option is enabled. For example, if my main counter is set to Bar/Beat and I would like to select bar 9 to bar 28, I can type the following using the numeric keypad: /9/28.
The following shortcut keys can be used:
• To separate (splice) an edit selection, press command + E (Mac) or Ctrl + E (Windows) or B with the Edit window key focus enabled. We can then copy or cut it using the regular key commands.
• To move the selection by the nudge value, press the + and - keys on the numeric keypad.
For More Information: www.packtpub.com/pro-tools-hd-11/book

Editing Techniques
[ 48 ]
• To move the content within the clip, hold control (Mac) or Start (Windows) and the + or – keys on the numeric keypad.
Beat DetectiveAs we saw previously, Beat Detective is a powerful tool for analyzing rhythmic performances and extracting groove templates. When it comes to correct drum performances, we can use Beat Detective to perform many other tasks. The standard Beat Detective procedure has four steps:
1. Bar/Beat Marker Generation: This is used to analyze and create bar/beat markers on which the next steps will be based:
1. Make an edit selection.2. In the Selection section, press Capture.3. In the Detection window, click on Analyze and adjust the Sensitivity
slider to match or be as close as possible to your previously selected resolution settings.
2. Clip Separation: This section allows for separating the clips on the generated Bar/Beats markers. If there is nothing to adjust, click on Separate.
3. Clip Conform: Much like the Quantize window, it performs quantization and groove functions to match the separated clips to the grid. The Standard tab will quantize to the grid and let you apply some swing too. The Groove tab lets you apply any user-made groove templates or factory ones.
4. Edit smoothing: This is a batch fade smoothing tool, used to fi ll and crossfade the gaps created by the clip conform function. Click on Smooth. Adjust the crossfade settings to your liking, but 5 to 10 ms is a good start for drums.
These four steps will be used in both Normal and Collection modes, which refer to the two different methods of analyzing audio with Beat Detective's Bar/Beat Marker Generation process.
Normal modeIn step 1 of the Beat Detective procedure, we analyzed the audio (or MIDI) clip to create bar/beat markers. When working on a single track, this will be fi ne. However, if we are trying to cut a drum multitrack all at once, we have to select multiple clips together.
For More Information: www.packtpub.com/pro-tools-hd-11/book

Chapter 2
[ 49 ]
With the normal mode, Beat Detective will generate markers based on the combined transients of all the selected tracks. Many problems arise with this technique, especially when working with the recorded drums; adjusting the sensitivity fader usually ends up with too many or too few markers.
Beat Detective false markers
We can manually add a marker by clicking on the clip with the grabber tool, or remove it by holding option ( Mac) or Alt (Windows) and clicking on the marker. This method can be a bit time consuming.
When a drummer plays to the click and his or her hits are far behind or far ahead, beat triggers, which follow the recorded audio, can be assigned to the wrong bar divisions. To make sure every Bar/Beat marker is linking to the correct grid position, we can display the information on the clip next to the markers by clicking on the Show Trigger Time box. If any of them is wrong, we can correct this by double-clicking on the marker and enter the correct Bar/Beat value. The window is the same as the Identify Beat function we will see later.
Trigger time displayed
One good way of working in the normal mode and avoiding too many wrong triggers is to divide your song into sections and work on them one at a time, because different type of playing can lead to different time signatures and velocity, fooling Beat Detective.
For More Information: www.packtpub.com/pro-tools-hd-11/book

Editing Techniques
[ 50 ]
Collection modeCollection mode is a more advanced way of collecting information to generate Bar/Beat markers. This mode allows adjusting the detection settings for each track individually (kick, snare, hi-hat, or any other of your choice) and then copy the combined result across other tracks.
For example, we can analyze kick and then snare, collect both the information, and separate the other microphones following the bar/beat markers generated by kick and snare only. When using collection mode, it is also preferable to use the closest microphones, as sound takes time to travel and triggering from microphones further away will cut the closer ones when it comes to separating the clips. By working with the closest ones, we ensure that we keep all the information.
To use collection mode, from step 1 of the Beat Detective procedure, select Collection from the Selection drop-down menu inside the Beat Detective window.
• Add All: This clears collection and adds current triggers• Add Unique: This adds current triggers to the existing collection• Clear all: This clear all triggers from the collection
The trick is to alternate between the collection mode and the normal mode for step 1 of the Beat Detective procedure, then move to the next step. To collect bar/beat markers, perform the following steps:
1. Capture your selection, select normal mode, and click on analyze.2. Adjust the sensitivity settings, edit markers manually if necessary, then
select Collection from the Detection drop-down menu and press Add All to save them to the collection; lets call it "memory".
3. Select the normal mode instead of the collection mode.4. Now the fi rst track is collected. Let's move the selection to the next track, to
add to the collection memory. Keep the exact same edit-selection position with the key command ; to move the selection down, or P to move the selection up.
5. Click on Analyze and adjust the sensitivity settings. You can also edit the markers, if necessary.
6. Switch back to collection mode and click on Add Unique to ask Pro Tools to try to fi gure out if two hits are very close to each other. If they are, they should be considered as one and the latest one should be discarded, or click on Add All to add every trigger regardless of the position.
7. If you need to add more tracks, repeat from step 3 of this procedure.
For More Information: www.packtpub.com/pro-tools-hd-11/book

Chapter 2
[ 51 ]
8. Now that we have collected the correct Bar/Beats markers in the memory, the only thing we have to do is to extend the selection of all the tracks using the ; and P shortcuts, but press Shift to make a selection, that is, Shift + ; or Shift + P.
9. Move to the Clip Separation tab and continue to correct and quantize the drum performance or use the Groove Template Extraction function to save this groove before editing it.
Groove templates using multiple collections across many instruments in the track can lead to very interesting Band Grooves.
All tracks selected following the kick and snare generated bar/beats markers
For More Information: www.packtpub.com/pro-tools-hd-11/book

Editing Techniques
[ 52 ]
Don't forget to use the Clear All function of the collection mode window before working on other sections of the song.
Mapping project tempo to the audioTempo mapping is the opposite of quantizing. No drummer is a perfect drum machine; they can sometimes be too off tempo, but on the other hand, programming or quantizing drums on perfect grid timing usually ends up with clinical and lifeless performances. The tiny variations in tempo that each player bring to the table shows us that tempo is not always 100% steady, and this can be a good thing. Instead of adding artifi cial grooves or user-made groove templates, we could create a tempo map of the performance to automate tempo changes, matching the recorded performance.
Using Identify BeatThe simplest and safest way of mapping tempo is to use the Identify Beat function pressing command + I (Mac) or Ctrl + I (Windows), beginning from the fi rst beat and working our way to the end, identifying every bars/beat, and/or fi ner divisions. This is time consuming, but usually never goes wrong.
Using Beat DetectiveI usually do create tempo maps on beat divisions in the collection modes, using the generate Bar | Beat Generation function. This feature allows for converting the bar/beat markers into tempo change events, creating a tempo map.
In the Beat Detective window, preferably using the collection mode, create a Bar/Beat marker with the Beats resolution. Why not sub-Beats? Using fi ner beats subdivisions can often lead to too many tempo changes and also many manual adjustments.
Sticking to Beats and analyzing the kick and snare using the collection mode works really well; I fi nd myself creating perfect tempo maps in less than 10 minutes. On complex rhythmic patterns and song structures, this method works even better when analyzing one part of the song at a time (verse, chorus, middle eight, and so on). When we have correctly analyzed and created our bar/beat markers, click on the Generate button at the bottom of the Beat Detective's Bar/Beat Marker Generation window.
For More Information: www.packtpub.com/pro-tools-hd-11/book

Chapter 2
[ 53 ]
Tempo map created. Notice the tempo changes and that the grid now matches the drum performance.
If one of your markers was not correctly set and a wrong tempo change was generated, we can revert back with undo or manually modify the wrong tempo events.To do so, just click on the tempo marker to display the Identify Beat window.To make sure we do not have to manually re-adjust, it is better to display the trigger times and check their position before generating the tempo markers.
Elastic Audio for drumsWe saw earlier how to use Elastic Audio on single vocal tracks. Using Elastic Audio on multitrack performances, such as drums is also possible and very powerful. Keep that in mind, because as Elastic Audio relies on time stretching plugins, they will have a very small but sometimes noticeable effect on the sound quality, except for Varispeed. To use Elastic Audio across a drum recording, we can perform the following steps:
1. Create an Edit or Edit/Mix group of the drum tracks.2. Make an edit selection, including all your clips.3. Select Rhythmic from the Elastic Audio plugin selector.4. Select the Analysis view, then display the Elastic Properties window by
using option + 5 on the numeric keypad (Mac) or Alt + 5 on the numeric keypad (Windows).
5. Adjust the event sensitivity factor to get a closer match to what you need.
For More Information: www.packtpub.com/pro-tools-hd-11/book

Editing Techniques
[ 54 ]
6. Now, manually correct the analysis to get the best out of Elastic Audio. Using the pencil tool, click on any existing marker to promote it across all the tracks (retaining phase coherence). Many of them will already be in the correct place, but many others will need adjustment. We can choose to leave single markers behind; however, if activated, these can degrade the audio quality, as different time-stretching factors might happen across the tracks. Delete individual or grouped markers by holding option (Mac) or Alt (Windows) and clicking on the marker.
A clean drum analysis after some manual editing
7. Select the Warp view and move each hit individually, holding the Shift key.8. Now that our hits are correctly detected, we can conform them to the grid
using the Quantize window. Select Elastic Audio Events and quantize the audio like any other MIDI performance. We can also apply any groove templates we like.
9. Once the performance is tidy, display the Rhythmic plugin option window to tweak the decay rate. This setting can be adjusted per track and clip from the Elastic Properties window.
We can do a few more things with Elastic Audio, such as changing the pitch of any clip and changing its overall length with the TCE setting.
For More Information: www.packtpub.com/pro-tools-hd-11/book
Chapter 2
[ 55 ]
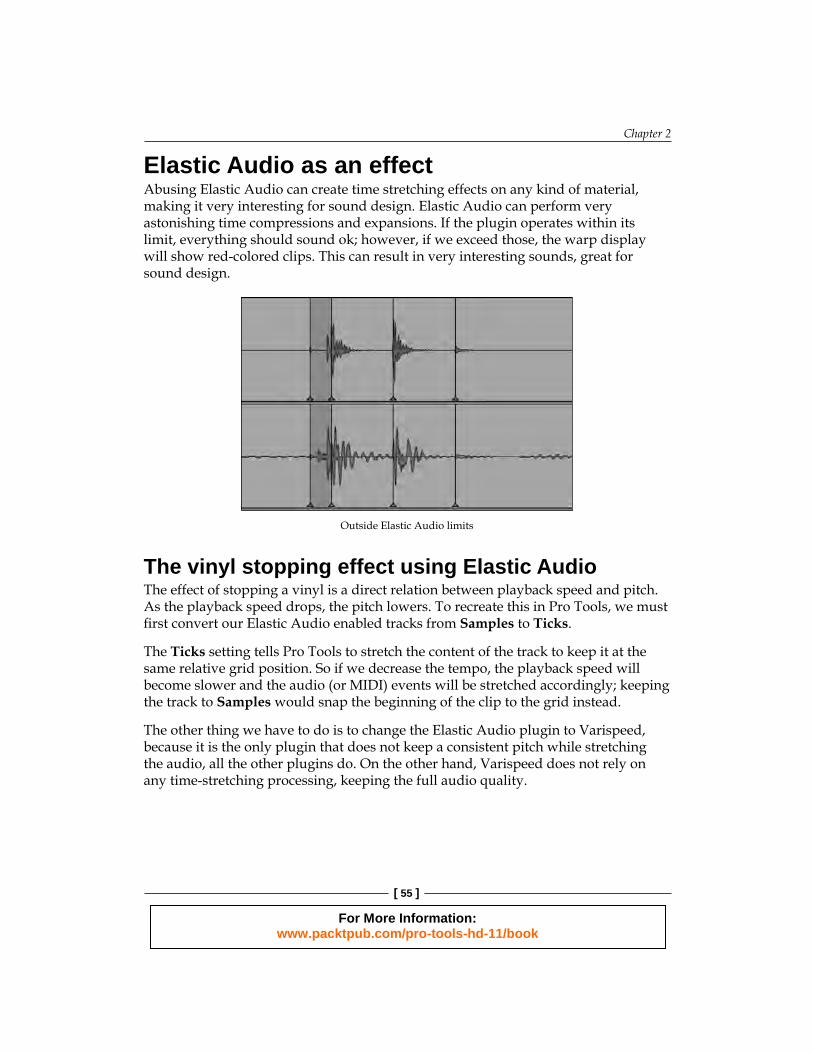
Elastic Audio as an effectAbusing Elastic Audio can create time stretching effects on any kind of material, making it very interesting for sound design. Elastic Audio can perform very astonishing time compressions and expansions. If the plugin operates within its limit, everything should sound ok; however, if we exceed those, the warp display will show red-colored clips. This can result in very interesting sounds, great for sound design.
Outside Elastic Audio limits
The vinyl stopping effect using Elastic AudioThe effect of stopping a vinyl is a direct relation between playback speed and pitch. As the playback speed drops, the pitch lowers. To recreate this in Pro Tools, we must fi rst convert our Elastic Audio enabled tracks from Samples to Ticks.
The Ticks setting tells Pro Tools to stretch the content of the track to keep it at the same relative grid position. So if we decrease the tempo, the playback speed will become slower and the audio (or MIDI) events will be stretched accordingly; keeping the track to Samples would snap the beginning of the clip to the grid instead.
The other thing we have to do is to change the Elastic Audio plugin to Varispeed, because it is the only plugin that does not keep a consistent pitch while stretching the audio, all the other plugins do. On the other hand, Varispeed does not rely on any time-stretching processing, keeping the full audio quality.
For More Information: www.packtpub.com/pro-tools-hd-11/book

Editing Techniques
[ 56 ]
Now we can create a tempo automation to simulate the vinyl effect. Drastic changes can be very interesting and creative.
To create a classic sounding stopping effect, fi rst select a timeline range and display the Tempo Operations window:
• option + 2 on the numeric keypad (Mac)• Alt + 2 on the numeric keypad (Windows)
I normally use the parabolic shape, but I encourage experimenting. We can also use the pencil tool to draw odd shapes.
Tempo Automation and Tempo Operations window
Using Vari-FiPro Tools features an AudioSuite plugin called Vari-Fi to quickly and easily get a vinyl-stopping effect. While this effect works quite well across many situations, it does not give any curve control and will therefore always sound similar.
We can fi nd the plugin by navigating to AudioSuite | Pitch-Shift | Vari-Fi. To use Vari-Fi:
1. Make an edit selection across one or multiple tracks.2. Choose Slow Down or Speed Up.
For More Information: www.packtpub.com/pro-tools-hd-11/book

Chapter 2
[ 57 ]
3. Selecting Fit To will constrain the result inside the current selection (handy to do, in the middle of a song) or Extend to extend the audio to fi t the result (better for a song ending).
4. Fades will either create a fade-in effect if we are speeding up, or a fade-out effect if we are slowing down.
SummaryIn this chapter, we saw some important editing techniques and other organizational concepts. Pro Tools is very powerful when it comes to editing an audio. We should try to use shortcuts as much as possible to improve our workfl ow. Beat Detective and Elastic Audio are two major features that made Pro Tools the industry leader. Mastering those tools will enhance your creativity and speed.
In the next chapter, we will look at some more advanced mixing concepts using hardware inserts, submixes, and automations, to get more out of our mixes in Pro Tools.
For More Information: www.packtpub.com/pro-tools-hd-11/book

Where to buy this book You can buy Pro Tools HD: Advanced Techniques and Workflows from the Packt Publishing website: http://www.packtpub.com/pro-tools-hd-11/book. Free shipping to the US, UK, Europe and selected Asian countries. For more information, please read our shipping policy.
Alternatively, you can buy the book from Amazon, BN.com, Computer Manuals and most internet book retailers.
www.PacktPub.com
For More Information: www.packtpub.com/pro-tools-hd-11/book