

![Untitled-1 [in.crigroups.com] · GÞTL-r"la-rrrrj. 1961—6i) 0.5 LEISüJGL1f111.] 9Ú(ÒGLDrrbÞ Gl£úquår Currrrrt+tu (Burrãrg) '6üTIjÚL_J5Lb' Lfi16iT6TT6ð)Lñ1 6fi16D6ÄTU-11TO£lg)](https://static.fdocuments.us/doc/165x107/60d261466817dd14a8641196/untitled-1-in-gtl-rla-rrrrj-1961a6i-05-leisjgl1f111-9gldrrb.jpg)
PRO FITNESS EXERCISE CYCLE - Choosing The Best...
16
PRO FITNESS EXERCISE CYCLE Downloaded from www.Manualslib.com manuals search engine
Transcript of PRO FITNESS EXERCISE CYCLE - Choosing The Best...
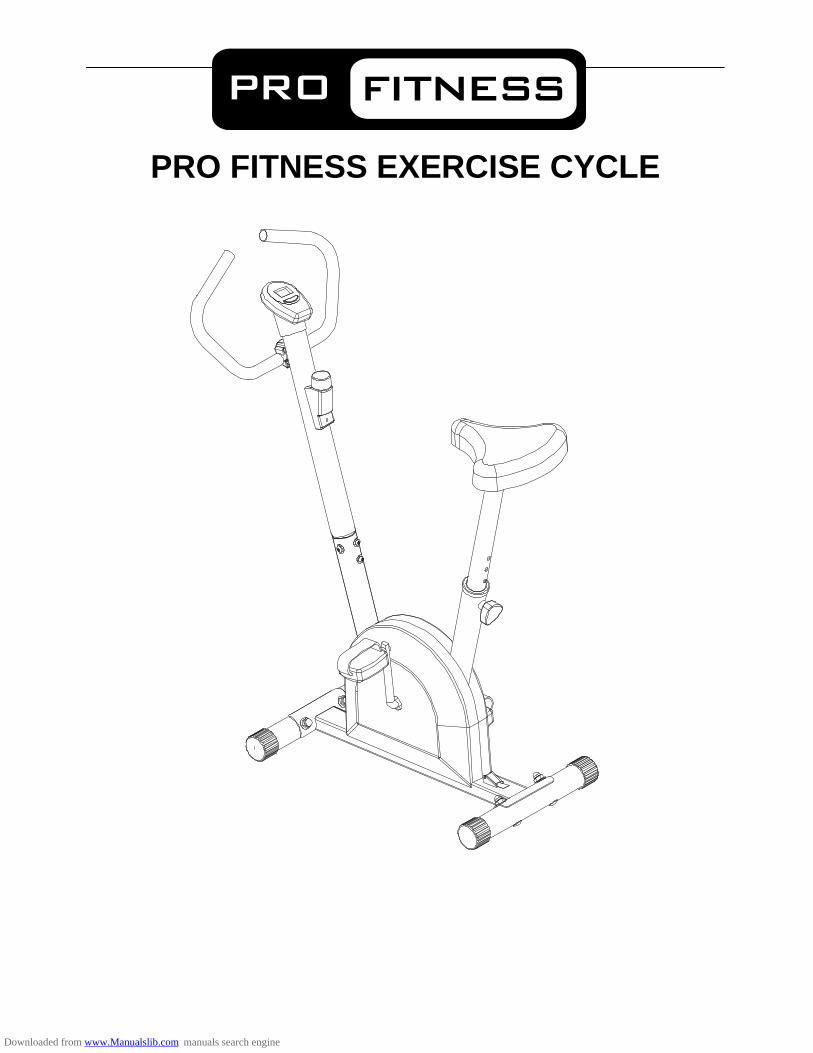
PRO FITNESS EXERCISE CYCLE
Downloaded from www.Manualslib.com manuals search engine
1
User instruction
The maximum weight capacity of this machine is 100KG. Person whose weight exceeds this limit
should not use this machine. The assembly size is 1300x600x410mm. Allow one person to use during
exercise
Safety is the most important factor when exercise. Please check each part and read the following
instructions:
Please check the parts list before using.
1. Please read this instruction before assemble or exercise。
2. Please put this machine on plain surface.
3. Make sure all bolts and nuts are locked tightly, all parts have no problem.
4. All parts should be adjusted smoothly.
5. Always wear appropriate clothing and footwear such as training shoes when exercising. Do not
use this machine barefoot.
6. Always do some warming-up exercise before your workout.
7. Please use this machine according to this manual.
8. This product is intended for use in clean dry conditions. You should avoid storage in excessively
cold or damp places.
9. Wish you enjoy your exercise。
IMPORTANT:
1. Please stop your exercise if you don’t feel comfortable like dizziness nausea, chest pain, or any
other abnormal feeling.
2. Please consult your doctor before an exercise plan to make sure if it will hurt your healthy by
using this equipment under your present body situation. The doctor’s suggestion is very
necessary! Please pay attention to the signals from our own body, incorrect and excessive
exercised will hurt your healthy.
3. This machine is designed for home use.
4. Do not use the machine until the damaged parts have been mended
5. Please pay more attention to the parts that easy to be damaged
6. Please keep all kids and pets away from exercise products when in use. Do not allow kids to climb
or play on them when they are not in use as this may lead to accident.
INSTRUCTION MANUAL
Downloaded from www.Manualslib.com manuals search engine

2
7. Never start a training session without warming up.
Contents
Section Page
Before you start -------------------------------------------- 3
Safety, Storage & Weight Limit ------------------------- 4
Exploded diagram ----------------------------------------- 5
Parts List For Exploded Diagram-----------------------6
Exercising information-------------------------------------9
Assembly step----------------------------------------------11
Instruction of the Meter---------------------------------- 14
Downloaded from www.Manualslib.com manuals search engine

3
Before You Start
Tools
If required, all of our products are supplied with basic tools, which will enable you
to successfully assemble your product. However, you may find it beneficial to
have a soft-headed hammer and perhaps an adjustable spanner handy as this
Prepare the Work Area
It is important that you assemble your product in a clean, clear, uncluttered area.
This will enable you to move around the product while you are fitting components
and will reduce the possibility of injury during assembly.
Work with a Friend
You may find it quicker, safer and easier to assemble this product with the help of a
friend as some of the components may be large, heavy or awkward to handle
alone.
Open the Carton
Carefully open the carton that contains your product, taking note of the warnings
printed on the carton to ensure that the risk of injury is reduced. Be aware of sharp
staples that may be used to fasten the flaps as these may cause injury. Be sure to
open the carton the right way up, as this will be the easiest and safest way to
remove all the components.
Unpack the Components
Carefully unpack each component, checking against the parts list that you have all
the necessary parts to complete the assembly of your product.
Please note that some of the parts may be pre-fitted to major components, so
please check carefully.
Downloaded from www.Manualslib.com manuals search engine
4
Safety
Before you under take any programme of exercise that will increase
cardiovascular activity lease be sure to consult with your doctor. Frequent strenuous
exercise should be approved your doctor and proper use of your product is essential.
Please read this manual carefully before commencing assembly of your product or starting to exercise.
Please keep all children away from exercise products when in use. Do not allow children to climb or
play on them when they are not in use.
For your own safety, always ensure that there is at least 1 Meter of free space in all directions around
your product while you are exercising.
Regularly check to see that all nut, bolts and fittings are securely tightened. Periodically checking all
moving parts for obvious signs of wear or damage.
Clean only with a damp cloth, do not use solvent cleaners.
Before use, always ensure that your product is positioned on a solid, flat surface. If necessary, use a
rubber mat underneath to reduce the possibility of slipping in use. Please make sure that all fastening
pieces are firmly locked and all parts are in normal state.
Always wear appropriate clothing and footwear such as training shoes or rubber shoes when
exercising. Do not wear loose clothing that could become caught or trapped during exercise. Never
stand on the bike with bare feet.
Weight Limit Your product is suitable for users weighing: 220LBS / 15.7Stones/ 100 KG or less.
Storage and Use Your product is intended for use in clean dry conditions. You should avoid storage in excessively cold or damp
places as this may lead to corrosion and other related problems that are outside our control.
Conformity This product conforms to:
(BS EN 957)- Part 1 and 5 Class (H)- Home Use- Class (C).
It is NOT suitable for therapeutic purposes.
AFTER SALE INFO Should you require any assistance regarding this product please contact ARGOS directly.
EXPLODED DIAGRAM
ARG
489-499 Avebury Boulevard
Saxon Gate West
Central Milton Keynes
MK9 2NW
Downloaded from www.Manualslib.com manuals search engine

6
Flat washer
PART LIST
No. Description Qty.
1 Pedal 1
2 Front stabilizer and Rear stabilizer 2
3 Main base frame 1
4 Bolt (M10*57mm) 4
5 Dome Nut 4
6 Flat washer 6
7 L type quick release 2
8 End Cap (Round shape) 4
9 Arc Washer 4
10 Handlebar stem 1
11 Tension control knob 1
12 Crank 2
13 Bolt (M8*15mm) 4
14 Washer 3
15 Adjustable Knob 1
16 Handle bar 1
17 Foam Grip 2
18 End cap Φ7/8’’ 2
19 Computer 1
20 Seat 1
21 Seat post stem 1
22 Nut 3
23 Computer cable 1
24 24 metal clip 1
25 Resistance cable 1
26 Handlebar Stem 1
27 Meter Mount Bracket 1
28 Handlebar Bracket Trim 1
29 Flat Washer 4
30 Belt button 1
31 Tension belt 1
32 Tension spring 1
33 bushing 1
Downloaded from www.Manualslib.com manuals search engine

8
REMARK: some parts were pre- assembled already
Downloaded from www.Manualslib.com manuals search engine

9
EXERCISE INSTRUCTIONS
Using your EXERCISE CYCLE will provide you with several benefits, it will improve your physical fitness. Tone
muscle and in conjunction with calorie controlled diet help you lose weight.
1、The Warm Up Phase
This stage helps get the blood flowing around the body and the muscles working properly. It will also reduce
the risk of cramp and muscle injury. It is advisable to do a few stretching exercises as shown below. Each
stretch should be held for approximately 30 seconds, do not force or jerk your muscles into a stretch-if it
hurts ,STOP.
stretching exercises as following show:
SIDE BENDS---FORWARD BENDS----OUTER THIGH----INNER THIGH---CALF/ACHILLES
2、The Exercise phase
This is the stage where you put the effort in. After regular use, the muscles in your legs will become more
flexible. Work to your own pace but it is very important to maintain a steady tempo throughout .The rate of
work should be sufficient to raise your heart beat into the target zone shown on the graph below.
200
180
160
140
120
100
80
20 25 30 35 40 45 50 55 60 65 70 75
AGE
HEAD RATE
85%
70%
TARGET ZONE
MAXIMUM
COOL DOWN
Downloaded from www.Manualslib.com manuals search engine

10
This stage should last for a minimum of 12 minutes though most people start at about 15-20 minutes.
3、The Cool Down Phase
This stage is to let your Cardio-vascular System and muscles wind down. This is a repeat of the warm up
exercise e.g. reduce your tempo, continue for approximately 5 minutes. The stretching exercises should now
be repeated, again remembering not to force or jerk your muscles into the stretch.
As you get fitter you may need to train longer and harder. It is advisable to train at least three times a week,
and if possible space your workouts evenly throughout the week.
4、Fault Finder
If you do not receive numbers appearing on your computer, please ensure all connections are correct.
MUSCLE TONING
To tone muscle while on your EXERCISE CYCLE, you will need to have the resistance set quite high. This will
put more strain on your leg muscle and may mean you cannot train for as long as you would like. If you are
also trying to improve your fitness you need to alter your training program. You should train as normal during
the warm up and cool down phase, but towards the end of the exercise phase you should increase resistance
making your legs work harder. You will have to reduce your speed to keep your heart rate in the target zone.
WEIGHT LOSS
The important factor here is the amount of effort you put in. The harder and longer you work, the more calories
you will burn. Effectively this is the same as if you were training to improve your fitness, the difference is the
goal.
USE
The seat height can adjust by removing the adjustment knob and raising or lowering the seat. There are 7
holes in the seat post allowing for a range of heights. Once the correct height has been chosen, refit the
adjustment knob and tighten.
The tension control knob allows you to alter the resistance of the pedals. A high resistance makes it more
difficult to pedal, a low resistance makes it easier. For the best results, please set the tension properly while
the bike is in use.
Downloaded from www.Manualslib.com manuals search engine

11
ASSEMBLY INSTRUCTION
TIPS
1、 Follow this assembly manual carefully.
2、 Make sure all bolts and nuts are securely tightened, using the provided locking washers.
1. Attach the Front Stabilizer (2) and Rear Stabilizer(2) into the Main Base Frame(3), using Bolt (4), Arc
washer(9), Dome Nut (5) .Screw the right pedal into the right Crank (12) using the supplied spanner, turning in
clockwise direction. The left pedal must be attached to the left Crank (12) with the supplied spanner, turning in
anti - clockwise direction.
2. Slide the upright Handlebar (10) into the Main frame (3) and secure with the 4 sets of M8 x 15mm Allen Bolts
(13), M8 x Curved Washer (29) and Spring Washer (6) .
Downloaded from www.Manualslib.com manuals search engine

12
3、Attach the seat post stem (21) to the
saddle (20), using 3 sets of nut (22) and washer(14)
Downloaded from www.Manualslib.com manuals search engine

13
5、Put the handle bar (16) to the Metal clip (24) on the handle bar stems (10) using a L type quick release (7)
and a flat washer (6) to make it tightly, and then cover the handle bar bracket trim (28) as shown in the image.
4、Slide the seat post stem (21) into the main Base
frame (3) and select the desired height by screwing
adjustment knob (15).Make sure that the knob (15) is
screwed tightly before sitting on the seat post
stem(21).
Downloaded from www.Manualslib.com manuals search engine

14
6.Set the Meter Mount Bracket(27) onto the Handlebar stem(10) .Connect tension wire B with computer wire
A,and then slide the computer into the bracket (27).
Exercise Computer
SPECIFICATIONS:
TIME-------------------------------------------------------------00:00-99:59
Downloaded from www.Manualslib.com manuals search engine

15
SPEED-----------------------------------------------------------0.0-99.9KM/H
DISTANCE----------------------------------------------------- 0.0-999.9KM
CALORIES------------------------------------------------------0-9999KCAL
KEY FUNCTION
SELECT: This key lets you to select and lock on to a particular function you want.
RESET: This key reset the value to zero by pressing the key.
OPERATION PROCEDURES:
1、AUTO ON/OFF:
The system turns on when and key is depressed or when it sensor an input from the speed sensor.
The processor turns off automatically when the speed sensor has no signal input or no keys are pressed for
approximately 4/5 minutes.
2、RESET:
The unit can be reset by either changing battery or pressing the RESET key for 4 seconds.
3、SELECT:
To choose the SCAN or LOCK. If you do not want the pointer on the function you want which begins blinking.
4、FUNCTION SETTING:
TIME
By pressing the SELECT key until the pointer advance to time.
.Press the SELECT key once to lock on the TIME function, the colon stop blinking.
SPEED
.Press the SELECT key until the pointer advance to SPEED and blinking.
.Press to SECLECT key once, the pointer should stop blinking and lock on the SPEED function.
DISTANCE
.Press to SELECT key until the pointer advance to DISTANCE and blinking Press the SELECT key once to
lock on to the DISTANCE function.
CALORIES:
.Press the SELECT key until the pointer advance to CALORIES and blinking.
.Press the SELECT key once the pointer should stop blinking and lock on to the CALORIES function.
SCAN:
.Automatic display of the following functions in the order shown.
TIME—SPEED----DISTANCE-CALORIES(repeat)
BATTERY
This monitor uses one“AA” batteries or AG13. You can replace the batteries at the batteries at the batteries
alit.
Downloaded from www.Manualslib.com manuals search engine


![)IZIPSTMRK JVMIRHWLMTW ^ååÏ ± 9Ú X± 9 ± å ERH å s± ^ xbtckstorage.blob.core.windows.net/site251/docs/Handout... · 2019. 5. 22. · & ] v z ] v } ] o l ] o o î ì í õ](https://static.fdocuments.us/doc/165x107/5fed64d054fa7e0b72465b74/izipstmrk-jvmirhwlmtw-9-x-9-erh-s-2019-5-22-.jpg)