Print Shop Work and Supply Orders - Cedarville University
12
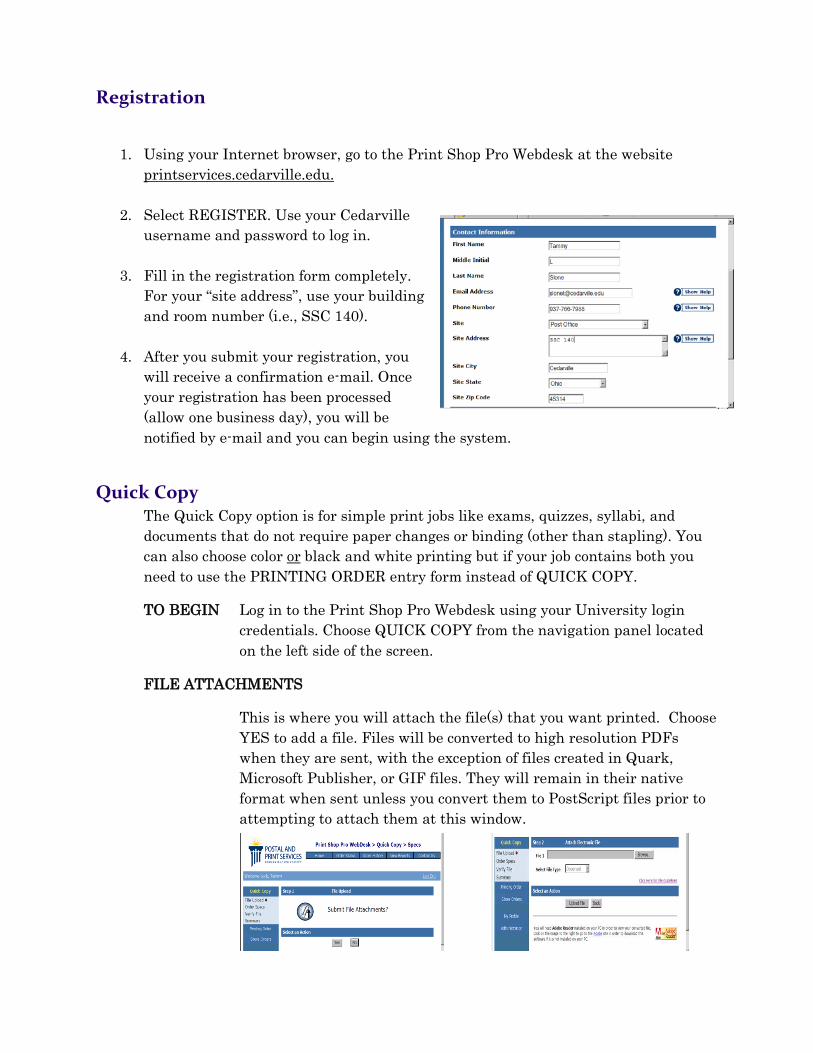
Registration 1. Using your Internet browser, go to the Print Shop Pro Webdesk at the website printservices.cedarville.edu. 2. Select REGISTER. Use your Cedarville username and password to log in. 3. Fill in the registration form completely. For your “site address”, use your building and room number (i.e., SSC 140). 4. After you submit your registration, you will receive a confirmation e-mail. Once your registration has been processed (allow one business day), you will be notified by e-mail and you can begin using the system. Quick Copy The Quick Copy option is for simple print jobs like exams, quizzes, syllabi, and documents that do not require paper changes or binding (other than stapling). You can also choose color or black and white printing but if your job contains both you need to use the PRINTING ORDER entry form instead of QUICK COPY. TO BEGIN Log in to the Print Shop Pro Webdesk using your University login credentials. Choose QUICK COPY from the navigation panel located on the left side of the screen. FILE ATTACHMENTS This is where you will attach the file(s) that you want printed. Choose YES to add a file. Files will be converted to high resolution PDFs when they are sent, with the exception of files created in Quark, Microsoft Publisher, or GIF files. They will remain in their native format when sent unless you convert them to PostScript files prior to attempting to attach them at this window.
Transcript of Print Shop Work and Supply Orders - Cedarville University
Registration
1. Using your Internet browser, go to the Print Shop Pro Webdesk at the website printservices.cedarville.edu.
2. Select REGISTER. Use your Cedarville username and password to log in.
3. Fill in the registration form completely. For your “site address”, use your building and room number (i.e., SSC 140).
4. After you submit your registration, you will receive a confirmation e-mail. Once your registration has been processed (allow one business day), you will be notified by e-mail and you can begin using the system.
Quick Copy The Quick Copy option is for simple print jobs like exams, quizzes, syllabi, and documents that do not require paper changes or binding (other than stapling). You can also choose color or black and white printing but if your job contains both you need to use the PRINTING ORDER entry form instead of QUICK COPY.
TO BEGIN Log in to the Print Shop Pro Webdesk using your University login credentials. Choose QUICK COPY from the navigation panel located on the left side of the screen.
FILE ATTACHMENTS
This is where you will attach the file(s) that you want printed. Choose YES to add a file. Files will be converted to high resolution PDFs when they are sent, with the exception of files created in Quark, Microsoft Publisher, or GIF files. They will remain in their native format when sent unless you convert them to PostScript files prior to attempting to attach them at this window.
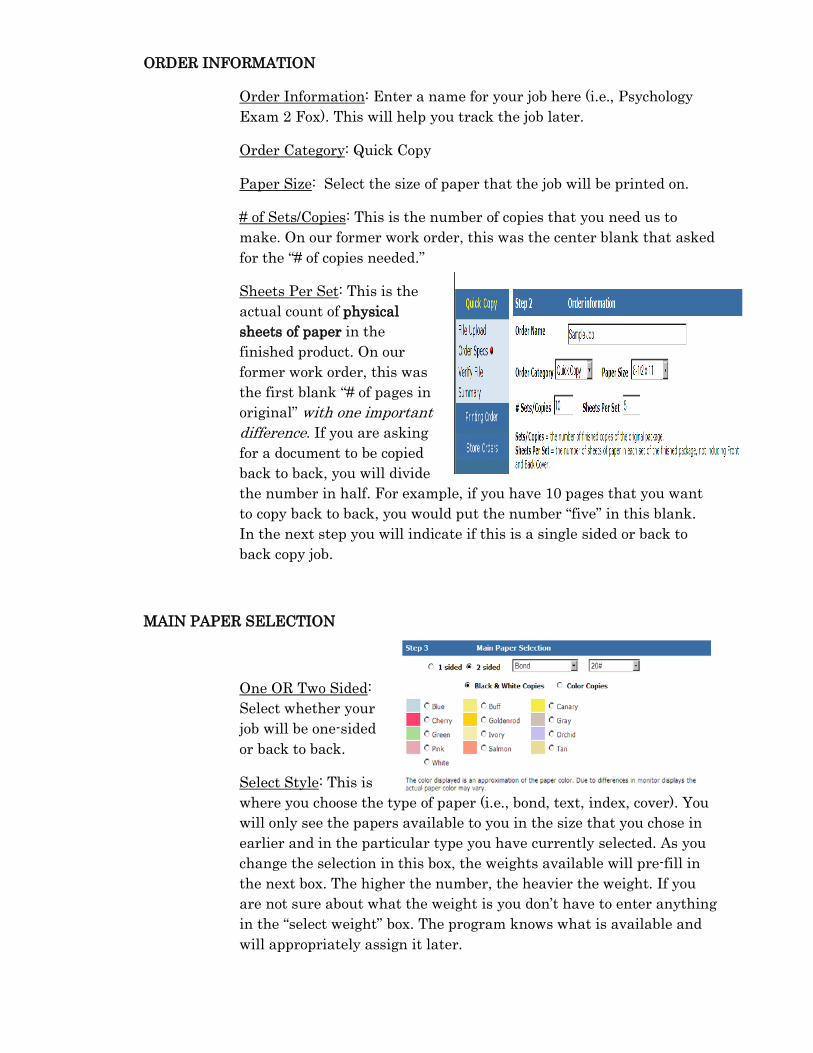
ORDER INFORMATION
Order Information: Enter a name for your job here (i.e., Psychology Exam 2 Fox). This will help you track the job later.
Order Category: Quick Copy
Paper Size: Select the size of paper that the job will be printed on.
# of Sets/Copies: This is the number of copies that you need us to make. On our former work order, this was the center blank that asked for the “# of copies needed.”
Sheets Per Set: This is the actual count of physical sheets of paper in the finished product. On our former work order, this was the first blank “# of pages in original” with one important difference. If you are asking for a document to be copied back to back, you will divide the number in half. For example, if you have 10 pages that you want to copy back to back, you would put the number “five” in this blank. In the next step you will indicate if this is a single sided or back to back copy job.
MAIN PAPER SELECTION
One OR Two Sided: Select whether your job will be one-sided or back to back.
Select Style: This is where you choose the type of paper (i.e., bond, text, index, cover). You will only see the papers available to you in the size that you chose in earlier and in the particular type you have currently selected. As you change the selection in this box, the weights available will pre-fill in the next box. The higher the number, the heavier the weight. If you are not sure about what the weight is you don’t have to enter anything in the “select weight” box. The program knows what is available and will appropriately assign it later.
Black and White Copies or Color: Choose whether your prints will be color or black and white. You only have one option here. If you want to copy one side in color and the other side in black and white you will have to exit and use the PRINTING ORDER option to do this.
Choose Color: Choose the color of paper.
COVERS Choose only if you need a front and/or back cover added. If you choose covers, you will enter the paper type/color in the next step.
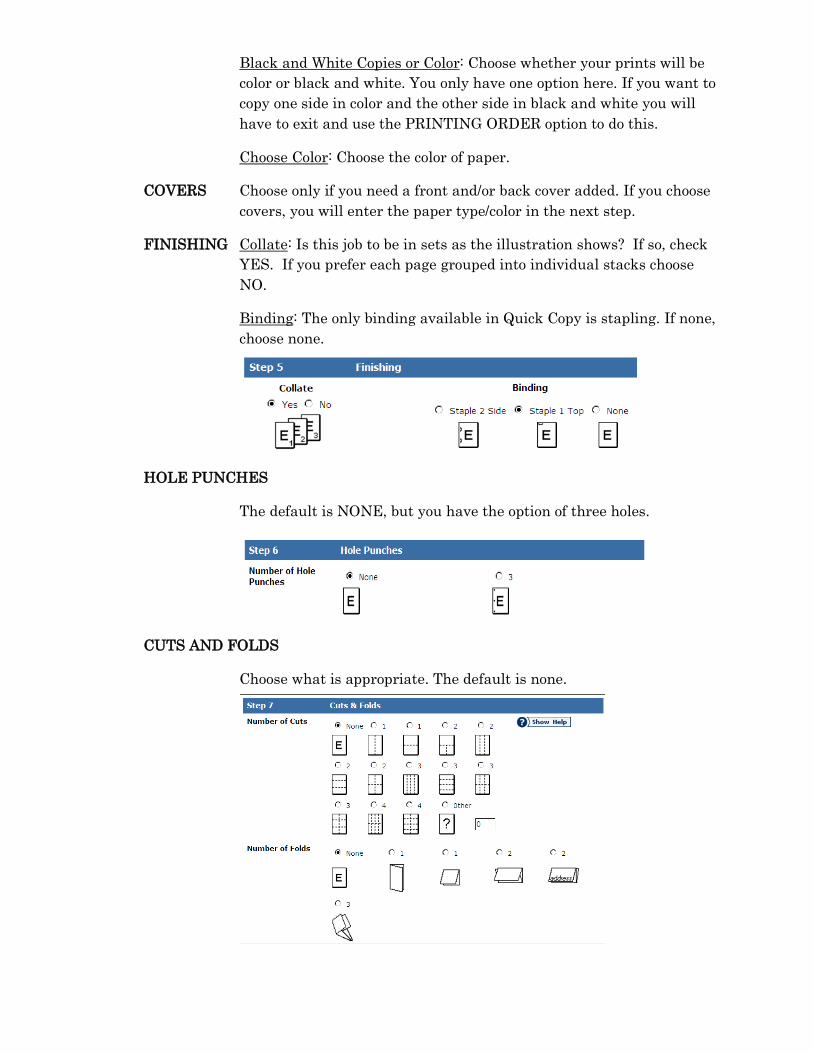
FINISHING Collate: Is this job to be in sets as the illustration shows? If so, check YES. If you prefer each page grouped into individual stacks choose NO.
Binding: The only binding available in Quick Copy is stapling. If none, choose none.
HOLE PUNCHES
The default is NONE, but you have the option of three holes.
CUTS AND FOLDS
Choose what is appropriate. The default is none.

BILLING AND DELIVERY
Contact and Phone: The default will be your name and phone.
Site: This is your department name or the account name you are charging.
Account Number: Choose the account number that matches the account name above. You will only have access to accounts you are authorized to charge.
Date Needed: The default will be 24 hours from the date you are requesting the job for most work. If the job is not needed that quickly, please choose another date.
Delivery Option: Choose whether you want us to place the job in your box here or if you want it delivered by campus mail. ALL DELIVERED EXAMS WILL REQUIRE A SIGNATURE AND THEY ARE ONLY DELIVERED ON THE AFTERNOON PACKAGE ROUTE.
Final Steps: PROOF CHECKING
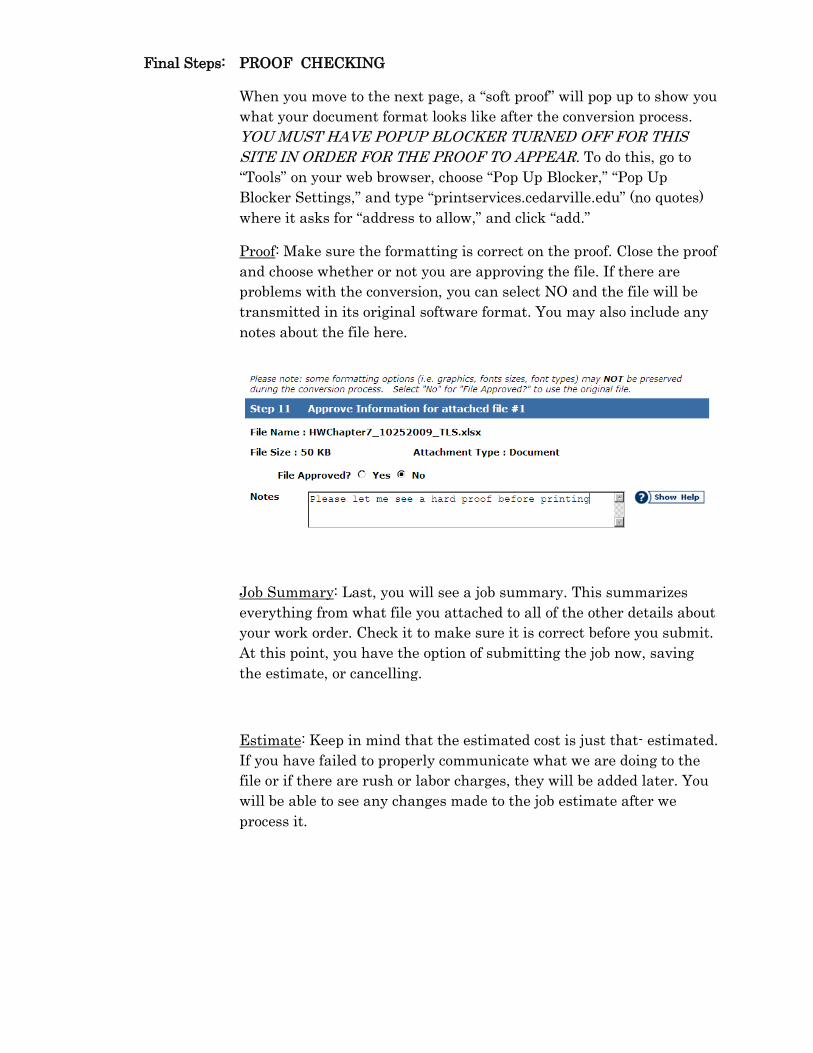
When you move to the next page, a “soft proof” will pop up to show you what your document format looks like after the conversion process. YOU MUST HAVE POPUP BLOCKER TURNED OFF FOR THIS SITE IN ORDER FOR THE PROOF TO APPEAR. To do this, go to “Tools” on your web browser, choose “Pop Up Blocker,” “Pop Up Blocker Settings,” and type “printservices.cedarville.edu” (no quotes) where it asks for “address to allow,” and click “add.”
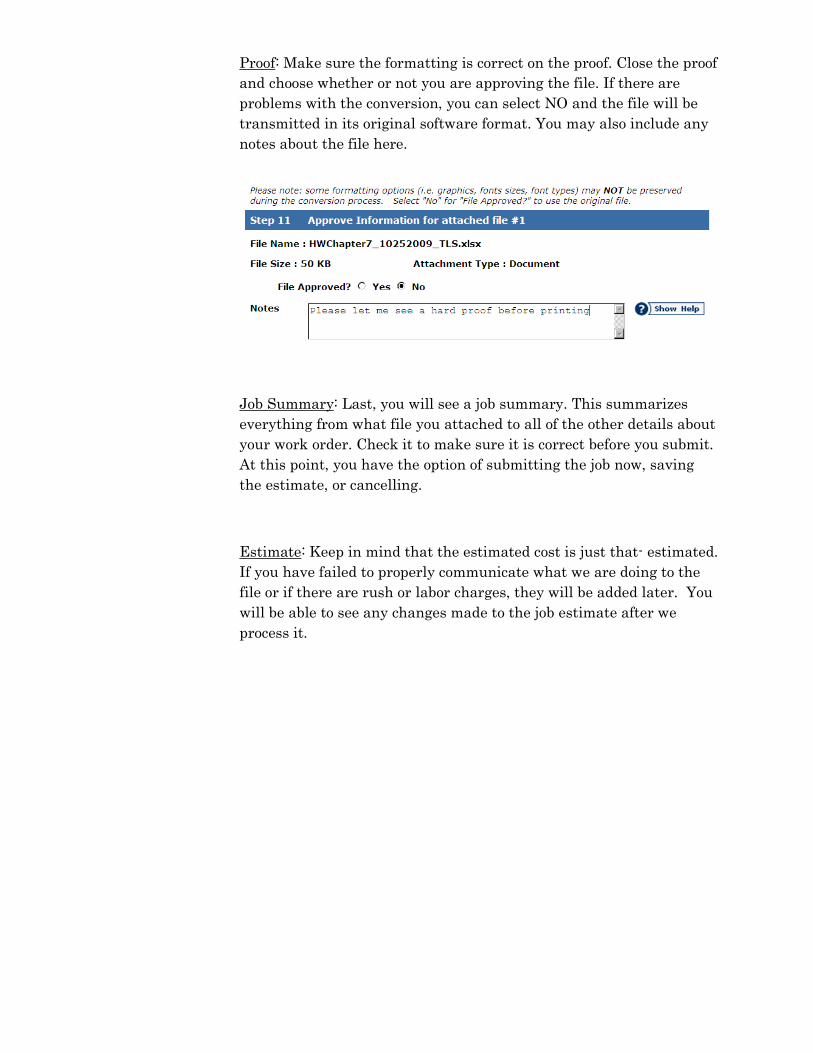
Proof: Make sure the formatting is correct on the proof. Close the proof and choose whether or not you are approving the file. If there are problems with the conversion, you can select NO and the file will be transmitted in its original software format. You may also include any notes about the file here.
Job Summary: Last, you will see a job summary. This summarizes everything from what file you attached to all of the other details about your work order. Check it to make sure it is correct before you submit. At this point, you have the option of submitting the job now, saving the estimate, or cancelling.
Estimate: Keep in mind that the estimated cost is just that- estimated. If you have failed to properly communicate what we are doing to the file or if there are rush or labor charges, they will be added later. You will be able to see any changes made to the job estimate after we process it.

Printing Order The PRINTING ORDER option is for jobs requiring paper color changes, tape or coil binding, notepads, color and black and white pages within the same document or other complex jobs.
TO BEGIN Log in to the Print Shop Pro Webdesk using your University login credentials. Choose PRINTING ORDER from the navigation panel located on the left side of the screen.
FILE ATTACHMENTS
This is where you will attach the file(s) that you want printed. Choose YES to add a file. Files will be converted to high resolution PDFs when they are sent with the exception of files created in Quark, Microsoft Publisher, or GIF files. They will remain in their native format when sent unless you convert them to PostScript files prior to attempting to attach them at this window.
CONTACT INFORMATION
Order Name: Enter a name for your job here (i.e., Psychology Exam 2 Fox). This will help you track the job later.
Contact and Phone: The default will be your name & phone.
Site: This is your department name or the account name you are charging.
Account Number: Choose the account number which matches the account name above. You will only have access to accounts you are authorized to charge.
ORDER INFORMATION
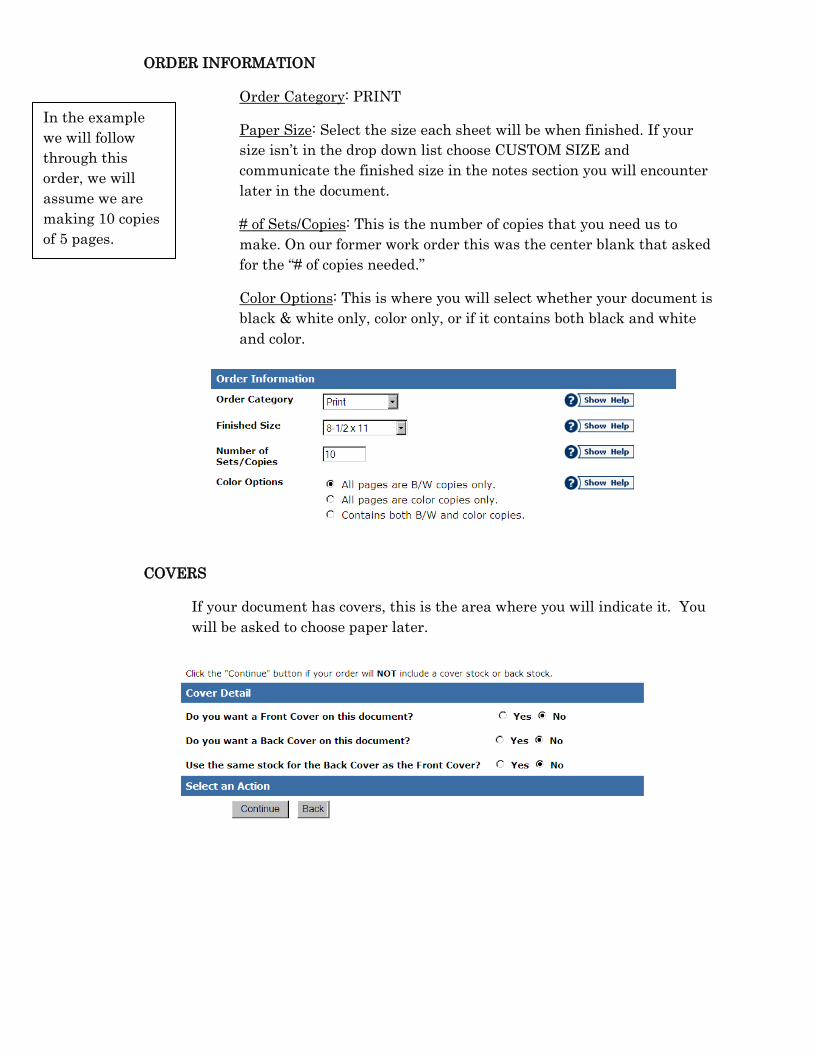
Order Category: PRINT
Paper Size: Select the size each sheet will be when finished. If your size isn’t in the drop down list choose CUSTOM SIZE and communicate the finished size in the notes section you will encounter later in the document.
# of Sets/Copies: This is the number of copies that you need us to make. On our former work order this was the center blank that asked for the “# of copies needed.”
Color Options: This is where you will select whether your document is black & white only, color only, or if it contains both black and white and color.
COVERS
If your document has covers, this is the area where you will indicate it. You will be asked to choose paper later.
In the example we will follow through this order, we will assume we are making 10 copies of 5 pages.
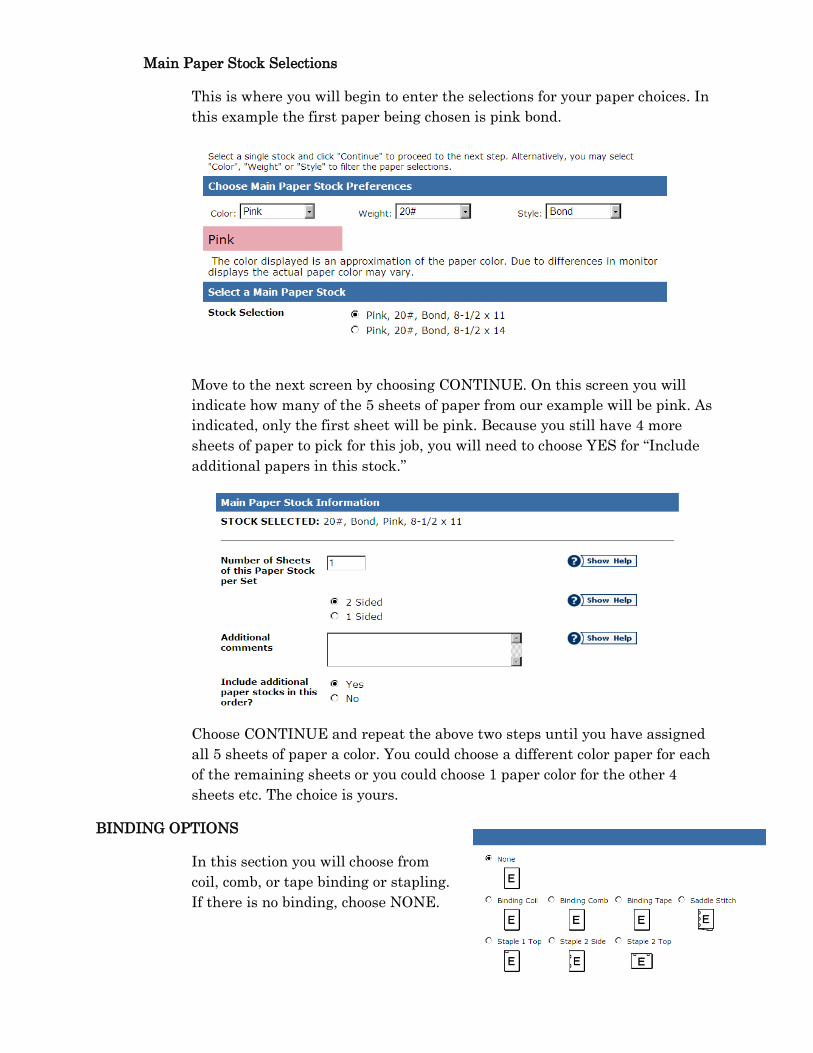
Main Paper Stock Selections
This is where you will begin to enter the selections for your paper choices. In this example the first paper being chosen is pink bond.
Move to the next screen by choosing CONTINUE. On this screen you will indicate how many of the 5 sheets of paper from our example will be pink. As indicated, only the first sheet will be pink. Because you still have 4 more sheets of paper to pick for this job, you will need to choose YES for “Include additional papers in this stock.”
Choose CONTINUE and repeat the above two steps until you have assigned all 5 sheets of paper a color. You could choose a different color paper for each of the remaining sheets or you could choose 1 paper color for the other 4 sheets etc. The choice is yours.
BINDING OPTIONS
In this section you will choose from coil, comb, or tape binding or stapling. If there is no binding, choose NONE.
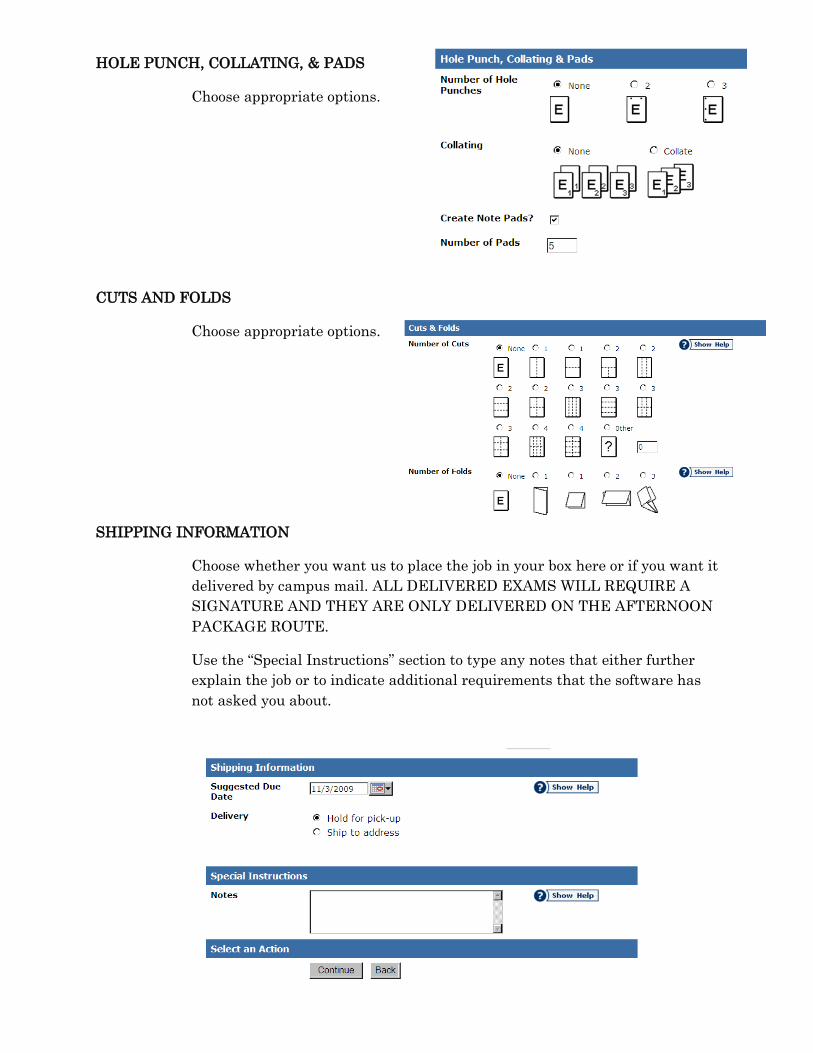
HOLE PUNCH, COLLATING, & PADS
Choose appropriate options.
CUTS AND FOLDS
Choose appropriate options.
SHIPPING INFORMATION
Choose whether you want us to place the job in your box here or if you want it delivered by campus mail. ALL DELIVERED EXAMS WILL REQUIRE A SIGNATURE AND THEY ARE ONLY DELIVERED ON THE AFTERNOON PACKAGE ROUTE.
Use the “Special Instructions” section to type any notes that either further explain the job or to indicate additional requirements that the software has not asked you about.
Final Steps: PROOF CHECKING
When you move to the next page, a “soft proof” will pop up to show you what your document format looks like after the conversion process. YOU MUST HAVE POPUP BLOCKER TURNED OFF FOR THIS SITE IN ORDER FOR THE PROOF TO APPEAR. To do this, go to “Tools” on your web browser, choose “Pop Up Blocker,” “Pop Up Blocker Settings,” and type “printservices.cedarville.edu” (no quotes) where it asks for “address to allow,” and click “add.”
Proof: Make sure the formatting is correct on the proof. Close the proof and choose whether or not you are approving the file. If there are problems with the conversion, you can select NO and the file will be transmitted in its original software format. You may also include any notes about the file here.
Job Summary: Last, you will see a job summary. This summarizes everything from what file you attached to all of the other details about your work order. Check it to make sure it is correct before you submit. At this point, you have the option of submitting the job now, saving the estimate, or cancelling.
Estimate: Keep in mind that the estimated cost is just that- estimated. If you have failed to properly communicate what we are doing to the file or if there are rush or labor charges, they will be added later. You will be able to see any changes made to the job estimate after we process it.

ORDER HISTORY/JOB STATUS/REPORTS
There are tabs located at the top of the home page of the Print Shop Pro Web desk that you will use to navigate to gain information including everything from order status to account history. You can view jobs you have submitted or if you are in charge of budget tracking, you can be set up as an administrator so that you can view any transactions that affect the accounts you have access to.
ORDER STATUS:
Use this tab to review jobs. This tab is for quick viewing submissions and does not have any editable or search options.
ORDER HISTORY:
This tab allows you filter and search for particular jobs, view job status, ask for reprints of a previous job, see pricing information for both print work and supplies purchased, or edit jobs that have been submitted but are not yet complete.
Filters: Jobs appear on the screen grouped by status with the most recent job in a particular status first. For example, if you have used the system to do quoting and you have “Quote Only” status on jobs, those jobs will be grouped in one section with the most recent quote request at the top. The same organization applies to “Submitted”, “In Production”, “Completed”, and all other job statuses. You can choose to look for jobs by a particular order category, site/dept name, status, or job name.
View: Use the view option in this section to view the job summary of a particular job, copy a print order for reprint, or reprint a job ticket.
Edit: Use the edit option to make changes in quantity, paper, etc. for a job you have submitted.