Primary Classroom Resource Booklet - ESERO
18
Discovering Life in the Solar System Primary Classroom Resource Booklet
Transcript of Primary Classroom Resource Booklet - ESERO

Discovering Life in the Solar System Primary Classroom Resource Booklet

Introduction Our planet is teeming with life, but we haven’t (yet) found life on another planet. In September 2020 scientists announced that they had found a gas on Venus called phosphine. On Earth, phosphine is made by living organisms.
This doesn’t mean that we have definitely found life on Venus; there might be some new chemical way to make phosphine rather than it being made by living organisms.
Even understanding exactly what life is, is difficult. Much of the life on our planet is in the forms of microorganisms. These microorganisms are all around (and on) us. Yeast is a common microorganism that we use in making bread and beer. Bacteria can be used to make yoghurt and biogas. Would we recognise yeast or bacteria on another planet? What about even larger forms of life that are very different from life on our planet? (see https://sci.esa.int/web/home/-/30550-life-in-extreme-conditions).
We might find life on another planet by detecting the gases that are made by living things. We can find the “fingerprints” of those gases in the spectrum of light that comes from a planet. Children could explore another type of “fingerprint” with Creeping Colours : https://www.sfi.ie/site-files/primary-science/media/pdfs/col/creeping_colours.pdf. This could be extended to simulate the hunt for bio-signatures: children could use chromatography to identify the colours in a mixture.
Not every planet is suitable for life. We think liquid water is essential for life, so the hunt for life is very often the hunt for water. Running water leaves traces on the landscape, so orbiters around Mars are taking images of the surface to help find areas that we could visit with a lander or rover.
Mars has been visited by many rovers and landers but choosing where to land takes a whole team (and a few years!). See this short video on what needs to be considered: https://mars.nasa.gov/resources/22095/mars-in-a-minute-how-do-you-choose-a-landing-site/
References:
Microbe Magic from APC: http://microbemagic.ucc.ie/
E-Bug: Background information on microbes with power points, lesson plans andstudent sheets in English and Irish.
DPSM/ESERO Framework for Inquiry
Theme Discovering Life in the Solar System
Curriculum
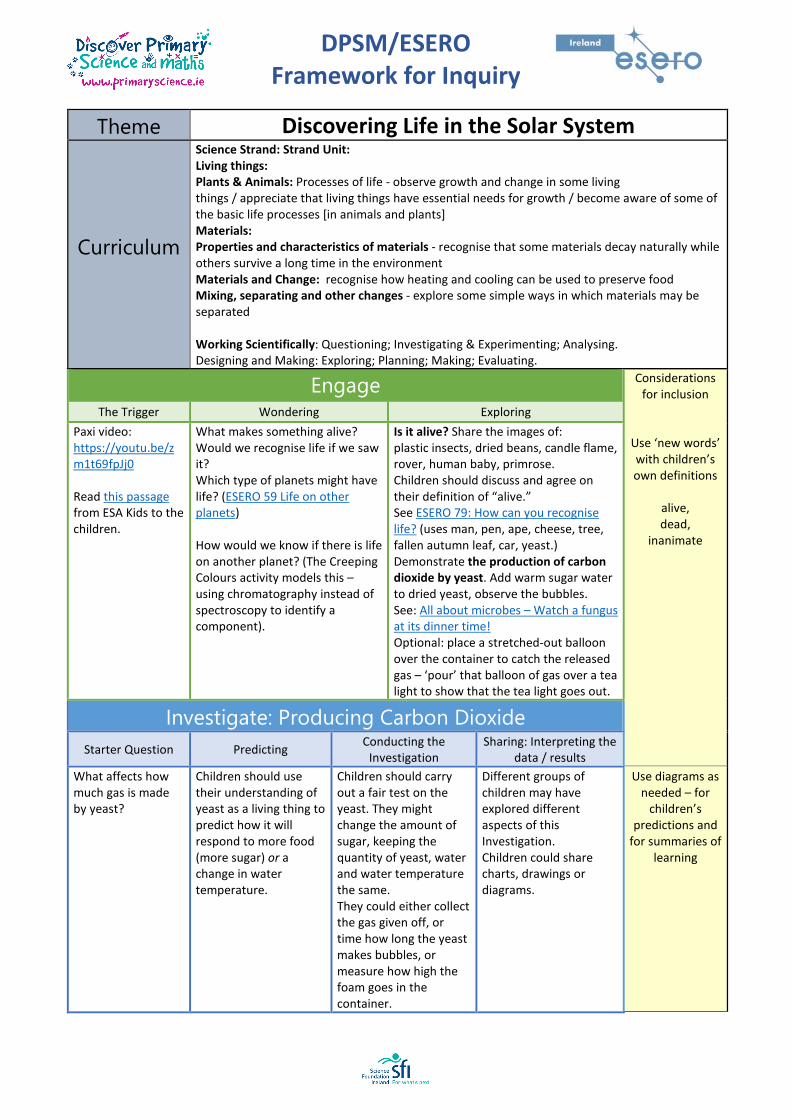
Science Strand: Strand Unit: Living things: Plants & Animals: Processes of life - observe growth and change in some living things / appreciate that living things have essential needs for growth / become aware of some of the basic life processes [in animals and plants] Materials: Properties and characteristics of materials - recognise that some materials decay naturally while others survive a long time in the environment Materials and Change: recognise how heating and cooling can be used to preserve food Mixing, separating and other changes - explore some simple ways in which materials may be separated
Working Scientifically: Questioning; Investigating & Experimenting; Analysing. Designing and Making: Exploring; Planning; Making; Evaluating.
Engage Considerations for inclusion
Use ‘new words’ with children’s own definitions
alive, dead,
inanimate
The Trigger Wondering Exploring Paxi video: https://youtu.be/zm1t69fpJj0
Read this passage from ESA Kids to the children.
What makes something alive? Would we recognise life if we saw it? Which type of planets might have life? (ESERO 59 Life on other planets)
How would we know if there is life on another planet? (The Creeping Colours activity models this – using chromatography instead of spectroscopy to identify a component).
Is it alive? Share the images of: plastic insects, dried beans, candle flame, rover, human baby, primrose. Children should discuss and agree on their definition of “alive.” See ESERO 79: How can you recognise life? (uses man, pen, ape, cheese, tree, fallen autumn leaf, car, yeast.) Demonstrate the production of carbon dioxide by yeast. Add warm sugar water to dried yeast, observe the bubbles. See: All about microbes – Watch a fungus at its dinner time! Optional: place a stretched-out balloon over the container to catch the released gas – ‘pour’ that balloon of gas over a tea light to show that the tea light goes out.
Investigate: Producing Carbon Dioxide Starter Question Predicting Conducting the
Investigation Sharing: Interpreting the
data / results What affects how much gas is made by yeast?
Children should use their understanding of yeast as a living thing to predict how it will respond to more food (more sugar) or a change in water temperature.
Children should carry out a fair test on the yeast. They might change the amount of sugar, keeping the quantity of yeast, water and water temperature the same. They could either collect the gas given off, or time how long the yeast makes bubbles, or measure how high the foam goes in the container.
Different groups of children may have explored different aspects of this Investigation. Children could share charts, drawings or diagrams.
Use diagrams as needed – for
children’s predictions and
for summaries of learning

DPSM/ESERO Framework for Inquiry
Investigate: Is there Life around us – Kitchen Detectives Starter Question Predicting Conducting the
Investigation Sharing: Interpreting the
data / results Where can we find life? Which surfaces will grow the most mould on the bread? or Which type of sanitizers work the best? Adapted from Kitchen Investigators
Children should use their understanding of microorganisms to predict which surfaces may have been exposed to the most microorganisms. OR Compare the effects of wiping surfaces with different types of sanitizers, then testing for microorganisms.
Children will use bread as a nutrient for microorganisms. Children could wipe the bread in different places around the classroom, then put it into a plastic bag, seal the bag and check over the course of a week or longer. Note: do not open the sealed bags.
Is there liquid at the bottom of any of the bags? this can be a sign that the microorganisms are growing and producing waste. Fungus will look fuzzy and might produce threads. Bacteria can make flat, circular colonies.
Investigate: Creeping Colours Starter Question Predicting Conducting the
Investigation Sharing: Interpreting the
data / results What happens when inks from coloured markers are absorbed by wet filter paper?
Children should explain which original colour markers they think contain the most different coloured inks.
Children should design a fair test to explore the ink colours.
Can they use their results to correctly identify an unknown coloured marker?
Take the Next StepApplying Learning Making Connections Thoughtful Actions
Simulate the hunt for life with chromatography of liquid food colouring. An extension to Creeping Colours.
Read the SETI Institute e-book on “10 Places to Search for Life Beyond Earth” (order a free copy from: https://community.seti.org/ebooks/ten-places-to-search.html)
Listen to Lisa Kaltenegger about how other planet might host life: https://www.cornell.edu/video/lisa-kaltenegger-nearest-exoplanets-could-host-life
Explore what plants need to live – an ESA resource: http://esamultimedia.esa.int/docs/edu/PR42_AstroFarmer.pdf
Timeline of the Universe – from ESA PR2: https://esamultimedia.esa.int/docs/edu/PR02_History_of_the_Universe_teacher_guide_and_pupil_activities.pdf
Reflection
Did I meet my learning objectives? What went well, what would I change? Are the children moving on with their science skills? What questions worked very well? What questions didn’t work well? Ask the children would they change anything or do anything differently. Are there cross curriculum opportunities here? What further questions did students have?
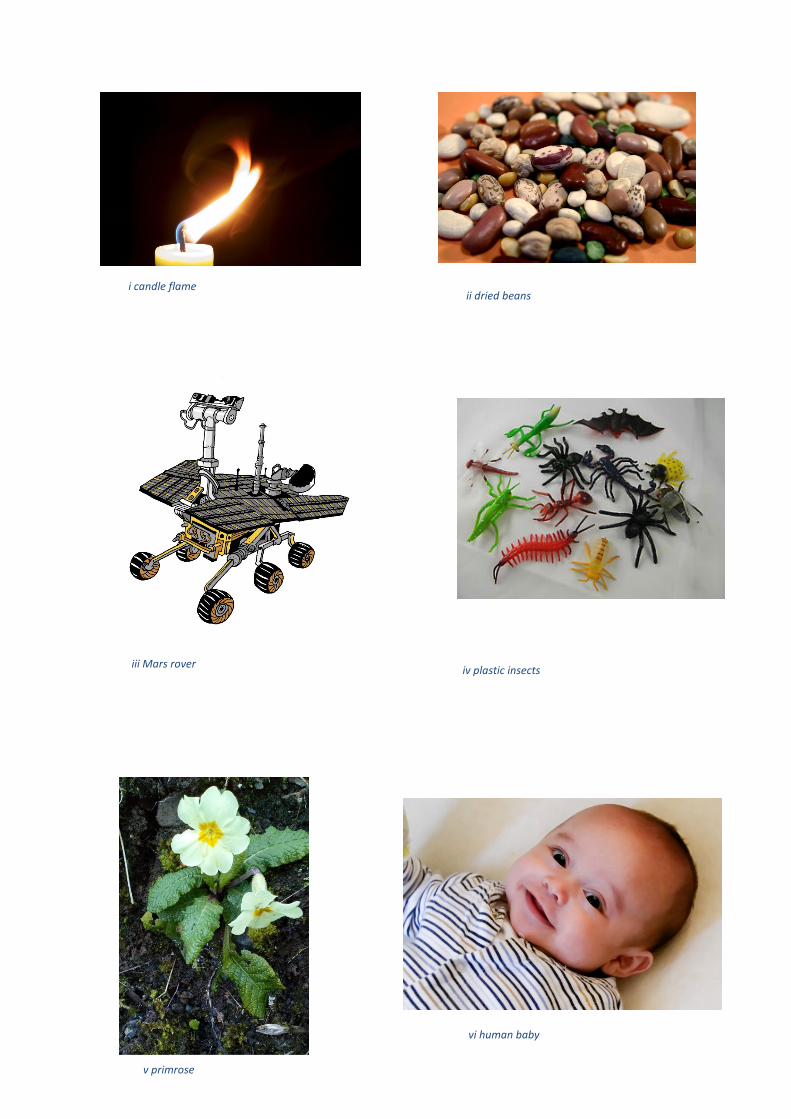
iii Mars rover
ii dried beans i candle flame
iv plastic insects
v primrose
vi human baby

time80 minutes
Life on other planetsLife in space
PreparationFor the activity Life on Earth, draw a table on the board as shown below, with the words temperature, gravity, atmosphere, and oxygen in the left-hand col-umn. The adjacent columns are to fill in the details of the planets you will be investigating.
Life on Earth 10 min.Show the children the table on the board. With the children, complete the column for the Earth. Explain that Earth has gravity, an atmosphere and that our air contains oxygen. Explain these terms if necessary, and write yes in the relevant spaces in the table. Also write down that the average temperature on Earth is 13 degrees.
Ask the children to describe how humans look. Does everyone look the same? Ex-plain that although people may differ, we all basically look the same. Explain that the other celestial bodies we know differ from the Earth in the points shown in the table. Ask the children if they think people would look different if the conditions on Earth were different.
The children investigate what people would look like on other celestial bodies.
learning outcomesTo:
• discover that differentcelestial bodies havedifferent conditionsregarding temperature,gravity, atmosphere,and oxygen
• know that beings on othercelestial bodies would notlook like us
materials needed• computers with internet• books about planets• colouring pencils
59V
PAGE 347 • Life in space • LESSON 59
Earth Venus Saturn ...
temperature 13o C ... ... ...
gravity yes ... ... ...
atmosphere yes ... ... ...
oxygen yes ... ... ...

People on other celestial bodies 50 min.Explain that life on the other planets in our solar system is not possible (yet). Organise the children into groups of four. Assign each group to a particular celestial body. Each group investigates the conditions on that celestial body. These include temperature (hotter or colder than Earth), gravity (stronger or weaker than Earth), whether there is an atmosphere, and if there is more or less oxygen in the air than on Earth. The children use books and the internet for their research. These are the questions per celestial body:
Venus: Temperature, hotter or colder than Earth?
(hotter)
Saturn: Temperature, hotter or colder than Earth? (colder)
The Moon: Gravity, stronger or weaker than Earth? (weaker)
Jupiter: Gravity, stronger or weaker than Earth?
(stronger)
Mercury: Is there an atmosphere? (no)
Mars: Oxygen: more or less in the air than Earth? (less)
PAGE 348 • Life in space • LESSON 59

The children use what they found out about their celestial body to answer Task 1a and b on the worksheet. Discuss how people would have to change to be able to live in these conditions. The group from the planet Mercury, for example, inves-tigate the dangers of living on a planet without an atmosphere.
Hand out the colouring pencils. The children complete Task 1c on the worksheet by drawing what people on their celestial body might look like.
What do they look like? 20 min.Ask each group what they have found out about their celestial body. Write the answers in the table on the board. Then ask the children what they think people on this celestial body would look like. Why did they draw their people the way they did? Possible explanations are:• People living on Venus would have to protect themselves from the Sun.
They might do this by developing a special thick skin, just like an elephant on Earth. • People on Saturn would need to protect themselves from the cold.
They could do this by having a thick layer of fat, or lots of hair.• On the Moon, people's legs would not have to bear so much weight
as on Earth. So they could have thinner legs.• If people lived on Jupiter they would have to be able to handle the strong force
of gravity. This would make it very hard to move, so it might help if they hadlots of muscles in their legs, and a very small body.
• Mercury doesn't have an atmosphere. This means there is no air pressure.So, people on Mercury would burst apart if they didn't make any adjustments.They would need some kind of protection, like a spacesuit to be able to liveon this planet.
• People on Mars would need to be able to cope with far less oxygen in the air.Their lungs would have to be very efficient to absorb the little oxygen thatthere is.
Come to the conclusion that people on Earth look the way they do because they have adapted to the conditions here. Explain that the groups of children have investigated just one difference between Earth and another celestial body. In real life there are far more differences from the conditions on Earth. So if we find life somewhere else in the universe, it will probably look very different from life on Earth. The children complete Task 2 on the worksheet.
PAGE 349 • Life in space • LESSON 59

time60 minutes
How can you recognise life?Life in space
PreparationFor the activity Searching for life you will need yeast, water, sugar, a plastic cup, and a small container.
Searching for life 20 min.Ask the children if they think there is life anywhere else in space apart from Earth. Why do they think that? Explain to them that up until now no life has been found anywhere else. Research looking at signs of life is being carried out, however. The project SETI (Search for Extraterrestrial Intelligence) was launched in 1999. Extraterrestrial means 'beyond the Earth'. In this search for extraterrestrial intel-ligence, radio telescopes search for signals in space that may have been sent by intelligent beings.Explain that people are carrying out research into extraterrestrial life. But what is life exactly? What do the children think? The children complete Task 1 on the worksheet. Ask how they filled in the table, ‘Is alive', 'Has lived' and ‘Is not alive and has never lived'. Copy the table onto the board. Encourage the children to add their own ideas to the columns. Together, look at the examples of life (from the categories ‘Is alive’ and ‘Has lived’). What characteristics do these organisms display compared to inanimate objects (from the category ‘Is not alive and has never lived’)? Explain clearly the difference between living and inanimate things. Dead organisms were once alive, so they belong in the category life. So the opposite of living is not 'dead' but 'inanimate’. Ask the children if they know what yeast is. Explain that we use yeast to make bread. The yeast helps the bread to rise. Demonstrate how yeast grows. Place a thin layer of yeast in the container. Stir the sugar into a plastic cup of water. Add this water to the yeast. What happens?
The children investigate how we determine if something is or has been alive.
learning outcomesTo:
• know that people on Earthare searching for life in space
• know what the characteristicsof life are
• know that life is not alwaysimmediately visible
materials needed• yeast
• water
• small container
• plastic cup
• sugar
PAGE 503 • Life in space • LESSON 79
79V

Determining life 35 min.Look together at the characteristics of life shown in Task 2 on the worksheet. Give an example for each characteristic. Ask the question: ‘What characteristics of life do the items named in Task 1 display?’ Encourage all the children to write down what they think and why.
Discuss the completed worksheets. Explain that a human being displays all the charac-teristics of life. You are born as a baby and grow into an adult. When you are an adult you continue to grow. For example, your skin heals when it has been damaged. People move. People absorb nutrients and oxygen from their environment to stay alive. They excrete substances, for example when they go to the toilet or sweat. People convert substances into other substances during digestion. For example, our bodies convert the carbohydrates in bread into sugars. People reproduce by having children. People respond to changes in their environment. For example, they shiver when they get cold, and they may decide to put on warmer clothes. Apes, and all other animals also display all the characteristics of life.Trees also grow larger and larger. They move, but this happens very slowly, for example when they turn their leaves to face the Sun. Trees absorb carbon dioxide from the air and excrete oxygen into the air around them. Trees reproduce via seeds which are carried on the air or spread by birds who eat the fruit. They respond to changes in their environment, for example by dropping their leaves when the days grow shorter (in autumn). A fallen autumn leaf is no longer alive, but dead. A pen or a piece of cheese do not display any characteristics of life. A car does dis-play some characteristics of life (it moves, excretes substances into the environment, converts substances and responds to change), but these processes are caused by people. A car does not grow, neither does it reproduce, so it is not a living being. Discuss which characteristics of life yeast displays. Yeast grows, because it absorbs water with sugar from its environment. This makes the yeast cells bigger. Yeast converts the sugar into alcohol and carbon dioxide and excretes this into the environ-ment. And believe it or not, yeast also reproduces! The yeast cells are able to divide, and the separated cells grow independently. Yeast also responds to changes in its environment. If there is oxygen in the air, it makes carbon dioxide. If there is no oxygen, it makes alcohol. Yeast is a fungus.
Explain that it can be very difficult to determine what life is. Sometimes it can be very difficult to see if something, such as yeast or a tree, displays all the characteristics of life. Scientists are continually discovering new forms of life, so a complete defini-tion of life has not yet been made.
Is all life visible? 5 min.Ask the children if all life is visible. What is the smallest creature they can think of? Explain that there are very tiny bacteria that you cannot see with the naked eye.
PAGE 504 • Life in space • LESSON 79
PAGE 505 • Life in space • LESSON 79
worksheet
79V
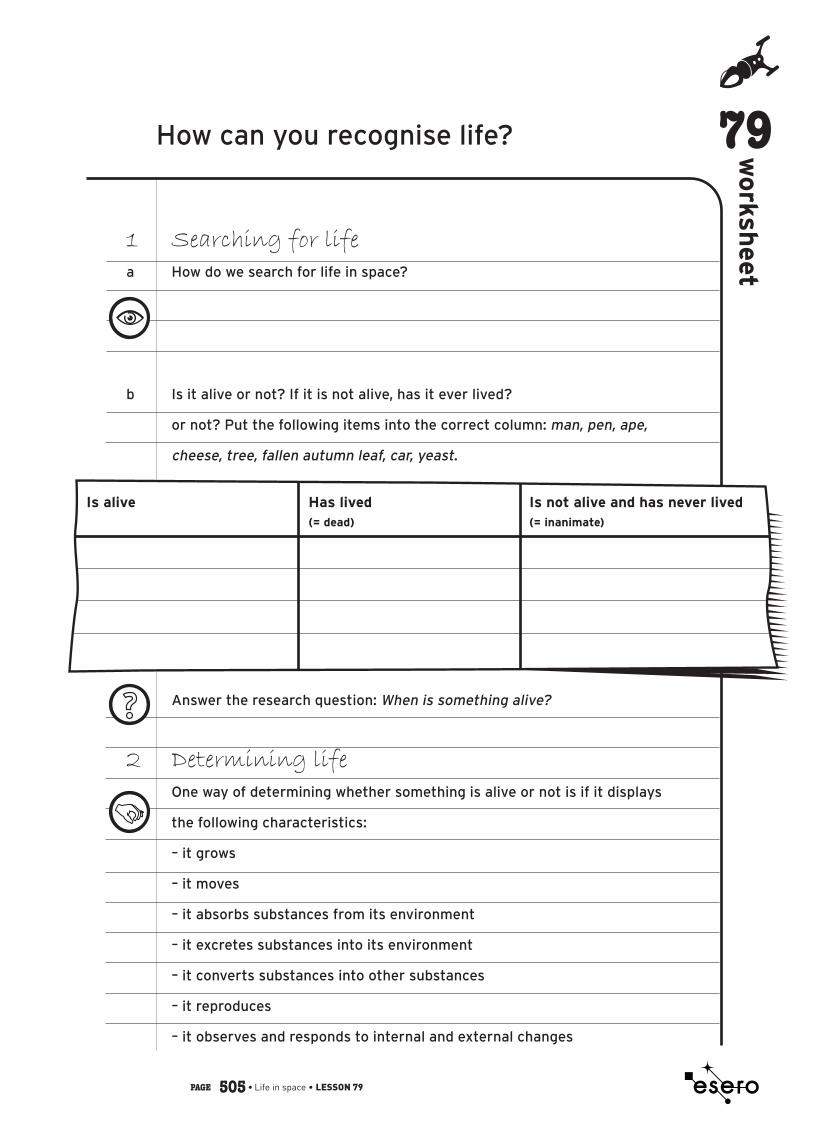
1 Searching for lifea How do we search for life in space?
b Is it alive or not? If it is not alive, has it ever lived?
or not? Put the following items into the correct column: man, pen, ape,
cheese, tree, fallen autumn leaf, car, yeast.
Answer the research question: When is something alive?
2 Determining lifeOne way of determining whether something is alive or not is if it displays
the following characteristics:
– it grows
– it moves
– it absorbs substances from its environment
– it excretes substances into its environment
– it converts substances into other substances
– it reproduces
– it observes and responds to internal and external changes
How can you recognise life?
Is alive Has lived Is not alive and has never lived(= dead) (= inanimate)

a For each item in the list below, cross out the characteristics of life which it
does not display. In the right-hand column, write why you think it does or
does not fulfil these conditions and if it is alive or not.
b Which items in the above table display all the characteristics of life?
human being
pen
ape
cheese
tree
fallen autumn leaf
car
yeast
grows / moves / absorbs substances excretes substances / converts substances reproduces / observes and responds
grows / moves / absorbs substances excretes substances / converts substances reproduces / observes and responds
grows / moves / absorbs substances excretes substances / converts substances reproduces / observes and responds
grows / moves / absorbs substances excretes substances / converts substances reproduces / observes and responds
grows / moves / absorbs substances excretes substances / converts substances reproduces / observes and responds
grows / moves / absorbs substances excretes substances / converts substances reproduces / observes and responds
grows / moves / absorbs substances excretes substances / converts substances reproduces / observes and responds
grows / moves / absorbs substances excretes substances / converts substances reproduces / observes and responds
PAGE 506 • Life in space • LESSON 79
write down why HERE
cross out what DOES NOT apply

All about microbes – Watch a fungus at its dinner time!
Yeast is a type of fungus and like mushrooms, you can eat it without any difficulty. Yeast is mainly used in the making of bread and the brewing industry. Yeasts are very small, they only have one cell and they can’t make their own food. Feed yeast in this simple experiment and see it in action!
What you will needPaperPencilTwo sachets of yeast (this is easy to find in the supermarket)Four small bowlsA mugA mug of warm water (ask an adult to help – it needs to be about the same temperature as your body – about 37oC)A mug of cold water3 teaspoons of sugar
What to do: Open the sachets of yeast and mix them together. Divide the paper into four and make four labels; warm water and sugar; cold
water and sugar; sugar; control. Divide the yeast between four small bowls and place a label on each bowl. Add a mug of warmed water and a teaspoon of sugar to the bowl labelled
‘warm water and sugar’. Add a mug of cold water and a teaspoon of sugar to the bowl labelled ‘cold
water and sugar’. Add a teaspoon of sugar to the bowl labelled ‘sugar’. Add nothing to the bowl labelled 'control'. Wait about 15 – 20 minutes and then look closely at the bowls.
What’s happening?Can you see bubbles in one of the bowls? This is the yeast feeding on the sugar youhave given it! The bubbles are carbon dioxide that is produced when the yeast eatsthe sugar.
Why don’t you see bubbles in the other bowls? Yeast needs warm water and sugar tofeed. So, you won’t see bubbles in the bowl with sugar and cold water, or just sugaror the control, which has neither sugar nor warm water!

Take 1 slice of bread and put into a plastic bag. Seal the bag and
label as control.
Add a sprinkling of water to the rest of the breadslices. Be careful and try not to soak the bread.
Take 1 slice of bread from step 2 and carefully rub it across your
kitchen floor; try not to break up the bread. Put it into a bag, seal it
and label the bag floor.
Repeat step 3 but for different kitchen surfaces, e.g. a shelf
in the fridge or the kitchen sink until all the bread is used. Each
time seal the bag and label with the surface name.
Place all the bags in a cupboard, and leave them for at least 1 week.
Take notes/photos of any changes you see to the bread every day. Neveropen the bags.
Method
This is a cool experiment to find out where all the microbes are hiding in your kitchen. But remember, not all microbes are harmful, most of the microbes you will find are completely harmless to us. Have fun playing microbe detective!
Ingredients
4 Slices of Bread
4 Small sealable plastic bags
(sandwich bags are fine)
A Sprinkle of water
A Magnifying Glass
A Marker Pen
A Notebook
A Camera (optional)
Results Explained
The control slice of bread was used to give you something to compare all the other
pieces of bread to. Fewer microbes would have grown on it because it was not
sprinkled with water.
On the other slices you should see lots of different types of microbes, like fungi and
bacteria, growing on the bread. This shows that different areas of the kitchen have
different numbers and types of microbes living on them.

Creeping Colours chromatographyEQUIPMENT Filter paper or blotting paper, Coloured markers, Beaker or jar, Water
PREPARATION Collect a good variety of coloured markers, both light and dark colours (the darkercolours work best as they contain a larger number of colours) and include a fewwaterproof colours as well (which will not separate out as they do not dissolve).
BACKGROUND Inks and dyes are made from different chemicals. To make all the differentINFORMATION colours, lots of different coloured chemicals are mixed together. As the water rises
up the filter paper, it dissolves the chemicals and carries them with it. Some chemicals are more easily absorbed by the paper than others and they travel up atdifferent speeds. The different chemicals, therefore, separate out.
Separating chemicals like this, by absorbing them, is called CHROMATOGRAPHY.
Chemists often use chromatography to test the purity of a substance. Doctors useit to test urine samples (e.g. for traces of sugar if diabetes is suspected).
SKILLS Observing
Investigating and experimenting
ACTIVITY To investigate what happens when inks from coloured markers are absorbed bywet filter paper.
Cut strips of filter paper just wide enough to fit into the jar. Make blobs of colourwith different markers on the paper approximately 5cm from the bottom. Put some water in the jar (to adepth of about 2 cm) and put the paper in the jar andwait.
What did the water do?
What happened to the colours?
Which markers contained most colours?
Why did the blobs from some
markers do nothing at all?
How could you detect forgery using chromatography?
SAFETY Care with water.
FOLLOW-UP ACTIVITIES (I) Can you make a multi-coloured book-marker using a long strip?
(II) Make a self-watering plant-holder (no need to worry about your plants while youare away on holidays.
(III) What colours make up the outer coatings onsome sweets, e.g. Smarties or M & Ms?

Simulating the Hunt for Life with Food Colouring and Chromatography
This is an activity where children are given a task to complete – “detect the signs of life.” This will be simulated in the classroom with food colouring and chromatography techniques.
Background:
Explain that chromatography is a technique used to separate out mixtures. Show how chromatography can be used to separate pigments in dyes and inks. Use either dark colour water soluble markers or food colouring to demonstrate with filter paper. Kitchen towel strips can be used instead of filter paper. Place a small amount of the
colour about 1 cm from the end of a strip of kitchen paper. Dip the end of the paper into water. The ink will dissolve in the water and be carried by the water up the paper. Different colour inks are carried by the water differently and some will settle out onto the paper before the others. This produces a streak of different colours across the paper.
Explain that just as some coloured inks comprise many colours, the atmospheres surrounding planets contain many different ingredients. Scientists are collecting information from space to help them discover exactly which gases surround those planets. Scientists use spectroscopy to split light into its component colours to reveal the “fingerprints” of various chemicals. These may indicate that the planet is habitable or that life might actually exist on the planet. Water, carbon dioxide, ozone or methane can be considered “biomarkers.” The gas methane has been detected on Mars.
Preparation:
Include some colours that separate into a mixture of dyes – these are usually the darkercolours like green, brown andblack. Pre-test this. If thesedarker colours contain one ofthe other dyes (i.e. green and/or black may contain blue), beprepared to point this out indiscussion. If this is the case, then it will not be possible to distinguish blue in a mixturefrom green or black. Keep the strips separate when wet – the colours can bleed from onestrip to another.
Black Blue Green Orange
iESA 2001. Illustration by Medialab

Practical:
Teacher should choose one colour of liquid food colouring to represent the gas that is the sign of life (say red food colouring = oxygen), and explain the other colours represent other gases in the atmosphere of a planet, like nitrogen, argon or helium.
Have the children compare the four different colours of food colouring (gases) using chromatography. Children should be encouraged to explore what happens if different quantities of colouring are used? different lengths of paper are used? the strips are left in the water for different lengths of time?
Can they establish a clear pattern for each colour? Once the base pattern is found for each colour of unmixed food colouring, challenge the children to find out which base colours are in a mixture of colours.
Offer them four or more mixtures of colouring that represent different planets’ atmospheres (only one or two should contain the red food colouring). Can they identify the ‘planet’ with oxygen/life?
i.e. Planet A: red and green colour, Planet B: black colour, Planet C: blue and greencolour, Planet D: black and red colour, Planet E: black and green colour
Discussion:
Does this technique allow them to measure the amount of the colour/biomarker? Or just its presence?
How could they modify the investigation to find out the answer to that question? (they might prepare mixtures with varying ratios of the target colour to another colour and compare the chromatographs).

DPSM/ESEROFramework for Inquiry - Promoting Inclusion
ENGAGE
REFLECTION
INVESTIGATE
TAKE THE NEXT STEP
When planning science activities for students with Special Educational Needs (SEN), a number of issues need to be considered. Careful planning for inclusion using the framework for inquiry should aim to engage students in science with real purpose. Potential areas of difficulty are identified below along with suggested strategies. This list is not exhaustive, further strategies are available in the Guidelines for Teachers of Students with General Learning Disabilities (NCCA, 2007).
POTENTIAL AREA OF DIFFICULTY
Delayed language development/poor vocabulary/concepts
POTENTIAL AREA OF DIFFICULTY
Fear of failure/poor self-esteem/fear of taking risks
Understanding Time and Chronology
Fine/Gross Motor Difficulties
Short Term Memory
POTENTIAL AREA OF DIFFICULTY
Developing Ideas
Communicating Ideas
STRATEGIES
• Teach the language of science demonstrating meaning and/or using visual aids (material, property, strong, weak, textured, dimpled, absorbent, force, gravity).
• Have the student demonstrate scientific phenomena, for example gravity —using ‘give me, show me, make me,’ as much as possible.
• Assist the student in expressing ideas through scaffolding, verbalising a demonstration, modelling.
• Use outdoor play to develop concepts.
• Did I take into account the individual learning needs of my students with SEN? What differentiation strategies worked well?• Did I ensure that the lesson content was clear and that the materials used were appropriate?• Was I aware of the pace at which students worked and the physical effort required?• Are there cross curriculum opportunities here? • Are the students moving on with their skills? Did the students enjoy the activity?
STRATEGIES
• Model the speculation of a range of answers/ideas.• Repeat and record suggestions from the students and refer back to them.
• Practice recording the passing of time, establish classroom routines that draw the students’ attention to the measurement of time.
• Teach and practice the language of time.
• Allow time to practice handling new equipment.• Allow additional time for drawing diagrams, making models etc. • Give students the option to explain work orally or in another format.
• Provide the student with visual clues/symbols which can be used to remind him/her of various stages of the investigation.
STRATEGIES
• Keep ideas as simple as possible, use visuals as a reminder of earlier ideas.• Discuss ideas with the whole group.• Repeat and record suggestions from students and refer back to them.• Encourage work in small group and in pairs.
• Ask students to describe observations verbally or nonverbally using an increasing vocabulary.• Display findings from investigations; sing, do drawings or take pictures. • Use ICT: simple written or word-processed accounts taking photographs, making video
recordings of an investigation.
More strategies, resources and support available at www.sess.ie