PREVOST MINI AIR BAG BELT TENSIONERS
6
PREVOST MINI AIR BAG BELT TENSIONERS Over the years on 2 different coaches I have had the miniature air bag belt tensioners to keep the fan and OTR air conditioning belts tight. They do a good job, but as they age they leak and need replacement. Not only do the bellows need to be replaced when leaks occur, the fittings need to be checked for leaks, and the valve and pressure regulator are also prone to leakage. Sometimes the pressure regulator can be fixed by tightening the six fasteners around the face. I have stretched the life of a regulator by doing that. Another consideration is to insure the air supply line to the valve has a check valve. If aux system pressure in the supply line drops to zero, the pressure in the lines and air bellows will back flow into the supply line if there is no check valve and the belts will loosen. If possible make sure the check valve is rated for high temps because the engine compartment has a lot of heat. Replacing the air bellows (air bags) is a simple process, but depending on the coach model year and design it can be difficult to get at the fasteners and air fittings, but no special tools will be needed. I cannot give you the specific air fitting sizes because on my coach they are a variety of sizes and I think the sizes are influenced by the manufacturer of the specific fittings used at the time the coach was produced. Apart from air supply fittings which need to be removed, the only thing securing the air bellows in place is a large 1 1/8” nut on the air fitting end, and a 9/16 bolt on the opposite end. Remove the air fittings, remove the large nut and the bolt and the air bellows will come right out. In almost every instance you will have to compress the bellows a little to get the air fitting end through the hole before sliding the bellows from its location. What follows is specific to a 2006 XLII. It may also apply to XL coaches as well as H3 with Series 60 engines, but I don’t know that for sure. The air bellows at the belt tensioner for the engine to fan gear box is the simplest to replace. As mentioned above once you disconnect the air supply line and the air line to the fan clutch belt tensioner, remove the “T” fitting the 1 1/8” nut and 9/16” bolt the bellows comes out and the new one can be installed. From that point on the project to replace the air bellows becomes more of a challenge, not because anything different has to be done, but getting your hands and tools in the places needed represents a challenge. I have the bruises and cuts to prove it. Small hands are needed. The bellows that puts tension on the idler pulley for the gear box to fan clutch belt is
Transcript of PREVOST MINI AIR BAG BELT TENSIONERS
PREVOST MINI AIR BAG BELT TENSIONERS
Over the years on 2 different coaches I have had the miniature air bag belt
tensioners to keep the fan and OTR air conditioning belts tight. They do a good job,
but as they age they leak and need replacement. Not only do the bellows need to be
replaced when leaks occur, the fittings need to be checked for leaks, and the valve
and pressure regulator are also prone to leakage.
Sometimes the pressure regulator can be fixed by tightening the six fasteners around
the face. I have stretched the life of a regulator by doing that. Another consideration
is to insure the air supply line to the valve has a check valve. If aux system pressure
in the supply line drops to zero, the pressure in the lines and air bellows will back
flow into the supply line if there is no check valve and the belts will loosen. If possible
make sure the check valve is rated for high temps because the engine compartment
has a lot of heat.
Replacing the air bellows (air bags) is a simple process, but depending on the coach
model year and design it can be difficult to get at the fasteners and air fittings, but no
special tools will be needed. I cannot give you the specific air fitting sizes because on
my coach they are a variety of sizes and I think the sizes are influenced by the
manufacturer of the specific fittings used at the time the coach was produced.
Apart from air supply fittings which need to be removed, the only thing securing the
air bellows in place is a large 1 1/8” nut on the air fitting end, and a 9/16 bolt on the
opposite end. Remove the air fittings, remove the large nut and the bolt and the air
bellows will come right out. In almost every instance you will have to compress the
bellows a little to get the air fitting end through the hole before sliding the bellows
from its location.
What follows is specific to a 2006 XLII. It may also apply to XL coaches as well as H3
with Series 60 engines, but I don’t know that for sure.
The air bellows at the belt tensioner for the engine to fan gear box is the simplest to
replace. As mentioned above once you disconnect the air supply line and the air line
to the fan clutch belt tensioner, remove the “T” fitting the 1 1/8” nut and 9/16” bolt
the bellows comes out and the new one can be installed. From that point on the
project to replace the air bellows becomes more of a challenge, not because anything
different has to be done, but getting your hands and tools in the places needed
represents a challenge. I have the bruises and cuts to prove it. Small hands are
needed.
The bellows that puts tension on the idler pulley for the gear box to fan clutch belt is

a little more difficult than the gear box bellows. The problem is limited access and
room to swing a 1 1/8” wrench to get the large nut off the bottom of the bellows. In
this portion of the project you need a mirror to help you see the air fitting and the
lower nut. The mirror will aid in placing the tools. The top 9/16 hex head bolt is easily
removed with a 9/16 deep well socket and wrench. A magnet helps to lift the top bolt
and washer from the well they are in.
The lower 1 1/8 nut on my coach this time was a challenge because it stripped the
threads from the white metal air bellows end cap and once it did that it just spun in
place and would not thread off the threaded end of the bellows. I ultimately had to
use a hole drilled sideways into the lower metal portion of the bellows for the
insertion of a hard steel pin that would hold it from spinning., Then I ended up using a
tie rod end removal fork to drive in between the bellows end and the lower mounting
plate to break the bellows from its place. Corrosion was the enemy and there likely
was other ways to remove the bellows but I used the tools I had. I mention the
process of drilling a hole, not because you may have to, but to point out age and
corrosion may work against you so be prepared to struggle a little and be creative if
need be.
I have spoken to folks that routinely replace the air bellows and they agree
replacement is usually very fast and easy, but if they have to fight with corrosion or
stubborn fasteners sometimes they end up using a Sawzall or equivalent to cut
things apart.
The final bellows was under the AC compressor for the over the road system. The air
fittings and nut were easily accessed and removed. Under the bellows was the 9/16”
bolt and with the limited space between the bumper and structural portion of the
chassis I barely had enough space to get my hand in, much less get a wrench on the
bolt. The tool I used was a 9/16” shorty open end wrench. The bolt came out easily
once I got the feel for where and how to get the wrench on the bolt head. Once the
bellows was out however I found it could not be removed from the space it was in
unless I took off or loosened the bumper. If I had taken the bumper off in the
beginning its removal would have been easy, so if you plan to do the work yourself
plan on removing the rear bumper or at the very least loosen an end so it can be
sprung out to provide a little more room.
Instead of loosening or removing the bumper I used a utility knife to cut the bellows
in half, right through the rubber portion and it easily came out of its place. If I was
putting new bellows back in I would have removed the bumper. This difficulty as
mentioned above appears to be only an issue with the XLII OTR equipped coaches.
Earlier model coaches had the air bellows located in an easily accessed place open
and with plenty of room to work.
The object of the above is to let everyone know air bellows replacement is a relatively
simple project for anyone with some basic tools. I have taken a different approach.
I have done away with the air bellows tensioners, the valve and the pressure
regulator. All of them plus the fittings have been sources of leaks and as can be
determined from above some bellows are a real pain to replace when needed. So
now my coach has a jack screw arrangement that I will describe below. My end
purpose was to eliminate the entire pneumatic belt tensioning system.
Since the bellows tighten the belts by expanding I needed a means by which I could
put something in their place and lengthen it by threading a nut down a threaded
portion to apply tension to the belts. I think the system described below will work.
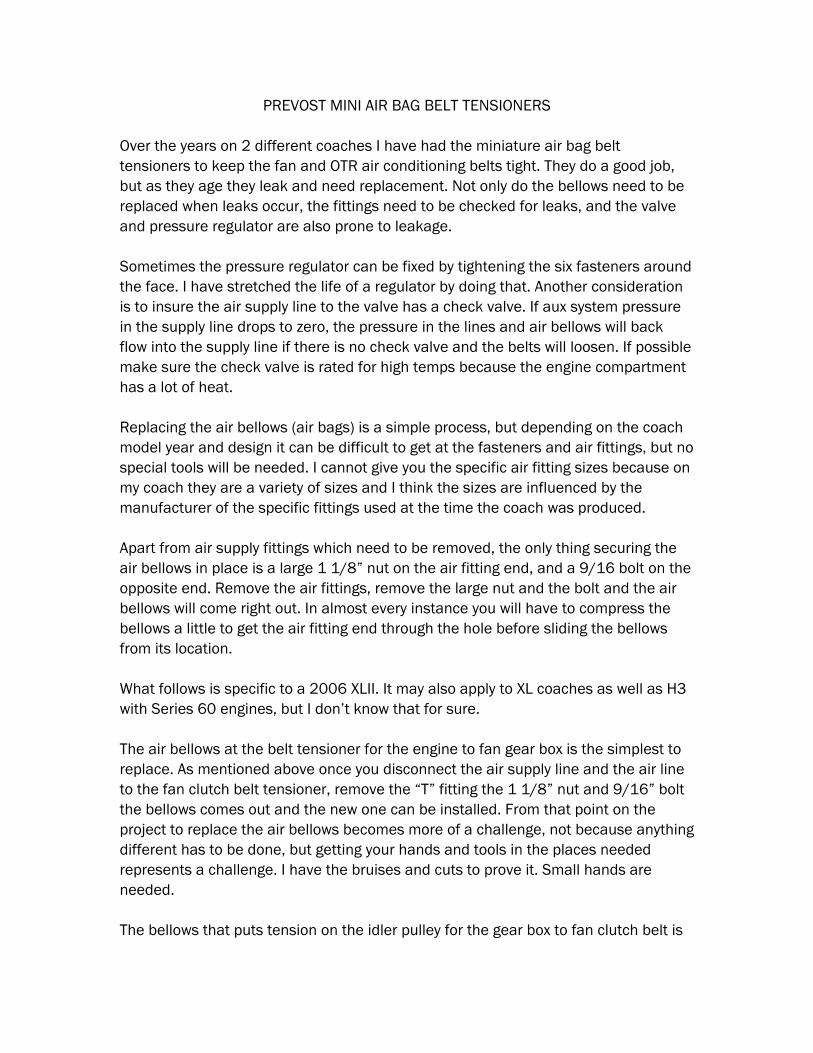
New belt tensioner at the fan drive gear box.
The jack screw shown above takes the place of the bellows.
The bolt on the LH end of the threaded rod secures the rod to the upper plate. To add
tension unscrew the nut on the RH end of the threaded rod until the correct tension
is met.
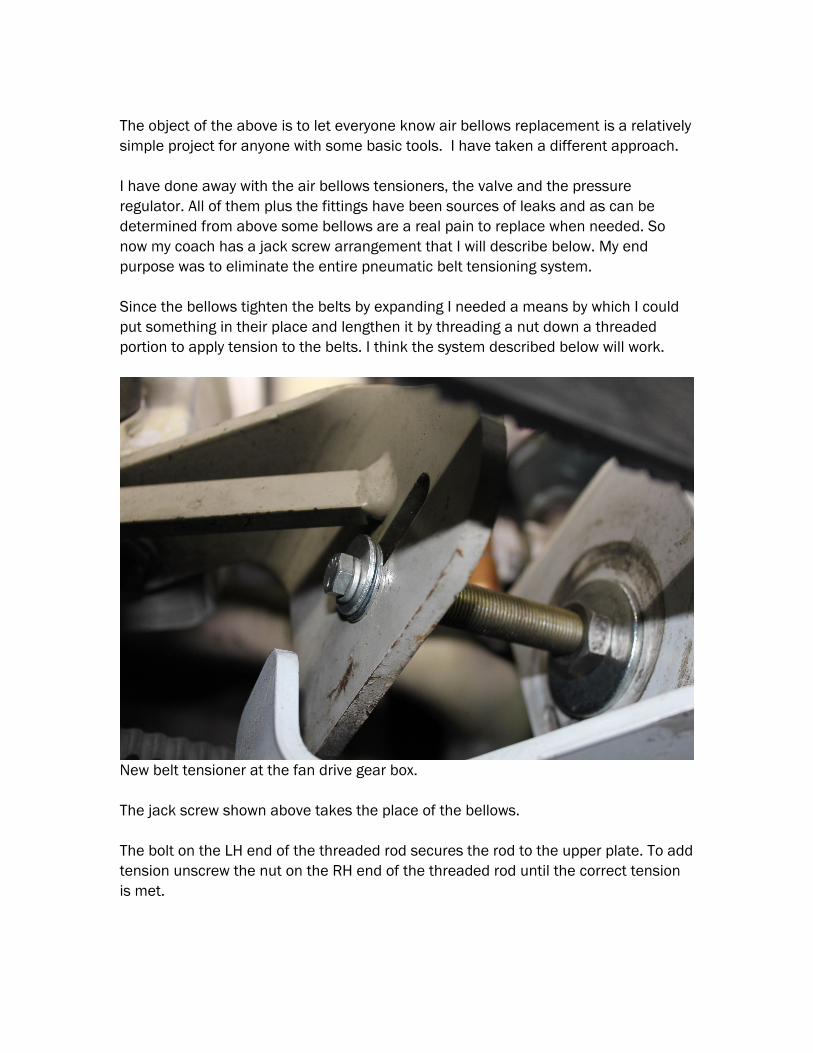
In this view of the same tensioner you can see the nut on the LH side. All that is doing
is providing the surface for pushing. Not seen is the bolt going into the hole drilled
and tapped as seen in the previous photo. The nut in the left center is used to
achieve the correct tension by threading it out as far as necessary, and then the nut
to the right is tightened to lock the threaded rod to the lower fixed plate. With the
nuts tight on both sides of the fixed plate the threaded rod length is permanently
maintained, the threaded rod is secure and will not move sideways or up and down.
After the photo above was taken lock washers were added between the nuts and
large washers.
To relax tension all that is required is to loosen the center nut, run it toward the nut
on the left and the belts will relax for changing. The entire pneumatic system has
been eliminated and in its place is a set of three jack screws.
I won’t pretend the jack screws make belt replacement easier, but it forever
eliminates any service requirements associated with the original pneumatic system
design. A big plus is the belts are always tight and there is no concern about starting
the coach with loose belts.

Fan clutch jack screw.
Air conditioner compressor jack screw.
The jack screw system of providing belt tension shown above is untested. I think it

will work quite well because in all three locations the steel threaded portion is under
pressure. The forces are straight up and down so there should be no sideways forces
to bend or break the threaded rod.
The rod is 5/8” diameter so it is quite strong. It has fine threads so adjustments can
be minute if required. Having installed the jack screws I know loosening and
adjusting the threaded jack screws is easier with the right tools so I will carry the
simple tools necessary to loosen the belts for replacement and to retighten the belt
tension. In the case of my coach I only need a conventional 15/16” box and open
end wrench, a 15/16” stubby box end wrench and a 3/8 drive 15/16” crow’s foot
wrench. Initial assembly and adjustments on the belt tensioners were a learning
process, but now that I have had them apart and back together a couple of times it is
a quick process and I hope one that saves ongoing maintenance that was once
required with the pneumatic system.
If you want to make this change to your coach all you need for materials is 5/8”
diameter threaded rod, nuts and washers. I used threaded rod cut from brake
chambers to make the brake chamber push rod the correct length. Threaded rod is
available in big box stores and is inexpensive if you wish to buy some.
I was able to center drill and tap the end of the threaded rod in a drill press. It could
probably be done in a vise, holding a drill but it would be more difficult. The rod was
cut to length using a hacksaw and a file or grinder was used to dress the cut end so
the nuts would easily thread onto the rod.
It took significantly less time to install the threaded rod jack screws than it did to
remove the air bellows previously in place and I am hoping this simplified system of
applying tension to the belts is much more durable and trouble free as well as
something easily adjusted so belt replacement is not a big problem.
As I begin using the coach with the new belt tightening system I am going to be
monitoring things closely. If I see any problems I will immediately modify this article to
reflect the problems and post it on the forum. I have not done anything that will
prevent me from restoring the system to the original design so if things do not work
out it will be back to the previous system.
Jon W. Wehrenberg
November 12, 2017